Le Hachoir 1800 ME7101 - Electric chopper TEFAL - Free user manual and instructions
Find the device manual for free Le Hachoir 1800 ME7101 TEFAL in PDF.
| Product type | Electric meat grinder |
| Brand | Tefal |
| Model | The Chopper 1800 ME7101 |
| Power supply | 220-240 V ~ 50/60 Hz |
| Power | 1800 W |
| Main functions | Meat grinding, sausage making, kebab preparation, cookies, juice and coulis (depending on model) |
| Included grinding plates | 3 plates: small holes (3 mm), medium holes (4.7 mm), large holes (7.5 mm) |
| Included accessories | Sausage tube, kebab accessory, cookie mold, juice and coulis accessory (depending on model) |
| Motor block material | Plastic |
| Material of accessories | Metal (stainless steel) and plastic |
| Pusher | Included to push food safely |
| Reverse function | Yes, to clear food in case of clogging |
| Storage compartment door | Yes, for storing accessories |
| Safety | On/off switch, reverse button, safety door, pusher; do not push with fingers |
| Maintenance and cleaning | Do not immerse the motor block; clean accessories with hot water and detergent; do not use abrasive products; grease the blade and plates after cleaning |
| Mechanical fuse | Integrated on the screw shaft to avoid overloads |
| Power cord | Replaceable by the manufacturer, after-sales service or a qualified person |
| Use | Household use only |
| Reference code | ME7101 |
| Additional accessories | Accessories for sausages, kebab, cookies, juice and coulis (depending on model) |
Frequently Asked Questions - Le Hachoir 1800 ME7101 TEFAL
User questions about Le Hachoir 1800 ME7101 TEFAL
0 question about this device. Answer the ones you know or ask your own.
Ask a new question about this device
Download the instructions for your Electric chopper in PDF format for free! Find your manual Le Hachoir 1800 ME7101 - TEFAL and take your electronic device back in hand. On this page are published all the documents necessary for the use of your device. Le Hachoir 1800 ME7101 by TEFAL.
USER MANUAL Le Hachoir 1800 ME7101 TEFAL
natural_image
Line drawing of a manual kitchen tool with handle, screw, and blade (no text or symbols)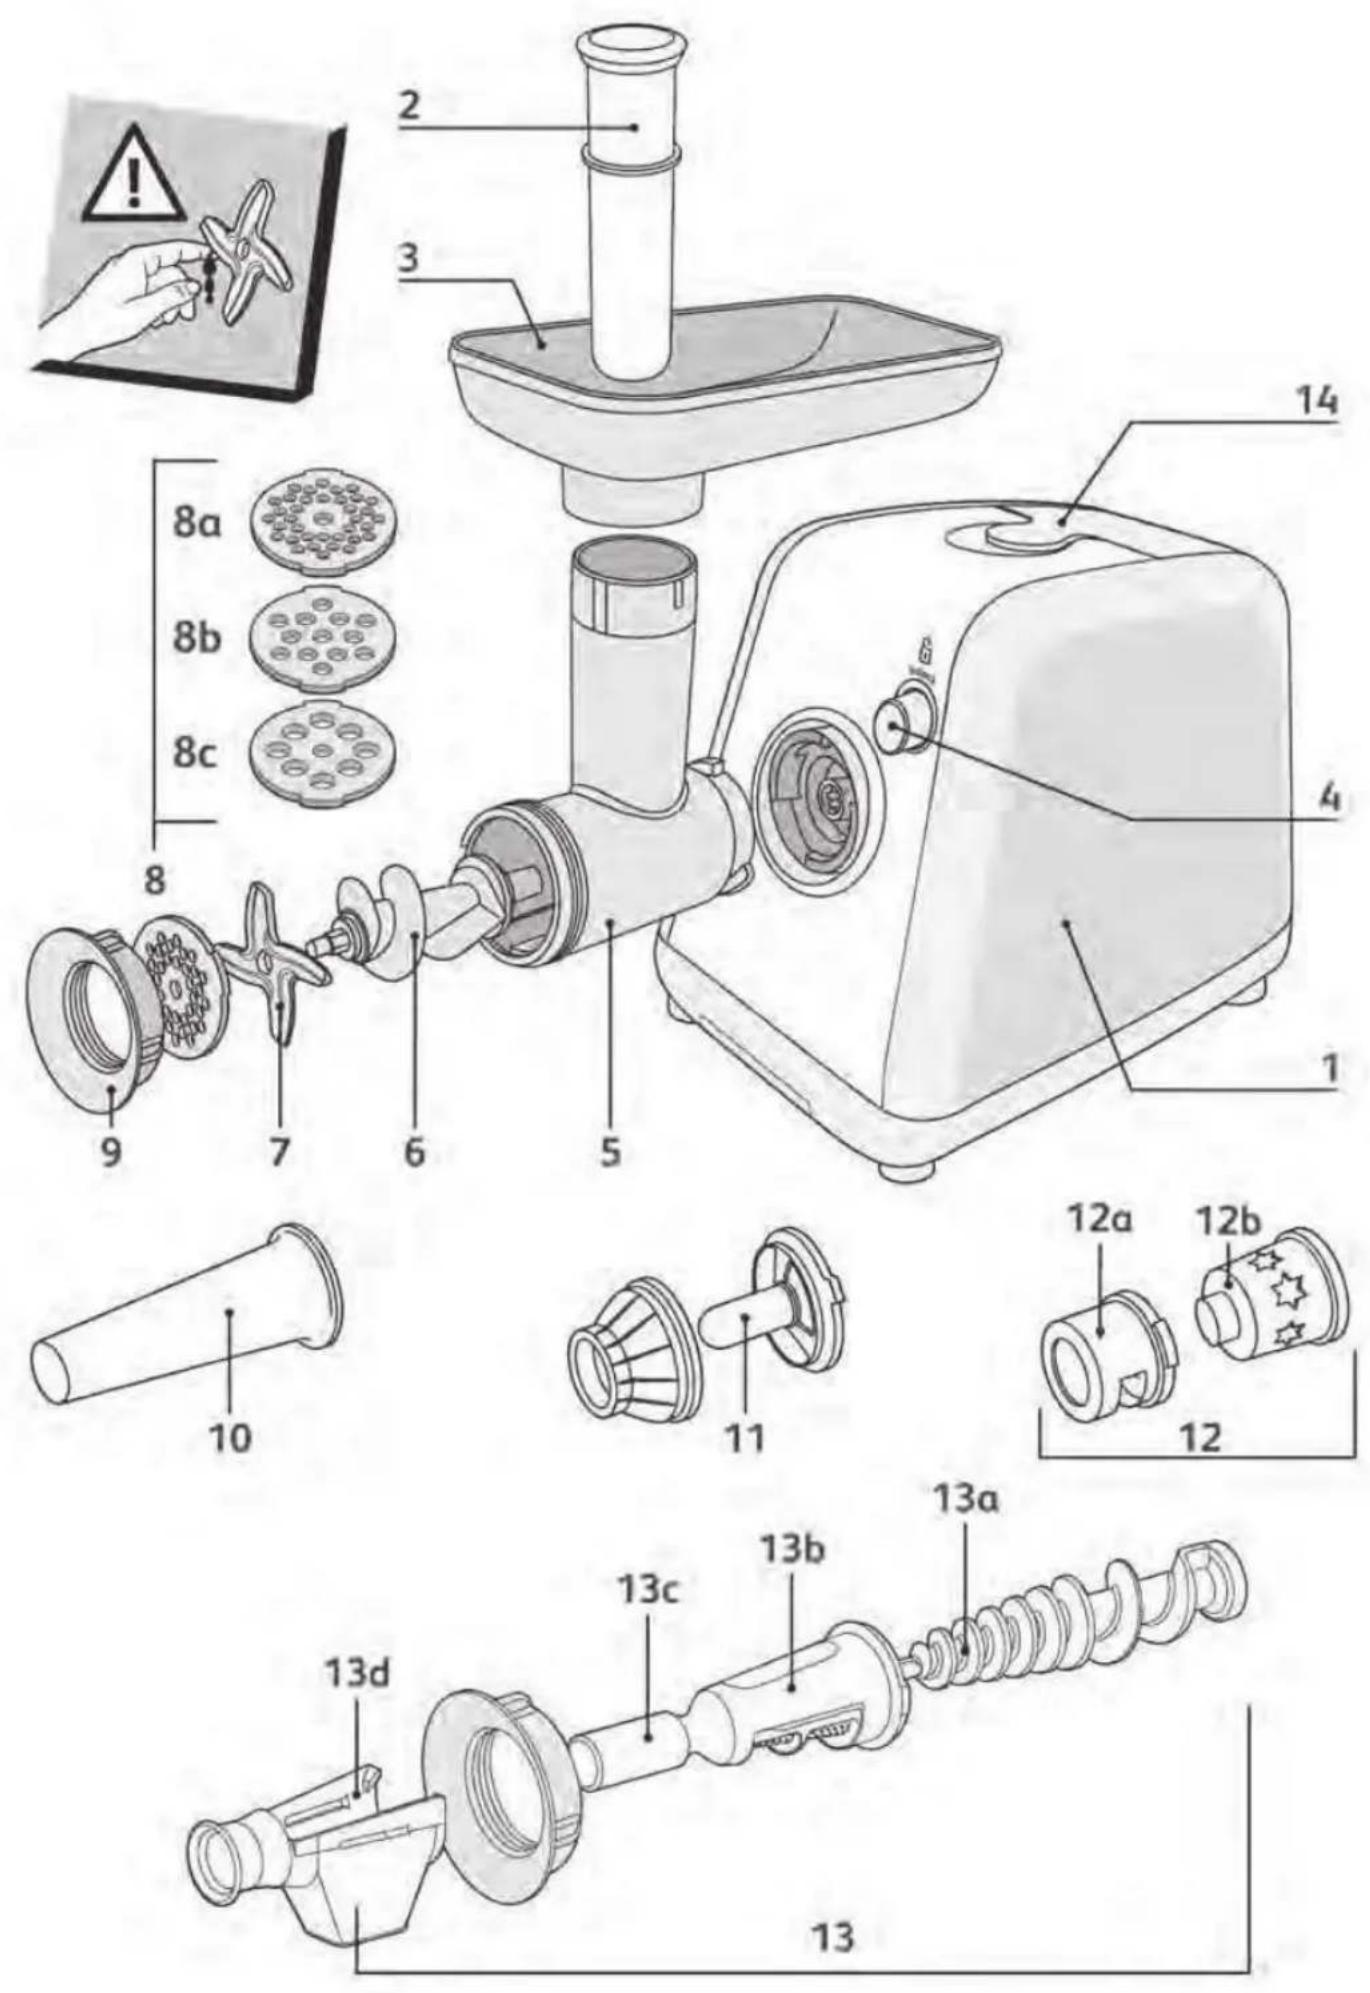
text_image
Diagram illustrating the process of a hair screw with labeled parts and directional arrows indicating motion or assembly.fig.1
text_image
Diagram of a mechanical device with labeled parts 1 and 2, showing directional arrows indicating movement or force.fig.2
natural_image
Illustration of a passenger seat with an arrow indicating direction, enclosed in a circular frame (no text or symbols)fig.3
natural_image
Close-up of a computer monitor with a black arrow pointing to the button (no text or symbols visible)fig.4
text_image
REVERfig.5
natural_image
Diagram of a mechanical assembly with gears and rollers, no text or symbols presentfig.6
natural_image
Diagram of an electrical component with a circular arrow indicating clockwise rotation around its body (no text or symbols present)fig.7
natural_image
Illustration of a manual kitchen tool with a side view showing internal components and motion arrows (no text or symbols)fig.8
natural_image
Illustration of a manual kitchen tool with exploded view and side view (no text or symbols)fig.9
natural_image
Illustration of a manual kitchen tool with exploded view and side view (no text or symbols)fig.10
natural_image
Technical illustration of a hair screw assembly with directional arrows indicating process flow (no text or symbols)fig.11
- This appliance complies with applicable technical rules and standards at time of manufacture.
- It is designed to run only on alternating current. Please check before first use that the mains power supply corresponds to that indicated on the appliance's rating plate.
- Do not place or use this appliance on a hot plate or close to a flame (gas cooker).
- Only use the appliance on a flat stable heat resistant working surface away from water being splashed. Do not turn it upside down.
-
Disconnect the appliance:
-
if it is not working correctly,
- before cleaning or maintenance,
- after use or if it has been left unattended,
-
on each accessory change.
-
Never pull the power cord to disconnect the appliance.
- Before using an extension lead, always first make sure it is in good condition.
- You must not use a household electrical appliance if:
- it has been dropped,
- the blade is damaged or incomplete.
- If the power supply cord is damaged, it must be replaced by the manufacturer, the manufacturer's authorised Service Dealer, or a person with similar qualification, to avoid any risk of danger.
- This product is designed for domestic use only. Any commercial use, inappropriate use or failure to comply with the instructions, the manufacturer accepts no responsibility and the guarantee will not apply.
- Do not use your fingers to push meat into the grinding unit. Always use the pusher.
- This appliance is not intended for use by children or persons who may suffer from a mental and/or physical impairment – unless they are adequately supervised in its operation and use by an adult responsible for their safety. Persons who have a limited or no understanding in the operation and use of this appliance must first read and fully understand the contents of these instructions and where appropriate seek additional guidance on its use from an adult responsible for their safety.
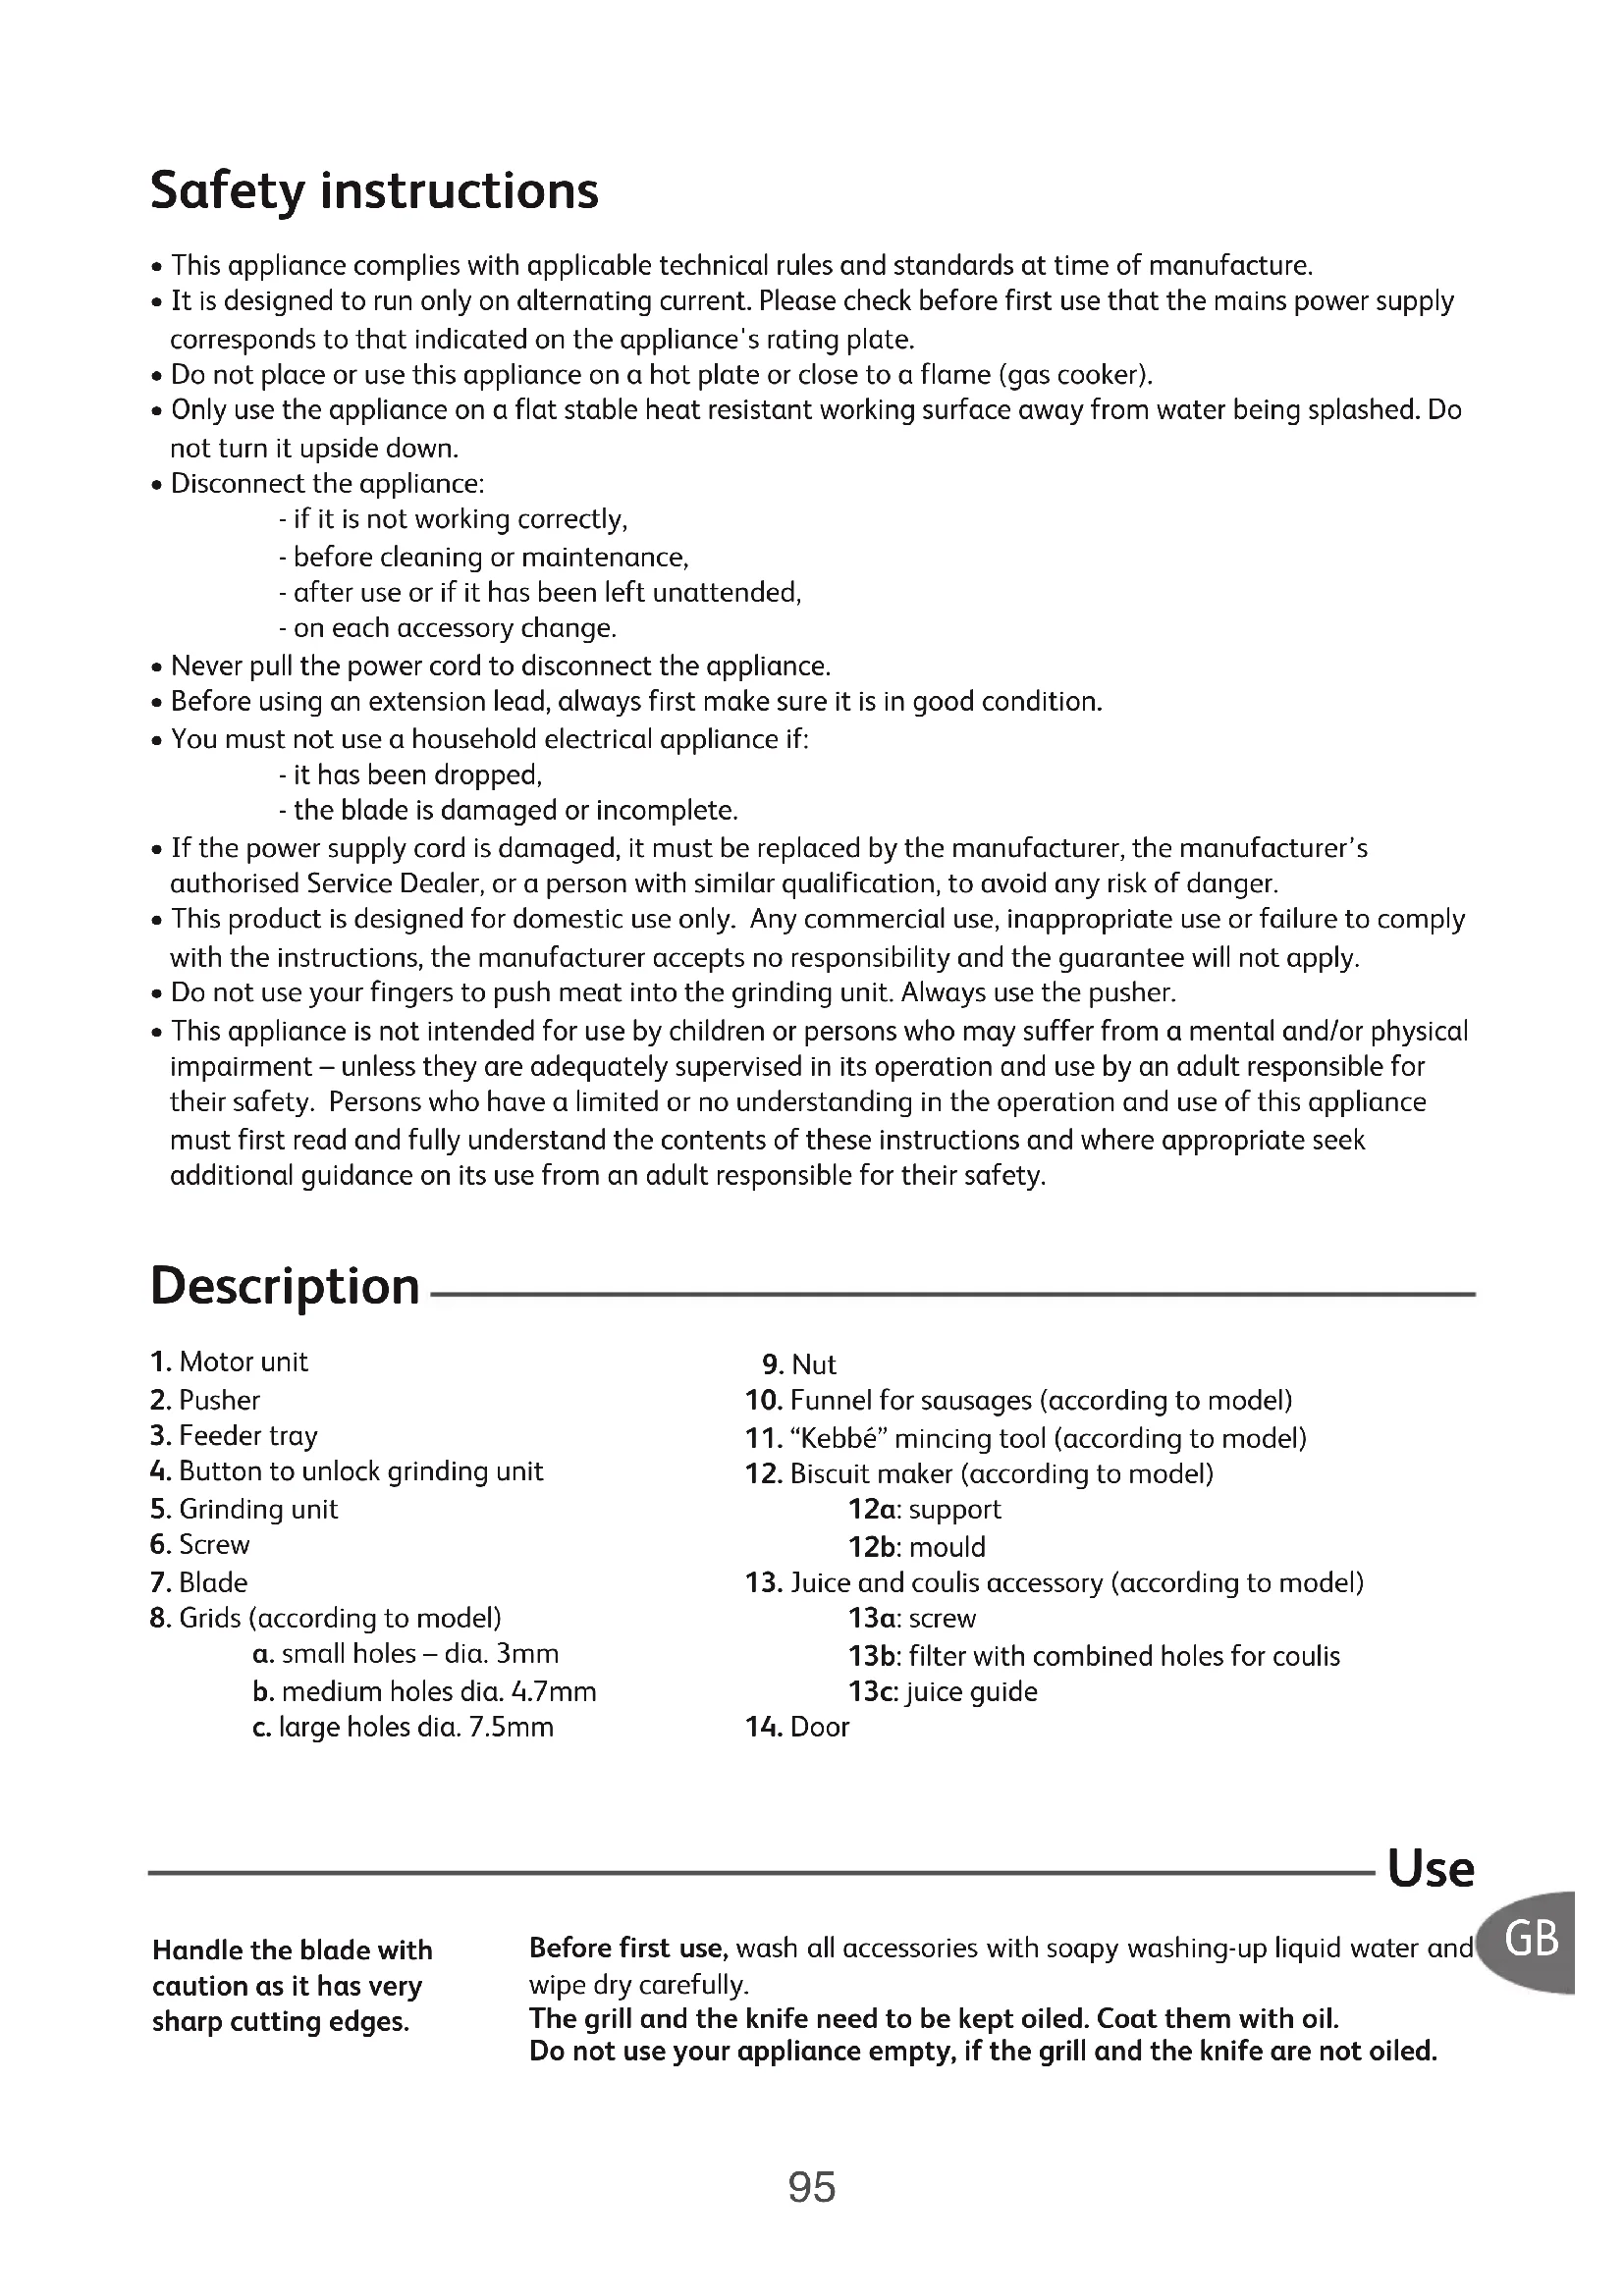
Description
- Motor unit
- Pusher
- Feeder tray
- Button to unlock grinding unit
- Grinding unit
- Screw
- Blade
- Grids (according to model)
a. small holes – dia. 3mm
b. medium holes dia. 4.7mm
c. large holes dia. 7.5mm
-
Nut
-
Funnel for sausages (according to model)
- "Kebbé" mincing tool (according to model)
- Biscuit maker (according to model)
12a: support
12b: mould
- Juice and coulis accessory (according to model)
13a: screw
13b: filter with combined holes for coulis
13c: juice guide
- Door
Use
GB
Handle the blade with caution as it has very sharp cutting edges.
Before first use, wash all accessories with soapy washing-up liquid water and wipe dry carefully.
The grill and the knife need to be kept oiled. Coat them with oil. Do not use your appliance empty, if the grill and the knife are not oiled.
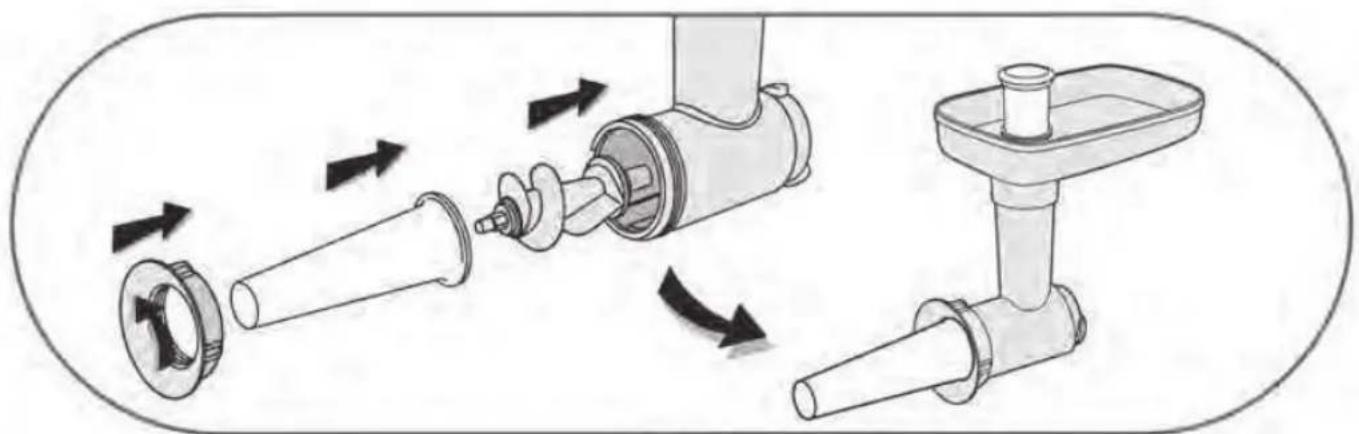
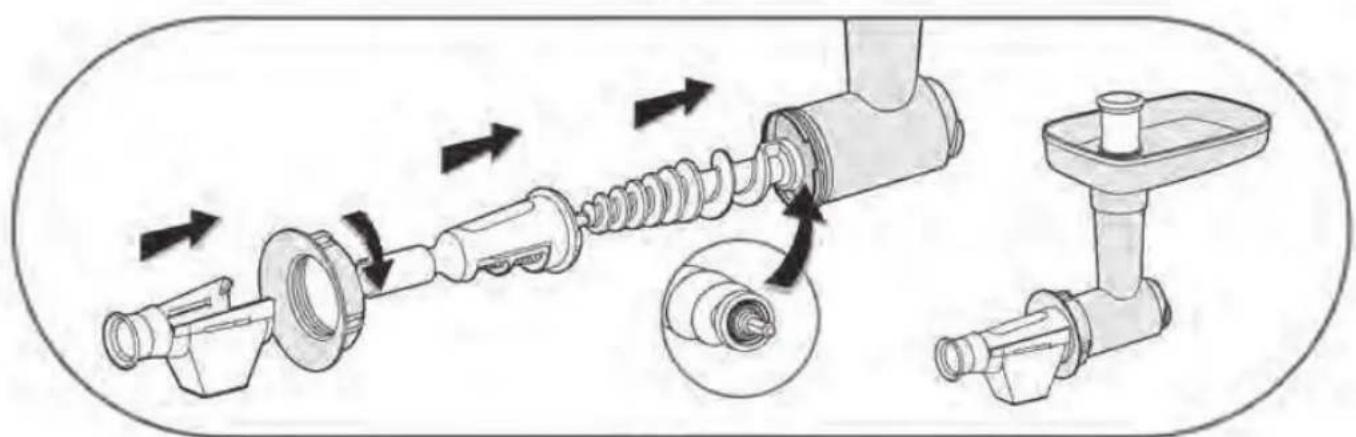
Assembling the grinding unit: (fig. 1)
- Introduce the screw (6) (long shaft first) into the grinding unit (5).
- Position the blade (7) on the short shaft of the screw setting the cutting edges facing outside on the grid side.
- Place the selected grid (8) on the blade and slot the two lugs into the two slots of the unit.
- Screw in the nut (9) fully without sticking.
- Check assembly. The axis must neither be loose nor stick in rotation. If loose or stuck, repeat assembly operations.
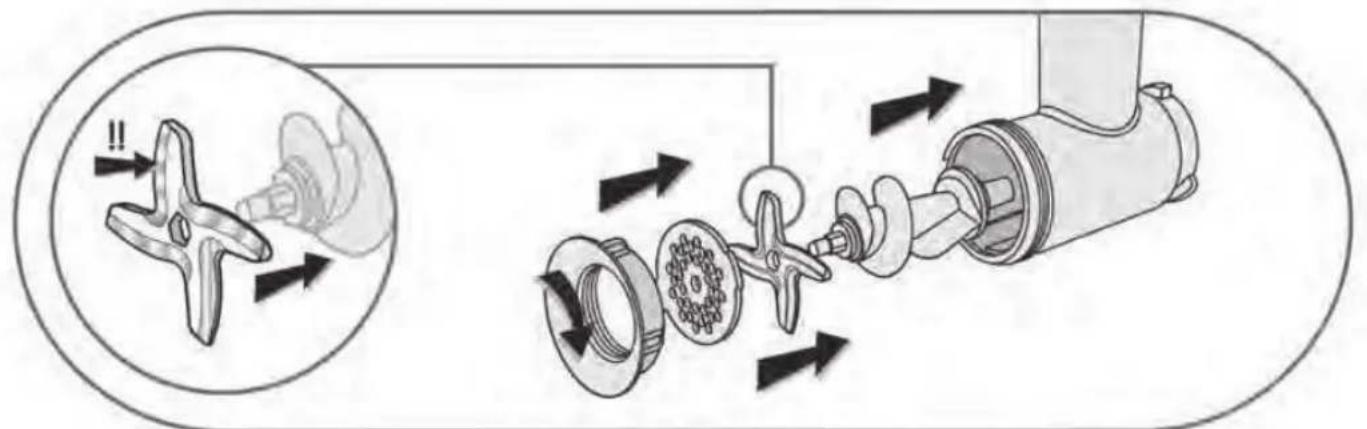
Fitting the grinding unit on the appliance:
Caution:
- Do not run the appliance empty (without grinding meat).
- You are advised to apply cooking oil to the grid after cleaning.
Never push with your fingers.
IMPORTANT: Wait for the appliance to come to a complete stop before pressing switches.
Make sure the appliance is switched off at the mains or unplugged.
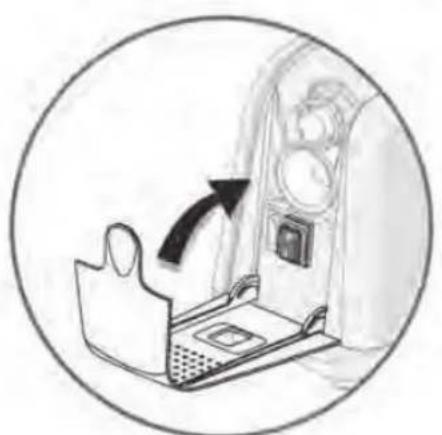
- Tilt the grinding unit to the right. (fig. 2).
- Fully engage the grinding unit into the motor unit and turn to the left, then engage the tray.
- Close the door (14).
-
Connect the appliance.
-
Prepare the ingredients to be chopped, first removing bones, cartilage, sinews and rind.
- Cut the meat into pieces (about 2cm × 2cm ) and place them on the tray.
- Never attempt to chop bits of bone, cartilage and rind.
- Select the grid:
- small holes: dia. 3mm: very tender meat
- medium holes: dia. 4.7mm: beef, pork, lamb, poultry, etc.
- large holes: dia. 7.5mm: sausages, fatty meats, etc.
- For maximum efficiency, cut pieces to a smaller size than the funnel.
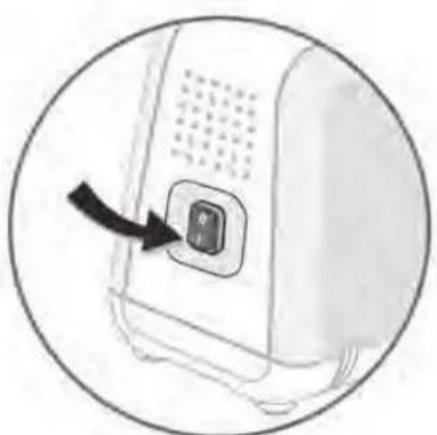
- Put a bowl under the grinding unit.
- Set the switch on the rear of the appliance to "I" (fig. 4).
- Introduce the pieces of meat into the grinding unit and push in using the pusher (2) if necessary.
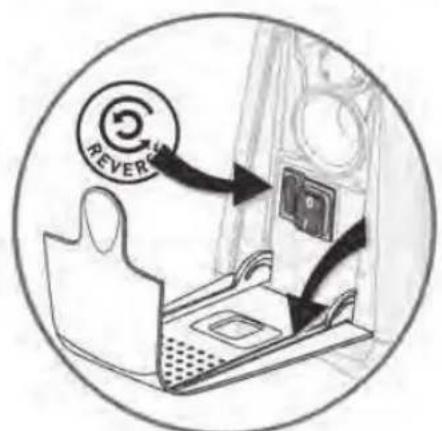
What to do if clogging occurs:
- Set the switch to the "O" position to stop the grinding unit.
- Open the accessory storage door.
- Press the "reverse" switch for a few seconds to release the food. (fig. 5);
- Then close the door and start again by pressing the main switch to complete grinding.

Note: Some recipes require high power (about 800 W). For such recipes, do not operate for more than 30 seconds at a time.
Example: Purée of split peas with bacon or mutton.
Ingredients: 100 g of bacon or mutton - 150 g raw split peas - 100 g flour - 50 ml water - 20 g garlic - salt - pepper - olive oil
- Mix the split peas and flour in a bowl then gradually blend with water to obtain a uniform mix.
- Put this mixture into the grinding unit feeder tray.
- Start the appliance and gradually push the mix into the tube using the pusher.
- Then introduce the bacon or mutton cut into pieces 2 cm x 2 cm with the garlic.
- Pour this mixture into a stewpot containing 1.5 litres of water. Mix and leave to cook for about 20 to 30 minutes.
- After cooking, add 12 a glass of olive oil and mix all together.
- The grinding unit is protected by a mechanical fuse built into the axis of the screw (6).
Check the food cutting instructions and the choice of grid before using the grinding unit so as to avoid abnormal overload or accidental blocking.
Dismantling your appliance:
Switch off and disconnect the appliance after use.
- Press the release button (4) located on the front panel of the appliance.
- Turn the grinding unit to the right.
- Fully release the unit and pull out.
- Unscrew the nut from the grinding unit and remove the accessories by pushing on the axis.
- Disconnect the appliance before cleaning and before removing the various accessories.
- Clean it using a damp cloth. All other parts can be washed in hot water using a washing up liquid. Never use scouring products.
You are advised to coat the blade and grinding unit grids with cooking oil after each cleaning.
Never immerse the motor unit in water.
Do not put the grinding head (including the grinding unit (5), screw (6), blade (7), the grid (8) and nut (9)) into the dishwasher.
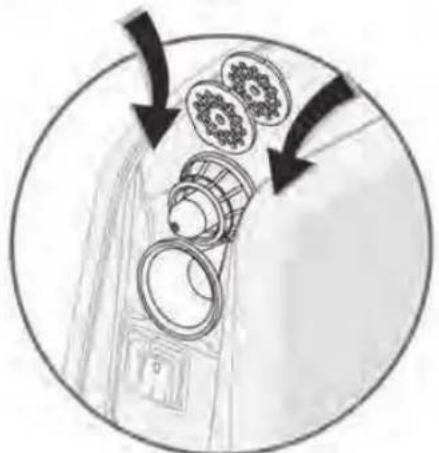
Storage:
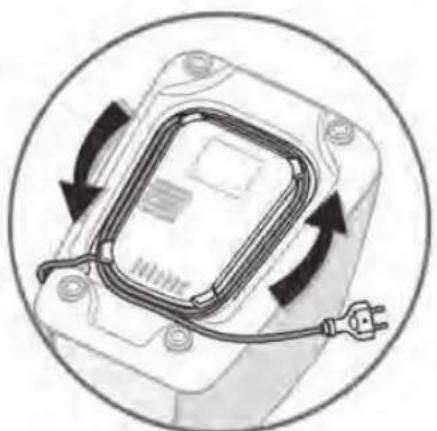
Store the accessories in the recesses provided under the accessory storage door (14) of the appliance (fig. 6).
You can wind the cord round under the appliance (fig. 7).
Additional accessories
Sausage funnel (according to model)
Use this accessory without the grid or blade. Fit it to the grinding unit for easy sausage making.
GB
Assembly (fig. 8):
• Fit the screw to the unit.
- Position the sausage funnel.
- Screw in the nut.
- Assemble the unit on the appliance.
Use:
- Prepare the sausage meat and season to taste.
- Soak the casing in water so it regains elasticity then thread it onto the tube (10).
- Put the sausage meat into the feeder tray, start up the appliance and press the meat down using the pusher to keep it feeding towards the end of the tube.
- Stop the appliance and make a knot in the casing to seal.
- Start up again and continue pushing the sausage meat with the pusher.
"Kebbe" accessory (according to model)
Use this accessory without the grid or blade. It adapts to the grinding unit so you can prepare mixes (e.g., lamb + bulgur wheat) in a tube shape. Cut the tubes obtained into short sections garnished with a mixture of minced meat and pinch the ends. Fry the meat balls obtained.
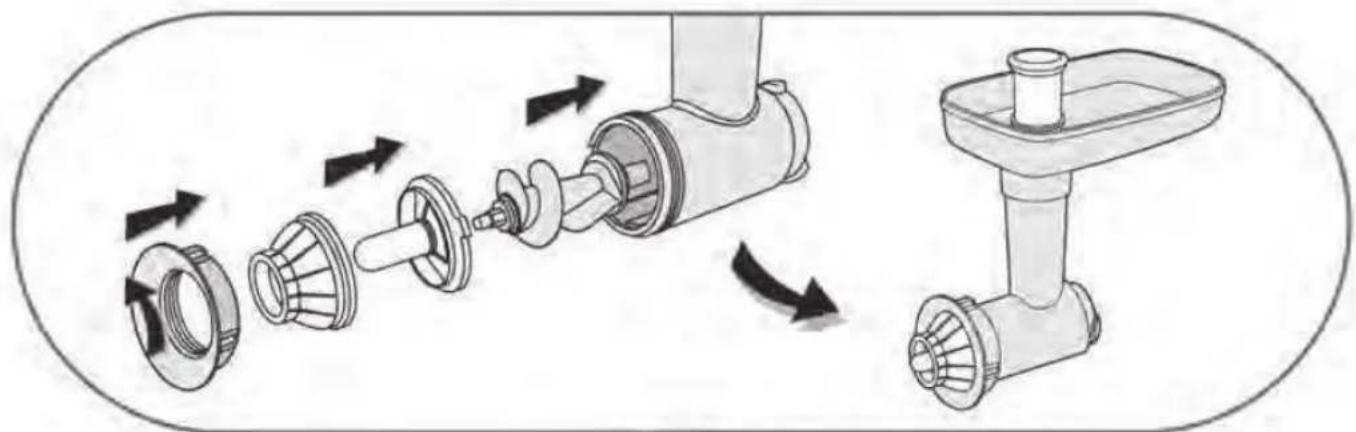
Assembly: same as with sausage funnel (fig. 9).
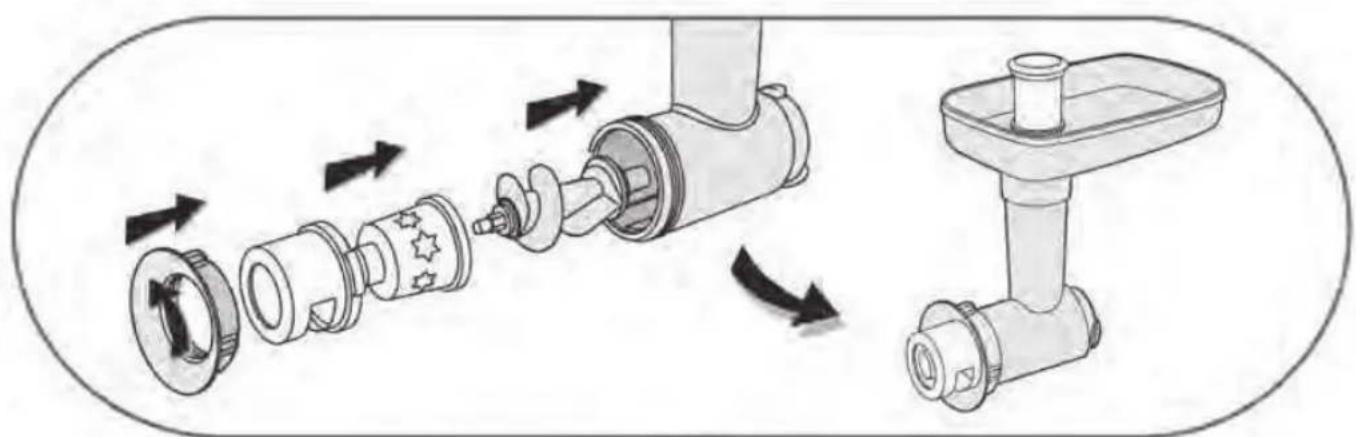
Biscuit maker (J) (according to model)
Assembly (fig. 10):
- Fit the screw (6) in the grinding unit (5) of the grinding head.
- Place the mould (12b) in the support (12a) and place the assembly on the grinding head ensuring that the lugs are aligned with the slots of the grinding unit (5) and screw the nut (9) in fully.
- Place the head thus fitted on the motor unit (1) as shown in (fig. 10).
Note: this accessory is used without either grid or blade.
Use:
- Prepare the mix (you will obtain better results with a soft mix).
- Choose the shape by pointing the arrow on the chosen shape.
- Start up the appliance and supply with mix.
Juice and coulis accessory (according to model)
Use this accessory to make coulis (red fruits and tomatoes) and juices (apples, pears, oranges, etc.). It fits to the grinding unit (5).
Assembly (fig. 10):
- Fit the grinding unit (5) of the motor unit (1).
-
Place the screw (13a) in the grinding unit (5).
-
Position the filter chosen for your preparation:
- (13b), filter with combined holes, for coulis or
- (13c), filter with small holes, for juices.
- Screw the nut onto the grinding unit (5).
- Position the juice guide (13d) under the filter fitted (13b or 13c).
Use:
- Coulis: Use filter (13b) that has 2 filtration hole diameters for better extraction.
To make coulis, it is essential to use fresh fruit only. According to the season and the quality of the fruit, you are advised to press the pulp a second time to get the most coulis as possible.
- Juice: Use filter (13c) with its single diameter filtration holes.
Place a recipient under the juice guide (13d) to recover the juice and another at the end of the filter (13b or 13c) to recover waste.
Once all accessories have been fitted, use your appliance as usual.
Cleaning:
All parts must be cleaned in hot water under the tap, using a washing up liquid. Never use abrasive products. Grids are easily cleaned using a brush (toothbrush style).
CAUTION:
Parts must not be cleaned in the dishwasher.
Electrical or electronic product at end of service life

Environment protection first!

Your appliance contains valuable materials which can be recovered or recycled.

Leave it at a local civic waste collection point.
GB