
Elite 14 LUX 50 BL - Range hood ELICA - Free user manual and instructions
Find the device manual for free Elite 14 LUX 50 BL ELICA in PDF.
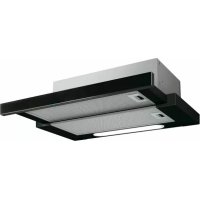



| Product type | Decorative cooker hood |
| Brand | Elica |
| Model | Elite 14 LUX 50 BL |
| Width | 50 cm |
| Power supply | 230 V – 50 Hz |
| Suction speeds | 3 speeds (1, 2, 3) |
| Lighting | LED, bulb 3W E14 |
| Mounting type | Built-in in a cabinet |
| Usage version | Extraction (external exhaust) or recirculation (internal recycling) |
| Minimum safety distance | 50 cm (electric hob) / 65 cm (gas or mixed hob) |
| Grease filter | Metal, washable monthly (hand or dishwasher) |
| Charcoal filter (recirculation) | Replace every 4 months (not cleanable) |
| Bulb replacement | LED 3W max, E14, accessible after removing the grid |
| Exterior cleaning | Damp cloth and neutral liquid detergent (no abrasives or alcohol) |
| Safety standards | Compliant with EN/IEC 60335, 61591, 60704 |
| Recycling | Complies with WEEE directive 2012/19/EU |
Frequently Asked Questions - Elite 14 LUX 50 BL ELICA
User questions about Elite 14 LUX 50 BL ELICA
0 question about this device. Answer the ones you know or ask your own.
Ask a new question about this device
Download the instructions for your Range hood in PDF format for free! Find your manual Elite 14 LUX 50 BL - ELICA and take your electronic device back in hand. On this page are published all the documents necessary for the use of your device. Elite 14 LUX 50 BL by ELICA.
USER MANUAL Elite 14 LUX 50 BL ELICA
EN - Instruction on mounting and use
EN - Instruction on mounting and use
Closely follow the instructions set out in this manual. All responsibility, for any eventual inconveniences, damages or fires caused by not complying with the instructions in this manual, is declined. This appliance is intended to be used in household and similar applications such as: - staff kitchen areas in shops, offices and other working environments; - farm houses; - by clients in hotels, motels and other residential type environments; - bed and breakfast type environments.
- It is important to conserve this booklet for consultation at any moment. In the case of sale, cession or move, make sure it is together with the product.
- Read the instructions carefully: there is important information about installation, use and safety.
- Do not carry out electrical or mechanical variations on the product or on the discharge conduits.
- Before proceeding with the installation of the appliance, verify that there are no damaged components. Otherwise contact your dealer and do not proceed with the installation.
Note: The parts marked with the symbol "(*)" are optional accessories supplied only with some models or otherwise not supplied, but available for purchase.

Caution
- Before any cleaning or maintenance operation, disconnect the hood from the mains by removing the plug or disconnecting the mains electrical supply. Always wear work gloves for all installation and maintenance operations.
- This appliance can be used by children aged from 8 years and above and persons with reduced physical, sensory or mental capabilities or lack of experience and knowledge if they have been given supervision or instruction concerning use of the appliance in a safe way and understand the hazards involved. - Children shall not be allowed to tamper with the controls or play with the appliance. - Cleaning and user maintenance shall not be made by children without supervision.
- The premises where the appliance is installed must be sufficiently ventilated, when the kitchen hood is used together with other gas combustion devices or other fuels.
- The hood must be regularly cleaned on both the inside and outside (AT LEAST ONCE A MONTH).
- This must be completed in accordance with the maintenance instructions provided. Failure to follow the instructions provided regarding the cleaning of the hood and filters will lead to the risk of fires. - Do not flambé under the range hood. - For lamp replacement use only lamp type indicated in the Maintenance/Replacing lamps section of this manual. The use of exposed flames is detrimental to the filters and may cause a fire risk, and must therefore be avoided in all circumstances.
Any frying must be done with care in order to make sure that the oil does not overheat and ignite.
CAUTION: Accessible parts of the hood may become hot when used with cooking appliances.
- Do not connect the appliance to the mains until the installation is fully complete.
- With regards to the technical and safety measures to be adopted for fume discharging it is important to closely follow the regulations provided by the local authorities.
- The air must not be discharged into a flue that is used for exhausting fumes from appliance burning gas or other fuels.
- Do not use or leave the hood without the lamp correctly mounted due to the possible risk of electric shocks.
- Never use the hood without effectively mounted grids.
- The hood must NEVER be used as a support surface unless specifically indicated.
- Use only the fixing screws supplied with the product for installation or, if not supplied, purchase the correct screws type.
- Use the correct length for the screws which are identified in the Installation Guide.
- In case of doubt, consult an authorized service assistance center or similar qualified person.
WARNING!
- Failure to install the screws or fixing device in accordance with these instructions may result in electrical hazards.
- Do not use with a programmer, timer, separate remote control system or any other device that switches on automatically.
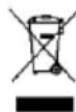
- This appliance is marked according to the European directive 2012/19/EC on Waste Electrical and Electronic Equipment (WEEE).
- By ensuring this product is disposed of correctly, you will help prevent potential negative consequences for the environment and human health, which could otherwise be caused by inappropriate waste handling of this product.
- The symbol on the product, or on the documents accompanying the product, indicates that this appliance may not be treated as household waste. Instead it should be taken to the appropriate collection point for the recycling of electrical and electronic equipment. Disposal must be carried out in accordance with local environmental regulations for waste disposal.
- For further detailed information regarding the process, collection and recycling of this product, please contact the appropriate department of your local authorities or the local department for household waste or the shop where you purchased this product.
Appliance designed, tested and manufactured according to:
- Safety: EN/IEC 60335-1; EN/IEC 60335-2-31, EN/IEC 62233.
- Performance: EN/IEC 61591; ISO 5167-1; ISO 5167-3; ISO 5168; EN/IEC 60704-1; EN/IEC 60704-2-13; EN/IEC 60704-3; ISO 3741; EN 50564; IEC 62301.
- EMC: EN 55014-1; CISPR 14-1; EN 55014-2; CISPR 14-2; EN/IEC 61000-3-2; EN/IEC 61000-3-3. Suggestions for a correct use in order to reduce the environmental impact: Switch ON the hood at minimum speed when you start cooking and keep it running for a few minutes after cooking is finished. Increase the speed only in case of large amount of smoke and vapor and use boost speed(s) only in extreme situations. Replace the charcoal filter(s) when necessary to maintain a good odor reduction efficiency. Clean the grease filter(s) when necessary to maintain a good grease filter efficiency. Use the maximum diameter of the ducting system indicated in this manual to optimize efficiency and minimize noise.
Use
The hood is designed to be used either for exhausting or filter version.

Extraction version
In this case the fumes are conveyed outside of the building by means of a special pipe connected with the connection ring located on top of the hood.
CAUTION!
The exhaust pipe is not supplied and must be purchased separately.
The diameter of the exhaust pipe must be equal to that of the connection ring.
CAUTION!
If the hood is supplied with an active charcoal filter, then it must be removed.
Connect the hood and discharge holes on the walls with a diameter equivalent to the air outlet (connection flange).
Use a duct of the minimum indispensable length.
Use a duct with as few elbows as possible (maximum elbow angle: 90°).
Avoid drastic changes in the duct cross-section.
Attention! If the hood is supplied with a carbon filter, then it must be removed.
Filtration version
The aspirated air will be degreased and deodorised before being fed back into the room.
In order to use the hood in this version, you have to install a system of additional filtering based on activated charcoal.
Attention! If the hood is not supplied with a carbon filter, then it must be ordered and mounted.
Installation
The minimum distance between the supporting surface for the cooking equipment on the hob and the lowest part of the range hood must be not less than 50 cm from electric cookers and 65 cm from gas or mixed cookers.
If the instructions for installation for the gas hob specify a greater distance, this must be adhered to.
! Electrical connection
The mains power supply must correspond to the rating indicated on the plate situated inside the hood. If provided with a plug, connect the hood to a socket in compliance with current regulations and positioned in an accessible area, after installation. If it is not fitted with a plug (direct mains connection) or if the plug is not located in an accessible area, after installation, apply a double pole switch in accordance with standards which assures the complete disconnection of the mains under conditions relating to over-current category III, in accordance with installation instructions.
WARNING!
Before re-connecting the hood circuit to the mains supply and checking the efficient function, always check that the mains cable is correctly assembled.
The hood is provided with a special power cable; if the cable is damaged, request a new one from Technical Service.
Mounting
Before beginning installation:
- Check that the product purchased is of a suitable size for the chosen installation area.
- Remove the charcoal (*) filter/s if supplied (see also relative paragraph). This/these is/are to be mounted only if you want to use the hood in the filtering version.
- Check (for transport reasons) that there is no other supplied material inside the hood (e.g. packets with
screws ( ) , guarantees ( ) , etc.), eventually removing them and keeping them.
This hood is designed for fitting in a cabinet or on some other support.
Operation
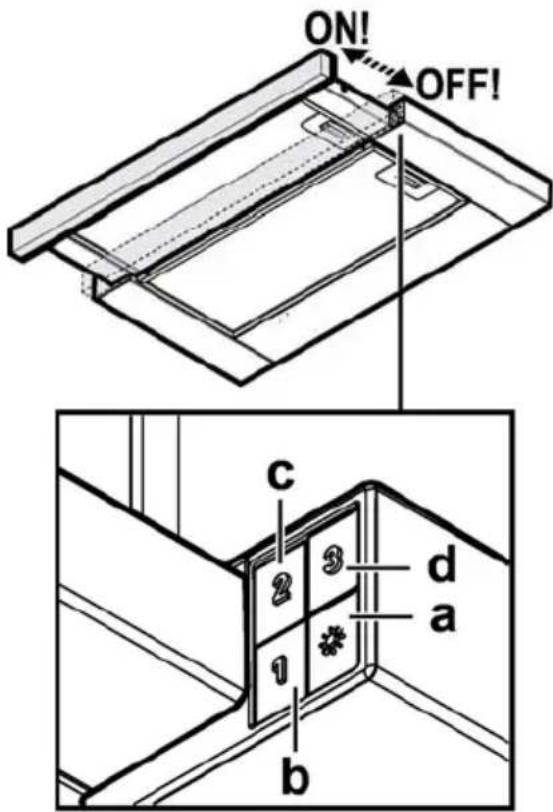
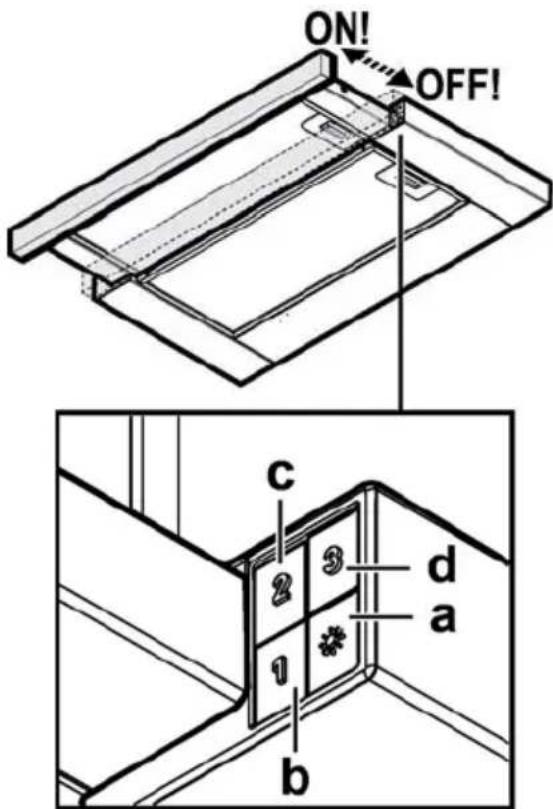
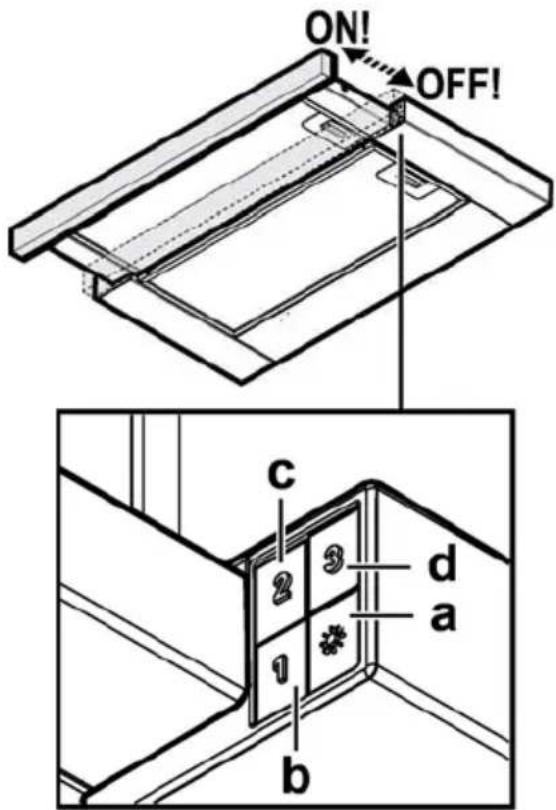
The hood is fitted with a control panel with aspiration speed selection control and a light switch to control cooking area lights.
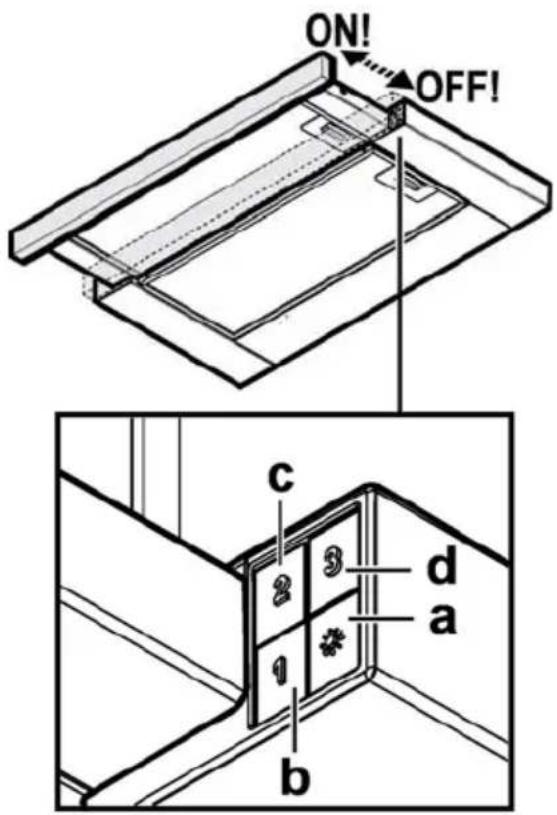
a. ON/OFF light switch b. Speed 1/OFF switch c. 2-speed selection d. 3-speed selection
Maintenance
Cleaning
Clean using ONLY a cloth dampened with neutral liquid detergent. DO NOT CLEAN WITH TOOLS OR INSTRUMENTS. Do not use abrasive products. DO NOT USE ALCOHOL!
Grease filter
Fig. 10-21
Traps cooking grease particles.
The grease filter must be cleaned once a month using non aggressive detergents, either by hand or in the dishwasher, which must be set to a low temperature and a short cycle. When washed in a dishwasher, the grease filter may discolor slightly, but this does not affect its filtering capacity. To remove the grease filter, pull the spring release handle.
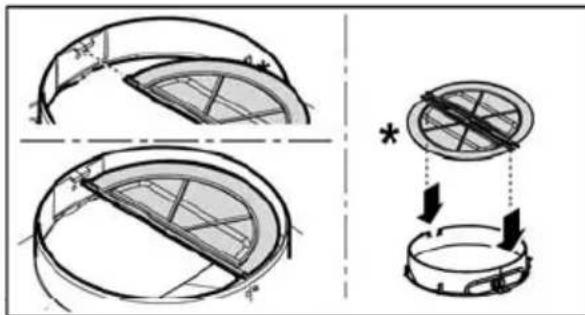
Charcoal filter (filter version only)
Fig. 20
It absorbs unpleasant odors caused by cooking.
The saturation of the charcoal filter occurs after more or less prolonged use, depending on the type of cooking and the regularity of cleaning of the grease filter.
In any case it is necessary to replace the cartridge at least every four months.
The charcoal filter may NOT be washed or regenerated.
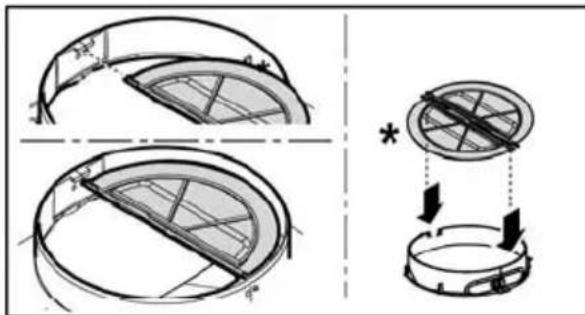
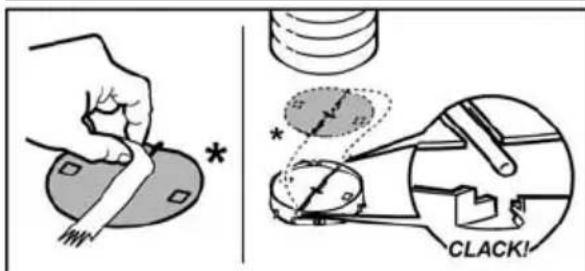
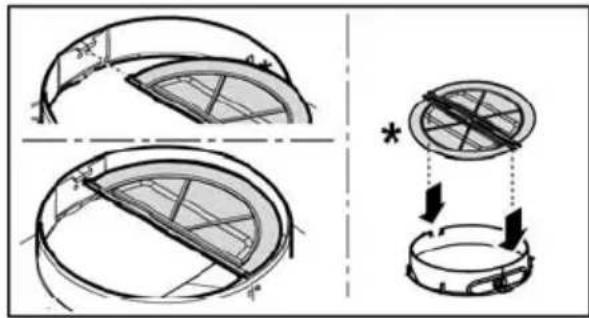
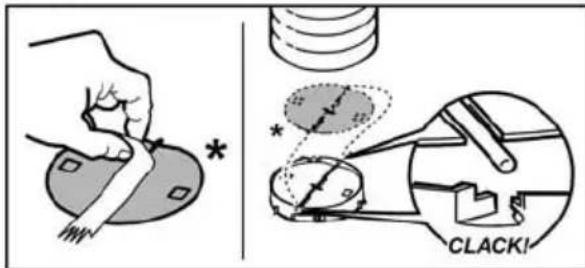
Remove the grease filters.
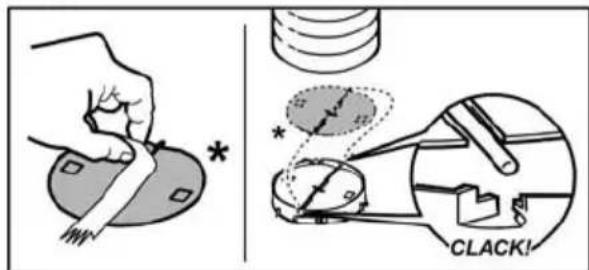
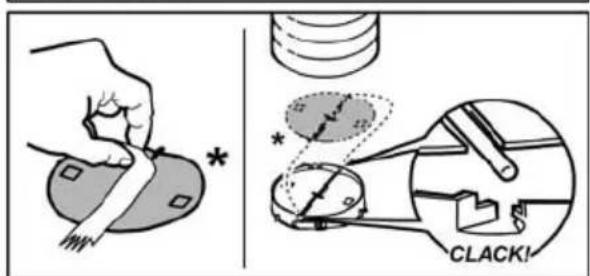
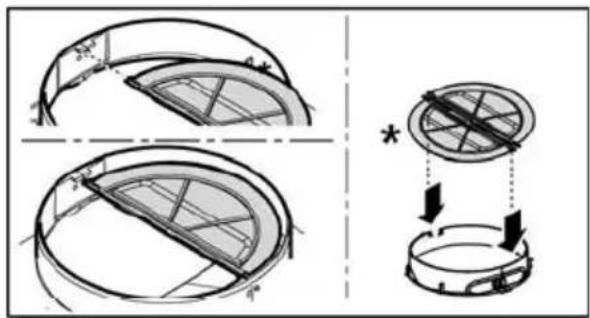
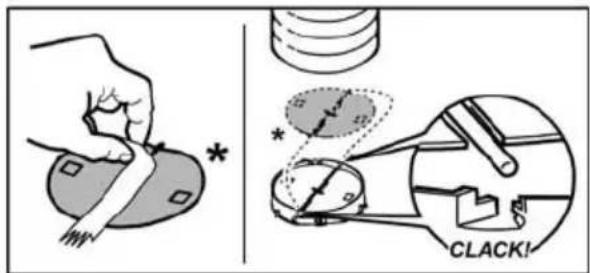
Apply one charcoal filter each side and hook it onto the hood. Refit the grease filter.
Replacing lamps
Disconnect the appliance from the electricity.
Warning! Prior to touching the light bulbs ensure they are cooled down.
Extract the drawer completely.
Remove the suction grill to access the lamp area.
Replace the damaged lamp.
Use E14 3W max LED lamps only. For more details, check enclosed leaflet "ILCOS D" (alfanumeric position "1d"). Put the grill back.
If the lights do not work, make sure that the lamps are fitted properly into their housings before you call for technical assistance.
On some models ONLY:
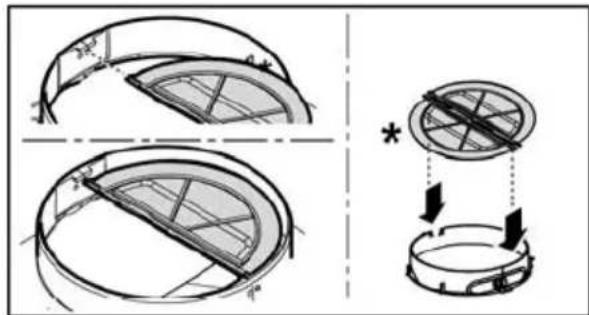
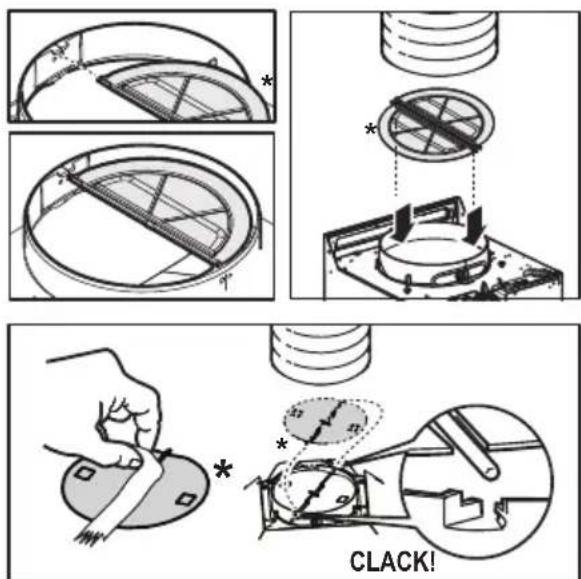
A Non Return Backdraft Damper is included in the supply, as optional accessory to be installed under certain installation conditions (i.e. if there is no protection against accidental backdraft of air from the outside). The damper must be installed inside the dedicated housing, inside of the Air Outlet Fitting, before installing the flue.
This appliance can be used by children aged from 8 years and above and persons with reduced physical, sensory or mental capabilities or lack of experience and knowledge if they have been given supervision or instruction concerning use of the appliance in a safe way and understand the hazards involved. Children shall not play with the appliance. Cleaning and user maintenance shall not be made by children without supervision.
This appliance is marked according to the European Directive 2012/19/EC on waste electrical and electronic equipment (WEEE).
By ensuring that this product is disposed of correctly, you will help prevent potential negative consequences for the environment and human health, which could otherwise be caused by inappropriate waste handling of this product.
The symbol on the product, or on the documents accompanying the product, indicates that this appliance shall not be treated as household waste. Instead it shall be handed over to the applicable collection point for the recycling of electrical and electronic equipment. Disposal must be carried out in accordance with local environmental regulations for waste disposal.
For more detailed information about treatment, recovery and recycling of this product, please contact your local city office, your household waste disposal service or the shop where you purchased the product.
This appliance has been designed, tested and manufactured in accordance with:
Safety: EN/IEC 60335-1; EN/IEC 60335-2-31, EN/IEC 62233. - Performance: EN/IEC 61591; ISO 5167-1; ISO 5167-3; ISO 5168; EN/IEC 60704-1; EN/IEC 60704-2-13; EN/IEC 60704-3; ISO 3741; EN 50564; IEC 62301. EMC: EN 55014-1; CISPR 14-1; EN 55014-2; CISPR 14-2; EN/IEC 61000-3-2; EN/IEC 61000-3-3. Recommendations for correct use to reduce environmental impact: Operate the hood at the lowest speed when starting to cook and increase it only after a few minutes of cooking. Increase the speed only in case of high concentration of cooking fumes and use the boost speed only in extreme situations. Replace the activated carbon filter when necessary to maintain good odor absorption. Clean the grease filter when necessary to maintain good grease absorption. Use the maximum diameter of the ducting system indicated in this manual to optimize efficiency and minimize noise.
Use
The hood has been manufactured in such a way that it can be used either as a ducted hood (with air extraction) or as a recirculation hood with activated carbon filter.

Version 8 of the manual
Replace the grease filter.
Replacing lamps
Disconnect the hood from the electrical supply.
Warning! Before touching the lamps, make sure they are cold.
Remove the filter.
ByaIe TnV oxapa anoppopnnc yia va eioeAthetae oTov xwpo otou Biokovtai oAumte.
Replace the lamp.
Use only LED E14 lamps up to 3W. For more information, consult the accompanying manual "ILCOS D" (numeric position "1d").
Restart the appliance.
Electrical and Electronic Equipment (WEEE)
- European Directive 2012/19/EC
- Waste Electrical and Electronic Equipment (WEEE).
This symbol on the product or its packaging indicates that this product must not be treated as household waste. Instead, it must be handed over to an applicable collection point for the recycling of electrical and electronic equipment. Please contact your local authorities, waste collection service, or the store where you purchased the product for more details.

The symbol on the product or its packaging indicates that this product must not be treated as household waste. Instead, it must be handed over to an applicable collection point for the recycling of electrical and electronic equipment. Please contact your local authorities, waste collection service, or the store where you purchased the product for more details.
The appliance is designed, tested, and manufactured in accordance with:
- Safety: EN/IEC 60335-1; EN/IEC 60335-2-31, EN/IEC 62233.
- Performance characteristics: EN/IEC 61591; ISO 5167-1; ISO
5167-3; ISO 5168; EN/IEC 60704-1; EN/IEC 60704-2-13; EN/IEC 60704-3; ISO 3741; EN 50564; IEC 62301.
- EMC - Electromagnetic compatibility: EN 55014-1; CISPR 14-1; EN 55014-2; CISPR 14-2; EN/IEC 61000-3-2; EN/IEC 61000-3-3.
Recommendations for correct use to reduce environmental impact: Turn on the extractor at minimum speed when cooking and leave it running for a few minutes after switching off the hob. Increase the speed only when there is a large amount of steam or smoke, and use the boost speed only in extreme situations. Replace the filters with active carbon filters when necessary to maintain good odor absorption efficiency. Clean the grease filters when necessary to maintain good grease filter efficiency. Use the maximum diameter of the air exhaust system, as indicated in this manual, to optimize efficiency and reduce noise.
The aspirator is intended for suction and exhaust of air through filters.

Exhaust air filtration
The exhaust air duct must be connected to the connecting flange via an air duct pipe.

ATTENTION!
The air duct pipe is not included in the accessories and must be purchased separately.
The diameter of the air duct pipe must correspond to the diameter of the connecting flange.

ATTENTION!
If the aspirator is equipped with an active carbon filter, the pipe must be removed.
Connect the aspirator to the air duct pipe and the openings in the wall. The diameter of the pipe must correspond to the diameter of the connecting flange for air exhaust.
Use a pipe with the necessary length. Use a pipe with as few bends as possible (maximum bend angle: 90°). Do not sharply bend the pipe!
ATTENTION! If the aspirator is equipped with an active carbon filter, the pipe must be removed.

Exhaust air filtration
The aspirated air is discharged through the exhaust air duct into the open air. To do this,
Use the aspirator in this operating mode; you must install the supplied filter system on the base of the filter with active carbon and exhaust.
WARNING! If the appliance is not equipped with an activated carbon filter, it must be purchased and installed before use.
Installation
The minimum distance between the surface on which the pots are placed and the lowest part of the kitchen hood must be not less than 50 cm in case of electric cookers and not less than 65 cm in case of gas or combination cookers.
If the instructions for the gas cooker specify a greater distance, this must be respected.

Electrical connection
The voltage in the electrical network must correspond to the voltage indicated on the rating plate of the hood, located on its inner side. If the hood is equipped with a plug, connect it to a socket that complies with the applicable standards and is accessible after installation. If it is not equipped with a plug (direct connection to the network), or if the socket is not accessible after installation, use a double-pole switch that complies with the standards, ensuring complete disconnection from the network in case of overvoltage category III, in accordance with installation rules.

WARNING!
Before connecting the hood to the network and checking that it functions correctly, check that the cables are installed as required.
The hoods are supplied with a special power cable; in case the cable is damaged, contact the after-sales service to obtain a new one.
Mounting
Before proceeding with the installation:
Make sure that the product you have purchased is of appropriate dimensions for the chosen installation location. Remove the grease filter(s) (if your chosen model is equipped with them). To do this, follow the operations in the relevant paragraph. Install the filter(s) back in case you intend to use the hood in the filtered version. Make sure that during transport no small objects, such as screws, warranty cards, etc., have fallen into the inner part of the hood; if you find any, remove them and keep them.
This type of hood must be installed in a cabinet or other suitable base.
Instructions for use
The hood is equipped with a control panel with the possibility to adjust the suction speed and a switch for the lighting of the hob.
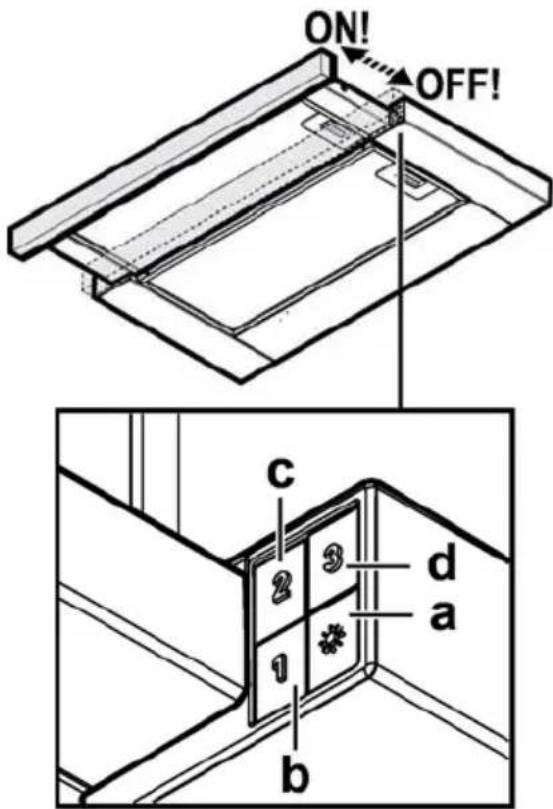
a. Switch ON/OFF. b. Switch OFF/speed 1 c. Set to speed 2 d. Set to speed 3
Maintenance
Cleaning
For cleaning use only a cloth dampened with neutral detergent. Do not use instruments or cleaning devices!
Avoid detergents containing abrasive particles. DO NOT USE SPIRITS!
Filter lubrication
Fig. 10-21
Lubricate the parts indicated in the figure.
Clean monthly with neutral detergent. Before cleaning, unplug the machine and let it cool down.
When the oil filter is in the machine, it is possible to remove it, but this in no way impairs its filtering capacity.
To remove the oil filter, press the spring mechanism.
Filter active carbon (only for filtering version)
Fig. 20
Remove the top cover by pressing the clips.
The active carbon filter should be replaced approximately every 6 months depending on the type of cooking. Clean the filter regularly.
The filter must be replaced when the indicator for filter contamination shows that it is necessary, or at least every 6 months.
It cannot be reused.
Remove the filter for the hood.
When the activated carbon filter is removed, the two sides of the aspirator and the cover must be removed.
Mount the new filter for the hood.
Normal of the LED ring.
Remove the plug from the LED connector.
Attention! Before taking the LED ring in hand, check that it has cooled down.
Remove the frame from the extractor.
To get access to the plafoniera, remove the aspirator grid.
Replace the damaged lamp.
Use only LED lamps with a maximum power of 3W-E14. For the replacement of the normal one, consult the attached sheet "ILCOS D" (code-letter position "1d").
Mount the new grid.
If the LED rings do not light up, check that they are mounted correctly before contacting technical support.
Only for professional use:
The appliance is supplied complete with installation kit, including a non-return valve. If the installation conditions require it (e.g., installation with a flue for spontaneous evacuation of combustion products), install the special seat in the air outlet connector before installing the flue for evacuation of exhaust gases.
RO - Installation and use instructions
Replace the defective bulb.
Use the appliance for exhausting fumes from appliances operating on gas or other fuels.
- Do not use or leave the hood without the lamps correctly installed, with the risk of electric shock.
- Never use the hood without the correctly installed grille!
- The hood must never be used as a support surface, unless explicitly indicated.
- Use only screws and fasteners supplied with the product for installation, or if not supplied, purchase screws of the correct type.
- Use the correct screw length as specified in the installation instructions. In case of doubt, consult an authorized service center with qualified personnel.
WARNING!
- Failure to install the appropriate screws and fasteners in accordance with these instructions may result in electrical hazards. Do not use the appliance with a programmer, timer, separate remote control, or any other device that switches on automatically.
This product is marked in accordance with European Directive 2012/19/EC on waste electrical and electronic equipment (WEEE).
By ensuring proper disposal of this product, you will help prevent potential negative consequences for the environment and human health.

The symbol on the product or its documentation indicates that this product must not be treated as household waste. Instead, it should be handed over to the appropriate collection point for recycling of electrical and electronic equipment.
Disposal must be carried out in accordance with local regulations for waste disposal.
Please dispose of the product separately from other waste at the end of its service life. Do not dispose of it as unsorted municipal waste. Take it to a separate waste collection point in your area, a waste disposal service, or the store where you purchased the product.
The device has been designed, tested, and manufactured in accordance with:
- Safety: EN/IEC 60335-1; EN/IEC 60335-2-31, EN/IEC 62233.
- Performance: EN/IEC 61591; ISO 5167-1; ISO 5167-3; ISO 5168; EN/IEC 60704-1; EN/IEC 60704-2-13; EN/IEC 60704-3; ISO 3741; EN 50564; IEC
62301.
EMC: EN 55014-1; CISPR 14-1; EN 55014-2; CISPR 14-2; EN/IEC 61000-3-2; EN/IEC 61000-3-3. Recommendations for correct use to reduce environmental impact: Turn on the extractor hood at minimum speed when you start cooking and leave it running for a few minutes after you finish cooking. Increase the speed only in case of large amounts of smoke and steam, and use the boost speeds only in extreme situations. Replace the charcoal filter(s) when necessary to maintain good odor removal efficiency. Clean the grease filter(s) when necessary to maintain good grease filter efficiency. Use the maximum diameter of the ducting system indicated in this manual to optimize efficiency and minimize noise.
Use
The hood is designed for use in extraction mode (air exhaust) or recirculation mode.

Use in extraction mode (air exhaust)
In this mode, vapors are discharged outside through a duct connected to the connecting ring.
CAUTION!
The exhaust duct is not included and must be purchased separately.
The diameter of the exhaust duct must match the diameter of the connecting ring.
CAUTION!
If the hood is equipped with a charcoal filter, make sure it is removed.
Insert the duct into the outlet pipe with a diameter corresponding to the air outlet opening (connecting flange).
Use a pipe with the minimum required length. Use a pipe with the fewest number of bends (maximum bend angle: 90°). Avoid sharp changes in the pipe direction.
Attention! If the hood is equipped with a charcoal filter, remove it.

Use in recirculation mode
Air
Before installation:
Check that the dimensions of the hood you purchased fit the chosen installation location. Remove the charcoal filters if present (see also the relevant section). The filters are installed only if you intend to use the hood in recirculation mode. Check that no objects have been left inside the hood during transport (e.g., bags of screws, warranty documents, etc.). If any, remove them and keep them.
This hood must be securely fixed to a wall or other suitable support.
Operation
The hood is equipped with a control panel for controlling the speed of the extraction motor and switching on the light for illuminating the cooking surface.
a. Light switch ON/OFF. b. Switch OFF/speed 1. c. Speed selector 2. d. Speed selector 3.
Maintenance
Cleaning
For cleaning, use only a special cloth dampened with a neutral liquid detergent. Do not use any tools for cleaning. Do not use products containing abrasive materials. Do not use alcohol!
Grease filters
Fig. 10-21
Removing the grease filter
The filter should be cleaned monthly with non-aggressive detergents, by hand or in the dishwasher at low temperature and with a short cycle.
Washing in the dishwasher may cause some discoloration of the grease filter, but its filtering characteristics remain absolutely unchanged.
To remove the grease filter, pull the spring handle towards you.
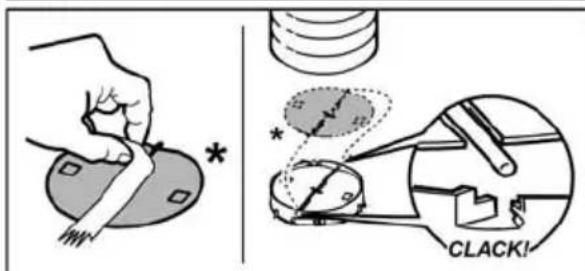
Charcoal filter (only for recirculation mode)
Fig. 20
Removing kitchen odors.
The charcoal filter becomes saturated after a more or less long period of use, depending on the type of cooking and the frequency of cleaning of the grease filters. In any case, replace the cartridge at least every 4 months.
The charcoal filter cannot be washed or regenerated.
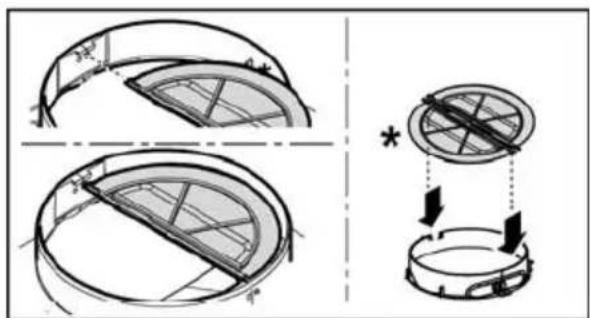
Remove the grease filter.
Install the charcoal filter on each side and rotate it until it locks into place.
Install the metal filters.
Replacing the lamps
Disconnect the appliance from the power supply.
Warning! Before touching the device, make sure it has cooled down.
Fully pull out the pull-out panel.
Remove the pull-out grille to gain access to the lamp sockets of the lighting.
Replace the damaged lamp.
Use only light bulbs with a maximum power of 3 W, with an E14 socket. For detailed information, refer to the enclosed manual "ILCOS D" (alphanumeric code "1d").
Reinstall the air filters for the pull-out grille.
If the lighting system does not work, check the correct installation of the lamps in the sockets before contacting the technical support center.
Only on some models
As an optional device, a flue gas non-return valve can be included in the kit, installed separately. If the conditions in which the equipment is installed require it (e.g., lack of protection against accidental backflow of air from above), install the valve in the corresponding hole in the exhaust air duct before installing the duct for smoke extraction.
Please follow the instructions given in this manual. The manufacturer assumes no responsibility for incorrect installation, use, or damage resulting from use of the device contrary to the instructions given in this manual. The hoods are designed for domestic use and for normal cooking, and are intended for household use.
It is important to keep these instructions for future reference. In case of sale, before handing over the device, make sure that the instructions are included with the product. - Read the instructions carefully: they contain important information on installation, use, and safety. It is forbidden to use electrical or mechanical devices to force the operation of the hood. - Before starting installation, check that all components are free of defects and not damaged. In case of damage, contact the point of sale and stop installation.
Note: Parts marked with the symbol (*) are optional accessories and are supplied only with some models, or are parts not included in the kit and must be purchased separately.

Warnings
Safety
Before starting any operation on the hood for cleaning or maintenance, disconnect the hood from the electrical power supply by unplugging it from the socket or switching off the main switch of the appliance.
- For all installation and maintenance operations, use the work instructions.
- The device can be used by children aged 8 and above and persons with reduced physical, sensory or mental capabilities, or lack of experience and knowledge, if they have been given supervision or instruction concerning use of the appliance in a safe way and understand the hazards involved. Children shall not play with the appliance.
Cleaning and user maintenance shall not be made by children without supervision.
The appliance must have sufficient ventilation when the hood is used simultaneously with other appliances burning gas or other fuels.
The hood must be cleaned frequently, both inside and outside (at least once a month), and always follow the instructions given in the maintenance manual.
Failure to follow the cleaning instructions for the hood and the filters increases the risk of fire.
It is strictly forbidden to prepare food over an open flame under the hood.
For lamp replacement, use only the lamps specified in the maintenance/replacement section of this manual.
Using the hood without the filters can cause overheating and may lead to fire, so it is necessary to avoid this in any case.
The appliance must be installed by qualified personnel to avoid any risk of fire.
WARNING: When the cooking surface is in use, accessible parts may become hot.
Do not connect the appliance to the electrical supply until the installation is completely finished. - This concerns technical measures and safety measures regarding the effects of vapors, strictly following the standards of local competent authorities. - The hood must not be used without the duct, unless it is used for recirculation mode with appliances that operate on gas or other fuels. Do not use or leave the hood without
Incorrectly installed lamps risk electric shock.
Never use the hood without the correctly installed grille! The hood must never be used as a support surface, unless specified. Use only the screws provided with the product for installation; if not provided, purchase screws of the correct type. Use the correct length of screws as indicated in the installation guide. - In case of doubt, consult an authorized center or qualified personnel.
WARNING!
Improper installation or use of devices for fixing in accordance with these instructions may lead to risks of electric shock. Do not use with a programmer, timer, separate remote control, or any other device that switches on automatically.
This product has been marked in accordance with the European Directive 2012/19/EC regarding waste electrical and electronic equipment (WEEE). By ensuring the correct disposal of this product, you will help prevent potential negative consequences for the environment and human health, which could otherwise be caused by inappropriate waste handling.

The symbol on the product or on its packaging indicates that this product must not be treated as household waste. Instead, it should be handed over to the applicable collection point for the recycling of electrical and electronic equipment. By ensuring this product is disposed of correctly, you will help prevent potential negative consequences for the environment and human health, which could otherwise be caused by inappropriate waste handling. For more detailed information about recycling of this product, please contact your local city office, your household waste disposal service, or the shop where you purchased the product.
The appliance has been designed, tested and manufactured in accordance with:
- Safety: EN/IEC 60335-1; EN/IEC 60335-2-31, EN/IEC 62233.
- Performance: EN/IEC 61591; ISO 5167-1; ISO 5167-3; ISO 5168; EN/IEC 60704-1; EN/IEC 60704-2-13; EN/IEC 60704-3; ISO 3741; EN 50564; IEC 62301. EMC: EN 55014-1; CISPR 14-1; EN 55014-2; CISPR 14-2; EN/IEC 61000-3-2; EN/IEC 61000-3-3. Correct use and maintenance of the appliance: switch on the appliance at minimum speed when cooking, and keep it running for a few minutes after cooking has finished.
Increase the speed only when there is a large amount of smoke and steam, and use the boost speed only in extreme cases. To maintain high efficiency in odor extraction, replace the charcoal filter(s) when necessary. To maintain high efficiency of the grease filter, clean the grease filter(s) when necessary. Use the maximum diameter of the ducting system indicated in the instructions to optimize efficiency and minimize noise.
Use
The appliance is designed for use in recirculation mode, with the air discharged back into the room, or in extraction mode with the air discharged outside.

Extraction mode
The air is extracted upwards through the exhaust pipe connected to the flange union.
WARNING!
The exhaust pipe is not supplied and must be purchased separately.
The diameter of the exhaust pipe must match the diameter of the connecting ring.
WARNING!
The hood must be installed in accordance with the installation instructions.
Install the hood partially into the exhaust pipe and exhaust outlet with the same diameter as the hood outlet (flanged).
Use the shortest exhaust duct. Use an exhaust duct with the minimum number of bends (maximum bend angle: 90°!). Avoid sharp changes in the cross-section of the exhaust duct.
Warning! If the hood is equipped with a charcoal filter, it must be removed.

Version with recirculation
Remove the hood from its packaging and place it back in the room. To use the hood in recirculation mode, it is necessary to install a filter system with activated charcoal.
Warning! If the hood is not equipped with a charcoal filter, install it before using the hood.
Installation
The distance between the lower part of the hood and the cooking surface must be at least 50 cm for electric hobs, and 65 cm for gas or combination hobs.
It is necessary to take into account the distances specified in the installation instructions for gas hobs.

Connection to the power supply
The voltage in the power supply must correspond to the characteristics indicated on the label located inside the hood. If the hood is supplied with a power cord, it must be connected to a socket that complies with current standards and is accessible after installation. If the cord is not supplied (direct connection to the power supply), or if the socket is not accessible after installation, a suitable two-pole switch must be installed that ensures complete disconnection from the mains under overvoltage category III conditions, in full compliance with installation rules.

WARNING!
Before connecting the hood to the power supply again, check the correctness of the work, and also check the mains fuse before installation.
The hood has a special power cord; in case of cord replacement, contact the technical service.
Installation procedure:
Check the dimensions of the device you have purchased against the chosen installation location. Remove the filter(s) if they are present (see also the relevant section). Reinstall the filter(s) if you wish to use the hood during the recirculation period. Check that the fasteners do not interfere with the installation, and remove them and keep them if they do.
The hood must be installed in the presence of an element or a support system.
Operation
The hood is operated via the control panel with airflow control and light control for illuminating the cooking surface.
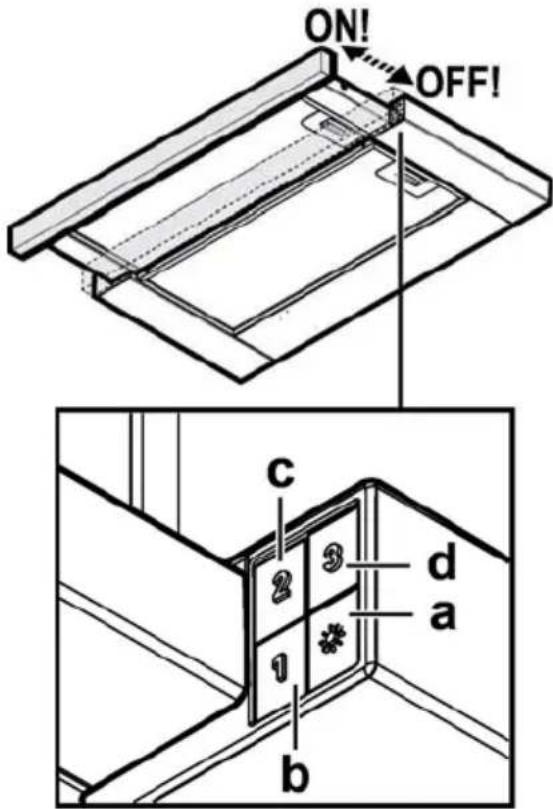
a. Light ON/OFF. b. OFF/Airflow 1 c. Airflow 2 d. Airflow 3
Maintenance
Cleaning
Use a specific service product, applied with a neutral detergent. Do not use abrasive products or tools for cleaning!
Do not use products that contain abrasives or materials. Do not use alcohol!
Grease filter
Fig. 10-21
Grease filter clogging, which occurs during cooking.
It must be cleaned with non-abrasive detergents, by hand or in a dishwasher at low temperatures and with a short cycle.
The carbon filter can be cleaned with water, but its characteristics from filtering odors will not change.
The grease filter can be washed by hand or in the dishwasher.
Carbon filter (only in recirculation mode) Max. 20
Removes unpleasant kitchen odors.
The carbon filter should be checked for saturation after a period of use no longer than...
Depending on the type of kitchen and the frequency of filter cleaning, in any case, the cartridge must be replaced at least every four months.
Do not wash or regenerate.
Remove the grease filters.
Attach the carbon filter to each side and
fix it to the hood.
Install the grease filters.
Replacing the lamps
Disconnect the appliance from the power supply.
Warning! Before touching the lamps, make sure they have cooled down.
Remove the lamp completely from its housing.
3HATN BNTJXHy peuITKy, 06 MaTN DOCTyn Do npoxHHn niDCBtKn.
3amHHTn N0WkoJKeHy NaMny.
BnKOpNCToByTe CbitIOioHi JAMN BnKIOHO MaKc.3W-E14. 6IbIeTaNbHoi IHOpMaui DVB. DoaTOK "ILCOS D" (no3uia "1d").
BcTaHOBtyn pewiTy
KuO CnCTema NiDcBITKn He npaioe, nepeBipTe BIPHy yCTaHOBky lamn B rH3da, pepeTmR 3Beptatncrdo UeHTpy texHIOI donOMOrn.
TIINbKn e deekux npodykmax:
JaDdaTkoBn akceCyap B cTaHdaptHi KOMnJIeKtaCiIO NOCTABJRACTbC3BOPOTnKlanaH DnA DNMy. JaKIo yMOBN YCTaHOBKn NOTpe6yIOT TaKNI KlaNaH (HaNPKnaD: BiDcyTHiCTb 3axNCTy BiD BuNaIckOBNX npOTarIB 33OBHi), BCTaBe NOrO B CneUaJIbHe rHIzO BCEPeNDi Po3'cMBy BO3dyXOBnYCKHOrO OTBOpY nepeD yCTaHOBKOHO Tpy6N BiDBeDeHHa DNMy.
DaibHdaybI acnantI naIandaHy 6apbcIHda 6yN HcyKayda 6eJIrIeHReH KOIaHy 7apTTapbIH caKTamaHaHHbIH KecipHeh 6onFaH OIKblBk Ept NeH 3aKbIM yuH Xayan 6epMeiDi. CopfbiW TEK KaHa Ynde naIandaHyra 6oJtBHa dA etin kO6aHaHaH.
Ke3KeJreH yaKbTTa 6yI HycayMeH naIdaIahy ywiH aKTaraH MaHbI3dbI. BybIM caTbIraH,TancbipraH HeMece KOJIraH Ke3De on OHbIMe 6ipre KaIraHbHa Ke3 JeTeKi3iHi3. HvckaydbI MyKnT OKbHb3: OHda 6yamDbI KOHdbpy, naJaNaHy XHe Kaybinci3dkiXeHiHde MaHb3dbI MmImET 6ap. БиIMHbIH 3JIeKTPoHDbIK HeMece MExaHnKaIbIK KOHCTpyKcIyCbIHda HeMece copfbl WENTINJzIyIbIK KaHaIapbIHda eKahdai da e3repictep kacamaHbI3. OpHaTydbOpbIHdAmac 6ypbIH 6epinreH 6apIbIK KypamdaTApdbIH 3aKbIMdaJImaFahbIH TeKcepiH3 Hemece opHaTydbI xaJfactbIpMac 6ypbIH DeIdaIraXa6apIacbHbI3.
Eckeptne: (*) TaH6acbl 6ap 6eniKTepe Kei6ip yrrinepmen 6epiTeIH (6acka XaFdaInapda 6epinMeTIn), 6ipak catbI anyfa 6oNaTbIH KocbIMwa akceccyapnap 6onbl TablaaBl.
Hyckaynap
Ke3 KeIreH Ta3aJay Hemece TexHNkaJIbIK Kbl3MeT KepceTy KymbICTapbIH opbIHdAmac 6ypbIH a7aHbI ShbIFapy Hemece XeJIiIK KyaT Ke3IH axbIPaTy apKblbl Copfbltbl 3JIeKTp XeJIcIHeH axbIPaTbIHbI3. OpHaTy XaHe TexHnKaJIbIK Kbl3MeT KepCety XyMbICTapbIH Kypri3reH Ke3Ne OpaBIM XyMbIC KOJfA6bIH KniH3. - ByI KypblfblHbI 8 JkactaftbI JxHe OdaH yInKeH bAlanap, DeHe, ce3y HeMece aKbln-Oi KaBilTtepi WeKTeyni TyIFaIap Hemece Taxipnbeci MeH 6iImi XOK TYIFaIap OHbl Kayinci3 XoJMeH NaJaIaNHyfa KaTbICTbl HyCKay aNbIn, bIKTmAn Kayintepdi YfblHfAH XafDaIda XHe 6aKblayda 60JFaHda NaIdaIaHa aIaBl.
Балалардын 6ackapy элем entтepин e3reptyime He xHe КурьлфыIMeH OйHaybHa JOKI бермey kepeK.
Do not use the device for purposes other than those described in the technical service instructions. If the device has been dropped or damaged by other means, it must be checked by qualified personnel before further use. The device must be cleaned both inside and outside (if possible) as needed, following the instructions provided in the technical service instructions. Cleaning standards and procedures for cleaning and maintenance must be strictly followed. Do not immerse the device in water or other liquids. For cleaning, use only the cleaning agents specified in the 'Technical Service/Cleaning' section of this manual. Using other cleaning agents or methods may damage the device, so avoid them. Do not use the device if it is damaged.
If the device is damaged or malfunctions, it must be repaired by qualified personnel.
CAUTION: The device's internal components may be damaged if the device is dropped or subjected to impact.
- Do not connect the device to an electrical outlet during installation.
- Consider the technical and safety measures against electric shock, and strictly follow the procedures established by relevant regulatory bodies. This device must be used only for the intended purpose of igniting gas or other fuels, and not for any other purposes. Do not use the device if the electrical cord or plug is damaged, or if the device has been dropped or damaged.
- Do not use the device if it has been dropped or damaged.
- Do not use the device if it has been dropped or damaged. Only use the replacement parts provided with the device; if not provided, use only original parts. Use the device only as described in the operating instructions. If you have any questions, contact qualified service personnel or the manufacturer's customer service.
WARNING!
Do not insert any objects into the device or its openings. Do not use the device with wet hands, or if it has been exposed to water or other liquids, or if it has been dropped or damaged.
Electrical and electronic equipment must be disposed of separately in accordance with European Directive 2012/19/EC (WEEE).
By disposing of this product separately, you help prevent potential negative consequences for the environment and human health.
Disposal of the device and packaging
The device must not be disposed of with household waste. It must be taken to a designated collection point for electrical and electronic equipment recycling.
By3yfa Tancbipy acnantbI kaTaNaDara acbipy XeHInderi XepriJIkiKTI epExeJepre caikec 1bIfapblnybl Tnic.
Бундан симдерп падалану, кайтайда rap acbipy epexelepi xehiHde TOnbik aknapaTTbI keprinikti akimwiinik opbIHapbIHah, KaIdbIKTapdbI kaTaNaidara acbipy KbI3MeTIHeH HeMece 6epinren eHIMdi Ci3 catbn anfah dykehen aana anacbl3.
KypbIbnfbl KeNecinepre caN KO6aHaHFaH, CbiHaHaH XeHe Xacan WbIfapBnFAH:
- Safety: EN/IEC 60335-1; EN/IEC 60335-2-31, EN/IEC 62233.
- Performance: EN/IEC 61591; ISO 5167-1; ISO 5167-3; ISO 5168; EN/IEC 60704-1; EN/IEC 60704-2-13; EN/IEC 60704-3; ISO 3741; EN 50564; IEC 62301. EMC: EN 55014-1; CISPR 14-1; EN 55014-2; CISPR 14-2; EN/IEC 61000-3-2; EN/IEC 61000-3-3. Instructions for reducing environmental impact:
Operate the appliance at the lowest speed and for a few minutes after cooking. Increase the speed only when necessary and use the highest speed only in exceptional cases. Use water filters when necessary to maintain the grease filter. Use oil filters when necessary to maintain the oil filter. For optimal performance and to reduce noise, use the maximum diameter of the ducting as indicated in the instructions.
Installation
The exhaust air must be discharged through a duct, or into a dedicated exhaust air duct.

This external exhaust duct must be connected to the exhaust air outlet.
WARNING!
The exhaust duct diameter must be equal to the diameter of the exhaust air outlet.
WARNING!
The exhaust duct must not be connected to the exhaust air duct of other appliances; it must be purchased separately.
The exhaust duct must be connected to the exhaust air outlet using the appropriate connection (flange).
Use the minimum required length of duct. Do not use long ducts (maximum length: 90°). Do not make sharp bends in the duct.
Check! If the cable is connected to the socket, they must be installed.

Water socket
The cable is connected to the socket, they are sold separately.
If the socket is installed, the plug must be inserted into the socket until it clicks, and then it is ready for use.
Check! If the cable is not connected to the socket, insert it until it clicks.
Connection
The distance from the socket to the edge of the hob should be at least 50 cm for electric hobs, and 65 cm for gas or combined hobs.
If during installation the gas hob is placed further than the socket, check it.
! Electric connections
When installing the hob, the technical requirements specified in the manual must be followed. If the hob is connected to the mains, it can be used after installation, but it must be connected to the mains with a plug. If the hob is not connected to the mains (permanently connected), or if the plug is not suitable after installation, then the installation must be carried out by a qualified electrician according to the instructions.
CHECK!
Connect the hob to the mains with a proper cable.
After installation, check it.
If the water connections are not properly sealed, contact the service organization for repair.
Close
OphatydbI 6acTay anDbHda:
- ΘΗΜΗ ΕλιωεΜι έρΗγ ΜρΗβι γυχή ἀνρής ἐκεύτουν τέκεριής.
- BencHei Kemip cy3riciH(lepH) (KaMTbIraH 6oJca) (6aca Jepdi KapaHbI3) aIbIHbI3. KaNaKtBuH cy3ri HycKaCbIH naJaHaHfbIHbI3 KeJIce, OHbI/Opapbl any KepeK. IwHne 6ypaHaJap, KeniNik KapTacbl, T.6. CnAKTbI 6ap cemKeJep CnAeKtbl KaKnak iwiHderi KocalkbI KypaIaDpbl (coHda OHaI TaCbIMaIaNay yuHOpHaJIaCTbIPbIFanF) TeKcePiH3. OIapDbI aBIn, Kayinci3 opbIHda caKTaHbI3.
CzhiHinH 6yn Tnni acnabI wkaΦKa Hemece baca Tipeke KipikTipinyi Kepek.
PaindanaHy
Cybyj XeIeTkiHJXbIaMdbIbIH 6aKbIay YuiH XaHe nnTaHbIH YcIHe XapbIK Tycipy YuiH, cybyj KaNarfbI backapy KaKaHbIme Xa6DbIKtanFaH.
a. KapbIKtbl KOCY/OLIIPY KOckblwbl b. 1-KbIДamDbIK/ΘUIPY KocKbIbIbI c. 2-ksblnDAMdbIKTbI TaHday d. 3-KbIJaAMdbIKTbTaHday
TexHnKaJIbIK KbI3MeT Kepcety
Tazanay
Ta3anay yuH IN TEK 6eTapan JyfbIu 3aTneH cyNaHraH apHaBb I uSybepeKTI naJaIaNbIHbI3. KYPblfbiHbI HEMECE TA3ALAY KYPALbIH PAJDAIAHBAHbI3! A6pa3nJIbIK Kocnacbl 6ap 3aTTbI naJaIaNbHaB13. CINPTTI PAJDAIAHBAHbI3!
MaCy3rici
10-21-cypet
Ac daBbHdyaDarbMai6eJwEKeTepiH yctan KaIaDbI.
Фиьтгд ai caын agreccnbTi emec kуfbIu 3aTapMeH, KOIMeH Hemece bIDcKyfbIu MaunHaDA, TEmeH Temnepatypada, YHemdi ta3anay Tepi6iHne Kyy Kepek. bIDcKyfbIu MaunHaDA kyyIraH mai yCTaTbIH qNtBtp Tycci3dEnHy i MyMKIn, 6ipak OdaH OHbIH cy3riKacNeTI Mynde e3repicci3 Kanadbl. Mai cy3ricin anbIn tacay uH cepinneni 6ocaty TTKacBH TapTbIHbI3
Kemip cy3riu (tek cy3riu-copfbiu TpyiHe) 20-cypet
Do not use the device without reading the instructions.
If the device is used for purposes other than its intended use, or if it is used incorrectly, the manufacturer's warranty may be void. In any case, the user is responsible for any damage caused by misuse.
Do not use the device if it is damaged or if there are visible defects.
Check the contents of the package.
If you have any questions about the device, contact
Check the contents of the package.
Operation
Connect the device to an electrical outlet.
Warning! Do not touch the heating elements, they are hot.
Do not cover the device.
To avoid electric shock, do not immerse the device in water or other liquids.
Do not operate the device with wet hands.
Only use the device with a maximum power of 3 W. Insert the plug into the socket marked "ILCOS D" ("1d" is the lamp designation).
Do not use the device outdoors.
If the device is not working properly, contact the technical service center. Do not attempt to repair the device yourself.
The air filter must be installed in the correct orientation, and it must be secured in the housing to prevent unfiltered air from entering the engine. Check the filter regularly and replace it when it is dirty or damaged.
Oh, they have a version
I P E D U N P E D Y B A H E!
The air filter is not supplied and must be purchased. The diameter of the air filter must be the same as the diameter of the connection pipe.
I P E D U N P E D Y B A H E!
If the aspirator is equipped with a filter, the filter must be removed.
Connect the aspirator with the hoses and the air outlet with a diameter equal to the air outlet (see figure).
! Use of the air filter is mandatory. ! Use of the hose with as few bends as possible (maximum angle of the bends: 90°). Avoid sharp bends in the hose.
Warning! If the aspirator is equipped with an activated carbon filter, the filter must be removed.

Variant with recirculation
The extracted air is freed from odors and then returned to the room. For use of the aspirator in this variant, it is necessary to install an additional system for
filtering based on activated carbon.
Warning! If the aspirator is not equipped with a filter, the filter must be ordered and installed before use.
Installation
The installation distance from the top of the cooker hood to the hob must not be less than 50 cm for electric hobs and 65 cm for gas or combined hobs. If the installation instructions for the gas hob specify a greater distance, this must be observed.

Electrical connection
The main power supply must correspond to the rating indicated on the rating plate inside the hood. If the hood is supplied with a plug, connect it to a socket in accordance with the relevant regulations, positioned in an accessible place after installation. If it is not supplied with a plug (direct connection to the electrical supply) or if the plug is not accessible after installation, use a double-pole switch in accordance with the standards, ensuring complete disconnection of the electrical supply under overvoltage category III, in accordance with the installation instructions.

WARNING!
Before (re)connecting the hood to the electrical supply and checking its functionality, always check that the power cable is correctly installed.
The hood is supplied with a power cable; in case of cable damage, contact the technical service for replacement.
Installation
Proceed with the installation:
Check that the purchased product is the correct size for the installation space. The outlet/filter/activated carbon filter if present (see relevant paragraph) must be installed only if the hood is to be used in the filtering version. Check that inside the hood (due to transport) there is no packaging material (e.g., screws, washers, etc.), and if there is, remove and discard it.
This type of hood must be installed inside a cabinet or another type of kitchen unit.
Operation
The hood is operated by a control panel with a suction speed regulator and a light regulator, located on the front of the hood.
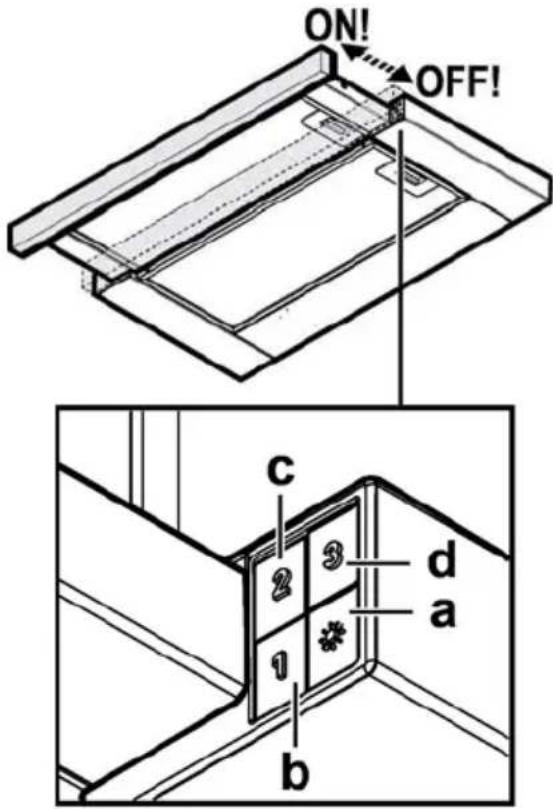
a. Switch for turning on/off the lights. b. Switch for off/speed 1 c. Speed 2 d. Speed 3
Maintenance
Cleaning
Use the vacuum cleaner only with the neutral detergent. Do not use it with the help of other instruments.
Do not use products containing abrasives. Do not use alcohol!
Oil filter
p. 10-21
For collecting the oil residues from the pan from the frying.
The metal oil filter must be cleaned once a month with neutral detergent, or in the dishwasher at low temperatures in a short interval.
With the transfer to the dishwasher, the metal oil filter may lose some of its characteristics, but its filtering properties do not change.
To remove the oil filter, pull it by the handle for removal.
Filter with active carbon (only for the version with filtering)
p. 20
For collecting the impurities from the pan from the frying.
The saturation of the filter with odors occurs sooner or later with prolonged use, depending on the type of frying and the frequency of cleaning the oil filter. In any case, it is necessary to replace the cartridge at least every 4 months.
It cannot be washed or reused.
Remove the oil filters.
Place one carbon filter on the side and attach it to the aspirator.
Check the oil level regularly.
Replacing the lamp
Switch off the appliance and unplug it.
Warning! Before replacing the lamp, make sure it has cooled down.
Remove the lamp cover.
Remove the ventilation grille for the lamp compartment.
Remove the grille.
Use only a lamp of type max 3W-E14. For more details, consult the enclosed document "ILCOS D" (ref. "1d").
Check the grille regularly.
If the light does not work, before calling technical support, check that the lamp is properly inserted.
Only in some models:
As an optional accessory, a ventilation valve for gas evacuation is supplied, which must be installed. If during installation you find it necessary (for example: lack of protection against accidental air flow from outside), insert it into the corresponding hole on the inside of the air outlet element before installing the exhaust duct.
(90° high beam) dimming
1
aai 1111

c
aia aai jil gll all jn no gai ai gai i jai
bill jy 51 Joo yolj
44444444444444444444444444444444444444444
a
#
y 50 65
j j j j j j j j j j j j j j j j j j j j j j j j j j j j j j j j j j j j j j j j j j j j j j j j j j j j j j j j
aiee jag a jai jai jai jai jai jai jai
1

y
Siall 1alil 1aii 1alil g jia jai jai i
Waste Electrical and Electronic Equipment (WEEE)
1
General information
General safety instructions
1
a a a a a a a a a a a a a a a a a a a a a a a a a a a a a a a a a
Read the instructions carefully before using the appliance.
y
Keep the appliance and its cord out of reach of children.
Do not use the appliance if it is damaged or malfunctioning.
-2-EN/IEC 60335-1 EN/IEC 60335-1 EN/IEC 62233,31
ISO 1-EN/IEC 61591; ISO 5167
EN/IEC 1-ISO 5168; EN/IEC 60704-3-5167
ISO 3741; EN 3-EN/IEC 60704-13-2-60704
.50564; IEC 62301
EN 55014-1; CISPR:((s) EMC
14-1; EN 55014-2; CISPR 14-2; EN/IEC 61000-
3-2; EN/IEC 61000-3-3

Therefore, the area of triangle ACD equals the area of triangle ADE plus the area of triangle ADC.
.ON/OFF 1
14.1/OFF 2b
2 acull jaii .c
3 aee jie d
aill
quadrilateral
21-10
20 20
LIB0149483B Ed. 09/18
- EN - INSTRUCTION ON MOUNTING AND USE
- CAUTION
- WARNING
- USE
- EXTRACTION VERSION
- FILTRATION VERSION
- INSTALLATION
- ELECTRICAL CONNECTION
- MOUNTING
- BEFORE BEGINNING INSTALLATION
- OPERATION
- MAINTENANCE
- CLEANING
- GREASE FILTER
- FIG
- CHARCOAL FILTER (FILTER VERSION ONLY)
- REPLACING LAMPS
- ON SOME MODELS ONLY
- VERSION 8 OF THE MANUAL
- EXHAUST AIR FILTRATION
- ATTENTION
- BEFORE PROCEEDING WITH THE INSTALLATION
- INSTRUCTIONS FOR USE
- FILTER LUBRICATION
- FILTER ACTIVE CARBON (ONLY FOR FILTERING VERSION)
- NORMAL OF THE LED RING
- ONLY FOR PROFESSIONAL USE
- RO - INSTALLATION AND USE INSTRUCTIONS
- USE IN EXTRACTION MODE (AIR EXHAUST)
- USE IN RECIRCULATION MODE
- AIR
- BEFORE INSTALLATION
- GREASE FILTERS
- CHARCOAL FILTER (ONLY FOR RECIRCULATION MODE)
- REPLACING THE LAMPS
- ONLY ON SOME MODELS
- WARNINGS
- SAFETY
- EXTRACTION MODE
- VERSION WITH RECIRCULATION
- CONNECTION TO THE POWER SUPPLY
- INSTALLATION PROCEDURE
- CARBON FILTER (ONLY IN RECIRCULATION MODE) MAX
- TIINBKN E DEEKUX NPODYKMAX
- HYCKAYNAP
- WATER SOCKET
- CONNECTION
- ELECTRIC CONNECTIONS
- CHECK
- CLOSE
- OPHATYDBI 6ACTAY ANDBHDA
- PAINDANAHY
- TEXHNKAJIBIK KBI3MET KEPCETY
- TAZANAY
- MACY3RICI
- CYPET
- AC DABBHDYADARBMAI6EJWEKETEPIH YCTAN KAIADBI
- KEMIP CY3RIU (TEK CY3RIU-COPFBIU TPYIHE) 20-CYPET
- DO NOT USE THE DEVICE WITHOUT READING THE INSTRUCTIONS
- OH, THEY HAVE A VERSION
- I P E D U N P E D Y B A H E
- VARIANT WITH RECIRCULATION
- PROCEED WITH THE INSTALLATION
- OIL FILTER
- FILTER WITH ACTIVE CARBON (ONLY FOR THE VERSION WITH FILTERING)
- REPLACING THE LAMP
- ONLY IN SOME MODELS
Brand : ELICA
Model : Elite 14 LUX 50 BL
Category : Range hood