PSX2500 - Multitools EGO - Free user manual and instructions
Find the device manual for free PSX2500 EGO in PDF.
| Product Type | Pole saw attachment for power head |
| Brand | EGO |
| Model | PSX2500 |
| Guide bar length | 250 mm |
| Chain pitch | 3/8 in (9.5 mm) |
| Recommended chain type | AC1000 / AC1001 |
| Recommended guide bar type | AG1000 / AG1001 |
| Chain oil tank capacity | 150 ml |
| Weight (with guide cover) | 2.0 kg |
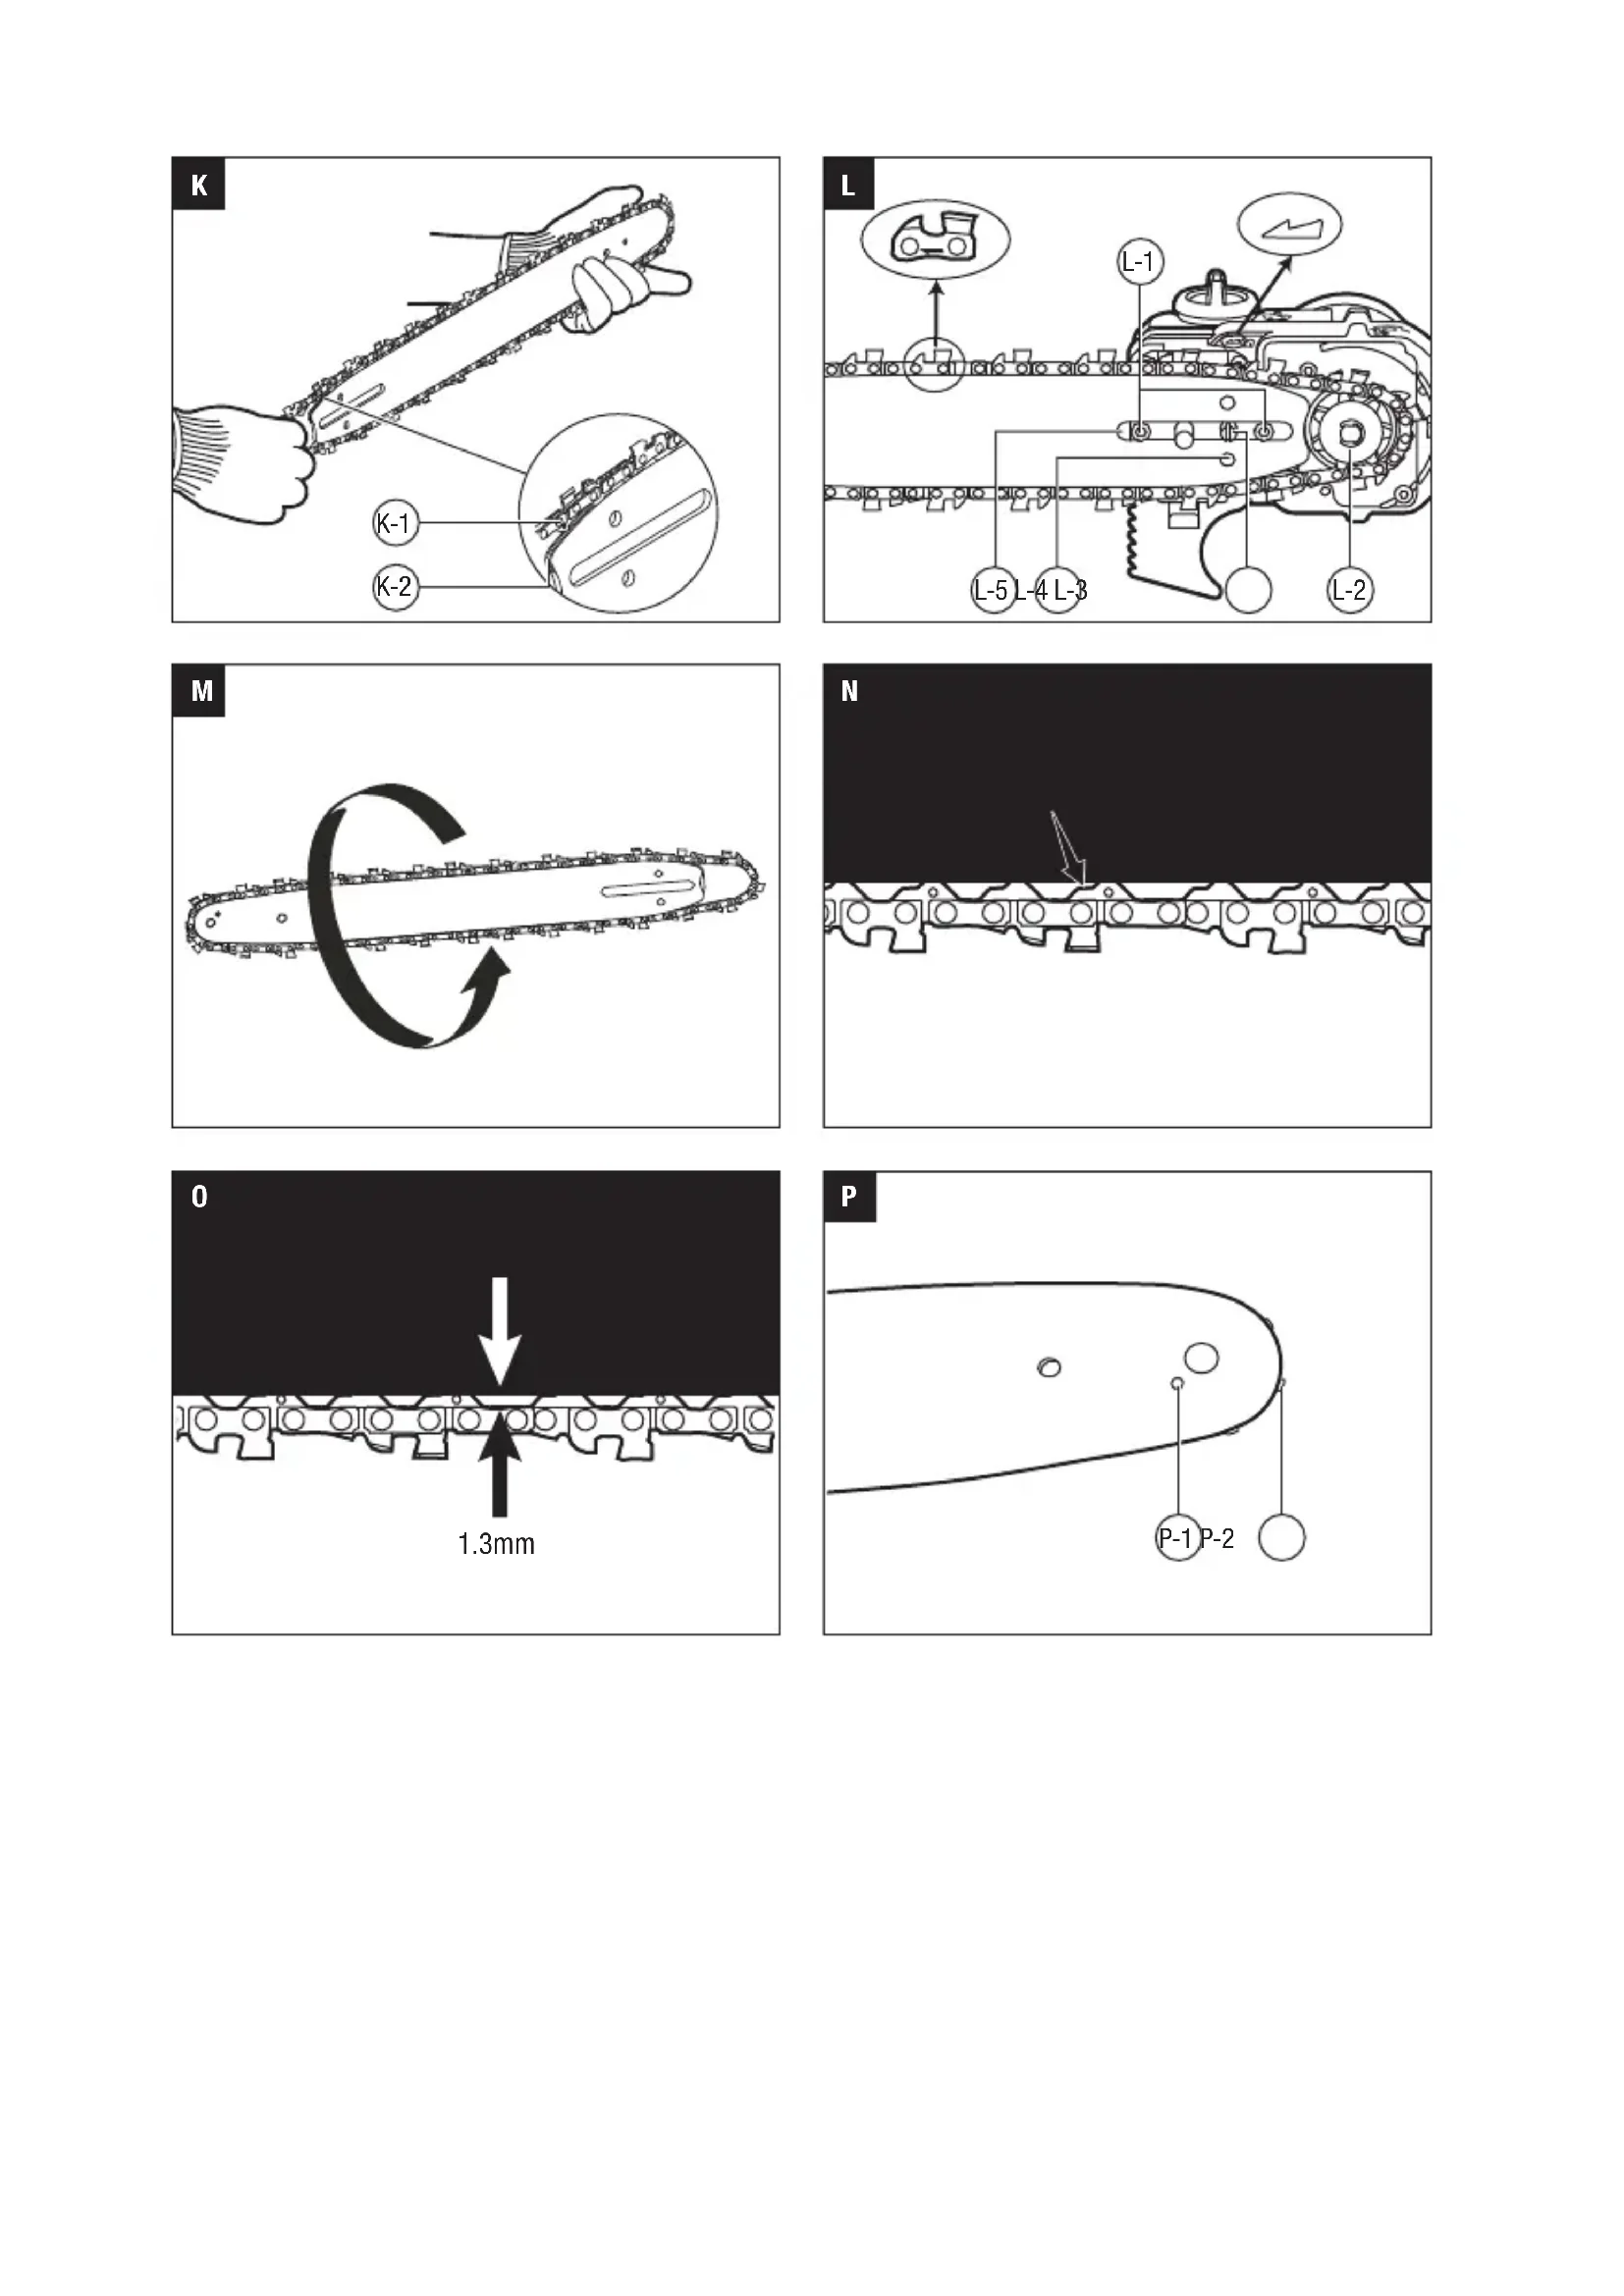
| Power source | 56 V lithium-ion battery (PPX1000 power head required) |
| Main functions | Pruning and trimming branches up to 20 cm in diameter |
| Recommended operating temperature | -10 °C to 40 °C |
| Recommended storage temperature | -20 °C to 70 °C |
| Guaranteed sound power level | 101 dB(A) |
| Vibration level (front/rear handles) | 1.2 m/s² (K=1.5 m/s²) |
| Maintenance and cleaning | Clean after each use with soapy water; lubricate the sprocket every week; replace worn chain and bar |
| Safety | Wear glasses, gloves, hearing protection; do not use near power lines (< 15 m); remove battery before maintenance |
| Spare parts and repairability | Use only identical EGO replacement parts; repairs by an authorized center |
Frequently Asked Questions - PSX2500 EGO
User questions about PSX2500 EGO
0 question about this device. Answer the ones you know or ask your own.
Ask a new question about this device
Download the instructions for your Multitools in PDF format for free! Find your manual PSX2500 - EGO and take your electronic device back in hand. On this page are published all the documents necessary for the use of your device. PSX2500 by EGO.
USER MANUAL PSX2500 EGO
natural_image
Line drawing of a long-handled mechanical tool with a handle and screw head (no text or symbols)OPERATOR'S MANUAL
POLE SAW
ATTACHMENT
MODEL NUMBER PSX2500
FOR USE ONLY WITH THE 56V LITHIUM-ION POWER POLE PPX1000
EN Pole saw attachment 5
text_image
Technical diagram of a chain-linking device with numbered parts and a labeled control panelA2
BA1400, BA2800,
BA4200, BA2240T,
BA1400T, BA2800T,
BA4200T, BA5600T
natural_image
Technical line drawing of a cylindrical electronic device with internal components (no text or symbols)CH5500E,
CH2100E
natural_image
Line drawing of a portable electronic device with ventilation slots and ports (no text or symbols)
text_image
B B-1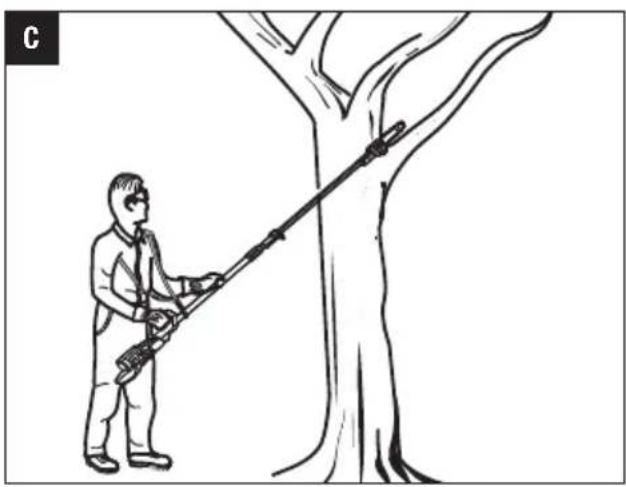
natural_image
Line drawing of a person using a long-handled tool to clean or extend a tree trunk (no text or symbols)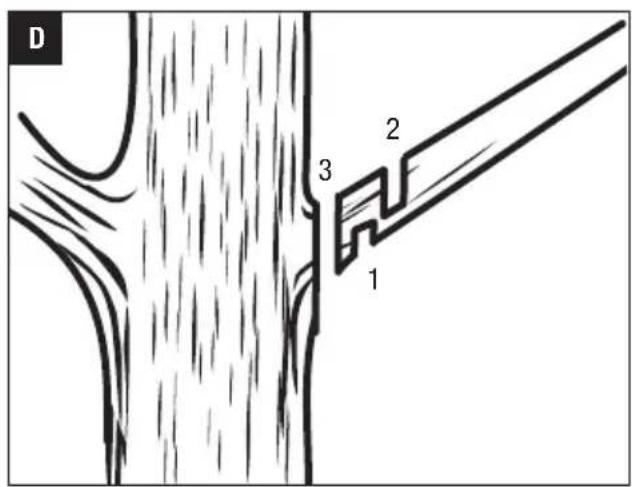
text_image
D 1 2 3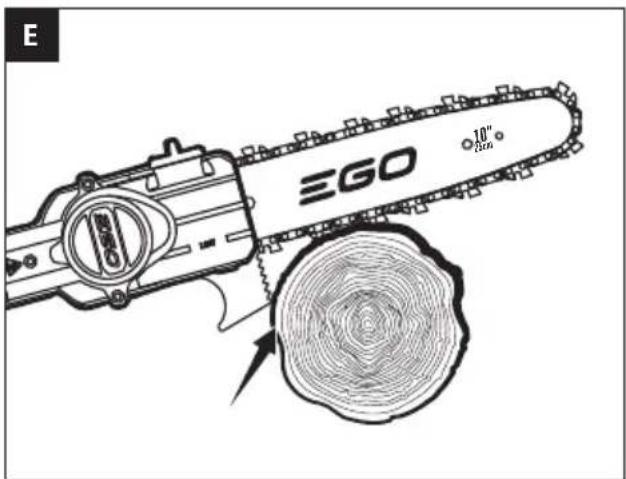
text_image
E EGO 10" 20in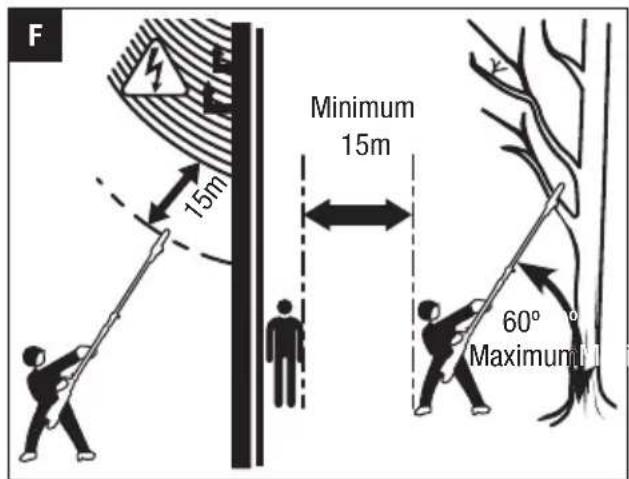
text_image
F 15m Minimum 15m 60° Maximum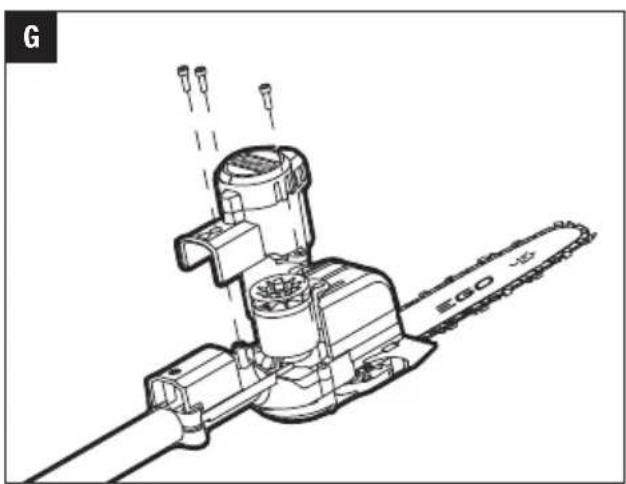
natural_image
Technical line drawing of a mechanical chain assembly (no text or symbols)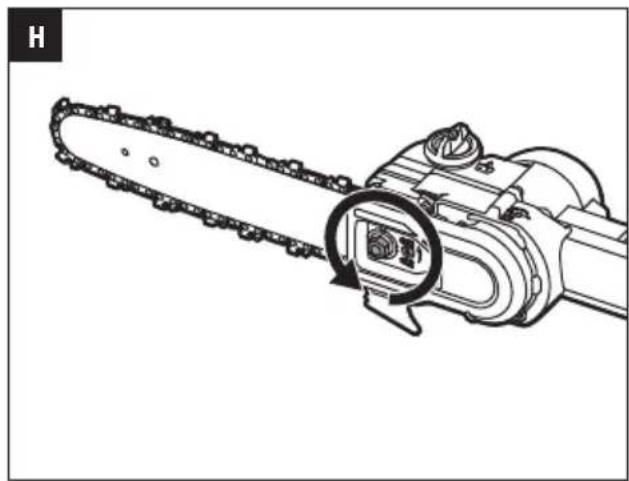
natural_image
Line drawing of a chain drive with a circular arrow indicating the blade (no text or symbols)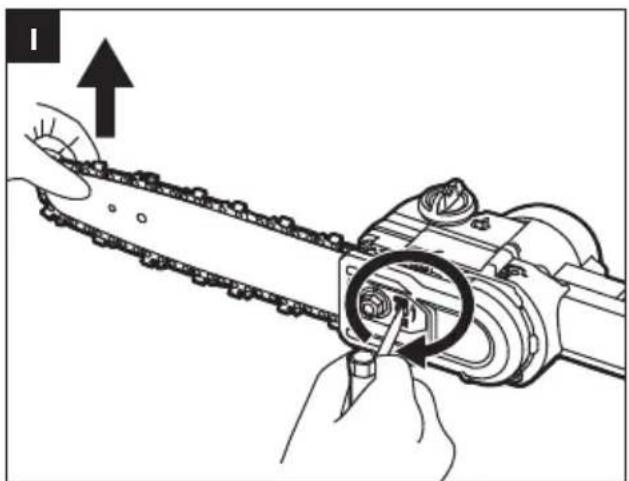
natural_image
Illustration of a mechanical chain being inserted into a gear, showing tool path and motion direction (no text or symbols)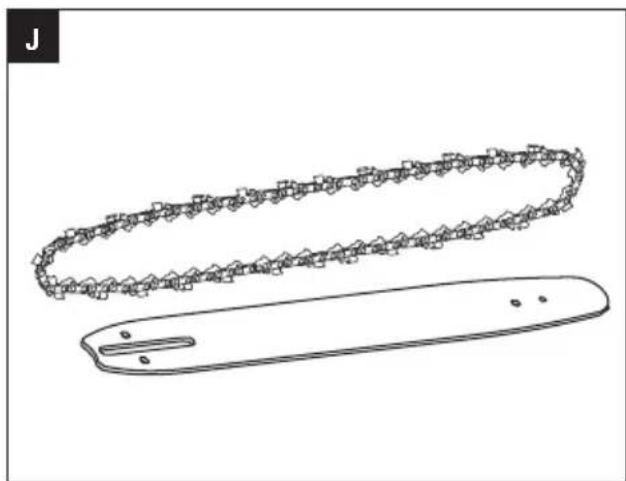
natural_image
Technical line drawing of two mechanical components: a chainmail and a flat blade (no text or symbols)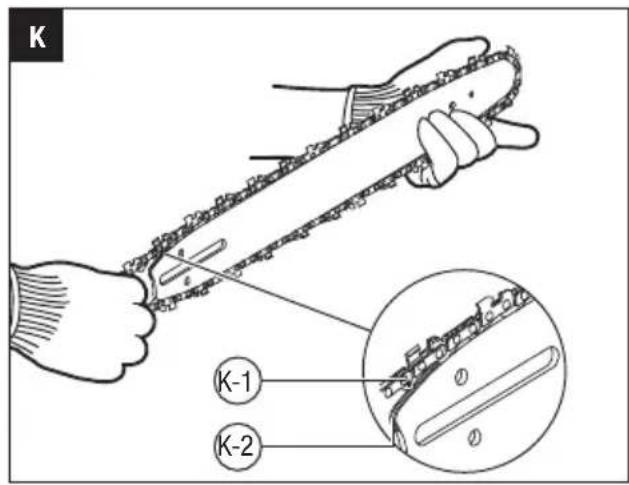
text_image
K K-1 K-2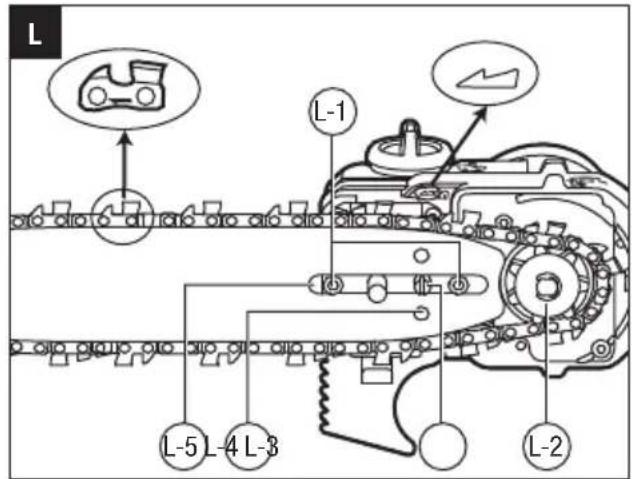
text_image
L L-1 L-5 L-4 L-3 L-2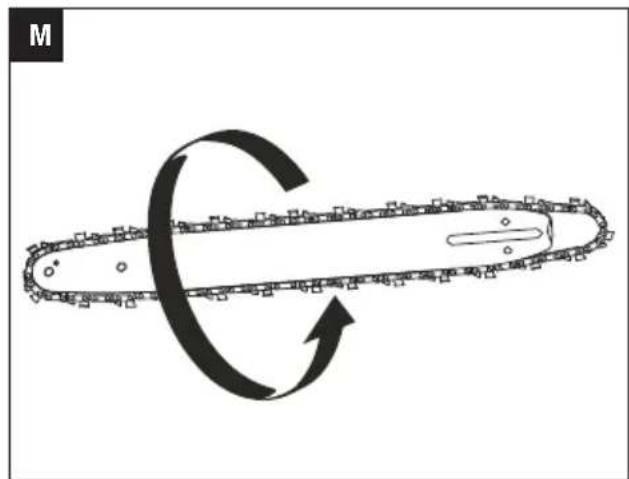
natural_image
Diagram of a chain drive with rotating and curved motion arrows (no text or symbols)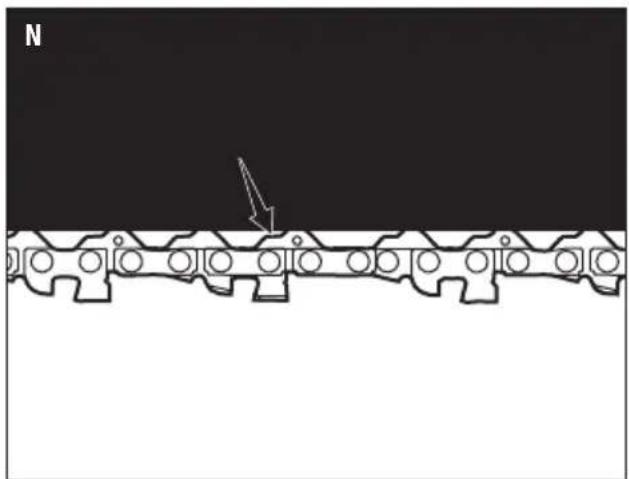
natural_image
Mechanical chain diagram showing a moving gear or chain with an arrow pointing to a specific point (no text or labels present)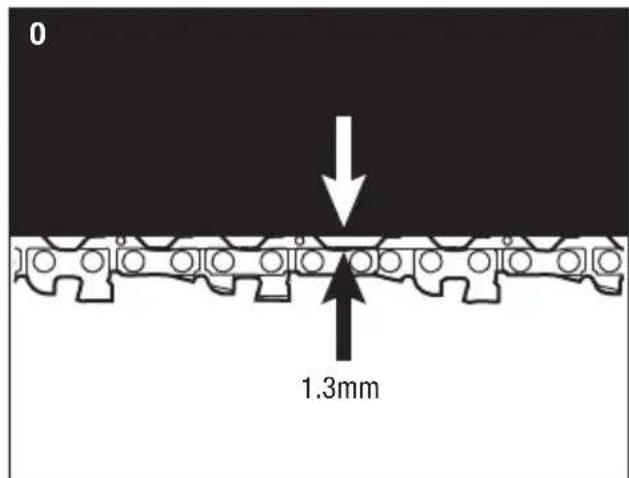
text_image
0 1.3mm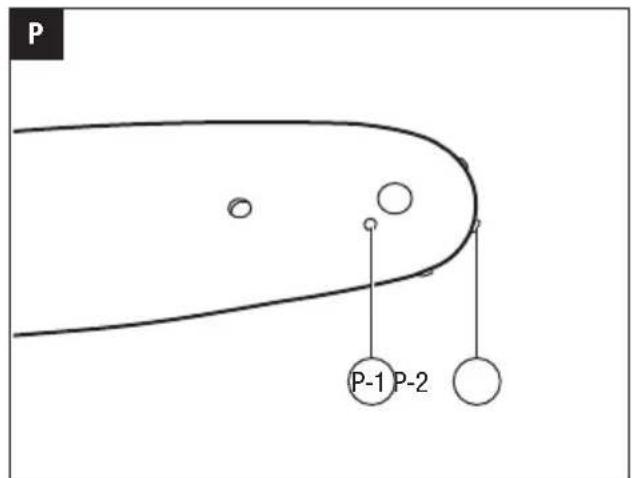
text_image
P P-1 P-2READ ALL INSTRUCTIONS!

READ OPERATOR'S MANUAL
⚠️ Residual risk! People with electronic devices, such as pacemakers, should consult their physician(s) before using this product. Operation of electrical equipment in close proximity to a heart pacemaker could cause interference or failure of the pacemaker.
WARNING: To ensure safety and reliability, all repairs and replacements should be performed by a qualified service technician.
SAFETY SYMBOLS
The purpose of safety symbols is to attract your attention to possible dangers. The safety symbols and the explanations with them deserve your careful attention and understanding. The symbol warnings do not, by themselves, eliminate any danger. The instructions and warnings they give are no substitutes for proper accident prevention measures.
WARNING: Be sure to read and understand all safety instructions in this Operator's Manual, including all safety alert symbols such as "DANGER," "WARNING," and "CAUTION" before using this tool. Failure to follow all instructions listed below may result in electric shock, fire, and/or serious personal injury.
SYMBOL MEANING
SAFETY ALERT SYMBOL: Indicates DANGER, WARNING, or CAUTION. May be used in conjunction with other symbols or pictographs.

WARNING: The operation of any power tools can result in foreign objects being thrown into your eyes, which can result in severe eye damage. Before beginning power tool operation, always wear safety goggles or safety glasses with side shields and a full face shield when needed. We recommend a Wide Vision Safety Mask for use over eyeglasses or standard safety glasses with side shields.
SAFETY INSTRUCTIONS
This page depicts and describes safety symbols that may appear on this product. Read, understand, and follow all instructions on the machine before attempting to assemble and operate it.
 | Safety Alert | Indicates a potential personal injury hazard. |
 | Read & Understand Operator's Manual | To reduce the risk of injury, user must read and understand the operator's manual before using this product. |
 | Wear Eye & Head Protection | Wear close-fitting safety glasses, earplugs or ear muffs and a safety hard hat with chin strap |
 | Wear Protective Gloves | Protect your hands with gloves when handling saw and saw chain. Heavy-duty, nonslip gloves improve your grip and protect your hands. |
 | Wear Safety Footwear | Wear non-slip safety footwear when using this equipment. |
 | Keep sufficient distance away from electrical power lines | To prevent electrocution, do not operate within 15 m of overhead electrical lines. Contact with or use near power lines may cause serious injury or electric shock resulting in death. |
 | CE | This product is in accordance with applicable EC directives. |
 | WEEE | Waste electrical products should not be disposed of with household waste. Take to an authorized recycler. |
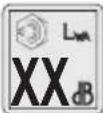 | Noise | Guaranteed sound power level. Noise emission to the environment according to the European community's Directive. |
| V Volt Voltage | ||
| mm Millimeter Length or size | ||
| cm Centimeter Length or size | ||
| kg Kilogram Weight | ||
EN
| n_0 | No Load Speed | Rotational speed, at no load |
| ... /min Per | Minute Revolutions per minute | |
| Direct Current | Type or a characteristic of current | |
IMPORTANT SAFETY INSTRUCTIONS
WARNING! When using electric gardening appliances, basic safety precautions should always be followed to reduce the risk of fire, electric shock, and personal injury, including the following:
READ CAREFULLY BEFORE USE
KEEP FOR FUTURE REFERENCE
DANGER! Do not operate near electrical power lines. The unit has not been designed to provide protection from electric shock in the event of contact with overhead electric lines, consult local regulations for safe distances from overhead electric power lines and ensure that the operating position is safe and secure before operating the tool.
POLE SAW SAFETY WARNINGS
- Keep all parts of the body away from the saw chain when the pole saw is operating. Before you start the pole saw, make sure the saw chain is not contacting anything. A moment of inattention while operating pole saws may cause entanglement of your clothing or body with the chain.
- Avoid unintentional contact with the stationary saw chain or guide bar rails. These can be very sharp. Always wear gloves and long pants or chaps when handling the pole saw, saw chain, or guide bar.
■ Always hold the pole saw with your one hand on the rear handle and your other hand on the front handle. Serious injury to the operator, helpers, and/or bystanders can result from one-handed operation. - Hold the power tool by insulated gripping surfaces only, because the saw chain may contact hidden wiring. Saw chains contacting a “live” wire may make exposed metal parts of the power tool “live” and could give the operator an electric shock.
■ Wear safety glasses and hearing protection. Further protective equipment for head, hands, legs and feet is recommended. Adequate protective clothing will reduce personal injury by flying debris or accidental contact with the saw chain.
- Do not operate a pole saw in a tree. Operation of a pole saw while up in a tree may result in personal injury.
■ Always keep proper footing and operate the pole saw only when standing on fixed, secure and level surface. Slippery or unstable surfaces such as ladders may cause a loss of balance or control of the pole saw.
■ Never operate a pole saw that is damaged or improperly adjusted or that is not completely and securely assembled. Be sure that the saw chain stops moving when the trigger switch is released.
- Inspect the work piece for nails, wire, or other foreign objects prior to cutting.
- When cutting a limb that is under tension be alert for spring back. When the tension in the wood fibers is released the spring loaded limb may strike the operator and/or throw the pole saw out of control.
■ Use extreme caution when cutting brush and saplings. The slender material may catch the saw chain and be whipped toward you or pull you off balance.
■ Aggressive or abusive cutting or misuse of the pole saw can cause premature bar, chain, and/or sprocket wear, as well as broken chain or bar, leading to kickback, chain throw or the ejection of material.
■ Never use the guide bar as a lever. A bent guide bar can cause premature bar, chain, and/or sprocket wear, as well as a broken chain or bar, leading to kickback, chain throw or the ejection of material.
- Carry the pole saw with two hands on the handles, with the pole saw switched off. When transporting or storing the pole saw always fit the guide bar cover. Proper handling of the pole saw will reduce the likelihood of accidental contact with the moving saw chain.
- Do not remove cut material or hold material to be cut when blades are moving. Make sure the switch is off when clearing jammed material. Saw chain continues to move after the switch is turned off. A moment of inattention while operating the pole pruner may result in serious personal injury.
■ Follow instructions for lubricating, chain tensioning and changing accessories. Improperly tensioned or lubricated chain may either break or increase the chance for kickback. Keep cutting edge sharp and clean for best performance and to reduce the risk of injury. - Keep handles dry, clean, and free from oil and grease. Greasy, oily handles are slippery causing loss of control.
- Cut wood only. Do not use pole saw for purposes not intended. For example: do not use pole saw for cutting plastic, masonry or non-wood building materials. Use of the pole saw for operations different than intended could result in a hazardous situation.
■ Do not use the pole saw in bad weather conditions, especially when there is a risk of lightning. This decreases the risk of being struck by lightning.
■ Stop the motor and remove the battery pack whenever you leave the tool.
■ Store idle appliances indoors. When not in use, appliances should be stored indoors in a dry and high or locked-up place with the battery pack removed, out of reach of children.
- Check damaged parts. Before further use of the product, a guard or other part that is damaged should be carefully checked to determine that it will operate properly and perform its intended function. Check for alignment of moving parts, binding of moving parts, breakage of parts, mounting, and any other condition that may affect its operation. A guard or other part that is damaged should be properly repaired or replaced by an authorized service center unless indicated elsewhere in this manual.
ADDITIONAL SAFETY INSTRUCTIONS FOR EXTENDED-POLE SAW
■ Do not charge the battery pack in rain, or in wet locations.
■ The battery pack must be removed from the appliance before it is scrapped.
■ The battery shall be disposed of safely.
- Do not dispose of the battery in a fire. The cells may explode. Check with local codes for possible special disposal instructions.
■ Do not open or mutilate the battery. Released electrolyte is corrosive and may cause damage to the eyes or skin. It may be toxic if swallowed.
CAUTION! The electrolyte is a dilute sulfuric acid that is harmful to the skin and eyes. It is electrically conductive and corrosive.
■ Exercise care in handling batteries in order not to short the battery with conducting materials such as rings, bracelets, and keys. The battery or conductor may overheat and cause burns.
■ Battery tools do not have to be plugged into an electrical outlet; therefore, they are always in operating condition. Be aware of possible hazards even when the tool is not operating. Take care when performing maintenance or service.
■ Remove the battery pack before servicing, cleaning or removing material from the tool.
■ Replacement parts - When servicing, use only identical EGO replacement parts. Use of any other accessory or attachment may increase the risk of injury.
■ Do not wash with a hose; avoid getting water in motor and electrical connections.
■ If situations occur that are not covered in this manual, use care and good judgment. Contact the EGO Service Center for assistance.
■ Save these instructions. Refer to them frequently and use them to instruct others who may use this tool.
■ If you lend this tool to someone else, also lend these instructions to them to prevent misuse of the product and possible injury.
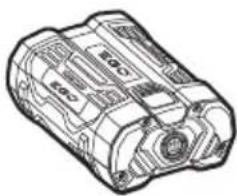
■ Use only with the battery packs and chargers listed in Fig.A2.
SAVE THESE INSTRUCTIONS
NOTE: SEE YOUR POWER POLE OPERATOR'S MANUAL FOR ADDITIONAL SPECIFIC SAFETY RULES.
SPECIFICATIONS
| Guide Bar Length 250 mm | ||
| Chain Pitch 3/8"(9.5 mm) | ||
| Chain Gauge 1.1 mm | ||
| Saw Chain Type AC1000/AC1001 | ||
| Guide Bar Type AG1000/AG1001 | ||
| Chain Oil Tank Capacity 150 ml | ||
| Recommended Operating Temperature | -10°C-40°C | |
| Recommended Storage Temperature | -20°C-70°C | |
| Weight (with chain sheath) 2.0 kg | ||
| Measured sound power level L_WA | 98.54 dB(A)K=2.3 dB(A) | |
| Sound pressure level at operator's ear L_PA | 85 dB(A)K=2.5 dB(A) | |
| Guaranteed sound power level L_WA (measured according to 2000/14/EC) | 101 dB(A) | |
| Valuation of vibration a_h : | Front handle | 1.2 m/s ^2 K=1.5 m/s ^2 |
| Rear handle | 1.2 m/s ^2 K=1.5 m/s ^2 | |
■ The above parameters are tested and measured equipped with power pole PPX1000.
■ The declared vibration total value has been measured in accordance with a standard test method and may be used for comparing one tool with another;
EN
■ The declared vibration total value may also be used in See “ATTACHING AN ATTACHMENT TO THE TELESCOPIC a preliminary assessment of exposure. POWER POLE” section in the power pole PPX1000
NOTICE: The vibration emission during actual use of the power tool can differ from the declared value in which the tool is used; In order to protect the operator, user should wear gloves and ear protectors in the actual conditions of use.
PACKING LIST (FIG.A1)
Recommended Bar and Chain for this Pole Saw
| PART NAME MODEL NUMBER |
| Guide Bar AG1000/AG1001 |
| Saw Chain AC1000/AC1001 |
DESCRIPTION
KNOW YOUR POLE SAW ATTACHMENT (Fig. A1)
- Saw Chain
- Guide Bar
- Shaft
- Oil-tank Cap
- Oil Tank
- Chain-sprocket Cover
- Tensioning Screw
- Bucking Spikes
- Bar Nut
- Chain Sheath
ASSEMBLY
⚠ WARNING: If any parts are damaged or missing, do not operate this product until the parts are replaced. Use of this product with damaged or missing parts could result in serious personal injury.
WARNING: Do not attempt to modify this product or create accessories not recommended for use with this pole saw. Any such alteration or modification is misuse and could result in a hazardous condition leading to possibly injury.
CONNECTING THE POLE SAW ATTACHMENT TO THE TELESCOPING POWER POLE
This pole saw attachment is designed for use with EGO 56V LITHIUM-ION telescoping power pole PPX1000.
operator's manual.
WARNING: Failure to secure the attachment and power pole as instructed above could result in serious injury or death.
WARNING: Never attach or adjust any attachment while the power head is running or with the battery installed. Failure to stop the motor and remove the battery may cause serious personal injury.
OPERATION
DANGER: Never cut near power lines, electric cords, or other electric sources. If the bar and chain jams on any electrical cord or line, DO NOT TOUCH THE BAR, CHAIN OR THE ALUMINUM POLE! THEY CAN BECOME ELECTRICALLY LIVE AND MAY BE VERY DANGEROUS. Continue to hold the pole saw by the insulated rear handle or lay it down and away from you in a safe manner. Disconnect the electrical service to the damaged line or cord before attempting to free the bar and chain from the line or cord. Contact with the bar, chain, other conductive parts of the pole saw, or live electric cords or lines could result in death by electrocution or serious injury.
WARNING: Do not allow familiarity with this product to make you careless. Remember that a careless fraction of a second is sufficient to inflict serious injury.
WARNING: Always wear eye protection, along with hearing protection. Failure to do so could result in objects being thrown into your eyes and other possible serious injuries.
Before each use, inspect the entire product for damaged, missing, or loose parts such as screws, nuts, bolts, caps, etc. Tighten securely all fasteners and caps and do not operate this product until all missing or damaged parts are replaced.
⚠ WARNING: To prevent serious personal injury, remove the battery pack from the tool before servicing, cleaning, changing attachments or removing material from the unit.
APPLICATIONS
You may use this product for the purpose listed below:
■ Limbing
Pruning
NOTICE: The tool is to be used only for its prescribed purpose. Any other use is deemed to be a case of misuse.
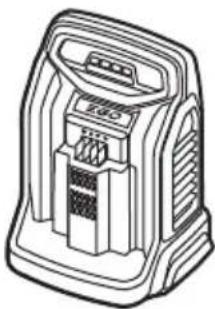
FILLING OILTANK WITH BAR AND CHAIN LUBRICANT (Fig. B)
WARNING: Do not smoke or bring any fire or flame near the oil or the pole saw. Oil may spill and cause a fire.
NOTICE: The pole saw is not filled with oil at the time of purchase. It is essential to fill the tank with chain oil before use. Chain life and cutting capacity depend on optimum lubrication. The chain is automatically lubricated with chain oil during operation. Please always attention the lubrication oil level in work and refill the tank timely as needed.
- Remove the battery pack from the power pole.
- Clean the oil tank cap and the area around it to ensure that no dirt falls into the oil tank.
- Place the pole saw attachment upright and rotate the oil tank cap counterclockwise to remove it.
- Carefully pour the bar and chain oil into the tank until it fills to the tank neck. Be careful not to let the oil spill from the opening. Wipe off any excess oil and close the oil tank cap.
NOTICE: The oil flow ratio could be adjusted by turning the adjusting screw counterclockwise to increase the oil output, clockwise to decrease the oil output (Fig. B)
B-1 Adjusting Screw
NOTICE: Do not use dirty, used or other contaminated oils. Damage may occur to the bar or chain.
PREPARATION FOR CUTTING (Fig. C)
Refer to "Important Safety Instructions" earlier in this manual for appropriate safety equipment.
■ Lift the tip of the guide bar to check for any sagging in the chain. The chain is correctly tensioned when there is no sag on the underside of the guide bar and the chain is snug, but it can be turned by hand without binding. If the tension requires adjustment, refer to the "REPLACING THE BAR AND CHAIN" section in the MAINTENANCE section of this manual for adjustment instructions.
- Check the tension of the bar nut before use. If it is loose, securely tighten the bar nut by turning it clockwise.
- Check the sharpness of cutting teeth on the saw chairpinched or trapped in the limb. If this should happen: and make sure the chain is well lubricated.
1. Stop the motor and remove the battery neck
NOTICE: For second and final cuts (from top of limb or branch), hold the bucking spikes against the limb being cut (Fig. E). This will help steady the limb and make it easier to cut with light downward pressure. If you force the cut, damage to the bar, chain, or motor can result in.
4. Release the trigger on the power pole as soon as the cut is completed.
NOTICE: Failure to follow proper cutting procedures will result in the bar and chain binding and becoming pinched or trapped in the limb. If this should happen:
■ Wear non-slip gloves for maximum grip and protecti Never stand directly under the limb you are cutting. Make sure that you have a secure and balanced footing. Watch out for obstacles such as tree stumps, roots and ditches, which could cause you to trip or stumble.
- Maintain a proper grip on the unit whenever the motor is running. Hold the unit firmly with both hands. Following the instructions in the section "HOLDING THE TELESCOPIC POWER POLE" in PPX1000 operator's manual
- For safe and better operation, put on the shoulder strap across the shoulder. Adjust the shoulder strap into a comfortable operating position. Following the instructions in the section "MOUNTING THE SHOULDER STRAP" in PPX1000 operator's manual to attach the shoulder strap onto the power pole.
WARNING: The shoulder strap is also a quick release mechanism in hazardous situation. When an emergency occurs, take it off your shoulder immediately, no matter what way the strap is in.
TO START/STOP THE TOOL
See "STARTING/STOPPING THE POWER POLE" section in the power pole PPX1000 operator's manual.
BASIC CUTTING PROCEDURE (Fig. D & E)
Follow the steps below to prevent damage to tree or shrub bark. Do not use a back-and-forth sawing motion.
- Make a shallow first cut (1/4 of limb diameter) on the underside of the limb close to the main limb or trunk.
- Make a second cut from the top side of the limb outboard from the first cut. Continue the cut through the limb until the limb separates from the tree. Be prepared to balance the weight of the tool when the limb falls.
-
Make a final cut close to trunk.
-
Stop the motor and remove the battery pack.
EN
- If the limb can be reached from the ground, lift the limb while holding the saw. This should release the "pinch" and free the saw.
- If the saw is still trapped, call a professional for assistance.
LIMBING AND PRUNING (Fig. F)
This pole saw attachment is designed for trimming small branches and limbs up to 20cm in diameter. For best results, observe the following precautions.
- Plan the cut carefully. Be aware of the direction in which the branch will fall.

WARNING: Branches may fall in unexpected
directions. Do not stand directly under the branch being cut.
- The most typical cutting application is to position the unit at an angle of 60^ or less. As the angle of the pole saw shaft to the ground increases, the difficulty of making the first cut (from the underside of limb) increases.
- Remove long branches in several stages.
- Cut lower branches first to allow the top branches more room to fall.
- Work slowly, keeping both hands on the saw with a firm grip. Maintain secure footing and balance.
- Do not cut from a ladder; this is extremely dangerous. Leave such operations for professionals.
- Do not make the flush cut next to the main limb or trunk until you have cut off much of limb to reduce the weight. Following proper cutting procedures will prevent stripping the bark from the main member.
- Do not use the pole saw for felling or bucking.
- To prevent electrocution, do not operate within 15 m of overhead electrical lines and keep bystanders at least 15 m away.
MAINTENANCE

WARNING: Before inspecting, cleaning or servicing
the unit, stop the motor, wait for all moving parts to stop, and remove the battery pack. Failure to follow these instructions can result in serious personal injury or property damage.

WARNING: When servicing, use only identical
replacement parts. Use of any other parts can create a hazard or cause product damage. To ensure safety and reliability, all repairs, other than the items listed in these maintenance instructions, should be performed by a qualified service technician.
GENERAL MAINTENANCE
Avoid using solvents when cleaning plastic parts. Most plastics are susceptible to damage from various types of commercial solvents and may be damaged by their use. Use clean cloths to remove dirt, dust, oil, grease, etc.
CLEAN THE UNIT
■ After each use, remove the battery and clean debris from the chain and guide bar with a soft brush. Wipe the pole saw surface with a clean cloth moistened with a mild soap solution.
■ Remove the chain-sprocket cover, and then use a soft brush to remove debris from the guide bar, saw chain, sprocket and chain-sprocket cover.
■ Always clean out wood chips, saw dust, and dirt from the guide bar groove when replacing the saw chain.
■ Please examine the motor housing inside from the cooling vents and clear the debris every two weeks (fig.G).
NOTICE: Do not use any strong detergents on the plastic housing or the handle. They can be damaged by certain aromatic oils such as pine and lemon.
REPLACING THE BAR AND CHAIN

WARNING: Never touch or adjust the chain while
the motor is running. The saw chain is very sharp; always wear protective gloves when performing maintenance to the chain.
NOTICE: When replacing the guide bar and chain, always use the specified bar and chain combination listed in the "Recommended Bar and Chain for this Pole Saw" section.
Disassembling the Worn Bar and Chain (Fig. H)
- Remove the battery, allow the pole saw to cool and tighten the oil tank cap.
- Position the pole saw attachment on its side with the chain-sprocket cover is facing upwards.
- Wear gloves. Using the combi-wrench provided with the power pole, loosen the bar nut counterclockwise to remove it from the chain-sprocket cover. Clean the chain-sprocket cover with a dry cloth and save it for reassembly.
- Remove the bar and chain from the mounting surface. Remove the worn chain from the bar.
NOTICE: If there is difficulty in removing the bar and chain from the mounting surface, place the pole saw upright, with one hand support the bar, to loosen the tensioning screw clockwise with the other hand(Fig. I) and then remove the bar with the chain.
NOTICE: This is a good time to inspect the drive sprocket for excessive wear or damage.
Assembling the New Bar and Chain
- Lay the new saw chain in a loop on a flat surface and straighten any kinks (Fig. J).
- Place the chain drive links into the guide bar groove.
| K-1 Chain Drive Links |
| K-2 Guide-bar Groove |
- Hold the chain in position on the guide bar and place the loop around the sprocket of the pole saw(Fig. K).
NOTICE: Small directional arrows are engraved in the saw chain. Another directional arrow is molded into the tool body (Fig. L). When looping the saw chain onto the sprocket, make sure that the direction of the arrows on the saw chain will CORRESPOND to the direction of the arrow on the tool body. If they face in opposite directions, turn over the saw chain and guide bar assembly (Fig. M).
| L-1 Alignment Bulges |
| L-2 Sprocket |
| L-3 Tensioning Screw |
| L-4 Tension Pin |
| L-5 Guide-bar Slot |
- Place the guide bar on the mounting surface by sliding the guide-bar slot over the alignment bulges, making sure that the tension pin is inserted in the lower hole in the tail of the bar (Fig. L).
NOTICE: If there is difficulty in inserting the tension-adjusting pin into the hole, adjust the tensioning screw properly until the tension pin is located exactly in the hole.
- Reassemble the chain-sprocket cover, insert the bar nut through its mounting hole, and tighten it with the combi-wrench to ensure that the guide bar is installed in place.
- Tension the chain by following the section "ADJUSTING THE CHAIN TENSION".
- Hold the tip of the guide bar up and tighten the chain-sprocket-bar nut securely.
NOTICE: To extend the guide bar life, invert the bar occasionally.
ADJUSTING THE CHAIN TENSION
CAUTION: The saw chain must be properly tensioned before using.
-
Stop the motor and remove the battery pack before adjusting the chain tension.
-
Loosen the bar nut to finger tight.
- Hold the bar nose up, and adjust the tensioning screw until the following points apply (Fig. N):
■ Chain sag in the center of the bar is around:1.3mm (Fig. 0).
■ Wear gloves, ensure chain can be pulled along the bar smoothly with two fingers.
- After finishing chain tension adjustment, Hold the bar nose up and tighten the bar nut.
NOTICE: If chain sag in the center of the bar is not around 1.3 mm, readjust chain tension.
SPROCKET IN GUIDE BAR LUBRICATION
The guide bar has a sprocket at its tip. It must be lubricated weekly with chain oil injected into the lubricating hole by a grease syringe (not included) to extend the guide bar life (Fig. P). Turn the guide bar and check that the lubrication holes and chain groove are free from impurities.
| P-1 Lubricating Hole |
| P-2 $procket in Guide-bar Tip |
TRANSPORTING AND STORING
- Do not store or transport the pole saw attachment when it is running. Always remove the battery pack before storing or transporting.
- Always place the guide bar sheath on the guide bar and chain before storing or transporting the pole saw attachment. Use caution to avoid the sharp teeth of the chain.
- Clean the pole saw thoroughly before storing. Store the pole saw indoors, in a dry place that is locked and/or inaccessible to children and keep away from corrosive agents such as garden chemicals and de-icing salts.
- If the pole saw attachment is removed from the power head and stored separately, fit the end cap on the attachment shaft to avoid dirt getting into the coupler.
Protecting the environment
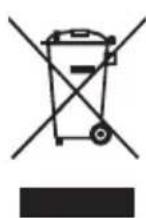
Do not dispose of electrical equipment, battery charger and batteries/rechargeable batteries into household waste!
EN
TROUBLESHOOTING
| PROBLEM CAUSE SOLUTION | ||
| Motor does not run. | The battery pack is not attached to the pole saw.No electrical contact between the saw and battery.The battery pack is depleted.The lock-off button is not depressed before pressing the trigger.The battery pack or power head is too hot.Saw chain is bound in the wood.Debris in bar groove.Debris in chain-sprocket cover. | Attach the battery pack to the pole saw.Remove battery, check contacts and reinstall the battery pack.Charge the battery pack.Press down the lock-off lever and hold it, then depress the trigger to turn on the pole saw.Allow the battery pack or power head to cool until the temperature drops below 67°C.Release the trigger; remove the saw chain and guide bar from the wood, then restart the pole saw.Press the saw chain against the wood, move the pole saw back and forth to discharge the debris.Remove battery pack, then remove chain-sprocket cover and clean out debris. |
| Motor runs, but chain does not rotate. | Chain does not engage drive sprocket. | Remove the battery pack and reinstall the chain, making sure that the drive links on the chain are fully seated on the sprocket. |
| Pole saw does not cut properly. | Insufficient chain tension.Dull chain.Chain installed backwards.Worn chain.Dry or excessively stretched chain.Chain not in bar groove. | Remove the battery pack and readjust the chain tension, following the section “ADJUSTING THE CHAIN TENSION”.Sharpen the chain cutters by a qualified service technician.Remove the battery pack and reinstall the saw chain, following the section “REPLACING THE BAR AND CHAIN”.Remove the battery pack and replace the chain following the section “REPLACING THE BAR AND CHAIN”.Check the oil level. Refill the oil tank if necessary.Remove the battery pack and reinstall the saw chain, following the section “REPLACING THE BAR AND CHAIN”. |
| Bar and chain running hot and smoking. | Check chain tension for over tightened condition.Chain oil tank is empty.Debris in guide bar groove. | Remove the battery pack and re-tension the saw chain; see the section “ADJUSTING THE CHAIN TENSION”.Filling bar and chain lubricant.Clear the debris in the groove. |
WARRANTY
EGO WARRANTY POLICY
Please visit the website egopowerplus.com for full terms and conditions of the EGO Warranty policy.
LISTA DE PEÇAS (IMAGEM A1)
RENG∅RING AF APPARATET
TRANSPORT OCH FÖRVARING
GENERELT VEDLIKEHOLD
POLITYKA GWARANCYJNA EGO
USCHOVEJTE SI TYTO POKYNY
POZNÁMKA: DODATEČNÁ BEZPEČNOSTNÍ PRAVIDLA VIZ NÁVOD PRO NÁSTAVEC.
TECHNICKÉ ÚDAJE
DÔLEŽITÉ BEZPEČNOSTNÉ POKYNY
A CSOMAG TARTALMA (A1 ÁBRA)
CITIȚI MANUALUL DE INSTRUCTIUNI
LUGEGE KASUTUSJUHENDIT
OLULISED OHUTUSJUHISED
nggnggnggnggnggnggnggnggnggnggnggnggnggnggnggnggnggnggnggnggnggnggnggnggnggnggnggnggnggnggnggnggnggnggnggnggnggggggggggggggggggggggggggggggggggggggggggggggggggggggggggggggggggggggggggggggggggggggggggggggggggggggggggggggggggggggggggggggggggggggggggggggggggggggggggggggggggggggggggggggggggggggggggggggggggggggggggtt
ylsg6mbg0b yjboi loa#mnmg0b do#bs0s do#g0om yj6sqng8s aglsdmm lsg6mbgg0s. yj6sqng8oon zsggs0on qs ajo#s3gng ylsg6mbg0b yjboi loa#mnmg0n qs dsoo yls#s#d0o zsb#s#g0go. ylsg6mbg0b yjboi loa#mnmg0b do#abgd0o oszobssycq s s#g06sqng0u nsodg lsg6mb0b s#ydm0b noizl. dso do9 de#mceg0eymo obly#ydg0go qs y5gmnbcmg0go an smos b ydmbzgg0u oszog5 sgoymg0u fimno 3m2g0yng0u ajd3mgncg0o.
( \text{cm} ) ( \text{d} ) ( \text{cm} ) ( \text{d} ) ( \text{s} ) ( \text{b} ) ( \text{h} ) ( \text{b} ) ( \text{o} ) ( \text{l} ) ( \text{x} ) ( \text{s} ) ( \text{d} ) ( \text{s} ) ( \text{d} ) ( \text{m} ) ( \text{d} ) ( \text{m} ) ( \text{o} ) ( \text{d} ) ( \text{h} ) ( \text{s} ) ( \text{d} ) ( \text{m} ) ( \text{o} ) ( \text{s} ) ( \text{d} ) ( \text{m} ) ( \text{o} ) ( \text{b} ) ( \text{s} ) ( \text{b} ) ( \text{o} ) ( \text{g} ) ( \text{b} ) ( \text{l} ) ( \text{s} ) ( \text{b} ) ( \text{o} ) ( \text{b} ) ( \text{o} ) ( \text{o} ) ( \text{n} ) ( \text{g} ) ( \text{b} ) ( \text{l} ); ( \text{b} ) ( \text{o} ) ( \text{b} ) ( \text{o} ) ( \text{o} ) ( \text{n} ) ( \text{g} ) ( \text{l} ); ( s\bar{\theta} ) ( b\bar{\theta}\bar{\theta} b\bar{\theta}\bar{\theta}\bar{\theta}. o\bar{\theta}\bar{\theta}\bar{\theta}\bar{\theta}\bar{\theta}\bar{\theta}\bar{\theta}\bar{\theta}\bar{\theta}\bar{\theta}\bar{\theta}\bar{\theta}\bar{\theta}\bar{\theta}\bar{\theta}\bar{\theta}\bar{\theta}\bar{\theta}\bar{\theta}\bar{\theta}\bar{\theta}\bar{\theta}\bar{\theta}\bar{\theta}\bar{\theta}\bar{\theta} \ d\bar{\theta}\bar{\theta}s\bar{\theta}\bar{\theta}\bar{\theta}\bar{\theta}\bar{\theta}\bar{\theta}\bar{\theta}\bar{\theta}\bar{\theta}\bar{\theta}\bar{\theta}\bar{\theta}\bar{\theta}\bar{\theta}\bar{\theta}\bar{\theta}\bar{\theta}\bar{\theta}\bar{\theta}\bar{\theta}\bar{\theta}\bar{\theta}\bar{\theta}\bar{\theta}\bar{\Theta}\bar{\Theta}\bar{\Theta}\ q_{s}o_{0}b_{0}o_{0}d_{3}g_{6}l_{3}g_{6}d_{m}y_{m}g_{6}l_{5}s_{6}\ q_{s3}s_{6}s_{6}s_{6}s_{6}s_{6}s_{6}s_{6}s_{6}s_{6}s_{6}s_{6}s_{6}s_{6}s_{6}s_{6}s_{6}s_{6}s_{6}s_{6}s_{6}s_{6}s_{6}s_{6}s_{6}s_{6}s_{6}s_{6}s_{6}s_{6}s_{6}s_{6}s_{6}s_{6}s_{6}=1.
■ ὅμηθβαργδοςμη βγήβοις σχόγισηγεσός
ως ἀγηδόςσηγδοςμός δησχόμόςδ ως
δαγκού θαγκούδα-δγισδμός γδαμονζομίς
γαγκού, χγαγκού, χαγκού δαγκού δαγκού δαγκού δαγκού δαγκού δαγκού δαγκού δαγκού δαγκού δαγκού δαγκού δαγκού δαγκού δαγκού δαγκού δαγκού δαγκυό δαγκυό δαγκυό δαγκυό δαγκυό δαγκυό δαγκυό δαγκυό δαγκυό δαγκυό δαγκυό δαγκυό δαγκυό δαγκυό δαγκυό δαγκυό δαγκυό δαγικυό δαγικυό δαγικυό δαγικυό δαγικυό δαγικυό δαγικυό δαγικυό δαγικυό δαγικυό δαγικυό δαγικυό δαγικυό δαγικυό δαγικωνδαγικωνδαγικωνδαγικωνδαγικωνδαγικωνδαγικωνδαγικωνδαγικωνδαγικωνδαγικωνδαγικωνδαγικωνδαγικωνδαγικωνδαgamma και και και και και και και και και και και και και και και και και και και και και και και και και και και και και και και και και και και και και και και και και και και και και και και και και και κουν νερερερερερερερερερερερερερερερερερερερερερερερερερερερερερερερερερερερερερερερερερερερερερερερερερερεφος
■ ར ར ར ར ར ར ར ར ར ར ར ར ར ར ར ར ར ར ར ར ར ར ར ར ར ར ར ར ར ར ར ར ར ར
■ རྩྲས་པའ རྱལ་བྱན་ལྟོར་པུ་བྱལ་མཆེ།
བྱལ་ལྟོར་ཟང་བྱལ་ལྟོར་པུ་བྱལ་མཆེ།
དཀྱམ་རྣམ་པར་བྱལ་སྒྱིག་པར་པར་བྱལ་སྒྱིག་པར་པར་བྱལ་སྒྱིག་པར་པར་བྱལ་སྒྱིག་པར་པར་བྱལ་སྒྱིག་པར་པར་བྐལ་སྒྱིག་པར་པར་བྱལ་སྒྱིག་པར་པར་བྱལ་སྒྱིག་པར་པར་བྱལ་སྒྱིག་པར་པར་བྱལ་སྒ୍ན།
དཀྱམ་རྣམ་པར་བྱལ་སྒ୍ན།
དཀྱམ་རྣམ་པར་བྱལ་སྒ୍ན།
དཀྱམ་རྣམ་པར་བྱལ་སྒ୍ན།
དཀྱམ་རྣམ་པར། བདངས། བདངས། བདངས། བདངས། བདངས། བདངས། བདངས། བདངས། བདངས། བདངས། བདངས། བདངས། བདངས། བདངས། བདངས།
■ არ მოაცილთ ხელსაწყოს მოწილი
საცნები ან ხელთ დაიქირთი
yusfngmo lugbdo, fngg qubdo gusfngmo lugbdgmdwomb3d3g0u5b dmfsmdou 26mglados.dmdsmdou 36mglados. dofbdgdoqun sozomsl.
■ Asshghgos dmghmno qos dmblgbon sghdghwshnbo hengjng hengdun sghdym bghmlshyml.
■ zsdmcmwymo bgmlsfgymdo dgnbsbgom dgbmdsdo. hmqglusg sm bcqds dsmo zsdmygbgs, gmydfgfm bgmlsfgymdo ybqs nyml dgbsbgymo dgbmdsdo ddmsm qs dsmsm qs3g0cm lsonsgldo, dmblbommo
sāngdōngshēngshēngshēng shāngdōngshēngshēng sāngdōngshēngshēngshēngshēngshēngshēngshēngshēngshēngshēngshēngshēngshēngshēngshēngshēngshēngshēngshēngshēngshēngshēngshēngshēngshēngshēngshēngshēngshēngshēngshēngshēngshēngshēnghgghghghghghghghghghghghghghghghghghghghghghghghghghghghghghghghghghghghghghghghghghghghghghghghghghghghghghghghghghghghghghghghghghghghghggggggggggggggggggggggggggggggggggggggggggggggggggggggggggggggggggggggggggggggggggggggggggggggggggggggggggggggggggggggggggggggggggggggggggggggggggggggggggggggggggggggggggggggggggggggggggggggggggggggg
g y g u s g y g u s g y g u s g y g u s g y g u s g y g u s g y g u
B B. B. B. B. B. B. B. B. B. B. B. B. B. B. B. B. B. B. B. B. B. B. B. B. B. B. B. B. B. B. B. B. B. B. B. B. B. B. B. B. B. B. B. B. B. B. B. B. B. B. B,
நெய்செயுவே
■ ยก Yellow Book of Yellow Book by the Democratic Book of the Democratic Book of the Democratic Book of the Democratic Book of the Democratic Book of the Democratic Book of the Democratic Book of the Democratic Book of the Democratic Book of the Democratic Book of the Democratic Book of the Democratic Book of the Democratic Book of the Democratic Book of the Democratic Book of the Democratic Book of the Democratic Book of the Democratic Book of the Democratic Book of the Democratic Book of the Democratic Book of the Democratic Book of the Democratic Book of the Democratic Book of the Democratic Book of the Democratic Book OF the Democratic Book OF the Democratic Book OF the Democratic Book OF the Democratic Book OF the Democratic Book OF the Democratic Book OF the Democratic Book OF the Democratic Book OF the Democratic Book OF the Democratic Book OF the Democratic Book OF the Democratic Book OF the Democratic Book OF the Democratic Book OF the Democratic Book OF the Democratic Book OF the Democratic Book OF the Democratic Book OF the Democratic Book OF the Democratic Book OF the Democratic Book OF the Democratic Book OF the Democratic Book OF the Democratic Book OF the Democratic Book of the Democratic Book OF the Democratic Book OF the Democratic Book OF the Democratic Book OF the Democratic Book OF the Democratic Book OF the Democratic Book OF the Democratic Book OF the Democratic Book OF the Democratic Book OF the Democratic Book OF the Democratic Book OF the Democratic Book OF the Democratic Book OF the Democratic Book OF the Democratic Book OF the Democratic Book OF the Democratic Book OF the Democratic Book OF the Democratic Book OF the Democratic Book OF the Democratic Book OF the Democratic Book OF the Democratic Book of
■ ghbsgmbm qs ghzjnglo dmbdsmgdouozol zsqso3oqgo hsdmlszoro go z3qgo dbsnbg. qssmghywnoqgo z3qgo zmdgmcgynm lsdyjsm 3mbogosdo. do3ygzoan dooomgdgdu lggosdo "dbsnbg" ,db hsdmlszoro go mgnqol gsdsgnbs" hsdmlszoro dmabdsgmdmoi oblygnyfgsdo, hsms qssdsgnm o b6nol z3qgo gmydghywn dgmbg.
m_3m_5 m_3m_5
VAŽNA SIGURNOSNA UPUTSTVA
VAŽNA SIGURNOSNA UPUTSTVA
.הכלההוּרָהוּרָהוּרָהוּרָהוּרָהוּרָהוּרָהוּרָהוּרָהוּרָהוּרָהוּרָהוּרָהוּרָהוּרָה
.הכלההוּרָהוּרָהוּרָהוּרָהוּרָהוּרָהוּרָהוּרָהוּרָהוּרָהוּרָהוּרָהוּרָהוּרָהוּרָה:4
הכלההוּרָהוּרָהוּרָהוּרָהוּרָהוּרָהוּרָהוּרָהוּרָהוּרָהוּרָהוּרָהוּרָהוּרָהוּרָה .1
و Estimated Others on the Policies of the United States. Upon a visit by the United States, we will be interested in the United States.