PS 47 Bp Mister - Steam cleaner Kärcher - Free user manual and instructions
Find the device manual for free PS 47 Bp Mister Kärcher in PDF.
| Product type | Cordless steam cleaner |
| Brand | Kärcher |
| Model | PS 4/7 Bp (PS 47 Bp Mister) |
| Dimensions (L x W x H) | 510 x 380 x 960 mm |
| Weight | 13.6 kg |
| Battery type | AGM, 12 V, 7 Ah |
| Runtime | 8 hours |
| Charging time | 5 hours (completely discharged battery) |
| Charger mains voltage | 230 V (PS 4/7 Bp) / 240 V (PS 4/7 Bp *UK) |
| Clean water tank volume | 3.9 liters |
| Operating pressure | 0.68 MPa |
| Detergent flow rate | 0.19 l/min |
| Intended use | Professional disinfection (hotels, schools, hospitals, etc.) |
| Recommended disinfectant | Kärcher RM 735 (ref. 6.295-597.0) |
| Safety | Shutdown in case of leakage, short-circuit protection |
| Routine maintenance | Clean nozzle, tank and filter; rinse after each use |
| Spare parts | Original Kärcher accessories and parts |
| Warranty | According to country conditions, material and manufacturing defects |
| Operating temperature | Above 0 °C |
Frequently Asked Questions - PS 47 Bp Mister Kärcher
User questions about PS 47 Bp Mister Kärcher
0 question about this device. Answer the ones you know or ask your own.
Ask a new question about this device
Download the instructions for your Steam cleaner in PDF format for free! Find your manual PS 47 Bp Mister - Kärcher and take your electronic device back in hand. On this page are published all the documents necessary for the use of your device. PS 47 Bp Mister by Kärcher.
USER MANUAL PS 47 Bp Mister Kärcher
natural_image
Line drawing of a medical or industrial robotic device with coiled spring and wheels (no text or symbols)Deutsch 3
English 7
Français 11
Italiano 15
Nederlands 19
Español 23
Português 28
Dansk 32
Norsk 36
Svenska 40
Suomi 44
Ελληνικά 48
Türkçe 52
Русский 56
Magyar 61
Čeština 65
Slovenščina 69
Polski 73
Românește 77
Slovenčina 81
Hrvatski 85
Srpski 89
Български 93
Eesti 98
Latviešu 102
Lietuviškai 105
Українська 110
العربيئة 115
Inhalt
text_image
Labeled diagram of a medical or laboratory device with numbered parts for identification①Transportgriff
Hinweis
text_image
Technical diagram showing a mechanical assembly with labeled parts 1, 2, and 3, including a downward arrow indicating motion or force.Chairman of the Board of Management

S. Reiser
Director Regulatory Affairs & Certification
71364 Winnenden (Germany)
Tel.: +49 7195 14-0
Fax: +49 7195 14-2212
Winnenden, 2021/05/01
Contents
| General notes | 7 |
| Intended use | 7 |
| Device description | 7 |
| Safety instructions | 8 |
| Operation | 8 |
| Batteries | 9 |
| Transport | 9 |
| Storage | 9 |
| Care and maintenance | 9 |
| Troubleshooting guide | 9 |
| Technical data | 10 |
| Declaration of Conformity | 10 |
General notes
Read the original instructions before using the device for the first time and act in accordance with it. Keep the original instructions for future reference or for future owners.
Scope of delivery
Check the contents for completeness when unpacking. If any accessories are missing or in the event of any shipping damage, please notify your dealer.
Environmental protection
The packing materials can be recycled. Please dispose of packaging in accordance with the environmental regulations. Electrical and electronic appliances contain valuable, recyclable materials and often components such as batteries, rechargeable batteries or oil, which - if handled or disposed of incorrectly - can pose a potential threat to human health and the environment. However, these components are required for the correct operation of the appliance. Appliances marked by this symbol are not allowed to be disposed of together with the household rubbish.
Notes on the content materials (REACH)
Current information on content materials can be found at: www.kaercher.com/REACH
Warranty
The warranty conditions issued by our relevant sales company apply in all countries. We shall remedy possible malfunctions on your appliance within the warranty period free of cost, provided that a material or manufacturing defect is the cause. In a warranty case, please contact your dealer (with the purchase receipt) or the next authorised customer service site. (See overleaf for the address)
Accessories and spare parts
Only use original accessories and original spare parts. They ensure that the appliance will run fault-free and safely. Information on accessories and spare parts can be found at www.kaercher.com.
Hazard levels
△DANGER
- Indication of an imminent threat of danger that will lead to severe injuries or even death.
- Indication of a potentially dangerous situation that may lead to severe injuries or even death.
⚠ WARNING
△CAUTION
- Indication of a potentially dangerous situation that may lead to minor injuries.
ATTENTION
- Indication of a potentially dangerous situation that may lead to damage to property.
Intended use
Use the device only in accordance with the information in these operating instructions.
- This battery-operated device is suitable for commercial use, e.g. in hotels, schools, hospitals, factories, shops, offices, and rental companies.
- The device is intended for disinfecting tables, shelves, door-knobs and hard-to-reach places.
- The device is not suitable for disinfecting glass surfaces (residues are visible).
- Place the disinfectant in the device's fresh water tank according to the manufacturer information. We recommend the Kärcher RM 735 disinfectant (order no. 6.295-597.0, 5 litres).
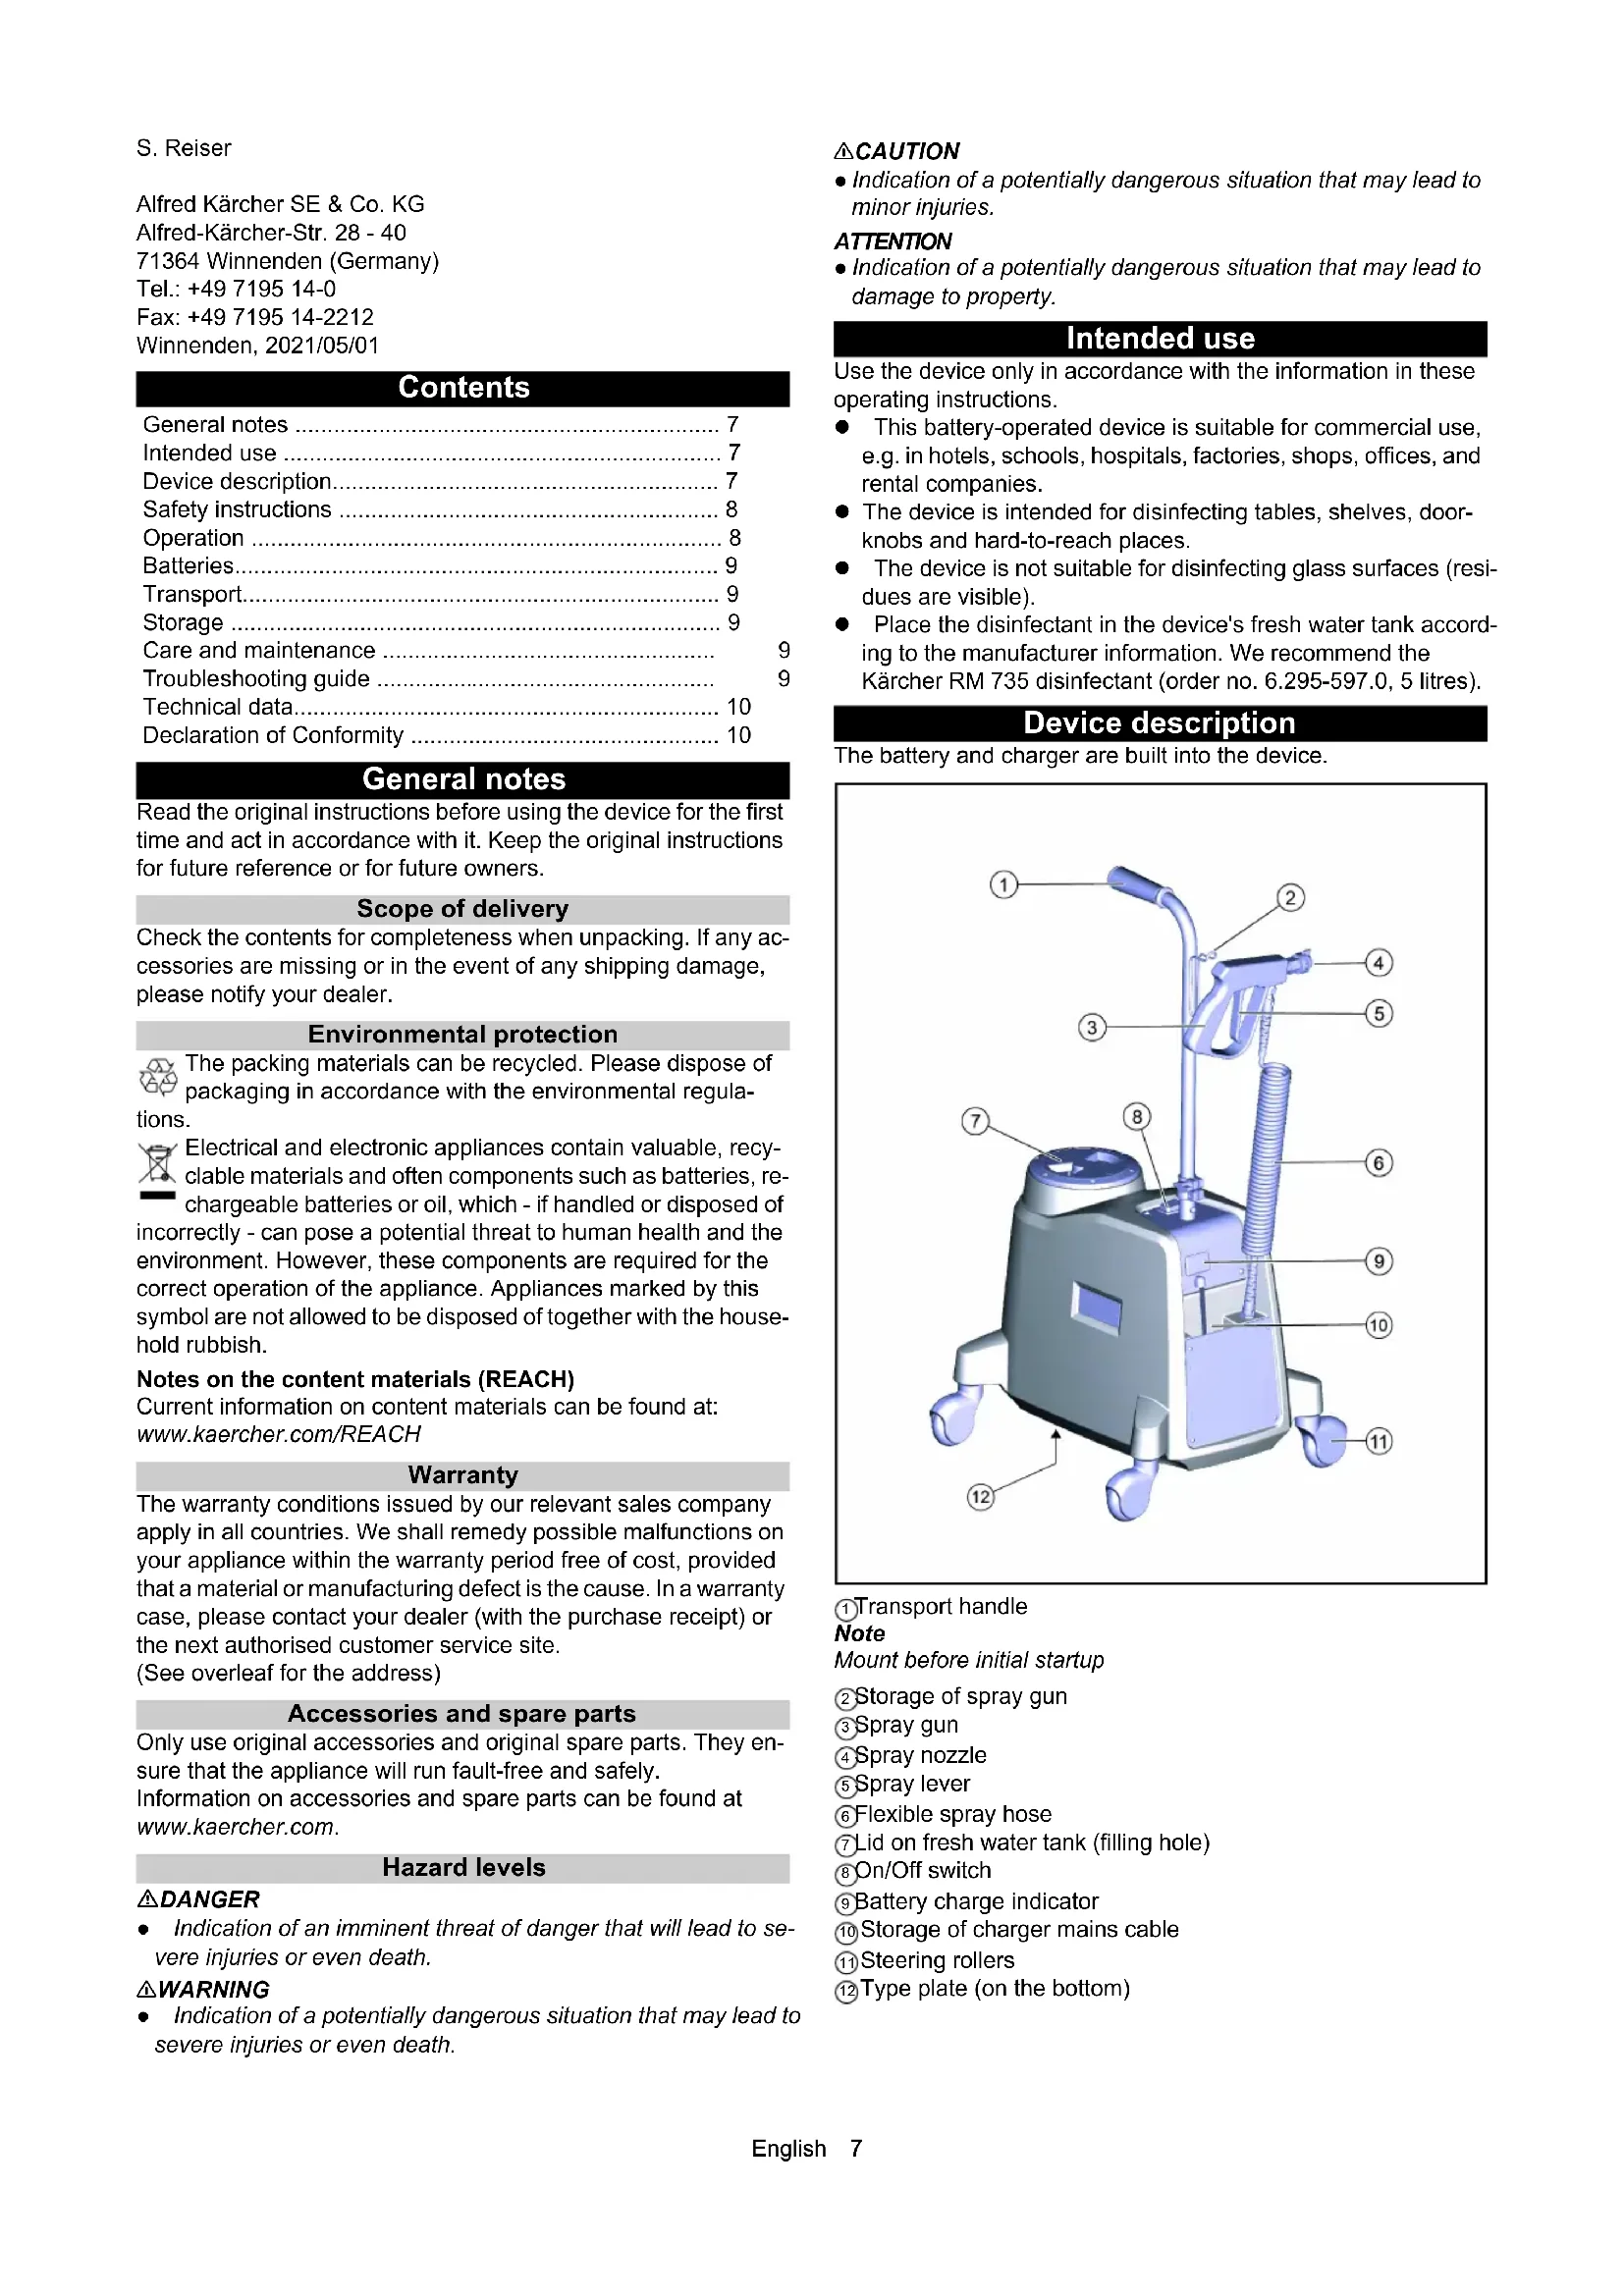
Device description
The battery and charger are built into the device.
text_image
Labeled diagram of a medical or laboratory device with numbered parts for identification①Transport handle
Note
Mount before initial startup
②Storage of spray gun
③ Spray gun
④ Spray nozzle
⑤Spray lever
⑥Flexible spray hose
⑦Lid on fresh water tank (filling hole)
⑧On/Off switch
⑨Battery charge indicator
⑩ Storage of charger mains cable
⑪ Steering rollers
⑫ Type plate (on the bottom)
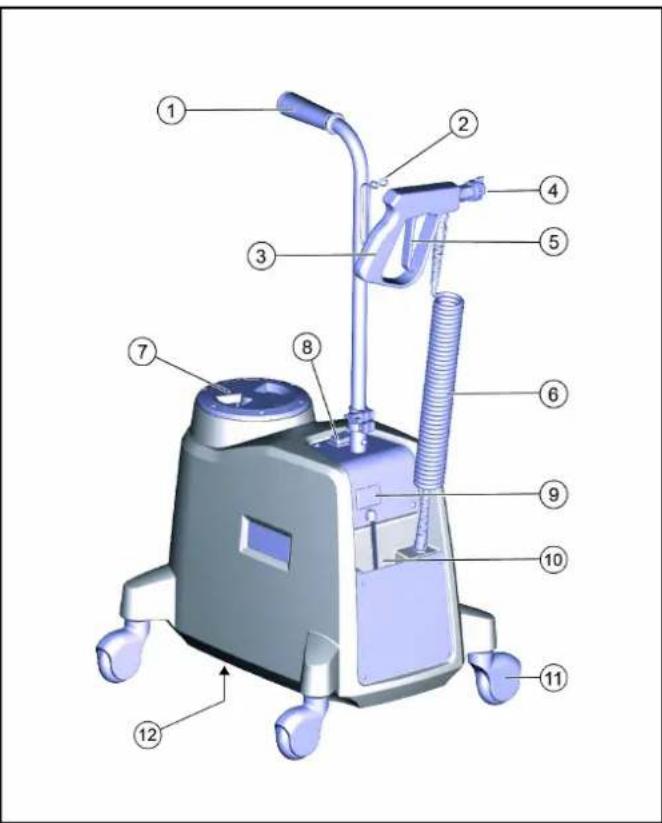
Installation of handle
Must be installed once before initial startup.
text_image
Technical diagram showing a mechanical assembly with labeled parts 1, 2, and 3, including a downward arrow indicating direction.①Handle
②Locking device (ball)
③Hand screw
-
Insert the pipe into the holder using the enclosed handle. Push in the locking device (ball) and push the pipe on until the ball snaps into place.
-
Tighten the hand screw.
Safety instructions
General safety instructions
△ DANGER • Risk of asphyxiation. Keep packaging film out of the reach of children.
⚠ WARNING • Only use the device for its proper use. Take into account the local conditions and beware of third parties, in particular children, when working with the device. • Persons with reduced physical, sensory or mental capabilities and persons lacking experience and knowledge may only use the appliance if they are properly supervised, have been instructed on use of the appliance safely by a person responsible for their safety, and understand the resultant hazards involved. • Only people who have been instructed on how to use the device, or have proven their ability to operate it, and have been explicitly instructed to use it, must use the device. • Children must not operate the device.
- Children must be supervised to prevent them from playing with the appliance.
⚠️ CAUTION • Safety devices are provided for your own protection. Never modify or bypass safety devices.
Risk of electric shock
△ DANGER • Only connect protection class I devices to properly earthed power sources. • The voltage indicated on the type plate must match the voltage of the power source. • Never touch the mains plug and socket with wet hands.
△ WARNING • Switch off the device immediately in the event of leaks. • Check the power supply cable with mains plug for damage before operation each time. Do not put the device into operation with a damaged power supply cable. Have a damaged power supply cable replaced immediately by the authorised customer service / qualified electrician. • Only use the mains connection prescribed by the manufacturer.
Operation
△ DANGER • When using the device in hazard zones (e.g. service stations), adhere to the respective safety regulations. • Operation in explosive atmospheres is prohibited. • Never spray explosive liquids such as petrol, paint thinner or heating oil, which can form explosive vapours or combustible mixtures when in contact with air. Do not spray acetone, undiluted acids, solvents or highly corrosive substances such as active chloride as they attack the materials used on the device. • Do not use the device to
disinfect electrical devices, e.g. oven, extractor hood, microwave, television, lamp, hair dryer, electric heating, etc.
△ CAUTION • Check the device and the accessories each time before operation, in particular the mains connection and extension cable, to make sure it is safe and working correctly. Pull out the mains plug in case of any damage and do not use the device.
ATTENTION • Do not operate the device at temperatures below 0 °C. • Pay attention to the safety inspection for mobile devices for industrial use in accordance with the locally applicable regulations
Operation with disinfectant
⚠️ CAUTION ● Keep the disinfectant out of the reach of children.
- Never use the recommended disinfectants undiluted. Observe all the information on the product label. Should disinfectants come into contact with eyes, rinse these out immediately and thoroughly using water and seek medical attention immediately. The same applies if disinfectants are swallowed. - Only use the disinfectants recommended by the manufacturer and observe the application, disposal and warnings from the disinfectant manufacturers. - Ensure that the work area is adequately ventilated to avoid inhaling aerosols. In poorly ventilated rooms, wear suitable respiratory protection.
Care and service
△ WARNING • Prior to cleaning, service and the replacement of parts, you must switch off the device. Disconnect the mains plug on mains-operated devices. Disconnect the battery of battery-operated devices.
△ CAUTION ● Repairs may only be carried out by approved customer service sites or staff qualified in this area who are familiar with all relevant safety instructions.
ATTENTION • Short-circuits or other damage. Do not clean the device with a hose or high-pressure water jet.
Operation
Initial startup
△DANGER
Unsuitable disinfectants
Risk of injury
Use only KÄRCHER products.
Never fill solvents, flammable fluids (e.g. petrol, acetone, thinner) or alcohol-based disinfectants.
Use protective gloves and safety goggles when handling disinfectant cleaner. Avoid contact with eyes and skin.
Observe the safety and handling instructions on the product labels or in the disinfectant's safety data sheets.
⚠ WARNING
Risk of injury
Check that the device, accessories, supply lines and connections are in a correct condition. Do not use the device if it is not in perfect condition.
1 Check the battery charging state at the battery charge indicator on the device.
Green indicator light - no battery charging required
Yellow indicator light - battery charging recommended
Red indicator light - charge the battery
For information on charging the battery, see "Battery" chapter.
2 Fill the fresh water tank, do not overfill it.
Turn the lid of the fresh water tank in the direction of the arrow (bayonet).
Note: If work has already been carried out, there will be a vacuum in the tank and the lid will be difficult to open. In this case, wait a little until the vacuum is released.
3 Mix the recommended disinfectant with a little water (according to the manufacturer information) and add it to the water in the fresh water tank.
4 When applying the disinfectant, make sure that the spray pattern of the spray nozzle is perfect. Check this before each operation. Clean or replace it if necessary.
Operation
⚠ WARNING
Health risk
Use a protective mask in rooms with poor ventilation.
ATTENTION
When working, make sure that the spray pattern of the spray nozzle is perfect.
1 Switch on the device at the switch.
2 Unlock the lever on the spray gun and start working.
3 Wet objects and surfaces to be disinfected over the full surface and completely.
Shutting down
1 Switch off the device at the switch.
2 To clean the tank, empty it completely. Spray until it is emptied. The procedure can be accelerated by unscrewing the spray nozzle.
3 Attach the spray gun to the holder.
Batteries
Safety instructions
△DANGER
Risk of fire and explosion
Do not place tools or other objects on the battery.
Naked flames and smoking must be strictly avoided.
Ensure the room is well ventilated when charging batteries.
Only use batteries and chargers approved by Kärcher (original spare parts).
⚠ WARNING
Environmental risk due to improper disposal of batteries
Ensure that defect or used batteries are disposed of safely (contact a waste management company or Kärcher Service).
Charging the battery
When the battery is fully discharged, charging takes about 5 hours.
-
Press the ON / OFF switch to the "OFF" position.
-
Plug the mains plug of the charger into a correctly earthed socket.
a The charging process begins automatically.
b The device cannot be used during the charging process.
c To check the charging state, switch on the device briefly, the pump will start. The battery charge indicator lights up yellow when the battery is partially charged and green when the battery is fully charged.
-
Unplug the mains plug from the socket after charging.
-
Store the mains plug and the cable in the storage compartment.
Transport
△CAUTION
Failure to observe the weight
Risk of injury and damage
Be aware of the weight of the device during transport and storage.
- When transporting in vehicles, secure the device against slipping and tipping over according to the applicable guidelines.
Storage
ATTENTION
Danger of frost
Incompletely emptied devices can be destroyed by frost. Completely empty the device and accessories.
Protect the device from frost.
-
Empty the device and the pump completely.
-
Store the device in a frost-protected place.
-
Charge the battery every 2 months.
Care and maintenance
Cleaning the device and accessories
ATTENTION
Risk of damage to the surfaces
Do not use any abrasive or aggressive detergents for cleaning purposes.
-
Clean the device every day with a damp cloth, soaked in mild washing lye.
-
Empty the tank every day after use, fill in warm water (max. 40^ C) and rinse the tank including the spray gun and spray nozzle. To do this, switch on the spray pump with the switch.
-
If necessary, unscrew the spray nozzle and clean it with warm water and a soft brush. For removal, switch off the device and press the lever of the spray gun to reduce the pressure inside.
Maintenance work
Maintenance by the customer
Note
All servicing and maintenance work must be performed by a qualified specialist. If necessary, you can consult a Kärcher specialist dealer at any time.
• Daily maintenance
1 Check spray hoses for leaks and damage. Replace them if there is a leak or damage to avoid pressure loss.
2 Check the mains cable with plug for damage, have a damaged mains cable replaced immediately by the authorized Customer Service.
3 Check the spray gun and the spray pattern of the spray nozzle.
• Weekly maintenance
1 Check seals for wear and leaks.
2 Check the function and power of the device.
• Annual service
1 Check the air pressure in the pressure tank. *
Note
* By authorised Customer Service
Service work by authorised Customer Service
ATTENTION
The following repair and service work inside the device must be carried out by an authorised Customer Service.
- Check / replace battery and fuses
- Check / replace charger and mains cable
- Check / replace pump
- Check air pressure in the pressure tank
Troubleshooting guide
| Fault Cause Rectification | ||
| The battery does not charge 1 ON / OFF switch is in the "ON" position2 Fuse defective3 Loose cable4 Battery faulty | 1. Press the ON / OFF switch to the "OFF" position. To check the charging state on the battery charge indicator, briefly switch on the device.2. Contact Customer Service3. Contact Customer Service4. Contact Customer Service | |
| Spray pump is running / little or no disinfectant solution | 1 Spray nozzle clogged2 Filters dirty | 1. Clean / replace spray nozzle2. Check filter for dirt, clean if necessary |
| Fault Cause Rectification | ||
| Spray pump is running / low spray pressure | 1 Pump contaminated2 Battery charging state low3 Pump worn | 1. Rinse the spray system2. Charge the battery3. Contact Customer Service |
| Spray pump is not running 1 Battery charging state low2 Pump defective3 Fuse on circuit board defective | 1. Charge the battery2. Contact Customer Service3. Contact Customer Service | |
| Spray pump does not switch off | 1 Air in the spray system2 Fresh water tank empty | 1. Unscrew the spray nozzle and press the lever of the spray gun until the pump is vented2. Refill the tank |
| Pump or spray jet pulsates 1 Too little air in the pressure tank 1. Fill in air in the pressure tank (2.7 bar / 270 kPa) | ||
Technical data
| PS 4/7 Bp1.007-085.0 | PS 4/7 Bp *UK1.007-086.0 | ||
| Device performance data | |||
| Operation duration with fully loaded battery h 8 8 | |||
| Battery | |||
| Battery type AGM AGM | |||
| Battery capacity | Ah | 7 | 7 |
| Charging time when the battery is completely discharged | h 5 5 | ||
| Working voltage of the battery | V | 12 | 12 |
| Fuse | A | 5 5 | |
| Charger | |||
| Mains voltage | V | 230 | 240 |
| Phase | ~ | 1 1 | |
| Frequency | Hz | 50 | 50 |
| Ambient conditions | |||
| Ambient temperature | °C | -5 bis +40 | -5 bis +40 |
| Humidity, non-condensing | % | 0 - 90 | 0 - 90 |
| Dimensions and weights | |||
| Length x width x height | mm | 510 x 380 x 960 | 510 x 380 x 960 |
| Fresh water tank capacity | l | 3,9 | 3,9 |
| Operating pressure | MPa | 0,68 | 0,68 |
| Detergent flow rate | l/min | 0,19 | 0,19 |
| Weight | kg | 13,6 | 13,6 |
Subject to technical modifications.
Declaration of Conformity
EU Declaration of Conformity
We hereby declare that the machine described below complies with the relevant basic safety and health requirements in the EU Directives, both in its basic design and construction as well as in the version placed in circulation by us. This declaration is invalidated by any changes made to the machine that are not approved by us.
Product: Pressure cleaner
Type: 1.007-xxx
Currently applicable EU Directives
2006/42/EC (+2009/127/EC)
2014/30/EU
2011/65/EU
Harmonised standards used
EN 60335-1
EN 60335-2-54
EN 60335-2-29
EN 55014-1: 2017 + A11: 2020
EN 55014-2: 2015
EN 61000-3-2: 2014
EN 61000-3-3: 2013
EN 62233: 2008
EN IEC 63000: 2018
The signatories act on behalf of and with the authority of the company management.

Chairman of the Board of Management

S. Reiser
Director Regulatory Affairs & Certification
Documentation supervisor:
S. Reiser
Alfred Kärcher SE & Co. KG
Alfred-Kärcher-Str. 28 - 40
71364 Winnenden (Germany)
Ph.: +49 7195 14-0
Fax: +49 7195 14-2212
Winnenden, 2021/05/01
Declaration of Conformity (UK)
We hereby declare that the product described below complies with the relevant provisions of the following UK Regulations, both in its basic design and construction as well as in the version put into circulation by us. This declaration shall cease to be valid if the product is modified without our prior approval.
Product: Pressure cleaner
Type: 1.007-xxx
Currently applicable UK Regulations
S.I. 2008/1597 (as amended)
S.I. 2016/1091 (as amended)
S.I. 2012/3032 (as amended)
Designated standards used
EN 60335-1
EN 60335-2-54
EN 60335-2-29
EN 55014-1: 2017 + A11: 2020
EN 55014-2: 2015
EN 61000-3-2: 2014
EN 61000-3-3: 2013
EN 62233: 2008
EN IEC 63000: 2018
The signatories act on behalf of and with the authority of the company management.
H. Jenner
Chairman of the Board of Management

S. Reiser
Director Regulatory Affairs & Certification
Documentation supervisor:
S. Reiser
Alfred Kärcher SE & Co. KG
Alfred-Kärcher-Str. 28 - 40
71364 Winnenden (Germany)
Ph.: +49 7195 14-0
Fax: +49 7195 14-2212
Winnenden, 2021/05/01
Contenu
text_image
Labeled diagram of a medical or laboratory device with numbered parts for identificationtext_image
Technical diagram showing a mechanical assembly with labeled parts 1, 2, and 3, including a downward arrow indicating motion or force.2006/42/CE (+2009/127/CE)
2014/30/UE
2011/65/EU

H. Jenner
Chairman of the Board of Management

S. Reiser
Director Regulatory Affairs & Certification
71364 Winnenden (Germany)
text_image
Labeled diagram of a medical or laboratory device with numbered parts for identificationtext_image
Technical diagram showing a mechanical assembly with labeled parts 1, 2, and 3, including a downward arrow indicating motion or force.①Impugnatura
②Fusibile (sfera)
③Vite a mano

H. Jenner
Chairman of the Board of Management
S. Reiser
Director Regulatory Affairs & Certification
71364 Winnenden (Germany)
Tel.: +49 7195 14-0
Fax: +49 7195 14-2212
Winnenden, 01/05/2021
Inhoud
text_image
Labeled diagram of a medical or laboratory device with numbered parts for identificationtext_image
Technical diagram of a mechanical assembly with numbered components and directional arrow indicating motion or force①Handgreep
②Zekering (bal)
③ Handschroef
Chairman of the Board of Management

S. Reiser
Director Regulatory Affairs & Certification
71364 Winnenden (Germany)
Tel.: +49 7195 14-0
Fax: +49 7195 14-2212
Winnenden, 2021/05/01
text_image
Labeled diagram of a medical or laboratory device with numbered parts for identification① Asa de transporte
Nota
text_image
Technical diagram showing a mechanical assembly with labeled parts 1, 2, and 3, including a downward arrow indicating motion or assembly.① Asa
②Fusible (bola)
③Tornillo de mano
2006/42/CE (+2009/127/CE)
2014/30/UE
2011/65/UE
Chairman of the Board of Management

S. Reiser
Director Regulatory Affairs & Certification
71364 Winnenden (Germany)
Tel.: +49 7195 14-0
Fax: +49 7195 14-2212
Winnenden, 01/05/2021
Indice
text_image
Labeled diagram of a medical or laboratory device with numbered parts for identification①Pega de transporte
Aviso
text_image
Technical diagram showing a mechanical assembly with labeled parts 1, 2, and 3, including a downward arrow indicating direction.2006/42/CE (+2009/127/CE)
2014/30/UE
2011/65/UE

Chairman of the Board of Management
S. Reiser
Director Regulatory Affairs & Certification
Winnenden, 01/05/2021
Indhold
text_image
Labeled diagram of a medical or laboratory device with numbered parts for identification①Transportgreb
Obs
text_image
Technical diagram showing a mechanical assembly with labeled parts 1, 2, and 3, including a downward arrow indicating direction.2006/42/EF (+2009/127/EF)
2014/30/EU
2011/65/EU
Chairman of the Board of Management
S. Reiser
Director Regulatory Affairs & Certification
71364 Winnenden (Germany)
Tlf.: +49 7195 14-0
Fax: +49 7195 14-2212
Winnenden, 2021/05/01
Indhold
Generelle merknader 36
Forskriftsmessig bruk.... 36
www.kaercher.com/REACH
Garanti
text_image
Labeled diagram of a medical or laboratory device with numbered parts for identification①Transporthåndtak
Merknad
text_image
Technical diagram showing a mechanical assembly with labeled parts 1, 2, and 3, including a downward arrow indicating motion or force.2006/42/EF (+2009/127/EF)
2014/30/EU
2011/65/EU
Anvendte harmoniserte standarder
EN 60335-1
EN 60335-2-54
EN 60335-2-29
EN 55014-1: 2017 + A11: 2020
EN 55014-2: 2015
EN 61000-3-2: 2014
EN 61000-3-3: 2013
EN 62233: 2008
EN IEC 63000: 2018

Chairman of the Board of Management
S. Reiser
Director Regulatory Affairs & Certification
71364 Winnenden (Germany)
Tlf.: +49 7195 14-0
Winnenden, 2021/05/01
Innehåll
Allmän information 40
text_image
Labeled diagram of a medical or laboratory device with numbered parts for identification.①Transporthandtag
Hänvisning
Montera före start
text_image
Technical diagram showing a mechanical assembly with labeled parts 1, 2, and 3, including a downward arrow indicating motion or force.①Handtag
②(Kul)-säkring
③Handskruv

Chairman of the Board of Management
D-71364 Winnenden (Germany)
Tfn: +49 7195 14-0
Fax: +49 7195 14-2212
Winnenden, 01.05.2021
S. Reiser
Director Regulatory Affairs & Certification
Sisältö
text_image
Labeled diagram of a medical or laboratory device with numbered parts for identification① Kuljetuskahva
Huomautus
text_image
Technical diagram showing a mechanical assembly with labeled parts 1, 2, and 3, including a downward arrow indicating motion or force.
Chairman of the Board of Management
71364 Winnenden (Germany)
Puh.: +49 7195 14-0
Director Regulatory Affairs & Certification
Περιεχόμενα
text_image
Labeled diagram of a medical or laboratory device with numbered parts for identification①Λαβή μεταφοράς
Υπόδειξη
text_image
Technical diagram showing a mechanical assembly with labeled parts 1, 2, and 3, including a downward arrow indicating direction.①Χειρολαβή
② Ασφάλεια (σφαίρα)
Chairman of the Board of Management

S. Reiser
Director Regulatory Affairs & Certification
71364 Winnenden (Germany)
Tηλ.: +49 7195 14-0
Φαξ: +49 7195 14-2212
Winnenden, 2021/05/01
İçindekiler
Genel uyarılar 52
text_image
Labeled diagram of a medical or laboratory device with numbered parts for identification.① Taşıma tutamağı
Not
text_image
Technical diagram of a mechanical assembly with numbered components and directional arrow indicating motion①Tutamak
② Sigorta (küre)
③El vidasí
2006/42/AT (+2009/127/AT)
2014/30/AB
2011/65/AT
Chairman of the Board of Management

S. Reiser
Director Regulatory Affairs & Certification
Winnenden, 2021/05/01
Содержание
Общие указания 56
text_image
Labeled diagram of a medical or laboratory device with numbered parts for identificationtext_image
Technical diagram showing a mechanical assembly with labeled parts 1, 2, and 3, including a downward arrow indicating motion or force.Chairman of the Board of Management
S. Reiser
Director Regulatory Affairs & Certification
text_image
Labeled diagram of a medical or laboratory device with numbered parts for identification.① Szállítófogantyú
Megjegyzés
text_image
Technical diagram showing a mechanical assembly with labeled parts 1, 2, and 3, including a downward arrow indicating motion or force.Chairman of the Board of Management
S. Reiser
Director Regulatory Affairs & Certification
Winnenden, 2021/05/01
Obsah
text_image
Labeled diagram of a medical or laboratory device with numbered parts for identification①Přepravní držadlo
Upozornění
text_image
Technical diagram showing a mechanical assembly with labeled parts 1, 2, and 3, including a downward arrow indicating motion or assembly.2006/42/ES (+2009/127/ES)
2014/30/EU
2011/65/EU
Chairman of the Board of Management
S. Reiser
Director Regulatory Affairs & Certification
Zmocněnec pro dokumentaci: S. Reiser
Alfred Kärcher SE & Co. KG
Alfred-Kärcher-Str. 28 - 40
Winnenden, 2021/05/01
Kazalo
Splošna navodila 69
Namenska uporaba 69
Opis naprave 69
Varnostna navodila 70
Upravljanje....70
Baterije....71
Transport....71
Skladiščenje.... 71
text_image
Labeled diagram of a medical or laboratory device with numbered parts for identification.①Transportni ročaj
Napotek
Montirajte pred zagonom
text_image
Technical diagram of a mechanical assembly with numbered components and directional arrow indicating motion2006/42/ES (+2009/127/ES)
2014/30/EU
2011/65/EU

H. Jenner
Chairman of the Board of Management

S. Reiser
Director Regulatory Affairs & Certification
Winnenden, 1. 5. 2021
Spis treści
Wskazówki ogólne 73
text_image
Labeled diagram of a medical or laboratory device with numbered parts for identificationtext_image
Technical diagram showing a mechanical assembly with labeled parts 1, 2, and 3, including a downward arrow indicating motion or force.2006/42/WE (+2009/127/WE)
2014/30/UE
2011/65/UE
Chairman of the Board of Management

S. Reiser
Director Regulatory Affairs & Certification
71364 Winnenden (Germany)
Tel.: +49 7195 14-0
text_image
Labeled diagram of a medical or laboratory device with numbered parts for identification.①Mâner de transport
Indicatie
text_image
Technical diagram showing a mechanical assembly with labeled parts 1, 2, and 3, including a downward arrow indicating motion or force.Directive UE relevante
2006/42/UE (+2009/127/UE)
2014/30/UE
2011/65/UE
Norme armonizate aplicate
EN 60335-1
EN 60335-2-54
EN 60335-2-29
EN 55014-1: 2017 + A11: 2020
EN 55014-2: 2015
EN 61000-3-2: 2014
EN 61000-3-3: 2013
EN 62233: 2008
EN IEC 63000: 2018
Chairman of the Board of Management
S. Reiser
Director Regulatory Affairs & Certification
71364 Winnenden (Germania)
Tel.: +49 7195 14-0
Fax: +49 7195 14-2212
Winnenden, 2021/05/01
Obsah
Všeobecné upozornenia 81
text_image
Labeled diagram of a medical or laboratory device with numbered parts for identification.①Prepravné držadlo
Upozornenie
text_image
Technical diagram showing a mechanical assembly with labeled parts 1, 2, and 3, including a downward arrow indicating motion or force.①Rukovät'
②Poistka (gul'ka)
③Ručná skrutka
-
Rúrku priloženej rukováte vložte do uchytenia. Zatlačte poistku (gul'ka) a rúrku tlačte dovtedy, kým sa gul'ka nezaistí.
-
Utiahnite ručnú skrutku.
Bezpečnostné pokyny
2006/42/ES (+2009/127/ES)
2014/30/EÚ
2011/65/EÚ
Chairman of the Board of Management

S. Reiser
Director Regulatory Affairs & Certification
71364 Winnenden (Germany)
Tel.: +49 7195 14-0
Fax: +49 7195 14-2212
Winnenden, 01.05.2021
Sadržaj
Opće napomene 85
text_image
Labeled diagram of a medical or laboratory device with numbered parts for identification①Transportna ručka
Napomena
text_image
Technical diagram showing a mechanical assembly with labeled parts 1, 2, and 3, including a downward arrow indicating motion or assembly.①Ručka
②Osigurač (kuglica)
③Ručni vijak
2006/42/EZ (+2009/127/EZ)
2014/30/EU
2011/65/EU
Primijenjene uskladene norme
EN 60335-1
EN 60335-2-54
EN 60335-2-29
EN 55014-1: 2017 + A11: 2020
EN 55014-2: 2015
EN 61000-3-2: 2014
EN 61000-3-3: 2013
EN 62233: 2008
EN IEC 63000: 2018

H. Jenner
Chairman of the Board of Management
S. Reiser
Director Regulatory Affairs & Certification
Opunomoćenik za dokumentaciju:
S. Reiser
Alfred Kärcher SE & Co. KG
Alfred-Kärcher-Str. 28 - 40
71364 Winnenden (Njemačka)
Tel.: +49 7195 14-0
Telefaks: +49 7195 14-2212
Winnenden, 01.05.2021.
Sadržaj
Opšte napomene 89
Namenska upotreba 89
Opis uređaja 89
Sigurnosne napomene....90
Rukovanje....90
Akumulatori....91
Transport....91
Skladištenje 92
www.kaercher.com/REACH
Garancija
U svakoj zemlji važe uslovi garancije koje je izdala naša nadležna distributivna organizacija. Bilo kakve smetnje na uređaju otklanjamo besplatno u garantnom roku, ukoliko je uzrok smetnje greška u materijalu ili proizvodnji. U slučaju koji podleže garanciji obratite se sa računom vašem distributeru ili narednoj ovlašćenoj lokaciji servisne službe.
text_image
Labeled diagram of a medical or laboratory device with numbered parts for identification.①Transportna ručka
Napomena
text_image
Technical diagram showing a mechanical assembly with labeled parts 1, 2, and 3, including a downward arrow indicating motion or force.①Ručka
②Osigurač (kugla)
③Ručni vijak
-
Cev ručke uvedite u prihvatnik. Utisnite osigurač (kuglu) i gurajte cev dok se kugla ne uklopi.
-
Pritegnite ručni zavrtanj.
Sigurnosne napomene
Opšte sigurnosne napomene
2006/42/EZ (+2009/127/EZ)
2014/30/EU
2011/65/EU
Primenjene harmonizovane norme
EN 60335-1
EN 60335-2-54
EN 60335-2-29
EN 55014-1: 2017 + A11: 2020
EN 55014-2: 2015
EN 61000-3-2: 2014
EN 61000-3-3: 2013
EN 62233: 2008
EN IEC 63000: 2018
Potpisnici deluju po nalogu i uz punomoć upravnog odbora.

H. Jenner
Chairman of the Board of Management

S. Reiser
Director Regulatory Affairs & Certification
Lice ovlašćeno za dokumentaciju: S. Reiser
Alfred Kärcher SE & Co. KG
Alfred-Kärcher-Str. 28 - 40
71364 Winnenden (Germany)
Tel.: +49 7195 14-0
Winnenden, 2021/05/01
Съдържание
Общи указания 93
Употреба по предназначение 94
text_image
Labeled diagram of a medical or laboratory device with numbered parts for identificationtext_image
Technical diagram showing a mechanical assembly with labeled parts 1, 2, and 3, including a downward arrow indicating motion or force.Chairman of the Board of Management

S. Reiser
Director Regulatory Affairs & Certification
www.kaercher.com/REACH
Garantii
text_image
Labeled diagram of a medical or laboratory device with numbered parts for identification.①Transpordikäepide
Märkus
text_image
Technical diagram showing a mechanical assembly with labeled parts 1, 2, and 3, including a downward arrow indicating motion or force.2006/42/EÜ (+2009/127/EÜ)
2014/30/EL
2011/65/EL

H. Jenner
Chairman of the Board of Management

S. Reiser
Director Regulatory Affairs & Certification
71364 Winnenden (Germany)
Tel: +49 7195 14-0
Winnenden, 2021/05/01
Saturs
text_image
Labeled diagram of a medical or laboratory device with numbered parts for identificationtext_image
Technical diagram of a mechanical assembly with numbered components and directional arrow indicating motion or force①Rokturis
②Blokešanas elements (lode)
③Rokas skrūve
Chairman of the Board of Management
S. Reiser
Director Regulatory Affairs & Certification
text_image
Labeled diagram of a medical or laboratory device with numbered parts for identification① Gabenimo rankena
Pastaba
text_image
Technical diagram showing a mechanical assembly with labeled parts 1, 2, and 3, including a downward arrow indicating motion or assembly.①Rankena
②Fiksatorius (rutulys)
③Ranka priveržiamas sraigtas

H. Jenner
Chairman of the Board of Management

S. Reiser
Director Regulatory Affairs & Certification
text_image
Labeled diagram of a medical or laboratory device with numbered parts for identificationВказівка
text_image
Technical diagram showing a mechanical assembly with labeled parts 1, 2, and 3, including a downward arrow indicating motion or force.
Chairman of the Board of Management

S. Reiser
Director Regulatory Affairs & Certification
71364 Winnenden (Germany)
Тел.: +49 7195 14-0
Факс: +49 7195 14-2212
Chairman of the Board of Management

S. Reiser
Director Regulatory Affairs & Certification
وكيل التوشيق:
إس رايزر
Alfred Kärcher SE & Co. KG
Alfred-Kärcher-Str. 28 - 40
71364 Winnen
text_image
Technical diagram of a mechanical assembly with numbered components and directional arrow indicating motiontext_image
Labeled diagram of a medical or laboratory device with numbered parts for identification① مقبض النقل
ارشاد
www.kaercher.com/REACH
الضمان
natural_image
Black and white icon of a hand giving a thumbs-up gesture (no text or symbols)THANK YOU!
MERCI! DANKE! iGRACIAS!

Register your product and benefit from many advantages.
www.kaercher.com/welcome


Rate your product and tell us your opinion.
natural_image
Icon showing a gear and wrench inside a square frame (no text or symbols)www.kaercher.com/dealersearch
Alfred Kärcher SE & Co. KG
Alfred-Kärcher-Str. 28-40
71364 Winnenden (Germany)
Tel.: +49 7195 14-0
Fax: +49 7195 14-2212