
Solo CS 4235 - Saw AL-KO - Free user manual and instructions
Find the device manual for free Solo CS 4235 AL-KO in PDF.
| Brand | AL-KO |
| Model | Solo CS 4235 |
| Product type | Cordless battery chainsaw |
| Weight (with bar and chain) | 3.80 kg |
| Weight (without bar and chain) | 3.15 kg |
| Power supply | Lithium-ion battery 36 V / 42 V max. |
| Battery capacity | 7.5 Ah |
| Charging time | Approximately 150 minutes |
| Available guide bar length | 25 cm (10"), 30 cm (12"), 35 cm (14") |
| Cutting length | 17 cm (10"), 22 cm (12"), 27 cm (14") |
| Chain speed (idle) | 15-20 m/s |
| Chain speed (under load) | 7-20 m/s (adjustable eco/power) |
| Chain sprocket pitch | 3/8" |
| Chain oil tank capacity | 250 ml |
| Chain brake | Yes, manual (hand guard) |
| Overload protection | Yes |
| Sound power level (LwA) | 108 dB(A) |
| Sound pressure level (LpA) | 88 dB(A) |
| Vibration level (hand-arm) | 2.5 m/s² |
| Drive link thickness | 1.1 mm / 1.27 mm depending on chain |
| Compatible chains | 90PX040X, 91PX045X, 91PX052X |
| Compatible guide bars | 104MLEA041, 120SDEA041, 140SDEA041 |
| Sprocket type | Star sprocket |
| Warranty | Legal (wear parts excluded) |
Frequently Asked Questions - Solo CS 4235 AL-KO
User questions about Solo CS 4235 AL-KO
0 question about this device. Answer the ones you know or ask your own.
Ask a new question about this device
Download the instructions for your Saw in PDF format for free! Find your manual Solo CS 4235 - AL-KO and take your electronic device back in hand. On this page are published all the documents necessary for the use of your device. Solo CS 4235 by AL-KO.
USER MANUAL Solo CS 4235 AL-KO
AL-KO KOBER GROUP Kottz, Germany
This documentation or excerpts therefrom may not be reproduced or disclosed to third parties without the express permission of the AL-KO KOBER GROUP.


1 About these operating instructions 34
1.1 Symbols on the title page 34
1.2 Legends and signal words 34
2 Product description 34
2.1 Designated use 34
2.2 Possible foreseeable misuse 35
2.3 Residual risks.. 35
2.4 Safety and protective devices 35
2.4.1 Switch-on protection 35
2.4.2 Chain brake/chain brake bracket. 35
2.4.3 Overload protection 35
2.5 Symbols on the appliance 35
2.6 Scope of supply 36
2.7 Product overview (01) 36
3 Safety instructions 37
3.1 General Power Tool SafetyWarnings 37
3.1.1 Work area safety 37
3.1.2 Electrical safety 37
3.1.3 Personal safety.. 37
3.1.4 Power tool use and care 38
3.1.5 Battery tool use and care 38
3.1.6 Service 38
3.2 Chain saw safety warnings 38
3.3 Causes and operator prevention of kickback 39
3.4 Safety information regarding the rechargeable battery 39
3.5 Safety information regarding the charging unit 40
3.6 Safety information when working 41
3.6.1Operator 41
3.6.2 Operating times 41
3.6.3 Vibration load.. 41
3.6.4 Noise pollution 42
3.6.5 Working with the chain saw 42
4 Installation 43
4.1 Installing the guide rail (02, 03) 43
4.2 Installing the saw chain (02, 03) 43
4.3 Tightening the saw chain (04, 05) .... 43
5 Start-up. 43
5.1 Charging the rechargeable battery (06, 07) 44
5.2 Filling saw chain oil (08) 44
5.3 Function test of the chain brake 45
5.3.1 Testing the chain brake with motor switched off (09) 45
5.3.2 Testing the chain brake with motor switched on (09) 45
6 Operation 45
6.1 Check the saw chain oil 45
6.2 Putting on the rechargeable battery belt system (10) to (13). 46
6.3 Inserting/removing the battery (14).... 46
6.4 Connecting the voltage supply (15, 16) 46
6.5 Switching the motor ON and OFF (17) 46
6.6 Testing the chain brake 47
6.7 Increase/decrease speed of saw chain [Eco-Mode/Power-Mode Function] (18) 47
6.8 Checking the charge status of the rechargeable battery, "Motion Detection" (07) 47
7 Working behaviour and working technique. 47
7.1 Felling trees (19, 20) 48
7.2 Delimbing (21) 49
7.3 Cross-cutting (22-25) 49
7.4 Cutting converted timber 50
8 Maintenance and care. 50
8.1 Checking the chain tension 50
8.2 Sharpening the saw chain (26) 50
8.3 Cleaning the chain sprocket interior ... 51
8.4 Changing over the quick-tension chain wheel (27) 51
8.5 Checking, turning and greasing the guide rail (28, 29). 51
8.6 Chain maintenance table.. 51
9 Transport 52
10 Storage 52
11 Disposal 53
12 After-Sales / Service 53
13 Technical data 54
14 Help in case of malfunction. 55
15 Guarantee. 56
16 EU declaration of conformity. 56
1 ABOUT THESE OPERATING INSTRUCTIONS
The German version is the original operating instructions. All additional language versions are translations of the original operating instructions.
It is essential to carefully read through these operating instructions before start-up. This is essential for safe working and trouble-free handling.
Always safeguard these operating instructions so that they can be consulted if you need any information about the appliance.
Only pass on the appliance to other persons together with these operating instructions.
Comply with the safety and warning information in these operating instructions.
1.1 Symbols on the title page
Symbol Meaning

Symbol for operating instructions
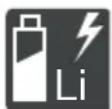
Symbol for device with Li-Ion battery
1.2 Legends and signal words

DANGER!
Denotes an imminently dangerous situation which will result in fatal or serious injury if not avoided.

WARNING!
Denotes a potentially dangerous situation which can result in fatal or serious injury if not avoided.

CAUTION!
Denotes a potentially dangerous situation which can result in minor or moderate injury if not avoided.
IMPORTANT!
Denotes a situation which can result in material damage if not avoided.

NOTE
Special instructions for ease of understanding and handling.
2 PRODUCT DESCRIPTION
These operating instructions describe a hand-operated electric chain saw that is operated with a rechargeable battery.
2.1 Designated use
The chain saw is exclusively designed for domestic, DIY and gardening applications. In this sector, the chain saw can be used for light wood sawing work, e.g. for:
Cutting up timber
Pruning hedgerows
Sawing firewood
Because of the electrical drive, the rechargeable battery-chain saw can be used not only on open ground but also in closed rooms for sawing wood. Any application not in accordance with the application described here shall be regarded as misuse.
The rechargeable battery-chain must only be used with the following components:
Rechargeable battery belt system BTA 42 - Item no. 127442
Lithium-ion rechargeable batteries - Item no. 127390
Charging unit - C150 Li, Item no. 127391
This appliance is intended solely for use in non-commercial applications. Any other use (as well as unauthorised conversions or add-ons) are regarded as contrary to the intended use and will result in exclusion of the warranty as well as loss of conformity (CE mark); the manufacturer will
thus decline any responsibility for damage and/or injury suffered by the user or third parties.

CAUTION!
Danger of injury due to non-designated use!
If wood or other substances embedded with foreign bodies are sawn with the chain saw, injury can result.
Only use the chain saw for light wood sawing work.
Before sawing wood, check for foreign bodies, e.g. nails, screws, fittings.
2.2 Possible foreseeable misuse
- Do not saw off any branches that are directly or at an acute angle above the user or other persons.
- Do not use old oil or mineral oil for lubrication of the saw chain.
Do not use the tool in a potentially explosive atmosphere.
2.3 Residual risks
Even when using the appliance as intended, there is always a certain residual risk that cannot be excluded. The following hazards cannot be ruled out due to the nature and design of the appliance.
- Contact with the exposed teeth of the chain (risk of cutting)
Access to the moving chain (risk of cutting)
Sudden and unexpected movement of the bar (risk of cutting) - Detachment of parts of the chain (risk of cutting/injury)
- Detachment of parts of the wood being worked on
Impairment of hearing during work if ear defenders are not used
2.4 Safety and protective devices

WARNING!
Danger of serious injury from manipulated safety and protective devices
As a result of manipulated safety and protective devices, serious injury can occur when working with the chain saw.
Never deactivate safety and protective devices.
Only work with the chain saw if all safety and protective devices function correctly.
2.4.1 Switch-on protection
If the operator applies the throttle quickly several times in succession, the chain saw switches off for a few seconds to protect the electronics and the saw chain. In this case, wait until the chain saw can be switched on again.
2.4.2 Chain brake/chain brake bracket
The chain saw has a manual chain brake that is triggered by the chain brake bracket, for example if kickback occurs. If the chain brake is tripped, saw chain and motor are stopped immediately.
2.4.3 Overload protection
The chain saw is equipped with an overload protection which switches off in case of overload.
After a cooling-down phase, the chain saw can be switched on again.
2.5 Symbols on the appliance
Symbol Meaning

Pay special attention when handling this product.
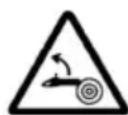
Danger of kickback!
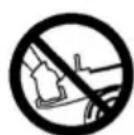
Do not operate the chain saw with one hand!

Do not use in the rain! Protect against moisture!
Symbol Meaning

Wear a protective helmet, ear defenders and eye protection!

Wear protective gloves!

Wear sturdy shoes!

Read the operating instructions before starting operation.
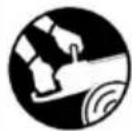
Always operate the chain saw with both hands!
2.6 Scope of supply
The battery chain saw trimmer is designed for operation with the PowerFlex lithium ion battery (Art. No. 127390). The charger for PowerFlex batteries (Art. No. 127391) is required for charging the battery.
IMPORTANT!
Danger of damage to the appliance and battery
If the appliance is operated with an unsuitable battery, both the device and the battery may be damaged.
Only operate the appliance with the specified rechargeable battery.

NOTE
Rechargeable battery, charger and belt are not included in the scope of supply and must therefore be purchased separately.
After unpacking, check that all the parts have been delivered.
No. Component
1 Battery chain saw
2 Chain bar
3 Chain guard
4 Saw chain
5 Operating instructions
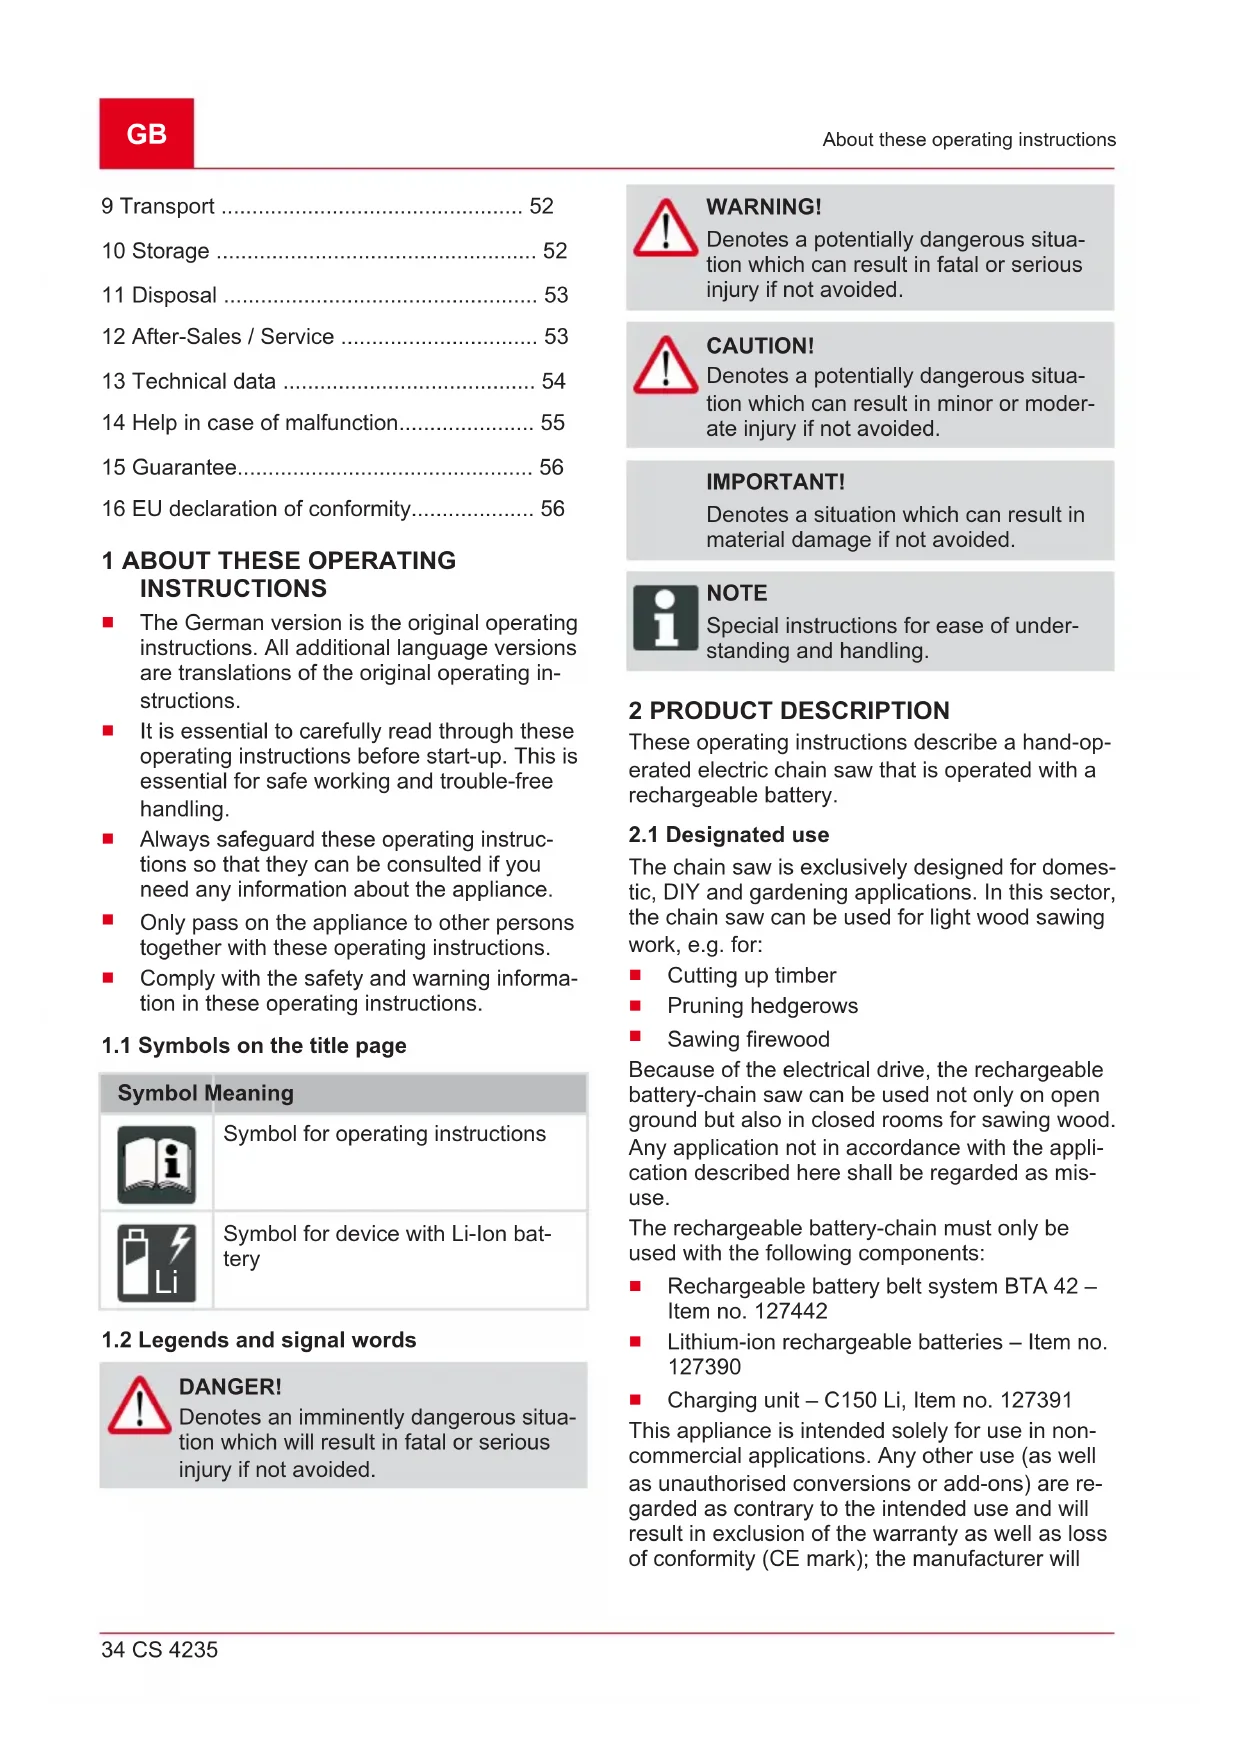
2.7 Product overview (01)
No. Component
1 Chain guard
2 Chain bar
3 Saw chain
4 Bumper spike
5 Chain brake bracket
6 Handle
7 Cap of the chain oil tank
8 Eco Mode / Power Mode control panel
9 Rear handle
10 Throttle lever
11 Throttle lever locking knob
12 Viewing aperture of the chain oil tank
No. Component
13 Socket for battery connecting cable
14 Cover for chain sprocket
15 Quick-tension chain wheel with central lock and rotating ring
16 Rechargeable battery
17 Charger
18 Rechargeable battery belt system with connecting cable*
: Not included in the scope of supply, but can be purchased under the following item numbers:
Rechargeable battery belt system BTA 42 - Item no. 127442
Lithium-ion rechargeable batteries - Item no. 127390
Charging unit - C150 Li - Item no. 127391
3 SAFETY INSTRUCTIONS
3.1 General Power Tool SafetyWarnings

WARNING!
Read all safety warnings and all instructions.
Failure to follow the warnings and instructions may result in electric shock, fire and/or serious injury.
Save all warnings and instructions for future reference.
The term "power tool" in the warnings refers to your mains-operated (corded) power tool or battery-operated (cordless) power tool.
3.1.1 Work area safety
- Keep work area clean and well lit. Cluttered and dark areas invite accidents.
- Do not operate power tools in explosive atmospheres, such as in the presence of flammable liquids, gases or dust. Power tools create sparks which may ignite the dust or fumes.
- Keep children and bystanders away while operating a power tool. Distractions can cause you to lose control.
3.1.2 Electrical safety
Power tool plugs must match the outlet. Never modify the plug in any way. Do not use any adapter plugs with earthed
(grounded) power tools. Unmodified plugs and matching outlets will reduce risk of electric shock.
Avoid body contact with earthed or grounded surfaces such as pipes, radiators, ranges and refrigerators. There is an increased risk of electric shock if your body is earthed or grounded.
- Do not expose power tools to rain or wet conditions. Water entering a power tool will increase the risk of electric shock.
- Do not abuse the cord. Never use the cord for carrying, pulling or unplugging the power tool. Keep cord away from heat, oil, sharp edges or moving parts. Damaged or entangled cords increase the risk of electric shock.
- When operating a power tool outdoors, use an extension cord suitable for outdoor use. Use of a cord suitable for outdoor use reduces the risk of electric shock.
If operating a power tools in a damp location is unavoidable, use a residual current device (RCD) protected supply. Use of an RCD reduces the risk of electric shock.
3.1.3 Personal safety
- Stay alert, watch what you are doing and use common sense when operating a power tool. Do not use a power tool while you are tired or under the influence of drugs, alcohol or medication. A moment of inattention while operating power tools may result in serious personal injury.
Use personal protective equipment. Always wear eye protection. Protective equipment such as a dust mask, non-skid safety shoes, hard hat, or hearing protection used for appropriate conditions will reduce personal injuries.
Prevent unintentional starting. Ensure the switch is in the off-position before connecting to power source and/or battery pack, picking up or carrying the tool. Carrying power tools with your finger on the switch or energizing power tools that have the switch on invites accidents.
Remove any adjusting key or wrench before turning the power tool on. A wrench or a key left attached to a rotating part of the power tool may result in personal injury.
Do not overreach. Keep proper footing and balance at all times. This enables bet
ter control of the power tool in unexpected situations.
- Dress properly. Do not wear loose clothing or jewellery. Keep your hair, clothing and gloves away from moving parts. Loose clothes, jewellery or long hair can be caught in moving parts.
If devices are provided for the connection of dust extraction and collection facilities, ensure these are connected and properly used. Use of these devices can reduce dust-related hazards.
3.1.4 Power tool use and care
- Do not force the power tool. Use the correct power tool for your application. The correct power tool will do the job better and safer at the rate for which it was designed.
- Do not use the power tool if the switch does not turn it on and off. Any power tool that cannot be controlled with the switch is dangerous and must be repaired.
- Disconnect the plug from the power source and/or the battery pack from the power tool before making any adjustments, changing accessories, or storing power tools. Such preventive safety measures reduce the risk of starting the power tool accidentally.
Store idle power tools out of the reach of children and do not allow persons unfamiliar with the power tool or these instructions to operate the power tool. Power tools are dangerous in the hands of untrained users. - Maintain power tools. Check for misalignment or binding of moving parts, breakage of parts and any other condition that may affect the power tool's operation. If damaged, have the power tool repaired before use. Many accidents are caused by poorly maintained power tools.
- Keep cutting tools sharp and clean. Properly maintained cutting tools with sharp cutting edges are less likely to bind and are easier to control.
Use the power tool, accessories and tool bits etc. in accordance with these instructions, taking into account the working conditions and the work to be performed. Use of the power tool for operations different from those intended could result in a hazardous situation.
3.1.5 Battery tool use and care
- Recharge only with the charger specified by the manufacturer. A charter that is suitable for one type of battery pack may create a risk of fire when used with another battery pack.
Use power tools only with specifically designated battery packs. Use of any other battery packs may create a risk of injury and fire. - When battery pack is not in use, keep it away from other metal objects, lie paper-clips, coins, keys, nails, screws or other small metal objects, that can make a connection from one terminal to another. Shorting the battery terminals together may cause burns or a fire.
Under abusive conditions, liquid may be ejected from the battery; avoid contact. If contact accidentally occurs, flush with water. If liquid contacts eyes, additionally seek medical help. Liquid ejected form the battery may cause irritation or burns.
3.1.6 Service
Have your power tool serviced by a qualified repair person using only identical replacement parts. This will ensure that the safety of the power tool is maintained.
3.2 Chain saw safety warnings
- Keep all parts of the body away from the saw chain when the chain saw is operating. Before you start the chain saw, make sure the saw chain is not contacting anything. A moment of inattention while operating chain saws may cause entanglement of your clothing or body with the saw chain.
Always hold the chain saw with your right hand on the rear handle and your left hand on the front handle. Holding the chain saw with a reversed hand configuration increases the risk of personal injury and should never be done.
Hold the power tool by insulated gripping surfaces only, because the saw chain may contact hidden wiring. Saw chains contacting a "live" wire may make exposed metal parts of the power tool "live" and could give the operator an electric shock.
Wear safety glasses and hearing protection. Further protective equipment for head, hands, legs and feet is recommended. Adequate protective clothing will reduce
personal injury by flying debris or accidental contact with the saw chain.
- Do not operate a chain saw in a tree. Operation of a chain saw while up in a tree may result in personal injury.
Always keep proper footing and operate the chain saw only when standing on fixed, secure and level surface. Slippery or unstable surfaces such as ladders may cause a loss of balance or control of the chain saw. - When cutting a limb that is under tension be alert for spring back. When the tension in the wood fibres is released the spring loaded limb may strike the operator and/or throw the chain saw out of control.
Use extreme caution when cutting brush and saplings. The slender material may catch the saw chain and be whipped toward you or pull you off balance. - Carry the chain saw by the front handle with the chain saw switched off and away from your body. When transporting or storing the chain saw always fit the guide bar cover. Proper handling of the chain saw will reduce the likelihood of accidental contact with the moving saw chain.
Follow instructions for lubricating, chain tensioning and changing accessories. Improperly tensioned or lubricated chain may either break or increase the chance for kickback. - Keep handles dry, clean, and free from oil and grease. Greasy, oily handles are slippery causing loss of control.
Cut wood only. Do not use chain saw for purposes not intended. For example: do not use chain saw for cutting plastic, masonry or non-wood building materials Use of the chain saw for operations different than intended could result in a hazardous situation.
3.3 Causes and operator prevention of kickback
Kickback may occur when the nose or tip of the guide bar touches an object, or when the wood closes in and pinches the saw chain in the cut. Tip contact in some cases may cause a sudden reverse reaction, kicking the guide bar up and back towards the operator.
Pinching the saw chain along the top of the guide bar may push the guide bar rapidly back towards the operator.
Either of these reactions may cause you to lose control of the saw which could result in serious personal injury. Do not rely exclusively upon the safety devices built into your saw. As a chain saw user, you should take several steps to keep your cutting jobs free from accident or injury.
Kickback is the result of tool misuse and/or incorrect operating procedures or conditions and can be avoided by taking proper precautions as given below:
- Maintain a firm grip, with thumbs and fingers encircling the chain saw handles, with both hands on the saw and position your body and arm to allow you to resist kickback forces. Kickback forces can be controlled by the operator, if proper precautions are taken. Do not let go of the chain saw.
- Do not overreach and do not cut above shoulder height. This helps prevent unintended tip contact and enables better control of the chain saw in unexpected situations.
Only use replacement bars and chains specified by the manufacturer. Incorrect replacement bars and chains may cause chain breakage and/or kickback.
Follow the manufacturer's sharpening and maintenance instructions for the saw chain. Decreasing the depth gauge height can lead to increased kickback.
3.4 Safety information regarding the rechargeable battery
This section mentions all the basic safety and warning information to be heeded when using the rechargeable battery. Read these instructions.
Only use the rechargeable battery as designated, i.e. for AL-KO rechargeable battery-driven appliances. Only charge the rechargeable battery with the AL-KO charging unit provided.
Only unpack the new rechargeable battery from the original packaging when it is to be used.
Fully charge the rechargeable battery before using it for the first time and always use the specified charger. Comply with the details given in these instructions for use for charging the rechargeable battery.
- Do not use the rechargeable battery in environments where there is a potential risk of explosion and/or fire.
- Do not expose the rechargeable battery to moisture and humidity when in use with the appliance.
- Protect the rechargeable battery from heat, oil and fire to prevent it being damaged so no vapours and electrolyte liquids can escape.
- Do not subject the rechargeable battery to impacts or throw it.
- Do not use the rechargeable battery when soiled or wet. Before use, clean and dry the rechargeable battery with a dry, clean cloth.
- When battery pack is not in use, keep it away from other metal objects, like paperclips, coins, keys, nails, screws or other small metal objects that can make a connection from one terminal to another. Burns or fire can result from a short-circuit.
- Do not open, dismantle or crush the rechargeable battery. There is a danger of electric shock and short-circuit.
An improperly used and damaged rechargeable battery can cause vapours and electrolyte liquid to escape. Vent the room adequately and in the case of any disorders, consult a doctor.
If accidental contact with electrolyte liquid occurs, flush with water and thoroughly rinse the eyes immediately. Then consult a doctor.
This rechargeable battery must not be used by unauthorised persons unless they are supervised by a person responsible for their safety or have been instructed on how to use the rechargeable battery. Unauthorised persons include, for example:
Persons (including children) with limited physical, sensory or mental aptitude.
Persons who have no experience and/or knowledge of the rechargeable battery.
Children must be supervised and instructed so they do not play with the rechargeable battery.
- Do not leave the rechargeable battery permanently in the charger. For prolonged storage, remove the rechargeable battery from the charger.
- When not in use, remove the rechargeable batteries from the operated appliances.
Dry the unused rechargeable battery and store in a closed place. Protect from heat and
direct sunlight. Unauthorised persons and children must not have access to the rechargeable battery.
3.5 Safety information regarding the charging unit
This section mentions all the basic safety and warning information to be heeded when using the charger. Read these instructions.
Only use the appliance as designated, i.e. for charging the intended rechargeable batteries. Only charge original rechargeable batteries from AL-KO in the charging unit.
Before each use, inspect the entire appliance and especially the mains cable and the rechargeable battery compartment - for damage. Only use the appliance when it is in proper working order.
- Do not use the appliance in environments where there is a potential risk of explosion and/or fire.
Only operate the appliance indoors and do not expose it to moisture and humidity.
Always place the charging unit on a well ventilated and non-inflammable surface because it heats up during the charging process. Keep the ventilation slots clear and do not cover the appliance.
Before connecting the charging unit, make sure that the mains voltage matches the voltage stated in the "Technical data".
Only use the mains cable for connecting the charging unit, not for any other purpose. Do not carry the charging unit by the mains cable and do not remove the power plug from the power outlet by pulling on the mains cable.
- Protect the mains cable from heat, oil and sharp edges to prevent it being damaged.
- Do not use the charging unit and rechargeable battery when soiled or wet. Before using the appliance, clean and dry the rechargeable battery.
- Do not open the charging unit or rechargeable battery. There is a danger of electric shock and short-circuit.
For your own safety, have your appliance repaired by qualified specialist personnel only using original spare parts.
This appliance must not be used by unauthorised persons unless they are supervised by a person responsible for their safety or have
been instructed on how to use the appliance. Unauthorised persons include, for example:
Persons (including children) with limited physical, sensory or mental aptitude
Persons who have no experience and/or knowledge of the appliance.
Children must be supervised and instructed so they do not play with the appliance.
Dry the unused appliance and store in a closed place. Unauthorised persons and children must not have access to the appliance.
3.6 Safety information when working
Heed the country-specific safety regulations, e.g. from the relevant trade associations, social security systems, authorities for industrial safety.
Only work in sufficient daylight or artificial lighting.
- Keep the working area free from objects (e.g. off-cuts) - danger of stumbling.
The user is responsible for accidents involving other people and their property.
If you are working with a chain saw for the first time:
Have the salesperson or another expert explain the operation of the chain saw, or attend a course.
Prior to the first use, at the very least practice cutting round wood on a saw frame or stand.
3.6.1 Operator
- Young people under 16 years of age and people who do not know the operating instructions are not allowed to use the tool.
To operate the chain saw, you must be rested and in good physical and mental health. If you must not exert yourself for health reasons, ask your doctor whether it is possible to work with a chain saw.
3.6.2 Operating times
Heed the country-specific regulations for the operating times of chain saws. The operating times of chain saws can be limited by national and local regulations.
3.6.3 Vibration load

WARNING!
Danger due to vibration
The actual magnitude of the vibration emissions during the use of the appliance may deviate from that stated by the manufacturer. Observe the following influencing factors before or during use:
Is the appliance being used as intended?
Is the material being cut or processed in the proper manner?
Is the appliance in a proper condition of use?
Is the cutting tool properly sharpened or is the correct cutting tool installed?
Are the handle grips and any optional vibration grips mounted, and are they firmly attached to the appliance?
Only operate the tool at the motor speed required for the respective work. Avoid using the maximum speed in order to reduce noise and vibrations.
The noise and vibrations of the tool can increase due to improper use and maintenance. This leads to damage of the health. In this case, immediately switch off the tool and have it repaired by an authorised service workshop.
The degree of stress due to vibration depends on the work to be performed or on the use of the tool. Estimate the stress and plan appropriate work breaks. This considerably reduces stress due to vibration over the entire working time.
- Extensive use of the tool exposes the operator to vibrations, which can lead to circulatory issues ("white fingers"). To avoid this risk, wear gloves and keep your hands warm. If any symptoms of "white fingers" occur, immediately consult a physician. These symptoms include: Numbness, loss of feeling, tingling, itching, pain, reduced muscular strength, changes in the colour or condition of the skin. Normally these conditions affect the fingers, hands or pulse. The risk increases at low temperatures (below approx 10^ ).
Take long breaks during your working day so you can recover from the noise and the vibra
tions. Plan your work in such a way that the use of appliances that generate strong vibrations is spread over several days.
If you notice an unpleasant sensation or discoloration of the skin on your hands when using the tool, stop work immediately. Take sufficient work breaks. Without sufficient breaks, a hand/arm vibration syndrome can occur.
- Minimise your risk of being exposed to vibrations. Maintain the tool according to the instructions in the operating instructions.
If the tool is used frequently, contact your dealer to purchase anti-vibration accessories (e.g. handles).
Define how the vibration load can be limited in a work plan.
3.6.4 Noise pollution
A certain level of noise exposure from this appliance is inevitable. Carry out noisy work at approved and specified time periods. Observe rest periods as necessary and restrict the duration of the work to a minimum. For your personal protection and protection of persons in the vicinity, appropriate hearing protection must be worn.
3.6.5 Working with the chain saw

WARNING!
Danger of serious injury.
If an incompletely mounted chain saw is used, serious injury can be caused.
Only use the chain saw when it has been fully mounted.
Before each use, perform a visual inspection in order to check that the chain saw is complete and does not contain damaged or worn components. Safety and protective devices must be intact.

WARNING!
Risk of injury due to chain saw being started inadvertently
A chain saw that is started inadvertently can lead to serious injury. Therefore, remove the rechargeable battery during:
Testing, adjustment work and cleaning work
Work on the cutting equipment
Leaving the chain saw
Transport
Storage
Maintenance and repair work
Danger
Never work alone.
Always keep a first-aid kit to hand in case of accidents.
- Avoid touching metal objects in the ground or which are conductively connected to the ground.
The personal protective equipment comprises:
Protective helmet
Hearing protection (e.g. ear defenders, especially when working for than 2.5 hours a day)
Protective glasses or face visor incorporated in the protective helmet
Protective trousers with cut protection inlay
Sturdy working gloves
Safety boots with high-grip sole and steel toe caps
- Do not use the chain saw above shoulder height, since safe handling is no longer possible in this way.
- When changing position, switch off the engine and put on the chain guard.
When chain saws are not in use, always put on the chain guard and remove the rechargeable battery. - Switch the chain saw off before putting it down.
- Do not use the chain saw for levering or moving wood.
Only specialist personnel are allowed to saw trunks that are thicker than the length of the chain bar.
Only start the cut once the saw chain is running, never switch on the chain saw already in the kerf.
Make sure that no saw chain oil gets onto the ground.
Do not undertake sawing work in the rain, snow or stormy weather.
Never disable safety and protective devices.
4 INSTALLATION

WARNING!
Danger of serious injury.
If an incompletely mounted chain saw is used, serious injury can be caused.
Only use the chain saw when it has been fully mounted.
Before each use, perform a visual inspection in order to check that the chain saw is complete and does not contain damaged or worn components. Safety and protective devices must be intact.

CAUTION!
Danger of laceration injuries.
The sharp edges of the saw chain can cause laceration injuries when assembling.
Before installation, remove the rechargeable battery.
Wear safety gloves when installing the saw chain and the guide rail.
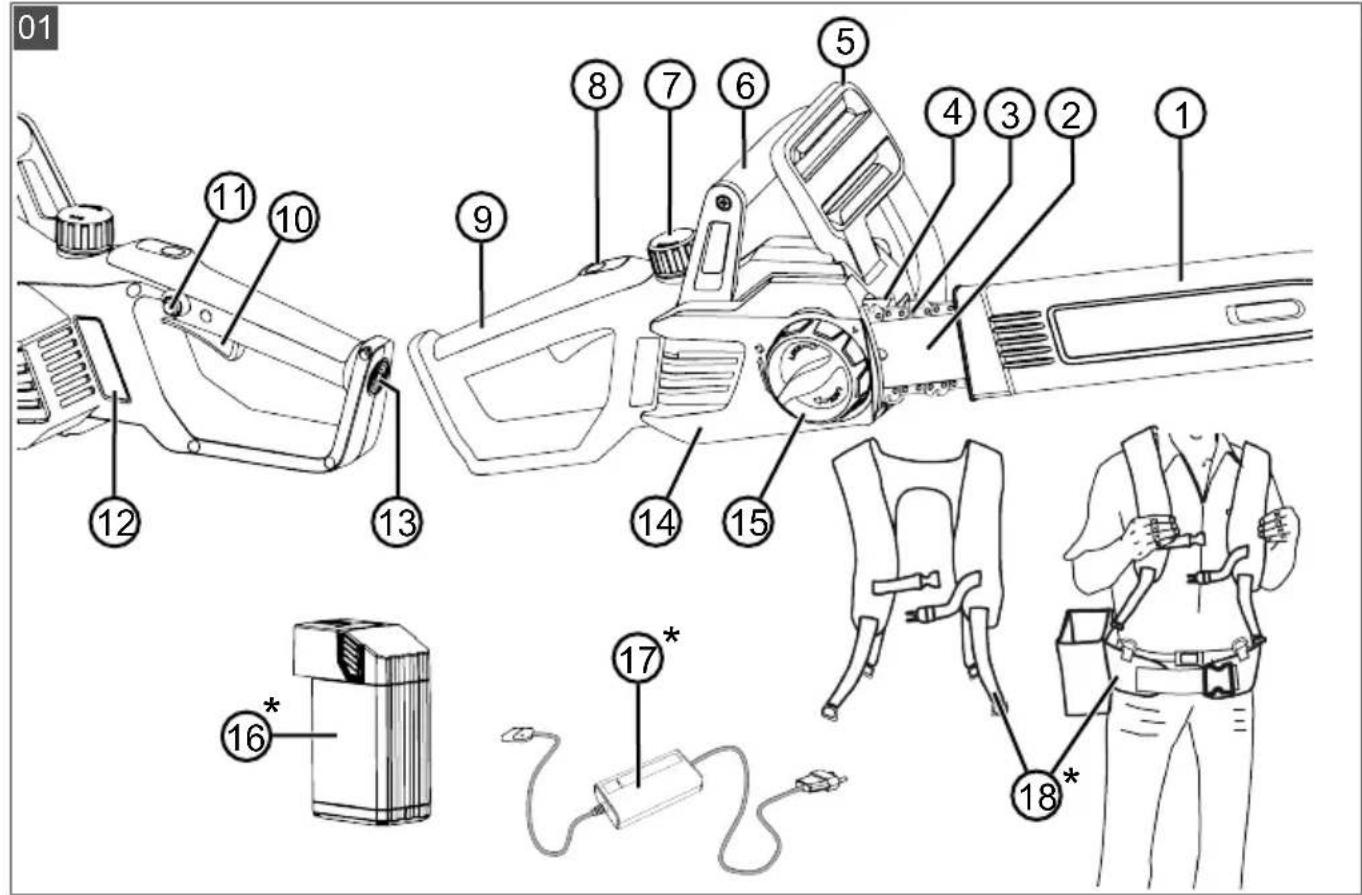
4.1 Installing the guide rail (02, 03)
- Pull chain brake bracket (02/1) in the direction of bow handle (02/A) in order to release the chain brake.
- Turn central lock (02/2) anti clockwise and remove together with cover (02/3).
- Set guide rail (03/1) on guide pin (03/2) and push so far back that the saw chain can be mounted.
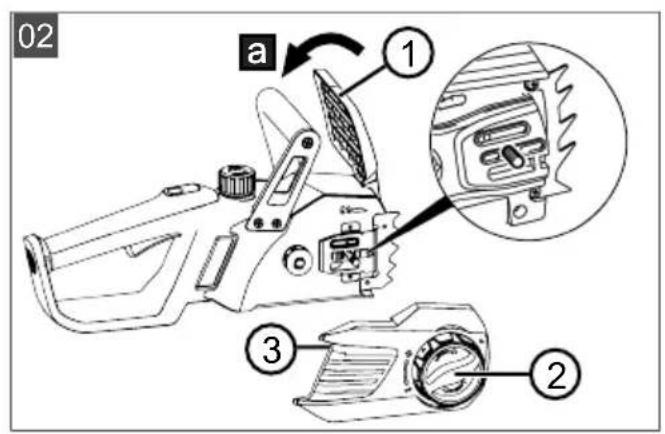
4.2 Installing the saw chain (02, 03)
- Place the saw chain on chain sprocket (03/3) and in the groove of guide rail (03/1).
-
Guide the saw chain around the reversing sprocket of the guide rail. The saw chain must hang down slightly on the underside of the guide rail.
-
Fit cover (02/3) and tighten central lock (02/2) slightly.
4.3 Tightening the saw chain (04, 05)

NOTE
The saw chain has been tensioned correctly when:
It is in contact with the underside of the guide rail and can be pulled through by hand
It can be lifted by 3 - 4mm in the middle of the guide rail
- Check the seat of the saw chain so that it sits correctly on the chain sprocket and in the guide rail.
- Turn rotating ring (04/1) towards cover (04/2) so that the two triangles are facing one other (04/a).
- Turn central lock (05/1) in clockwise direction (05/a). Do not tighten the central lock fully or turn back by one turn.
- Turn rotating ring (05/2) in clockwise direction until the saw chain has been tensioned correctly as described above (05/b).
- Turn the central lock (05/1) in clockwise direction until it is fixed in place.
5 START-UP

DANGER!
Danger of fatal injury and danger of extremely severe injury.
Lack of knowledge of the safety instructions and operating instructions can lead to extremely serious and even fatal injury.
Read and follow all safety instructions and instructions for use in these operating instructions as well the operating instructions which are referred to before you start using the chain saw.

WARNING!
Danger of serious injury.
Serious injury can be caused if there are damaged components on the chain saw.
Before each use, perform a visual inspection in order to check that the chain saw is complete and does not contain damaged or worn components. Safety and protective devices must be intact.
5.1 Charging the rechargeable battery (06, 07)

CAUTION!
Danger of fire during charging!
Due to heating of the charger, there is a danger of fire if it is placed on an inflammable surface and is not adequately ventilated.
Always use the charger on a non-inflammable surface or in a non-combustible environment.
If available: Keep the ventilation slots free.

NOTE
Fully charge the rechargeable battery before using it for the first time. The rechargeable battery can be charged in any charge status. Interrupting charging does not damage the rechargeable battery.

NOTE
When charging, the rechargeable battery is protected from overcharging due to automatic detection of the charge status and thus can remain connected to the charging unit for some time, but not permanently.

NOTE
Heed the separate operating instructions for the rechargeable battery and for the charging unit.
- Connect rechargeable battery (06/1) to charger (06 / 2,06 / a) and charger (06 / 3,06 / b) to the mains voltage. The charging process begins. The LED on the charging unit lights
green, the charge status is displayed on the rechargeable battery.
- Observe the charge status displays on the rechargeable battery (07). The charging process takes approx. 2.5 hours until fully charged. The charging process ends automatically when the rechargeable battery is fully charged.
- Disconnect the rechargeable battery from charger (06/a) and the charger from the mains voltage (06/b).
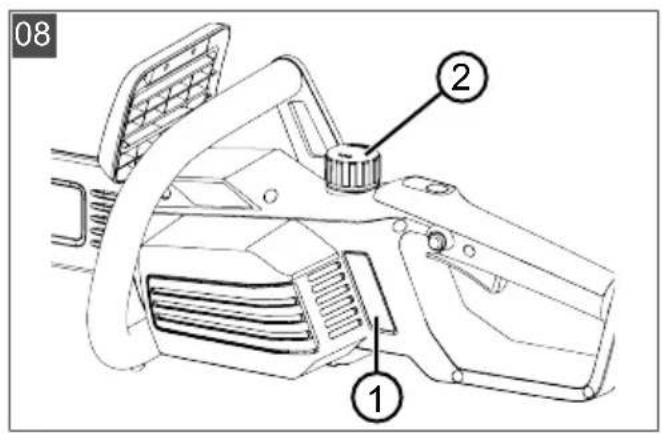
5.2 Filling saw chain oil (08)
IMPORTANT!
Danger of damaging the chain saw
The chain saw will be severely damaged if there is too little or even no saw chain oil in the tank or if it has dried/is sticky. Dried/sticky saw chain oil can lead to damage to oil-channelling components and the oil pump.
Damage also occurs if used oil is used. The use of used oil leads to environmental damage!
For start-up work, fill saw chain oil into the tank.
Do not use any used oil!
Each time before changing the rechargeable battery at the latest, fill the tank with saw chain oil again.
The saw chain and the guide rail are continuously supplied with oil during operation by means of an automatic oiler system. The saw chain oil protects against corrosion and premature wear.
There must always be sufficient saw chain oil in the tank to lubricate the saw chain sufficiently.
Use only environmentally friendly, biodegradable, high-quality saw chain oil for lubrication of the saw chain and guide rail. This oil must be transported and stored in approved and appropriately labelled containers.
Each time before starting work or changing the rechargeable battery, check the oil level and replenish the saw chain oil if necessary:
- Check the oil level in the viewing aperture of the tank (08/1). It must always be possible to see oil. The minimum and the maximum oil level must not be exceeded.
- Refill saw chain oil via filler neck (08/2) if necessary.
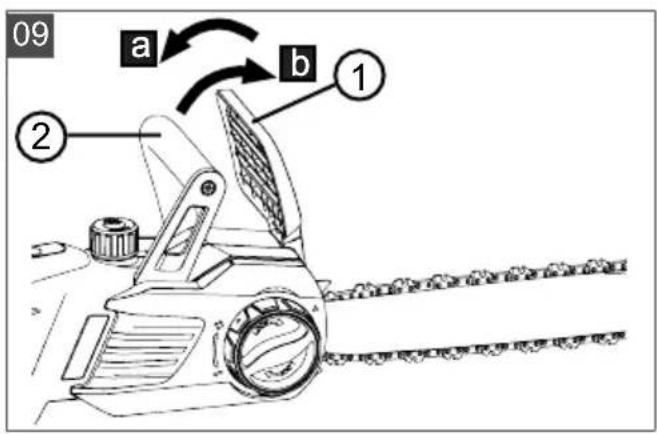
5.3 Function test of the chain brake
The chain saw has a manual chain brake that is triggered by the chain brake bracket, for example if kickback occurs.
If the chain brake is tripped, saw chain and motor are stopped immediately.

DANGER!
Danger of fatal injury as a result of negligent handling!
Extremely serious injury and even fatal injury can be caused as a result of careless and unexpected movements of the chain saw.
Pay attention to safety and work with a high level of concentration when using the chain saw.
Do not press any switch when releasing the chain brake.

WARNING!
Danger of fatal injury and danger of extremely severe injury due to a defective chain brake
Extremely serious injury and even fatal injury of the operator can be caused if the chain brake does not function, e.g. due to kickback by the running saw chain.
Check the chain brake each time before starting work.
- Do not switch the chain saw on if the chain brake is defective. In this case, have the chain saw checked in a customer service workshop.
5.3.1 Testing the chain brake with motor switched off (09)
- Pull out the rechargeable battery (see chapter 6.3 "Inserting/removing the battery (14)", page 46).
- To release the chain brake, pull chain brake bracket (09/1) in the direction of bow handle (09/2) (09/A). The saw chain can be pulled through by hand.
- Push chain brake bracket (09/1) forwards (09/B) to engage the chain brake. It must not be possible to pull the saw chain through.
5.3.2 Testing the chain brake with motor switched on (09)

NOTE
Release the chain brake each time before switching on the chain saw.
- Hold the chain saw securely and firmly at the bow handle and rear handle.
-
Pull chain brake bracket (09/1) in the direction of bow handle (09/2) (09/a) to release the chain brake.
-
Switch on the motor.
- Push chain brake bracket (09/1) forwards (09/b). Saw chain and motor must stop immediately.
6 OPERATION

DANGER!
Danger of fatal injury and danger of extremely severe injury.
Lack of knowledge of the safety instructions and operating instructions can lead to extremely serious and even fatal injury.
Read and follow all safety instructions and instructions for use in these operating instructions as well the operating instructions which are referred to before you start using the chain saw.
Comply with working time regulations in force in your country.
Grip the rear handle firmly with your right hand and the bow handle with your left hand, and hold them tightly.
Do not release the handles as long as the motor is running.
Do not use the chain saw if you are:
Tired
Unwell
Under the influence of alcohol, medicines and drugs
6.1 Check the saw chain oil
Procedure see chapter 5.2 "Filling saw chain oil (08)", page 44.
IMPORTANT!
Danger of damaging the chain saw
The chain saw will be severely damaged if there is too little or even no saw chain oil in the tank or if it has dried/is sticky. Dried/sticky saw chain oil can lead to damage to oil-channelling components and the oil pump.
Damage also occurs if used oil is used. The use of used oil leads to environmental damage!
Each time before starting work, check that enough saw chain oil is present in the tank.
If the oil level is low, refill saw chain oil.
Do not use any used oil!
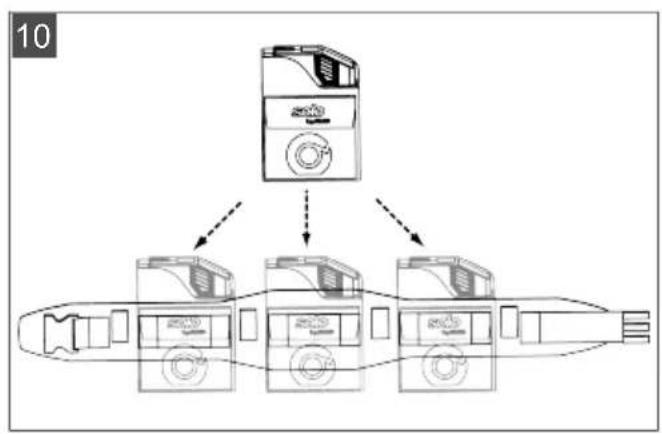
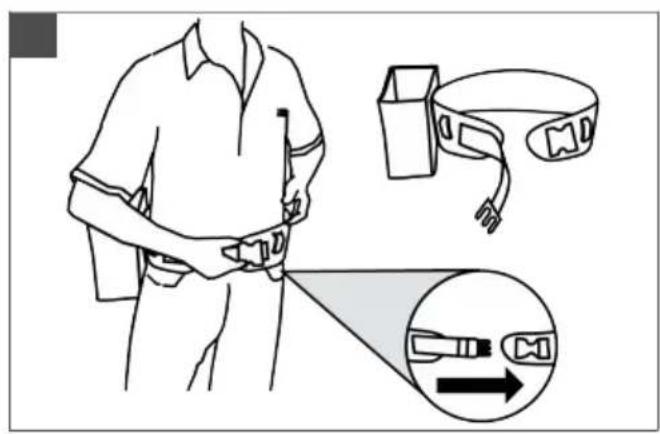
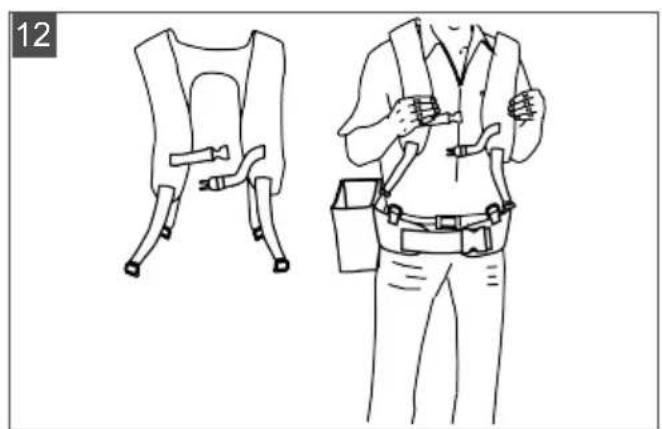
6.2 Putting on the rechargeable battery belt system (10) to (13)
Put on the rechargeable battery belt system as shown in Figures (10) to (13).
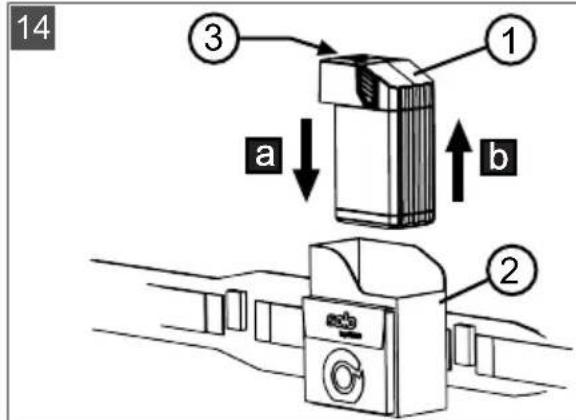
6.3 Inserting/removing the battery (14)
Inserting the battery
- Push in (14/a) the rechargeable battery (14/1) into the rechargeable battery belt system (14/2) until it locks.
Pull out the rechargeable battery
- Press and hold the unlock button (14/3) on the rechargeable battery (14/1).
- Pull out (14/b) the rechargeable battery (14/1).
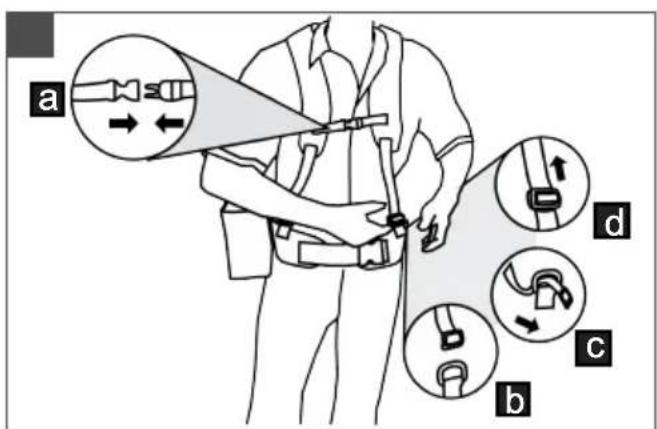
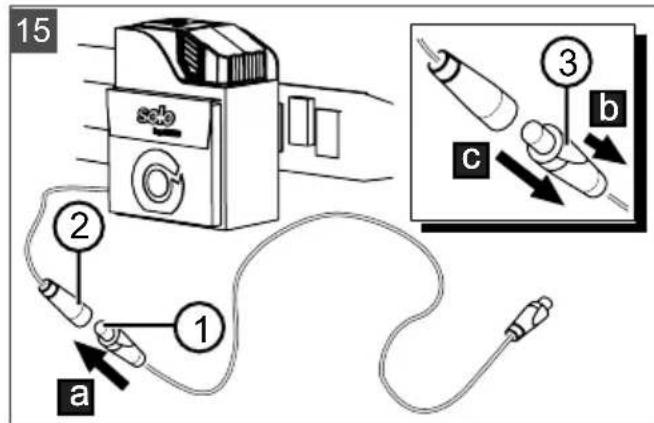
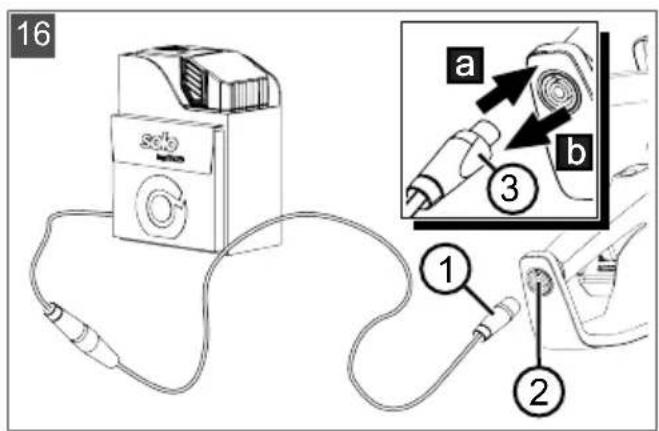
6.4 Connecting the voltage supply (15, 16)
Mounting the connecting cable
- Align the first connector of the connecting cables (15/1) to the guiding pin and guide slot of the rechargeable battery belt system connector (15/2), join, and turn slightly clockwise until the locking and unlocking switch (15/3) audibly engages.
- Align the second connector of connecting cable (16/1) with the guiding pin and guide slot of connection socket (16/2) of the tool, push (16/a) into connection socket (16/2), and turn slightly clockwise until the locking and unlocking switch (16/3) audibly engages.
Dismounting the connecting cable
- Pull locking and unlocking switch (15/3) backwards (15/b), turn the connector slightly to the left and pull out (15/c).
- Pull locking and unlocking switch (16/3) backwards, turn the connector slightly to the left and pull out (16/b) of the connection socket of the tool (16/2).
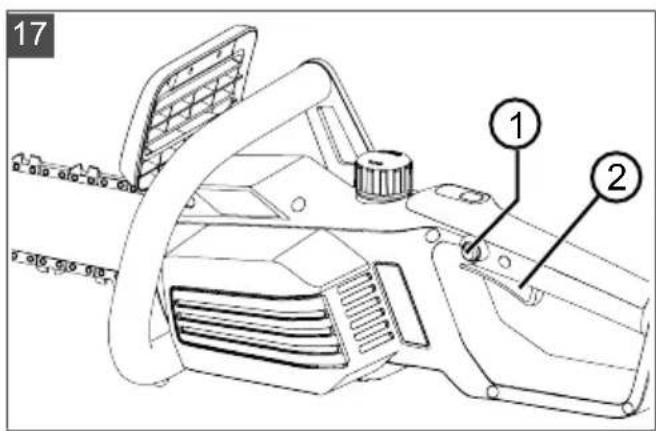
6.5 Switching the motor ON and OFF (17)

CAUTION!
Danger of hearing impairment!
The operation of the chain saw causes intense noise that can cause hearing impairment.
During work with the chain saw, wear ear defenders.

NOTE
Release the chain brake each time before switching on the chain saw.
Switching on the motor:
- Release the chain brake.
- Press and hold locking button (17/1) with your thumb.
- Press and hold throttle lever (17/2).
- Release locking button (17/1). It is not necessary to keep the locking button pressed once the chain saw has started. The locking button is intended to prevent inadvertent starting of the chain saw.
Switching off the motor:
- Release throttle lever (17/2).
6.6 Testing the chain brake
Procedure see chapter 5.3 "Function test of the chain brake", page 45.

WARNING!
Danger of fatal injury and danger of extremely severe injury due to a defective chain brake
Extremely serious injury and even fatal injury of the operator can be caused if the chain brake does not function, e.g. due to kickback by the running saw chain.
Check the chain brake each time before starting work.
- Do not switch the chain saw on if the chain brake is defective. In this case, have the chain saw checked in a customer service workshop.
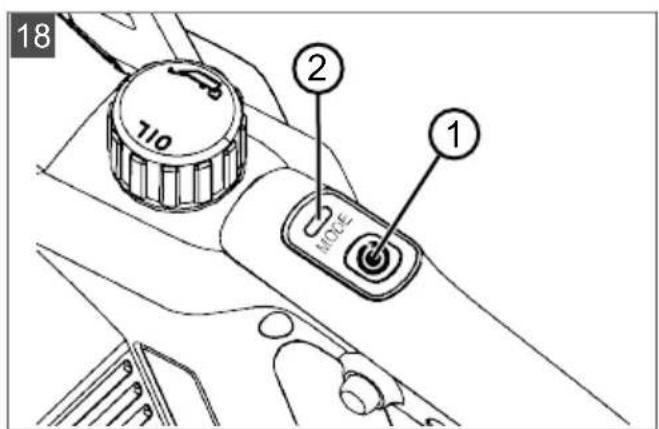
6.7 Increase/decrease speed of saw chain [Eco-Mode/Power-Mode Function] (18)
The Eco Mode/Power Mode function allows you to increase or decrease the speed of the saw chain at random. At higher speed (Power Mode), the operating time of the battery is reduced.
- Press button (18/1). LED (18/2) lights up when Power Mode is selected.
- Press button (18/1) again to deactivate Power Mode.
If the tool is switched off and then switched on again, it starts with the previously selected setting.
6.8 Checking the charge status of the rechargeable battery, "Motion Detection" (07)
A charge status indicator is located on the top of the rechargeable battery. This activates automatically for a few seconds if the rechargeable battery is gently shaken.
-
Shake the rechargeable battery. The LEDs of the charge status indicator light according to the charge status of the rechargeable battery.
-
To identify the charge status, see:
Charge status displays on the rechargeable battery
LEDs Displays
| Red (07/1) | ■ Lights: Rechargeable battery is completely discharged. ■ Flashes repeatedly 1x: Correctable error, e.g. too high or low temperature. ■ Flashes repeatedly 2x: Hardware error, e.g. rechargeable battery is defective. |
| Green (07/2) | Lights: Rechargeable battery is charged to >0 %. |
| Green (07/3) | Lights: Rechargeable battery is charged to >25 %. |
| Green (07/4) | Lights: Rechargeable battery is charged to >50 %. |
| Green (07/5) | Lights: Rechargeable battery is charged to >75 %. |
The green LED for the current charge status flashes during charging. The green LEDs for the low charge states light permanently.
Operating time of the rechargeable battery
If the operating time of the rechargeable battery is reduced in spite of it being fully charged, the rechargeable battery is at the end of its service life and must be replaced by a new original rechargeable battery.
7 WORKING BEHAVIOUR AND WORKING TECHNIQUE

NOTE
Courses in the use of chain saws and techniques for felling trees are regularly held by various forestry organisations.

DANGER!
Danger of fatal injury due to inadequate technical knowledge!
Inadequate technical knowledge can result in extremely serious up to fatal injury!
Only trained and experienced people are allowed to fell trees and lop branches.

DANGER!
Danger of fatal injury from splintered wood!
Wood chips caught up in the chain can cause extremely serious and even fatal injury!
Remove loose chips and wood splinters from the part to be sawn.
7.1 Felling trees (19, 20)
Observe the following points before and during felling operations:
- When felling trees, care must be taken to ensure that other persons are not exposed to danger, that no supply lines are connected and that no damage to property is caused. If a tree comes into contact with a supply line, the utility company must be informed immediately.
Also pay attention to other people's property, animals or objects. These must not be in the danger zone. Immediately notify the owner in case of damage.
The safe distance from other workplaces or objects should be at least 212 tree lengths. - Judge the falling direction of the tree.
- Factors influencing the falling direction of the tree:
Natural lean of the tree
The position of larger branches
Height of the tree
Branches growing on one side
Level ground or slope
Asymmetrical growth, wood damage
Wind direction and wind speed
Snow load
- When working on a slope, always work uphill of the tree to be felled.
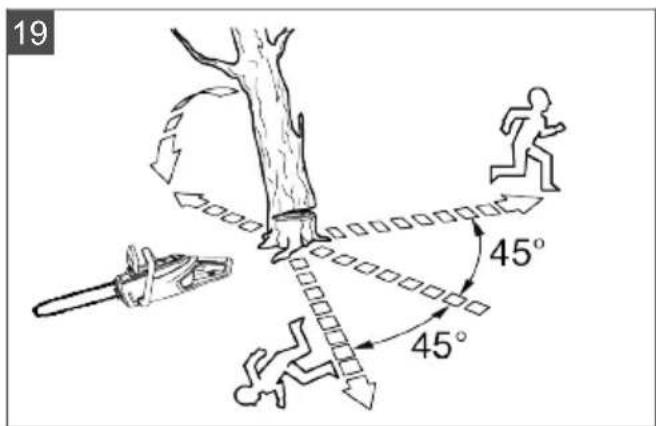
Establish your escape route in advance, and make sure that there are no obstacles in the way. The escape route should be at an angle of approx. 45^ backwards from the falling direction (19).
The trunk must be free from growth, branches and foreign bodies (e.g. dirt, stones, loose bark, nails, staples, wire, etc.).
Make two undercuts and one back cut in order to fell a tree.
- During back cuts and cross-cuts, place the bumper spike firmly against the wood to be cut.
- Saw the first undercut (20/C) horizontally, then the second undercut at an angle of at least 45^ from above. This prevents the chain saw becoming trapped when you make the second undercut. The undercut must be as close as possible to the ground and in the required felling direction (20/E). The depth of the undercut should be about 1/4 of the diameter of the trunk.
- Cut the back cut (20/D) exactly horizontally opposite to the undercut. The back cut must be made 3-5 cm above the horizontal undercut.
- Saw in the back cut (20/D) sufficiently deep so that a bridge (20/F) of at least 1/10 the trunk diameter remains between the undercut (20/C) and the back cut (20/D). This bridge prevents the tree from twisting and falling in the wrong direction. The tree should start to fall when the back cut (20/D) approaches the bridge (20/F). Do not saw through the bridge! If the tree falls whilst you are sawing:
Interrupt the back cut if the tree does fall in the wrong direction or leans back and traps the chain saw. To open the cut and fell the tree, drive in wedges made of wood, plastic or aluminium in the direction of the required felling line.
- Immediately pull the chain saw from the cut, switch it off and put it down.
Walk away in the direction of the escape route.
Watch out for falling branches and twigs.
- If the tree remains standing, drive wedges into the back cut in order to cause it to fall in a controlled way.
Note: Use only wedges made of wood, plastic or aluminium.
- At the end of sawing work, immediately remove your ear defenders and listen out for signals or warning calls.
Only experienced or trained people should make plunge cuts, longitudinal cuts and boring cuts (20).

DANGER!
Danger of fatal injury from a falling tree!
Having no escape route when felling a tree represents a danger of serious and even fatal injury!
Do not start the felling work until you are sure there is an unobstructed escape route away from the tree to be felled.

DANGER!
Danger of fatal injury from an uncontrollably falling tree!
Uncontrolled falling trees can lead to extremely serious and even fatal injury!
In order to guarantee controlled felling of a tree, leave a bridge between the undercut and the back cut. The length of this bridge should be approx. 1/10 of the trunk diameter.
Do not carry out any felling work in windy conditions.
7.2 Delimbing (21)
Delimbing is the separation of branches from the felled tree. Observe the following points:
Support the chain saw against the tree trunk with the bumper spike during the work.
Leave larger, downward-pointing branches supporting the tree standing at first.
Cut off smaller branches with one cut.
Saw off branches systematically and sequentially from the tree (21/a). First, saw off any branches that might hinder you. Then cut off the branches that create tension. Finally saw off the main branch at the base.
Saw off free-hanging branches from above (21/b), but not from below.
Pay attention to branches under tension, and saw through these from underneath upwards (21/c) in order to avoid the chain saw becoming trapped.
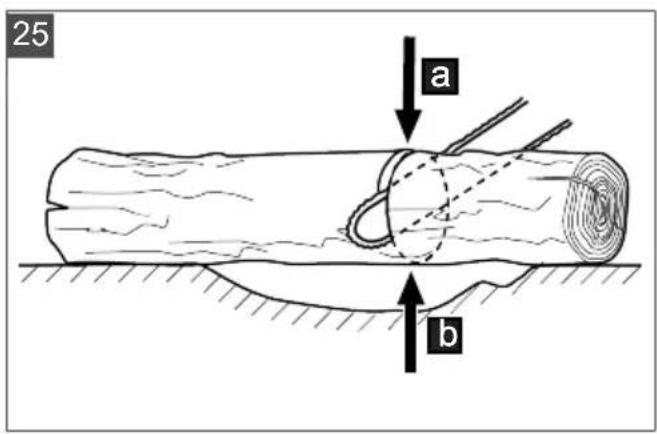
7.3 Cross-cutting (22 - 25)
Cutting to length means dividing the felled tree into sections. Observe the following points:
Ensure that your feet are stable and that your body weight is evenly distributed over both feet. If possible, the trunk should be backed
and supported by branches, beams or wedges.
- When working on a slope, always stand uphill from the tree trunk, because it could roll away (22).
Guide the chain saw so that there is no part of your body in the extended sweep arc of the saw chain.
Position the bumper spike directly adjacent to the cut edge and allow the chain saw to pivot about this point. Do not exert any pressure at the end of the cut.
In order to maintain full control of the chainsaw at the moment of sawing, reduce the contact pressure towards the end of the cut without releasing the tight hold on the chainsaw handles.
Make sure that the saw chain does not touch the ground.
At the end of the cut, wait for the saw chain to come to a halt before you remove the chain saw.
Always switch off the motor of the chain saw before you go to the next tree.
The entire length of the tree trunk is in contact with the ground:
Saw through the tree trunk from above (23/ a), without cutting into the ground.
Tree trunk is lying raised at one end:
To prevent the chain saw becoming trapped and the wood splintering, first saw through 1/3 of the trunk diameter from below (24/a), then saw through the remainder from above, down as far as the cut made from underneath (24/b).
Tree trunk is lying raised at both ends:
To prevent the chain saw becoming trapped and the wood splintering, first saw through 1/3 of the trunk diameter from above (25/a), then saw through the remainder from underneath, up as far as the cut made from above (25/b).

DANGER!
Danger of fatal injury due to kickback!
The operator can be fatally injured by kickback of the appliance.
It is essential to comply with the measures in order to avoid any kickback.
7.4 Cutting converted timber
Heed the following points during this work:
Use a secure cutting surface (sawing trestle, wedges, beams).
Make sure you are standing securely and that your bodyweight is evenly distributed.
Secure logs to prevent them twisting.
Only start the cut once the saw chain is running. Never switch on the chain saw already in the kerf.
- Do not secure the wood with your foot and do not get another person to hold it.
8 MAINTENANCE AND CARE

WARNING!
Danger of cutting injuries
Danger of cutting injuries when reaching into sharp-edged, moving appliance parts and into cutting tools.
Before maintenance, care and cleaning work, always switch off the appliance. Remove the rechargeable battery.
Always wear protective gloves during maintenance, care and cleaning work.
The chain saw complies with all relevant safety standards. Repairs are only allowed to be performed by qualified specialists, and with the exclusive use of genuine spare parts.
After each use, check the chain saw for wear and renew any damaged components.
- Do not get the machine wet or expose it to moisture. Clean plastic parts with a cloth and do not use any cleaning agents or solvents.
Clean the cooling air slots if they are blocked.
- Do not spray the chain saw not with water and do not use a high-pressure cleaner.
Only use spare parts specified by the manufacturer.
8.1 Checking the chain tension
Frequently check the chain tension, because new saw chains stretch.
At operating temperature, the saw chain stretches and hangs down.

NOTE
The saw chain has been tensioned correctly when:
It is in contact with the underside of the guide rail and can be pulled through by hand
It can be lifted by 3 - 4mm in the middle of the guide rail

CAUTION!
Danger of injury due to the saw chain jumping off!
An insufficiently tensioned saw chain can jump off during operation and lead to injury.
Frequently check the chain tension. The chain tension is too low if the drive links come out of the groove on the underside of the chain bar.
Re-tension the saw chain properly if the chain tension is too low.
8.2 Sharpening the saw chain (26)

DANGER!
Danger of fatal injury due to kickback!
The operator can be fatally injured by kickback of the chain saw.
Sharpen the saw chain properly.

NOTE
Inexperienced chain saw operators are recommended to have the saw chain sharpened by a specialist at the customer service.
The saw chain must always be well-sharpened for reasons of safety and efficiency.
Sharpening is required if:
The saw chips are like sawdust.
Greater force is necessary for cutting.
The cut is not straight.
Vibration increases.
If you get trained customer service personnel to sharpen the chain for you, they will be able to do this with the appropriate tools for a minimum of material removal and even sharpening of all teeth.
You can sharpen the saw chain yourself using special round files whose diameters are adapted
to the specific chain type (see chapter 8.6 "Chain maintenance table", page 51). A certain amount of skill and experience is necessary to avoid damage to the teeth.
To sharpen the saw chain:
1. Switch off the chain saw and remove the rechargeable battery.
2. Release the chain brake.
3. Clamp the guide rail with fitted saw chain in a suitable vice, taking care that the saw chain can move freely.
4. Tension the chain if it is slack.
5. Place the file in the corresponding guide and then guide the file through the opening of the tooth making sure that you keep an even angle according to the tooth profile.
6. Only perform a few strokes of the file and exclusively in the forwards direction, then repeat the working step on all teeth in the same orientation (right or left).
7. Reverse the position of the guide rail in the vice and repeat the working step on the remaining teeth.
8. Check that the limit tooth does not project beyond the checking tool, and file off any projection using a flat file, then round down the profile.
9. After sharpening, clean away all filings and dust, then lubricate the saw chain in an oil bath.
The chain must be renewed if:
The length of the teeth is less than 5mm
Where applicable: The mark on the teeth of the cutting elements is exceeded;
The play on the links at the chain rivets is excessive.
8.3 Cleaning the chain sprocket interior
Thoroughly clean the chain saw after each use.
- Remove the rechargeable battery and place the chain saw on a stable base.
- Unbolt the cover of the chain sprocket.
- Clean the inside with a suitable brush.
- Remove the saw chain and take out the guide rail.
- Clean the groove in the rail and the oil inlet bore.
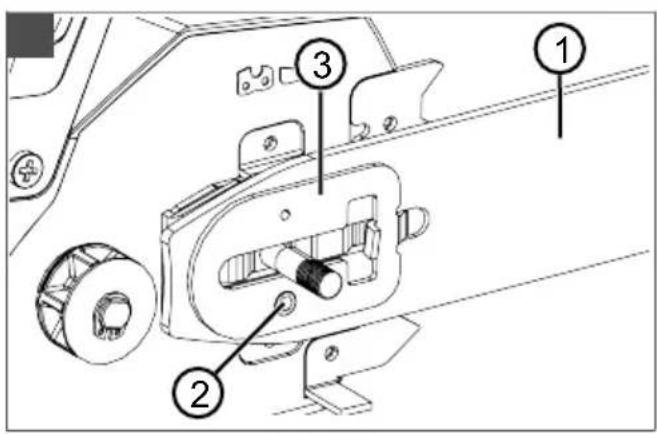
8.4 Changing over the quick-tension chain wheel (27)
- Remove guide rail (27/1). Remove screw (27/2) and release the adapter sheet metal from the guide rail with the tensioning hook (27/3).
- Turn the guide rail around the longitudinal axis.
- Attach the adapter sheet metal to the guide rail with the tensioning hook again and fix in place with the Phillips screw again.
- Install the guide rail again, see chapter 4.1 "Installing the guide rail (02, 03), page 43.
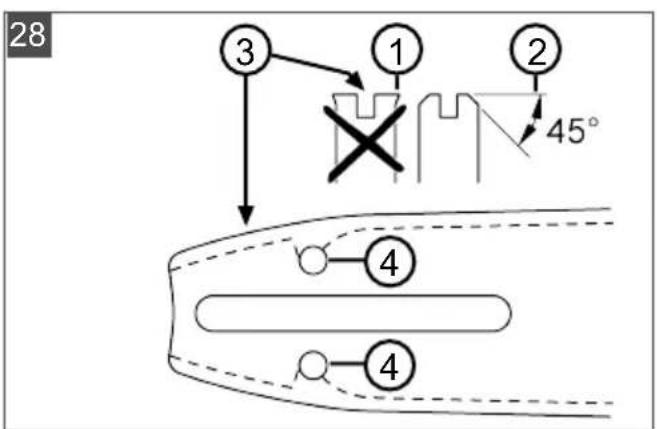
8.5 Checking, turning and greasing the guide rail (28, 29)
Checking the guide rail
Regularly check the guide rail for damage. If necessary, remove protruding burrs (28/1), i.e. file off at an angle of 45^ (28/2).
Turning the guide rail
The guide rail must be turned over after each chain sharpening and chain change in order to avoid one-sided wear.
- Change over the quick-tension chain wheel on the guide rail, see chapter 8.4 "Changing over the quick-tension chain wheel (27)," page 51.
- Turn the guide rail.
Greasing the guide rail
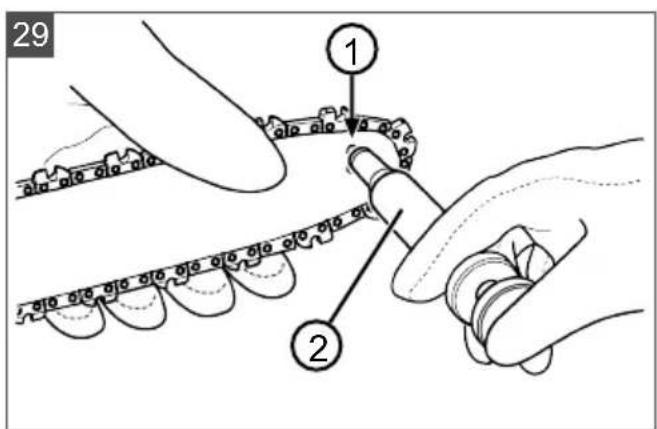
- Carefully clean groove in rail (28/3) and oil inlet bores (28/4).
- Carefully clean lubricating hole (29/1) from both sides.
- Use a grease gun (29/2) to pump in sufficient grease on both sides until the grease emerges evenly at the tips of the sprocket. Keep turning the sprocket when doing this.
8.6 Chain maintenance table

WARNING!
Danger of serious injury.
Use of an unapproved saw chain or guide rail on the chain saw can result in serious injuries.
Use only approved saw chains and guide rails.
| Saw chain (guide rail) | File diameter Top plate an- gle | Down angle Head tilt angle (55°) | Depth gauge setting | ||
| Rotational an- gle of the tool | Inclination an- gle of the tool | Side plate angle | |||
| 90PX040X (104MLEA041) | 4.5 mm 30° 0° 75° 0.025" | ||||
| 91P045X (120SDEA041) | 5/32" 30° 0° 85° 0.025" | ||||
| 91PX052X (140SDEA041) | 5/32" 30° 0° 85° 0.025" | ||||
| Depth gauge setting File | |||||
9 TRANSPORT

WARNING!
Danger of fatal injury and danger of extremely severe injury.
During transport, a running saw chain can lead to extremely serious and even fatal injury.
Never carry and transport the chain saw with the saw chain running.
Before transporting, carry out the measures mentioned above.
Before transporting, carry out the following measures:
- Switch off the chain saw and remove the rechargeable battery.
- Fit the chain guard.
-
Carry the chain saw only at the bow handle. Guide rail and saw chain should be facing to the rear.
-
In vehicles: Secure the chain saw against tipping over, damage and leakage of chain oil.
10 STORAGE
Thoroughly clean the chain saw after each use. Store it in a dry, lockable place out of the reach of children.
Carry out the following jobs before intervals in work lasting for longer than 30 days:
- Switch off the chain saw and remove the rechargeable battery.
Empty the oil tank for the saw chain oil.
Remove the saw chain and guide rail, clean it and spray it with rust-proofing oil.
Thoroughly clean the chain saw and store it in a dry place.
IMPORTANT!
Danger of damaging the chain saw
Dried/sticky saw chain oil can lead to damage to oil-channelling components or the oil pump after lengthy storage.
- Remove the saw chain oil from the chain saw before each extended period of storage.
11 DISPOSAL
Information on the German Electrical and Electronic Equipment Act (ElectroG)

Electrical and electronic appliances do not belong in household waste, but should be collected and disposed of separately.
Used batteries or rechargeable batteries that are not installed permanently in the old appliance must be removed before disposal. Their disposal is regulated by the battery law.
- Owners or users of electrical and electronic appliances are obliged by law to return them after use.
The end user bears personal responsibility for deleting his personal data from the old appliance to be disposed of.
The symbol of the crossed-through rubbish bin means that electrical and electronic appliances may not be disposed of in the household rubbish.
Electrical and electronic appliances can be handed in at the following places at no charge:
Public service disposal or collection points (e.g. municipal building yards)
Points of sale of electrical appliances (stationary and online) provided traders are obliged to take them back or offer this voluntarily.
These statements only apply to appliances that are installed and sold in the countries of the European Union and are subject to European Directive 2012/19/EU. Different provisions may apply to the disposal of electrical and electronic appliances in countries outside the European Union.
Information on the German Battery Act (BattG)

Used batteries and rechargeable batteries do not belong in household waste, but should be collected and disposed of separately.
For safe removal of batteries or rechargeable batteries from the electrical appliance and for information on their type or chemical system, follow the further information within the operating or installation instructions.
- Owners or users of batteries and rechargeable batteries are obliged by law to return them after use. Return is limited to the handover of customary household quantities.
Used batteries can contain harmful substances or heavy metals that can cause damage to the environment and human health. Reuse of the used batteries and use of the resources contained therein contributes to the protection of these two essential commodities.
The symbol of the crossed-through rubbish bin means that batteries and rechargeable batteries may not be disposed of in household rubbish. In addition, if the symbol Hg, Cd or Pb appears under the rubbish bin, this stands for the following:
Hg: Battery contains more than 0.0005% mercury
Cd: Battery contains more than 0.002% cadmium
- Pb: Battery contains more than 0.004% lead Rechargeable batteries and batteries can be handed in at the following places at no charge:
Public service disposal or collection points (e.g. municipal building yards)
Points of sale of batteries and rechargeable batteries
Disposal points of the common take-back system for the used batteries of appliances
Disposal point of the manufacturer (if not a member of the common take-back system)
These statements apply only to rechargeable batteries and batteries that are sold in the countries of the European Union and that are subject to European Directive 2006/66/EU. Different provisions can apply to the disposal of rechargeable batteries and batteries in countries outside the European Union.
12 AFTER-SALES / SERVICE
In the event of questions of warranty, repair or spare parts, please contact your nearest ALKO Service Centre. These can be found on the Internet at:
www.al-ko.com/service-contacts
13 TECHNICAL DATA
| Chain saw CS 4235 | |
| Item no. 113616 | |
| Idling speed 15 – 20 m/s | |
| Operating speed 7 – 20 m/s | |
| Chain sprocket pitch 3/8" | |
| Chain brake Yes (electrical, PCB and brake rod) | |
| Chain run-on time (DIN EN 60745-2-13 – 19.107) Max. 0.15 s | |
| Chain run-on time (DIN EN 50144-2-13:2001 – 18.104) Max. 2 s | |
| Activation of the chain Twofold | |
| Chain oil tank volume 250 ml | |
| Weight with guide rail and saw chain 3.80 kg | |
| Weight without guide rail and saw chain 3.15 kg | |
| Overload protection No | |
| Sound power level LwA (DIN EN ISO 3744) 108 dB(A) | |
| Sound pressure level LpA | 88 dB(A) K = 3.0 dB(A) |
| Vibration value (DIN EN 28662-1)* | 2.5 m/s² K = 1.5 m/s² |
| Saw chain | 90PX040X | 91PX045X | 91PX052X |
| Drive link thickness | 1.1 mm | 1.27 mm | 1.27 mm |
| Chain bar | 104MLEA041 | 120SDEA041 | 140SDEA041 |
| Length of the guide rail | 10" / 25 cm | 12" / 30 cm | 14" / 35 cm |
| Cutting length | 17 cm | 22 cm | 27 cm |
* Notes:
The vibration emission value given has been measured according to a standardised test method and can be used to compare one power tool with another.
The vibration emission value can also be used for an initial assessment of the exposure (vibration exposure degree).
The vibration emission value may differ from the given value during actual use of the power tool, depending on how the power tool is used.
Try to keep the vibration load as low as possible. Exemplary measures to reduce vibration are the wearing of gloves when using the tool and the limitation of working time. All parts of the operating cycle must be taken into account (e.g. times when the power tool is switched off and those in which it is switched on but runs without load).
| Battery 127390 | |
| Rated voltage 36 V / 42 V max. | |
| Rated capacity 7.5 Ah | |
| Charging duration approx. 150 min | |
| Charging unit 127391 | |
| Mains voltage 230 V (AC) | |
| Mains frequency 50 Hz | |
| Output voltage 42 V (DC) | |
| Operating temperature range 0 °C – +40 °C |
14 HELP IN CASE OF MALFUNCTION

CAUTION!
Risk of injury
Sharp-edged and moving appliance parts can lead to injury.
Always wear protective gloves during maintenance, care and cleaning work.
Switch off the appliance and remove the rechargeable battery.
| Malfunction Cause Remedy | ||
| Engine does not run. No battery | voltage present. Have the power supply checked by a qualified electrician. | |
| Overload protection has switched off. | Wart until the overload protection re-establishes the power supply. | |
| Chain brake engaged. Release the chain brake. | ||
| The guide rail and saw chain become hot when running. Generation of smoke. | The saw chain is tensioned too tightly. | Reduce chain tension. |
| Oil tank is empty. Replenish the saw chain oil. Inspect the oil tank for damage. | ||
| The oil entry hole and/or groove of the guide rail are dirty. | Clean the oil entry hole and groove of the guide rail. | |
| Motor running, but the saw chain does not move. | The saw chain is tensioned too tightly. | Reduce chain tension. |
| Appliance faults Contact an AL-KO service centre. | ||
| Only sawdust is thrown out, rather than wood chips. The chain saw has to be pushed through the wood. | The saw chain is blunt. | Sharpen the saw chain or contact an AL-KO service centre. |
| Appliance vibrates unusually. | Appliance faults Contact an AL-KO service centre. | |

NOTE
If you encounter any malfunctions that are not listed in this table or that you cannot rectify yourself, please contact our customer service.
15 GUARANTEE
We will resolve any material or manufacturing faults on the appliance during the legal warranty period for claims relating to faults, in accordance with our choice either to repair or replace. The legal warranty period is determined by the legislation of the country in which the appliance was purchased.
Our warranty promise applies only if:
These operating instructions are heeded
The appliance is handled correctly
Original spare parts have been used
The warranty becomes void in the case of:
Unauthorised repair attempts
Unauthorised technical modifications
Non-intended use
The guarantee excludes:
Paint damage that can be attributed to normal wear and tear
Wear parts that are marked with a frame (x) on the spare parts card
The guarantee period commences with purchase by the first end user. The date on the proof of purchase is decisive. In the event of a guarantee claim, please take this guarantee declaration and the original proof of purchase, and contact your dealer or the nearest authorised customer service centre. This statement does not affect the purchaser's statutory claims for defects against the vendor.
16 TRANSLATION OF THE ORIGINAL EU DECLARATION OF CONFORMITY
We hereby declare that this product in its marketed form conforms to the requirements of the harmonised EU Directives, EU safety standards and the product-specific standards.
Product
Battery chain saw
Serial number
G4013022
Type
CS 4235
Sound power level
EN ISO 3744
measured/guaranteed
103.3 dB(A) / 108 dB(A)
EC type approval
M6A-17 12-47028
Manufacturer
AL-KO Geräte GmbH
Ichenhauser Str. 14
89359Kotz
Deutschland
EU directives
2006/42/EC
2014/30/EU
2000/14/EC
2011/65/EU
Conformity evaluation
2000/14/EC Appendix V
Notified body (2000/14/EC)
TÜV SÜD Product Service GmbH
Ridlerstraße 65
80339 Munich
Germany
No.0123
Duly authorised person for technical file
Andreas Hedrich
Ichenhauser Str. 14
89359Kotz
Deutschland
Harmonised standards
EN 60745-1:2009+A11:2010
EN 60745-2-13:2009+A1:2010
EN 55014-1:2006+A1:2009+A2:2011
EN 55014-2:2015
Kotz, 01/12/2017

Dr. Wolfgang Hergeth
Managing Director
VERTALING VAN DE ORIGINELE GEBRUIKERSHANDLEIDING Inhoudsopgave
2 PRODUCTOMSCHRIJVING
2.4.3 Beveiling against overbelasting
Dr. Wolfgang Hergeth Managing Director
TRADUCTION DE LA NOTICE D'UTILISATION ORIGINALE
Table des matieres
www.al-ko.com/service-contacts
13 CARACTERISTIQUES TECHNIQUES
Peligro defaulted to a vibration.
www.al-ko.com/service-contacts
www.al-ko.com/service-contacts
13 TEHNIČNI PODATKI
| Verižna Žaga CS 4235 | |
| Št. izd. 113616 | |
| Hitrost v prostem teku 15–20 m/s | |
| Delovna hitrost 7–20 m/s | |
| Razdelitev – verižnik 3/8" | |
| Zavora verige da (elektricna, PCB in za- | vorni drog) |
| Čas izteka verige (DIN EN 60745-2-13 - 19.107) maks. 0,15 s | |
| Čas izteka verige (DIN EN 50144-2-13:2001 - 18.104) maks. 2 s | |
| Aktiviranje verige dvodelno | |
| Prostornina posode za olje verige 250 ml | |
| Teža z mečem in verigo 3,80 kg | |
| Teža brez meča in verige 3,15 kg | |
| Preobrenitvena zaščita ne | |
| Raven zvočne moči LwA (DIN EN ISO 3744) 108 dB(A) | |
| Raven zvočnega tlaka LpA | 88 dB(A) K = 3,0 dB(A) |
| Vrednost tresljajev (DIN EN 28662-1)* | 2,5 m/s2 K = 1,5 m/s2 |
| Veriga | 90PX040X | 91PX045X | 91PX052X |
| Debelina pogonskih Členov | 1,1 mm | 1,27 mm | 1,27 mm |
| Meč | 104MLEA041 | 120SDEA041 | 140SDEA041 |
| Dolžina meča | 10"/25 cm | 12"/30 cm | 14"/35 cm |
| Dolžina reza | 17 cm | 22 cm | 27 cm |
2000/14/ES, priloga V
Priglaseni organ (2000/14/ES)
TÜV SÜD Product Service GmbH
Ridlerstraße 65
80339Munchen
Nemčija
st.0123
Oseba, odgovorna za pripravo dokumentacije
Andreas Hedrich
Ichenhauser Str.14
89359Kotz
Nemčija
Usklajeni standardi
EN 60745-1:2009+A11:2010
EN 60745-2-13:2009+A1:2010
EN 55014-1:2006+A1:2009+A2:2011
EN 55014-2:2015
Kotz, 1. 12. 2017

Dr. Wolfgang Hergeth, generalni direktor
PRIJEVOD ORIGINALNIH UPUTA ZA UPORABU
Sadržaj
1 Informacao o Uputama za uporabu. 184
www.al-ko.com/service-contacts
13 TEHNICKI PODACI
| Lančana pila CS 4235 | |
| Kat. br. 113616 | |
| Brzina u praznom hodu 15 – 20 m/s | |
| Radna brzina 7 – 20 m/s | |
| Raspodjela lančanika 3/8" | |
| Kočnica lanca Da (električna, PCB i kočna | poluga) |
| Vrijeme zaustavljanja lanca (DIN EN 60745-2-13 – 19.107) maks. 0,15 s | |
| Vrijeme zaustavljanja lanca (DIN EN 50144-2-13:2001 – 18.104) maks. 2 s | |
| Aktiviranje lanca Dvostruko | |
| Volumen spremnika ulja za lanac 250 ml | |
| Masa s vodilicom i lancem pile 3,80 kg | |
| Masa bez vodilice i lanca pile 3,15 kg | |
| Zašita od preopterećenja Ne | |
| Razina zvučne snage LwA (DIN EN ISO 3744) 108 dB(A) | |
| Razina zvučnog tlaka LpA | 88 dB(A) K = 3,0 dB(A) |
| Vrijednost vibracija (DIN EN 28662-1)* | 2,5 m/s² K = 1,5 m/s² |
| Lanac pile | 90PX040X | 91PX045X | 91PX052X |
| Debljina pogonske veze | 1,1 mm | 1,27 mm | 1,27 mm |
| Vodilica | 104MLEA041 | 120SDEA041 | 140SDEA041 |
| Duljina vodilice | 10" / 25 cm | 12" / 30 cm | 14" / 35 cm |
| Duljina reza | 17 cm | 22 cm | 27 cm |
Wolfgang Huyer
Dr. Wolfgang Hergetl
Managing Director
PREKLAD ORIGINÁLNIHO NÁVODU K POUŽITÍ
Obsah
www.al-ko.com/service-contacts
13 TECHNICKÉ UDAJE
3 BEZPEČNOSTNÉ POKNY
3.1 Vseobecnbe bezpecnostnepokyny pre elektrickne naradie

VAROVANIE!
Precitajte si vsetky bezpecnostnupozornenia aPokyny.
www.al-ko.com/service-contacts
13 TECHNICKÉ UDAJE
2000/14/ES, priloha V
Schvalovaci urad (2000/14/ES)
TÜV SÜD Product Service GmbH
Ridlerstraße 65
80339Munchen
Nemecko
C. 0123
Dr. Wolfgang Hergeth Managing Director
AZ EREDETİ KEZELÉSI UTMUTATÓ FORDITÁSA
Tartalomjegyzék
- A gázkart (17/2) engedje el.
6.6 Lancfek Ellenorzese
www.al-ko.com/service-contacts
13 TEKNISKE DATA
Kontakt AL-KO-servicested.
Bemyndiget organ (2000/14/EF)
TÜV SÜD Product Service GmbH
Ridlerstraße 65
80339 München
Tyskland
Nr. 0123
Ansvarlig for dokumentationen
Andreas Hedrich
Ichenhauser Str. 14
89359Kotz
Tyskland
Harmoniserede standarder
EN 60745-1:2009+A11:2010
EN 60745-2-13:2009+A1:2010
EN 55014-1:2006+A1:2009+A2:2011
EN 55014-2:2015
Kotz, 01-12-2017

Dr. Wolfgang Hergeth
Managing Director
Symbol for bruksanvising
WARNING! Risk for vibration
www.al-ko.com/service-contacts
13 TEKNISKA SPECifikATIONER
Anmalt organ (2000/14/EG)
TUV Rheinland LGA Products GmbH
Tillystraße 65
80339 Nurnberg
Tyskland
Nr 0123
Befullmaktigad for documentation
Andreas Hedrich
Ichenhauser Str. 14
D-89359Kotz
Tyskland
Harmoniserade standarder
EN 60745-1:2009+A11:2010
EN 60745-2-13:2009+A1:2010
EN 55014-1:2006+A1:2009+A2:2011
EN 55014-2:2015
Kotz, 2017-12-01

Dr. Wolfgang Hergeth
Managing Director
OVERSETTALSE AV DEN ORIGINALE BRUKSANVISNINGEN
Innhold
1 Omijke bruksanvisingen 351
1.1 Symboler på tittelsiden 351
1.2 Tegnforklaringer og signalord 351
2 Produktbeskrivelse 351
2.1 Tiltenktbruk 351
2.2 Mulig og paregnelig feil bruk 352
2.3 Restrisiko 352
2.4 Sikkerhets- og beskyttelsenusanordninger 352
2.4.1 Bruksbeskytse 352
2.4.2 Kjedebrems/kjedebremsbyle .... 352
2.4.3 Overlastbeskyttelse 352
2.5 Symboler pa maskinen 352
2.6 Leveransens omfang 353
2.7 Produktoversikt (01) 353
Symbol for bruksanvisingen
Symbol for apparatus med li-ion-batteri
1.2 Tegnforklaringer og signalord

FARE!
7 ARBEIDSFREMTREDEN OG ARBEIDSTEKNIKK

MERK
8 VEDLIKEHOLD OG PLEIE

ADVARSEL!
Fare for kuttskader
www.al-ko.com/service-contacts
13 TEKNISKE DATA
7.1Koku gasa (19,20)
www.al-ko.com/service-contacts
13 TEHNISKIE DATI
5 BbO D E KcNJIyatauIIO. 457
5.1 3apnka akkymyTopa (06, 07).458
5.2 3anpaBka macna JIJIa CMA3KN IINb-HoH cenn (08) .458
5.3Поверка pa6oToCnOc6HocTn TopMo3a uei.. 459
5.3.1 Поверка Торmoа сени рпьВКПЮЧЕНOM ДВИГАТЕ (09)......459
5.3.2ПоверкаТорmo3aципprьbl- KIOUeHHOM DBURAteNe (09).459
6 YnpaBneHne 460
6.1 PpOBepka Macna dJa Cma3Kn nIb-HoH cenn 460
6.2HaedeBaHneIPOaCHOINCTeMbI(10)- (13) 460
6.3 YcTaHOBka n n3BneueHne aKKymyTopa (14). 460
6.4 YctaHObKa NCTOCHNka NHTAHn (15, 16) .460
6.5 BkIIOueHne N BBIKIOueHne DBBraTe- 17) .461
6.6ПоберкаТормозацeni.. 461
6.7 YBeHnueHne/YMeHbIeHne CKOpOCTN NIIbHOI cENI [ΦyHKUpapeKIMOB Eco/Power] (18) 461
6.8 Поберka coctoHna 3apyaakky- myJtopa - «Обаружендвижe- Hnra》(07) 461
7 Pa6ooye noBedeHne n cnocob pa6oTbI... 462
7.1Падене деревьев (19,20) 462
7.2 O6pe3aHne BeToK (21) 463
7.3Поперейнаяpacиловka deprета(22-25) 464
7.4Поперуняpacиловк\Pломatepe naIOB 464
8TexobcnykubHne u yxoD 464
8.1ПоверкаНаТяженицeni 465
8.2 3aToUka nIbHoi ceni (26) 465
8.3 OuHCTKa BHyTpEHHero npocTpaHCTBa 3Be3doUKN 466
8.4 IpepecTaHOBka 6bIcTpo3aKIMMHO y- cTpoIcTba (27) 466
8.5Пюверka,Врашениисma3ыВанhoe Hapравл Anye 7HHb (28,29).....466
8.6 PapameTpbl ceenni nnametp Ha- nIbHnka. 466
9 TpaHcnpTnpoBka 467
10 XpaeHne 467
11 Ytnn3aun 468
12 CepBnchoe o6cnyKuBaHne 469
13TexHnueckne xapaKTepeNCTnKn 470
14 YctpaHHe HEnCnpaBHOcte 471
15 TapaHTn 472
16ДeКларачиO COOTBETCTBn CTaHdap-TaM EC. 472
1 INHΦOPMAUЯ O PYKOBODCTBE NO 3KcPJIyATAUIN
HemeckaBepcncoepKNT opunnaHbHoe pykoBOcTBO no 3Kcnnyatau. Bce ocTaHbIe 3bIKOBbie Bercn — 3TO nepeBObl OpunHaJIbHOro pykoBOcTBA NO 3KcnnyatauN.
O63aTeIbHo npouHTaIe daHHoe pyKOBOdCTBO nO 3KcNpyatauIN nepeB BBOOM B 3KcNpyatauIO. 3To Heo6xOJMo dIra 6e3onacHoi n 6e3OTka3HOJ pa60TbI.
Bcerda depknte 3to pykoOdcTBO no 3Kc- nnyataunnoD pyko, yTo6bl npouHTaTb ero, ecn Bam notpe6yeTcra HOpmaun o6 y- cTpoiCTBe.
IpepeaBaIte yCTpOcTBO dpym Iuam TOJIbKO BMeCTe C 3TUM pYKOBODCTBOM IO 3Kc- nnyataun.
Ipoptyte n co6loudaite yka3aHnno TeXHHke 6e3oNaChocTu n ppeDynpexJdeHnna, npNBedeHHbE B daHHOM pyKOBODCTBe no 3KcNpyatau.
1.1 CnMBOJbHa TnTynbHOn CTpaHnue
CnmboJ 3HaueHne

CIMBOJ pyKOBoIDCTBa NO 3KcNpyaTaUIN
CnmboJdIy yctpoiCTBa c JNTNHOHHbIM aKKymyIaTOPOM
1.2 YcNoBHbIe 06o3HaueHn I cnHaJIbHbIe CNoBa

ONACHOCTb!
Yka3bIbaeHa onachyU cHTyaUHO, KO-Topa,ecn ee He n36exaTb, npBODNT K CMEPTN INN cepbe3HbIM TpaBMam.

PNEyPEXKDEHNE!
Yka3bIbAeT Ha NOTeHcuaJIbHO ONaCHyO cnTyauuIO, KOtOpA, ecn ee He n36eKaTb, MOxET npNBecTN K CMePTN INCepBe3HbIM TpaBMam.

OCTOPOXHO!
Yka3bIbaeHa NOTehuJaIbHo ONaChyO cnTyauHIO, KOTopAa, ecn ee He n36eKaTb, MOKeT PnBecTN TpaBMam JERKoN cpeiHe TjXeCTN.

BHIMAHNE!
Yka3bIbaeHa cnTyauHIO, KOtOpa, ecn ee He n36exKaTb, MoKeT npNBecTN K MyueCTBeHHOMy yuep6y.

ПРИМЕЧАНЕ
CneuaHbIe yka3aHnI dIy oBnerYe HnI NOHMaHnI N KcNpyaTuN.
2 OINCAHNE IPODyKTA
B 3tOM pyKOBoDCTBe NO 3KcNpyaTaun OnncaHa pyHna ZenHna 3JIeKTPoPnla, KOtopa NOnyuaet nTahne OT aKKymyJrTopa.
2.1 NcnoJb3ObaHne no Ha3NaYeHnIO
LcHnHa nHa paccHTaHa NckHouHTeBHo Ha npImeHeHne B DOMaUHem N npuycaDe6Hom XO3yICTBe.B 3Toi oBnactn cenHnA nHa nOdoXoDnT dIpaCnIOBKn IerKo DpeBecInbI, HapnMep, dIa:
pacnIOBKNINNOMaTepeNaOB,
Pe3kn n3ropoJe
PacnIOBKn npOB
BnaorapnKpueckomy npNBOy aKKymJIaTOpHyu cHny MoXHO NcNoJIb3OBaTb dJa pacNIIOBKn DpeBecnHbI He ToJIbKO Ha OTKpbITOM BO3dyxe, Ho N B 3akpbItbIX NOMeHnx. NcIOJIb3OBaHHe, KOTOPoe IpOTNbOpeuHT ONICAHHO My B HAcToJsem DokKymeHte, CHTaETcR NcNoJIb3OBaHHem He No Ha3NaUeHIO.
AkkymyIaTOpHyU cENHyU pAnly pa3peWaaETcNcNoJIb3OBaTb TOJIbKO CO CJIeDyUOUMN KOMNOHeHTaM:
AkkymyIaTOPHa IORCha CnCTema BTA 42 - No 3aka3a:127442
Литни-нонынakумлгтр—№ 3aka3a: 127390
3apAnHoe yctpoiCTBO-C150 Li, N2 3aka3a: 127391
3TO yCTPOIcTBO npeHa3HaueHO dJa YacTHORO IcNoJIb3OBaHnI. JIO6oe dpyroE ncNoJIb3OBaHne IIN HecaHKUHOHnpOBaHHbIe N3MeHeHnI N DO- IONHeHnCHTaOTcN cNOJIb3OBaHNEm He NO Ha3HaueHnIO n pInBOJrK aHHyJInpOBaHnIO rpaHTn, a TAKKe IOTepn COOTBETCTBnR (3NaK CE) IN OTKa3 OT KAKoJ-NIO 0TBETCTBeHHOCt 3a y- Uep6, HaneceHHbI IOJIb3OBaTeJIIO IIN TpeTbe CTOpOHe N3rOTOBuTEJI.

OCTOPOXHO!
Onachoctb TpaBMnpoBaHn npu nCnoJb3OBaHn He no Ha3HaueHnO!
PacnIOBka ceHNoI nIIOJ dpeBecnbl IIN dpYnx MaTePnaNoB, KOtOpble coDeprXaT NOCTOPOHHe pPeDMeTbI, MOKeT npNBecTI K TpaBMe.
IcnoB3ynte cenHyTOny TOJbKO dIpaCnIOBKnJeKoIpeBecnHbl.
OcmoTpuTe dpeBecnHy nepeI paCnnIOBkoH Ha HAnuHne NoCTOpOHnx npEIMeTOB, HApnPmep rBO3dE, WypnoB,ΦHTnHROB.
2.2 PpimepbI HnpaBnJIbHOro npImeHeHna
He obpe3aTb BeTKn, KOtOpbIe pacnoJIOKeHbI npRAMO nIN NOd OCTpbIM yrIOM HaN noJIb3O-BaTeIeM ININ dpyrIMN IucaMn.
He nCnoB3yIe OTPa6oTaHHoe MacNo IIN MInHepaJIbHOe MacNo DJIa CMa3KN INJbHOJ ueN.
He pa3peuaaetcnaonb3oBaTb yctpoiCTBO BO B3pbIBOONaCHOpeJe.
2.3 OctaToHbIe pNCKn
JaKe npn nCNoB3OBaHn yCTpoNCTBa no Ha3Ha-yeHnIO cyuEcTByeT OCTaTOUHbI pNCK, KOToPbI HeBO3MOxHO NCKIQUHTb. KOHCTpyKzra yCTpO-CTBa He I03BOJRAET NCKIQUHTb CJeDyUOUIne O-nacHOCTn.
KoHTaKT C OTKpbITbIMN 3y6bYM N cENN (onacHOCTb nope3OB).
IocTyK Bpaaiouecraeenn (onacnoctb nope3OB).
Bhe3aHoe HneppeBnueHHoe nepemeuneHne nIbHOJ uINhbl (OnaCHOCTb Iope3OB).
UdaneHne Yacteien cenn (onacHoctb nope3OB/ TpaBmbl).
Udajeneue cacte o6pa6oTaHHoJ dpeBecnHbl.
Hapyuhe Hne cnyxa BO BpeMa pa6oTbI,ecn He nCnoJIb3OBAtB 6epyu.
2.4 PpeoXpaHnteNbHbIe n 3aunTHbIe ycTpoiCTBa

PNEyIPEXDEHNE!
Onachocbcepe3hix TpaBM, Bbl-3BaHHbIX MaHnnyIpOBaHHeM npeOxpaHntBHBIMN 3aunTHbIMN y-CTPOICTBAMN
I3-3a MaHnPyInpOBAHn npedoxpaHnTeNbHbIMN 3aUNTHbIMN yCTPOINCTBaMn np pa6ote c eHNO nIOo MOryT Bo3HNKHyTb cepbe3HbIe TpaBMbl.
HnB Koem Cnyuae He BbIBOJNTe N3 cTpor IpeoXpaHITeNbHbIe N 3a- uHTbIe ycTpoiCTBa!
Pa60TaIe C cenHoi nioi, TOnbko ecnBce npedoxpaHntbHbIe N 3a- uTHbIe ycTpoHcTBa pa6oTaIOT npaBnJbHO.
2.4.1 3auntataotBKJIOueHnra
Ecn onepaTop Bbinyckaet ra3 HeckoIbko pa3 noDpa, cenHaa nHa OTKIOUaETcH Ha HeckOJIbKO cekyHd InA 3aunTbI eNeKTPOHKn NINlbHOJ
CEN. B 3TOM cIyuae DOxKdntecb NOBTOPOBBOKIOUOHeH NENHOINIINI
2.4.2 Topm03 zenn / pbiur Topm03a zenn
LcHnHa Nnla HMeet pyHOn TOpMo3 cEN, KOTOpbI aKTHBnpyETc NOMOu bIO pbUra TOpMo3a cEN, HanpImep, B cnUyae OTdauN. PnCpa6aTbIBAHn TOpMo3a cEN NcEHn Ha Nla N DBuRaTeNb MRHOBeHH OCTaHaBnBAIoTcR.
2.4.3 3aunta ot neperpy3kn
CenHna nHa oChaSeHa 3aunToI OT nepepy3K, KOtopa ee BbIKIOuaET BCnyae nepepy3Kn. Nocne KopoTko fpa3bl OxJaxDeHnA CEHNyO nnLy MOxHO CHOBA BKNIouHTb.
2.5 CmboJIbHa yctpoINCTBe
3 YKA3AHN NO TEXHnKE B3ONACHOCTN
3.1 06uye yka3aHnno TeXnKe 6e3oNaChocTn dJa 3JIeKtpOnHCTpyMeHTOB

PNEyIPEXKDEHNE!
IpoHTaTe Bce yka3aHnNo TexHnKe 6e3OpacHOCTn HnHcTpkykUn.
HecobIIOeHHe yka3aHnNo TexHKe 6e3OpacHOCTN IN HcTpyKcN MoKet npNBecrN K yApy 3JekTpuecknM ToKOM,poXapY n (n) cepBe3HbIM TpaBmam.
CoxpaHInTe BCE yKa3aHnI NO TexHnKe 6e3OpacHOCTn INHcTpyKUnn DnJaNbHeJWeO NcNoJIb3OBaHnI.
Ucnonb3yemoe yka3aHuaX no mexHuke 6e3o nachocmu obo3haueHue «3neKmpouHcmpyMeHM» omHocumc u K 3neKmpouHcmpymeHmam, paBomatozum om cemu (c cemeebim Ka-6enem), u K 3neKmpouHcmpyMeHmam, paBomatozum om aKKymyJamopa (6e3 cemebozo KaBeJn).
3.1.1 BezonachocTb Ha pa6oYem MecTe
Pa6ooye MeCTO DOJXHO 6bITb YnCTbIM uxopo7o ocBeueHhbIM. BeCnpraDOK Ha pa6ooyem MeCTe HIN HeOCBeueHbIe yuactKN MOryT PnVBecTNI K HeCuaCTbIM Cnyaam.
He pa6oTaIe C 3JIeKTPoHnHCTpyMeHTOM BO B3PbIBOONaCHO CpeE, B KOToPOH NMeOTcra TropOue XnIDKOCTN, Ra3bl NIN nbInb. 3JIeKTPoHnHCTpyMeHTb I POn3BOJrT NCKpy, OT KOTopoM MoXeT BOCPiJaMeHHTbcra Nblb NII napbl.
Bo BpemnncnoB3OBAHnna 3neKtpoH- ctpymeHa He noDnyckaIte K ce6e DeTe n dpynx IIOJe. Ecnn Bbl OTBneyeTecb, MOKeTe NOTepaTb KOHTpOJIb HAd 3neKtpoH- ctpymeHToM.
3.1.2 Θlektpnuecka 6e3onacHocTB
UTeNceIb 3JKeTPOINHCTpyMeHTa DOJXeH noDxOAnTb Kpo3eTke. UTeNceIb HeNb3a MoiΦuInpOBaTb.B 3JKeTPOINHCTpyMeHTax C 3aUHTbIM 3a3eMJIeHNHeJIb3a IcNoJIb3OBaTb UTeNceIbHbIe aAdanTepbl.
HemodnphiuropoBaHHbIe wTeNcEIN noDxOJaUne po3ETK yMeHbWauT pNCK yDapa 3-NeKTpNueCKM TOKOM.
I36eraTe 0n3neCKoro KOHTaC 3a- 3emHeHHbIMN NOBepxHocTAMN Tpy6, CNCTEM OTONJIeHnA, NINT N XOJOnJBHnKOB. Ecni BaWe TeNo 3a3emJeHo, cyueCTByET IOBblHeHHbI pNcK ydapa 3JIeKTpUeCKIM TOKOM.
He noBepraTe 3JKeTponHcTpymeHTbI BO3DeiCTBnIO DOxJa NIN CbIpOCTN. PpOHKNHOBEHne BObl B 3JKeTponHcTpymeHT NOBbIaet pNCK yDapa 3JKeTpNuecknM TOKOM.
He nCnoJb3yIte Ka6eJIb He no Ha3NaueHnIO, YTO6bI HeCTN, BeWAtb 3JeKTPoHNCTPymENT NNI YTO6bIBBITAHyTb WTeNCeJIb N3 pO3eTK. DepxNTe Ka6eJIb NOaJIbWe OT NCTOCHNKOB Jxapbl, MacJa, OCTpbIX KpaEB NIN DBNrAIOUxxCraCTeYCTpOInCTBa. IOBpeXdEHHbIe NII 3anyTaH-HbIe Ka6eJIa IOBbIaOT PnCK yDapa 3JeKTPnYeCKIM TOKOM.
EcnBbIpa6oTaeteC3NeKtpOnHcTpymeHTOM NOOTKpbITbIM HebOM,NCNoJIb-3yIte TOnbKO TaKHe ydInHtEni,KOTOpbIe NpOxDaTakKe DJIa NCNoJIb3OBaHNHa Ynue. NcNoJIb3OBaHne ydInHtEnI, KOTOpbI ppeDHa3NaueH dJIa yUInCbI,yMeHb-1waePnCK yDapa 3NeKtpuYeCKM TOKOM.
Ecn3JKeKTPoHnCtpymENT Bce JHeO6XODIMO HcNoJIb3OBaTb BO BnaJHoN CpeDe, NcNoJIb3yIte yCTpOoiCTBO DnΦΦepenUaJIbHO 3aIHTbl. NcNoJIb3OBaHne y-CTPOiCTBa DnΦΦepeHuaJIbHO 3aIHTbl yMeHBsAeT pNCK yIapa 3JNeKTPnueckm ToKOM.
3.1.3 NiuHai 6e3oNaCHOCTb
Ipn pa6ote c 3neKtpoHcTpymeHTOM CJeDyET npoBJIaTb BHIMATEJbHOCTb IN NOxOuNTb K BbINOJIHeHIO pa6OT C yeT KIM IOHNMaHHeM ueLecOO6pa3HOCTn DeiCTBn. He dOnyckaetc nCNoIb3OBAHne 3JekTPoHcTpymeTa B COCToHn y-CTaIOCTn, IOD DeIeCTBnE m AIKORoI, HApKOTnuecknx IIN NekapCTBeHHbIX npenaP aTOB. KpaTKOBpeMeHHoe OTCytCTBne BHIMATEJbHOCTn pN INCNOJIb3OBAHIn 3JekTPoHcHTpymeTa MOXeT CTaTB IpNUnHOJ CePbe3HbIX TpaBM.
IcnoJb3yIte cpeCTBa HndBnDyaIbHO 3aunTbI N o6raTeJIbHO Hocnte 3aunTHbIe ouKn. B 3aBNCIMOCTN OT TUNA I yCNOBn npimHeHnna 3JeKTPoINHCTpyMeHTa IcNoIb-
3OBaHHe TaKnx CpeIcTB INHINBnUdyaIbHOJ 3a- IuNTbl, KaK peCnnpaTOP, HeCKoJIb3raaJ3a- IuTHa JOByB, 3auNTHaJ KAcKa IIn cpeICTBa 3auNTbl OprAHOB Cnyxa, CyIeCTBeHHO CHNJaET PNUK NOLyueHn TpaBMbl.
I36eaiTe clyaHoro BKIOueHn. He- 06xOAMo y6eINTbC8 B TOM, YTO 3NeKtponpBOp BbIKNoUey, npExJe Yem NOkKIOuATb erO K nCTOCHNY pNTAHN u (nI) aKKyMylrToPty, 6paTb B pyKn IIN nepeHocntb. Ecnn npn HOseHN 3NeKtpOnHCTpyMeHTa Hn erO NODKIOUeyHn K nCTOCHNY pNTAHN Bbl DEpxNte naJIeU Ha BbIKIOuaTeNe, 3TO MOKeT npVBecTI K HeCyaCTHBIM CnyaAM.
I Ipexe qem BKNIOHTb 3NEKTPoHCTpyMeHT, ydaJIte yCTaHOBOUHbIE HnCTpyMeHTbI INI raeYhBe KJIouH. NonaJHne IHCTpymeHTa INI KJIIOuA B DIBXKyUHeCya-CTN yCTpOJCTBa MOKeT pINBecTu K TpaBMIpOBaHIO.
I36eata Heydo6Horo noJoxhen Ta. Heo6xOIMO BbI6paTb yCTOnuHBOe noJoxHne, KOTOpoe B IIO60m MOMeHT No3BOJNT COXpAHNT paBHOBecne. 3TO NOMOXET LyUwe KOHTPOINPOBaTb NOJoxHne 3JIeK- TPOINHCTpyMeHTa B HENpeBnDEHHbIX CNTya- cIax.
HaedeBaIte noDxOJaUy OeJy. He cneJeT HaedeBaTb npocToPhyIO OeJdy IIN yKpaWeHn. DepxKe BoNoCbI n OeJy BdaJI N OT DBrNkUnxCraCTeN. PpocToHna OeJda, yKpaWeHn I dInHHbIe BOJIOcbl MOrTy INonactB DBrNkUxNeecr YactN.
Ecn npedycmotpeha yctahOBka y- cTpoiCTB dIyOTcABHnN ydepxAHn Nbln, yOcTOBepbTeCb, YTO OHN NOcOeDInHeHbI nPaBnIbHO nCNoJb3yOTcR. OTcAcsbHaHne Nbln MOKET yMeHbWaTb ONacHOCTb BO3dEICTBnN PbJIIN.
3.1.4 NcnoB3OBAHne 3JeKtpOnHCTpyMeHTa n pa60Ta C Hm
He neperpykaTe yctpoNCTBO. IcnoIb-3yInTe dIpa6Otbl nOxOJaUm 3JeKtpoHnHcTpymEnT.CnOxOJaUm 3JeKTPoHNCTpymENTOM BnPepHa3HaueHHoI dIpa6Otbl CpeDe Bbl cMOKeTe pa6OtaTb lyuWe n yBepeHHee.
He nCnoJb3yIte 3JeKTpOHnHCTpyMeHT, BbIKIOuATeJIb KOTOPOro NcOpueH. 3JeK- TPOINHCTpyMeHT, KOTOpBn HeJIb3R BKJIOUHTb IIN BBIKIOUHTb, ONaCEH IN Tpe6yeT peMOHTa.
I Ipejde Yem HactpanBaTb ycTpoiCTBO, MeHrTb 3aIyactn NIN NOMeCTNb ycTPOI-CTBO Ha XpaHeHne, BbITAHTE WTeNCJIb n3 po3ETKn (NIn) INBLeKHTe aKKyMylA-Top. Ota Mepa npedocTOPOXHOCTN PO3BOJNT He dOnycTtB cIyuaHOrO BKIOUeHnE JNeKTPOIHCTpymeHTa.
XpaHnTe HEnCNoJIb3YeMbIe 3JNeKTPoHNCTpyMeHTbIB HeNOCTyINHom dJa DeTeMecTe. He N03BOJnIe NcNoJIb3OBA Tb y-CTPOINCTBO JnIaM, KOTOpBIE He 3HaKOMbl C Hm IIn He npOHTaII 3TN INHCTpyKUnN. 3JNeKTPoHNCTpyMeHTbI ONaCHbI, ecJIuNX NCNoJIb3YIO THeONbITHbIe JIOJN.
TtataeBHO 3a60bTecsb 06 3JIeKtpOnHCTpyMeHTax. KoHTpOInpyIte, 6eZynpeHHO Jn FyHKUHOHPYOT NOBxKhbIe YaCTN, He npXaTbI, He cLOMaHbI N He NOBpeXJdeHb IIN OHN DO TAKO CTeNEH, YTO 3JIeKTPoHHCTpyMeHT xyXe FyHKUHOHPyET. IpeE nCNoB3OBAHNem yCTPOcTBaIOBpeXJdeHHbI YeACTN DOnXHbI 6blTb OTpeMOHTnpOBaHbI. MHOrO HecuactHBIX Cny-uaEB npONCXODIT NO BnHE 3JIeKTPoHHCTpyMeHTOB, 3a KOTOpbIMN PINOxo yXaXKBaII.
CoxpaHnTe pexyIe HNCTpyMeHTbIOcTpbIMN DEpxNTe INX B YnCTOTE.TaTeJIbHO yXoXeHHbIe pexuyIe HNCTpyMeHTbIC OCTpbIMN pexyUIMM KpaAM MeNbIe 3a-CTpeBaIOT NIM NJIeYe NOJIb3OBaTbcR.
IcnoJb3yUte 3JeKTPoHnCTpyMeHT, npuHaJIeXHOCTN, HacaDN N T. D. B COOTBeTCTBUN C DaHHbIMN INCHtpyKUnyAMN. YuHTbIBaHTe ycNoBnA TpyDa n CpeunOfky pa6oTbI. IcnoJb3OBaHHe 3JeKTPoHnCTpyMeHTOBdЯ ueNei, dJa KOTOpbIX OHN He npedYCMOTpeHbl, MoKeT npINBeCTN K ONaChbIM CNTya-
3.1.5 NcnoJIb3OBAHne INHCTpyMeHTa c aKKyMylrTOpOM
3apjkaTe aKKymyIaTObI TObKO B 3apnHbIX yCTPOINCTBax, KOToPbIe peKOMHeIOBaHbI npOn3BOInTeJem. Ecn3apJHOe yCTPOINCTBO, KOTOpoe NOxOHT IJIa ONpeJeHHO BnDa aKKymyIaTOpOB, INcNoIb3yETC C DpyrIMN aKKymyIaTOpAMN, cyueCTByeT ONaCHOCb IoXapa.
IcnoJb3yInTe B 3NeKtpOnHCTpyMeHTax TOJbKO npedYCMOTpeHHbIe dJIa 3TOrO aK KyMylAToPbI. IcnoJb3oBaHne dpynX akkyMylAToPOB MOKeT pUBeCTN K TpaBMam N O-nachOCTn Nojapa.
ДерхиTe HeHcNoJIb3yEmbIe aKKymJYTOpbl NOdaJIbIe OT cKpeNOK,MOHeT,KnHO-yei,ΓBO3dEi,BnHTOB IN dpyrnx MeJIKNXMeTaJIINueCKNX ppeMToB,KOTOpbIe MOrTy Bbl3bIBaTb 3aMbIkaHne KOHTaKTOB.KoPOTKoe 3aMbIkaHne MExdy aKKymJYTopHbIMNKoHTaKTAMMOKeT Bbl3BaTb BO3rOpaHnIJIIN IOxap.
Pn HnepnabHbHom NcNoJb3ObaHnn n3 aKKymyIaTopa MoKet BbITEKaTb KNDKOCTb. 36eraIte KOHTaTc C HMM. Pnp CnyauHOM KOHTaKTe CMOIe ee BOIoE CInn XnDkoCTb nonana B rna3a, o6paNTecb 3a MeduHcKoN NOMoub. BbTEK-7aayakMyJIaTOpHaer XnDkoCTb MOKET Bbl3BaTb pa3dpaxHe NKeKn IIN OXOrn.
3.1.6 CepBnC
3.2 Yka3aHnno TeXnKe 6e3oNaChocTn npn o6paueHn c ceHnO nnloN
PemOHnpOBaTb 3JKeKtpOHnHcTpymeHT DOJXeH ToIbKO KBaINΦnUPOBaHHbIcneuaJIncT, nCNoJIb3yApuRHaJIbHbIe 3anYacTN. TAKIM o6pa3OM oBeceNeuBaETcOxpaHeHne HaJeKHOCT yCTpOInCTBa.
ДерхиTe Bce YacTN TeNa NOaJIbWe OT BpaaIooJeCЯenn.пepeTemКak BKIOUcTaB NIIy, cIeJyET y6eINITbcrB TOM,чTOцENb He KOHTaKTIpyet C KaKIMnIIn6o PpeMeTaMn.KpaTKOBpeMeHHaRe HBNMaTeJIbHOCTb Prn pa6ote C cIeHNoi NIOI MOKeT pnpBeCTN K IonoaHaHIO ODeJdbI NN YuacteY TeNa B DBrNxUyOcЯenb.
IpaBoy pyKoJ depXnTe ceHnyo nHy 3a 3aHIO pUky, a neBoi — 3a nepeHIO. PnpdePknBaTecb IMeHNO 3ToI cxEMbl: B npOTNBOM clyuae pNCK NOnyuEHHa TpaBMbl yBeJIuNbAeTcra.
ДерхиTe элкtpоннсчymeHT B TOlbko B nOlnpoBaHHо JaoHNoH ChTn, TAK Ka KnIbHaЯ Cenb MoKet KacaTbCа CkpblBIX IHHN.ПиьНьецп,КOTopbIe npikacAOCTcK TOKONpOBODaIM npOBoDam,ДenaHOT MeTaNlueckneЧactN элкtponHcTpymeNTa TOKONpOBODaIM N MOryT Bbl3BaTb ydap 3-NeKTPnueckm TOKOM onepaTopa.
HaedeBaIte 3aunTHbIe OUKn I cpeDCTBa 3aunTbI opraHOB clyxa. Kpome Toro, peKOMeHNyETcNcNOJb3OBaTb CpeDCTBa DnA 3aunTbI rOIOBbl, pyK, Hor n CTynHei. HAdneKaaJg 3aunTHa Jodexda ChnkaeTpck TpaBMIpOBaHn B pe3ynbTaTe nonadaHnCtpykKn UIn cnyaHOro COnpNKOCHOBeHn C NIIbHoN ueBIO.
He nCnoJb3yIte cenHyo nnIy, haxOJaCb Ha depeBe. Ppi nCNoJIb3OBaHm INCTpyMeHTa Ha depeBe cyIeCTByeT BepoTHOCTb TpaBMnPOBaHn.
O6raTeJIbHO 3aHMaIte ycToUHBOe noJIOKeHne HcNoJIb3yIte cENHyU NnJy TOJIbKO Ha TBepDo,HaJeXHo I paBHOnOBepxHocTn. Ha cKoJIb3KoN nn HeCTa-6nJIbHO ONOpHO NOBepXHocTn (Ha npImep, Ha JleCTnue) MOxHO JERKO NtEpyTB paBHObecne nJIn KOHTpOB Na d cENHO nINoJ.
IOMHHTe, YTO HAnpJxHeHHa BetKa npn OTNINIBaHH MoXeT OTnpyXHHtB. NocIe CHrTna HApJxKeHH B DpeBeCHbIX BOJIOKhAX BetKa MoXeT ydapITb OepaTopa IIN BBi6NTb 3 erO pyk ceHnyo nIpy.
Pn cpe3aHnn noJnecka n MoJOnbIX depeBbeB co6IIOdaIte oc6byo octopoxHOCTb.ToHKnBEKn MOrYT 3anyTaTbc BcENN yIapNTb Bac NII NBBeCTNu Bac N3 paBHOBecn.
I InpeHocN cENHOI NINbIBBIKIOHTe ee n depKNTe 3a nepeHIOpykny, NOBepHyB NINbHOI cENbIO OT TeHa. TpaHCnOPTnPOBaT bXpaHNTb cENHyIO nIy CJeDyeT TObKO B 3aUHTHom YexNe. ByTe KpaHHe OCTOPoJHbI npI o6paUeHN C cENHOI NINO, YTObI CHN3NTb BEPOrTHOCTb HnpeHnAmepeHHOrO COpNIKOCHOBEHNc CBpaUOSeCra cENbIO.
Co6IIOaJIte HNCTpyKcHn NO CMa3bIBaHNIO,HaTJXeHHIO cENN I 3aMeHe npHaIJIexXHoCTeH. HenpaBInbHO HaTAYtae nnCMA3aHHa Yenb MoKeT IOnHyTB. TaKxE Bo3pactaET pNCK OTdauH.
Cneinte, yTo6bI pyKn 6bln cyxImn n YnCTbIMn, 6e3 MaenuX cNeob Macna nn Cma3Kn. PyKn, BbIMa3aHHbIe MacJOM nn Cma3KOi, CTaHOBATc CKOJIb3KIMN, IN Bbl MOKeTe NOTepTb KOHTpONb HAD NINOi.
Pa3pe7aetc nIINITb TOnbKO dpeBecnHy. He nCnoJIb3yIte nIpy dIra BblOnHeHn HenpeDycmOTpeHHbIX pa60.TpImep: IJRA pa3pe3aHn INaCTMaCCOBbIX N3deI IN, KInPNuHO KnAdKn IIN CTPONTeJIb-HbIX MaTePnaIOB (KpOME DepeBAnHbIX). IcNoJIb3OBAHne cENHO nIIbI He No Ha3Ha- ueHIO MOKeT pINBeCTN K BO3HNKHOBEHIO O- NaChbIX CNTyaU.
O6paTHa O7dau YBJIeTcCneCTBnEM HenpaBnIbHOro IIN HePamOTHO NOIb3OBaHnE3NeKTponHCTpyMeHTOM. Yo6bl He DOnyCTNTb ee, Co6IIOaIte CneDyUOuNE MepbI ppeOCTOpOXHOCTN.
Ipoquho depxknte uehny nny o6eHmnyakuMn, comKhyb naIbucbl BOKpyr puek.Pacnojaratb TeNo n pyKn cIeDyET TaKIMobpa30m, yTo6bl MoXHO 6blIO npOTNBODeiCTBOBaT bOpaTHo OTaue.Ecnn BCE Heo6xOdmbie MebpI preDoctopoxHoCTn 6blIINpreIpnHtB I COOTBETCTBNN C yKa3aHNMyn IO TexHnke 6e3OnacHOCTn, Nolb3ObaTeNb cnpabNTbcraC O6pTaHoi OTdaueH. Hn BV KOem cnUyae He OTnyckaiTe uehny nny.
N36eraTe Heyo6Horo noJoxHeNra He NnIInTe BbIe yPobHra NnEur. 3To nO-3BOJIaTe IyUWe KOHTpOINPOBaTb Nnly B HeOxuHaHHbIX CNTyaunEx N36eraTb cOpNKocHOBHeHra KOHca ShInhbl C dpyrIMn PpeMaTM.
IcnoJb3yIte TOnbko npedncaHbIe npoN3BODHTeJIem 3aNaChbIe uHHbIu NIIbHbIe cenn. B npOTnbHom cnUyae Bo3-MoKeH pa3pbIb ceni, KOTOpbI npuBeTeK o6paTHOH OTdaue.
CobJIOdaIte npedocTabeHHbIe npo3-BoNTeJIem HNCTpyKcHn PO 3aTOUKe n TeXO6cnyxHBaHIO nnlbHOJ cenn. CnHOM Hn3Km OrpaHNUTeJI bIy6uHb I Bpe3aHnA NOBbIaEe TBepoTHOCtB o6paTHOH OTda-yn.
3.4Инструкции по 6e3oNaChoctnaKKyMylrTopa
B 3TOM pa3dene nepeuucnEhb BCE o6uie npabnna Texnkn 6e3oNaChocTu n npedynpeKdeHn, KOtOpbIe DOJXHbI co6IIOdaTbc npn nCNOb-3ObaHn aKKymyIaTopa. PpoHTaIe 3TN INCTpykun!
IcnoB3ynte TOnbKO aKymyIaTOpbl, npedHa3HaeHHbIe IJyCTpoiCTB KOMnAHN AL-KO, KOtOpblpe pa6oTaIOT ot aKymyIaTopa.3apjKaIte aKymyIaTOp TOnbKO c NOMOJIbIO 3apJHOrO yCTpoiCTBa AL-KO n3 KOMnNeKta.
Ipeed nCnoJb3OBAHnem N3BneKeNTe HOBbI aKkyMnyTOp N3 opuHaJIbHOy yNaKOBKn.
I IopHocTbIO 3apAInTe aKKyMnyTOp nepeI nepBbIM NcNoJb3OBaHNHe M BcerDa NcNoJb-3yeTe yka3aHHoe 3apAInHOe yCTpoiCTBO. BcerDa co6JIouaInTe INΦopMauIO OTHoCnTeJbHo 3apAKn aKKyMnyTOpA, KOTopAcoDePjNITcR B DaHHOM pKOBODCTBe NO 3KcNpyatauIN.
He nCnoJIb3yIte aKKyMylTOp B IIOXapo- N B3pbIBOONaCHOcpeJe.
He noDBepraIte aKKyMylTOp BO3JeCTBIO BJIaRn I cbipocTn npn 3KcNpyatauyn yctpoi-CTBa.
3aunuaTe aKkymyIaTOp OT Bo3deNCTBnA TeIIa, Macna n OrHb BO n36eXaHne erO NOBpeXdEHNr n yTeuKn napOB n XnDkoTo 3JeKTpOJNTa.
He pa3paKaIe n He 6pocaiTe aKKymyIaTOp.
He nCnoJb3yIte 3aRpa3HeHHbI nnBn BnaxHbI aKKymJrTOp. Ipeep nCnoJb3ObaHneM aKKymJrTopa OunchTe erO uNCToI cyXoIT PpIKoN BBICyuNTe.
ДерхиTe 3apЯЖeHHbI aKKyMyJrTOp, KOTopbI He nCNoB3yeTcR, BdAn OT MeaJIHnueCKNX ppeMToB (HaPnPmEp, KaHcEJaPcknxCKpeNOK, MOHeT, KJIoueI, rBO3deI, WypynOB) BO n36ExaHne 3aMbIkaHnja KOHTaKTOB. KopotKoe 3aMbIkaHne MoKeT npNBecTu K NOnyHuHIO OXOrOB nII NOxApY.
He otKpbBaIte, He pa36npaIte n He n3-MeIbuaIte aKKyMnyTOp. 3To npuBeTe K nopaxKeHIO 3JIeKTPnuECKIM TOKOM IIN KOpOTKOMY 3aMbIkaHIO.
HenpaBnIbHoe nCnoJIb3OBAHne n NOBpeJdeHne aKKyMylTOpa MoKet npINBeCTn K yTeUKe KNDKOCTn 3NeKTPOJNTa. IpOBeTpnte nomE-ueHne, a 3aTeM o6paTntEc b K BpaCy. Pn KoHTaKTe C KNDKOCTbIO 3NeKTPOJNTa
TtataTeNbHO NOMOITecb N TtataTeNbHO npoMoIte rna3a. 3atem o6patnteCb K Bpaay.
AkkymyIaTOp 3anpeuaeTcNcNoJIb3OBA Tb NOCTOPOHnIM nIaM, a IMeHHO: ecNI OHn HaxoJrTc Nd Ha6JIIODeHNMe MIIua, OTBeTCTBeHHOrO 3a IN 6e3OJaCHOCb, INI npOIINHCTpyKTaK No 3KcnIyatauINn AKKymyIaTopa. IocToPOHHne IIna BkIIOUaHT, HanpIMep:
JIuca(BKIOUaJdTee)COrpaHnueHHbIMNΦn3nueckmN,CEHCOPHBIMNUNYMCTBeHHbIMBO3MOXHOCTaM.
JIuca, KOtOpbIe He NMeHOT ONbITa n (JIN) 3HaHn O6 aKKyMyJrTope.
IeTNdoJXHbHaXoAnTbcNpNcMOTpOM, NIM Heo6xOaMo 3anpeTb nIpaTb c aKky- MynAToPOM.
He octabnTe aKymyIaTOp B 3apAnHom yCTpoiCTBe Ha dInTeNbHoe Bpem. IIn dInTeJbHorO XpaHEnr Heo6xOIMo N3BJeYb aKymyIaTOp n3 3apAnHO rO yCTpoiCTBa.
N3BNeKaTe aKcymJrTOp n3 yCTpOuCTBa,ecn OH He NCNOJb3yIOTc.
XpaHnTe HeNCIOJIb3yEmbI aKKMyJrTOp B cyXOM 3aKpbITOM MecTe. BepeYb OT BO3dEnCTBn JApbl I npRMBIX COJHeuHbIX Lyuei. DocTyI HBeABTOPn3OBAHHbIX Nluc n DeTeN K aKKMyJrTOpy 3aIpeUeH.
3.5Инструкши no 6e3oNaChocTN 3apdHOrO yCTpoiCTBa
B 3TOM pa3dene nepeueucneHb BCE obuie npabnla Texnki 6e3oNaChocTu n ppeDynpexKeHHa, KOTOpbie DOJXHbI COJIIOdaTbc npi NCNoJIb-3OBAHIN 3apAHO YoCTpoiCTBa. IpOHTaIte 3TN INHcTpyKcun!
IcnoB3yIte yCTpoiCTBO TOnbKO nHa3Ha-ueHIO,TO eCTb,ДЯЗКИ yKa3aHHbIX AkKymyIaTOpOB.BCTaBnIe B 3apJdHoe y-CTPOIcTBO NCKIQUHTeJIbHO OPUNHaJIbHbIe aKKymyIaTOpbl AL-KO.
IpeedKaKdbIMNCNoB3OBAHnem npOBepaTe BCE yCTpoiCTBO,B TOM YnCNe, Ka6JIb NtAHHN OTCeK DnA AKKyMylTOpa Ha npEd-Met NOBpeXdEHN. IcNoJb3yIte TOnbKO nCnpabHOe yCTpoiCTBO.
He nCnoJIb3yIte yCTpoIcTBO B noJapo- nB3pbIBOONaCHO cpeJe.
IcnoJIb3yInTe yCTpOINCTBO NCKJIIOHTeJIbHO B NOMeUeHn H He NOBepraTe ero BO3dI-CTBnIO DOxJr INN BnAIn.
Bcerda nomeuaTe 3apJdHoe ycTpoIcTBO Ha xopoIo npoBeTpnaEmyIO n HeropOuyIO
NOBePxHOCTb, NOCKOJIbKy OHO HArpeBaetcAo BpeM 3aprKn. OcBo6oJTe BeHTnIaUNOHhIe OTBepCTnI He NaKpbIbAitYe yCtpoiCTBO.
Ipeid noKIOUeHEm 3apJHOro yCTpoi-CTBa y6eNTecb B HAnuHn HApJKeHn cTe, yKa3aHHoro B pa3dene «TexHueckne xaPakTepNCNI>.
IopKnIOuayTe shHyp nHTaHnN NCKIOUHTeJIbHO K 3apAINOMy ycTPOINCTBy N IcNoIb3yInTe erO no Ha3HaueHnIO. He nepenocTe 3apJdHoe ycTPOINCTBO 3a UHyp nITaHnN H He TAHNTe 3a BnIKy, BblHMaj shHyp nITaHnN n3 po3ETKN.
3aunuainTe uHyp nHTanHn OTeTnna,Macna nOctpbIX KpaEB BO n36eKaHne ero nobpeK- DeHn.
He nCnoJb3yIte 3aIrp3HeHoe IIN BnaXHoe 3apJHOe yCTPOiCTBO. Ipeep nCnoJb3OBAHNEM ONUCTnte N BbICyUHTe yCTPOiCTBO n aKKymjTOp.
He BCKpbBaIte 3apAIDHOe yCTpOINCTBO n aKymyJITOP.3TO npBBeT K NopaxKeHIO 3JIeKTPnueckm TOKOM INN KOpOTKOMy 3aMbIKAHNIO.
UTo6bI pa6Ota 3JIeKTPoINHCTpymEnTa 6bla 6e30nacHO,peMOHTnpOBaTB yCTPOICTBO DoJKeH ToJIbKO KBaJIInΦuINpOBaHHbI CneuAnCT,NCNoB3yApINHaNbHbIe 3aN- qactn.
UcTpoNCTBO 3anpeuaeTcN cnoJb3OBA Tb NOCTOPOHNM IucaM, a IMeHNO: ecn OHN HaXoJrTa NOD HabIOJeHEm Iuca, OTBeTCTBeHHoro 3a IN 6e3OnaChOCTb, INI pOuJIINHCTpykTax IO 3KcNpyaTauny UcTPOJCTBa. NocToPoHHe Iuca BKNIOUaOT, HapPImep:
Ntua(BkIIOUyAJeTei)COrpaHnueHHbIMMΦn3uyeCKIMN,CEHCOPHBIMNINYMCTBeHHbIMNBO3MOXHOCTaM
JIuca, KOTOpbIe He IMMeT OnblTa N (JIN) 3HaHmO6 yCTpOInCTBe.
I DeTN DOJXHbI HAXOINTBcra NOD npNCMOTpOM, nIM Heo6xOIMO 3aIpeTnTB nIpaTb C y- CTPOICTBOM.
XpaHnTe HeuCnOJIb3yEmoe yCTpoiCTBO B cyXOM 3aKpbItom MecTe. DocTyn HeaBTOpN3oBaHHbIX Nluc N DeTei K yCTpoiCTBy 3anpe-
3.6 Yka3aHnno TeXnKe 6e3OnaCHOCTN BO BpeMpa6oTbI
CobioaTe yka3aHnNo texnke 6e3oNaHocTN B KOHKpeTHbIX cTpaHax, HapnMpE, y-
Ka3aHnI NO TexHnke 6e3oNaChOCTn npocceCNoHaJIbHbIX accounau, oHIOB couaNb-Horo obecneueHnI, orpAHOB 3dpaBOOxpaHeHnI.
IcnoJb3yIte yCTpOietBO TOnbKO npN DOCTaTOUHOM DHeBHom NIN NCKycCTBeHHOM OCBe-
Pa6o7a 30Ha, Cb6o7H8 OT NOcTOPOHHx npeMeTob (HaNPmEp, o6pe3KOB) - onacHOCTb cNOTbIKAHJ.
OnepatopnnnnoB3OBateIbOTBeuHOT3a XN3HBnIMyUeCTBOdpyTnxLIu.
EcnBbIpa6oTaTe c cenHoi nnoi BnepBble:
Ponpocnte npoabua nIIN dpyrorocneuanncta oobacnhtb, kak obaaatbc6eH30nIO, nIIN npoiDNTe KypcbI.
IpeepnepBbIM npimMeHHeM nonpaKTNUkyTeCb, NO KpaHHe Mpe, B paCnIOBKe 6peBeH Ha KO3Jax INN NODCTaBKe.
3.6.1 OnepaTopbI
YCTPOIcTBO 3aPepaetcNcnoJIb3OBaTb DeTAM B BO3pacte Do 16 Iet N IINuam, He O3HaKOMJIeHHbIM C pkyoBOdCTBOM NO 3KcPiyaTaUIN.
IIO6o YeNoBek, pa6OtaUcN C cENHOI NIOJ,doXKeH 6bITb OTDOxHyBIm,3DOpOBbIM n HaxoINTbcR B xopoWe fOpme.EcIn no COCToHNHO 3DopOBbYToMJIeHne 3aPepa-etCra,Heo6xOdmo CnpocuTb y Bpaua,MoxHo IIN pa6OtaTb C cENHOI NIOJ.
3.6.2 Bpempa6oTbI
Co6IIOJaIe T B OTHOWeHn B BpeMeHn pa6oTbI
ZeINbIX NII KOHKpeTHOcTpaHbI. BpeMpa6oTbI
ZeINbIX NII MOKeT OpAHuHbATbcra HaUNoHaJIb- HbIMN MeCTbIMN npaBnAmn.
3.6.3 Bn6paunOHna Harpy3ka

PNEyPEXEHHIE!
Onachoctb Bn6paun
ФakTnueckoe 3NaueHne Bn6paUOnHno 3MnCCnn npn nCNoB3ObaHn yCTpoCTBa MoKet OTnUaTbCn OT 3aBNeHHoTO npOn3BOuNTeNem 3NaueHn. Ha6JIoDaIte CneDyUOuNne fakTopb Bo3Dei-CTBnJ Do Nn BO BpeM nCNoB3ObaHnJ:
IcnoJb3yETcJn yctpOCTBO no Ha3HaueHIO?
MATEPnAn pa3pe3an nIn o6pa6oTah npaBnblHo?
HaxoNTcIyUcTPOINCTBO BXopoWem pa6Ouem coCTOHN?
PpaBnIbHO JN 3aoCTpeH nn ycta-HOBJIeH pexyun nHcTpyment?
UcTaHOBJIeHJI KPOHHTeHJI,ecNI Tpe6yeTc,IOnONHITeHBIeBn6paUNHHbIMpyKINIOJTOHOJIOn OHn CoEHNHeHc yCTpOJCTBOM?
3KcNpyaTnpuYte yCTpoiCTBO TOnbKO C aactOTOB BpaueHn DBNrAteIe, Heo6xOdmoIgONOTeNBHO pa60tI. N36eaiTe MaKcMaJIbHOJ YACTOTBI BpaueHn, YTO6bl CHIN3NTb yPOBeHb 7yMa n BN6paun.
13-3a HnnpabHOBIO nCNoB3OBAHnI TexHnueckoro 06cnykBaHHu WM N Bn6pauny UCTPOINCTBA MOrYT NOBbICNTbcr. 3TO HAHOCTBpei 3DOpOBbU OeNoBeka.B TAKNX CNYaX HeMeJInHo BblNIOuaTe yCTPOINCTBO I O6paTITecb 3a eO peMOHTOM B aBTOpN3OBAHHbI CEPBNCbH I cHTp.
CTeNEHb Bn6paCIOHO HorapJxehn3aBNCNTOT BbIOnHReMoN pa6OtBI INN NcNoJIb3OBAHnYcTPOiCTBa.OUeHnte N yctAHOBnTE COOTBeTCTByUoUne nepepbIBbI B pa6Ote.B pe3yJIbTaTe Bn6paCIOHHa Harpy3ka B TeueHne BCero pa6Ouyero BpemeHn 6yDet 3HaunTeJIbHO CHNXKeHa.
Диntьная ekcnlyatauaуctpoicTBa noB-Bepraet onepaTopa Bn6paunu N MOxET Bbl3BaTb npo6nemblc KpOBOOpaueHneM (CmNTOM «6eIoro nalba»).UTo6bl yMeHbUnTb 3OT pNCK, Hocnte nepuATkn I depKHTe pyKn B TePNe. B cnyae obHapyKeHna CmNTOMA «6eIoro naIbua» HeMeJleHNO o6paTntecb K Brpy. 3TN CImNTOMbl BKIOUcaHOT B ce6ra: OHemHe, Notepu ChvBCTBnTeBHOCTN, NOKaJIbIBaHne, 3yd, 60JIb, cna6OCTb, N3MeHeHne
CUBeta NIN COCTOHNK KOKN. O6bIuHO 3TN CIMNTOMBI BINRAOT Ha NaJIbUbi, pyKN IIN nyIbc. PnHn3Knx TemNepaTypax (npimepHo Hnke 10^) onachoctb nobblwaeTcra.
DenaiTe BO Bpempa6oeryDnHdNtIb-HbIe nepepbIBbl, yTO6bl OTDOxHyTb OT Wyma N Bu6paun. PAnHpyTe CBOIO pa6Oy TaKIM 6pa3OM, yTO6bl pa3DeJIHTb EKnIpyatauY-CTPOJCTB, KOTOpBE CO3JaOT CNIbHbIe BN-6paun, Ha HeCKoJIbKO dHei.
EcnBbI NOyBCByeTe NcKOMΦopT INN DnCXPOMIO KOKN PnN NcNoJIb3OBAHIN Y- cTpoIcTBa B pykax, HEmeJNeHNO ppeKpaTInTe pa60Ty. YcTaHOBtNE DOCTaTOUHbIe nepepbI-BbIB pa60Te.Pa60Ta 6e3 DoCTaTOUHbIX nepepbIOB MOKeT PpNBecTN K MeCTHOB Bu6pa- COnOHHO BoJe3HN.
MHHIMN3npyTe pnc BO3deJCTBnB Bu6pa- uIN. BbIOnHnTe o6cnyKnBaHne np6opa B COOTBeTCTBnC INHCTpyKuYMaMn B pykoBOdCTBE NO 3KcIIyatauIN.
Ecnn obopydOBaHne nCNoIb3yeTcra YacTo, o6paNTecb K DInIepy, yTObI npno6peTn aHTNBn6paunOHhIe akceccyapbl (HaNPmEp, pyKn).
BПане pa6OТы onpeДeЛNTe,кak moxHo O-rgpaHnHTb Bn6paCNoHnyo Harpy3ky.
3.6.4 Akyctnccka harpy3ka
HeKOTopa akyctueckara Harpy3ka, BbI3BaHHa 3TmU yCTPOINCTBOM, Heu36exHa. BblOJIHnTe 5ymhble pa60tbI B yCTaHOBJeHHbI e ONpeJe- IeHHbIe cPOKn. Pn Heo6xOIMOCn CneDyET y- YHTbIBaTB yKa3AHN OTHOCNTeJbHO «TnxX u-COB》 n ORpaHnUHBaTB pOdoJXnTEJBHOCTb pa60tbI Han6OJee Heo6xOIMbIM. JIЯ obecneYeHn JInHOn 3aUnTbI N 3aUnTbI NIIc, HaxOJauxxCr No6n3OCTn, Heo6xOIMo HocNTb bepuSi.
3.6.5 Pa6oTa c ceHNoI nJIo

PPEyIeHNE! Onachocb cepbe3hbx TpaBM.
B cnyuae nCnoJb3OBAHnHa He noJHoCTbIO CO6paHHo CEHNHO nnblc cyueCTByeT PNCK NOyUeHn cepbe3HbIX TpaBM.
He nCnoB3yIte cenHyIO nnIy, noka OHa He 6yDet nonHocTbIO co6paHa.
BbINOJIHnTe Bn3yaJIbHbI OCMOTp nepeKaJdbIM NcNoJIb3OBAHHeM, yTo6bI y6eINtbcraB TOM, yTo cENHa- rNIIa NOnHOCTbIO CO6paHa I He coDEpkNT NOBpeKdEHHbIX INI IN3- HOWeHHbIX DeTanei. Bce npedoxpaHHTeJIbHbIE n 3aUInTHbIe ycTpoI- CTBa DOJIXHbI NCpabHOb FOyHKuO-HnpOBaTb.

PPEyPPEKDEHNE!
OnachocTb TpaBMbl 3-3a HenpeHa-MepeHHoro BkHoueHn cenHoN nIJIbI
HenpeDnHaMepeHHoe BkIoueHne cenHOH NIIbI MOKeT PnVBecTN K cepBe3HbIM TpaBMam. Io3tOMy n3BNeKaIte aKcMyJrTOP B CneDuOuX CnyaX:
TEXHnueckOMOCMOTpe,peyIINPOBKe N OCHCTKe;
pa60Ta c npHaadJeXHOCTaM;
OCTaBHeHne cenHOH nnIbI 6e3 npnCMOTpa;
TpaHcnpTnpOBka;
pa3MeueHn Ha xpaHeHne;
TEXHnueckOM O6cIyXnBaHN n peMOHTe;
B Cnyuae onaCHOCTN.
Hikorda He pa6oTaIe B OOnHOky.
Bcerda depknte haroToBe anTeky Ha cnyuay paHeHn.
I36eraTe KOHTaKTa C MeTaJIHueCKIMN IpeDMeTAMn, HAXOJUIMMnC B 3eMJIe IJIN 3JIeKTPuYeCKn COeDInHeHHbIMN C Hei.
CpeIcTbA ININBnDyaJIbHOJ 3aUHTbI BKNIO- yauT:
3aunTHa KaKa;
cpeicTba 3auntbI cnyxa (Hanpimep,6epyu),ocobehno,koIpaoboun DehbcoctabJraTe 6oJee 2,5 yacOB;
3aUHTbIe OUK INN UNTOK 3aUHTHOJ KACKN;
3aunthbIe UTaHbIC BCTaBKOJ IJIa3aUN-Tbl OT NOpe3OB;
Kpenkne pa6oue nepaTkn;
6e3onacHaj o6yBb c HeckoJb3aJeN NO-DOWBOn HCTaJIbHbIM HOCKOM.
He nCnoB3yIte ueHyIO NnUy Bblue ypoBna nnue, 6e3oNaChra paOta B 3TOM NOLOXKeHN He BO3MOxHa.
Ipn CMeHe MeCTa BbIKNoCHTe DBNrATeJn HaDeHbTe cENHyU 3aUNTy.
Ecnu cenHna He nCnoNb3yeTc, yCTaHOBnTe cenHyU 3aunTy u N3BneKeNTe aKKymyJrTop.
KnaTe CEHyTOJy TOJbKO B BbIKIOueH-HOM COCTOHN.
He nCnoB3yIte cenHyIO NIIy B KaueCTBe MexaHnueckOro pbIurapa IIN dIpy nepemeueHnA DpeBecnbl.
BpeBHa,ToIuHnA KOToPbIX npeBblIaEeT dINHy NIIbHOJ WInHb,IOnXHbI paCNIJIIBaTBcR TOIbKO KBaIINΦUncpOBaHHbIM nepcoHaJOM.
IpnctabJnTe Nny K o6pa6aTbBaemomy MaTePnAly TOnbKO C pa6oTaUoSeNnBHO nCeNbH, HN B KOe Cnyae He NpOKJIuOaHTe pa6oTaUOyU cENHyU Nny K NnBHO cen.
CJeIte 3a Tem, YTo6bI MacJIO JnJa Cma3Kn NJIbHOJ CEEN He NonajaNO B 3emHIO.
He ninnte BO Bpemr Ioxd, Cherona ana nnu
Hn B koem cnyuae He BbIOJTe n3 cTpor npedeoxpaHnteNbHbIe N 3aunTHbIe ycTpoi-CTBa.
4 MOHTAK

PPEyIeHNE! Onachocb cepbe3hbx TpaBM.
B cnyuae nCnoJb3OBAHnHa He noJIHoCTbIO CO6paHHoI cENHOI NIIbI cyueCTByeT PnCK NOJyEHnA cepbe3HbIX TpaBM.
He nCnoB3yIte cenHyo nIy, noka OHa He 6yTe nOJIHOCTbIO co6paHa.
BbINOHnIte Bn3yaIbHbI OCMOTp nepeK kaxDbIM NcNoIb3ObaHHeM, yTO6bl y6eINTbcR B TOM, qTO cENHa- r nnla nONHOCTbIO CO6paHa I He coDEpxNT NOBpeJdeHHbIX INN IN3- HOWeHHbIX DeTanei. Bce npedoxpaHntJIbHbI e 3aunTHbIe ycTpoICTBa DOJXHbI NCnpabHNOyHKUHO-HnpOBaTb.

OCTOPOXHO! Onachoctb pe3aHbIX paH.
B npoecce c6opkn octpbie kpaanbl-HoIeennMoryT cTaTB npuHnO pe3a-HbIX paH.
IpeenHaayanomc6opknCneyET BbHyTb aKKMyJrTOP.
PnBbIOJIHeHn pa6oT no yCTaHOBKe NIIbHOJ cENI HAnpaBJIIO- 3aUNTHbIMN nepyATkAMN.
4.1 MoHTaK HanpaBJIouSei uHHbI (02, 03)
1.Перемecnte рьчагtopmo3aцenn(02/1)к дуrogов рунke(02/a),чтобл pa36локиpoВаТbTopmo3цenv.
2. ПовернITE центральный за мok (02/2) поTNВ уасовский STpeлки и симпге erо вмecтес Кршков (02/3).
3. YctaHOBnTe HnpaBnIooUo uHy (03/1) Ha HnpaBnIooN 6oT (03/2) n nepemecntte ee Ha3aHaCTOJbKO, UTo6bl MoXHo 6blNo y-CTaHOBnTB NINbHyIO ueNb.
4.2 MoHTaK NJIbHOJ cENn (02, 03)
-
YIIOXINTe NIIbHyU cENb Ha 3Be3DOy CEEN (03/3) n B KaHaBky HAnpaBnIooJeN ShHbI (03/1).
2.ObepHnTe NnIbHyUeNb BOKpyr BeDOMo3Be3doUKN HnPaBnJIOSeuE uINbI. NnIbHaueNB DoJXHa CNeRka npOBnCaTb C HxKHeCTOpOHbI HnPaBnJIOSeuE uINbI. -
YctaHOBnTe KpbIuKy (02/3) n cnerka 3aTHeN-Te ceHTpaJIbHbI 3Amok (02/2).
4.3 HaTajkeHne nnIbHOJ cenn (04, 05)

ONACHOCTb! ONaCHOCTb JnJ Kn3Hn n ONaCHOCTb TKeJIbIX TpaBM.
He3haHne yka3aHn no TexHke 6e30- nacHOCTn INHcTpyKuN No 3KcPnyatau NMOxET npNBecTu K cepBe3HbIM TpaBMam I daXe Cmeptn.
IpouHTaTe n co6JIoJaTe BCE yka-3aHnI NO TexHnke 6e3OanChOCTn INHCtpyKcII N O kCpNpyaTaun DaHHO pyKOBoODCTBa, a TaKKe pyKOBoDCTBa NO 3kCnPyaTaUn, O KOTOpbIX IDeT peB, Do IcNoJb3OBaHnI ZenHOI pInbl!

PPEyPExEHNE! Onachocb cepbe3HbIX TpaBM.
IobpeJeHne DeTanee cenHOI Nnbl MOxET npNBecTN K cepBe3HbIM TpaBMaM.
BbINOHnIte Bn3yaJIbHbI OCMOTp nepeK KaJdbIM NcNoIb3ObaHneM, yTo6bl y6eINtbcraB TOM, yTo cENHa- rNIIa NOnHocTbIO CObpaHa n He coOpkNT NOBpeKdEHHbIX INIIN 13- HOWeHHbIX DeTanei. Bce npedoxpaHnTeNbHbIe 3aUHTbIe ycTpoICTBa DOJIxHbI NCpabHO fYHKUHOHropoBaTb.
5.1 3apka aKKymyTopa (06,07)

OCTOPOXHO! Пожарoonacnoctb пи зараздke!
HarpB 3apAnHO yCTpoNCTBa moKet npNBecTN K NoXapy, ecn erO nOCTaBnTb Ha JERKO BOCnIaMeHraUoNeCRA NOBepxHOCTn H He OBeCneuNTb DoCTaTOHy BOHTnJIaCNU.
Bcerda nCnoB3yIte 3apAHOe y- cTpoiCTBO Ha HeropUoye NOBepxHOcTn IN B HeropUoye CpeJe.
Pn Heo6xoDnMoCTn: OcBo6Onte BeHTnIaUOnHHbI OTBepCTnI.

ПРИМЕЧАНЕ
Ipepe npBbIM nCNoB3OBAHnEm aKkyMnyTOp Heo6xOdmo NOnHOCTbIO 3aprDITb. AKKymyTOp MOXHO 3apxKaTb npNIO6OM yPOBHe 3apra. IpepbBaHne 3aprKn He npINBOIDNT K NOBpeJDeHNIO aKKymyTOpa.

ПРИМЕЧАНЕ
БларуавOTOMATNueckomypacno3-HabAHU yPOBn 3apya BO Bpem 3aPdKn aKKMyJrTOp 3aunuEh OT nepepy3KN, TaKIM oBa3OM, MoKeT OCTaBaTbCBy 3apAHNOM yCTpoiCTBe B TeueHne ONpeDeJIeHHOro BpeMeH, Ho He NoCTOraHHO.

ПРИМЕЧАНЕ
Iopno6Hocn CM. BOTdJIbHbIX pyKOBOcTBax NO 3KcNpyaTuIN K aKKymyTTOpy I 3apAnHomY yCTpoiCTBy.
1.ПоДКИHOnTe aKKMyJЯrTop (06/1) K 3apAnHOmy yCTpoiCTBy (06/2, 06/a), a 3apAnHoe y-CTpoiCTBO K cetn (06/3, 06/b).HaunhaeTc8 3apAnka. ИndkaToP Ha 3apAnHom yCTpoiCTBe rOpNT 3eJIeHbIM cBeTOM - aKKMyJЯrTop 3apXKaETCra.
2. 06paaTe BHMaHne Ha INdkaTOpbI COCTOHN3apJa aKKymyTAToPA (07).POnHa3apJaKn pN NOnHOM 3apJe DnITcN pNmepHO 2,5 Yaca. 3apJa npeKpaAaETcN aBTOMaTnueCKN, KOrJa aKKymyTAToP NOHOCbIO 3apJNTcN.
3. OTKIIOUHTe aKKyMnyTOp OT 3apAHOro y- cTPOJcTBa (06/a), a 3apAIDHOe ycTPOiCtBO OT cETn (06/b).
5.2 3anpaBka macna JIJIcMa3KN NJIbHOJ cenn (08)
BHIMAHNE!
OnachocTb NOBpeXdEHNr cENHOIJIbl
EcIn B 6aKe CnNkOM MaNo IIN HeT Macna DnA Cm3Kn PnIbHOJ cEN NnEcNn OHO BvICyUeHO/CKJIeEHO, 3TO MoKTe PnIBeCTN K cepBe3HbIM NOBpeJdeHNrM cENHO Nnbl. BbICYuBaHne/ CKJeNBaHne Macna DnA Cm3Kn PnIb-HoNcNn MOKeT PnIBeCTN K NOBpeJdeHNIO MacNOHEcyux DeTaJIeN INn MacJrHO HAcOca.
IobpeKdEHe TaKke npOcXoHt npn IcNoIb3OBaHm Otpa6OtaHHoro Macna. IcNoIb3OBaHne Otpa6OtaHHoro Macna npBODNT K BpeDHomy BO3DeiCTBnIO Ha OKpyKaIOUyO cpeNy!
3aneTe Macno IJRA CMA3KN NINb-HoI cENB 6aK nepeB BBODOM B EKCnPyatauHO.
He nCnoB3yIe Otpa6oTaHHoe macnO!
3anonHnTe 6ak HObIM Macnom IЯ Cma3kn PnIbHOJ cENI camoe IO3dHee npKaoDOn 3aMeHe aKKyMnyTopa.
ABTomatuecka Cma3oHna CnCTMa HenpepbIBHO CHabKaet Macnom NnIbHyO cenb HnHaPpABJIOU OINHy BO Bpempa60tbl. MacnoDnA CMA3Kn NnIbHO UeN 3aunuaet OT KoppO3nn I npexDeBpemeHHoro n3Hoca. Jn Heo6XoDMORO Cma3bIBaHnN NnIbHO UeN B 6ake BcerDa DOJXHO HaxODHTbcra DoCTaTOHoe KOInueCTBO Macna DnA CMA3Kn NnIbHOu cenn.
Дя СмаьВаньпиьнгс龟ин HanpaBЯHо- 贝电 WINbI NcNoB3yIe TOlbKO KaueCTBeHHoe 3KoIOnuHoe,бIoNOrnueckn pa3naraIOUeecr MacNo DЯ Cma3Kn PnIbHOBцEN, TpaHCnOpTpyIte I XpaHInTe MacNo ToIbKO B pa3peUeHHbIX IN COOTBeTCTBeHHO MapKnpoBaHHbIX EMKOCtAx.
Ipepe KaKdbIM NcNoJb3OBAHneM npKaKdoj 3aMeHe aKKymyIaTopa cNe dyet npOBeprTb ypoBHe MAcna I DOJIbBaTb MaCNO dIra CMa3Kn PnIbHOI CEIN B CInyae Heo6XoDmOCTN:
- Пюверъ Te ypoBeHb Macna uepe3 cmoTpoBoe okHo 6aka (08/1). B cmoTpoBOM okHe BcerDa dOJxHO 6bITb BnDHO MacNo. He donycka-etcra npeBblIeHne MNHMaIbHOro mAKCmMaIbHOro ypoBHa macna.
- 3anonHnIte Macnom dIy cMa3Kn NnIbHOu cn nnpe3 3a npabOuyh I WtUep (08/2), ecnn Heo6xOIMO.
5.3 Поверка pa6otocnoc6hoctn Topmo3a ceH
Jenna nmeT pyHOn TOpMo3 cenn, KOTopbA kTNBnpyETc NOMOsbIO pbIaRa TOpMo3a cenn, HanpImep, B cnUae OTdauN.
Pn cpa6aTbIbAHmN TopMo3a Zenu ZENHaa NnA n DBnIaTeJIb MTHOBeHHO OCTaHaBJIbBAOTcra.

ONACHOCTb!
Onachoctb IJIa KUN3Hn N3-3a He6peK-Horo o6paueHn!
He6peXHoe HnepeBnDcHHOe DbIXeHNy cENHOI NIIbI MOrTy PnIBecTn K CaMbIM cepbe3HbIM TpaBMam IIN daXe CMePTN.
Pn pa6ote c ceHno nIIOu pyKOBOCTByNTecb COOpaKeHnAIM 6e3-ONaCHOCTN HHe TepaHTe KOHcHTpaCNU.
PnIe6IOKINPOBAHNNTOPMO3aZe- HNe HAXIMaHTe HN Ha KaKoB Bbl- KIOUaTeJIb.

PNEyNPEKDEHNE!
Onachoctb dIy JN3Hn npck TjKeJbIX TpaBM n3-3a HeNCnpaBHORo TOPMo3a cenn
Ecnn Topmo3 ceni He pa6oTaET, HapnI-Mep, B cnyuae OTdauH pa6oTaIOUeN CEHN0 NIIbI, 3TO MOKeT npNBecTN K CaMbIM cepbe3HbIM TpaBMam N daXe CMeptn onepaTopa.
PpOBepeIe TOpMo3 ceni nepeKKaXdbIM Haayanom pa6oTbI.
He BkIouaIte cenHyIO nIy,ecn TopMo3 cENn HeNCpAbeH.B 3tOM clyuae o6paTntEcB 3a npOBepKoI cENHO NIIbI B CneUaIIN3NpOBaHNyIO MaCTepCKyIO.
5.3.1 Поверка Торmoэцени ри вкlioуehHom DBnraTeJIe (09)
- Изгелкite akумларTop (сm. олава 6.3 "YcmaHObka u u3eNeueHue akyMylamopa (14), Cmp. 460).
- TTo6bI pa36IOKIpOBaTb TopMo3 cen, nepeMeCTnTe (09/a) pbUar TopMo3a cen (09/1) B HAnpaBHeHn DyroBoi pyKu (09/2). PInbHa- Ra cenb MoKeT npOBopauHBaTbcr pykoN.
- YTO6bI BKHOnuHTb TOPMo3 cenn, NOBepHnTe (09/b) pbUar TopMo3a cenn (09/1) BnpeEi. NInbHa r cenb He dOJIxHa npOBopauNBaTbCra.
5.3.2 Поверка Торmoэцени рпьБыкlioуehHom Двигател (09)

ПРИМЕЧАНЕ
Pepd BkHueHem cenHOI p3-6nokpyTe TOpMO3 cenn.
- Kpenko DepeKnTe ceHnyo nny 3a DyroByo n 3aDHOIO pyky.
2.ПеремecHTe (09/a)pbUarTopMo3aцENn (09/1)ВнанразовиPyuKN(09/2) npa36IokpyTe TopMO3цENn. - BkIIOUHTe DBUNrAteJIb.
4.Перемecntte(09/b)pbyarTopmo3aцen (09/1)ВпepED.IINbHЯцьиДвURATeNB DOJXHBI HemeДпeHHO OCTaHOBITbcr.
6 YNPABJIENHE

ONACHOCTb!
OnachocTbДЯЖИЗНиOnachocTb TЯкелыхТраВМ.
He3haHne yka3aHn no TexHnke 6e3o- nacHOCTn INHcTpyKcNn NO 3KcNpyaTaCn MOKeT npNBecTn K cepBe3HbIM TpaBMam N daKe CmepTN.
IpouHTaTe n co6IouaTe BCE yka-3aHnNo TeXnKe 6e3oNaChOCTn INHcTpyKcNn No 3KcNPyTaCn DaHHO pyKOBoDCTBa, a TaKKe pyKOBoDCTBa NO 3KcNPyTaCn, O KOTOpbIX IeT peYb, Do NcNOJIb3OBaHnue cENHO nnbl!
Co6nIouaIte HaunOHbHbIe NOLOKeHnpeTnHTpyUOuIe DOnyCTmOe BpeMpa-60Tbl.
O6xbaTnte 3aHIOpyknypapBoi, aDyroByIPOpyknyJIeBOIpyKoi, nUdepXnBaIte y-CTpoIcTBO.
He otnyckaai Te pyuKn, noka pa6oTaET DnurataTeJIb.
He nCnoJIb3yIte cENHyIO nIly:
Pn yctaioctn,
PnPiIOXOMcMOyBCTBUN,
IOBBO3eINCTBnEMaIKOROJMaMeNKA-MENTOBHnHApKOTNKOB.
6.1 PpOBepka Macna dIa Cma3Kn NJIbHOJ cenn
Iopraok deiCTBn CM. 2naea 5.2 "3a npaaKa macna dna cma3ku nunbhoi ueu (08) Cmp.458.
BHIMAHHE!
Onachoctb noBpeKdEHHa cenHoi nnIbl
EcN B 6aKe CnUkOM MaNo IIN Het Macna DnA CMa3Kn PnIbHOJ cEN NnEcN OHO BbICyUeHO/CKJIeEH, 3TO MOKeT npNBecTN K cepBe3HbIM NOBpeJdeHNrM cENHOIbI. BbCyuINBaHne/ CKNeINBaHne Macna DnA CMa3Kn PnIb-HO cEN MocKe T npNBecTN K NOBpeJdeHNo MacNoHeCyUx DeTaJe INn MacJIraHOrO HaCoca.
NobpejdeHne TaKke npocxOHT npn IcnoIb3OBaHn Otpa6oTaHHOro Macna. IcnoJIb3OBaHne Otpa6oTaHHOro Macna npINBOJNT K BpeHOMy BO3DeiCTBnIO Ha OKpyKaIOUyO cpey!
Ipeed hauajom paobtby6eHITecb, yTO B 6ake DoCTaTOUHOe KOIN-yeCTBO Macna dJa CMA3Kn NInbHOJ cenn.
Ecn npoBHeMaCna dIa Cma3Kn NnIbHOI cENHn3Kn, 3aONHnTe cenHyIO nnIy.
He nCnoB3yIe oTpa6oTaHHoe MacnO!
6.2 HaedeBaHne noaChoi CnCTembl (10)-(13)
YCTAHOBNTe aKKyMylrTOPHyIO NORCHyO CNCTEmy, KAK NOKa3aHO Ha pnc. (10)-(13).
6.3 YcTaHOBka N n3BneueHne aKKMyJrTopa (14)
BcTaBa kkyMnyTopa
- BctabTnTe (14/a) aKKymyIaTOp (14/1) b aKymyIaTOpHyIO IORChyIO CnCTeMy (14/2) do ynpa.
N3BneueHne aKKymyIaTopa
- HaxMMTe u ydeprXnBaIte KhoNky fNKcau (14/3) ha aKKymyItope (14/1).
- BbInbTe (14/b) akKymyTApTOp (14/1).
6.4 YctaHOBka nCTouHnKa nHTaHn (15, 16)
MOHTAX COeHHTeJIbHOrO Ka6eJra
- BbipOBHnTe n COBmecTnTe nepBbI WTeKepeoedHHnteBHorO Ka6eMa (15/1) c BeDyuMn ZanPamN HAnpaBnaIOUzIM KeNo6OM WTeKepa AKKyMylTopHOI NOrCHOI CnCTeMbI (15/2), CnerKa NOBopaunBaIte No YacBOi CTpeJIke Do Tex nop, NOKa He 6yDet HaKaT
BbIKIIOuATEteIb 6IOKIpOBKn I pa36IOKIpOBKn (15/3).
2. CoBmecHTe BTOPOJ WTeKep CoeINHITeJIb-HORO Ka6eJRA (16/1) c HAnpabLJIOUcIMN can-ΦAMN i HAnpabLJIOUcNI JKeI06 rHe3Ja NOd-KJIIOUeHnry UcTPOJCTBa (16/2), NpeMeCtNTe (16/a) erO B rHe3DO NOdKJIIOUeHnry I NOBepHHTe HEMHOro No YacOBoN CTpeJIke Do Tex NOP, NOKa He 6yDeT HaxKaT BbIKJIIOUaTeJIb 6JIOKIPOBKn i pa36JIOKIPOBKn (16/3).
DEmoHTax CoeHHnteHoro Ka6eJra
- NotaryHnTe Ha3aJ (15/b) BbIKIOuATeJIb 6IOKn-POBKN I pa36NoKInpOBKn (15/3), HEMHO NO-BepHnTe WTEKeP BNeBO N BbITAHnTe erO (15/c).
- Notarynte Ha3ad (16/b) BbIKIOUaTeJIb 6JIOKINpOBKN I pa36JIOKINPOBKN (16/3), HEMHOro NOBepHTe WTEKeP BNeBO N BbITAHNTe erO n3 rHe3da NoDKNIOUeHn yCTpoIcTBA (16/2).
6.5 BkIIOueHne N BBIKIOueHne DBrarTeJIa (17)

OCTOPOXHO!
OnachocTb nobpeKdEHHn opraHOB cnyuxa!
Pn pa6ote ueHOnI nIbI CO3daeTcCnIbHbI IyM, KOTOpBIMoKET npNBecTn K HApUWeHnCnyxa.
Hocnte 3aunTHbIe 6epu npn pa-6oTe c cenHO nnIO.

ПРИМЕЧАНЕ
PepeB KJIIOUeHnEM cENHOI pIbI pa3-6JOKpyTe TOpMO3 cenn.
BkHoueHne DnurataTeia:
- Pa36nokpyTe TOpMo3 cenn.
2.BoJIbIIMnIaJIbIeMHaXmIteNyIepJXnBaITe KHOJKy 6JOKIpOBKn (17/1). - Haxmte u ydepXnBaIte KHONky pbIyra ra3 (17/2).
- OTnycHTe KhoNky 6boknOBKn (17/1). Nocne 3anycka ueHoi nnbly ydepxnbatb KhoNky 6boknOBKn He Tpe6byetc. KhoNka 6boknOBKn Cnyknt IJn ppeoTbpaueHnna He npedHaMepeHHoro 3anycka ueHoi nnbl.
BbIKIIOueHHe DnIRaTeJIa:
- Otnyctnte pbiuar r3a (17/2).
6.6 Поберка Торmoэци
Iopraok deiCTBm cm. 2naBa 5.3 "Ppoeepka pa-bomocnoc6hocmu mopmo3a ueu", Cmp. 459.

PNEyPExKDeHne!
Onachoctb dIy JxN3Hn n pNCK TJXeJIbIX TpaBM I3-3a HeNCnpaBHOrTO TopM03a cENI
Ecn TopMo3 ceni He pa6oTaET, HapnMep, B cnyuae OTdauH pa6oTaIOUeien CENHOI NJIbI, 3TO MOKeT npVBecTN KcMbIM cepbe3HbIM TpaBMam I daJce Cmeptn onepaTopa.
IpoBepaTe TOpMo3 ceni nepeKaKdbIM Haayanom pa6oTbl.
He BkIouaIte cenHyIO nIy,ecn TopMO3 cENn HeNCpABeH.B 3tOM cnUyae o6paTITecb 3a npOBepKoI cENHO nnblB CneuaJIN3npOBAHHyIO MaCTepCKyIO.
6.7 YBeJIuYeHne/YMeHbIeHne cKOpocTn ПИьНоцп [Функця ржIMOB Eco/ Power] (18)
C cyHKnepeKIMOB Eco/Power moXHO yBeJIuHTb mIyMeHbWNTb CKOpOCTb nJbHOJ cENI NO XeJIaHIO. Pn6OJIee BbICOKI CKOpOCTN (peXIM Power) BpempaTbI aKKymjTopa cokpaataetcra.
- Haxmte KhoNky (18/1). CBeToaNoHbI NH-dnkaTOp (18/2) ropnt, kOrda BkIoUeH peXmM Power.
- Haxmte KhoNky (18/1) eue pa3, yTo6bI BblKIOHHTb peXIM Power.
Ecni yCTpoiCTBO BbIKIIOuHTb, a 3aTeM CHOBA BKIOUHTb, OHO 3aNyCKaeTc r NocJeHHeBbl-6paHHo HAcTPOiKOi.
IcnoB3OBAHHbIe 6aTapeiKn n aKKyMyJrTOpbI He OTHOCrTcR K 6bITOBOMy Mycopy.Ero Heo6xOJIMo co6npaTb n yTuIN3uPoBaTb OTdEJIbHO!
YTo6bI 6e3oNaCHO BbHyTb 6aTaapeKn HnAkkymyIaTOpbI N3 3JIeKTPnueCKoro yCTpoi-CTBa,a TaKKe IOnyUHTb INΦopMaunIO OnxTINe HN XmUneCKOIN CnCTeme,CM.DONJIHNTeNbHyIO INΦopMaunIO B pyKOBoDCTBe NO3KcNpLyatauIN NIn yCTaHOBKe.
BnaJeIbCuI nn noJIb3OBaTeIe 6aTaapeek nnn aKKyMnyTOpOB 063yOTc BepHyTb y-CTpoIcTBo nocne IcNoJIb3OBaHnC corlacho 3akOhy.Bo3BpaOrpAHuINBaETc DOnycTmblkONUYeCTBOM npIO6peTeHHbIX nn yTNIIIN3NPOBaHHbIX TOBaOB dIa DomauHero XO-3raJCTBa.
NcnoIb3OBaHHbIe 6aTapeMOryt CoepKaatb BpeHbIe BeIeCTBa IIN TReKeIbIe MeTaIbI, KO-TopbIe MOrYT HaHeCTn Bpe OkpyKaIOUeI cpeIe N yUeP6 3dOpOBbIy. NobToPnaI nepepa6Otka NcNoJIb3OBaHHbIX 6aTapeKIn N NcNoJIb3OBaHne pecypcoB, CoepKaUnxCBy HNX, CnOCo6CTByET 3aUHTe 3TNX DByx BaJhBix AKTNBOB.
CnMBOJ nepeuepkHyTORO MycOPHORO KOHTeHepa O3Haayet, yTO 6aTapeKNI aKKyMyJIrTOpbI HeJIb-3Y yTNIN3NpOBaTB BMeCTe C 6blTOBbIMN OTXoJaMN.
Kpome TOrO, NOc CnMBOJOM MyCOPHOrO KOHTeHepa HaneceHbI CnMBoJIbI Hg, Cd nIi Pb. 3To BblrAINT CNeDyUOuIM O6pa30M:
Hg: 6atapea coepknt 6onee 0,0005 % pty
Cd: 6atapea coepknt 6oJee 0,002 % kaMnA
Pb: 6atapea coepxnt 6oinee 0,004 % cBnHua
AkkymyIaTOpbI 6aTapeiKIMoXHO 6ecnIaTHO CdaTb B CNeDyUHIX MeCTax:
TocydapctBeHHa cnj6a no yTuHn3aunn nn nyHKt c6opa (HaNPmep, MyHnIpaIbHbIe cknaIbI)
Mara3nHb6aTaapeek n aKKymyIToPOB
IyHKtbl npHema o6uei cnCTembl BO3BpaTa NCNoJIb3OBAHHbIX 6aTapeek yctpoiCTB
Пунктул пиема n3rotobntela (ecn OH He YBЯETcYJIeHOM ObbeDINHeHHOu CnCTembl BO3Bpata)
3TN 3aBHeHn DeiCTBnTeHbI TOJbKO DnA kKymyTOpOB n 6atapei, KOTOpBie npOdaOTcB CtpaHax Ebponeckoro Co103a n COOTBeTCTByIOT DnpeKtBe 2006/66/EC. B cTpaHax 3a npdeJaMn Ebponeckoro Co103a MOYr DeiCTBOBaTb DpyrHe npabHa, kacaHnuecR yTnIn3aun 6atapei n aKKymyTOpOB.
12 CEPBNUCHOE OBCJNYKUBAHNE
Ecni y Bac ecTb BONPOcBi OTHOCnteNbHO rapaHTn, peMOHTa NIN 3anachbIX qactei, o6paTn-TeCb B 6IinXaIiN cepBnchbl ueHtp AL-KO. A-dpec MOxHNo haInB V INTEpHeTe no cJeDyUoMeMy aDpecy: www.al-ko.com/service-contacts
13 TEXHnueCKNE XAPAKTEPNCIKN
HanpajkeHne Ha BbIXoJe 42 B (noct. Toka)
Dnana30H pa6oynx TemnepaTyp oT 0do +40^
14 YCTPAHEHNE HENCPABHOCTEIN

OCTOPOXHO!
Onachoctb TpaBMPOBaHn
DnKyuunec DaTaN n DeTaN C OCTpbIM KpaM MOrY T npBecT N TpaBMam.
Bo Bpemr Texo6cnyKuBaHnry, yXOda n OuchTkn pa60TaIe B 3aunTHbIX nepuATkax!
BbIKIOHTe yCTPOINTOHnN3BNEKIne aKKMyJATOP!
HecnpaBHOCTb PnUHa CnocO6bI yctpaHeHna
BnraTeIb He pa6oTaET. Het HanpJxKeHna aKKymyra
Topa.
IopyuHTe 3JIeKtpnky npOBepntb NHHIO 3JIeKTPoCHa6KeHn.
Cpa6oTana 3aunTa oT nepepy3Kn.
IOnIOxJNTe, NOKa 3aUNTa OT nepepy3KN He BOCCTaHOBn TITAHne.
HanpaBnaIouaI shHa n nnb-Ha cenb HarpeBaIOTc. IoRbJIeHHe dblMa.
TopMo3 ueHn BbIKIOueH. Pa36IOKpyTe TopMo3 ueHn.
AkkymyIaTOPHaa cenHa a nla
PpOn3BODnTeJIb
AL-KO Geräte GmbH
Ichenhauser Str. 14
89359Kotz
Германя
Лицо, OTBETCTBeHHoe 3a COCTaJIeHne DOKyMentTa
Andreas Hedrich
Ichenhauser Str. 14
89359Kotz
Германя
CepinHbI Homep
G4013022
Tnn
CS 4235
DnpeKTHBbIEC
2006/42/EC
2014/30/EC
2000/14/EC
2011/65/EC
TapMOHn3npoBaHHbIe cTaHdApTbI
EN 60745-1:2009+A11:2010
EN 60745-2-13:2009+A1:2010
EN 55014-1:2006+A1:2009+A2:2011
EN 55014-2:2015
YpoBHeB 3ByKOBoMouHOCHTN
EN ISO 3744
I3MepeHHbI/rapaHTnpoBaHHbI
103,3 έБ(A) / 108 έБ(A)
OueHka COOTBETCTBnA
2000/14/ECПиложенve V
CeptnuΦnkat COOTBet
CTBNA Tnna N3deJNRA CTaHdapTAM EC
M6A-17 12-47028
OTBeTCTBeHHbI opraH (2000/14/EC)
TUV SUD Product Service GmbH
Ridlerstraße 65
80339Munchen
Германя
Nr. 0123
Kotz, 01.12.2017 r.

Dr. Wolfgang Hergeth
Managing Director
IPEKJIAD OPINIHJY NOCIBHNA 3 EKCPIYATAUII
3mict
1IhOpMaia npo noci6HnK i3 ekcnnyatau 474
1.1 CmboJn Ha TtTybHi cToPiHci 474
1.2 YMOBHI no3haeHHra cnHahbhi cnoBa 474
2Onnc npncptpo 474
2.1 BnKOpncTaHHa npn3HaueHHaM 474
2.2Пиклади He npabunbHoro 3actocyBaHHa .475
2.3 3aIIuKoBi pU3nKu. 475
2.4 3anobixhi Ta 3axnchi eIemEnTn ......... 475
2.4.1 KOHTaKTop yBIMKHeHHra 475
2.4.2 RaJbMo NaHOra / BaXJIb raJIbMa NaHcIora 475
2.4.3 3axnCT BiD nepeBaHTaXeHHra.... 476
2.5 YMOBHI no3HaueHnHa npicTpoi 476
2.6 KomnJIeKt noCTaBKn 476
2.7 Bi3yaIbHn orIy I Bnpo6y (01) 477
3ПраинаТexHik6e3neKu 477
3.1 3araJIbHI peKOMeHdaaui 3 6e3neKe n e- neKTpoIHcTpymEHTy... 477
3.1.1 Be3neka ha po6oOmy micui... 477
3.1.2 EneKtpnHa 6e3neKa 477
3.1.3 Bezneka IIOeI 478
3.1.4 KopncTyBaHHeJekTpOnnIKoIO i NOBOdKeHH 3 HeI 478
3.1.5 KopncTyBaHHaKymyIaTOpHIM npnlaam i NOBOxKeHHa 3 Hm...479
3.1.6 Cepbic. 479
3.2IpaBnlaTexhikn6e3neKn niJvac po6oTu 3 NaHcUROBmN nIaMn... 479
3.3ПичИн 3ВОРТНьоI BiДачI ta 3a-CTepeЖeHЯ ДЯ ONEpaTopa....480
3.4 Ihctpykuii 3 6e3nekn akymyIaTopa .... 480
3.5 Ihctpyku 3 6e3nekn 3apndHoro npn- cTpoU 481
3.6 IpaBnlaTexHikn 6e3neKn niJ qac po6oTu.. 482
3.6.1 Onepatopn 482
3.6.2 Yac po6oTu 482
3.6.3 BiopauiHe HabaHTaKeHHra 482
3.6.4 AkycTnHe HabaHTaXeHHra 483
3.6.5 Po6oTa 3 eJekTpponnkoIO....483
4 CknaaHnra 484
4.1 MoTax HapmHoi (02, 03) ....484
4.2 MoHTaX NIIJIbHOrO NaHcIHa (02, 03) .484
4.3HaTgAHHnIyIbHoro IaHOra (04,05) 484
5 BBeHeHH B ekCnPyTauiio. 485
5.1 3apdkaHHaKymyTopa (06, 07) ...485
5.2 3aJIbBaHHJ NaHcIHorOBOr MaCTnJa (08) .486
5.3 IpeBipka npaue3daTHocTi raJbMa naHcIra... 486
5.3.1 NpeBipka ralbma naHOra 3 yBIMKHeHm DBrHyHom (09) .486
5.3.2переверка raьма lanцura 3 BIMKHeHIM DBnryHom (09).....487
6 Eknpnyataia 487
6.1 IpebeipTe IaHIOroBe MaCTnIO.....487
6.2HaIraHnI NOaCHOI CnCTeMn (10) - (13) 487
6.3 BcTaBka/BuJaIeHnHa aKymyJrTopa (14) 487
6.4 BcTaHOBnEHn JKepeHa XnBnEHn (15, 16) 487
6.5 YbIMKHeHHr/BmMKHeHHr DnBryHa (17) 488
6.6 NpeBipka raIbMa IaHcIora. 488
6.7 36iNbWeHnra/3MeHWeHnra WbNkoCTi nIyJIbHoro IaHcIora [Функця pe- xIMIB Eco/Power] (18) .488
6.8 NpeBipka pIBn3apny akymyIto- pa—«BnBneHn pyxy》(07)……488
7 Po6oça noBéɪnka Ta cnocić po6oTn......489
7.1 3BaJIIOBaHHa DepeBa (19,20)489
7.2 O6pi3aHHr iINOK (21) 490
7.3Попeчне розиювань deprета (22-25) 491
7.4 PonepeueHe po3nnIOBaHHn nnIOMaTepiAnib. 491
8 Texhiue He 06cnyrobyBaHHa Ta dOrnld .... 491
8.1 PpeBipka Hatay IaHcIora 492
8.2HaTgAnHnIyIyIbHoro IaHcIgra (26) 492
8.3 OuHueHHBHyTpihbOro npocTopy 3ipouKn 492
8.4 IpeceTaHOBka 1WBnKO3aTnCKHOro npncToPO (27) 493
8.5 NpeBepika, noBepTaHH Ta 3MaUyBaHHHaHpMaHoi UHH (28, 29).... 493
8.6 TaBnucy o6cnyroByBaHnHaHcIora .. 493
9 TpaHcnpTyBaHHra 494
1036epirahnra 494
11 Ytunizaiia 494
12 CepBicHe 6cnyroByBaHHa 495
13TexHiHxapaKTepcntn 496
14 YcyHeHH HeCnPaBHOCTe 497
15Garantia 498
16 Dieknapaig npo BiinobiHictb cTanap-Tam EC 498
1 IHΦOPMAUJI IPO NOCIEHNIK I3 EKCPIIYATAUII
Himeuzka Bercia Micntb opnirhaibn noci6nki 3 ekcnnyatauii. Bci ihi mobhi bepcii -e nepeknaOpnrHaIbHoro noci6nka 3 ekcnnyatauii.
O6OB'3KOBO npoHTaTe uei noc6HnK i3 ekCnIyatauii neped BBeDeHHaM BekCnIyatauio. Ie e Heo6xIDHO yMOBOIO 6e3neuHO ta 6e3BIMOBHO pO6OTn.
3aBxDn TpMaIte uei nocibnk i3 ekcnnyatauiPi dykoH, o6 npouHTaN Ioro, kuo Bam 3HaOobTbcra IHopmaia npo npictpi.
IpeedabaTe npncTpim iHnM oO6am TINbKn pa30m 3 nIM noci6HnKo m3 ekcnjyatauii.
IpoountaTe Ta DotpmytecBka3iBOK 3 texhikn 6e3neKn Ta nonepedxehb, 0o MicTAYbcB Ucbomy nocibNky 3 ekcnnyataii.
1.1 CnmboJn Ha TntyIbHi n CTopIHci
yMOBHe n03Ha- yehn
3NaueHH

CIMBOJ noci6Hnka 3 ekcnnyataui
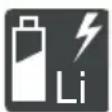
CnmboI JIJI npncToIO 3 JITiH-nHm akymyJrTOPOM
1.2 YMOBHnNo3HaueHH Ta CnHnBHi CIOBa

HEB3NEKA!
Bka3ye Ha He6e3neuHy cnTyauio, Ka, KaIO II He yHnKHyTN, pN3BOoNTb Do CmepTi a60 cepNo3Hnx TpaBM.

NONEPEDKEHHRA
Bka3ye Ha noteHuiHo He6e3neuHy CHTyaui, Ika, kio II He yHnKHyTN, MoKe npn3BeCTn Do cMepti abo cepno3Hnx TpaBM.

OBEPEXHO!
Bka3yHa NoteHuiHo He63neHy CnTyaio, Ka, KaIO II He yHNKHyTN, MoKe np3BecTI TpaBMvBaHHa NERKOI Ta cepeHbOITJAKKOCTI.

YBARA!
Bka3ye Ha cnTuayuio, kka, kkuo II He yHnKHyTN, MOKe Ipn3BeCTn Do MaHOBoro 36ntky.

ПРИМITKA
CneuiJIbHI BkazIBKn JnKpaIoro po3y-minHa Ta noJereHHe np60Tu.
2 OINC INPNCPOHO
Ucbomy noci6Hky onncaHO eNeKtpnuHy naHIOROby nny 3 KINBneHHm BiD akymyIaTopa.
2.1 BnKOpncTaHnHa 3a npn3NaueHHaM
IaHIOROBa IIpa03paxObaHa BnKJIIOUHO IJa BnKOpNCtAHB DOMaIHbOMy Ta npicaIbHOMy roCnoApCTBi. Y ciN obNaCTi 3hAxODntbcr IaHIOROBa IIpa, kY MoKHa BnKOpNCtATn IJa Ier
Knx po6it i3 po3nnHOBaHHn DepeBnHn, HanpnKnad:
po3nHIOBaHHnnOMaTepiaiiB;
Bupi3aHHKINBOJNTIB;
po3nIIOBaHHaIOB.
3aBnEeKtpHOMy npBOy aKymTOpHy NaHIOROBy NlIy MoXHa BnKOpNCTOByBaTu DnPo3nnIOBaHHa DepeBHN He TIlbKn Ha BiKDpToMy nobTiPi, ani bnpimiuHHi. Byd-kaHe iHwe 3actocyBaHHa OKpIM ONicaHOrO, BBAkaTbcra BnKOpNCTaHHaM He 3a npn3NaueHHaM.
AkymyjTOpHy IaHIOrOBy NnIy MoXHa BnKOpNCTOBByBaTN TiNbKN 3 TaKIMN KOMNOHeHTaMn:
AkymyIaTopHa noIcHa cInTeMa BTA 42 — No 3amOBJIeHHr: 127442
IiTi-iOHn aKymyTop - No 3aMOBneHHra: 127390
3apdHn npucptpi—C150 Li, N2 3amOBJIeHHa: 127391
Ue npncptpi npn3haeHO nI npBaTHORo BnKOpnCTaHH. Byd-ye IHwe BnKOpncTaHH a6o HeCAHKIOHObAHi 3mHn Ta DONoBHeHH KOHcTpyKuBBaXaOTbcBnKOpNCtAHHM He 3a npn3HaueHNi npn3BOJrTO do aHyIOBaHH rapaHTii, a TAKOX BTPATN BiINOBIDHOCTi (3hak CE) Ta BiIMOBBiD 6ydb-koBIDNOBIAJIbHOCTi 3a IKOdy, 3aBdaHy KOpNCtBuAeBi a60 TpeTI CTOPOHIBPO6HnKa.

OBEPEKHO!
He6e3neKa TpaBMyBaHHy pa3i BnKOpncTaHH He 3a npu3HaueHHam!
Po3nnIOBaHHeJeKtpOnnIkoUyXOpipiHNxTIN,0npoxoArytepe3depeBHy a6oInuMaTepiAnMozHe npN3BeCTNdoOTpMaHnTpaBMn.
BukopncToByTe eNeKtpOnnky BnKIOUHO IJIa IeKnx po6it i3 po3nIIOBaHHA DepeBHH.
IpepeD po3nHIOBAAHHaM BuaJAnTe 3 DepeBUNH yXkopiDi npedMeTn, HapnKnaD, CBAxN, rBNHTn, fITnHn.
2.2 PpNKJaHn HnpaBnJbHoro 3aCTOCyBaHHa
3a6bopoHeNo 3pi3aTn rIKN, kki po3taWobani npraMo a6o NiD roCTpM Kytom HAd onepaToPOM a6o iHsIMN oc6amn.
He BnKOpNCTOBuYTe dIa 3MaUyBaHNa IINJIbHOrO IaHcIOra BiDnpaCbObaHe MaCTnIO a6o MInepaNbHe MaCTnIO.
3a6oponeHo BnKOpncTOByBaTn npucpti y Bu6yOhe6e3neuHomy cepedobuui.
2.3 3aunukovi pN3nK
Habib 3a yMOBn BkOpncTahHn npcTpoIO 3a npn3HaueHHm 3aIIuIaIObCpN3NK, kI HeMOXnBO NOBHCTO BkIOUHTN. Y 3aJIeXHOCTi BiD Tnpy npcTpoIO Ta Ioro KOHcTpyKci HEMOXnBO BkNIOHTN HAcTyNHl He6e3NeKn.
KoHTaKT i3 BiDkPntMn 3y6aMn naHcIora (He6e3neKa OTPmAHnpaHn).
KohtaKT i3 IaHIOrOM, kIIN ige He 3ynHnBcR (He6e3neKa OtpMaHHra p3aHOi paHI).
HecnoiBaHn a6o Hepepe6aueHn pyx uHHn (He6e3neKa OTPMaHn paHn).
BiokpemJIeHHaCTINJaHciIora(pi3aHi paHN/He6e3neKa TpaBMyBaHHa).
BidokpemHnHaCTnH DepeBnH, 0o o6po-6JraTbcra.
IopuyennCnyx npacpo6oBpa3i HeBVKOpncTaanHn 3aco6ib 3axncty opraHIB Cnyxy.
2.4 3anobixhhi Ta 3axnchi eJemeHTN

NONEPEDKEHHI
Pn3nk OTPmamHna cepno3nX TpaBM Chepe3 MaHInyIaIcII 3anobixHMn Ta 3axnCHMn npncTporMn
MaHinylaqii 3aNo6ixHHMn Ta 3axnCHMN npnCTpOAMMOxyTb npn3BecTN Do OTPmAHnHcepno3Hx TpaBM niD yac BnKOpNCtAnHRe neEeKtpoNlKn.
YkoHomy pa3i He BmKaIte 3a-no6ixhi Ta 3axnChi npucTpo!
BukopncToByTe eNeKtpOnnky TINbKn ToDi, KOnN Bci 3anobixHi Ta 3axnChi npucTpoi cyHKioHyOt b npabnIbHo.
2.4.1 KOHTaKTop yBimKHeHHr
KoHn onepaTop kiIbKa pa3iB WbNIDKO BiIDKpne DpoceIbHy 3acNIHKy, eNeKTponNka BIMNkAcTbcra Ha deKiIbKa ceKyHd, uO6 3axNCtNTu eNeKTPOHky Ta NnIbHN NaHcIor. Y cIbOMy pa3i doueKaIteC, nOKn eNeKTponNky MoXHa 6ytu 3HOBy BBIMKHHTN.
2.4.2 RaJbMo NaHcIora / BaXJIb raJIbMa NaHcIora
IaanioroBa nna Mae pyHe raIbMo IaHiora,
Ke aKTHBycBcra 3a DonomoroIO BaxKeJraIbMa
IaHiora, HnprKnlaD, y BNpaKy BiDaayi. Y pa3i
CnpaBobyBaHHraIbMa NaHcIora NaHcIoroBa nnla i DnBryH MNTTEBO 3yINHRAOTbcra.
2.4.3 3axnCT BiD nepeBaHTaXeHHA
EneKtpoNnKa NoCTaHaCTbC8 O6NaHnHO 3axnCTOM BID nepeBaHTaXeHH, IIO BVIMNKaE DBNrHy y pa3i nepeBaHTaXeHH.
Iicra kopoTKoro nepioy oxoJooKeHHeJeKToPOnIKy MOxHa 3HOBy BBIMKHyTN.
2.5 YMOBHI No3HaueHHa npncTpoi
| Умовныеcano-чени | Знuchеня |
| ! | Будьтештою обереки пiod час користуваши постroduг! Користуваши постroduг! |
| Небезке вidiдач! | |
| Ев Б Д Д Д D D D D D D D D D D D D D D D D D D D D D D D D D D D D D D D D D D D D D D D D D D D D D D D D D D | |
| Н Д D D D D D D D D D D D D D D D D D D D D D D D D D D D D D D D D D D D D D D D D D D D D D D D D |
2.6 KomnJIeKt NOCTaBKn
AkyMnyTopHa IaHcIOrBa NIIa npN3HaYeHa DnBVKOpNCtAHnI 3IiTi-IoHHm aKymyJrTOpom PowerFlex (No 3amOBneHn: 127390).ДпЗapЯЖання akymyJrTOpaNotpi6eH 3apAnHn npncTpi JnA kymyJrTOpa PowerFlex (No 3aMOBJIeHn: 127391).
YBAGA!
He6e3neka noxkoJxHn npncptpoTa akymyITopa
Ku npicpi npaue 3 HnpabnlbHnAkymyIaTOPOM,TOeMOKe np3BecTu DO NOkOJeHHn PnucpTo TaakmyIaTopa.
Pnncpi npaioe TjIbKn 3 npu3Ha-ueHIM dIy cboRo aKymyTOpom.

ПРИМITKA
AkymyIaTOp,3apdHn npucTpI Ta no- RcHc CnCTema He BXoJrB y KOMnKeT NoCTaHaHH,ix MoXHa npu6aTu 3a OkpeMM 3AmOJIeHHM.
PioaNaKyBaHHnpeKoHaITeC,IO Bci KOMNoHEnTIOCTabJIeHi.
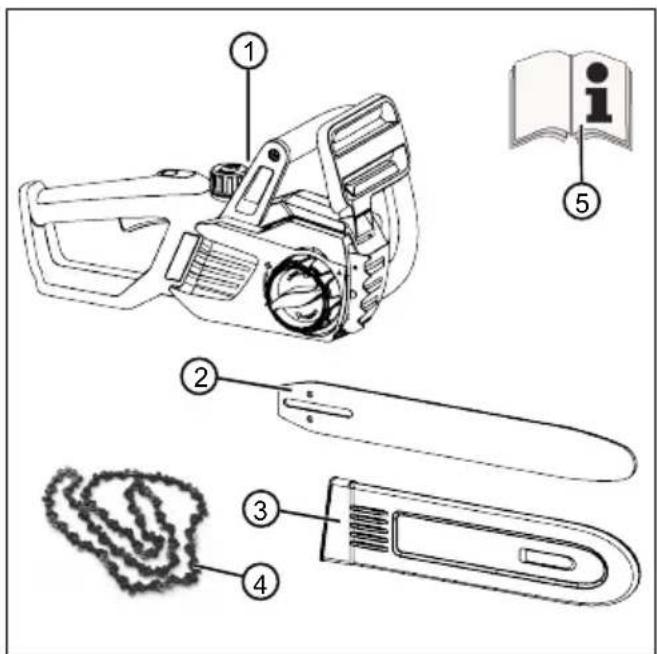
Hoomep
KOMNOHeHTa
1 AkymytnopHa IaHcIorOba Nila
2 HanpMaHa 1nHa
3 LaHcIyroBm 3axnCT
Ho- KOMNOHeHTa Mep
4ПиЯьнлянцor
5 Noci6HnK 3 ekCnnyaTauii
2.7 Bi3yαnbHn orIaD Bnpo6y (01)
Ho- KOMNHOHeTa Mep
1 LaHcIyroBn 3axnCT
2 HanpMaHa 1nHa
3ПиЯьнлянцior
4 3y6yata niiDnopa
5 Baiknb ranbma naHua
6 DyrroBa pyka
7 KpnuKa 6aka JnlaHnucorOBoro MaCTUHa
8 PanaJIb kepyBaHHra pexmamn Eco/ Power
93aHpyka
10 Baikibra3y
11 Khonka 6IokyBaHHa BaxeIra3y
12OrnaOBe BIKHO 6aKa IJaIaNHcIroBO- ro MaCTnla
13 Hizdo Jnla 3'eHyBaIbHoro Ka6enHO aKymyIaTopa
14 Koxyx 3ipoukn
15 WbNdko3aTnCKHn npncpti 3 cehTpajbHm 3amkom i o6epTOBm KJIb-cem
16 AkymyIaTOp*
17 3apAHHn npncTpii*
18 AkymyIaTOPHa nOraCHa cNcTeMa 3i 3'eHbJIbHIM Ka6eIeM*
*: He BxOuNTb y KOMnNeKT NoCTaHaHH, aJe DoCTynHO 3a TaKIMN HomepAMN 3aMOBLeHH:
AkymyIaTopHa noIa cncTeMa BTA 42 — No 3amOBJIeHHr: 127442
JIiTiI-oHHn aKymyJrTop - No 3aMOBNeHHra: 127390
3apdHn npucTpii — C150 Li — No 3amOBJIeHHa: 127391
3 ПРавиJA TEXHIKи BE3NEKn
3.1 3araIbHi peKoMeHdaaui 3 6e3neKn eNeKTpoIHcTpymEnTy

PONEPEDEXEHHRA
Ybaxho npoHTaTe Bci npabnla Texhik6e3neKa Ta Bka3iBKn.
HeoTpMaHH npabn Texhik 6e3neKn Ta Bka3iBOK MoKe npu3BeCTn Do ypaKHeH eJeKTPnHm Ctpymom, noKexi OToPMaHH TAKKnx TpaBM.
36epiraTe npabnTaTexhki 6e3neKu Ta Bka3iBKn DJI BAkOpncTaHHaBMai6yTHbOMy.
Tepmi《eNEKmponpuana》,oOeukopucmoeyembc8 npabunax mexniku 6e3neku,cmocyembc npunaie i3 kuehennm bID eNEkmpuHoi Mepeki (3 KaBenem KuehnenHu) Yu akymyamopa (6e3 KaBenu KuehenHa).
3.1.1 Bezeke ha pooboy Mici
Pobocha 30ha Ma6 Bytn YnctOTo Ta Do6pe ocBtIeHIO. Be3nai i norahe ocBItIeHnra — cynyTHNI HeuacnX BnnaKIB.
3a6bopohreTbcBnKOpncToByBaTH uee nektpponpnaD y Bn6yXohe6e3neuHomy cepeobnui, de e nerko3aumnti piHn, ra3n nn. EneKtpponpnaDi CTBOPIOt b ickpN, BiJ knx nI r3n moKyTB 3aropitncra.
KopncTyOuNcB eNeKTponpnuJaOM, TpMaIte dTe Ta iHux ocio Ha 6e3neHi BIdTaHI. KaIO BV BiDBOJIueTecr, BV MoKeTe BTPaTITN KOHTPOJb HAd eNEKTponpnuJa-OM.
3.1.2 EneKtpnHa 6e3neKa
UTeke npnlaNy maB iDnOBiDaTn KOHcIgrypaui po3eTK. 3a6opOHeo 6ydb-ramuHOM MoNΦikyBaTu wTekep. He BnKOpncTOByte aanTpepn pa3om i3 3a3emHeHMn eJeKtpopnlaadam. BnKOpNCtAnHnHEmoNΦikOBaHnx wTekepi i nIXoJxnpo3ETOK 3HNkye pN3NK ypaXeHHra eJeKtpnuHIM cTpyMOM.
YHnKaIte fi3nHOro KOHTaKTy 3a3emJeHNm NOBepxHMy, HApNKlaad Tpy6amn,paiaTOpAMn, pNTAmn Ta XOJOnNbHnKaM. Y pa3i 3a3emHeHHa Tina 3bIbWyeTbcpaN3k ypaXeHH eJekTpUHMM CTpyMOM.
Bepexitb eJektpponpnaB iD douyu n BOIOrn. NotpanHnBa BOnnBeJektpponpnaD niDbNtUe pN3NK ypaXeHHra eJekTpnuHM cTpyMOM.
He TarghItb 3a Ka6eIb XINBJIeHHra, 0o6 nepeMeictn, iDticn npnaad Yu Bi'd'EdHATn Ioro BID MepeXi. TpMaIte Ka6eIb Ha 6e3neHi BIdCTahi BiD MaCTnla, roCTpIX KpOMOK, DxepeN TeNla i npedMeTIB, 1O pyxaOTbcra. NookoJKeHHa afo 3a- nIpyBaHHra Ka6eIIO NiDBNUcE pN3NK ypa- XeHHra eJeKTPnuHIM cTpymom.
Ipaouc 3 eKtpnpnaom Ha Bynui, BnkopncToByte noobxBaIbHn Ka6nb, npdaTHn dJa noi6Horo BnkopnCTaHH. BnkopncTaHH cneiaJbHo npn3Ha-ueHoro dJa ekcnlyaTaui Ha Bynuci Ka6eIo 3HNXyE pN3NKy ypaXeHHra eJeKtpnHm CTpyMOM.
Y pa3i Heo6xidnocti ekcnnyatauii enek- TpO npnaDy y BONOROM cepedOBnCi CKOpNCaTteCra ABOTMaTHm 3anobixHnM BnMnKaueM, zo di c npn nOraBi CTpyMy BNtOKy. 3actocyBaHHra 3anobixHoro BVnMkaua 3nKye pN3NK ypaXeHHra eNeKTpnHnM CTpyMOM.
3.1.3 Bezneka IIOdei
Будьтeyвжн,стжгза cBoIMДями i KepuyTeCg 3dopOBm rny3dom nID yac po6oti 3 eNeKTPponpnilaDom. He KopnCTyIeTcE gEeKTPponpnilaDom,Якso BV BTOMJIeHi a6O nepe6yBaCe Te nID BnINBOM HapKOTuHnx 3aco6iB, anKOroIIO uN Me-DNKamENTIB.KopoTKoUacHa HeyBaXHicTb nID yac po6OTn 3 eNeKTPponpnilaDom moKe cnpuHNHTn cepNo3Hy TpaBMY.
KopncTyTeec3acobamn iHdNbIdyaIbHo ro 3axncty n o6OB'zkoBO HaJraIte 3aXncHi OkyIapn. 3aJeXHO Bi d cnocoby mOB BnKOpNCtAHnE nekTponpnilaNy 3aco-6n iHDbIyabHoro 3axncty, k-OT pecnPapTop, Hecn3bke 3axnCHe B3yTT, I0JOM iHaBvUHnKi, CyTTcBO 3HxKyIOb pN3NK OTpImaHn TpaBMn.
YHnKaIte HeHaBMnCHOrO yBIMKHeHH. PepekoHaItecra, 0eEKeTpOpnpaD BmKHeHO, nepH HIX NiKJIooatu Noro Do DxpePa JKNBLeHH Ta (a6o) akymyIaTopa, 6paTu BpyKn a6o nepehoCHTn. He Hocitb eKeTpOpnpaD, TpMaOCh NaIeCb Ha BN-Mkaui, i He NiKJIooaTe YBIMKHeHn eJeK-TPOpnpaD do MepeXi. Lc MoKe np3BeCTn Do HeUacHOrO BnPaIky.
Ipeed yBIMKHeHnEM eJeKTponpnpnaLy 3HiMiMb i3 HbOro IHcTpymEnT dJa perylIOBaHHra raIKOBi KIOUci. IHcTpymENT a6o
KNHOU, 03NaOHTbCnHa DeTani npnnaNy, Ka 06epTaetbcn, MoKe 3aBdaTn TpaBM.
YHnKaIte He3pyHoro NOJoxeHHa TINA. Bn6epiB CTiKe NIOJoxeHHa Ta 36epirAitpe pIBHObary.Lcdo3BOInTb Kpaue KOHTPOIIOBaTN eNEKtpoPpnaD y Henepe6aueHnx CNTyaucix.
Hocitb nixoayn oajr. He BdraTe npocstopn oajr a6o npkpcn. TpmaTe BOLOcc i Oajr Ha 6e3neuHi BiDcTahi BiD DeTanei, kpi pyxaOTbcr. Pocstopn Oajr, npkpcn Ta DOBRE BOLOCC MoxyTb 3aIpyTaTncB TaKnx DeTanJx.
Ipekeohntec, 0 npctpoi dna BIDCMOKTyBaHHy yNOBIOBaHHnny (3aHaABHocTi) nIKNoyeHi Ta npaBnIbHO BNKOpNCTOBYOTc. 3actocyBaHHr TaNX npncTPOIB 3HnKYe pN3IKN, 0o BVHnKaIOTb BHacNiOk 3aHnJeHoCTi.
3.1.4 KopncTyBaHHeJIekTpOnnIkoIO i NOBOJKeHHa 3 Heo
He nepeBaHTaKyIte npnlaD. BnKOpncToBByTe dIy BnKoHaHH po6Ot BiNobiHn eNeKTponpnaD. 3aIJa MaKcImaJIbHOI eFeKTnBHOCTI n 6e3neKn He nepeBuSyTe Bka3aHm diana3OH nOTyXHoCTi eNeKTponpnaDy.
He KopncTyItec eNeKtpponpnilaam i3 HecnpabHnM BmNkaayem. EneKtpponpnila, knn HeMOxJIbBO BBIMKHyTu a6o BmMKHyTu, c He6e3neuHm i nOpTe peMoHTy.
IpeHx3miHOBAtn HanaTuBaHHaMinHOBAtnpnaadny BIDnpabnTnpnaHa 36epirAHN, BntarHt bTekep i3 po3eKn a6o BnMItb akymyJrTop. LyeHEMOJIINBUTb HeHaBMUChe yBIMKHeHHe-NeKTponpnuJa.
36epiraTe eNEKtpnpnlaN, 0o He BnKOpNCTOByOTbcra, y HeOcJXHOMy dJa DiTei mcui. He Do3BolnaTe KOpncTyBaTnceEeKTPponpnaDom oc6am, kI He 0bi3HaHi 3 Hm a6o He npouHTaN ci Bka3IBKn. Y pa3i BnKOpNCtAnHReNoCbIdYeHUMN oc6a-Mn eNEKTPponpnaDN c He6e3neuHNM.
6aJIbNO BoDorJaIte 3a eNeKtpponpna- dAmn. CTeXTe 3a Tm, 0o6 pyxomi deTani 6e3dOranHO npauOBAHn i He 3aueMnJnCra, Ta 0o6 He 6yNo 3JamAHnx i Nowko- DxeHnx DeTanei, kI npuyuToB po6OtyeNeKtpponpnaLy. Ipeed BnKOpncTaHnM npnA dy BiDpeMOHTy Te NOnKOdXeHi deTani. PpruHIO 6araTbox HeuacnX BnPaI
KIB E HeHaJeXHn DOrIa 3a eNeKTpOpnpnaDOM.
PikyuHIncTpymeHT Ma6 6yTu 3aBXdN uNCTHM i roctpum. PeTeIbHo dOrIaHyTuPiKyuHIncTpymeHT i3 roctpumn Je3aMn MeHWe 3auemJIOeTbcra I Hm neIwe KepyBaTu.
BukopncToBynte eJektpponpnaad, npnJaDra, BCTaBHH iNcTpymeHT TooO,doTpyMnyOuHcB uX Bka3iBok. YpaxObyTe yMOBN BUKOpncTaHH Ta xapaKTe pObTo. BukopncTaHH eJektpponpnaadIb He 3a npn3HaueHHMa MoKe npn3BeCTn Do BHNKHeHHa He6e3neHnx CNTyaui.
3.1.5 KopncTyBaHnAkyMnyTOpHm npnaDom i NOBODKeHHa 3 Hm
3apjkaTe akymyIaTO pTbKn 3a DonoMoroTo 3apJHOrO npCTpoIO, peKOMeHDoBaHOro BnPo6NkOM. 3apJHm npCTpi, np3HaueHm dJa 3apJxKaHH oDHorO Tnpy akymyIaTOPIB, MoKe cPnPHHTn POnKeKy B pa3i BnKOpNCtAHHr 3 iHUnMn akymyJIaTOpaMn.
BukopncToByte BeneKtpponpnaI nnue npn3NaheHi IAnZbOro akymyJTopn. BnkOpncTaHHI INHux akymyJTopiB MoKe npn-3BeCTN Do TpaBMvBaHHa 6o noxekxi.
TpmaTe aKymyIaTOPn aKOMora dani BiDCKPINOK,MOHeT,KNIOUcIB,UBAxIB,RBHTiB Ta iHux dpio6hnx MetaneBux npeMeTIB, RIKMOxTyB BKNJNKaTN 3AMKaHHaKOHTaKTiB.3aMnKaHHa KOHTaKTiB aKymyIaTopa MoKe cnpuHHNTOnikn abo noKexy.
3a HnpaBnIbHOro BnKOpncTaHHa 3 aky MyJrTopa MoKe IoteKTn pIDHa. YnKaJTe KOHTaKtY 3 HeU. Y pa3i KOHTaKtY npOMnIte ypaxeHe Micse BoDoU. JaKuo PiHa NotpanHa B Ouy, 3BepHiTbcra No MeDnHy DOnomOry. PdHa, 10 BuTikac 3 akyMjIaTopa, MoKe BnKJIrkatn Nopda3HeHHa Shkpu a6o onIKn.
3.1.6 CepBic
DopyaHTe peMOHT eJekTpOpnpaNy JIwE KBaJIΦIKOBaHm CneuianiCTam, 0o BNKOpNCTOByOTb opriHaJIbHI 3anYactHH. Ce rapaHTyEc, 0o npnaI i HadaI bYe 6e3-NeuHIM DnBnKOpNCTaHH.
3.2 PpaBnla Texhikn 6e3neKn iN da cpo60tn 3 NaHcIIOBUMn nIaMn
He ha6nkaTecA Do nIJIbHOro naH- Iura, KOII nIIa npauoc. Npeed 3a- nyckOM IIIN nepeKoHaTecB TOMy, IO IIJIbHNIaHIOr Hi 3 YIM He 3iWTOBxy
CTbca. He3haHa HeyBaxHicTh b nIac po60Ti 3 NaHcTOBOO NIOo MOKe npN3BeCTn Do TORO, Oo OaR a6o qACTnH Tina 3actpRHyTb B NNJIbHOMy naHcO3i.
IpaBa pyKa MaC 3aBxDn JExKaTn Ha 3a- dHi pyuCi IaHcIgROBoi nlln, a IiBa pyKa —Ha nepeDiH. 3a6OpOHeHO MInrtn pyKIMiczAMN, yTpMHyOnI NaHcIgROBy nIy, OckIbKn ce NiDbNusye pN3NK HeUacHOro Bn- naDky.
TpmaTe eKeTpponpaT iNbKn B i30- IbOBAHn DOLOHHi YactnHi, OckIbKn nIJIbHn NaHOr MoKe TOPKaTncr npXOBaHnx NiHi. NnABy Hn NaHcUroN, kI TopKaIOTbcr cTpymOpnpoBIDnX dpoTiB, po6nTb MeTaJIeBi YactnH eKeTpponpaNy cTpymOpBoIDnMIMIOxTy BnKJIrkATn Udap eJIeKTPnuHM CtpymOM OepaTopa.
HaJaRaTe 3axnChi OkyJapn Ta HabyuHnKn. PekomeHdyctbCk KopncTyBaTncn iHUnm 3acO6amn Dnla 3axncty roIobn,pyK i Hr. 3axnchOndAnr 3Hnxype n3Nk TpaBM, BnKnHKaHx TpickAmn, 0o JeTtB, I BNnaDKOBUM 3ITKHeHHM 3 NIIJIbHm NaHcHOrom.
3a6bOpHeNo BnKOpNCToBvBaTn JaHcIyOrBy nIy, cnIaIHy Ha IpeBi. BnKOpNCTaHHa TAKOMy NIOJoxeHHI MOXe npu3BeCTn Do TpaBM.
Hora 3aBXn Ma c Ma n H a iHy T oky O-nopn, NaHcIOrOBy Nny MoKHa BMkataN, Nnue CToaH a Mi ciH, 6e3neuH i pIB-Hi NOBepxHi. Po6oTa Ha cN3bKi a60 XNT-ki NOBepxHi, HapnKnad, Ha CXoJax, MOKe npn3BeCTn Do BtpaTn PiHOBaRn a6o KOHTpoJIHO HAD NaHcIOrOBOIO NINOIO.
IiD yac 3pi3aHHHaTARHeHOi rIKn Heo6- XIDHO BpaxOByBaTN pN3NK 3BOPOTHOI BiD aHi. KOn HATrA DepeBHX BOLOKOH 3HJxCyEbC, CnIIra Ha rIKKa Ni d eFekToM BiDaHi MOKe BdAPITn OepaTopa Ta (a60) BiKnHyTu NaHcTOBOv Nnny 3 NoaJIbWoIO BTPaTOO KOHTPOIIO.
Будъе obepexHmN NiJ qac 3pi3aHnЯ va- rapHknib i MoNoDnx narOHiB. ToHki MaTepi- aIIMoKyTb NOTpAnITu B INJIaJIbHn IaHcIor i BdapITu Bac Ta (a60) Bu6HTu Bac 3 PiBHO- Barn.
IiD yac nepemieHn TpImaTe BmKHeHy IaHIOROBy nny 3a nepeHIO pyky, TpImaOuy nIIaJIbHn IaHcIor Akomora dani BiD TiJa. IiD yac nepeHceHH a6o 36epiraHH naHcIORBOoi nlln 3aBxDN BVKOpNCTOByte YoXn DnA shHH. PpaBnbl-
Ha ekcnnyatai naHIOROOI nIIIN 3HN3NTb pn3NK BnnaKOBORo 3ITKHeHHN 3 NJIaNbHM paHIOROM,Io pyxaCTbcra.
DotpmyteBkazIBOKoO3MaUyBaHnHaTAYaHcIoraTa3anachnx DeTaNei. HeataHyTu a6o He3MaueHn IaHcIor MoKe npBaTncA 6o 36InbUnr PN3NK 3BOPOTHO BIDnayi.
Плдтумуите ручи сухими та чстими, 6e3 cniidimactnna abo knpy.Puka,3a- 6pydHeHa Knpom abo mactnIOM,CTaC cIn3bKOIO, lo MOKe npn3BecTN Do BtpaTIN KOHTPOnIO.
BVKOpNCToByTe Nnky BnKIOUHO dny pizahna depeBa. He BnKOpNCToByTe naHcIOrOBy nny dny iHux notpe6. PnKlaad: He BnKOpNCToByTe naHcIOrOBy nny dny pizahna nlaactMaCn, 6ydiBeJIbHnx Ta iHux HeDepeBHX MaTepiAniB. 3aToCyBaHHraHaHcIOrBOi nnI dy nIHux onepaui MoKe 6yTu He6e3neuHm.
3.3ПичHHN 3BOPOTbOi BiДaqui Ta 3acTepeKeHnЯ dIЯ onepaTopa
BiDaua MoKe BnHKHyTu, KaHc Hic uHHN CTNa-ctbca 3 nepeuKOdo, a6o KaQo DepeBO CKJaDa-ctbca, 3amKkaOu npjyuy NIOUHy NaHcIora.
3iTKHeHn Hocy uHHn 3 nepeuKOIO MOKe B DeaKnx BnnaKax BnKnKaTn 3BOpOTHy BiDnay, KOJn uHa BIDKnDaETbcra Bropy i Ha3aI, B HanpMy Ky onepaTopa.
3aTnCKaHHra NIIJIbHOrO NaHcIora y BepXhiy aCTHI WINH MoKe BNKNIkATN WBnDKn BiDcOK NIIJIbHOrO NaHcIora do onepaTopa.
Li Bnua MoKyTb np3BecTu DO BtpaTu KOHTpoJIO Ha eNeKTPoNNIO TO Ta Do TjKnx TpaBM. He MoXHa CnoDiBaTnc TaIbKn Ha 3ano6ixHi npCtpoi eNeKTPoNNi. KopucTyBaU eNeKTPoNNiMaE BxNTu 3axOdB nla 3anobiraHHa HeuacnX Bnapkib I TpaBM nic yac poBOn.
3BOPOTH BIDaHa e pe3yIbTaTOM HnnpabunbHO To KopnCTyBaHH iNCTpyMeHTOM Ta / a6o HnnpaBnblnx IpOueDyp a6o yMOB po60Tu. lMOxHa yHNKHyTN, BKNBUn TAKNX 3anobixhIX 3axoDiB:
Iiud pi3aHnra TpmaTe NnyMiuHO oboma pykamn, oxonlnooyn obndi pykoTKn eJeKTPoNnBeJNKm nalbceM iInShMN nalbZaMn pykn. Po3aWynte CBOcTIINO i pykn TaKm YNHOM, 06 36epiratN KOHTPONb HAD PNNKO O B pa3i 3BOPOTHOI BiDaui. Onepatop Moke npotndiaTn cnni 3BOPOTHOI BiDaayi 3a yMOBn, 1O 6yNn BxNTi HaJIexHi 3axOOn 6e3neKn. He donyckaaiTe
6e3KoHTpOJIbHOrO nepemiiueHHra eJekTpOnn.
He npotaryte pykn 3aHaTOn daJeKO i He pixte Bnue pibra CBoro nIeua. Ie Do3BOJNTb yHnKHyTN BnnaKOBnx 3iTKHeHb nnN 3 KInCizBkAmn i DonomOxke KpaSe KOHTpOJIbA-Tn eIeKtpoNlky B Hepepe6aueHx o6cta-BnHax.
Iiud 3amHn BnKOpncToByTe TlBKn uHH Ta pixyu i naHcUOrn, 3a3HaueHi BNpO6HnKOM. BnKOpncTahn HeBiDnOBiDnX uHH i pixyuix naHcUorB MOKe npN3BeCTn Do po3pNBy naHcUora i / a6o Do BnHnKHeHHra 3BO-pOTHOI BiDaui.
DotpmyTecb IHctpyKciBnpo6Hnka i3 3aToCyBaHHra Ta TexO6cnyROByBaHHra eNeKtpoNN. 3HnKeHHra Tn6nHn npOnIy MOKe npN3BeCTn Do NoactiHaHHra 3BopOTHO BIdaqi.
3.4 IInctpykui 3 6e3neKn akymyIaTopa
U cybomy po3di iOnicaHo Bci 3aRaJIbHi npaBnla 3 Texhikn 6e3neKn Ta nonepedXeHHraKx cnId DToPmYBaTncrPi dac BnKOpNCtAHH aKymyIa-Topa. PpOHTaTe ci IHcTpykui!
BukopncToByTe Jnue akymyIaTopn, npn3NaueHi dJa npucTroob KOMnaHII AL-KO, kni npaioTb BiD akymyIaTopa. 3apJxKaIe aKymyIaTOp Jnue 3a Donomoro 3apJdHoro npucTroo AL-KO 3 KomnneKty.
IpeD BnKOpNCaHHaB NTaRHTb HOBn akyMyJrTop i3 opriHaJIbHOi ynaKOBKn.
■ NobHicTIO 3apJdiTB akymyIaTO nped nepuIM BnKOpNCtAHNm i 3aBXKnBn BnKOpNCToBynte Bka3aHHn 3apJdHn npncTpi. 3abXKnDoTPmMyTeCb IHOpMauii UoO 3apJdxHaHnAkyMylrTopa, JkaMiCTNTbCBAbOMy NoCi6Hnky 3 ekCnPyataii.
He BnKOpNCToBvIe akMylTOp B noKeXoTa Bn6yXoHe6e3neuHx cepeOBoUax.
He hapaxaIte akymyIop Ha BnIIB BOIOrn i BorKoCTi NiD yac ekCnnyatauqii npncTpoI.
3axuatae akymyIaTOp BiD BVnBv TeNna, MaCTnla Ta BOHIO, 0o6 yHnKHyTu NOro no- uKOJKeHHa N BtOKy nap Ta piKoro eNeK- TpOliTy.
He po3paKaIe Ta He KndaIte akymyTAp.
He BnKOpncToBynte 3a6pydHeneH a6o BOIOnrnn akymyIaTOp. Ipeed BnKOpncTaHHm akymyIaTopa OunCTiTb NOrO YnCTOIO CyXOIO raHcipKOIO Ta BnCyUItb.
TpmaTe 3apAKeHn aKymyIaTOp, kNHe BnKOpNCTOByeTBcra, kHaNdaI BiD MeTaNEBux npEaMeTIB (HaPnKnaI, KaHceIpaCbKnxCKpiIOK, MoHET, KIOuYiB, ZBxIB, WypyniB), Uo6 yHnKHyTN 3aMnKaHHaKOHTaKTiB. KopOTKe 3aMnKaHHa MoKe npN3BeCTn Do OTpMaHHa OnikIB a60 noXeKi.
He BiKpBaIte, He po3bpaIte Ta He no-Dpi6HouTe aKymyIaTOp. Ie npu3BeJe do y-paxKeHHra eNeKTPnHm cTpymom abo KopoT-Koro 3aMkaHHa.
HenpaBnIbHe BnKOpncTaHH Ta noWKoJKeHN Hny akymyIaTopa MoKe np3BecTu Do BVtOKy pIKoro eNeKTPoNITy. PpObitpIb npMiuIeHN, a NotIM 3BepHItbcr do Nikapra. Y pa3i KoHTakTy 3 piDnHO eNeKTPoNITy peTeJIbHo NOMInTEcra Ta peteJIbHO npomnIte Oci. Notim 3BepHItbcr do Nikapra.
AkymyIaTOp 3a6bOHeHO BnKOpNCTOByBaTu CTOpOHHIM Oc06am, a Came: Akuo BOHnpe6yBaHTb iN HarJrOM Oc06n, BiIOBiDaJIbHOI 3a ixHIO 6e3NeKy, a6o npouu nIHCTpykTaX i3 ekCnIyatauii akymyIaTopa. CToPOnHi Oc06n BKnUOHaOTb, HApnKnaIaD:
ocioB(TOMy uncni diTei) i3 o6mexKeHMMnΦi3uHMMn, ceHCOPHMn a6o po3ymOBnMN MOKINBOCTaMn;
oci6, kI He MaIOMb IOCBiDy Ta (a6o) 3HaHb npo akMyJrTOp.
IITN NOBUNHI nepe6yBaTN niD HargnAOM, iIM Heo6XiDHO 3a6OpOnTu 6abNTncr 3 akymyJr-Topom.
He 3aIIuIaIe akymyIaTOp B 3apAINOMy npncTpoi Haidobro.ДЯ TpUbaNoro 36epirHn HcIiD BnHrTa n AkymyIaTOp i3 3apAINHO npncTPOIO.
BnMaIte aKymyIaTOp i3 npncTroIO, RaIcNo He BnKOpNCToBYeTe NOrO.
36epiraTe akymyIaTOp y cyxomy 3akpntomy micu. TpmaTe npnaad kHaJdani BiD dKepeI TeIIa Ta npmIX COHnIX npOMEiB. DocTyI HeABTOpU3ObaHIX ocIb Ta diTei Do akymyIaTopa 3abOpOHeHO.
3.5 Ihctpykuii 3 6e3neKn 3apAHoro npnctpo
Y zubomy po3di nOncaHO Bc 3araIbHi npabnla 3 Texhki be3neKn Ta nonepeJxKeHHa, knx cniDOTpmyBaTncPi d Yac BVkOpncTaHHa 3apdHOro npncptpo. IpouHTaTe ci iNctpkyi!
BukopncTOByTe npncTpii TIlbKn 3a npn3Ha-ueHHaM, To6To,ДЯЗApXaHn3a3Haue-Hnx akymyIaTopiB. BcTabIaIe B 3apJHn
npiuTpi BnKIOUHO opurihbHi akymyIToPn AL-KO.
Ipeed KoxHm BnKOpncTaHHm nepeBipraYte yBeCb npncTpi, y Tomy Yncni, KaebJxNB- IeHHa Ta BiCik dJa akymyIaTopa Ha npedMet noXkoDkeHb. BnKOpncTOByTe TiNbKn cnpabHn npncTpi.
He BnKOpncToBvIte npucTpiB NoJKeJo-Ta Bn6yOHe6e3neuHx cepeoBnuaX.
BnKOpncToByTe npncTpiBnKnIOuHO B npMiueHHi Ta He HapaxaIte NOro Ha BnINB Do-uy afo BoIOnr.
3aBxDn CTaBTe 3apAHy npucTpi Ha do6pe npoBiTpOBAHy Ta Heropuoy nobepxHIO, OckInbKn BIn HarpibaTbcN iD Yac 3apAKeHN. 3BilbHiB BeHTnJaui Hi OTbOpN Ta He HaKpnBaIe npucTpi.
Ipeed niknueeHHa3apdHoro npncptpoI nepekoHaTeC8 B HaraBHOcti HanpyrM MepeKi, 3a3NayeHoB po3diI《TexHiHxapaKTepnCTNKU》.
Плкюауе Кавель кИВЛЕнг ВИКЛЮЧноdo 3apяДНОТРСТРОТa ВИКОРИСТОВУITENoTo 3a npn3HaueHHaM. He nepeHOCbTe 3apRdHnnpCTPII 3a Ka6elbЖИВЛЕнг Ta HeTЯHITb 3a ITeKep, BmMaOuN Ka6elbЖИBJIeHHa 3po3ETKn.
3axuatae uHpy xNBHeHHa BID TeNla, MaCTnla Ta roctpux KpaIB, 0o6 yHnKHyTu Noro NOxKOJKeHHa.
He BnKOpNCTOByTe 3a6pydHeni a6o BONori 3apAHN npNcTpii AkymyIaTOp. Npeed BnKOpNCTaHHM ONUCTITb Ta BucywiB npNcTpii n AkymyIaTOp.
He BiKpNaIe 3apAHN npnCTpiN akyMnyTOp. Lepn3BeNe do ypaXeHH eNeKtpuHNM cTpymom a6o KOPOTKO rAMKaHHa
3aIbBnacHoi6e3neKnDopyuAtepeMOHT npnady nIwE KBaIipikOBaHm CneuianicTAM,IO BnKOpNCTOByoTb opriHaJIbHi 3an-actHH.
Ipnctpi 3aboponeHo BnKOpncToByBaTn CToPOnHHIM ocobam, a came: kuo BOH npe6yBaIObPiHaJIaOM ocO6N, BiIOBiaJbHOi 3a ixHIO 6e3neKy, a6o npouu nn IHCTpykTaX i3 ekCnnyatauii npicTpo. CToPOHHI oc6N BKIOUaIOb, HAnpIKNaId:
ocioB(TOMyHnCniDiTei)i3OBMeXeHmMΦi3uHmN,ceHCOPHMn a6o pO3ymOBMNMOKJIINBOCTaM;
ocib, kHe MaIOb IOCBiDy Ta (a6o) 3HaHb npO npNCpti.
IITn noBHHi nepe6yBaTu nID hargJdOM, iIM Heo6xidNo 3a6bOpHTu 6abTncs3 npncTroE M.
36epiraTe npucptpi, knn He BnKOpncTOBycTbCry, y cyxomy 3akpntomy micui. Docyn HeABTOPIN3OBaHnx oci Ta diTei Do npucptpo 3aboponeho.
3.6 IpaBnla Texhikn 6e3neKn iId qac po6oTn
I DToPmMyTeCsperioHaJIbHnX npaBnTexHIKn 6e3neKn, HapnKnaD, npopeciHnx acoia- ci, coiaJIbHnx fOHNiB, opraHIB oxopoHn npaCi.
BukopncToByte npucptiinbkn 3a DocTaHboi KInbKocTi DeHHoro Cbitna a6o 3a WtYuHoro OCbitnHeHH.
Po6oHa 3OHa BIlbHa BiD npEdmetIB (HapnKlaI, YactInn npOnnly) - He6e3neKa CnotnKaHHra.
KopncTyBaH Hece BiIDNoBIdaJIbHicTb 3a 3aDaHHaIKoDN JIOJAM YI XHi BnAchOCTi.
YKIO Bn npaioTe 3 NaHIOROBOIO NINOIO Bnepwe:
Ponpocitb npoabua a6o 6ydb-akoro faxibpa03'acnntnpinncippobotn IaHcuroBoi nIIN a6o npoindt b HauanH.
IpeepnIm 3actocyBaHHm nonpaKtkyntecxOa6p03nnIOBAtN KOIoHa K03Jax a6o niDCTabci.
3.6.1 Onepatopn
Oco6am, kI He 16-piHoro Bky a6o He 03HaonmJIeHI 3 noci6nKOM 3 ekcnnyatauii, 3aboponeHO BnKOpNCTOByBATn npnlaD.
Будь-якалюнha,ио пацhoe3 naHIOROBOIO nINIOIO,NOBHHa 6yTN BiDNoCHIOIO,3dopoBOIO Ta nepe6yBaTu B rapHiΦopMi.JaKIO 3a CTahOM 3dopoOB'He MoXHa BTOMnOBaTnC, cIiD 3aNTaTu y NiKapr,u MoXHa npauOBAtu 3 NaHIOROBOIO nINIOIO.
3.6.2 Yac po60tn
Dotpmytec npabn odo yacy po6tN 3 eJeleKtponnKamn KOHKpeTHoi KpaIHn. Yac po6tN 3 eJeleKtponnKamn MOKe 6yTu obmxeHn HauiOHaJIbHMn Ta MicceBHMn HopMaTnBaMn.
3.6.3 Bi6pauiHe HaBaHTaKeHHa

PONEPENKENH
He6e3neka Bi6pauii
ΦaKTnUHe 3NaueHnB i6pauiHoI emicii nIq Yac BnKOpNCTaHH npNCtpoIO MOKe BiDi3HrTnC8 BiD 3aBJeHOro BnPo6HnKOM 3NaueHH. CnoCTepiraTe 3a HabeDeHNM HnXy e KaTOpAMn BVnHy Do a6o Ni d Yac BnKOpNCTaHH:
■ Yu BHKOPNCTOBcTbCg npncTpim 3a npn3HaueHHm?
Yu MaTepiAn po3pi3aHn a6o o6po-6JIeHn npaBnIbHo?
Yn npicpii nepe6yBaB po6oomy cTahi?
U npabnlbHo 3arocTpeHn a6o BCTaHOBHeHn pi3aIbHn iHcTpyment?
Uv BCTaHOBJIeHI KPOHJTeHNi i,JaKIIO NOTPI6HO,doATKOBI Bi6pauiHi pyuKn,iuN UIbHO BOH3'EdHaHI 3 npncTpoem?
Ekcnnyatyte npncptiinbkn 3 qactotoo O-6eptanHnBnryha, Heo6xioHO nnBnKo-HaHHn OKpeMoIO pObotu. YnkaTe MaKcMaJIbHOI qactOTn o6epTahHn, 0o6 3HN3HTPiBeHb Wymy i Bi6paui.
Yepe3 HnpaBnIbHy eKcnnyataciIO taTexHicHe o6cnyroByBaHHa Wym i Bi6paia npi-CTPOIO MOKyTb NiDBrNtncs. Lc 3aBdae IIKoDN 3dOpOB'IO JIoDHN. Y TaNX BnPaIckx HeraiHO BmKHiTb PnCtpi i 3BepHITbc 3a NOro peMOHTOM B aBTOpN3OBaHni cepBicHni ceHTp.
CTyInb Bi6pauiHoro HabaHTaXeHHaJEnKtB BiD BnKOHyBaHOi pO6OTn a6o BnKOpNCTAHn npNCtPOIO.OuHITb i BcTahOBiTb BIDNOBIDI nepePBn B po60ti. B pe3yIbTari Bi-6pauiHe HABaHTaXeHHnpoTgrom BCbOro po6Ochoro yacy 6yde 3NaUHO 3HNKeHo.
Tpmbana ekcnnyataia npnctroo hapaxac onepatopa Ha Bi6paui i moke BnknkaTu npoblemn 3 kpoBOO6irom (CmNTOM «6iNOro naIbca').Uo6 3meHunr nce pnsK, Hocitb pykabu ta Tpmaute pykB Tenni. Y pa3i BnABHeHHa CmNTOMy «6iNOro NaIbca» HeraHNO 3BepHiTbcra Do Iikapra. Do uX CmNTOMIB HaLeXaTb: OHIMHH, BtpaTa yUTNbBOcTi, NOKJIOBaHH, CBepixk, 6ilb, cna6kiCTb, 3MiHa KOnbopy a6o cTahy shkpn. 3a3Bnuai ci CmNTOMn BnINBaOTb Ha naIbci, pykn a6o
nybc.3a Hn3bKnx Tempepatyp (npn6n3Ho HnKye 10^) pn3nk 3poctae.
Poibt nbacpooboro Dnra Tpnbani nepepBn, 0o6 BiinuTn Bid wmy i Biopaui. PnahyTe cboIO po8Oy TaK, 0o6 po3diuNTn ekcnnyatauio npucTroIB, kci CTbOpIOHTb cnIbHi Biopauii, Ha KInbka DNIB.
KuBo BN BiDcyBaTe DnCKompOpT a6oKaUO BUNHKa DCXPOMi uKipN iD Yac BVKnOpNCaHHa PnCtpoB pykax, HeraHNo npnHiHb poBOTy. BcTaHObit DoCTaTHi nepePBn BpoBOTi. PoBota 6e3 DoCTaTHix nepePB MoKe npn3BeCTn do MicceBOI Bi6pauiHOi XBOPoBu.
Mimimi3yTe pN3NK BpNNBy Bi6pauii. BnKohynTe o6cnyroBvBaHH npncIpo BIIOBIDHO do IHCTpykui B noci6Hky 3 ekcnnyatauii.
KoO6nHaHnBnKOpNCTOByETbcyaTc0, 3BepHItbcrdoDInepa,o6 npnd6atn aHTnBi6pauiHi akcecyapn (HanpNKlaD,pyKn).
Y nlaHpi p6oTn Bn3HaUTe, kMOxHa o6MeKHTn Bi6pauiHe HabaHTaKeHH.
3.6.4 AkyctNueHHe HabaHTaXeHHH
DeKoro akcTnHoro HabaHTaKeHHa, cnpuHHeHoro cHm npncTroem, He moXHa yHnKHyTu. BkoHynte wumHi pObTu y BCTaHOBneHi i BN3NaueHi TepmiHn. 3a notpe6n cnid bpaxoByBatn Bka3iBKn 10do «TnxN rOdn» i o6MeJyBaTu TpnbJIcTb po60Tu ha6inbU Heo6xInHO. Dna 3a6e3neHn OocnToRo 3axncty Ta 3axncty oc6, kI nepe6yBaOTb nO6n3y, Heo6xInHO HocNTu HabuyHNKN.
3.6.5 Po6ota 3 eNeKtpoNnIkoI

NONEPEDKEEHHRA
Pn3nk OTPmamHc cepno3nX TpaBM.
BukopncTahnHHe npabNbHO 3MOHTObaHO eIeKtpoNlKn MoKe Ipn3BecTu Do OTPMaHHcepNo3Hx TpaBM.
BukopncToByTe eJekTpOnnIky, nIe kUo II NOBHCIO 3MOHTOBAHO.
Ipeed KOxHMM BnKOpNCaHHM BnKOHyIe Bi3yAlbHm KOHTpOJIb, 06nepeKoHaTncB TOMy, 0eJeKTPoNIIky NOBHICTIO 3MOHTOBaHO I 00BOHa He MICTNTb 6yDb-RAkX N0uKOJKeHi a6o 3HOUeHx DeTaIeN. Bci3anobixhi Ta 3axnChi npcTpoi NOBHHI cnpabHO yHKioHyBatn.

NONEPEIXEHHI He6e3neka OTPmAHnTpaBM BiD BNnaKOBOrO 3anyCky eNeKTponnKn
BunapKOBn 3anyck eJekTpOnnIKN Mo-Ke npN3BeCTn DO OTPMaHnCePNO3Hx TpaBM. Tomy BnImaTe aKymyIaTOp y TaKnx BUnapKax:
TexHOrO ornay, peryIIOBaHHa OuHcHn;
PobToN3piKyuMmObnaHaHHaM
Ku eJektponnky Tpe6a 3aunuTN
TpaHcnOpTyBaHHa
po3miueHHHa 36epirAHH;
TexhiHoro obcnyroByBaHHaTapeMOHTy;
Bpa3i He6e3neKn.
Hikoln He npaioTe Haodnui.
3abxnd Tpmaite Hanaorotobia anTeky Ha BnnaDOK npaHeHb.
YHnKaIte KOHTaKTy 3 MetaJIeBIMN npEIMETAMN, uO 3HaxoJrTbC8 B 3emJI a6o eNeK-TPuHNO NOEdHaHI Do Hei.
Ido3acobibinDnBidiyaanbHoro3axncTyHaJeXaTb:
3axncha kacka;
3acobn 3axncty cnyxu (hapnknad,6epywi),ocobno, kO npo6oyn deHbCTaHOBt bNoHa2,5rOHN;
3axnchIOkyIpyn a6o 1uNTOK 3axnchoi KaCKN;
3axnchi ⅢtaHn 3i BCTaBKOIO DnA 3axncty Bi nopi3iB;
MiChi po6oju pykabnkn;
6e3neueHE B3yTTa 3 HeKOB3KOIO NiIOUBOIO i CTAJIeBIM HOCOM.
He BnKOpNCToBvIe NaHcIOrOBy Nnny BnIe pIBHnIpeu, 6e3neuHa po6oTa B cIbOMy noJIOXKeHHi HEMOXJIbA.
Y pa3i 3miHn Miczra po60Tu BmKHiTb DBNrHy i HadiHbTe 3axnt LaHOra.
Y pa3i HeBnKOpNCTaHH NaHcIgROBoI NIIIN BCTaHOBITb 3axnct IaHcIgra i 3HIMITb akMyJLTop.
Knaitb IaHIOROBy nIy TiIbKn y BnMKHeHO My cTaHi.
He BnKOpNCToBvIe IaHcIgOrBy nIy B JAKoCTi MexaHiUHO BaxKeIa6O dJa nepeMi-ueHHa DepeBHH.
KoIOni,TOBUnHa JkNx nepeBnUyE DOBXnHy NIIJIbHOI UHNH,MAOTb PO3NJIIOBAtncr TINbKN KBaJIiΦIKOBaHm nepcoHaONM.
IpnctabnIte nNkY do o6pObIobaHOro MaTepiany TINbKN 3 npauOuHM nnJaNbHM NaHcUROM, HIKON He BMkaIte eJeKtpOnnKy 3 yKe npctabneHm Do MaTepiany NaHcUROM.
CTeXTe 3a Tm, 06 JaHcIgOBe MaCTnIO He nonadano Ha 3eMJIHO.
He nnnnre nid qac doouy, chironady abo. wTOpMy.
He BnboDte 3 naDy 3anobixhi Ta 3axnchi npncTpoi.
4CKIADAHNRA

NONEPEDKEHHRA
Pn3nk OtpmaHH cepno3Hx TpaBM.
BnKOpNCTaHHe npabNbHO 3MOHTObaHo eJekTpOnnIK MoKe np3BeCTn Do OTPMaHHcepNo3Hx TpaBM.
BukopncToByTe eNeKtpOnnKy, Nlle kio II NOBHiCTIO 3MOHTOBAHO.
Ipeed KOxHMM BnKOpNCtAHHM BnKOHyTe Bi3yaJIbHm KOHTpOJIb, 06nepeKoHaTnC8B TOMy, 0eJeKToPONIKy NOBHCTIO 3MOHTOBaHO I 0BOHa He MICTNTb 6yDb-4kN X N0UKOJXeHI a6o 3HOWeHx DeTanei. Bci 3ano6ixHi Ta 3axnChi npucTpoI NOBHHI cnpabHO cyHKcIOHyBatn.

OBEPEXHOI!
He6e3neka OTPmamHn pi3aHnx paH!
Tocpi kpaii nnilbHoro naHcIora MoKyTB npn3BecTu DO OTpMaHHra p3aHnx paH niD yac MOHTaKy.
ДемоHTуиTeix,першн fix BCTaHOBJIIOBaTN aKymyIaTOp.
HaJaRaIte 3axnChi pykabuCi nД yac MOHTaKy nIIaIbHOrO naHcIora i Ha- npMHOI uHH.
4.1 MoHTaK HanpMaHoi WuHu (02, 03)
-
Notaryt b Baxinb ralma naHcIora (02/1) 3a Duroby puKy (02/a), oob po3bNokyBaTn ralmo naHcIora.
2.Поверніть центральни замok (02/2) npotruodHHNKOBoi CTpiIKN i 3HIMiTb pa3om i3 KoJxvXOM (02/3). -
BctaHObITb HapmHy uHHy (03/1) Ha HapmHi 6oHTn (03/2) i nepemictb Ha3aTak, UO6 MoXHa 6yNo BCTaHOBHTn NINJbHn IaHIOr.
4.2 MoTtax nIIJIaIbHoro IaHcIora (02, 03)
- YknaiItb nIyIbHn IaHcIg Ha 3ipOuy NaHcIgra (03/3) i B KaHaBky HaprMaHOI ShHH (03/1).
2.ObepHItb nIJIbHNJnAHCIOr HABKOJO BeDeHOI 3iOoKn HAprrMHOI uHH.NIJIbHNJn IaHcIOr NOBHeH 3nerKa IPOBnCaTn 3 HIXHbOI CTOpOHn HAprrMHOI uHH. - BctaHOBiTb Ha Micce KoxyX (02/3) i 3nerka 3aTARHITb CEHTpaIbHn 3amok (02/2).
4.3 HataraHHa nnJIaIbHoro IaHcIora (04, 05)

ПРИМITKA
ПиЯлбнл NaHOr npaBnIbHo HATyHHTN, RAIO BII:
PnIyrae Do HxHbOi CTOpOHn Ha- npMHOI uHHn i npOBepTaεTbcr pyKOIO;
πiДиMaeTbcR BcepeDnHi HAnpMHOI 3-4 MM.
- IpekehauTeCBy TOMy, 00 NnIaIbHn IaHcIg npabNbHO BCTaHOBNeHO Ha 3ipoCuI Ta HapmHiuHni.
2.Повернітбобертое кинcke (04/1)В напразмky кожуха (04/2)Тak,лобдва ТркуТнka 6уп 3верниоиdoонdoнoro (04/a). - ПоветаиTe (05/a) сентраьн 3amok (05/1) за говинкою CTPIKIO. 3aТгИтб сентраьн 3amOK He до KiHЯ a6o nobepHITb Ha оdnH obepT ha3aI.
- NobeptaTe o6eToBe KInbue (05/2) 3a roDHHNKOBIO CTpiIKOIO, DOKN NINJbHnI NaHcIor He 6yde HaTyrHyTo (05/b) npaBnBHO, kONcaHO BnSe.
5.Повернitsь центалбни замok (05/1) 3a ro-DHHNKOBOIO CTPIKOKO IO Knaцанн.
5 BBEENHBA EKCNIYATAUIO

HE6E3NEKA!
Pn3nk cmepti a6o Tjkknx TpaBM.
He3haHn npabn Texhik 6e3neK Ta ekcnnyataq MoKe npn3BecTNo cepHno3Hx TpaBM i HabiTb cMepti.
IpnoutaTe i Bci npabnna Texhikn 6e3neKn Ta ekcnnyatau, uo micTbCnB cBomy nociHky, a TAKOK IHCTpykui 3 ekcnnyatau, nepeD BNKOpNCtAHnM eJeKTPoNnIKn, a TAKOJ DToPmYntecn ix!

NONEPEDKEEHHRA
Pn3nk OTPmuHaHH cepno3Hx TpaBM.
KaHoHa eJekTpOnnUci BCTaHOBNeHo NOKoJKeHi Detani, ce MoKe npN3Be-CTN DO OTPMaHHcepNo3HNx TpaBM.
Ipeed KOKHIM BUKOPNCaHHM BIKOHyIe Bi3yaJIbHI KOHTPOJIb, 0o6 nepeKoHaTcB TOMy, 0o eJekTPOIIKy NOBHICTIO 3MOHTOBAHO I 00 BOHa He MICTNTb 6yDb-RAkX N0UKOJxeni a6o 3HOWeHx Detanei. Bci 3anobixHi Ta 3axnChi npCtpoI NOBHHI cnpabHO yHKIOHyBatN.
5.1 3apdkaHHa kymyTopa (06, 07)

OBEPEKHO!
Ioxekxohoe6e3neka nid yac 3apdKaHHa
Harpibahna 3apndoro npncpto moke npn3Bectn do noxeki, kkuo noctabntn ha nEko3aMnCTi nobepxhi i He 3a6e3neuHTn DOCTaTHO BEHTNJraIIO.
3aBXdN BnKOpncToByuTe 3apAHy npucptiHa HeropouHIOBepxHi y HeropOChycepeoBuNi.
3a noTpe6n: 3BilbHITb BeHTnJIaIHi OTBOpN.

ПРИМITKA
AkymyIaTOp cniD NOBHCIO 3apAHTNIpePeNepuIM BnKOpNCtAHnM.AkymyIaTOp MOxHa 3apJxKaTu Ha 6yDb-RAKOMy eTani po3prJKeHH. IpepeNuHn3apJxKeHH He BnInBaE Ha CTAH aKymyJIaTopa.

ПРИМITKA
3aBnA BToMaTuHOMy po3ni3HaBaHNIO pIBNa 3ap4y niD Yac 3ap4xHaHHaKymyIaTOp 3axuSeHO BiNpeBaHTaKeHHI, TaKIM YINOM, MoKe 3aJIuTaNC B 3ap4nHOMy npiCtpoi npoTARom NeBHOrO yacy, aJe He NoCTiHo.

ПРИМITKA
IotpmyBaTncb OKpeMnx npaBnT texhiKn 6e3neKn npn BnKOpncTaHHi akymyTopa Ta 3apAHO rnpNCtpoH.
1.ПдкнчсakymyЯTop(06/1)do3apdHoro npictpo(06/2,06/a),a3apdHn npicctpiI —do mepeki(06/3,06/b).Ppoec 3apdXeHHra po3noayacb.IndkaTop Ha 3apdHOM My npictpoi CBITNbce 3eHeHM KOJbOpom —akymyЯTop 3apdKaetbcr.
2. 3BepTaIe yBary Ha iHnKaTOp nPBnCTaHy 3apAkyakmyJrTopa (07). NobHe 3apAxDkaHn 3a NOBHO 3apAky TpNBae np6n3Ho 2,5 roDHH. Ppoec 3apAxDkaHn npnnHcTBcA aBTOMaTHUHO, KOJIy AkMyJrTop 6yde nobHi- cTIO 3apAxDKeHO.
3. Bumknitb akymyIaTOp BiD 3apArdHoro npnctpoIO (06/a), a 3apArdHNI npncTpii — BiD mepeksi (06/b).
5.2 3aJIINBaHHraIaHcIIOROBOrMaCTnla (08)
YBAGA!
He6e3neka nowkoJxHnHaHIO-roBOoi nnn
3aHaTTo MaIa KInbKicTB a6o BiIDcyTHiCtB
IaHcIIOBOrO MaCTnla B 6aky IaHcIIO-
ROBoI IIIN, a6o Ioro BucxHnR/CKLeIOBAHHaMe npN3BeCTn Do cepNo3Hnx
NOkOJKeHb NJIaNbHO rAnlora. BcXHaHHrackLeIOBaHHra NaHcIIOBOrO
MaCTnla MoKe npN3BeCTn Do noWko-
IXeHHa MaclonpOBiDnHex DeTaNei i
MacJHOrO Hacoca.
NookxHn TaKoB Bi6yBaTbC B pa3i BnKOpNCTaHH BIDnpaOBoHOro MaCTnA. BnKOpNCTaHH BiNPaOBoHAHO MactnA npN3BOdntb Do 3a6pyd-HeHH DOkInl!
IpeepBBeDeEHnM BekCnnyataciIO 3aIOBHITb 6ak JauHcIIOBnM MaCTNIOM.
He BnKOpNCToBvIe BiIpaCbOBaHemactnIO!
3aOBHIOIte 6ak IaHcIIOROBIM MaCTINOM Haini3Hlwe nId Yac 3amHn aKymyIaTopa.
ABTOMaTHHa MaCTnIbHa CnCTema 6e3nepepBHO NOCTaUae MaCTnO y nnIaIbHn IaHcIor i Ha- npMHy uHHy nIac po6oTu. NaHcIroBe MaCTnIO 3axuuae BID KOp03i Ta nepeDachoro 3HOsyBaHH. DnA Heo6xIHORo 3MaUyBaHHn nnIaIbHO IaHcIra B 6aky 3aBXdN Mae 6ytN DOCTaTHK KbcICTb IaHcIYOBOro MaCTnla. DnA 3MaUyBaHHn nnIaNbHO rNaHcIora I Ha- npRMHOI uHH NkOpNCtOByTe TINbKn JaICHe eKOJorUHe MaCTnIO, 10 6ionoruH OPO3KnadaetbCz, DnA nnIaIbHnx NaHcIorIB, TpaHCnpTyte i 36epiraute MaCTnIO TiIbKn B Do3BOJeHX i BiNIOBDMO MapKOBaHHX EMHOCTx.
Ipeed KOxHnBvKOpNCtAHnM i nD qac KoxHOi 3amHn akymyJrTopa cnID nepeBiprtu pBeHb MaCTnla Ta DOJNBATN MaCTnIO 3a Notpe6n:
- NpeBipTe pBeHb MaCTnla Yepe3 orJydoBe BIKHO 6aka (08/1).B orJydoBOMy BIKHI 3aBX- Dn MaC 6yTN BnHO MaCTnIO. MiHimaJIbHni i MaKcMaIbHNI pBeHb MaCTnla He NoBUNHi 6yTN nepeBnueHi.
- 3a noTpe6n DoJIbBaIte JIaHcIIOROBe MaCTInIo uepe3 3aIpaBHN WtUceP (08/2).
5.3 IpeBipka npaue3daTHocTi raIbMa IaHcIora
JaHOrOba nIa Mae pyHe raIbMo JaHOra,
JKe aKTHByEcTbc8 3a DonOMoHO BaxKeIraIbMa
JaHOra, HApnKnaD, y BInpaDky BiDaayi.
ypa3i cnpaubobyBaHHraIbMa IaHcIora IaHcIO-roBa nnla i Dnryh MmTEBO 3yNnHraIOTbcra.

HE6E3NEKA!
He6e3neka JIJI KITTJ Uepe3 HeI6aJe NOBOJXeHH!
He6ani Ta Henepe6auehi pyxn eIek-TPoNNIKMOKytb CnpuHHTN cepNo3Hi TpaBMn a6o HabITb CMEptb.
BukopncToByte eNeKtpOnnky, 03- HaimOBuNCb Texhiko6e3neKn Ta IINue B CkOHcHTpObaHomy cTaHi.
PiДчасДe6NOKyBaHHraJbMaJah-цюгHeHaTnCKaITe HeHaXoDнИВIMNKaU.

NONEPEDXEHHRA
Pn3nk cmepti a6o cepno3hux TpaBM uepe3 HecnpaBHe raIbMo IaHcIora
Kaio raIbmo IaHcIora He npaIoo, ce MoKe npn3BecTn Do cepno3Hnx TpaBM i HabiTb Cmepti onepatopa, HapnKna, y pa3i BiJaui npaIooUO rnnIbHoro IaHcIora.
IpebipraTe raIbMo IaHcIora nepei noayatkom po60Tu.
He BMkaTe eJekTpOnnIky, kUO raIbMo IaHcIgra HecnpaBHe. B zuoMy BnnaKy BiInpaBTe NIIJIbHni IaHcIg Ha nepeBipKy B MaICTepHIO 3 06cIpyroByBaHHa KIncHTiB.
5.3.1 Ipebeipka raIbma laHcIora 3 yBIMKHeHM DBNrHyHom (09)
KUO npnstpiB BMkHyTN, a NOTIM 3HOBy BBIMKHHTN, BIN 3aNyckaetbcra 3 OCTaHHIM Bn6paHNM HanaSTyBaHHAM.
6.8 IpeBipka pIBn 3apAky akymyIaTopa — «BnBneHny pyxy» (07)
Y Bepxhiy qactnHi akymyIaTopa 3haxoIbC8 iH nnkaTOp pIBH 3apAHy. Bin aBtOMaTuHb BMnKa-ctbC8 Ha KInbKa CeKyH, kUO 3nerKa nOTpycHTu akymyIaTOp.
- Notpycitb akymyIaTOp.CBITIOIOHi iHnkaTOpn pIBHa 3apA dy akymyIaTopa 3acBiyOtbcra 3anexHo BiD pIBHa 3apA dy akymyIaTopa.
2. IpepeBipTe piBHeN 3apAy:
IIndkaTopo pIBH3apAkyakymyTota
IhdkaTopn Cmntom
UepBoHn (07/1)
Cbitntbc: AkymyIaTOp NOB-HicTHo po3pJxKeHo.
Kinbka pa3ib 6IImae 1x: cta- nacnomnilka, Hapnikna, 3aHaTO BncoKa a6o Hn3bKa TempepaTypa.
Kilbka pa3ib 6nImac 2x:Anapathn 3bi, Hapnkna,akymyIaTOp HecnpaBnH.
3eJenn (07/2)
Cbitnb:PiBHe3apAkyakymyIaTopa Bnue 0%
3eJenn (07/3)
Cbitnb:PiBeHb3apnyakymyIaTopa Bnue 25%
3eJenn (07/4)
Cbitnb:PiBeHb3apnyakymyIaTopa Bnue 50%
3eelen (07/5)
CbiTbcr:PiBeHb3apAky MyJtopa Bnue 75%
IiD yac 3apxHnHa 3eHn iHdkatop 6nMaE, Bka3yOuHa nToOuHn pIBeHb 3apAy. 3eJIeHi iHdkatOpn Hn3bKOro pIBHra 3apAdy noCTiHo CBITbCra.
Yacpo60TuakymyIaTopa
KuO He3BaXaHOn Ha NOBHe 3apJxKeHH TpNBAiictbpo60Tu kMyIaTopa 3HaUHO 3HnKeHo,ue O3Haayae, 1o TepMIn npuaTHocTI aKymyIaTopa BnueepnaHo, i NOro cIId 3amHHTN HOBM.
7 POBOOVA NOBEIINKA TA CNOCIBPOBOTN

PIMITKA
CinbckoRocnoapcbki raIy3eBi ctpaxoBi o6'edHaHnpepyJrphNo npOnohyOtB Kypcn no pOboTi 3 naHOrOBmN nnaMn i Bnpy6kn Nicy.

HEBE3NEKA!
He6e3neka dIy KITTayepe3 HeoocTaTHicTb npopeciHnx 3HaHb!
HeoctaTHi npocciHi 3HaHHyMoKyTb npn3BeCTn Do BaKnx TpaBM i HabiTb cMept!
Bnpy6ky nicy n obpi3ky rioK moXHa dopyuata n tiIbKn obiHaHm i DocBiiueHm IIOJAM.

HEBE3NEKA!
He6e3neKa dIy XHTTaype3 po3ue- nIeHHa depeBHH!
Tpick MoKyTb npn3BecTu Do cepNo3Hnx TpaBM i HabiTb Cmepti!
BudaiitbTpicknIOCKoJKN3detani, 0po pO3nnHoeTbcra.
7.1 3BaJIIOBaHHaIpeBa (19,20)
CnoctepiraTe 3a HabeHnIMn HnKYe paKTopaMn BnNBy do a6o niD yac 3BaJIIOBaHHa DepeBa:
IiD yac 3BaHOBaHHapeB cnid no6bTu npo Te, uo6 iHsi ocobn He hapaxannc Ha 6ydb-ky He6e3neky, uo6 He 6yNo KOHTaTy 3 liHiamu nocTaahnn i He 6yNo HaneceHo MaTePiaJbHnx 36ntkiv. RaKuo DepeBO BCTynae B KOHTaKT i3 liHicO nocTaahHH, HeraHNOBIOMTe KomyHaJIbHy cnyK6y.
Takok3a6e3neute 3axnct yxkoBlnachocti TBapin a6o npedmetib.BoH He noBHHI 3haoDNTnCBA He6e3neuHi 30HI. Y pa3i no- shKOJKeHHa HeraHNOBIDOMTe npo ce BnaCHNKy.
Be3neuHa BiDcTaHb MIX iHsIMn pOboUMM Miczamn abo IpeMetamn Mae cTahOBHTN He MeHwe 2 1/2 DOBXHH DepeBa.
OuiHb HnprMOK naIHnDepeBa. BpiIaJIbHe 3NaueHHnДЯ HnprMky naIHnHЯ DepeBa MaIb:
PnpoDnHaxnldepeBa;
po3TaUyBaHHBENIKNXrINOK;
BUCOTApeBa;
3poctaHHr iINOK 3 OndHoro 60ky;
po3TaUyBaHHa pIBHnHi a6o cxnIi;
acnMeTpnuhe 3pOCTaHHn, NOIkoJKeHHn DepeBnHn;
Hanpamoki WbNdkicTb BiTy;
CHIROBE HabaHTaXeHHr.
Upaizi po3TaUyBaHHHa cxuPi npauioTe Bn- 1e 3BaIIOBaHOrO depeBa.
IpekoHaTeC, 0y Bn6paHni 30Hi BiXoOy Hemae nepeuKoJ. 30Ha BiXoOy Mae po3Ta- WOBByBaTnc np6n3Ho Ni kYtOM 45^ 3a Di aroHaIIIO B HaNPaMKy, npoTNLeXHOMy HaNPaMKy BaIKN (19).
CTOB6yp Mae 6bytn OunueneHn BiD yarapHnKIB, rIOK i CTOpOHHIX npeMTeTIB (HaNPnKnaI, 6pydy, KaMeHb, Kopn, 0o BiUdawpOByETbcra, UBXiB, cko6, dpoTy tOso).
Iio6 3BaInTu DepeBO, Heo6XiIDHO BnKoHaTu Dba niDnna i ODNH BaONuHn npOnn.
1.ПдчсВиубУваннТа рОзплIOВаHHЯHa-ДИнHO 3aTиСHITb 3y6ЧАу пДору y DepeBO, 卢о рОзплIOHOTb.
2.CnoaTy BnKoHaTe NiDn (20/C) rOpN3OH TaIbHo,NotIM HABCKOCn 3Bepxu NID Kytom He MeHwe 45^ .Le Do3BOJNTy YNHKHyTN 3aTnC KaHHra NaHIOROBOI NIN NID Yac BnKoHaHHa DpyrOro NiDnny. IiDNNIIOBAHH Mae 6yTN Akomora 6nXqHM Do 3emNi Ta 3hAxODNTnc B Heo6XiHDomy Hanpmi 3BaJIIOBAHH (20/E). Tn6nHa NiDnNIIOBAHH MaE CTAHOBTN Pn- 6n3Ho 1/4 diametpa cToB6ypa.
3. 3po6itb BaNouHn npoHn (20/D) Habnpotn NiDnHy ToUHO rOpN3OHTaIbHo. BaNouHi npoNn Heo6xIdHo pObTuHa 3-5 cm Bnue roPn3OHTaIbHoro NiDnHy.
4. Глибина валочого порочу (20/D) поинь
на 6утп тakою, соб mixи пдллom (20/C) i
валочим порочкованям (20/D) зашив-
ся недочи (20/F) не мени 1/10 даметра
стовся. Рей недочи запостае обертын-
ю i падин dopeва венравиьому на-
прыку. Пд уас habлженья валочого
порочу (20/D) до недочу (20/F) Depevo
mae поати падати. У кождому рази he po3-
плкоте пдлл nonepek!
Kkpo depebo naaepiuc po3nnIOBaHHN:
KIO DepeBO NaaBc HnnpabNbHomy Hnnpmky Nn BiXnJIeTbc Ha3ad i 3aTNCKaE NaHcIgOBy nny, npnnHITb nJnT. Ipn po3tncKaHH npOnNy i nepeneCenHRepeBa B Notpi6Hn Hnnpmok B6nTe B Heo6xHy NiHIO naDInHRepeB'HN, nlaCTMacobn a6o aHOMiHcBn KlnH.
HeraHbBVeIb naHcIorOby nIy 3 npOnNy, BmKHiTb i BiKnadItb II.
BiDiIaTb y 3OHy BiXoLy.
CTeXTe 3a naIauOUMnIINKaMn.
5.Якшо DepeBo npoObKyEc cTOrTu, B6nBUn KlnHn B BaIooHn npOnnJ, 3po6iTb KOHTpoJIbOBAHe 3BaIIOBaHHa.
Ipumimka: Oo3e0nembcra bukopucmooyama nu nue knuu 3 depeea, nacmmacu a6o aniomihio.
8 TEXHlUHE OBCJyROBYAHHRA TAOIJIaI

NONEPEJXEHH! He6e3neka nopizB!
He6e3neka OTPMaHHaHx paH nIac KOHTaKTu 3 roCTpIMn pyXOMMn DeTaJIaMn npncTpoIO i pIXyUm IHcTpymENTom.
3aBXd BmukaiTe npucpii neped TexHiHm i cepBicHM 06cIyroByBaHHm i oOnuEHHam. BnIMt b akyMnyAToP.
3aBXHn Hocitb 3axnChi pykabnKn iIacTexHiHoro o6cnyroByBaHHa, DOrJyTa OUnuHn.
IaHOrOBA nIIa BiINoBiae BCIM cneCiJIbHM CTaHdApTAM 6e3NeK. PEmoHTHi poBoTI MaIOTB npOBODNTNcR TiJIbKN KBaJIiΦIKOBAHm ΦaxIBZr-MN BVKIIouHO i3 BnKOpNCtAHJM OpNIHaJIbHNX 3aNaChNX YactNH.
Iicna Koxhoro BnKOpncTahnna nepeBipTe IaHcIOROBy nny Ha 3Hoc Ta y pa3i Heo6xid-HocTi 3amHiTB noXkoDxKeHi Detani.
Cπiδ 6eperTn npicptpi BID BnNBy BOAn a6o BOJOrn. OunuAte nIaCTNKOBi DeTanI TKaHINHO TO Ta He BnKOpNCToBvIe MNUOci 3ac06n a-6o po3uHHNI.
OuHuaTe BeHTnJaCuiHi XaJIHO3i, JaKIO BOHN 3acMueH.
He po3nHIOte BDOy Ha nIJIbHn IaHcIor i He BNKOpNCTOByTe OUYBaU BnCOKOro TnCKy.
BukopncToByTe TiIbKn 3a3HaueHi Bnpo6HnKOM 3anachi YactuHn.
8.1 Ipebeipka haTay naHcIora
Yepe3 kopoTki iHTepBaHn nepeBipraTe HaTAR naHIOrA, ockInbKn HOBI naHIOrN po3TaryIOTbcR.
B npoueci ekcnnyatau npn harpiBaHni nnilb-Hnn IaHcIg noDobKyETbcra Ta npOBncae.

PIMITKA
Пильнл NaHcIOr npaBnIbHo HATyHHTN,ЯKIO BIn:
npiJrae do HxHbOi CTopoHn Ha-npMHOI uHHn i npoBepTaetbcry pkoio;
piidimaeTbcBcepeHnHaHnpMHOI uHHn Ha 3-4 MM.

OBEPEXHOI!
He6e3neka TpaBmyBaHHn npn cxoDi nnIbHorO naHcIora!
Cna6ko HataHytni NaHcIg MoKe 3iCKoHTn nIac po60Tu Ta npu3BecTNo TpaBMn.
IocTInHO KOHTPOnIOte HaTg NaHcIOra.HaTg NaHcIOra 3acNa6Kn, KOINpo6OJI NaHKn BnCTynAHTb 3 KaHaBKn Ha HnKHi CTOpOHi HAnpMHOI UHHN.
HaTayIe IaHcIg, KOnn HataI NaHcIgra 3acna6kn.
8.2 HatahaHHnIJIbHoro naHOra (26)

HE6E3NEKA!
He6e3neKa dJa KHTy Chepe3 BiDauY!
BiDaua eIeKtpoNIIK MoKe np3BeCTn Do cepNo3Hnx TpaBM OepaTopa.
3aTouyuTe nIJIbHn IaHcIg npaBUNbHO!

PIMITKA
HeoocbiueHm KopnctyBaayam naHOrBnx nIOK pekomeHyEMO BiDaTNIJIbHn IaHcIg dIra 3aToCyBaHHy cepBiChy cnyx6y.
3 MipkyBaHb 6e3neKn Ta epeKTHBHOCTi po6OTn Dyke BaxKnBO, 06 nIJIbHn JaHcIg 6yB do-6pe 3aToueHn.
Heo6xioBnKohyBaTu 3aToueHH, KOIN:
BND Tnpn HaraDyE nnI;
Дяпяняняnotpi6HObOKlaadTu 3HaChi 3yCnJIJI;
NIIJIHHH HenpIeMe;
36inbwyetbcBipacia.
KUO BIKOHHA3aTOyBaHH DOpyAcTbCnueiian3OBAHOMy ceHTpy, Ioro BIKOHHOtB Ha CneuiabHOMy 0bnHaHHI, 0o 3a6e3neuHtMiHimaBn 3pi MaTepiany i pIBHomiphe 3aToeHN HBCix pIXyHX KpOMOK.
CamoctiHNO 3aToCHNIINJIbHNJNAHOrMOKHa 3a DonomoroIO cneiaIbHOrO kpyrIoro HAnnKa, diametp JKO rio nID6npaOTb i3 ypaxyBaHHmnapameTpIB naHOrA (INB. po3in 8.6 "TaBnuzaobcnyoByBaHHra NaHou2a", cmopIHka 493).L063aToHTN IaHOr 6e3 NowkoJKeHH 3y6uB, noTpi6Ha HABHICTb NEBHO DOCBiDy Ta HABNUOK.
ДяЗATOUeHnIINJIbHOrOJahIgora:
- Bumkhitb naHcIorOby nIy Ta BnMiTb akyMyJrTOp;
- BidnyctiB ralbmo naHciora.
- HadiiHo 3aΦikCyIe HanpMHy 3i BCTaHOBHeHIM NIIJIbHIM NaHcIOrom y BiNObiD-HNX JeuaTAX, NepeKoHaBwncb, 100 NIIJIb-HIN IaHcIg MoKe BiNbHO nepemiuatncr.
- HataRHiB nIIaJIbHn IaHcIg, aKIO BIn Ocna6JeHn.
- BctaHOBiB HAnNJOK Ha CneuiJIbHy HApRmHy, NotIM BCTaBTe HAnNJOK B 3anaDInHy 3y6-4, NiItpMMyOuN NoCTiHn Haxn 3a npoFiJem pIXyOi KpOMKn.
6.Пикладынлд кьka pa3iB BnKIOUHO cnepeDy i NOBTopiB zuO DiO Ha BCix pIXyUnx KpOMkaxВ TOMуЖ HAnpMky (npabi a6o nibi).
7.ПомиЯнTepo3TaUyBaHHHaHnPmHOI uHHN B 3aTnCKHOMy npNCTOcyBaHHi Ha npOTnJIeKHe i NOBTopiTB zuDIO Ha IHuNX pIXyUx KpOMKax. - Npeebipte, 3o 3y6eub-0mbexyBaH He BnctTynae 3a Kpa npilaay, 3o BnKOpncTObyETbcraIg npebipkn, 6pO6iB MoKnBn BnCTyn PNOCKIM HAnlKOM, 3akpyrlnBUn npofinb.
9.ПисязatoeHЯВuДaIITb Bci cniIиOBpo6- KI I NII HAnNkOMI 3MaCTITb NIIJIbHNI NaHcIgY MaCTINbHi BaHHi.
Cni3amHHTNaHcIg, KOIN:
I OboXnHa pixyoi KpOMKn 3Hnxkyetbca Do 5 MM a6o MeHwe;
3a HaBHOCTi: He nepeBnUyTe no3HaKy Ha 3y6ux pIXyUnx naHOK;
3a3op JaHOK Ha 3aKJenKax 3aBeNkN.
8.3 OuHnHn BHyTpHbOro npocTopy 3ipouKn
PeteNbHO ouHuaTe IaHcIorOBy niny nicJnKHO BnKOpncTaHH.
- BnMItb akymyIaTOp i nocTaBTe naHcIroBOy NnIy Ha cTIky NOBepxHIO.
- BnKpyTITb KoxyX 3ipoUKN.
- 3a Donomoro npixoandaoroeh3nka OCHITb BHytpiunipoctip.
- 3HIMITb NINJIbHN IaHcIHor, a NOTIM HApPmHy IiHHy.
- OuNCTITb na3 uHHi MaCTINOBnYcHnO TBip.
8.4пектоановkaшвдко3aTNCKHOro npictpo10 (27)
- 3HЯTTI HAnpMHOI WHHN (27/1): BiDkpyTITb rBnHT (27/2) i ocna6Te nlaCTHy aanTepa 3 HATJXHMn rakamn (27/3) HAnpMHOI WHHN.
- NobepHITb HapmHy uHy HABKONo n03- doBxHboi OCI.
- 3HOBy npnKpiniTb nactHy aanTepa 3 HaTJxHIMn rakAMn Ha HaprrmHy uHy i 3aqiKcYnte ix 3HOBy rBnHTom i3 XpectOBmUJIiOm.
- BctaHobitb Ha Micue HnnpMHy uHHy, DnB. po3di 4.1 "MoHmax HnnpMHOI uHu (02, 03) ", cmopiHa 484.
8.5 IpeBipka, nobepTaHHra Ta 3MauYBaHHa HapmHOi uHHn (28, 29)
IpebipTe HnpanMHy uHy
Perynpho nepebipiae HapymHy uH na no- shkoJKeHHa. BuaTb 3aNpKn (28/1) nIacKm Hannikom niKyTom 45^ (28/2).
IpepeBepTaHHHaHpA MHOI uHH
Uo6 yHnKHyTN OJHOCTOpOHbOro 3HOCy, cIi pepeBepTaTn HAnpMaMHy uHy nCJIa KOKHOrO 3aTouCyBaHH i 3amHn NaHcIora.
- NpeBCTaHObIb WBNdKO3aTnCKHn npNCptiHa HAnpMaHiuHHi, DnB. po3di 8.4 "NpeCmaHo6ka uBdKO3amuckHo2o npucmpo (27),cmopihka 493.
- IpepeBepHb HappMHy uHHy.
3mactitb HanpymHy uHy
- PeTeJIbHo OuHcTiTb Na3 UHH (28/3) i MaCTnIIOBUNyCKHi OTBOpN (28/4).
- PeTeJIbHO OUHCTiTB MaCTnIbHn OTBip (29/1) 3 o6ox cTopiH.
- 3a donomoroIO mactnIbHoro Inpuca no cep3i (29/2) 3anpaBte 3 o6ox 6okib cTilbkn mactnla, 06 BOHO pIBHomipHO BmUNo Ha kInx 3ipoQKn. Pn CbOMy nocTiHNO npOKpyuTe 3ipOky.
8.6 Ta6nua o6cnyroByBaHH naHoura

NONEPEDXEHHRA
Pn3nk OtpmaHH cepno3Hx TpaBM.
BukopncTaHHa IaHcIorobi II NJI He cahKIOHOBaHOI INIJIbHOrO IaHcIora a- 6o HaprrMoHoi UHH MoKe npVBecTn Do cepNo3Hx TpaBM.
BukopustobyTe TIlbKn caHKioHOBaHi nIJIbHI IaHcUOrn i HanpymHi
www.al-ko.com/service-contacts
14 YCYHEHHA HECNPPABHOCTEIN

OBEPEXHO!
He6e3neKa TpaBMyBaHn
Pyxomi deTani Ta deTani 3 roctpMn KpaMm MOkyb npu3BecTu Do TpaBM.
IiudacTexHHyoro 6cbnyroByBaHHraDy Ta OunuHn3abKn CnId BdrgaTn 3axnchi pykabuci!
Bumkhytn npncpti Ta BnHnTn akymyIaTOP!
HecnpaBhicTb PnunHa YcyHeHHA
Дигун He npaioe. Hema Hanyn aymynaTo
pa.
3axnt Bi nepeBaHTaKeHHBIMKHyBCr.
DopyiB eJektpnKoBi nepeBipTu NiHIO eJekTpponoctaayHna.
Tajbmo JanaHJOra BUMKHeHO.
3auekaIte,doKINJBLeHH3axncty BiI nepeBaHTaxeHH He BiHOBtbcra.
ПиЯьнланцIg 3aHaITOn HATrHytN.
BiDnycTiB HataR naHiora.
MacJHn 6ak npoxhHi. DOnHte IaHcIroBe MaCTNJIO.
IpebeipTe macnHn 6ak Ha noxko- dxKeHHa
Hanpymha uHa Ta nIyIb-Hn IaHcIg HarpBaOTbcI.
IOnBaDmMy.
MacnoBnynckHn oTbip i (a- 6o) na3 uHHn 3a6pydneHi.
OuNCTIb macNoBnPyckHn OTBip i (a6o) na3 uHHn.
DnHy npaucoc, aJe nnJyHnn NaHcIg He o6epTaTbcra.
ПиЯьнланцior 3aHaITo HataHryTuN.
Bidnyctitb Hatair naHiora.
HecnpaBnict npnilaDy
3BepHtbcra do cepBicHoro ueHTpy komnahii AL-KO.
3amictb TnpCN BnKndaetbcra DepeBn nn. NaHcIroBOy nIy 3aTncHyNo DepeBnHOJ.
AkymyjTOpHa IaHcIyOrBa nla
CepiHn Homep
G4013022
Tun
CS 4235
PIBEh3ByKOBoi NOTyKHOCTI
EN ISO 3744
BmipraHn/rapaHToBaHn
103,3 έB(A) / 108 έB(A)
CepTnΦiKaT BiNObiHocti Tnny BInpo6y cTaHapTAM EC
M6A-17 12-47028
Bnpo6nK
AL-KO Geräte GmbH
Ichenhauser Str. 14
89359Kotz
HimeyuHa
InpeKTHBn EC
2006/42/EC
2014/30/EC
2000/14/EC
2011/65/EC
OuzHKa BiINOBiaHocti
2000/14/EC DoaTOK V
HotnФikOBaHm opraH (2000/14/EC)
TÜV SÜD Product Service GmbH
Ridlerstraße 65
80339Munchen
HimeyuHa
Nr. 0123
YnoBHOBaXeHa OcO6a, 0o cKlaJa daokymentauio
Andreas Hedrich
Ichenhauser Str. 14
89359Kotz
HimeyuHa
TapMOHizOBaHi cTaHdApTu
EN 60745-1:2009+A11:2010
EN 60745-2-13:2009+A1:2010
EN 55014-1:2006+A1:2009+A2:2011
EN 55014-2:2015
Kotz, 01.12.2017

Dr. Wolfgang Hergeth Managing Director


- ABOUT THESE OPERATING INSTRUCTIONS
- Symbols on the title page
- Symbol Meaning
- Legends and signal words
- DANGER!
- WARNING!
- CAUTION!
- IMPORTANT!
- NOTE
- PRODUCT DESCRIPTION
- Designated use
- Danger of injury due to non-designated use!
- Possible foreseeable misuse
- Residual risks
- Safety and protective devices
- Danger of serious injury from manipulated safety and protective devices
- Switch-on protection
- Chain brake/chain brake bracket
- Overload protection
- Symbols on the appliance
- Scope of supply
- Danger of damage to the appliance and battery
- No. Component
- Product overview (01)
- SAFETY INSTRUCTIONS
- General Power Tool SafetyWarnings
- Work area safety
- Electrical safety
- Personal safety
- Power tool use and care
- Battery tool use and care
- Service
- Chain saw safety warnings
- Causes and operator prevention of kickback
- Safety information regarding the rechargeable battery
- Safety information regarding the charging unit
- Safety information when working
- Operator
- Operating times
- Vibration load
- Danger due to vibration
- Noise pollution
- Working with the chain saw
- Danger of serious injury.
- Risk of injury due to chain saw being started inadvertently
- INSTALLATION
- Danger of laceration injuries.
- Installing the guide rail (02, 03)
- Installing the saw chain (02, 03)
- Tightening the saw chain (04, 05)
- START-UP
- Danger of fatal injury and danger of extremely severe injury.
- Charging the rechargeable battery (06, 07)
- Danger of fire during charging!
- Filling saw chain oil (08)
- Danger of damaging the chain saw
- Function test of the chain brake
- Danger of fatal injury as a result of negligent handling!
- Danger of fatal injury and danger of extremely severe injury due to a defective chain brake
- Testing the chain brake with motor switched off (09)
- Testing the chain brake with motor switched on (09)
- OPERATION
- Check the saw chain oil
- Putting on the rechargeable battery belt system (10) to (13)
- Inserting/removing the battery (14)
- Inserting the battery
- Pull out the rechargeable battery
- Connecting the voltage supply (15, 16)
- Mounting the connecting cable
- Dismounting the connecting cable
- Switching the motor ON and OFF (17)
- Danger of hearing impairment!
- Testing the chain brake
- Increase/decrease speed of saw chain [Eco-Mode/Power-Mode Function] (18)
- Checking the charge status of the rechargeable battery, "Motion Detection" (07)
- Charge status displays on the rechargeable battery
- Operating time of the rechargeable battery
- WORKING BEHAVIOUR AND WORKING TECHNIQUE
- Danger of fatal injury due to inadequate technical knowledge!
- Danger of fatal injury from splintered wood!
- Felling trees (19, 20)
- Danger of fatal injury from a falling tree!
- Danger of fatal injury from an uncontrollably falling tree!
- Delimbing (21)
- Cross-cutting (22 - 25)
- Danger of fatal injury due to kickback!
- Cutting converted timber
- MAINTENANCE AND CARE
- Danger of cutting injuries
- Checking the chain tension
- Sharpening the saw chain (26)
- Cleaning the chain sprocket interior
- Changing over the quick-tension chain wheel (27)
- Checking, turning and greasing the guide rail (28, 29)
- Checking the guide rail
- Turning the guide rail
- Greasing the guide rail
- Chain maintenance table
- TRANSPORT
- STORAGE
- DISPOSAL
- Information on the German Electrical and Electronic Equipment Act (ElectroG)
- Information on the German Battery Act (BattG)
- AFTER-SALES / SERVICE
- TECHNICAL DATA
- HELP IN CASE OF MALFUNCTION
- Risk of injury
- GUARANTEE
- Our warranty promise applies only if:
- The warranty becomes void in the case of:
- The guarantee excludes:
- TRANSLATION OF THE ORIGINAL EU DECLARATION OF CONFORMITY
- Product
- Serial number
- Type
- Sound power level
- EC type approval
- Manufacturer
- EU directives
- Conformity evaluation
- Notified body (2000/14/EC)
- Duly authorised person for technical file
- Harmonised standards
- VERTALING VAN DE ORIGINELE GEBRUIKERSHANDLEIDING Inhoudsopgave
- PRODUCTOMSCHRIJVING
- Beveiling against overbelasting
- TRADUCTION DE LA NOTICE D'UTILISATION ORIGINALE
- Table des matieres
- CARACTERISTIQUES TECHNIQUES
- Peligro defaulted to a vibration.
- TEHNIČNI PODATKI
- Priglaseni organ (2000/14/ES)
- Oseba, odgovorna za pripravo dokumentacije
- Usklajeni standardi
- PRIJEVOD ORIGINALNIH UPUTA ZA UPORABU
- Sadržaj
- TEHNICKI PODACI
- PREKLAD ORIGINÁLNIHO NÁVODU K POUŽITÍ
- Obsah
- TECHNICKÉ UDAJE
- BEZPEČNOSTNÉ POKNY
- Vseobecnbe bezpecnostnepokyny pre elektrickne naradie
- VAROVANIE!
- Schvalovaci urad (2000/14/ES)
- AZ EREDETİ KEZELÉSI UTMUTATÓ FORDITÁSA
- Tartalomjegyzék
- Lancfek Ellenorzese
- TEKNISKE DATA
- Bemyndiget organ (2000/14/EF)
- Ansvarlig for dokumentationen
- Harmoniserede standarder
- WARNING! Risk for vibration
- TEKNISKA SPECifikATIONER
- Anmalt organ (2000/14/EG)
- Befullmaktigad for documentation
- Harmoniserade standarder
- OVERSETTALSE AV DEN ORIGINALE BRUKSANVISNINGEN
- Innhold
- Tegnforklaringer og signalord
- FARE!
- ARBEIDSFREMTREDEN OG ARBEIDSTEKNIKK
- MERK
- VEDLIKEHOLD OG PLEIE
- ADVARSEL!
- Fare for kuttskader
- 7.1Koku gasa (19,20)
- TEHNISKIE DATI
- INHΦOPMAUЯ O PYKOBODCTBE NO 3KcPJIyATAUIN
- CnMBOJbHa TnTynbHOn CTpaHnue
- CnmboJ 3HaueHne
- YcNoBHbIe 06o3HaueHn I cnHaJIbHbIe CNoBa
- ONACHOCTb!
- PNEyPEXKDEHNE!
- OCTOPOXHO!
- BHIMAHNE!
- ПРИМЕЧАНЕ
- OINCAHNE IPODyKTA
- NcnoJb3ObaHne no Ha3NaYeHnIO
- Onachoctb TpaBMnpoBaHn npu nCnoJb3OBaHn He no Ha3HaueHnO!
- PpimepbI HnpaBnJIbHOro npImeHeHna
- OctaToHbIe pNCKn
- PpeoXpaHnteNbHbIe n 3aunTHbIe ycTpoiCTBa
- PNEyIPEXDEHNE!
- 3auntataotBKJIOueHnra
- Topm03 zenn / pbiur Topm03a zenn
- 3aunta ot neperpy3kn
- CmboJIbHa yctpoINCTBe
- YKA3AHN NO TEXHnKE B3ONACHOCTN
- 06uye yka3aHnno TeXnKe 6e3oNaChocTn dJa 3JIeKtpOnHCTpyMeHTOB
- PNEyIPEXKDEHNE!
- BezonachocTb Ha pa6oYem MecTe
- Θlektpnuecka 6e3onacHocTB
- NiuHai 6e3oNaCHOCTb
- NcnoB3OBAHne 3JeKtpOnHCTpyMeHTa n pa60Ta C Hm
- NcnoJIb3OBAHne INHCTpyMeHTa c aKKyMylrTOpOM
- CepBnC
- Yka3aHnno TeXnKe 6e3oNaChocTn npn o6paueHn c ceHnO nnloN
- 3.4Инструкции по 6e3oNaChoctnaKKyMylrTopa
- 3.5Инструкши no 6e3oNaChocTN 3apdHOrO yCTpoiCTBa
- Yka3aHnno TeXnKe 6e3OnaCHOCTN BO BpeMpa6oTbI
- OnepaTopbI
- Bpempa6oTbI
- Bn6paunOHna Harpy3ka
- PNEyPEXEHHIE!
- Onachoctb Bn6paun
- Akyctnccka harpy3ka
- Pa6oTa c ceHNoI nJIo
- PPEyIeHNE! Onachocb cepbe3hbx TpaBM.
- PPEyPPEKDEHNE!
- OnachocTb TpaBMbl 3-3a HenpeHa-MepeHHoro BkHoueHn cenHoN nIJIbI
- MOHTAK
- OCTOPOXHO! Onachoctb pe3aHbIX paH.
- MoHTaK HanpaBJIouSei uHHbI (02, 03)
- MoHTaK NJIbHOJ cENn (02, 03)
- HaTajkeHne nnIbHOJ cenn (04, 05)
- ONACHOCTb! ONaCHOCTb JnJ Kn3Hn n ONaCHOCTb TKeJIbIX TpaBM.
- PPEyPExEHNE! Onachocb cepbe3HbIX TpaBM.
- 3apka aKKymyTopa (06,07)
- OCTOPOXHO! Пожарoonacnoctb пи зараздke!
- 3anpaBka macna JIJIcMa3KN NJIbHOJ cenn (08)
- OnachocTb NOBpeXdEHNr cENHOIJIbl
- Поверка pa6otocnoc6hoctn Topmo3a ceH
- Onachoctb IJIa KUN3Hn N3-3a He6peK-Horo o6paueHn!
- PNEyNPEKDEHNE!
- Onachoctb dIy JN3Hn npck TjKeJbIX TpaBM n3-3a HeNCnpaBHORo TOPMo3a cenn
- Поверка Торmoэцени ри вкlioуehHom DBnraTeJIe (09)
- Поверка Торmoэцени рпьБыкlioуehHom Двигател (09)
- YNPABJIENHE
- OnachocTbДЯЖИЗНиOnachocTb TЯкелыхТраВМ.
- PpOBepka Macna dIa Cma3Kn NJIbHOJ cenn
- BHIMAHHE!
- Onachoctb noBpeKdEHHa cenHoi nnIbl
- HaedeBaHne noaChoi CnCTembl (10)-(13)
- YcTaHOBka N n3BneueHne aKKMyJrTopa (14)
- BcTaBa kkyMnyTopa
- N3BneueHne aKKymyIaTopa
- YctaHOBka nCTouHnKa nHTaHn (15, 16)
- MOHTAX COeHHTeJIbHOrO Ka6eJra
- DEmoHTax CoeHHnteHoro Ka6eJra
- BkIIOueHne N BBIKIOueHne DBrarTeJIa (17)
- OnachocTb nobpeKdEHHn opraHOB cnyuxa!
- Поберка Торmoэци
- Onachoctb dIy JxN3Hn n pNCK TJXeJIbIX TpaBM I3-3a HeNCnpaBHOrTO TopM03a cENI
- YBeJIuYeHne/YMeHbIeHne cKOpocTn ПИьНоцп [Функця ржIMOB Eco/ Power] (18)
- CEPBNUCHOE OBCJNYKUBAHNE
- TEXHnueCKNE XAPAKTEPNCIKN
- YCTPAHEHNE HENCPABHOCTEIN
- Onachoctb TpaBMPOBaHn
- HecnpaBHOCTb PnUHa CnocO6bI yctpaHeHna
- PpOn3BODnTeJIb
- Лицо, OTBETCTBeHHoe 3a COCTaJIeHne DOKyMentTa
- CepinHbI Homep
- Tnn
- DnpeKTHBbIEC
- TapMOHn3npoBaHHbIe cTaHdApTbI
- YpoBHeB 3ByKOBoMouHOCHTN
- OueHka COOTBETCTBnA
- CeptnuΦnkat COOTBet
- CTBNA Tnna N3deJNRA CTaHdapTAM EC
- OTBeTCTBeHHbI opraH (2000/14/EC)
- IPEKJIAD OPINIHJY NOCIBHNA 3 EKCPIYATAUII
- 3mict
- IHΦOPMAUJI IPO NOCIEHNIK I3 EKCPIIYATAUII
- CnmboJn Ha TntyIbHi n CTopIHci
- YMOBHnNo3HaueHH Ta CnHnBHi CIOBa
- HEB3NEKA!
- NONEPEDKEHHRA
- OBEPEXHO!
- YBARA!
- ПРИМITKA
- OINC INPNCPOHO
- BnKOpncTaHnHa 3a npn3NaueHHaM
- OBEPEKHO!
- He6e3neKa TpaBMyBaHHy pa3i BnKOpncTaHH He 3a npu3HaueHHam!
- PpNKJaHn HnpaBnJbHoro 3aCTOCyBaHHa
- 3aunukovi pN3nK
- 3anobixhhi Ta 3axnchi eJemeHTN
- NONEPEDKEHHI
- Pn3nk OTPmamHna cepno3nX TpaBM Chepe3 MaHInyIaIcII 3anobixHMn Ta 3axnCHMn npncTporMn
- KOHTaKTop yBimKHeHHr
- RaJbMo NaHcIora / BaXJIb raJIbMa NaHcIora
- 3axnCT BiD nepeBaHTaXeHHA
- YMOBHI No3HaueHHa npncTpoi
- KomnJIeKt NOCTaBKn
- YBAGA!
- Hoomep
- KOMNOHeHTa
- Ho- KOMNOHeHTa Mep
- Bi3yαnbHn orIaD Bnpo6y (01)
- Ho- KOMNHOHeTa Mep
- ПРавиJA TEXHIKи BE3NEKn
- 3araIbHi peKoMeHdaaui 3 6e3neKn eNeKTpoIHcTpymEnTy
- PONEPEDEXEHHRA
- Bezeke ha pooboy Mici
- EneKtpnHa 6e3neKa
- Bezneka IIOdei
- KopncTyBaHHeJIekTpOnnIkoIO i NOBOJKeHHa 3 Heo
- KopncTyBaHnAkyMnyTOpHm npnaDom i NOBODKeHHa 3 Hm
- CepBic
- PpaBnla Texhikn 6e3neKn iN da cpo60tn 3 NaHcIIOBUMn nIaMn
- 3.3ПичHHN 3BOPOTbOi BiДaqui Ta 3acTepeKeHnЯ dIЯ onepaTopa
- IInctpykui 3 6e3neKn akymyIaTopa
- Ihctpykuii 3 6e3neKn 3apAHoro npnctpo
- IpaBnla Texhikn 6e3neKn iId qac po6oTn
- Onepatopn
- Yac po60tn
- Bi6pauiHe HaBaHTaKeHHa
- PONEPENKENH
- He6e3neka Bi6pauii
- AkyctNueHHe HabaHTaXeHHH
- Po6ota 3 eNeKtpoNnIkoI
- NONEPEDKEEHHRA
- Pn3nk OTPmamHc cepno3nX TpaBM.
- NONEPEIXEHHI He6e3neka OTPmAHnTpaBM BiD BNnaKOBOrO 3anyCky eNeKTponnKn
- 4CKIADAHNRA
- Pn3nk OtpmaHH cepno3Hx TpaBM.
- OBEPEXHOI!
- He6e3neka OTPmamHn pi3aHnx paH!
- MoHTaK HanpMaHoi WuHu (02, 03)
- MoTtax nIIJIaIbHoro IaHcIora (02, 03)
- HataraHHa nnJIaIbHoro IaHcIora (04, 05)
- BBEENHBA EKCNIYATAUIO
- HE6E3NEKA!
- Pn3nk cmepti a6o Tjkknx TpaBM.
- Pn3nk OTPmuHaHH cepno3Hx TpaBM.
- 3apdkaHHa kymyTopa (06, 07)
- Ioxekxohoe6e3neka nid yac 3apdKaHHa
- 3aJIINBaHHraIaHcIIOROBOrMaCTnla (08)
- He6e3neka nowkoJxHnHaHIO-roBOoi nnn
- IpeBipka npaue3daTHocTi raIbMa IaHcIora
- He6e3neka JIJI KITTJ Uepe3 HeI6aJe NOBOJXeHH!
- NONEPEDXEHHRA
- Pn3nk cmepti a6o cepno3hux TpaBM uepe3 HecnpaBHe raIbMo IaHcIora
- Ipebeipka raIbma laHcIora 3 yBIMKHeHM DBNrHyHom (09)
- IpeBipka pIBn 3apAky akymyIaTopa — «BnBneHny pyxy» (07)
- IpepeBipTe piBHeN 3apAy:
- IIndkaTopo pIBH3apAkyakymyTota
- IhdkaTopn Cmntom
- Yacpo60TuakymyIaTopa
- POBOOVA NOBEIINKA TA CNOCIBPOBOTN
- PIMITKA
- HEBE3NEKA!
- He6e3neka dIy KITTayepe3 HeoocTaTHicTb npopeciHnx 3HaHb!
- He6e3neKa dIy XHTTaype3 po3ue- nIeHHa depeBHH!
- 3BaJIIOBaHHaIpeBa (19,20)
- TEXHlUHE OBCJyROBYAHHRA TAOIJIaI
- NONEPEJXEHH! He6e3neka nopizB!
- Ipebeipka haTay naHcIora
- He6e3neka TpaBmyBaHHn npn cxoDi nnIbHorO naHcIora!
- HatahaHHnIJIbHoro naHOra (26)
- He6e3neKa dJa KHTy Chepe3 BiDauY!
- OuHnHn BHyTpHbOro npocTopy 3ipouKn
- 8.4пектоановkaшвдко3aTNCKHOro npictpo10 (27)
- IpeBipka, nobepTaHHra Ta 3MauYBaHHa HapmHOi uHHn (28, 29)
- IpebipTe HnpanMHy uHy
- IpepeBepTaHHHaHpA MHOI uHH
- 3mactitb HanpymHy uHy
- Ta6nua o6cnyroByBaHH naHoura
- YCYHEHHA HECNPPABHOCTEIN
- He6e3neKa TpaBMyBaHn
- HecnpaBhicTb PnunHa YcyHeHHA
- CepiHn Homep
- Tun
- PIBEh3ByKOBoi NOTyKHOCTI
- CepTnΦiKaT BiNObiHocti Tnny BInpo6y cTaHapTAM EC
- Bnpo6nK
- InpeKTHBn EC
- OuzHKa BiINOBiaHocti
- HotnФikOBaHm opraH (2000/14/EC)
- YnoBHOBaXeHa OcO6a, 0o cKlaJa daokymentauio
- TapMOHizOBaHi cTaHdApTu
Brand : AL-KO
Model : Solo CS 4235
Category : Saw