
CSA 2020 - Saw AL-KO - Free user manual and instructions
Find the device manual for free CSA 2020 AL-KO in PDF.
| Brand | AL-KO |
| Model | CSA 2020 |
| Product type | Battery-powered pole pruner (pole chainsaw) |
| Power source | Lithium-ion battery B50 Li (not supplied), charger C30 Li or TC30 Li recommended |
| Rated battery voltage | 36 V (estimate) |
| Guide bar length | Approximately 25 cm (not specified) |
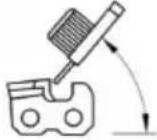
| Chain type | Oregon 91P033X |
| Guaranteed sound power level | 92 dB(A) |
| Measured sound power level | 90.4 dB(A) |
| Chain oil type | Biodegradable chain oil |
| Oil tank capacity | Not specified |
| Main functions | Tree pruning from the ground, branch cutting |
| Included parts | User manual, shoulder strap, hex key/screwdriver, protection cover |
| Warranty | Legal according to the country of purchase |
| Regular maintenance | Check chain tension, lubrication, clean guide rail, sharpen chain if necessary |
| Safety | Wear gloves, goggles, helmet, safety shoes; keep 10 m distance from power lines; do not use in rain |
| Proper use | Pruning of stable trees and bushes from the ground, standing on stable ground |
| Storage | Dry, locked, out of reach of children; drain oil for storage >30 days |
Frequently Asked Questions - CSA 2020 AL-KO
User questions about CSA 2020 AL-KO
0 question about this device. Answer the ones you know or ask your own.
Ask a new question about this device
Download the instructions for your Saw in PDF format for free! Find your manual CSA 2020 - AL-KO and take your electronic device back in hand. On this page are published all the documents necessary for the use of your device. CSA 2020 by AL-KO.
USER MANUAL CSA 2020 AL-KO
natural_image
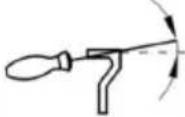
Technical line drawing of a mechanical tool or device with multiple arms and connectors (no text or symbols)| DE |
| GB |
| NL |
| FR |
| IT |
| ES |
| SI |
| HR |
| PL |
| CZ |
| SK |
| HU |
| DK |
| SE |
| NO |
| FI |
| LT |
| LV |
| RU |
| UA |


Inhaltsverzeichnis
Deutsch 8
English....27
Nederlands 45
Français....64
Italiano 83
Español 102
Slovenščina 121
Hrvatski....139
Polski 156
Česky 175
Slovenská 192
Magyarul....210
Dansk 229
Svensk 246
Norsk 263
Suomi 280
Lietuvių 297
Latviešu 315
Русский 333
Україна 353
© 2017
AL-KO KOBER GROUP Kötz, Germany
This documentation or excerpts therefrom may not be reproduced or disclosed to third parties without the express permission of the AL-KO KOBER GROUP.


natural_image
Technical line drawing of a mechanical tool or device with intersecting lines, no visible text or symbols


Nr. Bauteil
www.al-ko.com/service-contacts
1 About these operating instructions 29
1.1 Legends and signal words.... 29
2 Product description 29
2.1 Scope of supply 29
2.2 Symbols on the appliance 29
2.3 Safety and protective devices 30
2.4 Intended use.... 30
2.5 Possible foreseeable misuse.... 30
2.6 Residual dangers 30
2.7 Product overview 30
3 Safety 31
3.1 General safety instructions for power tools 31
3.2 Electrical safety 31
3.3 Personal safety.... 31
3.4 Use and handling of the electrical tool 31
3.5 Safety in the workplace 32
3.6 Use and handling of the rechargeable battery-operated tool 32
3.7 Service 32
3.8 Safety information for chain saws (EN 60745 Part 2-13) 32
3.9 Causes and prevention of kickback (EN 60745 Part 2-13) 33
3.10 Safety instructions for the polemounted pruner.... 33
3.10.1 Work instructions (13) 33
3.10.2 Vibration load 34
3.10.3 Noise pollution 34
3.10.4 Safety information regarding the rechargeable battery 34
3.10.5 Safety information regarding the charging unit.... 35
4 Installation.... 36
4.1 Installing the polemounted pruner attachment (01- 02).... 36
4.2 Extending/shortening the telescopic pole (03) 36
4.3 Installing the guide rail and saw chain (04 - 08) 36
4.4 Tensioning and slackening the saw chain (09) 37
4.5 Filling saw chain oil (10) 37
4.6 Attaching the carrying belt to the appliance (19) 37
5 Start-up 38
5.1 Charging the rechargeable battery 38
5.2 Inserting and pulling out the rechargeable battery (11).... 38
6 Operation 38
6.1 Switching the appliance on and off (12) 38
7 Working behaviour and working technique (14 – 18) ...... 38
8 Maintenance and care 39
8.1 Checking the chain tension 39
8.2 Checking the chain lubrication 39
8.3 Saw chain and guide rail 39
8.3.1 Replacing the saw chain and guide rail.... 39
8.3.2 Turning the guide rail.... 39
8.3.3 Sharpening the saw chain 39
8.3.4 Cleaning the guide rail.... 40
9 Storage 40
10 Transport 40
11 Disposal 41
12 After-Sales / Service 42
13 Help in case of malfunction.... 42
14 Guarantee.... 44
15 EU declaration of conformity.... 44
1 ABOUT THESE OPERATING INSTRUCTIONS
The German version is the original operating instructions. All additional language versions are translations of the original operating instructions.
It is essential to carefully read through these operating instructions before start-up. This is essential for safe working and trouble-free handling.
■ Always safeguard these operating instructions so that they can be consulted if you need any information about the appliance.
■ Only pass on the appliance to other persons together with these operating instructions.
■ Comply with the safety and warning information in these operating instructions.
1.1 Legends and signal words

DANGER!
Denotes an imminently dangerous situation which will result in fatal or serious injury if not avoided.

WARNING!
Denotes a potentially dangerous situation which can result in fatal or serious injury if not avoided.

CAUTION!
Denotes a potentially dangerous situation which can result in minor or moderate injury if not avoided.
IMPORTANT!
Denotes a situation which can result in material damage if not avoided.

NOTE
Special instructions for ease of understanding and handling.
2 PRODUCT DESCRIPTION
The polemounted pruner allows you to prune, trees and other shrubs conveniently and safely from the ground. This eliminates the time-consuming and dangerous work on a ladder or a tree.
2.1 Scope of supply
The polemounted pruner is intended to be operated using the rechargeable battery B50 Li (art. no. 113559). This is not included in the scope of supply.
IMPORTANT!
Danger of damage to the appliance and battery
If the appliance is operated with an unsuitable battery, both the device and the battery may be damaged.
■ Only operate the appliance with the specified rechargeable battery.
For charging the rechargeable battery, the charging unit C30 Li (art. no. 113560) or TC30 Li (art. no. 113561) is required.

NOTE
You will find further information in the following operating instructions:
■ "Li-Ion rechargeable battery B50 Li" (doc. no. 442228)
■ "Charging unit C30 Li / TC30 Li for battery B50 Li" (doc. no. 442230)
2.2 Symbols on the appliance
Symbol Meaning
 | Pay special attention when handling this product. |
 | Do not use in the rain! Protect against moisture! |
 | Wear a protective helmet, ear defenders and eye protection! |
 | Wear protective gloves! |
 | Wear sturdy shoes! |
Symbol Meaning

Read the operating instructions before starting operation.

Maintain a distance of 10 m from live lines.
2.3 Safety and protective devices
Protective cover of the guide rail
Before transport, the protective cover must be pushed onto the guide rail and saw chain to avoid injuries to persons and damage to objects.
2.4 Intended use
The polemounted pruner is intended to prune established trees and other shrubs from the ground. The user must stand firmly on the ground (13).
Only biodegradable saw chain oil must be used. Any use other than the designated use described here is deemed as non-designated.
The polemounted pruner must not be used in the commercial sector.
2.5 Possible foreseeable misuse
- Do not saw off any branches that are directly or at an acute angle above the user or other persons.
■ Do not operate the appliance standing on a ladder.
■ Only use one extension pipe, even if further extension pipes are available.
■ Do not use any used oil or mineral oil.
■ Do not use the appliance in a potentially explosive atmosphere.
2.6 Residual dangers
Even during correct use of the appliance, there is always a certain residual risk that cannot be excluded. Depending on the use, the following potential risks can be derived from the type and construction of the appliance:
■ Contact with wood chips and oil dust flying around
■ Inhalation of wood chip particles and oil dust
Injuries caused by saw chain parts flying around
■ Cutting injuries on the saw chain
2.7 Product overview
No. Component
| 1 Protective cover of the guide rail |
| 2 Telescopic pole |
| 3 Fill opening of the oil tank |
| 4 Saw chain |
| 5 Chain bar |
| 6 Fastening screw |
| 7 Chain sprocket cover |
| 8 Tree grip |
| 9 Viewing aperture of the oil tank |
| 10 Clamping screw |
| 11 Chain tensioning screw |
| 12 Battery |
| 13 On/Off switch |
| 14 Unlocking button |
| 15 Handle |
| 16 Eye for carry strap |
| 17 Shoulder strap |
3 SAFETY
3.1 General safety instructions for power tools

WARNING!
Read all safety instructions, instructions, illustrations and technical data that are provided with this power tool.
Failure to comply with the following instructions can lead to an electric shock, fire and/or series injuries.
- Keep all safety instructions and other instructions for future reference.
The term "power tool" used in the safety instructions refers to mains-operated power tools (with mains line) and to battery-operated power tools (without mains line).
3.2 Electrical safety
- Avoid physical contact with earthed surfaces such as on pipes, heaters, cookers and refrigerators. There is an increased risk of electric shock if your body is earthed.
- Keep electrical tools out of the rain and away from moisture. Water getting into an electrical tool increases the risk of an electric shock.
3.3 Personal safety
- Be alert, pay attention to what you are doing and take a cautious approach to working with a power tool. Do not use a power tool if you are tired or under the influence of drugs, alcohol or medicines. A moment's inattentiveness when using the power tool can result in serious injury.
■ Wear personal protective equipment, and always use safety goggles. The injury risk can be reduced by wearing personal protective equipment such as a dust mask, non-slip shoes, a protective helmet or ear defenders, depending on the type and application of the power tool. - Avoid starting to operate the appliance inadvertently. Ensure the switch is in the off-position before connecting to power source and/or battery pack, picking up or carrying the power tool. Accidents can be caused by leaving your finger on the switch when you carry the power tool or when you connect it to the power supply.
■ Remove the adjusting tools or spanner before you switch on the power tool. A tool or spanner that is in a rotating part of the machine can cause injury.
- Avoid an abnormal bodily posture. Make sure you can stand safely and keep your balance at all times. This will enable you to control the power tool better if something unexpected happens.
■ Wear suitable clothing. Do not wear baggy clothing or jewellery. Keep your hair, clothes and gloves away from moving parts. Loose clothing, jewellery or long hair can be snagged on moving parts.
3.4 Use and handling of the electrical tool
- Do not overload the power tool. Use the appropriate power tool for the job you are doing. Using the appropriate power tool will enable you to work more effectively and safely in the specified performance range.
- Do not use a power tool if it has a defective switch. A power tool that can no longer be switched on or off is dangerous and must be repaired.
■ Disconnect the plug from the socket and/or remove the battery before you make adjustments to the appliance, replace parts or put the power tool away. This precautionary measure will prevent the power tool from starting inadvertently. - Keep unused power tools out of the reach of children. Do not allow people to use the power tool if they are not familiar with it or have not read these instructions. Power tools are dangerous if they are used by inexperienced people.
- Look after power tools and the insertion tool with care. Check whether moving parts function perfectly and do not stick, whether there are any broken parts or parts that are damaged in such a way that the function of the power tool is impaired. Have damaged parts repaired before using the power tool. Many accidents are caused by failure to maintain power tools properly.
- Keep cutting tools sharp and clean. Carefully maintained cutting tools with sharper cutting edges are less likely to stick and are easier to control.
■ Use power tools, accessories, insertion tools, etc. according to these instructions. When doing so, take account of the working conditions and the activity to be undertaken. Using power tools for applications other than the intended purpose can result in dangerous situations.
- Keep the grips and grip surfaces dry, clean and free from oil and grease. Slippery grips and grip surfaces prevent safe operation and control of the power tool in unforeseen situations.
3.5 Safety in the workplace
- Keep your working area clean, and make sure it is well illuminated. Untidiness or dimly lit working areas can lead to accidents.
- Do not work with the power tool in a potentially explosive atmosphere with the presence of flammable liquids, gases or dust. Power tools give rise to sparks that can ignite the dust or vapours.
- Keep children and other people away from the power tool when using it. If you are distracted, you may lose control of the power tool.
3.6 Use and handling of the rechargeable battery-operated tool
■ Only recharge batteries with chargers that are recommended by the manufacturer. Using a charger intended for one particular type of rechargeable battery with a different type of rechargeable battery represents a fire risk.
■ Only use batteries in the power tools that are intended for this purpose. Using other batteries can lead to injuries and represents the risk of fire.
- Keep the unused rechargeable battery away from paper clips, coins, keys, nails, screws or other small metal objects that could short-circuit the contacts. A short circuit between the rechargeable battery contacts can result in burns or fire.
■ Incorrect use can result in fluid leaking out of the rechargeable battery. Avoid coming into contact with it. In case of inadvertent contact, rinse off with water. If the fluid gets into your eyes, additionally seek medical assistance. Leaking rechargeable battery fluid can lead to skin irritations or burns.
- Do not use a damaged or changed rechargeable battery. Damaged or changed batteries can behave unpredictably and lead to fire, explosion or a risk of injury.
- Do not expose a rechargeable battery to fire or high temperatures. Fire or temperatures over 130 °C can cause an explosion.
■ Comply with all of the instructions for charging, and never charge the rechargeable battery or the rechargeable battery-operated tool outside of the temperature range specified in the operating instructions. Incorrect charging or charging outside of the permissible temperature range can destroy the rechargeable battery and increase the risk of fire.
3.7 Service
For your own safety, only have your power tool repaired by qualified specialist personnel using genuine spare parts. This ensures that the power tool remains safe.
■ Never maintain damaged batteries. All rechargeable battery maintenance should only ever be undertaken by the manufacturer or authorised customer service points.
3.8 Safety information for chain saws (EN 60745 Part 2-13)
- Keep all parts of your body away from the saw chain when the saw is running. Before starting the saw, make sure that nothing is touching the saw chain. When working with a chain saw, one moment of inattention can mean your clothing or parts of your body coming into contact with the saw chain.
■ Always hold the chain saw with your right hand on the rear grip and your left hand on the front grip. Holding the chain saw with your hands the other way around increases the risk of injury and is not allowed.
- Hold the electrical tool using the insulated handle surfaces because the saw chain could come into contact with its own mains cable. Contact between the saw chain and a live cable can result in electrical current flowing through metal parts of the machine, leading to electric shock.
■ Wear protective goggles and ear defenders. Further protective equipment is recommended for the head, hands, legs and feet. Appropriate protective clothing reduces the risk of injury due to flying chips and inadvertent contact with the saw chain.
■ Do not work with the chain saw in a tree.
Risk of injury when operating in a tree.
■ Always make sure you are standing firmly and only use the chain saw if you are standing on firm, secure and level ground. Slippery ground or unstable standing surfaces such as on a ladder can lead to a loss of equilibrium or loss of control over the chain saw.
- When cutting a branch that is under tension, expect it to spring back. When the tension in the wood fibres is released, the branch under tension can hit the operator and/or cause a loss of control over the chain saw.
Take particular care when cutting under-growth and young trees. The thin material can get caught in the saw chain and hit you or cause you to lose your balance.
- Carry the chain saw at the front grip when it is switched off, and have the saw chain pointing away from your body. Always put on the protective cover when transporting or storing the chain saw. Careful handling of the chain saw reduces the probability of inadvertent contact with the running saw chain.
■ Follow the instructions for lubrication, chain tensioning and changing accessories. An incorrectly tensioned or lubricated chain can either tear or increase the risk of kickback.
- Keep the grips dry, clean and free from oil and grease. Greasy, oily grips are slippery and result in loss of control.
■ Only saw wood. Do not use the chain saw for work for which it is not intended. Example: Do not use the chain saw for sawing plastic, masonry or construction materials that are not made of wood. Using the chain saw for non-designated work can lead to dangerous situations.
3.9 Causes and prevention of kickback (EN 60745 Part 2-13)
Kickback can occur if the tip of the chain bar touches an object or if the wood bends and traps the saw chain during cutting.
In many cases, contact with the tip of the bar can lead to an unexpected, rearward reaction causing the chain bar to be knocked upwards and towards the operator.
If the saw chain is trapped on the top edge of the chain bar, the bar can be forced rapidly back towards the operator.
Each of these reactions can result in you losing control of the saw, with the possibility of severe injury. Do not rely entirely on the safety devices installed on the chain saw. As user of a chain saw, you should take various measures to be able to work without accident and injury.
Kickback is the consequence of incorrect or faulty use of the electric tool. It can also be prevented by taking suitable precautions as described below:
- Hold the saw firmly with both hands, with your thumb and fingers around the grips of the chain saw. Hold your body and arms in a position that allows you to withstand the kickback forces. If suitable measures are taken, the operator will be able to control the kickback forces. Never release the chain saw.
- Avoid any abnormal posture, and do not saw anything above shoulder height. This will avoid inadvertent contact with the tip of the bar, and allow better control of the chain saw in unexpected situations.
■ Always use replacement bars and saw chains prescribed by the manufacturer. Incorrect replacement bars and saw chains can lead to the chain breaking and/or to kickback.
■ Comply with the instructions of the manufacturer for sharpening and maintaining the saw chain. Depth limiters set too low increase the tendency to kickback.
3.10 Safety instructions for the polemounted pruner
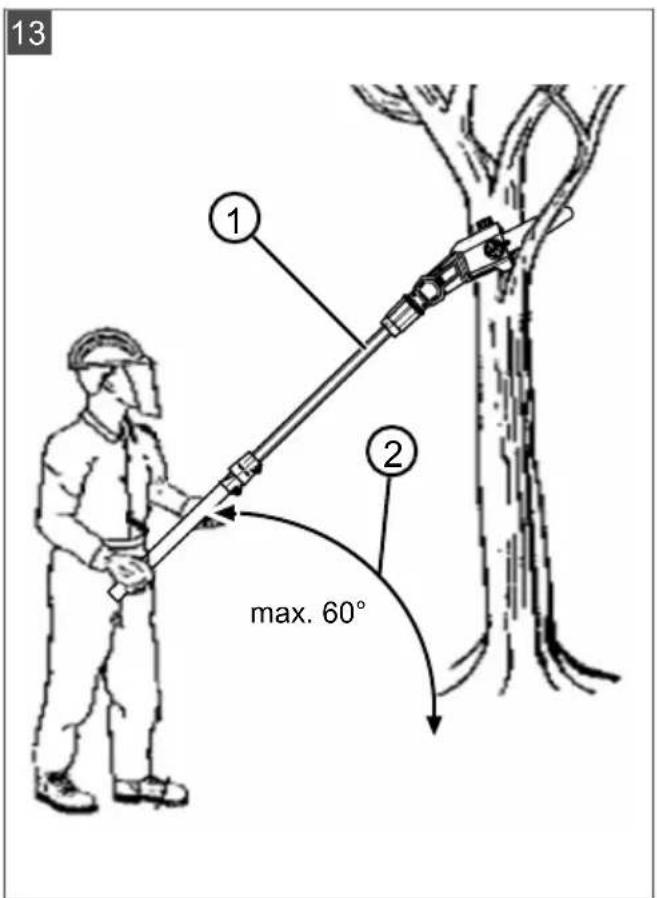
3.10.1 Work instructions (13)
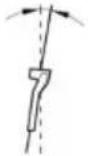
During pruning, lift the polemounted pruner (13/1) to a maximum angle of 60^ (13/2). At a steeper angle, you inevitably get into the area where cut-off branches can fall. Always stand outside this area.
Plan an escape route in advance for getting out of the way of falling branches. This escape route must be free of obstacles such as sawn-off branches or slippery places that could hinder getting out of the way.
- Keep a safe distance from bystanders, animals, objects or buildings, which is at least approx. 2.5x the length of the branch to be sawn off. If that is not possible, saw the branch off piece by piece.
- Do not attempt to saw a branch that has a diameter greater than the length of the chain bar.
- Avoid moving branches or objects becoming caught in the saw chain. In this case, immediately switch off the polemounted pruner.
■ Remove the rechargeable battery from the basic appliance and push the protective cover over the saw chain for:
■ Testing, adjustment work and cleaning work
■ Work on the guide rail and saw chain
■ Leaving the appliance
Transport
Storage
■ Maintenance and repair work
Danger
- Maintain a minimum distance of 10 m to overhead electrical lines.
3.10.2 Vibration load

WARNING!
Danger due to vibration
The actual magnitude of the vibration emissions during the use of the appliance may deviate from that stated by the manufacturer. Observe the following influencing factors before or during use:
Is the appliance being used as intended?
Is the material being cut or processed in the proper manner?
Is the appliance in a proper condition of use?
Is the cutting tool properly sharpened or is the correct cutting tool installed?
Are the handle grips and any optional vibration grips mounted, and are they firmly attached to the appliance?
■ Only operate the appliance at the motor speed required for the respective work. Avoid using the maximum speed in order to reduce noise and vibrations.
The noise and vibrations of the appliance can increase due to improper use and maintenance. This leads to damage of the health. In this case, immediately switch off the appliance and have it repaired by an authorised service workshop.
The degree of stress due to vibration depends on the work to be performed or on the use that the appliance is put to. Estimate the stress and plan appropriate work breaks. This considerably reduces stress due to vibration over the entire working time.
■ Extensive use of the appliance exposes the operator to vibrations, which can lead to circulatory issues ("white fingers"). To avoid this risk, wear gloves and keep your hands warm. If any symptoms of "white fingers" occur, immediately consult a physician. These symptoms include: Numbness, loss of feeling, tingling, itching, pain, reduced muscular strength, changes in the colour or condition of the skin. Normally these conditions affect the fingers, hands or pulse. The risk increases at low temperatures.
Take long breaks during your working day so you can recover from the noise and the vibrations. Plan your work in such a way that the use of appliances that generate strong vibrations is spread over several days.
If you notice an unpleasant sensation or discoloration of the skin on your hands when using the appliance, stop work immediately. Take sufficient work breaks. Without sufficient breaks, a hand/arm vibration syndrome can occur.
- Minimise your risk of being exposed to vibrations. Maintain the appliance according to the instructions in the operating instructions.
If the appliance is used frequently, contact your dealer to purchase anti-vibration accessories (e.g. handles).
- Avoid working with the appliance at temperatures below 10 °C. Define how the vibration load can be limited in a work plan.
3.10.3 Noise pollution
A certain level of noise exposure from this appliance is inevitable. Carry out noisy work at approved and specified time periods. Observe rest periods as necessary and restrict the duration of the work to a minimum. For your personal protection and protection of persons in the vicinity, appropriate hearing protection must be worn.
3.10.4 Safety information regarding the rechargeable battery
This section mentions all the basic safety and warning information to be heeded when using the rechargeable battery. Read these instructions.
■ Only use the rechargeable battery as designated, i.e. for AL-KO rechargeable battery-driven appliances. Only charge the rechargeable battery with the AL-KO charging unit provided.
■ Only unpack the new rechargeable battery from the original packaging when it is to be used.
■ Fully charge the rechargeable battery before using it for the first time and always use the specified charger. Comply with the details given in these instructions for use for charging the rechargeable battery.
- Do not use the rechargeable battery in environments where there is a potential risk of explosion and/or fire.
- Do not expose the rechargeable battery to moisture and humidity when in use with the appliance.
■ Protect the rechargeable battery from heat, oil and fire to prevent it being damaged so no vapours and electrolyte liquids can escape.
- Do not subject the rechargeable battery to impacts or throw it.
- Do not use the rechargeable battery when soiled or wet. Before use, clean and dry the rechargeable battery with a dry, clean cloth.
- Do not open, dismantle or crush the rechargeable battery. There is a danger of electric shock and short-circuit.
This rechargeable battery must not be used by unauthorised persons unless they are supervised by a person responsible for their safety or have been instructed on how to use the rechargeable battery. Unauthorised persons include, for example:
■ Persons (including children) with limited physical, sensory or mental aptitude
■ Persons who have no experience and/or knowledge of the rechargeable battery.
Children must be supervised and instructed so they do not play with the rechargeable battery.
- Do not leave the rechargeable battery permanently in the charger. For prolonged storage, remove the rechargeable battery from the charger.
- When not in use, remove the rechargeable batteries from the operated appliances.
Dry the unused rechargeable battery and store in a closed place. Protect from heat and direct sunlight. Unauthorised persons and children must not have access to the rechargeable battery.
3.10.5 Safety information regarding the charging unit
This section mentions all the basic safety and warning information to be heeded when using the charger. Read these instructions.
■ Only use the appliance as designated, i.e. for charging the intended rechargeable batteries. Only charge original rechargeable batteries from AL-KO in the charging unit.
Before each use, inspect the entire appliance – and especially the mains cable and the rechargeable battery compartment – for damage. Only use the appliance when it is in a proper working order.
- Do not use the appliance in environments where there is a potential risk of explosion and/or fire.
■ Only operate the appliance indoors and do not expose it to moisture and humidity.
■ Always place the charging unit on a well ventilated and non-inflammable surface because it heats up during the charging process. Keep the ventilation slots clear and do not cover the appliance.
Before connecting the charging unit, make sure that the mains voltage matches the voltage stated in the "Technical data".
■ Only use the mains cable for connecting the charging unit, not for other purposes. Do not carry the charging unit by the mains cable and do not remove the power plug from the power outlet by pulling on the mains cable.
■ Protect the mains cable from heat, oil and sharp edges to prevent it being damaged.
- Do not use the charging unit and rechargeable battery when soiled or wet. Before using the appliance, clean and dry the rechargeable battery.
- Do not open the charging unit or rechargeable battery. There is a danger of electric shock and short-circuit.
For your own safety, have your appliance repaired by qualified specialist personnel only using original spare parts.
This appliance must not be used by unauthorised persons unless they are supervised by a person responsible for their safety or have been instructed on how to use the appliance. Unauthorised persons include, for example:
■ Persons (including children) with limited physical, sensory or mental aptitude
- Persons who have no experience and/or knowledge of the appliance.
■ Children must be supervised and instructed so they do not play with the appliance.
Dry unused appliances and store in a closed place. Unauthorised persons and children must not have access to the appliance.
4 INSTALLATION

WARNING!
Danger of serious injury
If an incompletely mounted polemounted pruner is used, serious injury can be caused.
■ Only use the polemounted pruner when it has been fully mounted.
Before each use, perform a visual inspection in order to check that the polemounted pruner is complete and does not contain damaged, worn or loose components. Safety and protective devices must be intact.

CAUTION!
Danger of laceration injuries.
The sharp edges of the saw chain can cause laceration injuries when assembling.
■ Before installation, remove the rechargeable battery.
■ Wear safety gloves when installing the saw chain and the guide rail.
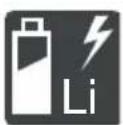
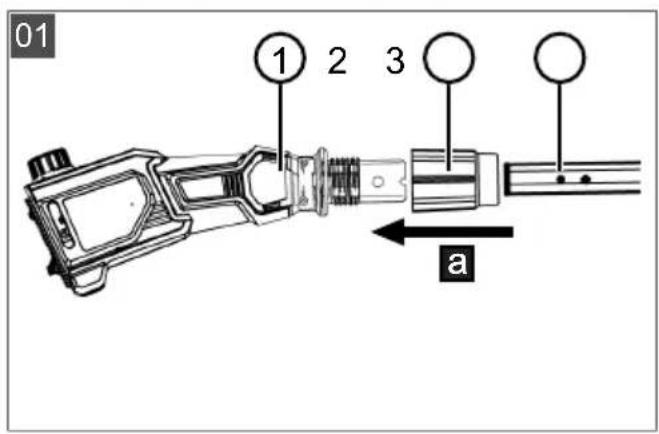
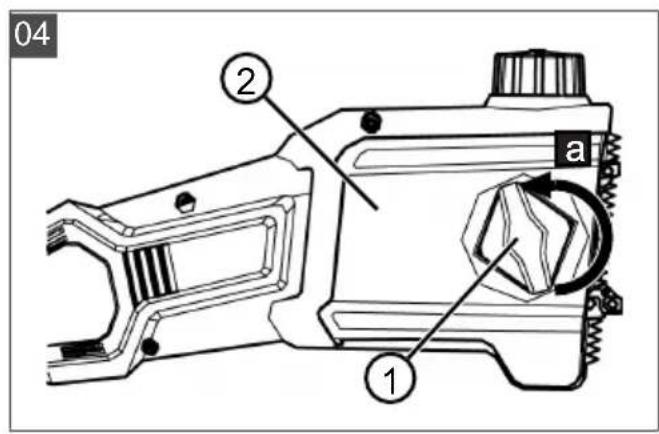
4.1 Installing the polemounted pruner attachment (01-02)
- Put the coupling (01/2) onto the telescopic pole (01/3) and push the coupling into the polemounted pruner head (01/1) as far as it will go (01/a).
- Screw (02/a) the coupling (02/1) as far as it will go in the direction of the polemounted pruner head (02/2).
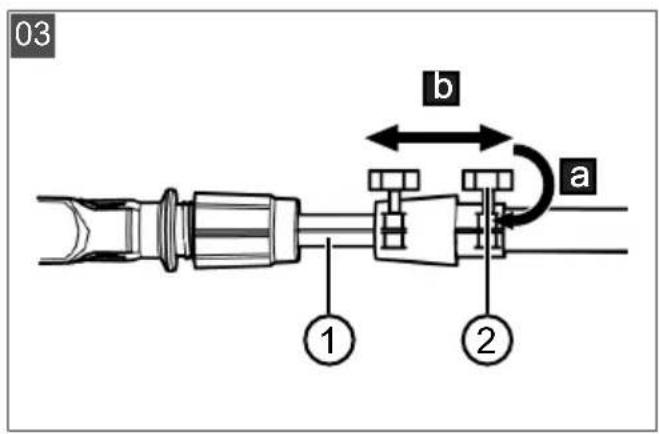
4.2 Extending/shortening the telescopic pole (03)
The telescopic pole (03/1) is infinitely adjustable. This means the length can be adjusted as required for the work.
- Unscrew (03/a) the clamping screw (03/2) until the clamp is released.
- Move the telescopic pole until the desired length is set (03/b)
- Screw the clamping screw tight.
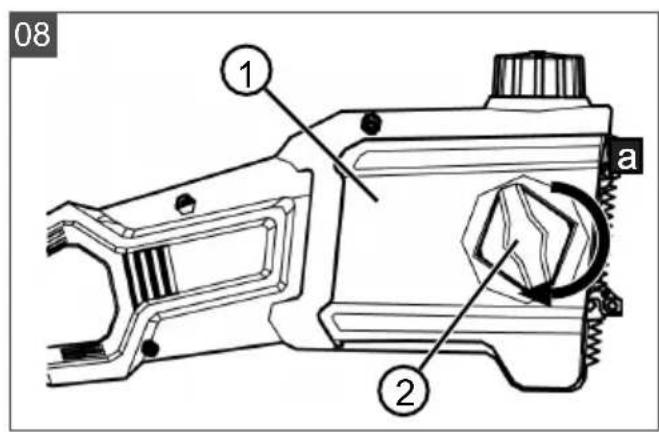
4.3 Installing the guide rail and saw chain (04 - 08)

CAUTION!
Risk of injury on the saw chain
The cutting edges of the saw chain are very sharp so that cutting injuries can occur when handling the saw chain. Before all work with the saw chain, heed the following:
■ Switch off the appliance and remove the rechargeable battery.
■ Wear protective footwear.
- Loosen (04/a) the fastening screw (04/1) of the chain sprocket cover (04/2). Remove the fastening screw and chain sprocket cover.
-
Use the screwdriver on the Allen key to loosen the chain tensioning screw (05/1). Turn the chain tensioning screw until the chain tensioning pin (05/2) is at the rear thread end (05/a).
-
Insert the saw chain:
-
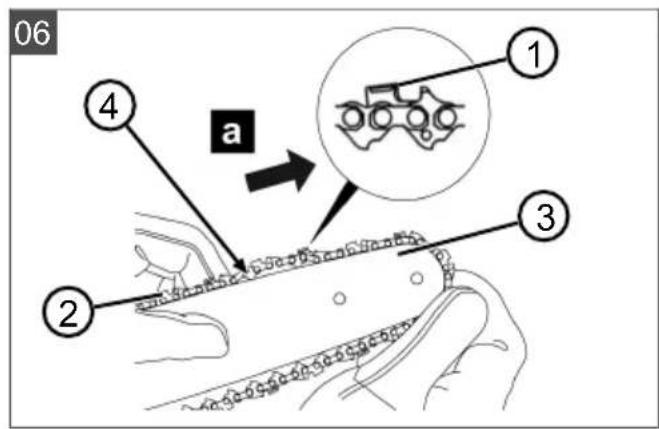
Align (06/a) the cutting teeth (06/1) of the saw chain (06/2) that are to lie at the top of the guide rail to the tip of the guide rail (06/3).
Note: Make sure that the chain is correctly mounted!
Place the saw chain in the groove (06/4) of the guide rail and guide completely around the guide rail. -
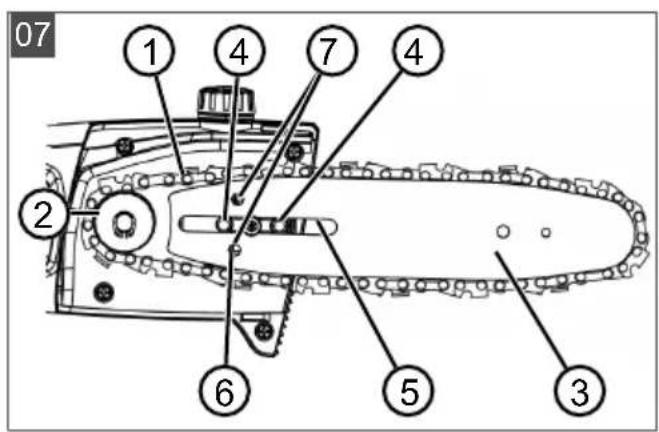
Lay the guide rail together with the saw chain laid on it in the open housing:
■ Lay the saw chain (07/1) around the drive sprocket (07/2).
- Align the guide rail (07/3) in such a way that the two guide pins (07/4) grip in the slotted hole (07/5) of the guide rail.
- Align the guide rail so that the chain tensioning pin (07/6) grips in one of the two chain tensioning holes (07/7).
-
Align the saw chain so that it is in contact in the groove of the guide rail and on the drive sprocket.
-
Put on the chain sprocket cover (08/1) and insert the fastening screw (08/2) and tighten (08/a).
-
Tension the saw chain (see chapter 4.4 "Tensioning and slackening the saw chain (09)", page 37).
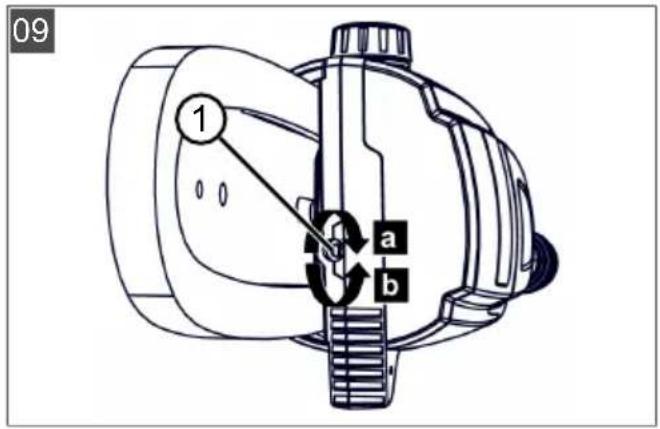
4.4 Tensioning and slackening the saw chain (09)
- Tension the saw chain; use the screwdriver on the Allen key:
■ Tensioning the saw chain: Turn the chain tensioning screw (09/1) clockwise (09/a).
■ Slackening the saw chain: Turn the chain tensioning screw anti-clockwise (09/b).
- Check the chain tension(see chapter 8.1 "Checking the chain tension", page 39). Repeat the previous step if necessary.
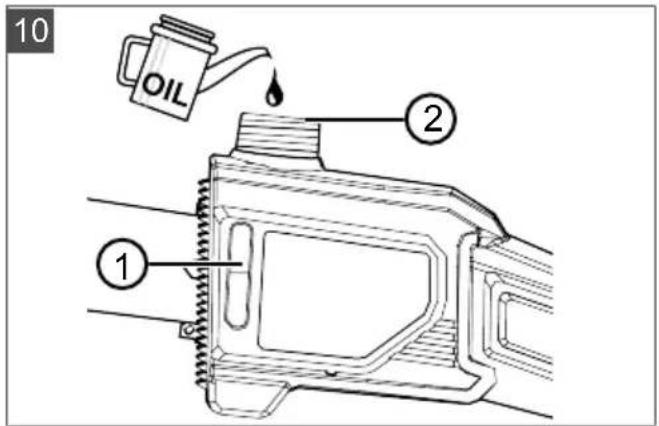
4.5 Filling saw chain oil (10)
There is no appliance saw chain oil in the appliance upon delivery.
IMPORTANT!
Danger of damage to the appliance
Use of the appliance without saw chain oil leads to damage of the saw chain and the guide rail.
■ Never operate the appliance without saw chain oil.
■ Before starting work, fill the saw chain oil in the oil tank and check the oil level during the work.
At least before starting work each time, check that the chain lubrication is working.
The service life and cutting performance of the saw chain depend on optimum lubrication. The saw chain has oil applied to it automatically during operation.
IMPORTANT!
Danger of damage to the appliance
Due to the metallic abrasion it contains, the use of used oil for lubricating the chain would lead to premature wear of the guide rail and saw chain. Also, the warranty of the manufacturer will become void.
■ Never use used oil, only biologically degradable saw chain oil.
IMPORTANT!
Danger of environmental damage
The use of mineral oil for the chain lubrication leads to serious environmental damage.
■ Never use mineral oil, but only biologically degradable saw chain oil.
Each time before starting work or changing the rechargeable battery, check the oil level and replenish the saw chain oil if necessary:
- Check the oil level in the viewing aperture (10/1) of the oil tank. It must always be possible to see oil. The minimum and the maximum oil level must not be exceeded.
- Place and hold the polemounted pruner horizontal on a firm surface.
- Clean the appliance around the oil tank cap (10/2).
- Unscrew the oil tank cap.

NOTE
■ Use a funnel for easier filling.
- Do not allow any dirt to get into the oil tank.
- Fill the oil tank with biologically degradable saw chain oil. While doing so, check the oil level in the viewing aperture of the oil tank. Do not allow it to overrun.
- Screw down the oil tank cap again.
4.6 Attaching the carrying belt to the appliance (19)
The supplied carrying belt transfers the load onto your upper body.
- Hang the carrying belt (19/2) over your shoulder.
-
Hook the snap hook of the carrying belt into the eye (19/1) on the appliance.
-
Adjust the length of the carrying belt by moving the buckle on the carrying belt so that the appliance is comfortable to carry.
- Carry out a number of work movements with the appliance switched off to test the length of the carrying belt. Adjust the length of the carrying belt if necessary.
5 START-UP
5.1 Charging the rechargeable battery
The rechargeable battery is partially charged. Fully charge the rechargeable battery before using it for the first time. The rechargeable battery can be charged in any charge status. Interrupting charging does not damage the rechargeable battery.

NOTE
For detailed information, heed the separate operating instructions for the rechargeable battery and for the charging unit.
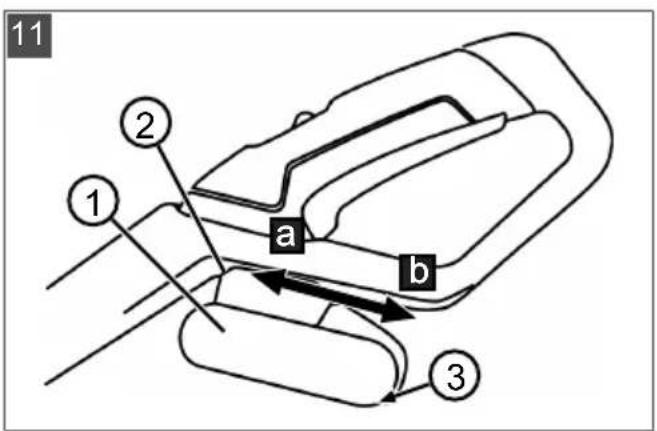
5.2 Inserting and pulling out the rechargeable battery (11)
Inserting the rechargeable battery (11/a)
- Push the rechargeable battery (11/1) into the rechargeable battery slot (11/2) until it engages.
Pulling out the rechargeable battery (11/b)
- Press and hold the unlock button (11/3) on the rechargeable battery (11/1).
- Pull out the rechargeable battery.
6 OPERATION

CAUTION!
Danger of burns
The gearbox housing becomes hot during operation.
- Do not touch the gearbox housing.
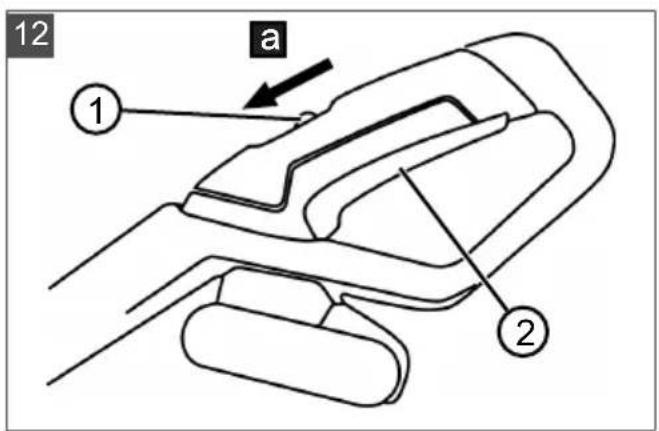
6.1 Switching the appliance on and off (12)
Switching on the appliance
- Bring the appliance in the working position.
- Press and hold (12/a) the unlocking button (12/1) on the basic appliance.
-
Press and hold the on/off switch (12/2).
-
Release the unlocking button. It is not necessary to keep the unlocking button pressed once the appliance has started. The unlocking knob is intended to prevent inadvertent starting of the appliance.
Switching off the appliance
- Release the On/Off switch (12/2).
7 WORKING BEHAVIOUR AND WORKING TECHNIQUE (14 – 18)

WARNING!
Increased risk of falling
There is a greater risk of falling if work is carried out from an elevated position (e.g. ladder).
■ always work with the appliance from the ground and make sure that you are standing securely.
■ Heed the safety instructions.
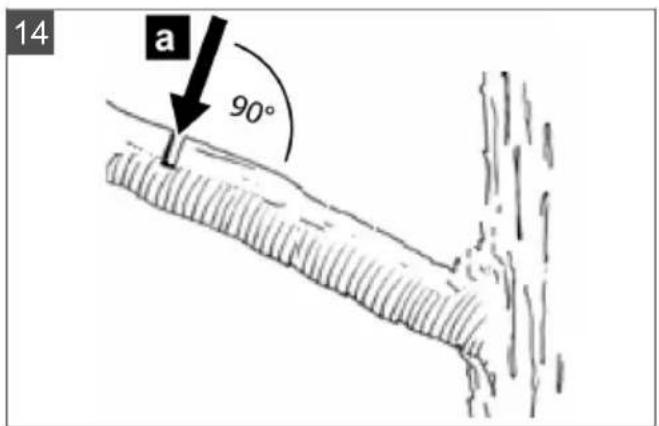
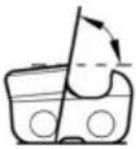
■ Where possible, stand so that the cut can be carried out at an angle of 90^ to the branch (14/a).
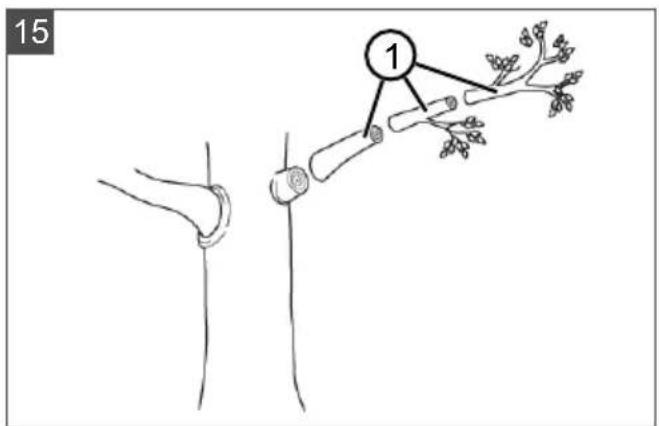
■ Saw off thick branches in sections in order to have better control over the point of impact (15/1).
■ Never saw in the flaring at the beginning of the branch in order to improve the healing of the wound and to avoid rot (16).
■ Press (17/a) the polemounted pruner against the branch (17/2) with the tree grip (17/1) when sawing to stabilise it on the branch.
Before the branch is sawn off (18/b), make a relief cut (18/a) on the underside of the branch. This can avoid the bark tearing off and causing difficult-to-heal damage to the tree. The relief cut should not be deeper than 1/3 of the branch thickness to avoid any trapping of the polemounted pruner.
■ Always pull the polemounted pruner with rotating saw chain out of the branch so that it does not become trapped.
8 MAINTENANCE AND CARE

WARNING!
Danger of cutting injuries
Danger of cutting injuries when reaching into sharp-edged, moving appliance parts and into cutting tools.
■ Before maintenance, care and cleaning work, always switch off the appliance. Remove the rechargeable battery.
■ Always wear protective gloves during maintenance, care and cleaning work.
8.1 Checking the chain tension

CAUTION!
Risk of injury on the saw chain
The cutting edges of the saw chain are very sharp so that cutting injuries can occur when handling the saw chain. Before all work with the saw chain, heed the following:
■ Switch off the appliance and remove the rechargeable battery.
■ Wear protective footwear.
Frequently check the chain tension, because new saw chains stretch.
- Pull through the saw chain a little by hand and, while doing so, check:
When cold: The saw chain has been tensioned correctly when it can be lifted by approx. 3 – 4 mm in the middle of the guide rail and can be pulled though easily by hand. At operating temperature, the saw chain stretches and hangs down.
The drive links of the saw chain are not allowed to come out of the groove on the underside of the guide rail – otherwise the saw chain could jump off.
- Re-tension the saw chain if necessary (see chapter 4.4 "Tensioning and slackening the saw chain (09)", page 37).
8.2 Checking the chain lubrication
Check the function of the automatic chain lubrication by switching on the polemounted pruner and pointing its tip towards a piece of cardboard or paper placed on the ground.
IMPORTANT!
Danger of damage to the appliance
Ground contact invariably leads to blunting of the saw chain.
Do not make contact with the ground with the chain and maintain a safety distance of 20 cm.
- Switch on the appliance.
- Hold the tip of the guide rail in the direction of a cardboard box or paper on the ground.
If the check produces a growing trace of oil, this indicates the automatic oiling function is operating correctly.
If there is no trace of oil even though the oil tank is full: Clean the oil entry hole in the appliance and the groove of the guide rail (Cleaning the guide rail).
If this is not successful, please contact our customer service.
8.3 Saw chain and guide rail
8.3.1 Replacing the saw chain and guide rail
Replacing the saw chain and guide rail
The saw chain and guide rail are exposed to significant wear. Change the saw chain and guide rail immediately if correct function is not assured.
8.3.2 Turning the guide rail
In order to avoid one-sided wear on the guide rail, turn it every time the chain is changed.
8.3.3 Sharpening the saw chain

CAUTION!
Risk of injury due to kickback
Damaged or incorrectly sharpened saw chains increase the danger of kickback! This can result in injuries.
■ Clean the saw chain regularly.
- Check the saw chain regularly for damage and replace if necessary.
If you are not familiar with sharpening the chain: Contact our relevant customer service.
The saw chain must be sharpened in the following cases:
■ Only sawdust is thrown out, rather than wood chips.
■ The polemounted pruner must has to be forced through the wood during pruning.
For the inexperienced user: Have the saw chain sharpened by a specialist/customer service. If you are sharpening the saw chain yourself, heed the following values. Accessories can be obtained from specialist retailers.
| Chain type File diameter Top plate angle | Down angle Head tilt angle (55°) | Depth gauge setting | ||
 |  |  | ||
 | Rotational angle of the tool | Inclination angle of the tool | Side plate angle | |
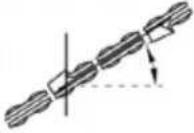 |  |  | ||
| Oregon 91P033X 5/32" 30° 0° 80° 0.025" | ||||
| Depth gauge setting File |  | |||

NOTE
Only remove a little material when sharpening!
We recommend using a chain sharpening tool for sharpening your saw chain.
8.3.4 Cleaning the guide rail
- Clean the guide rail, the groove of the guide rail and the oil outlet openings regularly.
- Use a flat file to remove the burrs that have built up on the guide rail due to the saw chain.
9 STORAGE
Thoroughly clean the appliance after each use and – if present – attach all covers. Store the appliance in a dry, lockable place out of the reach of children.
Carry out the following jobs before intervals in work lasting for longer than 30 days:
-
Empty the oil tank for the saw chain oil.
-
Remove the saw chain and guide rail, clean it and spray it with rust-proofing oil.
- Thoroughly clean the appliance and store it in a dry place.
IMPORTANT!
Danger of damage to the appliance
Dried-on/sticky saw chain oil can lead to damage to oil-channelling components after lengthy storage.
■ Remove the saw chain oil from the appliance before an extended period of storage.
10 TRANSPORT
Before transporting, carry out the following measures:
- Switch off the appliance.
-
Remove the rechargeable battery from the appliance.
-
Pack the battery properly.

NOTE
The nominal energy of the rechargeable battery is less than 100 Wh. Therefore, heed the following transport instructions.
The li-ion rechargeable battery contained in the appliance is subject to the hazardous goods law, but can be transported under simplified conditions:
The undamaged rechargeable battery can be transported on public roads by the private user without further conditions provided it is packaged for retail sale and the transport serves personal purposes. The weight limits for batteries sent separately must be observed:
Max. 30 kg total weight per package when transported by road, rail and water
No upper limit for air transport but max. 2 pieces per package
If damage to the battery (e.g. due to the appliance falling) is suspected, transport is not permissible.
■ Commercial users who carry out the transport in connection with their main activity (e.g. delivery from and to building sites, or demonstrations) can also take advantage of this simplification.
In both cases, it is essential to take the mandatory precautions mentioned above to prevent any leakage of the contents. In other cases, it is essential to comply with the regulations of the hazardous goods law. In the case of non-compliance, severe penalties can be imposed on the sender and possibly the transporter.
Additional notes on transport and shipment
■ Only transport or ship lithium-ion rechargeable batteries in an undamaged state.
- Secure the appliance in such a way as to prevent it from starting to operate inadvertently during transport.
- Secure the appliance with strong outer packaging (cardboard shipment box). Use the manufacturer's original packaging if possible.
■ Ensure correct identification and documentation of the consignment during transport or dispatch (e.g. by parcel or forwarding):
When transporting by road, rail and water, a warning sticker must be applied to the packaging when the battery/batteries accompany the appliance. No warning sticker is necessary if the battery/batter-
ies are installed or fitted into the appli- ance, since the outer packaging/original packaging must already comply with spe- cific regulations.
A warning sticker must always be placed on the packaging when transporting by air. The maximum weight limits for batteries sent together with the appliance must be observed: max. 5 kg battery weight per package and max. 2 pieces per package, if the battery/batteries are accompanying the appliance.
Please find out in advance whether transport is possible with the selected service provider, and show your shipment.
We recommend involving a hazardous goods specialist in the preparation of the shipment. Please heed any other national regulations.
11 DISPOSAL
Information on the German Electrical and Electronic Equipment Act (ElectroG)

■ Electrical and electronic appliances do not belong in household waste, but should be collected and disposed of separately.
■ Used batteries or rechargeable batteries that are not installed permanently in the old appliance must be removed before disposal. Their disposal is regulated by the battery law.
- Owners or users of electrical and electronic appliances are obliged by law to return them after use.
■ The end user bears personal responsibility for deleting his personal data from the old appliance to be disposed of.
The symbol of the crossed-through rubbish bin means that electrical and electronic appliances may not be disposed of in the household rubbish. Electrical and electronic appliances can be handed in at no charge at the following places:
■ Public service disposal or collection points (e.g. municipal building yards)
■ Points of sale of electrical appliances (stationary and online) provided traders are obliged to take them back or offer this voluntarily.
These statements only apply to appliances that are installed and sold in the countries of the European Union and are subject to European Direc-
tive 2012/19/EU. Different provisions may apply to the disposal of electrical and electronic appliances in countries outside the European Union.
Information on German Battery Act (BattG)

■ Used batteries and rechargeable batteries do not belong in household waste, but should be collected and disposed of separately.
For safe removal of batteries or rechargeable batteries from the electrical appliance and for information on their type or chemical system, follow the further information within the operating or installation instructions.
- Owners or users of batteries and rechargeable batteries are obliged by law to return them after use. The return is limited to the handover of customary household quantities.
Used batteries can contain harmful substances or heavy metals that can cause damage to the environment and human health. Reuse of the used batteries and use of the resources contained therein contributes to the protection of these two essential commodities.
The symbol of the crossed-through rubbish bin means that batteries and rechargeable batteries may not be disposed of in household rubbish. In addition, if the symbol Hg, Cd or Pb appears under the rubbish bin, this stands for the following:
■ Hg: Battery contains more than 0.0005 % mercury
Cd: Battery contains more than 0.002 % cadmium
■ Pb: Battery contains more than 0.004 % lead Rechargeable batteries and batteries can be handed in at the following places at no charge:
■ Public service disposal or collection points (e.g. municipal building yards)
■ Points of sale of batteries and rechargeable batteries
■ Disposal points of the common take-back system for the used batteries of appliances
■ Disposal point of the manufacturer (if not a member of the common take-back system)
These statements apply only to rechargeable batteries and batteries that are sold in the countries of the European Union and that are subject to European Directive 2006/66/EU. Different provisions can apply to the disposal of rechargeable batteries and batteries in countries outside the European Union.
12 AFTER-SALES / SERVICE
In the event of questions of warranty, repair or spare parts, please contact your nearest AL-KO Service Centre.
These can be found on the Internet at: www.al-ko.com/service-contacts
13 HELP IN CASE OF MALFUNCTION

CAUTION! Risk of injury
Sharp-edged and moving appliance parts can lead to injury.
■ Always wear protective gloves during maintenance, care and cleaning work.
| Malfunction Cause Remedy | ||
| Engine does not run. | Recharge-able battery is flat. | Charge the re-chargeable bat-tery. |
| Recharge-able battery missing or recharge-able battery not seated correctly. | Insert the re-chargeable bat-tery correctly. | |
| Power sup-ply is inter-rupted. | Remove the bat-tery.Clean the plug con-tacts.Insert the re-charge-able battery again. | |
| Motor keeps cutting out | The On/Off switch is de-fective. | Contact an AL-KO service cen-tre. |
Malfunction Cause Remedy
| The guide rail and saw chain become hot when running. Generation of smoke. | The saw chain is tensioned too tightly. | Check the chain tension. Re-tension the saw chain. |
| Oil tank is empty. | Replenish the saw chain oil. | |
| The oil entry hole and/or groove of the guide rail are dirty. | Clean the oil entry hole and groove of the guide rail. | |
| Motor running, but the saw chain does not move. | The saw chain is tensioned too tightly. | Check the chain tension. Re-tension the saw chain. |
| Appliance faults | Contact an AL-KO service centre. | |
| Only sawdust is thrown out, rather than wood chips. The pole-mounted pruner must be forced through the wood. | The saw chain is blunt. | Sharpen the saw chain or contact an AL-KO service centre. |
| Appliance vibrates unusually. | Appliance faults | Contact an AL-KO service centre. |
| Rechargeable battery operating time is significantly shorter. | The service life of the rechargeable battery has expired. | Replace the rechargeable battery. Only use genuine accessories from the manufacturer. |
Malfunction Cause Remedy
| Rechargeable battery cannot be charged. | Rechargeable battery contacts are dirty. | Contact an AL-KO service centre. |
| Rechargeable battery or charging unit is defective. | Replace the rechargeable battery or charging unit. Only use genuine accessories from the manufacturer. | |
| Rechargeable battery is too hot. | Allow the battery to cool down. |

NOTE
If you encounter any malfunctions that are not listed in this table or that you cannot rectify yourself, please contact our customer service.
14 GUARANTEE
We will resolve any material or manufacturing faults on the appliance during the legal warranty period for claims relating to faults, in accordance with our choice either to repair or replace. The legal warranty period is determined by the legislation of the country in which the appliance was purchased.
Our warranty promise applies only if:
■ These operating instructions are heeded
■ The appliance is handled correctly
■ Original spare parts have been used
The warranty becomes void in the case of:
■ Unauthorised repair attempts
■ Unauthorised technical modifications
Non-intended use
The guarantee excludes:
■ Paint damage that can be attributed to normal wear and tear
■ Wear parts that are marked with a frame xxxxxx (x) on the spare parts card
The guarantee period commences with purchase by the first end user. The date on the proof of purchase is decisive. In the event of a guarantee claim, please take this guarantee declaration and the original proof of purchase, and contact your dealer or the nearest authorised customer service centre. This statement does not affect the purchaser's statutory claims for defects against the vendor.
15 EU DECLARATION OF CONFORMITY
We hereby declare that this product in its marketed form conforms to the requirements of the harmonised EU Directives, EU safety standards and the product-specific standards.
| Product | Manufacturer |
| Cordless polemounted prun-er | AL-KO Geräte GmbHIchenhauser Str. 14 |
| Serial number | D-89359 Kötz |
| G4990012 | Germany |
| Type | EU directives |
| CSA 2020 | 2006/42/EC |
| 2014/30/EU | |
| Sound power level | 2000/14/EC |
| EN ISO 3744 | 2011/65/EU |
| measured/guaranteed | Conformity evaluation |
| 90.4 dB(A) / 92 dB(A) | 2000/14/EC Appendix V |
Duly authorised person for technical file
Andreas Hedrich
Ichenhauser Str. 14
D-89359 Kötz
Germany
Harmonised standards
EN 60745-1:2009+A11:2010
EN 60745-2-13:2009+A1:2010
EN 55014-1:2006+A1:2009+A2:2011
EN 55014-2:2015
Kötz, 01/08/2017

Wolfgang Hergeth
Managing Director
VERTALING VAN DE ORIGINELE GEBRUIKERSHANDLEIDING Inhoudsopgave
2 PRODUCTOMSCHRIJVING
Nr. Component
N° Pièce
15 DÉCLARATION DE CONFORMITÉ CE
N. Componente
www.al-ko.com/service-contacts
13 SUPPORTO IN CASO DI ANOMALIE

CAUTELA!
N.° Componente
www.al-ko.com/service-contacts
13 AYUDA EN CASO DE AVERÍA

¡PRECAUCIÓN!
Riesgo de lesiones
Št. Sestavni del
12 SERVISNA SLUŽBA/SERVIS
www.al-ko.com/service-contacts
13 POMOČ PRI MOTNJAH

PREVIDNO!
| Br. Dio |
| 1 Zaštitni poklopac vodilice |
| 2 Teleskopska šipka |
| 3 Otvor za punjenje spremnika ulja |
| 4 Lanac pile |
| 5 Vodilica |
| 6 Pričvrsni vijak |
| 7 Poklopac zupčanika lanca |
| 8 Granična kandža za drvo |
| 9 Kontrolno staklo spremnika ulja |
| 10 Stezni vijak |
| 11 Vijak za napinjanje lanca |
| 12 Akumulator |
| 13 Sklopka za uključivanje/isključivanje |
| 14 Gumb za deblokadu |
| 15 Ručka |
| 16 Ušica za nosivi pojas |
| 17 Remen za nošenje |
3 SIGURNOST
Nr elementu
www.al-ko.com/service-contacts
13 POMOC W PRZYPADKU USTEREK

OSTROŻNIE!
Č. Součást
www.al-ko.com/service-contacts
13 POMOC PRI PORUCHÁCH

POZOR! Nebezpečenstvo zranenia
Sz. Alkatrész
www.al-ko.com/service-contacts
13 HIBAELHÁRÍTÁS

VIGYÁZAT!
Sérülésveszély
Nr. Komponent
7 ARBEIDSMÅTE OG ARBEIDSTEKNIKK (14 – 18)

ADVARSEL! ∅kt fare for fall
8 VEDLIKEHOLD OG PLEIE

ADVARSEL! Fare for kuttskader
Wolfgang Hergeth Managing Director
KÄÄNNÖS ALKUPERÄISESTÄ KÄYTTÖOHJEESTA
Sisällysluettelo
Nro Osa
7 DARBINÈ ELGSENA IR DARBO METODIKA (14–18)

www.al-ko.com/service-contacts
13 PAGALBA ATSIRADUS SUTRIKIMU

ATSARGIAI!
Pavojus susižaloti
Nr. Detala
www.al-ko.com/service-contacts
Номер компонента
www.al-ko.com/service-contacts


- Inhaltsverzeichnis
- About these operating instructions 29
- Product description 29
- Safety 31
- Installation.... 36
- Start-up 38
- Operation 38
- Working behaviour and working technique (14 – 18) ...... 38
- ABOUT THESE OPERATING INSTRUCTIONS
- Legends and signal words
- DANGER!
- WARNING!
- CAUTION!
- IMPORTANT!
- NOTE
- PRODUCT DESCRIPTION
- Scope of supply
- Danger of damage to the appliance and battery
- Symbols on the appliance
- Symbol Meaning
- Safety and protective devices
- Protective cover of the guide rail
- Intended use
- Possible foreseeable misuse
- Residual dangers
- Product overview
- SAFETY
- General safety instructions for power tools
- Electrical safety
- Personal safety
- Use and handling of the electrical tool
- Safety in the workplace
- Use and handling of the rechargeable battery-operated tool
- Service
- Safety information for chain saws (EN 60745 Part 2-13)
- Causes and prevention of kickback (EN 60745 Part 2-13)
- Safety instructions for the polemounted pruner
- Work instructions (13)
- Vibration load
- Danger due to vibration
- Noise pollution
- Safety information regarding the rechargeable battery
- Safety information regarding the charging unit
- INSTALLATION
- Danger of serious injury
- Danger of laceration injuries.
- Installing the polemounted pruner attachment (01-02)
- Extending/shortening the telescopic pole (03)
- Installing the guide rail and saw chain (04 - 08)
- Risk of injury on the saw chain
- Tensioning and slackening the saw chain (09)
- Filling saw chain oil (10)
- Danger of damage to the appliance
- Danger of environmental damage
- Attaching the carrying belt to the appliance (19)
- START-UP
- Charging the rechargeable battery
- Inserting and pulling out the rechargeable battery (11)
- Inserting the rechargeable battery (11/a)
- Pulling out the rechargeable battery (11/b)
- OPERATION
- Danger of burns
- Switching the appliance on and off (12)
- Switching on the appliance
- Switching off the appliance
- WORKING BEHAVIOUR AND WORKING TECHNIQUE (14 – 18)
- Increased risk of falling
- MAINTENANCE AND CARE
- Danger of cutting injuries
- Checking the chain tension
- Checking the chain lubrication
- Saw chain and guide rail
- Replacing the saw chain and guide rail
- Replacing the saw chain and guide rail
- Turning the guide rail
- Sharpening the saw chain
- Risk of injury due to kickback
- Cleaning the guide rail
- STORAGE
- TRANSPORT
- Additional notes on transport and shipment
- DISPOSAL
- Information on the German Electrical and Electronic Equipment Act (ElectroG)
- Information on German Battery Act (BattG)
- AFTER-SALES / SERVICE
- HELP IN CASE OF MALFUNCTION
- CAUTION! Risk of injury
- GUARANTEE
- EU DECLARATION OF CONFORMITY
- Duly authorised person for technical file
- Harmonised standards
- VERTALING VAN DE ORIGINELE GEBRUIKERSHANDLEIDING Inhoudsopgave
- PRODUCTOMSCHRIJVING
- DÉCLARATION DE CONFORMITÉ CE
- SUPPORTO IN CASO DI ANOMALIE
- CAUTELA!
- AYUDA EN CASO DE AVERÍA
- ¡PRECAUCIÓN!
- Riesgo de lesiones
- SERVISNA SLUŽBA/SERVIS
- POMOČ PRI MOTNJAH
- PREVIDNO!
- SIGURNOST
- POMOC W PRZYPADKU USTEREK
- OSTROŻNIE!
- POMOC PRI PORUCHÁCH
- POZOR! Nebezpečenstvo zranenia
- HIBAELHÁRÍTÁS
- VIGYÁZAT!
- Sérülésveszély
- ARBEIDSMÅTE OG ARBEIDSTEKNIKK (14 – 18)
- ADVARSEL! ∅kt fare for fall
- VEDLIKEHOLD OG PLEIE
- ADVARSEL! Fare for kuttskader
- KÄÄNNÖS ALKUPERÄISESTÄ KÄYTTÖOHJEESTA
- Sisällysluettelo
- DARBINÈ ELGSENA IR DARBO METODIKA (14–18)
- PAGALBA ATSIRADUS SUTRIKIMU
- ATSARGIAI!
- Pavojus susižaloti
- Номер компонента
Brand : AL-KO
Model : CSA 2020
Category : Saw