Trio Best Friend+ Comfort - Stroller CHICCO - Free user manual and instructions
Find the device manual for free Trio Best Friend+ Comfort CHICCO in PDF.
| Product type | Modular stroller with reversible seat |
| Brand | Chicco |
| Model | Trio Best Friend+ Comfort |
| Recommended age | From 6 to 36 months |
| Maximum child weight (stroller) | 15 kg |
| Maximum child weight (carrycot) | 9 kg |
| Maximum basket weight | 3 kg |
| Maximum weight hanging on handle | 2 kg |
| Number of seat recline positions | 3 |
| Number of leg rest positions | 3 |
| Number of handle positions | 4 |
| Restraint system | 5-point harness with harness covers and crotch protector |
| Brake type | Parking brake pedal on right rear wheel |
| Front wheels | Swiveling or fixed (lockable by lever) |
| Canopy | Removable and adjustable |
| Rain cover | Included, usable only with canopy |
| Compatible accessories | Car seats BEST FRIEND, KAILY, KIROS i-Size Fast In; carrycots BEST FRIEND LIGHT and COMFORT |
| Cleaning | Damp sponge and mild soap; no solvents or abrasives |
| Lubrication | Dry silicone oil for moving parts |
| Warranty | Against conformity defects according to national standards |
Frequently Asked Questions - Trio Best Friend+ Comfort CHICCO
User questions about Trio Best Friend+ Comfort CHICCO
0 question about this device. Answer the ones you know or ask your own.
Ask a new question about this device
Download the instructions for your Stroller in PDF format for free! Find your manual Trio Best Friend+ Comfort - CHICCO and take your electronic device back in hand. On this page are published all the documents necessary for the use of your device. Trio Best Friend+ Comfort by CHICCO.
USER MANUAL Trio Best Friend+ Comfort CHICCO
natural_image
Line drawing of a baby stroller with four wheels and a canopy (no text or symbols)
text_image
chicco®


natural_image
Illustration of a hand gripping a mechanical device with a red arrow indicating the joint (no text or symbols present)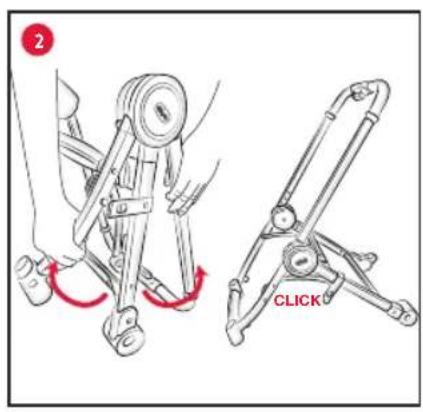
text_image
2 CLICK
natural_image
Illustration of a hand holding a small mechanical component with a red arrow indicating direction (no text or symbols)
natural_image
Technical line drawing of a mechanical assembly with a side view showing a wheel and shaft (no text or symbols)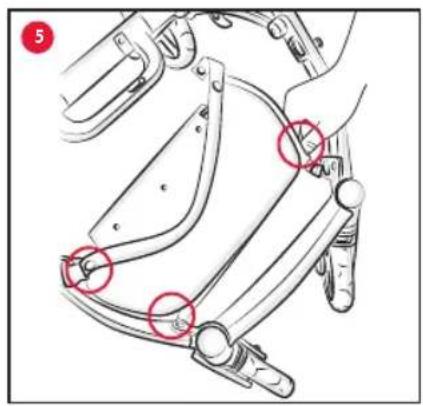
natural_image
Mechanical linkage diagram showing joints and brackets (no text or symbols)
text_image
5A A A €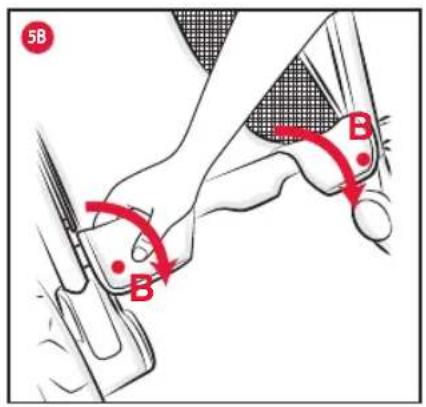
text_image
5B B B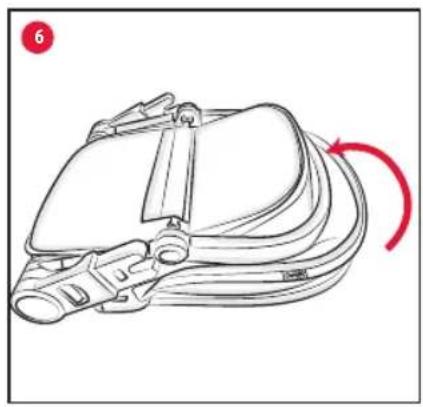
natural_image
Line drawing of a medical device with attached tubing and a red curved arrow indicating rotation (no text or symbols)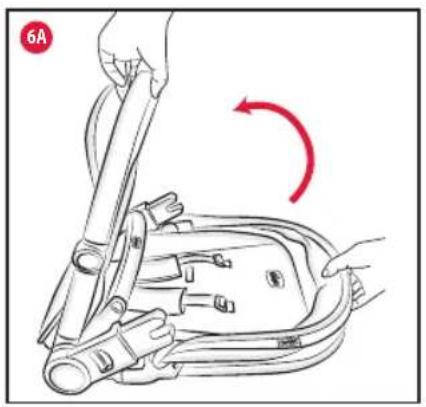
natural_image
Illustration of a hand using a tool to lift a mechanical component, with a red curved arrow indicating rotation (no text or symbols present)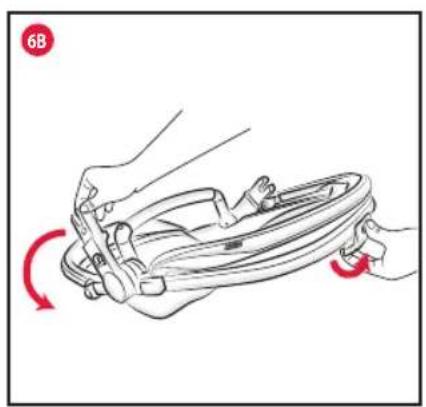
natural_image
Illustration of a hand holding a bicycle steering wheel with red motion arrows indicating rotation (no text or symbols)
natural_image
Illustration of two children in stroller chairs with red arrows indicating movement or pressure points (no text or symbols)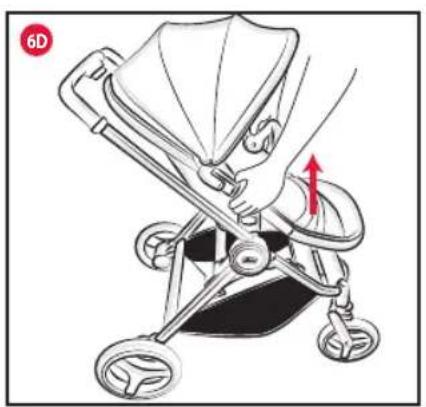
natural_image
Illustration of a baby stroller with hand and arrow indicating movement (no text or symbols)
text_image
Diagram of a stroller with numbered parts and directional arrows indicating movement or positioning, including an inset view of the seat.
natural_image
Illustration of a stroller with fan blades and wheels, showing internal structure and a magnified inset (no text or symbols)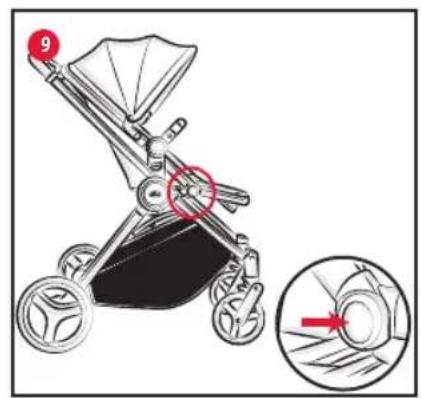
text_image
9
natural_image
Line drawing of hands using a tool to adjust or install a mechanical component (no text or symbols visible)
natural_image
Mechanical assembly diagram showing a lever mechanism with a red arrow indicating motion direction (no text or symbols present)
text_image
12
text_image
13
text_image
13A
text_image
14
natural_image
Illustration of a hand holding a small object with a red arrow pointing to it, next to a vehicle chassis (no text or symbols)
text_image
15A
text_image
16
text_image
16A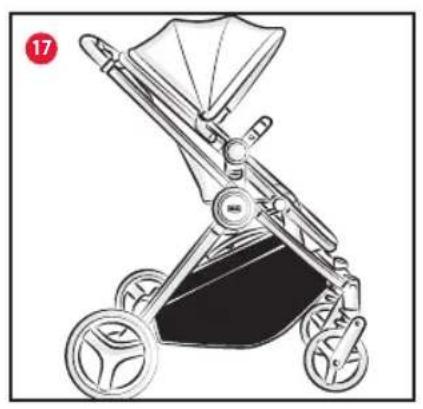
natural_image
Line drawing of a baby stroller with wheels and canopy (no text or symbols)
text_image
17A 4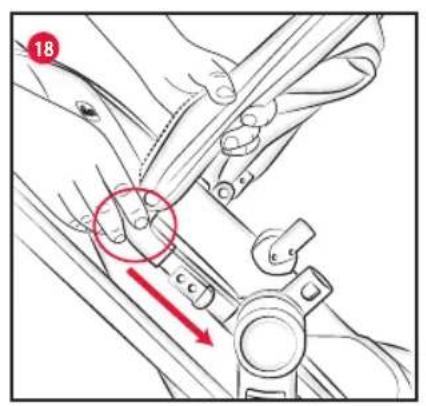
text_image
18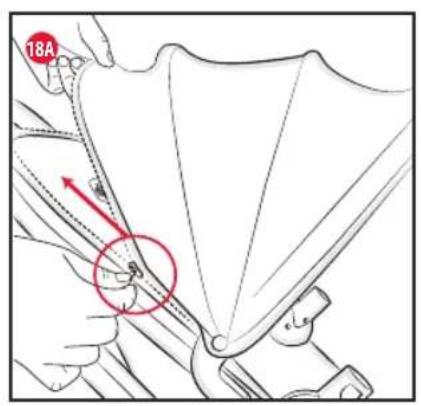
text_image
18A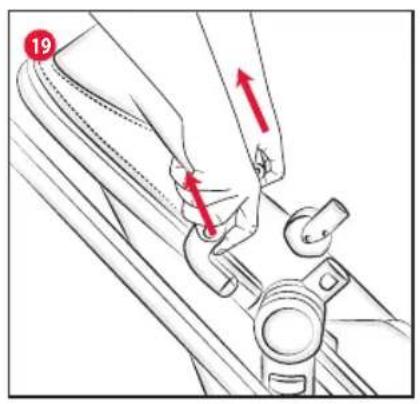
text_image
19 20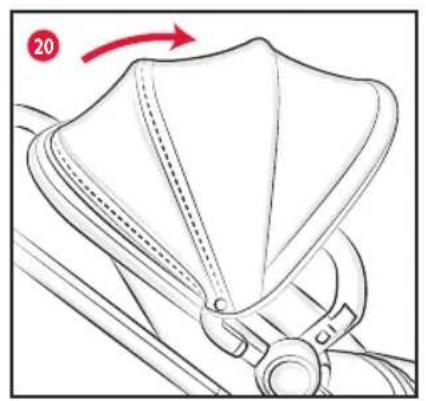
natural_image
Line drawing of a mechanical component with a red arrow indicating direction (no text or symbols)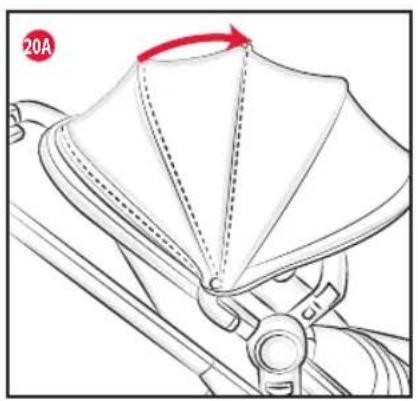
natural_image
Technical line drawing of a mechanical component with folded paper and a red arrow indicating rotation (no text or symbols)
natural_image
Illustration of a baby stroller with hand operating the basket (no text or symbols)
text_image
22 A A B
natural_image
Line drawing of a hand holding a seatbelt with attached straps and chains (no text or symbols)
natural_image
Line drawing of a hand inserting a cup into a seatbelt (no text or symbols)
natural_image
Illustration of a stroller with hands operating the handle (no text or symbols)
text_image
Diagram showing a hand operating a vehicle chassis with labeled parts and directional arrows indicating motion or movement.
text_image
26A CLICK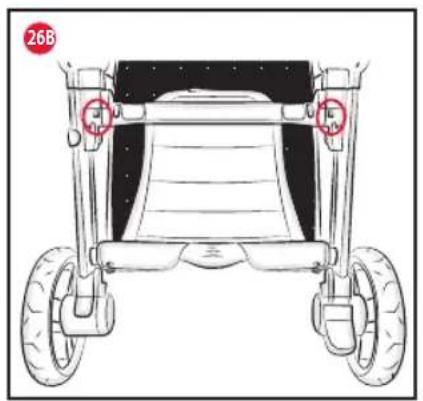
natural_image
Technical line drawing of a vehicle chassis with wheels and a seat, no text or symbols present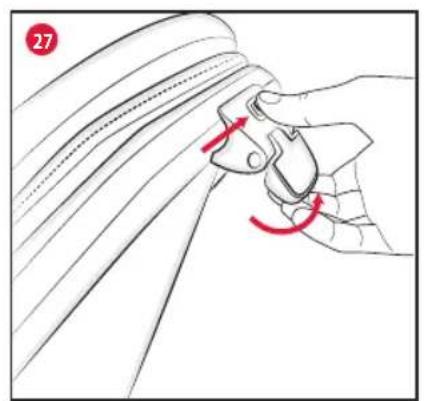
natural_image
Illustration of a hand holding a clip with red motion arrows indicating movement (no text or symbols)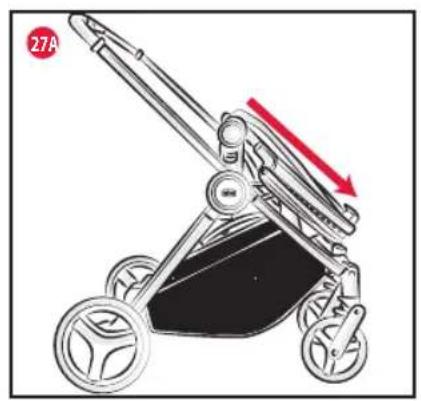
natural_image
Illustration of a stroller with wheels and a red arrow indicating motion (no text or symbols)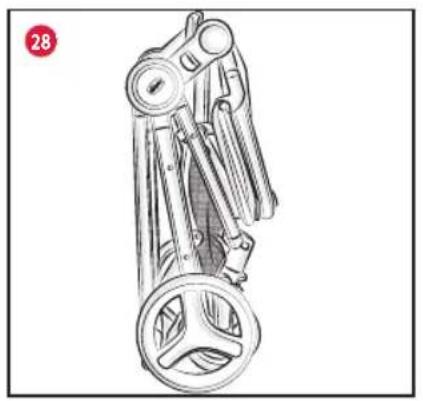
natural_image
Technical line drawing of a mechanical device with gears and levers (no text or symbols)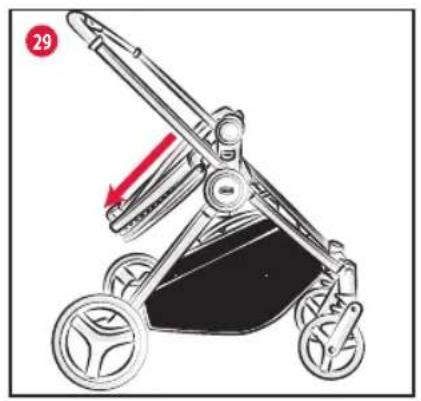
natural_image
Illustration of a stroller with wheels and a red arrow indicating motion (no text or symbols)
natural_image
Technical line drawing of a mechanical lever mechanism with a red circular indicator (no text or symbols)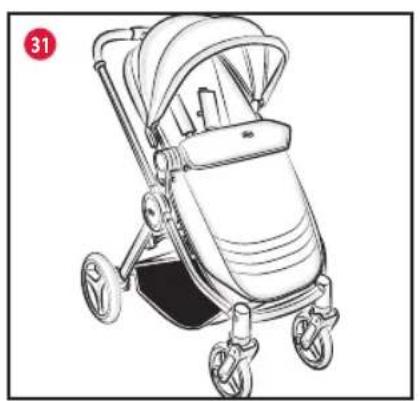
natural_image
Line drawing of a baby stroller with four wheels and a hooded seat (no text or symbols)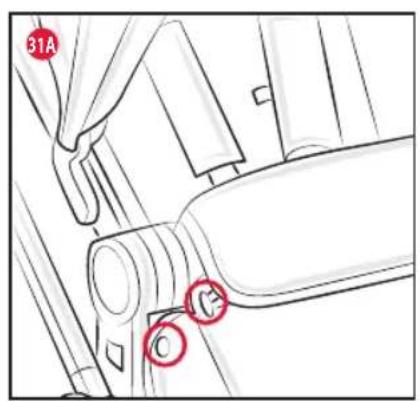
text_image
31A C C2
natural_image
Line drawing of a baby stroller with red arrows indicating motion or movement (no text or symbols)
natural_image
Line drawing of a hand using a manual tool to lift a small fan (no text or symbols)
text_image
32A CLICK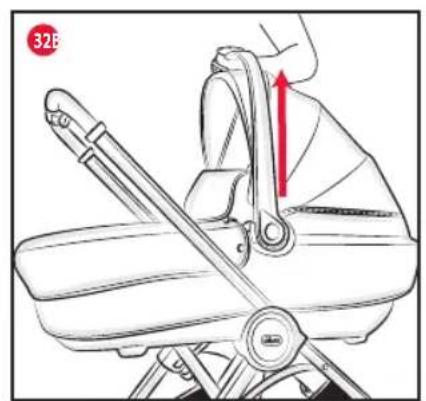
text_image
32B
text_image
33 LIGHTCOMFORT
natural_image
Line drawing of a seatbelt buckle with a key inserted (no text or symbols)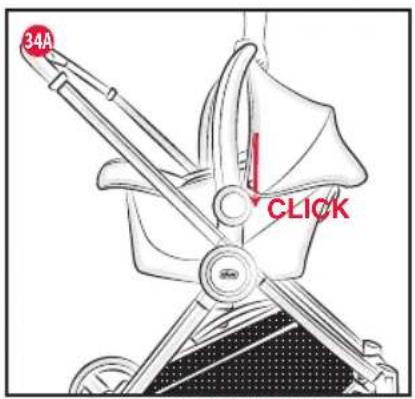
text_image
34A CLICK
text_image
34B
natural_image
Illustration of a hand pressing down on a vehicle's seat frame (no text or symbols)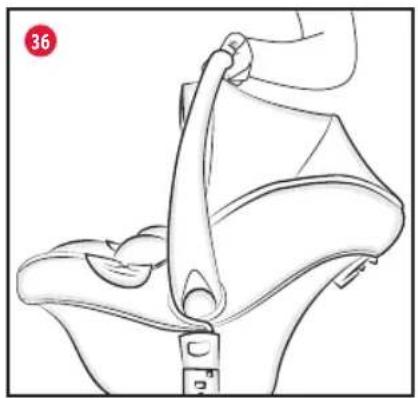
natural_image
Line drawing of a person's seatbelt with a handle and seatbelt connector (no text or symbols)
text_image
36A CLICK
text_image
36B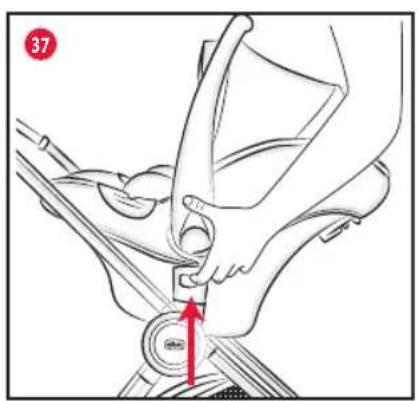
text_image
37


BEST FRIEND - PASSEGGINO
ISTRUZIONI D'USO
IMPORTANTE - LEGGERE ATTENTAMENTE E CONSERVARE PER FUTURO RIFERIMENTO.
ATTENZIONE: PRIMA DELL'USO RI-MUOVERE ED ELIMINARE EVENTUALI SACCHETTI DI PLASTICA E TUTTI GLI ELEMENTI FACENTI PARTE DELLA CONFEZIONE DEL PRODOTTO O COMUNQUE TENERLI LONTANI DALLA PORTATA DEI BAMBINI.
AVVERTENZE
AGGANCIO/SGANCIO SACCA
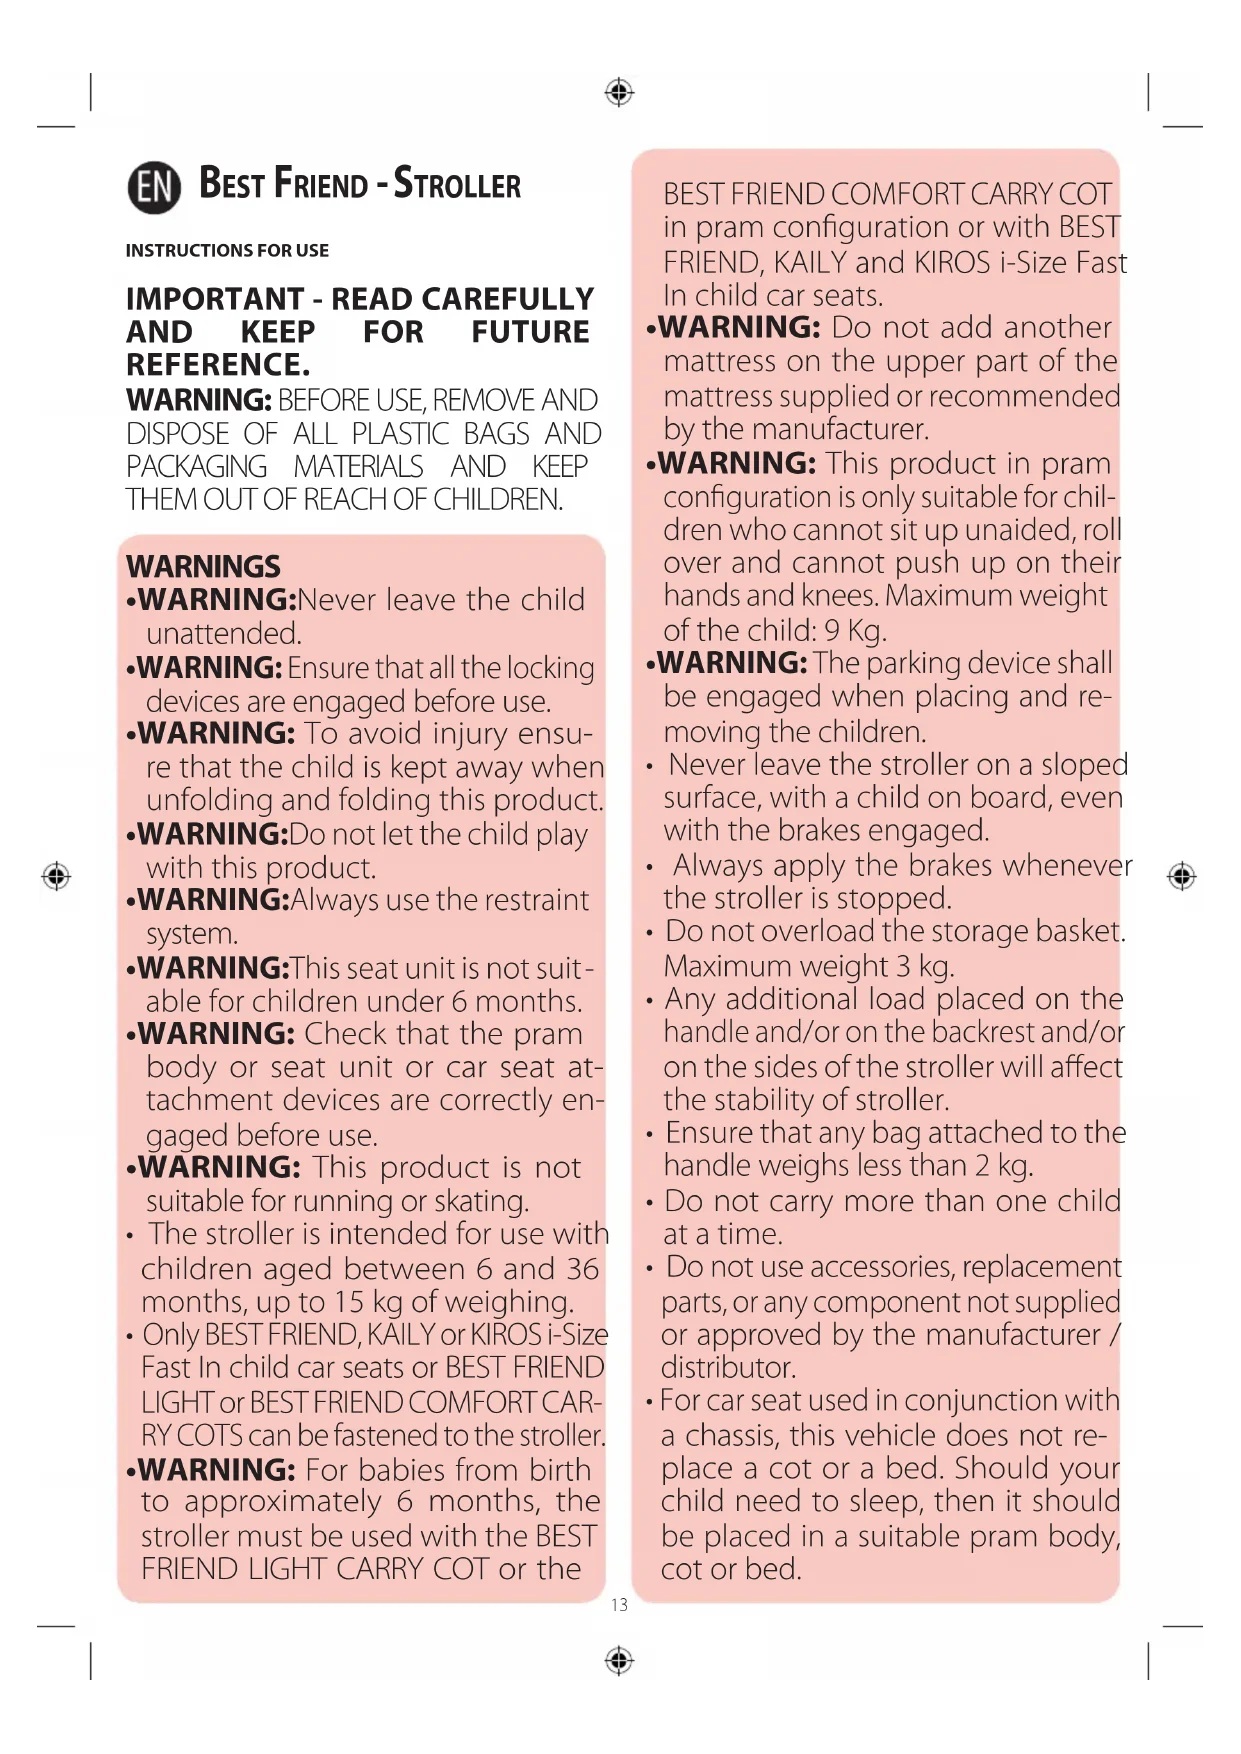
IMPORTANT - READ CAREFULLY AND KEEP FOR FUTURE REFERENCE.
WARNING: BEFORE USE, REMOVE AND DISPOSE OF ALL PLASTIC BAGS AND PACKAGING MATERIALS AND KEEP THEM OUT OF REACH OF CHILDREN.
WARNINGS
- WARNING: Never leave the child unattended.
- WARNING: Ensure that all the locking devices are engaged before use.
- WARNING: To avoid injury ensure that the child is kept away when unfolding and folding this product.
- WARNING: Do not let the child play with this product.
- WARNING: Always use the restraint system.
- WARNING: This seat unit is not suitable for children under 6 months.
- WARNING: Check that the pram body or seat unit or car seat attachment devices are correctly engaged before use.
- WARNING: This product is not suitable for running or skating.
- The stroller is intended for use with children aged between 6 and 36 months, up to 15 kg of weighing.
- Only BEST FRIEND, KAILY or KIROS i-Size Fast In child car seats or BEST FRIEND LIGHT or BEST FRIEND COMFORT CARRY COTS can be fastened to the stroller.
- WARNING: For babies from birth to approximately 6 months, the stroller must be used with the BEST FRIEND LIGHT CARRY COT or the
BEST FRIEND COMFORT CARRY COT in pram configuration or with BEST FRIEND, KAILY and KIROS i-Size Fast In child car seats.
- WARNING: Do not add another mattress on the upper part of the mattress supplied or recommended by the manufacturer.
- WARNING: This product in pram configuration is only suitable for children who cannot sit up unaided, roll over and cannot push up on their hands and knees. Maximum weight of the child: 9 Kg.
- WARNING: The parking device shall be engaged when placing and removing the children.
- Never leave the stroller on a sloped surface, with a child on board, even with the brakes engaged.
• Always apply the brakes whenever the stroller is stopped.
- Do not overload the storage basket. Maximum weight 3 kg.
- Any additional load placed on the handle and/or on the backrest and/or on the sides of the stroller will affect the stability of stroller.
- Ensure that any bag attached to the handle weighs less than 2 kg.
- Do not carry more than one child at a time.
- Do not use accessories, replacement parts, or any component not supplied or approved by the manufacturer / distributor.
- For car seat used in conjunction with a chassis, this vehicle does not replace a cot or a bed. Should your child need to sleep, then it should be placed in a suitable pram body, cot or bed.


- Before assembly, check that the product and all of its components have not been damaged during transportation. Should any part be damaged, do not use it and keep it out of reach of children.
- Do not use this product if some parts are broken, torn or missing.
• The product must be assembled by an adult.
• This product must only be used by an adult.
• Make sure that the person using the stroller knows how to do it in the safest way. - Ensure that during these operations the moveable parts of the stroller do not come into contact with your child.
- Never use the stroller on staircases or escalators: you could suddenly lose control of it.
• Always pay attention when going up and down steps or pavements. - Do not let your child climb onto the storage basket: it could break the basket, injure the child and overturn the stroller.
• To avoid all strangulation risks, never give children objects with cords or strings attached, or leave them with in proximity of such objects. - If the stroller has been exposed directly to sunlight for a long time, you must let it cool down before placing your child inside of it.
- Prolonged exposure to direct sunlight may cause the material and fabric to fade.
- Prevent the stroller from contact with salty water. It might cause the formation of rust.
- Do not use the stroller on the beach.
- When unused, the stroller should be kept out of reach of children.
LIST OF COMPONENTS
- Frame
- Seat
- 2 Rear wheels
- 2 front wheels
- Bumper bar
- Storage basket
• Hood
• 2 shoulder strap pads and one crotch strap cover pad (comfort kit) - Rain cover
Important Note: The pictures and instructions contained in the booklet are referred to the complete stroller model. Some of the components and functions described here may vary depending on the model purchased.
ADVICES FOR CLEANING AND MAINTENANCE
This product requires periodical maintenance. The cleaning and maintenance of the product must only be carried out by an adult.
CLEANING
The cover cannot be removed. Clean the fabric parts using a wet terry towel and neutral soap. Periodically wipe clean plastic parts with a soft damp cloth. Dry the metal parts, after possible contact with water, in order to avoid the formation of rust. Do not use solvents or abrasive products. The washing symbols and relative meanings are indicated below:

Do not wash

Do not bleach

Do not tumble dry

Do not iron

Do not dry clean
MAINTENANCE
Lubricate the moving parts only if necessary, with a light application of a silicone based lubricant. Regularly check the condition of the wheels and, keep them clean from dust and sand. Make sure that all plastic parts that slide on the metal tubes are clean from dust, dirt and sand, in order to avoid frictions that may compromise the optimal performance of the stroller. Keep the stroller in a dry place.
FIRST ASSEMBLY OF THE STROLLER
-
Release the closing device (Fig. 1) and push the front part of the stroller forward until you hear a click (Fig. 2).
-
Insert the front wheel into the appropriate hole until hearing a locking click (Fig. 3). Repeat the same operation for the second front wheel.
-
To mount the rear wheel, insert the wheel pin into the hole on the rear leg tube, ensuring that the flat part of the pin corresponds with the hole in the frame as shown in Figure 4. Repeat the same operation for the other wheel.
WARNING: Before using the stroller, make sure that the wheels are well secured to the structure.
- Install the basket, positioning the part with the strips in the direction of the front tube. Insert the strips into the designated holes on the frame, fastening them with the specific snap buttons (Fig. 5).
Secure the central part of the basket to the rear tube with the


respective snap buttons.
Fasten the basket to the central part of the rear tube by securing it to the two sides with the two snap buttons (A) as seen in Figure
5A. Complete the operation by winding the fabric around the tube and fastening it with the snap buttons (B) (Fig. 5B).
The packaging includes the disassembled stroller frame and closed seat.
- To fit the seat on the stroller, open it by separating the seat from the backrest as seen in figures 6 – 6A until you hear the locking click. Press on the lever found on the backrest to change the position of the joints (Fig. 6B). It is now possible to install the seat on the frame. The seat can be assembled on the stroller in both directions: forward facing and rearward facing (Fig. 6C).
WARNING: Make sure the seat is installed properly by pulling it upwards (Fig. 6D).
- To remove the seat, press the grey side buttons and pull upward (Fig. 7).
WARNING: Do not remove the seat from the stroller when the child is inside it.
SEAT ADJUSTMENTS
Once the seat is fitted on the frame, it can be reclined in three different positions.
- The entire seat can be reclined by pressing on the lever found on the upper edge of the backrest (Fig. 8).
LEGREST ADJUSTMENTS
- It is possible to adjust the leg rest in three positions by simultaneously pressing the buttons shown in figure 9.
REMOVABLE BUMPER BAR
The stroller is equipped with removable bumper bar.
-
To remove it, press the buttons located on the sides (Fig. 10).
-
To position and remove the child, unhook the bar from one side only (Fig. 11).
WARNING: Always fasten the safety harnesses. The bumper bar IS NOT a device for containing your child.
WARNING: The bumper bar must not be used to lift the stroller with the child inside of it.
HOW TO USE THE SAFETY HARNESS
- The stroller is equipped with a retaining system with five anchoring points, consisting of two shoulder straps, two adjusting holes, a waist belt and a crotch strap with buckle, already assembled.
WARNING: To adapt the belts to the body of the child, use the shoulder straps, passing them through the two adjustment holes as indicated in Figure 12.
-
After laying the child in the stroller, fasten the belts by threading first the two forks inside the shoulder strap holes (Fig. 13) and then insert them inside the crotch strap buckle (Fig. 13A); adjust the length of the straps, ensuring that they adhere to the child's shoulders and body correctly.
-
To unfasten the waist belt, press and pull the lateral prong (Fig. 14).
WARNING: Always use the restraint systems. For the safety of your child use all five fixing points of the safety harness belts.
PARKING BRAKE
The stroller is equipped with pedal parking brake located on the right rear wheel.
- To engage the parking brake, press the pedal downward with one foot (Fig. 15).
To disengage the parking brake, push the pedal upwards (Fig. 15).
WARNING: Always apply the brakes whenever the stroller is stopped. Never leave the stroller on a sloping surface with your child inside it, even if the parking brake is engaged.
WARNING: After engaging the parking brake, make sure the
brakes are properly enabled on both rear wheels.
SWIVEL WHEELS
The stroller has front swivel/fixed wheels.
It is recommended to use the wheels in the fixed mode on particularly changeable surfaces. The use of the wheels in the swivel mode is recommended in order to increase the control of the stroller on a normal road surface
- To allow the front wheels to swivel, push the lever shown in Figure 16 towards the outside then repeat this operation on the other wheel.
To lock the front wheels, push the lever shown in Figure 16A towards the inside then repeat this operation on the other wheel.
WARNING: Both wheels must always be locked or unlocked at the same time.
HANDLE ADJUSTMENT
The stroller features a handle that can be adjusted in height, according to the user's needs.
- Beginning from the folded position (Fig. 17), the handle can be adjusted to 4 different positions by pressing the release button located on the centre of the handle (Fig. 17A).
After switching from one position to the other, make sure the automatic locking mechanism is properly engaged.
HOOD
A hood can be installed on the stroller.
The seat features two joints positioned on the sides of the backrest for securing the hood.
- To secure the hood, insert the fastening system in the joints (Fig. 18). Then, secure the fabric part of the hood using the zipper located on the frame next to the backrest. (Fig. 18A).
WARNING: The hood must be fixed on both sides of the stroller. Ensure that the hood is correctly secured into position.
-
To remove the hood, open the zipper on the fabric part completely and pull up on the joints and hood (Fig. 19).
-
To adjust the hood, pull and/or push the central part (Fig. 20).
RAIN COVER
The stroller is equipped with a rain cover.
WARNING: Use the cover only after having installed the hood. The rain cover cannot be used on the stroller without the hood; it may represent a suffocation hazard for the child. When the rain cover is fitted on the stroller, never leave it exposed to direct sunlight with the child inside, as the temperature will rise considerably.
- To secure the rain cover, completely open the stroller hood, position the rain cover on the hood then wrap it around the external tube of the backrest. To complete the assembly, also wrap the opposite side of the rain cover around the tube in the foot area (Fig. 21), securing it with the designated strips. After use, hang the rain cover to dry (if it is wet) before folding and storing it away out of the reach of children.
WARNING: Use only the supplied rain cover.
COMFORT KIT
-
There is a comfort kit comprising two shoulder strap pads (A) and one crotch strap pad (B) (Fig. 22).
-
To assemble, thread the shoulder straps in the designated slots (Fig. 23) making sure to leave the vertical seam facing outward. The shoulder straps can be adjusted according to your child's size.
-
Slide the crotch strap into the slot in the material as seen in Fig. 24.
FOLDING AND UNFOLDING THE STROLLER
To fold the stroller, put the handle in the closed position (Fig. 17). It is possible to close the stroller in three different modes: without the seat, leaving the seat fastened to the frame in either the forward facing position or the rearward facing position.
FOLDING AND UNFOLDING THE STROLLER WITHOUT THE SEAT
- To remove the seat, press the grey buttons located near the seat's joints (Fig. 25). Fold the stroller by sliding the grey button (on the transversal tube) outwards whilst lifting up on the handle (Fig. 26), compacting the frame until you hear a locking click (Fig. 26A).
- To unfold the stroller, undo the lock hook (Fig. 1) and turn the handle upwards until you hear a click. The stroller is properly unfolded when green is visible in the two openings shown in figure 26B.
FOLDING AND UNFOLDING THE STROLLER WITH THE FORWARD FACING SEAT
- Fold the seat by sliding the grey button outwards whilst lifting up on the lever located on the upper edge of the backrest (Fig. 27) and pushing the backrest forwards until it is fully compact (Fig. 27A). Fold the stroller by sliding the grey button (on the transversal tube) outwards whilst lifting up on the handle (Fig. 26), compacting the frame until you hear a locking click (Fig. 26A). The stroller is now folded with the seat fastened to the frame (Fig. 28).
- To unfold the stroller, carry out the operations described in point 25 and then place the seat into position.
FOLDING AND UNFOLDING THE STROLLER WITH THE REARWARD FACING SEAT
- Fold the seat by sliding the grey button outwards whilst lifting up on the lever located on the upper edge of the backrest (Fig. 27) and pushing the backrest forwards until it is fully compact (Fig. 29). Fold the stroller by sliding the grey button (on the transversal tube) outwards whilst lifting up on the handle (Fig. 26), compacting the frame until you hear a locking click (Fig. 26A).
- To unfold the stroller, carry out the operations described in point 25 and then place the seat into position.
LEG COVER
(Included only if you purchased the Stroller together with the BEST FRIEND LIGHT CARRY COT or the BEST FRIEND COMFORT CARRY COT)
The carry cot cover may be also used as leg cover for the stroller configuration.
30. To fit the leg cover, insert the leg rest in the leg cover compartment (Fig. 31) and pass the upper fabric strap over the handle, securing it with the designated buttons/holes (Fig. 31 A).
USING THE CARRY COT AND CHILD CAR SEAT ON THE STROLLER FRAME
The BEST FRIEND LIGHT CARRY COT, BEST FRIEND COMFORT CARRY COT or the BEST FRIEND, KAILY or KIROS i-Size Fast In CHILD CAR SEATS can be fastened to the frame of the CHICCO BEST FRIEND stroller.
WARNING: For a safe and correct installation of the BEST FRIEND CARRY COT (LIGHT or COMFORT), refer to the respective carry cot manuals.
First, remove the stroller seat from the frame.
FASTEN/RELEASE THE CARRY COT
- To assemble the BEST FRIEND CARRY COT (LIGHT or COMFORT) onto the frame, hold the handle in the transport position (Fig. 32), position the BEST FRIEND CARRY COT (LIGHT or COMFORT) on the lateral joints of the stroller with the foot zone rearward facing. Ease it down on the frame until you hear a click (Fig. 32A).
WARNING: Before use, ensure that the BEST FRIEND CARRY COT (LIGHT or COMFORT) is properly fastened by pulling up on it (Fig. 32B). - To release the BEST FRIEND CARRY COT (LIGHT or COMFORT) from the stroller, put the handle in the vertical position
(transport), push the button located at the feet for BEST FRIEND LIGHT CARRY COT (button located in the hear area for the BEST FRIEND COMFORT CARRY COT) and lift it up from the frame (Fig. 33).
FASTENING/REMOVING BEST FRIEND AND KAILY CHILD CAR SEATS
- To assemble The BEST FRIEND and KAILY CHILD CAR SEATS onto the frame, hold the handle in the transport position (Fig. 34), positioning the child car seat on the lateral joints of the stroller with the foot zone rearward facing. Ease it on the frame until you hear a click (Fig. 34A).
WARNING: Before use, ensure that the child car seat is properly fastened by pulling up on it (Fig. 34B).
34. To release The BEST FRIEND and KAILY CHILD CAR SEATS from the stroller, put the handle in the vertical position (transport), push the button located behind the backrest and lift it up from the frame (Fig. 35).
WARNING: The fastening and releasing operations for the carry cot or child car seat can be carried out also with your child inside; however, these operations may be more difficult to execute with the child's weight.
Pay attention when carrying out the above mentioned operations.
FASTENING/REMOVING THE KIROS i-SIZE FAST IN CHILD CAR SEAT
- To assemble the KIROS i-SIZE FAST IN CAR SEAT onto the frame, hold the handle in the transport position (Fig. 36), positioning the child car seat on the lateral joints of the stroller with the foot zone rearward facing. Ease it on the frame until you hear a click (Fig. 36A).
WARNING: Before use, ensure that the child car seat is properly fastened by pulling up on it (Fig. 36B). - To remove the KIROS i-SIZE FAST IN Child Car Seat from the stroller, press the buttons under the handle on both sides and pull upwards (Fig. 37).
WARRANTY
The product is guaranteed against any conformity defect in normal conditions of use as provided for by the instructions. The warranty shall not therefore apply in the case of damage caused by improper use, wear or accidental events. For the duration of the warranty on conformity defects please refer to the specific provisions of applicable national laws in the country of purchase, where appropriate.

BEST FRIEND - POUSSETTE
NOTICE D'EMPLOI
IMPORTANT - À LIRE ATTENTI- VEMENT ET À CONSERVER POUR CONSULTATION ULTÉRIEURE.
AVERTISSEMENT : AVANT LÉM - PLOI, ENLEVER ET ÉLIMINER TOUS LES SACS EN PLASTIQUE ET ÉLÉMENTS QUI FONT PARTIE DE L'EMBALLAGE DU PRODUIT ET LES TENIR HORS DE PORTÉE DES ENFANTS.
AVERTISSEMENTS
RÅD FÖR RENGÖRING OCH SKÖTSEL
LUKNING OG ÅBNING AF KLAPVOGNEN
LUKNING OG ÅBNING AF KLAPVOGNEN MED SÆDET VENDT FREMAD
RÅD FOR RENHOLD OG VEDLIKEHOLD
ARTSANA GERMANY GMBH
Borsigstrasse 1-3
28923 Alcorcon (Madrid)-Spain
902 117 093
www.CHICCO.es

ARTSANA PORTUGAL S.A.
ARTSANA POLAND Sp.z o.o.
Ul. Połczyńska 31 A
01-377 Warszawa
+48 22 290 59 90
www.CHICCO.pl

ООО "Артсана Рус"
ARTSANA BRASIL LTDA.
Dec V. Ruben Dario 1015
Colonia Lomas De Providencia 44647
Guadalajara, Jalisco-Mexico
01800 702 8983
www.CHICCO.com.mx

ARTSANA ARGENTINA S.A.
Uruguay 4501
Victoria Cp(1644)
San Fernando-Buenos Aires-Argentina
0810-888-2442
www.CHICCO.com.ar

ARTSANA INDIA PRIVATE LIMITED,
7Th Floor, Tower B, Paras Twin Towers,
Golf Course Road, Sector 54
Gurgaon - 122002 - Haryana, India
(+91)(124)(4964500)
www.CHICCO.in

ARTSANA S.p.A.
22070 Grandate (CO) - Italy
Tel. (+39) 031 382 111
Fax (+39) 031 382 400
www.CHICCO.com
NOTE