MS 7741 - Heating Mesko - Free user manual and instructions
Find the device manual for free MS 7741 Mesko in PDF.
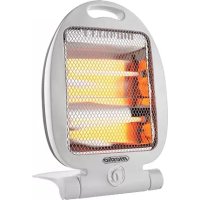
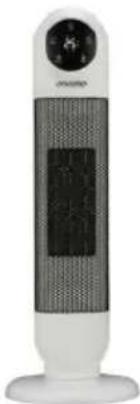
| Product type | Convector with thermostat and Turbo fan |
| Brand | Mesko |
| Model | MS 7741 |
| Power supply | 220-240 V~50 Hz |
| Maximum power | 2000 W |
| Heating powers | 750 W / 1250 W / 2000 W (3 levels) |
| Fan | Yes, can operate alone or with heating |
| Thermostat | Yes, adjustable, maintains temperature |
| Timer | 24 hours, programming in 15-minute segments |
| Dimensions (approx.) | Height 40 cm, width 60 cm, depth 20 cm |
| Weight (approx.) | 4 kg |
| Overheat protection | Yes, automatic shut-off |
| Usage | Household only |
| Installation location | Flat, stable surface, away from water and flammable materials |
| Foot assembly | Yes, supplied separately, 4 self-tapping screws |
| Cleaning | Damp cloth, do not immerse |
| Safety instructions | Do not cover, do not use in a bathroom, keep 1 m away from flammable objects |
| Repairability | Repairs by authorized service center only |
| Environmental compliance | Sort packaging, do not dispose of appliance with household waste |
Frequently Asked Questions - MS 7741 Mesko
User questions about MS 7741 Mesko
0 question about this device. Answer the ones you know or ask your own.
Ask a new question about this device
Download the instructions for your Heating in PDF format for free! Find your manual MS 7741 - Mesko and take your electronic device back in hand. On this page are published all the documents necessary for the use of your device. MS 7741 by Mesko.
USER MANUAL MS 7741 Mesko
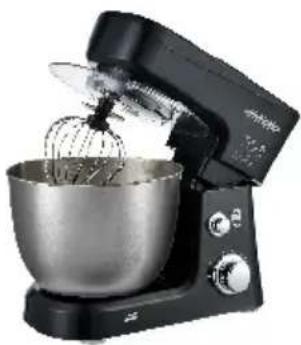
GENERAL SAFETY CONDITIONS
IMPORTANT SAFETY INSTRUCTIONS
READ CAREFULLY AND KEEP FOR FUTURE REFERENCE
- Before using the device, read the user manual and follow the instructions contained therein. The manufacturer is not liable for damage caused by using the device contrary to its intended use or improper operation.
- The device is for home use only. Do not use for any other purposes inconsistent with its intended purpose.
Hz grounded socket.
To increase operational safety, do not connect multiple electrical devices to one circuit at the same time.
- Be especially careful when using the device when children are nearby. Children should not be allowed to play with the appliance. Do not allow children or persons unfamiliar with the appliance to use it.
- WARNING: This equipment may be used by children over 8 years of age and persons with reduced physical, sensory or mental capabilities, or people who lack experience or knowledge of the equipment, if they are supervised or have been given instructions on how to use the equipment. instructions on the safe use of the device and are aware of the dangers associated with its use. Children should not play with the equipment. _ Cleaning and maintenance of the device should not be performed by children unless they are over 8 years of age and these activities are performed under supervision.
- Whenever you have finished using it, remove the plug from the power socket by holding the socket with your hand. DO NOT pull on the power cord.
- Do not immerse the cable, plug or the entire device in water or any other liquid. Do not expose the device to weather conditions (rain, sun, etc.) or use it in high humidity conditions (bathrooms, damp camping houses).
- Periodically check the condition of the power cord. If the power cord is damaged, it should be replaced by a specialist repair facility to avoid a hazard.
- Do not use the appliance if the power cord is damaged, if it has been dropped or damaged in any way, or if it does not operate normally. Do not repair the device yourself, as this may result in electric shock. Take the damaged device to the appropriate service center for inspection or repair. All repairs may only be performed by authorized service points. Improperly performed repairs may pose a serious threat to the user.
- Place the device on a cool, stable, even surface, away from hot kitchen appliances such as: electric stove, gas burner, etc.
- Do not use the device near flammable materials.
-
The power cord must not hang over the edge of the table or touch hot surfaces.
-
Do not leave the device or the power supply plug unattended when switched on.
- To provide additional protection, it is advisable to install a residual current device (RCD) in the electrical circuit with a rated residual current not exceeding 30 mA. In this regard, please contact a specialist electrician.

Do not use the device near water, e.g. in a shower, in a bathtub or over a sink with water.
-
When the appliance is used in the bathroom, unplug it from the socket after use, as the proximity of water poses a risk even when the appliance is turned off.
-
Do not allow the device or power supply to get wet. If the device falls into water, immediately remove the plug or power supply from the power socket. Do not put your hands into the water when the device is plugged in. It must be checked by a qualified electrician before being used again.
-
Do not handle the device or power supply with wet hands.
-
The radiator should only be placed on a flat, stable surface
-
Before removing the plug from the socket, always turn off the heater and turn the thermostat knob to the minimum position.
-
Do not use the heater in rooms with high air humidity - bathrooms, showers, swimming pools, etc. Humidity may cause a short circuit and damage the device.
-
The operating heater must be supervised and within sight at all times. When leaving the room where the heater is operating, always turn it off. If the heater is not working, always remove the plug from the socket.
-
Do not connect the heater to an automatic shut-off device, such as a thermal control device or timer.
-
Flammable materials, e.g. furniture, bedding, paper, clothes, curtains, etc., should be kept at a distance of at least one meter from the heater.
-
Do not cover the device during operation or place any objects on it. Do not use the device to dry clothes.
-
The power cord cannot be laid above the radiator and should not touch or lie near its hot surfaces. Do not place the fan heater under an electrical socket.
-
Heating surfaces may heat up to temperatures higher than 60 °C . The fan heater should be placed in a place where children and animals do not have access to it.
-
The device cannot be installed or used in vehicles.
-
There are parts inside the appliance that may be hot or cause sparks. Do not turn on the Heater in places where materials such as gasoline, paint or other flammable substances are used or stored.
ASEMBLY OF THE HEATER
Before using the heater, the feet (supplied separately in the carton), must be fitted to the unit. These are to be attached to the base of the heater using the 4 self-tapping screws provided, taking care to ensure that they are located correctly in the bottom ends of the heater side mouldings. Look at picture D.
BEFORE FIRST USE
Do not use the heater unless the feet are correctly assembled.
Do not place the device on carpets having a very high pile. Ensure that the device is not located close to curtains or furniture as this could create a fire hazard.
Place the device on flat, even surface.
Always unplug the device before moving it from one location to another.
WARNING: It is normal when the heaters are turned on for the first time or when they are turned on after having not been used for a long period of time that the heating elements may emit some smell and fumes. The smell and fumes will disappear after short time of operation.
WARNING: In order to avoid a hazard due to inadvertent resetting of the thermal cut-out this device must not be supplied through an external switching device such as a timer or connected to a circuit that is regularly switched on and off by the utility.
WARNING: Do not use this heater in small rooms when they are occupied by persons not capable of leaving the room on their own, unless constant supervision is provided.
Device description: Convector heater with thermostat and Turbo fan MS7741 – look at picture A
-
Handles
-
Control panel
3.Feet
-
Air inlet grid
-
Air outlet grid
-
Thermostat knob
7.Switch of fan
8.Rocker switches of heating power
- Timer knob
9A. Segment position: turned off
9B. Segment position: turned on
- Slide switch of timer
DEVICE OPERATION
HEATING OPERATION
-
Plug in the heater into a suitable socket.
-
Turn the thermostat knob (6) fully in a clockwise direction to the maximum setting "MAX".
-
Turn on the heating elements by means of the rocker switches (8) on the side panel. When the heating elements are on the switches (8) will illuminate by red lamp. There are 3 levels of heating power: 750W, 1250W and 2000W. For maximum heat output both switches should be on.
-
When the desired room temperature has been reached, the thermostat knob (6) should be turned slowly anti-clockwise until the thermostat is heard to click off and the lights on the element switches (8) are seen to go out. After this the device will keep the air temperature in the room at the set temperature by switching on and off automatically.
FAN OPERATION
To speed up heating effect in room and get more warm air around switch on the fan switch (7) when rocker switches of heating power (8) are switch on also. You can also switch on the fan switch (7) when rocker switches of heating power (8) are switch off to get more air circulation in room.
TIMER OPERATION
This model is also equipped with a 24-hour clock which has 96 segments on its circumference, each representing 15 minutes of time. With this timer, you can select the time and duration of the period (s) that the heater will operate at any time slot during the 24 hours.
* In the central position (denoted by the clock symbol) the timer will switch the heater on and off at times set by the segments, (see setting the timer, below).
* In the position denoted by the "I", timer will continue to run (the mini hand of the clock rotates inside the small clock on the thermostat knob) but it will not work effective (not switching on and not switching off the heating). The power will be fed continuously to the heater. This enables the heater to be on all the time if required.
* In the position denoted by the "0", the timer continues to run (the mini clock hand rotates) but no power is fed to the heater.
Setting the Timer
Ensure the slide switch (10) on the timer knob (9) is at the mid position next to the clock symbol.
Rotate the outer ring of the timer in a clockwise direction until the current time is lined up with the arrow pointer, i.e. if the time the timer is being set is 8 p.m., rotate the outer ring until the number 20 is in line with the arrow pointer.
Set the time the heater is required to run by moving the red segments located inside the ring. The segment is turn on (look at picture C between 16:00 – 21:00, totally 5 hours) when it is slid to the OUTER edge of the ring. Move the number of segments appropriate to the running period(s) required, one segment means 15 minutes of operation. If need to heat continuously by period of 3 hours starting from 8 p.m. then slide to the outer edge of the ring 12 adjacent segments between numbers 20 and 23.
When set, the heater will operate each day during the times programmed. Note, the heater must always be plugged into a power socket, the rocker switches of heating elements (8) must be in the switch on position and the thermostat knob (6) must be suitably set to ensure the device will start heating.
The segment is turn off when it is slid inside to the centre of the ring (look at picture C between 21:00 – 16:00, totally 7 hours).
If the heater is required to run continuously the slide switch (10) on the timer should be set to the "l" position.
If it is subsequently required to revert to timer operation, the slide switch (10) on the timer should be set to the central (clock) position.
Note: When using in timer mode, due consideration should be given to the fact that the heater may come on whilst unattended.
CLEANING AND MAINTENANCE
Make sure the device is not hot. Remove the plug from the socket before cleaning. Keep the inlet and outlet openings clean. Clean the outside of the heater by wiping with a damp cloth and buff with a dry cloth. Do not use any detergents or abrasives and do not allow any water to enter the heater. Do not immerse the device in water. Pack the device in bag to protect from the dust. Store it in a cool, dry place until next use.
OVERHEAT PROTECTION
The device is provided with a safety system that automatically cuts the power to the heater in the event of overheating. If this event occurs, switch the device off, remove the plug from the power outlet and wait until the device has cooled down (after about 10
DEUTSCH
KUSHTET E PËRGJITHSHME TË SIGURISË UDHËZIME TË RËNDËSISHME TË SIGURISË
LEXONI ME KUJDES DHE MBANI PËR REFERENCA TË ARDHMEN
OLULISED OHUTUSJUHISED
LUGEGE HOOLIKALT JA SÄILITA EDASISEKS KASUTAMISEKS
OPĆI USLOVI SIGURNOSTI
VAŽNE SIGURNOSNE UPUTSTVA
PAŽLJIVO PROČITAJTE I ZAČUVAJTE ZA BUDUĆE REFERENCE
-
Prije korištenja uređaja, pročitajte korisnički priručnik i slijedite upute sadržane u njemu. Proizvođač nije odgovoran za štetu uzrokovanu upotrebom uređaja suprotno njegovoj namjeni ili nepravilnim radom.
-
Uređaj je samo za kućnu upotrebu. Nemojte koristiti u bilo koje druge svrhe koje nisu u skladu s njegovom namjenom.
VAŽNE SIGURNOSNE UPUTE
PAŽLJIVO PROČITAJTE I SAČUVAJTE ZA BUDUĆU REFERENCU
- Prije uporabe uređaja pročitajte korisnički priručnik i slijedite upute sadržane u njemu. Proizvođač ne snosi odgovornost za štetu nastalu korištenjem uređaja protivno namjeni ili nestručnim radom.
- Uređaj je samo za kućnu upotrebu. Nemojte koristiti u druge svrhe koje nisu u skladu s njegovom predviđenom svrhom.
WERKING VAN HET APPARAAT:
VERWARMING
natural_image
Glass juicer with orange juice and white lid, no visible text or symbolsCITRUS JUICER MS 4010
Milk Frother
MS 4493

natural_image
White blender with purple liquid, no visible text or symbols on the device bodyBLENDER WITH JAR MS 4079
natural_image
Black kitchen stand mixer with a hand mixer inside, no visible text or symbolsMIXER WITH BOWL MS 4217
natural_image
Digital kitchen scale with digital display showing 0 and 10 ohms (no text or symbols on the appliance)KITCHEN SCALE MS 3165
natural_image
White water purifier with blue liquid and control knob (no visible text or symbols)AIR HUMIDIFIER MS 7965
natural_image
Black and white photo of a UV light bulb with lattice structure, no visible text or symbols on bodyMOSQUITO KILLER LAMP MS 7933

Weather Station MS 1177
natural_image
Black and white photo of a pair of hair filter pens (no visible text or symbols)NOSE TRIMMER MS 2929
mesko
natural_image
Black and white photo of a black watermelon-shaped kettle with a handle and side panel (no visible text or symbols)ELECTRIC KETTLE MS 1284
natural_image
Black and white photo of a portable food grater with a red and green button (no visible text or symbols)SANDWICH MAKER MS 3032

natural_image
Product photo of a white electric shaver with a small container and plastic bottle (no visible text or symbols)HAND BLENDER MS 4624
natural_image
Black microwave oven with two baked goods inside a glass oven (no visible text or symbols)ELECTRIC OVEN MS 6021

natural_image
Black and white photo of a black electronic device with a circular handle (no visible text or symbols)NUT MAKER MS 3041
natural_image
Exterior view of a modern stainless steel juiceizer with a side cup (no visible text or symbols)JUICE EXTRACTOR MS 4126
natural_image
White portable electric water heater with a circular top and mesh grille (no visible text or symbols)CERAMIC FAN HEATER MS 7736

natural_image
White and black hair dryer with brand logo (no visible text or symbols on body)HAIR DRYER MS 2262

natural_image
White industrial air conditioner unit with ventilation slots and control panel (no visible text or symbols)AIR CONDITIONER MS 7911
AFTER SALE SERVICE NOTICE
| GB | If you want to buy spare parts or make any complaints, please contact the seller who issued the receipt directly. |
| DE | Wenn Sie Ersatzteile kaufen oder reklamieren möchten, wenden Sie sich bitte direkt an den Verkäufer, der die Quittung ausgestellt hat. |
| FR | Si vous souhaitez acheter des pièces de rechange ou faire des réclamations, veuillez contacter directement le vendeur qui a émis le reçu. |
| ES | Si desea comprar repuestos o presentar alguna queja, comuníquese directamente con el vendedor que emitió el recibo. |
| PT | Se você quiser comprar peças de reposição ou fazer alguma reclamação, entre em contato diretamente com o vendedor que emitiu o recibo. |
| LT | Jei norite jsigyti atsarginių dalių ar pateikti nusiskundimų, susisiekite tiesiogiai su kvitą išdavusiu pardavėju. |
| LV | Ja vēlaties iegādāties rezerves daļas vai izteikt pretenzijas, lūdzu, sazinieties tieši ar pārdevēju, kurš izsniedza čeku. |
| EST | Kui soovite osta varuosi või esitada pretensioone, võtke otse ühendust kvitungi väljastanud müüjaga. |
| HU | Ha pótalkatrészeket szeretne vásárolni, vagy panaszt szeretne tenni, forduljon közvetlenül a bizonylatot kiállító eladóhoz. |
| BS | Ako želite kupiti rezervne dijelove ili napraviti reklamaciju, obratite se direktno prodavaču koji je izdao račun. |
| RO | Если вы хотите купить запчасти или предъявить какие-либо претензии, пожалуйста, свяжитесь напрямую с продавцом, выдавшим чек. |
| CZ | Chcete-li zakoupit náhradní díly nebo uplatnit jakoukoli reklamaci, kontaktujte přímo prodejce, který účtenku vystavil. |
| RU | Dacă doriți să cumpārați piese de schimb sau să faceți vreo reclamație, vă rugăm să contactați direct vânzătorul care a emis chitanța. |
| GR | Eáv θέλετε να αγοράσετε ανταλλακτικά ή να κάνετε οποιαδήποτε παράπονα, επικοινωνήστε απευθείας με τον πωλητή που εξέδωσε την απόδειξη. |
| MK | Ако сакате да купите резервни делови или да поднесете какви било поплаки, контактирајте директно со продавачот кој ja издал сметката. |
| NL | Als u reserveonderdelen wilt kopen of een klacht wilt indienen, neem dan rechtstreeks contact op met de verkoper die de bon heeft afgegeven. |
| SL | Ie želite kupiti nadomestne dele ali vložiti reklam acije, se obrnite neposredno na prodajalca, ki je izdal račun. |
| FI | Jos haluat ostaa varaosia tai tehdä valituksia, ota yhteyttä suoraan kuitin antaneeseen myyjään. |
| PL | W przypadku chęci zakupu części zamiennych lub zgło szenia ewentualnych reklamacji należy kontaktowai się bezpośrednio ze sprzedawca, który w ystawił paragon. |
| IT | Se desideri acquistare pezzi di ricambio o presentare reclami, contatta direttamente il venditore che ha emesso la ricevuta. |
| HR | Se desideri acquistare pezzi di ricambio o presentare reclami, contatta direttamente il venditore che ha emesso la ricevuta. |
| SV | Im du vill köpa reservdelar eller göra nigra reklam ationer, vänligen kontakta säljaren som utfärdat kvittot direkt. |
| DK | Hvis du ønsker at købe reservedele eller reklamere, bedes du kontakte sägeren, som har udstedt kvitteringen, direkte. |
| UA | İkö vi хочете придбати запчастини або подати будь- які претензії, зверніться безпосередньо до продавця, який видав чек. |
| SR | Ако желите да купите резервне делове или да уложите рекламацију, обратите се директно продавцу који је издао рачун. |
| SK | Ak si chcete küpii náhradné diely alebo uplatnii ak úkoïvek reklamáciu, kontaktujte priamo predajcu, ktorý účtenku vystavil. |
| AR | Інданا اتنکب غretsی فشراء جملقة رایشوا میدقتيأ یوکثه ی جریف لاتصال عنابلابالذي أصدیر الإipsال گرشاپب |
| BG | Ако искате да закупите резервни части или да направите оплаквания, моля, свържете се директно с продавача, който е издал касовата бележка. |
| AZ | Ehtiyat hissələri almaq və ya hər hansı śikayət etmək istəyirsinizsə, qəbzi verən satıcı ilə birbaşa alaqə saxlayın. |
| ALB | Nëse dëshironi të blini pjesë këmbimi ose të bëni ndonjë ankesë, ju lutemi kontaktoni drejtpërdrejt shitësin që ka lëshuar faturën. |