525ECS - Electric mower HUSQVARNA - Free user manual and instructions
Find the device manual for free 525ECS HUSQVARNA in PDF.

User questions about 525ECS HUSQVARNA
0 question about this device. Answer the ones you know or ask your own.
Ask a new question about this device
Download the instructions for your Electric mower in PDF format for free! Find your manual 525ECS - HUSQVARNA and take your electronic device back in hand. On this page are published all the documents necessary for the use of your device. 525ECS by HUSQVARNA.
USER MANUAL 525ECS HUSQVARNA
natural_image
Close-up of a red car hood with a stylized orange logo (no visible text or symbols)GB Operator's manual 2-22
SE Bruksanvisning 23-43
DK Brugsanvisning 44-64
NO Bruksanvisning 65-85
natural_image
Simple line drawing of an open book enclosed in a circle (no text or symbols)525BX
EAC

KEY TO SYMBOLS
Symbols
WARNING! The machine can be a dangerous tool if used incorrectly or carelessly, which can cause serious or fatal injury to the operator or others.
Please read the operator's manual carefully and make sure you understand the instructions before using the machine.

Always wear:
- Hearing protection
• Approved eye protection
• A breathing mask should be used when there is a risk of dust.

Gloves should be worn when necessary.
This product is in accordance with applicable EC directives.

The blower can forcibly throw objects that can bounce back. This can result in serious eye injuries if the recommended safety equipment is not used.

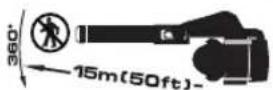
The blower operator must ensure that no people or animals come closer than 15 metres.
When several operators are working at the same site a safety distance of at least 15 metres must be in effect.
Air purge
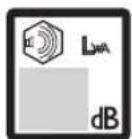
Noise emission to the environment according to the European Community's Directive. The machine's emission is specified in the Technical data chapter and on the label.
Other symbols/decals on the machine refer to special certification requirements for certain markets.
The engine is switched off by moving the stop switch to the stop position.
CAUTION! The stop switch automatically returns to the start position. In order to prevent unintentional starting, the spark plug cap must be removed from the spark plug when assembling, checking and/or performing maintenance.
Regular cleaning is required.
Visual check.
Refuelling.
Choke lever in "open position".
Choke lever in "closed position".


2 - English


natural_image
Pure geometric diagram with intersecting lines and a circular pattern (no text or symbols)CONTENTS
Contents Note the following before
KEY TO SYMBOLS
Symbols 2
CONTENTS
Contents 3
Note the following before starting: 3
INTRODUCTION
Dear Customer, 4
WHAT IS WHAT?
What is what on the blower? 5
GENERAL SAFETY PRECAUTIONS
General 6
SAFETY INSTRUCTIONS
Personal protective equipment 8
Machine's safety equipment 8
ASSEMBLY
Blow pipe 11
FUEL HANDLING
Fuel 12
Fueling 13
STARTING AND STOPPING
Starting and stopping 14
WORKING TECHNIQUES
General working instructions 16
MAINTENANCE
Carburettor 18
Muffler 18
Cooling system 18
Spark plug 18
Air filter 19
Maintenance schedule 20
TECHNICAL DATA
Technical data 21
EC Declaration of Conformity 22
starting:
Please read the operator's manual carefully.

WARNING! Long-term exposure to noise can result in permanent hearing impairment. So always use approved hearing protection.

WARNING! Under no circumstances may the design of the machine be modified without the permission of the manufacturer. Always use original accessories. Non-authorized modifications and/or accessories can result in serious personal injury or the death of the operator or others.

WARNING! A blower is a dangerous tool if used carelessly or incorrectly and can cause serious, even fatal injuries. It is extremely important that you read and understand the contents of this Operator's manual.
Husqvarna AB has a policy of continuous product development and therefore reserves the right to modify the design and appearance of products without prior notice.
The blower is only designed for blowing lawns, pathways, asphalt roads and the like.


INTRODUCTION
Dear Customer,
Congratulations on your choice to buy a Husqvarna product! Husqvarna is based on a tradition that dates back to 1689, when the Swedish King Karl XI ordered the construction of a factory on the banks of the Husqvarna River, for production of muskets. The location was logical, since water power was harnessed from the Huskvarna River to create the water-powered plant. During the more than 300 years in existence, the Husqvarna factory has produced a lot of different products, from wood stoves to modern kitchen appliances, sewing machines, bicycles, motorcycles etc. In 1956, the first motor driven lawn mowers appeared, followed by chain saws in 1959, and it is within this area Husqvarna is working today.
Today Husqvarna is one of the leading manufacturers in the world of forest and garden products, with quality as our highest priority. The business concept is to develop, manufacture and market motor-driven products for forestry and gardening, as well as for the building and construction industry. Husqvarna's aim is also to be at the front edge for ergonomics, usability, security and environmental protection. That is the reason why we have developed many different features to add to our products within these areas.
We are convinced that you will appreciate with great satisfaction the quality and performance of our product for a very long time to come. The purchase of one of our products gives you access to professional help with repairs and service whenever this may be necessary. If the retailer who sells your machine is not one of our authorised dealers, ask for the address of your nearest service workshop.
It is our wish that you will be satisfied with your product and that it will be your companion for a long time. Think of this operator's manual as a valuable document. By following its content (usage, service, maintenance, etc), the life span and the second-hand value of the machine can be extended. If you sell this machine, make sure that the operator's manual is passed on to the buyer.
Thank you for using a Husqvarna product.
Husqvarna AB has a policy of continuous product development and therefore reserves the right to modify the design and appearance of products without prior notice.


natural_image
Pure geometric diagram with intersecting lines and circular shapes (no text or symbols)WHAT IS WHAT?
text_image
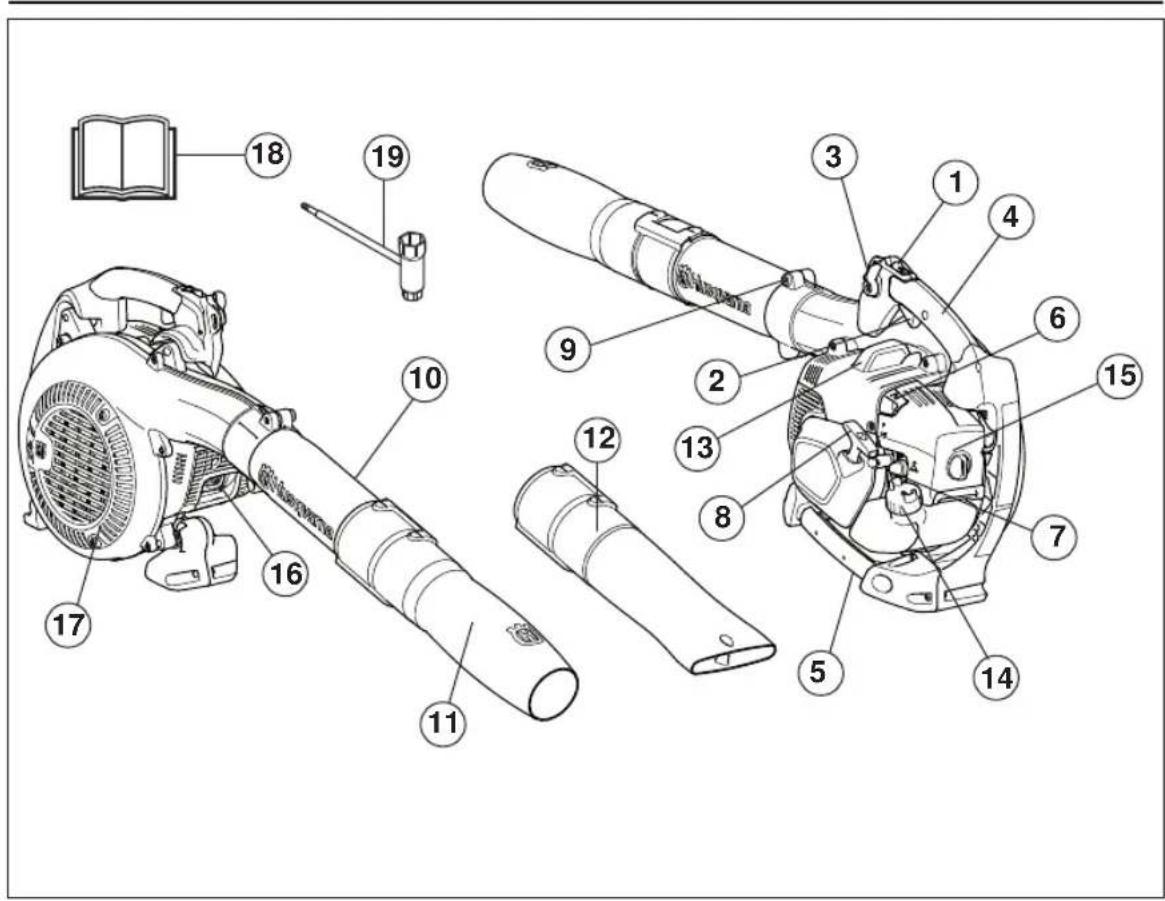
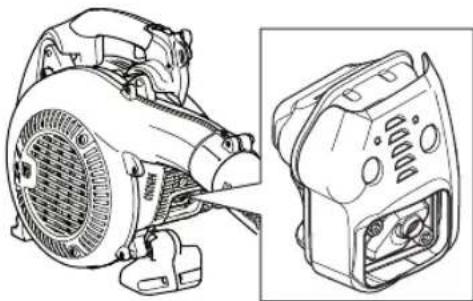
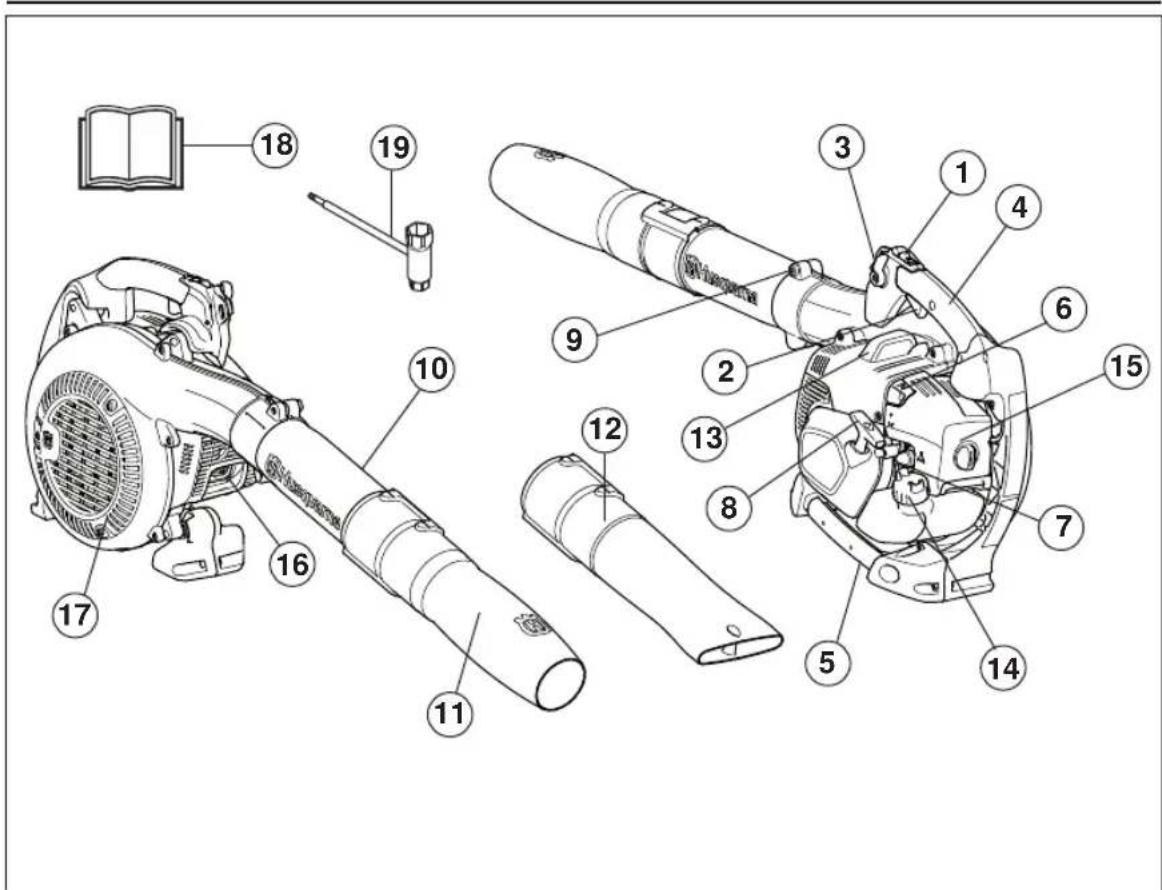
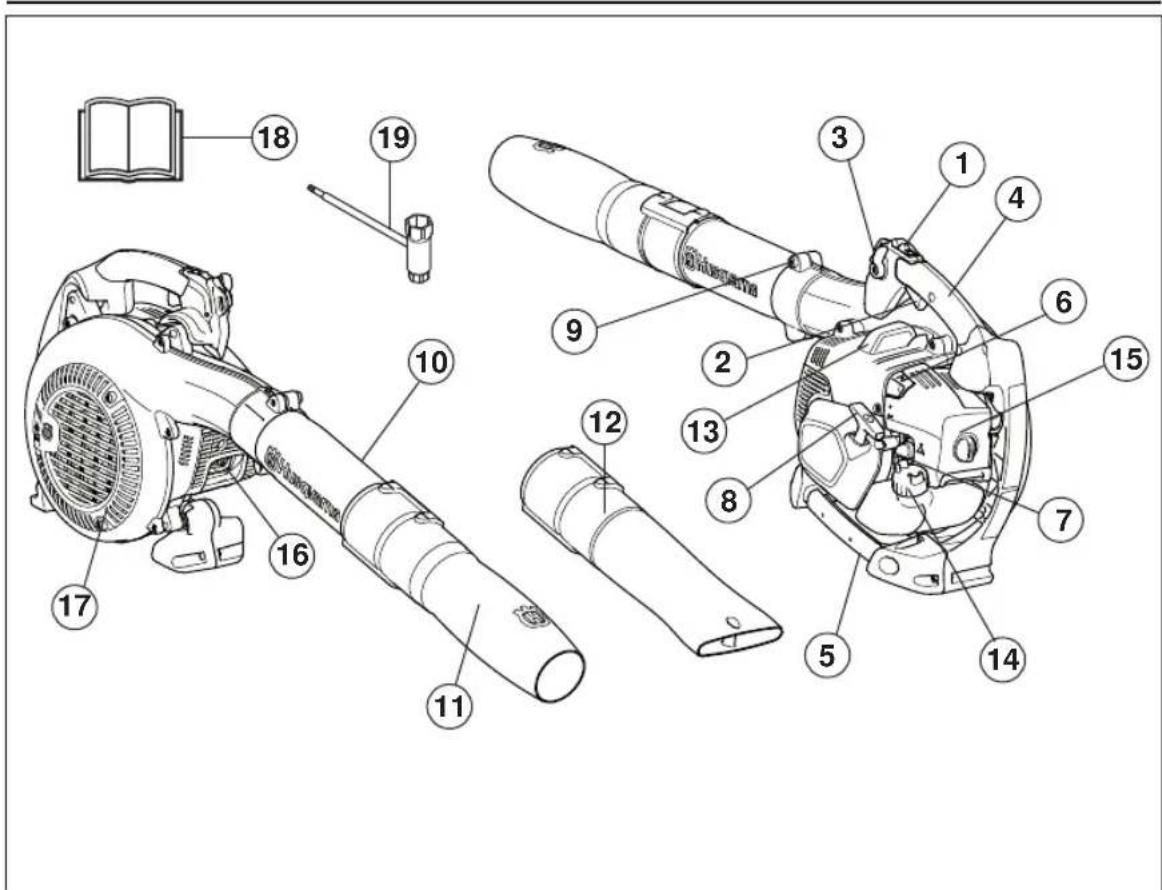
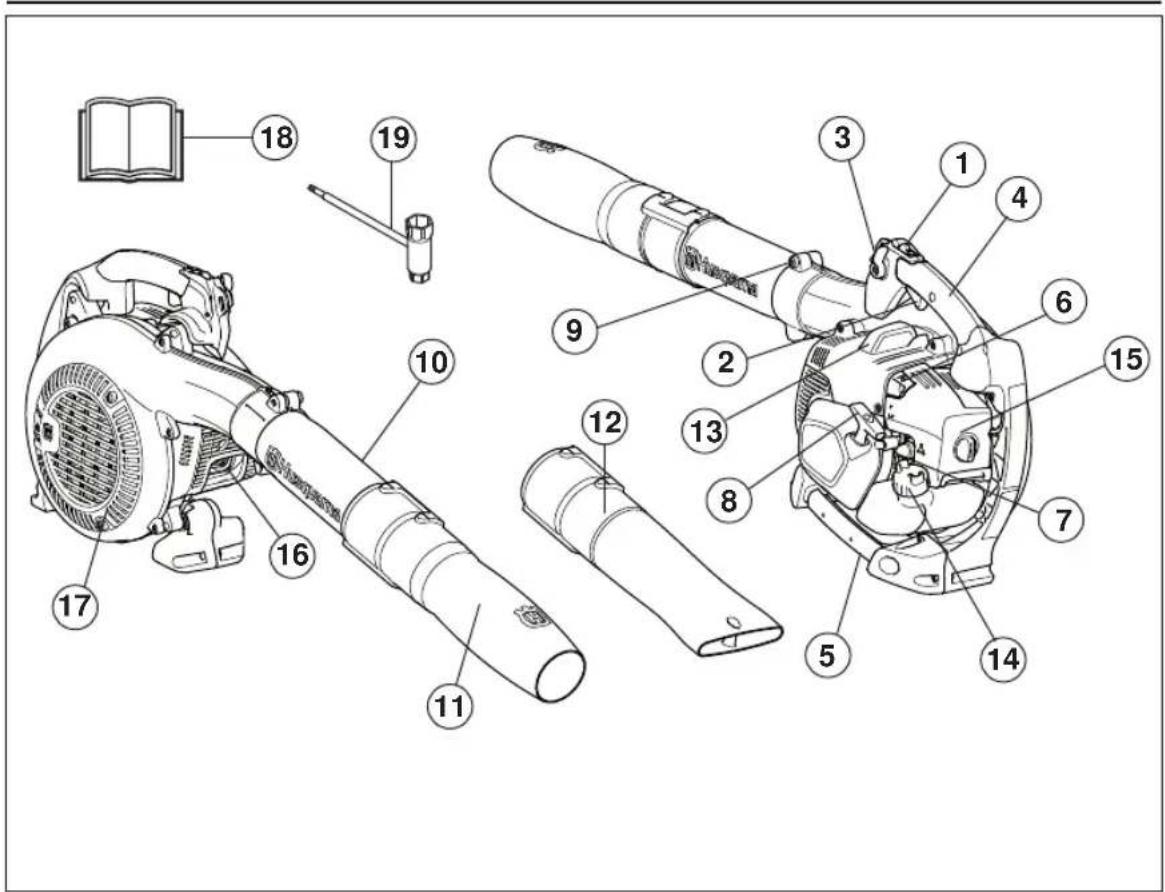
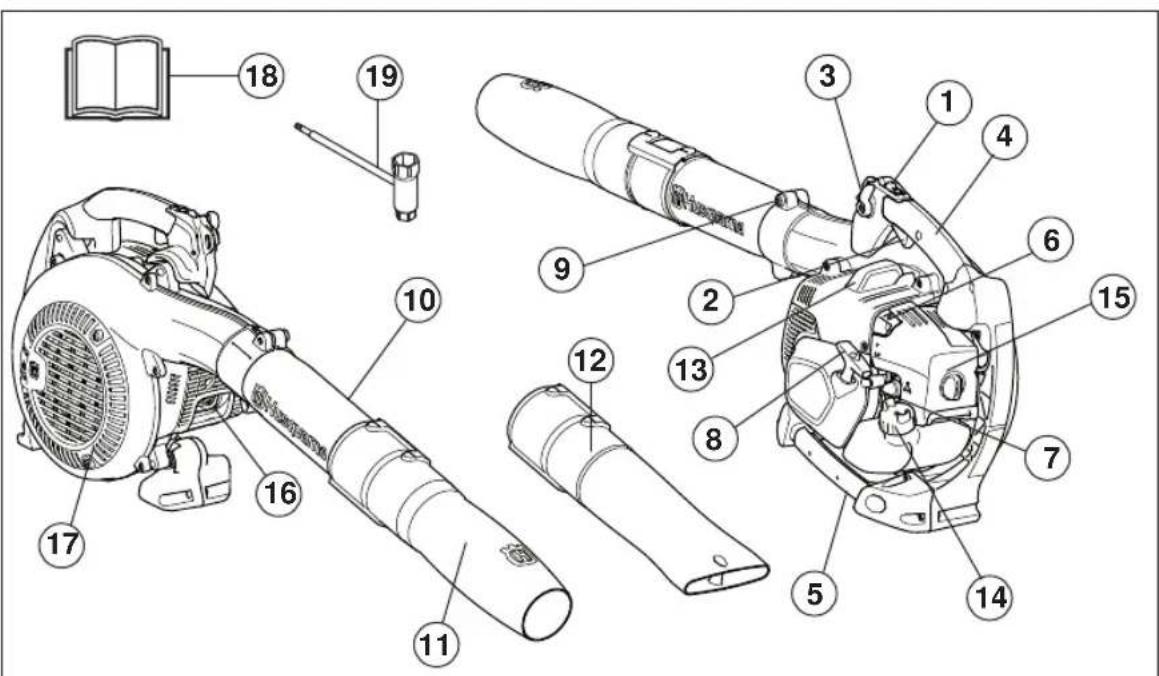
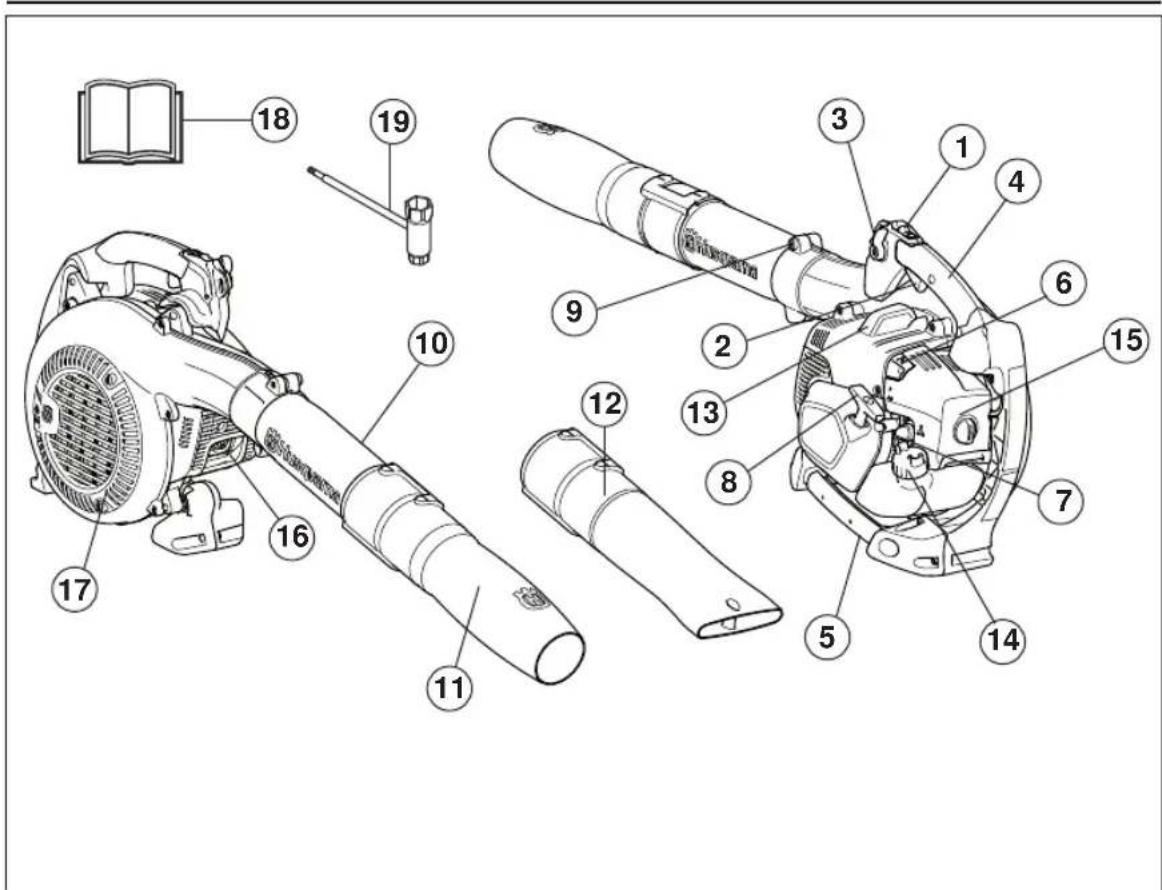
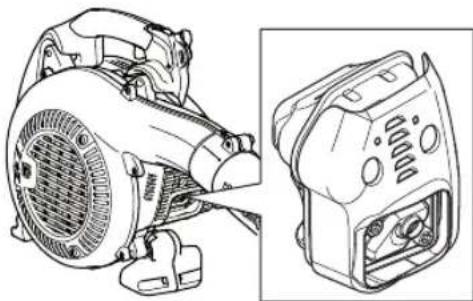
Technical diagram of a handheld device with numbered parts for identification and assembly reference.What is what on the blower?
1 Stop switch
2 Throttle control
3 Throttle settings control
4 Control handle/Operating handle
5 Handle
6 Choke control
7 Primer bulb
8 Starter handle
9 Tube clamp screw
10 Intermediate pipe
11 Round nozzle
12 Flat nozzle
13 Spark plug
14 Fuel cap
15 Air filter
16 Muffler
17 Air intake screen
18 Operator's manual
19 Combination spanner
English - 5
GENERAL SAFETY PRECAUTIONS
General

WARNING! Overexposure to vibration can lead to circulatory damage or nerve damage in people who have impaired circulation. Contact your doctor if you experience symptoms of overexposure to vibration. Such symptoms include numbness, loss of feeling, tingling, pricking, pain, loss of strength, changes in skin colour or condition. These symptoms normally appear in the fingers, hands or wrists. These symptoms may be increased in cold temperatures. In order to reduce the risk of whitefinger disease, the following precautions are strongly recommended.
Wear thick anti-vibration gloves.
Take more than 5 minutes of break in warm place frequently.
Maintain a firm grip at all times, but do not squeeze the handles with constant, excessive pressure.
If you feel discomfort, redness and swelling of your fingers or any other part of your body, see a doctor before getting worse.
IMPORTANT!
The blower is only designed for blowing lawns, pathways, asphalt roads and the like.
Carry out an overall inspection of the machine before use. See the maintenance schedule.
Never use the machine if you are tired, if you have drunk alcohol, or if you are taking medication that could affect your vision, your judgement or your co-ordination.
Wear personal protective equipment. See instructions under the "Personal protective equipment" heading.
Dress properly. Do not wear loose clothing or jewellery. Keep your hair, clothing and gloves away from moving parts. Loose clothes, jewellery or long hair can be caught in moving parts.
Never use a machine that has been modified in any way from its original specification.
Never use a machine that is faulty. Carry out the safety checks, maintenance and service instructions described in this manual. Some maintenance and service measures must be carried out by trained and qualified specialists. See instructions under the Maintenance heading.
All covers and guards must be fitted before starting. Ensure that the spark plug cap and ignition lead are undamaged to avoid the risk of electric shock.
The blower operator must ensure that no people or animals come closer than 15 metres. When several operators are working at the same site a safety distance of at least 15 metres must be in effect.
Never allow children to use the machine.
Never allow anyone else to use the machine without first ensuring that they have read and understood the contents of the operator's manual.
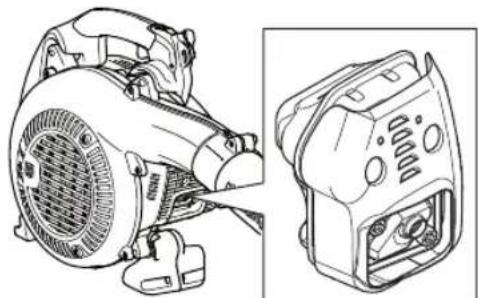
Always check for any objects that may block the air intake screen before beginning work.
Always contact local authorities and make sure you are following applicable directives.
Keep all parts of your body away from hot surfaces. Metallic parts and engine cover reach high temperatures during operation and doing so could result in serious burns.
Never remove debris from the inlet screen while the engine is runing. Contact with rotating blower fan result in a serious personal injury.


natural_image
Pure geometric diagram with intersecting lines and a circular pattern (no text or symbols)GENERAL SAFETY PRECAUTIONS

WARNING! This machine produces an electromagnetic field during operation. This field may under some circumstances interfere with active or passive medical implants. To reduce the risk of serious or fatal injury, we recommend persons with medical implants to consult their physician and the medical implant manufacturer before operating this machine.
Starting
- Never start the machine indoors. Exhaust fumes can be dangerous if inhaled.
- Observe the surroundings and ensure that no people or animals can come into contact with the blower.
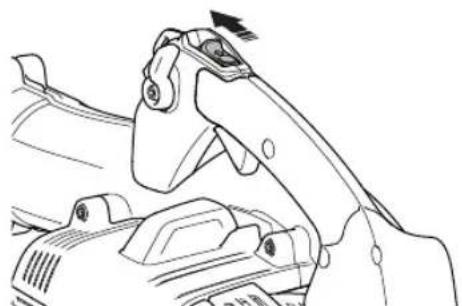
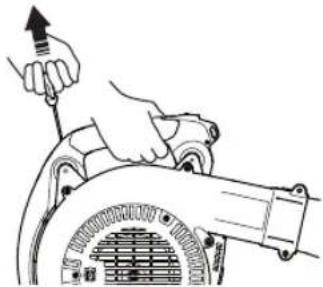
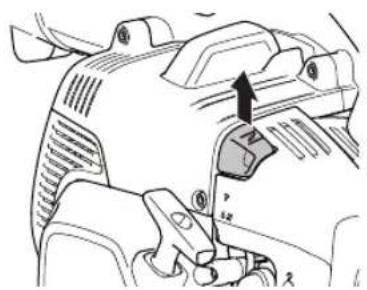
Place the machine on the ground, press the machine body against the ground with your right hand (NOTE! Not your foot). Now grasp the starter handle with your left hand and then pull quickly and firmly.
natural_image
Line drawing of a hand using a tool to lift a motor or fan (no text or symbols present)Fuel safety
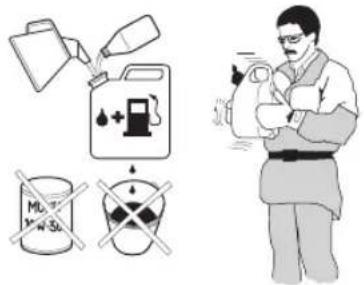
• Always use a fuel container with an anti-spill valve.
- Never refuel the machine while the engine is running. Always stop the engine and let it cool for a few minutes before refuelling.
- Make sure there is plenty of ventilation when refuelling or mixing fuel (petrol and 2-stroke oil).
- Avoid all skin contact with fuel. Fuel is a skin irritant and may even cause skin changes.
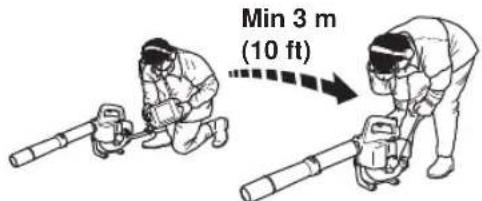
- Move the machine at least 3 m from the refuelling point before starting it.
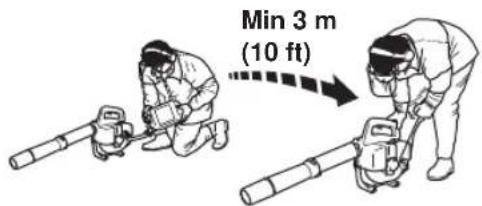
text_image
Min 3 m (10 ft)- Never start the machine:
- If you have spilled fuel on it. Wipe off the spillage and allow remaining fuel to evaporate.
- If you have spilled fuel on yourself or your clothes, change your clothes. Wash any part of your body that has come in contact with fuel. Use soap and water.
- If the machine is leaking fuel. Check regularly for leaks from the fuel cap and fuel lines.
Transport and storage
- Store and transport the machine and fuel so that there is no risk of any leakage or fumes coming into contact with sparks or open flames, for example, from electrical machinery, electric motors, electrical relays/ switches or boilers.
- When storing and transporting fuel always use approved containers intended for this purpose.
- When storing the machine for long periods the fuel tank must be emptied. Contact your local petrol station to find out where to dispose of excess fuel. Empty the fuel tank and press the primer until all fuel has been emptied. Remove the spark plug and drop a spoon of 2-stroke oil in the cylinder. Turn over the engine a few times and then put the spark plug back in place.
- Ensure the machine is cleaned and that a complete service is carried out before long-term storage.
- Secure the machine during transport.
- Store the machine in a dry, cool, well-aired and dust-free location. Store the machine out of reach of children.

WARNING! Take care when handling fuel. Bear in mind the risk of fire, explosion and inhaling fumes.


SAFETY INSTRUCTIONS
Personal protective equipment

WARNING! You must use approved personal protective equipment whenever you use the machine. Personal protective equipment cannot eliminate the risk of injury but it will reduce the degree of injury if an accident does happen. Ask your dealer for help in choosing the right equipment. Please read the operator's manual carefully and make sure you understand the instructions before using the machine.

WARNING! Listen out for warning signals or shouts when you are wearing hearing protection. Always remove your hearing protection as soon as the engine stops.
- Gloves should be worn when necessary.

- Wear hearing protection that provides adequate noise reduction.
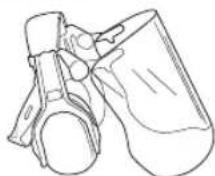
• Always wear approved eye protection. If you use a visor then you must also wear approved protective goggles. Approved protective goggles must comply with the ANSI Z87.1 standard in the USA or EN 166 in EU countries. Blows from branches or objects that are thrown can damage the eyes.

natural_image
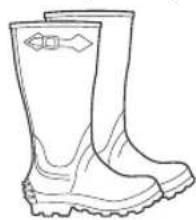
Line drawings of two types of safety goggles, one front view and one side view (no text or symbols)- Wear sturdy, non-slip boots.
natural_image
Line drawing of a pair of boots with visible branding and sole details (no text or symbols)• Always wear heavy, long pants, boots, gloves, and a long-sleeve shirt. To reduce the risk of injury associated with objects being drawn into rotating parts, do not wear loose clothing, scarves, jewelry, etc. Secure hair so it is above shoulder level.
- A breathing mask should be used when there is a risk of dust.

• Always have a first aid kit nearby.

text_image
FIRST AID KITMachine's safety equipment
This section describes the machine's safety equipment, its purpose, and how checks and maintenance should be carried out to ensure that it operates correctly. See the "What is what?" section to locate where this equipment is positioned on your machine.

WARNING! Never use a machine that has faulty safety equipment! Carry out the inspection, maintenance and service routines listed in this section.
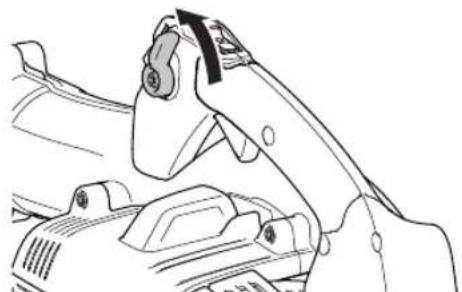
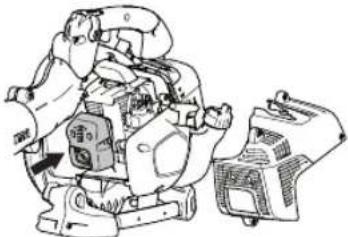
Stop switch
Use the stop switch to switch off the engine.
natural_image
Technical line drawing of a mechanical assembly with no visible text or symbolsRemove the ignition cable and the spark plug to carry out inspection and maintenance.
8 - English
SAFETY INSTRUCTIONS
Vibration damper
Your machine is equipped with a vibration damping system that is designed to minimize vibration and make operation easier.
natural_image
Technical line drawing of an electric motor with mounting flanges and a central vent (no text or symbols)
WARNING! Overexposure to vibration can lead to circulatory damage or nerve damage in people who have impaired circulation. Contact your doctor if you experience symptoms of overexposure to vibration. Such symptoms include numbness, loss of feeling, tingling, pricking, pain, loss of strength, changes in skin colour or condition. These symptoms normally appear in the fingers, hands or wrists. The risk increases at low temperatures.
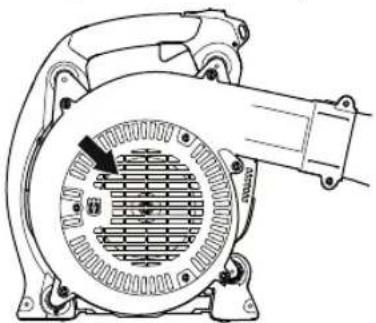
Muffler

The muffler is designed to keep noise levels to a minimum and to direct exhaust fumes away from the user.
natural_image
Technical line drawing of an electric motor and its internal casing (no text or symbols)A muffler fitted with a catalytic converter is also designed to reduce harmful exhaust gases.
In countries that have a warm and dry climate there is a significant risk of fire. We therefore fit certain mufflers with
a spark arrestor mesh. Check whether the muffler on your machine is fitted with this kind of mesh.
natural_image
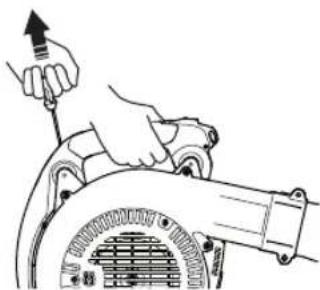
Line drawing of a device housing with an arrow indicating assembly or disassembly (no text or symbols present)For mufflers it is very important that you follow the instructions on checking, maintaining and servicing your machine.
Never use a machine that has a faulty muffler.
natural_image
Diagram of a device with a prohibition symbol overlay (no text or labels)Regularly check that the muffler is securely attached to the machine.
natural_image
Technical line drawing of an electric motor and its internal components (no text or symbols)SAFETY INSTRUCTIONS
If the muffler on your machine is fitted with a spark arrestor mesh this must be cleaned regularly. A blocked mesh will cause the engine to overheat and may lead to serious damage.

natural_image
Line drawing of a mechanical device with exploded view showing internal components (no text or symbols)NOTE!
Make sure that the spark arrestor is screwed in place correctly.

WARNING! Mufflers fitted with catalytic converters get very hot during use and remain so for some time after stopping. This also applies at idle speed. Contact can result in burns to the skin. Remember the risk of fire!

WARNING! The inside of the muffler contain chemicals that may be carcinogenic. Avoid contact with these elements in the event of a damaged muffler.
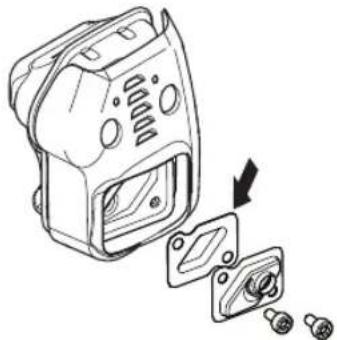
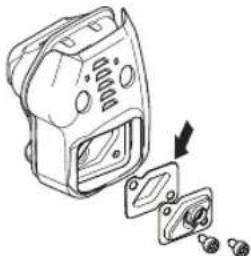
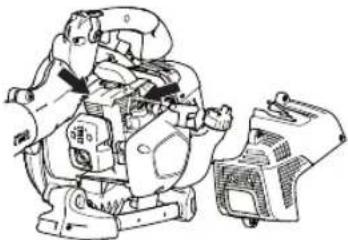
Air filter
Never use the leaf blower without an air filter or with a damaged or deformed filter element as unfiltered, dusty air can quickly destroy the engine.
10 - English
ASSEMBLY
Blow pipe
The blower tube has a pegged slot mounting system to the unit.
- To install or remove the blower tube, the tube clamp screw must be loosen.
- Align slot in the blower air outlet with the raised rib on the intermediate tube and insert tube until the holes in the tube and housing align.
• Re-tighten the tube clamp bolt.
text_image
Technical diagram showing exploded view of a mechanical component with numbered parts and assembly steps1 Tube clamp screw
2 Intermediate tube
3 Round nozzle
4 High speed nozzle
FUEL HANDLING
Fuel
CAUTION! The machine is equipped with a two-stroke engine and must always be run using a mixture of petrol and two-stroke oil. It is important to accurately measure the amount of oil to be mixed to ensure that the correct mixture is obtained. When mixing small amounts of fuel, even small inaccuracies can drastically affect the ratio of the mixture.
WARNING! Always ensure there is adequate ventilation when handling fuel.
Petrol
CAUTION! Always use a good quality petrol/oil mixture (at least 90 octane).
- The lowest recommended octane rating is 90. If you run the engine on a petrol with a lower octane rating than 90 this can cause knocking. This leads to an increased engine temperature, which can result in serious engine damage.
- When working at continuous high revs a higher octane rating is recommended. Use good quality unleaded petrol.
Ethanol blended fuel, E10 may be used (max 10% ethanol blend). Using ethanol blends higher than E10 will create lean running condition which can cause engine damage.
Two-stroke oil
- For best results and performance use HUSQVARNA two-stroke oil, which is specially formulated for our two-stroke engines. Mixture 1:50 (2%).
- If HUSQVARNA two-stroke oil is not available, you may use another two-stroke oil of good quality that is intended for air cooled engines. Contact your dealer when selecting an oil. Mixing ratio 1:33 (3%).
- Never use two-stroke oil intended for water-cooled outboard engines, sometimes referred to as outboard oil.
- Never use oil intended for four-stroke engines.
| Petrol, litre Two | -stroke oil, litre | |
| 2% (1:50) 3% (1 | 33) | |
| 5 0,10 0,15 | ||
| 10 0,20 0,30 | ||
| 15 0,30 0,45 | ||
| 20 0,40 0,60 | ||
Mixing
• Always mix the petrol and oil in a clean container intended for fuel.
• Always start by filling half the amount of the petrol to be used. Then add the entire amount of oil. Mix (shake) the fuel mixture. Add the remaining amount of petrol.
- Mix (shake) the fuel mixture thoroughly before filling the machine's fuel tank.
text_image
Illustration showing a chemical experiment with a jester, water stopstack, and a person holding a bottle, accompanied by safety symbols.- Do not mix more than one month's supply of fuel at a time.
- If the machine is not used for some time the fuel tank should be emptied and cleaned.
12 - English


natural_image
Pure geometric diagram with intersecting lines and a circular pattern (no text or symbols)FUEL HANDLING
Fueling


WARNING! Taking the following precautions, will lessen the risk of fire:
Refuel in a well ventilated area. Never fuel the machine indoors.
Do not smoke or place hot objects near fuel.
Always shut off the engine before refuelling.
Always stop the engine and let it cool for a few minutes before refuelling.
When refuelling, open the fuel cap slowly so that any excess pressure is released gently.
Tighten the fuel cap carefully after refuelling.
If you have spilled fuel on it. Wipe off the spillage and allow remaining fuel to evaporate.
Always move the machine away from the refuelling area and source before starting.
- Move the machine at least 3 m from the refuelling point before starting it.
text_image
Min 3 m (10 ft)- Clean the area around the fuel cap. Contamination in the tank can cause operating problems.
- Ensure that the fuel is well mixed by shaking the container before filling the tank.
- Check the fuel level before each use and leave space for the fuel to expand, because the heat from the engine and the sun may otherwise cause the fuel to expand and overflow.
- Keep the handle dry and free from oil and fuel.
• Always store fuel in an approved container designed for that purpose.
STARTING AND STOPPING
Starting and stopping


WARNING! Always move the machine away from the refuelling area and source before starting. Place the machine on a flat surface.
Make sure no unauthorised persons are in the working area. Otherwise there is a risk of serious personal injury. The safety distance is 15 meters.
The machine may only be started in its complete design. If the machine is started without all the guards fitted there is a risk of personal injuries.
Starting
Throttle position: Set the throttle position setting to the idling position.
natural_image
Line drawing of a mechanical component with a curved handle and lever mechanism (no text or symbols)Air purge: Press the air purge repeatedly until fuel begins to fill the bulb. The bulb need not be completely filled.
natural_image
Line drawing of a car's seat and dashboard assembly (no text or symbols)Cold engine
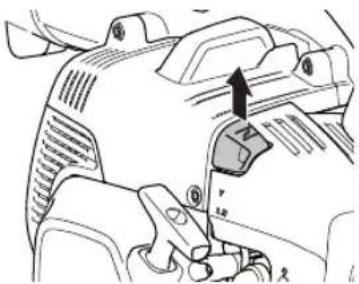
Choke: Set the choke control in the choke position.

natural_image
Technical diagram of a mechanical component with an arrow indicating direction (no text or symbols present)Hold the body of the machine on the ground using your right hand (CAUTION! Not with your foot!).
Grip the starter handle, slowly pull out the cord with your left hand until you feel some resistance (the starter pawls grip), now quickly and powerfully pull the cord. Never twist the starter cord around your hand.
Repeat pulling the cord until engine attempts to start (or maximum 5 pulls).
Move choke control down to run position.
Pull the cord until engine starts and gradually operate throttle trigger for increasing engine speed to operate speed.
Warm engine
Use the same starting procedure as for a cold engine but without setting the choke control in the choke position. If the engine won't start after several attempts, close the choke and repeat pulling the rope.
NOTE!
Air is released as soon as the engine is started, even when idling.
When the engine fails to start after several attempts due to overchocking, open the choke and repeat pulling the rope.
CAUTION! Do not pull the starter cord all the way out and do not let go of the starter handle when the cord is fully extended. This can damage the machine.
natural_image
Line drawing of a hand using a tool to lift a motor or fan (no text or symbols present)14 - English
STARTING AND STOPPING
CAUTION! Do not put any part of your body in marked area. Contact can result in burns to the skin, or electrical shock if the spark plug cap has been damaged. Always use gloves. Do not use a machine with damaged spark plug cap.
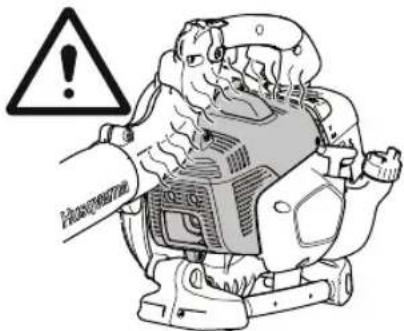
text_image
Warning sign with exclamation mark and robot illustration, indicating hazard or cautionStopping
Move the throttle trigger to the idling position and press the stop switch until the engine comes to a complete stop.
natural_image
Technical line drawing of a mechanical component with no visible text or symbolsCAUTION! The stop switch automatically returns to the start position. In order to prevent unintentional starting, the spark plug cap must be removed from the spark plug when assembling, checking and/or performing maintenance.
WORKING TECHNIQUES
General working instructions
IMPORTANT! This section considers basic safety rules when working with blowers. If you encounter a situation where you are uncertain how to proceed you should ask an expert. Contact your dealer or your service workshop. Avoid all usage which you consider to be beyond your capability.
Show consideration to persons in your surroundings by avoiding using the machine at unsuitable times, such as late in the evening or early in the morning. Reduce the noise levels by limiting the number of equipment units used simultaneously. Read through and follow the simple directions so that you disturb your surroundings as little as possible.
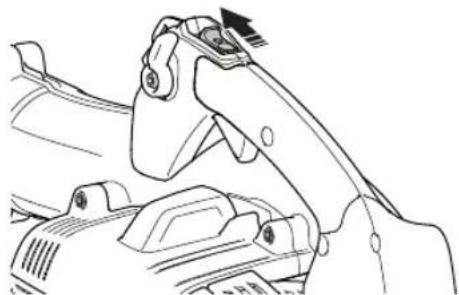
- This blower is a hand held type. The blower is held using the handle by hand. It is operated and controlled by the handle while operating. The speed of the air jet is controlled with the throttle. Select the speed that best suits the application. To avoid holding your finger on the throttle all the time when using the blower, the required throttle can be set with the throttle adjuster (D). Full throttle is obtained when the throttle adjuster is pushed in fully.
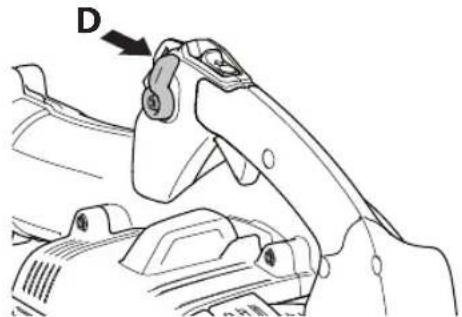
natural_image
Mechanical assembly diagram showing a lever mechanism with labeled component D (no text or symbols beyond label)- Use the blower with the lowest possible throttle. It is seldom necessary to use full throttle, and many work procedures can be done at half throttle. A lower throttle means less noise and less dust, and it is also easier to keep control over the rubbish collected together/moved.
- Use a rake or a brush to release rubbish stuck to the ground.
- Hold the opening of the blower as close to the ground as possible. Utilise the entire length of the blow pipe to keep the air current close to the ground.
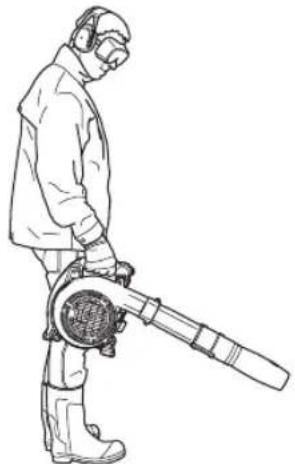
natural_image
Line drawing of a person in protective gear holding a handheld air conditioner (no text or symbols)- Clean up afterwards. Make sure that you have not blown rubbish into someone's garden.
- Use the machine during normal working hours to avoid unnecessary noise. Avoid working early in the morning or late at night.

WARNING! Be aware of your surroundings. If anyone approaches your work area, set the throttle control to the lowest throttle until the person is at a safe distance. Direct the blower away from people, animals, play areas, open windows and cars etc.
Basic safety rules

- No unauthorised persons or animals may be present in the working area, which is 15 metres.
- Allow the engine to cool before refuelling.
- Keep all parts of your body away from hot surfaces.
- Never touch the spark plug or ignition cable while the engine is running. Touching the spark plug or plug may result in being subjected to an electrical shock.
- The powerful currents of air can move objects at such a speed that they can bounce back and cause serious eye injuries.
- Do not direct the air jet towards people or animals.
- Stop the engine before assembling or dismantling accessories or other parts.
- Do not use the machine in bad weather, such as dense fog, heavy rain, strong wind, intense cold, etc. Working in bad weather is tiring and can lead to dangerous conditions, e.g. slippery surfaces.


natural_image
Pure geometric diagram with intersecting lines and a circular pattern (no text or symbols)WORKING TECHNIQUES
- Minimise the blowing time by lightly wetting dusty areas or using spray equipment.
- Reduce water consumption by using blowers instead of water hoses for different applications around the lawn and garden, such as lattices, screens, grills, porches, etc
- Make sure you can move and stand safely. Check the area around you for possible obstacles (roots, rocks, branches, ditches, etc.) in case you have to move suddenly. Take great care when working on sloping ground.
- Never put the machine down with the engine running unless you have it in clear sight.
- Engine exhaust fumes contain carbon monoxide, which can cause carbon monoxide poisoning. For this reason you should not start or run the machine indoors, or anywhere that is poorly ventilated.
- The blower must not be used while on a ladder or scaffolding.
- CAUTION! Do not use the machine unless you are able to call for help in the event of an accident.
Basic working techniques

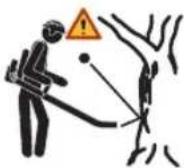
WARNING! Watch out for thrown objects. Always wear eye protection. Stones, rubbish, etc. can be thrown up into the eyes causing blindness or serious injury. Keep unauthorised persons at a distance. Children, animals, onlookers and helpers should be kept outside the safety zone of 15 m. Stop the machine immediately if anyone approaches.

WARNING! Always stop the engine before cleaning.
The speed of the air jet is regulated by means of the throttle. Select the speed best suited for respective tasks. You can set the throttle position using the throttle position settings and by doing so not need to hold your finger on the throttle all the time you are using the blower. Full throttle is obtained when the control is held back fully.
- Check that the air intake is not blocked, for example, by leaves or rubbish. A clogged air intake reduces the machine's blowing capacity and increases the engine's working temperature, which can result in engine failure. Stop the engine and remove the object.
- Be aware of the wind direction. Work with the wind to make your work easier.
-
Use the full blower nozzle extension so the air stream can work close to the ground.
• Always check to be sure that no debris has been blown onto someone else's property. -
Never point a blower tube toward an open flame to avoid the possibility of igniting the unit, causing injury to yourself or damage to surroundings.
• Using the blower to move large piles is time consuming and creates unnecessary noise. - Keep a good balance and a firm foothold.
- When work is finished the machine should be stored vertically.


MAINTENANCE
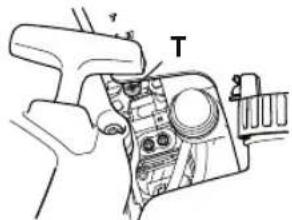
Carburettor
Adjustment of the idle speed
Before any adjustments are made, make sure that the air filter is clean and the air filter cover is fitted. Adjust the idle speed using the idle adjustment screw T, if it is necessary to readjust.
text_image
TRecommended idle speed: See the Technical data section.
Muffler
CAUTION! Some mufflers are fitted with a catalytic converter. See chapter on Technical data to see whether your machine is fitted with a catalytic converter.
The muffler is designed to reduce the noise level and to direct the exhaust gases away from the operator. The exhaust gases are hot and can contain sparks, which may cause fire if directed against dry and combustible material.
natural_image
Technical line drawing of a mechanical assembly with no visible text or symbolsSome mufflers are equipped with a special spark arrestor mesh. If your machine has this type of muffler, you should clean the mesh at least once a week. This is best done with a wire brush. On mufflers without a catalytic converter the mesh should be cleaned weekly, or replaced if necessary. On mufflers fitted with a catalytic converter the mesh should be checked, and if necessary cleaned, monthly. If the mesh is damaged it should be replaced. If the mesh is frequently blocked, this can be a sign that the performance of the catalytic converter is impaired. Contact your dealer to inspect the muffler. A
blocked mesh will cause the machine to overheat and result in damage to the cylinder and piston.
natural_image
Line drawing of a device with an arrow indicating assembly or transformation (no text or symbols present)CAUTION! Never use a machine with a defective muffler.

WARNING! Mufflers fitted with catalytic converters get very hot during use and remain so for some time after stopping. This also applies at idle speed. Contact can result in burns to the skin. Remember the risk of fire!
Cooling system
To keep the working temperature as low as possible the machine is equipped with a cooling system.
natural_image
Technical line drawing of a mechanical assembly (no text or symbols visible)Clean the cooling system with a brush once a week, more often in demanding conditions. A dirty or blocked cooling system results in the machine overheating which causes damage to the piston and cylinder.
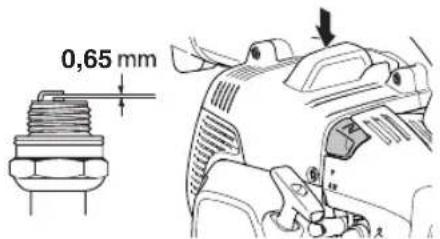
Spark plug

The spark plug condition is influenced by:
- Incorrect carburettor adjustment.
- An incorrect fuel mixture (too much or incorrect type of oil).
- A dirty air filter.
These factors cause deposits on the spark plug electrodes, which may result in operating problems and starting difficulties.
If the machine is low on power, difficult to start or runs poorly at idle speed: always check the spark plug first before taking any further action. If the spark plug is dirty,
18 - English


natural_image
Pure geometric diagram with intersecting lines and a circular pattern (no text or symbols)MAINTENANCE
clean it and check that the electrode gap is 0,65 mm. The spark plug should be replaced after about a month in operation or earlier if necessary.
text_image
0,65 mmCAUTION! Always use the recommended spark plug type! Use of the wrong spark plug can damage the piston/cylinder. Check that the spark plug is fitted with a suppressor.
Air filter
The air filter must be regularly cleaned to remove dust and dirt in order to avoid:
• Carburettor malfunctions.
- Starting problems.
- Loss of engine power.
- Unnecessary wear to engine parts.
• Excessive fuel consumption.

text_image
Technical diagram of a mechanical device with numbered components for identification1 Foam plastic filter (urethan filter)
2 Felt filter
3 Screen
Clean the filter every 25 hours, or more regularly if conditions are exceptionally dusty.
Cleaning the air filter
Close the choke control by setting the choke into a choke position.
natural_image
Technical diagram of a mechanical component with no visible text or symbols- Remove the air filter cover and take out the filter. Wash it clean in warm, soapy water. Clean also the inside of the filter cover by using air or a brush. Ensure that the filter is dry before refitting it.
- Remove the Felt filter from the filter holder and gently brush debris from the filter.
• Install screen and Felt filter to the air filter holder.
• Install the foam filter in the air filter cover.
• Install the air filter cover.
An air filter that has been in use for a long time cannot be cleaned completely. The filter must therefore be replaced with a new one at regular intervals. A damaged air filter must always be replaced. Damaged, very dirty, or fuel-soaked air filter must always be replaced.
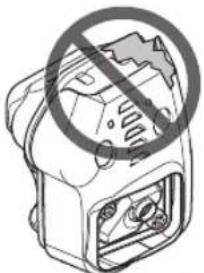
Air intake screen
Check that the air intake is not blocked, for example, by leaves or rubbish. A clogged air intake reduces the machine's blowing capacity and increases the engine's working temperature, which can result in engine failure. Stop the engine and remove the object.
natural_image
Technical line drawing of an electric motor with visible cooling fins and mounting brackets (no text or symbols)
WARNING! Never use the blower if the screen is not in place. Before use, check that the screen is in place and undamaged.
Fuel filter
Check the fuel filter for contamination and the fuel hose for cracks or other defects. Replace if necessary.


MAINTENANCE
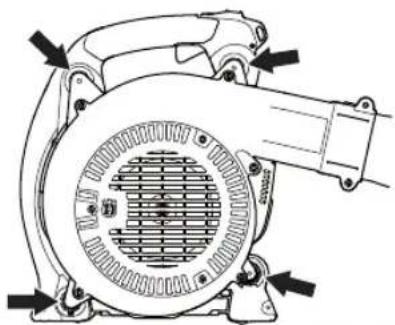
Maintenance schedule
The following is a list of the maintenance steps that must be performed on the machine. Most of the items are described in the Maintenance section. The user must only carry out the maintenance and service work described in this Operator's Manual. More extensive work must be carried out by an authorized service workshop.
| Maintenance | Daily maintenance | Weekly maintenance | Monthly maintenance |
| Clean the outside of the machine. X | |||
| Make sure the throttle trigger lock and the throttle function correctly from a safety point of view. | X | ||
| Check that the stop switch works correctly. X | |||
| Clean the air filter. Replace if necessary. X | |||
| Check that nuts and screws are tight. X | |||
| Check that there are no fuel leaks from the engine, tank or fuel lines. | X | ||
| Check the fuel filter for contamination and the fuel hose for cracks or other defects. Replace if necessary. | X | ||
| Check that all sides of the air intake screen are not blocked. X | |||
| Check the starter and starter cord. X | |||
| Check that the vibration damping elements are not damaged. X | |||
| Clean the outside of the spark plug. Remove it and check the electrode gap. Adjust the gap to 0,65 mm or replace the spark plug. Check that the spark plug is fitted with a suppressor. | X | ||
| Clean the machine's cooling system. X | |||
| Clean or replace the spark arrestor mesh on the muffler (only applies to mufflers without a catalytic converter). | X | ||
| Clean the outside of the carburettor and the space around it. X | |||
| Check the fuel filter for contamination and the fuel hose for cracks or other defects. Replace if necessary. | X | ||
| Check all cables and connections. X | |||
| Replace the spark plug. Check that the spark plug is fitted with a suppressor. | X | ||
| Check and clean the spark arrestor mesh on the muffler (only applies to mufflers fitted with a catalytic converter). | X |


TECHNICAL DATA
Technical data
Technical data 525BX
Engine
Cylinder displacement, cm ^3 25,4
Idle speed, rpm 3000
Catalytic converter muffler Yes
Speed-regulated ignition system Yes
Ignition system
Spark plug NGK BPMR8Y
Electrode gap, mm 0,6-0,7
Fuel and lubrication system
Fuel tank capacity, litre 0,45
Weight
Weight without fuel, kg 4.3
Noise emissions
(see note 1)
Sound power level, measured dB (A) 104
Sound power level, guaranteed L_WA dB (A) 106
Noise levels
(see note 2)
Equivalent sound pressure level at the operator's ear, measured according to EN15503 dB(A)
Round nozzle 91
Flat nozzle 92
Vibration levels
(see note 3)
Equivalent vibration levels (ahv,eq) at handles, measured according to EN15503, m/s²
Round nozzle 1,2
Flat nozzle 2,0
Fan performance
Max. air velocity with round nozzle, m/s: 70
Max air velocity with flat nozzle, m/s: 86
Air flow with round nozzle, m^3/min 13
Air flow with flat nozzle, m^3/min : 10
Note 1: Noise emissions in the environment measured as sound power ( L_WA ) in conformity with EC directive 2000/14/EC. Reported sound power level for the machine has been measured with the original cutting attachment that gives the highest level. The difference between guaranteed and measured sound power is that the guaranteed sound power also includes dispersion in the measurement result and the variations between different machines of the same model according to Directive 2000/14/EC.
Note 2: The equivalent sound pressure level value is calculated with a work cycle of a duration of 1/7 for idling and 6/7 for racing. Reported data for equivalent sound pressure level for the machine has a typical statistical dispersion (standard deviation) of 1 dB(A).
Note 3: The equivalent vibration level value is calculated with a work cycle of a duration of 1/7 for idling and 6/7 for racing. Reported data for equivalent vibration level has a typical statistical dispersion (standard deviation) of 1 m/s^2 .


English - 21


TECHNICAL DATA
EC Declaration of Conformity
Husqvarna AB, SE-561 82 Huskvarna, Sweden, tel +46-36-146500, declares under sole responsibility that the blowers Husqvarna 525BX with serial numbers dating 2016 and onwards (the year is clearly stated on the rating plate, followed by the serial number), comply with the requirements of the COUNCIL'S DIRECTIVE:
- of May 17, 2006 "relating to machinery" 2006/42/EC.
- of February 26, 2014 "relating to electromagnetic compatibility" 2014/30/EU.
- of May 8, 2000 "relating to the noise emissions in the environment" 2000/14/EC. Conformity assessment according to Annex V.
For information relating to noise emissions, see the Technical data chapter.
The following standards have been applied: EN ISO 12100:2010, CISPR 12:2009, EN 15503:2009/A1:2013
SMP Svensk Maskinprovning AB, Box 7035, SE-750 07 Uppsala, Sweden, has performed voluntary type examination on behalf of Husqvarna AB. The certificates are numbered: SEC/14/2423
Huskvarna March 30, 2016
Pe Gusterton
Per Gustafsson, Development manager (Authorized representative for Husqvarna AB and responsible for technical documentation.)
SYMBOLFÖRKLARING
Symboler
text_image
Diagram showing fuel pump icons and traffic symbols including water drop, valve, and plug

INNEHÅLL
natural_image
Pure geometric diagram with intersecting lines and circular shapes (no text or symbols)INLEDNING
Bäste kund!
natural_image
Pure geometric diagram with intersecting lines and circular shapes, no text or symbols presentVAD ÄR VAD?
text_image
Exploded view diagram of a handheld device with numbered parts for identificationnatural_image
Illustration of a hand using a tool to lift a motor or fan (no text or symbols visible)Bränslesäkerhet
text_image
Min 3 m (10 ft)natural_image
Line drawings of two types of safety goggles, one front view and one side view (no text or symbols)natural_image
Line drawing of a pair of boots with visible branding (no text or symbols)text_image
FIRST AID KITnatural_image
Technical line drawing of a mechanical component with no visible text or symbolsnatural_image
Technical line drawing of an electric motor with mounting flanges and a central vent (no text or symbols)
natural_image
Technical line drawing of an electric motor and its internal casing (no text or symbols)natural_image
Line drawing of a mechanical component with exploded view and mounting holes (no text or symbols)natural_image
Diagram of a device with a prohibition symbol overlay (no text or symbols present)natural_image
Technical line drawing of an electric motor and its internal casing (no text or symbols)natural_image
Line drawing of a mechanical component with exploded view and mounting holes (no text or symbols)SÄKERHETSINSTRUKTIONER
NOTE!
text_image
Technical diagram showing four labeled mechanical components with arrows indicating assembly or movement stepsnatural_image
Pure geometric diagram with intersecting lines and a circular pattern (no text or symbols)BRÄNSLEHANTERING
Drivmedel
text_image
Diagram illustrating fuel efficiency and pollution control with labeled symbols for fuel, gas, and water.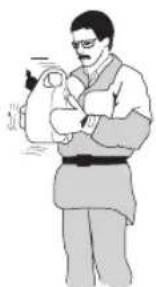
natural_image
Illustration of a person holding an object, possibly a medical or educational device (no text or symbols visible)text_image
Min 3 m (10 ft)natural_image
Pure geometric diagram with intersecting lines and a circular pattern (no text or symbols)START OCH STOPP
Start och stopp


natural_image
Technical line drawing of a mechanical component with no visible text or symbolsnatural_image
Line drawing of a car interior showing mechanical components and a hand valve (no text or symbols)Kall motor
natural_image
Technical diagram of a mechanical component with no visible text or symbolsnatural_image
Line drawing of a hand using a tool to lift a motor or fan (no text or symbols present)


START OCH STOPP
natural_image
Technical line drawing of a mechanical assembly with no visible text or symbolsnatural_image
Pure geometric diagram with intersecting lines and a circular pattern (no text or symbols)ARBETSTEKNIK
natural_image
Technical line drawing of a mechanical component with labeled part D (no text or symbols beyond label)natural_image
Line drawing of a person in protective gear using a handheld air conditioner (no text or symbols)natural_image
Pure geometric diagram with intersecting lines and a circular pattern (no text or symbols)UNDERHÅLL
Förgasare
text_image
Technical diagram of a mechanical device with labeled components and partsnatural_image
Technical line drawing of a mechanical assembly with no visible text or symbolsnatural_image
Diagram of a device with an arrow indicating a process or transformation, showing internal components and a final connector (no text or symbols present)natural_image
Technical line drawing of a robotic arm and mechanical component (no text or symbols)text_image
Technical diagram of a mechanical device with numbered components for identification1 Skumplastfilter
(Urethan filter)
2 Felt filter
3 luftintagsskärm
natural_image
Technical diagram of a mechanical component with no visible text or symbolsnatural_image
Technical line drawing of an electric motor with visible stator and rotor (no text or symbols)
natural_image
Pure geometric diagram with intersecting lines and a circular pattern (no text or symbols)UNDERHÅLL
Underhållsschema
natural_image
Pure geometric diagram with intersecting lines and a circular pattern (no text or symbols)TEKNISKA DATA
natural_image
Pure geometric diagram with intersecting lines and circular shapes, no text or symbols presentSYMBOLFORKLARING
Symboler
natural_image
Pure geometric diagram with intersecting lines and a circular pattern (no text or symbols)INDHOLD
text_image
Technical diagram of a handheld device with numbered parts for identification and assembly reference.natural_image
Line drawing of a hand using a tool to lift a motor or fan (no text or symbols present)Brændstofsikkerhed
text_image
Min 3 m (10 ft)- Start aldrig maskinen:
natural_image
Line drawings of two types of safety goggles, one plain and one with a magnified view (no text or symbols)natural_image
Line drawing of a pair of boots with visible tread pattern and buckles (no text or symbols)natural_image
Technical line drawing of a mechanical assembly with no visible text or symbolsnatural_image
Technical line drawing of an electric motor with mounting bracket and side-mounted shaft (no text or symbols)
natural_image
Technical line drawing of an electric motor and its internal casing (no text or symbols)natural_image
Line drawing of a device housing with an arrow indicating assembly or disassembly (no text or symbols present)natural_image
Diagram of a device with a prohibition symbol overlay (no text or symbols present)natural_image
Technical line drawing of an electric motor and its internal casing (no text or symbols)SIKKERHEDSINSTRUKTIONER
natural_image
Line drawing of a mechanical component with exploded view and mounting holes (no text or symbols)NOTE!
text_image
Technical diagram showing four labeled mechanical components with arrows indicating assembly or movement, likely illustrating a mechanical assembly or assembly process.text_image
Diagram illustrating fuel injection and discharge process with labeled chemical symbols and prohibition signs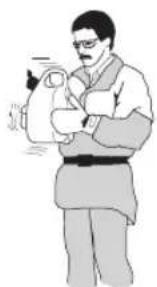
natural_image
Illustration of a person holding an object, possibly a medical or ceremonial item (no text or symbols visible)natural_image
Pure geometric diagram with intersecting lines and a circular pattern (no text or symbols)BRÆNDSTOFHÅNDTERING
Tankning


text_image
Min 3 m (10 ft)natural_image
Technical line drawing of a mechanical assembly with no visible text or symbolsnatural_image
Line drawing of a car interior showing a hand operating the wheel (no text or symbols)Kold motor
Choker: Stil chokeren i chokestilling.

natural_image
Technical diagram of a mechanical component with no visible text or symbolsnatural_image
Line drawing of a hand using a tool to adjust or install a mechanical component (no text or symbols present)


natural_image
Pure geometric diagram with crosshair and circular shapes (no text or symbols)START OG STOP
text_image
Warning sign with exclamation mark and robot illustration, indicating hazard or cautionStop
natural_image
Technical line drawing of a mechanical component with no visible text or symbolsnatural_image
Line drawing of a person in protective gear using a handheld air conditioner (no text or symbols)natural_image
Pure geometric diagram with intersecting lines and a circular pattern (no text or symbols)ARBEJDSTEKNIK
text_image
Technical diagram of a mechanical device with labeled components and partsAnbefalet omdrejningstal i tomgang: Se kapitlet Tekniske data.
Lyddæmper
BEMÆRK! Visse lyddæmpere er forsynet med katalysator. Se kapitlet Tekniske data for at se, om din maskine er forsynet med katalysator.
natural_image
Technical line drawing of a mechanical assembly with no visible text or symbolsnatural_image
Line drawing of a device with an arrow indicating assembly or transformation (no text or symbols present)natural_image
Technical line drawing of a robotic arm with attached components (no text or symbols)natural_image
Pure geometric diagram with intersecting lines and a circular pattern (no text or symbols)VEDLIGEHOLDELSE
text_image
Technical diagram of a mechanical assembly with numbered parts, likely for assembly or maintenance instructions.1 Skumplastfilter (urethanfilter)
2 Filtfilter
3 Skærm
text_image
Technical diagram of a mechanical component with labeled parts and directional arrow indicating movement or forcenatural_image
Technical line drawing of an electric motor with visible cooling fins and mounting base (no text or symbols)
text_image
Diagram showing fuel pump icons and traffic symbols including water drop, valve, and plug

INNHOLD
natural_image
Pure geometric diagram with intersecting lines and a circular pattern (no text or symbols)INNLEDNING
Kjære kunde
natural_image
Pure geometric diagram with intersecting lines and circular patterns (no text or symbols)HVA ER HVA?
text_image
Technical diagram of a handheld device with numbered parts for identification and assembly reference.natural_image
Illustration of a hand using a tool to adjust or install a mechanical component (no text or symbols visible)Brennstoffsikkerhet
- Bruk bensinkanne med overfyllingsbeskyttelse.
- Fyll aldri brennstoff på maskinen när motoren er i drift. Stans motoren og la den avkjöles noen minutter för brennstoff fylles på.
- Sørg for god ventilasjon ved tanking og blanding av brennstoff (bensin og totaktsolje).
- Unngå all hudkontakt med brennstoff. Brennstoffet forårsaker hudirritasjon og kan også føre til hudforandringer.
text_image
Min 3 m (10 ft)- Start aldri maskinen:
natural_image
Pure geometric diagram with intersecting lines and a circular pattern (no text or symbols)SIKKERHETSINSTRUKSJONER
natural_image
Line drawings of two types of safety goggles, one plain and one with a gasket (no text or symbols)natural_image
Line drawing of a pair of boots with textured soles (no text or symbols)text_image
FIRST AID KITnatural_image
Technical line drawing of a mechanical component with no visible text or symbolsnatural_image
Technical line drawing of an electric motor with mounting flanges and a central vent, showing no text or symbols.
natural_image
Technical line drawing of an electric motor and its internal casing (no text or symbols)natural_image
Technical line drawing of a mechanical component with exploded view and mounting holes (no text or symbols)natural_image
Diagram of a device with a prohibition symbol overlay (no text or labels)Kontroller regelmessig at lyddemperen sitter fast i maskinen.
natural_image
Technical line drawing of an electric motor and its internal casing (no text or symbols)natural_image
Line drawing of a mechanical component with exploded view and mounting holes (no text or symbols)72 - Norwegian
SIKKERHETSINSTRUKSJONER
NOTE!
text_image
Technical diagram showing four labeled mechanical components with arrows indicating assembly or movement, likely illustrating a mechanical assembly or assembly process.natural_image
Pure geometric diagram with crosshair and circular pattern (no text or symbols)BRENNSTOFFHÅNDTERING
Brennstoff
text_image
Diagram illustrating fuel and gas safety symbols including a container with fuel drop, fuel can with 'MU' label, and no warning signs.
natural_image
Illustration of a person holding an object, possibly a medical or industrial device (no text or symbols visible)text_image
Min 3 m (10 ft)natural_image
Line drawing of a mechanical component with a lever and adjustment knob (no text or symbols)natural_image
Technical line drawing of a mechanical component with no visible text or symbolsKald motor
Choke: Still chokehendelen i choke-stilling.

natural_image
Technical diagram of a mechanical component with no visible text or symbolsnatural_image
Line drawing of a hand using a tool to lift a motor or fan (no text or symbols present)START OG STOPP
natural_image
Technical line drawing of a mechanical assembly with no visible text or symbolsnatural_image
Pure geometric diagram with crosshair and circular pattern (no text or symbols)ARBEIDSTEKNIKK
natural_image
Technical line drawing of a mechanical component with labeled part D (no text or symbols beyond label)natural_image
Line drawing of a person in protective gear using a handheld air conditioner (no text or symbols)natural_image
Pure geometric diagram with intersecting lines and a circular pattern (no text or symbols)VEDLIKEHOLD
Forgasser
natural_image
Technical line drawing of a mechanical assembly with no visible text or symbolsnatural_image
Technical line drawing of a device with an arrow indicating assembly or transformation (no text or symbols present)OBS! Bruk aldri maskinen med en lyddemper som er i dårlig stand.

natural_image
Technical line drawing of a mechanical assembly with no visible text or symbolstext_image
Technical diagram of a mechanical assembly with numbered parts labeled 1, 2, and 31 Skumplastfilter (uretanfilter)
2 Filtfilter
3 Skjerm
natural_image
Technical diagram of a mechanical component with arrows indicating direction (no text or symbols)natural_image
Technical line drawing of an electric motor with visible blades and mounting base (no text or symbols)
natural_image
Pure geometric diagram with intersecting lines and circular shapes (no text or symbols)VEDLIKEHOLD
Vedlikeholdsskjema
Tennplugg NGK BPMR8Y
Elektrodeavstand, mm 0,6-0,7
natural_image
Pure geometric diagram with intersecting lines and a circular pattern (no text or symbols)TEKNISKE DATA
natural_image
Pure geometric diagram with intersecting lines and circular shapes, no text or symbols presentNorwegian - 85

natural_image
Pure geometric diagram with concentric circles and radial lines, no text or symbols presentMERKKIEN SELITYKSET
Tunnukset
natural_image
Pure geometric diagram with intersecting lines and a circular pattern (no text or symbols)SISÄLTÖ
text_image
Technical diagram of a mechanical device with numbered parts for identificationPuhaltimen osat
natural_image
Line drawing of a hand using a tool to lift a fan or fan device (no text or symbols present)text_image
Min 3 m (10 ft)natural_image
Line drawings of two types of safety goggles, one front view and one side view (no text or symbols)natural_image
Line drawing of a pair of boots with visible tread pattern and buckles (no text or symbols)text_image
FIRST AID KITnatural_image
Technical line drawing of a mechanical assembly with no visible text or symbolsnatural_image
Technical line drawing of an electric motor with mounting bracket and side-mounted shaft (no text or symbols)
natural_image
Technical line drawing of an electric motor and its internal casing (no text or symbols)natural_image
Line drawing of a device housing with an arrow indicating assembly or disassembly (no text or symbols present)natural_image
Diagram of a device with a prohibition symbol overlay (no text or symbols present)natural_image
Technical line drawing of an electric motor and its internal casing (no text or symbols)natural_image
Technical line drawing of a mechanical component with exploded view and mounting holes (no text or symbols)Finnish - 93
TURVAOHJEET
NOTE!
text_image
Technical diagram showing four labeled mechanical components with arrows indicating assembly or movement, likely illustrating a mechanical assembly or assembly process.natural_image
Illustration of a person holding an infant with a medical device (no text or symbols visible)natural_image
Pure geometric diagram with intersecting lines and a circular pattern (no text or symbols)POLTTOAINEEN KÄSITTELY
Tankkaus


text_image
Min 3 m (10 ft)natural_image
Mechanical assembly diagram showing a lever mechanism with no visible text or symbolsnatural_image
Line drawing of a car's internal components, including a valve and handle (no text or symbols)Kylmä moottori
Rikastin: Aseta rikastin rikastusasentoon.

natural_image
Technical diagram of a mechanical component with no visible text or symbolsnatural_image
Line drawing of a hand using a tool to lift a motor or fan (no text or symbols present)KÄYNNISTYS JA PYSÄYTYS
text_image
HypnoticsPysäytys
natural_image
Technical line drawing of a mechanical component with no visible text or symbolsnatural_image
Line drawing of a person in protective gear holding a handheld air conditioner (no text or symbols)natural_image
Pure geometric diagram with intersecting lines and a circular pattern (no text or symbols)PERUSTEKNIKKA
text_image
Technical diagram of a mechanical device with labeled components and partsnatural_image
Technical line drawing of a mechanical assembly with no visible text or symbolsnatural_image
Technical line drawing of a mechanical device with exploded view and mounting bracket (no text or symbols)natural_image
Technical line drawing of a robotic arm and mechanical components (no text or symbols)natural_image
Pure geometric diagram with intersecting lines and a circular pattern (no text or symbols)KUNNOSSAPITO
text_image
Technical diagram of a mechanical assembly with numbered components for identificationnatural_image
Technical diagram of a mechanical component with no visible text or symbolsnatural_image
Technical line drawing of an electric motor with visible cooling fins and mounting base (no text or symbols)
natural_image
Pure geometric diagram with intersecting lines and a circular pattern (no text or symbols)EINLEITUNG
natural_image
Pure geometric diagram with intersecting lines and circular patterns (no text or symbols)

natural_image
Pure geometric diagram with concentric circles and radial lines, no text or symbols presentWAS IST WAS?
text_image
Technical diagram of a handheld device with numbered parts for identification and assembly reference.natural_image
Illustration of a hand using a tool to adjust or install a mechanical component (no text or symbols visible)text_image
Min 3 m (10 ft)natural_image
Pure geometric diagram with intersecting lines and a circular pattern (no text or symbols)natural_image
Line drawings of two types of safety goggles and a device (no text or symbols)natural_image
Line drawing of a pair of boots with visible branding (no text or symbols)text_image
FIRST AID KITnatural_image
Technical line drawing of a mechanical component with no visible text or symbolsnatural_image
Technical line drawing of an electric motor with mounting flanges and a central vent (no text or symbols)
natural_image
Technical line drawing of an electric motor and its internal casing (no text or symbols)natural_image
Technical line drawing of a mechanical component with exploded view and mounting holes (no text or symbols)natural_image
Diagram of a device with a prohibition symbol overlay (no text or labels)natural_image
Technical line drawing of an electric motor and its internal casing (no text or symbols)natural_image
Line drawing of a mechanical component with exploded view and mounting holes (no text or symbols)NOTE!
text_image
Technical diagram showing four labeled mechanical components with arrows indicating assembly or movement stepstext_image
Diagram illustrating fuel injection and discharge process with labeled chemical symbols and prohibition signs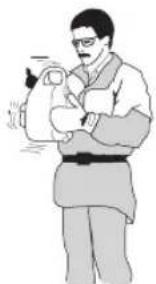
natural_image
Illustration of a person in uniform holding an object, no text or symbols visibletext_image
Min 3 m (10 ft)natural_image
Technical line drawing of a mechanical component with no visible text or symbolsnatural_image
Technical line drawing of a mechanical assembly with no visible text or symbolsKalter Motor
Choke: Den Chokehebel in Choke-Lage führen.
natural_image
Technical diagram of a mechanical component with no visible text or symbolsnatural_image
Line drawing of a hand using a tool to lift a motor or fan (no text or symbols present)STARTEN UND STOPPEN
text_image
PlayhouseStoppen
natural_image
Technical line drawing of a mechanical assembly with no visible text or symbolsnatural_image
Pure geometric diagram with intersecting lines and a circular pattern (no text or symbols)ARBEITSTECHNIK
natural_image
Technical line drawing of a mechanical component with labeled part D (no text or symbols beyond label)natural_image
Line drawing of a person in protective gear using a handheld air conditioner (no text or symbols)natural_image
Pure geometric diagram with intersecting lines and a circular pattern (no text or symbols)WARTUNG
Vergaser
natural_image
Technical line drawing of an internal combustion engine assembly (no text or labels)natural_image
Diagram of a device with an arrow indicating a process or transformation (no text or symbols present)natural_image
Technical line drawing of a robotic arm and mechanical component (no text or symbols)text_image
Technical diagram showing exploded view of a mechanical assembly with numbered components1 Schaumstofffilter (Urethanfilter)
2 Filzfilter
3 Gitter
natural_image
Technical diagram of a mechanical component with no visible text or symbolsnatural_image
Technical line drawing of an electric motor with cooling fan and shaft (no text or symbols)
natural_image
Pure geometric diagram with intersecting lines and a circular pattern (no text or symbols)TECHNISCHE DATEN
natural_image
Pure geometric diagram with intersecting lines and circular shapes, no text or symbols present

natural_image
Pure geometric diagram with concentric circles and radial lines, no text or symbols presentEXPLICATION DES SYMBOLES
Symboles
text_image
Diagram showing a download icon above a card with Litter and dB label, indicating signal or data transfer.natural_image
Pure geometric diagram with intersecting lines and a circular pattern (no text or symbols)SOMMAIRE
natural_image
Pure geometric diagram with intersecting lines and a circular pattern (no text or symbols)QUELS SONT LES COMPOSANTS?
text_image
Exploded view diagram of a mechanical device with numbered parts for identificationnatural_image
Line drawing of a hand using a tool to lift or adjust a fan component (no text or symbols present)Sécurité carburant
text_image
Min 3 m (10 ft)natural_image
Line drawings of two types of safety goggles, one front view and one side view (no text or symbols)natural_image
Line drawing of a pair of boots with visible branding (no text or symbols)natural_image
Technical line drawing of a mechanical assembly with no visible text or symbolsnatural_image
Technical line drawing of an electric motor with cooling fan and mounting bracket (no text or symbols)
natural_image
Technical line drawing of an electric motor and its internal components (no text or symbols)natural_image
Line drawing of a device housing with an arrow indicating assembly or disassembly (no text or symbols present)natural_image
Diagram of a device with a prohibition symbol overlay (no text or symbols present)


INSTRUCTIONS DE SÉCURITÉ
natural_image
Technical line drawing of an electric motor and its internal casing (no text or symbols)natural_image
Line drawing of a mechanical component with exploded view and mounting holes (no text or symbols)NOTE!
text_image
Technical diagram showing exploded view of a mechanical component with numbered parts and directional arrows indicating assembly or assembly steps.text_image
Diagram illustrating fuel injection and discharge process with labeled chemical symbols and prohibition signs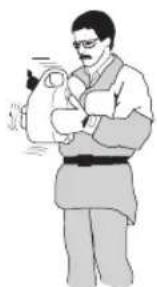
natural_image
Illustration of a person holding an object, possibly a medical or educational device (no text or symbols visible)natural_image
Pure geometric diagram with intersecting lines and a circular pattern (no text or symbols)MANIPULATION DU CARBURANT
text_image
Min 3 m (10 ft)natural_image
Technical line drawing of a mechanical assembly with no visible text or symbolsnatural_image
Technical line drawing of a mechanical component with no visible text or symbolsMoteur froid
Starter: Tirer la commande de starter.

natural_image
Technical diagram of a mechanical component with no visible text or symbolsnatural_image
Line drawing of a hand using a tool to adjust or install a mechanical component (no text or symbols present)DÉMARRAGE ET ARRÊT
natural_image
Technical line drawing of a mechanical component with no visible text or symbolsnatural_image
Line drawing of a person in protective gear using a handheld air conditioner (no text or symbols)natural_image
Technical line drawing of a mechanical assembly with no visible text or symbolsnatural_image
Line drawing of a device with an arrow indicating a component or assembly (no text or symbols present)natural_image
Technical line drawing of a robotic arm and mechanical components (no text or symbols)natural_image
Pure geometric diagram with intersecting lines and a circular pattern (no text or symbols)ENTRETIEN
text_image
Technical diagram of a mechanical assembly with numbered components for identificationnatural_image
Mechanical component diagram showing a lever mechanism with an arrow indicating direction (no text or symbols present)natural_image
Technical line drawing of an electric motor with cooling fan and mounting bracket (no text or symbols)
natural_image
Pure geometric diagram with intersecting lines and a circular pattern (no text or symbols)INLEIDING
Beste klant!
natural_image
Pure geometric diagram with intersecting lines and circular patterns (no text or symbols)

natural_image
Pure geometric diagram with concentric circles and radial lines, no text or symbols presentWAT IS WAT?
text_image
Exploded view diagram of a mechanical device with numbered parts for identificationnatural_image
Illustration of a hand using a tool to lift a motor or fan (no text or symbols visible)Brandstofveiligheid
text_image
Min 3 m (10 ft)natural_image
Pure geometric diagram with intersecting lines and a circular pattern (no text or symbols)VEILIGHEIDSINSTRUCTIES
natural_image
Line drawings of two types of safety goggles and a device (no text or symbols)natural_image
Line drawing of a pair of boots with visible branding and sole details (no text or symbols)natural_image
Technical line drawing of a mechanical assembly with no visible text or symbolsnatural_image
Technical line drawing of an electric motor with mounting flanges and a central vent (no text or symbols)
natural_image
Technical line drawing of an electric motor and its internal casing (no text or symbols)natural_image
Technical line drawing of a mechanical component with exploded view and mounting holes (no text or symbols)natural_image
Diagram of a device with a prohibition symbol overlay (no text or symbols present)VEILIGHEIDSINSTRUCTIES
Controleer regelmatig of de geluiddemper vastzit in de machine.
natural_image
Technical line drawing of an electric motor and its internal casing (no text or symbols)natural_image
Line drawing of a mechanical device with exploded view and mounting holes (no text or symbols)NOTE!
text_image
Technical diagram showing four labeled mechanical components with arrows indicating assembly or movement stepsnatural_image
Pure geometric diagram with intersecting lines and a circular pattern (no text or symbols)BRANDSTOFHANTERING
Brandstof
text_image
Diagram illustrating fuel injection and discharge process with labeled components and prohibition signs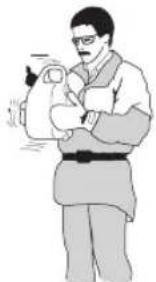
natural_image
Illustration of a person holding an object, no text or symbols presenttext_image
Min 3 m (10 ft)natural_image
Technical line drawing of a mechanical component with no visible text or symbolsnatural_image
Line drawing of a car interior showing a hand valve and seat (no text or symbols)Koude motor
Choke: Zet de choke-hendel in de choke-positie.

natural_image
Technical diagram of a mechanical component with no visible text or symbolsnatural_image
Line drawing of a hand using a tool to lift a motor or fan (no text or symbols present)STARTEN EN STOPPEN
natural_image
Technical line drawing of a mechanical component with no visible text or symbolsnatural_image
Pure geometric diagram with intersecting lines and a circular pattern (no text or symbols)ARBEIDSTECHNIEK
natural_image
Technical line drawing of a mechanical component with labeled part D (no text or symbols beyond label)natural_image
Line drawing of a person in protective gear holding a large industrial fan (no text or symbols)natural_image
Pure geometric diagram with intersecting lines and a circular pattern (no text or symbols)ONDERHOUD
Carburateur
natural_image
Technical line drawing of a robotic arm with attached components (no text or symbols)natural_image
Diagram of a device with an arrow indicating a step, showing internal components and a final connector (no text or symbols present)natural_image
Technical line drawing of a mechanical assembly with no visible text or symbolstext_image
Technical diagram of a device with numbered components, likely illustrating a mechanical or electrical assembly.natural_image
Technical diagram of a mechanical component with no visible text or symbolsnatural_image
Technical line drawing of an electric motor with visible cooling fins and mounting base (no text or symbols)
natural_image
Pure geometric diagram with crosshair and circular pattern (no text or symbols)TECHNISCHE GEGEVENS
natural_image
Pure geometric diagram with intersecting lines and circular shapes, no text or symbols presentDutch - 169

natural_image
Pure geometric diagram with concentric circles and radial lines, no text or symbols presenttext_image
Diagram showing a download icon above a CD with LWA and dB labels, indicating audio or digital signal.natural_image
Pure geometric diagram with intersecting lines and a circular pattern (no text or symbols)ÍNDICE
text_image
Technical diagram of a mechanical device with numbered parts for identificationnatural_image
Line drawing of a hand using a tool to lift a motor or fan (no text or symbols present)text_image
Min 3 m (10 ft)natural_image
Line drawings of two types of safety goggles, one front view and one side view (no text or symbols)natural_image
Line drawing of a pair of boots with visible branding and sole features (no text or symbols)natural_image
Pure geometric diagram with intersecting lines and a circular pattern (no text or symbols)natural_image
Technical line drawing of a mechanical component with no visible text or symbolsnatural_image
Technical line drawing of a mechanical pump or motor with mounting flanges and internal grid structure (no text or symbols)
natural_image
Technical line drawing of an electric motor and its internal casing (no text or symbols)natural_image
Line drawing of a device housing with an arrow indicating assembly or disassembly (no text or symbols present)natural_image
Diagram of a device with a prohibition symbol overlay (no text or symbols present)


natural_image
Technical line drawing of an electric motor and its internal casing (no text or symbols)natural_image
Line drawing of a mechanical component with exploded view and mounting holes (no text or symbols)NOTE!
text_image
Technical diagram showing exploded view of a mechanical component with numbered parts and directional arrows indicating assembly or assembly steps.text_image
Diagram illustrating fuel injection and discharge process with labeled chemical symbols and prohibition signs
natural_image
Illustration of a person holding an object, possibly a medical or educational device (no text or symbols visible)natural_image
Pure geometric diagram with intersecting lines and a circular pattern (no text or symbols)text_image
Min 3 m (10 ft)natural_image
Technical line drawing of a mechanical assembly with no visible text or symbolsnatural_image
Line drawing of a car's seat and dashboard assembly (no text or symbols)Motor frío
natural_image
Technical diagram of a mechanical component with no visible text or symbolsnatural_image
Line drawing of a hand using a tool to adjust or install a mechanical component (no text or symbols visible)ARRANQUE Y PARADA
natural_image
Technical line drawing of a mechanical component with no visible text or symbolsnatural_image
Line drawing of a person in protective gear using a handheld air conditioner (no text or symbols)natural_image
Technical line drawing of a mechanical assembly with no visible text or symbolsnatural_image
Diagram of a device with an arrow indicating a step, showing internal components and a final button (no text or symbols present)natural_image
Technical line drawing of a mechanical assembly with no visible text or symbolsnatural_image
Pure geometric diagram with intersecting lines and a circular pattern (no text or symbols)MANTENIMIENTO
text_image
Technical diagram of a mechanical assembly with numbered components for identification1 Filtro de espuma (filtro de uretano)
2 Filtro de fieltro
3 Pantalla
natural_image
Technical line drawing of a mechanical component with an arrow indicating direction (no text or symbols)natural_image
Technical line drawing of an electric motor with visible blades and mounting base (no text or symbols)
natural_image
Pure geometric diagram with intersecting lines and a circular pattern (no text or symbols)INTRODUÇÃO
Prezado cliente!
natural_image
Pure geometric diagram with intersecting lines and circular shapes, no text or symbols present

natural_image
Pure geometric diagram with concentric circles and radial lines, no text or symbols presentCOMO SE CHAMA?
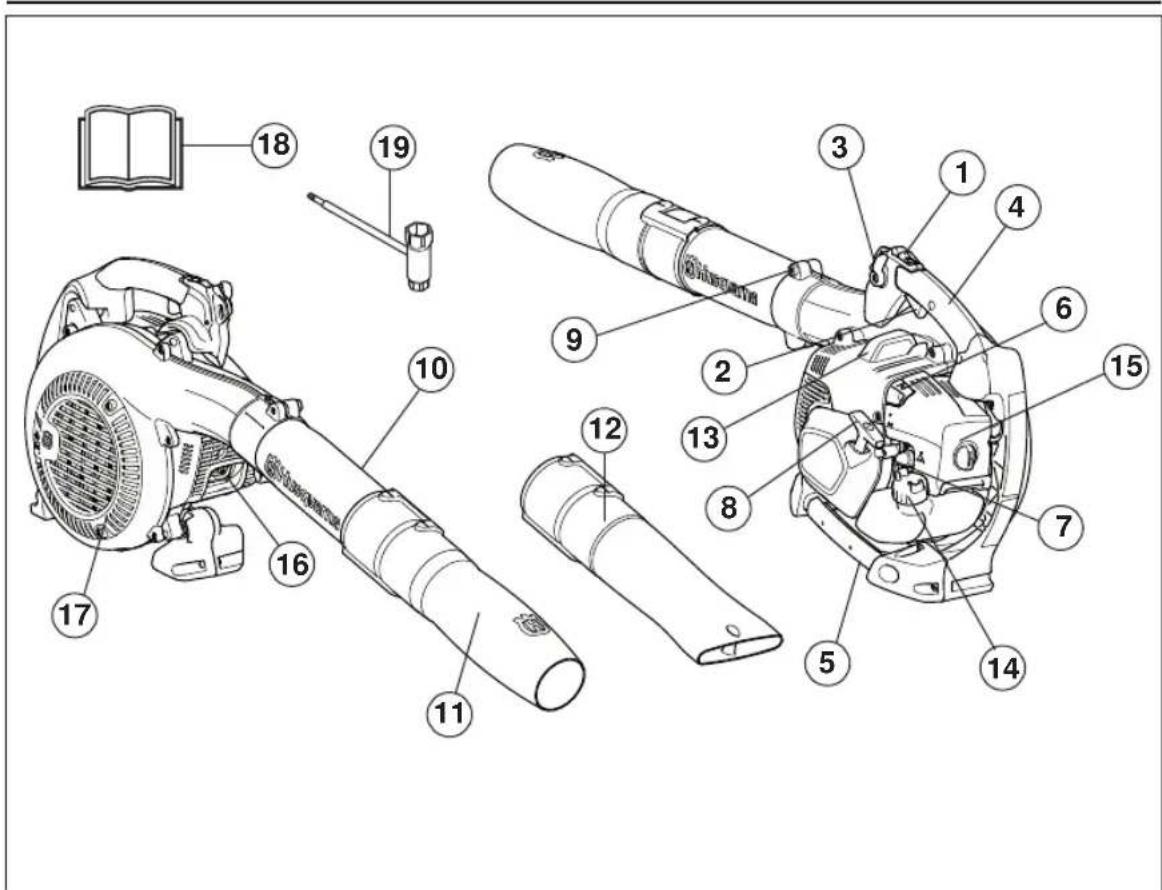
text_image
Exploded view diagram of a mechanical device with numbered parts for identificationComo se chama no soprador?
natural_image
Illustration of a hand using a tool to adjust or install a mechanical component, with no visible text or symbols.text_image
Min 3 m (10 ft)natural_image
Line drawings of two types of safety goggles, one open and one closed, with no text or symbols present.natural_image
Line drawing of a pair of boots with visible branding (no text or symbols)natural_image
Technical line drawing of a mechanical assembly with no visible text or symbolsnatural_image
Technical line drawing of an electric motor with mounting flanges and a central vent (no text or symbols)
natural_image
Technical line drawing of an electric motor and its internal casing (no text or symbols)natural_image
Technical line drawing of a mechanical component with exploded view and mounting holes (no text or symbols)natural_image
Diagram of a device with a prohibition symbol overlay (no text or labels)INSTRUÇÕES DE SEGURANÇA
natural_image
Technical line drawing of an electric motor and its internal casing (no text or symbols)natural_image
Technical line drawing of a mechanical component with exploded view and mounting holes (no text or symbols)NOTE!
text_image
Technical diagram showing four labeled mechanical components with arrows indicating assembly or movement stepstext_image
Diagram illustrating fuel injection and discharge process with labeled components and no-drawn symbols
natural_image
Illustration of a person holding an object, no text or symbols presenttext_image
Min 3 m (10 ft)natural_image
Technical line drawing of a mechanical component with no visible text or symbolsnatural_image
Line drawing of a mechanical component with a knob and handle (no text or symbols)Motor frio
text_image
Technical diagram of a mechanical component with labeled parts and directional arrow indicating motion or forcenatural_image
Line drawing of a hand using a tool to lift a motor or fan (no text or symbols present)ARRANQUE E PARAGEM
natural_image
Technical line drawing of a mechanical assembly with no visible text or symbolsnatural_image
Pure geometric diagram with intersecting lines and circular shapes (no text or symbols)TÉCNICA DE TRABALHO
natural_image
Line drawing of a person in protective gear holding a handheld air conditioner (no text or symbols)natural_image
Pure geometric diagram with intersecting lines and a circular pattern (no text or symbols)MANUTENÇÃO
Carburador
natural_image
Technical line drawing of a mechanical assembly with no visible text or symbolsnatural_image
Technical line drawing of a mechanical device with an arrow indicating assembly or transformation (no text or symbols present)natural_image
Technical line drawing of a mechanical assembly with no visible text or symbolstext_image
Technical diagram of a mechanical device with numbered components for identification1 Filtro de espuma (filtro de uretano)
2 Filtro de feltro
3 Protecção
natural_image
Mechanical component diagram showing a lever mechanism with no visible text or symbolsnatural_image
Technical line drawing of a mechanical electric motor with visible blades and mounting base (no text or symbols)
natural_image
Pure geometric diagram with intersecting lines and a circular pattern (no text or symbols)MANUTENÇÃO
natural_image
Pure geometric diagram with intersecting lines and circular shapes (no text or symbols)ESPECIFICAÇÕES TÉCNICAS
text_image
Diagram showing a download icon above a CD with LWA and dB labels, indicating audio or digital signal.natural_image
Pure geometric diagram with intersecting lines and a circular pattern (no text or symbols)INDICE
natural_image
Pure geometric diagram with intersecting lines and a circular pattern (no text or symbols)CHE COSA C'È?
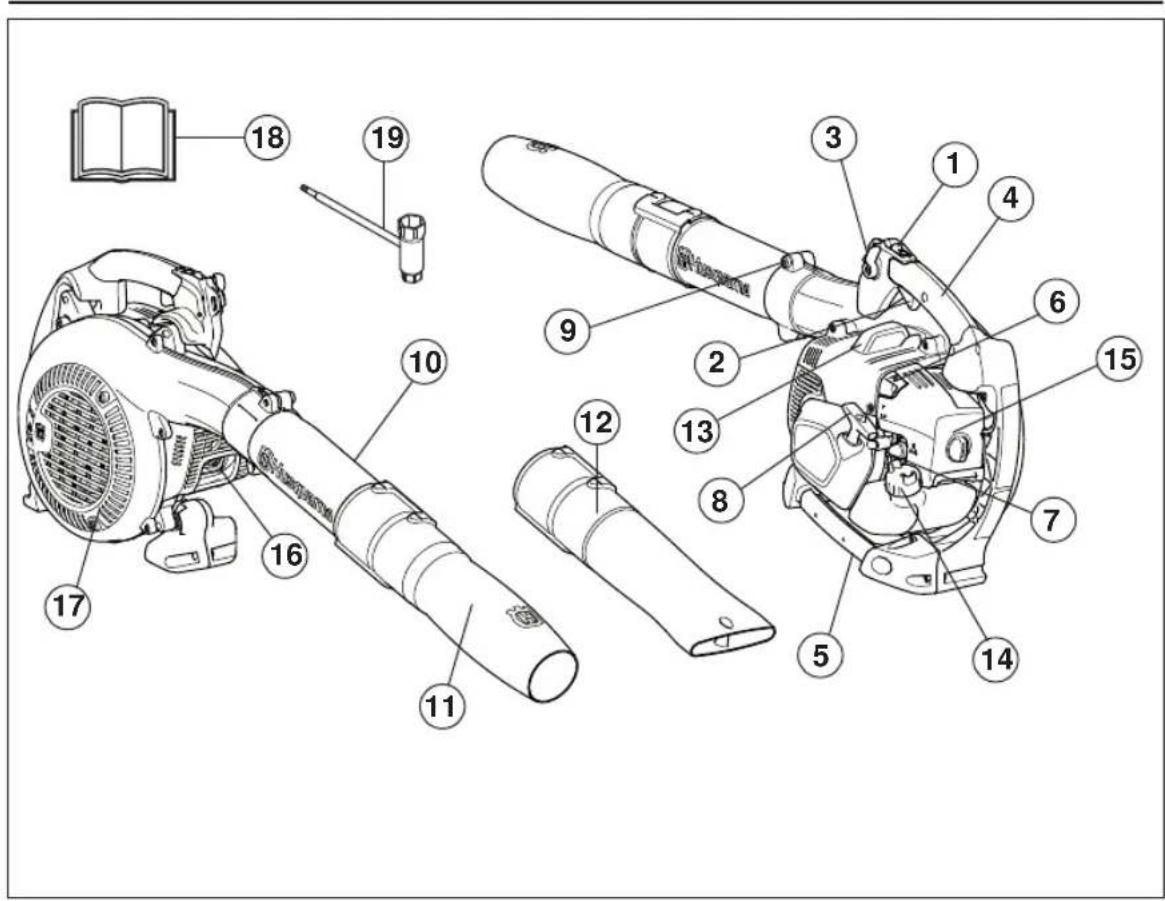
text_image
Technical diagram of a handheld device with numbered parts for identification and assembly reference.natural_image
Illustration of a hand using a tool to lift a fan or fan device (no text or symbols visible)Carburante
text_image
Min 3 m (10 ft)natural_image
Line drawings of two types of safety goggles, one open and one closed, with no text or symbols present.natural_image
Line drawing of a pair of boots with visible tread pattern and side clasp (no text or symbols)text_image
FIRST AID KITnatural_image
Technical line drawing of a mechanical component with no visible text or symbolsnatural_image
Technical line drawing of an electric motor with mounting flanges and a central vent (no text or symbols)
natural_image
Technical line drawing of an electric motor and its internal housing (no text or symbols)natural_image
Technical line drawing of a mechanical component with exploded view and mounting holes (no text or symbols)natural_image
Diagram of a device with a prohibition symbol overlay (no text or symbols present)


NORME DI SICUREZZA
natural_image
Technical line drawing of an electric motor and its internal casing (no text or symbols)natural_image
Line drawing of a mechanical component with exploded view and mounting holes (no text or symbols)NOTE!
text_image
Technical diagram showing four labeled mechanical components with arrows indicating assembly or movement, likely illustrating a mechanical assembly or assembly process.text_image
Diagram illustrating fuel and waste disposal methods with labeled symbols for fuel, waste, and disposal.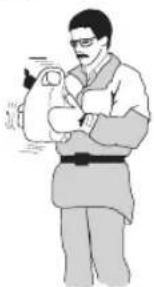
natural_image
Illustration of a person holding an object, no text or symbols visiblenatural_image
Pure geometric diagram with intersecting lines and a circular pattern (no text or symbols)text_image
Min 3 m (10 ft)natural_image
Mechanical assembly diagram showing a lever mechanism with no visible text or symbolsnatural_image
Line drawing of a car interior showing the wheel and seat assembly (no text or symbols)Motore freddo
natural_image
Technical diagram of a mechanical component with no visible text or symbolsnatural_image
Line drawing of a hand using a tool to adjust or install a mechanical component (no text or symbols present)224 - Italian
text_image
Warning sign with exclamation mark and robot illustration, indicating hazard or cautionArresto
natural_image
Technical line drawing of a mechanical component with no visible text or symbolsnatural_image
Line drawing of a person in protective gear using a handheld air conditioner (no text or symbols)natural_image
Pure geometric diagram with intersecting lines and a circular pattern (no text or symbols)TECNICA DI LAVORO
natural_image
Technical line drawing of a mechanical assembly with no visible text or symbolsnatural_image
Technical line drawing of a mechanical component with an arrow indicating assembly or transformation (no text or symbols present)natural_image
Technical line drawing of a robotic arm and mechanical components (no text or symbols)natural_image
Pure geometric diagram with intersecting lines and a circular pattern (no text or symbols)MANUTENZIONE
text_image
Technical diagram of a mechanical assembly with numbered components for identificationnatural_image
Technical diagram of a mechanical component with an arrow indicating direction (no text or symbols present)natural_image
Technical line drawing of an electric motor with visible blades and mounting base (no text or symbols)
natural_image
Pure geometric diagram with intersecting lines and a circular pattern (no text or symbols)CARATTERISTICHE TECNICHE
Bocchetta piatta 2,0
natural_image
Pure geometric diagram with intersecting lines and a circular pattern (no text or symbols)ΕΙΣΑΓΩΓΗ
Αγαπητέ πελάτη!
natural_image
Pure geometric diagram with intersecting lines and circles, no text or symbols present

natural_image
Pure geometric diagram with concentric circles and radial lines, no text or symbols presentTI EINAI TI;
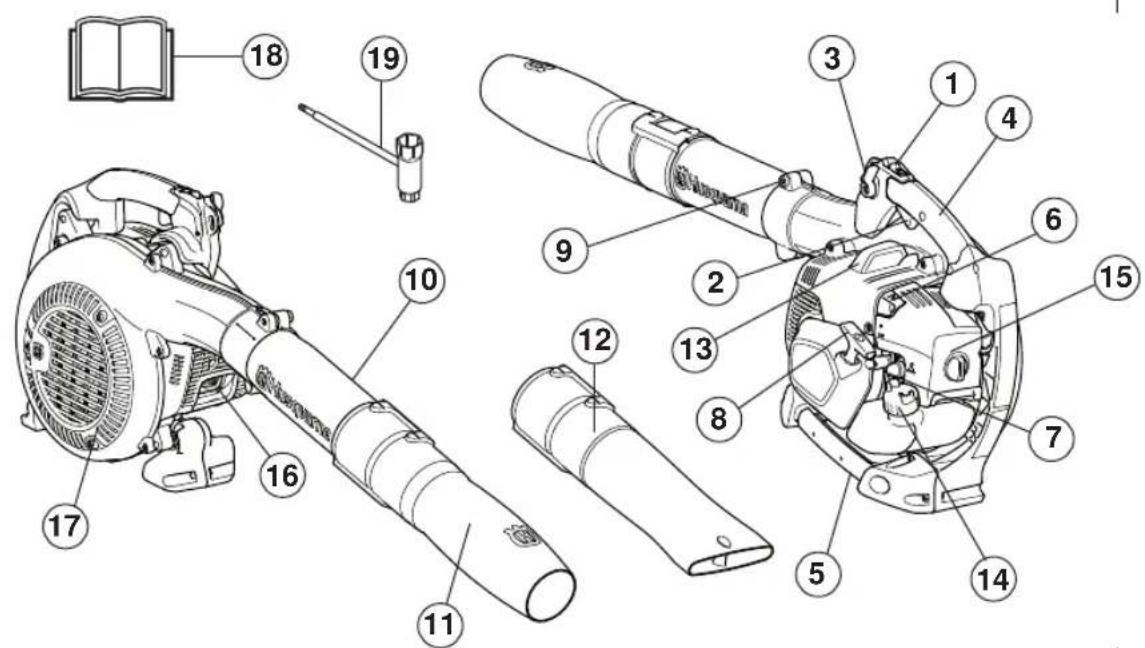
text_image
Technical diagram of a handheld device with numbered parts for identification and assembly reference.natural_image
Line drawing of a hand using a tool to lift a motor or fan (no text or symbols present)Ασφάλεια καυσίμων
text_image
Min 3 m (10 ft)natural_image
Line drawings of two types of safety goggles, one front view and one side view (no text or symbols)natural_image
Line drawing of a pair of boots with visible branding (no text or symbols)natural_image
Technical line drawing of a mechanical assembly with no visible text or symbolsnatural_image
Technical line drawing of an electric motor with mounting bracket and side-mounted shaft (no text or symbols)
natural_image
Technical line drawing of an electric motor and its internal casing (no text or symbols)natural_image
Line drawing of a mechanical device with exploded view and mounting holes (no text or symbols)natural_image
Diagram of a device with a prohibition symbol overlay (no text or labels)ΟΔΗΓΙΕΣ ΑΣΦΑΛΕΙΑΣ
natural_image
Technical line drawing of an electric fan assembly and its internal components (no text or symbols)natural_image
Technical line drawing of a mechanical component with exploded view and mounting holes (no text or symbols)text_image
Technical diagram showing four labeled mechanical components with arrows indicating assembly or movement stepstext_image
Min 3 m (10 ft)natural_image
Technical line drawing of a mechanical component with no visible text or symbolsnatural_image
Line drawing of a car interior showing a hand valve and seat (no text or symbols)Κρύος κινητήρας
text_image
Technical diagram showing mechanical component with labeled parts and directional arrow indicating motion or forcenatural_image
Line drawing of a hand using a tool to lift a motor or fan (no text or symbols present)natural_image
Technical line drawing of a mechanical component with no visible text or symbolsnatural_image
Pure geometric diagram with intersecting lines and a circular pattern (no text or symbols)TEXNIKH EPRASIAΣ
natural_image
Technical line drawing of a mechanical component with labeled part D (no text or symbols beyond label)natural_image
Line drawing of a person in protective gear using a handheld air conditioner (no text or symbols)natural_image
Pure geometric diagram with intersecting lines and a circular pattern (no text or symbols)ΣΥΝΤΗΡΗΣΗ
Καρμπυρατέρ
natural_image
Technical line drawing of a mechanical assembly with no visible text or symbolsnatural_image
Technical line drawing of a mechanical component with an arrow indicating assembly (no text or symbols present)natural_image
Technical line drawing of a mechanical assembly with no visible text or symbolstext_image
Technical diagram of a mechanical device with numbered components for identificationnatural_image
Technical line drawing of a mechanical component with no visible text or symbolsnatural_image
Technical line drawing of an electric motor with cooling fan and shaft (no text or symbols)
natural_image
Pure geometric diagram with intersecting lines and a circular pattern (no text or symbols)TEXNIKA ΣΤΟΙΧΕΙΑ
natural_image
Pure geometric diagram with intersecting lines and circular shapes, no text or symbols presentGreek - 253

natural_image
Pure geometric diagram with concentric circles and radial lines, no text or symbols presentEXPLICATIA SIMBOLURILOR
Simboluri
text_image
Diagram showing a download icon above a CD with LWA and dB labels, indicating audio or digital signal.natural_image
Pure electrical circuit lines without any symbols254 – Romanian


natural_image
Pure geometric diagram with intersecting lines and a circular pattern (no text or symbols)CUPRINS
text_image
Technical diagram of a handheld device with numbered parts for identification and assembly reference.natural_image
Illustration of a hand using a tool to lift a motor, no text or symbols presenttext_image
Min 3 m (10 ft)natural_image
Line drawings of two types of safety goggles, one closed and one open, with no text or symbols present.natural_image
Line drawing of a pair of boots with visible tread pattern and side clasp (no text or symbols)natural_image
Technical line drawing of a mechanical component with no visible text or symbolsnatural_image
Technical line drawing of an electric motor with cooling fan and mounting bracket (no text or symbols)
natural_image
Technical line drawing of an electric motor and its internal housing (no text or symbols)natural_image
Technical line drawing of a mechanical component with exploded view and mounting holes (no text or symbols)natural_image
Diagram of a device with a prohibition symbol overlay (no text or symbols present)


INSTRUCTIUNI DE SIGURANTÂ
natural_image
Technical line drawing of an electric motor and its internal casing (no text or symbols)natural_image
Line drawing of a mechanical component with exploded view and mounting holes (no text or symbols)text_image
Technical diagram showing four labeled mechanical components with arrows indicating assembly or movement stepstext_image
Diagram illustrating fuel injection and discharge process with labeled chemical symbols and prohibition signs
natural_image
Illustration of a person holding an object, possibly a medical or educational device (no text or symbols visible)natural_image
Pure geometric diagram with intersecting lines and a circular pattern (no text or symbols)MANIPULAREA COMBUSTIBILULUI
Alimentarea


text_image
Min 3 m (10 ft)natural_image
Technical line drawing of a mechanical assembly with no visible text or symbolsnatural_image
Line drawing of a car interior showing the wheel and seat components (no text or symbols)Motor rece
natural_image
Technical diagram of a mechanical component with no visible text or symbolsnatural_image
Illustration of a hand using a tool to adjust or install a mechanical component (no text or symbols visible)text_image
Exposure ExposureOprire
natural_image
Technical line drawing of a mechanical component with no visible text or symbolsnatural_image
Line drawing of a person in protective gear using a handheld air conditioner (no text or symbols)natural_image
Pure geometric diagram with intersecting lines and a circular pattern (no text or symbols)REGULI DE LUCRU
text_image
Technical diagram of a mechanical device with labeled components and partsnatural_image
Technical line drawing of a mechanical assembly with no visible text or symbolsnatural_image
Line drawing of a device with an arrow indicating a step, showing internal components and a final button (no text or symbols)natural_image
Technical line drawing of a mechanical assembly with no visible text or symbolsnatural_image
Pure geometric diagram with intersecting lines and a circular pattern (no text or symbols)ÎNTRETINERE
text_image
Technical diagram of a mechanical assembly with numbered components, likely for assembly or maintenance instructions.text_image
Technical diagram of a mechanical component with labeled parts and an arrow indicating directionnatural_image
Technical line drawing of an electric motor with visible blades and mounting base (no text or symbols)
natural_image
Pure electrical circuit lines without any symbolsEstonian - 275


SISUKORD
natural_image
Pure geometric diagram with intersecting lines and a circular pattern (no text or symbols)SISSEJUHATUS
Lugupeetud tarbija!
natural_image
Pure geometric diagram with intersecting lines and circular shapes, no text or symbols presentMIS ON MIS?
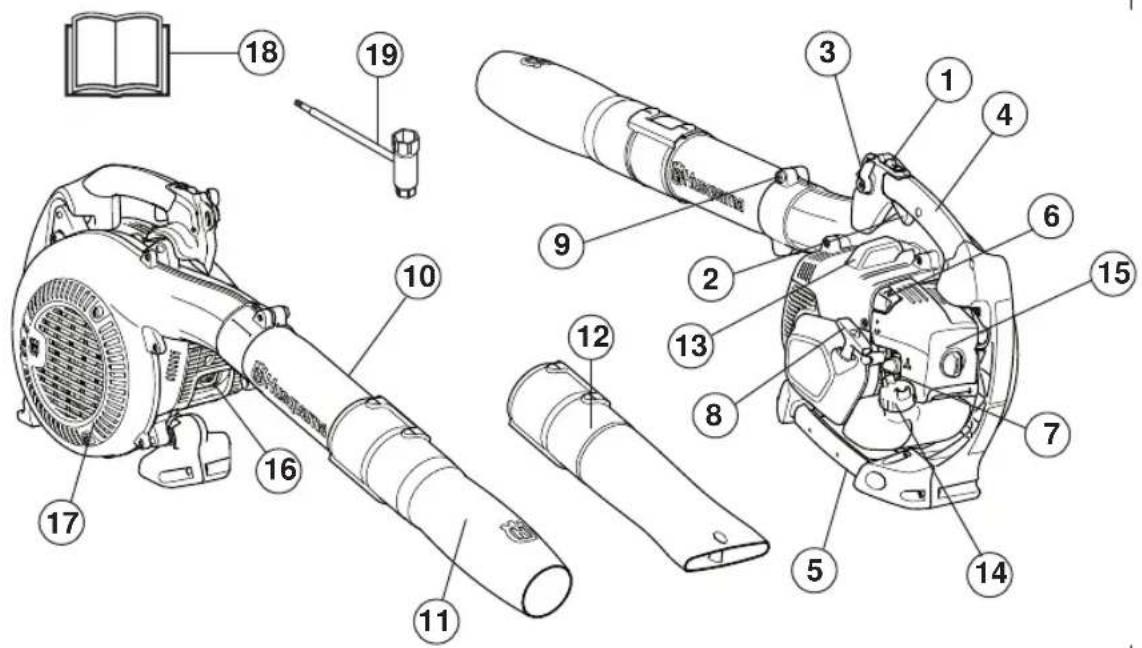
text_image
Technical diagram of a handheld device with numbered parts for identification and assembly reference.natural_image
Illustration of a hand using a tool to lift a motor or fan (no text or symbols visible)text_image
Min 3 m (10 ft)natural_image
Pure geometric diagram with intersecting lines and a circular pattern (no text or symbols)OHUTUSEESKIRJAD
natural_image
Line drawings of two types of safety goggles, one front view and one side view (no text or symbols)natural_image
Line drawing of a pair of boots with visible tread and buck (no text or symbols)text_image
FIRST AID KITnatural_image
Technical line drawing of a mechanical component with no visible text or symbolsnatural_image
Technical line drawing of an electric motor with mounting flanges and a central vent (no text or symbols)
natural_image
Technical line drawing of an electric motor and its internal components (no text or symbols)natural_image
Technical line drawing of a mechanical component with exploded view and mounting holes (no text or symbols)natural_image
Diagram of a device with a prohibition symbol overlay (no text or labels)natural_image
Technical line drawing of an electric motor and its internal casing (no text or symbols)natural_image
Line drawing of a mechanical device with exploded view showing internal components (no text or symbols)OHUTUSEESKIRJAD
Veenduge, et sädemepüüdja on kindlalt kinni kruvitud.

text_image
Technical diagram showing exploded view of mechanical components with numbered parts and directional arrows indicating assembly or assembly steps.1 Toruklambri polt
2 Pikendustoru
3 Ümar otsak
4 Körgsurveotsak


natural_image
Pure geometric diagram with intersecting lines and a circular pattern (no text or symbols)KÜTUSE KÄSITSEMINE
Küttesegu
text_image
Diagram illustrating fuel and water safety symbols including a container with 'ML' and 'W 3c', a fuel can with '+', and a pump bottle pouring liquid into a container.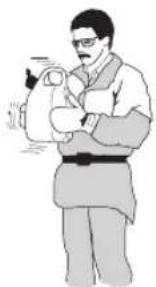
natural_image
Illustration of a person holding an object, no text or symbols presenttext_image
Min 3 m (10 ft)Estonian - 285
KÜTUSE KÄSITSEMINE
natural_image
Line drawing of a car's engine compartment showing valve and gear assembly (no text or symbols)natural_image
Technical line drawing of a mechanical component with no visible text or symbolsKülm mootor
text_image
Technical diagram showing mechanical component with labeled parts and directional arrow indicating motion or forceHoidke seadme korpust parema käega vastu maad (TÄHELEPANU! Mitte jalaga).
natural_image
Line drawing of a hand using a tool to lift a motor or fan (no text or symbols present)KÄIVITAMINE JA SEISKAMINE
text_image
PlayhouseSeiskamine
natural_image
Technical line drawing of a mechanical assembly with no visible text or symbolsnatural_image
Pure geometric diagram with intersecting lines and a circular pattern (no text or symbols)TÖÖVÖTTED
natural_image
Technical line drawing of a mechanical component with labeled part D (no text or symbols beyond label)natural_image
Line drawing of a person in protective gear holding a handheld air conditioner (no text or symbols)natural_image
Pure geometric diagram with intersecting lines and a circular pattern (no text or symbols)HOOLDUS
Karburaator
text_image
Technical diagram of a mechanical device with labeled components and partsnatural_image
Technical line drawing of an internal combustion engine assembly (no text or labels)natural_image
Diagram of a device with an open lid and two connectors, showing a directional arrow (no text or symbols present)natural_image
Technical line drawing of a robotic arm and base unit (no text or symbols)text_image
Technical diagram of a mechanical device with numbered components for identification1 Vahtplastist filter (uretaanfilter)
2 Vildist filter
3 Võre
natural_image
Technical diagram of a mechanical component with no visible text or symbolsnatural_image
Technical line drawing of an electric motor with cooling fan and shaft (no text or symbols)
natural_image
Pure geometric diagram with intersecting lines and a circular pattern (no text or symbols)TEHNILISED ANDMED
EÜ kinnitus vastavusest
natural_image
Pure geometric diagram with intersecting lines and circular patterns (no text or symbols)Estonian - 295

natural_image
Pure geometric diagram with concentric circles and radial lines, no text or symbols presentSIMBOLU NOZİME
Simboli
natural_image
Pure geometric diagram with intersecting lines and a circular pattern (no text or symbols)SATURS
text_image
Technical diagram of a handheld device with numbered parts for identification and assembly reference.Pūtēja uzbūve
1 Stop slēdzis
2 Droseles vadiba
3 Droseles iestatijumu vadiba
4 Vadibas rokturis/Darbibas rokturis
5 Rokturis
6 Droselyvārsts
7 Degvielas süknis
8 Startera rokturis
9 Caurules skavas skrūve
natural_image
Line drawing of a hand using a tool to lift a motor or fan (no text or symbols present)text_image
Min 3 m (10 ft)• Nekad nedarbiniet mašinu:
natural_image
Line drawings of two types of safety goggles and a device (no text or symbols)- Izmantojiet neslidošus un stabilus zābakus.
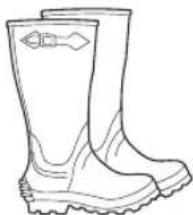
natural_image
Line drawing of a pair of boots with visible tread pattern and sole plate (no text or symbols)text_image
FIRST AID KITnatural_image
Technical line drawing of a mechanical component with no visible text or symbolsLai veiktu ierices apskati un apkopi, nonemiet aizdedzes vadu un aizdedzes sveci.
Vibrāciju slāpētājs
natural_image
Technical line drawing of an electric motor with cooling fan and mounting bracket (no text or symbols)
natural_image
Technical line drawing of an electric motor and its internal casing (no text or symbols)natural_image
Technical line drawing of a mechanical component with exploded view and mounting holes (no text or symbols)natural_image
Diagram of a device with a prohibition symbol overlay (no text or labels)


DROŠĪBAS INSTRUKCIJAS
natural_image
Technical line drawing of an electric motor and its internal casing (no text or symbols)natural_image
Line drawing of a mechanical component with exploded view and mounting holes (no text or symbols)text_image
Technical diagram showing four labeled mechanical components with arrows indicating assembly or movement, likely illustrating a mechanical assembly or assembly process.text_image
Diagram illustrating fuel injection and discharge process with labeled components and prohibition symbols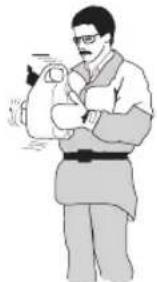
natural_image
Illustration of a person holding an object, possibly a medical or ceremonial item (no text or symbols visible)text_image
Min 3 m (10 ft)natural_image
Technical line drawing of a mechanical assembly with no visible text or symbolsDegvielas süknis: Piespiediet degvielas sükna gumijas sükniti vairakas reizes lidz süknitis ir piepildits ar degvielu. Süknitim nav jäbüt pilnigi pilnam ar benzinu.
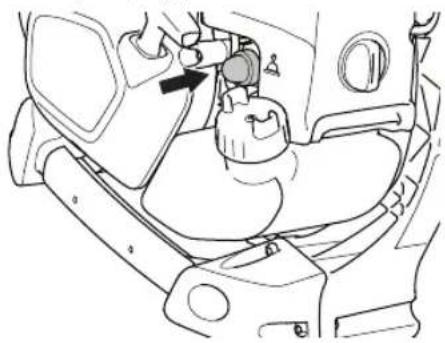
natural_image
Line drawing of a car interior showing a hand valve and seat (no text or symbols)Ja motors ir auksts
natural_image
Technical diagram of a mechanical component with no visible text or symbolsnatural_image
Line drawing of a hand using a tool to adjust or install a mechanical component (no text or symbols visible)IEDARBINĀŠANA UN APSTĀDINĀŠANA
text_image
Warning symbol with exclamation mark and robot illustration, indicating hazard or cautionApstādināšana
natural_image
Technical line drawing of a mechanical component with no visible text or symbolsnatural_image
Mechanical assembly diagram showing a bracket with labeled component D (no text or symbols present)natural_image
Line drawing of a person in protective gear using a handheld air conditioner (no text or symbols)natural_image
Pure geometric diagram with intersecting lines and a circular pattern (no text or symbols)DARBA TEHNIKA
Darbs nelabveligos laika apstaklos ir nogurdinošs un var radit bistamus apstaklus. kā piem, slidenas darba virsmā
natural_image
Technical line drawing of a mechanical assembly with no visible text or symbolsnatural_image
Line drawing of a device with an arrow indicating a component or assembly (no text or symbols present)natural_image
Technical line drawing of a robotic arm and control unit (no text or symbols)natural_image
Pure geometric diagram with intersecting lines and a circular pattern (no text or symbols)APKOPE
text_image
Technical diagram of a mechanical assembly with numbered components for identification1 Penoplasta filtrs (uretāna filtrs)
2 Filca filtrs
3 Siets
natural_image
Technical diagram of a mechanical component with no visible text or symbolsnatural_image
Technical line drawing of an electric motor with visible blades and mounting base (no text or symbols)
natural_image
Pure geometric diagram with intersecting lines and a circular pattern (no text or symbols)JVADAS
Gerbiamas kliente!
natural_image
Pure geometric diagram with intersecting lines and circular shapes, no text or symbols presentKAS YRA KAS?

text_image
Technical diagram of an electric motor with numbered parts for identification and assembly reference.natural_image
Line drawing of a hand using a tool to lift a motor or fan (no text or symbols present)text_image
Min 3 m (10 ft)natural_image
Line drawings of two types of safety goggles, one front view and one side view (no text or symbols)- Avėkite tvirtus guminius batus rantytu padu.
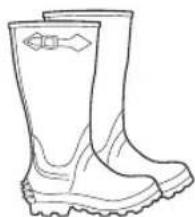
natural_image
Line drawing of a pair of boots with visible tread and buck (no text or symbols)text_image
FIRST AID KITnatural_image
Technical line drawing of a mechanical component with no visible text or symbolsnatural_image
Technical line drawing of an electric motor with mounting flanges and a central vent (no text or symbols)
natural_image
Technical line drawing of an electric motor and its internal casing (no text or symbols)natural_image
Technical line drawing of a mechanical component with exploded view and mounting holes (no text or symbols)natural_image
Diagram of a device with a prohibition symbol overlay (no text or labels)natural_image
Technical line drawing of an electric motor and its internal casing (no text or symbols)natural_image
Line drawing of a mechanical component with exploded view and mounting holes (no text or symbols)SAUGOS INSTRUKCIJOS
text_image
Technical diagram showing four labeled mechanical components with arrows indicating assembly or movement, likely illustrating a mechanical assembly or assembly process.text_image
Diagram showing fuel and gas symbols with labels like 'Molten' and 'Gas Pump', including a container with fuel drop and a cross symbol.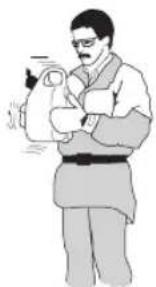
natural_image
Illustration of a person holding a briefcase and documents (no text or symbols visible)text_image
Min 3 m (10 ft)natural_image
Line drawing of a mechanical assembly with no visible text or symbolsnatural_image
Line drawing of a car interior showing a mechanical component with an arrow indicating direction (no text or symbols present)Šaltas variklis
natural_image
Technical diagram of a mechanical component with no visible text or symbolsnatural_image
Line drawing of a hand using a tool to lift a motor or fan (no text or symbols present)text_image
ProportionIšjungimas
natural_image
Technical line drawing of a mechanical component with no visible text or symbolsnatural_image
Technical line drawing of a mechanical component with labeled part D (no text or symbols beyond label)natural_image
Line drawing of a person in protective gear using a handheld air conditioner (no text or symbols)natural_image
Pure geometric diagram with intersecting lines and a circular pattern (no text or symbols)TECHNINÉ PRIEŽIŪRA
Karbiuratorius
text_image
Technical diagram of a mechanical device with labeled components T and a handle, likely for assembly or maintenance instructions.natural_image
Technical line drawing of a mechanical assembly with no visible text or symbolsnatural_image
Diagram of a device with an arrow indicating a process or transformation, showing internal components and a final connector (no text or symbols present)PASTABA! Niekada nenaudokite jrenginio su netvarkingu duslintuvu.

natural_image
Technical line drawing of a robotic arm and mechanical components (no text or symbols)text_image
Technical diagram of a mechanical assembly with numbered components for identificationnatural_image
Technical diagram of a mechanical component with no visible text or symbolsnatural_image
Technical line drawing of an electric motor with visible cooling fins and mounting base (no text or symbols)
natural_image
Pure geometric diagram with intersecting lines and a circular pattern (no text or symbols)TECHNINĖ PRIEŽIŪRA
natural_image
Pure geometric diagram with intersecting lines and a circular pattern (no text or symbols)TECHNINIAI DUOMENYS
EB atitikties patvirtinimas
natural_image
Pure geometric diagram with intersecting lines and circles, no text or symbols presentLithuanian - 337

natural_image
Pure geometric diagram with concentric circles and radial lines, no text or symbols presentKAJ POMENIJO SIMBOLI
Simboli
natural_image
Pure geometric diagram with intersecting lines and a circular pattern (no text or symbols)VSEBINA
NAVODILA ZA VARNO UPORABO
text_image
Technical diagram of a mechanical device with numbered parts, including a zoomed-in view and internal assembly.Sestavni deli pihalnika
natural_image
Line drawing of a hand using a tool to lift a motor or fan (no text or symbols present)Varna uporaba goriva
text_image
Min 3 m (10 ft)NAVODILA ZA VARNO UPORABO
natural_image
Line drawings of two types of safety goggles, one front view and one side view (no text or symbols)natural_image
Line drawing of a pair of boots with visible tread pattern and buckles (no text or symbols)text_image
FIRST AID KITnatural_image
Technical line drawing of a mechanical assembly with no visible text or symbolsNAVODILA ZA VARNO UPORABO
Blažilnik vibracij
natural_image
Technical line drawing of an electric motor with visible blades and mounting feet (no text or symbols)
natural_image
Technical line drawing of an electric motor and its internal components (no text or symbols)natural_image
Line drawing of a device housing with an arrow indicating assembly or disassembly (no text or symbols present)natural_image
Diagram of a device with a no-smoking symbol overlay (no text or labels)natural_image
Technical line drawing of an electric motor and its internal casing (no text or symbols)natural_image
Line drawing of a device housing with exploded view showing internal components (no text or symbols)Slovene - 345
NAVODILA ZA VARNO UPORABO
text_image
Technical diagram showing exploded and assembled views of a mechanical component with numbered parts and directional arrows indicating assembly or assembly.text_image
Illustration showing fuel and storage symbols with a person holding a bag, accompanied by warning signs for non-oil and fuel.natural_image
Pure geometric diagram with intersecting lines and a circular pattern (no text or symbols)RAVNANJE Z GORIVOM
Točenje goriva


text_image
Min 3 m (10 ft)natural_image
Line drawing of a mechanical component with a curved handle and lever mechanism (no text or symbols)natural_image
Line drawing of a car interior showing a hand valve and seat (no text or symbols)Hladen motor
Čok: Ročico čoka premaknite v položaj za čok.
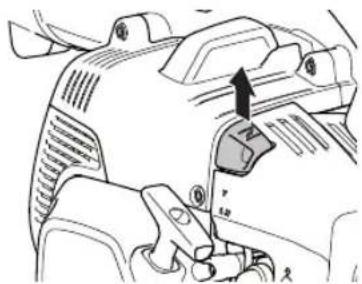
natural_image
Technical diagram of a mechanical component with no visible text or symbolsOhišje stroja z desno roko pritisnite ob tla (POZOR! Ne z nogo!).
Primate zaganjalno ročico, z levo roko počasi vlecite zaganjalno vrvico ven, dokler ne začutite določenega upora (prijem zaskočne kljukice zaganjalnika), nato pa vrvico hitro in močno potegnite. Vžigalne vrvice nikoli ne navijajte okoli zapestja.
Vrvico povlecite tolikokrat, da se motor skoraj zažene (največ 5-krat).
Ročico dušilnega ventila potisnite v položaj za delovanje.
natural_image
Illustration of a hand using a tool to lift a motor or fan (no text or symbols visible)natural_image
Pure geometric diagram with intersecting lines and a circular pattern (no text or symbols)VŽIG IN IZKLOP
natural_image
Technical line drawing of a mechanical component with no visible text or symbolsnatural_image
Line drawing of a person in protective gear using a handheld air conditioner (no text or symbols)natural_image
Pure geometric diagram with intersecting lines and a circular pattern (no text or symbols)DELOVNA TEHNIKA
natural_image
Technical line drawing of a mechanical assembly with no visible text or symbolsnatural_image
Line drawing of a device with an arrow indicating a component or assembly (no text or symbols present)natural_image
Technical line drawing of a mechanical assembly with no visible text or symbolstext_image
Technical diagram of a mechanical assembly with numbered components for identification1 Filter iz penaste plastike (uretanski filter)
2 Filter iz filca
3 Pokrov
natural_image
Technical diagram of a mechanical component with no visible text or symbols- Razstavite ohišje filtra in odstranite filter. Operite ga v topli milnici. Z zrakom ali krtačo očistite tudi notranjost pokrova filtra. Prepričajte se, da je filter suh, predno ga ponovno montirate.
- Odstranite filter iz klobučevine iz nosilca filtra in previdno odstranite umazanijo s filtra.
- Na nosilec zračnega filtra namestite pokrov in filter iz filca.
• V pokrov zračnega filtra namestite filter iz pene. - Namestite pokrov zračnega filtra.
natural_image
Technical line drawing of an electric motor with visible blades and mounting base (no text or symbols)
natural_image
Pure geometric diagram with intersecting lines and a circular pattern (no text or symbols)BEVEZETÉS
Tisztelt vásárlónk!
natural_image
Pure geometric diagram with intersecting lines and circular patterns (no text or symbols)MI MICSODA?
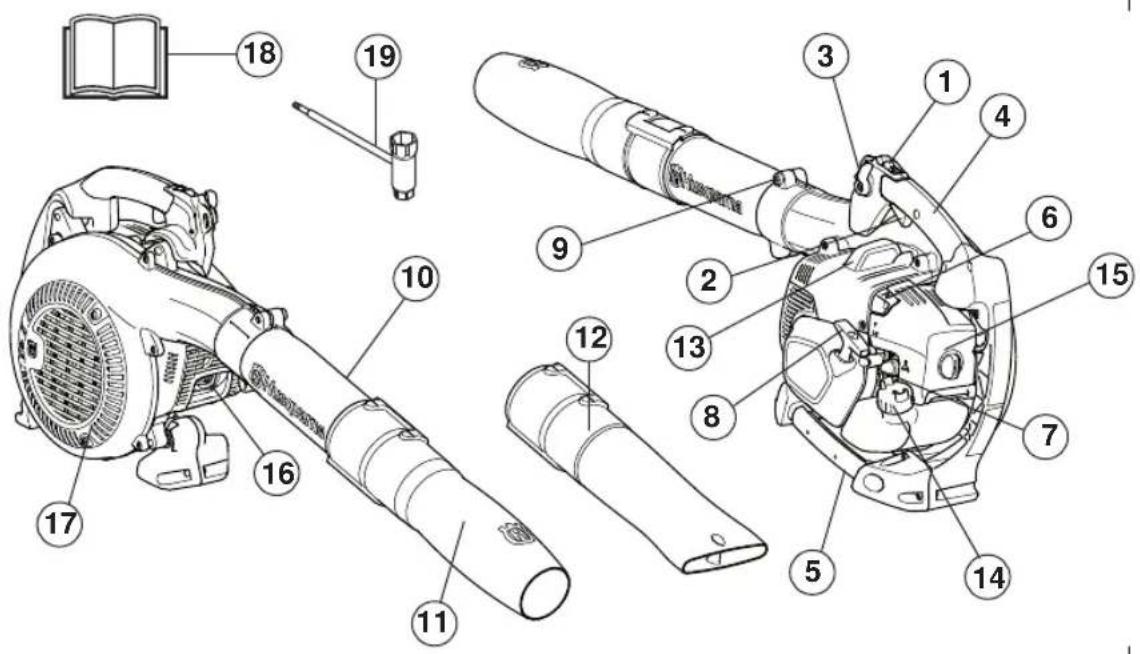
text_image
Technical diagram of a handheld device with numbered parts for identification and assembly reference.natural_image
Illustration of a hand using a tool to adjust or install a mechanical component (no text or symbols visible)Üzemanyagbiztonság
text_image
Min 3 m (10 ft)natural_image
Pure geometric diagram with intersecting lines and a circular pattern (no text or symbols)MUNKAVÉDELMI UTASÍTÁSOK
natural_image
Line drawings of two types of safety goggles, one plain and one with a pair of lenses (no text or symbols)natural_image
Line drawing of a pair of boots with visible branding (no text or symbols)text_image
FIRST AID KITnatural_image
Technical line drawing of a mechanical component with no visible text or symbolsnatural_image
Technical line drawing of a mechanical fan or motor assembly with mounting brackets and control panel (no text or symbols)
natural_image
Technical line drawing of an electric motor and its internal housing (no text or symbols)natural_image
Line drawing of a mechanical component with an arrow indicating assembly or adjustment (no text or symbols present)natural_image
Diagram of a device with a prohibition symbol overlay (no text or labels)


natural_image
Pure geometric diagram with intersecting lines and a circular pattern (no text or symbols)MUNKAVÉDELMI UTASÍTÁSOK
natural_image
Technical line drawing of an electric motor and its internal casing (no text or symbols)natural_image
Technical line drawing of a mechanical component with exploded view and mounting holes (no text or symbols)text_image
Technical diagram showing four labeled mechanical components with arrows indicating assembly or movement stepstext_image
Diagram showing fuel injection, fuel storage, and discharge with symbols for fuel, fuel pump, and waste bin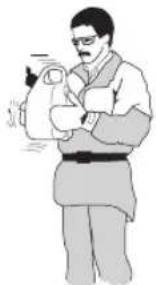
natural_image
Illustration of a person holding an object, no text or symbols presenttext_image
Min 3 m (10 ft)natural_image
Pure geometric diagram with intersecting lines and a circular pattern (no text or symbols)natural_image
Technical line drawing of a mechanical component with no visible text or symbolsnatural_image
Technical line drawing of a mechanical component with no visible text or symbolsHideg motor
natural_image
Technical diagram of a mechanical component with no visible text or symbolsnatural_image
Line drawing of a hand using a tool to adjust or install a mechanical component (no text or symbols visible)natural_image
Technical line drawing of a mechanical component with no visible text or symbolsnatural_image
Technical line drawing of a mechanical component with labeled part D (no text or symbols beyond label)natural_image
Line drawing of a person in protective gear holding a handheld air conditioner (no text or symbols)natural_image
Pure geometric diagram with intersecting lines and a circular pattern (no text or symbols)KARBANTARTÁS
Porlasztó
natural_image
Technical line drawing of a robotic arm with attached mechanical components (no text or symbols)natural_image
Line drawing of a device component with an arrow indicating assembly or transformation (no text or symbols present)natural_image
Technical line drawing of a mechanical assembly with no visible text or symbolstext_image
Technical diagram of a mechanical device with numbered components for identificationnatural_image
Technical diagram of a mechanical component with no visible text or symbolsnatural_image
Technical line drawing of an electric motor with visible blades and mounting base (no text or symbols)natural_image
Pure geometric diagram with intersecting lines and a circular pattern (no text or symbols)MÜSZAKI ADATOK
natural_image
Pure geometric diagram with intersecting lines and circles, no text or symbols presentHungarian - 379

natural_image
Pure geometric diagram with concentric circles and radial lines, no text or symbols presentZNACZENIE SYMBOLI
Symbole
natural_image
Pure geometric diagram with intersecting lines and a circular pattern (no text or symbols)SPIS TREŚCI
text_image
Technical diagram of a handheld device with numbered parts for identification and assembly reference.natural_image
Illustration of a hand using a tool to lift a motor or fan (no text or symbols visible)text_image
Min 3 m (10 ft)natural_image
Line drawings of two types of safety goggles, one front view and one side view (no text or symbols)natural_image
Line drawing of a pair of boots with visible tread pattern and side clasp (no text or symbols)natural_image
Technical line drawing of a mechanical component with no visible text or symbolsnatural_image
Technical line drawing of an electric motor with mounting flanges and a central vent (no text or symbols)
natural_image
Technical line drawing of an electric motor and its internal components (no text or symbols)natural_image
Line drawing of a mechanical component with exploded view and mounting holes (no text or symbols)natural_image
Diagram of a device with a prohibition symbol overlay (no text or symbols present)ZASADY BEZPIECZEŃSTWA
natural_image
Technical line drawing of an electric motor and its internal casing (no text or symbols)natural_image
Line drawing of a mechanical component with exploded view and mounting holes (no text or symbols)text_image
Technical diagram showing exploded view of a mechanical component with numbered parts and directional arrows indicating assembly or assembly steps.text_image
Diagram illustrating fuel injection and discharge process with labeled symbols for fuel, storage, and discharge.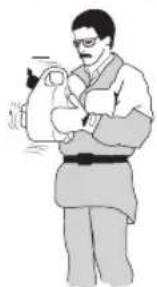
natural_image
Illustration of a person holding an infant, no text or symbols presentnatural_image
Pure geometric diagram with intersecting lines and a circular pattern (no text or symbols)OBCHODZENIE SIE Z PALIWEM
Tankowanie


text_image
Min 3 m (10 ft)natural_image
Mechanical assembly diagram showing a lever mechanism with no visible text or symbolsnatural_image
Line drawing of a car interior showing the wheel, seat, and dashboard (no text or symbols)Zimny silnik
natural_image
Mechanical component diagram showing a lever mechanism with no visible text or symbolsnatural_image
Illustration of a hand using a tool to adjust or install a mechanical component (no text or symbols visible)natural_image
Technical line drawing of a mechanical component with no visible text or symbolsnatural_image
Line drawing of a person in protective gear holding a large spray gun (no text or symbols)natural_image
Pure geometric diagram with intersecting lines and a circular pattern (no text or symbols)TECHNIKA PRACY
text_image
Technical diagram of a mechanical device with labeled components and partsnatural_image
Technical line drawing of a mechanical assembly with no visible text or symbolsnatural_image
Line drawing of a device with an arrow indicating assembly or transformation (no text or symbols present)natural_image
Technical line drawing of a mechanical assembly with no visible text or symbolsnatural_image
Pure geometric diagram with intersecting lines and a circular pattern (no text or symbols)KONSERWACJA
text_image
Technical diagram of a mechanical assembly with numbered components, likely for assembly or maintenance instructions.natural_image
Technical diagram of a mechanical component with no visible text or symbolsnatural_image
Technical line drawing of an electric motor with cooling fins and a handle (no text or symbols)
natural_image
Pure geometric diagram with intersecting lines and a circular pattern (no text or symbols)DANE TECHNICZNE
Dane techniczne
text_image
Diagram showing a download icon above a CD-ROM with 'L' and 'dB' labels, indicating audio or digital interface.text_image
Diagram showing fuel pump icons and vehicle symbols including water drop, valve, and plug


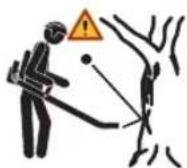
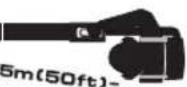
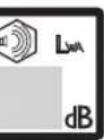
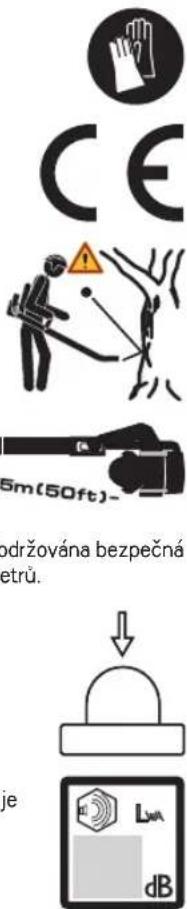
natural_image
Two black-and-white icons: a simple open book and a circular mask with sunglasses (no text or symbols)
natural_image
Two black-and-white icons: a simple open book and a circular mask with sunglasses (no text or symbols)
natural_image
Two black-and-white icons: a simple open book and a circular mask with sunglasses (no text or symbols)
natural_image
Two black-and-white icons: a simple open book and a circular mask with sunglasses (no text or symbols)
natural_image
Two black-and-white icons: a simple open book and a circular mask with sunglasses (no text or symbols)
natural_image
Two black-and-white icons: a simple open book and a circular mask with sunglasses (no text or symbols)
natural_image
Two black-and-white icons: a simple open book and a circular mask with sunglasses (no text or symbols)
natural_image
Two black-and-white icons: a simple open book and a circular mask with sunglasses (no text or symbols)
natural_image
Two black-and-white icons: a simple open book and a circular mask with sunglasses (no text or symbols)
natural_image
Simple line drawing of an open book and a circular icon with a mask (no text or symbols)
natural_image
Simple line drawing of an open book and a circular icon with a mask (no text or symbols)[Non-Text]
[Non-Text]
[Non-Text]
[Non-Text]
[Non-Text]
OBSAH
natural_image
Pure geometric diagram with intersecting lines and a circular pattern (no text or symbols)ÚVOD
Vážený zákazníku,
natural_image
Pure geometric diagram with intersecting lines and circles, no text or symbols present

natural_image
Pure geometric diagram with concentric circles and radial lines, no text or symbols presentCO JE CO?

text_image
Technical diagram of a handheld device with numbered parts for identification and assembly reference.natural_image
Line drawing of a hand using a tool to adjust or install a mechanical component (no text or symbols visible)text_image
Min 3 m (10 ft)- Stroj nikdy nestartujte:
natural_image
Line drawings of two types of safety goggles, one front view and one side view (no text or symbols)natural_image
Line drawing of a pair of boots with visible branding and sole details (no text or symbols)natural_image
Line drawing of a mechanical component with a circular base and textured top (no text or symbols)text_image
FIRST AID KITnatural_image
Technical line drawing of a mechanical component with no visible text or symbolsnatural_image
Technical line drawing of an electric motor with mounting bracket and side-mounted shaft (no text or symbols)
natural_image
Technical line drawing of an electric motor and its internal casing (no text or symbols)natural_image
Line drawing of a device housing with an arrow indicating assembly or disassembly (no text or symbols present)natural_image
Diagram of a device with a prohibition symbol overlay (no text or labels)natural_image
Technical line drawing of an electric motor and its internal components (no text or symbols)natural_image
Line drawing of a mechanical component with exploded view and mounting holes (no text or symbols)BEZPECNOSTNÍ PŘEDPISY
text_image
Technical diagram showing four labeled mechanical components with arrows indicating assembly or assembly stepstext_image
Diagram illustrating fuel injection and discharge process with labeled components and prohibition signs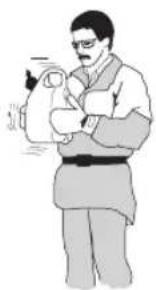
natural_image
Illustration of a person holding an object, no text or symbols presenttext_image
Min 3 m (10 ft)natural_image
Technical line drawing of a mechanical component with no visible text or symbolsnatural_image
Technical line drawing of a car interior showing mechanical components and a hand valve (no text or symbols)Studený motor
natural_image
Technical diagram of a mechanical component with no visible text or symbolsnatural_image
Line drawing of a hand using a tool to adjust or install a mechanical component (no text or symbols present)natural_image
Technical line drawing of a mechanical component with no visible text or symbolsnatural_image
Mechanical component diagram showing a bracket with labeled part D (no text or symbols beyond label)natural_image
Line drawing of a person in protective gear using a handheld air conditioner (no text or symbols)natural_image
Pure geometric diagram with intersecting lines and a circular pattern (no text or symbols)ÚDRŽBA
Karburátor
text_image
Technical diagram of a mechanical component with labeled parts T and x, showing internal structure and assembly.natural_image
Technical line drawing of a mechanical assembly with no visible text or symbolsnatural_image
Diagram of a device with an arrow indicating a step, showing components like a housing and buttons (no text or symbols present)natural_image
Technical line drawing of a mechanical assembly with no visible text or symbolstext_image
Technical diagram of a mechanical assembly with numbered components for identificationnatural_image
Technical diagram of a mechanical component with no visible text or symbolsnatural_image
Technical line drawing of an electric motor with visible blades and mounting base (no text or symbols)
natural_image
Pure geometric diagram with intersecting lines and a circular pattern (no text or symbols)ÚDRŽBA
natural_image
Pure geometric diagram with intersecting lines and circular shapes, no text or symbols present
TECHNICKÉ ÚDAJE
Technické údaje
natural_image
Pure geometric diagram with concentric circles and radial lines, no text or symbols presentTECHNICKÉ ÚDAJE
natural_image
Pure geometric diagram with intersecting lines and circles, no text or symbols presentCzech - 421

natural_image
Pure geometric diagram with concentric circles and radial lines, no text or symbols presentKL'ÚČ K SYMBOLOM
Symboly
text_image
Technical diagram of a handheld device with numbered parts for identification and assembly reference.Čo je čo na fúkači?
natural_image
Line drawing of a hand using a tool to lift a motor or fan (no text or symbols present)text_image
Min 3 m (10 ft)natural_image
Line drawings of two types of safety goggles, one front view and one side view (no text or symbols)• Noste masívne nekízavé topánky.

natural_image
Line drawing of a pair of boots with visible branding and sole details (no text or symbols)text_image
FIRST AID KITnatural_image
Technical line drawing of a mechanical component with no visible text or symbolsnatural_image
Technical line drawing of an electric motor with mounting bracket and side-mounted shaft (no text or symbols)
natural_image
Technical line drawing of an electric motor and its internal housing (no text or symbols)natural_image
Line drawing of a device housing with an arrow indicating assembly or disassembly (no text or symbols present)natural_image
Diagram of a device with a prohibition symbol overlay (no text or symbols present)natural_image
Technical line drawing of an electric motor and its internal casing (no text or symbols)natural_image
Line drawing of a mechanical component with exploded view and mounting holes (no text or symbols)Slovak - 429
BEZPECNOSTNY PRÍKAZ
text_image
Technical diagram showing four labeled mechanical components with arrows indicating assembly or movement, likely illustrating a mechanical assembly or assembly process.1 Upínacia skrutka trubice
2 Stredová trubica
3 Okrúhla tryska
4 Vysokorychlostná tryska
NARÁBANIE S PALIVOM
Palivo
text_image
Diagram illustrating fuel injection and discharge process with labeled chemical symbols and prohibition signs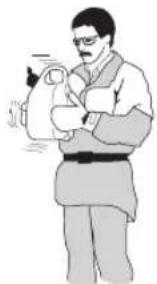
natural_image
Illustration of a person in traditional attire holding an object, no text or symbols visiblenatural_image
Pure geometric diagram with intersecting lines and a circular pattern (no text or symbols)NARÁBANIE S PALIVOM
Dopíňanie paliva


text_image
Min 3 m (10 ft)natural_image
Technical line drawing of a mechanical assembly with no visible text or symbolsnatural_image
Line drawing of a car interior showing the wheel and seat components (no text or symbols)Studený motor
Sýtič: Vytiahnite sýtič.

natural_image
Technical diagram of a mechanical component with no visible text or symbolsPravou rukou držte stroj na zemi (VAROVANIE! Nepridřžajte ho nohou!).
Uchopte štartovacie držadlo, l'avou rukou pomaly potiahnite šnúru, až kým nepocítite istý odpor (západky štartéra sa zachytávajú), a potom šnúru rýchlo a silno potiahnite.
Štartovaciu šnúru si nikdy neomotávajte okolo ruky.
natural_image
Illustration of a hand using a tool to adjust or install a mechanical component (no text or symbols visible)ŠTART A STOP
text_image
Warning sign with exclamation mark and robot illustration, indicating hazard or cautionZastavenie
natural_image
Technical line drawing of a mechanical component with no visible text or symbolsnatural_image
Line drawing of a person in protective gear using a handheld air conditioner (no text or symbols)natural_image
Pure geometric diagram with intersecting lines and a circular pattern (no text or symbols)PRACOVNÉ TECHNIKY
text_image
Technical diagram of a mechanical device with labeled components and partsnatural_image
Technical line drawing of a mechanical assembly with no visible text or symbolsnatural_image
Line drawing of a device with an arrow indicating assembly or transformation (no text or symbols present)natural_image
Technical line drawing of a robotic arm and mechanical components (no text or symbols)natural_image
Pure geometric diagram with intersecting lines and a circular pattern (no text or symbols)ÚDRŽBA
text_image
Technical diagram of a mechanical assembly with numbered components for identificationnatural_image
Technical diagram of a mechanical component with no visible text or symbolsnatural_image
Technical line drawing of an electric motor with visible cooling fins and mounting base (no text or symbols)
natural_image
Pure geometric diagram with intersecting lines and a circular pattern (no text or symbols)UVOD
Poštovani kupče!
natural_image
Pure geometric diagram with intersecting lines and circular patterns (no text or symbols)

natural_image
Pure geometric diagram with concentric circles and radial lines, no text or symbols presentŠTO JE ŠTO?
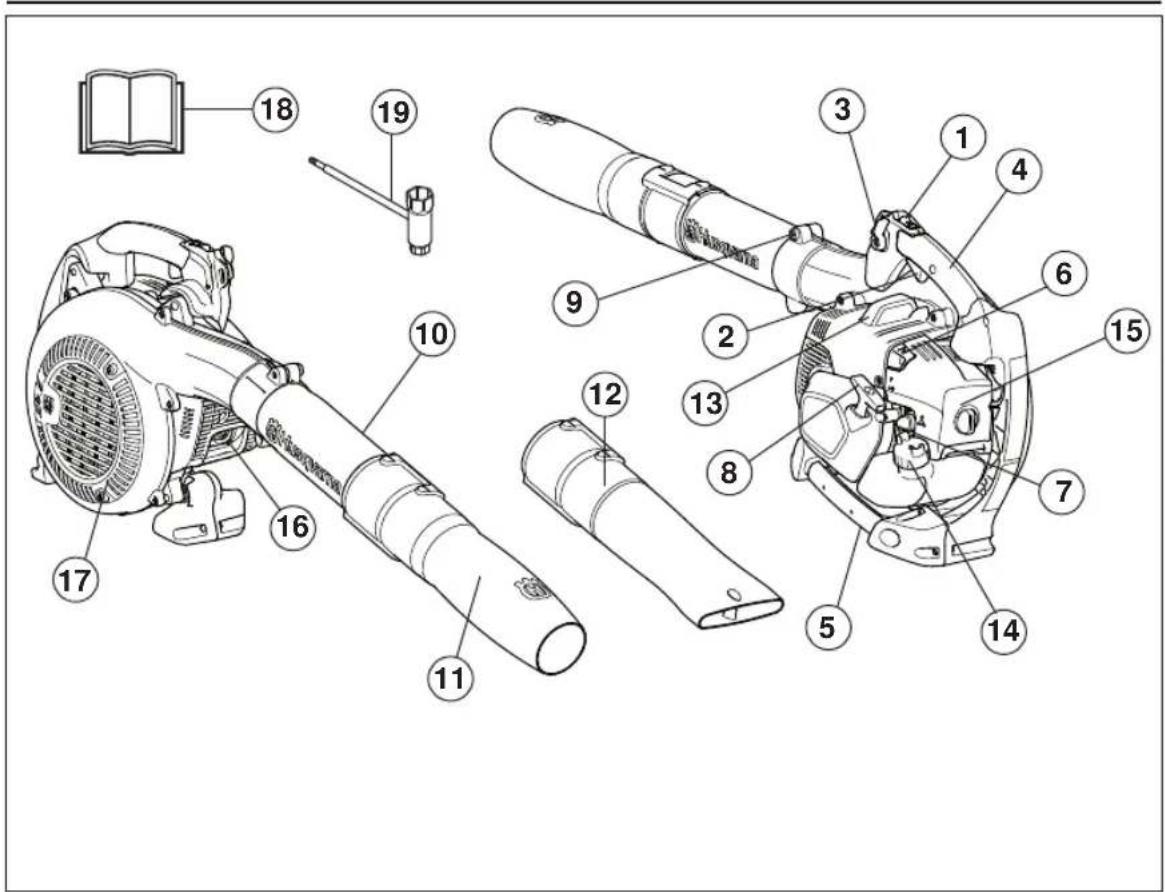
text_image
Exploded view diagram of a mechanical device with numbered parts for identificationnatural_image
Line drawing of a hand using a tool to adjust or install a mechanical component (no text or symbols present)text_image
Min 3 m (10 ft)natural_image
Line drawings of two types of safety goggles, one front view and one side view (no text or symbols)natural_image
Line drawing of a pair of boots with visible sole and side branding (no text or symbols)- Obavezno nosite čvrste duge hlače, čizrne, rukavice i majice dugih rukava. Kako biste smanjili opasnost od ozljeda nastalih uslijed povlačenja predmeta u rotirajuće dijelove, nemojte nositi labavu odjeću, šalove, nakit i slično. Učvrstite kosu iznad ramena.
text_image
FIRST AID KITSigurnosna oprema stroja
natural_image
Technical line drawing of a mechanical assembly with no visible text or symbolsnatural_image
Technical line drawing of an electric motor with cooling fan and mounting bracket (no text or symbols)
natural_image
Technical line drawing of an electric motor and its internal casing (no text or symbols)Ispušni lonac, opremljen katalizatorom, namijenjen je smanjenju štetnih ispušnih plinova.
natural_image
Technical line drawing of a mechanical component with exploded view and mounting holes (no text or symbols)Za prigušivače je veoma važno da se slijedi uputstva o provjeri, održavanju i servisiranju.
natural_image
Diagram of a device with a prohibition symbol overlay (no text or labels)natural_image
Technical line drawing of an electric motor and its internal housing (no text or symbols)Ukoliko je prigušivač na Vašem stroju opremljen sa mrežicom za sprečavanje iskri, mora se mrežicu redovno čistiti. Začepljena mrežica će uzrokovati pregrijavanje motora što može izazvati ozbiljan kvar motora.
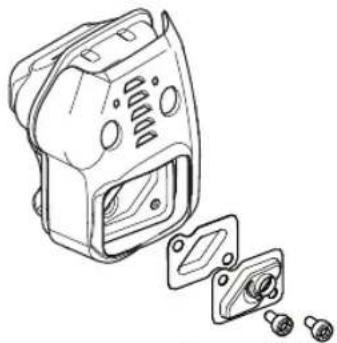
natural_image
Technical line drawing of a mechanical component with exploded view and mounting holes (no text or symbols)natural_image
Pure geometric diagram with intersecting lines and a circular pattern (no text or symbols)SASTAVLJANJE
text_image
Technical diagram showing four labeled mechanical components with arrows indicating assembly or movement, likely illustrating a mechanical assembly or assembly process.text_image
Diagram illustrating fuel injection and discharge process with labeled chemical symbols and prohibition signs
natural_image
Illustration of a person holding an object, possibly a medical or educational device (no text or symbols visible)natural_image
Pure geometric diagram with intersecting lines and a circular pattern (no text or symbols)RUKOVANJE GORIVOM
Punjenje goriva


text_image
Min 3 m (10 ft)- Očistite oko poklopca spremnika. Prljavština u spremniku ometa rad.
- Osigurajte da je gorivo dobro pomiješano trešnjom spremnika prije punjenja stroja.
- Prije svake upotrebe provjerite razinu goriva i ostavite prostora za njegovo širenje, jer u suprotnom toplina motora i sunca može uzrokovati širenje i prelijevanje goriva.
- Ručka mora biti suha, bez tragova ulja i goriva.
- Gorivo uvijek spremite u posudu koja je specijalno napravljena za tu namjenu.
UKLJUČIVANJE I ISKLJUČIVANJE
natural_image
Technical line drawing of a mechanical assembly with no visible text or symbolsPumpica za gorivo: Pritiščite pumpicu za gorivo dok gorivo ne ispuni pumpicu. Pumpica ne mora biti potpuno ispunjena.
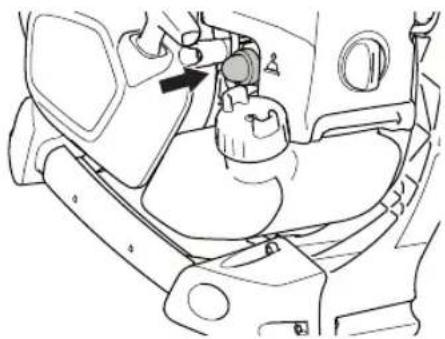
natural_image
Technical line drawing of a mechanical component with no visible text or symbolsHladan motor
natural_image
Technical diagram of a mechanical component with no visible text or symbolsDesnom rukom pridržavajte stroj na tlu (OPREZ! Ne koristite nogu!).
Primate ručku za pokretanje, polagano izvlačite kabel lijevom rukom dok ne osjetite otpor (prihvat zaklopca pokretača), a zatim brzo i snažno izvucite kabel. Nikad ne omotavajte startno uže oko šake.
Nastavite povlačiti kabel sve dok se motor ne pokuša pokrenuti (ili maksimalno 5 povlačenja).
Pomaknite ručicu čoka u položaj za pokretanje.
Povlačite kabel sve dok se motor ne pokrene i postepeno pritišćite okidač gasa kako biste broj okretaja motora povećali na radnu brzinu.
Topli motor
Koristite isti način pokretanja kao i kod hladnog motora, ali ne postavljajte polugu čoka u čok položaj. Ako se motor i nakon nekoliko pokušaja ne može pokrenuti, zatvorite čok i ponovno povucite uže.
Zrak se ispušta kada se motor pokrene, čak i kada je u stanju mirovanja.
Ako se motor i nakon nekoliko pokušaja ne može pokrenuti zbog zagušenja, zatvorite čok i ponovno povucite uže.
natural_image
Illustration of a hand using a tool to lift a motor or fan (no text or symbols visible)natural_image
Technical line drawing of a mechanical component with no visible text or symbolsnatural_image
Line drawing of a person in protective gear using a handheld air conditioner (no text or symbols)natural_image
Pure geometric diagram with intersecting lines and a circular pattern (no text or symbols)PRINCIP RADA
- Vrijeme puhanja smanjite što je više moguće na način da lagano navlažite prašnjava područja ili upotrebom raspršivača.
- Smanjite potrošnju vode koristeći puhalice umjesto crijeva za različite primjene na travnjaku i vrtu, poput rešetki, pregrada, mreža, pragova, itd.
- Obratite pažnju na sigurno kretanje i stajanje. Provjerite područje oko Vas da nema nekih prepreka (korjenje, kamenje, grane, rupe i slično) prilikom bočnog premještanja. Budite izuzetno oprezni pri radu na kosini.
- Nikada ne ostavljajte stroj s uključenim motorom ukoliko se udaljujete.
- Ispušni plinovi motora sadrže ugljični monoksid koji može izazvati trovanje ugljičnog monoksida. Iz tog razloga nikada nemojte pokretati stroj ili raditi u zatvorenom prostoru ili bilo gdje bez odgovarajuće ventilacije.
- Puhač se ne smije upotrebljavati na ljestvama ili skelama.
- PAŽNJA! Nikada ne koristite stroj bez mogućnosti zvanja u pomoć u slučaju nesreće.
natural_image
Technical line drawing of a mechanical assembly with no visible text or symbolsNeki prigušivači su opremljeni s specijalnom zaštitnom mrežicom. Ukoliko Vaš stroj ima takvu vrstu prigušivača, onda morate očistiti tu zaštitnu mrežicu barem jednom tjedno. To možete učiniti sa čeličnom četkom. Na ispušnim loncima bez katalizatora mrežicu čistite jednom tjedno ili zamjenite ako je potrebno. Na ispušnim loncima s katalizatorom, mrežicu čistite jednom mjesečno. Ukoliko je mrežica oštećena, obavezno ju zamjenite. Ukoliko je mrežica često blokirana, to može biti znak neispravnosti katalizatora. Stupite u dodir s
natural_image
Line drawing of a device with an arrow indicating a step, showing components like a door, socket, and buttons (no text or symbols present)natural_image
Technical line drawing of a mechanical assembly with no visible text or symbolsnatural_image
Pure geometric diagram with intersecting lines and a circular pattern (no text or symbols)ODRŽAVANJE
text_image
Technical diagram of a mechanical assembly with numbered components for identification1 Pjenasti plastični filtar (uretanski filtar)
2 Filcani filtar
3 Zaslon
Čistite filter nakon svakih 25 radnih sati ili češće ukoliko su radni uvjeti izuzetno prašnjavi.
natural_image
Technical diagram of a mechanical component with no visible text or symbols- Uklonite poklopac filtera zraka i uklonite filter. Operite ga u toploj sapunici. Očistite i unutrašnjost poklopca filtra zrakom ili četkom. Provjerite da je filter suh prije ponovnog vraćanja u stroj.
- Uklonite filcani filtar iz držača filtra i lagano iščetkajte krhotine iz filtra.
- Postavite zaslon i filcani filtar na držač filtra za zrak.
- Ugradite pjenasti filtar na poklopac filtra za zrak.
• Ugradite poklopac filtra za zrak.
natural_image
Technical line drawing of an electric motor with visible cooling fins and mounting base (no text or symbols)
natural_image
Pure geometric diagram with intersecting lines and a circular pattern (no text or symbols)UVOD
Draga mušterijo!
Čestitamo na vašem izboru Husqvarna proizvoda! Husqvarna ima dugu istoriju koja se može pratiti do 1689 kada je kralj Karl XI naredio izgradnju fabrike na obali reke Huskvarna, radi proizvodnje musketa. Njena pozicija na reci Huskvarna bila je logičan izbor, jer je reka korišćena za stvaranje vodene snage i tako snabdevala električnu centralu. Preko 300 godina fabrika Husqvarna proizvodi mnogobrojne proizvode, od štednjaka na drva do modernih kuhinjskih aparata, mašina za šivenje, bicikala, motocikala, itd. Prva motorna kosilica za travu uvedena je 1956, praćena motornom testerom 1959, i ovo je sektor u kome Husqvarna danas radi.
Husqvarna je trenutno jedan od vodećih svetskih proizvođača proizvoda za šumarstvo i baštovanstvo, a kvalitet i radne karakteristike su najviši prioriteti. Naš poslovni koncept obuhvata razvoj, proizvodnju i proučavanje tržišta motornih proizvoda za šumarstvo i baštovanstvo, kao i proizvoda za građevinsku i strukturnu industriju. Naš cilj je takođe da budemo na samom vrhu u oblasti ergonomije, pristupačnosti, bezbednosti i očuvanja okoline, pa je stoga razvijen veliki broj različitih karakteristika koje poboljšavaju proizvode u ovim sektorima.
Ubeđeni smo da ćete sa velikim zadovoljstvom uživati u kvalitetu i radnim karakteristikama našeg proizvoda još dugo vremena. Kupovina jednog od naših proizvoda daje vam pristup profesionalnoj pomoći oko popravki i servisiranja, kada god to bude potrebno. Ukoliko prodavac koji vam je prodao mašinu nije jedan od ovlašćenih servisera, zatražite od njega adresu najbližeg ovlašćenog servisa.
Nadamo se da ćete biti zadovoljni vašom mašinom, i uživati u njenom društvu, još mnogo, mnogo godina. Zapamtite da je ovo Uputstvo za rukovaoca važan dokument. Praćenje uputstava (upotreba, servis, održavanje, itd.) može znatno produžiti radni vek vaše mašine, i povećati njenu vrednost u daljoj prodaji. Ukoliko prodate vašu mašinu, ne propustite da novom vlasniku date Uputstvo za rukovaoca.
Hvala Vam što koristite Huskvarna proizvode.
natural_image
Pure geometric diagram with intersecting lines and circular patterns (no text or symbols)

natural_image
Pure geometric diagram with concentric circles and radial lines, no text or symbols presentŠTA JE ŠTA?
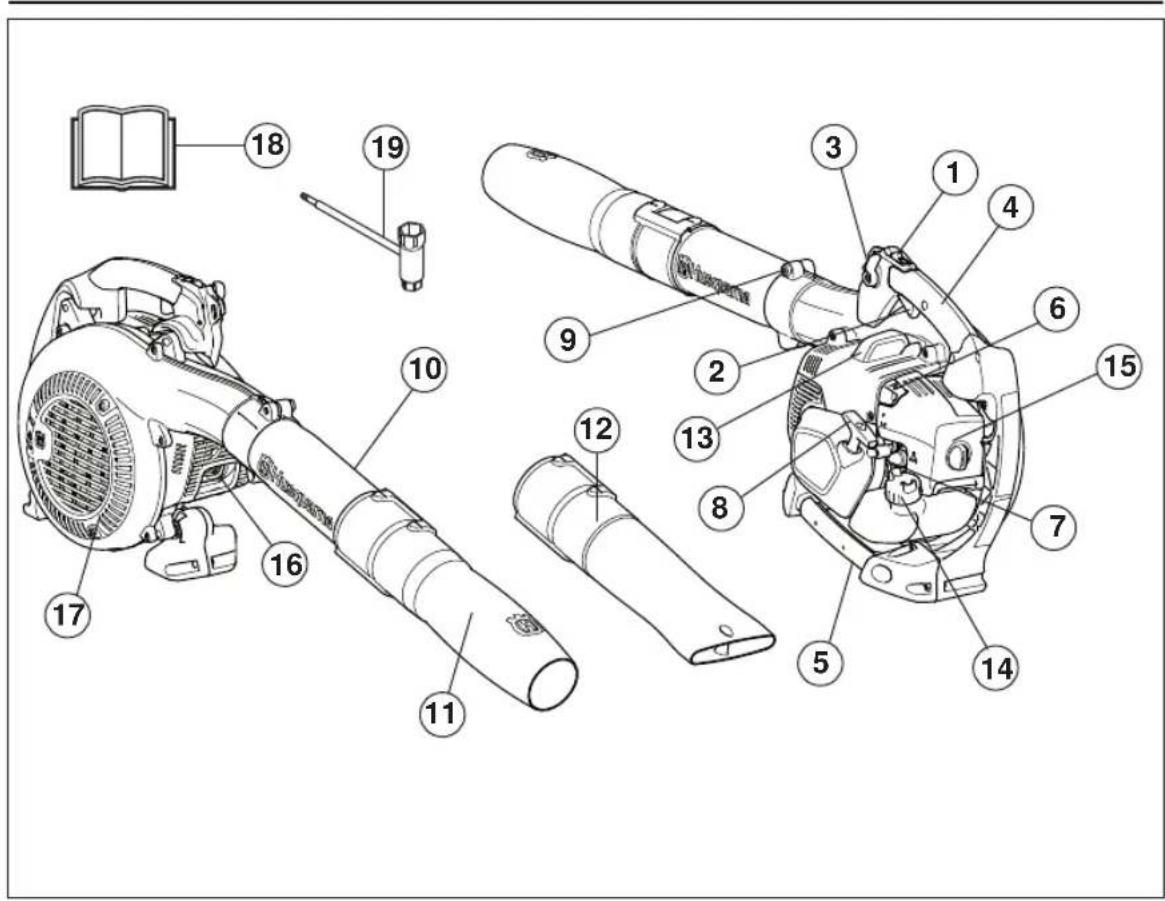
text_image
Technical diagram of a mechanical device with numbered parts for identificationnatural_image
Line drawing of a hand using a tool to lift a motor fan (no text or symbols)text_image
Min 3 m (10 ft)natural_image
Pure geometric diagram with intersecting lines and a circular pattern (no text or symbols)UPUTSTVA ZA BEZBEDNOST
Lična zaštitna oprema

natural_image
Line drawings of two types of safety goggles, one front view and one side view (no text or symbols)natural_image
Line drawing of a pair of boots with visible tread pattern and buckles (no text or symbols)text_image
FIRST AID KITnatural_image
Technical line drawing of a mechanical assembly with no visible text or symbolsnatural_image
Technical line drawing of an electric motor with mounting flanges and a central vent (no text or symbols)
UPOZORENJE! Preterano izlaganje vibracijama može da ošeteti krvotok, ili pak da ošeteti nerve kod ljudi koji imaju problema sa krvotokom. Obrati se lekaru ako imaš simptome preterane izloženosti vibracijama. Primeri takvih simptoma su obamrlost, gubitak osećaja, "žmarci", "iglice", bolovi, malaksalost i promene u boji i stanju kože ili površine koje. Ovi simptomi se obično pojavljuju u prstima, rukama i zglobovima. Rizik se može povećati prilikom nižih temperatura.
Prigušivač

Prigušivač je zamišljen da svede buku na minimum i da upućuje izduvne gasove što dalje od rukovaoca.

natural_image
Technical line drawing of an electric motor and its internal components (no text or symbols)natural_image
Technical line drawing of a mechanical component with exploded view and mounting holes (no text or symbols)Za prigušivače je vrlo bitno da se prati uputstva o proveravanju, održavanju i servisiranju.
Nikad ne upotrebljavaj mašinu s neispravnim prigušivačem.
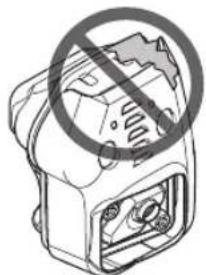
natural_image
Diagram of a device with a prohibition symbol overlay (no text or labels)Redovno proveravaj da li je prigušivač dobro pričvršćen za mašinu.
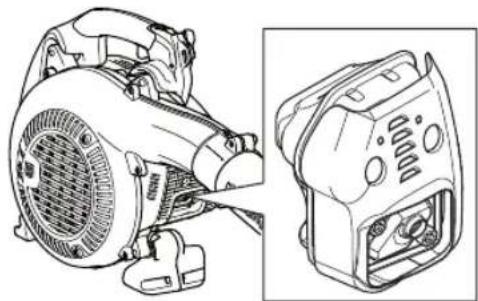
natural_image
Technical line drawing of an electric motor and its internal casing (no text or symbols)Ako prigušivač tvoje mašine ima mrežu protiv varničenja ta se mreža mora redovno čistiti. Začepljena mreža dovodi do pregrevanja motora i može da prouzrokuje teško oštećenje.
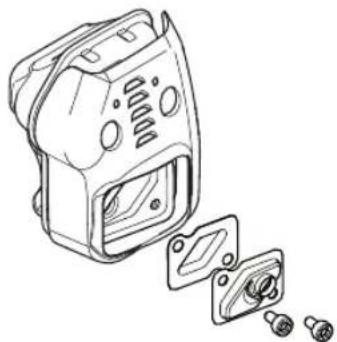
natural_image
Line drawing of a mechanical component with exploded view and mounting holes (no text or symbols)470 – Serbian
UPUTSTVA ZA BEZBEDNOST
Uverite se da je iskrolovka pravilno zašrafljena.

text_image
Technical diagram showing exploded view of a mechanical assembly with numbered components and directional arrows indicating assembly steps.text_image
Diagram illustrating fuel injection and discharge process with labeled components and no-drawn symbols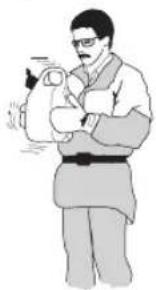
natural_image
Illustration of a person holding an object, no text or symbols presenttext_image
Min 3 m (10 ft)- Obrišite dobro gorivo oko poklopca rezervoara. Nečistoća koja prodre u rezervoar može prouzrokovati smetnje u radu motora.
- Pazite da gorivo bude dobro promešano, tako što se sud sa mešavinom protrese pre punjenja rezervoara.
- Pre svake upotrebe proverite količinu goriva i ostavite prostora za širenje goriva jer toplota od motora i sunca može da dovede do širenja i prolivanja goriva.
- Održavajte ručku suvom i bez tragova ulja ili goriva.
- Gorivo uvek čuvaj u propisanom kontejneru namenjenom toj svrsi.
PALJENJE I GAŠENJE
Paljenje i gašenje


UPOZORENJE! Uvek sklonite uređaj daleko od mesta i izvora dolivanja goriva pre paljenja. Smesti mašinu na čvrsto tlo.
Nadgledaj da nema neovlašćenih lica unutar područja rada, inače postoji rizik ozbiljnih ličnih ozleda. Udaljenost bezbednosti je 15 metara.
natural_image
Technical line drawing of a mechanical component with no visible text or symbolsPumpa za gorivo: Stisnite gumeni mehur pumpe za gorivo više puta, tokom čega se mehur počinje puniti gorivom. Mehur se netreba napuniti sasvim.
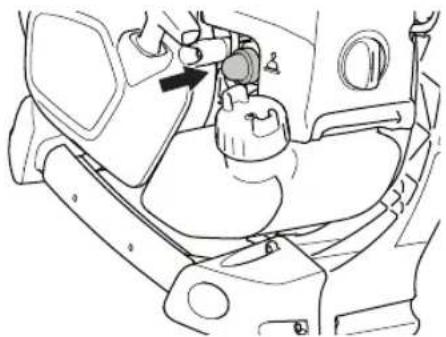
natural_image
Line drawing of a car interior showing the steering wheel and dashboard (no text or symbols)Hladan motor
Saug: Staviti ružicu sauga o položaj paljenja pod saugom.
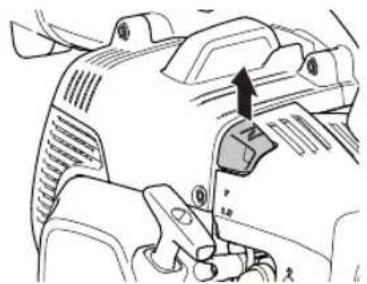
natural_image
Technical diagram of a mechanical component with no visible text or symbolsnatural_image
Line drawing of a hand using a tool to lift a motor or fan (no text or symbols present)NAPOMENA! Ne stavljajte delove tela u označeni prostor. Kontakt može prouzrokovati opekotine na koži, ili strujni udar, u slučaju da je kapica svećice oštećena. Uvek koristite


PALJENJE I GAŠENJE
natural_image
Technical line drawing of a mechanical component with no visible text or symbolsNAPOMENA! Zaustavni prekidač automatski se vraća u startni položaj. Kako ne bi došlo do slučajnog puštanja u rad. prilikom montiranja, provere i/ili izvođenja radova na održavanju treba ukloniti kapicu sa svećice.
TEHNIKA RADA
natural_image
Line drawing of a person in protective gear using a handheld air conditioner (no text or symbols)- Očistite delove nakon rada. Pazite da ne oduvate smeće u tuđu baštu.
natural_image
Pure geometric diagram with intersecting lines and a circular pattern (no text or symbols)ODRŽAVANJE
Karburator
natural_image
Technical line drawing of a mechanical assembly with no visible text or symbolsNeki prigušivači opremljeni su specijalnom mrežom. Ako tvoja mašina ima takav prigušivač treba mrežu čistiti bar jednom nedeljno, što se radi žičanom četkom. Na prigušivaču buke bez katalizatora, hvatač varnica treba čistiti i eventualno zameniti jednom nedeljno. Na prigušivaču buke sa katalizatorom hvatač varnica treba prokontrolisati i eventualno očistiti jednom mesečno. Kod eventualnih oštećenja
natural_image
Diagram of a device with a door panel and two separate lockers, showing a directional arrow (no text or symbols)NAPOMENA! Ne upotrebljavajte nikada mašinu sa prigušivačem buke koji je u lošem stanju.

natural_image
Technical line drawing of a mechanical assembly with no visible text or symbolsRashladni uređaj čisti četkom jednom nedeljno, a po potrebi i češće. Prljav ili začepljen rashladni uređaj dovodi do pregrevanja mašine i oštećenja klipa i cilindra.
Svećica

Na stanje svećice utiče:
text_image
Technical diagram of a mechanical assembly with numbered components for identification1 Penasti plastični filter (uretanski filter)
2 Filter od filca
3 Ekran
natural_image
Technical diagram of a mechanical component with no visible text or symbols- Demontirajte poklopac vazdušnog filtra i skinite filtar. Operite ga u čistoj i toploj sapunici. Vazduhom ili četkom očistite i unutrašnjost poklopca filtera. Proverite da li je filtar suv i zatim ga montirajte.
- Uklonite filcani filter iz držača filtera i četkicom polako očistite ostatke iz filtera.
- Ugradite ekran i filter od filca na držač filtera za vazduh.
- Postavite sunderasti filter u poklopac vazdušnog filtera.
- Postavite poklopac vazdušnog filtera.
natural_image
Technical line drawing of an electric motor with visible blades and mounting base (no text or symbols)
natural_image
Pure geometric diagram with intersecting lines and a circular pattern (no text or symbols)TEHNIČKI PODACI
natural_image
Pure geometric diagram with intersecting lines and a circular pattern (no text or symbols)SADRŽAJ
Sadržaj Prije paljenja obrati pažnju na
OBJAŠNJENJE ZNAKOVA
Znakovi 484
SADRŽAJ
Sadržaj 485
Prije paljenja obrati pažnju na slijedeće: 485
UVOD
Poštovani kupče! 486
ŠTA JE ŠTA?
text_image
Technical diagram of a handheld device with numbered parts for identification and assembly reference.natural_image
Pure geometric diagram with intersecting lines and a circular pattern (no text or symbols)OPŠTE SIGURNOSNE INSTRUKCIJE

UPOZORENJE! Ova mašina prilikom rada stvara elektromagnetsko polje. To polje, u nekim okolnostima, može doći u sukob sa aktivnim ili pasivnim medicinskim implantatima. Radi smanjenja rizika od ozbiljne ili po život pogubne ozljede, preporučujemo osobama sa medicinskim implantatima da se prije rukovanja ovom mašinom posavjetuju sa svojim ljekarom i proizvođačem medicinskih implantata.
Paljenje
- Nikad ne pali mašinu u zatvorenom prostoru. Uvijek misli na opasnost od udisanja izduvnih gasova.
- Posmatrajte okruženje i osigurajte da osobe i životinje ne mogu doći u dodir sa uređajem za otpuhivanje.
Položite mašinu na tlo, pritisnite kućište mašine na tlo sa desnom rukom (NAPOMENA! Ne sa stopalom). Uhvatite ručicu za pokretanje lijevom rukom i povucite je čvrsto i brzo.
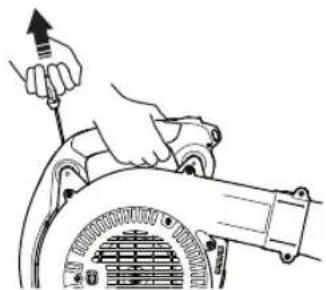
natural_image
Line drawing of a hand using a tool to lift a motor, no text or symbols presentSigurnost goriva
text_image
Min 3 m (10 ft)- Nikad ne pali mašinu:
- Ako si prosuo gorivo po njoj. Obriši dobro i pusti da ostaci benzina ispare.
- Ako si prosuo gorivo po sebi ili po svojoj odjeći, promjeni odjeću. Operi dijelove tijela koji su bili u dodiru sa gorivom. Upotrijebi sapun i vodu.
- Ako iz mašine curi gorivo. Kontroliši redovno da benzin ne curi okolo poklopca rezervoara i creva goriva.
Transport i čuvanje
- Čuvaj i transportuj mašinu i gorivo tako da eventualno curenje i isparenja ne dođu u kontakt sa varnicama ili otvorenom vatrom, na primjer od električnih mašina, elektromotora, utičnica/prekidača ili parnih kotlova.
- Pri čuvanju i transportu goriva moraju se koristiti za to specijalno predviđene i odobrene posude.
- Pri dužem čuvanju mašine gorivo se mora isprazniti. Obavjesti se u najbližoj benzinskoj pumpi šta da uradiš sa viškom goriva. Ispraznite rezervoar za gorivo i pritisnite ubrizgivač tako da se svo gorivo potroši. Uklonite svjećicu i sipajte kašiku ulja za dvotaktne motore u cilindar. Nekoliko puta okrenite mašinu te vratite svjećicu na njeno mjesto.
- Pobrini se da je mašina dobro očišćena i da je potpuno servisiranje izvršeno prije dugotrajnog skladištenja.
• Učvrstite mašinu kod prijevoza. - Mašinu odlažite na suhom, hladnom i dobro provjetrenom mjestu bez prašine. Čuvajte mašinu dalje od dohvata djece.

UPOZORENJE! Budi oprezan pri rukovanju sa gorivom. Misli na opasnost od požara, eksplozije i udisanja.
SIGURNOSNE INSTRUKCIJE
Lična zaštitna oprema

UPOZORENJE! Pri upotrebi mašine će se samo odgovarajuća lična zaštitna oprema koristiti. Lična zaštitna oprema ne eliminiše rizik na povredu ali smanjuje posljedice ako se povreda dogodi. Zatraži pomoć prodavača motornih pila da ti pomogne izabrati pravu opremu. Pročitaj pažljivo uputstvo o upotrebi i shvati sadžaj prije nego upotrijebiš mašinu.

UPOZORENJE! Uvijek budite pozorni u zapažanju signala upozorenja ili dovike kada se upotrebljava zaštita sluha. Uvijek skinite zaštita sluha netom zaustavljanja motora.
- Rukavice se moraju upotrebljavati kada je to potrebno.
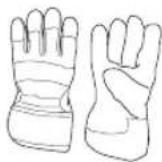
- Zaštita sluha mora imati dovoljan prigušujući efekat.
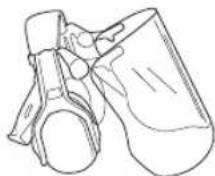
- Odobrena zaštita za oči se uvijek mora upotrijebiti. Pri upotrebi vizira istovremeno se mora upotrijebiti odobrene zaštitne naočale. Odobrene zaštitne naočale su takve koje ispunjavaju standard ANSI Z87.1 za SAD ili EN 166 za EU-države. Dijelovi grana ili drugih objekata koji se otpuhuju mogu oštetiti oči.
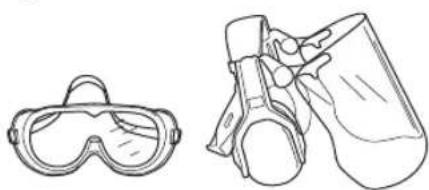
natural_image
Line drawings of two types of safety goggles, one front view and one side view (no text or symbols)natural_image
Line drawing of a pair of boots with visible tread pattern and side button (no text or symbols)- Uvijek nosite teške dugačke hlače, čizme i majice dugih rukava. Da biste smanjili rizik od ozljeda vezanih za objekte koji se uvlače u rotirajuće dijelove, ne nosite odjeću koja
visi. šalove, nakit itd. Osigurajte kosu tako da se nalazi iznad nivoa ramena.
- Ako postoji opasnost od prašine potrebno je koristiti masku za disanje.
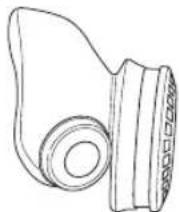
natural_image
Technical line drawing of a mechanical assembly with no visible text or symbolsnatural_image
Technical line drawing of an electric motor with mounting bracket and side-mounted shaft (no text or symbols)
natural_image
Technical line drawing of an electric motor and its internal casing (no text or symbols)Prigušivač sa katalizatorom je konstruisan da umanjuje štetne sastojke u izduvnim gasovima.
natural_image
Line drawing of a device housing with an arrow indicating assembly or disassembly (no text or symbols present)Za prigušivač zvuka je veoma važno da se prate instrukcije za kontrolu, održavanje i servis.
Nikad ne upotrebljavaj mašinu koja ima neispravan prigušivač zvuka.
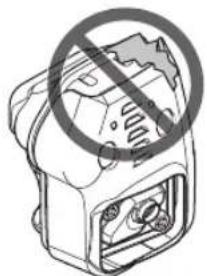
natural_image
Diagram of a device with a prohibition symbol overlay (no text or symbols present)Kontroliši redovno da li je prigušivač dobro pričvršćen na mašini.
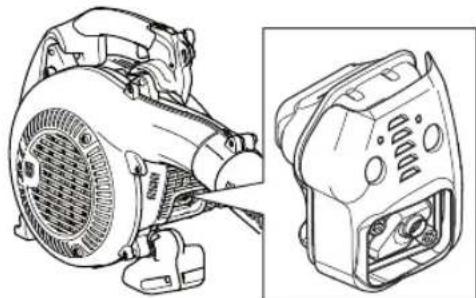
natural_image
Technical line drawing of an electric motor and its internal casing (no text or symbols)Ako je prigušivač zvuka na tvojoj mašini opremljen mrežicom koja štiti od varničenja, treba je redovno čistiti. Začepljena


SIGURNOSNE INSTRUKCIJE
natural_image
Line drawing of a mechanical component with exploded view and mounting holes (no text or symbols)text_image
Technical diagram showing four labeled mechanical components with arrows indicating assembly or movement, likely illustrating a mechanical assembly or assembly process.natural_image
Pure geometric diagram with intersecting lines and circular patterns, no text or symbols presentRUKOVANJE GORIVOM
Pogonsko gorivo
text_image
Diagram illustrating fuel injection and discharge process with labeled components and prohibition symbols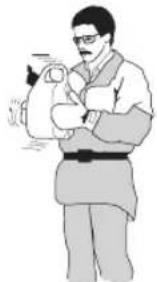
natural_image
Illustration of a person in traditional attire holding an object, no text or symbols visible- Ne mješaj nikad više goriva nego što je potrebno za maksimalno jedan mjesec.
- Ako se mašina ne upotrebljava duži period treba isprazniti rezervoar i očistiti ga.


natural_image
Pure geometric diagram with intersecting lines and a circular pattern (no text or symbols)RUKOVANJE GORIVOM
Punjenje


text_image
Min 3 m (10 ft)- Osuši prostor oko poklopca tako da bude potpuno čist. Nečistoće u rezervoaru uzrokuju smetnje u pogonu.
- Pobrini se da gorivo bude dobro izmješano tako što ćeš promućkati posudu prije nego naspeš gorivo.
- Provjerite nivo goriva prije svake upotrebe i ostavite prostor kako bi se gorivo moglo širiti, jer bi u suprotnom toplota mašine i sunce mogli dovesti do širenja i preticanja goriva.
- Ručke održavajte suhima i čistima od ulja i goriva.
- Gorivo treba biti uskladišteno u za to specijalno namjenjenim i odobrenim posudama.
PALJENJE I GAŠENJE
Paljenje i gašenje


UPOZORENJE! Uvijek udaljite mašinu od područja na kojem punite gorivo i od izvora punjenja. Spusti mašinu na čvrstu podlogu.
Pobrini se da se nikakve druge neovlaštene osobe ne nalaze u zoni rada jer u suprotnom postoji rizik za ozbiljne tjelesne povrede. Sigurnosno odstojanje je 15 metara.
natural_image
Technical line drawing of a mechanical assembly with no visible text or symbolsPumpa za gorivo: Pritisnite gumeni mjehur pumpe za gorivo više puta, sve dok se mjehur počinje puniti gorivom. Mjehur se netreba napuniti potpuno.
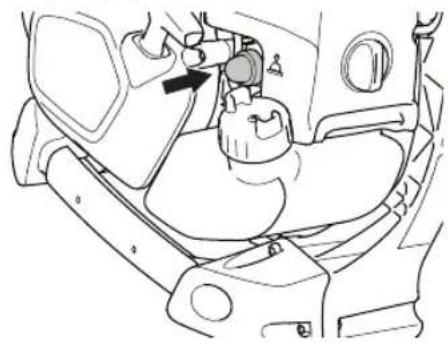
natural_image
Line drawing of a car interior showing a hand valve and seat (no text or symbols)Hladan motor
Saug: Staviti ružicu sauga o položaj paljenja pod saugom.
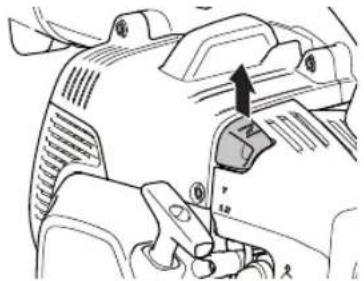
natural_image
Technical diagram of a mechanical component with an arrow indicating direction (no text or symbols present)Položite mašinu na tlo, pritisnite kućište mašine na tlo sa desnom rukom (PAŽNJA! Ne sa stopalom!).
Uhvatire ručicu za pokretanje, lijevom rukom polagano izvlačite kabel dok ne osjetite otpor (prihvat zaponca startera) pa snažno i brzo izvucite kabel. Nikad ne omotavaj startno uže oko šake.
Povlačite uže dok se motor ne pokuša pokrenuti (ili maksimalno 5 povlačenja).
natural_image
Line drawing of a hand using a tool to adjust or install a mechanical component (no text or symbols present)PALJENJE I GAŠENJE
text_image
HoneywellGašenje
Podesite ručicu za gas u položaj rada na prazno i pritišćite prekidač za zasutavljanje dok se mašina ne zaustavi u potpunosti.

natural_image
Technical line drawing of a mechanical component with no visible text or symbolsPAŽNJA! Stop prekidač se automatski vraća na start poziciju. Da bi se spriječilo nenamjerno paljenje, poklopac ručice za paljenje mora biti skinut sa ručice za paljenje tokom montiranja, provjeravanja i/ili servisiranja.
TEHNIKA RADA
natural_image
Technical line drawing of a mechanical component with labeled part D (no text or symbols beyond label)natural_image
Line drawing of a person in protective gear holding a handheld air conditioner (no text or symbols)- Očistite radno mjesto nakon završetka. Uvjerite se da niste otpuhali otpad u nečiji vrt.
- Koristite mašinu tokom uobičajenih radnih sati kako biste izbjegli nepotrebnu buku. Izbjegavajte rad rano ujutro ili kasno uveče.

natural_image
Pure geometric diagram with intersecting lines and a circular pattern (no text or symbols)TEHNIKA RADA
- Izbjegavaj upotrebu ako prijeti nevrijeme naprimjer gusta magla, jaka kiša, jak vjetar, jaka zima itd. Raditi po lošem vremenu je zamorno i mogu nastati opasne okolnosti, na primjer klizave podloge.
- Smanjite vrijeme otpuhivanja laganim ovlaživanjem prašnjavih površina ili pomoću sprejeva iz opreme.
- Smanjite potrošnju vode upotrebom uređaja za otpuhivanje umjesto crijeva za vodu pri različitim poslovima čišćenja oko travnjaka i vrtova, kao što su rešetke, zakloni, prečke, trijemovi itd. Uređaj se ne smije koristiti na ljestvama ili skelama.
- Obrati pažnju da se možeš sigurno kretati i stajati. Pogledaj da nema eventualnih prepreka za neočekivano micanje (korjenje, stijene, grane, rupe, jarci itd.). Upotrijebi veliku opreznost kada radiš na nagnutom terenu.
- Nikad ne spuštaj mašinu sa motorom u pogonu bez da imaš kontrolu nad njom.
- Ispušni gasovi motora sadrže ugljenmonoksid koji može uzrokovati trovanje ugljenmonoksida. Zbog toga nemoj nikada paliti ili upotrebljavati mašinu u zatvorenom prostoru, ili gdje je protok zraka nedovoljan.
- Puhač se ne smije koristiti na ljestvama ili skeli.
- PAŽNJA! Nikad ne upotrebljavaj mašinu bez mogućnosti da nekog možeš pozvati u pomoć u slučaju nesreće.
text_image
Technical diagram of a mechanical device with labeled components and partsnatural_image
Technical line drawing of a mechanical assembly with no visible text or symbolsNeki prigušivači zvuka su opremljeni sa posebnom mrežicom koja gasi iskrice. Ako je i tvoja mašina opremljena jednim takvirm prigušivačem zvuka treba mrežicu očistiti jednom sedmično a najbolje je čistiti sa čeličnom četkom. Na prigušivačima zvuka bez katalizatora je potrebno mrežicu čistiti i eventualno mjenjati jednom sedmično. Na prigušivačima zvuka sa katalizatorom je potrebno mrežicu kontrolisati i eventualno čistiti jednom mjesečno. Ako na mrežici postoje eventualna oštećenja potrebno ju je zamjeniti. Ako se mrežica često začepljava to može biti znak da je smanjena funkcija katalizatora. Kontaktiraj svog
prodavca radi kontrole. Sa oštećenom mrežicom se mašina pregrijava što dovodi do oštećenja na cilindru i klipu.
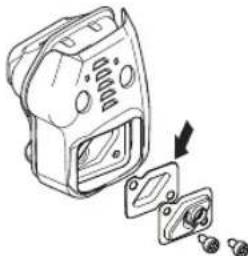
natural_image
Line drawing of a device with an arrow indicating a step, showing components like a door and buttons (no text or symbols present)PAŽNJA! Nikad ne upotrebljavaj mašinu sa prigušivačem zvuka koji je u lošem stanju.

UPOZORENJE! Prigušivač zvuka sa katalizatorom je vrlo vruć kako kod upotrebe tako i nakon gašenja mašine. To važi i kod rada mašine u praznom hodu. Doticanje može izazvati opekotine na koži. Obrati pažnju na opasnost od požara!
Rashladni sistem
natural_image
Technical line drawing of a robotic arm and mechanical component (no text or symbols)Čisti rashladni sistem četkom jedanput sedmično ili češće po potrebi. Nečist ili začepljen rashladni sistem prouzrokuje pregrijavanje mašine i oštećenja cilindra i klipa.
Svjećica motora

natural_image
Pure geometric diagram with intersecting lines and a circular pattern (no text or symbols)ODRŽAVANJE
text_image
Technical diagram of a mechanical assembly with numbered components for identification1 Pjenasti plastični filter (uretanski filter)
2 Filcani filter
3 Ekran
Očisti filter nakon 25 sati rada ili češće ako se radi u neuobičajeno prašnjavoj sredini.
Čišćenje filtera za vazduh
Zatvorite regulator čoka tako što ćete postaviti čok u čok položaj.
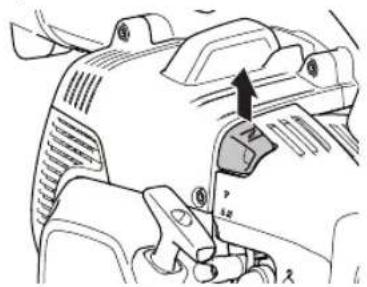
natural_image
Technical diagram of a mechanical component with no visible text or symbols- Demontiraj poklopac filtera za vazduh i ukloni filter. Operi ga u toploj vodi da bude čist. Također očistite unutrašnjost poklopca filtera zrakom ili četkom. Pobrini se da filter bude suh kad se ponovo montira.
- Uklonite filcani filter iz držača filtera i četkicom polako očistite ostatke iz filtera.
- Montirajte ekran i filcani filter na držač filtera zraka.
- Postavite spužvasti filter u poklopac filtera zraka.
• Postavite poklopac filtera zraka.
Dugo upotrebljavan filter ne može se nikad dobro očistiti. Filter se mora mijenjati u jednakim vremenskim razmacima.
natural_image
Technical line drawing of an electric motor with visible blades and mounting base (no text or symbols)
UPOZORENJE! Nikada ne koristite uređaj za otpuhivanje ako rešetka nije na svom mjestu. Prije upotrebe provjerite da li se vijak nalazi na svom mjestu i da nije oštećen.
Filter goriva
Provjerite da filter goriva nije prljav i da crijevo za dovod goriva nije napuklo ili na drugi način oštećeno. Zamijenite ukoliko je potrebno.
Bosnian - 501


ODRŽAVANJE
Šema održavanja
U nastavku su date upute za održavanje koje je potrebno provoditi na ovoj mašini. Većina radnji je opisana u poglavlju Održavanje. Korisnik smije vršiti servisiranje i održavanje samo kako je navedeno u ovom uputstvu za upotrebu. Obimnije radove smije izvršavati samo ovlašteni servis.
| Održavanje | Dnevno nadgledanje | Sedmično nadgledanje | Mjesečno nadgledanje |
| Očisti mašinu izvana. X | |||
| Provjerite da li zatvarač gasa i gas rade sigurno. X | |||
| Kontroliši da li stop-prekidač funkcioniše. X | |||
| Čisti zračni filter. Promjeni ga po potrebi. X | |||
| Provjeri da li su zavrnuti šarafi i matice. X | |||
| Kontroliši da nema ispust goriva iz motora, rezervoara goriva ili cijevi goriva. | X | ||
| Provjerite da filter goriya nije prljav i da crijevo za dovod goriva nije napuklo ili na drugi način oštećeno. Zamijenite ukoliko je potrebno. | X | ||
| Provjerite da sve strane zaslona za ulaz zraka nisu blokirane. X | |||
| Kontroliši aparat za paljenje i njegovo uže. X | |||
| Prekontroliši da vibracioni izolatori nisu oštećeni. X | |||
| Očisti svjećicu izvana. Demontiraj je i kontroliši razmak između elektroda. Podesi razmak na 0,65 mm ili zamjeni svjećicu. Nadgledaj da svjećica ima tkz. štit protiv radio valova. | X | ||
| Očistite rashladni sistem mašine. X | |||
| Očisti ili zamjeni mrežicu protiv iskričenja na prigušivaču zvuka (važi samo za prigušivače zvuka bez katalizatora). | X | ||
| Očisti karburator izvana i prostor oko njega. X | |||
| Provjerite da filter goriva nije prljav i da crijevo za dovod goriva nije napuklo ili na drugi način oštećeno. Zamijenite ukoliko je potrebno. | X | ||
| Prekontroliši sve kablove i prilkjučke. X | |||
| Promjeni svjećicu. Nadgledaj da svjećica ima tkz. štit protiv radio valova. | X | ||
| Kontroliši i eventualno očisti mrežicu protiv iskričenja na prigušivaču zvuka (važi samo za prigušivače zvuka sa katalizatorom). | X |


TEHNIČKI PODACI
Tehnički podaci
Tehnički podaci 525BX
Motor
Zapremina cilindra, cm ^3
25.4
Broj obrtaja pri praznom hodu, rpm 3000
text_image
Diagram showing a speaker icon with 'L' and 'dB' labels, above a downward arrow symbolizing signal or attenuation.text_image
Diagram showing fuel pump icons and traffic symbols including water drop, valve, and plugTurkish - 505


İÇİNDEKİLER
natural_image
Pure geometric diagram with intersecting lines and a circular pattern (no text or symbols)GİRİŞ
Değerli Müşterimiz,
natural_image
Pure geometric diagram with intersecting lines and circles, no text or symbols present

natural_image
Pure geometric diagram with concentric circles and radial lines, no text or symbols presentNE NEDİR?
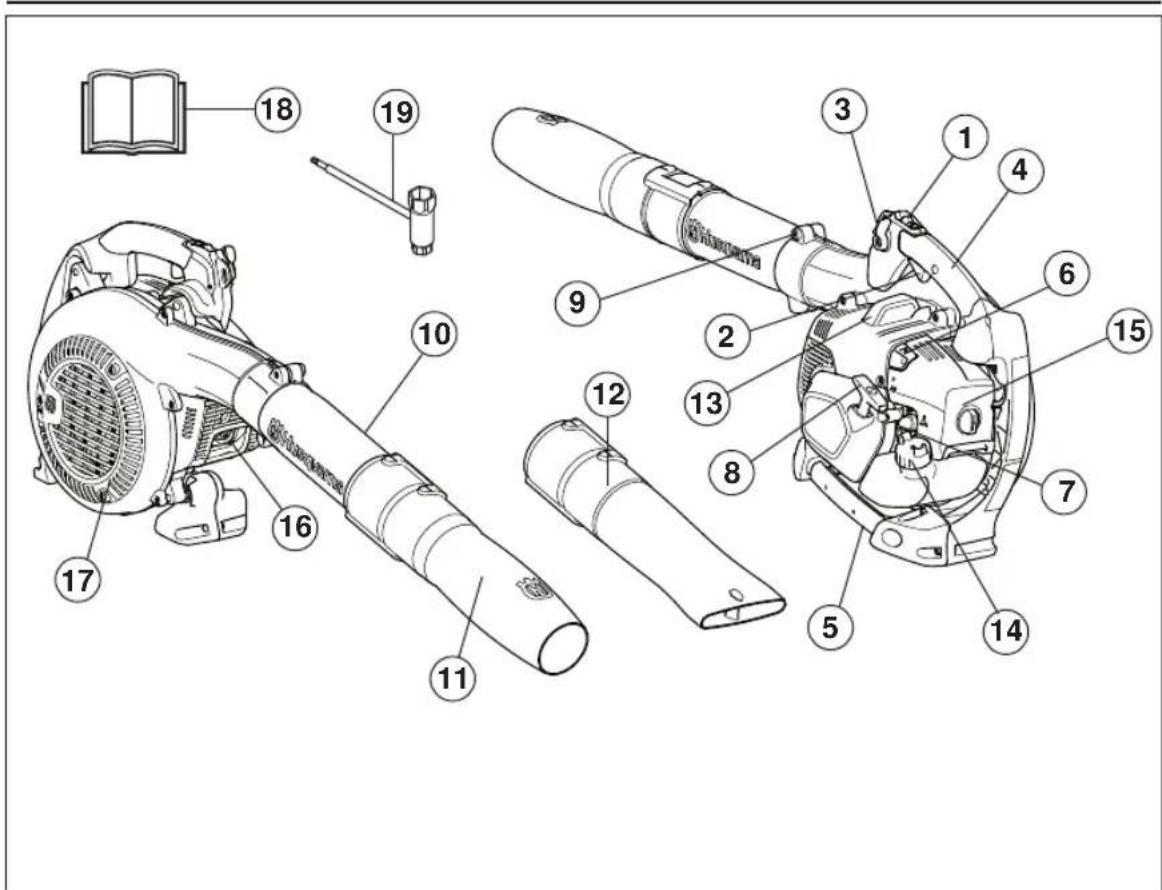
text_image
Technical diagram of a handheld device with numbered parts for identification and assembly reference.natural_image
Illustration of a hand using a tool to lift a motor or fan (no text or symbols visible)Yakıt güvenliği
text_image
Min 3 m (10 ft)natural_image
Line drawings of two types of safety goggles, one front view and one side view (no text or symbols)natural_image
Line drawing of a pair of boots with visible tread pattern and buckles (no text or symbols)text_image
FIRST AID KITMakinenin güvenlik donanímí
natural_image
Technical line drawing of a mechanical assembly with no visible text or symbolsnatural_image
Technical line drawing of an electric motor with mounting flanges and a central vent, showing no text or symbols.
natural_image
Technical line drawing of an electric motor and its internal casing (no text or symbols)natural_image
Technical line drawing of a mechanical component with exploded view and mounting holes (no text or symbols)natural_image
Diagram of a device with a prohibition symbol overlay (no text or symbols present)natural_image
Technical line drawing of an electric motor and its internal casing (no text or symbols)natural_image
Line drawing of a mechanical component with exploded view and mounting holes (no text or symbols)512 – Turkish
text_image
Technical diagram showing exploded view of a mechanical component with numbered parts and assembly instructionsnatural_image
Pure geometric diagram with crosshair and circular pattern (no text or symbols)YAKIT KULLANIMI
Çalıştírici
text_image
Diagram illustrating fuel injection and discharge process with labeled components and prohibition symbols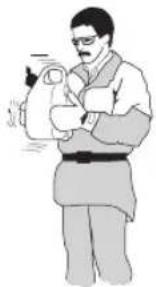
natural_image
Illustration of a person holding an object, possibly a medical or industrial device (no text or symbols visible)text_image
Min 3 m (10 ft)natural_image
Line drawing of a mechanical component with no visible text or symbolsnatural_image
Technical line drawing of a mechanical component with no visible text or symbolsSoğuk motor
natural_image
Technical diagram of a mechanical component with no visible text or symbolsnatural_image
Line drawing of a hand using a tool to lift a motor or fan (no text or symbols present)ÇALIŞTIRMA VE DURDURMA
natural_image
Technical line drawing of a mechanical component with no visible text or symbolsnatural_image
Pure geometric diagram with intersecting lines and a central circular pattern (no text or symbols)ÇALIŞMA TEKNİKLERİ
natural_image
Technical line drawing of a mechanical component with labeled part D (no text or symbols beyond label)natural_image
Line drawing of a person in protective gear using a handheld air conditioner (no text or symbols)natural_image
Technical line drawing of a mechanical assembly with no visible text or symbolsnatural_image
Diagram of a device with an arrow indicating a process or transformation (no text or symbols present)natural_image
Technical line drawing of a mechanical assembly (no text or symbols visible)text_image
Technical diagram of a mechanical assembly with numbered components for identification1 Plastik köpük filtre (üretan filtre)
2 Keçe filtre
3 Perde
natural_image
Technical diagram of a mechanical component with no visible text or symbolsnatural_image
Technical line drawing of an electric motor with visible blades and mounting base (no text or symbols)
natural_image
Pure geometric diagram with intersecting lines and a circular pattern (no text or symbols)TEKNİK BİLGİLER
natural_image
Pure geometric diagram with intersecting lines and circular shapes (no text or symbols)ЧТО ЕСТЬ ЧТО?
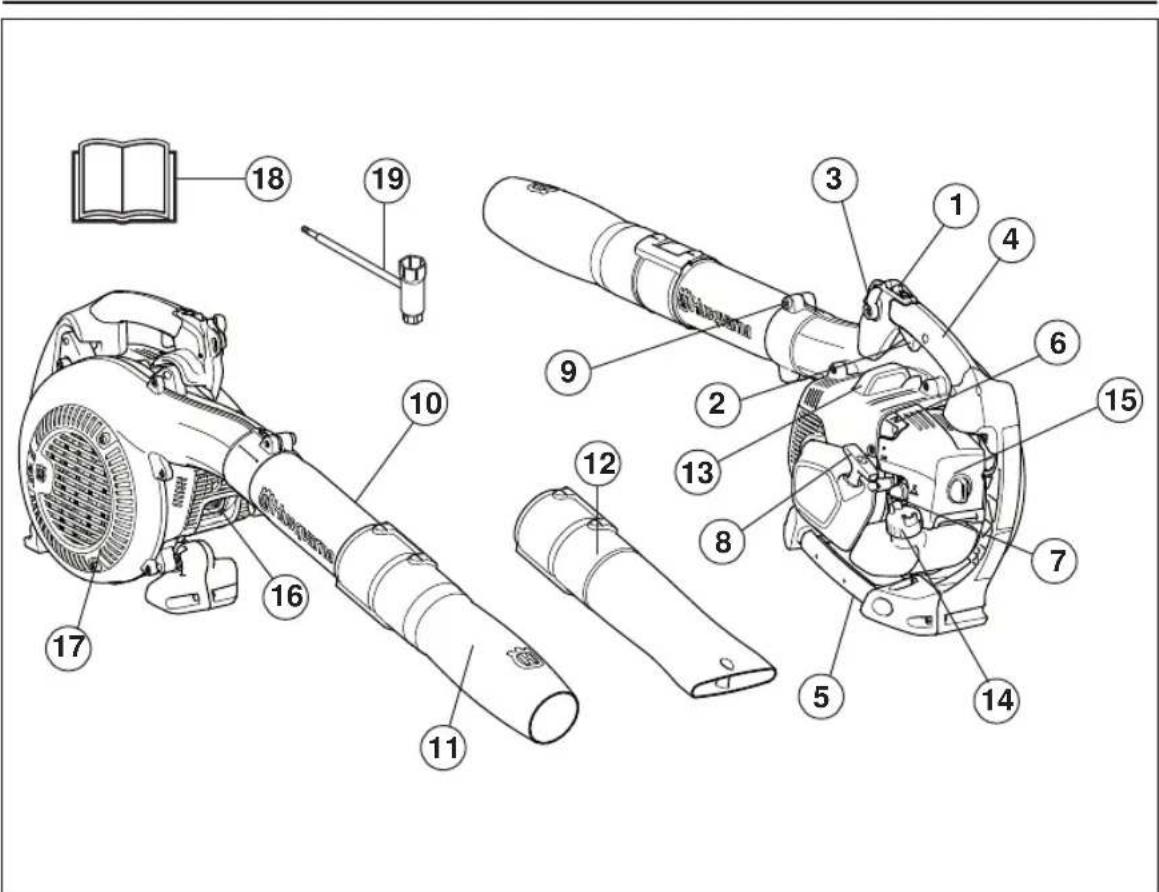
text_image
Technical diagram of a handheld device with numbered parts for identification and assembly reference.natural_image
Pure geometric diagram with intersecting lines and circular shapes, no text or symbols present
natural_image
Line drawing of a hand using a tool to adjust or install a mechanical component (no text or symbols present)text_image
Min 3 m (10 ft)natural_image
Line drawings of two types of safety goggles, one open and one closed, with no text or symbols present.natural_image
Line drawing of a pair of boots with textured soles (no text or symbols)text_image
FIRST AID KITnatural_image
Technical line drawing of a mechanical component with no visible text or symbolsnatural_image
Technical line drawing of an electric motor with mounting flanges and a central vent (no text or symbols)
natural_image
Technical line drawing of an electric motor and its internal components (no text or symbols)natural_image
Technical line drawing of a mechanical component with exploded view and mounting holes (no text or symbols)natural_image
Diagram of a device with a prohibition symbol overlay (no text or symbols present)natural_image
Technical line drawing of an electric fan and its internal components (no text or symbols)natural_image
Line drawing of a mechanical component with exploded view and mounting holes (no text or symbols)text_image
Technical diagram showing four-step assembly steps of a battery with labeled components and directional arrows indicating motion.text_image
Diagram illustrating fuel and chemical hazard symbols: a container with fuel nozzle, a bottle pouring liquid, and two crossed-out cans labeled 'MLV' and 'SO2'.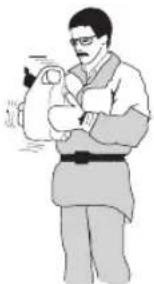
natural_image
Illustration of a person in traditional attire holding an infant (no text or symbols visible)natural_image
Pure geometric diagram with intersecting lines and a circular pattern (no text or symbols)□□□,^<□ □□□□TM...□^Ÿ ' '□<^,□CE
‡aïðaâêa òîïèeâîi


“...”, “...†, ...! ”, “óiúðáíèß dènèà aíçíèñáíèß ínæàdà íóæíí ó÷ånòù něááópùèà iǎdû tǎaínòíðáíínoè:
faiðaáeó làøeíú ôíeeáú néáaóao tőieçaíaèou á óiðiði ááioééedőáiño mäuáíeßö. faiðaúaáonß çaiðaáeßòú làøeíó á çaeðuòíí mäuáíe.
text_image
Min 3 m (10 ft)• ì÷ênõèòù êõûøéó ôïèeâîîâi àaêa. ïàèe÷èâ çàãðßçíáíèé â ôïèeâîîi àaêâ aâääò ê íàðaâîßì â òaíóa âäeâaòaœß.
• “āīnòiāāduòàñū, ÷òì ōīēeāī ōīdīrī nìāqəli, ānòðbōeāàs āiēiñòu rādāa çāoāaēíe ōīeēaīnai áaèa.
• Ιδίαάβεόα όδίαίιι όίεεαὰ ἰάδαὰ εὰæμὶ
ἐπίεύςταίεὰὶ ἐπὸαλεβεόα ἰαῖοῖ ἀαὲå
ìà dànèòǎièa oìèeàà, oùè eàè a iòìèaíīn neó÷àà oàieī tò aāēaàòàèß è nǐéiòa ïæào nǐnǐánoàīaàòù dànèòǎièp oìèeàà è aāi tǎoàèeàó.
• ὁ÷êè âîëæíû âuòù nóðèiè è ñâîâîâíúìè òò làñēà è ôûïeêâà.
•,ñáááðáíèoá óíneéaí a niáöeàéuíí tóááíacía÷áííúð äeß yótaí áieínoßó.
ЗАПУСК И ОСТАНОВКА
Запуск и остановка


natural_image
Mechanical assembly diagram showing a lever mechanism with no visible text or symbolsnatural_image
Line drawing of a car interior showing hand positioning and seatbelt mechanism (no text or symbols)Холодный двигатель
natural_image
Technical diagram of a mechanical component with no visible text or symbolsnatural_image
Line drawing of a hand using a tool to lift a motor, no text or symbols presentnatural_image
Technical line drawing of a mechanical component with no visible text or symbolsnatural_image
Line drawing of a person in protective gear holding a large fan or blower (no text or symbols)natural_image
Pure geometric diagram with intersecting lines and a circular pattern (no text or symbols)МЕТОД РАБОТЫ
text_image
Technical diagram of a mechanical device with labeled components and directional arrowsnatural_image
Technical line drawing of a mechanical assembly with no visible text or symbolsnatural_image
Line drawing of a device with an arrow indicating a step, showing components like a door, button, and connector (no text or symbols present)natural_image
Technical line drawing of a mechanical assembly (no text or symbols visible)natural_image
Pure geometric diagram with intersecting lines and a circular pattern (no text or symbols)text_image
Technical diagram of a mechanical assembly with numbered components for identificationnatural_image
Technical diagram of a mechanical component with arrows indicating direction (no text or symbols)natural_image
Technical line drawing of an electric motor with visible blades and mounting base (no text or symbols)
natural_image
Pure geometric diagram with intersecting lines and a circular pattern (no text or symbols)ТЕХНИЧЕСКИЕ ДАННЫЕ
natural_image
Pure geometric diagram with intersecting lines and circular shapes, no text or symbols present
natural_image
Pure geometric diagram with concentric circles and radial lines, no text or symbols presenttext_image
Technical diagram of a handheld device with numbered parts for identification and assembly reference.natural_image
Line drawing of a hand using a tool to lift a motor or fan (no text or symbols present)text_image
Min 3 m (10 ft)natural_image
Line drawings of two types of safety goggles, one front view and one side view (no text or symbols)natural_image
Line drawing of a pair of boots with visible branding (no text or symbols)text_image
FIRST AID KITnatural_image
Technical line drawing of a mechanical assembly with no visible text or symbolsnatural_image
Technical line drawing of an electric motor with cooling fan and mounting bracket (no text or symbols)
natural_image
Technical line drawing of an electric motor and its internal components (no text or symbols)natural_image
Line drawing of a mechanical device with exploded view and mounting holes (no text or symbols)natural_image
Diagram of a device with a prohibition symbol overlay (no text or symbols present)


natural_image
Technical line drawing of an electric motor and its internal casing (no text or symbols)natural_image
Line drawing of a mechanical component with exploded view and mounting holes (no text or symbols)text_image
Technical diagram showing four labeled mechanical components with arrows indicating assembly or movement stepsnatural_image
Illustration of a person holding an infant, no text or symbols presentnatural_image
Pure geometric diagram with intersecting lines and a circular pattern (no text or symbols)РАБОТА С ГОРИВОТО
Зареждане с гориво

text_image
Min 3 m (10 ft)natural_image
Mechanical assembly diagram showing a lever mechanism with no visible text or symbolsnatural_image
Line drawing of a car interior showing the wheel and seat assembly (no text or symbols)Студен двигател
natural_image
Technical diagram of a mechanical component with no visible text or symbolsnatural_image
Line drawing of a hand using a tool to lift a motor, no text or symbols presentnatural_image
Technical line drawing of a mechanical component with no visible text or symbolsnatural_image
Technical line drawing of a mechanical component with labeled part D (no text or symbols beyond label)natural_image
Line drawing of a person in protective gear holding a large industrial fan (no text or symbols)natural_image
Technical line drawing of a mechanical assembly with no visible text or symbolsnatural_image
Diagram of a device with an open lid and internal components, showing a directional arrow (no text or symbols present)natural_image
Technical line drawing of a mechanical assembly with no visible text or symbolstext_image
Technical diagram of a mechanical assembly with numbered components for identificationnatural_image
Technical diagram of a mechanical component with no visible text or symbolsnatural_image
Technical line drawing of an electric motor with visible blades and mounting bracket (no text or symbols)
natural_image
Pure geometric diagram with intersecting lines and a circular pattern (no text or symbols)natural_image
Pure geometric diagram with intersecting lines and circles, no text or symbols present
natural_image
Pure geometric diagram with concentric circles and radial lines, no text or symbols presentマークの説明
シンボルマーク
text_image
Exploded view diagram of a handheld device with numbered parts for identificationブロワーの各部名称
natural_image
Illustration of a hand using a tool to adjust or install a mechanical component (no text or symbols visible)燃料の安全について
text_image
Min 3 m (10 ft)natural_image
Line drawing of a mechanical component or device with no visible text or symbolsnatural_image
Line drawings of two types of safety goggles, one front view and one side view (no text or symbols)natural_image
Line drawing of a pair of boots with visible tread pattern and buckles (no text or symbols)natural_image
Line drawing of a mechanical component with a circular base and textured top (no text or symbols)- 常に救急箱を身近に備えてください。
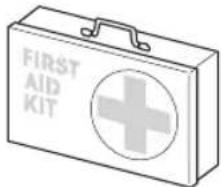
text_image
FIRST AID KIT製品の安全装置
natural_image
Technical line drawing of a mechanical component with no visible text or symbolsnatural_image
Technical line drawing of an electric motor with mounting flanges and a central vent (no text or symbols)
natural_image
Technical line drawing of an electric motor and its internal components (no text or symbols)natural_image
Line drawing of a mechanical device with exploded view and mounting holes (no text or symbols)natural_image
Line drawing of a device with a circular symbol overlay (no text or symbols present)natural_image
Technical line drawing of an electric motor with side and top views (no text or symbols)natural_image
Technical line drawing of a mechanical component with exploded view and mounting holes (no text or symbols)安全注意事項
注意!
text_image
Technical diagram showing four-step assembly steps of a device with labeled components and directional arrows indicating motion.text_image
Diagram illustrating chemical process steps: pouring fuel into a gas container with 'ML' and 'V-3u' labels, and no chemical symbols for pollution.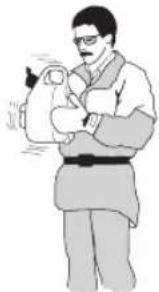
natural_image
Illustration of a person holding an infant, no text or symbols presenttext_image
Min 3 m (10 ft)natural_image
Technical line drawing of a mechanical component with no visible text or symbolsnatural_image
Line drawing of a car interior showing a hand operating the wheel and seatbelt mechanism (no text or symbols)冷機エンジン
natural_image
Mechanical component diagram showing a lever mechanism with an arrow indicating direction (no text or symbols present)natural_image
Line drawing of a hand using a tool to adjust or install a mechanical component (no text or symbols visible)始動と停止
natural_image
Technical line drawing of a mechanical assembly with no visible text or symbolsnatural_image
Technical line drawing of a mechanical component with labeled part D (no text or symbols beyond label)natural_image
Line drawing of a person in protective gear using a manual air blower (no text or symbols)natural_image
Technical line drawing of a mechanical assembly with no visible text or symbolsnatural_image
Line drawing of a device component with an arrow indicating assembly or transformation (no text or symbols present)natural_image
Technical line drawing of a robotic arm and a mechanical device (no text or symbols)text_image
Technical diagram of a mechanical device with numbered parts for identificationnatural_image
Mechanical component diagram showing a lever mechanism with a black arrow indicating direction (no text or symbols present)natural_image
Technical line drawing of an electric motor with a handle and mounting base (no text or symbols)
EN - The object of the declaration described in the Declaration of conformity is in conformity with the relevant Union harmonization legislation:
- of June 8, 2011 "on the restriction of the use of certain hazardous substances in electrical and electronic equipment" 2011/65/EU. The following standards have been applied:
- EN 50581:2012

WARNING: Tampering with the engine voids the EU type-approval of oduct.
H1156688-38,525BX,GB_1.fm Page 233 Tuesday, April 19, 2016 10:37 AM
www.husqvarna.com
Original instructions
Bruksanvisning i original
text_image
Black and white barcode image with vertical lines and a central dot2019-04-17