RCA 200 - Aquarium EDEN - Free user manual and instructions
Find the device manual for free RCA 200 EDEN in PDF.
| Type of product | Aquarium heater with thermostat |
| Brand | Eden |
| Model | RCA 200 |
| Power consumption | 200 W |
| Supply voltage | 230 V AC |
| Network frequency | 50 Hz |
| Mains cable length | 1.5 m |
| Temperature regulation range | +18 °C to +32 °C |
| Suitable for freshwater | Yes |
| Suitable for seawater | Yes |
| Dimensions (Ø × H) | 33 × 315 mm |
| Weight | 0.25 kg |
| Immersion protection | IPX8 (up to 0.8 m) |
| Protection class | II (double insulation) |
| Tube material | Glass |
| Fixation | Suction cups included |
| Main functions | Thermostatic heating, calibration, operation indicator light |
| Cleaning | With clean water and a soft sponge, without chemicals |
| Safety | Disconnect before handling in water, 30 mA RCD protection recommended, do not use if cable damaged |
| Maintenance | Regularly check temperature and calibrate if necessary |
Frequently Asked Questions - RCA 200 EDEN
User questions about RCA 200 EDEN
0 question about this device. Answer the ones you know or ask your own.
Ask a new question about this device
Download the instructions for your Aquarium in PDF format for free! Find your manual RCA 200 - EDEN and take your electronic device back in hand. On this page are published all the documents necessary for the use of your device. RCA 200 by EDEN.
USER MANUAL RCA 200 EDEN
| V | \( \Delta T \) | ||
| 5 °C | 10 °C | 15 °C | |
| ≤ 25 I | 25 W | 25 W | 75 W |
| ≤ 50 I | 50 W | 50 W | 100 W |
| ≤ 75 I | 50 W | 75 W | 150 W |
| ≤ 100 I | 75 W | 100 W | 200 W |
| ≤ 150 I | 100 W | 150 W | 300 W |
| ≤ 200 I | 150 W | 200 W | 2 × 200 W |
| ≤ 250 I | 200 W | 250 W | 2 × 250 W |
| ≤ 300 I | 250 W | 300 W | 2 × 300 W |
Verschleitsteile
Saugnäpfe
Entsorgung
HINWEIS
Electrical connection
- Only connect the unit if the electrical data of the unit and the power supply match.
- Only plug the unit into a correctly installed outlet.
- The device is to be supplied through a residual current device (RCD) having a rated residual operating current not exceeding 30mA .
- Protect open plugs and sockets from moisture.
Safe operation
- Disconnect all electrical devices in the water from the power supply before reaching into the water. Otherwise there is a risk of severe injuries or death by electrocution.
- Do not use the unit, if electrical lines or the housing are damaged.
- The supply cord cannot be replaced. If the cord is damaged, the appliance should be scrapped.
- Never pull on electric cables. In particular, never carry units on their cables.
- Route lines in such a way that they are protected from damage and do not present a tripping hazard.
- Do not use the unit together with chemicals, food, flammable, explosive substances or other liquids aside from water.
- This unit can be used by children aged 3 and above and by persons with reduced physical, sensory or mental capabilities or lack of experience and knowledge if they are supervised or have been instructed on how to use the unit in a safe way and they understand the hazards involved. Do not allow children to play with the unit. Only allow children to carry out cleaning and user maintenance under supervision.
- Never carry out technical changes to the unit.
- Only use original spare parts and accessories.
- Should problems occur, please contact the authorised customer service or EDEN.
Intended use
Only use the product described in this manual as follows:
- As a thermostat controlled aquarium heater.
- Indoors and for private aquarium-keeping purposes.
- While adhering to the technical specifications. ( Technical data)
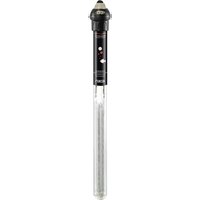
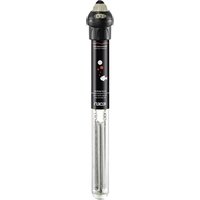
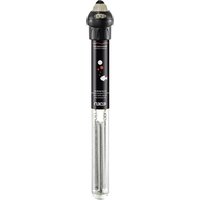
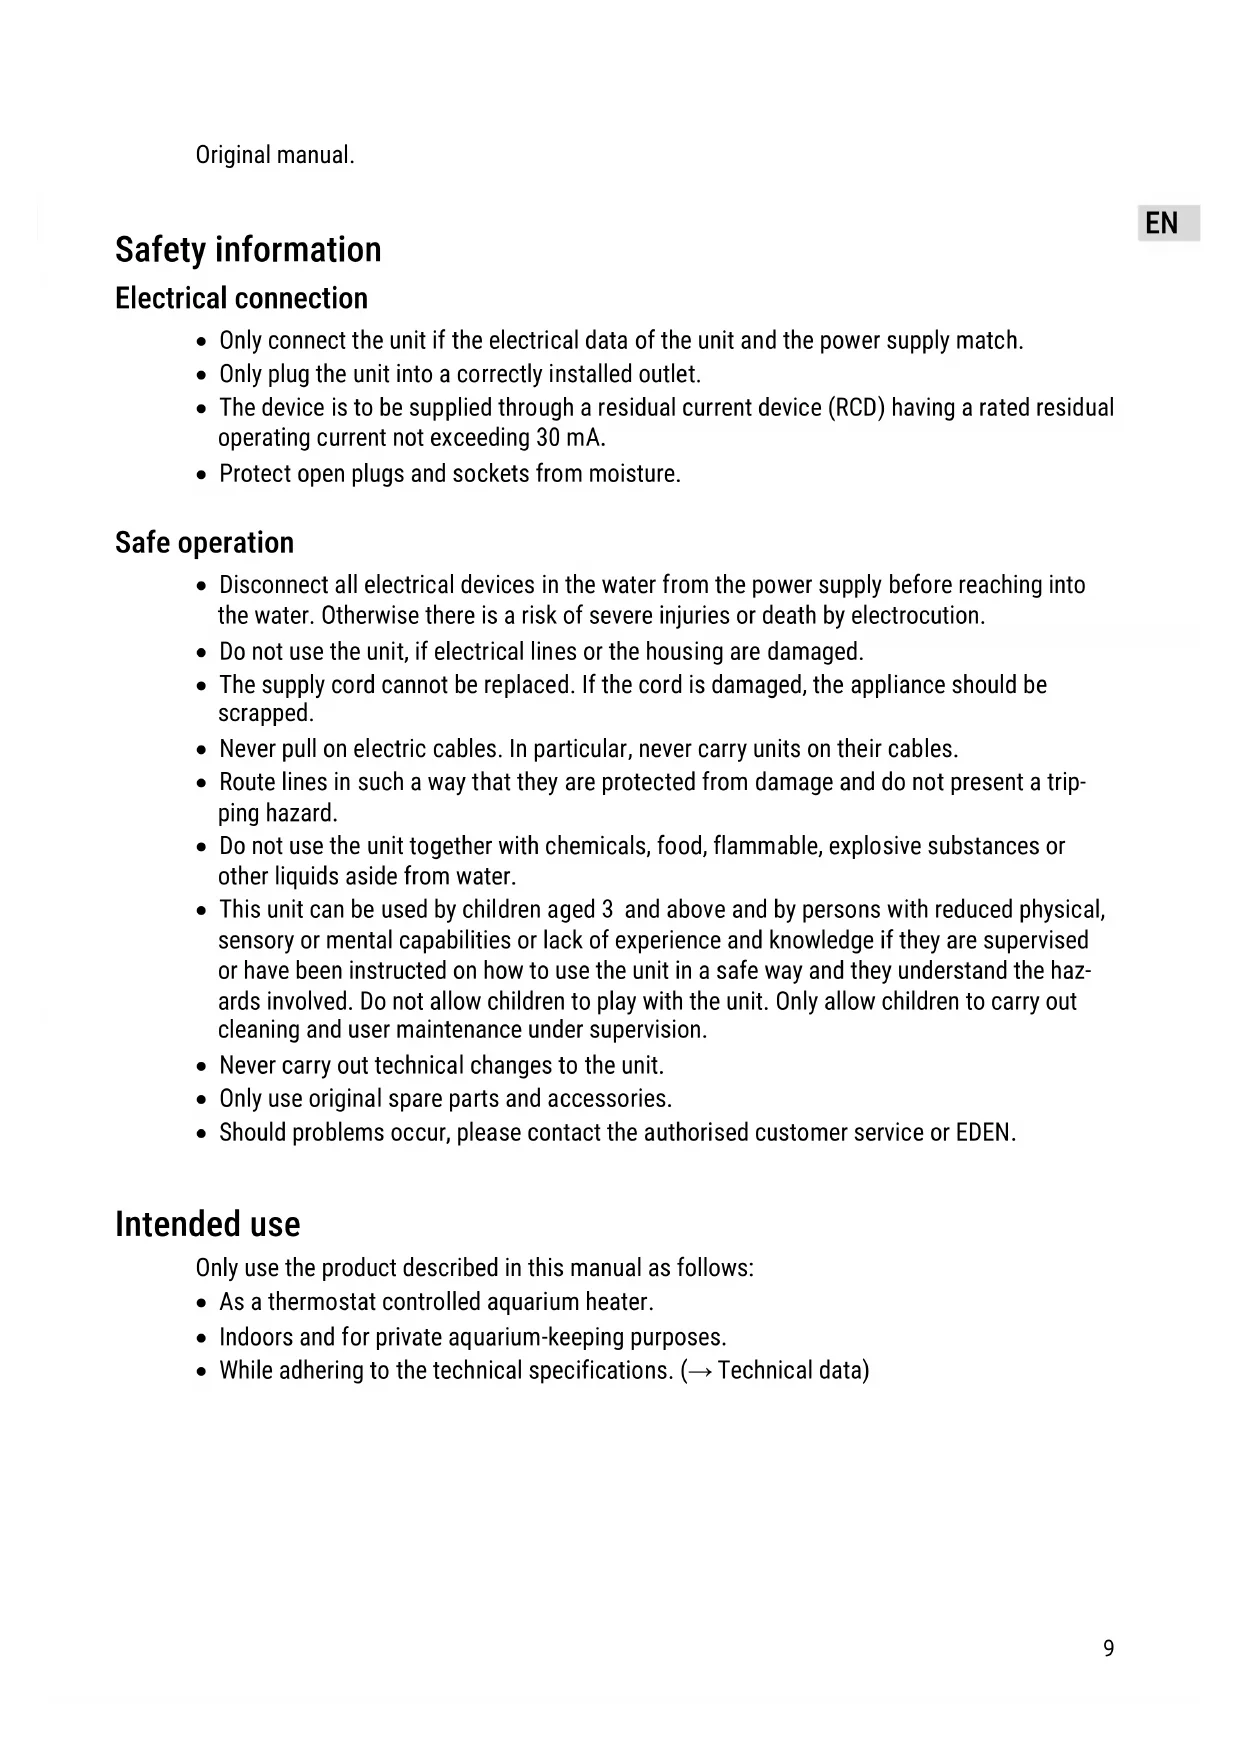
Product Description
HUP0001
1 Heating head with temperature controller
2 Minimum immersion depth mark
3 Power cable
4 Bulb with heater
5 Holder
6 Suction cups
Symbols on the unit
IPX8

The unit is protected against the results of permanent immersion in water to a depth of 0.8m

Protection class II. The unit is securely disconnected from the power supply by a reinforced or double insulation.

Only use the unit in indoor spaces

Do not dispose of the unit with normal household waste.

Read the operating instructions.
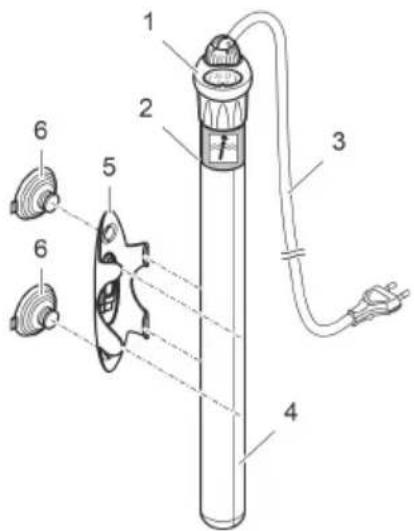
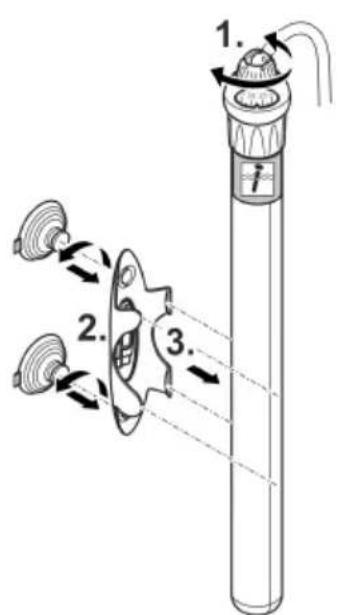
Installation and connection
① The desired water temperature can only be achieved if the heating capacity of the heater is suitable for the volume of water in the aquarium and is positioned in an area with good water circulation. (→ Recommended heating power)
EN
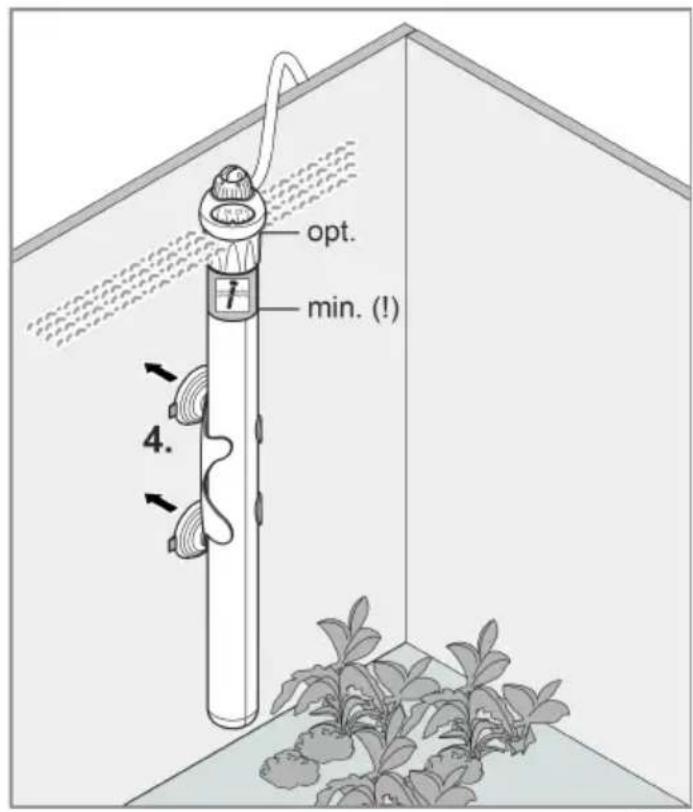
- Ensure that the unit is immersed in water at least up to the minimum immersion depth marking.
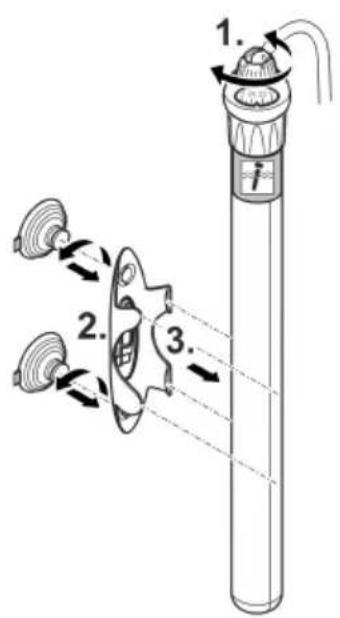
The unit can be completely immersed in water. - Turn the temperature controller to the desired temperature value.
- Insert the supplied suction cups into the holder by twisting.
- Pay attention to the alignment of the tabs (they should point upwards or to the side).
- Clamp the holder to the unit.
- Position the unit with the heating element pointing towards the floor of the filled aquarium on a clean, smooth surface in an area with good water circulation.
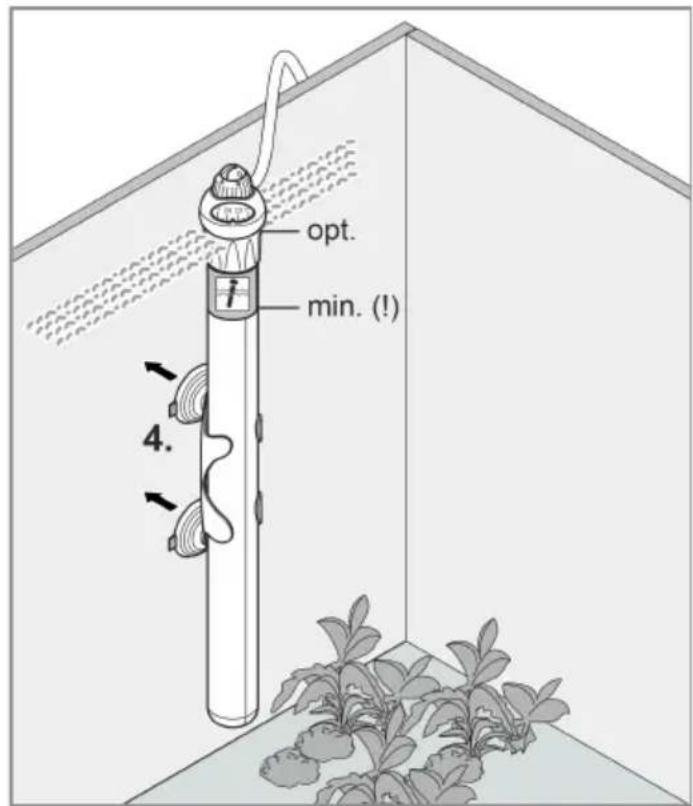
HUP0005
Commissioning/start-up
Switching ON/OFF
CAUTION
Risk of burns from hot surface.
- Only switch on the heater when the bulb is submerged in water.
-
Turn the heater off and let it cool down before removing it from the water.
-
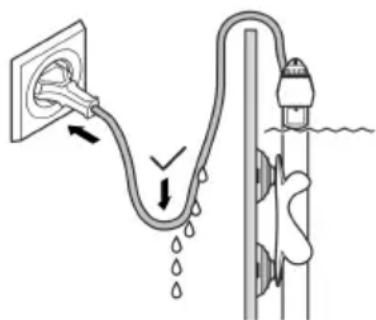
Wait approx. 30 minutes before switching on so that the thermostat can adjust to the temperature of the water.
- Route the power connection cable such that it forms a drip loop!
Switching on: Connect the unit to the mains. The unit switches on immediately.
Switching off: Disconnect the unit from the mains.

HUP0002
Checking the temperature values
① The heater switches on and off automatically in order to maintain the set temperature.
- A light in the glass bulb indicates that the heater is functioning.
- The light and heater are switched off when the set temperature is reached.
How to proceed:
- When the unit has been operating for about one day, check the water temperature with a precision thermometer.
- The measured temperature is lower than the set temperature: Check the water flow around the unit and, if necessary, move the unit to a different position where the water circulation is not obstructed by e.g. plants
Measure the temperature again after some time. - The temperature difference is still too great: Calibrate the unit. ( Calibrating the unit)
- The measured temperature is higher than the set temperature: Calibrate the unit. ( Calibrating the unit)
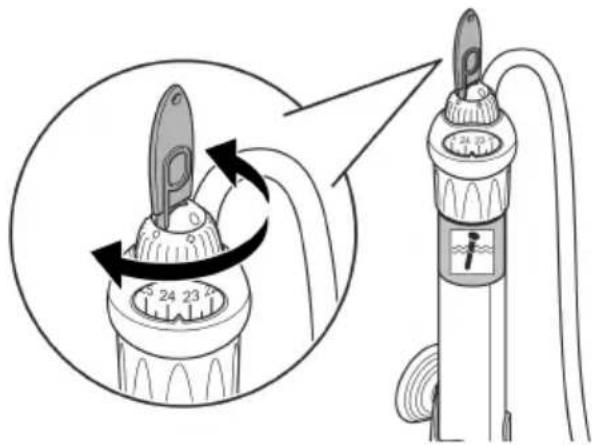
Calibrating the unit
- Calibration range: It is possible to calibrate the unit by plus 3^ and minus 3^ .
- The calibration controller protrudes out of the different-coloured temperature controller. There are 3 fixed positions in the plus and minus range. Each position corresponds to approx. 1 degree centigrade.
- Do not attempt to go outside the calibration range.
How to proceed:
- Use a screwdriver for the calibration or break the supplied tool out of the holder.
- Measured temperature is too high: Keep the temperature controller at the set value and move the calibration controller in the direction of - (minus).
- Measured temperature is too low: Keep the temperature controller at the set value and move the calibration controller in the direction of + (plus).
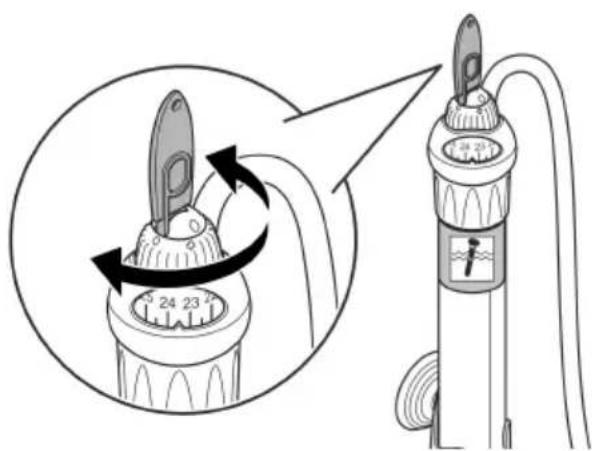
HUP0006
Maintenance and cleaning
If necessary, clean the unit with clear water using a soft sponge or cloth.
- Do not not use cleaning agents or chemical solutions.
Malfunction remedy
| Malfunction | Cause | Remedy |
| The water does not heat up. | No mains voltage | Check the mains voltage. |
| Unit defective | Replace unit | |
| Water does not reach the set temperature. | Insufficient water circulation | Check the temperature. |
| Unit is not calibrated. | Calibrate the unit. | |
| The heating capacity of the unit is not sufficient with regards to the ambient temperature or water volume to be heated up. | Select a suitable unit. |
Technical data Unit data
| EDEN RCA | 25 | 50 | 75 | 100 | |
| Connection voltage | V AC | 230 | 230 | 230 | 230 |
| Mains frequency | Hz | 50 | 50 | 50 | 50 |
| Power consumption | W | 25 | 50 | 75 | 100 |
| Length of power cable | m | 1.5 | 1.5 | 1.5 | 1.5 |
| Suitable for fresh water | ✓ | ✓ | ✓ | ✓ | |
| Suitable for salt water | ✓ | ✓ | ✓ | ✓ | |
| Temperature control | °C | +18 ... +32 | +18 ... +32 | +18 ... +32 | +18 ... +32 |
| Dimensions (Ø × H) | mm | 33 × 205 | 33 × 205 | 33 × 243 | 33 × 243 |
| Weight | kg | 0.20 | 0.20 | 0.20 | 0.22 |
| EDEN RCA | 150 | 200 | 250 | 300 | |
| Connection voltage | V AC | 230 | 230 | 230 | 230 |
| Mains frequency | Hz | 50 | 50 | 50 | 50 |
| Power consumption | W | 150 | 200 | 250 | 300 |
| Length of power cable | m | 1.5 | 1.5 | 1.5 | 1.5 |
| Suitable for fresh water | ✓ | ✓ | ✓ | ✓ | |
| Suitable for salt water | ✓ | ✓ | ✓ | ✓ | |
| Temperature control | °C | +18 ... +32 | +18 ... +32 | +18 ... +32 | +18 ... +3 |
| Dimensions (Ø × H) | mm | 33 × 315 | 33 × 315 | 33 × 370 | 33 × 370 |
| Weight | kg | 0.25 | 0.25 | 0.28 | 0.28 |
Recommended heating power
Recommended heating capacity depending on the volume of water V and the temperature difference T between the desired water temperature and the lowest ambient temperature.
| V | \( \Delta T \) | ||
| 5 °C | 10 °C | 15 °C | |
| ≤ 25 I | 25 W | 25 W | 75 W |
| ≤ 50 I | 50 W | 50 W | 100 W |
| ≤ 75 I | 50 W | 75 W | 150 W |
| ≤ 100 I | 75 W | 100 W | 200 W |
| ≤ 150 I | 100 W | 150 W | 300 W |
| ≤ 200 I | 150 W | 200 W | 2 × 200 W |
| ≤ 250 I | 200 W | 250 W | 2 × 250 W |
| ≤ 300 I | 250 W | 300 W | 2 × 300 W |
EN
Wear parts
- Suction cups
Disposal
NOTE
Do not dispose of this unit with household waste.
- Dispose of the unit by using the return system provided for this purpose.
- Should you have questions, please contact your local disposal company. They will give you information on how to correctly dispose of the unit.
Render the unit unusable by cutting the cables.
| V | \( \Delta T \) | ||
| 5 °C | 10 °C | 15 °C | |
| ≤ 25 I | 25 W | 25 W | 75 W |
| ≤ 50 I | 50 W | 50 W | 100 W |
| ≤ 75 I | 50 W | 75 W | 150 W |
| ≤ 100 I | 75 W | 100 W | 200 W |
| ≤ 150 I | 100 W | 150 W | 300 W |
| ≤ 200 I | 150 W | 200 W | 2 ×200 W |
| ≤ 250 I | 200 W | 250 W | 2 × 250 W |
| ≤ 300 I | 250 W | 300 W | 2 × 300 W |
Pèces d'usure
- Ventouses
Recyclage
REMARQUE
| V | \( \Delta T \) | ||
| 5 °C | 10 °C | 15 °C | |
| ≤ 25 | | 25 W | 25 W | 75 W |
| ≤ 50 | | 50 W | 50 W | 100 W |
| ≤ 75 | | 50 W | 75 W | 150 W |
| ≤ 100 | | 75 W | 100 W | 200 W |
| ≤ 150 | | 100 W | 150 W | 300 W |
| ≤ 200 | | 150 W | 200 W | 2 × 200 W |
| ≤ 250 | | 200 W | 250 W | 2 × 250 W |
| ≤ 300 | | 250 W | 300 W | 2 × 300 W |
NL
Slijtagedelen
Zuignappen
| V | \( \Delta T \) | ||
| 5 °C | 10 °C | 15 °C | |
| ≤ 25 I | 25 W | 25 W | 75 W |
| ≤ 50 I | 50 W | 50 W | 100 W |
| ≤ 75 I | 50 W | 75 W | 150 W |
| ≤ 100 I | 75 W | 100 W | 200 W |
| ≤ 150 I | 100 W | 150 W | 300 W |
| ≤ 200 I | 150 W | 200 W | 2 × 200 W |
| ≤ 250 I | 200 W | 250 W | 2 × 250 W |
| ≤ 300 I | 250 W | 300 W | 2 × 300 W |
Piezas de desgaste
- Ventosas
Desecho
INDICACION
| V | \( \Delta T \) | ||
| 5 °C | 10 °C | 15 °C | |
| ≤ 25 I | 25 W | 25 W | 75 W |
| ≤ 50 I | 50 W | 50 W | 100 W |
| ≤ 75 I | 50 W | 75 W | 150 W |
| ≤ 100 I | 75 W | 100 W | 200 W |
| ≤ 150 I | 100 W | 150 W | 300 W |
| ≤ 200 I | 150 W | 200 W | 2 × 200 W |
| ≤ 250 I | 200 W | 250 W | 2 × 250 W |
| ≤ 300 I | 250 W | 300 W | 2 × 300 W |
Peças de desgaste
- Ventosas
| V | \( \Delta T \) | ||
| 5 °C | 10 °C | 15 °C | |
| ≤ 25 I | 25 W | 25 W | 75 W |
| ≤ 50 I | 50 W | 50 W | 100 W |
| ≤ 75 I | 50 W | 75 W | 150 W |
| ≤ 100 I | 75 W | 100 W | 200 W |
| ≤ 150 I | 100 W | 150 W | 300 W |
| ≤ 200 I | 150 W | 200 W | 2 × 200 W |
| ≤ 250 I | 200 W | 250 W | 2 × 250 W |
| ≤ 300 I | 250 W | 300 W | 2 × 300 W |
Lukkedele
Sugeskale
Bortskaffelse
BEMAERK
| V | \( \Delta T \) | ||
| 5 °C | 10 °C | 15 °C | |
| ≤ 25 I | 25 W | 25 W | 75 W |
| ≤ 50 I | 50 W | 50 W | 100 W |
| ≤ 75 I | 50 W | 75 W | 150 W |
| ≤ 100 I | 75 W | 100 W | 200 W |
| ≤ 150 I | 100 W | 150 W | 300 W |
| ≤ 200 I | 150 W | 200 W | 2 × 200 W |
| ≤ 250 I | 200 W | 250 W | 2 × 250 W |
| ≤ 300 I | 250 W | 300 W | 2 × 300 W |
Slidedeler
Sugekopp
Kassering
MERK
| V | \( \Delta T \) | ||
| 5 °C | 10 °C | 15 °C | |
| ≤ 25 I | 25 W | 25 W | 75 W |
| ≤ 50 I | 50 W | 50 W | 100 W |
| ≤ 75 I | 50 W | 75 W | 150 W |
| ≤ 100 I | 75 W | 100 W | 200 W |
| ≤ 150 I | 100 W | 150 W | 300 W |
| ≤ 200 I | 150 W | 200 W | 2 × 200 W |
| ≤ 250 I | 200 W | 250 W | 2 × 250 W |
| ≤ 300 I | 250 W | 300 W | 2 × 300 W |
Slitagedelar
- Sugproppar
SV
Avfallschantering
ANVISNING
| V | \( \Delta T \) | ||
| 5 °C | 10 °C | 15 °C | |
| ≤ 25 I | 25 W | 25 W | 75 W |
| ≤ 50 I | 50 W | 50 W | 100 W |
| ≤ 75 I | 50 W | 75 W | 150 W |
| ≤ 100 I | 75 W | 100 W | 200 W |
| ≤ 150 I | 100 W | 150 W | 300 W |
| ≤ 200 I | 150 W | 200 W | 2 × 200 W |
| ≤ 250 I | 200 W | 250 W | 2 × 250 W |
| ≤ 300 I | 250 W | 300 W | 2 × 300 W |
Kuluvat osat
Imukupit
Havittäminen
OHJE
| V | \( \Delta T \) | ||
| 5 °C | 10 °C | 15 °C | |
| ≤ 25 I | 25 W | 25 W | 75 W |
| ≤ 50 I | 50 W | 50 W | 100 W |
| ≤ 75 I | 50 W | 75 W | 150 W |
| ≤ 100 I | 75 W | 100 W | 200 W |
| ≤ 150 I | 100 W | 150 W | 300 W |
| ≤ 200 I | 150 W | 200 W | 2 × 200 W |
| ≤ 250 I | 200 W | 250 W | 2 × 250 W |
| ≤ 300 I | 250 W | 300 W | 2 × 300 W |
Kopóalkatrészek
- Tapadókorongok
Megsemmisités
TUDNIVALO:
| V | \( \Delta T \) | ||
| 5 °C | 10 °C | 15 °C | |
| ≤ 25 I | 25 W | 25 W | 75 W |
| ≤ 50 I | 50 W | 50 W | 100 W |
| ≤ 75 I | 50 W | 75 W | 150 W |
| ≤ 100 I | 75 W | 100 W | 200 W |
| ≤ 150 I | 100 W | 150 W | 300 W |
| ≤ 200 I | 150 W | 200 W | 2 × 200 W |
| ≤ 250 I | 200 W | 250 W | 2 × 250 W |
| ≤ 300 I | 250 W | 300 W | 2 × 300 W |
| V | \( \Delta T \) | ||
| 5 °C | 10 °C | 15 °C | |
| ≤ 25 I | 25 W | 25 W | 75 W |
| ≤ 50 I | 50 W | 50 W | 100 W |
| ≤ 75 I | 50 W | 75 W | 150 W |
| ≤ 100 I | 75 W | 100 W | 200 W |
| ≤ 150 I | 100 W | 150 W | 300 W |
| ≤ 200 I | 150 W | 200 W | 2 × 200 W |
| ≤ 250 I | 200 W | 250 W | 2 × 250 W |
| ≤ 300 I | 250 W | 300 W | 2 × 300 W |
Deli, ki se obrabo
- Priseski
Odlaganje odpadkov
NASVET
| V | \( \Delta T \) | ||
| 5 °C | 10 °C | 15 °C | |
| ≤ 25 I | 25 W | 25 W | 75 W |
| ≤ 50 I | 50 W | 50 W | 100 W |
| ≤ 75 I | 50 W | 75 W | 150 W |
| ≤ 100 I | 75 W | 100 W | 200 W |
| ≤ 150 I | 100 W | 150 W | 300 W |
| ≤ 200 I | 150 W | 200 W | 2 × 200 W |
| ≤ 250 I | 200 W | 250 W | 2 × 250 W |
| ≤ 300 I | 250 W | 300 W | 2 × 300 W |
Potrošni dijelovi
Sisaljke
Zbrinjavanje
NAPOMENA
| V | \( \Delta T \) | ||
| 5 °C | 10 °C | 15 °C | |
| ≤ 25 I | 25 W | 25 W | 75 W |
| ≤ 50 I | 50 W | 50 W | 100 W |
| ≤ 75 I | 50 W | 75 W | 150 W |
| ≤ 100 I | 75 W | 100 W | 200 W |
| ≤ 150 I | 100 W | 150 W | 300 W |
| ≤ 200 I | 150 W | 200 W | 2 × 200 W |
| ≤ 250 I | 200 W | 250 W | 2 × 250 W |
| ≤ 300 I | 250 W | 300 W | 2 × 300 W |
Consumabile
- Ventuze
OTCTpaHЯBaHe Ha HeN3npaBHOCTN
| Hem3npabnocst | Прична | Помоц 3a отстраявае |
| Вodата не се заточь | Линсва наразожене в мржatable | Проберete наразожене в мржatable |
| Уреьт e Deф ekт end | Покмение уреа | |
| Вodата неdoesntura haceptoe-hata tempepatypa | Нedlyостаъчна циркулачи на bo-data | Проберete Tempepatypa |
| Уреьт не e kalібріран | Калібрірайte уреа | |
| Ото пітелпату мошноct на уреда lo отошенье на Tempepatypatura наnomецению калічесьотовoda, koeto trябва дa ce zatочь, e ppekalileho nuskca | Изберete похаяду und |
TexHnueckn daHHN
Данни за урEDA
| EDEN RCA | 25 | 50 | 75 | 100 | |
| Зхсанваши посяжени | V AC | 230 | 230 | 230 | 230 |
| Мрекова чECTOTA | Hz | 50 | 50 | 50 | 50 |
| Консуmpирана моцноct | W | 25 | 50 | 75 | 100 |
| Дължина на мрековая ka-бел | m | 1,5 | 1,5 | 1,5 | 1,5 |
| Пок啸яш за садда вoda | ✓ | ✓ | ✓ | ✓ | |
| Пок啸яш за морска вoda | ✓ | ✓ | ✓ | ✓ | |
| Контул наTemпературата | °C | +18 ... +32 | +18 ... +32 | +18 ... +32 | +18 ... +32 |
| Разmersи (Ø × B) | mm | 33 × 205 | 33 × 205 | 33 × 243 | 33 × 243 |
| Тergло | kg | 0,20 | 0,20 | 0,20 | 0,22 |
| EDEN RCA | 150 | 200 | 250 | 300 | |
| Зхсанваши посяжени | V AC | 230 | 230 | 230 | 230 |
| Мрекова чECTOTA | Hz | 50 | 50 | 50 | 50 |
| Консуmpирана моцноct | W | 150 | 200 | 250 | 300 |
| Дължина на мрековая ka-бел | m | 1,5 | 1,5 | 1,5 | 1,5 |
| Пок啸яш за садда вoda | ✓ | ✓ | ✓ | ✓ | |
| Пок啸яш за морска вoda | ✓ | ✓ | ✓ | ✓ | |
| Контул на Temпературата | °C | +18 ... +32 | +18 ... +32 | +18 ... +32 | +18 ... +32 |
| Разmersи (Ø × B) | mm | 33 × 315 | 33 × 315 | 33 × 370 | 33 × 370 |
| Тergло | kg | 0,25 | 0,25 | 0,28 | 0,28 |
IpenopbUteHa OTOpJIteHa MoUHocT
IpenopbunTeHa OTOpHnTeHa MoUHoc KaTo yHKcna Ha BODnO6em V n Tempeatyp Hata pa3nka T MeKdy JKeJHaHata Tempepatya Ha BoDaTa N Hau-HnCKaTa Tempepatya Ha OKoJHata cpea:
| V | \( \Delta T \) | ||
| 5 °C | 10 °C | 15 °C | |
| ≤ 25 I | 25 W | 25 W | 75 W |
| ≤ 50 I | 50 W | 50 W | 100 W |
| ≤ 75 I | 50 W | 75 W | 150 W |
| ≤ 100 I | 75 W | 100 W | 200 W |
| ≤ 150 I | 100 W | 150 W | 300 W |
| ≤ 200 I | 150 W | 200 W | 2 × 200 W |
| ≤ 250 I | 200 W | 250 W | 2 × 250 W |
| ≤ 300 I | 250 W | 300 W | 2 × 300 W |
BcTaHOBJIeHHa Ta NiKJIIOUeHHa
① BaxaHOI TempepaTyB ODN MOxHa DOcAITN IINe B TOMy BUNaKDy, KOJI NOTyxHicTb HarpiBy BiIOBidae 06'Emy BOIN B aKBapiymi N o6irpiBaay po3taoBaHn y 30Hi 3 Xopo-oo npKnyauie BoDn. ( PekomeHDoBaHa nOtyxHicTb HarpiBy)
3aHvIOIte pNCTpiy BVMyMIMyM IO No3HaKMIHImaJIbHOI rI6HH 3aHypeHH
- PnucTpiM OXXHa 3aHVDUTN NOBHCIO.
- Поверніть ретулготор Tempepatурп на 6жане 3нayчehня Tempepatур.
- Pnncockn, 0o BxoOaTb do KOMnIeKTy NOCTaBKn, BKpyTiTb y TpMaq. -3BepHITb vBarv Ha opieHTauio nlaHKn (Bropv nn B6iK).
3aTNCHTb TDMaH Ha PnCTD0i.
- Po3mictiB npncpti 3 HarpibalbHm elememtOM Ha dHi 3aOBHeHOro aKBapiyMa ha YnCti, rIaNehbki NOBepxHI B 30Hi 3 HaleXHOU uPKyIciEO BOIN.
UK
BVeDeHnB eKcPnyaTauio
BMnKaHHBmKKaHH

OBEPEXKHO
He6e3neka onikiv biI rapaoyi nobepxhi.
BmkaTe harpibau Iiue ToDi, KOJIcKJIHa KOJI6a 3aHypeHa y BODy.
- Nepw Hix DiCTaBn HarpiBa 3 BoDn, BmKHiTb Ioro i daIte Nomy OxOHOHTN.
- Почекаite 6иько 30 xвилн, nepш hix BmkaTи, уб Терmoctat MIR npuctocybaTncdo Tempepatyp BOH.
- PpokladaTe MepeXeBn Ka6en TaKm YHOM, 06 yTBOpJLac KpanIeNoi6Ha neTla.
YbimKHeHH. IiKnIouitb npncTpii do eJeKtpomepeksi. Pnpctpi Bmkaetbcra Opa3y.
BumKHeHHa. Bi'edHaIe npncpti Bid eJeKeTpomepeki.
HUP0002
Ipebeipte 3naueHnra TemnpaTpyn
① 06irpiBaay BMnKaεTbCra Ta BmNkaεTbCra cAmOCTiH, NiTpmyoyn HanaSTOBaHy Temnepaotypy.
-CbItno y cKnHnI KOJIbIcBIDHTb npo po60Tu o6irpBa4a.
Cbitno i o6irpiBaBUMKahObcra, KOJIIOOcRHyTo HalaTTObAoH TeMnepaTypn.
Heo6xioBnKoHaTu NaCTynHii:
-Датиnpo npaцювати псntpoToOдн DeHb i notim nepeBipTu TEmnepatypy BOnn.
BumipraHa TemnepaTypa Hxua 3a BCTaHOBJeHy: PepeBipTu nOTIK BoHn HaBKOIo npIcTpoIO i 3a Heo6xIDHOCTi nepeCTaBHTu pncTpiH Na Micue, De MeHwe nepenOH cnpKyJauCII BOIN (HaNPuklaad uee3 poclnHH).
- Yepez Dejan yac 3HOBy BmiprTn TemnepaTpy.
- Pi3HnIa TempepaTpye HaTo BnOka: BiKanIbpyBaTu npucpii. ( BiKaJIbpyBaTu npucpii)
- BvmipraHa TemnepaTpa Bua hix HanaToBaHo: BiKaIi6pyBaTu npucTpii. ( BiKaIi6pyBaTu npucTpii)
BidkaI6pyBaTn npnctri
-ДIANa3OH Kani6pyBaHHa:ПпстpiМожнадokani6pyBaTu Ha 3°CВпIoC iHa 3°CВMiHyc.
- PerylaTOp kaIbpyBaHnB BiDi3HReTbcB BID 3aap6oBaHO rHmKoIbOpom peryIaTopa TemnepaTpy. B IIIOc Ta MiHyc dIana3OHaX 3aikcoBaHO no 3 no3uii. KoxHa no3uia BiINOBiJaE np6n3Ho 1 rpaDcy Uelbcj.
He HamaraTeCb nepeuTn 3a diana3oH kaJIi6pyBaHHa.
Heo6xioHOBuKoHaTuHacTynHi ii:
-Дякалбуваннэзactocyute BnKpyTKy a60 BnlaMaTe iHCTpyMeHT,Якь BXODNTbdo KOMJIeKTV.3TPMmaHa.
BumipraHa temnepaIpa HADTo BnCOka: TpmaTe pyky HanaHTyBaHHa HanaTobAHOMy 3NaueHHI Ta nobepHITb peYrAToP kaJI6pyBaHHa HAnpMky - (Minyc).
BumipraHa TemnepaTypa HAnTo Hn3bKa: TpMaIe pyKu HanaTuBaHHa HanaTobAHOMy 3NaueHHI Ta nobepHITb perYJrTOP KaJI6pyBaHHa HAnpMky + (nIIOc).
HUP0006
Ynctka i DOrJa
3a notpe6n nooictiB npncptiynctOIO BOIO IM'koIO ry6KOIO a60 raHvipKOIO.
He BnKOpNCToBvTe MmHi 3acO6n a6o ximuiHp03uHN.
UK
UcyHeHH HeCnpaBHOcte
PekomeHdoBaHa nOtUxKHiCt b HarpiBy
PekomeHdoBaHa notyxHicTb HarpIBy 3aJexHo BiD o6'Emy BODn V Ta pi3HnCi Tempepatyp T MIX 6aXaHO TEMpepatypo BOi Ta MiHimaBHO TEMpepatpo Ho HABKOJIuHbOro cepe DOBnua
| V | \( \Delta T \) | ||
| 5 °C | 10 °C | 15 °C | |
| ≤ 25 I | 25 W | 25 W | 75 W |
| ≤ 50 I | 50 W | 50 W | 100 W |
| ≤ 75 I | 50 W | 75 W | 150 W |
| ≤ 100 I | 75 W | 100 W | 200 W |
| ≤ 150 I | 100 W | 150 W | 300 W |
| ≤ 200 I | 150 W | 200 W | 2 × 200 W |
| ≤ 250 I | 200 W | 250 W | 2 × 250 W |
| ≤ 300 I | 250 W | 300 W | 2 × 300 W |
HarpeBaTeIb pa3peWaeTcB KJIIOuATb TOnbKO TOrda, KOrda CTeKJIaHHa KOn6a NorpyKeHa NOBvOy.
-ПрждчemИЗВлесьHarpeBaTeиьВОды,HeO6xOДМоEROOTKЛIOHTbИСЧаJaIaIaIaIaIaIaIaIaIaIaIaIaIaIaIaIaIaIaIaIaIaIaIaIaIaIaIaIaIaIaIaIaIaIaIaIaIaIaIaIaIaIaIaIaIaIaIaIaIaIaI
- IopoJxdaTb npm. 30 MInHyT Do BkIIOueHn, YTO6bl TepMOCTaT CMOr aAnTnpoBaTbcr K TempepaType BObl.
- YIIOXHTe CeTeBOI nPoBOI TaKIM O6pa3OM, YTO6bl O6pa3OBaIacb KaIeJIbHaI neTJI!
BknHtB: POnCoeHNHe np6Op K cEtN. Pnp6Op BkJIouaETc HEmdJeHHo.
BbIKIOUHTb: OTKIOUHTe yCTpoNCTBO OT cETN.

HUP0002
YcTpaHHe HEnCnPaBHOCTN
PekomeHdyemam MouHOTb HarpeBa
PekomeHdyemar MoHocb HarpeBa B 3aBnCmOCTn OT o6beMa BObl V npa3HOCTN TeMne- pAtyp T MeJy Tpe6yeMoN TeMnpaTpyoB BoI N CamO Hn3KoN TeMnpaTpyo OkpykaHO zuero Bo3duxa:
| V | \( \Delta T \) | ||
| 5 °C | 10 °C | 15 °C | |
| ≤ 25 I | 25 W | 25 W | 75 W |
| ≤ 50 I | 50 W | 50 W | 100 W |
| ≤ 75 I | 50 W | 75 W | 150 W |
| ≤ 100 I | 75 W | 100 W | 200 W |
| ≤ 150 I | 100 W | 150 W | 300 W |
| ≤ 200 I | 150 W | 200 W | 2 × 200 W |
| ≤ 250 I | 200 W | 250 W | 2 × 250 W |
| ≤ 300 I | 250 W | 300 W | 2 × 300 W |
I3haunBaIOUneCyaTeaJIi
- Ппсocкn
Yttnn3aun
YKA3AHHE
DahHoe yctpoIcTBO HeIb3a YtINn3nPoBaTb BMeCTe C DomaunHMN OTXoamn!
- Ytuln3npyTe yctpoiCTBO uepe3 npedymotpeHHyo dIa 3TOrO cnCTemy Bo3Bpata 3JIeK-tpoTOBapOB.
Pn BO3HKnHOBeHn BOpocOB n npo6IeM o6paaItecB MeCTHyO fIpMy yTnIn3aun. TaM Bbl NOnyUHTe HfOpMaIuO O npabNlbHoN yTnIn3aun yCTpOietBa.
CdaTe yctpoCTBO HnprOdHbIM IJN 3KcNlyataun, nepepe3aB 3neKtpoka6JIb.
原始说明书。
安全提示
电气连接
| 5 °C | 10 °C | 15 °C | |
| ≤ 25 I | 25 W | 25 W | 75 W |
| ≤ 50 I | 50 W | 50 W | 100 W |
| ≤ 75 I | 50 W | 75 W | 150 W |
| ≤ 100 I | 75 W | 100 W | 200 W |
| ≤ 150 I | 100 W | 150 W | 300 W |
| ≤ 200 I | 150 W | 200 W | 2 × 200 W |
| ≤ 250 I | 200 W | 250 W | 2 × 250 W |
| ≤ 300 I | 250 W | 300 W | 2 × 300 W |
磨损件
- 吸盘
丢弃处理
提示
本设备不得按生活垃圾进行废弃处理。