
BXBM600E - Other kitchen appliances BLACK & DECKER - Free user manual and instructions
Find the device manual for free BXBM600E BLACK & DECKER in PDF.
| Product type | Bread machine |
| Brand | Black & Decker |
| Model | BXBM600E |
| Power | 600 W |
| Power supply | 220-240 V ~ 50/60 Hz |
| Maximum capacity | 1 kg (500 g, 750 g or 1000 g loaf) |
| Number of programs | 17 automatic programs |
| Programs included | Basic bread, quick bread, sweet bread, French bread, whole wheat bread, rice bread, gluten-free bread, dessert, mix, dough, knead, cake, jam, yogurt, additional baking, glutinous rice, defrost |
| Additional settings | Crust selection (light, medium, dark), weight option, delay timer |
| Keep warm function | Yes, automatic 1 hour |
| Viewing window | Yes |
| Bread pan type | Non-stick, removable |
| Accessories included | Measuring cup, measuring spoon, hook fork |
| Display | Backlit LCD |
| Dimensions (approx.) | 30 x 25 x 35 cm |
| Weight (approx.) | 5 kg |
| Exterior material | Plastic and stainless steel |
| Maintenance and cleaning | Bread pan and accessories dishwasher safe (gentle cycle) or wash with warm soapy water |
| Safety | Overheat protection, automatic shut-off in case of problem |
| Repairability | Authorized Black & Decker after-sales service |
| Warranty | Legal warranty of conformity |
Frequently Asked Questions - BXBM600E BLACK & DECKER
User questions about BXBM600E BLACK & DECKER
0 question about this device. Answer the ones you know or ask your own.
Ask a new question about this device
Download the instructions for your Other kitchen appliances in PDF format for free! Find your manual BXBM600E - BLACK & DECKER and take your electronic device back in hand. On this page are published all the documents necessary for the use of your device. BXBM600E by BLACK & DECKER.
USER MANUAL BXBM600E BLACK & DECKER
natural_image
Line drawing of a kitchen appliance with control panel and door (no text or symbols)EN. Instructions for use
FR. Mode d'emploi
Many thanks for choosing to purchase a Black+Decker brand product.
Thanks to its technology, design and operation and the fact that it exceeds the strictest quality standards, a fully satisfactory use and long product life can be assured.
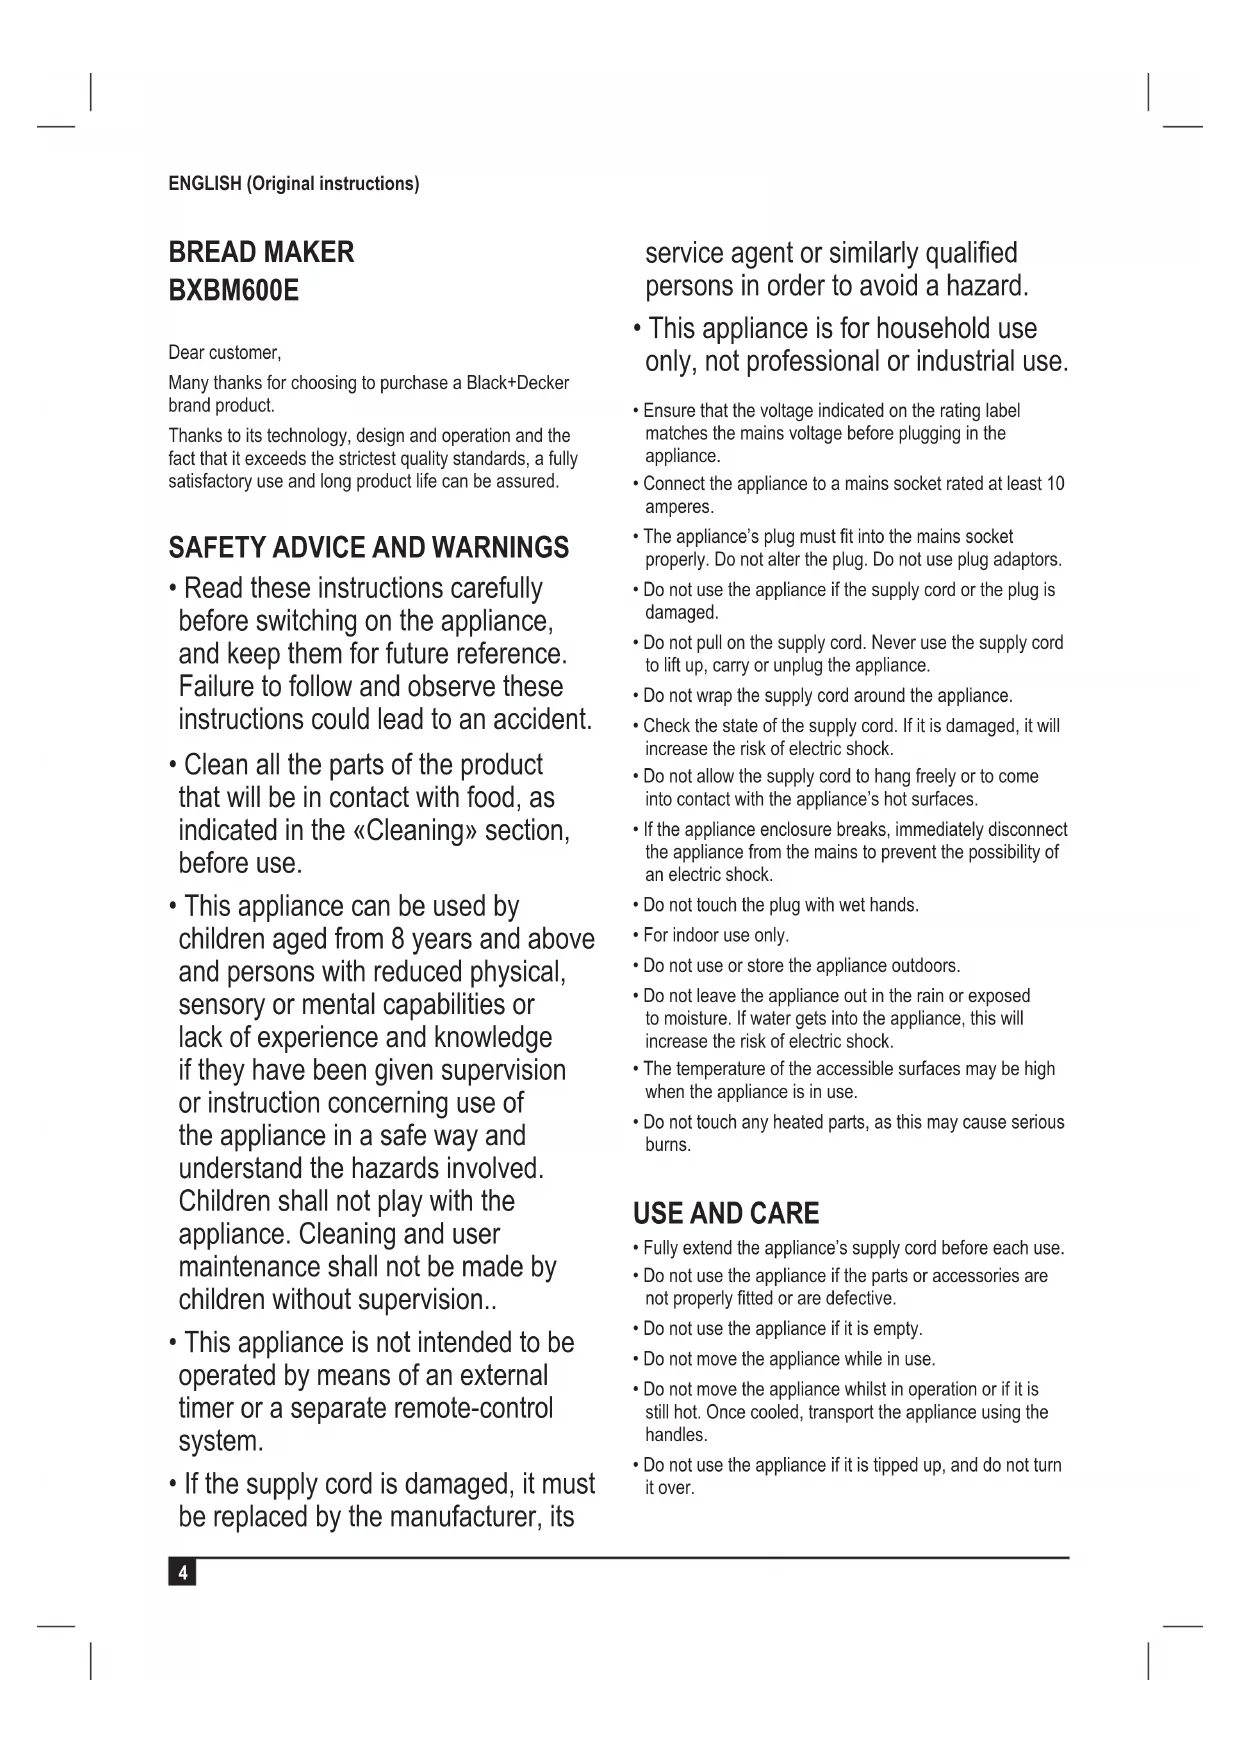
SAFETY ADVICE AND WARNINGS
- Read these instructions carefully before switching on the appliance, and keep them for future reference. Failure to follow and observe these instructions could lead to an accident.
- Clean all the parts of the product that will be in contact with food, as indicated in the «Cleaning» section, before use.
- This appliance can be used by children aged from 8 years and above and persons with reduced physical, sensory or mental capabilities or lack of experience and knowledge if they have been given supervision or instruction concerning use of the appliance in a safe way and understand the hazards involved. Children shall not play with the appliance. Cleaning and user maintenance shall not be made by children without supervision..
- This appliance is not intended to be operated by means of an external timer or a separate remote-control system.
- If the supply cord is damaged, it must be replaced by the manufacturer, its
service agent or similarly qualified persons in order to avoid a hazard.
- This appliance is for household use only, not professional or industrial use.
- Ensure that the voltage indicated on the rating label matches the mains voltage before plugging in the appliance.
- Connect the appliance to a mains socket rated at least 10 amperes.
- The appliance's plug must fit into the mains socket properly. Do not alter the plug. Do not use plug adaptors.
- Do not use the appliance if the supply cord or the plug is damaged.
- Do not pull on the supply cord. Never use the supply cord to lift up, carry or unplug the appliance.
- Do not wrap the supply cord around the appliance.
- Check the state of the supply cord. If it is damaged, it will increase the risk of electric shock.
- Do not allow the supply cord to hang freely or to come into contact with the appliance's hot surfaces.
- If the appliance enclosure breaks, immediately disconnect the appliance from the mains to prevent the possibility of an electric shock.
- Do not touch the plug with wet hands.
- For indoor use only.
- Do not use or store the appliance outdoors.
- Do not leave the appliance out in the rain or exposed to moisture. If water gets into the appliance, this will increase the risk of electric shock.
- The temperature of the accessible surfaces may be high when the appliance is in use.
- Do not touch any heated parts, as this may cause serious burns.
USE AND CARE
- Fully extend the appliance's supply cord before each use.
- Do not use the appliance if the parts or accessories are not properly fitted or are defective.
- Do not use the appliance if it is empty.
- Do not move the appliance while in use.
- Do not move the appliance whilst in operation or if it is still hot. Once cooled, transport the appliance using the handles.
-
Do not use the appliance if it is tipped up, and do not turn it over.
-
Do not turn the appliance over while it is in use or connected to the mains.
- Do not overload the appliance's work capacity.
- Use the specific quantities of flour and raising agent as indicated in each programme in the recipes section.
- Disconnect the appliance from the mains when not in use and before undertaking any cleaning task.
- Store this appliance out of reach of children and/or persons with physical, sensory or reduced mental or lack of experience and knowledge.
- Do not store or transport the appliance if it is still hot.
- Keep the appliance in good condition. Check that the moving parts are not misaligned or jammed, and make sure there are no broken parts or anomalies that may prevent the appliance from operating correctly.
- Never leave the appliance connected and unattended if it is not in use. This saves energy and prolongs the life of the appliance.
- Allow to cool for one hour before subsequent use.
- Under no circumstances should the appliance be operated for more time than necessary.
- As a reference, in the annexed table appears several recipes that include the amount of food to process.
- CAUTION: Do not use the appliance if the window is cracked or broken.
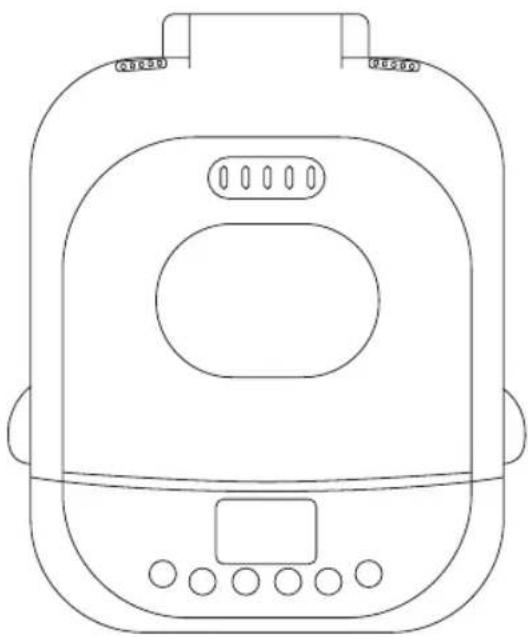
DESCRIPTION
A Window
B Stir Bar
C Bread barrel
D Bread barrel handle
E Body
F Control panel
G Measuring cup
H Measuring spoon
I Hook fork
CONTROL PANEL
1 LCD
2 Menu
3 Weight
4 ▲▼ Timer
5 Crust
6 Start/Pause/Stop
If the model of your appliance does not have the accessories described above, they can also be bought separately from the Technical Assistance Service.
INSTRUCTIONS FOR USE
BEFORE USE
- Make sure that all products' packaging has been removed.
- Before using the product for the first time, clean the parts that will come into contact with food in the manner described in the «Cleaning» section.
- Some parts of the appliance have been lightly greased. Consequently, the first time the appliance is used, light smoke may be detected. After a short time, this smoke will disappear.
- Prepare the appliance according to the function you wish to use:
- On the first few tries, it's possible that the bread will not have the desired appearance, but with a little practice, you'll soon get the hang of it.
USE
- Open the lid.
- Remove the bread barrel by turning the handle anticlockwise.
• Fix the mixing stir bar in place. - Add the ingredients in the correct order.
- Put the bread barrel in place until it fits correctly, turning the handle clockwise.
- Close the lid.
- Extend the supply cord completely before plugging it in.
- Connect the appliance to the mains.
- Turn the appliance on by using the Start/Pause/Stop button, a beep will be heard, and the LCD display will default to Program 1.
- Press the program selector button (MENU) to select the desired program (see table of recipes).
- Press the (CRUST) selector button to select the desired browning level (light, medium, dark).
- Press the weight selector button to move the arrow to select the weight of bread desired (500 g, 750 g, 1000 g). (WEIGHT is not an option in programs 8-17).
- If desired, press ▲▼ buttons to increase the cycle time shown on the LCD display. (Delay function is not available in programs 11, 13, 14, 15, and 17).
- Switch the appliance on by pressing the Start/Pause/Stop button. A short beep is heard, and the two dots in the time display begin to flash as the program starts. The stir bar will begin to mix your ingredients. If Delay Timer
is activated, the stir bar will not mix ingredients until the program is set to begin.
- To stop a program, press the Start/Pause/Stop button (6) until a beep confirms that the program has been switched off.
- In order to minimize the generation of acrylamide during the toasting process, avoid reaching dark brown colours on the toasted bread.
- Once the process is complete, ten beeps will be heard, and the appliance will shift to the Keep Warm setting for 1 hour. You can press the Start/Pause/Stop button for 3 seconds to stop the process, and the Keep Warm setting will end.
- Unplug the appliance from the mains and then open the lid using oven mitts.
- Let the bread barrel cool down slightly before moving the bread. Use oven mitts, and carefully turn the bread barrel handle anti-clockwise to unlock it and lift up the handle to remove it from the machine.
- Caution: the bread barrel and bread may be very hot! Always handle with care.
- The appliance can be switched on again using the Start/Pause/Stop button once the control device has cooled; if it does not switch on again, do not force it; allow it to cool.
- Using oven mitts, turn the bread barrel upside down (with the bread barrel handle folded down) onto a wire cooling rack or clean cooking surface and gently shake until the bread falls out. Use a non-stick spatula to gently loosen the sides of the bread from the bread barrel.
- Let the bread cool for about 20 minutes before slicing. It is recommended to slice bread with an electric cutter or serrated bread knife. It is not advisable to use a plain-edge chef's knife. Otherwise, the bread may be subject to deformation.
- If the stir bar remains in the bread, gently pry it out using a spatula or small utensil. The bread is hot; never use your hand to remove the stir bar. When the operation is complete, unplug the appliance from the mains.
WARNING DISPLAY
- "H:HH": This warning means that the temperature inside of the bread barrel is too high. Press the Start/Pause/Stop button to stop the program, unplug the appliance from the mains, open the top lid, and let the machine cool down completely for 10-20 minutes before restarting.
• Overtemperature protection will not be enabled until the current program is completed. After the machine cools down, it can be used normally - "E:E0": This warning means that the temperature sensor is disconnected. Press the Start/Pause/Stop button to stop the program, unplug the supply cord. Please contact
the nearest authorized service agent for examination, repair or electrical/mechanical adjustment.
REMOVING BREAD
- The bread barrel will be hot, and oven mitts should be used. Remove the bread barrel by lifting the bread barrel handle and turning it counterclockwise to unlock it and pull the bread barrel straight up from the base of the chamber.
- Carefully shake the bread upside down until the bread falls out of the bread barrel. Allow to cool on a wire rack for 10 minutes before slicing. Slice it with a bread knife.
- Tip: if the stir bar comes out in the loaf, remove the hook fork.
KEEP WARM
- After the baking program is complete, the bread machine will beep 10 times and shift to keep warm setting for 1 hour. It will be displayed "0:00". To cancel the keep warm process, press the Start/Pause/Stop button for 3 seconds.
- Tip: removing the bread immediately after the baking program is complete will prevent the crust from becoming darker.
PROGRAM MENU
1 BASIC BREAD
- Is a type of bread made with simple ingredients such as flour, water, salt and yeast. It has a soft and fluffy texture on the inside and a crispy crust on the outside.
2 QUICKBREAD
- Kneading, rising and baking time is shorter than basic bread. The bread interior tissue is denser.
- Quick bread are made with baking powder and baking soda that are activated by moisture and heat. For perfect quick bread, it is suggested that all liquids be placed at the bottom of the bread barrel; dry ingredients on top; during the initial mixing of quick bread batters, dry ingredients may collect in the corners of the pan, and it may be necessary to help machine mix to avoid flour clumps. If so, use a rubber spatula.
3 SWEET BREAD
- For bread with additives such as fruit juices, grated coconut, raisins, dry fruits, chocolate or added sugar. Due to a longer phase of rising, the bread will be light and airy.
4 FRENCH BREAD
- For light bread made from fine flour. Normally the bread is fluffy and has a crispy crust. This is not suitable for baking recipes requiring butter, margarine or milk.
5 WHOLE-WHEAT BREAD
- For baking of bread containing significant amounts of whole-wheat. This setting has a longer preheat time to allow the grain to soak up the water and expand. It is not advised to use the delay function, as this can produce poor results. Whole wheat usually produces a crispy thick crust.
6 RICE BREAD
- Mix cooked rice into the flour with 1:1 to make the bread.
7 GLUTEN-FREE BREAD
- For the bread of gluten-free flour and baking mixtures. Gluten-free flours require longer for the uptake of liquids and have different rising properties.
8 DESSERT
- Kneading and baking those foods with more fat and protein.
9 MIX
- Stir to let the flour and liquids mix thoroughly.
10 DOUGH
- This program prepares the yeast dough for buns, pizza, crusts, etc. to bake in a conventional oven. There is no baking in this program.
11 KNEAD
- Kneading only, no rising or baking. Used for making dough for pizzas, etc.
- NOTE: Adjustable time between 00:08-00:45 minutes.
12 CAKE
- Kneading, rising and baking occurs. Soda or baking powder is used to aid the rising process.
13 JAM
- Use this setting for making jams from fresh fruits and marmalades from oranges. Do not increase the quantity or allow the recipe to boil over the bread barrel in the baking chamber. Should this happen, stop the machine immediately and remove the bread barrel carefully. Allow to cool and clean thoroughly.
14 YOGURT
• Ferment to make the yogurt.
- The fermentation time can be set; there are 6:00 -10:00 time options. The default is 8:00. Press the time ▲ key to increase, press the time ▼ key to decrease (30 minutes each time), and the buzzer will sound 10 times after the end.
- When working, the triangle arrow on the screen points to: Fermentation.
15 BAKE
- For additional baking of bread is needed because a load is too light or not baked through. In this program, there is no kneading or rest.
16 STICKY RICE
- Kneading and baking the mix of polished glutinous rice and rice.
17 DEFROST
- For defrost frozen food before cooking.
- Default 30 min: adjustable from 0:10 to 2:00, 10 min for each pressing.
NOTE 1: In some programs, the display will beep 10 times and flash "ADD" when it recommends adding fruit if desired.
ONCE YOU HAVE FINISHED USING THE APPLIANCE
- Turn the appliance off using the Start/Pause/Stop button.
- Unplug the appliance from the mains.
- Remove the bread barrel by turning the handle anticlockwise, using a cloth, as it will be hot.
- Remove the bread from the bread barrel with the help of a wooden spatula or similar heat-resistant implement; do not use utensils that could damage the non-stick coating.
- Allow to cool for 20 minutes before cutting
- Close the lid.
- Clean the appliance.
ACCESSORIES
- Measuring cup accessory: This accessory is used for measuring quantities.
- Measuring spoon accessory: This accessory is used for measuring quantities.
- Hook fork: This accessory is used in case of difficulty in removing the mixing paddle from the dough/bread after cooking.
PRACTICAL RECOMMENDATIONS
- Use exact amounts.
- Add fresh ingredients at room temperature.
- Add the ingredients in the correct order according to the recipe. Always use liquid ingredients first, then the dry ingredients and lastly, the baking powder.
- Do not use chemical baking powder.
CLEANING
- Disconnect the appliance from the mains and allow it to cool before undertaking any cleaning task.
- Clean the equipment with a damp cloth with a few drops of washing-up liquid and then dry it.
- Do not use solvents or products with an acid or base pH, such as bleach, or abrasive products, for cleaning the appliance.
- Do not let water or any other liquid get into the air vents to avoid damage to the inner parts of the appliance.
- Never immerse the appliance in water or any other liquid or place it under running water.
- It is advisable to clean the appliance regularly and remove any food remains.
- If the appliance is not in good condition of cleanliness, its surface may degrade and inexorably affect the duration of the appliance's useful life and could become unsafe to use.
-
The following pieces may be washed in a dishwasher (using a soft cleaning program) or soapy hot water:
-
Cup
- Spoon
- Hook fork
- Bread barrel
-
Stir bar
-
The draining/drying position of the articles washable in the dishwasher or in the sink must allow the water to drain away easily.
- Then dry all parts before their assembly and storage.
SERVICE
- Any misuse or failure to follow the instructions for use renders the guarantee and the manufacturer's liability null and void.
ANOMALIES AND REPAIR
• Take the appliance to an authorised technical support service if problems arise. Do not try to dismantle or repair without assistance, as this may be dangerous.
WARRANTY AND TECHNICAL ASSISTANCE
This product enjoys the recognition and protection of the legal guarantee in accordance with current legislation. To enforce your rights or interests, you must go to any of our official technical assistance services.
You can find the closest one by accessing the following web link: https://www.blackanddecker.eu//
You can also request related information by contacting us.
You can download this instruction manual and its updates at https://www.blackanddecker.eu//
FOR EU PRODUCT VERSIONS AND/OR IN THE CASE THAT IT IS REQUESTED IN YOUR COUNTRY: ECOLOGY AND RECYCLABILITY OF THE PRODUCT
- The materials of which the packaging of this appliance consists are included in a collection, classification and recycling system. Should you wish to dispose of them, use the appropriate public containers for each type of material.
- The product does not contain concentrations of substances that could be considered harmful to the environment.

This symbol means that in case you wish to dispose of the product once its working life has ended, take it to an authorised waste agent for the selective collection of waste electrical and electronic equipment (WEEE).
This appliance complies with Directive 2014/35/EU on Low Voltage, Directive 2014/30/EU on Electromagnetic Compatibility, Directive 2011/65/EU on the restrictions of the use of certain hazardous substances in electrical and electronic equipment and Directive 2009/125/EC on the ecodesign requirements for energy-related products.
Information regarding substances of very high concern (SVHC) according to Regulation 1907/2006/EC (REACH): This product contains Lead, CAS No. 7439-92-1.
Black & Decker® and BLACK+DECKER™ and the Black & Decker® and BLACK+DECKER™ logos are registered trademarks of The Black & Decker® Corporation and are used under licence. All rights reserved. Imported and Distributed by ENGINEERING AND TECHNOLOGY FOR LIFE, S.L. Avda. Barcelona s/n Oliana, 25790, Spain
| Menus Seq. | Ingredient | Volume Volume | Volume Remark | |||
| 1 Basic bread | Time 2:55 3:00 3:05 | |||||
| bread weight 500 g 750 g 1000 g | ||||||
| [1] water 210 ml 260 ml | 320 ml | |||||
| [2] salt 12 tsp 1 tsp 1 tsp Put it in the corner of the barrel | ||||||
| [3] sugar | 1 Tbsp | 2 Tbsp | 2 Tbsp | Put it in the corner of the barrel | ||
| [4] oil 1+12 Tbsp 2+12 Tbsp 3 Tbsp | ||||||
| [5] high gluten flour | 2+1/3 cups / 320 g | 3 cups / 420 g | 3+12 cups / 500 g | |||
| [6] instant yeast 34 tsp 1 tsp 1 tsp | Add to the dry flour, do not mix it with any liquid | |||||
| 2 Quick bread | Time 1:55 2:00 2:05 | |||||
| bread weight 500 g 750 g 1000 g | ||||||
| [1] water 140 ml 190 ml | 230 ml Water temperature 40-50 °C | |||||
| [2] salt 2/3 tsp 34 tsp 1 tsp Put it in the corner of the barrel | ||||||
| [3] sugar | 1 Tbsp | 2 Tbsp | 3 Tbsp | Put it in the corner of the barrel | ||
| [4] oil | 2 Tbsp | 2+12 Tbsp | 3 Tbsp | |||
| [5] high gluten flour | 2 cups / 290 g | 2+12 cups / 360 g | 3 cups / 435 g | |||
| [6] instant yeast | 2+12 tsp | 2+12 tsp | 2+12 tsp | Add to the dry flour, do not mix it with any liquid | ||
| 3 Sweet bread | Time 3:40 3:45 3:50 | |||||
| bread weight 500 g 750 g 1000 g | ||||||
| [1] water 120 ml 160 ml | 220 ml | |||||
| [2] salt 12 tsp 12 tsp Put it in the corner of the barrel | ||||||
| [3] egg 1 pc 1 pc 1 pc | ||||||
| [4] sugar | 2 Tbsp | 3 Tbsp | 4 Tbsp | Put it in the corner of the barrel | ||
| [5] oil | 1+12 Tbsp | 2 Tbsp | 2+12 Tbsp | |||
| [6] Milk powder 14 cup 1/3 cup 12 cup | ||||||
| [7] high gluten flour | 2 cups / 290 g | 2+34 cups / 380 g | 3+12 cups / 500 g | |||
| [8] instant yeast 34 tsp 1 tsp 1 tsp | Add to the dry flour, do not mix it with any liquid | |||||
| 4 French Bread | Time 3:55 4:00 4:05 | |||||
| bread weight 500 g 750 g 1000 g | ||||||
| [1] water 180 ml 260 ml | 320 ml | |||||
| [2] salt | 2 tsp 2+12 tsp 3 | tsp Put it in the corner of the barrel | ||||
| [3] | sugar | 1+12 Tbsp | 1+12 Tbsp | 2 Tbsp | Put it in the corner of the barrel | |
| [4] | oil | 1 Tbsp | 1+12 Tbsp | 2 Tbsp | ||
| [5] | high gluten flour | 2+14 cups / 300 g | 2+34 cups / 400 g | 3+12 cups / 500 g | ||
| [6] instant yeast ^3/4 tsp 1 tsp 1 tsp | Add to the dry flour, do not mix it with any liquid | |||||
| 5 Whole-wheat bread | Time 3:55 4:00 4:05 | |||||
| bread weight 500 g 750 g 1000 g | ||||||
| [1] water 180 ml 220 ml | 270 ml | |||||
| [2] salt | 2/3 tsp | ^3/4 tsp | 1 tsp Put it in the corner of the barrel | |||
| [3] | sugar | 1+34 Tbsp | 2 Tbsp | 3 Tbsp | Put it in the corner of the barrel | |
| [4] | oil | 2 Tbsp | 2+12 Tbsp | 3 Tbsp | ||
| [5] | high gluten flour | 1 cup / 145 g | 1+12 cups / 180 g | 2 cups / 220 g | ||
| [6] | whole-wheat flour | 1 cup / 145 g | 1+12 cups / 180 g | 2 cups / 220 g | ||
| [7] instant yeast ^3/4 tsp 1 tsp 1 tsp | Add to the dry flour, do not mix it with any liquid | |||||
| 6 Rice bread | Time 2:40 2:45 2:50 | |||||
| bread weight 500 g 750 g 1000 g | ||||||
| [1] water 150 ml 190 ml | 240 ml | |||||
| [2] salt | 2/3 tsp | ^3/4 tsp | 1 tsp Put it in the corner of the barrel | |||
| [3] egg | 1 pc | 1 pc | 1 pc | |||
| [4] | sugar | 1 Tbsp | 2 Tbsp | 2 Tbsp | Put it in the corner of the barrel | |
| [5] oil | 2 tsp | 2+12 tsp 3 tsp | ||||
| [6] | cooked rice | ^1/_4 cup | 1/3 cup | ^1/_2 cup | Use cooled-down cooked rice | |
| [7] | high gluten flour | 2 cups / 290 g | 2+12 cups / 360 g | 3 cups / 435 g | ||
| [8] instant yeast ^3/4 tsp 1 tsp 1 tsp | Add to the dry flour, do not mix it with any liquid | |||||
| 7 Gluten-free bread | Time 2:55 3:00 3:05 | |||||
| bread weight 500 g 750 g 1000 g | ||||||
| [1] water 140 ml 190 ml | 230 ml | |||||
| [2] salt 2/3 tsp 34 tsp 1 tsp Put it in the corner of the barrel | ||||||
| [3] sugar | 2 Tbsp | 2+12 Tbsp | 3 Tbsp | Put it in the corner of the barrel | ||
| [4] oil | 2 Tbsp | 2+12 Tbsp 3 Tbsp | ||||
| [5] gluten-free flour | 1+34 cups / 255 g | 2 cups / 290 g | 2+14 cups / 325 g | |||
| [6] corn flour | 14 cups / 35 g | 12 cups / 70 g | 34 cups / 110 g | Can replace with oat flour | ||
| [7] instant yeast | 34 tsp 1 tsp 1 tsp | Add to the dry flour, do not mix it with any liquid | ||||
| 8 Dessert | Time 1:40 / | / | ||||
| [1] egg | 2 pcs | |||||
| [2] milk | 1 cup | |||||
| [3] cooked rice | 1+12 cups | |||||
| [4] sugar 12 Tbsp | ||||||
| [5] raisin 12 cups | ||||||
| 9 Mix | Time 0:15 | |||||
| [1] water 330 ml | ||||||
| [2] salt | 1 tsp | Put it in the corner of the barrel | ||||
| [3] oil | 3 Tbsp | |||||
| [4] high gluten flour | 4 cups / 560 g | |||||
| 10 Dough | Time 1:30 / 750 g 1:30 / 1000 g | |||||
| [1] water 260 ml 330 ml | ||||||
| [2] salt | 1 tsp 1 tsp | Put it in the corner of the barrel | ||||
| [3] oil | 2+12 Tbsp 3 Tbsp | |||||
| [4] high gluten flour | 2+34 cups / 400 g | 4 cups / 560 g | ||||
| [5] instant yeast | 1+12 tsp | 1+12 tsp | Add to the dry flour, do not mix it with any liquid | |||
| 11 Knead | Time 0:08 Adjustable from 0:08 to 0:45 | |||||
| [1] water | appropriate amount | |||||
| [2] salt | 1 tsp | |||||
| [3] oil | 3 Tbsp | |||||
| [4] | high gluten flour | appropriate amount | ||||
| 12 Cake | Time 2:20 | Dissolve sugar in egg and water, mix well with an electric mixer, then put the other ingredients together into a bread barrel, then start this menu. | ||||
| [1] water 30 ml | ||||||
| [2] egg | 3 pcs | |||||
| [3] sugar 1⁄2 cups | ||||||
| [4] oil | 2 Tbsp | |||||
| [5] | self-rising flour | 2 cups / 280 g | ||||
| [6] instant yeast 1 tsp | ||||||
| 13 Jam | Time 1:20 | |||||
| [1] pulp | 3 cups | Stir until mushy; water can be added if needed. | ||||
| [2] starch 1⁄2 cups | ||||||
| [3] sugar 1 cup | Add sugar to personal taste | |||||
| 14 Yoghurt | Time 8:00 | Adjustable from 6:00 to 10:00 | ||||
| [1] milk | 1000 ml | |||||
| [2] | lactic acid bacteria | 100 ml | ||||
| 15 Bake | Time | 0:30, adjustable from 0:10 to 1:30 | ||||
| [2] | The appliance maintains a temperature of around 150 °C. The time is adjustable using the “▲” and “▼” buttons. | |||||
| 16 Sticky rice | Time 1:20 | |||||
| [1] water 275 ml | ||||||
| [2] glutinous rice | 250 g | |||||
| 17 Defrost | Time 0:30 | |||||
UNITS AND EQUIVALENCY MEASUREMENTS
- tsp: teaspoon
- tbsp: tablespoon
• 1 cup: 100 g
• 12 cup: 120 ml
• 1 cup: 240 ml - ml: millilitre
• g: gram
TROUBLESHOOTING
| PROBLEM PROBLEM CAUSE | SOLUTION | |
| Odour or burning smell. | Flour or other ingredients have spilt into the baking chamber. | Stop the bread maker and allow it to cool completely. Wipe excess flour etc., from the baking chamber with a paper towel. |
| Ingredients not blending can hear the motor turning. | Bread barrel or stir bar may not be installed properly. | Make sure the stir bar is set all the way on the shaft. |
| Too many ingredients. Measure ingredients accurately. | ||
| “HHH” displays when the Start/Stop button is pressed. | Internal temperature of the bread maker is too high. | Allow the unit to cool down in between programs. Unplug the unit, open the lid and remove the bread barrel. Allow to cool for 15-30 minutes before beginning new programs. |
| The window is cloudy or covered with condensation. | May occur during mixing or rising programs. | Condensation usually disappears during baking programs. Clean window well in between uses. |
| The stir bar comes out with the bread. | Thicker crust with dark crust setting. | It is not uncommon for the stir bar to come out with the bread loaf. Once the loaf cools, remove the stir bar with a spatula. |
| The dough is not blending throughly. Flour and other ingredients are built up on the sides of the pan. The bread loaf is coated with flour. | Bread barrel or stir bar may not be installed properly. | Make sure the bread barrel is securely set in the unit, and the stir bar is firmly on the shaft. |
| Too many ingredients. | Make sure ingredients are measured accurately and added in the proper order. | |
| Gluten-free dough is typically very wet. It may need additional help by scraping the sides with a rubber spatula. | Excess flour can be removed from the loaf once baked and cooled. Add water, one table tsp at a time, until the dough has formed into a ball. | |
| Bread rises too high or pushes lid up. | Ingredients not measured properly (too much yeast, flour). | Measure all ingredients accurately and make sure sugar and salt have been added. |
| Stir bar not in bread barrel. | Try decreasing yeast by 1⁄4 tsp (1,2 ml). | |
| Forgot to add salt. Check the installation of the stir bar. | bar. | |
| Bread does not rise; loaf short. | Inaccurate measurement of ingredients or inactive yeast. | Measure all ingredients accurately. Check the expiration date of yeast and flour. |
| Lifting lid during programs. Keep the lid closed during baking. | ||
| The temperature of the liquids is very cold. | Liquids should be at room temperature. | |
| Bread has a crater in the top of the loaf once baked. | Dough has risen too fast. Too much yeast or water. Incorrect program was chosen for the recipe. | Do not open the lid during baking. Select a darker crust option. |
| The crust colour is too light. Opening the lid during baking. | Do not open the lid during baking. Select a darker crust option. | |
| The crust colour is too dark. Too much sugar in the recipe. | Decrease the sugar amount slightly. Select a lighter crust option. | |
| The bread loaf is lopsided. | Too much yeast or water. Measure all ingredients accurately. | Accurately. Decrease yeast or water slightly. |
| Stir bar pushed dough to one side before rising and baking. | Some loaves may not be evenly shaped, particularly with whole-grain flour. | |
| Loaves made are different shapes. | Varies by the type of bread. | Whole-grain or multi-grain is denser and may be shorter than basic white bread. |
| The bottom is hollow or holey inside. | Dough too wet, too much yeast, no salt. | Measure all ingredients accurately Decrease yeast or water slightly. Check salt measurement. |
| Water is too hot. Use room temperature water. | ||
| Under-baked or sticky dough bread. | Too much liquid; incorrect program chosen. | Decrease liquid and measure ingredients carefully. Check the program chosen for the recipe. |
| Bread mashes down when slicing. | Bread is too hot. | Allow to cool on a wire rack for 15-30 minutes before slicing. |
| Bread has a heavy, thick texture. | Too much flour, old flour. Not enough water. | Try increasing water or decreasing flour. Whole-grain bread will have a heavier texture. |
| The base of the bread barrel has darkened or is spotted. | After washing in a dishwasher. | This is normal and will not affect the bread barrel. |
MACHINE À PAIN DOMESTIQUE BXBM600E
Cher Client,
RECOMMANDATIONS PRATIQUES
VEILIGHEIDSADVIES EN WAARSCHUWINGEN
WAARSCHUWINGSWEERGAVE
ALS U KLAAR BENT MET HET APPARAAT
FOR EU-PRODUKTVERSIONER OG/ELLER I TILFÆLDE AF, AT DET KRÆVES I DIT LAND PRODUKTETS ∅KOLOGI OG GENANVENDELIGHED
Oliana, 25790, Spain
ENHETER OCH EKVIVALENSMÄTNINGAR
- tsk: tesked
- msk: matsked
• Kopp 100 g
• ½ kopp: 120 ml
• Kopp 240 ml - ml: milliliter
• g: gram
//https://www.blackanddecker.eu
הכלההוּרָה,הכלההוּרָה,הכלההוּרָה,הכלההוּרָה,הכלההוּרָה,הכלההוּרָה,הכchia
ENGINEERING AND TECHNOLOGY FOR LIFE, S.L.
Avda. Barcelona s/n, Oliana, 25790, Spain
www.blackanddecker.eu
- SAFETY ADVICE AND WARNINGS
- USE AND CARE
- DESCRIPTION
- CONTROL PANEL
- INSTRUCTIONS FOR USE
- BEFORE USE
- USE
- WARNING DISPLAY
- REMOVING BREAD
- KEEP WARM
- PROGRAM MENU
- BASIC BREAD
- QUICKBREAD
- SWEET BREAD
- FRENCH BREAD
- WHOLE-WHEAT BREAD
- RICE BREAD
- GLUTEN-FREE BREAD
- DESSERT
- MIX
- DOUGH
- KNEAD
- CAKE
- JAM
- YOGURT
- BAKE
- STICKY RICE
- DEFROST
- ONCE YOU HAVE FINISHED USING THE APPLIANCE
- ACCESSORIES
- PRACTICAL RECOMMENDATIONS
- CLEANING
- SERVICE
- ANOMALIES AND REPAIR
- WARRANTY AND TECHNICAL ASSISTANCE
- FOR EU PRODUCT VERSIONS AND/OR IN THE CASE THAT IT IS REQUESTED IN YOUR COUNTRY: ECOLOGY AND RECYCLABILITY OF THE PRODUCT
- UNITS AND EQUIVALENCY MEASUREMENTS
- MACHINE À PAIN DOMESTIQUE BXBM600E
- RECOMMANDATIONS PRATIQUES
- VEILIGHEIDSADVIES EN WAARSCHUWINGEN
- WAARSCHUWINGSWEERGAVE
- ALS U KLAAR BENT MET HET APPARAAT
- FOR EU-PRODUKTVERSIONER OG/ELLER I TILFÆLDE AF, AT DET KRÆVES I DIT LAND PRODUKTETS ∅KOLOGI OG GENANVENDELIGHED
- ENHETER OCH EKVIVALENSMÄTNINGAR
Brand : BLACK & DECKER
Model : BXBM600E
Category : Other kitchen appliances