BXMZ901E - Other kitchen appliances BLACK & DECKER - Free user manual and instructions
Find the device manual for free BXMZ901E BLACK & DECKER in PDF.

| Product Type | Combination microwave with grill and convection |
| Brand | Black & Decker |
| Model | BXMZ901E |
| Microwave power | 900 W |
| Capacity | 25 L |
| Power supply | 230 V ~ 50 Hz, 10 A |
| Display | LED |
| Microwave power levels | 9 levels (10% to 100%) |
| Cooking modes | Microwave, Grill, Convection, Combination (Co-1, Co-2), Microwave+Convection |
| Convection temperatures | 110 °C to 200 °C |
| Timer | Up to 95 minutes |
| Additional functions | Defrost, Auto-menu (9 programs), Quick cook 30s, Multi-step cooking (up to 3), Clock, Child lock |
| Included accessories | Glass turntable, Rotating ring, Baking tray |
| Maintenance | Clean with a damp cloth and mild detergent. Do not immerse. |
| Safety | Door lock, overheating protection, automatic shut-off |
| Warranty | In compliance with current legislation, approved after-sales service |
| Repairability | Must be repaired by an approved technician |
Frequently Asked Questions - BXMZ901E BLACK & DECKER
User questions about BXMZ901E BLACK & DECKER
0 question about this device. Answer the ones you know or ask your own.
Ask a new question about this device
Download the instructions for your Other kitchen appliances in PDF format for free! Find your manual BXMZ901E - BLACK & DECKER and take your electronic device back in hand. On this page are published all the documents necessary for the use of your device. BXMZ901E by BLACK & DECKER.
USER MANUAL BXMZ901E BLACK & DECKER

natural_image
Line drawing of a microwave oven with control panel and door (no text or symbols)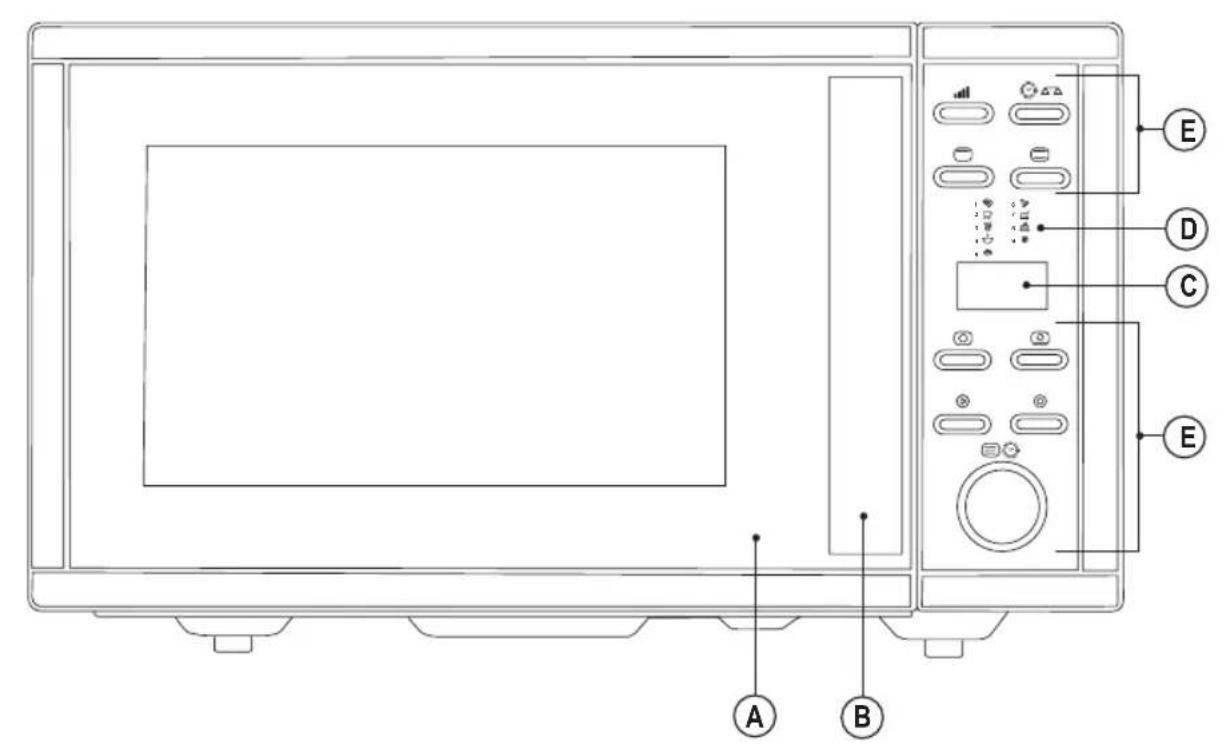

ENGLISH
(Original instructions)
Microwave Oven BXMZ901E
Dear customer,
Many thanks for choosing to purchase a BLACK+DECKER brand product.
Thanks to its technology, design and operation and the fact that it exceeds the strictest quality standards, a fully satisfactory use and long product life can be assured.
Read these instructions carefully before switching on the appliance and keep them for future reference. Failure to follow and observe these instructions could lead to an accident.
SAFETY ADVICE AND WARNINGS
◆ IMPORTANT SAFETY INSTRUCTIONS READ CAREFULLY AND KEEP FOR FUTURE REFERENCE.
◆ WARNING: If the door or door seals are damaged, the oven must not be operated until it has been repaired by a competent person.
◆ WARNING: It is hazardous for anyone other than a competent person to carry out any service or repair operation that involves the removal of a cover which gives protection against exposure to microwave energy.
◆ WARNING: Liquids and other foods must not be heated in sealed containers since they are liable to explode.
◆ This appliance is only for domestic use, not for industrial or professional use. It is not intended to be used
by guests in hospitality environments such as bed and breakfast, hotels, motels, and other types of residential environments, even in farm houses, areas of the kitchen staff in shops, offices and other work environments.
◆ The appliance requires suitable ventilation in order to work properly. Leave a space of 20 cm above the appliance and 5 cm on either side.
- Only use utensils that are suitable for use in microwave ovens.
◆ Metallic containers for food and beverages are not allowed during microwave cooking.
- When heating food in plastic or paper containers, keep an eye on the oven due to the possibility of ignition.
◆ The microwave oven is intended for heating food and beverage. Drying of food or clothing and heating of warming pads, slippers, sponges, damp cloth and similar may lead to risk of injury, ignition or fire.
- If smoke is emitted, switch off or unplug the appliance and keep the door closed in order to stifle any flames.
◆ Microwave heating of beverages can result in delayed eruptive boiling; therefore, care must be taken when handling the container.
◆ The contents of feeding bottles and baby food jars shall be stirred or shaken and the temperature checked before consumption, in order to avoid burns.
◆ Eggs in their shell and whole hard-boiled eggs should not be heated in microwave ovens since they may explode, even after microwave heating has ended.
◆ Clean all the parts of the product that will be in contact with food, as indicated in the cleaning section, before use.
◆ The oven should be cleaned regularly and any food deposits removed.
◆ Failure to maintain the oven in clean condition could lead to deterioration of the surface that could adversely affect the life of the appliance and possibly result in a hazardous.
◆ The appliance shall not be cleaned with a steam cleaner.
◆ The microwave oven is intended to be used freestanding.
◆ The appliance shall not be placed in a cabinet.
- This appliance can be used by children aged from 8 years and above and persons with reduced physical, sensory or mental capabilities or lack of experience and knowledge
if they have been given supervision or instruction concerning use of the appliance in a safe way and understand the hazards involved.
- This appliance is not a toy. Children should be supervised to ensure that they do not play with the appliance.
◆ Cleaning and user maintenance shall not be made by children unless they are supervised.
◆ The temperature of the door and other accessible surfaces may be high when the appliance is in use. -
Do not use the appliance in association with a programmer, timer or other device that automatically switches it on.
◆ Do not remove the mica plate covering the wave guide.
If the connection to the mains has been damaged, it must be replaced, take the appliance to an authorised technical support service. Do not attempt to disassemble or repair the appliance by yourself in order to avoid a hazard.
◆ This appliance is for household use only, not professional, industrial use. -
Ensure that the voltage indicated on the rating label matches the mains voltage before plugging in the appliance.
- Connect the appliance to a base with an earth socket withstanding a minimum of 10 amperes.
◆ The appliance's plug must fit into the mains socket properly. Do not alter the plug. Do not use plug adaptors.
ENGLISH
(Original instructions)
- Do not force the power cord. Never use the power cord to lift up, carry or unplug the appliance.
Do not allow the power cord to hang or to come into contact with the hot surfaces of the appliance.
◆ Check the state of the power cord. Damaged or tangled cables increase the risk of electric shock.
◆ Do not touch the plug with wet hands. - Do not use the appliance if the cable or plug is damaged.
If any of the appliance casings breaks, immediately disconnect the appliance from the mains to prevent the possibility of an electric shock. - Do not use the appliance if it has fallen on the floor, if there are visible signs of damage or if it has a leak.
Do not place the appliance on hot surfaces, such as cooking plates, gas burners, ovens or similar.
◆ The appliance must be used and placed on a flat, stable surface.
USE AND CARE:
◆ Fully extend the appliance's power cable before each use.
◆ Do not use the appliance when empty.
- Do not use the appliance if the on/off switch does not work.
◆ Disconnect the appliance from the mains when not in use and before undertaking any cleaning task.
◆ Make sure that dust, dirt or other foreign objects do not block the fan grill on the appliance.
Use the appliance and its accessories and tools in accordance with these instructions, taking into account the working conditions and the work to be performed. Use the appliance for operations different from those intended could result in a hazardous situation.
♦ CAUTION: Do not use the appliance if the glass is cracked or broken.
Service:
CAUTION: Maintenance or repair work, which requires only trained technicians, should carry out the removal of the microwave protection cover, as such actions are dangerous.
◆ Any misuse or failure to follow the instructions for use renders the guarantee and the manufacturer's liability null and void.
DESCRIPTION
A Microwave oven door
B Opening handle
C LED screen
D Auto menu guide
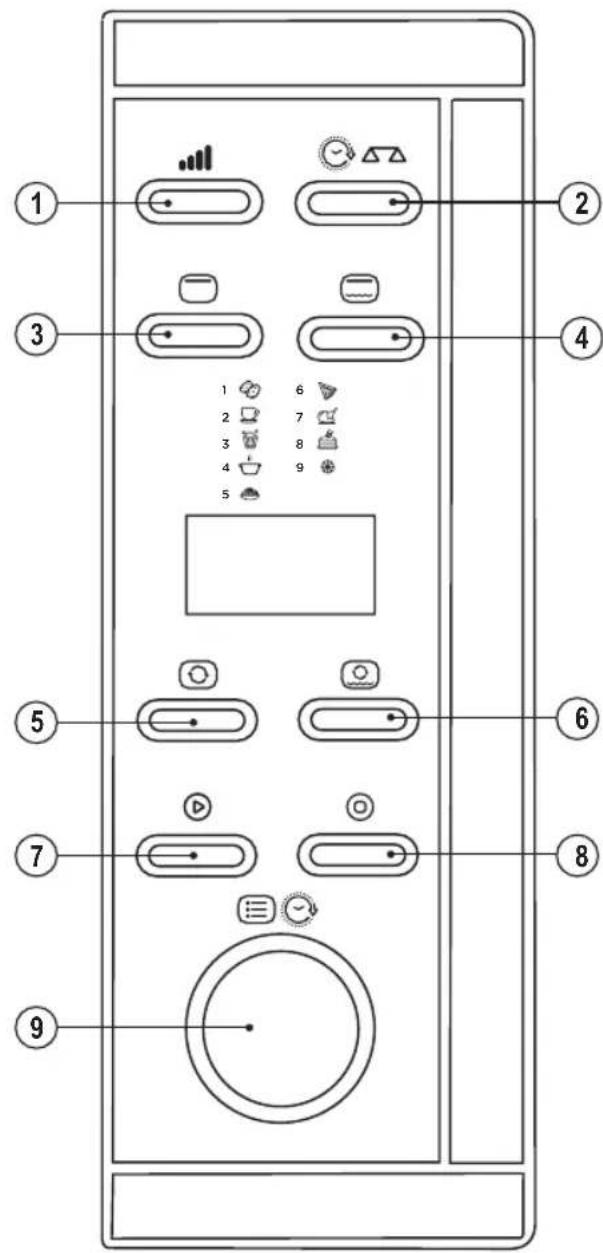
E Control panel
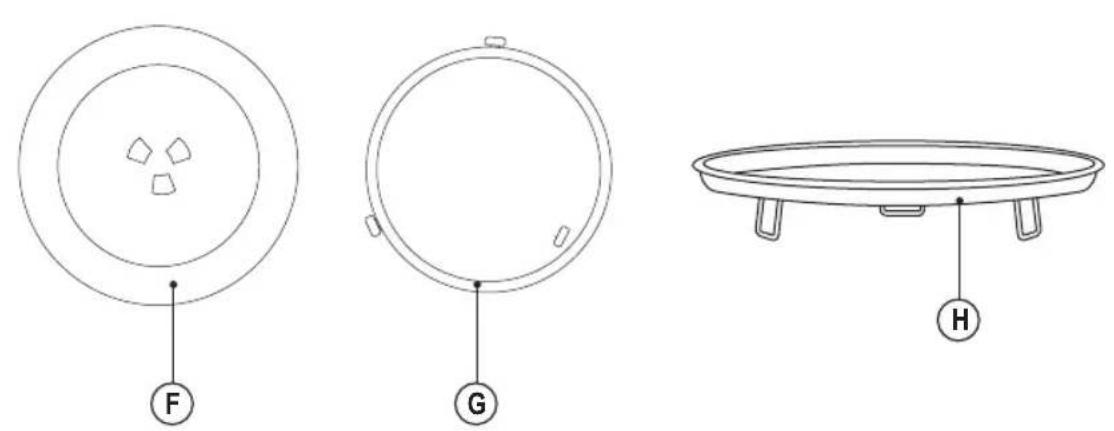
F Turntable
G Turntable Wheels
H Bake tray
1 Power selector
2 Clock button/Weight adjust
3 Grill selector
4 Combination function selector
5 Convection selector
6 Micro+convection selector
7 Start button
8 Stop/Cancel button
9 Multifunction knob
If the model of your appliance does not have the accessories described above, they can also be bought separately from the Technical Assistance Service.
INSTALLATION
- Be sure to remove all packaging material from inside the appliance.
- Do not cover or obstruct any of the openings of the appliance.
◆ The plug must be easily accessible so it can be disconnected in an emergency.
◆ Check the oven for any damage, such as misaligned or bent door, damaged door seals and sealing surface, broken or loose door hinges and latches and dents inside the cavity or on the door. If there is any damage, do not operate the oven and contact qualified personnel.
◆ Do not place anything over the Microwave.
- Keep the oven separated about 5cm for each side and 20cm on behind to ensure the correct ventilation.
- Don't use the oven outdoors
Plate mounting
◆ Remove all carton and plastic from the inside of the appliance.
Place the plate wheels (G) in the internal cavity of the Microwave oven by assuring that they stay inside of the recess on the interior base.
◆ Place the plate over the wheels by matching the centre
with the internal piece connected to the motor.
First time plugging in (General Instructions)
When the oven first plugged in, beep will sound and all symbols will light on. At this time, press the stop/cancel button to go to standby mode.
In the process of cooking, if it is not realizing any function, after 20 seconds the oven will return to standby mode.
During cooking, if press STOP/CANCEL pad once, the program will be paused, then press START/QUICK START pad to resume, but if press STOP/CANCEL pad twice, the program will be cancelled.
- After ending cooking, the screen will display End with sound every two minutes until user press any pad or open the door.
This microwave has a cooling function. After two minutes of use, the cooling fan will remain switched on about 3 minutes to ensure the correct ventilation of the microwave oven.
Setting Clock time
This is a 24- or 12- hour clock. You can choose to set the clock time in 24- or 12- hour cycle by pressing the CLOCK pad.
◆ In standby mode, press CLOCK pad once or twice to select 24- or 12- hour clock.
◆ Turn MENU/TIME knob to set hour digit.
◆ Press CLOCK pad once.
◆ Turn MENU/TIME knob to set minute digit.
◆ Press CLOCK pad to confirm.
NOTE: During cooking, you can check the current time of the clock by pressing CLOCK pad.
INSTRUCTIONS FOR USE
Before use:
◆ Make sure that all products' packaging has been removed.
◆ Prepare the appliance according to the function you wish to use:
Open the door
◆ Pull the handle to open the door.
Express cooking
◆ Place the food inside the microwave oven and close the
(Original instructions)
ENGLISH
door.
◆ Press the start button. The microwave oven will start working at max power during 30 seconds.
NOTE: You can add 30 seconds to the express cooking every time you press the start button.
Microwave:
◆ Place the food in the appliance and close the door.
◆ From standby mode, press the power selector to choose the desired power.
◆ Turn the multifunction knob to select the cooking time.
◆ Press the start button to start cooking.
NOTE: This microwave has 10 power levels. Press the power selector several times to go through them. 100% (900W), 90%(810W), 80% (720W), 70% (630W), 60% (540W), 50% (450W), 40% (360W), 30% (270W), 20% (180W), 10% (90W).
NOTE: The maximum cooking time is 95 minutes.
GRILL COOKING
-Place the food in the appliance and close the door.
-From standby mode press the function selector once.
-Turn the multifunction knob to set the cooking time.
-Press the start button to start cooking.
NOTE: The maximum cooking time is 95 minutes.
Combination Cooking
-Place the food in the appliance and close the door.
-From standby mode, press the combi selector once or twice to select Co-1 or Co-2 mode.
-Turn the multifunction knob to select the time.
-Press the start button to start the function
NOTE: Co-1 uses 30% microwave power and 70% grill power. Mode Co-2 uses 55% microwave power and 45% grill power.
Convection
During convection cooking, hot air is circulated inside the oven to make crispy foods quickly and evenly. This oven has different temperatures: 200 °C, 190 °C, 180 °C, 170 °C, 160 °C, 150 °C, 150 °C, 140 °C, 130 °C, 120 °C, 110 °C.
To preheat the oven:
-In standby, press the convection selector to select the desired temperature.
-Press the start button once to confirm. The oven will start working and it will make a sound once it gets to

ENGLISH
(Original instructions)
the temperature. Every 5 seconds will sound.
NOTE: If you don't do anything when the oven is preheated, it will sound every 5 seconds during 30 minutes. After that time, it will be automatically switched off.
To cook with convection after preheating
-Open the door and place the food container at the centre of the turntable. TIP: you can use the bake tray as a non-stick tray, just like the ovens.
-Turn the multifunction knob to set the cooking time.
-Press start button to start cooking.
NOTE: During cooking, you can check the temperature pressing the convection button.
Microwave + convection
This oven can mix microwave power with convection power to offer new possibilities in cooking. It has four temperatures available in mixing: 200 °C, 170 °C, 140 °C, 110 °C.
-In standby press the micro+convection selector to select the desired temperature.
-Turn the multifunctional knob to select the time of cooking.
-Press the start button to confirm.
defrost
-Place the food in the appliance and close the door.
-From standby, turn the knob anti-clockwise and select auto mode 9.
-Turn the multifunctional knob to select the time of cooking.
-Press the start button to confirm.
NOTE: During the defrosting process, the system will beep and stop in the middle time so you can turn your food over. Once you have done it, press the multifunction knob to resume.
Multi-stage cooking
Your oven can be programmed for up to 3 automatic cooking sequences. Suppose you want to set the following cooking program:
Microwave cooking some food at max power during 10 min and, after that, grill cooking for 5 minutes.
Multi-stage Cooking
This microwave allows to cook in 3 different cooking steps. For example, we suppose that you want use 100% microwave power during 15 minutes and use the grill during 5 minutes.
-Press the power selector once
-Use the turning knob to select 15 minutes.
-After that, press the function selector once to select the grill.
-Adjust the time to 5 min.
-Press the start button to start cooking.
NOTE: Modes Auto-menu, defrost and express cooking cannot be used as a step on the multi-stage cooking.
Child lock
This function is used to avoid accidents because of unnoticed use by kids.
Child lock will be automatically activated after one minute without operation. In this state all pads are disabled.
To cancel the child lock, open the door.
AUTOMENU
In order to use this function, you will just have to know the weight and the type, for example, if it is milk, you will have to choose liquids.
-Turn the turning knob counter-clockwise to select the correct menu. You will find a table regarding this menu below.
-Press the weight adjust to select the weight or the pieces.
-Press the start button to cook.
| Menu Weight / Quantity | |
| A1Potatoes | 1-3 pieces |
| A2Milk/Coffee/Liquids | 1-3 cups (200ml) |
| A3Popcorn | 99 g |
| A4Reheating | 200 – 800 g |
| A5Pasta | 100 g(450ml water) |
| 200 g(800 ml water) | |
| 300g(1200 ml water) | |
| A6Pizza | 150 – 450 g |
| A7Chicken | 800 – 1400 g |
| A8Cakes | 475 g |
| A9Defrosting | Check the defrosting section. |
NOTE: For mode 7, microwave will stop in the middle of the operations to turn the food over.
NOTE: The result of auto cooking will depend on much factors. If you find the result not quite accordingly, adjust the cooking time a little bit.
Once you have finished using the appli- ance:
◆ Clean the appliance.
CLEANING
◆ Disconnect the appliance from the mains and allow it to cool before undertaking any cleaning task.
◆ Clean the equipment with a damp cloth with a few drops of washing-up liquid and then dry.
Do not use solvents, or products with an acid or base pH such as bleach, or abrasive products, for cleaning the appliance.
Do not let water or any other liquid get into the air vents to avoid damage to the inner parts of the appliance.
- Never submerge the appliance in water or any other liquid or place it under running water.
◆ Remove the glass plate and the rotating ring for cleaning. Clean in hot, soapy water or in a dishwasher. Replace parts correctly.
- It is advisable to clean the appliance regularly and remove any food remains.
ANOMALIES AND REPAIR
Take the appliance to an authorised technical support service if product is damaged or other problems arise. Do not attempt to disassemble or repair the appliance yourself as this may be dangerous.
For EU product versions and/or in case that it is requested in your country:
Ecology and recyclability of the product
The materials of which the packaging of this appliance consists are included in a collection, classification and recycling system. Should you wish to dispose of them, use the appropriate public recycling bins for each type of material.
- The product does not contain concentrations of substances that could be considered harmful to the environment.
This symbol means that in case you wish to dispose of the product once its working life has ended; take it to an authorised waste agent for the selective collection of Waste from Electric and Electronic Equipment (WEEE).
This appliance complies with Directive 2014/35/EU on Low Voltage, Directive 2014/30/EU on Electromagnetic Compatibility, Directive 2011/65/EU on the restrictions of the use of certain hazardous substances in electrical and electronic equipment and Directive 2009/125/EC on the eco-design requirements for energy-related products.
Warranty and technical assistance
This product enjoys the recognition and protection of the legal guarantee in accordance with current legislation. To enforce your rights or interests you must go to any of our official technical assistance services.
You can find the closest one by accessing the following web link: http://www.2helpu.com/
You can also request related information, by contacting us (see the last page of the manual).
You can download this instruction manual and its updates at http://www.2helpu.com/
FRANÇAIS
Micro-ondes + Convection
ENGINEERING AND TECHNOLOGY FOR LIFE, S.L.
Avda. Barcelona s/n
Oliana, 25790, Spain