RBC47SEO - String trimmers RYOBI - Free user manual and instructions
Find the device manual for free RBC47SEO RYOBI in PDF.
| Product type | String trimmer / Brushcutter |
| Brand | RYOBI |
| Model | RBC47SEO |
| Engine type | 2-stroke, air-cooled |
| Fuel | Unleaded petrol (91 octane min.) and synthetic 2-stroke oil mixture |
| Mix ratio | 40:1 (2.5% oil) |
| Spark plug | L8RTF (NHSP LD or BOSCH), gap 0.5 mm |
| Air filter | Washable with soapy water, annual replacement recommended |
| Cutting head | ReelEasy™ line trimmer head, single round line 2.4 mm diameter |
| Brushcutter blade | Tri-Arc™ (special blade) |
| Debris guard | Included with removable grass deflector |
| Harness | Included, with quick release system |
| Front handle | Adjustable |
| Starting | Manual (recoil starter) or optional electric (OES18 starter) |
| Warranty | 24 months, extendable by online registration |
| Standards | CE, EAC, compliant with directives 2006/42/EC, 2014/30/EU, 2000/14/EC |
| Intended use | Cutting tall grass, weeds, brush (with blade) |
| Safety | Hearing and eye protection recommended, engine stop, throttle lock |
Frequently Asked Questions - RBC47SEO RYOBI
User questions about RBC47SEO RYOBI
0 question about this device. Answer the ones you know or ask your own.
Ask a new question about this device
Download the instructions for your String trimmers in PDF format for free! Find your manual RBC47SEO - RYOBI and take your electronic device back in hand. On this page are published all the documents necessary for the use of your device. RBC47SEO by RYOBI.
USER MANUAL RBC47SEO RYOBI
It is essential that you read the instructions in this manual before assembling, maintaining, and operating the product.
Subject to technical modifications.
CE


| Important! | It is essential that you read the instructions in this manual before assembling, maintaining and operating the product. |
| Attention! | Il est essentiel que vous lisiez les instructions contenues dans ce manuel avant d'assember, d'entretenir et d'utiliser le produit. |
| Achtung! | Es ist wichtig, dass Sie vor Zusammenbau, Wartung und Benutzung des Produktes die Anweisungen in dieser Anleitunglesen. |
| jAtencion! | Resulta fundamental que lea este manual de instrucciones antes de realizar el montaje, el mantenimiento y de utiliser este producto |
| Attenzione! | E' importante leggere le istruzioni contenate nel presente manuale prima di montare il prodotto, svolgere le operazioni di manutenzione sullo stesso e metterlo in funzione. |
| Let op! | Het is van essentieel belang dat u de instructies in deze gebruksaanwijzing leest voor u het product monteert, onderhoudt en gebruikt. |
| Atença! | É fundamental que leia as instruções deste manual antes da montagem, manutenção e operação do aparxEho. |
| OBS! | Det er vigtigt, at man læser instrukserne i dette brugsanvising, inden man samler, vedligeholder og betjener produktet. |
| Observera! | Det ar viktigt att du læser instructurionerna i manuale fore montering, använding och underhäll av produits. |
| Huomio! | On tärkeä,etty luet tämän käsikirjan objeeen ennen tuotteen kokoamista, hultoa ja käytöä. |
| Adversell! | Det er viktig at du leser instruksjonene i dette manuale for sommensetting, vedlikehold og bruk av produits |
| BHMAMHIE! | Heobxodmno prouyta TB INCTpykuni B DaHOM pyKOBODCTBE Pered c60pkoi, obcnykBaHem i ekcnnyaatamei 3Toro n3delen. |
| Uwaga! | Koniecznie nalezy przyeczytać instructkcje zawarte w tym podrcczniku przed montažem, obsluga oraz konserwacja produktu. |
| Dulezité upozorněi! | Neinstalujte, neprovádejte udžbrbu ani nepoužívejte tento vyrobek dîve, než si přečete potkyny uvedené v toto návodu. |
| Figyelem! | Fontos, hagy a termek összeszerelése, karbantartása és használata elòtt elolvassa a kékönyvben talalható utasításokat. |
| Atentie! | Este esental sà cititi instructiunile din acest manual inainte de asamblare, efectuarea intretineri si operarea produsului. |
| Uzmanibu! | Ir svarigi izlasit sīs rokasgrāmatas instructcijas pirms uzstadīsanas, apkopes un preces darbināsanas. |
| Démesio! | Priś surenkant, prižürint ir naudojant gaminj, butina perskaityi šiame vadove pateiktus nurodymus. |
| Tähtis! | Enne masina kokkupanekut, hooldamist ja kasutama hakkamist tuleb käesolevas juhendis esitatud juhised kindlasti lábi lugeda. |
| Upozorenje! | Vrlo je važno da ste prije sklapanja, odžavanja i rada s ovm proizvodom pročitali upute u ovom priručniku. |
| Pomembno! | Pomembno je da pred montažo vzdriževanjem in uporabo tega izdelka preberete navodila v tem priročniku. |
| Upzornenie! | Je dôlezité, aby ste si pred montážou, udžbrbou a obsluhou produktu prečitali potkyny v toto návode. |
| Baxnho! | Изклочтелно baxnno eда почeteи INCTpykuniTE B HACTOJTO pБKOBOCTBO,педа дуpeninete KBM CRLOBAVAne, подрьжka ул pa60Ta C npodykta. |
| Baxnbo! | Дуку вадиму, заю вд рочатул снчтукii вцьому керінцтбіп лeredскlaданям, обслуговваням та ekспунаотціюціе машни. |
| Önemli! | Ürünü monte etmeden, kullanmadan ve bakimini yapmadan once bu kilavuzdaki talimatlari okumaniz onemlidir. |
Subject to technical modification | Sous réserve de modifications techniques | Technische Änderungen vorbehalten | Bajo reserva de modificaciones tecnicas | Con riserva di eventuale modifiche tecniche | Technische wizzigingen voorbehonden | Com reserva de modificações tecnicas | Med forbehold for tekniske ændringer | Med forbéhl for teknika andringar | Tekniset muutokset varataan | Med forbehold om tekniske endringer | Moryt 6bItb BHeceHb TeXnueckne n3MeHeHHa | Z astrzezeniem modyfikacji technicznych | Změny technickych udaju vyhrazeny | A muszaki modositas jegat fenntartjuk | Sub rezerva modificaţilor tehnice | Paturam tiesbas mainit tehniskos raksturlielumus | Pasiliekant teasie daryti techninius pakeitimus | Tehnilised muudatused voimalikud | Podloæno tehniekim promjenama | Tehnicne spremembe dopuscene | Pravo na technické zmeny je vyhradène | Поліжни Na TeXnueckи мodyнфпаци | E ob'ekTom Дяг Тхнчнix 3mɪn | Teknik degišklige tabidir.


1
2
3
4
5
6
Fig 6
4

5
6
Fig 13
12
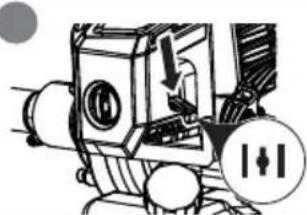
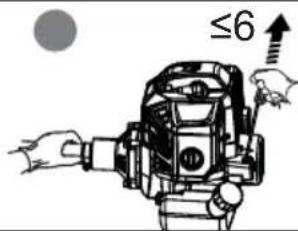
Fig 14


APPRENEZ A CONNAITRE VOTRE PRODUIT
English (Original Instruet
Safety, performance, and dependability have been given top priority in the design of your grass trimmer/brushcutter.
INTENDED USE
The grass trimmer/brushcutter is intended to be used only by adults who have read and understood the instructions and warnings in this manual and can be considered responsible for their actions. The product is only intended for use outdoors in a well ventilated area. For safety reasons, the product must be adequately controlled by using two-handed operation.
The product fitted with the grass trimmer head (and appropriate guard) is intended for cutting long grass, pulpy weed, and similar vegetation at or about ground level. When fitted with the Tri-Arc™ blade (and appropriate guard), it can also cut bushes. The product is not designed to be fitted with a saw blade.
The cutting plane should be approximately parallel to the ground surface. The product should not be used to cut or trim hedges, bushes, or other vegetation where the cutting plane is not parallel to the ground surface.
Do not use the product for any other purpose.
WARNING
To reduce the risk of injury, the user must read and understand the operator's manual.
WARNING
Do not attempt to operate the product until you have read thoroughly and understood completely all instructions and safety rules contained in this manual. Failure to comply may result in accidents involving fire, electric shock, or serious personal injury. Save the operator's manual and review frequently for continuing safe operation, and instructing others who may use the product.
WARNING
The product is not intended to be used by children or persons with reduced physical, mental, or sensory capabilities. Children should be adequately supervised to ensure they do not play with the product.
GENERAL SAFETY WARNINGS
For safe operation, read and understand all instructions before using the product. Follow all safety instructions. Failure to follow all safety instructions listed below, can result in serious personal injury.
Some regions have regulations that restrict the use of
the product. Check with your local authority for advice.
- Do not allow children or untrained individuals to use the product.
- Never start or run the engine in a closed or poorly ventilated area; breathing exhaust fumes can kill.
- Clear the work area before each use. Remove all objects such as rocks, broken glass, nails, wire, or string, which can be thrown or become entangled in the string head or blade.
- Wear full eye and hearing protection while operating this product. If working in an area where there is a risk of falling objects, head protection must be worn.
Hearing protection may restrict the operator's ability to hear warning sounds. Pay particular attention to potential hazards around and inside the working area. - Wear heavy long trousers, non-slip protective footwear, and gloves. Do not wear loose fitting clothing, short trousers, jewellery of any kind, or use with bare feet.
- Secure long hair so it is above shoulder level to prevent entanglement in any moving parts.
- Keep all bystanders, children, and pets at least 15 m away. Stop the product if anyone enters the area.
- Do not use the product when you are tired, ill, or under the influence of alcohol, drugs, or medication.
- Do not use in poor lighting. The operator needs clear unrestricted vision to identify potential hazards.
- Keep firm footing and balance at all times. Do not overreach. Overreaching can result in loss of balance or exposure to hot surfaces.
- Keep all parts of your body away from any moving part.
- Do not touch area around the silencer or cylinder of the product, these parts get hot from operation.
Always stop the engine and allow it to cool down before making any adjustments. - Do not smoke when mixing fuel or filling fuel tank.
- Mix and store fuel in a container approved for fuel.
- Mix fuel outdoors where there are no sparks or flames. Wipe up any fuel spillage. Move 9 m away from refuelling site before starting engine.
- Stop the engine and allow to cool down before refuelling or storing the product.
- Allow the engine to cool down; empty the fuel tank and secure the product from moving before transporting in a vehicle.
Always stop the engine and make sure all moving parts have come to stop before:
servicing
- leaving the product unattended
FRENDEESITPTNLSVDANOHUCSRUROPLSLHRETLTLVSKBGUKTR
English (Original Instruction)
- cleaning your product
-
changing accessories
clearing blockages -
checking for any damage after hitting an object
- checking for any damage if the product starts to vibrate abnormally
performing maintenance - removing blade
installingblade
WARNING
Never use cutting means or attachments, which are not specified by Ryobi in this manual. This includes the use of metal multi-piece pivoting chains and flailblades. These items are known to break up during use and present a high risk of serious injury to the operator or bystanders.
WARNING
Inspection after dropping or other impacts: Thoroughly inspect the product and identify any problems or damage to it. Any part that is damaged should be properly repaired or replaced by an authorised service centre.
GRASS TRIMMER SAFETY WARNINGS
- Replace the string head if cracked, chipped, or damaged in any way. Be sure the string head is properly installed and securely fastened. Failure to do so can cause serious injury.
- Avoid using on wet grass.
-
Do not walk backwards when using the product.
Walk, never run.
The small blade fitted to the cutting attachment guard is designed to trim the new extended line to the correct length for safe and optimum performance. It is very sharp; do not touch it, particularly when cleaning the product.
Always ensure that ventilation openings are kept clear of debris.
Before use and after any impact, check that there are no damaged parts. Examine the cutting means for signs of cracking or other damage. A defective switch or any part that is damaged should be properly repaired or replaced by an authorised service facility.
Make sure the head attachment is properly installed and securely fastened.
Make sure all guards, deflectors, handles, bolts, and fasteners are properly and securely attached. -
Do not modify the product in any way. This may increase the risk of injury to yourself or others.
Use only the manufacturer's replacement line in the cutting head. Do not use any other cutting attachment. - Never use the product without the cutting attachment guard in place and in good condition.
- Maintain a firm grip on both handles while trimming. Keep string head below waist level. Never cut with the string head located over 76 cm or more above the ground.
BRUSHCUTTER SAFETY WARNINGS
In addition to the above rules, these additional instructions are appropriate when using the product in brushcutter mode.
Use heavy-duty gloves while installing or removing the blades, they have sharp edges.
- Do not attempt to touch or stop the blade when it is rotating.
A moving blade can cause severe injury. Maintain proper control of the product with both hands until the blade has completely stopped rotating.
- Replace any blade that has been damaged. Always make sure the blade is installed correctly and securely fastened before each use.
Use only the manufacturer's replacement Tri-ArcTM blade. Do not use any other cutting attachment.
- Never cut any material over 13mm diameter.
- Your brushcutter is fitted with a harness. Carefully adjust the harness to fit comfortably and help to support the weight of the product at your right side.
- Identify the quick release mechanism and practice using it before you start using the product. Its correct use may prevent serious injury in case of an emergency. Never wear additional clothing over the harness or otherwise restrict access to the quick release mechanism.
- Cover the blade with the blade protector before storing the product, or during transportation. Always remove the blade protector before using the product. If not removed, the blade protector could become a thrown object as the blade begins to turn.
Exercise extreme caution when using the blade with the product. Blade thrust is the reaction that may occur when the spinning blade contacts anything it cannot cut. This contact may cause the blade to stop for an instant, and suddenly "thrust" the product away from the object that was hit. This reaction can be violent enough to cause the operator to lose control of the product. Blade thrust may occur without warning if the blade snags, stalls, or binds. This is more likely to
FRENDEESITPTNLSVDANOHUCSRUROPLSLHRETLTLVSKBGUKTR
English (Original Instruction)
occur in areas where it is difficult to see the material being cut.
For cutting ease and safety, approach the weeds being cut from the right to the left. In the event an unexpected object or woody stock is encountered, this practice could minimise the blade thrust reaction. Both hands must be used at all times to control the product.
TRANSPORTATION AND STORAGE
- Stop the engine and allow it to cool down before storing or transporting.
Clean all foreign materials from the product.
If a cutting blade is fitted, cover it with the blade protector. - Drain all fuel from tank into a container approved for petrol. Remember to properly replace and tighten the fuel cap.
- Run the engine until it stops, this will remove all fuel that could become stale and leave varnish and gum in the fuel system.
Store the product in a cool, dry, and well-ventilated place that is inaccessible to children. Keep away from corrosive agents, such as garden chemicals and de-icing salts. Do not store outdoors. - When transporting the product in a vehicle, secure it against movement or falling to prevent injury to persons or damage to the product.
- Never carry or transport the product while the engine is running.
- Abide all government and local regulations for the safety storage and handling of petrol. Excess fuel should be used in other 2-cycle engine powered equipment.
SHORT TERM
- Stop the engine, and allow it to cool down before storing.
Clean all foreign material from the product.
Store the product in a cool, dry, and well-ventilated place that is inaccessible to children. - Keep away from corrosive agents such as garden chemicals and de-icing salts.
Do not store outdoors.
RESIDUAL RISKS
Even when the product is used as prescribed, it is still impossible to completely eliminate certain residual risk factors. The following hazards may arise in use and the operator should pay special attention to avoid the following:
- Contact with cutting means
- Ensure that the blade protectors are fitted when the product is not in use. Keep hands and feet away from the blades at all times.
Injury caused by vibration
Always use the right tool for the job, use designated handles, and restrict working time and exposure.
Hearing injury caused by exposure to noise
Wear hearing protection and limit exposure.
Eye injury caused by flying debris
Wear eye protection at all times.
Risk of falling objects - Wear head protection if there is any risk of falling objects.
Kickback can occur when using the brushcutter. Ensure proper control by using both hands on the designated handles. Read and follow the directions elsewhere in this manual to help reduce the risk of kickback.
RISK REDUCTION
It has been reported that vibrations from handheld tools may contribute to a condition called Raynaud's Syndrome. Symptoms may include tingling, numbness and blanching of the fingers, usually apparent upon exposure to cold Hereditary factors, exposure to cold and dampness, diet, smoking and work practices are all thought to contribute to the development of these symptoms. There are measures that can be taken by the operator to possibly reduce the effects of vibration:
- Keep your body warm in cold weather. When operating the product, wear gloves to keep the hands and wrists warm. It is reported that cold weather is a major factor contributing to Raynaud's Syndrome.
After each period of operation, exercise to increase blood circulation.
Ensure that the product is correctly located in a designated working position before starting the product. - Limit the amount of exposure per day. Take frequent work breaks.
If you experience any of the symptoms of this condition, immediately discontinue use and see your physician.
WARNING
Injuries may be caused or aggravated by prolonged use of the product. When using any tool for prolonged periods, ensure you take regular breaks.
English (Original Instruction)
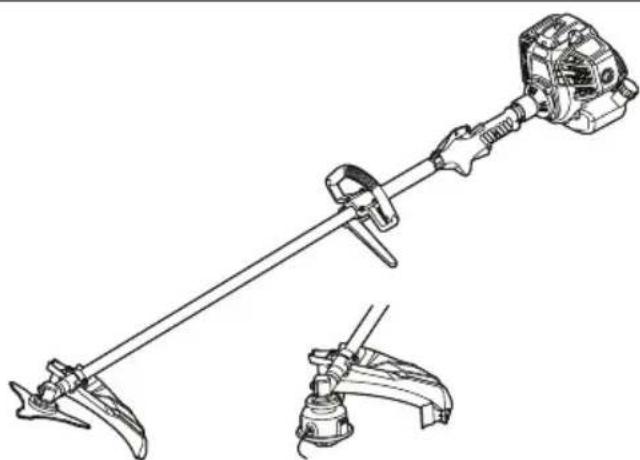
DESCRIPTION
- Power head
- Strap hanger
- Trigger handle
- Shaft
- Cutting attachment guard
- Tri-ArcTM blade
- ReelEasy™ grass trimmer head
- Front handle
- Quick release tab
- Latch
- Mounting bracket
- Screw
- Wrench
- Allen wrench (5 mm)
- Hole in the gear case
- Hole in the upper flange washer
- Upper flange washer
18.Blade washer - Cupped washer
- Blade nut
21.Gear head - Combination wrench
- Drive connector
- String head housing
- Spring
- Bolt
- Spool
- Knob
- String head cover
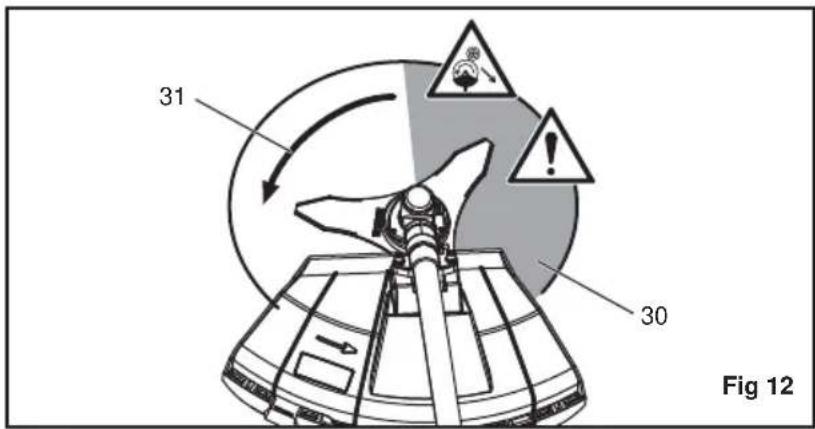
- Best cutting area
- Dangerous cutting area
- Direction of cutter rotation
- Ignition switch
- Throttle trigger
- Throttle lock
- Primer bulb
- Choke lever
- Tri-ArcTM blade protector
- Air filter knob
- Air filter cover
41.Filter - Starter bit
- Electrical starter
44.F/R button - Starter bit shaft
- Shaft hole on the engine
- Switch button
- Harness
- Grass deflector
- Blade guard
- Guard screw
- Washer
- Screw
- Lower barrier
SYMBOLS
Some of the following symbols may be used on the brushcutter/grass trimmer. Please study them and learn their meaning. Proper interpretation of these symbols allows you to operate the product better and safer.
| Safety alert | |
| To avoid serious personal injury, do not attempt to use this product until you read thoroughly and understand completely the operator's manual. | |
| Beware of thrown or flying objects. Keep all bystanders, especially children and pets at least 15 m from the operating area. | |
| Rotational direction and maximum speed of the shaft for the cutting attachment | |
| Wear non-slip safety footwear when using this equipment. | |
| Wear non-slip, heavy-duty gloves. | |
| Beware of blade thrust. | |
| Wear eye, ear, and head protection. | |
| To reduce the risk of injury or damage, avoid contact with any hot surface. | |
| Keep hands away from blades. | |
| Hot surface | |
| Use unleaded petrol intended for motor vehicle use with an octane rating of 91 [(R + M)/2] or higher. | |
| Use 2-stroke oil for air cooled engines. | |
| Mix the fuel mix thoroughly and also each time before refueling | |
| Conforms to all regulatory standards in the country in the EU where the product is purchased. | |
| EurAsian Conformity Mark |
FRENDEESITPTNLSVDANOHUCSRUROPLSLHRETLTLVSKBGUKTR
English (Original Instruction)

Stop the product
ASSEMBLY
UNPACKING
The product requires assembly.
- Carefully remove the product and any accessories from the box. Make sure that all items listed in the packing list are included.
Inspect the tool carefully to make sure no breakage or damage occurred during shipping. - Do not discard the packing material until you have carefully inspected and satisfactorily operated the tool.
PACKING LIST
Grass trimmer/Brushcutter x 1
ReelEasyTM grass trimmer head x 1
Cutting attachment guard x 1
Tri-ArcTMblade x 1
Harness x 1
Operator's manual x 1
Engine oil x 1
Combination wrench x 1
Wrench x 1
Allen wrench (5mm)× 1
Allen wrench (4mm)× 1
Bladenutx2
WARNING
If any parts are damaged or missing, do not operate the product until the parts are replaced. Failure to heed this warning could result in serious personal injury.
WARNING
Do not attempt to modify the product or create accessories not recommended for use with the product. Any alteration or modification is misuse and could result in a hazardous condition leading to possible serious personal injury.
WARNING
Never attach or adjust any attachment while power head is running. Failure to stop the engine may cause serious personal injury.
WARNING
Make sure all knobs and fasteners are fully tightened before operating the product; check it periodically for tightness during use to avoid serious injury.
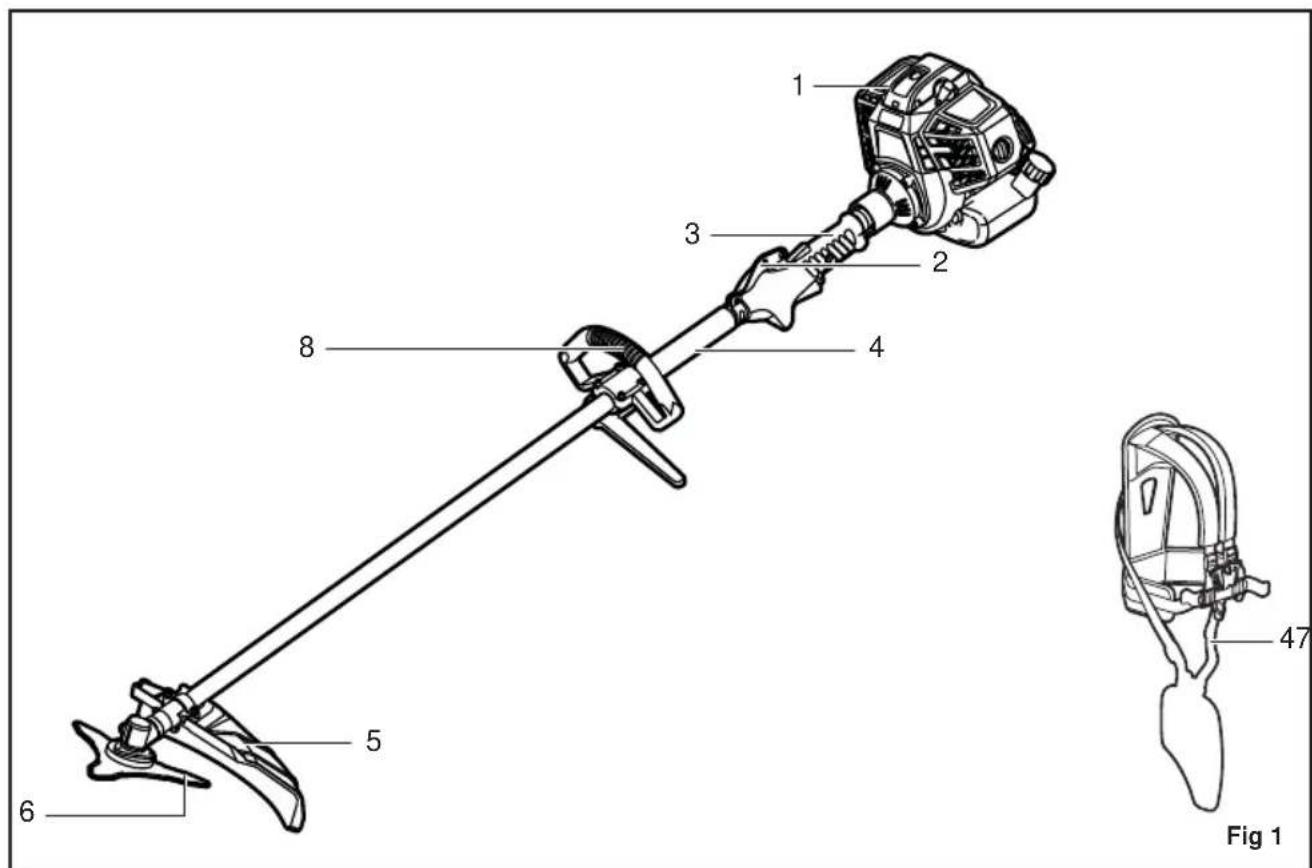
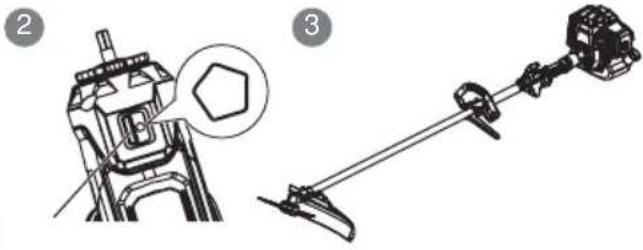
SETTING UP THE FRONT HANDLE
See figure 2.
- Remove the four bolts from the front handle.
- Position the front handle onto the shaft.
NOTE: The lever protruding from the front handle should point to the left side of the trimmer.
3. Position the bracket barrier underneath the front handle and secure it in place by screwing the bolts through the base of the front handle into to the bracket.
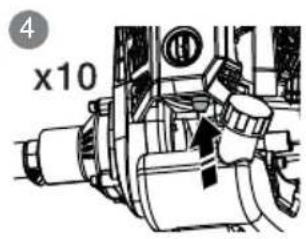
ATTACHING THE HARNESS
See figure 3.
- Connect the latch on the harness to the strap hanger.
- Adjust the strap hanger to a comfortable and balanced position where the blade or cutter attachment will suspend between 100mm and 300mm above the ground surface.
NOTE: Always use the harness with the product.
NOTE: To quickly release the product from the harness, sharply pull the quick-release tab.
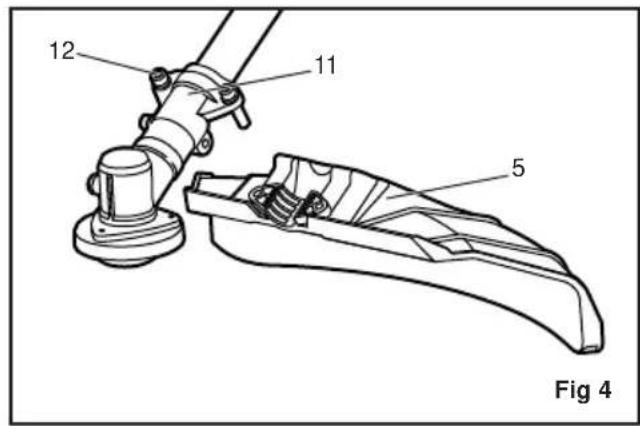
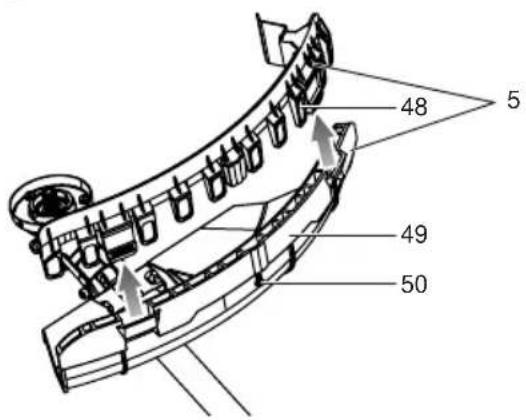
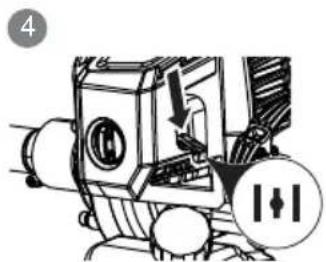
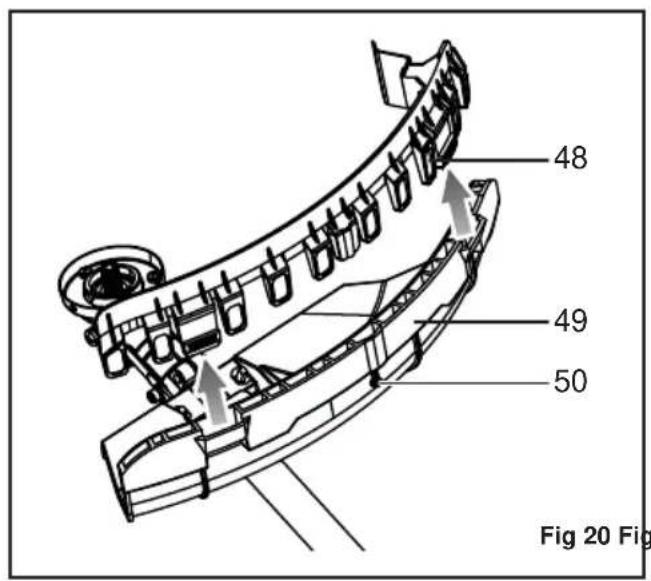
FITTING THE CUTTING ATTACHMENT GUARD
See figure 4.
- Attach the cutting attachment guard to the mounting bracket and align the screw holes on the cutting attachment guard to the screws on the mounting bracket.
- Tighten the screws.
WARNING
When using the ReelEasyTM grass trimmer head, the grass defl ector must be attached to the blade guard. See figure 21. When using the Tri-ArcTM blade, the grass defl ector must be removed from the blade guard. See figure 20.
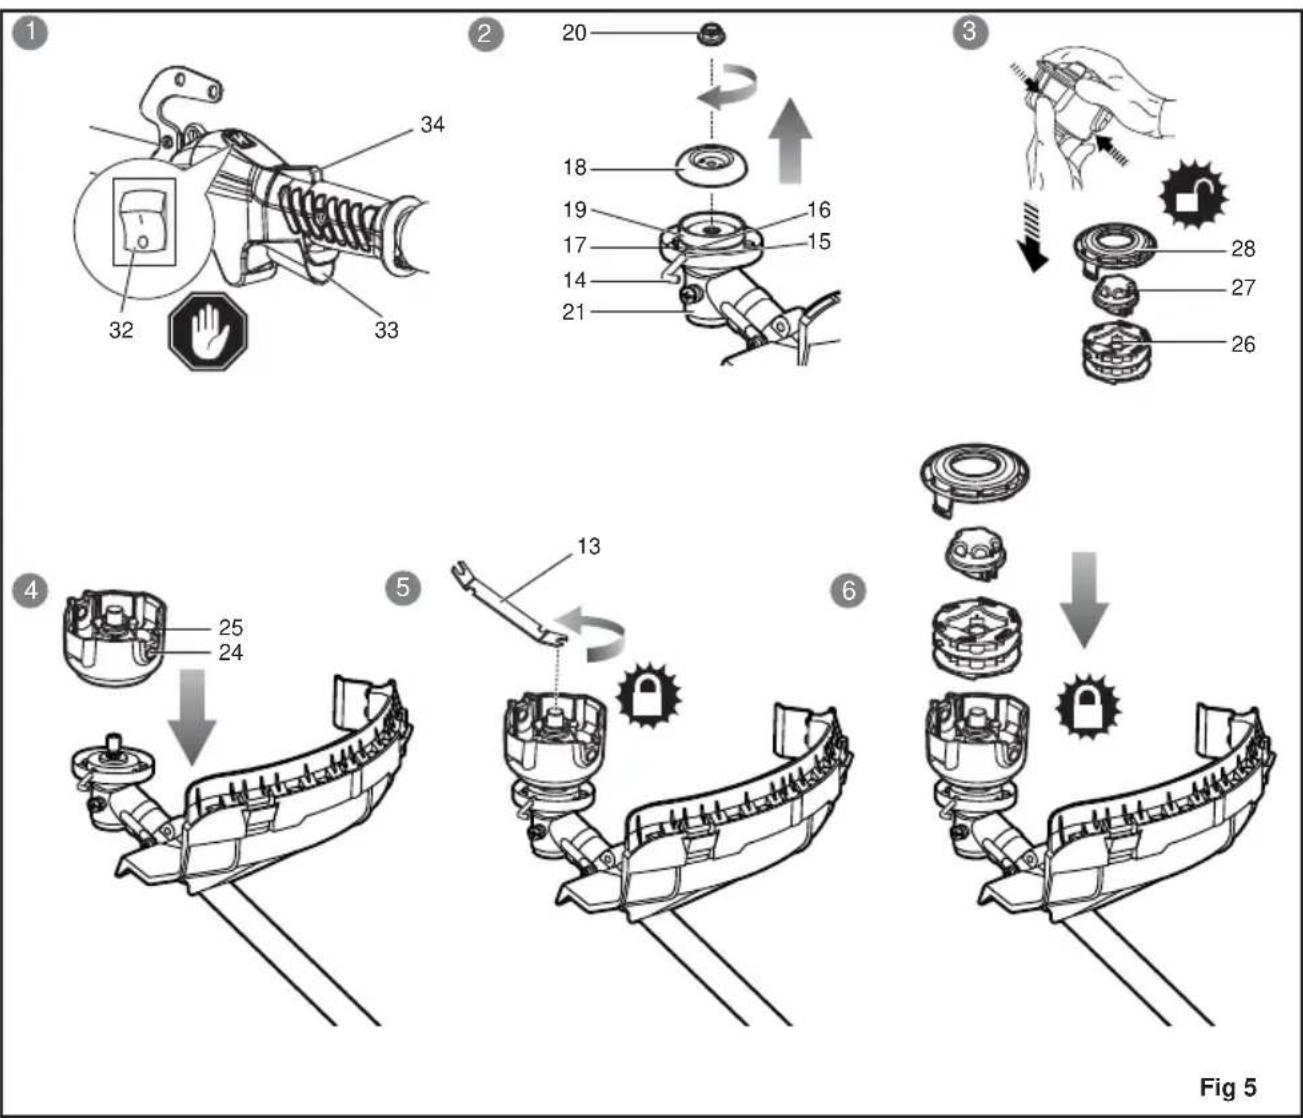
INSTALLING THE REELEASY™ GRASS TRIMMER HEAD
See figure 5.
- Stop the engine.
- Place the Allen wrench through the hole in the upper flange washer and the hole in the gear head. Turn the blade nut clockwise to remove.
- Remove the blade nut, blade washer, and cupped
English (Original Instruction)
washer from the gear shaft.
4. Open the ReelEasy™ grass trimmer head depressing the latches on each side. The contents of the bump head are spring-loaded, so keep your other hand over the string head cover while depressing the latches.
5. Remove the string head cover, bump knob, and line spool.
6. Install the drive connector and string head housing into the gear shaft. Place the Allen wrench through the hole in the upper flange washer and the hole in the gear head. Using the wrench, turn the drive connector counterclockwise to tighten securely.
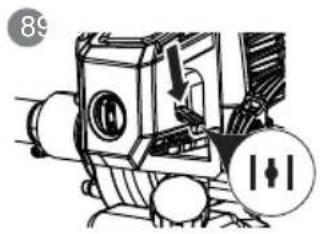
7. Reinstall the spool and spring. Make sure the symbol for "straight shaft" is visible.
8. Replace the bump knob by inserting it into the centre of the line spool.
9. Replace the string head cover, aligning latches with openings in the string trimmer head. Press cover and string trimmer head together until both latches snap securely into the openings.
10. Install the cutting line. Refer to "String replacement" later in the manual for additional information.
WARNING
To reduce the risk of serious personal injury, always stop the engine before making any adjustments, such as changing cutting heads.
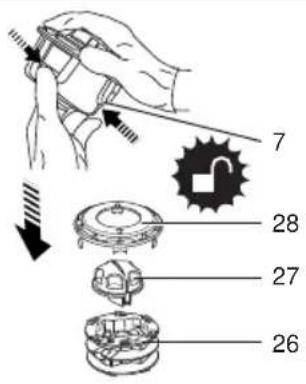
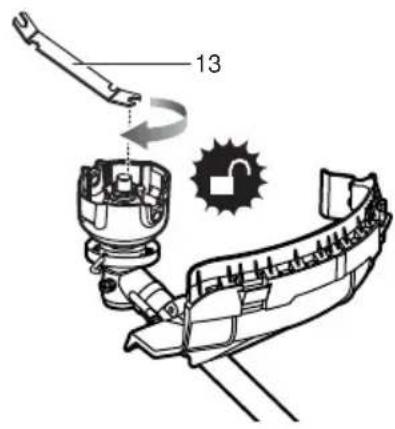
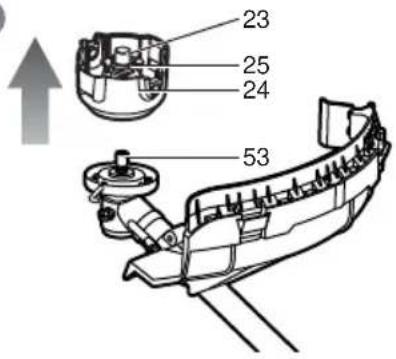
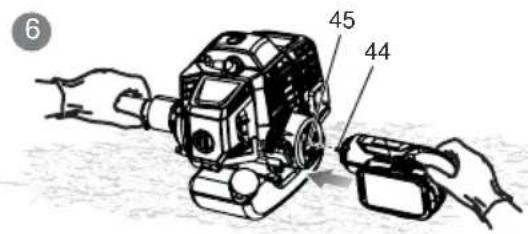
CONVERTING FROM GRASS TRIMMER TO BRUSHCUTTER (TRI-ARC™ BLADE)
Removing the ReelEasy™ grass trimmer head
See figure 6.
- Stop the engine.
- Open the ReelEasy™ grass trimmer head by depressing the latches on each side. The contents of the bump head are spring loaded, so keep your other hand over the string head cover while depressing the latches.
- Remove the string head cover, bump knob, and line spool.
- Place the Allen wrench through the hole in the upper flange washer and the hole in the gear head. Using a wrench, turn the drive connector clockwise to remove. NOTE: Store the disassembled parts together for later use.
WARNING
When using the Tri-ArcTM blade, the grass deflector must be removed from the blade guard. See figure 20.
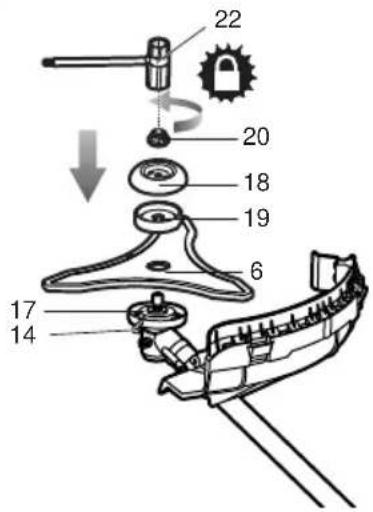
INSTALLING THE TRI-ARC™ BLADE
See figure 6.
WARNING
Be certain all knobs and fasteners are fully tightened before operating the product. Periodically check for tightness during use to avoid serious injury.
WARNING
Note that the blade nut is a nyloc nut, which is to be used for one time assembly only. Do not reuse the nyloc nut. When installing/reinstalling, use a new nyloc nut. Failure to follow this procedure can result in serious injury.
To reduce the risk of injury, keep the blade protector on the blade at all times. Remove the blade protector only during cutting operations.
-
Centre the blade on the upper fl ange washer and make sure the blade sits fl at. Install the cupped washer and make sure it sits well into the gear shaft. Install the blade washer with the raised centre away from the blade.
-
Install the blade nut.
- Place the Allen wrench through the hole in the upper flange washer and the hole in the gear head. Using the wrench, turn the blade nut counterclockwise to tighten (25 Nm).
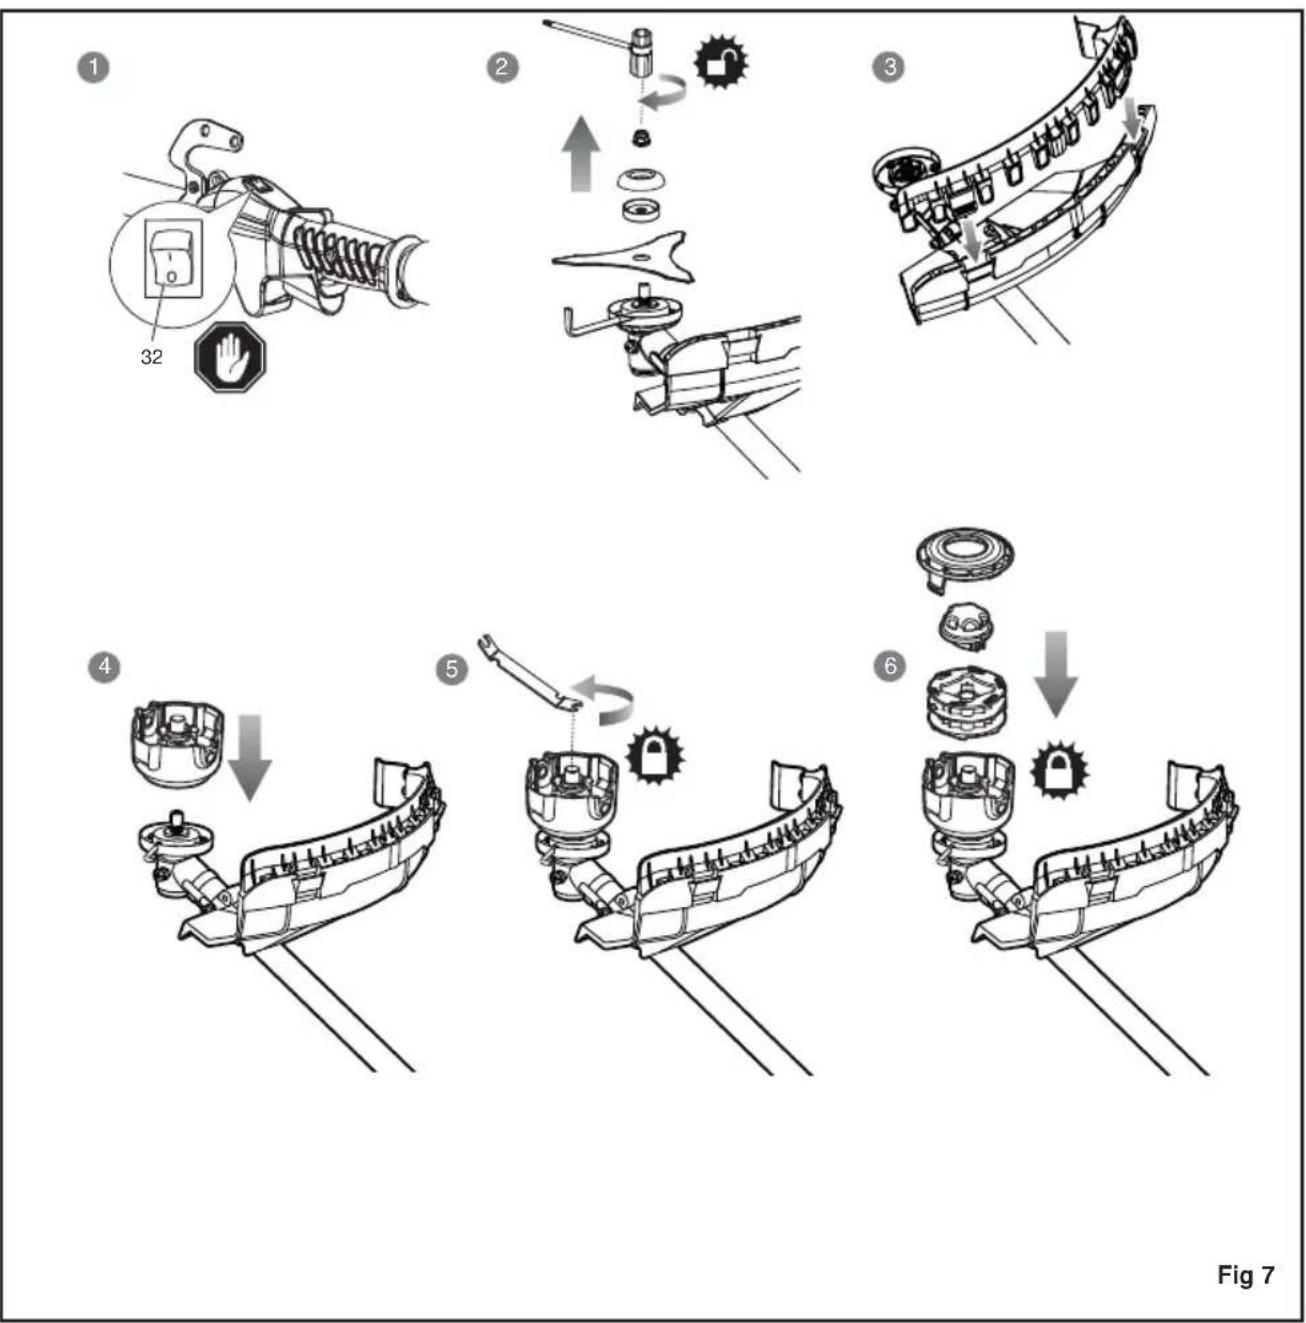
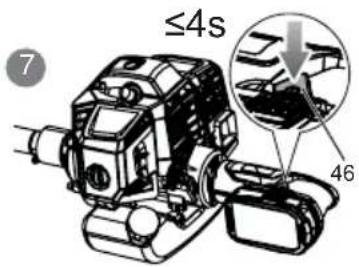
CONVERTING FROM BRUSHCUTTER (TRI-ARC™ BLADE) TO GRASS TRIMMER
Removing the Tri-Arc™ blade
See figure 7.
- Stop the engine.
- Place the Allen wrench through the hole in the upper flange washer and the hole in the gear head. Turn the blade nut clockwise to remove.
- Remove the blade nut, blade washer, cupped washer, and blade and retain for later use.
- Attach the grass defl ector to the blade guard by placing the two locking tabs into the two notches; tighten the screw.
NOTE: Store the disassembled parts together for later use.
Installing the ReelEasy™ grass trimmer head
See figure 7.
- Install the drive connector and string head housing into the gear shaft. Place the Allen wrench through the
FRENDEESITPTNLSVDANOHUCSRUROPLSLHRETLTLVSKBGUKTR
English (Original Instruction)
hole in the upper flange washer and the hole in the gear head. Using the wrench, turn the drive connector counterclockwise to tighten securely.
- Reinstall the spring and spool. Make sure the symbol for "straight shaft" is visible.
- Replace the bump knob by inserting it into the centre of the line spool.
- Replace the string head cover, aligning latches with openings in the string trimmer head. Press cover and string trimmer head together until both latches snap securely into the openings.
- Install the cutting line. Refer to "String replacement" later in the manual for additional information.
WARNING
When using the ReelEasy™ grass trimmer head, the grass deflector must be attached to the blade guard. See figure 21.
OPERATION
FUEL AND REFUELING
Handling the fuel safely
Always handle fuel with care. It is highly flammable.
Always refuel outdoors where there are no sparks and flames. Do not inhale fuel vapour. Do not smoke.
- Do not let petrol or lubricant come in contact with your skin.
- Keep petrol and lubricant away from the eyes. If petrol or lubricant comes in contact with the eyes, wash them immediately with clean water. If irritation is still present, see a physician immediately.
Clean up spilled petrol immediately.
MIXING THE FUEL
This product is powered by a 2-stroke engine and requires pre-mixing petrol and 2-stroke lubricant. Premix unleaded petrol and 2-stroke engine lubricant in a clean container approved for petrol.
This engine is certified to operate on unleaded petrol intended for motor vehicle use with an octane rating of 91 ( + ) / 2 or higher.
- Do not use any type of pre-mixed petrol/lubricant from fuel service stations.
Use synthetic 2-stroke lubricant only. Do not use automotive lubricant or 2-cycle outboard lubricant.
Mix 2.5% synthetic 2-stroke lubricant into the petrol. This is a 40:1 ratio.
- Mix the fuel thoroughly and also each time before refueling.
Mix in small quantities. Do not mix quantities larger than usable in a 30-day period. A synthetic 2-stroke lubricant containing a fuel stabiliser is recommended.

1 Litre + 25 ml =
2 Litres +50ml =
3 Litres + 75 ml = 40:1
4 Litres + 100 ml =
5 Litres + 125 ml =
FILLING THE TANK
Clean the surface around fuel cap to prevent contamination.
- Loosen fuel cap slowly to release pressure and to keep the fuel from escaping around the cap.
Carefully pour the fuel mixture into the tank. Avoid spillage.
Prior to replacing the fuel cap, clean and inspect the gasket.
- Immediately replace the fuel cap and hand-tighten. Wipe up any fuel spillage. Move 9 m away from the refueling site before starting the engine.
NOTE: It is normal for smoke to be emitted from a new engine during and after first use.
WARNING
Always shut off engine before fuelling. Never add fuel to the product when it is running or when the engine is hot. Move at least 9m (30 ft) from refueling site before starting the engine. Do not smoke.
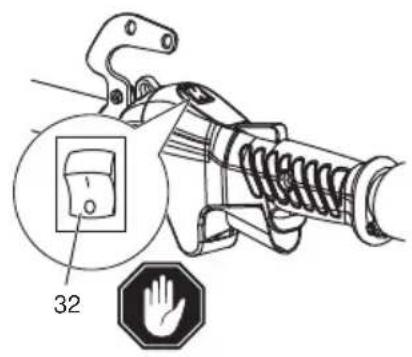
STARTING AND STOPPING
See figure 13-17.
| | | | Choke position A |
| | | | Choke position B |
WARNING
Never start or run the engine inside a closed or poorly ventilated area; breathing exhaust fumes can kill.
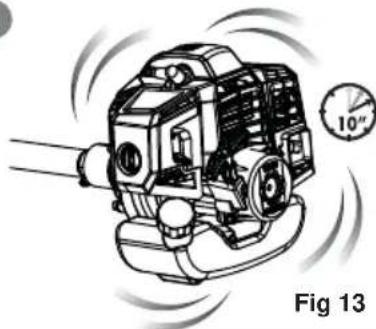
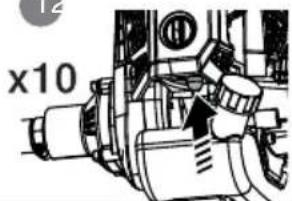
To start a cold engine by hand:
See figure 13.
- Lay the product on a flat, bare surface.
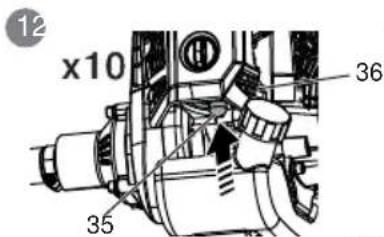
- Push the primer bulb approximately 10 times.
FRENDEESITPTNLSVDANOHUCSRUROPLSLHRETLTLVSKBGUKTR
English (Original Instruction)
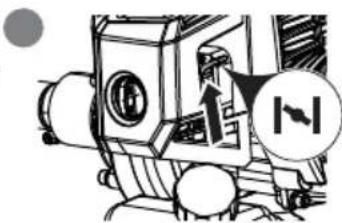
- Set the choke lever to position A (choke closed).
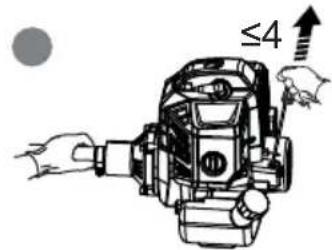
- Pull the starter grip with a quick firm and consistent upward motion until the engine attempts to start. Do not pull the starter grip more than 4 times.
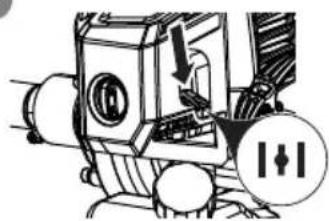
- Set the choke lever to position B (choke open).
- Pull the starter grip until the engine starts. Do not pull the starter grip more than 6 times.
NOTE: If the engine does not start, repeat the procedure from step 3.
7. Allow engine to warm up for 10 seconds prior to operation.
To start a warm engine by hand:
See figure 14.
- Lay the product on the ground.
- Set the choke lever to position B (choke open).
- Pull the starter grip with a quick, fi rm, and consistent upward motion until the engine starts.
Starting the engine using an electrical starter (optional):
WARNING
Only use the Ryobi OES18 electrical starter. Use of any other starter may damage the engine and cause serious personal injury.
WARNING
Before using the electrical starter to start the product, please read and understand completely the operation manual of the OES18 electrical starter to avoid improper operation and serious personal injury.
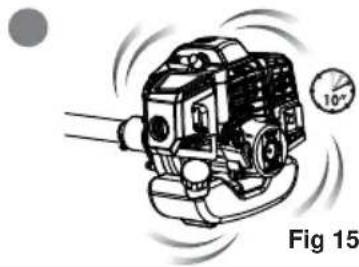
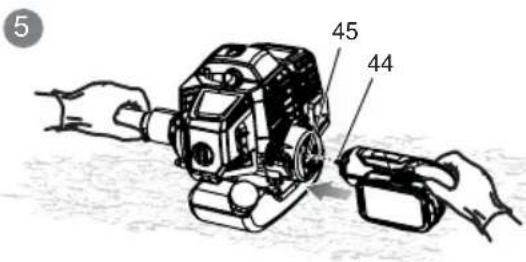
To start a cold engine by electrical starter:
See figure 15.
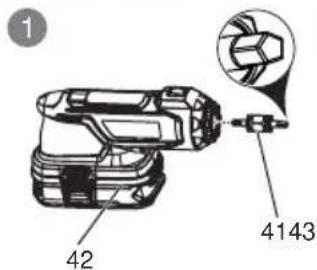
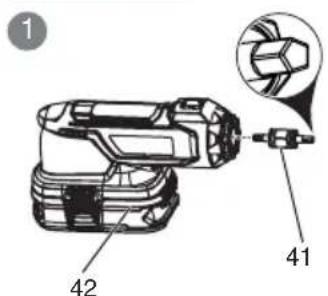
- Install the starter bit into the electrical starter with the pentagon bit facing outside.
- Push the F/R button to the left until the pentagon symbol shows on the F/R button.
- Lay the product on the ground and make sure that the cutting means do not come in contact with anything.
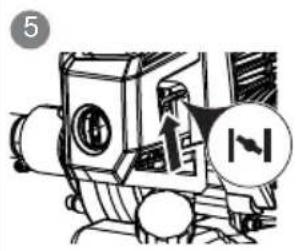
- Press the primer bulb 10 times. NOTE: After the 7th press, the fuel should be visible in the primer bulb. If not, continue pressing until the fuel is visible.
- Set the choke lever to position A (choke closed).
- Hold the insulated shaft with your left hand and use your right hand to put the starter bit shaft to the shaft hole on the engine, otherwise the engine will not turn. Make sure the starter bit is properly engaged.
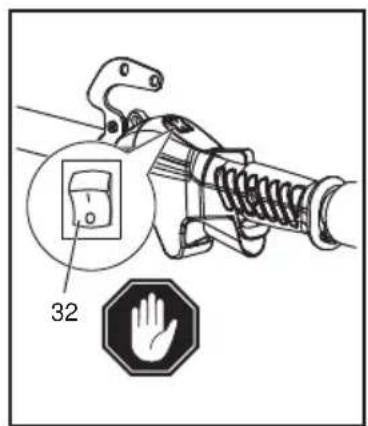
NOTE: The electrical starter is equipped with a safety
interlock. Do not press and hold on the switch button when putting the electrical starter shaft into the shaft hole on the engine. Also, the starter will not turn if the electrical starter is not properly engaged.
- Press and hold the electrical starter switch button until the engine attempts to start. Do not press the electrical starter for more than 4 seconds.
- Set the choke lever to position B (choke open).
- Press and hold the electrical starter switch button until the engine starts.
NOTE: If the engine does not start, repeat the procedure from step 5. Do not repeat the procedure more than 1 time. If the engine does not start after the second attempt, see the solution instruction for the "Flooded engine" in the "Troubleshooting" section of this manual.
10. Allow the engine to warm up for 10 seconds prior to operation.
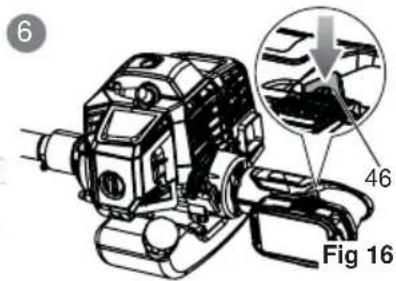
To start a warm engine by electrical starter:
See figure 16.
- Install the starter bit into the electrical starter with the pentagon bit facing outside.
- Push the F/R button to the left until the pentagon symbol shows on the F/R button.
- Lay the product on the ground and make sure that the cutting means do not come in contact with anything.
- Set the choke lever to position B (choke open).
- Hold the insulated shaft with your left hand and use your right hand to put the starter bit shaft to the shaft hole on the engine. Make sure the starter bit is properly engaged.
- Press and hold the electrical starter switch button until the engine starts.
NOTE: If the engine does not start, repeat the procedure from step 5. Do not repeat the procedure more than 1 time. If the engine does not start after the second attempt, see the solution instruction for the "Flooded engine" in the "Troubleshooting" section of this manual.
To stop the engine:
See figure 17.
Place the ignition switch to the "O" (OFF) position.
Hold the product with the right hand on the trigger handle and the left hand on the left handle. Keep a firm grip with both hands while in operation.
The product should be held at a comfortable position with the trigger handle about hip height.
Always operate the product at full throttle. Prolonged
FRENDEESITPTNLSVDANOFHUCSRUROPLSLHRETLTLVSKBGUKTR
English (Original instructions)
cutting at partial throttle will result in lubricant dripping from the silencer.
Cut tall grass from the top down to prevent grass from wrapping around the shaft housing and string head, which may cause damage from overheating.
If grass or debris becomes wrapped around the cutting means, stop the engine. Wear heavy-duty gloves to prevent injury from the sharp blades and carefully remove the debris.
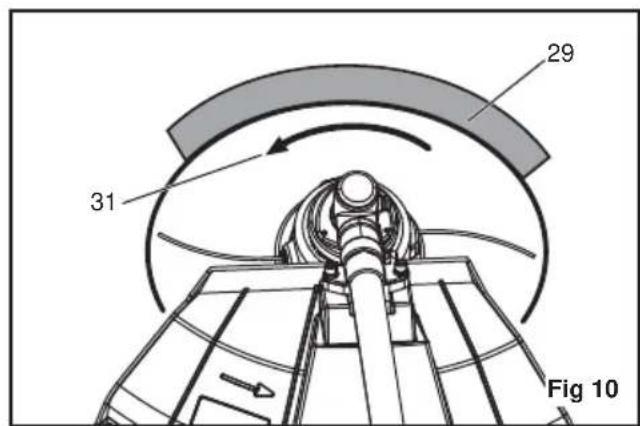
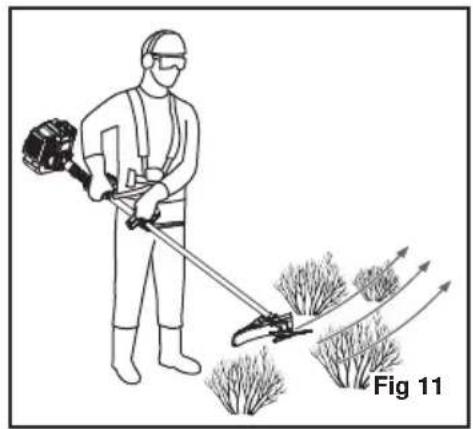
CUTTING TIPS
See figure 10.
Do not push into the grass to be cut. Move from side to side. Move forward a little at the end of each sweep.
- Keep the product tilted towards the area being cut.
Do not use in dangerous environments.
Use the tip of the string to do the cutting; do not force the string head into the uncut grass.
- Wire and picket fences cause extra string wear, even breakage. Stone and brick walls, kerbs and wood may wear string rapidly.
- Avoid trees and shrubs. Tree bark, wood mouldings, cladding and fence posts can be easily damaged by the string.
ADVANCING THE LINE
Line advance is controlled by tapping the string head on grass while running engine at full throttle.
Run engine at full throttle.
- Tap the knob on the ground to advance the string. The string advances each time the knob is tapped. Do not hold the knob on the ground.
The string should advance until it is cut to length by the line cutting blade located on the cutting attachment guard.
To help reduce the risk of kickback: Do not push into the material to be cut. Move from right to left in steady sweeps. Move forward a little at the beginning of each new sweep.
Hold the product with the right hand on the trigger handle and the left hand on the left handle. Keep a firm grip with both hands while in operation.
The product should be held at a comfortable position with the trigger handle about hip height.
- Maintain your grip and balance on both feet. Position yourself so that you will not be drawn off balance by the kickback reaction of the cutting blade.
Adjust the strap hanger to a comfortable position.
Exercise extreme caution when using the blade with the product. Blade thrust is the reaction that may occur when the spinning blade contacts anything it cannot cut. This contact may cause the blade to stop for an instant, and suddenly "thrust" the product away from the object that was hit. This reaction can be violent enough to cause the operator to lose control of the product. Blade thrust may occur without warning if the blade snags, stalls, or binds. This is more likely to occur in areas where it is difficult to see the material being cut. For cutting ease and safety, approach the weeds being cut from the right to the left. In the event an unexpected object or woody stock is encountered, this could minimize the blade thrust reaction.
TRI-ARC™ BLADE
The Tri-Arc™ blade is suitable for cutting pulpy weeds and vines only. When the Tri-Arc™ blade becomes dull, it can be turned over to extend its life. Do not sharpen the blade.
CUTTING TECHNIQUE
WARNING
The blades are sharp and can injure even if they are not moving. Exercise extreme caution when using the blade with the product. Safe operation of the product requires that you read and understand this operator's manual and all labels affxed to the tool.
- Both hands must be used at all times to control the product. Keep a firm grip with both hands while in operation.
- Maintain your grip and balance on both feet. Position yourself so that you will not be drawn off balance by the kickback reaction of the cutting blade.
- Inspect and clear the area of any hidden objects such as glass, stones, concrete, fencing, wire, wood, metal, etc.
- Never use blades near footpaths, fencing, posts, buildings or other immovable objects.
- Never use a blade after hitting a hard object without first inspecting it for damage. Do not use if any damage is detected.
For cutting ease and safety, approach the weeds being cut from the right to the left.
English (Original instructions)
MAINTENANCE
WARNING
Use only original manufacturer's replacement parts and accessories. Failure to do so may cause poor performance, contribute to possible injury, and will void your warranty.
The cutting attachment must not rotate in idle mode. If this requirement is not satisfied, the clutch has to be adjusted or the product needs an urgent maintenance by a qualified technician.
- You may make adjustments and repairs described in this user manual. For other repairs, have the unit serviced by an authorized service agent.
Consequences of improper maintenance may include excess carbon deposits resulting in loss of performance and discharge of black oily residue dripping from the silencer.
Make sure the cutting attachment guards, harness and handles are properly and securely attached to avoid the risk of personal injury.
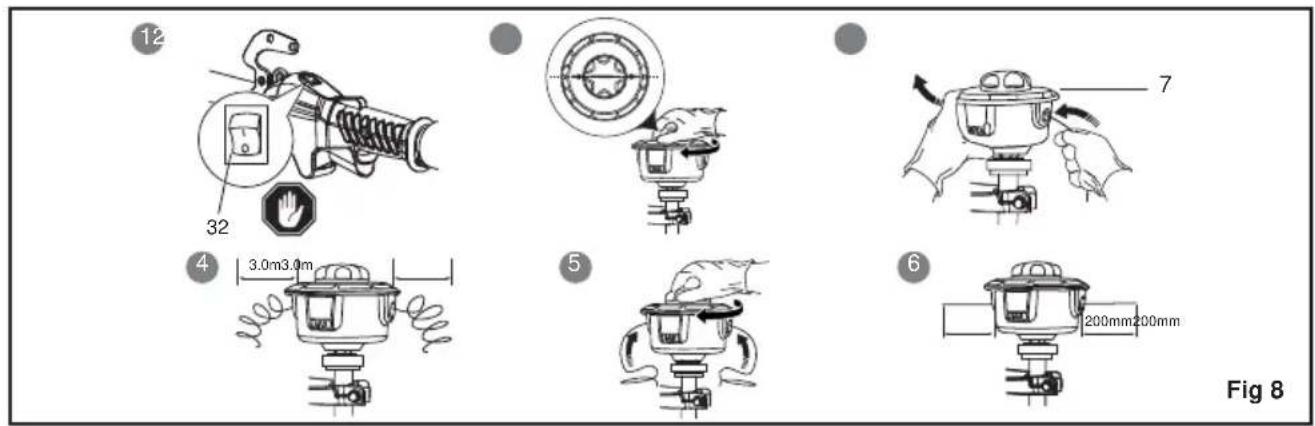
STRING REPLACEMENT
See figure 8.
Ensure the ignition switch is in the "off" position.
Use a 2.4mm diameter monofilament string.
Cut one piece of string approximately 6m in length.
- Rotate the knob on the string head until the line on knob aligns with the arrows on the top of string head.
Insert one end of the string into the eyelet located on the side of the string head and push until string comes out through eyelet on the other side. Continue to push string through the string head until the middle section of the string is inside the string head and string outside the string head is evenly divided on each side.
- Rotate the knob on the string head clockwise to wind the string.
Wind the string until approximately 20~cm remains protruding from the string head.
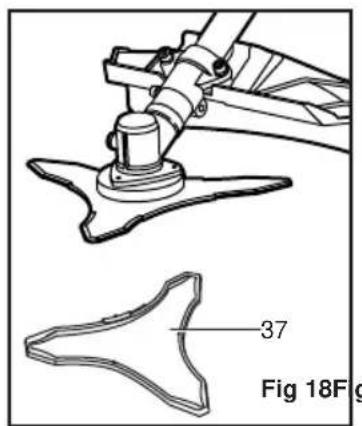
BLADE PROTECTOR
See figure 18.
Always place the blade protector on the blade when the product is not in use. The blade protector has clips round the edges to snap over the blade and keep it in place. Wear gloves and be cautious when handling the blade.
NOTE: Always remove the blade protector before using the product. If not removed, the blade protector could become a thrown object as the blade begins to turn.
CLEANING THE EXHAUST PORT AND SILENCER
Depending on the type of fuel used, the type and amount of oil used, and/or your operating conditions, the exhaust port and silencer may become blocked with carbon deposits. If you notice a power loss with your petrol-powered tool, a qualifi ed service technician will need to remove these deposits to restore performance.
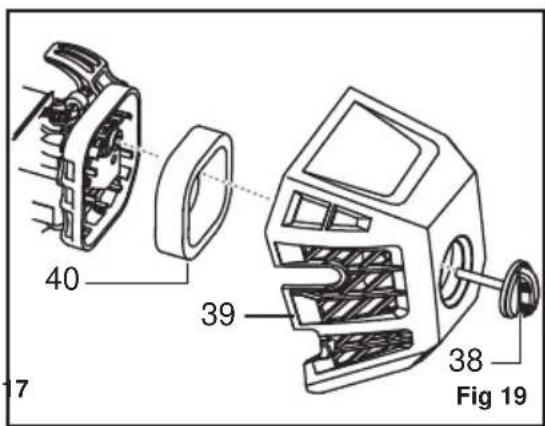
CLEANING THE AIR FILTER
See figure 19.
Ensure the ignition switch is in the "off" position.
Remove the air filter knob and air filter cover.
Remove the air filter and clean it with warm soapy water.
Rinse, and let the air filter dry completely.
Replace the air filter.
NOTE: If damaged, replace immediately.
Replace the air filter cover.
- Tighten the air filter knob.
NOTE: The air filter should be replaced annually for the best performance.
CHECKING THE FUEL CAP
WARNING
A leaking fuel cap is a fire hazard and must be replaced immediately.
The fuel cap contains a non-serviceable fi liter and a check valve. A clogged fuel fi liter will cause poor engine performance. If performance improves when the fuel cap is loosened, the check valve may be faulty or the fi liter may be clogged. Replace fuel cap if required.
SPARK PLUG
This engine uses an L8RTF/NHSP LD, or L8RTF/BOSCH spark plug or equivalent with 0.5mm electrode gap. Use an exact replacement.
CAUTION
Be careful not to cross-thread the spark plug. Cross-threading will damage the engine.
English (Original instructions)
| TROUBLESHOOTING | ||
| Problem Possible cause Solution | ||
| Engine does not start. | No spark. | The spark plug may be damaged, remove it and check for dirt and cracks. Replace with a new spark plug. |
| No fuel. | Push primer bulb until bulb is full of fuel. If bulb does not fi II, primary fuel delivery system is blocked. Contact a service dealer. If primer bulb fills, engine may be flooded (see next item). | |
| Flooded engine. | Remove spark plug, turn trimmer so spark plug hole is aimed at the ground. Make sure lever is in the open choke position and pull starter cord 10 to 14 times. This will clear excess fuel from engine. Clean and reinstall spark plug. With the throttle trigger fully depressed, pull starter cord three times with the lever at open choke position. If engine does not start, move choke lever to close choke position and follow normal starting instructions in "STARTING AND STOPPING" section. If engine still fails to start, repeat procedure with a new spark plug. | |
| Started rope is now harder to pull than when it was new. | Contact an authorised service centre. | |
| The knob is not fully tightened and the alignment arrows are not properly aligned. | Align the alignment arrows properly when setting the handle bar to its working position and fully tighten the knob. | |
| Engine starts but does not accelerate. | Carburetor requires adjustment. Contact an authorised service centre. | |
| Engine does not reach full speed and emits excessive smoke. | Oil fuel mixture is incorrect. Use fresh fuel | and the correct synthetic 2-stroke oil mix. |
| Air fi liter is dirty. | Clean air filter. Refer to "Replacing and Cleaning Air Filter" earlier in this manual. | |
| Carburetor requires adjustment. Contact an authorised service centre. | ||
| Engine starts, runs, and accelerates but will not idle. | Carburettor requires adjustment. Contact an authorised service centre. | |
| Blade continues to rotate at idle speed. | Carburetor requires adjustment. Contact an authorised service centre. | |
| Grass wraps round shaft housing and string head. | Cutting tall grass at ground level. Cut tall grass from the top down. | |
| Operating trimmer at part throttle. Operate the trimmer at full throttle. | ||
| Oil drips from silencer. | Operating trimmer at part throttle. Operate the trimmer at full throttle. | |
| Oil/fuel mixture is incorrect. Use fresh fuel and the correct synthetic 2-stroke oil mix. | ||
| Air fi liter is dirty. Clean per instruction in Maintenance Section. | ||
| Carburetor requires adjustment. Contact an authorised service centre. | ||
| | | | Choke Position A |
| | | | Choke Position B |
WARNING
COMBUSTIBLE REPOSTAJE
1|+25ml=
21+50ml=
31 + 75 ml = 40:1
41 + 100 ml =
51+125ml=
LLENADO DEL DEPOSITO
ALGEMENE VEILIGHEIDSWAARSCHUWINGEN
FÖRVARING PÅ KORT SIKT
1+25ml
21 + 50 ml =
31 + 75 ml = 40:1
41 + 100 ml =
51 + 125 ml =
OPTANKING
1|+25ml=
21 + 50 ml =
31 + 75 ml = 40:1
41 + 100 ml =
51 + 125 ml =
SÄLION TÄYTTÄMINEN
A REELEASYTM KASZALOFEJ FELSZERELESE
Lásd 5. abra.
MEPbI INPEOCTOPOXHOCTN INCIOJIb3OBAHIN KYCTOPE3A
JaHbIe npaBnA, B DONoJIHeHne K npuBeJeHHbIM BblIe npaBnAm, OTHocrTcK NcNoJb3ObaHIO HCTpyMeHTa B pexmE Kyctope3a.
Ipn yctahOBKe n CHrTmN ne3Bn pa6oTaTe B nepuatkax dna He6naropnpaTHbIX ycNOBn, TAK KAK ne3BnOChbOcTpble.
He npnkaacntecb K Bpaauoemycpexyemny noIOTHy Hne nbTaeTecb erO octaHOBTb.
DnBxKyueecraJe3BnE MoKet CtaTb npuHNO TjKeNoi TpaBMbl. YnpabJIeHne INCTpyMeHTOM Heo6xoJIMO OcyIeCTBJIaTb 06eMn pykamn Do nONHO OCTaHOBKn Je3BuN.
3aMeHnTe NOBpeKdEHHoe pexyuee noIOTHO. Bcerda npOBepaTE npabINbHocTb yCTaHOKN HaDExHKoCTb KpENHeHnpeKyuero nIoTHa nepek KaXDbIM NcNOJb3OBAHnEM.
IcnojB3yIe TOnbKO 3anachoe ne3Bne Tri-ArcTM ot npo13BOJnten. IcnojB3OBaHne Dpynx peKyuux HacaDOK He DonyckaETcR.
He nCnoNb3yTe dIpe3Kn MaTePnAna 6oJee 13 MM B DnAmEtpe.
BaunHCTpyMeHT OCHaUeHN PNeueBbIM PEMHeM. OTPerynpyuTe PneueBOI peMeHc yUeTOM MaccbI 3dEINN u yO6HO pa3MeCTInTe ero Ha cINIHe; npn 3TOM INHCTpyMeHT DOJKeH pAcNoJaTaBC cnpaba.
Haundte MexaHn3M 6bictporo OCBO6OKeHn H onpo6yIte ero nepeH hauJIOM nCNOJb3OBaHN yctpOcTBA.Ero npabINbHOe nCNOJb3OBaHne MOKET npedOTbpaTb cepbe3HbIe TpaBMbl B cnlyae BO3HKnHOBeHn Ype3BbUaHOn CNTyaUHn. HNKOrda He HocTe OdEgJy IOBepx pEmHn HnKaKm INhIM o6pa3OM He OrpaHnUBaIe DoCTyn K MexaHn3My 6bictporo OCBO6OKeHn.
HaedeBaIte 3aunTHoe yctpoCTBO Ha pexkyuee noJIOTHO nepei NOMeHem yctpoCTBa Ha xpaHHe Hn np TpaHCnpTupOBke. NepeN cnoJb30BaHem nHcTpymEHTa Bcerda CHMaIte 3aunTHoe yctpoCTBO.EcIn ero He cHrTb,3aunTHoe yctpoCTBO MOKeT 6bItb OT6pOHeHO, KOrDa Jne3BHe NaHET BpaAATBCra.
Co6IIOdaIe npedeJIbHyO OCTOpoxHocTb npn IcNOJb3OBAHnn pexkyIero JezBnC DaHHbIM yCTpoiCTBOM.OTCKOK peKyuIero JezBnMoKET npoN30HTnpn erO cOnpIKOCHOBeHN C KaKN-Mn6o He nOdaHUMcR 6pe3aHnIO npdMeTOM.Takoe cOnpIKOCHOBeHne MOKET npNBecTN K BHe3anHOH OCTAHOBKe BpaueHn JezBn N OT6paCbIBaHNIO HCTpyMeHTA OT 3TOr npenrTCTBn.OTdya MoKET OKa3aTBCra IOCTaTOUHO CNbHOu IN pINBEcTN K NOtepe KOHTPOHa Na YCTPOIcTBOM.OTCKOK peKyuIero JezBn MOKET npoN30HTn HEOXKnDAHHO, ECNI Je3Bne HaTaIKBaETcHa NpePrtCTBne, OCTaHaBJIbAEtcr NN 3aeJaT. Ioo6NaHcNTyauHm MOKET Bo3HKnHYtB npn pa6ote Ta, rge TpydHo paccMOptb Nope3aEmbl MaTepnai.
I Dn oBnerueHn nope3aHn n oBecneHn 6e3onachoctn nope3aTe pactehn cnpaba HJIeBO. B cnlyae HeoKndaHoro cnpNKOCHOBeHn C KaKIM-JIn6 npEmdetOM nn CO CTBOlOM DepeBa 3TO MOKeT CBcETN K MINHMMy OTdauy. YnpabHeHne IHCTpyMeHTOM BCerda OcyuEcTBJrTe DByMry pykAMn.
TPAHCNOPTNPOBKA IN XPAHEHNE
OctahOBITE n3dJIne, daIte eMy ocTbITb nepeI NOCTAHOBKOHa XpaHeHne Hn TpaHCnpTIpOBkoN.
OuHCTnTe yCTPOINCTBO OT BCEX NOCTOPOHNX MATEPNAIOB.
Ecn yctahOBnHO pexyuee noIOTHO,ero Heo6xoJIMO 3akpbIt npedoxpAHTeJeM Je3Bna.
CneTe BCE TOONBO n3 6aka B KAHNCTpy dna 6eH3nHa. He 3a6bBaIte TuaTeNbHO 3aKpbBaTb KpbUky TOONNBHO 6aka.
JaTe MOTopy npa6oTaTb, noka OH cam He octaHOBNTcra. 3TO N03BOJNT u36aBHTbcr O CTaporo TOnnBa, npedCTabJIHooero ONaCHOCTb 3aRpa3HeHnra TOnnHBHO CnCTeMbI HaraPOM M CMOJAMN.
XpaHnTe ero B npoxnaHOM, cyxom, xopoO npOBETpmbaEMOM n HeDcTynHom dIra DeTeMecTe. He depKnte 6eH30nny pRdOM c Koppo3nHbIMn BeueCTBaMn, TaKIMN KAK caIOBble XmNKaTbI nn pa3MopaxnBaIOua coNb. He xpaHnTe Ha oTKpbITOM BO3dyxe.
I TpaHcnpTupOBK3aKpeNte n3dennne TaK, 0TO6bOHO He MoIIO nepemuaTbc Nn ynaCTb
FRENDEESITPTNLSVDANOFIHUCSRUROPLSLHRETLTLVSKBGUKTR
Pycckn (IpeBOD n3 nepBOHaayaHbHbIX INHCTpyKcN)
BO n36ekahne TpaBMipobAHnepcoHaJa nn NOBpeKdHnN3deJn.
HnB Koem Cnyae He nepemeaTe yctpoNCTBO nppa6oTaUeM DnIraTeJe.
CobJIOaIte rocyapCTBeHHbIe IMecTHbIe HOpMbIXpaHEnr TOnJIINBa.CnIToe TOnJIINBO MOXHONCNOJB3OBaTb B DpyHX INHCTpyMeHTax CDBYXTaKTHbIMMOTOPOM.
KPATKOCPOHbI
BbIKIOHTe DBIRATEnb n daIte emy OCTbITb nepeTe TEM, kAK y6paTb erO Ha xpaHeHne.
OuHCTHe yCTPOHCTBO OT BCEX NOCTOPOHHX MaTePnaNoB.
XpaHnTe ero B npoxnaHOM, cyxom, xopoWo npoBeTpNaEMOM HEnOCTyHOM DnA DeTeMecTe.
He depknte 6eH30nIpy prdom c Koppo3nHbIMn BeueCTBaMn, TAKIMn KaK caIOBbie XmNKaTbI nn pa3MopaxNBAOua coJIb.
He xpaHHTe Ha oTKpbITOM Bo3dyXe.
BvIbTE BCEITDA OCTOPOXHbI
JaKe KOrDa n3DeJnne NcNoJIb3yIOT COrNaCHO HNCTpyKUaM, HeBO3MOxHO NOHOCtBIO yCTpaHHTb PAcTOpbI pncKa. Pn 3KcNlNyatauM MOrTy BO3HNKHyTb CNeDyIOuNE CNTuAuM, KOToPbIM NOJIb3OBAteNB DOJIKeH yDeJIaTb OcO6oe BHMaHHe, YTO6bI N36ExKaTb npo6JeM:
KohtakcpekuyuMnpncno6neHnM.
Korda HCTpymENT He NCNoB3yETc, HaJe3BnX DoJXHbI 6bITb yCTaHOBneHbI 3aunTHbIeYCTpOInCTBa. He donyckaiTe nonaHaHra pyk n HOB B 3OHy paobTb pexyux npncnoc6beHn.
TpaBmbl, Bbl3bBaemble Bn6pauee.
- PpIMHeHrTe HnCTpyMeHT TOJbKO NO CBOemy Ha3HaueHnIO, HcNoJIb3yIte HaJIeXaUne pyKm I co6JIoDaIte pa6OuN pexM.
IobpexdHne Cnyxa, Bbl3bBAEMOE BO3deNCTBnEM 乌yma.
Hocnte yctpoNCTBa 3aunTbI cnyxa n OrpaHnUBAIte npoONJNTeJIbHOCTb WymOBOrO BO3dEYCTBIA.
IobpeKdHHe rna3 nTeTmMycopom.
- O6raTeJIbHO HOCHTe yCTpOINCTBa dIaIITbI rna3.
Onachoctb npdaouxnpedMeTOB
- Ppi pa6oTe B 30He, rIe eCTb pNCK nAedHnnpEiMeTob, Heo6xOJIMO HOCHTb 3aUHTHyKacky.
Pp npapbote c KyctopeoM BbICOK pNCK OTCKOka. KoHTpoIpyuTe uHCTpyMeHT DByMa pyKaMu, DePxacb
3a COOTBETCTBYIOUne pyuKn. IpoHTaIte n cIeNyIte HNCTpyKcIyM DaHHOrO pyKOBoODCTBa, YTObI CHN3NTb PnCK OTCKOKa.
CHINXEHNE PNCKA
CunTaETc, TTO Bn6paunpyHOro HnCTpyMeHTa MoKet npBecTN K npOBHeHIO y OTJeBbIX JINu TAK Ha3bIbaEMoB 6one3H PeInHO (Raynaud's Syndrome).K CmTTOMAM MOryT OTHOCITCB NOKaJIbBAHne, OHemHeN e NOBeHne NaJbueB (KaN npn nepeoxnackDeHN). CunTAOT, YTO HacNeCDtBeHHbIE paKTopbl, OxNaXKeHne IN BlaXHOCTb, Deta, KypeHne n PpaKTnueckn ONbIT cnOco6CTByOT pa3BNTnIO 3TNX CmTTOMOB. Hnke npNBQATRC MepbI, KOtOpbIE MOKet npNRbOnepaTOP dA ChnHexHn BO3DeeCTBn Bn6paun:
OdeBaIteCb Tennee B XOnoHyo norOdy. Ppn 3KcNpyataunn H3dJIeHn HocHTe NepuATKn, YTo6bB COxpaHnTb pyKn n 3aJrACTbB Tenne.
Iocne kaxdoro 3Tana pa60tbl BbINOJHITe ynpaxHeHH dny ycJIeHH KPOOooPaueHH.
Haue deJaiTe nepepbBbI B pa6ote. Cokpatnte DInTeJIbHocTbe ExeDHeBHoro npe6bIBaHnHa OTkpblOM Bo3dyxe.
Pn noBHeHn KaKx-Nb6o n3 yKa3aHHbIX CmMTOMOB cpa3y Je npekpatnte pa60Ty n 6paTntecb no nx NOBOy K Bpauy.

OCTOPOXHO
CnIuKOM npoDOnknteJbHoe nCNoJIb3OBAHne HNCTpyMeHTa MoKeT npNBecTn K TpaBMe. Pn INcNoJIb3OBAHmN HNCTpyMeHTa B TeueHHe dInTeJIbHoro BpeMeHn DeaIte peryIaRhbIe nepepbIBbl.
ONICAHNE
1.Cunobon arperat
2.Pemewok nIy noDBeCKn
3. PyKoRTKa C KypKOM
4. Ban
5. 3aunTHa KpbIka peKyuue HacaKn
6. JIe3Bne Tri-ArcTM
7. Tpmmepnra ronobka ReelEasyTM
8. Ipeepnry pyka
9.3aueKka6bictporoOTcoeHHeHH
10.3auejka
11. KpeenexHbI KPOHHTeH
12. BnHT
13. Raeyhbl KJIIOH
14. Knou-Wectnrgpahn (5 mm)
15. OTeBepCTne B KoKxye Kopo6Kn nepedau
16. OTBepCTne BepxHn Wai6bl
FRENDEESITPTNLSVDANOFIHUCSRUROPLSLHRETLTLVSKBGUKTR
Pycckn (IpeBOD n3 nepBOHaayaHbHbIX INHCTpyKcN)
- Bēpxhny φπaɪnцeBa yən6a
- 甲6a nIbHoro ncka
- TapeIbIyIaTЯ IaIbIa
- Raika kpenneHn ne3Bn
- PedenyKtop
- Kom6HnHPOBaHHbI raeHbI KJIIOH
- MyΦTa npNbOda
- Kopnyc cTpyHHoI rOIOBkn
25.Пужина
26.BoNT - Wynbka
- Puyka
29.KpbIiKa CtpyHNoI rOIOBKn - HanboJee noXoJaun yacToK pa60tbl
- OnachbI yuactok pa0tbl
- HanpaBneHne BpaueHnOtpe3HOro ncka
- BbiknioyateIb 3ana
- Kypok akcepepatopa
35.ФИКcaTOpДрОСсЕЛьноуЗ 3aCNoHKn - Nopoc
- Pbyar 3acnoHkn
- Kpbuika Jne3Bnra Tri-ArcTM
- Puyka Bo3dUnHoro fInbTpa
- Kpbiuka BO3dUHoro fHbTpa
41.ΦnIbTp - HakoHeuHcK cTape
- Θεκτριηκειν Κατρερ
- Khonka BnepeHa3a
- Ban cTapTepa
- OTBepctne Bana Ha DnBraTeNe
- KhoNka BkJIIOHeHnA
48.Пивязнoi ременb - OTPaKaTeJIb TpaBbl
- PpeOxpaHnteIbHbI KOJINaK dIpyeKyuIero
yctpoinCTBa - Bont HanpaBnaHoue
52.卍甲6a - BnHT
- HuxhHn6apbep
YCNOBHbIE OBO3HAUHIN
Ha daHHOM yCTpoIcTBe MoryT npCytCTBOBaTb HeKOtOpBie n3 cNeDyUoIx 06O3HaueHn. N3yUHTe IN x 3aONMHnte, YTO OHI O3HaayOT. PpaBnJIbHOe IOHIMaHHe DaHHbIX 06O3HaueHn NO3BOJNT Bam JyUWe IN 6e3ONaChee NOb3OBaTBCd AHHbIM yCTpoIcTBOM.

BHHMaHHe
TPAHCΦOPMAUINI3 KYCTOPE3A (JIE3BNE TRI-ARCTM) BTPMMEP
CHIMAR ne3Bne Tri-ArcTM
CM.pnc.7.
1.OctaHOBInTe DnBnTeJIb.
2. YctaHOBNTe KINHc-WeCTnRpaHHNK B OTBepCTne BepxHe npOKnAKn N B OTBepCTne 3y6OaTOro peDyKTopa. DnA ChrTHraiknpekUero nonOTHa NOBepHnTe ee no yacOBOn CTpeJIke.
3. CHIMTE raKy u Shaay6 KypenHnna ne3Bn, KOHTprAky u ne3Bne n COxpaHnTe dny noCneDyUoero NCNOJb3OBAHnry.
4. YctaHOBNTe Bbl6paCbBaTeIb TpaBbHa 3aunTHbIKoKxy Ne3BnY, yCTaHOBNB DBe 6NOKpyUux NETINB DBe npope3; 3akpyTne BHT.
PIMMEUHNE: XpaHnTe CHrTbIe DeTaII B ODHOM MecTe IIN NOcJIeDyHOuIero NcONJb3OBAHnI.
YctaHOBka TpMMepHoI rOIOBKn ReelEasyTM
CM.pnc.7.
- YctaHOBHTe nepexoHNK npNBOda n KOpnyc KaTyuKN C JeCKoHa BaJI-WeCTepHIO. YcTaHOBHTe KInou- WeCTINrpaHHNK B OTBepCTne BepxHei npOKnaDNn B OTBepCTne 3y6CuToro peDyKTopa.C NOMOsbio raeHOrO KIIoua NOBepHNTe nepexoHNK npNBOda npOTNB qacOBoi CTpeKN, yTO6bl HaDeXHo erO 3akpyTNb.
- YctaHOBNTe KaTyuKU n npyKnHy. Y6eIITecb, yTO CmBOJ "PpAmoBaJ XOPOJO BnHO.
- YCTAHOBNTe Ha MecTo pyky, BCTaBnB ee B ueHTp 6o6nHbl.
- 3akpoTe KpbIuKy TpIMMepHOn roNOBKn, BbIpaBnBaar 3aueKn C OTBepCTnA Mn Ha TpIMMepHOn roNOBKe. Haxmte Ha KpbIuKy n TpIMMepHyO roNOBky oDHOBpeMeHHo, yTO6bl 3aueJkn 3aΦNKcIpOBAJNCb.
- YctaHOBnte pexyuyo necy. InyonyuHnI DOnOJIHNITbHOH HOpMaun CMOTpuTe rnaBy
FRENDEESITPTNLSVDANOFIHUUCSRUROPLSLHRETLTLVSKBGUKTR
Pycckn (IpeBOD n3 nepBOHaayaHbHbIX INHCTpyKcN)
"3aMeHa Jeckn"daJeE B HAcToIeM pyKOBoDCTBE.
QCTOPOXHO
PnncnoB3OBAHm TpmmMepHOn roJOBKn ReelEasyTM Ha 3aunTHyU KpbIuKU ne3BnA Heo6xOJMo yCTaHOBNTb TpaBOOTpcabIbATEnb. Cm. pnc. 21.
3KCNPIYATAUJA
TONJIINBOI3ANPABKABAKA
Be3onacHoe o6paueHne c TOnnBOM
Bybte Bcerda kpaHHe octopoXhb c tonnBOM. Oha oueh bERKO BOCnnaMeHReTc.
3anpaBnIte 6ak Bcerda Ha yInue. He dblnte ncapaHnA mTOnnBa.He Kypntb.
136eraTe KOHTaKa 6eH3nHa IIN Macna C KoxKei.
Oco6eHNO ocTepeaTecb nonaHaHn 6eH3Ha nIIMacna B rna3a.Ecn 6eH3nH nIIMacno nonannB rna3a, HEmeJneHNO npOMoIte nx yactoB BOIO. Ecn pa3paKeHne noCne 3TOr He npoJNO, HEmeJneHNO o6paTntecb Ko BpaCy.
Cpa3yKe BbITnpaITe npoINtBn 6eH3nH.
TOnJIuBHaCMECb
Motop INHCTpyMeHTa - DByXTaKTHbI, OH pa6oTaET Ha Cmecn 6eH3uHa n Macna dNra DByXTaKTHbIX DBrIaTeNei. CmeunBaIte He3TuINpOBaHHbI 6eH3NH C MacJOM dNra DByXTaKTHbIX DBrIaTeJe B YuctOIT CTAHapTHoN KaHnCTpe dNra 6eH3NuHa
Motop pa60tae Ha aBTOMo6nIbHOM He3TINIpOBAHHOM 6eH3nHE C OKTaHOBBIM YNCJOM 91 IJI BblE.
He noB3yTEcB TOINIBHOcmecbIO, npiroTOBneHHo HA 6eH3OKOJOHKAX DnA MOeIOB N MOTOPJIepOB.
IOnb3yntecb TOnbKO CnHTeTneckM MacnOM DnA BByXTakTHbIX DnBraTeNe. He nCNoJIb3yIte ABTOMOBnJIbHyO Cma3Ky nn 2-uknueckyo HApyKHyO CMA3Ky
106abteB6eH3nH 2.5%-HoE cHTeTneckoe Macno Dna 2-TaKTHO DBuratEn. Pponopun 1:40.
XopoOcmeuBaIe TOnJIbO nepeKKaJDo3anpaBko.
CmeuBaTe TOnnBO B He6oJbXx KOJIueCTBax: He 60nee yem Ha Mecra pa6oTbI. PeKomeHdyeTcra NOJb3OBAtbcra CnHTeTuYeCKIM MaclOM DnA DByXTaKTHbIX DBrIaTeNei, COdepXaUIM CTa6nN3atop 6eH3nHa.

1 + 25 ml =
2 + 50 ml =
3 + 75 ml =
4 + 100 ml =
5 + 125 ml =
3ANPABKA BAKA
Bo n36exkHne 3acopeHn TOnJIInBa npoTpnte 6ak BOKpyr KpbIuKn.
MeHnHOoTbHTnTe KpbIky 6aKa.
OcToPOxHO 3aJeTe TOnJIINBHyO CMeCb B 6aK. CtapaiTecb He npOIINBaTb ee.
PpeJde Yem 3aBnHvBaTb KpbIuKy, npOBepbTe COCTOARHe npOKnaKn.
HaedeHbTe KpbIuKy Ha ropNoBHy n Kpenko 3aBHTnTe ee. BItnpaTe pa3nBueecra ropOee. OToiDte Ha 9 M OT MeCTa3anpaBkn TOnJIbOM nepei 3anyckom DBrTaTeJ.
PIMMEUAHNE:BoBpemnnope npBoro nCIOJIb3OBAHm MOTopMOKETdbIMNTb.
OCTOPOXHO
Bcerda rnyuute DBrurateIb nepea3anpaBko. HnKoIa He doJIuBaIte TOnIIBO npn pa6OtaUeM nHCTpyMeTe I ropayem DBruratene. Nocne 3anpaBkn 6aka OTOnIte He MeHee Yem Ha 9 MetpoB OT Mecta 3anpaBKn, npexKe Yem 3anyckaTb MOTop. He Kypntb.
3ANYCKIOCTAHOB
CM.pnc.13-17.
Hikorda He 3aynckaTe HHe NcnoB3yIte pa6oTaOuNIM DniratEnb B 3akpyTOM NIN NINOx O PNOBETPnBaEMOM MeCTe; BdIXaHHe BixNONhIX Ra3OB MoKet npNBecTNI K JntalbHomy NCxOdy.
YTo6b3aBecTN XoNoHbI ABnraTeNb BpyHyO:
CM.pnc.15.
- IIOIOXKIne HNCTpyMeHT Ha 3EMJIIO.
FRENDEESITPTNLSVDANOFIHUCSRUROPLSLHRETLTLVSKBGUKTR
Pycckn (IpeBOD n3 nepBOHaayaHbHbIX INHCTpyKcN)
- HaxmTe KhoNky noCocca npMepHo 10 pa3.
- YctaHOBIne pbluJAKOK dpoCCeJI B nIoJKeHne A (3acNOHka 3aKpbIta).
- Notaryte 3a pyky CTapTepa pe3kIM DbIXKeHnEM BBepx, NOKA DBIrataJIb He HauHET 3anyckatbcra. He nepraIte pyky CTapTepa 6onbwe 4 pa3.
- YctaHOBtpe pbuaKoDpocceIe B noIOKeHne B (3acNOHa oTKpbIta).
- DepraTe 3a pyuKy cTapTepa, noka dBnraTeIb He 3anyctntc. He depraTe pyuKy cTapTepa 6oJbIe 6 pa3.
PIMMEAHNE: Ecnn DbrarTeB He 3nyckaetc, BepHNTecb K wary 3 n nobTopnte npoedpy.
7.перд pa6oton daite DBnraTeIIO nporpeTbca B TeueHne okono 10 cekyHd.
Tto6b3aBecTu TnBn DnRaTeN BpyHyIO:
Cm.pnc.14.
- NIOXNTe HNCTpymeHT Ha 3EMJIO.
- YctaHOBtpe pbUaXoK dPoCcEJI B noIOKeHne B (3acNOHka OTKpbIa).
- Notaryte 3a pyky cTapTepe pe3KIM DnBxKeHneM BBepx Do 3anycka Dnuratela.
3anyck DBrnraTeTn c nOmoBIO 3JIeKtpueckoro cTapTepa (onCNOHaIbHo):
QCTOPOXHO
IcnoJb3ynte TOnbKO 3NeKtpueckn CTapTep Ryobi OES18. IcnoJb3OBAHne DpyrO cTapTepa MoKeT NOBpeDHT BnraTeNb N CTAb PpUHHoT JxKeNoi TpaBMbl.
QCTOPOXHO
Ipeed 3anyckom Dbngatena INHCTpyMeHTa C NOMOsbIO 3NeKtpnueeCKORO CTapTepa BHIMATEJIbHO N3yUHTe pykoBOdCTBO NOJb3OBaTeNA 3NeKtpnueeCKORO CTapTepa OES18 BO n36exaHne HnnpabunbHO ero pa60tbi n npuHHHeNRA TjKeNo TpaBMbl.
3anyck xonodHoro dBnraTeJc NOMOuBIO 3neKtpueeCKoro cTapTepa:
CM.pnc.15.
- YctaHOBnTE HaKoHeuHnK CTapTepa B BAN CTapTepa, npn 3TOM nTnIrpHaHHb HAcOHeuHnK DoJnxEh 6bItb HanpabJeH HApJy.
- Haxmnte Ha KhoNky BnpepHa3aI cneBa, noka Ha KHONKe He NOBNTCA CMBOIN PAnTyROJbHnKa.
-
IIOIOXHTe HNCTpyMeHT Ha 3eMJIH N pOBoEpbTe, YTO6blpeKyuIe 3JIeMeHTbI He COpNIKAcAINCb Hn C KaKIMNnpEiMetamn.
-
HaxMnte 10 pa3 KhoNky noDcoca.
PIMMEAHNE: Nocne 7-ro Haxatna TONNBO NOBRAETcHa KNONKe NOcoca.Ecnn 3TOrO He npoCxoNT, npoDOnKaIte HaxmAtb Do noRBHeHn TONNBA.
- YctaHOBtE pbHaxok DpocceI B noIOKeHne A (3acNOHa 3akpbita).
6.ДерхитЕЗPyuKуИЗВспeнEHOrO MaTePnAJa NeBoI pyKo,a npaBoI BBeДITE BaI CTapTepaB O TBepCTne Bana CTapTepaHa DBnIraTeNe.IpoBepbTe CuENJIeHne Bala CTapTepa.
PIMMEAHHE: 3NeKtpnueckn cTapTe pOchauen ABTO6nOKpOBKO. He Haxmamte n He ydepXnBaHTe KHONKY BKNIOUeHn npn BBOe BAJa cTapeB OTBepCTne Bana cTapeHa Dniratene. CTapTe He HaHET BpaaTaBCra, ecnn Het COOTBeTcByIOuero CUENJIHn.
- Haxmte u ydepknBaIte KhoNky 3neKtpnueckoro cTape do Tex nop, noka DnirateJb He HaHET 3anyckatbcra. He depknte HaxaToi KhoNky cTape 6oJee 4 cekyHd.
- YctaHOBtPe pbIaXoK dpocceI B noIOKeHne B (3acNOHa oTKpbIta).
- Haxmte u ydepknBaTne KhoNky 3neKtpneccko orctapTepa do Tex np, noka dBnraTeIb He 3anyctntc. IPNMEUAHNE: Ecn n DnirateIb He 3anyckaeTc, BepHnTeCb K wary 5 n nobTopnte npoedpy. He noBtOpTe daHHy0 npoecdpy 6oone odHoro pa3a. Ecn n Dniratelb He 3anyctntcNoCne ODHO nonItk, cmOtpnte cncoc6 ycTaPHeHn HncnpabHoctn B pa3denax "3aInbDniratel" n "HeNCnpabHoctn n cnocobix yctpahEHnHaCToJero pykoBOdCTba.
- Npepa6oToI daTe DniratEnIO nporpeTbCBA TeueHne okono 10 cekyHd.
3anyck Tennoro DBnraTeTc NOMOuBIO 3JNEKTPueeCKOro cTapTepa:
CM.puc.16.
- YctaHOBnTe HakoHeuHnK CTapTepa B BaN CTapTepa, npn 3tOM nTnRpaHHbI HakoHeuHnK DoJXeH 6bITb HanpabJeH HApxy.
- Haxmte Ha KhoNky Bnepei/Ha3aI cneBa, noka Ha KHONKe He NOBNTCn CMBON IyRyOnbHnka.
3.ПОJOXITe INHCTpyMeHT Ha 3eMJIIO IN npOBepbTe,уTO6blpeKyuIe 3JIeMeHTbI He cOpnKacalncB Hc KaKIMNnpedMetamn. - YctaHOBnTe pbyHaxKo DpocceI B noJoxHe B (3acnoHka OTKpbIta).
5.Деркinte 3a pyky n3 BCneHHeHOro MaTePnAJa NeBoi pyKo, a npaBoI BBeInte BaI CTapTepaB O TBepCTne Bana CTapTepaHa Dniratene.IpoBepbTe CuenPiHne Bana CTapTepa. - Haxmte n yepkBaTe KhoNky 3neKtpueeckoro
FRENDEESITPTNLSVDANOFIHUCSRUROPLSLHRETLTLVSKBGUKTR
Pycckn (IpeBOD n3 nepBOHaayaHbHbIX INHCTpyKcN)
CTapTepa Do Tex nop, noka DnBraTeIb He 3anycTNTc.
PIMMEUAHNE: Ecnn DnBraTeIb He 3anyckaetc,
BepHntecb K Wary 5 N NOBTopIne IpoueDpy. He
NoBTopRnTe DaHHyo IpoueDpy 6oJIee OdHoro pa3a.
Ecnn DnBraTeIb He 3anycTNTc Nocne OdHoi NonblTK,
CMOTpIe CnOCo6 yCTpaHeHnHe HncnPabHOCTN B
pa3denax "3aINTb DnBraTeIb" n "HeNCnPabHOCTN n
CnOCo6blnx yCTpaHeHnHaactOJero pyKOBODCTBA.
OctahOB DnuratEn.
Cm.pnc.17.
Ipebeudte nepeknouateB noJoxHe "O"(BblKl.).
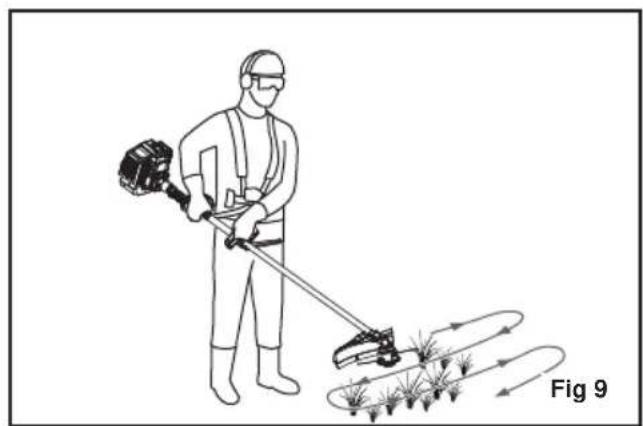
3KCNJLYATAUJTRPUMMEPA
Cm.pnc.9.
Bo3bMnte yctpoNCTBO npaBOn pyko3a pykOaTKy c KypKOM, a neBOn pyko - 3a neByIO pykOaTKy. Pn pa6ote KpeNko depKInTe INHcTpMeHT OBeMNpykAMn.
YcTPOINCTBO CNEyET DePkaTb B yO6HOM NIOJOKeHN, T06bl pbuakok dpocceJn 6bl Ha ypOBHe 6eDpa.
Bcerda pa6oTaTe Ha nonHOn MOUHOCTn. IInTeIbHoe nOpe3aHHe Ha HeNoJHOH MOUHOCTn npuBOIDNT Kpa36pb3rNBaHHIO Macna N3 rnyuHTeJIa.
Ioppe3aTe BbICkyo TpaBy Cbepxy BnH3, yTo6bI OHa He HamaTbIBaJIacb Ha KoxyX BaJa n CTpyHHyO rONOBKy, Tak KaK 3TO MOKe TpNBecTN K NOJOMKe BCJeCDTBne neperpeBa.
Ecnn TpaBa 3anyTbIaE tca BOKpyr KaTyuKc C necko, octaHOBnTe DnIraTeNb UyaIaNTe TpaBy. HaeBaIte nepaATKn, npexDe yem ydaIaTb o6pe3Kn TpaBl.
TEXHINCHECKOE OBCJNYKUBAHNE
QCTOPOXHO
NcnoB3yIe TOJbKO opnHnHaJIbHbIe 3aIyAcTn, akceccyapbl n HacaKn OT npOn3BOdnteJI. HeBbInonHeHne DaHHoro yKa3aHnMoKet npINBeCTn K HeyIOBJIeTBOpNTeHbHO pa6Ote NHCTpyMeHTa, TeJeCHOMy NOBpeXKeDeHIO n aHHyIpOBaHIO rapaHTn.
Pexyua HacaKa He DoJxHa Bpaatbca Ha xOIOCTbIX o6opotax. Ecn DaHHe yka3aHne He BBINOJIHReTc, MoKet Ntpe6oBaTbC peryIupOBKa Myfbl IIN CPOHyB peMOHT HnCTpyMeHTa KBaIINuPObaHHbIM CNEUaJIInCTOM.
BbMOKTe TaKKe BbINOJHHTb Dpyrne BnDbpeyIINPOBKN IN pEmoHThIE pa6OtBI, ONNCAHHbE BdaHHOM pyKOBOcTBe. DpyrNE BUNbI pEmoHTa DOJXHBbIOJNHARbCNEUaJINCOTOM yNOJHOMOueHHOH cepBnCHOrO ueHTpa.
BcneDCTBnHeHaIeXaIeroTexHueckoro 06cIyKbAHm MOKeT npOxCoDntb Ype3MepHoe 06pa3OBAHHe Harapa,TO BeTe K CHIXeHIO npOn3BOIDTeNbHOCTn, n BbITEKaHne n3 rnyuHTeY ePHOrO MACJRAHNCrTO OTCTOJ.
3AMEHA CTPYHbl
CM.pnc.8.
IpebeDte nepeKIOuATenb B noJoxHeNe "O" (Bblk.).
IcnoJIb3yIte MOHOBOJIOKOHHyO CTpyHy dHaMeTpOM 2.4 MM
OtpexbTe oT ctpyhkycok dHnHO 6M.
BpaaTe pyky Ha roNoBKe, noka cTpyHa Ha pyuke He BbIpOBHReTcCo CTpeJkAmn Ha BepxHei CToPOHe roNoBKn.
BCTaBbTe OINH KOHeC CTPHyBb B OTBepCTne, pacnoIOKeHHoe C 60KOBON CTOpOHb I RONOKCNCTpyHBn npotaunTE CTPyHy Ypee3 OTBepCTne Ha Dpyryo CTOpOHy. PpOraNBaIte CTPHy Ypee3 ROnOBky CTPHyb, NOKa CpeHNY qACTb CTPHyb He OKAKETcB HByTpN rONOBKn CTPHyb, a DNINA BHeuHX qAcTeN CTPHyB He OKAKETcPaBHOn No oBe CTOPOHb I RONOKN.
I NobopaunBa pyKoTky Ha roNoBKe cTpHyI npOTNB yacOBn cTpeJIKN, HAKpyTnTe cTpHy.
HakpyuBaIte ctpHy DoTex np, noka BbIcTynaUoia H3 rOIOBKn Yactb He COCTaBNT pN6JIuN3ITeJbHO 20 CM.
3AUHTHOE YCTPOICTBO PEXKUeIIOJOTHA
Cm.pnc.18.
Ecnn HNCTpymeHT He NcNoIb3yETcB CERda yctHaHabInBaIte Ha pexyuiee Ne3Bne 3aunTHoe yctpoiCTBO. Ha KpaX 3auNTHO rO yctpoiCTBa pexyuieo Ne3BnI NMeOTcra 3aueKn Dnra erO 3akpenHeHna Ha MeTe. Ppi Obauienm c pexyuim Ne3BnEM nOlb3yITecb nepaTkamn co6nOdaIte octopoXHoCTb.
INPIMEYAHNE: IpeD INCNOB3OBAHEm INHCTpyMeHTA Bcerda CHImaTe 3aunTHoe yCTpoiCTBO. Ecn ero He CHrTb, 3aunTHoe yCTPOIcTB OMOET 6bITb OTb POeHo, KOrDa Jne3BHe NaHET Bpaatcb.
FRENDEESITPTNLSVDANOFIHUCSRUROPLSLHRETLTLVSKBGUKTR
Pycckn (IpeBOD n3 nepBOHaayaHbHbIX INHCTpyKcN)
OuNCTKA BbIXIONHOROTBEPCTNAI
B 3abncmoctn OTCNONb3yemoro TOnnBa, Tnna, KOJIueCTBa Macna u yCNOBn pa60tbl, B BbIXONHOM OTBepCTn N B rIyWnteJe MoKet CKONITbcg OKaJIInHa. Ecnn OTMeuaETc CHNXeHne MOUHOCTn DBrIaTeTn YcTPOINCTBa, nra BOCCTaHOBIIeHn HOpMaIbHOH pa60tbl MoKet Notpe6oBaTbcg ydaJIeHne TaKOrO Harapa, YTO cNe dyET NopyuHTb KBaJIINuIUPOBAHOM cyuHaNCTy.
CHCTKA BO3DyUHHO ΦNltpA
Cm.pnc.19.
IpebeDntepepeKIOUaTeB B noJoxKeHne "O" (BbIKJ.).
CHIMMTEpyky BO3dyuHoro qnIbTp a n KpbIuKy BO3dyuHoro qnIbTp a.
CHIMMTE BO3dyHbI ΦnIbTp n npOMOnTe ero B TeNIOI MblbHOI BOe.
PpomOnTe n noJIHOCTbIO npocUHTe BO3dUHbI
3aMeHHTe BO3dyuHbI ΦnIbTp. IPNMEUAHNE: B cnyae noBpeXdEHNr cpa3y Je 3aMeHHTe erO.
YcTaHOBnTE KpbIuKy BO3dUuHOrO qInbTpA.
3aKpyTnTe pyKy BO3dyuHoro fHbTpA.
He pekomeHdyetcK 3KcnIyataun no nCTeueHN 5 neXpaehnC daTbI n3roTOBneHn86e3 npedBaPntelbHO npOBepKn.
Data n3rotobneHn (KoI DaTbI) OTWtAMNOBaH Ha NOBepxHOCTN KOpnyCa n3JeJIa.
Ppimep:
W17 Y2015, rnde Y2015 - roD n3rotobnneHn
W17-HeIeIaN3rOToBnEHH
OnpeDenb Mecau n3roTOBHeHn MoxHo cornaCHO npBeHnHO Hxke Ta6Jnce,Ha npImepe 2015 roda.
06paTte BnMaHne! KOnIyecTBo HeJeB B MeCaPe pa3NuaeTcra OT rOda B rOd.
1|+25ml=
21 + 50 ml =
31 + 75 ml = 40:1
41 + 100 ml =
51 + 125 ml =

BAKO PRIPILDYMAS
OBUNPDEUYNPEXHEHNAE3ONACHOCT
3a da 6bde pa6o7ata Bn 6e0nacHa, Tp6Ba da npooyete n da pa36peTe BCuKn yKa3aHn, npedn Da n3no13BaTe npOyKta. Cna3BaTe BCuKn HcTpyKm 3a 6e0nacHOCT. Ppi HeCna3BaHe Ha Te3n IHcTpyKm MOKe Da ce npuHrT TeKKn TEleChn NOpei.
B HЯkon pernoH DeIcTBaT Hape6n, KOnTo orpaHuaBaT yNoTppe6ata Ha npOdyKta. 3a cbbEtN ce 06pbuaTe KbM MeCTHnte BnaCTn.
He no3BONBAIte Ha deua nn Heo6yueHn Iua da H3NON3BAT To3n npOdyKT.
Hikora He cTaptnpaIte DnBraTeJb B 3aTBopeHo nn Cna6o npOBeTpInBO pOcTpaHCTBO; BnUWBaHTo Ha n3ropeJIte ra30Be MoKe Da e CmbpTOHOCHO.
BnHaH NouchBaIte pa6oTHOTo npocTpaHCTBO, npedn da n3non3BaTe ypeDa. IpemaxBaIte BCuKN npedmetn, kato KaMbHN, CuyneHN CTbKnA, npoHN, KUNa HIN BpB, KOITOMORAT Da OTXBpBKHAT NIN Da ce 3anNetat KopdoBata rnaBa.
Hocete nblna 3aunTHa eKINnPOBka 3a ouHTe n clyxa BN, KORATO 60pabNTe C npOdykTA. Ako pa6oTne B 30Ha, KbDeTo CbIeCTByBa PNCK OT naDaun npedmetn, Tpr6Ba da Hocnte kacka.
3aunTHnTe cpeCTBa 3a cnyxa MORat da nonpevat Ha onepaTopa Da yBa npdUnpdeHnHTe 3Byu. BbDete oc6eHO BHMATEHN 3a noteHuaHn OnachOCTB pa6oTHATA 30Ha N OKOHOJ.
Hocete 3dpabn nblnn nahtanohn, npedna3n Hennb3raun ce obyBkn npkabu. He hocete uipokn dpexn, Kbcn nahtanohn nn6kyta n He n3non3BaTe Maunhata, aKO He CTE C obyBkn.
Ibrrata koca Tp86Ba da 6bde npnbpaHa HnBO Ha paMeHete, 3a da ce n36erHe 3aannTaHeto B DnHexeNTe ce yactn.
IdpjTe BcNqKn CtpaHnHn Ha6nOdaTeu, DaCa n KINBOTHn Ha noHe 15M. CnpTe npOdyKta, aKO HkoHn HabJe3e B pa6oTHata 30Ha.
He n3noI3BaIe To3n npOdyKT, aKO cTe yMopeHn, 6oJIHn IINIOB BnIaHHeTO Ha aIKOXOn, HApKOTnCn INJI JeKapCTBa.
He n3non3BaTe Ta3n MaunHa npn cna6o oCBetIeHne. OnepaTopbT Tpr6Ba Da HMa Yncta
Octpne Tri-ArcTM x 1
Ipe3pamka x 1
PbkoBoDCTBO3aonepaTopax1
MoTOpHoMaCNoX1
KombnHnpaHraeuehKnHoux1
TaeuenKnHoux1
IeCToTeHeH KIO(5mm)x1
1ecTeHeH KIO(4mm)X1
TainkaHaoctpneTox2

PENyPExeHne
Ako IMa JINNCBaUH Nn NOBpeHn YacTN, He n3noJ3BaIe To3n IpOdyKT, PpeN Te Da 6bDaT 3aMeHeH. Hecbo6pa3raBaHeto C TOBa npedynpexKdEHH MoKe Da DOBeE Do cepNo3Hn Fn3NuCeKn HapaHbAHn.

PENDUNPEXDEHNE
He onntBaIte Da npomeHare To3n npodyKT nn da Cb3daBaTe npHaJNEXXHOCTN, KOHT He ca npenopbUaHN 3a ynotpe6a c Hero. BcKa nOo6Ha nonpaBka nn npomHa e HeKopekTHa ynotpe6a HMOKe Da Cb3daDe onachn ycNoBn N da HaHece cepno3Hn fns3neckn HapaHraBaHn.
CbaIaHe Ha octpneTo Tri-ArcTM
Bux Φuypa 7.
- Cnpete Dbrateta.
- NocTabete 8ecToctEHnHr -06pa3eH KInou npes OTbopa B 7aB6ata Ha rOpHnaFpHa n OTbopa B rIaBata 3a CKOpOCTHe. 3aBbPTeTe raKaTa Ha octpneTO NO NOCOKA Ha yacOBHnKOBaTc TpeJIka, 3a Da J MaxHETe.
- Maxhete raikata n wai6ata Ha octpneTo, yauKOBnHaTa wai6a n caMTo ocTpne n nn npnbepete 3a no-Kbcha ynotpe6a.
4.Ппкpenete DeФнeКТОРа 3a TpeBa KbM npEДna3nTeNЯ 3aДИСКА,ΚATO NOCTaBNTe DBETe 3aKlHouBaUu yUIN B DBaTAt XJIe6a;3aTERHTe BnHTa.
3A6EJIEXKKA: CbXpaHraBaIe pa3rno6eHnte yactn 3aeJHO 3a No-HaTaBtHa yNoTpe6a.
MOHTIpaHe Ha rnaBata ReelEasyTM 3a TpImep 3a TpeBa.
BuxΦurypa7.
- MoHTnpaIte 3aDbNkBaunr CbeDnHIne N Kopnyca Ha KOpIOBATA rIABA Bbpxy TpaHCMnCNOHHata OC. NocTabete WecTOCTEHnra I-OBpa3en KlnOu npes OTbopa B wain6ata Ha roPNHnA PhaHeu n OTbopa B rIbAba 3a ckopoCTne. C nomoTuHa raEHNn KlnOu 3aBbPTeTe 3aDbNkBaunr CbeDnHIne O6paTHo Ha YacOBHnKOBaTAtpeNka n Ro 3aTeRHeTe 3dPaBO.
- NocTabete OTHOBOMakapataNkopdaTa.Ybepete ce, yeCNMBOJIbT3a,,H3npaBeH npbT"ce BIXKa.
- NocTabete 6bpatHO konHTo 3a TnackKaHe, Kato ro BKapate B ueHTbpa Ha MaKapata C BnakHO.
- NocTabete OTHOBOKanaka Ha rnaBata 3a TpIMep 3a TpeBa, KATO HAnachete ΦKcatOpnte C OTBOPnte B rnaBata. PnTINCHete Kanaka n rnaBata 3a TpIMep 3a TpeBa, DOKATO DBATA ΦIKcatopa UpaKHAT Ha MRCTO B OTBOPnte.
- MoHTnpaTe KOpDATA 3a p3aHe. 3a DonbJIHnTeHa HΦopMaun BxKTe,3aMHa Ha KOpData" no-Hanpei
3APEXDAHE HA PE3EPBOAPA
IOnuHcTePe3epBoapa OKoJIO KanaqKaTa, 3aJa He Ce 3Ambpcn TOpNBOTo.
BaBHO pa3BbptTe kanaqkaTa Ha pe3epBoapa.
BHHMaTeJHO H3CnneTe TropNBHaTc Mec Bpe3epBoapa, KaTo BHIMaBaTe Da He Pa3CnneTe. PpeNi OTHOBO Da 3aBnTe KanaKATA, NouNCTeTe
ynpbtheHneTo npoBepTe daH e B do6po CbCTOHNHe.
Iocabete BeHara kanaKaTa n xy6aBo r 3aTeHete. Cb6epete pa3cunahoto ropnBO. OTterneTe ce Ha noHe 9 M OT MrcToTo Ha 3apeXdaHe c ropnBO, ppei Da cTaptnPate DnuratEn.
3A6EJEXKKA:ДиогатягТ можедаЗamyн,КORATo nycheteMaunHata3aNbPbNnBtNcIeTTOBa.
PDEUYPEXDEHNE
BnHaHn n3KnHouBaHte DnurTaTeI npEi 3apeKdaHe C ropuBO.Hnkora He no6abraIte rOpuBO KbM npOdyKa, Korato To npaboTn Hn Korato DnurTaTe e ropue. OtpbHHe ce NOHe Ha 9 M OT MxCTOTO, KbDeTo CTe nbHnn peepboapa c ropuBO, npEi da nychete DnurTaTe. He nywete.
3ABENEKKA: Ako DBnraTeJr He ce cTaptnpa, nobTope npoueypata ot cTbNka 5. He nobTapaIte npoueypata NOBce O T 1 nT. Ako DBnraTeJr He cTaptnpa Cnei BTOPI ONHT, BNXTE INHCTpyKuHNTe 3a peWeHHe 3a ,PiPebJIHeH C BOda Dnuraten" BaPaDena ,OTcpanBaHe Ha HEn3npabHOctn" Ha TOBA PboKOBOCTBO.
- Octabete TaBraTeJa 3arpee 3a 10 cekyHn npedpa6ota.
3a da cTaptnpate TOnbJ DBrarTeJ C eJeKtpueckn CTapTep:
BnKΦnrypa 16.
- MoHTnpaIte nycKObAra Tnaba B eNEKtpueckn CTAPTED C NEOBbHATA rnaBa 06bHata HABbH.
- Hatnche 6yToHa F/R HaJIaBO,doKaTO CmBoJbT Ha TeTOBgHnK ce NOKaKe Ha 6yToHa F/R.
- IocTabete npOdykTa Ha 3emra n ce yBepTe,pepeHHTe MEXAHMn He Bn3aT B KOHTaKT C HnIO
- NocTabete npocennna noct ha B (otbopen npocen).
- 3aDpBxTe DpBxxkata OT NeHonnact C JnBaTa CN pBka, n H3NON3BaIte DaChata CN pBka, 3a Da NOCTaBnte Bana Ha NyCKoBATA Tnaba B OTbopa Ha Bana Ha DnBnraTeHa. YBepeTe Ce, Ye NyCKoBATA Tnaba e PnABUNHO BKnOueHa.
- Hatachete n 3aDpbkTe 6yToHa 3a eJektpnueckn
FRENDEESITPTNLSVDANOFIHUCSRUROPLSLHRETLTLVSKBGUKTR
PABOTA C TPUMEPA 3A TPEBA
BuxΦurypa 9.
IpykTe npOyKTA c dRcHata pKa 3a pbKOXBaTKaTa Cbc cnycbN c JraBATA pKa 3a JraBATA pkoXBaTKa. IOnDbpkaTe do6bp XBaT c dBete pue no BpeMa pa6ota.
IpoDyKbT Tp86Ba Da ce IbpKHa Ha yO6Ha No3uHc DpbKkata Cbc CnycbK, HAMnpaCa Ce Ha BucOHNHa Ta Ha 6eepoto.
BnHa n3non3BaIte npOyKta Ha nbHa ckopoCT. PpOdbJnxTeHTo KocHe cbc CKoPcT, NO-HnCKa OT MaKcImaHnata, ue DOBeE do npokanBaHe Ha MacNo npe3 3arnyuHnteIra.
Kocete BnCOKata TpeBa OT rope HADONY, 3a da npedeOTbpaTne O6BnBaHETo Ha TpeBa OKO NOKpnyca Ha BaNa I rnaBata C BnAkhOTO, KOeTO MOKe Da npuynn NOBpeDi OT nperpraBaHe.
Ako OKoJIO rIaBaTa 3a KOpIaTa ce yBnE TpeBa, CnpTe DBrIaTeN I npEmaxHete TpeBaTa. HocTe pKabu, Korato npemaxBaTe TpeBHnTE OTp3bU.
CbBETN PNI PRA3AHE
BnK Φnypa 10.
He HatnckaTe KbM TpeBaTa, KOrTo ue 6bDe KOceHa. MeCTe OT eHata KbM dpyrata cTpaHa. PpemectBaTe MaNko HAnpeB B Kpar Ha BCaKO KocHe.
Дрьжтпpoукт haKIOHEn KbM O6JIacTTa Ha KOCHe.
He n3non3BaIte B onaChn cpeHn.
13noJ3BaIe Bbpxa Ha BnakHOTo 3a p3aHe; He HacnJbaTe rnaBata C BnakHOTo B HenoOpra3aHa TpeBa.
TeeneHte n DbpeHnte Opradn DonbHntenHO 3xa6raBt Ha BnaKHOTo N DOpN MORaT Da Ro CkBaT. CTeHN OT KAMbK N TyxN, BopDIOpN IN DbPBeCnHa MORaT 6bp30 Da N3HOcR T BnaKHOTo.
1368aBae Ta npBaTa n xpaTn. Kopa Ha DbPBO, DpbBeHn KopHn3n, 0bnuOBn n OrpaN MoRat neCHO
da6bdat nobpeDeHOTBnakHOTo.
PINIBNXBAHE HA BJIAKHOTO HANPEI
PnDnBnKBAHTo Ha KOpDAta ce ynpabJbBa Ype3 DOKOCBaHe Ha rnaBata Ha KOpDAta Do TpeBa, DOKaTO DBrAteTnPa60Tu np HAnbJHo OTBopeHn DpocenHn KlaHn.
NycheteDnuratelaHaMaKcMmJHahCKopoCt.
NouykaTe BnakHOTo B 3emrTa, 3a da ro npnBnKHe Hanpei. BnakHTo ce npnDbnKBa npn BCaKO notynBaHe Ha rnaBata. He dpbXte konyeTo Ha 3emrTa.
KopdaT Tp6Ba Da npemHe,doKaTo He 6bde cp3aHa Do DblnxHata OT dNcKa 3a p3aHe Ha Kopda, HAMpaC ce Ha npedna3nteJra 3a pexeuaTa npictabka.
PABOTACXPACTOPE3A
BuxΦurpya 11-12.
3a Da HamaNITE pUcKa OT OKaT: He HaTnCKaTe KbMaTePnAJa, KOITOPra6Ba Da 6bJe OTpR3aH. MecTeOTdRACHO HAJIABOB INoCTOARHHN OTKOCI. IpemecTaBteMAJko HAnpeD B Hauanoto Ha BCEKN HOB OTKOC.
IpykTe npOyKTA c dAChata pKa 3a pbKOXBaTKaTcBc cnycbK n C JBaTa pKa 3a JBaTa pkoXBaTKa. IOnDbpKaIe do6bp XBat c DBeTe pue no BpeMeHa pa6ota.
IpoDyKbT TpR6Ba Da ce DpbXn Ha yDo6Ha No3nna C dpBxKaTa Cbc Cnycbk, HAMnpaCa Ce Ha BnCOunHaTa Ha 6eDpoto.
I OndbpaKe Te Do6bp 3axBat n Cta6nHa onopa -Bbpxy DbaTa cn Kpaka. 3aemaTe cTa6nHa no3nua, Taka Ye da He 3ary6nte paBHOBeCne npn OTkaT ha peKeoTO yCTpoNCTBO.
Harracete xajkata 3a npespaikata B ydo6ha no3nui.
IpoBBAIte N3KIOUHTeJIHO BHNMaHHe npN 6opBaHeTo C To3n npOdyKT, KORATO e C npNkaueHO ocTpne. Ako OCTpneTO BIIe3E B CbIpnKOCHOBHeC Heo, Koeto He MOKe Da IpepeKe, MoKe Da BB3HKnHE peakunraTa obpaTeH TnaCbk. PnTAKOBa CbIpnKOCHOBHeO cTpneTo MOKe Da CNpe pR3KO H BHe3aHNO Da ,TNaChe" yPeDa B NoCoka, ObpatHa Ha yDapEnHa npeMTe. Ta3n peakunr MOKe Da e OocTaTbUHO MoUHa, 3a Da npuHn 3ary6bata Ha KOHTPOH NaHNCtpyMeHTA. ObpaTeH TnaCbk MOKe Da BB3HKnHe n3HeHaJDAuO, Ako OCTpNeO Ce 3aKaUn, 3aTbKHe nn6Ioknpa.BepoTHOCCTTA 3a ObpaTeH TnaCbk CE yBeJIuHabaB OBnactn, KbDeTo MaTePnAJIbT, KOITOT Pr6Ba Da 6bJe OTpR3aH, Ce BnKJa TpydHO. 3a neCHO n Be30ancho Prr3aHe npc7bNbaHTe KbM 6ypeHnTe, KOINTO ue pexete, OT DcHOn Ha JnBO. TOBa MOKe Da HamaJIi CnIATA Ha ObpaTHN TnaCbk IIpi HeouaKbaHaTa Cpeua C DbPbeH MaTePnAJI.
FRENDEESITPTNLSVDANOFIHUCCRUROPLSLHRETLTLVSKBGUKTR
PPEINNA3NTEJI 3A OCTPNETA
BnK Φnrypa 18.
BnHaH noCTabRyIe npEa3ntTeI Rbpyx octpneTo, KOrato ypeBbT He ce n3non3Ba. PpeNa3ntTeI rMaCKo6n OKONO p6oBeTe, KOtO upaKaBAt Bbpyx octpneTo, Ito oKcnpat. HocTe pbKaBUN BHMAbai Te npaPabo cOctpneTo.
3A6EJEXKKA:BnHaMmMaxaIe TpeDna3ntTeI, npeDn da n3noJ3BaTe ypeJa. PpeDna3ntTeJr MOKe Da n3XbpyN, aKO OCTpNETo 3aONUHe Da Ce BbPTN, DOKATO e MOHTnpaH.
IOYNUCTBAHE HA AYCNYXAN3AflyUHTENJIa
B 3aBNCIMOCT OT n3nON3BaHn rTn rOpNBO, Tnna n KOJIuYeCTBOTO Ha MacNoto N yCNOBnraTa HA eKCNIOataunr OTbOpbT Ha n3nyckateJHa Tp6ba n 3arNywnTeJrMorat Da ce 3anywat cbc caKdn. Ako 3aBeIeXKeIte 3ary6ha MoUHOCT BbB BaUNr 6eH3INHO INcTpymEHT, MoKe da e Heo6xOdmo KBaINΦnucnPah TexHk Da NOHCTn Te3n
He BnKOpNCToBnyTe npOyKT dIa 6yDb-koI MeTn, He nepepaxoBaHOI Buie.
TnepeJxehn
BctaHOBnHn HOxA Tri-ArcTM
DnBItbcr CTOpHky 6.
PonepeDxKeHHa
Ipeed BnKOpNCTaHHm npnlaDy cniBnEBHnTcN, 0yo ci KhoNk Ta KpInnblHi Detani nobHicTe 3aTgHyTu. 06 yHKHyTc cepno3Horo NowkoJKeHHn iD ac BnKOpNCTaHH, cni nepioNuHo nepeBiprTa 3aTayBaHH.
nonepedxehn
3BepHb ybary, zo raika ne3a - ce KOHTprAka 3 HeINHOBNM KJIbueem fipmN "Nyloc", kka BnKOpNCTOByeTbcra dIy ODHOPa3OBOro MOHTaxy. He BnKOpNCTOByte HeINHOBOy rayk NOBtOPO. BnKOpNCTOByTe HOBY HeINHOBOy rayk, KOIN BCTaHOBNIoTe a6o nepEMOHTOByeTe YacTHHN. HeBnKOHaHHu ci BKA3iBKn MoKe npNBecTN Do cepno3HOITpABMN a6o N0UKOdTN pIncTpii.
Uo6 3Hn3HTn pN3NK TpaBMyBaHH, He 3HimaTe 3axnCT 3 Je3a HOxa. 3HimaTe 3axnCHn UNTOK HOxa JnIe Ha Yac po60Tu.
- BiüeHTpyTe HIX Ha Ⅲai6i BepxHbOro ΦlaHcTo Ta nepekoHaTecra, 0o Bin ⅢjNbHO BCTaB Ha
FRENDEESITPTNLSVDANOFIHUCSRUROPLSLHRETLTLVSKBGUKTR
yKpaIHcBka MOBa (pepeKnaI opnirHaJIbHnx iHCTpyKci)
Micue. BctaHOBiB Ha Micue Tapinacty Waiby Ta nepekoHaTecra, 0o BOHa HadiHo cina Ha Ban peDyKTopa. BCTaHOIBt po3'em, TAK 0o NiIDHB Noro ceHTp po3BOPOTy nonati i nepekoHaTecra, 0o Bin 3haxOoNTbC B 6e3neCi B bana-WeCTepHi.
- BctahOBiB kOTyUkY 3 BOJIOciHHIO.
- Nomicitb raikobn KIOU KpI3b OTBip y wai6n BepxHbOro OJAAuHIO i OTBip B rONOBi peyKTopa. BnkopncTOByOu rAkoBNI KIOU, NOBepHiTB raKy Ie3a y HApMky npOTn RoHHNKoBOi cTpiIKN, 0o6 3aTARHyTN (25 cyT-phiHT).
IPEMOHTYBAHHK YUOPI3A (JE30 TRI-ARCTM) Y TPIMMEP
3MiHa HoxKa Tri-ArcTM
DnBItbcr CTOpInky 7.
- 3yHnHiB DnHyH.
2.ПрocуньтКOMбИОВаHи raiKOBи KIIOU chepe3 OTbip y wai6i BepxHbOroФlaHcra Ta OTbip y ronibci peykTopa.IOBepHiTb 3anobixHy MyfTy 3a roDHHNKOBHO CTPIKHO,IOB BnKpyTNITI. - 3HIMITbraKy ne3a,waHy ne3a,caWOnoDHy waHy Ta ne3o i 36epiraIte nIHaCTynHOrO BnKOpNCTAHH.
- BctaHObitb Bi6nBaTu paBn Ha 3axnCHn UInTOK;ДЯ CBOROBCTABTe Dba φikcatOpu Do npopisIB Ta 3atrHITb TBnHT.
PIMITKA:36epiraTe demoHTOBaHi yactHH pa3OM DnI NOdaBbOro BkOpNCtAHH.
YcTaHOBka roNoBKn TpIMpey ReelEasyTM
DnBItbcr CTOpInky 7.
- BctaHObitb po3' em npBDOy i Kopnyc rOIOBKn 3 BOJocIHHO Ha Ban peDyKTopa. NOMICTb raIKOBn KJIouc Kpi3b OTBip y wai6n BePxHbOro fnaHcuio IOTBip B rOIOBci peDyKTopa. 3a DonomoroTo raIKOBoro KInOua noBepHiB po3'em npBDOy npOTn rOINHHKOBOI cTpiKN, uO6 NaiiHO 3aTARHyTN.
- NpeBcTaHOBIb KOTyUky Ta CtpHy. NepeKoHaITeCb, "PpMn BAn" BuHa.
- 3HIMITb pyky po6ooyi rnoBkn, BCTaBnBn nn y ceHTp KOTyUKN.
- 3amihitb koxyx roibkn Tpimmepy, cymiCTNBuHn ikcatopn 3 OTbopamn Ha roiBui Tpimmepy. PnTnckaIte koxyx Ta roiBky Tpimmepy Onde Do OdHoro DOKN ikcatopn HadiHHO He BCTaHytBu OTbOpn.
- BctaHOBHeHH BONOCHI. 3BepHITbcr Do po3iny "3AmHa BOJocHi", 3o 3haxOHTbcra dani y piei iHCTpyKuii 3 TEXHCHoro 6cIyROByBaHHn Dnro OTPMaHHdoTaKOBoi IHOpMaui.
A PonepeJxehnH
Pn BnKOpncTaHHI rOIOBKn TpIMMepy ReelEasy TM Do 3axnCHoro Koxkya NOBHeH 6yTN pNkPInneH N BiD6NBau TpaBN. NbiItbcr CTopIHky 21.
ФУHKCUIOHYBAHнЯ
TANIBO TA 3APABKA
Be3neuHa po6oTa 3 naHOBm
ObaaItecB 3 naiBOM 3 o6epxHicTIO.Je Ierko 3anaioeTbcra.
YBeCb Yac 3anpaBnIe Ha BiDkpntomy Nobirpi, de HEmaec XoDnHex icKOp Ta nonyM'. He BdnxaiTe napn naHbA. He nannt.
YHnKaIe nOpapnnHnBeH3nHy a6o MaCTnHaBaWy Wkipy.
36epiraTe naiNBO Ta OINBy noaJI BiO uei. Pn npTpannnHHi 6eH3Hy a6o onNBu y ooi, HeraHOn npomnte ix uCTOHO BDOIO. Kaio nopa3HeHHra 36epiracbca, HeraHNO 3BepHITbcdo NiKapra.
OuHCTIb npoJNTn 6eH3nH HeraHNo.
3MlUBAHHIJIINBA
Le npodykT po3paxOBHn Ha XNBHeHH BID 2 TakTHORO DBNrHa i Bmarae nonepeDhboro 3miuBaHH6eHNHy i2-TakTHORO MaCTnla. 3MiuaTe HeETNUOBAHn 6eHNi 2-TaKTHe MOTOPHE Mactnno B uCTti cMHOCTi, 3atBepdxKeHOI dna 6eHNHy.
■ Cen DnHyN ceTnΦikOBaHn dIy po60Tu Hn HeeTNIOBAHHOMy aBTOMo6JIbHOMy 6eH3nHi 3 OKTaHOBIM YNCJOM 91 ([M + R] / 2) a6o Bnue.
He BnKOpNCToBvIe 6yDb-8Kn Tn nonepeHbO 3MiHaHOro 6eH3Hy / MaCTnla 3 naNBO3anpaBHX CTaHci.
BukopncTOByTe TINbKn 2-TaKTHe CnHTeTnueHc MOTOPHe MacNo. He BkOpncTOByTe aBTOMoBiHc MaCTnIO a60 2-TaKTHe 3OBHIuHE MaCTnIO.
3MiWaiTe 2,5% CnHTeTnue He 2-TaKTHe MOTOpHe MacNo 36eH3nHom. Lc cymi40:1.
3MiWaiTe naiNBO peTEnbHO, a TAKOX KOxHOro pa3y nepeed 3anpaBkoIO.
3miwaiTe B HeBENKnx KINbKOCTx. He 3miuyTe 6inbwe, HIX Ha 30-deHHN TepMin. CInHTeTuHn 2-TaKTTH MactNJbHN MaTepiA, Uo MiCTNb naJHBn CTa6iNi3aTOp peKOMeHdyEcra.
FRENDEESITPTNLSVDANOFIHUCSRUROPLSLHRETLTLVSKBGUKTR
yKpaIHcBka MOBa (pepeKnaI opnirHaJIbHnx iHCTpyKci)

1|+25ml=
21 + 50 ml =
31 + 75 ml = 40:1
41 + 100 ml =
51+125ml=
3ANOBHEHHBAKA
OuNCTIb NOBepxHIO HABKOIO naINBHOI KPNK, 0o6 3ano6iITn 3a6pyDHeHHIO.
Iocna6bTe KpNiky naNBHorO 6aka NOBInbHO, uO6CKnHyTN Tnck i yTpMaTn naINBO BiD npOTiKaHHaHABKOJNO KPMKNI.
O6epexHo 3aIInTe nainBHy cymiu B pe3epByap. YHnKaIte po3JNBy.
Ipeed 3amio naiBhoi KpuK, ouhctitb i ornHbTe npoknaKy.
Bippa3y 3amHHTKpnkky naJNBHO6aka i 3aTnHITb pyko. PpOpiTB 6yDb-8Kn BuTik nAInBa. Npeed 3anyCKOM DBnryHa BiDnDItb Bid Micu Do3anpaBneHH Ha BIDCTaHB 9 M.
PIMITKA: 3 HOBOR DnryHa nac i nicnepwOro 3actocyBaHHc HOpMaJIbHm.

Ponepedxehn
3aBxD 3yHnHTe DBNrHy Nepe3 3anpaKoIO. 3a6bOpOHaeTc DOINBaTN nAnBa, KOIn IHCTpyMeHT npauoe a60 KOJN DBNrHy rapAyn. BiDiuTb no KpaHne Mepe Ha 10 Metpi BID Micra 3anpaBKn, nepw HIX 3anyckatn DBNrHy. He naNTn.
3ANYCKI3YINHKA
See figure 13 - 17.
DnbiTbcra CToPiHky 14.
- TOKJIaIbIbIHCTpyMeHT Ha 3emJIO.
- BcTaHOBnT BaXinb DpoCeJIIOBaHHa Ha no3uio B (DPOCeIb BiUHHeH).
- NObepHtbypykcyctapTepa 3 npaboro60ky 3 WbndkoIO, piuyoio i noctiHoi BnCxixHOrO pyxy (He 6iNbue HIX B 6 pa3IB), nOKn DnBnyH He 3anyCTNTbcra.
3anyck DnurHa 3a DonomorOe nektpuHoro cTapTepa (He BxOHTb Do cTaHdpTHoro KOMnJIeKTy):

Nonepedxhen
BnKOpNCTOByTe TINbKn eNeKtpuHn CTapTep Ryobi OES18.BnKOpNCTaHHa 6yDb-IAKOro iHoro cTApTepa MoKe CnpuHHTn NOsKOJKeHHa DBnryHa Ta cepNo3Hy fi3nHy TpaBMy.

Nonepedxhen
Ipeed BnKOpNCTaHHaM eNEKtpuHOrO cTapTepa 173anycky IHcTpymEnTy, Heo6xIdHO npouHTaTN Ta NOBHicTHO 3po3ymITn KepiBHNUcTB0 3 EKnJyatauJIeNEKtpuHOrO cTapTepa OES18 3aJn yHnKHeHH HnPaBnJbHOrO BnKOpNCTaHH Ta nonepeDxKeHH pN3kky TpaBMyBaHH.
3anyck xonodHoro DBNrhya 3a Donomoroo eNEKtpnHoro cTapTepa (tIbKn rRBC254SBSO)
ДиВITбСТОПИКу 15.
- BCTABTe 6JOK CTapTepa B eNEKtpuHn CTapTep TaK, 0o6 n'YrNKyTHNk 6yB Ha3OBHi.
- HaTnCHITb KONky F/R B JIbN 6iK TaK, 0o6 Ha KOnuF/R 3'ABNCB CUMBOI N'TAUYTHNKA.
3.ПoknaДITb IHCTpymeHT Ha 3eMnTo Ta nepekoHaTecra, lo pizalhi 3ac06n He TOpKaHtbcr HJHX npeDMetIB.
yKpaIHcBka MOBa (pepeKnaI opnirHaJIbHnx iHCTpyKci)
- HatncHiTb rpyu 10 pa3iB.
NPMITKA: 7-oro HATNCKAHH, MOXHa no6aHTn NaIINBO B CTNCKHOMy HAcoci. JaKIO Hi, npoIOBxUte HAInCKATn DOKN NaIINBO MOXHa 6yde no6aHTn - BctaHOBtIN BaXinb DpocEnIOBaHHa Ha no3nio A (Dpocenb 3aunHeHn).
6.утpresmyoH i3OJbOBaHn BAN NIBO pykoH, npabOpykoBCTABe BAn CTapTepa Do OTbOpy Bana HaDbNHyHi.пepekoHaTecr, lo 6nok CTapTepa yBiWoby 3aun.
INPMITKA: EneKtpnHn CTapTe 6bnaHaHn 3axnCHM 6nKaTOpom. He HataNcKaIe Ta He yTpmyTe KONKy BMKaHHa, KOJI BBOInTe BaI eNeKtpnHoro CTapTepa B OTBip nla Bana Ha DnRyHi. CtapTe He npokpyuBaTMetbcra, kkuo eneKtpnHn CTapTe He ybiuob y 3aivn. - HatnchItb yTPMMyTe KHONKy BMKAHHa eJektpuHOro CTapTepa, DOKN DBUNyH He NoUHe 3anyckatncr. He yTPmMyTe eJektpuHn CTapTep DOBwe, HIX 4 cekyHn.
- BctaHOBnT BaxKinb DpOceJIIOBaHHa Ha no3nio B (Dpocenb BiUHHeH).
- HatncHtB n ytpmyTe KhoNky BMnKaHHeNEKtpnuHOro CTapTepa,doKN DBuRyH He 3anyCTntbCn. NPMITKA: KaO dBvryH He 3anyckaetbCn, NOBTOPiNb npoueDpy 3 kpoky 5. He nobTOpIOte npoueDpy 6Ibwe 1 pa3y. Kaio nicra dpyro i cnpobn DBrHyH He 3anyckaetbcn, cnpobnyte BpiUnn npo6nemy, 3BepHyBwncb do po3diny "3aHTm DBrHyH" y rnaBI "CyHeHH Henoiaok" zuoro KeipBnucTba.
- 03BONbTe DnBryHy nporpitnc BnpoDobK 10 ckyHnepe3anyckom.
3anyck nporpitoro 1BnryHa 3a DOnomoroo eJektpuHoro cTapTepa
DnBItbcr CTOpiKHy 16.
- BctaTe 6Iok cTape B eIeKtpuHn cTape TaK, 06 n'TnKyTHnK 6yB H3OBHi.
- Hatnchtb KhONky F/R B nIBn 6ik Tak, uO6 Ha KhoNci F/R 3'RBNCBc CmBOJ N'TNKyTHNuKa.
- Noklaɪdɪt bɪnctpymeHT Ha 3emJIIO Ta nepekoHaɪTeCra, ΚO pɪəaɪbHɪ 3ac06n He TOpkaIOTbcɪ nɪwɪx npeɪmTeB.
- BctaHOBHTBaxjNb DpOceJIIOBaHHHa no3nuioB (Dpocelb BiHHeH).
- Utpmyuoyi 30nbobAHn BAN NIOO pyko, npaBOO pykoBCTABTE BAN CTAPTePA DO OTBOPy BAHA y 3ayn.
- Hatnchitb n ytpmyte KhoNky BMnKaHHeNEKtpnuHOrO CTapTepa,doKn DBrHyH He 3anyctntbcn. PIMITKA: KaDbrHyH He 3anyckaTbcn, nobTopiTpnopeDpy 3 kpoky 5.He noBtOpIte npoceDpy
6inbwe 1 pa3y. Kaio nicna dpyroi cnpo6n Dbruyn He 3anyckaetbcra, cnpo6yte BpiuHn npo6nemy, 3BepHyBwncb do po3diny "3aHTn Dbruyn" y rnaBi "YcyhenHr Henonadok" uboro KepiBnTBA.
ДяЗинкDNBnHa.
DnBItbcraCTopiHky 17.
BcTaHOBIb nepemKau 3anaIOBaHH B noIOKeHH "O" (BIMK.
PEKIMN POBOTN TPIMMEPY
DnBtbcr CTOpHky 9.
B3bmitb iHCTpymEnT npaBOO pyKOIO 3a pyKy TpIrepa I nIBOIO pyKOIO 3a neBy pyKy. TpMaIte MiHO oboma pykamn niD yac po60tn.
PpnaTpe6a TpmaTu 3pyHomy nooXeHHi, ytpmyou npky Tpurepa Ha Bucoti CterOH.
3aBXKn npauoIte 3 npuaOHa NaOBHn noTyXHoCTi. TpBaJe BnKOpncTaHHn npu cactKOBo BiDnHeHomy dpoceni npn3BeDe Do KpaanHn OJINBn 3 rnyuHnka.
Le nepeewkoqkaTme obroptatncb tpabihabkoNOKkyxBaIipobooi roNoBKN,ta 3ano6iratmeNOWKoJKeHHM Bi neperpibaHH.
KaH a po6oy roBky HamotyEcbr TpaBa, BnKIOUHTb DnRyH Ta y6epitb TpaBy. OJraTe pykabuKN, nepH HIX 3HIMATN CKOWeHy TpaBy.
IOPAДИДЛЯPI3AHHЯ
DnBITbcraCTOpiHky 10.
He 3actocobyTe HADNIuKOBx 3cynIb, ITOBxaOHTpnmep. Move from side to side. PyxaTecb 3 ctopoHn B CTOPOHy, HApNkiHoi KoXhoro pyxy nOdaBaTe Tpnmep ynepeHa HeBeiNky BiCTaHb.
Ytpmyte hctpymHT haxnHeHm y HanpMky do 6bnaCTi, kka o6po6nTbcra.
He npaoute B he63neuHX noJoxeHHx.
BukopncToByTe KINHcKCTpyH,0o63po6nTu pi3aHH; He npMuyyTe roIOBky y HeiDpi3aHy TpaY.
IpoBt Ta qactokon BnKnkae DoaTKOBn 3HOC ctpyn, HabItb noJomKy. Ka'mHi Ta ceTnHi CTIN, 6opDIOpN i DepeBnHa MoxyTB WBNKO 3HOCn Ctpny.
YHnKaIte DepeB i YarapHnKIB. Kopa DepeB, DepeB'Ani MoNDnHn, 0bnuOBaHH Ta CTOBn MOxKyTb 6ytn NERKO NOwKOJKeHi CtpHoIO.
NPOCYBAHHBOJOCIH
361bwnTn DOBxHny BONochi, Heo6xioHO NOCTyKaTH pO60oIO rOIOBkoIO no Tpabi npi po60ti DBNrHa Ha NOBHOI NOTyKHOCTI.
BukopncToByTe DnHyH Ha nobHi nOtYxHOCTi.
HaTnchItb KhONky Ha oCHObi 06 npocyHTn
FRENDEESITPTNLSVDANOFIHUCSRUROPLSLHRETLTLVSKBGUKTR
yKpaIHcBka MOBa (pepeKnaI opnirHaJIbHnx iHCTpyKci)
BOJOCiHb. BONOCiHb npocyBaetbcg KOxHoro pa3y, npn HATNCKaHHI KHOKN. He npNTnCKaTe po6Ouy roJIbky do 3emni.
Bolocihb 6oipkeTbc Da noTpi6Hoi IOBxHn 3aBraKn ne3am,po3TaWOBAHM Ha 3axHCHOMy uNTky.
BVKOPNUCTAHN KUOPI3Y
DnBItbcra CToPiHKy 10-12.
3Hn3HTn pn3nk BiDcKoKy: He 3actocobyTe HADNIWKOBNX 3ycnIb, ITOBxaOuN TpIMep npi po6oti. PIBHomipno nepemiuyeTepmep pyxamn Cnpaba HaniBO i B npOTnHexHOMy Hanpymky. Ha noaTKy KOxHoro pyxy NOdaBaTe TpIMep ynepeHa HeBeJIky BiDCTaHb.
Bizbmitb iHctpymeHT npaBOO pyko0 3a pyky Tpurepa i nboHO pyko0 3a neBy pyky. TpmaTe MiHo oboma pykamn nD hac po60tN.
Ppunad Tpe6a Tpmau y 3pyHomy noNoxehHi, ytpmuyou npky Tpurepa Ha Bucoti cteroh.
TpmaTe pyky Ta 6anaHcyte Ha 06x Horax CtaHbTe TaKIM YINHom, 06 Bn He BtpaTIn 6anaHc nID yac BiDauYiBip3aIbHorO DnCKa.
Pnucocynte peimb y 3pyuhe noIOxehna.
CniD 6yTn DyKe ObepeKHNMI, KOpNCTUOCHCb ZIM IHCTpymeHTOM 3 HOXem NooTobx Ne3a Ce peakci, RaKa MOKe BUNHKATN, KOJI OBeptAIOcB Ne3a KOHTAKTyOb 3 YIMOCb, Uo He MoKyTB 3pi3Atu. Lcien KOHTAKMOKe npIN3BecTN Do 3ynHKn Ne3a Ha MNTb, i PANTOM "WTOBXHYTN" npNCPTPi DaNEKO BiD o6'ekTa, 3 AKNM BOHO 3ITKHyNoCg. Lp peakci moKe 6yTu DOCTaTHBo IHTEHCNBHIO, Uo5 BNIKKLNKATN BTPaTy ONepaTOPOM KOHTPOJ HA IpNCPTPoEM. NooTobx Ne3a MOKe BiID6yTncs 6e3 NonepeJxehn, JaKIo ne3o 3aunInIOc8, 3aTnChyTe a60 3B'z3aHe. Biporidhiue BCboro, ce MOKe BiID6yTncs B ObnaCTx, De BaxkO nobauNTu MaTepiAn, AKN 3pi3AcTbcra. DnI JERKOrTo Ta 6e3neHOrO KocIHHe, CliD 3pi3Atu 6bp'raHH, CNPaba HaniBO Y BnAaNky HecnOdiBaHOi NOBn PpeDMeta a60 CTOBbypa, Za npAKTKa MOKe MINiIM3yBATn peakciio noTobxHoxa.
HIX TRI-ARC
Hox Tri-ArcT npn3haeNo TINbKn DnT OBCnx 6yp'Anib iM'Knx CTe6en. KOnn HIX CTae TYNIM, NOrO MOxHa nepeBepHytn Uo6 noDobXkTN NOrO CTpOK cnyx6n. He roCTpntb HIX Tri-ArcTM.
YCTATKYBAHHIJIPI3AHH
A PonepeDxkeHH
Hoxi Dyke roctpi i MOkytb TpaBMByaTn, HabItb
Rkso BOHN HeBnKHi. CnI d 6ytu Dyke oBepeXHMn,
KOpNCTyOuChc b cIM mHCTpyMeHTOM 3 HOxEM
Be3neue HBNOPNCtAHn HCTpyMeHTy Bmarae,
Io6 BN npOHtAnn Ta 3po3ymIn n ce KepIBnTuBO 3
EcknlyataaTa BCI MapKyBaHHo3HaueHi Ha npnaDi.
YBeCbVac 6nDi pyKn NOBHHI 6yTN BKNOPcTaHi, 06 KOHTPOJIbOBATu CEIN npOdyKT. TpMaTe MiHOb O6oma pykam niJ cac po6oTn.
TpmaTe pyky Ta 6aHaHcyIte Ha o6ox Horax CtaHbTe TAKIM YHOM, Uo6 Bn He BtpaTIN6aHaHO iD yac BiDaayi Bid pi3aIbHOrO DnCKa.
IHCnEkTyIe i OunuAte oBnaCTb BiD 6yDb-kaNX npNXOBAHIX 06'KCTIB JHK HAnpNIKAJd CKJIAHKN, KAMHHa, 6eTOH, 3aropOki, dpoTn, DepeBnHa, MetaJI T.I.
3a6bOpOHeHNKOpNCTOByBaTN HIX 6iJI niOxIDnHx Dopiok, 3aropox, CTOBnIB, 6yDIBenb a6o iHnx Hepyxomnx 06'ekTtB.
3aBXdn IHcneKtyNe HIX Ha HAHBHCTb NOUKoDKKeHb nICnYdApy 06 TBepDn NpeDMet. He BnKOpNCTOBynte, kIIO 6yIO BnBJIeHe 6yDb-Ke NOUKoDKKeHHJ.
I JnJ NERKOro Ta 6e3neuHoro KocHH, cnid 3pi3aTn 6yp'HN, cnpaba HaniBO
TEXHIUEOBCJYTOBYBAHH
A PonepeJxehnH
Bukopocobyte Tlbyn opinhaJIbHi 3anachi
yacTHH, akcecyapn Ta obnadHaHH BID Bnpo6HnKa.
HeBkoHnna Liie BmOrn MoKe npnbctn Do
MOKnBOI TpaBMn, noraHOIpOdyKTINBHOCTI Ta MoKe
PpN3BeCTn DO BtpaTn rapaHTII.
PikyuBv30J He NOBHeH npaIOBaTN B XOIOCTOMy pexmi. RaB BMORA He 3aIOBOJIbHReTbcra, cnid ckoperByatn 3aTnCKaU a6o Notpi6HO TepMiHOBO 3BepHyTnCRA niTpPMKoHO Do KOmNETeHTHORO faxibra.
Bn moxete 3po6ntn peryIOBaHHra Ta pemOH, onncahi B cboMy noci6Hky KopnctyBaHa. IHwi BNn peMOHTy cnid npoBoaHTN B ABTOp3OBAHOmy cepBichOMy ceHTpi.
Hacnikn HenpaBnBHoro TexHCHoro 6cnyroBaHHaMOxyb BkHouatn Bcebe HaJINuKOBi BiKnJaEHBAByIeIO, 0 np3BODnT Do Btpn npOdyKTNBHOCT
FRENDEESITPTNLSVDANOFIHUCSRUROPLSLHRETLTLVSKBGUKTR
yKpaIHcBka MOBa (pepeKnaI opnirHaJIbHnx iHCTpyKci)
i Bnnycky YOpHOro MacnHaNcToro 3aIIMKy KpaneJb 3 rIyshnka.
IpekeKaHTeCg, 0o BcI 3axnHi oropDxKeHHpemeHi, dePleKToPi pyKn npaBnIbHo i HaDiHOb3akpinHei, 06 yHKHytn Pu3NkO tPmHaHH TpaBM.
3AMIHA BOJOCIHI
DnBItbcr CTOpHky 8.
BctaHObitb nepemukay 3anaHOBHH B nnoKeHH "O"(BIMK.
BukopncTOBynte MOHOHTky 2,4 MM y kOCTI BOIOChi.
BupixTe OINH MMaTOK BOIOciHi np6n3Ho 6 M y DOBXKHy.
IobepTaIe KhoNky Ha po6ouyi roNoBci Donokn liHia Ha KhoNci He cnibnae 3i cTpiKamn 3Bepx y po6ooyi roNoBki.
BCTaBTe KIneU BOnocHHy nTnHa CTopoHrToNobKni I wTOXBaIte DOKN BOnocHb He BnJde Kpi3b nTnHO hIWOMy 6oCi. PPOOBKyIe TtOXBaTHN BOnocHb Kpi3b po6Ouy rONOBky 3 BOnocHHIO DOKN CEpeHra YactNa HBOncHi He 6yDe ycepeHHIO pObooi rONOBKa Ta BOncIHb 33OBHI rONOBKn He 6yDe noiineHa nopIBHy 3 06x 60kIB.
IobepHITb KhoNky Ha po6oHi roNoBci npotn roHHNKOBoi CTpiKN, 106 nepeBipuTn BOIOciHB.
3aHnuaeTbcra cTnpaTu 3po6ooi roIOBKn o6epT BOJocHi np6JN3HO 20 cm.
3ANOBIXHHKJIe3A
ДиВITбСТОПИКу 18.
3aBxN BCTaHOBJIOte 3axnCHIK HOxA Ha HIX, KOIN npNJad He BnKOpNCTOBycTcR. 3axnCHNI TOK HOXA Ma KInCn NO KpaX, IIO BTpMHyOTb HIX B HAJExKHOMY noNoXeHHI. HAdraTe pykabuCi Ta 6yNbTe oBepeXHi npn BnKOpNCaHHI HOxA.
INPMITKA: Ipeed BnKOpNCtAHHm npncptpo 3aBxnn 3HimaTe 3anobixhNk 3Je3a. RaKIO He 3HrTn, 3ano6ixhNk Je3a MoKe CTATN KHyTUM 06'kTOM, KOJI Nle3O NOHe NOBepTaTnCra.
OuHcEHnBHXJIOHOroNOPTAITnyuHnKA
3aIeKHO BiTnny BnKOpNCTOBaHOro nAnBa, Tnny Ta KJIbKocTI MaCTnIbHOrO MaTePiaNy, Ta / a6o Baunx yMOB ekCnIyatauii, BnNyCKHNI OTBip i rIyUHNK MoKyTB 6yTN 3a6NOKoBAHI ByrIeCEBIMN BiKNaJedHHaM. RaIO BN 3BePTaEte yBary Ha BtpaTI NOtYXHoCTi BAwOro IHCTpymeHTA, npauiooyoro Ha 6eH3nHi, KOMTeENTHM cepBichn PhaxibeCb NobINHe npnbpatn CI BiKNaJedHH, Uo6 BiIDHOBTn HaneXHe FyHKioHyBaHH.
CHIeHHIOBITPRAHOFOIINbTPA
ДиВITбСТОПИКУ 19.
BcTaHOBItBepeMnKau 3anaHOBaHH B NOIOKeHHA "O"(BMK.
OuHHeHH oBnacti nobitpo3a6ipHnka i nobitprHoro fiNbtpa.
3HIMITb NOBITpHn HnIbTpIOuNCTITb NOro B Tenni MInbHi BOdi.
PpomnTe, i Hexa nOBitprHn fInbTp noBHCIO BUCOXHe.
3amihitb kpiuky nobitpnaHoro pfIbtpa.
PIMITKA: If damaged replace immediately.
3amihitb kpiuky nobitrpno horo pfhtpa.
3amHItb KpNkU NOBITpHoro pInbTpa.
PIMITKA: 3a6e3neueHHn HaKpaooi npOyKTNBHOCTI pInbTp Tpe6a MinrTa pa3Ha pik.
IPEBIPKA IANIBHORO BAKA

Ponepedxehn
Bntik naiinBHOI KPNKIN NOXeKHO He6e3neHn i NOBHeH 6yTu HeraH0 3aMHeHn.
PnBHa KpuKa Micntb He cnpaBnH pIbtp i 3BopOTHn KJanaH. 3a6ntn nnBnHn pIbTp np3BeDe do noripweHH po60tn DnHyHa. JaKIO npOpykTNBHCtB noINuyeTbcra, KOJI KpuKa nAIBHO 6aka ocna6JeHa, 3BopOTHn KJanaH MoKe 6yTu HecnpaBn A6o pIbTp 3a6ntn. 3amHiTb KpuKy naNBHO 6aka, Kaio notpi6Ho.
CBIYKA 3ANAJIHOBAHH
Bnryh BnKOpNCToBycTcRc YemnioH L8RTF/NHSP LD a6o L8RTF/BOSCH 0,5 MM BiDcTaHb Mx eNeKTpoaMn. BnKOpNCToByTe ToHy 3amHy i OopiHo 3amiHne.
PONEPEDIXEHH
Будte obepexhi, u6 He 3ipBaTn pi3b6neHHcBICK3anaJIIOBAHn. NepekpyuBaHH ctpHy MoKe cepno3HO NOUKoDHTN DBrHy.
NOWYK I YCYHEHHA HECNPABHOCTE
| ПюбLEMа Можлamba р�чы | На Виришени | |
| Двигун He зашистся. | Hemae ickpn. | Сбічka може 6утп пошкоожена, вidаліпь ii i nepeсір'te на\ наявісіль 6б rudу i Trpіцин. 3amініь HOBO' CBIVKO. |
| Hemae палва. | Натисініь сбічку залany, пох памма не сnobнehа\ палва.Ящо памочka не заловна, поvinнha\ состEMA поді палва збілковова.Зерініь сь\ сервініgoro цHTpy.Ящо сбічka зал\'ny заловна, двигун може 6ут6отол\'нелі, по\'ьіdіьdo NaCTYHORO\ nykTU. | |
| Зал'tи двигун. | Виімініь сбічку зал\'ал\'нелі, розташіte trім\'мір тak, ц\'об оТВIP сбічку зал\'ал\'нelіь 6уно сір\'я\'мOBАоу уніз. Пere\'ko\'a`nt\'cesb,zzo Baxilь 3н\'х\'ODITbCBy y BID\'krNTi' noisi\'ii Д\'р\'oc\'ь ta no\'TyrHITb MOTy3KU CTAPTEBA VD 10do 14разВ.ТakIM YCHINOM 3 DBVryna BVIDALITbCS над\'л\'ш\'О\' pалва.Пор\'u\'cITb Ta pepeBCTahOBITb Cbivky Зал\'л\'в\'ань.Ко\"Д\'р\'oc\'ь nob\'HICTO O\'c\'ab\'neHNI ta Baxilь 3н\'x\'ODITbCSy BID\'KITOMy NOLOXENHI nobі\'tr\'Poy 3ac\'Nikki,not\'R'HITb MOTy3KU CTAPTEBA TPI раз.N.; Я\"ьгYN He 3\'an\'yckA\'t\'CSy,not\'a\'Te Baxilь Д\'р\'с\'ьу y zak\r\'у TY\'PIMHKA".Я\"ьгYN BCE ODH No He 3\'an\'yckA\'t\'CSy, nob\'TopITb BVI\'henabeDEH I KPOK, BCTAHOBIVII MOBY CBIVKY 3azal\'enHry. | |
| Төр Трoc 3\'an\'ycky T\'rHETbCS С\'knadniш,ніж Нови. | Зber\'пься do cepвісногоцHTpy. | |
| Гол\'ьka He 3\'at\'rHUTa,як сід, a CT\r\'iKm ц\'ent\r\'u\'BaHANHry He c\'ibnadaIOb. | Висав'te рuceу y po\'oboe no\'looxenny tak,uz\'ob st\r\'iKm 3\'birlinca, ta nob\'HICTO 3azTyrHITb. | |
| Двигун 3\'an\'ycka\'t\'ьс, eine He набра\'doDocTaTHBOI not\'yKHOCTI. | Heobixidno BvdperynlOBATn karbopatop. | Зber\'пься do cepвісногоцHTpy. |
| Двигун He за\'ц\'oc Ha nob\'hIX обopotax ta/ч сіnlbNo dInmItb. | Пere\'bipte мactinbno-naninbHy cumi#. | Ви\'kopіstobuy're сбіve пал've 3 npabinbHOIO np\'op\'uzieVO 2-tak'THOrO Macna. |
| З\'ab\'ud\'eNo nob\'it\r\'yHmNФiNbtrp. | Д\'ві\'ь\'cra O\'ch\'eHnHa ekpana nob\'it\r\'yHORO φiNbTPa, paniue В zu\БOMу noci6NHy. | |
| Heobixidno BvdperynlOBATn karbopatop. | Зber\'пься do cepвісногоцHTpy. | |
| Двигун 3\'an\'ycka\'t\'ьс, п\'az\'oc i\ п\'піck\'o\r\'yctb,ale He п\'az\'oc HA xOJOCSTOMy xOdy. | Heobixidno BvdperynlOBATn karbopatop. | Зber\'пься do cepвісногоцHTpy. |
| Hixnpodovkye obeptatncsHa doZBil'ni shvdkocti. | Heobixidno BvdperynlOBATn karbopatop. | Зber\'пься do cepвісногоцHTpy. |
| Ралун\'ь: 3\'an\'ytaHa trpaВа рpo\ установку TrpimeprHу rol\'OBkИi\ п\'рх\'ьнісьст\'ур\'ь. | Plaka BvSOkU TrpavbHa pIBHi ZemNi. | Зр\'iz\'уte BvSOkU Trpavb 3 Бervини доиЗу. |
| Ek\'cnplnyatauia BvO6bPy pri nuchKOBOMy hanpykEnHII. | Ek\'cnplnyatauia BvO6bPy pri nobHOMy happykeHII. |
yKpaIHcBka MOBa (pepeKnaI opnirHaJIbHnx iHCTpyKciI)
EN RYOIBWARRANTY APPLICATION CONDITIONS
In addition to any statutory rights resulting from the purchase, this product is covered by a warranty as stated below.
- The warranty period is 24 months for consumers and commences on the date when the product was purchased. This date has to be documented by an invoice or other proof of purchase. The product is designed and dedicated to consumer and private use only. So there is no warranty provided in case of professional or commercial use. This warranty applies only on new products.
- There is a possibility to extend for a part of the range of power tools (AC/DC) the warranty period over the period described above using the registration on the www.ryobitools.eu website. The eligibility of products for extended warranty is clearly displayed in stores and /or on packaging and is contained within the product documentation. The end user is required to register his/her newly-acquired products online within 30 days from the date of purchase. The end user may register for the extended warranty in his/her country of residence if listed on the online registration form where this option is valid. Furthermore, end users must give their consent to the storage of their personal data that is required to be entered online. They must also accept the terms and conditions. The registration confirmation receipt, which is sent out by e-mail, and the original invoice showing the date of purchase will serve as proof of the extended warranty.
-
The warranty covers all defects of the product during the warranty period due to faults in workmanship or material at the purchase date. The warranty is limited to repair and/or replacement and does not include any other obligations including but not limited to incidental or consequential damages. The warranty is not valid if the product has been misused, used contrary to the instruction manual, or has been incorrectly connected to a power supply. This warranty does not apply to:
-
any damage to the product that is the result of improper or lack of maintenance
any product that has been altered or modified
- any product where original identification (trade mark, serial number) markings have been defaced, altered or removed
- any damage caused by non-observance of the instruction manual
- any product not displaying the CE approval mark on the rating plate
- any product that has been attempted to be repaired by a non-authorised warranty service centre or without prior authorisation by Techronic Industries
- any product connected to improper power supply (amps, voltage, frequency)
- any product used with inappropriate fuel mixture (fuel, oil, ratio of oil/ fuel mixture)
- any damage caused by external influences (water, chemical, physical, shocks) or foreign substances
normal wear and tear spare parts
- inappropriate use, overloading of the tool
- use of non-approved accessories or parts
- Accessories provided with the tool or purchased separately including but not limited to blades, saw chains, cutting lines, etc.
- Any periodic adjustments to or maintenance cleaning of carburettors
- Components (parts and accessories) subject to natural wear and tear, including but not limited to bump knobs, drive belts, clutch, blades of hedge trimmers or lawn mowers, harness, cable throttle, carbon brushes, power cord, tines, felt washers, hitch pins, blower fans, blower and vacuum tubes, vacuum bag and straps, guide bars, saw chains, hoses, connector fittings, spray nozzles, wheels, spray wands, inner reels, outer spools, cutting lines, spark plugs, air filters, gas filters, mulching blades, etc.
- For servicing, the product must be sent or presented to a RYOBI authorised service station listed for each country in the following list of service station addresses. In some countries your local RYOBI dealer undertakes to send the product to the RYOBI service organisation. When sending a product to a RYOBI service station, the product should be safely packed without any dangerous contents such as petrol, marked with sender's address and accompanied by a short description of the fault.
- A repair / replacement under this warranty is free of charge. It does not constitute an extension or a new start of the warranty period. Exchanged parts or products become our property. In some countries delivery charges or postage will have to be paid by the sender. Your statutory rights arising from the purchase of the product remain unaffected.
- This warranty is valid in the European Community, Switzerland, Iceland, Norway, Liechtenstein, Turkey and Russia. Outside these areas, please contact your authorised RYOBI dealer to determine if another warranty applies.
AUTHORISED SERVICE CENTRE
To find an authorised service centre near you, visit http://en.rybitools.eu/ header/service-and-support/service-agents.
FR RYOIB CONDITIONS D'APPLICATION DE LA GARANTEE
Normal slid pa reservedele
eu/header/service-and-support/service-agents.

SL
POGOJI ZA VELJAVNOST GARANCije RYOBI
EC DECLARATION OF CONFORMITY
Techtronic Industries GmbH
Max-Eyth-Straße 10, 71364 Winnenden, Germany
Herewith we declare that the product
Brushcutter / Grass Trimmer
Brand: Ryobi
Model number: RBC47SEO
Serial number range: 46202001000001 - 46202001999999
is in conformity with the following European Directives and harmonised standards
2006/42/EC, 2014/30/EU, 2000/14/EC, 2005/88/EC, 97/68/EC as last
amended 2012/46/EU,
EN ISO 11806-1:2011, EN ISO 14982:2009, EN ISO 3744:2010
Measured sound power level: 109.48 dB(A)
Guaranteed sound power level: 112 dB(A)
Conformity assessment method to Annex V Directive 2000/14/EC amended by 2005/88/EC.


Floyd Jeffrey Nesom (BSME)
Senior Director of Engineering
Winnenden, Oct. 13, 2016
Authorised to compile the technical file:
Alexander Krug, Managing Director
Techtronic Industries GmbH
Max-Eyth-Straße 10, 71364 Winnenden, Germany
DE
Max-Eyth-Straße 10, 71364 Winnenden, Germany
Winnenden, Oct. 13, 2016
Alexander Krug, Managing Director
Techtronic Industries GmbH
Max-Eyth-Straße 10, 71364 Winnenden, Germany
FR
DECLARATION DE CONFORMITE EC
Techtronic Industries GmbH
Max-Eyth-Straße 10, 71364 Winnenden, Germany
Winnenden, Oct. 13, 2016
Alexander Krug, Managing Director
Technoronic Industries GmbH
Max-Eyth-Straße 10, 71364 Winnenden, Germany
ES
Max-Eyth-Straße 10, 71364 Winnenden, Germany
Director seniorde Ingenieria
Winnenden, Oct. 13, 2016
Alexander Krug, Managing Director
Techtronic Industries GmbH
Max-Eyth-Straße 10, 71364 Winnenden, Germany
IT DICHIARZIONE DI CONFORMITA EC
Techtronic Industries GmbH
Max-Eyth-Straße 10, 71364 Winnenden, Germany
Winnenden, Oct. 13, 2016
Alexander Krug, Managing Director
Techtronic Industries GmbH
Max-Eyth-Straße 10, 71364 Winnenden, Germany
P T DECLARACAO EC DE CONFORMIDADE
Techtronic Industries GmbH
Max-Eyth-Straße 10, 71364 Winnenden, Germany
Pelo presente declaramos que os produits
Director Senior de Engenharia
Winnenden, Oct. 13, 2016
Alexander Kruq, Managing Director
Techtronic Industries GmbH
Max-Eyth-Straße 10, 71364 Winnenden, Germany

NL EC CONFORMITEITSVERKLARING
Techtronic Industries GmbH
Max-Eyth-Straße 10, 71364 Winnenden, Germany
Winnenden, Oct. 13, 2016
Alexander Krug, Managing Director
Techtronic Industries GmbH
Max-Eyth-Straße 10, 71364 Winnenden, Germany
DA EC OVERENSSTEMMELSESERKLIERING
Techtronic Industries GmbH
Max-Eyth-Straße 10, 71364 Winnenden, Germany
Winnenden, Oct. 13, 2016
Bemyndiget til at udarbeje de det tekniske kartotek:
Alexander Krug, Managing Director
Techtronic Industries GmbH
Max-Eyth-Straße 10, 71364 Winnenden, Germany
SV EC-DEKLARATION ANGÄENDE ÖVERENSSTÄMMIGHT
Techronic Industries GmbH
Max-Eyth-Straße 10, 71364 Winnenden, Germany
Senior Director of Engineering
Winnenden, Oct. 13, 2016
Alexander Krug, Managing Director
Techtronic Industries GmbH
Max-Eyth-Straße 10, 71364 Winnenden, Germany
NO EC-ERKLERAING OM PRODUKTOVERNSSTEMMELSE
Techronic Industries GmbH
Max-Eyth-Straße 10, 71364 Winnenden, Germany
Herved erklaerer vi atproduktet
Gressstrimmer/Ryddesag
Merke: Ryobi
Modellnummer: RBC47SEO
Serienummerserie: 46202001000001 - 46202001999999
er i samsvar med folgende europeiske direktiver og harmoniserte standarder 2006/42/EC, 2014/30/EU, 2000/14/EC, 2005/88/EC, 97/68/EC etter siste endring 2012/46/EU, EN ISO 11806-1:2011, EN ISO 14982:2009, EN ISO 3744:2010
Malt lydeffektniva: 109.48 dB(A)
Garantert lydefeffektniva: 112 dB(A)
Winnenden, Oct. 13, 2016
Autorisert til a setteSAMEN den tekniske filen:
Alexander Krug, Managing Director
Techtronic Industries GmbH
Max-Eyth-Straße 10, 71364 Winnenden, Germany
FI EC-SÄÄNNÖSTEN NOUDATTAMINEN
Techtronic Industries GmbH
Max-Eyth-Straße 10, 71364 Winnenden, Germany
Winnenden, Oct. 13, 2016
Alexander Krug, Managing Director
Techtronic Industries GmbH
Max-Eyth-Straße 10, 71364 Winnenden, Germany
RU 3AABJIeHHeO COOTBETCTBm TPEBOAHnR M EC
Techtronic Industries GmbH
Max-Eyth-Straße 10, 71364 Winnenden, Germany
HaCToHMMb3aBnHem,HTOdaHHbI npodyKT
Tpmmep/Kyctope3
Mapka: Ryobi
Homep moen: RBC47SEO
Дианэзн задockи HomepOB: 46202001000001 - 46202001999999
COOTBETCTBYET Tpe6oBAHnM CneIyIOuIX DmpeKTHB EC n corlaocBaHHbIX CTaHdAPTOB
2006/42/EC, 2014/30/EU, 2000/14/EC, 2005/88/EC, 97/68/EC B
nocJeHne peaKm 2012/46/EU
EN ISO 11806-1:2011, EN ISO 14982:2009, EN ISO 3744:2010
I3MepeHHbI yPoBeH 3ByKOBoM MoUHOCTn:109.48dB(A)
TapaHTnpyembI ypoBeHb 3BykoBoM MoUHocTn: 112 dB(A)
Cnoc6 oueHKn COoTBecTbna, npnIOKeHne V K dIpeKtBbe 2000/14/EC c
m3MeHeHnMn 2005/88/EC.


Floyd Jeffrey Nesom (BSME)
CtapshnTexHmueckn DnpeKTop
Winnenden, Oct. 13, 2016
JINIO,OTBETCTBEHHOE3aNOIROTBKYTexHHeCKOJKOMMeHTaUN:
Alexander Krug, Managing Director
Techtronic Industries GmbH
Max-Eyth-Straße 10, 71364 Winnenden, Germany

DEKLARACJA ZGODNOSCI EC
Techronic Industries GmbH
Max-Eyth-Straße 10, 71364 Winnenden, Germany
Winnenden, Oct. 13, 2016
Alexander Krug, Managing Director
Techtronic Industries GmbH
Max-Eyth-Straße 10, 71364 Winnenden, Germany

ECIZJAVAOUSKLAGENOSTI
Techtronic Industries GmbH
Max-Eyth-Straße 10, 71364 Winnenden, Germany
Winnenden, Oct. 13, 2016
Alexander Krug, Managing Director
Techronic Industries GmbH
Max-Eyth-Straße 10, 71364 Winnenden, Germany

PROHLÁSENI O SHODE EC
Techtronic Industries GmbH
Max-Eyth-Straße 10, 71364 Winnenden, Germany
Max-Eyth-Straße 10, 71364 Winnenden, Germany
Numar series: RBC47SEO
Winnenden, Oct. 13, 2016
Alexander Krug, Managing Director
Technoronic Industries GmbH
Max-Eyth-Straße 10, 71364 Winnenden, Germany


Floyd Jeffrey Nesom (BSME)
Director general de inginerie
Winnenden, Oct. 13, 2016
Autorizat sá completeness fisa tehnica:
Alexander Krug, Managing Director
Techtronic Industries GmbH
Max-Eyth-Straße 10, 71364 Winnenden, Germany

EC ATBILSTIBAS PAZINOJUMS
Techtronic Industries GmbH
Max-Eyth-Straße 10, 71364 Winnenden, Germany
Ar so pazijojoam, ka produkti
Zales trimmeris/Krumgriezis
Zimols: Ryobi
Modela numurs: RBC47SEO
Serijas numura intervals: 46202001000001 - 46202001999999
Winnenden, Oct. 13, 2016
Pilnvarots sastadit tehnisko failu:
Alexander Krug, Managing Director
Techtronic Industries GmbH
Max-Eyth-Straße 10, 71364 Winnenden, Germany

EC VASTAVUSDEKLARATSIOON
Techtronic Industries GmbH
Max-Eyth-Straße 10, 71364 Winnenden, Germany
Kinnitame, et see toode
Murutrimmer/Vosalikur
Mark: Ryobi
Mudeli number: RBC47SEO
Seerianumbri vahemik: 46202001000001 - 46202001999999
Winnenden, Oct. 13, 2016
Alexander Krug, Managing Director
Techtronic Industries GmbH
Max-Eyth-Straße 10, 71364 Winnenden, Germany

EC ATITIKTIES DEKLARACIJA
Techtronic Industries GmbH
Max-Eyth-Straße 10, 71364 Winnenden, Germany
Winnenden, Oct. 13, 2016
Jgaliotas sudaryi techninj faila:
Alexander Krug, Managing Director
Techtronic Industries GmbH
Max-Eyth-Straße 10, 71364 Winnenden, Germany

EC IZJAVA O USKLADENOSTI
Techtronic Industries GmbH
Max-Eyth-Straße 10, 71364 Winnenden, Germany
2006/42/EC, 2014/30/EU, 2000/14/EC, 2005/88/EC, 97/68/EC prema
Winnenden, Oct. 13, 2016
Ovlasten da sastavi tehničku datoteku:
Alexander Krug, Managing Director
Techtronic Industries GmbH
Max-Eyth-Straße 10, 71364 Winnenden, Germany
SL
IZJAVA EC O SKLADNOSTI
Techronic Industries GmbH
Max-Eyth-Straße 10, 71364 Winnenden, Germany
Winnenden, Oct. 13, 2016
Pooblascena oseba za sestavo tehnicne dokumentacije:
Alexander Krug, Managing Director
Techtronic Industries GmbH
Max-Eyth-Straße 10, 71364 Winnenden, Germany
BG
EC DEKJIAPAUH RA HA 3A CBOTBETCTBNE
Techtronic Industries GmbH
Max-Eyth-Straße 10, 71364 Winnenden, Germany
C HactoIeTo DeKnapnpaMe, Ye npOdykTNTe
TpMep 3a TpeBa/XpacTope3
Mapka: Ryobi
Homep Ha MoDena: RBC47SEO
O6XbaT Ha cepuHn Homepa: 46202001000001 - 46202001999999
OTROBAPRAHcneHHTeDnpeKTHNBHaECXapMOHN3pAHnCTaHdApTm
2006/42/EC, 2014/30/EU, 2000/14/EC, 2005/88/EC, 97/68/EC noceHa npomra 2012/46/EU.
EN ISO 11806-1:2011, EN ISO 14982:2009, EN ISO 3744:2010
H3MepeHO HMBO HA Wym:109.48 dB(A)
RapaHTnpaHO HnBO Ha yM: 112 dB(A)
MetnHa OueHbAe Ha CbotBcTcBnTo CbOpa3HO npInnoKeHne V OT
DinpeKTHBa 2000/14/EC, n3MeHeHa oT 2005/88/EC.


Floyd Jeffrey Nesom (BSME)
CtapuDnpekTopMaunHocptpoene
Winnenden, Oct. 13, 2016
YnbHOMOeHO NcE 3a cbCTaBHe Ha TexHueckn qaiI:
Alexander Krug, Managing Director
Techtronic Industries GmbH
Max-Eyth-Straße 10, 71364 Winnenden, Germany
SK
PREHLASENIE O ZHODE EC
Techtronic Industries GmbH
Max-Eyth-Straße 10, 71364 Winnenden, Germany
Winnenden, Oct. 13, 2016
Alexander Krug, Managing Director
Techtronic Industries GmbH
Max-Eyth-Straße 10, 71364 Winnenden, Germany
UK
EC DEKJIAPAUII PNO BIINOBIDHICTb
Techtronic Industries GmbH
Max-Eyth-Straße 10, 71364 Winnenden, Germany
PnUbOMy Mm 3aBnREMO,IO npOdyKT
TpIMMep/KyUopi3
Mapka: Ryobi
Model number: RBC47SEO
Homep moen: 46202001000001-46202001999999
Y BiNobiDHOCTI 3 HAcTynHMM EbponecBKMIM DnpeKTHBaMn Ta rapMOHIOBAHMN CTaHapTaMn
2006/42/EC, 2014/30/EU, 2000/14/EC, 2005/88/EC, 97/68/EC 3
OCTAHIMM 3MiHaMn 2012/46/EU
EN ISO 11806-1:2011, EN ISO 14982:2009, EN ISO 3744:2010
BumipraHn pibEnb 3BykoBoi nToTyKHOCTi: 109.48 dB(A)
TapaHToBaHm pIeHb 3ByKOBoI NOtyXHOCTI: 112 dB(A)
MeToI ouiHKn BiIOBIOHocTi Annex V Directive 2000/14/EC 3 nonpaKamM,
BHeceHMM 2005/88/EC.


Floyd Jeffrey Nesom (BSME)
CTapnTexHnDnpekTop
Winnenden, Oct. 13, 2016
Dosbin Ha cknadaHn TexhiHoro paina:
Alexander Krug, Kepyoum dupektoP
Techtronic Industries GmbH
Max-Eyth-Straße 10, 71364 Winnenden, Germany

EC UYGUNLUK BEYANI
Techtronic Industries GmbH
Max-Eyth-Straße 10, 71364 Winnenden, Germany
Isbu belgeilebu urunun
Winnenden, Oct. 13, 2016
Alexander Krug, Idari Muddur
Techtronic Industries GmbH
Max-Eyth-Straße 10, 71364 Winnenden, Germany


RYOBI.
Techtronic Industries GmbH
Max-Eyth-Straße 10,
71364 Winnenden, Germany
099992605001-01