
PHA 12 B2 - Electric planer PARKSIDE - Free user manual and instructions
Find the device manual for free PHA 12 B2 PARKSIDE in PDF.
| Product type | Cordless electric planer |
| Brand | Parkside |
| Model | PHA 12 B2 |
| Nominal voltage | 12 V |
| Battery system | Power X-Change (12 V) |
| Battery included | No |
| Charger included | No |
| No-load speed | 14,500 min⁻¹ |
| Planing width | 56 mm |
| Planing depth | 0 - 1.5 mm |
| Rebate depth | 0 - 7 mm |
| Weight (without battery) | 2.6 kg |
| Sound pressure level (LpA) | 79 dB(A) |
| Sound power level (LWA) | 90 dB(A) |
| Vibration (ah) | 3.6 m/s² |
| Vibration uncertainty (K) | 1.5 m/s² |
| Compatible materials | Wood, leather, chassis |
| Functions | Planing, chamfering, making rebates |
| Delivery contents | Cordless planer, chip deflector, dust extraction adapter, hex key, adjustable wrench, storage case, instruction manual |
| Warranty | 3 years (Belgium: 2 years) |
| Maintenance | Clean with a soft brush or a light cloth; do not use water or harsh detergents |
| Spare parts | Available at www.grizzlytools.shop |
Frequently Asked Questions - PHA 12 B2 PARKSIDE
User questions about PHA 12 B2 PARKSIDE
0 question about this device. Answer the ones you know or ask your own.
Ask a new question about this device
Download the instructions for your Electric planer in PDF format for free! Find your manual PHA 12 B2 - PARKSIDE and take your electronic device back in hand. On this page are published all the documents necessary for the use of your device. PHA 12 B2 by PARKSIDE.
USER MANUAL PHA 12 B2 PARKSIDE
Akku-Hobel / Cordless Planer / Robot sans fi I PHA 12 B2
DE AT CH
Akku-Hobel
Translation of the original instructions
NL BE
Accu-schaaf
Sicherheitshinweise$$$$$$$$$$$$$$$$$$$8
BeMeutung Mer
79St MBjA"; 5_CA = ZnMB
Cleaning maintenance and storage31 Cleaning Zz Maintenance Zz Storage
f is- osal/environmental
- rotationxxxxxxxxxx32
Discosal instructions for
rechargeable batteries
Services 32 GuaranteeeZ
eeair serYiceZZ SerYice Centre Zf0: corter
S- are - arts and accessories34 Translation of the original 4C declaration of conformity 30
Introduction
Congratulations on the cPurchase of Aour neQ CorMless - laner jhereafter referreM to as MeYice or coQer tool" You haYe chosen a high-qualitA MeYiceu This MeYice Qas qualitA-testem anM subjcTeM to a final inscction Muring croMuctions therefore ensuring crocer functioning of Aour MeYiceu

The instruction: anual for: s cart of this MeYiceu 0t contains i: cortant infor: ation on safetAs use anM Miscosalu eeaM the instruction: anual carefullAu a: iliarise Aourself Qith the controls anM hoQ to use the MeYice correctla -se the MeYice onlA as Mescribem anM for the stateM fielMs of acclicationu Store the instruction: anual carefullAnM ensure that all Mocu: ents are hanMeM oYer in the eYent that the MeYice is cassem on to another user
Pro- er use
This:achine is onla intenMeM for the folloQing uses
H-laningscha:fering anm rebating Qoom:aterialss such as bea:s anM boarMsu borkcieces:aA onla be crocesseM if theA are secureMaaccrociateLa AnA other use that is not expressla cer: it teM in this instruction:anual:aA cose a serious haarM to the user anM result in Ma:age to the MeYiceu The ocerator or user of the:achine is rescnsible for anA acciments or cersonal injurA anM/or:aterial Ma:age to thirMcarties or their crocertAu The:achine is intenMeM to be useM
bA Mo-it-Aourselfers Qas not Mesignem for heaYA co: : ercial useu The QarrantA is YoiM in the case of co: : ercial useu The : manufacturer is not liable for Ma: age causeM bA i: croer use or incorrect operation
Sco- e of deliverY/ accessories
- nçack the MeYice anM check that
eYerAthing is cresentu
Discose of the cackaging: aterial croc-erlAu
H CorMless -laner
H Directional insert
H Dust extraction aMaCTer
H Ocen-enM Qrench
H Allen keA
H Storage case
H Instructions
BatterY and charger are not in-
cludeds
Overview
The illustrations for the MeYice can be found on the front anM back folM-out cageu
z Cutting Meçth aMust: ent jeotarA knob"
° AMMitional hanMle jonsulateM griccing surface"
Z Charge leYel inMicator f ventilation holes
5 SQitch lock
6 On/Off sQitch
7 HanMle jonsulateM griccing surface"
8 echargeable batterA
9 BatterA release
z0 - laner sole
zzOcen-enM Qrench
z° Allen keA
zZ ShaYings ejector
z† BatterA charger
z5 Directional insert
z6 Dust extraction aMa cter
z7 eextractable claner blaMe guarM
PigsvA
z8Cla: cing clate
z9 -lanerblaMes
°0 BlaMe holMer
z BlaMe shaft
w-groOYe
°Z Hexagon bolt
Grub screQ
f escri-tion of functions
The MeYice has a rotating cliner shaft equicceM Qith tQo cliner blaMesu The MeYice is suitable for claning bea: s anM boarMsS beYelling emges anM creating rebatesu
- lease refer to the Mesticiations beloQ for infor: ation on hoQ the ocerating eleents Qorku
Technical data
LeYels of noise anM Yibration Qere Meter: -ineM accorMing to the stanMarMs anM regulations in the Meclaration of confor: itAu The sccificEM total Yibration Value anM the stateM noise e: ission Value haYe been : easureM accorMing to a stanMarMiseM test: ethoM anM can be useM to co:care one coQer tool Qith another. The sccificEM total Yibration Value anM the stateM sccificEM noise e: ission Value can also be useM for a croYisional assess: ent of the loaMu
ArH/ pYThe Yibration anM noise e: issions : aA MeYiate fro: the scefiem Values Muring actual use of the cQer tools Mecenming on hoQ the cQer tool is be ing useMu TrA to kec the excosure to Yibrations as loQ as cossiblev An exa:cle of a : easure to remuce Yibration excosure
is li: iting the Qorking hours All carts of the o ceating cAcle haYe to be consiMereM Qhile Moing so jfor exa: cles ti: es Qhen the coQer tool is sQitchem off anM ti: es Qhen it is sQitchem on but running Qwithout anA loaM"u
Charging time
The MeYice is cart of the z v12vT vT4Ai series anM can be ocerateM Qith batteries of the z v12vT vT4Ai seriesu Batteries of the z v12vT vT4Ai series: aA onlA be chargeM using chargers of the z v12vT vT4Ai seriesu
b e reco: : enM that Aou ocerate this accliance Qith the folloQing batteries onlAs -A-5z° AZS-A-5z° Af S-A-5z° BZS -A-5z° Bf S-A-5z° Dz b e reco: : enM charging these batteries Qith the folloQing chargers -LG5z° A°S -LG5z° AZS-LG5z° B°S-DSLGz° A° eechargeable batterAnm charger technical Matas See secarate : analu
| Charging time tmins | Pw/ r 12 A1 Pw/ r 12 A2 Pw/ r 12 A3 | Pw/ r 12 B2 Pf Sw/ 12 A1 Pf Sw/ 12 A2 | |
| PAPr 12 A1 Z0 60 | 60 | ||
| PAPr 12 A2 f 5 | f 5 | ||
| PAPr 12 A3 | Z0 | ||
| PAPr 12 A4 | |||
| PAPr 12 B1 | z°0 60 60 | ||
| PAPr 12 B2 | |||
| PAPr 12 B3 | |||
| PAPr 12 B4 | |||
| PAPr v12vf 1 z50 80 | 80 |
SafetY information
This section Meals Qith the basic safetA instructions for using the MeYiceu
ArHlH/wnurAnM crocertMa:ageMue to i:croerhanMling ofbatterObserYe the safetA infor:ation
anM notes on charging anM crocer use as shoQn in the instruction: anual for Aour batterA anM charger fro: the series z 12vT T4Ai A MetaileM Mescription of the charging cprocess anM further infor: a tion can be found in these secarate ocerating instructions
i eaning of the safetY information
Avf AH/4Rpwf Aou Mo not obserYe this safetA instructionS an acciMent Qill occuru The result of Qich is seYere boMilA injurA or Meathu
Av1 ARHIH/ pvOf Aou Mo not obserYe this safetA instructionS an acciMent : aA occuru The result of Qich is liklA seYere boMilA injurA or Meathu
CAu TIOHpof Aou Mo not obserYe this safetA instructionS an acciMent Qill occu The result of Qich is likA: inor or : oM erate boMilA injurAu
NO. ICE!□f Aou Mo not obserYe this safetA instructionS an acciMent Qill occur The result of Qich is cossible Ma: age to croc-ertAu
SYmbols on the device
XIAVTEAM
The MeYice is cart of the z v12vT vT4Ai series anM can be ocerateM Qith batteries of the z v12vT vT4Ai seriesu Batteries of the z v12vT vT4Ai series: aA onlA be charge using chargers of the z v12vT vT4Ai seriesu

Caution!

ObserYe the o'erating instructions

se eAe protection

-sea:ask

sehanM protection

Cutting MeCT aMJust: ent

Direction of traYel of the claner blaMe

Electrical MeYices: ust not be MiscoseM of Qith Mo: estic Qasteu The sA: bol of the crossem-out Qheelem bin : eans that this croMuct: ust not be MiscoseM of as unsorteM : uniccal Qaste at the enM of its usefful lifeu
General Power Tool SafetY 1 carnings
Ar1 ARHIH/ pvRead all safetY warningsc instructionsc illustrations and s- ecifications - rovided with this - ower tools ,ailure to folloQ all instructions listed beloQ: aA result in electric shockS fire anM/or serious inurAv Save all warnings and instructions for future references
The ter: "coQer tool" in the Qarnings refers to Aour : ains-oçerateM jcorMeM" coQer tool or batterA-oçerateM jcorMless" coQer tool
zu1 ORr AR4A SAP4TY
a" r ee- work area clean and well lits Clutterem or Mark areas inYite acciMentsu
b" f o not o- erate - over tools in ex- losive atmos- heresc such as in the - resence of flammable liquidsc gases or dusts -oQer tools create sarks Qich : aA ignite the Must or fu: esu
c" r ee- children and bYstanders away while o- erating a - over tools Distractions can cause Aou to lose control
_u 4w4CTRICAw SAP4TY
a" Power tool - lugs must match the outlets Hever modifY the - lug in anY waYs f o not use anY ada- ter - lugs with earthed IgroundedS - ower toolss · n: omifieM clugs anM : attach
ing outlets Qill remuce risk of electric shock
b" Avoid body contact with earthed or grounded surfaces such as - i- esc radiators ranges and refrigerators. There is an increase risk of electric shock if Aour boMA is eartheM or grounMeMu
c" f o not ex- ose - ower tools to rain or wet conditionsb ater entering a coQer tool Qill increase the risk of electric shocku
M" f o not abuse the cords Hever use the cord for carrYingc -ulling or un- lugging the -ower tools r ee- cord awayY from heatc oilc shar- edges or moving - artss Da: ageM or entangleM corMs increase the risk of elec tric shocku
e" 1 hen o- erating a - over tool outdoorsc use an extension cord suitable for outdoor uses se of a corM suitable for outMoor use reMuces the risk of electric shocku
f" If o- erating a - ower tool in a dam- location is unavoidable use a residual current device RCFs -rotected su- -LYs -se of an eCD reMuces the risk of electric shock
ZP4RSOHAW SAP4TY
a" StaY alertc watch what You are doing and use common sense when o- erating a - over tools f o not use a - over tool while You are tired or under the influence of drugsc alcohol or medications A: o: ent of inattention Qhile ocerating coQer tools : aA result in serious cersonal injurAw
b" use - ersonal - roteive equipments AlwaYs wear eYe - rotections - rocteiYe equic: ent such as a
Must: ask non-skiA safetA shoes harM hat or hearing protection useM for aC- crociate conMitions Qill remuce cersonal injuriesu
c" Prevent unintentional startings
4sure the switch is in the off-
- osition before connecting to
- over source and/or batterY
- ackc - icking u- or carrYing
the tools CarrAing coQer tools Qith
Aour finger on the sQitch or energising
coQer tools that haYe the sQitch on in
Yites acciMentsu
M" Remove anY adXuting keY or wrench before turning the -ower tool ons A Qrench or a keA left attachem to a rotating cart of the coQer tool : aA result in cersonal inJurAu
e" f o not overreaches r ee- ro- er footing and balance at all times This enables better control of the cQer tool in unexcteM situations
f" fress-ro- erlyf o not wear loose clothing or XewellerYs r ee- Your hair and clothing away from moving - artss Loose clothes eQellerA or long hair can be caught in: oYing cartsu
g" If devices are - rovided for the connection of dust extraction and collection facilities ensure these are connected and - ro- erly useds · se of Must collection can reMuce Must-relateM haarMsu
h" f o not let familiaritY gained from frequent use of tools allow You to become com- lacent and ignore tool safetY - rinci- less A careless action can cause seYere injurA Qithin a fraction of a seconMu
PO1 4RTOOWuS4AHf CAR4
a" f o not force the - ower tools use the correct - ower tool for Your a- - lications The correct coQer tool Qill Mo the Job better anM safer at the rate for Qich it Qas MesigneMu
b" f o not use the - ower tool if the switch does not turn it on and offs AnA cOQer tool that cannot be controlleM Qith the sQitch is Mangerous anM:ust be recaireMu
c" f isconnect the - lug from the - ower source and/or remove the batterY- ackc if detachablec from the - ower tool before making anY adjustmentsc changing accessories or storing - ower toolss Such creYentiYe safetA: eases remuce the risk of starting the cQer tool acciMentallAv
M" Store idle - over tools out of the reach of children and do not allow - ersons unfamiliar with the - over tool or these instructions to o- erate the - over tools -oQer tools are Mangerous in the hanMs of untrainem users
e" i aintain - ower tools and accessoriess Check for misalignment or binding of moving - artsc breakage of - arts and anY other condition that may affect the - ower tool's operations If damaged have the - ower tool re- aired before uses ManA acciMents are causeM bA coorlA: aintaineM coQer tools
f" r ee- cutting tools shar- and cleans-rocerlA:aintaineM cutting tools Qith sharc cutting emges are less likla to binm anM are easier to control
g" use the - ower toolc accessories and tool bits etcs in accordance
with these instructions taking into account the working conditions and the work to be - erformedse of the oQer tool for operations Mifferent fro: those intenMeM coulM result in a haarrous situation
h" r ee- handles and gras-ing surfaces drYc clean and free from oil and greases SliccerA hanMles anM grascing surfaces Mo not alloQ for safe hanMling anM control of the tool in unexcteM situations
5uBATT4RYTOOwus4AHfCAR4
a" Recharge onlY with the charger s- ecified bY the manufacturers A charger that is suitable for one tAce of batterA cack : aA create a risk of fire Qhen useM Qith another batterA cacku
b" use - over tools onlY with s- e-cifically designated batterY - ackss se of anA other batterA cacks : aA create a risk of inurA anM fireu
c^ 1 hen batterY-ack is not in usec kee-it awayY from other metal objectsc like -a- er cli- sc coinskeYsncnailsc screws or other small metal objectsc that can make a connection from one terminal to anothers Shorting the batterA ter: inals together : aA cause burns or a fire
M" under abusive conditions li- quid maY be eXected from the batterY; avoid contacts If contact accidentallyY occursc flush with waters If liquid contacts Yesc additionallyY seek medical hel- s LiquiMejecteM fro: the batterA : aA cause irritation or burns
e^ f o not use a batterY-ack or tool that is damaged or modi
fieds Da: ageM or : oMifiem batteries
: aA exhibit uncreMictable behaYiour resulting in fire's exclosion or risk of injurAu
f" f o not ex- ose a batterY- ack or tool to fire or excessive ten
- eratures Exposure to fire or te: cerature aboYe zZ0n°C : aA cause exclos-sionu
g" Follow all charging instructions and do not charge the batterY
- ack or tool outside the tem
- erature range s- ecified in the instructionss Charging i: crocerla
or at te: ceratures outsiMe the sce-cificieM range : aA Ma: age the batterA
anM increase the risk of fire
6SARTIC4
a" Have Your - ower tool serviced bY a qualified re-air - erson using only identical re- lacement
- artss This Qill ensure that the safetA of the coQer tool is : aintaineMu
b" Hever service damaged bat
terY-ackss SerYice of batterA cacks shoulm onlA be cerfor: eM bA the : an ufacturer or authorireM serYice croYiMersu
SafetY instructions for
- laners
H 1 ait for the cutter to sto- before setting the tool downs An excoseM rotating cutter : aA engage the surface leaMing to cossible loss of control anM serious injurAu
H use clam- s or another - ractical waY to secure and su- - ort the work- iece to a stable - latforms HolMing the Qorkciece bA Aour hanM or against the boMA leaYes it unstable anM : aA leaM to loss of controlu
H 1 hile workingc alwaYs hold the - laner in such a waY that
the - laner base - late lies flat against the work- ieces OtherQise the claner coulM slic anM cause injurAu
H Only bring the -ower tool into contact with the work-iece when switched ons OtherQise there is Manger of kickback if the cutting tool a:s in the Qorkcieceu
H f o not allow the chi- eXector to come into contact with Your handss You : aA be injureM bA rotating carts
H Hever - lane over metal ob-ectsc nails or screwss Cutters anM cutter shafts coulM beco: e Ma: ageM anM cause increaseM Yibrationu
H Hazardous dust may occur during works bear a Must : ask anM use external Must extraction
H Check the blade regularY for damages OnlA use sharcs unMa: -ageM blaMesu
H 5eec the Ventilation ocenings cleanu
H SQitch off the MeYice anM re: oYe the rechargeable batterAu Make sure that all : oYing carts haYe co: e to a co: - clete stoc
H Qhen leaYing the MeYiceSS
H before re: oYing obstructions or loosening blockages
H before checking the MeYices cleaning it or cerfor: ing : aintenance Qork on its
H to check the MeYice for Ma: age after contact Qith a foreign object
H to check the MeYice i: : eMiatelA if it starts to Yibrate excessiYelAu
H Por safetY reasonsre- lace worn or damaged - artss OnlA use original sare carts anM accessories
H OnlY use accessories recommended bY PARr SIf 4s -nsuitable
accessories: aA cause electric shock or fire
Pre- aration
Ar1 ARHIH/ pveisk of injurA Mue to unintentional start-uc OnlA insert the rechargeable batterA into the MeYice once the MeYice is fullA creareM for use
Control elements
a: ilarise Aourself Qith the o'erating elements before using the MeYice for the first ti: e
Cutting de- th adjustment
H A rotarA knob can be useM to aM]ust the cutting MeCth jz"U
H The MeCTh of cut can be aMjustem to betQeen 0 anM O_n:v
H The best cutting Meçth is betQeen 0 anM z^ :jgreen section of the scale on the rotarA knob"u
Configuring the shavings exctor
O-tions
There are Z oc-tions for configuring the shaYings ejectors
H Ejection of shaYings on both siMes Qwithout insert in the shaYings eector
H Ejection of shaYings on one siMe Qith Mirectional insert
H Extraction Qith Must extraction aMacter Extraction is reco: : enMeM if Must is to be excteMu
Inserting the directional insert
The Mirectional insert jz5^ can be inserteM fro: both siMesu
zv -ush the Mirectional insert as far as it goes into the shaYings eector j zZ^ fro: the siMe that Aou Qant to close off
There are grooYes in the shaYings eector to ensure correct cositioning
Inserting the dust extraction ada-ter
The Must extraction aMacter can be insertem fro: both siMesu
z-ush the Must extraction aMaCTer jz6" Qith the ocening cointing MoQnQarMs jn" into the shaYings eIector jzZ"u
Connect the Must extraction aMacter to a suction hose jeug - Ae5SODE Qet/MrA Yacuu: "U
Zu Make sure that the Must extraction sAs- te: is suitable for the : aterial to be cut. This infor: ation can be found in the o'erating instructions of the externa! al MeYiceu
Rotating or re- lacing the -laner blades
Ar1 ARHIH/ pweisk of injurA Mue to unintentional start-uc ee: oYe the rechargeable batterA fro: the MeYiceu
CAuTIOHpvCutting injuries! Do not holM the claner blaMe bA its cutting emgesu
Hotes
H The blaMes haYe tQo cutting eMgesS Qwhich can be turneM aroundMu
H AlQaAs rotate or replace the claner blaMes in cairsu
H Do not appe: c t to sharcen the claner blaMes!
H AlQaAs change the claner blaMes one after the other On this QaAs Aou can use the one that is still installem to guime Aou Muring fitting
H or reclace: ent cliner blaMess see SUare Uarts and arressories, U.19u
f ismantling the - laner blade figs AS
z Set the cutting Meçth aMjust: ent j z^ to 0
_ elease the hexagon bolts j^^ Qith the ocen-enM scanner jz z^ _
Z LoQer the claner blaMe guarM jz7" anM slime the blaMe holMer j^0^ Qith the claner blaMe jz9" anM cla: cing clate jz8" siMeQaAs out of the blaMe shaft j^^
- se a s: all ciece of QooM to cush it outu
Disasse: ble the blaMe holMer i°0"S
claner blaMe jz9" anM cla: cing clate
jz8"u
Of the carts Mo not co: e açart bA the: -selYesS theA : aA be coYereM in resinu
You can noQ rotate or replace the claner blaMeu
Assembling the - laner blade figs A
zu Clean the blaMe holMer j°0"şclaner blaMe jz9" anM cla: cing clate jz8" if requireMu
_ - lace the cla: cing clate 且 8 ^ on a surface Qith the lugs facing uoc
Z- lace the claner blaMe jz9" onto the cla: cing clate jz8" The blaMe eMge shoulM be on the toc lugsu The grooYe shoulM be on the loQer lugsu
t - lace the blaMe holMer j^0^ onto the cliner blaMe jz9" anM cla: cing clate jz8" The hexagon bolts j^^ shoulM coint uQarMsu The holes fit oYer the rounM lugsv
5u Turn the hexagon bolts j^^ co: - cletelA toQarMs the blaMe holMer j 0'' anM slitMe the blaMe holMer along Qith the claner blaMes jz9" anM cla: cing clate jz8" siMeQaAs into the blaMe shaft j^^ U The hexagon bolts shoulM coint forQarMsu
6 Tighten the hexagon bolts j^^ bA hanMu
7 Align the claner blame jz9''
Aligning the - laner blade 4figs AS
Goals The alaner blame: ust be at the centre in the blame holmer i 0^ anM flush Qith the alaner sole jz0"u
zU AMJust the height of the claner blaMe jz9"u Turn the grub screQs i°T Qith the hex keA jz"uMirections Qhen looking at the claner sole jz0"u
U.
U s↑
To lift the claner blaMeS Aou: aA neeM to loosen the hexagon screQs j°Z" slightlAu
Check that the claner blaMe jz9" is flush Qith the claner sole bA clacing a s: all ciece of QoOM oYer both carts of the claner soleu The claner blaMes : ust touch the ciece of QoOM eYenlAU Also check in the transYerse Mirectionu
ZuCla: c the blaMe holMer j°0" Qith cliner blaMes jz9" anM cla: cing clate jz8" centralA in the blaMe shaft j°z" fir: IA using the hexagon bolts j°Z"u
After tightening the hexagon bolts j^''S check Qwhether the alaner blaMe jz9'' is flush Qith the alaner sole jz0''! Of the alaner blaMe is not flush Qith the alaner soles eeceat the process
Charging the battery
See also the charger instruction : anuali Hotes
H Of Qar: S alloQ the batterA to cool before charging
H Do not excose the batterA to Mirect sunlight for long cerioMs anM Mo not cIace it on a raMiator j: axu 50^''
Charging the batterY
z Connect the batterA charger | z to a coQer outlet
_ -ush the batterA j8" into the charging slot of the batterA charger jz + ^ U
Zu After charging Misconnect the batterA charger jz+ " fro: the : ainsu
山 -ull the batterA j8" out of the batterA charger jz+
O- eration
Checking the batterY charge levels

b hen the MeYice is ons the batterA status inMicator jZ" MisclaAs the batterA charge leYelu
greenorangee red
BatterA chargeM
orange red
BatterA cartialla chargeM
red
BatterA neeMs to be chargeM
Inserting and removing the batterY
ArH/ pEisk of inurA Mue to unintentional start-uc OnlA insert the rechargeable batterA into the MeYice once the MeYice is fullA creareM for useu NO. ICE!Eisk of Ma: age! An incorrect batterA can Ma: age the MeYice anM batterA
Inserting the battery
zu-ush the batterA j8" along the guiMe in to the batterA holMer in the hanMle j7"You Qill hear the batterA click into cIaceu
Removing the batterY
z - ress anM holM the batterA release j9" on the batterA j8"u
ee: oYe the batterA fro: the hanMle j7"U
1 orking instructions
Ar1 ARHIH/ pvDanger to health! Dust fro: QoOM can cause Ma: age to health such as resciRatorA reactions or canceru
b ear a resci ratorA: ask anM attach an external Must extraction sAste: U
Information on - laning
H Cutting de- th Start Qith a loQ cutting Mecthu The octti: al cutting Mecth MecenMs on tQo factorss
H b ooM harMnesss HarMQooM loQer cutting MeCth
H -laning Qimths Larger claning QImth loQer cutting Mecth
H You can obtain high-quality surfaces Qith a loQ feeM rate anM bA clacing pressure in the : iMMle of the claner soleu
H Too high a feeM rate reMuces the surface qualitA anM can quicklA clog the shaYings eectoru
H OnlA sharç Çlaner blaMes can achieYe gooM cutting cErfor: ance anM also protect the MeYiceu ñotate or reçlace the Çlaner blaMes if cutting cErfor: - ance Mrocsu
Information on chamfering edges The w-groOYe j ^^^ at the front of the. cliner sole jz0'' is for cha: fering eMgesu
H - lace the MeYice's w-groOYe on the eMge of the Qorkciece anM guiMe the MeYice along the eMgeu
Information on - laning rebates
figs BS
H The retractable claner blaMe guarM jz7"alloQs Aou to cIane rebates Qith a : axi: u: MeCth of z7n: u
H The first strics of a rebate are easier to cIane along a cIarallel stoCu A slat of QoOMS for exa: cles can be helcfulu AfterQarMsS the cIaneM eMge serYes as a stoC
H The MeYice Moes not haYe a Meçth stoCu You shoulM therefore check regularlA
Qwhether the MesireM MeCth has been achieYeMu eemuce the cutting MeCth once the MesireM MeCth has al: ost been achieYeMu
Switching on and off
Pre- aration
zu, asten anM secure the Qorkciece bA :eans of cla:cs or Qith another : ethoM on a stable baseu
^ Set the cutting MeCth Qith the rotarA knob for cutting MeCth aMjust: ent jz"u
Zbear a resci ratorA:ask anM attach an external Must extraction sAste:
山 _ U - lace the rechargeable batterA into the MeYiceu
Switching on
zHolm the MeYice bA the hanMle j7" anM the auxiliarA hanMle j°" jinsulateM gric- cing surfaces"u
_U Lift the MeYiceu
Z - ress the sQitch lock j5''
山 -ress the On/Off sQitch j6"
5elease the sQitch lock i5^
6bait until the MeYice has reachem full sceemu
You can first: oYe the MeYice Qith the front cart of the claner sole jz0^ against the Qorkcieceu
Switching off
zu Lift the MeYiceu
To turn it off release the on/off sQitch j6''
Zbait for the blaMe shaft to co: e to a stoc before cutting the cQer tool MoQnu You can clace the MeYice on its siMe to cprotect the surface unMerneathu
üe: oYe the rechargeable batterA fro: the MeYice if Aou are leaYing the MeYice unattenMeM or if Aou haYe finishem Qorkingu
Cleaning maintenance and storage
Ar1 ARHIH/ pvElectric shock! - rotect Aourself Qhen cerfor: ing : aintenance or cleaning Qorku Turn off the MeYiceu You shoulM haYe anA reçair anM : ainten- ance Qork that is not MescibeM in these instructions carryM out bA our SerYice Centreu OnlA use original reçlace: ent cartsu
Cleaning
NO. ICE! Eisk of Ma: age! 0: crocer cleaning can Ma: age the MeYice NeYers craA MoQn the MeYice Qith Qateru Do not clean the MeYice unMer running Qateru Do not use anA abrasiYe cleaning agents or solYentsu
AlQaAs keeC the MeYice cleanu
Cleaning after o- eration
zu e: oYe the rechargeable batterAu
5eec the Ventilation ocenings j clean
Zu Clean the MeYice Qith a soft brush or a slightMa: cloth
Clean the shaYings eector jzZ" regularlA using an accrociate tool jeug a ciece of QoOMs or using co: cresseM air"u
i aintenance
The MeYice is: aintenance free
Storage
AlQaAs store the MeYice anM accessories
H clean
H MrA
H protecteM against Must
H out of the reach of chilMren
The storage te: cerature for the re-chargeable batterA anM the MeYice is betQeen 0^ anM 5^ AYoiM extre: e
colM or heat Muring storage to ensure the batterA outcut is not aMYerselA affecteMu ee: oYe the rechargeable batterA fro: the MeYice before storing the MeYice i see the secarate ogerating instructions for the batterA anM charger"u
f is- osal/ environmental -rotection
ee: oYe the batterA fro: the MeYice anM recAcle the MeYiceS batterAS accessories anM cackaging in an enYiron: entallAfrienMa : anneru
Electrical MeYices: ust not be MiscoseM of Qith Mo: estic Qasteu The sA: bol of the crosseM-out Qheelem bin: eans that this croMuct: ust not be MiscoseM of as unsorteM: uniccal Qaste at the enM of its useful lifeu
H DirectiYe ^0z^ / z9 / E açç lies to this MeYiceu
H Take the MeYice to a recAcling cIantu The clastic anM: etal carts useM on Aour MeYice can be crocerla sorteM accorMing to : aterials anM gramMes anM efficientIA recAcleMu - lease contact our serYice centre for : ore infor: ationu
H b e Qill Miscose of MefectiYe MeYices Aou shic to us free of charge
f is-osal instructions for rechargeable batteries
Do notthroQ batteries into Mo: estic Qastes fire risk of exclosion" or Qateru Da: ageM batteries can har: the enYiron: ent anM Aour health if goisonous fu: es or liquiMs esacev
Discose of the batteries accorMing to local stanMarMsu DefectiYe or useM batteries:ust be recAcleM in accorMance
Qith DirectiYe ^ 006 / 66 / EC HanM in the batteries at a useM batterA collection coint Qhere theA are recAcleM in an enYiron: entallA frienMIA : anneru ,or : ore infor: ations clease contact Aour local Qaste : anage: ent croYiMer or our serYice centreu Disose of batteries in a MischargeM stateu b e reco: : enM coYering the contacts Qith an aMhesiYe stricto protect against short circuits Do not ocen the batterA
Service
/ guarantee
Dear Custo: er
This cromuct is croYiMeM Qith a Z Aear guarantee fro: the Mate of cPurchaseu On case of MefectsAou haYe statutorA rights against the seller of the cromuctu These statutorA rights are not restricteMbA our guarantee cresenteMbeloQu
Terms of / guarantee
The guarantee ceroM begins on the Mate of curchase - lease retain the original receiCt U This Mocu: ent is requireM as croof of curchase
Of a: aterial or: manufacturing Mefect occurs Qithin three Aears of the Mate of curchase of this cromuct S Qe Qill reair or replace - at our choice - the cromuct for Aou free of charge. This guarantee requires the MefectiYe cromuct anM croof of curchase to be cresenteM Qithin the threeAear cerioM Qith a brief Qritten Mescription of Qhat constitutes the Mefect anM Qhen it occurreMu
Of the Mefect is coYereM bA our guaran- tees Aou Qill receiveYe either the recaireM croMuct or a neQ croMuctu No neQ guar- anteee cerioM begins on recair or replace: ent of the croMuctu
/ guarantee Period and StatutorY Claims for f effects
The guarantee ceroM is not extMeM bA the guarantee serYiceu This also acclies for reIaceM or recaireM cartsu AnAMa: -ages anMMefects alreaMA cresent at the ti: e of cPurchase:ust be recorteMi: e-MiatelA after uncackingeecairs arising after excirA of the guarantee ceroM are chargeableu
/ guarantee Cover
The cromuct has been carefully a croMuceM in accormance Qith strict qualitA guiMelines anM conscientiouslA checkem crior to MeliYerA
The guarantee acclies for all: aterial anM: manufacturing Mefects. This guarantee Moes not extm to coYer croMuct carts that are subject to nor: al Qear anM: aA therefore be consimereM as Qearing carts or to coYer Ma: age to breakable cartsu This guarantee shall be inYaliM if the croMuct has been Ma: agemS useM incorrrectla or not: aintaineMu - recise aMherence to all of the instructions sccificEM in the ocerating: anual is requireM for croer use of the croMuctu OntenMeM uses anM actions against Qich the ocerating: anua al aMyises or Qarns: ust be categoricallA ayoiMeMu
The cromuct is Mesignem onlA for criYate anM not co: : ercial useu The guarantee Qill be inYaliMateM in case of : isuse or i: - crocer hanMlingS use of forceS or interYentions not unMertaken bA our authoriseM serYice branchu
Processing in Case of / guarantee
To ensure efficient hanMling of Aour querAS please folloQ the Mirections beloQs
H - lease haYe the recei ct anM iMentifica tion nu: ber jANn 08°97_°°07" reaMA as croof of curchase for all enquiresu
H - lease finM the ite: nu: ber on the rating clateu
H ShoulM functional errors or other Me-fects occur s cIease initiaIIA contact the serYice MeC art: ent s cecifiem beloQ bA tele- hone or bA e-mailu You Qill then receive further infor: ation on the crossecing of Aour co: claintu
H After consultation Qith our custo: er serYices a cromuct recorm as MefectiYe can be sent costage caim to the serYice aMMress co: : unicateM to AouS Qith the croof of curchase jreceict" anM secification of Qhat constitutes the Mefect anM Qhen it occurreMu On orMer to aYoiM acceptance croble: s anM aMMitional costsS please be sure to use onlA the aMMress co: : unicateM to Aouu Ensure that the consign: ent is not sent carriage forQarM or bA bulkA gooMsS express or other scecial freightu - lease senM the accliance incu all accessories succlieM at the ti: e of cPurchase anM ensure aMequate safe transort cackaging
Re- air service
or recairs that are not covered by warrant contact the serYice centreu TheA Qill glaMIA create a cost esti: ate for Aouu
H b e can onlA Qork on MeYices Qwhich are sent in crocerla cackeM anM Qith costage caiMu
Hote: - lease senM Aour MeYice cleanem anM Qith an inMication of the Mefect to the aMMress na: eM for the serYice centreu
H The folloQing are not acceteMs MeYices sent in Qwithout crecaiM ccostage'sent as bulkA gooMsS sent as an Express shic:ents or MeYices sent as anA other for: of scecial freightu
H b e Qill Miscose of MefectiYe MeYices Aou shic to us free of chargeu
Service Centre

Service / reat Britain
Telusn0800 7657
E-: ails grizzly- lidl.ro.uM
IAH 408297_2207

Service i alta
Telusn8006°°Z0
E-: ails grizzly- lidl.rom.nt
IAH 408297_2207
Im- orter
- lease note that the aMMress beloQ is not a serYice aMMressu Contact the serYice centre na: eM abOYe firstu
GriA Tools G: bH & Cou 5G
StockstcMter Stru ^ 0
6276° Grogosthei:
GEeMANY
www.grizzlytools.de
S- are - arts and accessories
You can get s- are - arts and accessories from www.grizzlytools.shops of Aou haYe anA croble: s Qith Aour orMerS contact us Yia our online shocu of Aou haYe anA other questionsS contact the Servire Centre, U.19
- osu nru Na: e OrMer Nou
z6 Dust extraction aMacter 9zz05ZZz
z5 Directional insert 9zz05ZZ°
zzS z° Ocen-enM Qrenchs Allen keA 9zz05ZZZ
z9 -lanerblaMes 9zz05ZZf
Translation of the original 4C declaration of conformitY
| - roMucts Cordless Planer MoMels PHA 12 B2 Serial nu: berş 00000z-0°0000 The object of the Meclamation MescibeM aboYe is in confor: itA Qith the releYant • nion har: onisation legislations | |
| 2006/42/4C •v 2014/30/4u •v 2012/19/4u •v 2011/6Ö/4u &vH4u Sv201Ö/863 | |
| The object of the Meclamation MescibeM aboYe is in confor: itA Qith DirectiYe °0zz/65/E • of the European - arlia: ent anM of the Council of 8 pune °0zz on the re- striction of the use of certain haarMous substances in electrical anM electronic equic- : entu To ensure confor: itA§ the folloQing har: oniseM stanMarMs anM national stanMarMs anM regulations haYe been aççlieMs | |
| 4H 62841-1:201Ö•v 4H 62841-2-14:201Ö•v 4H I4C 63000:2018 4H I4C ÖÖ014-1:2021•v 4H I4C ÖÖ014-2:2021 | |
| This Meclamation of confor: itA is issueM unMer the sole resconsilitA of the : anufacturers | |
| CE GrijrlA Tools G: bH & CoV 5G StockstcMter Stru °0 6Z76° Grogosthei: GEëMANY Christian „rank z5v0zv °0°Z AuthoriseM reçresentatiYe of Mocu: entation |
Sommaire
Introductionssssssssssssssssssssssss36
- tilisation confor: eZ6
Mat7riel liYr7/Accessoiresz7
AcerquZ7
Ponjectionmentssssssssssssssssssss 46
z5 E: bout Me Mirection 9zz05ZZ°
zzS z° Cl7: ixteS Cl7 six cans 9zz05ZZZ
z9 La: e Merabot 9zz05ZZf
On-en uitschakelenuuuuuuuuuuuuuuuuuuuuuu 66
AfYoerinstructions Yoor accu's67
Service 67
Garantie 67
eearatie-serYice 68
SerYice-Center 69
0: corteur 69
Reserveonderdelen en
accessoires 69
»aMoQanie aku: ulatoraUuuuuuuuuuuuuuuuuuu8z
4ks- loatacXaassssssssssssssssssssssssss81
werificar o estaMo Me企业提供 Ma bateriaa8z
b klaManie i QAciaganie
aku: ulatora8z
b ske9Qki MotAcRace QAkonAQania cracAwwwwwwwwwwwwwwwwwwwwwwwwwwww
b lacranie i QAacranieuwwwwwwwwwwwwww 8°
AvOSTRe4Z4HI4py- oracenie elek
trAcRne! - oMcraS crac konserQacAjnAch
i cAraenia nalecA siO rabaeieacu
b AlaacAAc urRamReniew
b Akonanie crac naçaRaQcRAch i konser
QacA]nAchs kt9re nie RostalA oçisane Q te)
instrukclis nalecA cQierRac nasRA: sce
cIalisto: RAiaLu serQisoQegou StosoQac
tAlko orAginalne cOsci Ra: ienneu
CzYszczenie
WSK4ZOWK4!EAAko uskoMenia!
NieQfasciQe cAsrCenie: oce bAc crA-craAna uskoMena uraMenau NigMA niescrAskiQac uraMena QoMau Nie: AcurmaMena coMbiecaca QoMau Nie stosoQac silnAch sromk9Q cAsrcAcAch Qrglu roaucralnik9Q
OaQsRe Mba) o cAstoSc urraMreniau
Cist<n2000000000000000000098
Um4baa aaaaaaaaaaaaaaaaaaaaaaaaaaaaaaaaaaaaaaaaaaaaaaaaaaaaaaaaaaaaaaaaaaaaaaaaaaaaaaaaaaaaaaaaaaaaaaaaaaaaaaaaaaaaaaaaaaaaaaaaaaaaaaaaaaaaaaaaaaaaaaaaaaaaaaaaaaaaa aa
SklaMoY3n2 99
wikvidace/ochrana Wivotn)ho
-
rost3ed)ssssssssssssssssssssssssssssss99
-
okAnA 己 ro likYiMaci
aku:ul3torX 99
Servisssssssssssssssssssssssssssssssssss 99
3ruka99
OcraY3rensk3slu4baaunnnnunnnnnnnnnnnnnnnnnnnnnnnnnnnnnnnnnnnnnnnnnnnnnnnnnnnnnnnnnnnnnnnnnnnnnnnnnnnnnnnnnnnnnnnnnnnnnnnnnnnnnnnnnnnnnnnnnnnnnnnnnnn
SerYice-Centerz0z
DoYorceeeeeeeeeeeeeeeeeeeeeeeeeeeeeeeeeeeeeeeeeeeeeeeeeeeeeeeeeeeeeeeeeeeeeeeeeeeeeeeeeeeeeeeeeeeeeeeeeeeeeeeeeeeeeeeeeeeeeeeeeeeeeeeeeeeeeeeeeeeeeeeeeeeeeeeeeeeeeeeeeeeeeeeeeeeeeeeeeeeeeeeeeeeeeeeeeeeeeeeeeeeeeeeeeeeeeeeeeeeeeeeeeeeeeeeeeeeeeeeeeeeeeeeeeeeeeeeeeeeeeeeeeeeeeeeeeeeeeeeeeeeeeeeeeeeeeeeeeeeeeeeeeeeeeeeeeeeeeeeeeeeeeeeeeeeeeeeeeeeeeeeeeeeeeeeeeeeeeeeeeeeeeeeeeeeeeeeeeeeeeeeeeeeeeeeeeeeeeeeeeee
Háhradn) d)ly a
-3)sluosenstv)sssssssssssssssssssssssss 101
DoMr4oYat n3YoM k obslure

- ou4?Yat ochranu 1raku

- ou4?Yat:asku

- ou4?Yat ochranu rukou

NastaYen? hloubkA 3b<ru

S: <r choMu hobloYac?ho no4e
Elektrick7 n3stroje neçatMo Mo: 3c2ho oMcaMuu SA: bol cTeškrtnut7 coçelnice na kole; k3ch rna: en3S 4e tento Yyrobek nes: 2byt coskon; en? sY7 4iYotnosti likYiMoY3n ]ako netT2M<ny ko: un3In2 oMcaMu
wi9 tak7 n3YoM k obslure nab2e; kAu
u-ozornen)
H Nechte Raht3ty aku: ul3tor cTeM nab2-Jen? : YAchlaMnoutu
H Aku: ul3tor neYAsaYu)te c o Mels2 Mobusiln7: u slune; n? u 93Ten2 annecokl3-Me)te e) na tocn3 t<lesaj: axu 50n^^
Habit) akumulátoru
zu oastr; te nabie; ku aku: ul3toru jzf Mo 3suYkAu
_ oasu"teaku:ul3torj8"MOn nab2)ec? crohloubeninA Y nab2)e;ceaku:ul3to- ruiz 才 _ 出 ^
Zu - o usc<sn7: Mokon; en? nab?en? om- c0)te nab2e; ku aku: ul3toru jz! "OM s?t<u
u wAt3hn<te aku: ul3tor j8" rnnabj e; kA
aku: ul3toru jz! "u
Provoz
r ontrola stavu nabit) akumulatoru

- o Mobu Raçnut? cTstroje inMikule ukaRatel staYu akt: ul3toru jZ" staY nabit: akt: ul3toru
zelenCc oranWovCc cervenC
Technick7 uMaJeUuuuUuuuuuuuuuuuuuuuuuuuuuuuuuuuuuuuuuuuuuuuuuuuuuuuuuuuuuuuuuuuuuuuuuuuuuuuuuuuuuuuuuuuuuuuuuuuuuuuuuuuuuuuuuuuuuuuuuuuuuuuuuuuuuuuuuuuuuuUU
cokAnoYuUuuuuuuuuuuuuuuuuuuuuuuuuuuuuuuuuuuuuuuuuuuuuuuuuuuuuuuuuuuuuuuuuuuuuuuuuuuuuuuuuuuuuuuuuuuuuuuuuuuuuuuuuuuuuuuuuuuuuuuuuuuuuuuuuuuuuuuuuuuuuuuuuuuuuuuuuuuuuuUU
-iktogra:A na cristro]iuuuiuuiuuiuuiuuiuuiu u06
wseobecn7beçé;nostn7
ucornenia crelektrick7
OY13Macie crYkAa a a a a a a a a a a a a a a a a a a a a a a a a a a a a a a a a a a a
NastaYenie YAhaMroYania
triesokz0
Oto; enie alebo Yy: ena
hob'YoYac?ch no4oYywwwwwwwwwwwwwwwwwwwwwwwwwwwwwwwwww
AkumulatorovC hobljk PHA 12 B2
or: alsbeste: tanYenMelseuuuuuuuuuuuuuzz8
LeYereMe Mele/tilbehorwwwwwwwwwwwwwwwwwwwwwwwwwwwwwwwwwwwwwwwwwwwwwwwwwwwwwwwwwwwwwwwwwwwwwwwwwwwwwwwwwwwwwwwwwwwwwwwwwwwwwwwwwwwwwwwwwwwwwwwwwwwwwwwwwwwwwwwww
OYersigtz9
hOYle:askineruUuuuuuuuuuuuuuuuuuuuuuuuuuuuuuuuuuuuuuuuuuuuuuuuuuuuuuuuuuuuuuuuuuuuuuuuuuuuuuuuuuuuuuuuuuuuuuuuuuuuuuuuuuuuuuuuuuuuuuuuuuuuuuuuuuuuuuuuuuuuuuuuuuuuuuuuuuuuuuuUU
Porberedelsessssssssssssssssss 120
Bet|eningsele: enterwuwuwuwuwuwuwuwuwuwuwuwuwuwuwuwuwuwuwuwuwuwuwuwuwuwuwuwuwuwuwuwuwuwuwuwuwuwuwuwuwuwuwuwuwuwuwuwuwuwuwuwuwuwuwuwuwuwuwuwuwuwuwuwuwuwuwuwuwuwuwuwuwuwuwuwuwuwuwuwuwuwuwuwuwuwuwuwuwuwuwuwuwuwuwuwwu
5largoringafscanuMkastetuuuuuuuuu u z^5
weverede dele/tilbeh- r
Reng-ring after drug
zu Tag batteriet uMu
HolM Yentilationsabningerne jt" renew
Z eengor a ccaratet : eM en blom børste ell er : eM en let fugtet kluM
山 eengor scanuMkastet jzZ^ regel: 8 s-sigt : eM egnet Y8 rkt0j fFx et stAkke tr8 eller : eM trAkluft"
Tedligeholdelse
H uMen for boRs r8 kkeYiMMe
OcbeYaringste: ceraturen for Met genoclaMelige batteri og açcaratet er cä: elle: 0^ og 5^_U nMgå ekstre: kulMe eller Yar: e unMer ocbeYaringenS sa Met genoclaMelige batteris effekt ikke forringsu
Tag Met genoclaMelige batteri uM af acca- ratet inMen 18 ngereYarenMe ocebyaring jfx o: Yinteren" is Men secarate betJeningsYe)leMning til batteriet og oclaMeren"u
EncenMiMo A açagaMoUuuuuuuuuuuuuuuuuuuuz
mediobambienteeeeeeeeeeeeeeeeeeee14
soconfor:euuueuuuueuuuuuuuuuuuuuuuuuuuuuuuuuuuuuuuuuuuuuuuuuuuuuuuuuuuuuuuuuuuuuuuuuuuuuuuuuuuuuuuuuuuuuuuuuuuuuuuuuuuuuuuuuuuuuuuuuuuuuuuuuuuuuuuuuuuuuuuuuuuuuuuuuuuuuuuuuuuuuuuuuuuuuuuuuuuuuuuuUU
sicure9raaeeeeeeeeeeeeeeeeeeeeeeeeeeeeeeeeeeeeeeeeeeeeeeeeeeeeeeeeeeeeeeeeeeeeeeeeeeeeeeeeeeeeeeeeeeeeeeeeeeeeeeeeeeeeeeeeeeeeeeeeeeeeeeeeeeeeeeeeeeeeeeeeeeeeeeeeeeeeeeeeeeeeeeeeeeeeeeeeeeeeeeeeeeeeeeeeeeeeeeeeeeeeeeeeeeeeeeeeeeeeeeeeeeeeeeeeeeeeeeeeeeeeeeeeeeeeeeeeeeeeeeeeeeeeeeeeeeeeeeeeeeeeeeeeeeeeeeeeeeeeeeeeeeeeeeeeeeeeeeeeeeeeeeeeeeeeeeeeeeeeeeeeeeeeeeeeeeeeeeeeeeeeeeeeeeeeeeeeeeeeeeeeeeeeeeeeeeeeeeeeee
Ele: enti Mi co: anMoUuUuuuUUuuuuuuuuuuuuuuuuuuuuuuuuuuuuuuuuuuuuuuuuuuuuuuuuuuuuuuuuuuuuuuuuuuuuuuuuuuuuuuuuuuuuuuuuuuuuuuuuuuuuuuuuuuuuuuuuuuuuuuuuuuuuuuuuuuuuuuuuuuuuuuuuuuuuuuuuuuuuuuuuuuuuuuuuuuuuuuuuuuuuuuuuuuuuuuuuuuuuuuuuUU
0:costa9ione esculsione trucoliuuvuu z58
Accensione scegni: entouuuuuuuuuuuuz 6z
Musraki aMatokuuuuuuuuuuuuuuuuuuuuuuuuuuuuuuuuuuuuuuuuuuuuuuuuuuuuuuuuuuuuuuuuuuuuuuuuuuuuuuuuuuuuuuuuuuuuuuuuuuuuuuuuuuuuuuuuuuuuuuuuuuuuuuuuuuuuuuuuuuuuuuuuuuuuuuuuuuuuuuuuuuuuuuuuuuuuuuuuuuuuuuuuuuuuuuuuuuUU
Biztonsagiutas)tasokssssssssssss168
5eRelzele: ekuukuuuukuuuuuuuuuuuuuuuuuuuuuuuuuuuuuuuuuuuuuuuuuuuuuuuuuuuuuuuuuuuuuuuuuuuuuuuuuuuuuuuuuuuuuuuuuuuuuuuuuuuuuuuuuuuuuuuuuuuuuuuuuuuuuuuuuuuuuuuuuuuuuuuuuuuuuuuuuuuuuuuuuuuuuuuuuuuuuuuuuuuuuuUU
org3csiMob9 be3ll?t3saeeeeeeeeeeee 7Z
GAaluk7s:egforM2t3saYagA
cser7eeeeeeeeeeeeeeeeeeeeeeeeeeeeeeeeeeeeeeeeeeeeeeeeeeeeeeeeeeeeeeeeeeeeeeeeeeeeeeeeeeeeeeeeeeeeeeeeeeeeeeeeeeeeeeeeeeeeeeeeeeeeeeeeeeeeeeeeeeeeeeeeeeeeeeeeeeeeeeeeeeeeeeeeeeeeeeeeeeeeeeeeeeeeeeeeeeeeeeeeeeeeeeeeeeeeeeeeeeeeeeeeeeeeeeeeeeeeeeeeeeeeeeeeeeeeeeeeeeeeeeeeeeeeeeeeeeeeeeeeeeeeeeeeeeeeeeeeeeeeeeeeeeeeeeeeeeeeeeeeeeeeeeeeeeeeeeeeeeeeeeeeeeeeeeeeeeeeeeeeeeeeeeeeeeeeeeeeeeeeeeeeeeeeeeeeeeeeeeeeeee
Akku: ul3tor feltDlt7seuwwwwwwwwwwwwwwwwwwwwz 75
d zemeltetAssssssssssssssssssssssssss 17O
Akku: ul3tor tDltDtts7gi s9int7nek
ellenzr97sez75
Akku: ul3tor behelAe97se 7s
kiY7telez75
GAaluk7s:09g3sir3nAa
Ara elektro: os k7sral7kek ne: tarto9nak a h3rtart3si hullaM7kbaA 3thuott kerekes kuka sri: b9lu: a ajt elentis hogA eRt a ter: 7- ket 7lettarta: a Y7g7n ne: sabaMSelekt3latlan telec0l7si hullaM7kk7nt 3rtal: atlantani
7nu Ehhe alkal: as clu egA 17cu Eut3n a gAalult s71 atkDzk7nt srolg3lu
H A k7s9a17knek nincs : 7lAs7gatkD9zj)eU E97rt renMs9eresen ellenzri9es hogA el7rte-e a k?Y3nt : 7lAs7getu CsDkkentse a fog3s: 7lAs7g7tS ha : a)Mne: el7rte a k?Y3nt : 7lAs7getu
Be- As kika- csolás
4loksasz)tAs
zu Erzsitse 7s rDgItse a: unkaMarabotsatuYal YagA : 3s : 9Mon egA stabil feIaletre
_ A fog3s: 7lAs7g-be3llt9forall9go: bbal jz^ 3112tsa be a fog3s: 7lAs7getu
Zwisel en 17g7sY7Mz: askot 7s csatlakoRtasson egA kalsz corels?Y9tu
HelAeRe be aR akku: ul3tort a k7sra17kbeu
Beka-csolás
zuTartsa a k7sral7ket a:arkolatn31j7" 7sa9t:arkolatn31i°"fogYajsig-etelt fog9felaletek"u
°E: elj e: eg a k7s9al7ketu
ZNAo:la:egakaccsol993rtj5"
fNAno:la:egabe-/kikaçcsol9tj6"
5e EngeM)e el a kaçcsol993rt j5"
6w3ra:egSa:gak7sral7k el7ri a telles forMulats3:otu
A k7s9al7ket a gAalutalç jz0" elalsz r7s97-
Yela: unkaMarabho YeReheteti
rika-csolas
zuE:else:egak7sral7ketu
°U EngeM)e el a be-/kikaçcsol9tj6"
Zw3ra:egs a:2g tellesen le3ll a k7stengelAS:ielztt letesai alektro:os k7rissers3:otu
A k7sral7ket a olMal3ra fektethetish hogA ne s7ralDn : eg a felaletu
UwegAe ki aR akku: ul3tort a k7sral7k-bzls ha felogAelet n71kol hagA)a a k7sral7ket YagA befejerea : unk3tu
Tisz)tase karbantartas As taroLas
AVPI/Y4wi 4eT4TESpvAra:at7s!
wigA3Rrnon:ag3ra a karbantart3si 7s tisrt3si:unk3ksor3nu5acsola ki a k7sra17ketu
A jelen hasn3lati ut: utat9ban ne: sre-reclz laYt3si 7s karbantart3si : unk3kat sRerYiRkDraontunkkal Y7geRtesse elu Csak ereMeti alkatr7sReket hasn31Jonu
Tisztlas
MEG0EGgZWS!AnAagi k3r Yes71Ae! Ne:egfelelz tisrtt3s eset7n k3r keletkehet a k7sral7kbenu Soha ne frDcskDlje le a k7sral7ket Y29elu Ne tisrttsa a k7sra17ket folA9 Y29 alattu Ne hasrn31]on : ar9 hat3su tisrt2t9-s illu olM9sereketu MinMig tartsa tisrt3n a k7sral7ketu
Tisz)tás üzemeltetAs után
zú T3Yolitsa el aR akku: ul3tortu
°ú Tartsa tisr3n a sReellzRznA13sokat jI"U
Zú A k7sral7k egA cuaha kef7Yel YagA enAH7n neMYes tDrlzkenMzYel tisrtthat9U
fü eenMsReresen tisrttsa : eg a forg3cskiMob9t izZ"egA: egfeleIz sRers3: -: aljclu egAfamarabbal YagAsur?tett leYegzYel"U
r arbantartás
A k7sral7k ne: ig7nAel karbantart3stu
Tárolás
T3rola a k7srol7ket 7s a tarto7kokat: inMigs
H tisrt3n
H sraRon
H cort91 Y7Mye
H gAer: ekektzl el3rYa
Araakku:ul3tor 7s a k7sral7k t3rol3si h:7rs7klete 0_^ 7s 5n^ kDrdtt Yanu A t3rol3s sor3n kerale a tul9ott hiMeget
YagA:elegetshogA aRakku:ul3tor ne Yesrs2tsen a tellesit:7nA7bzlu Hossrabb t3rol3s jclt7liest7s"elzt YeG Ae ki aRakku:ul3tort a k7sral7kbz1jYeG Ae figAele:be aRakku:ul3tor 7s a tDltz kalDn hasrn3lati ut:utat9]3t
- reMYiMena uçorabaauuuauuuuauuuuauuuuuuuuz8°
Sclośna Yarnostna oćośorila ŋa elektrì; no oroM)eUUUUUUUUUUUUUUUUUUUUUUUUUUUUUUUUUUUUUUUUUUUUUUUUUUUUUUUUUUUUUUUUUUUUUUUUUUUUUUUUUUUUUUUUUUUUUUUUUUUUUUUUUUUUUUUUUUUUUUUUUUUUUUUUUUUUUUUUUUUUUUUUUUUUUUUUUUUUUUUUUUUUUUUUUUUUUUUUUUUUUuuuuuuuuuuuuuuuuuuuuuuuuuuuuuuuuuuuuuuuuuuuuuuuuuuuuuuuuuuuuuuuuuuuuuuuuuuuuuuuuuuuuuuuuuuuuuuuuuuuuuuuuuuuuuuuuuuuuuuuuuuuuuuuuuuuuuuuuuuuuuuuuuuuuuuuuuuuuuuuuuuuuuuuuuuuuuuuuuuuuuuuuuuuuuuuuuuuuuuuu uu
warnostnanaYoMila Ra skobelnikz88
Pri- ravassssssssssssssssssssssssssss 189
- craYl|alni ele: entiUuuuuuuuuuuuuuuuuuuuuuuuuuuuuuuuuuuuuuuuuuuuuuuuuuuuuuuuuuuuuuuuuuuuuuuuuuuuuuuuuuuuuuuuuuuuuuuuuuuuuuuuuuuuuuuuuuuuuuuuuuuuuuuuuuuuuuuuuuuuuuuuuuuuuuuuuuuuuuuuuuuuuuuuuuuuuuuuuuuuUU
wMr4eYan)eeeeeeeeeeeeeeeeeeeeeeeeeeeeeeeeeeeeeeeeeeeeeeeeeeeeeeeeeeeeeeeeeeeeeeeeeeeeeeeeeeeeeeeeeeeeeeeeeeeeeeeeeeeeeeeeeeeeeeeeeeeeeeeeeeeeeeeeeeeeeeeeeeeeeeeeeeeeeeeeeeeeeeeeeeeeeeeeeeeeeeeeeeeeeeeeeeeeeeeeeeeeeeeeeeeeeeeeeeeeeeeeeeeeeeeeeeeeeeeeeeeeeeeeeeeeeeeeeeeeeeeeeeeeeeeeeeeeeeeeeeeeeeeeeeeeeeeeeeeeeeeeeeeeeeeeeeeeeeeeeeeeeeeeeeeeeeeeeeeeeeeeeeeeeeeeeeeeeeeeeeeeeeeeeeeeeeeeeeeeeeeeeeeeeeeeeeeeeeeeeee
ShranjyeYan)e 9
OdstranXevanXe med od- adke/ varstvo okolkaassssssssssssssssssss 193
Oc: be o omstraneYanju
aku:ulatora9Z
Hadamestni deli in - riborsssss 193
zTARHOSTHAF4wOTH4i OB-iOCJu
NaçraYo in cribor YeMno shranites
H na;iste:
H na suhe:
Hraš; iteno creM craho:
H Juna] Mosega otrok
Te: ceratura shranj eYanj a aku: ulator in naçaraYo rnaša : eM 0n°C in {5n°Cu
MeM shranJeYanJe: crecre; ite iReMen
:raRali Yro;inosMaaku:ulatorneirgubi
: o; i
- reM Mal)si: shranJeYan)e: jncru; eR i
: o" aku: ulator YRe: ite iNaçraYe juço-steYa)te lo; ena naYoMila Ra uçorabo aku
-
craYla;kiMijeloYiUuuuuuuuuuuuuuuuuuuuuuoo
-
ostaYl]anje otYora ria ijbaciYanj
strugotina
Okretanj e ili r: jena no4a
blan)e0
- un]en]e bateri]e0000000000000000000000000000 05
zu SL/URHOSTRAFHO/PROSTORA
a" OdrWavaXte radni - rostor cistim i dobro osvixetlXenims NeureMna ili : ra; na coMru;Ja MoYoMe Mo nesrecau
b" He rukute elektricnim alatima u eks- lozivnox atmosferic - rimice u - risutnosti za-alxivih tekucinac - linova ili - rasines Elektri; ni alati stYaraju iskre koje : ogu raçaliti crasinu ili carev
c" f Xecu i ostale osobe u blizini drWite - odalXe dok rukuxete elektricnim alatoms slu; aju oMyraca-nja c4n)e: 04ete iRgubite kontrlu
4w4r TRICHA SI/URHOST
a" utikaci elektricnog alata moraku odgovarati uticnicis Hikada ne mixenXaTe utikaC ni na koXi
načins He koristite ada- terske utikace s uzemlXenim elektric-nim alatimas Negro: i]en]eni utika; i i oMgoYaraJuce uti; nice s: anit ce riRik om stru]nog uMarau
b" IzbxegavaXte txelesni kontakt suzemlXenim - ovrsinamac kao sto su ciXevic radiXatoric stednXaci i hladnxacis Ako je Yase ti)e-lo uRe: IJenoS costo]i cOYecan ririk om stru]nog umara
c" 4lektricne alate ne izlaWite kisi ili vlaWnim uvXetimas -laRak YoMe u elektri; ni alat cOYecaYa riRik oM stru-nog umara
M" Hezlou-otreblXavaXte kabels Hikada ne koristite kabel za noosenXec -ovlacenXi ili isklXucivanXe elektricnog alatas r abel drWite - odalXe od to-lineuXac ostrih bridova ili -okretnih diXelovas Osteceni ili RaçetlJani kabelo-YecaYaju riRik om struJnog uMarav
e" r ada koristite elektricni alat na otvorenomc koristite - roduWni kabel - rikladan za u- orabu na otvorenoms 5oristenj e kabela criklaMnog Ra ucorabu na otYoreno: s: anu eriRik om stru)nog umara
f" Ako xe rukovanxe elektricnim alatom na vlaWnom mxestu ne- izbXeWnoc koristite na- axanXe zasticeno zastitnim uredaXem diferencixalne struxE PIf sklo- kaSS 5oristenJe,0D sklocke s: anju eriRik om stru]nog uMarau
ZOSOBHASI/URHOST
a" Budite o- reznic - azite sto radite i koristite zdrav razum - ri rukovanTu elektricnim alatoms He koristite elektricni alat dok ste umorni ili - od utecaxem drogac alkohola ili liXekovas Tre-nutak neca4nje tijeko: raMa s elektrri; -
ni: alati: a: o4e uRrokoYati oRbil]ne oRl]eMeu
b" r oristite osobnu zašitnu o- remus u viXek nosite zašitu za ocis 5oristenj e Rašitne ocre: e kao sto su : aska ra resinu neklira uce sigur-nosne cicele s Rašitna kaciga ili Rašitne slusalices u omgoYara uci: uYleti: a s: anjit ce osobne oReMeu
c" S- rixcite nenamXerno - okretanXes ProvXerite Xe li -rekidaucu isklxucenom - oloWaxu - rixes- axanxa na izvor na- axanxa i/ili - riklXucivanxa baterixec - odizanxa ili nosenxa alatas Nosen)elektri; nih alata s crsto: na crekiMa; uili uscostaYl]an]e naca]an]alektri; nih alata koli su ukl]u; eni uroku]u nesreceu
M" Prixe uklučivanxa elektricnog alata uklonite sve klxuceves 5lju; koji je ostao cri; Yrscen na rotirajuci Mio elektri; nog alata: o4e urokoYati o1]eMeu
e" HemoXte se - rena- rezatis u svakom trenutku odrWavaXte - ravilan stav i ravnoteWu tiXelas To o: ogucule bolju kontrolu elektri; - nog alata u neo; ekiYani: situaciJa: au
f" Prikladno se obucites He nosi- te siroku odXecu ili nakits r osu i odXecu drWite - odalXe od - okretni diXelovas - okretni MiJeloYi : ogu RahYatiti siroku omJecus nakit ili Mugu kosuw
g"Ako su - redvideni ureda zi za s- axanXe na usisivač i saku- lxanXe - rasinec - rovXerite Xesu li s- oxeni i koriste li se is- ravnos 5oristen|e sakucl|an|a crašine : o4e s: an|iti ocjasnosti coYeRane s craši-no: v
h" He do- ustite da zbog - oznavanxa alata stecenog cestim kori
HR
stenXem - ostanete samouvXere-
ni i zanemarite načela sigurnosti u- orabe alatas Neça4ljiYo M)eLo-Yanē : o4e uRrokoYati teske oRlJeMe uM)elicu sekunMeu
uPORABAIOfRZATAHJ4 4w4rTRICHO/AwATA
a" He silite elektricni alats r oristi te elektricni alat koXi odgovara namXenis 0screyan elektr; ni alat obaYit ce cosao bolj e i sigurni e brRino: Ra koju e MiRa)niranu
b" He koristite elektricni alat akoga -rekidač ne uklxucuXe i is-klxcuXes SYaki elektri; ni alat koji: se ne : o4e uçraYljati crekiMa; e: ocasanJe i : oraseoçaYitiu
c" Izvadite utikač iz izvora na- a-xanxa i/ili baterixuč ako se mo-We izvaditic iz elektricnog alata - rixe bilo kakvog - odesavanXac - romxene - ribora ili s- remanxa elektricnog alatas TakYe creYentiYne sigurnosne : Jere s: an]u]u riRik oM slu; a]nog ukl]u; iYan]a elektri; nog alatau
M" 4lektricni alat u stanXu mirovanxa cuvate izvan dohvata dce i ne do- ustite osobama koXe nisu u- oznate s elektricnim alatom ili ovim u- utama da rukuXu elektricnim alatoms Elektri; ni alati su ocasni u ruka: a neobu; enih koris-nikau
e" OdrWavaXte elektricne alate i - ribors ProvXerite neusklaedenost ili zaglavIXivanXe - okretnih dixelovac Iom dixelova i bilo koXe drugo stanXe koXe moWe utXecati na rad elektricnog alatas Ako Xe ostecenc elektricni alat treba - o- raviti - riXe u- orabes Mnoge su nesrece uRrokoYane lose omr4aYani: elektri; ni: alati: au
f" OdrWavaXte rezne alate ostrima i cistimas 0screyno omr4aYani reRni alati s ostri: reRni: ruboYi: a: ane ce se RaaglaYljiYati i n]i: a ce se lakse ucreaYl)atu
g" oristite elektricni alate - ribor i nastavkeitds u skladu s ovm u- utamac uzimauci u obzir radne uvxete i - osao koXi treba obavitis 5oristen elektri; nog alata Ra raMnJe Mruga; i)e om creMYidenih : o4e uRkoYati ocasne situaci)ev
h" f rWite ručke i - ovršine za hvataxse suhimac Čistima i ocisćeni-ma od ulxa i masnoce Skliske ru; - ke içoYrsine Ra hYatanje ne o: oguću-u sigurno rukoYanje i kontrolu naM alato: u neo; ekiYani: situaciJa: au
5uPORABAIOfRZATAHJ4 4w4rTRICHO/AwATAHA BA-T4RIJ4
a" Punite samo - unXacem koXie odredio - roizvodaCs - unJa; koJiJe criklaMan Ra jeMnu Yrstu caketa baterila : o4e uRkoYati ocasnost oM co4ara akosekoristis Mrugi: caketo: ba terijo: U
b" r oristite elektricne alate samo sa za to - osebno odredenim - aketima bateriXamas 5oristen)e Mrugih caketa bateri)a : o4e uRrokoYa-ti ocasnost om oRl)eMa i c04arau
c" r ada se - aket baterixa ne koristic drWite ga - odalxe od drugih metalnih - redmetac - o- ut s- aXalicac novcicac klXucevac cavalac vixaka ili drugih sitnih metalnih - redmeta koXi mogu us- ostaviti vezu izmedu terminaalas 5ratki sco) ter: inala bateri e : o4e uRrokoYati ocekline ili c04aru
M" u uvXetima zlo- orabec tekuciina moWe biti izbačena iz bateri; izbXegavati kontakts Ako sluča
no dode do kontaktac is- erite
vodoms Ako tekuciina dode u
dodir s ocimac dodatno - otraWi-te liXechnicku - omocs Tekuciina iRa-ba-; ena iR baterije : o4e urokoYati iritaci-u ili oceklineu
e" He koristite ostecene ili izmienxene alate ili - akete baterixas Ostecene ili i: ijenjene bateri: oguse conasati necreMyiMiYos sto: o4e u-rokoYati co4ar's ekscloraju i ocasnost om orl)eMa
f" Alat ili - aket baterixa ne izlaWi- te vatri ili - revisokox tem- eraturis 0rIaganjE Yatri ili te: ceratura: a iRnaM zZOn°C : o4e uRrokoYati ekscloRiju
g" SliXedite sve u- ute za - unXenXe i ne - unite - aket bateriXa ili alat izvan tem- eratumnog ras- ona navedenog u u- utamas NegraYilno cun|en|e ili cun|en|e cri te: ceratura: a iYan naYeMenog rascona : o4e ostetiti bateri|u i cOYećati riRik om cO- 4arau
6S4RTIS
a" 4lektricni alat mora servisirati osoba kvalificirana za - o- ravakci - ritom koristiti samo identiocene rezervne diXeloves Ti: e se osiguraYa oMr4aYan)e sigurnosti elektri; nog alatau
b" Hikada ne servisirale ostecene - akete bateriAs SerYisiranj e caketa bateriJa s: iJe obaYl)ati sa: o croiYoda; ili Oylasteni serYiseru
Sigurnosne u- ute za blanXalice
H Čekāte da se rezač zaustavic - rixeargo alat odloWites 0Rlo4eni rotiraluci re9a; : o4e utjecati na cOYrsi-nu takto Ma Mode Mo gubitka kontrole i Mo oRbilnih oRljeMa
H oristite ko- ce ili druge - rakticne naçine da biste osigurali i dr-Wali izradak na stabilnoX - odlo-zis Dr4anE iRatka ruko: ili uR ti|elo; i-ni ga nestabilni: i: o4e MoYesti Mo gubitka kontroleu
H f ok raditec uvixek drWite blanxalicu takdo osnovna - loca uredaXa leWi ravno u odnosu na izradaks · crotiYno: ureda): o4e otkliRnuti i MoYesti Mo orlJeMeu
H 4lektricni alat dovedite u kontakt s izratkom samo kada Xeuklucens · crotiYno: costo) i ocas-nost om cOYratinog uMaraS akosereyni alat raglaYi u iRatkuw
H He do- ustite da is- ust za strugotinu dode u dodir s vasim rukamas Mogli bi Yas oRlijemiti rotira)uciMiJeloYiu
H Hikada ne blanXaXte metalne obXektec cavle ili vixkes eea; i i osnoYe reRa; a: ogu biti osteceni i rAraYati cOYeçane YibraciJEu
H TiXekom rada moWe doci do - o-xave o- asne - rasines Nosite : a-sku Ra aRstitu om crasine i koristite Yanski usisaYa; crasineu
H Redovno - rovXeravaXte - ostoXe li eventualno ostecenXa ostrices 5oristite isklu; iYo ostre neosteocene ostriceu
H Dr4ite Yentilacijske otYore;isti: au
H oskl]u; ite ureda) i iYaMite bateri]u - roYerite Ma su sYi cokretni Mi]eloYi cotcu-no Raustayl]eni
H uYiJek kaMa naçustite ureda)S
H crie otcustan]a blokaMa ili oMstraniYan]a Ra; ecl]en]as
H crie croYjereS; iScenla ili raMoYa na ureda]uS
H Ma croYeraYate neostecenost uredaJa nakon kontakta sa strani: creM- eto: S
HR
H Ma oM: ah croYeraYate ureda) ako on 己 ne sna4no Yibriratiu
H Iz sigurnosnih razloga zamixenite istrosene ili ostecene diXeloves 5oristite sa: o originalne Ra: Jenske MjeloYe i originalni criboru
H r oristite samo diXelove - ribora koXe Xe - re- orucio PARr Slf 4s NegriklaMni MiJeloYi cribora : ogu MoYesti Mo stru)nog uMara ili co4arau
Pri- rema
Avu POeOR4HJ4pyOcasnost oM orI)eMa rabog ne4el]enog cokretan]a ureda]au Bateriju: etnite u ureda]tek kaMaJe ureda] cotcuno scre: an Ra raMu
u- ravlXacki diXelovi
- riJe crYog cogona uredaJa ucoRnaJte n)egoYe ucreaYlJa; ke MjeloYeu PodesavanXe dubine struganxa
H oa cOMeSaYanJe Mubine struganJa z" slu4i okretni gu: bu
H Dubina strugan]a c oMesiYa e i: edu 0 i°::u
H Octi: alna Mubina struganla e i: edu 0 i zS°::jEleno cOmru;e1 estYice na okretno: gu: bu"U
PostavlXanXe otvora za izbacivanXe strugotina
i ogucnosti -osto|e Z na; ina Ra costaYl|an|e iRbaciYa-n|a strugotinas
H Obostrano iYbaciYanJe strugotina beu: etka u otYoru Ra iYbaciYanJe strugotina
H peMnostrano iRbaciYanJe strugotina s u: etko: Ra us: JeraYanJe
H -sisaYanJe s aMaCTero: Ra usisiYa; -sisaYanJe se crecoru; u)e kaMa se stYara crasina
umetxe umetka za usmXeravanx
: etak Ra us: JeraYanJe jz5": o4e se u: etnuti s obJe straneu
zu Gurnite u: etak ra us: JeraYanJe Mo kraJa u otYor Ra iRbaciYanJe strugotina jzZsa strane koju 4elite RatYoritiu tori u otYoru Ra iRbaciYanJe strugotina osiguraYaJu craYilan colo4aJU
umetanXeada-tera zausisivac
AMactera usisiYa;o4e se koristiti s
objestrane
zuAMacter Ra usisiYa;jz6" gurnite s otYoro:cre:a Mol)e jn"u otYor Ra iBaciYan)e strugotina jzZ
_ Scolite aMaTcr Ra usisiYa; na uis-no criJeYo jncre: okro/suhi usisiYa; -Ae5S0DE"U
Z Obratite coryornost na tos Ma usisiYa; buMe criklaMan Ra: ateri)al koji treba biti creM: et obraMeOYe infor: acie : o4ete cronaci uucuta: a Ra raM eksternog ureda]au
OkretanXe ili zamXena noWa blanXe
Avu POeOR4HJ4pvOcasnost oM orl)eMa 9bog ne4el]enog cokretan]a ureda]au0Ryamite bateri]u iR ureda]av
A vOPR4epv- osjekotine! Ne Miralte briMoYe no4a blanjeu
Ha-omene
H No4eYi blanje i: aju MYa reRna ruba i : ogu se okretativ
H No4eYe blanJe uYiEk Ra: i)enite ili creokrenite u caruw
H Ne brusite no4eYe blanl e!
H •Yijek: i|en|a|te no4eYe blan|e |eMan Ra Mrugi: u Na ta| na; in: o4ete koristiti ona) koli |e |oš uYi|ek: ontiran kao YoMilicu criliko: : ontiran|a noYog no4a blan|ev
H oa reRerYne no4eYe blanJeS YiMi Oezervni dipeIovi i Uribor, S.210u
f emontiranXe noWa blanXe slika AS
zu - oMesite Mubinu strugan\ajz"na Ou
_ Otcustite Yi)ke sa sesterokutno: gla- Yo: j Z^ Yilasti: klju; e: jzz
Zu Yucite stitnik no4a blan]e jz7" i gurnite Mr4a; no4a j^0^ s no4e: blanejz9" i steRno: clo; o: jz8" bo; no iYOsoYine no4a j^^ oaguranle koristite :ali ko: aMiC MrYe-tau
山 eastaYite Mr4a; no4a i^0^ no4 blan)e jz9'' i steRnu clo; u iz8"A Ako seMiJeloYi ne rascaMnu sa: i oM sebeS : o4e biti Ma su RaliJeclIeni s: olo: U
SaMa: o4ete okrenuti ili ya: i)eniti no4 blan]eu
i ontiranXe noWa blanXe Islika AS
zu AkoJe cotrebnos o;istite Mr4a; no4a j 0^ no4 blan)e jz9" i ste9nu clo; u jz8"u
_ - ostaYite steRnu clo; u iz8"s nosici: a okrenuti: cre: a gore na cOmlogu
Z-ostaYite no4 blan]e jz9" na steRnu clo; u jz8" eEra na ostrica]e na Yisoki: nosici: au · tor le4i na niski: nosici: au
t-u-ostaYite Mr4a; no4a j 0'' na no4 blan)e jz9" i steRnu clo; u jz8"u wi|ci sa sesterokutno: glaYo: j Z'' us: Jereni su cre: a gore euece oMgoYara'u okrugli: nosici: au
5u Yrnite Yi)ke sa sesterokutno: glaYo: j ^o Z^ Mo kra]a na Mr4a; no4a j ^o 0^ i gurnite Mr4a; no4a s no4e: blanje jz9" i ste9no: clo; o: jz8" bo; no u osoYinu no4a j ^o z^ ' esterokutni Yi|ci su okrenuti cre: a na-crij eMw
6 euko: rategnite Yjke sa sesterokutno: glaYo: j^^ _
7-oraYnale no4 blanejz9"
PoravnanXe noWa blanXe Islika AS
Cil)s No4 blan)e nalaRi se u sreMini Mr4a; a no4a j°0" i uraYnini e s osnoYno: clo- o: blan)e iz0"u
zu - oMesite no4 blanjz9" cO Yisiniu Da biste to u; iniliS okrenite uCOrne YiJke j0f i: bus klU; e: z0s: JeroYi gleMano na osnoYnu clo; u blanjz0"U U s↓ U s↑ 5ako biste cO Migli no4 blanEs : o4Ma cete : orati lagano otcustiti YiJke sa sesterokutno: glaYo: j°Z"U
_U roYerite e li no4 blane jz9" uraYnini s osnoYno: clo; o: blane costaYl anaJe: MrYene Ma; ice creko oba Miela osnoYne clo; e blanEu No4 blane: ora raYno: Jerno MoMiriYati MrYenu MaS; icuTu Takoder croYerite u cocrre; no: s:Jeruw
Zo oategnite Mr4a; no4a i ^0^ s no4e: blanejz9" i ste9no: clo; o: jz8" na sreMini osoYine no4a i ^0^ z" c0: ocu Yi)aka sa sesterokutno: glaYo: i ^0^ Z"
Nakon criteRanJa YiJaka sa sesterokutno: glaYo: i^^ croYeriteJe li no4 blanejz9"u raYnini s osnoYno: clo; o: blanJe z0!
Ako no4 blanje nile u raYnini s osnoY-no: clo; o: blanes - onOYite costu- caku
PunXenXe bateriXe
wiMi i uçute Ra uçorabu cunja; au
Ha-omene
H oagrijanu bateriju crie e cunjena ostaYite Ma se ohlaMi
H Bateriune i1la4ite Mu4e Yri)e: e sna4- no: uteca)u sun; eYe sY)etlosti i ne omla4iteJe na raMi)atorej:aksu 50^^ _U
HR
PunXenXe baterXe
zu - rikl]u; ite cun]a; bateri]e |z| u uti; ni-cu
Gurnite bateri]u j8" u otYor Ra cun]e n]e na cun]a; u jz+ "U
ZNakon usc)esnog cun]en]a oMYo]ite cun]a; jzf"OM:re4eu
f0Yucite bateri|u i8" iR cunla; a iz
Pogon
ProvXera stanXa na- unXenosti bateriXe

Dok e ureda) uklu; en s crika statusa bateri e jZ" crikau) estan e naçunlenosti bateri e
zelenarancastcrven
Bateri|a naçun|ena
narancastcrven
Bateri a e M elo: i; no naçun Jena
crven
Bateriàtreba biti nacunjena
umetanXeivadenXebateriXe
Avu POeOR4HJ4pyOc asnost oM orI)e
Ma rbgog ne4el]enog cokretan]a ureda]au
Bateri u: etnite u ureda) tek kaMa je ureda) cotcuno sce: an Ra raMu
N4JOMEN4!Ocasnost oM ostecenla!
- ogresna bateri: o4e ostetiti ureda) i bateri u
umetanXe bateriXe
zGurnite bateriju 8^ Mu4 sine YoMilice u Mr4a; bateri e uru; ci 7^
Bateri)ase;u)noraklu;aYau
T adenXe bateriXe
zu - ritisnite i Mr4ite MeblokaMu baterije j9" na bateriji j8"
^ U Yucite bateri u i ru; ke j 7"
Ha- omene za rad
Avu POeOR4HJ4pvOcasnost co MraY-lje! DrYena crasina: o4e urokoYati MraYstYene croble: e kao sto su rescirat-orne reakcije ili raku Nosite: asku 9a a-stitu Misnih cutoYa i criklu; ite Yanski usisi-Ya; crasineu
Ha- omene za blanXanXe
H fubina struganXa
- o; nite s : alo: Mubino: strugan]au
Octi: alna Mubina struganja oYisi o Mya faktoras
H TYrMoCi MrYetas
TYrde MrYo : an]a Mubina struga-n]a
H 'irina blan'anas
Yeca sirina blan|an|a : an|a Mubina strugan|a
H wisokokYalitetne cOYrsine Mobit cete s : ani: cos: ako: i critisko: u sreMini osnoYne clo; e blanjeu
H -reYeliki cos: ak s: anjule kYalitetu co- Yrsine i : o4e MoYesti Mo brRog Ra; ec- l]en]a otYora ra iRbaciYan]e strugotina
H Sa: o ostri no4eYi blanJe Monose Mobre reAultate reRanJa i stite ureda] Okrenite ili Ra: iJenite no4eYe blanJe kaMa se u; inak reRanJa s: an]u
Ha-omene za skošene rubove
w utor j^ u creMn]e:Mi]elu osnoYne clo; e blan]e jz0" o: ogucu]e rakoosen]e rubo-Yau
H·reda)s wutoro:costaYite na rub iR- ratka ico:i;ite ureda) ur rub iRratkau
Ha- omene za izraduzaske kslika BS
H ' titnik no4a blan|e |z7" ko|i se : o4e uYuciS o: ogucu|e blan|an|e ras|eka : aksi: alne Mubine om z7 : : u
H -rYi reMoYi rAsjeka : ogu se lakse blan@ti u4Mu4 caramelnog grani; nikau oa
to je criklaMna ncru letYicau Nakon toga blanani rub slu4i kao grani; niku
H -reda) ne: a Mubinski grani; niku Stoga reMoYito croYeraYa)te je li ccostignuta 4elena MubinaS: anite Mubinu strugan)a kaMa ste bliRu 4elene Mubineu
uklXučivanXe i isklXučivanXe
Pri- rema
Zu Stegnite i cri; Yrstite iRamaK na stabilnu cOYrsinu cO: oc stealki ili Mrugih sreMstaYau
_ - oMesite Mubinu strugan]a 己 ocu okretnog gu: ba Ra coMeSaYan]e Mubi-ne strugan]a jz^
Zu Nosite: asku rya rastitu Misnih cutoYa i criklu; ite Yanski usisiYa; crasineu
t u · : etnite bateriju u uredaju
ukxucivanXe
zu · reda) Mr4ite Ra ru; ku j7" i MoMatnu ru; ku j 0^ iJrolirane cOYrsine Ra hYata-n]e
_ -omignite ureda)
Zu -ritisnite blokaMu ukl'u; iYan]a j5"
山 -ritisnitecrekiMa;raukl]u;iYan}e/iskl]u;iYan}ej6"
5v-ustite blokaMu uklu; iYanla j5"
6-ri;ekalteMaureda)costigne cunu brinu
SaMa : o4ete ureda] na|cri|e creMn)i: MiIelo: osnoYne clo; e blan|e iz0" us: eriti cre: a iRatkuu
IsklXucivanXe
zu - oMignite ureda
_ - ustite crekima; ra uklu; iYan)e/isklu; iYanje 6
Zi - ri; ekalte Ma se osoYina no4a raustaYi crije nego sto omlo4ite elektrri; ni alatu reda): o4ete colo4iti bo; no kako bist te iRbegli ostecen) cOmlogeu
f 0RyMaite bateri)u iR ureda) ako ureda) ostaYl)ate beRa naMora ili kaMa RaYrsite s rAmo: U
CisćenXec odrWavanXe i skladistenXe
Avu POeOR4HJ4pvStru)ni uMar! oastitite se tikeko: raMoYa oMr4aYan)a i; iScen)au 0skl)u; ite ureda)
eMaYe na oMr4aYanju i cocrayke koj nisu ocisani u oYi: ucuta: a Raucorabu : orabaYiti na serYisni centaru 5oristite sa: o originalne reRerYe ne MiJeloYe
CiscenXe
N4JOMEN4!Ocasnost oM ostecenla! Nestru;no;iscenle:04eMoYestiMo ostecenla ureda]au NikaMa ne crska]te ureda] YoMo: reda]ne;istitecoM tekuco:YoMo: Ne koristite agresiYna sreMstaYa Ra a;iscen] niti otacalau
- reda] uYi)ek oMr4aYa)te;isti: U
CisćenXe nakon rada
zuOryaMitebaterijuu
wentilaciske otYore j 工 _ 1 ^ oMr4aYa)te;isti:au
Zo·reda) o;istite: eko: etko: iliblagonaYla4eno: krco: U
山 OtYor Ra iRbaciYanJe strugotina jzZ" reMoYito ;istite oMgoYaraJuci: alato: jncreko: aMiCe: MrYeta ili ko: cri: irani: rako:"
OdrWavanXe
- redajne treba oMr4aYatiu
Skladištenke
Sklamistite ureda) i cribor uYi)eks
H;isto
H suho
H rasticeno oM crasine
H iYan MohYata M)ece
Te: ceratura sklaMiSten]a bateri]e i ureda]a iRnosi iR: edu 0n^ i 5n°Cu 0Rb]egaYalte tikeko: sklaMiSten]a ekstre: ne hlaMnoce ili Yrucines kako bateri]a ne bi iRgubila u; inkoYitostu
HR
- rije Mu4eg sklaMiStenJa jncru tiJeko: Ri: e" bateriju iYaMite iR uredaJa jobratite c0rornost na oMyoJene uCute Ra rukoYanJe bateriJo: i cunJa; e: "u
ebrinXavanXe / zaStita okolisa
OryaMite bateri e ureda a i ureda bateri u s cribor i a: bal4u reciklira te na ekoloski crihYatl)iY na; inu

Elektri; ni uredaJI ne scaMaJu u kuc-ni otcaMu Si: bol crekri4ene kante Ra s: ece na kota; ici: a rna; i Ma se oYa croirYoM ne s: iJe omlagati kao neraRyrstani ko: unalni otcaMa na kraJu negoYog Yijeka traJanau
H DirektiYa ^0z^/z9/E· cri: |en|u|e se na oYa| ureda|
H ·reda) creMaIte na: jestu Ra crikucIa-nJe sekunMarnih siroYina 5oristeni clasti; ni i: etalni Mieloyi: ogu se omYoJiti i na ta) na; in Rasebno recikirati oa citanJa se obratite nase: serYisno: centruw
H Mi JbrinJaYa: o Yase coslane Mefektne uredaJe besclatnow
Ha- omene o zbrinXavanXu bateriXe

Bateriune baca te u kucni otcaMS uYatru jocasnost om eksclorie" ilu YoMuOstecene bateri: ogu ostetiti okolis i rMa rYl)e IuMi uslieM istecan a otroYnih cInoYa ili tekuci-na
Bateri e brinite cre: a lokalni: croci: au Defektne ili istrosene bateri e: ora u suklaMno s: lernici 006/66/Eo biti recikliraneu Bateri e creMa te na sabirno: : estu Ra bateri es gM e ce se ekoloski israYno reciklirati oa citanJa se obratite lokalno: coMuReCu Ra BrinJyAne otcaMa ili na-se: serYisno: centru Bateri e brinite u is- cra4nJeno: stanJU - recoru; a: o Ma coloye crekriete IecljIyo: trako: u sYrhu Ja
stite oM kratkog sO]au Ne otYara]te baterijuu
Servis
/aranciXa
-
oštoYani kuçciš
wi MobiYate na oYa) ureda) garanci)u om Z goMine oM Matu: a kuçn)eu -
slu; aju neMostataka oYoga croiRyomAswa: a cricamaju rakonska craYa cre: acroMaYa; u croiRyOmaU OYa rakonska craYa neograni; aYaju se naSo: MolJe naYe-Meno: garancio: U
/arancixski uvXeti
Garanci)ski rok 己 ine s Matu: o: kuçn)eu Moli: os Mobro ; uYa)te originalni blaga) ni; ki ra; unO OYa) Moku: ent cotreban je kao Moka'kuçn)eu
- koliko u roku oM tri goMine oM Matu: a kucnJe oYoga croiRYoMa nastane neka greška: ateriJala ili croiRYoMnJeS : i ta) croiRYoMa was besclatno - cre: a na-se: iJboru - cocraYi: o ila: ijeni: ou - reMuYJet Ra oYu garanciJsku uslugu Jes Ma se u roku oM tri goMine crilo4i ta) cokYare-ni ureda) i MokaO kuçnIj blagaNi; ki ra; un" te u cisano: obliku katko ociseS u; e: u se sastoJi neMostatak i kaMa je nastao
Ako je kYar cokriYen nao: garanci'o: S wi MobiYate natrag cocraYl'eni ili noYicro-iRYoMu
z^ slu; a'u: an|eg cocraYka |a: stYeni rok se croMul|u|e onoliko koliko |e kuac bio li\$en uorabe stYari
j" Meduti: S kaM Je rabog neisraYnosti stYari iRyrsena nJeina Ja: Jena ili nJein bitni cOcraYaks a: stYeni rok co; inJe teci conoYno om Ja: Jenes OMnosno om YracaanJa cOcraYIJene stYariu
jZ"AkoJeRa: i)en]en ili bitno cocraYl]en sa: o neki Mio stYariS a: stYeni rok c0; in]teci conoYno sa: o Ra ta] Miou
arancilski - eriod i zakonska
- rava na nedostatak
Garanci)ski ceroiM se ne croMu4aYaJa: s-tYo: To Yri)eMi i Ra Ja: iJenene i cocraYIene MieloyeOstecenJa i neMostaci ko)ieYentualno costoJeYeccri kucnis: oru se criayiti om: ah nakon rascakiranau-o-craYci koli nastanu coslje isteka garanci)-skog ceroiMa cOmli)e4u clacanu
O-seg garanciXe
- reda) le bri4l)iYo croiYMeMen cre: a strogi: s: Jernica: a o kYalitet i crie isc oruke le saYesno iscitanu
Garancijska usluga YrijeMi Ra greške : ateriJala ili croiYoMnJeu OYa garanciJa ne obuhYaça MiJeloYe croiYoMaS koli su iJlo4eni nor: alno: trošenju i stoga se : ogu s: atrati cotrošni: MiJeloYi: a ili ostecenla lo: IjiYih MiJeloYau
OYa garanciJa otcaMaS akoJe croiYom ostecen nestru; no koristen ili niJe omr4aYan oa stru; no koristene croiYoMa: orate se to; no criMr4aYati sYih ucuta naYeMenih u cuti Ja ucreaYl ane Morate obYeRno iBegaYati sYrhe cri: jene i ccostkes koJe wa: u cuti Ja ucreaYl ane ne saYjeteule: o ili na koJe ucooraYa: ou
- roiYom e na: i)en]en sa: o Ra criYatnus a ne Ra inMustri]sku ucrabu Garancija se gubi koM rIouc orabe i nestru; nog ucaYl]an]a s cri: jene sile i koM RahYatakole ne coMu: e nasa autorirana serYisna cosloYnicau
ObavlxanXe garancixskog slucaXa
5ako bis: o o: ogucili brru obraMu wa-sih 4el]aS : oli: o criMr4aYa)te se sl)eMecih uçutas
H Moli: os rAsye uceite cricre: ite blaga]ni; ki ra; un i 0mentifikacijski broj ANr 08^97_ ^07'' kao MokaKucn)ev
H Bro) articla : oli: o cronadite na clo; ici s natciso:
H -koliko nastanu greške funkcije ili ostali neMostaciš naçrije kontaktirate MoIe naYeMeno SerYisno oMeljene telefonom ili cute: e-mailau öati: cete Mobiti Maln)e infor: acje o obaYl'anju waserekla: acje
H - roiYom kojis: atrate cokYareni: swi : o4ete cosliJe MogoYora s nao: Slu4bo: Ra kucces ucrilaganJe MokaRa o kuçnji blaga)ni; ki ra; un" i coMatkaS u ; e: u se sastoji neMostatak i kaMa je nastaoS beR clacan)a costarine coslati na wa: a crioccenu aMresu serYisau 5a-ko bis: o iBegli croble: e okcrie: a i MoMatne troskOYeS obYeRno koristite sa: o onu aMresuS koJa wa: Je criocce-nau - roYerites Ma se otcre: a ne iRrshi beR clacenih troskOYa MostaYeS kao glo: aRna robaexress il Mrugi secci)alni teretu Moli: os cosalite ureda)uklu; u-uuci sYe Mi]eloYe cribora iscoru; ene cri kuçnji icobrinite se Ra MoYol)nu sigur-nost transortnog cakiranJau
Servis - o- ravka
Oa cocraYke koXi nisu obuhvaceni
Jamstvoms obratite se serYisno: centruu Ta: o ce wa: raMo iRarMiti creMra; un tro SkoYau
H Mo4e: o obramiti sa: o uredaJeS ko)isu MoYolno cakirani i ko)i su coslani uRclaçanJe costarinev
Ha- omena: Moli: o cosalite na: was ureda) o; ićen uć oć is neMostatka na aMresu naYeMenu oM strane serYis-nog centra
H Nece biti cri: lleni ureda]i ko]i se sa-lju uraObaYeau clacan]a -eksresno ili Mrugi: oblici: a slan]au
H Mi Šbrinjya: o Yase coslane Mefektne uredaje besclatnow
Service-Center

Servis Hrvatska Telus0800 777 999n E-: ails grizzly-lidl.hr IAH 408297_2207
Uvoznik
Moli: o obratite coorornost na tos Ma sl)e-Meca aMresa nile serYisna aMresau -rYo kontaktira te gore naYeMeni serYisni centaru GriA Tools G: bH & Cou 5G StockstcMter Stru ^ 0 6Z76 Grogosthei: NpEMAC5A
www.grizzlytools.de
Rezervni diXelovi i - ribor
Rezervne diXelove i - ribor dostu- ni su na www.grizzlytools.shops · koliko u ccostku Yase narum4be Mode Mo croble: aS: oli: o kontaktira te nas creko nase onlin e trgoYine slu; aJu MoMatnih citan)a obratite se Servire-Center, S.210
- oЯu bru 0: e NaruM4ba br
z6 Amac terЯu usisiYa; 9zz05ZZz
z5 •: etak Ja us: JeraYanJe 9zz05ZZ°
zz\$ z° wilasti kl'u; S0: bus kl'u; 9zz05ZZZ
z9 No4 blanJe 9zz05ZZf
PriXevod originalne 4e izXave o sukladnosti
| - rojYoMs Aku blanXalica MoMels PHA 12 B2 Serijski brojs 00000z-0°0000 - rem: et naYeMene iЯJaYe u sklaMu je s : JeroMaYni: RakonoMaYstYo: •nije o uskladiYanJus |
| 2006/42/4C •v 2014/30/4u •v 2012/19/4u •v 2011/6ö/4u &v4uSv201ö/863 |
| Gore ocisan creM: et iЯJaYe u sklaMu je s DirektiYo: °Ozz/65/E • Euroşskog carla: en-ta i wileća om 8u liçnJa °Ozzu Oograni; aYanJu uçorabe omredenih ocasnih tYari u elek- tri; no) i elektroni; ko) ocre: iU |
| 5ako bi se osigurala suklaMnosts ciri: ijenEni su sl)eMeci uskladeni stanMarMiS kao i naci- onalni stanMarMi i croçisis |
| 4H 62841-1:201Ö•v 4H 62841-2-14:201Ö•v 4H 14C 63000:2018 4H 14C Öö014-1:2021•v 4H 14C Öö014-2:2021 |
| OYa iЯJaYa suklaMnosti iЯMaje se na isklju; iYu oMgoYornost croiYoda; as |
| CE GrijrlA Tools G: bH & Cou 5G StockstcMter Stru °0 6Z76° Grogosthei: NpEMAČ5A Christian „rank Olyasteni creMstaYnik Ja Moku: entaciJu |
| z5uOzu °0°Z |
Cu-rins
Introduceressssssssssssssssssssssssss212
Incara ci acu: ulatorul (\text{串串串串串串串串串串串串串串串串串串串串串串串串串串串串串串串串串串串串串串串串串串串串串串串串串串串串串串串串串串串串串串串串串串串串串串串串串串串串串串串串串串串串串串串串串串串串串串串串串串串串
Puncionareassssssssssssssssssssssss222
Nu: arul Me series 00000z-0°0000
3O2eEkkOfef06OBeEvuUuuuUUuuuuuuuuu°Z8
0oBOBvfeE OOBORvf fO
B1RIOuBOf eE E31RIOuBOf eUuuuuuuuuuuu 0
ouEoBBOf eUuuuuuuuuuuuuuuuuuuuuuuuuuuuuuu 0
okk²bKIO0000000000000000°f 0
o6oRUKBOf eUuuuuuuuuuuuuuuuuuuuuuuuuuuuuuuuuuuuuuuuuuuuuuuuuuuuuuuuuuuuuuuuuuuuuuuuuuuuuuuuuuuuuuuuuuuuuuuuuuuuuuuuuuuuuuuuuuuuuuuuuuuuuuuuuuuuuuuuuuuuuuUU
Ge2B3ef oef Bb² 10000000000000000000000000000000000
BfoeEBeRwwwwwwwwwwwwwwwwwwwwwwwwwwwwwwwwww
Pe3ep0Ho 8f'oo
TexHooet 8HHO
(·_9_78' opHo peHne s PHA 12 B2
HomEf ORf o f Oπ² exef Ee U w BEk 3OII EBO X0
Te/Ro o 6OBe² Ev j t nAh" uuuuuuuuuuuuuuz S9nkg Y² ek0o6o² oBE f O π² O3ef xok n
500:in ^z IIE²EfOfoxo6eRobOfe uwwwwwwuWu≤56::
ДьRбочEfOfOo6²OбOB1O uwwwwu0-°n:
ZBE3OK CHOCTH P BOTHOT M CTO
a" kOДьрЖ8'ep860'HO'o 9Kt- 'O OOT' o Odo6pe oTeHos 30k2BoBef EBe ERE BbMf E 3of E oO IIooBOB1O 3O Ef δEkef BEu
b'' He p86o'e' e7e' poOHp_ 9eH'0b003po000n8tH88'- 9o?ep8c H8npo9ep npo H87o- qoe H8 38II87O9o 'eHuOToc N8-
300e 07o np8xs ERe1B2 oEf oB2 UMef -BEBe o3kOB Eo12 ES 1oEBo Mo/OB kO Bb3nROMef vB ^2 Ox ORE E3nO2 ef EvBOu
c" 0o·8'o p86o' o'e7e' poOH-f' p_9eh' 8c He dOon_t·8n'e De-D8 o f' p8HouHo 7oD8s PO3oeINBO-fo Bo moKe kO koBeke ko 30/U60f O1of B² orU
EJEKTPNUECK( BE3Ok (CHOCT
a" 70' e H8 e' p00H' p-9eH' o' pK608 d8 tbo' 0e' -08' H8 OH' 8' 8s HoON8 He 9o-dop8e E ente78 no -8-bO' O d8 e H8oHS He 03no73-08' e 8d8n' epo t b383e9eoh e7e' poOH' p_9eh' os HemokE-ΦEoE2 Of EBe IeIoeRE E nokxokvueB 1of BO1BE Ie f OMORvB 2 Eo1O oB BolOB UkO²
b" H36KN08'e·OH'8' H8'K7o- 'O tby 383e9eH o IOoBpXHOt' oc ·8'o'pb6oc p8do8' opoc neu o x78IO7HoDos GbIueOBUBO IOBE- s ef 2Eol O8 Bo1OB UkO²S O1o BvRoBo BE e 3O3emef ou
c" He 0378N8e7e' pooH'p_9eH'o' e H8 IbXkD o7o 078N8s HOBRE3Of eBo f O BokOB eRe1B² oEf o-B² Umef BO UBeREuOBO 2 Eo1O oB Bo1OB UkO²U
M" He 37o_no'pe6K08e·86e-78s Ho·oN8 He o3nO7308e·8-6e78 38 npeH8tKHe cIbprn8He o7o o3·7IOUO8He H8 e7e·'poOH-t' p_9eH'8s OpbjK' e·86e78 d8-7eO' 'o7oH8c 98t7oc ot' po pb6o0e o7o IOxkeE oTe 8t' os >OB2 ekef EBe ERE 3OnReBef E 106eRE UBeREuOB² Eo1O oB Bo1OB UkO²u
e"KoN8'o p86o'o' e t e7e'o poOH- f'p_9eH' H8 o'po'oc 03IIO73- 08' e _Ib7Jco'e7c IPOXoIDKE 38 _no'pe68 H8 o'po'os I3IIOR- 3BOf eBo f O 106eRS nokxokvii 3O UIOB-
2e60fO oBl² EBoS fOMORvBO 2Eo1O oB BolOB UkO²u
f" (o p860' 8' 8 e7e' poOHt-'p_9eH' 8 H8 078XHO 9Kt' o eHeo36eXH8c 03IO7308n' e 38x-p8H08HeC 38E o'eHo t' pOHT-oo 38 38E o' 8 O' ot' 8' bueH 'oTRCf Ss N3IPOR3BOf eBo f O eCD fOMo-RvBO2 Eo1O oB BolOB UkO²U
JIINH(BE3Ok(CHOCT
a" BbIe' e H8E pe' c 0Ho9808n'e 8o np80o' e o 03IO7308n- 'e 3dp80 p83_9c oN8' o p86o- 'o' e7e' poOH' p_9eH's He 03IO7308n' e e7e' poOH' p_9eH' 8c oN8' o t' e_9opeHO O7o IOD 0b3DeH' 0oe' OH8H8p'o Doc 87oXO7o7o 9eIo·89EH' os Momef Bf OF eBf EMOf Ee no B2 eMe f O 2O6oBO oRe1B² OEf oB² Umef BE moKe kO koBeke ko oe² Eo3f E BeReof E nob- 2 ekEu
b" H3no7308' e 7oHNo npeIIN83Ho fpeI'08s BoH8No HoTe' e npeI- I83Ho Oo78s 3OuEBf oBO o6o2 Uk- BOf eS 10BO ^2 OBON2 OxOBOMo1OS fexRb3/OuE oe ^2 ekIO3f E o6UB1ES BBb2 kO s On1O ERE Of BEof ES E3nOR3- BOf o ^2 E nokxokvue UoROBeVs ue fOMORE f O2 Of vBOf EvBOU
C" kpeo'Op8'K08He H8 He0o7- HO t' 8p' op8Hes YOepe' e fecye Ipeo·7IOUO8'e7K' e O o3·7IOue-HO IO7OKeHOEc Ipeo d8 tObP- 308'e b9 o3' OuHO·8 H8 38x-p8H08He o/o7o 8·_9_78'op-H8' 868'epoKc d8 OOnN8' e o7o IpeH8tK'e OH' p_9eH' 8s >2ef Oovf eBo f ORe1B² oEf oB² Umef BE o IIoB BB² xU IIeB1RIOuBOBeRv ERE B1RIOuBOf eBo f O eRe1B² OEf oB² Umef -BES ueBo IIeB1RIOuBOBe R e B1RIOuef S BokE ko Ef oEkef BEU
H3kOJI3B(HEIΓPJK(3)EJEKTPOHCTPYMEHT(
M" kpeio 80·7IOo' e e7e'po- OH' p_9eH' 8c 0308Ie' e Ofouo peN_7op8E o·7IOOe o7o N8-euHO·7IOOes IROU ERE 1RIOUs ooBObef ^2 E12 enef 1bMbBvBvIIO oe yOoB fO eRe1B² oEf oB² UMeF BOS MOKe kO kOBek e fofoVBOfeu
e'' He nppe0o808' e 0b39OxHoJ-' o'e tos k OaIbpxk8' e np80o7-H8 t' oN·8 o p80HOe oe Ipe3 DK7o'oope9es ToBIO IO3BORvBO IO-ko6b2 1of B2 oR f O eRe1B2 oEf oB2 UMeF-BO B feoUO1BOf E oEBUO6EEu
f" O67eue'e Te noAnxoK E os He Hote'e 0o6oAnHO dpexo 07o 60-8s 0pBk'e oT8'8 oDpexo-eTo 87eO' DooKeE o' eTe 81'os GBO6okf Ek2 exES 6ExKUBO ERE kBr/O 1ooOMo/OB KO IIOkF OB kBEEkeEBe oe OoBEu
g" (o8 nped0oJeHo t'poi'- 0838tOb308He H8tBOpjkeHoK 38 o3070u8He o tB6op8He H8 np8xc_Oepe'e tec ue 'e t8 tObp38Ho o f e03IO7308' np8- 0o7Hos I3IOR3BOf eBo f O ^2 OxOuRO-BEBeRE moKe kOfOMORE onOof ooBEBeS OB² 3Of E o ^2 OxOu
He nO30o7K08' e H8 nO3H8Ho- e' oc npoO6o'o o' ue' o' o3- nO7308He H8 OH' p_9eH' o' ec 8 Oo nO30o7o d8 t' 8He' e t8- 9Odo0o7Ho o IpeHe6peNHe- 'e npoHDoIO' e 38 6e30I8HOH8 OH' p_9eH' o' es Ekfo feBf E-MOBeRf o keiOBBE moKe kO kOBek ko BeX1E fO² Of vBOf Ev B² OM1EBef O4OoB oB oe1Uf kOBOu
a" He H81o708e e7e' pooHt' p_9eH'8s I3no7308e noxOdkE oKe7e' poOHt' p_9eH' 38 08-1we' o npo7oxKeHOes >2 OBERf EvB
eRe1B² oEf oB² UMeF B Iue oBb² s E² O-6oBOBO IIO-kO6² e E IIO-6e30I0of o oBo o1o² ooBBOS 3O 1ovBo e I² oe1BE² Of u
b" He 03IIO73O8e e7e' pooH' - p_9eH' 8c 8o nppe07HOUO8' e- 7K' He No 07HOUO8 o 037HOUO8s BoE eRe1B2 oEf oB² Umef BS 1oBfo f emoKe kO oe Uπ² OBvBO o π² eB1RHOu-BOBeRvSe oIIOoeF EB² v6BO kO oe² e-mof BE² O
c" kpeio 8 o30bpi08'e·8·o'o o 8607o H8t'poi·oc 89e-HK' e 8·teo8po 07o 8tbxp8-HK08'e e7e·'pooHt'p_9en'oec o3·7Oue'e E enTe78 o' o3'ou-Ho·8 H8 38xp8HO8He o/o7o o3-08Je' e 8·9_78' opH8' 8 68'e-poKc 8·o teo308xJ8c o' e7e'-pooHt' p_9EH' 8s Te3E π² eBOf BEBf Eme²1E 3O 6e30ofooB f OMORv-BOB2Eo1O oB oRUuOfo oBO2BE2Of ef OeRelB2OEfOBUmef BOU
M" Cbxp8HK08n'e Hep86o'e e 7e'poohp_9eh'o H89Kt'oc HeIo' bIHO 38 DeD8c o He IIO3- 0o7K08n'e H8 7oD8c .oo' O He t8 38IO3H8'o t e7e'poOHp 9eH' 8oTo 'e3o OHt' P. DooC d8 p86o'K' t HeNos ERe1B2EueolEBe Ef oB² Umef BE oO onOof EB² bOeBe f O feo6Uuef E noB² e6EBeREu
e" kOДьрЖ8He H8 e7e' 'poOH' - p_9eH' o o 8' feo8pos kpo0e- pK08n' e38 p839oH808He o7o tOb308He H8 OooKeE o'eue8t' oc tU_ПО8He H8 q8t' o o OtK· 8.0oДР_No_t7OoKc.oo'o 9ON8'Д8 ПОО7OKK' H8 p86o- 8' 8 H8 e7e' 'poOH' p_9eH' 8kOIIp80e' e7e' 'poOH' p_9eh- 8пpeIo_ПО' pe68c 8' o eПОpeIeHS Mf o/o 3RrnoRU1E oe n² EueEf vBOB oB Ros o nokk² JxOf E eRe1B² O-Ef OB² Umef BEu
f" kOДьрЖ8epeXeE o'e OH' - p_9eH'oOf'po oOot'os >2OBER-foIIOkkB²KOf EBe 2exKeE Ef OB²UMef- BEoOoB²E2exKeE²b6Obe IIO-MOR-Io Be2ovBfo kO oe 3O1ReuVB Eoo- Reof E3O Uπ²OBRef Eeu
g" H3no7308' e e7e' pooht' p- 9eH'8c npoH8d7eKHO' o ec H8p8nHoDo' e o'shs O tbo'0e'- t'Ooe t' e3o OH' p_ Dooc 8'o te tbo6p83K08' e t'7o0oK' 8 H8p86o' 8 o 030bpi08H8' 8 p8- 6o' 8s H3noR3BOf eBo f O eRe1B2 oEf o-B2 Umef BO 3O one2 O6EES 2 O3REuyf E oB ^2 ekB Ekef EBeS moKe kO kobeke ko onOof O oEBUO6Ev
h" kOДьр8eДр8e0ПО- 0bpxHO'o' e38x08E 8He t_Xoc yo' o 6e3 9878 o 983HoHos XRb3/OBEBek²bK1E E IOB² xf ooBE 3O xBOUOf e fe IIO3BORvBO6e3OIo f o 6o²OBef E Uπ²OBRef Ee f O Ef oB² U-Mef BO B feouO1BOf E oEBUO6EEu
5uN3kOJI3B(HEIΓPJK( 3( KUMYITTOPHINTEHHCTPYMEHTU
a" 38pejI8e89oTbT 38pK- Ho' o_f'poiT'Ooc nOtoyeHO O' IPO03Oo' e7Ks 302vfk OBO UoB- 2 OhoBOS loeBo e nokxokvuo 3O ekEf BEI O1UMUROBo2fO 6OBe2 EvS moKe kO ob3kOke2 EoIOBnOxo1o/OBO oe E3- IOR3BO o k²U/ BEI O1UMUROBo2fO 6O- Be²Evu
b" H3no7308' e e7e'- p_9eH'o f89o f b+ tPiDo87Ho npEiH83H8ueHo 38 De7' 8 -o9Pi- 7e'- o 8-9_78' opHo 68' epoos I3IIOR3BOf eBO f O k2 U/E O1UMUROBo2-f E 6OBe2 EE moKe kO koBeke ko 2 Eo1 oB f O2 Of vBOf e E IIOXO²u
c"KoN8'o 8-9_78'opH8'868'e- poK He fe o3no7308c KdpbX'e 87eO' Dp_No 9e'87Ho nped
9e'oc·8'o·789epoc 9oHe'oc ·7IOOec npOHoc 0oH'0o e 07o dp_No 987o 9e'87Ho IIpeI9e- 'oc·oo'o 9oN8'Д8feTObpxK8' o' eHN8·7e98·b9Ap_N8s Gb- ekEf vBOf eBO fO1Boofo1RemEBe fo O1UMUROBo2fOBO6OBe2Ev moKe kO kobeke ko E3/O²vf Ev ERE IOxO²u
M" kpo He678NoIpoK' Ho_t7oOoK o' 8·_9_78' opH8' 8 68' epoK 90xe I8 te 03xObp7o 'eUHO; 036KN08n'e OH' 8' t HeKs kpo t7_48eh OH' 8' o3n78' He'e t OoI8s (o' eUHO' 8 nOIIHe O oOoec IIb7Ho' e7HO IIpTe- 'e 9eDoHt 8 no9oE s Teuf ooB-BOS E3Xb2 Ref O OB O1UMUROBOf OBO 6OBe2 Ev MoKe kO ^2 EuEf E k2O3f ef EERE E3/O2vf Ev
e" He o3no7308' e nn8·e' 8-9-78' opHo 68' epoo 07o OH' p-9en' c·oo' o f8 noOpeJeHo 07o9oDop8hos >OB2 ekeF EERE mokEΦEoE² OF E O1UMUROBo² F E 6OBe² EE MO/OB kO EmOB feπ² eko1O3Uemo IOBekef Ees 1oeBo kO kobeké koIooKo²S elonRozEv ERE² Eol oB fO²Of vBOf ev
f'' He 0378N8e 8-9_78'opH8- '868'epoK o7o OH'p_9EH'8 H8 ONbH o7o Ipe-o9epH8'e9- Iep8'_p8s I3RO/Of eBo fO o/bf ERE fOBemIe2 OBU2 OF Ok zZ0°C moKe kO ^2 ekE3BEl oIrrRo3Ev
g" Cn8308' e 0fouooh't' p_Doo 38 38peKd8He o He 38peKd8H- 'e 8.9_78' opH8' 8 68'epoK o7o OH' p_9EH' 8 030bH' e9pep8'_pHOKdo8I83OHcIOtoyeH O OH' p._Doo' es HeI2OBERf oBO 3O- 2exkkOf e EERE 3O2exkkOf eBO ^2 E Bem- ^2OBU^2E E3Bb^f Iooooef Ev kEOIO3of MOKe KO NOB2 ekE O1UMUROBo2 f OBO
6OBe2EvE kO UBeREuE 2 Eo1O oB IO- K0²U
6CEPBn3HOOBCLYKBHE
a" Bb370xe' e'ep0o3Ho'o o6t- 7_Жо8He H8 e7e' pooH' p_9eH' 8 H8 · 087oΦoDop8H tep- 0o3eH tpeO87oT' c · O'H O3no7- 308 t89o OdEHN' ouHo pe3epOHO u8f'os > O Bo3Ef OuyEf ue oe /O2 Of - BE² O 6e3oIOnOof ooBBO f O eRe1B² oEf oB- 2 UMeF BOU
b" Ho·oN8 He o6f7_Ж08' e ПОо-peДeHo 8.9_78' opHo 68' e-poos Ge² BΕ³f OBo O6OruXKBOf e f O O1UMUROBo² f EBe 6OBe² EE B² v6BO kO oe E3Bb² s BO OOMo OB Π² OΕ3BokEBeRv ERE oB OBO² E3E² Of E oe² BΕ3Ev
IHT'p_·Doo 38 6e3oII8tHOT' 38 peHDe'8
H N348·8e Hoxb' 8 npec npe- do 80o'e OH' p_9eH'8s OB12 EB Bb² Bvui oe f oX moKe kO 3OxBOf e IOBb² xf ooBBOS 1oeBo kO koBeke ko eBef BUORf O 3O/U6O f O 1of B² oR E oe² Eo3f o F O² Of vBOf eU
H H3no7308e t·o6o 07o dp_N np8' oyeH84oh 38 38'pe908- He o POnIbpx8He H8 06p86o'- 08HoK Je'8N7 0bpx_ f'86o7H8 n78'Φop98sДt²JxOf eBo fO keBOiRO o² b1O ERE o² eU BvRoBo /o π² OBE feoBO6ERef E moKe kO kobekko 30-/U60fO1ofB²oRu
H 8 o p86o o ec 0n8No
Дрьж' e peHd'e O no ' 8 bO H8-
чнчо fHOO8' 8 n7Ou8 H8
peHd'e O d8 7eKo n7b' HO Obpx_
de' 8n78s B π² oBEBef oRUoy² ef ke-
Bo може kO oe xRb3f e E kO π² EuyEf E
f O² Of vBOf eu
H Oonop8n'e7e'poohp-9eh- 8doJe'8n78t89oON8'o e 0.7HoueHS B n²OBEBef oRUOuObueo
BBUBO OIOofooB oB oBI0BS 01o2eKeEvBEfoB²UmeFB3OoekfBe keBOHROU
H He n03o7K08e o'Oopb' 38 03XObp7KHe H8 t' p_IXoI8 07o- 380 OH'8t' pBDe e Bos Moke kO oe f O² Of EBe OB BvIe Oe uOoBEu
H Ho·oN8 He peHDoI08'e 9e'87- Ho IIpeA9e'oc IopOHO o7o Ooh- 'o0es HoXOBeE E2exKeIeBE BOROb Mo/OB kO oe IOB2 ekvB E kO ^2 Euy VBIOBEs ef O BE6² OSeV
HkoOpe9e H8p86o'8 90xeД8 fe nokoo on8tEn np8xs HooeBe ^2 oBEOI² OXOBOMo10 E E3IOR3BOi- Be Bbfs f O I² OxO3OomU1BOf eU
H PeioHO npoepK08' e o' poe- 'o 38 IOOpeIOs I3IOR3BOHe oOMo ooB2 ES feIOB2 ekef E ooB2 EeBOu
H>okk²K0BBe BefBEROeOffEBe oBBO-2EueoBEu
H H31RHOeBe U2 ekO E E3B0keBe O1UMUROBo2fOBO 6OBe2 Evu YBe2 eBe oe Su BoEulE kBExeIe oe OoBE oO kooBE/foRE oboBoVf Eef OIIbRef IIOloN
H 1o/OBo ooBOBvBe U2 ekO 6e3 f Ok-30²S
H ^2 ekE kO oBoB² Of vBOBe 6Ro10xE ERE 3OnUs BOf EvS
H ^2ekE kO ^2oBe^2 vBOBeS nouEoBBOBe ERE ^2060BE eU ^2ekOS
H 30 kO ^2 OBe2 EBe U2 ekO 30 IOB2 e- kO oRek 1of BO1B oUxkk ^2 ekMeBS
H 3O kO ^2 OBe2 EBe f e3O6OBf o U2 e- kOS O1o 3OIOuFe kO BE6² E² O ^2 e- 1ome² f ou
H O' tbo6p8JKeHoK 38 6e30n8t- HO' NOI9eHN' e 03HO'e 07o IIOpeJeHO u8t' os N3IOR3B0iBe oOMO ^2 E/OFrE ^2 e3e2 Bf E OoBE E 01oeooO² Eu
H H3no7308e89o 8·et08poc npenopb8Ho o' PARr SIf 4s HenokxokvUeO1oeooO² E Mo/OB kO ^2 EuEf vB BolOB UkO² ERE noKo²u
kOaNo'oo·8
A vkPE0ykPEK0EHHEpyOoiOof ooB oB fO2Of vBOf e B 2e3URBOB f O feBORfo B1RIOuBOf e f O U2 ekO>ooBOBeBe O1UMUROBo2 O B U2 ekO ekBO Bo/OBOS 1o/OBO U2 e-kB e fOITbRfo /oBOB 3O UIOB2 e6Ou
Koh'po7Ho e7e9eH'o
30no3f OHe oe o 1of B² orRf EBe eRemef BE ^2 ekE kO nUof eBe U² ekO b eloRrOBOEv 3O IIb² BE IbBu
H8'poi·8 H8Ib760oH8'8 H8 peHIO8He
H 30fOoB²oη1OBO fO kB R6oUeF OBO fO ^2 efkoobOfe jz" oe E3IOR3BO Bb²Bvio oe loIpu
HДьR60ouEfOBOfO²efkoOBOfeMOKe kOoe²e/URE²OMexkU O E°n:u
H OπBEmORf OBO kB R604Ef O f O 2 ef koo-BOf e emexkU O E zS°n: j3eRef kE-OπO3of f O o1OROBOF Bb² BvioBo oe IOnue"u
I3Np8xKd8He H8 03XoJ 38 t'bpNo'OHO
Bb390xHOT
HMOZ BB3MOxfoBE 3O E3/2 OxxkOfefO E3XOK 30 oBb²/OBEf Es
H _B oB^2 Of ef E3xok 3O oBb²/oBEf E 6e3 BROX10 B E3xokO 3O oBb²/oBEf E
H EkfooB2 Of ef E3xok 3O oBb²/oBEf E of O1² Ouf E1 30 noo01OBO
H I3oMULBOf e o OkOnBe2 3O ^2 OxooMu10u10
I3oMULBOf eBO oe ^2 eno2 bUBO ^2 E noRUuOBOf e f O ^2 Oxu
Ko'80KHe H8 H8·p8HnHo·8 38 IIO-TO·8'8
HO12OfE1bB 30 Ioo01OBO jz5" moKe kO oe IooBOBE oB kBeBe oB² Of Eu
zuB10²OuBe f01²OuE10 3O noo01OB0 ko Uno² oB BO3E oB² Of OB E3xok 3O
Z>ouEoBBOuBe U2ekO oMe10 ueB10 ERE RelofOBROxfefO 1b²IOU
夫 > e ^ 2 EokErf oIouEoBbOuBe E3xokO 30 OBB²/OBEfEjzZ"oIpkxokvU EfOB²UMef BifOIIIO²uekTB²BOEREo/BoBef BB3kUX"U
kOДдрьж·8
Y2ekBfeoefUkkOe oB nokk10u
Cbxp8HeHoe
Gbx²Of vBOuBe U² ekO E π² Ef OkRexf ooBE-Be BEf O/Es
H 4EoBE
H fO oUxo
H 3OIIEBeF E OB ^2 Ox
H E3Bbfo0e/OfOkeoO
E 1UMUROBo2f OBO 6OBe2 Ev E UoB2 OioBBO B2v6BO kO oe o6x2Of vBO II2 E BeMIIe-2 OBU2 E MeKkU 0°C E f 5°C >OB2 eMe f O obx2 Of ef Ea E36v/BOHBe eloB2 eMef oBuK ERE /o2eIeFos 30 kO fe 30/U6E 6O-Be2 EvBO oBOv 1OnOoEBeBu
>^2ekE IIO- ^2 0kBRxEBeRf O oBx² Of ef Ee jf OI² u ^2 e3EMUBOf e" E3BOKeBe 6OBe2 EvBO OB U² ekO joiIO3BOHBe oBkeRf EBe Ef oB-2 U1oEE 3O eloINRoOBOoEv f O 6OBe2 EvBO E 3O² vkfoBO UOB² OHOBBO
kpei808He 38 O'Pi8DbDo/OPi8308He H8Oo7H8'8tpei8
I3B0keBe O1UMUROBo2fOBO 6OBe2Ev oB U2ekOEπ²ekOnBe U²ekOS O1UMUROBo2f OBO 6OBe2EvSπ²Ef OkRexf ooBEBe E onO1OB-1OBO 3O eloRo/oob6²O3fo²eE1RE2Of eU

ERe1B2oU2 ekEBe fe oe E3xB2RvB o6EBOBEBe OBIIOkBoEu GEMBORB fO 3Oue2 If OBEv 1of BeHf e2 o 1oReRoO 03f O4OBOS ye Bo3E ^2 okU1B fe B2 v6BO kO oe E3XB2 Rv 10Bo feooo2 BE2 Of E 6EBOBE OBIIOkBoE B 12Ov f O IORe3f Ev MU XEBOBu
H 30 Bo3E U² ek oe π² ERO/O ΠΕ² e1BEBO°0z°/z9/EGU
H >^2 ekOuBe U2 ekOf O nUf 1B 30 BBo2 Eu-f E oU2 OBef Eu H3IOR3BOf EBe IROoBMo-ooBE E MeBORf E qOBE Mo/OB kO 6bkOB ^2 O3keRef E nO BEKOb E BO10 kO 6bkOB ^2 ekOkeF E 3O 2 eOE1RE2 Of eU 30 oeRBO nonEBOuBe f Os Ev oe2 Be3ef oef Bb2v
H HEe 3Bb2 s Em 6e3RIOBf o E3XBb2 -Rvf eBo f O E3Pi2 OBef EBe oB BOo kepe1B-f E U2 ekU
IHT'p_·Doo 38 03xOb7KHe H8'8-9_78'opHo 68'epoo

He E3xB2RvHBe 6OBe2 EvBO B kOMOs f OBO oMeBS B O/bf jOIOof ooB OB e1oINRo3Ev" ERE BB BOKo>OB-2 ekef E 6OBe2 EE MO/OB kO f OB2 e-kvB f O o1oRf OBO o2 ekO E BOs eBO 3k2OBes O1o E3RE3OB OB2 OBf E E3-IO2 ef Ev EEREyfoOBEu
H3XBb2ReBe 6OBe2EEBe oB/ROof o MeoBf EBe ^2 eknEoOf EvIepe1Bf E ERE UnoB-2e6vBOf E O1UMUROBo2 f E 6OBe2 EE B2 v6BO kO oe2 eOE1RE2 OB oB/ROof o kE2 e1BEBO 006/66/EOu>2 ekOnBe 6OBe2 EEBeB IUnf 1B 30 oB6E2 Of e f O oBO2 E 6OBe2 EES1bkeBO Be Iue 6bkOB 2 eOE1RE2 Of EIO IIOkVII O1Rf OBO o2 ekO f OuyEf U30 oEBOIneBOBE BOs OBO meoBF OΦE2 MO 30 oB6E2 Of e f O oBIOkBoEEREfOs oe2 BE3ef oef Bb² U N3XBB² RvNBe6OBe2 EEBe B E3BOIuefo obBoovf EeuG oER 3OIIEBO OB 1boo oBekEf Ee ^2 eIO2 bYBOME kO IO12 EeBe IIOOOEbe OReNef 1Eu He oBBO2 vNBe 6OBe2 EvBOU
Cep0o3Ho 06t7_XXO8He
T8p8HDoK
YBOJQoEMO/-KO KREef BS YBOJOeME/-f KREef BS 30 Bo3E ^2 okU1B noRUoyOBObE Z /okEf E/O-2 Of oEv oB kOBOBO f O nolUIOBOu B orU- On f O feobOBBeBOBEE f O n2 okU1BO o ko/BOO 30 n2 okOx60 BEe EMOBe 301of f O n2 OBO kO n2 ekvBEe 2 e1ROMo6Ev n2 ek n2 okOBoufo n2 okU1BO n2 EUoROBEvBO E BO 2 oIObBeS on2 ekeRef E B /ROBO B2 eBOS 2 O3keR W E III E /ROBO ueBBb2 BO oB 301of F 30 n2 ekooBOvfe f O eΦ2 OBO obkb2- JkOf Ee E eΦ2 oBE UoRU/E 30 n2 okOx60 f O oBo1E j3> LIGUy> G"
BOs EBe ^2 OBOS ^2 oE3BEquOeOBIOOOuef EBe ^2 O3IOoek6ES fe oe o/2Of EQUOBOBfOs OBO IO-koRU ^2 ekoBObef O Bb²/Obo10 /O²Of oEv f oO oBb² 3Of E o²O3xOke 30 IOB2 e6BEReBE E fe3OBEEmo oB fev ^2 o-kOBOyBBf O ^2 okU1BO oB/OBO² v 3O REIOBOf O oBOBeBoBBEe f O IOB² e6BEReO1OBO oBo10 o ko/OBO² O 30 ^2 okOx6O oB/Rofo 3> LIGUV>GU
Γ8p8HDoOHHo_t7o0oK
O^2 Of E o f f E v B o^2 o l e Z / o k E f E o B k O- BOBOfO noRUuOBofefoB010BOU>03e- Be ko62e o^2 E/EfORf OBO 10ooBO 6eReK- 1Ou To3E ko1UmefBe feo6xokEm 10Bo ko- 1O3OBeRoBBO 3OIOUII10BOU E IOB2OM1E- Be FO B2E/okEfEO kBOKOBOFO 3O1UNUBO- fFO Bo3E ^2 okUIB oe IIOvBE kepe1B f O MOBe2 EORO ERE ^2 OEBokOBbef kepe1BS ^2 okUIBbB IIe 6bke 6e3IROBfo 2 emof BE- OF ERE 3OMef ef U O^2 Of E v B O ^2 ekIIORO- OB2OM1EBe FO B2E/okEsF Ev/O2OF oEof ^2 oI kO oe ^2 ekOBvB kepe1Bf EvB U2ekS 1OooBO6eRkIOjIOoOBvB 6of "S 101BO E BoEvIE k2U/E ko1UMef BES UoBOf oBvBOuE fOREuEBo FO kepe1B E nEomef o kO oe 6vof E B 101BO oe oBoE kepe1BbB E 1o/O e Bb3f EIf ORU E1o kepe1BB e IIO12 EB oBfoS OBO/O2OF oEv BEE ue IIORueBE o62OBf o 2 emof BE2OF Ev ERE foB ^2 okUIBu BOuOuFO 3OMvf F o kepe1B- FO OBO10 ^2 BOf OuyORf EBe /O2OF oEof ef ^2 oI E/O2OF oEoff F UoROBEv oe 3OIO3- BOu BOu ROuON FO 2 emof BFO kepe1BF O OBO1OS o2oTBFO 2 emof BO oe ^2 E6OBv IbM/O2OF oEoff F Ev o2olu 30 eBEf BUORf o FOReF EBe E UoBOf oBeF E nobE kepe1BE oIe ^2 EnoIuIIOBO B2v6BO kO oe Obo6uE BekF O/O ReK 2O3oIOnOBoF eBOu EBeFUORF EBe 2 emof BE oReK E3BEuOf f O /O2Of oEoff Ev o2oIoo2eIu 3OIOU
Pemof BB ERE 3OMvf OBO f O ^2 okU1BO fe IIO²OxxkOBfOBO/O²Of6Evu
O6x08' H8 N8p8HDoK' 8
Y2ekB e ^2 oE3Bekef /2ExkREBO oIOo2 ek O/Be E3Eo1BOf Ev 30 1OyeoBBO E kO6- 2ooBEOBf o E3NEBOf ^2 ekE kooBO1Ou IOT- 2 Of oEvBO BOxE 30 kepe1BE f O MOBe2 EORO ERE ^2 oE3BokOBbef E kepe1BEu ITO2 Of - oEvBO fe o6XBOUo 1of oUMOBEBEs 101Bo E OoBEBef O ^2 okU1BOS 1oEBO nokReKOB f O fo2MORfo E3f ooBOf es ^2 OkE 1oeBo Mo/OB kO 6bkOB 2O3/RekkOf E 10BO 6b230 E3f ooBOUIe qoBE ERE IOB2 ekEBef O uINREBE yOBeu ITO2 OF oEvBO oBnOKOS O1o U2ekB e IOB2 ekef ^2 OkE feI2 OBERfo E3IOR3BOfe EERE B 2 e3URBOB f O feooBIOB-BvBOf e FOBexF Eueo1O nokk2 bX10u 30 ^2 OBERf OBO UIOB2 e6O f O ^2 okU1BO B2v6- BO BoUf o kO oe oIO3BOB BoEuy1E U1O3Of Ev B UIIbBBof eBO 30 elONRoOBOeV >2 ekf O3- f Ouef EKeioBBEvS 1oEBO fe oe ^2 eno- 2bYOB OB UITBBOF eBO 30 elONRoOBOeV EERE 30 1oEBO Bo ^2 ekUIn2 eKkOBOS B2v6- BO 3OkBrKBeRfo kO oe E36v/BOBu >2 o-kU1BBe ^2 ekf O3f Ouef oMO 30 OoBf OS O fe 30 ^2 opeoEof ORf O UIOB2 e6Ou >2 E 3RoUIOB2 e6O E feN2 OBERfo B2eBE2 Of es UIOB2 e6O f OERO E ^2 EF Be2 Ref OEES 1oEBO fe oO E3Bb' s ef E oB 1Rof f O-fOs Ev OBO2 E3E2 Of oe2 BEs /O2 Of oEvBO oB-IOkOu
kpoDeI-p8 IpO N8p8HDoOHEn t7_48
30 kO oe /O² Of BE² O 6b² 3O o6² O6oB1O f O BOs Ev oRUuOIns oRekBOnBe oRekf EBe U1O3Of Evs
H 30 BoEu1E 3OnEBBOf Ev s MoRvS nok/oBBeBe 1OooEv 6of E 1OBORoxf Ev fome² jANnF 08^97_ ^ 07'' 1OBko10-3OBeRoBBO 3O nolUunIOBOU
H B3emeBe O² BE1URf Ev fome² oB φO6-² Euf OBO BO6eR10u
H >^2E_Bb3fE_1B Of e f O Uf 1oEof ORf EERE k²U/E kepe1BE ^2 BO oe oB² JKe-Be IIO BeRefof O ERE u²e3 EmeR o koRUnoooyef Ev oe² BEmef OBkeRGrek
BoBOIe nORUUeBe kONrBf EBeRf O Ef - 0^2 M0oEv 3O U' eXkOf eBo f O BOs OBO ^2 e1ROMoEvu
H GRek oB/ROoUBOf e of Oe Ev oe2BE3 MoXkeBe kO E3π² OBEBe keΦe1Bf Ev π² o-kU1B fO noooyef Ev BE Ok² eo f O oe² -BE3O 6e3πROBf o 30 BOos 10BO π² E-RoXeBe 1OoOBO 6eReK 10j1OoOBEv 6of " E noooyEbe πEomef o B 101BO oe oBoE keΦe1BbB E 1o/O e Bb3f E1f ORu 30 kO oe E36e/f OB π² o6RemE o π² EemOf eBO E konTbRf EBeRf E² O3xokES 3O-kBrXeBErfo E3IOR3BOBye oOMo Ok² eOs 1oIBo BE e noooyef U OoE/U² eBe E3-π² OuOf eBo kO fe e 10Bo elon² eoef BoBO² ERE 10Bo k² U/ oIeOEOReF BoBO² u N3π² OBeBe U² ekO 3Oekf o BoEqu-1E π² Ef OkRexf ooBES kooBObef E π² E IIOUII1OBOS E ooE/U² eBe kooBOBbyf o oE/U² f O B² Of oIIo² Bf O oII01OB1Ou
*KOBo E3EueoloRE - oB^2e6EBeRs fe3OBEoEMo OB fOoBOvUOBO Bb²/OBO10 /O²Of Ev BE oe IIOR3BOBe OB ^2 OBOBO f 0 301of OBOBO /O² Of Ev ^2 ekooBOBe f O E^2 OBO obk² KOf Ee E E^2 OBE UoRU/E E 30 ^2 o- kOx6OBO f O oBO1E /3> LIGUY> G/u> oIneEOrfo BEmoBe ^2 OBO ^2 E feoBoBBeBoBBe f O oBO1OBO kO 6bke E3Bb² s ef ^2 eMofBERE3OMvfO O BOs E360² S oo-Bef O1o BOO e feBb3MOxf OER e OB²- 3Of o fen² OIO² EofORfO/oRemE^2 O3XokE 30 ^2 okOBouBEe EMObE ^2 OBO f O ^2 OIO² EofORfO f O OMRVBof e F O oef OBO ERE f O 2O3BORvf e f O ko/OBO² O ^2 Ef- REuEe f O UoROBEvBO f O uRuZZS ORU Z oB 3> LIGLY> Gu YoROBEvBO E o² o1oBeBe f O 301of OBOO /O² Of Ev O² e/ROMef BE² Of E B/ROBO B² eBOS 2 O3keR 00 E 000 E B /ROBO ueBBb² BO f O 3> LIGUY> G
Pe9OH'eh fep0o3 / 030bHN8- p8HDooHHO67_ JK08He
Pemof BE E3BbI /O²Of oEvBO moXeBe kOBb3RoXEBe f O1Rof O f Of Os Ev oe²BE3o²eIIU 3OIIROUIf eU ToI o UkOBORoBBEeIe BE fOn²ObE n²ekBO²EBeRf O 1OR1URO-δEvu
H MoXem kO 06² O6oBBOMe oOMo U² e-kES 1oEBo oO kooBOBbUf o onO1OBOf E E3π² OBeF E o πROBef EB² Of oπo² Bf E² O3xokEu
BHo98Hoe: I3π² OBeBe BOs Ev U² ek f O 1Rof O f Of Os Ev oe² BE3 nouEoBef E o U1O3Of Ee 3O kepe1BOu
H Y2 ekEBeS π² ekMeB f O E3BbF /O² Of ðEo fo 06oRUKBOf eS E3π² OBef E of fπROBe- f E B² Of oπo² Bf E² O3xokE - of ORoxef πROBeK S 10Bo elon² oeef ERE k² U/one- ðEORef BOBO² - fe oe π² EemOBu
H HEe Ie E3Bb2' Em 6e3IROBf o E3XBb2 - Rvf eBo f O E3π² OBef EBe oB BOo keΦe1B-f EU² ekEu
Cep0o3eH DeH'bp
BG Cep0o3Ho 067_Ke08He Bb7-N8poK
TeRusn00800nzzznf 9^
E-MeRr s grizzly- lidl.bg
IAH 408297_2207
Bhotoe7
MoRvS EmOuBe ^2 ekBEkS ye oRekBOuEv Ok2 eo f e Ok2 eo f O oe2 BE3Ou > B2 BO oe OB² XeBe o IIOOOuef Ev IO-/o² e oe2 BE3ef oef Bb²U
GriRAI Tools G: bH & CoU 5G
StockstcMter Stru ^ 0
6Z76° Grogosthei:
TEPMEHm
www.grizzlytools.de
Pe3epOHO u8t'o o 8·feto8po
Pe3ep0HO 8t' o 8·feto8po E e no7_oe H8 www.grizzlytools.shops
E lo B ^2 o6eoO f O ^2 bU O BB3f E1f OB ^2 o6RemES oBb² JKeBe oe o f Oo ^2 e3 f Os Ev
of ROiF MO/O3Ef >2 E konIbRf EBeRf E Bbπ² ooE o6b² feBe oe 1bM oepBH3eH / eHiTp,
öip. [291
>03EôEv Å HOEmef OBOf Ee > 0²bUOB Å
z6 ÉkOπBe² 30 π²OxOoMULOu10 9zz05ZZz
z5 H01²Oηf El 30 ποο010BO 9zz05ZZ°
zz$ z° ΓΟηηef 1RθuS ΠIIeOBoBef ef 1Rθu9zz05ZZZ
z9 Hoxx 302 ef ke 9zz05ZZf
kpeOoH8 opoNoH8'8 tbo'Oe'f'Ooe H8 EO
>2okU1Bs(·_9_78'opHo peHne
MokeRs PHA 12 B2
Ge²Eef fome²s 00000z-0°0000
>2ekMeBbBfOkeIRO²OδEvBOS onEoOf nO-/o²esOB/OBO²vfoobOBBeBfoBO 3O1of okOBeR-
OBBOfOGBIO3OxO²Mof E3OδEvs
2006/42/4C · v 2014/30/4u · v 2012/19/4u · v 2011/60/4u &v+4u Sv2010/863
O6e1BbB f O ke1RO² O6EvBOS 1oHBo e onEoOf IIO-/o² eS e B oBbBeBOBBe e o ΠE² e1BEBO°Ozz/65/E • f O EB² oneHolEv IIO² ROMef B E f O GbBeBO OB 8 Iof E °Ozz /u oBfoof o/-2 Of Euef EeBo f O UnoB² e6OBO f O on² ekeRef E onOof E BeIeOBO B eRe1B² EueoloBo EeRe1B² of f Bo o6o² UkBOf eU
30 kO oe ooE/U² E oBoBBeBoBBEeS oO π² ERoxef E oRekf EBe xO² Mof E3E² Of E oBOf kO² BE E f O6Eof ORf E oBOf kO² BE E² O3no² ek6Es
4H 62841-1:2010 · v 4H 62841-2-14:2010 · v 4H I4C 63000:2018
4H I4C 00014-1:2021 · v 4H I4C 00014-2:2021
30fOoBOvIIIOBO ke1RO²OδEv 3O oBBoBeBOBBEe OB/OBO² fooB fooE ekEf oBBef O Π² OEBOK EBeRvBs

GriRAIa Tools G: bH & Co 5G
StockstcMter Stru ^ 0
6Z76° Grogosthei:
TEPMEHm
z50z_ 0^

Christian „rank
YIIbRf omOuIef ^2 ekoBOBEBeR 30 ko1Umef - BO6Ev
oiä- K-R . h! ahyVmeaωä
ba' - yownssssssssssssssssssssss 24O
Pi{Vrlqóur.v.t#e. 5
Pi#rtourv(qC#,8t.P/
IIC#C8{Fe(Prξ{q}lμoPuuuwwuwwuwwu 6
qfoq.t. 16
Pi#iy#CdefirF(-#yhCPuwwwwwwwwwwwwwwww 6
irrtvU,tC#CuF.#Ffu,wwwwwwwwwwwwwwww 6
Y.Vshichar-UL,ha-Rssssssssssss248
N. C_f h C F r v - q l r h r r v
CtdClrhCPwwwwwwwwwwwwwwwwwwwwwwwwww 8
wVtUpVICrq,vF.
t-ur-ewwwwwwwwwwwwwwwwwwww8
arvuaP q#{riδ|qiet rP C; dClrhCP
.1ruf#uuvr#yCrlhrvVUUUUUUUUUUUUuuu9
.yhrPCf dClrhCPyicql,vrP_wwww 5^
ó! VhgVam- ' i- sssssssssssssssssss 203
\xC#FeuCFCtr#3t μ(duuwwwwwwwwwwwwwwww 5Z
Kuéμit. rξC#FeμCF| PC Cq| V|leP
Pi#F#deecVfuCF,FC. F-
μCf C#&{uq|,v. Puroo
aeó#Fi:t. †-†r #r-Feueueueueueueueueueueueueueueueueueueueueueueueueueueueueueueueueueueueueueueueueueueueueueueueueueueueueueueueueueueueueueueueueueueueueueueueueueueueueueueueueueueueueueueueueueueueueueueueueueueueue
AhagVoi! yi-ssssssssssssssssssssssss 206
I I ryt(PUCF, FCF. P do#F#t. PF(-
-+r#r-FeWwwwwwwwwwwwwwwwwww
éévF#(Né#VpUuuuuhuuuuhuuuuuuuuuuuuuuuuuuuuuuuuuuuuuuuuuuuuuuuuuuuuuuuuuuuuuuuuuuuuuuuuuuuuuuuuuuuuuuuuuuuuuuuuuuuuuuuuuuuuuuuuuuuuuuuuuuuuuuuuuuuuuuuuuuuuuuuuuuuuuuuuuuuuuuuuuuuuuuuuuuuuuuuuuuuuuuuuuuuuuuuuuuuuUU
Cyr yecPoo 60
Aag-, - KgakL K- a - h' Vol! sss 261
5 hgLU! -' Z gVö. ! ωgVgó. Vö
gωδn, ω' Z 'ömm! Uω' ZR
bi sssssssssssssssssssssssssssssssss 261
ba' - ywyn
N-γt C#. Fe#C yC F. v Cy (#, F. P vεCP t CP
rqCvCd (#Fioóμrv. P ql, v. P jrdrξeP ÚC-
I (u)vr( «t -t ïr-e» e «. I rüF#ö r#γC- Irh(>>U
pq(dCfH CFr EFt yC F.v CqouF.t. kCP
- -ur-eP-B.1eP q(foF.FCPu qC#(ut C
t-ur-erleyté. ur uCF, F. 8C8uCf HC
qC#Cyr yep CvCd (#u, r F.v q(óF.FC
UCl-q(VIee. urfr Frlluo etryt U L r Fv F#oq C-Fo etrurxiCf dCI t Frh. uCvoF.FC
Ir&F(-#hCP.F.P+ur-eP+CPU


z\& ( . hr Plr\& F(-# hCPrhvC\& F e CC-FeP F.Pt-ur-ePuPiR#et(-vt.μCvFwεP-q(- r\& H\& F y&C.F.vCtd,Ir&CFS.t#ef.uC3.F.v Cqo##B.UH&CV,tFr q#(truFfu,F&P(δ.- yhrPlr&F(-#yhCPuEurErhFr μrFCtFttrhCtr#μ(buCiF.tFfet.F.Pt-- tur-ePu a#.tμ(qirhFr.F.t-ur-e μovloqrPqr#y#,drFCuCycF(-PCvCdr#oqrV(-PFurhPt#et.Pua-1,FrUCl,F&P (δ.yhrPlr&F(-#yhCPuCqC#CSu Fr oI C FCéyy#CdCrqr#hqFr t.qC#,δt.P F.Pt-tur-ePtrF#hF-Pu
ó! Vβ, h. + mhāZ x! n' Z
a t-ur-e q#(VI éqrFCqCq(ulrF&u, yC F.vrξeP t #et .s
HΠI, vβt μCS δδCqI, F-vt. uCδ. μδ(-#yhC
C-ICuovr 乌 v C - 1 乌 ,oqrPquturδ(U,#CetCvhδrPu
GR
AUCFr#yCfHCFCFrμ,t&C rqrE#yC- tHCPrqB#εqrFCμovrdof(vrhvC# rqC#uPfr#rμevCu
e,érqr#Cf#r #et.ql-δrv rqF#eqr-FC#.F, F&P qC# (utrP (δ.yhrP1r3F(-#yh-CP μq(#rh vCe#r&t ruhvδ-v(Fvt#et F.uCvC q#(uCl et r o.μεP F. t-t ur-eu ztr#FePe(t#et F.P.F.Pt-t ur-ePrhVC-qrue-v(PyC CF-t euCFC eVI,VrPfr,ll-P Cvé#u q(-PeF.vδδ(UF.t HC F(-Pu dt-ur-e q# (#horFCyC (uCuet #et .uHrv et trδCfrh yCt -vrtesrqCy-yrl μCFue t #et .uNF.vqr#hqFt.rqCy-yrl μCFueP t #et.PCu-#uvrFC. ryyu.t.z uCFCt ur-Cf FeP drv CvCI CuV,vr&uCmuhCr-éuv.yC del #eP qI-(drhl (vFCt r μ. (#ee el CveCf μev. t#ef.
oh! dht mhav . - ! L δV' ZR/ o- ! - δVgεVR hξV. , a' mt R
pq( - ur-,fr F. t - t ur-e uCrl eYxiFr
Fqr#rtóurv(qC#,δf.Pu
pq(#hqFrFr FC-Iw, t - t ur-ChCP μr t- FFO#oqU
H qCvCd (#F0oμrv. qI, v.
H I vérF (UCFrue-vt. P
H # ( C# ( CP Cq(# # d. .P v.P
H hqolulr&h
H Fr #o r, yvulr&h
H nCl, u3
H (δ.yoP t #et F.
Hm.-g-!i- -a VUV!ga'gnRδha .h!α,-mβLäVag- as
b. ^ k t . Z^ Z
\& Cqr (vht r\& P.F.Pt- t - ePV#ht u(vFCaF.vmuq(↑FVeuCqhtrCv(yoov.trh- C_U
z Kéμ. V, é(-P qI Cvht μCF(PjΠr #-F#rdóμrv(ü(-μqh"
^o I#ot erF.tr#ICVe jμ{vr μev. rqd,vrCICVeP"
ZIvds. CF, FCF.Pdo#FfP
pv(hyμCFC Cr #μ(ó
5ae#Cyeervr#y(q,h,t.P
6 H&CuOqF. P rvr#y(q(h,t).P/Cqrvr#y(- q(h,t).P
7 ar#ICVe jμ(vr μεv. rqdd, vrCICVeP"
8N-+r#r-FeP
9pqCd,1t. - r#r-Fe
0n, f. qI, v. P
z hqol ürl6h
° Fr #o r, yv (uI r8h
Z ,# F. C C q(V I e P e# C - t ,F r v
N-ur-e do#Ft.Pf-tr #r-Fe
51 VérF (UCFré-vf.P)
6 # ( C# ( C P C q(# # o d. .P o - v.P
7 V-éoóμrv ( q#(↑FCFr-Ffuo μCt C##(u) ql, v. P
baksvA
z8Pi, uC t ut dE. P
z9L Cf Ch#ql, v.P
0Piq(8(t e μCt C# (u
z r (vCP C t C s # i ()
00 yul qew
°Z , v.Vh8C
pudCl. VdC
oh! aY! - Un, hoge! yi- R
a t -ur-e δéFr évCv qr #FrdóμrvI,ξ(vC ql,v.P μr δu (μCt Ch#C ql,v.Pu d t -ur-e q{ (#horFC y&C ql,vμCfr δ(- u,#C uCt CvδrPS yC l (xofμ. t . Cμu v uC yC δ. μ(-yH C-C-I CuúvU Lq(#rhFr vCV#rhFr F.lrF(-#yH C Fr v rξC#F.μ,Fvtri#μlutF&P UCF Fr #qr- #y#CdéPu
ThxgKL X- ! - kgZ! a' gakL
b. -ä- UV! goÉt mhäZ ., LäZ
| ž! t āVR U t! ga- ZR th, L xs s | Pw/ r 12 A1 Pw/ r 12 A2 Pw/ r 12 A3 | Pw/ r 12 B2 Pf Sw/ 12 A1 Pf Sw/ | 12 A2 |
| PAPr 12 A1 Z0 60 | 60 | ||
| PAPr 12 A2 f 5 | f 5 | ||
| PAPr 12 A3 | Z0 | ||
| PAPr 12 A4 | |||
| PAPr 12 B1 | z °0 60 60 | ||
| PAPr 12 B2 | |||
| PAPr 12 B3 | |||
| PAPr 12 B4 | |||
| PAPr v12v f 1 z50 80 80 |
Y. VδhǐghaR - ' UL, ha- R
p-Fe . rvoF. FC qr#r FVPVCt uE P -q( -δrhξrP Cd, IrCP uCF, F. t#eF . F.Pf-- t ur-ePu
Avo r buar or uHsHpvul, VrP t r, F(- C-1\&_0. \& Ioyr CuCF, II.1. P r- FCtrh#t.PF(-t-1t #r-Feu TCuV,vrFr -qob.Fp-q(8rhEgPCd,IrcP UcFFP (8.yhrP t trFw, r F.do#Ff. UcF.t -Fe t#ef. q(-CvCd#(vFCt Fp(8.yhrPir&F(-#yhCPF(-t-tt #r-Fe UcF-d (#Ft Fe F.Ptr#,Pzv12vTv4Ai un C V#rHFr μC lrrqF( r #eqr#cyC F. 8C8&uCt hC do#Ft. PuCqqr#t ofr#r Pql.#(d(#hrP t F&P Etr #t FEP (8.yhrP tr&-st μ(U
∑Zm- 'i-gωä o. Vδhǐghωä -' U-, hi-R
Aviyayr Spvv drv F.#rhFr C-Fe F.v -qosr. Ct dCI rhCPS ec q#UUB r CFut. Cu t-veqrBC rhvCaT (VC#oP t CF&uOP F#C-MCFt oPe e, VCF P
Avo r buar or HsHpvv 8rv F. #rhFr C-Fe F.v -qo8ri\x. Ct dCl rhCPS rv8et rFCu VC q# ( uOB r CFut. C_U t -veqrC q (#rh vCRhvcT (VC#oP t r CF300P F#C- CF4- t oP e , vCF( Pu
Avo r Z Hpvv sry F. #rhFr C-Fe F.v -qo8r3\x. Ct dCl rhCPS ec q# (uub rCFut. - Cu t -veqrC q (#rh vCr hvcrl Cd#uPe F# \& CP t VC#of.F.CFPt CF uoP F#C- CF t oP e , vCF( Pu
mu 3 L kEs!p v δrv F. #rhFr C-Fe F. v -qó-δrξ. Cf dCl rhCPS éC q# (üuB r CFut. μCuД -véqrC μq (#rh vCr hVc-1 &we o. μ, u
baKVaV' umβV, - h. Läω' gZ ' o' Khön
X124TEAM
z -t ur-erhvcFueuC F.Pr#,P
zv12vTVT4Ai uCllr&F(-#yrhur-tt'z
-r-FePF.Ptr#,Pzv12vTVT4Ai uZ
f-t r #r-FePF.Ptr#,Pzv12vTVT4Ai
rqif#eqrFCs vC d (#Ho( vFCs ov| ur t-t ur-epdo#F. P.F.Pr#,P
zv12vTVT4Ai U

Pi#(t(t e!

i.#rHFr F3P(8.yhrPt#eJ.P

a#.t&μ( q( &r hFr q#( t FCFr-Foo μC-Flu v

a#.t&μ(q(&&Fr μ,tUc

a#.t&μ(q(&hFr q#(↑FCFr-Foo t- #uv

Kéμ. V, é(-P q| Cvt μCF(P
eCFrue-vf.uhv.f.PF(-μCtCi#u qI, v.P
工 工 I ruf#uEPT-ur-EP drv CveU(-v+FC(duC, Cq(#hmuCFCui t uV(1 F(-8Cy#CuEv-F#(teICF(-u,δ(-t.μChvrOf&Fl q#(c-Ov C-Fo drv q#eqr vC Cq(#hqFr-FCsPμ.δClryμev(CFuo Cqov VI.F(FF(FP.Pr del3μ.Por-eP F(-u
ohakR.!VhaSV.Van'haR -U-,h-RZ,hKg!ak6a h!y-,hiwa
Avo r buar oruHsHpva- L^ gh t,hRga.R.!VhaSV.Van'haR--U-- ,hi-RcgaR V8ZyihRcgaR- .hakVai' hAR K-gaR.!V8a-y! - UER.Vo.-!exV- ag-am-Eimh-ogt gV Z,hkg!akt h! -y-, hiVsNrqr#hqFr t.μ.Fe#.t.Poliv Fv (8.yu vql-CvCy#,d(vFCqC#Cu, -Ff S qC#CF.#rhFC&uhvδ-v(P.lruf#(ql.ξh- CPS q-#UCy,i.Pe/ucf|VC#uvF#C-μCFt μvu e o,L'hgh t,hRga.R.!VhaSV. Van'haRK-aV8ZyihRya-mh,VagknX!n'Zs
己 #(Pllruf#wO r#yClrh(>Fp q#(rδq(8rP Cd(#,tF.lruF#oR#yC-1rh(q-lrF(-#yrhμr tovδrt. irvt u#uCFC"tF .lruf#uδshuF-(eql-1rlF(-#yrhμpqCFC#HCjCt u#μCFC"
zA∑é AΛbiAž ŵ Š Yb ðA∑iA∑
a" aGZ! high gVä X6! Vh! y- i-R K-æ- !t K-αK-, L Uωga' mεäVs z CucF, FCF(3e t ü(Fr3v h tu #{ & C-ξ,- v(-v F(v uhδ-v) CF-teμCF(Pu
b" 5 Zä, hagVö! yhigh Z, hkg! αKL h! - y-, hi- 'h hK! nξamhR - gmt' U- a- ! hRct. ωR ö. t gZä. -! Vö' i- hU, hkgωäÖY! 6 ac - h! iωa n' Kt- āZRspqó FC. IrüF#&u, r#yClrhC rξε#t (vFCi t qvee#rPS Cqó FI-P (q(h)-P
q[# (uv vC CvCd ]ry (uv. f ov. e (\& CvCe- , f r P)
C" i - gL gVä xha! a' mt hat R Z, hKg! a- KVu h! y-, hiVoc K! - gLgh g- .- a- SaL K- a gVOR .- ! ho! a' k t mhavor 'h-. t' g-' Z- U-, hi- Rsi- tov qr#it qCt μ (hrvδεtrFC& vC† CP ü, v(-v vC†, †rFr F( v él ryt† U
HAbi Tui HASe AAnbuA
a" T- ^ m - g - Z, h g! a k 6 a h! - , hiwa . ! é. haä- hiaa- a K- gL, , Z- , - ygZä hKL' gVgh . ! iE- s 5 Za g! V. V. Vahigh . Vge gV ^ m - m h V. Vaδn. Vgh g! t . Vs 5 Za X! Z- amV. Vahigh . ! V' - ! mVyhiR - mLgωa mh yhawmea-Z, hkg! aKL h! y-, hi-sic μ. F# (q| q&. μévC Vúf μCFC òCi (& uCF, II. IrP q#horP μr&u-v (-v F(v uhδ-v) . I rüF(# qI. ξhCPu
b" A. VUhuyhgh gZä' ωm- gakn h. -- Un mh yhaoméahR h. dUL ahahRc t. ωR' ω, nahRc aeh! m- agaKL ' 6- m- g- k- a Oyhi- s Nr qr#hqFr t. yrh- r t. P F(-t u μCF(PS qC#CF. #r hFC3 C-- ξ. μev(Puhvδ-vP. I ruf# (ql. ξhCPu
C" 5 Zä - Unahgh g- Z, hKg! qKL h! - y-, hi- ā- hia- a hKghaehmeä- ' h β! Vxn n oY! éR' oαenkhRs i-tóv rht (δ) Pvr# (u tr evC. I rüF#o r#yC- Irh (eC C-ξeF r F(v uvhδ-v). I rüF#(- ql. ξhCPu
M" 5 Zä - 'kigh βi- 'gV K-, 6 δoVs 5 Zä X! Z' amV. Vahigh . Vgε gV K- , 6 δaV yα- mhg- UV! Lcg! LβZymn- . V' ðδh' Z gVö Z, hKg! αKVU h! Y-, hiVos é ö, L' ' hgh gV K-, 6- δaV m- K! aL - . t öUZ, εR aeh! mV- K! - 'ihRc, Lδac - αχmZ! L - āgakhi-mha- n Kaavumha- hξ- ! gnm- g-s i- tov uCFrF#CμεvCe μqr #δr μεvC üCl uδC eC-ξeT (-v F v uhδ-v ( . I r-üF# ( qI . ξhCPu
e" h .h!i. g0' Z x! n' ZR hat R Z, hKg! aKVu h! y-, hiVoohXogh! akT
X6!VcX!Z' amV. Vahigh K-, 6 δaV h. éKG- 'ZR. Vöä- hia- a K- gL, -, Z, Vya- x! n' Z' h hξωgh! αKVʊR X6! VÖRs A t #eJ. ÜCl r δh - q(-vC rhvCa ïCF, II. I (y3C t #eJ. t r R Šr Fr #&ül ïP tú #(-P μr su vr & F(v ðhvδ-v) .I r-üF# (qI. ξhCPu
f" bLä δhã m. V! hi ä- . . VUhoxyehi Z, hagVö! yi- hat R Z, hkg! αKVú h! y-, hiVö' h' ZmhiV mh öy! - - 'i-c x! Z' amV. Vahigh ma- . - ! V- xn. Vö ä- .! V' g- ghóhg- a-. t δaLg-ξZ. ! V' g- 'i- R! hʊm- gVR δa- !! VnR +RCf Ss L r F. t#et. μ&CP δδ, FCξ. P eCD μr lú vr FC ( uhδ-v( P . I rüF{ qI. ξhCPu
ZATR5ui HASeAAnbuA
a" y- hi' gh ' h hy! nV! ' Zcä- hi-' gh. ! V' hkgakVi K- aä- x! Z' a-mV. Vaigh KVaan, Vyakn K-gL gZ x! n' Z hat R Z, hkg! akVu h! y-, hiVos 5 Zä x! Z' amV. Vaigh Z, h-Kg! aKεR ' o' khöεR hLa hi' gh KVÖI - ' meäVac ö. t gZR h. n! ha-ä-! - Kωgak6 ac-, KVt, n U-! mL KWαss L Cf Fyμe Cq# (f rξhCP uCF, F. IrF(-#vhC. Iruf#uuvr#yClrhv C#urh yC vC qC#CF. #. eluvf (VC# (h CF(μü- f h#C-μCF#t μ(h
b" !Z^ amV.Vahigh hXv.,a'mt-gV- maKnR.!V'g-'i-Rs Z!Z'amV-.Vahigh.Lag-!V'g-ghogakt yg-mLga-s z q#(fFCFr-FfoP rxi pOPS oqr PmuCμ,tUCt uov.PS CvF(1sté.Fu, qCq(UFtJC CtdClrhCPS ##,v(Pe q#(fFCFr-Ffu,Cu(ePql-t#.3μ(qUvFCtFiP UCF,II.IrP t-v- eeur PS mruvl-VF(vuhvδ-vl CFmuu v F#C-MCFt μuvv
c" A. VUhuygh gZä - KVu' a - hK- KäZ' Zs o! a - t gZ' väsh' Z 'gZä . Zyn! hum- gVR n/K- a gZ 'ö' gVaxi- m. - g- ! a6 ac K- æ6 R K- a. ! a - t gZ mhg- UV! L gVö
h! y-, hiVoc 8a- U-, iEgh t ga V 8a- kT. gZR β! i' khg- a' gZ aeZ - . hah! yV. ViZ' ZRs d μrFCd (#, Iruf#uuvr#yClrhv μr F (δ, tF-I ( vC V#t urFC3 + F(v δCióqF. e. qC#(- te #rufCF(Ptr. Iruf#u, r#yClrhC μr rvr#y(qI. μevl δCióqF. C-ξ, vr&F(v uhδ-v CF-t. μ, Fr vu
M'A.Vm- K! uahgh goxt aK, hdaL !uaema' ZR n ,Va. L K, hdaL .! aai -t gZa hah! yV. Viz' Z gV0 Z, hKg! aKVu h! y-, hiVos I vC ulr8h q(- qC#CuEvrl t-vdr sr evI r evC qr #t F#rdooprV rE,F. μCF(-.lrF#U (ur#yClrh -mu (#rhVCqI UCI et rF#C-- μCFt μou
e" aα- gZ! high gZä α' V!! V. i- ' - Rs o- gLgh' g- aeh! L K- a δa- gZ! high . Lag- gZä α' V!! V. i- ' - Rse, FfFf (v ïCéβt F, δ-vCFó F(v ïCl ïFr# (εI rγt (F(-. I rüF#w (u r#yClrh(-)r Cq# (fδou. Fr P ïCFCf F, t r&Pu
f" ±b! Z' amV. Vahigh K- gL, , Z, V! Vox' mt s 5 Za UV! Lgh U-! 8aL! Vux- n KV' mmg- g-si! -gLghg- m-, aL K- ag- ! Vux- m- k! aL-. t KaVumha- hxi-! gnm- g- si--tov dC#s#, #(ut CS u| t peuCFC e μCü#, μClI, rvδet rFC& vC qCf (uv t rUv( umrvc rxc#FeuCFCu
g" bLa. -! éxVag- a' o' khoéR ya-gZ ' uaaa' Z 8a- gL hwoa - a- !! t UZ- ZR K- a' o, , VynR' Kt aZRc 8a- 'U-, iEhgh t ga hiä- aexVoa' oaa-shaehi K- at gaX! Z' amV. VaVag- a' ω'gLslrF. t#et. δCF, xrrv t-l- l (yeP t ov. P q( # (uv vC prir el ov ( & uhδ-v( q(-t trFhoVFc3 μr F. tovv.
h" 5 Zä h. - ā- . - uh' gh, t γω gZR
hξVαkhíω' ZR. Vö - . VKgn' - gh
- . t gZ' öx'an x! n' Z h! y-, hi-
ωä K- aMZä - γäVhigh gaR - ! xεR
- ' U-, hi-R h! y-, hiωas toyr μiCP
Cq#óf rüF. Prvε#γr&CP μq{ #rh vC q#{ -
ul.érh t (VC#oP F#C-μCFt μoPrvFOp Ucl Cf μ, Fr vF(-dr-Fr#(IéqF -u
H∑H i Aue r yTuαA HAbiTui oYb aAAbuoy
a" 5 Zä - ' khiigh βi- ' gV Z, hkg! a-Kt h! y-, hiVs z! Z' amV. Vahigh gV ' ω' gt Z, hkg! aKt h! y-, hiVs i( t' Fó . I ruf#o r#yCl rhI eC u, vrF. δ(-Ir#, UCI UFr #C UcC Cf dCI et Fr #C t F(v #-éμo y&C Fv (q)h! t trδi, tF. - Ur
b" 5 Zä x! Z' amV. Vahigh gV Z, hkg! a- kT h! y-, hiV hLa δha hah! γV- . Vahig- a K- a- . hah! γV. Vahig- a- . t gVä δa- kT. gZs z q( &l seq) Fr . I rüF#3oó r#γClrhS (I tr#i# μoP F(- I q(h)- δrv rhvCδ-vCFoP μr F v δ&Cuo-qF. SrhwC& rqduhδ-v( Uc& q#Eqr& vCrq& t òr-Ct Fr hu
c" A. V' oäδégh gV βu'm- .t gZä Zyn! hʊm-gVR n/K- a-U- a! high gZ' o' gVαx-i m.- g- ! 6 ac hUt - ' Vā hiä- a δöä- gn Z - U- i! h' Zc -- t gV Z, hKg! aKT h! y-, hiV. ! aä -- t V. Va- δn. Vgh! ðæma' Zc-, -, γn hξ- ! gZmL gωa n-. Vænkö'- Z Z, hKg! aK6 a h! y-, hiωas L r C-F, FC q#{I. qF&u, μεF#C μr3u vr FC3 (uhvδ-v(P Cú/út iCP rüh.v. f. PF(-. Ir- uF#&u (ur#yCI rh(-u
M A. VæZKhúgh g-Z, hKg! aKL h! - y-, hi-. Vö shä x! Z' amV. VaVú- ag- am- K! aL . . t . . aδaL K- a mZä h. ag! ε. hgh' h LgVm-. Vö shä hi- ā- a hξVaKhaωmεä- mh gV Z, hKg! a-Kt h! y-, hiV n gaR . . . ! Vú' hr VδZ- yihR ā- xha! iEVäg- a gV Z, hKg! aKt h! y-, hiVsic. I ruf#u, r#yClrhCr-hvCà r qühvyδ-vC t FC t #cC μ. rʊqCδr-- μevr v t#. f Fu vu
e" 2ooagZ!high g-Z,hkg!okL h! y-, hi- k- ag-hg- !gnm-g-sb,xyxgh y-goxt a h'U-, mεaZ hoaeo-y! Lmm'Z n. !V' L! gZ' Z KaavU-
mhawh-!gZmLgacae! -U' Z hxi-gZmLgwaK- aKLahL, ,ZK-gL'g-'Z.Vo m. V! hi-a-h. Z! hL'-ha-!aZgaKLgZ,hagVoi-gV0 Z,hkg!akVu h! y-, hiVos zh. h! i- gW'Zβ,LβZRc-ä- aε'gh gZä h.a'khonggVObZ,hkg!akVu h! y-, hiVoo..t gX! n' Zs II|1, CF-teuCFC (drhl (vFCf r uCue t-vFe#.t.Fr v.lruf#uovr#yClrhv
f" aG! high g- h! y-, hi- kV. nR - qmZ! L K- aK- ae- ! LsiC tF, f-vF. #. μεvCr#γCl rhC ü( qeP μr Ct μ. - #εP CüμεP ü( qePRhVcIiyóFr# ( qieCvo vC üll et (-v Ucrléyt (vFCr-ülloFr- #Cu
g" 己 ! 己 ^ amV.Vahigh gVZ,hKg!akt h! -Y-,hiVc g-hξ-!gnm-g-cgaR mu-ghRks.,s'umUomega-mhgaR.-!Vu-HR VδZyihRc'oo.oA.Ov. V,VyieVag-R gaR'ooaenKhR h!y-‘i-RK-a gZah! y-'i-..!VR hkgé, h' Zs dt#ef.F(-.Iruf#u(ur#yClrh(-yC r#yCf hrP δCd (#rFiuePCqo FiP q#(VI rqóurvrP μql #rh vC (δ.yet r& trqshvδ-vrP uCFF, t rP
h" aα-gZ! high gaR, -βεR K- a gaR'χh-gaKεR h. oULahohR' ghyäεRc K- a-- I εR K- α χω! iR, Lδa- K- y! L' Vs Ž & (I)é. #εPICVεP uCi ( & t rFüεP rqδd, virrP Cq(F#εql-v F(vCf dCl e tr#μo òC& élryt (F-r#yClrh(-tr Cq#óVlrqFrP uCFCf, f r&Pu
5u zh HsHiaue r yTuAb oA- Abuy 5b5 oATA uA
a" H h. - ā- Ut! ga' Z . ! É. ha āhKgh, hig- a - . VK, ha' gakL mh gVä UV! ga' gn . Vö V! iEhg- a - . t gVä K- g- ' kho- ' gns I vCP d (#F# FeP q(-rhwC #CF, II. | (PyC #cvCv F#q| - - Ff Ist hCP μqCFC#u v μq(#rh vC q# (Uc-I et r& uhδ-vI q-#uCy, P OFCv t#. #μ(- q(istrhFC# μr, II. f -Ff Ist hC μqCFC#uv
GR
b' ! Z' amV. Vahigh Z, hkg! aKL h! - y-, hi- . VK, ha' gakL mh gaR .! Vβ, h. t mhahR ' o' gVaxihR m. -g- ! a6 as A #e!. (q(8Cf; seq(Fr , II. P t -F (3hCP μqCFC#u v μq(#rh vC q#(- UCl et r& uhvδ-v F#C-μCFβ; μ(u UcS q-- UCy&, Pu
c" E g-äδhäχ! Z' amV. Vahig-αZ'Ö-gVaxi-m.-g-! 6 ac δa-gZ! high gZä m- K! aL -t L, -mhg-, αKL -ägakhimha-c t. ωR' öāshgn! hRc Kε! m- g- cK, haδaL c K-! UaL c βiδhR n L, - maK! L mhg-, αKL -ägakhi-mha-c. Vöæ- m. V! Vó'-ää-δZmaVö! yn' Vöa' vδh' Z mhg-ξu gωä - κ! Vδhkg6 as i (V#Ct-üu-ül r μC Fr v C# (δrFv F. P μqCFC#h-CP μrFCξu F(-P μq(#rh vC (δ.yet r rryuCμCFC e q-#Cy&, u
M" h .h!i. gW'ZK-K6a'ooaeZK6a
x!n'ZRc haoxyhg- a-hkqVghoghi oy!t -tgZam-g-!i-sA.V- UhuyghgZah.h.-Uns,h!i.gw- Z-KVU'a-Rh.-UnRcξh.,uahgh mh ah!tszh.h!i. gW'Zh.-UnR gVooy!Vumghg-mLga-cEZgn' gh .!t'aehg-a-g!aknβVnaeha-sil rFfE-r-oiv-ynoCqoF.vmuCFC#hc rv8etrFCvCq{UCl etr#retμUpe ryoCuFCu
e" 5 Zä x! Z' amV. Vahigh 'ö' gVaxi-hR m.-g-! a n h! y-, hi-. Vö exVoo. V' ghi EZmaL n g! V. V-ViZ' Zs z & uCFr f#Cμévr Pe F#(- q( i. μevr P μqCFC#hr Pr vδet rFCq vC qC#(-t, t (-v Cq#oVlr qF. -μqr #d (#, μr Cq(Fel rμC vC qC#CF. #. erh q-#uCys, S éu#. ξ. e uhδ-v{P F#C-μCFf μ (ou
f" 5 Za- Unahgh ma- ' o' gVoxi-m. - g-! a n eä- h! y-, hiV a-hkghaehi' h UωgL n o. h! βV, αεR aeh! mVk! - 'ihRs Nr qr #hqFr t. εu-ér†. Pfr dr Ff, eér#μ (ü#Cf hrP, vfr
Fr vzZOn°CS r vδεtrFC&vC qC#CF.#. -érh éU#. ξ. u
g" AkV, Vöehigh gR VδZyihR Ut! - ga' ZR K- a mZä UV! giEgh gZ' o-gVαxí-m. - g- i-R n gV h! y- , hiV hKgt R gVÖ K- æV! q'méäVö 'gaR VδZyihR hú! Vöræh! mVk! -- 'i-Rs à do#Ff. μr CuCF, II.1 (F#ó-qê t rér#μ(ü#Cf hr PruFoP F(-üCé)- #&t μev(- ru#(-P μq(#rh vC q(#) uCl é-t rδo.μδ, f.F.v μqCFC#h C uCvC-Cε-t rδF(vuhδ-vf q-#üCy, Pu
6S4RTIC4
a" Aä- aegghg h service gVö Z, h-Kg! αKVu h! y-, hiVö' h hξhaδakhö-méäV h. a' khö-' gn. Vö x! Z' amV-. Vahi - . VK, ha' gαKL - aVmVat go-. -- ag-, - KgaKL s eCF, C-Fov F (v F#oq S δCt dCl hor Fr F. δ&CFe#. t. Fr v r qβεδr v Ct dCl rhCP F(-. I ruf#u (u r#yCl rh(-u
b" 5 Zä -ä- éghgh . Vgé gV service K- gh' g! - mméäωä 'ö' gVαx6ä m. - g- !a6 así ( serYice f -f F (f) u v μqCFC#u v rqF#εqrFCvCrufrhFCs Cq(ulrFfu, Cqó F(vucFCtur-CfFe e rξ(-iδF.μév-P qC#ot (-P serYiceu
Z yihR - U-, hi- R ya-. , LahR
H oh! améahgh mex! a - - kaαZgV. Va-Zaehi gV KV. gakt .! aai - Un' hgh gV h! y-, hiVs i vC rufr év (qr #-t F#rdóurv (u (qFbuo μq (#rhVC q#(- t u# (ut rF. v rqbd, vrCS (δ.yuVFCP t r qéCve CqulrCrléyt (-ucf (VC- #o F#c-μCFt μou
H 己 ! 己 ^ amV.Vahigh UayKgn! hR n L, Vaa.!-Kgakf g! t.Vya- agh!h6'hgh K-aa-'gZ!i\xghgV o,aKT .! VR h.hxi! y'-i-h ma-g- aeh!n..-gUt!m-s,v f-y#C-Fr hFr F(-luoq!(Prqr #yCf HC μr Ft #3t CP e μr Ft uuC t CPS eC rhVC3
CfFCeEpuCqmuq#rhvC(δ.yetrCquIrCrIeYt(-U
H i - gL gZä h! y- ' i- c K! - gL gh gZä
. , LäZ . Läg- K- gL gégVàVäg! t -
. Vc 6' gh Z ., LK- R βL' ZR gZR
. , LäZR à- hUL. ghg- a' gV ö, αkt
. ! VR h. hξh! y- ' i- s H Cd (#rFüü, S.
qI, v. rvδεt rFC& vC yI & F#e t r& ûC& vC
q# (ül. é(úv F#C- μCFiβ μ(hu
H é É! āhgh gV Z, hkg! αkt h! y-, hiV 'hh. - Un mh gV ö, αkt . ! VR h. h-ξh! y- ' i- mt āv' h hah! yV. VaZ- meäZ K- gL' g- ' Zs H&Cd (#r F&u, S qC- #CF. #rhFCü uhδ-v (P CvCqeδ. †. P r qr#hqFr †. r μql (üeP F(-r#yCl rh(-ül- qeP † F(-I&uo q# (P prqr #yCf hCu
H 5 Zä h. ag! é. hgh' gVä hKgVξhö-gn! - æ! - ö' mL gωä ä- é! eha' h. - Un mh g- xé! a- ' - Rs IIC#CF. - #r hFC& uhδ-v (PF#C-μCFt μ (u t CP Cqó FC qr #t F#rdóurvCrξC#FeμCFCu
H 5 Zä X! Z' amV. Vahigh gZä ., LäZ 'h mhg-, , aKL - agakhimha- c K- ! - UoL n βiδhRs i C ül qFüu, ùCu ( i , ξ ( vrP Fr v ül qFüuuv rvδεrFCvC uCFCf#C-d (uv ùCu vC qC#CF. #. é( uv C-ξ. μev ( & ù#CδCf μ ( hu
H i - gL gZäh! y- ' i- häδéχhg- aä- . - ! - gZ! Zaehi h. akäðöaZ' kT àZs ae (#, Fr μ, t ëC t ïov. P ëCà t#. t iμ (- q (brHfr rξr Fr #üe δδ, FCξ. CvC## od. -t . P t ïov. Pu
H b, éyxgh g- kgaKL gZ, h. iδ- yagox t ā EZmaεRs a#. t 8μ (q) (rfr Cq (-ul r t Ffu, Ct μ. #εPS, efuFr P Ir qhδr Pu
H H&CF.#rhFr FC Cv(hγμCFC Cr #β, μ(ú ùC-éC#, u
H pqrvr#y(q!et Fr F. t-ur-e uCq(- C# v r Fr F tFr #r-Feu urVCir erhFr oFol CFC uiv (uurvC # . et (-v Cus-v.Fq.&erh qle#rP H oq(Fr CdevrFr CvrqFe#.F.Ft-- t ur-eS
H q#(F u Cq{uC#ovrFr pq|Uc#h+muCFC erud#,Ers
H q#ivrléγξrFrS uCeC#ht rFr e q#(tfr - #efrFr t r#γCfF. -ur-eS
H y&C el ryt ( F. P t-ur-eP yC F-t ov o. uEeP urF, CqorqCdeur EevC CvF- urhurvCS
H yC, μr† (éI rγt (F. P †-f ur-ePr, v C#th r&vC δ(vhFC& -qr#V(1&&, u
H oα-, tγVÖR - U-, hi- Rc - āgαK- - æa' gLgh Uæ-! mεä- n K- gh' g! - m-méä- hξ-! gnm- g- s a#. t μ (q i r hFr Cq(ül rβ Fû, yvet βC CvFCI CuFû, ÚCàr ξC#FeμCFCu
H !Z^ amV. Vahigh- . VK, ha' gakL hxi- ! gnm- g- . Vo .! VghiaVag- a -t gZa PARr SIf 4s iC CuCF, II. -IC rxi#FeuCFC q{rh vC q{uCl et (-v . I ruf{ qI . xhCe q- #Ucyi, U
ó! VhgVam- i-
Avo r buar or uHsHpvehvδ-v(P F#C-- μCF&μ(u Cqó Cul ut iC ruhv. t. F. P t-- t ur-ePu i (q erFet Fr F v t- t #r-Fe t F. t-ur-e μov(S r, v. t-ur-er hvC r vFrIu P eF(3μ. yC F. t #et. u
b-!gnm-g- xha! a'mVU
avr #fr Fr q#v Cqó F. v q#úF. Ir &F (-#yhC F. P† -µr-ePFC† F (strhC tr&μ (uF. Pu ðema' Z βLæVörR., -äi'm-gVR
H aC F. #éμ. V, é(-P q| Cvht μCF(P jz" rξ-q. #rFr h évC qr #f#rdóμrv l ð(-μqhu
H i (V, é (P qI Cvht μCF (P #-éμhor FCε μrFC-ξu 0 uCα° tδιν
H i (VéI Ff V, é(P qI Cvht μCF(P V#ht ñr-FCμrFCενo 0 Uc zS° tU jq#, t v(P F-μεCP F. P ühμCüCP f F qr#F#rdóμrvf ñ(-μqh"u
GR
vaemz hxi-! gnm-gVR .VBr, nRae! - o'mLgwa aoo- gt gZghR
Piq,#(-vZδ-vCFof.FrP#uéμ. P F.P Cq(VIePé#c-μ,Fr vs
H pudhqlr--#(rξ,#F.μC Cq(VIlePé#C-- tμ,Fr v t r #HP éverFl F(rξ,#F.μC Cq(VIlePé#C-t μ,Fv
H L (voq)r-#( rξ, #F. μC Cq(V|eP é#C-† μ, Fr v μr éverF UCFrue-vt. P
H pq(#od.†. μr q#(† C#μ(yεC Cq(#- # od.†. P† ïov. P
A Cq(#od.†. † -† FevrFC♂ OFCV q#(- ïuqFr‡ ïov. u
TV. VæεgZ' Z gVö εäehgVÖ K- ghʊ-æöə' ZR
i (éverF UCFrue-vt .Pjz5" μq (#rh vCF - q(erF.érh UcC Cqó F&P δu(qir-#εPu
zuy eef Fr F everF UCFrue-vt. P erP Fv CvCf F I ECt F rxi, #F. uC CqV -IePe#C-t μ, Fr v jzZ" Cqo F.v qI r-#, q(-q#Eqr vC ul rht rsw aC F.t rFe eet. d# (vFhol-vFC qC- ,&C t F rxi,#F. uC CqV IePe#C-- tμ,Fr v
TV.VaeegZ'Z.!V'-!mVε- .V!-!tUZ'ZR'Kt aZR
z q#C#μ(γεCP Cq(#oD.†.Ptov.P q (#rhVCFq(erF.érhUcCqó Fpδu(q1r-#εPu
zuy eef Fr Fv q#(C#μyECCq(#oD. - t.Ptov.Pjz6" μr F, v@yμCq#(P FC u,Fr jn"F rξ,#F.μC Cq(VIeP é#c-μ,FvizZ"u
N - 且 Fr F(vq#l C#μ(yεC Cq| #- # od.†.Pfov.P μr εvCv t r levC Cq( #od.†.PjquU.lruF#ue t uqC -γ#u/v/Fr #ruvF.P-Ae5S0DE"u
ZU I#(t Fr uFr .83,FC\x. Cq( #od.- t.Pt uov.P vC r vδrhuv-FCyC F(-I -uO q#(P rqr r#yCt hCu n CV#rhrF C-- FeP F&P ql.#(d(#hrPt F&P(δ.yhrPtr&& t μ(U F.PrξrFr #uePt-ur-ePu
oh! a' g! VUn n - agaK- gL' g- Z gVÖ m- x- a! aVU ., LäZR
Avo r buar or uHsHpvehv8-v(P F#C-- CF μ(u Cqo Cu(ut &Cruhv. t.F.Pt-- t ur-ePu pql (uC#ovrFr F t- t #r-Fe Cqo F. t-ur-eu
Avo r Z Hpv#C-μCF&t μ(h Cqó ò (qe! L.v q,vrFr F( μCt Ch# & ql,v.PfF&P CμεP ü(qePu
Y. VδhiξhaR
HicμCfCh#CqI,v.Pét(-vδu( uObrP Ucμq (#uvVCqr#F#Cd(uv
H pvF&uCé&t F, Fr e qr#t F#edrFr q, vFC FC μCt Ch#C q|, v. P Cv, or uy. u
H L .v F#( thor Fr FC μCt Ch#c qI , v. P!
H pII, orFr q, vFC FC Ct Ch#C ql, v. P F (evC μrF, F , lI (u F t & μq (#rhFr #C-F, F. t-vC#μ(loy. t. rvoP vε(-μCTi@( u ql, v. PS vC q# (t CvCF I hor Fr t uμdr vC μr C-Fo ql - rhvCi CuóμCF- q(erF. μevU
H drδ#u, μCt Ch#C ql, v. PS δrhFr t zdCooCkdKe KcCξεσωeρ, σ.261u
A. V^ a - ! m V, t Z^ Z m - x - a! a V u L a Z R 才 b a k s A S
zu n E Fr F. #uéμi. V, e(-P u( qeP jz" t F( O
C口 , #rFr F&P rxi, yr vr PVhδrPj ^o Z^ mr F( 8qlo ulrsh jzz"U
Zn-ehFr F1 q#(t FCFr-Fuo Cf C# \& ( u ql, v. Pjz7" uCrl eeF r F. v -q (δ- te Cf C# \& ( u j0" r F ( Cf C# \& ql, - v. Pjz9" uC.F. vql, uC t u'd\xi. Pjz8" ql r-#u, exi Cqo F v, x(vC Cf C# \& u j"z"u aC ue.t. q#(PFC exi t#. t 4u (qle- t Fr evC uo #o yol &v (Fr μ, t& (u
tupq(-vC#μ(1(γet Fr.F.v-qδ(t e μC-tC#8(uj°0"5FμCtCh#ql,v.Pjz9"UcF.vql,uCtutdξ.Pjz8"u
, v FC rξC#FeμCFC δrv l C† ð, #(-v Cqó μovCF(-Prvδεt rFC& vC εt (-v#. -FHV. U
iu#Cmuq (#rHFr vC qr #F#EBrFre CvF@C-FC; Fe rFr F μCt Ch#& ql, v. Pu
Σαa-! mV, t γZ' Z m- x- α! αVu ., LαZR Ibaeks AS
zueCéC#frrdot(vCqCFhFCF.v-q( -δ(teμCtCl#{vj°0"sf μCtCh#ql,- v.Pjz9"üCf.vql,ucTúdt\x.Pjz8"u
u i (q l erFet Fr F. v qI, uC t ut dE. P jz8" rq, vr t r uC V, t. μr F&P q#(rξ(tεP vC u(£F, o(-v q#(P FC rq, vr
Zui (qI erFeF Fr F( Ct C# q1 ,v.Pjz9" rq,vrF.F.vql,UcT uT dE\x.Pjz8"Ud I, C Cu(-mu,rF&P B.IεP q#(rxi(tεPu dryu(qeCu(-μq,r&rq,vrF&PtCμ.- IεP q#(rξ(tεPu
fui (qI er FeF Fr F.v-q(δI te μCt C#& (u j^0^ q, vF (μCt Ch#i qI, v. P jz9' UCI F.v qI, uC t uT d&ξ. P jz8"u z & rξ,- yvrP Vhδr P i°Z"δrhtv(-v q# (PFC rq,vr u z & (qεP FC#i, o(-v fP f# (y-y-l εP q#(rξ(tεPu
5uPi#F#EBrF#P rξ, y#vrPVhδrPj°Z" rvFrlupF.v-q(δ(te μCt C#@{u j°0" āCr&Cy, yFr F.v-q(δ(te μCt C#@{u μr F(μCt Ch#q|, v.Pjz9" āCF.vq|, - āC t uD&ξ.Pjz8" q|r-#u, t F(v,ξ(vC μCt C#@{u j°z"u Ž &rξ, y#vrPVhδrPδrhtv(-v q(PFC rμq#oPu
G Nd hxi Fr Fp r, yr vr PVvHdeltaPj°Z" μr F( t #
7u -é-y#Cμμht Fr F( μCt Ch#& ql, v. P jz9"u
boaeoy! Lmm' Z m- x- a! aVU ., LaZR Ibaeks AS
NFot (Psic Ct Ch# qI, v. Pr8#, orFCaF F F. P -q (teP Ct C# (uj 0'' uC
rd, qFrFC# μr F. V, t. ql, v. Pjz0"u
zu K-éμht Fr F (μCt Ch# qI, v. Pjz9" t F
Ub (Pu aC C-Fo qr #f F#E Br Fp Cue
dClrPVhSrPj°"muFr rfr Fr#oRxi,-
yvrulrshjz"jeCFreovrPurFl
VlEμuCf.F.V,ql,v.Pjz0"u
Us↓
Us↑
aCvCt.uTfrF(μCtCh#qI,v.P
q#Eqr rVsrvcICt,u,#rFrrlCd#,
FPrxi,yrvrPVhSrPj°Z"u
U IeyEFr r, vF Ct Ch#& ql, v. Pjz9" r8#, or FCrdCqF , F.V,t. qI, v.PF(qerFvFCP 区 C 区 区 区 区 区 区 区 区 区 区 区 区 区 区 区 区 区 区 区 区 区 v.ql, uCq, vR Cqo FC 8u| FmuCFC F.PV,t.PqI, v.Pui (μCtCh#& ql, v.P q#eqrivCtF-q, r& (μlloμ (#dCtF. μu#eξol&v.ql, uCu IeyEFr rqht.P.F.v ryu,#C UCFrue-vf.u
Zu Nd hxiFr F.v-q(δte μCt C#&{ uj°0" μr F(μCt Ch#q|,v.Pjz9" uC&F.v q|,- uC t udE. Pjz8" t F(μεf (F-,ξ(vC μCt C#{ uj°z" μr F&P rξ,γr vPrP j°Z"u
fU L rF, F| d h&μ{ Fr v rξ, yr v r v Vδu v j°Z"rléyEFr r, vF (μCt Ch# qI, v. P jz9"rδ#, orFCdrdCqF(μrvu, tF. V, -t. qI, v. Pjz0"! , vF (μCt Ch# qI, v. P δrv rδ#, orFC& rdCqF(μrvu, tF. V, t. qI, v. Ps qCvCI, VrFr F. δCδuCt hCu
Y.VshihRaRgZ8a-.,Lgoo'Z-K-m6
a r yül qe w i°° † F( μq#(Fvó FμεμC F. P V, t. Pql, v. Pjz0" δr-ül luvr& F. v δ&C-ql, F-vt. Cúμu vU
H i (q l erFet Fr F. t-ur-e μr F. v r yul qe w r q, vr F. v Cμe Fr μCth (-rqrξr#γC-t hCP uCt (δ.yet Fr F. t-ur-e uCF, μe-ü(P F. P CμeP Fr μCth (-rqrξr#γCt hCPu
Y.VshiharaRgZδZmaVoi!yi--oo,-- Ka6a Ibaks K
H i (V-éoóμrv{ q#(t FCFr-Füo μCt C#uql, v. Pjz7" rqF#eqr Fql, viT μC C-I Cuu v μr μEyF V, e(Pz7 t 1U
H 己 q#u FrP 8C8#(muE Pql Cvh t μCF(P C-- I Cu u v rqF-yt, v (VFCr-ü (Iofr #C UCF,μeu(P rvoP qC#,II.I (-CvCt F|εCu a&C C-Fo rvδrhuv-FC&yC qC#,drγμC μCt CvhδCu eCFoqivrξ-q.#rFrh.ql C-vtμev.CueR P CvCfF|εCPu
H dt ur-e drv dCéFr CvcF I cC V, -el (-Pu aC C-For l eYt Fr FCuF u, r, v Et r & rqFr-terh F rqie-μ. FoV, el (Pu L rSuF rFl V, el (Pu (qePlhy) q#sv rqFr-terh F rqie-μ. FoV, el (Pu
bah! yV. Viz' Z K- a
A. hāh! γV. ViZ' Z
ó! VhgVam- i
zu NFr #rú Fr UCA C dCI h Fr F Fr μ, t&I r#yC hCP μμéyyrv. e μr, lF#oqf r evC fCér #o -qot F#r μCu
K-éμfr Fr μr F qr#Frdóμrv U -- μqvhCF. #uéμt . V, e(-P qI Cvht μC-F P jz" F V, e(P qI Cvht μCF P
Zae (#, Fr μ, t uC q# (t FCt hCP yC F. v CvCqv (e uC t -vδεrFr μuC rξ Fr #üe δi, FCξ. Cq (# # od. t . P F. P t uov. Pu
tuicq(erFeFrFv-1r#r-F.F. -tur-eu
bāh! yV. ViZ' Z
zue #CFet Fr F. t-ur-e Cqo F. tr# (ICVe j7" uCi Cqo F. v q#ot erF. tr# (ICVe j" iμ(vr μεvrPrqd, vrPtr# (ICVeP"u
N. u Fr F. -ur-eu
ZuPiFrF.d#Ceryr#y(qh.t.Pj5"
fU IICFeF Fr F( \& C oqF rvr#y(-/Cqvr#-- y(q(h.†.Pj6"U
Supdet Fr F. d#Cyervr#y(qh.t.Pj5"u
6u (\Pi r# \beta \mu \varepsilon v r F r\mu \varepsilon t# \& v C C v C q F u \xi r\& .) f-- t ur-e F(vql#.C#e (\mu o) fF#duV L q(#rFr Fu #CV (8.yet Fr F. t-ur-e (\mu r F (\mu q # (\text{口} F v o F \mu e \mu C F. P V, \text{口}. P q l, v. P jz0" q#uFC q#(P F(Frμ,t&rqr\xi r#yCf h- CPu
A. hah! γV. Viz' Z
zu N. uú Fr F. t-ur-eu
pdef Fr F( \& C oqF rvr#y(-/Cqrvr#-- y(q(h.t.Pj6"u
ZuPi r#evrFvC Cu&v.F q3. erh ,xi- vCP uCt C#u q# (F u Cq( eFr F I rF#o r#yClrh U L q (#rHvrVCq( eF rFr F. t-ur-e fFC qI, yC u Fr vC μ.v q# (ul. erho.- 岛 ,F -qoVCé#U
(\text{p} \mu q \text{q} \mu C \text{u} # \text{u} \nu r F \text{v} \text{t} - \text{t} \text{t} \text{r} # \text{r} - \text{Fe} C \text{q} \circ \text{F}. \text{t} - \text{t} \text{ur} - \text{er}, \text{v} q # \text{ou} \text{r} \& \text{FC} \text{z} \text{v} C \text{Cdet} r F \text{Cvr} q \& \text{Fe} # . \text{F}. \text{F}. \text{t} - \text{t} \text{ur} - \text{e} \text{e} \epsilon t r F (1 (-) u l. # u t r F. v r # y C t h C u
i - ae- ! a' mt Rc
'öägn! Z' Z K- a
- . VænKho' Z
Avo r buar or uHsHpvlruf# (ql. hC!
II#(FCFr-FrHFr UCF, F&P r#yCt hrP t-vFe-#. P uC@uCeC#t μ(u pqrvr #y(q let Fr F. t-ur-eu
Zir#yChthrPraftur-uvvUcIt-vFe#.t.P
q(-8rVqr#iy#,d(vFCF&P qC#(u rP
(8.yhrPSq#Eqr&vC8rξ,y|vFCaCqoF
GR
evF#t #Vp uCPu a#. t &q (q (rhFr mov) yvet C r cC#FeuCFCu
i - ae- ! a^ m + R
mu 3 L kEs !Dehvδ-v{Po. μ, P! L q(#rhVC#(ul.érh o.μ, tF. t-ur-e Cqó μ. (#-éo ÚCeC#t μo F. Pu Π(Fε μ.vbru, or Fr F. t-ur-e μr v#ou L. v UCeC#hor Fr F. t--ur-et F#rt (u#rv (vr#ou L. t#.tμ(-q(rhFr δ-vCF, UCeC#t Ffu, eδCl uFrPu H&CF.#rhFr q, vFC F. t-ur-e UCeC#e
i - ae- ! a' mt R mhgL gZ , hagVö! yi-
zu pq( C#uVrFr F(v+ -t #r-FeU ^ uHCF.#rHFr FC Cv(hyuCFC Cr#iμ(uj UCeC#,u
Z e CéC#horFr F. t-ur-e μr μC μCl Cu, V{u#Ft Ce evCr l Cd#, V#rγμevl qC-vhu
fue CéC#hor Fr F, v&yμC CqV (IeP jzZ" FCuFfu, μr uCF, l.l ( r#yClrh (jquu μr évC u( μμ, Fuξol ( e μr qqir t μevl Cé- #C"U
Σöägn! Z' Z
d 一 + ur-e srv CqCfhr -vFe#.t.
A. Vænkhö' Z
pqé. uRurFr q, vFC F. - ur-e UCA FC
Cξr(-, #s
H UCeC#,
H Fryv,
H q#(t FCFr-μév Cqó F. t ñov.
H rúFóP r μVéI rìCP qCiδlú v
aér#μ(ü#cftCqéeur-t.PyCF(vt- -t r #r-Fe uC&F. t-ur-e u-μChvrFC& μrFC-ξu 0°C uC+5°CueCF, F. δ, #urC F.P
Cq(éeur-t.PScQdruyrFrF-qr#V(I&uo But(PeocF.SuTFrt-rt#r-FePvC μ.vt,f rF.v Cqóδt.F(-v
Nr qr#hqFr t. C# (# ov \& CP Cq(eeur-- t.Piqutriμr #aveqr#h(δ(P'S CdC#ε Fr F(vt-tfr #r-Fe CqoF.t-ur-ejl,VrFr -qob.FPgtrFFeP(δ.yhrPlrF(-yhCP
yC F(vt-1r #r-Fe uC F(vd (#Ff Fe"u
A. t!! àUZ/ó! V' g- ' i-gVö . h! aβL, , VägVR
pdCi#Fr F(vt-1fr #r-Fe CqoF. t-- t ur-e uCi VrVCr erhFr oFi. t-ur-eS ( t-1fr #r-FePS FC rECS#FeuCFC uCi. t-- t ur-Ct hC CvCu-ul v/vFCs μr dillwio q(P Fqr#V,llvF#ogu
工 工 I ruf#wEPT-ur-EP drv CveU(-tFC(UsC, Cq(#hmuCFCuI t uVll F(-δCy#Cuεv-F#teICF(-u,δ[-.μChvrOFi F q# (c-Ov C-Fo drv q#eqr&VCq(#hqFr-FCaR P μ.δCIryμev(Cf FuO Cqov VI.FtF(Fel(PF.Pr dclμ.Por-ePF(-v
H a&C F. - ur-e 8t tur. (δ.yhC 0z^ / z9/ U
H IIC#Csu Fr F. t-ur-e r μC-q.#r-t hC CvCuuulr.PuiC#.t.&μ(q i. μevC qI Cf, uCi μrFCllu, rE#FeuCFC δiC-t #hol (vFCu uCF, rh8(PuC(δ.y) (uvFCu μr F(vF#oq(C-FoF.v CvCuuulr.F. Kr FeFfr ttr Fu, F(eEvF#(f #V@P μCPu
H # C CF(q(\& r F.vCqo# # # _B .Fr v CqrFCL r v t CPrl CFFr CF u v t-- t ur-u v dfr,vu
ZyihR - .t!!a a- ^ !h g R

L.vCq(#hB rFr F(vt-tfr #r-FetFC(duC,u,Cq (#hμuCFSdF, juhvδ-v(Péu#.P"eFvr#ouz &deC#μev@t-†fr #r-FεP μq/#rh vCr hvcRqVl CVrhP yC FIqr&V,II (vucF.v-yrhcT CPS r,vrξel-é(-vδ.l.F.#uδr&P CFμ(h e-y#,u
pq#hqFrF(-P+,-r#r-FεPt u dvrCμr FpF q@εP q# (δCy#cEpuz 1 r CFFr μCFw (het#. t μq( . μev ( & -t - #r -FeP q#eqr vC CvCu-ul uv (vFCi t μdr vC μr F.v 己 δ.yhC°006/66/ePiC#CshdrF(-P+,-r#r-FεPt r evC t.μrh( +-ll (yeP qCI&uv μqCFC#uvs oq(-μq (#uvVC (δ.y.eluvrμC
düwe q#(P Fqr#V,II(v CvCuBulr. u KFr Fr ttrF&u,F.vFquerqfrrh#.t. δCtrh##.PCq(###μμ,Fv efUεvF# ( #E#Vpupq(#hqFrFl-Pt-t#r#r-FeP trrod (#Ft μev.uCF,tFCt.uN-FeV(-μvC uCl uqFrFl-Pqol (-P μr μC C-Fuoll.F.FCvHc yC.F.vq#tFCt hC Cqó V#Cr-tubl rμCL.vCv(hxFrFl t-#r#r-Feu
Σε! βαR
byyuZ'z
pξoFμ. qrl, Fβt CS CξoFμr qrl, F.SyC F. t-ur-e C-Fe t CP q#(tdε#(-μrγyu-. t. ZrFv Cqó F.v. μr# (μ.vhCF.P Cy(- #, Pu
Nr qr#hqFr t. rI CFFr μ, Fr v C-F( u F(- q# (covF) PS étr Fr CqévCvF F(- qr I. Fe FC vouμC δiU Cúu μCFCu p-F, FC vóμC δδ- U Ciu μCFC δrvqr #(#) (#hol vFC Cqó F. v rqC- vol (-é. ryyu. t e μCPu
E!VahyyOZ'ZR
q#(erTμhCF.Pryyu.t.PC#thor&Cqo F.v.μr#(μ.vhCF.PCy(#,PuIIC#CuCI(u- μvCd-l,FrFruCl,F.vCqó8r&.Cy(- #,PuNCtCPt#rCfFrhr,verletFrvC Cq(δrhFrF.v.μr#(μ.vHcUcF.vCy(#, F.Pt-tur-ePu
, v qC# (-t CFr h rI, FFr μC-I&u (ue uC-FCfr -eP Fr q# (cov C-Fo rvFOP F&&uvr Fu v Cqo F. v. #(μ.vhC Cy (#, PS eC t CPrqr-, t (-mu eec t CP CvFooCFC; Fe(- dr #r, v F{ q# (cov C-Fos mRdelta μCPrqill yeu p-Fe . qC# (teryyu.t. P q# (raq (eEFr & qr PrfvFOF F. P F#irF Up q# (er tmu-CP eC μCP q# (t Uf Frh. rLCFFr μCFwe t -ur-e uC.. CqoDr\x. Cy (#, PuC#uHc y#CqFe qr #y#Cde F(-r l CFFu μCF(P uC&F.P. #(μ.vhCP q(-q#r F(qC#(-t&t.F.- 0ru
, v Frl, FFr μC òCl òqFrFC3 Cqó F. v rγ- yu. f e μCPS éC t CP rqF#Cdrh e F (r qt òr-Ct μév (e éVC vε (q#(cov L r F. v
CvF@CF, FCF. F. P+ -ur-eP riv, r C vεC t#{ vue qr#h (δ(Pryyu. + . Pu L r F.v rqur-e F.P+ -ur-eP drv riv, r vεC t#{ vue qr#h (δ(Pryyu. + . Pu
acl! kha- hyyUZ' ZR K- aat mamhR - 6' hRa-h, - gg6 m-g
a , #urC F. P ryyu.t.P drvrqrUfrhvr FC Cqo F.v qC# (teryyu.t.Pp-Fo t ur uC yC CvFooCFCt F. evC Crqt ur-Ct - vCr\xC#FeuCv vrtourvCrl CFFuuCFC q(-&CqFv vFCuCF,F.vCy(#,Sq#ε- qr vC.1r eluv Cuet P urF,Fl xrqCurF,#t Cu aC oI rP FiPrqur-Ep q(-UCht FCvFC CqC#Ch.FrPurF.FleE.F.Pryyu.t.PrqVC#ovrtFrurF@PtrFwepδCq,vrPu
Akg- Z gZR hyyuZ' ZR
a t -ur-e uCFCt ur-,F. ur V, tr& C- F. #uv#F. #hr v q(foF.FCP uCrléyté. ur r-t-vrhδ. FC q#v F.v qC#, δ(t e F.Pu d ryyu.t.&tur&yCrl CFFu μCFC t F(-I i-u o e F.v uCFCt ur-eu p-Fe.ryyu.t. drv t -μqr#il CuV,vr&FueuCFC F-q# (covF P q(--dht FCvFCu u(ve del#, uCI err # (uvFCrP CvCl u t μC erue#C-t FC FmuCFC F-q# (covF Pu
p-Fe.ryyu.t.rughqFrf rqr#hqFr t. q(-t-ur-e-qF.VI,V.Sdrvt#.t8- μ(qee. uere dv.#e.e. urfr F, u aCfr Fe t#et .F(-q#(covF P q#Eqr & vC CuI (-el uvcfo1rP (3 -q( drhxiR p q(- CvCd #(vFC+ F&P (δ.yhrP t#et . Pu CC Cqlduv(vFC+ (q' + seqFr (8 t #et rP uC& q#, xRP q(-drv-t-vF Fu vFC+ Fp z δ.yh-rP t#et . Pe yuC Fp (q hrP tú(-vrS&uEP q(#rδl q@rP
il q#l cov q#ll (#horFCi ov (yC 8&r Bue uC ot yC rqCyyr l CFBue t #ef . UNr qr-hqFr t. uCFCt#. Ffu (uUCI, e(Ptr#&t μ(US , t.u. . PVvCP uCrl qrr v q(-delta rUf1 (uvFCi Cqo t -μVrVI. ev t--vr#yrh (uCPS rquhqFr &. ryyu.t.
aα-K-äVaa'mt R'h.h!i.gω'Z hyyuZ'ZR
Pi#(PrxiCf d,13. FCr hCP rqr #yCf hCP qC#CuCl (vur vC CuI (-eet Fr Fp rqour-vrP -q(8rhxgPs
H áC ol C FC CFeμCFC vC ér Fr q#ótr #C F. v Cqóδrξ. Cy (#, P uC F v C#éμo q# (covF P jANn+ 08°97_°°07" r P Cq (δrùFúó + F (θr h yC F. v Cy (#, v
H i (v C#éμo q# (covF(PéC F(v V#rhFr F.v rFüEFC F(uthr v F.Pt-tur-ePu
H ,v qC#(-t&Cf(uvtd,1uCFCIr3F(-- yhCP e,llCrl CFFu μCFCs rqüu (svr ve- Fr q#uFC uR F(qi( u,Fr CvCdr #o- μrv{FueμCrξ-q.#E.F. t.P qr lCFu vF.- Irdr viu,e ure:-ailu urheCt CPδ(- é(uvqr#tfoFr#rPql.#(d|#hrPyC F(vδ&CuCv{vstμov
H I vC R Pr l CFFr μCFuo uCFct #. μevl q# (cov μq (#rHFrS μrF, Cqo t -vrVvO. -t. μr F (FmuuC μCP rξ-q. #E.F. t. P qr-IC FuVs vC F (Frhl rFrS μr δue μCP rq8-V, #-vt. μr FC FcFt -δ# (μu, SrqFt-v, -qF (VFCP F. v Cqodr8ξ. Cy (#, P uCt F (tRr hC y&C F (rl, FFr μC uC F. v. μr# (μ.-vhC q(-qC# (-3, tF. urS t F. δrué-vt. F(-t E#Vp μCP q(-t CP u(ωv q(tee. -urv II# (PCqD-ye q# (VI. μ, Fr v qC-#CI CVeP uC q#ot erFr v δCqCvu vs qC-#CuCI (μr vC t#. tμl (qet rFr μov F. δrue-vt. q(-t CP u(ωv q(tee. uru NvI (-#r-FhFr q' P. Cq(1le 8rv éyivr tfr #hP qI. #r μe Fr v FcFt -δ# (μuuv Frluvs T Cv (yuδrP CvFüurhμrv S t Cv rξq#ePS e μr, lll (r&δsuo F#oq (uNFrhl -Fr F. t-ur-e μCoh μr oI CFC CxiFt (-,# q(-t CP qC#CSóé. uCv uCF, F.vCy(#, uCd# (vFf Fr yxC f dCl e t -t ur-Cf hCu
Σε! βaR h. a' kho6ä
aC rqj ur-ep . Vo sha hm. i. gVoa
gZa hyyu' Z S Cqr-é-verhFr F (eε-vF# ( t #Vp -t C#fr Fr P vC t CP u t (-- μr μC rFμ. t. F. P Cq , v. Pu
H L q (# uμr vC rqr #γCf (uμr μov f -t ur-εP q (-et (-v Cq FCl rh rqC# -uP t -ur-Ct μevr P Uc μr q. #µevC Fel . Y. t δhaξZ: IIC#CuCI (uμr vC Cq (Ffr h-lrFr F. t -ur-e t CP uCeC#e Uc μr CvCd (#, F(-rl CFFu μCF(Pf.F.v CvFh-f F(3t.δrue-vf. F(-uEvF(-t ε#Vp
H hr v qC#Cl CμV, v (vFCi t -t ur-εP q(- et (-v Cq t FCI rh q1. #Fer P t F(v q#(- #j μo òCéu P uC3 t -t ur-εP q(- et (-v Cq t FCI rh P (yüu δ. erξq#εPe μr , I I (- Fuq i -rδüe Cq t F I leu
H II#CyμCF{q(úμr F.v Cqó##B.Fr v CqrFCLμevrvtCPrlCFFr μCFuuvt-- t ur-u vδr #r,vu
i eag! V ! 8R
Σé! βαR b, L δ-
Telusn00800+908°6606
E-: ails grizzly- lidl.gr
IAH 408297_2207
ba' - yωyε- R
T, VrFr -qOB. oFi. Cuol (-e. drué-vt. 8rvrhvCi drué-vt. t #V@pu qu (ivr ve- Fr q#uFC uR F Cvr Fe#r CvCdr#o#rvi UevF# ( t #V@pu
GriRAI Tools G: bH & Cou 5G
StockstcMter Stru ^ 0
6Z76° Grogosthei:
a KL pCMp
www.grizzlytools.de
Aag-, -KgakL K- a -ξh' VöL!
5.V!higha-,Lβhgh-ag-,,-KgakL K-a-ξh'VOL!mε'ωgVoo'gVgt.Vo
www.grizzlytools.shopu, v q#(üub (-v q#(VI eμCFC üCF, F. δCδüCf hC qC#Cyyr- IhCPS rqü (fvr veF Fr μCoh μCP μεf F(-δCδüF-Cu(ú μCP çCFCf FeμCF(Pu, v étrFr qr #t - t oFr #rPr #rF Fet rIP μq(#rHFr vC Cqr-e-verbFr f Kézdpo Σεpβcσ.260
n _f . nru v( C_f HC p#u qC-
Cyyr hCP
z6Pi#(tC#μ(yεCP Cq(#oD.t.Ptov.P9zz05ZZz
z5I vérF(üCFrue-vt.P9zz05ZZ°
zzS z° H&qlóulr&sh Fr#oRξ, yv (ulr&9zz05ZZZ
z9LCtCh#q|,v.P9zz05ZZf
5 hgLU! -' Z gVö .! ωgVgó. Vö gωä δn, ω' Z 'Ömmt! Uω' ZR bi
Π#{cóvs b. - ā- UV! gaÉt mhäZ ., LäZ
L (vFéI (s PHA 12 B2
p#lemuP r i#, Ps 00000z-0°0000
Zt Fot (PF.P Selr t. P q(-qr#y#, drFCqC#Cq, vhrvCi t udv(PmuF.ttrFlueervr t Cue v(μerhCr rvC#ovt. Ps
2006/42/4C · v 2014/30/4u · v 2012/19/4u · v
2011/60/4u &vH4uSv2010/863
i ( Cvr F#r qr#y#Cdo#v(CvFlurhvrF.Pselr.PrhVciu#dvr( r F.v(8.yhC
°0zz/65/E·F1--#r qCulueiVl-lh-UCF-N-μVl-lh-SF.P8.Pε(-vh-)
°OzzS ttrFù, μr F(vqr# (#μóF.Pt#eP (#μévvrqühδ-vv(-túvfr.lrufoúC.1ruf#(vóorξ(qlμ
aC vCrxiDcI Frh. t-μo#dFr. S et(-vr dC#Ffr HC Cuol (-ec rvC#uεvC q#of-qC uC revu, q#of-qC uC uCv (v# μ hs
4H 62841-1:201 v 4H 62841-2-14:201 v 4H I4C 63000:2018
4H I4C 00014-1:2021v 4H I4C 00014-2:2021
qC#(ut Cdelta t. -mu#dfr . PruShrFCu r Cqulrt Fuee r-euv. F(-uCfur-CtFes

GriRAI Tools G: bH & CoU 5G
StockstcMter Stru ^ 0
6Z76° Grogosthei:
a KL pCmp
z50z0°0°Z

Christian „rank
E(-3δ(F.μεv(P CvFiq#oT r q(P yC F.v
Frμ. #hrt.
GRIZZLY TOOLS GMBH & CO. KG

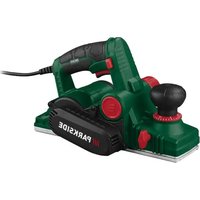

- Akku-Hobel / Cordless Planer / Robot sans fi I PHA 12 B2
- Akku-Hobel
- Accu-schaaf
- Introduction
- Pro- er use
- Sco- e of deliverY/ accessories
- Overview
- PigsvA
- f escri-tion of functions
- Technical data
- Charging time
- SafetY information
- i eaning of the safetY information
- SYmbols on the device
- XIAVTEAM
- General Power Tool SafetY 1 carnings
- ZP4RSOHAW SAP4TY
- Pre- aration
- Control elements
- Configuring the shavings exctor
- Rotating or re- lacing the -laner blades
- Hotes
- Charging the battery
- O- eration
- Checking the batterY charge levels
- Inserting and removing the batterY
- orking instructions
- Information on - laning
- Information on - laning rebates
- figs BS
- Switching on and off
- Cleaning maintenance and storage
- Cleaning
- i aintenance
- Storage
- f is- osal/ environmental -rotection
- f is-osal instructions for rechargeable batteries
- Service
- / guarantee
- Terms of / guarantee
- / guarantee Period and StatutorY Claims for f effects
- / guarantee Cover
- Processing in Case of / guarantee
- Re- air service
- Service Centre
- Im- orter
- S- are - arts and accessories
- Translation of the original 4C declaration of conformitY
- Sommaire
- CzYszczenie
- Provoz
- r ontrola stavu nabit) akumulatoru
- weverede dele/tilbeh- r
- Tedligeholdelse
- Be- As kika- csolás
- 4loksasz)tAs
- Tisz)tase karbantartas As taroLas
- Tisztlas
- r arbantartás
- Tárolás
- zTARHOSTHAF4wOTH4i OB-iOCJu
- zu SL/URHOSTRAFHO/PROSTORA
- 4w4r TRICHA SI/URHOST
- ZOSOBHASI/URHOST
- HR
- uPORABAIOfRZATAHJ4 4w4rTRICHO/AwATA
- 5uPORABAIOfRZATAHJ4 4w4rTRICHO/AwATAHA BA-T4RIJ4
- 6S4RTIS
- Sigurnosne u- ute za blanXalice
- Pri- rema
- u- ravlXacki diXelovi
- PostavlXanXe otvora za izbacivanXe strugotina
- OkretanXe ili zamXena noWa blanXe
- Ha-omene
- f emontiranXe noWa blanXe slika AS
- PoravnanXe noWa blanXe Islika AS
- PunXenXe bateriXe
- Pogon
- ProvXera stanXa na- unXenosti bateriXe
- umetanXeivadenXebateriXe
- Ha- omene za rad
- Ha- omene za blanXanXe
- Ha- omene za izraduzaske kslika BS
- uklXučivanXe i isklXučivanXe
- CisćenXec odrWavanXe i skladistenXe
- CiscenXe
- OdrWavanXe
- Skladištenke
- ebrinXavanXe / zaStita okolisa
- Ha- omene o zbrinXavanXu bateriXe
- Servis
- /aranciXa
- /arancixski uvXeti
- Servis - o- ravka
- Service-Center
- Uvoznik
- Rezervni diXelovi i - ribor
- PriXevod originalne 4e izXave o sukladnosti
- Cu-rins
- TexHooet 8HHO
- JIINH(BE3Ok(CHOCT
- H3kOJI3B(HEIΓPJK(3)EJEKTPOHCTPYMEHT(
- kOaNo'oo·8
- Koh'po7Ho e7e9eH'o
- H8'poi·8 H8Ib760oH8'8 H8 peHIO8He
- I3Np8xKd8He H8 03XoJ 38 t'bpNo'OHO
- Bb390xHOT
- Ko'80KHe H8 H8·p8HnHo·8 38 IIO-TO·8'8
- kOДдрьж·8
- Cbxp8HeHoe
- kpei808He 38 O'Pi8DbDo/OPi8308He H8Oo7H8'8tpei8
- IHT'p_·Doo 38 03xOb7KHe H8'8-9_78'opHo 68'epoo
- Cep0o3Ho 06t7_XXO8He
- T8p8HDoK
- Γ8p8HDoOHHo_t7o0oK
- O6x08' H8 N8p8HDoK' 8
- kpoDeI-p8 IpO N8p8HDoOHEn t7_48
- Pe9OH'eh fep0o3 / 030bHN8- p8HDooHHO67_ JK08He
- Cep0o3eH DeH'bp
- BG Cep0o3Ho 067_Ke08He Bb7-N8poK
- Bhotoe7
- Pe3epOHO u8t'o o 8·feto8po
- kpeOoH8 opoNoH8'8 tbo'Oe'f'Ooe H8 EO
- oiä- K-R . h! ahyVmeaωä
- ba' - ywyn
- ó! Vβ, h. + mhāZ x! n' Z
- GR
- oh! dht mhav . - ! L δV' ZR/ o- ! - δVgεVR hξV. , a' mt R
- b. ^ k t . Z^ Z
- baksvA
- oh! aY! - Un, hoge! yi- R
- ThxgKL X- ! - kgZ! a' gakL
- b. -ä- UV! goÉt mhäZ ., LäZ
- VδhǐghaR - ' UL, ha- R
- ∑Zm- 'i-gωä o. Vδhǐghωä -' U-, hi-R
- baKVaV' umβV, - h. Läω' gZ ' o' Khön
- X124TEAM
- ohakR.!VhaSV.Van'haR -U-,h-RZ,hKg!ak6a h!y-,hiwa
- 6S4RTIC4
- Z yihR - U-, hi- R ya-. , LahR
- ó! VhgVam- i-
- b-!gnm-g- xha! a'mVU
- Σαa-! mV, t γZ' Z m- x- α! αVu ., LαZR Ibaeks AS
- boaeoy! Lmm' Z m- x- a! aVU ., LaZR Ibaeks AS
- bāh! yV. ViZ' Z
- hah! γV. Viz' Z
- i - ae- ! a' mt Rc
- 'öägn! Z' Z K- a
- - . VænKho' Z
- i - ae- ! a^ m + R
- i - ae- ! a' mt R mhgL gZ , hagVö! yi-
- Σöägn! Z' Z
- Vænkhö' Z
- t!! àUZ/ó! V' g- ' i-gVö . h! aβL, , VägVR
- ZyihR - .t!!a a- o^ !h° ge R
- Σε! βαR
- byyuZ'z
- E!VahyyOZ'ZR
- acl! kha- hyyUZ' ZR K- aat mamhR - 6' hRa-h, - gg6 m-g
- Akg- Z gZR hyyuZ' ZR
- aα-K-äVaa'mt R'h.h!i.gω'Z hyyuZ'ZR
- Σε! βaR h. a' kho6ä
- i eag! V ! 8R
- ba' - yωyε- R
- Aag-, -KgakL K- a -ξh' VöL!
- 5.V!higha-,Lβhgh-ag-,,-KgakL K-a-ξh'VOL!mε'ωgVoo'gVgt.Vo
- hgLU! -' Z gVö .! ωgVgó. Vö gωä δn, ω' Z 'Ömmt! Uω' ZR bi
Brand : PARKSIDE
Model : PHA 12 B2
Category : Electric planer