SECDVR504 - Voice recorder KONIG - Free user manual and instructions
Find the device manual for free SECDVR504 KONIG in PDF.



User questions about SECDVR504 KONIG
0 question about this device. Answer the ones you know or ask your own.
Ask a new question about this device
Download the instructions for your Voice recorder in PDF format for free! Find your manual SECDVR504 - KONIG and take your electronic device back in hand. On this page are published all the documents necessary for the use of your device. SECDVR504 by KONIG.
USER MANUAL SECDVR504 KONIG
SEC-DVR504, SEC-SETDVR20
SEC-SETDVR30, SEC-SETDVR40
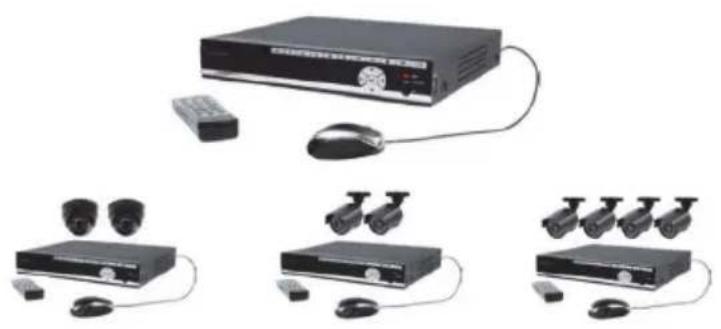
MANUAL (p. 2)
Security DVR Camera System
ANLEITUNG (S.17)
MANUAL DE USO (p. 77)
-
About this manual (p. 3)
Package contents (p. 3)
Technical specifications (p. 3)
Product description (p. 6) -
Front panel (p. 6)
- Rear panel (p. 7)
- Remote control (p. 7)
- Mouse (p. 8)
Installation instructions (p. 9)
- User instructions (p. 9)
- Login (p. 9)
Live view (p. 10) - Status and toolbar (p. 10)
- Record setting (p. 10)
- Manual recording (p. 11)
- Schedule recording (p. 11)
- Video playback (p. 11)
- Video edit (p. 11)
- Backup edited files (p. 12)
File back-up (p. 12)
-Back-up by time (p.13) -
Network settings-(p. 13)
-
Mobile phone support (p. 13)
-
Maintenance (p. 15)
Warranty(p. 15)
Disclaimer (p. 15)
Disposal (p. 15)
About this manual
This manual describes the operation and installation of the digital video recorder (DVR) and the cameras. Please refer to the extensive English manual for further details about the DVR.
We recommend that you read this manual before installing/using the security camera system.
- Keep this manual in a safe place for future reference.
Package contents
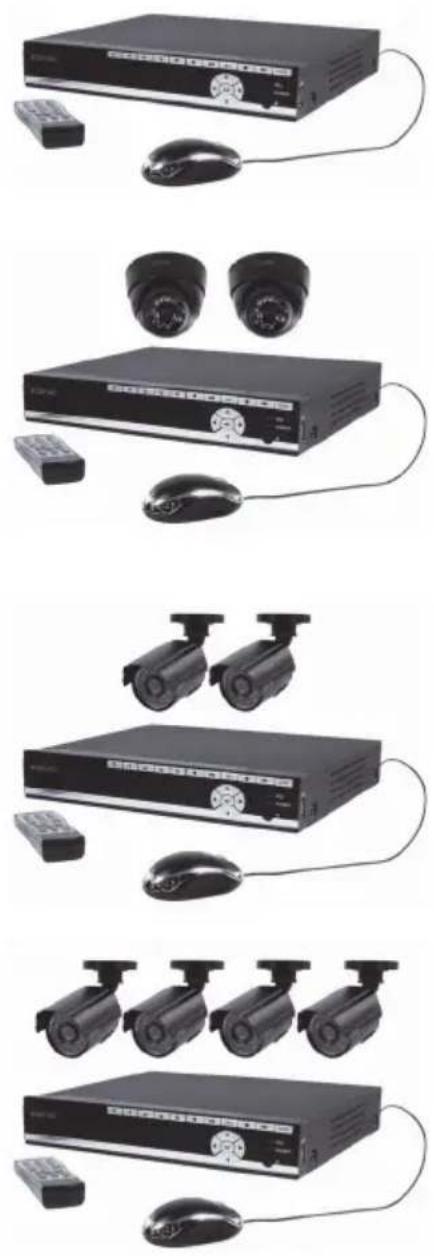
SEC-DVR504
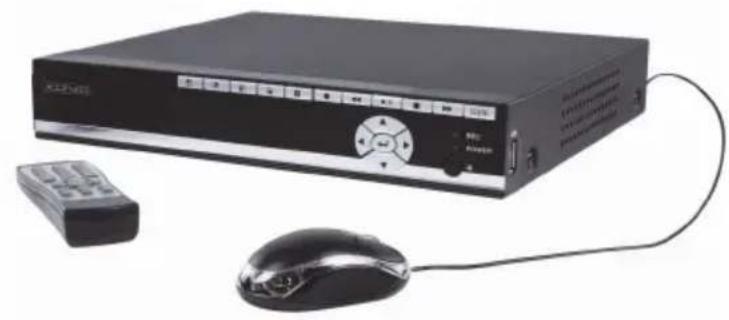
1x DVR
- 1x Remote control (incl. 2x AAA batteries)
- 1x USB mouse
- 1x AC/DC adapter with output for DVR and 4 cameras
1x CD-ROM
SEC-SETDVR20
1x DVR
2x Camera SEC-CAM355
- 2x 18 m connection cable
- 1x Remote control (incl. 2x AAA batteries)
- 1x USB mouse
- 1x AC/DC adapter with output cable for DVR and 4 cameras
- 1x CD-ROM
SEC-SETDVR30
1x DVR
2x Camera SEC-CAM25
- 2x 18 m connection cable
- 1x Remote control (incl. 2x AAA batteries)
- 1x USB mouse
- 1x AC/DC adapter with output cable for DVR and 4 cameras
1x CD-ROM
SEC-SETDVR40
1x DVR
4x Camera SEC-CAM25
- 4x 18 m connection cable
- 1x Remote control (incl. 2x AAA batteries)
- 1x USB mouse
- 1x AC/DC adapter with output cable for DVR and 4 cameras
1x CD-ROM
Technical specifications
Digital Video Recorder SEC-DVR504
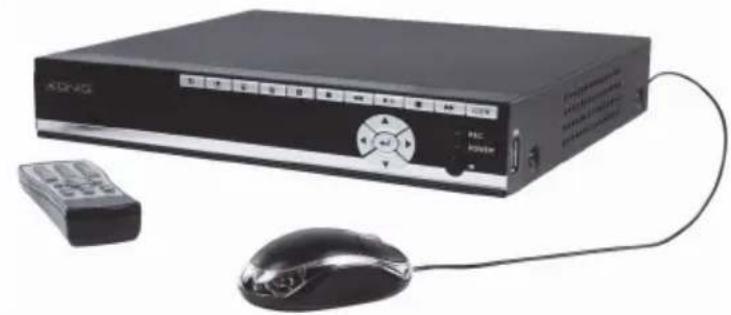
Video compression: H.264
Video system: PAL/NTSC
- Operating system: Linux
Video input: 4 channels, BNC
Video output: 1 channel BNC/1 channel VGA
VGA resolutions: 1280 x 1024
- Display resolutions: PAL: 720 x 576 / NTSC: 720 x 480
- Record resolutions: PAL: CIF (360 x 288) / HD1 (720 x 288) / D1 (720 x 576), NTSC: CIF (360 x 240) / HD1 (720 x 240) / D1 (720 x 480)
- Record frame rate: PAL: 50 fps @ D1, 100 fps @ HD1 / CIF, NTSC: 60 fps @ D1, 120 fps @ HD1 / CIF
- Display: Full screen / quad / PIP / S.E.Q.
HDD interface: 1x SATA 3.5 inch
HDD capability: Up to 2 TB (not included)
- Playback: 4 channels simultaneously
- Playback via network: 4 channels
Network interface: RJ45, 10 M / 100 M
Network protocol: Supports TCP/IP, DHCP, DDNS, PPPoE
Network function: Supports live view with Internet Explorer & smartphone
- USB interface: USB 2.0 for mouse and file back-up/upgrade
- Back-up: AVI file via USB flash / removable HDD USB disk / USB CD / network
Authority: Max. 7 users
Operation: Live view, record, playback, back-up and remote access at the same time
- Recording quality: Best / good / normal
- Record modes: Normal / schedule / motion detection / remote recording
- Pre-recording: 3 sec.
- Playback mode: Play / fast forward / fast rewind / frame by frame
- Playback search: Date / time / file list
- Recording pack time: 15 / 30 / 45 / 60 min.
- Privacy zone: Yes
Power supply: 12 V DC/2 A
- Dimensions: 250 × 220 × 40 mm
Weight: 1.5 kg
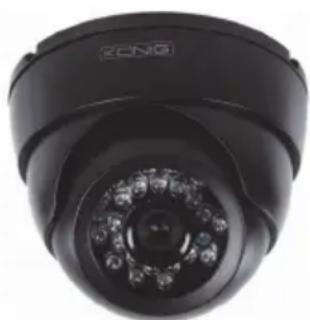
Camera SEC-CAM355
- Image chip: 1/3" Sharp CCD
-
Lens: 6.0 mm
Horizontal resolution: 420 TVL
View angle: 60^
Infrared LED: 24 pcs, 15 M
Light sensitivity: 0.001 Lux
Electronic shutter: 1/50 (1/60) ~ 1/100,000 sec.
S/N ratio: >48 dB -
White balance: Automatic
- Gamma correction: 0.45
- Protection: indoor use
- Working temperature: -10^ 45^
Video out: 1.0V p-p / 75 Ω
Voltage: DC 12 V
Dimensions: 97× 76
Weight (with bracket): 148 g
Camera SEC-CAM25
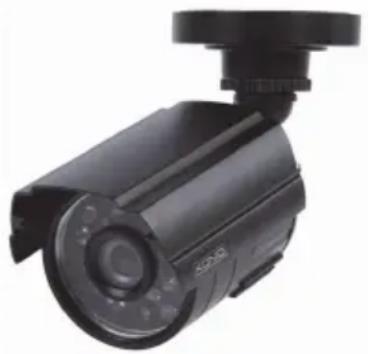
- Image chip: 1/4" Sharp CCD
- Lens: 3.6 mm
Horizontal resolution: 420 TVL
View angle: 60^
Infrared LED: 24 pcs, 15 M
Light sensitivity: 0.001 Lux
Electronic shutter: 1/50 (1/60) ~ 1/100,000 sec.
S/N ratio: >48 dB - Gain: Auto
- Gamma correction: >0.45
Protection: IP 66 - Working temperature: -10^ 45^
Video out: 1.0V p-p / 75 Ω
Voltage: DC 12 V
Dimensions: 57× 157
Weight (with bracket): 450 g
Safety precautions:

- Do not open the camera or DVR in the event of a malfunction. These products should only be opened by a qualified engineer.
- Do not submerge the camera and DVR in liquid.
- Do not expose the DVR to water or humidity.
- Do not expose the camera or DVR to high temperatures (see technical specifications).
- Do not install the system close to strong magnetic fields, such as speakers. This may affect the quality.
Product description
Description of the buttons and their functions on the front panel of the DVR:
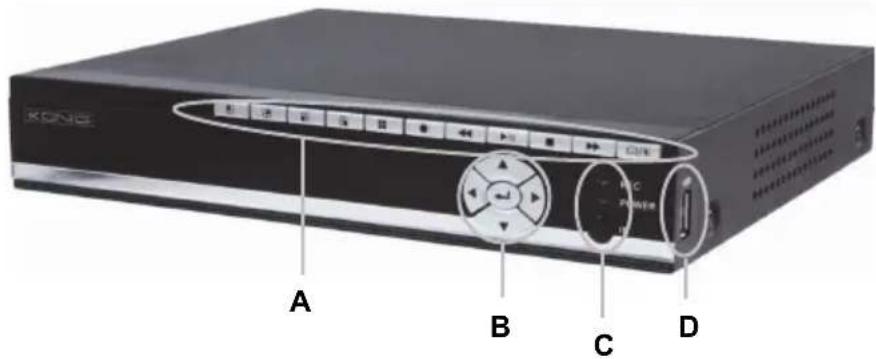
Section A:

Press to select channel 1
Press to select channel 2
Press to select channel 3
Press to select channel 4
Press to select QUAD mode and view all channels simultaneously
Press to start or stop manual recording (for programmed recording, enter the menu section of the DVR)

Press to rewind the video recording during playback mode.

Press to open the video search and playback menu. When the playback mode is activated, press this button to play/pause the recording.

Press to stop playback

Press to fast forward the video recording during playback mode

Press to access the toolbar, hide the toolbar, exit the menu and exit the sub menu. When the function toolbar is on screen, press the ENTER key to access the menu.
Section B:

Press the arrow buttons to navigate through the menu

Press the ENTER button to confirm choice in the menu
Section C:
REC Indicator lights up to indicate recording is in progress
POWER Indicator lights up when the DVR is powered on
IR Infrared receiving sensor for the use of the remote control
Section D:
USB port USB connection for mobile memory storage
Note: press the button in live view 10 times when there is no toolbar. This will switch the main menu between CVBS video output and VGA video output.
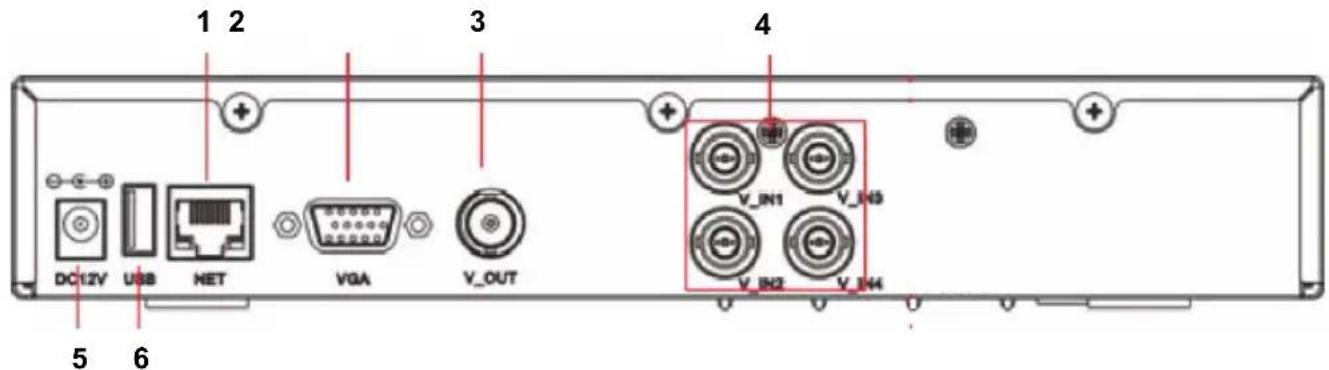
Description of the connectors on the rear panel of the DVR:
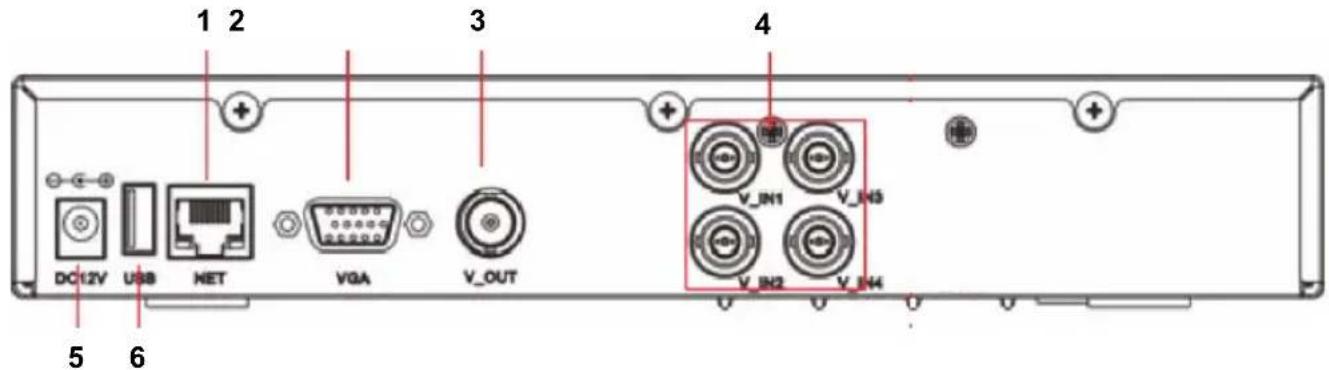
- Network interface RJ45, 10 M / 100 M
2.VGA video output for monitor - CVBS video output for monitor
- BNC input connectors for the connection of cameras
- DC power input (use only the supplied AC/DC power supply)
- USB port for mouse
Description of the remote control:
The functions and symbols of the buttons on the remote control are identical to the functions of the buttons with the same markings on the front panel of the DVR.
The following buttons can only be found on the remote control:

If the password is enabled, press the lock button to log out of the menu after changing settings such as the password.
Note: the default password for Admin is "888888" and the default password for user1 is "666666". In the menu > system > user, you can change the password of Admin and add another username and password.
Numerical buttons: press button 1, 2, 3 or 4 to select the camera channel. Other numerical buttons have no function for this model.
Press the ENTER button to confirm your choice in the menu.

Press the sequence button to start the automatic sequence between the connected cameras.

Mute button. Not applicable for this model.
Menu/ESC: press this button to enter the menu or exit menu/option

Quad button: press this button to switch to quad mode. Press button 1, 2, 3 or 4 to select the camera in full screen again.
Description of the mouse:
The mouse operates just like a mouse on a computer.
Right-clicking: In live view, right-clicking will either display or hide the toolbar.
From the main menu or a sub-menu, right-clicking will exit the current menu. Note that any changes to settings will not be saved after right-clicking.
Left-clicking: In menu unlock mode, left-clicking on the SYSTEM SETTINGS icon in the tool bar will open the main menu.
After entering the main menu, left-clicking will open sub-menus. In the "detail files" menu mode, left-clicking will play back one recording file.
By left-clicking, you can select values in edit boxes or pull-down menus. The system supports the input of Chinese characters and other special symbols, numbers and letters.
On the playback interface, left-clicking can control the fast-forward function, the rewind function, the slow-motion function, the frame-by-frame playback function and the normal play function. Left-clicking can also stop any of these processes or it can be used to exit from a mode or menu.
Left-clicking can be used to access the colour control bar, the volume control bar (n/a), and the screen control bar.
From the main menu, sub-menus, or playback view, left-clicking "x" will exit the current menu.
Left-clicking can also be used to select menu items.
Double-clicking In live view or video playback, double-clicking will maximize the left mouse key screen.
Mouse drag In the motion detection setting interface, you can left-click and then drag the frame to set the motion detection area.
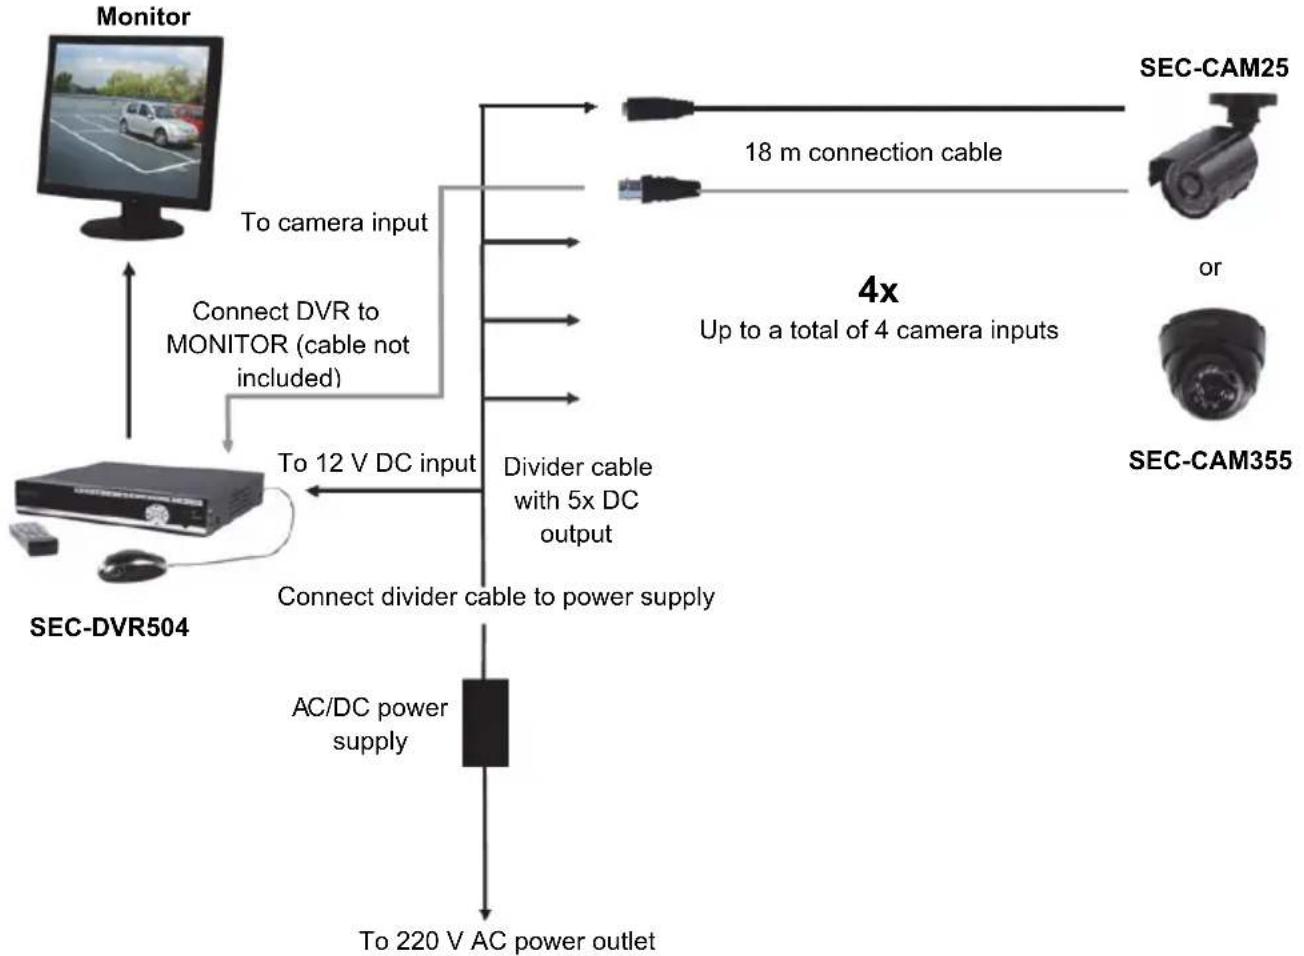
Installation instructions
User instructions
To get you started, the following chapters describe some of the features and functions of the DVR. Please refer to the extensive English manual for further details about the DVR. For system settings, it is recommended to use the mouse.
The DVR switches on automatically when the AC/DC power supply is connected to the DVR and a power outlet.
During configuration, press to restore the default setting. Press to save the settings.
Login:
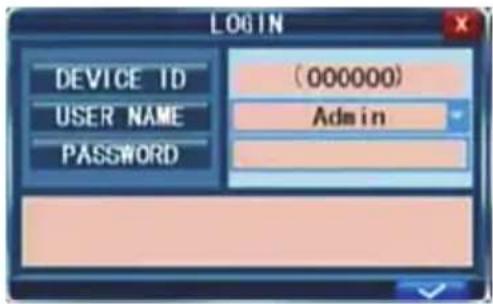
In live view, press twice or double-click the right key of the mouse in live view to display the toolbar. The login window will appear if the password is enabled. You can enter a user name and password to login.
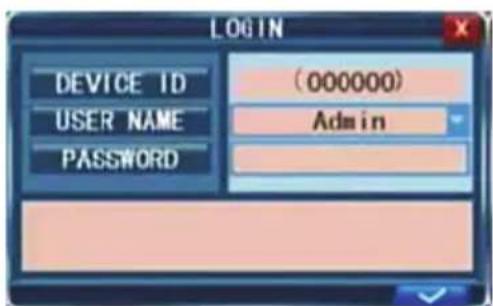
- The default password for Admin is 888888 and the default password for user1 is 666666.
- The device ID is used for connecting the IE interface. For the detailed operation, please refer to the extensive manual.
Note: logging into the DVR is necessary to enter the menu and change the settings.
Live view:
On-screen information during live view are real time images, names and states of each channel. The icons indicate the following:

Icon indicates that the channel has detected motion in the motion detection mode.

Red dot indicates that the channel is running in recording mode.
Status and toolbar:
In live view, press once or click the right key of the mouse to display the status bar.

System time Estimated remaining time of hard disk recording
In live view, press twice or double-click the right key of the mouse to display the toolbar if the password is disabled. When the password is available, you can see the toolbar only after login.

- System settings (menu) 6. E (electronic) Zoom
- Play (playback menu) 7. VGA/BNC switch
- Manual recording 8. PIP 1x1
- Key lock 9. PIP 1x2
- Auto sequence
Record setting:
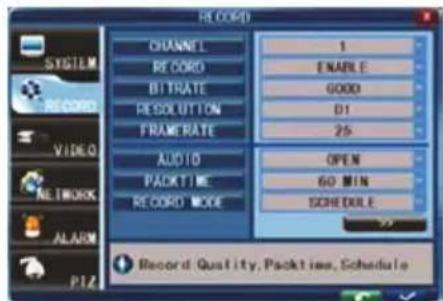
Select Toolbar System settings Record to enter the record menu. You can set quality, resolution, frame rate, pack time and record mode. There are three record modes: Manual Record, Always and Schedule. Always record mode will record with every channel all the time.
Frame rate: It is possible to adjust each channel frame rate independently. Real-time recording is 25 frames per second (fps) for PAL.
Please note that the recording frame rate limit varies depending on the recording resolution selected. Even though you may set the recording frame rate here, the system will automatically downgrade the recording frame rate if it exceeds DVR limitations.
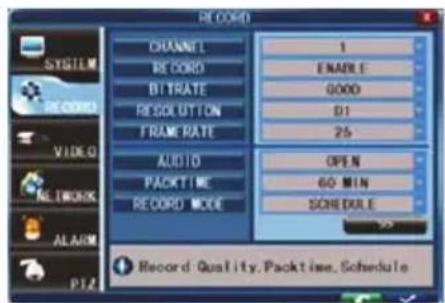
Resolution: the recording resolution has three options: D1, HD1 and CIF resolution. Standard Quality TV is equivalent to D1 quality. The resolution of each channel for recording can be adjusted independently.
Note: the audio function is not applicable for this model.
Manual recording:
Manual recording is useful for the times when you want to immediately record an event. To turn on manual recording, select Toolbar Manual Record or press the REC button on the front panel or on the remote control. A red dot will appear on the screen. To turn off the manual recording, press the REC button again.
Note: this option only works when the DVR is not already recording.
Schedule recording:
It allows you to create a schedule for recording tasks throughout the week, so that only certain selected events will be recorded.
CHANNEL: You can select one, two or all channels.
There are three modes for recording: Motion Detection record, NORMAL record and NO RECORD.
Different colours signify different recording modes: Orange means MD record, green means normal record and grey means no record. First select a colour cell below the screen. Then select a cell on the desired day. With the copy function, you can copy a setting to all days or a selected day.
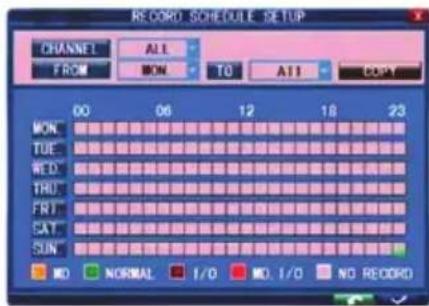
After completing the schedule, click on to activate the setting.
Note: Option I/O is not applicable for this model.
Video playback:
Select Toolbar Play to enter the Playback menu.
Method 1: Playback by date
Date input: Adjust the date and time to match the recording you are searching for. Select "TIME" and click on Enter to directly insert numbers to set the year, month and date. Now insert the time in the next field and click on
The following window will automatically appear. Select the channel of the video you want to play and click on . If only one channel is selected, the video from that channel will be displayed in full-screen mode. If two or more channels are selected, the videos from the selected channels will be displayed simultaneously over four frames.
Method 2:Playback by recording status
Insert the date, click search and you can see the recording status of this date.
Video edit:
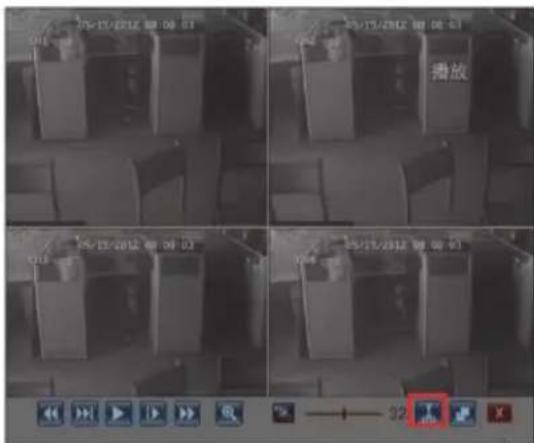
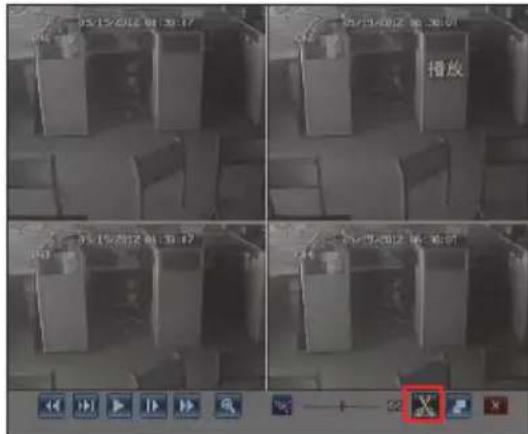
During the playback, choose the channel that you want to edit, click the button in the playback
control panel, and this icon will change to X. When you want to end the editing, click the button X and it will change to
Backup edited files:
After completing the editing, insert the USB device and click the button to enter into the following interface,
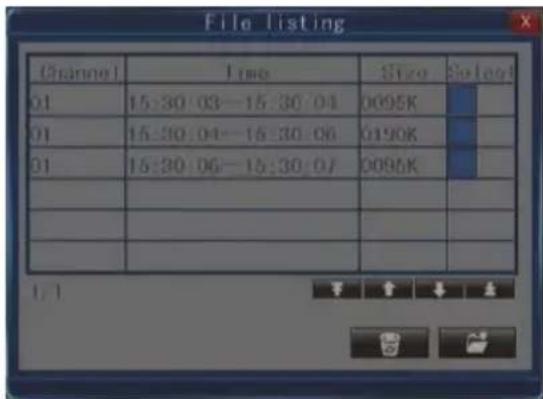
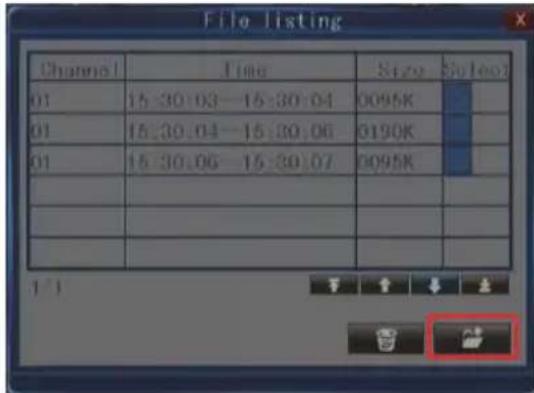
Choose the file, click the button and choose the file format, then the file will be saved into your USB device.
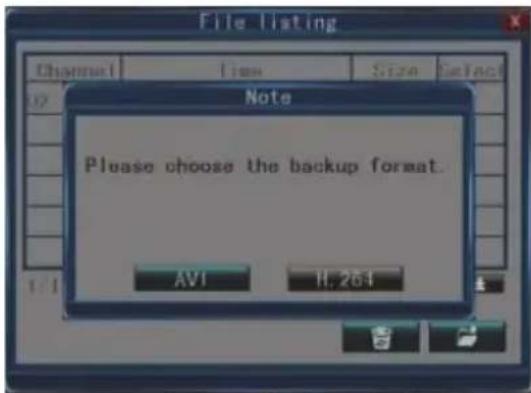
Note: The edited file listing can contain 18 pieces of records at maximum, you can click the button
to clean the list. If the list has obtained 18 pieces, the button will change to In
addition, if you exit the playback and the list will be cleaned automatically.
File back-up:
Select Toolbar Play Search to enter the file list. In this interface, you can back up a video file. Click
to switch pages. Select the video file you want to back up and click
to back up the video file to a USB memory device.
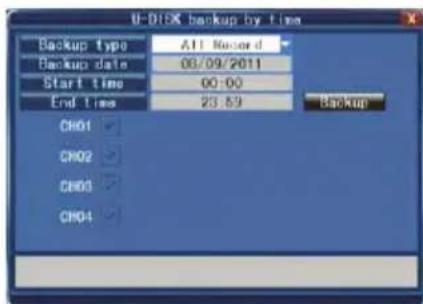
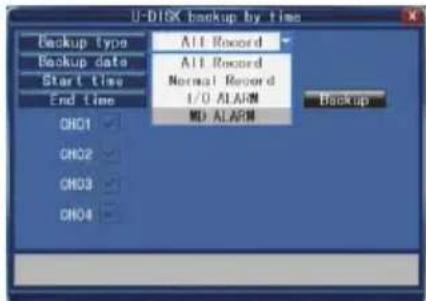
Backup by time:
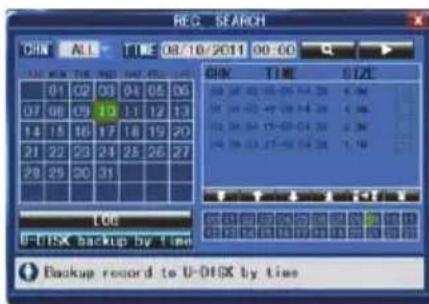
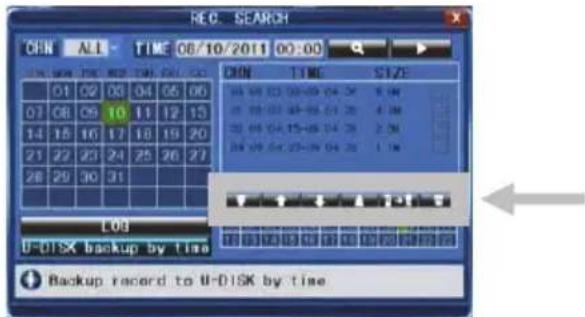
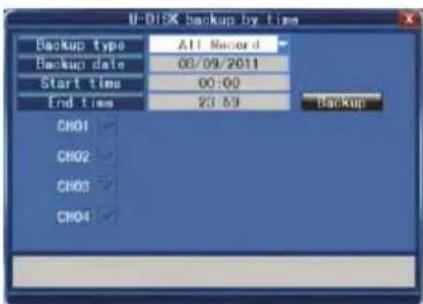
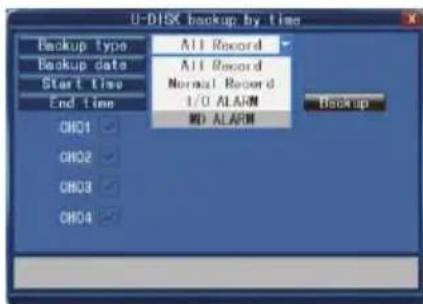
Move the cursor to [ ] (the icon will be highlighted when selected) and left-click to enter the [REC SEARCH] setting interface or press [> ] to enter the setting interface. Move the cursor to "U-DISK backup by time" and left click to access the "U-DISK backup by time" search (as shown in the figure below).
Network settings:
To set the network, any network/IP skills are recommended. Please contact your reseller or another person with network/IP skills for help.
To connect the DVR to the Internet, certain settings must be inserted into the DVR. To access your DVR via the Internet, you will need either a Static IP from your Internet Service Provider (ISP) or a router with Dynamic DNS (DDNS) capability and an account with an online DDNS service. This service is country-specific, but in many countries the manufacturer's suggested service is http://www.dyndns.com.
Select Toolbar System Setting Network.
Please refer to the extensive English manual for further details about the network settings.
Mobile Phone Support
This DVR device can transmit live feed from the CCTV cameras to your mobile phone, so that you can have 'on the go' access to your surveillance system from virtually anywhere. To view, you must install a mobile operating system specific program into your mobile. The mobile programs are located on the included CD, or downloaded via iTunes for the iPhone. In iTunes, please search for "MobileEye+". Please see the instruction manual for your mobile to install the program. Currently, there are a limited number of phones that are supported: Android and Apple iPhone.
Note:
- Prior to using this feature, you should apply for an Internet connection service for your mobile phone, such as 3G or 2.5G. Please contact your mobile service provider for details.
- You can only watch four live feed channels at a time with your mobile phone. Playback of recorded files is not available at the moment.
In the following example, we use the Android mobile phone. The usage of other mobile programs is substantially similar. For more detailed instruction, please view full user manual on the included CD. From the installation CD, install file "MobileEye+_2.0.6(04091435).apk" onto your Android mobile phone. See the user manual included with the phone for more details on installing this application..
(1) Find and execute the program "MobileEye+". First, a user needs to add devices. Click the " button.
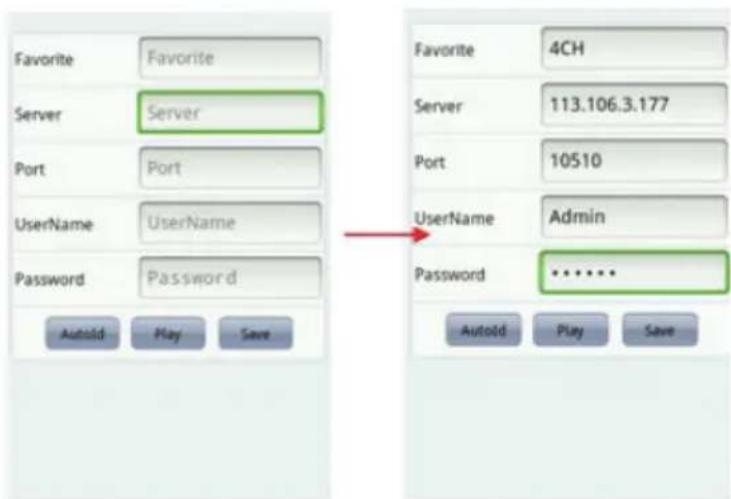
a. By IP address (or DDNS)
On the window of device information set up the DVR with "Favorite", "Server", "Port", "UserID" and "Password". Click Save to save.
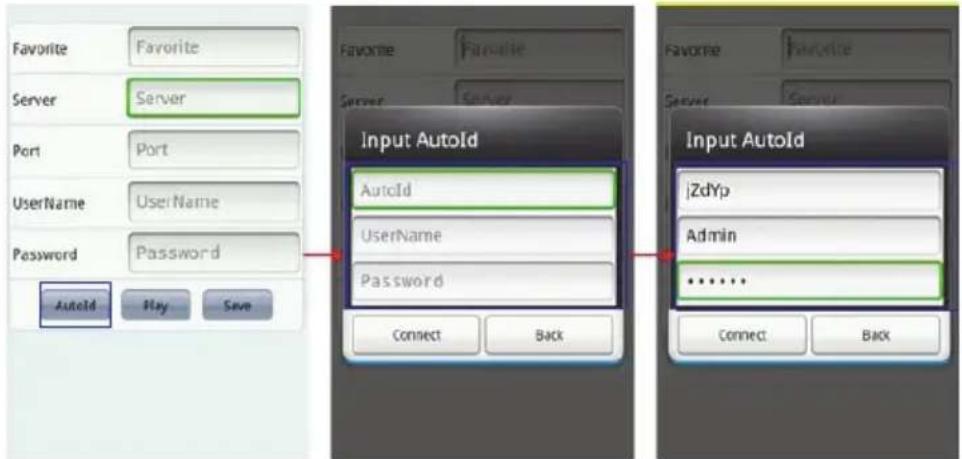
b. By Auto ID
On the window of device information click "Autold", then set up the DVR with "Autold", "UserID" and "Password". Click "Connect" to return to the main screen to connect the channel
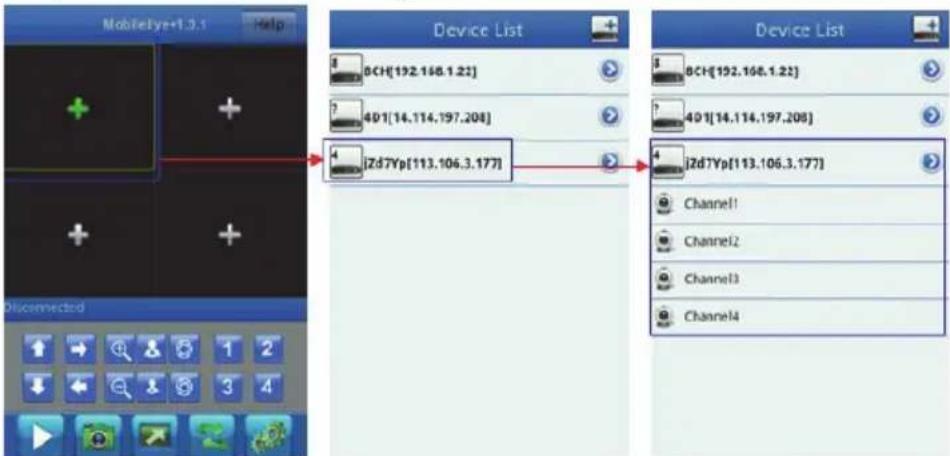
(2) Move the green frame cursor to one of the quad screen, and click to select one of the channels in the Device list, it will connect immediately.
(3) For PTZ operation, move the red frame cursor to one of the quad screens which are connected to the PTZ camera, using the following icons to control PTZ.

PTZ direction controls: up, down, left, right.
PTZ lens controls: zoom in/zoom out, focus+/ focus-, iris+/ iris-.
Other icons as below:
Use the numbers to select the live view channel to display. Play/Stop button.
Capture: to capture a frame of the video stream as a still photo.
Enlarge the selected channel, and back to quad view.
Device set up, you can set up Devices (DVR) unlimitedly.
Help Click it to enter the "help" interface for information of this software.
Maintenance:
Clean the DVR with a dry cloth.
Do not use cleaning solvents or abrasives.
Warranty:
Any changes and/or modifications to the product will void the warranty. We cannot accept any liability for damage caused by incorrect use of this product.
Disclaimer:
Designs and specifications are subject to change without notice. All logos, brands and product names are trademarks or registered trademarks of their respective holders and are hereby recognised as such.
Disposal:

This product is designated for separate collection at an appropriate collection point. Do not dispose of this product with household waste.
- For more information, contact the retailer or the local authority responsible for waste management.
This product has been manufactured and supplied in compliance with all relevant regulations and directives, valid for all member states of the European Union. It also complies with all applicable specifications and regulations in the country of sales.
Formal documentation is available upon request. This includes, but is not limited to: Declaration of Conformity (and product identity), Material Safety Data Sheet and product test report.
Please contact our customer service desk for support:
via website: http://www.nedis.com/en-us/contact/contact-form.htm
via e-mail: service@nedis.com
via telephone: +31 (0)73-5993965 (during office hours)
NEDIS B.V., De Tweeling 28, 5215 MC 's-Hertogenbosch, THE NETHERLANDS
DEUTSCH
Inhaltsverzeichnis:
Digitale videorecorder SEC-DVR504
Method 1: Uppseling after datum
Mobiletelefonsupport
KataoTaon kai ypaumn epyaaleiw:
AIO TIV TPOBoIg Oe TpaymuTko XpOvo TIEOTe Mia φopá n KAVTE δEgi KLk ME TO TIOVTIKI YIA TNV TPOBoIh TnC Vpaumc KaTaOtaoNCS.

Ωpa σuotnμatoc
EKTiμwεvoc xpovoc Tou exa aioeive iia eyyapn oTov oKAnpo diKa
AIO TIV PPOBn Oe PpaatikoxpOvo TIEOTE DUO Qopec n KAVTE DIIAO DEKIK TE TO TIOVTIK YIA PPOBn TNS ypauncs Epyaleiw, av exei aTVEpyoTOINthei o KWIOKCS PPOBaONs. Av diATIeTAI KWIOKCS PPOBaaonC, mTOpeITE vdoDEITE N ypaun Epyaleiw MDOV apou OuvDeTe.

123456789
Fil reservekopiering:
Reservekopiering after tid:
Flyt markoren til [▶] (ikonet markers Near det vælges) og venstreklik for at gå ind i [REC SEARCH] indstellingsinterfacet eller tryk på [▶/||] for at gå ind i indstellingsinterfacet. Flyt markoren til "U-DISK reservekopiering after tid" og venstreklik for at gå ind i "U-DISK reservekopiering after tid" sogning (som vist i figuren herunder).
PAL: 50 fps @ D1, 100 fps @ HD1 / CIF
NTSC: 60 fps @ D1, 120 fps @ HD1 / CIF
ПоноэкраHHьpeжIM/KBaДpaTop/peжIM«КарTNHkaВ KapTNHKe》/peжIM NOCENoBATEJIbHOCTN
1x nocneobatebHbI nHTepcEInc ATA 3,5IOHa
Do 2-x Tepa6aNT (B KOMnNeKT He BXoNT)
4 KaHaJa OndHOBpeMeHHO
4 KaHaJa
CTaHdapThb pa3bem RJ45, 10 M / 100 M
Iopdepkna npotokonob TCP/IP, DHCP, DDNS, PPPoE
IopdepxnbAeT Bn3npoBaHne no 3kpaHy npn nmoOn 6pay3epa Internet Explorer n cmapToHa
1/50(1/60)~1/100,000ceK.
1/50(1/60)~1/100,000ceK.
HaKMTe, YTo6bI BbIbpaTb KaHAn 2
HaKMTe, YTO6bI BbIbpaTb KaHAn 3
HaXMMTe, YTO6bI BbIbpaTb KaHAn 4
HaKmTe, YTo6bI BbIbpaTb peXIM KBaIpaTopa I npOCMOTpeTB BCE KaHaJIbIoNDHOpeMeHNO
HaxmTe, yTo6bI hauatb nJIn octaHOBntb pyuHO pexm 3aNCSn (JIy 3aIporpaMMnpoBaHHo 3aNNC BOINTE B pa3dEJI MeHIO cIpPOBOrO yCTpOYCTBA BVideo3aNCSn)
Haxmnte, yTo6bI nepeMoTaTb Ha3aD BnDeo3aNcB Bo Bpem peKIma BocnpOn3BeDeHna
HaxMMTe, YTO6bI OTKpbITb NOUCBnDeO MHeIO BOCpON3BeDEHnA. KOrda aKTNBpyeTcpeXIM BOCpON3BeDEHnA, HaxMMTe 3Ty KNOpKy, YTO6bI BOCpON3BecTN/npNOCTaHOBTb3aNNCb.
Haxmnte, Yo6bIOCTaHOBNTb BOCnpon3BeJeHne
HaKMnte, YTO6bl BKNIOHTb yCKOpEHHyIO nepeMOTky BnDeO3aHcN BnpeEd BO BpeMa BOCnpON3BeDHeH
HaxmTe, yTo6bl noka3aTb nAHeJIb IHCTpyMeHTOB, cPpTaTb nAHeJIb IHCTpyMeHTOB, BbiTNn3 MeHIO n BbiTNn3 NODMeHIO. Korda Ha 3KpaHe NOBNTc cyHKUHOHaNBaHra NaHeIb INCTpyMeHTOB, HaxmTe KnaBnUy ENTER, yTo6bl nOnyuNb doCTyn K MeHIO.
CeknB:

HaxmaTe cTpeNohIe KhoNkI dI npEpeMeIeHnI NO MeHIO

HaKmTe KhoNky ENTER, TTo6bI noTBePdntb BbI6Op B MeHIO
CeknA C:
REC HndnkaTOp 3aIopaeTcya3bBa,TOB daHHbIMOMeHTNdet 3aINCb
POWER HndkaTOp 3aropaetc, KOrda cnpoBoe yctpoCTBO BnDeo3anCn BKJIOyeHO
IR nncnboaHn yHKn nn nctahnoHHo ynpabneHn
CeknD:
USB nopT USB-coeHHeHne IJRA MO6nJIbHOro 3aONMHaUojo yCTpoIcTBA
Примechанee: ecn n paHeJIb INHCTpyMeHTOB He NOBJIaTeCry, HaxMITE KHOkky 10 pa3 npN Bu3npoBaHmNo 3KpaHy. 3TO BKNIOHT IaBHOe MeHIO MExy BbIXOdom NOnHORO BUnEOcHHaJa N BbIXODom rpaФuYeCKOrO BUnEOaDAnTepa.
Onncahne pa3bemOB Ha 3aHne naneHn cnofoBoro yctpoiCtba Bndeo3ann:
- Pa3bem ceTeBoro INHTeppeca RJ45, 10 M / 100 M
- BbIXoI rpaΦnueckoro BnIeOaIaNTepa IJIa MOHITopa
- BbIXoI nonHoro BnDeocnHaJa dIy MoHITopa
- Bxohhhe pa3bembl BNC nI npoknuehen Kaemp
- IcToUHnK NOCToRrHHOrO ToKa (IcNoJIb3yIe ToIbKO BXOJaIeB B KOMNNeKT NCToOHK NITaHnI nepeMeHHOrO ToKa/NoctoRrHHOrO ToKa)
- USB nopTДЯMbIшКI
Onncahne nylbTa dncTaHcNoHHoro ynpaBHeHra:
UncnoBbIe KhoNk:HaXMITE KhoNky 1,2,3nn4,HTo6bl BbI6paTb KaHaj KamepbI. OCTaJIbHbIe UncNoBbIe KhoNkHe HMeOT cyHKcIyDnA DAHHOJ MoDeJI.
Hakmte KhoIky ENTER nnoTbepeHn CBOero Bb6opa B MeHO.

Haxmte KhoNky «IocJeDoBaTeNbHOCTb», qTo6bl BKJIIOuHTb aBTOMaTnueCKyIO nocJeDoBaTeNbHOCTb CoeINHeHHbIX KaMep.

KhoNka oTKJIOUeHn 3Byka. He npImeHReTcB DaHHo MoDeJI.
Menu/ESC: HaxMnte 3Ty KONky, YTO6bI BOITN B MEHIO INB BIIITN N3 MEHIO/ONLIM

KhONka BKNIOUeHnRA KBaIpaTopa: HaxMMTe 3Tu KHONky, YTO6bI BKIOuHTb peXIM KBaIpaTopa.
HaXMITE KHOINy 1, 2, 3 nnn 4, YTO6bI BepHyTB Bbl6paHHyO kamepy B noNHO3KpaHHbI peXIM.
OnncahneMbIuN:
MbIb pa6oTaT TaK Je, KaK N KOMNbOTepHaM MbIb.
UeHOK npaBOK KHOKoI Pn Bn3npOBaHN No 3kpaHy UeHOK npaBOK KHOKoM MbIuN NO3BOJAreT MbIuN: OTO6paxKaTb NJIcKpbIBaTb NaHeJb HCTpyMeHTOB.
IeHcK npaBoN KONKO Mblu N03BOJAE T BbInTu N3 rnaBHO MeHIO INI INoDMeho. O6paTte BHMaHne, YTO IIObIe N3MeHeHn B HacTpOkaX He COxpaHrTcN oCJIe HaKaTn PpaBo KN KONKn MbluN.
UeJyok JbeoK HONKOI MbluN:
При НсИнХрОнHOM ржIMe pa6OТы MeHIO, ZeIчOK Левой KhoNkoMbluHa 3нake CNTSTEMHbIE HACTPOIKN Ha NaHeJIи INHCTpyMeHTOBПОВЯЯET OTKpbITb ГlaBHOe MeHIO.
IocJIe BxOdaB rIaBHOe MeHIO ⅢeJHOK JEBOHNKONKO Mbln N03BOJNT OTKpbITb NOMeHIO.BpeKIme MeHIO «detail files》UeJHOK JEBOHNKONKO MBIIIN N03BOJRAET BOCnPOn3BecTNOIN3aINCbIAembl qaiJ.
Pn NMOUJIeBOI KHOKN MBIIN MOXHO BbIbIpaTb InapaMeTpblB OKHax peaKtnpoBaHnI IN B MeHIO Oepaun. CnCTema noIepKnaeT cyHKuIO BBOda KNTaicknx NeporJInΦOB IN dpyRnx CneuaJIbHbIX CNMBOIO, YIcEJI N 6yKB.
B INHTepce BOCnpon3BeHnnaeJyHKUaMn yCKopeHNO nepemOTKn Bpepe, nepemOTKn Ha3aD, 3aMeJeHHoro BOCnpo3BeDeHnna, NOKaDPoBOrO BOCnpo3BeHnna n oblyHoro BOCnpo3BeHnna. JcIyok neBoi KHOJIKO MbluN PO3BOJAreT TaKKe OCTaHOBtB JIO6oN IX 3TNX PPOCECCOB IIN BbIITN n3 peKIMMa IIN MeHIO.
IeHcK JEBO KHOKO MbIMMOXHO NcONb3OBaTb DnI NOJyEHN IocTyNa NaHeHn HacToPmKn CBeTa, NaHeHn peYIpOBaHn rPOMKoCTN (He npMHeHMo B DaHHom clyuae) n NaHeHn ynpabEnHaN.
IeHOK NEOB KHOKOB Mbln NO3BOJET BbInu 13 INaBHORo MeHIO, IOMeHIO INPpeKIMMA BOCpON3BeJeHn.
IeHcK JEBOHNKO Mblu MoXHO TaKKe IcNoB3OBaTb DnA Bbl6Opa NyHKTOB MeHIO.
Двоинoiшелчok
HctpyKnna noIb3OBaTeJra
Ipeed hauanom pa6oTbI O3HaKOMbTeCb CO cNeDyUcEi HNCTpyKUeI, ONCbIBaHOuSeHekOTOpbie XapaKTePncTNKn I yHKunu cHPOBOrO yCTpOJCTBa BnDeO3aNNcN. JIJI NOUYeHNA DOONHHTbHOI HNΦOPMaUNO uHΦPOBOM yCTpOJCTBe BNDeO3aNNcN O3HaKOMbTeCb C pacWIPeHNHO INHCTpyKUeI Ha AHJINCKOM r3bIke. IJI NCTeMHbIX HAcTpoEk peKOMeHdyETc NOJb3OBaTbc MblbIO.
LcnpoBoe yctpoiCTBO BndeO3aHNCBKNIOuaTcA BtOMaTHueCKN,ecNI OHO NOCDoeHHeHO K NCTOCHNY PNTAHNIEpeMeHHORTOKAp/NOCTOARHHOROTOKaIKPO3eTke.
Bo BpemKaHnHaxmTe, TTObI BOCCTaHOBtB HAcTPOKn No yMOJIHaHIO. HaxmTe , TTObI COxpaHNTb HAcTPOkN.
BxoD BCncTemy:
IIO6paKeHn NaHeIN INCTpyMeHTOB HaKMITE DBAKDbI IIN DBaXDbI ⅢeIKHnTE npaBOI KHOKNMblN BO BpeMnB3npoBaHn IO 3kpaHy. TPOBNTcR OKHO BXOda, ecnn AKTNBnPoBaH napOB. IIN BxOda BCNCTeMy BBeDnTe NmR NOJb3OBaTeJI n napOB.
- Napojb admna no ymoJuaHnO 88888, a napojb noIb3OBaTeTn 1 no ymoJuaHnO 666666.
2.ИdHTnФнKaTOp yCTpoiCTBa nCNoIb3yeTcAДЯ ПОДСоЕДиEHЯ nHTePфEуca 6pay3epa Internet Explorer. ДЯ ПОчЕHЯ nOДрбHои nHΦopMauN no 3KcNpyaTuAuN БбРТNTecь KpacшпeHHoINHCTpyKUIn.
Приимechанec: Дд BA BXODA B MEHIO ИЗМЕHENЯ HAcTpoE K HxKHO OБЯ3aTeJIbHO BOITN B CnCTeMy cnФрOBOrO yCtpoIcTBa BnDeo3aIncn.
Bn3npoBaHne no 3KpaHy:
HΦopMaζη, OTo6paKaemá Na ΕkpAe Bo BpeM Bn3npOBaHnNo ΕkpAhy - ΕTO n3o6paKeHn B peaIbHOM BpeMeHn, Hα3BaHnN I COCTOHN KακDOrO KaHaJa. 3NauchN o6o3Naayot cneDuoyee:

3TOT 3HaOK 6o3HaHaet, yTo KaHaJIo6HApyKnI DvNKeHne BpeXmE O6HApyKeHnI DvNKeHnI.

Kpachna Toka 6o3Haayet, YTo KaHAn HaxOHTcB peXmE 3aHcN.
CocToHHe n naHeJIb IHcTppyMeHTOB:
PAL: 50 fps @ D1, 100 fps @ HD1 / CIF,
NTSC: 60 fps @ D1, 120 fps @ HD1 / CIF
Tam ekran / quad / PIP / S.E.Q.
1x SATA 3,5 inc
Lütfen kayit kare Higgins limitinin seçilen kayit yüzunjürgüne®,®,®,®,®,®,®,®,®,®,®,®,®,®,®,®,®,®,®,®,®,®,®,®,®,®,®,®,®,®,®,®,®,®,®,®,®,®,®,®,®,®,®,®,®,®,®,®,®,®,®,®,®,®,®,®,®,®,®,®,®,®,®,®,®,®,®,®,®,®,®,®,®,®,®,®,®,®,®,®,®,®,®,®,®,®,®,®,®,®,®,®,®,®,®,®,®,®,®,®,®. <|im_start|>assistant Lütfen kayit kare Higgins limitinin seçilen kayit yüzunjürgüne®,®,®,®,®,®,®,®,®,®,®,®,®,®,®,®,®,®,®,®,®,®,®,®,®. ayarlayabilmenize ragmen DVR kisitlamasini—asarsa sistem kayit kare Higgins otomatik olarak Düşürür.