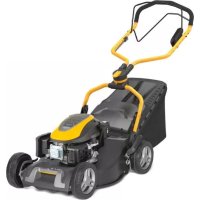
Multiclip 750 S AE - Lawn mower STIGA - Free user manual and instructions
Find the device manual for free Multiclip 750 S AE STIGA in PDF.
User questions about Multiclip 750 S AE STIGA
0 question about this device. Answer the ones you know or ask your own.
Ask a new question about this device
Download the instructions for your Lawn mower in PDF format for free! Find your manual Multiclip 750 S AE - STIGA and take your electronic device back in hand. On this page are published all the documents necessary for the use of your device. Multiclip 750 S AE by STIGA.
USER MANUAL Multiclip 750 S AE STIGA
MCS 470 Li 48 series
MCS 470 Li D48 series
MCS 500 Li D48 series


EN Pedestrian-controlled walk-behind battery powered lawn mower OPERATOR'S MANUAL
WARNING: read thoroughly the instruction booklet before using the machine.
ENGLISH - Translation of the original instruction ...... EN
text_image
Diagram illustrating a mechanical clamp mechanism with labeled components and directional arrows indicating motion or force.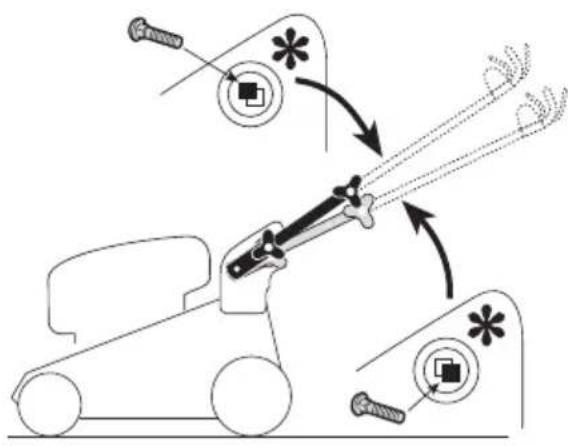
text_image
Diagram illustrating a robotic arm tool with labeled components and motion arrows, showing tool path and movement sequence.
natural_image
Technical line drawing of a mechanical linkage assembly (no text or symbols)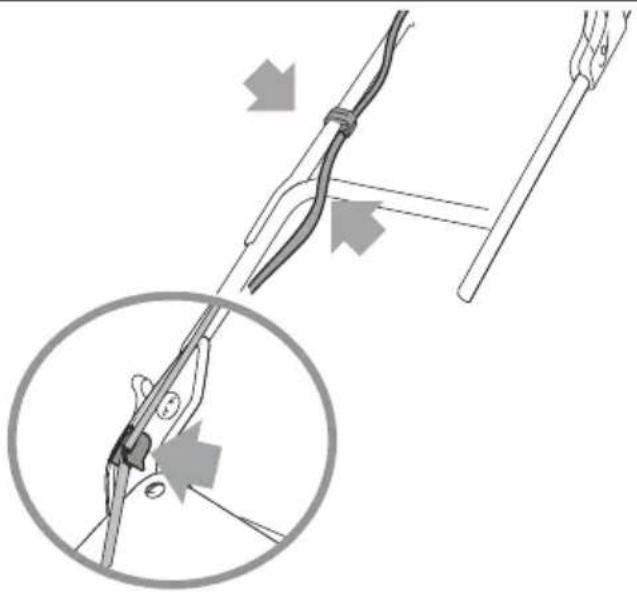
natural_image
Diagram showing a cable being adjusted for a cable, with an inset close-up highlighting the cable's adjustment (no text or symbols present)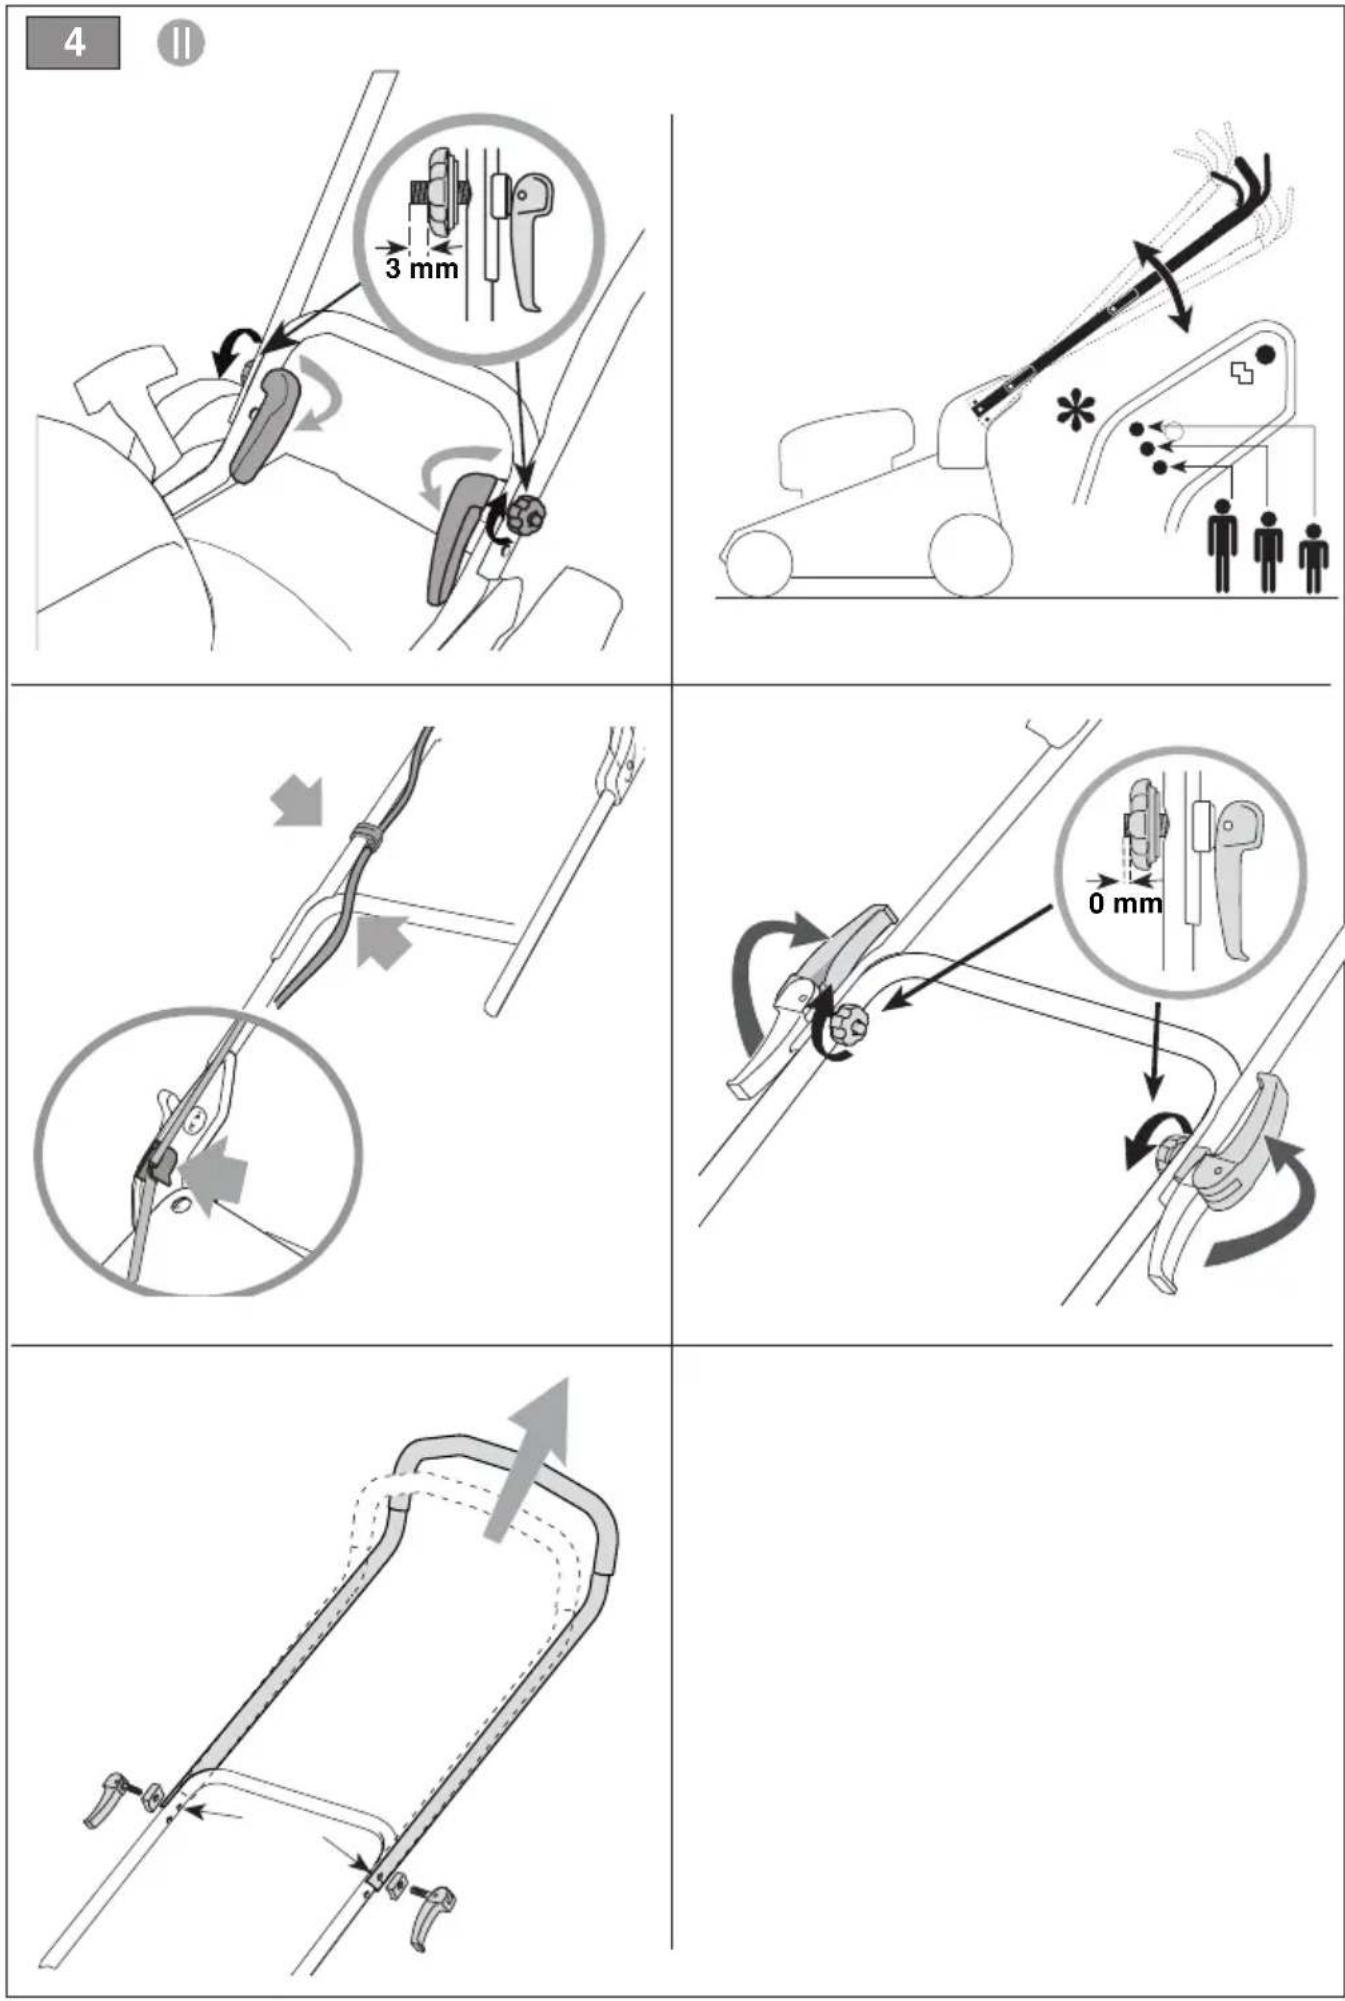
text_image
4 11 3 mm 0 mm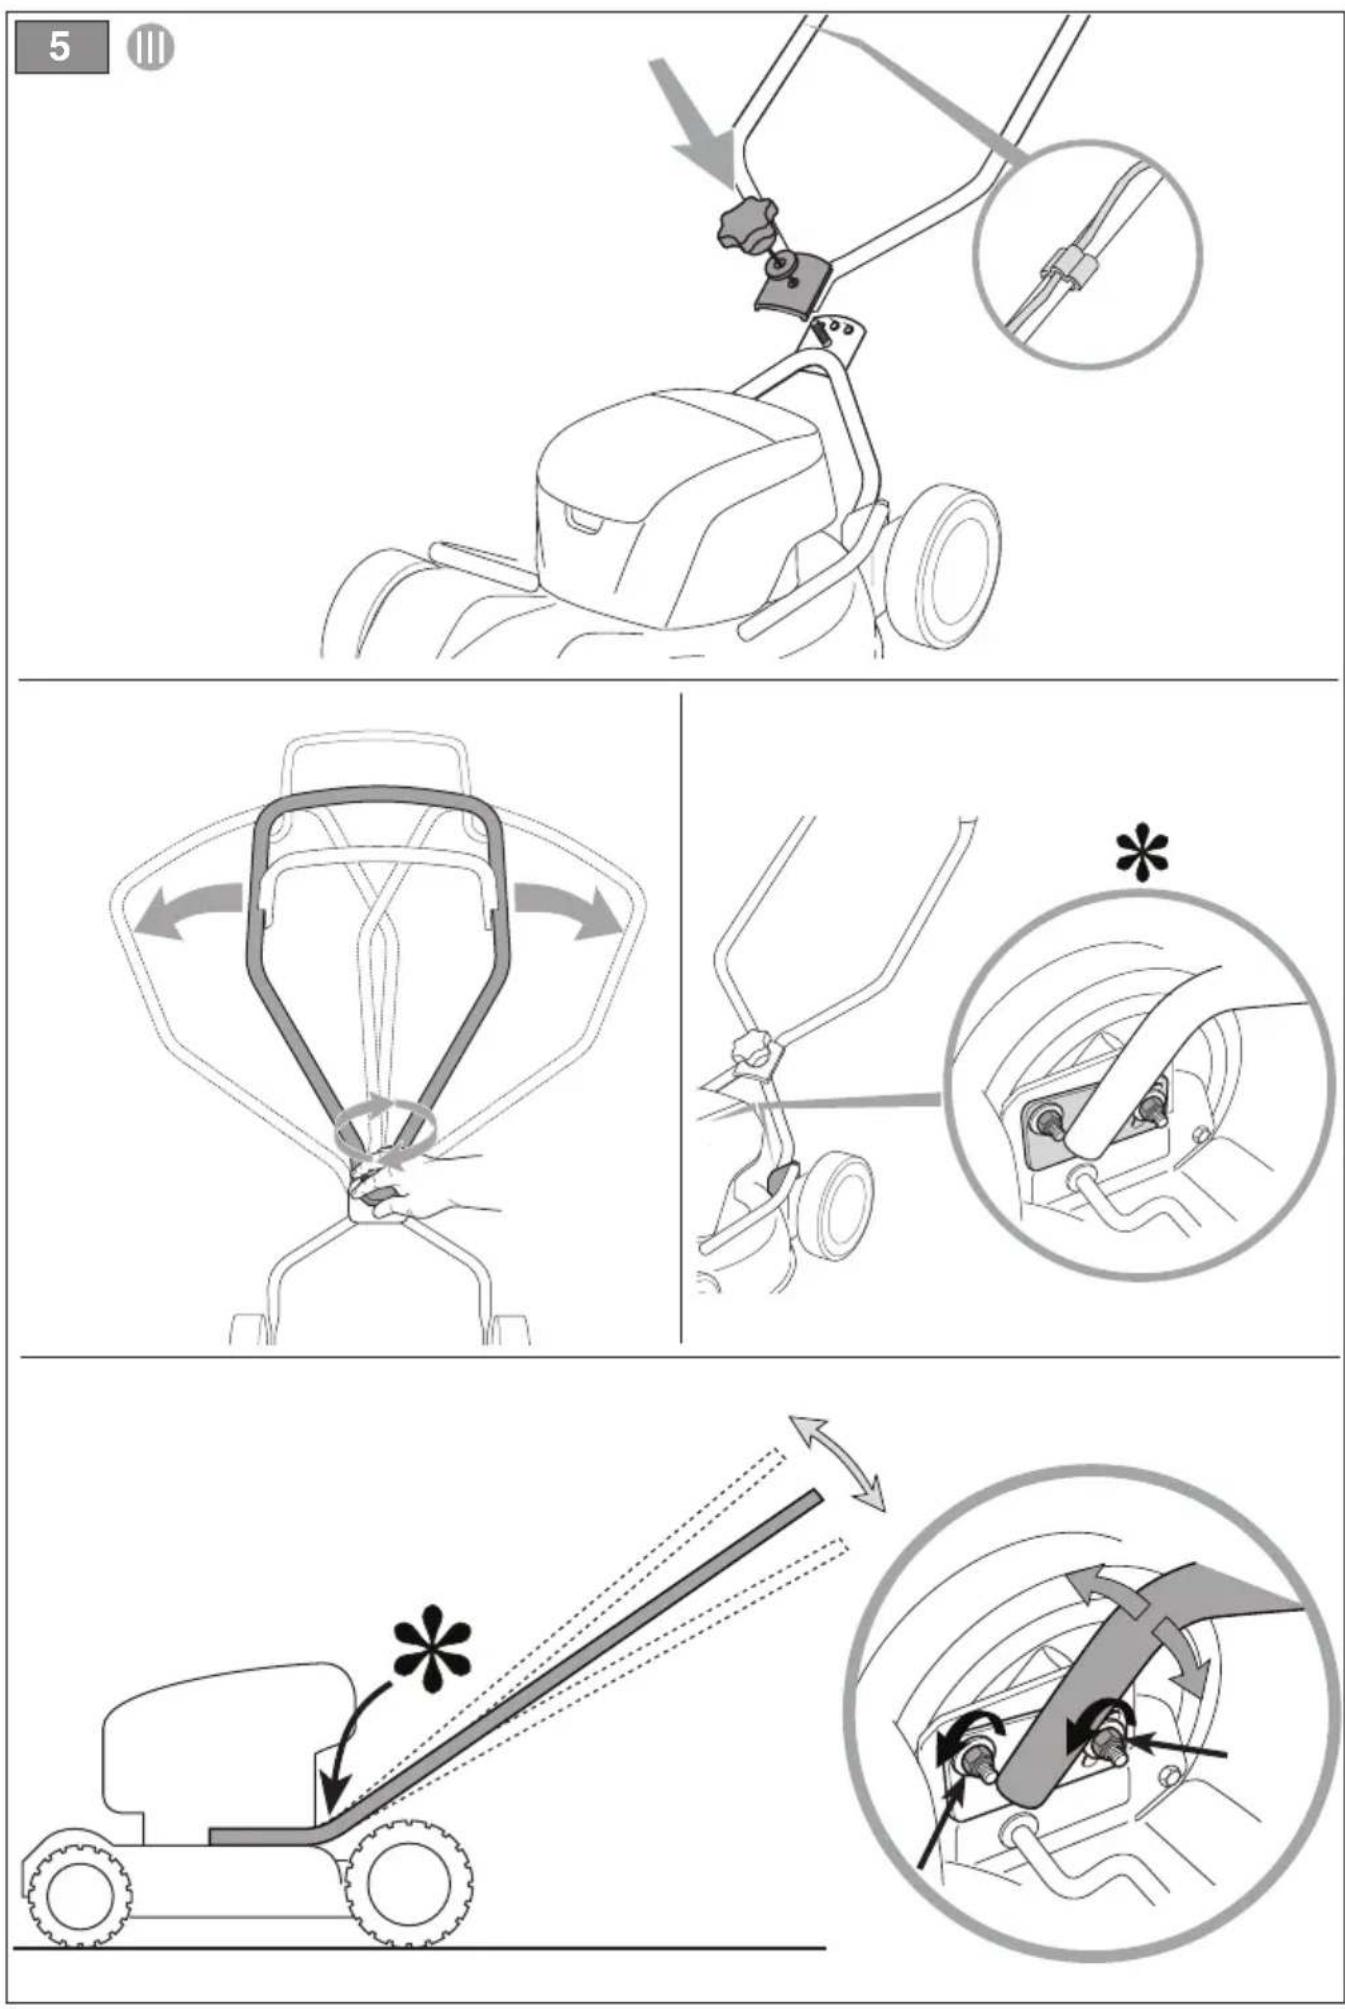
text_image
6 OFF ON I A OFF ON II A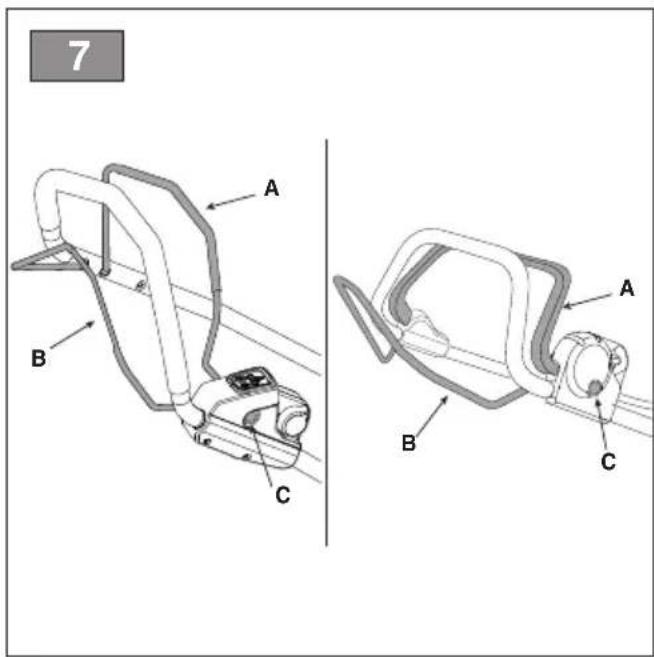
text_image
7 A B C A B C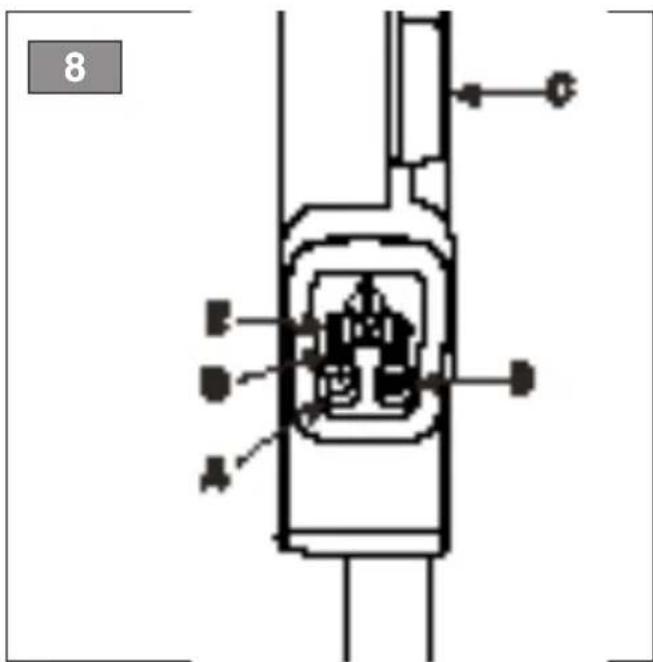
text_image
8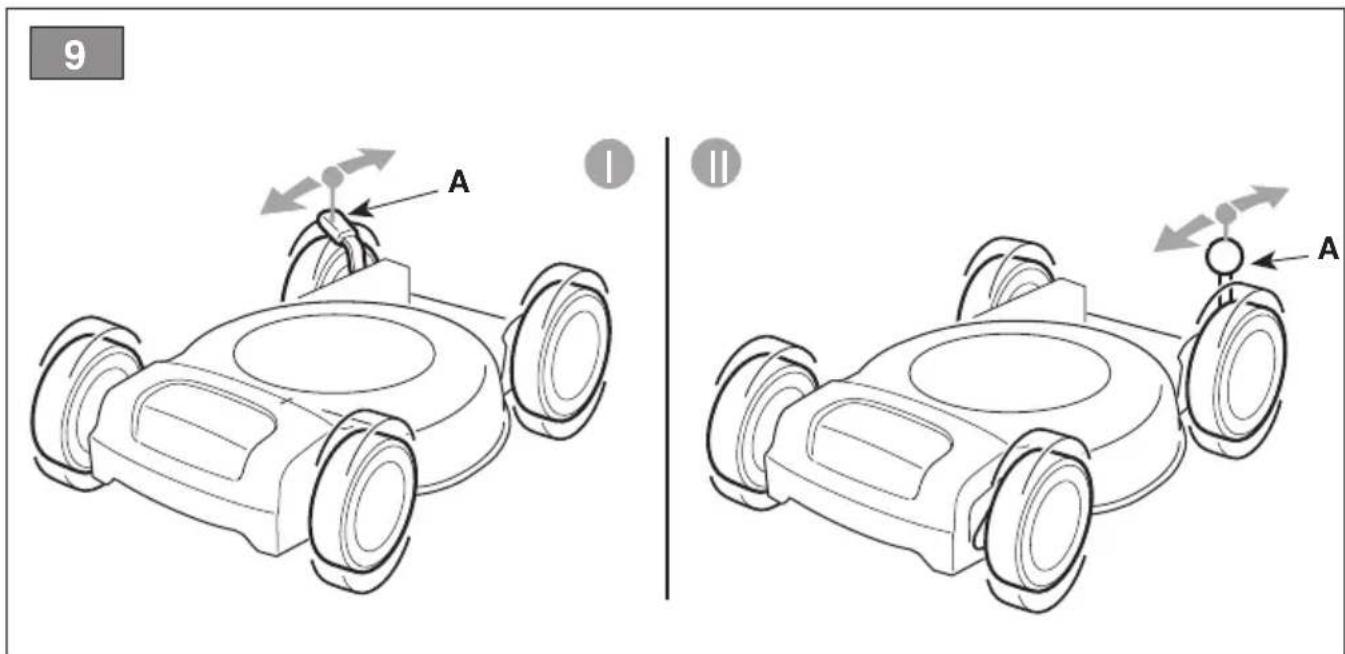
text_image
9 A I II A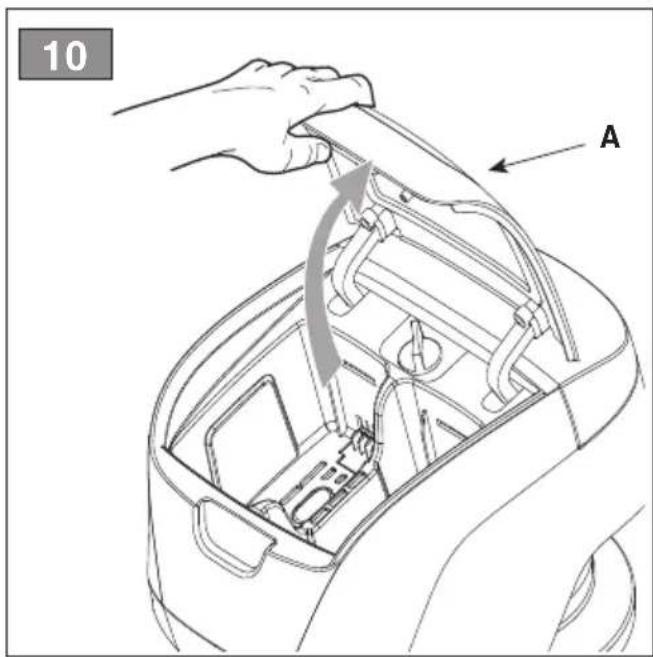
text_image
10 A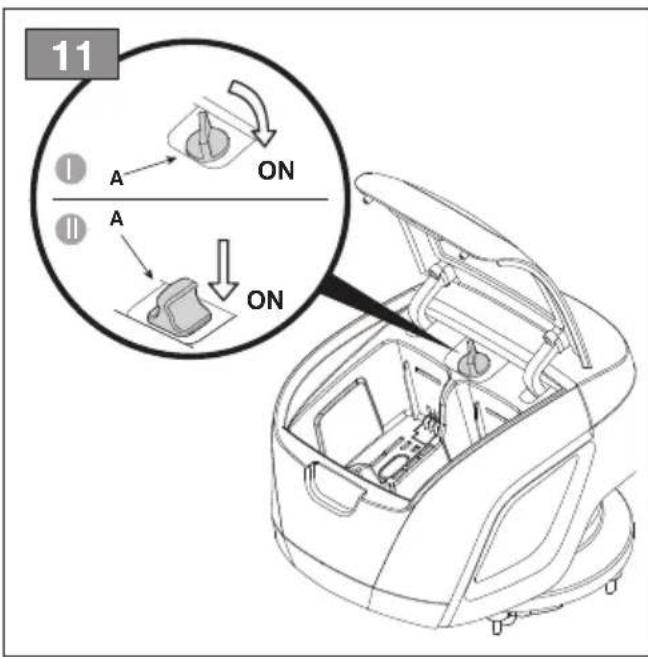
text_image
11 I A ON II A ON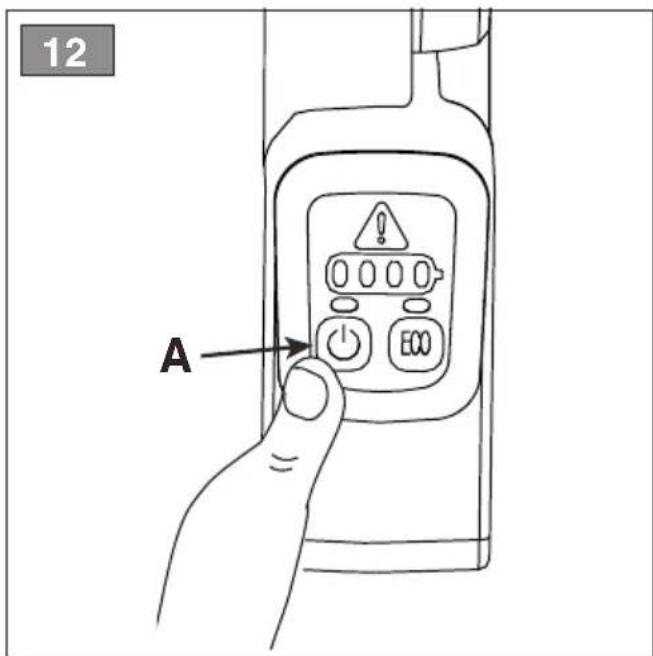
text_image
12 A
text_image
12 C B A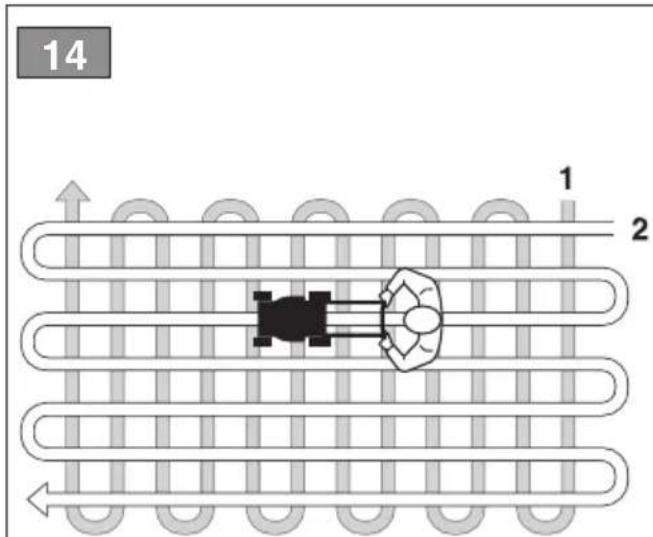
text_image
14 1 2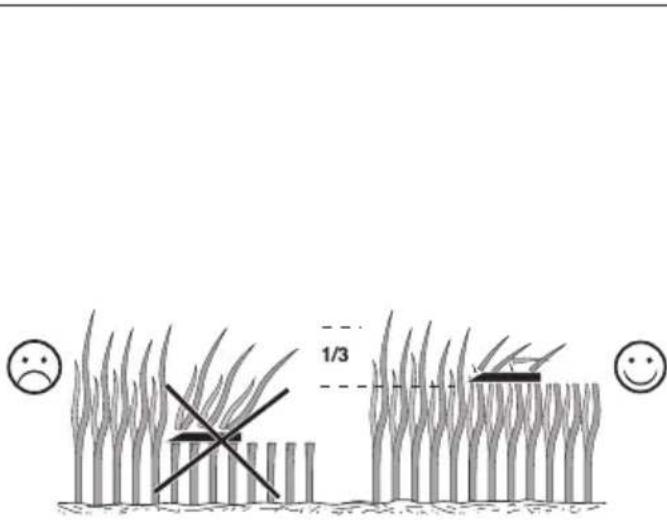
text_image
1/3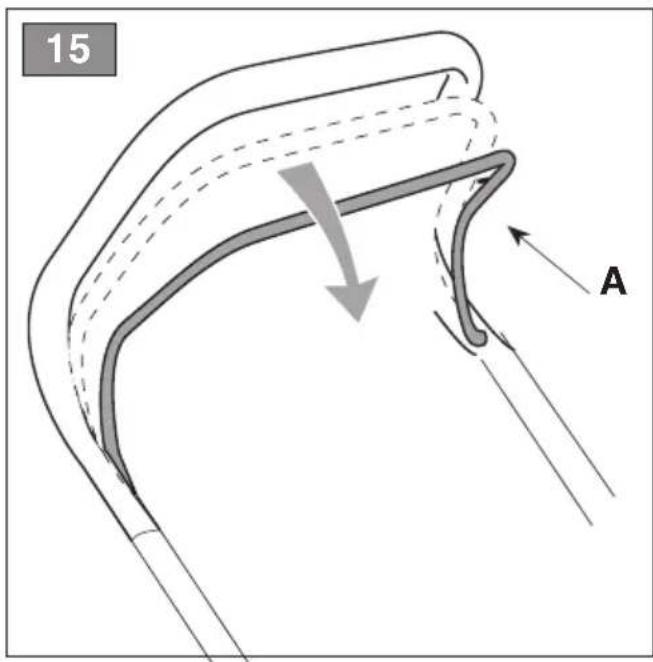
text_image
15 A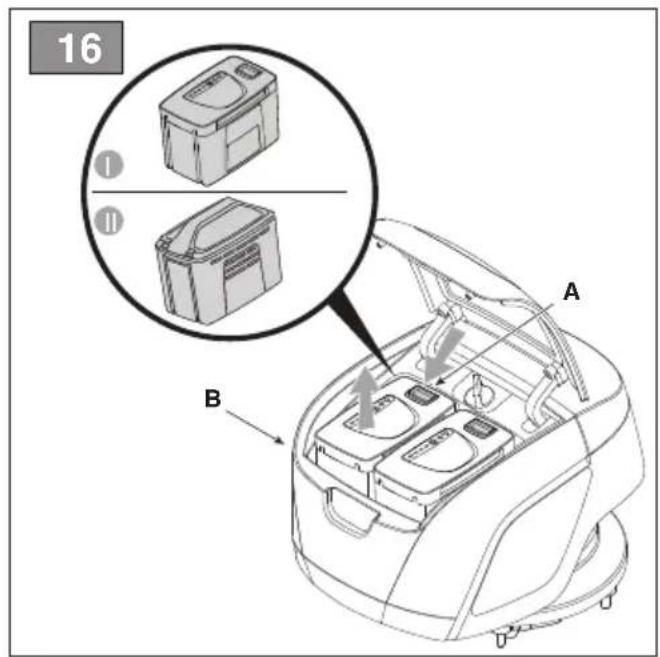
text_image
16 ① ⑪ A B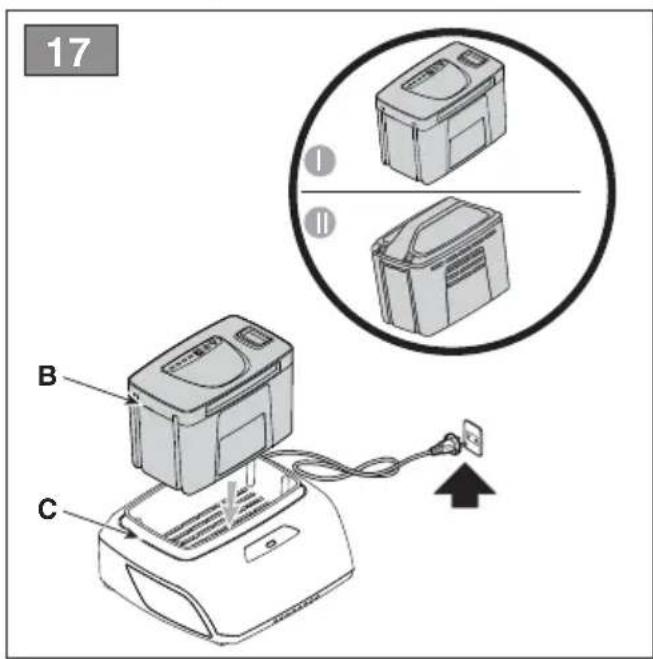
text_image
17 B C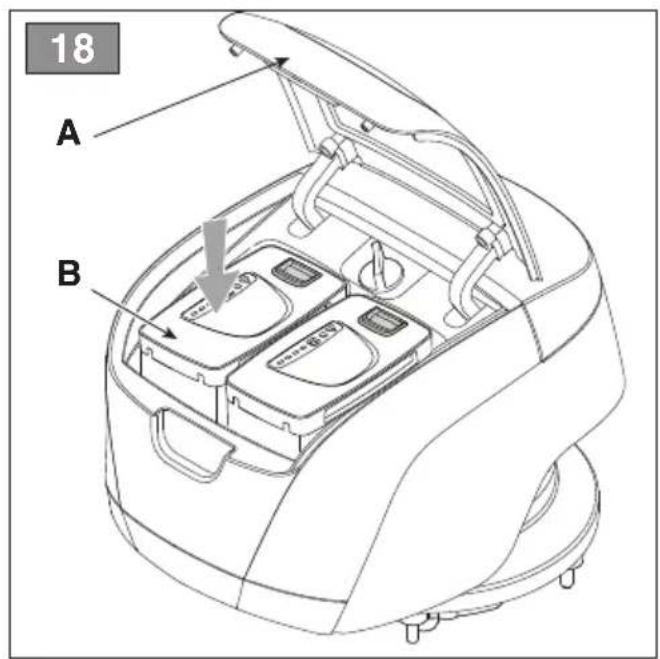
text_image
18 A B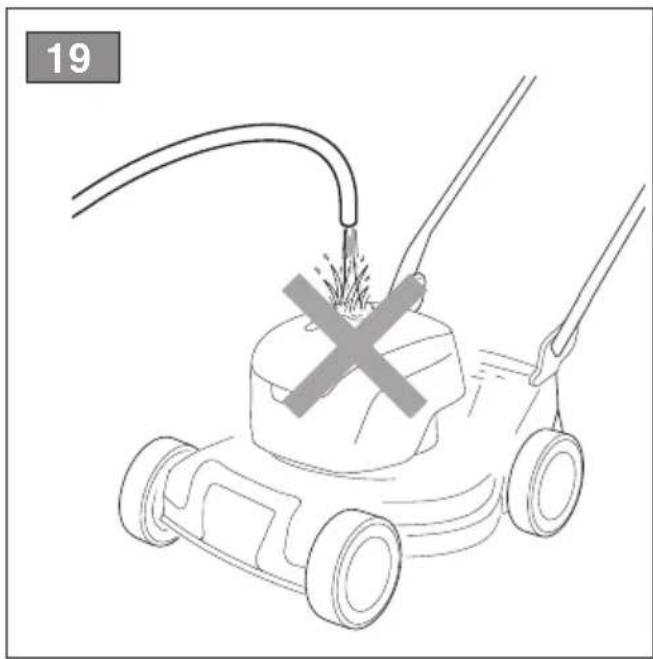
natural_image
Line drawing of a lawn mower with a cross mark indicating explosion or damage (no text or symbols)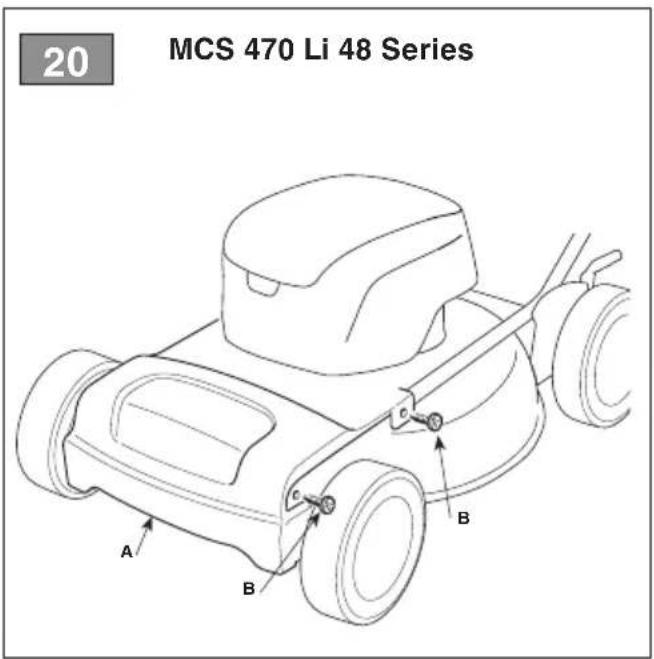
text_image
20 MCS 470 Li 48 Series A B C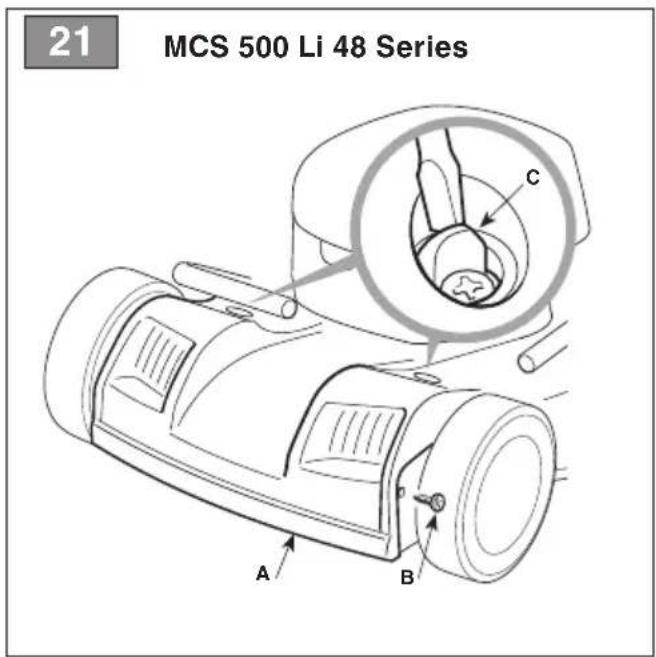
text_image
21 MCS 500 Li 48 Series A B C
text_image
22 A B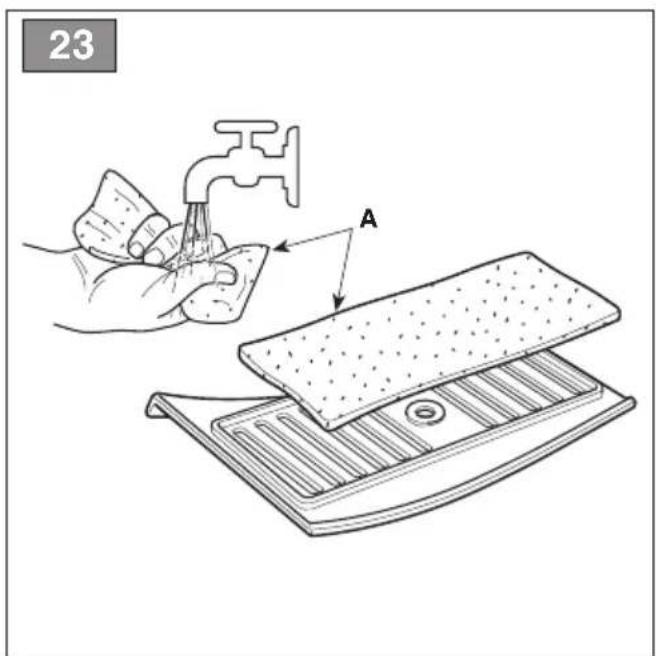
text_image
23 A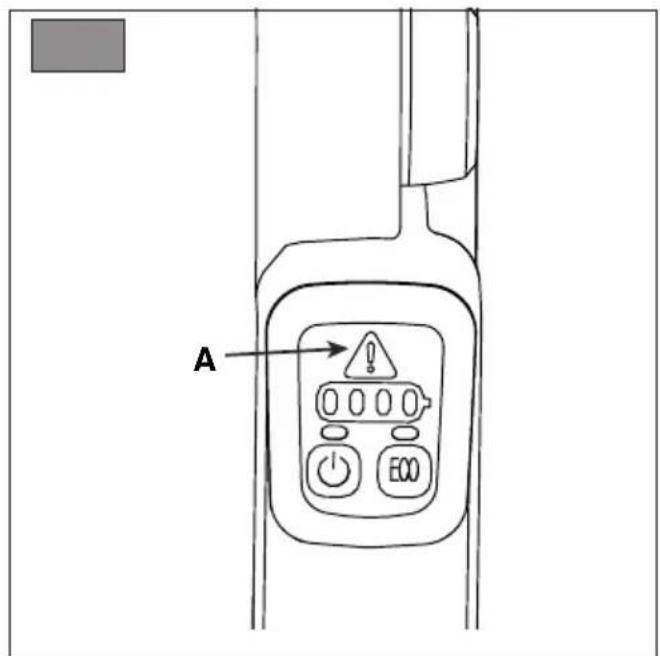
text_image
A
natural_image
Line drawing of a rectangular electronic device with ventilation slots and mounting holes (no text or symbols)
natural_image
Line drawing of a microwave oven with control panel and door (no text or symbols)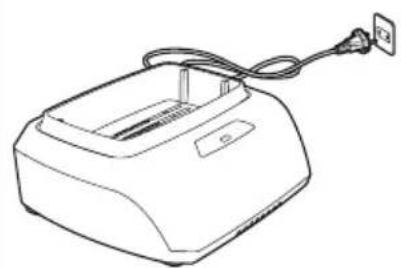
natural_image
Line drawing of a printer with cable and power outlet (no text or symbols)
natural_image
Line drawing of a rectangular electronic device with a cable and power outlet (no text or symbols)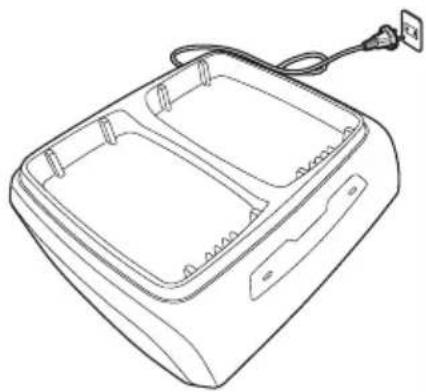
natural_image
Line drawing of a rectangular electronic device with a cable and power outlet (no text or symbols)- CONOSCERE LA MACCHINA....3
- USO DELLA MACCHINA 6
6. USO DELLA MACCHINA

2.5 Akumulator/Punjač akumulatora.... 3
2.6 Zaštita okolice....3
- UPOZNAVANJE S MAŠINOM....3
6.4 PRACOVNÍ ČINNOST
- XEIPISTHPIA EΛΕΓΧΟΥ 5
1.1 How to read the manual 1
1.2 References....1
- SAFETY REGULATIONS....1
2.1 Training....1
2.2 Preliminary procedures.... 2
2.3 During operation 2
2.4 Maintenance, storage 2
2.5 Battery / battery charger 3
2.6 Environmental protection.... 3
- GETTING TO KNOW THE MACHINE....3
3.1 Description of the machine and planned use ..... 3
3.2 Safety signs....4
3.3 Identification label 4
3.4 Main components....4
- ASSEMBLY 4
4.1 Assembly components 5
4.2 Handle assembly 5
- CONTROLS....5
5.1 Safety key (Deactivation device) 5
5.2 Handle 5
5.3 Cutting height adjustment....6
- USING THE MACHINE....6
6.1 Preliminary procedures....6
6.2 Safety checks....6
6.3 Start-up 6
6.4 Operation 7
6.5 Stopping the machine 7
6.6 After operation....7
- ROUTINE MAINTENANCE....7
7.1 General information 7
7.2 Battery....8
7.3 Cleaning 8
7.4 Nuts and bolts 8
7.6 Cleaning the air filter 9
- OCCASIONAL MAINTENANCE....9
8.1 Cutting means....9
- STORAGE....9
9.1 Storing the machine 9
9.2 Storing the battery....9
- HANDLING AND TRANSPORTATION 9
- ASSISTANCE AND REPAIRS 10
-
WARRANTY COVERAGE.... 10
-
Maintenance table.... 10
-
Problem identification .....11
14.1 For machines with electronic control....11
14.2 For machines without electronic control..... 12 -
ATTACHMENTS ON REQUEST 13
15.1 Batteries 13
15.2 Battery charger 13
1. GENERAL INFORMATION
1.1 HOW TO READ THE MANUAL
Some paragraphs in the manual contain important information regarding safety and operation and are emphasised in this manner:
NOTE OR IMPORTANT these give details or further information on what has already been said, and aim to prevent damage to the machine.
This symbol indicates danger. Failure to observe the warning can lead to possible personal and/or third party injury and/or damage.
- The paragraphs highlighted with a grey dotted square indicate the optional characteristics that are not available on all models documented in this manual.
- Check if the characteristics are available on this model.
Whenever reference is made to a position on the machine "front", "back", "left" or "right" hand side, this refers to the operator's working position.
1.2 REFERENCES
1.2.1 Figures
The figures in these instructions for use are numbered 1, 2, 3, etc.
The components indicated in the figures are
identified with letters A, B, C, and so on.
Reference to component C in figure 2 is indicated with the wording: "See fig. 2.C" or simply "(Fig. 2.C)".
The figures are given as a guide only. The actual pieces can differ from those illustrated in this document.
1.2.2 Titles
The manual is divided into chapters and paragraphs. The title of paragraph '2.1 Training" is a sub-title of "2. Safety regulations".
References to titles or paragraphs are marked with the abbreviation chap. or par. and the relevant number. Example: "chap. 2" or "par. 2.1"
2. SAFETY REGULATIONS
2.1 TRAINING
⚠️ Become acquainted with the controls and the proper use of the machine. Learn how to stop the motor quickly. Failure to follow the warnings and instructions may result in fire and/or serious injury.
- Never allow children or persons unfamiliar with these instructions to use the machine. Local laws may establish a minimum age for users.
- This appliance can be used by children aged from 8 years and above and persons with reduced
physical, sensory or mental capabilities or lack of experience and knowledge if they have been given supervision or instructions concerning use of the appliance in a safe way and understand the hazards involved. Children shall not play with the appliance. Cleaning and user maintenance shall not be made by children without supervision.
- Never use the machine if the user is tired or unwell, or has taken medicine, drugs, alcohol or any substances which may slow their reflexes and compromise his judgement.
- Do not allow children or other passengers to ride on the machine.
- Bear in mind that the operator or user is responsible for accidents or unexpected events occurring to other people or their property. It is the user's responsibility to assess the potential risk of the area where work is to be carried out and to take all the necessary precautions to ensure his own safety and that of others, particularly on slopes or rough, slippery and unstable ground.
- If the machine is sold or lent to others, make sure that the operator reads the user instructions contained in this manual.
2.2 PRELIMINARY PROCEDURES
Personal Protective Equipment (PPE)
- Always wear suitable work attire, hard-wearing safety footwear with non-slip soles and long trousers. Do not operate the machine barefoot or wearing open sandals. Wear hearing protection devices.
- Use of hearing protections can reduce the ability to hear any warnings (shouting or alarms). Be careful of what occurs around you in the work area.
- Wear protective gloves whenever your hands are at risk.
- Never wear scarves, shirts, necklaces, bracelets, loose flowing clothing, laces or ties or any hanging or flapping accessory that could get caught in the machine or in any objects or materials in the work area.
- Tie your hair back if it is long.
Work area/Machine
- Thoroughly inspect the entire work area and remove anything that could be thrown by the machine or damage the cutting means/rotating units (stones, branches, iron wire, bones, etc.).
2.3 DURING OPERATION
Work Area
- Do not use the machine in environments at risk of explosion, in the presence of flammable liquids, gas or powder. Power tools create sparks which may ignite the dust or fumes.
- Work only in daylight or with good artificial light in good visibility conditions.
- Keep persons, children and animals away from the working area. Children must be supervised by another adult.
- Avoid working with wet grass, in the rain and when there is a risk of a thunderstorm, especially lightening.
- Do not expose the machine to rain or wet environments. Water entering a power tool will increase the risk of electric shock.
-
Pay careful attention to uneven ground (hills, dips), slopes, hidden hazards and obstacles that could limit visibility.
-
Be very careful near ravines, ditches or embankments. The machine could overturn if a wheel slides over the edge or if the earth gives way.
- Always mow across a slope and never up and down it, being very careful when changing direction, making sure you have firm footage and that the wheels do not hit any obstacles (such as stones, branches, roots, etc.) that may cause the machine to slide sideways or make you lose control of it.
- Look out for traffic when using the machine near the road.
Behaviour
- Exercise caution when reversing or moving backwards. Look behind you to make sure there are no obstacles before and during operations in reverse gear.
- Never run, always walk.
- Do not allow the lawnmower to pull you along.
- Always keep hands and feet away from the cutting means, when starting and when using the machine.
- Attention: the cutting means will continue to rotate for a few seconds after disengagement or after you have switched off the motor.
- Keep away from the discharge opening.
⚠️ If something breaks or an accident occurs during mowing, turn off the motor immediately and move the machine away to prevent further damage; if an accident occurs with injuries or third parties are injured, carry out the first aid measures most suitable for the situation immediately and contact the medical authorities for any necessary health care. Carefully remove any debris which could cause damage or injury to persons or animals if ignored.
Use limitations
- Never operate the machine with guards damaged, missing or incorrectly assembled (grass catcher, side discharge guards, rear discharge guards).
- Don't use the machine if the attachments/tools are not installed in their seats.
- Never disengage, deactivate, remove or tamper with the safety systems/micro switches installed.
- Do not strain the machine too much and do not use a small machine for heavy-duty work; if you use the right machine, you will reduce the risk of hazards and improve the quality of your work.
Ensure regular maintenance and correct storage to maintain machine safety and high performance levels.
Maintenance
- Never use the machine with worn or damaged parts. Faulty or worn-out parts must always be replaced and never repaired.
- Be careful during adjustment of the machine to prevent entrapment of the fingers between moving parts of the cutting means and fixed parts of the machine.
The noise and vibration levels shown in these instructions are the maximum levels for use of the machine. The use of an unbalanced cutting element, the excessive speed of movement, or lack of maintenance have a significant influence on noise emissions and vibrations. Consequently, it is necessary to take preventive steps to eliminate possible damage due to high levels of noise and stress from vibration; Maintain
the machine well, wear ear protection devices, and take breaks while working.
Storage
- To reduce fire risks, do not leave containers with debris inside a room.
2.5 BATTERY / BATTERY CHARGER
IMPORTANT The following safety instructions are in addition to the safety requirements provided in the specific battery and battery charger manual delivered with this machine.
- Only use battery chargers recommended by the manufacturer to recharge batteries. An inadequate battery charger may cause electric shock, overheating or corrosive liquid to leak from the battery.
- Use only batteries specifically designed for your power tool. The use of other batteries may cause injuries and fire risks.
- Make sure that the machine is switched off before inserting the battery. Inserting a battery in a machine which is switched on can cause a fire.
- Keep all unused batteries at a distance from paper clips, coins, keys, nails, screws or other small metal objects as contact with the same can cause short circuits. Short circuits between battery contacts can lead to explosion or fires.
- Do not use the battery charger in places where there are inflammable vapours, substances or on easily inflammable surfaces like paper, fabric, etc. During recharge, the battery charger becomes heated and may cause fire.
- When transporting accumulators, make sure the contacts never come into contact with each other and never use metal containers to transport them.
2.6 ENVIRONMENTAL PROTECTION
Safeguarding the environment must be a relevant and priority aspect of machine use, of benefit to the community and the environment we live in.
- Avoid being a disturbance to the neighbourhood. Use this machine at reasonable times of the day only (not early morning or late evening when the noise could cause disturbance).
- Comply with local regulations for the disposal of packaging, deteriorated parts or any elements with a strong environmental impact; this waste must not be disposed of with regular waste, but must be separated and taken to collection centres, which will recycle the materials.
- Comply with local regulations for the disposal of waste materials.
- When the machine is decommissioned, do not dispose of it in the environment, but take it to a waste disposal facility in accordance with the local regulations in force.

Do not throw electrical equipment away with domestic waste. According to the European Directive 2012/19/EU on waste electrical and electronic equipment and its implementation in compliance with national standards, old electrical equipment must be collected separately, for eco-compatible recycling. If electrical equipment is disposed of in dumps or in landfills, hazardous substances can leak into the groundwater and contaminate the food chain, damaging your health and well-being. For further
information on the disposal of this product, contact your dealer or a domestic waste collection service.

At the end of their working life, dispose of batteries paying due attention to the environment. Batteries contain material classified as hazardous for you and the environment. They must be removed and disposed of separately at a facility that accepts lithium-ion batteries.

Separate waste collection of the products and packaging used allows the materials to be recycled and reused. Reuse of recycled materials help to prevent environmental pollution and reduces the demand for raw materials.
3. GETTING TO KNOW THE MACHINE
3.1 DESCRIPTION OF THE MACHINE AND PLANNED USE
This machine is pedestrian-controlled lawnmower.
The machine is essentially composed of a motor which drives a cutting means enclosed in a casing, equipped with wheels and a handle. The operator is able to operate the machine and use the main controls, always staying behind the handle at a safe distance from the rotating cutting means. If the operator leaves the machine, the motor and cutting means will stop within a few seconds.
3.1.1 Intended use
This machine is designed and built to cut grass in gardens and grassy areas, having dimensions in proportion to its cutting capacity; it is driven by an operator walking behind it.
Generally speaking this machine can: Mow, chop and deposit the grass on the ground (mulching effect).
The use of special attachments provided for by the Manufacturer as original equipment or which may be purchased separately, allows this work to be done in various operating modes, illustrated in this manual or the instructions that accompany the single attachments.
3.1.2 Improper use
Any other usage not in keeping with the aforementioned ones may be hazardous and harm persons and/or damage things. Examples of improper use may include, but are not limited to:
- Allowing children, animals or other passengers to ride on the machine as they could fall off and injure themselves or compromise safe driving by the operator.
- Letting oneself be transported by the machine.
- Using the machine to tow or push loads.
- Using the cutting means on surfaces other than grass.
- Use the machine for leaf or debris collection.
- Using the machine to trim hedges, or for cutting vegetation other than grass.
- Use of the machine by more than one person.
IMPORTANT Improper use of the machine will invalidate the warranty, relieve the Manufacturer from all liabilities, and the user will consequently be liable for all and any damage or injury to himself or others.
3.1.3 User types
This machine is intended for use by consumers, i.e. non-professional operators. It is intended for "DIY" use only.
IMPORTANT The machine must be used exclusively by one operator.
3.2 SAFETY SIGNS
The machine has various symbols on it (Fig. 2). Their function is to remind the operator of the correct conduct for use, with due care and caution. Meaning of symbols:


Warning. Read the instructions before operating the machine.


Danger! Risk of thrown objects. Keep all persons away from the work area whilst working.


Only for lawn mower with combustion engine.


Be careful when using the sharp cutting means. Do not put hands or feet near or under the opening of the cutting means. The cutting means continues to turn even after the motor has been switched off. Remove the safety key (deactivation device) before any maintenance is carried out.


Danger! Danger of cutting yourself. Cutting means in motion. Do not put hands or feet near or under the opening of the cutting means.
IMPORTANT Any damaged or illegible decals must be replaced. Order replacement decals from an Authorised Service Centre.
3.3 IDENTIFICATION LABEL
The identification label holds the following data (Fig.1).
- Sound power level.
- CE conformity marking.
- Year of manufacture.
- Type of machine.
- Serial number.
- Name and address of Manufacturer.
- Article code.
- Max. motor operation speed.
- Weight in kg.
- Power voltage and frequency.
-
Electrical protection rating.
-
Nominal power. Write the identification data of the machine in the specific space on the label on the back of the cover page.
IMPORTANT Quote the information on the product identification label whenever you contact an Authorised Service Centre.
IMPORTANT The example of the Declaration of Conformity is provided on the last pages of the manual.
3.4 MAIN COMPONENTS
The machine is composed of a series of main components that have the following functions (Fig.1):
A. Chassis: this is the casing that houses the rotating cutting means.
B. The engine: drives both the cutting means and the wheel traction (if available).
C. Cutting means: the element designed to cut the grass.
D. Handle: this is the operator's work station. It is long enough to ensure the operator remains at a safe distance from the rotary cutting means whilst working.
E. Battery (if it is not supplied with the machine, see chapter 15 "accessories on request"): provides the energy for starting the motor; its specifications and regulations for use are described in a specific manual.
F. Operator presence lever: this lever enables the cutting means and drive to be operated. The motor stops when both levers are released.
G. Drive engagement lever: this lever engages the drive to the wheels and allows the machine to move forward.
H. Hatch for accessing the battery compartment
I. Safety key (Deactivation device): The key enables / disables the machine electric circuit.
J. Battery charger (if it is not supplied with the machine, see chapter 15 "attachments on request"): device used to recharge the battery.
4. ASSEMBLY
The safety regulations to follow are described in chap. 2. Strictly comply with these instructions to avoid serious risks or dangers.
For storage and transport purposes, some components of the machine are not installed in the factory and have to be assembled after unpacking. Follow the instructions below.
⚠️ Unpacking and completing the assembly should be done on a flat and stable surface, with enough space for moving the machine and its packaging, always making use of suitable equipment. Do not use the machine until all the instructions provided in the “ASSEMBLY” section have been carried out.
4.1 ASSEMBLY COMPONENTS
The packaging includes assembly components.
4.1.1 Unpacking
- Carefully open the packaging, paying attention not to lose components.
- Consult the documentation in the box, including these instructions.
- Remove all the unassembled parts from the box.
- Dispose of the box and packaging in compliance with local regulations.

Before assembling, make sure the safety key is inserted into its housing.
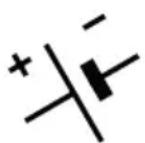
4.2 HANDLE ASSEMBLY
- Type "l"
Assemble the handle according to the indications in (Fig.3). - Type "II"
Assemble the handle according to the indications in (Fig.4). - Type "III"
Assemble the handle according to the indications in (Fig.5).
5. CONTROLS
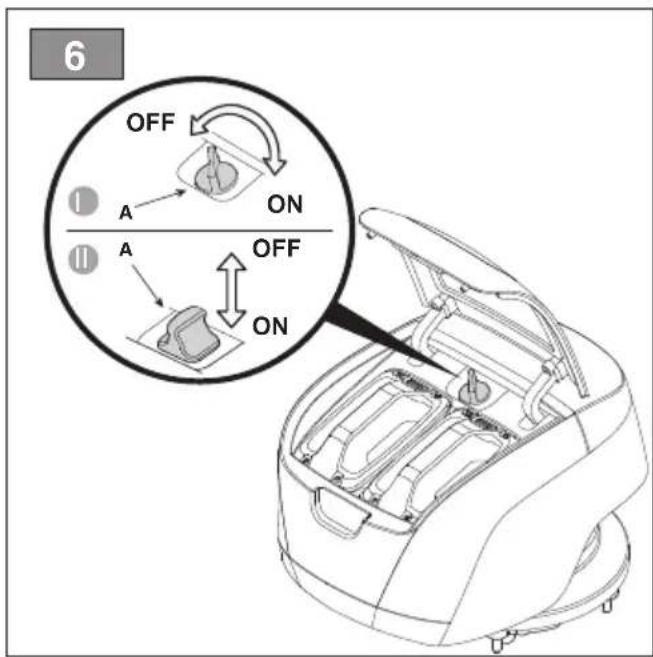
5.1 SAFETY KEY (DEACTIVATION DEVICE)
The key (Fig.6.A) found inside the battery compartment enables / disables the machine's electrical circuit. Removing the key, the electric circuit is completely deactivated to prevent uncontrolled use of the machine.
IMPORTANT Remove the safety key whenever the machine is unused or left unattended.
For certain models, if required, turn the key
• to "ON" position to activate the electric circuit
of the machine to activate its start-up.
- Turning the key to "OFF", the electric circuit
• of the machine is completely deactivated, to
• prevent any uncontrolled use of the machine.
5.2 HANDLE
5.2.1 Operator presence lever
The operator presence lever (Fig.7.A) enables the cutting means. It is located in front of the handle. Press the safety button (Fig.7.C) and bring the lever towards the handle in order to start the cutting means. When the lever is released, the motor automatically stops and all functions are disabled.
NOTE The cutting means engagement is possible only by pressing the yellow button on the right side of the handle and bringing the operator presence lever towards the handle.
5.2.2 Power button
The power button (Fig.8.A) is used to:

- Machine start-up. By pressing the button (Fig.8.A) the LED (Fig.8.B) switches on and the machine is ready for use.
NOTE The machine can be switched on only if the operator presence lever and the drive lever are released.
NOTE In case the machine is not operated, the LED turns off after 15 seconds and the above-mentioned operation must be carried out again.

Cutting means engagement.
NOTE The cutting means engagement is possible only by pressing the operator presence lever against the handle (see par. 6.3).
- Cutting means disengagement. With the cutting means engaged, release the operator presence lever (Fig.7.A); the cutting means stops whilst keeping the machine powered on.
5.2.3 Drive ON lever
IMPORTANT The engine has to be always started with the drive disengaged.
This engages the wheel drive and allows the machine to move forward. It is located behind the handle.

Drive engaged. The lawn mower is driven forward with the lever pulled against the handle (Fig.7.B). The lawn mower stops moving forward when the lever is released.
IMPORTANT Avoid moving the machine backwards when the drive is ON.
For certain models, the forward speed can be adjusted with the selection knob located on the right side of the handle (Fig.8.C). You can select 6 different levels of speed.

- Maximum speed (about 5 Km/h).

- Minimum speed (about 2.5 Km/h).
NOTE The last speed level selected remains set after the machine is turned off.
5.2.4 "ECO" button
The "ECO" mode allows to save energy when cutting the grass, optimising the battery life. Press the button (Fig.8.D) to enable or disable the "ECO" function. This mode is automatically deactivated when the operator presence levers are released.
NOTE It is not recommended to use the "ECO" function in heavy grass cutting conditions (cutting of dense, high, humid grass).
5.3 CUTTING HEIGHT ADJUSTMENT
Lower or raise the chassis to cut the grass at different heights.

Carry out this operation when the cutting means tionary.
The cutting height is adjusted by using the designated lever (Fig.9.A) that lifts or lowers the chassis to the desired position.
6. USING THE MACHINE

The safety regulations to follow are described in 2. Strictly comply with these instructions to avoid us risks or dangers.
6.1 PRELIMINARY PROCEDURES
Before starting work, it is necessary to carry out several checks and operations to ensure you can work efficiently and in maximum safety: Make sure that the safety key is not inserted in its slot. Place the machine in a stable horizontal position on the ground.
6.1.1 Checking the battery
Before using the machine for the first time after purchase, fully charge the battery following the instructions in the battery booklet. Before every use of the machine, check the battery charge status according to the instructions in the battery booklet.
6.1.2 Cutting height adjustment
Adjust the cutting height as indicated in (par. 5.3).
6.2 SAFETY CHECKS
Perform the following safety checks and check that the results correspond to those outlined on the tables.

Always carry out the safety checks before use.
6.2.1 General safety check
| Object Result | |
| Grips Clean, dry. | |
| Handle Fixed firmly to the machine. | |
| Cutting means Clean, not damaged or worn. | |
| Switch command Operator presence lever Drive ON lever | The lever must move freely, it must not need forcing and should return automatically and rapidly back to the neutral position. |
| Battery No damage to the casing, no liquid leakage. | |
| Screws/nuts on the machine and on the cutting means | Correctly tightened (not loose). |
| Cooling air ducts Not clogged. | |
| Machine No signs of damage | or wear. |
6.2.2 Machine operating test
| Action Result | |
| 1. Start the machine and engage the cutting means (par.6.3).2. Release the operator presence lever (Fig.15.A). | 1. The cutting means should move.2. The lever should return automatically and rapidly to the neutral position, the engine must switch off and the cutting means must stop within a few seconds. |
| 1. Start the machine (par. 6.3) and operate the drive lever (par. 5.2.3).2. Disengage the drive lever. | 1. The wheels should move the machine forward.2. The wheels should stop and the machine stops moving forward. |
| Test driving | No abnormal vibrations.No abnormal sound. |

If any of the results fail to match the indications ded in the tables, do not use the machine! Contact authorised Service Centre to have it checked and red if necessary.
6.3 START-UP
NOTE Start up the machine on a flat surface without obstacles or high grass.
NOTE Check if the battery combination is correct, following the instructions supplied in the "Technical data" table.
- Open the hatch for accessing the battery compartment (Fig.10.A).
- Fit the batteries correctly in their compartments (Fig. 7.2.3.A) pressing down until the end and until you hear it clicks firmly into position, ensuring thus the electrical contact.
- Insert the safety key until the end (Fig.11.A). If required, turn the key to "ON" position.
-
Completely close the hatch again.
-
For models that require using a power button for starting, use the power button (fig. 12.A). The LED stays on for 15 seconds.
-
Engage the cutting means by first pressing the safety button (Fig.13.B) and then pressing the operator presence lever (Fig.13.A).
-
To engage the traction, press the lever behind the handle (Fig.13.C).
6.4 OPERATION
IMPORTANT When working, always keep a safe distance from the cutting means, given by the length of the handle.
The battery power reserve (and therefore the lawn surface to be mown before recharging) depends on many factors, described in (par. 7.2.1).
- During use, the charge status of the batteries is displayed (remaining charge percentage) (Fig.8.E).
IMPORTANT If the motor stops because it is overheated whilst mowing, you must wait approximately 5 minutes before restarting it.
6.4.1 Grass cutting
- Start moving forward and mowing the grass area.
- Adjust speed and cutting height (para 5.3) in relation to lawn conditions (grass height, density and humidity) and the amount of grass to be cut.
* For traction models (par. 5.2.3): It is
recommended to avoid mowing on slopes
• with a degree higher than 15^ .
- The appearance of the lawn will improve if you alternate cutting in both directions at the same height (Fig.14).
• Always avoid removing a large quantity of grass. Never cut more than one third of the total grass height per single pass (Fig.14).
- Keep the chassis clean (par. 7.3.1).
6.4.2 Suggestions for maintaining your lawn
- To keep a lawn lush and green, it should be cut regularly. A lawn can be composed of different types of grass. If the lawn is cut frequently, grass and roots grow more vigorously, forming a solid grassy bed; if the lawn is cut is less frequently, higher grass and weeds start growing (clover and daisies, etc.). The frequency of mowing should be in relation to the rate of growth of the grass, which should not be left to grow too much between one cut and the next.
- The best height of grass on a well-kept lawn is approx. 4-5cm. With one mow, you do not need to remove more than a third of the total height. If the grass is very tall, it should be cut twice in a twenty-four hour period; The first time with the cutting means at maximum cutting height and the second cut at the height desired.
- Cutting too low tears and uproots the grass, giving it a "spotted" appearance.
-
During hot and dry periods, the grass should be cut a little higher to prevent the ground from drying out.
-
It is always better to cut the grass when it is dry. Do not cut wet grass; this could reduce cutting means efficiency due to sticky grass and tear the lawn.
- The cutting means must be in good state and well sharpened so that the grass is cut straight without a ragged edge that leads to yellowing at the ends.
6.5 STOPPING THE MACHINE
To stop the machine:
-
Release the operator presence lever (Fig.15.A).
-
For models that require using a power button for starting, use the power button (fig. 12.A).
-
Wait until the cutting means stops.

After stopping the machine, it will take a few seconds for the cutting means to stop.
IMPORTANT Always stop the machine.
- When moving between work areas.
- When driving on grass free surfaces.
- Every time it is necessary to overcome an obstacle.
- Before adjusting the cutting height.
- Any time the side discharge chute (if available) is removed or refitted.
6.6 AFTER OPERATION
- Stop the machine (par. 6.5).
- Open the hatch and remove the safety key.
- Remove the battery from its housing and recharge it (par 7.2.2).
- Allow the motor to cool before storing in an enclosed space.
- Clean (par. 7.3).
- Check there are no loose or damaged components. If necessary, replace the damaged components and tighten any screws and loose bolts or contact the authorised service centre.
IMPORTANT Remove the safety key whenever the machine is unused or left unattended.
7. ROUTINE MAINTENANCE
7.1 GENERAL INFORMATION
The safety regulations to follow are described in chap. 2. Strictly comply with these instructions to avoid serious risks or dangers.
⚠️ Before commencing any inspections, cleaning or maintenance/adjustments on the machine:
- Stop the machine.
- Remove the safety key, (never leave the key inserted or within the reach of children or unauthorised persons).
- Make sure that all moving parts have come to a complete stop.
-
Allow the motor to cool before storing in an enclosed space.
-
Read the relevant instructions.
- Use suitable clothing, protective gloves and goggles.
- The frequency and types of maintenance are summarised in the "Maintenance Table". The table will help you maintain your machine's safety and performance. It summarises the main interventions to be made and the frequency applicable to each of them. Carry out the relevant task as soon as it is scheduled to be performed.
- The use of non-genuine and/or incorrectly assembled spare parts and attachments could adversely affect machine operation and safety. The manufacturer shall decline all liability in the event of injuries or damages caused by such parts.
- Genuine spare parts are supplied by Authorised Assistance Centres and Dealers.
IMPORTANT Any maintenance and adjustment operations not described in this manual must be carried out by your Authorised Service Centre.
7.2 BATTERY
7.2.1 Battery power reserve
Battery power reserve (and therefore the lawn surface that can be mown before recharging is required) mainly depends on:
a. Environmental factors that cause higher energy requirements:
- Mowing dense, high and/or wet grass.
b. Machine cutting width; wider settings involve higher energy consumption.
c. Operator behaviour that should be avoided:
– Switching the machine on and off frequently whilst working.
- Setting a cutting height that is too low for the lawn conditions.
- Working at a speed that is too high in relation to the amount of grass to be removed.
NOTE During use, the battery is protected against total drainage with a protective device that switches off the machine and stops it from working.
To optimise battery power reserve it is always recommended to:
– Cut the grass when the lawn is dry.
– Cut the grass frequently so that it doesn't grow too tall.
- Set a higher cutting height when the grass is very tall, then set a lower height and cut the lawn again.
- Do not use the machine in "mulching" mode with very high grass.
- Use of the "ECO" mode (par. 5.2.4).
If the need arises to use the machine for sessions which exceed the capability of a standard battery, it is possible to:
– Purchase a second standard battery to immediately replace the discharged battery, without compromising the continuity of operations.
– Purchase a battery with an extended power reserve compared to the standard version (par. 15.1).
7.2.2 Battery removal and recharging
- Open the battery compartment access hatch and remove the safety key.
- Press the button on the battery (Fig.16.A) and remove the battery (Fig.16.B).
- Insert the battery (Fig.17.B) in its housing in the battery charger (Fig.17.C).
- Connect the battery charger to a power socket with the voltage indicated on the rating plate.
- Fully charge the battery according to the instructions in the battery/battery charger booklet.
NOTE The battery is equipped with a guard that inhibits recharging if the environmental temperature is not between 0 and +45 °C.
NOTE The battery can be recharged at any time, even partially, with no risk of damaging it.
7.2.3 Refitting the battery on the machine
When recharging is completed:
- Remove the battery from the housing in the battery charger (do not keep recharging when recharging is completed).
- Disconnect the battery charger from the mains power supply.
- Open the battery housing hatch (Fig.18.A), insert the battery (Fig.18.B) into its housing pressing down until you hear it click firmly into position and check the electrical contact.
Completely close the hatch again.
7.3 CLEANING
Clean thoroughly following the instructions below every time it is used.
7.3.1 Cleaning the machine
• Always make sure the air intakes are free of debris.
- Do not spray water onto the motor and electrical components, prevent them from getting wet (Fig.19).
- Do not use aggressive liquids to clean the chassis.
- To reduce fire hazards, keep the lawnmower and, in particular, the motor free of grass, leaves, or excessive grease.
Always keep the levers, display and buttons free of debris.
7.3.2 Cleaning the cutting means assembly
Remove grass debris and mud accumulated in the chassis to prevent it from drying and causing problems the next time the lawnmower is used. Tilt the machine laterally and make sure that it is stable before starting any work.
The paintwork of the internal part of the chassis may crack off over time due to the abrasive action of the cut grass; In this case, take immediate action by retouching the paintwork with rust-preventive paint, to prevent the formation of rust which may corrode the metal.
7.4 NUTS AND BOLTS
Keep all nuts, bolts and screws tight to be sure the equipment is in a safe working condition.
7.5 CLEANING THE TRANSMISSION
- Remove the guard once or twice per year (Fig.20.A) (Fig.21.A) by unscrewing the screws (Fig.20.B) (Fig.21.B).
- Only for the "MCS 500 Li 48 series" model: release the hooks (Fig.21.C).
- Then clean carefully using a brush or compressed air, removing the grass and dirt from the area around the transmission and belt.
- Always refit the guard (Fig.20.A) (Fig.21.A).
7.6 CLEANING THE AIR FILTER
The filter element must always be kept perfectly clean and must be replaced if it is broken or damaged. Proceed as follows:
- Clean around the air filter grid.
- Unscrew the screw (Fig.22.B) to remove the grid (Fig.22.A).
- Remove the filter element (Fig.23.A).
- Blow on the filter to remove dust and debris. If the filter is still dirty, wash the filter (Fig.23.A) with water and dry it with a clean cloth.
IMPORTANT Do not use petrol, detergents or any other products to clean the filter element.
- Clean the outside of the filter housing eliminating dust, debris or dirt.
- Fit the filter element (Fig.23.A) into its housing (making sure it is completely dry).
- Refit the grid (Fig.22.A) and tighten the screw (Fig.22.B).
8. OCCASIONAL MAINTENANCE

Before commencing any inspections, cleaning or maintenance/adjustments on the machine:
- Stop the machine.
- Remove the safety key, (never leave the key inserted or within the reach of children or unauthorised persons).
• Make sure that all moving parts have come to a complete stop. - Allow the motor to cool before storing in an enclosed space.
- Read the relevant instructions.
- Use suitable clothing, protective gloves and goggles.
8.1 CUTTING MEANS
An improperly sharpened cutting means pulls at the grass and causes the lawn to turn yellow.

Do not touch the cutting means until the key has
been removed and the cutting means is completely stationary.
All work on the cutting means (disassembly, sharpening, balancing, repairing, reassembly and/or replacing) are demanding jobs that require special skills as well as special tools; For safety reasons, these jobs are best carried out at a Authorised Service Centre.

Make sure damaged, misshapen or worn cutting s are replaced, together with the securing screws, reserve balance.
IMPORTANT Always use original cutting means bearing the code indicated in the "Technical Data".
Given product evolution, the cutting means listed in the "Technical Data" table may be replaced in time with others having similar interchangeable and operating safety features.
9. STORAGE
9.1 STORING THE MACHINE
When the machine is to be stored away:
- Wait for the engine to cool.
- Remove the safety key.
- Clean (par. 7.3).
- Check there are no loose or damaged components. If necessary, replace the damaged components and tighten any screws and loose bolts or contact the authorised service centre.
- Store the machine:
- In a dry place.
- Protected from inclement weather.
• Covered with a sheet where possible.
• In a place where children cannot get to it. - Making sure that keys or tools used for maintenance are removed.
9.2 STORING THE BATTERY
The battery must be kept in a cool, shaded place without humidity.
NOTE If unused for any length of time, recharge the battery every two months to prolong its working life.
10. HANDLING AND TRANSPORTATION
Whenever the machine is to be handled, raised, transported or tilted you must:
- Stop the machine (par. 6.5).
- Remove the safety key.
- Make sure that all moving parts have come to a complete stop.
- Wear heavy duty gloves.
- Hold the machine in the points offering a safe grip, taking into account the weight and its division.
- Use an appropriate number of people for the weight of the machine and the characteristics of the vehicle or the place where it must be placed or collected.
- Make sure that machine movements do not cause damage or injuries.
When transporting the machine on a vehicle or trailer, always:
- Use an access ramp of suitable strength, width and length.
- Load the machine with the motor switched off and pushed by an adequate number of people.
– Lower the cutting means assembly.
– Position it so that it cannot cause a hazard for anybody.
– Fasten firmly to the means of transport using ropes or chains to prevent it from tipping over.
11. ASSISTANCE AND REPAIRS
This manual provides all the necessary information to run the machine and for correct basic maintenance operations which can be performed by the user. Any regulations and maintenance operations not described herein must be carried out by your Dealer or Authorised Service Centre, which have the necessary knowledge and equipment to ensure that the work is carried out correctly, maintaining the correct degree of safety and the original operating conditions of the machine.
Any operations performed in unauthorised centres or by unqualified persons will totally invalidate the Warranty and all obligations and responsibilities of the Manufacturer.
- Only Authorised Service Centres can carry out guaranteed repairs and maintenance.
- The Authorised Service Centres only use genuine spare parts. Genuine spare parts and attachments have been designed specifically for machines.
- Non-original parts and attachments are not approved; use of non-original spare parts and attachments will jeopardise the safety of the machine and relieve the Manufacturer from all obligations or liabilities.
12. WARRANTY COVERAGE
The warranty conditions are intended for consumers only, i.e. non-professional operators.
The warranty covers all material quality and manufacturing defects recognised during the warranty period by your Dealer or Authorised Service Centre.
The warranty is restricted to the repair or replacement of components recognised as faulty.
It is advisable to send your machine once a year to an Authorised Service Centre for servicing, assistance and safety device inspection.
The warranty only applies to machines subjected to regular maintenance.
The user must follow all the instructions provided in the accompanying documentation.
The warranty does not cover damages resulting from:
- Failure to become familiar with the documentation accompanying the machine (Owner's manual).
• Professional use.
- Carelessness, negligence.
- External causes (lightning, impact, presence of foreign bodies inside the machine) or incidents.
- Incorrect use or assembly or prohibited by the manufacturer.
- Poor maintenance.
- Modification to the machine.
- Use of non-genuine spare parts (adaptable parts).
- Use of accessories not supplied or approved by the manufacturer.
The warranty does not cover:
- The routine/occasional maintenance operations (described in the owner's manual).
- Normal wear and tear of consumables such as the drive belt, cutting means, headlights, wheels, safety bolts and wiring.
• Normal wear and tear.
- Deterioration in the appearance of the machine due to use.
• Cutting means supports.
- Any ancillary expenses related to the enforcement of the warranty, such as costs incurred to travel to the user's location, transfer of the machine to the Dealer, rental of replacement equipment or calling of independent enterprises to perform maintenance work.
The user is protected by his or her own national legislation. The user's rights under the national laws or his or her own country are not in any way restricted by this warranty.
- MAINTENANCE TABLE
| Intervention Frequency Notes | ||
| MACHINE | ||
| Check all fasteners Before each use par. 7.4 | ||
| Safety checks/check controls Before each use par. 6.2 | ||
| Check the cutting means Before each use par. 6.2.1 | ||
| Check the battery charge status | Before each use * | |
| Recharge the battery After each use par. 7.2.2 * | ||
| General cleaning and inspection | After each use | par. 7.3 |
| Checking for any damage to the machine. If necessary, contact the authorised service centre. | After each use | - |
| Cleaning the air filter | Once a month | par. 7.6 |
| Cleaning the transmission 1-2 times a year par. 7.5 | |
| Replacing the cutting means - par. 8.1 *** | |
| Drive adjustment *** ** |
* Refer to the battery/battery charger manual.
** The operation must be carried out by your Dealer or a specialised Authorised Service Centre
*** Operation to be performed at the first signs of any malfunction
14. PROBLEM IDENTIFICATION
14.1 FOR MACHINES WITH ELECTRONIC CONTROL
| If problems persist after having performed the above operations, contact your dealer. | ||
| PROBLEM PROBALE CAUSE SOLUTION | ||
| 1. After pressing the starter button, the LED does not come ON. | Safety key is not inserted or is inserted incorrectly. | Insert the key (par. 6.3). |
| Safety key in "OFF" position. Turn the safety key to "ON" position (par. 6.3). | ||
| Battery is not inserted or is inserted incorrectly. | Open the hatch and check that the battery is fitted in its housing correctly (par. 7.2.3). | |
| Low battery. Check the battery status and recharge if necessary (par. 7.2.2). | ||
| Incorrect battery combination. | Check if the battery combination is correct, following the instructions supplied in the "Technical data" table. | |
| 2. After pressing the starter button, the LED does not come ON and the machine sets off a sound signal. | Internal motor anomaly. | Remove the safety key and contact the Authorised Service Centre for checks, replacements or repairs. |
| 3. The motor shuts down whilst working. | Battery is not inserted correctly. | Open the hatch and check that the battery is fitted in its housing correctly (par. 7.2.3). |
| Low battery. Check the battery status and recharge if necessary (par. 7.2.2). | ||
| 4. The danger LED lights up (Fig. 24.A) and the machine emits an acoustic signal. | Cutting means blocked. | Turn the machine off, remove the safety key and wear work gloves. Check and eventually remove any obstructions in the machine lower side (par. 7.3.2) that prevent rotation of the cutting means. If the problem continues, contact the Authorised Service Centre for checks, replacements or repairs (par. 8.1). |
| Machine fault | Remove the safety key and contact the Authorised Service Centre for checks, replacements or repairs. | |
| Drive motor over current for heavy working conditions (drive under stress). | -Make sure that the wheels are not blocked. Clean as needed.-Check the slope of the land you are working on (par. 6.4.1). | |
| 5. The danger LED lights up (Fig.24.A). | The thermal protection has tripped due to overheating of the machine. | Wait for at least 5 minutes and restart the machine. |
| 6. Mowing is difficult. | The cutting means is not in good state. | Contact the Authorised Service Centre for the sharpening or replacement of the cutting means. |
| 7. Excessive noise and/or vibration is experienced whilst working. | Cutting means fittings are loose or the cutting means is damaged. | Immediately turn off the motor and remove the safety key.Contact the Authorised Service Centre for checks, replacements or repairs (par. 8.1). |
| 8. Battery power reserve is low. | Severe working conditions requiring greater current absorption. | Optimise operations (par. 7.2.1). |
| Battery is insufficient for operating requirements. | Use a second battery or extended battery (par. 15.1). | |
| 9. The battery charger is not charging the battery. | Battery is not correctly inserted in the battery charger. | Check it is correctly inserted (par. 7.2.3). |
| Unsuitable environmental conditions. Recharge the battery in places with suitable temperatures (see battery/battery charger instruction manual). | ||
| Dirty contacts. Clean the contacts. | ||
| The battery charger is not energised. Check it is plugged in and the power socket is energised. | ||
| Faulty battery charger. Replace with an original spare part. | ||
| If the problem persists, refer to the battery/battery charger manual. | ||
14.2 FOR MACHINES WITHOUT ELECTRONIC CONTROL
| If problems persist after having performed the above operations, contact your dealer. | ||
| PROBLEM PROBABLE CAUSE SOLUTION | ||
| 1. The engine does not start when using the switch | Safety key is not inserted or is inserted incorrectly. | Insert the key (par. 6.3). |
| Safety key in “OFF” position. Turn the safety key to "ON" position (par. 6.3). | ||
| Battery is not inserted or is inserted incorrectly. | Open the hatch and check that the battery is fitted in its housing correctly (par. 7.2.3). | |
| Low battery. Check the battery status and recharge if necessary (par. 7.2.2). | ||
| Incorrect battery combination. | Check if the battery combination is correct, following the instructions supplied in the "Technical data" table. | |
| 2. The engine stops and the machine emits an acoustic signal. | Battery is not inserted correctly. Open the hatch and check that the battery is fitted in its housing correctly (par. 7.2.3). | |
| Low battery. Check the battery status and recharge if necessary (par. 7.2.2). | ||
| The thermal protection has tripped due to overheating of the motor. | Wait for at least 5 minutes and restart the machine. | |
| Cutting means blocked. Turn the machine off, remove the safety key and wear work gloves. Check and eventually remove any obstructions in the machine lower side (par. 7.3.2) that prevent rotation of the cutting means. If the problem continues, contact the Authorised Service Centre for checks, replacements or repairs (par. 8.1). | ||
| Machine fault | Remove the safety key and contact the Authorised Service Centre for checks, replacements or repairs. | |
| 3. Mowing is difficult. | The cutting means is not in good state. | Contact the Authorised Service Centre for the sharpening or replacement of the cutting means. |
| 4. Excessive noise and/or vibration is experienced whilst working. | Cutting means fittings are loose or the cutting means is damaged. | Immediately turn off the motor and remove the safety key.Contact the Authorised Service Centre for checks, replacements or repairs (par. 8.1). |
| 5. Battery power reserve is low. | Severe working conditions requiring greater current absorption. | Optimise operations (par. 7.2.1). |
| Battery is insufficient for operating requirements. | Use a second battery or extended battery (par. 15.1). | |
| 6. The battery charger is not charging the battery. | Battery is not correctly inserted in the battery charger. | Check it is correctly inserted (par. 7.2.3). |
| Unsuitable environmental conditions. Recharge the battery in places with suitable temperatures (see battery/battery charger instruction manual). | ||
| Dirty contacts. Clean the contacts. | ||
| The battery charger is not energised. Check it is plugged in and the power socket is energised. | ||
| Faulty battery charger. Replace with an original spare part. | ||
| If the problem persists, refer to the battery/battery charger manual. | ||
15. ATTACHMENTS ON REQUEST
15.1 BATTERIES
Different capacity batteries are available to suit specific operating requirements (Fig.25). The list of approved batteries for this machine can be found in the "Technical Data" table.
15.2 BATTERY CHARGER
Device used to recharge the battery (Fig.26).
ÍNDICE
1.1 KUIDAS KASUTUSJUHENDIT LUGEDA
- SÄÄNNÖLLINEN HUOLTO....7
7.1 Yleistä....7
7.2 Akku....8
7.3 Puhdistus....8
- YLIMÄÄRÄINEN HUOLTO....9
8.1 Leikkuuväline 9
- VARASTOINTI....9
9.1 Laitteen varastointi....9
9.2 Akun varastointi....9
10. MANUTENTION ET TRANSPORT
- SIGURNOSNE UPUTE....1
7. PLĀNOTĀ TEHNISKĀ APKOPE
7.1 VISPĀRĪGA INFORMĀCIJA
- APKOPES DARBU TABULA
2.5 ACCU / ACCULADER
2.6 BESCHERMING VAN DE OMGEVING
The Ground Truth image displays a single, solid horizontal line. According to Rule 2 (UNDERSCORE & LINE RULES), this is a stylistic or background line, not a placeholder underscore. Therefore, the OCR result must ignore it and output nothing or only meaningful text. The provided OCR content is "____", which consists of four underscores. This is an incorrect interpretation of the line as a placeholder, violating the rule that stylistic lines must be ignored. The OCR has hallucinated underscores where none should exist based on the GT's visual context. Hence, the OCR result is inconsistent with the Ground Truth.
7.4 MOEREN EN SCHROEVEN VOOR BEVESTIGING
- SIKKERHETSBESTEMMELSER....1
- BLI KJENT MED MASKINEN 3
3.1 Beskrivelse av maskinen og beregnet bruk..... 3
3.2 Sikkerhetssymboler 4
3.3 Identifikasjonsetikett 4
3.4 Hovedkomponenter 4
- MONTERING 4
- ORDINÄERT VEDLIKEHOLD....8
- EKSTRAORDINÆRT VEDLIKEHOLD 9
8.1 Klippeinnretning....9
- OPPBEVARING....9
2.4 VEDLIKEHOLD, LAGRING
3. BLI KJENT MED MASKINEN
3.1 BESKRIVELSE AV MASKINEN OG BEREGNET BRUK
7. ORDINÆRT VEDLIKEHOLD
7.1 GENERELT

6.1 CZYNNOŚCI WSTĘPNE
6.4 PRACOVNÁ ČINNOST
- SIGURNOSNA PRAVILA 1
2.1 Obuka....1
2.2 Pripremne radnje.... 2
2.3 Za vreme upotrebe....2
2.4 Održavanje, skladištenje 2
2.5 Baterija/Punjač baterije....3
2.6 Zaštita životne sredine....3
- UPOZNAVANJE MAŠINE....3
3.1 Opis mašine i predviđena upotreba.... 3
3.2 Sigurnosne oznake 4
3.3 Identifikaciona nalepnica 4
3.4 Glavni delovi....4
- MONTAŽA 4
4.1 Komponente za montažu 5
4.2 Montaža drške....5
- UPRAVLJAČKE KOMANDE....5
5.1 Sigurnosni ključ (Uređaj za isključivanje)...... 5
5.2 Drška 5
5.3 Podešavanje visine košenja 6
- UPOTREBA MASINE 6
6.1 Pripremne radnje.... 6
6.2 Sigurnosne kontrole....6
6.3 Pokretanje 6
6.4 Rad 7
6.5 Zaustavljanje....7
6.6 Nakon upotrebe 7
- REDOVNO ODRŽAVANJE....8
7.1 Uopšteno 8
7.2 Baterija 8
7.3 Čišćenje....8
7.4 Matice i šrafovi za fiksiranje 9
7.6 Čišćenje filtera za vazduh 9
- VANDREDNO ODRŽAVANJE....9
8.1 Rezna glava 9
- SKLADISTENJE 9
9.1 Skladištenje mašine....9
9.2 Skladištenje baterije....9
- POMERANJTE I TRANSPORT 10
- ASISTENCIJA I POPRAVKE 10
-
POKRIĆE GARANCIJE.... 10
-
Servisni list....10
-
Prepoznavanje problema....11
14.1 Za mašine a ELEKTRONSKIM
UPRAVLJANJEM....11
14.2 Za mašine BEZ ELEKTRONSKIM
UPRAVLJANJEM....13
- DODATNI PRIBOR NA ZAHTEV.... 14
15.1 Baterije 14
15.2 Punjač baterije 14
1. UOPŠTENO
1.1 KAKO SE SLUŽITI PRIRUČNIKOM
U tekstu priručnika neki paragrafi koji sadrže informacije od posebnog značaja, u pogledu sigurnosti ili rada, istaknuti su na drugačiji način, prema sledećem kriterijumu:
NAPOMENA ILI VAŽNO navodi detalje ili druge elemente u vezi sa već prethodno navedenim, kako bi se izbeglo oštećenje mašine ili nanošenje štete.
Simbol oznacava opasnost. Nepoštovanje upozorenja može dovesti do ličnih povreda rukovaoca ili drugih osoba i/ili izazvati štetu.
- Paragrafi obeleženi četvorouglom sa sivim tačkastim - stranama pokazuju opcijske karakteristike koje nemaju - svi modeli navedeni u ovom priručniku. Proverite da li je - ova karakteristika prisutna na vašem modelu mašine.
INNEHÅLLSFÖRTECKNING
- ALLMÄN INFORMATION ...... 1
The Ground Truth image displays a single, solid horizontal line. According to Rule 2 (UNDERSCORE & LINE RULES), this is a stylistic or background line, not a placeholder underscore. Therefore, the OCR result must ignore it and output nothing or only meaningful text. The provided OCR content is "____", which consists of four underscores. This is an incorrect interpretation of the line as a placeholder, violating the rule that stylistic lines must be ignored. The OCR has hallucinated underscores where none should exist based on the GT's visual context. Hence, the OCR result is inconsistent with the Ground Truth.
• D. Lgs. 262/2002, ANNEX VI, proc. 1 (Italy)
EN • The content and images in this User Manual were produced expressly for ST. S.p.A. and are protected by copyright – any unauthorised reproduction or modification to the document, either partially or in full, is prohibited.
text_image
Scanned text of a formal letter or document with multiple paragraphs and footnotes, likely from a formal letter or official record.Type: