
HI150W - Ironing board ASKO - Free user manual and instructions
Find the device manual for free HI150W ASKO in PDF.

| Product type | Retractable ironing board (Hidden Helper) |
| Brand | Asko |
| Model | HI150W |
| Maximum load | 10 kg |
| Main material | Steel and plastic |
| Power supply | None (non-electric) |
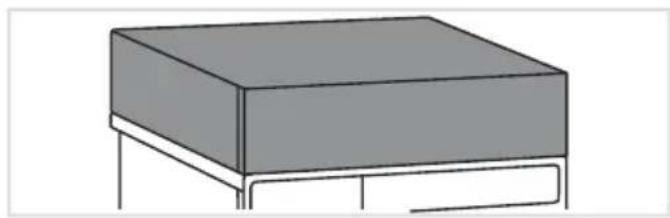
| Functions | Foldable and sliding integrated ironing board; installation under Asko washing machine or dryer |
| Installation | Between an Asko washer and dryer or on a single Asko appliance |
| Safety | Do not exceed 10 kg load; use only with Asko appliances |
| Maintenance and cleaning | Clean with a damp cloth; do not use abrasive products |
| Package contents | Hidden Helper device, mounting screws, key, mounting bracket, instructions |
| Compatibility | Asko washing machines and dryers (models TD 76, TD 86 and similar) |
| Board adjustment | Adjustable length via lateral plastic extensions |
| Approximate weight | Approximately 8 kg |
| Approximate dimensions (W x D x H) | 120 x 35 x 10 cm (board unfolded) |
Frequently Asked Questions - HI150W ASKO
User questions about HI150W ASKO
0 question about this device. Answer the ones you know or ask your own.
Ask a new question about this device
Download the instructions for your Ironing board in PDF format for free! Find your manual HI150W - ASKO and take your electronic device back in hand. On this page are published all the documents necessary for the use of your device. HI150W by ASKO.
USER MANUAL HI150W ASKO
OPERATING INSTRUCTIONS
Instructions for use of a hidden helper
Board
EN-CS-DA-DE-ES-ET-FI-FR-HR-IT-LV-LT-NL
NO-PL-PT-RU-SK-SL-UK-ZH.CN-ZH.TW
| 5EN -Warnings | 46Varjatud | |
| Installing a Hidden Helper | 7 Trikimislaua reguleerimine ja kinnitamine (enne esimest kasutuskorda) | 47 |
| Installing a hidden helper between a washing machine and a dryer | 7 | 48Varjatud |
| Installing a Hidden Helper onto the appliance | 9 Ulosvedettävän aputason asentaminen (Hidden Helper) | 49FI - Varoi |
| Adjusting and fixing the ironing board (before first use) | 10 Ulosvedettävän aputason asentaminen pesukoneen ja kuivausrummun vällin | 51 |
| Using a hidden helper | 11 12CZUlesUpozernänpomacn asentaminen | 51 |
| Umistěni skryteho pomocnika (Hidden Helper) | 14 Silityslaudan säätäminen ja kiinnittäminen kennen ensimmäistä käytöä | 53 |
| Umistěni skryteho pomocnika mezi pračku sušicku (Hidden Helper) | 14.. | 54 |
| 16Umsiženi skryteho pomocnika na stroj | 55Ulosveded | |
| Nastaveni a upevněni zhehlicího prkna (před prvnim použitím) | 17. Installation d'un Hidden Helper | 59 |
| Použiti skryteho pomocnika (Hidden Helper) | 18 19DAI'Advarsler | 59 |
| Montering af en Hidden Helper | 21 Reglage et fixation de la planche à repasser (avant la première utilisation) | 62 |
| Montering af en hidden helper mellem en vaskemaskine og en tørretumbler | 21 Utilisation de l'accessaire de buanderie | 64 |
| Montering af en Hidden Helper på apparatet | 23 Postavljanje skrivenog pomocnika (Hidden Helper) | 65HR - L |
| Justering og fastgorelse af strygebrættet (för firste brug) | 24 Postavljanje skrivenog pomocnika izmedu | 67 |
| Brug af en hidden helper | 25 perilice i sušilice | 67. |
| 26DERWarrjänjeislevenog...pomoćnika...na | 69 | |
| 29Installation eines Hidden Helper | ||
| Montage eines versteckten Helfers zwischen Waschmaschine und Wäschetrockner | 29 Podesavanje i učvršćivanje daske za glacanje (prije prve uporabe) | 70... |
| Installation eines Hidden Helper auf dem Gerät | 31 | 71Uporaba |
| Einstellen und Fixieren des Bügelbretts (vor dem ersten Gebrauch) | 32 Installazione di un Assistente nascosto (Hidden Helper) | 74 |
| 33Gebranzades versteckten Helfe s.lavatrice | 74 | |
| 34SE Advertencies (Hidden Helper) | 74 | |
| Instalación del asistente oculto (Hidden Helper) | 37 Installazione di un Assistente nascosto sull'elettrodomestico | 76 |
| Instalación de laersive oculta entre la lavadora y la secadora (Hidden Helper) | 37 Regolazione e fissaggio dell'asse da stiro (prima del primo utilizzo) | 77 |
| Instalar el asistente oculto (Hidden Helper) en el electrodométrico | 39 LV-Bridinajumi | 78Uso dell' |
| Ajustar y fijar la tabla de planchar (antes del primer uso) | 40 Slēptā paliga (Hidden Helper) | 81 |
| Uso de laersive oculta (Hidden Helper) | 41 Slēptā paliga uzstādīsana starp vejas | 81 |
| 42ET Hoijused masñiu un-zavetaju | 81 | |
| Varjatud ablise paigaldamine (Hidden Helper) | 44 Slēptā paliga uzstādīsana uz ieñces | 83 |
| Varjatud ablise paigaldamine pesumasina ja kuiivi vahele | 44 Gludinăsanas de la ieregulësana un nostiprinăsana (pirms pirmă lietojuma) | 84 |
Please read the instruction manual and save it for future reference.
To reduce the risk of injury to persons when using the product, follow basic safety instructions and warnings, including the following:
- Before using the product for the first time, please read all instructions and save them for future reference.
- Instructions for use are available on our website at www.asko.com.
- The product is intended solely for household use.
- Do not repair and do not attempt to replace any part of the product or to service it in any other way, unless this is expressly recommended in the instructions for use and maintenance or in the instructions for user repairs. Also, do not attempt any repairs or servicing if you do not understand the instructions entirely or if you lack the skills for such repairs.
- Any product repair and maintenance pertaining to safety or performance should be done by trained experts.
- In case of incorrect use or product servicing by an unauthorized person, the user shall be solely responsible for covering any damage or expenses.
- Do not allow children to play with the product or on the product. Watch children closely when you are using the product near them.
- The product is not intended for use by persons (including children) with impaired physical or mental capabilities or lack of experience and knowledge. Such persons should be instructed on safe use of the product by the person responsible for their safety.
- Do not allow children less than three years of age near the product unless they are supervised at all times.
- Do not let children younger than three years to come near the appliance, unless they are under constant supervision.
EN -Warnings
The following symbols are used throughout the manual and they have the following meanings:

INFORMATION!
Information, advice, tip, or recommendation

WARNING!
Warning -general danger

ELECTRIC SHOCK!
Warning - danger of electric shock
Original instructions
SAVE THESE INSTRUCTIONS FOR FUTURE REFERENCE!
Before the first use, it is necessary to remove all transport protection. The transport elements are intended to protect the hidden helper during transport and must be removed before start-up.

INFORMATION!
The maximum recommended load of the hidden helper is 10kg , so do not overload it to ensure safe use and prevent possible damage.
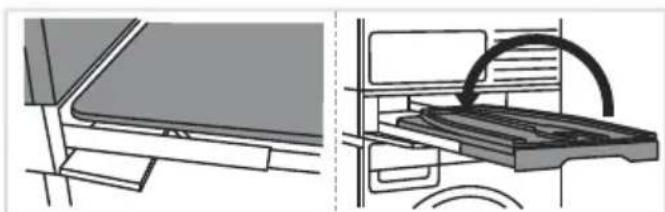
Installing a hidden helper between a washing machine and a dryer

WARNING!
The hidden helper may only be used with a washing machine and a dryer by the manufacturer Asko.

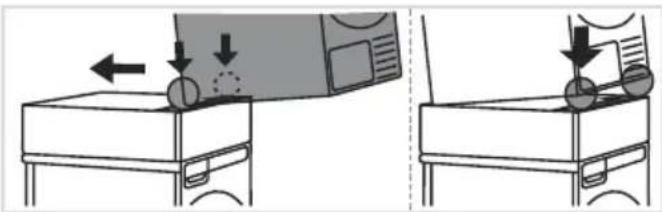
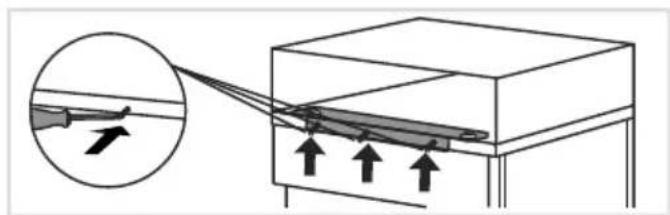
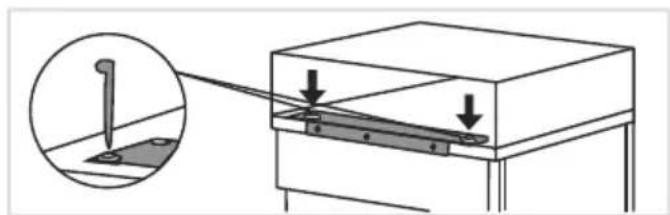
1 On the back of the washing machine, unscrew all three screws.
2 Install the hidden helper on the washing machine.
The fixation bracket is supplied in the hidden helper and has been temporarily fixed in the opposite direction during transport.
Before installation, unscrew it and tighten it to the back of the washing machine with three screws. For easier installation, first remove the ironing board (hidden helper) from the front side (see also point 4).
The hidden helper must be screwed onto the washing machine on the left and right sides of the fixation bracket.
Use the supplied spanner to tighten the two screws.
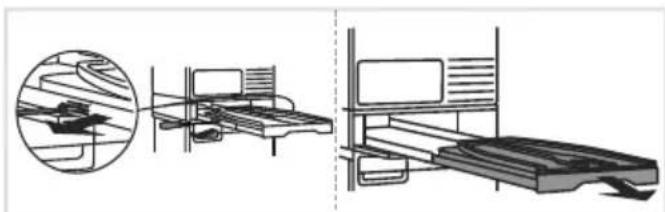
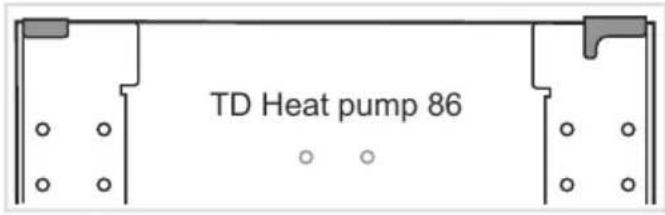
3 Installation of screws and brackets in different models of tumble dryers.
Before installing the tumble dryer, follow the instructions below to properly install the screws and brackets on the back of the hidden helper. Select the appropriate instructions according to the appliance model indicated on the rating plate on the inside of the dryer door. The end positions of the screws and brackets are shown.
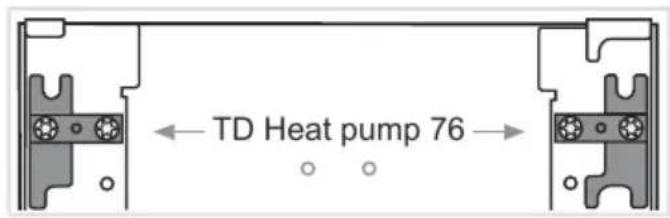
Tumble dryer with heat pump TD 76
The screws and brackets are pre-installed and ready for proper installation.
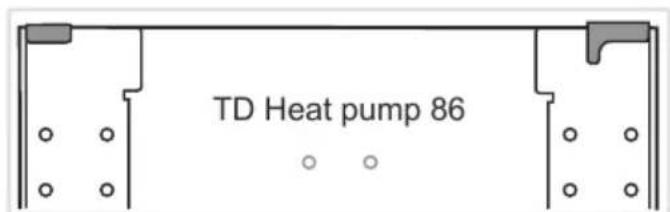
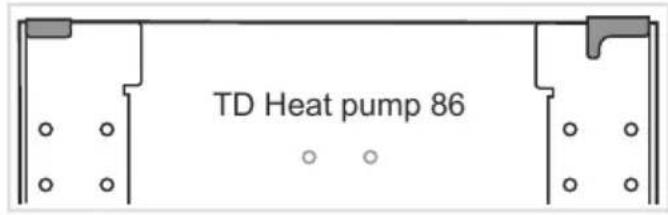
Tumble dryer with heat pump TD 86
The screws and brackets must be removed from the hidden helper beforehand.
Installing a Hidden Helper
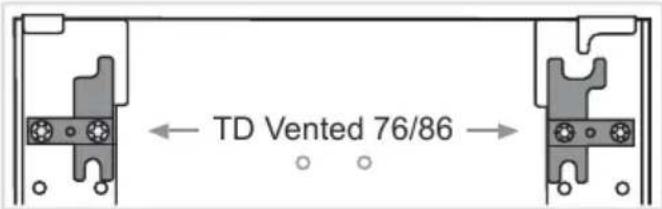
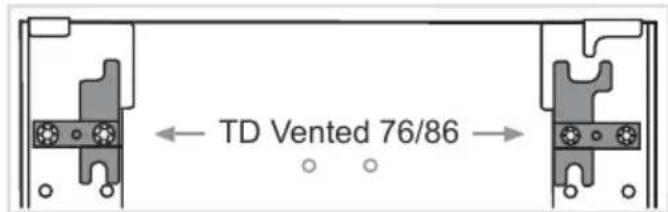
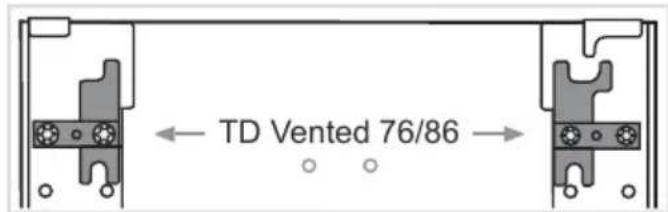
Vented tumble dryer TD 76/86
The brackets must be rotated by 180^ . First, unscrew, rotate and re-screw them.
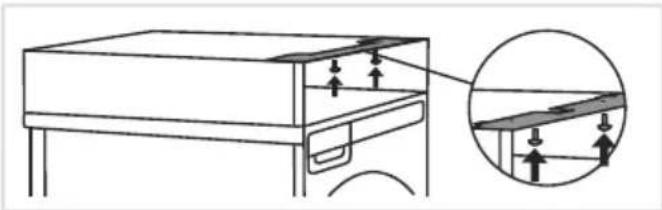
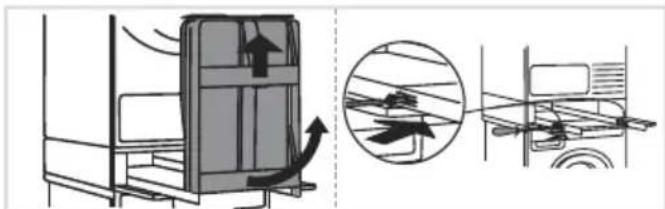
4 Installation of the front feet fixation Open the front cover and unscrew all the screws on the upper inner side and remove the front feet fixation.
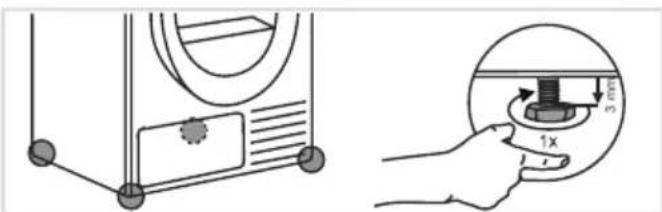
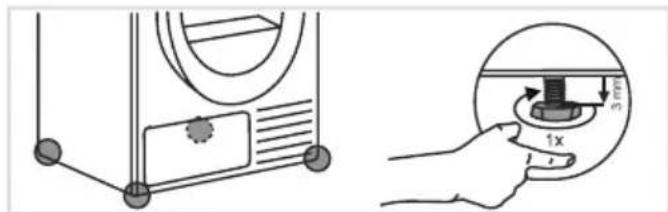
5 Before placing the tumble dryer on the hidden helper, use your hand to unscrew the feet by one turn (do not use a spanner).
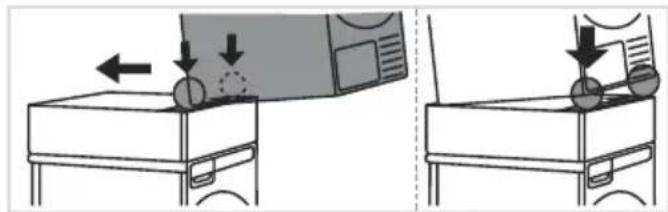
6 Lift the dryer, safely place it onto the pedestal drawer, and push it back until it locks into the pre-set brackets.
The hidden helper must be aligned with the front side of the dryer.
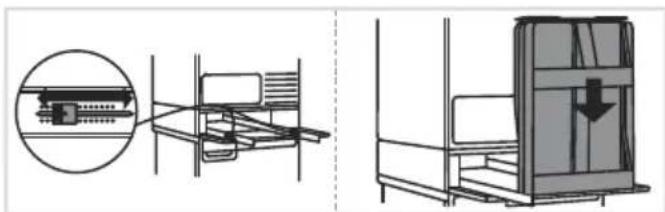
6.1 Once the tumble dryer is installed, reinstall the front feet fixation. Press the front feet fixation tightly against the tumble dryer and reattach it from underneath with the screws.
Then reinsert the ironing board.
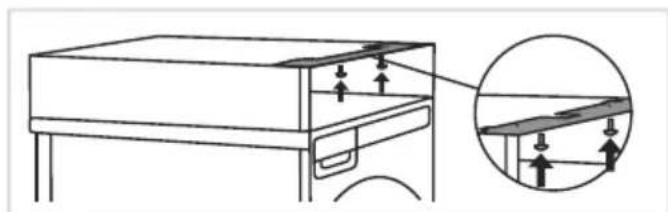
7 Final installation of the hidden helper between the washing machine and dryer, from the back.
Installing a Hidden Helper onto the appliance
WARNING!
The hidden helper may only be used with a washing machine and a dryer by the manufacturer Asko.

1 On the back of the appliance, unscrew all three screws.
2 Install the hidden helper on the appliance.
The hidden helper can be installed on a washing machine or tumble dryer.
The fixation bracket is supplied in the hidden helper and has been temporarily fixed in the opposite direction. Before installation, unscrew it and tighten it to the back of the washing machine with three screws, while in the case of a tumble dryer, unscrew only the outer two screws, as an intermediate hole is not provided.
For easier installation, begin by removing the Hidden Helper from the front side, then reattach it once the fixation element has been secured.
The hidden helper must be screwed onto the appliance on the left and right sides of the fixation bracket.
Use the supplied spanner to tighten the two screws.
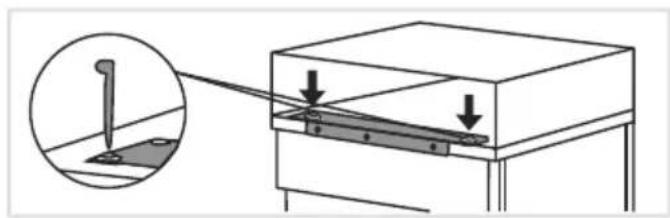
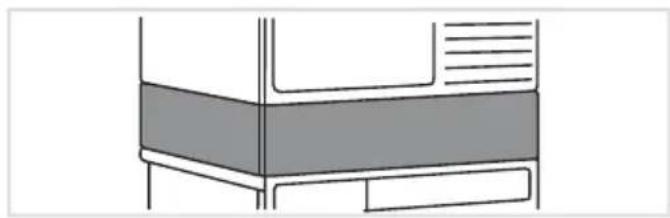
4 Final installation of the hidden helper on a washing machine or tumble dryer from the back.
If the upper brackets are an obstacle, you can remove them for a better visual appearance.

INFORMATION!
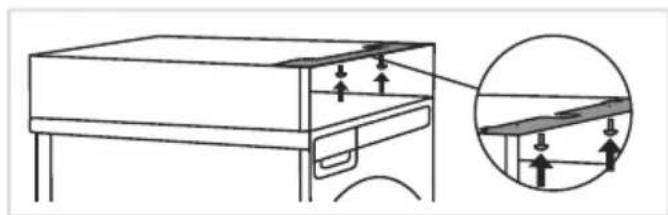
Before tightening the fixation bracket, ensure that the edges of the hidden helper are accurately aligned with the edges of the washing machine or tumble dryer.
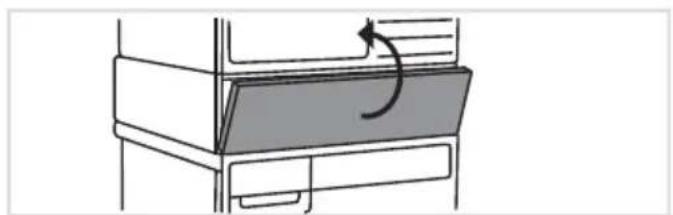
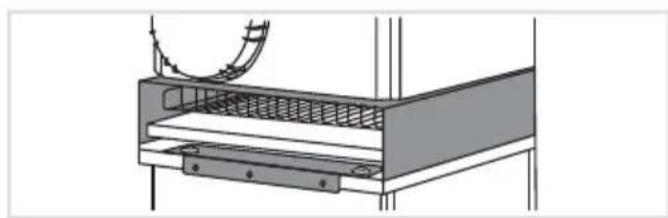
Adjusting and fixing the ironing board (before first use)
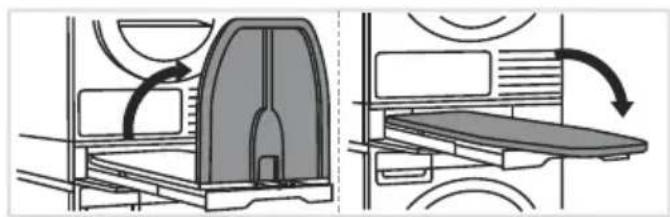

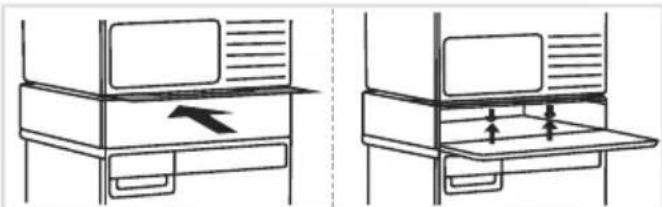
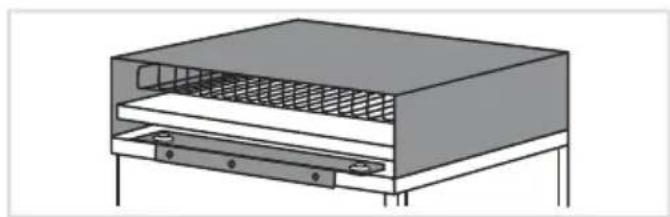
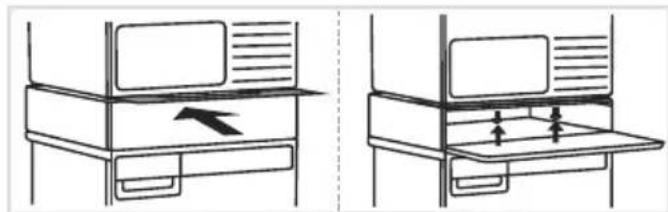
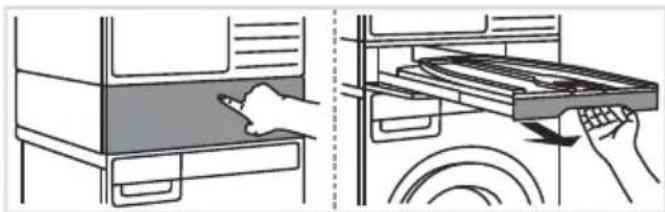
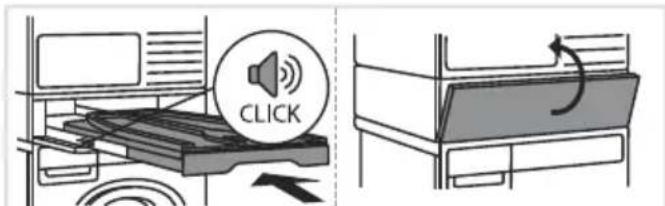
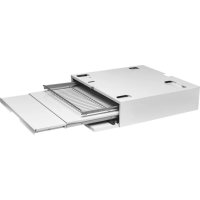
1 Press the hidden helper door to open it.
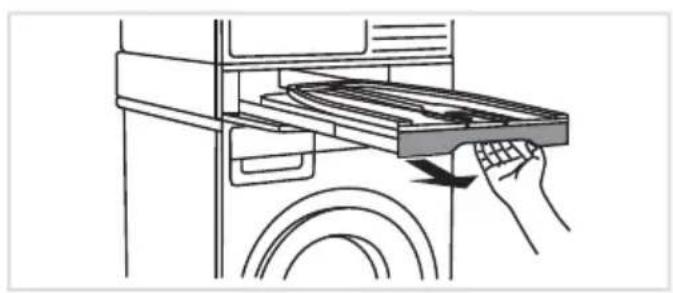
Hold the ironing board handle and pull it fully out towards you.
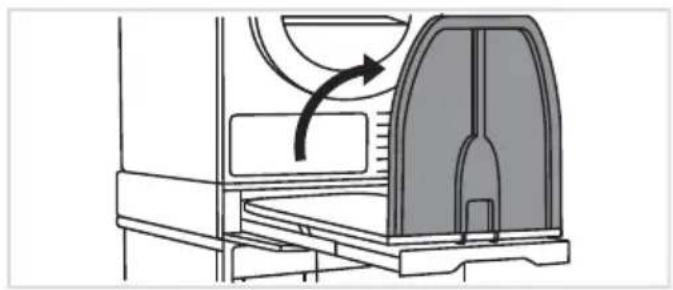
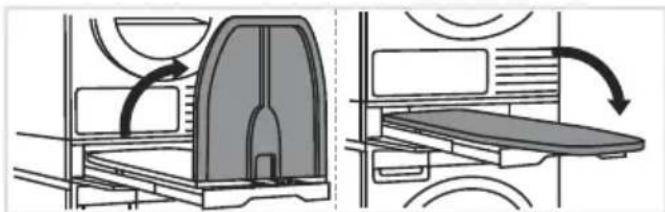
2 Unfold (open) the ironing board in the direction indicated in the figure.
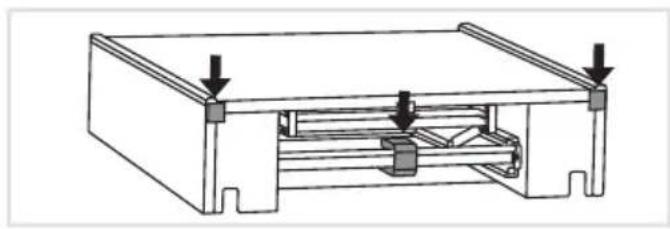
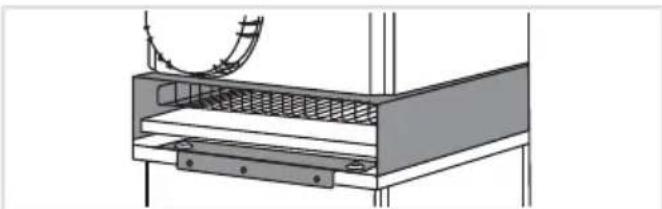
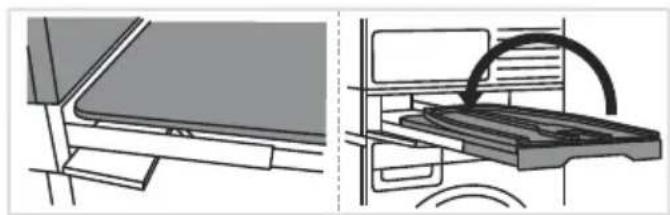
3 Check for stability before using for the first time. When the ironing board is in the locked position, it is very important that its back part is pressed tightly against the dryer.
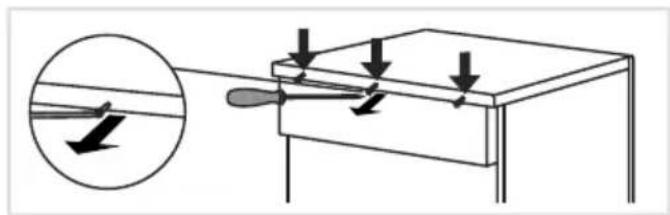
If the ironing board does not fit tightly, it can be adjusted as necessary. To do this, fold (close) the ironing board and follow steps 4, 5 and 6.
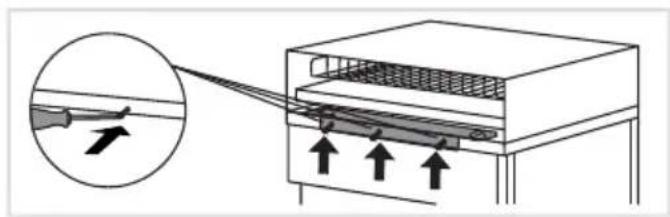
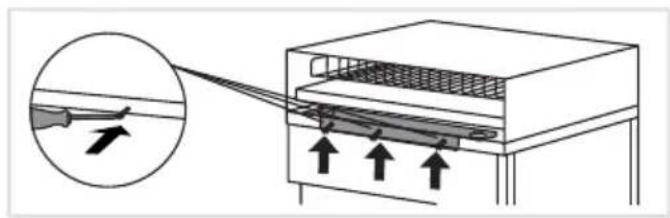
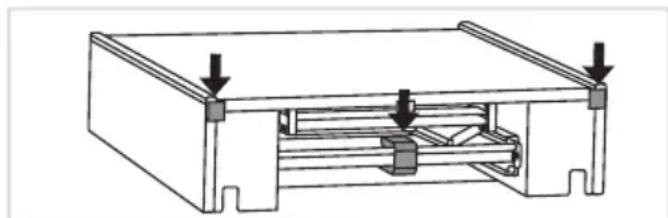
4 Use a screwdriver to carefully undo the screws on the guides on both sides (as shown in the figure) and pull out the ironing board under a right angle (perpendicularly).
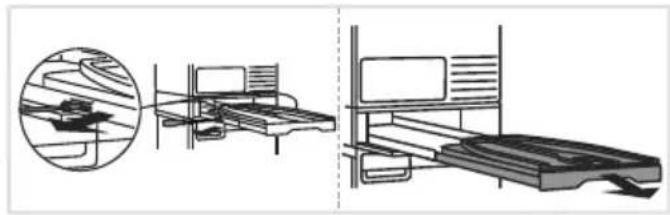
5 Detach the ironing board from the guides in the perpendicular direction, and set the length of the plastic plug extension on both sides.
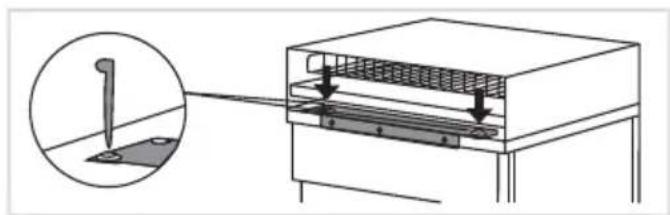
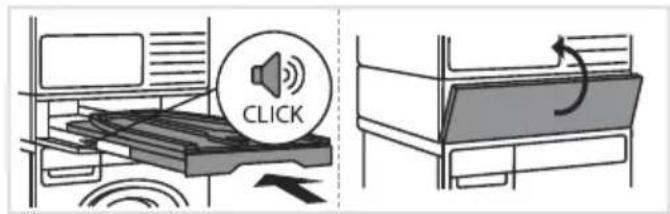
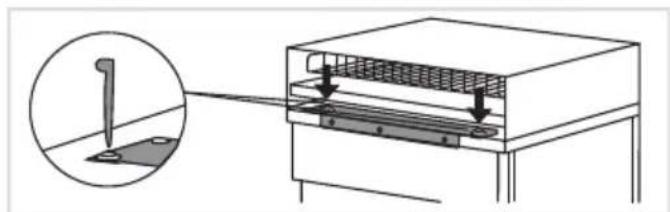
6 Then, replace and tighten the screws removed in step 4. Replace the ironing board (under a right angle).
7 When replacing the board (under a right angle), it has to audibly "CLICK" into place. Then, push the ironing board towards the inside of the hidden helper.
Close the hidden helper door.
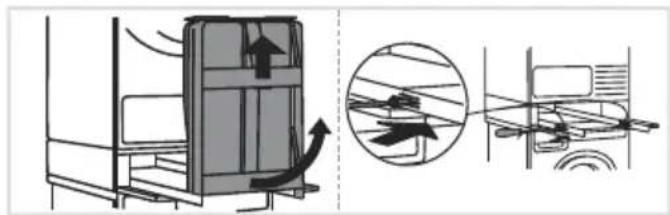
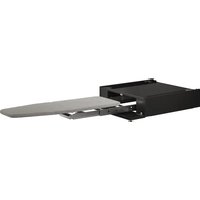
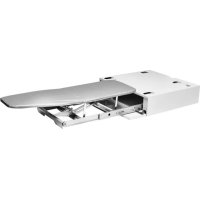
Using a hidden helper
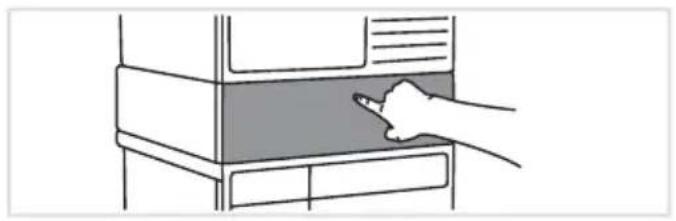
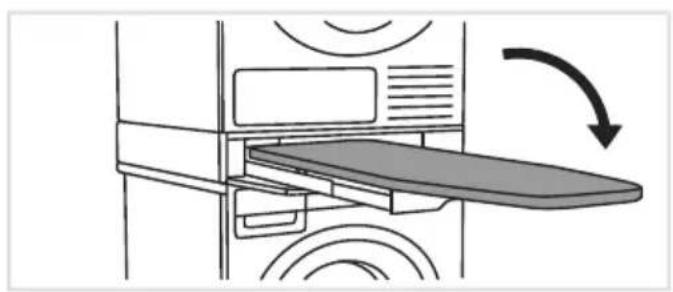

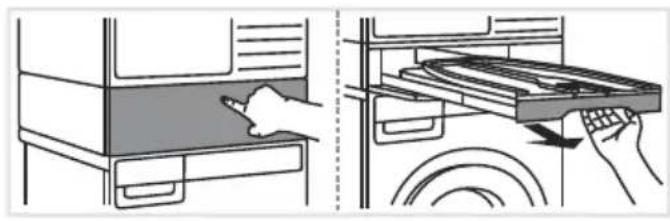
1 Press the hidden helper door to open it.
2 Hold the ironing board handle and pull it out towards you as far as it will go.
Extend the ironing board into a flat surface.
The ironing board is ready for ironing.
After ironing, fold the ironing board and press it back inside the hidden helper.
3 After use push the shelf back inside the hidden helper.

CTnpaIbHOI cyuINbHOI MaI
I PEPDOCTEPEKHEHNE!
HcnoIb3yIte aKceccyap (hidden helper) TOLbKO COBMeCTHO CO CTnpaJIbHbIMN N CyuINbHbIMN MaUNHaMn IpOu3BOdCTBa Asko.
1 OTKpyTNTeBce TPN BnHTa Ha 3aHHe cTeHK CTnpalbHO MaunHbl.
2 YcTaHOBnTe aKceccyap Ha CTnpaJIbHyo MaunHy.
ПOTИBOONPOKнДыВаюоee yCTpoIcTBO BXODIT B KOMПЛeKT aKCECCyapa N BpeMeHHO 3aKpenJIeHO B O6paTHOM HAnpaBLeHn Ha BpeMЯ TpaHCnOpTIpOBKn.
Ipeed yctahOBKoN OTHpyTHe erO n npHpyTHe TpeM BnHTaMn Ha 3aHIOU CTeHcy CTnpMaunHbI. YTo6bl ynpocTtB yCTAHOBky npOTnBOONpOKnDbIbAIOUeO yCTpoiCTBa, ChaJaA chIMn rnaDnBHyO doChy (aKceccyap) c IpeedHeN CTOpOHbI (CM. TaKHe nyHKT 4).
AKeCCyap Heo6xOJMo npKpyTHTb K CTnpaIbHoi MaunHe C IeBOH n paBOH cTOPOHbl IpOTnBOONpOKnDbIBaIOUeO yCTpoNCTBa.
PnlaeMbIM KIOyOM 3aKpyTnte 06a BnHTa.
3 YcTaHOBbA BnHTOB n KpeEnHbIX 3JIeMeHTOB dIpa3JIuHbIX MoJeIe cyIINbHbIX MaII
Ipeed yctahOBkOy cyuHbHO MaunHbCJeayTepnBeDeHHbIM HnKe HnCTpyKmMnJa npaBnBbYcTaHOBKn BnHTOB N KpeJExHbIX 3JemeHToB Ha 3aHne CTopoHe aKceccyapa. Bbl6epnte Tyn CytahOBKn B 3abncMoCTn OT MOnJIi MaunHb, KOtOpA yKa3aHa Ha 3aBoDcKoT TaBnUKe BHyTpEHNe CTOpOHe DBePcBi CyuHbHO MaunHbI. Poka3aHbI OKOHaTeJIbHbIe NOLOKeHHN BnH N KpeJExHbIX 3JemeHToB.

CyuHbHa MaunHa c TENIOBbIM HAcOCOM TD 76
BnHTbI n KpeNeKHbIe 3JIeMeHTbI yKe npedBaPnteJbHo yCTaHOBHeHb I rTOOBbl dI npabNtBHOYCTaHOBKn.
YctaHOBka akceccyapa (Hidden Helper)
CyuNbHa MaunHa C TENIOBbIM HAcOCOM TD 86
BnHbI n KpeNExHbI eAneMeHTbI Heo6XoDIMO npedBaPnteJbHo cHraTb C aKceccyapa.
CyuHbHa MaHHa BeHTnIaIOHOHoro Tna TD 76/86
KpeeHbIe 3JIeMeHTbl Heo6XoDnMo
noBepHyTb Ha 180°. Chauana OTKpyTnTe nX, noBepHnTe n CHOba npHKpyTnTe.
4 yctahOBkanepeDHeRo 3aunTHOrOJIeMeHtA
OTKpoTe nepeHIOI KpbIshky Hn3HyTpN C BepxHe CTOpOHbl OTKpyTHTE BCE BNHTbI n CHMNTe 3aunTHbI 3JIeMeHT.
5 Npeed Tem KaH noCTaBnTB cyuINbHyo MaunHy Ha akceccyap, BpyHyO OTBepHInTe HOKKn Ha OdNH 06opOT (He nCNoIb3yIte KJIou).
6 ПОДНИМITE cyuINbHyO MaunHy, aKHypaTHO yCTaHOBHTe ee Ha Kopnyc akceccyapa N 3aDbHbTe Ha3aI, noka OHa He 3aФNKcnpyeTcB PpeDyCMOTpeHHbIX MeCTax.
Akeccyap 0JHKeH 6bITb BbIPOBHeH no nepedHemy KpaO cyuHbHO MaunHbl.

6.1 NocJe yCTaHOBKn cyuHbHO MaunHbI yCTaHOBnTe nepdHn 3aHTbI 3JIeMeNT. IIOTHo npKMTe 3aHTbI 3JIeMeNT K cyuHbHO MaunHe n npKpyTnte erO BnHTAMn CHN3y.
3aTeM yCTaHOBnTe rJaIbHyO DOcHy Ha MecTo.
7 Bn c3aHn nocJe yCTaHOBKn akceccyapa MeJdy CTnpalbHOH cyuHbHOH MaunHOH.
YcTaHOBka akceccyapa (Hidden Helper)
YCTaHOBka aKceccyapa Ha MaSHHy
I PEPDOCTEPEKHEHNE!
HcnoIb3yIte aKceccyap (hidden helper) TOLbKO COBMeCTHO CO CTnpaJIbHbIMN N CyuINbHbIMN MaUNHaMn IpOu3BOdCTBa Asko.

1 OTKpyTNTeBce TPN BnHTa Ha 3aHHe cTeHK MaINHbI.

2 yctaHOBnTe aKceccyap Ha MaunHy.
AKeccyap MOHNO yCTaHOBnTb Ha CTnpaIbHyO nn CyuINbHyO MaunHy.
POTHBOONPOKnDbIBaHOUoe yCTPOINCTBO BXOINT BOBpAthOM NOLOXHeHH. Npeed yCTaHOBKOI CTEHKY CTHpaJIbHOH MaUNHbl, Ha CYUNJBHOH KaCpeIDHeE OTBepCTne He PpeDyCMOTpeHO.
YTo6bI ynpocTnTb ycTaHOBky, cnaJala cHmnte akceccyap c nepeDnei CTOPOhbl n ChOBA Jero noCle 3aKpenIeHn npOTnBOOpOKnDbIbAIOoero yCTpOJcTba.
B KOMJIeKT aKCECCyapa n BpeMeHHO 3aKpeNIIOTKpyTnte ero n npNKpyTnte TpeM BnHTamMaunHe OTKpyTnte TOJbHo Dba BHeuHnx BNHT
AKececcyap Heo6xOdHMo npHKpyTnTb K MaunHe cLeBoH n npaBo CToPOhbl npOTnBOOpOKnDbIbIaUcero yCTpOYCTBa. PpNlaRaEMbIM KJIIOOM 3aKpyTnTe 06a BnHTa.

4 BnC3aHn NocJe yCTaHOBKn akceccyapa Ha CTnpalbHyIO Hn CyuINbHyIO MaunHy. EcnBepxHne KpeeHHbIe 3JemeHTbIMeuaOT, INX MOHXO CHrTb DJIa YJyUWeHn BHeuHero BNda.

HHΦOPMAUЯ!
Ipeed Tem KaN npHpyTntb npOTnBOONpOKnDbIBaIOUeEuyCTpoiCTBO, BblPOBnTe Kpaar akceccya (hidden helper) c Kpaamn CTnpalbHOH nll cyuINbHO MaunHbl.
PereylnpoBka IopoJKeHnraIaIbHOJ DoCKN (pepe npBbIM HcNoJIb3OBAHNHeM)
1 HaKmTe Ha DBepy, TTo6bI OHa OTKpbIacb.
Bo3bMntecb 3a pyKy I NOJIHOCTbIO BblBnHbTe rlaIbHyIO DOCKy.
2 Pa3IoXnTe rIaIINbHyIO DOcky B HappaBHeHn, KaK nOHa3aHo Ha pncyHKax.
3 Npeed nepBbIM nCnoJb3ObaHnem npOBepbTe yctOnuBOCTb rAaDnIbHOJ DOCKN. B 3aΦNKcnpoBAHHOM NOLOKeHN HnKnRA qAcTb DOCHN DOJIKNHa HaJeKHO OINpaTbcn Ha cyuNbHyO MaunHy.
Ecnr rnaHbHa Docka He noJIHOCTbIO
onnpaetc Ha MaunHy, DOChy MOxHo
OTperyInpoBaTb. 3TOrO CLOXHTe
rnaHbHyIO DOChy N BbINOJHnTe DeIcTBnA 4,
5 n6.
4 C NOMOuBIO OTBepTHN aHHypaTHO OTHpyTNTe BnHTbI Ha HnpaBIAHoux C 06Enx CTOpOH (Ka NOKa3aHO Ha pncyHke) n NOJIHOCTbIO BblBNHbTe rlaDnIbHyIO DOCKy.
5 CHIMITE rlaHbHyO DOcKy C HnpaBIAIOx IOI pRbIM yTLOM. OtperynpuTe dINHy BbIDNKeHr ADOCKN, nepeCTaIB NlactIKOBbie OrpaHHTeIN C o6ex CTOpOH.
6 3aKpyTnTe o6paTHo BnHTbI, KOtOpbl Bbl OTkpyTnH B nyHKe 4. YcTaHOBnTe rJaDnIbHyIO DoCHy Ha MeCTO (noD npRmbIM yrIOM).
7 Пи установке (пд пямьим углom)doJIkeH pa3daTbc8 LcELyOH (CLICK).Пocle3TOrO 3aADBnBTe rIaIINbHyIO DOChy BHyTpbaKceccyapa.
3aKpoTe DBepy aHceccyapa.
IaHbHa Docka roToBa K pa6oTe.
Iocne IcnoJb3OBAHnCIOKHTe rJaINbHyIO Docky 3aADBHBTe 06paTHOB aKceccyap.
3 Nocne nCnoB3OBaHn 3aDbHbTe noNHy o6paTHo.

He Do3BOJnTe DITaM BIKOM Do Tpbox pOKiB nepe6yBaTH Bnpo6y, RaKIO BOHn He PiD NocTiINHM HaIydom.
He Do3B0JrTe DITaM MoIodJe TpbOx pOKiB Ha6JIHkaTnCBAHbO6y, RaKIO BOHN He nepe6yBaIoTB NiD NOCTiHm HaIJa
Y cybomy noci6Hnky BHKOpNCTOByIOTBcB Kha3aHi HNKepe No3HaChK, Aki MaIOTb BiIDNoBiDiHi 3Ha

IHΦOPMALI!
InΦopMaia, nopada, nikka3ka a6o peKOMeHaiai

YBAΓA!
PonepeJxHnHa: He6e3neKa

HE6E3NEKA UPAJKEHHJ EJEKTPNCHM CTPYMOM!
PonepeJxHeHHa: p3nK ypaKeHH eJIeKtpnHm CTpyMOM
OpriHaJIbHi iHcTpkyuii
36EPEKITb CEI NOCIBHNK IJI BHKOPNCTAHN B MAIBYTHbOMY.
Iepsh Hix BnHOpncTOBvBaTn npnilad ynepe, 3HimItb yc0 3axnchTy TpaHcnpTyBaIbHy ynaKOBHy. TpaHcnpTyBaIbHa φypHiTypa npn3NaheHa Dny 3axnctTy npnxOBAHOro nomiHnka (hidden helper) nid qac TpaHCnOpTyBaHH, II CJId 3HrTn nepeD THM, J nochatu BnHOpncTOBvBaTn Bnpi6.

IHΦOPMALI!
MaKcMajbHe peKoMeHDoBaHe habaHTaJKeHH npHXOBaHO r NOMiYnHa cTaHOBntb 10 Kr, ToI He nepeBaHTaJyIte Ioro, 3o6 3a6e3neuHTn 6e3neue HbNKOpNCTAHn Ta yHNKHyTn MOxJIIn NOsKOJKeHb.
BcTaHOBJIeHHaI npHXoBaHOrO nOmUHnKa (Hidden
Helper)
CyuNbHa MaunHa 3 TENOBHm HAcOCOM TD 86
O6OB'3KOB0 BnMIb rBHTn Ta KPOHHTeHH 3 npNXOBaHOro NOMiHuHa.
CywnbHa MaunHa 3 BeHTnlaueo TD 76/86 NOBepHITb KPOHwTeHH Ha 180°. CnoaTHy BiHKpyiTb ix, NOBepHITb i 3HOBy 3aKpyTiTb.
4 BcTaHOBJIeHHa fikcaTopa nepeHix HiKoK BiKpnIte nepedHIO KpNHy, BiKpyTiY yci TBnHTn Ha BepxHi BHyTpIiHi cToPOHi i 3HIMIT fikcaTop nepeHix HiKoK.

5 Npeed TmM, RaN NOCTaBHTn CyuINbHy MaunHy Ha npHXOBaHn NOMiHNK, BiDVBHTIb HIXKn BpyHy Ha ODNH 06epT (He BNkopNCTOByte raHOBN KIOU).

6ПидимITb cyuINbHy MaunHy,ObepeKHO nocTaBTe II Ha Tym6y-lyxIaIy i BiicCyBaIte Ha3aI,doKn BOHa He 3aΦiKcyETbcr y nonepedHbO BCTaHOBHeHX KPOHHTeHax.

PnHXOBaHn NOMiUHnK NOTpioHo BnpiBnTHn BiDHOCHO IINcboOoi CTOpOHn CyuHbHOI MaunHH.
6.1 HoJn cyuHbHy MaunHy BCTaHOBJeHo, BCTaHOBITb Ha Micue fikcaTopn nepehix HIXOK. IJIbHO npITncHITb fikcaTOp nepehix HIXOK Do cyuHbHOI MaunHN, nicra Yoro npHKpyTiB NORO 3HN3y TBNHTAMN.
BctaBTe npacyBaIbHy dOwHy Ha Micu.
7 KInueBn BapiaHT BCTaHOBJIeHHN npHXOBaHOro NOMiHnKa MiK npalbHO Ta cyuNbHOIO MaunHaMn -BnD 33aNy.
Inspired by Scandinavia
ASKO APPLIancies AB · SOCKERBRUKSGATAN 3, SE-531 40 LIDKOPING, SWEDEN · WWW.ASKO.COM
- OPERATING INSTRUCTIONS
- Please read the instruction manual and save it for future reference.
- To reduce the risk of injury to persons when using the product, follow basic safety instructions and warnings, including the following:
- EN -Warnings
- INFORMATION!
- WARNING!
- ELECTRIC SHOCK!
- Installing a Hidden Helper
- Installing a Hidden Helper onto the appliance
- Adjusting and fixing the ironing board (before first use)
- Using a hidden helper
- I PEPDOCTEPEKHEHNE!
- YctaHOBka akceccyapa (Hidden Helper)
- YCTaHOBka aKceccyapa Ha MaSHHy
- HHΦOPMAUЯ!
- PereylnpoBka IopoJKeHnraIaIbHOJ DoCKN (pepe npBbIM HcNoJIb3OBAHNHeM)
- IHΦOPMALI!
- YBAΓA!
- HE6E3NEKA UPAJKEHHJ EJEKTPNCHM CTPYMOM!
- BcTaHOBJIeHHaI npHXoBaHOrO nOmUHnKa (Hidden
- Helper)
Brand : ASKO
Model : HI150W
Category : Ironing board