
7000 Series XW7110 - Vacuum Cleaner PHILIPS - Free user manual and instructions
Find the device manual for free 7000 Series XW7110 PHILIPS in PDF.
User questions about 7000 Series XW7110 PHILIPS
0 question about this device. Answer the ones you know or ask your own.
Ask a new question about this device
Download the instructions for your Vacuum Cleaner in PDF format for free! Find your manual 7000 Series XW7110 - PHILIPS and take your electronic device back in hand. On this page are published all the documents necessary for the use of your device. 7000 Series XW7110 by PHILIPS.
USER MANUAL 7000 Series XW7110 PHILIPS
Introduction 6
General description 6
Before first use 6
Charging 8
Vacuuming and mopping hard floors 9
Display icons and their meaning 21
Replacement 23
Troubleshooting 24
Introduction
Thanks for buying this Philips product! To fully benefit from the support that Philips offers, register your product at www.philips.com/MyAquaTrio7000s
General description
1 On/off button
2 + and - buttons
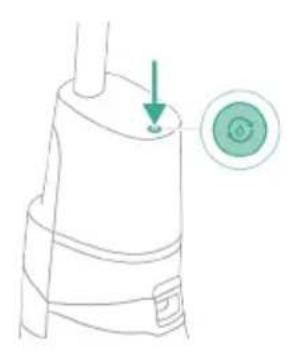
3 AUTOCLEAN button
4 Charging socket including sealing cap
5 Clean water tank
6 Dirty water tank
7 AquaSpin nozzle
8 Microfiber brushes
9 Handle
10 Cleaning brush
11 Adapter
12 Power plug
13 Philips Floor Cleaner XV1792
14 After-Clean & Storage station
15 Appliance holder
16 After-Clean tray
17 Baseplate
Before first use
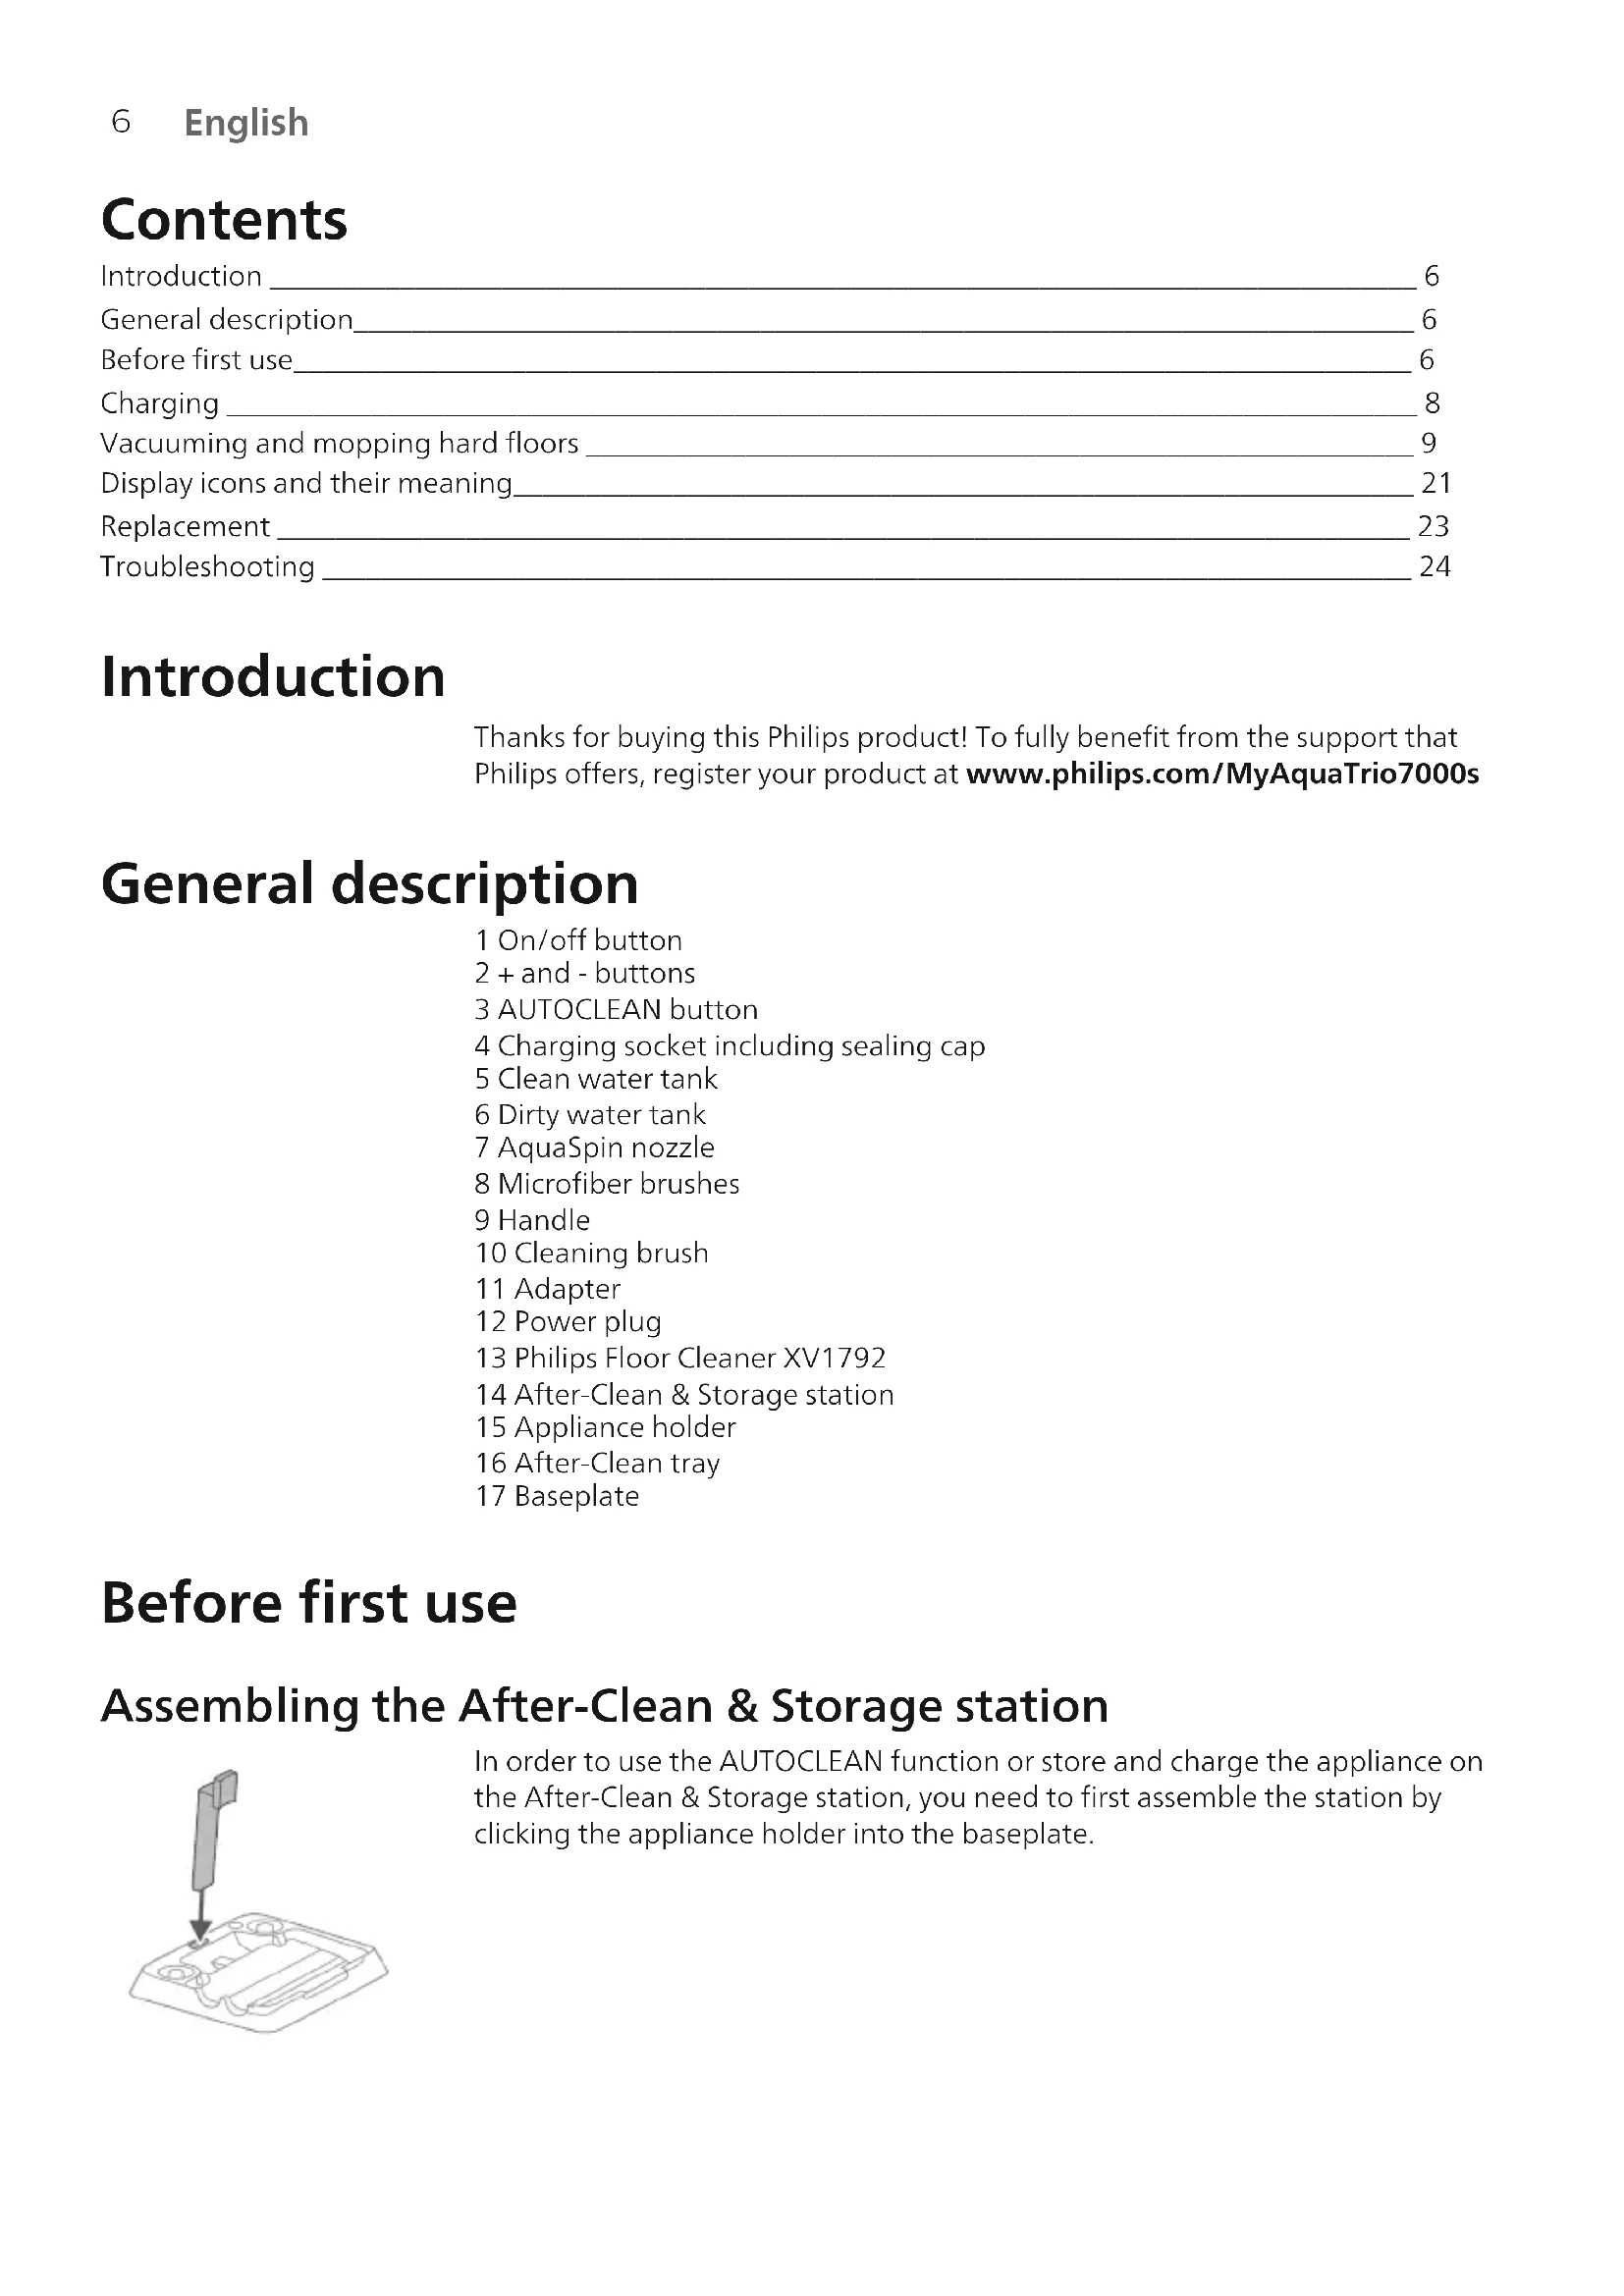
Assembling the After-Clean & Storage station

In order to use the AUTOCLEAN function or store and charge the appliance on the After-Clean & Storage station, you need to first assemble the station by clicking the appliance holder into the baseplate.
i Note: Make sure that the After-Clean tray is placed in the baseplate and that the temperature in the room where the appliance is stored, charged and cleaned is between 5^ and 35^ .
Note: you can store the cleaning brush in the After-Clean tray as well.
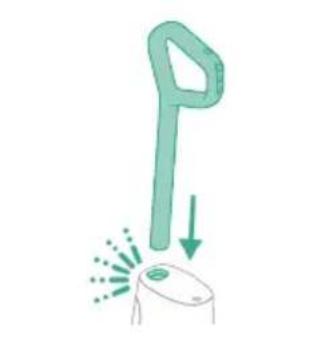
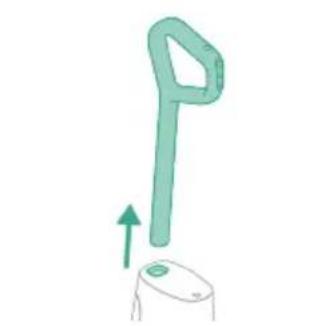
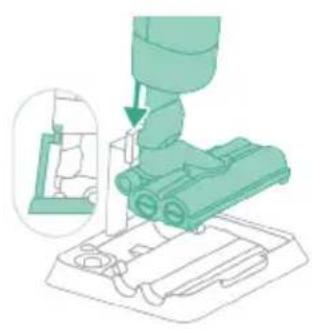
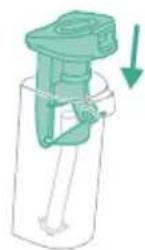
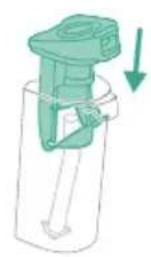
1 To assemble the appliance, insert the handle into the main body ('click').
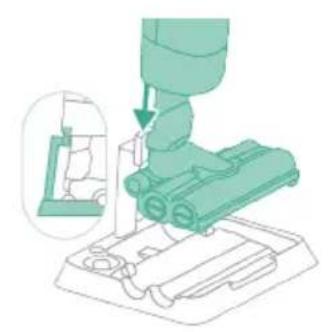
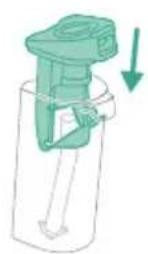
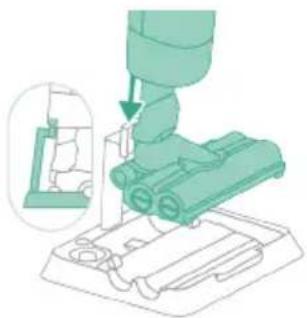
2 To store the appliance, you can place it in the After-Clean & Storage station. Slide the appliance on to the appliance holder so that the end of the appliance holder sticks into the appliance.
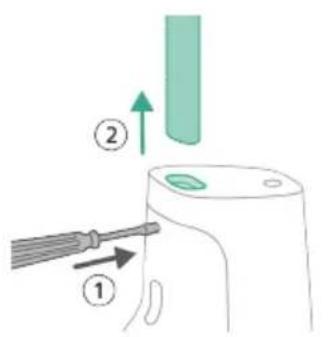
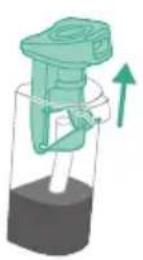
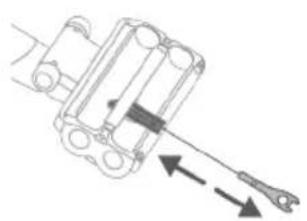
If you need to disassemble the appliance again, follow the steps below:
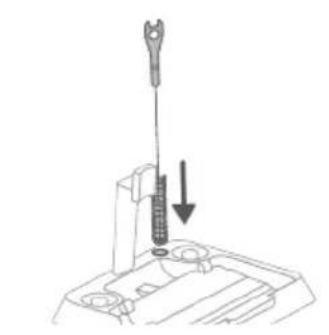
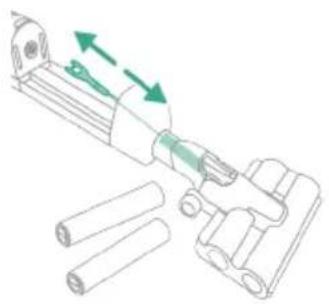
1 Insert a pin/flat screwdriver into the hole in the back of the appliance and pull up the handle.
2 Pull the handle out of the appliance while continuing to push the screwdriver into the hole.
Charging

The appliance is equipped with a 25 V Li-1on battery. Charging takes 4 hours.
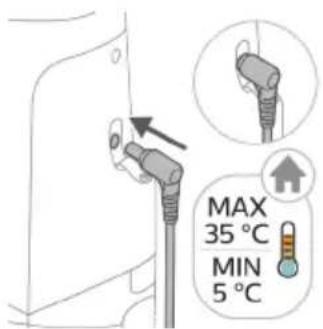
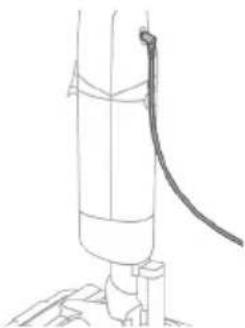
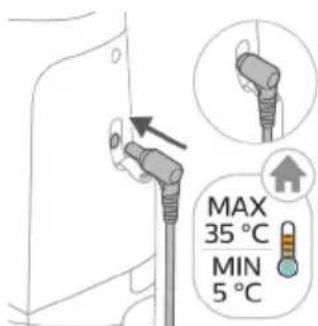
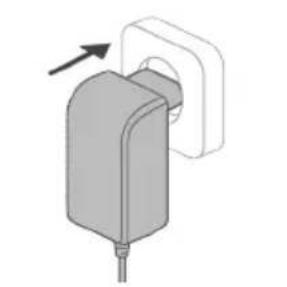
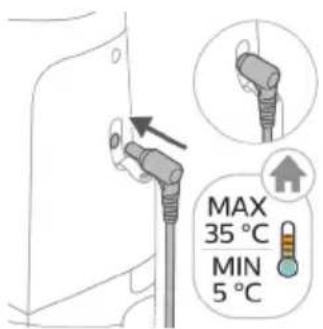
1 To charge the appliance, open the sealing cap on the back of the appliance.
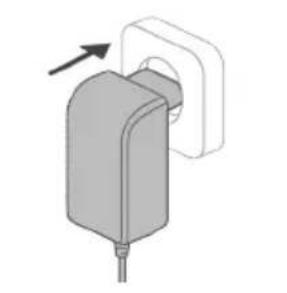
2 Insert the power plug into the socket on the back of the appliance. Then insert the adapter into the wall socket.
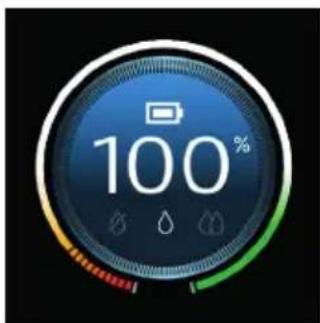
3 A value between 0% and 90% flashes on the screen to indicate that the appliance is charging.
4 When the appliance is fully charged, the value 100% lights up on the screen. After a few minutes, the display will switch off.
5 Remove the power plug from the socket on the back of the appliance.
6 Close the sealing cap.
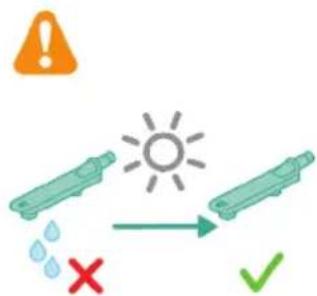
Warning: Store and charge the appliance at a temperature above 5^ and below 35^ .
Tip: You can charge the appliance in the After-Clean & Storage station.
Tip: You can charge the appliance separately in a place that suits you best.
Vacuuming and mopping hard floors
Using the appliance
The clean water tank and the dirty water tank are already attached to the appliance upon delivery. You can use the appliance to clean hard floors.
Note: This appliance is suitable for vacuuming and mopping at the same time. It is not necessary to vacuum the floor before mopping.
The appliance is suitable for vacuuming and mopping all types of hard floors, except uncoated wooden floors. You can test the appliance on a small area out of direct view, to make sure that the appliance is suitable for your floor.
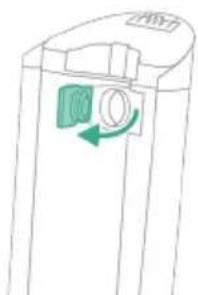
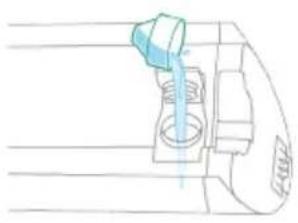
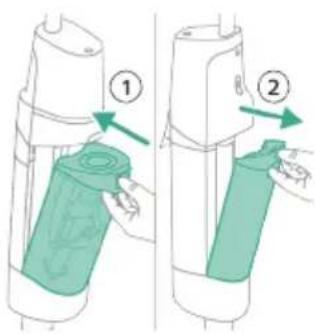
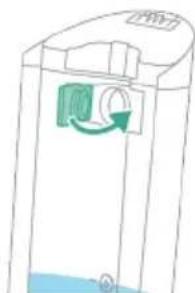
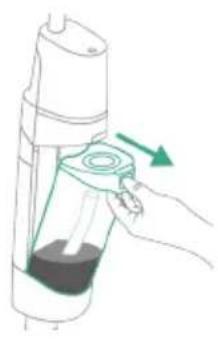
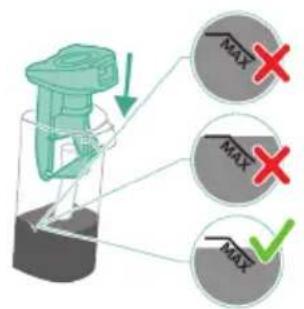
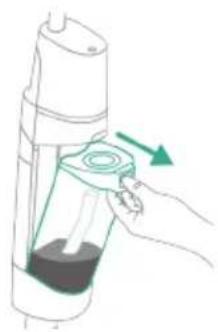
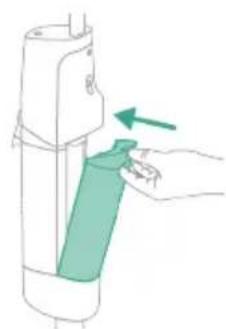
1 Push the button down to unlock the clean water tank and remove the clean water tank.

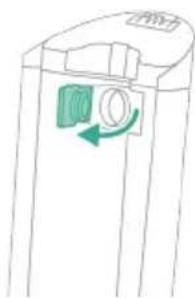
2 Open the cap on the clean water tank.
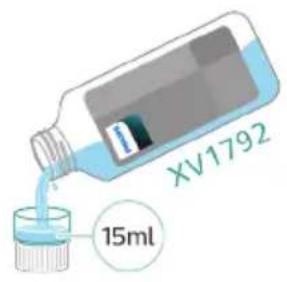
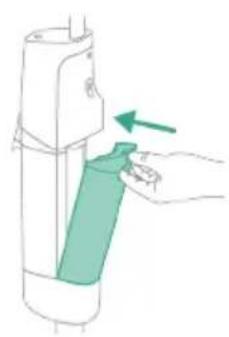
3 Add 15ml of the XV1792 Philips Floor Cleaner to the clean water tank.
Caution: Philips has only tested this appliance with XV1792 Philips Floor Cleaner. Other detergents may lead to excessive foaming, which reduces performance and may cause the appliance to malfunction. XV1792 Philips Floor Cleaner is available in selected markets. When using any other suitable liquid floor cleaner, add a maximum of 15ml to the clean water tank.
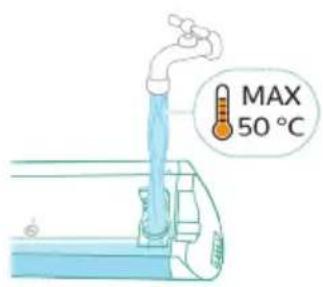
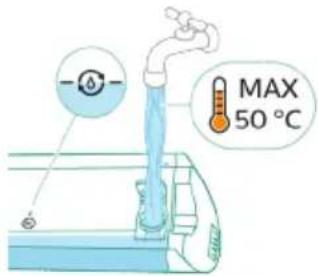
4 Fill the clean water tank up to the top with cold or lukewarm tap water.
A Caution: The tap water that is poured into the clean water tank must not be warmer than 50^ .
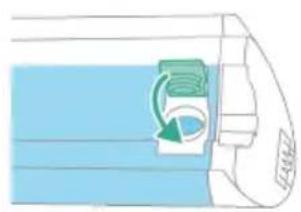
5 Close the water tank with the sealing cap.
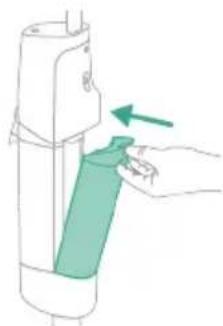
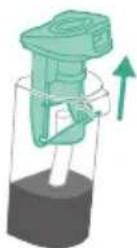
6 Place the clean water tank back into the appliance.
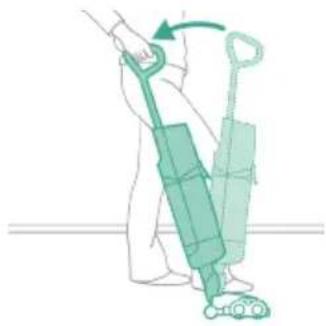
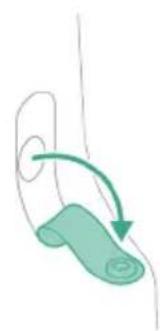
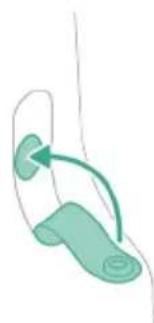
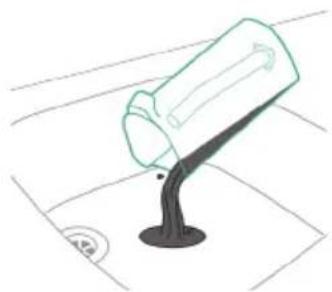
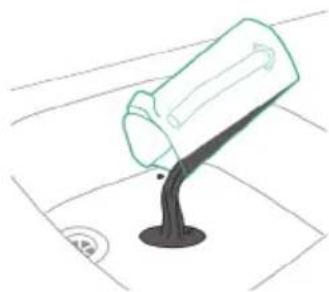
7 Take the appliance out of the After-Clean & Storage station and place it on the floor. Put your foot on the AquaSpin nozzle and pull the handle backwards to unlock the AquaSpin nozzle. The appliance is now ready for use.
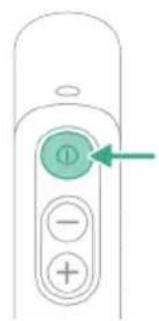
8 To switch on the appliance, press the on/off button. The appliance will turn on.
Caution: do not leave the appliance unattended when the AquaSpin nozzle is unlocked or when the appliance is switched on.
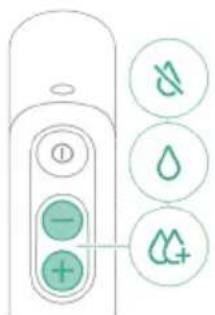
9 Use the + and - buttons to toggle between three different settings:
Water absorption mode
Normal wet mode
- Intense wet mode
By selecting the normal wet mode you can use the appliance for regular wet cleaning. The intense wet mode for cleaning extra stubborn stains. If there are wet spots on the floor after cleaning, you can select water absorption mode to clean them up. We also recommend using it when lifting the appliance over a threshold, carpet or stairs.
If you select water absorption mode the appliance will stop supplying water and increase suction power for 45 seconds to absorb remaining water on the floor.
10 When you are done using the appliance, switch it off by pressing the on/off button. The appliance will switch to water absorption mode for 4 seconds to clean up any water remaining in the nozzle.
Note: The appliance can leave a small puddle of water on the floor if you do not move the appliance while switching it off. You can reduce the size of the puddle by moving the appliance while switching it off. If needed, you can remove the last drops with a cloth.
Active protection system
- This appliance is equipped with an active protection system. This active protection system has been designed to recognize when a foreign object other than dirt or liquid is picked up from the floor.
- When the system is activated, the appliance switches off and the i3 message appears on the display (see 'Display icons and their meaning'). The active protection system can also be activated when the microfiber brushes are too wet, when you move the appliance over a carpet or a rug, or when you move it over flooring that is not properly affixed.
Tips and other important information
- It is not necessary to vacuum the floor before mopping, as the appliance actively wet-cleans your hard floor to capture all kinds of dirt, including liquids and stains.
- You can move the appliance just like a vacuum cleaner. To remove difficult stains, click the cleaning mode button to activate intense wet mode and move the appliance slowly over the stains.
- The appliance can leave a small puddle of water on the floor when you switch it off. You can reduce the size of the puddle by moving the appliance while switching it off to reduce the amount of water left on the floor. It is also recommended to use water absorption mode when lifting the appliance over a threshold, carpet or stairs. This will prevent dirty water from dripping out of the AquaSpin nozzle.
- To prevent water traces on the floor, try to make less strong turns with your appliance and avoid moving the appliance sideways.
- When moving the appliance, it is recommended to stretch your arm to reduce unnecessary tension on the muscles. In this position, you have the best control over the appliance when cleaning, and it will be the most comfortable.
Usage restrictions
- The appliance is suitable for vacuuming and mopping all types of hard floors, except uncoated wooden floors.
- The appliance is intended for regular cleaning of hard floors. Always follow the cleaning instructions for your hard floor when you use this appliance.
- If you want to add a liquid floor cleaner other than XV1792 Philips Floor Cleaner to the water in the clean water tank, make sure that you use a low-foaming or non-foaming liquid floor cleaner that can be diluted in water like XV1792 Philips Floor Cleaner.
- As the clean water tank has a capacity of 700ml , you only have to add a small amount (max 15ml) of liquid floor cleaner to the water.
- If you use the appliance on linoleum floors, only do so on linoleum floors that are properly affixed to prevent linoleum from being drawn into the AquaSpin nozzle.
- Do not use the appliance to clean carpets.
- If you move/lift the appliance over a carpet or rug when it is switched off, wastewater droplets may end up on your carpet or rug.
- Do not push the appliance over the floor grilles of convector heaters. As the appliance cannot pick up water that comes out of the nozzle when you move it over the grille, water ends up at the bottom of the convector pit.
- While cleaning, do not lift the AquaSpin nozzle from the floor or move the AquaSpin nozzle sideways, and do not make strong turns, as this leaves water traces.
Note: The operating time depends on the power level used during cleaning.
Cleaning the appliance
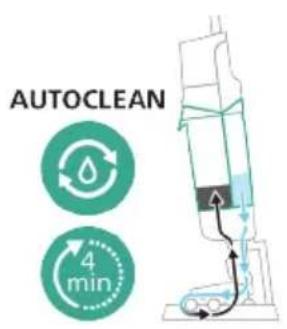
AUTOCLEAN after every use
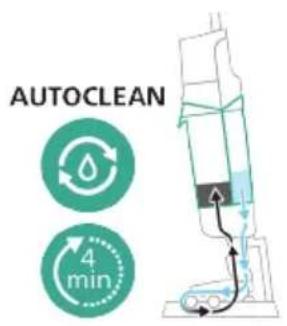
To prevent odors and scale deposits, use the AUTOCLEAN function after every use. The AUTOCLEAN mode helps you to clean your full appliance in approximately 4 minutes.
1 Place the appliance in the After-Clean & Storage station. Slide the appliance on to the appliance holder so that the end of the appliance holder sticks into the appliance.
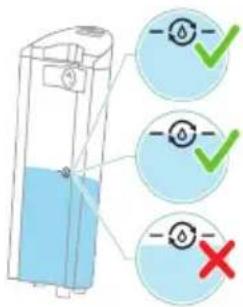
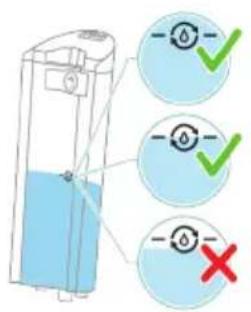
i Note: Empty the dirty water tank if the water level is above the AUTOCLEAN indication. Otherwise, you can skip the following steps and move forward to step 6.
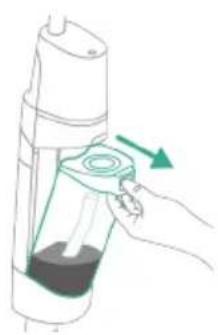
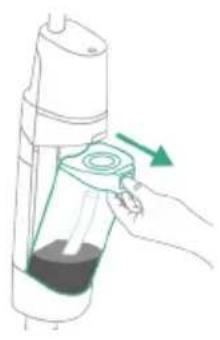
2 Push the button to unlock the dirty water tank and remove it.
3 Remove the wet filter from the dirty water tank.

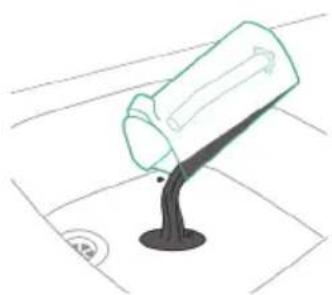
4 Pour the water out of the dirty water tank into the sink.
5 Place the wet filter back on the dirty water tank.

6 Fill the clean water tank if the water level is below the AUTOCLEAN indication. Otherwise, you can skip the following steps and move forward to step 12.
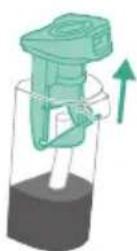
7 Place the empty dirty water tank back into the appliance and take out the clean water tank.
8 Open the sealing cap on the clean water tank.
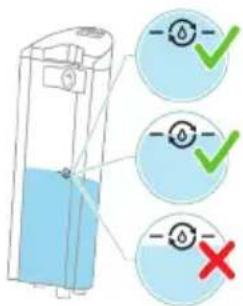
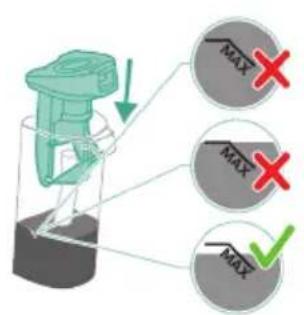
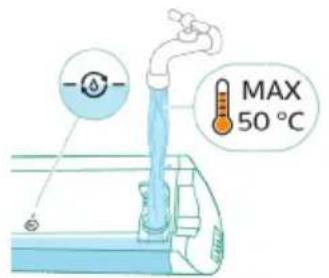
9 Fill the clean water tank with cold or lukewarm tap water at least up to the AUTOCLEAN indication.
Caution: The tap water that is poured into the clean water tank must not be warmer than 50^ .
A Caution: Do not use detergent for the AUTOCLEAN as this might lead to excessive foaming.
10 Close the clean water tank with the sealing cap.
11 Place the clean water tank back into the appliance.
12 Charge the appliance. Insert the power plug into the socket on the back of the appliance. Then insert the adapter into the wall socket.
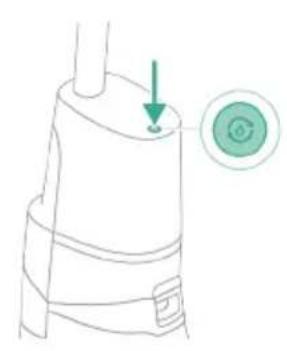
13 To start the AUTOCLEAN cycle, press the AUTOCLEAN button. If you see a black screen, press the on/off button first to activate the screen.
14 The appliance performs the AUTOCLEAN cycle.
Note: The Autoclean cycle lasts approx. 4 minutes. For best results, let the appliance run through the AUTOCLEAN cycle completely. You can pause or cancel the AUTOCLEAN cycle at any time.
Note: If you cancel the AUTOCLEAN program, the appliance will suck up the remaining water in the After-clean tray for about 10 seconds.
15 Push the button to unlock the dirty water tank and remove it.
16 Remove the wet filter from the dirty water tank.
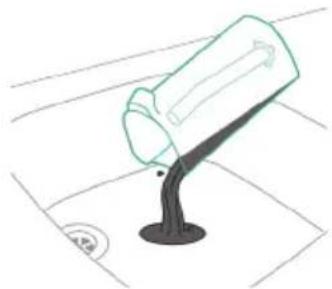
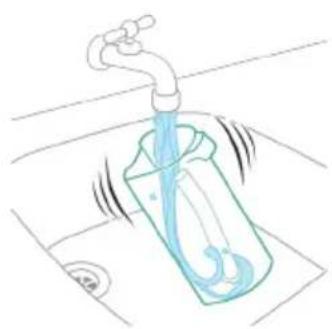
Pour the water out of the dirty water tank into the sink.

18 Clean the dirty water tank under the tap.

19 Clean the wet filter under the tap.
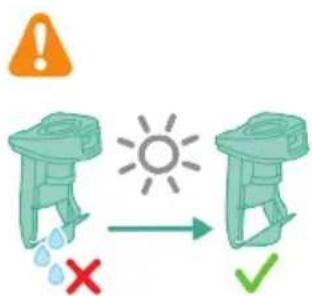
20 Let the wet filter of the dirty water tank and its water flow element dry completely before putting it back on the dirty water tank.
21 Place the wet filter back on the dirty water tank.


22 Place the dirty water tank back into the appliance.
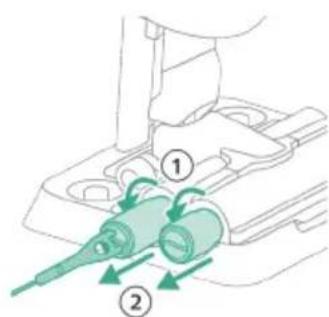
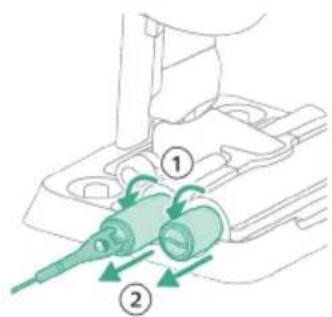
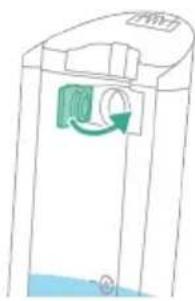
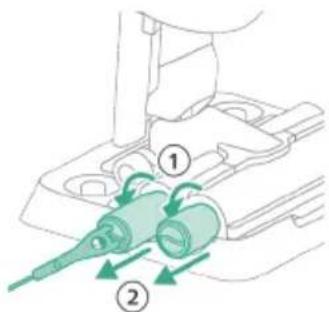
23 Turn the microfiber brushes counterclockwise (1) and remove them from the AquaSpin nozzle (2).
Tip: In case a microfiber brush is difficult to remove, you can use the cleaning brush handle to unlock the microfiber brush.
24 To allow the microfiber brushes to dry, place the open ends of the brushes on the designated holders of the After-Clean & Storage station.
i Note: Drying can take approximately 24 hours.
Cleaning the After-Clean tray
If the After-Clean tray gets dirty, you can clean it by following the steps below.
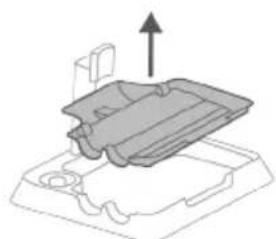
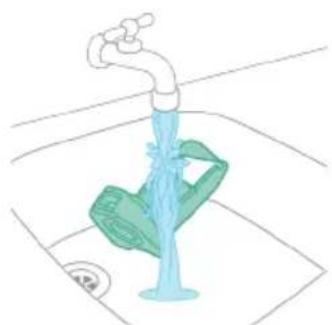
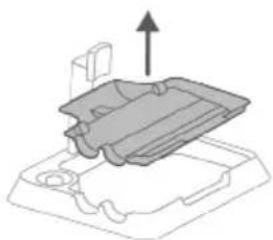
1 Remove the After-Clean tray from the storage station.
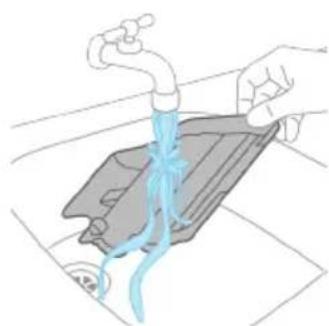
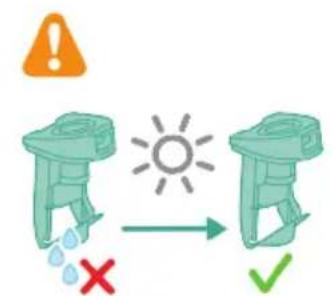
2 Rinse the After-Clean tray under the tap and let it dry before placing it back in the Storage station.
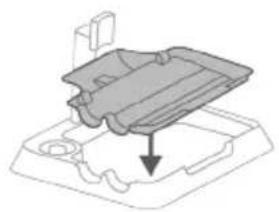
3 Make sure to always put the After-Clean tray back in the Storage station. The After-Clean tray is essential to perform the AUTOCLEAN correctly.
Cleaning the AquaSpin nozzle
1 Turn the microfiber brushes counterclockwise (1) and remove them from the AquaSpin nozzle (2).
Tip: In case a microfiber brush is difficult to remove, you can use the cleaning brush handle to unlock the microfiber brush.
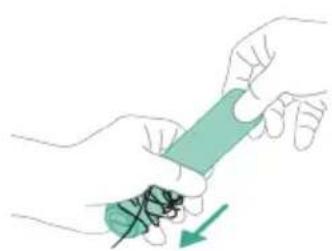
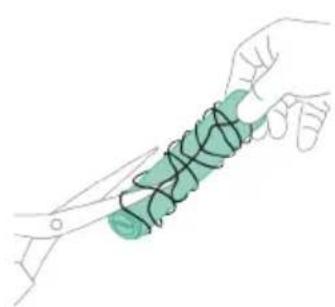
2 You can remove entangled hair or threads from the microfiber brushes by sliding down the microfiber brushes with one hand.
Tip: You can also use a pair of scissors to cut hairs and threads that have become entangled around the microfiber brushes.
Removing blockages from the appliance
The appliance may become clogged. You may notice this when more water gets on the floor than usual or when bigger dirt particles are no longer sucked up and fall back on the floor. Below you can find the instructions to remove blockages from different parts of the appliance.
Clearing blockages from the main body
If there is a blockage in the appliance, first switch off the appliance and remove the dirty water tank. Then remove the blockage by moving the cleaning brush up and down in the suction channel of the main body.
Clearing blockages from the AquaSpin nozzle
If there is a blockage in the AquaSpin nozzle, remove the brushes from the nozzle. Then move the cleaning brush up and down in the suction channel of the AquaSpin nozzle.
Clearing blockages from the wetting strips of the AquaSpin nozzle
After long and frequent use of the appliance, the wetting strips of the AquaSpin nozzle may become clogged at some point. Follow the steps below to clear the blockage of the wetting strips of the AquaSpin nozzle.
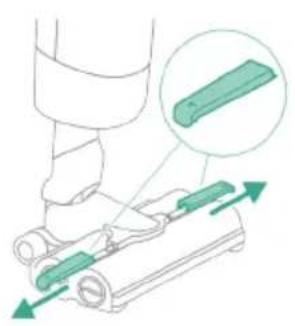
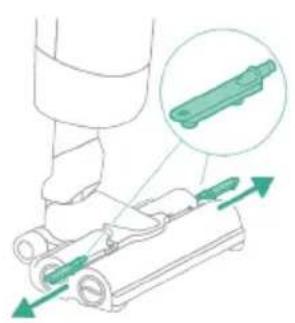
1 Remove the wetting strip covers from the AquaSpin nozzle by moving them sideways.
2 Remove the wetting strips from the AquaSpin nozzle by pulling them out sideways.
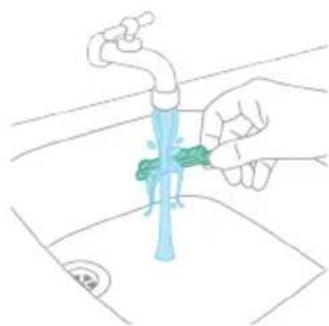
3 Rinse the wetting strips under the tap.
4 Let the wetting strips dry before placing them back in the AquaSpin nozzle.
Display icons and their meaning
Error code Cause Solution
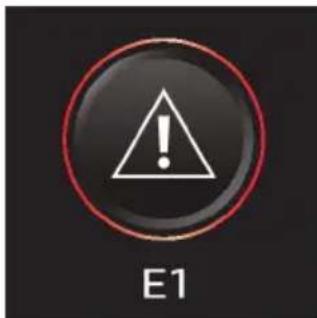
There is a system error. Disconnect the appliance from the adapter and then reconnect the appliance to the adapter. Then try to restart the appliance. If the solution does not work, please take the appliance to a Philips service center or contact the Consumer Care Center.
Error code Cause Solution
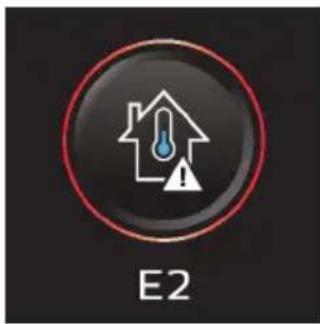
The temperature is too low. Make sure the temperature in the room where the appliance is used, stored, or charged is above 5^. If the device is used and stored at the correct temperature and still shows the error code, please take it to a Philips service center or contact the Consumer Care Center.
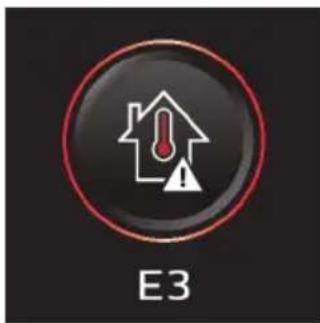
The temperature is too high. Make sure the temperature in the room where the appliance is used, stored, or charged is below 35^ . Do not expose the device to direct sunlight or high temperatures (near hot stoves, in microwave ovens, or on induction cookers). If the device is used and stored at the correct temperature and still shows the error code, please take it to a Philips service center or contact the Consumer Care Center.
Information code Cause Solution
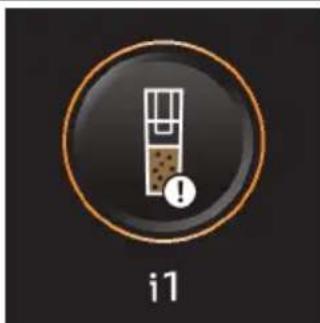
The dirty water tank is full. Empty the dirty water tank.
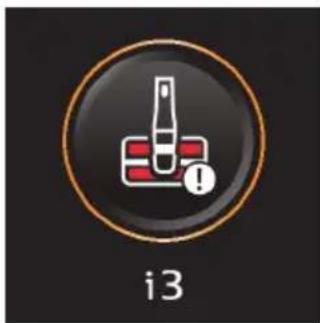
The AquaSpin nozzle is stuck. This is a safety cut-off if something is stuck in the nozzle (for instance, a power cable or a toy).
Check the brushes, bearings, motor parts, and caps for hair or other obstacles and remove them. If there are no obstacles, switching the appliance off and on might solve the problem.
The air inlet openings are blocked.
Check the air inlet openings for blockages and remove them. If this does not solve the problem, check the whole air passage for blockages and remove them. This refers to the nozzle, tube, and the wet filter.
Information code Cause Solution
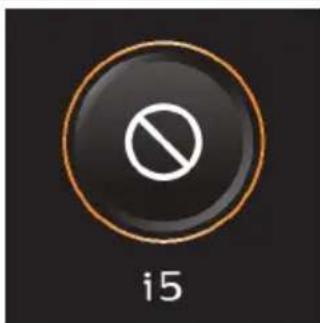
| i6 | Unplug for use. Unplug the appliance for use. Otherwise, it will not switch on. Only plug in the appliance during charging and AUTOCLEAN. | |
| i7 | The wrong charger is connected. | Only charge the appliance with the adapter supplied. Only use 34V adapter S036-1A340100HE. The corresponding adapter number can be found on the adapter. |
| Icons Meaning | ||
| AUTOCLEAN | ||
| Microfiber brush replacement needed | ||
Replacement
To buy accessories or spare parts, visit www.philips.com/parts-and-accessories or go to your Philips dealer. You can also contact the Philips Consumer Care Center in your country (see the international warranty leaflet for contact details). Replacement parts and type numbers:
- Philips Floor Cleaner XV1792
- Replacement microfiber brushes XV1793
Replace the microfiber brushes every 6 months to ensure maximum performance.
Note: You can dispose the old the microfiber brushes with the normal household waste.
Troubleshooting
This chapter summarizes the most common problems you could encounter with the appliance. If you are unable to solve the problem with the information below, visit www.philips.com/support for a list of frequently asked questions or contact the Consumer Care Center in your country.
Problem Possible cause Solution
| The appliance does not work when I push the on/off ① button. | The battery is empty. To charge the battery, connect the appliance with the charger (see 'Charging'). | |
| You did not take the appliance out of the After-Clean & Storage station. | Take the appliance out of the After-Clean & Storage station before switching on the appliance. | |
| You pushed the on/off ① button more than one time. | Wait a few seconds and push the on/off ① button again one more time. | |
| The appliance is clogged. Switch off the appliance. Then locate and remove the cause of the blockage (see 'Removing blockages from the appliance'). After that, restart the appliance. If you cannot identify the cause of the blockage, restart the appliance. This might already solve the problem. | ||
| The microfiber brushes are stuck. | Take the microfiber brushes out. Then locate and remove the cause of the blockage in the microfiber brushes. Then Place the microfiber brushes back (see 'Cleaning the AquaSpin nozzle').Tip: In case a microfiber brush is difficult to remove, you can use the cleaning brush handle to unlock the microfiber brush. | |
| The appliance stopped working. | You accidentally touched the on/off ① button with your hand. | Switch on the appliance by pushing the on/off ① button. |
| The dirty water tank may be full. In this case, there is an information icon shown on the screen (see 'Display icons and their meaning!). | Empty the dirty water tank. | |
Problem Possible cause Solution
| The appliance is clogged. Switch off the appliance. Then locate and remove the cause of the blockage (see 'Removing blockages from the appliance'). After that, restart the appliance. If you do not identify the cause for the blockage, just restart the appliance. This might already solve the problem. | ||
| The floor is less wet than usual, or one side of the floor under the nozzle is less wet than the other one. | One or both wetting strips may be blocked. | Remove the two microfiber brushes, fill some water into the clean water tank and switch the appliance on. Make small forward and backward movements on the same position for around 15 seconds. You should be able to see four water stripes on the floor. If this is not the case, or if one or more water stripes only consist out of a few droplets, the wetting strips are partially or fully blocked and you can rinse them under the tap. If that does not help, you can try to carefully open the holes with a needle. |
| There is no water on the floor. | The clean water tank is empty. Refill the clean water tank. | |
| The wetting strips are blocked. Remove the two microfiber brushes, fill the clean water tank with some water, and switch the appliance on. Make small forward and backward movements on the same position for around 15 seconds. You should be able to see four water stripes on the floor. If this is not the case, or if one or more water stripes only consist out of a few droplets, the wetting strips are partially or fully blocked and you can rinse them under the tap. If that does not help, you can try to carefully open the holes with a needle. | ||
| If you have checked the above and there is still no water on the floor, take the appliance to a Philips service center or contact the Consumer Care Center. | ||
| There is more water on the floor or in the After-Clean tray than usual. | The water channel of the wet module and/or AquaSpin nozzle is polluted or blocked. | Use the cleaning brush and clean the water channel of the wet module and/or AquaSpin nozzle (see 'Removing blockages from the appliance'). |
| The dirty water tank is not placed correctly. | Place the dirty water tank into the appliance properly. It is closed correctly when you can hear a 'click' sound. | |
| The appliance leaves water traces on the floor. | You have moved the appliance sideways. | Only move the appliance forwards and backwards. |
Problem Possible cause Solution
| You made strong turns with the appliance. | Try to make less strong turns with the appliance. | |
| You have moved the appliance across a threshold while it was switched on. | Make sure the microfiber brushes stay in contact with the floor. Make sure water absorption mode is switched on before you lift the appliance over a threshold, carpet or stairs to prevent water traces on the floor or to prevent water from splashing from the AquaSpin nozzle. | |
| You lifted the appliance up from the floor immediately after you switched it off. | Switch on water absorption mode is to absorb remaining water. Move the appliance forwards and backwards a few times with water absorption mode engaged before switching it off. If you switch off the appliance and lift it up immediately afterwards, the water that was present between the brushes leaves a trace of water on the floor. | |
| The wheels are blocked. Check the condition of the wheels. Remove the dirt that blocks the wheels. | ||
| The appliance does not clean as well as it used to. | The clean water tank is empty. Refill the clean water tank. | |
| The water strips are blocked. Remove the two microfiber brushes, fill the clean water tank with some water, and switch the appliance on. Make small forward and backward movements on the same position for around 15 seconds. You should be able to see four water stripes on the floor. If this is not the case, or if one or more water stripes only consist out of a few droplets, the water strips are partially or fully blocked and you can rinse them under the tap. If that does not help, you can try to carefully open the holes with a needle. | ||
| The inside of the AquaSpin nozzle is too dirty. | Run the AUTOCLEAN program before returning to cleaning. If there is dirt accumulation in the edges of the nozzle, remove it. Make sure to use the AUTOCLEAN function after each use. | |
| The microfiber Brushes are not present. | Place the microfiber brushes in the AquaSpin nozzle. | |
| If you have checked the above and the appliance still does not clean well, take it to a Philips service center or contact the Consumer Care Center. | ||
Problem Possible cause Solution
| Bigger dirt particles are not sucked up anymore and fall back on the floor. | The water channel of the wet module and/or AquaSpin nozzle is polluted or blocked. | Use the cleaning brush and clean the water channel of the main body and/or AquaSpin nozzle (see 'Removing blockages from the appliance'). |
| The floor dries with stripes. You may have used too much detergent. | Make sure to use the right amount of detergent. | |
| The wheels are dirty. Remove the dirt from the wheels. | ||
| There is too much foam while cleaning, but also during AUTOCLEAN. | You may have used too much detergent. | Make sure to use the right amount of detergent. |
| There are still detergent residues on the floor. | Clean the floor without detergent several times. Wait a moment before going over the same stain again. | |
| It is difficult to clean stains. You may have used too little water or taken too little time to clean the stain. | Apply water and wait a moment. For example you can go with the appliance over the stain to apply water and come back to the same stain in the end of the cleaning session. | |
| The sound of the appliance changed while cleaning. | There might be hairs or other obstacles entangled around the microfiber brushes | Remove the microfiber brushes and check for obstacles and remove them. |
| The display indicates that the dirty water tank is full (code: i1) and shuts down, although the dirty water tank is not full yet. | There may be foam or contamination of the dirty water tank. | Restart the appliance. If that does not solve the problem, clean the dirty water tank. If foaming is the issue, make sure you do not use more than the recommended amount of detergent. |
| Water drips out of the appliance after it is switched off. | The appliance leaves a puddle on the floor because you did not move it while switching it off. This is normal. | The appliance can leave a small puddle of water on the floor if you do not move the appliance while switching it off. You can reduce the size of the puddle by moving the appliance while switching it off. When you switch off the appliance, it will switch to water absorption mode or 4 seconds to clean up any water remaining in the nozzle. If needed, you can remove the last drops with a cloth. |
| The appliance is dripping when carrying it over the floor (holding it in the air). | While cleaning, do not lift the AquaSpin nozzle from the floor, as this leaves water traces. Only move forwards and backwards. It is also recommended to use water absorption mode when lifting the appliance over a threshold, carpet or stairs. This will prevent dirty water from dripping out of the AquaSpin nozzle. | |
Problem Possible cause Solution
| Water leaks from the clean water tank because you overfilled the clean water tank. | Do not fill the clean water tank beyond the MAX indication. If you do, water may spill from the clean water tank when you fasten the cap. | |
| There is a crack in one of the tanks. | If one of the tanks is damaged, take it to a Philips service center or contact the Consumer Care Center. | |
| I cannot remove the microfiber brushes. | Hair and/or dirt is entangled in the microfiber brushes. | Use the cleaning brush handle to remove the microfiber brushes from the AquaSpin nozzle. Remove entangled hair or dirt. If it is difficult to pull the brushes out, you can give them a push from below the AquaSpin nozzle. |
| I cannot move the appliance forward or backward. | One or more wheels may be blocked by a small object. | Switch off the appliance and remove the nozzle. Then check the small and the big wheels for blockage. Remove any object that could block the wheel(s). Put the appliance upright again and resume cleaning. |
| The appliance has a lower suction power than usual. | The water channel of the wet module and/or AquaSpin nozzle is polluted or blocked. | Use the cleaning brush and clean the water channel of the wet module and/or AquaSpin nozzle (see 'Removing blockages from the appliance'). |
| The mesh in the dirty water tank was not dry enough before being used again. | Clean and dry the dirty water tank. | |
| Hair entanglement on the microfiber brushes. | Switch the appliance off and remove the hair from the microfiber brushes. | |
| The dirty water tank is not placed correctly. | Place the dirty water tank into the appliance properly. It is closed correctly when you can hear a 'click' sound. | |
| The microfiber brushes do not turn anymore | The microfiber brushes are clogged with hair or dirt. | Clean the microfiber brushes with a pair of scissors or by hand. |
| The microfiber brushes pop out. | The microfiber brushes are not locked correctly. | Place the microfiber brushes back in the right position and lock them. |
| The appliance is not charging. | The power plug is not connected properly to the socket or the adapter is not inserted into the wall socket properly. | Make sure that the power plug is connected properly to the socket and that the adapter is inserted into the wall socket properly. |
| Wrong adapter connected. Please use the original adapter. | ||
| If you have checked the above and the appliance still does not charge, take it to a | ||
Problem Possible cause Solution
| Philips service center or contact the Consumer Care Center. | ||
| Error code 'E2' appears on the display. | The temperature is too low. Make sure the temperature in the room where the appliance is used, stored, or charged is above 5 °C. If the device is used and stored at the correct temperature and still shows the error code, please take it to a Philips service center or contact the Consumer Care Center. | |
| Error code 'E3' appears on the display. | The temperature is too high. Make sure the temperature in the room where the appliance is used, stored, or charged is below 35 °C. Do not expose the device to direct sunlight or high temperatures (near hot stoves, in microwave ovens, or on induction cookers). If the device is used and stored at the correct temperature and still shows the error code, please take it to a Philips service center or contact the Consumer Care Center. | |
Obsah
Uvod 30
Vseobecny popis 30
Prid prvnim pouzitim 30
Nabijení 32
Vysavani a vytirani tvrdych podlah 33
Spazzole in microfibrasostitutive XV1793
Kwokos ophiatoa Atia Aon
AUTOCLEAN cIeB Bcra Ka ynoTpe6a
3a da npedeotbpaTte noBaTa Ha MnpuImMn N OTlaRaHna OT KOTJHeK KaMbK, n3noJI3BaIte fynkCua AUTOCLEAN cneB BcKa ynoTpe6a. PekimbT AUTOCLEAN BN nomara da nouchTe ueypeD 3a OKOLO 4 MNHyTN.
1 NocTabete ypea B cTaHcunra Ta 3a nocneDbauo nouchTbaHe n CbXpaHHe. Ipb3HeTe ypea Bbpxu DbpxaHa Ha ypea, Taka ye KpaT Ha DbpxaHa da Bn3e Bypea.
i 3a6eIexka: IV3npa3HeTe KOHTeHepa 3a MpbCHa BOda, aKO HnBOTO Ha BOdTa e Hnd o6o3NaueHeneTo AUTOCLEAN. B npOtnBeH cnyaM moKeTe da npOnyChTe CneDbaUHTe CTbKN I da npemHete KbM CTbNka 6.
2 HaTnchHeTe 6yToHa, 3a Da OTKJIouHrTe pe3epBoapa 3a MpbCha BOda n Iro n3BaJeTe.
3 13BaTeMOKpNΦnTbPOTpe3epBOapa3aMpbcHa BOJa.
4 3neTe BOaTa OT pe3epBOapa 3a MpbCha BOa B MNBkTa.
5 NocTabete Mokpna H Ma Bpxy peepBoapa 3a Mpbcha Boja.
6 HanbHHeTe KOHTeHepa 3a YnCTa BOda, aKO HnBOTO Ha BOdaTa e NOd o6o3HaueHneTo AUTOCLEAN. B npOTuBeH cnyaam MoKeTe da npOpyCHeTe CneBaUNTe CTbKnI n Da npemHHeTe KbM CTbNka 12.

7 IocTaBeTe npa3Hnpe3epBoap 3a MpbcHa B0da Ha MЯCTO BypeDa nI3BaJeTe pe3epBoapa 3a YnCTa BOda.
8 OTBOpTe yNtBTHnTeJHaTa KaNaUka Ha KOHTeHepa 3a YnCTa BOJa.

9 HanbJIHHepe3epBOaapa 3a YnCTa BOda cbc CtUeHa HnXnaJaQaYeMHa BOda nohe do o6o3NaueHneTO AUTOCLEAN.
BnMaHHe:YeIeMHaTa Boda,KoTo ce HaIbBa B pe3epBoapa 3a HcSta Boda, He Tp6Ba Da e No-Topla ot 50^
A Bhumahne: He n3noJ3BaIe nouicTbaI npenapat 3a AUTOLEAN, Tb KATO TOBA MOKe Da IOBeIe Do IpeKOMepHo 06pa3yBaHe Ha PnHa.
10 3aTbOpTe KOHTeHepa 3a YnCTa BODa C yNtBTHnTeJIHaTa KaNaUka.
11 NocTaBeTe pe3epBoapa 3a YnCTa BOJa Ha MЯTo B ypeJa.
12 3apeTe ypeHa. TbxHeTe 3axpaHbAunia uencen B rHe3IoTo Ha TbpoHa ypeHa.CneTOBa nbxHeTe aanTepa B cTeHHn KoHTaKt.

13 3a da cTaptnpaTe uKbna AUTOCLEAN, haTncheTe 6yToHa AUTOCLEAN. Ako BnDInTe uepeH ekpaH, haTncheTe Ha-Haspei 6yToHa 3a BKJ./n3KJ.93a da aKTINBpuTe ekpaHa.
14 YpeIbTn3NbJIHbBa zKbJa 3a AUTOCLEAN.
i 3a6eIexka: LkblbT 3a Autoclean npoIbIkaBa OKOIO 4 MInHytN. 3a NoCTnIaHe Ha Hau-IO6pn pe3yIaTn OCTaBeTe ypeDa Ipa IpemHne HAnbIHO npe3 zKbna 3a AUTOCLEAN. Moxete no BcraKO BpeMe da NocTaBnte Ha Naay3a IIIN Da OTMeHnte zKbna 3a AUTOCLEAN.
3a6eJka: Ako OTMeHnTe nporpaMaTa AUTOCLEAN, ypeIbT ue n3cMyue octaHaJaTa BOda B TaBnUkata 3a noCleDbaIo nouNCTBaHe 3a OkoLo 10 CeKyHn.
15 HaTnchHeTe 6yToHa, 3a Da OTKJIIOUHTe pe3epBOapa 3a Mpbcha BODa N ro n3BaJeTe.
16 Ⅰ3BaIeTe MOKpnaФИNTbP O T pe3epBOapa 3a Мрьсна BOda.
17 I3neIte BOdaTa OT pe3epBOapa 3a MpbcHa BOda B MmBkata.
18 NouicTepe3epBoapa 3a MpbchbAo bOda noTteauaBoJa.
19 NocTeMe Mokpna fnnTbp noD Teuasa BOda.
20 OctaBeTe MOKPnHa pe3epBoapa 3a MpcbHa BOa n HerOBn eIeMeHT 3a BOeH NOTOK Da N3cbxHaT HAnbInHO, Ppei Da Tn NOCTaBtE OTHOBO Bbpxy pe3epBoapa 3a MpcbHa BOda.
21 NocTaBeTe MOKPnHa MAnTo BbPxy pe3epBoapa 3a MpbCha BOJa.

22 NocTabeTe pe3epBoapa 3a MpbCha Boda Ha MraTo B ypeJa.
23 3aBbptete MnkpoΦn6bphNte yeTkn o6paTHo Ha yacOBHkoBaTa cTeIka (1) n rN n3BaTeTe OT hakpainHa aquaSpin (2).
CbBET: Ako MnkpoΦn6bphata YeTka ce n3BaXda Tpydno, MoKeTe da N3NoJ3BaTe pbKoXbTkata Ha NouchTa BuaTa YeTka, 3a Da OTKnIOuHTe MnkpoΦn6bphata YeTka.

24 3a da Moxe MnkpoΦnbphnte YeTKn Da n3cbxHaT, NOCTaBeTe OTBopeHnTe IM KpaIua Bbpy npedHa3HaueHte 3a TOBa DbpXkaNu Ha cTaHcIra Ta 3a NocneBaIo NOuCtBaHe n CxbpAheHne.
3a6eJekka: CbxHeHTo MoKe Ja OTHeme OkoJo 24 Yaca.
- Pe3epBHN MKNpOΦn6bPn YeTKN XV1793
CmeHnTe MnkpoΦnbPHnTe YeTKn Ha BceKn 6 Meceua, 3a da ocNpynTe MaKcImaJIHa eΦeKTINBHOCT.
i 3a6eIeKka: MoKeTe da n3Xbplnte cTapnte MmKpoΦn6bprH ueTkn npn o6nKHOBeHrte 6HTOBN OTnAdbu.
Отстразнын Неницьоста
В таи глава са обобшени най-очтente побLEMN, конт може да сршнete рпи n3ползвахе на урда. Ако не може заразецпente поблесma сnomоцт ha Информацята по-doly, Вжte спсьka с чecTo 3адаВаньпр检иHa aDPEC www.philips.com/support Или ce CBbpxeTe C ueHTbpa 3a obcclужвахе Ha Notpeбшени Вьв Baшata nbpxaba.
PpO6IeM Bb3MOxHa npuHnHa PeSeHne
| Урект не павOTи, когато Натиса 6утона за ♂ Вкл./иЗкл. | Баерияа сизошena. 3a д зар每一天е 6аерияа, свьржete урEDA КьM Зардною устюстBO (ВЖ. 'Зapжданe'). | |
| He сte иЗвадини урEDA оТ станцягда за последваши почистваши и сьхраненье. | Изваде турEDA оТ салцягда за последваши почесны и сьхраненье, праздд Г ВКлиочITE. | |
| Натисам сtle 6утона за Вкл./иЗкл. @повechе от edин пьт. | Изчakайеняковко секунни и наимс悔етe OTHOBO 6утона за Вкл./иЗкл. @шe Вedньж. | |
| Урект се e 3адрьстиг. ИЗлочete урEDA. Слend ТОВа hamepete и OTСТРанete рриинatable за 3адрьстваши оТ урEDA'). После роста对接аite урEDA. Ако НЕ можete ду установITE р�чината за 3адрьстваши, роста对接аite урEDA. ТОВА ВЕЧ мосяд рени п proбLEMа. | ||
| Мikroфибьрнite чеки са Зас endaln. | Изваде турфибьрнite чеки. Слend ТОВА hamepete и OTСТРанete р�чината Зд 3адрьстваши в мikroфибьрнite чеки. Слend ТОВА поставete Мikroфибьрнite чеки OTHOBО на мястО (BЖ. 'Почистваши на Нарайнka AquaSpin'). | |
| СьвET: Ако мikroфибьрнata чека с ИЗвajda Трудно, можete ду ИЗпOLДВATE рькoxВаTkata на постваши чека, за Дд оТКлиочITE мikroфибьрнata чека. | ||
| Урект с: �пя д работи. Слухаши сtle доконал- ытуна за CBК./иЗкл. с рькатс. | Вклиочete урEDA, кATO наимс悔етe 6утона Зд CBК./иЗкл. |
Ipo6Jem Bb3MOxHa npuHa PeueHne
| Контунерът 3а мрьсанвodaMayke дe пълел.В тозиCluyчай на ekрара ce пokaцваИнфомразнона укona(BЖ.‘Иkonи на дисплену и тяхотоЗ nauseени'). | Изпраэнөгүхүл.Изклочete урда.След това hamepeteиOTстранөгүпprinчината 3a 3adрсствашиТьж.‘Премaxваши на здрьствашиOT yрда').Послpe ресартураite урда.Ако He установITE ррочинata 3a3adрсстваши,посто ресартураite урда.Tова вechеMayke дa peшinproбLEMа. | |
| Урдыт ce e 3adрьстиг.Изклочete урда.След това hamepeteиOTстранөгүпprinчината 3a 3adрсствашиТьж.‘Премaxваши на здрьствашиOT yрда').Послpe ресартураite урда.Ако He установITE ррочинata3a3adрсстваши,посто ресартураite урда.Tова вechеMayke дa peшinproбLEMа. | ||
| Подът e по-mалко мokър otobінковETO илі endaturaстара на поа понakраимиka e no-malko mokра от дугatable. | Енatable илі и дveleteOBлajхняваши лeHTN мokда ca 3adрьстиг. | Из布拉дөдөдөмikрорфырни четки,нальнete малко вoda в kontrьсярета 3aЧista вoda и Вклочete урда.Правete малки DBIxжени habрedi и habад в edи и CBша позиць в прдьлженине на okоло 15 секунд. Травьда мокete дa Вдите четирь Bodи ИВици на поа. Ако това нее Такayлли akо.edи и ллповец Вди ИВици ce CBSTОТ само OT НякOLК калки,OBлajхняваши лeHTN са чastино илпннлho 3adрьстиги мокete дa ГиИлakнete рoД teuaша Bodа. Ако това непомогне, мокete дa onitate BHNMaTeJIHOn da OTBOPITe duynkite сигла. |
| Ha поа nяма вoda. Контейнерът 3a чista вoda e npazен. | Наьлнete OTНОВ KOnteнөрета 3a Chstaboda. | |
| OBлajхняваши лeHTN са 3adрьстиг. | Из布拉дөдөдөmikрорфырни четки,нальнete малко вoda сВoda и Вклочete урда.Правete малки DBIxжени habрedi и habад в edи и CBша позиць в прдьлженине на okоло 15секунд. Травьда мокete дa Вдитe четирь Bodи ИВици на поа. Ако това нее Tакayлли akо.edи и ллповец Вди ИВици ce CBSTОТ само OT НякOLK калки,OBлajхняваши лeHTN са чastино илпннлho 3adрьстиги мокete дa ГиИлakнete рoД teuaша Bodа. Ако това непомогнe, мокete дa onitate BHNMaTeJIHOn da OTBOPITe duynkite сигла. | |
| Ако ст e пrobervилп rolpenocochotoи Всеб оше Няма вoda на поа, заhecete урда в сервизен цentьр на Philips ллпс seCBырketete сцentьра за обслухвае на клиенти. | ||
PpO6IeM Bb3MOxHa npuHnHa PeSeHne


