
Energy+ 58G098 - Electric hedge trimmer Graphite - Free user manual and instructions
Find the device manual for free Energy+ 58G098 Graphite in PDF.
| Product type | Electric hedge trimmer combined with chainsaw |
| Brand | Graphite |
| Model | Energy+ 58G098 |
| Supply voltage | 18 V DC |
| Battery type | Lithium-Ion (Li-Ion) |
| Protection class | III |
| Production year | 2021 |
| Maximum working length (chainsaw) | 250 cm |
| Maximum working length (hedge trimmer) | 260 cm |
| Cutting width (hedge trimmer) | 430 mm |
| Maximum stem cutting thickness (hedge trimmer) | 15 mm |
| Chain speed (no load) | 8 m/s |
| Guide bar length | 240 mm |
| Chain pitch | 3/8" (9.53 mm) |
| Chain oil tank capacity | 0.07 L |
| Cutting angle adjustment (hedge trimmer) | -22.5° to 90° (6 positions) |
| Weight (chainsaw) | 3.35 kg |
| Weight (hedge trimmer) | 3.2 kg |
| Sound pressure level (saw) | 79.5 dB(A) |
| Sound power level (saw) | 95.2 dB(A) |
| Sound pressure level (hedge trimmer) | 77.8 dB(A) |
| Sound power level (hedge trimmer) | 91.3 dB(A) |
| Package content | Chainsaw head, hedge trimmer head, telescopic pole, saw chain, shoulder strap, user manual, warranty card |
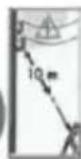
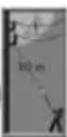
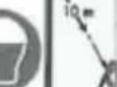
| Safety | Rain protection, hearing protection, safety glasses, non-slip shoes, gloves, protective clothing, helmet, minimum distance of 10 m from power lines |
| Maintenance | Regular lubrication, cleaning after use, chain sharpening, cleaning the guide and oil tank |
| Repairability | Repair by authorized service |
Frequently Asked Questions - Energy+ 58G098 Graphite
User questions about Energy+ 58G098 Graphite
0 question about this device. Answer the ones you know or ask your own.
Ask a new question about this device
Download the instructions for your Electric hedge trimmer in PDF format for free! Find your manual Energy+ 58G098 - Graphite and take your electronic device back in hand. On this page are published all the documents necessary for the use of your device. Energy+ 58G098 by Graphite.
USER MANUAL Energy+ 58G098 Graphite
THIS MANUAL AND KEEP THIS MANUAL FOR FURTHER REFERENCE.
SPECIFIC SAFETY RULES FOR BOOM SAWS
- Use the power tool only for its intended purpose.
- It is forbidden to work with a power tool under the influence of alcohol or other intoxicants, or when you are clearly tired or weak.
- Do not work in rain or in unfavorable weather conditions.
- When working, use the supplied shoulder strap.
- It is forbidden to use the boom with other cutting heads than the ones included in the set.
- When working with the chainsaw, pay particular attention to the surroundings - keep the saw head away from people and animals.
- Do not operate the tool near electric wires - cutting through it may result in electric shock!
- During work, the surroundings should provide an escape route for the operator in the event of a dangerous fall of the cut branch.
- During work, keep a stable position on a solid, flat and firm surface.
- Use personal protective equipment - eye protection, hearing protection, headgear, working clothes. Avoid loose clothing that can get caught in the saw mechanism. Use footwear to protect against slipping.
- When cutting larger branches, cut them in fragments - from the end of the branch to the trunk.
- Thicker branches should be cut from the bottom, then cut from the top. Attempting to cut a thick branch completely from below may cause the branches to pinch on the guide bar and jam the saw. Cutting a branch completely from the top will break the branch.
- Before each use, the technical condition of the tool and its consumables should be checked.
- Make sure the device is properly lubricated - regularly check the oil level in the tank and the patency of the lubrication system.
- Do not immerse the device in water or wash it under running water.
- Regularly check the degree of wear of the saw chain - the chain should be regularly sharpened, and if the degree of wear prevents further sharpening - replace it.
-
All maintenance should be performed with the device turned off with the battery removed.
-
Do not use the tool in the event of any damage or malfunction.
- In the event of alarming symptoms indicating improper operation of the device, immediately turn off and inspect the tool.
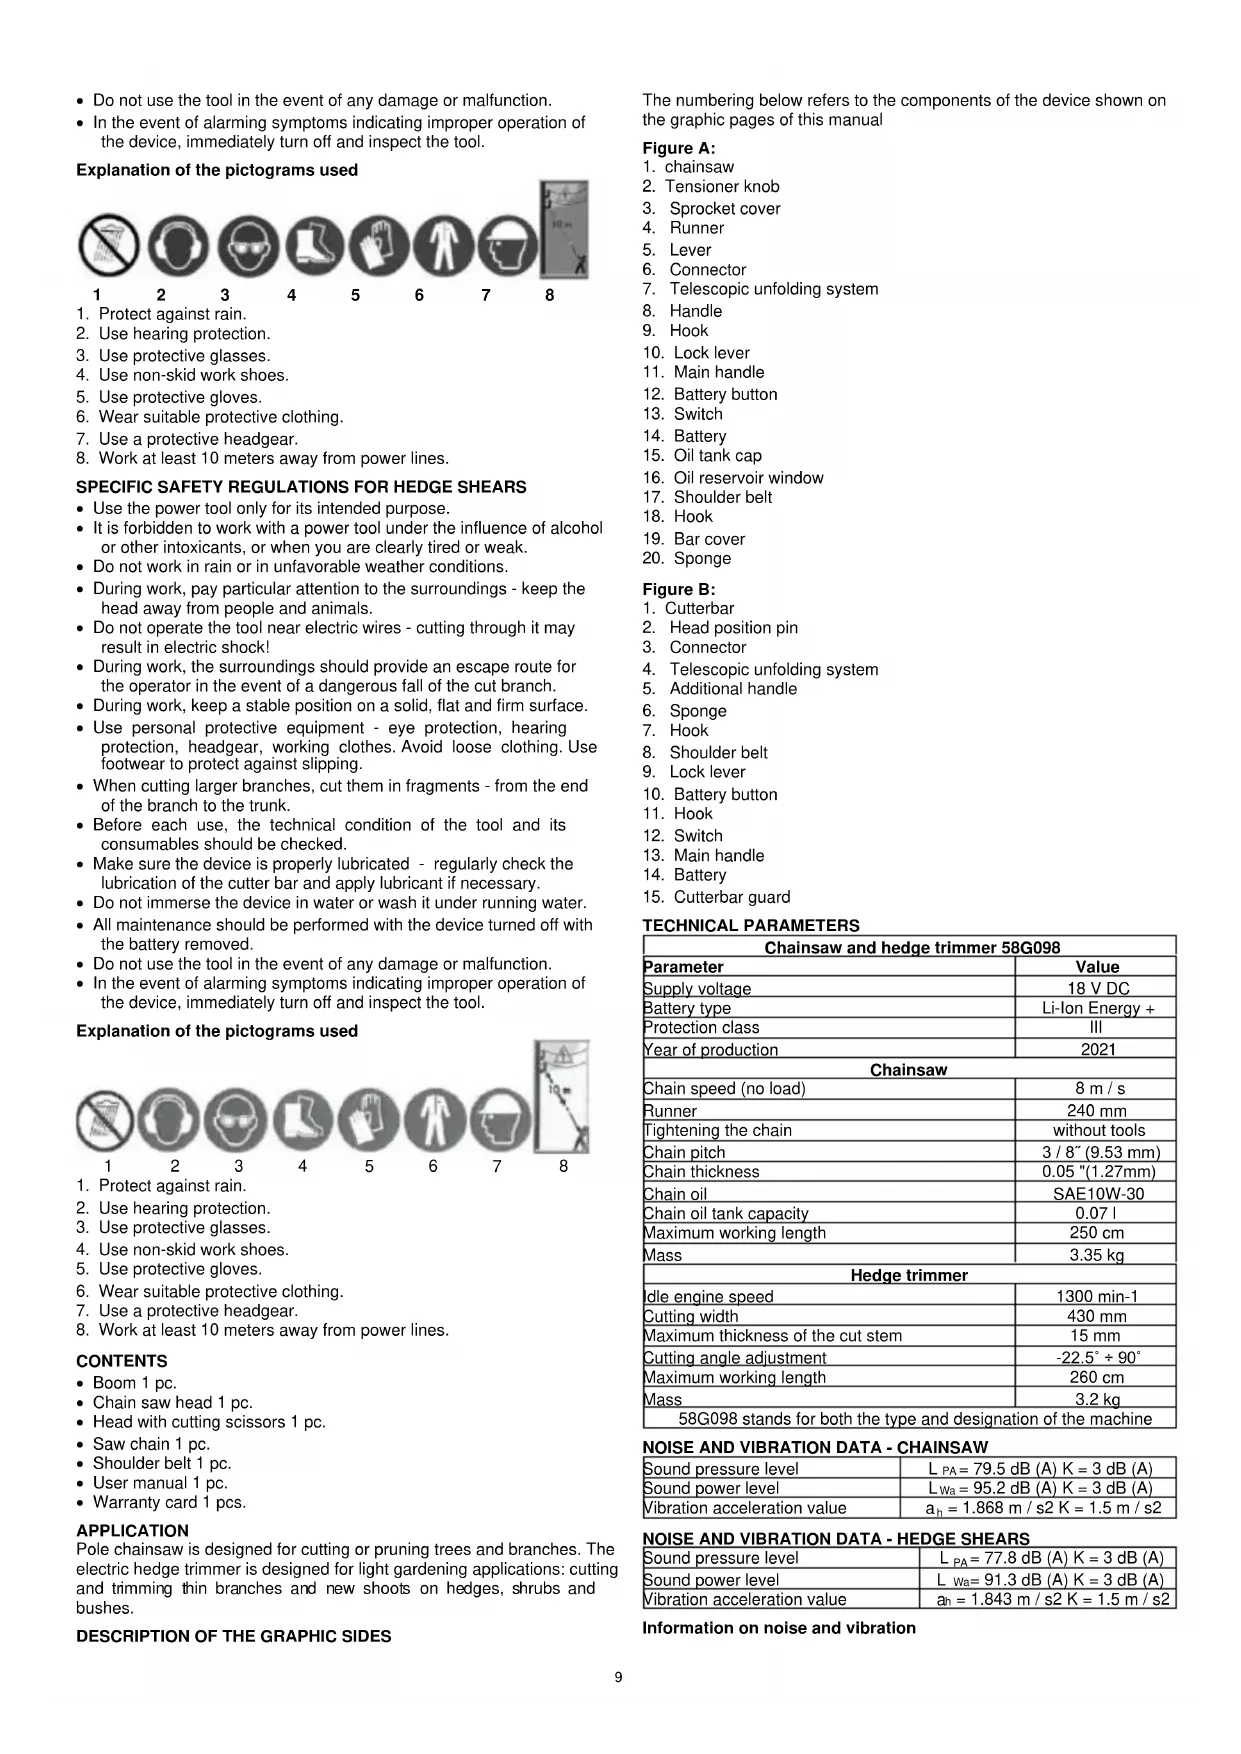
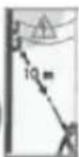
Explanation of the pictograms used

1

2


- Protect against rain.
- Use hearing protection.
- Use protective glasses.
- Use non-skid work shoes.
- Use protective gloves.
- Wear suitable protective clothing.
- Use a protective headgear.
- Work at least 10 meters away from power lines.
SPECIFIC SAFETY REGULATIONS FOR HEDGE SHEARS
- Use the power tool only for its intended purpose.
- It is forbidden to work with a power tool under the influence of alcohol or other intoxicants, or when you are clearly tired or weak.
- Do not work in rain or in unfavorable weather conditions.
- During work, pay particular attention to the surroundings - keep the head away from people and animals.
- Do not operate the tool near electric wires - cutting through it may result in electric shock!
- During work, the surroundings should provide an escape route for the operator in the event of a dangerous fall of the cut branch.
- During work, keep a stable position on a solid, flat and firm surface.
- Use personal protective equipment - eye protection, hearing protection, headgear, working clothes. Avoid loose clothing. Use footwear to protect against slipping.
- When cutting larger branches, cut them in fragments - from the end of the branch to the trunk.
- Before each use, the technical condition of the tool and its consumables should be checked.
- Make sure the device is properly lubricated - regularly check the lubrication of the cutter bar and apply lubricant if necessary.
- Do not immerse the device in water or wash it under running water.
- All maintenance should be performed with the device turned off with the battery removed.
- Do not use the tool in the event of any damage or malfunction.
- In the event of alarming symptoms indicating improper operation of the device, immediately turn off and inspect the tool.
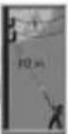
Explanation of the pictograms used


3


5


6
8
- Protect against rain.
- Use hearing protection.
- Use protective glasses.
- Use non-skid work shoes.
- Use protective gloves.
- Wear suitable protective clothing.
- Use a protective headgear.
- Work at least 10 meters away from power lines.
CONTENTS
Boom 1 pc.
- Chain saw head 1 pc.
- Head with cutting scissors 1 pc.
- Saw chain 1 pc.
Shoulder belt 1 pc.
- User manual 1 pc.
Warranty card 1 pcs.
APPLICATION
Pole chainsaw is designed for cutting or pruning trees and branches. The electric hedge trimmer is designed for light gardening applications: cutting and trimming thin branches and new shoots on hedges, shrubs and bushes.
DESCRIPTION OF THE GRAPHIC SIDES
The numbering below refers to the components of the device shown on the graphic pages of this manual
Figure A:
-
Telescopic unfolding system
-
chainsaw
- Tensioner knob
- Sprocket cover
- Runner
- Lever
- Connector
- Handle
- Hook
- Lock lever
- Main handle
- Battery button
- Switch
- Battery
- Oil tank cap
- Oil reservoir window
- Shoulder belt
- Hook
- Bar cover
- Sponge
Figure B:
- Cutterbar
- Head position pin
- Connector
- Telescopic unfolding system
- Additional handle
- Sponge
- Hook
- Shoulder belt
- Lock lever
- Battery button
- Hook
- Switch
- Main handle
- Battery
- Cutterbar guard
TECHNICAL PARAMETERS
| Chainsaw and hedge trimmer 58G098 | |
| Parameter | Value |
| Supply voltage | 18 V DC |
| Battery type | Li-Ion Energy + |
| Protection class | III |
| Year of production | 2021 |
| Chainsaw | |
| Chain speed (no load) | 8 m / s |
| Runner | 240 mm |
| Tightening the chain | without tools |
| Chain pitch | 3 / 8" (9.53 mm) |
| Chain thickness | 0.05" (1.27mm) |
| Chain oil | SAE10W-30 |
| Chain oil tank capacity | 0.07 l |
| Maximum working length | 250 cm |
| Mass | 3.35 kg |
| Hedge trimmer | |
| Idle engine speed | 1300 min-1 |
| Cutting width | 430 mm |
| Maximum thickness of the cut stem | 15 mm |
| Cutting angle adjustment | -22.5° ÷ 90° |
| Maximum working length | 260 cm |
| Mass | 3.2 kg |
| 58G098 stands for both the type and designation of the machine | |
NOISE AND VIBRATION DATA - CHAINSAW
| Sound pressure level | L PA = 79.5 dB (A) K = 3 dB (A) |
| Sound power level | LWa = 95.2 dB (A) K = 3 dB (A) |
| Vibration acceleration value | ah = 1.868 m / s2 K = 1.5 m / s2 |
NOISE AND VIBRATION DATA - HEDGE SHEARS
| Sound pressure level | L PA= 77.8 dB (A) K = 3 dB (A) |
| Sound power level | L Wa= 91.3 dB (A) K = 3 dB (A) |
| Vibration acceleration value | an = 1.843 m / s2 K = 1.5 m / s2 |
Information on noise and vibration
The level of noise emitted by the device is described by: the level of the emitted sound pressure Lpa and the sound power level LwA (where K is the measurement uncertainty). The vibrations emitted by the device are described by the value of the vibration acceleration a h(where K is the measurement uncertainty).
The following information: emitted sound pressure level Lp A, sound power level Lw A and vibration acceleration a h were measured in accordance with EN 60745-1. The given vibration level can be used for the comparison of devices and for the initial assessment of vibration exposure.
The stated vibration level is representative only for the basic use of the device. If the machine is used for different applications or with different working tools, the vibration level may change. The higher level of vibrations will be influenced by insufficient or too rare maintenance of the device. The reasons given above may result in an increased exposure to vibration during the entire period of operation.
To accurately estimate exposure to vibration, consider periods when the equipment is turned off or when it is turned on but not in use. After all factors have been carefully assessed, the overall vibration exposure may be significantly lower.
In order to protect the user against the effects of vibrations, additional safety measures should be implemented, such as: periodic maintenance of the device and working tools, protection of the appropriate temperature of hands and proper organization of work.
PREPARATION TO WORK
Note: The following instructions are valid for both pole saw and electric shears.
BATTERY INSTALLATION
The battery is installed by placing it on the slats in the socket (sliding it over). To remove the battery from the socket, you need to press the lock button on the battery (Fig. C).
HEIGHT ADJUSTMENT
The tool is equipped with a telescopic unfolding system. Loosen the knob by turning it clockwise. Pull the tube apart to the required length, then tighten the knob by turning it to the left (fig. D, E, F).
MOUNTING THE TOOL ON THE BOOM
Match both items. Push all the way in until the plug fits into the socket. Tighten the nut by turning counterclockwise. The separation of the tool from the boom is carried out in the reverse order of the same steps.
SHOULDER BELT
Note: Before starting work, always make sure that the shoulder belt is correctly fastened and the device is correctly attached to it. Use only a belt designed for work with these devices.
- Fasten the seat belt (fig. G)
- Attach the hook to the hook on the jib (fig. H).
- Place the strap over your shoulder (fig. 1).
TURNING ON THE MACHINE
The switch is equipped with a lock button that protects against inadvertent activation of the device. Press the lock button, then the power switch to start the machine. Release pressure on the switch to turn off the device.
Note: A device with a damaged locking mechanism should not be used. Before inserting the battery, press the on / off switch and make sure it returns to its original position when the pressure is released.
Note: The device is equipped with a braking system. When the pressure is released, the machine should come to a complete stop within 1 second. Otherwise, the device will not function properly and should not be used.
OPERATING MANUAL - CHAIN SAW
Note: The following instructions are for the pole saw included in the package.
CHAIN ASSEMBLY AND DISASSEMBLY
Note: Make sure the unit is turned off and the battery is removed before installing any item.
The chain is removed from the saw as follows:
- Lift the hood locking knob lever (Fig. J).
- Turn the lever counterclockwise until the rack cover opens (fig. K).
- Remove the rack cover. Remove the bar and chain (fig. L)
The chain is assembled according to the following steps:
Make sure the chain is facing the correct direction (fig. M)
- Position the chain by adjusting it to the guide bar and setting it over the sprocket at the same time (fig. N).
- Put the guide in its place.
- Place the rack cover in such a way that both fasteners are in their respective slots (fastener 1 through hole 2, clip 3 through hole 4) (fig. O).
- Press against the rack cover while gently moving the guide bar forwards or backwards until it locks by clicking (fig. P).
- Turn tensioner knob clockwise and check chain tension. The chain pulled away from the guide bar with a force of about 1kg should stand 5 - 7 mm (fig. Q, R).
- Turn the cover locking knob lever clockwise until the rack cover is locked (Fig. S). Close the lever.
CHAIN TENSION ADJUSTMENT
It may happen that the chain becomes loose after some time of operation. In this case, adjust the tension according to the following steps:
- Open the gear cover lock lever and twist it counterclockwise to slightly loosen the cover (fig. T).
- Turn the tensioner knob clockwise to tighten the chain against the guide bar (fig. U).
While gently supporting the guide, turn the cover lock lever back to lock it (fig. W). Close the lever.
LUBRICATION
The saw is lubricated automatically during operation. The device requires the oil level to be checked periodically and topped up if necessary. The oil level can be checked through the viewing window. The correct amount of oil in a chainsaw is 70ml . To refill the oil, lift the lever on the plug and unscrew it by turning it to the left. Add oil until the oil level reaches the bottom edge of the thread. Screw the cap tightly. After refilling the oil, before starting work, start the saw and wait until the device is lubricated (fig. X, Y).
CUTTING
Note: keep parts of your body away from the saw while working. Keeping a stable footing, hold the tool firmly with both hands. When cutting branches, the operator must always have a retraction path in the event that branches fall towards him. Do not cut with the tip of the guide bar - it may cause kickback.
When standing on a stable surface, set yourself up in such a position that the angle between the ground and the boom will not exceed 60^ when cutting. Do not press down on the branch with great force. When cutting large branches, cut them from the tip in fragments. Be especially careful and watch out for falling fragments of branches.
When cutting thick branches, first make a shallow cut from the bottom, then cut the branch from the top. Cutting thick branches all the way from below may pinch them in the guide bar and jam the saw. Cutting the whole piece from above may break the branches (fig. Z).
TRANSPORTING THE TOOL
When carrying the tool, remove the battery and put on the bar cover (fig. A1).
CHAIN SHARPENING
Note: Make sure the saw is turned off and the battery is removed from the machine.
If the following symptoms are present, the chain should be sharpened:
The shavings have a "mushy" structure.
- The chain cuts through the wood with difficulty.
- The cutting edge is visibly damaged.
- Saw pulls left or right (caused by uneven sharpening or damage to one side only).
Frequent but gentle chain sharpening is most effective. Then 2 - 3 thrusts with the file will be sufficient for each cutting edge. The construction of the saw chain is shown in fig . B1 .
Note: Too much distance between the blade and the depth gauge on the cutter link increases the risk of kickback.
Keep in mind the following rules:
-
The length of all blades should be the same - this reduces the risk of kickback and ensures smooth operation.
-
Do not sharpen the chain when the blade length is 3mm or less - the chain must be replaced with a new one.
-
The thickness of the chip depends on the distance between the cutting edge and the depth stop.
-
The optimal distance between the blade and the depth gauge for the 90PX and 91PX chains is 0.65 mm .
-
All blades should be sharpened at an angle of 30^ . Different angles accelerate wear, make the work less smooth, increase the risk of chain breakage.
-
Use files designed for sharpening saw chains.
-
Optimal file diameter for each type of blade: -90PX: 4.5mm (3/16") -91PX: 4.0mm (5/32")
- When sharpening, push the file away from you - do not sharpen in both directions.
- The shortest blade should be sharpened first. Then sharpen the others so that the blade length is equal.
- The method of file handling is shown in Figures C1, D1.
CLEANING THE GUIDE BAR
Chips and dust collect in the guide bar, impeding the free movement of the chain and negatively affecting lubrication. Clean it periodically when sharpening or replacing the chain with a thin tool (fig. E1).
CLEANING THE GEAR COVER
Chips, dust and other contaminants can accumulate under the rack and pinion cover and adversely affect the operation of the unit. It should be cleaned periodically (fig. F1).
CLEANING THE OIL DRAIN HOLE
The oil drain hole can become contaminated, preventing the oil from distributing properly on the chain and bar. This will negatively affect the operation of the device. The drain hole should be periodically cleaned according to the following instructions:
- Remove the sprocket cover and chain.
- Remove the debris with a thin screwdriver or similar tool.
- Install the battery and start the device using the switch. The oil will flow, removing any remaining impurities.
- Remove the battery. Refit the chain and close the sprocket cover (fig. G1).
CHANGING THE SPROCKET
A damaged or worn sprocket will damage the chain. Therefore, always check the condition of the sprocket before replacing the chain (fig. H1). If the rack is worn, replace it with a new one together with the circlip (fig. I1).
STORAGE
Before storing the device for an extended period of time, please follow the instructions below:
- Clean the device in accordance with the points above.
- Remove the head.
After cleaning the device, lubricate it by running it without load. - Put on the guide bar cover.
- Drain the oil reservoir.
PERIODIC MAINTENANCE
The table below shows the maintenance activities and the recommended period of time to perform them.
| Element / function | When / what how many? | |
| Chainsaw | Control | Before use |
| Cleaning | After use | |
| Inspection at an authorized service point | Every year / before storage | |
| Saw chain | Control | Before use |
| Sharpening | Before storage / in case of emergency | |
| Runner | Control | Before / after use |
| Disassembly | Before storing | |
| Lubrication | Lubrication system check | Before use |
| Switch | Control | Before use |
| Switch lock | Control | Before use |
| Oil plug | Checking tightness | Before use |
| Nuts and bolts | Control | Weekly |
TROUBLESHOOTING
| Problem | Possible cause | Proposed solution |
| The saw does not start. | Incorrect battery installation. | Install the battery according to the instructions. |
| Battery problem (low voltage). | Charge the battery and replace there are further problems. | |
| Block. | Press the unlock button | |
| The saw switches itself off after a short time. | Low battery. | Charge the battery and replace there are further problems. |
| Chain not lubricated. | Empty oil reservoir. | Top up the oil. |
| Dirty guide. | Clean. | |
| Lubrication system obstruction | Clean. | |
| The saw does not reach its maximum speed. | Incorrect battery installation. | Install the battery according to the instructions. |
| Low battery. | Charge the battery and replace there are further problems. | |
| Defective drive. | Repair at an authorized service point. | |
| Vibrations too strong (switch off immediately!) | Loose chain or guide bar. | Adjust the position of the guide and the tension. |
| Device damage. | Repair at an authorized service point. |
Note: The following instructions are valid for the included hedge trimmer.
ADJUSTING THE POSITION OF THE SCISSORS
Press the head position button and turn it to the required angle. Release the pressure on the button to lock the position. The angle can be adjusted from -22.5^ to 90^ in 6 positions (flq.J1,K1).
Note: After adjusting the angle, make sure that the head is in one of the 6 possible positions (clicking sound).
TRANSPORTING THE TOOL
When carrying the tool, remove the battery and put the scissors cover on. To remove the cover, gently squeeze it then pull (fig. L1).
PRUNING
While standing on a solid surface and assuming a stable position, set yourself up so that the angle between the boom and the ground during work does not exceed 60^ . While working, gently press the cut twigs. Thicker branches should be cut in fragments
CLEANING THE CUTTER BAR
The cutting bar should be cleaned with a dry or damp, soapy and squeezed cloth. After work, clean the strip from dust with a brush and lubricate it (fig. M1).
Note: do not use gasoline, alcohol or other chemicals for cleaning. It may damage the device. Do not wash the skirting board under running water or immerse it in water, as it may cause corrosion.
LUBRICATION
Before work or every hour during work, apply a low-density grease, eg in a spray, to the cutterbar (fig. N1).
STORAGE
Before storing the device for an extended period of time, please follow the instructions below:
- Clean the device in accordance with the points above.
- Remove the head.
- Put the cutterbar cover on.
- Store the tool out of the reach of children, in a dry place and not exposed to rain.
TROUBLESHOOTING
| Problem | Possible cause | Proposed solution |
| The engine is not running. | Battery not in place. | Install the battery according to the instructions. |
| Battery voltage too low. | Charge the battery and replace if there are further problems. | |
| Defective drive. | Repair at an authorized service point. | |
| The cutters switch of after a short time. | Battery voltage too low. | Charge the battery and replace if there are further problems. |
| Overheating. | Stop the machine and let it cool down. | |
| Drive does not reach maximum speed | Battery not installed properly. | Install the battery according to the instructions. |
| Battery voltage too low. | Charge the battery and replace if there are further problems. | |
| Defective drive. | Repair at an authorized service point. | |
| Blades do not move (turn off immediately!) | Wrong blade angle. | Make sure the head is properly install |
| Foreign bodies between the blades. | Turn off the device. Use pliers to remove debris. | |
| Defective drive. | Repair at an authorized service point. | |
| Vibrations too strong (switch off immediately!) | Blades damaged, bent or worn. | Replace the blades. |
| Defective drive. | Repair at an authorized service point. | |
| Motor and blades do not stop (remove battery immediately!) | Electricity failure. | Remove the battery. Repair at an authorized service point. |
ENVIRONMENTAL PROTECTION
Electrically powered products should not be disposed of with household waste, but should be disposed of in appropriate facilities. Information on disposal is provided by the dealer of the product or local authorities. Waste electrical and electronic equipment contains substances that are not neutral for the natural environment. Non-recycled equipment is a potential threat to the environment and human health..
"Grupa Topex Spólka z ograniczona odpwiedzialnoscia" Spólka komandytowa with its registered office in Warsaw, ul. Pograniczná 2/4 (hereinafter: "Grupa Topex") informs that all copyrights to the content of this manual (hereinafter: the "Manual"), including its text, photos, diagrams, drawings, and its compositions belong exclusively to the Topex Group and are subject to legal protection in accordance with the Act of February 4, 1994, on copyright and related rights (i.e. Journal of Laws of 2006 No. 90 Item 631, as amended). Copying, processing, publishing, modifying for commercial purposes the entire Manual and its individual elements, without the consent of Grupa Topex expressed in writing, is strictly prohibited and may result in civil and criminal liability.
DE
TEXHUNECKNEXAPAKTEPNCNIK
DAHHbIE, KACAIOUINECR WYMA N BIBPAUN - CEINHAR INIJA
DAHHbIE, KACAOUNECRA UyMA N BnBpALUNN - KYCTOPE3
CHCTKA HANPABJIIOUeI UINHbI
Ha HanpaBnIoue ounHe coBnPaetcTc TpyKKa n bIb, npenrTcByra Cbo6oHOMy DnXKeHHU cENn IN OTpNcaTeJbHO BnIa HA Cma3ky. PepnoDnueckn OuyuaiTe ee TOHKM INHCTpyMeHTOM pN 3aTOyKe nn 3ame He cenn (Pnc.E1).
UHCTKA KpbIiK3B3DOUKN
Ctpykkna, nIbIb I npyrme 3arp3HeHn Moryr HakaanNBaTc noKpbIikO 3Be3DoUKN OptuataeNb HO BnAraTb Ha pa6oTy ycToiCTBa. Ee cJeNyET nepNoDnueckn YnCTntb (pnc.F1).
OCHCTKA OTBEPCTNДЛ NODAH MACJA
OTBepCTne DnI NaNoaMocna MoKet 6bIt 3aRpa3HeHo, YTo npBedeT K He npabNtHomy pacnpdeJeHIO Macna No cenn N uHHe. 3To HeratNBHO cKaKeTcHa paOte yCtpoJCTBa. OTBepCTne DnI NaNoaMocNa Heo6xOIMNO nepnoNDueckn UCTNTb CNeDyUOM mOBpa30m:
CHIMITE KpbIkwky 3BcdoQKn uenb.
- YdaJIaNTe MycOp C NMOUTo TOHKoI OTBepTKn IIN aHaJIIOuHOrO HCTpyMeHTa.
- YcTaHOBnTe aKKyMyJrTOp n BkJIIOHnTe yCtPoINCTBO C NOMOuBbO BbIKIooYaTeJ. MacNo noteUeT, ydaJra BCE OCTabWneCer 3aqr3HeHH.
- N3BJIeKNTe aKKyMyJrTOp. YcTaHOBnTe cIeNb n 3aKpOITe KpbHJKy 3Be3doUKn (pnc. G1).
3AMEHA 3BE3DOUKN
NobpeJHnHa Hn H3HOeHHa 3B3DoYKa MoKeT nobpeINb cIeB.
NoTOMy BcERda npOBepRte coCToRHe 3Be3DoYKn nepeD 3AmHoJ
CEN (pnc.H1).
EcIN 3BcE3IOUka IN3HOUeHa, 3aMeHHTe ee HOBO BmecTe CO CTOnOpHBIM KOJIbLcOM (pnc.11).
XPAHEHNE
Ipeep xd xpaHHeHem yctpoiCTBa B TeueHne IINTeNbHoro BpeMeHn CJeDyIe TnpBHeDEHHbIM HKe IHCTpyKlunM:
BbINOHNHe YcTky ycTpoiCtBA B COOTBeTCTBn C npuBeJeHHbIMN BblIe NyHKTAMN.
CHIMMTE roJIOBky.
- Pocne uCCTK yCtpoiCTBa cMaXbTe erO, 3aNyCTNB 6e3 Harpy3Kn.
HaedeHbTe KpbIuKy Ha HappabJIOUyIO UHy.
- Onopoxhnte MacnaHoi 6aK:
NEPHNOIDNUECKOE TEXOBCJLYKUBAHNE
B Ta6nue Hnke npeDCTaBneHb IeNCTBnA NO TexHnueckomy
6cbnykubahnIO npekOMeHdyemar nepnoNDUHOCTb dNx BblNOJIHeHNA.
PYKOBOCTBO NO 3KCIYYATAUIN - KYCTOPE3
BHMMaHHe: CnEduOuIe HNCTpyKcnn IpeHa3NaueHbI DnR BXoJaero B KOMIIKeT KcyTope3a.
PERYINPOBKA NOJIOXEHNHOXHNU
Haxmte KhoNky no3nIOHOPOBaHna roOBKn n nobepHnte ee Ha Tpe6yembl yroI. OTnyCTne KhoNky, YTO6bl 3aФNKcnpoBaTb noOKeHne. Yrpon perynpyETcra ot-22,5°do 90° B 6 noOKeHHx (PNC.J1,K1). BHIMAHNE: Pocne perynpoBkn yrrna y6eintecb, TTO rnoOBk haoDNTcB B ODHOM 36 BO3MOXhBX INOJKeHH (3ByK UeJIYka).
NEPEHOCKA NHCTPYMEHTA
Pn nepeHocke HNCTpyMeHTa N3BNEKNTe aKKMyJrTOp N HaDeHbTe KpbIky Ha HOKNHcbl. YTo6bl CHrTb YEXoI, OCTOpOxHO erO COXMITE, a 3aTEM NOTAHTE (pnc.L1).
05PE3KA
CTOHa TBepDoI NOBepxHocTn I npHIMaJ yCtOuNBOe NIOXKeHne, 3aMmTe TaKyIO No3nUHO, YTO6bI BO BpeMpa6oTbI yrOJ Mekdy uTaHroI n 3emJe He npEblan 60^ .Bo BPempa6oTbI aKKypaTHo HAKIMaTe Ha cpe3aEmble BetoQKn. Boee ToIcTbe BcTK CneDyET pa3pe3aTb Ha parmENTbl.
CHCTKA JIe3BnA
Jne3Bne cneyet qnCTntb cyxO nn BnaXHO, MbIbHO n BbKaToN TkaHIO. NocJe pa6oTbI OuncTe Jne3Bne OT nbIn 1eTKO n CmaKbTe erO (pnc.M1).
BHMMaHHe He NcNoB3yIe TIIa YNCTKb 6EH3IN, CnIPT NIM DpyTne XMHueckne BeIecTBa. 3To MoKeT NOBpeNTb yCtpoIcTBO. He MoTe JIe3BVe NOD IPOTOHNO BDOIO H He IORpyKaIte B BODY, TAK KAK 3To MOKeT BbI3BaTb KoppO3HIO.
CMA3KA
Ppepa6oTo nnKakdbyac Bo Bpemra6oTbHaHocnte Ha ne3BnCma3ky Hn3kOIIIOTHOCHT, HApIMep, B BuDe cIpea (puc.N1).
XPAHEHNE
Ipeep xpaHennem yctpoiCTBa B TeueHne dInTeNbHO BpEmHn cJeNyTe npBeDeHHbIM Hxke NHCTpyKUaM:
BbINHHTe YCTKcY yCTpOietCTBa B COOTBeTCTBn C npNBedeHHbIMN BBIe NHyKTAMN.
CHIMMITE roJIOBky.
Haenebte Ha ne3Bne yexon.
XpaHnTe INCTpyMeHT B HeIOcTyHOM DnIaTeN, CyXOM 3aUuSeHHOM OT DOxJa MecTe.
PEUHEHNE IPOBJIEM
POncHeHH BnKOpncTaHnx nIKTOrpam
- 3axnauTe BID douY.
- BnKopncToBnyTe 3ac6o3axNCTy opraHb cnyx.
- BukopncToByuTe 3axChi okyIpyn.
- BnKOpncTOByTe HeKOB3Ke po6Oye B3yTTT.
- BnKOpncToBvIe 3axuChi pyKaBnUKN.
- OjaarTe BiDnOBiHm 3axnCHn OJAR
- BnKOpncToBnyTe 3axnChn rnoBHN y6ip.
- Працют e Na BiДсан i He MeHsE 10 MTePiB BiД JIHi eNeKTponepea.
KOMNJIeKT
Ctpina 1 wT.
- TOnOBKa 3 JAnHIOROBOIO NnIKOHO 1 uT.
- FONOBka 3 HOXNUJAMN 1 wT.
- Pijkyu nnHcIor 1 wT.
-Плесовп ремь 1ш.
- IHCtpykui3 ekcnnyatauii 1 wT.
- RapaHTiHnTaHOH 1 uT.
3ACTOCYBAHH
JaHcIorOba 6eH3oINa npn3HaYeHa dnn p3aHH a6o o6p3Kn depeB i rIOK. EneKtpuHn TpIMep dnn XNBONNoTy npn3HaYeHN dnn nERkoro caDIBHNTBa: o6p3aHH ToHKnx rIOK i HOBNx narOHb Ha XNBONNoTAX, KUax.
ONIC INIOCTPAUIN
PnBedeHa HxKHe Hymepaui CTocyeTbcra eIeMeHtIB npntpoIO, 3o6paKeHH Ha iInOCTpaicixdo uei
MaJIHOK A:
- LaHucorOba NnIka
- Pучka натужтени
- Kpnska 3ipoykn
- HanpymHa WnHa
- Baxinb
6.3'edhyBaay - TepeckoniHa cncTeMa po3KnaaHn
- RykoTka
- RaOK
10.Baxjib6nokybaHHa
11.OchOBHa pyyka - Khoika akymyIraTopa
- Bmkaay
14.AkymyTJTOP - PpO6ka OINBHOro 6aka
- BikoHue OINBHoro 6aka
17.Плесовп ремь
18.Гачok
19.3axnchKoKyxHaPmHOIuHH
20.у6ka
MaJIIOHOK B:
- Pikyuhe noonTHO
- WtntoNOJIOXeHHrTOJIOBKn
- 3'eDhyBa
- TeLeckoniHa cInTeMa po3KnaDaHHa
5.ДодаТКова ручka - TybKa
- TaOK
8.Плевовпемь - Baskinb6nokyBaHHa
- KhoIIka akymyIJITopa
- Tayok
- Bmkaay
13.OchOBHa pyka - AkymyraTop
15.3acnoHa pikyoro nooTHa
DAHI 0O O O W U M Y T A B I B P A U C I - JAHUIOROBA NNIKA
DAHI ODO WUMY TA BIBPAU - HOXNUI JINKBOJNOTY
| PíbeH 3bYkoBOrO TnCKy | LPA=77,8 έБ(A) K=3 έБ(A) |
| PíbeH 3bYkoBÖI ΑnotyXhOCTi | LwA=91,3 έБ(A) K=3 έБ(A) |
| 3haueHHeH pπικopeHHe BībpaúIi | aH=1,843 M/c2 K=1,5 M/c2 |
Inhopmaia npo wym Ta Bi6paio
PibHb ymy, knn reHepy npcTpi, onncyctbc: pIBHE 3ByKOBOTNCKy Lpa Ta pIBHE 3ByKOBoI notyXHOCTi LwA (de K - HeBn3HaehicTBBMIPBOAHH). Bi6paJia, lo CTbOPHeCTbc npCtpoE, onncyctbc npICKopeHHM Bi6paui i (de K - HeBn3HaehicTB BMIPBOAHH). PpIBeHi y daHin IHcTykui piBeHb 3ByKOBO Tncky LpA, pIBeHb 3ByKOBoI notyXHOCTi Lw Ta npCkopeHHa Bi6paui a BmIPBOaINCb 3riHo 3i cTaNdApTom EN 60745-1. Bka3aHn pIBeH b Bi6paui an MoKe BnKOpNCbTOyBaTHCA JnnpBHHH npCtpoB ta dna nonpehNbO uINKn BnNHy Bi6paui.
PnBBeHn pIeHb BiBaui c penpe3eHTaNBHM nIwe dIy OCHOBHX 3actocyBaHb npictpo. Raio npictpi 6yde BIKOPNCOTByBaTcNd IHHXu liEn a6o 3 IHUNMPO6OUMN IHCTpyMeNTAM, pIBeh BiBaui Moke 3MIHTnc. Ha 3biNbWeHH PIBH BApaui BnINBaTmHe Heoctathe abo 3aHaTTO piKe texHne 0cbnyrobyBaHH npictpo. Bka3ahi Bnue npnHN MOnkytb CnpNHNITn 3biNbWeHH BiPaui niJ cac ycbo rneipody ecknnyataui.
IraJIbHn BnNbB Biopaui NoTpi6Ho BpaXOByBaTN neipOu, KOJI npncTIPI BmKHeHO, a6o KOJI Bin yBIMKHeHH, ane He BnKOpNCToByc. Picna peTeJIbHOUI OciHKn BCIX HHHKIB 3araJIbHn BnJIb Biopaui MoKe 6yTu 3HaUHO HnKHM.
Ia 3axncty KopnctyBaay BID BnNBy Biopaui CnD BnKOpNCTOBvBaTn DoatKOBI 3axoyn6e3neKn, Taki JK: pernyaphe TexniHc O6cnYROBYBaHH npntpoio Ta po6oynix iHCTpyMeHTiB, 3a6e3neueHH HAnEHHoI Tempepatypk Ta npabunbHa opraHiaucipoBoTI.
IITROBKA DO POBOTN
Ybara: Habeenei HnXy e iHCTpyKcI CTocyHbCra NK NJIKN, TaK i eneKtpuHnx HOKnCb.
BCTAHOBJIENHRAKUMYJRTOPA
AkymynTOp BCTaHOBIOeTbCSIINXOM po3MIeHHNHO HA NnHaHKax y rHI3di (HacyBaHH).IIO6 BmHnTn AkymynTOp 3 rHI3da,notpi6Ho HATNCHTKHNKc6NOKyBaHH Ha AkymynTOpi (pnc. C).
PERYJIIOBAHHBNCOTN
IHCpymeH OcHaeH N TeNecKoHHO CNTEmo PO3KnadaHH. Pocna6te pyky, NOBepHyBn ii 3a roHHNKOBIO CTPIKOIO. PO3TnHITb Tpy6ky Do Heo6xidHO IOBXHN, NOTIM 3aTARHITb pyky, NOBepHyBn II BnIBO (Pnc.D,E,F).
MOHTAX IHCTPYMEHTY HA CTPIJY
3'6dHaTe oBnBa npEMeH. HAtncKaTe do ynpO, nOKI WTeKeP He BBIe B rH3do. 3aTyrHtB raKy, NOBepTaOHy II npOTn rOINHHKOBoi CtpINK. BiDokpemEnHn IHCTpyMeHTy BiD CTpiN 3diNCHoEcBcB NopAky, 3BOPOTHom TY Mm Ke KpOKAM.
JIeOBN PEMIHb
Ybara: Npeed noaTkom p06To 3aBxMn nepeBipJte, yn PneOBN peMH npabNbHO 3acte6Hytn i npctpi npabNbHO 3akpinJeHH Ha
Hbomy. BnKOpncToByTe TiIbKn peMiHb, npu3HaueHn dJa po60Tu 3 cIMN npucTPOAMn.
3aTe6HtB peMHb (puc.G).
- Pnkpinitb rauok do rauka Ha cTpini (pnc. H).
OyHITb peMHbYepe3 nIeue (pnc.1).
BMUKAHHRA MAUINH
Nepemkauch Ochaue Hn KhoKoH 6noKyBaHH, kA 3axuac BID HeHaBMCHOROBMKAHH npncptpo.HaTNCHTb KhoNKy 6noKyBaHH, a nOTIM nepemkauch XNBHeHH, uO6 3anyCTtN MaunHy. 3BilhItb nepemkauch, uOb BMKHHTn npncptpi.
Ybara: Pnctpi He cnid BnKOpNCTOByBAtn 3 NOkOKeHm MexaH3MOM 6bOKyBaHH. Npeed TMM, AKBCTaBNTn AkymyJrTOp, HATNCHITb Npeemkkay yBIMKHeHHBnMKHeHH Ta nepeKoHaTeCg, IIO BINOBepHyBCr y BuxiDne noNoKeHHn icIe 3BiNbHeHH Tccky.
Ybara: Pnncptpi Ochauen H raIbMiBHO CNTeMOH. PicJra3BilbHeHH TnCKy JaaHcHr NOBHeH NOBHCtHO 3yMHHTNcR IpOTaROM 1 CeKHyDn. IHaKHe npCptpi He npaObaTmE HanexHm HnHom i Ho He cnId BkOpNCTOByBaTu.
IHCTPYKUI3 EKCNIYATAUJII JAHUIOBA NINKA
Ybara:HaCtynhi iHCTpykui CTocyIOb cnnK, 0xOxOuTb B KOMnneKT.
3BIPKA TA DEMOHTAK JAHUIOFA
PpIMtKa. Ipepe yctahOBKOIO 6yIb-koRO eemeHTa nepeKoHaTecra, npncptpi BmKHeHO, aakmyJrTOp BnUyeHO.
JaHIOr 3HimaTbCra 3 NnKn HAcTyNHIM YIHOM:
PiHimTb BaxiNb xfKcTaOpa KpnuKn (pnc.J).
- NObepHtB BaxJIb npOTn roUHHNKOBoi cTpiKn, NOKn He BiIKpNcTBcKpnUka 3y6aCToR KOleca (Pnc. K).
3HIMITb KpUkky 3y6uctoro KOleca. 3HIMITb peKy Ta JauHcIg (PNC. L).
36ipka naHiora BkoHyetbcB taki noCniloBHOcti:
- IpekoHaHTeCya, 10 NaHcIg cnpaMOBaHn y npabNbHomy HaprMky (pnc. M).
BCTAHOBITb IaHIOr, HanaIaHTyBaBUN HorO 0oIO HanpMHOI peKn Ta BCTAHOBIN ODNHOACHO HAD 3y6uaCTHM KOJecOM (Pnc. N). - NocTaBTe HAnpRmHy Ha Micue.
- P03aUyIe KpIuKy 3y6bAcTOrO KOleCa TaKIM YHOM, IO6 O6nBa KpinneHH 6yIn y cBOiX BiNObiHNx Na3ax (KpinneHH 1 uepe3 OTBip 2, KpinneHH 3 uepe3 OTBip 4) (Pnc. O).
HaKpiuKy 3y6actoro Koneca, opepeXho nepemiaohn HapmHy Bnepea afo Ha3ad, nokn BOHa He 3aΦikcyetbc3 KnaaHHM (pnc.P). - NObepHtbypyKHaT8KHTeIa3raDHHNKOBIOCTpiIKOIO i nepeBipTe HATr IaHcIora. IaHcIor, BiTyrHytn BiHaprrMHOI peKn 3 3ycnllm 6bn3bKO 1 KI, NOBHeH BiICTaBaTN Ha 5 - 7 MM (pnc.Q,R).
- NObepHbBaxiNb xfikCaTopa KpuiKu 3a roHHNKOBOc CTpiKOIO, NOK KpuKa He 3aqiKcyTbcra (Pnc. S). 3akpnTe BaxiNb.
PERYIIOBAHHH HATRYJAHUIGA
MoKe cTaTnC, 0o Yepe3 DeaKm Yac pObTo HataR NaHcUro OocNa6He. YCbOMy BInaNkY BiDperyIHOte HaTg BiNobiDHO Do HAcTyNHx KpOKiB:
BiiKpnTe BaxjNb 6IIOkyBaHH KpUKN 3y6bactoro KOneca i NOBepHtB NOro npOTn rOHHNKOBoi CtpiKN, 0o6 TPOXN nocna6ntn KpUkny (Pnc.T).
- NObepHITb pyKu HataKnteIb B npaBo, 0o6 HaTyrHyTuHaHcIg Do HappMaHOi peKu (Pnc.U).
- 06epexHNO iItpmmyuHn HAnpymHy, nobepHiB BaxiNb fikCaTopa KpuKn Ha3ad, uo6 3aqiKcyBaTu NOrO (Pnc. W). 3akpiTe BaxiNb.
3MAUUBAHH
PiJ cac po60tN nnKka 3MaUyETbcra ABTomatuHNo. PnCTpiBmarae nepioDnuHoI nepeBipKn pIBHa macna i y pa3i noTpe6n DOnNBaHH. PiBeHb Macla moXHa nepeBipNT upe3 orJraObe BIKoHc. PpaBnBHa KInbKiCtB Macna dIg BeH3OnNJn CTahOBn7 70 Mn. Uo6 3anpabTu N macno, NiHimItb BaxJIb Ha np6ui i BiDkpyiTb Noro, NOBepHyBn BNIO. DoJnBaIte Macno DO Tnx nip, NOKi piBHeb Macna He DoocRHe HnKHBor O kpaI pIsbN. UInbHO 3akpyiTb KpuWky. Iicra 3anpabKn Macna nepeD noYatKom po60tN 3anyctITb nnKy i DouekaiTeCRA 3MaUeHHra npunctpo (Pnc.X,Y).
PI3AHH
Pnmtka: nid cac po60tn Tpmaite yactHn CBO rna Iodani BID nnK. Ytpmmyou CTky NoCTaby, MiHO Tpmaite IHcTpymeT o6oMa pykamn. Nid cac 3pi3aHHra nIOK oneapot nobHeH 3abXn MaTH moXnBicTB Bi6iRTn, kIIO ngn naHa HbOr. He pIXTe KINHKOM HanpMaHO peKN - ce MoKe npN3BeCtNo BIdnai.
CToayHa CTiKII NOBepxHi, npimitb Take noIoxeHHa 6n iD qac pi3aHHa Kt MIX 3emHe Ta cTpinO He nepeBmUyBaB 60^ .He TCHITb Ha
riky 3 BeNkoIO CnIO. 3piiaOHn BeNki riIN, po3piyTe ix Ha parMeHTn, NoHHaOu BiK KInuKa. BybTe Oco6nBO oBepeXhi i CTeXTe 3a naiaOUMn dparMeHTAmr rINOK.
3pi3aouH TOBCTI rIKN, CNOATKY 3p06iTB HeRNI6OKM 3pi3 3HN3Y, NOTIM 3piKTe rIKy 3Bepx. 3pi3aHH TOBCTNX rINOK NOBHICTHO 3HN3Y MOKe npn3BecTN Do iX 3actpyraHH y HAnpRMHI i 3aklnHHTN pNNkY. 3pi3aHH BCbOro UMaTKA 3Bepx MoKe npn3BecTN Do 3NaMaHH rIKN (PNC.Z).
IIEPEHECEHHIHCPTPYMEHTA
Пд.Yac nepheceHЯ INCTpyMeHTA BIMMaTe aKymyIaTOp i HAdiBaIte KpNkUHaNPraMHOi (Pnc.A1).
3ATOUBAHHJAHUO
PnIMtKa:pekeoHaTeC,IO nIIka BmKHeHa,aakMyJrTOp BnIyHeO 3 npCTpo.
PnHaBHOCTi HAcTyNHx O3Hak CmMTOMIB NaHcHr CnI3aTOHTN:
- CtpyKMaE «KaWnctTy» ctpyKtpy.
- NaHcIg Hacnny npop3ae DepeBHy.
- Pizyu enemeHT nomTHo noxkoJxehn.
-ПИнkaТЯнTeBcR BnIbO a60 BnpaBO(Yepe3 HepiBHomipHe 3aToUyBaHnA b6o N6KoJKeHHN Jnue OndHicCTopoHn).
Yacte, ane o6epexhe 3aToyBaHHra NaHcIgora e Hn6iNbW eEeKTHBHM. ToDi nna KoxHoro pixkyoro KpaHO 6yde DoCTaTHbO 2-3 uTOBXaHb Hanikkom. KoHcTpykui NaHcIgora nokaHa Ha pnc. B1.
Pnmtka:3aHaToBeJInkaBIDCTaHbMIXNe3OMIO6mexyBaUemIIN6HH Na IaHui pi3u 36IbWye pN3IK BIDaHi.
Pam'ataTe npo HactynH npaBnHa:
- IOBxHnHa Bcix Ie3 NOBHHa 6yTn OndakoIO - ce 3HNKc pu3NK BiDahi 13ae3neuey6e3nepe6iHy po60Ty.
He 3aTouyTe NaHcIg, RaIIO NOBxHa Ne3a CTAHOBnTb 3 MM a6o MeHue-JaHcIg Heo6XiHo 3amIHn Ha HOBN.
ToBunHa cTpyKk 3aJIeKHTb BiD BiIcTaHI MIX pIXyUIM KpaEM i o6mexyBaayem rIn6uHn. - OnTImaJIbHa BiIcTaHb MIX JIe3OM i O6MExyBaHem IIN6Hn IINr IAHUorIB 90PX i 91PX CTaHOBt b 0,65 MM.
Bci ne3a noBNHHi 6ytn 3atoyehi niK kYtOM 30^ .Pi3HI Kytn npCKOpHOb 3Hoc,po6JIbPo6Otu MeHs PnaBOHO, nIbNHyOTb p3NK o6pNBy naHOra.
BnKOpNCToByTe HannKn, npn3HaueHi DnA 3aToCyBaHHra NaHcIOrIB dnnok. - ONTImaJIbHnI DiAmTp nIIJKN IINr KOxHOro TIny Ie3a: -90PX:4,5 MM (3/16") -91PX:4,0 MM (5/32")
Iiudac3aToyBaHHBiduTobxUte Hannok Bicce - He 3aTouyTeB oNDbCTOpOHn. - HaimokopotweJe3oCnI3aTouyntnCnoaykTy. Notim 3aTouyitb iHuiTak, u6o6doBxHaJe3a6yna pIBHO.
Cnoci6o6po6kn noka3aHn Ha MaJIHOHKax C1, D1.
OuHueHHHaHPMHOI
Ctpykka i nnn 36npaioTbcra B HnpanMHI, nepeKoJkaIOuN BiIbHOMy pyxy IanaIora i HeratNBHO BnNBAIOUHa 3MaunBaHH. NepioDnHo Onuaute ii niuc aac 3aTouyBaHH a60 3AmHN NaHOra ToHKIM IHcTpymeHTOM (pnc.E1).
OuHHeHHKPNsK3yBACTOKOJlECA
Ctpykkna, nnt Ta iHui 3a6pydHeHHaMOKyTB HAKONuYBaTnca nip Kpnsko 3y6actoro KOneca Ta HeratNBHO BnNbaTn Ha po60ty npctpoio. II cnid nepiodnuho uCTNTn (pcn.F1).
OuHueHH3NHBHOOTBOPYMACJIA
3nBnO TBip Macna MoKe 3a6pyHHTnc, 10 npn3BeDe Do HnPaBnBHO PO3NOiNy Macna No NaHcIry Ta HanpMaH. Lc HeaTbHO nO3HaHTbcra Ha pOBoI npNCtpoIO. 3nBnO tBip Heo6xIDHO nepioDnH OOnuATn BiNObiHO Do HAcTyNHx IHCTpyKl:
3HIMITb KpUkky 3y6actoro KOneca Ta NaHcIor.
BudaiitcbmiTTOHKOIO BnKpyTKOIO a6o NDi6HIM IHCTpyMeHTOM.
BctahOBitb akymyIaTOp i 3anyctiB npncpti 3a donomorOIO nepemikaya. MacNo noUHe TeKTH, BuaJnHouN Bci 3a6pydHeHHA.
BnMItb aymyTApOp. BcTaHOBITb naHcIor i 3aKpnTe KpnWky 3y6OAcToTO KOJecA (pnc.G1).
3AMIHA 3Y6CACTOFOKOJECA
Nookjxhe a6o 3noe he 3y6acte konec npn3bde do nookjxehnaHpora.
Tomy neped 3amino IaHIOra 3abXn nepeBiprTe cTah 3y6actoro koneca (pnc.H1).
KUO BOHO 3HOWeHe, 3aMIHTb NOro Ha HOBe pa3OM i3 CTOnOpHM KJIbLcEM (pnc.11).
36EPITAHH
NepH HIX 36epiratn npncptpi npotrorm Tpnbano ro nepioy yacy, DOTPMMyTecb HabeDeHHHX Hxue IHctpkyu:
OuictitbpncptpiBIDNOIBHOHOHabeDeHNX Bnue nyKtib.
3HIMITbRONOBKY.
- Picna OunuHnna npnaNy 3maTITb Noro, npauoHn6e3 HabaHTaxKeHH.
- Hadihbe Te KpiuKy HanpmaHoi peKn.
3nIteMacNo.
NEPIOIDHETEXHIHEOBCJYROBYAHNHA
Y Ta6nui HxKHe HabeDeNo 3axOoN TexHcHoro 06ClyroBbAHNa Ta peKoMeHDoBaHH nepioD yacy dIg IX BVKoHaHH.

m = 311

3

4

5

6

7

8
-90PX: 4.5 mm (3/16 inch)
-91PX: 4,0 mm (5/32 inchi)
TENTO NAVOD A USCHOVEJTE TENTO NAVOD PRO DALSIPOUZITI.
ZVLASTNI BEZPECNOSTNI PRAVIDLA PRO RÁMOVÉ PILY
-91PX: 4,0 mm (5/32")
-91PX: 4.0mm (5/32")
Pri ostrenju pilo potisnite stran od sebe - ne brusite v obe smeri.
- Najprej je treba nabusiti majkrajse rezilo. Nato izoostrite druge, takao de je dolzina rezila enaka.
- Način ravnanja z datotekami je prikazan na slikah C1, D1.
CISCENJE VODILNE VRSTE
Chips in prah zbira v meça, ki ovira prosto gibanje verige in negativno vpliva na mazanje. Tako pri brusenju ali zamenjava verige s tankim orodjem periodicno ciscenje (sl. E1).
CISCENJE OPREMA COVER
KONKREETSED OHUTUSEESKIRJAD POOMSAAGELE

m = 311
8
KASUTUSJUHEND - KETSAAG
MOPEXKEH TPOH HOXKU3A PNET
58G098
BHIMAHNE BAXHO: IPOUYETETE BHIMATEJIHO IPEIN DA N3I0J3BATE EJEKTPOHHCTPYMEHTA
TOBA PbKOBOJCTBO I 3ANA3ETE TOBA PbKOBOJCTBO 3A DOnbJIHNTELHA CnPABKA.
CNEUHINIPIABNJIA3A6E3ONACHOCT3ATPOHOCTE
- I3noJI3BaIte eJekTpOHnHCTpymeHTa cAmO npeJHa3HaueHne.
3a6paHEno e da pa6oTnTe c enekTpOnHcTpymeHT noi Bb3deIcTBnETo Ha anKoxON nIN dpyIn yNoBaaN BeueCTBa, INN KOraTO CTe RaHbO yMopeHN nIN cnAbi.
He pa6oTe Te npn DbXk nn npn He6laornpnTm MeTeOpOIOuHn ycNoBna.
Korato pa60THe, n3non3BaIte npedocTaBeHaTa npespaMka 3a paMo.
3a6paheHo e 3n0n3BaHeTo Ha cTpenaTa C pyu npexeun rnaBn OCBEN BkHIOUeHNTe B KOMNKeKta.
Korato pa60ntte C BepnKnH TpnoH, 06bpeTe Oco6eHO BHMaHHe Ha OKoJIHaTa CpeDa - DpXkTe rnaBaTa Ha TpNoHa daNeu OT Xopa N KINBOTHI. - He pa6oTeTe c HnCTpyMeHTa 6nn30 do eJekTpnueCKn npOBOHnCn - npep3BaHeTo My MoKeJa DoBede Do TOKOB yap!
- ПО ВЕМЕ на пабota OKOLHOCТТа ТряБВа ДА оснгурп nbT 3a eBAkyaцИЯ на ONEpATOPA B CNYaHа ONaCHO nadaHe Ha OTPЯЗИЯ KIOH.
- No Bpeme Ha pa6oTa noDabpxaIte cta6nHa no3nua Bbpy TBbpda,paBHa n TBbpda NOBbpxHOCT.
- Ⅲποι3BaIte JIiHn Iπeɪna3Hn CpeɪCTBa - 3aɪnta Ha OHTe, 3aɪnta Ha cIyxa, ⅦʌnK, pa6oTHO oBleɪkNo. ɪsərbaɪte ⅦipOKuTe Dpexn, Kɔnto MOrat Da ce 3aKaHaT B MexaHm3Ma Ha TpnoHa. Ⅲποι3BaIte O6yBkn 3a Iπeɪna3BaHe OT noxlb3BaHe.
Korato pekete no-rolemn KIOH, HApexeHa ppaMeHTN -OT Kpar Ha KIOHa Do CTBona. - No-de6eINTE KNOH Tp46Ba Da ce OTPekaT OTdony, CneD TOBa OTrope. ONITbT 3a NbNHO OTPBAHe Ha DE6eN KNOH OTdOly MOKe Da DOBeE Do npuINnBaHe Ha KNOHTe Bpxy HAnpaBnBaUaTa UHa H 3acraHa He TaPnoHa. IV3p43BaHeto HA KNOH N3cIyNo OT BbPxA Si CyYNKIOHa.
- PpeBn BcKa yNoTpe6a Tp6Ba da ce npOBepBa TeHNueckOTo CbCToHHe Ha HNCTpyMeHTa N HerOBtE KOHCyMaTbN.
- YBepete ce, ye ycTpoiCBoTo e npaBnH0 Cm3aHo - peIOBHO npoBepBaIte HnBOTo Ha MacIoTO B pe3epBoapa I npoxOIMOCCTTa Ha CNTeMaTAt 3a Cm3BaHe.
He notanayte yctpoicTBOTBOBBAH He ro MInTe noTtea a BOda. - PeDobHO npOBepBaIte cTeHNTa Ha n3HocBaHe Ha Bepurata Ha TpnoHa - Bepurata Tpr6Ba Da ce 3aTOUba peDobHO nako CTeHtHa Ha n3HocBaHe ppeoTbpaTBA No-HaTaTbWHO 3aTOUbaHe - CMeHeTe.
Lanata noDpBka TprBa Da ce n3BbPwBa npn nKIOUeHO yCTPOIcTBo Cn3BaDeHa 6aTepe.
He n3no13BaIte HnCTpyMeHTa B CnyaHa NoBpeJa nnHEn3npaBHocT.
B cnuyaHa TpeBOxHn CmNTOMn, NOKa3Baun HenpaBUNHa pa60Ta Ha ypeHa, He3a6abHo n3KnIOyTe n npOBepe INHCTpyMeHTa.
O6aChenneHa n3n013BaHnTe NkTOrpaMn

1

2

3

4

5

6

7
8
1.3aunTeTeOTbXk
2.ИзползВаитсрдства3aЗшпт ha cnlyxa.
3. N3non3BaIte 3aunTHn Ounna.
4.Изпалове нелбзраши ce pa60но6увк.
5.ИЗнлзВа�Te 3auntHn pБкавиц.
6. Hocete noDxoJrso 3aunTHo oBleKJIO.
7.ИЗПОЛЗВАЙТЕЗДУNTHINДANKI.
8. Pa6oTeHa nOHe 10 MeTpa ot eJekTpnpoBOnTe.
CNEUΦNHYIINPABUNA3ABE3ONACHOCT3AHOXNUITE
- 3n0n3BaIe eNEKtpOnHCTpyMeHTa cMo n npedHa3HaHeHne.
3a6paHEno e da pa6oTnTe c eNEKTPOnHCTpyMeHT NOBb3dEChTBnETo Ha aNkoXoN ININ dpyrN yNoiBaun BeueCTBa, INIKORaTO CTe RaBHO yMOpEH NIN cnaBn. - He pa6oTe Te npn DbXk nn npn He6naTOnpnyTHm MeTeOpOToHn ycNoBna.
- IIO Bpeme Ha pa6oTa o6pbuaIte Oco6eHO BHIMaHHe Ha OKOJIHaTa CpeJa - DpbkTe rnaBaTaNaneu OT Xopa N KINBOTHN.
- He pa6oTeTe C nHCTpyMeHTa 6n30 Do eNeKtpueckn npOBODnCn -npepraBaHeTo My MoKe Da DOBeDe Do TOKOB yap!
- Ito BpeMe Ha pa6oTa OKoJHoCTTa Tpr6Ba Da ocNrgp NbT 3a EBAkyaun Ha onepaTopa B cnUayn Ha onaCHO nadaHe Ha OTPra3AHn KNoH.
- Ito Bpeme Ha pa6oTa noDnBpxKaIte cta6nHa nO3nua Bbpy TBbpda,paBa HnTBpDa NOBbpxHocT.
- 13no3BaIte IuHn npedna3Hn cpeCTBa - 3aunTa Ha OHTe, 3aunTa Ha cnlyxa, uanKn, paobTHO oBneKNo. 136raBauTe 1npoknte dpexn. 13no3BaIte 0bYbKn 3a npedna3BaHe ot NOxNb3BaHe.
Korato pexeTe no-rolemn KIOHn, HapeXeTe Ha fpaarmEn -OT Kpar Ha KIOHa do CTBona.
-Ппсдь BCяку nOTope6a Tp6Ba Да ce npOBePЯ BA TexHnueckoTO cbCTOHRHe Ha INHcTpymEHTa N HerOBtte KOHCyMaTbN. - YBepete ce, ye yctpoiCTBOTo e npaBnH0 cMa3aHO - peIOBHO npoBepraIte cMa3BaHeTo Ha peKeuTa JeHTa N HaHaCraIte Ny6pkaHT, aKO e Heo6XoIMO.
He notanTre yctpoiCTBOTO BbB BOa n He ro MmTe noT Teaua Boa.
LJnata nOaPbKa Tp6Ba Da ce N3BbPwBa npN N3KIOUeHO yCTPOINCTBO C N3BaDeHa 6aTePN.
He n3noJI3BaIte IHCTpyMeHTa B cIyauHa IIOBpeJa nn HeIN3npaBHocT.
B cnyuahn TpeBOXHN CmNTOMN, NOKa3Baun HnepaBnHa pa6oTa Ha ypeHa, He3a6abHO nKKnOyTe n npOBepe nHCTpyMeHTA.
06acheHHe Ha n3noJ3BaHnTe NkTOrpaMn


2
3
4
5
6
7
1
1.3aunTeTe OIbXJ.
2. N3no3BaTe cpeCTBa 3a 3auuTa Ha cnyxa.
3.ИЗнэБаитse 3aunTHn OUnna
4. 13no3BaIte Hennb3raun ce pa6oTHn o6yBKN.
5.ИЗПОЛЗВайтзашиТн рькавиц.
6. Hocete noDxOJaIoo 3aunTHo oBleKIO.
7. 3nON3BaIe 3aunTHn WAnKn.
8. Pa6oTeTe Ha nOhe 10 metpa oTeIeKToPonpoBoDInTe.
CbDbPXAHNE
- ByM 16p.
- FlanaBa 3a BepnKeH TpnoH 16p.
- ΓλaBa c Hoxnui 3a p83aHe 16p.
Bepira 3a TpnoH 16p.
PaMeHeKoJaH 16p.
PbkoBOcTBo 3a ynoTpe6a16p. - RapaHcMOHHa KaPaTa 1 6p.
PNIJIOXEHNE
BepnK TpnoE npedHa3Hae 3a p3aHe nIIN NOpR3BaHe Ha IbPbTa E KNOH. EneKtpuyeckaTAt HOXnua 3a XNB PNET e npedHa3HaeHa 3a Jekn npINOxehn B rpaDnHata: p3aHe N NOpR3BaHe Ha TbHKN KIOHN IHOBn N3DbHKN NO XNB PNET, Xpactn IN Xpactn.
ONICAHNE HA IPAQHHTE CTPAHN
Homepaunra no-dony ce oTHacr do KOMnoHEHTne Ha ycTPOcTBOTO, noka3aHn Ha npauuHNTe cTpaHnHa ToBa pkoBOcTB0
Durypa A:
- MOTOPHa pe3a4ka
- Konue 3a o6teray
- Kanak Ha 3b6hOTo KOneNo
-
6eray
-
NocT
- cbeHHTeI
- TeneckonuHa CnCTema 3a pa3bBaHe
8.Дрьжka - Kyka
- Noc3a 3aKIOUBaHe
11.OchOBHa npbXka - ByToH 3a 6aTePn
- PpeBkJIOyTe
14.Бatepna - Kanayka Ha pe3epBoapa 3a Macno
- PpO3opeu Ha pe3epBoapa 3a Macno
- Pamehen Konan
- Kyka
19.ПokpntneHa6apa - _b6a
ФИ Grypa B:
- Pexeua neHtA
- Μιηρτ 3a noJIOXeHne Ha rnaBaTa
- cbeHHTeN
- TepeckonuHa cncTeMa 3a pa3rBaHe
- DonbJHnTeJHa npBxka
- b a
- Kyka
- Pamehen kOJah
- JIoCT 3a 3aKnIOUyBaHe
10.Бутонзабатеря - Kyka
- IpeBkIIOHcTe
13.OCHOBHadpbXkKa
14.Бatepna
15.претаител на ржшялост
TEXHNUECKN NAPAMETPN
DAHHN 3A WUM N BUNPAUN - MOPEXEH TPOH
Korato HocHTe INHCTpyMeHTa, N3BaTe 6aTePnra Tn NOCTaBeTe KAnaka Ha WnHaTa (DmR.A1).
3ATOUBAHE HA BEPUNATA
3a6eKka: YbepTe ce, ye TpnoHbT e n3KIOueH iBaTePnraTa e N3BaDeHaOT MaUNHaTA.
Ako ca HaJIiue CNEHHTe CmITOMM, BepnraTa Tp8Ba Da oe 3aTOH:
CTpyxKNTeMMaT"kacaba"CTpykTypa.
BepuraTtpyndno npopraBa DbpBoTo.
- PexeIurT p6 e BvIMo IOBpeH.
TpnoHbT Dbpna HnBa Nn HaJcHO (npuHHeO OTHepaBHomepHo 3aToUbaHe nN NOpeJa cMo OT eHaTa CTpaHa).
YecToTO,HO HexHo 3aToUBaHe Ha BepnTa e Hai-efeKtNBHO.TorBa 3a BCEKn pexue p5b ige ca DocTaTbHn 2 -3 TnaCbu C nIInata. KOnctpykunraHa BepnRaHa TpnoHa e NOKa3aHa HaΦnr.B1.
3a6eJk: Tbpe RoJAMOT pa3cTOrHne MeKdy octpneTo n bIbOHHata Ha pexeUa Ta Bp3ka yBENHABA pNcKa OT o6paTeH yap. ImaTe npednCneHNte npabna:
-ДьнЖинATERAHA BCNUKNOCTPNeTa Tp6Ba Da e eHaKBA -TOBAMaJIraBa pUcKa OT obpaTeH yAp n rapaTHnpa rnaJaKa paBoTa.
He 3aToBaIe Bepirata, KOraTo DbJInHaTa Ha OcTpneTo e 3 MM INI No-MAnKO-Bepirata Tp6Ba Da ce CMeHn C HObA.
- De6eJIiHaTHa cTpKka 3aBnCt OT pa3cToHHeTO MeKdy peKeuHa p6 n orpaHnHTeHa dIbIbOuHaHa.
- ONTIMAJHOTo pa3cTOrHHe MEXy ocTpneTo n DbIbOuHata 3a BepurTe 90PX n 91PX e 0.65 MM.
Bcunoctpeta Tp6ba da 6bDat 3aToeHn noD bTbN ot 30 .Pa3nnHnTe brrn yckopraat nHocBaHeTo, npabrt pa6oTaNoMaNKo rJaKa, yBeHHaBat pncAOT CynBaHe Ha Bepnata.
- I3noI3BaIe foaiNoBe, npedHa3NaueHn 3a 3aToUbaHe Ha Bepn3a TpNOHn.
- OnTImaJIeH dIaMæTbP h aIJIa 3a BCEKn TIn ocTpne:
-90PX:4.5 MM (3/16")
-91PX:4.0 MM (5/32")
- Pn3 3aTOUBAHe n36yTaIe pnnata daJeY ot ce6e cn - He 3aTOUBATe N B DBeTe NOCOKN.
- Пьрв Трбв Да ce 3atoHн-КсСоТ OcTpne. CneTTOBa 3atoYe octHaJInte, Taka Ye IbJxMHaTa Ha ocTpneTo da e edHaKBa.
- MeToDbT 3a pa6oTa c faInObe e noka3aHa fHpyn C1, D1.
IOYNCBAHE HA HANPABHATA JIEHTA
B HanpaBnaBaata uHa Ce Cb6npat CTbProTHN n npax, KoTo B3npenrTcBA cBObOHO To DBKeHne Ha Bepurata N BNRe HcRaTHBO HA CMA3BaHeTo. NoCTbaTe ro nepoDnHo, KOrato 3aToOBate nn CMeHrTe Bepurata C TbHbK NHTpyMENT (fur.E1).
IOYNCBAHE HA KANAKA HA IPEDAKITE
HINOBe, npax i npyn 3ambpcntm Morat Da ce HATpynat nod Kanaka Ha 3b6hata peika n 3b6HO koneno I da NobnraHT He5naropnTHo Ha pa60tata Ha ypea. Tpa6Ba dacenocnCTba nepnoDnHo (F1).
IIOYCTBAHE HA OTTIYCKA 3A MACJITO
OTbopbt 3a n3ToBaHe Ha MacNtO MoKe Da ce 3aMbpCn, KoETo NpIpeuHa MacNtO Da ce pa3npedeH npabunH No Beprata H uHHata. ToBaUe Ce OTPa3n HeraTINBHO Ha paobotaHa yctpoiCTBO.TopeHaKHNrT OTbPra6Ba nepoDnHDo da ce noHCTBa cbflacHo cneHHTeNHCTpykui:
CbaJeTe kanaka Ha 3b6Hoto KOJEno IN Bepnata.
- OtctpaHete ocTaTbUHTe c TbHka OTBepTKa nn noDo6EHNCTpyMeHT.
- IocTabeTe 6aTePnIaTn n CTapTpnaTe YcTpoIcTBOTo C npEbkNIOuBaTeJI. MacNoTo Ue TeHe, npEmaxBaIK N BcHKn OCTaHaJI NpIMecn.
- N3BaTe 6aTeepnTa. NoCTabeTe OTHOB BepurTa n 3aTBopeTe KaNaka Ha 3b6HTo KOJIeIo (Φnr.G1).
CMRAHA HA 3bEJIETO
IobpeHNO Hn H3HO 3b6HO KOJENO Jne NOBpeDN Bepurata.3aTOBA BNHa npoBepBaHTe CbCTOHNTo Ha 3b6HOTo KOJENO, PpeN da CMeHIne Bepurata (fH1).
Ako cToiKaTa e H3HoCeHa, CMeHete r CHoBa 3aeDnO CCKoBaTa (Φnr.11).
CbXPAHEHNE
Ppei Da cxbxaHbAte yctpoNcTBOTo 3a npOdbJnxIeH nepNOd OT Bpeme,MOJI, CneDbai Te HnCTpyKunTe NO-DOJy:
- PioHcTeTe yCtpoiCTBOTO B CbOTBeTCTBHe C ToKHe TIO-rope.
- OTeTaPaHeTe INaBaTAt.
CneIOuHCTBaHe Ha ycTpoiCTBOTo, CmaKeTe ro, KaTO ro NycHeTe 6e3 HatoBapBaHe. - NocTaBeTe KanaKa Ha HnPaBnaBaUaTaJeHTa.
- N3ToyeTe pe3epBoapa 3a MacNo.
NEPNOINUHA NOIDPbJKA
TabmcaTa no-dony nok3Ba deHocTne no noDpBkKaTa npenopbHTeHHnepnoDT BpeMe 3a N3BbpBaHTo IM.
m = 311
m = 311
m = 311
m = 311
7
m = 311 ;
- Zastitite od kise.
- Koristite zašitu za sluh.
- Koristite zašitne naočale.
- Koristite neklizajuće radne cipele.
- Koristite zašitne rukavice.
- Nosite odgovarajuću zašitnu odjeću.
- Koristite zašitnoPokrivalo za glavu.
- Radite najmanje 10 metara od dalekovoda.
POSEBNI SIGURNOSNI PROPISI ZA ŠKARE ZA ŽIVICE
- Elektricni alat koristite samo za njegovu namjenu.
Zabranjeno je raditi s elektrichim alatom pod utjecajem akohola ili drugih opojnih sredstava, ili kada ste ocitu umorni ili slabi. - Nemojte raditi po kisi ili u nepovoljnim vremenskim uvjetima.
Tijekom rada posebno pazite na okolinu - drzite glavu podalje od ljudi i zivotinja. - Ne koristite alat u blizini elektrichnih zica -rezanje kroz njega moze dovesti do strujnog udara!
- Tijekom rada okolina treba osigurati put za bijeg za operatera u slucaju opasnog pada posjecene grane.
Tijekom rada zadrzite stabilan položaj na Čvrstoj, ravnoj i Čvrstoj povrsini. - Koristite osobnu zašitnu opremu - zašitu za oči, zašitu za sluh,Pokrivala za glavu, radnu odjeću. Izbjugavaje široku odjeću. Za zašitu od klizanja koristite obucu.
- Prilikom rezanja vecih grana izrežite ih u fragmentima - od kraja grane do debla.
- Prije svake uporabe potrebno je provjeriti tehnicko stanje alata i njegovog potrosnog materijala.
- Provjerite je li uredaj pravilno podmazan - redovito provjeravaje podmazivanje šipke rezača i po potrebi nanesite mazivo.
- Ne uranjajte uredaj u vodu niti ga perite pod tekućom vodom.
Svo odzavanje treba izvoditi s iskljucenim uredajem s izvadenom baterijom. - Nemojte koristiti alat u slucaju bilo kakvog ostecenja ili kvara.
U slučaju alarmantnih simptoma koji ukazuju na nepravilan rad uredaja, odmah iskligute i pregledajte alat.
UPUTSTVO ZA UPOTREBU - MOTORNA PILA
-90PX:4.5 mm (3/16")
-91PX:4,0 mm (5/32")
- Prilikom oštrjenja gurnite turpiju od sebe - nemojte oštriti u oba smjera.
- Najprije treba naostriti naokracu ostricu. Zatim naostrite ostale takoda duljina ostrice bude jegnaka.
- Način rukovanja datotekama prikazan je na slikama C1, D1.
CISCENJE VODILICE
U vodilici se skuplia strugotina i prasina, ometajuci slobodno kretanje lanca i negativno utjecuci na podmazivanje. Povremeno ga cistite kada oštrite ili mijenjate lanac tankim alatom (sl. E1).
CISCENJE POKLOPCA ZUPCANIKA
PodPoklopcem letve i zupcanika mogu se nakupiti strugotine, prasina i druga oneici-scenja i negativno utjecati na rad jedinice. Treba ga povremeno cistiti (sl.F1).
CISCENJE OTVORA ZA ISPUSTANJE ULJA
IOCEBHN B3E3BDHOCHN PONNC 3A 3KAP3A 3NBY OBNU
Kopnte eJektpnHn anat cmo 3a HefoBy HameHy.
3a6paheho je paHn ca eNEKTPnHm aIaTOM IOd JeCTBOM anKOxOHa nn Dpynx OOnjHx CpeDcTaBa, nn KaDa CTe OUnrJHeHO yMOPHn nn Cna6n.
HemojTe paNTn no KUNu u HEnoBOrbHM BpeMeHcKIM ycNoBMA.
ToKoMa paJa o6paTne nOce6Hy naXbHa OOKoINHy -dpKInTe rnaBy daBe od JbUdN nnBOTnBa.
He Kopnnte anat y 6nn3Hn enektpnuHx Xnca - npceuahe Kp03 Hera MoKe DoBecTu Do CtpyHor ydapa!
- Y ToKy pada OKOJIHnA Tpe6a Da o6e36eIu3na3 3a pykoBaouca y cnyuajy onachor nada nocehe rpahe.
Tokom pada dpxknte ctabnan h nooxkaj Ha ybpctoj, paBhoj n YBPcToj nobpunH.
Kopuncte JnHry 3aWHTHy onpemy - 3aWHTy 3a ouH, 3aWHTy 3a cnIyx, nokPbIaIa 3a InaBpy, paHy oDeHy. N36erabajte WnpOky OdeHy. Kopuncte oyHy 3a 3aWHTy od KIn3aHa.
Kada ceye Te Behe rpaHe, IceuTe Hx Ha fpaarmte - od Kpaja rpaHe do de6na.
- Ipe cBaKe yNoTpBe 6e Tpe6a npOBepTu TExHnUcKo CtaHe aIaTa HberOBor NotpouHOr MaTepuJaIa.
- YBepTe ce da je ypehaj npabuHNO noMa3aH - peoBHO npOBepaBJte noMa3BaIbe IINKe pe3aHa HHeCtE Ma3BO aKO je noTpe6Ho.
- He ypa hajte ypehajy BOdy HHTn ra nepuTe noTekyHOM BOJOM.
CBO odpxabahe Tpeba da ce oabba ca nckbyueHm ypehajem ca yKIObeHOM baTepnjom.
Hemojte Kopncntn anat y cnuyajy 6nno kakbor outheha nn KBapa.
- y cnuyajy anapMaHTnx CnMTOMa kojynka3yjHa HnepaBnIah paIypehaja, odMax NCKbByuHte n pnerneJaTe anaT.
06jaushhebekekopnshehnxnkTorpama

1


3

4

5

6

6

- 3aHTNTe OK MWe.
- Kopncntte 3aunty 3a cnyx.
- KopnCTnte 3aHTNTHe Haoape.
- Kopunctte HeKnIm3ajyhe paHne LInene.
- KopnCTnte 3aunTHe pykABuIe.
- Hocnte odrobajhy 3awtnthy odehy.
- Kopncntte 3aunTHny kany 3a rnaBv.
- Paɪnte Hajmahe 10 Meṭapa ōd ŠaɪkekoBóda.
CAJPKAJ
- ΓρaHa 1 KOM.
- JanaBaJaHuaHe TcTepe 1 KOM.
- JIaba ca Maka3ama 3a cehebe 1 KOM.
- LaHaau TecTepe 1 KOM.
- Nojac 3a paMe 1 KOM.
- NnyTCTBO 3a ynoTpe6y 1 KOM.
-「RapaHTHINNCT1KOM.
ANIKALUNJA
Motopha TeCTepa je dN3ajHnpaHa 3a ceHebe nIN ope3BaBe dpBeHa n rpaHa. EInktpnHn TpImep 3a XMBe orpaDe je dN3ajHnpaH 3a Jnake anNkaunje y 6aTu: ceHebe n O6pe3BaBe TaHKx rpaHa n HOBnx n3daHaka Ha XNBIMA orpaDama, X6bHy nX6bHy.
ONNC PPAΦNUKNX CTPAHA
Hymepauija nCnoe ce ODHcHa KOMNoHeTe ypehaja npKa3aHe Ha rpaunKIM CTpAHuama OBor ynyTCTBa
CnkaA:
- MOTOPHA TECTepa
- Dyrme 3a 3aTe3aHe
- NOKONaJNaHuaHnka
4.PyHHep - Nonyra
- KOHeKTop
- Teneckonncn cnctem 3a packnaanbe
8.Дршka - Xook
- Nonyra 3a 3akbyaBahe
- Tnabha pyka
- Dyrme 3a 6aTepejy
- Cbntux
- BaTepeJa
- POKIOnaPe3epBoapa 3a yIbe
- Ipo3op pe3epBoapa 3a yJbe
- Iojac 3a pame
- Xook
- POKLONaU uINKne
- Cyhhep
CnkaB:
-
Teneckonckn cncTeM 3a packnaabe
-
Pe34
- Nnna noJoxaja rnaBe
- KOHeKTop
- DogaTHa pyka
- Cyhhep
- Xook
- Nojac3a pame
- Nonyra 3a 3akbyaBaHe
- Dyrme 3a 6aTepnjy
- Xook
- Cntux
- TnaBHa pyka
- BaTepeju
- 3auneta pe3a4a
TEXHNUKN NAPAMETPN
MToTopHe TecTepe Maka3e 3a KINBy orpaDy 58T098
NapameTap Banye
IODAUO BUYUNBUNPAUNJAMA-UKAPE 3A 3NBUE
| Hиво 3ыуног приптоcke | П_А=77,8 дБ (A) K = 3 дБ (A) |
| Hиво снаге 3ыуka | П_Вa=91,3 дБ (A) K = 3 дБ (A) |
| В行政处罚 yбрзаны вибрациja | a_x=1,843 m / c2 K = 1,5 m / c2 |
HnΦopmaunje 6yun n Bn6paunjama
HnBO 6yKe kojy emtIyje ypehaj onncyje ce: HNBOOM emntOBaHor 3ByHOR npNTNcKa IIN HNBOOM 3ByHrhe Chare JB A(rJe je K MepHa HecnrypHocT). Bn6paunje koje emtIyje ypehaj onncyjce BpeHouhy Bn6paunOHor y6p3aHa a (rJe je K MepHa HecnrypHocT).
Cnehe Hnfoopmaueje:emtOBaHn HNBO 3BvHOr npTnCKa Jn, HNBO 3ByuHe cARe JbAn y6p3aHe Bn6paunje a x MepeHN cy y cknaNy ca EH 60745-1. TaH NBO Bn6paunja a xMOKe ce KopncHTn 3a nopeheypehaja n 3a NoeHTy npoceHy n3IOXeHOCTn Bn6paunjama.
Habeene HnBO BnBpaunja je pepe3eHTaTbAH cAmo 3a ochOBHy ynoptpe6y ypehaja. Ako ce Maunna Koprntn 3a paanmte npme He nIc pa a3nnuHTm paDnM anatma, HNO BnBpaunja ce moke npomeHn. Ha BnBO HnBO BnBpaunjy Tynhe HeNoBoHn nn cyBnwe petKO oDPkabAbeyepehaja. Ope Habeene pao3no3n Mory do nobehane HIOJoxeHOCTN BnBpaunjama TKOM YITABOR nepmoDA pada.
Ja 6ncte npeun3HO npoueHHHn H3JIOKeHoCT Bn6paunjama, y3MITE y o63np nepnoDe KaJa je onpeMa NcKbUyeHa nn KaJa je yKbUyeHa, ani ce He KopncTn. HakoH uTo cy cBn fakTopn naKbNBO npoueBeHH, yKnHn Ha3JIOKeHoCT Bn6paunjama MoKe 6NTn 3NaTHO HnKa.
YuTy 3aTnTe KOpncnka OyTucaJa Bn6paunja Notpe6Ho je cnpoBecTN DoaTHe Mepe 6e36eHocTn, Kao To cy: nepnoDnH0 OopKaBaHe ypeJaja n padnix anata, 3aTuTa ODroBapajhe Tempeatype pyky n npabnHa opraHn3aunja pada.
ПППЕМА 3A PAД
Hanomeha: Cnehe ynytcBa BaKe n 3a cTy6Hy TecTepy n 3a eJektpnHe MaKa3e.
Ako cy npncyTHn cneedeH CNMNTOMN, naHaTpe6a HAOUtpTN:
- CtpyroTnHe mAjy "KaWacTy" cTpkykTyp.
JaHaaTeWkoceyeKpO3dpBO. - Pe3Ha INBnca je BnDho oWtHeHa.
- TecTepa Byue neBO nIN DeCHO (y3pOKoBaHO HepaBHomepHM OuTpeHem nn OwTeHeHem cMo Ha jeHoj CTpaHn).
YeCTo, anH HexHo oUtpeHe naHa je HajeFikacnJe. TaJa he 3a cBaKy pe3Hy IVuCy 6InI DOBoJbHa 2-3 NotNcKa TypnJom. KoHCTpyKlJa NaHaTe TcTepe je npkaHa Ha cnu 61.
HaNoMeHa: PpeBEniKa ydaIbeHoCT n3MeHy ceuBa mepaHa dy6nHe Ha noynr pe3aqa noeHaba pn3NK oD noBpaTHoYdapca.
Imajte Ha ymy cnepeha npabuia:
DyKHa CBnX HOKeBa Tpe6a Da 6ye nCTa - OBO CmHByje pN3NK oJ NOBpaTHor ydapua n obe36ehyje HeCMeTah pad.
He outpnte naauc ka ja je nykina h ceuBa 3 MM nnn Mahe - naHaCe Mopa 3aMeHHTN HOBM.
- Ie6bHa cTpyrotInHe 3aBnCn oD pAcTojaHa n3MeHy pe3He nBnue n rpaHnHnKa dy6nHe.
- Ontmajna ydaheNoct n3MeHy ceuBa n pa3MaKa pe3Hor 3a 90nN 91PKC naHaCa 0,65 MM.
CBNHOKeBn Tpe6a HAOUtpen NOy rnoM O 30°.Pa3NHyTN yRIOBnybP3ATn XabHe, ONAKWATn paMahe cMOOTx, NOBeHabajy Pn3NK od NaHcna Noma.
Kopncntte Typnne nizajHnpaHe 3a oWtpeHe IHaHaTecTepa.
- OnTImaHn npeHHK TpyNije 3a CBaKn TIN CeHbA:
-90NKC:4,5MM(3/16")
-91PKC:4,0MM(5/32")
- PpNJIKOM OwTppeBa rypHnTe Tpynnjy oD ce6e - HemojTe OwTpntu y o6a cMepa.
- PpBO Tpe6a HAOuTpHTN HAJkpaHy OoTPnUy. 3aTMM HAOuTpNTe octane Tako Da DuyKHa CeuBa 6ye jeJHaKa.
- HauHH pyKOBaHa faajIOBIma je npIka3aH Ha cNkama U1,Д1.
YIWHEBE TPAKE 3A BOBHeE
YnOBn n npaunHa ce ckynbajy y BODmInu, ometayhncno6oHKnpeTaBe IaHua HcraTINBHO yTuCyHn Ha NOMa3Nbae. OChnte raIOBpemeHo KaDa OwTpTe INI MeBaTe NaHaC TaHKM aJATOM (cn.E1).
CHIHTHEBE NOKJONU3YNUAHNKA
YnOBn, npaunHa n Dpyr 3araHbauH Mory ce akymylnpaTn HcnoD nOKNoIua 3ynuHaNka n 3ynuHaNka n HeratNBHO yTucaTn Ha paJ jaJeHHue. TpeBa ra nepmoNuHo YmCTTN (Cn.Φ1).
UHHeBcOTBOPA3ANCNYUTAHBEYbA
OTBOP 3a INyUtahe yIba MoKe NOCTaTN KOHTAMHnPaH, CNpeaBajyHa da ce yIbe npabuHNO paCnopeNIO JAnCuY NUnKn. OBO he HeratNBHO yTucaTn Ha pad ypehaja. ODbOHN OTBOP Tpe6a nepNoDmHoo YnCTNTn Ipema CneDeHMM yNyTCTBUMA:
- CkHnTe noklonau NaHuaHnka nHaHa.
- YKIOHNTe OCTaTKe TaHKIM OdBnjaJeuHm IIN CnUHm aJATOM.
- INCTaInpajte 6atejuy n oKpeHnTe ypehaj nomohy npekndaay. Ybe he tehn, yknabajync bne poectane Heuictohe.
- YKJIOHnTe 6aTePjy. BpaTne naHau n 3aTBOpnte noKJOnau NaHuaHnKa (cN.Γ1).
ПРОМЕHA JAHUACHNKA
OwTeHEn Nn NCTpoeHn NaHauHmN he OWTtNTn NaHaC. CToRa, yBeK npOBepTe cTaHe NaHauHnKa npe 3aMeHe NaHca (cNka X1).
Ako je Hocau nCTpoWeH, 3aMeHHTe ra HOBIM 3ajeHIO ca ocNrypauHem (cI. N1).
CKIADNIITE
Ipe cknadmTeHa ypehaja Ha duynn BpemeHcKn nepnoi, cnneinte ynyTCTBa y HacTaBky:
OuHCTnTe ypehajycknaIay ca rope HabeJeHIM TaKaMa.
- YKNOHHTe TnABY.
- HakoH uHHeHa ypeHaja, noMaKnTe ra tako wTo hete ra nokpeHyTb 63 onTepeHeHa.
- CtabNTe noklonau BoDnIuue.
- Icnpa3HnTe pe3epBoap 3a yIbe.
IEPNIOINUHO ODPXABAHE
Tabena y hactaBky npika3yje akTnBHOCTN oDpxKaBaHa n npenOpyuHn BpeMeHcKn nepno3 3a HnXoBO O6aBbAhe.
| ЕLEMENT / Фунckeциlia | Када / колinglyко? | |
| МOTOPHA TECTERA | Конtrona | Пре уnotробe |
| Чишени | Нakон уnotробe | |
| Пэрелд у obnaшениом сөрөncу | Са发布时间 / рп сөлadiштэн | |
| Ланч.Tстеpe | Контpona | Пп eуnotробe |
| Оштpene | Пп eх scнадиштэн / у сычajи hyждe | |
| Рунер | Контpona | Пп / пооч eуnotробe |
| ДемоNTажa | Пп eх scнадиштэн | |
| Плдмазиваьe | П探测а систетаюдмazиваьa | Пп eуnotробe |
| Свиг津贴 | Контpona | Пп eуnotрobe |
| Зakлүчаваьeпreakdачa | Контpona | Пп eуnotрobe |
| Улынчeŋ | П探测а заггит检п | Пп eуnotрobe |
| Виjsи и habртke | Контpona | Нedingbo |
PEUABAbe IPOBJIEMA
| Плобlem | Могуну уз Pok | Плобоженио решende |
| Тостера ce He nokpehe. | Немаринна Истадацида bateри Joe. | Истадацяte bateрию решма уптустима. |
| ПлобLEM ca bateриом (низak нано). | Налунite bateрию и заимеITE je ai有很大 дотатнix рлоблесma. | |
| Блokирати. | Пл'tиснчITE дугма 3a откльчаванe | |
| Тостера ce самаши Крычу щ НAKОК КраTKOR Вremena. | Бateриja рpr краjusty. | Налунite bateрию и заимеITE je ai有很大 дотатнix рлоблесma. |
| Ланц подмазан. | Плразан розервогор за улб. | Долиjeeулб. |
| Пльави Вдоч. | Чіст. | |
| ОпструкциJA система подмазимьа. | Чіст. | |
| Тостера ce padу макималном Брзигом. | Немаринна Истадацида bateри Joe. | Истадацяte bateрию решма уптустима. |
| БateриJA рpr краjusty. | Налунite bateрию и заимеITE je ai有很大 дотатнix рлоблесma. | |
| Енсправан погон. | Пл\'равka y obnaшенom сөрвсу. | |
| Пл按键е вибраци Joe (ODмaj nckъчи!) | Плава Ланц aiin BODица | Пл\'дспite роложaj bo\"ице hanetocct. |
| Оштěнhoe урehaja. | Пл\'равka y obnaшенom сөрвсу. |
YNYTCTBO 3A YNOTPE6Y - UKAPE 3A KINBY OBNUY
Hanomeha: Cnehe ynyTcBa BaKe 3a npInoKeHe MaKa3e 3a XnBy orpaNy.
IIOEUABAHIE NOJOKAJAMAKA3A
PnTCHNTe DyIme rnaBe noIoxaja n OKpeHnte ra Ha notpe6Hy yIa. OTnyCTne npTNCaKHa DyIme 3a 3akJbYhabHe noIoxaja. Yrao ce MoKe NoDeCInO-22.5 日 do 90^ 6 no3uJa (fMr.J1,K1).
HanomeHa: HakoH noeJaaBa yra, yBepTe ce da je rnaBa y jeHoo od 6 moryhnx nonoxaja (KnK 3Byk).
TPAHCIOPT AJATA
KaHa HocHTe anat, n3BaHNTe 6aTeepnju y CTaBHTe NOKlonau 3a MaKa3e. Da 6bCTe YKNoHNIN NOKlonau, HeXHO rA CTCHNTe, a 3aTMM NOByuTE (cNka I1).
Ope3nBaBe
ДOK сюгпе на CBpctoj NOBpHmNи 3ay3nMaTe CTa6nHaN noIoxkaj, noctabIne ce Tako da yrao n3MeHy cTpeNe n Tna Tokom pada He npena3n 60^ . Tokom pada HexKHO npITucHIne odceyehe rpaHnue. De6JIe rpaHe Tpe6a InceHn Ha φpaarmhte
CHWTHHePE3A4A
Pe3Ha ⅢnIka Tpe6a Da ce NCTN cyBOM ININ BnaXHOM, canyHacTOM n IcueJehom Kpnom. HakoH pada OCHNTe TpaKy od npaunHe YETKOM n NOdmaxKeTe je (cN.M1).
HaHOMeHa: HEmoJTe KOpNCtNTn 6eH3nH, anKoxon nnn Dpyre XemkaJnne 3a nnHe. To MoKe OwTeNTn ypehaj. He nepTe naJCHy noD Tekyhom BOOM HHTN je ypaHajTe y BDOy, jep MOKe n3a3BaTn Kopo3nju.
IOMMA3NBAHbE
Ipe pada nn CBAKnx cat BpemeHa TOKOM paJa HaHeCnTe Mact Mane rctnHe, Hnp. y cnpejy, Ha HOX (cn. H1).
CKNAIINITE
Ipe cknadmTeHa ypehaja Ha dyxN BpemeHcKn nepnoD, cneDuTe ynyTCTBa y HacTaBky:
OuHCTnTe ypehajycknaJy ca rope HaBeJeHIM TaKaMa.
- Yknohnte rnaBy.
- Ctabite noknonau HOka.
Anat yBaTn BaH DomaJaja Deue, Ha cyBOM MeCTy H He n3NaTaTN KIN.
PEUABAbeIPO6JIEMA
| Поблел | Могуну узок | Проблесно решения |
| МOTOP He paи. | Батура Ниje на месту. | Инсталаятse Батупиju рема уптуCTВима. |
| Нанон Батупи ще яnpенизak. | НанунITE bataриьи и за themselves ща вима ддаTHINx поблелma. | |
| Немсправан поон. | Поррава у oblaшениом сөрв rescу. | |
| Нанон Батупи ще яnpenизak. | НанунITE bataриьи и за themselves ща вима ддаTHINx поблелma. | |
| Рezаши ce нскльуну щ 如ков кра tkор вретена. | Перегове. | Зayставile Машину и OCTавile щ 如 ce oxлади. |
| Погон не постени мамималу брэну | Батериja Ниje павлино Исталлара. | Исталларite Батерию пера угтустима. |
| Нанов Батериje щ. пөрөдя. | НанунITE Батерию и заменITE щ 如 има дүдathхи пөбөдема. | |
| Енсправан погон. | Погравka y obnaшенom сөрbethу. | |
| Оштоши ce He nomeрау (одмал искльуне!) | Погешан угao сүва. | Погobерида ялne щ ралaba павлино поставьehа. |
| Стара Тета Изөнүй пөрөдя. | Искльунite у畴үай. Кориспtle Көнүша дү уклонITE остатke. | |
| Енсправан погон. | Погравka y obnaшенom сөрbethу. | |
| Пөр Jake вібрашие (одмал искльуне!) | Оштошие су оштөнө, савлие илү NGТROSHA. | ЗаменITE оштошиe. |
| Енсправан погон. | Погравka y obnaшенom сөрbethу. | |
| Мотор и Рожеви се He заүставлaj (одмал Изваши батерию!) | Несанak сту jo. | УkslonITE Батерию. Погравite y OBnaшенom сөрbethу. |
3AWTNTA KMBOTHE CPEINHE
EneKtpuHn npO3BODn He Tpe6a Ondaratn Ca KyHMM OTnadom, BeHnx Tpe6a Ondaratn y OrodapajyHa noctpojeBa. HNfOpMaunJe O ondaraHy daje npOdaau pOno3BDoA nIn nokanHe Bnactn. OtnadHa eNeKtpnuHa n EneKtpoHcKa onPema caJpnK cyntaTHe Koje HnCy HeyTPanHe 3a npnpOHy cpeinyH.HepeuKnnpaHa onpema je NoTeHnJaHa npTeHa no XKNBTHy cpeDnHy n3dpabYeBuHy.
"Pyna Tonek Cnoka 3 orpaHn3OHa OndOBnEa3nAhnHocu" CnoKa KOMaHnTOba ca cedmTe m BapaaBn, yN. TporpauHsHa 2/4 (y DaBem TeKCTy; "Pyna Tonek) oBaBeWtBa DcBa ayTopcka npaba HcnpkajOBor nppyuHnka (y DaBem TeKCTy; "PnpuyHnki"), kRbUbyJynHerOB TeKT, fotporpaFjne, dJaRpaMe, uptexke N Herobe cacTaBe, npinaJady NckbYunBo Tonek rpynn n noDnyk npabHOJ 3awTNH y cnLAdy ca 3akOHOM a ayTopckMn CpOHNm npabMa od 4. p6bpya1994. (TJ. hacOnnc 3a zakoHe 193 2006. 6p. 90, TaKHa 631, caImMeHama). KOpnpaHe, oBpda, oBjaBbNaBe, KmjeHa y KomepuiJanaHe cbPxe UJenor PnpuyHnK n HberoNx noJeDnHaHHx enEmehata, 6e3 nCmeHe camIaHocTHrPyne Tonek CTpo Ro j 36paBHeNo MOKpe 3yTTnpatn rpaahhckom N KpnBnHOM odroBopHoHly.
GR NPQTOTYNO (AEITOYPTIKO) EΓXEIPIAIO AAYΣΟΠΡΟ NΚΑ ΨΑΙΔΑΚΙ ΦΡΑΚΤΟ Y MΝΟΥΜ 58G098
IPOSOXH SHMANTIKO: AIBA2TE IPOSEKTIA K PIN XPHSEMONIOIHETE TO HAEKTO EPRAAEO
AYTO EFXEPIIO KAI YAAETE AYTO TON EFXEPIIO TIA INPAITEPQ ANAOPA
ΣYΓKEKPIMENOI KANONE ΣAΦAΛEIA ΣI IPIIONIA MNOYM
XpnaiotoinoTeTo nAeKtpiKO epyaaio mOvo yia Tov TPOoPiO TOU.
- Attayopeetai n epyaiae nAekptkoepyaaio uToNv tnpiea aakooA n aaawv toivwv n otav eote eapawc Koupaoevoi naovapoi.
Mnyepyaceote oBpoxn noooupeveic kaipikec ouvthkec.
Oav epyaceote, xpoioutoioe ToV npexoevo iavta oou.
A tayopeueta n xpon TnS moupa a e aaec kepaaeKOTnC aTO autcTtou TEPaBavovta oTo oE.
- Otav epyaceotee to aauoattpiovo, dowte ibaitepn npooxno TTO TepiBaalov - kpatne To Kepai Tou Tpioviou paia atio avpwtoukaiwa.
Mx npoiouie to epyaleio kovtae naekptika kaawia -kottou tpoei va pokaaoei naktpoianxiia!
KaTaNdiapkeia TnCepyaoiac,TO TEPiBaalov PpTeIva TApexei
muo oOo diapuyng yia ToV xeipiotn OE TEPiTTwon ETTIKIVoungs
TTWONS TOKOpEvou KkAdou.
Kata thdiapkeia tnc epyaioias, kpatnoe pia otaepn theon e pia ouitayn, etindeh kal otaepn etikpaveia.
Xpnoiopoiohote atoikopooatauteuko eotaiou - ppoataia niuv, pooataia akons, kaumata kepaacs, poxa epyaaic. Atoquyete qapda poua tou mtopei va tiaotouv oTo uxavio tou Tpioviou. Xpnoiopoiohote utobnata yia ppoataia ano oiothon.
Otav kobete eeyalutepa kaidia, koyte ta oe pauoata - aTo TEaos Tou kaidoiu expi tov Kopmo.
Ta TAYUPEPA KALADI PPETEVA KOBOVTAI ATO KAATKAI pETA VA KOBOVTAI ATO TRAV.EAV TPOOATAHOEVEA KOUETEva Xovtpo KLADI EVTELAOS ATO KATW, MTOPEI VA TOIMTNsouv TA KALADI OTNV OBNYO PABOKAI VA MIAOKAPOV TO TPIOVI.To VA KOUETE EVA KALADI EVTELAOS ATO TIVKOPQHgTAOTAAEI TO KALADI.
Piv aTOKaE xpon, Ta PPenti va EeYxetai n TexviKn kataaon Tou epyaeiou kai twv avawoiuow tou.
Bébaiweite 0ti n oukeun aiiaivetai ootá - eEyxete taktika n otαθμn laioou stn deaeuvn kai n batotnta tou ouotnpatos liavans.
MnV BuOiEe Tn OoKEun OE VEPO KAI mN V TIV NIAVETE KATOW aTIO TPExouMevo VEPO.
ELeVxETe TAKTIA TOV BAto OOpas TnAsluOaTOU Pioviou - naLuOda TpTei va akovicetai TAKIka kai eav o BAtoos OOpas EITODIEI TepaTEpw Aokoviaa-AvtkataaOnote TIV.
Oe oepyaoies ouvtnpnons TpeTt va ekteauovtae noukeun aeepyoioinuev kai apapeevn tv tataia.
Mx npoiopoieTo epyaaleo oe pinnwn Bnns n duoeitoupyiac.
- Ε περιπτων ανησυχηκών συμπτωματων του ὄποδεικυουν ἀκαταλληλ Λειουργία της συοκεύς, αἰτένεργοτοιηθε Μεύως και επιθεωρησε το εργαλείο.
Etnynon Twv EIKOVypaKATW Tnou XpnoiopoTOnkav

1

2

3

4


6

7

8
-
PpoataeTne aTo nBoxn
-
Xpnoiouroinote Tpoostia akons
- XpoaiopoTOnote TPOoTaTeutika yuaia
- Xpoiouoioe aioiaotikataouta epaocia
- Xpnoipottoinote TPOOTATEUTKA yavria
- ΦορατεΚαταλληλΟ ΠΤΟΡΑΤΕΥΙΚΟ ρουχισό.
- XpnoiopoioiOte TPOoTaTeUnIko KaAuaMa KepaAnC.
- Epyaoteite Toulakyotov 10 tpa pa kpi a to nAekpopa Kaawia
SYKEKIPIMNOI KANONIEMOI AΦAIA ΠIA ΨAIA Α ΦYAKON
XpnoiopoTOnTo nEeKtpiO epyaleio mOvo ia Tov ppoopiao tou.
AtayopeuTai n epyaiae nEeKtpiO epyaiao utn tv emnpia aAkoAo n aaawv Toivw v otav EIATE Epaavoc Koupaevo i aduvaoi.
Mnyepyaoteaebpoxnnoeouoeickaiipkeosvhenke.
Kata tn diapkeia ts epyaoiasc, wote idaitepn tpooxn oTo Tepiabaov - kpatnoTE TO Kepai paia aio avpwtouc kai zwa.
Mx npoioiote to evaieo kovra e naekpika kalwaia -kottou mtopei va pokalaee i naekptoanlaia!
Kata n diapkeia tns epyaiaoc, to nepiiaaov npeneva npapeix iia odo diaapuyns ia tov xeiipotn oe pittwn etikivuvns TTwong tou kouevou kaidou.
Kata tni diapkeia tnc epyaiaic, kpatnoe mtaote pnh teon oia ouuayn, nntenkaiotaepn etipaveia.
XpnoiopoTOnate atoikopooatautekoEoiAio - TPOOtaia tiowv, PPOOtaia aKoNc, KaUmuata KepaHc, poxa epyaosac. AtIOpuyTe Ta apoi dpoxa. XpnoiopoTOnote UTobnmuata yia pooTaia aioai0n.
Otav KoBETe YEaIUTEpa KaOlaia, KoYTe Ta oE OpaUoPata - aTTO TEAOc TOU KAdoiu MEXPI Tov KOpO.
Piv aTó Kaθε XpHα, θa TIPETe Vα λEγXeTa i N TeXViK n KATAOaTou εpyaλeiou kai Twv avawotwv Tou.
BeBaiweite 0ti n oukeun iAiaivetai oWota - EeVxETAKTIKA Tn AITavon tnc paBou kai eapupocTei IATAVTKo evxpeiaTcAI.
Mny BuOIETe Tn ouakeun oE vepo kai uny TnV TIAVETE KATOW anTO TPexouuevo vepo.
OLeC OEPyAoIE OUVTHPnONS TPETEI VA EKTEAOvTAI ME TN OoKEUN aTeVEpyoToiInueN KAI aqaipeEv nTv mTaTApia.
Mx npoiotoeiTo epyaiao o Tepinwn Bnns duouitoupyic.
επeipitwn avnouynikwov ouTTWpatv TOUTOIDEIKVouv akataaann aeitoupyia nC ouokeun, aTVEpyoTOINOTE aepowc kai ETiEewpnoTe to epyaio.
Eteynon Twv Eikovoypaatw vTou xpooiotn8nkav

1

2

3

4


6
7
8
- Pooatae atro tn poxn
- XpnoiopoHoiote TPOoTaia akoHc
- XpnoiopoToInoTe TPOoTaTeUTiKa yuaHia.
- XpnoiIooIHOte aTIOAeONtIKa TnIoUToia epyaoic.
-
Xpnoipootoinote Tpootateutika yadvia.
-
Φοράτε καταλληλο προστατευικό pouχισό.
- Xpnoioutoirote TPOoTaEuniko KaUmuKaepaAnC.
- EpyaTeite Toulambdaotov 10 etpa paakpi aTio nAektpoopa kaawdia.
NEPIEXOMENA
Pnpoopopiec yia to bOpbo kai toug kpadaouos
To eTITIDO 0opBou TOU EKTEIETAI aIO TN OuaKEun TEPIYpapetai aTO: To eTITIDO TNC EKTEIPTOeVNS nxNTIKHS TIEoNG LPA KAI TO eTITIDO nxNTIKNS IOXUOC LWA (OTOU K EIVN aAEBAIoTnA pETPNOs).OI DovnoEIG TIOU EKTEIIOVATI aTO TN OuaKEun TEPIypaovtai aTO NTV TIN Tc ETTaUVGOS FOVNGS a (OTOU K EIVN aAEBAIoTnA pETPNOs). OIA KOLOUeC TANPOPOIeC: n oTAoUN EKTEIPTOeVNS nxNTIKNS TIEANGL PLa, n OTaOuN xNTIKNS IOXUOG LW A KA i N ETTaUVGON DOVNO C hETPHENKAV OUMFWVA ME TO EN 60745-1. To eDooEvO eTTIDEO DOVNO C h MTIOPEVI XPNIOIOTInOE YIA TNI OUYKPION OUsKEUW KAI YIA TNV apxIKN EKTJUNON TNG EKTEON GE Kpdaaouc. To avapepevo ETTIDEO DOVNO G EIVAI AVTTPOOAUTIKO MVO YIA T N BaaIKN XPNON TNG OUsKEUns. EAV TO UNXAVNJA XPNIOIOTIOEITAI YIA BIAIPOPETIKEC EPAPMOYEC H ME DIAIPOPETIA kpyaleia EpyaiaC, to eTTIDEO DOVNO C MTIOPEVI aAAAGEI. To uynlatoePO TENTIDEO DOVNoew Vg ETINPEAOTEI aTO NTV AVETAPKn N TOU OTIAVA OvTNpON TNG OuaKEUns. O IAOYIO TIOU AVapePVOTAI TAPATTAVU EVDEXETAI VA OBNYHOUV OE auqHMeVN EKTEON AE Kpdaaouc KATA N DiApKEIA OLokKnps TNG TEPIOBDU LEITOUPYiac.
Tia va ektiunote ie akpiieia tnv ekthetae on e kpaadoaouc, aabeTe Utoyn TIC TEPIOouc katia Tc oTOIOe o EOTAIoOc eivai aTVEpyoToinuevos n otav eivai EEpyoToinveos aAa dev XpnoiopoToeiT. Apou aIiooynboov TPoaeKTik oAoI oI Taayovtes, n ouvoikkthetaon e Kpaadoaouc mTopei va eivai OmaVTiKaamLOpEn.
Tia Tnv npoataia Tou xpntn antio ts eTTIWoeis Twv Kpaaoaw, Ta Tpentei va epapuocovtai paoetra metpa aoaaleiac, otnw: Tepiodik ouvtnpon nsc ouokeuncs kai twv epyaeiuv epyaia, Tpoataia nC katalnnnc Thepuokpaoias Twv xepiwkai owth opyavwn tns epyaia.
IPOETOIMEA IIA TH AOYAEIA
METAΦOPA TOY EPRAAEIY
OtaepeTe To epyaieio, aapaeote TIV mTatapia kai totoBtneTo kALUma Tou yaliodou. Ia va aapaeote To kALUmu, TIEOTo anla kai TpaBnTe TO (EK.L1).
KAAEMA
Evotkeote oiaouitayn etiapaveia kai taipveTe ia otaeepn theon, putheta TOV eauto aoc etoi wote n ywvia mtaegu tou bpaxiova kai Tou ebapouskata nvy epyaia va untpbetaive tic 60°. Evov pyaceote, TIOE ATAIA KAUMUVA KALABAKIA. Ta TAYUEPA KAAIDI PPETIE VA KOBOVTAI OE pauomuata
KAOAPIEMO TH KOTIKHE MIPA
H paBoc KOTnS TpETeI va KaOapiCetai e OTeYVo h UyPo, oAtouvOePo kai OTumuEvo TAVI. Meta Tny Epyaia, KaOapiote Tn AwoiDa aTTO n Okovn eEv a TIVeLo kai AITavete (EK.M1).
?91PX:4,0 mm (5/32")
ORIGINELE (BEDIENINGS)HANDLEIDING
KETTINGZAAG EN GIEK HEGGENSCHAAR
58G098
VOORZICTIG BELANGRIJK: AANDACHTIG LEZEN ALVORENS HET ELEKTRISCH GEREEDSCHAP TE GEBRUIKEN
DEZE HANDLEIDING EN BEWAAR DEZE HANDLEIDING VOOR VERDERE REFERENTIE.
SPECIFIEKE VEILIGHEIDSVOORSCHRIFTEN VOOR GIEKZAGEN
/The above listed product is in conformity with the following UE Directives://A fent jelzett temek megfel az alabbi iranyelveknek:/
Vysie popisany vyrobok je v zhode s nasledujucimi dokumentmi//Vyse popisany vyrobek splhuije nasledujici dokumenty://Onucanumn no-ope npodym omoeapra ha cnedhum okyemmu//Produsul descris mal sus respecta urmatoarele docume//Das obeyen beschriebene Produkt entspricht den folgenden Dokumenten//Il prodotto supra detrito e conformre ai segunti documentu/
| Dyrektywa Maszynowa 2006/42/WE/Machinery Directive 2006/42/EC//2006/42/EK Gépek//Smermina Europskeho Parlamentu a Rady 2006/42/ES//Smörnice Evropského Parlamentu a Rady 2006/42/ES//Düpekmuea za mawuHume 2006/42/EO//Directive 2006/42/CE privilutilaje//Maschinenrichtlinie 2006/42 /EG//Direttva machine 2006/42 /CE/ | Dyrektywa o Kompatybilinosci Elektromagnetycznej 2014/30/UE/EMC Directive 2014/30/EU/2014/30/EU/Memtromagneses összeferhelösesg/EMC Smermina Europskeho Parlamentu a Rady 2014/30/EU/EU/Memtromagnes 2014/30/EU/EU/Memtromagnes 2014/30/EU/EU/Memtromagnes 2014/30/EU privind compatibilitatea electromagnetica/Richtfinie über elekromagnetische |
| Verträglichkeit 2014/30 / EU/Direktiva sulla compatibilità electromagnetica 2014/30 / UE/ | |
| Dyrektywa RoHS 2011/65/UE zmieionna Dyrektywa 2015/863/UE/RoHS Directive 2011/65/EU as amended by Directive 2015/863/EU/A 2015/863/irányelvvel módositott 2011/65/EU RoHS irányelv//Smemica RoHS 2011/65/Ezmenená a doplenená 2015/863/EU//Sémice RoHS 2011/65/EU pozmelená2015/863/EU//Дуpekmuea 2011/65/EC na RoHS, uzmezenia cДуpekmuea2015/863/EC/Direktiva RoHS 2011/65 / UE modificata prin Direktiva 2015/863 /UE//RoHS-Richtlinie 2011/65 / EU geändert durch Richtlinie 2015/863 /EU/Dirett | Dyrektywa o Emisiji Halasu 2000/14/WE zmiezionna 2005/88/WE/Noise Emission Directive 2000/14/EC as amended 2005/88/EC//A 2005/88/EK módositott 2000/14/EK zajkibocsatasi irányelv / /Smemica o emislich hluku 2000/14/ES,2005/88/ES//Sémice o emislich hluku 2000/14/ES,2005/88/ES//Дуpekmuea za uymoobumemu.ruu 2005/88/CE/Lamsschutzrichtlinie 2000/14 / EG geändert durch 2005/88 /EG/Direttiva sulrumore 2000/14 / CE modificata dalla 2005/88 /CE/ |
| LwA=95,2 dB(A) K=3 dB(A) | LwA=98 dB(A) |
| Zmierzony poziom mocy akustycznej - pilarka tańcuchowa | Gwarantowy poziom mocy akustycznej - pilarka tańcuchowa |
| /The measured sound power level - chainsaw/ | /Guaranteed sound power level - chainsaw/ |
| /A miert hangteljesitményszt - läncfürresz/ | /garantát männisyseg - läncfürresz/ |
| /Nameraná hladina akustického vykonu - motorová pila/ | /zaručená hladina akustického vykonu - motorová pila/ |
| /Märená hladina akustického vykonu - motorová pila/ | /zaručená hladina akustického vykonu - motorová pila/ |
| /Mampehomo huo ha zeykoëma mochnocm - MOMOPHA pešačka/ | /epaunmupano huo ha zeykoëma mochnocm - MOMOPHa pešačka/ |
| /Nivelul de putere sonor māsurat - drujba/ | /Nivel de putere sonor garantat - drujba/ |
| /Gemessener Schalleistungspegel - Kettensäge/ | /Garantierter Schalleistungspegel - Kettensäge/ |
| /Ill livello di potenza sonora misurato - motosega/ | /Livello di potenza sonora garantito - motosega/ |
| LwA=91,3 dB(A) K=3 dB(A) | LwA=94 dB(A) |
| Zmierzony poziom mocy akustycznej – noźycy doźwyopłotu /The measured sound power level - hedge trimmer/ /A miert hangteljesitményszint - sōvényvágó/ | Gwarantowy poziom mocy akustycznej – noźycy doźwyopłotu /Guaranteed sound power level - hedge trimmer/ /garantát mennílység - sōvényvágó/ |
| /Nameraná hladina akustického vykonu - noźnice na zivy plot/ /Měfená hladina akustického vykonu - plotostřih/ | /zaručená hladina akustického vykonu - noźnice na zivy plot/ /Zaručená hladina akustického vykonu - plotostřih/ |
| /Měpehomo Húebo Na zhéykóea Mòuchocn - hóxuía 3a kúe nám/ | / Zapahmupánho Húebo Na zhéykóea Mòuchocn - hóxuía 3a kúe nám/ |
| /Nivelul de putere sonor māsurat - tuns gard viú/ | /Nivel de putere sonor garantat - tuns gard viú/ |
| /Gemessener Schallleistungspegel - Heckenschere/ | /Garantierter Schallleistungspegel - Heckenschere/ |
| /lì livello di potenza sonora misurato - tagliasiepi/ | /Livello di potenza sonora garantito - tagliasiepi/ |
| Pilarka lancuchowa spelnia wymagania norm: /The chains meet the requirements of the following standards: //A lancfurasz megfelé a követkežo szabványok követelmenyinek://Retazová pila spína poziadavyk nasedujúcich noriem: //Motorová piä spnjue pozadavyk nasedujícich norem: //Bepučným mpuoh omzoeapá na ušuckáanma na cneðhume cmaáapmu://Ferästrául cu lanf indepințe cerinfte umlatoarelor standarde://De Kettensäge erfüllt die Anforderungen der folgenden Nomen:/La motosega soddisla i requsiti delle seguniti nome:/ |
EN 60745-1:2009/A11:2010; EN ISO 11680-1:2011;
EN 55014-1:2017; EN 55014-2:2015;
- SPECIFIC SAFETY RULES FOR BOOM SAWS
- Explanation of the pictograms used
- SPECIFIC SAFETY REGULATIONS FOR HEDGE SHEARS
- CONTENTS
- APPLICATION
- DESCRIPTION OF THE GRAPHIC SIDES
- Figure A:
- Figure B:
- TECHNICAL PARAMETERS
- NOISE AND VIBRATION DATA - CHAINSAW
- NOISE AND VIBRATION DATA - HEDGE SHEARS
- PREPARATION TO WORK
- BATTERY INSTALLATION
- HEIGHT ADJUSTMENT
- MOUNTING THE TOOL ON THE BOOM
- SHOULDER BELT
- TURNING ON THE MACHINE
- OPERATING MANUAL - CHAIN SAW
- CHAIN ASSEMBLY AND DISASSEMBLY
- CHAIN TENSION ADJUSTMENT
- LUBRICATION
- CUTTING
- TRANSPORTING THE TOOL
- CHAIN SHARPENING
- CLEANING THE GUIDE BAR
- CLEANING THE GEAR COVER
- CLEANING THE OIL DRAIN HOLE
- CHANGING THE SPROCKET
- STORAGE
- PERIODIC MAINTENANCE
- ADJUSTING THE POSITION OF THE SCISSORS
- PRUNING
- CLEANING THE CUTTER BAR
- ENVIRONMENTAL PROTECTION
- DE
- TEXHUNECKNEXAPAKTEPNCNIK
- DAHHbIE, KACAIOUINECR WYMA N BIBPAUN - CEINHAR INIJA
- DAHHbIE, KACAOUNECRA UyMA N BnBpALUNN - KYCTOPE3
- CHCTKA HANPABJIIOUeI UINHbI
- UHCTKA KpbIiK3B3DOUKN
- OCHCTKA OTBEPCTNДЛ NODAH MACJA
- 3AMEHA 3BE3DOUKN
- XPAHEHNE
- NEPHNOIDNUECKOE TEXOBCJLYKUBAHNE
- PYKOBOCTBO NO 3KCIYYATAUIN - KYCTOPE3
- PERYINPOBKA NOJIOXEHNHOXHNU
- NEPEHOCKA NHCTPYMEHTA
- 05PE3KA
- CHCTKA JIe3BnA
- CMA3KA
- POncHeHH BnKOpncTaHnx nIKTOrpam
- KOMNJIeKT
- 3ACTOCYBAHH
- ONIC INIOCTPAUIN
- MaJIHOK A:
- MaJIIOHOK B:
- Inhopmaia npo wym Ta Bi6paio
- IITROBKA DO POBOTN
- BCTAHOBJIENHRAKUMYJRTOPA
- PERYJIIOBAHHBNCOTN
- MOHTAX IHCTPYMEHTY HA CTPIJY
- JIeOBN PEMIHb
- BMUKAHHRA MAUINH
- IHCTPYKUI3 EKCNIYATAUJII JAHUIOBA NINKA
- 3BIPKA TA DEMOHTAK JAHUIOFA
- PERYIIOBAHHH HATRYJAHUIGA
- 3MAUUBAHH
- PI3AHH
- IIEPEHECEHHIHCPTPYMEHTA
- 3ATOUBAHHJAHUO
- OuHueHHHaHPMHOI
- OuHHeHHKPNsK3yBACTOKOJlECA
- OuHueHH3NHBHOOTBOPYMACJIA
- 3AMIHA 3Y6CACTOFOKOJECA
- 36EPITAHH
- NEPIOIDHETEXHIHEOBCJYROBYAHNHA
- TENTO NAVOD A USCHOVEJTE TENTO NAVOD PRO DALSIPOUZITI.
- ZVLASTNI BEZPECNOSTNI PRAVIDLA PRO RÁMOVÉ PILY
- CISCENJE VODILNE VRSTE
- CISCENJE OPREMA COVER
- KONKREETSED OHUTUSEESKIRJAD POOMSAAGELE
- KASUTUSJUHEND - KETSAAG
- MOPEXKEH TPOH HOXKU3A PNET
- 58G098
- BHIMAHNE BAXHO: IPOUYETETE BHIMATEJIHO IPEIN DA N3I0J3BATE EJEKTPOHHCTPYMEHTA
- TOBA PbKOBOJCTBO I 3ANA3ETE TOBA PbKOBOJCTBO 3A DOnbJIHNTELHA CnPABKA.
- CNEUHINIPIABNJIA3A6E3ONACHOCT3ATPOHOCTE
- O6aChenneHa n3n013BaHnTe NkTOrpaMn
- CNEUΦNHYIINPABUNA3ABE3ONACHOCT3AHOXNUITE
- 06acheHHe Ha n3noJ3BaHnTe NkTOrpaMn
- CbDbPXAHNE
- PNIJIOXEHNE
- ONICAHNE HA IPAQHHTE CTPAHN
- Durypa A:
- ФИ Grypa B:
- 3ATOUBAHE HA BEPUNATA
- IOYNCBAHE HA HANPABHATA JIEHTA
- IOYNCBAHE HA KANAKA HA IPEDAKITE
- IIOYCTBAHE HA OTTIYCKA 3A MACJITO
- CMRAHA HA 3bEJIETO
- CbXPAHEHNE
- NEPNOINUHA NOIDPbJKA
- POSEBNI SIGURNOSNI PROPISI ZA ŠKARE ZA ŽIVICE
- UPUTSTVO ZA UPOTREBU - MOTORNA PILA
- CISCENJE VODILICE
- CISCENJE POKLOPCA ZUPCANIKA
- CISCENJE OTVORA ZA ISPUSTANJE ULJA
- IOCEBHN B3E3BDHOCHN PONNC 3A 3KAP3A 3NBY OBNU
- 06jaushhebekekopnshehnxnkTorpama
- CAJPKAJ
- ANIKALUNJA
- ONNC PPAΦNUKNX CTPAHA
- CnkaA:
- CnkaB:
- TEXHNUKN NAPAMETPN
- HnΦopmaunje 6yun n Bn6paunjama
- ПППЕМА 3A PAД
- YIWHEBE TPAKE 3A BOBHeE
- CHIHTHEBE NOKJONU3YNUAHNKA
- UHHeBcOTBOPA3ANCNYUTAHBEYbA
- ПРОМЕHA JAHUACHNKA
- CKIADNIITE
- IEPNIOINUHO ODPXABAHE
- YNYTCTBO 3A YNOTPE6Y - UKAPE 3A KINBY OBNUY
- IIOEUABAHIE NOJOKAJAMAKA3A
- TPAHCIOPT AJATA
- Ope3nBaBe
- CHWTHHePE3A4A
- IOMMA3NBAHbE
- CKNAIINITE
- 3AWTNTA KMBOTHE CPEINHE
- GR NPQTOTYNO (AEITOYPTIKO) EΓXEIPIAIO AAYΣΟΠΡΟ NΚΑ ΨΑΙΔΑΚΙ ΦΡΑΚΤΟ Y MΝΟΥΜ 58G098
- AYTO EFXEPIIO KAI YAAETE AYTO TON EFXEPIIO TIA INPAITEPQ ANAOPA
- ΣYΓKEKPIMENOI KANONE ΣAΦAΛEIA ΣI IPIIONIA MNOYM
- Etnynon Twv EIKOVypaKATW Tnou XpnoiopoTOnkav
- SYKEKIPIMNOI KANONIEMOI AΦAIA ΠIA ΨAIA Α ΦYAKON
- Eteynon Twv Eikovoypaatw vTou xpooiotn8nkav
- NEPIEXOMENA
- Pnpoopopiec yia to bOpbo kai toug kpadaouos
- IPOETOIMEA IIA TH AOYAEIA
- METAΦOPA TOY EPRAAEIY
- KAAEMA
- KAOAPIEMO TH KOTIKHE MIPA
- ORIGINELE (BEDIENINGS)HANDLEIDING
- KETTINGZAAG EN GIEK HEGGENSCHAAR
- VOORZICTIG BELANGRIJK: AANDACHTIG LEZEN ALVORENS HET ELEKTRISCH GEREEDSCHAP TE GEBRUIKEN
- DEZE HANDLEIDING EN BEWAAR DEZE HANDLEIDING VOOR VERDERE REFERENTIE.
- SPECIFIEKE VEILIGHEIDSVOORSCHRIFTEN VOOR GIEKZAGEN
Brand : Graphite
Model : Energy+ 58G098
Category : Electric hedge trimmer