
RT3 - Surveillance Camera Tenda - Free user manual and instructions
Find the device manual for free RT3 Tenda in PDF.
User questions about RT3 Tenda
0 question about this device. Answer the ones you know or ask your own.
Ask a new question about this device
Download the instructions for your Surveillance Camera in PDF format for free! Find your manual RT3 - Tenda and take your electronic device back in hand. On this page are published all the documents necessary for the use of your device. RT3 by Tenda.
USER MANUAL RT3 Tenda
Outdoor Wi-Fi Camera

https://www.tendacn.com/service/default.html
English - Get support and services
For technical specifications, user guides and more information, please visit the product page or service page on www.tendacn.com. Multiple languages are available. You can see the product name and model on the product label.
OocTynHi KInbKa MOB.
Bn MoKeTe nO6aHTn Ha3By BInpOby Ta MoJeIb Ha eTnKetU npOdykTy.
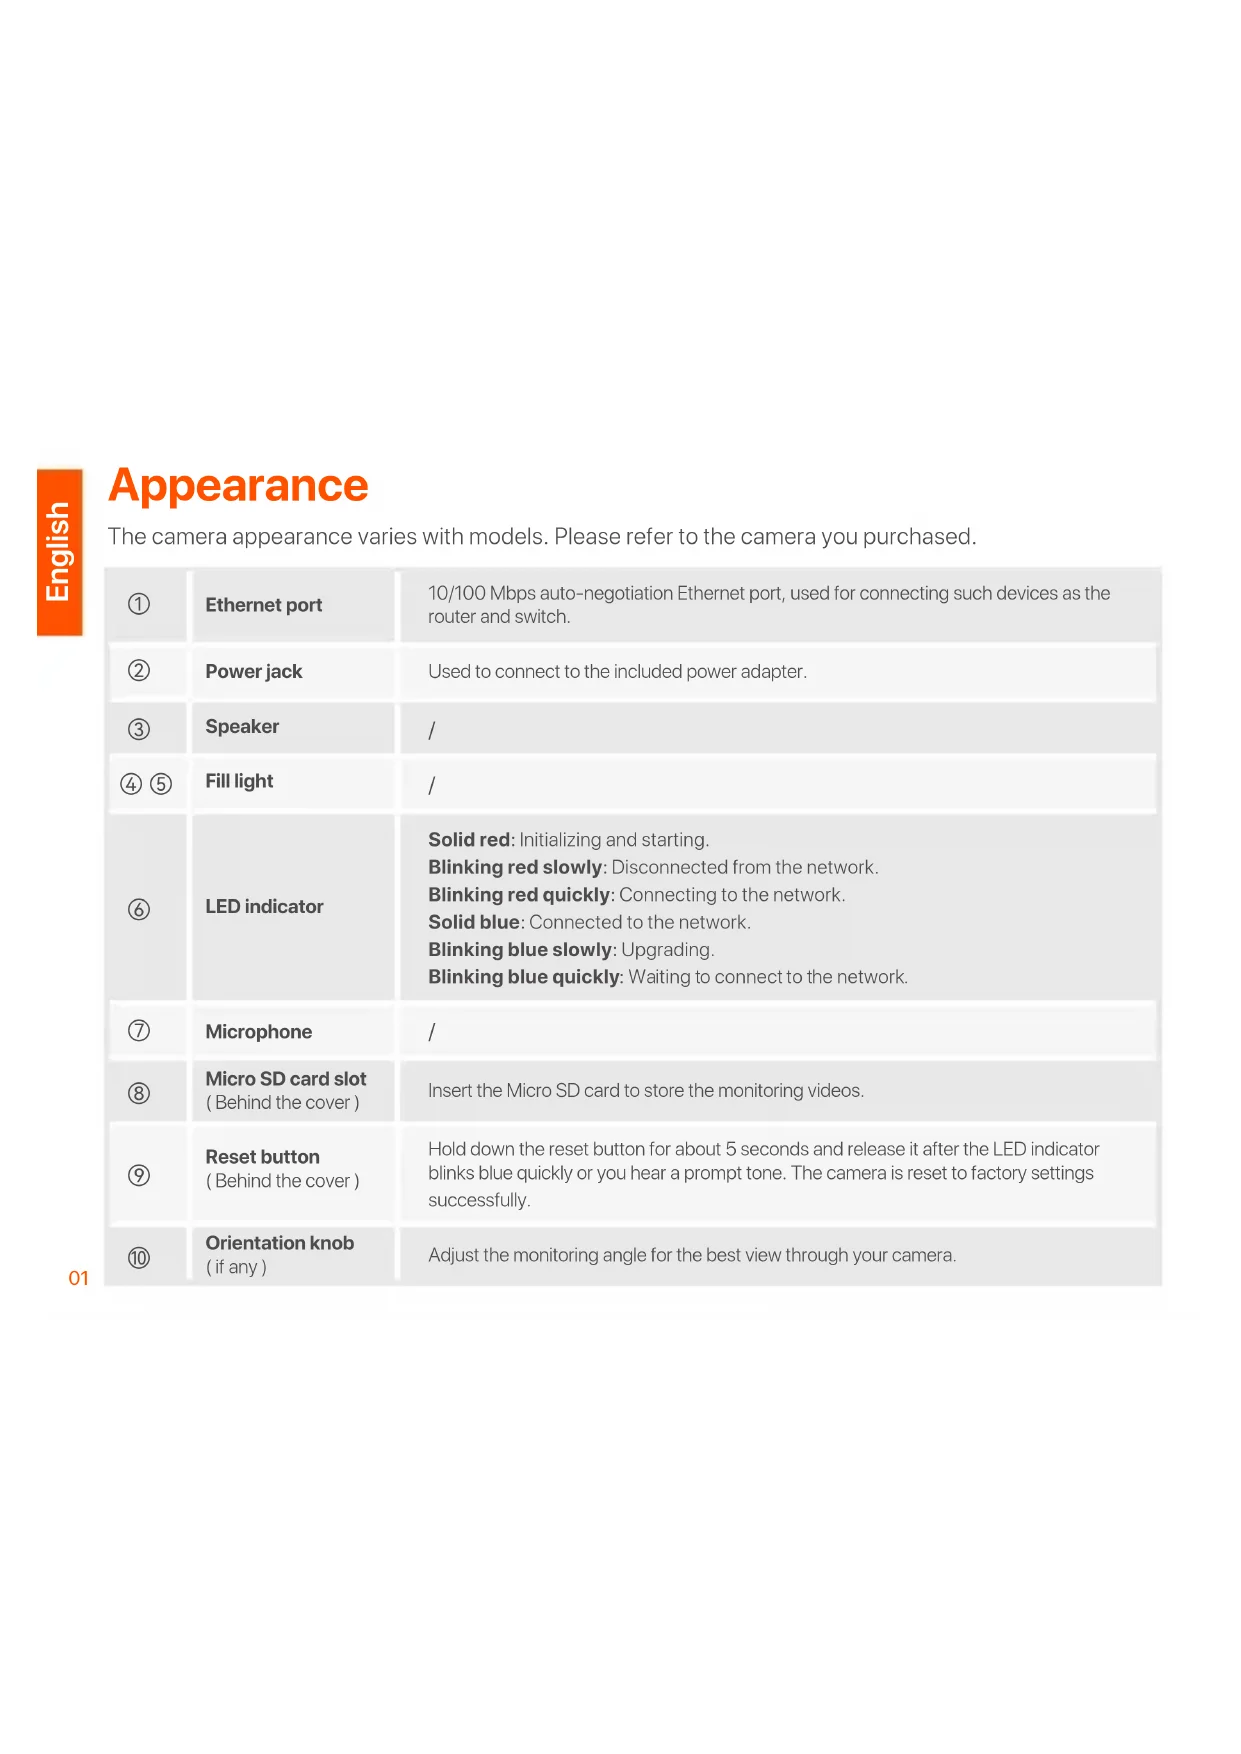
The camera appearance varies with models. Please refer to the camera you purchased.
| ① | Ethernet port | 10/100 Mbps auto-negotiation Ethernet port, used for connecting such devices as the router and switch. |
| ② | Power jack | Used to connect to the included power adapter. |
| ③ | Speaker | / |
| ④ ⑤ | Fill light | / |
| ⑥ | LED indicator | Solid red: Initializing and starting. Blinking red slowly: Disconnected from the network. Blinking red quickly: Connecting to the network. Solid blue: Connected to the network. Blinking blue slowly: Upgrading. Blinking blue quickly: Waiting to connect to the network. |
| ⑦ | Microphone | / |
| ⑧ | Micro SD card slot (Behind the cover) | Insert the Micro SD card to store the monitoring videos. |
| ⑨ | Reset button (Behind the cover) | Hold down the reset button for about 5 seconds and release it after the LED indicator blinks blue quickly or you hear a prompt tone. The camera is reset to factory settings successfully. |
| ⑩ | Orientation knob (if any) | Adjust the monitoring angle for the best view through your camera. |
Add the camera to TDSEE App

Tips
Before adding your camera, ensure that the router is connected to the internet successfully and the filter function is disabled.
- Power on the camera.
The LED indicator lights solid red after the camera is powered on. When the LED indicator blinks blue quickly, the camera is waiting to connect to a 2.4 GHz Wi-Fi network.
- Download the TDSEE App onto your mobile device by scanning the QR code or searching for TDSEE in the Google Play or App Store.


QR code
- Run the TDSEE App and follow the instructions to complete user registration. Enter the homepage, and tap Add a device or in the upper-right corner of the homepage.
- Scan the QR code on the top of the camera, and follow the instructions in the App.
After the settings are completed, you can see that the added camera is online on the homepage of the TDSEE App, and the camera has been managed by the TDSEE App.
Install the camera

Tips
- Make sure the ceiling is strong enough to withstand three times the weight of the camera.
- You may need a hammer drill, a drill bit (Diameter: 6 mm), a screwdriver, and a ladder for the installation.
Ceiling/wall mounting
- Place the template at the desired location.
- Drill screw holes and insert anchors into them. (Drill bit diameter: 6 mm; Hole depth: 28-32 mm)
- Fix the bracket (if any) to the desired location.
- Fix the camera using the screws.
Pole mounting
You can use this method if the bracket is provided.
- Pass the strap (self-prepared) through the holes in the bracket, and secure the bracket to the pole.
- Fix the camera using the screws.
Adjust the monitoring angle
Loosen the orientation knob (if any), adjust the orientation of the camera as required, then tighten the knob.
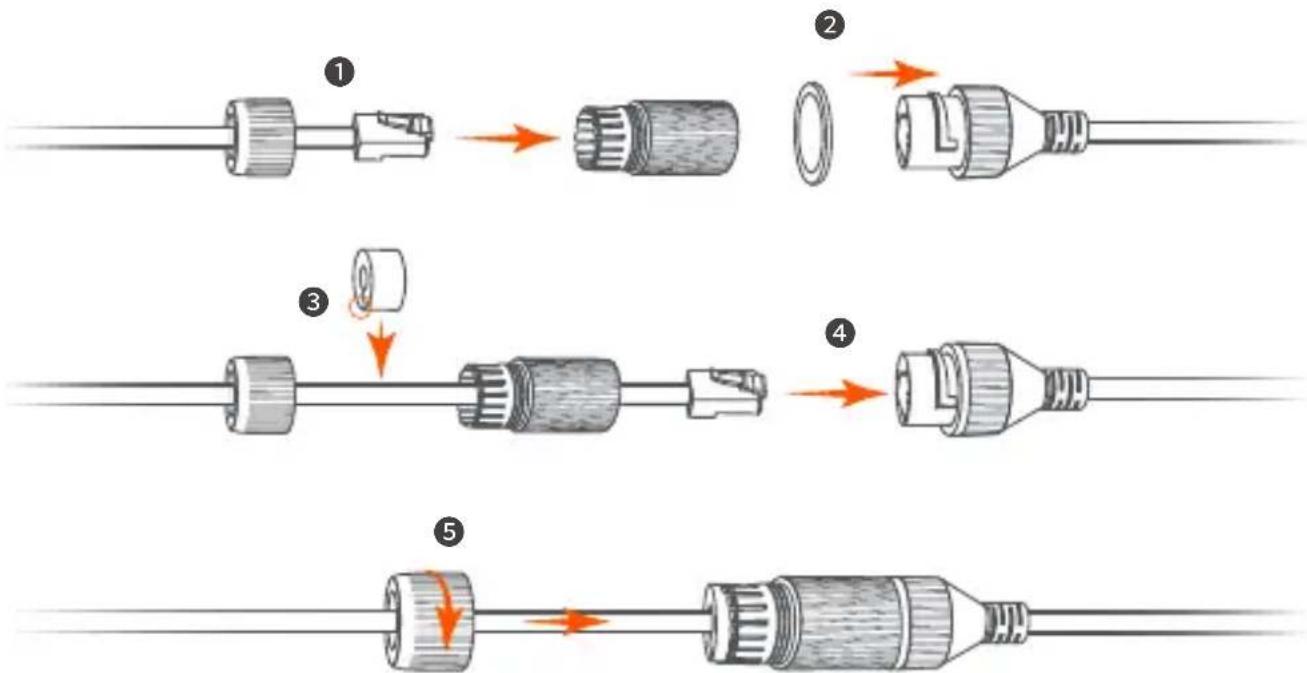
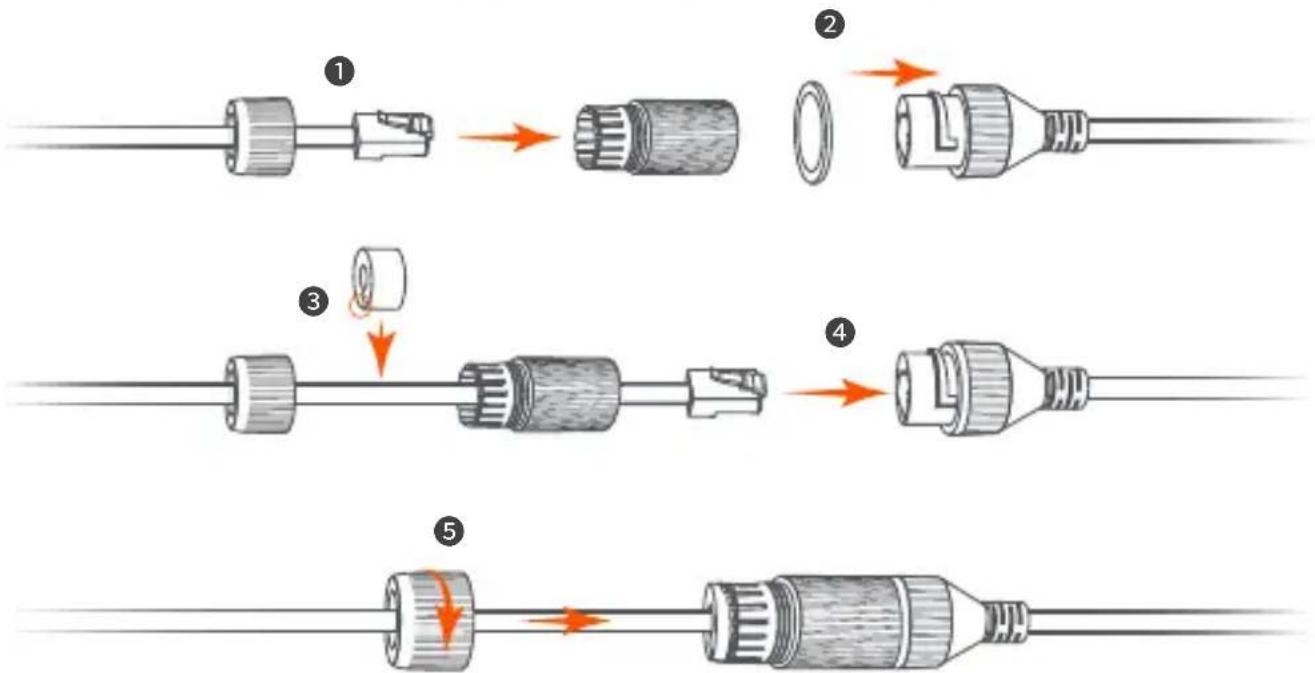
Install the waterproof kit

Tips
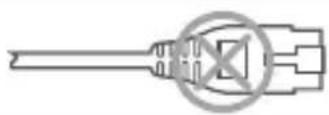
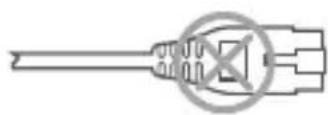
The included waterproof kit is not suitable for the Ethernet cable with protection cover on the crystal head. See the example on the right.
You can install the waterproof kit and wrap the end with waterproof tape for the Ethernet port as required. When you connect the Ethernet cable to the Ethernet port of the camera, the waterproof kit installation steps are as follows.
Power on the camera
Power on the camera after the camera is mounted. When the camera completes startup, it will automatically connect to the configured Wi-Fi network. When the LED indicator of the camera is solid blue, you can use the camera normally.
Log in to the web UI of the camera
After the camera works properly, you can manage the camera through TDSEE App or web UI (Some models of cameras support). (Please scan the QR code of Get support and services in this guide to obtain the related user guide.)
To log in to the web UI:
- Connect the computer to the router that is connected to the camera.
- Set the IP address of the computer to an unused one belonging to the same network segment as the IP address of the camera but different from the IP address of the camera.
By default, the login IP address of the camera is 192.168.1.203, and the DHCP function is enabled. If there is a DHCP server in the network, the IP address of the camera may be changed. Please refer to the actual IP address assigned to the camera by the DHCP server.
3.Start a browser and enter the IP address of the camera in the address bar to access the login page. Enter the LoginUsername (default: admin) and Login Password (default: admin123456), then click Login.

Tips
For network security, after you log in to the web UI, please modify your password in time.
05 After successful login, you can start to configure the camera as required.
FAQ
Q1: What should I do if I failed to add the camera?
A1: Try the following solutions:
- Ensure that the router is connected to the internet successfully.
- The camera only supports 2.4 GHz Wi-Fi network. When adding the camera, you need to connect the smartphone to a 2.4 GHz Wi-Fi network.
- Do not hide the Wi-Fi network of the router when adding the camera (After the camera is added successfully, you can hide the Wi-Fi network).
- Confirm whether the LED indicator of the camera blinks blue quickly. If not, please reset the camera and configure it again.
Reset method: Hold down the Reset button for about 5 seconds and release it when the LED indicator blinks blue quickly or you hear a prompt tone. The camera is reset successfully.
Q2: What should I do when the video preview is not smooth?
A2: Try the following solutions:
- Check if the Wi-Fi network of the router is smooth.
- Take the router closer to the camera and adjust the antenna angle of the camera to be vertical.
- When previewing the video with cellular mobile data, make sure that the internet connection of the smartphone is smooth.
- Auto (if supported), Fluent and HD are supported for video preview. You can switch the video clarity according to the internet status.
Q3: How to store the video?
A3: Try the following solutions:
Method 1: Install the micro SD card to the camera. The recording mode of the Micro SD card supports Alarm Recording and All Day Recording. By default, the recording mode is Alarm Recording, you can modify the recording mode according to the actual conditions.
Method 2: Subscribe to the Cloud Storage Service on TDSEE App.
Procedure: Run the TDSEE App, choose the camera on the homepage, then tap Cloud in the lower left corner. You can enjoy free cloud storage service (7-days continuous detection recording) for 3 months upon the first activation.
Method 3: Connect the camera to the NVR. The camera supports the ONVIF protocol and can be added to the NVR either wired or wireless method for recording storage. The default user name and password of the camera are admin and admin123456 respectively, you can change the default password on the web UI (some models of cameras support). The specific configuration method of the NVR is subject to the manufacturer's instructions.
Q4: How to get full-color monitoring video through the camera no matter in the daytime or at night?
A4: Set Night Vision Mode of the camera to Full-color Mode.
Method: Run the TDSEE App, choose the camera on the homepage, then tap Settings (the upper right corner) > Night Vision Mode, and choose Full-color Mode.

Q5. How to view the videos stored in the Micro SD card of the camera on the computer?
A5: If you remove the Micro SD card installed in the camera and view the videos from your computer, it is recommended to use VLC media player or Potplayer to play the videos.
Udseende
Download on the App Store
3.
CTeJIbOBn/HaCTiHHN MOHTax
- Po3MiCiTiB Ia6JIoH y NOTpi6Homy MiCi.
2.Прсевердлтб OTВОРИДЯ ГИNTIIB I BCТАВTe B HIX aHKePи.(ДiAmeTp CBepДla:6 MM; TlIbHnHa OTBOPY:28-32 MM) - 3akpiitb kpoHtTeH (aKo e) y noTpiHOMy Mici.
- 3akpiitb kamepy 3a dOnomorOTo rBnHTiB.
MOHTAX CTOBNa
Bn MoXeTe BnKOpNCToBbATN UeN MeTOn, JkUo E KPOHHTeH.
A3: CnpobuTe TaKi MeToDiN:
Cnoci6 1. BcTaHOBiTb KapTkU micro SD y kAmepy. Pekim 3aIncy kapTu Micro SD nItpmye Alarm Recording (3aInc TpIBOrn) i All Day Recording (3aInc npotraom ycboTo dHa). 3a 3aMOBvBaHHaM BcTaHOBJIeHO peKIM 3aIncy Alarm Recording (3aInc TpIBOrn), BN MOKeTe 3MiHTn peKIM 3aIncy BiINoBIINOdo foakTNuHX yMOB.
Cnoci6 2.Пдпшитьс Ha Cloud Storage Service (cnyxby xmapHoro cxOBu) y nporpaTt TDSEE.
IpoceDpya: 3anyctiB nporpaMy TDSEE, Bn6epiB kamepy Ha roNoBhi cToPiuCi, a NOTIM HATNCHiTb Cloud (Xmapa) y HxHbOMy liBOMy KyTi. Bu MoKeTe KOpNCtBuAtncs 6e3koWTOBHOIO nocLyroXMapHOrO 36epirAHnra (7 dHIB 6e3nepePBHOrO 3aNcCy BnABLeHH) npotarom 3 micaiB nicna nepsoi akTNaui.
Cnoci6 3.Пдклочь камеруdo NVR.Kamepa nIDtpmye npotoKoI ONVIF i moze 6byTu doHa do NVRДpoTOBIM abo 6e3dpoTOBIM cnoocobm dlya 36epirahn 3aHnciB.Im'я KOpNCyBaaya Ta napOl kamepn 3a 3amOBuyBaHHaM - admini admin123456 BiINOBiINO, i napOl moxHa 3miHHTu y Be6-iINTepfeinci KopNCTyBaaya. KoHKpeTHni cnoci6 konphiIpyaui NVR 3aJIeKNTb BiD INCTpykui Bnpo6nka.
Q4:Як OTРIMATN NOBOKOLbOpOBe BiJeO MOHITOPINrY Chepe3 KaMepy He3aJIeXHo BiD TORO, BDeHb YI BVOni?
A4: YctaHobItb Night Vision Mode (Pexm HiyHoro 6aueHn) kamepn Ha Full-color Mode (NoBHOKoJIbOpOBn peXm).
Cnoci6: 3anyctitb nporpaMy TDSEE, BnBepiTb kamepy Ha roJOBHni CTopiHci, notim HATNCHiTb Settings (HaIaStyBaHHa) ( y BepxHbOMy npabOMy KyTi)> Night Vision Mode (Pexm HiHoRo 6aueHHa) iBnBepiTb Full-color Mode (IOBHOKoJIbOpOBu IpeXIM).
Q5:Якпергелянту bideo3annci,збержени на кapт i Micro SD kamepi,на komn'tepi?
A5:Якшо Ви Вийнялп KapTKy Micro SD,Встановленив Камерi, i neperгеляни Bideo 3 KOMn'IoTepa, Дя вдтворень Bideo pekomehdyeTbcS BИКОРиСТОВуВaTN Meiianneep VLC a6o Potplayer.
BbHsEHN BnD
BbHnHnT BnHa KaMePa Ta Bapnpa Cnopei MoJeIte. MoJI, oBpHeTe ce KbM KaMePaTa, KoTo CTe 3akynnn.
yctpoNCTBO INI B TropHnA DeceH bTbI Ha HauaHaTa CtpaHnca.
4.СанрайTe QR кда отROpe Ha KaMepaTaNcIeBaITe INHCTpyKUInTe B npINOxKeHEnTo.
CneI KaTo HAcTpoNKeTe ca 3aBbPseHn, MoXeTe Da BnITe, Ye IobaBeHaTa KaMepa e OHnaH Ha NaHaJHaTa CTrpaHnUca Ha npIoXeHneTo TDSEE nYe KaMepaTa ce ynpabraBa o TpIoXeHneTo TDSEE.
Инстаирaite kamepaTa

CbbETN
-Mon, yBepTe ce, ye TaBaHbTe IocTaTbUHO 3npa, 3a da n3dbpxn Tprn nbTu TeTIOTo Ha KaMePaTu OCHObaTa.
-3aMOHTaxka MoKe da ca Bn Heo6xOuIMM yUdpHa 6OpMaunHb, 6yprna (JNaMeTbp: 6 MM), OTBepTk a n CtbIb6a.
TabaHeH/CTeHeH MOHTax
- NocTaBeTe Ⅲa6NoHa Ha XeJaHTo MrcTo.
- ПюбийTe OTBOPи 3a BINTObe И NOCTaBeTe anKepnВ Tяx. (ДиamEtbp Ha CBpeJIoTO: 6 mm; ДьлбочиHa Na OTBopa: 28-32 mm)
3.ФИКСИРаTe cKOBaTa(aKO ИмaТakaba)HaЖeЛaHOTOMЯCTO.
4.ФИКСИРаTe KaMepaTa C NOMOHTa Ha BINTOBeTe.
MOHTaX Ha nIIoH
MoxkeTe Da n3no3BaTe To3n MeToD, aKO e npEoCTaBeHa cKo6a.
A4: 3aJaTe Night Vision Mode (PexIM HOUHO BIXdHe) Ha KaMepaTa Ha Full-color Mode (TbJIHOuCBeTeH peXIM).
Meto: CtapTnpaTe npiloxeHneTo TDSEE, n36epTe KaMepaTa Ha NaHaHaTa cTpaHnca, cIeT TOBa DOKOcHeTe (HacTpoKn) (B roPnHa Decen bRbJ) > Night Vision Mode (Pexm 3a HOuHO BVXdAhe) n36epTe Full-color Mode (PbJHoCBeTeH pexm).
Q5: KaK da rIeJaTe BnDeoKlnNoBete, cxbpaHb Mlro SD kaPaTaHa KaMepaTa Ha KOMNIObpa?
A5: Ako n3BaJnte Micro SD KapTaTa, INcTaInpaHa B KaMepaTa, IN pperIeIaTe BVneOKJIINOBeTe oT BaIIra KOMIObP, IpeOpBHTeJIHo e da n3noJI3BaTe VLC media player IIIN Potplayer 3a Bb3IpOn3BExKdAnHe Ha BVneOKJIINOBe.
Erscheinung
A5: EcIIN Bbl n3BnkeaTe KapTy Micro SD, yCTaHOBJIeHHyU B KaMepe, INpOCMaTpINBaTe BnJeO co CBOero KOMNbIoTEpa, IInr BocPOn3BeIeHnRA BnJeO peKOMeHNyEtCra NcNoJb3OBaTb MeDnaPiIeep VLC nII Potplayer.
Wygliad
Wygliakameryroziwzaleznosciodmodelu.Zapoznajsi z zakupionkamera.
wagj p1i jaiybal oia plusuwl ciKs
gaoJIy jaoJIy gao, JaoJIy 0oJgaoJIy JxJoo (I)
11111111111111.2
aaiia aigjb
aaii 1

eall aglaal agaaal
Eaie
Ls Eternet 150

1
W-Wi-Fi 4KwblaljLJU W JnKJU LaiS1uic.8uSj DnJnKJU JauuB .uub Kw JnKJU pluucwclk, Cbgl qj JnKJU LED uo ng Suiuie.
1
pTaTgTDSEE 1Jx JyKJ101dcky KdyKJ1Jai j
peJI JI aJyAaJyJyJyJyJyJyJyJyJyJyJyJyJyJyJyJyJyJy
y 1
IP Ugic aS uE b 1uui yuui puusua uic Ugic ujusally jol IP Ugic uuyi p.2 .aie letisoo ngy oB
192.168.1.203 1yKJyUgUJyUgUJyUgUJyUgUJyUgUJyUgUJyUgUJyUgUJyUgUJyUgUJyUgUJyUgUJyUgUJyUgUJyUgUJyUgUJyUgUJyUgUJyUgUJyUgUJyUg

J. J. J. J. J. J. J. J. J. J. J. J. J. J. J. J. J. J. J. J. J. J. J. J. J. J. J. J. J. J. J. J. J. J. J. J. J. J. J. J. J. J. J. J. J. J. J. J. J. J. J. 3 Password Logging (Jgss: () (Jgss: )Username Login .(Jgss: ) Login (admin123456 : () (Jgss:
2
aalllg 1 g aegp dssseell paae y eepnpeepnneepnneepnneepnneepnneepnneepnneepnneepnneepnneepnneepnneepnneepnneepnneepnneepnneepnneepnneepnneepnneepnneepnneepnneepnneep

100000000000000000000000000000000000000
a
1
:1
1
J 2.4 W-Wi-Fi
2.4 Wi-Fi
()
(Wi-Fi
LED
0
Jaa 5 5 aal 1 Jc
LLED

Paaa yjaiy aie Lsie 2jj
:山
Wif
1
i 1
HHDFluent (AeD)Auto p
:3
::3
Micro SD 1
4 1
y
TDSEE 2
(Procedure)
Coud
3 7 7
ONVIFJRSsNVR 3
NVR
admin123456,admin
NVR

4
4
TDDEE 1
aLgjg jzj<(
M Micro SD 5
Jn Jnnnne nnnnne nnne nnnnne nnnnne nnnnne nnnnne nnnnne nnnnne nnnnne nnnnne nnnnne nnnnne nnnnne nnnnne nnnnne nnnnne nnnnne nnnnne nnnnne nnnnne nnnnne nnnnne nnnnne nnnnne nnnnne nnnnne nnnnne nnnnee
Potplayer VLC 1
g( x) = ( 1 + ax) - ( 1 - ax) - 2ax
Technical support
Shenzhen Tenda Technology Co., Ltd.
Floor 6-8, Tower E3, No.1001, Zhongshanyuan Road, Nanshan District, Shenzhen, China. 518052
Website: www.tendacn.com
E-mail: tendasecurity@tenda.cn
support.us@tenda.cn (North America)
support.uk@tenda.cn (United Kingdom)