
C50 - Surveillance Camera Tenda - Free user manual and instructions
Find the device manual for free C50 Tenda in PDF.

| Product Type | Indoor/Outdoor Wi-Fi Surveillance Camera |
| Brand | Tenda |
| Model | C50 |
| Resolution | 1080p Full HD (1920x1080) |
| Field of View | Horizontal: 90°, Vertical: 50°, Diagonal: 110° |
| Night Vision | Up to 10 meters with infrared LEDs |
| Connectivity | Wi-Fi 802.11 b/g/n, 2.4 GHz |
| Power Supply | DC 5V/1A via Micro USB |
| Dimensions (Approx.) | 90 x 70 x 50 mm (H x W x D) |
| Weight (Approx.) | 150 g (including stand) |
| Motion Detection | Yes, with push notification |
| Two-Way Audio | Yes, built-in microphone and speaker |
| Storage | MicroSD card up to 128 GB (not included) |
| Weather Resistance | IP65 (outdoor use) |
| Mounting | Wall mount or ceiling mount |
| App Support | Tenda Camera App (iOS/Android) |
| Maintenance | Clean lens with soft cloth; reposition as needed |
| Safety | Do not expose to extreme temperatures; use approved adapter |
| Spare Parts & Repairability | Contact Tenda support; no user-replaceable parts |
| Package Contents | Camera, stand, screws, power adapter, quick start guide |
| Operating Temperature | -10°C to 50°C |
Frequently Asked Questions - C50 Tenda
User questions about C50 Tenda
0 question about this device. Answer the ones you know or ask your own.
Ask a new question about this device
Download the instructions for your Surveillance Camera in PDF format for free! Find your manual C50 - Tenda and take your electronic device back in hand. On this page are published all the documents necessary for the use of your device. C50 by Tenda.
USER MANUAL C50 Tenda
is the registered trademark of Shenzhen Tenda Technology Co., Ltd.
All the products and product names mentioned here in are the trademarks or registered trademarks of their respective holders. Copyright of the whole product as integration, including its accessories and software, belongs to Shenzhen Tenda Technology Co., Ltd. Without prior expressed written permission from Shenzhen Tenda Technology Co., Ltd, any individual or party is not allowed to copy, plagiarize, reproduce, or translate it into other languages.
All photos and product specifications mentioned in this manual are for references only. Upgrades of software and hardware may occur; Tenda reserves the right to revise this publication and to make changes in the content hereof without obligation to notify any person or organization of such revisions or changes. If you would like to know more about our product information, please visit our website at http://www.tenda.cn
Table of Contents
1. Product overview....5
1.1.Package list ....5
1.2.Computer requirement 5
1.3.Introduction....5
1.4.Features ....5
1.5.Hardware overview....6
2. Installation 8
2.1.Hardware installation....8
2.1.1.Table install....8
2.1.1.1.Cube IP Camera 8
2.1.1.2.PTZ IP Camera....8
2.1.2.Wall install 9
2.1.2.1. Cube IP Camera 9
2.1.2.2.PTZ IP Camera....9
2.1.3.Hardware Connection....9
2.1.3.1.PTZ Camera....9
2.1.3.2.Cube IP Camera 10
3. Setup Wizard .... 11
4. HD series Web Configuration (For C50/C5) 15
4.1.View video....15
4.2. Running status....17
4.3. Video setting....18
4.3.1. Video parameter....18
4.3.2. Audio parameter....19
4.3.3. Image parameters....19
4.4. Network setting....19
4.4.1. LAN settings....20
4.4.2. WiFi setting....20
4.4.3. Remote Access setting 21
4.4.4. Onvif settings....22
4.5. Alarm setting....22
4.5.1. Motion Detection Setting....22
4.5.2. Sound detection Setting....23
4.5.3. Alarm mode setting....23
4.5.4. Scheduled time setting....24
4.6. Advanced setting....24
4.6.1. Auto capture 24
4.6.2. Record to TF/SD 25
4.6.3.E-mail setting....25
4.6.4. FTP setting 26
4.6.5. PTZ Protocol setting....27
4.6.6. Status LED setting 27
4.7. System setting 28
4.7.1.User management 28
4.7.2.Time settings....28
4.7.3. Reboot IP camera....28
4.7.4.Restore factory default....29
4.7.5. Backup/Restore settings....29
4.7.6. Upgrade....29
4.7.7. System Log 29
5. SD series Web configuration (for C30/C3)....29
5.1.View video 30
5.2. Run Status ....30
5.3. Video setting....31
5.3.1. Video parameters setting....31
5.4. Network setting....31
5.4.1. LAN setting....31
5.4.2. WiFi setting....32
5.4.3. Remote access setting....32
5.5. Alarm setting....33
5.5.1. Alarm setting....33
5.6. Advance setting....33
5.6.1. Device name setting....33
5.6.2. Local recording path....33
5.6.3. E-mail setting....34
5.6.4. FTP setting 34
5.7. System settings....35
5.7.1.User setting 35
5.7.2. Device date and time settings 35
5.7.3. PTZ settings 35
5.7.4.Restore factory setting....35
5.7.5. Reboot device....35
5.7.6. Upgrade Web UI 35
5.7.7. Upgrade system firmware....36
1. Product overview
1.1.Package list
Please check carefully if all listed items are included in the package as below:
1、One IP-Camera;
2、One CD;
3、One Quick Installation Guide;
4、Mounting bracket set;
5、One RJ45 Cable;
6、One Power adapter;
Note: Please do connect the power adapter to an electrical outlet that matches the adapter's rated input voltage, otherwise it will damage the device. If any item mentioned above is missing or damaged, contact the place of purchase immediately.
1.2. Computer requirement
● CPU: 2.0GHz or above(recommend 3.0GHz)
● RAM: 256MB or above(recommend 1.0GB)
● Graphic card: 64MHz or above
● OS: Windows 7, Vista, XP, Mac OS
- Internet Explorer6.0 or above, or compatible browser, Firefox etc.
1.3.Introduction
HD series IP Camera(C50,C5) provides a professional home or small business surveillance solution. Up to 720p HD video quality, rich detail and crisp image quality. With IRCUT to ensure that the images are real colour. Through PTZ control, can cover wider areas. Support motion detection and night vision function, round-the-clock surveillance. Easy to use, supports P2P technology, plug and view. Support two-way audio, it may voice intercom. Support WI-FI, can convenient links to the wireless router. Support H.264 video compression technology, need the minimum bandwidth, more suitable for smartphone viewing.
SD series IP Camera(C30,C3) provides a professional home or small business surveillance solution. Adopt MJPEG encoding technology, resolution up to VGA (640 * 480). Through PTZ control, can cover wider areas. Support motion detection and night vision function, round-the-clock surveillance. Easy to use, supports P2P technology, plug and view. Support two-way audio, it may voice intercom. Support WI-FI, can convenient links to the wireless router.
1.4.Features
HD series IP camera (C50,C5):
- HD plus IRCUT: 720p HD Video Quality, you can get rich detail and crisp image quality. With IRCUT to ensure that the images are real colour.
2.PTZ(C50): You can PTZ control, move to the area you want to see, cover wider areas. - Plug and View: Zero configuration. By leading “CloudNeteye” APP with the cloud P2P server, you do not need to configure the wireless router and DDNS. You only need to use your
smartphone scan the QR code of the device, automatic P2P registration, then you can view immediately, life is just that simple. plug and view.
4.Remote Viewing: Use P2P "CloudNeteye" APP, you can remote view through the iPhone, Android smartphone.
5.H.264 Video Compression: H.264 video compression technology, the same picture quality, need the minimum bandwidth network traffic, more suitable for smartphone viewing.
6. Night Vision: This device can not only able to work during the day, with infrared LED, it can also work at the night, round-the-clock surveillance.
7.WI-FI Connect: WI-FI easily connect to a wireless router. You can easily get rid of the trouble of deployment the Ethernet cable.
8. SD/TF storage card: You can store image and video on your SD/TF.
9.Motion detection and alarm: If you need to monitor a certain area, when an exception occurs in the region, trigger an alarm automatically, send alarm information by e-mail, FTP. (You can enter CD Driver:\FAQ\FAQ-en, Please refer to the FAQ-en question 4 for detail)
10. Two-way audio : Not just screen monitor, you can also voice intercom. When you find the abnormal situation, you can be reminded by voice intercom, to ensure safety.
11. Sound detection: When sound detection function is on, if detected abnormal voice within the scope of the camera to monitor, the camera will trigger the alarm automatically, and send alarm information through E-mail, FTP.
More feature: Concurrent multiple video streams、Account permissions
SD series IP camera(C30,C3):
1、PTZ(C30): You can PTZ control, move to the area you want to see, cover wider areas.
2、Plug and View : Zero Configuration. By leading “CloudNeteye” APP with the cloud P2P server, you do not need to configure the wireless router and DDNS. You only need to use your smartphone scan the QR code of the device, automatic P2P registration, then you can view immediately, life is just that simple. plug and view.
3、Remote Viewing: Use “CloudNeteye” APP, you can remote view through the iPhone, Android smartphone.
4、Motion detection and alarm: If you need to monitor a certain area, when an exception occurs in the region, automatically trigger an alarm, send alarm information by e-mail, FTP. (You can enter CD Driver:\FAQ\FAQ-en, Please refer to the FAQ-en question 4 for detail)
5、Night Vision: This device can not only able to work during the day, with infrared LED, it can also work at the night, round-the-clock surveillance.
6、WI-FI Connect: WI-FI easily connect to a wireless router. You can easily get rid of the trouble of deployment the Ethernet cable.
7、Two-way audio : Not just screen monitor, you can also voice intercom. When you find the abnormal situation, you can be reminded by voice intercom, to ensure safety.
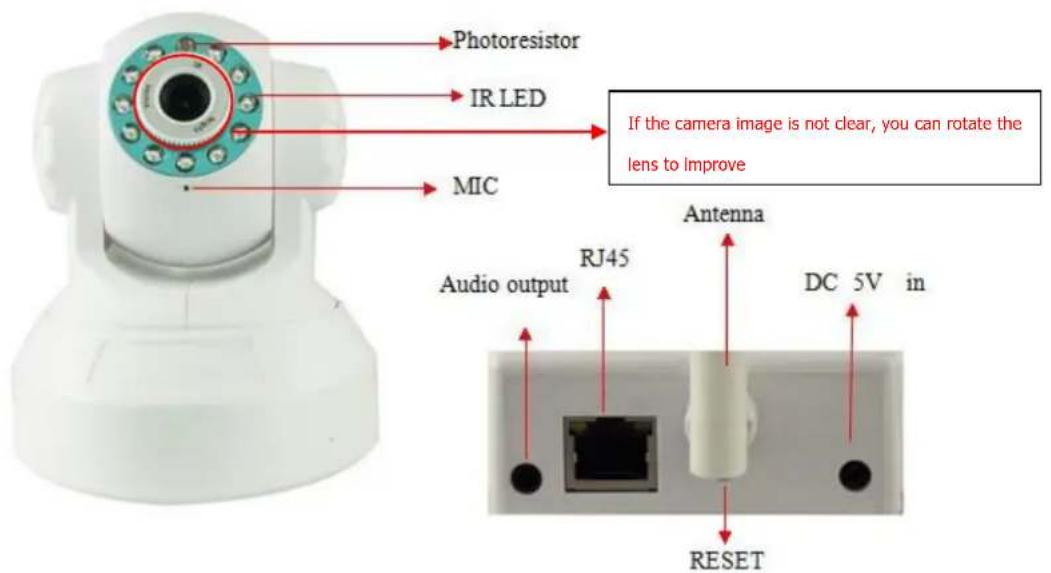
1.5.Hardware overview
HD series IP camera (C50、C5)

SD series IP camera (C30, C3)
C30
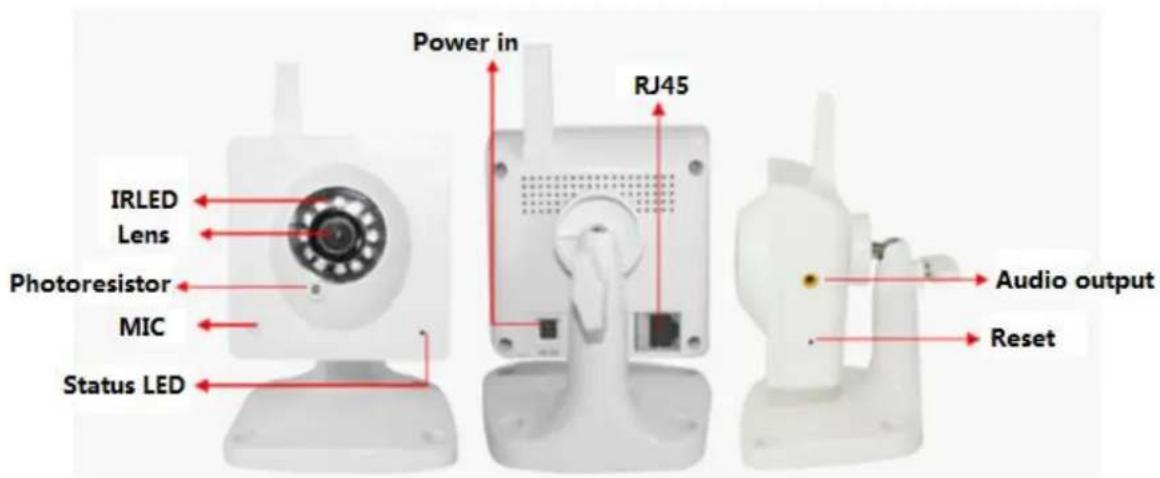
C3
2. Installation
2.1.Hardware installation
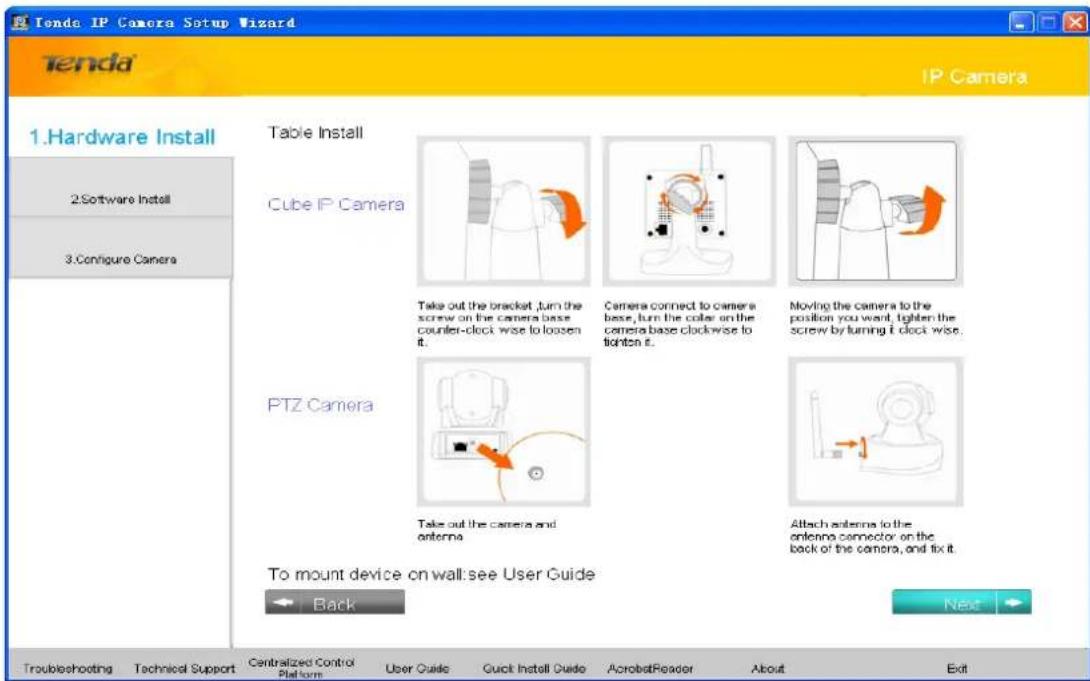
2.1.1.Table install
natural_image
Diagram of a device with internal components and orange circular arrows indicating motion (no text or symbols)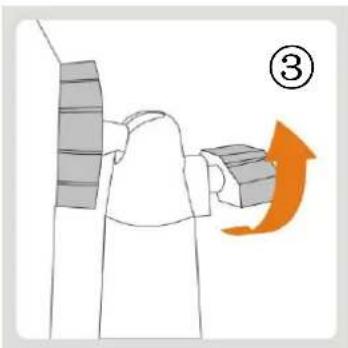
natural_image
Diagram showing a hand pressing down on a block with an orange arrow indicating motion (no text or symbols)Figure1.Take out the bracket ,turn the screw on the camera base counter-clock wise to loosen it. Figure2.Camera connect to camera base, turn the collar on the camera base clockwise to tighten it. Figure3.Moving the camera to the position you want, tighten the screw by turning it clock wise.
2.1.1.2.PTZ IP Camera
natural_image
Diagram of a mechanical device with an orange arrow pointing to a circular component, labeled with number 4 (no text or symbols on the device itself)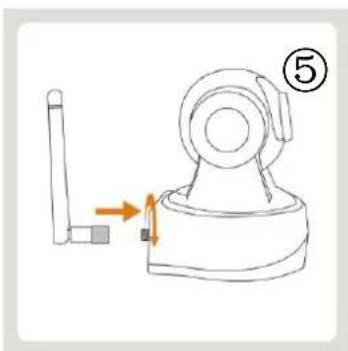
natural_image
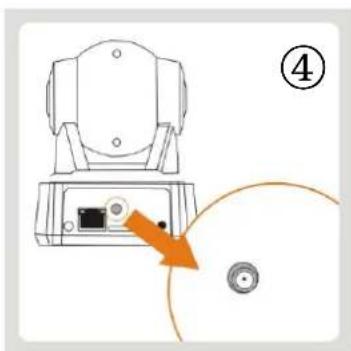
Line drawing of a mechanical device with a shaft and base, showing motion direction (no text or symbols)Figure4. Take out the camera and antenna
Figure5. Attach antenna to the antenna connector on the back of the camera, and fix it.
2.1.2.Wall install
According to your needs, refer to the figure to install.
2.1.2.1. Cube IP Camera
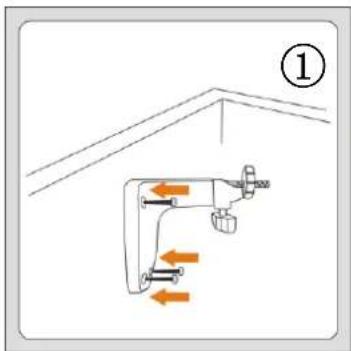
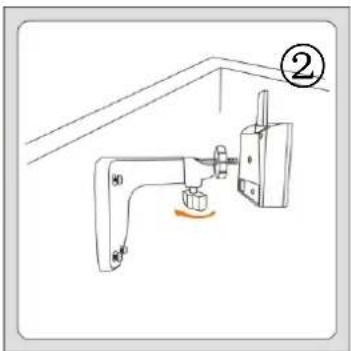
Figure 1: Take out the bracket, then fix the bracket to the wall using screws.
Figure 2: Turn the screw on the bracket counter-clock wise to loosen it.
natural_image
Technical line drawing of a mechanical bracket assembly with no visible text or symbols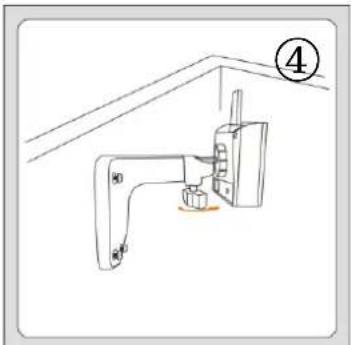
Figure 3: Camera connect to bracket, turn the collar on the bracket clockwise to tighten it.
Figure 4: Moving the camera to the position you want, tighten the screw by turning it clock wise.
2.1.2.2.PTZ IP Camera
natural_image
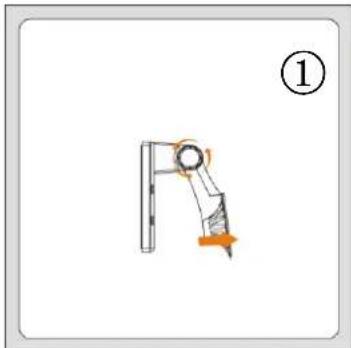
Diagram of a mechanical lever mechanism with a numbered label (1), showing motion direction and pivot point (no text or symbols beyond label)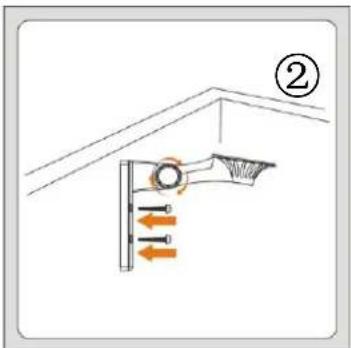
natural_image
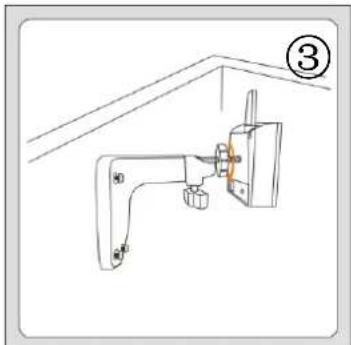
Diagram of a kitchen appliance mounted on a wall, showing a handle and base with no text or symbolsFigure 1: Turn the collar on the bracket to loosen it then move the camera to the position you want.
Figure 2: Turn the collar on the bracket to tighten it, then fix the bracket to the wall using screws.
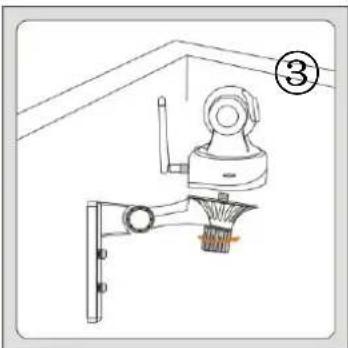
Figure 3: Camera connect to bracket, turn the collar on the bracket clockwise to tighten it.
2.1.3.Hardware Connection
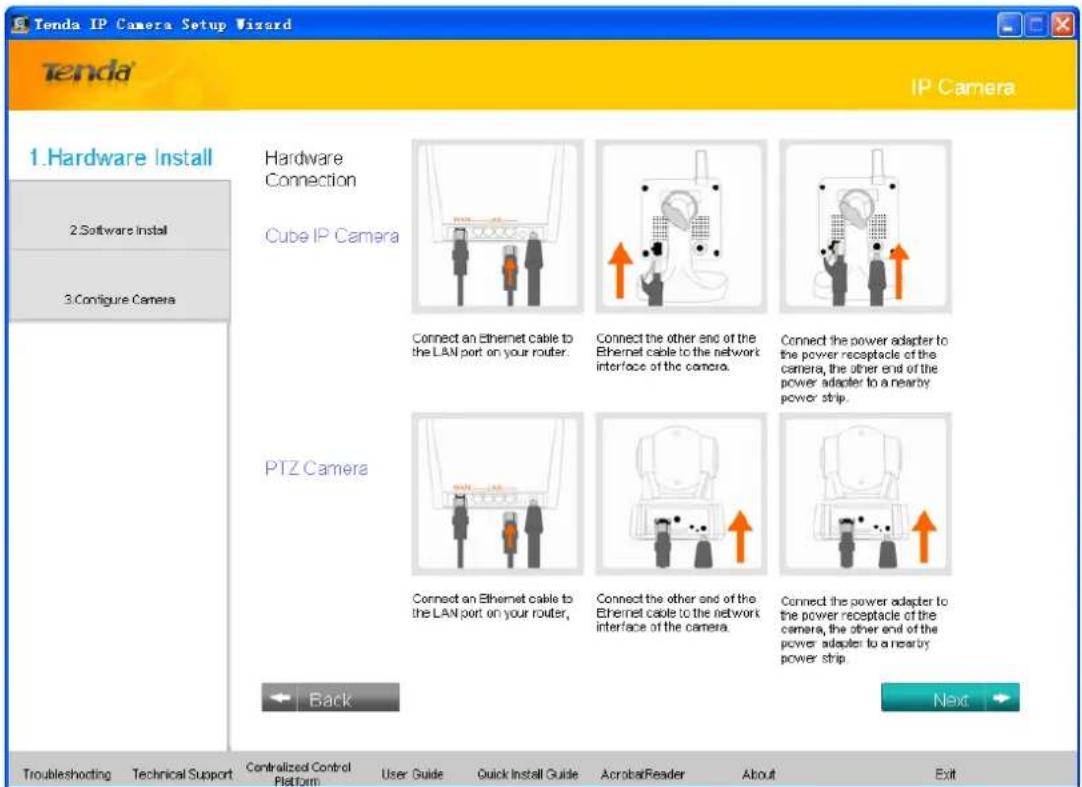
2.1.3.1.PTZ Camera
natural_image
Diagram of a mechanical device with an orange arrow indicating upward motion (no text or symbols)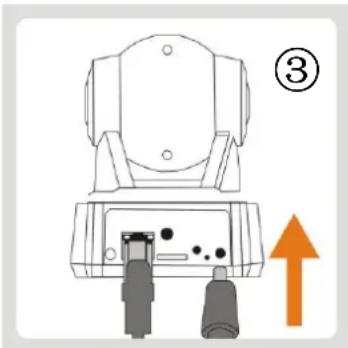
natural_image
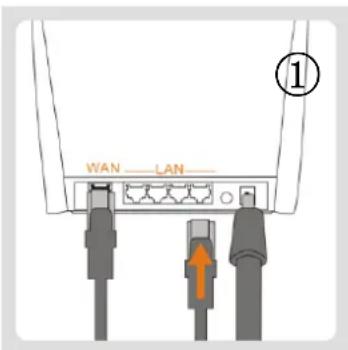
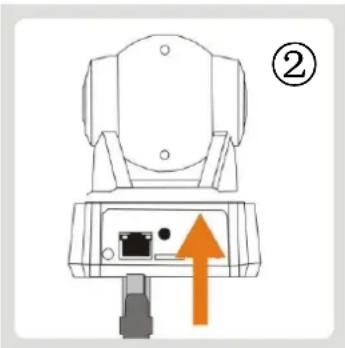
Diagram of a mechanical device with an orange arrow indicating upward motion (no text or symbols present)Figure1. Connect an Ethernet cable to the LAN port on your router. Note: If your Router connected to a MODEM. The camera is unable to connect to the port of the MODEM.
Figure2. Connect the other end of the Ethernet cable to the network interface of the camera.
Figure3. Connect the power adapter to the power receptacle of the camera, the other end of the power adapter to a nearby power strip. (Make sure power adapter is plugged properly into device power receptacle. Some users may mistakenly plug the power connector to device's audio interface)
2.1.3.2.Cube IP Camera
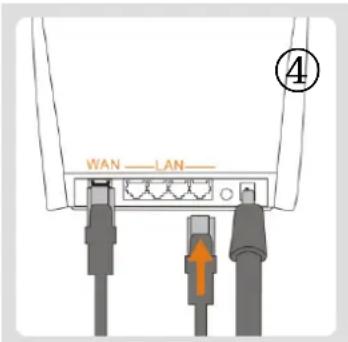
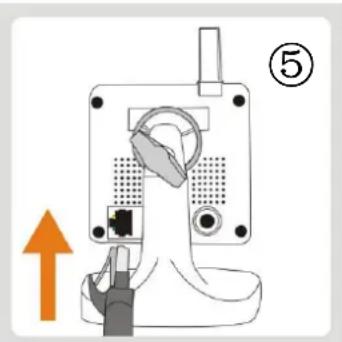
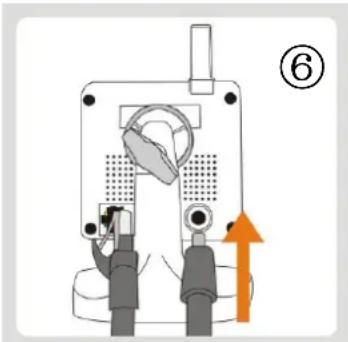
Figure 4. Connect an Ethernet cable to the LAN port on your router. Note: If your Router connected to a MODEM. The camera is unable to connect to the port of the MODEM.
Figure 5. Connect the other end of the Ethernet cable to the network interface of the camera.
Figure 6. Connect the power adapter to the power receptacle of the camera, the other end of the power adapter to a nearby power strip.
(Make sure power adapter is plugged properly into device power receptacle. Some users may mistakenly plug the power connector to device's audio interface).
3. Setup Wizard
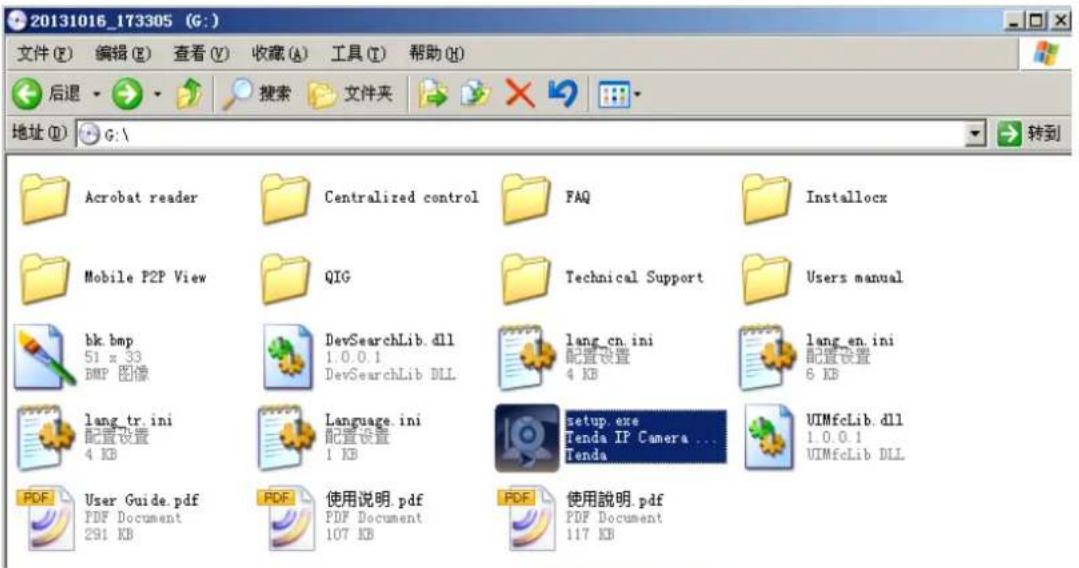
Step 1: Insert the included CD into your computer's CD drive, enter CD driver and then click

Setup.exe
to run the Setup Wizard utility. This wizard will guide you connect Tenda super
easy IP camera series to your network.
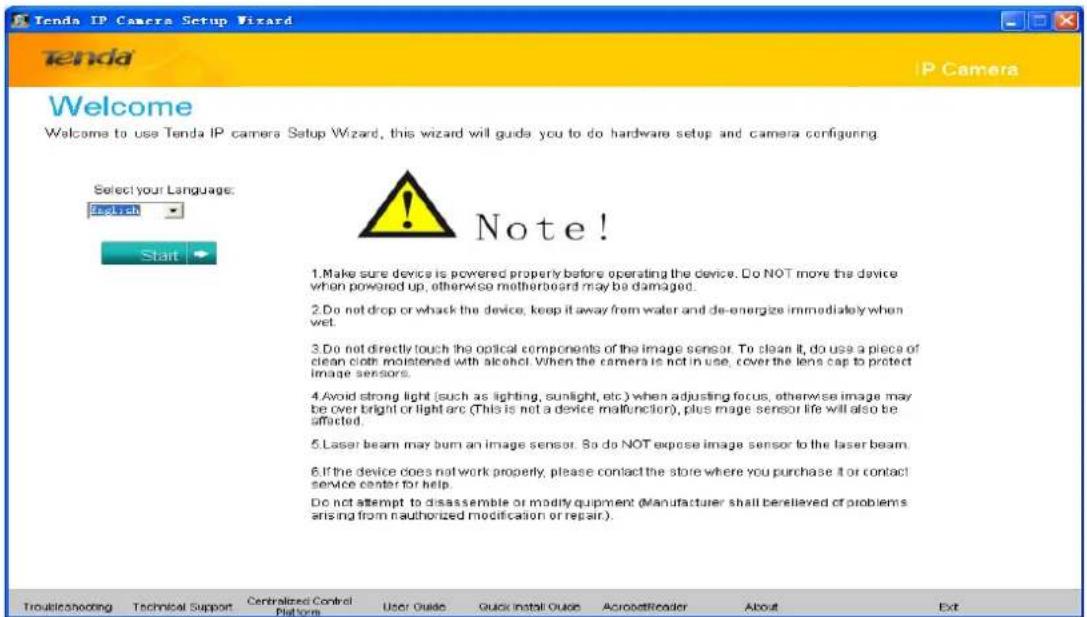
Step 2: Select the language you need and click " " in the appearing page.
Step 3: Follow instructions on the setup wizard screen below to complete installation of hardware
on desktop and then click

Step 4: Follow instructions on the setup wizard screen below to connect hardware (Make sure power adapter is plugged properly into device power receptacle. Some users may mistakenly plug
the power connector to device's audio interface) and then click " Next
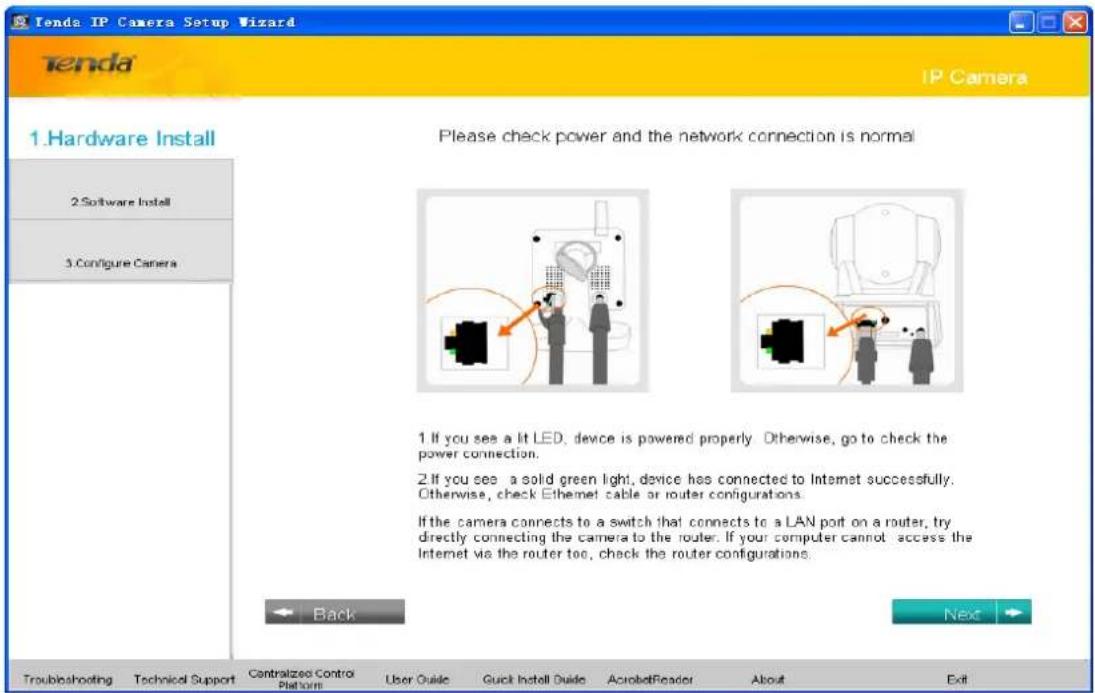
Step 5: Follow instructions on the setup wizard screen below to check power and network
connections. If everything is OK, click " Next
Step 6: Setup wizard will automatically complete Active-X detection and install (If your firewall asks whether to block the Active-X during installation, select allow installation to ensure successfully installation.)
Step 7: Follow instructions on the setup wizard screen below to complete basic configurations for
the camera and then click "Config(F6)
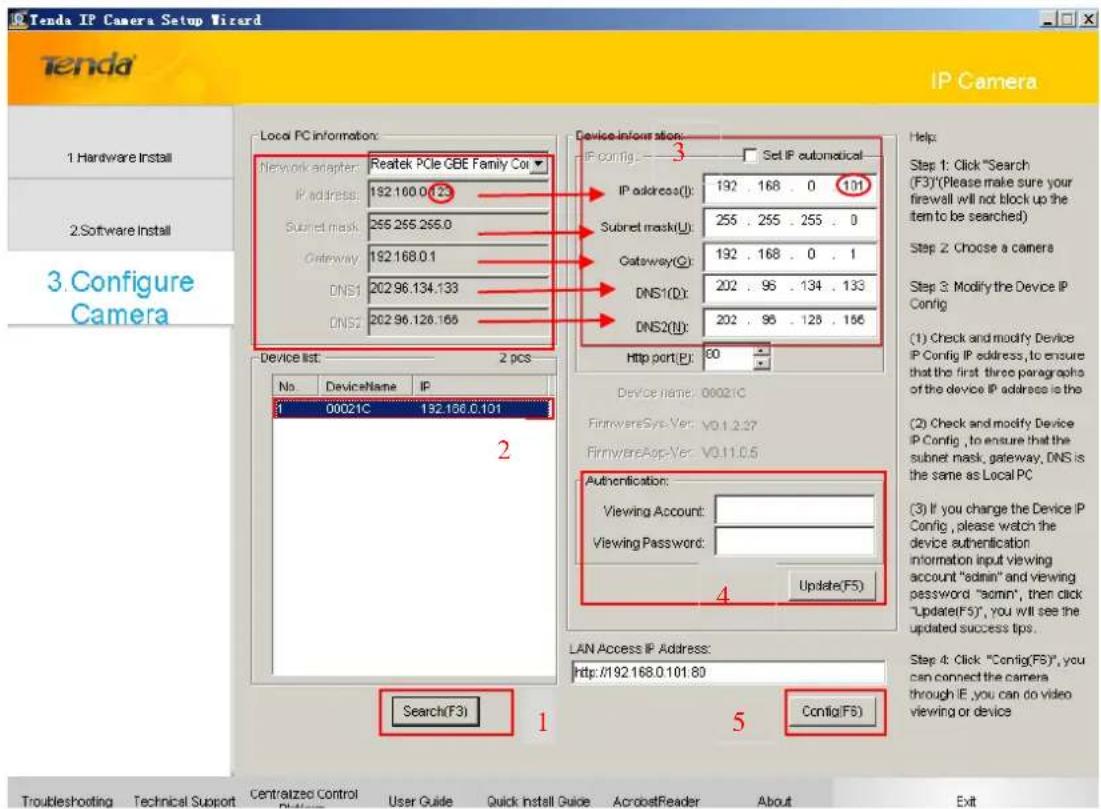
- Click "Search(F3)". (If your firewall asks whether to block the utility, select don't block or directly disable firewall before you start searching.)
Note: If it's fail to search the camera, please enter the CD driver: \FAQ\FAQ-en, refer to Question 1 for detail.
-
Choose a camera in "Device list" list box.
-
Set IP address of the camera
You can choose one of way to change the IP address of the camera.
Method One:Set IP address of the camera automatic, you need to check " " . Set IP automatic Note,this need your Router's DHCP Server function on.
Method Two:Set IP address of the camera manually.According to " parameter
items, change " -IP config=" arrow corresponding parameter items. Note " IP address(I): " parameter item, that number highlighted in red circles should not be the same.
- When you complete the settings above, watch the device authentication information input
viewing account "admin" and viewing password "admin", then click "Update(F5)", you will see the updated success tips.
Then Click "Search(F3)" again, Choose a camera that changed IP address in "Device list" list box.
5.Click" Config(F6)",enter "admin" in both user name and password text boxes on the appearing login window, and then click "OK" to enter the Web UI. You will then be able to watch
videos or do system settings.
4. HD series Web Configuration (For C50/C5)
You can follow the setup wizard, in the last step of the wizard, Click" Config(F6)", enter "admin" in both user name and password text boxes on the appearing login window, and then click "OK" to enter the Web UI. If you have not changed your camera's default IP address, simply launch a web browser, input http://192.168.0.188 and then press "Enter" key. Enter "admin" in both user name and password text boxes. And then click "OK" to enter the web UI. You will then be able to watch videos or do system settings.
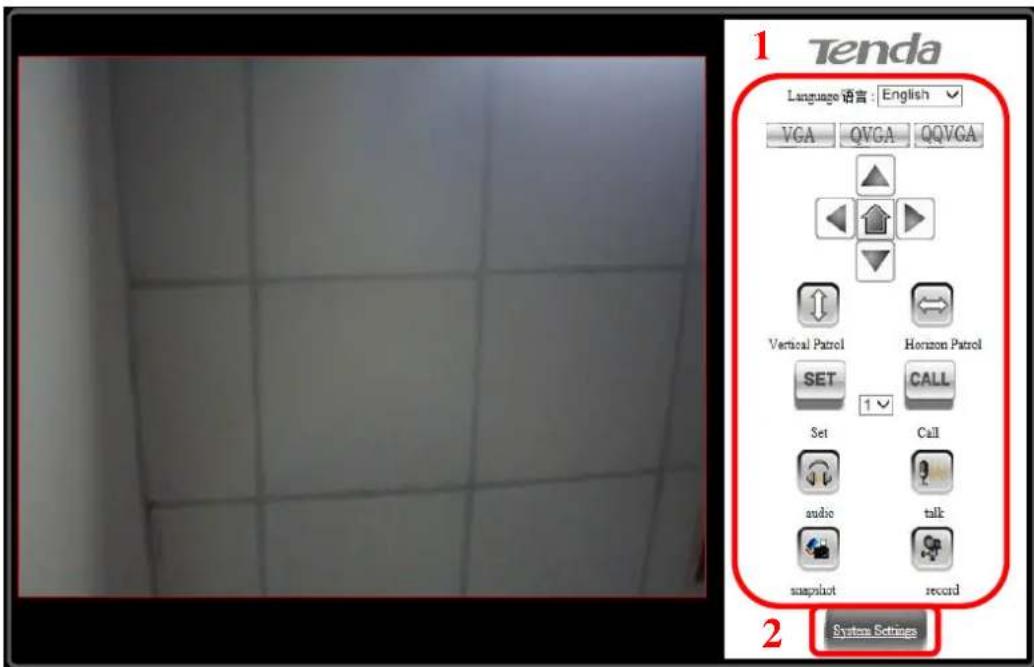
4.1.View video
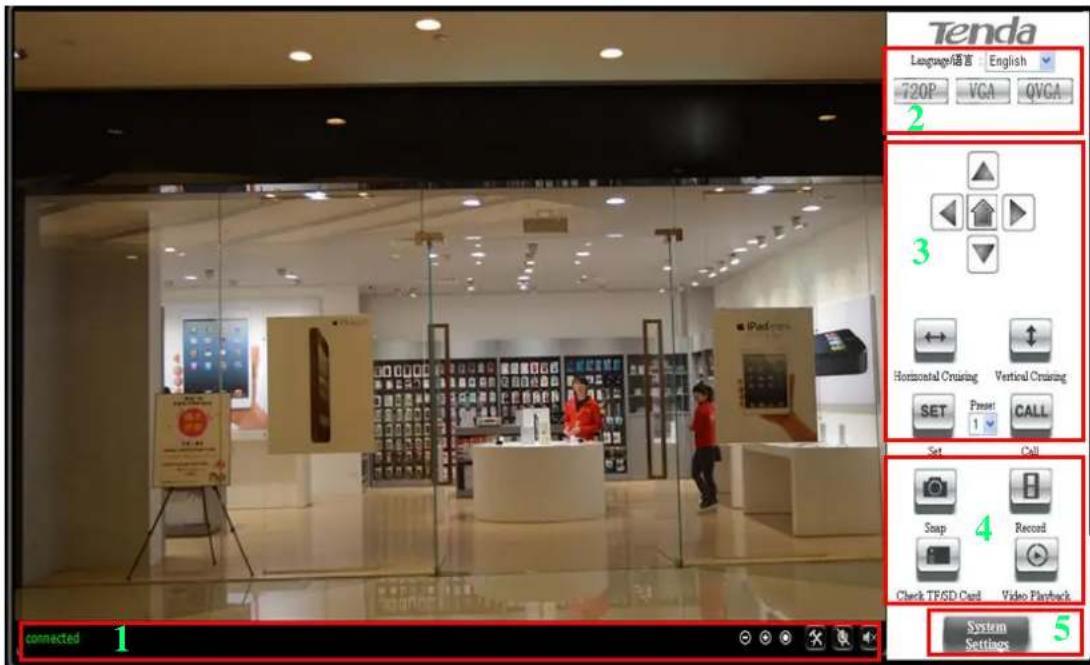
1) Status bar


-
Display connection status
-
Display record status: if click "Record", it will show "REC" which stands for recording; click record button again, it will stop;
-
Zoom out, zoom in and restore digital zoom
-
Set saving file path: set the location for recording and capturing file storage(The default
directory is D:\Record and D:\Snap );
-
Talk button: Click this button to hear what the person at the side of computer talks.
Click it again, it will stop playing; -
Audio monitor button: Click this button to hear what people talking about at the side of IP Cameras,
2) Select language and bit-rate
You can change language between Chinese and English.
You can select 720P (Image quality is best), VGA (Image quality is good) and QVGA (Image quality in general) to view video, example for view video by 720P in LAN, by VGA in internet, by QVGA in smartphone.
3) PTZ control
If the camera supports PTZ function, you can click up, down, left, right arrow to control the camera moving, click 1 button to center the camera.
When you set camera to a preset position, and then click SET button, after the camera is changed to other direction, click CALL button can move the camera to the position you have set.
4) Snap/record/SD card/playback
Click "Snap" button, to save the picture to the default path D:\Snap(If you want to
change the file path, please click
to set specified path)

Click "Record" button to start record. Click again to stop record, the default path is
D:\Record((If you want to change the file path, please click

to set specified path)
- Click “Check TF/SD card” can browse the files in the SD card (If the SD card already inside the camera), you can select file to download it;
Click "Playback" button, it will show a player which can play the record video. For these buttons

means: 'Play/Pause'; 'Open file'; 'Stop'; 'Prev file';
'Next file'; 'Frame'; 'Speed-'; 'Speed+.
5) Click "System settings" button to enter system setting web page, you can configure your camera.
4.2. Running status
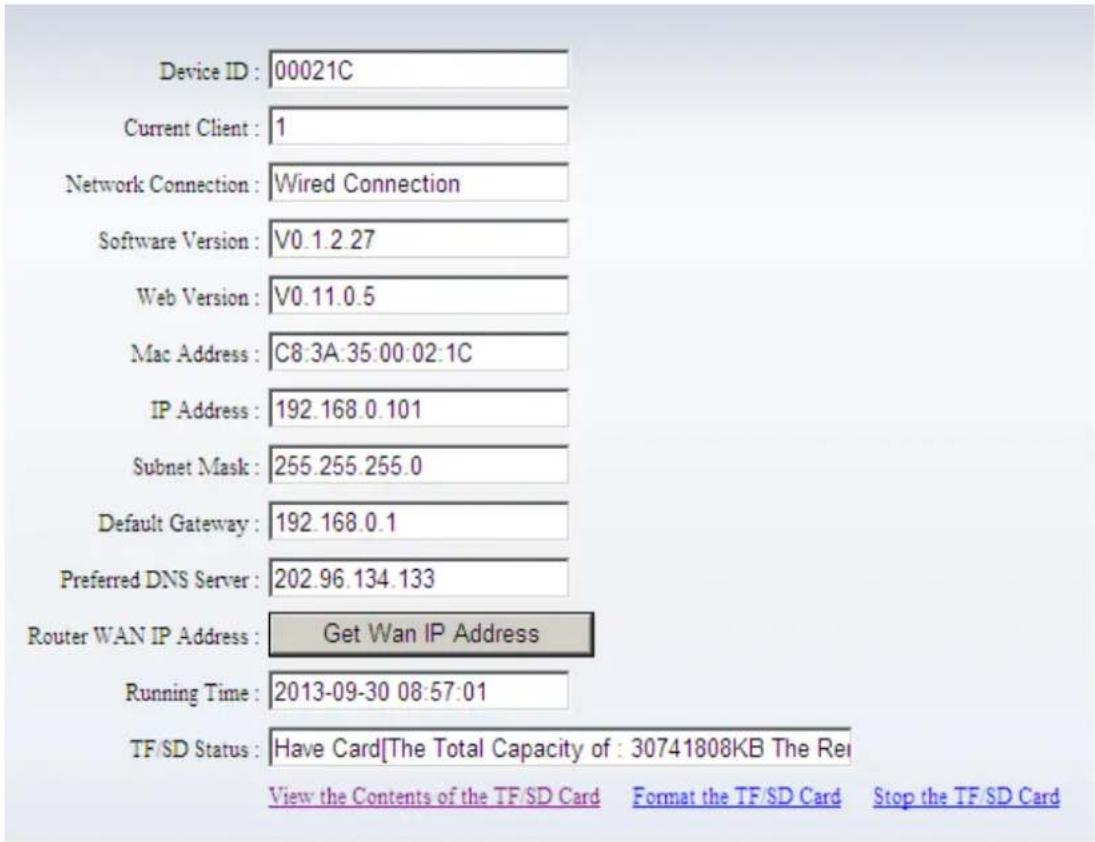
You can check some information of the device, example of software version, web version, Mac address, TF/SD card status.
Also can operate the functions for "Get Wan IP Address", "View the Contents of the TF/SD card", "Format the TF/SD card", "Stop the TF/SD card".
TF/SD status bar shows the free capacity if TF/SD card is inserted.
Tips:
① The device supports max 32G TF/SD card. Please format the TF/SD card to FAT32 before use the card on camera. Please check if the TF/SD Card matches the camera or not before purchasing the TF/SD Card.
② Please insert the TF/SD card when the device power off, otherwise damage the TF/SD card or the device can't read TF/SD card.
4.3. Video setting
4.3.1. Video parameter
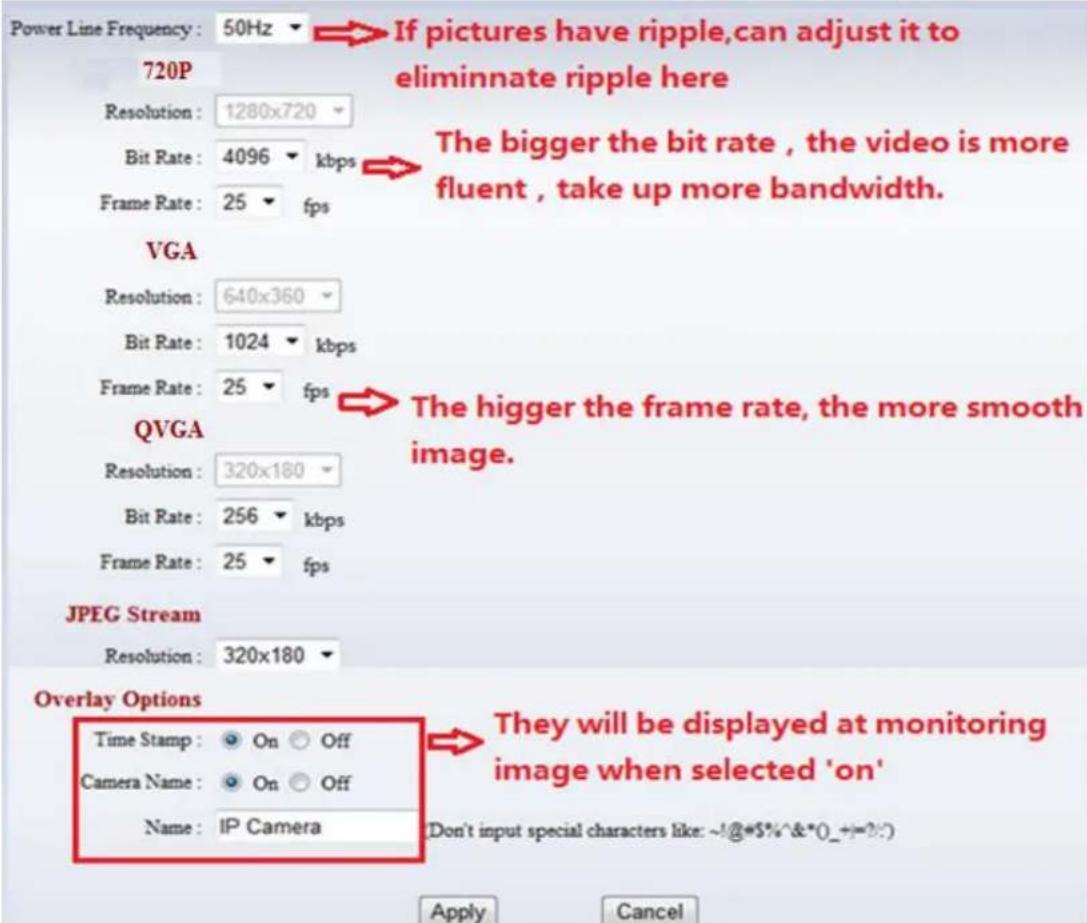
Note: When you modify the parameters, you need to click Apply to save your settings.
4.3.2. Audio parameter
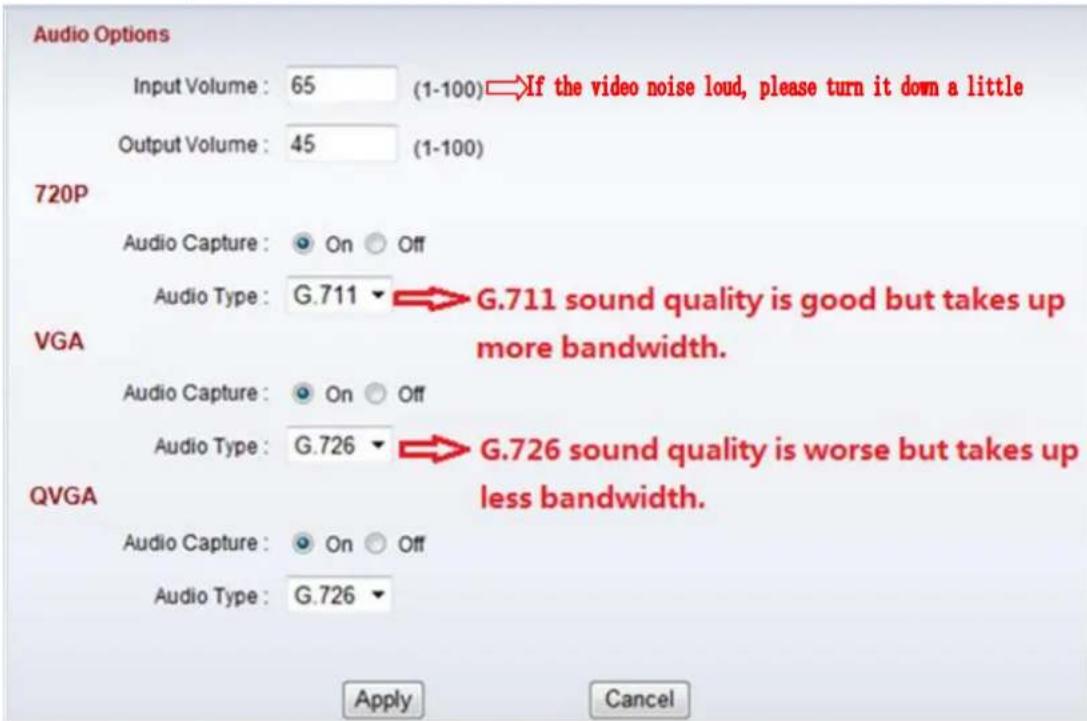
The camera supports G.711 and G.726 audio encoding format. The sound of the G.711 is better, but it occupies more bandwidth. If you click “On” of the audio capture, so it will transmit audio in corresponding video stream. Please open the audio here, should you hear the sound when clicking audio play button in 4.1.1.
Note: 1. If you want to do two-way audio by smartphone, the Audio Type need to set to G. 726.
- When you modify the parameters, you need to click Apply to save your settings.
4.3.3. Image parameters
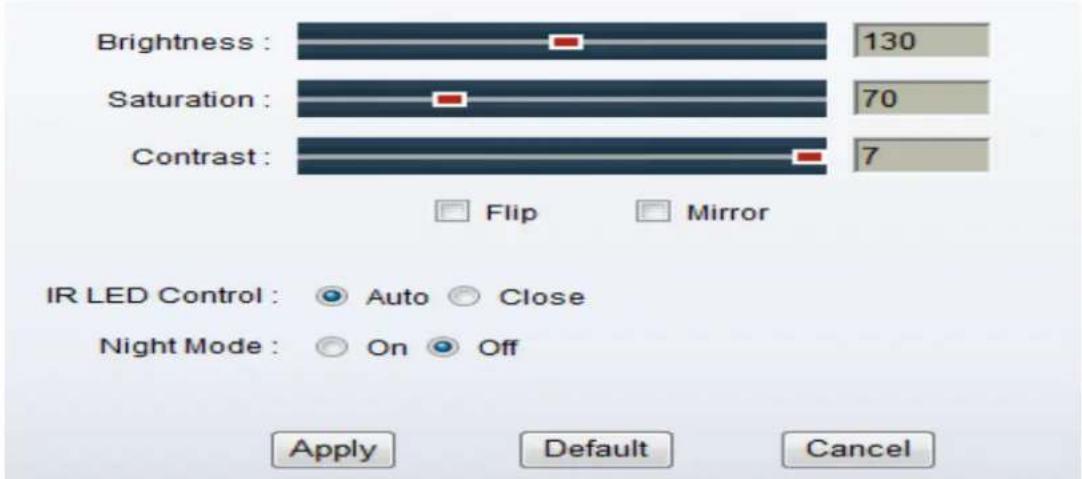
bar
| Metric | Value | | ------------ | ----- | | Brightness | 130 | | Saturation | 70 | | Contrast | 7 |The camera will switch to Night Mode in the case of poor lighting, when the Night Mode is "On", and the IR LED Control is set "Auto". When the camera is Night Mode, the image of the camera is black and white. If in the day, you see the image of the camera is black and white, you can increase lighting or turn off the Night Mode to solve it.
Note: When you modify the parameters, you need to click Apply to save your settings.
4.4. Network setting
4.4.1. LAN settings
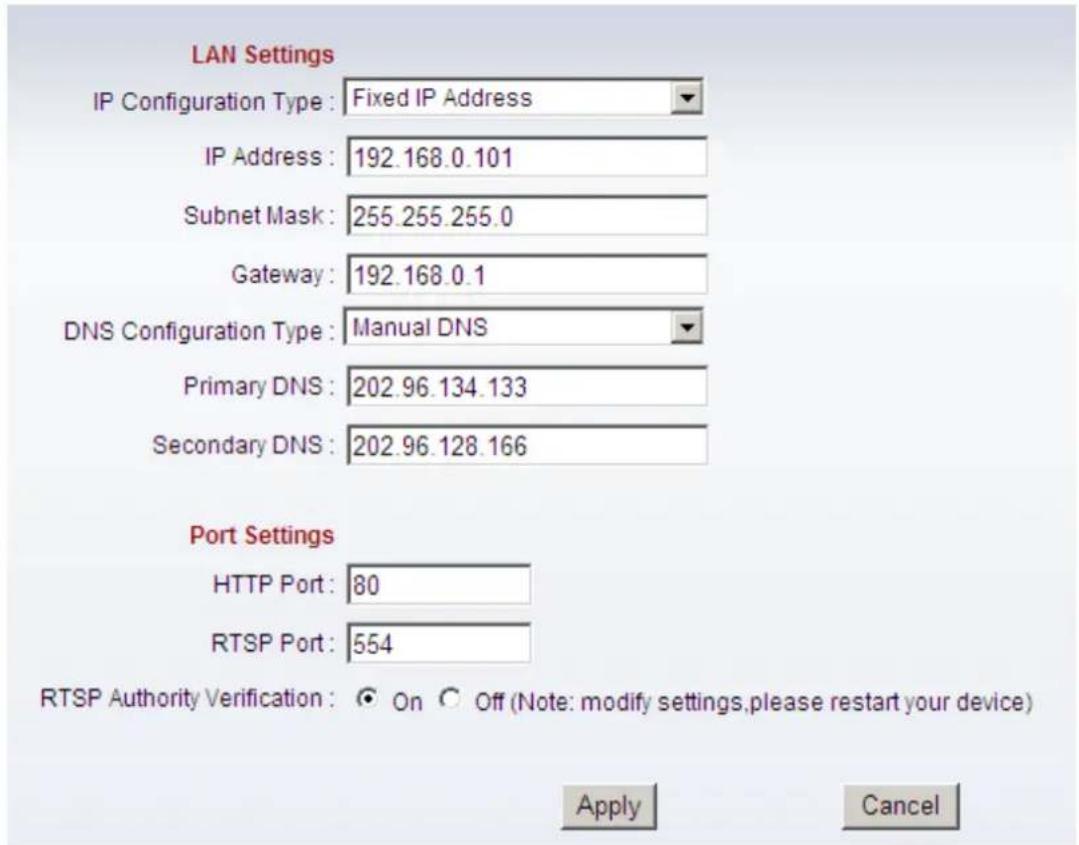
You can choose one of the way to change the IP address of the camera.
Method One: Set IP address of the camera automatically by select "Dynamic IP Address "in" IP Configuration Type" item. Note, this need your Router's DHCP Server function on.
Method Two:Set IP address of the camera manually by select "Fixed IP Address "in" IP Configuration Type" item. You can refer to 《Quick Installation Guide》step 4 "Configure Camera" Sub-step3 "Set IP address of the camera" for detail.
The default HTTP port is 80, if you do not modify the port, you can directly enter the camera IP in the web address field; if you change the port, you need to add ": " and port number behind the IP address. For example: If you modify the port is 8081, the camera IP address is 192.168.0.10. You must enter 192.168.0.10:8081 to access camera.
The cameras support RTSP protocol, if select "on" of "RTSP authority verification", you need to enter user name and password when invoke video by RTSP protocol.
Note: When you modify the parameters, you need to click Apply to save your settings.
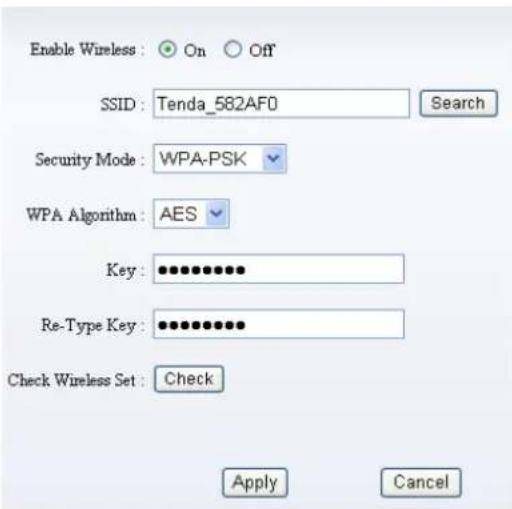
4.4.2. WiFi setting
Login camera in wired connection and enter wifi setting, and then operate as the following step.
| Join | RSSI | SSID | Encryption Mode | Authentication | Connection Mode | Channel |
| 57 | ChinaNet | NONE | OPEN | Infra | 1 | |
| 52 | ICES | TKIP | WPA2-PSK | Infra | 1 | |
| 47 | youhuard | AES | WPA2-PSK | Infra | 2 | |
| 99 | H3-novo | TKIP | WPA2-PSK | Infra | 3 | |
| 100 | Tenda_582AF0 | AES | WPA-PSK | Infra | 5 | |
| 23 | merays | TKIP | WPA2-PSK | Infra | 6 | |
| 52 | ChinaNet-6Mps | TKIP | WPA2-PSK | Infra | 6 |
Select 'On' and click 'Search', and then select wireless Router in pop up menu, click 'OK' and enter its password, click 'apply' to save the wireless settings. And you can click 'check' to check if the wireless setting is successful. After setting successfully, please pull out network cable, then you can use the wireless function.
4.4.3. Remote Access setting
User can also use third party DDNS, such as www.dynddns.us, User applies a free domain name from this website and fills the info into below blanks and saves the settings. Then enter into the Web page of your Router to do port mapping. Then you can remote access to the camera by your PC.
Note: The IP of the camera should be fixed IP address, otherwise it's unable to set the port mapping.
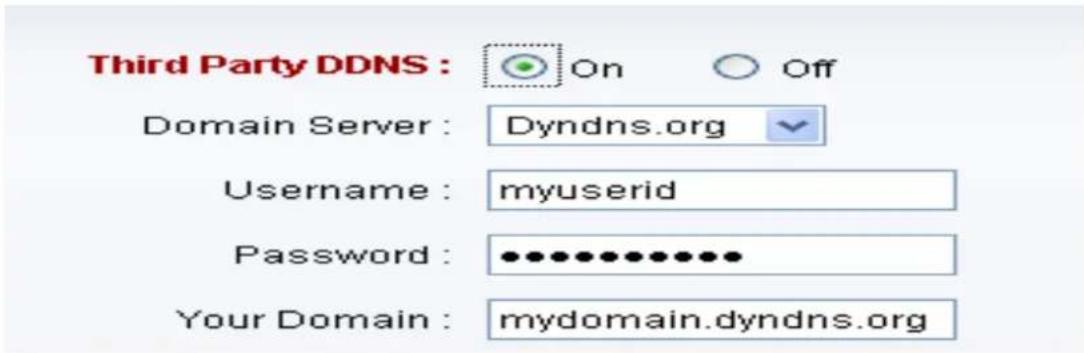
Note: Using the third party DDNS, if the http port is not 80, the port number should be added to the domain name with "":".
Example: http://chen.dynddns:8081.
Note: If there is something wrong with the set up a remote access, please enter the CD Driver: FAQ\FAQ-en, refer to Question 3.
4.4.4. ONVIF settings
ONVIF : On Off
Port : 8080
Authority Verification : ○ On ◆ Off
Apply
Cancel
The camera supports ONVIF protocol, so it can be interconnected with NVR that support ONVIF. Supported ONVIF version: 2.0.1
Note: When you modify the parameters, you need to click Apply to save your settings.
4.5. Alarm setting
4.5.1. Motion Detection Setting
You can check any window form "Window1" to "Window4" to monitor it. When the exception occurs in the windows, it will trigger alarm. In the sensitivity of options, the higher the value, the greater the sensitivity, the more easy to trigger the alarm.
If the motion detection windows was designated, and then click "Apply", and do" Alarm mode setting" (Refer to 4.5.3 Alarm mode setting, such as E-mail Alarm and Email setting success), if an exception occurs in the selected windows, alarm is triggered automatically, then send the pictures to the corresponding mailbox.
You can enter CD Driver: \ FAQ\FAQ-en, please refer to the FAQ-en question 4 for detail.
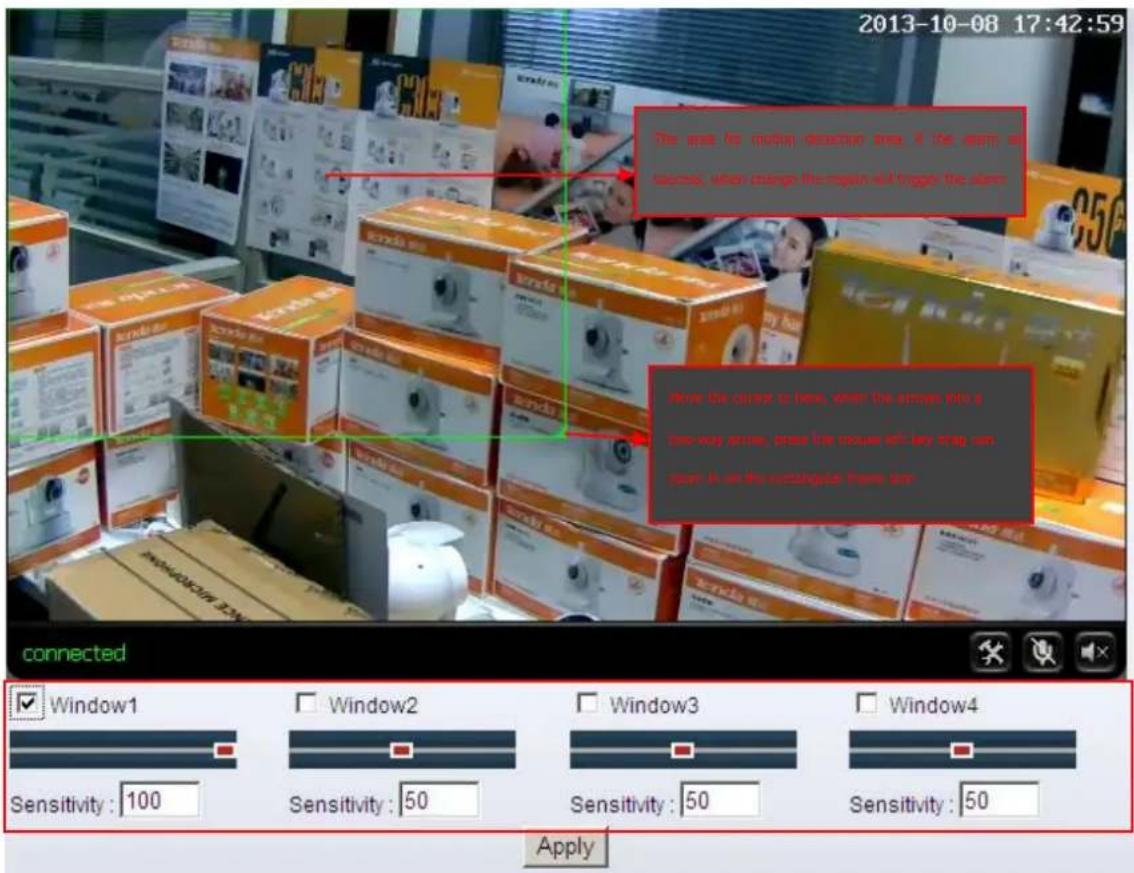
Please click “apply” after the settings are done, and motion detection takes effect. The higher value, the higher sensitivity. The camera will trigger corresponding alarm when any change occurs in the detection area.
4.5.2. Sound detection Setting
If the camera Sound detection function is "on" and click "apply", and set "Alarm mode setting" (Refer to 4.5.3 Alarm mode setting, such as E-mail Alarm and Email setting success) and "Scheduled time setting"(Refer to 4.5.4 for detail), in the selected arming time, when the camera detecte abnormal sound, the camera will trigger alarm, snap and send to the corresponding mailbox. (The higher the sensitivity, the more likely trigger an alarm)
Sound detection ⚙ On ⚡ Off
Sensitivity: 50 (1-100)
Apply
Cancel
The Sound detection function is off default. When you select "on" and click "Apply", the sound detection will be on. The value of sensitivity higher, more easily to trigger the alarm.
4.5.3. Alarm mode setting
You can set the following way to get the alarm information. You just need to check the item
you want to set it.
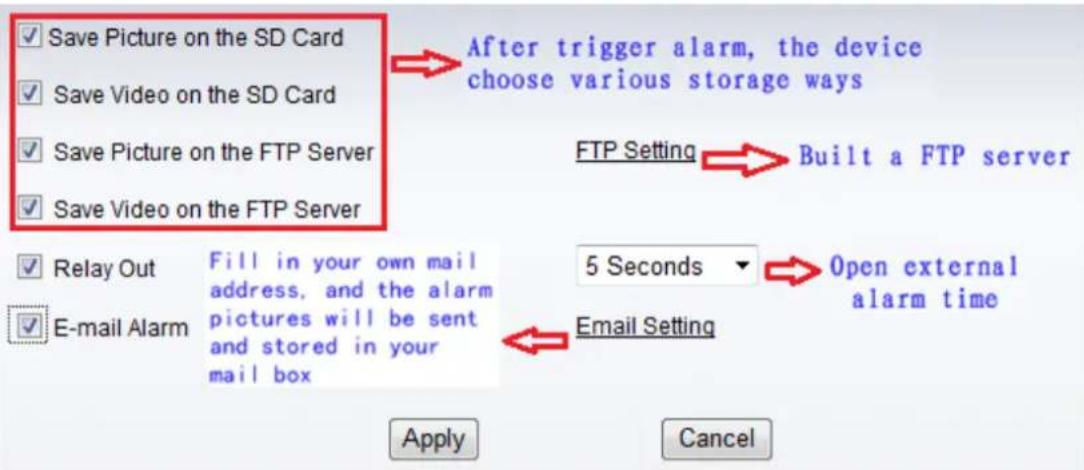
About Email Setting, you can enter CD Driver: \ FAQ\FAQ-en, please refer to the FAQ-en question 4 for detail.
Note: When you modify the parameters, you need to click Apply to save your settings.
4.5.4. Scheduled time setting
Select the time you want to alarm. The default value is all time. If you want to alarm on certain time, you can select it on the time table.

The device will trigger the alarm only during the scheduled time period, you can select the scheduled time according to your request. As shown above, it sets armed time from Mon 8:30 to 9:30, you only need to click the corresponding time block to set them, the time block will become green when you selected.
Note: Please make sure your system time is correct before you set the alarm time period. Please refer to chapter 4.8.2 to set system time.
Note: When you modify the parameters, you need to click Apply to save your settings.
4.6. Advanced setting
4.6.1. Auto capture
The camera will snap to TD/SD card or FTP server in the selected time by the time interval you setting.
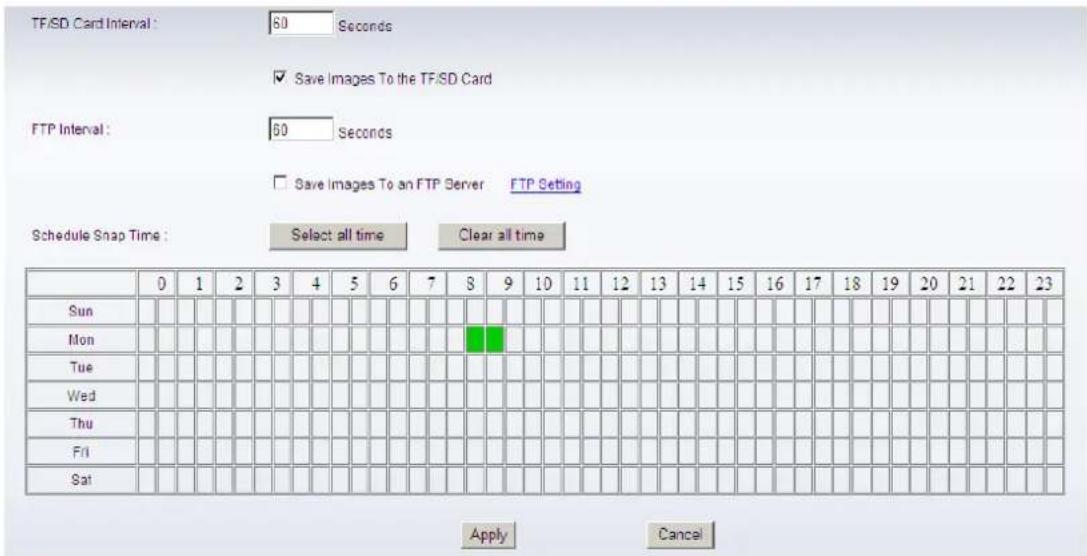
If you check "Save Images to the TF/SD card", the snap pictures will be stored into SD card during the setting time.
If you check "Save Images To an FTP Server", the snap pictures will be stored into FTP server during the setting time.
As shown above, it sets auto capture from Mon 8:30 to 9:30, you only need to click the corresponding time block to set them, the time block will become green when you selected.
Note: When you modify the parameters, you need to click Apply to save your settings.
4.6.2. Record to TF/SD
If "Record to TF/SD" function is on, then the camera will record and store to TF / SD card automatically in the selected time period.
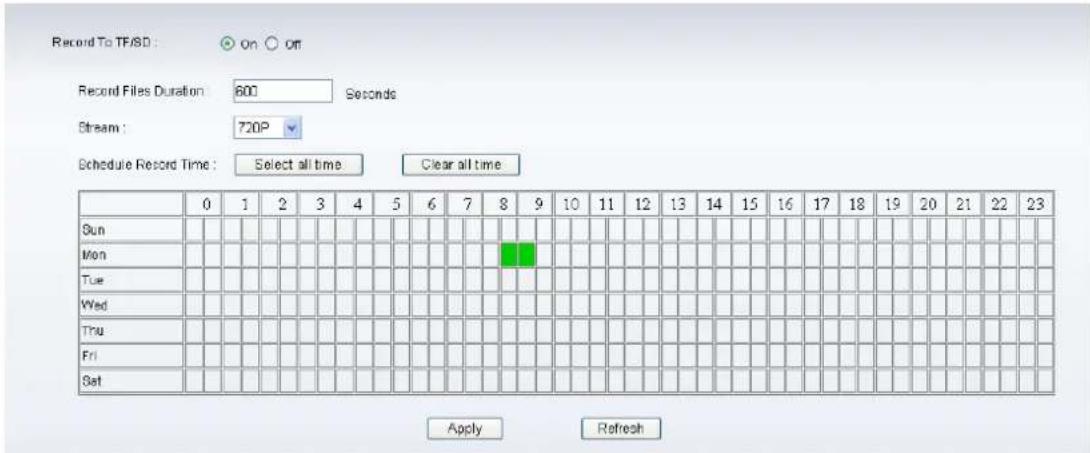
As shown above, it sets record from Mon 8:30 to 9:30, you only need to click the corresponding time block to set them, the time block will become green when you selected.
Note: When you modify the parameters, you need to click Apply to save your settings.
4.6.3.E-mail setting
When it detects alarming, it can send email to your appointed email box, but you need to set email service parameters correctly. As shown below, click "Submit" to save these parameters, and
then you can click "Test" to check if the setting is successful.

The SMTP server name: It is mailbox server, for example of SOHU mailbox, it is "smtp.sohu.com". Please fill all blanks which we filled above. Otherwise, the settings will fail.
Please click "Test" to test if the E-mail setting is successful.
Note: If it's failure when you point "Test", You can enter CD Driver:\FAQ\FAQ-en, please refer to question 4 for detail.
4.6.4. FTP setting
The device will snap live pictures and send them to FTP server when alarming, but need to set the FTP setting correctly. As shown below, after the setting is finished, click "Test" to check your settings are correct or not.
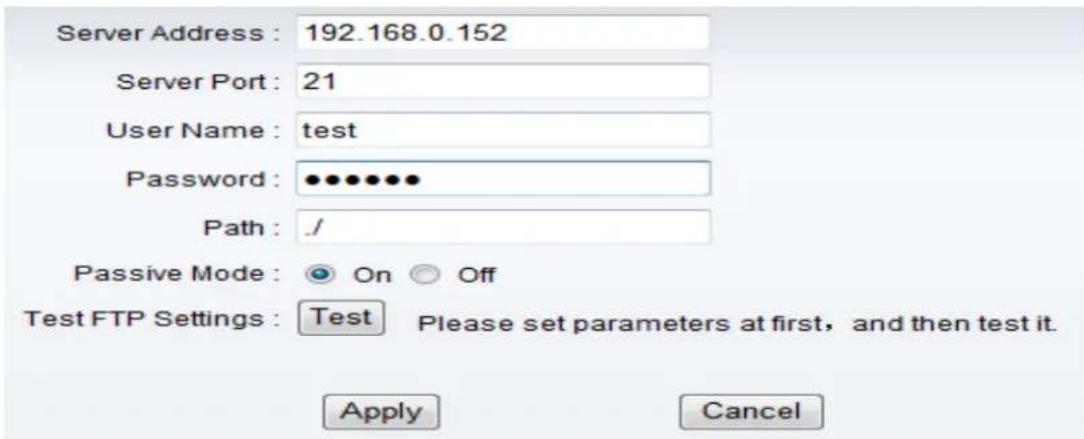
Before to use FTP function, please get the following ready.
1) FTP user name and password
2) FTP storage space and the authority
3) Create sub-category to store the video or pictures.
Note: The password should not be special character, otherwise the camera can't identify it.
4.6.5. PTZ Protocol setting
PTZ Protocol Setting, set the cruise laps, PTZ speed, self-inspection location, Close alarm when PTZ movement. When you click Apply after setting the corresponding data will be saved.

Cruise laps: You can choose any number between 1 to 50, the camera will turn the corresponding number.
Note: Suggest you cruise laps not to set too big, If you set it is too big, the machine service life will be shorten.
PTZ speed: PTZ hava fast, the second fast, slow, You can choose any one in the three levels, to adjust rotational speed of PTZ.
Center While Self Check: when the Center While Self Check is on, restart the camera, the camera's lens location is center automatically.
Close the alarm PTZ movement: When you select On, the camera will not trigger alarm when PTZ movement. If you select Off, the camera will trigger alarm when PTZ movement. Users need to click on the “” after change the Settings, the corresponding Settings will be saved.
4.6.6. Status LED setting
If you feel dazzling lights behind the camera affect your sleeping at night, you can choose to turn off the Status LED by select On.

Note: When you modify the parameters, you need to click Apply to save your settings.
4.7. System setting
4.7.1. User management
| purview | User Name | Password | Re-Type Password |
| Administrator | admin | ●●●●●● | ●●●●●● |
| Operator | user | ●●●● | ●●●● |
| Guest | guest | ●●●●● | ●●●●● |
There are 3 levels of user authorization in it.
- Administrator: “admin” has the highest authority. It can do any settings. The factory default password: admin.
Note: It is recommended you set the administrator account user name is “admin”. Set your own password. If the administrator account user name is not “admin”, the user can not use PTZ function of the PTZ camera in centralized control software IPCamMonitor.
◆ User: user can only operate the device but can't do any settings. The default password is user.
◆ Guest: User can view the video, but can't operate the device. The default password is guest.
Note: Please change these 3 level passwords when your first use to ensure your safety.
4.7.2. Time settings
First time you use the camera, maybe the time on the picture is incorrect. Because the camera need to get the current time by Internet. If the camera connect to Internet, the camera will get current time, the time of the camera will update automatically.
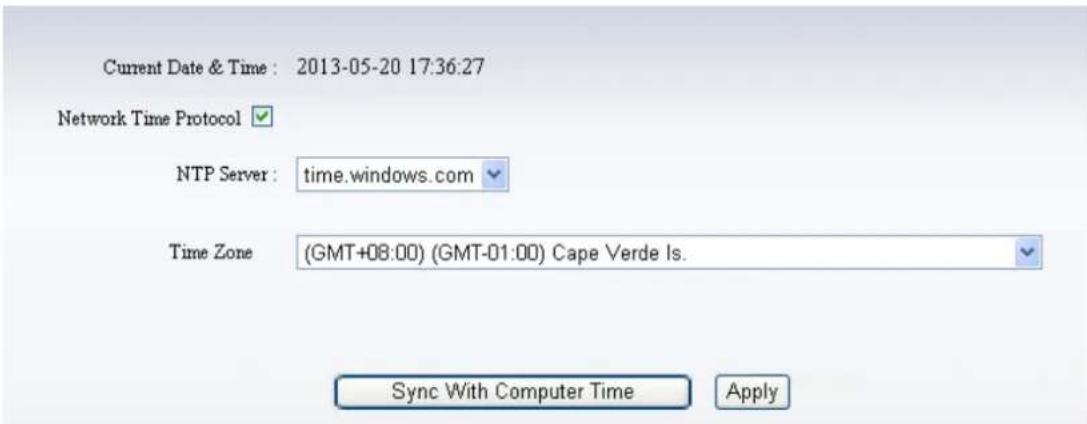
Please select the time zone at first and then select a NTP server and obtain time from network time server.
4.7.3. Reboot IP camera
The camera will automatically restart when the firmware upgrade.
The camera will automatically restart When change the camera "Power Line Frequency" or "Audio Type".
4.7.4. Restore factory default
Restore factory default
4.7.5. Backup/Restore settings
Backup Settings Data : Confirm
If you click “Confirm” of Backup setting data, the camera will create a file, you can store it to your computer, and you can directly call this file to restore the settings. The function helps to manage the cameras and no need to do all the settings again.
4.7.6. Upgrade
Firmware Upgrade :
Browse
Confirm
The firmware upgrade is for updating system firmware and web UI.
4.7.7. System Log
System Log
[2013_01_17 20:36:23] ipc_server start.
[2013_01_18 10:52:00] user(admin) login for live stream.
[2013_01_18 11:02:43] user(admin) logout from live stream.
[2013_01_18 11:03:09] user(admin) login for live stream.
[2013_01_18 11:04:17] user(admin) logout from live stream.
[2013_01_18 11:06:42] user(admin) login for live stream.
[2013_01_18 11:08:12] user(admin) logout from live stream.
[2013_01_18 12:38:21] user(admin) login for live stream.
[2013_01_18 12:39:15] user(admin) logout from live stream.
5. SD series Web configuration (for C30/C3)
You can follow the setup wizard, in the last step of the wizard, Click" Config(F6)", enter "admin" in both user name and password text boxes on the appearing login window, and then click "OK" to enter the Web UI. If you have not changed your camera's default IP address, simply launch a web browser, input http://192.168.0.188 and then press "Enter" key. Enter "admin" in both user name and password text boxes. And then click "OK" to enter the web UI. You will then be able to watch videos or do system settings.
5.1. View video
1) Operation interface
Language selection: support Simplified Chinese and English
Resolution selection button: VGA/QVGA/QQVGA (640*480/320*240/160*120)
PTZ control button: up/down/left/right/center

Vertical Patrol/Horizontal Patrol/Set preset/Call preset/Listen/Talk/Snapshot/Record
2) System settings
Click "System settings" button to enter system setting web page, you can configure your camera.
5.2. Run Status
| Device Status | |
| Device Firmware Version | 50.2.0.145 |
| Device Embedded Web UI Version | 0.11.1.3 |
| Alias | IPCAM |
| MAC | 78:A5:DD:02:FA:A6 |
| Wifi MAC | 78:A5:DD:02:FA:A4 |
Refresh
You can check device firmware version, Web UI version, Alias, device MAC address etc.
5.3. Video setting
5.3.1. Video parameters setting


OSD/IR LED control/flip/mirror
5.4. Network setting
5.4.1. LAN setting
| Network | |
| Obtain IP from DHCP Server | |
| IP Addr | 192.168.0.121 |
| Subnet Mask | 255.255.255.0 |
| Gateway | 192.168.0.1 |
| DDNS Server1 | 8.8.8.8 |
| DDNS Server2 | 192.168.0.1 |
| Http Port | 80 |
If you want to change ip address of the camera, except for changing it in setup wizard, also you can change it in "LAN setting" of network setting.
5.4.2. WiFi setting
| Wifi | |||
| Wireless Network List | ID | SSID | MAC |
| 1 | ChinaNet-0001 | 00:27:19:FC:57:F5 | |
| 2 | owen | EC:88:8F:58:95:66 | |
| 3 | F4:EC:38:32:15:78 | ||
| 4 | 00A8F0002296 | 48:02:2A:40:66:76 | |
| Scan | |||
| Using Wireless LAN | ✓ | ||
| SSID | |||
| WI-FI Channel | 0 | ||
| Network Type | Infra ✓ | ||
| Authentication | None ✓ | ||
Enter the Wireless LAN Setting, click the "Scan" button, it will show you all the wireless networks detected in the Wireless Network list column. Select one of them and tick "Using Wireless LAN", then the relevant data of the selected wireless network will be shown in the following blanks. Input the password and click "Submit", then the WIFI setting is finished. Unplug the cable, then you can connect to router by WiFi.
Note When the device is connected both WiFi and wired, it will firstly connect to the wired network. If the camera enables DHCP to obtain IP address automatically, so the IP address is not same in wired connection and wifi connection, recommend to set fixed IP address for the camera.
5.4.3. Remote access setting
User can also use third party DDNS, such as www.3322.org, User must apply a free domain name from this website and fill the info into the below blanks and save the settings, and then in the router to do port mapping, can remote access to the network camera (note: IP should be set to manual IP network camera, does not automatically get, otherwise unable to set the port mapping).
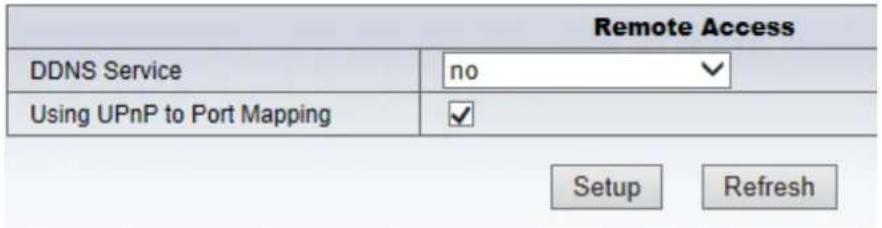
If you enable UPnP, once the IP camera is connected into the LAN, it will communicate with the router in the LAN and do the port-forwarding with open port of router automatically, so the user don't need to login the router for doing the port-forwarding, only tick "Using UPnP to Port Mapping" to finish the setting.
Note: If there is something wrong with the set up a remote, please enter the CD:\FAQ\FAQ-en, See the third explanation in the FAQ-en.
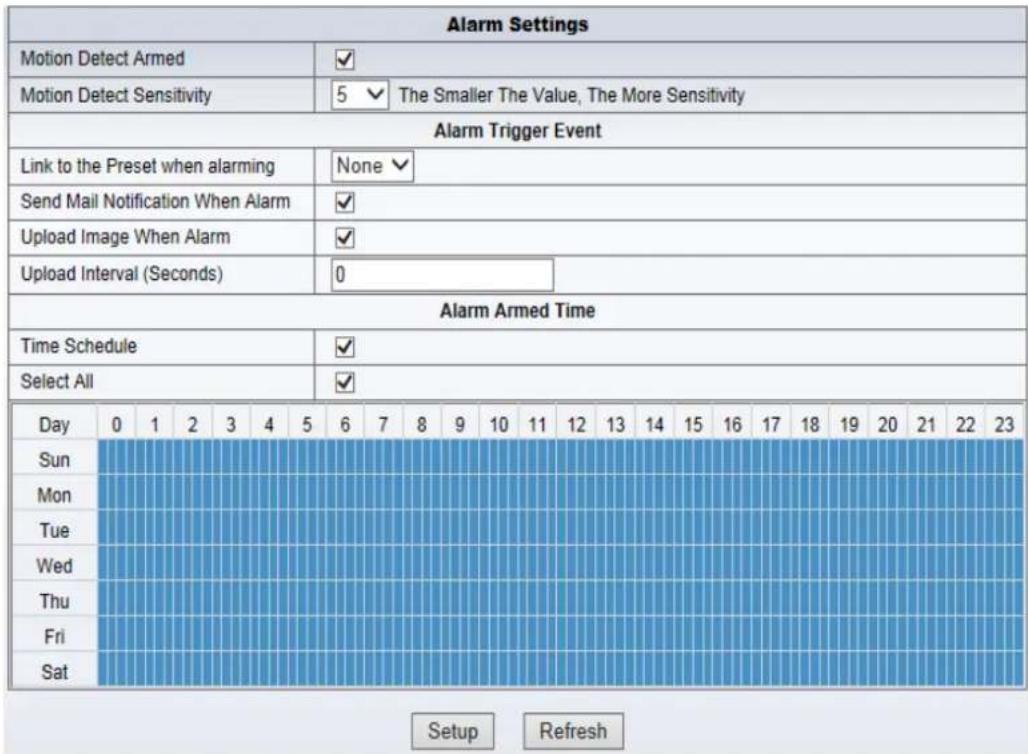
5.5. Alarm setting
5.5.1. Alarm setting
If user needs to monitor a fixed area, it will detect the motion and trigger the alarm when there is any motion in the area. In the motion detect sensibility, the smaller the value, the more sensitivity.
After triggering the alarm, you can adopt several alarm mode in armed time.
- Link to the Preset when alarming: need to set preset point of the camera;
➢ Send alarm info by email (one email include a picture); every alarm trigger a email;
➢ Send the snap to the FTP server, user can also set the interval time between two pictures.
The device only triggers alarming when it detects any motion in armed time. User can set schedule time to be "all the time", also assign the armed time. Before you set "Time Schedule", please go to "Device Date and Time settings" to set the correct time for the item.
5.6. Advance setting
5.6.1. Device name setting
The user can name the camera, example for home, office etc.
5.6.2. Local recording path
The camera will be automatically create a file folder named "Record files" in root directory of disk C:\when the user don't set "local recording path" and launch recording directly, and then save recording file to the folder.
| Local Recording Path | ||
| Local Recording Path | C:\Users\Administrator\Desktop | select... |
| Record Time Length(Minute) | 5 | Least 5 Minutes, MAX 10 Minutes |
| Reserved Disk Space(MB) | 200 | Least 200MB |
| Cover Previous Recording | ☑ | |
5.6.3. E-mail setting
When it detects alarming, it can send email to your appointed email box, but you need to set email service parameters correctly. As shown below, click "Submit" to save these parameters, and then you can click "Test" to check if the setting is successful.
| Sender | ipcam@qq.com | |
| SMTP Server | smtp.qq.com | Please select √ |
| SMTP Port | 25 | |
| Need Authentication | √ | |
| SSL | NONE √ | |
| SMTP User | ipcam | |
| SMTP Password | ●●●●●●● | |
| Receiver 1 | ipcamera@qq.com × | |
| Receiver 2 | ||
| Receiver 3 | ||
| Receiver 4 | ||
| Test Please set at first, and then test. | ||
5.6.4. FTP setting
The device will snap live pictures and send them to FTP server when alarming, but need to set the FTP setting correctly. As shown below, after the setting is finished, click "Test" to check your settings are correct or not.
| FTP | ||
| FTP Server | 192.168.1.3 | |
| FTP Port | 21 | |
| FTP User | admin | |
| FTP Password | ●●●●● | |
| Upload Interval (Seconds) | 0 | Blank or O means 'Upload the picture from time to time' |
| Test Please set at first, and then test. | ||
Note: For using the FTP function, you need to apply a user with authority that you can write and create submenu and some memory space.
5.7. System settings
5.7.1. User setting
| Users Settings | |||
| User Authority | User | Password | |
| Administrator | admin | ●●●●●● | |
| Operator | |||
| Visitor | |||
5.7.2. Device date and time settings
You can enable "Sync with NTP Server" when the device was connected to WAN, but need to select correct time zone where the camera is located, otherwise need to select "Sync with PC time".
| Device Date & Time Settings | |
| Device Clock Time Zone | 2013年6月22日 12:06:00 |
| Device Clock Timezone | (GMT +08:00) Beijing, Singapore, Taipei |
| Sync With NTP Server | |
| NTP Server | time.nist.gov |
| Sync with PC Time | |
5.7.3. PTZ settings
It will stop cruise automatically after cruising an hour when you select cruise turns as "always".
| PTZ Settings | |
| Disable Preset | |
| Call the Preset after reboot | Disable √ |
| PTZ Speed | Fast √ |
| Cruise Turns | 2 √ |
5.7.4. Restore factory setting
Click "Restore factory setting" and confirm, the camera will restore to factory setting and reboot.
5.7.5. Reboot device
You can reboot the device.
5.7.6. Upgrade Web UI
There are two kinds of firmware run in the camera, one is system firmware, another one is Web UI, you can upgrade them respectively.
5.7.7. Upgrade system firmware
There are two kinds of firmware run in the camera, one is system firmware, another one is Web UI, you can upgrade them respectively.
- Table of Contents
- Product overview....5
- Installation 8
- Setup Wizard .... 11
- HD series Web Configuration (For C50/C5) 15
- System setting 28
- SD series Web configuration (for C30/C3)....29
- Product overview
- 1.1.Package list
- Computer requirement
- 1.3.Introduction
- 1.4.Features
- SD series IP camera(C30,C3):
- 1.5.Hardware overview
- Installation
- 2.1.Hardware installation
- 2.1.1.2.PTZ IP Camera
- 2.1.2.Wall install
- Cube IP Camera
- 2.1.2.2.PTZ IP Camera
- 2.1.3.Hardware Connection
- 2.1.3.1.PTZ Camera
- 2.1.3.2.Cube IP Camera
- Setup Wizard
- HD series Web Configuration (For C50/C5)
- 4.1.View video
- 1) Status bar
- 2) Select language and bit-rate
- 3) PTZ control
- 4) Snap/record/SD card/playback
- Running status
- Tips:
- Video setting
- Video parameter
- Audio parameter
- Image parameters
- Network setting
- LAN settings
- WiFi setting
- Remote Access setting
- ONVIF settings
- Alarm setting
- Motion Detection Setting
- Sound detection Setting
- Alarm mode setting
- Scheduled time setting
- Advanced setting
- Auto capture
- Record to TF/SD
- 4.6.3.E-mail setting
- FTP setting
- PTZ Protocol setting
- Status LED setting
- System setting
- User management
- Time settings
- Reboot IP camera
- Restore factory default
- Backup/Restore settings
- Upgrade
- System Log
- SD series Web configuration (for C30/C3)
- View video
- Run Status
- Video setting
- Video parameters setting
- Network setting
- LAN setting
- WiFi setting
- Remote access setting
- Alarm setting
- Alarm setting
- Advance setting
- Device name setting
- Local recording path
- E-mail setting
- FTP setting
- System settings
- User setting
- Device date and time settings
- PTZ settings
- Restore factory setting
- Reboot device
- Upgrade Web UI
- Upgrade system firmware
Brand : Tenda
Model : C50
Category : Surveillance Camera