DMS106XT - Switch D-LINK - Free user manual and instructions
Find the device manual for free DMS106XT D-LINK in PDF.
| Product Type | Unmanaged Network Switch |
| Brand | D-Link |
| Model | DMS106XT |
| Category | Switch |
| Ethernet Ports | 5 x 2.5GBase-T (Ports 1-5) + 1 x 10GBase-T (Port 6) |
| Supported Speeds | 100 Mbps, 1 Gbps, 2.5 Gbps, 5 Gbps, 10 Gbps |
| Supported Cable Type | Category 5 (Cat 5) or higher up to 100 meters |
| Power Supply | External power adapter (DC) |
| Approximate Dimensions | 148 x 100 x 30 mm |
| Approximate Weight | 500 g |
| Key Features | Standard mode, TURBO mode (low latency, multicast, port-based QoS), link/activity LED |
| Maintenance and Cleaning | Clean with a soft, dry cloth. Do not use solvents. |
| Safety | Use a certified power adapter. Do not expose to moisture. Turn off when cleaning. |
| Spare Parts and Repairability | No user-serviceable parts. Contact D-Link support. |
| General Information | Limited warranty (see manual). Technical support: www.dlink.com/support |
Frequently Asked Questions - DMS106XT D-LINK
User questions about DMS106XT D-LINK
0 question about this device. Answer the ones you know or ask your own.
Ask a new question about this device
Download the instructions for your Switch in PDF format for free! Find your manual DMS106XT - D-LINK and take your electronic device back in hand. On this page are published all the documents necessary for the use of your device. DMS106XT by D-LINK.
USER MANUAL DMS106XT D-LINK
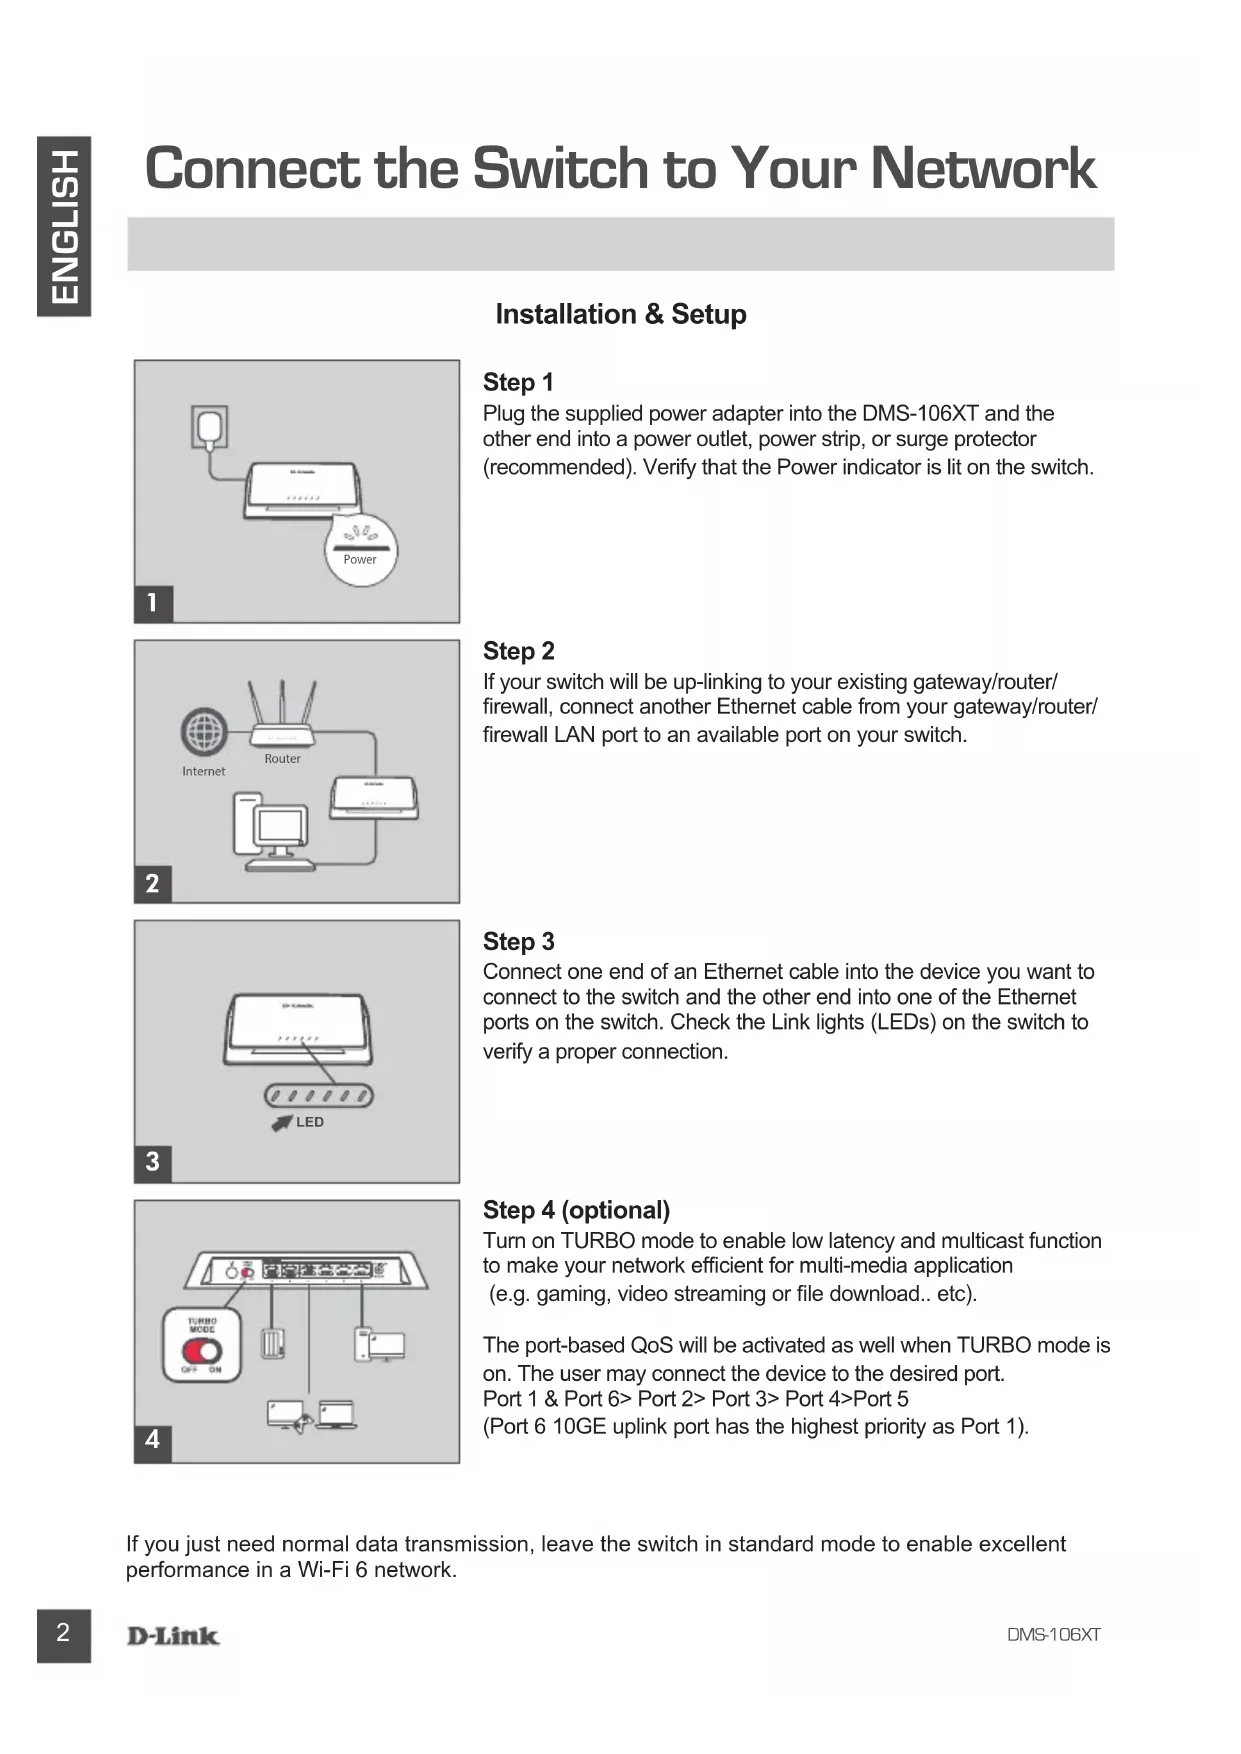
Connect the Switch to Your Network
Installation & Setup
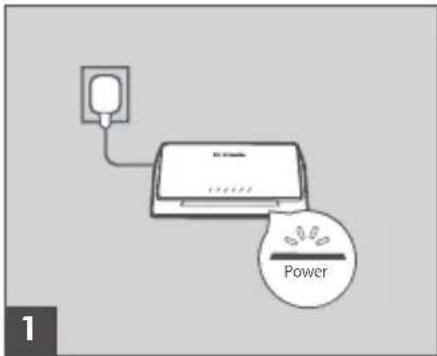
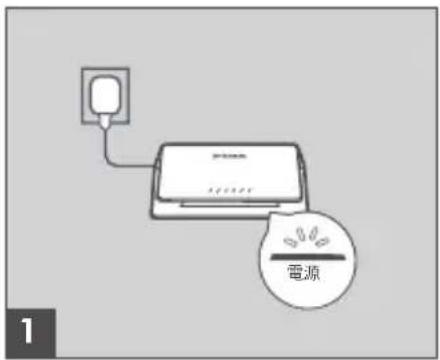
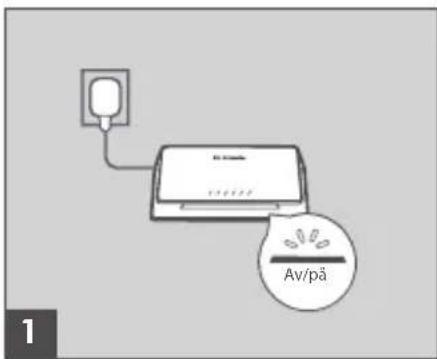
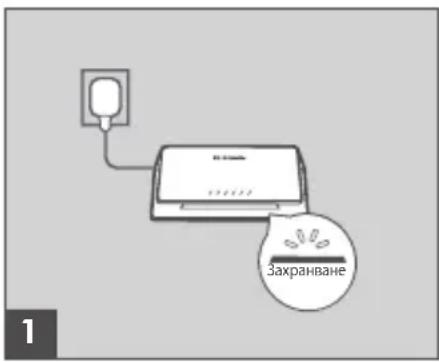
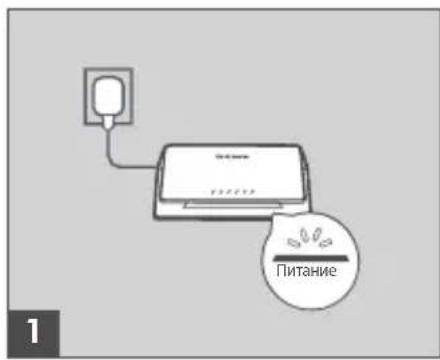
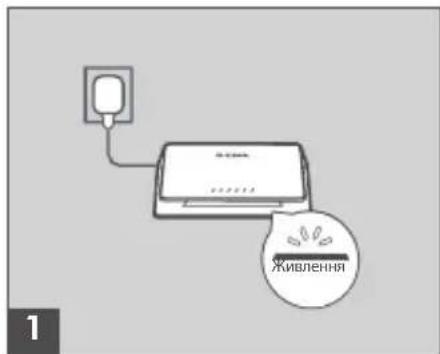
Step 1 Plug the supplied power adapter into the DMS-106XT and the other end into a power outlet, power strip, or surge protector (recommended). Verify that the Power indicator is lit on the switch.
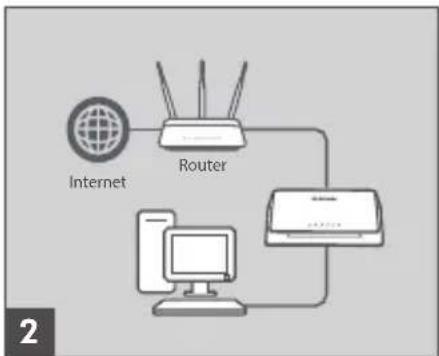
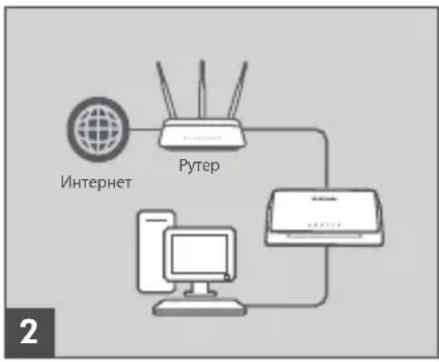
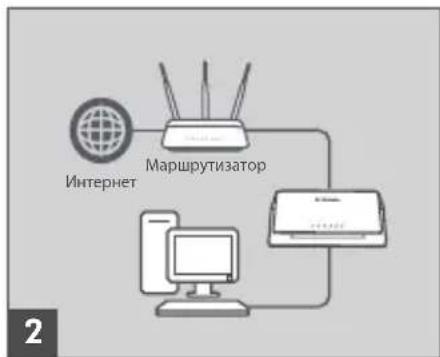
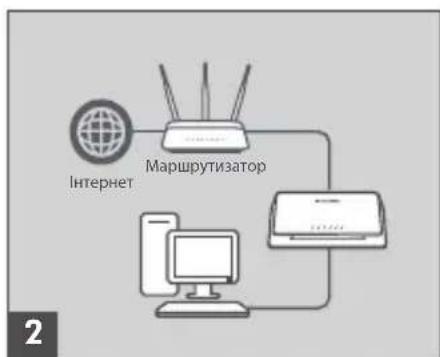
Step 2 If your switch will be up-linking to your existing gateway/rodter/ firewall, connect another Ethernet cable from your gateway/rodter/ firewall LAN port to an available port on your switch.
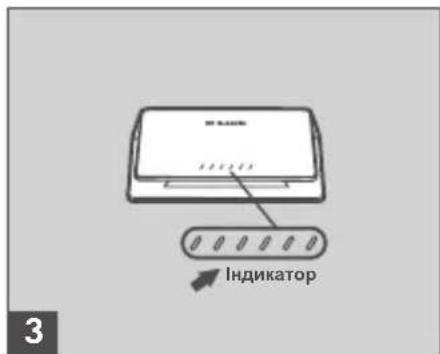
Step 3 Connect one end of an Ethernet cable into the device you want to connect to the switch and the other end into one of the Ethernet ports on the switch. Check the Link lights (LEDs) on the switch to verify a proper connection.
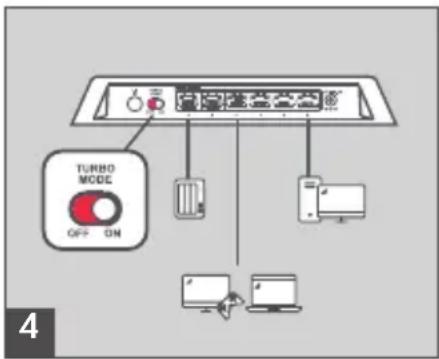
Step 4 (optional)
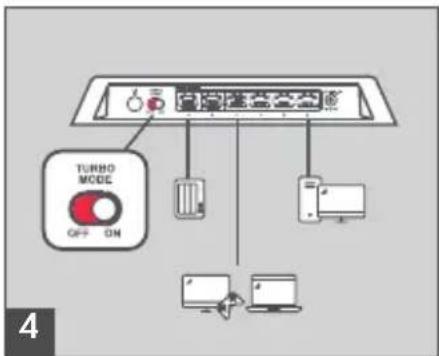
Turn on TURBO mode to enable low latency and multicast function to make your network efficient for multi-media application (e.g. gaming, video streaming or file download.. etc).
The port-based QoS will be activated as well when TURBO mode is on. The user may connect the device to the desired port. Port 1 & Port 6> Port 2> Port 3> Port 4>Port 5 (Port 6 10GE uplink port has the highest priority as Port 1).
If you just need normal data transmission, leave the switch in standard mode to enable excellent performance in a Wi-Fi 6 network.
Cables and Speeds
The following table describes the network cables that you can use for the switch connections and the speeds that these cables can support, up to 328 feet (100 meters).
| Speed Cable Type | |
| 100 Mbps Category 5 (Cat 5) or higher | rated |
| 1 Gbps, 2.5 Gbps, or 5 Gbps Category 5e (Cat 5e) or higher rated | |
| 1 Gbps, 2.5 Gbps, or 5 Gbps Category 6A (Cat 6A) or higher rated | |
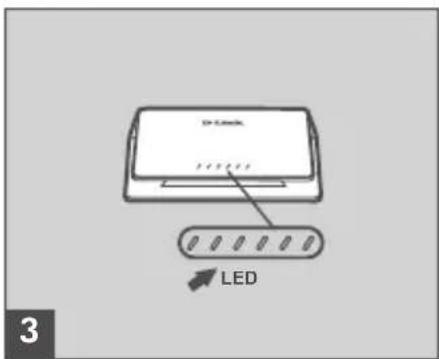
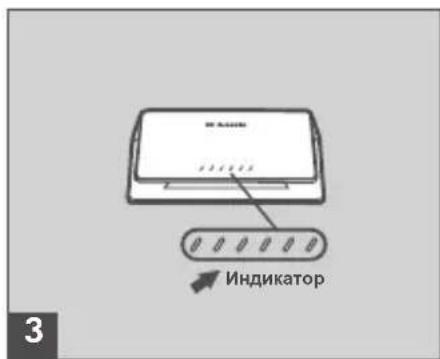
Port LED Connection Speed
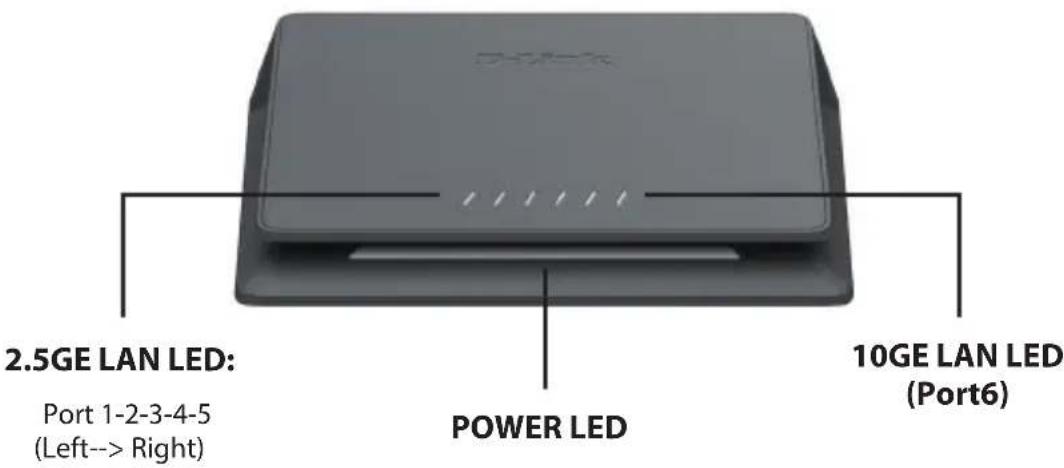
Comprehensive LED indicators display the conditions of the Switch and status of the network. The LED indicators of the Switch include Power and Link/Act described as below.
| Location LED | D Indicative Color | or Status | Description | |
| LED in front panel | Power White | Blinking Initialization process | ||
| Solid Ready for use | ||||
| Turbo mode Multi-colors Slow Blinking | Initialization Process:The power LED will change to multi-colors when turbo mode is activated. | |||
| Power/Turbo Off Light off Device Power Off or LED off | ||||
| LED Per 2.5G BASE-T Port (Port 1-5 from Left to right) | Link/Act/Speed | Blue | Solid 2.5GE Connection | |
| Blinking Data transmission/Activity | ||||
| White | Solid 1GE or below speed connection | |||
| Blinking Data transmission /Activity | ||||
| Off Light off No link or LED off | ||||
| LED Per 10G BASE-T Port | Link/Act/Speed | Light Blue | Solid 10GE connection | |
| Blinking Data transmission/Activity | ||||
| Blue | Solid 5G/2.5GE connection | |||
| Blinking Data transmission /Activity | ||||
| White | Solid 1GE or below speed connection | |||
| Blinking Data transmission/Activity | ||||
| Off Light off No link or LED off | ||||
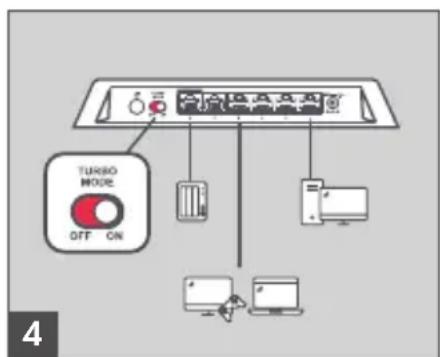
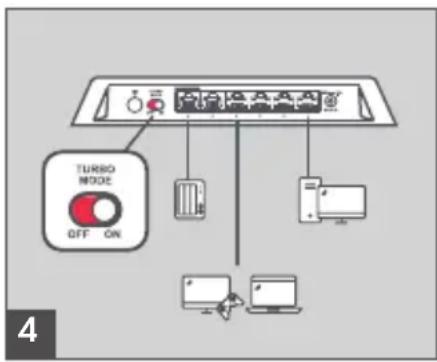
Rear Panel Description
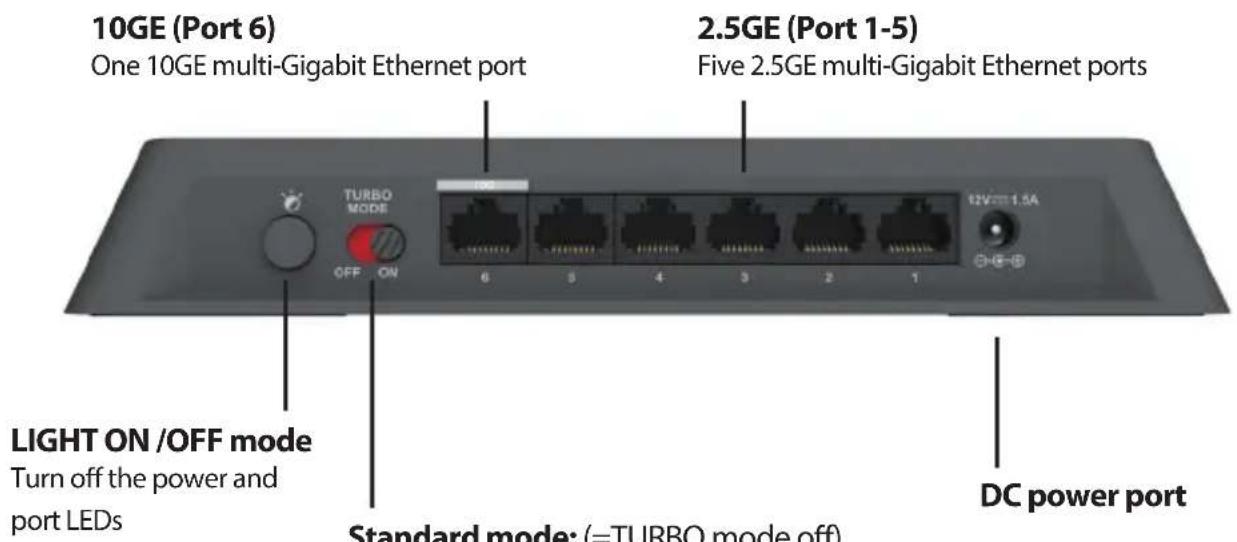
Standard mode: (= TURBO mode off) Enable for normal operation with high-speed acitivities-e.g. data transmission in Wi-Fi 6 network.
TURBO mode: Enable for faster performance and Port-based QoS settings for multi-media serivces
DC Power Jack:
Power is supplied through an external AC power adapter. Check the technical specification section for information about the AC power input voltage.
TURBO mode:
This button is to enable advanced functions, including low latency mode, multicast function and Port-based QoS for multi-media services.
LED ON/OFF:
This is to turn off the POWER and LAN status LEDs.
LAN Ports:
Port 1 to 5 supports 2.5G Multi-gigabit Ethernet. Port 6 support 10G Multi-gigabit Ethernet.


http://www.dlink.com/support


http://www.dlink.com/warranty

http://www.dlink.com/resources/business
TECHNICAL SUPPORT
dlink.com/support
http://www.dlink.com/resources/business
TECHNISCHER SUPPORT
dlink.com/support
http://www.dlink.com/resources/business
SUPPORT TECHNIQUE
dlink.com/support
http://www.dlink.com/resources/business
ASISTENCIA TECNICA
dlink.com/support
http://www.dlink.com/resources/business
ASSISTENZA TECHNICA
dlink.com/support
http://www.dlink.com/resources/business
Technische ondersteuning
dlink.com/support
Porty 1 - 5 obsluguja standard Multi-gigabit Ethernet 2.5G. Port 6 obsluguje standard Multi-Gigabit Ethernet 10G.


http://www.dlink.com/support


http://www.dlink.com/warranty

http://www.dlink.com/resources/business
POMOC TECHNICZNA
dlink.com/support
http://www.dlink.com/resources/business
TECHNICKÁ PODPORA
dlink.com/support

http://www.dlink.com/resources/business
MOSZAKI TÁMOGATÁS
dlink.com/support
Koble til svitsjen på nettverket ditt
Installering og konfigurering
Trinn 1
http://www.dlink.com/resources/business
TEKNISK STOTTE
dlink.com/support
Taend for TURBO-tilstand for
at aktivere lav forsinkelse og multicast-funktion for at gore dit netværk effektiv for multimediaprogrammer (e.g. gaming, videostreaming eller download af file etc).
http://www.dlink.com/resources/business
TEKNISK SUPPORT
dlink.com/support
http://www.dlink.com/resources/business
TEKNINEN TUKI
dlink.com/support
Anslut switchen till ditt natverk
http://www.dlink.com/resources/business
TEKNISK SUPPORT
dlink.com/support
http://www.dlink.com/resources/business
ASSISTÊNCIA TÉCNICA
dlink.com/support
http://www.dlink.com/resources/business
TEXNIKH YIIOSETHPIEH dlink.com/support
http://www.dlink.com/resources/business
TEHNIČKA PODRŠKA dlink.com/support
http://www.dlink.com/resources/business
http://www.dlink.com/resources/business
SUPPORT TEHNIC
dlink.com/support
CbpxTe npeBknUoyBaTeJRA Mpejata cn
Инстаниpaneи Настpoиka
CTbNka1
BknHouTe npnIOKeHn 3axpaHbau, aanTep B DMS-106XT, a dpyrrnT kpaI-B 3axpaHbau n3xOd, pa3KnOHTeIN nn FInTbp 3a 3aunTa OT npenappeKHe (npenopbTuNTeHNo).PpOBepTe daN INDnKaTOptbT 3a 3axpaHbAHe Ha npBeKNIOuBaTeJcCBtN.
CTbkn2
Ako npEKNIOUbaTeI 6bJe Cbbp3aH KbM cbIeCTByBaUNBn reInTyen/pyTep/3aunTHa cTeHa, CbPKeTe pyr Ethernet kaBen OT LAN npTa Ha reInTyen/pyTepa/3aunTHaTa cTeHa KbM haJIuHeN npT Ha npEKNIOUbaTeI.

CTbInka 3
CbpxeTe eHnna KpaHa Ethernet Ka6ena c yctpoicTBOTO, KOeTO nckaTe Da CbpxeTe KbM npBkNIOuBaTeNa, a Dpyrna KpaB eHN ot Ethernet nopToBeTe Ha npBkNIOuBaTeNa. PpOBepTe CBETnInHe Na Link (cBeTOnIOuTe) Ha npBkNIOuBaTeNa, 3a daCTe cnryPHN, Ye e Cbpx3aHO npaBnHNO.
CTbNka 4 (no XeJanaHne)
BkIIOUeTe TYP6O pexHM, 3a da aKTHBnPaTe cyHKUraTa 3a HnCKa IaTeHTHOCT mMyTTNkAcT, 3a Da HnPaBnTE MpeXaTA cN eΦeKTNBHa 3a MyTTmEiHNO npINOxKeHne (HaNP. INrPn, BNDeO CTpnMnHr ININ N3TeJIHe Ha qaiNoBe. n dpyn).
http://www.dlink.com/resources/business
Pripojte prepínač k svojej sieti
http://www.dlink.com/resources/business
TECHNICKÁ PODPORA
dlink.com/support
Heynpabnembl konmytaTopc5 nopTaMn 100/1000/2.5GBase-Tn 1 nopTom 10GBase-T
KOMNJIeKT NOCTABKN
- KommyTaTop DMS-106XT
+AanTep nntaHn
+KpaTKoe pyKOBoIDCTBO NO yCTaHOBKe
YcTaHOBka N HacTpoiKa
War 1
IOnKIIHouTe BXOJaMn B KOMNJIeKT NOCTaBKn aAnTep NITAHnK COOTBeTCTByIOUeMy pa3bemy Ha 3aHne NaHei NOMMyTaTopa N K 3JIeKtpuecko po3Etke HnCteBOMy fHbTpY (peKomeHdyeTc). Y6eNTecb, YTO INHdkatop NITAHnHa KOMMyTaTope rOpNT.
War 2
Ecni Tpe6byTcN pOdkHouHTb K KOMMyTaTOpy 7JIHO3/MapIpyTu3aTOp/ MeKcTeBOi 3KpaH, POKHouHTe Ethernet-Ka6eBb K npTy LAN Ha CyUecTByIOuEM YCTPOINCTBE IN DOCTYINHOMy npTy HA KOMMyTaTope.
War 3
IopKnHouHte Ethernet-ka6eBb K ceTeBOMy yCTpoiCTBy N K OndHomy n3 nopToB Ethernet Ha KOMMyTaTope. EcIn COOTBeTCTByUoUsn INdIkAToP Ha KOMMyTaTope rOpNT, To yCTpoiCTBO IopKnHoyeHO K nopTy HAdJeXaUIM o6pa3Om.
Uar 4 (onuohnbo)
BknIOUHTpeKIM TURBO nIaAknBaun MHOraDpeChO paCCbIINn peKIMa nepeaun daHbIX 6e3 3aepKeC c eJIbIO obecneueHn 3oFekTUBHO pa60TbMyJbTMEnHbIX npInIOxHeHn (HaNPmEp, dIy 6bICTPOI nepeaun faiNOB n NOTOKOBOr MyJbTMEdna, Irp B peKIMe OHnAH N T. n.).
TEXHINUeCKNEXAPAKTEPNUCTIKN
AnnapaTHoe o6ecneueHne
Год: C - 2012, D - 2013, E - 2014, F - 2015, G - 2016, H - 2017, I - 2018, J - 2019, 0 - 2020, 1 - 2021.
AnMaTbI, KypMaHaFa3bl K-ci,143 yH
Ten.: +7 (727) 378-55-90
E-mail: almaty@dlink.ru
zujuunu
bpuu, TuuiPw2tu 3-nn
puunuufuu, 23/5
2ln. +374 (10) 39-86-67
E. l. hnuun.info@dlink.am
Latvija
Riga,Lielirbes iela 27
Tel.: +371 (6) 761-87-03
E-mail: info@dlink.lv
Lietuva
Vilnius, Žirmūnú 139-303
Tel.: +370 (5) 236-36-29
E-mail: info@dlink.lt
Eesti
E-mail: info@dlink.ee
Türkiye
Uphill Towers Residence A/99
Atasehir /ISTANBUL
Tel: +90 (216) 492-99-99
Email: info.tr@dlink.com.tr
20 nn
un n
nni nnn
072-2575555
support@dlink.co.il


HekepoBaHn KomyTaTOp 3 5 nopTaMn 100/1000/2.5GBase-Ti 1 nopTom 10GBase-T
KOMnJIeKT NocTaUaHHa
+KomyTatop DMS-106XT
+AanTepKINBJIeHHa
+Kopotknnoi6Hk3iBCTaHOBHeHHA
Підключенья komут口罩
BctaHOBJIeHHaHaJauTByBaHHa
Kpok 1
ПдкючыадантетжИВлпгь,КOTPNBxOДNTБdoKOMПЛЕТу NOCTaUHЯ,До BiДиОВIDHOro po3'Emy Ha 3aДи ПaHeni KOMyTaTopa Ta Do eJekTpNHyoi po3eTKn ab60 MepeXeBOrO φiNbTpY (peKOMeHdyeTbca).IpeKoHaITecra,IO iHДиKaTOp JxINBлпEHЯ NaKOMyTaTopi CBiTbca.
Kpok 2
KUo nOtpi6Ho NiKIOuHTn Do KOMyTaTopa WJIO3/MapIpyTN3aTOp/ MIXMepeXeBn Ekapn, NIKIOUHTb Ethernet-ka6eJIb Do npTy LAN Ha icHyIOvMy npICrpoi i do DocTyHoro npTy Ha KOMyTaTOpi.
Kpok 3
Piiknouitb Ethernet-ka6eBdo MepeXeBOrnpictpoIO i do Ondoro 3 nopTIB Ethernet Ha komyTaTopi. JaKIO BiINOBiDNH iHNkAtop Ha KOMyTaTopi cBITbCRA, To npucptpi NiKlNoyeHO Do npOpy HaneXHM YNHOM.
Kpok 4 (onioHaIbHo)
YbIMkhItbpeKIMTURBOdЯaknBauii6araToaDpeChoro nepeDaBAHHIpeKIMypePaDiHaNX6e33aTpMOK3MeTOIO 3a6e3neueHHeFekTNBHOiPo60TuMylbTmEiHINXdoaTKIB (HaPnKlaIa,IJIa WbNkoIpeJaCfaiNIB i nOTOKOBOro MybTmEia,iropBpeKIMoiOHnaHITn).
Iicna yBimKHeHHpeXmMy TURBO taKoK 6yJe aKTINBOBaHa cyHKcJq QoS Ha oCHOBI npTy. KopnCTyBaU moKe nIDKnHouHTn npncTpii Do Heo6xHOrO npTy Ha KOMyTaTopi.
A D P E C N T A T E J E F O H N O F I C I B D-L I N K I N O B C B O M Y C B I T Y
http://www.dlink.com/corporate/worldwideoffices/
連接交換器到您的網路
安裝與設定