
K 770 - Saw HUSQVARNA - Free user manual and instructions
Find the device manual for free K 770 HUSQVARNA in PDF.
User questions about K 770 HUSQVARNA
0 question about this device. Answer the ones you know or ask your own.
Ask a new question about this device
Download the instructions for your Saw in PDF format for free! Find your manual K 770 - HUSQVARNA and take your electronic device back in hand. On this page are published all the documents necessary for the use of your device. K 770 by HUSQVARNA.
USER MANUAL K 770 HUSQVARNA
natural_image
Silhouette of a mechanical lever or lever with a handle and central fulcrum (no text or symbols)120iTK4-P
EAC

EN Operator's manual 2-26
DA Brugsanvisning 27-51
Troubleshooting....21
Transportation and storage....22
Technical data.... 23
Accessories.... 24
EC Declaration of Conformity.... 26
Introduction
Product description
Husqvarna 120iTK4-P is a battery telescopic pole saw.
Work is constantly in progress to increase your safety and efficiency during operation. Speak to your servicing dealer for more information.
Intended use
Use the product to cut branches and twigs. Do not use the product for other tasks.
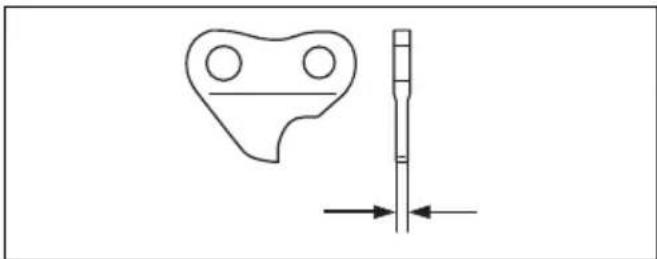
Product overview

-
Saw head
-
Chain tensioning knob
-
Chain oil tank
-
Guide bar
-
Shaft
-
Harness support hook
-
Keypad
-
Telescopic function
-
Power trigger lockout
-
Power trigger
-
Front handle
-
Rear handle
-
Battery charger
-
Cord
-
Power on/Warning LED
-
Battery
-
Battery release buttons
-
Battery indicator button
-
Warning LED
-
Battery indicator LED
-
Start/Stop button
- SavE button
- Warning LED
- Operator's manual
- Harness
- Transport guard
Symbols on the product
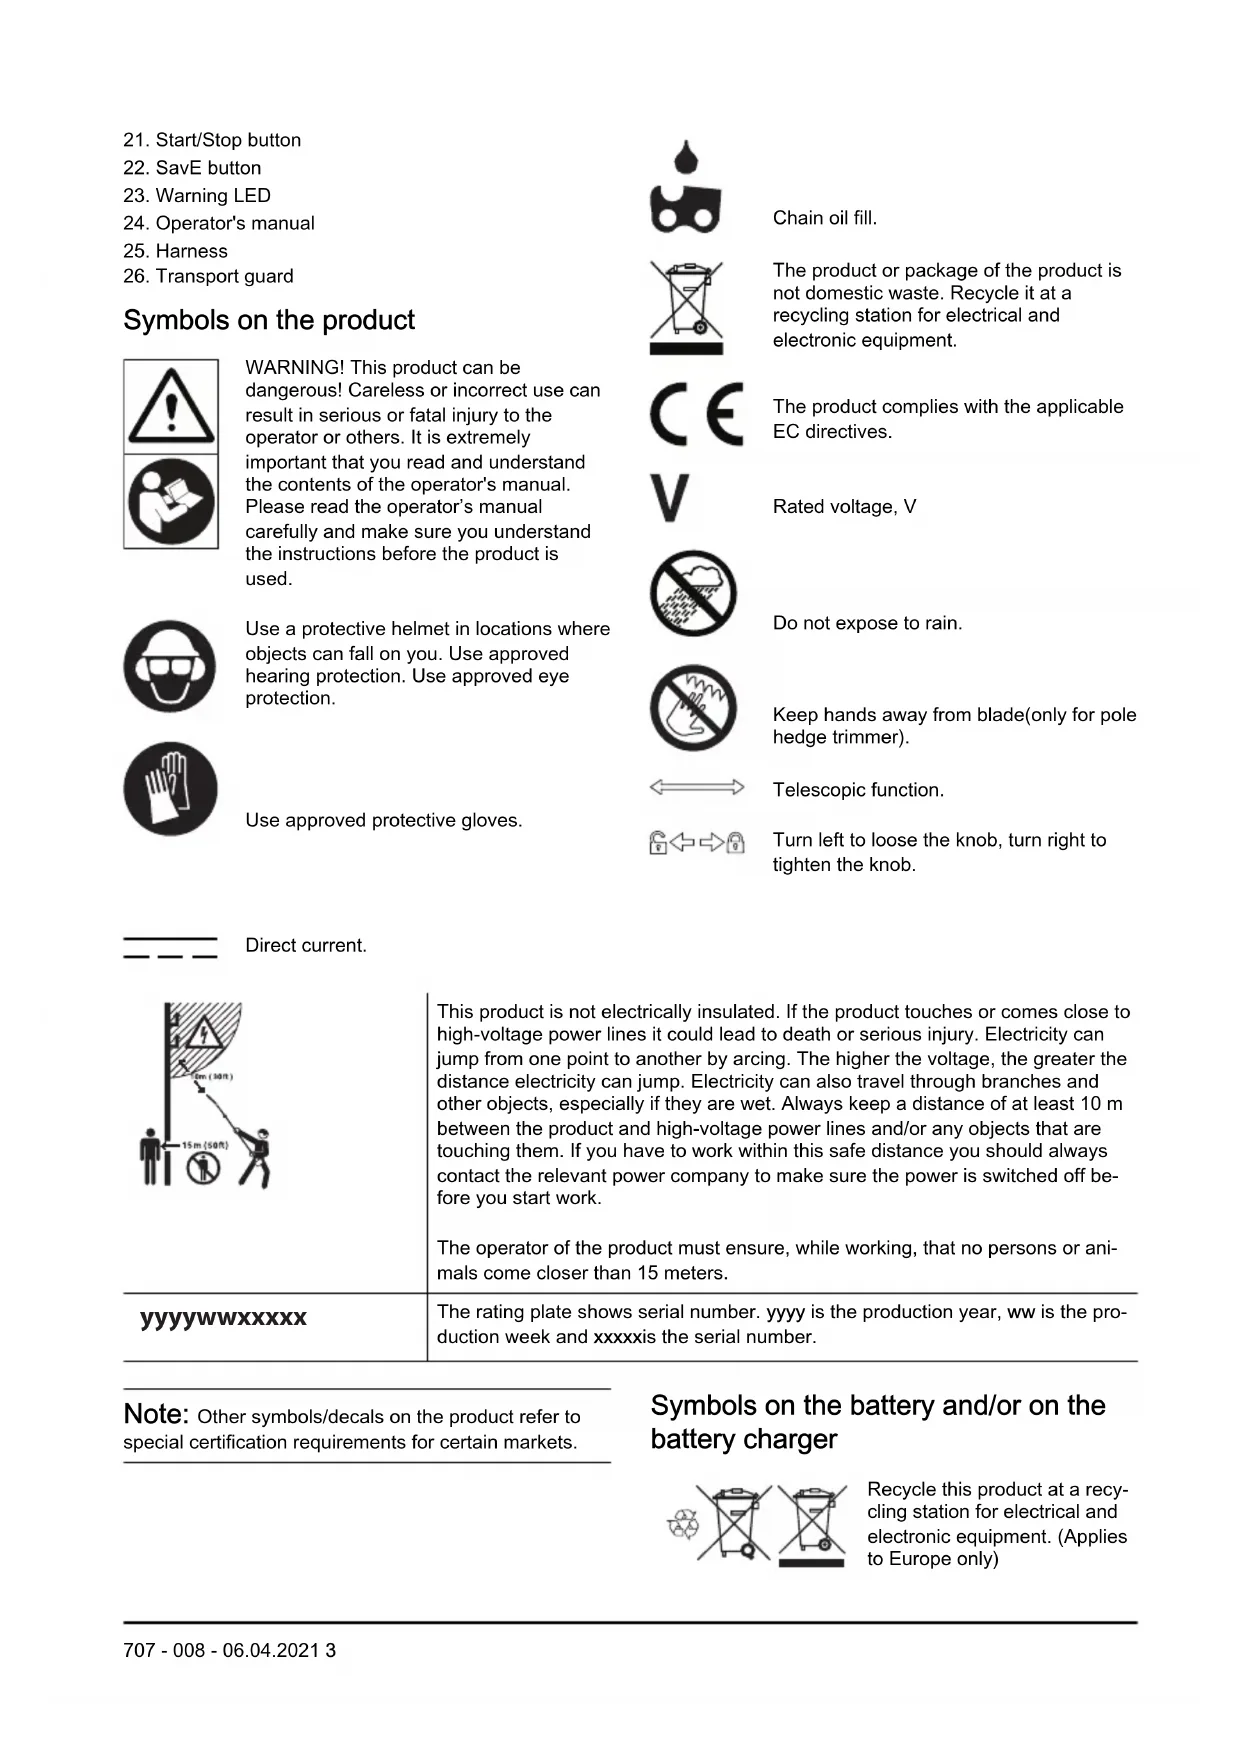
WARNING! This product can be dangerous! Careless or incorrect use can result in serious or fatal injury to the operator or others. It is extremely important that you read and understand the contents of the operator's manual. Please read the operator's manual carefully and make sure you understand the instructions before the product is used.

Use a protective helmet in locations where objects can fall on you. Use approved hearing protection. Use approved eye protection.

Use approved protective gloves.
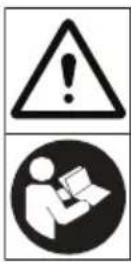
Chain oil fill.
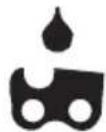
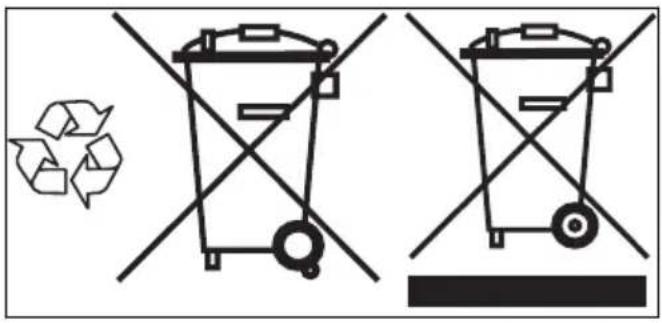
The product or package of the product is not domestic waste. Recycle it at a recycling station for electrical and electronic equipment.

The product complies with the applicable EC directives.

Rated voltage, V

Do not expose to rain.
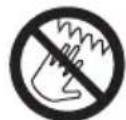
Keep hands away from blade(only for pole hedge trimmer).
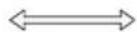
Telescopic function.
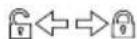
Turn left to loose the knob, turn right to tighten the knob.

Direct current.

This product is not electrically insulated. If the product touches or comes close to high-voltage power lines it could lead to death or serious injury. Electricity can jump from one point to another by arcing. The higher the voltage, the greater the distance electricity can jump. Electricity can also travel through branches and other objects, especially if they are wet. Always keep a distance of at least 10 m between the product and high-voltage power lines and/or any objects that are touching them. If you have to work within this safe distance you should always contact the relevant power company to make sure the power is switched off before you start work.
The operator of the product must ensure, while working, that no persons or animals come closer than 15 meters.
yyyyMMddxxxxxx
The rating plate shows serial number. yyyy is the production year, ww is the production week and xxxxis the serial number.
Note: Other symbols/decals on the product refer to special certification requirements for certain markets.
Symbols on the battery and/or on the battery charger
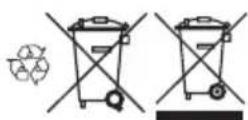
Recycle this product at a recycling station for electrical and electronic equipment. (Applies to Europe only)

Fail-safe transformer.

Use and keep the battery charger indoors only.

Double insulation.
Product liability
As referred to in the product liability laws, we are not liable for damages that our product causes if:
• the product is incorrectly repaired.
- the product is repaired with parts that are not from the manufacturer or not approved by the manufacturer.
- the product has an accessory that is not from the manufacturer or not approved by the manufacturer.
- the product is not repaired at an approved service center or by an approved authority.
Safety
Safety definitions
Warnings, cautions and notes are used to point out specially important parts of the manual.
WARNING: Used if there is a risk of injury or death for the operator or bystanders if the instructions in the manual are not obeyed.
CAUTION: Used if there is a risk of damage to the product, other materials or the adjacent area if the instructions in the manual are not obeyed.
Note: Used to give more information that is necessary in a given situation.
General safety instructions

WARNING: Read the warning instructions that follow before you use the product.
- Remove the battery to prevent the product from being started by accident.
- This product is a dangerous tool if you are not careful or if you use the product incorrectly. This product can cause serious injury or death to the operator or others.
- Do not use the product if it is changed from its initial specification. Do not change a part of the product without approval from the manufacturer. Only use parts that are approved by the manufacturer. Injury or death is a possible result of incorrect maintenance.
- Do a check of the product before use. See, Safety devices on the product on page 8 and Maintenance on page 15. Do not use a defective
product. Do the safety checks, maintenance and service instructions described in this manual.
- Children should be supervised to ensure that they do not play with the product. Never allow children or other persons not trained in the use of the product and/or the battery to use or service it. Local laws may regulate the age of the user.
- Keep the product in a locked area to prevent access for children or persons that are not approved.
- Store the product out of reach of children.
- Under no circumstances may the design of the product be modified without the permission of the manufacturer. Always use original accessories. Non-authorized modifications and/or accessories can result in serious personal injury or the death of the operator and others.
Note: National or Local laws can regulate the use. Comply to given regulations.
General power tool safety warnings

WARNING: Read all safety warnings and all instructions. Failure to follow the warnings and instructions may result in electric shock, fire and/or serious injury.
Note: Save all warnings and instructions for future reference. The term "power tool" in the warnings refers to your mains-operated (corded) power tool or battery-operated (cordless) power tool.
Work area safety
- Keep work area clean and well lit. Cluttered or dark areas invite accidents.
- Do not operate power tools in explosive atmospheres, such as in the presence of flammable liquids, gases or dust. Power tools create sparks which may ignite the dust or fumes.
- Keep children and bystanders away while operating a power tool. Distractions can cause you to lose control.
Electrical safety
- Power tool plugs must match the outlet. Never modify the plug in any way. Do not use any adapter plugs with earthed (grounded) power tools. Unmodified plugs and matching outlets will reduce risk of electric shock.
- Avoid body contact with earthed or grounded surfaces, such as pipes, radiators, ranges and refrigerators. There is an increased risk of electric shock if your body is earthed or grounded.
- Do not expose power tools to rain or wet conditions. Water entering a power tool will increase the risk of electric shock.
- Do not abuse the cord. Never use the cord for carrying, pulling or unplugging the power tool. Keep cord away from heat, oil, sharp edges or moving parts. Damaged or entangled cords increase the risk of electric shock.
- When operating a power tool outdoors, use an extension cord suitable for outdoor use. Use of a cord suitable for outdoor use reduces the risk of electric shock.
- If operating a power tool in a damp location is unavoidable, use a ground fault circuit interrupter (GFCI) protected supply. Use of a GFCI reduces the risk of electric shock.
Personal safety
- Danger! Do not operate near electrical power lines. The unit has not been designed to provide protection from electric shock in the event of contact with overhead electric lines. Consult local regulations for safe distances from overhead electric power lines and ensure that the operating position is safe and secure before operating the saw chain pole pruner.
- Stay alert, watch what you are doing and use common sense when operating a power tool. Do not use a power tool while you are tired or under the influence of drugs, alcohol or medication. A moment of inattention while operating power tools may result in serious personal injury.
- Use personal protective equipment. Always wear eye protection. Protective equipment such as dust mask, non-skid safety shoes, hard hat, or hearing protection used for appropriate conditions will reduce personal injuries.
- Prevent unintentional starting. Ensure the switch is in the OFF-position before connecting to a power source and/or battery pack, picking up or carrying the tool. Carrying power tools with your finger on the switch or energising power tools that have the switch on invites accidents.
-
Remove any adjusting key or wrench before turning the power tool on. A wrench or a key left attached to a rotating part of the power tool may result in personal injury.
-
Do not overreach. Keep proper footing and balance at all times. This enables better control of the power tool in unexpected situations.
- Dress properly. Do not wear loose clothing or jewellery. Keep your hair, clothing and gloves away from moving parts. Loose clothes, jewellery or long hair can be caught in moving parts.
- If devices are provided for the connection of dust extraction and collection facilities, ensure these are connected and properly used. Use of dust collection can reduce dust-related hazards.
- Do not let familiarity gained from frequent use of tools allow you to become complacement and ignore tool safety principles. A careless action can cause severe injury within a fraction of a second.
- The vibration emission during actual use of the power tool can differ from the declared total value depending on the ways in which the tool is used. Operators should identify safety measures to protect themselves that are based on an estimation of exposure in the actual conditions of use (taking account of all parts of the operating cycle such as the times when the tool is switched off and when it is running idle in addition to the trigger).
Power tool use and care
- Do not force the power tool. Use the correct power tool for your application. The correct power tool will do the job better and safer at the rate for which it was designed.
- Do not use the power tool if the switch does not turn it on and off. Any power tool that cannot be controlled with the switch is dangerous and must be repaired.
- Disconnect the plug from the power source and/or the battery pack from the power tool before making any adjustments, changing accessories, or storing power tools. Such preventive safety measures reduce the risk of starting the power tool accidentally.
- Store idle power tools out of the reach of children and do not allow persons unfamiliar with the power tool or these instructions to operate the power tool. Power tools are dangerous in the hands of untrained users.
- Maintain power tools. Check for misalignment or binding of moving parts, breakage of parts and any other condition that may affect the power tool's operation. If damaged, have the power tool repaired before use. Many accidents are caused by poorly maintained power tools.
- Keep cutting tools sharp and clean. Properly maintained cutting tools with sharp cutting edges are less likely to bind and are easier to control.
- Use the power tool, accessories and tool bits etc. in accordance with these instructions, taking into account the working conditions and the work to be performed. Use of the power tool for operations different from those intended could result in a hazardous situation.
- Keep handles and grasping surfaces dry, clean and free from oil and grease. Slippery handles and grasping surfaces do not allow for safe handling and control of the tool in unexpected situations.
Battery tool use and care
- Recharge only with the charger specified by the manufacturer. A charger that is suitable for one type of battery pack may create a risk of fire when used with another battery pack.
- Use power tools only with specifically designated battery packs. Use of any other battery packs may create a risk of injury and fire.
- When battery pack is not in use, keep it away from other metal objects, like paper clips, coins, keys, nails, screws or other small metal objects, that can make a connection from one terminal to another. Shorting the battery terminals together may cause burns or a fire.
- Under abusive conditions, liquid may be ejected from the battery; avoid contact. If contact accidentally occurs, flush with water. If liquid contacts eyes, additionally seek medical help. Liquid ejected from the battery may cause irritations or burns.
- Do not use a battery pack or tool that is damaged or modified. Damaged or modified batteries may exhibit unpredictable behavior resulting in fire, explosion or risk of injury.
- Do not expose a battery pack or tool to fire or excessive temperature. Exposure to fire or temperature above 130^ / 265^ may cause explosion.
- Follow all charging instructions and do not charge the battery pack or tool outside the temperature range specified in the instructions. Charging improperly or at temperatures outside the specified range may damage the battery and increase the risk of fire.
Service
- Have your power tool serviced by a qualified repair person using only identical replacement parts. This will ensure that the safety of the power tool is maintained.
- Never service damaged battery packs. Service of battery packs should only be performed by the manufacturer or authorized service providers.
Pole pruner safety warnings - personal safety
- Keep all parts of the body away from the saw chain when using the pole pruner. Before you start the pole pruner, make sure the saw chain is not contacting anything. A moment of inattention while operating pole pruners may cause entanglement of your clothing or body with the saw chain.
-
Always hold the pole pruner with your right hand on the rear handle and your left hand on the front handle. Holding the chain saw with a reversed hand configuration increases the risk of personal injury and should never be done.
-
Hold the pole pruner by insulated gripping surfaces only, because the saw chain may contact hidden wiring or its own cord. Saw chains contacting a "live" wire may make exposed metal parts of the pole pruner "live" and could give the operator an electric shock.
- Wear eye protection. Further protective equipment for hearing, head, hands, legs and feet is recommended. Adequate protective equipment will reduce personal injury from flying debris or accidental contact with the saw chain.
- Do not operate a chain saw in a tree, on a ladder, from a rooftop, or any unstable support. Operation of a chain saw in this manner could result in serious personal injury.
- Always keep proper footing and operate the chain saw only when standing on fixed, secure and level surface. Slippery or unstable surfaces may cause a loss of balance or control of the pole pruner.
- When cutting a limb that is under tension, be alert for spring back. When the tension in the wood fibres is released, the spring loaded limb may strike the operator and/or throw the pole pruner out of control.
- Use extreme caution when cutting brush and saplings. The slender material may catch the pole pruner and be whipped toward you or pull you off balance.
- Follow instructions for lubricating, chain tensioning and changing the bar and chain. Improperly tensioned or lubricated chain may either break or increase the chance for kickback.
- Carry the pole pruner by the front handle with the pole pruner switched off and away from your body. When transporting or storing the pole pruner, always fit the guide bar cover. Proper handling of the pole pruner will reduce the likelihood of accidental contact with the moving saw chain.
- Cut wood only. Do not use pole pruner for purposes not intended. For example: do not use pole pruner for cutting metal, plastic, masonry or non-wood building materials. Use of the pole pruner for operations different than intended could result in a hazardous situation.
- Keep handles dry, clean and free from oil and grease. Greasy, oily handles are slippery causing loss of control.
- Do not attempt to fell a tree until you have an understanding of the risks and how to avoid them. Serious injury could occur to the operator or bystanders while felling a tree.
- This pole pruner is not intended for tree felling. Use of the pole pruner for operations different than intended could result in serious injury to the operator or bystanders.
- We strongly recommend that first time users practice sawing logs on a saw horse or cradle.
Causes and operator prevention of kickback
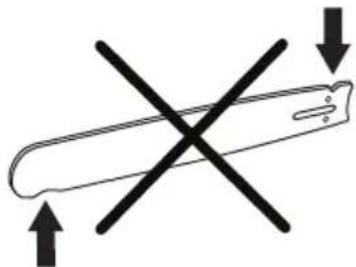
Kickback may occur when the nose or tip of the guide bar touches an object, or when the wood closes in and pinches the pole pruner in the cut. Tip contact in some cases may cause a sudden reverse reaction, kicking the guide bar up and back towards the operator. Pinching the pole pruner along the top of the guide bar may push the guide bar rapidly back towards the operator. Either of these reactions may cause you to lose control of the pole pruner which could result in serious personal injury. Do not rely exclusively upon the safety devices built into your pole pruner. As a pole pruner user, you should take several steps to keep your cutting jobs free from accident or injury. Kickback is the result of pole pruner misuse and/or incorrect operating procedures or conditions and can be avoided by taking proper precautions as given below:
- Maintain a firm grip, with thumbs and fingers encircling the pole pruner handles, with both hands on the pole pruner and position your body and arm to allow you to resist kickback forces. Kickback forces can be controlled by the operator, if proper precautions are taken. Do not let go of the pole pruner.
- Do not overreach and do not cut above shoulder height. This helps prevent unintended tip contact and enables better control of the pole pruner in unexpected situations.
- Only use replacement guide bars and pole pruners specified by the manufacturer. Incorrect replacement guide bars and pole pruners may cause chain breakage and/or kickback.
- Follow the manufacturer's sharpening and maintenance instructions for the pole pruner. Decreasing the depth gauge height can lead to increased kickback.
General pole pruner safety warnings
Follow all instructions when clearing jammed material, storing or servicing the pole pruner. Make sure the switch is off and the battery pack is removed.
Unexpected actuation of the pole pruner while clearing jammed material or servicing may result in serious personal injury.
Personal protective equipment

WARNING: Read the warning instructions that follow before you use the product.
• Always use approved personal protective equipment when you use the product. Personal protective equipment cannot fully prevent injury but it decreases the degree of injury if an accident does occur. Let your dealer help you select the right equipment.
- Use a helmet if it is possible that objects can fall on you.
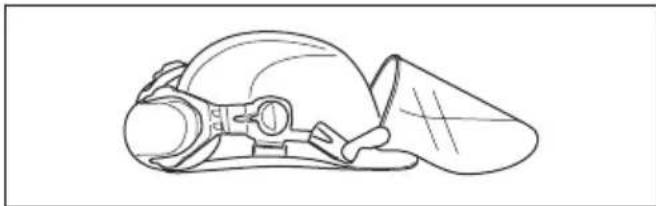
natural_image
Line drawing of a helmet with a visor and cap (no text or symbols)- Use approved hearing protection.

natural_image
Line drawing of a mechanical component or device (no text or symbols)- Use approved eye protection. If you use a visor, you must also use approved protective goggles. Approved protective goggles must agree with the ANSI Z87.1 standard in the USA or EN 166 in EU countries.

natural_image
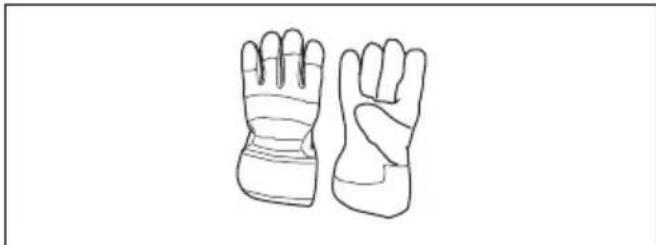
Line drawings of glasses and footshoes (no text or symbols)- Use gloves when it is necessary, for example when you attach, examine or clean the cutting equipment.
natural_image
Line drawing of a pair of gloves with bandages and straps (no text or symbols)- Use protective boots, or shoes, with non-slip soles.

natural_image
Line drawing of a pair of boots with visible tread pattern and sole plate (no text or symbols)- Use pants with saw protection. - Use clothing made of a strong fabric. Always use heavy, long pants and long sleeves. Do not use loose clothing that can catch on twigs and branches. Do not wear jewelry, short pants, open shoes or go
with bare feet. Put your hair up safely above your shoulders.
- Keep first aid equipment close at hand.

Safety devices on the product

WARNING: Read the warning instructions that follow before you use the product.
In this section the product's safety features, its purpose and how checks and maintenance should be carried out to ensure that it operates correctly. See instructions under the heading Product overview on page 2 to find where these parts are located on your product.
The life span of the product can be reduced and the risk of accidents can increase if product maintenance is not carried out correctly and if service and/or repairs are not carried out professionally. If you need further information please contact your nearest servicing dealer.

WARNING: Never use a product with defective safety components. The product's safety equipment must be inspected and maintained as described in this section. If your product fails any of these checks, contact your service agent to get it repaired.
CAUTION: All servicing and repair work on the machine requires special training. This is especially true of the machine's safety equipment. If your machine fails any of the checks described below you must contact your service agent. When you buy any of our products we guarantee the availability of professional repairs and service. If the retailer who sells your machine is not a servicing dealer, ask him for the address of your nearest service agent.
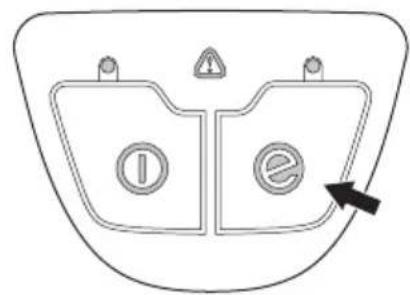
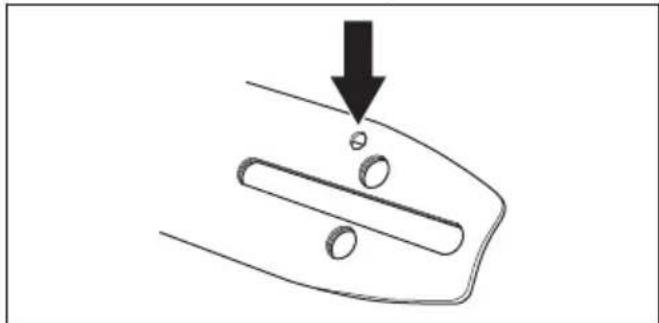
To do a check of the keypad
- Push and hold the start/stop button (A).
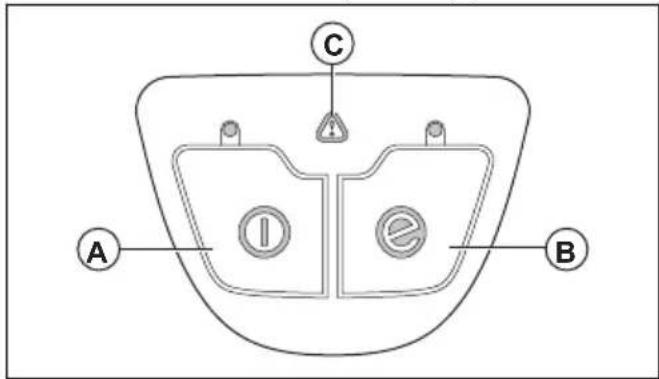
a) The product is on when the LED is on. b) The product is off when the LED is off.
-
Refer to To start the SavE function on page 14 for the function of the SavE button (B).
-
Refer to Troubleshooting on page 21 if the warning indicator (C) is on or flashes.
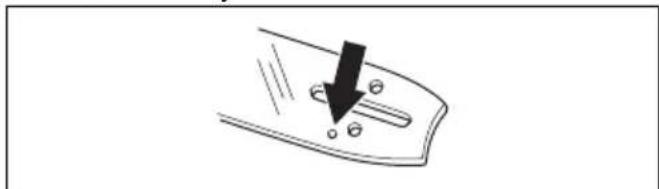
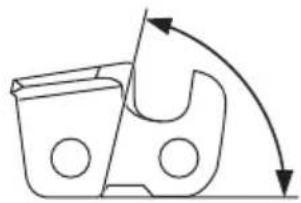
To do a check of the power trigger lockout
The power trigger lockout prevents accidental operation. When you release the handle, the power trigger and the power trigger lockout move back to their initial position.

natural_image
Line drawing of a firearm with attached grip and handle (no text or symbols)- Make sure that the power trigger is locked when the lockout is in its initial position.
natural_image
Technical line drawing of a mechanical device with no visible text or symbols- Pull and release the lockout and make sure that it moves back to its initial position.

natural_image
Technical line drawing of a mechanical tool or device with directional arrows indicating movement (no text or symbols present)- Make sure that the power trigger and the lockout move freely and that the return spring operates correctly.
natural_image
Technical line drawing of a mechanical device with directional arrows indicating movement or force (no text or symbols present)- Start the product, see To start the product on page 13.
- Apply full speed.
- Release the power trigger and make sure that the cutting attachment stops fully.
Safety instructions for the cutting equipment

WARNING: Read the warning instructions that follow before you use the product.
- Only use approved guide bar/saw chain combinations and filing equipment. Refer to Maintenance on page 15 for instructions.
- Use protective gloves when you use or do maintenance on the saw chain. A saw chain that does not move can also cause injuries.
- Keep the cutting teeth correctly sharpened. Obey the instructions and use the recommended file gauge. A saw chain that is damaged or incorrectly sharpened increases the risk of accidents.

natural_image
Simple line drawing of a VR headset with a starburst effect (no text or symbols)- Keep the correct depth gauge setting. Obey the instructions and use the recommended depth gauge setting. Too large depth gauge setting increases the risk of kickback.

natural_image
Technical line drawing of a mechanical component with a U-shaped groove and circular holes, no text or symbols present.• Make sure that the saw chain has the correct tension. If the saw chain is not tight against the guide bar, the saw chain can derail. An incorrect saw chain tension increases wear on the guide bar, saw chain and chain drive sprocket. Refer to Accessories on page 24.
- Do maintenance on the cutting equipment regularly and keep it correctly lubricated. If the saw chain is not correctly lubricated, the risk of wear on the guide bar, saw chain and chain drive sprocket increases.

natural_image
Simple line drawing of a mechanical component with a droplet above it (no text or symbols)Safety instructions for operation

WARNING: Read and obey the warning instructions that follow before you use the product.
- Ensure that no people or animals come closer than 15 m (50 ft.) while you work. When several operators are working in the same area the safety distance should be at least 15 m. Otherwise there is a risk of serious personal injury. Stop the product immediately if anyone approaches. Never swing the product around without first checking behind you to make sure that no one is within the safety zone.
- Never use the product in bad weather, for instance in dense fog, in heavy rain, strong winds, intense cold, etc. Extremely hot weather may cause overheating of the product. Working in bad weather is tiring and
often brings added risks, such as icy ground, unpredictable felling direction, etc.
- Do not allow children to use or be in the vicinity of the product. Since the product is easy to start, children may be able to start it if they are not kept under full surveillance. This can mean a risk of serious personal injury. Disconnect the battery when the product is not under close supervision.
- Ensure that people, animals or other things can not affect your control of the product or that they do not come in contact with the cutting attachment or loose objects that are thrown out by the cutting attachment.
- Listen out for warning signals or shouts when you wear hearing protection. Always remove your hearing protection as soon as the product stops.
• Overexposure to vibration can lead to circulatory damage or nerve damage in persons who have poor circulation. Speak to your physician if you experience symptoms of overexposure to vibration. Such symptoms include numbness, loss of feeling, tingling, pricking, pain, loss of strength, changes in skin colour or condition. These symptoms usually show in the fingers, hands or wrists.
- Never use a cutting attachment without an approved guard. If an incorrect or faulty guard is fitted this can cause serious personal injury.
- Always stop the product, remove the battery and make sure that the cutting equipment stops completely before you start to do any work on the product. Departure from the sharpening instructions considerably increase the risk of kickback.
- If you encounter a situation where you are uncertain how to proceed you should ask an expert. Contact your dealer or your service workshop. Avoid all usage which you consider to be beyond your capability.
- Avoid all usage which you consider to be beyond your capability.
- Never use the product if you are fatigued, while under the influence of alcohol or drugs, medication or anything that could affect your vision, alertness, coordination or judgment.
- The product can be thrown violently to the side when the tip of the guide bar comes in contact with a fixed object. This is called kickback. A kickback can be violent enough to cause the product/operator to be propelled in any direction, and possibly lose control of the product. Avoid cutting with the guide bar tip.
- Do not use the product unless you are able to call for help in case of an accident.
- Keep a good balance and a firm foothold. Make sure that you can move and stand safely. Check the area around you for possible obstacles (roots, rocks, branches, ditches, etcetera) in case you have to move suddenly. Take great care when you work on sloping ground.
- Always inspect the working area. Remove all loose objects such as stones, broken glass, nails, steel
wire, string, etcetera, that could be thrown out or become wrapped around the cutting attachment.
• Take great care when cutting a tree that is in tension. A tree that is in tension may spring back to its normal position before or after being cut. If you position yourself incorrectly or make the cut in the wrong place the tree may hit you or the product and cause you to lose control. Both situations can cause serious personal injury.
- Keep a good balance and a firm foothold.
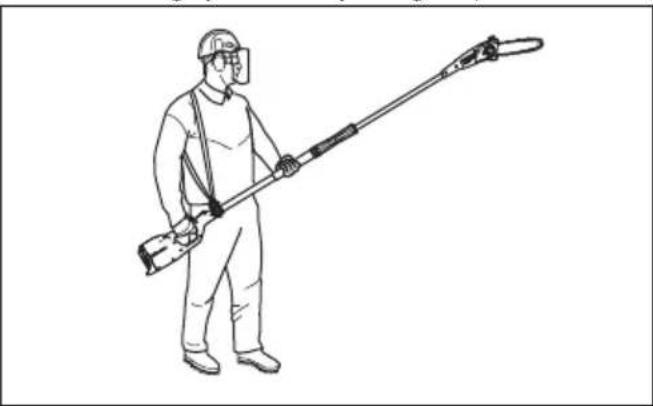
- Use the harness to support the weight of the product and make it easier to handle.
• Always hold the product with both hands. Hold the product on the right side of your body.

natural_image
Line drawing of a person in full protective gear using a long-handled tool (no text or symbols)- Stop the product before you move to another area. Attach the transport guard before carrying or transporting the product any distance.
- Never put the product down when it is activated unless you have it in clear sight.
- If the product is operated at temperatures below -10^ the product and the battery must be stored in a heated space for at least 24 hours before starting work.
- Never stand directly under underneath a branch that is being cut. This could lead to serious or even fatal personal injury.
- Observe the applicable safety regulations for work in the vicinity of overhead power lines.
- This product is not electrically insulated. If the product touches or comes close to high-voltage power lines it could lead to death or serious bodily injury. Electricity can jump from one point to another by arcing. The higher the voltage, the greater the distance electricity can jump. Electricity can also travel through branches and other objects, especially if they are wet. Always keep a distance of at least 10 m between the product and high voltage power lines and/or objects that are touching them. If you have to work within this safe distance you should always contact the relevant power company to make sure the power is switched off before you start work.
- A faulty cutting attachment may increase the risk of accidents.
Battery safety

WARNING: Read the warning instructions that follow before you use the product.
- The recommended battery is BLi10. The batteries are software encrypted.
- Use the BLi10 battery that is rechargeable as a power supply for the related Husqvarna products only. To prevent injury, do not use the battery as a power supply for other devices.
- Risk of electrical shock. Do not connect the battery terminals to keys, screws or other metal. This can cause a short circuit of the battery.
- Do not use batteries that are non-rechargeable.
- Do not put objects into the air slots of the battery.
- Keep the battery away from sunlight, heat or open flame. The battery can cause burns and/or chemical burns.
- Keep the battery away from rain and wet conditions.
- Keep the battery away from microwaves and high pressure.
- Do not try to disassemble or break the battery.
- Do not let battery acid touch your skin. Battery acid causes injuries to the skin, corrosion and burns. If you get battery acid in your eyes, do not rub but flush with water for minimum 15 minutes. If battery acid has touched your skin, you must clean the skin with a large quantity of water and soap. Get medical aid.
- Use the battery in temperatures between -10^ (14 °F) and 40^ (104 °F).
- Do not clean the battery or the battery charger with water. See To clean the product, the battery and the battery charger on page 21.
- Do not use a defective or damaged battery.
- Keep batteries in storage away from metal objects such as nails, screws or jewelry.
- Keep the battery away from children.
Battery charger safety

WARNING: Read the warning instructions that follow before you use the product.
- Risk of electrical shock or short circuit if the safety instructions are not obeyed.
- Do not use other battery chargers than the one supplied for your product. The recommended charger is QC80 when you charge the BLi10 battery.
- Do not try to disassemble the battery charger.
-
Do not use a defective or damaged battery charger.
-
Do not lift the battery charger by the power cord. To disconnect the battery charger from a mains socket, pull out the plug. Do not pull the power cord.
- Keep all cables and extension leads away from water, oil and sharp edges. Make sure that the cable is not caught between objects, for example, doors, fences or equivalent.
- Do not use the battery charger near flammable materials or materials that can cause corrosion. Make sure that the battery charger is not covered. Pull out the plug to the battery charger if there is smoke or fire.
- Only charge the battery indoors in a location with good airflow and away from sunlight. Do not charge the battery outdoors. Do not charge the battery in wet conditions.
- Only use the battery charger where the temperature is between 5^ (41°F) and 40^ (104°F). Use the charger in an environment which has a good airflow, dry and free from dust.
- Do not put objects into the cooling slots of the battery charger.
- Do not connect the battery charger terminals to metal objects as this can short circuit the battery charger.
- Use approved mains sockets that are not damaged. Make sure that the cord of the battery charger is not damaged. If extension cables are used, make sure that the extension cables are not damaged.
Safety instructions for maintenance

WARNING: Read the warning instructions that follow before you do maintenance on the product.
- Remove the battery before you do maintenance, other checks or assemble the product.
- The operator must only do the maintenance and servicing shown in this operator's manual. Turn to your servicing dealer for maintenance and servicing of a larger extension.
- Do not clean the battery or the battery charger with water. Strong detergent can cause damage to the plastic.
- If you do not do maintenance, it decreases the life cycle of the product and increases the risk of accidents.
- Special training is necessary for all servicing and repair work, especially for the safety devices on the product. If not all checks in this operator's manual are approved after you have done maintenance, turn to your servicing dealer. We guarantee that there are professional repairs and servicing available for your product.
- Only use original spare parts.
Assembly
Introduction

WARNING: Read and understand the safety chapter before you assemble the product.
To assemble the shaft
- Make sure that the electrical plugs are aligned.

- Connect the ends of the shaft (A) fully.
- Tighten the screw handle on the saw head side of the shaft (B).
To adjust the length of the shaft
- Loosen the screw handle at the battery housing side of the shaft (A).

- Adjust the shaft to an applicable length.
- Tighten the screw handle (B).
To adjust the harness
Always use the harness when you operate the product.
The harness gives maximum control during operation of the product. The harness decreases the risk of tiredness in your arms and back.
- Put on the harness.
- Attach the product to the harness support hook.
- Adjust the length of the harness until the support hook is roughly level with your right hip.
natural_image
Line drawing of a person in full protective gear using a long-handled tool (no text or symbols)Operation
To do a function check before you use the product
- Examine the air intake for dirt and damage. Remove grass and leaves from the product with a brush.
- Make sure that the product operates correctly.
- Tighten all nuts and screws.
-
Make sure that the saw head is attached correctly.
-
Examine the saw head for damages, for example, cracks. Replace the saw head if it is damaged.
- Make sure that the covers are not damaged and that the covers are attached correctly.
To connect the battery charger
-
Connect the battery charger to the voltage and frequency that is specified on the rating plate.
-
Put the plug in a grounded socket outlet. The LED on the battery charger flashes green one time.
Note: The battery does not charge if the battery temperature is more than 50 °C/122 °F. If the temperature is more than 50 °C/122 °F, the battery charger makes the battery become cool before the battery charges.
To connect the battery to the battery charger
Note: Charge the battery if it is the first time that you use it. A new battery is only 30% charged.
- Make sure that the battery is dry.
- Connect the battery to the battery charger.
- Make sure that the green charging light on the battery charger comes on. That means that the battery is connected correctly to the battery charger.
- When all LEDs (A) on the battery come on, the battery is fully charged.

- To disconnect the battery charger from the mains socket, pull the plug. Do not pull the cord.
- Remove the battery from the battery charger.
Note: Refer to the battery and battery charger manuals for more information.
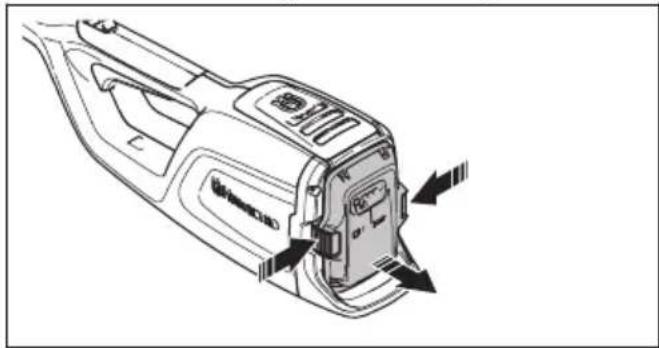
To connect the battery to the product
WARNING: Only use Husqvarna original batteries in the product.
-
Make sure that the battery is fully charged.
-
Put the battery into the battery holder of the product. The battery must move into the holder easily, if not, it is not installed correctly.

natural_image
Line drawing of a mechanical device with a handle and internal components (no text or symbols)- Push the lower part of the battery and push it in fully into the battery holder. The battery locks into position when you hear a click.
- Make sure that the latches lock in position correctly.
To start the product
- Push and hold the start/stop button until the green LED comes on.

- Pull the power trigger lockout rearward and hold the power trigger.
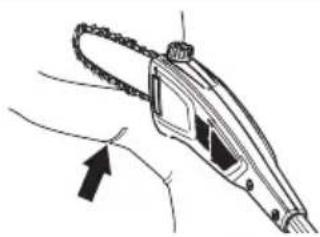
To cut branches

WARNING: Observe great care when working close to overhead power lines. Falling branches can result in short circuiting.
- Whenever possible, position yourself so that you can make the cut at right angles to the branch.
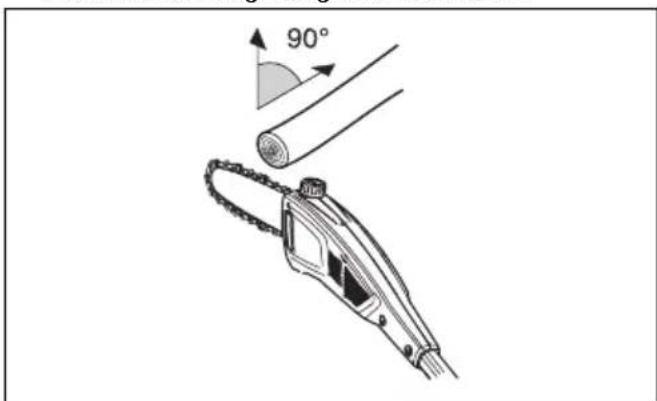
- Cut large branches in sections so that you have better control over where they fall. You should also pay attention to the fact that falling branches can bounce in the direction of the user after hitting ground.

natural_image
Simple line drawing of a human knee joint with a bar magnet and leaf-like structure attached (no text or symbols)- Never cut through the swelling at the root of the branch as this will slow down healing and increase the risk of fungal attack.

natural_image
Medical illustration showing a surgical instrument inserted into a joint (no text or labels)- Use the stop at the base of the cutting head to provide support during cutting. This will help prevent the cutting attachment from bouncing on the branch.

natural_image
Line drawing of a hairpin with a handle and lever mechanism (no text or symbols)- Make an initial cut on the underside of the branch before cutting through the branch. This will prevent tearing of the bark, which could lead to slow healing and cause permanent damage to the tree. The cut should not be deeper than 13 of the branch thickness to prevent jamming. Keep the chain running while you withdraw the cutting attachment from the branch to prevent it jamming.
natural_image
Line drawing of a chain-link device with an arrow pointing to it, no text or symbols present• Make sure you have a firm footing and that you can work without being hampered by branches, stones and trees.
WARNING: Never activate the power trigger without having the cutting attachment in full view.
To start the SavE function
The product has a SavE function. The SavE function gives the longest operation time from the battery.
- Push the SavE button. The LED comes on to show that the function is on.
- Push the SavE button again to stop the SavE function.
To stop the product
- Release the power trigger.
- Push the stop button and then the green LED light goes off.
- Remove the battery from the product. Push the 2 release buttons and pull out the battery.
natural_image
Technical line drawing of a mechanical component with directional arrows indicating assembly or movement (no text or symbols)Maintenance
Introduction
WARNING: Read and understand the safety chapter before you do maintenance work on the product.
Maintenance schedule
WARNING: Remove the battery before you do maintenance.
WARNING: Remove the battery before you do maintenance on the product.
The following is a list of the maintenance steps that you must do on the product. Refer to the tasks in the maintenance chapter for more information.
| Maintenance Daily Weekly Monthly | |||
| Clean the external parts of the product with a dry cloth. Do not use water. | X | ||
| Make sure that the start and stop button works correctly and are not damaged. | X | ||
| Make sure that the power trigger and the power trigger lockout function correctly from a safety point of view. | X | ||
| Make sure that all controls work and are not damaged. | X | ||
| Keep the handles dry and clean. Makes sure that there is no oil and grease on the handles. | X | ||
| Make sure that the saw chain cover is not damaged. Replace the saw chain cover if it is damaged. | X | ||
| Make sure that the screws and nuts are tight. X | |||
| Clean the oil tank cap X | |||
| Make sure that the battery release buttons on the battery works and locks the battery in the product. | X | ||
| Examine that the battery charger is not damaged and function correctly. | X | ||
| Make sure that the battery is not damaged. X | |||
| Make sure that the battery is charged. X | |||
| Make sure that the battery charger is not damaged. | X | ||
| Examine all cables, couplings and connections. Make sure that there is no damage or dirt. | X | ||
| Clean the saw chain cover. X | |||
| Do a check of the connections between the battery and the product. Do a check of the connection between the battery and the battery charger. | X | ||
| Make sure that the saw head is not damaged. Replace the saw head if it is damaged. | An approved Husqvarna dealer must do all servicing on the saw head. | ||
| Examine the wear of the chain drive sprocket. | Replace the chain drive sprocket after approximately 100 hours of operation or more frequently if it is necessary. | ||
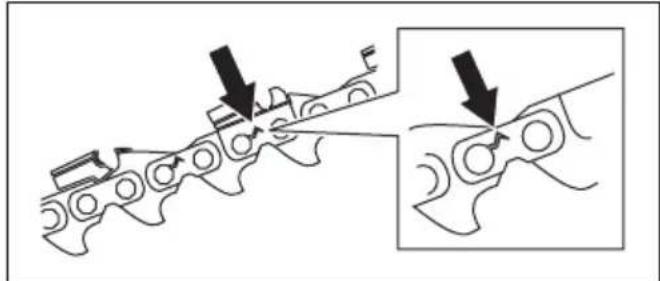
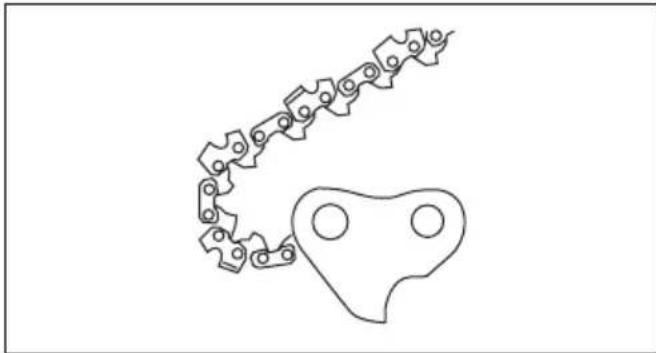
To examine the cutting equipment
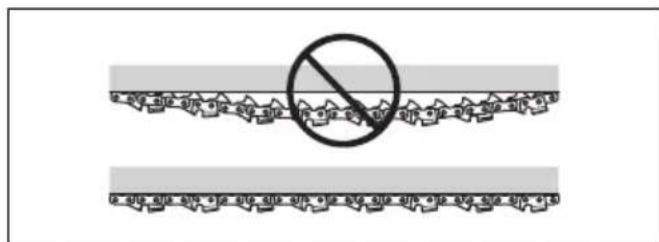
- Make sure that there are no cracks in rivets and links and that no rivets are loose. Replace if it is necessary.
natural_image
Mechanical assembly diagram showing two stages of tooling or machining process (no text or symbols)- Make sure that the saw chain is easy to bend. Replace the saw chain if it is rigid.
- Compare the saw chain with a new saw chain to examine if the rivets and links are worn.
- Replace the saw chain when the longest part of the cutting tooth is less than 4 mm/0.16 in. Also replace the saw chain if there are cracks on the cutters.
natural_image
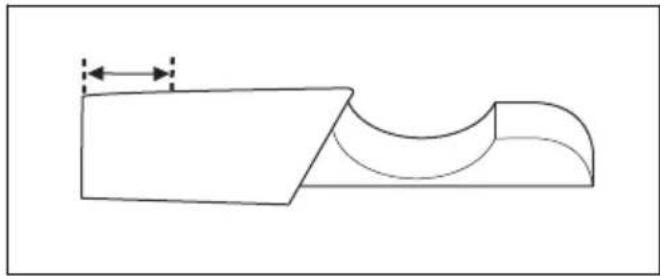
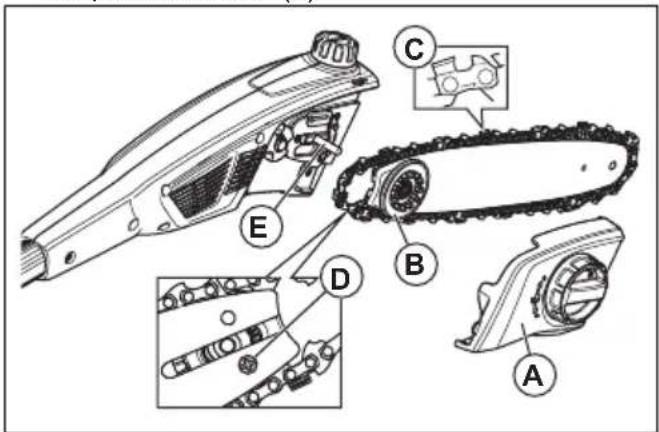
Pure geometric diagram showing a rectangular shape with a curved cutout and a dashed line indicating a dimension (no text or symbols)To replace the guide bar
- Turn the locking knob counterclockwise and remove the protective cover (A).
- Remove the guide bar with the saw chain attached.
- Remove the saw chain from the guide bar.
- Remove the bolt (D) and remove the gear. Keep the gear near.
- Install the gear with the bolt (D) into the new guide bar.
- Put the saw chain in the groove of the guide bar.
- Install the guide bar and gear (B) onto the guide bar pin (E).
- Install the saw chain around the drive sprocket. Make sure that the cutting teeth point in the direction away from the drive sprocket (C).
- Install the protective cover (A) and turn the locking knob clockwise.
- Tighten the saw chain. Refer to To adjust the tension of the saw chain on page 19 for instructions.
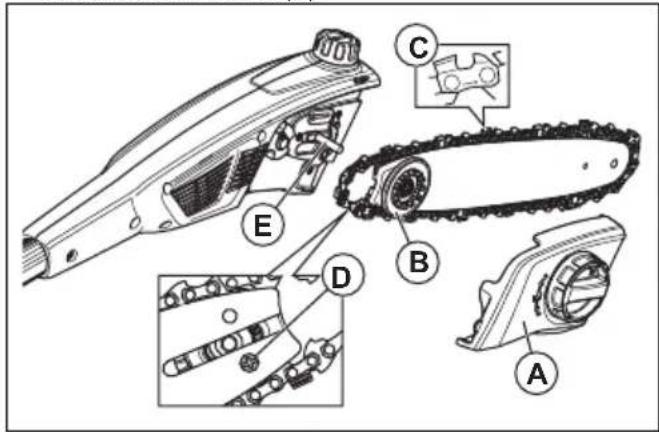
To replace the saw chain
- Turn the locking knob counterclockwise and remove the protective cover (A).
- Remove the guide bar with the saw chain attached.
- Remove the saw chain from the guide bar.
- Put a new saw chain in the groove of the guide bar.
- Install the guide bar and gear (B) onto the guide bar pin (E).
- Install the saw chain around the drive sprocket. Make sure that the cutting teeth point in the direction away from the drive sprocket (C).
- Install the protective cover (A) and turn the locking knob clockwise.
- Tighten the saw chain. Refer to To adjust the tension of the saw chain on page 19 for instructions.
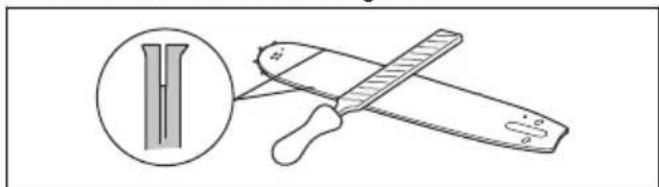
To sharpen the saw chain
Information about the guide bar and saw chain
WARNING: Use protective gloves when you use or do maintenance on the saw chain. A saw chain that does not move can also cause injuries.
Replace a worn or damaged guide bar or saw chain with the guide bar and saw chain combination recommended by Husqvarna. This is necessary to keep the safety functions of the product. Refer to Accessories on page 24, for a list of replacement bar and chain combinations that we recommend.
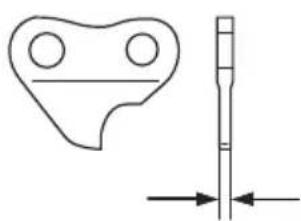
- Guide bar length, in/cm. Information about the guide bar length can usually be found on the rear end of the guide bar.

natural_image
Simple line drawing of a test tube with a downward arrow pointing to a small internal component (no text or symbols)• Number of teeth on bar tip sprocket (T).

natural_image
Simple line drawing of a chain with a starburst pattern inside, no text or symbols present.- Chain pitch, in. The distance between the drive links of the saw chain must align with the distance of the teeth on the bar tip sprocket and drive sprocket.

• Number of drive links. The number of drive links is decided by the type of guide bar.
natural_image
Pure mechanical linkage diagram without any text, numbers, or symbols- Bar groove width, in/mm. The groove width in guide bar must be the same as the chain drive links width.
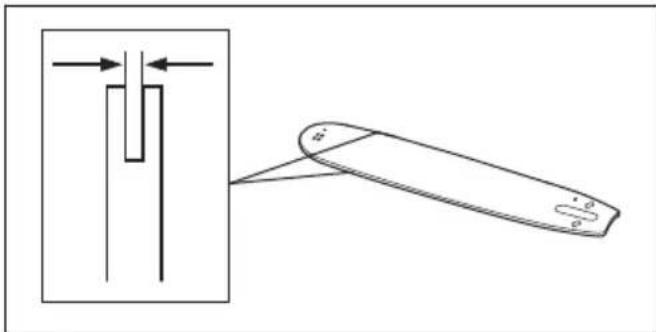
natural_image
Diagram showing a mechanical component with arrows indicating direction, alongside a separate view of a device with labeled parts (no text or symbols present)- Chain oil hole and hole for chain tensioner. The guide bar must align with product.

natural_image
Simple line drawing of a mechanical component with two arrows indicating direction (no text or symbols)- Drive link width, mm/in.
natural_image
Pure technical diagram showing a mechanical part with circular holes and a vertical rod, no text or symbols present.General information about how to sharpen the cutters
Do not use a blunt saw chain. If the saw chain is blunt, you must apply more pressure to push the guide bar through the wood. If the saw chain is very blunt, there will be no wood chips but sawdust.
A sharp saw chain eats through the wood and the wood chips becomes long and thick.
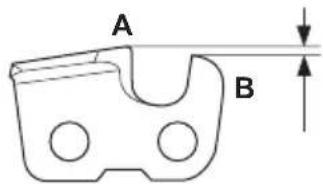
The cutting tooth (A) and the depth gauge (B) together makes the cutting part of the saw chain, the cutter. The difference in height between the two gives the cutting depth (depth gauge setting).
When you sharpen the cutter, think about the following:
- Filing angle.

natural_image
Technical line drawing of a mechanical tool with two views: one showing a curved arrow and the other showing a diagonal striped handle (no text or symbols)- Cutting angle.

natural_image
Pure mechanical diagram showing a gear or cam mechanism with no text, numbers, or symbols
natural_image
Simple line drawing of a mechanical component with curved arrows indicating motion or force (no text or symbols)- File position.

natural_image
Line drawing of a hand holding a tool with a handle and lever (no text or symbols)- Round file diameter.

natural_image
Simple line drawing of a dropper with a handle and a small symbol (no text or labels)It is not easy to sharpen a saw chain correctly without the correct equipment. Use Husqvarna file gauge. This will help you to keep maximum cutting performance and the kickback risk at a minimum.

WARNING: The force of the kickback increases a lot if you do not follow the sharpening instructions.
Note: Refer to To sharpen the cutters on page 18 for information about sharpening of the saw chain.
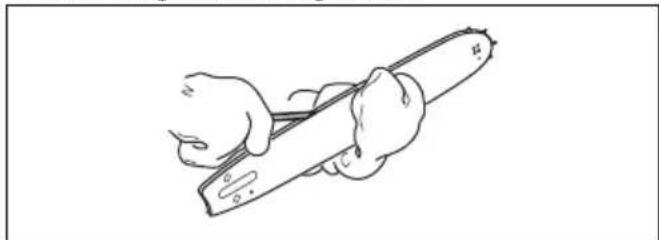
To sharpen the cutters
- Use a round file and a file gauge to sharpen the cutting teeth.

natural_image
Three line drawings of mechanical parts: a pipette, a plastic bag, and a segmented device (no text or symbols)Note: Refer to Accessories on page 24 for information about which file and gauge that Husqvarna recommends for your saw chain.
- Apply the file gauge correctly on to the cutter. Refer to the instruction supplied with the file gauge.
- Move the file from the inner side of the cutting teeth and out. Decrease the pressure on the pull stroke.

natural_image
Technical illustration of a mechanical clamp or bracket assembly (no text or symbols)- Remove material from one side of all the cutting teeth.
-
Turn the product around and remove material on the other side.
-
Make sure that all cutting teeth are the same length.
General information about how to adjust the depth gauge setting
The depth gauge setting (C) decreases when you sharpen the cutting tooth (A). To keep maximum cutting performance you must remove filing material from the depth gauge (B) to receive the recommended depth gauge setting. See Technical data on page 23 for instructions about how to receive the correct depth gauge setting for your saw chain.

WARNING: The risk of kickback increases if the depth gauge setting is too large!
To adjust the depth gauge setting
Before you adjust the depth gauge setting or sharpen the cutters, refer to General information about how to sharpen the cutters on page 18, for instructions. We recommend you to adjust the depth gauge setting after each third operation that you sharpen the cutting teeth.
We recommend that you use our depth gauge tool to receive the correct depth gauge setting and bevel for the depth gauge.
natural_image
Two types of tools: a saw and a tool holder (no text or symbols visible)- Use a flat file and a depth gauge tool to adjust the depth gauge setting. Only use Husqvarna depth gauge tool to get the correct depth gauge setting and bevel for the depth gauge.
- Put the depth gauge tool on the saw chain.
Note: See the package of the depth gauge tool for more information about how to use the tool.
- Use the flat file to remove the part of the depth gauge that extends through the depth gauge tool.

natural_image
Technical line drawing of a mechanical tool or device with no visible text or symbolsTo adjust the tension of the saw chain

WARNING: A saw chain with an incorrect tension can come loose from the guide bar and cause serious injury or death.
A saw chain becomes longer when you use it. It is important to adjust the tension of the saw chain regularly to make sure that it is correct. Do a check of the tension of the saw chain before you operate the product. Tighten the saw chain as tightly as possible, but it must be possible to pull the saw chain around freely by hand.
Note: A new saw chain has a running-in period. Do a check of the tension more frequently during this period.
- Turn the locking knob counterclockwise to unlock the chain tension adjuster.

natural_image
Three-panel illustration of a hand tool with adjustment knobs and arrows indicating motion (no text or symbols)-
Turn the chain tension adjuster clockwise to tighten the saw chain. Apply as much tension to the saw chain as possible. It must be tight against the guide bar.
-
Make sure that you can pull the saw chain around freely by hand and that it does not hang from the guide bar.

natural_image
Illustration of two hands holding a curved object with directional arrows indicating motion or force (no text or symbols)- Turn the locking knob clockwise to lock the chain tension adjuster.
To lubricate cutting equipment

WARNING: Poor lubrication of cutting equipment may cause the chain to snap, which could lead to serious, even fatal injuries.
WARNING: Do not use waste oil! Waste oil is dangerous for persons, the product and for the environment.
Saw chain oil
- Use saw chain oil of good adherence to the saw chain. The saw chain oil must keep its viscosity in all weather, for example, during hot summer or cold winter.
- Use Husqvarna chain oil for maximum saw chain life and to keep environmental damage to a minimum. If Husqvarna saw chain oil is not available, use a standard saw chain oil.
- In areas where oil for lubrication of saw chains is not available, use EP 90 transmission oil.
Do a check of the level of oil in the oil tank regularly to prevent damage to the saw chain and guide bar.

natural_image
Technical line drawing of a mechanical device with a lever and gear mechanism (no text or symbols)To fill with oil
Fill with saw chain oil after 1 hour of operation or when the battery is empty.
- Open the oil tank cap on the top of the saw head.
- Fill with Husqvarna saw chain oil.
- Attach the oil tank cap.
To examine the saw chain lubrication
- Start the product and let it run at 3/4 speed. Point the nose of the guide bar at a light color surface almost 20 cm (8 in) away.
- After 1 minute of running, a line of oil shows on the light surface.
- If you cannot see the line of oil after 1 minute, clean the oil channel in the guide bar. Clean the groove in the edge of the guide bar.
- Start the product and let it run at 3/4 speed. Point the nose of the bar at a light color surface almost 20 cm (8 in) away.
- After 1 minute of running, a line of oil shows on the light surface.
- If you cannot see the line of oil after 1 minute, speak to your approved dealer.
To do a check if lubrication does not work
- Check that the oil channel in the bar is not obstructed. Clean if necessary.
natural_image
Simple line drawing of a mechanical component with a downward arrow and circular features (no text or symbols)- Check that the oil channel in the gear housing is clean. Clean if necessary.
- Check that the bar tip sprocket turns freely. If the chain lubrication system is still not working after carrying out the above checks you should contact your service workshop.

natural_image
Simple line drawing of a curved object with a black arrow pointing to a small circular feature (no text or symbols)To do a check of the guide bar
- Make sure that the oil channel is not blocked. Clean if it is necessary.
natural_image
Simple line drawing of a switch mechanism with a black arrow indicating downward motion (no text or symbols)- Examine if there are burrs on the edges of the guide bar. Remove the burrs using a file.
natural_image
Illustration of a cutting tool and a flat blade, with a magnified inset showing the blade's tip (no text or symbols)- Clean the groove in the guide bar.
natural_image
Line drawing of a hand holding a tool, no text or symbols present- Examine the groove in the guide bar for wear. Replace the guide bar if it is necessary.

- Examine if the guide bar tip is rough or very worn.
natural_image
Simple line drawing of a tool with two crossed lines and arrows indicating direction (no text or symbols)- Make sure that the bar tip sprocket turns freely and that the lubricating hole in the bar tip sprocket is not blocked. Clean and lubricate if it is necessary.

natural_image
Illustration of a hand holding a pen with a curved arrow indicating rotation (no text or symbols)- Turn the guide bar daily to extend its life cycle.

To clean the product, the battery and the battery charger
- Clean the product with a dry cloth after use.
- Clean the battery and battery charger with a dry cloth. Keep the battery guide tracks clean.
- Make sure that the terminals on the battery and the battery charger are clean before use.
- Clean around the oil tank cap with a brush.
- Clean the inner surface of the protective cover with a brush.
To examine the battery and the battery charger
- Examine the battery for damages, for example cracks.
- Examine the battery charger for damages, for example cracks.
- Make sure that the connection cord of the battery charger is not damaged and that there are no cracks in it.
Troubleshooting
Keypad
| Problem Possible faults | Possible solution | |
| Green start LED flashes. | Low battery voltage. Charge the battery. | |
| Red error LED flash-es. | Overload. The cutting attachment is blocked. stop the product. Remove the battery. Clean the cutting attachment from unwanted materials. Loosen the chain. | |
| Temperature deviation. Let the product become cool. | ||
| The power trigger and the start button are pushed at the same time. | Release the power trigger and push the start button. | |
| The product does not start. | Dirt in the battery connectors. Clean the battery connectors with compressed air or a soft brush. | |
| Red error LED comes on. | It is necessary to do servicing on the product. | Speak to your servicing dealer. |
Battery
| Problem Possible faults Possible solution | ||
| Green LED flashes. Low battery voltage. Charge the battery. | ||
| Red error LED flashes. The battery is empty. Charge the battery. | ||
| Temperature deviation. Use the battery in temperatures between -10°C (14°F) and 40°C (104°F). | ||
| Overvoltage. Remove the battery from the battery charger. | ||
| Red error LED comes on. Cell difference is to much (1V). Speak to your servicing dealer. |
Battery charger
| Problem | Possible faults Possible solution | |
| Red error LED flashes. Temperature deviation. Use the battery charger in temperatures between 5 °C (41 °F) and 40 °C (104 °F). | ||
| Red error LED comes on. Speak to your servicing dealer. | ||
Transportation and storage
Transportation and storage
- The supplied Li-ion batteries obey the Dangerous Goods Legislation requirements.
- Obey the special requirement on package and labels for commercial transportation, including by third parties and forwarding agents.
- Speak to a person with special training in dangerous material before you send the product. Obey all applicable national regulations.
- Use tape on open contacts when you put the battery in a package. Put the battery in the package tightly to prevent movement.
- Remove the battery for storage or transportation.
- Put the battery and the battery charger in a space that is dry and free from moisture and frost.
- Do not keep the battery in an area where static electricity can occur. Do not keep the battery in a metal box.
- Put the battery in storage where the temperature is between 5^ / 41^ and 25^ / 77^ and away from open sunlight.
-
Put the battery charger in storage where the temperature is between 5^ / 41^ and 45^ / 113^ and away from open sunlight.
-
Use the battery charger only when the surrounding temperature is between 5^ / 41^ and 40^ / 104^ .
- Charge the battery 30% to 50% before you put it in storage for long periods.
- Put the battery charger in storage in a space that is closed and dry.
- Keep the battery away from the battery charger during storage. Do not let children and other not approved persons to touch the equipment. Keep the equipment in a space that you can lock.
- Clean the product and do a full servicing before you put the product in storage for a long time.
- Use the transportation guard on the product to prevent injuries or damage on the product during transportation and storage.
- Attach the product safely during transportation.
Disposal of the battery, battery charger and product
The symbol below means that the product is not domestic waste. Recycle it at a recycling station for
electrical and electronic equipment. This helps to prevent damage to the environment and to persons.
Speak to local authorities, domestic waste service or your dealer for more information.
Note: The symbol shows on the product or package of the product.
Technical data
Technical data
| 120iTK4-P | |
| Motor | |
| Type PMDC 36V | |
| Chain speed, m/sec 10 | |
| Features | |
| Low energy mode savE | |
| Oil tank | |
| Capacity, l/cm3 | 0.07/70 |
| Weight | |
| Without battery, kg/lb 4.1/9.1 | |
| Noise emissions1 | |
| Sound power level, measured dB(A) 93.79 | |
| Sound power level, guaranteed LWA dB(A) 97 | |
| Sound levels2 | |
| Equivalent sound pressure level at the operator's ear, dB(A) 80.6 | |
| Vibration levels3 | |
| Vibrations levels at handles, measured according to ISO 22867, m/s2 | |
| Collapsed, front handle/rear handle 0.793/0.676 | |
| Extended, front handle/rear handle 1.475/0.773 | |
Only use an original Husqvarna BLi battery in your product.
Approved batteries
| Battery BLi10 | |
| Type Lithium-ion | |
| Battery capacity, Ah Refer to battery rating decal | |
| Nominal voltage, V 36 | |
| Weight, kg 0.8 |
Approved battery chargers
| Battery charger QC 80 | |
| Input voltage, V 100-240 | |
| Frequency, Hz 50-60 | |
| Power, W 80 |
Accessories
Guidebar and saw chain combinations
The following combinations are CE approved.
| Guide bar Saw chain | ||||
| Length, inch Pitch | inch Gauge, mm Type | Length, number of drive links | ||
| 10 1/4" | 1.3 | Husqvarna H00 | 58 | |
Saw chain filing and file gauge
Use the recommended file gauge to get the correct filing angles. We recommend you to always use the recommended file gauge to restore the sharpness of the saw chain.
If you do not know which saw chain you have on your product, speak to your servicing dealer.
 | [0x55] |  | 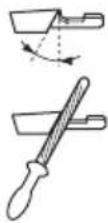 | 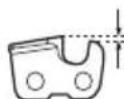 |  | 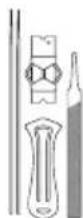 | |
| mm/in mm/im 15 ∅ | 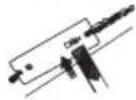 | ||||||
| 00 4.0 / | 5/32 85° 30° 0° | 0.65/0.025 50 | 56981-03 5796 | 536-01 |
EC Declaration of Conformity
Husqvarna AB, SE-561 82 Huskvarna, Sweden, tel: +46-36-146500, declares that the pole pruner Husqvarna 120iTK4-P with serial numbers dating 2021 and onwards (the year is clearly stated on the rating plate, followed by the serial number), comply with the requirements of the COUNCIL'S DIRECTIVE:
• of May 17, 2006 "relating to machinery" 2006/42/EC
- of February 26, 2014 "relating to electromagnetic compatibility" 2014/30/EU
- of June 8, 2011 "restriction of use of certain hazardous substances" 2011/65/EU
The following standards have been applied:
EN 62841-1:2015, EN ISO 11680-1:2011, EN ISO 12100:2010, EN 55014-1:2017+A11, EN 55014-2:2015, EN IEC 63000:2018.
TÜV Rheinland LGA Products GmbH, Tillystrasse 2, D-90431 Nuernberg, Germany, 0197, has carried out voluntary EC type examination in accordance with machinery directive's (2006/42/EC) article 12, point 3b. The certificate for EC type examination has the number: BM 50491650 0001
Huskvarna, 2020-12-30

Pär Martinsson, Development Manager (Authorized representative for Husqvarna AB and responsible for technical documentation)
Indhold
Indledning....27
Sikkerhed....29
Montering....37
Drift.... 37
Vedligeholdelse.... 40
Fejlfinding.... 46
natural_image
Line drawing of a helmet with visor and cap (no text or symbols)natural_image
Line drawing of a human pelvic bone (no text or labels)natural_image
Line drawing of a mechanical component or bracket (no text or symbols)natural_image
Line drawing of two gloves with bandages and shaded areas (no text or symbols)- Brug beskyttelsesstøvler eller -sko med skridsikre såler.

natural_image
Line drawing of a rubber boots with visible tread pattern and buckles (no text or symbols)- Brug bukser med savværn.
natural_image
Line drawing of a firearm with attached grip and buttons (no text or symbols)natural_image
Technical line drawing of a mechanical device with no visible text or symbolsnatural_image
Technical line drawing of a mechanical tool or device with directional arrows indicating movement (no text or symbols present)natural_image
Technical line drawing of a mechanical device with directional arrows indicating movement or force (no text or symbols)natural_image
Simple line drawing of a device with a starburst effect (no text or symbols)natural_image
Pure technical line drawing of a mechanical part with no text or symbolsnatural_image
Simple line drawing of a droplet falling from above a U-shaped object (no text or symbols)natural_image
Line drawing of a person in full protective gear using a long-handled spray gun (no text or symbols)natural_image
Line drawing of a person in full protective gear using a long-handled tool (no text or symbols)Drift
natural_image
Line drawing of a handheld device with internal components and a black arrow pointing to a component (no text or symbols)natural_image
Technical illustration of a chain-link robotic device with a 90-degree angle indicator (no text or symbols present)natural_image
Simple line drawing of a human knee joint with a connecting rod and attached bone structure (no text or symbols)natural_image
Medical illustration showing a surgical instrument inserted into a hip joint (no text or labels)natural_image
Line drawing of a hand holding a chain-link tool with a handle, showing motion direction (no text or symbols)natural_image
Line drawing of a hand holding a chain tag device with an arrow indicating motion (no text or symbols)natural_image
Diagram of a dual-decker door with labeled buttons (I and e) and warning symbols, no readable text or labels present.natural_image
Technical line drawing of a mechanical device with directional arrows indicating movement or assembly (no text or symbols present)Vedligeholdelse
Indledning

natural_image
Mechanical assembly diagram showing two stages of toolpathing (no text or labels)natural_image
Pure geometric diagram showing a rectangular shape with a curved cutout and a dashed line indicating a dimension (no text or symbols)natural_image
Simple line drawing of a test tube with a downward arrow pointing to its side (no text or symbols)natural_image
Simple line drawing of a chain with a starburst pattern inside, no text or symbols present.natural_image
Diagram showing a mechanical component with arrows indicating direction, alongside a separate schematic view of a device with a handle and base (no text or symbols)natural_image
Pure diagram of a mechanical or electrical component with arrows indicating direction (no text or symbols)• Drivledsbredde, mm/tommer
natural_image
Technical line drawing of a mechanical part with a vertical shaft and dimension arrows (no text or symbols)natural_image
Technical line drawing of a mechanical tool with two views: one showing a curved arrow indicating rotation, the other showing a straight handle (no text or symbols)- Skærevinkel.
natural_image
Pure mechanical diagram showing a gear or cam mechanism with no text, numbers, or symbols- Filestilling.

natural_image
Line drawing of a screwdriver with a handle and lever (no text or symbols)- Rundfilsdiameter.

natural_image
Simple line drawing of a dropper with a handle and a small symbol (no text or labels)natural_image
Three technical line drawings of mechanical components: a pipette, a plastic component, and a segmented device (no text or symbols)natural_image
Technical illustration of a mechanical clamp or bracket assembly (no text or symbols)natural_image
Two mechanical tools: a flat tool and a clamped tool (no text or symbols visible)natural_image
Technical line drawing of a mechanical tool or connector with an arrow indicating direction (no text or symbols present)natural_image
Three sequential illustrations of a handheld device with arrows indicating motion, no text or symbols present.natural_image
Illustration of two hands holding a curved object with directional arrows indicating motion or force (no text or symbols)natural_image
Technical line drawing of a mechanical device with two circular components and a chain, no visible text or symbolsSådan påfyldes olie
natural_image
Simple line drawing of a mechanical component with a downward arrow and two circular features (no text or symbols)natural_image
Simple line drawing of a curved object with two small circles and an arrow pointing to it (no text or symbols)natural_image
Illustration of a knife and a measuring tool with a magnified inset showing the blade (no text or symbols)natural_image
Illustration of a hand using a tool to cut a cylindrical object (no text or symbols visible)natural_image
Simple line drawing of a test tube with two crossed arrows indicating direction (no text or symbols)natural_image
Illustration of a hand holding a pen with a curved arrow indicating rotation (no text or symbols)natural_image
Simple line drawing of a tool or plunger with an arrow indicating direction (no text or symbols)Tekniske data
Tekniske data
natural_image
Line drawing of a pair of gloves with bandages and shaded areas (no text or symbols)natural_image
Line drawing of a rubber boots with visible tread pattern and buckle (no text or symbols)natural_image
Line drawing of a mechanical tool or device with no visible text or symbolsnatural_image
Technical line drawing of a mechanical device with no visible text or symbolsnatural_image
Technical line drawing of a mechanical device with directional arrows indicating movement or force (no text or symbols present)natural_image
Technical line drawing of a mechanical device with directional arrows indicating movement or force (no text or symbols)natural_image
Simple line drawing of a VR headset with a starburst effect (no text or symbols)natural_image
Technical line drawing of a mechanical component with a dimension arrow (no text or symbols)natural_image
Simple line drawing of a droplet falling into a container with two circular ports (no text or symbols)natural_image
Line drawing of a person in full protective gear using a long-handled spray gun (no text or symbols)natural_image
Line drawing of a person in full protective suit and helmet using a long-handled tool (no text or symbols)Betrieb
natural_image
Line drawing of a handheld device with a labeled connector (no text or symbols present)natural_image
Diagram of a chain-linking tool with 90-degree angle annotation (no text or symbols on the diagram itself)natural_image
Simple line drawing of a human knee joint with a barbed wire attached to the lower leg (no text or symbols)natural_image
Medical illustration showing a surgical instrument with a cross mark, no text or symbols presentnatural_image
Line drawing of a hairdryer with a chain handle and lever mechanism (no text or symbols)natural_image
Line drawing of a chain-linking tool with an arrow indicating the handle (no text or symbols present)natural_image
Technical line drawing of a mechanical device with arrows indicating assembly or movement (no text or symbols)Wartung
Einleitung

natural_image
Mechanical assembly diagram showing two stages of toolpathing (no text or labels)natural_image
Pure geometric diagram showing a rectangular shape with a curved cutout and a dashed line indicating a dimension (no text or symbols)natural_image
Simple line drawing of a test tube with a downward arrow indicating force or movement (no text or symbols)natural_image
Simple line drawing of a chain with a star-like pattern inside, no text or symbols present.natural_image
Diagram showing a mechanical component with arrows indicating direction, alongside a separate view of a curved object with labeled points (no text or symbols present)natural_image
Simple line drawing of a mechanical component with two arrows indicating direction (no text or symbols)natural_image
Technical diagram showing a mechanical component and a vertical rod with directional arrows (no text or labels)natural_image
Technical line drawing of a mechanical component with two views: one showing a curved arrow and the other showing a diagonal bar (no text or symbols)- Schnittwinkel.

natural_image
Simple line drawing of a mechanical component with curved arrows indicating motion or force (no text or symbols)- Schärfposition.

natural_image
Simple line drawing of a screwdriver holding a lever (no text or symbols)natural_image
Simple line drawing of a dropper with a small symbol (no text or labels)natural_image
Three technical illustrations of mechanical components: a dropper, a bracket, and a clamp (no text or symbols)natural_image
Mechanical assembly diagram showing a linkage mechanism with no visible text or symbolsnatural_image
Line drawing of two mechanical tools: a textured tool and a clamped tool (no text or symbols)natural_image
Technical line drawing of a mechanical component with no visible text or symbolsnatural_image
Three-panel illustration of a mechanical device with rotating components and directional arrows (no text or symbols)natural_image
Illustration of two hands holding a curved object with directional arrows indicating motion or force (no text or symbols)natural_image
Technical line drawing of a mechanical component with a chain and directional arrow (no text or symbols)natural_image
Simple line drawing of a mechanical component with a downward arrow and circular features (no text or symbols)natural_image
Simple line drawing of a curved object with two small circles and an arrow pointing to it (no text or symbols)natural_image
Diagram showing a tool interacting with a vertical bar and a flat blade, with an inset magnified view of the bar (no text or symbols)natural_image
Line drawing of a hand using a tool to cut a cylindrical object (no text or symbols)natural_image
Simple line drawing of a test tube with two crossed arrows indicating direction (no text or symbols)natural_image
Illustration of a hand holding a device with a curved arrow indicating rotation (no text or symbols)natural_image
Simple line drawing of a tool or blade with an arrow indicating direction (no text or symbols)natural_image
Line drawing of a helmet with visor and cap (no text or symbols)natural_image
Line drawing of a mechanical component or device with no visible text or symbolsnatural_image
Line drawing of glasses and binoculars (no text or symbols)natural_image
Line drawing of two gloves with bandages and shaded areas, no text or symbols presentnatural_image
Line drawing of a pair of boots with visible tread pattern and buckles (no text or symbols)natural_image
Line drawing of a mechanical tool or device with no visible text, numbers, or symbolsnatural_image
Technical line drawing of a mechanical tool or device with no visible text or symbolsnatural_image
Technical line drawing of a firearm with directional arrows indicating movement (no text or symbols)natural_image
Technical line drawing of a mechanical tool or device with directional arrows indicating movement (no text or symbols present)natural_image
Simple line drawing of a VR headset with a starburst effect (no text or symbols)natural_image
Technical line drawing of a mechanical component with a U-shaped groove and a vertical dimension arrow (no text or symbols)natural_image
Simple line drawing of a droplet falling from a container with two circular holes (no text or symbols)natural_image
Line drawing of a person in full protective gear using a long-handled tool (no text or symbols)natural_image
Line drawing of a person in full protective gear using a long-handled tool (no text or symbols)Funcionamiento
natural_image
Line drawing of a handheld device with internal components and a connector (no text or symbols)natural_image
Diagram of a chain-linking device with a 90-degree angle indicator (no text or symbols present)natural_image
Simple line drawing of a human knee joint with a branch and leafy tree (no text or symbols)natural_image
Medical illustration showing a surgical instrument with a cross mark, no text or symbols presentnatural_image
Diagram of a hairdryer with a chain attachment, showing hand and blade structure (no text or symbols)natural_image
Illustration of a hand holding a chain-link device with an arrow pointing to the cable (no text or symbols present)natural_image
Technical line drawing of a handheld device with arrows indicating component placement (no text or symbols)Mantenimiento
Introducción

natural_image
Mechanical assembly diagram showing two stages of toolpathing (no text or labels)natural_image
Pure technical line drawing of a mechanical part with no text or symbolsPara sustituir la espada
natural_image
Simple line drawing of a cylindrical object with a downward arrow and two small circular features inside (no text or symbols)natural_image
Simple line drawing of a chain with a star-like symbol inside, no text or labels present.natural_image
Diagram showing a mechanical component being inserted into a housing, with no visible text or symbols.natural_image
Simple line drawing of a mechanical component with two arrows indicating direction (no text or symbols)natural_image
Technical line drawing of a mechanical part with a vertical scale and dimension arrows (no text or symbols)natural_image
Technical line drawing of a mechanical tool with two views: one showing a curved component and the other showing a grooved handle (no text or symbols)- Ángulo de corte.
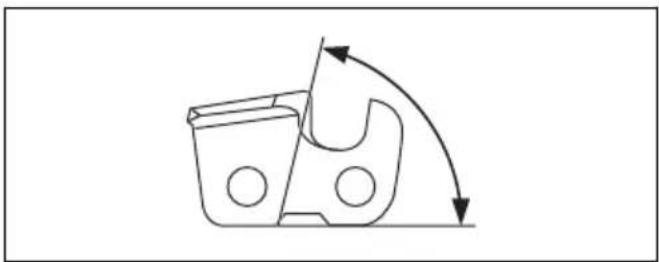
natural_image
Pure mechanical diagram showing a gear or cam mechanism with rotational arrows (no text or symbols)natural_image
Line drawing of a screwdriver holding a lever and connecting pin (no text or symbols)natural_image
Simple line drawing of a dropper with a small symbol (no text or labels)natural_image
Three line drawings of different household appliances: a pipette, a plastic bag, and a textured device (no text or symbols)natural_image
Technical illustration of a mechanical clamp or bracket assembly (no text or symbols)natural_image
Two mechanical tools: a textured tool and a clamped device (no text or symbols visible)natural_image
Technical line drawing of a mechanical tool or component with no visible text or symbolsnatural_image
Three-panel diagram showing mechanical components with arrows indicating motion or force, no text or symbols present.natural_image
Illustration of two hands performing a rope manipulation technique (no text or symbols)natural_image
Technical line drawing of a mechanical component with a directional arrow indicating motion (no text or symbols)Llenado de aceite
natural_image
Simple line drawing of a mechanical component with a downward arrow and two circular features (no text or symbols)natural_image
Simple line drawing of a curved object with a black arrow pointing to its base (no text or symbols)natural_image
Illustration of a pair of sawes with a magnified inset showing a cylindrical object (no text or symbols)natural_image
Line drawing of hands using a tool to cut a cylindrical object (no text or symbols)natural_image
Simple line drawing of a test tube with two crossed arrows indicating direction (no text or symbols)natural_image
Illustration of a hand holding a rectangular object with an arrow indicating rotation (no text or symbols)natural_image
Simple line drawing of a tool or plunger with an arrow indicating rotation (no text or symbols)natural_image
Line drawing of a helmet with a visor and a triangular cap (no text or symbols)natural_image
Line drawing of a mechanical component or bracket (no text or symbols)natural_image
Line drawing of a mechanical component or device (no text or symbols)natural_image
Line drawing of a pair of boots with visible tread pattern and buckles (no text or symbols)natural_image
Line drawing of a firearm with attached grip and trigger mechanism (no text or symbols)natural_image
Technical line drawing of a mechanical tool or device with no visible text or symbolsnatural_image
Technical line drawing of a mechanical device with directional arrows indicating movement or force (no text or symbols present)natural_image
Technical line drawing of a mechanical tool with directional arrows indicating movement or force (no text or symbols present)natural_image
Simple line drawing of a VR headset with a starburst effect (no text or symbols)natural_image
Technical line drawing of a mechanical component with a U-shaped groove and a vertical arrow indicating force or dimension (no text or symbols)natural_image
Simple line drawing of a droplet falling from a container with two circular holes (no text or symbols)natural_image
Line drawing of a person in full protective gear using a long-handled spray gun (no text or symbols)natural_image
Line drawing of a person in full protective gear using a long-handled tool (no text or symbols)Käyttö
natural_image
Line drawing of a mechanical device with a labeled component (no text or symbols present)natural_image
Simple line drawing of a human knee joint with a branch and leafy branches (no text or symbols)natural_image
Medical illustration showing a surgical instrument with a cross mark on the hip joint (no text or labels)natural_image
Line drawing of a hairless manual tool with a chain and lever mechanism (no text or symbols)natural_image
Line drawing of a chain-link robotic device with an arrow pointing to the handle (no text or symbols present)natural_image
Technical line drawing of a handheld device with internal components and directional arrows (no text or symbols)Huolto
Johdanto

natural_image
Mechanical assembly diagram showing two views of a chain with arrows indicating motion (no text or labels)natural_image
Pure geometric diagram showing a rectangle and a curved shape with a dashed line indicating a dimension (no text or symbols)natural_image
Simple line drawing of a test tube with a downward arrow pointing to its side (no text or symbols)natural_image
Diagram showing a vertical pipe with directional arrows and a schematic of a mechanical component (no text or symbols)natural_image
Pure diagram of a tool or bracket with arrows indicating direction (no text or symbols)natural_image
Technical line drawing of a mechanical part with a vertical dimension and directional arrows (no text or symbols)natural_image
Technical line drawing of a mechanical component with two views: one showing a curved arrow indicating rotation, the other showing a cross-sectional view of a cylindrical rod (no text or symbols)• Leikkuukulma.

natural_image
Pure mechanical diagram showing a gear or cam mechanism with no text, numbers, or symbols• Viilan asento.

natural_image
Line drawing of a hand tool with a handle and lever, no text or symbols presentnatural_image
Simple line drawing of a dropper with a small symbol (no text or labels)natural_image
Three technical illustrations of mechanical components: a dropper, a bracket, and a clamp device (no text or symbols)natural_image
Technical illustration of a mechanical clamp or bracket assembly (no text or symbols)natural_image
Line drawing of two tools: a grater and a tool holder (no text or symbols)natural_image
Technical line drawing of a mechanical tool or connector with a threaded shaft and base, showing no text or symbols.natural_image
Three sequential diagrams showing mechanical components with arrows indicating motion, no text or symbols present.natural_image
Illustration of two hands holding a curved object with directional arrows indicating motion or force (no text or symbols)natural_image
Technical line drawing of a mechanical component with a directional arrow indicating motion (no text or symbols)Öljyn lisääminen
natural_image
Simple line drawing of a mechanical component with a downward arrow and two circular features (no text or symbols)natural_image
Simple line drawing of a curved object with a black arrow pointing to its base (no text or symbols)natural_image
Simple line drawing of a switch mechanism with a black arrow indicating downward motion (no text or symbols)natural_image
Illustration of a pair of scissors cutting a piece, with a magnified inset showing the blade (no text or symbols)natural_image
Line drawing of a hand holding a tool, no text or symbols presentnatural_image
Simple line drawing of a test tube with two crossed arrows indicating direction (no text or symbols)natural_image
Line drawing of a hand holding a pen with an arrow indicating rotation (no text or symbols)natural_image
Simple line drawing of a pen-like object with an arrow indicating direction (no text or symbols)natural_image
Line drawing of a helmet with a visor and cap (no text or symbols)natural_image
Line drawing of a pair of shoes (no text or symbols)natural_image
Line drawings of glasses and footshoes (no text or symbols)natural_image
Line drawing of two gloves with bandages and shaded areas, no text or symbols presentnatural_image
Line drawing of a pair of boots with visible tread pattern and buckles (no text or symbols)natural_image
Line drawing of a mechanical tool or device with no visible text, numbers, or symbolsnatural_image
Technical line drawing of a mechanical device with a handle and internal components (no text or symbols)natural_image
Technical line drawing of a mechanical tool or device with directional arrows indicating movement (no text or symbols present)natural_image
Technical line drawing of a mechanical device with directional arrows indicating movement or force (no text or symbols)natural_image
Simple line drawing of a VR headset with a starburst effect (no text or symbols)natural_image
Pure technical line drawing of a mechanical part with no text or symbolsnatural_image
Simple line drawing of a droplet falling from a container (no text or symbols)natural_image
Line drawing of a person in protective gear using a long-handled spray gun (no text or symbols)natural_image
Line drawing of a person in full protective gear using a long-handled spray gun (no text or symbols)Utilisation
natural_image
Line drawing of a handheld device with a black arrow pointing to a component (no text or symbols visible)natural_image
Diagram of a chain-linking device with a 90-degree angle indicator (no text or symbols on the diagram itself)natural_image
Simple line drawing of a human knee joint with a branch and leafy branches (no text or symbols)natural_image
Medical illustration showing a surgical instrument with a cross mark on the hip joint (no text or labels)natural_image
Line drawing of a hairless manual tool with a chain and lever mechanism (no text or symbols)natural_image
Line drawing of a chain-linking device with an arrow pointing to the handle (no text or symbols present)natural_image
Technical line drawing of a mechanical device with directional arrows indicating assembly or movement (no text or symbols)natural_image
Mechanical assembly diagram showing two stages of toolpathing (no text or labels)natural_image
Pure technical line drawing of a mechanical part with no text or symbolsnatural_image
Simple line drawing of a cylindrical object with a downward arrow and two small circular holes, no text or symbols present.natural_image
Simple line drawing of a chain with a star-shaped central element (no text or symbols)natural_image
Diagram showing a mechanical component with a shaft and a folded part, no text or symbols presentnatural_image
Simple line drawing of a mechanical component with two arrows indicating direction (no text or symbols)natural_image
Technical line drawing of a mechanical component with a vertical shaft and arrow indicating direction (no text or symbols)natural_image
Technical line drawing of a mechanical tool with two views: one showing a cutaway view and the other showing a detailed fillet (no text or symbols)• L'angle d'impact.

natural_image
Simple line drawing of a mechanical component with curved arrows indicating motion or force (no text or symbols)• La position de la lime.

natural_image
Line drawing of a screwdriver holding a tool, no text or symbols presentnatural_image
Simple line drawing of a dropper with a small symbol (no text or labels)natural_image
Three technical line drawings of mechanical components: a dropper, a plastic clamp, and a connector (no text or symbols)natural_image
Technical illustration of a mechanical clamp or bracket assembly (no text or symbols)natural_image
Two mechanical tools: a textured tool and a rectangular tool with internal components (no text or symbols visible)natural_image
Technical line drawing of a mechanical component with a threaded fastener inserted (no text or symbols)natural_image
Three-step diagram showing mechanical components with arrows indicating motion, no text or symbols presentnatural_image
Illustration of two hands holding a curved object with directional arrows indicating motion or force (no text or symbols)natural_image
Technical line drawing of a mechanical device with a lever and adjustment knob (no text or symbols)Remplissage d'huile
natural_image
Simple line drawing of a mechanical component with a downward arrow and circular features (no text or symbols)natural_image
Simple line drawing of a curved object with two small circles and an arrow pointing to its base (no text or symbols)natural_image
Simple line drawing of a switch mechanism with a black arrow indicating the direction (no text or symbols)natural_image
Diagram showing a tool interacting with a cylindrical object, with an inset magnified view of the tool (no text or symbols present)natural_image
Line drawing of a hand holding a cylindrical object with a handle, no text or symbols presentnatural_image
Simple line drawing of a test tube with two crossed arrows indicating direction (no text or symbols)natural_image
Illustration of a hand holding a pen with a curved arrow indicating rotation (no text or symbols)natural_image
Simple line drawing of a tool or plunger with an arrow indicating direction (no text or symbols)natural_image
Line drawing of a helmet with a visor and a triangular cap (no text or symbols)natural_image
Line drawing of a mechanical device with no visible text or symbolsnatural_image
Line drawing of a mechanical component or bracket (no text or symbols)natural_image
Line drawing of two human gloves with bandages and shaded areas (no text or symbols)natural_image
Line drawing of a boots with visible tread pattern and buckle (no text or symbols)natural_image
Line drawing of a mechanical tool or device with no visible text or symbolsnatural_image
Technical line drawing of a mechanical device with no visible text or symbolsnatural_image
Technical line drawing of a mechanical device with directional arrows indicating movement or force (no text or symbols present)natural_image
Technical line drawing of a mechanical device with directional arrows indicating movement or force (no text or symbols present)natural_image
Simple line drawing of a VR headset with a starburst effect (no text or symbols)natural_image
Pure technical diagram of a mechanical part with no text, numbers, or symbolsnatural_image
Simple line drawing of a droplet falling from a container with two circular ends (no text or symbols)natural_image
Line drawing of a person in full protective gear using a long-handled spray gun (no text or symbols)natural_image
Line drawing of a person in full protective gear using a long-handled tool (no text or symbols)Utilizzo
natural_image
Line drawing of a handheld electric shaver with a black clip and label (no readable text or symbols)natural_image
Simple line drawing of a human knee joint with a bone and a branch (no text or symbols)natural_image
Medical illustration showing a surgical instrument with a cross mark on the hip joint (no text or labels)natural_image
Line drawing of a manual hairpin with a chain and lever mechanism (no text or symbols)natural_image
Line drawing of a chain-link robotic device with an arrow indicating motion (no text or symbols)natural_image
Technical line drawing of a mechanical device with directional arrows indicating movement or force (no text or symbols present)Manutenzione
Introduzione

natural_image
Mechanical assembly diagram showing two stages of toolpathing (no text or labels)natural_image
Pure technical line drawing of a mechanical part with no text or symbolsnatural_image
Simple line drawing of a cylindrical object with a downward arrow and two small circular features inside (no text or symbols)natural_image
Diagram of a mechanical linkage or chain with a central star-like component (no text or symbols)natural_image
Diagram showing a mechanical component with a shaft and a curved blade, no text or symbols presentnatural_image
Simple line drawing of a mechanical component with two arrows indicating direction (no text or symbols)natural_image
Pure technical diagram showing a mechanical part and a vertical rod with directional arrows (no text or symbols)natural_image
Technical line drawing of a mechanical tool with two views: one showing a curved cut and arrow, the other showing a diagonal cutting tool (no text or symbols)- Angolo di taglio.
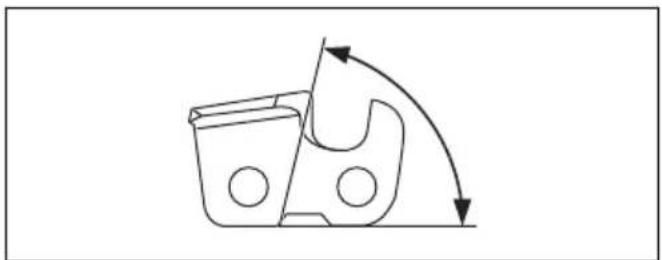
natural_image
Simple line drawing of a mechanical component with curved arrows indicating motion or force (no text or symbols)natural_image
Line drawing of a screwdriver holding a lever and pin (no text or symbols)natural_image
Simple line drawing of a dropper with a small symbol (no text or labels)natural_image
Line drawings of three mechanical tools: a dropper, a bracket, and a clamp device (no text or symbols)natural_image
Technical illustration of a mechanical clamp or bracket assembly (no text or symbols visible)natural_image
Two types of tools: a flat tool and a mechanical device (no text or symbols visible)natural_image
Technical line drawing of a mechanical tool with a threaded end and directional arrow (no text or symbols)natural_image
Three sequential diagrams showing a mechanical device with rotating components and directional arrows, no text or symbols present.natural_image
Illustration of two hands holding a curved object with directional arrows indicating motion (no text or symbols)natural_image
Technical line drawing of a mechanical device with a lever and adjustment knob (no text or symbols)natural_image
Simple line drawing of a mechanical component with a downward arrow and circular features (no text or symbols)natural_image
Simple line drawing of a curved object with a black arrow pointing to a small circular feature (no text or symbols)natural_image
Simple line drawing of a switch mechanism with a black arrow indicating downward motion (no text or symbols)natural_image
Illustration of a knife and a cutting tool with a magnified inset showing a blade (no text or symbols)natural_image
Line drawing of a hand using a tool to cut or spread a cylindrical object (no text or symbols)natural_image
Simple line drawing of a test tube with two crossed arrows indicating direction (no text or symbols)natural_image
Illustration of a hand holding a pen with a curved arrow indicating rotation (no text or symbols)natural_image
Simple line drawing of a tool or plunger with an arrow indicating direction (no text or symbols)Dati tecnici
Dati tecnici
WAARSCHUWING: Lees alle
natural_image
Line drawing of a helmet with visor and blade, no text or symbols presentnatural_image
Line drawing of a mechanical component or device (no text or symbols)natural_image
Line drawing of glasses and footshells (no text or symbols)natural_image
Line drawing of two gloves with bandages and straps, no text or symbols presentnatural_image
Line drawing of a pair of boots with visible sole and side seams (no text or symbols)natural_image
Line drawing of a firearm with attached grip and buttons (no text or symbols)- Controleer of de activeringsschakelaar is vergrendeld wanneer de vergrendeling in de beginpositie staat.

natural_image
Technical line drawing of a mechanical tool or device with no visible text or symbolsnatural_image
Technical line drawing of a mechanical device with directional arrows indicating movement or force (no text or symbols present)natural_image
Technical line drawing of a mechanical device with directional arrows indicating movement or force (no text or symbols present)natural_image
Simple line drawing of a U-shaped object with circular holes and a starburst effect (no text or symbols)natural_image
Pure technical line drawing of a mechanical part with no text or symbolsnatural_image
Simple line drawing of a droplet falling from a container (no text or symbols)natural_image
Line drawing of a person in full protective gear using a long-handled spray gun (no text or symbols)- Stel de as af op de gewenste lengte.
- Draai de schroefhandgreep (B) vast.
Draagstel afstellen
natural_image
Line drawing of a person in full protective gear using a long-handled tool (no text or symbols)Werking
natural_image
Line drawing of a handheld electric shaver with a cable outlet (no text or symbols)natural_image
Simple line drawing of a human knee joint with a connecting rod and attached plant tissue (no text or symbols)natural_image
Medical illustration showing a surgical instrument with a cross mark, no text or symbols presentnatural_image
Line drawing of a hand holding a chain-link tool, showing mechanical components and motion direction (no text or symbols)natural_image
Line drawing of a hand holding a mechanical device with a chain and arrow indicator (no text or symbols)natural_image
Diagram of a dual-panel door with circular buttons and warning symbols, no readable text or labelsnatural_image
Technical line drawing of a mechanical device with directional arrows indicating movement or assembly (no text or symbols present)Onderhoud
Inleiding

natural_image
Mechanical assembly diagram showing two stages of toolpathing (no text or labels)natural_image
Pure technical line drawing of a mechanical part with no text or symbolsnatural_image
Simple line drawing of a cylindrical object with a downward arrow and internal oval shape, no text or symbols present.natural_image
Simple line drawing of a chain with a star-like pattern inside, no text or symbols present.natural_image
Technical line drawing showing a mechanical component with a vertical shaft and a folded part (no text or symbols)natural_image
Simple line drawing of a mechanical component with two arrows indicating direction (no text or symbols)natural_image
Technical diagram showing a mechanical part with a vertical scale and directional arrows (no text or labels)natural_image
Technical line drawing of a mechanical tool with two views: one showing a curved arrow indicating rotation, the other showing a diagonal bar (no text or symbols)- Snijhoek.

natural_image
Simple line drawing of a mechanical component with curved arrows indicating motion or force (no text or symbols)• Vijlpositie.

natural_image
Line drawing of a screwdriver holding a lever and pin (no text or symbols)natural_image
Simple line drawing of a dropper with a small symbol (no text or labels)natural_image
Three technical illustrations of mechanical components: a dropper, a plastic clamp, and a connector (no text or symbols)natural_image
Technical illustration of a mechanical clamp or bracket assembly (no text or symbols visible)natural_image
Two mechanical tools: a textured tool and a rectangular device with internal components (no text or symbols visible)natural_image
Technical line drawing of a mechanical tool or component with no visible text or symbolsnatural_image
Three-step diagram showing a mechanical device with rotating components and directional arrows, no text or symbols present.natural_image
Illustration of two hands performing a manual task with arrows indicating motion (no text or symbols)natural_image
Technical line drawing of a mechanical component with a directional arrow indicating motion (no text or symbols)Olie bijvullen
natural_image
Simple line drawing of a mechanical component with a downward arrow and circular features (no text or symbols)natural_image
Simple line drawing of a curved object with a black arrow pointing to its base (no text or symbols)natural_image
Simple line drawing of a switch mechanism with a black arrow pointing to the button (no text or symbols)natural_image
Illustration of a pair of scissors cutting a piece, with a magnified inset showing the blade (no text or symbols)natural_image
Line drawing of a hand holding a cylindrical object with a handle, no text or symbols presentnatural_image
Simple line drawing of a test tube with crossed x marks and downward arrows indicating direction (no text or symbols)natural_image
Line drawing of a hand holding a pen with an arrow indicating rotation (no text or symbols)natural_image
Simple line drawing of a tool handle with an arrow indicating direction (no text or symbols)Product, accu en acculader reinigen
- Saghode
- Kjedestrammerknapp
- Kjedeoljetank
- Sverd
- Riggrør
- Opphengskrok for sele
- Tastatur
- Teleskopfunksjon
-
Kraftutløsersperre
-
Kraftutløser
- Fremre håndtak
- Bakre håndtak
- Batterilader
- Ledning
- LED-lampe for strøm på / advarsel
- Batteri
- Batteriutløserknapper
-
Batteriindikatorknapp
-
Varsellampe
- LED-indikator for batteri
- Start/stopp-knapp
- SavE-knapp
- Varsellampe
- Bruksanvisning
- Sele
- Transportbeskyttelse
Nominell spenning, V

natural_image
Line drawing of a helmet with a visor and a flat hat (no text or symbols)natural_image
Line drawing of a mechanical component or device with no visible text or symbolsnatural_image
Line drawing of a vertebra with visible vertebrae and surrounding bone structure (no text or labels)natural_image
Line drawing of two human gloves with bandages and straps (no text or symbols)- Bruk vernestøvler, eller sko, med sklisikre såler.

natural_image
Line drawing of a pair of boots with visible tread pattern and side clasp (no text or symbols)natural_image
Line drawing of a mechanical device with lever and handle (no text or symbols)natural_image
Technical line drawing of a mechanical device with no visible text or symbolsnatural_image
Technical line drawing of a mechanical tool with directional arrows indicating movement (no text or symbols)natural_image
Technical line drawing of a mechanical device with directional arrows indicating movement or force (no text or symbols)natural_image
Simple line drawing of a VR headset with a starburst effect (no text or symbols)natural_image
Technical line drawing of a mechanical component with a dimension arrow (no text or symbols)natural_image
Simple line drawing of a droplet falling from a container with two circular holes (no text or symbols)natural_image
Line drawing of a person in protective gear using a long-handled tool (no text or symbols)-
Koble til endene til riggrøret (A) fullstendig.
-
Trekk til skruhåndtaket på saghodesiden av riggrøret (B).
- Juster riggrøret til en egnet lengde.
- Trekk til skruhåndtaket (B).
Slik justerer du selen
natural_image
Line drawing of a person in full protective gear using a long-handled spray gun (no text or symbols)Drift
natural_image
Line drawing of a handheld device with a black arrow pointing to the internal component (no text or symbols visible)natural_image
Simple line drawing of a human knee joint with a tool inserted into the ligament (no text or symbols)natural_image
Medical illustration showing a surgical instrument inserted into a hip joint (no text or labels)natural_image
Line drawing of a hairpin with a chain handle, showing hand positioning and motion arrows (no text or symbols)natural_image
Line drawing of a handheld device with a loop handle and arrow indicator (no text or symbols)natural_image
Technical line drawing of a mechanical device with directional arrows indicating assembly or movement (no text or symbols)Vedlikehold
Innledning

natural_image
Mechanical assembly diagram showing two stages of toolpathing (no text or labels)natural_image
Pure geometric diagram showing a rectangle and a curved shape with a dashed line indicating a dimension (no text or symbols)Skifte av sverd
natural_image
Simple line drawing of a test tube with a downward arrow indicating force or direction (no text or symbols)• Antall tenner i nesehjulet (T).
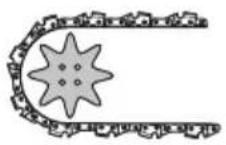
- Kjededeling, tommer. Avstanden mellom drivlenkene til sagkjedet må stemme med avstanden til tennene på sverdets nesehjul og drivhjulet.
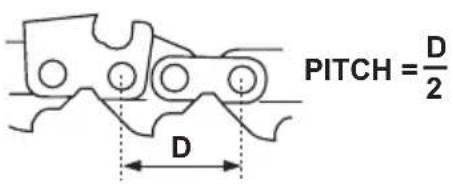
natural_image
Diagram showing a vertical pipe with directional arrows and a magnified view of a device with labeled points (no text or symbols present)natural_image
Pure diagram of a tool or bracket with arrows indicating direction (no text or symbols)natural_image
Technical line drawing of a mechanical component with a side view showing a shaft and circular features (no text or symbols)natural_image
Technical line drawing of a tool with two views: one showing a curved handle and rotation arrow, the other showing a diagonal blade with textured handle (no text or symbols)- støtvinkel

natural_image
Pure mechanical diagram showing a gear or cam mechanism with no text, numbers, or symbols- filstilling
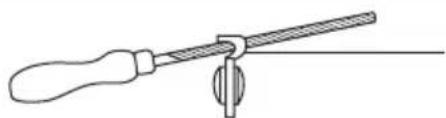
natural_image
Line drawing of a pair of scissors with a handle and pointed tip (no text or symbols)- rundfildiameter
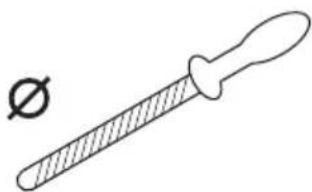
natural_image
Simple line drawing of a dropper with a handle and a small symbol (no text or labels)natural_image
Three line drawings of different household appliances: a pipette, a plastic bag, and a textured device (no text or symbols)natural_image
Mechanical assembly diagram showing a clamp or bracket with diagonal bracing and mounting bracket (no text or symbols)natural_image
Two line drawings of tools: a flat tool and a mechanical device (no text or symbols)natural_image
Pure mechanical diagram showing a tool interacting with a component, without any text, numbers, or symbols.natural_image
Diagram showing three sequential steps of a mechanical device with rotating components and directional arrows (no text or symbols)natural_image
Illustration of two hands performing a manual task on a curved object, with arrows indicating motion direction (no text or symbols)natural_image
Technical line drawing of a mechanical device with a lever and gear mechanism (no text or symbols)Påfylling av olje
Fyll på sagkjedeolje etter én times bruk eller när batteriet er tomt.
natural_image
Simple line drawing of a mechanical component with a downward arrow and circular features (no text or symbols)natural_image
Simple line drawing of a curved object with two circular holes and an arrow pointing to it (no text or symbols)Slik kontrollerer du sverdet
natural_image
Simple line drawing of a switch mechanism with a black arrow pointing to the button (no text or symbols)natural_image
Diagram showing a tool interacting with a cylindrical object, with an inset magnified view of the tool (no text or symbols present)natural_image
Line drawing of a hand holding a tool, no text or symbols presentnatural_image
Simple line drawing of a test tube with two crossed x marks and downward arrows indicating direction (no text or symbols)natural_image
Line drawing of a hand holding a pen with an arrow indicating rotation (no text or symbols)natural_image
Simple line drawing of a tool or plunger with an arrow indicating direction (no text or symbols)Merk: Symbolet vises på produktet eller produktets emballasje.
Tekniske data
Tekniske data
natural_image
Line drawing of a helmet with visor and cap (no text or symbols)- Utilize protetores acústicos aprovados.

natural_image
Line drawing of a mechanical component or device with no visible text or symbolsnatural_image
Line drawing of glasses and footshoes (no text or symbols)natural_image
Line drawing of a pair of boots with visible tread pattern and buckles (no text or symbols)natural_image
Line drawing of a mechanical device with lever and grip (no text or symbols)natural_image
Technical line drawing of a mechanical device with no visible text or symbolsnatural_image
Technical line drawing of a firearm component with directional arrows indicating movement (no text or symbols)natural_image
Technical line drawing of a mechanical tool with directional arrows indicating movement or force (no text or symbols present)natural_image
Simple line drawing of a VR headset with a starburst effect (no text or symbols)natural_image
Pure technical line drawing of a mechanical part with no text or symbolsnatural_image
Simple line drawing of a droplet falling from a container with two circular holes (no text or symbols)natural_image
Line drawing of a person in protective gear using a long-handled tool (no text or symbols)natural_image
Line drawing of a person in full protective gear using a long-handled tool (no text or symbols)Funcionamento
natural_image
Line drawing of a handheld electric shaver with internal components and a black arrow indicating a cable or connector (no text or symbols)natural_image
Diagram of a manual chain saw cutting a cylindrical part with a 90-degree angle indicator (no text or symbols present)natural_image
Simple line drawing of a human knee joint with a branch and leafy branches (no text or symbols)natural_image
Medical illustration showing a surgical instrument inserted into a hip joint (no text or labels)natural_image
Line drawing of a hand holding a chain-link device with a handle, showing no text or symbolsnatural_image
Line drawing of a hand holding a chain-link device with an arrow indicating motion (no text or symbols)natural_image
Technical line drawing of a mechanical device with directional arrows indicating movement or assembly (no text or symbols present)Manutenção
Introdução

natural_image
Mechanical assembly diagram showing two stages of toolpathing (no text or labels)natural_image
Pure geometric diagram showing a rectangular shape with a curved cutout and a vertical dimension line (no text or symbols)natural_image
Simple line drawing of a test tube with a downward arrow pointing to a small internal component (no text or symbols)natural_image
Simple line drawing of a chain with a central star-like shape (no text or symbols)natural_image
Diagram showing a mechanical component being inserted into a housing, with no visible text or symbols.natural_image
Simple line drawing of a mechanical component with two arrows indicating direction (no text or symbols)• Largura dos elos de acionamento, mm/pol.
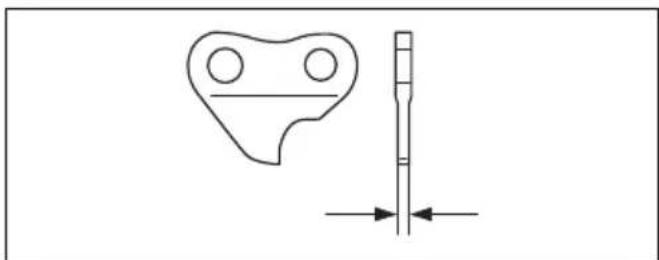
natural_image
Technical line drawing of a mechanical component with a vertical scale and dimension arrow (no text or symbols)natural_image
Technical line drawing of a mechanical tool with two views: one showing a curved cut and arrow, the other showing a diagonal grooved handle (no text or symbols)- Ângulo de corte.

natural_image
Simple line drawing of a mechanical component with curved arrows indicating motion or force (no text or symbols)- Posição da lima.

natural_image
Simple line drawing of a tool with a handle and lever, no text or symbols presentnatural_image
Simple line drawing of a dropper with a small symbol (no text or labels)natural_image
Three line drawings of mechanical parts: a handle, a gear-like component, and a segmented tool (no text or symbols)natural_image
Technical illustration of a mechanical clamp or bracket assembly (no text or symbols)natural_image
Two types of hair tools: a flat tool and a textured brush (no text or symbols)natural_image
Technical line drawing of a mechanical component with no visible text or symbolsnatural_image
Three-panel diagram showing mechanical components with arrows indicating motion or force, no text or symbols present.natural_image
Illustration of two hands performing a physical maneuver with directional arrows indicating motion (no text or symbols)natural_image
Technical line drawing of a mechanical component with a chain and directional arrow (no text or symbols)Abastecer com óleo
natural_image
Diagram showing a mechanical component with a downward arrow and two circular features (no text or symbols)natural_image
Simple line drawing of a curved object with a black arrow pointing to its base (no text or symbols)natural_image
Simple line drawing of a switch handle with a black arrow pointing to the button (no text or symbols)natural_image
Diagram showing a tool interacting with a cylindrical object, with no visible text or symbolsnatural_image
Line drawing of a hand holding a cylindrical object with a handle, no text or symbols presentnatural_image
Simple line drawing of a test tube with two crossed arrows indicating direction (no text or symbols)natural_image
Illustration of a hand holding a pen with a circular arrow indicating rotation (no text or symbols)natural_image
Line drawing of a helmet with visor and clasp (no text or symbols)natural_image
Line drawing of a pair of binoculars (no text or symbols)natural_image
Line drawing of glasses and footshells (no text or symbols)natural_image
Line drawing of two gloves with bandages and shaded areas, no text or symbols presentnatural_image
Line drawing of a rainforest boots with visible tread pattern and sole (no text or symbols)natural_image
Line drawing of a firearm with attached grip and barrel (no text or symbols)natural_image
Technical line drawing of a mechanical device with no visible text or symbolsnatural_image
Technical line drawing of a mechanical tool or device with directional arrows indicating movement (no text or symbols present)natural_image
Technical line drawing of a mechanical tool with directional arrows indicating movement (no text or symbols)natural_image
Simple line drawing of a VR headset with a starburst effect (no text or symbols)natural_image
Technical line drawing of a mechanical component with a dimension arrow (no text or symbols)natural_image
Simple line drawing of a device with a droplet above it and a curved base (no text or symbols)natural_image
Line drawing of a person in full protective gear using a long-handled tool (no text or symbols)natural_image
Line drawing of a person in full protective gear using a long-handled spray gun (no text or symbols)Drift
natural_image
Line drawing of a handheld device with a black arrow pointing to the internal component (no text or symbols visible)natural_image
Diagram of a chain-linking tool with 90-degree angle annotation (no text or symbols on the diagram itself)natural_image
Simple line drawing of a plant stem with leaves, no text or symbols presentnatural_image
Medical illustration showing a surgical instrument inserted into a hip joint (no text or labels)natural_image
Diagram of a hand holding a chain-link tool with arrows indicating motion (no text or symbols)natural_image
Line drawing of a hand holding a chain-shaped tool with an arrow indicating motion (no text or symbols)natural_image
Technical line drawing of a mechanical device with directional arrows indicating assembly or movement (no text or symbols present)Underhåll
Introduktion
natural_image
Mechanical assembly diagram showing two views of a chain with arrows indicating motion (no text or labels)natural_image
Pure geometric diagram showing a rectangle and a curved shape with a dashed line indicating a dimension (no text or symbols)Byta ut svärdet
natural_image
Simple line drawing of a test tube with a downward arrow pointing to its side (no text or symbols)- Antal tänder i noshjulet (T).

natural_image
Simple line drawing of a chain with a star-shaped gear-like shape inside (no text or symbols)natural_image
Diagram showing a mechanical component with an arrow indicating direction, alongside a separate view of a device with a curved handle (no text or symbols)natural_image
Simple line drawing of a tool or component with two arrows indicating direction (no text or symbols)natural_image
Pure technical diagram showing a mechanical part and a vertical rod with directional arrows (no text or symbols)natural_image
Technical line drawing of a mechanical tool with two views: one showing a curved cut and arrow, the other showing a diagonal cutting tool (no text or symbols)- stötvinkeln

natural_image
Simple line drawing of a mechanical component with curved arrows indicating motion or force (no text or symbols)- filläget

natural_image
Line drawing of a screwdriver holding a lever with a central pivot (no text or symbols)- rundfilens diameter.

natural_image
Simple line drawing of a dropper with a small symbol (no text or labels)natural_image
Mechanical assembly diagram showing a clamp or bracket with a diagonal bar and vertical rod (no text or symbols)WARNING: For stor understalling that kastriskent!
natural_image
Three-step diagram showing mechanical components with arrows indicating motion, no text or symbols presentnatural_image
Illustration of two hands performing a physical maneuver with arrows indicating motion direction (no text or symbols)natural_image
Technical line drawing of a mechanical component with a directional arrow indicating motion (no text or symbols)Fylla på olja
natural_image
Diagram of a mechanical component with a downward arrow and two circular features (no text or symbols)natural_image
Simple line drawing of a curved object with a black arrow pointing to a small circular feature (no text or symbols)Kontrollera svärdet
natural_image
Simple line drawing of a switch handle with a black arrow pointing downward (no text or symbols)natural_image
Illustration of a pair of crossed tools with a magnified inset showing a vertical bar (no text or symbols)natural_image
Line drawing of a hand holding a tool, no text or symbols presentnatural_image
Illustration of a hand holding a pen with a curved arrow indicating rotation (no text or symbols)natural_image
Diagram of a tool with an arrow indicating direction, showing a curved handle and a small oval object inside (no text or symbols)natural_image
Line drawing of a helmet with a pair of goggles and a flat cap (no text or symbols)natural_image
Line drawing of a pair of shoes (no text or symbols)natural_image
Line drawing of a mechanical component or device (no text or symbols)natural_image
Line drawing of two different types of gloves or gloves, shown in side and top views (no text or symbols)natural_image
Line drawing of a pair of boots with textured soles (no text or symbols)natural_image
Line drawing of a mechanical tool or device with no visible text or symbolsnatural_image
Technical line drawing of a mechanical device with no visible text or symbolsnatural_image
Technical line drawing of a firearm with directional arrows indicating movement (no text or symbols)natural_image
Technical line drawing of a mechanical tool or device with directional arrows indicating movement (no text or symbols present)natural_image
Simple line drawing of a VR headset with a starburst effect (no text or symbols)natural_image
Technical line drawing of a mechanical component with a dimension arrow (no text or symbols)natural_image
Simple line drawing of a droplet above a U-shaped object (no text or symbols)natural_image
Line drawing of a person in full protective gear using a long-handled spray gun (no text or symbols)natural_image
Line drawing of a person in full protective gear using a long-handled spray gun (no text or symbols)Provoz
natural_image
Line drawing of a handheld device with a cable inserted, showing internal components and a black arrow pointing to a component (no text or symbols present)natural_image
Simple line drawing of a knee joint with a connecting rod and attached bone (no text or symbols)natural_image
Medical illustration showing a surgical instrument inserted into a hip joint (no text or labels)natural_image
Line drawing of a hairpin with a chain and lever mechanism, showing no text or symbolsnatural_image
Line drawing of a hand holding a device with a chain and arrow indicator (no text or symbols)natural_image
Diagram of a car front panel with two circular buttons labeled 'I' and 'e', and an arrow pointing to the bottom panel (no text or symbols beyond labels)natural_image
Technical line drawing of a mechanical device with directional arrows indicating assembly or movement (no text or symbols present)Zastavení výrobku
natural_image
Mechanical assembly diagram showing two stages of a chain with arrows indicating motion (no text or labels)natural_image
Pure geometric diagram showing a rectangular shape with a curved cutout and a dashed line indicating a dimension (no text or symbols)Výměna vodicí lišty
natural_image
Simple line drawing of a test tube with a downward arrow indicating compression or dislocation (no text or symbols)natural_image
Simple line drawing of a chain with a star-like pattern inside, no text or symbols present.natural_image
Diagram showing a mechanical component with arrows indicating direction, alongside a separate view of a folded or tapered object (no text or symbols present)natural_image
Pure diagram of a mechanical component with arrows indicating direction (no text or symbols)natural_image
Technical line drawing of a mechanical part with a vertical dimension line and directional arrow (no text or symbols)natural_image
Technical line drawing of a mechanical tool with a curved arrow indicating rotation (no text or symbols)- Úhel břitu.

natural_image
Simple line drawing of a mechanical component with curved arrows indicating motion or force (no text or symbols)- Poloha pilníku.
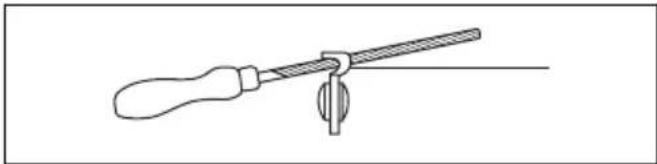
natural_image
Line drawing of a screwdriver holding a flat screwdriver (no text or symbols)- Průměr pilníku.

natural_image
Simple line drawing of a dropper with a small symbol (no text or labels)natural_image
Three technical line drawings of mechanical components: a dropper, a bracket, and a clamp (no text or symbols)natural_image
Mechanical assembly diagram showing a clamp or bracket with diagonal bracing and mounting holes (no text or symbols)natural_image
Line drawing of two tools: a textured tool and a mechanical device (no text or symbols)natural_image
Technical line drawing of a mechanical component with no visible text or symbolsnatural_image
Three-panel diagram showing mechanical components with arrows indicating motion or force, no text or symbols present.natural_image
Line drawing of two hands holding a curved object with directional arrows indicating motion (no text or symbols)natural_image
Technical line drawing of a mechanical component with two rods and a knob, no text or symbols presentDoplňování oleje
natural_image
Simple line drawing of a mechanical component with a downward arrow and two circular features (no text or symbols)natural_image
Simple line drawing of a curved object with a black arrow pointing to its base (no text or symbols)natural_image
Simple line drawing of a switch mechanism with a black arrow pointing downward (no text or symbols)natural_image
Illustration of a pair of scissors cutting a piece, with a magnified inset showing the blade (no text or symbols)natural_image
Line drawing of a hand holding a cylindrical object with a handle, no text or symbols presentnatural_image
Illustration of a hand holding a pen with a circular arrow indicating rotation (no text or symbols)natural_image
Simple line drawing of a tool handle with an arrow indicating direction (no text or symbols)natural_image
Line drawing of a helmet with a visor and a triangular cap (no text or symbols)natural_image
Line drawing of a mechanical component or device with no visible text or symbolsnatural_image
Line drawing of a mechanical component or assembly (no text or symbols)natural_image
Line drawing of a pair of boots with visible tread pattern and buckles (no text or symbols)natural_image
Line drawing of a mechanical tool or device with no visible text or symbolsnatural_image
Technical line drawing of a mechanical device with no visible text or symbolsnatural_image
Technical line drawing of a mechanical device with directional arrows indicating movement or force (no text or symbols present)natural_image
Technical line drawing of a mechanical tool with directional arrows indicating movement or force (no text or symbols present)natural_image
Simple line drawing of a VR headset with a starburst effect (no text or symbols)natural_image
Technical line drawing of a mechanical component with a U-shaped groove and a vertical arrow indicating force or dimension (no text or symbols)natural_image
Simple line drawing of a mechanical component with a droplet above it (no text or symbols)natural_image
Line drawing of a person in full protective gear using a long-handled spray gun (no text or symbols)natural_image
Line drawing of a person in full protective gear using a long-handled tool (no text or symbols)Töö
natural_image
Line drawing of a handheld device with a label 'SHAROCHO' and an arrow pointing to its internal component (no readable text or symbols beyond the label)natural_image
Diagram of a dual-chamber air vent with labeled buttons and warning symbols (no text or labels)- Tõmba toitelüliti lukku tahapoole ja hoia toitelülitit.
Okste lõikamine
natural_image
Line drawing of a chain-linking tool with a 90-degree angle indicator (no text or symbols on the diagram itself)natural_image
Simple line drawing of a human knee joint with a hand holding a branch (no text or symbols)natural_image
Medical illustration showing a surgical instrument inserted into a hip joint (no text or labels)natural_image
Line drawing of a hairdryer with a chain and lever mechanism (no text or symbols)natural_image
Line drawing of a hand holding a chain-link device with an arrow pointing to the side (no text or symbols present)natural_image
Technical line drawing of a cleaning tool with arrows indicating component placement (no text or symbols)Hooldamine
Sissejuhatus

natural_image
Mechanical assembly diagram showing two stages of toolpathing (no text or labels)natural_image
Pure technical line drawing of a mechanical part with no text or symbolsnatural_image
Simple line drawing of a test tube with a downward arrow indicating force or movement (no text or symbols)natural_image
Simple line drawing of a chain with a central gear-like shape (no text or symbols)natural_image
Diagram showing a mechanical component with an arrow indicating direction, alongside a separate view of a curved object (no text or symbols present)- Saeketi ölitamisauk ja pingutusauk. Juhtplaat peab sobima kokku seadmega.

natural_image
Pure diagram of a mechanical component with arrows indicating direction (no text or symbols)• Veolüli laius, mm/tollid.

natural_image
Technical line drawing of a mechanical part with a vertical shaft and circular features, no text or symbols presentnatural_image
Technical line drawing of a mechanical tool with an arrow indicating rotation and a cross-sectional view (no text or symbols)• Lõikenurk.
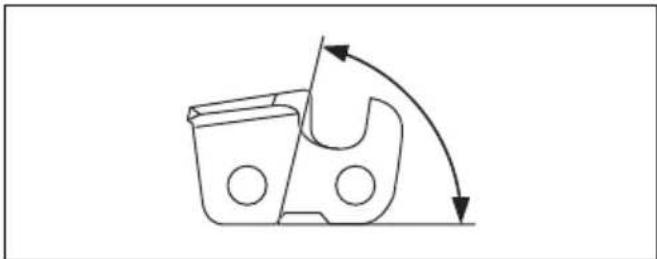
natural_image
Diagram of a mechanical component with curved arrows indicating motion or force direction (no text or symbols)• Viili asend.

natural_image
Line drawing of a screwdriver holding a lever with a fulcrum (no text or symbols)natural_image
Simple line drawing of a dropper with a small symbol (no text or labels)natural_image
Three technical illustrations of mechanical components: a dropper, a gear-like component, and a clamp device (no text or symbols)natural_image
Mechanical assembly diagram showing a clamp or bracket with hatched pattern, no text or symbols presentnatural_image
Line drawing of two mechanical tools: a radial tool and a clip device (no text or symbols)natural_image
Technical line drawing of a mechanical component with no visible text or symbolsSaeketi pinge reguleerimine
natural_image
Three-step diagram showing mechanical components with arrows indicating motion, no text or symbols presentnatural_image
Illustration of two hands holding a curved object with directional arrows indicating motion or force (no text or symbols)- Ketipingsusregulaatori lukustamiseks keerake lukustusnuppu päripäeva.
Lõikeosa määrimine
natural_image
Technical line drawing of a mechanical component with a directional arrow indicating motion (no text or symbols)Õli lisamine
natural_image
Diagram of a mechanical component with a downward arrow and circular features (no text or symbols)natural_image
Simple line drawing of a curved object with two small circular holes and an arrow pointing to its base (no text or symbols)Juhtplaadi kontrollimine
natural_image
Simple line drawing of a switch component with a black arrow pointing to the button (no text or symbols)natural_image
Illustration of a pair of scissors cutting a piece, with a magnified inset showing the blade (no text or symbols)natural_image
Line drawing of a hand holding a ruler or measuring tool (no text or symbols present)natural_image
Simple line drawing of a test tube with two crossed arrows indicating direction (no text or symbols)natural_image
Illustration of a hand holding a pen with a curved arrow indicating rotation (no text or symbols)natural_image
Simple line drawing of a pen-like object with an arrow indicating direction (no text or symbols)- Glava pile
- Kotačić za zatezanje lanca
- Spremnik ulja za lanac
- Vodilica
- Vratilo
- Noseća kuka za naramenice
- Tipkovnica
- Teleskopska funkcija
-
Blokada okidača paljenja
-
Okidač paljenja
- Prednja ručica
- Stražnja ručka
- Punjač baterije
- Uže
- LED napajanja/upozorenja
- Baterija
- Gumbi za oslobađanje baterije
-
Gumb indikatora baterije
-
LED za upozorenje
- LED indikatora baterije
- Gumb za pokretanje/zaustavljanje
- Gumb savE
- LED za upozorenje
- Korisnički priručnik
- Naramenice
- Transportni štitnik
Simboli na proizvodu

UPOZORENJE! Ovaj proizvod može biti opasan! Neoprezna ili nepravilna upotreba može uzrokovati ozbiljne ili smrtne povrede rukovatelja strojem ili drugih osoba. Iznimno je važno pročitati i usvojiti sadržaje ovog korisničkog priručnika. Prije rukovanja proizvodom pažljivo pročitajte korisnički priručnik i usvojite upute.

Na lokacijama na kojima postoji opasnost od padajućih predmeta nosite zaštitnu kacigu. Upotrebljavajte odobrenu zaštitu sluha. Upotrebljavajte odobrenu zaštitu za oči.

natural_image
Line drawing of a helmet with visor and cap (no text or symbols)- Koristite odobrenu zaštitu sluha.
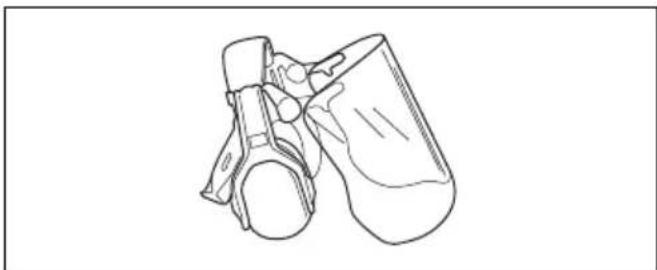
natural_image
Line drawing of a pair of binoculars (no text or symbols)- Koristite odobrenu zaštitu za oči. Ako nosite vizir, morate nositi i odobrene zaštitne naočale. Odobrene zaštitne naočale moraju ispunjavati standard ANSI Z87.1 za SAD ili EN 166 za države EU-a.
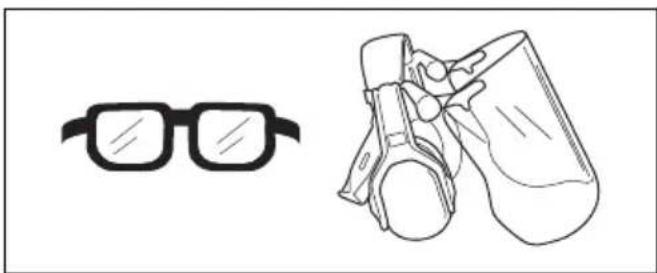
natural_image
Line drawing of glasses and footshoes (no text or symbols)natural_image
Line drawing of two gloves with bandages and shaded areas, no text or symbols present- Nosite zaštitne čizme ili cipele s protukliznim potplatima.
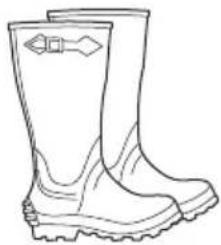
natural_image
Line drawing of a boots with visible tread pattern and buckle (no text or symbols)- Koristite hlače sa zaštitom od motorne pile.
- Nosite odjeću napravljenu od čvrstog materijala. Uvijek nosite teške duge hlače i duge rukave. Nemojte nositi široku odjeću koja može zapinjati za grane i prutove. Nemojte nositi nakit, kratke hlače, otvorene cipele ni hodati bosonogi. Kosu podignite na sigurnu visinu iznad ramena.
natural_image
Line drawing of a mechanical device with lever and grip (no text or symbols)natural_image
Technical line drawing of a mechanical device with no visible text or symbolsnatural_image
Technical line drawing of a mechanical device with directional arrows indicating motion (no text or symbols)- Provjerite slobodno kretanje okidača paljenja i blokade te pravilno funkcioniranje povratne opruge.

natural_image
Technical line drawing of a mechanical device with directional arrows indicating movement or force (no text or symbols present)-
Pokrenite proizvod, pogledajte Pokretanje proizvoda na stranici 342.
-
Dajte puni gas.
-
Otpustite okidač paljenja i provjerite je li se rezni pribor potpuno zaustavio.
Sigurnosne upute za opremu za rezanje

UPOZORENJE: Prije upotrebe proizvoda pročitajte upozoravajuće upute u nastavku.
- Upotrebljavajte samo odobrene kombinacije vodilice/lanca motorne pile i opremu za oštrenje. Za upute pročitajte Održavanje na stranici 344.
- Pri radu s lancem motorne pile ili njegovim održavanjem nosite zaštitne rukavice. Lanac motorne pile koji se ne pokreće također može prouzročiti ozljede.
- Pazite da su rezni zupci dobro naoštreni. Poštujte upute i upotrebljavajte preporučeni mjerač razmaka. Oštećeni ili neispravno naoštreni lanac motorne pile povećava opasnost od nezgoda.

natural_image
Simple line drawing of a VR headset with a starburst effect (no text or symbols)natural_image
Pure technical line drawing of a mechanical part with no text or symbols- Provjerite je li lanac motorne pile pravilno zategnut. Ako lanac motorne pile ne naliježe zategnuto na vodilicu, lanac može iskočiti. Neispravna zategnutost lanca motorne pile smanjuje habanje vodilice, lanca motorne pile i pogonskog zupčanika lanca. Pogledajte Dodaci na stranici 354.
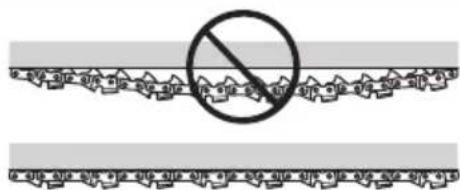
natural_image
Simple line drawing of a water droplet falling from a container (no text or symbols)Sigurnosne upute za rad
UPOZORENJE: Prije upotrebe
natural_image
Line drawing of a person in protective gear using a long-handled tool (no text or symbols)- Potpuno spojite krajeve osovine (A).
- Zategnite navojnu ručku na dio osovine s glavom pile (B).
Prilagodba duljine osovine
- Otpustite navojnu ručku na strani osovine s kućištem baterije (A).

- Podesite odgovarajuću duljinu osovine.
- Zategnite navojnu ručku (B).
Prilagodba naramenice
natural_image
Line drawing of a person in full protective gear using a long-handled tool (no text or symbols)Rad
natural_image
Line drawing of a mechanical device with labeled ports and a black arrow pointing to a component (no text or symbols present)- Pritisnite donji dio baterije i gurnite je do kraja u držač. Baterija se učvršćuje u položaju škljocajem.
- Provjerite jesu li se zatvarači pravilno zaključali na mjestu.
- Pritisnite blokadu okidača paljenja unatrag i zadržite okidač paljenja.
Rezanje grana
UPOZORENJE: Obratite pozornost prilikom rada u blizini nadzemnih električnih vodova. Grane koje padaju mogu dovesti do kratkog spoja.
- Kada je to moguće, uvijek se postavite tako da možete napraviti rez na grani pod pravim kutom.

natural_image
Simple line drawing of a human knee joint with a connecting rod and attached bone (no text or symbols)natural_image
Medical illustration showing a surgical instrument inserted into a hip joint (no text or labels)- Koristite prekidač za zaustavljanje u dnu rezne glave kako biste olakšali rezanje. Tako sprječavate "poskakivanje" rezne opreme po grani.
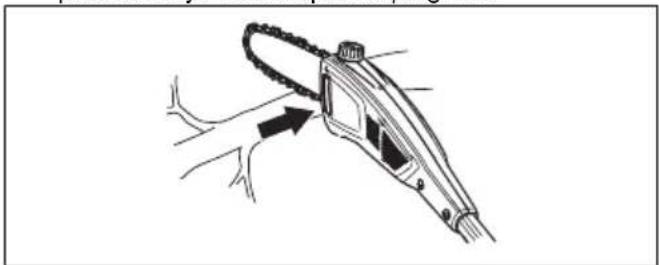
natural_image
Line drawing of a hairpin with chains attached to its side, showing mechanical components and motion arrows (no text or symbols)natural_image
Line drawing of a hand holding a mechanical device with a chain and arrow indicator (no text or symbols)- Uvjerite se da imate čvrst oslonac i da možete raditi te da vam grane, kamenje i drveće ne smetaju.
UPOZORENJE: Okidač paljenja nikada nemojte aktivirati ako nemate pregled cijele rezne opreme.
Pokretanje funkcije SavE
Proizvod je opremljen funkcijom SavE za štednju energije. Funkcija SavE osigurava najdulje vrijeme rada baterije.
- Pritisnite tipku SavE. Kada se uključi zeleni LED indikator, znači da je funkcija aktivna.
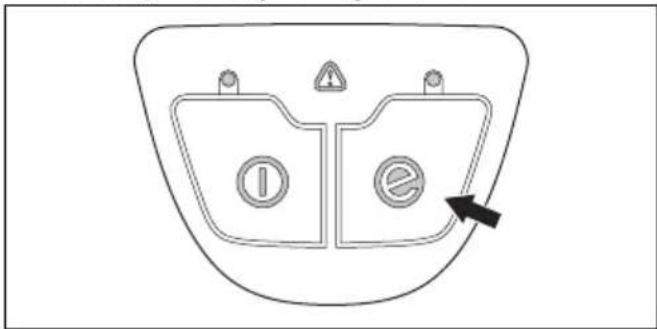
natural_image
Technical line drawing of a handheld device with directional arrows indicating movement or assembly (no text or symbols present)Održavanje
Uvod
natural_image
Mechanical assembly diagram showing two stages of toolpathing (no text or labels)- Pobrinite se da se lanac motorne pile može lako savijati. Zamijenite lanac motorne pile ako je krut.
- Usporedite lanac motorne pile s novim lancem motorne pile da biste provjerili jesu li nitne i spone istrošene.
- Zamijenite lanac motorne pile kada je najdulji dio reznih zubaca manji od 4 mm / 0,16 inči. Također zamijenite lanac motorne pile ako na kružnoj pili postoje pukotine.

natural_image
Pure geometric diagram showing a 3D shape with a curved cutout and a rectangular base, no text or symbols present.Zamjena vodilice
- Skinite vodilicu zajedno s lancem motorne pile.
- Lanac motorne pile skinite s vodilice.
- Odvrnite vijak (D) i izvadite zupčanik. Zupčanik odložite pri ruci.
- Zupčanik pomoću vijka (D) ugradite u novu vodilicu.
- Lanac motorne pile stavite u utor vodilice.
- Vodilicu i zupčanik (B) postavite na klin vodilice (E).
- Lanac motorne pile postavite oko pogonskog kotača. Rezni zupci moraju biti okrenuti u smjeru suprotnom od pogonskog kotača (C).
- Postavite zaštitni poklopac (A) i kotačić za zaključavanje zavrnite u pravcu kazaljke na satu.
- Pritegnite lanac motorne pile. Za upute pogledajte Prilagodba zategnutosti lanca pile na stranici 348.
Zamjena lanca motorne pile
- Skinite vodilicu zajedno s lancem motorne pile.
- Lanac motorne pile skinite s vodilice.
- Novi lanac motorne pile stavite u utor vodilice.
- Vodilicu i zupčanik (B) postavite na klin vodilice (E).
- Lanac motorne pile postavite oko pogonskog kotača. Rezni zupci moraju biti okrenuti u smjeru suprotnom od pogonskog kotača (C).
- Postavite zaštitni poklopac (A) i kotačić za zaključavanje zavrnite u pravcu kazaljke na satu.
- Pritegnite lanac motorne pile. Za upute pogledajte Prilagodba zategnutosti lanca pile na stranici 348.
Oštrenje lanca pile
Informacije o vodilici i lancu motorne pile

UPOZORENJE: Pri radu s lancem motorne pile ili njegovim održavanjem nosite zaštitne rukavice. Lanac motorne pile koji se ne pokreće također može prouzročiti ozljede.
Istrošenu ili oštećenu vodilicu ili lanac motorne pile zamijenite kombinacijom vodilice i lanca motorne pile koju preporučuje poduzeće Husqvarna. To je neophodno za očuvanje sigurnosnih funkcija proizvoda. Popis kombinacija rezervnih vodilica i lanaca koje mi preporučujemo potražite ovdje Dodaci na stranici 354.
- Duljina vodilice, inči/cm. Informacije o duljini vodilice obično se mogu pronaći sa stražnje strane vodilice.

natural_image
Simple line drawing of a cylindrical object with a downward arrow and two small circular holes, no text or symbols present.- Broj zubaca na vršnom zupčaniku vodilice (T).

- Razmaci u lancu, inči. Razmak između pogonskih karika lanca motorne pile mora odgovarati razmaku između zubaca na vršnom zupčaniku vodilice i pogonskih zupčanika.

- Broj pogonskih članaka. Broj pogonskih članaka određuje vrsta vodilice.

natural_image
Pure mechanical linkage diagram without any text, numbers, or symbols- Širina utora u vodilici, inči/mm. Širina utora u vodilici mora biti ista kao i širina pogonskih članaka lanca.
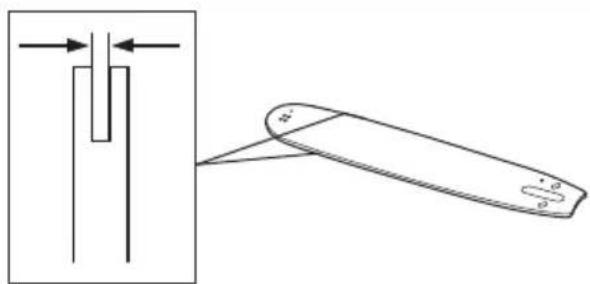
natural_image
Diagram showing a vertical tube with arrows pointing to it and a horizontal device with a control knob (no text or symbols)- Provrt za ulje za lanac i provrt za napravu za zatezanje lanca. Vodilica se mora poklapati s proizvodom.
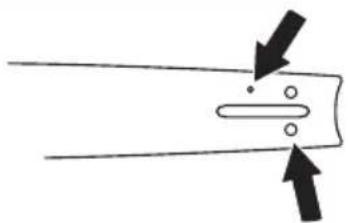
natural_image
Pure diagram of a mechanical component with arrows indicating direction (no text or symbols)natural_image
Technical line drawing of a mechanical part with a vertical dimension and directional arrows (no text or symbols)natural_image
Technical line drawing of a mechanical tool with two views: one showing a curved cut and rotation arrow, the other showing a grooved handle (no text or symbols)- Kut rezanja.
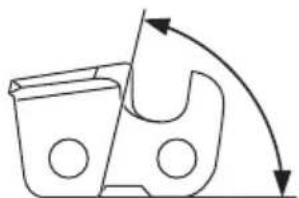
natural_image
Pure mechanical diagram showing a gear or cam mechanism with no text, numbers, or symbols- Položaj turpije.

natural_image
Line drawing of a hand tool with a handle and lever, no text or symbols presentnatural_image
Simple line drawing of a dropper with a handle and a small symbol (no text or labels)natural_image
Three line drawings of mechanical components: a pipette, a plastic bag, and a textured device (no text or symbols)natural_image
Technical illustration of a mechanical clamp or bracket assembly (no text or symbols)-
Uklonite materijal s jedne strane svih reznih zubaca.
-
Okrenite proizvod pa uklonite materijal i s druge strane.
- Pobrinite se da su svi rezni zupci iste duljine.
Opće informacije o načinu podešavanja postavke mjerača dubine
Postavka mjerača dubine (C) smanjuje se kad oštrite rezni zubac (A). Radi očuvanja maksimalnih reznih učinaka morate ukloniti isturpijani materijal iz mjerača dubine (B) da biste dobili preporučenu postavku mjerača dubine. Za upute o načinu dobivanja ispravne postavke mjerača dubine za vaš lanac motorne pile pogledajte Tehnički podaci na stranici 352.
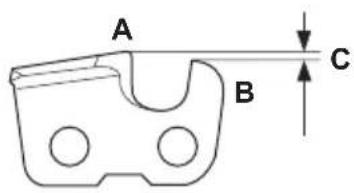
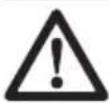
natural_image
Two mechanical tools: a tool with a textured handle and a clamped device (no text or symbols visible)natural_image
Pure mechanical diagram showing a tool interacting with a gear (no text or symbols)Prilagodba zategnutosti lanca pile

natural_image
Three-step diagram showing a device with rotating buttons and connecting rods, no text or symbols present.natural_image
Illustration of two hands performing a physical maneuver with directional arrows indicating motion (no text or symbols)natural_image
Technical line drawing of a mechanical device with two blades and a handle, showing no text or symbolsDolijevanje ulja
Ulje za lanac motorne pile dolijte nakon jednog sata rada ili kada se isprazni baterija.
natural_image
Simple line drawing of a mechanical component with a downward arrow and circular features (no text or symbols)natural_image
Simple line drawing of a curved object with a black arrow pointing to a small circular feature (no text or symbols)Provjera vodilice
- Pobrinite se za prohodnost kanala za ulje. Ako je to potrebno, očistite ga.
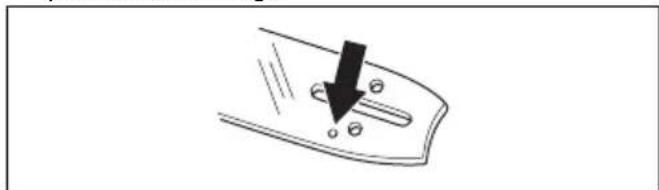
natural_image
Simple line drawing of a switch mechanism with a black arrow pointing to the button (no text or symbols)natural_image
Illustration of a pair of crossed tools with a magnified inset showing a cylindrical object (no text or symbols)- Očistite utor u vodilici.

natural_image
Line drawing of a hand holding a tool, no text or symbols present- Pregledajte je li istrošen utor u vodilici. Ako je potrebno, zamijenite vodilicu.

- Pobrinite se da se vršni zupčanik vodilice može slobodno okretati i da nije začepljen provrt za podmazivanje u vršnom zupčaniku vodilice. Očistite i podmažite ako je to potrebno.
natural_image
Line drawing of a hand holding a pen with a circular arrow indicating rotation (no text or symbols)natural_image
Simple line drawing of a tool handle with an arrow indicating direction (no text or symbols)Napomena: Simbol se nalazi na proizvodu ili pakovanju proizvoda.
Tehnički podaci
Tehnički podaci
| 120iTK4-P | |
| Motor | |
| Vrsta PMDC 36 V | |
| Brzina lanca, m/s 10 | |
| Značajke | |
| Način rada niske energije savE | |
| Spremnik za ulje | |
| Kapacitet, l/cm ^3 | 0,07/70 |
| Težina | |
| Bez baterije, kg/lb 4,1/9,1 | |
| Emisije buke ^40 | |
| Izmjerena jačina zvuka dB(A) 93,79 | |
| Jamčena razina jakosti zvuka LWA dB (A) 97 | |
| Razine buke ^41 | |
| Ekvivalentne razine tlaka zvuka na uhu rukovatelja, dB(A) 80,6 | |
| Razine vibracije ^42 | |
| Razine vibracija na ručkama, izmjerene u skladu s normom ISO 22867, m/s ^2 | |
| Sklopljene, prednja ručka /stražnja ručka 0,793 / 0,676 | |
| Rasklopljene, prednja ručka /stražnja ručka 1,475 / 0,773 | |
Uz proizvod upotrebljavajte samo originalne baterije Husqvarna BLi.
Odobrene baterije
| Baterija BLi10 | |
| Vrsta Litij-ion | |
| Kapacitet baterije, Ah Pogledajte nazivnu naljepnicu baterije | |
| Nazivni napon, V 36 | |
| Težina, kg 0,8 | |
natural_image
Line drawing of a helmet with a visor and a triangular cap (no text or symbols)natural_image
Line drawing of a mechanical component or bracket (no text or symbols)natural_image
Line drawing of a mechanical component or device with no visible text or symbolsnatural_image
Line drawing of a pair of boots with visible tread pattern and buckles (no text or symbols)natural_image
Line drawing of a mechanical device with lever and grip (no text or symbols)natural_image
Technical line drawing of a mechanical tool or device with no visible text or symbolsnatural_image
Technical line drawing of a mechanical tool or device with directional arrows indicating movement (no text or symbols present)natural_image
Technical line drawing of a mechanical device with directional arrows indicating movement or force (no text or symbols present)natural_image
Simple line drawing of a device with a starburst effect (no text or symbols)natural_image
Pure technical line drawing of a mechanical part with no text or symbolsnatural_image
Simple line drawing of a droplet falling from above a U-shaped object (no text or symbols)
natural_image
Simple line drawing of a droplet falling into a container with a handle (no text or symbols)natural_image
Line drawing of a person in full protective gear holding a long-handled tool (no text or symbols)natural_image
Line drawing of a person in full protective gear using a long-handled tool (no text or symbols)Üzemeltetés
natural_image
Line drawing of a handheld device with a black arrow pointing to a component (no text or symbols)natural_image
Diagram of a hairpin with a 90-degree angle indicator, showing mechanical components and motion (no text or symbols)natural_image
Simple line drawing of a human knee joint with a bone and a tree branch (no text or symbols)natural_image
Medical illustration showing a surgical instrument with a cross mark on the hip joint (no text or labels)natural_image
Diagram of a hairpin with a chain and handle, showing hand movement (no text or symbols)natural_image
Diagram of a hand holding a chain-link device with an arrow pointing to a small object (no text or symbols present)natural_image
Technical line drawing of a mechanical device with directional arrows indicating movement or force (no text or symbols present)Karbantartás
Bevezető

natural_image
Mechanical assembly diagram showing two stages of toolpathing (no text or labels)natural_image
Pure technical line drawing of a mechanical part with no text or symbolsnatural_image
Simple line drawing of a test tube with a downward arrow indicating compression or dislocation (no text or symbols)natural_image
Simple line drawing of a chain with a star-like shape inside, no text or symbols present.natural_image
Diagram showing a mechanical component with arrows indicating direction, alongside a separate schematic view of a device with a handle and base (no text or symbols)natural_image
Pure diagram of a mechanical or electrical component with two arrows indicating direction (no text or symbols)natural_image
Technical line drawing of a mechanical part with a cylindrical shaft and circular features, showing a dimension arrow (no text or symbols)natural_image
Technical line drawing of a mechanical tool with two views: one showing a curved arrow indicating rotation, the other showing a straight handle (no text or symbols)• Vágási szög.

natural_image
Pure mechanical diagram showing a gear or cam mechanism with no text, numbers, or symbols- Reszelőpozíció.
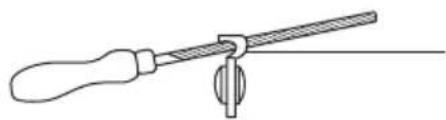
natural_image
Line drawing of a screwdriver with a handle and lever (no text or symbols)natural_image
Simple line drawing of a dropper with a handle and a small symbol (no text or labels)natural_image
Three line drawings of mechanical components: a pipette, a plastic component, and a textured device (no text or symbols)natural_image
Mechanical assembly diagram showing a tool interacting with a bracket and shaft (no text or symbols)natural_image
Two mechanical tools: a flat tool and a clamped tool (no text or symbols visible)natural_image
Technical line drawing of a mechanical tool or device with an arrow indicating direction (no text or symbols present)natural_image
Three-panel illustration of a mechanical device with rotating components and arrows indicating motion (no text or symbols)natural_image
Illustration of two hands holding a curved object with directional arrows indicating movement (no text or symbols)natural_image
Technical line drawing of a mechanical device with a lever and shaft, no text or symbols presentAz olaj utántöltése
natural_image
Diagram of a mechanical component with a downward arrow and circular features (no text or symbols)natural_image
Simple line drawing of a curved object with a black arrow pointing to its base (no text or symbols)natural_image
Simple line drawing of a switch mechanism with a black arrow indicating downward motion (no text or symbols)natural_image
Illustration of a pair of crossed tools with a magnified inset showing a cylindrical object (no text or symbols)natural_image
Line drawing of a hand holding a cylindrical object, possibly a tool or device (no text or symbols present)natural_image
Simple line drawing of a test tube with two crossed arrows indicating direction (no text or symbols)natural_image
Illustration of a hand holding a pen with a circular arrow indicating rotation (no text or symbols)natural_image
Simple line drawing of a tool or plunger with an arrow indicating direction (no text or symbols)natural_image
Line drawing of a helmet with visor and clasp (no text or symbols)natural_image
Line drawing of a mechanical component or device with no visible text or symbolsnatural_image
Line drawing of a mechanical component or device with no visible text or symbolsnatural_image
Line drawing of two human gloves with bandages and straps (no text or symbols)natural_image
Line drawing of a pair of boots with visible tread pattern and buckles (no text or symbols)natural_image
Line drawing of a mechanical tool or device with no visible text or symbolsnatural_image
Technical line drawing of a mechanical device with no visible text or symbolsnatural_image
Technical line drawing of a mechanical device with directional arrows indicating movement or force (no text or symbols present)natural_image
Technical line drawing of a mechanical device with directional arrows indicating movement or force (no text or symbols present)natural_image
Simple line drawing of a VR headset with a starburst effect (no text or symbols)natural_image
Technical line drawing of a mechanical component with a U-shaped groove and circular holes, showing a dimension arrow (no text or symbols)natural_image
Simple line drawing of a droplet falling into a container with two circular ports (no text or symbols)natural_image
Line drawing of a person in protective gear using a long-handled tool (no text or symbols)natural_image
Line drawing of a person in full protective gear using a long-handled spray gun (no text or symbols)Naudojimas
natural_image
Line drawing of a handheld device with a label and arrow pointing to the internal component (no readable text or symbols)natural_image
Simple line drawing of a human leg with a branch and leafy branch (no text or symbols)natural_image
Medical illustration showing a surgical instrument inserted into a hip joint (no text or labels)natural_image
Line drawing of a hairpin with a chain and lever mechanism, showing no text or symbolsnatural_image
Line drawing of a medical or surgical device with an arrow indicating a point of interest (no text or symbols present)natural_image
Technical line drawing of a mechanical component with directional arrows indicating assembly or movement (no text or symbols)Techninė priežiūra
lvadas

natural_image
Mechanical assembly diagram showing two stages of a turning process with arrows indicating motion (no text or labels)natural_image
Pure technical line drawing of a mechanical part with no text or symbolsnatural_image
Simple line drawing of a cylindrical object with a downward arrow and two small circular features inside, no text or symbols present.natural_image
Diagram of a chain with a star-shaped internal structure, no text or symbols presentnatural_image
Pure diagram of a mechanical component with arrows indicating direction (no text or symbols)• Varantysis narelis, mm / col.

natural_image
Technical line drawing of a mechanical part with a vertical dimension line and directional arrow (no text or symbols)natural_image
Technical line drawing of a mechanical tool with two views: one showing a curved arrow indicating rotation, the other showing a straight handle (no text or symbols)- Pjovimo kampas

natural_image
Simple line drawing of a mechanical component with curved arrows indicating motion or force (no text or symbols)• Dildès padètis

natural_image
Line drawing of a screwdriver holding a lever with a central pivot (no text or symbols)natural_image
Simple line drawing of a dropper with a small symbol (no text or labels)natural_image
Line drawings of three mechanical components: a dropper, a plastic clamp, and a tool holder (no text or symbols)natural_image
Mechanical assembly diagram showing a clamp or bracket with diagonal bracing and mounting holes (no text or symbols)natural_image
Line drawing of two tools: a textured tool and a mechanical clamp (no text or symbols)natural_image
Technical line drawing of a mechanical component with no visible text or symbolsnatural_image
Three-panel diagram showing mechanical components with arrows indicating motion or force, no text or symbols present.natural_image
Illustration of two hands performing a rope manipulation technique (no text or symbols)natural_image
Technical line drawing of a mechanical component with a directional arrow indicating motion (no text or symbols)Alyvos įpylimas
natural_image
Simple line drawing of a mechanical component with a downward arrow and circular features (no text or symbols)natural_image
Simple line drawing of a curved object with a black arrow pointing to its base (no text or symbols)natural_image
Simple line drawing of a switch mechanism with a black arrow indicating the direction (no text or symbols)natural_image
Illustration of a pair of crossed tools with a magnified inset showing a vertical tool (no text or symbols)- Išvalykite kreipiančiosios juostos griovelj.

natural_image
Line drawing of a hand holding a cylindrical object with a ruler, no text or symbols presentnatural_image
Simple line drawing of a test tube with two crossed arrows indicating direction (no text or symbols)natural_image
Illustration of a hand holding a pen with a curved arrow indicating rotation (no text or symbols)natural_image
Line drawing of a helmet and cap assembly (no text or symbols)natural_image
Line drawing of a mechanical component or bracket (no text or symbols)natural_image
Line drawing of a mechanical component or device with no visible text or symbolsnatural_image
Line drawing of two human gloves with bandages and segmented palm (no text or symbols)- Lietojiet aizsargapavus vai apavus ar neslidošu zoli.
natural_image
Line drawing of a pair of boots with visible tread pattern and buckles (no text or symbols)natural_image
Line drawing of a mechanical device with lever and grip (no text or symbols)natural_image
Technical line drawing of a mechanical device with no visible text or symbolsnatural_image
Technical line drawing of a mechanical device with directional arrows indicating movement or force (no text or symbols present)natural_image
Technical line drawing of a mechanical tool or device with directional arrows indicating movement (no text or symbols present)natural_image
Simple line drawing of a VR headset with a starburst effect (no text or symbols)natural_image
Technical line drawing of a mechanical component with a dimension arrow (no text or symbols)natural_image
Simple line drawing of a droplet falling into a container with two circular holes (no text or symbols)natural_image
Line drawing of a person in full protective gear using a long-handled spray gun (no text or symbols)natural_image
Line drawing of a person in full protective gear using a long-handled tool (no text or symbols)Lietošana
natural_image
Line drawing of a handheld device with a black arrow pointing to a component (no text or symbols)natural_image
Simple line drawing of a human knee joint with a connecting rod and attached bone (no text or symbols)natural_image
Medical illustration showing a surgical instrument inserted into a hip joint (no text or labels)natural_image
Line drawing of a hairpin with a chain and arrow indicating motion (no text or symbols)natural_image
Line drawing of a hand holding a chain-link device with an arrow indicating motion (no text or symbols)natural_image
Pure diagram of a door handle with two circular buttons and a black arrow pointing to the right side (no text or symbols)natural_image
Technical line drawing of a hairdryer tool with directional arrows indicating component placement (no text or symbols)Apkope
levads

natural_image
Mechanical assembly diagram showing gear meshing and cutting process (no text or labels)natural_image
Pure technical line drawing of a mechanical part with no text or symbolsnatural_image
Simple line drawing of a test tube with a downward arrow indicating force or direction (no text or symbols)• Sliedes iemavas zobrata zobu skaits (T).
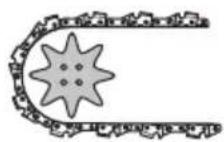
natural_image
Technical line drawing showing a mechanical component with an arrow indicating direction (no text or symbols)natural_image
Pure diagram of a tool or bracket with arrows indicating direction (no text or symbols)natural_image
Technical drawing of a mechanical part with a side view showing a vertical profile and dimension arrows (no text or labels)natural_image
Technical line drawing of a mechanical tool with two views: one showing a curved arrow indicating rotation, the other showing a textured handle (no text or symbols)• Zāgēšanas leņkis.

natural_image
Pure mechanical diagram showing a gear or cam mechanism with rotational arrows (no text or symbols)• Viles stāvoklis.

natural_image
Line drawing of a pair of scissors with a handle and base, no text or symbols presentnatural_image
Simple line drawing of a dropper with a handle and a small symbol (no text or labels)natural_image
Three line drawings of mechanical components: a pipette, a plastic bag, and a textured device (no text or symbols)natural_image
Mechanical assembly diagram showing a clamp or bracket with hatched pattern, no text or symbols presentnatural_image
Two mechanical tools: a flat tool and a clamped tool (no text or symbols visible)natural_image
Technical line drawing of a mechanical tool or device with no visible text or symbolsnatural_image
Three-step diagram showing mechanical components with arrows indicating motion, no text or symbols presentnatural_image
Line drawing of two hands holding a curved object with directional arrows indicating motion or force (no text or symbols)natural_image
Technical line drawing of a mechanical device with two blades and a central hub, showing no text or symbols.Ellas uzpildīšana
natural_image
Simple line drawing of a mechanical component with a downward arrow and circular features (no text or symbols)natural_image
Simple line drawing of a curved object with a black arrow pointing to its base (no text or symbols)natural_image
Simple line drawing of a switch mechanism with a black arrow pointing to the button (no text or symbols)natural_image
Illustration of a pair of scissors cutting a piece, with a magnified inset showing the blade (no text or symbols)natural_image
Line drawing of a hand holding a tool, no text or symbols presentnatural_image
Simple line drawing of a test tube with two crossed arrows indicating direction (no text or symbols)natural_image
Simple line drawing of a tool with an arrow indicating direction (no text or symbols)Piezime: Simbols ir redzams uz produkta vai produkta iepakojuma.
Tehniskie dati
Tehniskie dati
natural_image
Line drawing of a helmet with visor and clasp (no text or symbols)natural_image
Line drawing of a pair of shoes (no text or symbols)natural_image
Line drawing of glasses and footshells (no text or symbols)natural_image
Line drawing of two gloves with bandages and shaded areas, no text or symbols presentnatural_image
Line drawing of a pair of boots with visible tread pattern and sole patches (no text or symbols)natural_image
Technical line drawing of a mechanical device with lever and grip (no text or symbols)natural_image
Technical line drawing of a mechanical device with no visible text or symbolsnatural_image
Technical line drawing of a firearm with directional arrows indicating movement (no text or symbols)natural_image
Technical line drawing of a mechanical tool or device with directional arrows indicating movement (no text or symbols present)natural_image
Simple line drawing of a mechanical component with a starburst effect (no text or symbols)natural_image
Pure technical line drawing of a mechanical component with no text or symbolsnatural_image
Simple line drawing of a droplet falling from a container with a handle, no text or symbols present.natural_image
Line drawing of a person in protective gear using a long-handled tool (no text or symbols)natural_image
Line drawing of a person in full protective gear using a long-handled spray gun (no text or symbols)Przeznaczenie
natural_image
Line drawing of a mechanical device with a handle and internal components (no text or symbols)natural_image
Simple line drawing of a human knee joint with a bone and attached plant branch (no text or symbols)natural_image
Medical illustration showing a surgical instrument inserted into a hip joint (no text or labels)natural_image
Line drawing of a hairpin with a chain handle and lever mechanism, showing hand placement (no text or symbols)natural_image
Line drawing of a handheld device with a chain strap and arrow indicator (no text or symbols)natural_image
Technical line drawing of a mechanical device with arrows indicating assembly or component (no text or symbols)Przegład
Wstęp
natural_image
Mechanical assembly diagram showing two views of a chain with arrows indicating motion (no text or labels)natural_image
Pure geometric diagram showing a rectangular shape with a curved cutout and a dashed line indicating a dimension (no text or symbols)Wymiana prowadnicy
natural_image
Simple line drawing of a cylindrical object with a downward arrow and internal oval shape, no text or symbols present.natural_image
Simple line drawing of a chain with a star-like symbol inside, no text or labels present.natural_image
Diagram showing a mechanical component with a vertical rod and a curved handle, connected to a rectangular device (no text or symbols present)natural_image
Simple line drawing of a mechanical component with two arrows indicating direction (no text or symbols)natural_image
Technical line drawing of a mechanical part with a vertical shaft and dimension arrows (no text or symbols)natural_image
Technical line drawing of a mechanical tool with two views: one showing a curved cut and arrow, the other showing a diagonal blade with hatched texture (no text or symbols)- Kat ostrza.

natural_image
Simple line drawing of a mechanical component with curved arrows indicating motion or force (no text or symbols)natural_image
Line drawing of a screwdriver holding a tool, no text or symbols presentnatural_image
Simple line drawing of a dropper with a small symbol (no text or labels)natural_image
Three line drawings of mechanical components: a dropper, a folded component, and a segmented clamp (no text or symbols)natural_image
Technical illustration of a mechanical clamp or bracket assembly (no text or symbols visible)natural_image
Two mechanical tools: a flat tool and a clamped tool (no text or symbols visible)natural_image
Pure mechanical diagram showing a tool interacting with a gear (no text or symbols)natural_image
Three-step diagram showing mechanical components with arrows indicating motion, no text or symbols presentnatural_image
Illustration of two hands performing a rope or cable manipulation technique with directional arrows indicating movement (no text or symbols)natural_image
Technical line drawing of a mechanical component with a directional arrow indicating motion (no text or symbols)Uzupełnianie oleju
natural_image
Diagram showing a mechanical component with a downward arrow and two circular features (no text or symbols)natural_image
Simple line drawing of a curved object with a black arrow pointing to a small circular feature (no text or symbols)natural_image
Simple line drawing of a switch handle with a black arrow pointing to the button (no text or symbols)natural_image
Illustration of a pair of scissors cutting a piece, with a magnified inset showing the blade (no text or symbols)natural_image
Line drawing of a hand using a tool to cut or extend a cylindrical object (no text or symbols)natural_image
Simple line drawing of a test tube with two crossed arrows indicating direction (no text or symbols)natural_image
Illustration of a hand holding a pen with a circular arrow indicating rotation (no text or symbols)natural_image
Simple line drawing of a tool with an arrow indicating direction (no text or symbols)natural_image
Line drawing of a helmet with a visor and a pointed cap (no text or symbols)- Utilizați un sistem omologat de protectie a auzului.

natural_image
Line drawing of a mechanical device with no visible text or symbolsnatural_image
Line drawing of a mechanical component or device with no visible text or symbolsnatural_image
Line drawing of two types of gloves showing different grip positions (no text or symbols)natural_image
Line drawing of a rubber boots with visible tread pattern and buckles (no text or symbols)natural_image
Line drawing of a mechanical device with lever and grip (no text or symbols)natural_image
Technical line drawing of a mechanical device with no visible text or symbolsnatural_image
Technical line drawing of a firearm with directional arrows indicating movement (no text or symbols)natural_image
Technical line drawing of a mechanical device with directional arrows indicating movement or force (no text or symbols)natural_image
Simple line drawing of a VR headset with a starburst effect (no text or symbols)natural_image
Pure technical diagram of a mechanical part with no text, numbers, or symbolsnatural_image
Simple line drawing of a droplet falling from a container with two circular ends (no text or symbols)natural_image
Line drawing of a person in protective gear using a long-handled tool (no text or symbols)natural_image
Line drawing of a person in full protective gear using a long-handled spray gun (no text or symbols)Functionarea
natural_image
Line drawing of a mechanical device with no visible text or symbolsnatural_image
Technical line drawing of a chain-linking device with a 90-degree angle indicator (no text or symbols present)natural_image
Simple line drawing of a human leg with a branch and leafy branch (no text or symbols)natural_image
Medical illustration showing a surgical instrument with a cross mark on the hip joint (no text or labels)natural_image
Line drawing of a manual hairpin with a chain and lever mechanism (no text or symbols)natural_image
Diagram of a chain-link robotic device with an arrow pointing to the handle (no text or symbols present)natural_image
Technical line drawing of a mechanical device with arrows indicating assembly or movement (no text or symbols)Întreținerea
Introducere
natural_image
Diagram showing mechanical assembly with two views of a chain (no text or symbols)natural_image
Pure technical line drawing of a mechanical part with no text or symbolsnatural_image
Simple line drawing of a test tube with a downward arrow pointing to a small internal component (no text or symbols)natural_image
Simple line drawing of a chain with a central star-like shape (no text or symbols)natural_image
Diagram showing a mechanical component with arrows indicating direction, alongside a separate schematic view of a device with a handle and base (no text or symbols)natural_image
Pure diagram of a mechanical or electrical component with two arrows indicating direction (no text or symbols)natural_image
Technical line drawing of a mechanical part with a vertical shaft and circular features, showing directional arrows (no text or symbols)natural_image
Technical line drawing of a mechanical tool with two views: one showing a curved arrow indicating rotation, the other showing a straight handle (no text or symbols)natural_image
Simple line drawing of a mechanical component with curved arrows indicating motion (no text or symbols)- Pozitia pilei.

natural_image
Line drawing of a pair of scissors with a handle and base, no text or symbols present• Diametrul pilei rotunde.

natural_image
Simple line drawing of a dropper with a handle and a small symbol (no text or labels)natural_image
Three line drawings of mechanical parts: a pipette, a plastic bag, and a textured container (no text or symbols)natural_image
Mechanical assembly diagram showing a tool interacting with a bracket and shaft (no text or symbols)natural_image
Two types of tools: a saw and a mechanical clamp (no text or symbols visible)natural_image
Technical line drawing of a mechanical tool or device with no visible text or symbolsnatural_image
Three-panel illustration of a mechanical device with rotating components and directional arrows, no text or symbols present.natural_image
Illustration of two hands holding a curved object with directional arrows indicating movement (no text or symbols)natural_image
Technical line drawing of a mechanical device with a lever and shaft, showing no text or symbolsUmplerea cu ulei
natural_image
Simple line drawing of a mechanical component with a downward arrow and circular features (no text or symbols)natural_image
Simple line drawing of a curved object with a black arrow pointing to a small circular feature (no text or symbols)natural_image
Simple line drawing of a switch mechanism with a black arrow indicating downward motion (no text or symbols)natural_image
Illustration of a cutting tool and a pin with a magnified inset showing the blade (no text or symbols)natural_image
Line drawing of a hand using a tool to cut a cylindrical object (no text or symbols)natural_image
Simple line drawing of a test tube with two crossed arrows indicating direction (no text or symbols)natural_image
Illustration of a hand holding a device with a curved arrow indicating rotation (no text or symbols)natural_image
Line drawing of a helmet and cap assembly (no text or symbols)natural_image
Line drawing of a mechanical component or bracket (no text or symbols)natural_image
Line drawing of a mechanical component or device (no text or symbols)natural_image
Line drawing of two human gloves with bandages and shaded areas (no text or symbols)natural_image
Line drawing of a pair of boots with visible tread pattern and buckles (no text or symbols)natural_image
Line drawing of a mechanical device with lever and grip (no text or symbols)natural_image
Technical line drawing of a mechanical device with no visible text or symbolsnatural_image
Technical line drawing of a mechanical device with directional arrows indicating movement or force (no text or symbols)natural_image
Technical line drawing of a mechanical tool or device with directional arrows indicating movement (no text or symbols present)natural_image
Simple line drawing of a device with a starburst effect (no text or symbols)natural_image
Pure technical line drawing of a mechanical part with no text or symbolsnatural_image
Simple line drawing of a droplet falling from a container with two circular holes (no text or symbols)natural_image
Line drawing of a person in protective gear using a long-handled spray gun (no text or symbols)natural_image
Line drawing of a person in full protective gear using a long-handled tool (no text or symbols)Prevádzka
natural_image
Line drawing of a handheld device with a black arrow pointing to the internal component (no text or symbols)natural_image
Diagram of a dual-chamber air vent with labeled buttons and warning symbols (no text or numbers present)natural_image
Simple line drawing of a human knee joint with a bone and a branch (no text or symbols)- Nikdy nerežte cez zhrubnutú čast' pri koreni konára, pretože sa tým spomalí hojenie a zvýši sa riziko napadnutia hubami.
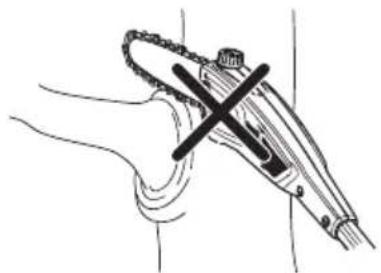
natural_image
Medical illustration showing a surgical instrument inserted into a hip joint (no text or labels)natural_image
Diagram of a hairless electric shaver with a lever and handle, showing no text or symbolsnatural_image
Diagram of a chain-linking device with an arrow pointing to the handle (no text or symbols present)natural_image
Technical line drawing of a mechanical device with directional arrows indicating assembly or movement (no text or symbols present)Údržba
Úvod

natural_image
Mechanical assembly diagram showing two stages of toolpathing (no text or labels)natural_image
Pure technical line drawing of a mechanical part with no text or symbolsnatural_image
Simple line drawing of a cylindrical object with a downward arrow and two small circular features inside, no text or symbols present.- Počet zubov na ozubenom koliesku lišty (T).

natural_image
Diagram of a mechanical linkage or chain with a central gear-like component (no text or symbols)- Rozstup ret'aze (palce). Vzdialenost' medzi hnacími článkami ret'aze sa musí zhodovat' so vzdialenost'ami zubov na ozubenom koliesku vodiacej lišty a hnacom ozubenom koliesku.

- Počet vodiacich článkov. Počet vodiacich článkov je určený typom vodiacej lišty.
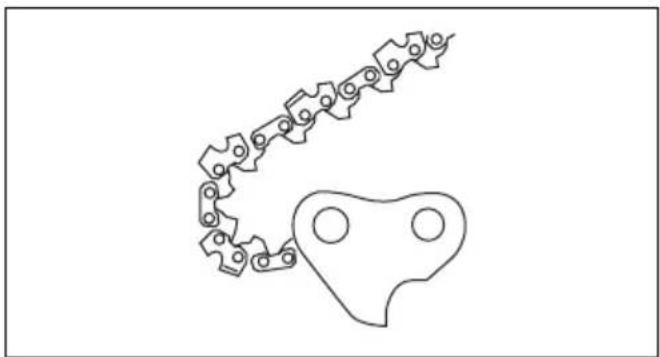
natural_image
Pure mechanical linkage diagram without any text, numbers, or symbolsnatural_image
Diagram showing a mechanical component with an arrow indicating direction, alongside a separate view of a slide-like object (no text or symbols present)- Otvor mazania ret'aze a otvor pre napínač ret'aze. Vodiaca lišta sa musí zhodovat's výrobkom.
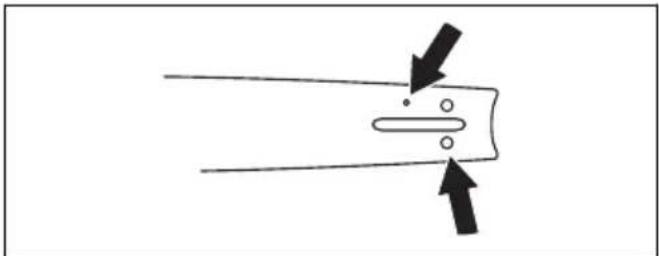
natural_image
Simple line drawing of a tool or component with two arrows indicating direction (no text or symbols)natural_image
Technical line drawing of a mechanical part with a cylindrical shaft and circular features, no text or symbols presentnatural_image
Technical line drawing of a mechanical tool with two views: one showing a cutaway view and the other showing a grooved handle (no text or symbols)• Uhol rezania.

natural_image
Simple line drawing of a mechanical component with curved arrows indicating motion or force (no text or symbols)- Poloha pilníka.
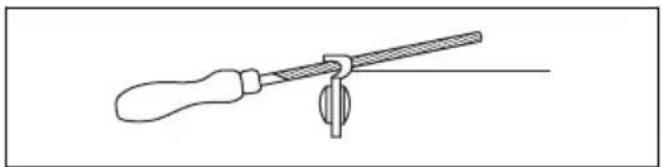
natural_image
Line drawing of a screwdriver holding a lever and pin (no text or symbols)natural_image
Simple line drawing of a dropper with a small symbol (no text or labels)natural_image
Three technical line drawings of mechanical components: a dropper, a plastic clamp, and a connector (no text or symbols)natural_image
Technical illustration of a mechanical clamp or bracket assembly (no text or symbols)natural_image
Two mechanical tools: a radial tool and a clamped tool (no text or symbols visible)natural_image
Technical line drawing of a mechanical tool or connector with no visible text or symbolsNastavenie napnutia ret'aze píly
natural_image
Three sequential diagrams showing a mechanical device with rotating components and directional arrows, no text or symbols present.- Na utiahnutie ret'aze pily otočte nastavovač napnutia ret'aze v smere hodinových ručičiek. Čo najviac napnite ret'az pily. Musí byt' utiahnutá voči vodiacej lište.
- Skontrolujte, či môžete rukou voľne otáčat’ ret’az píly a či ret’az na vodiacej lište neprevisa.

natural_image
Illustration of two hands holding a curved object with directional arrows indicating motion (no text or symbols)natural_image
Technical line drawing of a mechanical device with a lever and shaft, no text or symbols presentDoplnenie oleja
natural_image
Simple line drawing of a mechanical component with a downward arrow indicating force or direction (no text or symbols)natural_image
Simple line drawing of a curved object with a black arrow pointing to its base (no text or symbols)Kontrola vodiacej lišty
natural_image
Simple line drawing of a switch mechanism with a black arrow pointing downward (no text or symbols)natural_image
Diagram showing a tool interacting with a cylindrical object, with no visible text or symbolsnatural_image
Line drawing of a hand holding a tool, no text or symbols presentnatural_image
Simple line drawing of a test tube with two crossed arrows indicating direction (no text or symbols)natural_image
Illustration of a hand holding a pen with a circular arrow indicating rotation (no text or symbols)natural_image
Simple line drawing of a tool or plunger with an arrow indicating direction (no text or symbols)natural_image
Line drawing of a helmet with visor and cap (no text or symbols)natural_image
Line drawing of a mechanical component or device (no text or symbols)natural_image
Line drawing of a mechanical component or device (no text or symbols)natural_image
Line drawing of two human gloves with bandages and straps (no text or symbols)natural_image
Line drawing of a pair of boots with textured soles (no text or symbols)a) Izdelek je vklopljen, ko lučka LED sveti. b) Izdelek je izklopljen, ko lučka LED ne sveti.
natural_image
Line drawing of a mechanical tool or device with no visible text or symbolsnatural_image
Technical line drawing of a mechanical device with no visible text or symbolsnatural_image
Technical line drawing of a mechanical device with directional arrows indicating movement or force (no text or symbols present)natural_image
Technical line drawing of a mechanical device with directional arrows indicating movement or force (no text or symbols present)natural_image
Simple line drawing of a VR headset with a starburst effect (no text or symbols)natural_image
Technical line drawing of a mechanical component with a dimension arrow (no text or symbols)natural_image
Simple line drawing of a droplet falling from a container with two circular holes (no text or symbols)natural_image
Line drawing of a person in protective gear using a long-handled spray gun (no text or symbols)- Konca popolnoma potisnite na gred (A).
- Zategnite krilni vijak na rezalni glavi gredi (B).
- Gred si prilagodite na primerno dolžino.
- Zategnite krilni vijak(B).
Nastavitev oprtnika
natural_image
Line drawing of a person in full protective gear using a long-handled spray gun (no text or symbols)Delovanje
natural_image
Line drawing of a handheld device with a cable outlet and internal components (no text or symbols)- Pritisnite na spodnji del baterije in jo popolnoma potisnite v nosilec. Baterija se zaskoči, ko slišite klik.
- Zapahi se morajo pravilno zaskočiti.
Zagon izdelka
- Pritisnite in pridržite gumb za vklop/izklop, dokler ne zasveti zelena lučka LED.

- Zaklep sprožilca plina povlecite nazaj in ga pridržite.
Rezanje vej

natural_image
Simple line drawing of a human knee joint with a connecting rod and attached bone (no text or symbols)natural_image
Medical illustration showing a surgical instrument inserted into a hip joint (no text or labels)natural_image
Line drawing of a hairpin with a chain and lever mechanism, showing no text or symbolsnatural_image
Line drawing of a hand holding a mechanical device with a chain and arrow indicating motion (no text or symbols)-
Znova pritisnite gumb SavE, će želite funkcijo izklopiti.
-
Pritisnite in pridržite gumb za zaustavitev, dokler zelena lučka LED ne ugasne.
- Odstranite baterijo iz izdelka. Pritisnite 2 gumba za sprostitev in izvlecite baterijo.
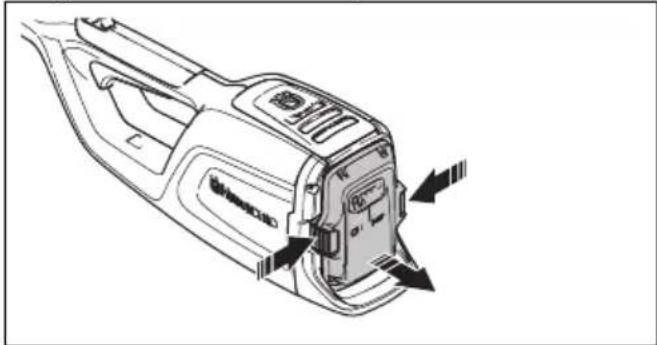
natural_image
Technical line drawing of a hairdryer tool with directional arrows indicating component placement (no text or symbols)Izklop izdelka
- Sprostite vklopnis sprožilnik.
Vzdrževanje
Uvod
natural_image
Mechanical assembly diagram showing two stages of tooling or machining process (no text or symbols)- Prepričajte se, da je verigo mogoče preprosto zviti. Če je veriga toga, jo zamenjajte.
- Verigo primerjajte z novo verigo, da ugotovite, će so kovice in členi obrabljeni.
- Zamenjajte verigo, ko je najdaljši del rezalnega zoba krajši od 4 mm/0,16 palca. Verigo prav tako zamenjajte, će so na rezilih razpoke.

natural_image
Pure geometric diagram showing a rectangular shape with a curved cutout and a dashed line indicating a dimension (no text or symbols)Zamenjava meča
natural_image
Simple line drawing of a cylindrical object with a downward arrow and two small circular features inside (no text or symbols)natural_image
Simple line drawing of a chain with a star-shaped internal element (no text or symbols)natural_image
Diagram showing a mechanical component with arrows indicating direction, alongside a separate view of a curved object (no text or symbols)natural_image
Simple line drawing of a mechanical component with two arrows indicating direction (no text or symbols)- Širina gonilnega člena v mm/palcih.

natural_image
Technical drawing of a mechanical part with a side view showing a cylindrical feature and dimension arrows (no text or symbols)Splošne informacije o brušenju rezil
natural_image
Technical line drawing of a mechanical tool with two views: one showing a curved arrow indicating rotation, the other showing a straight handle (no text or symbols)- Kot rezanja.

natural_image
Pure mechanical diagram showing a piston-cylinder joint with curved arrows indicating motion (no text or symbols)
natural_image
Simple line drawing of a mechanical component with curved arrows indicating motion or force (no text or symbols)- Položaj pile.

natural_image
Line drawing of a hand tool with a handle and lever, no text or symbols present- Premer okrogle pile.

natural_image
Simple line drawing of a dropper with a handle and a small symbol (no text or labels)natural_image
Three line drawings of mechanical parts: a pipette, a plastic bag, and a textured container (no text or symbols)natural_image
Technical illustration of a mechanical clamp or bracket assembly (no text or symbols)natural_image
Two mechanical tools: a flat tool and a clamped tool (no text or symbols visible)natural_image
Pure mechanical diagram showing a tool interacting with a gear (no text or symbols)natural_image
Three-panel illustration of a mechanical device with arrows indicating motion or force, showing internal components and wiring (no text or symbols)- Privijte verigo tako, da vijak napenjalca verige obrnete v smeri vrtenja urinega kazalca. Verigo napnite kolikor je mogoče. Trdno se mora prilegati meču.
- Prepričajte se, da lahko verigo nemoteno premikate z rokami in se ne poveša z meča.
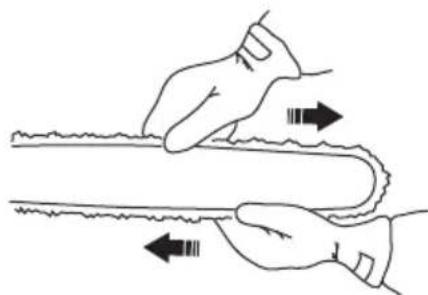
natural_image
Illustration of two hands performing a physical maneuver with directional arrows indicating motion (no text or symbols)- Zaklepni vijak obrnite v smeri vrtenja urinega kazalca in tako zaklenite nastavitveni vijak napenjalca verige.
Mazanje rezalne opreme

natural_image
Technical line drawing of a mechanical device with a lever and gear mechanism (no text or symbols)Dolivanje olja
natural_image
Simple line drawing of a mechanical component with a downward arrow and two circular features (no text or symbols)- Preverite, ali je kanal za olje v ohišju gonila čist. Po potrebi očistite.
- Preverite, ali se zobnik meča na vrhu meča prosto vrti. Če sistem za mazanje verige še vedno ne deluje pravilno, se obrnite na servisno delavnico.
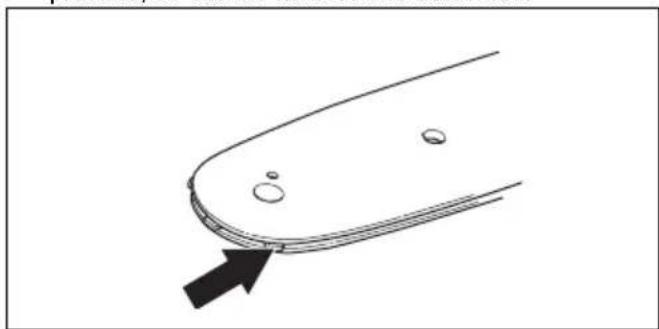
natural_image
Simple line drawing of a curved object with two small circles and an arrow pointing to it (no text or symbols)Preverjanje meča
- Prepričajte se, da oljni kanal ni zamašen. Po potrebi ga očistite.
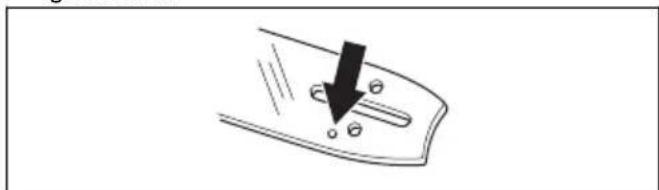
natural_image
Simple line drawing of a switch handle with a black arrow pointing downward (no text or symbols)- Preglejte, ali so na robovih meča grobi ostanki. S pilo odstranite grobe ostanke.

natural_image
Illustration of a pair of scissors cutting a flat blade, with a magnified inset showing the blade's tip (no text or symbols)- Očistite utor v meču.

natural_image
Line drawing of a hand holding a long-handled tool or tool (no text or symbols present)- Preverite, ali je utor v meču obrabljen. Po potrebi zamenjajte meč.

- Preverite, ali je konica meča groba ali zelo obrabljena.
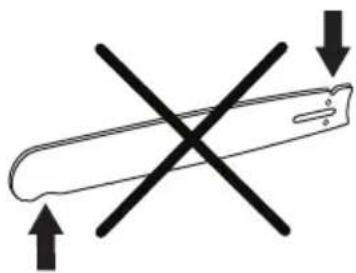
natural_image
Simple line drawing of a test tube with two crossed arrows indicating direction (no text or symbols)natural_image
Illustration of a hand holding a device with a circular arrow indicating rotation (no text or symbols)natural_image
Simple line drawing of a tool or plunger with an arrow indicating direction (no text or symbols)Tehnični podatki
Tehnični podatki
natural_image
Line drawing of a helmet with a visor and cap (no text or symbols)natural_image
Line drawing of a human pelvic bone (no text or labels)natural_image
Line drawings of glasses and footshoes (no text or symbols)natural_image
Line drawing of two gloves with bandages and shaded areas (no text or symbols)natural_image
Line drawing of a pair of boots with visible branding and sole features (no text or symbols)natural_image
Line drawing of a mechanical device with lever and grip (no text or symbols)natural_image
Technical line drawing of a mechanical device with no visible text or symbolsnatural_image
Technical line drawing of a mechanical device with directional arrows indicating movement or force (no text or symbols present)natural_image
Technical line drawing of a mechanical device with directional arrows indicating movement (no text or symbols)natural_image
Simple line drawing of a VR headset with a starburst effect (no text or symbols)natural_image
Technical line drawing of a mechanical component with a dimension arrow (no text or symbols)natural_image
Simple line drawing of a droplet falling into a container with a handle (no text or symbols)natural_image
Line drawing of a person in protective gear using a long-handled spray gun (no text or symbols)natural_image
Line drawing of a person in full protective gear using a long-handled tool (no text or symbols)Операция
natural_image
Line drawing of a handheld device with internal components and a black arrow pointing to a component (no text or symbols)natural_image
Simple line drawing of a human knee joint with a connecting rod and attached bone (no text or symbols)natural_image
Medical illustration showing a surgical instrument with a cross mark, no text or symbols presentnatural_image
Line drawing of a hand holding a chain-link tool with arrows indicating motion (no text or symbols)natural_image
Line drawing of a hand holding a chain-link device with an arrow indicating motion (no text or symbols)natural_image
Technical line drawing of a handheld device with directional arrows indicating movement or assembly (no text or symbols present)Поддръжка
Въведение

natural_image
Mechanical assembly diagram showing two stages of toolpathing (no text or labels)natural_image
Pure technical line drawing of a mechanical part with no text or symbolsnatural_image
Simple line drawing of a test tube with a downward arrow indicating force or movement (no text or symbols)natural_image
Simple line drawing of a mechanical chain with a central gear-like component (no text or symbols)natural_image
Diagram showing a vertical tube with directional arrows and a magnified view of a slide-like object (no text or symbols)natural_image
Pure diagram of a mechanical component with arrows indicating direction (no text or symbols)- Ширина на кулисна предавка mm/in.
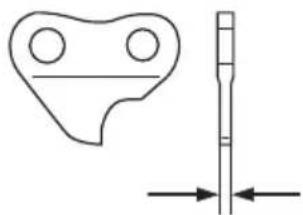
natural_image
Pure technical diagram showing a mechanical part and a vertical rod with directional arrows (no text or symbols)natural_image
Technical line drawing of a mechanical tool with two views: one showing a curved arrow indicating rotation, the other showing a straight handle (no text or symbols)• Ђгъл на рязане.

natural_image
Simple line drawing of a container with circular holes and curved arrows indicating motion (no text or symbols)natural_image
Line drawing of a pair of scissors with a handle and base, no text or symbols presentnatural_image
Simple line drawing of a dropper with a handle and a small symbol (no text or labels)natural_image
Three line drawings of mechanical components: a pipette, a plastic clamp, and a segmented component (no text or symbols)natural_image
Technical illustration of a mechanical clamp or bracket assembly (no text or symbols)natural_image
Line drawing of two tools: a pair of a tool and a mechanical device (no text or symbols)natural_image
Technical line drawing of a mechanical tool with a drill bit and threaded end (no text or symbols)natural_image
Three-panel line drawing showing a mechanical device with rotating components and directional arrows (no text or symbols)natural_image
Illustration of two hands performing a physical maneuver with directional arrows indicating motion (no text or symbols)natural_image
Technical line drawing of a mechanical device with a lever and gear (no text or symbols)Напълване на масло
natural_image
Simple line drawing of a mechanical component with a downward arrow and circular features (no text or symbols)natural_image
Simple line drawing of a curved object with two small circles and an arrow pointing to it (no text or symbols)natural_image
Illustration of a pair of sawes with a magnified inset showing a blade (no text or symbols)natural_image
Line drawing of hands holding a tool or tool, no text or symbols presentnatural_image
Simple line drawing of a tool with two crossed X marks and downward arrows indicating direction (no text or symbols)natural_image
Illustration of a hand holding a rectangular object with an arrow indicating rotation (no text or symbols)natural_image
Simple line drawing of a tool or plunger with an arrow indicating direction (no text or symbols)natural_image
Line drawing of a helmet and gear assembly (no text or symbols)natural_image
Line drawing of a mechanical component or device with no visible text or symbolsnatural_image
Line drawing of a vertebral implant (no text or labels)natural_image
Line drawing of a pair of human hands with bandages and shaded regions (no text or symbols)natural_image
Line drawing of a pair of boots with visible branding and sole details (no text or symbols)natural_image
Technical line drawing of a mechanical tool or device with no visible text or symbolsnatural_image
Technical line drawing of a mechanical device with no visible text or symbolsnatural_image
Technical line drawing of a firearm with directional arrows indicating movement (no text or symbols)natural_image
Technical line drawing of a mechanical tool or device with directional arrows indicating movement (no text or symbols present)natural_image
Simple line drawing of a VR headset with a starburst effect (no text or symbols)natural_image
Pure technical line drawing of a mechanical part with no text or symbolsnatural_image
Simple line drawing of a droplet falling into a container with circular ports (no text or symbols)natural_image
Line drawing of a person in protective gear holding a long-handled tool (no text or symbols)natural_image
Line drawing of a person in full protective suit and helmet using a long-handled tool (no text or symbols)Λειτουργία
natural_image
Line drawing of a handheld device with internal components and a connector (no text or symbols)natural_image
Diagram of a manual chain saw cutting a cylindrical part with a 90-degree angle indicator (no text or symbols present)natural_image
Simple line drawing of a human knee joint with a bone and a branch (no text or symbols)natural_image
Medical illustration showing a surgical instrument inserted into a hip joint (no text or labels)natural_image
Line drawing of a hand holding a chain-link device with a handle, showing motion direction (no text or symbols)natural_image
Line drawing of a hand holding a chain-link device with an arrow indicating motion (no text or symbols)natural_image
Technical line drawing of a mechanical device with directional arrows indicating movement or assembly (no text or symbols present)Συντήρηση
Εισαγωγή
natural_image
Mechanical assembly diagram showing two stages of toolpathing (no text or labels)natural_image
Pure technical line drawing of a mechanical part with no text or symbolsnatural_image
Simple line drawing of a cylindrical object with a downward arrow and internal oval feature (no text or symbols)natural_image
Simple line drawing of a chain with a starburst pattern inside, no text or symbols present.natural_image
Diagram showing a vertical pipe with directional arrows and a schematic of a mechanical component (no text or symbols)natural_image
Pure diagram of a mechanical component with arrows indicating direction (no text or symbols)natural_image
Pure technical diagram showing a mechanical part and a vertical rod with directional arrows (no text or symbols)natural_image
Technical line drawing of a mechanical tool with two views: one showing a curved arrow indicating rotation, the other showing a straight handle (no text or symbols)• Γωνία κοπής.

natural_image
Simple line drawing of a container with circular holes and curved arrows indicating motion (no text or symbols)• Θέση λίμας.
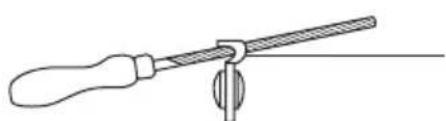
natural_image
Line drawing of a tool with a handle and lever, no text or symbols present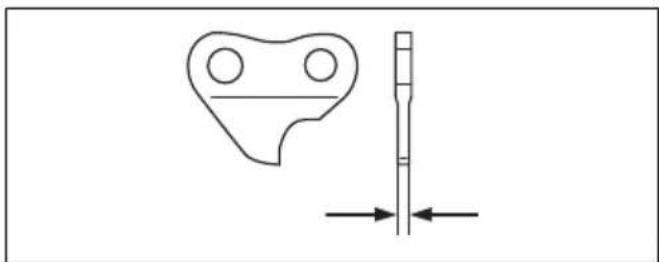
natural_image
Pure technical diagram showing a mechanical part and a vertical rod with directional arrows (no text or symbols)natural_image
Simple line drawing of a dropper with a handle and a small symbol (no text or labels)natural_image
Three line drawings of mechanical components: a pipette, a plastic clamp, and a segmented component (no text or symbols)natural_image
Technical illustration of a mechanical clamp or bracket assembly (no text or symbols)natural_image
Two types of hair tools: a flat tool and a textured tool (no text or symbols visible)natural_image
Technical line drawing of a mechanical tool or clamp device with no visible text or symbolsnatural_image
Three-step diagram showing mechanical components with arrows indicating motion, no text or symbols presentnatural_image
Illustration of two hands performing a rope manipulation or cutting operation (no text or symbols)natural_image
Technical line drawing of a mechanical tool or device with a curved handle and arrow indicator (no text or symbols)Πλήρωση λαδιού
natural_image
Diagram of a mechanical component with a downward arrow and circular features (no text or symbols)natural_image
Simple line drawing of a curved object with a black arrow pointing to its base (no text or symbols)natural_image
Simple line drawing of a switch mechanism with a black arrow indicating the direction (no text or symbols)natural_image
Illustration of a knife cutting a tool with a magnified inset showing the blade (no text or symbols)natural_image
Line drawing of a hand using a tool to cut a cylindrical object (no text or symbols)natural_image
Simple line drawing of a test tube with two crossed arrows indicating direction (no text or symbols)natural_image
Illustration of a hand holding a device with a circular arrow indicating rotation (no text or symbols)natural_image
Simple line drawing of a tool or plunger with an arrow indicating direction (no text or symbols)yyyyMMddxxxxxx
natural_image
Line drawing of a helmet with a visor and a flat hat (no text or symbols)natural_image
Line drawing of a mechanical component or device with no visible text or symbolsnatural_image
Line drawing of a mechanical component or device (no text or symbols)natural_image
Line drawing of two human gloves with bandages and palm, no text or symbols presentnatural_image
Line drawing of a pair of boots with visible tread pattern and buckles (no text or symbols)natural_image
Line drawing of a mechanical device with no visible text or symbolsnatural_image
Technical line drawing of a mechanical device with no visible text or symbolsnatural_image
Technical line drawing of a mechanical device with directional arrows indicating movement or force (no text or symbols present)natural_image
Technical line drawing of a mechanical device with directional arrows indicating movement or force (no text or symbols present)natural_image
Simple line drawing of a VR headset with a starburst effect (no text or symbols)natural_image
Technical line drawing of a mechanical component with a U-shaped groove and a horizontal shaft, no text or symbols present.natural_image
Simple line drawing of a droplet falling into a container with circular ports (no text or symbols)操作のための安全注意事項

natural_image
Line drawing of a person in full protective gear using a long-handled spray gun (no text or symbols)natural_image
Line drawing of a person in full protective gear using a long-handled tool (no text or symbols)Operation (動作)
製品使用前の機能チェック
natural_image
Line drawing of a handheld device with internal components and a black arrow pointing to a component (no text or symbols)natural_image
Simple line drawing of a human knee joint with a ligament attached to the femur (no text or labels)natural_image
Medical illustration showing a surgical instrument with a cross mark on the hip joint (no text or labels)natural_image
Diagram of a hairpin with a chain and lever mechanism, showing hands and motion arrows (no text or symbols)natural_image
Line drawing of a chain-linking tool with an arrow indicating motion (no text or symbols)natural_image
Technical line drawing of a mechanical device with directional arrows indicating movement or assembly (no text or symbols present)
natural_image
Line drawing of a chain-linking tool with an arrow indicating motion (no text or symbols)メンテナンス
はじめに

natural_image
Mechanical assembly diagram showing two stages of toolpathing (no text or labels)natural_image
Pure technical line drawing of a mechanical part with no text or symbolsガイドバーの交換方法
natural_image
Simple line drawing of a test tube with a downward arrow indicating compression or dislocation (no text or symbols)- ノーズスプロケットの歯の数(T)。

natural_image
Simple line drawing of a stylized letter 'C' with a starburst inside, no text or symbols present.natural_image
Diagram showing a mechanical component with a shaft and a handle, connected to a rectangular block (no text or symbols)natural_image
Simple line drawing of a mechanical component with two arrows indicating direction (no text or symbols)natural_image
Technical line drawing of a mechanical component with a vertical shaft and circular features, no text or symbols presentカッターの目立て方法に関する一般情報
natural_image
Technical line drawing of a mechanical tool with two views: one showing a curved arrow indicating rotation, the other showing a straight handle (no text or symbols)- 切削角度。
natural_image
Simple line drawing of a mechanical component with curved arrows indicating motion (no text or symbols)・ヤスリの位置。

natural_image
Line drawing of a screwdriver with a handle and lever (no text or symbols)- 丸ヤスリの直径。

natural_image
Simple line drawing of a dropper with a handle and a small symbol (no text or labels)natural_image
Three technical line drawings of mechanical components: a pipette, a plastic clamp, and a segmented component (no text or symbols)natural_image
Technical illustration of a mechanical clamp or bracket assembly (no text or symbols)natural_image
Two mechanical tools: a flat tool and a clamped tool (no text or symbols visible)natural_image
Technical line drawing of a mechanical tool or connector assembly (no text or symbols)ソーチェンの張りの調整方法

natural_image
Three-step diagram showing a mechanical device with rotating components and directional arrows, no text or symbols present.natural_image
Illustration of two hands holding a curved object with directional arrows indicating motion (no text or symbols)natural_image
Technical line drawing of a mechanical component with arrows indicating direction (no text or symbols)オイルの補充方法
natural_image
Simple line drawing of a mechanical component with a downward arrow and two circular features (no text or symbols)natural_image
Simple line drawing of a curved surface with two small circles and an arrow pointing to the edge (no text or symbols)ガイドバーを点検するには
natural_image
Illustration of a pair of sawes with different blade shapes, one shown in a circle (no text or symbols)- ガイドバーの溝を清掃します。

natural_image
Line drawing of a hand holding a tool, no text or symbols presentnatural_image
Simple line drawing of a test tube with two crossed arrows indicating direction (no text or symbols)natural_image
Illustration of a hand holding a pen with a circular arrow indicating rotation (no text or symbols)natural_image
Simple line drawing of a tool or plunger with an arrow indicating direction (no text or symbols)- 톱 헤드
2.체인 장력 조절 손잡이
3.체인 오일 탱크
natural_image
Line drawing of a helmet with visor and clasp (no text or symbols)natural_image
Line drawing of a mechanical component or device with no visible text or symbolsnatural_image
Line drawing of a mechanical component or device with no visible text or symbolsnatural_image
Line drawing of a pair of gloves with bandages and straps (no text or symbols)natural_image
Line drawing of a pair of boots with visible branding and sole details (no text or symbols)natural_image
Line drawing of a mechanical tool or device with no visible text or symbolsnatural_image
Technical line drawing of a mechanical device with no visible text or symbolsnatural_image
Technical line drawing of a mechanical device with directional arrows indicating movement or force (no text or symbols present)natural_image
Technical line drawing of a mechanical device with directional arrows indicating movement or force (no text or symbols present)natural_image
Simple line drawing of a VR headset with a starburst effect (no text or symbols)natural_image
Pure technical line drawing of a mechanical component with no text or symbolsnatural_image
Simple line drawing of a droplet falling from a container with two circular openings (no text or symbols)작동에 대한 안전 지침

natural_image
Line drawing of a person in protective gear using a long-handled spray gun (no text or symbols)natural_image
Line drawing of a person in full protective gear using a long-handled spray gun (no text or symbols)작동
제품 사용 전의 기능 점검 방법
natural_image
Line drawing of a handheld device with a labeled component (no text or symbols present)natural_image
Diagram of a chain-linking tool with 90-degree angle annotation (no text or symbols on the diagram itself)natural_image
Simple line drawing of a human knee joint with a branch and leafy tree (no text or symbols)natural_image
Medical illustration of a surgical instrument with a cross mark, showing no text or symbolsnatural_image
Line drawing of a hairdryer with a chain and lever mechanism (no text or symbols)natural_image
Diagram of a hand holding a chain-link device with an arrow pointing to the handle (no text or symbols present)natural_image
Diagram of a dual-chamber toilet or sink with warning symbols and an arrow indicating direction (no text or labels)natural_image
Technical line drawing of a mechanical device with directional arrows indicating assembly or movement (no text or symbols present)제품 정지 방법
1.파워 트리거를 놓으십시오.
유지 보수
서문

natural_image
Mechanical assembly diagram showing two stages of toolpathing (no text or labels)natural_image
Pure technical line drawing of a mechanical part with no text or symbols가이드 바를 교체하려면
natural_image
Simple line drawing of a cylindrical object with a downward arrow and two small circular features inside (no text or symbols)•바끝 스프로켓 부분의 이 수(T)
natural_image
Diagram showing a vertical tube with arrows pointing to it and a curved object with a labeled angle (no text or symbols present)natural_image
Simple line drawing of a tool or bracket with arrows indicating direction (no text or symbols)-구동 고리 폭, mm/인치.

natural_image
Technical line drawing of a mechanical part with a vertical dimension and directional arrows (no text or symbols)natural_image
Technical line drawing of a mechanical tool with two views: one showing a curved arrow indicating rotation, the other showing a diagonal grooved blade (no text or symbols)•절단각

natural_image
Pure mechanical diagram showing a gear or cam mechanism with no text, numbers, or symbols·평줄 위치

natural_image
Line drawing of a tool with a handle and lever, no text or symbols present·원형줄직경
natural_image
Simple line drawing of a dropper with a handle and a small symbol (no text or labels)natural_image
Three line drawings of different household appliances: a pipette, a plastic bag, and a textured device (no text or symbols)natural_image
Mechanical assembly diagram showing a linkage mechanism with no visible text or symbolsnatural_image
Two types of tools: a flat tool and a mechanical clamp (no text or symbols)natural_image
Technical line drawing of a mechanical tool or device with no visible text or symbols톱 체인 장력 조절 방법

natural_image
Three-step diagram showing a mechanical device with rotating components and directional arrows (no text or symbols)natural_image
Illustration of two hands holding a curved object with directional arrows indicating motion or force (no text or symbols)natural_image
Technical line drawing of a mechanical component with a lever and shaft, no text or symbols present오일 채우는 방법
natural_image
Diagram showing a mechanical component with a downward arrow and circular features (no text or symbols)natural_image
Simple line drawing of a curved object with two small circles and a black arrow pointing to its base (no text or symbols)가이드 바 점검 방법
natural_image
Simple line drawing of a switch mechanism with a black arrow indicating the direction (no text or symbols)natural_image
Diagram showing a tool and a crossbar with a magnified inset of a cylindrical object (no text or symbols)- 가이드 바의 품을 청소합니다.

natural_image
Line drawing of a hand holding a tool, no text or symbols presentnatural_image
Simple line drawing of a tool with two crossed lines and arrows indicating direction (no text or symbols)natural_image
Simple line drawing of a tool with an arrow indicating direction (no text or symbols)기술 정보
기술 정보
- Gergaji belah
- Tombol penegang rantai
- Tangki minyak rantai
- Bar panduan
- Aci
- Cangkuk sokongan abah-abah
- Pad kekunci
- Fungsi teleskopik
- Penyekat picu kuasa
-
Picu kuasa
-
Pemegang hadapan
- Pemegang belakang
- Pengecas bateri
- Kord
- Kuasa dihidupkan/LED Amaran
- Bateri
- Butang keluarkan bateri
- Butang penunjuk bateri
- LED amaran
-
LED penunjuk bateri
-
Butang Mula/Henti
- Butang SavE
- LED amaran
- Manual pengendali
- Abah-abah
- Pengadang pengangkutan
natural_image
Line drawing of a helmet with a visor and cap (no text or symbols)natural_image
Line drawing of a pair of binoculars (no text or symbols)natural_image
Line drawings of glasses and binoculars (no text or symbols)- Gunakan sarung tangan apabila perlu, contohnya apabila anda memasang, memeriksa atau membersihkan peralatan memotong.
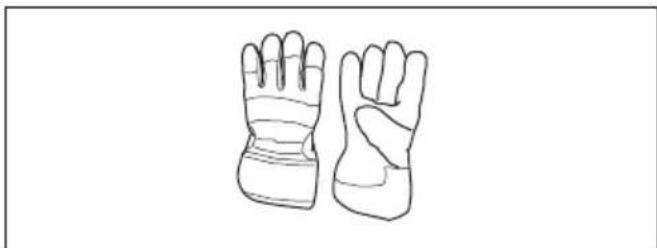
natural_image
Line drawing of a pair of gloves with bandages and straps (no text or symbols)natural_image
Line drawing of a pair of boots with visible tread pattern and sole patches (no text or symbols)natural_image
Line drawing of a mechanical device with lever and grip (no text or symbols)natural_image
Technical line drawing of a mechanical device with no visible text or symbolsnatural_image
Technical line drawing of a firearm with directional arrows indicating movement (no text or symbols)natural_image
Technical line drawing of a mechanical device with directional arrows indicating movement or force (no text or symbols)natural_image
Simple line drawing of a 3D object with circular holes and a starburst effect (no text or symbols)natural_image
Pure technical line drawing of a mechanical part with no text or symbolsnatural_image
Simple line drawing of a droplet falling from above a U-shaped container (no text or symbols)natural_image
Line drawing of a person in protective gear using a long-handled spray gun (no text or symbols)natural_image
Line drawing of a person in full protective gear using a long-handled tool (no text or symbols)Pengendalian
natural_image
Line drawing of a handheld device with internal components and a connector (no text or symbols)natural_image
Simple line drawing of a knee joint with a connecting rod and a separate branch (no text or symbols)natural_image
Medical illustration showing a surgical instrument inserted into a hip joint (no text or labels)natural_image
Line drawing of a hairpin with a chain and lever mechanism (no text or symbols)natural_image
Line drawing of a hand holding a mechanical device with an arrow indicating motion (no text or symbols)natural_image
Pure diagram of a door handle with two circular buttons and a black arrow pointing to one (no text or symbols)natural_image
Technical line drawing of a mechanical component with directional arrows indicating assembly or movement (no text or symbols present)Penyelenggaraan
Pengenalan

natural_image
Mechanical assembly diagram showing two views of a chain with arrows indicating motion (no text or symbols)natural_image
Pure geometric diagram showing a rectangle and a curved shape with a dashed line indicating a dimension (no text or symbols)- Tanggalkan bar panduan dengan rantai gergaji dipasangkan.
- Tanggalkan rantai gergaji daripada bar panduan.
- Letakkan rantai gergaji baru dalam alur bar panduan.
- Pasang bar panduan dan gear (B) pada pin bar panduan (E).
- Pasang rantai gergaji di sekeliling gegancu pemacu. Pastikan titik gigi pemotong berada di arah yang menjauhi gegancu pemacu (C).
- Pasang penutup pelindung (A) dan pusingkan tombol pengunci mengikut arah jam.
- Ketatkan rantai gergaji. Rujuk Untuk melaraskan ketegangan rantai gergaji pada halaman 658 untuk arahan.
natural_image
Simple line drawing of a test tube with a downward arrow indicating compression or dislocation (no text or symbols)- Bilangan gigi pada gegancu hujung bar (T).
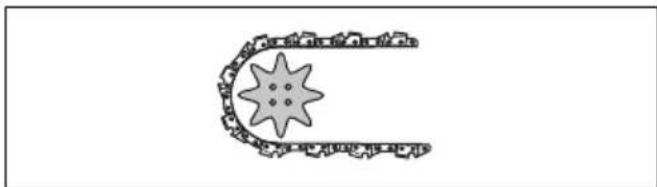
natural_image
Simple line drawing of a chain with a starburst pattern inside, no text or symbols present.natural_image
Diagram showing a mechanical component with arrows indicating direction, alongside a separate view of a folded or folded part (no text or symbols present)natural_image
Simple line drawing of a mechanical component with two arrows indicating direction (no text or symbols)• Lebar rantai pacuan, mm/in.

natural_image
Pure technical diagram showing a mechanical part and a vertical rod with directional arrows (no text or symbols)natural_image
Technical line drawing of a tool with two views: one showing a curved arrow indicating rotation, the other showing a straight handle (no text or symbols)- Sudut pemotongan.

natural_image
Pure mechanical diagram showing a piston-cylinder mechanism with curved arrows indicating motion (no text or symbols)• Kedudukan kikir.

natural_image
Line drawing of a pair of scissors with a handle and base, no text or symbols present• Diameter kikir bulat.
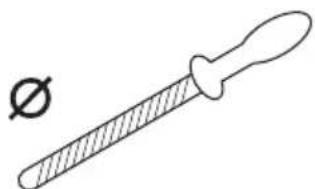
natural_image
Simple line drawing of a dropper with a handle and a small symbol (no text or labels)natural_image
Three line drawings of mechanical parts: a pipette, a plastic bag, and a textured device (no text or symbols)natural_image
Mechanical assembly diagram showing a tool interacting with a bracket and shaft (no text or symbols)natural_image
Two types of tools: a flat tool and a mechanical device (no text or symbols visible)natural_image
Technical line drawing of a mechanical tool or connector with an arrow indicating direction (no text or symbols present)Untuk melaraskan ketegangan rantai gergaji
natural_image
Three-step diagram showing a mechanical device with rotating components and directional arrows, no text or symbols present.natural_image
Illustration of two hands performing a rope manipulation technique (no text or symbols)natural_image
Technical line drawing of a mechanical device with a lever and shaft, no text or symbols presentnatural_image
Simple line drawing of a mechanical component with a downward arrow and circular features (no text or symbols)natural_image
Simple line drawing of a curved object with two small circular features and an arrow pointing to it (no text or symbols)natural_image
Simple line drawing of a switch or lever mechanism with a black arrow pointing downward (no text or symbols)natural_image
Illustration of a knife cutting a cylindrical object with a magnified inset showing the blade (no text or symbols)natural_image
Line drawing of a hand holding a tool, no text or symbols presentnatural_image
Simple line drawing of a test tube with two crossed arrows indicating direction (no text or symbols)natural_image
Illustration of a hand holding a pen with a curved arrow indicating rotation (no text or symbols)natural_image
Simple line drawing of a tool or plunger with an arrow indicating direction (no text or symbols)Data teknikal
Data teknikal
| 120iTK4-P | |
| Motor | |
| Jenis PMDC 36V | |
| Kelajuan rantai, m/saat 10 | |
| Ciri-ciri | |
| Mod tenaga yang rendah savE | |
| Tangki minyak | |
| Kapasiti, l/cm ^3 | 0.07/70 |
| Berat | |
| Tanpa bateri, kg/lb 4.1/9.1 | |
| Pengeluaran hingar ^76 | |
| Paras kuasa bunyi, ukuran dB(A) 93.79 | |
| Tahap kuasa bunyi, dijamin LWA dB(A) 97 | |
| Tahap bunyi ^77 | |
| Aras tekanan bunyi setara di telinga pengendali, dB(A) 80.6 | |
| Tahap getaran 78 | |
| Tahap getaran pada pemegang, diukur mengikut ISO 22867, m/s ^2 | |
| Diruntuhkan, pemegang hadapan/pemegang belakang 0.793/0.676 | |
| Dilanjutkan, pemegang hadapan/pemegang belakang 1.475/0.773 | |

Постоянный ток.

Точка смазки цепи.
natural_image
Line drawing of a helmet and safety goggles (no text or symbols)natural_image
Line drawing of a mechanical device with no visible text or symbolsnatural_image
Line drawing of a mechanical component or device with no visible text or symbolsnatural_image
Line drawing of a pair of gloves with bandages and fingers (no text or symbols)natural_image
Line drawing of a boots with visible tread pattern and buckles (no text or symbols)natural_image
Line drawing of a mechanical device with lever and grip (no text or symbols)natural_image
Technical line drawing of a mechanical device with no visible text or symbolsnatural_image
Technical line drawing of a mechanical device with directional arrows indicating movement or force (no text or symbols present)natural_image
Technical line drawing of a mechanical device with directional arrows indicating movement or force (no text or symbols present)natural_image
Simple line drawing of a mechanical component with a starburst effect (no text or symbols)natural_image
Pure technical line drawing of a mechanical part with no text or symbolsnatural_image
Simple line drawing of a droplet falling into a U-shaped container (no text or symbols)natural_image
Line drawing of a person in protective gear using a long-handled spray gun (no text or symbols)natural_image
Line drawing of a person in full protective gear using a long-handled tool (no text or symbols)Эксплуатация
natural_image
Line drawing of a handheld device with a label 'SHINCHO' and an arrow pointing to its side panel (no other text or symbols)natural_image
Simple line drawing of a knee joint with a connecting rod and force arrows (no text or symbols)natural_image
Medical illustration showing a surgical instrument inserted into a hip joint (no text or labels)natural_image
Line drawing of a hairdryer with a chain handle and lever mechanism (no text or symbols)natural_image
Line drawing of a hand holding a chain-link device with an arrow pointing to the cable (no text or symbols present)natural_image
Technical line drawing of a handheld device with internal components and directional arrows (no text or symbols)natural_image
Mechanical assembly diagram showing two views of a chain with arrows indicating motion (no text or symbols)natural_image
Pure geometric diagram showing a rectangle and a curved shape with a dashed line indicating a dimension (no text or symbols)natural_image
Simple diagram of a cylindrical object with a downward arrow and two small circles inside, no text or symbols present.natural_image
Simple line drawing of a chain with a star-like shape inside, no text or symbols present.natural_image
Diagram showing a mechanical component with a shaft and a clamped part, no text or symbols presentnatural_image
Simple line drawing of a mechanical component with two arrows indicating direction (no text or symbols)natural_image
Technical line drawing of a mechanical part with a vertical shaft and arrow indicating direction (no text or symbols)natural_image
Technical line drawing of a mechanical tool with two views: one showing a curved arrow indicating rotation, the other showing a textured handle (no text or symbols)- Угол резания.

natural_image
Pure mechanical diagram showing a gear or cam mechanism with no text, numbers, or symbolsnatural_image
Line drawing of a tool with a handle and central knob (no text or symbols)natural_image
Simple line drawing of a dropper with a handle and a small symbol (no text or labels)natural_image
Three line drawings of mechanical components: a dropper, a plastic component, and a connector (no text or symbols)natural_image
Mechanical assembly diagram showing a clamp or bracket with diagonal hatching and mounting holes (no text or symbols)natural_image
Two mechanical tools: a flat tool and a clamped tool (no text or symbols visible)natural_image
Technical line drawing of a mechanical tool or connector with a threaded shaft and threaded base (no text or symbols)natural_image
Three-step diagram showing mechanical components with arrows indicating motion, no text or symbols presentnatural_image
Line drawing of two hands holding a curved object with directional arrows indicating motion (no text or symbols)natural_image
Technical line drawing of a mechanical device with a lever and adjustment knob (no text or symbols)Заправка маслом
natural_image
Simple line drawing of a mechanical component with a downward arrow and two circular features (no text or symbols)natural_image
Simple line drawing of a curved object with two small circular features and an arrow pointing to it (no text or symbols)natural_image
Diagram showing a tool interacting with a pair of pins, one pin highlighted and the other with a handle (no text or symbols present)natural_image
Line drawing of a hand holding a tool, no text or symbols presentnatural_image
Simple line drawing of a test tube with two crossed arrows indicating direction (no text or symbols)natural_image
Illustration of a hand holding a pen with a curved arrow indicating rotation (no text or symbols)natural_image
Simple line drawing of a tool handle with an arrow indicating direction (no text or symbols)natural_image
Line drawing of a helmet and seat (no text or symbols)natural_image
Line drawing of a mechanical component or bracket (no text or symbols)natural_image
Line drawing of a mechanical component or bracket (no text or symbols)natural_image
Line drawing of a pair of human hands with bandages and shaded areas (no text or symbols)natural_image
Line drawing of a pair of boots with visible branding and sole details (no text or symbols)natural_image
Line drawing of a mechanical device with lever and grip (no text or symbols)natural_image
Technical line drawing of a mechanical device with no visible text or symbolsnatural_image
Technical line drawing of a mechanical device with directional arrows indicating movement or force (no text or symbols present)natural_image
Technical line drawing of a mechanical device with directional arrows indicating movement or force (no text or symbols)natural_image
Simple line drawing of a VR headset with a starburst effect (no text or symbols)natural_image
Technical line drawing of a mechanical component with a dimension arrow (no text or symbols)natural_image
Simple line drawing of a droplet above a U-shaped object (no text or symbols)natural_image
Line drawing of a person in protective gear using a long-handled spray gun (no text or symbols)natural_image
Line drawing of a person in full protective gear using a long-handled spray gun (no text or symbols)Çalışma
natural_image
Line drawing of a handheld device with a label and arrow pointing to the internal component (no readable text or symbols)natural_image
Simple line drawing of a knee joint with a connecting rod and attached bone (no text or symbols)natural_image
Medical illustration showing a surgical instrument inserted into a hip joint (no text or labels)natural_image
Line drawing of a hairpin with chains attached to a branch (no text or symbols)natural_image
Line drawing of a handheld device with a chain strap and arrow indicator (no text or symbols)natural_image
Technical line drawing of a hairdryer tool with directional arrows indicating component placement (no text or symbols)Ürünü durdurma
natural_image
Mechanical assembly diagram showing two stages of tooling or machining process (no text or symbols)natural_image
Pure geometric diagram showing a rectangular shape with a curved cutout and a dashed line indicating a dimension (no text or symbols)Kılavuzu değiştirme
natural_image
Simple line drawing of a cylindrical object with a downward arrow and two small circular holes, no text or symbols present.natural_image
Simple line drawing of a chain with a star-like pattern inside, no text or symbols present.natural_image
Diagram showing a mechanical component with arrows indicating direction, alongside a separate view of a curved object (no text or symbols)natural_image
Pure diagram of a mechanical or electrical component with two arrows indicating direction (no text or symbols)natural_image
Technical drawing of a mechanical part with a side view showing a cylindrical feature and dimension arrows (no text or symbols)natural_image
Technical line drawing of a mechanical tool with two views: one showing a curved component and the other showing a straight handle (no text or symbols)- Kesme açısı.

natural_image
Pure mechanical diagram showing a gear or cam mechanism with no text, numbers, or symbols- Eğe konumu.

natural_image
Line drawing of a hand tool with a handle and lever mechanism (no text or symbols)natural_image
Simple line drawing of a dropper with a handle and a small symbol (no text or labels)natural_image
Three technical line drawings of mechanical components: a pipette, a plastic clamp, and a segmented component (no text or symbols)natural_image
Technical illustration of a mechanical clamp or bracket assembly (no text or symbols)natural_image
Two technical illustrations of tools: a radial tool and a mechanical clamp (no text or symbols)natural_image
Technical line drawing of a mechanical tool or device with no visible text or symbolsnatural_image
Three-step diagram showing a mechanical device with rotating components and directional arrows (no text or symbols)natural_image
Line drawing of two hands holding a curved object with directional arrows indicating motion or force (no text or symbols)natural_image
Technical line drawing of a mechanical device with a lever and adjustment knob (no text or symbols)Yağ doldurma
natural_image
Simple line drawing of a mechanical component with a downward arrow and circular features (no text or symbols)natural_image
Simple line drawing of a curved object with a black arrow pointing to its base (no text or symbols)natural_image
Simple line drawing of a switch mechanism with a black arrow pointing to the button (no text or symbols)natural_image
Diagram showing a tool interacting with a vertical bar, with an inset magnified view of the bar (no text or symbols)natural_image
Line drawing of hands using a tool to cut or spread a rectangular object (no text or symbols)natural_image
Simple line drawing of a tool with two crossed X marks and downward arrows indicating direction (no text or symbols)natural_image
Illustration of a hand holding a small object with an arrow indicating rotation (no text or symbols)natural_image
Simple line drawing of a tool or plunger with an arrow indicating direction (no text or symbols) | [2D3T] |  | 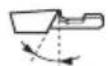 |  |  |  |  |
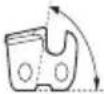 |  |  | |||||
 | |||||||
| mm/inç mm/i, 5/10 | |||||||
| 00 4,0 / | 5/32 85° 30° 0° | 0,65/0,025 50 | 56981-03 5796 | 536-01 | |||
natural_image
Line drawing of a helmet and binoculars (no text or symbols)natural_image
Line drawing of a mechanical component or device (no text or symbols)natural_image
Line drawing of a mechanical component or bracket (no text or symbols)natural_image
Line drawing of two human gloves with bandages and shaded areas (no text or symbols)natural_image
Line drawing of a pair of boots with textured soles (no text or symbols)natural_image
Line drawing of a mechanical device with lever and grip (no text or symbols)natural_image
Technical line drawing of a mechanical tool or device with no visible text or symbolsnatural_image
Technical line drawing of a mechanical device with directional arrows indicating movement or force (no text or symbols present)natural_image
Technical line drawing of a mechanical device with directional arrows indicating movement or force (no text or symbols present)natural_image
Line drawing of a VR headset with a starburst effect (no text or symbols)natural_image
Technical line drawing of a mechanical component with a dimension arrow (no text or symbols)natural_image
Simple line drawing of a mechanical component with a droplet above it (no text or symbols)natural_image
Line drawing of a person in full protective gear using a long-handled spray gun (no text or symbols)natural_image
Line drawing of a person in full protective gear using a long-handled tool (no text or symbols)Експлуатація
natural_image
Line drawing of a mechanical device with a handle and internal components (no text or symbols)natural_image
Diagram of a dual-chamber toilet fan with labeled buttons (I and e) and warning symbols, no readable text or labels present.natural_image
Simple line drawing of a plant stem with leaves, showing root and stem details (no text or symbols)natural_image
Medical illustration showing a surgical tool interacting with a patient's hip joint (no text or labels)natural_image
Diagram of a hairpin with a chain and lever mechanism, showing no text or symbolsnatural_image
Diagram of a chain-linking tool with an arrow indicating direction (no text or symbols present)natural_image
Technical line drawing of a mechanical device with directional arrows indicating movement or assembly (no text or symbols present)natural_image
Mechanical assembly diagram showing two stages of toolpathing (no text or labels)natural_image
Pure technical line drawing of a mechanical part with no text, numbers, or symbolsЗаміна шини пилки
natural_image
Simple line drawing of a test tube with a downward arrow pointing to its end (no text or symbols)natural_image
Simple line drawing of a chain with a star-like shape inside, no text or symbols present.natural_image
Diagram showing a mechanical component with directional arrows and a separate schematic view (no text or symbols)natural_image
Simple line drawing of a mechanical component with two arrows indicating direction (no text or symbols)natural_image
Pure technical diagram showing a mechanical part and a vertical rod with directional arrows (no text or symbols)natural_image
Technical line drawing of a mechanical tool with two views: one showing a curved component and the other showing a straight handle (no text or symbols)• Кут різання.

natural_image
Simple line drawing of a mechanical component with curved arrows indicating motion or force (no text or symbols)natural_image
Line drawing of a screwdriver holding a lever and pin (no text or symbols)natural_image
Simple line drawing of a dropper with a small symbol (no text or labels)natural_image
Three technical illustrations of mechanical components: a dropper, a gear-like component, and a connector (no text or symbols)natural_image
Technical illustration of a mechanical clamp or bracket assembly (no text or symbols visible)natural_image
Two mechanical tools: a radial tool and a clamped tool (no text or symbols visible)natural_image
Pure mechanical diagram showing a tool interacting with a gear (no text or symbols)natural_image
Three-step diagram showing a mechanical device with rotating components and directional arrows, no text or symbols present.natural_image
Illustration of two hands performing a physical maneuver with directional arrows indicating movement (no text or symbols)natural_image
Technical line drawing of a mechanical tool or device with a directional arrow indicating movement (no text or symbols present)Заливання мастила
natural_image
Simple line drawing of a mechanical component with a downward arrow and circular features (no text or symbols)natural_image
Simple line drawing of a curved object with a black arrow pointing to its base (no text or symbols)Перевірка шини
natural_image
Simple line drawing of a switch or lever mechanism with a black arrow pointing downward (no text or symbols)natural_image
Diagram showing a tool interacting with a mechanical component, with an inset magnified view of a cylindrical object (no text or symbols)natural_image
Line drawing of a hand using a tool to cut a cylindrical object (no text or symbols)natural_image
Simple line drawing of a test tube with two crossed arrows indicating direction (no text or symbols)natural_image
Simple line drawing of a tool or blade with an arrow indicating direction (no text or symbols)natural_image
Line drawing of a helmet with a visor and a flat blade (no text or symbols)natural_image
Line drawing of a mechanical component or device with no visible text or symbolsnatural_image
Line drawing of a mechanical component or device with no visible text or symbolsnatural_image
Line drawing of two different gloves with bandages and straps (no text or symbols)natural_image
Line drawing of a pair of boots with visible branding and sole details (no text or symbols)natural_image
Line drawing of a mechanical device with lever and grip (no text or symbols)natural_image
Technical line drawing of a mechanical device with no visible text or symbolsnatural_image
Technical line drawing of a mechanical device with directional arrows indicating movement or force (no text or symbols present)natural_image
Technical line drawing of a mechanical device with directional arrows indicating movement or force (no text or symbols present)natural_image
Simple line drawing of a VR headset with a starburst effect (no text or symbols)natural_image
Technical line drawing of a mechanical component with a dimension arrow (no text or symbols)natural_image
Simple line drawing of a droplet above a U-shaped object (no text or symbols)natural_image
Line drawing of a person in protective gear using a long-handled spray gun (no text or symbols)natural_image
Line drawing of a person in protective gear using a long-handled tool (no text or symbols)Vận hành
natural_image
Line drawing of a mechanical device with labeled ports and an arrow pointing to a component (no text or symbols present)natural_image
Diagram of a chain-linking tool with a 90-degree angle indicator (no text or symbols present)natural_image
Simple line drawing of a human knee joint with a branch and leafy branches (no text or symbols)natural_image
Medical illustration showing a surgical instrument with a cross mark on the hip joint (no text or labels)natural_image
Illustration of a hairdryer with a chain handle and lever mechanism (no text or symbols)natural_image
Line drawing of a hand holding a chain-link device with an arrow pointing to the cable (no text or symbols present)natural_image
Technical line drawing of a mechanical device with labeled ports and arrows indicating assembly or movement (no readable text or symbols)Bảo trì
Giới thiệu

natural_image
Mechanical assembly diagram showing two stages of tooling or machining process (no text or symbols)natural_image
Pure geometric diagram showing a 3D shape with a curved cutout and a rectangular base, no text or symbols present.natural_image
Simple line drawing of a test tube with a downward arrow pointing to a small internal component (no text or symbols)natural_image
Simple line drawing of a chain with a star-like symbol inside, no text or labels present.natural_image
Diagram showing a mechanical component with a vertical rod and a triangular base, connected by an arrow indicating direction (no text or symbols present)natural_image
Simple line drawing of a mechanical component with two arrows indicating direction (no text or symbols)natural_image
Technical line drawing of a mechanical part with a cylindrical shaft and circular features, no text or symbols presentnatural_image
Technical line drawing of a mechanical tool with two views: one showing a curved arrow indicating rotation, the other showing a diagonal bar with handle (no text or symbols)• Góc cắt.

natural_image
Simple line drawing of a mechanical component with curved arrows indicating motion or force (no text or symbols)- Vị trí giữa.
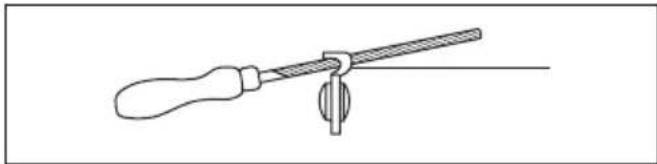
natural_image
Line drawing of a screwdriver holding a tool, no text or symbols presentnatural_image
Simple line drawing of a dropper with a small symbol (no text or labels)natural_image
Three technical illustrations of mechanical components: a dropper, a gear-like component, and a tool holder (no text or symbols)natural_image
Technical illustration of a mechanical clamp or bracket assembly (no text or symbols)natural_image
Line drawing of two tools: a radial tool and a mechanical device (no text or symbols)natural_image
Mechanical assembly diagram showing a tool interacting with a component (no text or symbols visible)natural_image
Three-step diagram showing mechanical components with arrows indicating motion, no text or symbols presentnatural_image
Illustration of two hands performing a physical maneuver with directional arrows indicating motion (no text or symbols)natural_image
Technical line drawing of a mechanical device with a lever and gear assembly (no text or symbols)Cách đồ đầy dầu
natural_image
Simple line drawing of a mechanical component with a downward arrow and circular features (no text or symbols)natural_image
Simple line drawing of a curved object with a black arrow pointing to its base (no text or symbols)natural_image
Simple line drawing of a switch mechanism with a black arrow indicating downward motion (no text or symbols)natural_image
Illustration of a pair of scissors cutting a piece, with a magnified inset showing the blade (no text or symbols)natural_image
Line drawing of a hand holding a long tool or ruler, no text or symbols presentnatural_image
Illustration of a hand holding a pen with a curved arrow indicating rotation (no text or symbols)natural_image
Simple line drawing of a tool or plunger with an arrow indicating direction (no text or symbols)-
锯切头
-
链条张紧旋钮
-
链油箱
4.导板
yyyyMMddxxxxx
natural_image
Line drawing of a helmet with a visor and a pointed cap (no text or symbols)- 请使用获得批准的听觉保护设备。
natural_image
Line drawing of a mechanical component or device with no visible text or symbolsnatural_image
Line drawing of a mechanical component or device (no text or symbols)natural_image
Line drawing of a pair of gloves with bandages and straps (no text or symbols)- 穿上带有防滑鞋底的防护靴或安全鞋。

natural_image
Line drawing of a pair of boots with visible tread pattern and side clasp (no text or symbols)natural_image
Line drawing of a firearm with attached grip and barrel (no text or symbols)natural_image
Technical line drawing of a mechanical device with no visible text or symbolsnatural_image
Technical line drawing of a mechanical tool or device with directional arrows indicating movement (no text or symbols present)natural_image
Technical line drawing of a mechanical device with directional arrows indicating movement or force (no text or symbols)natural_image
Simple line drawing of a VR headset with a starburst effect (no text or symbols)natural_image
Pure technical line drawing of a mechanical part with no text or symbols
natural_image
Simple line drawing of a droplet falling into a container with a handle (no text or symbols)操作安全须知
natural_image
Line drawing of a person in full protective gear using a long-handled tool (no text or symbols)natural_image
Line drawing of a person in full protective gear using a long-handled tool (no text or symbols)操作
在使用产品前进行功能检查
natural_image
Line drawing of a handheld device with a labeled grip and cable (no text or symbols)- 向后拉动开关扳机锁并按住开关扳机。
切割树枝

natural_image
Simple line drawing of a plant stem with leaves, no text or symbols presentnatural_image
Anatomical line drawing of a hip joint with a surgical instrument inserted (no text or labels)natural_image
Diagram of a hairpin with a chain and lever mechanism, showing no text or symbolsnatural_image
Line drawing of a hand holding a chain-link device with an arrow pointing to the cable (no text or symbols present)natural_image
Technical line drawing of a handheld device with internal components and directional arrows indicating movement (no text or symbols)维护
引言

natural_image
Mechanical assembly diagram showing two stages of toolpathing (no text or labels)natural_image
Pure technical line drawing of a mechanical part with no text or symbols更换导板
natural_image
Simple line drawing of a cylindrical object with a downward arrow and internal features (no text or symbols)- 导板顶端链轮上的齿数 (T)。

natural_image
Simple line drawing of a chain with a star-shaped internal element (no text or symbols)natural_image
Diagram showing a mechanical component with arrows indicating direction, alongside a separate view of a folded or folded part (no text or symbols present)natural_image
Simple line drawing of a mechanical component with two arrows indicating direction (no text or symbols)- 驱动链节宽度 (mm/in)

natural_image
Pure technical diagram showing a mechanical part and a vertical rod with directional arrows (no text or symbols)有关如何磨利切割齿的一般信息
natural_image
Technical line drawing of a mechanical tool with two views: one showing a curved arrow indicating rotation, the other showing a straight handle (no text or symbols)- 切割角。

natural_image
Pure mechanical diagram showing a gear or cam mechanism with rotational arrows (no text or symbols)- 锉刀位置。
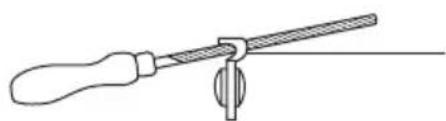
natural_image
Line drawing of a tool with a handle and lever, no text or symbols present- 圆锉直径。

natural_image
Simple line drawing of a dropper with a handle and a small symbol (no text or labels)natural_image
Three line drawings of mechanical components: a dropper, a plastic component, and a textured device (no text or symbols)natural_image
Mechanical assembly diagram showing a clamp or bracket with diagonal bracing and mounting brackets (no text or symbols)natural_image
Two types of tools: a flat tool and a mechanical clamp (no text or symbols)natural_image
Pure mechanical diagram showing a tool and gear assembly without any text, numbers, or symbols调整锯链的张紧度

natural_image
Three-step diagram showing a device with rotating buttons and connecting rods, no text or symbols present.natural_image
Illustration of two hands holding a curved object with directional arrows indicating motion or force (no text or symbols)natural_image
Technical line drawing of a mechanical component with a directional arrow indicating motion (no text or symbols)加油
natural_image
Simple line drawing of a mechanical component with a downward arrow and two circular features (no text or symbols)natural_image
Simple line drawing of a curved object with two small circular holes and an arrow pointing to it (no text or symbols)检查导板
- 确保油道未堵塞。必要时进行清洁。

natural_image
Diagram of a knife and blade assembly with a magnified inset showing a cylindrical component (no text or symbols)- 清洁导板中的沟槽。
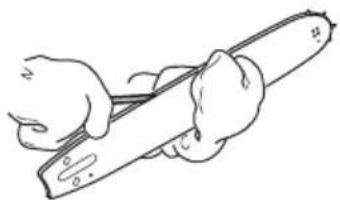
natural_image
Line drawing of a hand holding a tool, no text or symbols present- 检查导板槽是否磨损。必要时请更换导板。

- 检查导板顶端是否粗糙或磨损严重。

natural_image
Simple line drawing of a test tube with two crossed arrows indicating direction (no text or symbols)natural_image
Illustration of a hand holding a pen with an arrow indicating rotation (no text or symbols)- 每日转动导板,以延长其使用寿命。
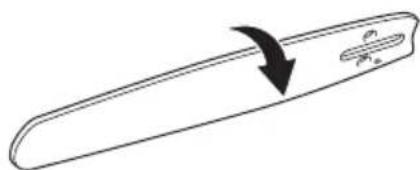
natural_image
Simple line drawing of a tool or plunger with an arrow indicating direction (no text or symbols)清洁产品、电池和电池充电器
注意:产品或产品的包装上显示此符号。
技术参数
技术参数
