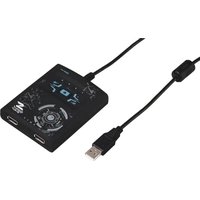
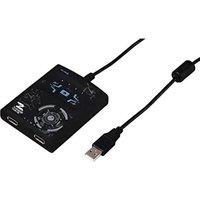
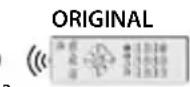
6in1 00040074 - Controller HAMA - Free user manual and instructions
Find the device manual for free 6in1 00040074 HAMA in PDF.
| Product type | Universal remote control |
| Brand | Hama |
| Model | 6in1 00040074 |
| Number of controllable devices | Up to 6 devices (TV, DVD, STB, Sound, AUX, DVBT) |
| Power supply | 2 AAA batteries (LR03/Micro) 1.5 V |
| Dimensions (approx.) | 20 x 5 x 2.5 cm |
| Weight (with batteries) | Approximately 100 g |
| Infrared range | Up to 10 m |
| Code memory | Up to 350 codes per device type |
| Special functions | Learning, Macro Power, Channel and Volume Punch-Through, Code Recognition |
| Programming modes | Direct entry, manual search, automatic search, recognition |
| Max learning keys | 125 keys |
| LED indicator | Status LED for confirmation |
| Cleaning | Soft dry cloth, avoid abrasive products |
| Operating temperature | Moderate climatic conditions, dry indoor |
| Battery safety | Observe polarity, do not recharge, remove if unused for long time |
| Warranty | Warranty exclusion in case of misuse (see manual) |
| Recycling | Compliant with European directives (WEEE and batteries) |
| Package contents | Remote control, code list, instruction manual |
Frequently Asked Questions - 6in1 00040074 HAMA
User questions about 6in1 00040074 HAMA
0 question about this device. Answer the ones you know or ask your own.
Ask a new question about this device
Download the instructions for your Controller in PDF format for free! Find your manual 6in1 00040074 - HAMA and take your electronic device back in hand. On this page are published all the documents necessary for the use of your device. 6in1 00040074 by HAMA.
USER MANUAL 6in1 00040074 HAMA
Operating Instructions
Bedienungsanleitung
Moded'emploi
Instruccionesdeuso
Gebruiksaanwijzing
Istruzioniperl'uso
Instrukcjaobslugi
Hasznalatiutmutató
Manualdeutilizare
Návodk pouziti
Navodnapouztie
Manualdeinstruções
Bruksanvisning
PykoBoIDCTBON03KcIpyaTauu
Pa6oTHaHnHcTpyKlun
O8nyiecxprnnc
Kullanmakilavuzu
Kayttoohje
GB
D
F
E
NL
1
PL
H
RO
CZ
SK
P
S
RUS
BG
GR
TR
FIN
Thankyouforchoosinga H amaproduct.
Takeourtimeandreadthefollowinginstructionsandinformationinfull.Please keeptheseinstructionsinasafeplaceforlaterreference.
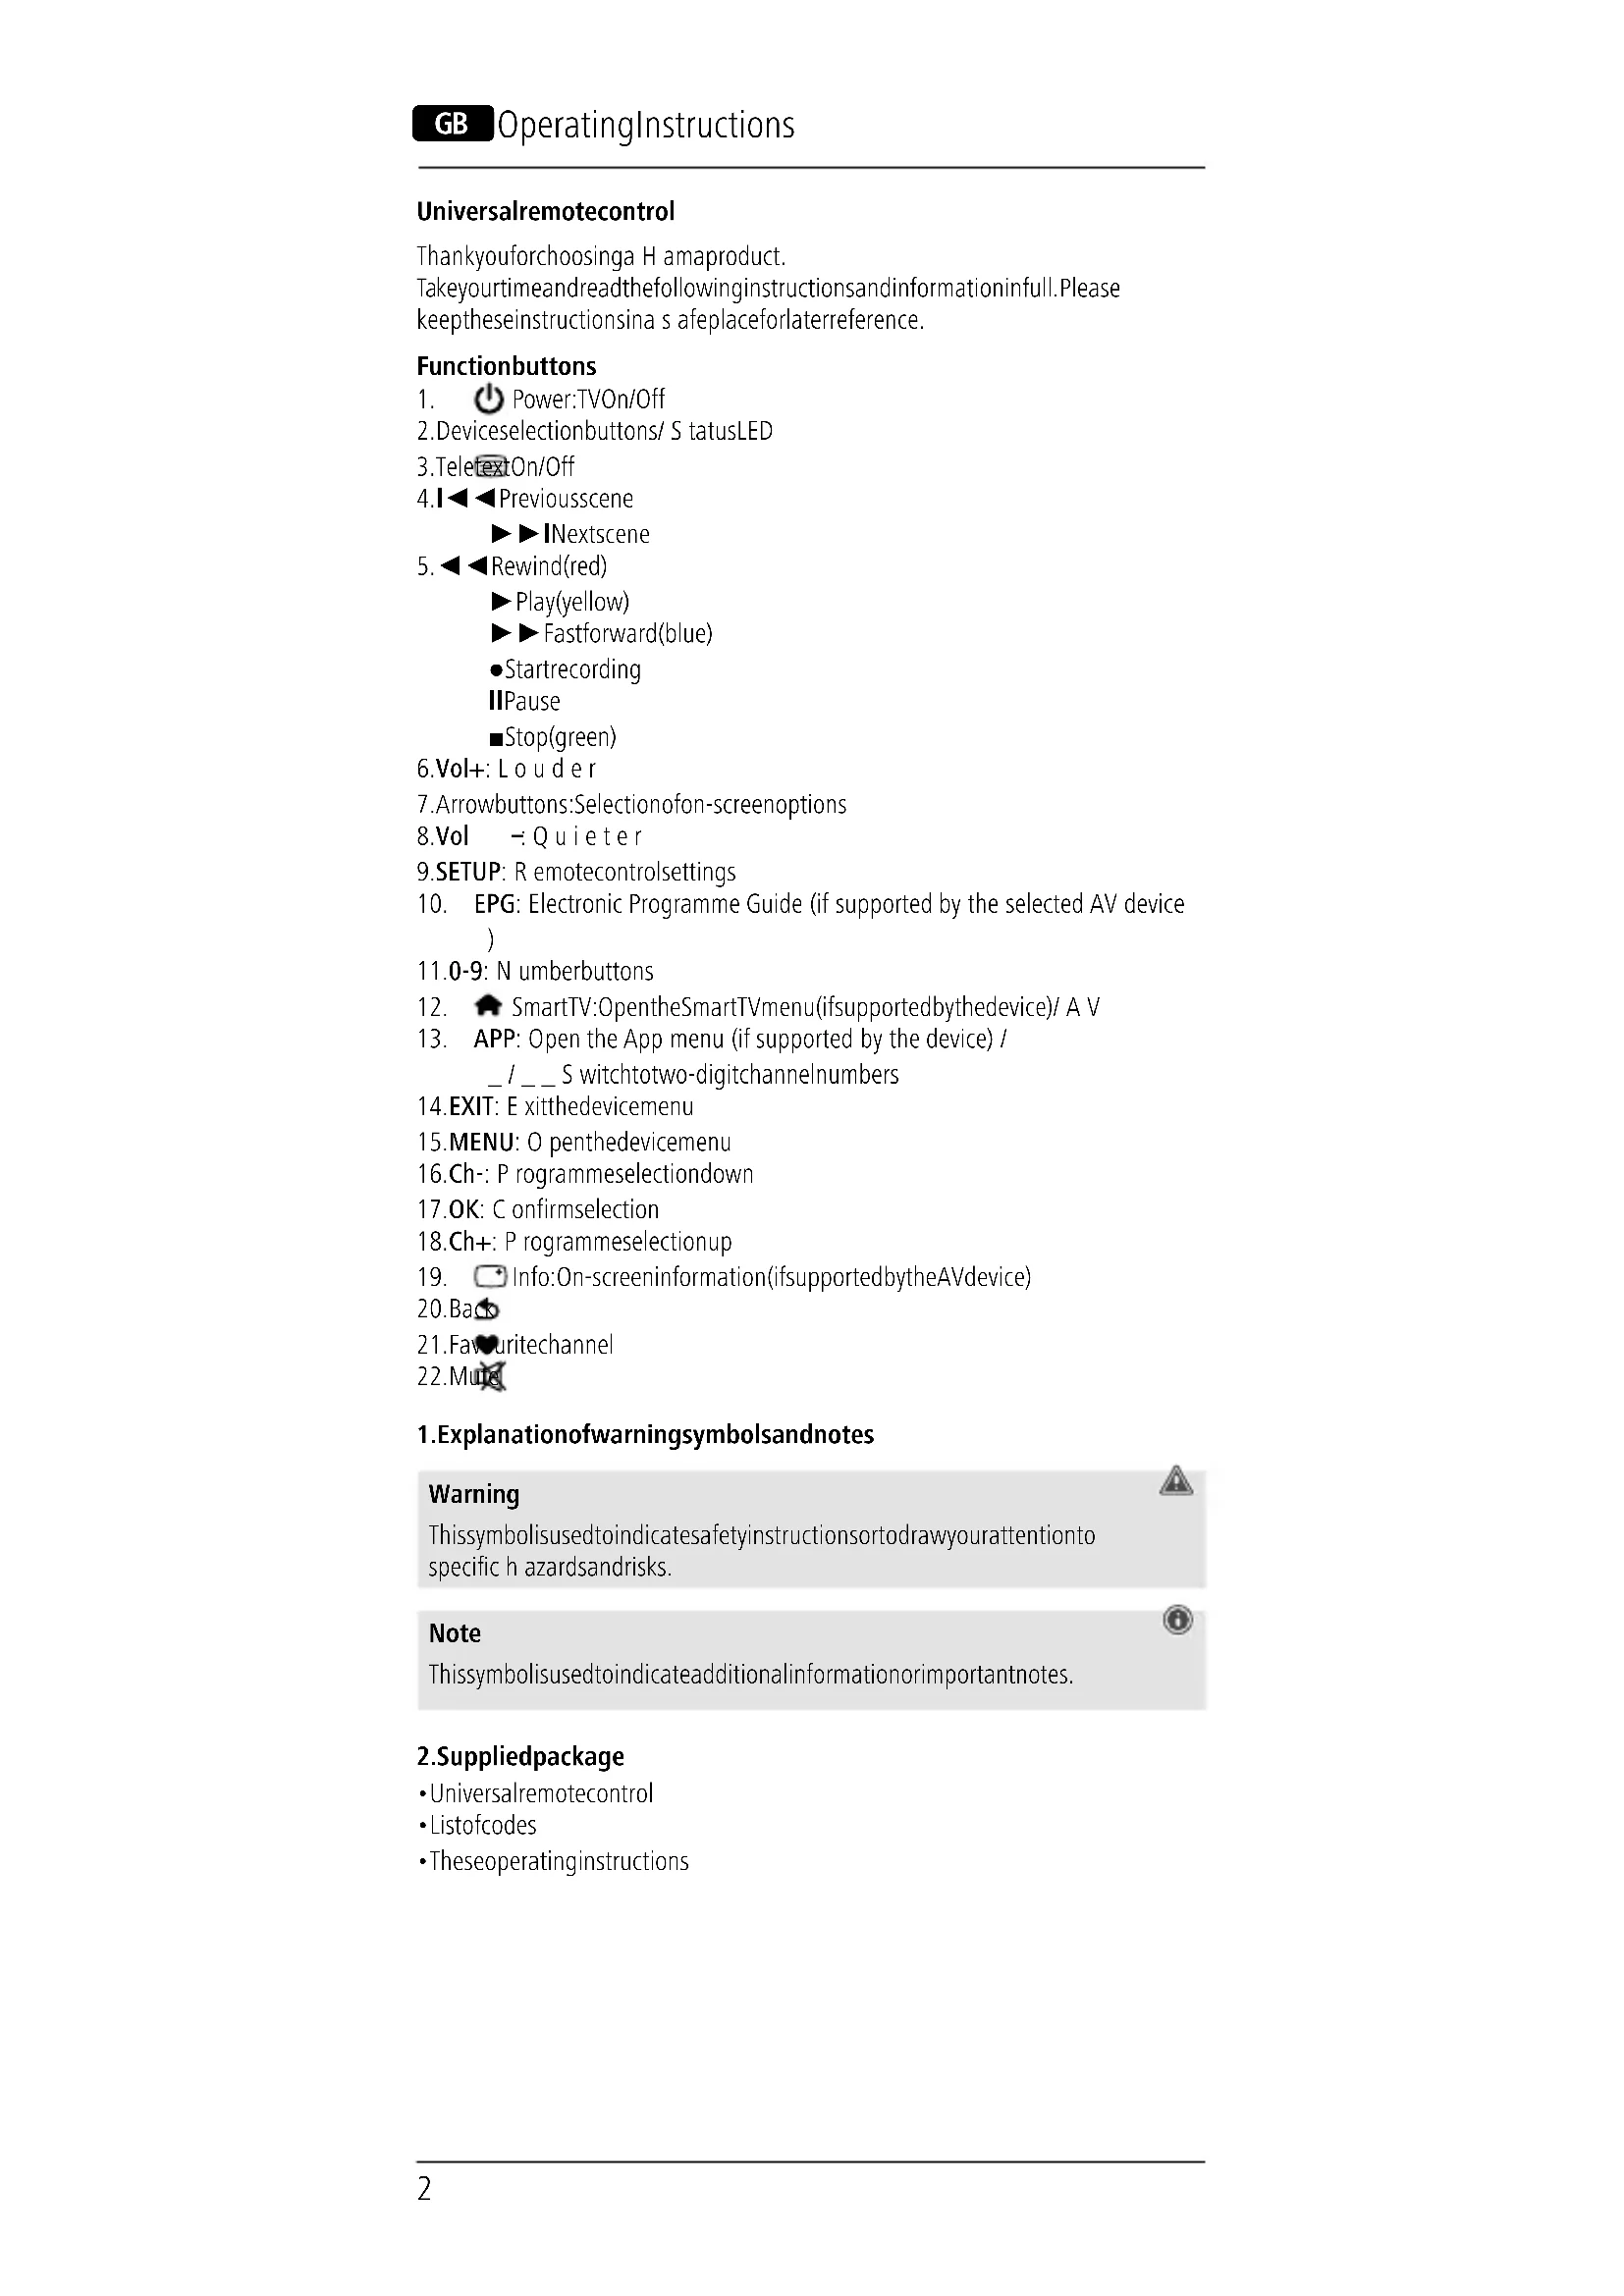
Functionbuttons
- Power:TVOn/Off
2.Devicesectionbuttons/ S tatusLED
3.TeleTextOn/Off
4.1 Previousscene
▶■Nextscene
5. Rewind(red)
▶Play(yellow)
Fastforward(blue)
- Startrecording
IPause
Stop(green)
6.Vol+ L ouder
7.Arrowbuttons:Selectionofon-screenoptions
8.Vol -:Quieter
- Setup: Remotecontrolsettings
- EPG: Electronic Programme Guide (if supported by the selected AV device)
11.0-9: N umberbuttons - SmartTV:OpentheSmartTVmenu(ifsupportedbythedevic) / AV
- APP: Open the App menu (if supported by the device) / S witchtotwo-digitchannelnumbers
14.EXIT: Exiththedeviceenu
15.MENU: O penthedevicemenu
16.Ch:- Programmeselectiondown
17.OK: Confirmselection
18.Ch+: Programmeselectionup - Info:On-screeninformation(ifsupportedbytheAVdevice)
20.Baco
21.Favuritechannel
22.Mun
1.Explanationof warningsymbolsandnotes
Warning Thisssymbolisusedtoindicatesafetyinstructionsontodrawyourattentiononto specifichazardsandrisks.
Note Thissymbolisusedtoindicateadditionalinformationorimportantnotes.
2. Supplied package
-Universalremotecontrol
- Listofcodes
Theseoperatingsinstructions
3.Safetyinstructions
- Donotusetheuniversalremotecontrolindampenvinonmentsandavoid contactwithsplashingwater.
- Keep the universal remote control away from heat sources and do not expose ittodirectsunlight.
- As with all electrical products, the universal remote control should be kept out ofthereachofchildren.
- Thisproductisintendedforprivate,non-commercialuseonly.
- Use the product only for the intended purpose.
- Protect the product from dirt, moisture and overheating and use it in dry rooms only.
- Do not use the product in areas in which electronic products are not permitted.
- Donotdroptheproductanddonotexposeittoanymajorshocks.
- Do not modify the product in any way. Doing so voids the warranty.
- Keep the packaging material out of the reach of children due to the risk of suffocation.
- Disposethepackagingmaterialimmediatelyinaccordancewiththelocally applicableregulations.
- Do not operate the product outside the power limits specified in the technical data.
- Donotopenthedevicereorcontinuetooperatietitifitbecomesdamaged.
- Do not attempt to service or repair the product yourself. Leave any and all serviceworktoqualifiedexperts.
- Onlyusethearticleundermoderateclimaticconditions.
Warning-Batteries
- When inserting batteries, note the correct polarity (+ and - markings) and insert the batteries accordingly. Failure to do so could result in the batteries leakingoreexploding.
- Only use batteries (or rechargeable batteries) that match the specified type.
- Before you insert the batteries, clean the battery contacts and the polarity contacts.
- Donotallowchildrentochangebatterieswithoutsupervision.
- Donotmixoldandnewbatteries,orbatteriesofdifferenttypesorfrom differentmanufacturers.
- Remove the batteries from products that are not being used for an extended period (unless these are being kept ready for an emergency).
- Donotshort-circuitbatteries.
- Donotchargebatteries.
- Donotburnbatteries.
- Keepbatteriesoutofthereachofchildren.
- Neveropen, damageorswallowbatteriesorallthemtoenterthe environment. They can containtoxic, environmentallyharmful heavymetals.
- Removespentbatteriesfromtheproductanddisposeofthemwithout delay.
- Avoid storing, charging and using in extreme temperatures and at extremely lowatmosphericpressures(suchasathighaltitudes).
4. Firststeps- Insertingthebatteries
Note
- Alkaline batteries are recommended. Use two batteries of the type "AAA" (LR03/Micro).
- Removethebatterycoveronthebackoftheuniversalremotecontrol(A).
- Insertthebatteries, observing the" + / - "marksforpolarity(B).
- Closethebatterycompartment(C).
Note:Codememory
Eachprogrammedcodeotaught-inbuttonisretainedevenduringbattery replacement.
Note:Energysavingfunction
- The remote control switches itself off automatically if a button is pressed for longerthan15seconds. This prolongsthelifeofthebatteriesiftheremote control is stuck in a place where the buttons are pressed permanently, e.g. betweensofacushions.
Note:Low b atterydisplay
- This remote control indicates when the batteries are getting low. If the status LED flashes 5 times after a button is pressed, the batteries are weak and shouldbereplacedpromptly.
5. Setup
Note
- For proper infra-red transmission, always hold the remote control in the approximated direction of the devicecetobeporated.
- Ifnobodyismadewithin30seconds,SETUPmodeisautomatically terminated.TheLEDflashesthreetimesandthengoesout.
- Eachtypeofdevicecanbeprogrammedunderanydevicebutton,e.g.aTV canbeprogrammedunderDVD,AUX,etc.
- You cannot operate a device with the universal remote control while it is in Setupmode.ExitSetupmodeandselectthedevicetobep operated using thedeviceselectionbuttons.
- Please note that the remote control emits infra-red signals. These are not visible tothehumaneye.
Each time the button is pressed, the status LED flashes to indicate which devicemodeisactive.
5.1Directcodeentry
A code list is included in the universal remote control's extent of delivery. The coderlistcontainsfour-digitcodesforsettingtheremotecontroltoworkwith mostAVequipmentmanufacturers.
For easy orientation, the codes are sorted first by type of device (TV, DVD, etc.) and within the type of device alphabetically by brandname.
5.1.1 Switchthedeviceyouwishtooperateon.
5.1.2 Pressthe"SETUP"buttonuntiltheLEDlightsuspendcontinuously.
5.1.3 Usethedevicebuttontoselectthedevicetobeoperated(e.g.TV). Iftheselectionissuccessful, theLEDflashesonceandthenlightsup permanently.
5.1.4Searchthecodelistforthebrandandtypofthedevicetobeoperated
5.1.5 Enterthecorrespondingfour-digitcodeusingthenumberbuttons0-9. The LED confirms the entry of each digit with a short flash and goes out afterthefourthdigit.
5.1.6Thentesttheremotecontrolandcheckwhetherthedesiredfunctionscan becontrolled.Itispossiblethatthefirstcodeisnotthemostsuitable, andpossiblynotallfunctionsareavailable.Inthiscase,trythenextcode mentionedfortheselecteddevicetype/brandfromthelist.
Note

-A v alidcodeisautomaticallysaved.
- If an invalid code is entered, the status LED flashes 3 times and then lights uppermanently. A new codecanthenbeentered.
- Ifnodeviceselectionismade, thelastdeviceselectionmadeis automatically used.
5.2Manualcodesearch
Theuniversalremotecontrolhasaninternalmemorythatalreadycontainsupto 350 codes per device type for the most common AV devices. You can go through these codes until the device to be operated shows a response. For example, the devicetobepoperatedswitchesoff("POWER"button)orchangeschannel("CH+/ CH-"buttons).
5.2.1 Switchthedeviceyouwishtooperateon.
5.2.2 PresstheSETUPbuttonuntiltheLEDlightsupermanently.
5.2.3Usethedevicebuttontoselectthedevicetobeoperated(e.g.TV). Iftheselectionissuccessful, theLEDflashesonceandthenlightsup permanently.
5.2.4Pressthe"POWER"or"CH+/CH-"buttonoscrollthroughthepresetcodes untilthedevicetobepolaratedshowsa r response.
5.2.5Press"SETUP"tosavethecodeandexitthecodesearch.TheLEDgoes out.
5.2.6Thentesttheremotecontrolandcheckwhetherthedesiredfunctions canbecontrolled.Itispossiblethatthefirstcodefoundisnotthemost suitable,andpossiblynotallfunctionsareavailable.Inthiscase,repeat steps 5.2.1.-5.2.5.The code search starts with the next code following thelastonesaved.
Note

- Press the [EXIT] button to exit Setup mode without saving a code. The status LEDs3 t imesandthengoesout.
- Ifnodeviceselectionismade, thelastdeviceselectionmadeisautomaticallyused.
- A maximum of 350 codes of the most common devices can be stored in the internal memory. Due to the numerous AV devices available on the market, it may happen that only the most common main functions are available. If this is the case, repeat steps 5.2.1 to 5.2.5 to find a more compatible code. A code may not be available for some specific device models.
5.3Automaticcodesearch
Theautomaticcodesearchusethestesamepresetcodesasthemanualcodesearch
(5.2). However, the universal remote control automatically searches the codes until the device to be operated shows a response. For example, the device to be operated switchesoff("POWER"button)orchangeschannel("CH+/CH-"buttons).
5.3.1Switchthedeviceyouwishtooperateon.
5.3.2Pressthe"SETUP"buttonuntiltheLEDlightsupcontinuously.
5.3.3 Use the device button to select the device beoperated (e.g.TV). If these selection success, successful, the LED flashes once and then lights up permanently.
5.3.4Pressthe"CH+/CH-"or"POWER"buttonstartthethe automatic code search.TheLEDflashesonceandthenlightsuppermanently.Ittakes6 secondsforthearuniversalremotecontrolstopstartthefirstsearch.
Note:

Settingthesearchspeed
- The default setting for the search time per code is 1 second. If this does not suit you, you can change to a search time of 3 seconds per code. To switch between search times, press "CH+" or "CH-" within the 6 seconds before the automatic codesearchstarts.
5.3.5 The LED confirms the respective code searches with a single flash.
5.3.6 As soon as the device to be operated shows a response, press the "SETUP" button save the code and exit the code search. The LED goes out.
5.3.7Thentesttheremotecontrolandcheckwhetherthedesiredfunctions canbecontrolled.Itispossiblethatthefirstcodefoundisnotthemost suitable,andpossiblynotallfunctionsareavailable.Inthiscase,repeat steps5.3.1.-5.3.6.
Thecodesearchstartswiththenextcodefollowingthelastonesaved.
5.3.8Tocanceltheautomaticsearchduringthesearchprocess,pressthe"EXIT" button.
Note

- Iffallcodeshavebeensearchwithoutsuccess, theuniversalremote controlsexitstheautomaticcodesearchandautomaticallyreturnsto operatingmode. Thecurrentlystoredcoderemainsunchanged.
5.4Coderecognition
Code recognition offers you the ability to determine a code you have already saved.
5.4.1 Pressthe"SETUP"buttonuntiltheLEDlightsupcontinuously.
5.4.2 Use the device button to select the device to be operated (e.g. TV). If these selection is successful, the LED flashes on and then lights up permanently.
5.4.3Pressthe"SETUP"button.TheLEDflashesonceandthenlightsup permanently.
5.4.4 Press one of the number buttons from 0 to 9 to search for the first digit. TheLEDflashesonceforthefirstdigitofthefour-digitcodenumber.
5.4.5Repeatstep5.4.4forthesecond,thirdandfourthdigitstrespectively.
5.4.6 You can then enter the determined code in the table below if you need to edit again at a later time (e.g. after accidentally deleting the remote control settings).
| CODES | ||
| TVSOUNDSTB | ||
| DVDAUXDVBT | ||
6.Specialfunctions
6.1 Channelpunch-through
With the channel punch-through function, the Ch+or Ch-commandscan bypass the currently controlled device and change the channels of a second device. All other commands are unaffected.
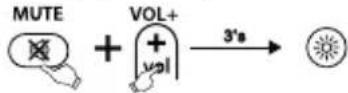
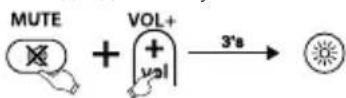
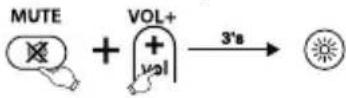
6.1.1Toactivatethechannelpunch-throughfunction:
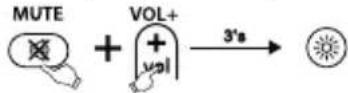
- Pressandholdthe[MUTE]and[Vol+]buttonssimultaneouslyforapprox.3 sec. until the status LEDsup continuously.
- Usethedevicebuttontoselectthedevicetobepoperated(e.g.[TV]).A successful selection is confirmed by the status LED flashing once and then lightingupcontinuously.
- Enter the code [9] [6] [0], the status LED flashes 2 times and then lights up permanently.
- Press the "[Ch+]" button. The LED flashes once and then lights up permanently.
- Pressthedesireddevicebutton(e.g.[STB]).Thesettingisactivatedwhenthe statusLEDflashes3 t imesandthengoesout.
6.1.2Todeactivatethechnelpunch-throughfunction:
- Pressandholdthe[MUTE]and[Vol+]buttonssimultaneouslyforapprox.3 sec. until the status LEDsup continuously.
- Usethedevicebuttontoselectthedevicetobep operated(e.g. [TV]).A successful selection is confirmed by the status LED flashing once and then lightinqupcontinuously.
- Enter the code [9] [6] [0], the status LED flashes 2 times and then lights up permanently.
- Press the "[Ch+]" button. The LED flashes once and then lights up permanently.
- Pressthedesireddevicebutton(e.g.[STB]).Thesettingisdeactivatedwhen the status LED flashes 3 times and then goes out.
Note
- If an invalid code is entered, the status LED flashes 3 times and then lights uppermanently. A newcodecanthenbeentered.
6.2VolumePunchThrough/ VolumeLockandUnlock
Withthevolumepunch-throughfunction, the [Vol+] or [Vol-], [MUTE] commandscan bypass the currently controlled device and change the volume of a second device. All other commands are unaffected.
Note

- Onsomedevices, the [Vol+], [Vol-] and [MUTE] buttonshavenofunction. In this case, theremotecontrolautomaticallyforwardsthecommandstothe programmedTV.
6.2.1 Transfervolumecontrol-Volumelock
- Press and hold the [SETUP] button for approx. 3 sec. until the status LED lights upcontinuously.
- Use the corresponding device button (e.g. [TV]) to select the desired device to which the volume control is to be transferred. A successful selection is confirmed by the status LED flashing once and then lighting up continuously.
- Press the [MUTE] button. The LED flashes once and then lights up permanently.
- Press the [Vol+] button. The setting is activated when the status LED flashes 3 times and then goes out. The [Vol+], [Vol-] and [MUTE] buttons were successfully transferred.
6.2.2Unlockvolumecontrol-Volumeunlock
- Press and hold the [SETUP] button for approx. 3 sec. until the status LED lights upcontinuously.
- Use the corresponding device button (e.g. [TV]) to select the device to which the volume control has been transferred. A successful selection is confirmed by the statusLEDflashingonceandthenlightingupcontinuously.
- Press the [MUTE] button. The LED flashes once and then lights up permanently.
- Press the [Vol-] button. The setting is deactivated when the status LED flashes 3 times and then goes out. The [Vol+], [Vol-] and [MUTE] buttons have been successfully unlocked.
Note

- This functionisdeactivatedinthefactorysettings.
6.3MacroPower
Macro Power allows you to switch two AV devices on/off simultaneously.
6.3.1ToactivatetheMacroPowerfunction:
- Pressandholdthe[MUTE]and[Vol+]buttonssimultaneouslyforapprox.3 sec. untilthestatusLEDlightsupcontinuously.
- Usethedevicebuttontoselectthedevicetobeperated(e.g.[TV]).A successfulselectionisindicatedbythestatusLEDflashingonceandthen lightinqupcontinuously.
- Enter the code [9] [5] [0], the status LED flashes 2 times and then lights up permanently.
- Usethedevicebuttonselecttheseconddevicetobep operated(e.g.[STB]) which is to be switched on in the future. A successful selection is indicated by thestatusLEDflashingonceandthenlightingupcontinuously.
Pressthe[OK]button.Thesettinghasbeensuccessfullyactivatedwhenthe statusLEDflashes3 timesandthengoesout.
6.3.2TodeactivatetheMacroPowerfunction:
- Pressandholdthe[MUTE]and[Vol+]buttonssimultaneouslyforapprox.3 sec. untilthestatusLEDlightsupcontinuously.
- Usethedevicebuttontoselectthedevicetobep operated(e.g.[TV]).A successfulselectionisindicatedbythestatusLEDflashingonceandthen lightingupcontinuously.
- Enter the code [9] [5] [0], the status LED flashes 2 times and then lights up permanently.
- Usethedevicebuttontosecttheseconddevice(e.g.[STB])thatwas previously switched on. A successful selection is indicated by the status LED flashingonceandthenlightingupcontinuously.
Pressthe[EXIT]button. ThesettinghasbeendeactivatedwhenthestatusLED flashes3 timesandthengoesout.
Note

- If an invalid code is entered, the status LED flashes 3 times and then lights uppermanently. A newcodecanthenbeentered.
- Setupmodeisautomaticallyterminatedafterapprox.30secondsifnobutton is pressed. The status LED flashes 3 times and then goes out.
7.Learningfunction
This remote control is equipped with a learning function. This allows you to transferfunctionsfromyouroriginalremotecontroltothisuniversalremote control.
7.1 Before you start the learning function
- Make sure that all batteries used in both remote controls are in perfect condition. Changethemifnecessary.
- Placeyouroriginalremotecontrolandtheuniversalsremotecontrolnextto eachothersothattheinfrareddiodesoftheremotecontrolsare directly oppositeeachother.
- If necessary, correct the height of both remote controls to achieve optimal alignment.
- The distance between the two remote controls should be approx. 3cm
Note

- Donotmovetheremotecontrolsduringthelearningprocess.
- Make sure that the room lighting is not fluorescent tubes or energy-saving lamps, asthesecouldcauseinterferenceandthushinderthelearning process.
- Thedistancebetweenthwetremotecontrolsandthenearestlightsource shouldbeatleast1 m etre.
The learningprocesssisterminatedwithoutsavingifnobutionispressedornosignalisreceivedfor30sec.whilelearningmodeisactivated. - In learning mode, each button can only be assigned one function. A new function overwrites the function previously taughton this button.
- The TV, DVD, STB, SOUND, AUX, DVBT and SETUP buttons cannot be assigned new functions.
7.2Activatingthelearningmode
- Pressandholdthe[MUTE]and[VOL+]buttonssimultaneouslyforapprox. 3 sec. until the status LED lightsup continuously.
-
Usethedevicebuttontoselectthedevic(e.g.[TV])forwhicha new function is to be taught. A successful selection is confirmed by the status LEDflashingonceandthenlightingupcontinuously.
-
Enter the code [9] [8] [0], the status LED flashes 2 times and then lights up permanently.
4.Theuniversalremotecontrolisnowinlearningmode.
Note

-
If the status LED flashes 8 times and the learning mode ends automatically, youhavealreadytaughttooymybuttonsandtheavailablememoryisfull. Theremotecontrolcanstore a m aximumof125taught-inbuttons.
-
Ifnodeviceselectionismade, thelastdeviceselectionmadeisautomaticallyused.
7.3Transferringthebuttonfunction
-
Pressthe button on the original remotecontrol whose function you want to transfer. To confirm that the command has been received, the status LED of the universalremotecontrol flashes.
-
Nowpress the button on the universal remote controltowhichthefunctionistobetransferred.
-
The function LED of the universal remote control flashes 3 times for confirmation and then lights supermanently again. Thenewfunction is now saved.
-
Totransferthefunctionsoadditiona buttons, repeatthesesteps.
-
Pressthe [SETUP] button save all taught-infunctions sandexit the learningmode.
Note

When changing the batteries of the universalremotecontrol, the function of the taught-inbuttons are retained.
7.4Deletingtaughtfunctions
7.4.1Deletinga t aughtfunction
- Pressandholdthe[MUTE]and[VOL+]buttonssimultaneouslyforapprox. 3 sec. until the status LED lightsup continuously.

- Select the device you want to clear a learned command using the device key (e.g. [TV]). A successful selection is indicated by the LED with one flashfollowedbypermanentlight.
- Enter the code [9] [8] [1], the status LED flashes 2 times and then lights up permanently again.
- Pressthe button whose function you wish to want to delete. The status LED flashes 4 times and the desired function is deleted.
7.4.2Deletingalltaughtfunctions
- Pressandholdthe[MUTE]and[VOL+]buttonssimultaneouslyforapprox. 3 sec. until the status LEDsupcontinuously.
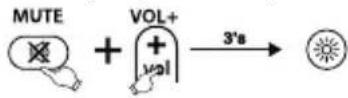
- Select the device you want to control using the device key (e.g. [TV]). A successfulselectionisindicatedbytheLEDwithoneflashfollowedby permanentlight.
- Enter the code [9] [8] [2], the status LED flashes 2 times and then lights up permanently again.
- Press the [SETUP] button, the status LED flashes 4 times and all taught-in functions are d elected.
8.Restoringfactorysettings
8.1 Press and hold the [SETUP] button for approx. 3 seconds until the status LEDsupcontinuously.
8.2Pressthe[MUTE]button.ThestatusLEDflashesonceandthenlightsup permanently.
8.3 Press the [0] button. The status LED flashes 4 times and the remote control hasbeensuccessfullyresettothefactorysettings.
Note

All set-up device settings and taught-in functions are deleted when resetting to thefactorysettings.
9.Maintenance
- Neveruseoldandnewbatteriesintheuniversalremotecontrolatthesame time, as old batteries tend to leak and can lead to a loss of performance.
- N evercleantheuniversalremotecontrolwithscouringagentsorharsh cleaningagents.
- Keep the universal remote control free of dust by cleaning it with a dry soft cloth.
10.Troubleshooting
Q.Myuniversalremotectrldoesnotwork!
A. Check the AV device. If the main switch on the device is off, the universal remotecontrolcannnotoperatethedevic
A. Check that the batteries are inserted correctly and that the polarity has been observed.
A. Check that you have pressed the appropriate device button forthedevic
A. Replace the batteries if the battery level is low.
Q.If there are multiple device codes listed for the brand of my AV device, how do I's electtthecorrectdevicecode?
A. To determine the correct device code for the AV device, test the codes one after theotheruntilmostofthebuttonssworkproperly.
Q.MyAVdeviceonlyrespondstosomebuttoncommands.
A. Try other codes until most of the buttons work properly.
Q.ThebrandofmyAVdeviceisnotmentionedinthecodelist.
A. Inthiscase, use the manual code search (Section 5.2) or the automatic code search (Section 5.3). During the code search, all codes for a device type are tested across manufacturers, e.g. all codes for SAT receivers regardless of the manufacturer.
Q.I have tried all the available codes for the brand of my AV device from the code list, but none of the codes mentioned work.
A. Inthiscase, usethemanual codesearch (Section 5.2) or the automatic code search (Section 5.3). During the code search, all codes for a device type are tested across manufacturers, e.g. all codes for SAT receivers regardless of the manufacturer.
11.Warranty disclaimer
Hama GmbH & Co KG assumes no liability and provides no warranty for damage resulting from improper installation/mounting, improper use of the product from failure to o bservertheoperatinginstructionsand/or safety notes.
12. Recycling information
Noteonenvironmentalprotection:
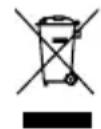
FollowingtheimplementationofEuropeanDirective2012/19/EUand 2006/66/EUtothenationallegalsystems,thefollowingapplies: Electricalandetechnicdeviceraswellasbatteriesmustnotbedisposedofwithhouseholdwaste.Consumersareobligeblylaw toreturnelectriclelandelectronicdevicesaswell asbatteriestothe
designatedpubliccollectionpointsortothepointofsaleattheendoftheir servicelives.Detailedinformationonthistopicisdefinedinthenationallaws of the respective country. This presence of the above symbol on the product, operatinginstructionsorpackageindicatessthatheproductissubjecttothesese regulations. By recycling, reusing the materials or other forms of utilising old devices/batteries, you are making an important contribution to protecting our environment.
6.1Zender-punch-through
6.1Punch-Throughposturi
Information: Kodminne
- Allaprogrammeradekoderochknapparibibehãllsävenvidbatterbyte.
Information:Energisparfungtion
Fjarrkontrollenstangsavautomatiskomngonknapphalsintrycktlangretid an 15 sekunder. Det forlanger batteriernas livslangi d om fjarrkontrollenskullehamnanagonstansdarnkapparnahhalsintrycktapermanent.t.ex.mellandynomai s offan.
Information:Indikeringforsvagabatterier
6.1Kanal-punch-through
Medfunktionenkanal-punch-throughkankommandonaCh+ellerCh-kringgadenhetsomstyrsochbytakanaleri en a nnanenhet.Ovrigakommandon paverkasinte.
8.Vol :HaMaJIraBaHeHa3ByKa
-
SETUP: HacpoKaHaJaNCTaHcNoHHoToyPpAbHeHne
-
EPG: EneKtpoHNO nporpaMHO pBkoBOcTBo (aKO ce noDbpxa oT u36paHToAV yCTpOuCTBO)
-
0-9:Бутоисцифprn
-
SmartTV:OTbapnHeHMeHoSmartTV(aKocennoBpKaOTkpaHOTO yCTPOICTBO)/AV
-
APP: OТваряне Ha MeHIO C npIIOxEHHa (aKo ce IODIbPka OT KpaHOT yctpoiCTBO) / _/— CMHaKaMbMdBUcNΦpeHINHomepaHaKaHaJI
-
EXIT: HanyckaHeHaMeHIoToHayCTpOCTBOTO
15.MEHIO:OTbapraHemaHEMOHAYcTPOJCTBOTO
16.Ch-ИЗборанPORpama,надoly
17.OK:NoTbpxJaBaHaHeHa360p
18.Ch+:N360phanporpama,Harope
- INΦopMaζη: On screen INΦopMaζη (ako ce noДьрka oT AV yCTpOιCTBOTO)
20.Ha
21.JHMMnnporpaMn
22.MuCnnpaHaHa3Byka
1. 06aHHeHa npedynpeDnteln CmBoln yka3aHn
IpeDynpexdeneHne
U3noBace,3a0a0603Haayabayka3aHne3a6e3oNaChocTnIIN3aHaHacOu BHIMAHNEtOKbMKOHKeTHnONaCHOCTUN pNCKOBe.
Yka3aHne
I3noBace,3aao6o3HaayBaonbJHnTeHnHΦopMaunuBaxHyka3AHy.
2.OKOMNJIeKTOBkaHaNoCTaKaTa
-YNHnBepcAaHNOIaTcAaHIOHOHyOpBaJIeHHe
CnncbKc K OIOBE
-TobaynbTbaHe3a06cnykBaHe
3.Yka3aHn3a6e3oNaCHOCT
He n3noJ3BaIte yHnBepcaJIHO tNCTaHcUHHO ynpabJIeHne B MOKpn cpeNi n36raTe KOHTaKT C npbcku BOda.
-ДрьхтуговерсалнотонданционнупавленидадауOTNTOHINHA TOJIINHa HrO IINaIarTe Ha NIpEeKTHa CbHcYeBa CBETJINHa.
-Noo6HOHAbCNUKNKeNEKtpueeckNypeu,ynHBepcaHOTOnCTaHcNOHHO ynpabHe He Tp6Ba Da nonaDa BpbuteHa deua.
- PpOdyKbT e ppeBvIeH 3a IuHa, HeCToNaHcKa 6nToBa yNoTppe6a.
- I3noJ3BaIte npOyKta cAmO 3a npEbnHeHaT a ceI.
- PanaTe npOdykTa OT 3aMbpcraBaHe, BlaRa N ppepraBaHe n rO n3NoI3BaIte CaMOB C yXnIpomeueHn.
He n3noI3BaIte npOyKTA B 30H, B KOITo He ca pa3peWeH eJIeKtpOHn npOyKTu.
He no3B0JIaIe Ha npOyKta Da nda Hn He ro n3JaarTe Ha cnJIHn Bn6paun.
He npabete npomeHbypea.Taka 3ary6nte npabo HBCaKBN rapaHnOHnnpTeHcun.
3aIbIJIKeTIHO IpbXTe MaIKIe DaIeHa TaJIeHe OT OnaKOBbHnMaTePnaJ, mMaOnaCHOCTOT3aDyUbaAHe.
-3XbPnTe onakOBbHm MaTePnJI BeHara CByHArO DeIcTbaUHTe Ha MRCTO pa3npoep6n 3a NxBbPnHe H O TnaDbu.
He n3noJ3BaIte npOyKta N3BbH HerOBnTe rpaHnHa MoUHocTtA, NOCOeHNb T exHnueCKNTeHaHH.
He OTBapraIte npOdykTa n npn noBpeHa He npoJbIJaBaIte da ro H3NoJI3BaTe.
He ce onntbaine camn da ocbnykBaTe nnn peMOHTnPate npoDyKta. OctabeTe BCaKaBA TexHuecka noDnpBxka Ha KOMNPeHTHnTE CneuaJIInCTn.
- 3n0n3BaIte npoDyKta cmo npu ymepeH KInMaTmHn YcIOBna.
PpeDynpeKxdeHne-6aTeepn
3aIbJNKeTHeHOBHMAbaTe3aPabuHHotopa3nOLOXeHHeHaONOLOCNTe (HaIINcN+H-) Ha 6aTePunTE I rN NOCTaBETe N CbOTBeTHMa HAHN. Pn HecNa3BaHEmMaONaCHOCTOTnTmAHEnNEKcN03rHA6aTePUNTE.
- 3nno3BaIte cAmO akymyIaTOpN (nn6aTePun), KOnTO CbOTBeTCTBaT Ha nocOeHnTn.
-ПпспнoctаьанehaбatepentenoyncteTeKHTaKTteHa6aTePntEn HacpeuHNTeKOHTaTK.
-Hepa3peuabaTaHaedaeuaDcMeHr6aTeepnue3Ha3Op.
He cmecBaIte cIapn HOBn batepnn, KaKTo n batepnn ot pa3nueH TIN nnnpou3BODNTeJ.
-OTcpanhaBaiTe6atepeuNTeOTpOkyTn,KoTOHMAaCen3NOJ3BaT 3aNo-dbIro BpeMe (OCBeH aKO Te He Ce IbpxaT B rOtOBHOCT 3a CneWeH cnUyai).
-HeCbBp3BaIte6aTepeHnTeHaKbCo.
-He3apekkaaTe6aTepeuInTe.
HeXbBpIaIte6aTepePiTE B0fH.
CbxpahnBaTBe6aTepeHNTe,HeIOCTbHN3aDeua.
- Batepnnte HnKora He 6Ba Da 6BnAT OTBapHn, NOBpeXdaHn, TbntaHn INN3XBpIaHn B npnpOdaT. Te MoRat Da CbDpbXkT TeKKn MetaII, KONTocaOTpOBHHnnONacHN3aOKoHnatcpeJa.
MaxheTe OT npOyKta H He3a6abHO 3XbBpIe N3xa6eHITe 6aTePM.
- N368BaIe CbXpaHHeHne, 3apeXdaHne H3NoJ3BaHne npn ekCTpeMHN TemnepaTyPn IN3KJIIOHTeHNO HICKO HaJIraHc Hb3Dyxa (KaTO HanpImepHarOJIemMBuCOUHN).

4.Пьрвстбпкн-пoctabянHeha6atepuNTe
Yka3aHne
-Прениватcaeалкалнбаери.N3noJ3BaIteДБe6aTeepnOttIN "AAA"(LR03/Micro).
-OTcpaHHeTeKaHaeToHaOaTeJeHHeTeo3a6aTepuNTeO3aHataCTpaHaHa yHbepcaHHTOAnCTaHNoHHoynpabHeHn(A).
- NocTabete 6aTepeNTe KaTo Cna3BaT MapKnpOBKeTe "+/-" 3a NoJIpaHOCTTa (B).
-3aTbopeTeoTdeJeHneTo3a6aTepuNTe(C).
Yka3aHne:Pamet3akOdoB
BceKnIporpamnpaHkoDnINbCekno6yueH6yToHce3ana3BaT,doPnIO BpeMeHaMaHaHa6aTepyra.
Yka3aHHe:ФyHKnIa3anecTeHeHaeHeprna
-ДuctanohnoHOToynpaBneHnecen3KIOHbAABTOMaTHHO,akO6yTOH 6bIe HATNCHTa NO-DbIro OT 15 cekHyd. TOba yIbJxaba NoJe3Hna XIBOTHa6BaTePnITe,aKOINCTaHnOHToynpabJIeHHe6bIe3aKeIeHo Ha MRCTo,Ha KoETo HENpeKbCHATO Ce HATNCKAT 6yTOHNTe,Hanp.MexDy Bb3rJaBHNuNTeHaDnBaHa.
Yka3aHHe:HdNkAtOp3aAn3ToeH6aTePm
-TOBaAnCTaHcNHOHoypAbHeHneOKa3BaKorA6aTePnITecAn3ToUeHN. AkocBeTOnIONbT3actATyCnpemrHe5bTncIeHaTnCKaHeHaJaDeH 6byToH,6aTePnITe Ca n3ToUeHN I Tp6Ba Da 6bDat CMeHEH Bb3MOxHO Hau-ckopo.
5. Setup
Yka3aHne
-3a npabHnHnHpapepBHeOpenaBaHaHaInpbXTeIaNtAHIOHOynpaBHeHne B np6Jln3nteHnata Nocoka Ha ynpabLaBaHOTO yCTPOIcTBO.
AkoBpaMKnteHa30cekyHnHe ce n3BbpHbBBeKdahe,SETUPpeXmblcnpkepkaTbaaBTOMaTHNO.CBeToIOHObTMgATPnINbTN CNEITOBAn3raCBA.
BceKHTnUyCTpoNCTBOMOxedabDenpOrpaMnPAHNOIDPOn3BOJeH 6yToH3ayCTpoNCTBO,Hanp.TeNEBu3OpMOxedabDenpOrpaMnPAHNOI DVD,AUXnT.H.
C y HnBepcaHOTOnCTaHcUHOHoynpAbeHHeHEMeOKeTaO6cIyKbATE yCTPOINCTBO,doKATO TO ceHAMIPA BpeXIM Setup.HanyChTepeXIma Setupn 36epeTeYCTPOINCTBOtO3aO6cIyXBAHeuepe36yToHInTe3aIn36Op HayCTPOINCTBO.
Molna,obbphete BnmaHne Ha ToBa,Ye NCTaHcNHOHTo ynpabNeHne n3npaaanHΦpauepeBHeNCrHaJI.THeecABIMM3aOBeWKOTOKO.
- PnBcKaHOHaTNCaHe Ha 6yToH, CBeToIONoJB3a CTaTyC Mmra N NOKa3Ba KOIpexMmHayCTpoiCTBOTe a KtNBHe.


5.1ДиpeKTHOBbBExKaHaHaKoI
B o KOMPJIeKTOBkataHaIOCTaBkTaHaayHNBepCaJHOTOnCTAHUHOynpaBHeHne ce cIbpxka CnncbKc K KOIOBE. CnncbKbT c KOIOBe cbIbpxkaYeInpuNΦpeHNIKOIOBe3aHaCTPOKaHAdnCTAHUHOHTOynpaBHeHne3aNOBEeTOpON3BOIDTeINHaAVcTPOCTBa.
3ano-NechoopnentnpaHKeOIOBcTeNbPBOCaOpTnpaHINOBuHa yctpoCTBTO (TV, DVD n T.H.), a BbTpE BbB BuaHa yctpoIcBTBOTo n o a36yuepeDCNOPeDIMMeHaTaHaMapKITE.
5.1.1BkIIOHcTeUcTPOiCTBOTo3a06CJIyXBaHe
5.1.2 Hatnche6byToHa"SETUP",doKaTOCBETOINoBtCBETHe3aNoCToHHO.
5.1.34pe36ytoHa3ayctpoiCTBaun36epeTeyeCTPOICTBOTo3aO6cnyXbaHe (Hanp.TV).Pn yCneuhen 360p CBeTOIOBbT Mna BeINbX n CneI TOBa CBETINOCTOHHO.
5.1.4 B cnncbka c kOIOBete noTbpceTe MapKaTa n Tnna Ha yCTpoiCTBOTo 3a 06cnyXbaHe.
5.1.5 BbBeTe CbOTBeTHnue YeTnpuΦpeh KOD ype3 ByToHnTe C uΦp n 0-9.CBeToIOIObTnOaBbPxaBbBExJaHeToHaOtJeHNHTeUΦp n CbOTBEHO C NO eNHO KpaTKO MfAre H I3rAcBa CJIeYETBbPtata UΦpa.
5.1.6 CneTobATCTBaIteDnCTaHOnHOTo ynpabHeHne n npoBepeTe, daJIN keHaHIne FyHKmN MORat Da ce ynpabJIaBAt. Bb3MoXHo e NpBpBnT KoJ Da He e Hau-nOxOJaUa, eBEHT. He ca HauuH BCuKn FyHKmN. B TO3NClyaun3npo6BaIteCnEJaUncOueH3aun36paHnraBn/MapKa ypeKnOOTcncbKa.
Yka3aHne
- BaIIeHKOJce3aIamETBaABTOMaTHUHO.
Ako e BbBeH HeBaJIeH KOI, CBeToIOIOBt 3a CTaYc npeMnRBA 3 nTIN CNeITOBaCBETHeHnePckhato.CneTTOBaMOKeJaaceBbBeDeHOBKO. - Ako He e HappaBEN n36op Ha yCTpoiCTBO, ABTOMaTHuHO ce n3noJ3Ba nocJeHnIaTHaPaBEnn36OpHayCTpoiCTBO.

5.2PbCHOTbpceHeHaKo
YHnBepcaHnTo DnCTaHIOHO ynpaBHeHne pa3NoIar C BbTpEHa NaMeT, B KOrTO Beue Ce sbDbpxA Tdo 350 KoJa 3a BceKu TnU yCtpoiCTBO 3a Hau-YeCTO cpeuaHnTe AV yCtpoiCTBa. MoKeTe Da npemHeTe pE3 Tez KODoe, Dokato yCtpoiCTBO3aO6cLyXbaHEnoKaKepeakun.HanpImepyCTpoiCTBO3a O6cLyXbaHe ce n3KnUoyBa (byToH "POWER") nn Cmehn nporpaMaTa (byToH "CH+/CH-").
5.2.1BkIIOHcTeUcTPOiCTBOTo3a06cLyKBaHe
5.2.2HaTnchete6yToHaSETUP,doKaTOCBetoIONbTCBtHe3aONCTOHHo
5.2.3 6ytoHa 3a yctpoiCTBa n36epete yctpoiCTBOTo 3a o6cnykBaHe (Hanp. TV). Pnycneu Hen36op CBeTOIOIOBt MInrA BeINbX N CNeI TOBa CBETN NOCTOARHHO.
5.2.4 Hatnche6byoN "POWER"nnn"CH+/CH-,"3a da npelnctte npes npedBapnteHNOHaCTpoeHNTeKOIOBe,doKaTOyCTpOINCTBOTo3a 06CnyXbaHEnOKaKepeakun.
5.2.5 HatncheTe "SETUP", 3a da 3anaMeTnte KoJa n da HanycheTe TbpcHeTo HakoJ.CBETOIOIOBtN3rACBa.
5.2.6 CnTeTOBa TeCTBaIte NCTaHcNIOHOTO ynpabJIeHHe n npOBepe, daJIxKeJAHnTe cyHKuMOrat Da ce ynpabJIaBAt. Bb3MOXHO e nbPbNtHaMEpeH KOd Da He e Ha-noDxoJaUa, eBEHT. He ca HaJIuHb BCuKnKyHKuN. B To3n CnyaH NOBTopeTe CTbNk 5.2.1-5.2.5. TbpceHTo HaKOdCTapTnPaCbCcJeBaUaKoD, KOITocNeDbANOCJeHO3aNaMeTeHnKoD.
Yka3aHne

- Hatnche6byoHa [EXIT], 3a da n3ne3eTe ot pexima 3a hactpoika, 6e3 da 3anametraBe KOi. CBeToIOIOBt 3a CTatyc npemurBa 3 nbTu n cneT TOBa n3racBa.
- Ako He e HanpaBEN 360p Ha yCTpoIcTBO, aBTOMaTHUHO ce n3nOJI3Ba nocJeHnAeTHanpaBEnH36OpHayCTpoIcTBO.
BbBbTpeWHaTanaMeTMoraTda6bDaT3aNaMeTeHmMaKcMym350koJa HaN-yeCTocPeuHnHTeYcTpoNCTBa.NopadIMHorO6pOHNHTecpeuaHcHAna3apaAVyctpoNCTBaMOxEdaceClyu,uecaHAnuEcamo Hn-yeCTo N3NoJ3BaHnTE OCHOBnФyHKn. BTo3n Cnyau nobTopet eCTbKn 5.2.1do 5.2.5,3a Da HamePte CbBMecTmKoD.3a HkON CneuAaHn MoJeN yCTPOINCTBa E B3MOXHO Da HMa HANUeH KoI.
5.3ABTomaHTuHOTbpcHeHaKoI
ABTOMaTHHOTOBpceHaKOJIN3Ib3BaCbIITenpeBapInTeHNoHAcTroeH KOIOBeKaTObpUHOToTBpCeHaKoJ(5.2).YHMBepCaIHOTOnCTaHcNOHHO npabJIeHne IpeTbPCBA, O6aue, KOIOBeTe ABOtMaTHUHO, IOKaTO 06ClyXBaUToYCTPOBCTBONOKaXepeAuzna.HanPIMEpyCTPOINCTBO3aOcNkXBaHece N3KIOUvBa (6yTOH "POWER") nII cMeHn pOrpamata (6yTOH "CH+/CH-").
5.3.1BkIIOUeTeYcTpoCTBOTo03aO6CJyKBAHe.
5.3.2 HATNCHETe 6yToHa "SETUP",doKATO CBeTOnIOBbT CBeThe 3a NoCTOHHO.
5.3.3 4pe36ytoHa 3a yctpoiCTBa n36epete yctpoiCTBOTo 3a o6cnlyXbaHe (Hanp. TV).Pn ycneuH n36op CBetOIOIOBt Mura BeHNbK i CneT TOBa CBETN NOCTOHHO.
5.3.4 HaTnCHete 6yToHa "CH+/CH-" nnn "POWER", 3a da cIaptnpate abTomatHHTO TbpcHe ha KoD. CBeTOAnoDbT Mna eENH nbT n CneT TOBa CBETn NOCTOARHHO. OTHema 6 cekyHn, DOKATO yHNBepCaJHOTO INCTAHUHO HcTPOINCTBO 3aONueC NpbTO TbpcHe.
Yka3aHme:

HactpoKaHaCkoPocTtHaTbpcHe
CtahapThataHacTpoKa3aBpeMeTo3aTbpcHeHaBceKkoJe1 cekynda.AkotobAeBnycTpoBa,MoXeTeJaACMeHntEkbMBpeMe3a TbpceHeo3cekyndnHabCEKkoJ.3aJAcMeHntEmexkydpemHaTa 3a TbpceHe,HatncheTe"CH+"nn"CH-"BpaMKte Ha6ceyni npen HauJIoTOHaABTomATNuHOTbpcHeHaKOJ.
5.3.5 CBeToIOIObT NOTBbPxAbaCbOTBEHTHnTe TbpceHnHa KoIc eINHnHO MURAHe.
5.3.6CneKatoocpoBTO3a06cnykbaHenoKaepeaknHaTnCHete 6yToHa"SETUP",3aJa3anamTeKoJaNdaHanyChete TbpcHeTo Ha KOJ.CBeTOnmOdbTn3racBa.
5.3.7 CnToBaTeCTBaIe DnCTaHcHOnHTo ynpabNeHne n npOBepTe, daJIy XeJAHInTe FyHKcIMM MORaT Da Ce ynpabNBAbT. Bb3MoXHO e NpBvIaT HaMepeH KOd Da He e Hau-nOxOJaUa, EBeHT. He Ca HauNHy BCuKN FyHKcIMN. B TozN CnyaH NobTOpe CTbKn 5.3.1-5.3.6. TbpceHeToHaKOdCTaptnPacBcCneDbaunKaOD, KOnTOcNeDbaNoCneHO 3aNaMeTeHnKoI.
5.3.83aandapekbccheaBtOMaTHUHOTOTbpcheHOBpeMeHAnpocecaHa TbpceHe,HaTNCheTe6yToHa"EXIT".
Yka3aHne

AkoBcunKoIOBe6bDaTnpetbpceH6e3ycnex,yHNBepcaHHTO DnCTaHNoHHoynpabHeHHeHanyckaABTomTuHOTbpcHeHaKOAn ABTomAtuHO Ce BpbuaBpa6ToH pexm. Tekyuo 3anaMeTeHNrT KoI OCTaBaHepomehen.
5.4Pa3n03HaBaHeHaKoI
Pa3no3HaBaHeToHaKoBnIpEaRaBb3MoXHoCTTaJaOppeJeNTeBeue 3anamTeHOTBackoI.
5.4.1 Hatnche6byToHa"SETUP",doKaTO CBeToIONoBt CBeThe 3a NoCToHHO.
5.4.2 6ytoHa 3a yctpoiCTBa n36epTe yctpoiCTBTO 3a o6cnykBAHe (Hanp. TV).Pn ycneweH n36op CBetoIOIObT Mrra BeHNbX N CJeT TOBA CBETN noCTOAHHO.
5.4.3 Hatnche ToToHa SETUP.CBeToIONoBt Mna eHn NcEe TOBa CBETNOCTOHHO.
5.4.4 Hatnche einn ot 6ytoHnTe C uHp n ot O do 93a Tbpcene Ha npBpatauHpa.CBeTOnIONbTMnRabeNbX3anBpbatauHpaHa etnpnUdpeHnHOMepHaKoD.
5.4.5 NOBTOpeTe CbNka 5.4.4 CbOTBeTHO 3a BTOpata, TpeTATA uYeTBbpTaTa UΦpa.
5.4.6 CnED TOBA MOXETE Da HAnecete OnpedeneHIN KOD B NocOeHATA NO-DOJy TaBnua, aKO IMATE HyKDa OT Hero B No-KbcEH MOMENT (HaNP. CnED n3TPBaHEnorpeWkaHAnaHCTpOKNTeHaNCTaHcUHOHHTOyPabJeHne).
| CODES | ||
| TVSOUNDSTB | ||
| DVDAUXDVBT | ||
6.CneunalHnHyHKcnn
6.1Punch-ThroughHanporpamn
CfHKnraTpaunch-ThroughHa nporpamKOMaHnTe Ch+nn Ch-Morat da 3ao6koJIaTTeKyoOpnPaBIABaHOToyCTpoiCTBOI a C MeHrTpporpaMnteHa BTOPOyCTpoiCTBO.BcNKnDpyRkOMaHnHeCa3acerHaTnOTtBa.
6.1.1ФункцяТаPunch-ThroughHanporpamceakTUBpaTaka
- Hatnche n 3a npkTe 6yToHnTe [MUTE] n [Vol+] 3a OK. 3 cekyhni,dokaTO CBeTOnIONbT3actatYCaCBETHe3aNOCTOHHO.
- Ype3 6ytoHa 3a yctpoiCTBa n36epete yctpoiCTBTO 3a o6cIyXbaHe (Hapr. [TV]).YcneuHnTn36Op ce NOTbBpKdAba C eNHOkpaTHo pEmuRbaHe Ha CBETOINOda3aCTaTyCa, KOITOCNEIToBA3aONOVAaDCBETINOCOTHHO.
BbBeTeKoJa[9][0],npu Koeto CBeToIOIObT 3a CTatYCa npemirBa 2 PtTN CJeIeTOBACBETNIOCTOARHHO. - HaTnCHete 6yToHa [Ch+]. CBeToIIOIbT 3a cTaTyC npemIrBa BeIhBX N CJIeD TOBACBETINOCTOHHO.
HaTnCHete XeJAHnIa 6yToH 3a yCTpoiCTBO (Hanp. [STB]). HAcTpOuKaTa e aKTbUpaHa, KOrATo CBeToDIONbT 3a CTAtyc IpemrHe 3 nTn n CneI TOBa m3rache.
6.1.2ФункцяТaPunch-ThroughHanporpamncedeakTbnpataka:
- Hatnche n 3a npkTe 6ytoHnte [MUTE] n [Vol+] 3a ok. 3 cekyhni,dokaTO CBETOIOBt3actatYCaCBETHe3aNOCTOHHO.
- Ype3 6yToHa 3a yctpoiCTBa n36peTe yctpoiCTBOTo 3a o6cnykBaHe (HAnp. [TV]).YcneuHnTn36Op ce NOTBbPckDaBa c eDHOKpaTHo npemurBaHe Ha CBETOINOda3aactatUca, KOITOCNEITOBa3aONOVAbaDCBETINOCOTAHHO.
BbBeTeKoJa[9][0], npn Koeto CBToOnIObT 3a CtaTyca npemrBa 2 NbTNn CJeIeTOBACBETINOCTOAnHHO.
HaTnCHete 6yToHa [Ch+]. CBeToIIOJbT 3a CTAtyc npemIrBa BeIbX n CJIeD TOBACBETINTOCTOARHHO.
HaTnCHeTe XeJAHnT 6yToH 3a yCTpoiCTBO (Hanp. [STB]). HAcTPOkata e DeakTNBpaHa, KOrato CBeToIOIObT 3a CtATyc NpeMmIHe 3 nTn n CJIeT TOBa n3rache.
Yka3aHne
Ako e BbBeDen HeBaJIuIeH KO,I, CBeToIOJIOBt 3a CTAtyc npeMnRBA 3 NtN I CNeTTOBACBeTHHepeKbCHaTO.CneTTOBAMOKeJaCeBbBeDeHOBKO,I

6.2 Punch-Through Ha cnlaTa Ha 3Byka / 6IokupaHe/OCB06KdaBaHe Ha peryIupaHTo Ha cnlaTa Ha 3Byka - 3akIIOUbaHe N OTKIIOUbaHe Ha3Byka
C cyHKueta Punch-Through Ha cnilata Ha 3Byka, KOaHnTe [Vol+] nnn [Vol-], [MUTE] moarat da 3aoBkoJrT Tekyo ynpabJraBaHOTO yCTpoIcTBo n da HAcTPOr TcnilataHa3ByKaHaABTopoYcTpoIcTBo.BcuKnDpyRkOMaHInHeca3aerHaNt TOBa.
Yka3aHne
- Pn HkON yCTpOInCTBa 6yToHInTe [Vol+], [Vol-] n [MUTE] HmAt fynKuHa. B T O3NcLyauaIINCTaHcNOHHOToynpAbeHHeaBtOMaTHHOppePaUa KOMaHdNTeKbMnporpammuPAHnTBeBn3Op.
6.2.1PpexBbPnHeHaperynnpaHToHacnlaTaHa3ByKa-3aknOVAheHa 3ByKa
HaTnCHHeI 3aIpbXTe 6yToHa [SETUP] 3a OK. 3cekyHm, JOKaTO CBETOINObT3aCTaTYCaCBETHe3aNOCTOHHO.
- 3n0JI3BaIe CbOTBETHn86yToH 3a yCTpOInCTBO (Hanp. [TV]), 3a da n36peTe JekHaHOYOCPTPOINCTBO, KbMKOEtOdaCenPexBbPnIPeryNIPAHeTOHaCnIaTa Ha 3Byka. YcneuHnTn36Op Ce nOTBbPjDaBA C eHNOKpaTHo PpeMnRbaHe Ha CBETOINOdA3actaTyCa, KOITOCNEITOBa3AnOuHbADACBETNOCTOHHO.
HaTnCHeTe 6yToHa [MUTE]. CBeToOnOJbT 3a CtaTyC npemrBa BeHbX n CneI TOBACBetINIOCTOARHO.
HaTnCHete 6yToHa [Vol+].HactpoiKaTa e aKtNbIpaHa, KOraTO cBeToIONoBt 3a CTAtyc npemrHe 3 nbTu n CneI TOBa n3rache. ByToHnTe [Vol+], [Vol-] n [MUTE]canpeXbPJIeHNyCneuHO.
6.2.20cbo6oxdaBaHeHapeRyInpaHepToHaCnIataHa3ByKa-OTKJIIOUbaHe Ha3Byka
HaTnCHete n 3aIpbXte 6yToHa [SETUP] 3a OK. 3cekyHn,doKaTO CBETOINIOBt3aCTaTVCaCBETHe3aNOCTOARHO.
- 3N0J3BaIe Cb0TBeTHH6yToH 3a yCtpoIcTBO (Hanp. [TV]), 3a da n36epete yCTPOIcTBTO, KbM KOEt e 6nlo npExBbpNeHO perynnpaHTo Ha cnlaTa Ha 3Byka.YcneuHnrt N36Op CE NOTBbpKDaBA C eDnOKpaTHo PpeMNrBaHe Ha CBEToIONo3aCTaTVCa.KoITOCNEIToBA3anoYBaACBETINOCTOHHO.
HaTnCHete 6yToHa [MUTE]. CBeToOnoIb3a CtaTyc npemIrBa BeHbX n CneI TOBACBETNIOCTOHHO
HaTnCHeTe 6yToHa [Vol-].HactpOaKaTa e EaekTbUpaHa, Korato CBeToNoDbT 3a cTatyc npemrHe 3 nbTu n Cne ToBa n3rache. ByTOHtE [Vol+], [Vol-] n [MUTE]caocBc06oDeHnuCneuHo.
Yka3aHne
- Ta3n ΦyHKπu e DeaKTHBnpuHa BB bαβρηHnte HactpOKn.
6.3MacroPower
CMacroPowerMOXeTe eHOBpeMeHHo Da BKNIOUbaTe/N3KIOUbaTe DBe AV yCTpOCTBa.
6.3.1ФункцяtaMacroPowerceakTUBpataKa:
HaTnCHHe 3aIpbXte 6yToHnTe [MUTE] n [Vol+] 3a OK. 3 cekyn, IOKaTO CBETOIOIOBt3actATyCACBEThe3anocToHHO.
- Upe3 6yToHa 3a yctpoiCTBa n36bepete yctpoiCTBTO 3a o6CnJxBaHe (Hanp. [TV]).YcneuHnTn36bOpceNOKa3BaUpe3eHNKpaTHOpemrBaHeHa CBeTOnNoJa3aCTaTyCa.KoITocNeIToBa3aONuBAJaCBeTInOCTOHHQ.
BbBeTeKoJa[9][5][0], npn Koeto CBeToOnIObT 3a cTAtyCa npemrBa 2 NttnC JntTOBaCBETNIOCTOHHO.
- 3n0n3BaIte 6yToHa 3a yCTpoIcTBO, 3a da n36peTe BTOPO To yCTpoIcTBO, KOETO ue ce o6ClyXBA (HAnp. [STB]), KOETO CbUO TpA6Ba Da CE BKIOUBA B 6bJeue.YCneuHnTn36OpCenoka3BaUpe3ENoKpaTHOnPemrBaHeA CBETONoN3aCTATVCA KOTOCENTOBa3aNoYBaJACBETNOCTOHHO.
HaTnCHete 6yToHa [OK].HAcIpoKata e aKtINBpapa yCneuHo, KOraTO CBETOIOIObT 3a CTATYC npeMnIHe 3 NtN cIeT TOBa I3rache.
6.3.2Функштмacr macroPowercedeakTbBnpaTaka:
HaTnCHHeI 3aIpbXte6yToHnte[MUTE]n[Vol+]3aOK.3cekyHn,IokaTO CBETOIOIObT3actATyCaCBETHe3aNOCTOHHO.
- Upe3 6yToHa 3a yctpoiCTBa n36epete yctpoiCTBTO 3a o6cnyXBAhe (Hanp. [TV]).YcneuHnTn36bOpceNOKa3BaUpe3eHNKpaTHOnPemrIBaHeHa CBETOINOda3aactatTuCA, KOUtOcJIeTOba3aONoVBaIacCBETINOCToHHO.
BbBeTeKoJa[9][5][0], npn KoETO CBETOIOIObT 3a CTAtyCa npemirBa 2 NbTNn CJeNTOBACBTINOCToHHO.
- 3n0JIbAaIte 6yToHa 3a yCTpoINCTBO, 3a da n36peTe 2-TO yCTpoINCTBO (HAp. [STB]), KOEtO Docera cbIoo ce e BKIIIOVAIIO. YcneuHnIr n36Op ce noka3Ba qe3eHNOKpaTHONpEMNRBaHeHaCBeTOnIOJa3actaTyCa, KOITOCJeTOba 3aNOvBAdaCBETINOCtOHHO.
HaTnCHete 6yToHa [EXIT].HAcTpouKaTa e DeaekTnBnpaHa, KOrATo CBeToIONoBt 3a CTatyc npemrHe 3 nTu n CneI TOBa n3raChe.
Yka3aHne

Ako e BbBeH HeBaJIIneH KOI, CBeToIOIOBt 3a CTAtyc npemrBa 3 nTn I CNeITOBaCBETINHepeKbcHato.CneTTOBaMOKe,IaceBbBeHOBKOJ.
- PexmbT "Setup" ce npekpaTBA ABTomATNuHO cneI OK. 30 ckyHn, ako He ce HATNCHE hKoN 6yToH. CBeToIOJbT 3a CTAtyc MInrA 3 NbTu n Cnei TOBAn3raCBA.
7.FyHKmra3ao6yHeHne
Toba nctaHnOHNo ynpabIeHne e o6OpyDbaHo c fynKcIa 3a o6yHeHne. C HeHaNOMOoMoxKeTeanPexBbPInTefpyHKcIuTeHaBaWeTooprHaJIHO nCTaHnOHHOynpaBNeHHeHtOBayHBePcaJIHOncTaNCHOnHOynpaBLeHne.
7.1PpeiIaTapTpateyHKuMaTa3a06yuHne
-06bpeTeBHHMaHHeHa6e3yIpeHuOTcToHaHEHaBCNkMn3NoJ3BaHn 6aTeepnn B DBeTe DuctaHIOHNy ynpabJeHn. Pn HxKda rncMeHeTe.
IocTabete BaWeto opunHnHO nCTaHNoHNO ynpabHeHne uHyBepcaHOTo DnCTaHNoHHOuynpabHeHneEDHOIOpyrOtaKa,YeHNppaepBeHtEeNDOni HaNCTaHNoHHHTeynpabHeHnaaceHaMnPaTHenOpceDCTBeHOeHNHaJd npyf.
Ako e Heo6xoJIMMO KopurnpaTe BnCOUHnHa Ta Ha DBeTe NCTaHnOHn YnpabHeHne,3aDanoCTnHrTeoNTmAmHnHO npABHBaHe.
- Pa3cTOnHHeTo MekDy DBeTe NuctaHcUHHn YnpaBHeHn Tp6Ba Da e OK. 3 cm.
6in1

ca.3cm
ORIGINAL
Yka3aHne
-HeBnKTeIeNCTaHcNIOHHNTEynpaBneHnOBpeMeHa npoccaHa obyehne.
YBepetce,eynpocBETneHnetoHAnomeeHHeTOHeCTaBaBbnpoc3a LymHecuHTnTpb6nnnHepePCNECTBaUKNpyuKn,3aIoToTEMOra Da npedINBkAT CmyueHnN da nonpeyat Ha npoceca Ha obyeHne.
Pa3cTOnHHeToHaDBeTeHCTaHcUOnHHuNpabJIeHnHOa-6JIM3KIN3TOUHN HA CBETInHa Tp8Ba Da e MmHmym 1 MeTp.
-ⅠpouecbTbHa06yueHnecepeKpTaBa63anaMeTBAhe,akONOBpeMe HaaKTINBnpaHnpOueChao6yueHne3a30cek.He6bJeHaTnCHaT6yToHNi He6bJenpnietCnHaj.
B npouec Ha obyeHne BCEKn 6yToH MoKe da 6bJe 3aet cAmO c eHa cyHKnna.HOBaФyHKnnaIpe3aIINcBaO6yHeHaTaIOMoMeHTabBpxyTO3n 6yToHФyHKnna.
- BytoHnTe TV, DVD, STB, SOUND, AUX, DVBT n SETUP He morat da ce 3aematc HOBuФyHKUIN.

7.2AKnBnPaHnAnpouecaHa06yHeHne
- HATNCHETe eHOBPemHeHn 3aApbXte 6yToHnTE [MUTE] n [VOL+] 3a OK. 3cekyn,doKATOCBETOnIO,bT3actaTyCaCBtHe3anocToHHO.
- 3n0n3BaIte6yToHa3aYcTpoiCTBO,3aDaH36peTe yCtpoiCTBOTO (Hanp. [TV]),3akoTeOTPra6BaJadaceOeBuHOBaФyHKUry.YCneuHnAtn3bOp ceNtBbpxJaBa C eHOKpaTHo PpeMnBaHe Ha CBetOnIOda 3a CTatyca, KOITOCNEITOBa3AnOuBaJadCBETINOCTOHHO.
- BbBeTe Kda [9] [8] [0], npn Koeto CBeToIONoBt 3a CTatYca npemrBa 2 nTIN CJeTTOBACBETNIOCTOARHNO.
- Cera yHnBepcaJHOTo dIcTaHIOHO ynpabJIeHne ce HAMIPA B pexm Ha 06yueHne.
Yka3aHne

AkoCBetoIOIOBt 3a CtaTc npemHre 8 nI npexmblHa o6yehne Ce npekpatn ABTomauHO, Bce cTe o6yHn TBbpDe MHOrO 6yToHn HaJIHn Hata NaMe e NbHa. DntaHnOHTO ynpabHeHne MoKe Da 3aNaMetn Makcmym125o6yeH6yToHa.
- Ako He e HanpaBEN 360b np Ha yCTpoNCTBO, ABTOMaTHHO Ce n3NOJ3BA NOcJIeHNrTHAnpaBEN36OpHayCTPOINCTBO.
7.3PpexBbPnHafoyHKnnaHa6yToHn
1.Hatnche6yToHaBbpyOpnHaHnHToNDctaHcNoHHOynpaBneHne,HytofynKznnckateDanpexBbplnte.3anOTbpxJdHne,YeKOMaHdaTa e npeta,CBeTOIONbT3aCTaTycaHayHNBepCaHOTOnCTaHcNOHO ynpabHeHMeNra.
2.CeraHaTncHete6yToHaHaayHnBepcAaHToOncTaHcuOnHoynpaBnHe, BbpxkyoIToTp4BaDab6bDenpexBbPneHaftyHKunraTa.
3.ФункционаннгсБЕТОДМнHAYHNBEPcAнTOHOTaHUNHOHoynpaBHe Hne Mnra 3птИЗа NOTbPxJDEHne I CNeI TOBA CBETN HeNpeKbCHaTo. HobatafYHKUncerae 3 anaMeTeHa.
4.3aapanpexBbplnteФyHKUINTeHaDpyf6yTOHn,NOBTOpeTe3NCTbnKn
5.HaHnCHeTe6yToHa[SETUP],3aJa3aIamEtneBCNkuO6yeHnФyHKuINn daHanyChTepeKImaHaO6yHeHne.
Yka3aHne

PnncmaHaabaTeepnteHayHnBepcAHOtOaHIOHooHoynpabHeHne yHKunTeHa06yueHte6yToHnce3ana3BaT.
7.4N3tpnBaHaeha6yueHHyHKuun
7.4.1N3tpnBaHeHaObYeHaQyHKcun
- HaTnCHeTe eHOBpEmHo n 3aApbXte 6yToHnTe [MUTE] n [VOL+] 3a OK. 3cekyn,doKaTOCBETOINO,bT3actaTyCaCBeThe3anocToHHo.
- 甲pe36ytoHa3aH36opHa yctpoiCTBO H36epeTe TOBa yctpoiCTBO (Hanp. [TV]), 3a KoETO Tp8bA Da 6bIe N3TpTa 3ayHe fynKzma. YcneweH 36Op ce 06o3HaHaa Ype3 eNHOkpaTHO MmraHe Ha LED INHdkatopa 3a CbCTOHNTo I N OcNeDBAUONOCTOHHOCBeTeHE.
- BbBeIeTe KoJa [9] [8] [1], npn KoTo CBeToDIOBbT 3a CTAtyCa npemrBa 2 NttnC JneT0BAoTHOBOCETINOCTOHHO.
- Hatnche6ytoHaunrTophiHKnnaCKate Da n3tpneTe.CBeToOnoBt 3a cTAtyca Mna 4 nTn n 36paHata fynKcnna e n 3tpnTa.
7.4.2U3tpnBaHaeHbCUNKIOBcyHEnyHKcM
- HaTnCHete eIHOBpeMeHHo 3aApbXte 6yToHtE [MUTE] n [VOL+] 3a OK. 3cekyHd,IOKaTOCBETOINO,Db3aCTaTyCaCBETHe3AnocToHHo.
- 1360ha ha yctpoiCTBO n36epe ToBa ycTPOIcBO (HaP. [TV]), 3a KoEtToPbBa da 6bDat n3TpTN BChuKN 3ayueHNyHKun. YcneuHn36op ce o6o3Haaba ype3 eHNOkpaTHo MmraHe Ha LED mNdkatopa 3a CbCTOHHTe NocJeBAAIO NOCTOHHO CBteHe.
- BbBeTe KoJa [9] [8] [2], npi KoTo CBeToDnOdbT 3a CTAtyCa npemrBa 2 NttnC JneTObaOTHOBOCBETNIOCTOHHO.
4.HaTnCHeTe6yToHa[SETUP]npKoETOCBETOIONoBt3actatYcapanpeMnRBA 4 nTn N BCNUO6yeHn FyHKUm Ca n3TpTu.
8.BpbuaheKbMpa6pnuHTeHaCTpoKn
8.1 HATNCHEt n 3aPbXte 6yToHa [SETUP] 3a OK. 3 ckyHn, DOKATO CBETOINObT3actaTyCaCBETHe3aNOCTOHHO.
8.2HaTnCHete6yToHa[MUTE].CBeToIOIObT3aCTaTycnpemRBAeHbXn CNeIToBACBETNOTHOBONTOAHO.
8.3 HaTnCHete 6yToHa [0]. CBeToOnIOBt 3a CTatYca npemrBa 4 nBtN nDnCTaHcNOHHOTO ynpabJIeHne E BbpHato Do φaBpHHTe HAcTpONK.
Yka3aHne

BcunKHaHpaBeHHHaCTpOuKnHaYcTPOJCTBOToN O 6yueHnФyHKUncne 3TPNBaTnPbBpuaHeKbMΦa6pnHHTeHaCTpOuKn.
9.Полдрьжka
HnKora He n3no3BaIte eHOBpeMeHHO CTapu HOBu 6aTePN B yHnBepcaJIHOIOCTAHUHOHOHNOHPaBHeHne,3aIoTOCTApNTe6aTePMNIMATCKIOHOCT KbM n3TNUAHE N MoRat Da IOBeDAt Do 3aYbHa HA MOUHOCT.
B HnkaKbB CnyaH He NoCTBaTe yHNBepCaHHTO nCTaHNoHHO ynpabHe C a6pa3NBn CpeCTBa IIN arpeCUBH NooCTBaI npenapATN.
-ПодьркайтеспсанционнотурпавленичсгсгггггггггггггггггггггgBaTeCbCcYxamekakbpna.
10.0TCTpaHbAbeHaHeu3npaBHOctn
B.MoToyHnBepcaJIHOIOCTaHcIOHOHOypaBJIeHHeNeHcyHKcIOHnpa!
O.IpOBepTe AV yCTpoIcTBOTo.AKO IJIaBHNrT NpeBkHIOuBaTeJn Ha yCTpoIcTBOTo eN 3KJIIOUeH,yHINBepCaJIHOtOJaNTaHcUNOHHOynpaBNeHHeMeMOxega O6ClyKBayCTpoIcTBOTo.
O.IpOBepe, daJIb 6atePnte ca noCTaBHeH npabINHO n noJIpyHocT Ta e 6nla cna3eHa.
O.IpoBepete,daJIINCTe HATNCHAN CbOTBETHNA 6yTOH 3a yCTPOICTBO.
O.PnHnCbK3apArdHa6aTepeInrTeImcMeHeT.
B.Ako3aMapkaTahAmoetoAVyctpoiCTBOcAnocOeHnHKOJIKOKoJa3a yctpoiCTBO,Kakdaun36epanpaunbuiHnHkoJQ
O.3a da onpeenite npabnHnna K0d 3a AV yctpoiCTBTO, TcTeBaIte KOIOBete eINHCJIeDpyr,OKaTOnOBeYeTo6yToHnOHyKUHOHpaTnpabnHIO.
B.Moeto AV yctpoiCTBO pearnpa cAmo Ha HraKOn KOMaHn OT 6yToHn.
O.OnntaTc npyr KOD,doKATO NOBueTeo byToHn FyHKUHOHnpaT npabuHNO.
B. MapkaTHa MoETo AV yCTpoNCTBO He e NocOeHa B CnncbKa C KOIOBe.
O.BTO3nCnyaHn3no3BaIte p6yHOToTbpcHeHaKoI(rna5.2)IJI naBtOMaTHUHOToTbpcHeHaKOJ(rna5.3).PpINpOceCaHaTbpcHeHa KOIBCNUKKOIOBE3aJaDEHTNHyCTPOINCTBOCETeCTBaT6e33HaueHHeOT npON3BOIDNTeJIa, T.e.Hanp.BcUKN KoIOBe 3a SAT npneMHNK, He3ABNCIM0 OT npON3BOIDNTeJIa.
B.Ⅲπρo6BaxBCnHnHaJIuHnKoIDoe3aMapKaTaHaMoEToAVyctpOCTBOOT CnncbKa C KOIOBE, HO HNKOI OT NOCOeHInTe KOIOBe He ΦyHKUOnHnpa.
O.BTO3n CnyaHn3no3BaIte p6yHOTo TbpcHe Ha KOJ (rna5.2) nIa ABToMaTHuHOToTbpcHeHaKoJ(rna5.3).PpInpOceCaHaTbpcHeHa KOIBCNUKIOKOIOBE3aJaDEHTNpyCTPOINCTBOCETeCTBaT6e33HaueHHeOT npOn3BOIDNTeJI, t.e. HAnp. BCNUKIOKOIOBE 3a SAT npHEmHik, He3aBNCIM0 OIT npOn3BOIDNTeJI.
11.N3KNH0yBaHeHaOtroBOPHOCT
Hama GmbH & Co KG He noema OTROBOPHOCT nI rapaunca 3a nobpei, KOnto ca pezytat ot HnnpabUNHa mHctalaucn, MOHTax uynotpeba Ha npOyka TnN OTHecna3BaHeApbKOBOcTBOT03aekcnloatauau/nnHayKa3aHnraTa3a 6e3onacHOCT.
12.yKa3aHn83an3XbBpIHe
Yka3aHneoTHOcH03aunTaTahaOKoJHaTaCpeJa:
OTmOmeHaHaHnPaHnAeHaeBpOneNcKnteDnpeKtBn 2012/19/EU n 2006/66/EO B HaaNoHaHnHOTo npaBO Ha CbOTBeHTHe CTpaHn BaxKn CneHNOTo: ENeKTpnueCKnTe N eNeKTPOHnTe ypei n 6atePnnte He 6Ba Na ce N3XbBpJrT C bNTOBHe O TNaDbu. Iotpe6nTeIe T JbXeHnO3aKaOHnDaBbpHeeNEKtpnueCKnTe
eNEKtpoHnHTe ypeiN 6aTepeHnTE B KpaHa TeXHHN EKcIIOAtaUHOHe CpOK Hau3rpaJeHnTe3aueJItaO6IeCTBeHNyHKTOBe3acbupaHHeaOTnaDbuIN HInHaTbProBcknro6EKT. IOpno6HocHTeNoBbnpocaperJAmEHNTpaHn B 3aKOHDoTeNCTBOTO Ha CbOTBeTHaTcTaHa.CmBOJbT BbPx npOyKa, YtTBaHETo3ayNoTpe6aIIIONaOBKaTahAcOyBaKbMte3nPa3nopei6n. Upe3peuKlnpaHTo, npepa60TKaTahAmATEpnaJIteENIpyrHΦopMHa onoJ3OTbOPraBaHehactapTeyei/6aTepeHHBueOnpHacrTe3a3aunTaHa HauataoKoJlnHacpeJa.
Tnlexpiotnpoyevikcxponc
ZaeuxapiotoumuoueuaEaevanpoovtncHama.
5.1Aeonkataxwpionkwokw
6.1Punch-Throughkavaλωv

m = 311 ;
86652Monheim/Germany
Service& Support

www.hama.com

+499091502-0
D GB