
Speedshot Ultimate 54478 - Controller HAMA - Free user manual and instructions
Find the device manual for free Speedshot Ultimate 54478 HAMA in PDF.

| Product type | Controller converter for console |
| Brand | Hama |
| Model | Speedshot Ultimate 54478 |
| Compatibility | PS3, PS4, Xbox 360, Xbox One |
| Connectivity | USB (2 front ports for mouse/keyboard, 1 side port for controller) |
| Power supply | Via console USB port |
| Dimensions | Approximately 10 x 5 x 2 cm |
| Weight | Approximately 100 g |
| Main functions | Key programming (11 channels), mouse settings (speed, dead zone, Y-axis inversion), turbo functions, automatic fire, permanent fire, circular menu support |
| Care and cleaning | Clean with a soft, dry cloth. Do not use solvents or abrasive products. |
| Safety | Do not open or modify the device. Any unauthorized intervention voids the warranty. |
| Spare parts and repairability | No spare parts available. Contact Hama customer service for any issues. |
| General information | Requires a compatible controller for each console. Works best with recommended mice and keyboards (see compatibility list). |
Frequently Asked Questions - Speedshot Ultimate 54478 HAMA
User questions about Speedshot Ultimate 54478 HAMA
0 question about this device. Answer the ones you know or ask your own.
Ask a new question about this device
Download the instructions for your Controller in PDF format for free! Find your manual Speedshot Ultimate 54478 - HAMA and take your electronic device back in hand. On this page are published all the documents necessary for the use of your device. Speedshot Ultimate 54478 by HAMA.
USER MANUAL Speedshot Ultimate 54478 HAMA
Operating Instructions
Bedienungsanleitung
Mode d'emploi
The keyboard and the mouse are set to the following default settings:
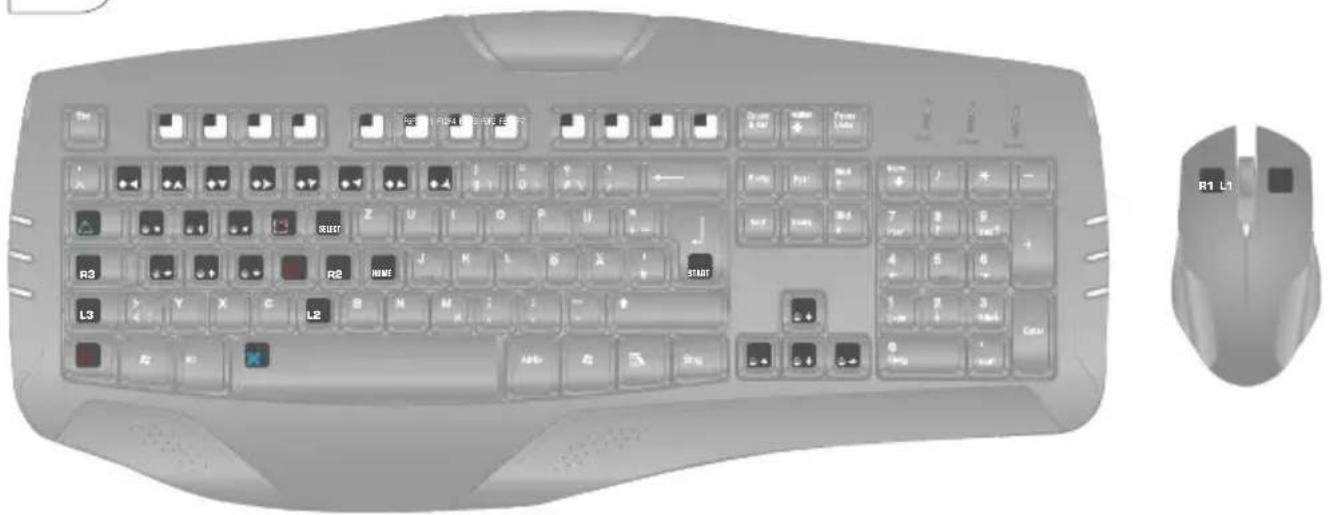
PS3

natural_image
Row of six gray square icons with white symbols, no text or labels presentCorresponds to the left analog stick

natural_image
Row of eight gray square buttons with white geometric shapes, no text or symbols presentCorresponds directional pad
Xbox One


Corresponds to the left analog stick

natural_image
Row of eight gray square buttons with white geometric shapes, no text or symbols presentCorresponds directional pad
Default settings
The keyboard and the mouse are set to the following default settings:
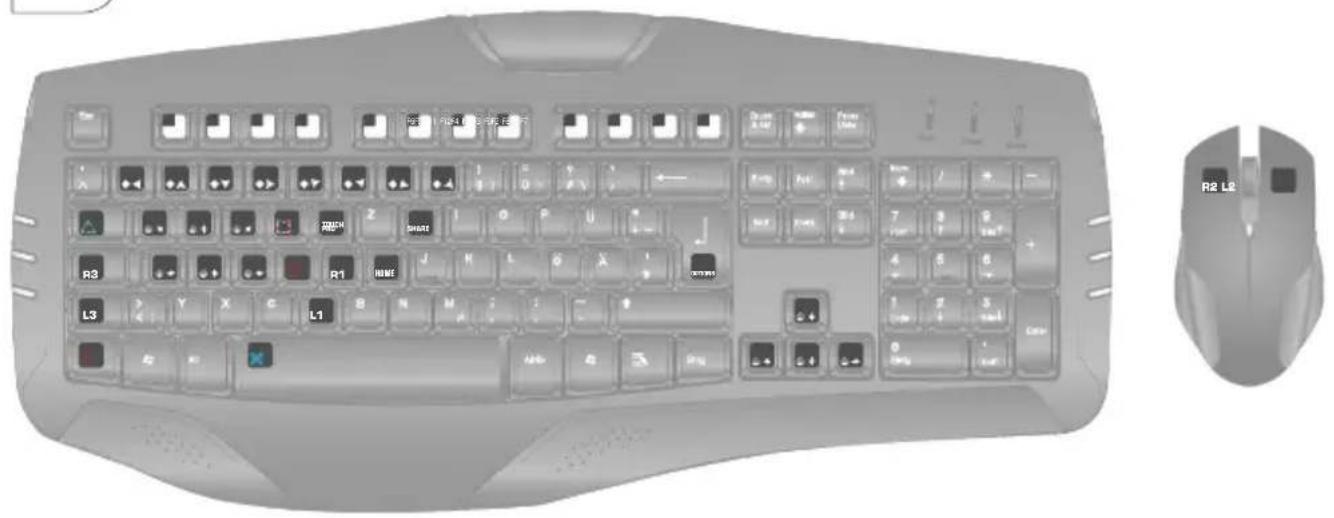
PS4

natural_image
Row of six gray square icons with white symbols, no text or labels presentCorresponds to the left analog stick

natural_image
Row of eight gray square buttons with white directional arrows, no text or symbols presentCorresponds directional pad
Xbox 360


Corresponds to the left analog stick

natural_image
Row of eight square icons with white arrow symbols, no text or labels presentCorresponds directional pad
I. Getting Started....3
Mouse....3
Keyboard....3
Controller 3
II. General assignment.... 5
Key programming (for experienced users): 5
-
Select an available configuration profile: ....5
-
Changing key configuration ....5
III. Mouse settings ....5
-
Inverting the mouse movement on the Y-axis ....5
-
Adjusting mouse speed....6
-
Setting the dead-zone ....6
-
Assigning mouse movement....6
IV. Additional functions....7
-
Rapid-fire function....7
-
Auto-fire function ....7
-
Constant-fire function....7
-
Add-On for circular menus....8
V. Troubleshooting.... 8
-
Look for a solution on the Hama Gaming YouTube channel....8
-
Reset to factory settings....8
-
Update the software....8
-
Driver update installation instructions....9
VI. Support and contact....9
VII. Safety instructions.... 9
I. Getting Started
- First, check whether your accessory is compatible with the Speedshot Ultimate.
Mouse
- With USB connection
- Wired
• Very high dpi resolution - On the Speedshot compatibility list
- Recommendation: Hama uRage Illuminated mouse (Hama item number: 113722)
Keyboard
- With USB connection
- Wired
- Without macro/hub function
- Without mouse function
- On the Speedshot compatibility list
- Recommendation: Hama uRage Illuminated keyboard (Hama item number: 113728)
Controller
- Xbox360: Use on the Xbox360 requires a wire Microsoft Xbox360 controller. Unfortunately, a wireless controller with a charging kit will not work. This is because the charging kit can transmit power, but not data.
- PS4: Use on the PS4 requires a fully charged Sony DualShock 4 controller.
-
Xbox One: Use on the Xbox One requires a Microsoft Xbox One controller.
-
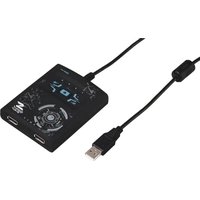
Connect the mouse and keyboard to the two USB ports on the front of the converter. The interface on the side is intended exclusively for connecting the controller. However, it does not matter which of the two front interfaces you use to connect the mouse or keyboard.
-
Now, disconnect the other controllers from your console. For wireless controllers, you have to log out of the console or switch it off.
- Connect the controller (not required for the PS3)
4.A) For use with the PS4 & Xbox One Take the included Micro-USB cable and connect it to the USB port on the side of the Speedshot. Connect the other end of the Micro-USB cable to your switched-off Sony DualShock 4 or Xbox One controller.
4.B) For use with Xbox 360
Connect your wired Microsoft Xbox360 controller
straight to the USB port on the side of the converter.
5. Now, connect the Speedshot's connection cable straight to your console using an available USB port (never a USB hub)
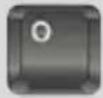
6. Next, press the home button in the middle of the Speedshot converter to start up the Speedshot. Pay attention to the Player LEDs (1-4) on the converter. The Speedshot always connects to the next available channel. If you want to play as Player 1, switch the other controllers off and repeat the procedures that the Player 1 LED lights up.
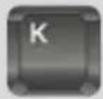
7. The LEDs "M" (for mouse) and "K" (for keyboard) on the converter let you see if the mouse and keyboard have been correctly recognised. If the LEDs are not lit up as in the image below, try connecting the converter again or, if possible, try to connect a different keyboard or mouse. If you have problems, you can either consult Section VI of the operating instructions or contact our Customer Support team (contact details in Section VII).

8. Configuration
Once the mouse is ready for use, the resolution and speed can often be further optimised. The large number of different mouse chip sets and control engines for games means that there is no single optimal setting.
You can set your own personalized, optimal resolution/speed by adjusting the following 4 parameters:
- Mouse speed in the Options menu of the individual game (see the operating instructions for the game)
- D PI switch on the mouse (available as a feat on most mouse models)
- Speed settings on the Speedshot (details can be found in the operating instructions under "IV. Item 2")
- Dead zone settings on the Speedshot (details can be found in the operating instructions under "IV. Item 3")
- Y-axis distortion: via the included software (see software operating instructions)
Due to the number of different game engines on consoles, the Speedshot converter does not provide the exact same control as a Gaming PC, however by adjusting it optimally and using good equipment (see the included list of compatible equipment), it's possible to aim and look around much more precisely and quickly than with a controller. Hama Gaming is not liable for any unfair competitive advantages that result when used in Online mode.
9. Connecting headsets
andFor u se with PS4:

Note
If the headset is connected straight to the controller, no signal can be forwarded.
- Connect your headset straight to the round 3.5 mm connection to the right of the Speedshot converter.
For use on Xbox One

Note
Because of an accessories limitation for Xbox One, only the small Microsoft Xbox One mono headset can be used for the Skype app. Unfortunately, general use of the in-game chat is not possible.
- Connect your wired Microsoft mono headset straight to the connected Microsoft Xbox One controller.
- Install the Skype app and make a test call after starting the app to test the headset's functionality.
For use on Xbox 360

Note
Because of an accessories limitation, only the small Microsoft Xbox 360 mono headset can be used.
- Connect your wired Microsoft mono headset straight to the connected Microsoft Xbox360 controller.
- Briefly press the home button to open the home menu and select "Friends".
- Select one of your friends and then "Send message"/"Add voice output".
- Recordamessage and listen to it yourself to test your headset's functionality.
For use on the PS3:
Connect the headsets as previously using Bluetooth or directly to the console via USB.
II. General assignment
(key- & o ptimisation settings)
Key programming (for experienced users):
1. Select an available configuration profile:
The function keys (F1-F12) allow you to save various key configuration profiles. The factory setting of the keyboard is a automatically set to F1, which is the only profile that is pre-assigned and can not be changed. To assign the keys individually, select one of the 11 configuration profiles available (F2-F12) Up to 11 different configuration profiles can be saved at any given time.
To switch to one these profiles, type "Alt" and the respective function key together:
| Shortcut Function | |
| Alt + F1 | Standard P rofile |
| Alt + F2 | Programmable profiles |
| Alt + F3 | |
| Alt + ... | |
| Alt + F12 |
2. Changing key configuration
(only possible for programmable profiles 2-12)
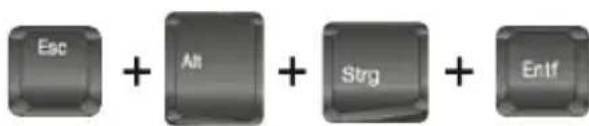
2.1 Press and hold the "Esc" key until you get to Section 2.4 in these instructions
2.2 Tap the key whose standard layout should be reassigned lightly and briefly (the LED "P" on the converter should light up)
Info:
- No matter how much you reprogram, during the programming, all functions in all channels are always on factory setting (see illustration of the factory setting).
- The assignment of the functions works on all standard keys of the keyboard (but not macro, multimedia, F-keys or ESC) and on standard buttons of the mouse (left, right, middle and the "Back" and "Forward" buttons, which are mostly found on side of the mouse).
2.3 Press the desired target key
2.4 Now release the "Esc" key. The key is now re-assigned.
III. Mouse settings
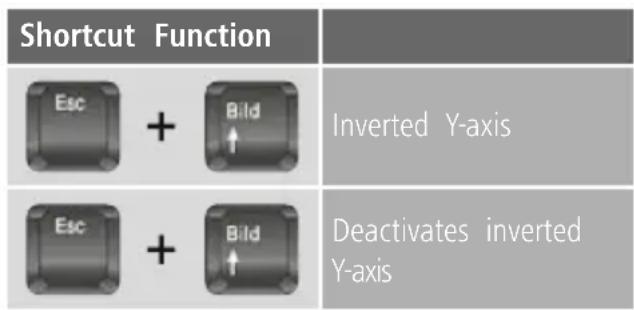
- Inverting the mouse movement on the Y-axis
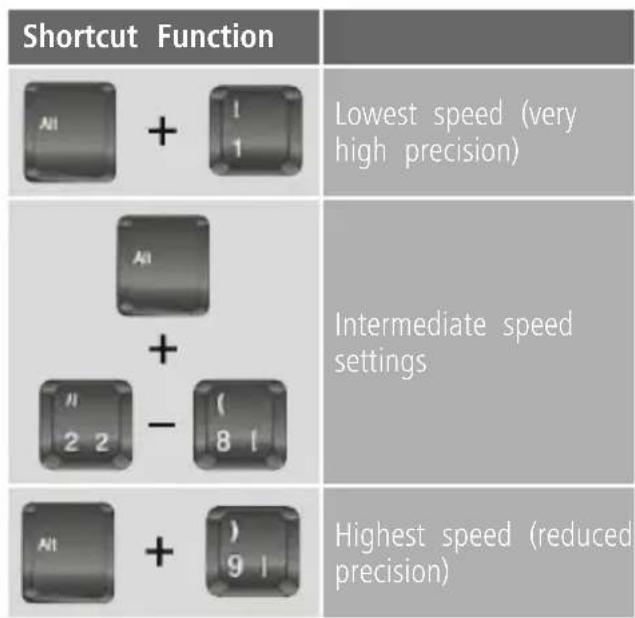
2. Adjusting mouse speed
The higher the speed is set on the keyboard, the quicker the converter needs to emulate the movements. Due to the fact that the movement can be slightly distorted the higher the level is set, we recommend that you first raise the mouse speed as high as it can go before the speed is 'adapted' even higher.
| Shortcut Function | |
| Minimum dead-zone (suitable for high-resolution mouse devices) | |
| Intermediate dead-zone settings | |
| Maximum dead-zone (ideal for very low-resolution mouse devices) |
The factory-setting speed level is set to 5.
4. Assigning mouse movement
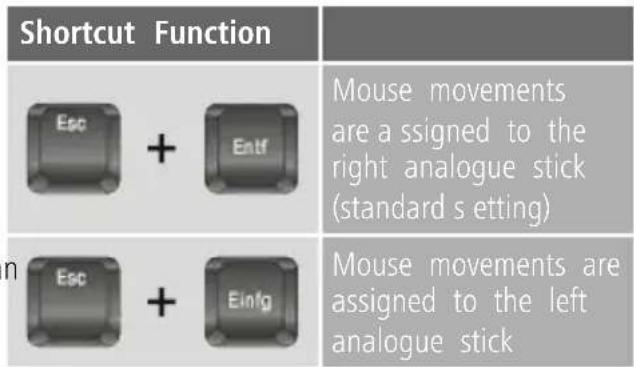
The factory setting assigns the mouse movement to the right analogue stick. If you want to use the left analogue stick to control the mouse, you can switch the modes using the following key combination:
3. Setting the dead-zone
(for experienced users)
The dead-zone determines the speed at which a movement command is registered in the game. All mouse movements that happen under the dead-zone are not recognised in the game. If you would like to optimise the precision of your mouse, you can choose from the following options:
IV. Additional functions
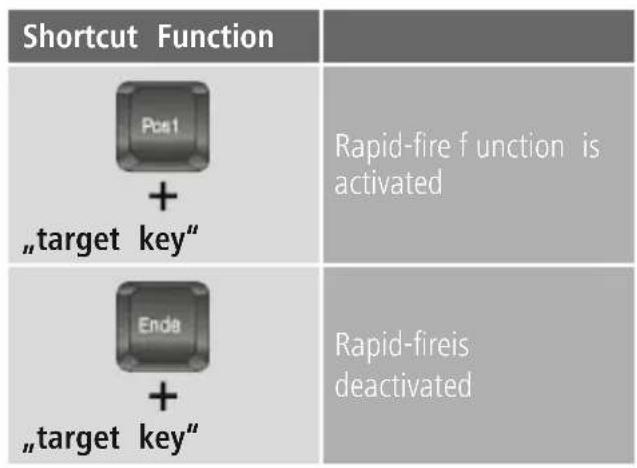
1. Rapid-fire function
The rapid-fire function simulates a quick, repeated keystroke while a key is being held (for example, rapidly fireahandgun or to jump quickly to dodge something) Use the following shortcut keys to activate this function:
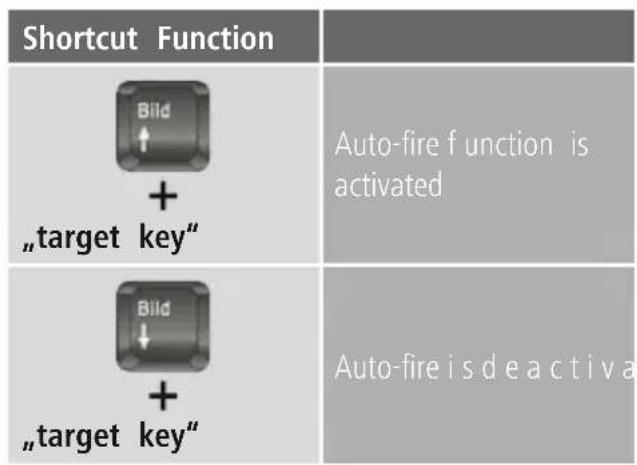
2. Auto-fire function
The auto-fire function simulates a quick, repeated keystroke without having to press the key. Once auto-fire is activated using the key combination, the quick repetition of the keystroke will be simulated until the respective key combination deactivates the function.
3. Constant-fire function
The Constant-fire function simulates a constant pressing of a button, even though you only tip on the button shortly. For instance, your game to character can walk through the entire game world, by pressing only one button shortly.
| Shortcut Function | |
| Druck S-Abf + "target key" | Activating Constant-fire |
| Pressing "Target Key" again | Deactivates the Constant-fire until the button is pressed again |
| Druck S-Abf + "target key" | Deactivates Constant-fire a t t his button completely |
4. Add-On for circular menus
In many console games (e.g. Mass Effect, Red Dea Redemption, Deus Ex) the gaming menus work on base of circular menus. Using these circular menus with a keyboard and mouse, is often a tricky issue.
With the pre-installed Add-On it is possible though, to start a control stick rotation in circular menus b only keeping one button pressed.
If the games circular menu is controlled with the left stick:
| Shortcut Function | |
 | Moving the cursor anticlockwise through the circular menu |
 | Moving the cursor clockwise through the circular menu |
If the games circular menu is controlled with the right stick:
| Shortcut Function | |
 | Moving the cursor anticlockwise through the circular menu |
 | Moving the cursor clockwise through the circular menu |
V. Troubleshooting
If you are having problems with the converter, you have the following options:
1. Look for a solution on the Hama Gaming YouTube channel
/Go to www.youtube.com and search for the following keywords to find tutorials for the adapter: "Hama Gaming Speedshot Converter". Here you can find detailed instructions to optimise your adapter's settings, as well as tips on helpful ways to use the additional functions.
2. Reset to factory settings
All settings (including key configuration) will be deleted from all profiles and the original settings will be restored:
Important!
Wait at least 10 seconds after resetting to be sure that all of the data has been reset. Disconnecting the adapter too soon may lead to malfunctions.
3. Update the software
3.1 Go to www.hama.co.uk.
3.2 Enter the item number 00054478 in the search field.
3.3 Click on the item. If you don't see the item, click "Downloads" to open the Downloads tab and then click "Drivers".
3.4 Download the driver and install it on your Speedshot converter as follows:
4. Driver update installation instructions
4.1 Double click on the driver and leave the driver window open on your screen.
4.2 Press and hold the Home button in the middle of the converter.
4.3 Connect the converter directly to a USB interface on your PC, still holding the Home button the entire time.
4.4 As soon as the driver window indicates under "Device" that the adapter has been recognised, you may release the Home button.
4.5 Select "UPGRADE".
4.6 Do not disconnect the device until you are informed that the update was completed successfully.
VI. Service and Support
Please contact Hama Product Consulting if you have any questions about this product.
Hotline: +49 9091 502-115 (German/English)
Further support information can be found here:
www.hama.com
VII. Safety instructions
- Do not attempt to service or repair the device yourself. Leave any service work to qualified technicians.
- Do not modify the device in any way. Doing so voids the warranty.
I. Getting Started....11
Maus....11
Tastatur....11
Controller 11
8. Konfiguration
8. Configuration
8. Настройка
8. Конфигурация
GB Note on environmental protection:
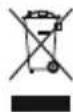
After the implementation of the European Directive 2002/96/EU and 2006/66/EU in the national legal system, the following applies: Electric and electronic devices as well as batteries must not be disposed of with household waste. Consumers are obliged by law to return electrical and electronic devices as well as batteries at the end of their service lives to the public collecting points set up for this purpose or point of sale. Details to this are defined by the national law of the respective country. This symbol on the product, the instruction manual or the package indicates that a product is subject to these regulations. By recycling, reusing the materials or other forms of utilising old devices/Batteries, you are making an important contribution to protecting our environment.
- Default settings
- Getting Started....3
- General assignment.... 5
- Mouse settings ....5
- Additional functions....7
- Troubleshooting.... 8
- Support and contact....9
- Safety instructions.... 9
- Getting Started
- Mouse
- Keyboard
- Controller
- Configuration
- You can set your own personalized, optimal resolution/speed by adjusting the following 4 parameters:
- Connecting headsets
- andFor u se with PS4:
- Note
- For use on Xbox One
- For use on Xbox 360
- For use on the PS3:
- General assignment
- Select an available configuration profile:
- Changing key configuration
- Info:
- Mouse settings
- Adjusting mouse speed
- Assigning mouse movement
- Setting the dead-zone
- Additional functions
- Rapid-fire function
- Auto-fire function
- Constant-fire function
- Add-On for circular menus
- Troubleshooting
- Look for a solution on the Hama Gaming YouTube channel
- Reset to factory settings
- Important!
- Update the software
- Driver update installation instructions
- Service and Support
- Safety instructions
- Getting Started....11
- Konfiguration
- Настройка
- Конфигурация
- GB Note on environmental protection:
Brand : HAMA
Model : Speedshot Ultimate 54478
Category : Controller