GDC40 - Pressure washer GREENWORKS - Free user manual and instructions
Find the device manual for free GDC40 GREENWORKS in PDF.
User questions about GDC40 GREENWORKS
0 question about this device. Answer the ones you know or ask your own.
Ask a new question about this device
Download the instructions for your Pressure washer in PDF format for free! Find your manual GDC40 - GREENWORKS and take your electronic device back in hand. On this page are published all the documents necessary for the use of your device. GDC40 by GREENWORKS.
USER MANUAL GDC40 GREENWORKS
English (Original instructions)
SPECIFICATIONS
| Model GDC40 | |
| Rated Voltage 40V | |
| Rated Pressure 5.5 MPa | |
| Permissible Pressure 7 MPa | |
| Power Rating 650W | |
| Rated Water Flow 3.7 l/min | |
| Maximum Water Flow | 5 l/min |
| Maximum Water Inlet Pressure | 0.7 MPa |
| Maximum Water Inlet Temperature | 40°C |
| LPA(sound pressure level) | 76.38dB(A),K:3.0db(A) |
| LWA(sound power level) | 92.34dB(A),K:3.0db(A) |
| Protection Degree | IPX 5 |
| Vibration < 2.5 m/s² K=1.5 | m/s² |
| Battery | 29717/ 29727 |
| Charger | 2910907 |
DESCRIPTION
See figure 1.
- Handle
- ON/OFF Switch
- Water outtake
- Bucket
- Bucket buckle
- Base unit
- Battery door
ASSEMBLY
UNPACKING
This product requires assembly.
- Carefully open the carton, then remove the product and any accessories from the carton.
If in doubt, call Greenworks Tools Customer Service for assistance. Operation of a product that may have
been improperly preassembled could result in serious personal injury.
Inspect the product carefully to make sure no breakage or damage occurred during shipping.
- Do not discard the packing material until you have carefully inspected and satisfactorily operated the product.
If any parts are damaged or missing, please contact Greenworks Tools Customer Service for assistance.
WARNING
If any parts are damaged or missing do not operate this product until the parts are replaced. Use of this product with damaged or missing parts could result in serious personal injury.
WARNING
Do not attempt to modify this product or create accessories not recommended for use with this product. Any such alteration or modification is misuse and could result in a hazardous condition leading to possible serious personal injury.
WARNING
Do not connect to power supply until assembly is complete. Failure to comply could result in accidental starting and possible serious personal injury.
PACKING LIST
- Main machine
- Manual
Detergent tank - Adjustable fan jet nozzle
High pressure hose
Trigger and wand
Bucket
ASSEMBLING THE SPRAY WAND (See Figure 2.)
- Installing Wand to Pressure Washer Gun Insert the male baynet end (8) of the wand into the female bayonet outlet (9) firmly. While pushing in the wand firmly, turn clockwise until tabs lock into place to ensure a leak-free connection.
ASSEMBLING THE BUCKET (See Figure 3.)
Align the water inlet (10) on the base unit with the outlet(11) on the bottom of the bucket, and seat the bucket on the base unit.
English (Original instructions)
Check alignment to ensure a proper seal and connection.
- Flip up the buckles on the base unit and latch to bucket. Press down on the buckle ends to lock the bucket to the base unit
BTTERMY INSTALLATION (See Figure 4.)
Open the door of the battery housing.
Align groove in battery pack with raised rib on pressure washer.
Make sure the latch on the pressure washer snaps in place and that battery pack is secured in pressure washer before beginning operation.
Close the door.
BATTERY REMOVEL (See Figure 4.)
Set the switch to the OFF position.
Press the button and take out the battery.
OPERATION
Applications
This pressure washer can be used for the purposes listed below:
- Removing dirt and mould from decks, cement patios, and walls.
- Cleaning cars, boats, motorcycles, outdoor furniture and barbeques.
CONNECTING HIGH PRESSURE HOSE (See Figure 5.)
Fiting
Push the connector (12) of the high pressure hose into the mount (13) on the trigger handle until it engages.
Removing
Actuate the spring button (14) and pull the high pressure hose out of the mount.
WARNING
The washer must be used on a secure and stable surface in a standing, upright position.
ADDING WATER TO THE BUCKET (See Figure 6.)
The water supply must come from a water main. NEVER use hot water or water from ponds, lakes, etc. For ease of use, a self-coiling hose (not provided) is recommended.

WARNING
Always switch off the mains disconnecting switch when leaving the machine unattended

WARNING
Do not fill the bucket with the bucket still fixed on the base unit.
Before adding water to the bucket:
Inspect the filter in the water intake.
If the filter is damaged, do not use the machine until the filter has been replaced.
CONNECTING THE WATER SUPPLY TO PRESSURE WASHER (See Figure 7.)
NOTE: If you do not want to use the bucket, you can use the base unit directly as a pressure washer.
Connect a garden hose to the water inlet.
- Attach a garden hose to water supply.

CAUTION
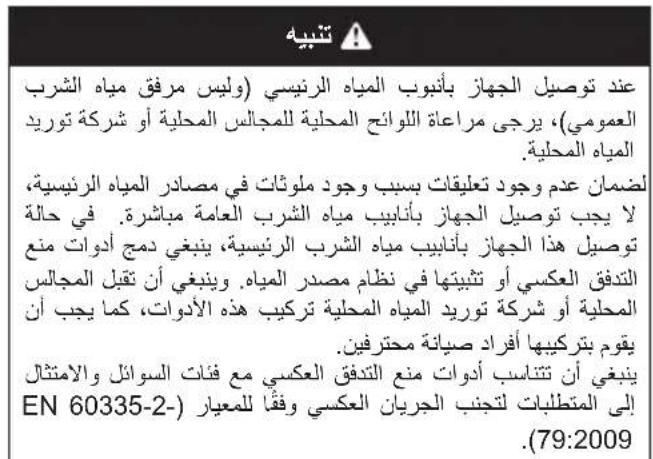
When connecting the appliance to the water supply mains (not public drinking water supply mains), please observe the local regulations of local boards or local water supplier.
To ensure that there is no feedback of contaminant into the water supply, the appliance must not be connected directly to the public drinking water supply mains.
If the appliance is connected to potable water mains, backflow prevention devices should be incorporated in or fixed to the water supply system. The installation should be accepted by local boards or water supplier and should be conducted by professional technical personnel. The backflow prevention devices should be appropriate to fluid categories and comply with the requirement to avoid back siphonage according to EN 60335-2-79:2009.
USING THE GUN (See Figure 8.)
For greater control and safety, keep both hands on the gun at all times.
Squeeze the trigger (15) to operate the pressure washer.
Release the trigger to stop the flow of water through the nozzle.
English (Original instructions)
To engage the lock-out:
Press the lock-out button (16) to the ON position.
To disengage the lock-out:
Press the lock-out button to the OFF position.
USING THE NOZZLES (See Figure 9.)
CAUTION
NEVER change nozzles without engaging the lock out on the gun and NEVER point the lance at your face or at others.
To connect a nozzle to the lance:
Turn off the pressure washer. Pull trigger to release water pressure.
■ Engage the lock out on the gun by pulling down on the lock out until it clicks into the slot.
Press the button on the lance and insert the nozzle, aligning the pin on the nozzle with the hole.
Rotate the nozzle to adjust the spray shape.
ADDING DETERGENT TO THE PRESSURE WASHER (See Figure 10-11.)
Use only detergents designed for pressure washers; household detergents, acids, alkalines, bleaches, solvents, flammable material, or industrial grade solutions can damage the pump. Many detergents may require mixing prior to use.
Prepare cleaning solution as instructed on the solution bottle.
NOTE: Use a funnel, if needed, to prevent accidental spilling of the detergent outside the tank. If any detergent is spilled during the filling process, make sure the unit is cleaned and dried before proceeding.
To apply soap:
Pour detergent in the detergent tank.
Install the soap tank to the trigger gun.
Start the pressure washer and spray the detergent on a dry surface using long, even, overlapping strokes. To prevent streaking, do not allow detergent to dry on the surface.
STARTING AND STOPPING THE PRESSURE WASHER (See Figure 12.)
CAUTION
Do not run the pump without the water in the bucket connected and turned on.
Add the water into the bucket.
Install the bucket and lock it out.
Install the battery pack.
Set the switch to the ON position to start the motor.
Turn the garden hose on then squeeze the high pressure trigger.
MAINTENANCE
WARNING
When servicing, use only identical replacement parts. Use of any other parts may create a hazard or cause product damage.
WARNING
Before inspecting, cleaning, or servicing the machine, shut off motor, wait for all moving parts to stop, and remove the battery pack. Failure to follow these instructions can result in serious personal injury or property damage.
GENERAL MAINTENANCE
Avoid using solvents when cleaning plastic parts. Most plastics are susceptible to damage from various types of commercial solvents and may be damaged by their use. Use clean cloths to remove dirt, dust, oil, grease, etc.
WARNING
Do not at any time let brake fluids, petrol, petroleum based products, penetrating oils, etc., come in contact with plastic parts. Chemicals can damage, weaken or destroy plastic which may result in serious personal injury. Only the parts shown on the parts list are intended to be repaired or replaced by the customer. All other parts should be replaced at an authorized service centre.
NOZZLE MAINTENANCE (See Figure 13.)
Excessive pump pressure (a pulsing action felt while squeezing the trigger) may be the result of a clogged or dirty nozzle.
Unplug the pressure washer.
Turn off the pressure washer and shut off the water supply. Pull trigger to release water pressure.
Remove the nozzle from the lance.
NOTE: Never point the spray lance at your face.
Using a straightened paper clip or nozzle cleaning
English (Original instructions)
tool, free any foreign materials clogging or restricting the nozzle.
Using a garden hose, clear/flush debris out of nozzle.
Reconnect the nozzle to the lance.
Turn on the water supply.
STORING THE PRESSURE WASHER
Store in a dry, covered, frost-free area where the weather can't damage it. Always empty water from gun, hose and pump.
NOTE: The use of a pump protector is recommended to prevent cold weather damage during storage over the winter months.

Separate collection. This product must not be disposed of with normal household waste. Should you find one day that your product needs replacement, or if it is no further use to you, do not dispose of it with household waste. Make this product available for separate collection.

Separate collection of used products and packaging allows materials to be recycled and used again.
Re-use of recycled materials helps prevent environmental pollution and reduces the demand for raw materials.
Batteries
At the end of their useful life, discard batteries with due care for our environment. The battery contains material which is hazardous to you and the environment. It must be removed and disposed of separately at a facility that accepts lithium-ion batteries.
OBUEE TEXHNUECKOE OBCJNYKUBAHNE
N36eraIte NcNoJIb3OBaHnI paCTBOpITeJeI dIra OUHCTK nIpaTNIKOBbIX DeTaeIe. BoJIbUnHCTBO nIpaTMAcc IIOBepKeHbI pa3pyuWeHnIO npI BO3dEICTBNI pa3JIuHbIX TINOB KOMMepuecknx paCTBOpITeJeI mOryT 6bITb NOBpeXDeHbI npI INcNoJIb3OBaHnI. IOnJIb3yInTeCb YnCToI TKaHbIO dIra ydaJIeHnI rpa3N, nbJIn, MaCna, KOHCnCTeHTHO CMa3Kn I.T.D.
A INPEDOCTEPEXEHNE
HnkOrda He donyckaIte, YTO6bI TOPMO3HbIe XnIKoCTN, 6eH3nH, npOdyKTBi Ha HeOpTIAHO O C HOB e, npoHn KaUo u Nem aCnA NT. D KOHTaKTnPOBaIIc C PIACTNKOBbIMN DeTaJIaMNI. XmUneCKNe BeUeCTBa MOrY TNOBpeDNTb, OCnA6NTb IIN pa3pyuNTb PIACTMaCCy, YTO MOKeT pPnBecTNI K cepBe3HbIM TpaBMam. ToIbKO DeTaN, BXODJUne B NepeueHb DeTanei, PpeHa3NaYeHb IIN peMOHTa IIN 3aMeHbI KIneHtOM. BCE OCTaJIbHbIe DeTaN IOnXhbl 3aMeHraTbcra B aBTOpN3OBAHHOM cepBnCHOM ceHTpe.
TEXHNUECKOE OBCJNYKUBAHNE COJIJA (CM. pncyhoK 13.)
N36bIToHoe daBHeHne HacOca (ouyueHne npnbCaunn npn Haxatnn Ha Tprrrep) MoKeT 6bItb pe3yIbTaTOM 3acopa nn 3aqrpa3HeHna conJa.
OTKNoHTe MoIuNK NOd DaBHeHEm OT NCTOUYKa nTuHa.
BbIKHouHTe MoUHK NOI DaBHeHEm OTKHouHTe NoaHy BObl. HaxMITE TpIRrep dna C6poca daBHeHra BObl.
CHNMTe cOnIc paCbINTeJbHOJ WtAHn.
PIMMEUHNE: 3 anpeu aetc HnpaBnTb paCbIInTeJbHyo TuHaHy ce6e B NIO.
Ic nonb 3 yIte BbInpMaHEnHyO cKpen K y nn H C TpyMeHTdIJaOnCtKncCoNna, yDaJInt e NOCTOpOHn MaTePnaJ, 3acOpNBnn CoNIO nn Cy3NBn erO OTBepCTne.
C NOMOu boc aodoboro uhaHa oUcHTe/cmouTe MycOp n3 conJa.
I OndcoeDHHnTe conNo K uTaHre.
BknHouHTe noaHy BoIbI.
XPAHEHNE MOUUKA NOI DABJIENHEM
XpaHntbBCyxOM,3aKpblTomHe3aMe p3aIO
IeMMOnMeUeHN,rdEnoTOrnHbEycNOBnA
HemOry TNOBpeNTb N3dEne. Heo6xoDmO BcERda
CINBaTb BDOy N3NCTOJIeta, UNaHra HAcoca.
PIMMEUHNE: Pek omEHyetcNcNoJIb3OBAtbcpeIcTBo 3aunTbI HacocA IINpEIOTBpaueHINNOBpeXdEHNI OT XoJIoHDHOI NOrOdbI BO BpeMxpaHeHNA B3mMHne MeCraCbI.
Pycckn (IpebeOd opnHaJIbHbIX nHcTpyKcn)
YTNIN3AUIN

Pa3dIbHbIc6opMycopa.3To n3dIeHe dOJIxHO yTIN3HpOBaTbCBA MecTe C DpyIMN 6bITOBbIMn OTXoAMn. Pocne OKOHuaHN Cpoka cnyk6bl
n3dEner Greenworks He BbIbpaCbBaIte erO Bmecte C 6bITOBbIMn OTXoAMn. POnrTOBbTe erO dIra pa3dIbHoro c6opMycopa.

Pa3dIbHbI c6Op oTpa6oTaHHbIX n3dEnn mNCIOJIb3OBAHHbIX yNAKOBOUHbIX MaTePnaJIOB IO3BOJIaER Ix nepepa6aTbIBaTb I NOBTOPHO NCIOJIb3OBAbI.
IcnoIb3OBAHne nepepa6oTaHHbIX MaTePnaIOB NOMORAET IpeIoTbPaTnTb 3aRpy3HeHne OkpykaIOUeI cpebl n CHNKAeT Cnpoc Ha cbIpbe.
Batteries

B KOHcpe cpoKa CnyKbI 6aTapey Tynn3npyTe nxC HndJexKaUe 3a60ToN 6oKpyKaIOUe CpeJe. Batape CoepxNT BeueCTBa, KOTOpBe RaJIHOTCr ONaChbIMn DnRA Bac N OkpyKaIOUe CpeDbI. Ee CneNyET CHaTB N OTnPaBnTB DnY Tynn3aCmN B NyHKT PnPema OTPa6OtaHHbIX NITN-NOHbIX 6aTapei.
GENERELT VEDLIKEHOLD
| Model GDC40 | |
| Rated Voltage 40V | |
| Rated Pressure 5.5 MPa | |
| Permissible Pressure 7 MPa | |
| Power Rating 650W | |
| Rated Water Flow 3.7 l/min | |
| Maximum Water Flow | 5 l/min |
| Maximum Water Inlet Pressure | 0.7 MPa |
| Maximum Water Inlet Temperature | 40°C |
| LPA(sound pressure level) | 76.38dB(A),K:3.0db(A) |
| LWA(sound power level) | 92.34dB(A),K:3.0db(A) |
| Protection Degree | IPX 5 |
| Vibration | < 2.5 m/s² K=1.5 m/s² |
| Akumulator | 29717/ 29727 |
| Ładowarka akumulatora | 2910907 |
DESCRIPTION
Patrz Rysunek 1.
He nJIHHeKoΦaTa, KOrato TRe Bce OueФNKCuPaHa Bbpxy 6a3OBTo yCTPOIcTBO.
Ipeu Da do6aBnte Boda KbM KoopaTa:
PpOBepeTeΦnITbpaHa BOdHnI N3TOUHNK.
AkoΦnntbpt e NOBpeDeH, He n3noJ3BaIte MaunHaTa, npde Da 6bde 3aMeHeH.
CBbP3BAHEHABOIOCTPYKATAKbMBOIOCHA BdNTEHATA CNCTEMA (BnK qnr. 7.)
3A6ENEKKA: Ako He nCKaTe Da n3nON3BaTe K0paTa, MoKeTe Da n3nON3BaTe 6a3OBOTO yCTpOInCTBO dIpeKTHo KaTo BOIOCTpyKa.
CbpxKeTe rpaHnckm Mapkyu KbM BOHnBxOJ.
3akpenete rpaHckn Mapkyu KbM BOIOOdaBaHeTo.
BHIMAHHE
IpnCbBp3BaHeHaype DaKbMbOdoCna6D nTeHnHaTAmpeka(HeKbMoobseCTBeHa BOOCha6DnTeHnMaPpeka 3a NITeHa BODa), CnA3BaHnTe PnpDnncAHnra HameCTHataKOM hNnHnHameCTHO BOOCha6DnTeHnO dpYKeCTBO. 3a Da Cte CnpyhN, Ye Hma Da NmAbpaTHo BnBaHe Ha 3amBPCNTeHN BB BOOCha6DnTeHnHa MPeKa, ypeBt He Tp8Ba Da ce CBbp3Ba DnpeKTHO KbM ObSeCTBeHaTA BOOCha6DnTeHnA MPeKa 3a NITeHa BODa. Ako ypeBt e CBbp3aH KbM Mpeka 3a NITeHa B Od a, Yc TpoiCTBaT a3anpeDoTbPaTaBAHe O6paTHn NOtOK Tp8Ba Da ca BrpaDeHN BbB BOOCha6DnTeHnHa TcNCTema NN da Ca npkpenen H KbM HeR. IHCTanaunrta Tp8Ba Da e OOn6peHa OT MeCTHATA KOMcnH NIN OT BOOCha6DnTeHnTO dpYKeCTBO I Tp8Ba Daaceu3 BbpHTnpocepNoHaHHNTExHnU . UcTPOiCTBaTa3a npedOTbPaTaBAHe Ha O6paTHN NOtOK Tp8Ba Da ca NODxOJaUN 3a CbOTBeHTNeK ATEROpuN TeUHOCTN I da OTROBapRT Ha N3NCKBaHeto 3a N36RaBaHe Ha O6paTHo N3TOBaHe ppe3 CnfoHa Cbo6pa3Ho EN 60335-2-79:2009.
PnroTBeTe noCCTBaunpa3TBop cnopeyka3aHnraHa 6yTuJkata My.
3A6ELEKKA: Pn Heo6xOIMocN 3n0JI3BaIte cyHna, 3a Da npedOTbpaTne pa3nIBaHe n3BbH pe3epBoapa. Ako no BpeMe Ha nbJHeHTo ce pa3nee NOuchTbau npenapat, NOUcTe N IOdCyWete MaunHaTa, npen Da npoDbJXKe.
3a da n3non3BaTe canyH:
Cunete nouchTbau npenapaT bpe3epBoapa.
MoHTnpaIte pe3epBoapa 3a canyH KbM nCTOJIeTHaTApbKOXBaTKa.
CTaptnpaTe BOIOCTpykata n HAnpbckaTe C noHCTBaU npenapaT cyxa NOBbpxHOCT C NOMOuTa
HaIbJIr,paBHN,piPiOKpBaUcCe,MaxOBe.3a Da npedOTbPaTne NOBaTa Ha NeTHa,He OCTaBnTe npenapaTa da 3acbXHe BbPxy NobbpxHOCTTa.
CTAPTIPAHE IN CINPAHE HA BOIOCTPYIKATA (Bux K 12.)
BHIMAHHE
He nyckaIte nomnata 6e3 B0da B Cbbp3aHaTa N BKJIIOUeHa KOpa.
HantbJnHeTe BODaTa B KOpaTa.
HCTaIpaIteKoPaTaIyΦnKcpaIte.
HCTaJnpaTe akyMylatopHaTa 6aTepey.
IocTabete npeBknIOyBaTeJn B no3uON (BKJ.), 3a da cTaptnape DnurateJn.
IpycheTe rpaHcKm Mapkyu HaTncHeTe cnycbKaHa BOIOCTpykata.
IOnDnPbXKA

PNEyPENKDEHNE
Pn cepBn3HO 06cIyKBaHe I3noI3BaIte cAmO nJeHTnHn pe3epBn qactn. I3noI3BaHeto Ha dpYrN qACTn MoKe da BN NOCTaBN B ONaCHOCT Nn Da noBpeDn npOdykTa.

PNEyPKeXJDEHVE
IpeiHNCKeTnpaHe, NOUcTbaHe IIN cepBn3HO
06CnyXBaHe Ha MaunHaTa N3KIOuOte DBNrATeJIa,
N3yakaIe DOkATO CnpAT BCNUKn DBNXeUcN Ce
Yactn n OTCTpaHete akymlaTopHaTa 6aTePn.
Hecna3BaHTo Ha Te3n yka3aHn MoKe da IOBeDe
do cepno3Hn Qn3NuEckn HapaHbAHn nn
IMyUeCTBeHn UetN.
OCHOBHA NOIDPbJKA
N368raBaiTe H3NOI3BaHTo Ha pa3TbOpnteI npn
NouchTaBHeTo Ha nactMacobte qactn. NobeTeo nn
aCTMaCnCaUy BCTBnTEJnKbMp a3NJu
HN BINOBe pa3TbOpnteIN MoKe Da Ce NOBpeJr npn
H3NOI3BaHTo Ha TaKbA. H3NOI3BaHTe YnCTn napcaJIn,
3a da npEmaxHete KaI, npax, Macno, rpec n T.H.
jill jlll ljj jlll jlll jlll jlll jll
Laiell (9) Jai Laiall Jia Jia Laiell (8)
Jalalalalalalalalalalalalalalal
y
(3J)
(11) 2
aannnnn nn nnnnne
Lss slls
aiaai iiaiie
aaiiie iiae iie
(4)
y
aie aiee iie eae
法
aill 150
Iailll alllal
Xaoguladi
yoo
Kuy aayyai pI gui yu u 1 yu .sucuall u "TOOLS
- ybi 1
iie 1
gai jil 1i i 1i 1i 1i 1i 1i 1i 1i
()
Jus
1
(.4
OFF
A
yie
C
aaii iiaai iaii iaii iaii iai
A
1
(8jai jbi)
g wll g 1y 1 y j a 10 10 10
Jai (15) 1
aagall no clll gaii jil
:JaiJI J
.(ON)
:
.(OFF)
(9jll jil) 1
A
y 1
:
aill bia 1y jil y i aial alal gibl
aaii 15y jia jao y iinall jaii S
J 1
biailly jwali jie (j) biiall elin
(10-11
e jz jz jll baii jz jz jz jz jz jz jz jz
1
A
aiee eae aee
(.6j)
aallll alal y. g a e 100000000000000000000000000000000000000000
(3)
A
a
A
aaii 100
:glal gl alal alal Jd
olall jia jia jiall
jill jiljil jiljil jiljil jiljil
(1.7 jaii jil) biailly jwali jgjgl slal jua
aLaeS auey 1 8g y 1 1 1 1 1 1 1 1 1 1 1 1 1 1 1
biwali ay
a
eal
ENDEESITFRPT NLRU FISVNODA PLCS SK SL HR HUROBGEL ARTRMELTLVET
()
(1.3 Jai jil) aagai
(1)
ailll jaa aiee 1jll jg e jil
aolal jaa aaii
elal bia c jy djj
a
g 1
aalil 1
- | x - 2| = | x - 4| | x - 6| | x - 8| | x - 10| | x - 12|
A
aall aai sall
clall jiuua Jiu
biically jiej
y 1111111111111111111111111111111
.
jglal jall wbal gial aiaa glg y
eaii j
:diol ay
■
■
aaiy aaiy gaii gaii eao y jay aaiy pa
- 1
A
a
ON
Jlll biaiial lij yae i aaiai j
aaleal ayjyall
A
y 1
A
j j j j j j j j j j j j j j j j j j j j j j j j j j j j j j j j j j j j j j j j j j j j j j j j j j j j j j j j j j j j j j j j j j j j j j j j j j j j j j j j
:alaiy
a 1 1 1 1 1 1 1 1 1 1 1 1 1 1 1 1 1 1 1 1 1 1 1 1 1 1 1 1 1 1 1 1 1 1
111
A
cll l jll jll jll g 100000000000000000000000000000000000000000000000000000000000000000000000000000
jglsln

XeIy.11 p 1000000000000000000000000000000000000000000000000000000000000000000000000000000000000

L 10000000000000000000000000000000000000000000000000000000000000000
| yuyu | - |
| yuj | - |
| yujun | - |
| yujin | - |
| yujin | - |
| yujin | - |
| yujin | - |
(2)oiin no
n nn nnnnnnnnnnnnnnnnnnnnnnnnnnnnnnnnnnnnnnnnnnnnnnnnnnnnnnnnnnnnnnnnnnnnnnnnnnnnnnnnnnnnnnnnnnnnnnnnnnnnnnnnnnnnnnnnnnnnnnnnnnnnnnnnnnnnnnnnnnnnnnnnnnnnn
(x3)
nnn n o'oan n (10) nn nooh nn nn nn .o'oan n n n nn nn nn nn (11) nn
DIOXINN NNNN 100
n nn nnnn nnnn nn nn nnnnnnnnnnnnnnnnnnnnnnnnnnnnnnnnnnnnnnnnnnnnnnnnnnnnnnnnnnnnnnnnnnnnnnnnnnnnnnnnnnnnnnnnnnnnnnnnnnnnnnnnnnnnnnn
(4)noon noh
.
n nn nnnnnnnnnnnnnnnnnnnnnnnnnnnnnnnnnnnnnnnnnnnnnnnnnnnnnnnnnnnnnnnnnnnnnnnnnnnnnnnnnnnnnnnnnnnnnnnnnnnnnnn
yynnnn nn nnynnn nn nnnn
| GDC40 | |
| V 40 | ### |
| MPa 5.5 | ### |
| MPa 7 | ### |
| 650W | ### |
| I/min 3.7 | ### |
| I/min 5 | ### |
| MPa 0.7 | ### |
| °C40 | ### |
| (76.38dB(A),K:3.0db(A) | ### LPA |
| (92.34dB(A),K:3.0db(A) | ### LWA |
| IPX 5 | ### |
| m/s1.5=K m/s22.5> | ### |
| 29727 /29717 | ### |
| 2910907 | ### |
(777 1)
1
1/7yynnn 2
DnN.3
4
70 5
0'02nTTn'.6
7n o7n .7
n nn nnn
y
nnnnn nn nnnn nn nnnn
.
nTn n nn nnn nnn nnn nnn nnn
ynn nn nnn nn (15)nn nn ynn nnn nn nn nn nn nn nn nn nn nn nn nn nn nn nn nn nn nn nn nn nn nn nn nn nn nn nn nn nn nn nn nn nn nn nn nn nn nn nn nn nn nn nn nn nn nn nn nn nn nn nn nn nn nn nn nn nn nn nn nn nn nn nn nn nn nn nn nn nn nn nn nn nn nn nn nn nn nn nn nn nn nn nn nn nn nn nn nn nn nn nn nn nn nn nn nn
:hyn ayh
ON (16) nyn yn?
:hyan
P
OF后
(7n 9)
nir
11n n nn nn nn nn nn nn nn nn nn nn nn nn nn nn nn nn nn nn nn nn nn nn nn nn nn nn nn nn nn nn nn nn nn nn nn nn nn nn nn nn nn nn nn nn nn nn nn nn nn nn nn nn nn nn nn nn nn nn nn nn nn nn nn nn nn nn nn nn nn nn nn nn nn nn nn nn nn nn nn nn nn nn nn nn nn nn nn nn nn nn nn nn nn nn nn nn nn nn nn nn
:innn
.0n
y
.ynnnn n7 n 19n
010n nn nn nnn
(7x 9-10) ynna nnnn nn nnnn
n nn nnnnnnnnnnnnnnnnnnnnnnnnnnnnnnnnnnnnnnnnnnnnnnnnnnnnnnnnnnnnnnnnnnnnnnnnnnnnnnnnnnnnnnnnnnnnnnn
.
(4) nnn no
nion
ynnno
nuyh
vin
n nn nnnn nn nnnn nn nnnn
110
□7a1
(5)
n nn nnn (12) nnn n n n (13)
mon
n nn y n nn nn nn nn (14) nn nn nn nn nn
Xn
n nn nnnnnnnnnn
(6)7n90n
n nn nnnnnnnnnnnnnnnnnnnnnnnnnnnnnnnnnnnnnnnnnnnnnnnnnnnnnnnnnnnnnnnnnnnnnnnnnnnnnnnnnnnnnnnnnnnnnnnnnnnnnnn
Baaanbwnn7ywn,wnynTTOA
XnnaA
77 777777777777777777777777777777777777
Xn
77
non nnoyn noonn nnnnnnnnnnnnnnnnnnnnnnnnnnnnnnnnnnnnnnnnnnnnnnnnnnnnnnnnnnnnnnnnnnnnnnnnnnnnnnnnnnnnnnnnnnnnnnnn
H
77.78.62.73.74.75.76.77.78.79.70.71.72.73.74.75.76.77.78.79.70.71.
nnon nnon noon nnnn nn nnnnnnnnnnnnnnnnnnnnnnnnnnnnnnnnnnnnnnnnnnnnnnnnnnnnnnnnnnnnnnnnnnnnnnnnnnnnnnnnnnnnnnnnnnnnn
0000000000000000000000000000000
ENDEESITFRPT NLRU FISVNODA PLCS SK SL HR HUROBGEL ARTR HE LTLVE
(nnnn)
Pn nnnn nn nnnn
X
0000000000000000000000000000000000000000000000000000000000000
(13)
Valymo priemons pripikite j nos rezervuara.
Statykite jirengin muilo rezervuara.
Start the pressure washer and spray the detergent on a dry surface using long, even, overlapping strokes. To prevent streaking, do not allow detergent to dry on the surface.
AUKŠTO SLEGIO PLAUTUVO JUNGIMAS IR ISJUNGIMAS (Žr. 12 pav.)
ISPÉJIMAS
Nejunkite siurblio, jei prittvirtintame kibire nera vandens, o plautuvas jjungtas.
All new Greenworks Tools machinery is supplied with a 2 year parts and labour warranty from original date of purchase. A 30 day warranty is available for machines used professionally as Greenworks Tools are designed primarily to be used by DIY consumers.
This warranty is non-transferable.
LIMITATIONS
This warranty applies only to defective parts/components and does not cover repairs due to:
- Normal wear and tear.
- Routine tune up or adjustment
- Damage caused by improper handling/abuse/misuse or neglect.
- Overheating due to lack of maintenance.
- Damage due to fittings/fasteners becoming loose/detached through lack of maintenance.
- Damage caused by cleaning with water
- Machines serviced or repaired by non-authorised Greenworks Tools service centres.
- Machines incorrectly assembled or adjusted.
- Damage caused by improper use of the machine.
- Damage caused by improper winterisation (pressure washers)
-
Items considered as consumable parts are not normally covered by the warranty, including but not limited to:
-
Batteries
Electric cables - Blade and blade assemblies
Belts -
Filters
-
Chucks and tool holders
-
Certain products may contain components such as engines, transmissions from an alternative manufacturer, these items will be subject to the appropriate manufacturer's warranty policy except where Greenworks Tools Europe GmbH agrees to underwrite any claims outside the said manufacturer's warranty period.
- Second hand goods are not covered under this warranty policy.
- The fitting of spares, replacements or extra components which are not supplied or approved by Greenworks Tools Europe GmbH.
Warranty
To claim a warranty on any product under this policy a proof of original purchase is required. Credit card statement do not qualify as sufficient proof of purchase. In the first instance of a warranty event occurring the consumer should return the product to the original place of purchase with their proof of purchase. The machine will be sent to our central service facility and an inspection made. If the machine be found to be at fault it will be repaired and sent back to the address of the consumer free of charge. Machines that retail for less than €100 euros including sales taxes will generally be replaced.
If the central service facility finds that machine is not found to be at fault then the consumer will be advised they will need to pay for the cost the repair.
This warranty policy is subject to change from time to time to accommodate the needs of new products. A copy of the latest warranty policy will be available at www.greenworkstools.eu.

Greenworks Tools garanti for hobbymaskerGreenworks Tools in
GARANTIPERIOD
TapaHOnHH npaBnHa Ha Greenworks Tools 3a camOeHN MaHNH
IEPNOI HA IAPAHUNTA
Bcunn Maunn Ha Greenworks Tools ce npedoctabr c 2-rounha rapaunna 3a cepbnHa deHooT nepebHN qactn, chntaHO OT daTata Ha 3akynbahe Ha npdykTa. PnpocTabra Ce camo 30-dHeBH a rapanu 3a npocecnoHAnH NoION3BaHne Maunn, 3auTo npodytme Ha Greenworks Tools ca npdHa3hauhen npdeMmHO 3a kIneHTn, paOteHn CSc camoJENn MaunnH. Hactoata rapaunua He moke da ce npexbprna.
OTPAHNUEHHN
Hactoata rapaHcna e BaInHa cAmO 3a DepeKTHn qactN/ KOMnoHEHTn H He NOKPbA peMOHTn, NopoEHN OT: 1. HopMaIHO n3HOCBaHe n AmOpTn3aUria.
- PyTHHHH HAcTPOKKn IIN DeHOCn no perynpahe.
3.Пов体育场пчненOT He npabnno6opabHe/3IoynoTpe6a/ rpeuho n3NoI3BaHne nnpraBa Ha He6peXHoCT. - IperpraBaHe npaDi NoWa NODpbXkKa
- NopBpei npaPi pa3Xna6eHn/pa3KaueHn cHaKn nNcKpeNTnHn eIemEnT B CneDCTBnE Ha Noa PndpBxka.
- NOBpeH, npuHHeH B CJIeCTBHe Ha NoUcTBAHe C BOJa.
- MaunHH, 06cnyKbAHn Hn peMOHTnpaHn OT cepBn3n ceHTpOBe, KOTo He ca oTOpN3npaHn OT Greenworks Tools.
8.MaunHnKoTcaccrno6eHNnnpeynpaHn HnnpabuHNO. - NOBpeH, npoOeHn OT HnnpaBnJIHO 6opabeHe c MaunHaTa.
-
NOBpei, nopoDeHn OT HnpaBnHIO 3aImBaHe (BOOcTpyKn)
-
EInemEnH, KOnTo ce cCHTaT 3a KOHCymATNB, HO O6nKHOBHe He Ce NOKPnBaT OT rapaHnIyTa, BKNIOUHTeJIHO (HO He CaMo):
-Батурш
EneKtpueecknKa6eJN
- OctpneTn KOMNNEKTN OCTPneTa
Pembun
-ФИNTPn
- NaTpoHHnN nIbpxaun 3a HcTpymeHTn
-
HЯко npodykTN MoRAT da cbdbpxKAT KOMNoHEHTN (Hapmep DbrarateMn, TpaHCMncn) OT dpyrN pOn3BOJNTeN - 3a Te3n eIemEtN ca Bcna rapaHIOHNHTe ycNOBnHa CbOTBeTHn npOn3BOJNTeOcbH bClyaTne, Korato Greenworks Tools Europe GmbH ce cbfNaac Da noKpNe IeTe, KOtTO He ce nokpNBat OT rapaHIOHNHNE nepnoD Ha To3n npOn3BOJNTeN.
-
CToKn BVtopa ynoTpe6a He ce nokpmbat OT hactoaaTa rapanuia.
- MoTHIpaHTo Ha pe3epBn YacTn, 3aMeCTBaUu ININ DOnbNHTeHN KOMNoHEHTN, KOTo He ca IpeOCTabeHn ININ ODo6peHn OT Greenworks Tools Europe GmbH.
Fapanua
3a npedraBaHe h rapaHnoHnck 3a dahen npdykt Tpr6Ba da ce npdeocTabn Doka3aTeNTBO 3a nbpBOHaauHNO My 3aKnyBaHe.
N3BneueHnHTAOT KpeDTHnKAPTN He npdeCTabnBaT BAnHIO
Doka3aTeNTBO 3a3akynBaHe. PnPnbTO Bb3HNbKaHnHO HcNObNe,
No3BOBaIaO npdeRBABaH ra paHnOHeh NCK,KnHeHTb Tpr6Ba Da
3aHece npOyKTa Ha MCTOTO Ha HerOBTo NpboHauHNO 3aKyTuBaHe,
KbTeTo Tpr6Ba Da npdeocTabn Doka3aTeNTBO 3a3akynBaHeo.
MaunHaata 6bDe n3npaTeHa Do hauInr InaBeH cepBnEe HcETbp,
KbTeTo 6bDe n3BbpuHnHcneKuHa. Ako CE yCTahOBn PhapuH
deΦeKt NO muaHnata, Ta 6bDe 6e3PiAtHO pemOHtnpaHa n
n3npaTeHa o6patHo ha aDpeca Ha KIneHTa. MaunHnte Ha na3apHa
ctOIOCT NO 100 eBPO (BKN.DaHbK npdoax6a) O6NHO He 6bDaT
NoDMehHH C HOBn.
Ako haunrT rnaBHe cepBn3eH ceHTbpeYcTaHOBN Za6pnuHn DepeKTo N O MaunHaT, KIneHTb Tse 6bJe yBeDomeH, Ye Toi Ue TprBa da 3annat pa3xOdnte No peMOHa Ha npOdyKTa.
HactoInte rapaHIOHH npaBnla MoT a 6bDat npomeHa n nepnoDnHO, 3a da 6bDaT aKtYanHO aadantnpaH N kM HOHT npodykTN. Konne Ha Na-AkTaYAnHTe rapaHIOHH npabnla e HanaHNo ha aDpec www.greenworkstools.eu.

Ioiitik yyyuno ng ouake uuv maotopepaoc Greenworks Tools
NEPIOAOEETY HEN
Ola ta vea unxavnata tnc Greenworks Tools ouvodevovtar a tro
eyunon 2 etw yia ta eapntnata kai ta epyatika touc, aio nvy
apxikn npopounvia ayopac. Eyyunon 30 npewv napexetai yia
unxavnata tou xpnoioutoiouvtai tayyEAmuKAc, kaowt a
Tpoivta nC Greenworks Tools ateuehuvovtar kupiw os paaitexvecs
katavaawtes poiovtwu maatopepaotc.
H eyunon evai un metabetaaianm.
NEPIOPIEMOI
H Tapaouaa Eyyunon Ioxuei movo ia Eaattwpatiké Egaptnmuata/Evotnte
kai dev kALUTTEI ETIOKEUECTIOU Opeiaovtai OE:
1. Duoioloyik φθopá.
- 2uvθEει Επιοκεύες ἡ προσαρμόγες.
- Znmuic Tnou Ppokalovtai aT ovapuoTo xeipioKataxpnan/ eoPAAevn xPon n aeia.
- Yπερθερμανον λόγω ελλειψης Μυντήρονης.
- Znuiá luyw xiaipwong/aTiooataoong εapntmuw/ouvdeuww εaiaic eaaiyns ouvtnpns.
- Znui Ttou TpokAnkE aTó Kaapiao με vepo.
- Mxavnata Tou uoBaalovtai oepic n Etnkeues e μη ΕouioDtoiv a Kvtpa epic ngreenworks Tools.
- Eaqaevn ouvapoloyon n pooapoyn uxavnatuv.
- Znue s loyw akataaanns xpono ts tou nxaivmaotc.
- Znuiéc loyw eopaaevnc ykataaans yia to xieuwa (poebEe
- Στοίεια του θεωρούνται αυλώσιμα, δεν καλύπτονται συνήως από την εγγύπω, συμπερλιαβανομένων ενδεικτία τυν εξής:
MntatapieC
HAEKPTiKaKawdi
AeTIDEcKai diataEeIeAeTIOWv
1uVTEs
·iAtpa
New Greenworks Tools
"
nnnn n
n nn nnnn nnnn nnnn nn nnnn nn nnnn nn nnnn nn nnnn nn nnnn nn nnnn nn nnnn nn nnnn nn nnnn nn nnnn nn nnnn nn nnnn nn nnnn nn nnnn nn nnnn nn nnnn nn nnnn nn nnnn nn nnnn nn nnnn nn nnnn nn nnnn nn nnnn nn nnnn nn nnnn nnnn nn nnnn nn nnnn nn nnnn nn nnnn nn nnnn nn nnnn nn nnnn nn nnnn nn nnnn nn nnnn nn nnnn nn nnnn nn nnnn nn nnnn nn nnnn nn nnnn nn nnnn nn nnnn nn nnnn nn nnnn nn nnnn nn nnnn nn nnnn nn
n
n nn nnnnnnnnnnnnnnnnnnnnnnnnnnnnnnnnnnnnnnnnnnnnnnnnnnnnnnnnnnnnnnnnnnn
- .2. m
3.nnnn
4.nnnn 70
.50in
.
.6
.7 Greenwork
. Tools
.8.124
9.122070
10 (ynnna)
,nnnnn nn nnnnnnnnnnnnnnnnnnnnnnnnnnnnnnnnnnnnnnnnnnnnnnnnnnnnnnnnnnnnnnnnnnnnnnnnnnnnnnnnnnnnnnnnnnnnnnnnnnnnn
:
n7710
youn
DNON
17nnnno09n
n nn nnnn nnnn nnnn nnnn nnnn nnnn nnnn nnnn nnnn nnnn nnnn nnnn nnnn nnnn nnnn nnnn nnnn nnnn nnnn nnnn nnnn nnnn nnnn nnnn nnnn nnnn nnnn nnnn nnnn nnnn nnnn nnnn nnnn nnnn
Greenworks ynnn nn nnnn nn nnnn nn nnnn nn nnnn nn nnnn nn nnnn nn nnnn nn nnnn nn nnnn nn nnnn nn nnnn nn nnnn nn nnnn nn nnnn nn nnnn nn nnnn nn nnnn nn nnnn nn nnnn nn nnnn nn nnnn nn nnnn nn nnnn nn nnnn nn nnnn nn
1.
11
XW IN NnN7 07nNnNnNnNnNnNnNnNnNnNnNnNnNnNnNnNnNnNnNnNnNnNnNnNnNnNnNnNnNnNnNnNnNnNnNnNnNnNnNnNnNnNnNnNnNnNnNnNnNnNn
Greenworks Tools Europe GmbH by wink
#
y
n 100 nnnnnnnnnnnnnnnnnnnnnnnnnnnnnnnnnnnnnnnnnnnnnnnnnnnnnnnnnnnnnnnnnnnnnnnnnnnnnnnnnnnnnnn
197n nyn 70
y nynn nn nnnn nnnn nnnnnnnnnnnnnnnnnnnnnnnnnnnnnnnnnnnnnnnnnnnnnnnnnnnnnnnnnnnnnnnnnnnnnnnnnnnnnnnnnnnnnnnnnnnnnnnnnnn
n .a. n .n .n .n .n .n .n .n .n .n .n .n .n .n .n .n .n .n .n .n .n .n .n .n .n .n .n .n .n .n .n .n .n .n .n .n .n .n .n .n .n .n .n .n .n .n .n .n .n .n .n . n . n . n . n . n . n . n . n . n . n . n . n . n . n . n . n . n . n . n . n . n . n . n . n . n . n . n . n . n . n . n . n . n . n . n . n . n . n . n . n . n . n . n . n . n . n . n.

"Greenworks Tools" buitines paskirties irenginiu garantijos taisykles
GARANTIJOS LAIKOTARPIS
EN EC DECLARATION OF CONFORMITY
Manufacturer: Changzhou Globe Co., Ltd.
Address: No. 65 Xinggang Rd., Zhonglou Zone, Changzhou, Jiangsu, China
Name and address of the person authorised to compile the technical file:
Name: Peter Soderström
Adress: Hjortronvagen 3, 555 93 Jönköping, Sweden
Herewith we declare that the product
Category .High Pressure Washer
Model GDC40
Serial Number See product rating label
Year of Construction. See product rating label
■ is in conformity with the relevant provisions of the Machinery Directive
■ is in conformity with the provisions of the following other EC-Directives MD Machinery Directive 2006/42/EC
2014/30/EU (EMC-Directive), and
2000/14/EC (Noise-Directive) incl.modifications (2005/88/EC)
And furthermore, we declare that
The following (parts/clauses of) European harmonised standards have been used EN 60335-2-79
EN 60335-1
EN 62233
EN 55014-1
EN 55014-2
EN ISO 3744
the following (parts/clauses of) other technical standards and specifications have been used EN ISO 3744
Measured sound power level LWA:92.34dB(A)
Guaranteed sound power level LWA: 93 dB(A)
Conformity assessment method to Annex V/ Directive 2000/14/EC
Place, date: Changzhou, 22/07/2016 Signature: TedQu Haichao (BEng, CEng, MIET)
Quality Director
Adresse: No. 65 Xinggang Rd., Zhonglou Zone, Changzhou, Jiangsu, China
Indirizzo: No. 65 Xinggang Rd., Zhonglou Zone, Changzhou, Jiangsu, China
MD Machinery Directive 2006/42/EC
Adresse: No. 65 Xinggang Rd., Zhonglou Zone, Changzhou, Jiangsu, China
MD Machinery Directive 2006/42/EC
2014/30/EU (Directive EMC), et
2000/14/CE (Directive Émissions Sonores) y-compris modifications (2005/88/CE)
Endereço: No. 65 Xinggang Rd., Zhonglou Zone, Changzhou, Jiangsu, China
Adres: No. 65 Xinggang Rd., Zhonglou Zone, Changzhou, Jiangsu, China
Ampes: No. 65 Xinggang Rd., Zhonglou Zone, Changzhou, Jiangsu, China
IIMy n aDpec Jnua, OTBETCTBENHO 3a NOJROTOBky TEXHnueckOДOKymeHTaCIN:
MD Machinery Directive 2006/42/EC
2014/30/EC (Директua EMC), e
2000/14/EC (Директва пошуmy) сизмени ($2005/88/EC)
Kpome 3Toro, Mbl 3aBnem, yTO
6bIINNCNOJb3OBaHbICNeDyUOuNE Yactn IIN CTaTbN eBponecknx corlacoBaHHbIX cTaHdapTOB
EN 60335-2-79
EN 60335-1
EN 62233
EN 55014-1
EN 55014-2
EN ISO 3744
I3mepenHbI ypoBeHb 3BykoBO MoUHocTn LWA:92.34 dB(A)
TapaHTnpyembI ypoBeHb 3BykoBOmOuHocTn LWA:93 dB(A)
MeToD oueHKn COOTBeTCTBnA yIOBneTBopReT PpIIOKeHHo V DInpeKTHBb 2000/14/
EC&2005/88/EC.
Mesto, Data: Changzhou,22/07/2016
Osoite: No. 65 Xinggang Rd., Zhonglou Zone, Changzhou, Jiangsu, China
MD Machinery Directive 2006/42/EC
Adress: No. 65 Xinggang Rd., Zhonglou Zone, Changzhou, Jiangsu, China
MD Machinery Directive 2006/42/EC
Adresse: No. 65 Xinggang Rd., Zhonglou Zone, Changzhou, Jiangsu, China
MD Machinery Directive 2006/42/EC
2014/30/EU (EMC-Direktivet), og
2000/14/EC(Stoydirektiv) inkl. endringer (2005/88/EC)
Adresse: No. 65 Xinggang Rd., Zhonglou Zone, Changzhou, Jiangsu, China
Adres: No. 65 Xinggang Rd., Zhonglou Zone, Changzhou, Jiangsu, China
MD Machinery Directive 2006/42/EC
Adresa: No. 65 Xinggang Rd., Zhonglou Zone, Changzhou, Jiangsu, China
Adresa: No. 65 Xinggang Rd., Zhonglou Zone, Changzhou, Jiangsu, China
MD Machinery Directive 2006/42/EC
2014/30/EC (Smernica EMC) a
2000/14/EC (Smernica pre hluk) vrátane modifikácii (2005/88/EC)
Naslov: No. 65 Xinggang Rd., Zhonglou Zone, Changzhou, Jiangsu, China
Ime in naslov osebe, ki je pooblascena za sestavljanje tehnicne dokumentacije:
Ime: Peter Soderström
Naslov: Hjortronvagen 3, 555 93 Jonkoping, Sweden
MD Machinery Directive 2006/42/EC
Adresa: No. 65 Xinggang Rd., Zhonglou Zone, Changzhou, Jiangsu, China
Ime i prezime, i adresa osobe ovlaštene da sastavi tehničku datoteku:
Ime i prezime: Peter Soderström
Adresa: Hjortronvagen 3, 555 93 Jonkoping, Sweden
MD Machinery Directive 2006/42/EC
2014/30/EC (EMC-Direktiva) i
2000/14/EC (Direktiva o buci) uključujuci preinake (2005/88/EC).
Cim: No. 65 Xinggang Rd., Zhonglou Zone, Changzhou, Jiangsu, China
MD Machinery Directive 2006/42/EC
Adresa: No. 65 Xinggang Rd., Zhonglou Zone, Changzhou, Jiangsu, China
MD Machinery Directive 2006/42/EC
Ampes: No. 65 Xinggang Rd., Zhonglou Zone, Changzhou, Jiangsu, China
Ime n aadpec Ha IIncTeO, ynbHOMoueHo da cbCTaBn TexHnueckna paJI:
Ume: Peter Soderström
Ampec: Hjortronvagen 3, 555 93 Jonkoping, Sweden
C HacToaTeTo DeKnapnpaMe, Ye npOdyKTbT
Kateropny Booctpyka pod Bnco Ko hajrahe
MoIeI GDC40
CepneH Homep . BIX eTnKeTa c HOMHaJIHInTe CToHOCTH
ToiHa Ha npOn3BOIDCTBO .BxK etNkeTa c HOMHaJIHnTe cToHOCn
OTROBAPRA Ha cBOTBeTcBAuNTe pa3nope6n Ha NipeKtNBaTa OTHOCHO MaunHInTe
OTROBAPa pa3nope6nte Ha cneHHTe pyrN dnpekTbHa EO
MD Machinery Directive 2006/42/EC
2014/30/EC (Директва за EMC) n
2000/14/EC (N3nbYBaH wym OT Maunn H cbojxehn, KOUTo pa6otrHa
OTKpnto) BKNIOHTeJHO npomehnte (2005/88/EC)
OcBeH ToBa IekJIapIpuMe,Ye
ca npinloxeHn cneHNTe (uaCTn/Knaay3n OT) eBponecknte xapMOHn3npaHn CTaNapTu
EN 60335-2-79
EN 60335-1
EN 62233
EN 55014-1
EN 55014-2
EN ISO 3744
I3mepeHo HnBO Ha wum LWA: 92.34 dB(A)
TapaHTnpaHO HnBO Ha shyM LWA: 93 dB(A)
MeToH a OueHbAHe Ha cBtBeTcBnETo CbO6pa3Ho npJIOXeHne V ot DnpeKtnBa
2000/14/EC&2005/88/EC
MЯсто, Дata: Changzhou, 22/07/2016
Директор КачесТВО
No.65 Xinggang Rd., Zhonglou Zone, Changzhou, Jiangsu, China
iilll lall g jol all jolgic g
Peter Soderstrom
Hjortronvagen 3, 555 93 Jonkoping, Sweden
i 1
80
GDC40
iil
i
1
sevitceriD-CE aiee eee eae ee eae eae eae eae eae eae eae eae eae eae eae eae eae eae eae eae eae eae eae eae eae eae eae eae eae eae eae eae eae eae eae eae eae eae eae eae
MD Machinery Directive 2006/42/EC
2014/30/EU (U
2000/14/EC (Uuue uue uuaa) 2005/88/EC
:1 1 1 1 1 1 1 1 1 0
(aaiial)
EN 60335-2-79
EN 60335-1
EN 62233
EN 55014-1
EN 55014-2
EN ISO 3744
(A)Bd 92.34:LWA
(A)Bd 93:LWA
2000/14/EC&2005/88/EC 5
(BEng, CEng, MIET)
S OBC = S COD + S_ BDO
Changzhou, 22/07/2016:
Ted.

AT UYGUNLUK BEYANI
Uretici: Changzhou Globe Co., Ltd.
Adres: No. 65 Xinggang Rd., Zhonglou Zone, Changzhou, Jiangsu, China
No. 65 Xinggang Rd., Zhonglou Zone, Changzhou, Jiangsu, China
y
Peter Soderstrom:nu
Hjortronvagen 3, 555 93 Jonkoping, Sweden
X
n
GDC40
y
y
(2006/42/E)
n
MD Machinery Directive 2006/42/EC
2000/14/EC (nnnnn nn nnnn (2005/88/EC)
:UINN,
Adresas: No. 65 Xinggang Rd., Zhonglou Zone, Changzhou, Jiangsu, China
MD Machinery Directive 2006/42/EC
2014/30/EK (EMC-direktyva), ir
2000/14/EK (Triukšmo direktyva) jskaitant pakeitimus (2005/88/EK).
Adrese: No. 65 Xinggang Rd., Zhonglou Zone, Changzhou, Jiangsu, China
Personas, kas atbildigs par tehniska faila apkopošanu, vards un adrese:
Vards: Peter Soderström
Adrese: Hjortronvagen 3, 555 93 Jonkoping, Sweden
MD Machinery Directive 2006/42/EC
2014/30/EK (Elektromagnetikas atbilstibas (EMC) direktiva), un
2000/14/EK (Direktiva par trokşnu emisiju), ieskaitot grozijumus (2005/88/EK)
Mes ari pazinojam, ka
ka ir ieveroti šadi Eiropas harmonizetie standarti(to dalas/ paragrafi)
EN 60335-2-79
EN 60335-1
EN 62233
EN 55014-1
EN 55014-2
EN ISO 3744
Izmertitas skanas jaudas limenis LWA: 92.34 dB(A)
Garantêais skanas intensitates limenis LWA: 93 dB(A)
Aadress: No. 65 Xinggang Rd., Zhonglou Zone, Changzhou, Jiangsu, China