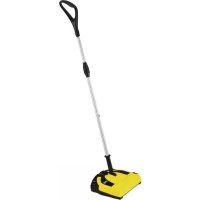
WRE 4 - Electric broom Kärcher - Free user manual and instructions
Find the device manual for free WRE 4 Kärcher in PDF.
| Product type | Electric broom / Weed eliminator |
| Dimensions (L x W x H) | 1370 x 230 x 380 mm |
| Weight | 2.8 kg (battery-only version) or 3.3 kg (with battery and charger) |
| Power supply | 18 V lithium-ion battery (compatible with Kärcher Battery Power 18/25) |
| Brush rotation speed | 2300 to 2800 rpm |
| Brush diameter | 180 mm |
| Brush material | Nylon |
| Usage | Outdoor only, for removing moss and weeds on hard surfaces and in joints |
| Key features | Rotating nylon brush, adjustable telescopic handle, pivoting cleaning head |
| Sound pressure level | 71 dB(A) |
| Sound power level | 87 dB(A) |
| Hand-arm vibration | < 2.5 m/s² |
| Safety | Safety lock on switch, splash-proof protective cover, do not immerse |
| Maintenance | Replacement of bristle strip, protective cover, cleaning with damp cloth |
| Spare parts | Original accessories and spare parts available at www.kaercher.com |
| Warranty | Manufacturer's warranty according to country conditions, after-sales service address on the back of the manual |
Frequently Asked Questions - WRE 4 Kärcher
User questions about WRE 4 Kärcher
0 question about this device. Answer the ones you know or ask your own.
Ask a new question about this device
Download the instructions for your Electric broom in PDF format for free! Find your manual WRE 4 - Kärcher and take your electronic device back in hand. On this page are published all the documents necessary for the use of your device. WRE 4 by Kärcher.
USER MANUAL WRE 4 Kärcher
WRE 4 Battery WRE 4 Battery Set
natural_image
3D rendering of a handheld metal detector with yellow and black components, accompanied by a small rectangular device (no visible text or symbols)Deutsch 5
English 13
Français 21
Italiano 30
Nederlands 38
Español 46
Português 55
Dansk 63
Norsk 71
Svenska 78
Suomi 86
Ελληνικά 94
Türkçe 103
Русский 110
Magyar 120
Čeština 128
Slovenščina 136
Polski 144
Românește 153
Slovenčina 162
Hrvatski 170
Srpski 178
Български 186
Eesti 195
Latviešu 202
Lietuviškai 210
Українська 218
Қазақша 227
日本語 237
العربيya 245
A

natural_image
3D rendered mechanical component with yellow and gray parts, no visible text or symbols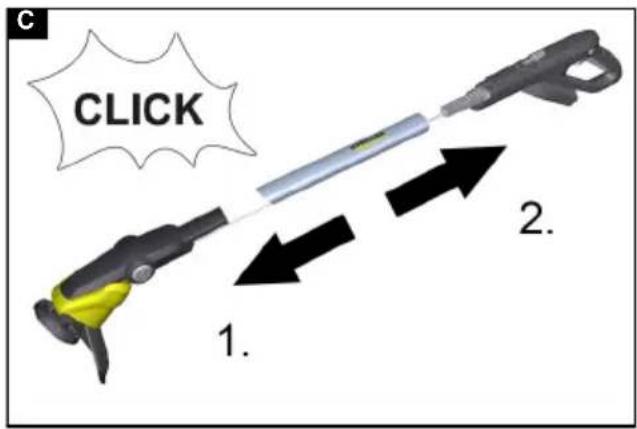
natural_image
Diagram showing three black arrows pointing outward from a metallic rod or pipe (no text or symbols)
natural_image
Close-up of a yellow electric vehicle charging plug with a circular head and arrow indicating clockwise motion (no text or symbols)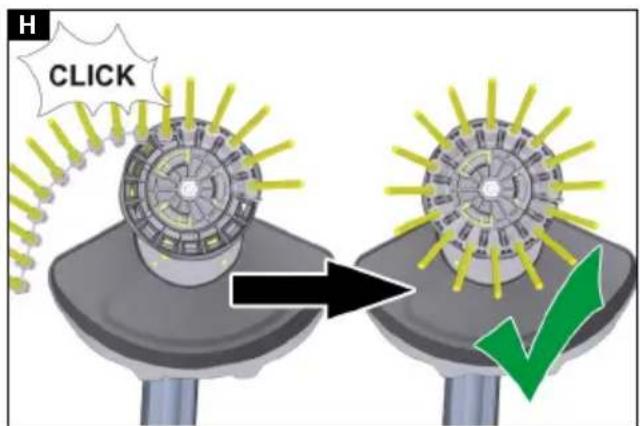
natural_image
3D rendering of a car wheel assembly with yellow components and a black arrow indicating motion (no text or symbols)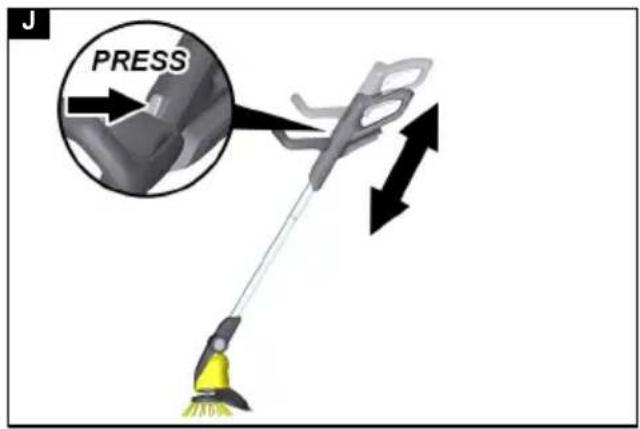
Inhalt

H. Jenner
Chairman of the Board of Management

S. Reiser
Director Regulatory Affairs & Certification
71364 Winnenden (Germany)
Tel.: +49 7195 14-0
Fax: +49 7195 14-2212
Winnenden, 2018/10/01
Contents
General notes 13
General safety instructions ..... 13
Weed remover WRE 4 ..... 14
Safety instructions. 14
Plug-in charger 14
Safety instructions. 14
Battery pack/charger.....15
Intended use 15
Environmental protection ..... 15
Brush protective cover ..... 15
Symbols on the device ..... 15
Accessories and spare parts. . . . . . . 15
Scope of delivery....15
Device description....16
Installation....16
Initial startup 16
Information on operating with a battery pack and charger 16
Switching on the device 18
Removing weeds. 18
Transport....18
Storage 18
Correct storage of the device ..... 18
Care and service....18
Changing the bristle strip ..... 18
Replacing the protective cover ..... 18
Removing the second handle ..... 19
Cleaning 19
Troubleshooting guide....19
Warranty 20
Technical data 20
EU Declaration of Conformity ..... 20
General notes


Read the original operating instruction before using the de-
vice for the first time and act in accordance with it. Keep the original operating instructions for future reference or for future owners.
General safety instructions
⚠️ DANGER ●Risk of asphyxiation. Keep packaging film out of the reach of children.
⚠ WARNING
● Persons with reduced
physical, sensory or mental capabilities and persons lacking experience and knowledge may only use the appliance if they are properly supervised, have been instructed on
use of the appliance safely by a person responsible for their safety, and understand the resultant hazards involved. ● Children must not operate the device. ● Children must be supervised to prevent them from playing with the appliance.
Note ● Do not operate the device when other persons or animals are in the work area.
Weed remover WRE 4 Safety instructions
- Never fully immerse the device in liquids.
- Only operate the device outdoors.
- Regularly check the device for damage. Do not operate the device if you discover visible damage.
- Ensure that the surface to be cleaned is free of sand, stones or loose elements before starting work. These can be flung away during cleaning or damage the surface and the device.
- Be aware of the recoil of the device during operation. The device can move uncontrollably back and forth when switched on. Hold the device securely and maintain a solid and safe footing.
- Do not operate the device in the vicinity of devices that are connected to electrical power.
- Observe the safety instructions provided with the battery pack.
Plug-in charger Safety instructions
⚠️ DANGER ●Risk of explosion. Do not charge batteries (primary cells). ●Do not charge the battery pack in an explosion-hazard environment. ●Do not throw battery packs into a fire or into the household rubbish. ●Avoid contact with fluid leaking from defective batteries. Immediately rinse off the fluid using water if contact is made, and also consult a doctor in the event of contact with the eyes.
⚠ WARNING ● Persons with reduced physical, sensory or mental capabilities and persons lacking experience and knowledge may only use the appliance if they are prop-
erly supervised, have been instructed on use of the appliance safely by a person responsible for their safety, and understand the resultant hazards involved. ●Children must not play with the appliance. ●Children must be supervised to prevent them from playing with the appliance. ●Children from the minimum age of 8 may use the appliance if they are properly supervised or have been instructed in its use by a person responsible for their safety, and if they have understood the resultant hazards involved. ●Children may only perform cleaning work and user maintenance under supervision. ●Check that the mains voltage corresponds with the voltage stated on the type plate of the charger. ●Only use the charger for charging approved battery packs. ●Inspect the plug-in power supply, connection cable, battery adapter and battery pack for damage every time before use. Do not use any damaged devices. Replace any damaged devices. ●Do not charge any damaged battery packs. Replace damaged battery packs with battery packs approved by KÄRCHER.Does not apply to appliances with a fixed battery ●Do not open the charger. In case of damage or defect, replace the charger. ●Protect the connection cable against heat, sharp edges, oil and moving unit parts.
⚠CAUTION ●Do not use the battery pack when dirty or wet. ●Do not put the battery pack into the battery adapter of the charging device if it is dirty or wet.
ATTENTION ● Short circuit hazard. Protect the contacts of the battery adapter against contact with metal parts. ● Short circuit hazard. Do not store the battery packs together with metal objects. ● Risk of damage. Do not wind the connection cable around the plug-in power supply or the battery adapter. ● Never cover the charger during use. ● Do not carry the charger by the connection cable.
Note ● Be sure to read the safety instructions enclosed with the battery pack. Adhere to the safety instructions during use.
Battery pack/charger
Read and adhere to the operating instructions and safety instructions for handling the battery and charger.
Intended use
⚠ WARNING
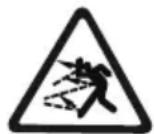
Risk of injury from flung particles
Use the weed remover only with an intact protective hood.
The device is intended for removing moss and weeds from straight joints and complex surfaces.
Only use the device in private households. The telescoping handle and pivoting cleaning head can be adjusted to suit different body heights.
Foreseeable misuse
Any type of improper use is prohibited.
The operating personnel are liable for damage resulting from incorrect use.
Environmental protection

The packing materials can be recycled. Please dispose of packaging in accordance with the environmental regulations.

Electrical and electronic appliances contain valuable, recyclable materials and often components such as batter-rechargeable batteries or oil, which - if filled or disposed of incorrectly - can be a potential threat to human health and environment. However, these comps are required for the correct operation the appliance. Appliances marked by this tool are not allowed to be disposed of other with the household rubbish.
Notes on the content materials (REACH)
Current information on content materials can be found at: www.kaercher.com/REACH
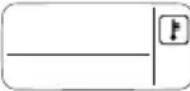
Brush protective cover
Illustration B
The protective cover prevents the operator or persons in the vicinity from being injured by flung particles.
Symbols on the device
Weed remover WRE 4
Warning of flying objects.
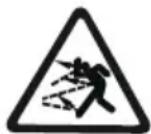
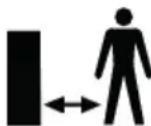
Keep other persons away from the work area.

Wear suitable hearing protection and safety goggles when operating the device.
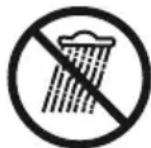
Protect the device from rain and spray water.
Plug-in charger
 | Protect the device from moisture. Store the device in a dry place. Do not subject the device to rain. The device is only suitable for indoor use. | |
 | The device meets the requirements of protection class II. | |
Accessories and spare parts
Only use original accessories and original spare parts. They ensure that the appliance will run fault-free and safely.
Information on accessories and spare parts can be found at www.kaercher.com.
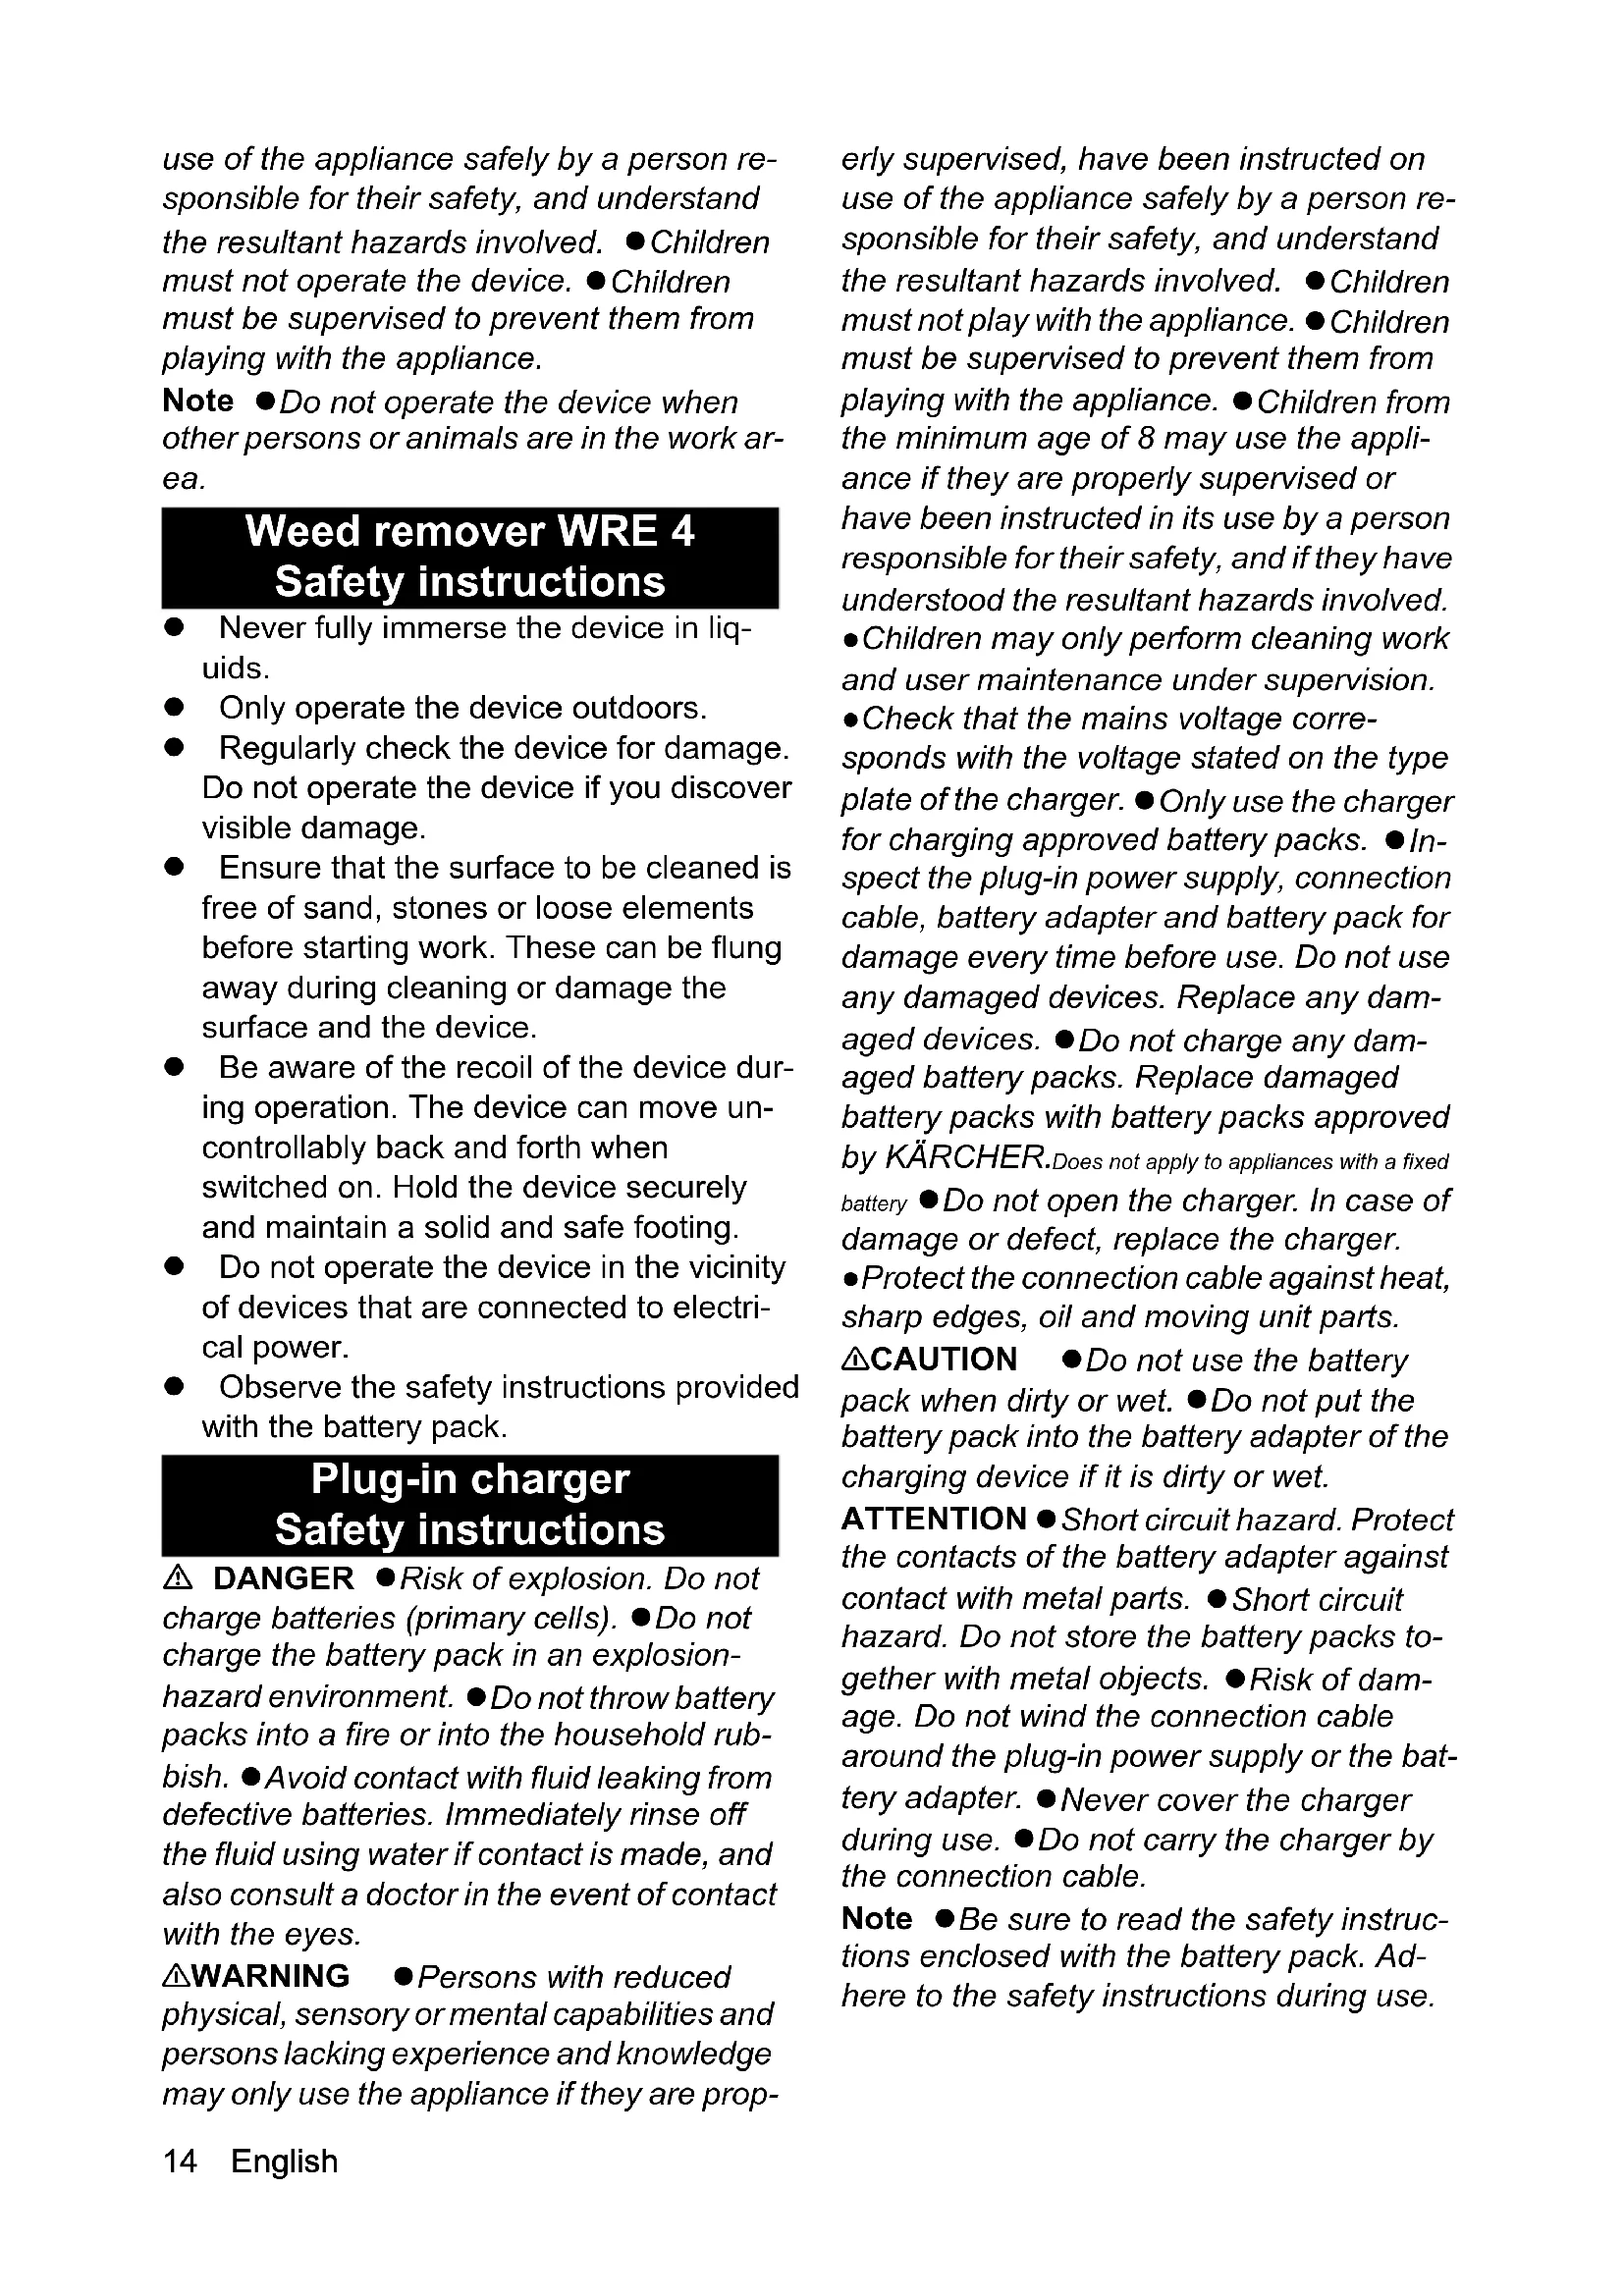
Scope of delivery
The scope of delivery for the appliance is shown on the packaging. Check the contents for completeness when unpacking. If any accessories are missing or in the event of any shipping damage, please notify your dealer.
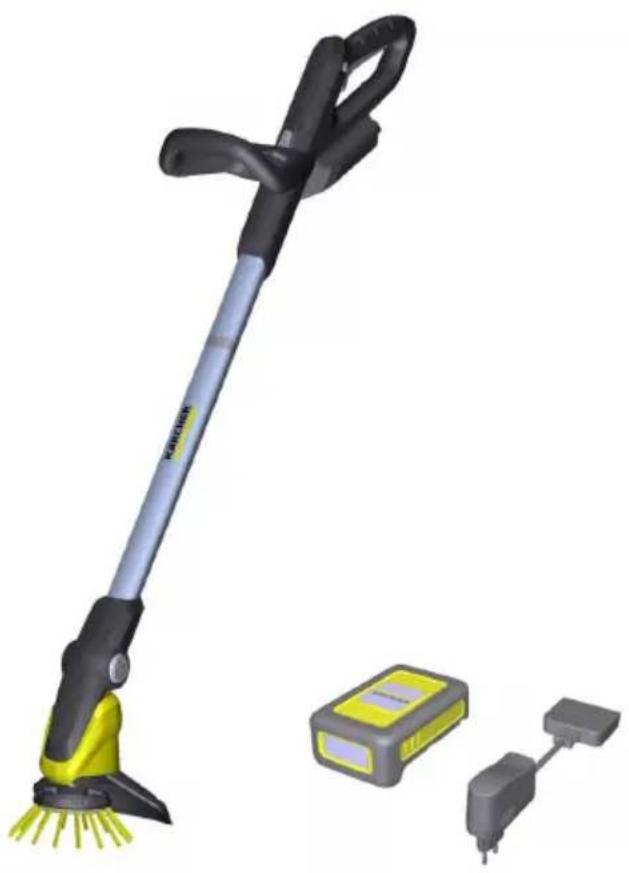
Device description
Illustration A
①Rotating nylon brush
②Brush protective cover
③Pivoting cleaning head
④Pivoting cleaning head unlocking button
⑤Telescoping handle
⑥ Second handle
⑦Power switch unlocking button
⑧Telescoping handle unlocking button
⑨Handle
⑩Power switch
⑪ Mount for 18 V Battery Power battery pack
Installation
- Push the pipe provided with the cham- fered side into the motor housing. The pipe latches audibly into place.
ATTENTION
Risk of damage
The handle is pre-installed and set to the shortest telescopic length. Do not change the setting until the telescoping handle is completely installed.
- Insert the upper tube section into the mount on the handle.
Illustration C
The pipe latches audibly into place.
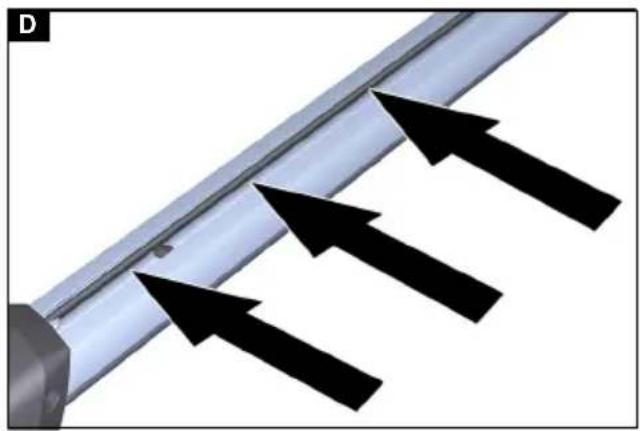
- Fit the power cable into the cable duct in the telescoping handle from the bottom to the top.
Illustration D
- Push the second handle into the mounting.
Illustration E
The pipe latches audibly into place.
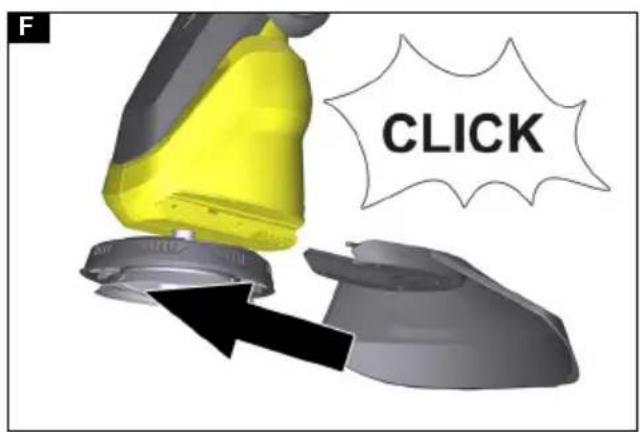
- Push the protective cover into the mounting.
Illustration F
The pipe latches audibly into place.
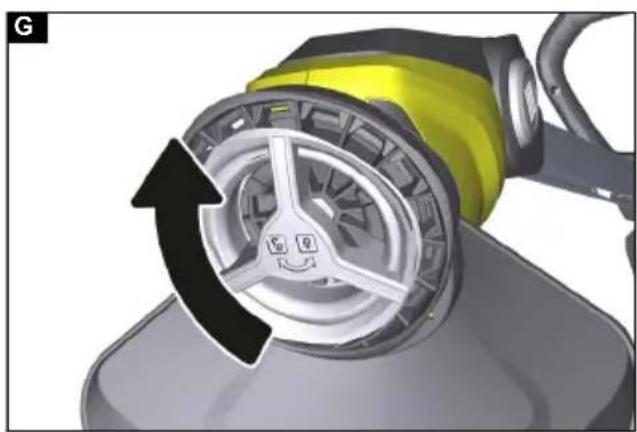
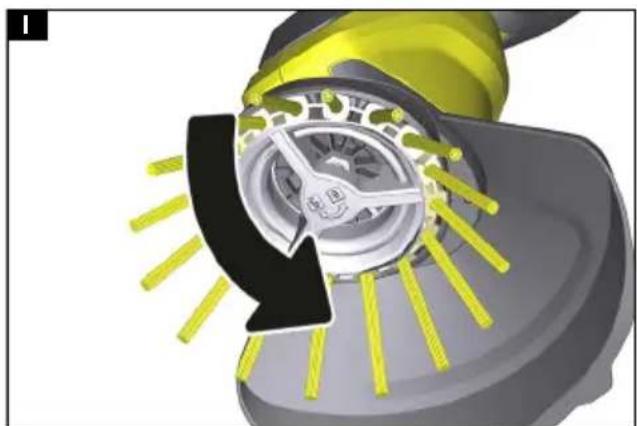
- Screw open the handle lock of the holder and remove.
Illustration G
- Press the bristle strip in a circle into the brush holder and latch into place.
Illustration H
- Fit the handle cover and screw closed.
Illustration I
Initial startup
Adjusting the device
Adjusting the telescoping handle
You can adjust the length of the device to suit your requirements.
- Press the unlocking button.
- Adjust the telescoping handle as desired.
Illustration J
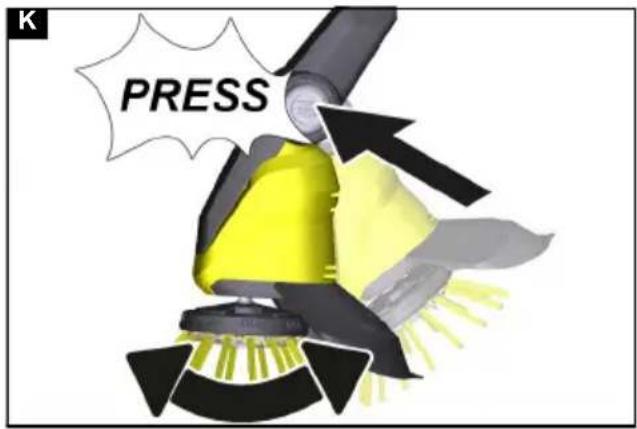
Adjusting the cleaning head
You can adjust the angle of the cleaning head to suit your requirements.
- Press the unlocking button.
- Adjust the cleaning head as desired.
Illustration K
Inserting the battery pack
ATTENTION
Dirty contacts
Damage to the device and battery Check the battery mount and the contacts for soiling and clean them as necessary before inserting the battery.
- Push the battery into the mounting in the device until it audibly latches into place.
Removing the battery
⚠ WARNING
Uncontrolled startup
Risk of injury
Remove the battery pack from the device during work breaks and before carrying out any service or care work.
- Press the unlocking button.
- Remove the battery from the device.
Information on operating with a battery pack and charger
Display
The battery pack is equipped with a display. The following information is shown in the display:
- Charging state
- Charging progress
● Remaining charging time
Note
The runtime adjustment is generated via capacity switching!
- Error messages
The display rotates when the battery pack is inserted, according to the device being used.
| Display Meaning | |
| Battery pack in storage | |
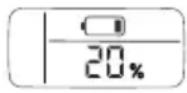 | Charging state of the battery pack while not in use. |
| Battery pack in use | |
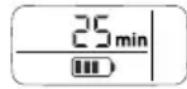 | Remaining battery life of the battery pack while in use. |
| Charging the battery pack | |
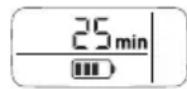 | Remaining charging time of the battery pack during charging. |
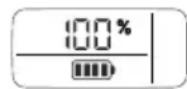 | The battery pack is fully charged. |
| Fault display | |
 | The battery pack temperature lies outside the permissible temperature range or the battery pack is disabled due to a short circuit (see Chapter). |
 | Battery pack is defective and disabled for safety. Do not continue using the battery pack and dispose of it properly. |
| Operation | |
Operation
△CAUTION
Loose battery pack
Risk of injury and damage
Ensure that the battery pack engages correctly.
Note
The display shows the remaining run time in minutes while the device is in use.
Charge partly discharged battery packs after use.
Before using the battery pack in a KÄRCH-ER Battery Power (+) system, please ob-
serve the operating instructions and safety instructions for the device being used.
Check that the battery pack and the device (18 V - 36 V) match before use.
- Push the battery pack into the mounting on the device.
- Remove the battery pack from the device after completing the work.
- Charge the battery pack after completing the work.
Charging process
Note
Notes on operating the device are provided in the battery pack operating instructions or on the device being used.
- Push the battery pack into the battery adapter of the charger.
- Plug the plug-in power supply into the socket.
- The charging process begins automatically.
The battery pack display shows the remaining charging time. The display shows 100% when the battery pack is fully charged. - Unplug the battery pack from the battery adapter after charging.
- Unplug the plug-in power supply from the socket.
Note
The charged battery pack can remain in the charger until it is used. There is no danger of overcharging.
Avoid unnecessary energy consumption and unplug the charger when the battery pack is fully charged.
Display shows the temperature symbol
The battery pack cannot be charged outside the permissible temperature range.
The battery pack display shows the temperature symbol when attempting to charge.
- Wait until the battery temperature lies within the normal range.
The charging process starts when the battery pack temperature has reached the permissible temperature range.
Switching on the device
You must press the unlocking button to enable the power switch (safety function).
Only then can the device be switched on via the power switch.
- Press the unlocking button.
- Press the power switch at the same time.
The device starts up, the unlocking button can be released and the device continues running.
- Release the power switch.
The device stops.
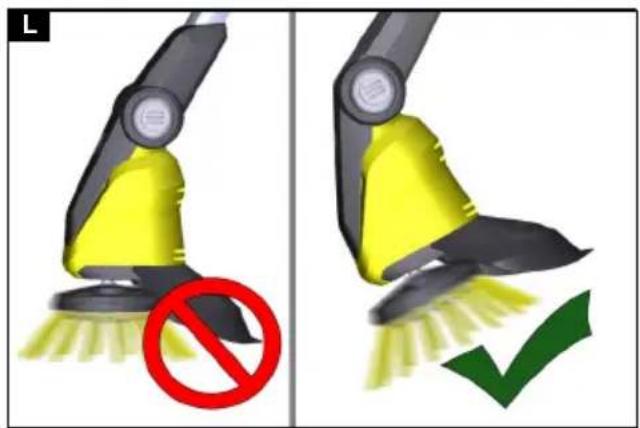
Removing weeds
- Always guide the device with slow movements over the surface to be cleaned, at a slight angle without applying any pressure. Do nor guide the device flat over the surface.
Illustration L
-
Work on stubborn weeds multiple times slowly.
-
Hold the device at the side of the second handle when cleaning joints so that it is slightly titled. Please note that loose material in the joint may also be removed.
Note
Please note that the device only removes weeds at the surface. It does not remove the roots.
The gentle nylon brush is capable of removing a wide range of weed types from and between almost any hard surface. The cleaning results can however vary depending on external influences (ambient humidity, ground moisture and ambient temperature).
ATTENTION
Risk of damage
Do not scrub with the device or use the protective cover for scraping. This may damage the device
Transport
△CAUTION
Failure to observe the weight
Risk of injury and damage
Be aware of the weight of the device during transportation.
Storage
△CAUTION
Failure to observe the weight
Risk of injury and damage
Be aware of the weight of the device during storage.
Correct storage of the device
Store the device by hanging from the eye in the handle. You can also alternatively place the device on the edge of the protective cover.
ATTENTION
Risk of damage to the brushes
Do not store the device standing on the brushes.
Care and service Changing the bristle strip
Note
The bristle strip must be replaced when the bristles show signs of wear.
- Remove the battery pack from the device.
- Screw open the handle lock of the brush holder and remove.
- Pull out worn out bristle strip and the removal aid.
- Press the new bristle strip section by section into the holder and latch into place (see "Installation").
- Fit the handle cover and screw closed.
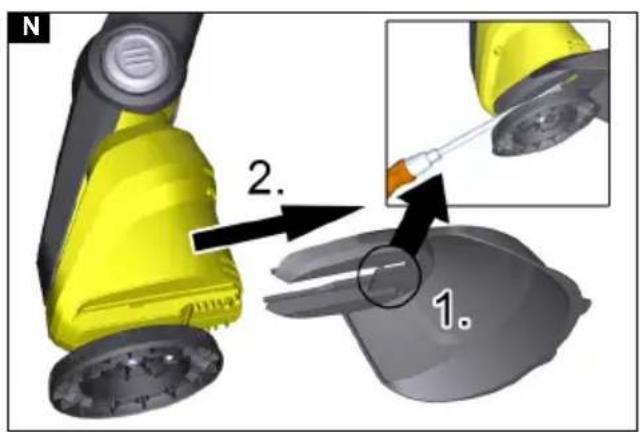
Replacing the protective cover
⚠ WARNING
Risk of injury from flung particles
Use the weed remover only with an intact protective hood.
The protective cover must be replaced when it shows signs of wear such as cracks or fractures.
- Remove the bristle strip.
- Release the lock on the protective cover with a flat-blade screwdriver.
- Pull the protective cover away to the rear.
- Fit the new protective cover and latch into place.
Illustration N
Removing the second handle
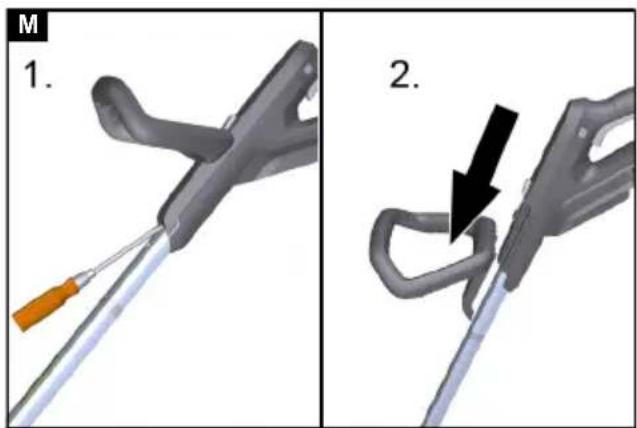
Illustration M
The second handle can be removed for repair purposes.
- Release the lock on the second handle with a flat-blade screwdriver.
- Pull the second handle downwards and out of the holder.
Take care to ensure that the second handle engages on re-installation.
Cleaning
The battery pack must be removed from the device before cleaning.
ATTENTION
Improper cleaning
Damage to the device
Do not clean the device with a hose or high-pressure water jet.
Do not use aggressive detergents.
Do not knock the brush on the ground.
- Remove the battery pack.
- Remove the plant residue using a brush.
- Clean the device with a moist cloth.
Troubleshooting guide
Malfunctions often have simple causes that you can remedy yourself using the following overview. When in doubt, or in the case of malfunctions not mentioned here, please contact your authorised Customer Service. As the battery pack ages, even if it is looked after, its capacity reduces such that the full run time will no longer be reached when fully charged. This does not indicate a defect.
Faults on the device
The device does not start up
The battery pack is not inserted correctly.
- Push the battery pack into the mounting in the device until it audibly latches into place.
The battery pack is discharged.
- Charge the battery pack.
The battery pack is in sleep mode. -
Press and hold the power switch longer or press the power switch a second time.
The battery pack is defective. -
Replace the battery pack.
The device stops during operation
The battery has overheated
-
Stop working and allow the battery to cool down to the permissible temperature range. This can take a few minutes.
The device stops during operation
Bristle strip blocked/device overloaded/motor protection has triggered. -
Allow the device to cool down for a few minutes.
- Press less hard when operating the device
Unsatisfactory cleaning results
Worn bristles
- Replace the bristle strip.
Faults during charging
Battery pack not charging, display is on Defective charger.
- Replace the charger.
Battery pack not charging, display is off Battery pack is completely discharged or defective.
-
Wait and see if the display shows the remaining charging time after a while. If the display remains off then the battery pack is defective.
-
Replace the battery pack.
Battery pack not charging, display shows the temperature symbol
The battery pack temperature is too low/high.
- Put the battery pack in a moderate temperature environment and wait until the battery pack temperature returns to the normal range, see chapter "Technical data" in the battery pack operating instructions.
The charging process begins automatically.
Battery pack malfunctions General fault
Display shows broken battery symbol Battery pack is defective and disabled for safety.
- Do not use the battery pack.
- Dispose of the battery pack in the correct manner.
Faults during operation
Display shows the temperature symbol
The battery pack temperature is too low/high.
- Wait until the battery temperature returns to the normal range, see chapter "Technical data" in the battery pack operating instructions.
In case of a short-circuit, the battery pack is disabled for 30 seconds. If the short-circuit occurs more frequently, the battery pack is permanently disabled.
- Connect the battery pack to the charger to unlock it.
Display shows remaining run time 0, device switches off
The battery pack is discharged.
- Charge the battery pack.
Storage faults
Display shows no remaining capacity
The battery pack is discharged.
- Charge the battery pack.
Display shows a remaining capacity of 70%, but the battery pack is fully charged
The battery pack is in automatic storage mode. The storage mode is activated if the battery pack has not been used for more than 21 days. This function protects the battery cells against rapid ageing and increases their service life.
- Fully recharge the battery pack before next use.
Warranty
The warranty conditions issued by our relevant sales company apply in all countries. We shall remedy possible malfunctions on your appliance within the warranty period free of cost, provided that a material or manufacturing defect is the cause. In a warranty case, please contact your dealer (with the purchase receipt) or the next authorised customer service site.
(See overleaf for the address)
Technical data
| W | WRE 4 | |
| attery | Battery Set |
Device performance data
| Battery pack type - Battery | |
| Power | |
| 18/25 | |
| Working voltage of V the battery | 1 | 8 | 1 |
| Brush speed 1/min 2300- | 2300- |
| 2800 | 2800 |
| Brush diameter mm 180 180 |
| Brush material | Nylon | Nylon |
Dimensions and weights
| Weight | kg | 2,8 | 3,3 |
| Length x width x height | mm | 1370 x | 1370 x |
| 230 x | 230 x | ||
| 380 | 380 |
Determined values
| Hand-arm vibration value | m/s2 | <2,5 | <2,5 |
| K uncertainty m/s | 2 | 0,2 | 0,2 |
| Sound level | dB(A) | 71 | 71 |
| K uncertaintypA | dB(A) | 2 | 2 |
| Sound power level | dB(A) | 87 | 87 |
| LWA+ K uncertaintyWA |
Subject to technical modifications.
EU Declaration of Conformity
We hereby declare that the machine described below complies with the relevant basic safety and health requirements in the EU Directives, both in its basic design and construction as well as in the version placed in circulation by us. This declaration is invalidated by any changes made to the machine that are not approved by us.
Product: Weed remover
Type: WRE 4
Currently applicable EU Directives
2006/42/EC (+2009/127/EC)
2014/30/EU
2011/65/EU
2000/14/EC
Harmonised standards used
EN 60335-1
EN 62233: 2008
EN 55014-1: 2006+A2: 2011
EN 55014-2
EN 50581
Conformity evaluation procedure used
2000/14/EC: Appendix V
Sound power level dB(A)
Measured: 85
Guaranteed: 87
The signatories act on behalf of and with the authority of the company management.

H. Jenner
Chairman of the Board of Management

S. Reiser
Director Regulatory Affairs & Certification
Documentation supervisor: S. Reiser
Alfred Kärcher SE & Co. KG
Alfred-Kärcher-Str. 28 - 40
71364 Winnenden (Germany)
Ph.: +49 7195 14-0
Fax: +49 7195 14-2212
Winnenden, 2018/10/01
Contenu
2006/42/CE (+2009/127/CE)
2014/30/UE
2011/65/EU
2000/14/CE

H. Jenner
Chairman of the Board of Management

S. Reiser
Director Regulatory Affairs & Certification
Responsable de la documentation : S. Reiser
Alfred Kärcher SE & Co. KG
Alfred-Kärcher-Str. 28 - 40
71364 Winnenden (Germany)
Tél.: +49719514-0
Chairman of the Board of Management

S. Reiser
Director Regulatory Affairs & Certification
71364 Winnenden (Germany)
Tel.: +49 7195 14-0
Fax: +49 7195 14-2212
Winnenden, 01/10/2018
Inhoud
Accupack / laadapparaat
Het accupack is defect.
De accu is oververhit
Accupack is volledig ontladen of defect.
| W | WRE 4 | |
| Battery | Battery | |
| Set |
Chairman of the Board of Management

S. Reiser
Director Regulatory Affairs & Certification
71364 Winnenden (Germany)
Tel.: +49 7195 14-0
Fax: +49 7195 14-2212
Winnenden, 2018/10/01
E
2006/42/CE (+2009/127/CE)
2014/30/UE
2011/65/UE
2000/14/CE

H. Jenner
Chairman of the Board of Management

S. Reiser
Director Regulatory Affairs & Certification
71364 Winnenden (Germany)
Tel.: +49 7195 14-0
Fax: +49 7195 14-2212
Winnenden, 01/10/2018
Índice
Avisos gerais....55
Remover as ervas daninhas ..... 59
Transporte 60
Armazenamento....60
Remover as ervas daninhas
2006/42/CE (+2009/127/CE)
2014/30/UE
2011/65/UE
2000/14/CE

H. Jenner
Chairman of the Board of Management

S. Reiser
Director Regulatory Affairs & Certification
Winnenden, 01/10/2018
Indhold
| W | WRE 4 | |
| Battery | Battery Set |
2006/42/EF (+2009/127/EF)
2014/30/EU
2011/65/EU
2000/14/EF
R
E
Chairman of the Board of Management

S. Reiser
Director Regulatory Affairs & Certification
71364 Winnenden (Germany)
Tlf.: +49 7195 14-0
Fax: +49 7195 14-2212
Winnenden, 2018/10/01
Indhold
Generelle merknader 71
Generelle sikkerhetsinstrukser.....71
Ugressfjerner WRE 4. . . . . . . . . . . . . . . 71
| W | WRE 4 | |
| Battery | Battery Set |
2006/42/EF (+2009/127/EF)
2014/30/EU
2011/65/EU
2000/14/EF
Anvendte harmoniserte standarder
EN 60335-1
EN 62233: 2008
EN 55014-1: 2006+A2: 2011
EN 55014-2
EN 50581
2000/14/EF: Vedlegg V
Lydeffektnivå dB(A)
Målt: 85
Garantert: 87
Chairman of the Board of Management

S. Reiser
Director Regulatory Affairs & Certification
71364 Winnenden (Germany)
Tlf.: +49 7195 14-0
Winnenden, 01/10/2018
E
Innehåll
Allmän information 78
Chairman of the Board of Management

S. Reiser
Director Regulatory Affairs & Certification
D-71364 Winnenden (Germany)
Tfn: +49 7195 14-0
Fax: +49 7195 14-2212
Winnenden, 2018/10/01
Sisältö
| W | WRE 4 | |
| Battery | Battery Set |
Laitteen tehotiedot

Chairman of the Board of Management
E
S. Reiser
Director Regulatory Affairs & Certification
Dokumentointivastaava: S. Reiser
Alfred Kärcher SE & Co. KG
Alfred-Kärcher-Str. 28 - 40
71364 Winnenden (Germany)
Puh.: +49 7195 14-0
Winnenden, 2018/10/01
Περιεχόμενα
| W | WRE 4 | |
| Battery | Battery Set |
Διαστάσεις και βάρη
| Bápoç kg 2,8 3,3 | ||
| Mήkoç x πλάtoç x | mm 1370 x | 1370 x |
| úψoç | 230 x | 230 x |
| 380 | 380 | |
Μετρημένες τιμές

Chairman of the Board of Management

S. Reiser
Director Regulatory Affairs & Certification
71364 Winnenden (Germany)
Tηλ.: +49 7195 14-0
Φαξ: +49 7195 14-2212
Winnenden, 2018/10/01
İçindekiler
2006/42/AT (+2009/127/AT)
2014/30/AB
2011/65/AT
2000/14/EG
Chairman of the Board of Management

S. Reiser
Director Regulatory Affairs & Certification
Winnenden, 2018/10/01
Содержание
H. Jenner
Chairman of the Board of Management

S. Reiser
Director Regulatory Affairs & Certification
71364 Winnenden (Germany)
Тел.: +49 7195 14-0
Факс: +49 7195 14-2212
| W | WRE 4 | |
| Battery | Battery Set |
Chairman of the Board of Management

S. Reiser
Director Regulatory Affairs & Certification
Winnenden, 2018/10/01
Obsah
Obecné pokyny 128
W WRE 4 Battery Battery Set
Zjištěné hodnoty
| Hodnota vibrací ru- m/s2 | <2,5 | <2,5 |
| kou/paží |
| Nejistota K | m/s ^2 | 0,2 | 0,2 |
2006/42/ES (+2009/127/ES) E
2014/30/EU
2011/65/EU
2000/14/ES
Chairman of the Board of Management

S. Reiser
Director Regulatory Affairs & Certification
Zmocněnec pro dokumentaci: S. Reiser
Alfred Kärcher SE & Co. KG
Alfred-Kärcher-Str. 28 - 40
Winnenden, 2018/10/01
Kazalo
Splošna navodila 136
2006/42/ES (+2009/127/ES)
2014/30/EU
2011/65/EU
2000/14/ES
Chairman of the Board of Management

S. Reiser
Director Regulatory Affairs & Certification
Winnenden, 1. 10. 2018
Spis treści
2006/42/WE (+2009/127/WE)
2014/30/UE
2011/65/UE
2000/14/WE
Chairman of the Board of Management

S. Reiser
Director Regulatory Affairs & Certification
71364 Winnenden (Germany)
Tel.: +49 7195 14-0
Winnenden, 2018/10/01
E
Cuprins
Directive UE relevante
2006/42/UE (+2009/127/UE)
2014/30/UE
2011/65/UE
2000/14/UE
Norme armonizate aplicate
EN 60335-1
E
EN 62233: 2008
EN 55014-1: 2006+A2: 2011
EN 55014-2
a EN 50\$81 t e r y

H. Jenner
Chairman of the Board of Management

S. Reiser
Director Regulatory Affairs & Certification
71364 Winnenden (Germania)
Tel.: +49 7195 14-0
Fax: +49 7195 14-2212
Winnenden, 2018/10/01
Obsah
Všeobecné upozornenia ..... 162
Odstraňovač buriny WRE 4
Bezpečnostné pokyny
Odstraňovač buriny WRE 4
2006/42/ES (+2009/127/ES)
2014/30/EÚ
2011/65/EÚ
2000/14/ES

H. Jenner
Chairman of the Board of Management

S. Reiser
Director Regulatory Affairs & Certification
71364 Winnenden (Germany)
Tel.: +49 7195 14-0
Fax: +49 7195 14-2212
Winnenden, 01.10.2018
Sadržaj
Opće napomene 170
Chairman of the Board of Management

S. Reiser
Director Regulatory Affairs & Certification
Opunomoćenik za dokumentaciju: S. Reiser
Alfred Kärcher SE & Co. KG
Alfred-Kärcher-Str. 28 - 40
71364 Winnenden (Njemačka)
Tel.: +49 7195 14-0
Telefaks: +49 7195 14-2212
Winnenden, 2018/10/01
Sadržaj
Opšte napomene.... 178
Opšte sigurnosne napomene ..... 178
Odstranjivač korova WRE 4 ..... 178
Sigurnosne napomene 178
Punjač sa utikačem. 178
Sigurnosne napomene 178
Akumulatorsko pakovanje / punjač . . . 179
Namenska upotreba 179
Zaštita životne sredine ..... 179

H. Jenner
Chairman of the Board of Management

S. Reiser
Director Regulatory Affairs & Certification
Lice ovlašćeno za dokumentaciju: S.
Reiser
Alfred Kärcher SE & Co. KG
Alfred-Kärcher-Str. 28 - 40
71364 Winnenden (Germany)
Tel.: +49 7195 14-0
Winnenden, 2018/10/01
Съдържание
Chairman of the Board of Management

S. Reiser
Director Regulatory Affairs & Certification
71364 Winnenden (Germany)
Тел.: +49 7195 14-0
Факс: +49 7195 14-2212
Виненден, 2018/10/01
Sisukord
Üldised juhised.... 195
Üldised ohutusjuhised 195
Umbrohueemaldaja WRE 4 ..... 195
Ohutusjuhised 195
Pistiklaadija 196
Ohutusjuhised 196
Akupakk / laadija 196
Sihtotstarbeline kasutamine.... 196
Keskkonnakaitse 196
2006/42/EÜ (+2009/127/EÜ)
2014/30/EL
2011/65/EL
2000/14/EÜ
Chairman of the Board of Management

S. Reiser
Director Regulatory Affairs & Certification
71364 Winnenden (Germany)
Tel: +49 7195 14-0
Winnenden, 2018/10/01
Saturs
Chairman of the Board of Management

S. Reiser
Director Regulatory Affairs & Certification

Chairman of the Board of Management

S. Reiser
Director Regulatory Affairs & Certification
| W | WRE 4 | |
| Battery | Battery Set |
Розміри та вага
Chairman of the Board of Management

S. Reiser
Director Regulatory Affairs & Certification
71364 Winnenden (Germany)
Тел.: +49 7195 14-0
Факс: +49 7195 14-2212
| W | WRE 4 | |
| Battery | Battery Set |
Chairman of the Board of Management

S. Reiser
Director Regulatory Affairs & Certification
Winnenden, 2018/10/01
目次
Chairman of the Board of Management

S. Reiser
Director Regulatory Affairs & Certification
文書の全権委員:S. Reiser
Alfred Kärcher SE & Co. KG
Alfred-Kärcher-Str. 28 - 40
71364 Winnenden (Germany)
電話番号:+49 7195 14-0
251 WRE 4 analyst Agricultural
251 إرشادات السلامة
251 قابس جهاز الشحن
natural_image
Black and white icon of a hand giving a thumbs-up gesture (no text or symbols)THANK YOU!
MERCI! DANKE! iGRACIAS!

Register your product and benefit from many advantages.
www.kaercher.com/welcome


Rate your product and tell us your opinion.
natural_image
Icon showing a gear and wrench inside a square frame (no text or symbols)www.kaercher.com/dealersearch
Alfred Kärcher SE & Co. KG
Alfred-Kärcher-Str. 28-40
71364 Winnenden (Germany)
Tel.: +49 7195 14-0
Fax: +49 7195 14-2212