K 55 pet - Electric broom Kärcher - Free user manual and instructions
Find the device manual for free K 55 pet Kärcher in PDF.

| Device type | Water and dust vacuum cleaner |
| Power | 1200 W |
| Tank capacity | 15 liters |
| Weight | 5.5 kg |
| Dimensions | 360 x 360 x 500 mm |
| Filtration | Foam filter, cartridge filter |
| Included accessories | Suction tube, wet and dry nozzle, filter |
| Usage | Ideal for cleaning dry and wet surfaces |
| Maintenance | Regular filter cleaning, tank emptying |
| Safety | Overload protection, safety power cable |
| Warranty | 2 years |
Frequently Asked Questions - K 55 pet Kärcher
User questions about K 55 pet Kärcher
0 question about this device. Answer the ones you know or ask your own.
Ask a new question about this device
Download the instructions for your Electric broom in PDF format for free! Find your manual K 55 pet - Kärcher and take your electronic device back in hand. On this page are published all the documents necessary for the use of your device. K 55 pet by Kärcher.
USER MANUAL K 55 pet Kärcher
natural_image
Line drawing of a cleaning vacuum cleaner with handle and base (no text or symbols)Deutsch 3
English 8
Français 12
Italiano 17
Nederlands 22
Español 26
Português 31
Dansk 36
Norsk 40
Svenska 44
Suomi 48
Ελληνικά 52
Türkçe 57
Русский 61
Magyar 66
Čeština 70
Slovenščina 74
Polski 78
Românește 83
Slovenčina 88
Hrvatski 93
Srpski 97
Български 101
Eesti 106
Latviešu 110
Lietuviškai 115
Українська 119
Қазақша 124
العربية 133
Register and win! www.kaercher.com/register-and-win
EAC

59664730 04/16
natural_image
Diagram of a cleaning or cleaning tool with directional arrows indicating rotation (no text or symbols)

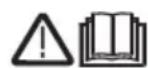
Please read and comply with these original instructions prior to the initial operation of your appliance and store them for later use or subsequent owners.
Proper use
- Use this battery operated appliance only for personal use, for cleaning rooms; use only the accessories and spare parts approved by KÄRCHER for such use.
- The appliance is not suitable for cleaning deep-pile carpets and wet floors.
- The appliance is not suitable for cleaning concrete, gravel, etc.
The manufacturer is not responsible for any damages that may occur on account of improper use or wrong operations.
Environmental protection

The packaging material can be recycled. Please do not place the packaging into the ordinary refuse for disposal, but arrange for the proper recycling.
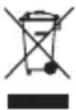
Old appliances contain valuable materials that can be recycled. Please arrange for the proper recycling of old appliances. Batteries and accumulators contain substances that must not enter the environment. Please dispose of your old appliances, batteries and accumulators using appropriate collection systems.
Safety instructions
- This device is not intended for use by persons (including children) with reduced physical, sensory or mental abilities or lacking experience and/or knowledge, unless they are supervised by a person responsible for their safety or are instructed by these persons on the use of the device. Children should be supervised, to ensure that they do not play with the device.
⚠️Risk of injury
- The appliance contains rotary brush roller; please never touch them with the fingers or any other tool when the appliance is in operation!
- Remove the batteries before starting any maintenance jobs or repairs to the machine!
Information regarding the battery
- You may recharge the battery using only the original charger provided with the appliance or a charger approved by KÄRCHER.
- Short circuit hazard! Do not insert conductive objects (such as screwdrivers or similar) into the charger plug.
- Do not expose the battery to direct sunlight, heat or fire, there is a risk of explosion.
Tips for using the battery charger
– In case of visual damage, replace the charger with charger cable immediately by original parts.
- The voltage indicated on the type plate must correspond to the supply voltage.
- Only use and store the charger in dry rooms, ambient temperature 5 - 40^ .
- Never touch the mains plug with wet hands.
Start up
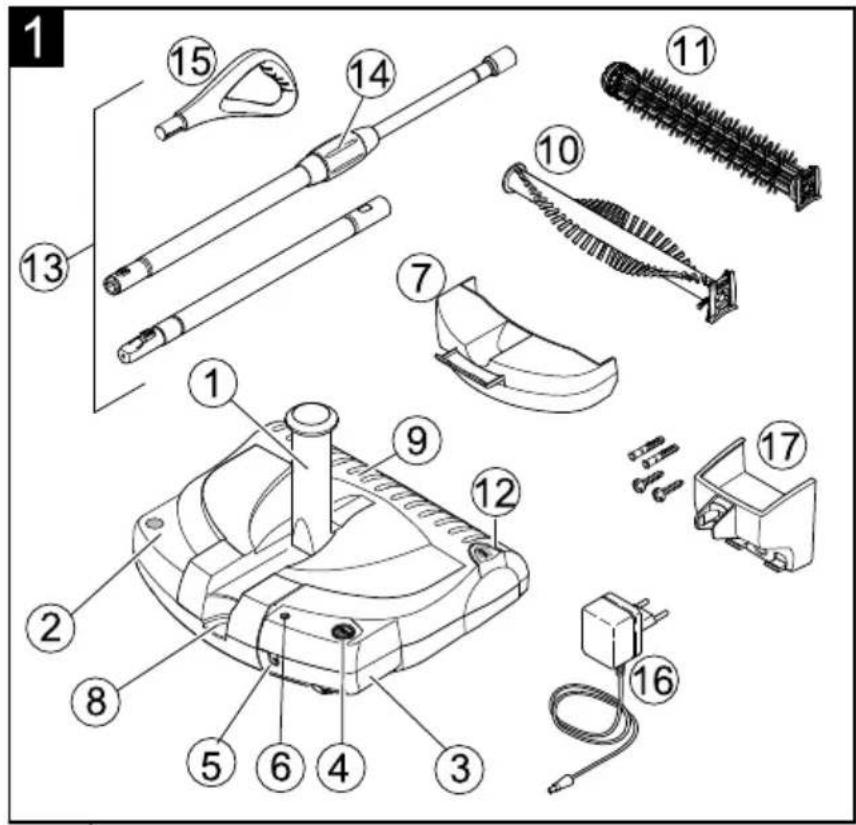
Description of the Appliance
When unpacking the product, make sure that no accessories are missing and that none of the package contents have been damaged. If you detect any transport damages please contact your dealer.
Note: Please refer to page 2 for figures of the appliance and the operation.
Illustration 1
1 Joint at the appliance
2 ON/OFF foot switch
3 Rechargeable battery, detachable
4 Unlocking button, battery
5 Charging box
6 Charging display
7 Dirt container, detachable
8 Unlocking the lid of dirt container
9 Casing
10 Scope of delivery K 55: Brush roller, changeable
11 Scope of delivery K 55 pet: Brush roller with cleaning cover (animal hair brush), can be interchanged
12 Unlocking button for the changeable brush
13 Telescopic strut, adjustable height
14 Turning handle
15 Handle
16 Charger with charging cable
17 Wall mount with fasteners
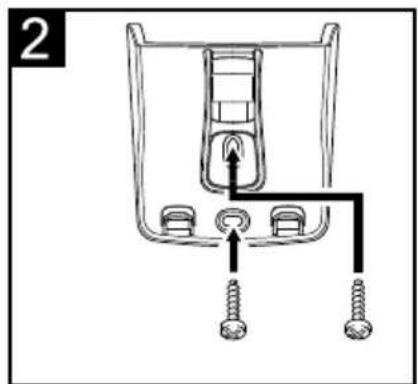
Installing the wall unit
Illustration 2
The wall mount is to be used for storing the appliance and the charger.
→ Fix the enclosed wall mount at an easily accessible point near to a socket - the fastener is enclosed.
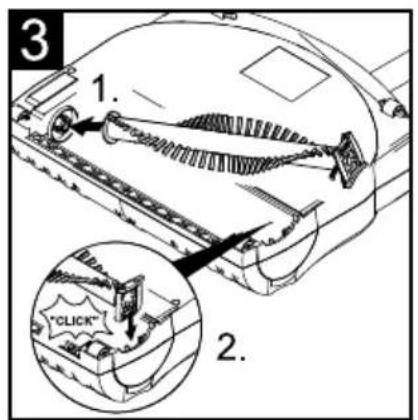
Insert the brush roller
Illustration 3
The brush roller has not yet been inserted in the appliance at the time of delivery. Please insert the brush roller before starting the appliance.
→ Turn the casing.
→ Insert the brush roller in the side-intake.
→ Press in the holder of the brush roller into the intake and check that it is sitting properly.
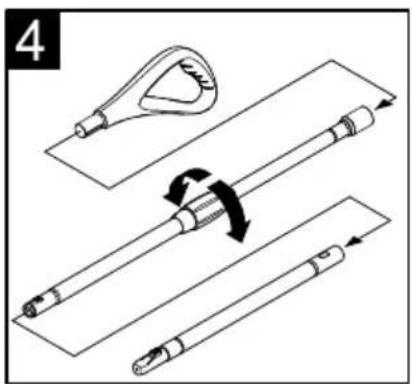
Installing the telescopic handle and the handle and adjusting the height
Illustration 4
The telescopic strut consists of 3 parts. While assembling it, make sure that the parts lock into each other.
→ Insert the handle on the longer strut with turning handle.
→ Insert together the longer and shorter struts; while assembling it, press the locking button.
→ Insert the entire strut with the locking button into the joint on the appliance.
→ Loosen the handle and pull out the strut to the desired working height; turn the handle to the correct position and tighten using the turning handle.
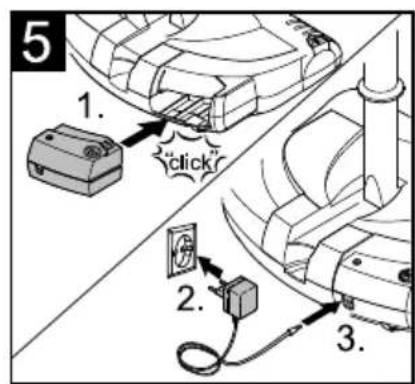
Inserting and charging the battery
Illustration 5
The battery has not yet been inserted in the appliance at the time of delivery. Please insert the battery before commissioning the appliance.
→ Remove the rechargeable battery from its packing.
→ Insert the battery into the intake until it locks.
→ Charge the battery: The battery can be charged when it is in the appliance or removed from it. Note: The following section describes the charging process when the battery is in the appliance.
→ Insert the charger delivered with the appliance into a proper socket.
→ Important note for charging: Always switch off the appliance otherwise the battery will not get charged.
→ Insert the charging cable in the charging box at the battery.
→ When the operating display glows, it means the charging process has started. The charging time for an empty battery is approx. 14 hours.
Note: If the operating display does not glow, switch off the machine because otherwise the charging process cannot start.
→ Remove the plug from the charger socket and disconnect the charger from mains power after you have finished charging.
Operations
Starting the work
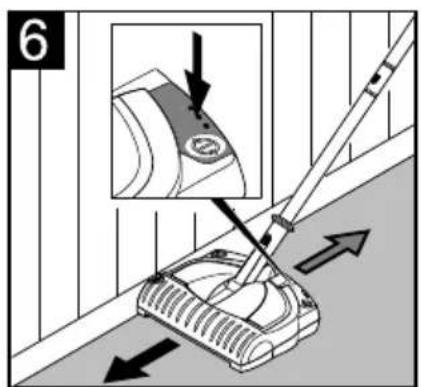
Illustration 6
→ Switch on the appliance; press the on/off foot switch to do so.
→ Move the appliance forward and backward to clean it.
→ K 55: Use the right side (the side with an unlocking button for the changeable brush) for cleaning close to the edges.
Interrupting the work
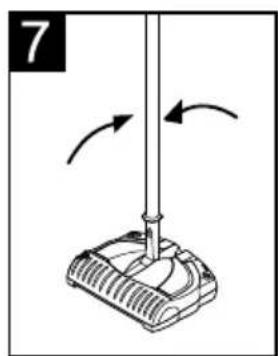
Illustration 7
→ Switch off the appliance; press the on/off foot switch to do so.
→ Place the telescopic strut in an upright position during breaks; there is a stopper that holds it in position.
Finishing your work
→ Switch off the appliance when finished.
→ Empty dirt container after each cleaning.
Emptying the dirt container
Illustration 8
The dirt container can be removed in 2 ways:
1) Hold the appliance high at the joint with one hand and unlock the lid of the dirt container. Note: Hold the casing firmly so that it doesn't open downward too fast.
2) Place the appliance on the floor and unlock the lid of the dirt container. Note: Hold
the telescopic strut firmly so that it doesn't fall down.
→ Unlock lid of the dirt container and pull it upward.
→ Lift the dirt container upward at the handle and empty it.
→ Re-insert the dirt container and close the lid.
Storing the appliance
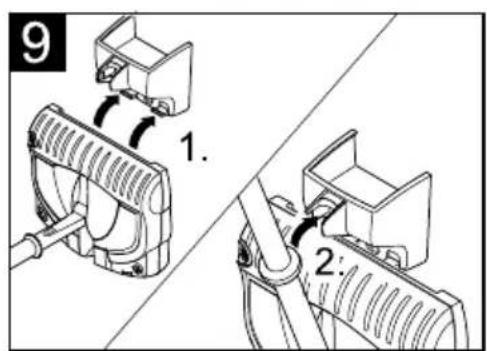
Illustration 9
→ Store the appliance in the wall mount.
→ Alternatively, you can also store the device at the handle; if required, turn the handle (refer section "Adjust telescopic strut and handle").
→ Charge the battery.
Maintenance and Care
Caution
Remove the battery prior to any care and maintenance work.
Cleaning the device
→ Wipe the appliance using a damp cloth. Do not use any aggressive agents, such as cleaning powder.
Change/ clean the brush roller
K 55: Brush roller
Illustration 10
→ Press the unlocking button and remove the brush roller.
→ Remove wound up hair using a knife or scissors. Move the knife along the defined cutting edge and then remove the loosened hair.
→ Insert the cleaned or new brush roller and ensure that it sits properly.
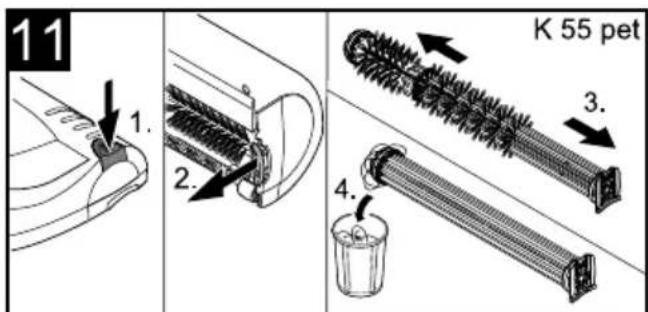
K 55 pet: Clean the brush roller with the cleaning cover (animal hair brush)
Note: Please clean animal hair brush after each use!
Illustration 11
→ Press the unlocking button and remove the brush roller.
Animal hair that has wounded can be removed in the most simple way:
→ Pull out the cleaning cover from the brush roller; the hair that has come off remains stuck there and can be disposed off in the household garbage.
Note: First cut the long animal or human hair that has got wounded with the help of a knife or scissors; then remove the cover.
→ After cleaning, insert back the cover.
→ Insert the cleaned or new brush roller and ensure that it sits properly.
Service
Warranty
The terms of the guarantee that is applicable in each country have been published by our respective national distributors. Any fault that occurs with your appliance during the guarantee period will be repaired free of charge, provided that it has been caused by a material or manufacturing defect. Guarantee claims should be addressed to your dealer or the nearest authorized customer service depot, and supported by documentary evidence of purchase.
Troubleshooting
Operating display does not glow
→ The appliance is switched on during the charging process.
Switch off the appliance using the On/Off switch.
Appliance does not clean properly
→ Clean or replace the brush rollers (refer chapter "Replace/ clean brush roller").
→ Charge the battery (refer chapter "Charging the battery").
Dirt is being thrown out of the appliance
→ Empty the full dirt container (refer chapter "Empty dirt container").
Spare parts
You will find a list of spare parts at the end of these operating instructions.
To order the spare parts, please contact your dealer or the nearest authorised Customer Service Centre.
Customer Service
Our KÄRCHER branch will be pleased to help you further in the case of questions or faults. See address on the reverse.
Specifications
| Operating time when battery is fully charged (depends on the flooring) | max. 30 | min |
| Working voltage of the battery | 4,8 V | |
| Charging current for empty battery | 14 | h |
| Voltage of the charger 5,8 V | ||
| Charging current 130 mA | ||
| Sound pressure level (EN 60704-2-1) | 60 dB(A) | |
| Weight (incl. battery) 2,0 kg | ||
| Battery type NiMH | ||
Subject to technical modifications!
Disposing of old device and battery pack
→ Arrange for the proper environmentally friendly disposal of the old device.
Please remove the battery pack prior to disposing of the device.
→ Remove the battery pack with its casing and dispose of properly (at a collection site or the dealer). There is no need to disassemble the plastic casing.
⚠ Warning
- Do not open the battery, as there is a risk of an electrical shock; also, irritating or caustic vapors can escape.
Cher client,
Monter le support mural
Illustration 2
Mult stimate client,

natural_image
Icon showing a gear and wrench inside a square frame (no text or symbols)http://www.kaercher.com/dealersearch

71364 Winnenden (Germany)
Tel.: +49 7195 14-0
Fax: +49 7195 14-2212