USER MANUAL SC 1020 Promo Kärcher
Regi ster and win! www.kaercher.com

| DE Kurzanleitung | SV Snabbguide | RO Instruetiuni pe scurt |
| EN Quick reference | FI Pikaohje | SK Krátky námod |
| FR Instructions abrégées | EL Σύντομες oðŋγíε | HR Krakte upute |
| IT In sintesi | TR Klsa Kullanım Talimati | SR Kratko uputstvo |
| NL Korte handleiding | RU Кразкове руковозво | BG Кразков ультванe |
| ES Descripción breve | HU Róvid bevezétés | ET Lühijuhend |
| PT Instruções resumidas | CS Strucný námod | LV İsa lietošanas instrukcija |
| DA Kort drugsanvising | SL Kratko navodilo | LT Trumpa instrukcija |
| NO Kortveiledning | PL Skrocona instrukcja obstugi | UK Стисné посibник |

Inhaltsverzeichnis
Description of the Appliance EN - 5
Quick Reference EN - 6
Safety instructions EN - 6
Operation EN - 7
How to Use the Accessories EN - 8
Maintenance and care EN - 9
Troubleshooting EN - 10
Technical specifications EN - 10
Dear Customer,

Please read and comply with these original instructions prior
the initial operation of your appliance and store them for later use or subsequent owners.
Proper use
Only use the steam cleaner for private household applications. The unit is meant for steam cleaning and can be used with appropriate accessories as described in these operating instructions. Especially mind the safety instructions during use.
Environmental protection

The packaging material can be recycled. Please do not place the package to the ordinary refuse for disposal, but go for the proper recycling.

Old appliances contain valuable materials that can be recycled. Please arrange for the proper recycling of old
appliances. Please dispose your old appliances using appropriate collection systems.
Notes about the ingredients (REACH)
You will find current information about the ingredients at:
Symbols in the operating instructions
Danger
Immediate danger that can cause severe injury or even death.
Warning
Possible hazardous situation that could lead to severe injury or even death.
Caution
Possible hazardous situation that could lead to mild injury to persons or damage to property.
Symbols on the machine

Steam
CAUTION - Danger of scalding
Description of the Appliance
The scope of delivery of your appliance is illustrated on the packaging. Check the contents of the appliance for completeness when unpacking.
In the event of missing accessories or any transport damage, please contact your dealer.
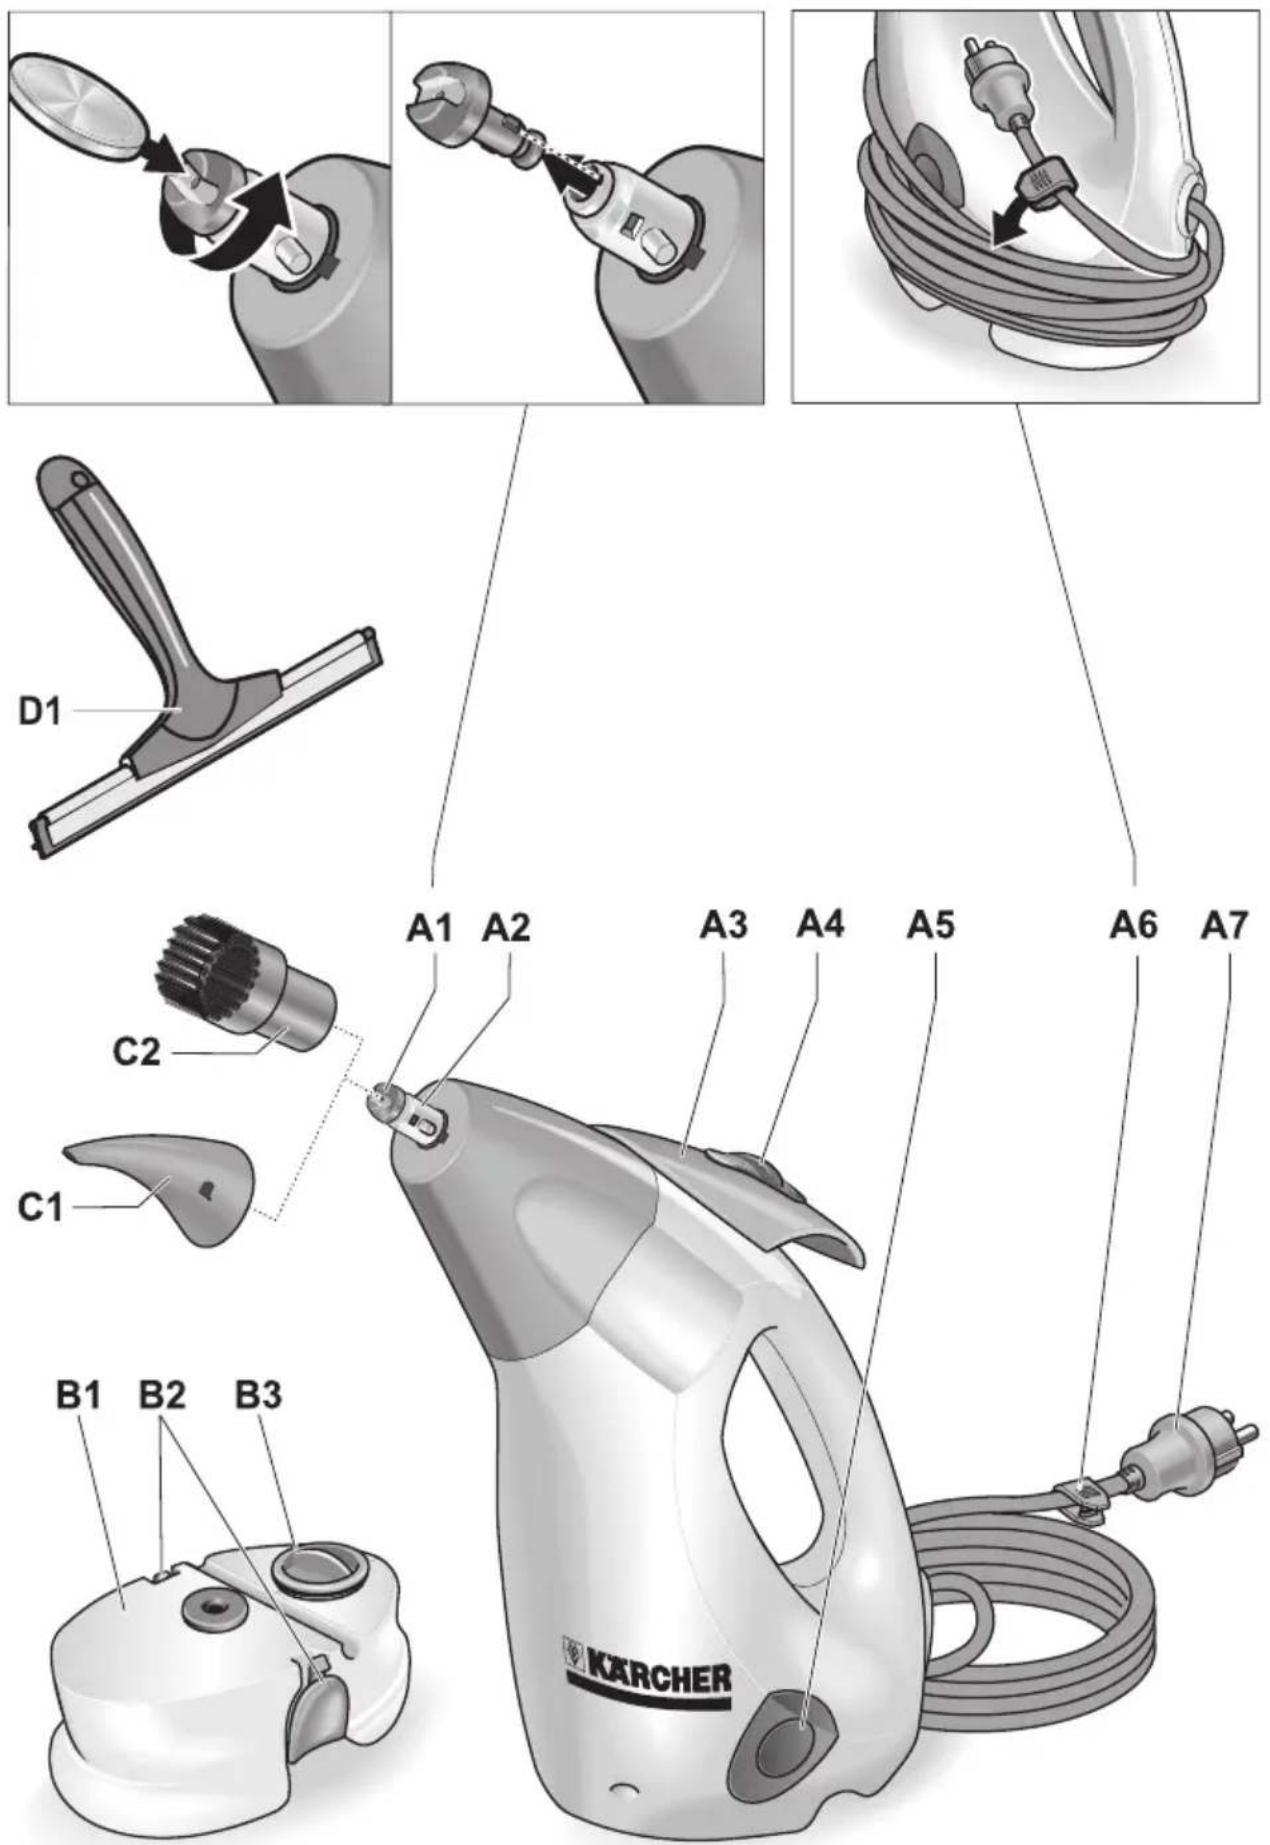
Illustrations on fold-out page 3!
A1 Nozzle insert
A2 Steam nozzle
A3 Steam lever
A4 Steam lever locking (child control) front - steam lever blocked rear - steam lever released
A5 Manual decalcification pump
A6 Cable clamp
A7 Mains cable with mains plug
B1 Water reservoir
B2 Unlocking button
B3 Reservoir cover
C1 Detail nozzle
C2 Round brush
D1 Window wiper
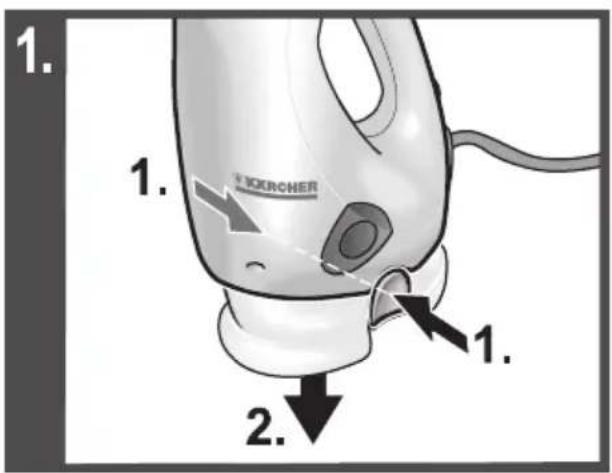
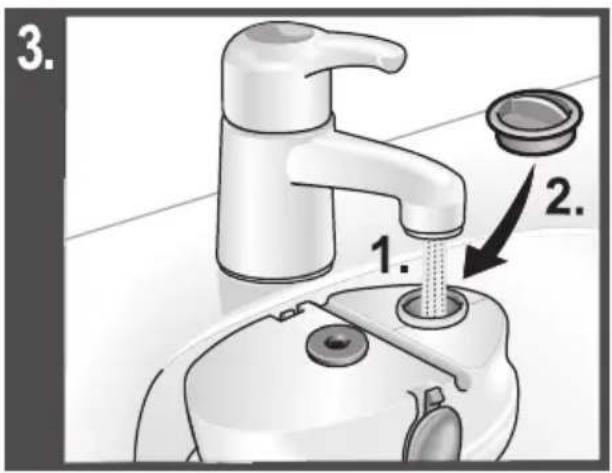
Quick Reference
Illustrations on fold-out page 4!
1 Take off water reservoir.
2 Remove the tank lid.
3 Fill water reservoir, close reservoir cover.
4 Fasten water reservoir.
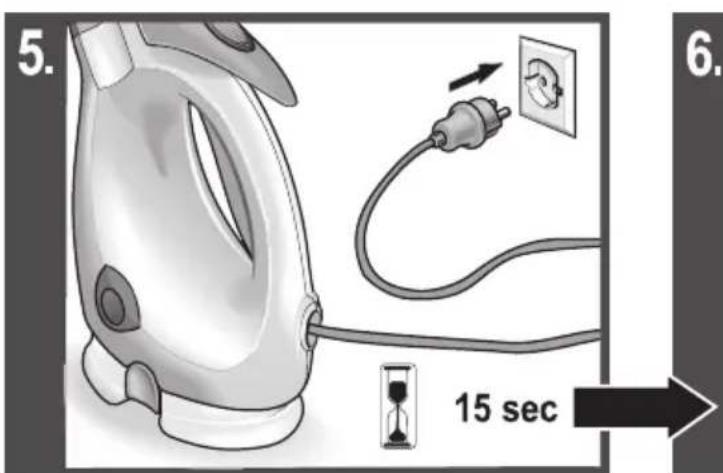
5 Plug in the main plug. The steam cleaner is ready for use after approx. 15 seconds.
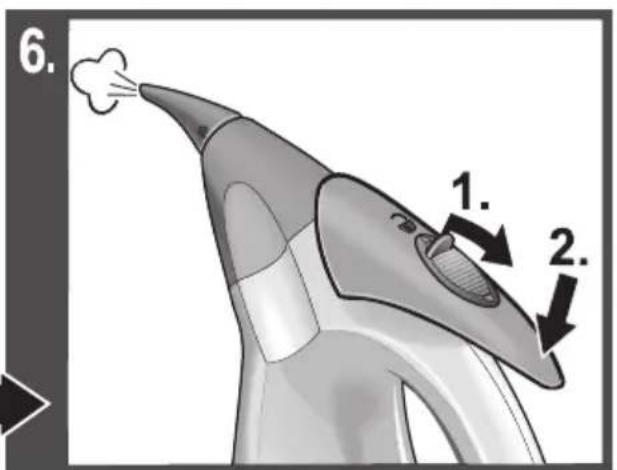
6 Push the lock backwards and press the steam lever.
Safety instructions
Danger
The appliance may not be used in areas where a risk of explosion is present.
If the appliance is used in hazardous areas the corresponding safety provisions must be observed.
- Never use the appliance in pools containing water.
The device should not be used to clean electrical appliances such as oven, exhaust, micro-wave, televisions, lamps, hairdryer, electrical heating systems, etc.
Check the faultless condition of the appliance and the accessories before using it. Otherwise, the appliance must not be used. Please check in particular the power cord, the safety lock, and the steam hose.
If the power cord is damaged, please arrange immediately for the exchange by an authorized customer service or a skilled electrician.
Please arrange for the immediate exchange of a damaged steam hose. You may only use a steam hose that is recommended by the manufacturer (see spare parts list for the order number).
Never touch the mains plug and the socket with wet hands.
Never use the appliance to clean objects containing hazardous substances (e.g. asbestos).
- Never touch the steam jet from a short distance with your hands and never direct the steam jet to persons or animals (risk of scalds).
Warning
The appliance may only be connected to an electrical supply which has been installed in accordance with IEC 60364.
The appliance may only be connected to alternating current. The voltage must correspond with the type plate on the appliance.
In wet rooms, e.g. bathrooms, connect the appliance to sockets with a series connected RCD adapter.
Unsuitable extension cables can be hazardous. Only use a splashproof extension cable with a minimum section of 3 × 1 mm^2 .
The connection between power cord and extension cable must not lie in water.
If couplings of the power cord or extension cable are replaced the splash protection and the mechanical tightness must be ensured.
The operator must use the appliance correctly. When working with the appliance, he must consider the local conditions and pay due care and attention to other persons, in particular children, who are nearby.
This device is not intended for use by persons (including children) with reduced physical, sensory or mental abilities or lacking experience and/or knowledge, unless they are supervised by a person responsible for their safety or are instructed by these persons on the use of the device. Children should be supervised, to ensure that they do not play with the device.
Never leave the appliance unattended when it is in operation.
■ Be very careful while cleaning tiled walls with sockets.
Caution
Make sure that the power cable or extension cables are not damaged by running over, pinching, dragging or similar. Protect the power cable from heat, oil, and sharp edges.
- Never fill solvents, solvent-containing liquids or undiluted acids (e.g. detergents, benzene, paint thinner, and acetone) into the water reservoir as these substances affect the materials used on the appliance.
The steam switch must not be locked during the operation.
- Protect the appliance from rain. Do not store outside.
Operation
Attaching the Accessories
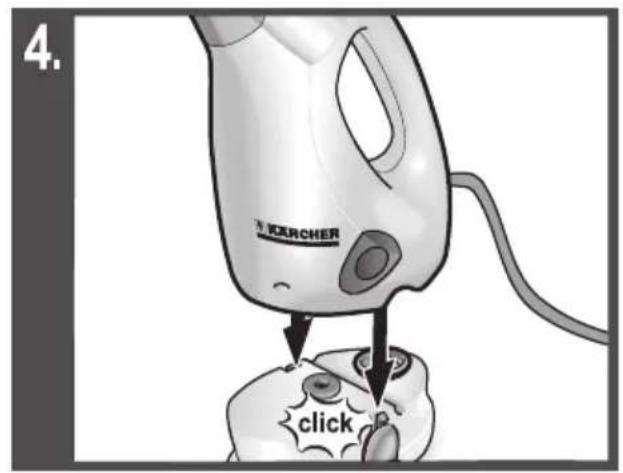
If necessary (see chapter "Using accessories"), connect the required accessories to the steam nozzle.
To do so, insert the two grooves of the accessories into the latches of the steam nozzle and turn clockwise until the stop.
Removing the Accessories Danger
Hot water may drip out of the accessory parts while you are detaching them! Never detach accessory parts while steam streams out - risk of scalding!
Push the lock to the front (steam switch blocked).
Turn the installed accessories counterclockwise and pull them off the steam nozzle.
Filling the Water Reservoir
The water reservoir may be refilled at any time.
Note: If you always use usual commercial distilled water it is not necessary to descale the boiler.
Separate the water tank from the casing; for this, press the two release buttons to the inside and pull the water tank off toward the bottom.
Remove the tank lid.
Fill the water tank with fresh water.
Caution
Do not fill in detergents or other additives!
Close the water tank with the tank lid.
Fasten the water tank to the casing.
Turning on the Appliance
Caution
The water tank must be installed and filled.
Warning
Do not operate the decalcification pump.
Otherwise, you will pump water into the appliance which spurs out of the steam nozzle when inserting the mains plug.
Insert the mains plug into a socket.
Note: The steam cleaner is ready for use after approx. 15 seconds.
Push the steam switch lock to the back.
Actuate the steam lever to release steam.
Note: During the initial startup, a small smoke cloud may escape from the steam nozzle! The appliance requires a short run-in time. At first, the escaping steam is irregular and moist, some water drops may leak out. The amount of steam flowing out increases continuously until the maximum amount is reached after about 1 minute.
Turning Off the Appliance
Release the steam lever.
Note: The steam discharge does not stop immediately; but it decreases continuously. There is no more steam discharge after a few seconds.
Push the lock to the front (steam switch blocked).
Disconnect the mains plug from the socket.
Coil the mains power cable around the water tank and fasten with a cable clamp.
How to Use the Accessories
Important application instructions
Cleaning textiles and upholstery
Prior to treatment with the steam cleaner, always check the reaction of the textiles in an inconspicuous location: Steam heavily at first, then let dry and then check for colour or shape changes.
Cleaning of Coated or Lacquered Surfaces
Be careful when you clean kitchen and living room furniture, doors, parquet, lacquered or plastic-coated surfaces. The wax, furniture polish, plastic surfaces or paint can come loose or stains can be created. Therefore, always clean these surfaces with a steamed cloth only.
Caution
Never direct the steam jet at glued edges as the edge band may loosen. Do not use the steam cleaner on unsealed wooden or parquet floors.
Cleaning of Glass
In case of low outside temperatures, especially in the winter, warm up the window pane by slightly steaming the entire glass surface. This will prevent tensions on the surface which might lead to glass breakage.
Caution
Do not direct steam onto the sealed locations of the window frame to prevent damage.
Steam nozzle
Use the steam nozzle without accessories,
- to remove odours and wrinkles from hanging clothes by steaming them at a distance of 10 to 20~cm .
to remove dust from plants. Here, keep a distance of 20-40 cm.
- for moist dusting, by briefly steaming the cloth and wiping the furniture with it.
Detail nozzle
The closer this nozzle is to the contaminated area, the higher the cleaning effect, as the temperature and the steam are highest at the nozzle output. Especially suited for cleaning difficult access locations, joints, fittings, drains, sinks, toilets, blinds and heaters. Heavy limescale can be drenched in vinegar prior to steam-cleaning. Let the vinegar penetrate for about 5 minutes.
Round brush
Attached brushes can therefore be used to remove heavy soiling.
Caution
Not suited for the cleaning of sensitive surfaces.
Squeegee
Application:
- Windows, mirrors
Glass surfaces on showers
- other smooth surfaces
Apply steam to the glass surface evenly with the steam nozzle from a distance of approximately 20~cm
Strip the glass surface in straight lines from the top to the bottom using the rubber lip of the window nozzle. Wipe the rubber lip and the bottom edge of the window dry after each strip.
Maintenance and care
Danger
Always disconnect the mains plug and allow the steam cleaner to cool down before performing any maintenance work.
Dscaling
As limescale builds up in the appliance, we recommend to descale the appliance in the following intervals (TF=tank fillings):
Note: If you always use usual commercial distilled water it is not necessary to descale the boiler.
| Degree of hard-° dH mmol/l RF
ness |
| I soft 0- 7 0-1,3 35 |
| II medium 7-14 1,3-2,5 30 |
| III hard 14-21 2,5-3,8 20 |
| IV very hard >21 >3,8 15 |
Note: Please contact your Conservancy Board or the local water supply company to inquire about the hardness of your water.
Starting the decalcification
Disconnect the mains plug from the socket.
Allow the steam cleaner to cool down.
Remove the nozzle insert from steam nozzle. To do this, rotate the nozzle insert counterclockwise with a coin and pull the nozzle insert out.
Warning
Only use products approved by KARCHER to exclude any damages of the appliance.
User the KÄRCHER decalcifier sticks (order no. 6.295-047) to decalcify the water. Please follow the dosing instructions on the packaging while using the decalcifying solution.
Caution
Use caution when filling and emptying the steam cleaner. The descending solution can have an aggressive effect on delicate surfaces.
Fill the decalcification solution into the water tank.
Close the water tank with the tank lid.
Fasten the water tank to the casing.
Press the decalcification pump (A5) for approx. one minute in regular pump
movements until the decalcification solution escapes from the open steam nozzle (best over a washbasin).
Loosen, drain and rinse the water tank with clear water.
Allow the decalcification solution to take effect in the appliance for 8 hours.
Rinsing of the dissolved limescale
Fill the water tank with fresh water.
Close the water tank with the tank lid.
Fasten the water tank to the casing.
Caution
Do not plug in the mains plug!
Pump the water for one minute with the decalcification pump through the appliance into a washbasin.
Hold the appliance over a washbasin and now connect the mains plug.
Warning
Hot water spots - scalding danger!
Press the steam lever and let the appliance evaporate into a washbasin for two minutes.
Reinstall the nozzle insert into the steam nozzle and tighten the nozzle insert in a clockwise direction.
The steam cleaner is ready to use.
Spare parts
Use only original KARCHER spare parts. You will find a list of spare parts at the end of these operating instructions.
Warranty
The warranty terms published by the relevant sales company are applicable in each country. We will repair potential failures of your appliance within the warranty period free of charge, provided that such failure is caused by faulty material or defects in manufacturing. In the event of a warranty claim please contact your dealer or the nearest authorized Customer Service centre.
Please submit the proof of purchase.
(See address on the reverse)
Troubleshooting
Often, failures have simple causes and you can do the troubleshooting yourself using the following overview. If you are in doubt or if the failure is not listed here please contact the authorized customer service.
Danger
Repair works may only be performed by the authorized customer service.
Always disconnect the mains plug and allow the steam cleaner to cool down before performing any maintenance work.
Decreased steam amount
Appliance is decalcified.
Decalcify appliance.
Steam decreases during the work / no steam
No water in the water reservoir.
Refill water
Steam lever cannot be pressed anymore
Steam switch is secured with the lock / child-proof lock.
Push the steam switch lock to the back.
Steam nozzle is plugged
Remove the nozzle insert from the steam nozzle (see page).
Clean the nozzle insert.
Briefly switch on the appliance.
Reinstall the nozzle insert into the steam nozzle and tighten the nozzle insert in a clockwise direction.
Safety thermostat
If the boiler thermostat fails and the appliance overheats, then the safety thermostat turns off the appliance.
Please contact your local KARCHER customer service to arrange for the reset of the safety thermostat.
Technical specifications
Power connection
Voltage 220-240
V
1~50 Hz
Protective class I
Protection class IPX4
Heating output 1600 W
Dimensions
Water reservoir 0,25 I
Weight (without accessories) 1,2 kg
Width 190 mm
Length 100 mm
Height 280 mm
Subject to technical modifications!
Special accessories
Order number
Round brush kit 2.863-058
4 round brushes for the detail nozzle
Round brush kit with brass 2.863-061 bristles
removal of especially stubborn dirt ideal for insensitive surfaces.
Round brush with scraper 2.863-140
Round brush with two rows of heat-resistant bristles and a scraper. Not suitable for sensitive surfaces.
Avkalker-sticks 6.295-047
Isitici performansi 1600 W
Boyutlar
Su deposu 0,25 I
Aigiriik (aksesuar hariç) 1,2 kg
Genislik 190 mm
Uzunluk 100 mm
Yukseklik 280 mm
ChyTne npHaJnEkhOcTei
Onachocmb
Ipu cnamuu npuHadnexhocme u3 npubopa moxem ebimekamb 2opraa eoda! He chumaume hacaKu BO epMa nodaTu npa - yepo3a obeapueaHua!
Haayano ydaJeHnHaKnn
BbItaIte ITeNceIbHyIO BnKy n3 p03eTKI.
→ DaTb napocenapaTopy octtbyTb.
YdaNTb n3 napOBn HacaKn y3eN NOdkHouEnn HaCaoK. Jnra 3Toro C NOMOuMoHoneBtIO NOBepHyTb y3eN NOdkHouEnn HaCaoK npOTNB YacBOB CTpeKN I BblTaunTb erO.
IpeynpeKdeHue
Bo u36exaHue noepeXdeHua npubopa uonb3yume monbko npodykmbl, odo6peHHie fupmoi KARCHER.
Ha6op KpyrIbIX 2.863-058
4 KpyrIbIX ⅢeTKn IJIa φopcyHKn TOneHNo CTpyN
Ha6op KpyrIbIX 5eTOK c MedHoi 2.863-061
5eTnHOi
Mult stimate client,

Vyhrievacy kon 1600 W
Rozmery
Vodná nárž 0,25 I
NouctBaHe Ha CTbKJIO
Пи НИСКИ ВьншИ TemпераТури 3aTOnJIeTe CTbKЛATA Ha npO3OpUITE,пpeДN BCnUKO npe3 3IMaTa, KaTO JIeKO HApPbCKaTe Cnapa ZJIaTa CTbKJIeHa NOBbPxHOCr. ПО TO3N NaHcH Ce N36ЯВaT HAnpExKeHry HA NOBbPxHOCCTTa, KOINTO MORaT Da DOBeDaT Do ChyINBaHe Ha CTbKJIoTO.
BHumaHue
He hacoubaume napama KbM 3aneyamaHume Meema Ha pamkama Ha npo3opeua, 3a da He au noepedume.
Дюза за пара
I3noJI3BaIte IIO3aTa 3a npa 6e3 npHaIeJXHOCTN,
3aOTcTaHЯBaHe Ha MIn3Mn IbHKn OT OKaYeHN dpexN, KaTo rHn Hapbckate c npapa OT pa3CToHne To 10-20 cm.
3a nouchTbaHe Ha npax no cBeTЯ. Pn TOBa cna3BaIte pa3cToHne ot 20-40 cm.
3a BnaJHo NouchTbaHe Ha npax, KaTo HanoNTe KbpNaTa 3a KpaTKO c npapa n cnei TOBa N36bPseTe Me6eJIte C He.
CTpyHa IIO3a
KoIrkoto no-6n30 e Ta da 3aMbpcHOTOMcTO, TOLKOBA NO-BUCOK e efeKTbT OT NOUHCTBaHeTo, TbN KATO TemnepaTypaHa napata ca HauBVCOKHa n3XOda Ha dIO3aTa. Oco6eHo npaKTNUHO 3a NOUHCTBaHe Ha TpydNO DOCTbHN MeCTa, fyn, apMaTyPi, KaHaN, yMNBaJIHnC, ToaJIeTHN, UOpN IIN paAdnAToPi. PpeNi IOuHCTBaHe C npapa CNIHnTe BapOBNKOBN OTNaRaHm MOrAT Da 6bDaT HApPbCKaHn C OueT, OCTabete Da NODeJCTBa 5 MInHyTN, CneD TOBa OBeNeIte c npapa.
KpbTna YeTka
Taka 6laorodaepne Ha yeTKnte MORaT IeCHO da 6bdat OTCTpaHEn n ynpntTe 3ambpcaBaHHa.
BhumaHue
He e noodxodya 3a noucmeane Ha uecembeumenu noebpxHocmu.
PpncTabka 3a npo3Opun
Ynotpe6a:
- PpO3Opu, orpeJaHa
- CtbkneHn NOBbpxHOCTNa DaUka6HH
- dpyrI rJaIKn NOBbpxHOCTN
O6nBaIe c npa cTbKJHeHITe NOBbpxHOCTn paBHOMepHo CДIO3aTa 3a npa ot pa3cTOHHe OKONo 20 cm.
→ C rymenia oBaI Ha npinCTaBkaTa 3a npo3OpU n3BbPwBaIe DvIXeHnI OTOpe HADONY no cTbKHeHaTa NOBbPxHocT. Cnei BcAKO dBIXeHne IODCyuBaIe Tc Kbpna rymenia OBaI N DoHNrT KpaI Ha npo3opeua.
PnJn n noDnpbXka
Onachocm
ObcyxheHemO da ce u3bpuBa cAmo npu u3aedeH uencen u oxnaden napocmpyen ypeD.
OTcTpaHЯBaHe Ha BapOBuK
TbN KaTO NO CTeHnTE Ha ypeDa ce OTnara BapOBnK, Hne npenOpbUBaMe ypeDbT Da ce NouchTBa OT BAPOBnK Ha CJIeDHnTE INHTepBaJI (NP=blnHeHnHa pe3epBoapa):
3a6eJekka: Ppu nocmohna ynompeba Ha decmunupaHa oda om mbpz. Mpeka He e Heo6xodmo noucmbaHe Ha KomJIeHua KaMbK E komena.
| Hиво на Тьрдост | ° dH | mmol/l | ПР |
| П м e к o | 0-7 | 0-1,3 | 35 |
| II сpeДно | 7-14 | 1,3-2,5 | 30 |
| III Тьрдо | 14-21 | 2,5-3,8 | 20 |
| IV Много Тьрдо | >21 | >3,8 | 15 |
3a6eJekKa: TebpocmHa ha boda om BauuB oDopOBoM moKeme da hayume om cnKy6a BodoCnAbae uNu om obuHama.
CTapTnpaHe Ha noUcTbaHeTo Ha BapOBnKa
→ ɪnɜːbædʒeɪsɛncεŋa oT kɔHTaʊkTa.
OctaBeTe napoctpyHnY ypeI da ce oxna.
OTctpaHETe BINOKKata Ha IIO3ata OT IIO3ata 3a npa. 3a cenTa 3aBbPTeTE BIOKKata Ha IIO3ata C MOHeTaN0 NOCOKa O6paTHa Ha YAcOBHNKOBATA CTpeJIka IN 3BaIeTe BINOKKata Ha IIO3ata.
IpeynpekdeHue
U3non3eaume eduHcmeHo npenopbuaHume om KARCHER npodykmu, 3a da u36eHeme noepda ha ypeda.
→Изпольайт e 3a пемaxbaHe Ha варовик a CTIKOBeTe 3a пемaxbaHe Ha варовиka Ha KДRCHER (№ 3a польчka 6.295-047).При NOCTABЯн e Ha pa3TBopa 3a пемaxbaHe Ha варовиka ИЗПОЛ3Вайт e уka3aHnЯТа 3adoЗиран e Ha onaKOBkata.
BHumaHue
Bhumaaumepu nbnhehemo u u3npa38aHemnoHa ypeda 3a napho noucmbahe. Pa3mboPb m cpeuy komne KaMbk MoKe da pa3rde uecmeenu Hn IO6bpxHnU.
→ HanbIHeTe Bpe3epBoapa 3a BOda pa3TBOp 3a NOUcTBAHe Ha BapOBuK.
3aTBopeTe pe3epBoapa 3a BOna c KaNaKa Ha pe3epBoapa.
3aKpeNeTe pe3epBoapa 3a BOda KbM Kopnyca.
→HaTnCKaIte NOMnTa 3a NoUcCTBaHe Ha BapOBuKa OKOIO eHa MNHyTa 3a paBHomePn DnIXeHnHa NOMnTa, DOkATO pa3TBOpbT 3a NOUcCTBaHe Ha BapOBuKa 3aNoUHe Da n3JIu3a OT OTBopeHaTa IIO3a 3a npa (HaN-Do6pe HaJyMnBaJIHnK).
Ocbo6oJeTe pe3epBoapa 3a BOda, n3npa3HeTe ro ngn3PJaKHeTe c YnCTa BOda.
OcTaBeTe pa3TBopa 3a nouNCtBaHe Ha BapOBnka Da nOeInCTBa 8 yaca B ypeJa.
OTMnBaHe Ha OTdJIInJc Ce BapOBuK
→ HambnHeTe pe3epBoapa 3a BOda c YnCTa BOda.
3aTBopeTe pe3epBoapa 3a BOda c KaNaka Ha pe3epBoapa.
3aKpeTe pe3epBoapa 3a BOda KbM Kopnyca.
BhumaHue
He u3eaXdaume uencena!
→ПьрвИЗнOMпTe 3a eДи МИHyТа BОДа C
ПOMnATA 3a NOчИСТВаHе Ha BapOBИK ПpeЗ
урEDA ВУМВВАЛНИК.
→ДрьжteуpeдандуMBAJIHNKиeДВa cera BKIIOHTe UeINCEla.
IpeynpeKdeHue
Iopeu bOdHu npbcku-onachocm om u3apnHe!
→HaTnCHeTe JocTa 3a npa N ocTabeTe ypeDa 3a DBe MInHyTN B yMnBaJIHnK, 3a Da n3JIe3e npaTa.
Пoctabete BnOxKaTa HaДIO3aTa OTHOBBДIO3aTa 3anapa N 3aBbPTeTe 3dpaBOBnOxKaTa HaДIO3aTa NO NOCOKaHa YacOBHnKObTa CTpeJka.
Пароструйн我不是уpeд e roTOB 3a pa6oTa.
Pe3epBn yactn
I3no3BaTe cAmO opuHaJIHn pe3epBHN
yactn Ha KARCHER. CncbK Ha pe3epBHTe
yactn ige Hamepte B kpa Ha HacToaTO
YnbTbaHe 3a pa6ota.
TapaHcH
BbB Bcya CtpaHa BaxaT rapaHIOHNTe yCNOBna, ny6nkyBaHn OT OTOpN3npaHata OT Hac
DnCTpn6yTopcka QnpMa. EBeHTyaHn IOBpeDN Ha Baun yPeI 0e OTCTpaHIM B pAMKIne Ha
rapaHIOHHn Cpok 6e3PnAthO, aKO CE Kacae 3a
DeΦeKT B MaTePnAInTe Nn Pn PPOIN3BODcTBO. B
rapaHIOHEn CnyaH ce O6bpHeTe KbM
DnCTpn6yTopa Nn NaH-6n3Kn OTOpN3npaH
cepBn3, KaTo npeDCTaBnTe KacoBata 6eNeJkKa.
(Adpcnte ige HamePnTe Ha 3aDnata cTpaHnca)
POMOUII HEN3IIpaBHOCTN
Mhoro yeCTO npuHnTe 3a nobpeHa ca eIemHTapHn i C nOMoTtHa cIeHNTe yka3aHnMoKe camN da rN OTcTaHnTe. Ako He CTe cnrypHn IIN NOBpeHnTe He ca OnncAHn Tuk, oBbPHeTe ce KbM OTOpN3npaHn cepBn3.
Onachocm
PemohmHume deuHocmu no ypea da ce u36bpuweam eduncmeHo om omopuzupan cepu3.
Obcyxhehmo da ce u3bpuwa cmo npu u3aedeH uencen u oxnaedn napocmpyeh ypeod.
HamaJIeHO KOJIuYeCTBO napa
Iyopea IMa BapOBuK.
→Почирете варовика OTурда.
NapaTa HamaJЯBa npu pa6Ota / HЯMa napa
JInca Ha BOda B pe3epBOapa 3a BOda.
→OnbIbAHe c BOda
IocTa 3a napata He MoXe Da ce BKnIOUCh IocTbT 3a napata e ocIngammaen c 6IoknipoBkata / 3aunTata ot Deca.
Ⅲ6yTaIte Ha3aI 6JIOKINPOBkaTa Ha JIOCTa 3a npaTa.
IIO3aTa 3a npape 3anyuweHa
OTcTaHeTe BnOxKaTa Ha IIO3aTa OT IIO3aTa 3a napa (BnK CTp.).
→Поунстваноюзараза пара.
→ BkIIOUeTe ypeDa da pa6OTn 3a MaJIko.
Пoctabete BLOKKata HaДIO3aTa OTHOBBДIO3aTa 3anapa N 3aBbPTeTe 3dpaBOBLOKKata HaДIO3aTa NO NOCOKaHa YacOBHnKOBaTa CTpeJka.
Преедаен Термocтат
Ako perylaTOpbT Ha hajraHTo OTkaxe NypeDbT npepee, toraba npedna3HnT TepMOCTaT N3KIOUvBa ypeda.
3a BpBuaHe B n3XoJHo NOLOXeHne Ha npEiPa3HnI TepMoCTat Ce o6bPHeTe KbM OToPi3uPAHnI cepBn3 Ha KDRCHER.
TexHnueckn DaHHN
EneKtpo3axpaHbAHe
HanpekeHne 220-240 V 1\~50 Hz
Klac 3aunTa n
Градун с ha 3aцит a IPX4
DaHHN 3a MOUHOCTTa
HarpeBaTeHa MoUHocT 1600W
Pa3mepn
BoJeH pe3epBoap 0,25 n
Tero (6e3 1,2 KpHnAdneJXHocTn)
UnpouHa 190MM
100MM
Bncoyna 280 MM
3ana38ame cu npabomo Ha mexHuyecku u3MeHeHua!
ElenemHTN OT cneuaJIHaTa OKOMIIeKTOBka
Homep 3a npbukn
KomnneK KpbTn YeTkn 2.863-058
4KpbTnueTKn3aTOUKObAToCTpyHaDIO3a
KomnneK KpbTn YeTK n c 2.863-061
MecnHROBaYeTHa
3a OTCpaHЯBaHe Ha yNOpNTn 3aMbpcYBaHnI.
IdeaHn 3a He cyBCTBNTeHN NOBbpxHOCTn.
Kpbrrna yetka c wabp 2.863-140
KpbIa YeTka C Dba pega TepMoycToiYBa yeTnHa n eDInH 7a6bp. He e noDxoJaza 3a cyBCTBNTeJIH NOBbpxHOCTN.
CTNKOBe 3a npemaxBaHe Ha 6.295-047 BapOBnka
Sisukord
Uldmärkusi ET - 5
Seadme osad ET - 5
Luhijuhend ET - 6
Ohutusalased markused ET - 6
Käitamine ET - 7
Lisavarustuse monteerimine
3acToCyBaHHnI npHaIaI
BaxnBi Bka3iBkn 0do 3acTocyBaHHa
YnueHnBvPo6iB3TeKCTnIu a6o nonieCTepy
IpeD npoBeHnM o6p6Kn 3 DoNOMOIO npncTPOO dJa YnueHHa napoCnID 3aBxDi npeBiprTu CTiKicTB TeKCTnBnHex Bnpo6IB do BnHy npu. Hacampeed, cIid Do6pe o6pOHTu npoTO Bpi6,notIM npocuHTu NOrTa, HapeSti, nepeBipTu CTiKicTB ap6yBaHH Ta HaBHicTB DeOpMaui
OuHHeHHa NOBepXoHb 3 NOKpTTa Ta IaKOBaHx IOBepXoHb
При чиши Кухоннх Me6nib Ta Me6nib Дя
KBapTnpi, DBepei, NapKeTy, NaKOBaHnx
Nobepxohb a60 nobepxohb i3 NOKpTTm, BICK,
Me6JIeBa nOJIpya, StTuYe NOKpTTa a60
Фар6a MoKyb po3uHHTncsA b6o MoKytB
BHHKHyTN pIyMn. Tomy taki nobepxhi MoKHa
6bpo6JIaTn TiIbKn npOnapeHOIO cepBeTkoIO.
yeaaa!
He HanpaBnaIme napy Ha npukneChi KpaKu, ockilbku obknaDka MoKe eidKneimucr. He bukopucmoByume npucmpiu dny uueHnre depee'hux abo napkemhux nIdno2 be3 nokpumma.
OuHcHcKJa
Пи Ии3ькИx 30ВиIшИх TemпepaTypax, HacampepeД, y3IMKу, nporpiIte BiKOHHe cKIO. 3aBЯКи CbOMy Bn 3MOXeTe JERKO o6pO6uTn napoIO BCIO NOBepXHIO cKla. Y takni cnoci6 Bdactbcry yHnKHyTu HAnpyrN NOBepXHi, zu OMOxe npIN3BeCTn Do pO3bITTЯ cKla.
yeaaa!
Napy He HnpaBnIomb Ha yuJNbHeHi diJnHKU 6iJa eIKoHoo paMu dJa 3aNo6iaaHna II ywkOdoXeHHa.
NapoBa HacaKa
BnKOpNCToBvBaTn napOBy hacaKy 6e3doaTKOBOrO oblaHaHnHnIЯ
- ycyHeHHa 3aIaxiB Ta cKnaIOK Ha BnCraHx npedMeTax Ondry npu o6pO6ci 3 BiDcTaHi 10-20 cm.
BuaIeHnIy 3 pOcInH. DToPmMyTeCb BiDCTaHI 20-40 cm.
-ДЯ 3BOJIOXeHnI npOTnpaJIbHOI TkaHnHn. WbNdko 6pO6iT bTKaHnHy npoTO Ta npOTpiT HeO Me6nI.
ΦopcyHka TouKOBoro Ctpymeha
YIM 6nXue 3a6pydHe He MicCe, Tm BnUe eΦeKT YnUeHHaOckIbKn HaBnua TempepaTpa Ta Buxi napu 3a6e3neuyoTbcra Ha BnXoDi 3 fOpcyHKn. Oco6JnBO nIXoDHT b DnO uNt HnBaKoOCTyHnX MicB, CTNKIB, apMaTyP, cToKiB, paKOBnH, TyanetIB, kAnIO3i a60 paiaTopiOB analeHH. CInbHn BaHnHn HaIT nepequHnHM npoMOxJnBO 36pni3HyTuOcTOM a60 JIMoHHO a60 JIMoHHO KncIoTOU, 5 XbINnH daTn NODIaTN, a NiCnaCboro o6pOHTn npoIO.
Kpyrna Ⅲtka
3aBdAnuHHeHHo 1tKHO E MoXnBicTb IerKOro BnAneHnA CtiKnx 3a6pyDHeHb.
yeaaa!
He npu3haeHa dna ouuueHHa yumnueux noeepxohb.
HacaKaДЯ MNTTBAIKOH
3actocyBaHHa:
Bikha,Дзеркалa
cknIHI NOBepxHi dyuOBnx Ka6iH
- iHnii rnaaki nobepxhi
→ PiBHomipHo BvnapuyIte cKJIHy NOBepxHIO 3a DOnOMOrOIO napoBoI HacaIKI Ha BiDCTaHI 6JIN3bKO 20 cm.
→Протпь скяну NOBepxHIO CMyKKAMN 3Bepxy BHN3 3a DOIOMOHO rMBOoro KpaH O HacdKn ДЯ MTTB BiKOH.ПICЯ ПoxODKeHHRA KOKHoi CMyKKI nPOTnPaIte HAcYXo rMOBNI KpaT Ta HIXHIO qACTINHy BIKHa TKAHNHOIO.
.00000000000000000000000000000000000000000
s rfo aogallawgbrs
aagll aawgbsr ggljll aog
acllljocoljol
J
y/ JaeIe /JaeIeJIaJalIJIaJalIJIaJalIJIaJalIJIaJalIJIaJalIJIaJalIJIaJalIJIaJalIJIaJalIJIaJalIJIaJalIJIaJalIJIaJalIJIaJalIJIaJalIJIaJalIJIaJalIJIaJalIJIaJalIJIaJall
·aa
2> aboo Jkuu Lg>g Ijra a>giol jzll aog no jnll wdo
·d
)
eJlclJL.
jL
ooJ8g2
aall
·
.
JgJl Pw> clll jj
#
1aSswI Jgogy
JJI JI JI aiaa aai jg JI JI 1000000000000000000000000000000000000000000000
Jusc g> jcb c jgeJ C 10 .UJ UJI JI dJg
图
yj-ssllla/ j/s
Jg>JJ JgJgJgJgJgJgJgJgJgJgJgJgJgJgJgJgJgJgJgJgJgJgJgJgJgJgJgJgJgJgJgJgJgJgJgJgJgJgJgJgJgJgJg
•
g s 100 ggl aagbbr j 100 ggl aagbbrj g jglll g 100 g jg jj jj
•
J aI Jg SsW .KARCHER Jg g 1c aolc ojla
jglg
I/llj/192110J:la/ 1a/1p/12w/11> y/12y/1n a/1 Jraawy/gw/1r/gia//baa//
aagg aagagaaawgbjz jil alac pdswly aagall awgbjdr aclll jlac olj ssc aaeg 2
J 1
J) RCHERK JIJI J I
WgG .(6.295-047
JlOeJcJ (6.295-047
JLJcJcJcJcJcJcJcJcJcJcJcJcJcJcJcJcJcJcJcJcJcJcJcJcJcJcJcJcJc
A
Jg j 16
Lj
.
.
.
Jusllg>lgalrran g jzjag
Lg Jg Jg Jg Jg Jg Jg Jg Jg Jg Jg Jg Jg Jg Jg Jg Jg Jg Jg Jg Jg Jg Jg Jg Jg Jg Jg Jg Jg Jg Jg Jg Jg Jg Jg Jg Jg Jg Jg Jg Jg Jg Jg Jg Jg Jg Jg Jg Jg Jg Jg
aI
1
1
1
1
gill a
pL
111
plw 1
20 2
. p
Jl J
.
.
.
.
.
.
aIgllg aIie
Jb
Jl|J|
aJb jgJgJgJgJgJgJgJgJgJgJgJgJgJgJgJgJgJgJgJgJgJgJgJgJgJgJgJgJgJgJgJgJgJgJgJgJgJgJgJgJgJgJgJgJgJgJgJgJgJgJg
JI 1 JI I JI JI JI JI JI JI JI JI JI JI JI JI JI JI JI JI JI JI JI JI JI JI JI JI JI JI JI JI JI JI JI JI JI JI JI JI JI JI JI JI JI JI JI JI JI JI JI JI JI JI J
.45k//u/1j0g:1c1j//a0g
s aS 10
J
jg>15jg>12:ab>lo
pUwUJdUJdU
JU Ug JgU aJ g
Jdawlogl.
g>llg jllg aigswll no as
Aalogjy/
gJ JdAill lIg JI JI
JU 1
Jd aLw lo g/ w/9.la>
j//g aigsw// no a5w//xog
151g > / gdd
gai do slga slal jj Jo wgi
glaolgo lcaag>0 aluw
a0jol>1)
g 1g
a aasallgall 1
yagcll jj sJo wlgj gia.jgeJl
1g0 Lc agi2o alIw 1gog/ aio
aal aai lal gbrbll ojic
oIwI aOxw Ic oRg
p/2i/1c/la//jla//
j Q j A
sJ j0 jgJl |io p|xjw| jg
(Jb)
poc no sll Jably aoln
oogcal/1j1j1j1jbiicj
JgJyIoo g>ga/gyol
Jglllww aolg yj
aIgI aIgI
JgJ 1
1
lo9 joo aaaa a b
Jg GAAy JIaIEC 60
aaaa a b2e jyjy yjg>
Jaeal lagg JEC 60
a20 11w p/2w/ lc jaoy/
2oo 1x3, ooc bdo cio sloall zo
jy/ Lc
J 1
yJyJSLALI yDdAillllwg aS
AaI I 10000000
.
Jg Jg
JL
Jc. kallgcll
y 11111111111111
slll jssjlae
. aLla// a.sla//g
J 151111111111111111111111111111111111111111111111111111111111
llw alog JlIiwl Ic |gfoj>
aod jbrn c aaiil lssy jyogll
yjy/oaiaeal claa//
alog JIiW/ lc |gfoj>1.
gq sb c aI/IuJyog// llw
yjy/oaiaeal clae// aois
JlI JdWbJgJgJc
Sjll JgB JdWJbJ
LJI
JrQaJ
Jg//LcP Jjglg aJgJbJ.
Jy.J/11J211pgbJ JduwJ
aJcJyJ11JzJ11pgbJ 11xJ
aJgJbJ Lb//JgRgeaJ
.(Jg/Jg
HK
Karcher Limited
Unit 10,17/F.
APEC Plaza
49HoiYuenRoad
Kwun Tong,Kowloon (02)357-5863
Karcher S.p.A. Via A.Vespucci 19 21013 Gallarate (VA) 848-998877
IRL
Karcher Limited
12 Willow Business Park
Nangor Road
Clondalkin Dublin 12
(01) 409 77 77
KOR
Karcher Co. Ltd. (South Korea)
872-2 Sinjeong-Dong,
Yangcheon-Gu,
Seoul, Korea Zip code 158-856
02-322-6588, A/S.1544-6577
MAL
Karcher Cleaning Systems Sdn. Bhd.
No.8, Jalan Serindit 2
Bandar Puchong Jaya
47100 Puchong, Selangor
(03)58821148
MEX
Karcher Mexico, SA de CV
Av. Gustavo Baz No. 29-C
Col. Naucalpan Centro
Naucalpan, Edo. de Mexico
C.P. 53000 Mexico
018000241313
NZ
Karcher Limited
12 Ron Driver Place
East Tamaki,Auckland
(09)274-4603
P
NEOPARTSII-Equipamentos,S.A. Av. Infante D.Henrique, Lote 35
1800-218 Lisboa 218558300
PL
Kärcher Sp. zo.o.
UI. Stawowa 140
31-346 Krakow
(012)6397-222
PRC
Kärcher Cleaning Systems Co., Ltd.
Part B, Building 30,
No. 390 Ai Du Road
Shanghai Waigaoquiao 200131
(021)5046-3579
RO
Karcher Romania s.r.l.
Sos.Odaii Nr.439
013606Bucuresti 0372709001
RUS
OOO «Kepxep»
109147,MockBa
yI.TaraHcKa,I.34,ctp.3
+74952283945
S
Kärcher AB
Tagenevagen 31
42502 Hisings-Kärra (031)577-300
SGP
Karcher Asia Pacific Pte. Ltd.
5 Toh Guan Road East
01-00 Freight Links
Express Distripark
Singapore 608831
6897-1811
SK
Kärcher Slovakia, s.r.o.
Beniakova 2
94901 Nitra
037 6555 798
TR
Kärcher Servis Ticaret A.S.
9 Eylül Mahallesi
307 Sokak No. 6
Gaziemir / Izmir
(0232) 252-0708
TWN
Karcher Limited
5F/6. No.7
Wu-Chuan 1st Rd
Wu-Ku Industrial Zone
Taipei County
(02) 2299-9626
UA
Kärcher Ukraine
Kilzeva doroga, 9
03191, Kyiv
(044) 594 75 75
UAE
Karcher FZE
Jebel Ali Free Zone
RA 8,XB1,Jebel Ali,Dubai (04)8836-776
USA
Alfred Karcher, Inc
2170 Satellite Blvd
Suite 350
Duluth, GA 30097
678-935-4545; 877-527-2437
ZA
Kärcher (Pty.) Limited
144 Kuschke Street
Meadowdale
Edenvale 1614
(011) 574-5360
KARCHER www.kaercher.com