
PRF0166938 - Range hood ELICA - Free user manual and instructions
Find the device manual for free PRF0166938 ELICA in PDF.
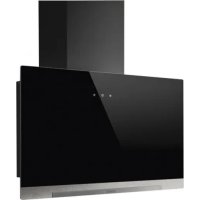



| Brand | Elica |
| Model | PRF0166938 |
| Product Type | Kitchen Hood |
| Use Version | Ducted (external evacuation) or recirculating (recycling with carbon filter) |
| Number of Speeds | 3 speeds + booster |
| Control | Push buttons with LED indicators |
| Lighting | Integrated LED |
| Grease Filter | Metallic, dishwasher safe or hand washable |
| Activated Charcoal Filter | Optional, for recirculation version; replace every 4 months |
| Filter Saturation Indication | Yes: grease filter every 40 h, charcoal filter every 160 h |
| Timer | Yes, programmable (20/15/10 min depending on speed) |
| Power Supply | 220-240 V ~ 50/60 Hz |
| Minimum Installation Distance (electric hob) | 45 cm |
| Minimum Installation Distance (gas or mixed hob) | 65 cm |
| Installation | Wall-mounted, with drilling template provided |
| Safety Standards | Compliant with EN/IEC 60335-1, EN/IEC 60335-2-31 |
| Usage | Domestic |
| Included Accessories | Fixing screws, drilling template, instruction manual |
| Spare Parts and Repairability | Grease and charcoal filters available; LED lamps replaceable by a professional; contact after-sales service |
| Evacuation Connection Type | Connection flange (diameter to be adapted to duct) |
Frequently Asked Questions - PRF0166938 ELICA
User questions about PRF0166938 ELICA
0 question about this device. Answer the ones you know or ask your own.
Ask a new question about this device
Download the instructions for your Range hood in PDF format for free! Find your manual PRF0166938 - ELICA and take your electronic device back in hand. On this page are published all the documents necessary for the use of your device. PRF0166938 by ELICA.
USER MANUAL PRF0166938 ELICA
Closely follow the instructions set out in this manual. All responsibility, for any eventual inconveniences, damages or fires caused by not complying with the instructions in this manual, is declined. This appliance is intended to be used in household and similar applications such as: - staff kitchen areas in shops, offices and other working environments; - farm houses; - by clients in hotels, motels and other residential type environments; - bed and breakfast type environments.
The hood can look different to that illustrated in the drawings in this booklet. The instructions for use, maintenance and installation, however, remain the same.
- It is important to conserve this booklet for consultation at any moment. In the case of sale, cession or move, make sure it is together with the product.
- Read the instructions carefully: there is important information about installation, use and safety.
- Do not carry out electrical or mechanical variations on the product or on the discharge conduits.
- Before proceeding with the installation of the appliance, verify that there are no damaged components. Otherwise contact your dealer and do not proceed with the installation.
Note: The parts marked with the symbol "(*)" are optional accessories supplied only with some models or otherwise not supplied, but available for purchase.

Caution

Electrical connection
The mains power supply must correspond to the rating indicated on the plate situated inside the hood. If provided with a plug, connect the hood to a socket in compliance with current regulations and positioned in an accessible area, after installation. If it is not fitted with a plug (direct mains connection) or if the plug is not located in an accessible area, after installation, apply a double pole switch in accordance with standards which assures the complete disconnection of the mains under conditions relating to over-current category III, in accordance with installation instructions.
WARNING! Before re-connecting the hood circuit to the mains supply and
checking the efficient function, always check that the mains cable is correctly assembled.
WARNING! If the supply cord is damaged, it must be replaced by the manufacturer, its service agent or similarly qualified persons in order to avoid hazard.
- The minimum distance between the supporting surface for the cooking equipment on the hob and the lowest part of the range hood must be not less than 45 cm from electric cookers and 65 cm from gas or mixed cookers.
If the installation instructions for the gas hob specify a greater distance, this must be adhered to.
- Before any cleaning or maintenance operation, disconnect the hood from the mains by removing the plug or disconnecting the mains electrical supply. Always wear work gloves for all installation and maintenance operations.
- This appliance can be used by children aged 8 years and above and persons with reduced physical, sensory or mental capabilities or lack of experience and knowledge if they have been given supervision or instruction concerning use of the appliance in a safe way and understand the hazards involved.
- Children shall not be allowed to tamper with the controls or play with the appliance.
- Cleaning and user maintenance shall not be made by children without supervision.
- The premises where the appliance is installed must be sufficiently ventilated
when the kitchen hood is used together with other gas combustion devices or other fuels.
- The hood must be regularly cleaned on both the inside and outside (AT LEAST ONCE A MONTH).
- This must be completed in accordance with the maintenance instructions provided. Failure to follow the instructions provided regarding the cleaning of the hood and filters will lead to the risk of fires.
- Do not flambe under the range hood.
- Do not remove filters during cooking.
- For lamp replacement use only lamp type indicated in the Maintenance/Replacing lamps section of this manual.
The use of exposed flames is detrimental to the filters and may cause a fire risk, and must therefore be avoided in all circumstances.
Any frying must be done with care in order to make sure that the oil does not overheat and ignite.
CAUTION: Accessible parts of the hood may become hot when used with cooking appliances.
- Do not connect the appliance to the mains until the installation is fully complete.
- With regards to the technical and safety measures to be adopted for fume discharging it is important to closely follow the regulations provided by the local authorities.
- The air must not be discharged into a flue that is used for exhausting fumes from appliance burning gas or other fuels.
WARNING! Failure to install the screws or fixing device in accordance with these instructions may result in electrical hazards.
- Do not use or leave the hood without the lamp correctly mounted due to the possible risk of electric shocks.
- Never use the hood without effectively mounted grids.
- The hood must NEVER be used as a support surface unless specifically indicated.
- Use only the fixing screws supplied with the product for installation or, if not supplied, purchase the correct screws type.
- Use the correct length for the screws which are identified in the Installation Guide.
- In case of doubt, consult an authorized service assistance center or similar qualified person.
WARNING! Do not use with a programmer, timer, separate remote control system or any other device that switches on automatically. - The range hood is intended to be installed over a hob having 6 heating elements. - This appliance is marked according to the European directive 2012/19/EC on Waste Electrical and Electronic Equipment (WEEE). - By ensuring this product is disposed of correctly, you will help prevent potential negative consequences for the environment and human health, which could otherwise be caused by inappropriate waste handling of this product.

- The symbol on the product, or on the documents accompanying the product, indicates that this appliance may not be treated as household waste. Instead it should be taken to the appropriate collection point for the recycling of electrical and electronic equipment. Disposal must be carried out in accordance with local environmental regulations for waste disposal.
- For further detailed information regarding the process, collection and recycling of this product, please contact the appropriate department of your local authorities or the local department for household waste or the shop where you purchased this product.
Appliance designed, tested and manufactured according to:
- Safety: EN/IEC 60335-1; EN/IEC 60335-2-31, EN/IEC 62233.
- Performance: EN/IEC 61591; ISO 5167-1; ISO 5167-3; ISO 5168; EN/IEC 60704-1; EN/IEC 60704-2-13; EN/IEC 60704-3; ISO 3741; EN 50564; IEC 62301.
- EMC: EN 55014-1; CISPR 14-1; EN 55014-2; CISPR 14-2; EN/IEC 61000-3-2; EN/IEC 61000-3-3. Suggestions for a correct use in order to reduce the environmental impact: Switch ON the hood at minimum speed when you start cooking and keep it running for a few minutes after cooking is finished. Increase the speed only in case of large amount of smoke and vapor and use boost speed(s) only in extreme situations. Replace the charcoal filter(s) when necessary to maintain a good odor reduction efficiency. Clean the grease filter(s) when necessary to maintain a good grease filter efficiency. Use the maximum diameter of the ducting system indicated in this manual to optimize efficiency and minimize noise.
Use
The hood is conceived for the suction of cooking fumes and steam and is destined only for domestic use.
The hood is designed to be used either for exhausting or filter version.

Extraction version
In this case the fumes are conveyed outside of the building by means of a special pipe connected with the connection ring located on top of the hood.

CAUTION!
The exhausting pipe is not supplied and must be purchased apart.
Diameter of the exhausting pipe must be equal to that of the connection ring.

CAUTION!
If the hood is supplied with active charcoal filter, then it must be removed.
Connect the hood and discharge holes on the walls with a diameter equivalent to the air outlet (connection flange).
Using the tubes and discharge holes on walls with smaller dimensions will cause a diminution of the suction performance and a drastic increase in noise.
Any responsibility in the matter is therefore declined.
! Use a duct of the minimum indispensable length.
! Use a duct with as few elbows as possible (maximum elbow angle: 90° ).
! Avoid drastic changes in the duct cross-section.

Filtration version
The aspirated air will be degreased and deodorised before being fed back into the room.
In order to use the hood in this version, you have to install a system of additional filtering based on activated charcoal.
Installation
As described in the installation drawings perform 6 holes (8 mm diameter, 40 mm deep), in the positions shown in the drilling template, to fix the hood support bracket and the exhaust flue. After installation, check that the hood and exhaust flue are perfectly aligned.
Mounting
Before beginning installation:
- Check that the product purchased is of a suitable size for the chosen installation area.
- Remove the charcoal (*) filter/s if supplied (see also relative paragraph). This/these is/are to be mounted only if you want to use the hood in the filtering version.
- Check (for transport reasons) that there is no other supplied material inside the hood (e.g. packets with screws (串) guarantees (串) , etc.), eventually removing them and keeping them.
Expansion wall plugs are provided to secure the hood to most types of walls/ceilings. However, a qualified technician must verify suitability of the materials in accordance with the type of wall/ceiling. The wall/ceiling must be strong enough to take the weight of the hood.
Do not tile, grout, or silicone this appliance to the wall. Surface mounting only.
Operation
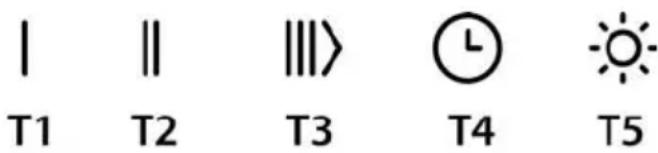
Model A
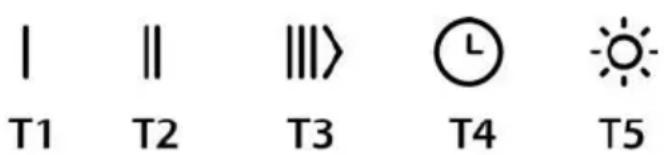
| I | II | III> | L | |
| T1 | T2 | T3 | T4 | T5 |
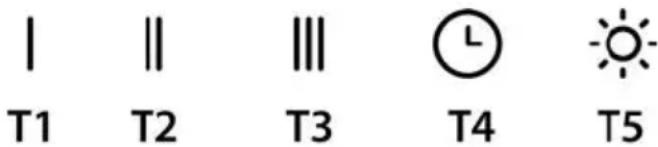
| Model B | ||||
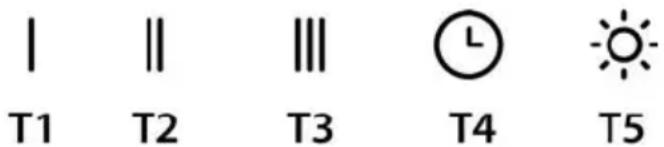
| I | II | III | L | |
| T1 | T2 | T3 | T4 | T5 |
First speed (T1)
Press T1 to activate the first speed. When the function is activated, the LED turns on with a fixed light. Press T1 again to turn the hood off.
Second speed (T2)
Press T2 to activate the second speed. When the function is activated, the LED turns on with a fixed light. Press T2 again to turn the hood off.
Third speed and BOOSTER (T3) model A only
When the hood is off or with the first or second speed active, the third speed can be activated by pressing the button T3 and the LED will turn on with a fixed light.
If T3 is pressed again, the booster turns on. The booster can only be activated if the third speed is already active. When the booster is on, the LED T3 starts to flash. While the booster is working, it is possible to switch to the first or second speed by pressing the desired speed button T1 or T2, the booster will turn off and the selected speed will be activated.
When the booster is on, press T3 again to turn the hood off. After 5 minutes, the booster automatically turns off and the third speed is automatically activated.
Third speed (T3) model B only
Press T3 to activate the third speed. When the function is activated, the LED turns on with a fixed light. Press T3 again to turn the hood off.
Timer (T4)
The timer can be activated when the first, second, or third speed is active. When the function is activated, both the LED of the Timer (T4) and that of the previously selected speed (T1/T2/T3) turn on with a fixed light.
The duration of the timer depends on the selected speed:
First speed T1 = duration 20'
Second speed T2 = duration 15'.
Third speed T3 = duration 10'.
When a speed is timed, the timer can be deactivated by pressing T4, or one of the other two inactive speeds. To turn the hood off, press the speed again to which the timer had previously been linked.
NOTE: model A only
The timer cannot be activated when the booster is active. When the time expires, the hood turns off. When a speed is timed, it is possible to switch to other speeds by pressing the desired speed button, this operation will turn the timer off.
Light (T5)
The light can be activated at any time by pressing key T5. When the function is activated, the LED turns on with a fixed light.
Filter setting
Activation or deactivation of the filter indicators is only possible with the hood off.
To access the configuration menu, hold pressed T2+T3, once inside the menu T1 will start to flash.
The default setting is:
- grease filter indicator (T2) on, therefore active;
- Odour filter indicator (T3) off, therefore not activated.
T2 activates/deactivates the grease filter indicator. T3 activates/deactivates the odour filter indicator. To exit the menu, hold pressed T1 or wait 10 seconds.
Filter reset
The hood signals the need for filter maintenance at regular intervals:
- Grease filter every 40 hours;
- Odour filter every 160 hours.
In this case, with the hood off, when the user touches any button the interface signals two types of needs for a period of 10 seconds:
- If T1+T2 flash: grease filter maintenance;
- - If T1+T3 flash: odour filter maintenance.
During the 10 seconds it is possible to reset the grease filter by pressing T1+T2 and to reset the odour filter by pressing T1+T3. After the reset, the button combinations will flash rapidly twice. The interface will now work as normal.
Please note:
During the 10 seconds, the hood will work normally but without any visual feedback regarding the speed buttons. If during the 10 seconds no operations are carried out, the LEDs will stop flashing and the visual feedback will return to normal.
Maintenance
Cleaning
Clean using ONLY a cloth dampened with neutral liquid detergent. DO NOT CLEAN WITH TOOLS OR INSTRUMENTS. Do not use abrasive products. DO NOT USE ALCOHOL!
Grease filter
Fig. 18
Traps cooking grease particles.
The grease filter must be cleaned once a month using non aggressive detergents, either by hand or in the dishwasher, which must be set to a low temperature and a short cycle. When washed in a dishwasher, the grease filter may discolor slightly, but this does not affect its filtering capacity.
To remove the grease filter, pull the spring release handle.
Charcoal filter (filter version only)
Fig. 19
It absorbs unpleasant odors caused by cooking.
The saturation of the charcoal filter occurs after more or less prolonged use, depending on the type of cooking and the regularity of cleaning of the grease filter.
In any case it is necessary to replace the cartridge at least every four months.
The charcoal filter may NOT be washed or regenerated.
Circular charcoal filter
Apply one on each side as cover to both the shield grids of the motor impeller, then turn clockwise.
For disassembly, turn counter-clockwise.
Replacing lamps
The hood is equipped with a lighting system based on LED technology.
The LEDs guarantee optimal lighting, a duration up to 10 times longer than traditional lamps, and allow saving 90% electrical energy.
For replacement, contact the technical service.
WARNING! First check whether
- Grease filter every 40 hours. Odor filter every 160 hours.
Before starting installation:
Circular filter
WARNING: Before operating the appliance, the parts of
the appliance must be heated.
Do not connect the device to the mains. Disconnect before proceeding with installation.
- Regarding the technical specifications and safety measures that must be taken for the evacuation of fumes and air, it is recommended to strictly follow the rules prescribed in the regulations of the competent local authorities.
- The aspirated air must not be exhausted towards the devices used for venting of flue gases, nor towards open workplaces with gas or other fuels.
WARNING! Incorrect installation of the bolts and mechanisms for fastening in accordance with these instructions may lead to risks of electric shock.
- Do not use or leave the aspirator without properly installed lamps due to possible risk of electric shock.
- Never use the aspirator without a properly installed grille!
- The aspirator must never be used as a support surface unless this is specifically indicated.
- For installation, use only the bolts supplied with the device, or if available, similar bolts of appropriate length.
- Use bolts of appropriate length, as indicated in the installation manual.
- In case of doubt, please contact the authorized service for technical maintenance or qualified personnel.
WARNING! Do not use with a programmer, timer, remote control, or any other device that activates automatically.
- The device is intended for installation above a gas hob with a maximum of 6 burners.
- European Directive 2012/19/EC
- Waste Electrical and Electronic Equipment (WEEE).
Before installing and using this appliance, please read the instructions carefully.
The symbol on the product or its packaging indicates that this product must not be treated as household waste. Instead, it should be handed over to the appropriate collection point for the recycling of electrical and electronic equipment. Please contact your local authorities, the waste collection service, or the store where you purchased this product for more details.

The symbol on the product or its packaging indicates that this product must not be treated as household waste. Instead, it should be handed over to the appropriate collection point for the recycling of electrical and electronic equipment. Please contact your local authorities, the waste collection service, or the store where you purchased this product for more details.
The appliance has been designed, tested, and manufactured in accordance with:
- Safety: EN/IEC 60335-1; EN/IEC 60335-2-31, EN/IEC 62233.
- Performance: EN/IEC 61591; ISO 5167-1; ISO 5167-3; ISO 5168; EN/IEC 60704-1; EN/IEC 60704-2-13; EN/IEC 60704-3; ISO 3741; EN 50564; IEC 62301. EMC - Electromagnetic Compatibility: EN 55014-1; CISPR 14-1; EN 55014-2; CISPR 14-2; EN/IEC 61000-3-2; EN/IEC 61000-3-3.
Tips for correct use to minimize the impact on the environment: Switch on (ON) the extractor at minimum speed when you start cooking and leave it running for a few minutes after cooking is finished. Increase the speed only in case of large amounts of smoke and vapor, and use the boost speed only in extreme situations. Replace the filters/charcoal filters when necessary to maintain good extraction efficiency. Clean the grease filters when necessary to maintain good grease filter efficiency. Use the maximum diameter of the air exhaust system, as indicated in this manual, to optimize efficiency and minimize noise.
Use
The extractors are designed to extract smoke and vapors produced during cooking and are intended for domestic use only.
The extractor has the following purpose: it sucks in and exhausts air or filters it, while at the same time recycling it.

Extractor version
The air is exhausted outdoors through an exhaust pipe connected to the connecting flange.

WARNING!
The exhaust pipe is not included among the accessories and must be purchased separately.
The diameter of the exhaust pipe must match the diameter of the connecting flange.

Connect the appliance to the mains with the activated carbon filter, ask for the required to be removed.
Connect the appliance to the exhaust pipe and open the vents. The diameter of the pipe must correspond to the diameter of the connecting flange for air exhaust.
Connecting to the exhaust pipe and openings with a smaller diameter than the nominal diameter of the aspirator will significantly increase the noise during operation.
In this case, the manufacturer does not assume any responsibility.
Use the pipe with the necessary length.
Use the pipe with the possibly shortest number of elbows (maximum bend of the pipe: 90°). Do not sharply bend the pipe!

Recirculation
The aspirated air is returned purified into the room. To use the aspirator in this mode of operation, it is necessary to install a carbon filter system on the base of the filter with the activated carbon filter.
Mounting
Drill the holes, as shown in the diagram, (Ø 8 mm, depth 40 mm), while keeping the distance to the markings on the template, to fix the aspirator and the support plate for the chimney. After you have fixed them, make sure that the aspirator and the chimney are perfectly aligned between them.
INSTALLATION
Before you proceed with the installation:
Make sure that the product you have purchased corresponds to the dimensions of the chosen place for installation. Remove the filter/grilles with the activated carbon filter (it is disassembled, if the model you have purchased is equipped with it). To perform this, follow the operation in the corresponding paragraph. Mount the filter/grilles only in case you want to use the aspirator in the recirculation version. Make sure that during transport, no foreign objects have entered the inside of the aspirator, such as screws, packaging materials, etc.; if you find any, remove them and keep them.
For all this, we recommend that you entrust a qualified technician, to be sure that the supplied accessories are suitable for the installation. The wall, the furniture, the cabinet, must be sufficiently stable to withstand the load.
| I | II | III> | L | |
| T1 | T2 | T3 | T4 | T5 |
| Моden B | ||||
| I | II | III | L | |
| T1 | T2 | T3 | T4 | T5 |
First speed (T1)
Press T1 to activate the first speed. When the function is activated, the LED indicator turns on with a fixed light. Press T1 again to switch off the aspirator.
Second speed (T2)
Press T2 to activate the second speed. When the function is activated, the LED indicator turns on with a fixed light. Press T2 again to switch off the aspirator.
Third speed BOOSTER (boost) (T3) only model A
When the aspirator is deactivated or the first or second speed is activated, the third speed can be activated via button T3 and the LED indicator turns on with a fixed light.
Press T3 again to activate the booster. The booster can be activated only when the third speed is already activated. When the booster is on, the LED indicator T3 starts to flash. While the booster is functioning, it is possible to switch to the first or second speed by pressing the respective speed button T1 or T2; the booster will switch off and the selected speed will be activated. When the booster is on, press T3 again to switch off the aspirator.
After the booster is switched off automatically, the third speed is activated automatically.
Third speed (T3) only model B
Press T3 to activate the second speed. When the function is activated, the LED indicator turns on with a fixed light. Press T3 again to switch off the aspirator.
Timer (T4)
The timer can be activated when the first, second, or third speed is activated. When the function is activated, both the LED indicator of the timer (T4) and
the selected speed (T1/T2/T3) turn on with a fixed light.
The timer can be adjusted depending on the selected speed:
First speed T1 = duration 20
Second speed T2 = duration 15'.
Third speed T3 = duration 10'.
When a speed with a timer is selected, the timer can be adjusted by pressing T4, and it is not active at other speeds. To turn off the aspirator, press the speed at which the timer was set.
NOTE: see model A
The timer cannot be activated when the booster is active. After the time expires, the aspirator turns off. When a speed with a timer is selected, you can switch to other speeds by pressing the button for the desired speed; this operation will turn off the timer.
Light (T5)
The light can be activated at any time by pressing button T5. When the function is activated, the LED indicator turns on with fixed light.
Filter adjustment
Activating or deactivating the filter indicator can only be done when the aspirator is connected.
To reset the filter counter, press the combination T2+T3, if necessary, in the menu T1 will not respond.
-FILTER AGAINST MIRAGE EVERY 160 HOURS.
In this case, when the aspirator is turned off, when the user presses any button, the display will flash for 10" to indicate the need:
- if T1+T2 is pressed: filter check between washes;
- Press T1+T3 to reset the filter against mist.
During the 10" period it is possible to reset the filter against mist by pressing T1+T2, and to reset the filter against mist by pressing
T1+T3. After the reset, the button combinations will not work for a short time.
The appliance will now work as usual.
Attention:
During the 10" period, the appliance operates normally, but there is a visual indication for the button for the filter. If no operation is performed during the 10" period, the LED indicators will go off and the visual indication will return to normal.
Maintenance
Cleaning
For cleaning, use ONLY a cloth
dampened with neutral cleaning agent. DO NOT
USE INSTRUMENTS OR SHARP OBJECTS FOR CLEANING!
Avoid agents that contain abrasive particles.
DO NOT USE ALCOHOL!
Filter for mist
Fig.18
The filter is a spare part, separated during maintenance.
Use only genuine neutral preparations. The machine has a temperature display and a short washing cycle.
When changing the filter in the washing machine, it is possible to do it yourself, but this in no way impairs its filtering ability.
To remove the filter for the washing machine, press the button with the mechanical mechanism.
The filter is active carbon (only for filter version)
Fig. 19
The filter holder is released when pressed.
The active carbon filter should be replaced approximately every six months, depending on the frequency of use.
In any case, it is necessary to replace the filter with active carbon every six months or when the filter clogging indicator shows that it is necessary.
Do not reuse it.
Cover the active carbon filter
Place one filter on each side, so that the two protective grilles of the working wheel of the motor are covered, then tighten in the direction of the clockwise arrow.
When installing, tighten in the direction opposite to the clockwise arrow.
Top of the cover. Screws
The aspirator has a lighting system with
The manufacturer guarantees optimal lighting, up to 10
The no-drip system and the lamps allow 90% energy savings.
For any issues, contact the technical service.
RO - Installation and use instructions
was mounted correctly.
The device was developed, tested, and manufactured in accordance with:
- Safety: EN/IEC 60335-1; EN/IEC 60335-2-31, EN/IEC 62233.
- Operational characteristics: EN/IEC 61591; ISO 5167-1; ISO 5167-3; ISO 5168; EN/IEC 60704-1; EN/IEC 60704-2-13; EN/IEC 60704-3; ISO 3741; EN 50564; IEC 62301. EMC: EN55014-1; CISPR 14-1; EN55014-2; CISPR 14-2; EN/IEC61000-3-2; EN/IEC61000-3-3. Recommendations for correct use to reduce environmental impact: Turn on the extractor hood at minimum speed when you start cooking, and leave it running for a few minutes after you finish cooking. Increase the speed only in case of a large amount of smoke and steam, and resort to using higher speeds only in extreme situations. Replace the charcoal filter when necessary, and clean or replace the grease filters when necessary to ensure good efficiency of the grease filter. Use the maximum diameter of the duct system specified in this manual to optimize efficiency and minimize noise level.
Use
The hood is used to extract smoke and steam during cooking and is intended solely for domestic use.
The hood is designed to operate in either air extraction mode or air recirculation mode.

Using air extraction mode
In this mode, vapors are discharged outside through a duct connected to the connecting ring.

ATTENTION!
The exhaust hose is not included in the kit and must be purchased separately.
The diameter of the exhaust hose must match the diameter of the connecting collar.

ATTENTION!
If the hood is equipped with a charcoal filter, remove it.
Connect the hood to the exhaust pipe with a diameter corresponding to the air outlet opening (connecting flange).
Installing pipes with a smaller diameter will reduce the air suction power and sharply increase the noise level.
The manufacturer disclaims all liability in this regard.
! Use a pipe with the minimum necessary length. ! Use a pipe with the fewest bends (maximum bend angle: 90°). ! Avoid sharp changes in pipe diameter.

Using the timer function
Third speed: T3 = duration 10 minutes.
When it operates at a speed with the timer, you can turn off the timer by pressing the T4 button, or by pressing any other speed button not activated. To turn off the hood, press the speed button again to which the timer mode was applied.
NOTE: ONLY FOR MODELS A
It is impossible to activate the timer while the hood is off. When the time elapses, the hood turns off. When one of the speeds operates with the timer, you can switch to another by pressing the corresponding speed button. This operation activates the timer.
Lighting (T5)
The light can be turned on at any time by pressing the T5 button. When this function is activated, the corresponding LED lights up with a steady light.
Switching on/off the filter indicators can only be done when the hood is switched off.
To access the configuration menu, press and hold the T2+T3 buttons. After entering the menu, start pulsing T1.
The default setting is as follows:
- The pre-filter indicator (T2) is lit, i.e. on; -The carbon filter indicator (T3) is not lit, i.e. off.
T2 switches on/off the pre-filter indicator. T3 switches on/off the carbon filter indicator. To exit the menu, press and hold the T1 button for 10 seconds.
Resetting the filters
At regular intervals, the hood analyzes the need for filter maintenance:
- pre-filter every 40 hours; -carbon filter every 160 hours. In such cases, with the hood off, when the user touches any button, the interface will flash for 10 seconds to indicate the two types of required operations: -if T1+T2 pulse: maintenance of the pre-filter;
- if T1+T3 pulse: maintenance of the carbon filter.
Within 10 seconds, you can reset the pre-filter indicator by pressing T1+T2 and the carbon filter indicator by pressing T1+T3. After performing the reset, quickly press the combination of these buttons twice. The interface will then function as usual.
Warning:
During these 10 seconds, the hood will operate normally, but there will be no visual feedback on the speed buttons. If no action is taken during these 10 seconds, the flashing will stop and visual feedback will return to normal mode.
Maintenance
Cleaning
For cleaning, use only a special cloth moistened with a neutral liquid detergent. Do not use any tools
for cleaning. Do not use products containing abrasive materials. Do not use alcohol!
Grease filters
Fig. 18
Retains particles of fat coming from cooking.
The filter should be cleaned monthly with mild detergents, either by hand or in the dishwasher at low temperature and with a short cycle.
Washing in the dishwasher may cause some discoloration of the metal filter, but its filtering characteristics remain absolutely unchanged.
WARNING! Incorrect installation of the screws or devices
fixed in accordance with these instructions may lead to the risk of electric shock.
- Do not use or plug in the hood without correctly installed lamps, as there is a risk of receiving an electric shock. Never use the hood without correctly installed grille! The hood must never be used as a support surface unless explicitly indicated. Use the screws for fixing the accessories included in the kit, which are not in the kit, use screws of the correct type. Use the correct length of screws as indicated in the installation instructions.
- In case of doubt, consult an authorized service center or qualified personnel.
WARNING! Do not use with a programmer, timer, separate remote control or any other device that switches on automatically. The hood is intended for installation above a hob with no more than 6 heating elements.
This product has been marked according to the European Directive 2012/19/EC on waste electrical and electronic equipment (WEEE). By ensuring proper disposal of this product, you will help prevent potential negative consequences for the environment and human health, which could otherwise be caused by inappropriate waste handling.

The symbol on the product or on its accompanying documents indicates that this product should not be treated as household waste. It must be handed over to the applicable collection point for the recycling of electrical and electronic equipment. Disposal must be carried out in accordance with local environmental regulations for waste disposal. For more detailed information about treatment, recovery and recycling of this product, please contact your local city office, your household waste disposal service or the shop where you purchased the product.
Designed, tested and certified for safety:
- Benefits: EN/IEC 60335-1; EN/IEC 60335-2-31, EN/IEC 62233.
- Performance data: EN/IEC 61591; ISO 5167-1; ISO 5167-3; ISO 5168; EN/IEC 60704-1; EN/IEC 60704-2-13; EN/IEC 60704-3; ISO 3741; EN 50564; IEC 62301. EMC: EN 55014-1; CISPR 14-1; EN 55014-2; CISPR 14-2; EN/IEC 61000-3-2; EN/IEC 61000-3-3. Order in correct operation and to reduce impact on the environment: Turn on the hood at minimum speed before starting cooking and let it run for a few minutes after finishing cooking. Increase the speed only in case of large amounts of smoke and steam and use the boost speed in extreme cases. To maintain high efficiency in removing odors, if necessary, perform cleaning
of the charcoal filter(s). To maintain high efficiency of the grease filter, if necessary, perform cleaning of the grease filter(s). Use the maximum diameter of the air exhaust system, as indicated in the instructions, to optimize efficiency and minimize noise.
Use
The hood is designed for domestic use to remove fumes and steam produced during cooking, intended for household use.
The hood is designed for use in recirculation mode, with the air discharged back into the room, or in ducting mode with air recirculation.

Ducting version
The air is discharged outside through an exhaust pipe connected to the flange.

WARNING!
The exhaust pipe is not supplied and must be purchased separately.
The diameter of the exhaust pipe must match the diameter of the connecting ring.

WARNING!
If the hood is equipped with a charcoal filter, it must be removed. Remove the filter from the hood and connect the exhaust pipe with the same diameter as the air outlet (see figure).
Use of partial exhaust pipes and openings with a smaller diameter will lead to reduced efficiency of operation and increased noise levels.
Therefore, we disclaim any liability for the above.
BukopocToByte HaikopoTun BnTJxHn KaHaJ.
! BnKOpNCToBByTe BmTgKHN KaHn 3 HaimeNNO KINbKiCTHO NobopoTIB (MaKcImaJIbN Kyt NOBOPOTy: 90°
YHnKaIe p3Knx 3mIH nIooJI nepepi3y BITraXHO KAHaNy.

BapiaHT 3 pInbtpaucieIO
BtHyte nobirpa 3HexnpiOeTbC Ta OunuyeTbC Ta 3HOBy nobepTaetbC B npmiueHn. Ira toro, u6 BKOpNCTOVaTN KOBnak y cybomy pexmI, Heo6xindHO BCTaHOBNI DOaTKOBy CNCTemy fInbTpIB 3 aKTHBOBaHN BynilnM.
Inctanua
JIKOKa3aHOHaKpcJeHHxNoyctAHOBUjPocBepnT6OTbOpB (8MM TIN6HNO40 MM),B MICJX Bka3AHNX Na 7a6N0Hi CBepInHH,IO63akPiNTBnTAKKkyI KPOHHTNIITPMKNKaMHy. IpoBiprTN BKiUyCTAHOBKnYnBnTAAKKaI KaMHc6Be3DorOHBOBIPBHHi.
Inctantia
Ipeep noaTkoM MoTaXy:
IpeebipTe 06pO3MpIn npD6aHOro Bamn Bnp6y nIXoDNnDo BVbpaHoro Micu NOro MoHTaxy. 3HIMITbByrIbHnBn Bt/naRkUo BiH/BOH npCyTHi (DINBNTNC TaKoK BiIDNoBIDnH po3dIn).Bt/Pn 3HOby
BCTAHOBHIOHOBCA RIKIO Bn XOyTe BnKOpNCTOByBaTN KOBN BpeKIMPiEUPKyIJI.
IpeBipuN uO6 BcepeHnHi KOBnaka He 3aHuaIOc npEmTIB, NOMUeHNx TuDn Ha Yac NOro TpaHcnpTyBaHHa (HaPnKnla, NaKeTNkB 3 WpynAmn, JnCTIB rapaHTi i T.n.), kso BOHn E, BmIMtB iX i 36peEeKtB.
B KOMNNEKT BNTKKN BXOJrTB Wpynn DnI KpINHeHH, po3paXOBaHHa 6iNbWicTb TnIB CTIn/CTen. Ipote Heo6xioHO 3BepHytncdo KBanipikOBaHOro Texhka DnI NepeBipKn npDAtHOCTi MatepiAinB 3aHexHocTi BiD TnY CTHN uCteni. CtHa/CtEe NOBHH6yTN DOCTaTHBo MlHMm, UoB BNTPmATn Bary BNTKNN.
Функционування
Modelb A
Moden B
Nepwa wBnDkiCTb (T1)
HaTnckyIe T1 dny BkIIOueHHN neplooi WbNDKocTi. Pnp BkIOueHHI ciEi cyHKuB, BiNOBIDH N CI D cnaJaxe i ropntb NoCTiHMM CBITLOM. 3HOBy HATnCKyIe Ha T1 dny BmKnIOueHHB BNTXHO KOBnaka.
Dpyra wBnKicTb (T2)
HaTnCKyIe T2 dIy BKnIOUeHHApyroI uBnKoCTi. Ipn BKnIOUeHHI ciE i fyku, BiNIOBIDHm CId cnaIaxye i ropntb noCTIHMM CBITLOM. 3HOBy HaTnCKyIe Ha T2 dIy BnKIOUeHHBnTAAHOr KOBNaka.
Tpeta Wbndkictb Ta yHKuJBOOSTER (PiDCNIOBAU) (T3) TInbKn Dnma Modeni A
PnB BmKHeHomy BVTRXHOMy KOBNaKy, a TakoX npN BkIOHeHX nepui a6o npTNI WBnKoCTi, MOxHa BkIOHTN TpeTIO WbIDKiCTb HATNCHEHHM KHONK N3 i CnAaxHe NoCTiHIM CBITIOM BiIOBIDHn CI.
IpaJIbIe HaTnCHeHHa KHOKny T3 3aIyCTnTb booster. Booster MoKe 6byN BKnIOueHn IuSe nICnTa TORO, Ka 6By a BKnIOueHa Tpe Ta WbNDKcTb. PnBKnIOueHomy booster, CII KHOKN T3 NoUHae npIbCyBaTn. B XoJi poBoTn booster MoHa nePeYtn Do nepWo iaboDpyrooi WbNDKcTi IxRaxOM HaTnCKaHHa HA KHOKN BiNobIDHOI WbNDKcTi T1 a6o T2, NiDCNIIOBAu BIMKHeTbcra, a obaHa WbNDKcTb BKnIOHTbcra.
IINBNIIOHHeHH BNTJHKHO KOBNaK npN BIKIOHcHOMy booster, 3HOBy HATNCHTb Ha KHONky T3.
Yepe3 5xbnHnpo60n booster aBtOMaTHNO BmNkaeTbcra, a BNTKkna NOBepTaEcBoTo TpeBoI WbNdkocTi.
TpetaWdkictb(T3)tinbkn dnn moeniB
HaTnCKyIe T3 dnn BkIIOHeHn dpyroI wBnKocTi. Ipr BkIOHeHni ciEi cyHKu, BiINOBiHN CId cnaJaxye i ropntb noCTiHM CBITnOM. 3HOBy HATnCKyIe Ha T3 dnn BkNIOHeHH BnTRXHO KOBnaka.
Timer (Taimep) (T4)
Timer moxha Bknohata npn BknoeHnx nepo,dpyroai 60 tpboi wBnkocti. kuo zyHKia BknoeHa, to CI Timer (T4) i CIpaHne obaHOi WbNdkocti (T1/T2/T3) 6dyt b ropit n IOCTIHMM CBITJOM.
Tpnbicbpo6tTimet3anexntbBidobpaHOIWBnKoCTi:
First speed T1 = 20 min.
Second speed T2 = 15 min.
Third speed: T3 = 10 min.
When one of the speeds is working with a timer, you can turn on the timer by pressing button T4, until the button of the other speed is not turned on. To turn off, press again the button of the speed to which the timer mode was applied.
NOTE: Only in mode A
It is impossible to turn on the timer while the booster is working. After the set time has elapsed, the knob turns off. When one of the speeds is working with a timer, you can switch to another speed by pressing the button of the required speed. This operation turns off the timer.
Drawing (T5)
Drawing can be turned on at any moment by pressing button T5. When this function is turned on, the corresponding LED lights up and burns with a steady light.
Pressing the button
Turning on and off the indicators of the button can be done only with the knob turned off.
To change the configuration, press and hold buttons T2+T3, then press T1 until the beep sounds.
Restoring the default settings:
- The coarse filter indicator (T2) is lit, i.e. turned on;
- The fine filter indicator (T3) is not lit, i.e. not turned on.
T2 turns on/off the indicator of the coarse filter.
T3 BKNIOaC / BIMNKaC iNDnKATOp De3OOpyIOHO φINbTpY.ДЯ BIXOy 3 MeHIO BIKOHaTe TpNBaJIe HATNCKaHHA HA KONKy T1 a60 NoyeKaIte 10 cekyHd
BiDHOBHeHHcTaTcyΦinbtpiB
Yepe3 neBHI INTEpBaNIN BNTKHN KOVnak CnHaI3ye npo Heo6xHicThb Texo6CnyroByBaHHa #inbtpiB:
- KInpoyIOBNIIOBaIbHnIΦiNbTp KOKHi 40 roDnH; -De3oOpuyOCHnΦJbTpKoXHi 160 roHn.
Y TaKix BnIaKax, PnBIMKHeHomy KOBNaKy, B MOMeHT DoTNIky KopncTyBaHa 6yNb-RAKOI KHONKI, INTEpeMeC 6yJe CINHanIsyBaTN npOTAROM 10 cekyHnpo DBOx TINax Heo6xIDHX onepaui:
- kIIO T1+T2 nyIbcyIOTb: Texo6cnyroByBaHHJ KInprooyIOBNIIOBaIbHOrO φiNbtpy;
- kT1+T3 nyIbcyIyob: texo6cnyrobyBaHH
de3oOpuyoTo o fInbtpy.
IproTROM 10 cekHyd MoXHa cKHyTu iHdkaJIO XipooyNoBHOBaHOro pInbTpuy HATNCHEHHrM T1+T2 iHdkaJIO De3OOpYHOrO pInbTpuy HATNCHEHHrM T1+T3. Iicn BIKOHAnHr YbORo CkDaHn, KOM6iHaJIu KHONK WbNko 6NIMHyTb DbiHi. Teep iTepeCf yHKuiHoHyBaTmme, Ra 3aBxDn.
yBara:
IproTgrom 10 cekyHd BVTRJxHKn KOBnak 6yde npaObaTH HopMaJIbHO, ane He 6yde Bi3yaJIbHoro 3BopOTHO 3B'ra3ky Ha KHONkax BKNIOHeHHa WBNKoCTe. RaLIO B XoDi 10 cekyHd He 6yde BnKOHaHO XoDHnx Di, CIIN nepeCTaHyTB nyIbCyBaTH, i BiyAlbHNI 3BOpOTHNI 3B'ra3OK NOBepHeTbcrdo HopMaJIbHoro peKIMy.
Dorla
Ynctka
ДяЧИСТКI BИКОПUCTOBYЛTE ПИЛСЕ СNEUIАЛБИ СЕВETКИ, HAMOCHENY HeITpAlbHIM pIDKIM MIOHIM 3aCobOM. HE BIVKOPUCTOBYITE 3ACOBIB ABO IHCTPYMEHTIB DЯ OCHUSEHH!
He BnKOpNCTOByIte 3aoc6n IIO MaHOb a6pa3nBHi MaTepiAn. HE BnKOpNCTOByIte CnIPT!
Fig. 18
Grease filter delay, which occurs during cooking.
Clean them thoroughly with mild detergents, by hand or in the dishwasher at low temperatures and with a short cycle.
When washing metal grease filters in the dishwasher, they may lose color, but their filtering characteristics will not change.
To remove the grease filter, pull the spring-loaded handle of the filter.
Charcoal filter (only for recirculation mode)
Fig. 19
Removes kitchen odors.
Checking the charcoal filter for saturation is carried out
more often depending on the type of cooking and the frequency of cleaning the grease filter. In any case, it is necessary to replace the cartridges at least every six months.
Not washable or regenerable.
Round charcoal filter
Place the filter on the upper side of the protective grille of the motor impeller, after turning the filter clockwise.
To remove, turn the filter counterclockwise.
This lamp is designed for lighting systems based on LED technology.
LED lamps provide high-quality lighting, lasting 10 times longer than conventional lamps and saving up to 90% of electrical energy.
For replacement, contact the technical service.
The lamp must be installed in a luminaire that is designed for this purpose. If the lamp is used in a luminaire not intended for it, there is a risk of fire or electric shock. The lamp may only be used in luminaires that are suitable for its dimensions and construction. Installation, maintenance, and repair must be carried out by qualified personnel.
Before installation, read the instructions carefully. If the lamp is damaged, do not install it. Check the lamp for any damage to the glass, housing, or base. Do not use the lamp if the glass is cracked or if the electrical or mechanical construction is damaged, or if the ventilation slots are blocked. If any of these conditions are present, do not install the lamp and contact the manufacturer.
Note: (*) The lamp may be supplied with some accessories (not included in all cases), which are necessary for installation.

Instructions

Electrical connections
The installation must be carried out in accordance with the applicable technical regulations. If the lamp is installed incorrectly, it may cause a fire or electric shock. If the lamp is not installed correctly (e.g., not properly connected), or if the electrical connections are not secure, do not use the lamp.
If the lamp is not installed correctly, or if the electrical connections are not secure, do not use the lamp. In such cases, contact a qualified electrician to correct the installation.
WARNING!
Before connecting the lamp to the electrical supply, ensure that the power is turned off.
WARNING! The installation must be carried out by an authorized technician or a qualified electrician.
The distance between the gas cylinder and the electric hob should be at least 45 cm for hobs without a mark, and at least 65 cm for hobs with a mark.
If the gas cylinder is installed closer than the distance indicated in the instructions, move it further away.
Do not replace or repair the components yourself; contact a qualified specialist or the manufacturer's service center to replace or repair the electric hob.
During installation and maintenance work, the appliance must be
disconnected from the power supply.
This appliance can be used by children aged 8 and above and persons with reduced physical, sensory or mental capabilities or lack of experience and knowledge if they have been given supervision or instruction concerning use of the appliance in a safe way and understand the hazards involved. Children shall not play with the appliance.
Children must not be allowed to change the control elements or play with the appliance.
Cleaning and user maintenance shall not be made by children without supervision.
- If the appliance is used near other gas appliances or other open flames, the installation location must be well ventilated.
The appliance must be cleaned both inside and outside (at least once a year) according to the instructions given in the maintenance instructions.
The cleaning standards and the frequency of cleaning and maintenance depend on
- the intensity of use. It is possible to extend the service life by cleaning the appliance regularly.
- For installation, only this
According to the technical passport, the device is intended for use in accordance with the instructions.
It is possible to use the device for other purposes, but this may lead to a reduction in its service life.
To prevent the device from being damaged or malfunctioning, it is necessary to follow the instructions for use.
CAUTION: The device may be damaged if used with tobacco products.
- Do not connect the device to an electrical outlet without proper grounding.
- When using the device, take into account the technical and safety requirements established by the relevant authorities.
The device is intended for use in rooms where there is no risk of explosion or fire, and where the air is clean.
The device must be connected to a power source that meets the requirements specified in the technical passport. Do not use the device in damp or dusty environments.
WARNING! Do not use the device in explosive or flammable atmospheres.
The device can be connected to electrical outlets that are properly grounded.
- Do not use the device in areas with high humidity. If the device gets wet, it must be dried before use.
- Use the device only with the power adapter provided. If the adapter is not provided, use a suitable adapter. The device must be connected to a power source that meets the requirements specified in the technical passport. If you have any questions, contact the manufacturer or an authorized service center.
WARNING! Do not use the device with a damaged power cord, plug, or if the device has been dropped or damaged. The device is intended for indoor use only.
Electrical and electronic appliances must be disposed of separately from household waste in accordance with the European Directive 2012/19/EC (WEEE).
By disposing of this product separately from household waste, you help prevent potential negative consequences for the environment and human health.
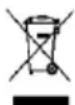
If the appliance is no longer usable, it must be taken to a designated collection point for the recycling of electrical and electronic appliances. Instead, it should be handed over to a collection point designated for the disposal of electrical and electronic appliances.
Handing over the appliance for disposal complies with the requirements for the disposal of electrical and electronic appliances.
When disposing of the product, follow the disposal procedures and take the appliance to a specialized organization, which will handle the disposal of the product in accordance with the regulations.
For repairs, replacement, and maintenance:
Safety: EN/IEC 60335-1; EN/IEC 60335-2-31, EN/IEC 62233. - Performance: EN/IEC 61591; ISO 5167-1; ISO 5167-3; ISO 5168; EN/IEC 60704-1; EN/IEC 60704-2-13; EN/IEC 60704-3; ISO 3741; EN 50564; IEC
- EMC: EN 55014-1; CISPR 14-1; EN 55014-2; CISPR 14-2; EN/IEC 61000-3-2; EN/IEC 61000-3-3.
Instructions for proper disposal for the authorized organization:
Before starting work, ensure that the appliance is disconnected from the power supply and has been off for at least 2 minutes. Do not touch the heating elements and the motor with wet hands, and do not operate the appliance with wet hands (or bare feet). To maintain good ventilation, do not block the air inlet or outlet. To maintain good ventilation, do not block the air inlet or outlet. For cleaning and maintenance, follow the instructions provided in this manual.
Cleaning
The filter is designed to capture grease and smoke and is intended for domestic use only.
The filter is intended for use in a ventilation hood or for air purification in a kitchen.

Filter instructions
This filter is made of a special material that captures grease particles.
The required diameter and the tightening torque are given in the table below.
The required hole must be drilled with a drill bit of the specified diameter. Check the holes with the required holes using a gauge (tightening gauge). If the hole diameter is smaller than required, enlarge it by reaming, using a reamer.
! Do not exceed the maximum permissible torque. ! There is a maximum permissible torque (maximum: 90°). ! Do not apply additional force to the handle.

Water connection
If the water pressure is too high, install a pressure reducer.
The water supply hose must be connected to the water supply system with a suitable connection. The hose must be laid without kinks or twists.
Installation
To ensure the gasket and seal are tight, drill a hole (diameter 8 mm, depth 40 mm) in the wall at the marked position. After drilling, insert the gasket and seal into the hole.
Sealing
During installation:
- Check the water connection(s) for leaks. If the water connection(s) are leaking, tighten them. If the water connection is damaged, replace it. Check all connections, hoses, etc. for leaks. Tighten any loose connections. Replace damaged parts.
The water hose must be connected to the water supply with a suitable connection (e.g., a tap connector). Make sure the connection is tight to prevent leaks. The hose must be laid without kinks or twists.
Model A
First start (T1)
Press the T1 button to start the first start. If the function is not used, the
direct channel is active. Press the T1 button to stop the purge.
Second start (T2)
Press the T2 button to start the second start. If the function is not used, the direct channel is active. Press the T2 button to stop the purge.
Third start and BOOSTER (heating) (T3) Only in models
When the purge is complete or after the first or second start, the third start button T3 can be used to start the third start, at which point the direct channel is active.
If the T3 button is pressed again, the heating starts. The heater can only be started after the third start. When the heater is started, the T3 indicator lights up. When the heater is running, the first or second start button can be used to start the first or second start, at which point the heater stops and the corresponding start is started.
Press the T3 button to stop the purge when the heater is started.
The heater automatically turns off after the third start has been started.
Third start (T3) Only in models
Press the T3 button to start the second start. If the function is not used, the direct channel is active. Press the T3 button to stop the purge.
Timer (T4)
After the first, second, or third start, the timer can be started. When the function is started, the timer (T4) and the corresponding start (T1/T2/T3) are active on the direct channel.
The balance of the cold water supply:
First stage T1 = supply 20
Second stage T2 = supply 15'.
Third stage T3 = supply 10'.
When the cold water mode is activated, if the temperature T4 is not reached, the cold water supply pressure can be increased by another method. For this purpose, the following procedure is recommended:
Adjust the cold water supply valve accordingly.
EXPERT: TEAM MODELS
If the water flow is insufficient, check the water flow. After the supply is activated, the water flow will be correct. If the cold water mode is not activated, the cold water supply pressure can be increased by another method, but this action should be performed only when the temperature is still low.
Lamp (T5)
T5 can be used for water flow when the supply is activated. If the water flow is insufficient, check the water channel.
Water purification
The water purification indicators can be used for water flow or purification when the water flow is correct.
For configuration and adjustment, use T2+T3 to adjust the water flow, and when the adjustment is complete, use T1 to start the cold water flow.
Electrical parameters:
- The water purification indicator (T2) is used, and then it is adjusted;
- The indicators (T3) are turned on, the contact is on the bench.
T2 means the main indicator is on. T3 means the auxiliary indicator is on. Press and hold the T1 button for 10 minutes.
Indicator operation
To perform technical maintenance on the indicators, the following is necessary:
- Main indicator: 40 hours of operation;
- Auxiliary indicator: 160 hours of operation.
In this case, turn off the power, wait for the next type. Press and hold for 10 minutes. Then take two signals:
- If T1+T2 is active: technical maintenance of the main indicator is required; - If T1+T3 is active: technical maintenance of the auxiliary indicator is required.
After 10 minutes, by pressing T1+T2, the main indicator can be operated, and by pressing T1+T3, the auxiliary indicator can be operated. After operation, the combinations will be active twice. The interval is set by the system. Note this:
Turn off the power for 10 minutes. If the indicators do not work, they may need to be replaced. If after 10 minutes they still do not work, stop the operation and replace the indicators.
Technical maintenance
Cleaning
For cleaning, use only a soft cloth dampened with water.
Cleaning or maintenance tools
WARNING! Do not use abrasive or chemical cleaners.
Oil filter
Figure 18
Before starting work, install the filter.
The filter must be replaced if it is clogged, after the machine has been used, or according to the temperature and gas analysis requirements.
It is possible to install the filter without removing the machine, but it is not recommended to do so without disconnecting it.
To remove the oil filter, use the special wrench.
Old oil (or used oil) - Figure 19
After the first use, install a new filter.
If the oil filter is clogged or the pressure drop is too high or too low, it should be replaced with a new filter of the same type. In any case, replace it at least once a year.
The oil filter must not be reused and is not subject to repair.
Replacement oil filter
Remove the protective cap from the new filter, then install it in place.
For this, use the appropriate wrench.
Start the machine
The body of the DIOID technical documentation is not intended for use in the Kazakh language.
The body of the documentation contains information about the device, its components, and 10 essential safety rules, as well as 90% of the electrical energy consumption for maintenance.
For operation, technical service is required. Please contact us.
They are the official version
1
a 1
(T5)
T1 aall L3+T2
a
(T2)
jbi jill
(T3)
Jia 1
T3. 1000000000000000000000000000000000000000000000
10 1 T1 ic a ysb
cuiuai
a aall g iial l c jaiil 1000 jaii jaii jaii jaii jaii jaii jaii jaii jaii jaii jaii jaii jaii jaii jaii jaii jaii jaii jaii jaii jaii jaii jaii jaii jaii jaii jaii jaii jaii jaii jaii jaii jaii jaii
aai
EN/IEC 60335-2- EN/IEC 60335-1:EN/IEC 62233,31 EN/IEC 61591;ISO 5167-1;ISO 5167-3;ISO 5168;EN/IEC 60704-1;EN/IEC 60704-2-13;EN/IEC 60704-3;ISO 3741;EN .50564;IEC 62301
EN 55014-1; CISPR 14-1; EN: yblblgl.55014-2; CISPR 14-2; EN/IEC 61000-3-2; EN/IEC zall jlll jlll l a 61000-3-3 aill gllglll aoc 11111111111111111111111111111111111111111111111 glll llll llll llll llll llll llll llll llll llll llll llll llll llll llll llll llll llll llll llll llll llll llll llll llll llll llll llll llll llll llll llll llll llll l lll llll llll llll llll llll llll llll llll llll llll llll llll llll llll llll llll llll llll llll llll llll llll llll llll llll llll llll llll llll llll llll llll lll
i 1 j j j j j j j j j j j j j j j j j j j j j j j j j j j j j j j j j j j j j j j j j j j j j j j j j j j j j j j j j j j j j j j j j j j j j j j j j j j j j j j j j j j j j
J 1 J 1 J 1 J 1 J 1 J 1 J 1 J 1 J 1 J 1 J 1 J 1 J 1 J 1 J 1 J 1 J 1 J 1 J 1 J 1 J 1 J 1 J 1 J 1 J 1 J 1 J 1 J 1 J 1 J 1 J 1 J 1 J 1 J 1 J
100 100

- CAUTION
- ELECTRICAL CONNECTION
- USE
- EXTRACTION VERSION
- FILTRATION VERSION
- INSTALLATION
- MOUNTING
- BEFORE BEGINNING INSTALLATION
- OPERATION
- FIRST SPEED (T1)
- SECOND SPEED (T2)
- THIRD SPEED AND BOOSTER (T3) MODEL A ONLY
- THIRD SPEED (T3) MODEL B ONLY
- TIMER (T4)
- NOTE: MODEL A ONLY
- LIGHT (T5)
- FILTER SETTING
- FILTER RESET
- MAINTENANCE
- CLEANING
- GREASE FILTER
- FIG
- CHARCOAL FILTER (FILTER VERSION ONLY)
- CIRCULAR CHARCOAL FILTER
- REPLACING LAMPS
- BEFORE STARTING INSTALLATION
- CIRCULAR FILTER
- EXTRACTOR VERSION
- WARNING
- RECIRCULATION
- THIRD SPEED BOOSTER (BOOST) (T3) ONLY MODEL A
- THIRD SPEED (T3) ONLY MODEL B
- NOTE: SEE MODEL A
- FILTER ADJUSTMENT
- USE INSTRUMENTS OR SHARP OBJECTS FOR CLEANING
- FILTER FOR MIST
- THE FILTER IS ACTIVE CARBON (ONLY FOR FILTER VERSION)
- COVER THE ACTIVE CARBON FILTER
- TOP OF THE COVER. SCREWS
- RO - INSTALLATION AND USE INSTRUCTIONS
- USING AIR EXTRACTION MODE
- ATTENTION
- USING THE TIMER FUNCTION
- NOTE: ONLY FOR MODELS A
- LIGHTING (T5)
- RESETTING THE FILTERS
- GREASE FILTERS
- DUCTING VERSION
- BAPIAHT 3 PINBTPAUCIEIO
- INCTANUA
- INCTANTIA
- IPEEP NOATKOM MOTAXY
- ФУНКЦИОНУВАННЯ
- MODELB A
- MODEN B
- NEPWA WBNDKICTB (T1)
- DPYRA WBNKICTB (T2)
- TPETA WBNDKICTB TA YHKUJBOOSTER (PIDCNIOBAU) (T3) TINBKN DNMA MODENI A
- TIMER (TAIMEP) (T4)
- NOTE: ONLY IN MODE A
- DRAWING (T5)
- PRESSING THE BUTTON
- BIDHOBHEHHCTATCYΦINBTPIB
- DE3OOPUYOTO O FINBTPY
- DORLA
- YNCTKA
- CHARCOAL FILTER (ONLY FOR RECIRCULATION MODE)
- REMOVES KITCHEN ODORS
- ROUND CHARCOAL FILTER
- INSTRUCTIONS
- ELECTRICAL CONNECTIONS
- THE DEVICE CAN BE CONNECTED TO ELECTRICAL OUTLETS THAT ARE PROPERLY GROUNDED
- FILTER INSTRUCTIONS
- WATER CONNECTION
- SEALING
- DURING INSTALLATION
- MODEL A
- FIRST START (T1)
- SECOND START (T2)
- THIRD START AND BOOSTER (HEATING) (T3) ONLY IN MODELS
- THIRD START (T3) ONLY IN MODELS
- EXPERT: TEAM MODELS
- LAMP (T5)
- WATER PURIFICATION
- INDICATOR OPERATION
- TECHNICAL MAINTENANCE
- CLEANING OR MAINTENANCE TOOLS
- OIL FILTER
- FIGURE
- OLD OIL (OR USED OIL) - FIGURE
- REPLACEMENT OIL FILTER
- START THE MACHINE
- THEY ARE THE OFFICIAL VERSION
- (T5)
- CUIUAI
Brand : ELICA
Model : PRF0166938
Category : Range hood