
Viper TQS - Controller THRUSTMASTER - Free user manual and instructions
Find the device manual for free Viper TQS THRUSTMASTER in PDF.
| Product type | Throttle for flight simulator |
| Brand | Thrustmaster |
| Model | Viper TQS (Throttle Quadrant System) |
| Category | Flight controller |
| Compatibility | PC (Windows) |
| Connectivity | USB-C |
| Number of buttons | 19 physical buttons + 2 virtual (mode B) |
| Number of axes | 5 axes |
| Stops | CUT OFF (engine cutoff) and AFTERBURNER (afterburner) |
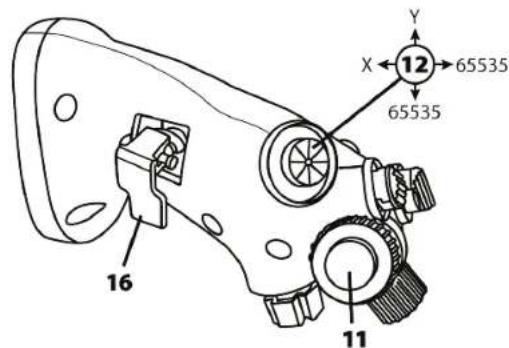
| Grip | Metal, 1:1 scale replica of the F-16 fighter jet |
| Friction adjustment | Yes, via an accessible screw on the side (tool included) |
| Mounting on support | M6 compatibility; screw fixing or via TM Flying Desk Mount / Clamp (sold separately) |
| Software | T.A.R.G.E.T. (advanced programming, drag & drop, scripts) |
| Power supply | USB bus (5V) |
| Estimated weight | Approximately 1.5 kg |
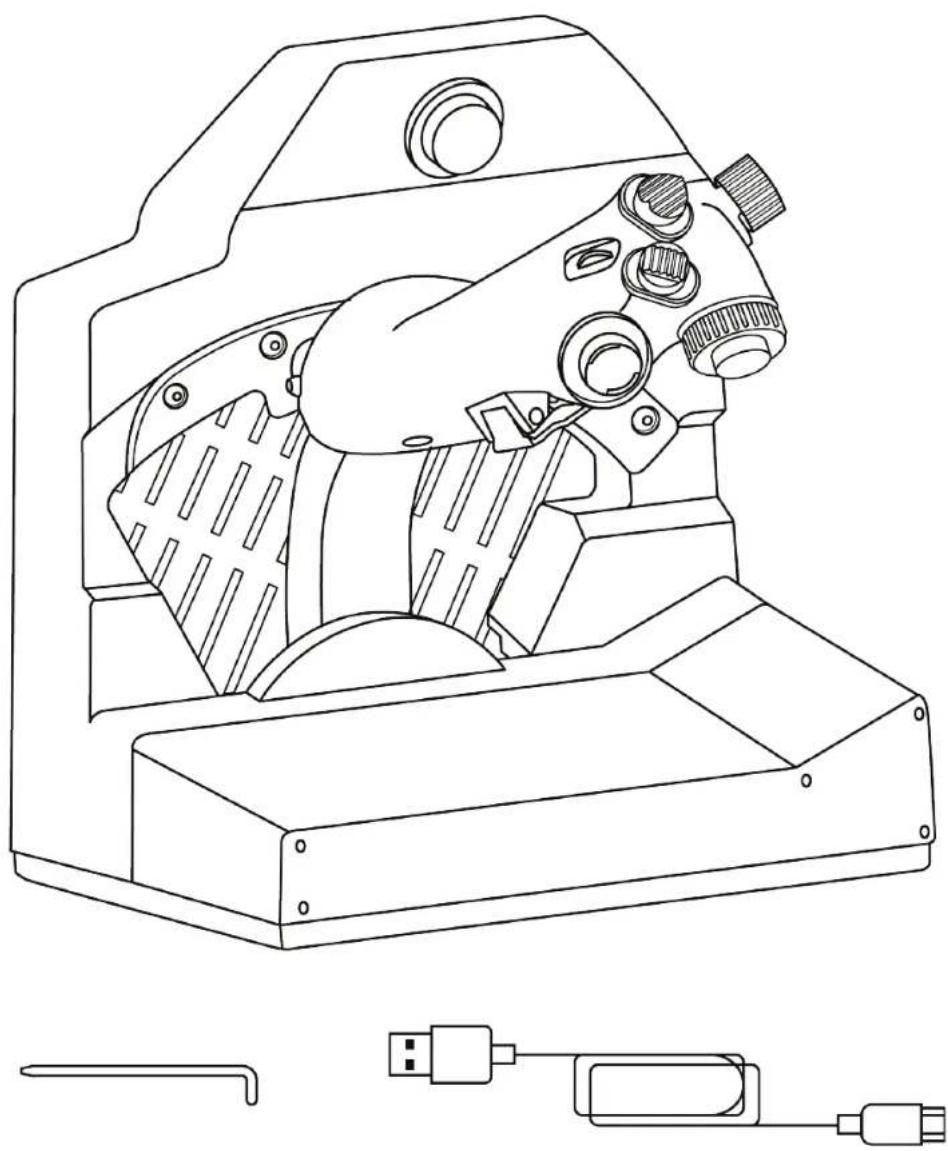
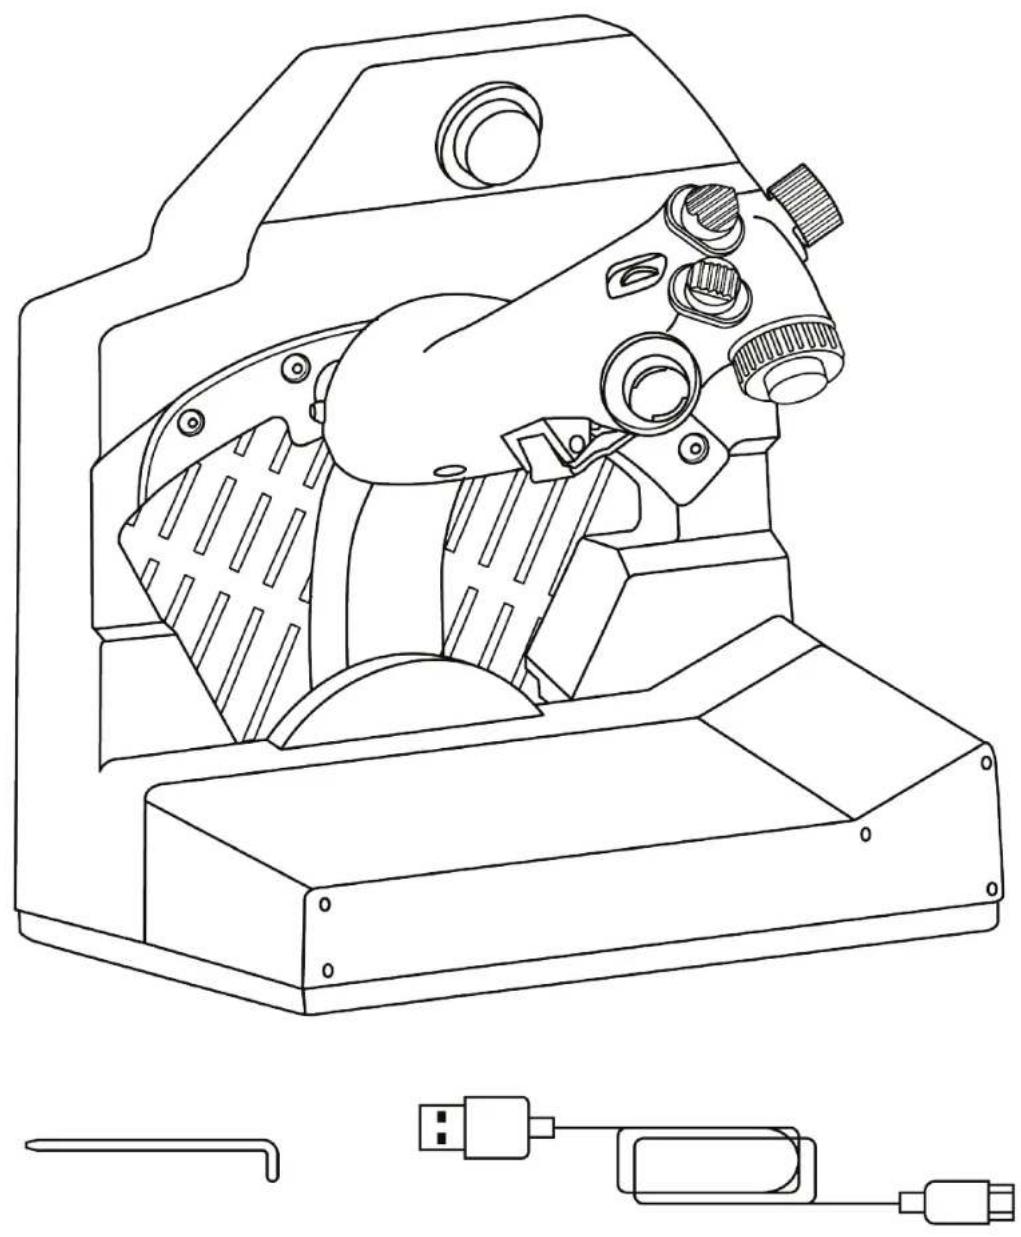
| Box contents | Viper TQS, friction adjustment tool, mission card clip, user manual |
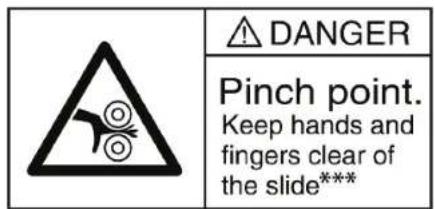
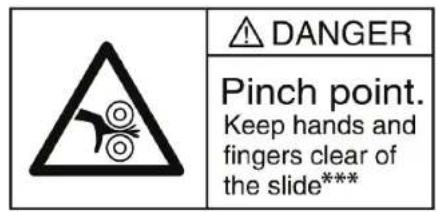
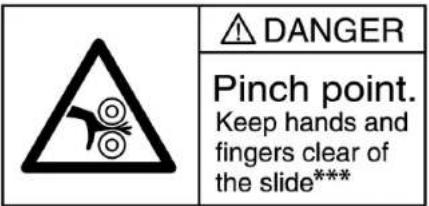
| Safety | Pinching hazard – do not place fingers in the stop spaces; use on a solid surface (wood or MDF) |
| Maintenance and cleaning | Clean with a soft, dry cloth; do not use liquids or abrasive products |
| Spare parts and repairability | Contact Thrustmaster technical support for any repair or part |
| General information | Requires a firmware update before use; download from the Thrustmaster support website |
Frequently Asked Questions - Viper TQS THRUSTMASTER
User questions about Viper TQS THRUSTMASTER
0 question about this device. Answer the ones you know or ask your own.
Ask a new question about this device
Download the instructions for your Controller in PDF format for free! Find your manual Viper TQS - THRUSTMASTER and take your electronic device back in hand. On this page are published all the documents necessary for the use of your device. Viper TQS by THRUSTMASTER.
USER MANUAL Viper TQS THRUSTMASTER
Carefully read the instructions provided in this manual before installing the product, before any use of the product and before any maintenance. Be sure to follow the safety instructions. Failure to follow these instructions may result in accidents and/or damage. Keep this manual so that you can refer to the instructions in the future.
TABLE OF CONTENTS
- BOX CONTENTS 5
- VIPER TQS FEATURES 6
- MAPPING OF BUTTONS AND AXES 8
- INFORMATION ABOUT USING VIPER TQS... 10
- ADJUSTING THE FRICTION 11
- INSTALLATION ON A SUPPORT 12
- INSTALLING VIPER PANEL* 17
- INSTALLATION ON PC 20
- CUT OFF AND AFTERBURNER DETENTS.....23
- T.A.R.G.E.T ADVANCED PROGRAMMING SOFTWARE 26
- FAQ AND TECHNICAL SUPPORT 28
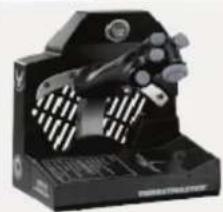
Rev up your engines and fly into the danger zone with the iconic throttle quadrant system from the U.S. Air Force's VIPER — the world's most widely-used modern fighter aircraft!
Take your cockpit to the next level with the unique ergonomics of a 1:1 scale HOTAS replica featuring a metal handle, plus realistic buttons and detents.
This manual will help you install and use your VIPER TQS under the best conditions. Before taking off, make sure to carefully read all of these instructions and warnings: they will help you get the most enjoyment out of your product.

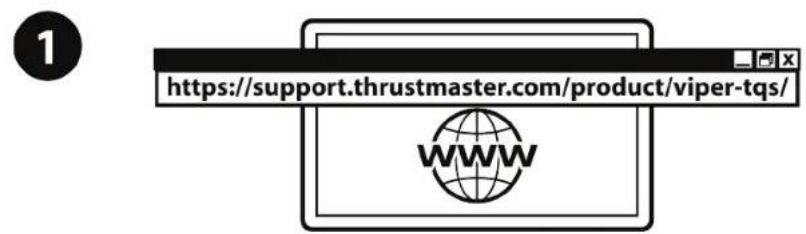
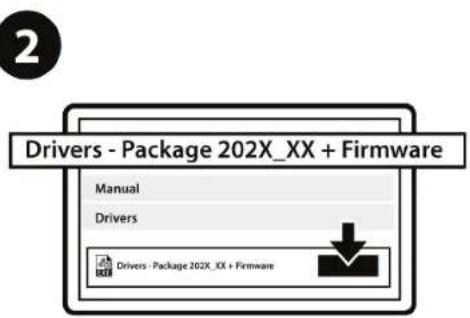
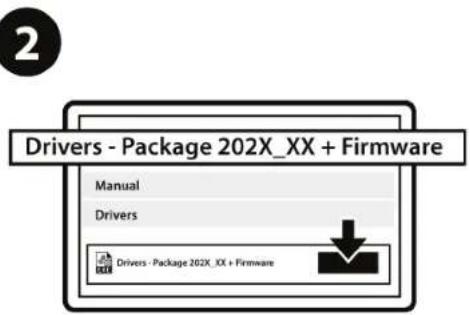
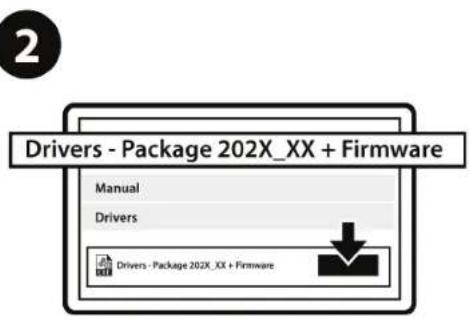
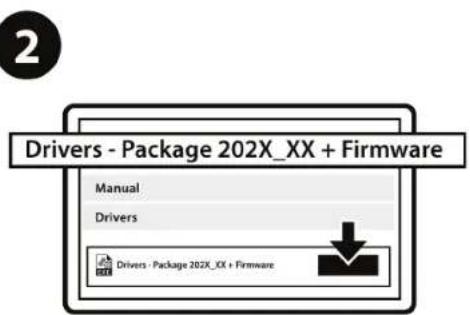
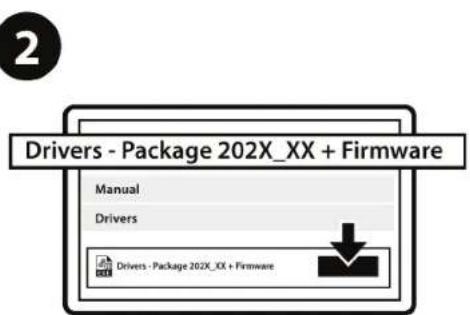
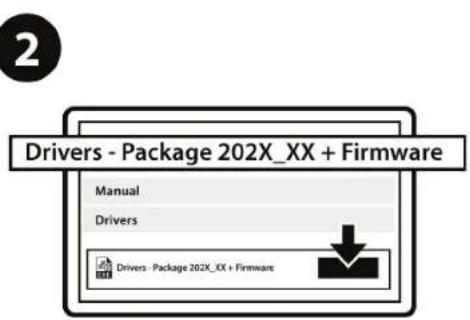
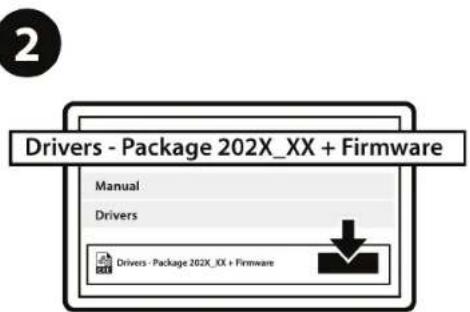
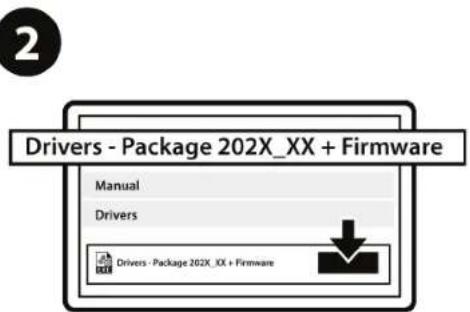
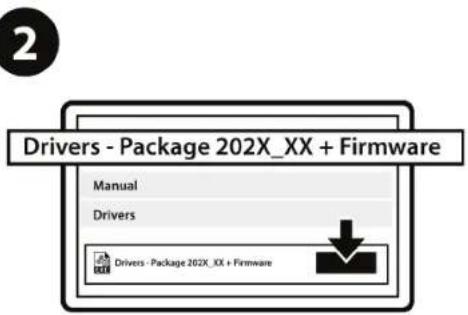
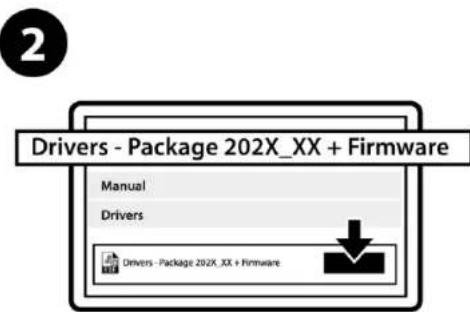
Updating the firmware
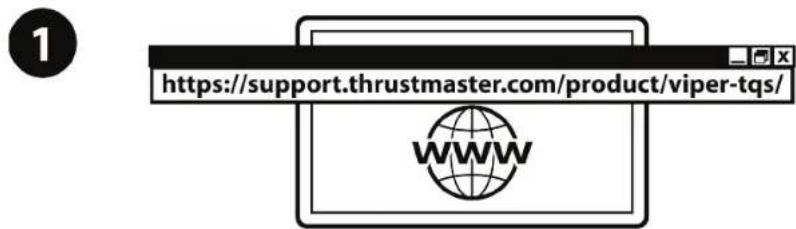
In order for VIPER TQS to function properly in video games, you must update its firmware.
To carry out the update, please visit
https://support.thrustmaster.com/product/vipertqs/
Select Firmware, then follow the instructions — including the downloading and installation procedure.
1. Box contents
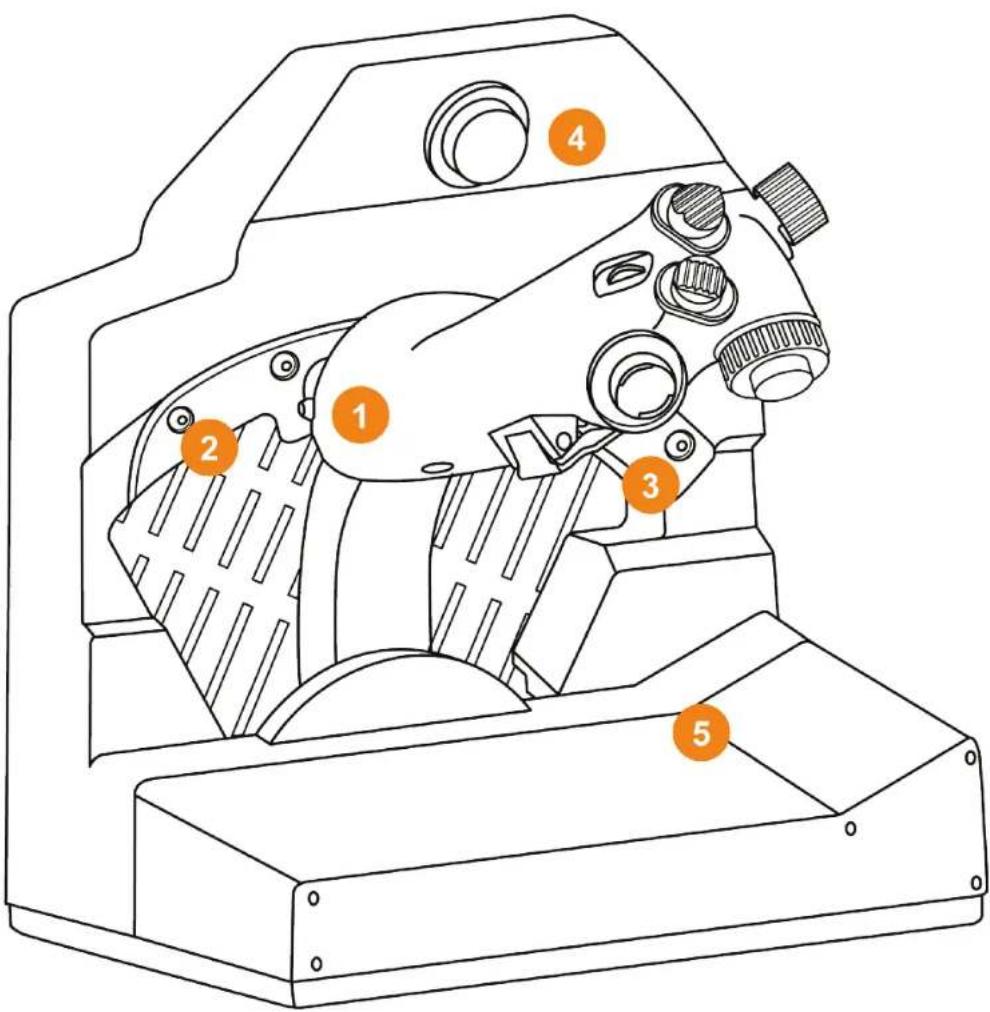
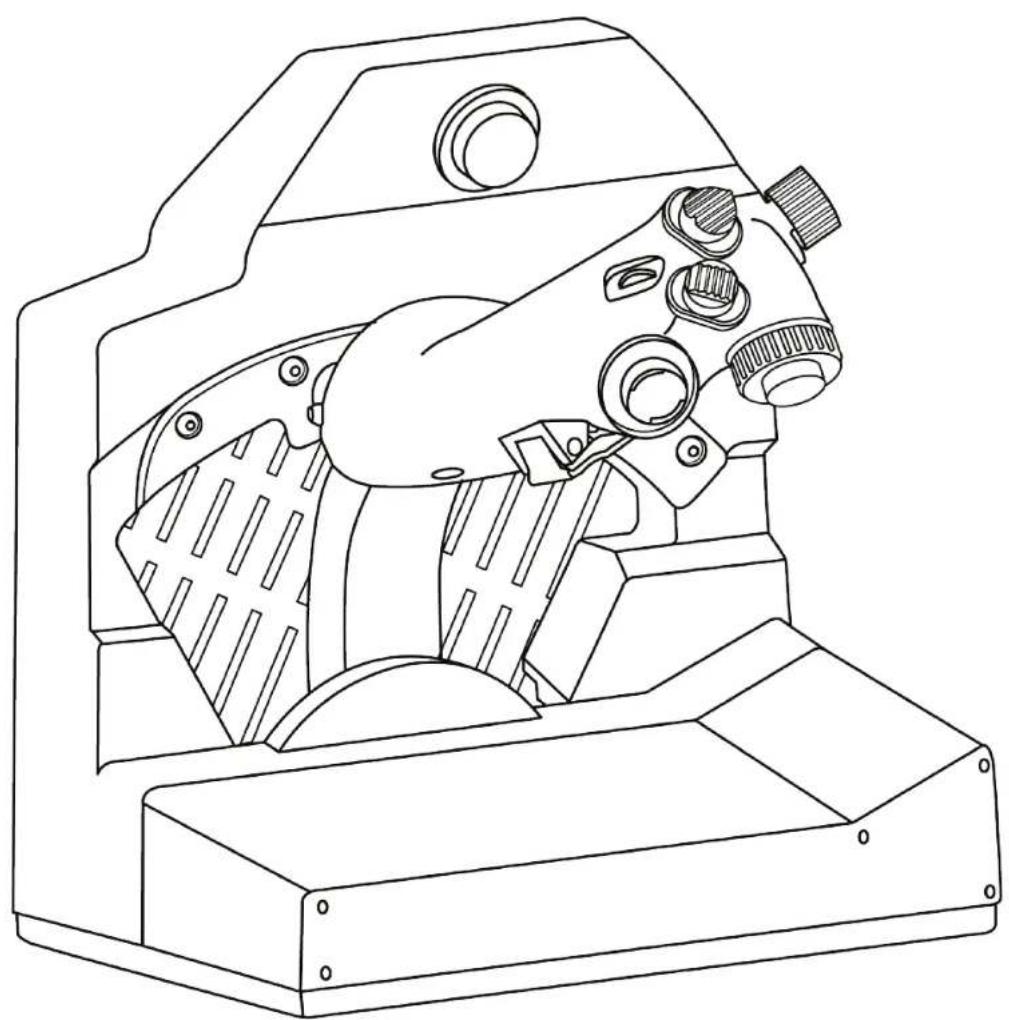
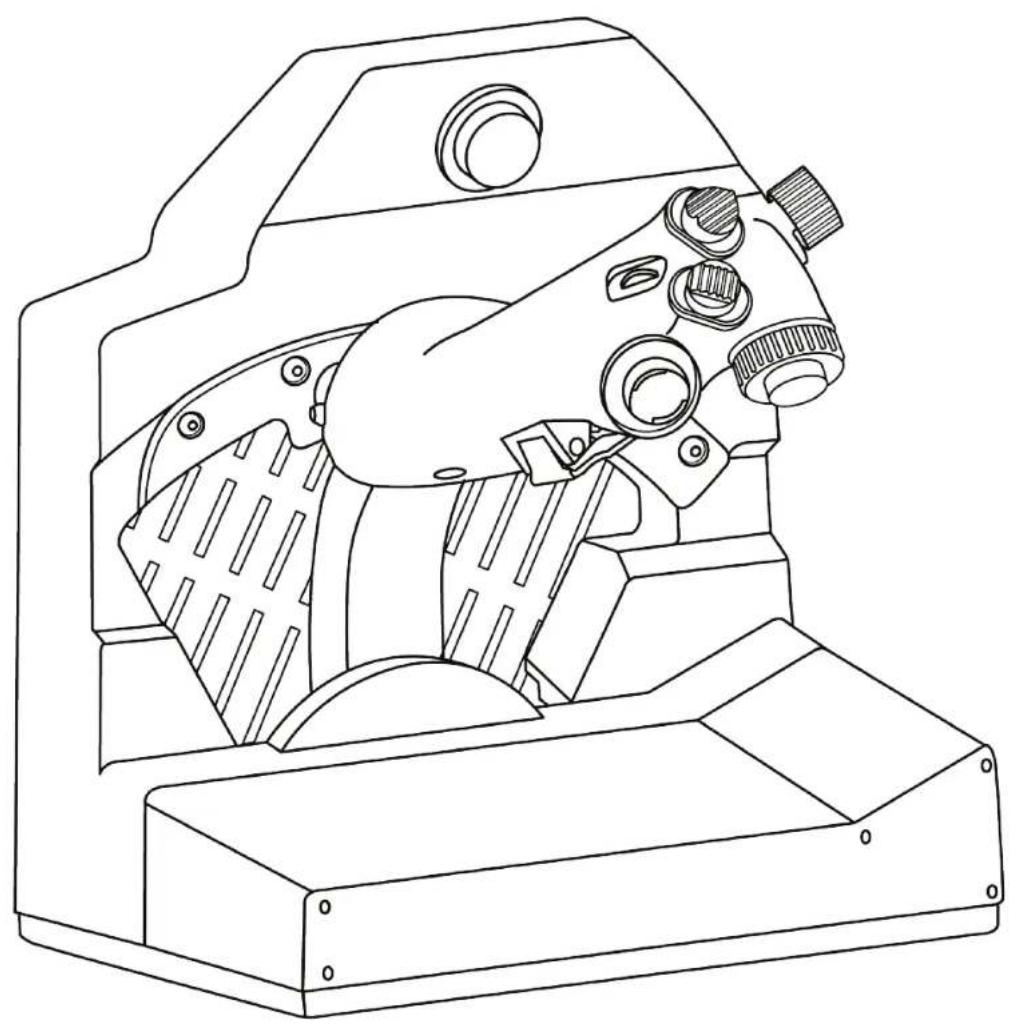
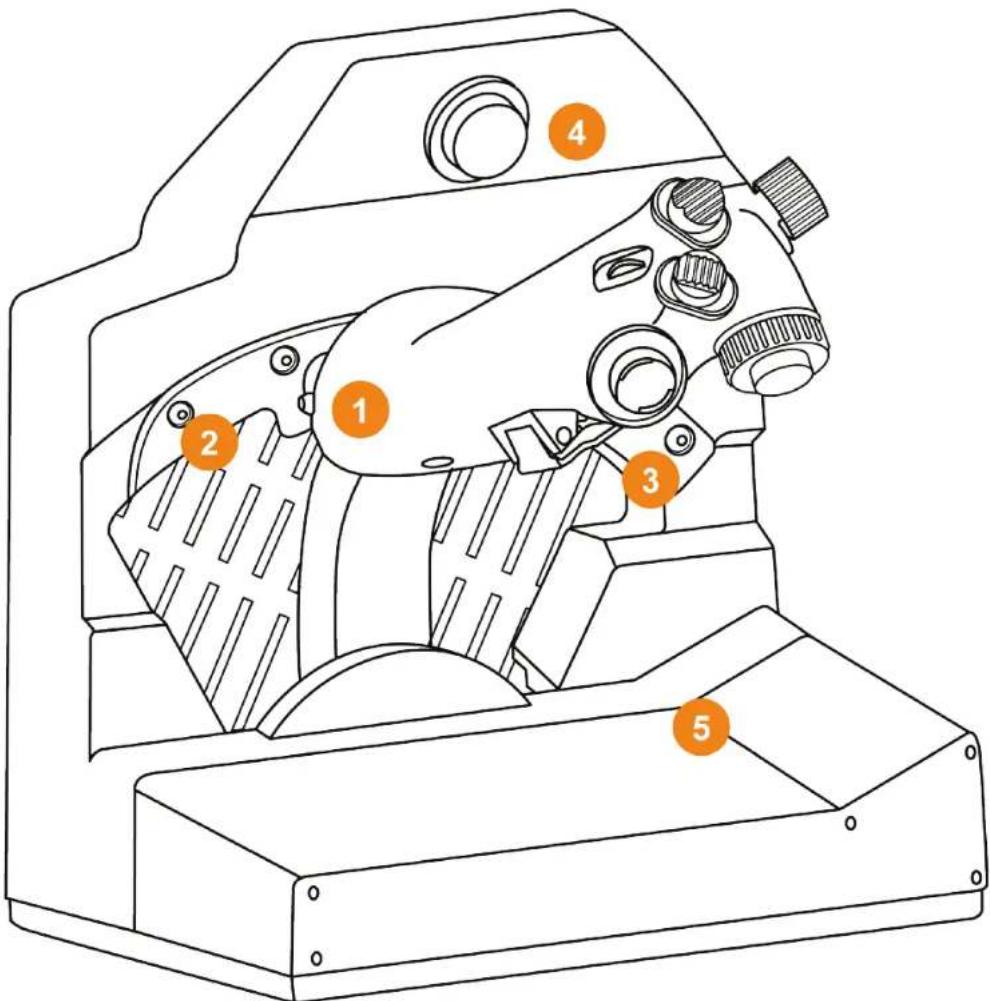
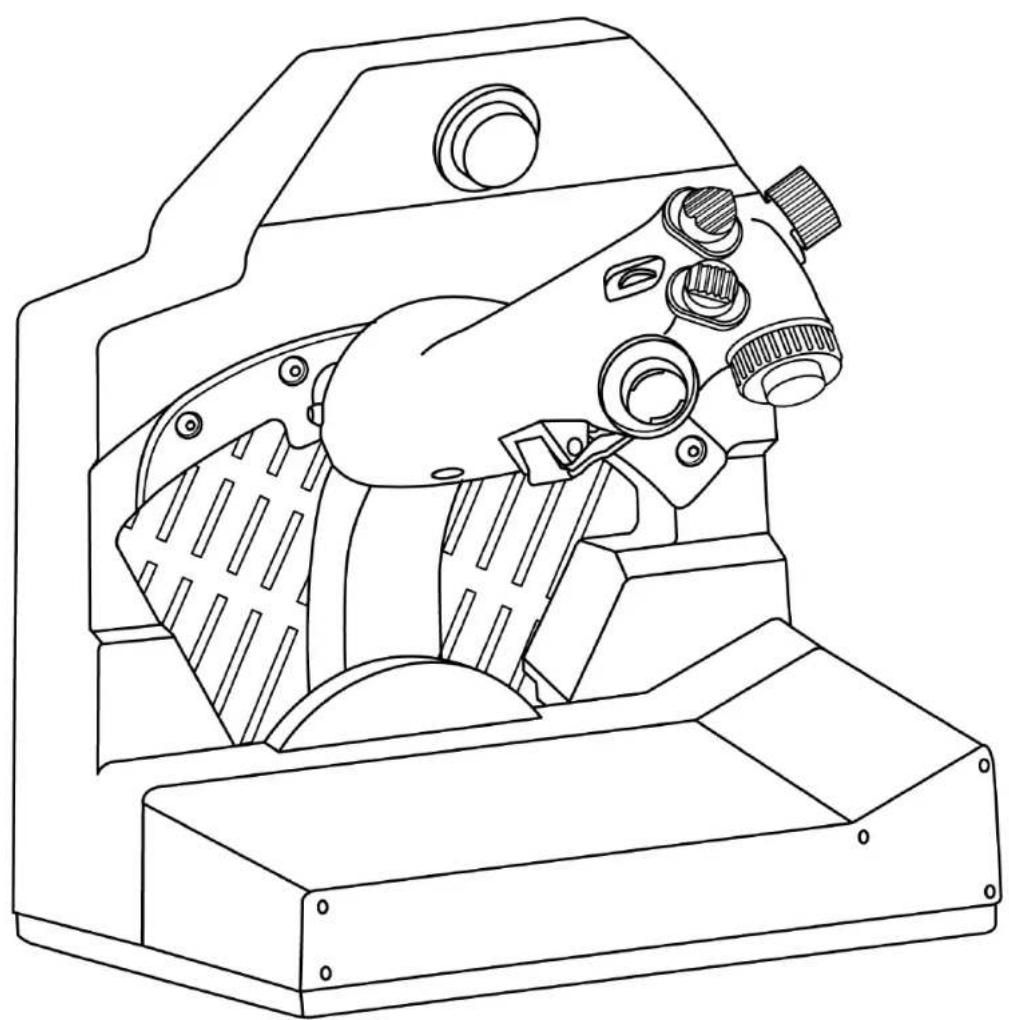
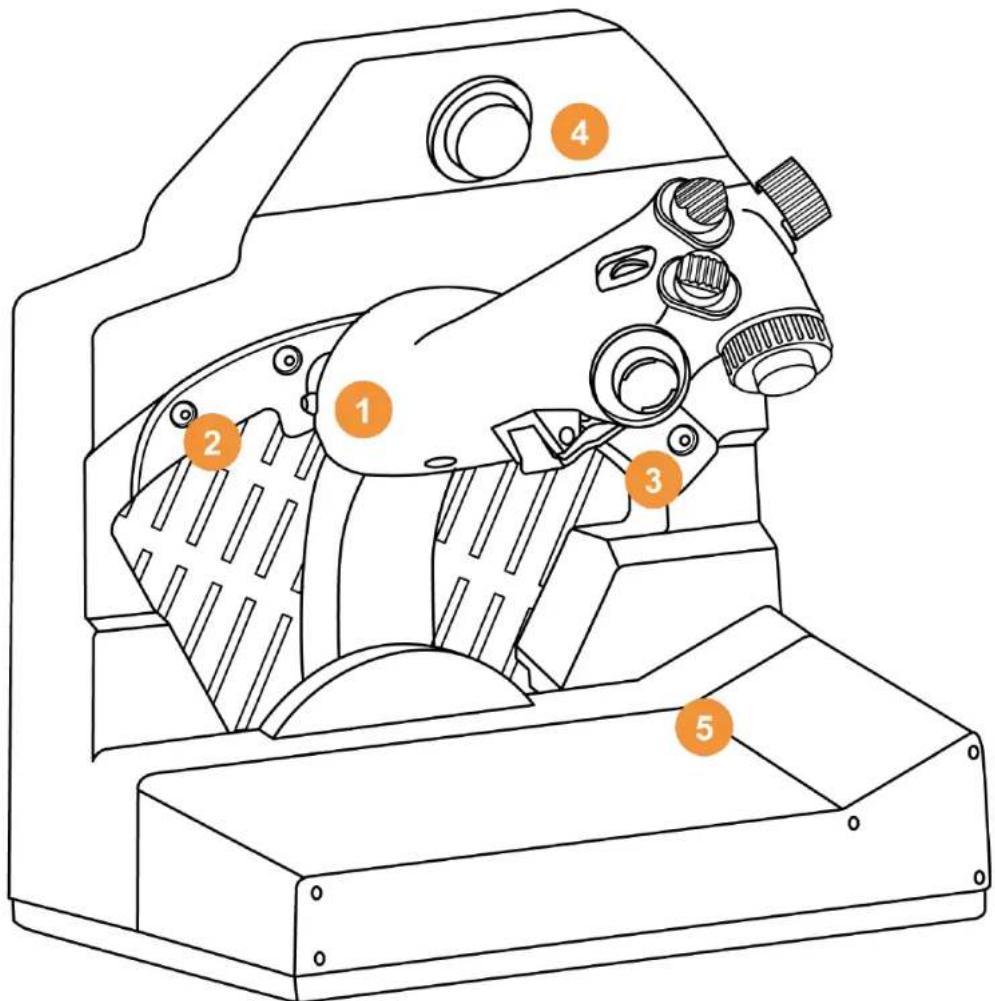
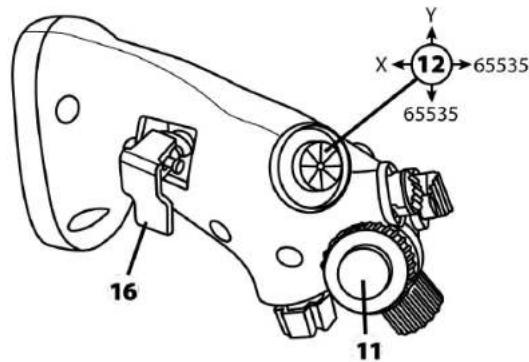
2. VIPER TQS features

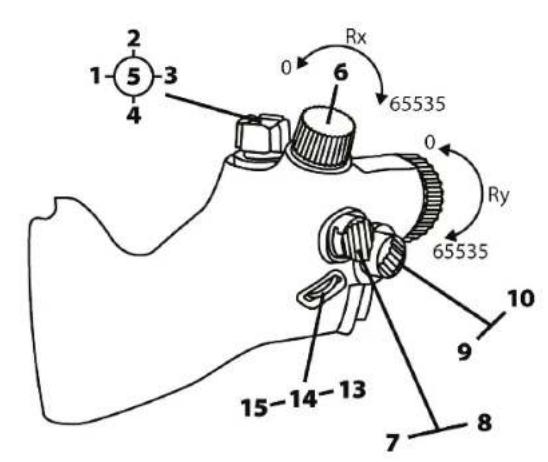
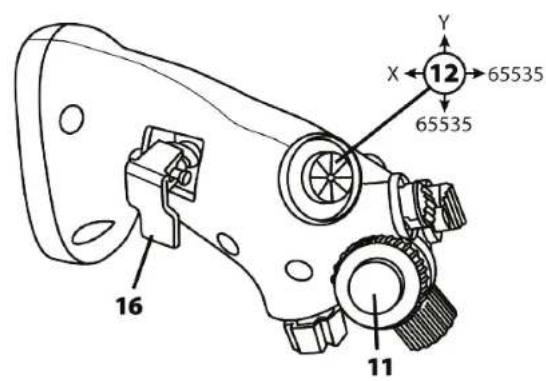
- Handle
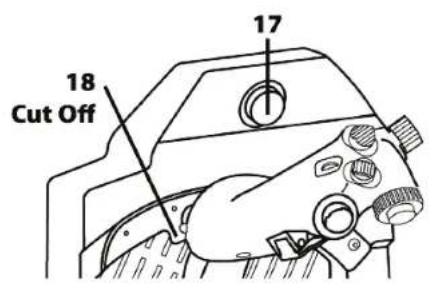
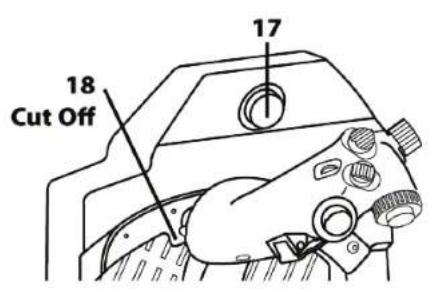
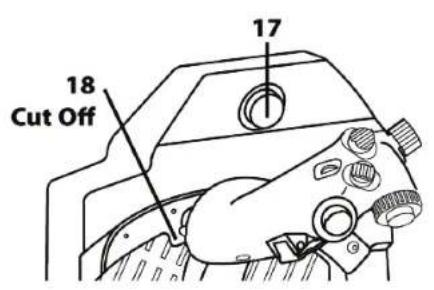
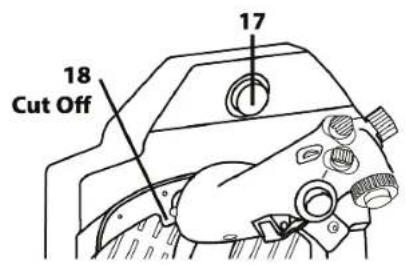
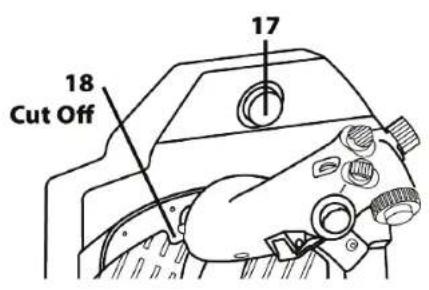
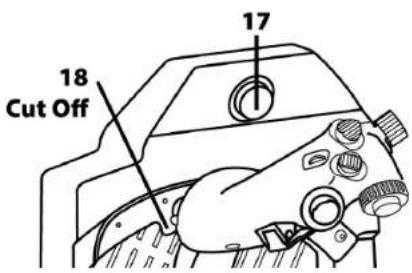
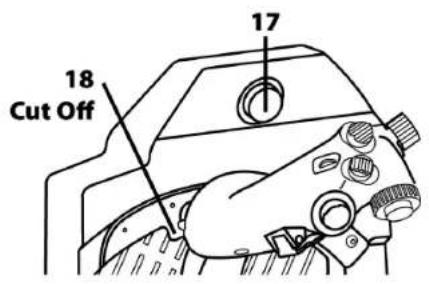
- Cut Off stop
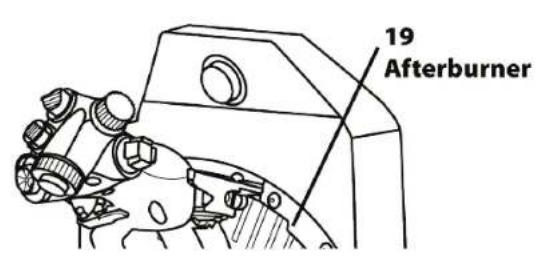
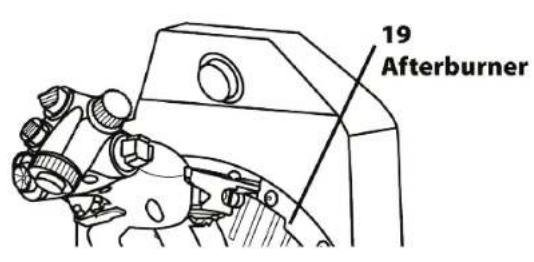
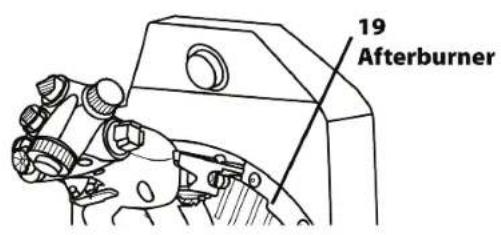
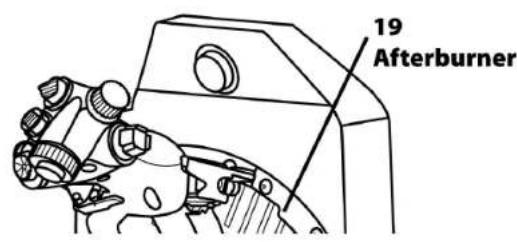
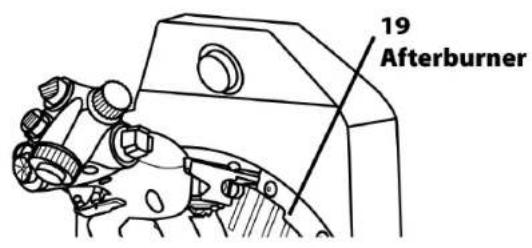
- Afterburner stop
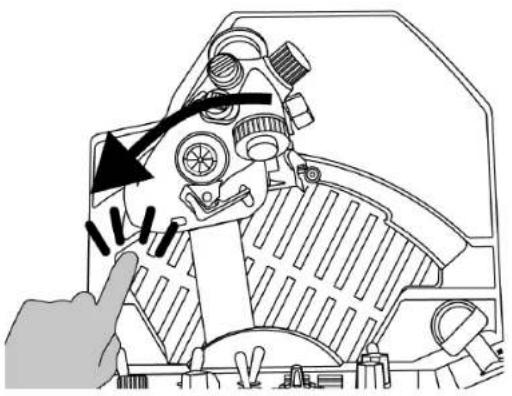
- CHAFF/FLARE slap switch
- Clip for mission map
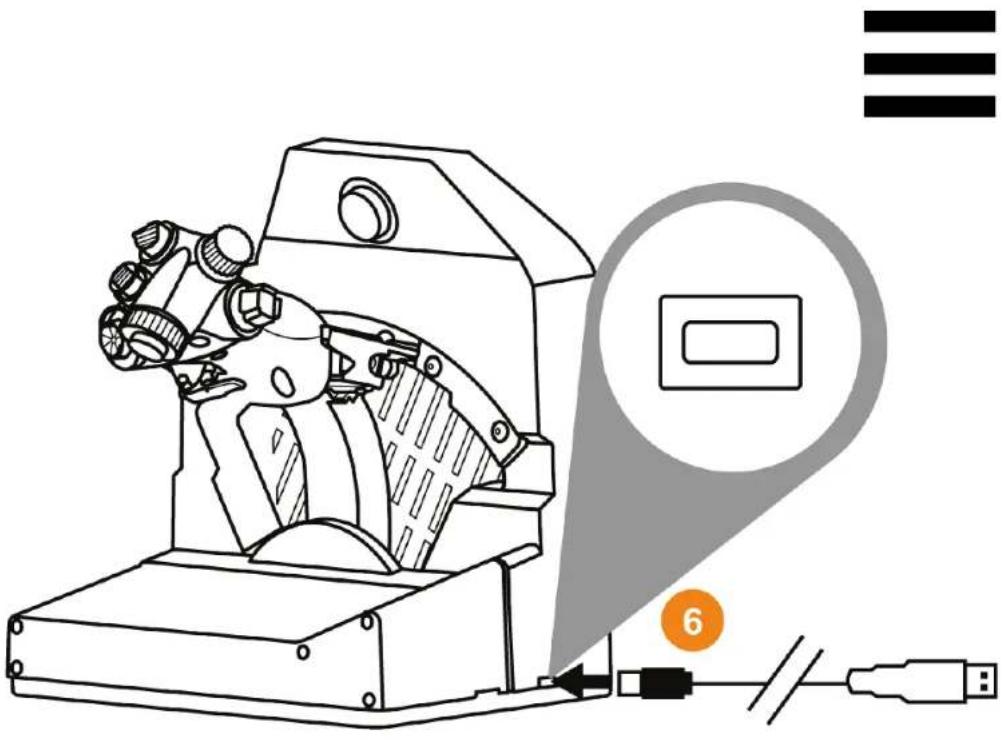
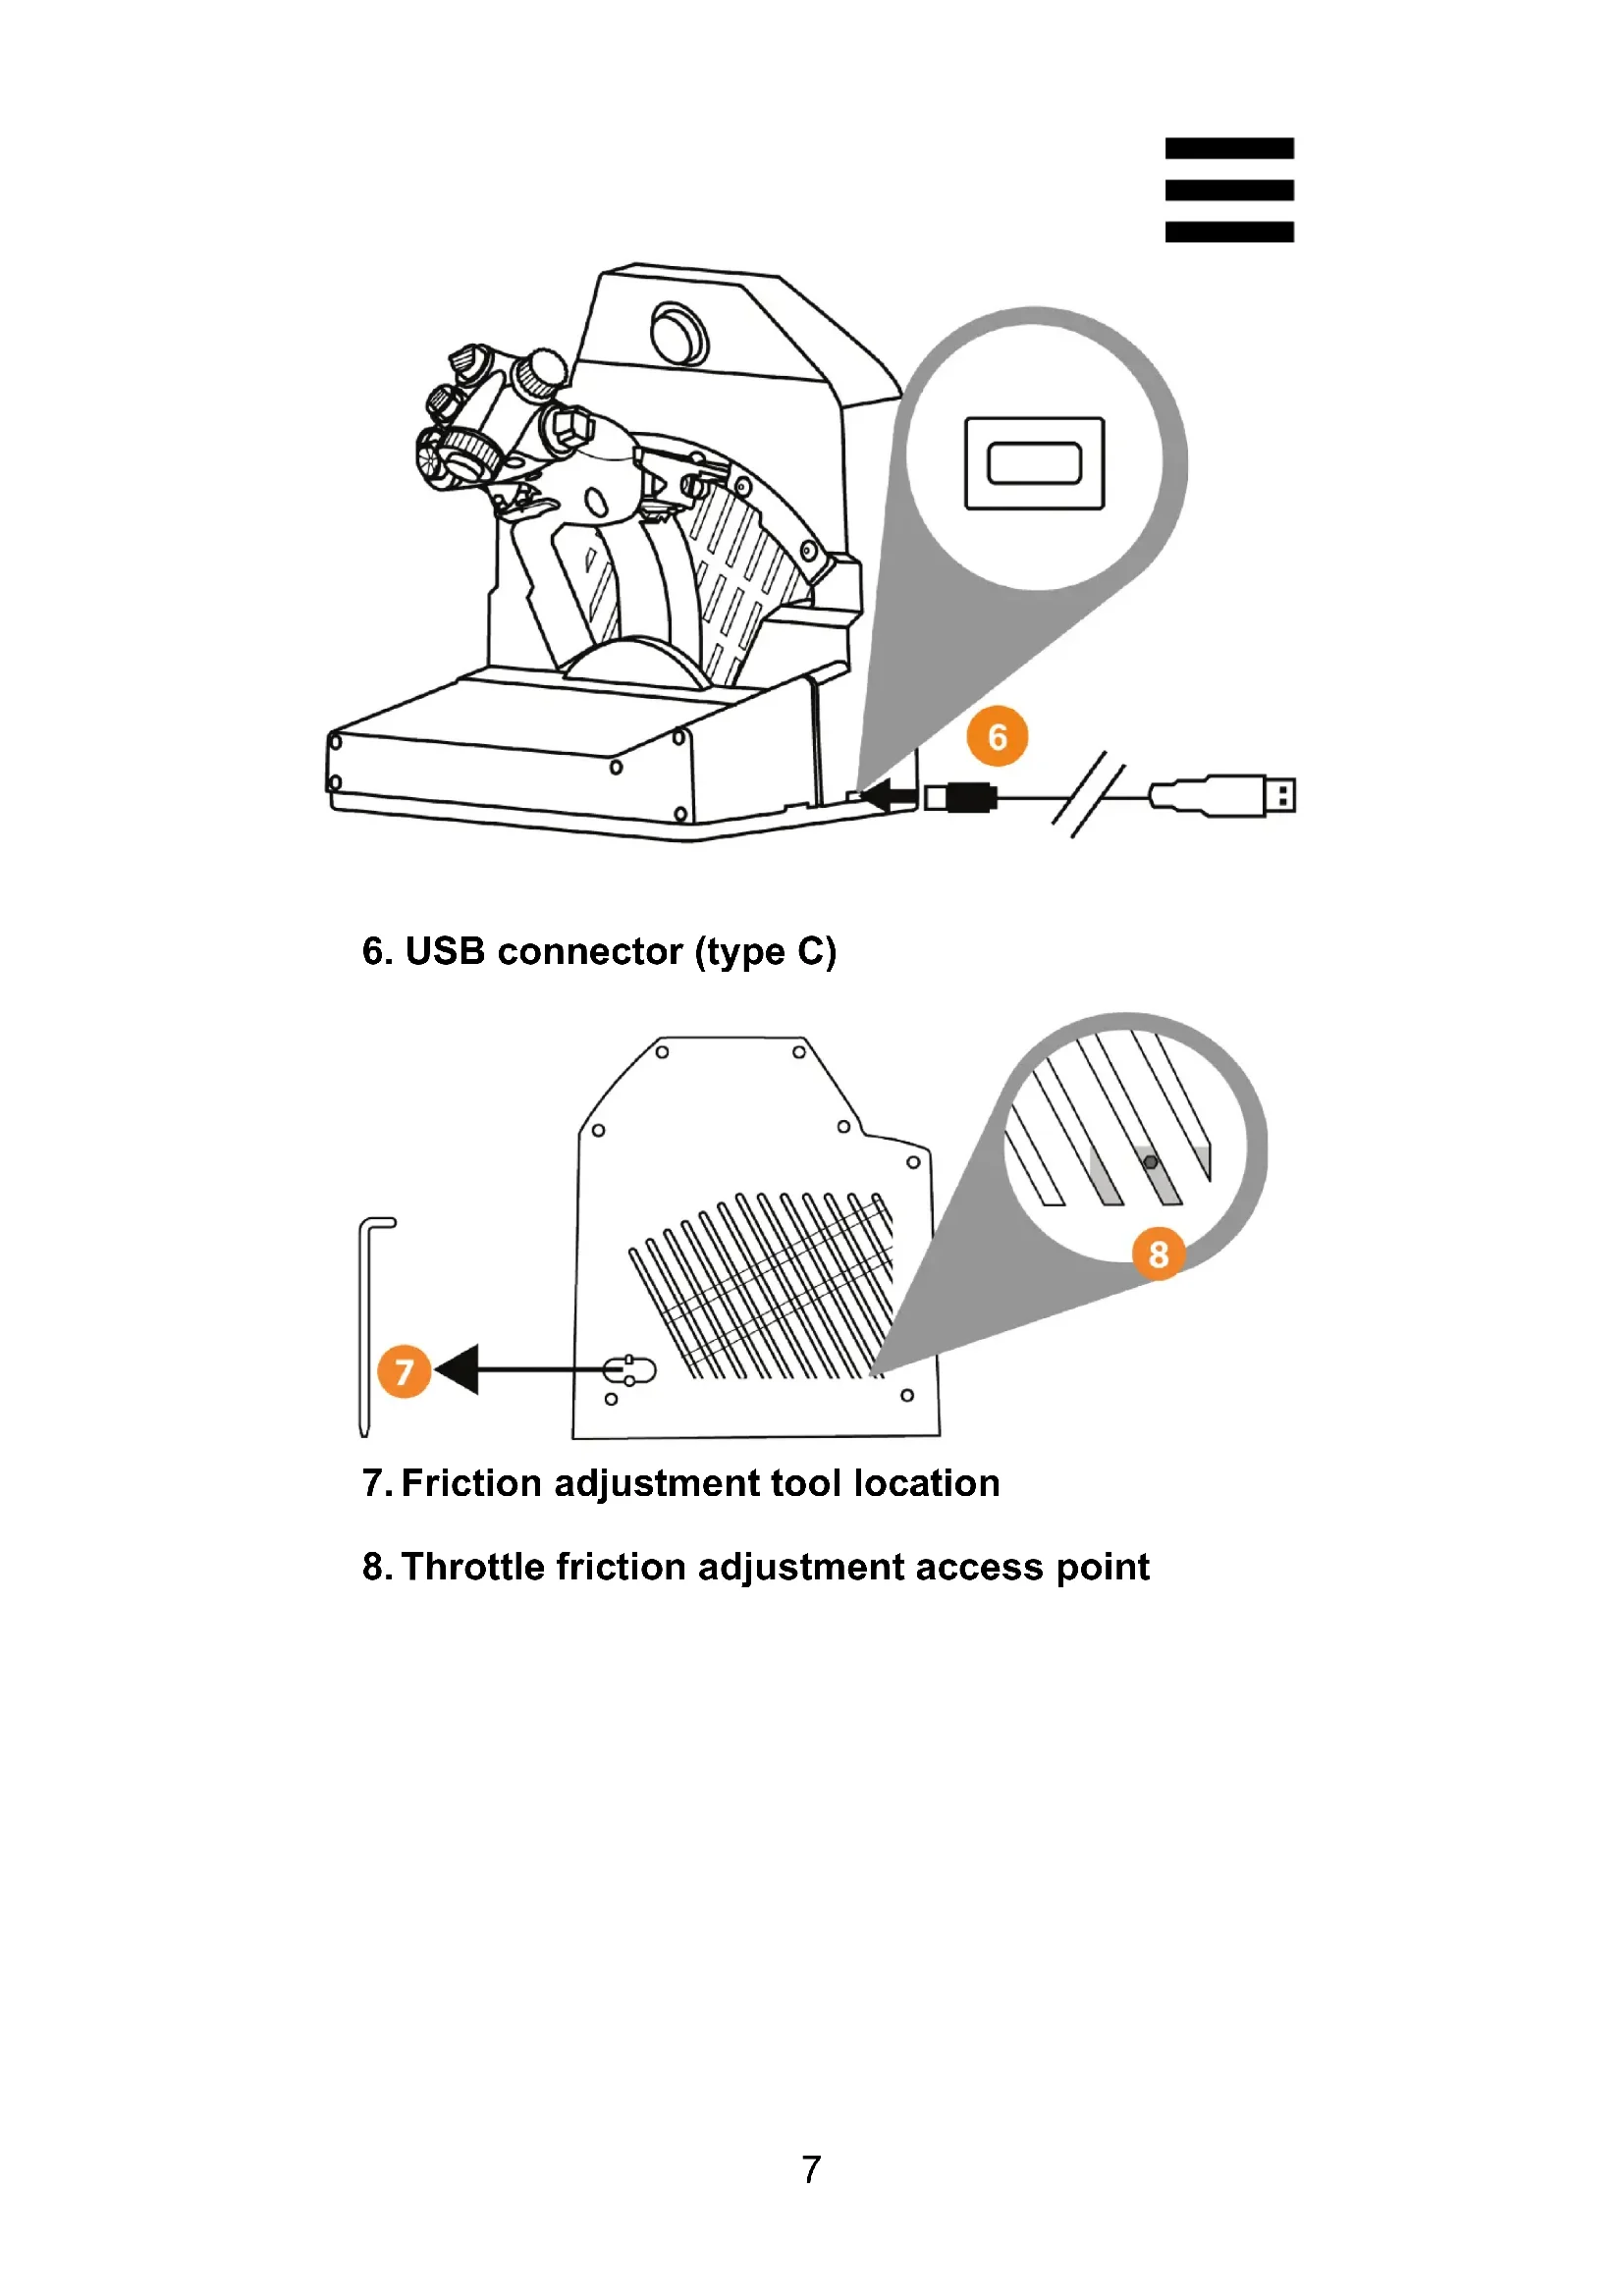
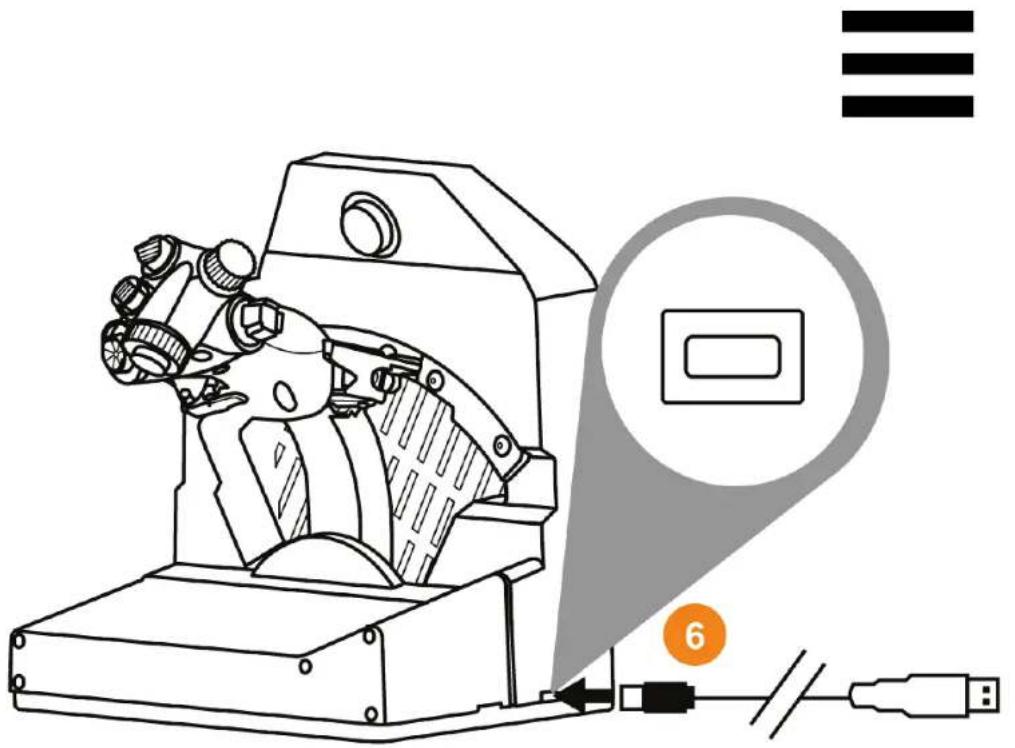
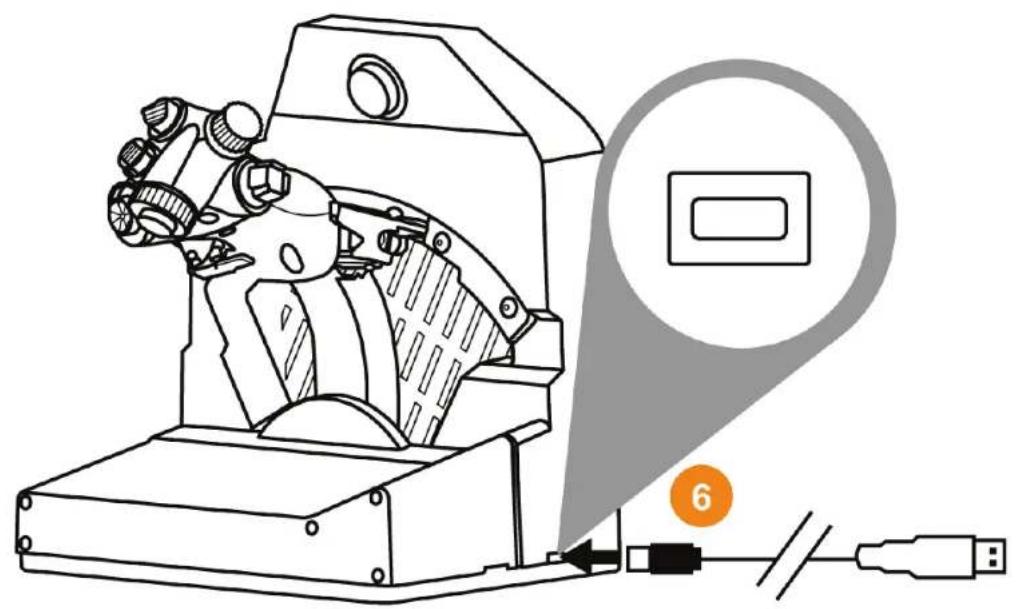
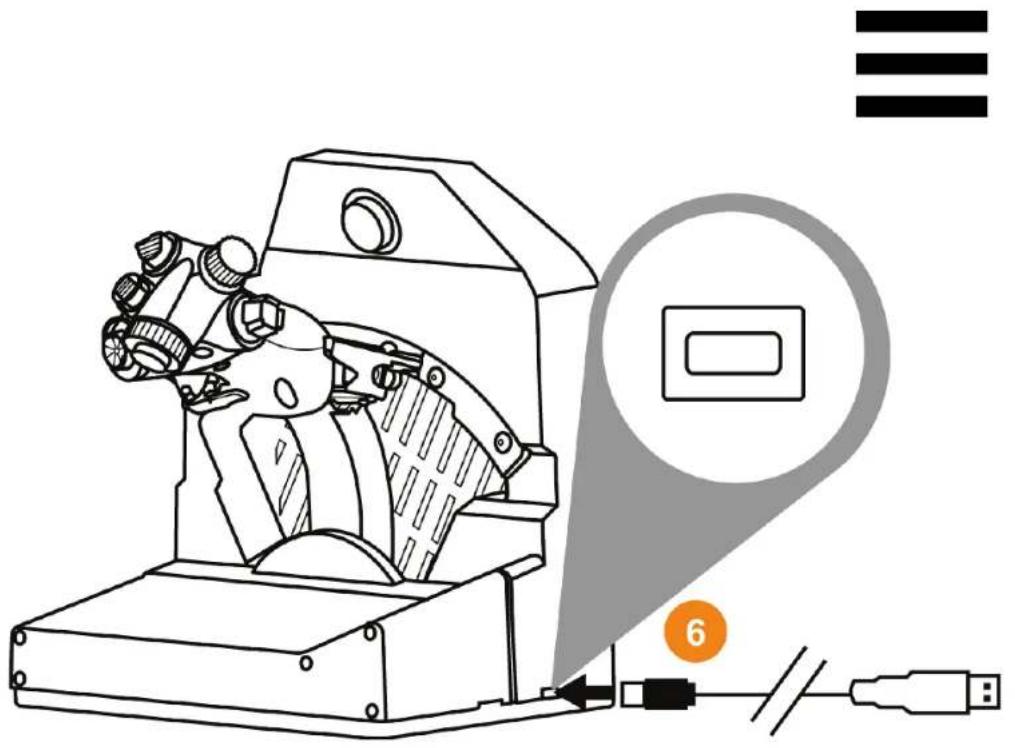
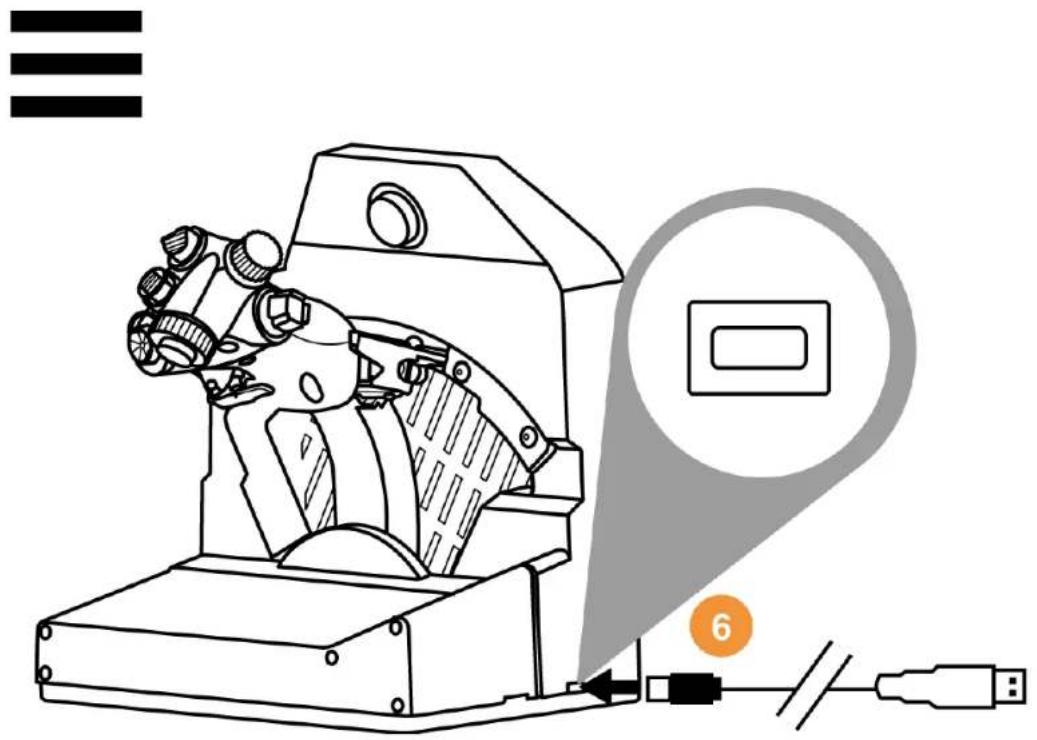
6. USB connector (type C)
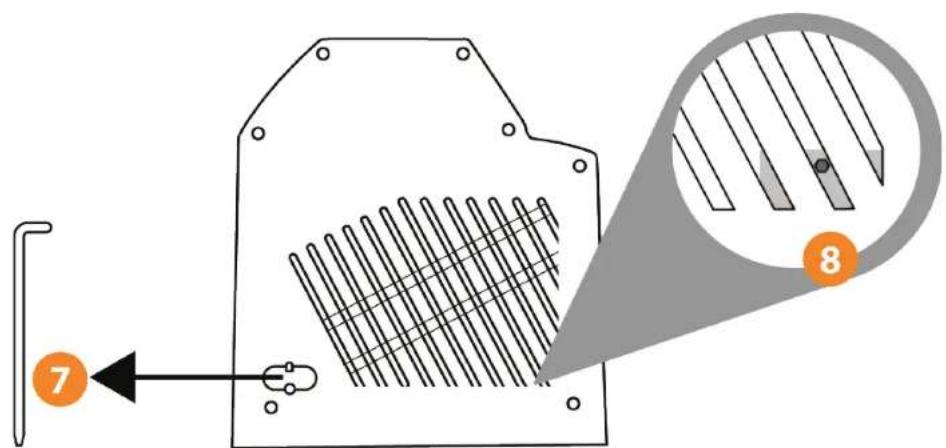
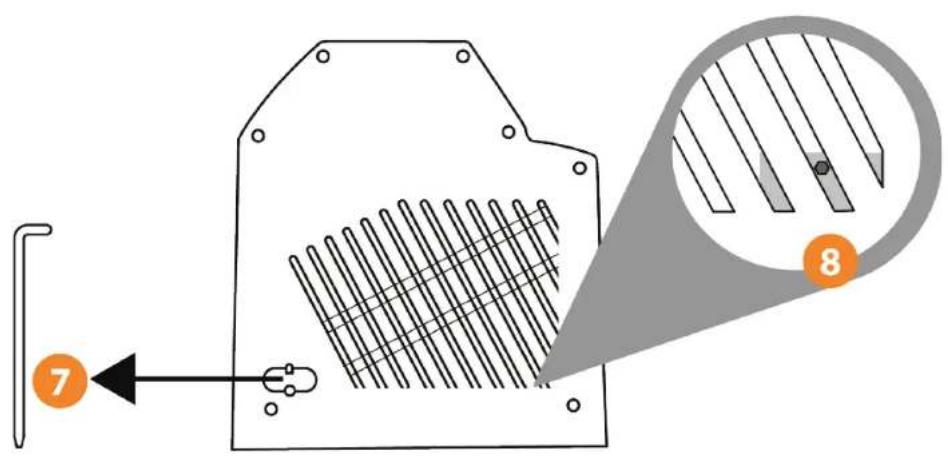
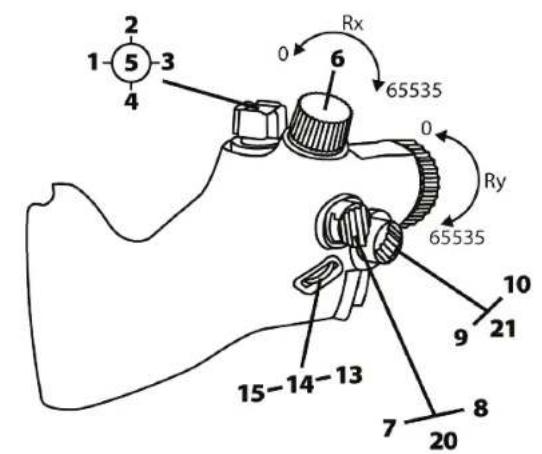
7. Friction adjustment tool location
- Throttle friction adjustment access point
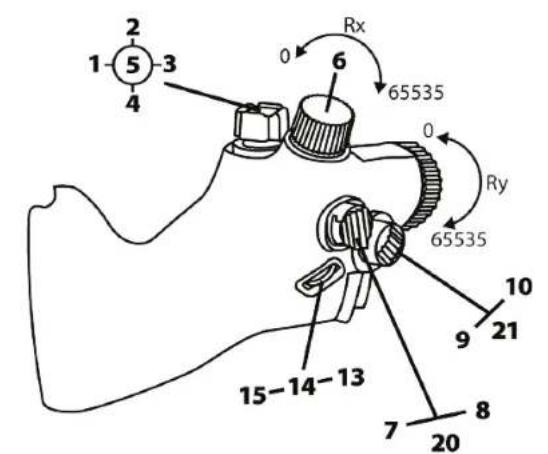
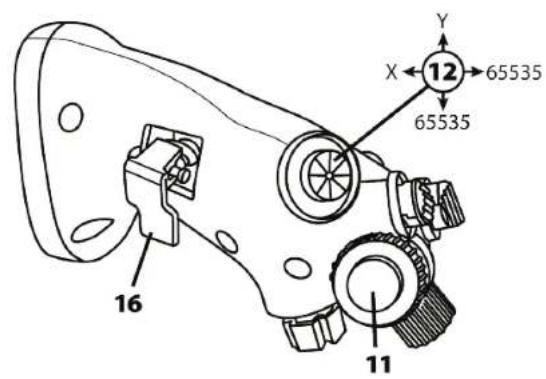
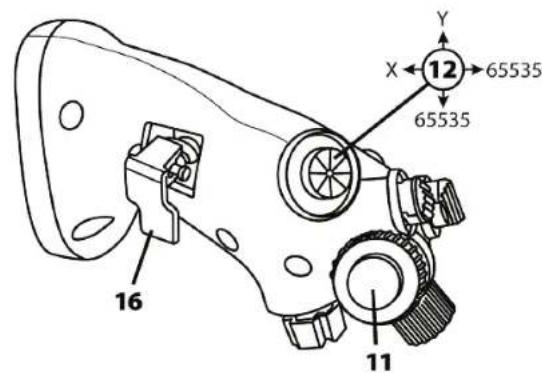
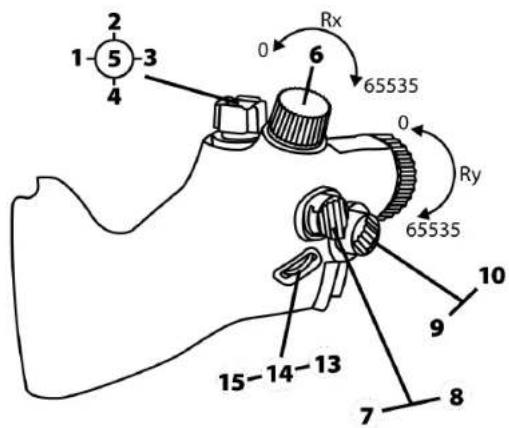
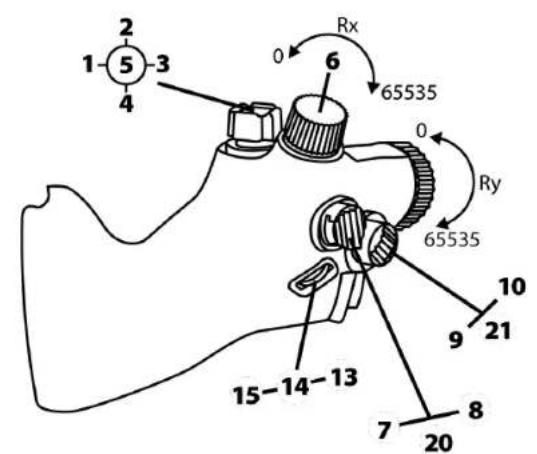
3. Mapping of buttons and axes
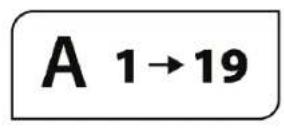
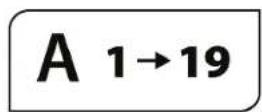
VIPER TQS handle: mapping of the 19 buttons and 5 axes in mode A (without virtual buttons)
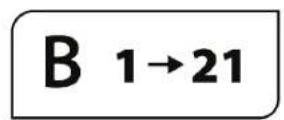
Mode B: with virtual buttons

4. Information about using VIPER TQS

Pinch hazard
Never place your fingers in the stop areas when you are using the handle.


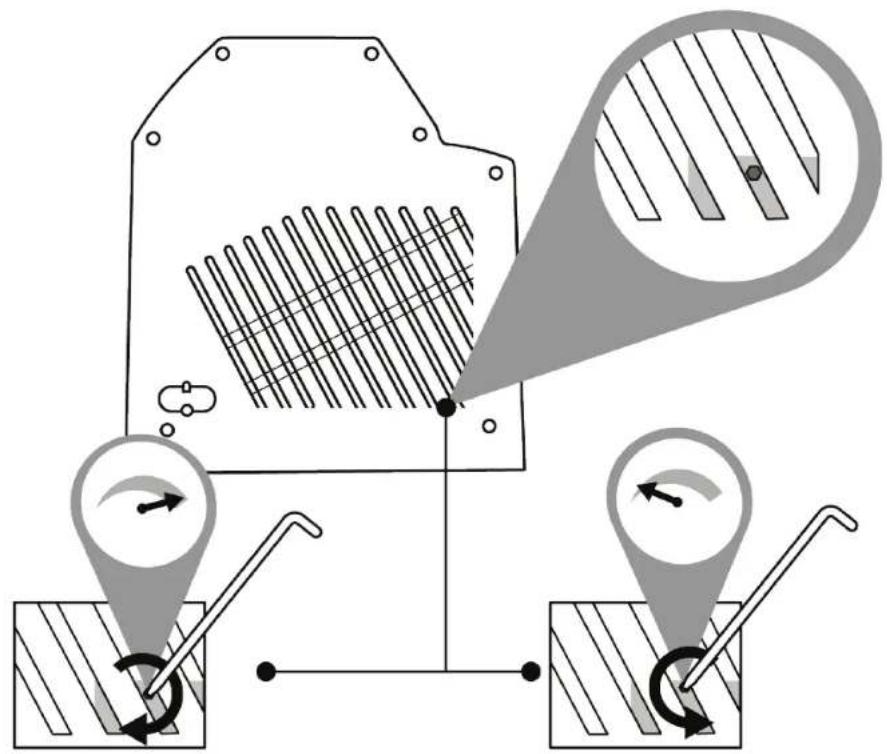
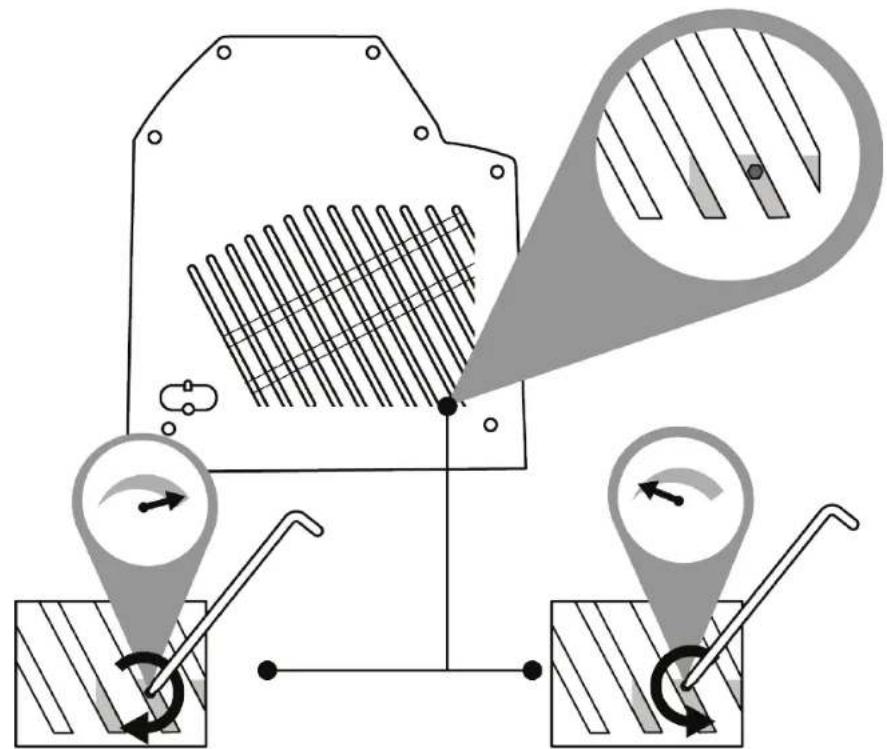
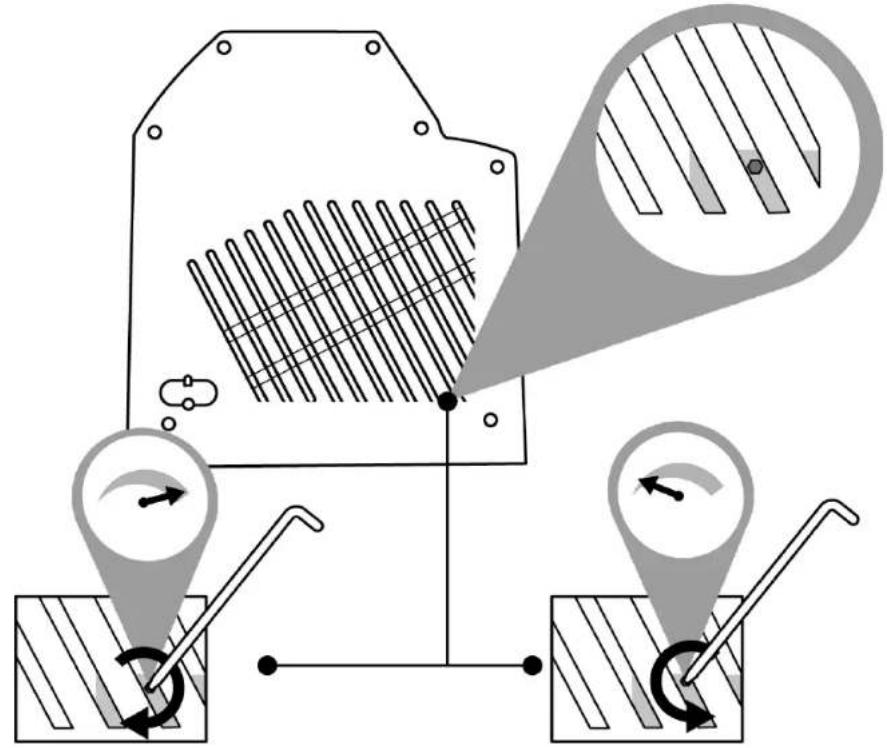
5. Adjusting the friction
You can adjust the friction of your VIPER TQS throttle quadrant to your own personal preference by using the tool included on the side of VIPER TQS. Please note, however, that optimal throttle friction has been set by default at the factory.
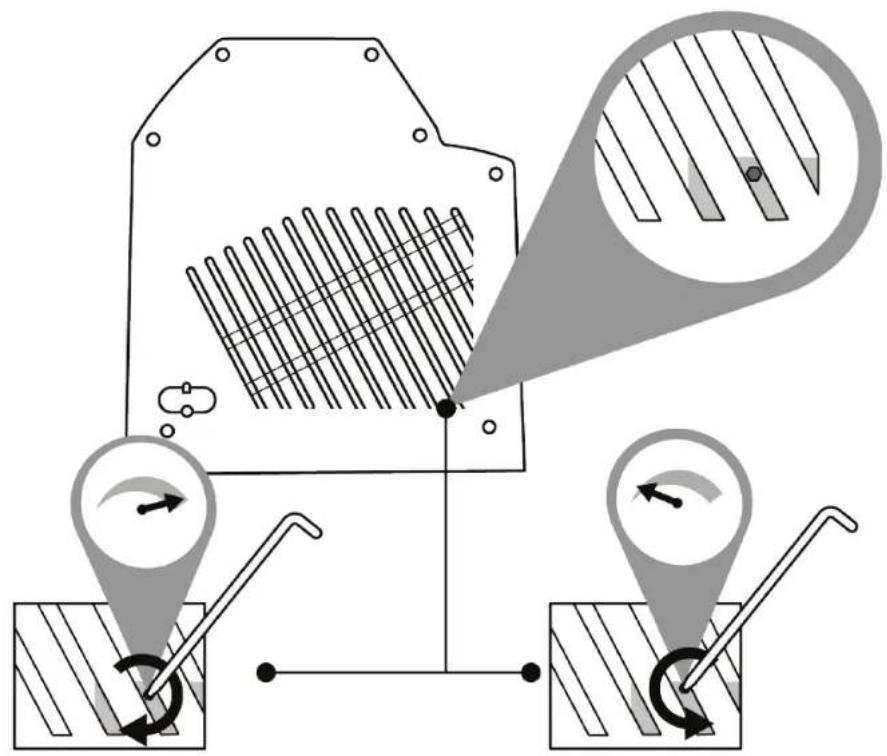

In order to avoid damaging the friction system, be sure not to overtighten the adjustment screw.
Also, be sure not to completely untighten the adjustment screw: by doing so, you run the risk that the throttle will no longer be able to stay in position.
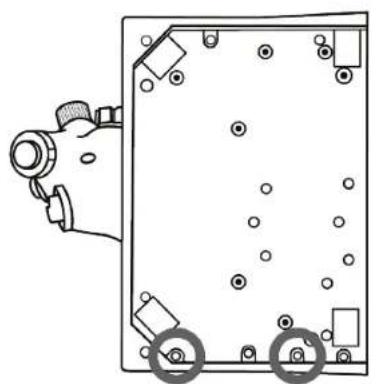
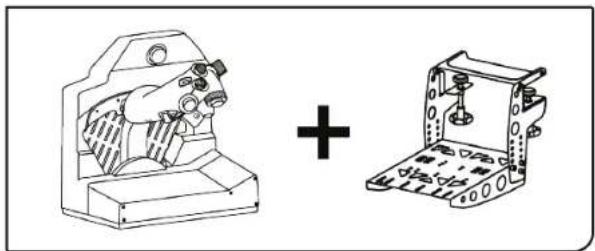
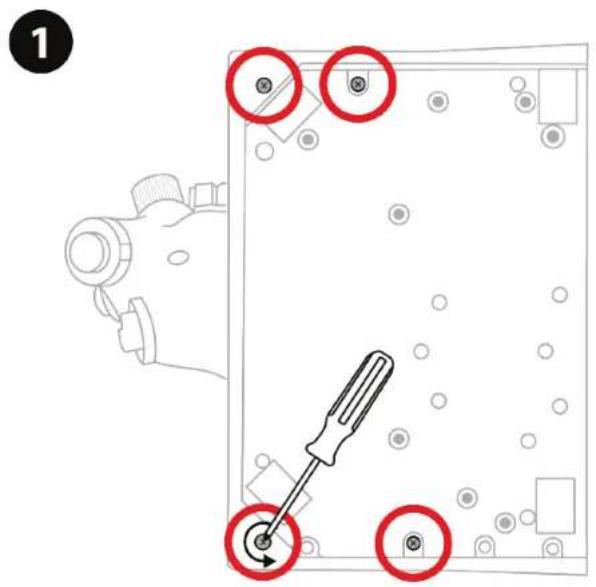
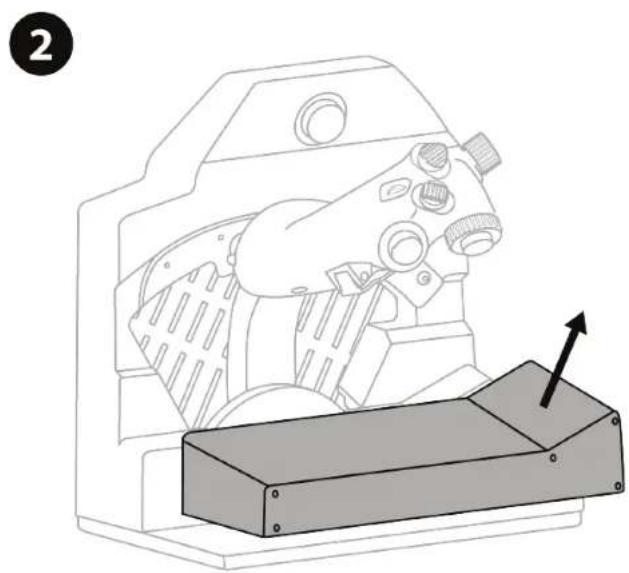
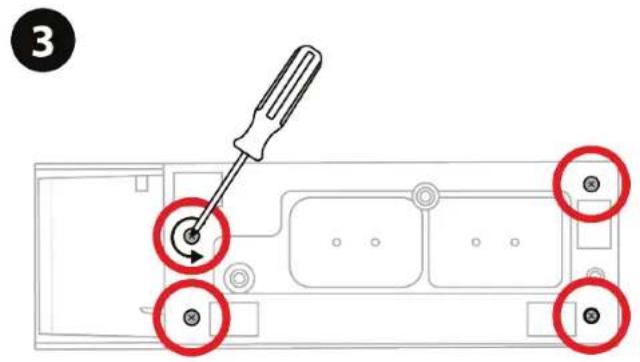
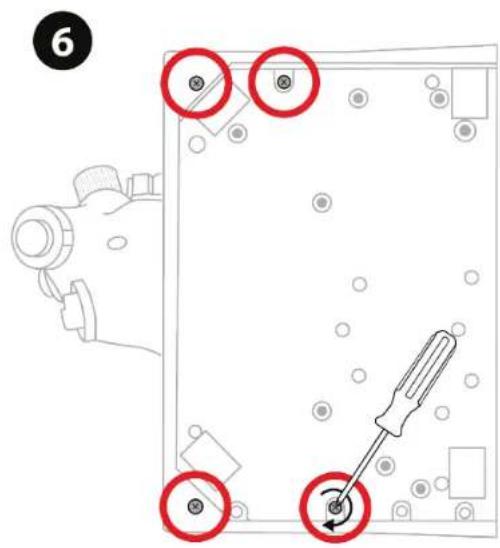
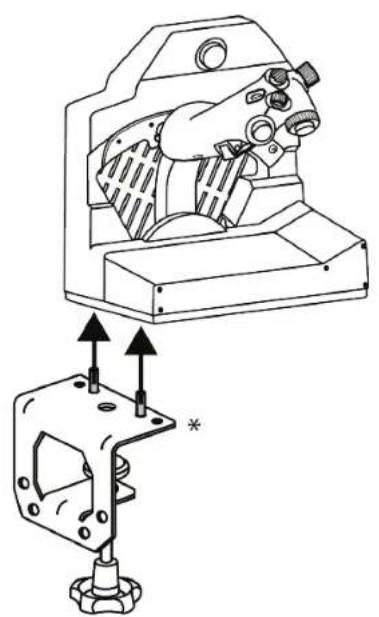
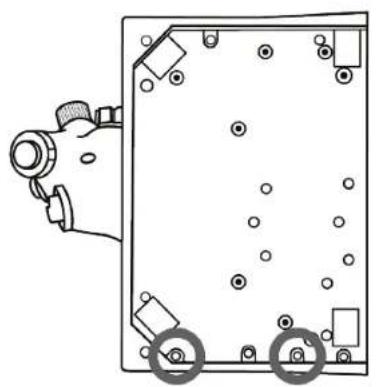
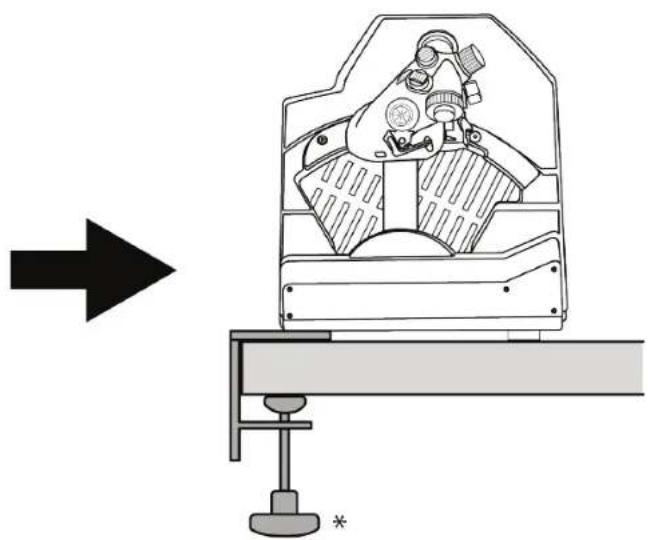
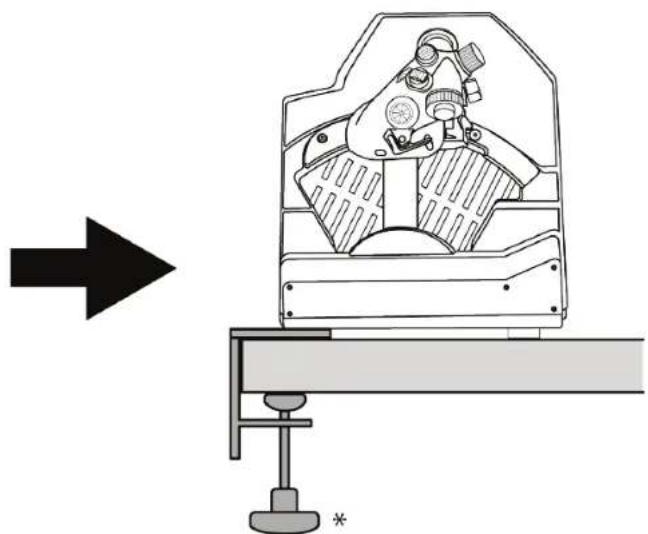
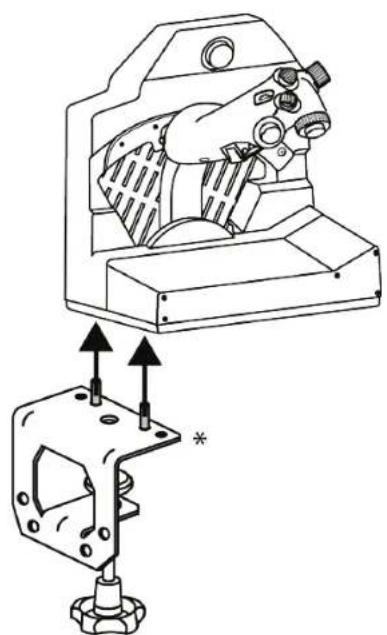
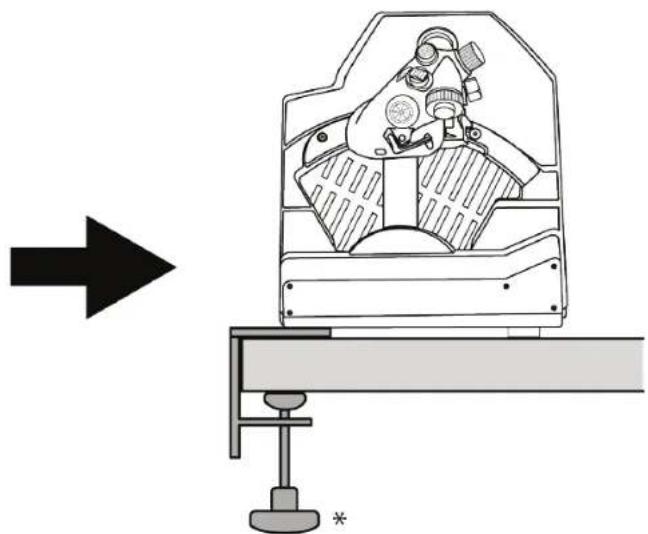
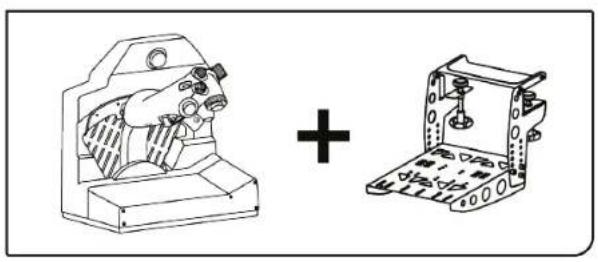
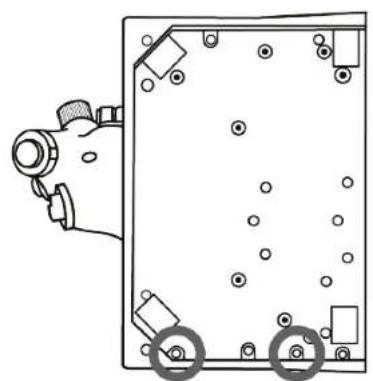
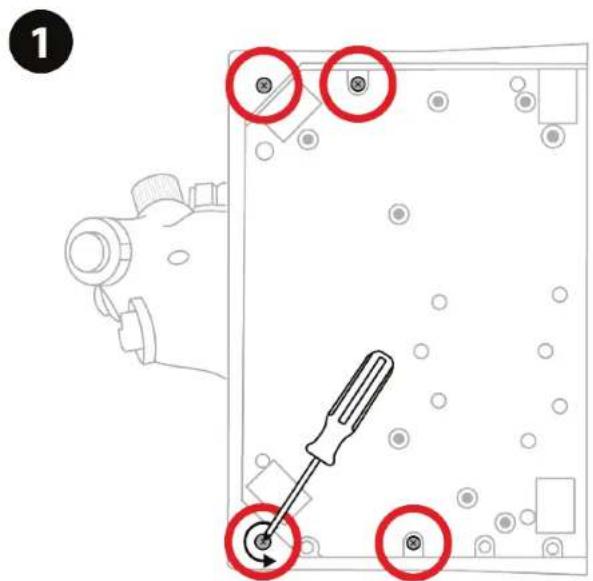
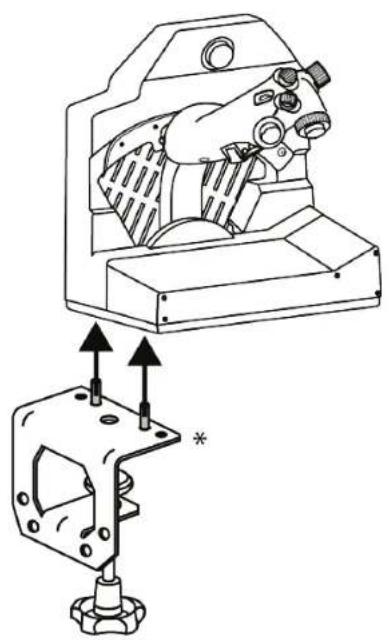
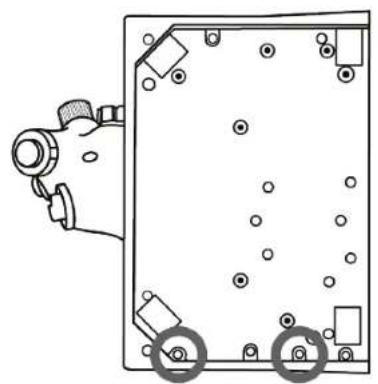
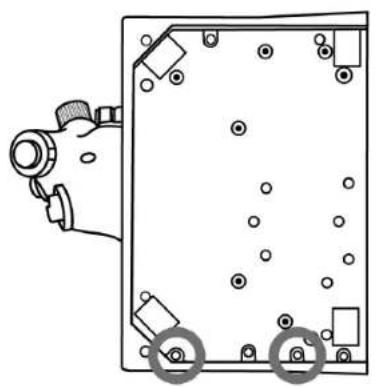
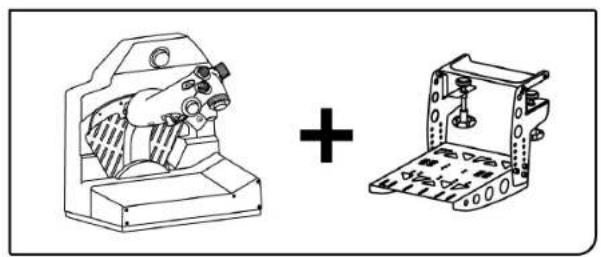
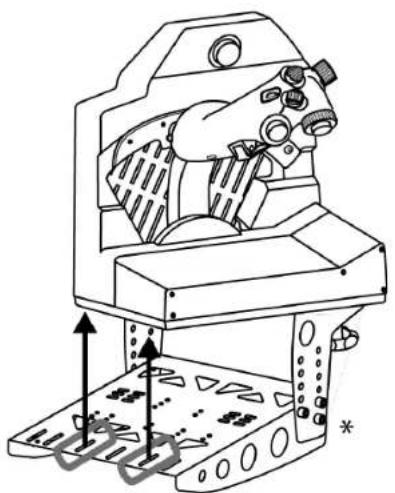
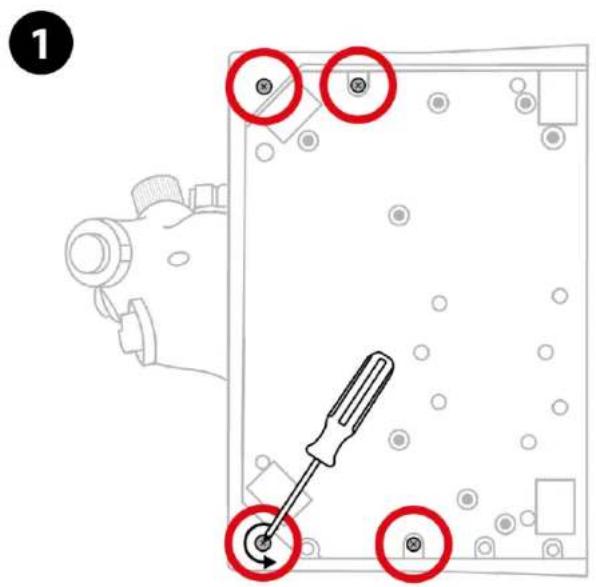
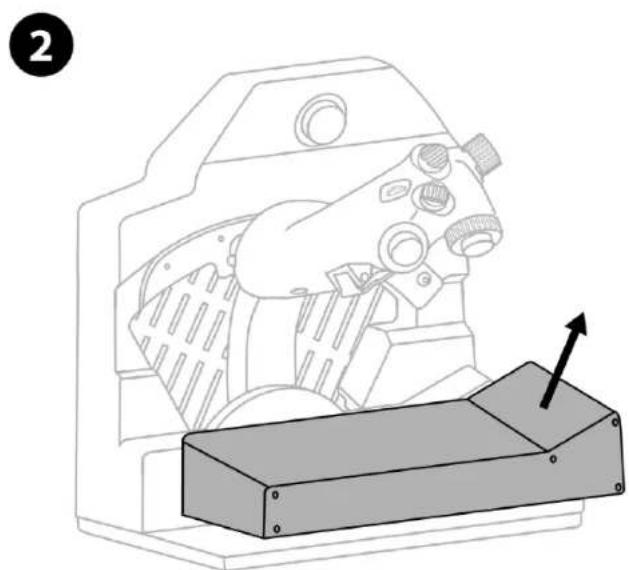
6. Installation on a support

VIPER TQS can be installed on different types of supports. Most cockpits and supports available on the market are already compatible with similar Thrustmaster products (i.e. HOTAS Warthog).
Please keep in mind that VIPER TQS features a powerful lever effect, and must therefore be firmly attached.
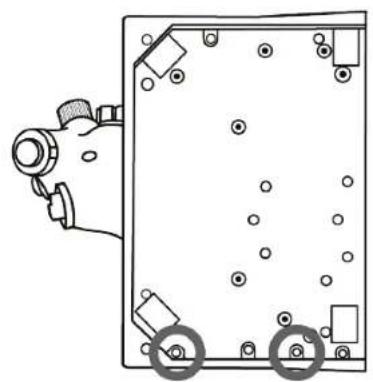
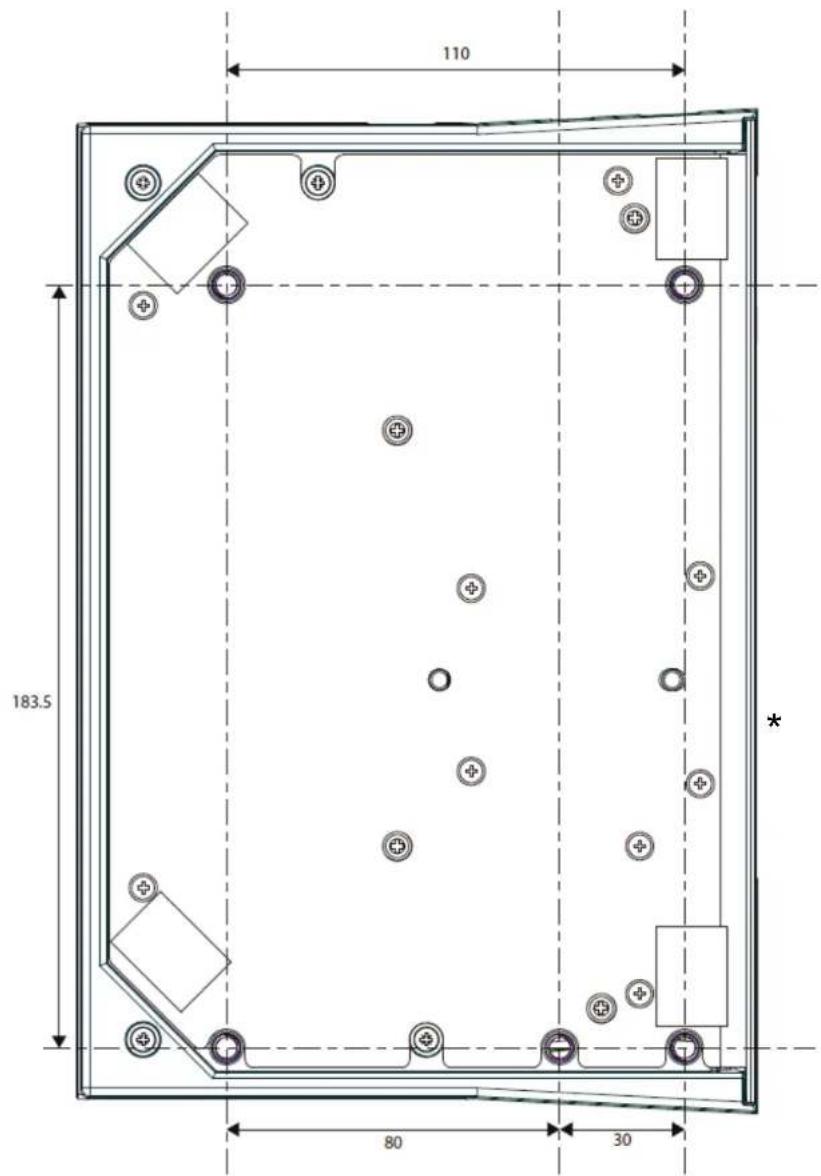
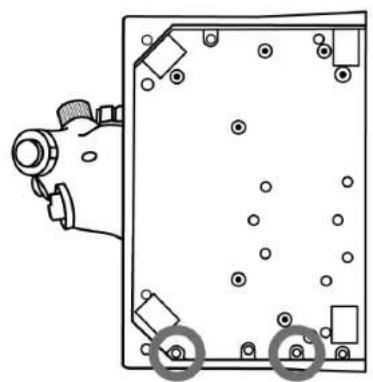
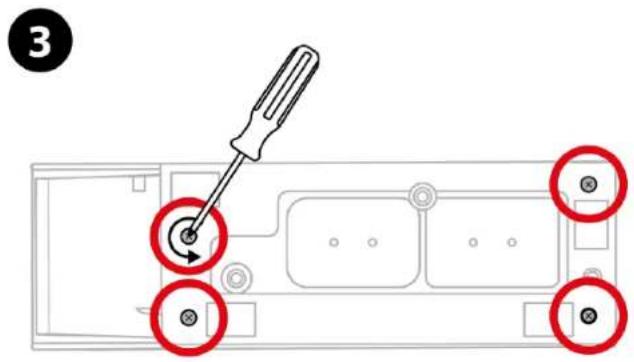
Attach the base to your support using suitable M6 screws (not included), so as not to damage the handle. A complete VIPER TQS blueprint is available at https://support.thrustmaster.com/product/vipertqs/

Before each use, make sure that VIPER TQS is still properly attached to the support, according to the instructions specified by the manufacturer.
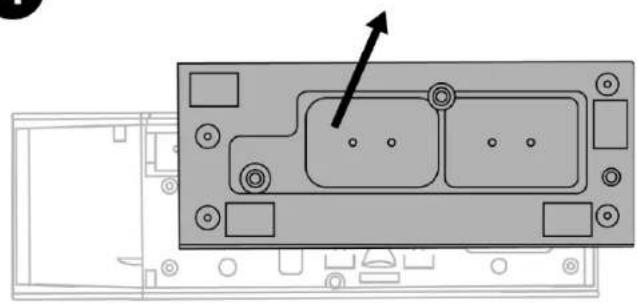
Be sure to take into account the material that your support is made of, and ensure that it is possible to safely attach the product to it. VIPER TQS must be used on a desk made of a solid material (i.e. MDF or wood), without any hollow or glass components.

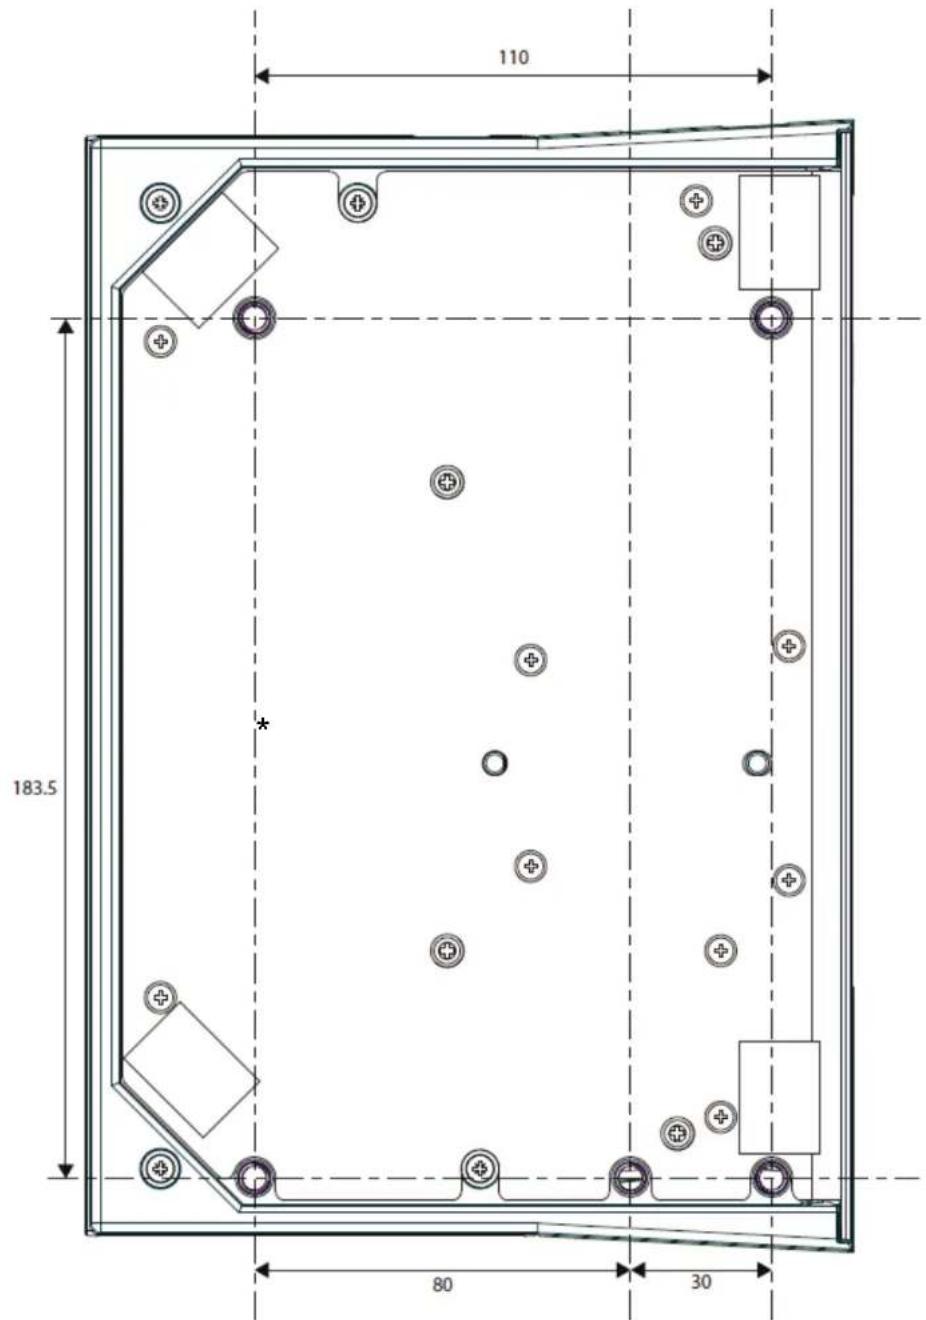
Mounting blueprint dimensions (in mm)
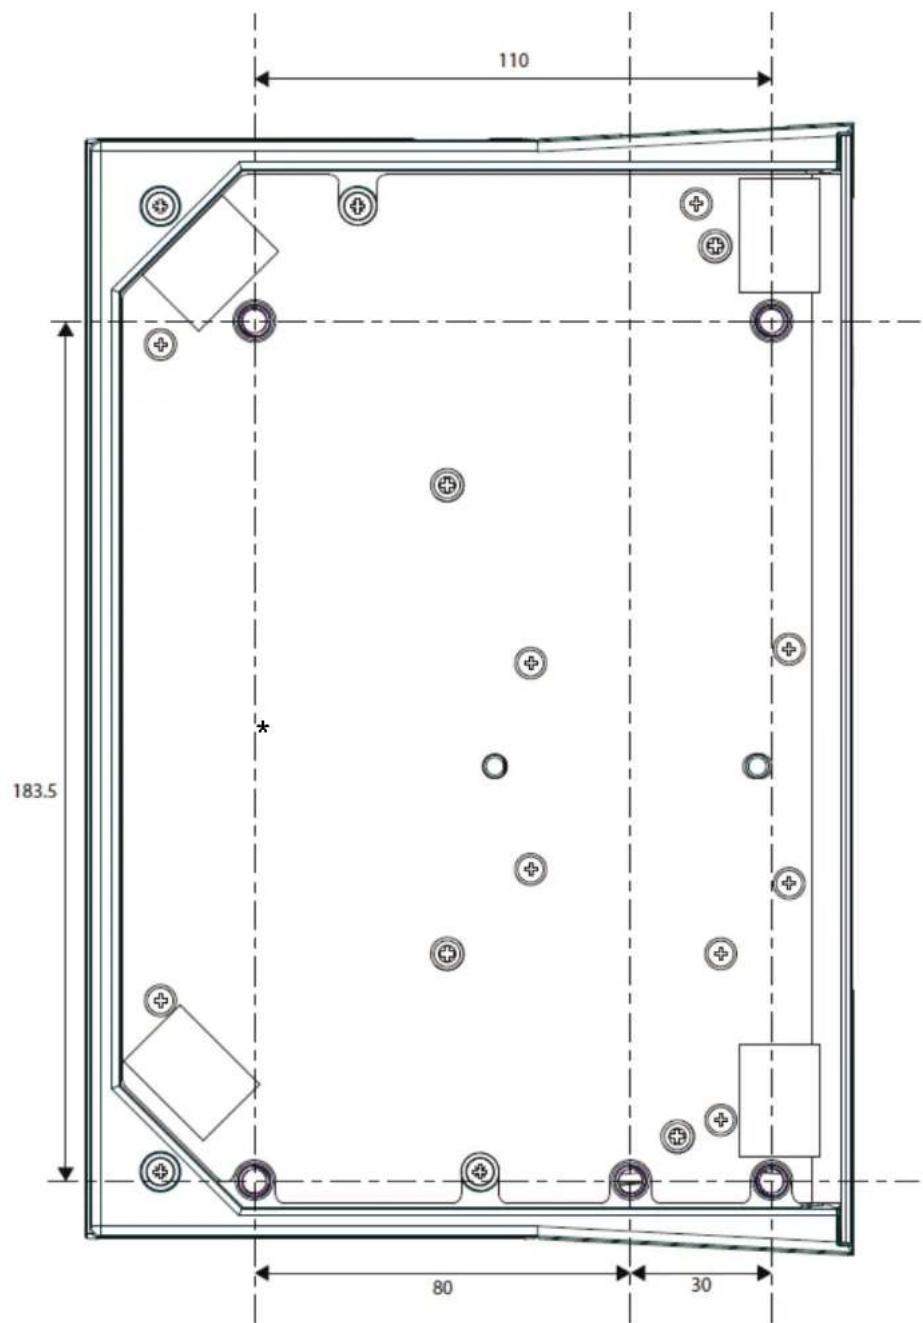
You can download the mounting blueprint from https://support.thrustmaster.com/product/vipertqs/, then print it out and use it on your support in order to prepare the drill holes.
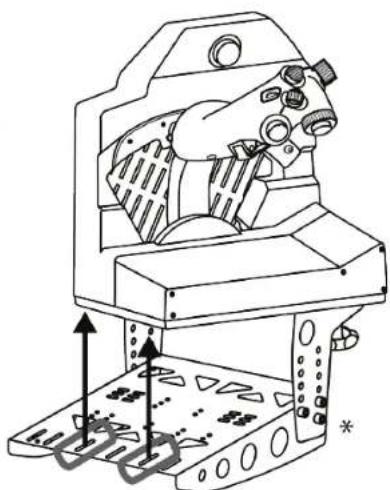
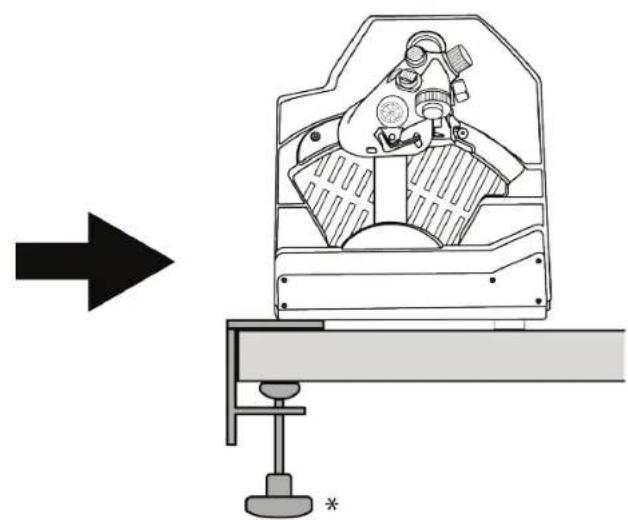
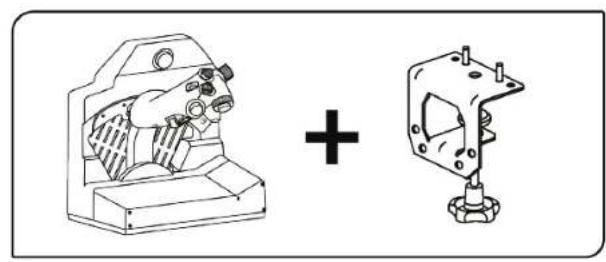
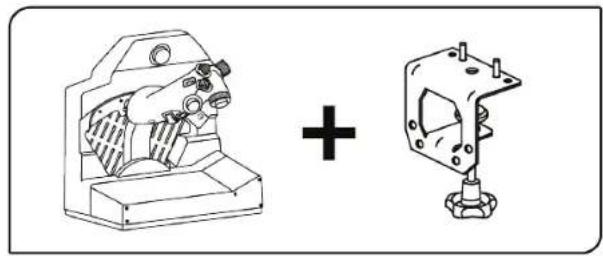
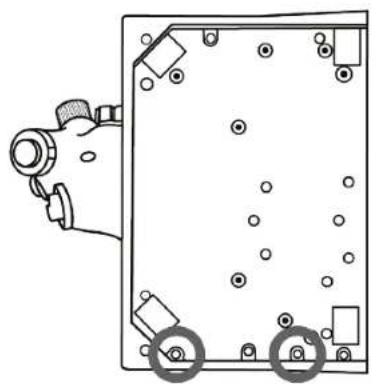
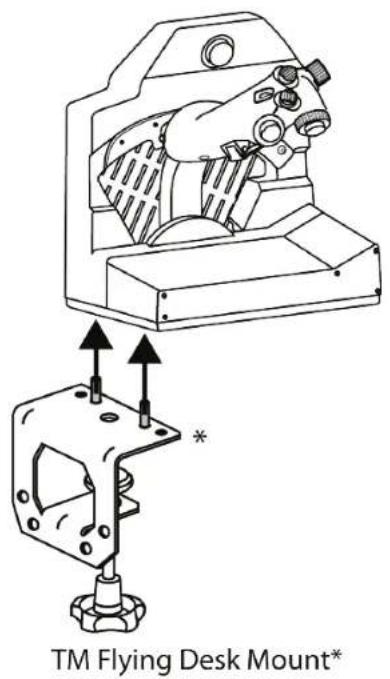
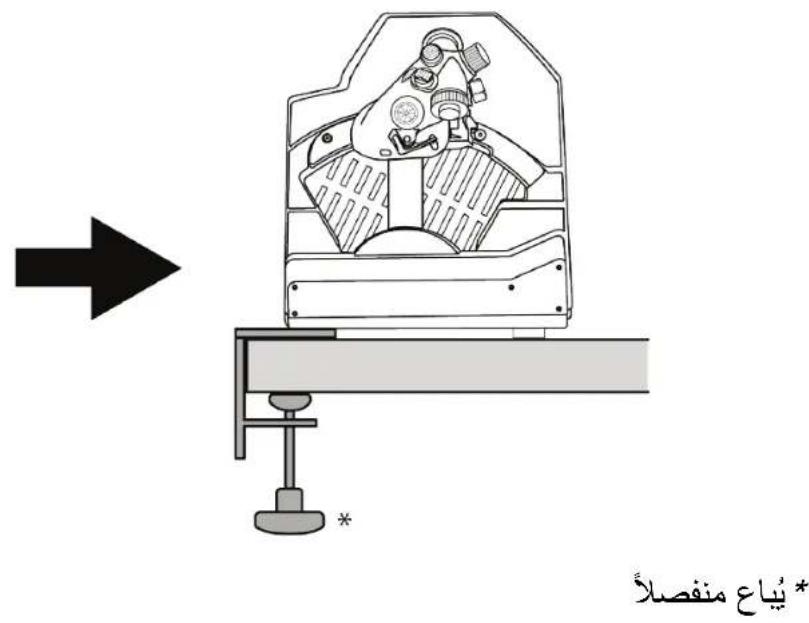
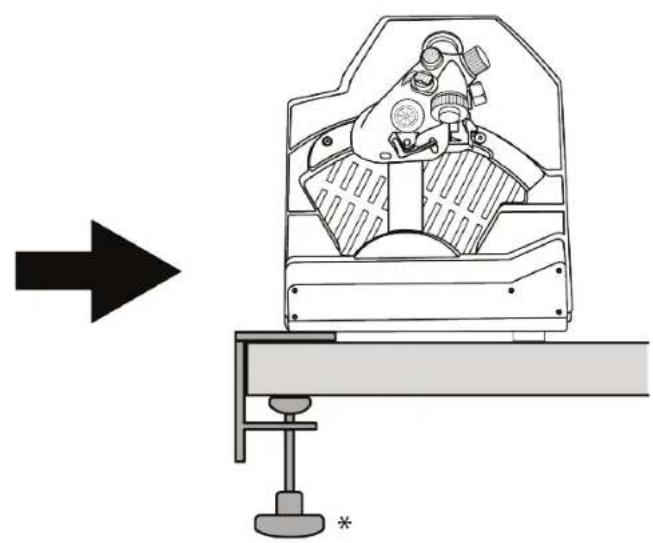
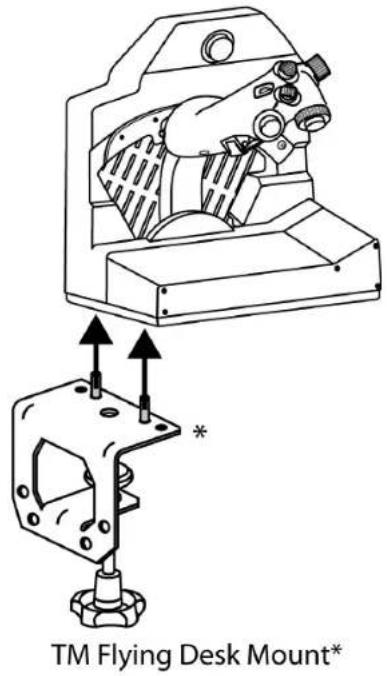
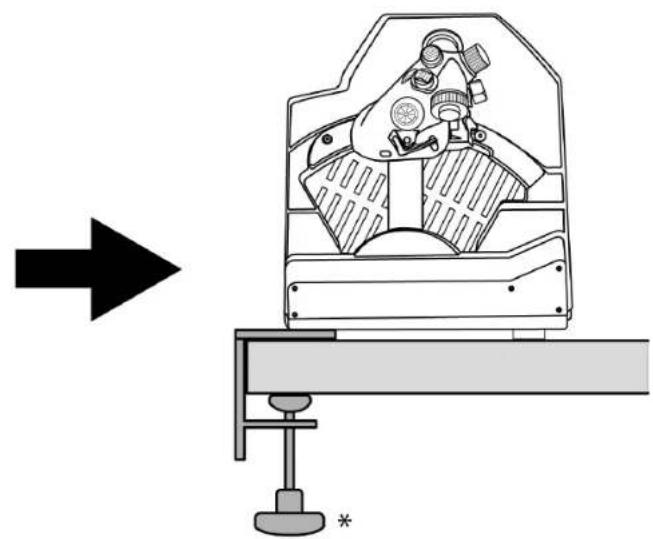
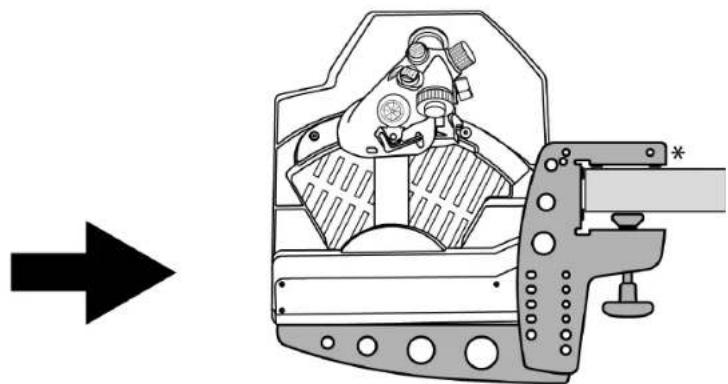
Installation using TM Flying Desk
Mount*
TM Flying Desk Mount is a metal mounting system featuring a clamping screw, improving the ergonomics and piloting position when using your device. This system is designed for use with desks and tables from 0.6-2.0 inches / 15-50 mm thick.
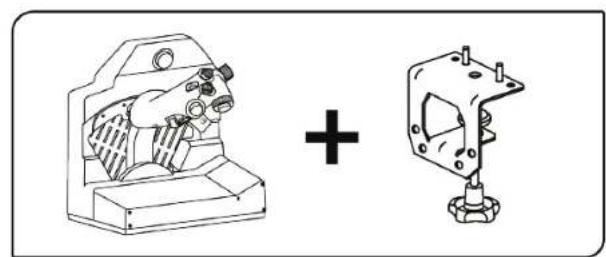
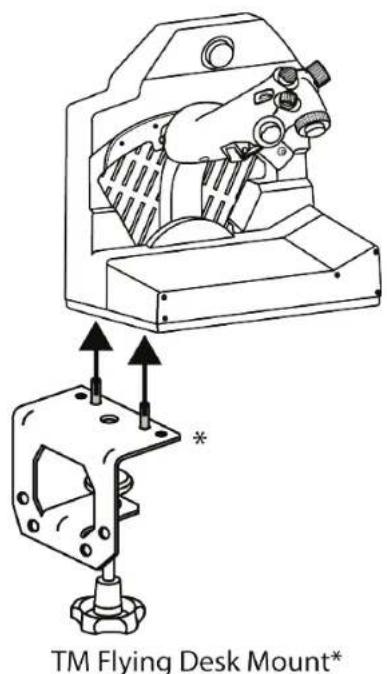
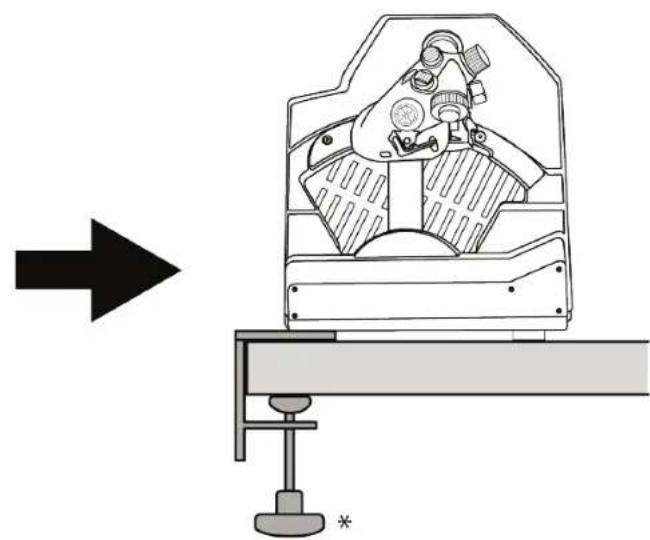
*Sold separately
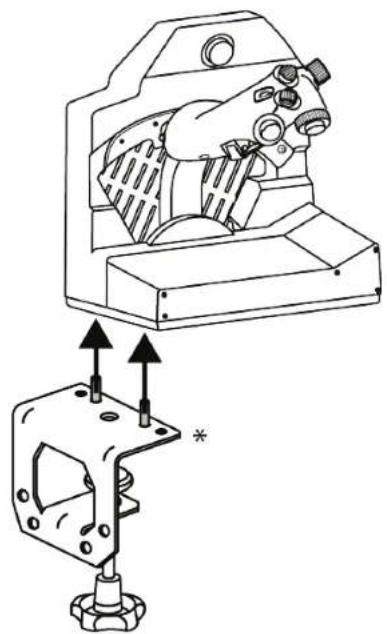
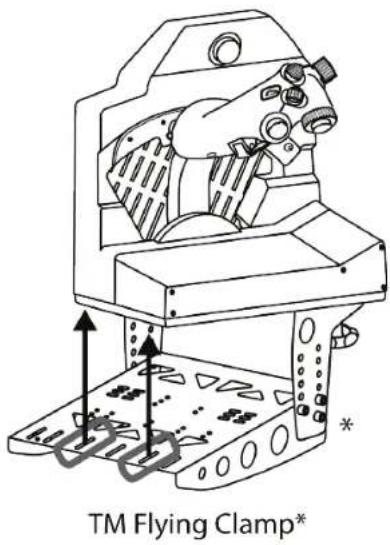
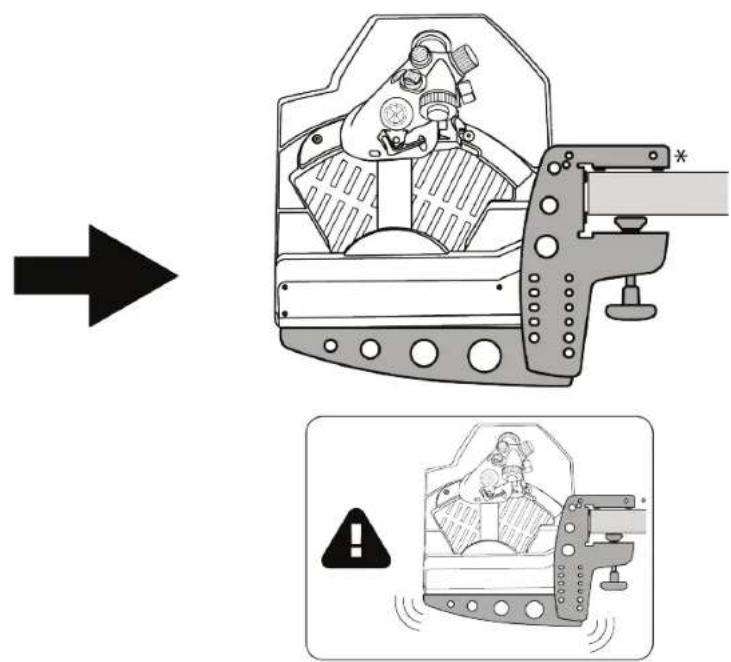
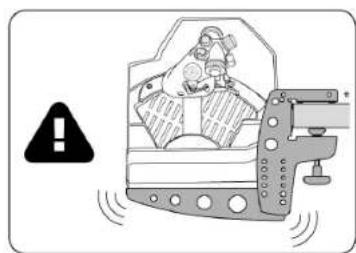
Installation using TM Flying Clamp*
TM Flying Clamp is a height-adjustable support designed by Thrustmaster for its flight simulation accessories. This mounting system features two clamping screws allowing it to be adjusted for use with desks and tables from 0.6-1.8 inches / 15-45 mm thick.
TM Flying Clamp*
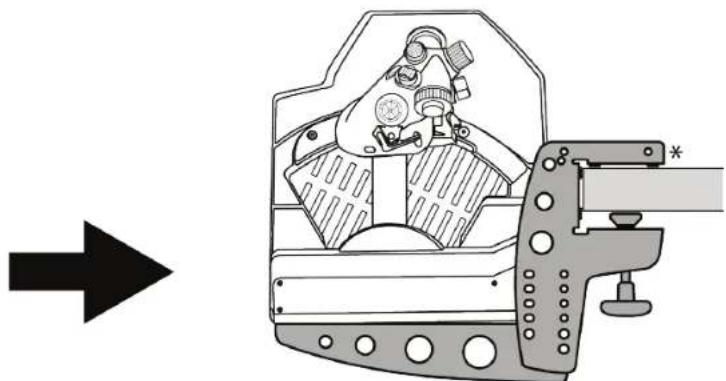

*Sold separately

Please note that the heavy weight of VIPER TQS may result in unwanted movements of the mounting system.
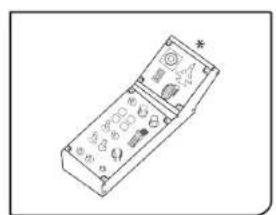
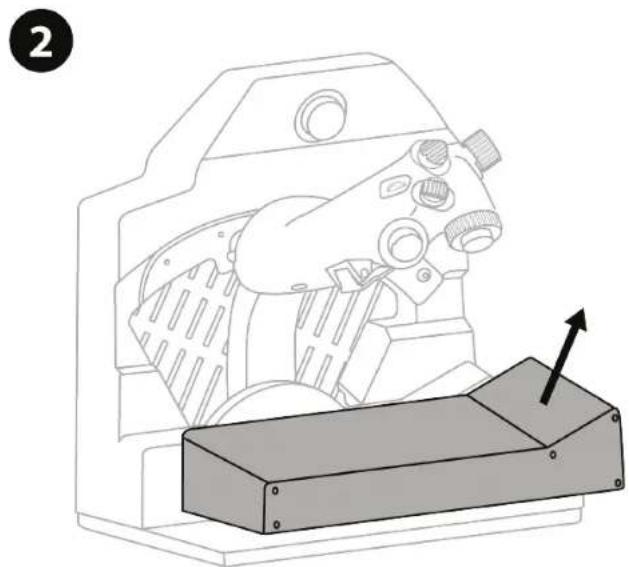
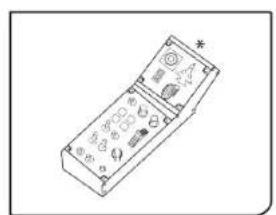
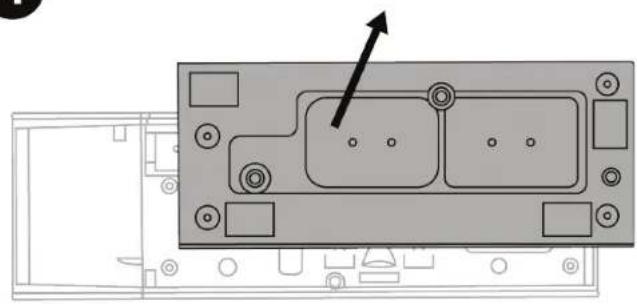
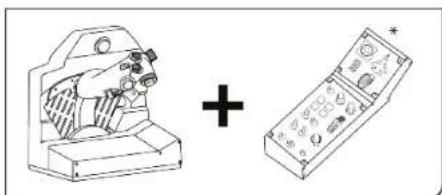
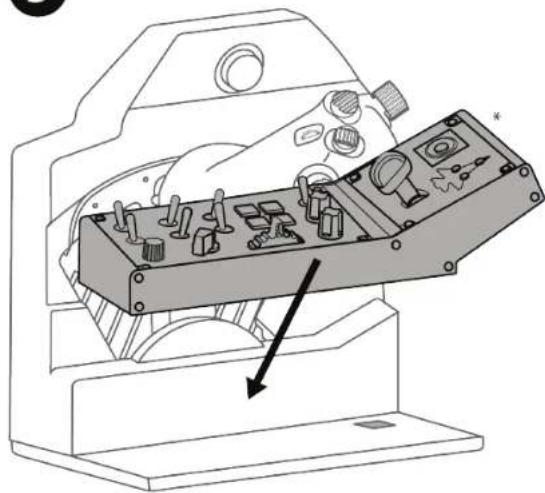
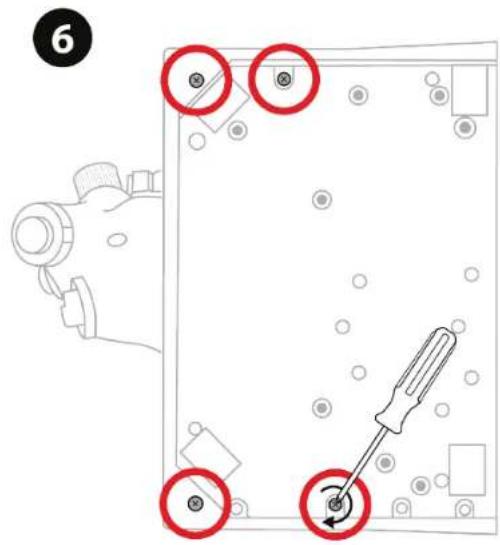
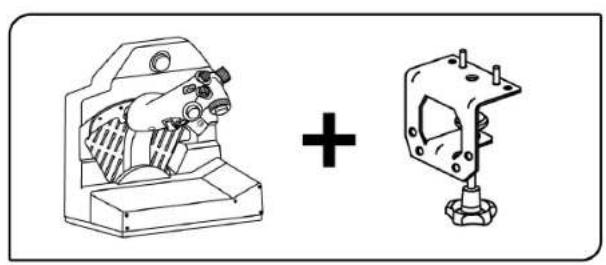
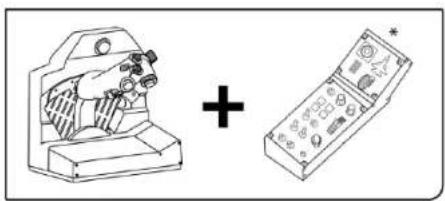
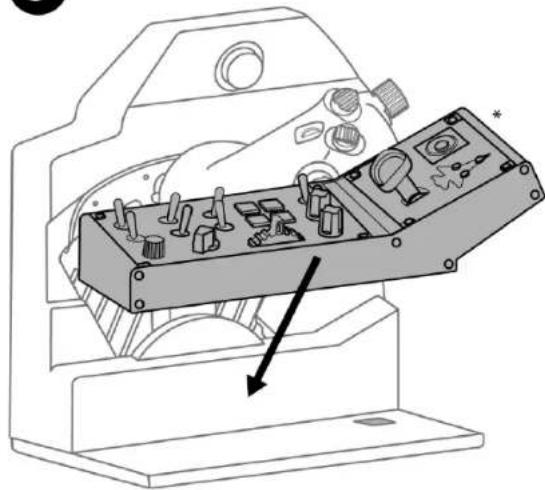
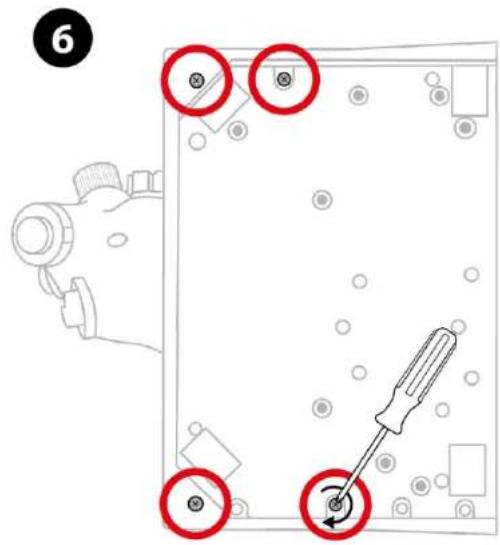
7. Installing VIPER PANEL*
*Sold separately. VIPER PANEL is included with VIPER TQS Mission Pack.
VIPER PANEL is a control panel that lets you expand your flight/combat capabilities with a total of 43 buttons and 1 axis — all of which are programmable via the T.A.R.G.E.T software. VIPER PANEL is a complement to VIPER TQS.

4


5
*Not included
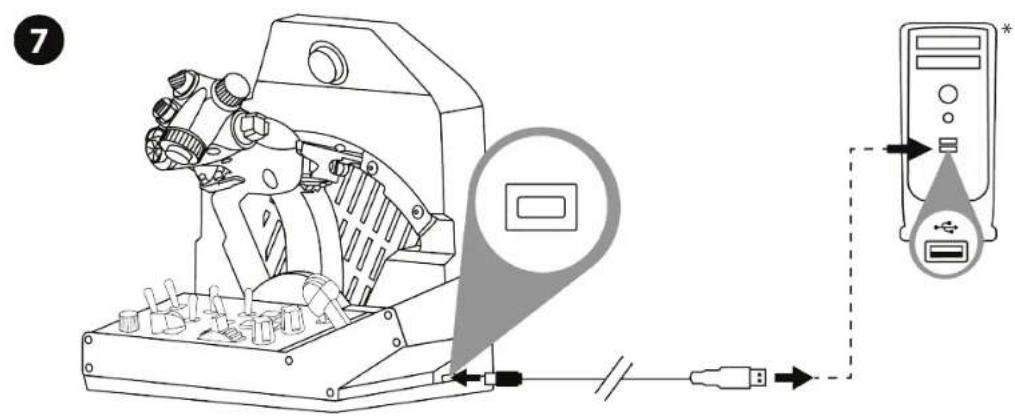
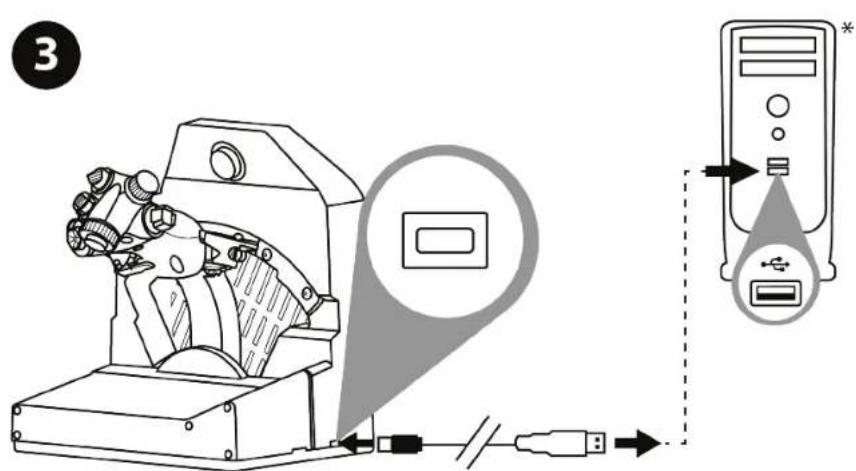
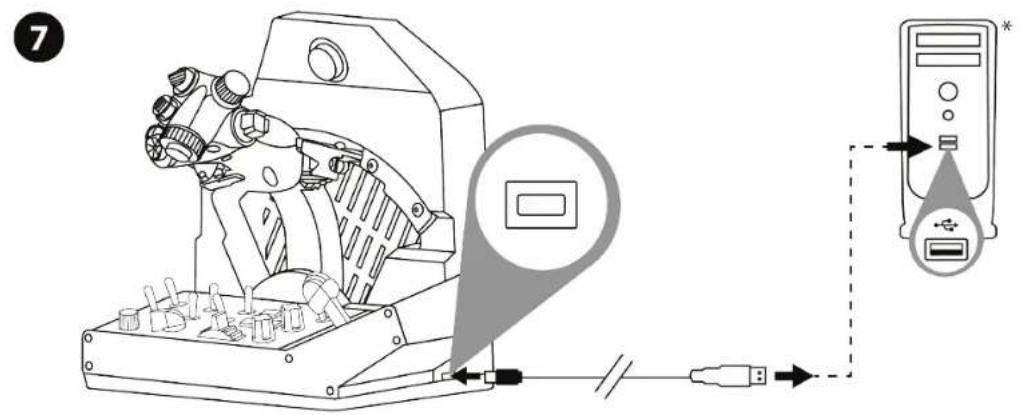
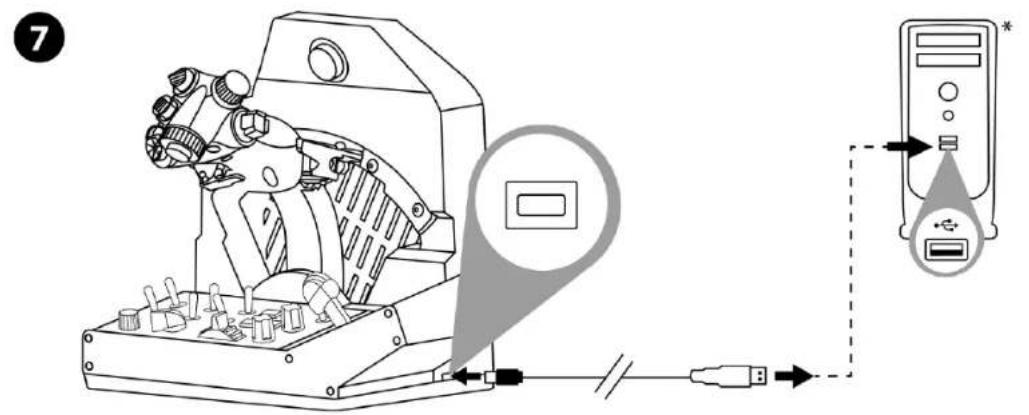
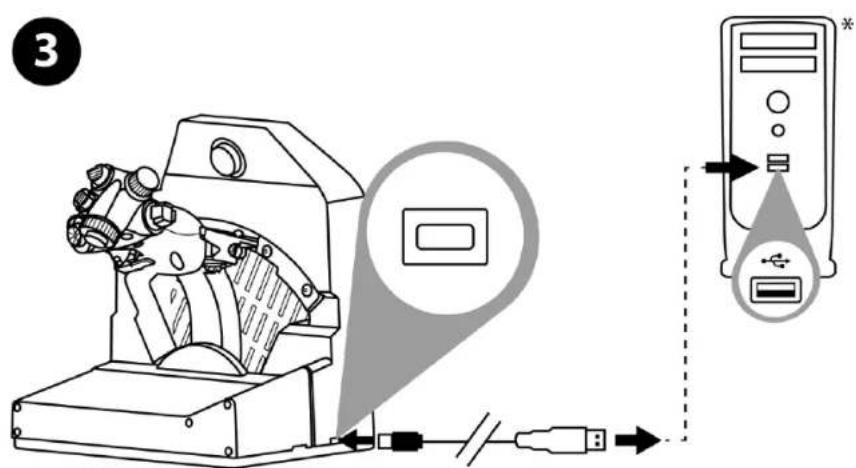
8. Installation on PC
Please visit https://support.thrustmaster.com/product/viper-tqs/.

Download and install the PC driver and its customized interface for the Windows Control Panel.

Once the PC driver has been installed, connect the USB connector to one of your PC's USB ports.
*Not included
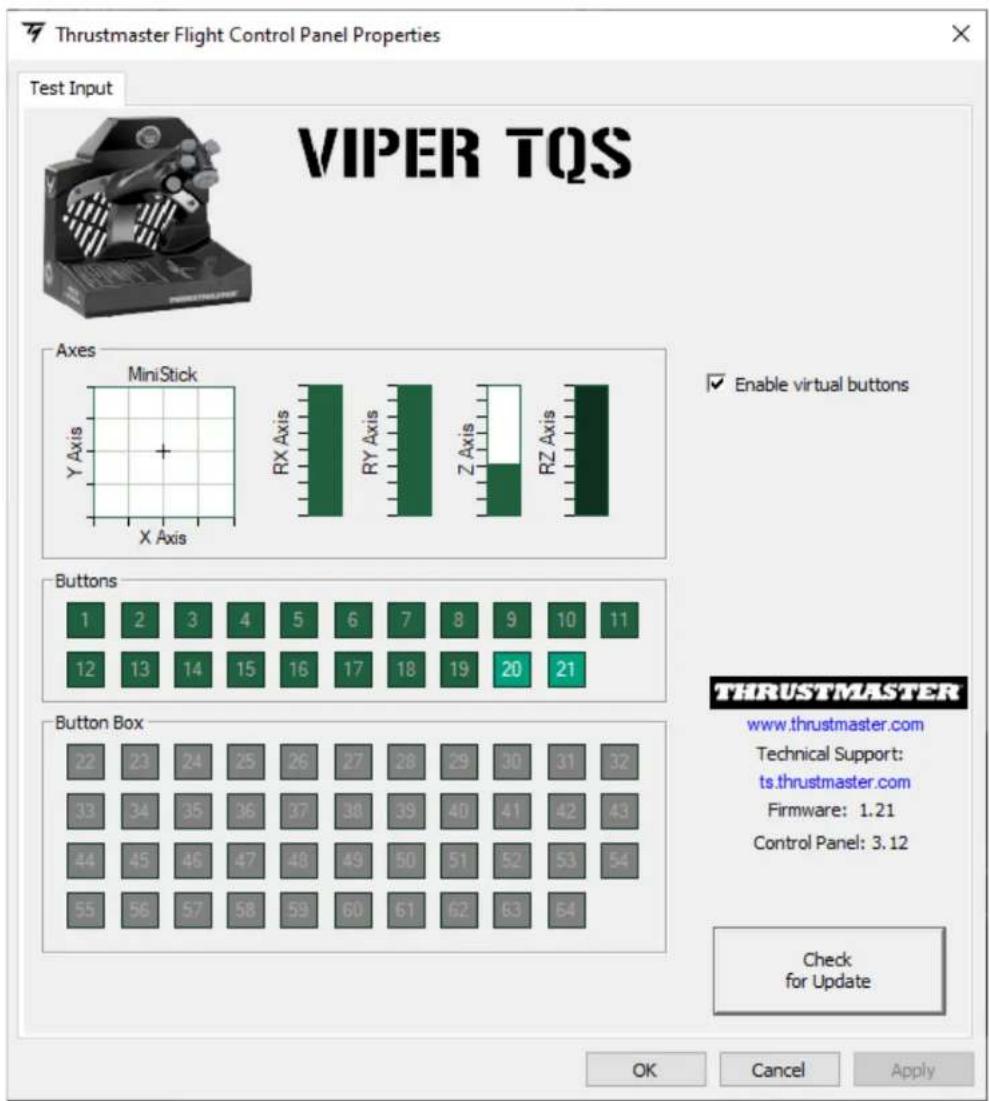
To access the Control Panel, select Start / All apps / Thrustmaster / Control Panel or Control Panel (in Windows 10).
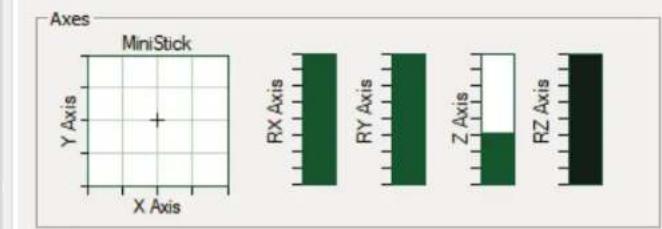
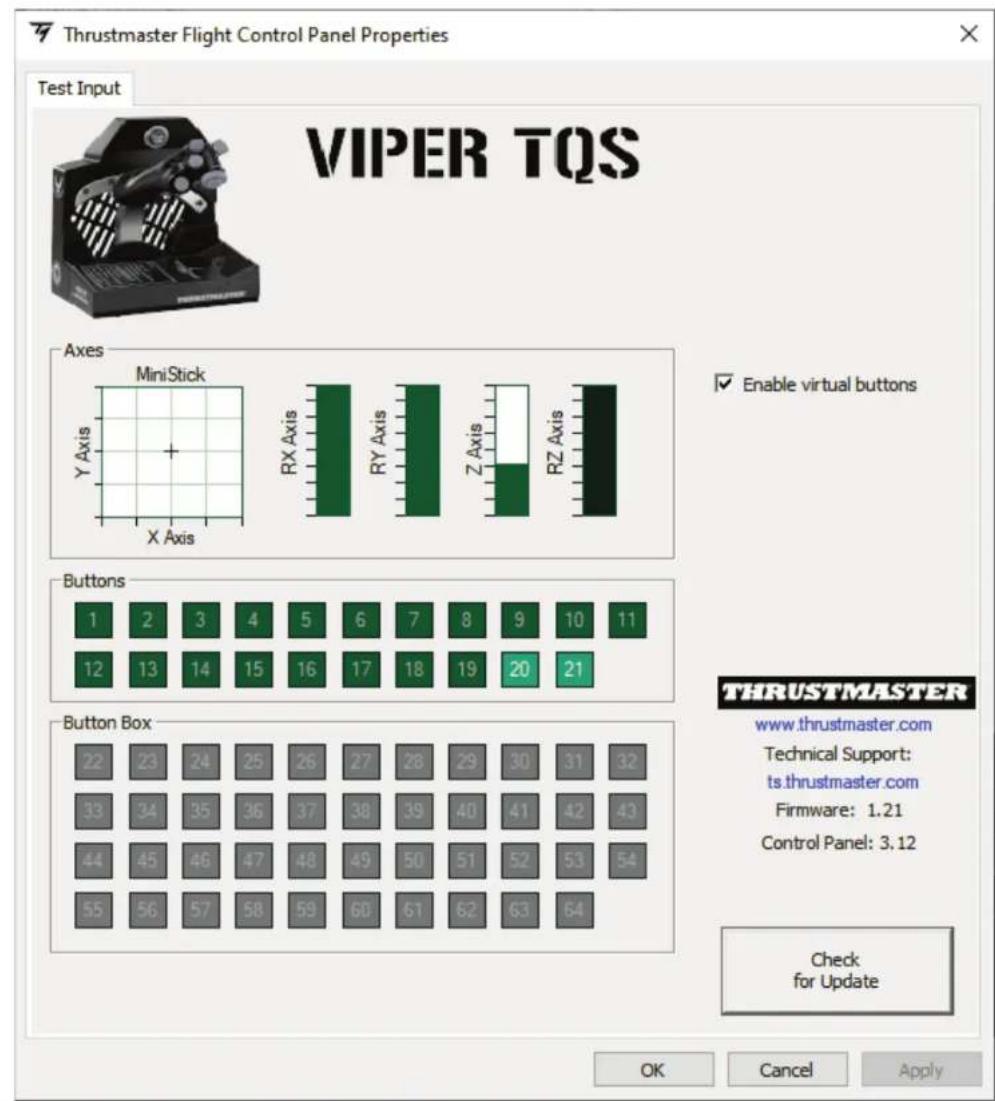
The Game Controllers dialog box is displayed. The accessory appears onscreen with the name VIPER TQS and OK status.
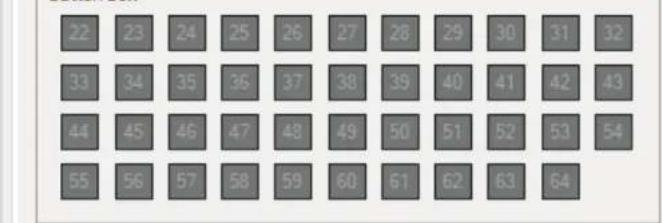
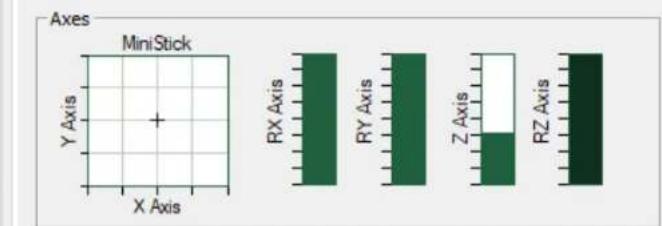
In the Game Controllers dialog box, click Properties to test and view all functions.
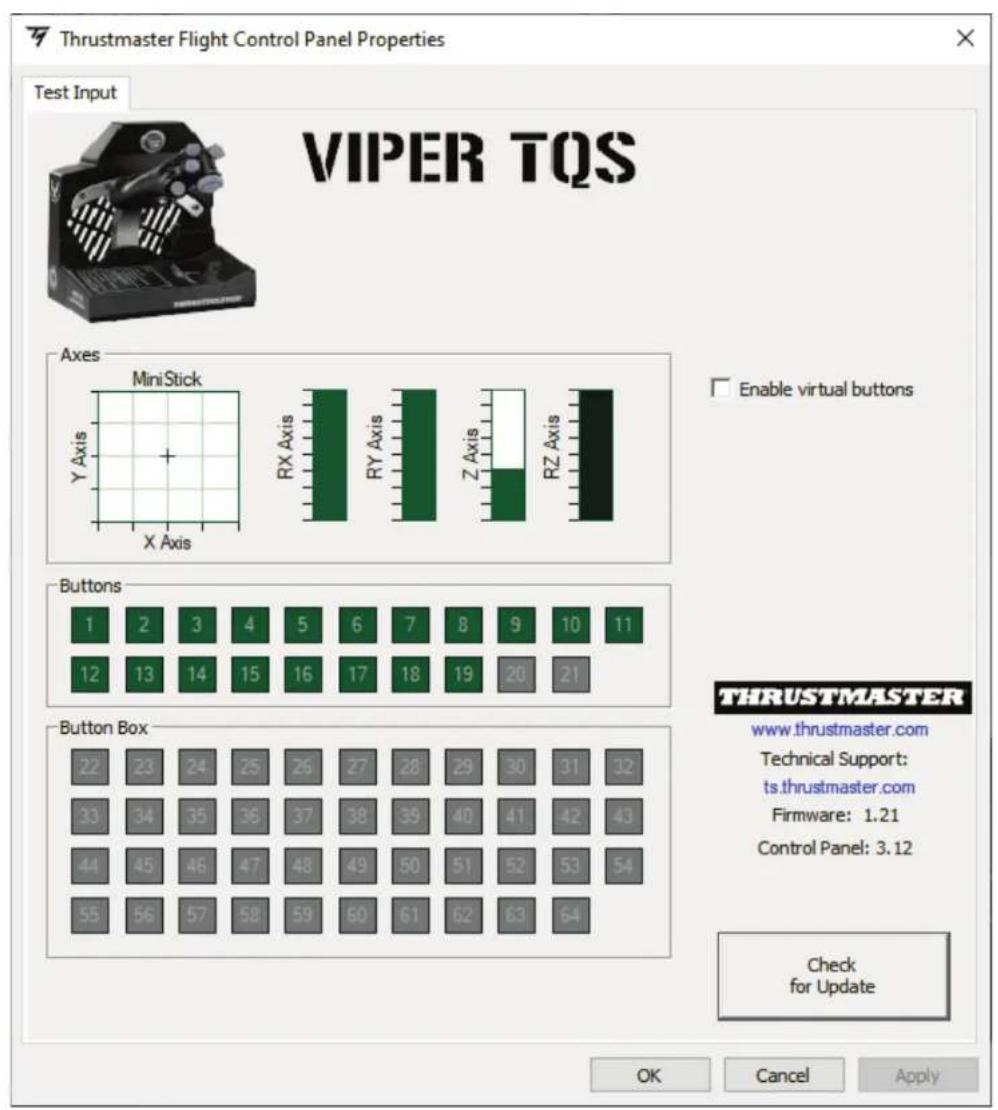
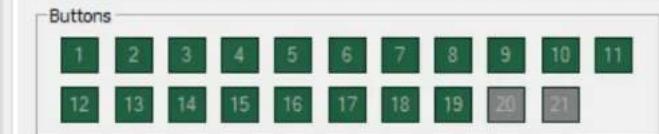
Enable virtual buttons (Enable virtual buttons):
This function lets you enable or disable the virtual buttons on the handle (buttons 20 and 21). Click Apply (Apply) once you have selected the mode that you want to use.
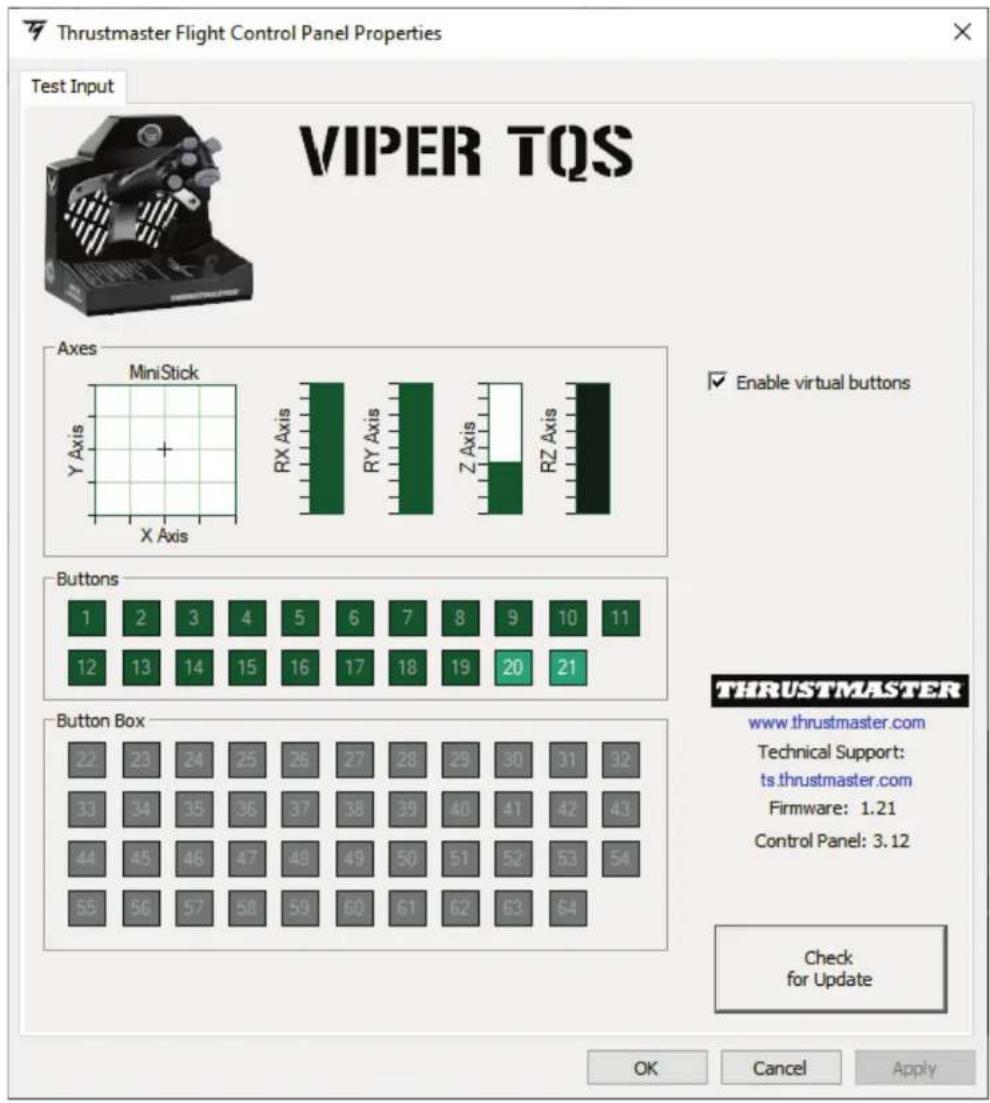

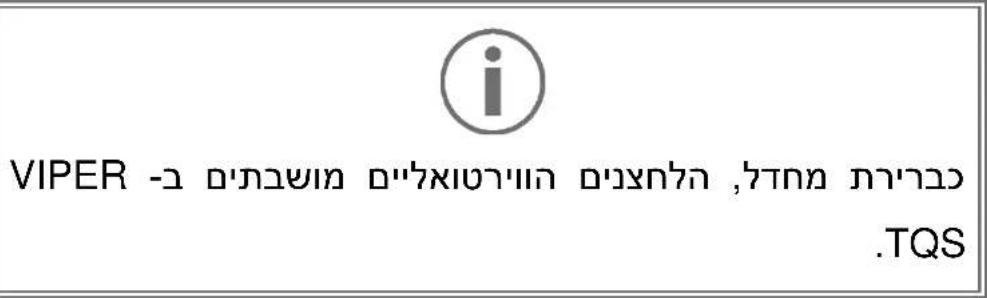
The virtual buttons are disabled by default on VIPER TQS.
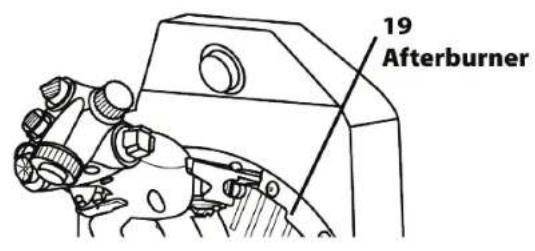
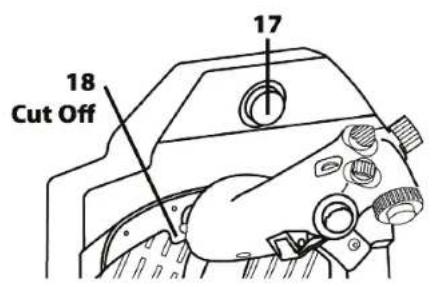
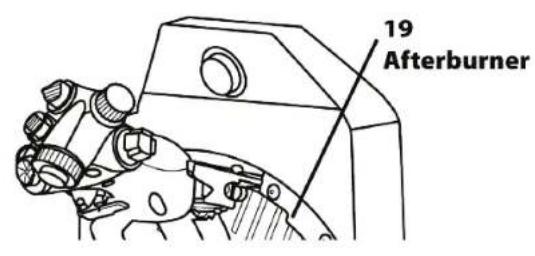
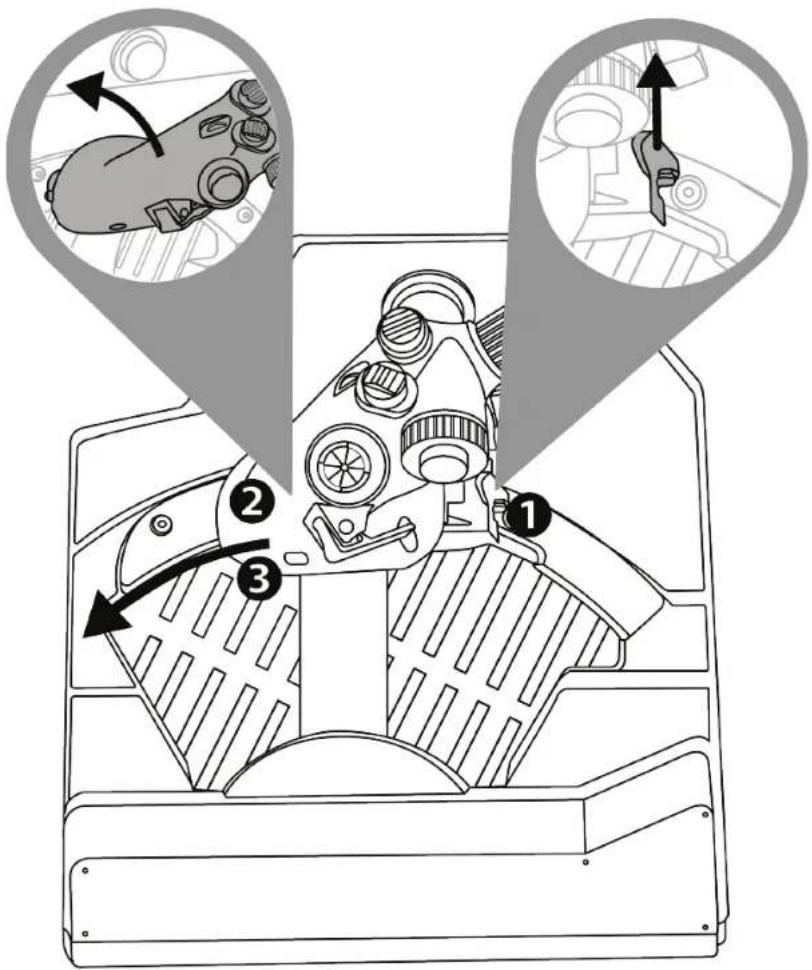
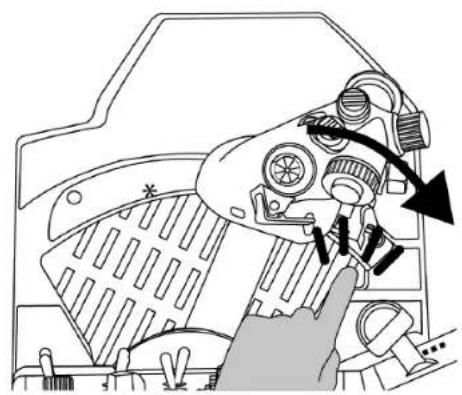
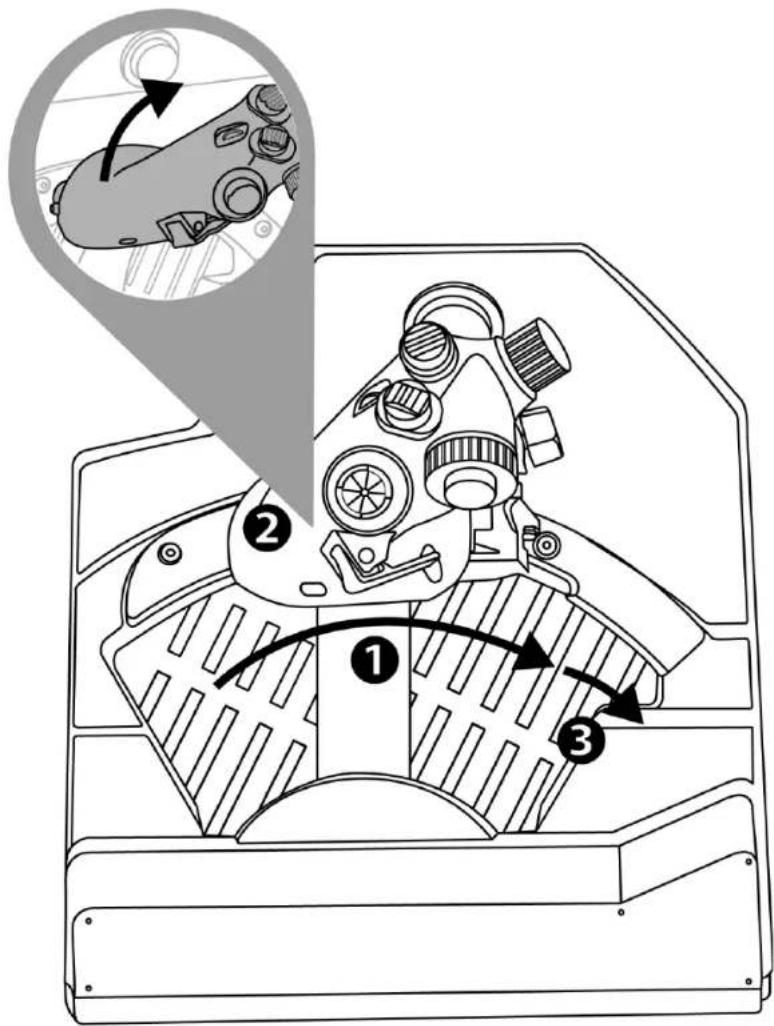
9. CUT OFF and AFTERBURNER detents
The VIPER TQS throttle quadrant features a realistic system of CUT OFF and AFTERBURNER detents (the Afterburner module is removable).
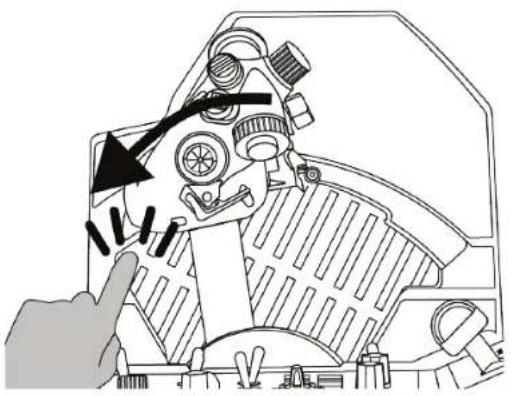
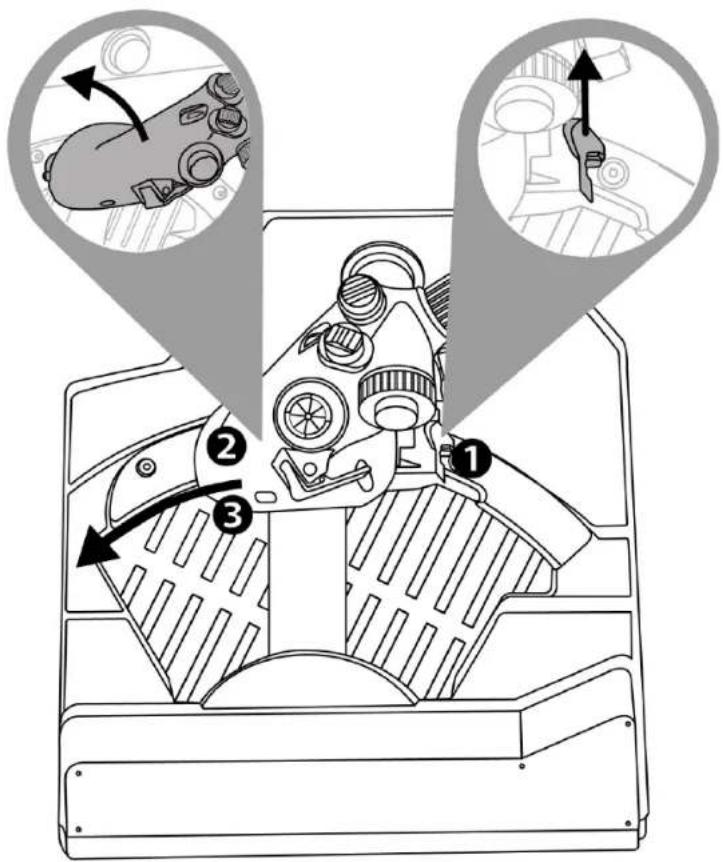
CUT OFF
After having positioned the throttle at the IDLE stop, press the "engine cut-off unlocking" trigger ① to lift up the handle in order to get over the stop ②, then put the handle in the OFF position ③.
To turn the engines back on, carry out this procedure in reverse.
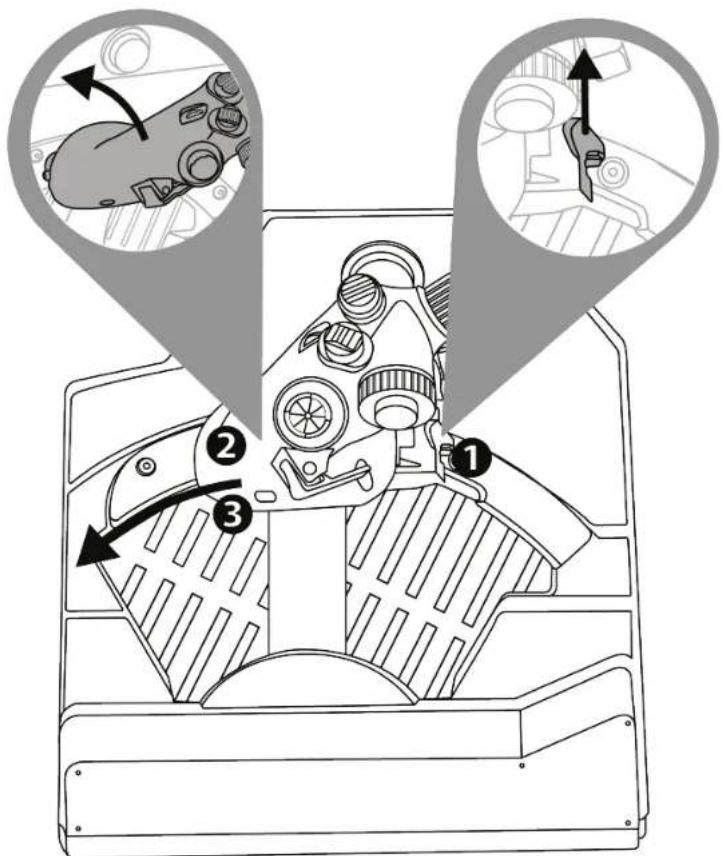
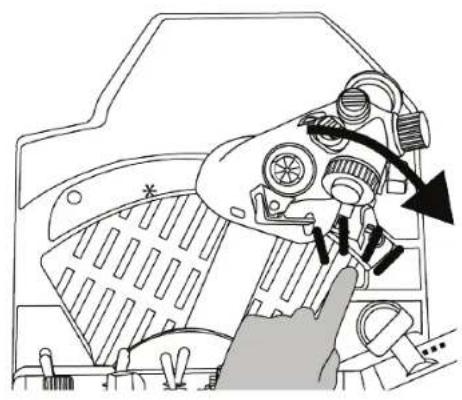
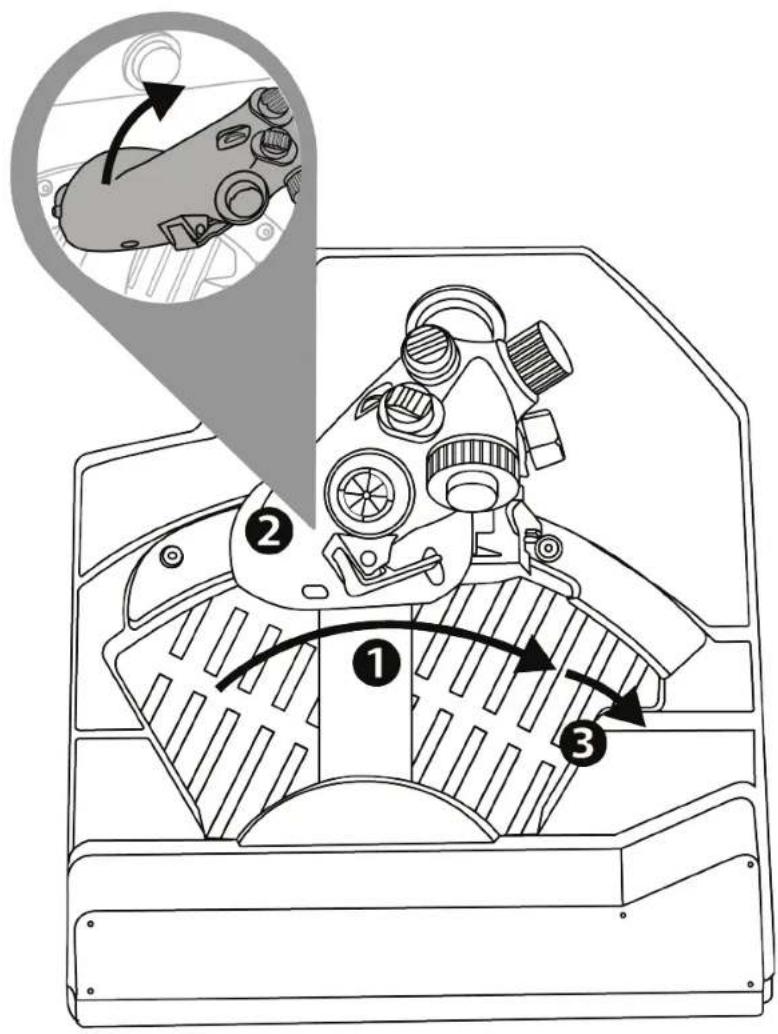
AFTERBURNER
Move the throttle to the stop ① and lift it up ② in order to get over the stop and engage the afterburner ③.

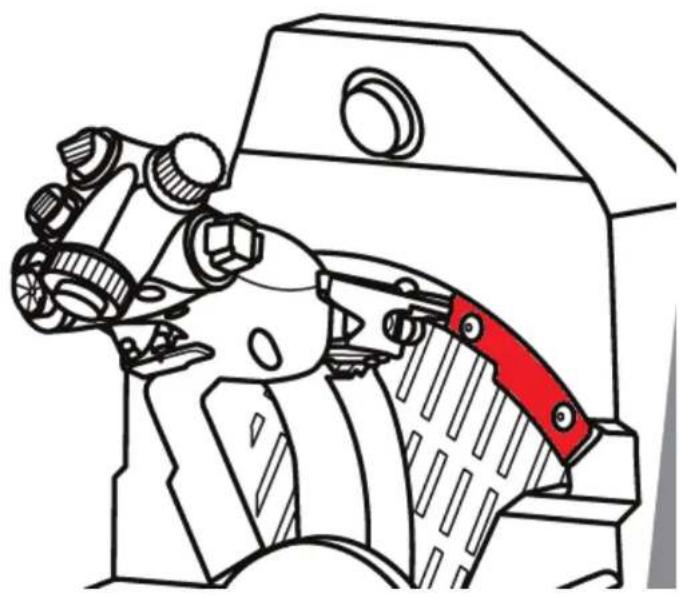
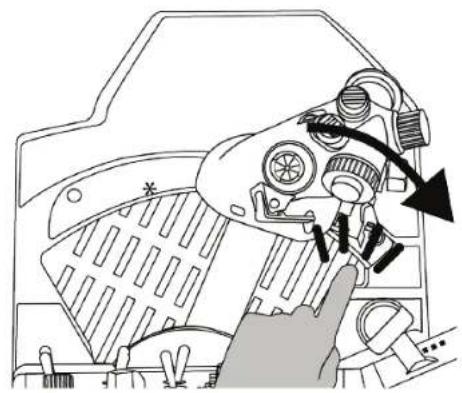
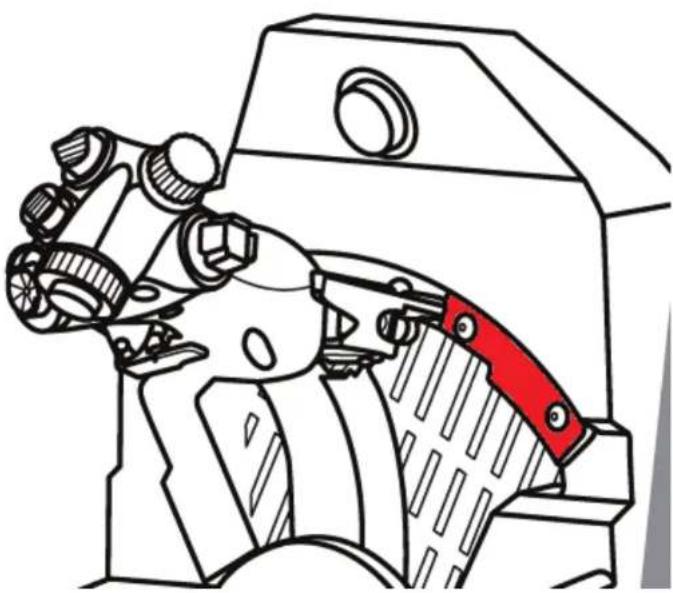
Uninstalling the AFTERBURNER stop
The stop of the Afterburner module is positioned at 80% of the value of the axis.
If you need 100 % of the throttle’s travel without a stop (for a particular simulator), you can remove the Afterburner module and its stop by unscrewing the module’s two screws using an Allen key (not included).
10. T.A.R.G.E.T advanced
programming software

Please visit
https://support.thrustmaster.com/product/viper-tqs/.
In the Software section, download and install the
T.A.R.G.E.T advanced programming software.
Main features of T.A.R.G.E.T
- Different possible configurations for the axes.
- Different possible programming levels: Basic, Advanced and Script.
- Use of the Drag and Drop principle.
- Ability to combine the VIPER TQS throttle quadrant with various Thrustmaster joysticks (HOTAS Cougar, HOTAS Warthog, T.16000M, MFD Cougar Pack, all of which are also compatible with T.A.R.G.E.T), allowing them to be recognized as a single USB device.
- Access to advanced profiles created by the Thrustmaster community.
11. FAQ and technical support
Do you have questions regarding VIPER TQS, or are you experiencing technical problems? If so, visit the Thrustmaster technical support website:
https://support.thrustmaster.com/product/viper-tqs/.

THrustMASTER
VIPER TQS
THROTTLE QUADRANT SYSTEM
Pour PC (Windows 10/11)
https://support.thrustmaster.com/product/vipertqs
https://support.thrustmaster.com/product/viper-tqs/.

https://support.thrustmaster.com/product/viper-tqs/
https://support.thrustmaster.com/product/vipertqs/
https://support.thrustmaster.com/product/viper-tqs/

https://support.thrustmaster.com/product/viper-tqs/.

https://support.thrustmaster.com/product/viper-tqs/.
https://support.thrustmaster.com/product/viper-tqs/

https://support.thrustmaster.com/product/viper-tqs/
https://support.thrustmaster.com/product/viper-tqs/.

THrustMASTER
VIPER TQS
THROTTLE QUADRANT SYSTEM
Per PC (Windows 10/11)
Manuale d'uso

https://support.thrustmaster.com/product/vipertqs/

TM Flying Desk Mount*
* Venduto separatamente
https://support.thrustmaster.com/product/viper-tqs/.
https://support Thrustmaster.com/product/viper-tqs/.
https://support.thrustmaster.com/product/viper-tqs/.

THrustMASTER
VIPER TQS
THROTTLE QUADRANT SYSTEM
Para PC (Windows 10/11)
Manual del usuario

https://support.thrustmaster.com/product/vipertqs/
https://support.thrustmaster.com/product/viper-tqs/.

https://support.thrustmaster.com/product/viper-tqs/.
https://support.thrustmaster.com/product/viper-tqs/.

THrustMASTER
VIPER TQS
THROTTLE QUADRANT SYSTEM
Para PC (Windows 10/11)
Manual do Utilizador

https://support.thrustmaster.com/product/viper-tqs/
https://support.thrustmaster.com/product/viper-tqs/

https://support.thrustmaster.com/product/viper-tqs/.

https://support.thrustmaster.com/product/viper-tqs/.
https://support.thrustmaster.com/product/viper-tqs/.

THRUSTMASTER
VIPER TQS
THROTTLE QUADRANT SYSTEM
PC (Windows 10/11)
PykoBoDcTBo nOJIb3OBaTeIa

BHMATEIbHO npOHTaTe INHCTpyKcN,
CoDEpKaUeC8 B DaHHOM pyKOBOdCTBe, nepeyCTaHOBkoJ, nepeJJIIObIM NcNoJIb3OBaHNEM
PPOdyKTa I nepeJJIIObIM TeXHnueCKM
06cnykBaHNem. O6a3aTeJIbHO co6JIoJaTe
TnpaBnla TexHKn 6e3OpacHOCTn. HecO6JIoJeHne
TexHKn 6e3OpacHOCTn MoKeT PnVBecTN K
HechactHbIM clyuaym nII INOBpeJxdeHnYM.
CoxpaHnte 3TO pyKOBoDCTBO, YTObI nMeTb
BO3MOxHOCTB ObpaTITbcR K INHCTpyKcNm B 6yDuIeM.
OΓJIABJIΕΗΝΕ
- CODEPXMOE KOPOBKn 5
- VIPER TQS — ONICAHNE YCTPOICTBA....6
- ΦυHKιM N KHOPIK I OCEI 8
- INHOPMALLAOBNCPOJb3OBAHIN VIPER TQS 10
- PEGYUNPOBKA TPEHNA 11
- YCTAHOBKA HA ONOPE 12
- YCTAHOBKA VIPER PANEL* 17
- NOdkJIIOUcHHeK PC 20
- ΦHKCATOPbICUT OFF I AFTERBURNER..23
10.PACUINPEHHOE IOДПЯ
ПОГРAMMIPOBAHЯ T.A.R.G.E.T 26 - YACTO 3AДАВАБМьIE BОПРОСыИ
TEXHINUECKA ПОДДЕРЖKA 28
3aynctte CBOI DBnraTei N OTnpabJIrTecb B OpanchyIO 3OHy, ynpabJIra CBOIM camOJeTOM C NOMoIbIO KOII INeHdApHOrO 6JOKa pbIarOB, KOTOpbIM oChaIaJIncs CBamOJeTbI VIPER BBC CUSA — cambie paCnpocTpaHeHHbIe B MInpe COBpeMeHHbIe nCTpe6nteJI.
ПоДнIMITE сВОй кOKПТ Ha HOБьй урOBeHB 6лагорадя унkaльной зрюнOMКе peлKKH HOTAS B macstabe 1:1 cmetaJIчecко pyKoRTko, a TaKKe peaINCTnHbIMN KHOЛКamN I ΦИКcaTOpamN.
https://support.thrustmaster.com/product/viper-tqs/
BbI6epTe Firmware
- Tocka doctyna K perylinpOBKe cnIbI TpeHnA
3.ФункцинК"HОПОКиoce"
PykoTka VIPER TQS:Функци 19 кногokи 5 ocey B peЖIMe A (6e3 Виртуалььных кногok)


PeximB:cBnptyaJIbHbIMN KHOKNaMn


4. Информаць об Incpoьзовани VIPER TQS

Onachoctb 3aueemnneHna
HnkOrda He nomeaTe naIbciB 30HbI ynpa npNcNoJIb3OBaHnPyKoTKn.


5. PeruInpoBka TpeHnA
Bb moke Te OTpeRyInpOBaTb TpeHne B 6JIOKe pbyarOB VIPER TQS B COOTBeTCTBn C BaIIMN JInHbIMN IpeINoYTeHnA M C NOMOUsbIO INHCTpyMeHTa, BXODaTeBO KOMJIeK T NOCTaBKn VIPER TQS. Ondako o6paTnte BHNMaHne, YTO ONTImaJIbHOe TpeHne pbUra yCTaHOBJIeHO IO yMOJIuaHnIO Ha 3aBOJe.

YTo6bI He NOBpeiNTb CnCTeMy TpeHnA, He 3aTЯrBaIte peRyJInpoBOOHyBIM BnHT CnIIuKOM CnIbHO. KpOme TOrO, He BbIKpyUHBaIte peRyJInpoBOOHyBIM BnHT NOpHoCTbIO: 3TO MoXeT PpINBeCTN K TOMy, YTO pyKOraTKa IpepcTaHET φnKcnpoBaTbcR B HuxHOM NOpJoxHnI.
6. YctaHObKa Ha onope

VIPER TQS moxho yctaHaBnBaTb Ha pa3JIuHbIe TINbI Oonop. BoJIbShInHCTBO ImeIoUxxCra Ha pbIHKe KOKNTOB IN Oonop COBMeCTIMbl C aHaJIoRnHbIMN npOdyKTamn Thrustmaster (hanpimep, HOTAS Warthog).
CneIyET nOMHITb, yTO VIPER TQS o6laaet MoIhIM pyIauKhbIM 3oΦeKTOM I IOaTOMy DOJIKeH 6bITb IpoUHO 3akpeIeH. PnIKpeNITE 6a3y K onope c NOMOuIO NOxODaIcx BInTOB M6 TaK, yTO6bI He NOBpeIITb pyKoIrKy. (BInTbI B KOMIIeKTH He BXOJaT.)
Поби черпж VIPER TQS можно нату на сатEs https://support.thrustmaster.com/product/viper-tqs/

Ipeed kajdbim nCnoB3OBaHnem y6eDntecb, YTO VIPER TQS no-mpexKhemy npabInbHo 3akpePHeH Ha onope B COOTBeTCTBm C INHCTpyKzmaMn, yKa3aHHbIMN npOn3BOIDHTeJIeM.
ОьзаTeMbHO yuHTbIbAite MaTePnAn, n3 KOTOpOro
cdeHaBaSha onopa, n y6eINTecb, YTO K HeMy MoXHo
HaJeXHo PpIKpeNITb yCTpoiCTBO. CToJIeShNuca, Ha
KOTopoB Bbl KpeNITE VIPER TQS,doJxHa 6bITb cdeJaHa
n3 ZeIbHoro Kycka MaTePnAna (HaIprImep, MΦ nIi
DepeBa), 6e3 noIOCTeINII CTekJIAHHbIX 3JIeMeHTOB.

Pa3MepbI MOHTaXHoro Yeptexa (B MM)
Bbl moxete ckaaTa b MOHTaXHyIO cxemy C caYta https://support.thrustmaster.com/product/vipertqsl, 3aTeM paCneuatab ee n npInoXnTb K onopeДЯ NOIROTOBKN OTBepCTn.
YcmaHOBKa c nOoubTO TM Flying
Desk Mount*
TM Flying Desk Mount — зто металлеская систema
KpeHHeNc 3aXIMhBIM BnHTOM, yIyUaIOua
3proHOMKU I NOLOXeHne NIIOTa npN NCNoJIb3OBaHHN
yctpoiCTBa. 3Ta cnCTema npedHa3NaueHa dIa
KpePHeHnK cToJeShnCe ToIuHo1 15-50 MM.

*Ppodaemcormdelloho
YcmaHOBKa c uCNoJIb3ObaHuem TM Flying Clamp*
https://support.thrustmaster.com/product/viper-tqs/.
B pa3dene Software (PporpaMMHoe o6ecneueHne)
ckaayte n yctaHOBNTe paCUnpeHHoe IO dIy
https://support.thrustmaster.com/product/viper-tqs/.

THrustMASTER
VIPER TQS
THROTTLE QUADRANT SYSTEM
Pro PC (Windows 10/11)
Uživatský manuál

https://support.thrustmaster.com/product/viper-tqs/
https://support.thrustmaster.com/product/viper-tqs/

https://support.thrustmaster.com/product/viper-tqs/.
https://support.thrustmaster.com/product/viper-tqs/.
https://support.thrustmaster.com/product/viper-tqs/.

THrustMASTER
VIPER TQS
THROTTLE QUADRANT SYSTEM
PC (Windows 10/11) écin
Kullanici Kilavuzu

https://support.thrustmaster.com/product/viper-tqs/
Lüften su adresi ziyaret edin:
https://support Thrustmaster.com/product/viper-tqs/.

PC surcuses ne Windows Denetim Masasi icin ozel arayuzunu indirip yukleyin.
https://support Thrustmaster.com/product/viper-tqs/.
Software (Yazilim) kismindan T.A.R.G.E.T gelismis
https://support.thrustmaster.com/product/viper-tqs/.

THrustMASTER
VIPER TQS
THROTTLE QUADRANT SYSTEM
Dla PC (Windows 10/11)
Instrukcja obslugi

https://support.thrustmaster.com/product/viper-tqs/

TM Flying Desk Mount*
* Do nabycia osobno
https://support.thrustmaster.com/product/viper-tqs/.
https://support.thrustmaster.com/product/viper-tqs/.
https://support.thrustmaster.com/product/viper-tqs/.

THrustMASTER®
VIPER TQS
THROTTLE QUADRANT SYSTEM
PC用(Windows10/11)
一-一斯二一

https://support.thrustmaster.com/product/viper-tqs/
TM Flying Desk Mount*
*别壳品
https://support.thrustmaster.com/product/viper-tqs/.

THRUSTMASTER
VIPER TQS
THROTTLE QUADRANT SYSTEM
PC (Windows 10/11) 版
用户手册

https://support.thrustmaster.com/product/viper-tqs/
https://support.thrustmaster.com/product/viper-tqs/

https://support.thrustmaster.com/product/viper-tqs/
https://support.thrustmaster.com/product/viper-tqs/
https://support.thrustmaster.com/product/viper-tqs/.

THRUSTMASTER
VIPER TQS
THROTTLE QUADRANT SYSTEM
PC (Windows 10/11) 版
使用者手册

https://support.thrustmaster.com/product/viper-tqs/
https://support.thrustmaster.com/product/vipertqs/

https://support.thrustmaster.com/product/viper-tqs/
https://support.thrustmaster.com/product/viper-tqs/
https://support.thrustmaster.com/product/viper-tqs/.

THRUSTMASTER
VIPER TQS
THROTTLE QUADRANT SYSTEM
PC通用(Windows10/11)
사용심명서

試焉也 對,試焉也 次用者,其引
用志保
戸対 裁上思社。
志相将如自于,相有之。
在合n.
聖詠詞書來到,還可觀看。
目录
https://support.thrustmaster.com/product/viper-tqs/
Firmware(艷戦) 設 備
諸者爲反猶何言之,則不爲反。
1. 才景内容用
2. VIPER TQS 僅
- 편울
2.Cut Off トイン - Afterburner 法在电
- CHAFF/FLARE 會籲 S/wi
5.일무지도용울리
- 썼드라운 . VIPER PANEL = VIPER TQS Mission Pack 0%
五
https://support.thrustmaster.com/product/viper-tqs/을부礙해 主信心지오.
Afterburner 80%
Jitteme witeh hou.
https://support.thrustmaster.com/product/viper-tqs/을zburg해 主信心시오.
Thrustmaster 此式(OTAS) (HOTAS, HOTAS
Warthog, T.16000M, MFD Cougar Pack, 0I MoDn
吉吉T.A.R.G.E.T和有关)的合
https://support.thrustmaster.com/product/viper-tqs/.

THRUSTMASTER
VIPER TQS
THROTTLE QUADRANT SYSTEM
(Windows 10/11)
piaaai

iill 1 jlll l l l l l l l l l l l l l l l l l l l l l l l l l l l l l l l l l l l l l l l l l l l l l l l l l l l l l l l l l l l l l l l l l l l l l l l l l l l l
Jgall
- 1
- 2.VIF
- 11
- VIPER TQS ^
- 5
- 6
- VIPER PANEL
-
- 23...... AFTERBURNER GUT OFF 9.
- T.A.R.G.E.T 10.
- 11111111111111111
a 111111111111111111111111111111111111111
1alll 5
y 1:1 HOTAS
a 1
VIPER TQS 150
i 1

i
sll
VIVE
.
j j j 1
https://support.thrustmaster.com/product/viper-tqs/
()
Firn
1

- c

VIPER TQS .2

1.
Cut Off 2
Afterburner 3
FLARE/CHAFF 4
aagai 5
(C 6. J
7.
8.
)A5w19VIPERTQS
()


:B
B 1 21
VIPER TQS 4

aaii aiee iie e gill glblio slaal

5.
VIPER TQS 151111111111111111111111111111111111111

bIaIyIyIyIyIyIyIyIyIyIyIyIyIyIyIyIyIyIyIyIy

ggl g. 1e 10 10 10 10 10 10 10 10 10 10 10 10 10 10 10 10 10 10 10 10 10 10 10 10 10 10 10 10 10 10 10
Joo Joo
.(HOTAS Warhog) Thrustmaster
VIPER TQS
P( 5,0) .A( 1,0)
()M6
VIPER TQS
https://support.thrustmaster.com/product/viper-tqs/

VIPER TQS
aaiiis
J 51, 51
VIPER TQS
()
a j g a g g a


()
https://support.thrustmaster.com/product/viper
j 5 jill bbi jii sla
tq/s
*TM Flying Desk Mount
T M F l 50,15 50,15
*TM Flying Clamp /
T M F l 50
Laiie 1

VIPER TQS
15
*VIPER PANEL 7
VIPER TQS VPER PANEL
Mission Pack
VIPER PANEL 43 VIPER TQS VIPER PANEL T.A.R.G.E.T

4
5

i
8
g j 1
.https://support.thrustmaster.com/product/viper-tqs/
/ CbiBll / Control Panel JJ
Windows Control Panel / Thrustmaster
(10
iie
OK VIPER TQS
5
1
Thrustmaster Flight Control Panel Properties
Test Input
VIPER TQS
Enable virtual buttons

- Buttons
THRUSTMASTER
-ButtonBox
www.thrustmaster.com
Technical Support:
ts.thrustmaster.com
Firmware: 1.21
Control Panel: 3.12
Checkor Update
OK
Cancel
Apply

: (A) Enable virtual buttons
(204
Aol

.VIPER TQS

- AFTERBURNER, CUT OFF .9
CUT OFF 1111111111111111111111111111111111111111111
Afterburner Afterburner
CUT OFF
"J 1111111111111111111111111111111111111
. ③ OFF
Lsc 1y1 12 y

AFTERBURNER
gill abai jolj 2 4j g 0 gill abai
3 2ggl j
AFTERBURNER
80 80 Afterburner 80 gabai jgl) aiaa iin no n nn qilal a k 100 aiai i 11
aill aagai aai, Afterburner 80 gai j 11 (nss
T.A.R.G.E.T a

g jyj 1 gao j
./https://support.thrustmaster.com/product/viper-tqs
aaiia aiee eae ee eee e e e e e e e e e e e e e e e e e e e e e e e e e e e e e e e
A. T.A.R.G.E.T
T.A.R.G.E.T
Script AdvancedBasic:
1
VIPER TQS
HOTAS (HOTAS Cougar) Thrustmaster
MFD Cougar Pack, T.16000M, Warthog
.https://support.thrustmaster.com/product/viper-tqs/

THrustMASTER
VIPER TQS
THROTTLE QUADRANT SYSTEM
For PC (Windows 10/11)
Användarmanual

INNEHÄLLSFÖRTECKNING
- INNEHÄLL I FÖRPACKINGEN 5
- VIPER TQS - FUNKTIONER 6
- MAPPNING AV KNAPPAR OCH AXLAR 8
- ANVÄNDNINGSINFORMATION FÜR VIPER TQS 10
- JUSTERA FRIKTIONEN 11
- INSTALLATION PÅ ETT STÖD 12
- INSTALLERA VIPER PANEL* 17
- INSTALLATION PÄ PC 20
- CUT OFF-OCH AFTERBURNER-SPÄRRAR.23
- AVANCERADE PROGRAMMERINGS-PROGRAMMET T.A.R.G.E.T 26
- VANLIGA FRÅGOR OCH TEKNISK
SUPPORT 28
https://support.thrustmaster.com/product/viper-tqs/
TM Flying Desk Mount*
*Saljs separat
Installation med TM Flying Clamp*
https://support.thrustmaster.com/product/viper-tqs/.
https://support.thrustmaster.com/product/viper-tqs/.
https://support.thrustmaster.com/product/viper-tqs/.

THrustMASTER
VIPER TQS
THROTTLE QUADRANT SYSTEM
PC (Windows 10/11)
Käyttoohje

https://support.thrustmaster.com/product/viper-tqs/
https://support.thrustmaster.com/product/viper-tqs/.
https://support.thrustmaster.com/product/viper-tqs/.
https://support.thrustmaster.com/product/viper-tqs/.

THrustMASTER
VIPER TQS
THROTTLE QUADRANT SYSTEM
Pre PC (Windows 10/11)
Návod na použitie

Pred instalaciou produktu, pred akymkol'vek pouzitim produktu a pred akoukol'vek udrzbou si pozorne precitajte pouky uvedené v toto navode.
Bezpodmienečne dodržiavajte bezpečnostné pokyny. Nedodržanie tychtoPokynov moze viest' k nahodám a/alebo škodám. Uschovajte siarto námod, aby ste si ho mohli v budúcnosti prečitat'.
OBSAH
- OBSAH BALENIA 5
- FUNKCIE VIPER TQS 6
- MAPOVANIE TLACIDIEL A OSI 8
- INFORMÁCIE O POUŽIVANÍ VIPER TQS......10
- NASTAVENIE TRENIA 11
- INSTALÁCIA NA PODPERU 12
- INSTALÁCIA VIPER PANEL* 17
- INSTALÁCIA NA PC 20
- ZARÁŽKY CUT OFF A AFTERBURNER 23
- POKROČILÍY PROGRAMOVACÍ SOFTWARE
T.A.R.G.E.T. 26
11.ČASTOKLADENÉ OTÁZKY A TECHNICKA PODPORA 28
Našartujte svoje motory a vyletté do nebezpečnej zony s ikonickým systémom plynového kvadrantu z lietadla VIPER od U.S. Air Force – najpoužívanejsieho moderného bojového lietadla na svete!
https://support.thrustmaster.com/product/viper-tqs/
Vyberte Firmware (Firmvér) a potom postupujte podl'apokynov - vrátane postupu stahovania a instalácie.
1. Obsah balenia

2. Funkcie VIPER TQS
- Rukovat'
- Zaręzka Cut Off
- Zarazka Afterburner
- Spinač CHAFF/FLARE
- Klip pre mapu misie
https://support.thrustmaster.com/product/viper-tqs/.

https://support.thrustmaster.com/product/viper-tqs/.
V sekci Software (Softver) si stiahnite a nainstalujtePokrociy programovaci softver T.A.R.G.E.T.
Hlavné vlastnosti T.A.R.G.E.T
https://support.thrustmaster.com/product/viper-tqs/.

THrustMASTER
VIPER TQS
THROTTLE QUADRANT SYSTEM
PC-hez (Windows 10/11)
Használati utmutató

https://support.thrustmaster.com/product/viper-tqs/.

THrustMASTER
VIPER TQS
THROTTLE QUADRANT SYSTEM
(Windows 10/11) w
wnnnn

y nnnn nn 197 y nnnn nn nnnn nn nnnn nn nnnn nn nnnn nn nnnn nn nnnn nn nnnn nn nnnn nn nnnn nn nnnn nn nnnn nn nnnn nn nnnn nn nnnn nn nnnn nn nnnn nn nnnn nn nnnn nn nnnn nn nnnn nn nnnn nn nnnn nn nnnn nn nnnn nn nnnn
DyynPin
-
- VIPER TQS w nnn 2.
-
- VIPER TQS-2 win'wn 4.
11 5. -
- *VIPER PANEL 7.
20 8.
23......AFTERBURNER-CUT OFF 1xyn 9. -
- 11.
https://support.thrustmaster.com/product/viper
tqs / =
Dnnn (nn) Firmware nn
nnnnnnnnnnnnnnnnnnnnnnnnn

- 9

VIPER TQS w nnn .2
- nT
- 1
Afterburner 干 yn.3
FLARE / CHAFF ann.4
nnnnnon109n.5

(C xio) USB nnn.6
7
xnnn19 wVIPER TQS n
A (D)
A 1 19

xnBo
B 1 21

VIPER TQS-4

nTnynnnnnnnnnnnnnnnnnnnnnnnnnnnnnnnnnnnnnnnnnnnnnnnnnnnnnnnnnnnnnnnnnnnnnnnnnnnnnnnnnnnnnnnnnnnnn

5. 7
VIPER TQS 7777777777777777777777777777777777
#
X 1111111111111111111111111111111111111111

VIPER TQS
O'xin' O'xin o'piu O'xin niuvinn O'un Xn
.(HOTAS Warhog w) Thrustmaster w
VIPER TQS-
nni nnnn
M6 1yNnNnNnNnNnNnNn
nT7ywn7TO,(O77x7)Onnn
nVIPER TQS n A
https://support.thrustmaster.com/product/viper
tqs/

VIPER TQS- w xih w ,w
JINIINN 197,nain
T1H,nainnnnnnn nn nnnn7 97
-wwwn7 w.nio nnnn nn
in MDF ,wn) nn nnnn nn VIPER TQS
.10n 107n n77,(y

(n"na) nnnnniu

2
https://support.thrustmaster.com/product/viper
tqs/.
TM Flying Desk Mount n?
wnn nnn nn nnnnnn nn nnn
IT noyn .wnn
.n"n 15-50
7912 7n1*
TM Flying Clamp
Thrustmaster
n nn nnn nnn nnn nnn nnn nnn nnn nnn nnn nnn nnn nnn nnn nnn nnn nnn nnn nnn nnn nnn nnn nnn nnn nnn nnn nnn nnn nnn nnn nnn nnn nnn nnn nnn nnn nnn nnn nnn nnn
15-45 iynnnnny nny ny yin nn nn
.n"n
TM Flying Clamp*
7917n

VIPER TQS 77777777

*VIPER PANEL w npnn .7
VIPER TQS Mission - VIPER PANEL
Pack.
VIPER PANEL 43 /n/
XIN VIPER PANEL .T.A.R.G.E.T nwn nn nn. VIPER TQS wnn

4
5

7172x7
wnnn .8

n
https://support.thrustmaster.com/product/viper-tqs/.
xnnn nn n PC-7 nn nn nn nn nn nn nn nn nn nn nn nn nn nn nn nn nn nn nn nn nn nn nn nn nn nn nn nn nn nn nn nn nn nn nn nn nn nn nn nn nn nn nn nn nn nn nn nn nn nn nn nn nn nn nn nn nn nn nn nn nn nn nn nn nn nn nn nn nn nn nn nn nn nn nn nn nn nn nn nn nn nn nn nn nn nn nn nn nn nn nn nn nn nn nn nn nn nn nn nn
n nn nnnnnnnnnnnnnnnnnnnnnnnnnnnnnnnnnnnnnnnnnnnnnnnnnnnnnnnnnnnnnnnnnnnnnnnnnnnnnnnnnnnnnnnnnnnnnnnnnnnnnnnnnnnnnnnnnnnnnnnnnnnnnnnnnnnnnnnnn
7170X7

/nnn nn n,Control Panel nn
nivnwnx thrustmaster/Control Panel/nip74xn
.(Windows 10-2) n
Dy yon nn nyn .nnn nn n
.OK ooiuon VIPER TQS
TITAIINN 7yynn nnu nnu-nnn
.
Thrustmaster Flight Control Panel Properties
Test Input
VIPER TQS
Enable virtual buttons
THRUSTMASTER

www.thrustmaster.com
Technical Support:
ts.thrustmaster.com
Firmware: 1.21
Control Panel: 3.12
Checkor Update
OK
Cancel
Apply
Enable virtual buttons :(r
xynn nn nynn 1 xynnnn nn nynnnn .21-20ynnnn) nynnynnnn .(nn) Apply yinns ,
AFTERBURNER-1 CUT OFF .9
CUT nyn nn nynn nnnn VIPER TQS nynnn nn nn nn) AFTERBURNER-1 OFF
.Afterburner
CUT OFF
n" 107,IDLE nynnnn nn
2 1ynn nn nyn nn nn nnnn
OFF
.19n n nn nn nn nn nn nn nn nn nn nn nn nn nn nn nn nn nn nn nn nn nn nn nn nn nn nn nn nn nn nn nn nn nn nn nn nn nn nn nn nn nn nn nn nn nn nn nn nn nn nn nn nn nn nn nn nn nn nn nn nn nn nn nn nn nn nn nn nn nn nn nn nn nn nn nn nn nn nn nn nn nn nn nn nn nn nn nn

AFTERBURNER
JN JNJ 2 NNN 1,1 JYN7 JYXNN JYN JYNNNJYNJYNN3.
ywnn npnn nnonA
80% Afterburner 100% Afterburner 100% Afterburner 100% Afterburner 100% Afterburner 100% Afterburner 100% Afterburner 100% Afterburner 100% Afterburner 100% Afterburner 100% Afterburner 100% Afterburner 100% Afterburner 100% AfterBurner 100% Afterburner 100% Afterburner 100% Afterburner 100% Afterburner 100% Afterburner 100% Afterburner 100% Afterburner 100% Afterburner 100% Afterburner 100% Afterburner 100% Afterburner 100% Afterburner 1

atpna nT.A.R.G.E.Tn .10

n
https://support.thrustmaster.com/product/viper-tqs/.
n nn nnnn nn (nn) Software ypn
.
T.
- .D
Advanced,(o'o)Basic nnnn nn
.0970)Script-1 (Tnnn)
nnnn nnuu -
VIPER TQS nynn nn
, HOTAS Warthog ,HOTAS Cougar) Thrustmaster n'an
- 7 DnNn nn ,MFD Cougar Pack ,T.16000M
.1nX USB won nn nnnn (T.A.R.G.E.T
nyn 7y nnnn nn
.Thrustmaster

nnu nnu nnu 11
n7x7 7
:Thrustmaster w nnnn nn nnnn nn nnnn nn nnnn nn nnnn nn nnnn nn nnnn nn nnnn nn nnnn nn nnnn nn nnnn nn nnnn nn nnnn nn nnnn nn nnnn nn nnnn nn nnnn nn nnnn nn nnnn nn nnnn nn nnnn nn nnnn nn nnnn nn nnnn nn nnnn nn nnnn nnnn nn nnnn nn nnnn nn nnnn nn nnnn nn nnnn nn nnnn nn nnnn nn nnnn nn nnnn nn nnnn nn nnnn nn nnnn nn nnnn nn nnnn nn nnnn nn nnnn nn nnnn nn


- TABLE OF CONTENTS
- Updating the firmware
- Box contents
- VIPER TQS features
- Mapping of buttons and axes
- Mode B: with virtual buttons
- Information about using VIPER TQS
- Pinch hazard
- Adjusting the friction
- Installation on a support
- Installation using TM Flying Desk
- Mount*
- Installation using TM Flying Clamp*
- Installing VIPER PANEL*
- Installation on PC
- Enable virtual buttons (Enable virtual buttons):
- CUT OFF and AFTERBURNER detents
- CUT OFF
- AFTERBURNER
- Uninstalling the AFTERBURNER stop
- T.A.R.G.E.T advanced
- programming software
- Main features of T.A.R.G.E.T
- FAQ and technical support
- THrustMASTER
- VIPER TQS
- THROTTLE QUADRANT SYSTEM
- Pour PC (Windows 10/11)
- Para PC (Windows 10/11)
- Manual del usuario
- PC (Windows 10/11)
- PykoBoDcTBo nOJIb3OBaTeIa
- OΓJIABJIΕΗΝΕ
- 3.ФункцинК"HОПОКиoce"
- PeximB:cBnptyaJIbHbIMN KHOKNaMn
- Информаць об Incpoьзовани VIPER TQS
- Onachoctb 3aueemnneHna
- PeruInpoBka TpeHnA
- YctaHObKa Ha onope
- YcmaHOBKa c nOoubTO TM Flying
- Desk Mount*
- YcmaHOBKa c uCNoJIb3ObaHuem TM Flying Clamp*
- THrustMASTER®
- PC (Windows 10/11) 版
- PC通用(Windows10/11)
- 目录
- 才景内容用
- VIPER TQS 僅
- Jgall
- VIPER TQS .2
- VIPER TQS 4
- *TM Flying Desk Mount
- *TM Flying Clamp /
- *VIPER PANEL 7
- 8
- Thrustmaster Flight Control Panel Properties
- Enable virtual buttons
- : (A) Enable virtual buttons
- - AFTERBURNER, CUT OFF .9
- T.A.R.G.E.T a
- T.A.R.G.E.T
- INNEHÄLLSFÖRTECKNING
- Installation med TM Flying Clamp*
- OBSAH
- Obsah balenia
- Funkcie VIPER TQS
- Hlavné vlastnosti T.A.R.G.E.T
- DyynPin
- VIPER TQS w nnn .2
- VIPER TQS-4
- 7
- #
- TM Flying Desk Mount n?
- *VIPER PANEL w npnn .7
- wnnn .8
- Enable virtual buttons :(r
- AFTERBURNER-1 CUT OFF .9
- ywnn npnn nnonA
- atpna nT.A.R.G.E.Tn .10
- T.
- nnu nnu nnu 11
Brand : THRUSTMASTER
Model : Viper TQS
Category : Controller