
B40 B Elite - Lawn mower MCCULLOCH - Free user manual and instructions
Find the device manual for free B40 B Elite MCCULLOCH in PDF.
| Product type | Brushcutter (grass trimmer, weed cutter) |
| Brand | McCulloch |
| Model | B40 B Elite |
| Displacement | 40.1 cm³ |
| Weight (without fuel, without cutting equipment) | 7.3 kg |
| Fuel | 2-stroke gasoline/oil mixture (50:1 ratio with McCulloch Universal oil) |
| Fuel tank capacity | 1.0 liter |
| Idle speed | 3000 rpm |
| Maximum recommended speed | 12000 rpm |
| Maximum power | 1.5 kW at 9000 rpm |
| Spark plug type | NGK CMR7H-10 (gap 0.9-1.0 mm) |
| Main functions | Weeding, brush cutting, forest clearing |
| Compatible cutting equipment | P35 weed trimmer head, grass blade (255-3, 255-4), clearing blade 200-22 |
| Safety | Harness with quick release, blade guard, throttle lock, stop button, anti-vibration protection |
| Routine maintenance | Air filter cleaning every 25 h, spark plug check, fuel drain for long-term storage |
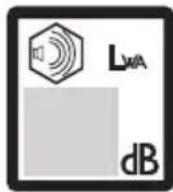
| Sound level (acoustic pressure at ear) | Up to 100 dB(A) depending on equipment |
| Vibration level (handles) | From 3.4 to 5.2 m/s² depending on equipment |
| CE compliance guarantee | Directives 2006/42/EC, 2014/30/EU, 2000/14/EC |
Frequently Asked Questions - B40 B Elite MCCULLOCH
User questions about B40 B Elite MCCULLOCH
0 question about this device. Answer the ones you know or ask your own.
Ask a new question about this device
Download the instructions for your Lawn mower in PDF format for free! Find your manual B40 B Elite - MCCULLOCH and take your electronic device back in hand. On this page are published all the documents necessary for the use of your device. B40 B Elite by MCCULLOCH.
USER MANUAL B40 B Elite MCCULLOCH
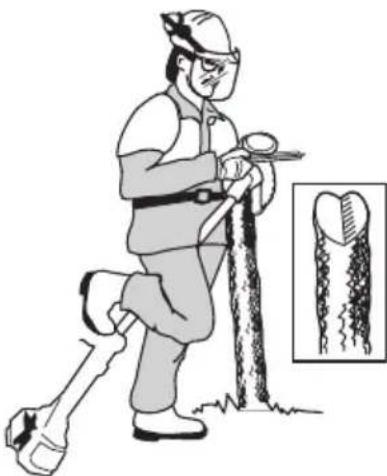
WARNING! A clearing saw, brushcutter or trimmer can be dangerous if used incorrectly or carelessly, and can cause serious or fatal injury to the operator or others. It is extremely important that you read and understand the contents of this operator's manual. Please read the operator's manual carefully and make sure you understand the instructions before using the machine.

Always wear:
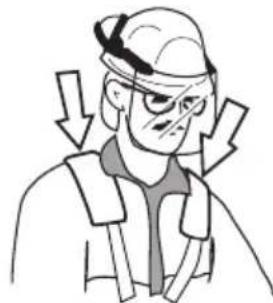
- A protective helmet where there is a risk of falling objects
Approved hearing protection
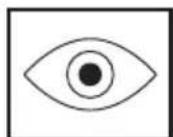
Approved eye protection
Max. speed of output shaft, rpm
This product is in accordance with applicable EC directives.
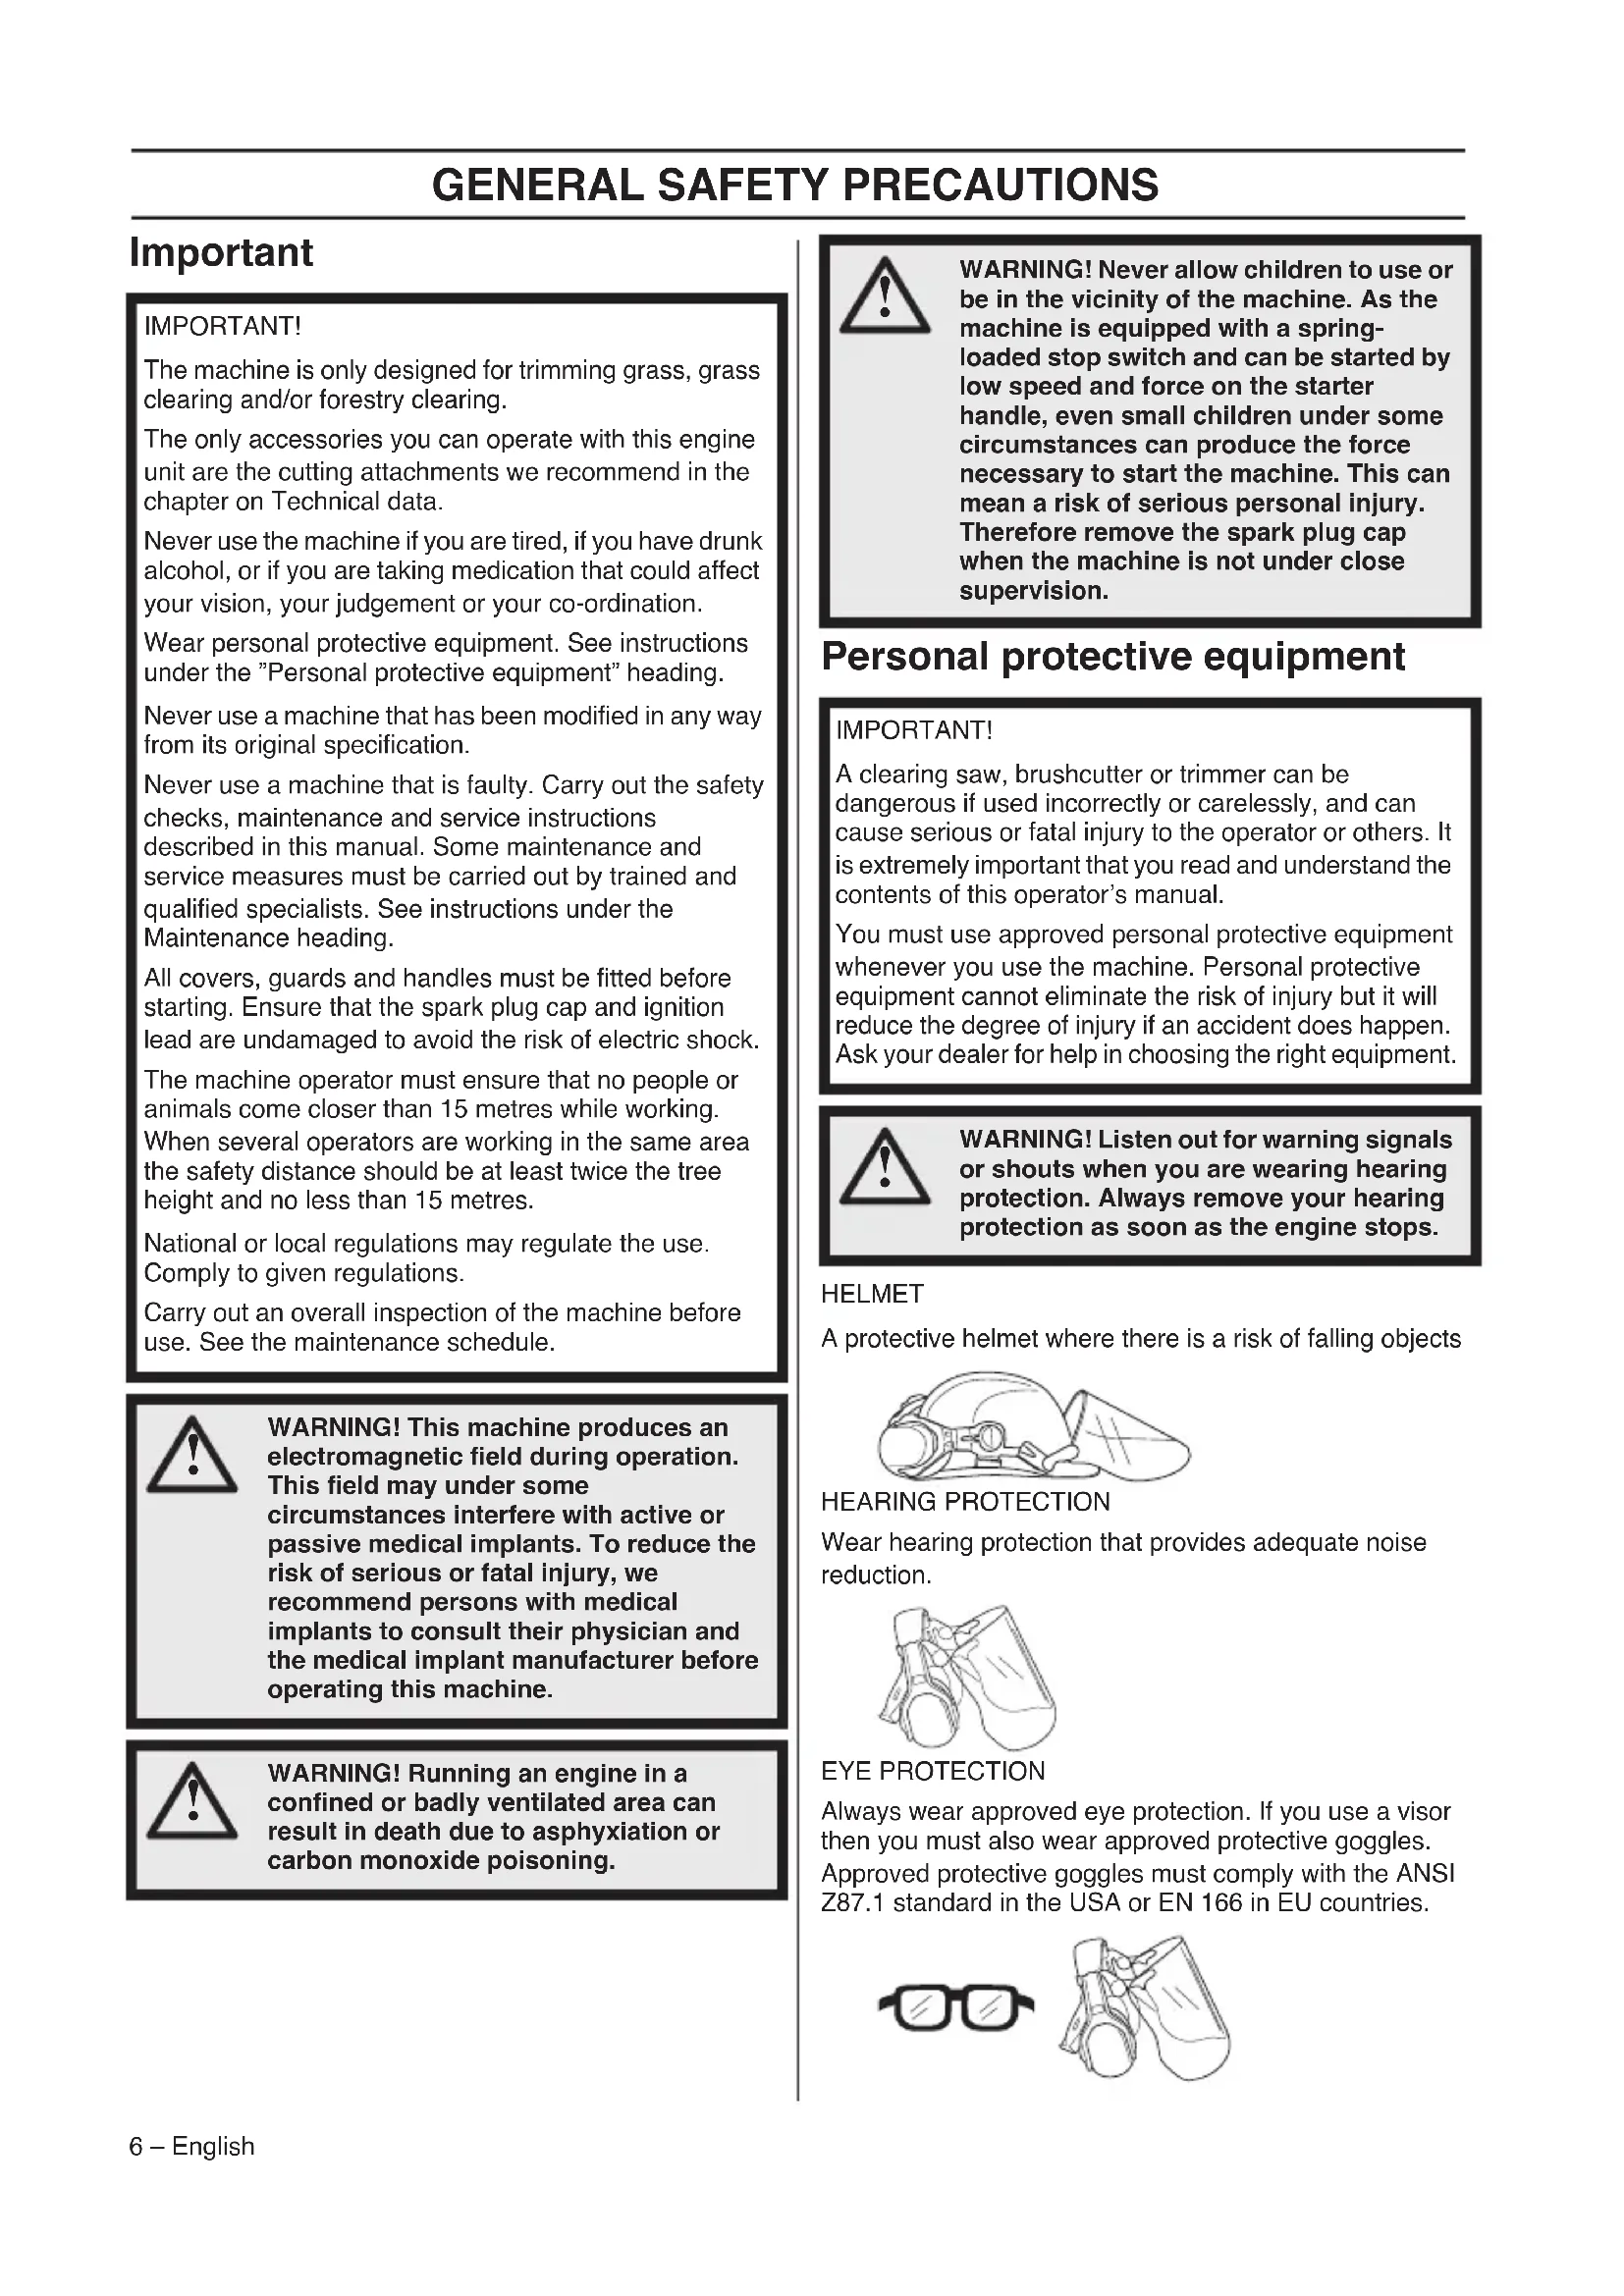
Watch out for thrown objects and ricochets.
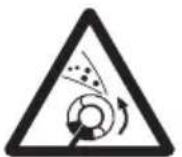
The operator of the machine must ensure, while working, that no persons or animals come closer than 15 metres.
Machines fitted with saw blades or grass blades can be thrown violently to the side when the blade comes into contact with a fixed object. This is called blade thrust. The blade is capable of amputating an arm or leg.
Always keep people and animals at least 15 metres from the machine.
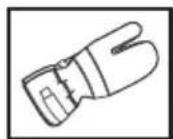
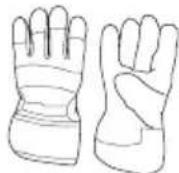
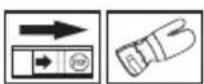
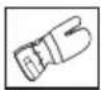
Always wear approved protective gloves.
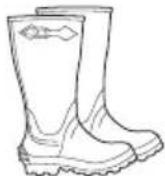
Wear sturdy, non-slip boots.


Choke: Set the choke control in the choke position.
Air purge
Noise emission to the environment according to the European Community's Directive. The machine's emission is specified in the Technical data chapter and on the label.
Refuelling.

Other symbols/decals on the machine refer to special certification requirements for certain markets.
Switch off the engine by moving the stop switch to the STOP position before carrying out any checks or maintenance.
Always wear approved protective gloves.
Regular cleaning is required.
Visual check.
Approved eye protection must always be used.


CONTENTS
Contents Note the following before starting:
KEY TO SYMBOLS
Symbols 2
CONTENTS
Contents 3
Note the following before starting: 3
INTRODUCTION
Dear Customer, 4
WHATIS WHAT?
What is what on the brush cutter? 5
GENERAL SAFETY PRECAUTIONS
Important 6
Personal protective equipment 6
Machine's safety equipment 7
Cutting equipment 10
ASSEMBLY
Assembling the handlebar and throttle 13
Fitting blades and trimmer heads 13
Fitting the blade guard and saw blade 14
Fitting the transport guard 15
Adjusting the harness and brush cutter 15
FUEL HANDLING
Fuel safety 16
Fuel 16
Fueling 17
STARTING AND STOPPING
Check before starting 18
Starting and stopping 18
WORKING TECHNIQUES
General working instructions 20
MAINTENANCE
Carburettor 24
Muffler 24
Cooling system 25
Air filter 25
Fuel filter 25
Bevel gear 25
Spark plug 26
Maintenance schedule 27
TECHNICAL DATA
Technical data 28
EC-declaration of conformity 29
Please read the operator's manual carefully.

WARNING! Long-term exposure to noise can result in permanent hearing impairment. So always use approved hearing protection.

WARNING! Under no circumstances may the design of the machine be modified without the permission of the manufacturer. Always use original accessories. Non-authorized modifications and/or accessories can result in serious personal injury or the death of the operator or others.

WARNING! A clearing saw, brushcutter or trimmer can be dangerous if used incorrectly or carelessly, and can cause serious or fatal injury to the operator or others. It is extremely important that you read and understand the contents of this operator's manual.
INTRODUCTION
Dear Customer,
Thank you for choosing a McCulloch product. You are thereby part of a story that started long ago, when the McCulloch Corporation started its manufacturing of engines during World War II. In 1949, when McCulloch introduced its first light one-man chainsaw, woodworking would never be the same again.
The line of innovative chainsaws would continue over the decades, and business was expanded, first by airplane and cart engines in the 1950s, then by mini chainsaws in the 1960s. Later, in the 1970s and 80s, trimmers and blower vacs were added to the range.
Today, as a part of the Husqvarna group, McCulloch continues the tradition of powerful engines, technical innovations, and strong designs that have been our hallmarks for more than half a century. Lowering fuel consumption, emissions and noise levels are of top priority to us, as is improving safety and user-friendliness.
We certainly hope that you will be satisfied with your McCulloch product, as it is designed to be your companion for a long time. By following this operator manual's advice on usage, service, and maintenance, its lifespan can be extended. If you should need professional help with repair or service, please use the Service Locator at www.mcculloch.com.
McCulloch has a policy of continuous product development and therefore reserves the right to modify the design and appearance of products without prior notice.
This manual can also be downloaded at www.mcculloch.com.
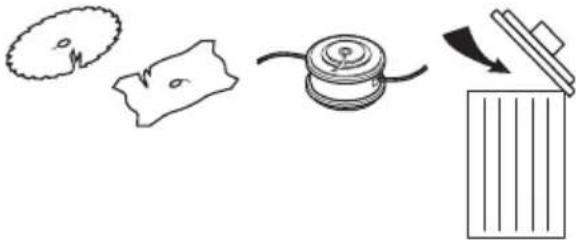
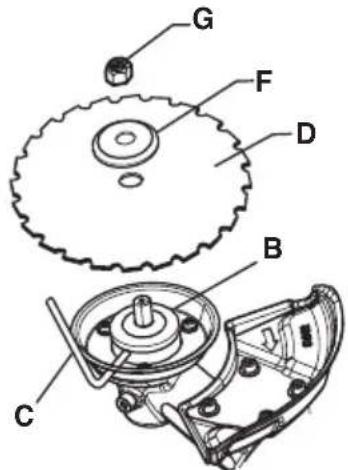
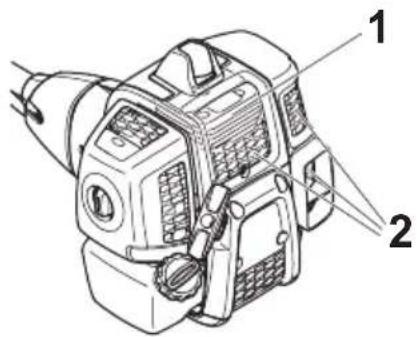
WHAT IS WHAT?
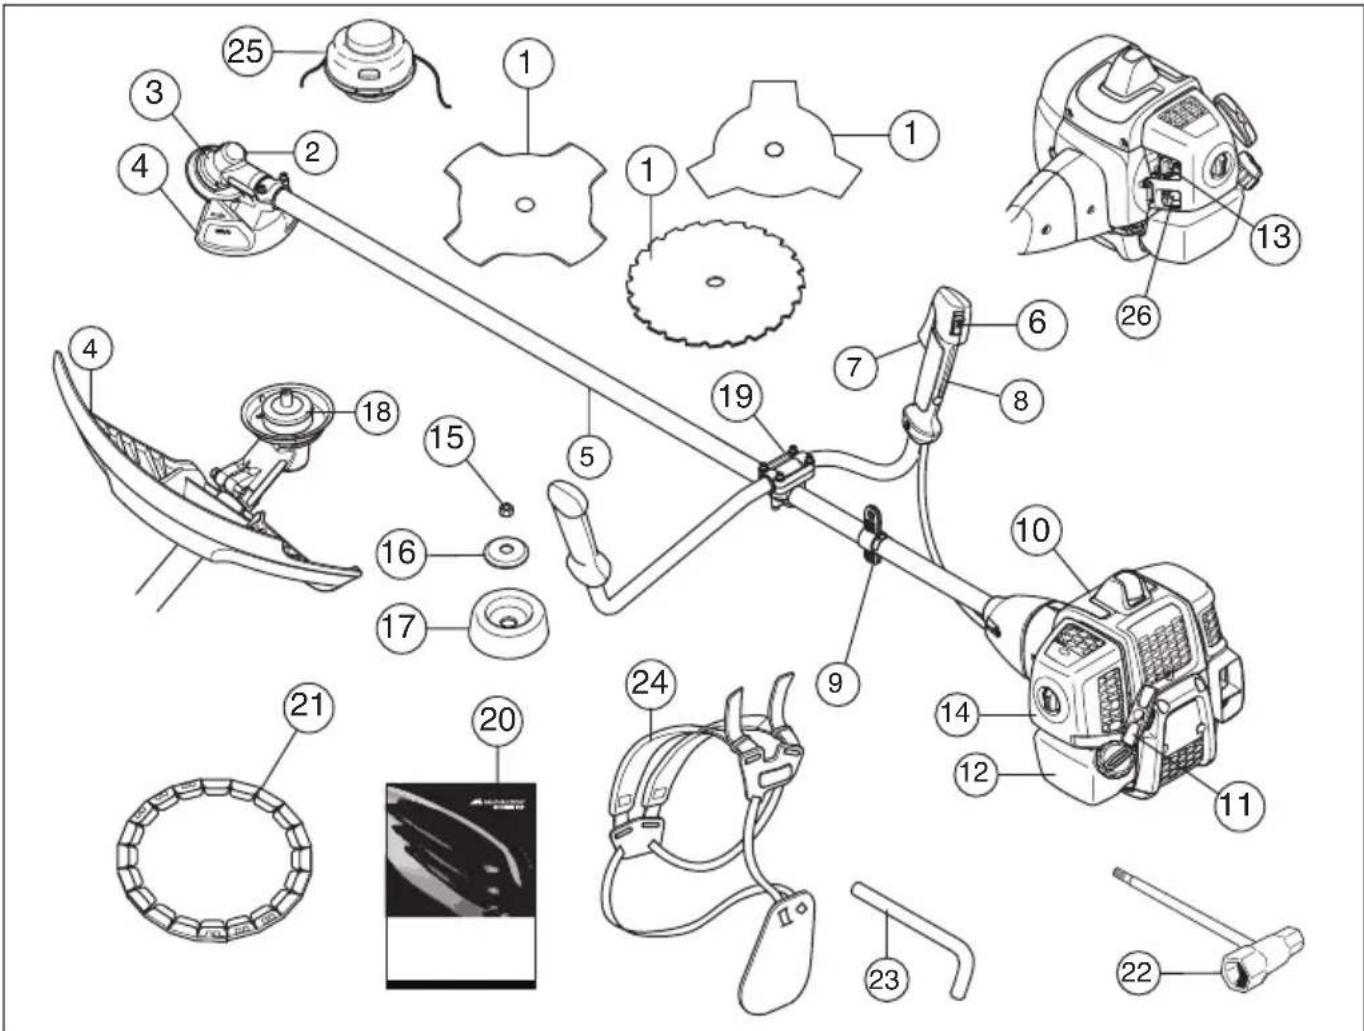
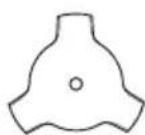
What is what on the brush cutter?
1 Blade
2 Grease filler cap, bevel gear
3 Bevel gear
4 Cutting attachment guard
5 Shaft
6 Stop switch
7 Throttle trigger
8 Throttle lockout
9 Suspension ring
10 Cylinder cover
11 Starter handle
12 Fuel tank
13 Choke control
14 Air filter cover
15 Locking nut
16 Support flange
17 Support cup
18 Drive disc
19 Handlebar clamp
20 Operator's manual
21 Transport guard
22 Socket spanner
23 Locking pin
24 Harness
25 Trimmer head
26 Air purge
Important
IMPORTANT!
The machine is only designed for trimming grass, grass clearing and/or forestry clearing.
The only accessories you can operate with this engine unit are the cutting attachments we recommend in the chapter on Technical data.
Never use the machine if you are tired, if you have drunk alcohol, or if you are taking medication that could affect your vision, your judgement or your co-ordination.
Wear personal protective equipment. See instructions under the "Personal protective equipment" heading.
Never use a machine that has been modified in any way from its original specification.
Never use a machine that is faulty. Carry out the safety checks, maintenance and service instructions described in this manual. Some maintenance and service measures must be carried out by trained and qualified specialists. See instructions under the Maintenance heading.
All covers, guards and handles must be fitted before starting. Ensure that the spark plug cap and ignition lead are undamaged to avoid the risk of electric shock.
The machine operator must ensure that no people or animals come closer than 15 metres while working. When several operators are working in the same area the safety distance should be at least twice the tree height and no less than 15 metres.
National or local regulations may regulate the use. Comply to given regulations.
Carry out an overall inspection of the machine before use. See the maintenance schedule.

WARNING! This machine produces an electromagnetic field during operation. This field may under some circumstances interfere with active or passive medical implants. To reduce the risk of serious or fatal injury, we recommend persons with medical implants to consult their physician and the medical implant manufacturer before operating this machine.

WARNING! Running an engine in a confined or badly ventilated area can result in death due to asphyxiation or carbon monoxide poisoning.

WARNING! Never allow children to use or be in the vicinity of the machine. As the machine is equipped with a spring-loaded stop switch and can be started by low speed and force on the starter handle, even small children under some circumstances can produce the force necessary to start the machine. This can mean a risk of serious personal injury. Therefore remove the spark plug cap when the machine is not under close supervision.
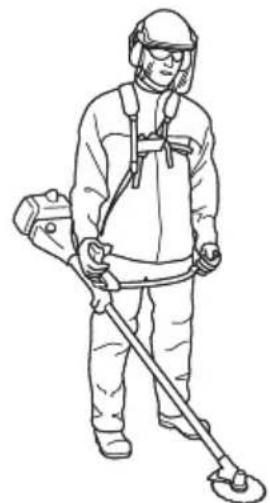
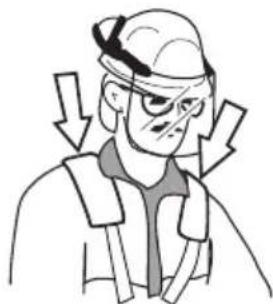
Personal protective equipment
IMPORTANT!
A clearing saw, brushcutter or trimmer can be dangerous if used incorrectly or carelessly, and can cause serious or fatal injury to the operator or others. It is extremely important that you read and understand the contents of this operator's manual.
You must use approved personal protective equipment whenever you use the machine. Personal protective equipment cannot eliminate the risk of injury but it will reduce the degree of injury if an accident does happen. Ask your dealer for help in choosing the right equipment.

WARNING! Listen out for warning signals or shouts when you are wearing hearing protection. Always remove your hearing protection as soon as the engine stops.
HELMET
A protective helmet where there is a risk of falling objects

HEARING PROTECTION
Wear hearing protection that provides adequate noise reduction.
EYE PROTECTION
Always wear approved eye protection. If you use a visor then you must also wear approved protective goggles. Approved protective goggles must comply with the ANSI Z87.1 standard in the USA or EN 166 in EU countries.
00
GENERAL SAFETY PRECAUTIONS
GLOVES
Gloves should be worn when necessary, e.g. when fitting cutting attachments.
BOOTS
Wear boots with steel toe-caps and non-slip sole.
CLOTHING
Wear clothes made of a strong fabric and avoid loose clothing that can catch on twigs and branches. Always wear heavy, long pants. Do not wear jewellery, shorts sandals or go barefoot. Secure hair so it is above shoulder level.
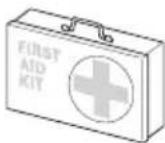
FIRST AID KIT
Always have a first aid kit nearby.
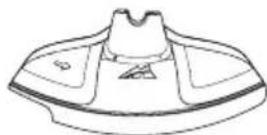
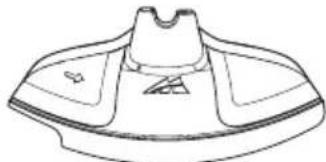
Machine's safety equipment
This section describes the machine's safety equipment, its purpose, and how checks and maintenance should be carried out to ensure that it operates correctly. See the "What is what?" section to locate where this equipment is positioned on your machine.
The life span of the machine can be reduced and the risk of accidents can increase if machine maintenance is not carried out correctly and if service and/or repairs are not carried out professionally. If you need further information please contact your nearest service workshop.
IMPORTANT! All servicing and repair work on the machine requires special training. This is especially true of the machine's safety equipment. If your machine fails any of the checks described below you must contact your service agent. When you buy any of our products we guarantee the availability of professional repairs and service. If the retailer who sells your machine is not a servicing dealer, ask him for the address of your nearest service agent.

WARNING! Never use a machine with faulty safety equipment. The machine's safety equipment must be checked and maintained as described in this section. If your machine fails any of these checks contact your service agent to get it repaired.
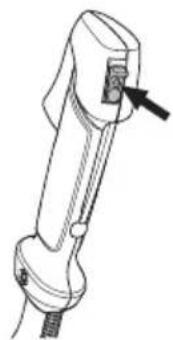
Throttle lockout
The throttle lockout is designed to prevent accidental operation of the throttle control. When you press the lock (A) (i.e. when you grasp the handle) it releases the throttle control (B). When you release the handle the throttle control and the throttle lockout both move back to their original positions. This movement is controlled by two independent return springs. This arrangement means that the throttle control is automatically locked at the idle setting.
Make sure the throttle control is locked at the idle setting when the throttle lockout is released.
Press the throttle lockout and make sure it returns to its original position when you release it.
GENERAL SAFETY PRECAUTIONS
Check that the throttle trigger and throttle lockout move freely and that the return springs work properly.

See instructions under the heading Start. Start the machine and apply full throttle. Release the throttle and check that the cutting attachment stops and remains at a standstill. If the cutting attachment rotates with the throttle in the idle position then the carburettor idle setting must be checked. See instructions under the heading Maintenance.
Stop switch
Use the stop switch to switch off the engine.

Start the engine and make sure the engine stops when you move the stop switch to the stop setting.
Cutting attachment guard

This guard is intended to prevent loose objects from being thrown towards the operator. The guard also protects the
operator from accidental contact with the cutting attachment.

Check that the guard is undamaged and not cracked. Replace the guard if it has been exposed to impact or is cracked.
Always use the recommended guard for the cutting attachment you are using. See chapter on Technical data.

WARNING! Never use a cutting attachment without an approved guard. See the chapter on Technical data. If an incorrect or faulty guard is fitted this can cause serious personal injury.
Vibration damping system

Your machine is equipped with a vibration damping system that is designed to minimize vibration and make operation easier.
Using incorrectly wound cord or a blunt or incorrect cutting attachment (wrong type or incorrectly filed, see instructions under the heading Filing the blade) increases the level of vibration.
GENERAL SAFETY PRECAUTIONS
The machine's vibration damping system reduces the transfer of vibration between the engine unit/cutting equipment and the machine's handle unit.
Check that the vibration damping element is undamaged and securely attached. Contact your McCulloch dealer to replace the vibration damping system. Visit www.mcculloch.com.

WARNING! Overexposure to vibration can lead to circulatory damage or nerve damage in people who have impaired circulation. Contact your doctor if you experience symptoms of overexposure to vibration. Such symptoms include numbness, loss of feeling, tingling, pricking, pain, loss of strength, changes in skin colour or condition. These symptoms normally appear in the fingers, hands or wrists. The risk increases at low temperatures.
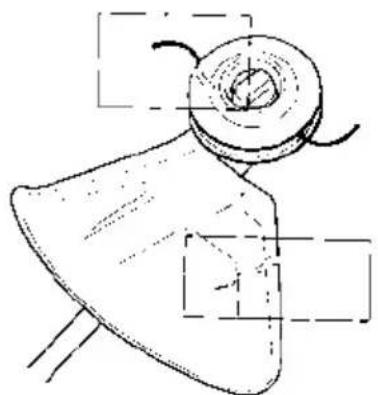
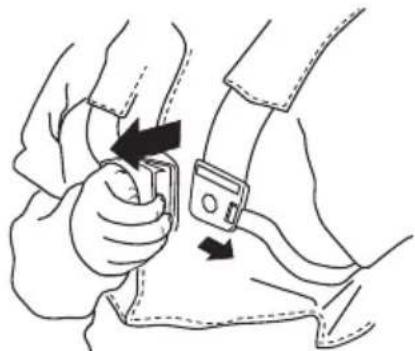
Quick release
There is an easily accessible, quick release fitted at the front as a safety precaution in case the engine catches fire, or in any other situation that requires you to free yourself from the machine and harness. See instructions under the heading Adjusting the harness and brush cutter.
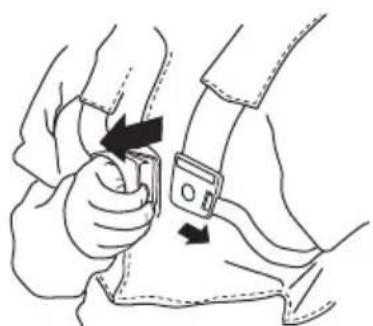
Check that the harness straps are correctly positioned. Once the harness and machine have been adjusted, check that the harness quick release works correctly.
Muffler
The muffler is designed to keep noise levels to a minimum and to direct exhaust fumes away from the user.
In countries that have a warm and dry climate there is a significant risk of fire. We therefore fit certain mufflers with a spark arrestor mesh. Check whether the muffler on your machine is fitted with this kind of mesh.
If the muffler on your machine is fitted with a spark arrestor mesh this must be cleaned regularly. A blocked mesh will cause the engine to overheat and may lead to serious damage.
GENERAL SAFETY PRECAUTIONS
For mufflers it is very important that you follow the instructions on checking, maintaining and servicing your machine. Regularly check that the muffler is securely attached to the machine. Never use a machine that has a faulty muffler.

WARNING! The inside of the muffler contain chemicals that may be carcinogenic. Avoid contact with these elements in the event of a damaged muffler.

WARNING! Bear in mind that: The exhaust fumes from the engine are hot and may contain sparks which can start a fire. Never start the machine indoors or near combustible material!
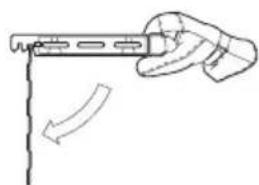
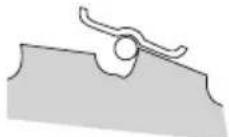
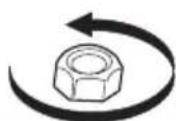
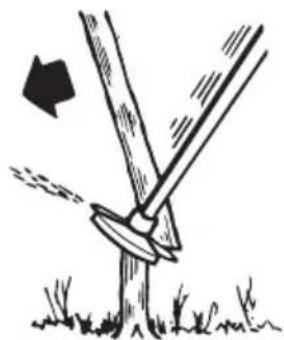
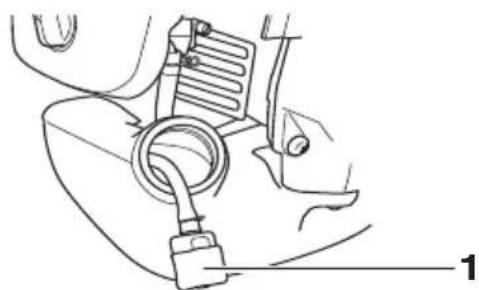
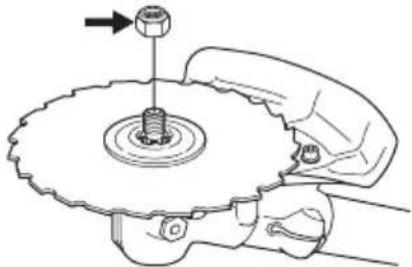
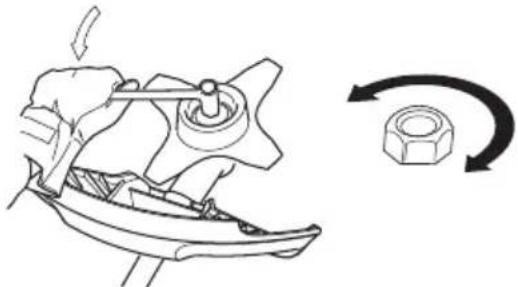
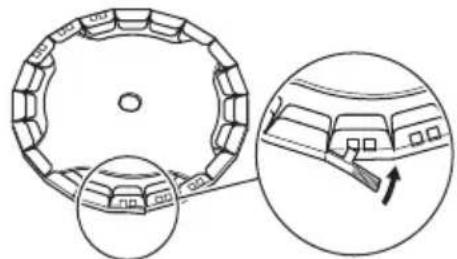
Locking nut
A locking nut is used to secure some types of cutting attachment.
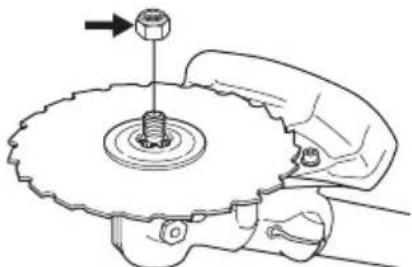
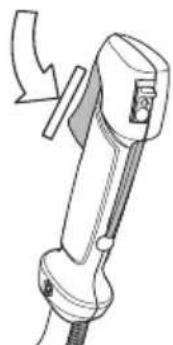
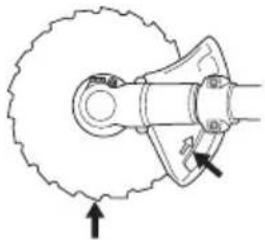
When fitting, tighten the nut in the opposite direction to the direction of rotation of the cutting attachment. To remove it, undo the nut in the same direction as the cutting attachment rotates. (CAUTION! The nut has a left-hand thread.) When loosening and tightening the saw blade nut, there is a risk of injury from the teeth of the saw blade. You should therefore always ensure that your hand is shielded by the blade guard when doing this. Always use a socket spanner with a shaft that is long enough to allow this. The arrow in the diagram shows the area where you
should operate the socket spanner when loosening or tightening the nut.
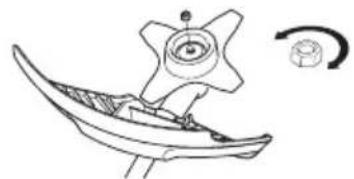
Tighten the nut using the socket spanner.
Cutting equipment
This section describes how to choose and maintain your cutting equipment in order to:
- Reduce the risk of blade thrust.
- Obtain maximum cutting performance.
- Extend the life of cutting equipment.
IMPORTANT!
Only use cutting attachments with the guards we recommend! See the chapter on Technical data.
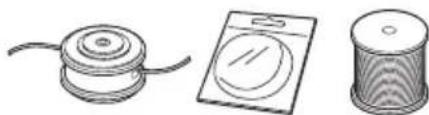
Refer to the instructions for the cutting attachment to check the correct way to load the cord and the correct cord diameter.
Keep the teeth of the blade correctly sharpened! Follow our recommendations. Also refer to the instructions on the blade packaging.
Maintain the correct blade setting! Follow our instructions and use the recommended file gauge.

WARNING! Always stop the engine before doing any work on the cutting attachment. This continues to rotate even after the throttle has been released. Ensure that the cutting attachment has stopped completely and disconnect the HT lead from the spark plug before you start to work on it.

WARNING! Using an incorrect cutting attachment or an incorrectly sharpened blade increases the risk of blade thrust.
GENERAL SAFETY PRECAUTIONS
Cutting equipment
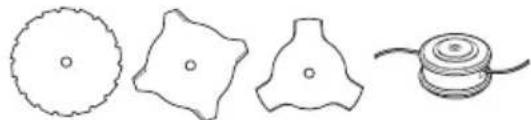
Saw blades are intended for cutting fibrous types of wood.
Grass blades and grass knives are intended for cutting coarse grass.

A trimmer head is intended for trimming grass.
General rules
Only use cutting attachments with the guards we recommend! See the chapter on Technical data.
Keep the teeth of the blade correctly sharpened! Follow our instructions and use the recommended file gauge. An incorrectly sharpened or damaged blade increases the risk of accidents.
Keep the correct setting on the saw blade! Follow our instructions and use the recommended setting tool. An incorrectly set saw blade increases the risk of jamming and blade thrust, and damage to the saw blade.
Check the cutting attachment for damage or cracks. A damaged cutting attachment should always be replaced.
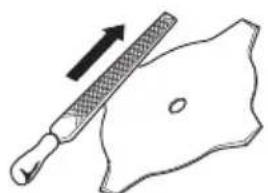
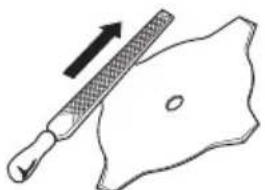
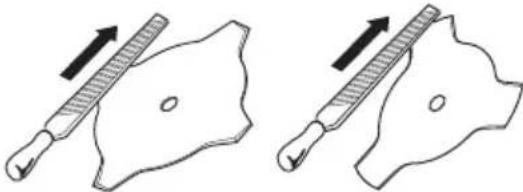
Sharpening grass knives and grass blades
- See the cutting attachment packaging for correct sharpening instructions. Sharpen blades and knives using a single-cut flat file.
- Sharpen all edges equally to maintain the balance of the blade.
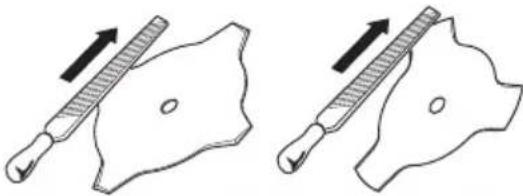

WARNING! Always discard a blade that is bent, twisted, cracked, broken or damaged in any other way. Never attempt to straighten a twisted blade so that it can be reused. Only use original blades of the specified type.
Sharpening the saw blade
- See the cutting attachment packaging for correct sharpening instructions.
A correctly sharpened blade is essential for working efficiently and to avoid unnecessary wear to the blade and brush cutter.
GENERAL SAFETY PRECAUTIONS
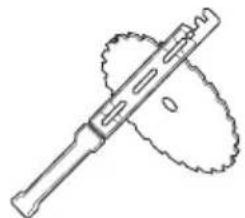
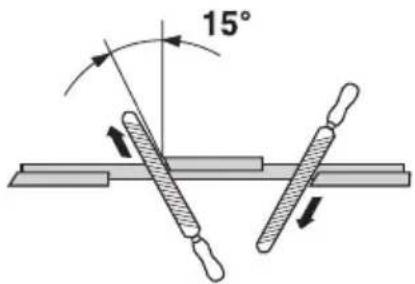
- Make sure that the blade is well supported when you file it. Use a 5.5mm round file with a file holder.
- The filing angle is 15^ . File alternate teeth to the right and those in between to the left. If the blade has been heavily pitted by stones it may be necessary to dress the top edges of the teeth with a flat file, in exceptional cases. If so, this should be done before filing with a round file. The top edges must be filed down by the same amount for all the teeth.
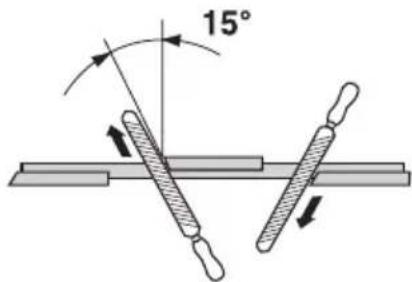
Adjust the blade setting. This should be 1mm
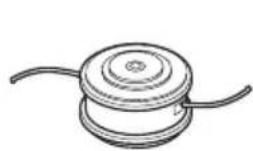
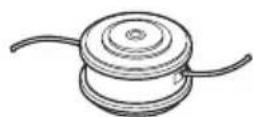
Trimmer head
IMPORTANT!
Always ensure the trimmer cord is wound tightly and evenly around the drum, otherwise the machine will generate harmful vibration.
- Only use the recommended trimmer heads and trimmer cords. These have been tested by the manufacturer to suit a particular engine size. This is especially important when a fully automatic trimmer head is used. Only use the recommended cutting attachment. See the chapter on Technical data.
- Smaller machines generally require small trimmer heads and vice versa. This is because when clearing using a cord the engine must throw out the cord radially from the trimmer head and overcome the resistance of the grass being cleared.
- The length of the cord is also important. A longer cord requires greater engine power than a shorter cord of the same diameter.
- Make sure that the cutter on the trimmer guard is intact. This is used to cut the cord to the correct length.
To increase the life of the cord it can be soaked in water for a couple of days. This will make the line tougher so that it lasts longer.
Assembling the handlebar and throttle

- Fit the handlebar in the handlebar clamp on the shaft using four screws.
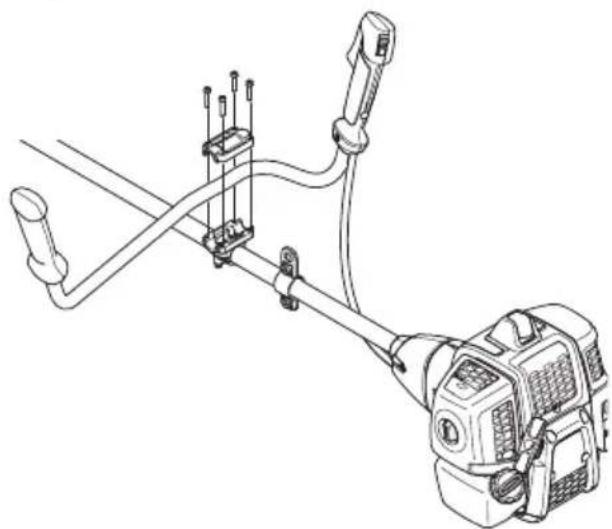
- Fit the protective sleeve as shown in the diagram.
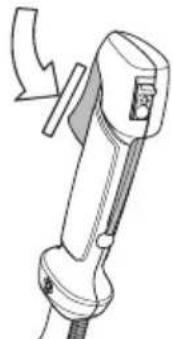
Fitting blades and trimmer heads

WARNING!
When fitting the cutting attachment it is extremely important that the raised section on the drive disc/support flange engages correctly in the centre hole of the cutting attachment. If the cutting attachment is fitted incorrectly it can result in serious and/or fatal personal injury.


WARNING! Never use a cutting attachment without an approved guard. See the chapter on Technical data. If an incorrect or faulty guard is fitted this can cause serious personal injury.
IMPORTANT! If a saw blade or grass blade are to be used the machine must be equipped with the correct handlebar, blade guard and harness.
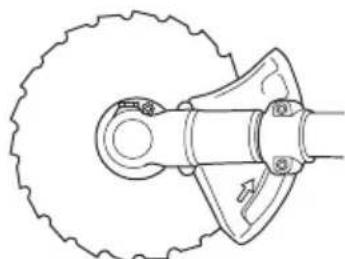
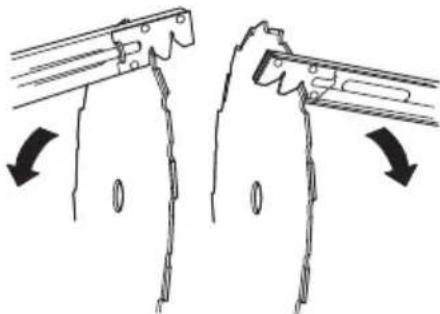
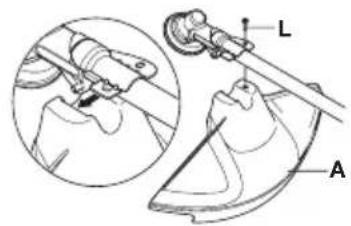
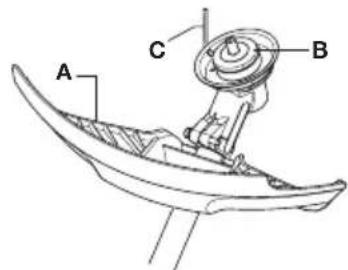
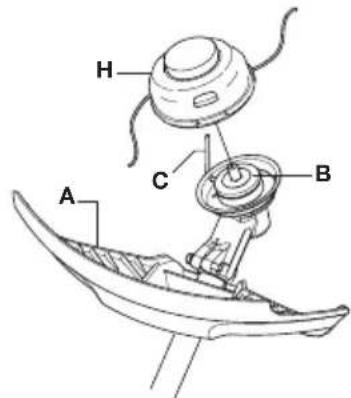
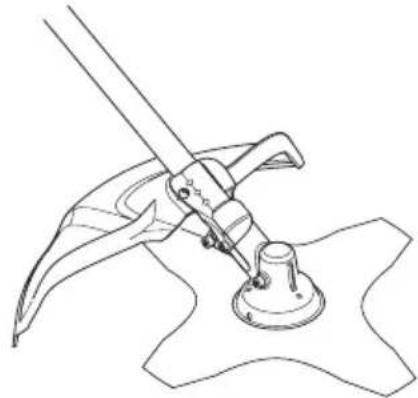
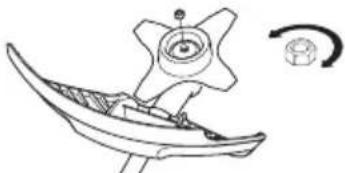
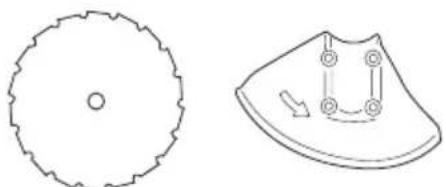
Fitting a blade guard, grass blade and grass cutter

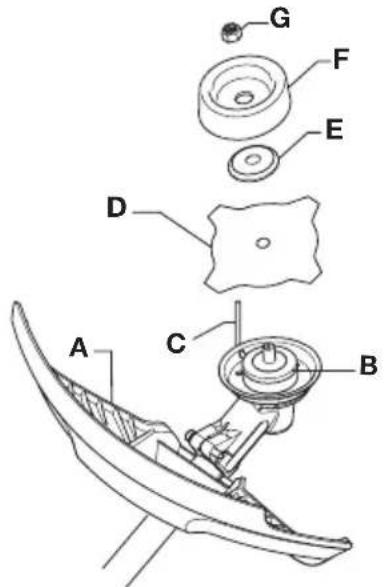
- Hook the blade guard/combination guard (A) onto the fitting on the shaft and secure with the bolt (L). Use the recommended blade guard. See the Technical data section.
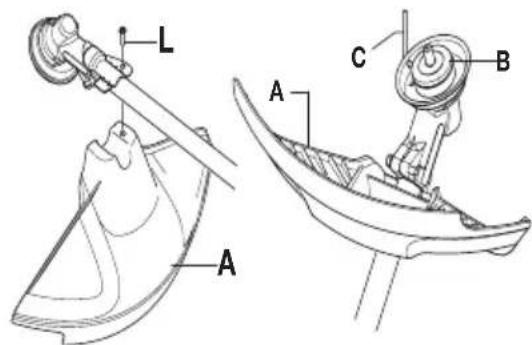
- Fit the drive disc (B) on the output shaft.
- Turn the output shaft until one of the holes in the drive disc aligns with the corresponding hole in the gear housing.
- Insert the locking pin (C) in the hole to lock the shaft.
- Place the blade (D), support flange (E) and support cup (F) on the output shaft.
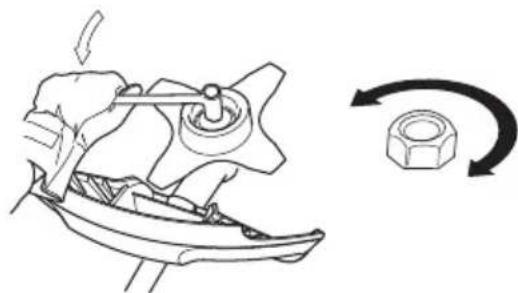
- Fit the nut (G). The nut must be tightened to a torque of 35-50 Nm (3.5-5 kpm). Use the socket spanner in the tool kit. Hold the shaft of the spanner as close to the blade guard as possible. To tighten the nut, turn the spanner in the opposite direction to the direction of rotation (Caution! left-hand thread).

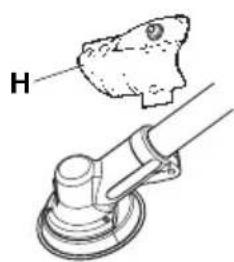
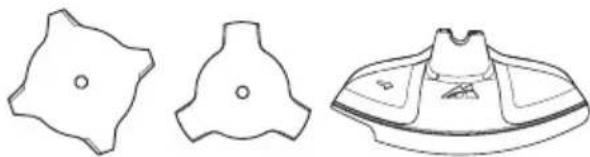
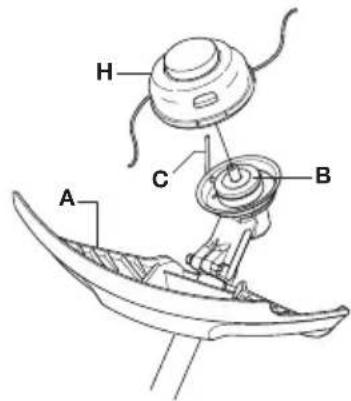
Fitting the trimmer guard and trimmer head
- Fit the correct trimmer guard (A) for use with the trimmer head.
- Hook the trimmer guard/combination guard onto the fitting on the shaft and secure with the bolt (L).
- Fit the drive disc (B) on the output shaft.
- Turn the output shaft until one of the holes in the drive disc aligns with the corresponding hole in the gear housing.
- Insert the locking pin (C) in the hole to lock the shaft.
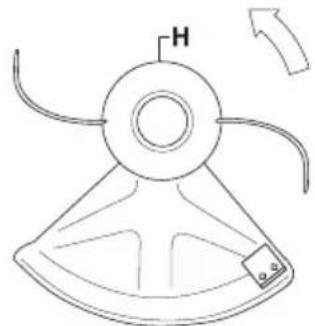
- Screw on the trimmer head/plastic blades (H) anticlockwise.

- To dismantle, follow the instructions in the reverse order.
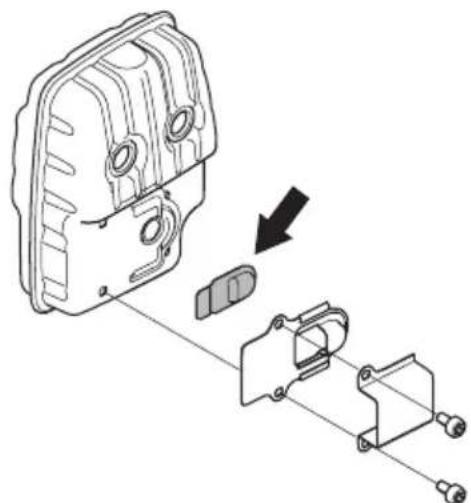
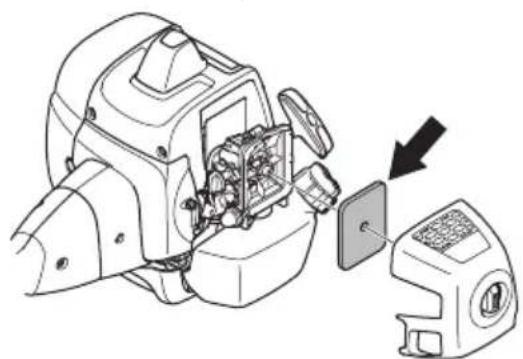
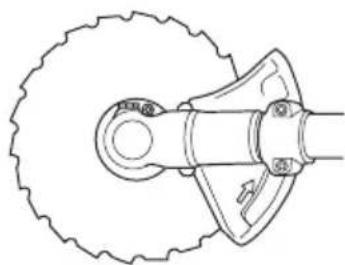
Fitting the blade guard and saw blade
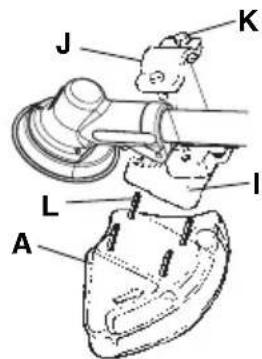
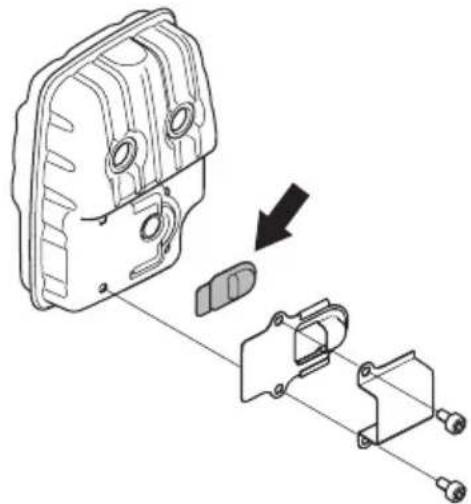
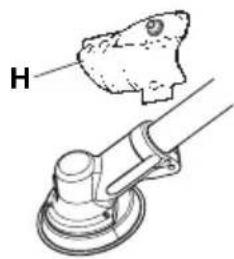
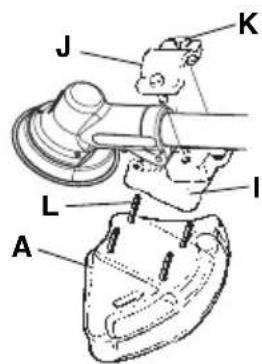
- Remove the mounting plate (H). Fit the adapter (I) and bracket (J) with the two screws (K) as shown. Fit the blade guard (A) to the adapter using the 4 screws (L) as shown.
CAUTION! Always use the recommended guard for the cutting attachment you are using. See chapter on Technical data.
- Fit the drive disc (B) on the output shaft.
- Turn the output shaft until one of the holes in the drive disc aligns with the corresponding hole in the gear housing.
- Insert the locking pin (C) in the hole to lock the shaft.
- Place the blade (D) and support flange (F) on the output shaft.
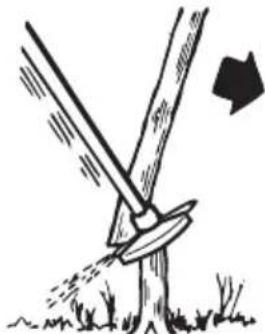
- Fit the nut (G). The nut must be tightened to a torque of 35-50 Nm (3.5-5 kpm). Use the socket spanner in the tool kit. Hold the shaft of the spanner as close to the blade guard as possible. To tighten the nut, turn
the spanner in the opposite direction to the direction of rotation (Caution! left-hand thread).

- When loosening and tightening the saw blade nut, there is a risk of injury from the teeth of the saw blade. You should therefore always ensure that your hand is shielded by the blade guard when doing this. Always use a socket spanner with a shaft that is long enough to allow this. The arrow in the diagram shows the area where you should operate the socket spanner when loosening or tightening the nut.
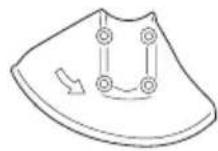
Fitting the transport guard

Attach the transport cover on the blade as shown.
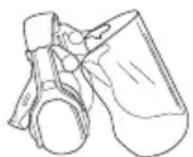
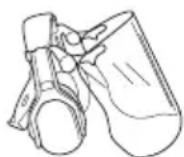
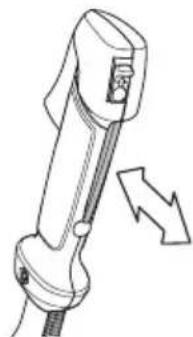
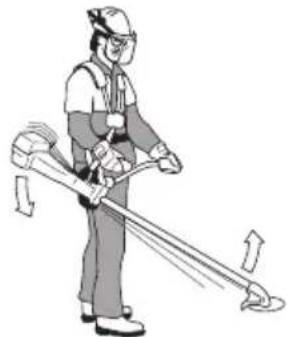
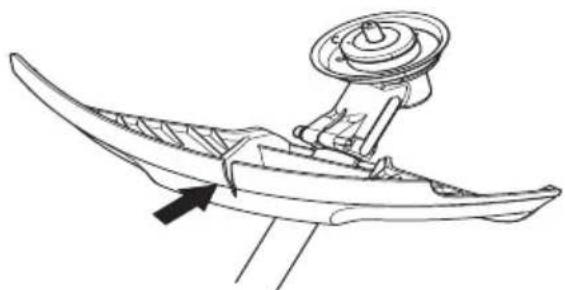
Adjusting the harness and brush cutter

WARNING! When using a brush cutter it must always be hooked securely to the harness. Otherwise you will be unable to control the brush cutter safely and this can result in injury to yourself or others. Never use a harness with a defective quick release.
Quick release
At the front is an easily accessible, quick release. Use this if the engine catches fire or in any other emergency situation that requires you to free yourself from the machine and harness.

Spreading the load on your shoulders
A well-adjusted harness and machine makes work much easier. Adjust the harness for the best working position. Tension the side straps so that the weight is evenly distributed across both shoulders.
Correct height
Adjust the shoulder strap so that the cutting attachment is parallel to the ground.
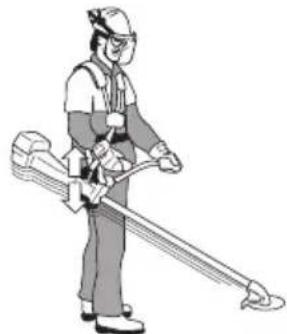
Correct balance
Let the cutting attachment rest lightly on the ground. Adjust the position of the suspension ring to balance the brush cutter correctly.
Fuel safety
Never start the machine:
1 If you have spilt fuel on it. Wipe off the spillage and allow remaining fuel to evaporate.
2 If you have spilt fuel on yourself or your clothes, change your clothes. Wash any part of your body that has come in contact with fuel. Use soap and water.
3 If the machine is leaking fuel. Check regularly for leaks from the fuel cap and fuel lines.
Transport and storage
- Store and transport the machine and fuel so that there is no risk of any leakage or fumes coming into contact with sparks or naked flames, for example, from electrical machinery, electric motors, electrical relays/ switches or boilers.
- When storing and transporting fuel always use approved containers intended for this purpose.
- When storing the machine for long periods the fuel tank must be emptied. Contact your local petrol station to find out where to dispose of excess fuel.
- Ensure the machine is cleaned and that a complete service is carried out before long-term storage.
- The transport guard must always be fitted to the cutting attachment when the machine is being transported or in storage.
- Secure the machine during transport.
- In order to prevent unintentional starting of the engine, the spark plug cap must always be removed during long-term storage, if the machine is not under close supervision and when performing all service measures.

WARNING! Take care when handling fuel. Bear in mind the risk of fire, explosion and inhaling fumes.
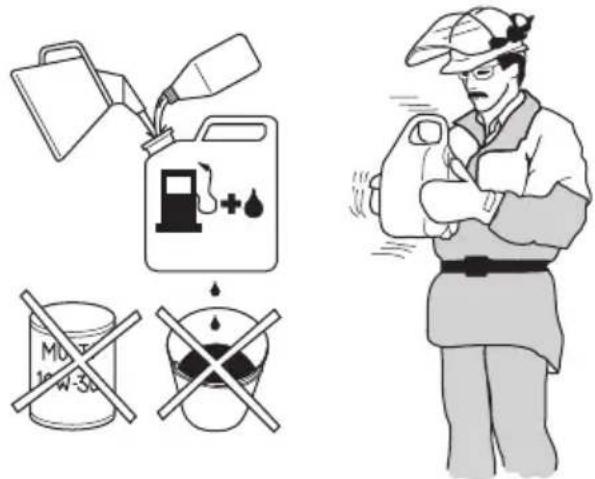
Fuel
CAUTION! The machine is equipped with a two-stroke engine and must always been run using a mixture of petrol and two-stroke oil. It is important to accurately measure the amount of oil to be mixed to ensure that the correct mixture is obtained. When mixing small amounts of fuel, even small inaccuracies can drastically affect the ratio of the mixture.

WARNING! Fuel and fuel fumes are highly inflammable and can cause serious injury when inhaled or allowed to come in contact with the skin. For this reason observe caution when handling fuel and make sure there is adequate ventilation.
Petrol

CAUTION! Always use a quality petrol/oil mixture at least 90 octane (RON). If your machine is equipped with a catalytic converter (see chapter on Technical data) always use a good quality unleaded petrol/oil mixture. Leaded petrol will destroy the catalytic converter.
Use low-emission petrol, also known as alkylate petrol, if it is available.
Ethanol blended fuel, E10 may be used (max 10% ethanol blend). Using ethanol blends higher than E10 will create lean running condition which can cause engine damage.
- The lowest octane recommended is 90 (RON). If you run the engine on a lower octane grade than 90 so-called knocking can occur. This gives rise to a high engine temperature, which can result in serious engine damage.
- When working at continuous high revs a higher octane rating is recommended.
Two-stroke oil
- For best results and performance use Universal, Universal powered by McCULLOCH two-stroke engine oil, which is specially formulated for our air-cooled two-stroke engines.
- Never use two-stroke oil intended for water-cooled engines, sometimes referred to as outboard oil (rated TCW).
- Never use oil intended for four-stroke engines.
- A poor oil quality and/or too high oil/fuel ratio may jeopardise function and decrease the life time of catalytic converters.
- Mixing ratio
1:50 (2%) with Universal, Universal powered by McCULLOCH two-stroke oil.
1:33 (3%) with oils class JASO FB or ISO EGB formulated for air-cooled, two-stroke engines.
| Petrol, litre | Two-stroke oil, litre | |
| 2% (1:50) | 3% (1:33) | |
| 5 0,10 0,15 | ||
| 10 0,20 0,30 | ||
| 15 0,30 0,45 | ||
| 20 0,40 0,60 | ||
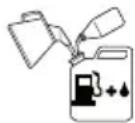
Mixing
Always mix the petrol and oil in a clean container intended for fuel.
- Always start by filling half the amount of the petrol to be used. Then add the entire amount of oil. Mix (shake) the fuel mixture. Add the remaining amount of petrol.
- Mix (shake) the fuel mixture thoroughly before filling the machine's fuel tank.
- Do not mix more than one month's supply of fuel at a time.
- If the machine is not used for some time the fuel tank should be emptied and cleaned.
Fueling


WARNING! Taking the following precautions, will lessen the risk of fire:
Mix and pour fuel outdoors, where there are no sparks or flames.
Do not smoke or place hot objects near fuel.
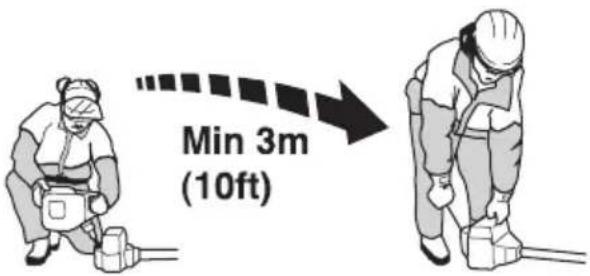
Always shut off the engine before refuelling.
Always stop the engine and let it cool for a few minutes before refuelling.
When refuelling, open the fuel cap slowly so that any excess pressure is released gently.
Tighten the fuel cap carefully after refuelling.
Always move the machine away from the refuelling area and source before starting.
Always use a fuel container with an anti-spill valve.
- If you have spilt fuel on it. Wipe off the spillage and allow remaining fuel to evaporate.
- Clean the area around the fuel cap. Contamination in the tank can cause operating problems.
- Ensure that the fuel is well mixed by shaking the container before filling the tank.
Check before starting

- Check the blade to ensure that no cracks have formed at the bottom of the teeth or by the centre hole. The most common reason why cracks are formed is that sharp corners have been formed at the bottom of the teeth while sharpening or that the blade has been used with dull teeth. Discard a blade if cracks are found.

- Check that the support flange is not cracked due to fatigue or due to being tightened too much. Discard the support flange if it is cracked.
- Ensure the locking nut has not lost its captive force. The nut lock should have a locking force of at least 1.5 Nm. The tightening torque of the locking nut should be 35-50 Nm.
- Check that the blade guard is not damaged or cracked. Replace the blade guard if it is exposed to impact or is cracked.
- Check that the trimmer head and trimmer guard are not damaged or cracked. Replace the trimmer head or
trimmer guard if they have been exposed to impact or are cracked.
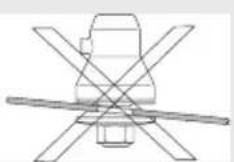
- Never use the machine without a guard nor with a defective guard.
- All covers must be correctly fitted and undamaged before you start the machine.
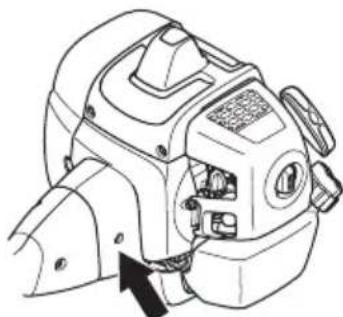
Starting and stopping


WARNING! The complete clutch cover and shaft must be fitted before the machine is started, otherwise the clutch can come loose and cause personal injury.
Always move the machine away from the refuelling area and source before starting. Place the machine on a flat surface. Ensure the cutting attachment cannot come into contact with any object.
Make sure no unauthorised persons are in the working area. Otherwise there is a risk of serious personal injury. The safety distance is 15 metres.
Starting

Ignition: Set the stop switch to the start position.
Choke:
Set the choke control in the choke position.
STARTING AND STOPPING
Primer bulb:

Press the air purge repeatedly until fuel begins to fill the bulb. The bulb need not be completely filled.

WARNING! When the engine is started with the choke in either the choke or start throttle positions the cutting attachment will start to rotate immediately.
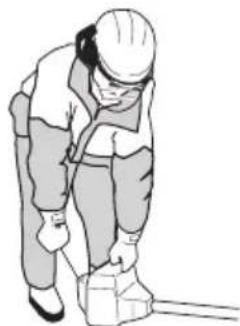
Hold the body of the machine on the ground using your left hand (CAUTION! Not with your foot!). Grip the starter handle, slowly pull out the cord with your right hand until you feel some resistance (the starter paws grip), now quickly and powerfully pull the cord. Never twist the starter cord around your hand.
Repeat pulling the cord until the engine starts. When the engine starts, return choke control to run position and apply full throttle; the throttle will automatically disengage from the start setting.
CAUTION! Do not pull the starter cord all the way out and do not let go of the starter handle when the cord is fully extended. This can damage the machine.
CAUTION! Do not put any part of your body in marked area. Contact can result in burns to the skin, or electrical shock if the spark plug cap has been damaged. Always use gloves. Do not use a machine with damaged spark plug cap.
Stopping

Stop the engine by switching off the ignition.
CAUTION! Stop the engine by switching off the ignition.
General working instructions
IMPORTANT!
This section describes the basic safety precautions for working with brush cutters and trimmers.
If you encounter a situation where you are uncertain how to proceed you should ask an expert. Contact your dealer or your service workshop.
Avoid all usage which you consider to be beyond your capability.
You must understand the difference between forestry clearing, grass clearing and grass trimming before use.
Basic safety rules

1 Look around you:
To ensure that people, animals or other things cannot affect your control of the machine.
To ensure that people, animals, etc., do not come into contact with the cutting attachment or loose objects that are thrown out by the cutting attachment.
- CAUTION! Do not use the machine unless you are able to call for help in the event of an accident.
2 Inspect the working area. Remove all loose objects, such as stones, broken glass, nails, steel wire, string, etc. that could be thrown out or become wrapped around the cutting attachment.
3 Do not use the machine in bad weather, such as dense fog, heavy rain, strong wind, intense cold, etc. Working in bad weather is tiring and often brings added risks, such as icy ground, unpredictable felling direction, etc.
4 Make sure you can move and stand safely. Check the area around you for possible obstacles (roots, rocks, branches, ditches, etc.) in case you have to move suddenly. Take great care when working on sloping ground.
5 Take great care when cutting a tree that is in tension. A tree that is in tension may spring back to its normal position before or after being cut. If you position
yourself incorrectly or make the cut in the wrong place the tree may hit you or the machine and cause you to lose control. Both situations can cause serious personal injury.
6 Keep a good balance and a firm foothold. Do not overreach. Keep proper footing and balance at all times.
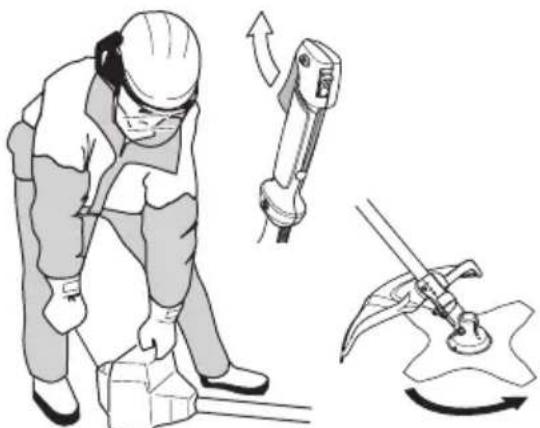
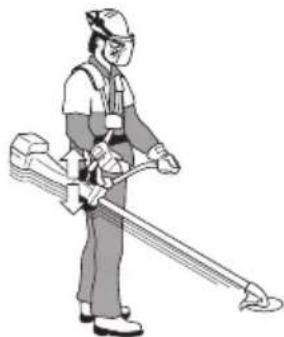
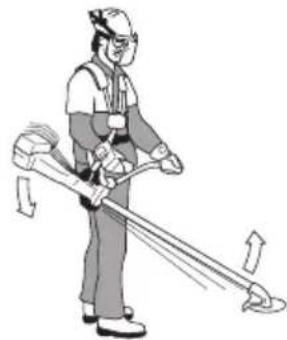
7 Connect the machine to the suspension ring on the harness. Always hold the machine with both hands. Hold the machine on the right side of your body. Keep all parts of your body away from the hot surfaces. Keep all parts of your body away from the rotating cutting attachment.
8 Keep the cutting attachment below waist level.
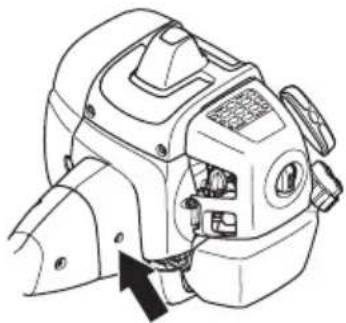
9 Switch off the engine before moving to another area. Fit the transport guard before carrying or transporting the equipment any distance.
10 Never put the machine down with the engine running unless you have it in clear sight.
The ABC of clearing
Always use the correct equipment.
- Make sure the equipment is well adjusted.
- Follow the safety precautions.
- Organise your work carefully.
Always use full throttle when starting to cut with the blade.
Always use sharp blades.
- Avoid stones.
Control the felling direction (take advantage of the wind).

WARNING! Neither the operator of the machine nor anyone else may attempt to remove the cut material while the engine is running or the cutting equipment is rotating, as this can result in serious injury.
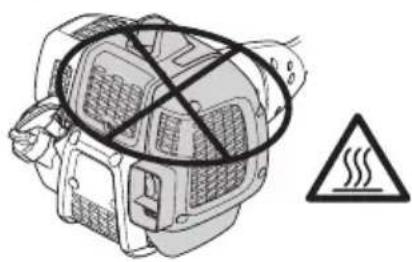
Stop the engine and cutting equipment before you remove material that has wound around the blade shaft as otherwise there is a risk of injury. The bevel gear can get hot during use and may remain so for a while afterwards. You could get burnt if you touch it.

WARNING! Watch out for thrown objects. Always wear approved eye protection. Never lean over the cutting attachment guard. Stones, rubbish, etc. can be thrown up into the eyes causing blindness or serious injury.
Keep unauthorised persons at a distance. Children, animals, onlookers and helpers should be kept outside the safety zone of 15 metres. Stop the machine immediately if anyone approaches. Never swing the machine around without first checking behind you to make sure no-one is within the safety zone.

WARNING! Sometimes branches or grass get caught between the guard and cutting attachment. Always stop the engine before cleaning.
Working methods

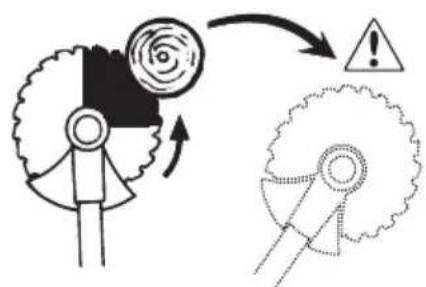
WARNING! Machines fitted with saw blades or grass blades can be thrown violently to the side when the blade comes into contact with a fixed object. This is called blade thrust. A blade thrust can be violent enough to cause the machine and/or operator to be propelled in any direction, and possibly lose control of the machine. Blade thrust can occur without warning if the machine snags, stalls or binds. Blade thrust is more likely to occur in areas where it is difficult to see the material being cut.
Avoid cutting with the area of the blade between the 12 o'clock and 3 o'clock positions. Because of the speed of rotation of the blade, blade thrust can occur if you attempt to cut thick stems with this area of the blade.
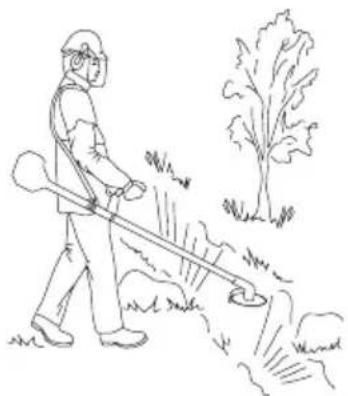
- Before you start clearing, check the clearing area, the type of terrain, the slope of the ground, whether there are stones, hollows etc.
-
Start at whichever end of the area is easiest, and clear an open space from which to work.
-
Work systematically to and fro across the area, clearing a width of around 4-5 m on each pass. This exploits the full reach of the machine in both directions and gives the operator a convenient and varied working area to work in.
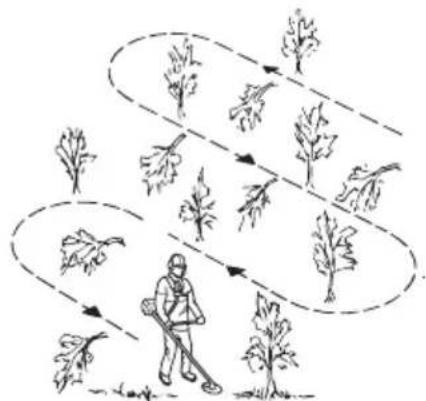
- Clear a strip around 75m long. Move your fuel can as work progresses.
- On sloping ground you should work along the slope. It is much easier to work along a slope than it is to work up and down it.
- You should plan the strip so that you avoid going over ditches or other obstacles on the ground. You should also orient the strip to take advantage of wind conditions, so that cleared stems fall in the cleared area of the stand.
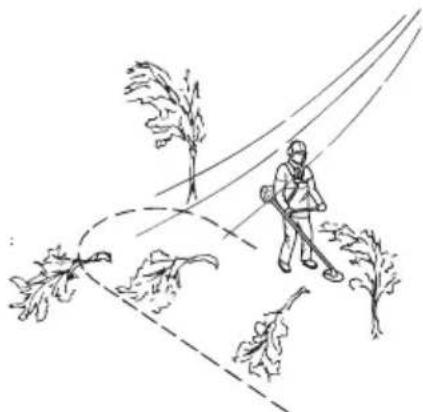
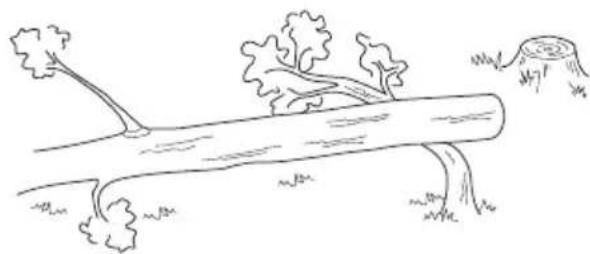
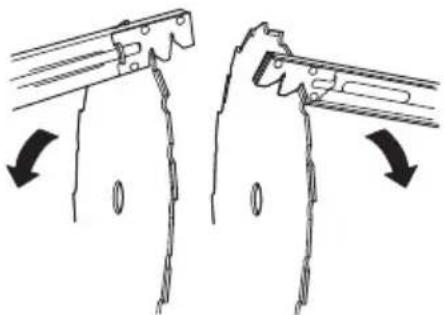
Forestry clearing using a saw blade


- The risk of blade thrust increases with increasing stem size. You should therefore avoid cutting with the area of the blade between 12 o'clock and 3 o'clock.
To fell to the left, the bottom of the tree should be pushed to the right. Tilt the blade and bring it
English - 21
diagonally down to the right, exerting firm pressure. At the same time push the stem using the blade guard. Cut with the area of the blade between 3 o'clock and 5 o'clock. Apply full throttle before advancing the blade.

- To fell to the right, the bottom of the tree should be pushed to the left. Tilt the blade and bring it diagonally up to the right. Cut with the area of the blade between 3 o'clock and 5 o'clock so that the direction of rotation of the blade pushes the bottom of the tree to the left.
- To fell a tree forwards, the bottom of the tree should be pulled backwards. Pull the blade backwards with a quick, firm movement.
- Large stems must be cut from two sides. First determine which direction the stem will fall. Make the first cut on the felling side. Then finish cutting the stem from the other side. Adjust the cutting pressure to match the size of the stem and the hardness of the
wood. Small stems require more pressure, while large stems require less pressure.
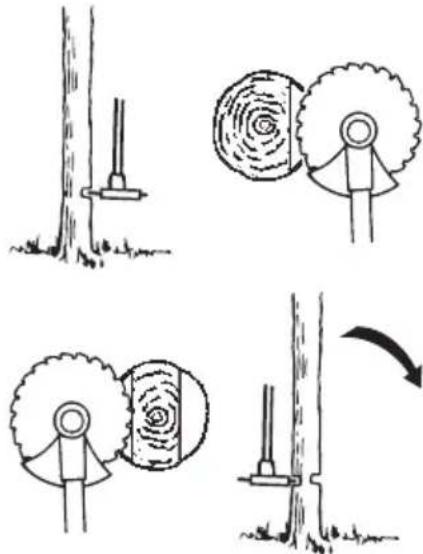
- If the stems are tightly packed, adapt your walking pace to suit.
- If the blade jams in a stem, never jerk the machine free. If you do this the blade, bevel gear, shaft or handlebar may be damaged. Release the handles, grip the shaft with both hands and gently pull the machine free.
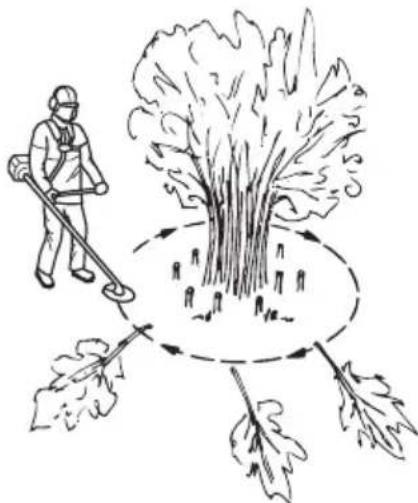
Brush cutting with a saw blade


- Thin stems and brush are mown down. Work with a sawing movement, swinging sideways.
- Try to cut several stems in a single sawing movement.
- With groups of hardwood stems, first clear around the group. Start by cutting the stems high up around the outside of the group to avoid jamming. Then cut the stems to the required height. Now try to reach in with the blade and cut from the centre of the group. If it is still difficult to gain access, cut the stems high up and let them fall. This will reduce the risk of jamming.
Grass clearing using a grass blade


- Grass blades and grass knives must not be used on woody stems.
- A grass blade is used for all types of tall or coarse grass.
The grass is cut down with a sideways, swinging movement, where the movement from right-to-left is the clearing stroke and the movement from left-to-right is the return stroke. Let the left-hand side of the blade (between 8 and 12 o'clock) do the cutting.
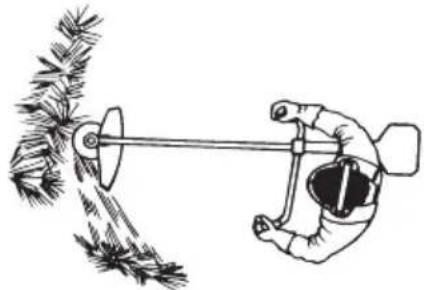
- If the blade is angled to the left when clearing grass, the grass will collect in a line, which makes it easier to collect, e.g. by raking.
Try to work rhythmically. Stand firmly with your feet apart. Move forward after the return stroke and stand firmly again. - Let the support cup rest lightly against the ground. It is used to protect the blade from hitting the ground.
- Reduce the risk of material wrapping around the blade by following these instructions:
1Always work at full throttle.
2Avoid the previously cut material during the return stroke.
- Stop the engine, unclip the harness and place the machine on the ground before you start to collect the cut material.
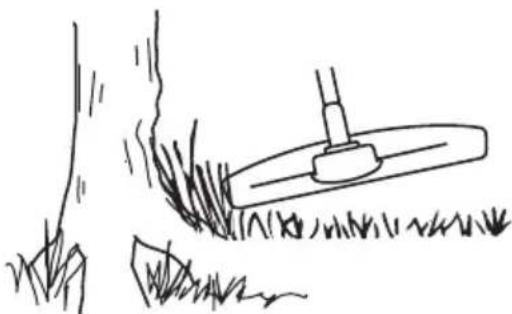
Grass trimming with a trimmer head


Trimming
- Hold the trimmer head just above the ground at an angle. It is the end of the cord that does the work. Let the cord work at its own pace. Never press the cord into the area to be cut.

-
The cord can easily remove grass and weeds up against walls, fences, trees and borders. However it can also damage sensitive bark on trees and bushes, and damage fence posts.
-
Reduce the risk of damaging plants by shortening the cord to 10-12 cm and reducing the engine speed.
Clearing
- The clearing technique removes all unwanted vegetation. Keep the trimmer head just above the ground and tilt it. Let the end of the cord strike the ground around trees, posts, statues and the like. CAUTION! This technique increases the wear on the cord.
- The cord wears quicker and must be fed forward more often when working against stones, brick, concrete, metal fences, etc., than when coming into contact with trees and wooden fences.
- When trimming and clearing, you should use less than full throttle (80%) so that the cord lasts longer and to reduce the wear on the trimmer head.
Cutting
- The trimmer is ideal for cutting grass that is difficult to reach using a normal lawn mower. Keep the cord parallel to the ground when cutting. Avoid pressing the trimmer head against the ground as this can ruin the lawn and damage the tool.

- Do not allow the trimmer head to constantly come into contact with the ground during normal cutting. Constant contact of this type can cause damage and wear to the trimmer head.
Sweeping
- The fan effect of the rotating cord can be used for quick and easy clearing up. Hold the cord parallel to and above the area to be swept and move the tool to and fro.

- When cutting and sweeping you should use full throttle to obtain the best results.
Carburettor
Adjusting the idle speed (T)
Check that the air filter is clean. When the idle speed is correct, the cutting attachment should not rotate. If adjustment is required, close (turn clockwise) the idle adjustment screw T, with the engine running, until the cutting attachment starts to rotate. Open (turn anticlockwise) the screw until the cutting attachment stops. The idle speed is correctly set when the engine runs smoothly in all positions, and there is a clear margin to the speed at which the cutting attachment starts to rotate.
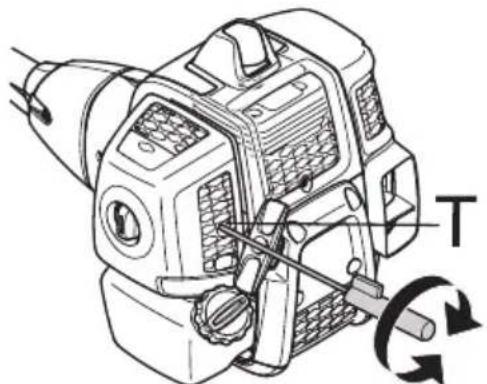
Rec. idle speed: See the Technical data section.

WARNING! If the idle speed cannot be adjusted so that the cutting attachment stops, contact your dealer/service workshop. Do not use the machine until it has been correctly adjusted or repaired.
Muffler
CAUTION! Some mufflers are fitted with a catalytic converter. See chapter on Technical data to see whether your machine is fitted with a catalytic converter.
The muffler is designed to reduce the noise level and to direct the exhaust gases away from the operator. The exhaust gases are hot and can contain sparks, which may
cause fire if directed against dry and combustible material.
Some mufflers are equipped with a special spark arrestor mesh. If your machine has this type of muffler, you should clean the mesh at least once a week. This is best done with a wire brush.
On mufflers without a catalytic converter the mesh should be cleaned weekly, or replaced if necessary. On mufflers fitted with a catalytic converter the mesh should be checked, and if necessary cleaned, monthly. If the mesh is damaged it should be replaced.

If the mesh is frequently blocked, this can be a sign that the performance of the catalytic converter is impaired. Contact your dealer to inspect the muffler. A blocked mesh will cause the machine to overheat and result in damage to the cylinder and piston.
CAUTION! Never use a machine with a defective muffler.

WARNING! Mufflers fitted with catalytic converters get very hot during use and remain so for some time after stopping. This also applies at idle speed. Contact can result in burns to the skin. Remember the risk of fire!
Cooling system

To keep the working temperature as low as possible the machine is equipped with a cooling system.
The cooling system consists of:
1 Cooling fins on the cylinder.
2 Air intake.
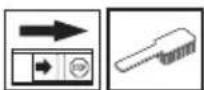
Clean the cooling system with a brush once a week, more often in demanding conditions. A dirty or blocked cooling system results in the machine overheating which causes damage to the piston and cylinder.
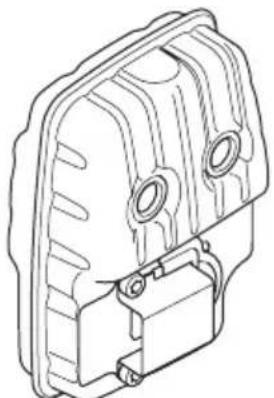
Air filter
The air filter must be regularly cleaned to remove dust and dirt in order to avoid:
- Carburettor malfunctions
Starting problems - Loss of engine power
- Unnecessary wear to engine parts.
- Excessive fuel consumption.
Clean the filter every 25 hours, or more regularly if conditions are exceptionally dusty.
Cleaning the air filter
Remove the air filter cover and take out the filter. Blow clean with compressed air.
An air filter that has been in use for a long time cannot be cleaned completely. The filter must therefore be replaced with a new one at regular intervals. A damaged air filter must always be replaced.
Fuel filter
1 Fuel filter
When the engine runs short of fuel supply, check the fuel cap and the fuel filter for blockage.
Bevel gear

The bevel gear is filled with the right quantity of grease at the factory. However, before using the machine you should check that the bevel gear is filled three-quarters full with grease. Use HUSQVARNA special grease.
The grease in the bevel gear does not normally need to be changed except if repairs are carried out.
Spark plug

The spark plug condition is influenced by:
- Incorrect carburettor adjustment.
- An incorrect fuel mixture (too much or incorrect type of oil).
A dirty air filter.
These factors cause deposits on the spark plug electrodes, which may result in operating problems and starting difficulties.
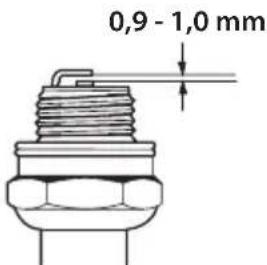
If the machine is low on power, difficult to start or runs poorly at idle speed: always check the spark plug first before taking any further action. If the spark plug is dirty, clean it and check that the electrode gap is 0,9 - 1,0mm . The spark plug should be replaced after about a month in operation or earlier if necessary.
CAUTION! Always use the recommended spark plug type! Use of the wrong spark plug can damage the piston/ cylinder. Check that the spark plug is fitted with a suppressor.
MAINTENANCE
Maintenance schedule
The following is a list of the maintenance steps that must be performed on the machine. Most of the items are described in the Maintenance section. The user must only carry out the maintenance and service work described in this Operator's Manual. More extensive work must be carried out by an authorized service workshop.
| Maintenance | Daily maintenance | Weekly maintenance | Monthly maintenance |
| Clean the outside of the machine. X | |||
| Check that the harness is not damaged. X | |||
| Make sure the throttle trigger lock and the throttle function correctly from a safety point of view. | X | ||
| Check that the handle and handlebar are undamaged and secured correctly. | X | ||
| Check that the stop switch works correctly. X | |||
| Check that the cutting attachment does not rotate at idle. X | |||
| Clean the air filter. Replace if necessary. X | |||
| Check that the guard is undamaged and not cracked. Replace the guard if it has been exposed to impact or is cracked. | X | ||
| Check that the blade is correctly centred, is sharp, and is not cracked. An off-centre blade will cause vibration that could result in damage to the machine. | X | ||
| Check that the trimmer head is undamaged and not cracked. Replace the trimmer head if necessary. | X | ||
| Check that the locking nut of the cutting equipment is tighten correctly. | X | ||
| Check that the transport guard for the blade is intact and that it can be secured correctly. | X | ||
| Check that nuts and screws are tight. X | |||
| Check that there are no fuel leaks from the engine, tank or fuel lines. | X | ||
| Check the starter and starter cord. X | |||
| Clean the outside of the spark plug. Remove it and check the electrode gap. Adjust the gap to 0,9-1,0 mm or replace the spark plug. Check that the spark plug is fitted with a suppressor. | X | ||
| Clean the outside of the carburettor and the space around it. X | |||
| Check that the bevel gear is filled three-quarters full with lubricant. Fill if necessary using special grease. | X | ||
| Check the fuel filter from contamination and the fuel hose from cracks or other defects. Replace if necessary. | X | ||
| Check all cables and connections. X | |||
| Replace the spark plug. Check that the spark plug is fitted with a suppressor. | X |
TECHNICAL DATA
Technical data
Technical data B40 B ELITE B40 BT ELITE
Engine
Cylinder displacement, cm^3 40,1 40,1
Cylinder bore, mm 40,5 40,5
Stroke, mm 31,1 31,1
Idle speed, rpm 3000 3000
Recommended max. speed, rpm 12000 12000
Speed of output shaft, rpm 8220 8220
Max. engine output, acc. to ISO 8893, kW/ rpm 1,5/9000 1,5/9000
Ignition system
Spark plug NGK CMR7H-10 NGK CMR7H-10
Electrode gap, mm 0,9-1,0 0,9-1,0
Fuel and lubrication system
Fuel tank capacity, litre 1,0 1,0
Weight
Weight without fuel, cutting attachment and guard, kg 7,3 7,4
Noise emissions
(see note 1)
Sound power level, measured dB (A) 112 112
Sound power level, guaranteed L_WA dB (A) 118 118
Noise levels
(see note 2)
Equivalent sound pressure level at the operator's ear, measured according to
EN ISO 11806 and ISO 22868, dB(A):
Equipped with trimmer head (original) 100 100
Equipped with grass blade (original), 255-3 99 99
Equipped with grass blade (original), 255-4 99 99
Equipped with saw blade (original) 98
Vibration levels
(see note 3)
Equivalent vibration levels (a_hv,eq) at handles, measured according to EN ISO 11806 and ISO 22867, m/s²
Equipped with trimmer head (original), left/right 3.4/4.4 3.4/4.4
Equipped with grass blade (original), left/right, 255-3 3.5/3.4 3.5/3.4
Equipped with grass blade (original), left/right, 255-4 5.2/5.1 5.2/5.1
Equipped with saw blade (original), left/right 4.5/4.2
Note 1: Noise emissions in the environment measured as sound power (L_WA) in conformity with EC directive 2000/14/EC. Reported sound power level for the machine has been measured with the original cutting attachment that gives the highest level. The difference between guaranteed and measured sound power is that the guaranteed sound power also includes dispersion in the measurement result and the variations between different machines of the same model according to Directive 2000/14/EC.
Note 2: Reported data for equivalent sound pressure level for the machine has a typical statistical dispersion (standard deviation) of 1 dB (A).
Note 3: Reported data for equivalent vibration level has a typical statistical dispersion (standard deviation) of 1m / s^2
TECHNICAL DATA
| B40 B ELITE, B40 BT ELITE | ||
| Approved accessories Type Cutting attachment guard, Art. no. | ||
| Centre hole in blades/cutters, Ø 25,4 mm | ||
| Output shaft thread M12 | ||
| Grass blade/grass cutter | Grass blade 255-4 1" (Ø 255 4-teeth) | 580 30 50-01 |
| Grass blade 255-3 (Ø 255 3 teeth) | 580 30 50-01 | |
| Saw blade Saw blade 200-22 (Ø 200-22 teeth) 581 33 84-01 | ||
| Trimmer head P35 580 30 50-01 | ||
| Support cup Fixed - | ||
EC Declaration of Conformity
(Appplies to Europe only)
We, Husqvarna AB, SE-561 82 Huskvarna, Sweden, tel: +46-36-146500, declare that the brush cutters McCULLOCH B40 B ELITE, B40 BT ELITE with serial numbers dating from 2016 onwards (the year is clearly stated on the rating plate, followed by the serial number), comply with the requirements of the COUNCIL'S DIRECTIVE:
- of May 17, 2006 "relating to machinery" 2006/42/EC.
- of February 26, 2014 "relating to electromagnetic compatibility" 2014/30/EU.
- of May 8, 2000 "relating to the noise emissions in the environment" 2000/14/EC. Conformity assessment according to Annex V. For information relating to noise emissions, see the Technical data chapter.
The following standards have been applied:
EN ISO 12100:2010, CISPR 12:2009, EN ISO 14982:2009, EN ISO 11806-1:2011.
RISE SMP Svensk Maskinprovning AB, Box 7035, SE-750 07 Uppsala, Sweden, has performed voluntary type examination on behalf of Husqvarna AB. The certificates are numbered:
B40 B ELTE, B40 BT ELITE - SEC/12/2339
Huskvarna February 13, 2018

Per Gustafsson, Development manager (Authorized representative for Husqvarna AB and responsible for technical documentation.)
SYMBOLFÖRKLARING
Symboler
Drag at tanklocker noga after tankning.
Kontrol for start 73
Start og stop 73
ARBEJDSTEKNIK
Montering at transportbeskytelse

Volumen benzintank, liter 1,0 1,0
Vægt
Volumbensintank,liter 1,0 1,0
Vekt
Attention: projections et ricochets.
Wasist was am Freischneider? 262
NoJIb3yIteCb He cKoJIb3aIIMN yCTOnuINBbIMn canOrAmN.
3acNoHka TOnJIiBa: YcTaHOBnTe 3acJIOHky TOnJIiBa B NOJIOHeHne CbITHeHnI.
TOnJIbHbI Hacoc.
Uymo3aHTbIe 3MnCCN B OKpykaIOyIO cpeDy corlaCHO DnpeKTHBbEbponeckoro Co06ueCTBa.3MnCCN MaINHbI npNBedeHa B rnaBe TexHnueckne DaHHbI Ha Ta6JnueKe.
Nobtopha3npaKa.
NacnopTnA Ta6nUka c yKa3aHnem cepnHoro HOMepa. yyy o3Haayet roJ npOn3BOOCTBa,WW- npOn3BOOCTBeHHyO HeJeIIO..
ДугпссИМБОЛы/нakлеликHaMaшинe OTHOCЯTСКсециальнБIMТpe60BaHnЯM cepTNФИKALUHa onpeDEJIeHHbIXpbIHkax.
IpoBepKa n/nnn 06cJyHnBaHne
DOnHHb BblnoJHrTbcra TToJIbKO
npn BblKJIOueHHOM DBNrTaTeJe,
KOrDa KHOJa ocTaHoBKn
HaxoINTcB noJIOKeHn STOP.
Noj3yTecb cneuaJIbHbIMN 3aunTHbIMN nepuATKaMn.
Tpe6yeTepyJApHOn uCTKN.
MecTo Bn3ayalbHoi npoBepKn.
063aTeBHo cneJeT noJIb3OBAtbc npOBepHHBM 3aUNTHbIM OyKAMN.


yyyywwxxxxxx
CoepeHne Ieped 3anyckom npocJIeIte 3a
IPORCHHECNIMBOJIOB
YcNoBHeIe 0603HaueHn 319
COIDEPKHAHNE
CoepnHaHne 320
Pepen 3anyckom npocneiTe 3a cJeNyUoM: 320
BBEДЕΗΝΕ
YBaHaembl nokyntelb! 321
UTOECTb UTO?
UTo eCTb UTo Ha noOpne3uKe? 322
OBUINE INPEIDINICAHNIAIIO
BE30NACHOCTN
BaHHaHnHΦopMaun 323
CpeIcTBA 3aunITbI onepaTopa 323
YcTpoiCTBa 6e0nacHocTN MaHHb324
Пильный annapaT 328
CBOPKA
MoHTaKpyJI npUyKnra3a 331
YcTaHOBKaJe3BnI rOJIOBKn TpIMMepa 331
YcTaHOBKaIHTKaJIe3BnIJIe3BnIJIaJIJIeHn 332
YcTaHOBka TpaHcnpTHoro 333
PeryIipOBaHHe noJIoHeHnOcHaCTKn I noDpe3uKa 333
ПРавиJAOBPAUSEHINCTOПЛВOM
PpaBnla 6e3onacHocT npn 3anpaBKe 335
IpoIroTOBKa TOnJIINBHOcMecn 335
3anpaBka 336
3ANYCKIOOCTAHOB
PpOBePKa nepei nycKoM 337
3anyck nocTaHOBka 337
METOД PABOTы
O6Ine pa6oUne HhCtpyKuN 339
TEXHINUECKOE OBCJYKBAHNE
Kap6iopaTop 344
TnyuTeJIb 344
CnCTema oxlanHdHn 345
Bo3nyHbI ΦnIbTp 345
ToJIINBHyI 尼 尼 尼 345
YrnoBa 3y6aTaTnepeDaua 345
Cbeua 346
IpaKnTexHnueckoro 06cLyHHBaHn 347
TEXHINUCKNEXAPAKTEPNCIKN
TexHueeckne xapaKTePncTnKn 348
TapaHTnE C ocooTBeTCTBn 349
cJIeIyUOuIM:
BHHMaTeJIbHo npOuecTb HnHCTpyKUIO no 3KcnJyatau.

PNEyPENKDEHNEI
IpoJIOJIINTeJIbHoe BO3JeICTBnE Wyma Daet HeN3JIeUHMoe yXyDiWeHne Cnyxa. Bcerda noJIb3yI TeCb, noTOMy, cneuaJIbHbIMn HayuHnKaMn.

IPEyPENHEHNE! Hn npKaKnx
06CToTeJIbCTBax He DoNyCKaeTcR
BHeceHne N3MeHeHn B
nepBoHaayJIbHyIO KoHCTpyKUHO
MaunHb 6e3 pa3peWeHnA
N3rOToBnTEJI. Nolb3yInTeCb ToJbKO
OpnHaJIbHbIMN 3aNacTAMN.
BHeceHne Hepa3peWeHHbIX N3MeHeHn
n/IIIN cNoJIb3OBaHne Hepa3peWeHHbIX
npncnoc6JeHn MoKeT npNBecTN K
cepBe3HOJ TpaBMe IIN DaJIe K
CMePeJIbHOMy NcxOdy IJIa OepaTopa
IIN dpynX JnL.

IPE.DYIPPEKDEHNE!Nope3uK, KycTope3 NJI TpIMMep, KOToPbIMN NOJIb3yOTc H6peXHo NJI
He npaBnJIbHO, MoryT OKa3aTbcra
OanChbIM INCTpyMeHTOM, KOToPbIM
MOHeT HaHeCTN cepBe3HyU NJI
CmePeTJIbHyIO TpaBMy NoJIb3oBaJIeJIO
NJI NKpyHaOUsM. Upe3BbUaHOBaHHo, YTO6bl Bbl IpOuNTaJI
HactToaee PykoBoDcTB0 NnoJaJIne erO coedeHae.
DaHHbBbIKJIOuHaTeJIb NcNoJIb3YeETcJaNoJIHO OCTaHOBKn DBVaTeJIa.
3anycntTe DniratJeN npOBepbTe, Yo6bl OH ocTaHOBnLC npN nepeBoe BbIKJIOuAteJIa B noLoKeHHe cTOn.
OBUNE INPEIINCAHNAIO B3OAPACHOCTN
3aunTa peKyuIero o6OpyIOBaHnI
3Ta 3aunTa npedHa3HaueHa IJI TORo, YTo6bI He
DonycNTb OT6pacbBaHnI npedMeTOB B
HanpaBHeHn NoIb3OBeTEn. 3aunTa
npedHa3HaueHa TaKHe IJIra 3aunTbI
NoIb3OBeTEn O T CJIyAaHOrO cOpNKOCHOBeHnC
pe3yumm 6opuyoBaHnEM.
PpOBepbTe, yTo6bI 3aUHTa He 6bla noBpeJdeHa n YTo6bHa He Hr He 6bln TpeuH. 3aMeHInTe 3aunTy, ecn OHa 6bla noDBepHeHa ydApy nn ecnn Ha HeeecTb TpeuHHb.
Bcerda noIb3yI TeCb peKoMeHdyEmo 3aunToi
Ja KaHDoRo Tnna neKyUeO o6OpydoKaHn. CM.
TlaBy TexHnueckne daHHbe.

PNEUYPPEJDEHNE! KaTeROpueckn 3anpeaaetcnaNoJIb3ObaTb peHyuee 6opuyoBaHne 6e3 cMOHTnpoBaHHo peKOMeHNdyemOn 3aunTb. CM. rJaBy TexHnueckne daHHbIe. YctaHOBka HenpaBnJIbHoN nIN NOBpeJdeHHo3 aunTb, MoHeT npVBecn K cepbe3HO TpaBMe.
Cnctema raseHnBn6paun
BaHaMaunHaOcHaSeHa CnCTeMoIraWeHnBbpaunHa pyKoTkax,CKoHcTpynpOBaHHoIJIA
MaKcImaJIbHOro yIIO6HOrO noJIb3OBAHn8 6e3 BIV6pnpOBAHn MaINHbl.
HenpaBnIbHo 3aKpenHeHa NcKa NJI
He3aToeHHoe, HenpaBnIbHoe peHyuee
obopyoBaHne (He coOTBeTcTByUOuN TIN NJI
HenpaBnIbHo 3aToueHHble, cM. pa3JeI
3aTaunBaHne Je3Bn) cnoc6CTbyOT yBeJNuEHHIO
Bn6paun.
CnTeMa Bn6poraueHna MaunHb cHnHaet ypoBeH bN6paunnepeaBaem ot DBnraTeJn nn peKyuero 06OpydoBaHna Ha pyKoTKn.
IpoBepbTe, yTo6bl aMopTn3aTop 6bl B CeJeocTn Ixopo0o 3akpenHe. O6paTnTecb K dInJepy McCULLOCH IJRA 3aMeHb CnCTeMb rAweHnBa6paun. Nocetnte www.mcculloch.com.

IPEyPENDEHIE!JITeBHoE BO3deNCTBNE Bn6paun MoKeT npNBecNTK TpaBMe KpOBOo6paueHn IIN paCCTpOoiCTBaM HepBHOcCTEmbl yIIOe C HApUWeHHbIM KpOBoo6paueHnEM.Bcnyae NOBHeHnCmNTOMOB npeRpy3KNOT Bn6paun cJeDyeT O6paTntbcrK Bpauy.TakIMn CmNTOMAMMOryT 6bIb OHMeHne, NoTepr AYBCNTBeJIbHOCTN, "KeOTKn", KOJOTbe", 60JI, NOteP cnJIb nnCna6ocTB, N3MeHHeHne UBeTa N COCToHn KOnn. O6bHuNo IOo6hBi e CmNTOMbl npoABnIoTcHa naIbCuax, pykax nII 3aIacTbAx. Pn Hn3KoI Tempeatype pNCK yBeInuNbAeTcra.
БистороТстегиВане
B KaueCTBe 3JIeMeHTo 6e3oNaChOcTu Ha rpyuN NMeTcJ IerKoDocTyuHbI, 6bICTpO OTCTeRnBaIOUncr 3aMoK, npeDyCMOTpeHHbI Ha cLyuAa Bo3ropaHn IIN JIO6oI pyrO cnTyaCIn, Tpe6yIoUeI 6bcTporo ocBo6oHdEHNr OMaunHbI n OChAcTKn. Cm. yKa3aHn B pa3deJe
OBUNE PPEINCAHNA NO B3OAPCHOCTN
PeryIpoBaHne noIoKeHnO cHaCtKn nnope3uKa.

YdocToBepbTecb,TO npNB3HbIe peMHIOcHaCTKn 6bln npaBnIbHo pacnoJonoHebl. Korda MaunHa 6ydt OtperyInpoBaHa, npoBepbTe pa60Ty cnCTMbl 6bIcTporo OTcTeRnBaHHOcHaCTKn.
IynteIb
InyuTeJI npEHa3HaueH IJI CHNKeHnYpOBH MyMa N OTbOa B CTOpOHy O T pa6oTaIOUeO YeNoBeka BbXJONHbIX Ra3OB.
B cTpaHax C hApKIM n CyXIM KJIMMaTOM BepoTHOCTb BO3HNKHOBeHn IOxapOB OyeBnHa. IOnToMy Mbl o6Opyduyem HeKOToPbIe rLyuINTeJI T.H.NCKpOylaBnBaIOue CEkOJ. PpOBepbTe,
obopyoBaH nI rIyIeJIb BaIeM MaINHbI TaKoI ceTkoI.
EcnI rnyuTeNb Ha BaWei MaunHe
DonoJIHTeNbHO 6OpUdoBaH NcKporacmM
fNbTpOM,ero CJeDuyeT peryJnepHo npOuNsaTb.
3a6NBnncr FnBtPoMoKeT Bb3BaTb nepePeb
DBVaTeJIr I npNBecTN K cepBe3HbIM
NoBpeXdEHnM DnuIaTeJI.
IpnHaJnHrIyWnteJaTaKOroTunaOyeHb BaHHo CToPOco6JIIOdaTb HNCTpyKcIMn no npOBepKe,yxOdy nO6cLyJHHBaHNIO.PepNoDiueckn npOBepaTe,HTo6blrIyWnteJIb 6bl HaJeHHO 3aKpeJIeHnKaOpnyce MaunHb.HNKoRda He IcnoJIb3yInTeMaunHyCdeΦeKTHbIM rIyWnteJeM.

IPEyIPEJDEHNE! BrnyuTeJe
ecTb xIMnKaTb, KOToPbIe MOryT
Bbl3bBaTb paKOBbIe 3a6OJIeBAHnI.
N36eraIte KOnTaKTAc cTtMn
JIeMeHTaMn B Cnyae NOBpeJDeHnI
rnyuTeJIa.

PNEyPENHEHIE!OMHnTe o cJeIyoIeM:BbIXlonHbe r3bl DBraTeIaRopuNIMoTy CoepHaTb NCKpb, KoTopbIMoRyT cTaTb npUHOn noKapa. No3ToMy MaunHy HNKoIa He CJIeDyET 3anyckaTb BHyTpNI NOMeHINr IIN pAOM CJeKOBocnJaMeHReMbIM MaTepnaJOM.
OBUNE INPEIINCAHNAIO B3OAPACHOCTN
KoHTpraɪka
Ha HeKoTOpbIX BnIax peHxuero 06OpyIOBaHnIa IJI KpeJIeHnI NcNoJIb3yeTc KOHTpraiKa.
Pn c6opKe Hao 3aTgNBaTb raiKy npoTnB HanpaBHeHn BpaueHn peKyIero o6OpdyoBaHn. Pn pa36opKe Hao OTBnHcNBA Tb raKy B HanpaBHeHn BpaueHn peKyIero o6OpdyoBaHn. (3AMEUAHNE! RaKa Imeet JeBoCTOpOHIOpe3b6y.) Pn ocna6JIeHN n 3aTayBaHN raKn Ie3BnДЯ NIIeHNpy Ka MoJET 6bl TpaBMnpoBaHa 3y6bMyn ne3Bn. CtaPaNTecb, UTo6bl npn 3ToI pa6Ote Ba7a pyKa Bcerda 6bla 3aunuHa uNTkOM ne3Bn. 3Ta 3aDa7a 06JeYaeTcra 3a Cuet INCNoJIb3OBAHN dJIiHHOro TopoBOrO KJIoua.Ha IIJIocTpaCm nCTpeLKOIn OKa3AH yuaTOK,B KOTOpom cJeDyET pacnoJaRaTb TopoBbIKIou npn ocla6JIeHN n 3aTAYBaHN raKn.
3aTaNITe raKy TopLeBbIM raeYhbIM KJIIOyOM.
Пильный annapaT
B HacToaIeM pa3JeIe onuCaHo To, KaK BbI, 6laOJaAp npaBnIbHOMy o6cJyKINBaHIO n IcNoJIb3oBaHIO npaBnIbHOro peKJuero o6OpdyoBaHry:
CHN3NTb pnck OTdaun MaunHbl.
IocTnMbMaKcImMaJIbHOro 3ΦeKTo npNIIeHIN.
- PpoJInTb cpoK cIyX6bl nJIbI nIIJIbHO rannapata.
BAHHO!
IoiB3yITeCb peHcyIIM o6OpyIOBaHNEM ToJIbKO C HAMn npEHaHa3HaueHHoI IJa Hero 3aunToi! CM. rIaBy TexHnueckne daHHble.
PoiIb3yITeCb yKa3aHnA Mm INHCTpyKuN IJIpeHHyUeO6OpUoBaHnA IJI npaBnBHOYcTaHOBKn CTPHybl N Bbl6opa npaBnBHoIOnDInaMeTp aCTpyHbl.
3y6bJNe3BnIdoJIHHbI 6bIT npaBNJbHo 3aToueHb! CneIyTe Haun HcTpkyLNI. IpaBnla 3aTaUNBaHnnpuBeJeHb TaKHe Ha ynaKOBKe Je3BnI.
No.ДернБаTe npaBnIbHyIO pa3BoDKy!
BbINOJIHЯTe yKa3aHЯ HaIINx INcTppyKUIM n
noJIb3yItecb peKoMeHDoBaHHbIM 7a6JIoHOM IJIa
pa3BoDKN.

PPEyPENEHNE!Bcerda BbKIOuayTe DnIraTeJIb nepeTEm, KaK npNCTynNTb K paOte HaKaKoJnn6O yAcTBIO peHyseO6OpyOBAHNA. ONo npOioJHaet BpaAaTbc DaKe npN OTnyeHHOM dpocceJe.YdoctOBepbTecbBTOM,yTo peHyuNe o6OpyOBAHne OCTaHOBNOCb NOJHOCbUOTcoEduHTe pOBODOT CBeuN 3aHNrAHA, npExde Yem npNCTynNTb K pa6oTe c Hm.

PPEyIPEKDEHNE! HenpaBnBHopekyuee o6opyoBaHne nHepaBnBHO 3aToeHHbIe 3y6bJNe3BnyBvBeluHBAIoT pck OTaun.
Пильны annapaT
JIe3Bne IJIЯ nIIbI npEHa3HaueHo IJIa cpe3aHnKycTapHKnOB IN ToHKnx DepeBbeB.
Ie3Bne HONH JnTpaBbI npedHa3HaueHb IJIa BBiKaWIBaHNA CINbHOJ TpaBbI.
OBUNE PPEINICAHNIO B3OAPCHOCTN
ToIobKa TpIMMepa npeHa3HaueHa IJnTpIMMepHO CTpIKKn.
06nne npabna
Iolb3yI Tecb peKyuIM o6OpyIOBaHHeM ToIbKO c HAMn IpeHa3HaueHHoДЯ Hero 3aunToI! CM. rnaBy TexHnueckne daHHhe.
Pekyu3y6bJa ne3BnJdoJIHHb6bTb npaBnIbHo 3aToueHb! Nolb3yntecb HauMM peKoMeHdaUaYMaN Iwa6NoHOM JIra 3aTaunBaHn. HenpaBnIbHo 3aToueHHe OINIOBpeKeJeHHe Je3Bne yBeJIuHBAeT pNcK HeCuaTHbIX ClyaeB.
Co6JIOdaIe npaBnJIbHyIO pa3BoIDKy nIIb! BblnoJIHЯTe Haun IHcTpkyuIN I noJIb3yI TeCb peKoMeHdyeMbIM INcTpMyeHTOM IJIpa3BOIDKn. HenpaBnJIbHO ocUeCTBJIeHHaR pa3BoIDKa nIIbl yBeJIuHBAeT pNCK 3aKJIInHNBaHN I OToDAuN I HaHocNT BpeIJe3BIVI NIIbl.


PpOBepbTepeHyuee o6OpyIOBaHne HaHaJIuHne NOBpeKHeHn Hn TpeuH. NObpeKHeHHoe peHyuee o6OpyIOBaHne cJeNyET O6raTeJbHo 3aMeHNb.
3aTaunBaHne HoxHa N Je3Bn TpaBbl
HaynakOBKepeKyUeOobopyoBaHnOnncAoH KAK npaBnIbHo npOn3BoNDt 3aTaYnBaHne. Je3BHe NHOx 3aTaYnBaHO Tc nIOckm HanNlbHKOM c OdHocTOPOHHM y3OpOM.
-Дя coханя 6aJaHcnpOBKn, Bce yrIbIdoJHKh6bTb3aToeHbOДиHaKOBO.

PNEyPENHEHNE!Bcerda Bb6paBbAaTe norHyToe, nepeKoWeHHoe,TpeChyBwee, pa3OpBaHHoeIINIOBpeJdeHHoe INhBM 06pa3OMJe3Bne.He nbTaTaeCB BblpMnTB nepeKoWeHHoeJe3Bne IJIa NOBTOHOICNOJIb3OBAHnI. POnb3yIeTcB ToJIbKO ICnpaBHbIM NJIe3BnMnPpeDnCaHHOrToTna.
3aTaYBaHHeJe3BnIINbI
HaynakOBKepeKyuO6OpyIOBaHnOncaHO KaK npaBnIbHo npOn3BoNDt 3aTaYnBaHne.
IpaBnIbHo 3aToeHHoe Ie3Bne RaJIae Tcra YcIOBnEM 000EKeTINBHOn pa6OtBu Nno3BOJnEeN 136ExHaTb HeHyHOro N3HOca Je3BnA N noDpe3uKa.

- YdocToBepbTecb B Tom, qTo y JneBna ecTb xopo7a onopa, KOrDa Bbl Nolb3ayTeCb
OBUNE PPEIINCAHNAIO B3OAPCHOCTN
HannbHKOM. Nolbytec KpyIbIM HannbHKOM Ha 5,5 MM c depHaTeJeM.

YroJ3aTauHbAHn 15Jb.3y6b3aTaUHbAOTcOINBnpaBO n OIN BJeBO.EcIn JneBHeCINbHO NO6NIO KaMHm, BepXHra CToPOHa3y6uMa MoKeT,B INCKJIIOUHTeJIbHbIX CLyuaRx,HynDaTbcR B 3aTaUHbAHn NIOCKHM HAnINbHnKOM.B TaKnx CLyuaRx ETO HaIODeJaTb D0 3aTaUHbAHn KpyrIbIM HanINbHnKOM. 3aTaUHbAHne BepxHei NOBepxHoCTn DOJHKHO BblNOJHrTbcr OINHaKOBo Ha BCex 3y6bx.
OtperynpyTe pa3BoDky. OHa doJHHe coCTaBJIaTb 1 MM.
TpIMMepHa rOJIOBka
BAXHO!
O63aTeIbHo y6eIITecb B TOM, yTO cTpyHa TpIMMepa nIoTHo n paBHOMepHO HaMoTaHa Ha 6apa6an, nockoJIbKy B npOTNBHom cIyuae Bo3MOHHb BpeHbE BN6paCIn.
-ПоьзуТecbToьКо peKOMeHDoBaHHbIMN roJOBkAmn TpIMMepa nCTpyHaM. OHN npOBepeHbI N3rTOBHTeJIeMa HcOOTBeTcTBne pa3Mepa KOnKpeTHoro DBuRaTeJIa. 3To ocO6eHHo BaHHo npN cNoJIb30BaHIn noJIHoCTbIO aBTOMaTHINpoBaHHo rOJIOBKN TpIMMepa. PJIb3yITecb ToBJKO peKOMeHdoBaHHbIM peKUIMm o6OpYDoBaHHMe. Cm. rIaby TexHnueckne daHHie.

O6bHNO IJI MaHbWe MaunHb Tpe6yOTc H60JIbIe rOIOBKn TpMMepa N Hao6OpOT. 3To CB3aHO C TeM, YTO npN KoUeHN C nCNoJIb3OBAHnEM cTpyHb DnRgATeNb DoJInHe oT6paCbBaTb cTpyHy B paDnAJIbHom HanpaBHeHN OT rOIOBKn TpMMepa, BCTpeuay npN eTOM cOnpoTnBJeHne co cTopoHbl cKaaUNBaEMoTpaBbl.
Длнэстуны Такгы Ванha.Болгдлннаястуна Тpe6уET 60лге мошно ГдИгагеля,Чем КорOTКаястуна TaKOrO He Диametpa.
- YdoCTOBepbTecb, YoTo HoH, pa3MeeHHei Ha 3aInte TpIMMepa, He NoBpeKJdeH. OH nCNoJIb3yETcA JIA o6pe3Kn CtpyHb I Do HxHHoI dLIInHb.
IyBeyHnCpKa Cnyh6blcTpyHbIe MOHHOB TeueHHe HeCKoJIbKnx DHei BbIMaYBaTB BoJe.3To cJeJaTe ee nIoTHee, I OHa DoJIbWe npOepHHTcra.
MOnTaJyIpyuKnra3a

- YcTaHOBnTe 3aUHTbI KOHx CoJIaCHO o6pa3uY.
YcTaHOBKaJe3BnI rOJIOBKn TpIMMepa

PNEДУПЕХДECHNE!
Pn ycTaHOBKe peHyJero
obopydoBaHn, NcKIOuHTeJIbHo
BaHHo, YTo6bl HAnpaBnOua
noBOdkoBOro naTpoHa/OnOpHoro
fIaHua 6bJa nocpeDInHe oTBepCTna
peHyJero o6opyDoBaHn.
HenpaBnJbHO ycTaHOBJeHHoe
peHyJee o6opyDoBaHne MoHe CTaTb
npuHoi cepBe3HO/nIiN
CMepeTJIbHO TpaBMbl.

PNEUYPENHE! KaTerOpueckn 3anpeaetcnaNoIb3oBaTbpexHyee 6opuyOBAHne 6e3 cMOHTnpOBaHHo peKOMeHnyeMoN 3aunTb. Cm. rIaby TexHnueckne daHHbIe. YctaHOBka HnpaBnblHoN IIN NOBpeKeHDeHHo 3aunTb, MoHeT npNBecTN K cepBe3HO TpaBMe.
BAKHO!ДЯ pa6OtbI cJe3BnEMДЯ NJIeHINNc JIe3BnEMДЯ KOWeHINr TpaBBi,HaMaWInHeDoJIkeH 6bITb pyJb npaBnIbHOro TUna,NTOKДЯ JIe3BnI INOChAcTKa.
YcTaHOBkaIuNTKaIJIaJe3BnA,Je3BnA IJIa TpaBbl HoxaIJIa TpaBbl

3aunTyJe3BnY/Kom6HnHpoBaHHyIO 3auNTy(A) cJeDyeT 3aCenITb B KpeJIeHN Ha Tpy6Ke BaJaN 3aΦNKcnpoBaTb BNHTOM (L). IcnoJb3yIte peKoMeHDoBAHHbI uNTOK JJIa Je3Bn. CM. Pa3JeI TexHnueckne xapakTePncTNIK.

HaTeB Ha BbIXoHoi BaI NOBOKOBII naTPOH (B).
IobopaBbTaB BaJI Je3BnJIO TeXnop, noka OdHO n3 OTBepCTnB NOBOKOBOM naTPOHe He COBMeCTNTcA C OTBepCTnEM B Kopnyce 3y64aToI nepeDaH.
BCTaBnTb cTOnOpHbI uTnΦT (C) BOTBepcTne, YTO6bl 3aΦHKcnpoBaTb BBXOJHOB BAJI.
HaTeb Ha BbIXoHoi BaI Je3Bne (Д),onopHbI ΦlaHeu (E) n onopHbI KoJnaK (Φ).
HaTeBraKy(Γ).MoMeHT3aTAAKnraKaPaBeH 35-5HM(3.5-5Km).NoIb3yTeCbTopoBOM KIOOcM N3 Ha6opa INcTppyMeHTa.ⅠepHnTe pyky KIOOa KaK MoHHo 6JIHe KUHTKyJe3Bna.ΓaKa 3aTARBaETc npINBpaSeHn TopeBOrO KIOOa npOTNB HAnpaBJIeHn BpaSeHn TpIMMepa(BHIMAHHE!JeBOcTOPOHHrape3b6a).
YcTaHOBKa ⅢNTKa N TpIMMepHoI ROJOBKN
- YcTaHOBnTe 3aunTy TpmmMepa (A)ДЯ pa6oTbI C rOJIOBkoTpmmMepa.


3aunTy Tpmmepa/Kom6nHnpoBaHHyU 3aunTy cJeDyeT 3aCenntb B KpenJIeHN Ha Tpy6Ke BaJa n 3aΦNKcnpoBaTb BNHTOM (J).
- HaTeb Ha BbIXoHoi BaI NOBOkOBbl naTpoH (B).
-ПоворачиВаь Вал ЛеваяdoТexnop,noka OДноИЗ OTВерстNiВ NOВОДКOBOM NaTpOHe He COBМecTITcA COTBерстIeM B KOpnyce 3y6чатоипердаи.
BCTaBnTb CtonOpHbI WTHΦT (C) BOTBepcTne, 3aΦHKcnpoBaTb BbIXOHOB BaI.
3aBHTte BHTbHa roJIOBKe TpMMepa / nlaCTNKOBbIX Je3BnX (H) npOTnb yacobon cTpeJIKN.
-Дя сягту noBTopntb BCE onepaun B o6paTHOM npRKe.
YcTaHOBKa ⅢNTKa Je3BnI N Je3BnIДЯ ПИЛeHnI
-CHIMTe KpeneHHyIO nlaCTnHy (H). YcTaHOBnte nepexoHNK (N) n KpeJIeHne (N) DBym6 6oNTamn (K) KaK nokaHaHo Ha pncyHke. IITOKJe3Bna(A) KpeINTC4-MA6 6oTAMn (JI) K nepexoHNKy, KaK nokaHaHo Ha pncyHke.
06paTne BnHMaHHe!Bcerda noJb3yTeEcB peKoMeHnyeMo3aunToI JIA KaHDoRTO TIna
NeKyUeero 06OpyoHaHn. Cm. rnaBy TexNueeKnne daHHbIe.

- HaTeb Ha BblOdHoi BaI noBoiKoBbI naTpoH (B).
ПоворачиВаьВаллелЗвяdoТexnop,noka OДноИЗOTBepCTNBI NOBoIDKOBOm naTpoHe He COBMecTITcR c OTBepCTNeM B Kopnyce 3y6uaToI nepeDAuN.
BCTaBnTb CTOnOpHbI WtNΦT (C) B O TBepcTne, YTO6bl 3aΦNKcnpoBaTb BbIXOHOH BaI. - YcTaHOBnTe Je3Bne (Д) n onOpHbI ΦJIaHeU (Φ) Na BBIXoHOn OCN.
HaTe b rky (F).MomeH 3aTJHKrAraKn paBeH 35-50 Hm (3.5-5 KRM).NoIbayTEcb TopoBOM KJIIOyOM n3 Ha6opa INCTpyMeHTa. DepeHITe pyuKy KJIIOy KaK MoXHO 6JIINe K IunTKy Je3Bna. RaKa 3aTЯRnBaETCr npi BpaueHn TopCeBOrO KJIIOy a npOTNB HanpaBLeHn BpaSeHn TpIMMepa (BHIMAHHE!JeBocToPOHHra pe3b6a).

- Pn ocJIa6JIeHn n 3aTgRbAHn raiKn JIe3BnJ IJIy NIIeHn, pyKa MoJeT 6bITb TpaBMIpOBAHa 3y6bMaN Je3BnA. CTaPaITeCb, YTo6bl npn 3ToI pa6oTe Ba7a pyKa Bcerda 6bla 3aUuIeHa ⅢNTKOM Je3BnA. 3Ta 3aJa4u o6JeYaeTcra 3a cYeT NCNoJIb30BaHn DJIINHOro TopoBOrO KJIoua. Ha nIIIOCTpaCnN CTpeIKo NOKa3aH yAcTOk, B KOTOpom cJeDyET pacNoIaratb
TopoBbKIOU npOcJa6JeHnN 3aTgBaHnraIKN.

YcTaHOBKa TpaHCnOpTHOro ⅢNTka

3aKpoTeJe3Bne 3aunTHbIM YexIOM JnTpaHcnpTnpOBKn, KaK nOKa3aHo Ha pncyHKe.
PerguHpoBaHne noJokHeNnOchacTKn nnope3uKa


PNEyPENHEHNE!Pnppa6oTe nope3uK Bcerda doJnHe 6bTb noBeWeH Ha ocHacTke. BnHom cIyuae Bb He CmOKeTe 6eOnaChO ynpAByTb nope3uKOM, nTo MoKeT npNBecTK TpaBMPOBaHIO Bac InuHO, IIn dpynx. HnkOrda He noJIb3yntecb ocHAcTkO co cIomAHbIM 6bICTpo OTCTeRnBaOUMcraMKoM
Bbictpoe oTcTeuBaHne
Cnepei NmeeTcJerKoOocTynHbI N 6bICTpoOTCTeRNaUOnc3aMOK. NoJIb3yITeCb IM B clyae,ecJIIN DBIratEJIb 3arOpITcNII INB dpyroJ
aBapnHoi CNTyaCIN, KOJa Heo6xOJIMo 6bIcTpo BBcBo6oOnTbcra N3 OChAcTKN OT MaunHbl.
PaBHomepHoe pacpeJeIeHne Harpy3Kn Ha Ileu
Xopoio oTpeyInpoBaHHa oChacTk aMaunHa 3NaHTeNbHO 06JeYraIoT pa6OTo. OTepyInpuTe oChactky dJa HAnJyUWeRo pa6OeRo noJooHeHn. HaTaNthe 60KOBbIe JAMKn TaK, UTo6b Bec paBHOmePHo pacpeJeIcR Ha IJIeHi.
PpaBnJIbHa BbICota
OtperynpyTe pIeueBopeMeHb TaKIM 6pa30M, UTo6bpeHuyee o6OpyDoBaHne paonlaRaLOb npaJIleJbHo 3emIe.
PpaBnIbHbI 6aJahc
OnycntTe peKyuuee obOpyIOBaHne, uTo6bI OHO cJIerKa npNKACAJc3emn. IpeMeecNTe noDBecHyo npoyuHny dJa DocTHeHna Tpe6yeMOrO 6aHaHcaNoDpe3uHa.
IpaBnla 6e3oNaChocTn npn 3aPpABKe
HnkOrda He BkIouaTe MaunHy:
1 EcInn Bn npoJnTOnnBO Ha Hero. IpOtpnte 6pbI3rN n ocTaBTe ocTaTKn 6eH3nHa BblnapITbcra.
2EcJIN Bbl npoJInI TOnJIInBO Ha ce6yNJIN CBOO OeHJy, CMeHInTe OJeHHy. NOMOIte Te YacTN TeJa, KOToPbIe 6blN B KOHTaKTe C TOnJIINBOM. PJIb3yITecbMbIOM NBOIo.
3 EcJn Ha MaunHe npocxOuNT yTeukKa TOnJIbBa. PeryIpaHNo npoBepaTe KpbIkw Ky TOnJIbHBOrO 6aka N IlaHaHn Ha npedMeT npoTeKaHn.
TpaHcnpTnpoBka n XpaHeHne
CneNyETxpaHHTbI TpaHCnOpTnpoBaTb MaunHy NToJIINBO TaKIM 06pa3OM, YTo6bl He 6blno pncKa KOHTa KaT aNoTeKOB nIn npob C nCKpamN INOtKpbITbM OrHeM, HApPImep, y 3JNeKTpOMaUnH, 3JeKTPoDBnTaTeJeN, 3JeKTPnuecknx IN CnIOBbIX NepeKJIIOuAteJeN/ HarpeBaTeJeN KOTIOB.
ToJIbBO BcerIa cJeIyEt XpaHITb IN TpaHCnOpTnpoBaTb CneIaJIbHbIX eMKocTAX, npEHa3HaueHHbIX JIA 3ToI LeJI.
-Перд Tem,Кak HanpaBnTb yctpoiCTBO HaДЛNTeJIbHoe xpaHeHne, cIeIyET OnopOHHITb TOnJIIBHbI 6aK. BByacHTe Ha MeCTHO6EH303anpaBOuHoi cTaHcUN, KyDa Bbl MoKeTe CJIHTb Otpa6oTabWee TOnJIIBO.
CneITe 3a TeM, UTo6b MaunHb 6bla xopoO oUHHeHoi, N To6bl nepeJe ee npDoJnHTeBbIM XpaHeHem 6blo BbIOJIHeHO NoJIHoe 0cJyKINBaHne.
-ПиТранспорТурOBКИХpaHeHIMMaHINHbI HaHEM BcerДа DOЛжЕНО 6bITb ycTaHOBJIeHa TpaHCnOpTHa 3aUHTa peKJuIero 06OpydoBaHЯ.
- 3akpenJaIe MaunHy Bo BpeM TaHcnpTIpOBKn.
- UTo6bI He npOn3OwIo HEnpOn3BOJbHOro 3anycka DnBraTeJIa, KoJINaUcK CBeu nCJIeDyEt CHIMaTb npN dJIInTeJIbHom XpaHeHn, ecJI MauINHa 6yJeT ocTaBJIeHa 6e3 npICMoTpa N npN JIO6OM 06cJIyHNBaHn.

PNEUYPEXJEHNE! Co6JIOaIte octopoxHHocTb npn o6paueHnC TOnNtBOM. NOMHTe 06 onacHcTn nokapa, B3pbIBOB IN BdbixaHn napOB.
PoirotobKa TOnJIbHNoI CMeCn
BHIMAHHE! MaunHa ochaeta HbYxTaKTHbIM DniratJeHm IdoJHHa Bcerda pa6oTaTb Ha cMecn 6eH3nHa N MacJa dJa DByxtaKTHbIX DniratJeH.
Дя noJyehn npaBnIbHOro cocTaBa TOnJIbHoi Cmecn cJeDyeT aKKypaTHO OTMeprTb KOJIuYeCTBO BXOJaUeR O B cocTaB MacJa. PpN npIrTOBJIeHn H60JIbWoTo KOnIyuEcTBA TOnJIbHoi Cmecn DaKe MaJna HeToUHocTb MoHeT CInbHo NOBJIraTb Ha KaueCTBO TOnJIbHoi Cmecn.

PNEyPENJDEHNE!ToNJIINo IcnapeHne ToNJIINBa OYeHb NooapanacBHe IMOryT npNBecTnK cepb3HbIM TpaBMam npN BdbixAHmN KOHTaKeTc KOnKeH. ByDbTe No3Tomy OCTOpONHbI npN o6paueHN C TOJIINBOM N o6ecneBte XopoWyo BeHTNJLACNU npN o6paueHN C TOJIINBOM.
BéH3nH

BHIMAHNE!NoIb3yIeTcB BceIa CMeCbIO MacJa
N OuyIeHHOro 6eH3NuHa C MInHMaJIbHbIM
OKTaHOBBIM YIcIOM 90 (RON).IJRA DNIRaTeJeI c
KaTAlIN3aTopom (CM.ΓJIaBy TexHnueCKne DaHHBe)
PpIMeHReTcraTOJIbKO He3TuINpOBaHHbI 6eH3IN C
PpIMecbIO MaJla.He3TuINpOBaHHbI 6eH3IN
NOPITKATALIN3aTop.
Pn BO3MOHHocTn NOJIb3yITeCb 3KoJIoRnueckm, T.H. ⅢeJIOUHbIM 6eH3nHOM.
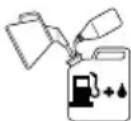
ДоЗВОЛЯЕТСВЕВКОПИСТОВУВАТИ NGINIBHу 6eH3iHOBO-eTAHOLOBByO cyMiU E10 (BMIC eTAHOly He 6iJIbwe 10% ).Y BnnaKy BnKOpIcTaNHHa CmIWeI 3 BnIIM BMICToM eTAHOly MOHt b BnHnKHyTu pOboOi yMOBn, 3ДaTHi BnKJIkKaTN noSHKOДнEHHa DBNryHa.
- PeKOMeHnyeMOe MInHmAlbHoe OKTaHOBoe YncNo 90 (RON). EcIIN DnBraTeJIb 6yJeT pa6oTaTb npN 6OJIee Hn3KOM OKTaHOBOM YncJIe Yem 90,To DnBraTeJIb MoHeT DaBaTb CTyK.3To npINBOIDNT K yBeJIuYeHIO TempeaTpbl DnBraTeJIa, YTO B CBOIO OUpeEb MOHeT npINBeCTNI K erO cepB3HbIM NOJOMKaM.
-ПиДЛNTeJIbHoi pa6OTe Ha BbICOKx 06OpOtax peKOMeHnyeTcNcNoJIb3OBAt b6eH3nH c 6oJee BBICOKIM OKTaHOBBIM YIcJOM.
MacnoIyBxTaKTHbIX DnRaTeJe
Дя ДocнHeHЯ Лушero pe3yЛьТаи MoUHocTN, NOIb3yItecb MaclOM Universal, Universal powered by McCULLOCHДЯ DBYXTaKTHBIX DBINrATeJei, KOToPoe CneuaJIbHO CO3dAnHO JЯHAuX DByXTaKTHBIX DBINrATeJei C BO3DyUHbIM OXJaXDeHMe.
ПРавILA OBPAUSEHЯ C TOПЛВOM
-нкогда He noььуTecb MacIOM,празнэзнayeHHbIM ДЯДByXTaKTHbIX loIOuHbIX DBNraTeJIe C BoIЯHbIM oxJaXdEHNEM,T.H."outboardoil" (HaIMeHoBaHne TCW).
Hikorda He npimeHaTe MacNo IJy YeTbIpexTaKTHbIX DBNaTeJeN.
Hn3Koe KaueCTBO MacJa NJN ype3MepHo 6orataa Cmecb MacJa/ToNJBa MoHeT CO3JaTb pCK NOJOMKN FyHKUIN KaTaJIa3aTopa IN CHINHEHNA cpoKa eO CJyH6bl.
-Пророрси Смшьаня 1:50 (2%) c MacIOM ДлЯ DByXtakThbIX DBnrgateJe Universal, Universal powered by McCULLOCH.
1:33 (3%) c pyuM MacnmaI dIa IByxTaKTHbIX DnRaTeJe C Bo3dyuHbIM oxJaHexHeMe, KJacca JASO FB/ISO EGB.
noBepHeb cnIbHomy yapy,nx cJeNyET 3aMeHHTb.

HnKoIaHe noJIb3yITeCbMaunHo6e33auNTbl NJI He C NOBpeJDeHHo 3aUNToI.
BceKoJnaknnepe3anyckOMMaunHbdoJHHb6bTbpAaNbHo CMOHTnpoBaHbI 6e3 noBpeX,DeHn.
3anyck n octaHOBka


IPEJUYPENEHNE! Npe3anyckom
INHCTpyMeHTa DOJIHHbI 6bITb
NOJHOCTbIO COBMeUeHbI KOJINaK
CcENJIeHn I Tpy6Ka BaJa, NOcKOJIbKy,
B INpOTUBHOM Cnyae, BO3MOxHbI
OCJa6JIeHne CcENJIeHnI
TpaBMnpoBaHne.
IpeE3anyckOM BcerdaOTHocHTe MaunHy BCtOPOHy OT MeCta 3anpaBKn. IocTaBbTe MaunHy Ha yCTOnuNByIO NOBepxHocTb.CneDnTe 3a TeM,UTo6bpeKyuee o6OpyDoBaHne He 3aUenNo HNKaKoI npEdMeT.
CJIeIITe 3a TeM, YTo6bIB 3oHe pa60TbI He 6blIO NOCTOpOHnX, B INHom CJyUae BO3HnKaET pNCK cepBe3HbIX TpaBM. 3OHa pNcKa 15 MeTpOB.
3anyck

3aHnHaHHe: NpeBecTN BbIKIouaTeJIb 3aHnHaHnB NoIOHeHne BKJIoueHn.
3acJIoHKa TOnJIbA:
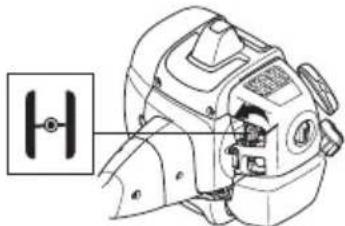
YcTaHOBnTe 3acJIOHky TOnJIbBa B NOJIOKeHne CbITHeHr.
TOnJIINBHyI HAcOC:
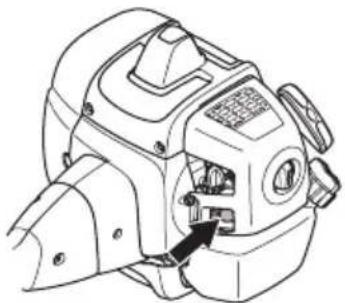
CoHMMTe HeckoJIbko pa3 pe3nHObyo rpyu TOnJIINBHorO HAcOca nOKa B Hee He HauchET NoCTynaTb TOnJIInBO. rpyu Het Heo6xoJIMocTn 3aNoJIHrTa NOLHoCTbIO.

BnraTeIbOCTaHaBnBaetcnyTem BblKIOueHna3aHnraHn.
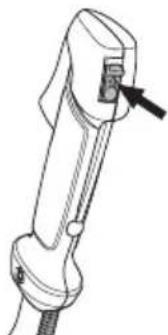
BHIMAHHE!ДигагельoctaHaBnBaetcnyTeM BbIKJIIOUeHIN3aHrAHH.
O6upepa6oue nHcTpyKcnn
BAJHO!
B 3ToM pa3JeIe onNcaHbI oChOBHbIe npaBnla
TexHKn 6e3onacHocTn npi pa6oTe
noJpe3uKOM n TpIMMepom.
EcIn Bbl OkaiTeCb B CNTyaLnn, B KOTopoB Bbl noUyBCTByeTe HeyBepenHocTb, OCTaHOBNTecb N 3anpocnte COBET cneuaJncta. CBxHNTecb C Baunm DnIepom NnM MaCTepcKoN NO 06cLyHHBaHIO.
He nbTaIteCb peWntb KaKyIO-Jn6o 3aJaCy,ecJIN Bbl CHTaTe, YTO OHa HaxOДNTc8 3a npeJeJaMn BaIHX BO3MOHHOCTeI.
Ipepa6oToCnHcTpymeHTOM,BblOJIHHbI NOHbPa3HNuMeHdY pauchTkoNopocnB Jecy,KoWeHHeM TpaBbN TpMMepHo 06pa6oTKo ra3oHoB.
OchOBHbIe npaBnla 6e3oNaChocTn


1OrJHNTecb BOKpyr:
-Поверпг,чTo6bI no6JIN3OCTn He 6blno JIOdei, HINBOTHbIX NIIpyrnx O6BeKTOB, KoTOpblc MoryT NOBJIYrTaHa BaWy pa6O Ty.
- UTo6bIyIOCTOBepNTbc8, YTO HIKTO He CMOHET OKa3aTbc8 B COpNKOCHOBeHN C peKyuIM o6opyoBaHEm IIN npEJaMeTaMn, KOToPbIe MOrTy O76paCbIbA Tb8c8peKyuIM o6opyoBaHEm npi pa6Ote.
- O6paTnTe BnHMaHHe! HnKOrda He noJb3yItecB MaINHO B CNTyaCNI, npN KoTopoB Bb He cMOHeTe nO3BaTb Ha nOMoCb npN HecHaCTHom clyuae.
2ПpoBepbTe yuactok pa6oTb. Y6epnte BCE cBo6oJHo JIeHaUe IpeMTebl, KaK HanpIMep KAMHN, pa36nToe cTeKIO, rBO3IN, CTaJIbHyIO npOBoJOKy, BepeBKN IN npOuee, KOtOpBte MOryT 6b1b OT6poWeHb NIN 3aTaNHTb B peKnyuee o6OpydoBaHne.
3 He pa6oTaIe c pe3HcKOM B nIIOxN x noOdHbIx ycNoBnax. TaKnx, KaK rycToTymaH, cnIbHbI doHdb, pe3Kn IBeTep, cnIbHbI XoIoD, N T.d. Pa6oTa B nIooxyIO norOdy CnIbHo yToMnReT bbl3bIBaET DOnOJIHNTeJbHbI pNCK, Happ.OT cKOJIb3KOrO rpyHTa INIHN HenpeIcKa3yeMoRo HanpaBVeHnra naDeHnRA DepeBa NT.d.
4 Y6eIITecb, yTo Bam Bo3MOHHO CToTb cTa6nJIbHo. IpoBepbTe, HeT JIn BOKpyr Bac BO3MOHXbIX NOMex IN npenraTcTBN (KOpHei, KAMHei, BetOK, AM NT.D.) ecJIN Bam Bdpyr
6yTe HxHNo 6bIcTpo nepemecntbCra. ByIbTe Oco6eHHo BHMaTeJbHb npn pa6oTe B cKloHe.
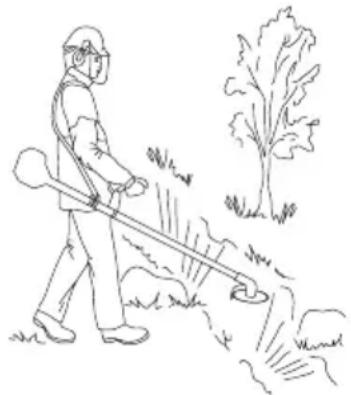
5 Co6IIOJaIeMaKcIMaJIbHyIOOCTopoHHocTb npn NIIJHNN HAprrHeHHbIX CTBOJOB. HanpRHeHHb CTBoJ MoKeT BHe3aHNo cnpyHNHTb, BepHyBwncb B nepBOHaayAbHoe noLoJeHne Do nIN NoCte NIIeHn. EcJN BcToNTc HEnpaBUNbHO CToPOHbI INn HaunHaeTe NIIJeHne B HenpaBUNbHOM MeCTe, DepeBO MoHeT ydapNTb Bac IIN MaWHy TaK, UTO Bbl NOTepeReTe ynpabLeHne. O6e cnTyaUIMoYr npNBecTN K cepBe3HO TpaBMe.

6 CoxpaHraTe xopoOee paBHOBeCne nHaJeHHyO onopy Hor. He npKlaIbBaIe Te cIINKoM 6oJIbIcx ycIiN. Bcerda co6IIOaIte npaBnIbHyIO IncTaHcIIO n 6aIIaHCnpOBky.
7IocEnHtMeMaHHyKNoBecHomyKolbuy OchactKn Bcerda depHnTe MaHHy DBym pyKaMn. depHnTe MaHHy C npaBoi CTopoHbOT TeJa.He pa6oTaTe B6Jn3n ropaynx NOBepxHocTe. He pa6oTaTe B6Jn3n Bpaauoeseh HacaKn IJIpe3aHbJ.
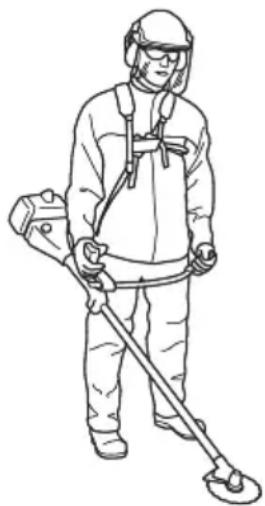
8 PeHyyuee o6opuyoBaHne OJHKHo HaxoDnTbcn HnKe nOra ca.
9 Npeed npeHocKo oTKJIOUHTe DnVraTeJIb. Npeed npeHocOM Ha 6oJbwoe paccToaHne I TpaHCnopTnpOBKo CJeDyeT HcNoJb30BaTb TpaHCnopTHyO 3aunTy.
10 He cIeIyEt onyckaTb MaunHy Ha 3emJIO npn pa6oTaIoUeM IbVraTeJe, 3a NCKJIouHeHEm cIyuaeB, KOrDa OH xopoO BoIeH.
A36yka paacuNTkn
BcerIa noJIb3yITeCb coOTBeTCTByIOUIM o6OpyIOBaHHeM.
Bcerda noIb3yI Tecb xopowo oTpeYnipoBaHHbIM 60pydoBaHHeM.
- Co6IIOJaTe npeIINcaHnRA TexHnKn 6e3oNacHocTn.
Xopoio opraHn3yTe pa6OToY.
- PeHbTe JIe3BnEm BceIa Ha noJIhIx o6OpOtax DBNrataTeJIa.
BcerIa noJIb3yI Tecb xopoIo 3aToeHHbIMNJe3BnAMy.
-ИЗбэрэн Камнен.
- YnpaBJIyTe HnpaBJIeHnEm NaIeHnY (yUHTbBAJTe HnpaBJIeHne BETpa).

PNEyPENHEHNE! Hn noJb3oBaTeJIb MaunHOHNKTo DpyrO He DoJIHe NblTaTbC y6npaTB B CTOpOHy OTnJIeHHbIMaTePmaJ KOrJa MoTOp pa60TaETNn KOrDa BpaaaetcpeHyuee o6opyDoBaHne, TaK KaK 3To MOHeT npNBecTN K cepB3HbIM TpaBMam..
IpeTe KAK y6npaTb MaTepnaJ, HaMoTaBmnc BOKpyr OCN HoHa, octaHOBnte MOTOp n peKyuue o6opyoBaHne, TaK KaK BInHom cLyuae co3daeTc npCK TpaBM. YIIOBaJ nepeDaay MoKeT HarpeTbc8 Bo Bpem pa60TbN OCTaBaTbc8 ropyei HeKOToOpoe Bpem. 3TO Co3daeT pck NOJyueHn OXkora npN KOHTaKTe.

PNEyPENHEHNE!OcTepeaTecb 076pacbBAeMbIX npedMeTOB.
NoIb3yItecB Ccerda Odo6peHHbIMn 3aunTHbIMn OOKAMn.HNKoRda He
HaKJIOHNTeCB HAd, uHTOM peHyuero
obopyoBaHn. Kamn, mycop n np.
Moryt OT6pacbIBaTbcra Brna3a N
npNBecTN K cJeNToE NIn B cepb3HbIM TpaBMam.
B 30He pa60TbI He DoJIHHbI
HaxoINTbcra NocToPOHNHe. JeTu,
JINBOHTbIe, 3pITeJIu I NOMOuNKn
doJIHHbI 6bITb BHe 30HbI pa60TbHa
pacCToAHn 60JeE 15 M.EcNI KTO-
JI6o npi6JIuHaetcK Bam Bo BpeM
pa60TbI, HEmeJLeHNO octaHOBNTe
MaunHy.HNKOrDa He NoBopaUHaNTecb
C MaunHo, He nocMoTpeB BHaJaIe
Ha3a,I He y6eDnUBuNCb B Tom, YTo B
30He pncKa HIKORo Het.

PNEyIPEHDEHNE!HOrdaB npocTpaHCTBe MeJdy 3aunToi npexuM o6opyoBaHem 3acTpBeBAOT BeKu Nn TpaBa. Pepd Tem, KaK Bbl 6ynde npouuatab, octaHOBNTe DBNrataJIb.
MeToaIpa6oTbI

IPEJYIPPEHDEHNE!Maunhbl, OchaueHHbIe NOppe3uKamNnJI Jne3BnA MIIpe3KN TpaBbl, MoHeT pe3KO 6pocaTB B CToPOHy, KOrDa Jne3BnBXoADT B KOHTaKTc 3aKpenLeHHbIM o6BeKtOM.3To Ha3bIbaeTcO Tdaue.NOTaayMoKeT 6bIT DocTaTOUHO cINbHO, YTO6bIOT6pocNTb MaunHy INI ONepaTopaB IIO6OM HAnpaBLeHN, B pe3yJIbTaTe Qero MOKeT 6bITb NOTepaH KOnTpOJIb HaMaunHO.OTdaayMoKeT 6bITb HeoHNaHHo, eCInJe3BVe 3aueNTcra 3a UTO-Jn60, 3acTpyHET nIN 3anyTaetc. OTdaua HanboJeBepoTHa B Cnyuae, eCIn NINOxo BVIDHO NOpe3aEMbl MaTePnaI.
I36eaiTe nJIeHn yuactKOM Je3BnMeHny ufoi 12 n 3 no ufepe6nayUacOB.Pnp nJIeHNn 3Tm yuactKoM HaTOJIcTBIX CTBOJAX I3-3a cKOpocTNBpaueHnJe3Bn BO3MOHHa OTdaHa.
-Перд Tem,Кak npncTynntb KpacuNTKe, cIeNyet npOBepnTb ouHuaemb yuactok,ero cocToHHe,HaKJIoH,HaJIuYe KaMHei,ЯM T.N.
-ПослеэтогопрстуалгкрабоTe,наннаясcamoroЛERKOrOучacTKa,TO6bCo3ДаТь
OTKpbIToe noJe N yJyUHNTb BnIMocTb npN paacnCTKe.
B npoecce pa60bI nepMeaTecb Ha3aBnpei nonepek yuactka, KaJbXoJdoJIHeOXBtBAbPa60uyacToK B 4-5 MeTpOB.3To IOCTnIgaeTc npn noJHOM nCNoJIb3OBAHNBCeI pa60yeI IIOUaIIN 3axBaTa MaunHbIBO6oNX HApabJeHHx N o6ecneuHaETonepaTopa yDObHbIM m MeHauUmMcra pa60umyuaCTkOM dJa pa60tbl.

ДлнHa nyTn DoJHnHa cocTaBnA Tb np6JIn3nteJbHo 75 M. No Mepe BblnoJIHeHn pa6Otbl nepemEuaiTe 3anpaBOHyo KaHnCTpy.
Ha cKJHOHax nyTb cIeNyET npOKJaIbIbA Tb noI npaMbIM yrJLOM K cKJHOy. Iopa3do JerYe pa6oTaTb nonepeK cKJHOHa, Yem noIDHMmaRcB n onyckaRcNo cKJHOHy.
- NyTb DOJIKeH 6bITb cnJaHnpoBaH TaKIM O6pa3OM, yTo6bI Bbl MoRJI N36eHaTb KaHaB IN HbIX npenrTCTBn. Kpome TOrO, HaIO corJlacOBbBAbT nyTb c HanpaBJeHHeM n CnIoN BeTpA, TaK yTo6bI cpeaHHbIe CTBoJI naJaIN Ha yHe ouNtseHHyU TeppuTopNo.
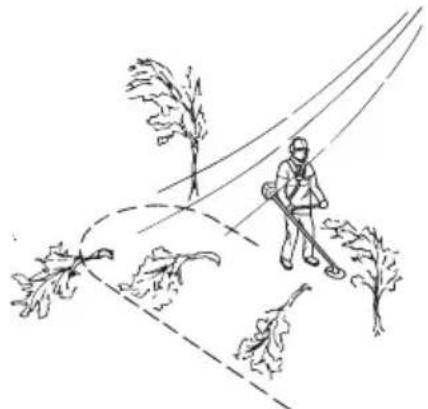
Ouuctka leca Je3Bnem IJIy INJIeHnI

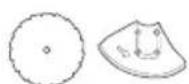
-Пи npimMeHnн Лe3BnK ToIcTbM CTBoJAM Bo3pacTaet pnc OTdaun. NToTMy cneJeYET
I36eRaTb npIMHeHn yUacTKa Je3BnM MeHny UΦpoi 12 n 3 no UΦep6NaDy YacOB.
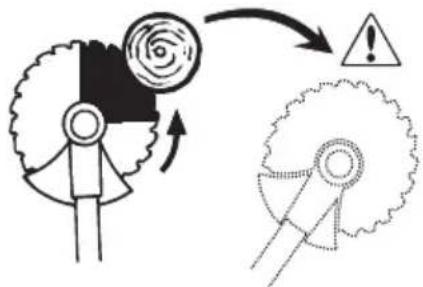
ДлгToR,уTo6bI DepeBO ynaLo HaJIeBO, HHHIOU YacTb DepeBa cJeDyeTe OToDBHHyTb BnpaBO.HaKIoHnTe Je3BnE n pe3KIM DBNHeHnEM nepemecTnTe erO no DnaRoHaJIN BHN3 n BnpaBO.B To He BpEm npHHMnTe K CTBOJy UNTOK Je3BnJ.NcNoJb3yInTe yAcTOK Je3BnJ MeJdY CnΦpAMN 3 n 5 no CnΦep6NaJy YacOB. IpePd NaJalom NnJIeHnry yBeJIuNbTe o6OpOTb Do MaKcImaJIbHbIx.
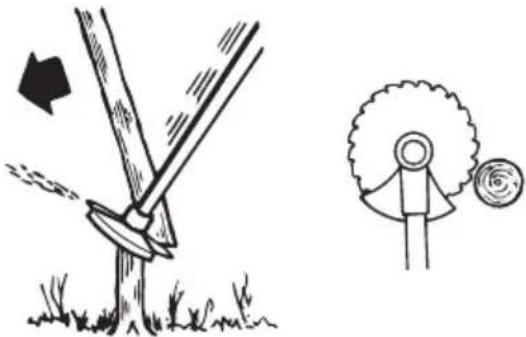
ДяТOrO,YTo6bI DepeBO yanaLo HAnpaBO, HHHIOU YacTb DepeBa cJeDyeTe CdBHyTb BJIeBO.HaKIoHnTe JIe3BnE N pe3KIM DINHeHnEM nepeMeCtNTe ero no DNarOHaJI INBn3 BnpaBO. IcnoJb3yIte yuactok Je3BnA MeJNy UΦpAMN 3 n5 no UΦep6naTy qacOB, TaK YTO6bI HApBaJIeHnE BpaSeHnRA Je3BnA nepeHecNo HHHIOU YacTb DepeBa BJIeBO.
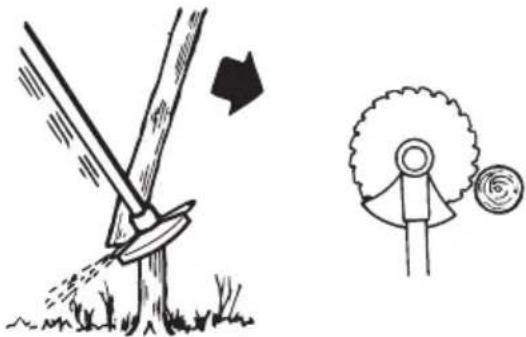
-ДяТOrO,уTo6bI DepeBO ynaLo BnpePeH NHHIOU YacTb DepeBa CJIeDyEt NOTaHyTb Ha3aI. NToTHHe Jle3Bne Ha3aI 6bIcTpblIM n pe3KIM DBrHKeHHeM.
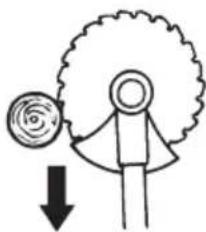
Bolbne CTBOJIcJeIyETpeaTcDByxCToPOH. OnpeJeNITe, B KaKOM HanpaBHeHINdoJIHeYnacTBCTBOJ.CHaUaCJeIyETnpImeHTb NlNy co CTOPOHbI NaDeHnA.3aTeMNIJIte c dpyoTcTOPOHbI, YTO6bI NOBaJIHTbCTBOJ.PaJaIOOe DaBLeHne DoJIHHOCOTBeTcBOBaTb ToIuHHe CTBOJaNTBepDOCTN daHHo npOdbI DepeBa.ДЯHe60JIbXx CTBOJOB Tpe6yeTc8oJIbWoeDaBHeH, B TO BpEM, Ka JIA KpyNbIXCTBOJOB Tpe6yeTcMeHbWe daBHeHne.
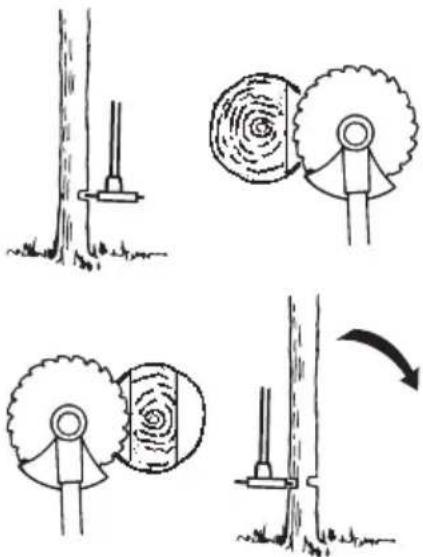
- Ecnn CTBOJIbCTOAT NIOtHO, yuHTbIaIe 3To npn Bb6ope cKOpocTn pOdBnHexHn.
- EcJn Je3Bne 3aKMeT B npOnJIe, HNKoRda He
deprAaTe MaunHy, nbTaRaCb OCBO6OaNTb ee. Bbl MoKeTe B TaKOM Cnyuae NOBpeaNTb Je3BNe,
yIIOByIO nepeDaUy, BaII nnpyIb. OTnycTInTe
pyKoRTKn, yXBaTInTe oBeIMn pyKaMn BaII n
MeIJIeHHO NOTaHNTE MaunHy, YTO6bl
OCBO6OaNTb ee.
Pe3aHne KycTapNka Je3Bnem IJIy IIJIeHnI


ToHKne CTBOJIbI KycTapHKNcKaaUNBaIOCTc. Pa6oTaIe no npHcNpy MaTHnKa, packaunBaHem n3 cTOpOHb B cTOpOHy.
-ПовытайТecсpe3aTb HeckoЛьКо CTBOЛOB OДнIM DBИнHeHnEM.
-Пи Сретан ИСТВЕНБИХ КстApнкOB, paCnCTbTe ChaJaMa MecTo BOKpyr. CnJInte BHaJaIe BbICOKNe KpaHnE nHI, YTO6bl He ДОуСТИТь 3aCtpeBaHЯ. 3aTe mCnJInte nHI Do HeJaeMoB BbCoTb.I NocIe aTOrO nonTaIteCb HauaTb paCnCTKcY c cepdINbI KcTapNka.EcJN eTO He noJyuaetc, CpexbTe 6OJIe BeBicOKNe nHI nДaJIte CTBOJAm BO3MOHHOCTb yNaCTb Ha 3eMЛIO. 3TO CHN3NT pNCK 3acTpeBaHЯ peHyUeRo dNcKa.
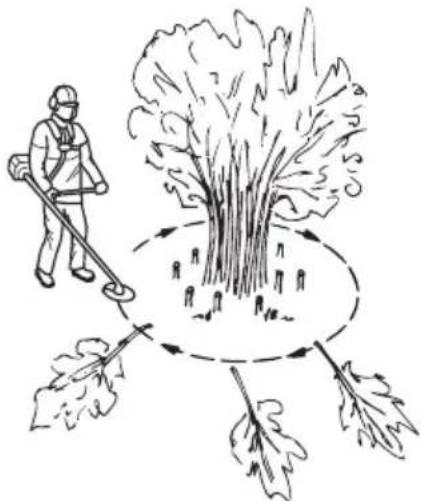
Poe3Ka TpaBblne3BnEMIJIaTpaBbl

-Ne3BnI H0Hn IJIa TpaBbI He OJIHHbI NcnoJb3OBA TbCra Cpe3AHnCTBOJIOB.
JIe3BHeIJIaTpaBbI npEJaHa3HaueHo IJIa BcEx BVIOB BbICOKO INI CNJbHOI TpaBbl.
-Прон3ВОДиTe KoWeHne MaTHTHkoBbIM DBNKeHHeM N3 cToPOhBi B cToPOHy, DBNKeHne Cnpaba HaleBO 6yJeT pa6OuHm DBNKeHneM n DBNKeHneCJIeBO HAnpabo 6yJeT Bo3BpaTom. JIe3BnE DoJHKHO cpe3aTb TpaBy CBOHM JeBbIM Kpaem (Ha UINΦep6NaTe YacOB-MeKdy 8 n 12).
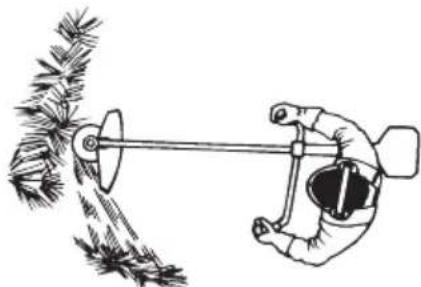
- EcJn HaKNoHbIe3BHe HeCKoJIbKO BJIeBO npn noDpe3Ke, To cpe3aHHa TpaBa 6yJeT yKJaDbBaTbCpOBHbIMn PjaAMn, YTo o6JerHT ee cTpe6aHne.
CTapaTecb pa6oTaB b OJHom pHTMe. CToTe yCTOuHBO, NOCTaBnB CTOnb Hor Ha HeKOTOpOM
pacCToHnIpyrO Tpyra. NocJe B03BpaTHOrO DnHexHe nepeDBNbTecb BnepeI ONrTcTaHbTe B yCToHNBOM NOIOKeHN.
-OnopHaaYaUkaDOLHHa npNJeraTbK 3emJe OHa npEdoxpaHReT Je3BHe oT cOpNKacaHnca 3emJe.
- YMeHbWnte pNc 3aKpyuBaHnMaTePnaJaBOKpyr Je3Bn, BblNoJHra CJeDyUOHe yKa3aHn:
1Pa6oTaIe BcerdaHa noJIbIX o6OpOtaxra3a. 2CTapaTecb He npoxoNTbNo yHe cpe3aHHo TpaBe npu BO3BpATHOM DINHHeHN.
-Перед Tem, Кад Начать сбиразь сретанHyюТраBy, OCtaHOBNTe ДВИгаTeЛь ИСHMITe ЛямКу.
TpMMepHa 6pa6oTKa ra3oHOB TpMMepHo roJIOBkoI

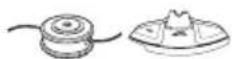
TpMMepHa cTpHHKa
-ДернITE roJIOBky TpIMMepa HENOCpeICTBeHHo HaI 3eMJIe NOD yRJOM. Pa60Tu BbINOJIHReT KOHeU CTpyHb. DaiTe CtpyHe BO3MOHHocTb pa6OtaTb cCObCTBEHHoI CKOpocTbIO. He npHHMaIte CtpyHy K BbIKaUNBaEMOMy yUacTKy.

CTpyHa MoKHeT NcRKO cKaUHbTa TpaBy n copHnky CTeH,3a60pa,JepeBBeB 6OpIopOB, OHaKo OH MoHeT TaKHe NOBpeDnTB CyBCTBnTEJbHyO Kopy Ha JepeBbAx N KyCTapHnKaX N nobpeDnTB cToJb3a60pOB.
Pnck noBpeHdEHHpaacTeHH yMeHbuaeTc3a cuet yKopaunBaHHcTpyhdo10-12cm uMeHbueHHyNCla 06OpOTOBdbVaTeJIa.
OuNTKa
- Pn OuNCTKe npOn3BoNDITc ydaJIeHHe Bcei HeJeIaTeJbHOI pAcTIteJIbHOcTn. IepHHTe RoIOBky TpIMMepa HEnOpeCDtBeHNO HaI 3eMJIe, nOKaUHBA eI. NycTb KOHeC CTpyHbI yapReTcO 3eMIO BOKpyr DepeBbeB,
cToJ6OB, cTaTuN T.n. 3AMEUAHNE! TaKo npneM yCnJIiBaeT n3Hoc cTpHybl.

CTpyHa n3HaunBaetc6bctpee ndoJHHa BbIBnraTbcra Yaue npna pa6oTe cpeN KAMHei, KnpNua, 6eToHa, MeTaJInueCKnx 3a6OpOB n T.I. YEm npn pa6oTe cpeN DepeBBeB N DepeBAAHbIX 3a6OpOB.
-ПиТримернСтпжkeиочсткеслдуET He noJIHOCTBIO OTKpbBaTbДрocceIb (80%), UTo6bl npOДЛNTb cpoK cLny6bl cTpHybl N yMeHbWHTb n3HOC rOJOBKn TpIMMepa.
Cpeka
TpMMep ndeaJIbHO noXoINT JIЯ cpe3aHnra TaKoI TpaBbl,do KOTopoT TpyIDHO Do6paTbcra, noJIb3ayc b 06bUHO ra3OHOKocNIkoB. B npOuece cpe3Kn IepHNTe CtpHy npaJIleJIbHO 3eMJIe. N36eraIte npNIMMaHnra FOIOBKN TpMMepa K 3eMJIe, nocKOJIbKy MoHHO HcnpOpTNTb raoHn NOBpeDHTb IHcTpMyMeHT.

He onyckaTe nocToHHoro copnKocHOBeHnra roJOBKn TpMMepa c 3emLeB npOcece cpeKN. NocToHHoe copnKocHOBeHne MoKeT npVBecTu K NOBpeHdEHNIO H3HOCy RoJOBKn TpMMepa.
IopmdTaHne
BENTINpyuooee DeIcTBnE BpaaiooeycnC TpyHb MoXeT 6bITb NcNoJIb3OBAHO JIA 6bICTPOH INJeKoOn OuaCTKn. DepHXTe CTPHy npaJIleJbHo HAD NOIMTaEMbIM yUacTKOM I BOIDNTe TpIMMepom IV3 CTOpOHBI CTOPOHy.
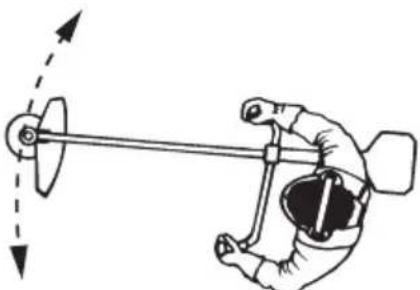
-Пи сраЗк e n noДмeТанИ nЯ noЛучЕнЯ HanluyuWix pe3yЛьтАТOB ДрocceЛьdoJIжEH 6bIb OTKpbT NOJIHOCTBIO.
Kap6upaTop
Perylnpobka xoJocToRo xaT
IpoBepbTe,TO BO3dyHbI ΦINbTp YnCTbI. PnI npaBnIbHom YncIe O60pToB Ha XoNocTOM XOypeKyuJa HacaKa He DoJIHb BpaAsTbcJ. PnI Heo6xoDnMoCTn KoppeKtnpOBKn 3akpbBaIte (NOBOPaUBAIte No YacOBoi CTpeJIke) BVHT peryInpOBKn O60pOtB XoIOcToro XoJa T npn 3anyuEHHOM DBNrAteJe, Do Tex nop, noka peHyuaHacaDA He NaHET BpaAsTbcJ. OTKpbBaIte (NOBOPaUBAIte NPOTNB YacOBoi CTpeJIkn) BNHT Do Tex nop, noka peHyuaHacaDA He OCTaHOBNTcY. UcCNo O60pOTB Ha XoIOcTOM XOy yCTaHOBJIeHo npaBnIBHo, ecJN DnBraTeJIb pa6oTaet POBHO BO BCEX NOJOnHeHNx, INMeeTcJ Donyck Do CKopocTu, Ha KOTopoi HaunHaet BpaAsTbcrpeHyuaHacaDA.
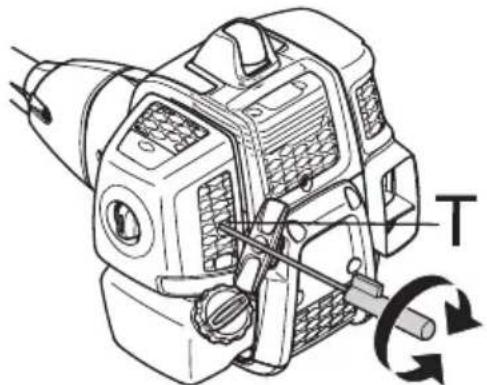
PekomeHnyeMoE KOJI-BO 06OpOTOB Ha XOJocTOM XoNy: Cm. Pa3JeI TexHnueckne xapaKTepcntKN.

PNEyPENJDEHNE!EcIn xoJocTbe 06opoTbHeB03MOHHO
OTpepyIInpoBaTb TaK,UTo6bl peHyyuee 06OpyIOBaHne cToJIo HEnoDBNHHO,
06paauTecb K npo#aBcy/B
MacTepeKyu. He noJb3yntecb
MaunHoi, noka He 6yJeT BbInolHeHa
ToHaa peYJInpOBKa IJIpeMOHT.
TnyuNTeJIb
06paTnte BHMaHne! HeKoTOpbie rIyuINTeJIIOchAaHeBkKaTaJIn3aTopoM.Cm.rJaByTexHnueckNe daHHbe,yTo6bI yHaTb ecTb Jn HaBaWeMaUNHe KaTaJIn3aTop.
InyuTeIb cIyHcIJIa CHINHeHrypoBHaUyMaIOTBoJa paKaJIeHHbIX BbIXlonHbIXra3OBOTpa6oJero.BbIXlonHbe ra3blOueHrOpJyHe mOryt coedePbTaNckpbl,TO MoJHe TnpJBecTNK
noKapy npn npaMOM nonaHaHn Ha cyxOu BocnlaMeHyoUncMaTePnaJ.
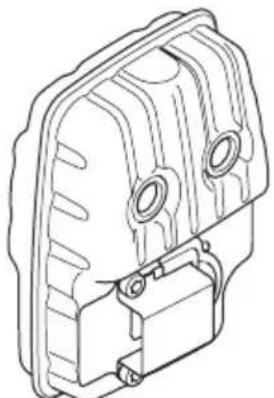
B HeKoTOpbIx rLyuHnTeJnx npeDycmOTpeH cneUaJIbHbI NcKporacNTeJIb. EcJIbBaHa MaUHa 06opyIOBaHa TaKIM rLyuHnTeJIeM, ceTKy fNJIbTpcaJeNyET YnCtNTb pa3 B HeJeJIIO. HanLyuUHe NOJIb3OBAtbcr CtaJIbHO JIeTKoI.
EcIn Ha BaWeM INHCTpyMeHTe CToNT rLyuHTeJIb TaKOro Tnna, To cTeKy cJeDyEt OChMaTb He peKe oHOro pa3a B HeJeLIO. Ha rLyuHTeJx C KaTajn3aTopom, TaKyO ouNcTKy DoCTaTOUHO npOn3BOJNTb pa3 B MecA. PpN Bo3NHKOHeHn NOBpeJNeHn Ha cETke ee CJeDyET 3aMeHNTb.
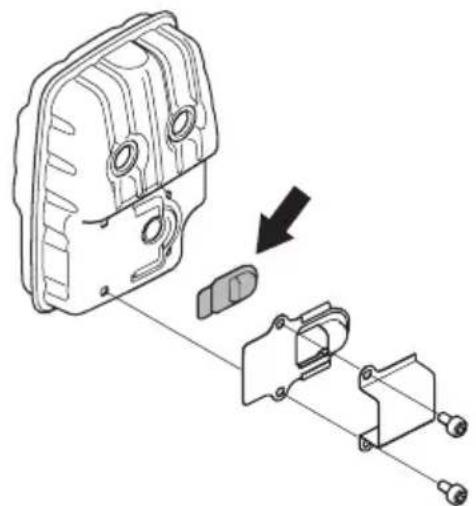
Ecni cetKa yacTo 6bBaeT 3acopeHa, 3NaHT
yHKnJa KaTaN3aTopa yxUdWeHa. O6paauTecb
K BaWeMy npOaBcy 3a COBeTom. 3acopeHne cETKn
BbIOBt nepeRpeB DnRaTeJn NOBpeJdeHne
UJIINHnpa NnopShra.
BHIMAHHE! He noJb3yIeTcMb MaunHoi c nobpeKeHHbIM rJyWnteJIem.

IPEyIPEHEHNE!IyuHTeJIb KaTaN3aTopa CnIbHo HArpeBaetcB Ipocece pa6oTbI NocJe pa6oTbI HeKoToOpoe BpemO ocTaetcRopAUM. 3To npocXoJNT IN B peHIMe XoIOCToro xOJa.CopnIKoCHOBHeHne MoHET Bb3BaTb OOHr KOHN.IOMHITe 06 onacHocTn noHapa!
Cnctema oxlaeHna
Для obecneueHЯΚak MoHHo 6OJIe HN3KoI pa6oey TempepaTpybMaUNHa o6OpyIOBaHa cnCTeMoI OXJaHKeHЯ.
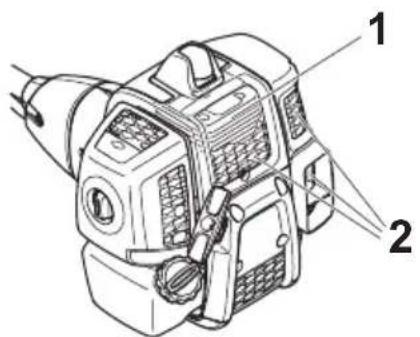
CocTaB cncTeMbI oxJaHneHnA:
1 Pe6pa oxlandeHnHa py6aWke UJInHpa.
2Bo3dyxo3a6opHnK.
Ipon3BOInTe OuNCTKy CnCTEmbOxJaHDeHnA
ueTKoB pa3 B HeJeLIO NN YaSe, ecJN 3TOrO
Tpe6yIOT ycNoBnpa6oTbI. 3aRpy3HeHHa NNN
3acOpEHNa CnCTeMa OxJaHDeHnMoHeT
npNBecTN K NepePpeBy MaunHb I Bbl3BaTb
noBpeXdEHNe nopHnI NcJINHdpa.
Bo3nyuHbI ΦnJIbTp


Bo3dyuHbI ΦnIbTp cIeDyET peryJrApoHo YnCTHTb oT nbIIN rpa3N dJa TOrO, YTO6bI n36eHaTb cJeDyUoXn NOBpeHdEHH:
C6oBpa6oTeKap6iopaTopa
TpyHocTB3anycka
-ПадениmoшноTNДВURAteя
HapacnBnHoc qacteBnBaTeJra
- 4pe3mepHbI paCXoD ToJIInBa
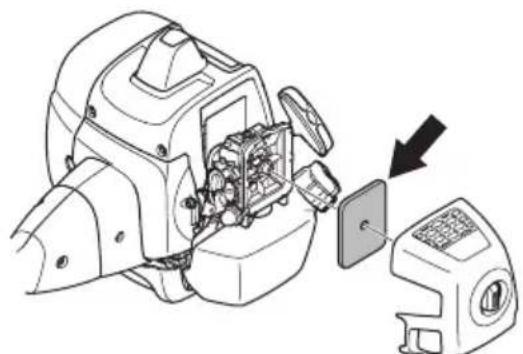
Bo3nyhblnBtp cIeNyet ouNt bKaHbIe 25
yacOB nIy uae, ecJIM MeTo pa60Tb CNIuKOM
3aIbJIeHO.
OuInCTKa BO3nUshHOro HnIbTpTa
CHIMnTe KpbIuKy Bo3DyUHOro ΦnJIbTp a N BbHbTe ΦnJIbTp. OuncntTe erO cTpye Bo3Dyxa.
Bo3dyhBnΦNtBp nocJe 3KcnLyatauB TeueHne HeKOToPOrBOpeMeHN HeBO3MOxHo NOJHOCTbO BByNCHTb. PoTOMy eRo HxHo nepNoDnueCKn MeHrTa Ha HObI. NOBpeXDeHHbI Bo3dyhBnΦNtBp Heo6xoDnMo 3aMeHNTb.
TOnJIbHbI ΦnJIbTp


1ToJIINBHHI J_bT_p
KordaB DnRaTeJe 3aKaHnBaeTcTOnJIbBO, npoBepbTe KpbIuKy TOnJIbHOrO 6aKa N ToNJIbHbI ΦNbTp Ha 3acopene.
YrnoBa3y6uataa nepedaua

YrIIOByIO 3y6aTyIO nepeDaUy 3anoJHnIoT
DocTaToUHbIM KOJIuYeCTBOM KOHCnCTeHTHO
cMa3Kn Ha 3aBOJe-N3rOToBnTeJe. Ondako,
npexJe Yem NOb3oBaTbcra NINO, cJeDyeT
y6eINtbcryTO Ta nepeJaHa Ha 3/4 3anoJHHeHa
cMa3Koi. PoJIb3yInTecb CneUaJIbHoN cMa3Koi
HUSQVARNA.
O6bHNO KOHCNCTeHTHa CMa3Ka He HJxJaetcB 3aMeHe, 3a NCKJIIOUeHNEm CJIyuaEB peMOHTa nepeDaun.
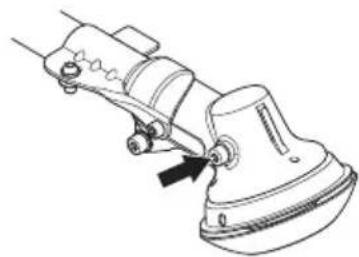
Cbeya 3aKnraHna
Ha pa6oty cBeu 3aHHraHnBJIHOT cIeIyUOHe
- HenpaBnIbHa paRyInpOBka Kap6IopaTopa.
- HeydOBtBOpTeJbHa pa6oay cMecb (cJIuHKOM MHOrO MaCJa uJH HeCOOTBeTCTByUoue MacJo).
-Pr3HbB03dyHbHfNJIbTp.
3TNΦaKTopbBnIyIOT Ha 06pa3oBaHne HaragaHa 3JIeKTopdax CBeuN MoY T npNBecTn K c6oM B pa6oTe N TpyDnHocTm npn 3anycke.
EcnI DnIraTeJIb TepreT MoHocTb, nIoXo
3anycKaeTcra, nIoXo: PpeBde Hcero DepeHHT
60opoTb XoJocToRo xOda: npexDe Bcero
npOBepbTe CBeyu 3aHrAHHa. EcnI CBeya rpa3Ha,
npOuNCTITE ee n npOBepbTe 3a3Op 3JeKtpoDoB,
0,9-1,0 MM.CBeyu HxHHO MeHrTa Upe3 MeCua
pa60Tb Nnn npn Heo6xoDmocTu aae.
BHIMAHNE! Bcerda nCnoB3yTe TOnbKo yKa3aHHbI Tn CBeu! PnpMeHeHne HecooTBeTCTByUSeM MoJeN MoJcT npNBecTNI K cepbe3HbIM NOBpeHdEHNr MnpHr/UNINHpa. CJeDInTe 3a TeM, YTo6bI CBeya 6bla ocHaueHa T.H.N3OJIaUeI paDNONOMex.
TpaΦnK TexHnueckoro 06cnyJnBaHnA
HnHe npNBeDen HnepeHb 06cLyHHBaHn, KoTOpoe Heo6xOIMo BblNOJHrTa Ha MaunHe. BoJbHNcTBo NyHKToB onNcaHb B pa3deJe O6cLyHHBaHne. Nlb3oBaTeNb MoHET BblNOJHrTa ToJbKO TaKne pa60Tb no 06cLynHBaHIO n cepBnCy, KOTOpBe ONcaHb B daHOM pykoBOJCTBe. O6cLyHHBaHne 60JbWero oxBaTa DOJIHKHO BblONJIHrTBc aBTOpN30BAHHo cepBnCHOn MacTepcKoI.
| Texhnicckoe octcnynibahne | EkeJeHne-BHoe obcclyni- BaHne | EkeHeJeI- bHoe obcclyni- BaHne | EkeMeecy- choe obcclyni- BaHne |
| Очирсту сн�ту мente chарун. X | |||
| Проберъ, чтобь лямka He 6bla nobpeждени. X | |||
| Проберъ, чтобь ограичпеловаим ra3a и ручka ra3a оТВeчалы Требоганям бezоласноctи. | X | ||
| Проберъ, чтобь рухаяк a и рльь 6blan ceль b xopoшо Зakpenлев. | X | ||
| Проберъ пбоу контака оstановки. X | |||
| Проберъ, чтобь рожушee obopudobане He bpaasalocb Na холoctых obopotax. | X | ||
| Прочstnte bo3duuhsbй Фильт.В сныаe Heobxodimoctn 3amehite. | X | ||
| Проберъ, чтобь зашипа He 6bla nobpeждени a uTo6bHa Na He н He blio trpeuin.Заменite зашипу, eclin Oha 6bla noDberpehe Na удару плс ecln Ha He necb Trpeuinbl. | X | ||
| Проберъ, чтобь le3bve 6blo xopoшо OTceHTPOBAHO, zatoeHo N н He pacteckaLob. HeOTceHTPOBAHNOE le3bVE BbIAeT ВИбрацио,чTO monet prinBeCTN K nobpejdeHIO MaSHINb. | X | ||
| Проберъ, чтобь rolobka TrpIMMepa He 6bla nobpejdeHana, uTo6bHa Na He N He 6blo TpeuIN. Пrin Heobxodimoctn 3amehite roJOLBky TrpIMMepa. | X | ||
| Проберъ, чтобь koHtrpaia Kejuшero obopudobaning 6bla правлбho 3aTaryta.. | X | ||
| Проберъ, чтобь ТраHCnopTHbI npedoxpaHITb Jle3Bna He 6bln cIomah N 6bln pRaBilbNo 3akpenlleH. | X | ||
| Проберъ 3aTaykku raeK i 6OJItoB i noDTaHNTe B clyuae Heobxodimoctn. | X | ||
| Проберъ, чтобь He 6blo yTeckn TOnlina C dBrGaTeJЯ, 6aka ил Trpy6ok noDACh TOnlina. | X | ||
| Проберъ стартс co erO shypom. X | |||
| Очирсту habунHyю nobexHOCt b CbeU 3aHnirAria. ChaTb i поберъ 3a3op MeHd y 3LekTpoДAMi. OtpereylnipobaTb erO do 0,9-1,0 mm Ил замeHITb CbeU. Пrobеръ,чTo6bHa Na Cbeue 6bl T.H. ИЗЛЯТOP radionomex. | X | ||
| Пробьть karbupatop In okryhanoiошee erO npocTpaHcTBO. X | |||
| У dioctobepitbsc,чTo yrIobvaj 3y6caTaj na nepedaу ha 3/4 Задлесна cMa3koJ. 3aOJIHnITb ee B clyuae Heobxodimoctn, Испььзу спeцmaJIbHyu cMa3Ky. | X | ||
| Проберъ,чTo6bTolPONIBHbI phIbTp He 6bln 3aRpy3HEnIиla НТПANVBHOM shlaHre He 6blO TpeuIN Ilin dpytgX deФeKTOB. Пrin Heobxodimoctn 3aMeHIne. | X | ||
| Осmotrtite Bce npoboda n coeDinHena. X | |||
| ЗамeHITb cBevy 3aHnirAria. ПrobеръчTo6bHa Na Cbeue 6bl T.H. ИЗЛЯТOP radionomex. | X |
TexHnueckne xapaKTepeNCTnKN
TexHnueckne xapaKTepeNcTnKn B40 B ELITE B40 BT ELITE
BnraTeJIb
ObemuHpa,cm3 40,140,1
dNaMaTeP cHInHpa,MM 40,5 40,5
ДлИн ha oxda, MM 31,1 31,1
O6opOtblxOJocToTOxoJa,o6/MnH30003000
PeKOMeHdyemble MaKcImaJIbHbIe BbICOKNe 06oPoTbI, 06/MnH 12000 12000
CkopocTbBpaueHnHa BbIXoHOn oN, 06/MnH 8220 8220
MaKcImaJIbHaB BbIXoHHa MoUHocTb DnIraTeJIaCHo ISO 1,5/9000 1,5/9000 8893,KBT/06/MnH
CnCTema3aHnraHna
Cbeua zanraHnNGK CMR7H-10 NGK CMR7H-10
3a3op 3JIeKToPOIOB,MM 0,9-1,0 0,9-1,0
CnTeMa TOnJIbA /cMa3Ku
Emkoctb TOnJIbHOrO 6aKa, JntpoB 1,0 1,0
Bec
Bec,6e3 TOnJIbBa,p9KyUeO o6OpyIOBaHnI 3aIITbI,Kr 7,3 7,4
3MnccnI Wyma
(CM.npHm.1)
UpoBHeHbIyMa,ImMepeHHbI Ib(A) 112 112
YpoBeHb 7yMa, rapaHTnpoBaHHbI LwAID(A) 118 118
YpOBeHb Wyma
(CM. PnpMeuHaHne 2)
YpoBeHb 乌MoBOr O daBJIeHnHa ypoBHe yxa noJIb3OBaTeJnI3MepeH corIacHo EH ICO 11806 n ICO 22868, d5(A)
C roJIOBko TpIMMepa (opuHaJIbHo) 100 100
CJe3BnEMIJIaTpaBbI (opuHHaJIbHbIM),255-3 99 99
CJe3BnEMJnTpaBbI (opuHHaJIbHbIM),255-4 99 99
Y6eTe ce,Ye nycKOBnT MExaHn3bM IN KCaTopbT Ha IpoceHaTa KLnana ce DnNnA
CBo6oJHo N B'3BpaTHHTe npyHnH ca B n3npaBHocT.
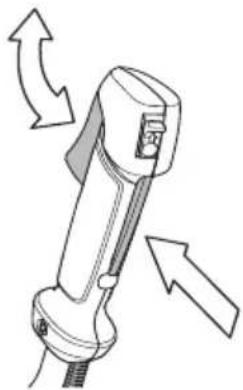
BnHTe HnCtpyKuNTe B pa3deI CTapTnpaHe.
CTapTnpaTe yCtpoNCTBOTo HnoJaTe NbJIHa ra3.
OTnycHTe peryJatopa Ha ra3 n ce y6edeTe, yepeKeJIoTO 06OpUdBaHe cInpa IocTaBa
HeNoDBrHHo.AKO CJIeN KaTo nocTaBnTe
noDaBaHeTo Ha r3Ta Ha npa3eH XoI, peKeJIoTo
obOpUdBaHe npOdbJIHaBa Da ce BbpTN, TpRbBA da
ce npOBepn peryJinPobKaTa Ha npa3Hn YOd Ha
kap6ypaTopa.BnK INcTpyKuNTe B pa3deI
PiDpBHKa.
KJIoucTOn
I3noJI3BaITe KJIIOUa CToI 3a cnIPAHe Ha IIBnIgATEJI.
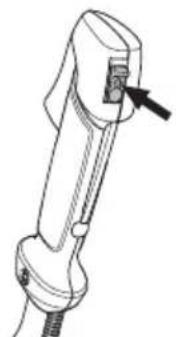
BkIoute DnVraTeJnCe y6eTe,Ye Toi ce n3KIOUyBa,KoTaTO KIOUyBTe nocTaBeH B noLoKeHHe cToI.
OBUHCTPYKUN 3A BE3OJACHAPABOT
3aunTa 3apeKeIeTo o6OpyDbaHe

Ta3n 3aunTa e npedHa3NaueHa da npedna3Ba oT OTCkaUHe Ha npedMeTN KbM onepaTopa. 3aunTa npeDoTbpaTBA ocBeH ToBa IOnnp Ha onepaTopa c peJeTo 06OpyDbAhe.
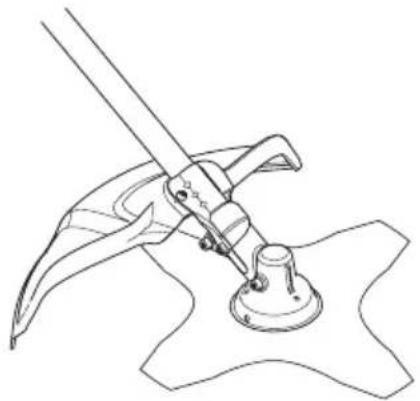

Y6eTeCe,Ye 3aunTaTa He e noBpeHa n Ye He ca ce 6pa3yBaIIn NyKHaTnHn.CMeHeTe 3aunTaTa, aKO TRe 6nla N3IOxHeHa Ha ydapn nn Ce e HanyKaJa.
I3noJI3BaIte BnHarI npenOpbHaHaTa 3aIHTuTAt 3a cneUHfNHOTo peHeIo 06OpyDbAe. BnK pa3JeI Texueckx xapaKTePncTKn.

IPEyIPEJDEHNE!Pn HnKaBn 06cToaTeJCTBa He 6nBa Da ce I3noJI3Ba peHeeTo O6OpYdBaHe,6e3 Da e MoHTnpaHo Oo6peHaTa 3aunTa. BnK pa3deTexHueckn XapaKTepNCtKn. N3noJI3BaHeTo Ha NorpeuHO nIHN HeN3npaBHO 3aUnTHO 06OpyDbaHe MoHe Da DoBeDe Do cepNo3Ha TeJeCHa noBpeJa.
ANTINBn6paLIOHHa cncTeMa
BawaTa MaunHa e cHa6eHa c aHTNBn6paCNoHHa cnCTema, CBeHdaaDo MHNmym Bn6paunra n 06leKyaBaasa pa6oTaT.
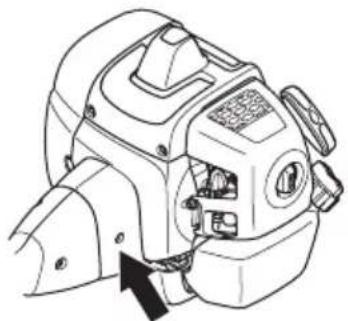
N3noJ3BaHeTo Ha HenpaBnH0 HaMoTaHa Kopda
HnHa HeHaToyeHo, HenpaBnH0 peKeIoo
o6OpyDbaHe (nOrpeWeH Tn nI npReuho
HaToueHo,BnKnHCTpykCmnte B pa3JeI
HaToUbaHe Hape3eua) BoNi Do 3acNJBaHe HNBOTo
Ha BV6paunTe.
ANTINBn6paUHOHHaTa cnCTema Ha MaunHaTa HamaJIbBa BN6paUHTa, npedabaaca ce ot DnurataJIpeJeTo o6OpyDbaHe Bbpxy pKoXBaTKaTa Ha MaUNHaTa.
PpOBepTe daJIH aHTnBn6paCIOHnTE eJemeHTn He ca noBpeIeHN I ca 3dpaBO 3akpeIeHN. CBbpeTe ce c Baunr DnCtpn6yTop Ha McCULLOCH, 3a da nOIMeHnTe aHTnBn6paCIOHnHaTa CnCTema. NocTeTe www.mcculloch.com.

IPEyIPEXJEHNE! IpeKoMepHo
n3laHaHe Ha Bn6paun MoKe Da
doBeJe Do npaHeHna Bbpxy
KpbBOHOCHn CbDOBe N HepBHaTa
CnCTema Ha Xopa CbC CMUeHnB
KpbBOO6paueHneTo. NoTbpcTe
Jekapcka nOMo, aKO ce NOBRT
cMMNTOMN, KOTo MOraT da ca
pezyltaT OT Bn6paun. TaKnBa
cMMNTOMn Ca HAnpImeP n3TpbnBaHe,
3ary6a Ha yYBCTBnTEJHocT, "rJInuKn", "6OdEHN", 60JKN,
fN3NuCeKa OTnycHaTOcT, npomHa Ha
Cbeta Nn CBCTOaHHeTo Ha KOHaTa.
Te3n cMMNTOMn Ce nOABRaT
o6NKHOBeHo Ha npbCTHTe, pbcTe N
KNTKnte. PnckT MoHe Da ce yBeJInuN
npn HnCKn TempeaTypn.
Бьрзо оTKonчаBaHe
OTnpedepa3noJHO JecHO DocTbHNO 6bp30 OTKoNpaBaHe KaTo MApka 3a 6e3ONaCTHoCT, aKO DBnraTeJIaT Ce Bb3nJaMeHN NIN B Dpyr n CNTyaUN, INsCKBaUN 6bp30 Da ce ocBo6oHdnte OT MaunHaTa n camapa. BnN HnctpykUnnteB
OBUHCTPYKUN 3A BE3OJACHPA6OTA
pa3dEe PeryIipaHe Ha noIooKeHneTo Ha cMapa I xpacTope3a.
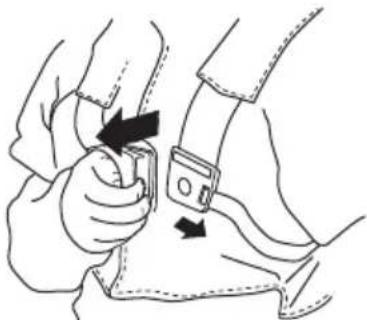
Y6eTeCe,Ye peMbUHTe Ha cama pa ca pa3noLoKeHn npaBnIHo.CneI peryInpaHe Ha camapa N MaunHaTa, npoBepeTe daJIb6bp30To OTKOnuBaHaTe Ha camapa e B n3npaBHOCT.
Aycnyx
AycnyxbT CBeJda Do MNHmym paBnueTo Ha
yMa HAcOyBa oTpa6oTeHnte Ra3OBe BcTpaHn OT
pa6oTeuJ.
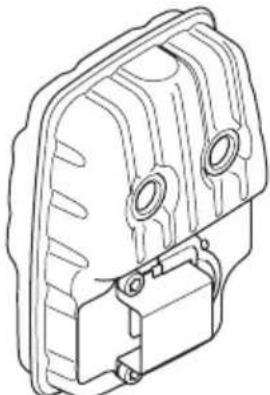
B ctpaHc ropeu n cyx KImat BepoTHOCTTa OT b3NkBaHe Ha noHapn e roJMa. ETo 3aio Hne cHa6dJaBame HAKOn aycnycn C NCKporacnteJHa MpeHa. PpOBepeTe daHn aycnyxbT Bn e cHa6deH c TaKaba MpeHa.
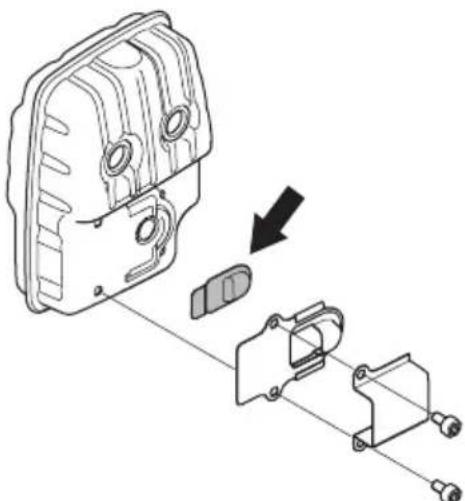
Ako aycnyxbT Ha MaunHaTa Bn e cHa6JeH cNCKporacnteJHa MpeHa, Ta Tp86Ba Da ce358-Bulgarian
noHCTBa peIOBHO. 3aMbpcHaTa MpeKa npeIIN3BnKBA nperepBaHe Ha IBNrATeJr N MoKe Da IOBeJe Do cepNo3Hn noBpeN.
IIO OTHOWeHHe Ha acnyxaeN3KJIouHTeJIHO BaHHo Da ce CnA3BaT INHCTpyKUInTe 3a npEJIeI, NOIdpbXka N cepBn3. IpoBepraBte peDobHo HaJeHHocTTa Ha 3aKpenBaHeTo Ha aycnyxbT KbMaunHaTa. HNKora He N3NoJ3BaIte MaunHa c NoBpeDeH aycnyx.
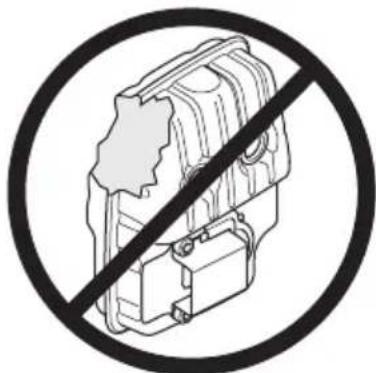

IPEyPENHEHIE!BbTpewHocTtHa Wymo3aJnyWnteJIcBdbpHaXmIKaJI, KOnTO MoHe Ja caKaHcpeoreHH. B cJyauyaeWymo3aJnyWnteJIrTe NOBpeDeH,136raBaIte Donnp C Te3n eJeMeHTN.

PPEyIPEHDEHNE!He3a6paBraTe, ue:OTpa6oTeHnTe ra3OBe oT DBrataJIca ropeuN B TAX MoRaT Da cBd'bpHaNT NcKpN, KOITo da npEIN3BnKaT noHap. He cTapTnpaTe HNKora MaunHaTa B nOmeHne HII 6JIn30do rOpNBMaTePnAIn!
KoHTpaIaKa
MoHTnpaHe Ha pe3eU n TpIMepHa rIaBa

PNEUYPENDEHNE!
Pn MoTaN Ha peHneo o6OpyDbaHe ot
NkIOuHTeJIHa BaHHocTe npedAkBata
Ha 3aBnBaJra DNCK/ONOpHNFaNaHeU
Da nonaIHe npaBnHO B cHTpaHnRA
OTbOP Ha peHneTo o6OpyDbaHe.
PiPeSHo MOHTnpaHo peHneTo
o6OpyDbaHe MoHe Da DoBeDe Do
cepNo3Hn N/INn OnacHn TeJeCHN
noBpeNi.
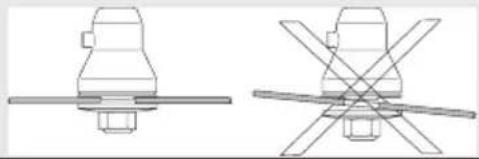

IPEUYIPENHENE!Pn HNKaBn 06cToTaeTbA He 6Nba Da ce N3noJ3Ba peHeoTo 06OpyDbAHe, 6e3 Da e MOHTnpaHo Oo6peHaTa 3aunTa. BnK pa3Je TexHnueckn XapaKTepncTNI. N3noJ3BaHeTo Ha norpesho NJI HeN3npaBHO 3auntHO 06OpyDbAHe MoKe Da IOBeDe Do cepNo3Ha TeJeCha noBpeDa.
3AIONOMHETE! 3aДаИЗnoJ3BaTepe3eU3a ceueHeIINKocHe,MaunHaTa3aIbJIHKTeJIHO Tp86Ba Da eO6OpyDbaHa c npHaJaIeKaUnTe ynpaBLeHne,3aUnTaHa pe3euaN caMap.
MoHTnpaHe Ha 3aunTaHa pe3eua, pe3eU Hox 3a KocHe

3aunTaHape3eua(A)ce3aKaayBdbpHauHa DByceKUHOHAJIc ce 3aKpenBa c eINHBnT(L).N3noJ3yBaIte npenOpbyaHaTa3aunTaHape3eua.BnKpa3JeI TexHuecknx xapakTepcntkN.

-MontpaTe 3aBnBaunI Nsck (B) Bbpxy nXoHaTa oc.
BbptTe oko octHa pe3eua,doKaTo eHOnOT OTBbpcTnraHa 3aDbNBAunnaDnCKcbBnAHe COTBbpcTneTo Ha npedabKaTa.
-ПocTaBete cnnpaTeHnHnUΦT (C)В OTBbPcTneTo,3a Da ce ΦNKcnpa ocTa.
-NotabeTepe3eua(D),onopHnaHeu(E)n onopHnaK(F)HaN3xoDnBaJ.
-ПocTaBeTe raKata (Γ).MoneHbT Ha 3aTraHaTo Ha raKaTa ce paBnBa Ha 35-50 Hm (3,5-5 KRM).Pa6oTeTe cIyXnraeueh KIOUOT KOMNKeTA INcTpMeHTN. XBaHeTe dPbHKaTa Ha KJIIOu KaOJIKOTo e Bb3MOHHo no6JIn3O do 3aunTaHa pe3eua. RaKaTa ce 3aTgA qpe3 BbPteHe Ha IyXnRA KIOU B o6paTHa nocKaTa Ha BbPteHeTo Ha TpImepa (BHIMAHNE! JnBxOdoBa pe36a).
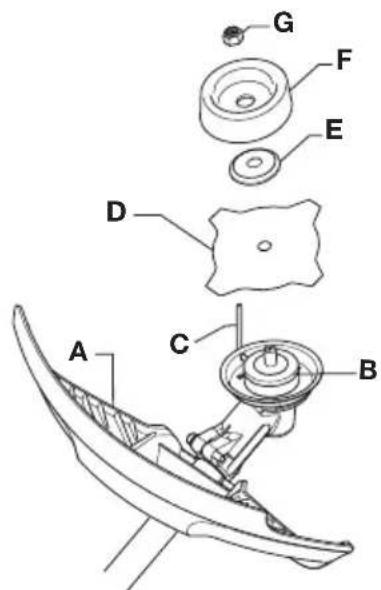
MoHTnpaHe Ha TpIMepHaTa 3aunTa n TpIMepHaTa rnaBa
-MontpaTne npedBnHeHaTa TpIMepHa 3aunTa (A) 3a pa6oTa c TpIMepHaTa rnaBa.
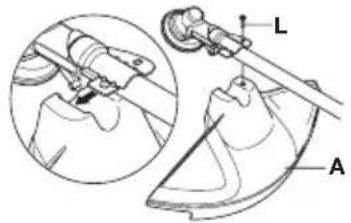

TpimepHaTa 3aunTa/Kom6nHnpaHaTa 3aunTa ce 3aKaUBa KbM NbpHauHa Ha DByceKUHOHnBAJNCeNkCnpa C eINH BnHT (J).
-MoHTnpaTe 3aBnBbuaaN JaCK (B) Bbpxy n3XoDHaTa oc.
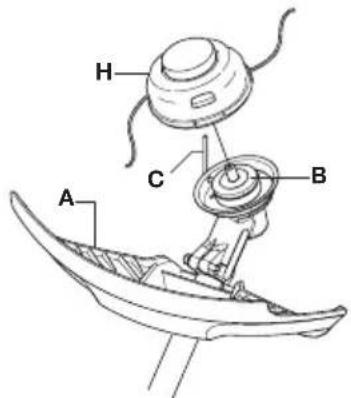
Bbptete OKoNo octa Ha pe3eua,doKaTo eHOnOT OTBbpcTnraTa Ha 3aDbNkBaunr DNCKcBnaDHe COTBbpcTneTo Ha npedabKaTa.
-NotabeTe cnpaTeJHHnIuΦT (C) B OTBbPCTneTo,3a Da ce uKcnpa oCTa.
-3aBnTe TpHMePHaTa rIaBa/rrbKaBnTe pe3u (H) 6paTHo Ha YacOBnKOBaTa cTpeJka.

-ДемоHTaньт ceи3BbpyBa B O6paTeH pei.
MoHTIpaHe Ha 3aunTa Ha pe3eua n pe3eua 3a ceuehe
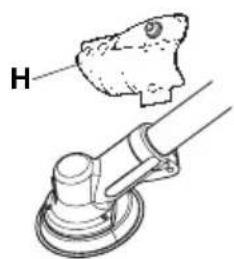
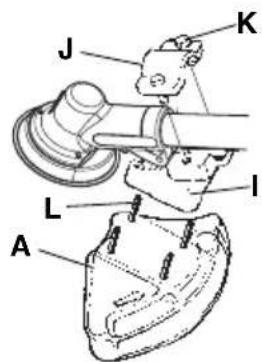
CbaIeTe nlaHkata (H). MoHTpaaiTe cBeINHTeJIHnE eJeMeHT (N) IN KanaUKaTa (N) C DbTa BnHTa (K) CbIacHo pncyHKaTa. 3aunTata Ha pe3eua (A) ce moHTnpa c NOMOHTa Ha 4 BnHTa (JI) Bbpxy cBeINHTeJIHnE eJeMHT cBrlacHo pncyHKaTa. BHIMAHNE! N3noJI3BaIte BnHaRn npenopbHaHATA 3aunTtA 3a cneuHNOto peHeo o6OpUdBaHe. BnK pa3JeI Texueckn xapakTepcntkn.
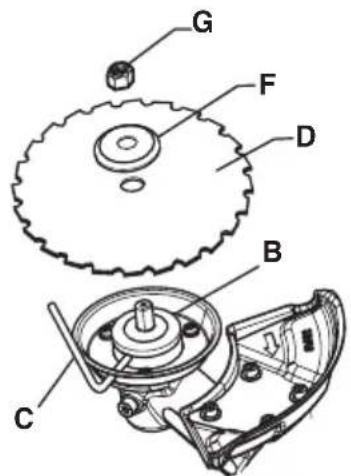
-MoHTnpaIte 3aBnHbAunna (B) Bbpxy n3xoHaTa oc.
BbptTe oko octa Ha pe3eua,doKaTo eHOrOT OTBbpcTnraTa Ha 3aDbNnBaunr DaCKcbBnAHe COTBbpcTneTo Ha npedabKaTa.
-ПocTaBeTe cInpaTeJHnIaNΦT(C)В OTBbPcTneTo,3aJa ceФИKcnpaOCTa.
-ПocTaBeTe pe3eua (Д)и onopHnЯ ФлaHeu (Ф) Bbpxy n3xOДHaTа oc.
- NocTaBeTe raiKaTa (Γ). MomeHTbT Ha 3aTgAHeTo Ha raiKaTa ce paBnBa Ha 35-50 Hm (3,5-5 KRM). Pa6oTeTe c flynxraeueh KIOUOT KOMNKeTA INHCTpyMeHTN. XBaHete DpbHKata Ha KIOUa KOJIKOto e Bb3MOxHO no6JIN3O do 3aunTaHa pe3eua. Raikata ce 3aTgA Upe3 BbPteHe Ha flynxra KIOU B o6paTHa nocoKaTa Ha BbPteHeTo Ha TpIMepa (BHIMAHNE! IЯBoxoDoBA pe36a).
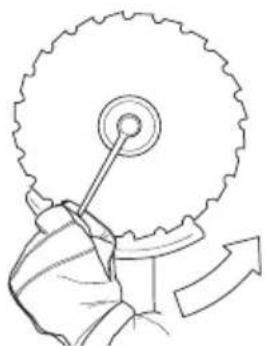
-Пи pa3xJa6BaHe n 3aTЯHa He raKaTa Ha pe3eua 3a ceyeHe, c7bueCTByBa pNCK OTHapaHЯBaHe ot 3b6nTe Ha pe3eua 3a ceyeHe.CTpemeTe ce, pbKaTa Bn BnHarn da e 3aunTeHaOT 3aUnrTaHa pe3eua, KOrato N3BbPWBATEo3n Bn pa60Ta. N3noJ3BaIte BnHarn rLyxraeueH KJIoc C DocTaTBuHO Dblra dpbHKa, KOeTo DaBa Bb3MoHHocT 3a ToBa.CTpJIkaTaHa pncyHKaTa nokaBa yuactbKbT, KbJeTo Tp8Ba Da 6bde pa3noJIOHe rJyXnT KJIou npi pa3xJa6BaHe nIn 3aTЯHa He raKaTa.
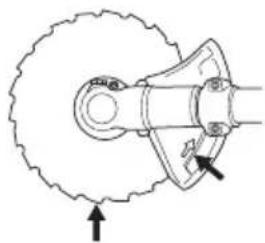
Mоntиране Ha TpaHcnpTHaTа 3aunta

IocTaBeTe Kanaka 3a TpaHcnpTnpaHe Bbpxy pe3eua, KaKTo e NOKa3aHo.
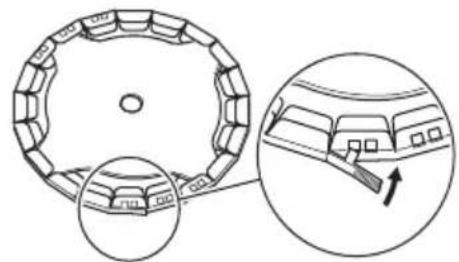
HartlaçYe Ha camapa n Ha xpacTope3a

PPEyIPEHDEHNE! Pnpa6oTa c
xpaCTope3a ToT Tp8Ba BnHaRn Da
6bJe OKaueh B camapa. B 06paTeH
cLyuayBHe HMa Da CTe B CbCToHne
da MaHEbpapTe 6e3OnacHo
Xpactope3a N TOBa MoHe Da IOBeDe Do
HapaYBaHe Ha Bac Nn Dpyr. He
N3NoJ3BaYTe HNKOra camap C
noBpeDeHO 6bp3o OTKOnyBaHe.
Бьрзо оTKonчаBaHe
OTnped,HaJecho DoocTbHNO MrcTo,e nocTaBeHo 6bp3o OTKOnuabaHe.N3noJ3BaITe rO,aKO DBnraTeJIaT Ce Bb3nJaMeHN HINB dpyrn ABapnHn CNTyaun,HaJaraun 6bp3o Da ce OCBO6oNDteOTcMapaN MaunHaTa.

PaBHomepHo HaToBapBaHe Ha paMeHaTa
I06pe Hargnacn camap n MaunHa 06JeKyaBaT 3NaHTeJHo pa6oTaTa. Harlacete camapa 3a Hanio6po pa6oTHO noJIOHeHne. 3aTeHete
CTpaHnUHnTe peMbTu TaKa, Ye TerIto Da ce pa3npedeJn paBHOmepHo Bbpxy DBeTe paMeHa.
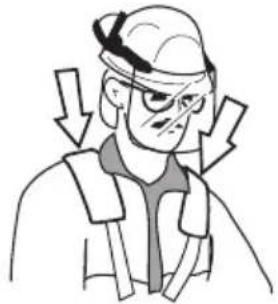
PpaBnHa BncoOuHa
PeryIpaIte paMeHnT peMbK TaKa,Ye peKeJeTo o6OpyDbHe Da 3acTaHe ycnpeHnHa 3eMraTa.
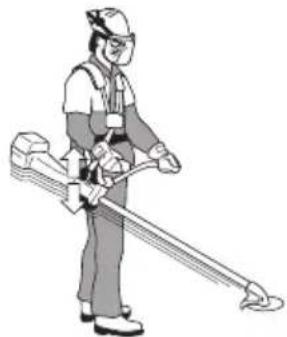
PpaBnIeH6aJahc
OnpeTe peHHeTo 6OpUdBaHeTo JKeO B 3eMra.
IpeMeCTe KyKaTa 3a OkuBaHe, 3a Ja
ypaBHOBeCnTe npaBnHo xpacTope3a.
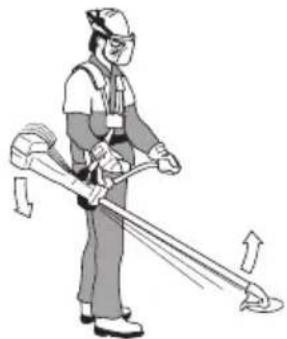
БezonaacHocT npi 6opaBeHe c roPnBO
Hnkora He cTaptnpaIte MaunHaTa:
1 Ako cTe n3JIeJIrROPINBO Bbpxy Hero. N3TpNIte pa3JIaIIOTo ce rOpINBO IJIu MacJIo NocTaBeTe OCTaTbUInTe OT rOpINBOTo Da ce N3napT.
2 Ako cTe n3JIeJIrROPnBO Bbpxy ce6e cn nnI npexnte cn ce npeo6JeueTe. N3MnIte Te3n Yactn Ha TAnTo Cn, KOnTO ca 6NIn B KOHTaKT cROPnBO.N3NoJ3BaIte canyn I BOda.
3 Ako MaunHaTa NMa Teu Ha rOpuBO. IpoBepaBaiTe peIOBHO 3a TeOBe oT KanaKa M MapKyuTe 3a rOpuBOTo.
TpaHcnpT ncbxpaHeHne
CbXpaHЯBaI Te N TpaHCnOpTnpaIe MaHHaTa n FopINBOTo TaKa, Ye Da HMa onacHocTe BeHTyaJIeN TeU INn IN3napEny Da BnA3aT B KOHTaKT C NCKpn INn OTKpNT INaMbK, HApPIMepOT eJKeKTPnueCKn MaHNH, eJKeKTPoIBvraTeJIn, eJKeKTPnueeCKn/CnIOBn npEbkJIIOuBaTeJIn INn HaPeBaTeJIn.
- TOpNBoTo Tp6Ba Da ce cbxpaHraBa n TpaHCnOpTnpa B CneUmaJHo npeHa3HaueHn 3a Ta3n UeJ N ODo6peHn Ty6n.
AkoMaunHaTaIe Ce cxbpHaBa 3a no npoDbJHHTeJeH nepNoID CJIeDBA RopNBnrt peepBoap Da 6bIe N3npa3HeH.ObbpHeTce KbM 6eH3nHocTaHcNJa Ta CN 3a INHOpMaLna KbIe Da N3JIeTe N3JIuWbKa oT rOpNBO.
- YBepTe ce, Ye MaunHaTa e noHcTeHa N Ye npEiN DblrOcpOuHOTo 3aKoHcepBnpaHe e npoBeDeHo TbJHo o6clyHbAHe.
TpaHcnopTHaTa 3aunTa 3apeXeToO o6opyBaHe Tp86Ba, npn TpaHcnopT n cbxpaHaBaHe Ha MaunHaTa, da e MOHTnpaHa BnHaN.
- O6e3onaceTe MaunHaTa npn TpaHcnopTupaHe.
3a da npeIoTbPaTtHe HeyMnIeHo 3anaIbAHe Ha DBrIaTeJI, KanaUkata Ha CBeuTa BInHaTrp6Ba Da ce CBaJI npN DJIbIroBpeMeHOncBxpaHbAHe aKO MaunHaTa He e noD npKHaI3Op N KOraTo N3nBJIHbAte BCNUKINTEXHnueckn OepaLm no o6CJyHbAHe HaMaunHaTa.

PNEUYPENEXHEHNE!PpOABBaTe npEa3INBocT npn pa6oTa c rOpNBoTo. NOMHeTe, Ye mMa onacHocT OT noHap, B3pNBOBe n BdNWBaHe Ha napn.
Topnbacmec
BHIMAHHE! MaunHaTa e o6OpyDbHa c DByTaKToB dBnraTeJ n BnHarTp86Ba da pa6oTu
cBc CMEC O T 6eH3nH IN DByTaKToBO MacNo. 3a da ce
noJyH Heo6xOIMOTO CbOTHOseHne Ha CMeCTa,
KOJIuYeCTBOTo Ha MaLoTO TpA6Ba Da ce OTMepBa
TouHo. PnCMEcBaHe Ha MaIKN KOJIuYeCTBa
RopINBO, DOpN He3HaUHTeHN OTKIoHeHnO T
KOJIuYeCTBOTo MacNo MoRaT Da BLOWaT PRA3Ko
CbOTHOseHneTo Ha CMeCTa.

IPEyIPEKeHNE! TOpNBOTo nOTnAdHnTe npOdyKTHoT TOpNBOTo caJIeCHO Bb3nJaMeHmIMu MoRaT daInpuHnHT cepNo3Ho HapaHЯBaHe npBdNWBaHe Nn KOrATo BJ3aT BKOHTaKT C KoHaTa. IopaN Ta3nInpuHnCa6bIoDaBaTe BHMaHneKorato 6opabnte c TropBOHHepeMeHHo npOBepraBaTe dAnCbEcTBBya aDeKBaTHa BeHTnlaunia.
BehnH

BHIMAHHE! BnHaHn n3noJ3BaIte cmecn ot KaueCTBeHn 6eH3nH/MacNo Hai-MaJIko 90 OKTaHa (RON).Ako MaunHaTaNBe e o6OpyDbaHa c KaTALNTUeH KOHBepTop (BnHTe rJaBaTa TexNueckn DaHH) BnHaRn n3noJ3BaIte 6eOIOBn Cmecn 6eH3nH/MacNo c Do6po KaueCTBO. OJOBHnT 6eH3nH Ie pa3pyuN KaTALNTUH N KOHBepTop.
Ako mMaTe Ha pa3noJIoHeHne ekoIorNueH 6eH3nH, T.H. aKuJaTeH 6eH3nH, cJeDb Taon da ce n3noJ3Ba.
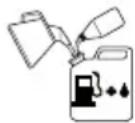
TOpINBO c eTaHOJOBa CMeC, MoHe Da ce N3NoJ3Ba E10 (cMeC c MaKc. 10% eTaHOJI). N3NoJ3BaHeTo Ha eTaHOJIOBn CMeCn, No-BuCOKn OT E10, Ie cb3daJe looH yCJIOBnHa pa6Ota, KoEt OMOHe Da nobpeNi DBrIgTaTeJIa.
·HaH-NHCKOTnpenopbUbaHOOKTaHOBOcIe 90 (RON).AkoBneNoDaBaTeHaDNBnraTeJIrTopINBO COKTaHOBO YNCIO,NO-HNcKO OT 90, MOHe Da Ce NoJyHuYkaHe.ToBaBoNi Do eHa BncoKa TeMnepaTypa HaDNBnraTeJIr, Koeto MoHe Do IOBeEeDo cepNo3Ha nobpeJa Ha DBnraTeJIr.
-Пи npoДьлнИтЕнHa pa6Ota Ha BnCOkN 06opoTn ce npenopbUHa n3noJ3yBaHeTo Ha 6eH3nH cno-BncoKo OKTaHoBO YnCNo.
Maclo 3a DByTaKToB DBrVaTeJ
Инолзов Te ДытakToBOTo ДвигаTeJHo macNo Ha Universal, Universal powered by McCULLOCH,Koeto cneuaJHo npOn3BeJeHo
3a DByTaKToBN DnBnraTeN C Bb3DyHo OxJaHdaHe, 3a Da noJnyUHTe Hau-Do6bp pe3yIaT N npOn3BoNDtEnHocT.
Hikora He n3noJI3BaIte DByTaKToBO MacJo, PpeHa3HaueHO 3a N3BbH6OpIOBn DBNrAteJIN C BoJHO OXJaHdAHe, NOHkoRa 06o3HaayBaHo KaTo MacJo 3a N3BbH6OpIOBn DBNrAteJIN (Koeto Hocn ImeTo TCW).
3a6paHeHo e n3noJ3yBaHTo Ha MacJIo 3a YeTnpuNTaKTOBn DnRgTeJI.
Cmec c HnCKoKaueCTBeHo MacJo NJI npekaleHo 60rata Ha MacJo/roPBO MoKe Da n3JOnHn Ha onaChocT FyHKUraTa Ha KaTaJIHTuHn KoHBepTop I Da HaMaJIe EKcNlOaTaUHOHHMy XNBOT.
CbctabHa cMeCTa 1:50 (2%) cDByTaKToBOTo MacNo Ha Universal, Universal powered by McCULLOCH. 1:33 (3%) CdpyrMaMacna, npeHa3HaueHn 3a DByTaKTOBn DBnraTeJn C Bb3dUHo oxJaDaHe, KlaacnphiupaHn 3a JASOFB/ISO EGB.
Ako ce OKaKeTe B cHTyaun, B KOrTo
UyBCTByBaTe HeyBepeHocT no OTHoWeHne Ha 3nOJI3BaHeTo, Ce NocBBeTBaIe Cbc CnEuaJIncT. CbPKeTe ce c dNcTpN6Tyap nnCbc cepBn3a cn.
IaKoTeBaKaBOH3noJ3BaHe,3a KoTo ce cyBCTBaTe HeOCTaTbUc KaJIuNnupaH.
Ppei Da npcTbNtE KbM pa6oTa BHe Tp86Ba Da pa3JIuYBaTe MeHdy NoUcTBAHe Ha rOpNC T yAcTbK, OKocraBHe Ndo00ΦopMaHe Ha TpeBnI pIoUs.
OchOBHn npaBnla 3a 6e3onacHoCT


1OrJeaTe ce:
-6eTe ce,Ye Ha6JIn3o Hma Xopa,HINBOTHN Jn npyn 06eKTN, KOITo MoaT da nonpeuat Ha pa6oTaTa BN.
3a da ce y6eHnTe,Ye HMa onacHocT xopa, HIBOTN NIN PpeDMeTN Da Bnra3a TB DOnnp C peHeoTo 06OpUdBaHe NIN Ye HMa npeDMeTu, KOITO DA OTCKOuAT OT peHeoTo 06OpUdBaHe.
BHIMAHHE! He pa6oTeTe HnKOra C MaunHaTa, KOraTo HrMaTe Bb3MOHHOCT Da NOBnKaTe NOMou BcJyau Ha 3JonoLyka.
2OrIeJaTe pa6oThaTa nNoi. OTCpaHeTe BcKaKBN TbpKaJnCe o6eKn, TaKbA KaTo KaMbHn, cUynEHn CTbKJa, rB03JeN, CToMaHeHn TeIOBe, HnIu np., KOnTO MoarT da 6bDat NOxBpJIeHN IIn Da ce OMOT OkOJIo peKeio TO obOpyDbAHe.
3 He pa6oTeTpnpILOwn KJIIMMaTnHycNoBnHa. HanpIMep npn PJIbTHaMbIa, CInJeH dJxI, cnJeH BAtbp, CInJeH cTyI N T.H. Pa6oTaTbNIOIoO BpeMe e n3MOpHTeJIHa N MoKe Ia IOBeDeI OOnacnCITyauuN, KaTo HApIMep XJIb3raBOcT, NOBJIYBaHe NocOKaTa Ha NaJaHe Ha DbPBoTo N T.H.
4 NOrpHHeTe Ce Da MoHeTe Da cToNTe N da ce npE,DbNxBaTe 6e3onacHo. PpoBepeTe 3a eBHeHTyaJIHn npenTcTBn npn HeoUaKBaHo npE,DbNxBaHe (KopeHN,KambH,NxpaCTN,
KaHaBKn T.H).BbTeMe MHoro npedna3nBn npa60Te B HepaBeH TepeH.

5BbTeNeKJIIOUHTeJIHO npEJa3JINB npi CpA3BaHe Ha HanperHaTn CTb6la.
HanperHaTTo cTb6JIO MoHe, KaTo npEiN, TaKa
HcJeKaTo rO CpeHeTe, BHe3aHNo Da oTCKoU
H da ce BbpHe BeCTecTBeHOTo CNoLoHeHne.
Ako cToNTe OTKbM HenpaBnHaTa CtpaHa NIn
Cp83BaTe Ha HenpaBnHOMrTO, CTb6JIoTo
MoHe Da yApn Bac Nm MaunHaTa Taka, Ye da
3ary6nte KOHTpoI. NDbete 06ctoTEnCTBa
Morat Da IOBeDaT Do cepno3Ha TeJecha
NOBpeJa.

6 Na3eTe cTa6nHno paBHOBeCne nCToTte TBbpNo Ha 3emrTa. He ce npoTraIte npekalneHo HadaJeu,doKaTo pa6oTnTe. POnDbpxaIte CbOTBeTHaTa CTbNka N 6aJahc npes 4JIoTO BpeMe.
7 CbpxTe MaHHaTa KbM KyKaTa 3a OkayBaHe Ha Ka6eHnA CHon. BnHaN dpXrTe MaHHaTa c DBe pBue. IpXrTe MaHHaTa BCtpaHn OT TAnlOTo cn. Na3eTe BCnKu qactn Ha TAnlOTo cn DaJeU OT RopeuNTe NobpXHOCTn. Na3eTe BCnKu qactn Ha TAnlOTo cn DaJeU OT BbPraTo ce peHexo 06OpyDbAHe.

8ДрьнTepexeToToobopydBaHeNoI HNBOToHa Kpbcta cn.
9Pn npenacHe Tp6Ba DnurTaTeJrT da 6bde cnprH. Pn npenacHe Ha no-DbIpya3cToHnHa TpaHcnOpTnpaHe Tp6Ba Da ce n3noJIaYBa TpaHCnopTHaTa 3auNTa.
10 HnKora He nocTabrYe MaunHaTa Ha 3emrTa, Korato DnBraTeJrPa6oTu, 6e3 Da NMaTe HaI3Op Bbpxy He.
A36yKa Ha nouNCtBaHeTo
Pa6oTeBnHa n npaBnJHo o6OpyDbaHe.
- O6opydBaHeTo Tp86Ba Da 6bDe BnHaRn Do6pe HarJaaceHo.
Cn3BaIe HhCTpyKUInTe 3a 6e3onacHocT.
- OpranupaTe Do6pe pa6oTaTa.
- Pe3eUbT Tp86Ba da pa6oTu BnHaRn Ha nBJHn o6opOt npn donnpaHe.
Pa6oTeTe BnHaRc dO6pe HaToeHn pe3u.
-ИЗБЯВай Te yДари В Камьн.
- HanpaBJIaBaiTe nocKaTa Ha naJaHeTo (H3noJ3BaIe nocKaTa Ha BAYbpa).

PNEyPENHE! HnTo
onepaTopbT Ha MaunHaTa, HnTo HnKoI
Dpyr Tpr6Ba Da ce OnITBaT da
OTcpanBaT Nap3aHnMaTePnaI
doKaTo DnraTeJrTa paOtn nIi
doKaTo pe3eUbT Ce dBHH, TbN KaTo
TOBa MoHe Da DoBede Do cepNo3Ho
HapaHbAHe.
CnnpaTe DnraTeI np3eIa npedI da oTcTpaHbAte MaTePnaJa, KoToCe e HaTpynl Bbpx yocTa Ha TpNoHa, 3aIoTO B npoTnBeH cLyuayi CbIecTByBa onacHocOT HapaHbAHe. IIO BpeMe Ha pa60Ta HEnocpeDCTBeHo cJeTobA, bRloBaTa npedeBkMoKe Da e HaropeSeHa. PnI dOnnp CbIeCTByBa pNCK OT n3rapAHe.

PPEyPENHEHNE!OnachoctOT XbpaunnpedMeTuBnHarn HocTe Odo6peHaOTcBoTBeTHNTEopraHn 3aunTHaeknnpoBka3aOHTe. HkoraHe ce HabeHdaIte OTbJd 3aunTaHa pe3eua.BOHTe BN MOrat da nonadHaT KaMbHn OtnaDbu, KOnToMorat Da DoBeDaT Do CJIenota NIN cepNo3Ho HapaHbAHNA.
ДрькTe BbHnHa Ha pa3ToHnne.
Дeцa, HINBOTn, 3pnteNn Xopa,
KoITo BN nomarAT, Tp86Ba Da ce
HaMpaT Ha 6e3onaceHo pa3ToHnne
OT 15 M. Korato HЯКоI ce np6LnnH,
Tp86Ba He3a6abHo Da cnpTe
MaunHaTa. HNKora He ce n3Bp7aaiTe
c MaunHaTa, 6e3 npdi ToBa da
npOBepiTe dAn 3ad Bac He ce HAMpa
HЯКоI B 3OHaTa 3a 6e3onacHOCT.

PNEyPENHEHIE!NoHkaCe 3aDpCTBaT KIOHN NIN TpeBa MeJdy 3aunTaTaN peKeIooTo o6OpyDbAHe. BnHaru n3KJIouBaIte DnRaTeJnnpen noocTBaHe.
HaunHn Ha pa6Ota

IPEUYPENHEHNE!MaunHnTe, cbopbHeNc TpnoHOBn pe3u Nnpe3u 3a TpeBa,MoraT cnJHo da ce pa3TbpCrt HactpaH,NKoTaTO pe3eCbT BLe3e CbnpNKocHOBeHne C HAKoHEnoDBnHexH o6eKT.ToBa ce HapUHa pa3TbpCBAHe Ha pe3eua. Pa3TbpCBAHeTo Ha pe3eua Mohe Da 6bDe DoCTaTbUHO cnJHo N da 3aBbPTN MaunHaTa N/NNOnepaTopa BB BCraKa nocoka,KoTo BEporTHO Ie DOBeJe Do 3ary6a Bbpxy UnpaBLeHneTo Ha MaunHaTa OT onepaTopa.Pa3TbpCBAHeTo Ha pe3eua Mohe Da ce noJyuN 6e3 BCraKaKBO npdynpeJdeHne aKO MaunHaTa 3akny KpyenH Klonn cTe6No, 3aklnn Nn Ce 3anIte. Pa3TbpCBAHeTo Ha pe3eua e noBepoarTHO Da ce cnJyuB paioH, KbTeTo e TpyDnDa ce Ha6JIOdaBa cpr3BaHna MaTePnAJI.
N36yBaIe ceyeHe B yAcTbKa Ha pe3eLa MeJdy 12 n 3 Yaca. Pn DOnnpaHe 3a cPra3BaHe Ha Je6eIn CTb6Ja, nopAaN cKOpocTTa Ha BbpTeHTo Ha pe3eLa, MoHe da ce NoJyuObpaTeH TJaCbK ImeHNo B To3N OnopeH yAcTbK Ha pe3eLa.
-ПпeДи Да npистБиNTe KБМ noUcTBAHe,ТрбБа Да пОВерИte учacтБka,КоITo Ue noUcTBATe,BИДа HA TepeHa,HaKЛоHa,HaJIuYHrTo Ha KaMbHn,ЯMn T.H.
3anouheTe oT To3n KpaHa pa6oTHna yuacTBk, KOTo e Hau-JeK, n cn ocHpypTe do6bp npoxo npn noocTbaHe.
Pa6oTeCnCTeMaTHuHo,KaTo Ce DnHInTe HAnpeiHa3aI,HanpeKo Ha pa6oTHnYyacTbK I npN BceKn 3amax 0xbaaate 06pa6oTeHa ⅢnpHaOT4-5M.Taka ce n3noJ3yBa nblnra T 0xbat Ha DeicTBne Ha MaunHaTa N BDbTe NocOKn O npaTopbT cN OcnrypRa ydo6eH pa3Ho6pa3eH pa6oTeyacTbK.
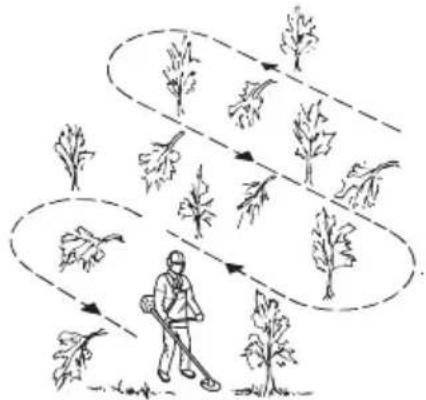
-ДьлннHaHa npoxOHaTa nBTeKa TpЯ6Ba da e OKoJIO 75 M. ПпемecТВаITE ДЕТОС ГорвOTO сбо6pa3Ho HanpeДBAHeTo Ha pa6ota.
BHaKJHOHeH TepeH cIeDb npoxOHaTa nTbTeKa Da ce npokapa Hnnpa KaCkoHa.3HaunTeJHo no-JecHO e Da ce DnHHTe Hnnpa Ka HCIOHa, oTKoJKOTo Da ce N3KaYBaTe n CIn3aTe no CKJHOHa.
- PpOxOHaTa nBTeKa Tpr6Ba Da e npOkaHa TaKa, Ye Da MoHeTe Da N36eHHeTe poBOBe N dpyrN npenTcTBnB TpeHa. OcBeH ToBa Tpr6Ba Da CbO6pa3nTe npOxoHaTa nBTeKa c nocOKaTa N cnIaTa Ha Brtbpa, TaKa Ye cPra3aHIne CTb6Ja Da naDAt Bbpxy Beue NouchTeH TepeH.
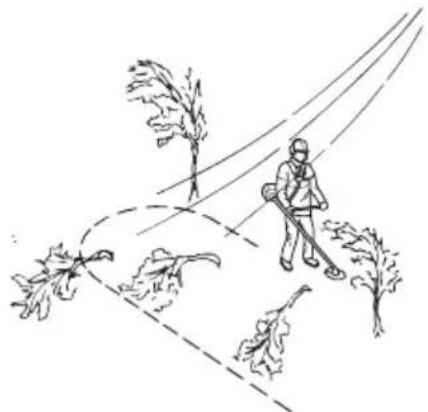
NouchTbaHe Ha ropa c pe3eU 3a ceueHe


-Пи ДОпиране 3a ceче He Na De6eNcTb6Ja HapacTb PnCKbT OT O6paTeH TlaCbK. ETo 3aIo Tp8Ba Da n36rBaTe Ja peKeTe B yUacTBka Ha pe3eua MeHdy 12 n 3 Yaca.
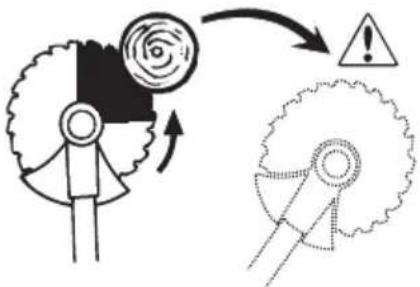
3a da naHe IbPoTo HaJIyBo,doJHaTa YacT HaIbPoTo Tp6Ba Da ce OTMecTu HaJaCHO. HAKIoHete pe3eua n CbC cnJHo DnJHeHne cpeKeTe npKa HoJoY n HaJAcHO. PnITcTe eHOBpeMeHHo 3aunTaTa Ha pe3eLa KbM CTb6IoTO. DonPeTe B yAcTbKa Ha pe3eMa MeJHy 3 n 5 Yaca. PoJaTe NbJHa rA3 npEiN da DonpeTe pe3eua.
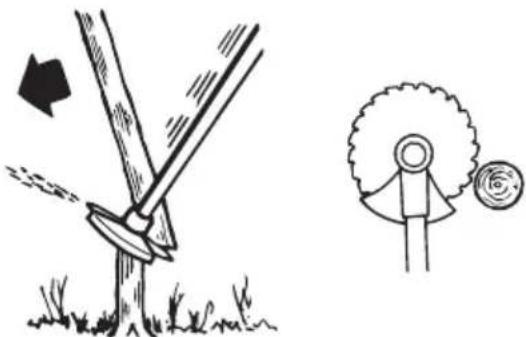
3a da naHe IbPBoTo HaJraCHo,doHaTa qacT HaIbPBoTo Tp6Ba Da ce OTMecTu HAJIBO. HAKIoHeTe pe3eua n CbC cnIHoo DnHKeHne cpeKeTe npko Harope u HAJIBO. Onpete Byyactbka Ha pe3eua MeHdy 3u5 yaca, TaKa ue NocOKaTa Ha BbPteHeTo Ha pe3eua da OTMeCTN DOJIHaTa qAcT Ha IbPBoTo HAJIBO.
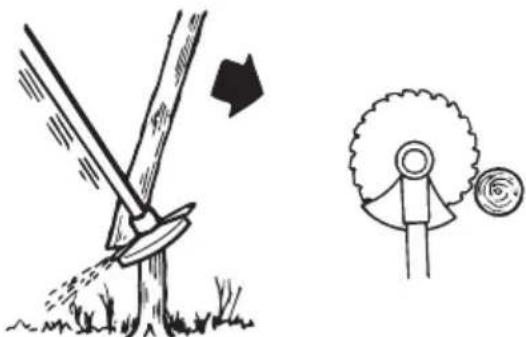
3a da MoHe IbpoTo Da naHe Hanpei,doHaTa My yacT Tp6Ba da ce OTMeCTn Ha3a.
I3TeTlTepe3eCa c 6bp3o n cnJIHO dBHHeHne Ha3a.
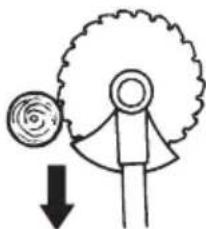
-ToJIeMnCTb6Ja, T.H.ДBycTpahHn CTb6Ja, TpIbBa Da ce peKaHAT OT DBe CTPaHn. OtnpeJeIeTe NbpBO B KaKBa NOcoKa Da naHHe cTb6JIoTO.3anOuHete OTKbM CTPaHaTa Ha naHaHeTo.Cnei ToBa CpeHete cTb6JIoTOOT dpyrata cTpaHa, 3a Da rO nobAInte. HatnckBT Ha noDaBaHe Ce Cbo6pa3raBa C De6eJIHaHaTa Ha cTb6JIoTO IN TBbPdOcTTa Ha BnDa IDbPBeCnHa. Cna6n CTb6Ja n3NCKBaT no-cINHO noDaBaHe, DoKaTo 3a RoJeMeMTe cTb6Ja e Heo6xoIMo noCna6o noDaBaHe.
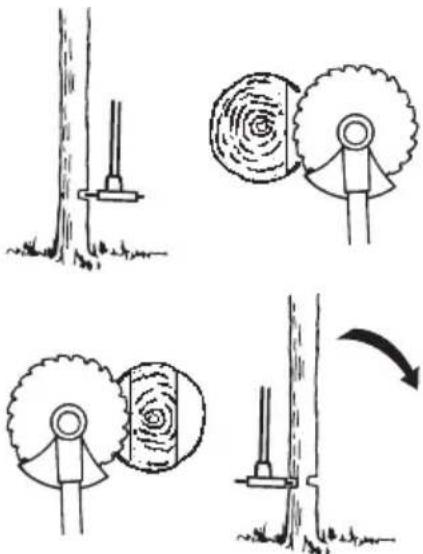
Korato cTb6JaTa ca HaTbCTo CneiBa CKOpocTTa Ha npuBnKBaHe da ce cb06pa3n C ToBa.
HnKora He n3dbpnbTe p3KO MaunHaTa, aKo pe3eTc ce 3akJeuB C Tb6NoTo. HnaYe MoKeTe Da NOBpeNITe pe3eCa, KOJHOBaTa 3b6Ha npedAka, DByceKUOnHnBaI nn ynpabJIeHneTo. OTnycHeTpkoXBAknte, XBaHeteC DBeTe pbcE NByceKUOnHnBaI n 6aBHO n3TerIte MaunHaTa.
Prahe Ha xpacT c pe3eU 3a ceueHe


- TbHKnTe cTb6Ja u xpacTnTe ce noKocBaT. Pa6oTeTe c MaxaJoo6pa3Hn n3cNuau IN DBNHeHn B CtpaHn.
-OnntaTe ce da ceyeTe HraKoJko cTb6Ja c eHNO n3Cu7a0 DnHeHne.
Korato nouCTBaTe xpactaJaK, 3anoHeTe npBPO OKoJIo xpactaJaKa. 3anoHHeTe c H3cNuaHeTo Ha BncoKInTe cTb6Ja oT BbHnHaTa CTpaHa Ha xpactaJaKa, 3a Da N36eRHeTe 3akJeUbaHe npi CeueHeTo. OTceueTe cJeT OBa CTb6JaTa Ha HeJaHaTa BnCOUnHa. OOnTaIte ce cJeT TOBa Da BkapaTe pe3eua I da N3ceYeXpactaJaKa OTkbM UeHTpaJHaTa My YacT. Ako Bbnpekn BCnuKo ce OKaHe Tpydno Da NoCTurHrTe ToBa,OTceyeTe NO-BnCOKIne CTb6Ja, Taka Ye Te Da onaDat HaoKOJIo. TaKa pncKbT OT 3akJeUbaHe npi CeueHe HamaJIyBa.

KoceHe Ha TpeBa c pe3eU 3a KoceHe


- Pe3UTe HHOBoTe 3a KoCeHe He 6nBa Da ce H3noJ3BaT 3a DbPBeCInHHcTb6Ja.
3a BcNcKn BINOBe BVcKa NJI rbcTa TpeBa ce H3noJ3Ba pe3eU 3a KoceHe.
TpeBaTa ce KOCn C MaxaIOBnHO CTpaHNo DBNKeHne, KaTo npN DnKHeHne O T JAcHo Ha JIABO Ce Kocn, a DBnKeHneTO OT JIABO Ha JAcHo e BpShaO dBNKeHne. 3a KocHe Ce N3noJ3Ba JIABaTa CTpHa Ha pe3eua (B YacOBnKOBn o6XbAT 8 do 12 yaca).

-При Лж Десен На Клон На pezeца пи Косе He,ТpeBa ce CTpynBa Ha ИВица,КоeTo yIecHЯBa c6upaHeTo n, HanpIMepc rpe6No.
-CTapaIte ce da pa6oTHe pNTMnUHo. 3actaHeTe cTa6nHOB Jek pa3Kpa4. PpeBnKaHeTo Hanpei Ce n3BbPwBa cJeI
BpIaIoTo DnHHeHne, KaTo cJeT ToBa 3aCTaBaTe OTHOBcTa6NJIHo.
- OnopHnT Kanak JeKO ce Do npHa Do 3eMaTa. Toi cLyHH 3a npEJa3BaHe Ha pe3Eu a OT HaTpynBaHe Ha npbCT.
3a da HamaJIte pNcKa oT 3aDpbcTBaHe Hape3eua c TpeBa, cna3BaIte cJeHnTe npabuJa:1Pa6oTe TE BnHa n c noaDeHa nJHa ra3.2I36raBai Te Toky lo Okocehata TpeBa, npiBpbuAto DnHeHne.
Cnpete DnBraTeJ,OTKaUeTe camapa nocTaBeTe MaunHaTa Ha 3emrTa npEi Da 3anoHHe Ta Cb6puAte OkOeHaTa TpeBa.
KocHe Ha TpeBa C TpIMepHa rJaBa

OoKocBaHe
-ДрькTe TprMepHaTa rJaBa HenocpeIcTBeHo Hau 3eMaTЯ NaHakNoHeTe noI bIbI. Pa6oTata ce nBbPwBa OT KpaI Ha KopdaTa. OctaBeTe KopdaTaN pa6oTN B cO6CTBeHn pITbM. He npITnCKaIte HNKora KopdaTa KbM OKocBaHn yUacTbK.

KopdaTMOKeJeecHOaKocn TpeBa nIJIeBEni noKpaCTeHN,OrpaDN,INbPBeTaN6OpIOpN,Ho TMAOHe CbWo TaKa Da NOBpeDN CyBcTBnTEJHaTa Kopa Ha NbPBeTaTaN xpactNTe,KAKTO INCTbJb6oBeTe Ha orpaDInTe.
PnckbT OT NOBpeHdaHe Ha pacTeHnraTa ce HamaJIyBa 6IarOdapeHne Ha CkbcraBaHeTo Ha Kopdata 10-12 cm n HamaJIyBaHeTo Ha 6pOHa 06opOTte Ha DBnRaTeJ.
3aunctbaHe
-ПиЗачИСТВане ce npeMaxBaцЯлata HeHeJIaTeJIHa pactITeJIHocT.ДрБКTe TpIMepHaTa rJaBA HenOcpeIcTBeHo Hd 3emYtA.OCTaBeTe KpaTHa KOpIaTa da ce yDpyB 3emYtA OKoJIo IbPBeTa, CTbJI6OBe,
ctatyn npyrn.3A6EJENKKA!To3nHaHH 3acnBaH3HocBaHeTo Ha KopdaTa.

KopdaTa ce n3HocBa no-6b3o n Tp86Ba da ce n3TeTJnNo-ueTo npna paoTa cpei KaMbHn, TyxJn, 6eToH, MeTaJIHn orpaDi N T.H. B cpaBHeHne c pa6oTaTa cpeI DbPBeTa n DbPBeHn orpaDi.
-Пи ДООКОСBAHe И 3aЧИСТВаHe TрЯ6BaДa He
ноДаВaTe ИЗЦЯлпьЛeн ГАЗ (80%), за дacce
пpoДыЖи ИИВОТа Ha KОрДaТa Идacce HAmaЛn
ИЗНOCBAHETO Ha ТрIMЕрHATAгЛаВa.
KoceHe
TpMepbTe nIealeH 3a KocHe Ha TpeBa Ha MecTa, KbTeTa TpydHO MoHeTe Da N3NoJ3BaTe Kocauka.ДрьжTe KopdaTa ycnpoeHn Ho 3emrTa npKocHe. N36raBaiTe npHTNcKaHTo Ha TpMepHaTa rJaBa Do 3emrTa, TbKaTo MOKeTe Da HaKbphNTe TpeBHAta nIoU, n da noBpeDInTe ypeDa.

-Ⅲ6rBaTe TpMepaHaTa rJaBa Da e B nocToHHeN DoInp CbC 3eMaT. NocToHnT DOnnP MoKe Ia npEiN3BnKa NoBpeNi N BoDn Dn HocBaHe Ha TpMepHaTa rJaBa.
NouTBaHe
-BeHTnJIpaToIeNCTBHeHaBbTpAaTaCe KOpJa MoHe Ia 6bJe H3NoJ3yBaHo 3a 6bp3o N leCho NouchTbaHe. JpbHTe KopdaTa ycnpoeHNO HaNd yuactbKa, KOITo noUcTbATE, KaTO DBNHHTe ypeDa Hanpei Ha3aI.

-Пи Косе He n noUcTbaHe Tpr6Ba Da ce 3noJ3Ba nBJHa ra3 3a noCTuRaHe Ha Do6bp pe3yJrTaT.
Kap6ypaTop
PeryjnapaHe Ha npa3HnTe o6opoTn (T)
IpoBepTe DaJIbB3dUshHnT fHJTbp e YnCT.
Korato o60pOTte Ha npa3eH xoJ ca ToCHN,
peHeToO o6OpyDBAHe He Tpr6Ba da ce BbPTN.
Ako Ce n3nckBa HargacHne, 3aTBopTe
(3abPTeTe No nocoka Ha yacOBHKOBaTa
CTpeJa) BNHTbT T 3a peryJnpaHne Ha o6OpOTte
Ha npa3eH xoJ, npi pa60Teu DBrTaTeJ, DoKaTO
peHeToO o6OpyDBAHe 3anoHne da ce BbPTN.
OTbopeTe (3abPTeTe cpeU y nocOKaTa Ha
DBHHHeHne Ha yacOBHKOBaTa CTpeJa) BNHTa
doKaTo peHeToO o6OpyDBAHe cnpe. O6OpOTte
Ha npa3eH xoJ de 3aDaBaT npaBnHOb Korato
DBrTaTeJrPa60Tu NlaBHO BbB BCnKu
noLoHeHn, n CbIeCTByBa rCaHa rpaHnLa 3a
o6OpOTte, npi KoNTo peHeToO o6OpyDBAHe
3anoYBa da ce BbPTN.
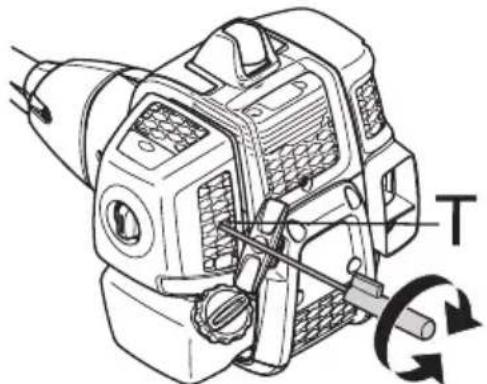
PpenopbuaHn 06oPoTH Ha npa3Hna XoJ: BnK pa3deI TexHnueckn xapaKTepNCtNK.

PNEUYNPEXHEHIE! CbpeTe ce c dncTp6yTopa/cepBn3a cn, aKo 06opOTHe Ha npa3Hn XoH He Morat da 6bDat peryInpaHn TaKa, ye peKeIto o6OpUdBaHe Da cnpe. He pa6oTeTe C MaHHaTa, ppei THe e peryInpapaHa nPi peMOHTnpaHa.
Aycnyx
BHIMAHHE! Hякоaycynca cha6deHn c KaTaN3aTop.BNK pa3deJ TexNueckn xapaKTePncTNI 3a da onpeJeNTe daJI MaunHaTa Bne cha6deHa c KaTaN3aTop.
AynbTe npHa3HaeyHaMaJBaHe paBnIeTo Ha Wyma HAcOyBaHe Ha Otpa6oTeHnTe raoBe BcTpaHn oT onepaTopa. Otpa6oTeHnTe ra30Be ca HarpeTu MoRat da
cBbPkaT NCKpn, KOINTa InpEn3BnKaT noHap, KaTaTO nonaHaT Bbpxy cyx nIropJIb MaTepeNaJ.
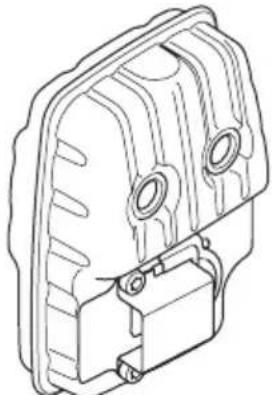
HЯkon TINOBe aycnyx ca cha6deneH cbc cneLnaJHa NCKporacNTeJIHa MpeHa. Ako Ba7aTa Ma7HnA e cha6deHa c acnyx OT TaKbB Tn, CJeDBA da J nouNCtBaTe eHeceDMNHyo. NoucTBAHeTo ce N3BbPwBa C TeJeHa YeTKa.
MpeKaTa Ha aycnucn 6e3 KaTajn3aTop ce noynctBa n npn Heo6xOuMoCt ce noDMeH eKeecdMnUHo. MpeKaTa Ha aycnucn C KaTajn3aTop ce npOBepraHa npn Heo6xOuMoCt ce noDMeHa BeHNbHa Mece. B clyua, Ye MpeKaTa e NobpeDeHa, T Ta Tp6Ba da ce noDMeH.

YeCTOTo 3aApbCTBaHe Ha MpeHata MoHe da e noka3aTeI 3a noBpeDa B KaTaN3aTopa.ObbpHeTe ce KbM dNcTpN6yTopa cn 3a TexHnueckn npereJed.Ako pa6oTInTe Cb3 aDpBcTeHa MpeHa, DnurTaTeIaT ce npeharpa, cJeIcTBne Ha Koeto ce NoBpeHdA T UININHDbPbT N 6yTaNoTo.
BHIMAHHE! He pa6oTeTe HnKOra c MaunHa, uHTo aycnye noBpeDeH.

IPEyPENHEHNE!Aycnucnte, 60bpyBaHcKaTaJIIN3aTOp ce HarpBAt CInHO B npoceca Ha pa6oTa nN3BeCTHO BpeMe cJeT Oba.TOba e BaJIiHO N3a npa3HnXoJ. DOKOCBaHeTo IM MoHe Da npeIN3BnKa n3rapHNHa KOHata.BHmAbaiTe 3a onachocT OT noxap!
OxlaNTeJHa cncTeMa


3a noJyUaBaHe Ha KOJIKOTo e Bb3MOHHo NO-HuCKa pa6OTha TemnepaTypa MaunHaTa e Cha6IeHa c OxJaNTeJIHa CnCTema.
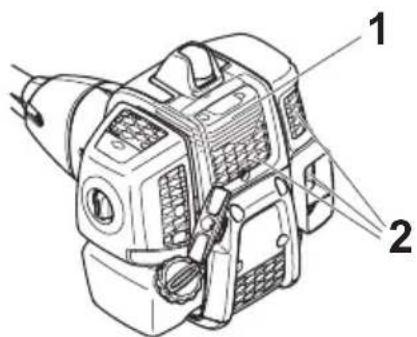
OxlaIITeJIHaTa cNcTeMa ce CbCTOn oT:
1 OxlaInteJIH pe6pa B cIJIINDbpa.
2BxoJauBb3nyx.
IooNCTBaIte OXJaIITeJIHaTa CnCTema
eHecEDMNHyC YeTKa N No-YecTo, aKO
o6cTOrTeJcTBaTaN3NCKBAt ToBa. 3aMbpcHa
OxJaIITeJIHa CnCTema npeDn3BnKBA nperpRaHe
Ha MaunHaTa, KoEt BoIN Do NOBpeHdaHe Ha
6yTaIToN cIIInHdbpa.
Bb3nyuhenΦnTbp

Bb3duHnT fNITbTpra6Ba da ce nouNCtBa peoBHO oT npax N 3aMbpcaBAHnna da ce n36erHaT:
HapuHnBpa6oTaHaKaP6ypaTopa
-Прблемпри старпанe
-HaMaJaBaHe Ha MoiHocTTa
-HeHyxHo 3HocBaHe Ha yactteHa DnBnTaTeJra
- TБьрде Голм pa3хоД Ha ropИВО.
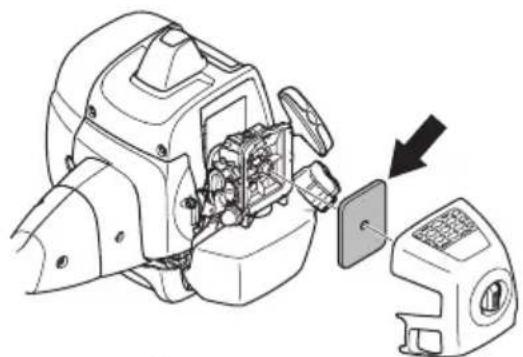
HITbpt Tp6Ba da ce nouctBa cJeB BCEKn 25
yaca pa6ota nn no-ecTo, aKO pa6oTHOTO
MrcTOe MHOrnpaHNo.
NouctBaHe Ha Bb3dUnHnA fNITbp
CbaTe Kanaka Ha Bb3dyuHnA fNtbp n 3BaTe fNtbpa. IpoDyxaTe ro cbc crbcTeH Bb3dyx.
Bb3dyweH fNtbp, n3noJ3yBaH nbIro BpeMe, He MoKe Da ce nouchn HanbIHO. ETo 3aio Ha onpeJeHn INTepBaJN OT BpeMe ToI Tp6Ba Da ce noDMeHa C HOB. NobpeJeH B3dyweH fNtbp Tp6Ba Da 6bJe HnpeMeHHO cMeHeH.
TopnbEn nIITbP

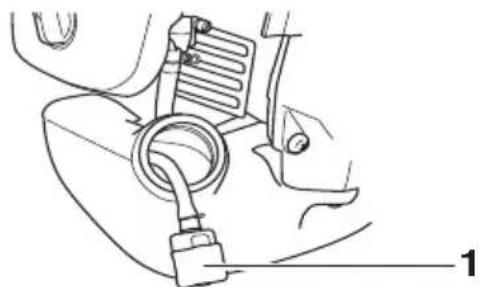
1TopuBEnΦnTbP
Korato DnurataeTn3NTBa HeoCTnHa npntok Ha ropnBO, npOBepTe Da He ca 3anyuHeH Kanaykata 3a rOpBTo n rOpNBnTfNtbp.
brloBa 3b6Ha npedabka

brIbTa 3b6Ha npdaBKa ce 3anbJa c Heo6xoJIMOTO KoJnuecTBo rpec B 3aBoJa npOn3BOJnteJ. Ho npdi Da ce Bb3noJ3BaTe ot MaunHaTa, Tpr6Ba da ce y6eJnte, ye 3b6HaTa npdaBKa e 3anbJIHeHa Ha 3/4 C rpec. Pa6oTeTe cbc cneuaJHa rpec HUSQVARNA.
06nKHOBeHO KOHCNCTeHTHaTa CMa3Ka He ce HyJdae OT 3aMeHЯHe, OCBeh aKO npEJaBkata ce peMoHTnpa.
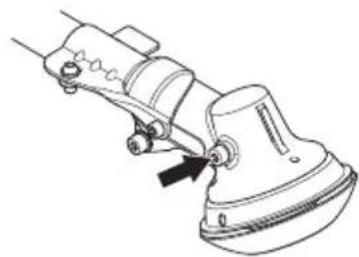
3anaJInteJHa CBeU
CbctoHHeTo Ha 3anaJIHTeJIHaTa CBeU, ce BJIure OT:
- HenpaBnHa peryInpoBka Ha Kap6ypaTopa.
- HenpaBnJIeH npIMec Ha MacNo B rOpNBOTo (TBbPdE MHOg MaCNo NJIH HeKaueCTBeHo MacNo).
-3ambpeH Bb3dyweH hntbp.
Te3nΦaKTOpN BoJrT Do HacJaRBaHnBbpxy
eJeKToPOnIte Ha 3anaJIrTeJIHaTa CBeu N MoRaT Da
npEiIN3BnKaT CmUeHn B pa6oTaTa N
3aTpPydHeHn npn CtapTnpaHeto.
Ako DnIraTeJIaTpa6oTu c HnCKa MoUHocT, MaunHaTa ce CTapTnpa TpydHo n pa6oTu loWo Ha npa3eH xOJ: Tpr6Ba npeDn BcNUpKo Da npoBepNTe 3anaJIteJIHaTa CBeu. Ako 3anaJIteJIHaTa CBeu, e 3AmbpcHe, Ta Tpr6Ba da Ce nouchTu n da ce npOBepn XJa6nHaTa MeHdy eJeKTpoJnte da e 0,9- 1,0 MM. 3anaJIteJIHaTa CBeu, Tpr6Ba da ce eoMHe N cIeD oKOIo eDIN MceU, IIn dOpN No- YecTo, aKO ToBa ce HaJaRa.
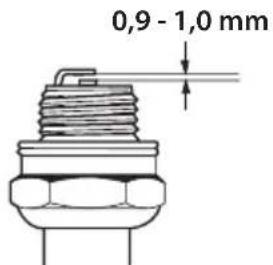
BHIMAHHE! N3noJ3yBaIte BnHaHn 3anaJIteJIHITe CBeUIn OT npenOpbuaHn BnI! N3noJ3yBaHeTo Ha nOrepeH Tn CBeUu MoHe Da npEduN3BnKa cepNo3Hn NobPeDu H a 6ytanoTo/ uINHHbpa. Y6eTeCe, ye 3anaJIteJIHaTa CBeU e Cha6DeHa cbc 3auNTa O pAnocMyuEHHa.
PbKKA
TexHnuecko 06cIyXBaHe
CneBa cncbK c onepaunTe no noDpBHKaTa, KOTo Tp86Ba da ce n3nBnHnBaT no MaHHaTa.
NoBeueTo ot no3nUInTe ca onncaHn B pa3deJa NoDpBHKa. NTope6nTeJrT Tp86Ba da n3nBnHnBa camo
pa6oTaTa no noDpBHKaTa n 06cnyHbaHeTo, onncaHn B To3n HapbYnK Ha onepata. No-KpynHnte
peMOHTn Tp86Ba da ce n3nBnHnBaT OT OToPn3npaH cepBu3.
| Поспсте машина от въшина с trрана. X | |||
| Убаде тse, чe самарьт He e nobpe徳н. X | |||
| Пробerte далу phиксаторьт на газда и газда павOTВ 6ебонасен рeshим. | X | ||
| Пробerte далу рьковытkaТа и уразвлениTo caHeюрдении з akpeneni здраво. | X | ||
| Пробerte Функшино pareнTo Ha Klioч стог. X | |||
| Убаде тse, чe рженьоTo оборudане He ce BьрtnHa npazehxod. | X | ||
| Пробerte Вьздунни phильтbp. ПдмениTo в слоча на HeobхODIMOCT. | X | ||
| Убаде тse, чe зашитata He e nobpe徳н и чe He ca se obразуваи рухсанни. Сmedete зашитata, по Тя e bila na IIIложения на удariи и le He ankyakala. | X | ||
| Убаде тse, чe Новьт e doбpe цentриран, наточen He ce e Hanuksal. Лошо цentриран Нж пeding�ИКВа Вибраци, Koeto моче да doveside до nobpeda на Машина. | X | ||
| Убаде тse, чe TrimeperhaТа Гала He e nobpe徳и и Наяma ryнотини. Рли ИобхODIMOCT Тreambera Тримернata Гала Дд sb'de smeнe ha. | X | ||
| Пробerte далу raайkaТа на phиксатора за рөншоTo оборudанe e павилно заferнata. | X | ||
| Убаде тse, чe TrapнсорTHaТа зашитА He e nobpe徳и и моче дa sb'de павилно захрendeHa. | X | ||
| Пробerte далу BCINCHI raiKи и ВИNTOBe с Загнети. X | |||
| Убаде тse, чe Ная могиевН Teu OT Двигаеля, pezeрв形象ил Маркушte за рогиBOto. | X | ||
| Пробerte старта и shhura Кын Hero. X | |||
| Пробerte заллenteлнata сөш otвн. Саллente я и робerteххлнoga Meндүүлүдүлүдүлүдүлүдүлүдүлүдүлүдүлүдүлүдүлүдүлүдүлүдүлүдүлүдүлүдүлүдүлүдүлүдүлүдүлүдүлүдүлүдүлүдүлүдүлүдүлүdүлүдүлүдүлүдүлүдүлүдүлүдүлүдүлүдүлүдүлүдүлүдүлүдүлүдүлүдүлүдүлүдүлүдүлүдүлүдүлүдүлүдүлүдүлүдүлүдүлүدүлүдүлүдүлүдүлүдүлүдүлүдүлүдүлүдүлүдүлүдүлүдүлүдүлүдүлүдүлүдүлүдүлүдүлүдүлүдүлүдүлүдүлүдүлүдүлүдүлү徳п.TаэлмогиTO He e HanykaH Ili IMA dpyra navre da no Hero. Рли ИобхODIMOCT подмениe. | X | ||
| Пробerte BCINCHI kaБели n cБединен. X | |||
| Смение заллenteлнata сөш. Uбаде тse, чe зашилenteлнata сөш, e снбдение сбс зашилtna ot padinocmшени. | X |
TexHnueckxapaKTepeNCTnKn
Texnueckx xapaKTepeNCTnKn B40 B ELITE B40 BT ELITE
ДигагеЛ
O6em Ha 1nHbpa, cm3 40,1 40,1
BmeCTMocT Ha roPbHnpe3epBoap,JIHTPN 1,0 1,0
TeTIO
TeIIO6e3 rOpINBOTo,peHHeoTo 06OpyDBAHe nPpeDna3nTeJIa,Kr 7,3 7,4
UyMOBnEMNCN
(BHK.3a6eJenKa1)
PabHnue Ha 3ByKOBn eEeK, n3MepeHo b dB (A) 112 112
PaBnue Ha 3ByKOBn eEeKT, rapaHTnpaHo LwA dB (A) 118 118
PavHnIeHaWyma
(BH.3a6eJenKa2)
EKBnBaJIeHTHO HnBO Ha 3ByKOBoTo HaJaIraHe Bbpxy yxOTo Ha onepaTopa, n3MepeHo cbrJlacHo EH ICO 11806 n ICO 22868, dE(A)
06opyuBaH c TprnMepHa rIaBa (opnHaJIHa) 100 100
O6opydBaH c pe3eU 3a KocHe (opnHnaIeH), 255-3 99 99
O6opuBaH c pe3eU 3a KocHe (opnHaJIen), 255-4 99 99
O6opyDbaH c npKyIrp (opnHaJIeH) - 98
PabHnue Ha Bn6paunraTa
(BH.3a6eJenKa 3)
EKBnBaJIeHTHn HnBa Ha Bn6paUraTa (ahv,eq) B pBkoXBaTKNTe, n3MepeHn cbrJaIacHo EN ISO 11806 n ISO 22867, m/s2
06opydBaHc TpImeepHa rIaBa (opnInHaJIHa), IyBO/JaCHo 3.4/4.4 3.4/4.4
O6opyuBaHcpe3eU3aKocHe(opunHaJIeH),JIABO/DIcHO,255-3 3.5/3.4 3.5/3.4
06opydBaHcpe3eU3aKocHe(opnHnHaJeH),JyBo/DacHo,25534 5.2/5.1 5.2/5.1
O6opyuBaH c upkkyIap (opunHaJIeH), JIABO/JaCHO - 4.5/4.2
3a6eJHka 1: WymoBa eMnCnB OKOJIHaTa CpeJa, n3MepeHa KaTo 3ByKOB eFeKeT (LwA) cbrIacHo EO dInpeKTnBa 2000/14/EO. OTyeTeHnTe HbA Ha Wyma 3a MaunHata ca n3MepeHn C opuHnHaJIHOTo peHeo 06OpyDBeHe, KoTo DaBa Ha-NBCOKOTo HbO. Pa3NJkKaTa MeJdy rapaHTnpaHOTn N3MepeHTo HbO Ha Wyma E B ToBa, Ye rapaHTnpaHTo HbO Ha Wyma BKJIOUcBa CbIo N IINcNepCnTa B pe3yJTAtTE oT N3MepBaHeTo, KaTo n BapNaCmnte MeJdy pa3JIuHnTe MaunHn OT eJInn CbSs MoJeI, B CboTBetCTBne C dInpeKTnBa 2000/14/EC.
3a6eJHKa 2:OTcTeHNTe DaHHN 3a EKBNaJIeHTHO To HnBO Ha 3ByKOBoTo HaJaRaHe 3a MaunHaTa NmAT TnUHa cTaTncTnuecka DnCnepcnr (CTaHdapTHO OTKNoHeHne) ot 1 dB (A).
3a6eJIeHka 3:OTcTeHnTe DaHHN 3a eKBBaJIeHTHOTo paBHnIe Ha Bn6paIyTa IMaT TINuHa CTatncTuecka IInCnepcn (CTaHApTHo OTKJIOHeHne) ot 1 m/s2.
TEXHnueCKXAPAKTEPNCNIKNI
| В40 B ELITE, B40 BT ELITE | ||
| Одобreno и prиспособлия Тиц | Заша за р散热ею оборudвае, apt. £ | |
| Централен оTOВор на peэци/Hожове 0 25,4 MM | ||
| Ос на peэца с peэба M12 | ||
| Peэц за кocен/нож за кocен | Peэц за кocен 255-4 1" (Ø 255, 4 зьбa) | 580 30 50-01 |
| Grass blade 255-3 (Ø 255 3-зьбa) | 580 30 50-01 | |
| Peэц за сechе | Цркулар 200-22 (Ø 200, 22 зьбa) | 581 33 84-01 |
| Тримерна тгава P35 580 30 50-01 | ||
| Опөн калak Нөндөн - | ||
Uzemanyagkeverek 396
Tankolás 397
Loket, mm 31, 1 31, 1
Rohulōikamine rohuteraga

1:50 (2%) ar Universal, Universal powered by McCULLOCH divtaktu ellu.
1:33 (3%) ar citam ellam, kas izstradatas ar gaisu dzesejamiem divtaktu motorium, klasificetiem prieks JASO FB/ISO EGB.
| Benzins, litres Di | vvtaktu ellà, litros | |
| 2% (1:50) | 3% (1:33) | |
| 5 0,10 0,15 | ||
| 10 0,20 0,30 | ||
| 15 0,30 0,45 | ||
| 20 0,40 0,60 | ||
Degvielas sajauksana
- Maisiet benzin un ellu tira trauka, kas ir paredzets degvielam.
- lelejet pusi vajadziga benzina daudzuma. Tad pielejet visu daudzumu ellas. Samaisiet (sakratiet) degvielas maisijumu. Tad pielejet atlikuo benziu.
- Pirms iepildisanas masinas tvertne pamatigi samsiet (sakratiet) degvielas maisijumu.
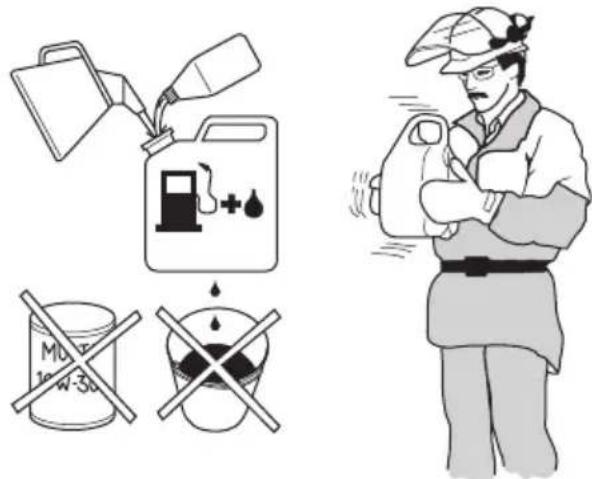
Degvielas daudzumu sagatavojiet ne vairak k viena meneša lietosanai.
- Ja masina netiek lietota ilgaku laiku, iztuksojiet un iztiriet degvielas tvertni.
Degvielas uzpildisana

BRIDINA JUMS! Sekojsie uzmanibas pasakumi mazinas aizdegsanas risku:
Sajauciet un iepildiet degvielu arpus telpam, nedariet to dzirkstelu vai liesmu tuvumā.
Nesmekejiet un neturiet siltus prieksmetus degvielas tuvuma.
Vienmér izslédziet motoru, pirms degvielas uzpildisanas.
Pirms degvielas uzpildisanas izsledziet motoru un laujiet tam dazas minutes atdzist.
Atveriet degvielas tvertnes vaku lenam, lai iespejamais spiediens tiek samazinats lenam.
Pec degvielas uzpildisanas rupigi nosledziet degvielas tvertnes vaku.
Pirms iedarbinas vienmér parvietrojiet masinu projam no degvielas uzpildisanas vietas un avota.
Lietojiet degvielas tvertni ar aizsargaprikojumu pret parplusanu.
Ja uz ta ir uzljusi degviela. Saslaukiet izljuso un laujiet degvielas atlikumiem izgarot.
Notiriapt degvielas tvertnes vaku.Netirumi,kas nonak tvertne var izraisit trucejumus darba.
- Pärliecinieties, ka degviela ir labi samaisita, sakratot degvielas trauku pirms uzpildisanas.
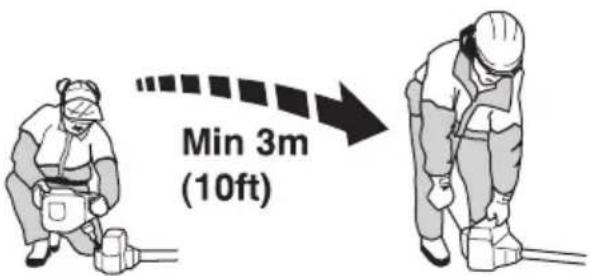
IEDARBINAŠANA UN APSTADINAŠANA
Slutenes garums, mm 31, 1 31, 1
Brivgaitas apgriezenu skaits, apgr./min 3000 3000
leteicamais maksimalais apgriezenu skaits, r/min 12000 12000
Izejosas ass atrums, apgr./min. 8220 8220
Maks. motora jauda saskaar ISO 8893, kW/ apgr./min. 1,5/9000 1,5/9000
Aizdedzesystema
Aizdedzes sce NGK CMR7H-10 NGK CMR7H-10
Elektrodu attalums, mm 0,9-1,0 0,9-1,0
Degvielas/ellosanas sistema
Benzina tvertnes tilpums, litri 1,0 1,0
Svars
Svars bez degvielas, griesanas aprikojuma, un aizsarga, kg 7.3 7.4
Troksna emisijas
(skatit piezimi.1)
Skañas jaudas limenis, mérits dB(A) 112 112
Benzino bakelio turis, litrai 1,0 1,0
Svoris
Sytic: Vytriahnite sytic.
Palivovapumpa.
Hlukové emisie do okolia su v sulade so smernicou Europskej unie. Emisie stroja su stanovené v kapitole Technické udaje a na nalepke.
Plinenie paliva.
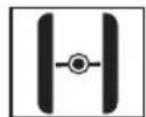
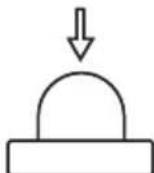
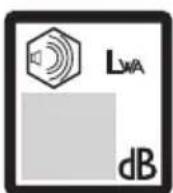

Ostatné symboly/emblémy na stroji odkazuju na zvlástne poziadavky certifikácie pre urcité trhy
Vypnite motor posunutim vypinaca do polohy STOP, predtym nez budete vykonavat akekolvek kontroly alebo udrzbu.
Rashladni system 600
Filter za zrak 600
Filter za gorivo 600
Puzni zglob 600
Svjecica 601
Raspored održavanja 602
TEHNICKI PODACI
Tehnicki podaci 603
OPSTE SIGURNOSNE INSTRUKCIJE
Vazno 637
OPSTE SIGURNOSNE INSTRUKCIJE
RUKAVICE
Rukavice se moraju upotrebljavati kada je to potrebno, npr. prilikom montiranja reznog priibora.
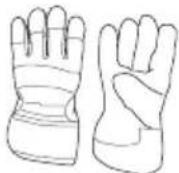
CIZME
OPSTE SIGURNOSNE INSTRUKCIJE
Kontrolisi da li regulator gasa i regulator za ogranicavanje gasa idu lako kao i da li fungcioniusu njihovi sistemi povratnih apruga.

Vidi odjeljak Paljenje. Upali masinu i daj puni gas. Otpusti regulaciju gasa i kontrolisi da li se rezni pribor zaustavlja i ostaje u mirnom položaju. Ako rezni pribor rotira sa regulacijom gasa u položaju praznog hoda potrebno je kontrolisati podesenost karburatora pri praznom hodu. Vidi uputstva pod rubrikom Održavanje.
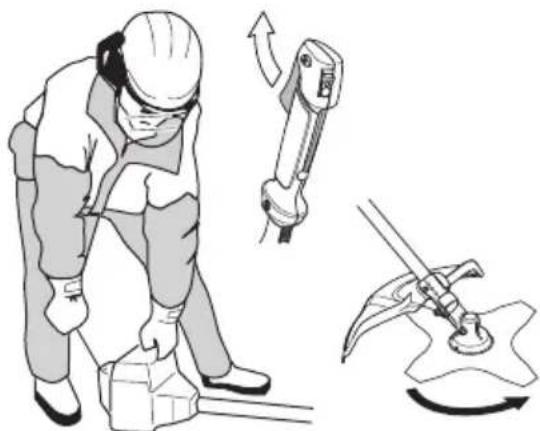
Prekidač za gašenje
Prekidač za gašenje se upotrebljava da se ugasi motor.

Upali motor i kontrlisi da li se motor ugasi kad se prekidač premjesti u stop-položaj.
Zastita reznog pribora

Ova zašita je predvidena da sprijeci da razni predmeti budu odbačeni prema rukovaocu. Zašita sprijěcava takode da rukovalac dode u kontakt sa reznim priborom.
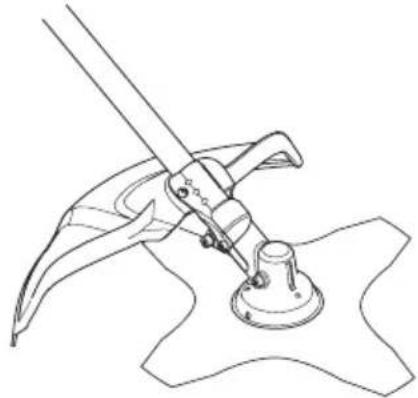
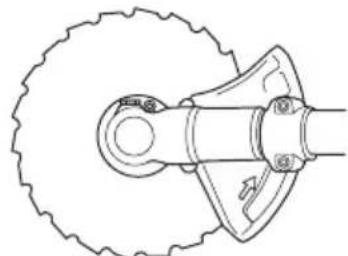
Kontrolisi da li je zaštita naostećena i da nema pukotina. Zamjeni zaštitu ako je bila izložena udarcima ili ima pukotine. Uvjek upotrebljavaj preporucenu zaštitu specificnog reznog pribora. Vidi odjeljak Tehnički podaci.

UPOZORENJE! Ni pod kojim uslovima se ne smije upotrebljavati rezni pribor bez da je odobrena oprema montirana. Vidi odjeljak Tehnicki podaci. Ako se montira pogresna ili ostecena zastita to moze dovesti do ozbiljnih tjelesnih povreda.
OPSTE SIGURNOSNE INSTRUKCIJE
Antivibraciones系統
OPSTE SIGURNOSNE INSTRUKCIJE
Za prugisivač zvuka je veonna važno da se prate instrukcije za kontrolu, održavanje i servis. Kontroliš redovno da li je prugisivač dobro pričvrscen na masini. Nikad ne upotrebljavaj masinu koja ima neispravan prugisivač zvuka.


UPOZORENJE! Unutrasnjost prigušivaca zvuka sadrži kemikalije koje mogu biti kancerogene. Izbjugavaje dodirelementima u slucaju ostecenog prigušivaca zvuka.

UPOZORENJE! Misli na to: Ispušni gasovi motora su vruci i iskricavi i mogu izazvati požar. Zato nikad ne pali masinu u kuci ili blizu zapaljivih materija!
Matica brave
Za neku tipu reznog pribora upotrebljava se matica brave za utvrdivanje.
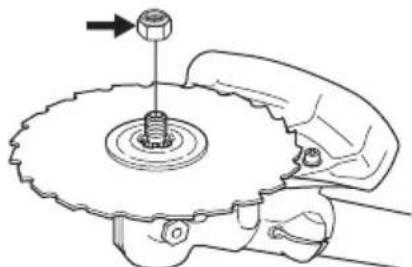
OPSTE SIGURNOSNE INSTRUKCIJE
Sjcicvo za travu i noz za travu su predvideni da se koriste pri rezanju deblje trave.
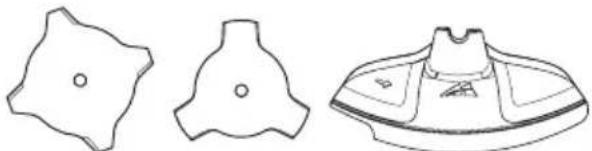
Glava trimera je predvidena za trimovanje trave.
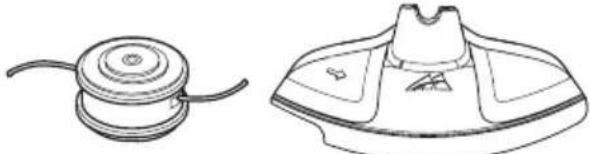
Osnovna pravila

Uputrebljavaj Jedino reznipribor skupa sa onom zašitom koju mi preporucujemo! Vidi odjeljak Tehnicki podaci.
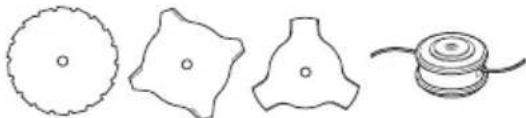
Održavaj rezne zupce na sjecivu ispravnno naostre! Slijedi nase instrukcije i upotrebljavaj sablon za turpijanje koji je preparucen. Pogresno naostreno ili osteceno sjecivo povecava rizik nasrece.
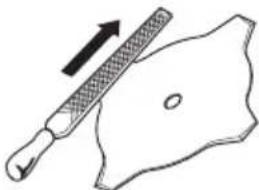
Pravilno podesite ostricu! Slijedite nase upute i koristite preporuceni alat za podesavanje. Pogresno podesena ostrica povecava rizik zapinjanja i povratnog udara. te ostecenja ostrice.
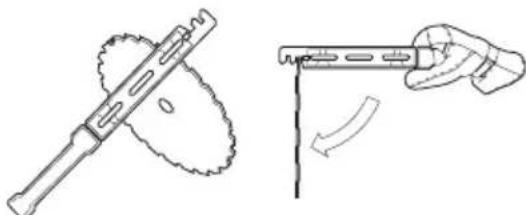
Kontrolisi da li jerezni pribor ostecen ili ima pukotina. Ostecni reznipribor se uvijek mora zamjeniti.
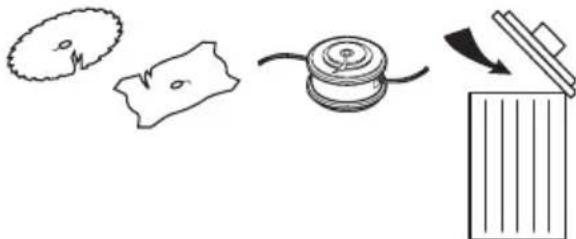
IeBnpi6 BiNoBiae HaJeHHM BmOram EC.

OcTepiraTecpaNkoWety Ta npEeMeTiB, 0o BiDcKaKyIOb.

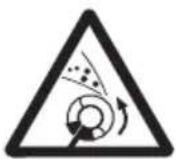
Piucpo6oTuBpaDiYci15 MeTpibBIDKOpNCTyBaUa He NOBHHo 6yTuIIOJeNt TBapnH.
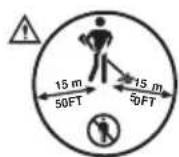
YBnnaKy, kso iHcTpymeHT,
06laHaHnI DnCKOBOIO NIKKOIO
uN NIKOIO IJIa TpaBn,
HaTpanJle Ha HepyXOMNI
npEiMeT, NIKy MoJe p3ko
BiDKNHyTN B6ik. LcHa3nBaetbcra
BiDdaua. Jezo NNk 3daTHe BiTATn pyKy Ch
Hory. JIoDN Ta TBapHH 3aBHN NOBnHi
3haxoNTscr Ha BiCTaHI He MeHsE 15 MeTpIBiD
iHcTpymeHTy.
3aBnOJaTBeBiNobiHi 3axnCi pyKaBnCi.

B3yBaIte MiUHe B3yTTaI3 He cJIN3bKOIO iIDOWBOIO.
Utopka: NpebeiItb Utopky y 3akpnte noJIOHeHHa.
OuHnHH npoDyBkoIO nobITpA.
WymoBi BnKnIy HaBKOJIuHc cepeOBNue BiIOBIdaIOb HopMaM EC.deTaJIbHiSy IHOpMaIIO npo WymoBi BnKnIIn IHCTpyMeHTy noHaHO y po3diT "TexHiHi DaHI" Ta Ha 6ipci.
3anpaBJIeHHJ.
Ihni no3HaeyHnHa
iHCTpyMeHTi Biinobiaotb BmOram
cneuaBnHex cepTnKatIB nnaeBnX pHHkib.
IpeTmK npoBOnTu TexHnOrJy npeBipKy iHcTpymeHTy, BmKHiTB DnHy, nepeBibu BmNkauy noLoHeHHr STOP (3YnIHKA)
3aBnOJraTe BiNobiHi 3axncHi pyKaBnCi.
Heo6xioHOperyJapHo uCTnI nCTpyMeHT.
BiyaJIbHnOrJrI.
3aBnKopntyTeCnpeBipeHm 3axNCHM npncTOcYBaHHM dJa OeJ.

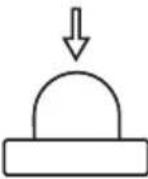
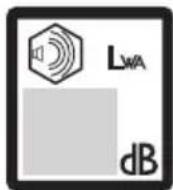

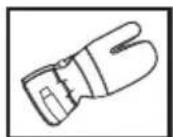

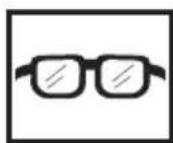
3mict dejki npa npeed TUM, JK
YMOBHI N03HAUEHH
P03NaeHHa 689
3MICT
3Mict 690
deki npaPi nepeTm, k noatn: 690
BCTYn
UaHOBnKOpncTyBaCy,691
山 O 山 O ?
Ioo e 1o Ha oUncHi nnJi? 692
MoHTaHpyKIB'Y Ta BaHeJy IpoCeJIa 701
YcTaHOBKa HOJIiB I rOJIOBOK TpIMepa 701
BcTaHOBJIeHHa 3axuChHOro KoHyxa Ta HOnHa-nnKn 702
MoHTaH pJIacTHINH IJIra TpaHCnOpTyBaHHa 703
PpInacyBaHHpeMeHIB TaOuHcHoI NnIKN 703
POBOTA 3 NAIINBOM
3axoDi 6e3neKn npn 3anpaBci naJIbBa 705
PaniBo 705
3anpaBJIeHnnaJIiBa 706
NYCKTABBIMNKAHH
IpeBipKa npei nycKoM 707
Iyck Ta BmKKaHH 707
TEXHIKA POBOTN
3araIbHi Bka3iBKn IJpa po6oTu 709
TEXHUYEOBCJYTOBYBAHH
Kap6opatop 714
TnyuHnK 714
CnCTema oxoJIOdHeHH 715
PykabuNi noTpi6Ho BJaRaTu, KOJy Ucbomy e Heo6xHicTb, HapnKJaI, NiJ Yac 3MiHN Cu BCTaHOBJIeHH pIKyOi HacaIKN.
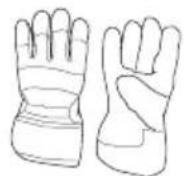
B3YT
HaIraIe 3axnche B3yTTa 3i CtaJIeBIM HOCOM Ta HeCJIN3bKOIO NiDOWBOIO.
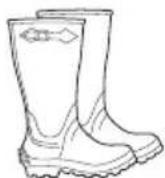
OДЯΓ
BdraTe OJr, BnroToBJeHn 3MiUHOITKaHnHn; yHKaTe HaTo npocToporo OJry, kNIMir 3aYinaTncs3a MaI Ta BeNIki rIKN.3aBXnD BdaRte Lyni Ka Ta DOBri WTaHn. He oJraTe Ha cac po6oTu wOpiTIB, caHdaJIb, DOpORoCINHocTe, a TaKOH He XoDiTB 60coHn. 3aHnITb BOLOccr TaK, 606 BOHO 6yNo BVne nIeuei.
ANTEUKA
3aBnTpMaTe anTeyky niPyKoIO.
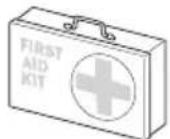
CnpaJxHnJa 6e3neuHoi po6oTu
B zuMy po3diOncaHo cnopdKeHHaJI
6e3neuHoi po6oTu i Noro npn3HaueHHa, Ta
noRcHeo, k noTpi6Ho npoBOHTn nepeBipKy Ta
06cLyroBaHHaJI npaBnIbHorO
fYHKIOHyBaHHaBOrO cnopdKeHHa. nIBiTbcra
po3diJ "Io e 0o?", 0o6 no6aHTn, De Ha
IHCTpyMeHTi 3haxoNTbcra ce cnopdKeHHa.
TpBaJIicTb cLyH6n iHCTpyMeHTy MoHe 3MeHUnTncA, a He6e3neKa HeuacnX BnnaKIB 3pOcTn, RaKIO Ioro 06cLyroBvBaHHra npoBoNTn HEnpaBnIbHo, a6o JaKIO 06cLyroBvBaHHra Ta peMOHT BnKOHyBaTmYtbcr He faxiBzmaN. RaKIO Bnnotpe6yeTe DoaTKoBOiHfOpMaui, 3BepHiTbcr, 6ydJ lacKa, dO Ha6nnHOrO ueHTpy 06cLyroBvBaHHra.
JaHaOCTpTuN HiK-nuKy?

- IhctpyKu, Jk npaBnIbHo HaocTpTu piHcyi HacaKn, INBiTbcHaixynaKoBu.
IpaBnJIbHo HarOcTpEHH HIX e DnyHe BaHJIINBIM IJRA eΦeKTHBHOi pO6TO; Ye TaKOH DonOMarac yHnKHyTu HenoTpi6HOro 3HouyBaHHa HOHa Ta OuNCHOI NIKN.
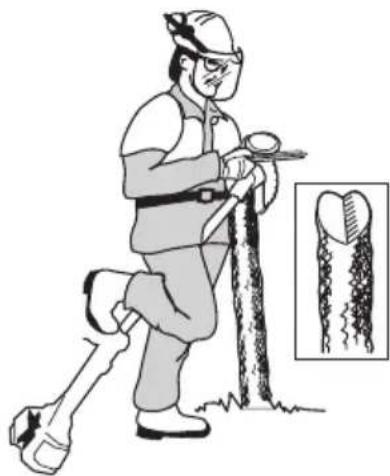
Пд уас roctpiHЯ HIX NOBHeH 6yTuДо6pe 3akpinJIeHn. KopncTyIeCЯ KpyrJIM HAnIIbHnKOM diametpom 5,5 MM i3 TpImaYeM.

·KyT npHarocTppeHHIOBUNHeH cTaHOBNTu 15^ HaroctpouTe 3y6u TAKIM YINHom: OINH y npabn 6iK, dpyrny JIIBN, notim 3HOBy B npabn, i TaK daJI. Y BHNATKOBNX BInaKaX, KOJI HIX CNlBHo NOxKOJKeHNI KAMIHHM
BCTaHOBiTb pyKIB'BA 3aTnCKaPyKIB'Ha BaIy 3a DOnOMoROO YoTHpBOX rBNHTiB.
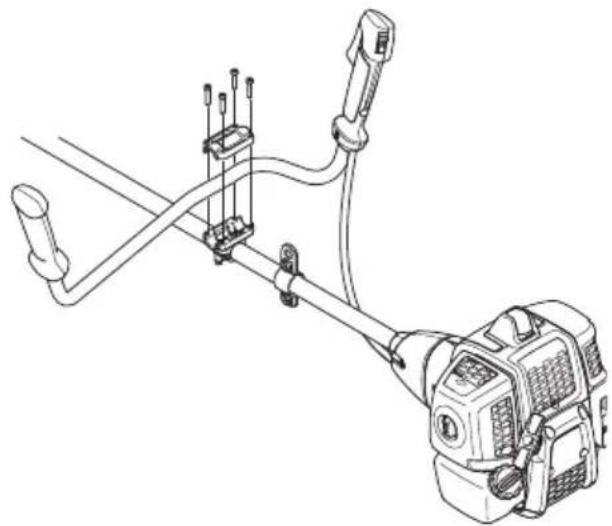
- PpNJaTMyTe 3axnCHN KOxy K noka3aHo Ha cxemI.
YcTaHOBKa HOXiB i rOJIOBOK TpIMepa

YBARA!
PnBCTaHOJIeHI pIkyoI HacaKn BaKInBO, 06 NiIHaTa YacTNaH DaNcKy npBoyU ONOpHOrO fJaHua npAIBbHO yBiWLa B UeHTpaJIbHn OTBip pIKyoo HacaKn. Raio pIKyu HacaKDy 3akPinJeHo HeppABINbHO, Ce MoHe npN3BeCTN Do cepNo3Ho i/a6o CMepeJIbHO TpaBMn.
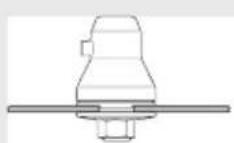
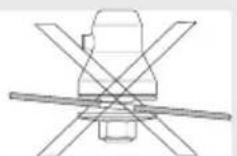

YBAI!Hikoln He KopncTyTecepiHcyHMn HacaKamn 6e3 BiNobiDHor03axnCHoro KOHyxa. DnBItbcr po3diT"TexHiHaH."BkOpncTaHHHeCnpaBHOrO uH He BiNobiDHoroKOHyxa MoHe cnpuHNHTn cepNo3Hi npaHeHH.
BAJINBO!Akuo Bn 36npaTeC8KopncTyBaTnc Hoxem-nIkoO uHoxem IJI TaPABi,HCtpyMeHT noTpi6Ho o6laHaTH BiIDNoBIdHM pyKiB'am, KOxuyom dJa HOHa Ta peMeHrM.
BcTaHOBJIeHHa KOxUxa IJIa HOHa, HOHa Ta pI3aKa IJIa TpaBN.
3aknTe KOhyxom IJI HoHa/KoM6iHOBaHIM KOxyom (A) BaI Ta 3akpinb 60lTom (L). BInkopncToByIte peKOMeHIOBaHIN KOxyx IJI HOHa. DnBtbc po3dI"TexHiN daHI".

·BcTaHOBiTbДИСК npINBoyu (B)Ha BnXiДиВaJ.
- O6epTaIe BaI, IOnOKn OdINH 3 OTBopIB INCKy npNBOy He cnIBnaTe 3 BiINOBiHNM OTBOPOM y Kopnyci 3y6uactoi nepedaqui.
BCTaBTe cTOnOpHn uTnΦT (C) B oTbip, 0o6 3aikcyBaTN BaI.
- YctaHOItb HIX (D), onopHy MaHHeTy (E) i onopHnI IaHeuB (F) Ha BnXiHN BaJ.
3akpyTbraKy (G). 3ycnIJIa 3aTaryBaHHraIKN NOBHHIO DOpIBHOBATu 35-50 Hm (3,5-5 KRM). CkopncTaNTecr TopueBM raKOBIM KIOUcem iHa6Opy IHCTpymeHTi. TpMaJTe pyKy TopeBOr RaKOBo r KOIOyA KoMOra 6NIHHe Do 3axnCHOro KOHyxa. 06 3aTARHyTu raKy, NoBepTaTIe KIOUy HAnpMky, npOTnLEHOMy Do HApRMky OeTpAHHr HoHa (YBArA! JIbO6iHa Hapi3ka).
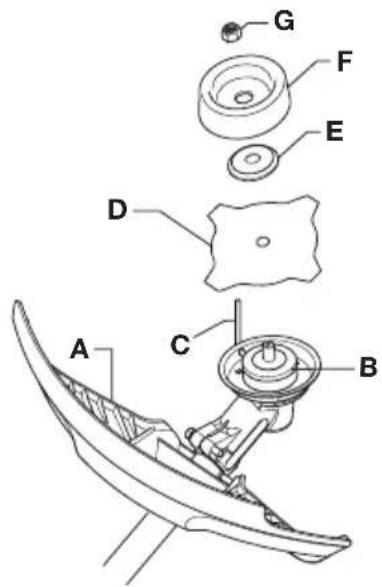
3БИРАHHЯ
YcTaHOBka KOHyXa TpIMepa NroJIOBKn TpIMepa
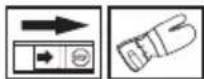
BcTaHOBJIeHHaPiBHOBaI
PikyuHa HacaKa NOBHHa 3JeRka TopKaTncs3emIi. BiDperyJIOHeNoLoXeHnraRaka-tpMaUa,0o6 HINK Ka 3HaXoDNBCa B npaBnBHOMy noLoHeHHI.
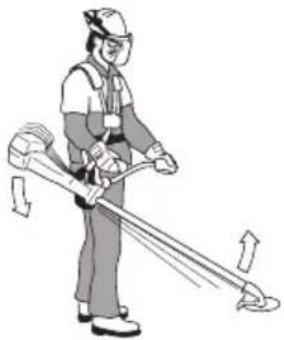
3axoDi 6e3neKn npn 3anpaBci naIiBa
B HODHomy pa3i He BMnKaaTe iHCTpyMeHT:
1 RaKo Bn po3JIHn Ha HbO r naJIbO. BnTpIb iHcTpymeHT Ta noyeKaIte, nOK naiBa 3aJIuKn BnnapyIbCra.
2 KaBn po3JInnaJnBO Ha ce6e cH CbiO OJaR, nepeoJrHiTbcra. BmNte YacTHNu Tla,Ha KI noTpapanNo naJnBO.ДЯцBo cKOpncTaITeca MJIOM Ta BoDoIO.
3Якшio iHcTpymeHT nponyckaД naJIbBO. PeryIЯрно nepebipnyTe,чИ Кпшka 6aky Ta Tpy6kn NaJIbHoe CnCTMmHe nponyckaIOb naJIbBa.
TpaHcnOpTyBaHHra36epiraHHa
36epiraTe Ta TpaHcnOpTyIte IHCtpymeHT i naJIbBO TaK, 0o6 HabiTb y BnnaAdKy BnToKy naJIbBa YI NOrO BnnapiB BoHN He noTpapanJy KoHTaKT 3 BiKnpNTM BorHeM Ta icKpaMN Bi eJeKTPnUHH MaunH, DBNrHyHIB, eJeKTPnUHHx peJIe/BmNkaiv CBnNePib.
Длг36epiraHHЯиpeBeseHHЯINBaKopncTyItecRaIDnoBIHm nocydom,прИЗHaYeHIMДлгТaknxцЛeN.
-ПиЗбepirahHiIHcTpymeHT npToTGM IOBrorO yacy, naINBn6ak nobHHeH 6yTu nopoJHHim. Ioo6doBiDaTnc,de Kpaue 3NtHuAnLlWok naINBa, 3BepHiTbcra Ha MicUeBy 6eH303anpaBky.
-Перд 36ерганнam iHctpymeHTy npotяromdoBrorO uacy, nepekoHaIteCra, lo BIn nouichiHn i so npoBeHei Bci BiIIOBIiHi po60Tu 3 o6clnyroByBaHHa.
-Пи 36epirahHi Ch TpaHcnopTyBaHHi HCTpyMeHTy NoTpi6Ho OJraTu Ha pIky Hacaiky 3axnchN yoxoJ.
HaHnO3aikcyTe npncTpiI TpaHCnopTyBaHH.
-ДяЗANO6iraHЯ HeHaBMnCHOrO 3anycky DBNryHa, NaTPOH CBiKu 3aJaHeHHa NOBInHe 6yTu 3aBKn 3HrTn npu TpBaIOMy 36epirahHi, kku o HcTpymeHT He nepe6yBae nID cyBOpIM HaJlAOM, a TaKoH npu Bcix npoUeDypax i3 Noro 06cLyroByBaHHa.

YBAΓA! Bynte o6epenHi, npaiouOu3 naIbOM. PAm'raTae npo He6e3neKy 3aRopHHBn6yH Ta BdNxahnBnapipB.
Pajnbo
YBAI! IIncTpymeHT 06JaHaHo DBoTaKTHIM DBNHyHOM, Tomy Jnro pO6oTu cIiD 3aBHHIN BIKOpNCToByBaTn cyMiu 6eH3nHy Ta MoTopHOi OJI IJIA BoTaKTHnx DnRyHiB. 06 oTpMaTu cyMiu y
npaBnblHi nponopui, BaJInBO ToHOb BiMiprTNIkbKicTB oii. Ppi 3miuByaHI He3NaUHO KJIbKocTi naIbHaBtB He3NaUHI HeToUHOCti MoHytb CNbHO BnHHT Ha nponopciO cyMiwi.

YBAI! PaJIbO Ta Noro BUnapn JERko 3aMauTbcra I MoKByTb 3aBdaTn cepNo3Hoi WKOdN npu BAnxAHHi Ta noTpapanJHHHa Kipy. Tomy 6yDbTe o6epeHHi npu po6oTI 3 paJIbOM i nepeKoHaHTecr, 10 npmIueHnro DoCTaTHbO npoBITpOEtbcra.
Beh3nH

YBAI! 3aBKnBuN BkOpncToByTe RaicHy 6eH3nHOBO/OJIHy cyMiU 3 OKTaHOBm YNCJOM He Hnue 90 (uocNo RON). RaKIO iHcTpymeHT 06laHaHn KaTalITnHy m CnAIOBaYe M BxLlonHnx ra3iB (DnBiTBcpo3dIN "TexHiHi daHI"), BkOpncToByTe RaICHy 6eH3nHOBO/OJIHy cyMiU, 1o He MicTNTb CBnHIO. BkOpncTaHHra 6eH3nHy 3i CBnHcEm BnBeDe 3 Nay KaTALITnHy cnaIOBaU BxLlonHnx ra3iB.
Pn MoKInBocTi BnKOpncToByIte 6eH3nH i3 Hn3bKIM piBHeM BnKnIDiB 1kI,INBnx peOBOH (TaK 3BaHn aNkIaT).

ДоЗВОЛЯЕТБСВИКОРИСТОВУВАТи NAЛINВHy 6eH3iHoBO-eTaHOLNoBую cyMiU E10 (BMicTeTaHOJy He 6iJIbIe 10%). Y BnAnDky BIVKOpNcTahHЯ cyMiUeY 3 BnIIM BMICToM eTaHOJy MOxHTb BInHKNHyTN pO6Oci yMOBи, 3ДaTHI BIVKJIINKaTи NOsKOДжehня DBNryHa.
·MihimalbHe peKOMeHIOBaHe OKTaHOBe YnCNo dopiBHOe 90 (YncNo RON).Pnp BnKOpNCtAHHi 6eH3nHy 3 OKTaHOBm YncLOM, HnHcIM 3a 90, MOJIINBn TAK 3BaHn CtykIT. Ue cnpuHne neperpipIB DnVryHa, 1O MoHe npVBecTn Do Iyoro cepno3HOr nooKOJKeHHra.
-ПиТпьалій po60ti Ha BnCOKnx 06epTax, peKOMeHnyeMo BnKOpNCToBvBaTN 6eH3nH i3 BnIIM OKTaHOBm YIcJIoM.
OJIЯДЛЯДВOTAKTHOROДВИRGyHa
Для одерханн Крашиpe3уьтав
ВИКориToByTe MacТиLo Для ДВоТаКTHnx
ДВИгИВ Universal powered by McCULLOCH lo
спeцajьно пиз nauseе Для наши
ДВОТаКTHnx ДВИгИВ i3 NOВiTPЯн
oxoJIoDJIeHHaM.
HikoJn He KopncTyTecra OJIeIO,Io npu3HaueHa IJIa DBOTaKTHnx DBrHyHiB 3
BOJHIMOXOJIODHeHHM,IkyIHKOLN Ha3nBaIOb 30BHIuHbOIO OJIIEo (MapkyBaHHa TCW).
HikoJn He KopncTyntec oJIeIO JIA qOTnpuNTaKTHnx DBNrHyHb.
Hn3bka kictb oJIi Ta/a6o Hnto BeNkacCTKa OJIi B CymiMoHe BnBeCTn 3 JaNy KaTajITuHn CnAIOBaU BxJONHnx Ra3IB TaCKOPOTNTu Hac HopMaJIbHoI NOro po60Tu.
- Pponopui cymi
1:50 (2%) Mactnlo JIJIy BoTaKTHINx DInrHyHIB Universal powered by McCULLOCH.
1:33 (3%) npn BnKOpncTaHHi iHoi oJIi dJa DBOTaKTnX DnBHyHb 3 NOBiTPraHm OxOIOJHeHHaMK JAcNphiKaui JASOFB/ISO EGB.
Pn3anpaBci BiKpyuYte Kpnuky naNBHO 6aky noBilbHo,io6 noctynoBO 3MeHINTu TnCK.
PicIa 3anpaBHeHH o6epHHo, aIe ⅢJIbHO 3aKpNITe KpNkY.
Ipeep3anyckom 06OB'3KoBO BiDIIITb i3 MaunHO BID Micu3anpaBHeHH.
3aBnIN BIKOpNCToByTe naNBHn 6ak 3 aHTnponyckHM KJanaHom.
-ЯкоВи розлелп Ha HbOro naJINBO. BnTpIb IHCTpyMeHT Ta noYeKaITe, nOKn NaJIbBa 3aJIiShK BuNapyIbCra.
BntpiB kpnkny naIINBHorO 6ky Ta nobepxHIO 6Ira ropIOBHH.3a6pydHeHH B 6aky Mohe cnpuHHnT npo6Jemn y po60ti.
- Ⅲo6do6pe nepemiuata naJInuBO,notpyciTb MicTkicTb i3 naJInuBOM nepeI 3anpaBJIeHHaM.
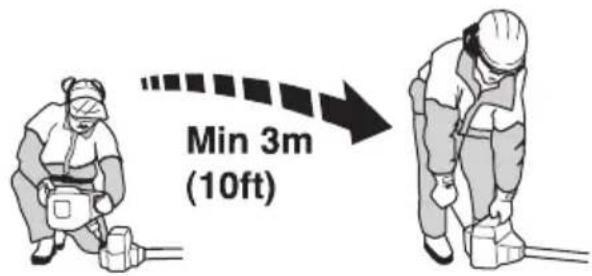
Перевірka перацькOM

OrJHbTe HIX, nepeBipTe, uH HeMae TpiuH B OCHObi 3y6uB Ta 6Ira CEHTpaIbHoro OTbOpY. Jk npaBnlo, TpiuHN BuHnKaIOTB, JaKo npn HarocTpeHi B OCHObi 3y6uB yTbOpNBcA dyHe roCTpN KyT, a6o npn po6oTi 3 He HarocTpeHM HoKeM. B pa3i BuRbNeHHra TpiuH 3aMiHiTb HIX.
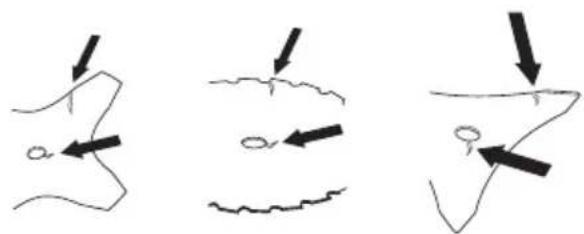
- IpeBipTe, Hn Ha onOpHMy fHaHHeMae TpiuHH, uOMoHyb yTBopOBaTcNpN 3HOweHHi a6o BiD NaHTo CnIbHOro 3aTaryBaHH. B pa3i BnABnBJeHHr TpiuHH 3aMIHiTb onOpHn FNaHeCb.
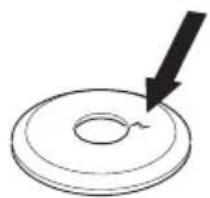
-NepekoHaTecra,0fikcyuca raika He BtpaTnla CBOrO 3ucnI. fikcyuca cnla raIKN NOBHHa cTaHOBHTn npHaimHi 1,5HM. Raiky cIiD 3aTARHyTu 3 cnlo 35-50 Hm.
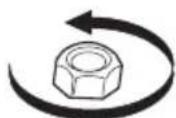
- IpepeBipTe 3axnCHn KOHx HoHa, 06 HnHbOMy He 6yIIO TpiuH, i 06 BIn He 6yB nOoKdHeH. 3amHtB 3axnCHn KOxHy, kIo BIn 3a3HaB yIapy a6o Mae TpiuHy.

- IpepeBipTe roJIOBky TpIMepa Ta 3axnchN KoJyX, 06 BOHn He 6yIi NOoKoJHeHi He MaJIu TpiuH. 3amHItb roJIOBky TpIMepa Ta
3axnchN KOhuy, kso BOH 3aHaJydp a6o Maotb TpiuHy.

HikoJn He KopncTyTecraHcTpymeHTOM 6e3 KOhyxa a6o 3 noWkoJHeHm KoHyxom.
Yci KpnuKn noBHHi 6yTu npaBnIbHo BcTaHOBJIeHi I Ha Hx He Mae 6yTu HiKaNX ykoJHeHb Nepe3anyCKOM DBNrHyHa.
Пуск Та Вими Кання


YBAI! Npei noaTkom noTpi6Ho BcTaHOBNTn Kpnk Ky 3uenHeHHaBaLo, ockJIbKn iHaKwe 3uenHeHH MoJe Bi'EnHaTncr i 3aBdaTn TpaBMn.
Ipepe 3anyckOM 06OB'3KoBO BiDiiDiTb i3 MaunHIO BiMicu 3anpaBHeHH. PoklaDiTb IHcTpymeHT Ha pIBHy nobepxHIO. IpekoHaIteC, 1O pixyHa HacaKa Hi Do YOro He DOTyJIeTBcJ.
BneBHITbc, 1o Ha po6oyomy Mici Hemae CTOpOHHIX IIOJe, OCKJIbKn B iHOMy BNnAdKy icHye He6e3neKa cepNo3HOro TpaBMvBaHHa. Be3neHa BiJaIb cTaHOBHTb 15 MeTpib.
Nysck

3anaJIeHHa: IpeBeIITb BIMKau y noJooHeHHa BBIMKHeHHa.
Utopka:
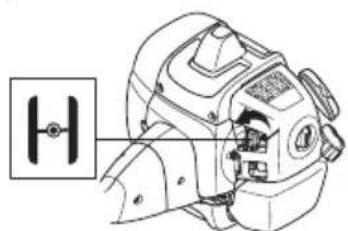
IpeBeiTb wTopky y 3akpnte noJnoHeHHa. KhoNka Hacoca:
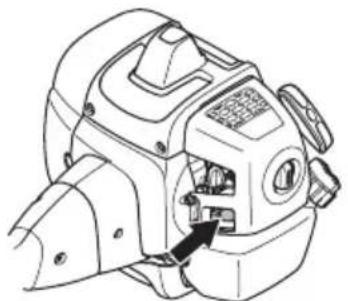
HaTnCKaIte HeoDHopa3OBo KhoNky Hacoca, noKu naJIbBO He noUHe 3anOBHObaTu 6aJIoH. BaJIOH He NOBHHn 6yTu NOBHicTTO 3anOBHeHM.

YBAI!PnBvIMKHeHIDBvHyHaPiKyuHa HacaKaNoUHeOpa3yHXo6ePaTnc, He3aJIeHHoBiDToR,UnSTOpKa 3aKpHTa,Un3HaxoITbCBynoJIoHeHHI BBIMKHeHHA DpoceJIa.
IiBOIO pyKOIO npITnCHiTb Kopnyc iHCTpyMeHTa do 3eMNI (YBAIA! He po6iTb uboro HoroIO!. Bi3bMitb pyKy cTapTepa i NobilbHO noTARHtB shHyp npaBOIO pyKOIO, nOKn He BIDUyeTe cnpoTINB (CnpaLBoBye 3uenenHra 3y6IB), TOni NotarHtB shHyp pi3ko i CInbHo. HiKoJIr He HaMoTyIe uHyp cTapTepa Ha pyKy.
3po6itb dekiIbka cnpo6, nOKn DBrHyH He 3aBeTeBcra. KoJI NDbRyH 3aBeJeHo. NObepHiTb 8Topky y po6oye noJIOKeHHa, BiIKpNIte nobHicTIO dpocJIb, i peHM NyCkY aBTOMaTHUHO BIMKHeTBcra.
YBA! He BntaryTe uHyp cTapTepa nobHicTIO i He BiDnyckaiTe pyuKn cTapTepa, JaKIo uHyp nobHicTIO BNTaRHeHo. Lc MoHe noWkoJNTn IHCTpyMeHT.
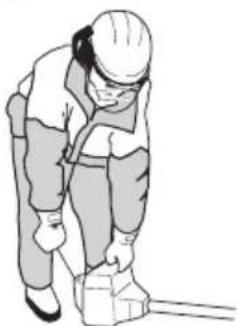
YBAI! He nomiauTe 6ydb-ky qacTHy BaWoTo Tla B 3a3NaueHy o6JAc7b. dOTNK MoHe npNBecTN Do onikB wKipn cH npa3Kn eJeKTpNHM CTpyMOM, kKIO KObnak CbiCi 3anaJIbOHaHH 6yB ykoJHeH.N. 3abKn BNkOpNCToByTe
pyKaBnUKn. He BnKOpncToByTe iHcTpymeHT 3 ukoJHeHm KObnaKom CBiUKN 3anaJIIOBaHHa
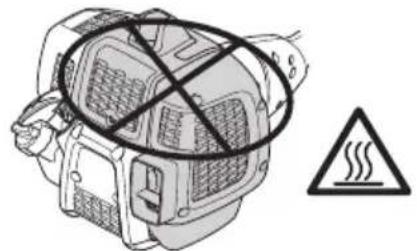
BumKHeHHA

3ynHITb DBNrHy, BIMKHyBwN 3anaJeHHra.
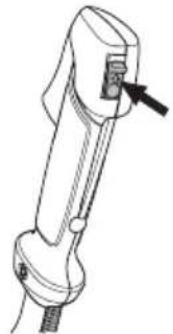
YBAΓΑ! 3ynnHtBДВrγH, BmKHyBιn 3anaJIeHH.
3aaraIbHi Bka3iBKn IJIЯ po60TN
BAKJIINBOI!
LyaactnHaNoaHcHoeOCHOBHi 3axoN6e3neKn npno6oToI 0uNCHMNI NIKaMn Ta TpImepaMn.
KIO BUNHKHe cHTyaIaI, KOJIb BN 6yTe He BnEBHeH, IO poBNTu IaJI, 3ynHITbcra Ta cnTaNTE npaN y faxibua. 3B'JXITbcra i3 npoabLcem a6o ceHtpom o6cIyroByBaHHa.
He HamaraiTeca 3po6ntu Te, 0o 3daetbcra Bam no3a MeKaMn Bauxx MoHJIbOcTei.
CJIi3pO3yMiTiPi3HnIcMoMk 3pi3aHHaM DepeB, KocIHHM TpaBN Ta NiCDTpNraHHaM TpaBN.
OchOBHi npaBnla 6e3neKIn


1PonjraaTe IOBkoJa:
- 6yIb-0o iHwe He nepeKoJHaTmE B KepyBaHHi HcTpymeHTom.
-Ⅲo6 nepekoHaTnc, 10 piKyuHa HacaKa a6o npedMeTu, Aki MoKyTb BiDcKOHTu npn po6oTi, He noTpapanJaTb y IIOJe YI TBapH.
YBAI! He KopncTyIeTec iHcTpymeHTOM, kIo y pa3i HeuacHOrO BnnaKy HemaE MoJInBOCTi nOKJIkaTu Ha Donomory.
2ПepeBipTepo6oYeMiCte.Pn6epiTbBCI BnnaKOBi npEdmEtN,Taki KaMHHa,po36nte cKJIO,LBAXN,CTaJIeBy npOBoJIOky,MOTy3KN Ta iH.,Aki MoHyTB BiDcKOHTNu HAmOTaTncHa pIXyU HacaIKy.
3 He kopncTyIeCra IHCTpyMeHTOM B noraHy noroDy - HapnKJaD, BrYcTm TymaH, cnJIbHni DoU, cnJIbHNI BiTeP, KOJI NyHe XoJIoNDHO Ta iH. Po6OtaB noraHy noroDy BTOMIOe, a TaKOH cTBOpoe IOnaTKOBy He6e3neKy, HapnKJaD, OKeJeDb, HenepeI6auyBaHicTb HaprMky naDiHHa 3piayBaHnx DepeB Ta iH.
4IpekoHaTeC, 0 Bu MoHeTe 6e3neHcToTn Ta pyxatncr. IpebipTe, Hn HabkoJHOema MOKINBux nepeWkoJ (KopiHHKaMiHHra, rIKN,poBN Ta iH.) y BnAnky, kku Tpe6a 6ynde
pi3ko nepemictnncs. BybTe duyhe ybaHHi, npaouuHa cxnaX.
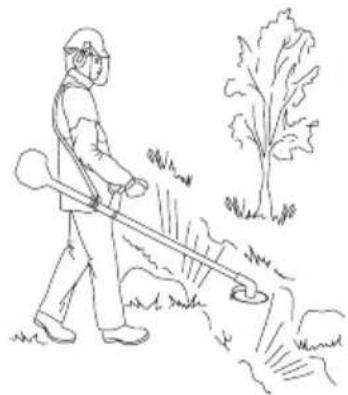
5 ByIbTe DyHe yBaHHi, 3pi3yOuH HaxnJIeHi DepeBa. HaxInJe He DepeBO MoHe panToBo noBepHyTncr Do CBOrO HopMaJIbHOr ONoJooHeHH, IpeD TmM a6o nicJa TorO, RaN JOrO 3pIXyTB. JkUo Bn 3aImMeTe HEnpaBnJIbHe noJIOHeHH YI 3po6nTe HaDiY HEnpaBnJIbHOmy MicU, DepeBO MoHe 3aChenITn Bac a6o IHcTpymEt I BV BtPaTnTe KepyBaHH NaH Nm. O6nDbI cHTyaCiMoKyTb npNBecTN Do cepNo3HOr TpaBMyBaHH.

6 CJIikkyIe 3a pIBHOBarOTo Ta CTiKIM NOLOHeHHaM. He npNKlaJaTe DyHe BeJIKNX 3ycnIb. 3aBKnDIOTpMMyTEcB npaBnHoi nCTaHci i 6aJHaCyBaHHa.
7Пд'еднTe iHCTpyMeHT Do KJIbUЯ NiIbIbicHOICNTeMn.3aBHNr TpIMaHTe iHCTpyMeHT O6Oma pyKaMn.TpIMaTe iHCTpyMeHT 3 npaboro 60ky BaWOro TiJa.He npaIOte No6JN3y rapaUnx nobepxoHb.He npaIOte no6JN3y HacaKnДЯpiahHn,io o6epTaetbcra.
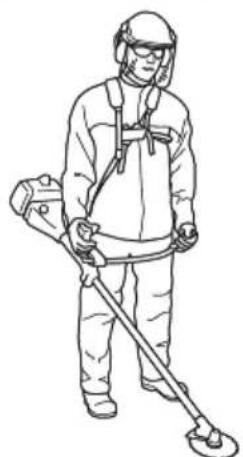
8 TpmaIe piHcyu HacaKky HnHue pIBna.
9 Npeep TmJIKpeeTnB iHwE MicLe, BIMKHiTb DBrHy. Npehenocayn IHcTpymeHTy TpaHcnpTyOuN Ioro Ha 6yDb-ky BiDCTaHb, BCTaHOBJIIOIte Ha HbOro 3axNCHI yoxOI.
10 Hikoln He KnaiItb IHcTpMeHT 3 npaiooumIM DBrHyom Ha 3emIIO, xi6a oio noo do6pe BnIO.
OchOBHpiHnHnnpo6OTn3po3uNTK
3aBnIN BIKOpncToBynte BiNIOBiHe cnopdHHeHH.
-ПepekoHaITecЯ,юспоряджehнда6pe npinacobaHe.
-ДOTpIMyITeCЯ3axoIb6e3neKn.
- PeTeJIbHo npOduMyuTe BaUy po6oTy.
-KoJn nouHaeTe po6OTo HooHeM,3aBHN npaIouTe Ha nobHi WbNkocTi.
-3aBHHKOpNCTuTEcraTcPmHHOHaMn.
- YHnKaITe KaMiHHa.
CniKyuTe 3a HnPmOM naHnHa 3pi3yBaHnx pocInH (BpaxoByTe BiTe).

YBAI! Hi KopncTyBaCy, Hi 6yDb-Komy iHwMy He I03BoJRAeTbC8 3HiMaTN 3pi3aHm MaTePiaJ, NOKn npaLIOE DBrHy a6o 06epTaEc HacaJa, ockJIbKn Ye MoHe CnpuHHTn cepNo3Hy TpaBMy.
IpeTMMKBNdaJIaTIe,IO
HaMToAIOcHbAaHHOa,BIMKHiTB
DnRyH Ta 3ynHITb pIKyuN eJeMeHT;
BInOMy BnnaIky icHyE He6e3neKa
TpABMyBaHHra 3y6uacTa nepeDaay
MoHe Harpitnci 3aJNaWatncr
rapyoo npotraom DejkoRo cacy.
DoTOPKHyBUnCb Do Hei, MoJHa
06NeKTncr.

YBA!OcTepiraTecnpeMeTIB,IO BiDcKaIyOTb.3aBKnKOpNCTuITecn nepeBiPeHm 3axncHm cnpA,IHeHHm IJIoue.HikoN He HaxnIaTecn uee3 axncn Koxy pkiyooi HacaKn.KamHH,cmTT TaIH.MoKe BiDcKOHTn i NOTrpanNTu B Oci, cnpuHHBun CInoTy Cu cepNo3Hy TpaBMy.
CTopOHHI JIOJN NOBHHI 3HaxoINTcH Na 6e3neuHi BiCtahi. DiTn, TBapHH, cnorJaayi Ta nomuHKN noBHHI nepe6yBaTu 3a MeJAMn 30H 6e3neKn, 10 cTaHOBHTb 15 MeTpIB. Heraio HO BmKHiTB iHCTpyMeHT, kXo XTOCb niidJe. HiKOn He NoBepTaaiTe iHCTpyMeHT, He nepeBipNBUn, YH HIKOro HeMa e 3a cnIHoo.

YBAI! IHKoJIMK KOHyXOM Ta pIHyOIO HacaKOIO NOTpAnJIOTb RIKN Ta TpaBa. Npei Tm Jk BnJaJIaTIx, 06OB'3KOBO 3ynHITb DBNrHyN.
MeToOnpo6oTu

YBAI!Y BnnaKy,JaKIO IHCTpyMeHT, 06laHaHnD NsCKOBOIO NINKOIO YN NINKOIO DnTpaBN,HaTpanJIe Ha HepyxomN IpeMTe,NNKy MoHe pi3KO BiIKHyTN B6iK. Ce Ha3NBAeTbcra BiDaaya BiDaaya MoHe 6ytu DocTaTHbO CnIbHOIO dJRA 3aKpyuBaHH MaunHn A6o onepaTopa B 6yNb-koMy HAnpMrky iMOHNBoB TpaTN KOHTPOJIO Ha, MaunHOIO. BiDaaya MoKe cTaTncs6e3 nonepeJeHHra, JaKIO MaunHa, 3aTnckaeTbcra,3aKlnHIOeTbcra a6o 3rNaeTbcra.BiDaaya YacTiwe Bi6yBaetbcra B3ohax, De BaHKo no6aHTn MaTepiA, 9o 06p3aeTbcra.
He 3pi3yIte pocJIHHuacTnHOo HOHa,
Hc Ha cIeep6IaTI roHHNkA
BIDNOiDa e npomIKy M1K 12 Ta 3
rOIOHO. JkIo npo6yBaTu 3p3aTN
POCJIHN LiEIO uacTHnHO, TO MOJIINBa
BiJa4u, Ioo CnpuHReTbcra
WBnKicTIO o6epTaHHa HOHa.
-Перд Косинг Мперевпдлнку,Вд MicLecBoCTi,HaxnI3emJI,a TaKox HaBHCb KaMHra Ta 3anaH.
-ПочhiТь 3 найлergшочасинділгнi i BИКосiTь TaM npocTip, поиHAIOч 3яКOrO npaLIOBaTUMMeTe.
- PpaIouTe cncTeMaTuHNo, iIDtB BnpeiD, notim Ha3aI, BIKoWUOu Cmyr 3aBUnpKn 4-5 MeTpIb 3a Odn npoxi. Ipn Taikin po60Ti Bn NobHicTIO BIKOpNCToByeTe MOHINBOCTI IHcTpymEtY B o6ox HapPmKax i OTPMMyeTe 3pyHy Ta p3HomaiTHy dIJIHKy dIJIpo60Tu.

BnKoWyTe cmry 3aBdoBHKn np6Jn3Ho 75 MeTpi. IpeHocbTe KaHicTp y 3 naJIbHM no Mpi npocyBaHH po6OtN.
Ha cxnili cnil npaioBAtn B3IOBHNbOro. Ha6arato Ierwe npaioBAtn B3IOBHN cxnIy, anH Bropy-BHn3.
Bn6npaTe Hnprm pyxu TaK, 06 He nepexoHTn Chepe3 pOBn Ta iHni nepekoOn. 06 3pi3aHi pocnnnHa naaHa cKOweHy actnHy, npn Bn6opi Hnprmky pyxu cIiBpaxoByBaTN BiTep.

3pi3yBaHHaDepeB 3a IOnOMoTOHOHa-NNIKN

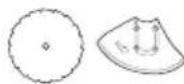
He6e3neKa BiJaayi 3pocTae 3i 36IbWeHHaM TOBunH cTOBbypa. He 3piyTe pocJInH YactnHOo HOka, lo Ha uΦep6JatI rOuHHKa BiNoBIaep npomHKy M1k 12 Ta 3 roDnHO.
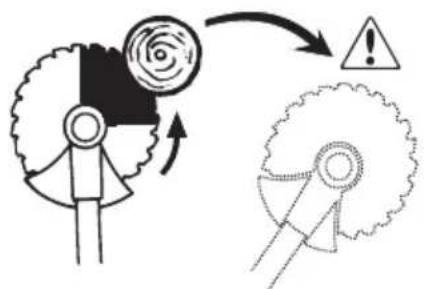
- ⅢO6 DepeBo BnAIO Ha LiBy cTOpOHy, Hn3 DepeBa noTpi6HOTnCHyTN BnpaBO. HaxNilIb Hix Ta BeiB Ioro B npaby cTOpOHy no diarOHaJI, npNKJablwn 3ycuJIJI. OndouacHO HATncHiTa CTOB6yp KOnxOM JIA HOHa. 3p3yIe CTOB6yp TiEO YactnHOIO HOHa, 0o HA UINep6LaTI RoINHHKAb BiINOBiJaE npomIKKy MIn 3 Ta 5
roHIO. YBIMKHiTb NOBHy WBNikcIbTiNbKn nicJzboRnDBoNbTe HIX Do DepeBa.
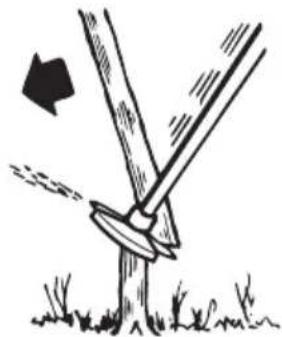
- Ⅲo6 DepeBo BnaIHO Ha npaBy cTOpOHy, Hn3 DepeBa noTpio6Ho TnChyTu BnIO. HaxNJiTb HiK B npaBy cTOpOHy no DiarOHaJI DoropN. 3piayTe CTOB6yp TiEo YactHNOHO HoJa, 0o Ha UΦep6NaTi RoDInHHKa BiINOBIAe npOMiHKy M1K 3 Ta 5 RoDInHOIO - ToDi Cnla o6epTaHHa HOKa TnCHyTIme Hn3 DepeBa BnIO.
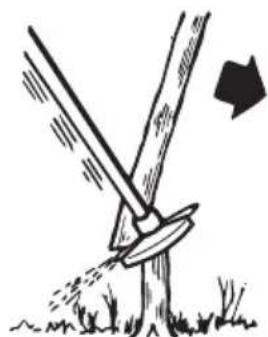
-06 depeBo BnAIO BnepeI, Ioro Hn3 cIiTnCHyTu Ha3a.I. WbNkIM Ta neBHM pyxOM notarHITb HIX Ha3a.I.
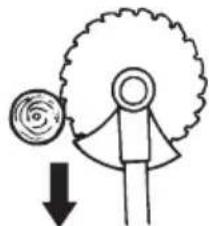
Belenki cTob6ypn noTp6H0 3pi3aTu 3 DBox 60kIB. CnoaTk y Bn3HaUTe, Kyu n naTaUmme DepeBO. Nepu HauPi3 3po6iTB 3 6Oky B JKN n aDAtmE depeBO.To i zakHui TB 3pi3yBaHH, 3po6nBuHn Haip3 3InwO Ro 6Oky.CNu, 3 KIO Bu TncHe Ta DepeBO npn 3pi3yBaHH, NobHHa BiDnOBiDaTu TOBunHi cTob6ypa Ta TBepdoCTI DepeBHN.
Maji cTob6ypn noTppe6yIb 6JIbwoi cnJN, Todi KBeJIki-MeHoi.
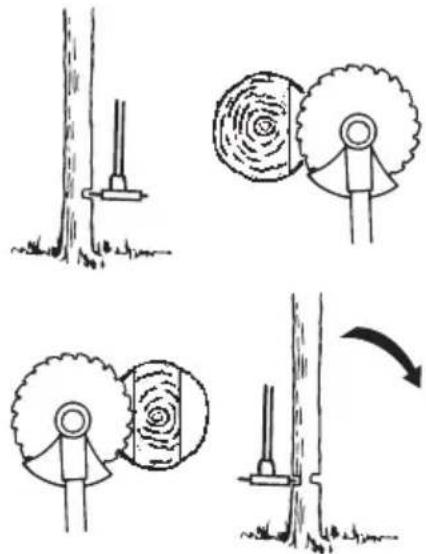
JaKoIepeBa pocTyb rycTo,To nI6epiB BiIOBIDHy WBNkicTb pyxy.
- JI KIO HIX 3acTpraAe y cTOB6ypi, He BnCMNkyIte Ioro. JI KIO TAK 3po6ntu, To MoHnHa NOIKoIHTu HIX, 3y6uacty nepeaay, BaI a6o pyKIB'a. BiDnyctiB pyuKn, oXonitb oboma pykamn BaI Ta o6epHHo BNTarHiTb IHCTpyMeHT.
3pi3yBaHHKyuBHOHeM-nIko


ToHKi cTob6ypn Ta MaJIeHbKi KyI MoJHa 3pi3yBaTN 3pa3y H. PpaIOHe, Haue 3BNUaHIO NIKOIO, BOJAn IHCTpyMeHT 3 60ky B 6ik.
- HamaraiTeec 3pi3aTu JeKJIbKa cTob6ypiB 3a OdHM pyxom.
3pi3youKu3 TBepnMn CTOB6ypamn, cnouatky 06piTe Cte6Ja HABKOJIo KUa. 0o6 yHnKHyTN 3acTpraHHN HoHa, noCuHaNTe o6pi3yBaTu 3OBHiHi Cte6Ja KUa TPOxN BnIe BiJ 3emJI. NtIM 06piKeix Do notioBHOi BnCOTN. TeNep cnpO6yIte npocvHTn HIX B cepeDnHy KUa i npodobHITb 3pi3yBaHHa. Jkso BCE ue BaHKo DocTynnTncA Do cepeDnH, To 06piKeCTOB6ypn TPOxN BnIe BiJ 3emJI i daIte IM
Bnactn. Lc 3MeHnntb He6e3neky 3acTpraHHa Hoxa.
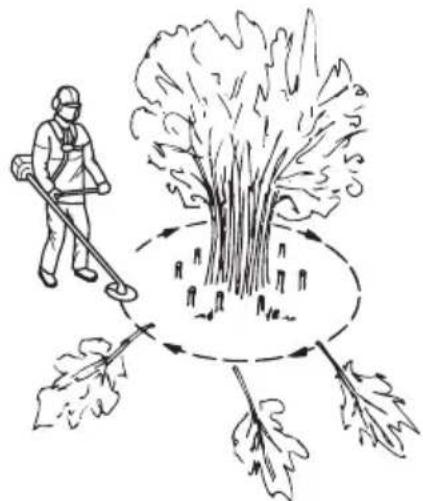
KociHHa TpaBNHOHcEMIJIaTpaBN


Honnamn Ta pi3aMn IJIra TpaBN He MoHHa 3pi3yBaTN CTOB6ypn DepeB.
HIIJITpABN BIKOpNCToByETbcr JJI KOCIHHBcix BNIDB BUCOKOI Ta rpy6oi TpaBn.
TpaBy KocTb MaTHNKOBIM pyxamn 3 60ky B 6ik -pyx cnpaBa HaJIBO 6yde po6oUM, a 3JIba HanpaBO - 3BopoTHM. HiX NOBHeH KOCNTu TpaBy JIBIM KpaEM, lo HA uNep6laTi RoDHHNka BiINoBIaE npomirKy MIX 8 Ta 12 RoDHHOJ.
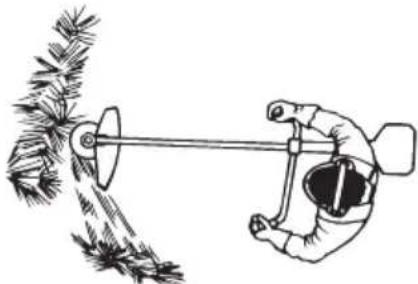
KIO,CKOuyou TpaBy,HHX HAXNJNTu TPOXN BJIBO,TO Tpaba JraTmE BOINH PRA,IO noJERWHTb II 36npaHH, HanpNKJaI rpa6JAMN.
- HamaraiTeCn npauOBaTu B OOnHOMy pHTMi. CtiIte BneBHeHO, po3CTaBnBun HOrn. IicJra 3BopoTHoro pyx npoiDiTb Bnepei i 3HOBy 3aIMtB CTiKe NOJooHeHH.
- OnopHa MaHHeTa noBnHHa 3JIerKa npNJrTn Ha 3emIIO.BoHa 3ano6irae yIapy Hoka o6 3emIIO.
- Ⅲo63MeHnTn He6e3neKy HAMOTyBaHHPOcJIIN Ha HiK, BIKOHyIe TaKi BKa3iBKN:13aBKnI npaIouTe Ha nobHi WbNdkocTi.2PiJ qac 3BopoTHOrO pyxH He npoBOdbTe HoJHemno BHe 3pi3aHi TpaBi.
-Перд.TIMяк noуаТи 36иpaTи 3pi3aHy TpaBy, BIMKHiTBДИrHy,3HIMiTbpeMeHi Ta noKlaIITb IHCTpyMeHT Ha 3eMJIIO.
IiCtpnraHH TaBn TpImepHO
TIOBKOIO

PiictpnHaHHa
TpMaTe TpMepHy roJbKy HaI caMoIO 3eMleio Nk KyTom. NIdcTpNraHHBnKoHyeTbcra camE KInCem Whpy. Hexa Whyp npauoe 3 BlnacHO O WbNdkicTIO. HikoJI He npNTnCKaTe Whyp do dIINHKn, Ha kI npauoeTe.

- Hyp JERKO MoHe BIKOswyBaTN TpaBy Ta MoJIoI naOHn 6iJIa CTIn, oropOnHi, DepeB Ta 6OpIopiB, XoHa Bn MoHe i NooKoDHTN CToBn OropOnHi Ta CyTnBu Kopy Ha JepeBax i Kyux.
- ⅢO6 3MeHnTn He6e3neKy noKoJxHeHH poCInH,CKopoTiB WHyp Do 10-12 cm Ta 3MeHwiTb WBNkicTb DnVryHa.
BukouyBaHHa
- Pn BnKoUyBaHHi BnJaIyO TB BCH HeNoTpi6Hy pocJInHnicTB. TpMaIte TprMepHy roJIOBky HaI caMoIO 3eMneIO Ta HaxNJITb II. KHeuB shHypa BdaprTmMeTbcra 06 3eMJIIO, NOBHCIO BVnIyOuN pocJInHnicTB 6IJa DepeB, cTOBni, na'M'rTHNKIB Ta iH. YBAFA! Takn cnoci6 po6OTn npnWBnDyE 3HOWeHHHaHpy.
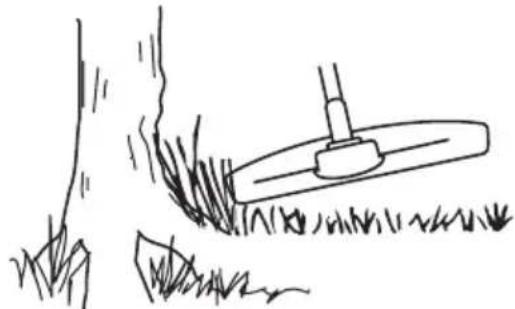
- Hyp 3HouyEbCwBnDwe iIoro cIiD BnCyBaTu acTiwe, KOnBn Bn npaOeTe Ha DiJIHKax 3 KaMHHAM, CERIO, 6eTOHOM, MeTaJIeBMn orOpokam TaIH, aHIk npu po6oTI 6IJIa DepeB Ta DepeB'AHX orOpOH.
-Пи niIDcTpriAHHI Ta BnKOswBaHHI TpaBn, cJIid npaICOBaTN Ha MeHsiI WbNdkocTi (80%), 0o6 npOIOBHTN Yac HopMaJIbHOi po6OTu Hhpy Ta 3MeHsHTN 3HOWeHHr TpIMePHOI RoJOBKn.
KociHHa
Tpimep iideaIbHm piweHHn mJnKocinHn TpaBn,do koiBaHKo Iobpatnc 3BnuauHo ra3ohokocapko. KoJn Kocnte, TpImaTe uHyp npaJIeJbHO do 3emJI.HamaraItec H ne pINTNCKaTN TpIMepHy roJIOBky do 3emJI,6o ce MOHe NOWKOHTN Jk IHCTpyMeHT, TaK ira3OH.

Kocny TpaBy, He daBaIte roJolOBuI nocTinHo TopKaTnC3eMJI. TaKni nocTInHNI KOHTaKT roJOLBKN 3 3eMJeIO MoHe npNBecTu Do II noWKoJKeHH Ta 3HOWeHHJ.
PiIMiTaHHa
CTpymiNb nobITpra, kNn BnHnKae npn o6epTaHHi Hhpy, MoHa BnKOpncTaTn DJIa WbNdkoro Ta IerKoro npn6npaHn. TpMaIte shyp napaJIbHo Do dIJIaHKn, kY np6npaTe, Ta BoDiTB iHcTpymeHT 3 60ky B 6ik.
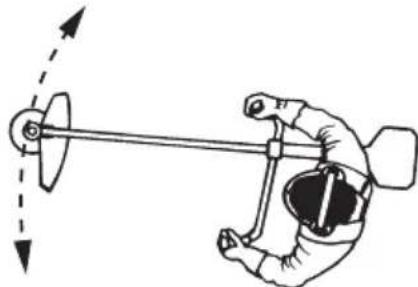
- 06 Otpmata NaHkpaui pezyltaTn npi KocinHt Ta nDiMiTaHH, noTpioBAtn Ha MaKcMaJIbHi WbNdkoCTi.
Kap6iopaTOp
PerguHbHaXoJocToOxOy(T)
IpekeKaHaTeC, 10 NOBITpHn FJIbTp YnCTn.
KIO OncNo o6eptiXoJocToO xOdy e
npaBnIbHM, pIXyHa HacaJa He NobHHa
o6eTatnc. RaIO NoTpi6HO peryIIOBaHH,
3akpyTiB (3a RoINHHKOBOc TpiIKoIO) RBnHT
peryIIOBaHHxOIOcTO xOdy T, npn npaioouomy
DInrHi, nOKn piYCu HacaJa He noUHe
o6eTatnc. BiKpyTiB (noBepTaIte npOTn
roINHHKOoi cTpiIKu) RBnHT, nOKn piXyua
HacaJa He 3ynHnTbcra. YncNo o6eptiB
xoIOcTO rOxOy BCtAHOBJeHo npaBnIbHo, kIO
DbNryH npaQoe pIBHO y Bcix NOLOKeHHx, i e qITka
MeHa 10oO WBnIDKocTi, 3 KIOO pIXyHa HacaKa
noHnae o6eptatnc.
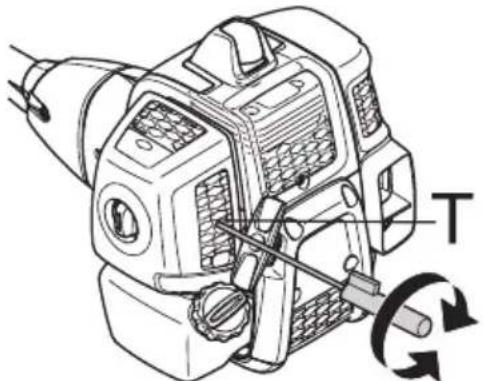
PeKoMeHIOBaHa WbNdkicTb xOJocToro xOy: NBiTiBc np3di "TexHihi daHi".

YBAI! RaKo He BdaeTbcra BipeRyIIOBAtn WbNkicTb TaKIM YHOM, 06 Hx 3ynHnBCa, 3BepHITbcr Do npOaBua 6o B ceHTp oCnyroByBaHH. He KopncTyuTecra IHCTpyMeHToM, nOKn NOro Do6pe He BipeRyIIOUb a6o noJarOraTb.
TnyuHnK
YBAI!JeakiIyHnKiO6JaHaHiKaTalituHm cnaIIOBaem ra3iB. 06 doBiTaTnc, yHcTpymENT o6JaHaHn TaKIM cnaIIOBaHem, nBiTBcpo3di "TexHiHi daHi".
Iywnk npn3NaHEn nJIA 3MeHWeHH pIBH yMy Ta BiDBeHeHH BxNlonHnx ra3iB noaJI BiKopncTyBaay. BxNlonHi ra3n MaIOb BnCOky Temnepatypi MicTAYb Ickp, kI, notpanNBun Ha
cyxi Ta JERKo3aMnCTi peOBOHN,MOHYb npNBecTIO 3aropHHa.
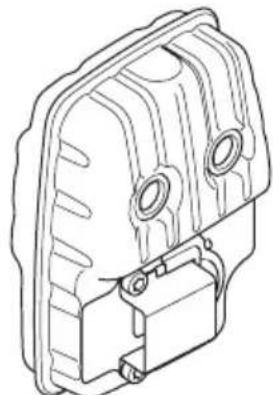
JeKrnyuHnKn 06laHaHo icKponorIHHaOUMCiTKaMn. JaKIO iHCTpyMeHT 06laHaHO rLyuHnKomTaKOro TnNy, ciTKy cJIi UcHtNTn npHaMHi pa3 HaTnKdEhb.HaIKpaae po6ntu ce dpoTaNHO uTkoJ.
CITKrIyshNKiB,aki He 06laHaHHi KaTaJIiTuHIM cnaIOBaYeM BuxlonHx Ra3iB, CiiD YnCTHTN 1OToHHa 6o npn noTpe6i 3amHraTN. CITKr IyshNKiB,06laHaHnx BiINObIHm cnaIOBaYeM, CiiD nepeBipraTn oomicra i npn noTpe6i YnCTHTN.NoWKoJHeHy ciTKy ciiD 3aMIHTN.

Ko cItka yacto 3a6nBaetbc,ue CbiuHtbp oTe,po pObota KaataiTnHoro cnaIIOBau razIB noripwnlacb.3BepHITbcn do npoanu,ooN nepeBipntr IyunHK.Po60ta 3a6nToIO cITKOIO rIyUnKa cnpuHHnbpeperp IBnuRgamma,oo npn3BeDe Do nowKoJHeHHa ciinHpy Ta nopshra.
YBAΓA! HikoJIn He KOpNcTyIteCg iHCTpyMeHTOM, B JAKORO HecnpaBnI rIyshNK.

YBAI!IyuHnK,06naHaHn KaTalITNcHmCnAIOBaYeBMxJIoNHnx ra3iB,DyHe CnIbHo HarpBaEtbcn iD cacpo6oTuI DeKn Yac 3aJIuWaeTbcra rapaUMnicJzynHKn. Ce TaKOH CTocyeTbcrpo6oTu Ha XOJocToMy xOdy.Pnp DoTopKy MoXHa OTrmuTaOn onIKu Wkipn. PAm'TaaiTe npo He6e3neKy 3aropHHn!
Cnctema oxoJooJeHHa
Ioo6 3ano6irtnneperpiBaHHIO BnVryHa, IHcTpymeHT 06laHaHo CnCTeMOO OxJIoNHeHH.
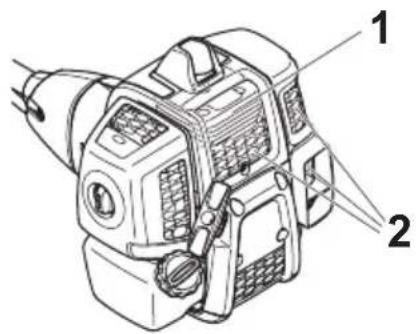
BoHa cKJaDaeTbc3:
1 Pe6ep oxoJIOdKeHHHa cnJIiHpi.
2 3a6ip noBiTpI.
CnCTeMy oxoJIoHeHHcIiD uHcTHTn pa3 Ha TnKdEhb, a KaIO Ubo BImaIaOTb yMOBn, To qactiwe. Po6Ota 3 a6pydHeHO a60 3a6NToIO CnCTeMoIO oxoJIoHeHHcPnUHNb nepepiB DnryHa, Ioo npu3BeDe Do noWkoJHeHHa NliHdpy Ta nopshra.
ПовитаянoiЛьТр
NobitpHn fJIbTp noTpi6Ho peYJrApo OuIaTN BID Nny Ta 6pydy, uO6 yHNKHyTN:
- HecnpaBHocTei Kap6iopaTopa
-Пpo6Jem i3 3anyckom
BtpaTn noTyHHocTi DBrHyHa - HenoToPi6Horo 3NoUyBaHHaTeTaeNDbuRyHa.
-HaMipHnx BntpaT naIbHorO.
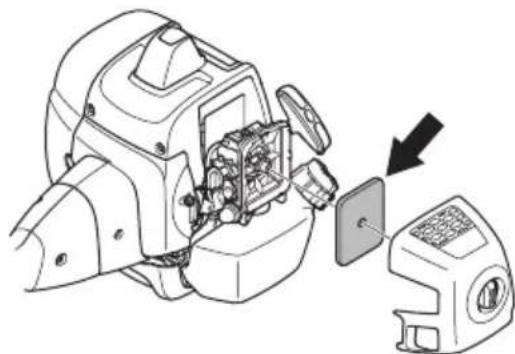
Ipouunai Te fiJIbTp uepe3 KOHHi 25 roHn po6oTn, a npn po6oTI B Micx, de 6arato Nny, i yactiwe.
OuicKa noBipraHoro foIbtpy
3HIMITb KpUkky NOBITpaI BNTaHIb 0JIbTp. PpOdynte NOro 3HaTm NOBITpAM.
Hemoknbo NOBHCIOOuNCTU NOBITpHNI ΦIbTp, AKN BIKOpNCTOByBaBCa IpoTgrom DOBrOrO uacy. Tomy qac BiD uacy Noro cIi3aMiHOBaTN. NookoKeHH OJIbTp o6OB'raKOBo nOTpi6Ho 3aMIHTN.
PajnBnIΦiNbTp
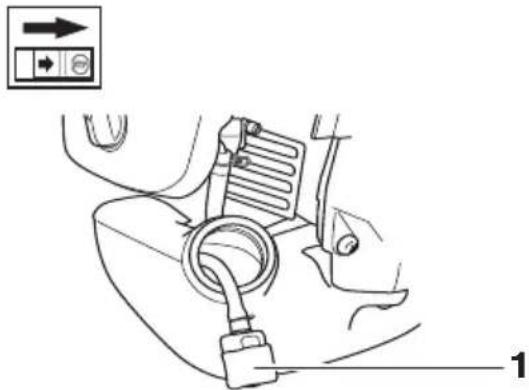
1ПалИВний Флтр
KIO DnHy npaUoe 3a 6paKoM naIbBa, nepeBipTe naIBHy KpiuKy Ta naINBnH fIbTp Ha npEiMeT 6lokyBaHH.
3y6uacta npepa

Ha 3aBoDi 3y6uAcTy nepeAay HAnOBHIOUToB Heo6xIDHO KInbKicTIO MacTuJa. OHaK, npei BIKOpNCtAHnM IHCTpyMeHTy Bam Heo6xIDHO nepeBipNTI, uo6 3y6uAcTa nepeDaay 6yJa 3aONBHeHa Ha TpN UBeptTi MaCtNJOM.
BnKOpncToByTe cneLiaJIbHe MaCTnIO HUSQVARNA.
Якправно, мacrно He noTpi6Ho 3MiHOBaTu, xi6a y BnnaKny peMoHTy nepedaqi.
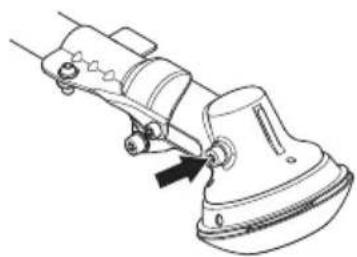
Cbiuka 3anaJIeHnIa

Ha cTaH cbiK3anaJIeHHBnJIuBa:
- PoraHo BiDpeRyIbOBaHn Kap6IopaTOp.
- HeKaHa nαnVBHa cyMiH (3a6aTaTo oJIi a6o OJIa HeBIDNoBIDHO TUNy).
3a6pydHeHn noBiTpraHn fJIbTp.
Ce Bce cnpuHnYe yTBOpEHn BiKJaedeHb Ha eJeKToPoaX CbiUKN, 0o MoHe npuaBecTn Do npo6Jem y po6Oti a6o TpydHooij npn 3anycky.
IHCtpMeHT Btpaae noTyHicTb, noraHo npaue Ha xoNoCTomy XOdy uNoIoro BaHKo 3aBeCTn: 3aBHNnepeBipTe CBiKy 3anaJIeHHN nepu Hx npuMaTu 6yNb-aki NoaJIbSi II. Kaoc BiUka 3abPyDHeHa, II cIi OuncTtTu Ta nepeKoHaTnc, IIO npOMIKo MIn eJeKTPoDaMn CTaHOBTb 0,9-1,0 MM.CbiKy 3anaJIeHHN cIiD 3aMIHTu Chepe3 MicAubpoBoTn, a JKiO BVHNIKe He noTpbe6a, To WbNDwe.

YBAI! 3aBnKOpncTyTecpeKoMeHIOBaHIMNCbiKaMn 3anaJIeHH! BnKOpncTaHHHeBiNobIHnx CBIyOK 3anaJIeHH MoJepn3BeCTNo noIKoJHHeHH nopHry/LuINiHpy.
IpekeKaHTeCg, 0cBvka 3anaJIeHHMa 06MeHyBaHnpyrN.
Bnpo6n BiinnoBiaTb TaKIM cTaHapTaM:
EN ISO 12100:2010, CISPR 12:2009, EN ISO 14982:2009, EN ISO 11806-1:2011.
RISE SMP Svensk Maskinprovning AB, Box 7035, SE-750 07, M. Yncal, UBeia, apo6nla TInoBy nepeBipky Bi imeH Husqvarna AB. IocbiueHH npohymepoBaHi:
B40 B ELTE, B40 BT ELITE - SEC/12/2339
Huskvarna, 13 JIoToro 2018 poKy

Per Gustafsson, INpeKTop 3 nTahb po3BnTkY (ynOBHOBaHeHn npEeCTaBnK KomnaHii Husqvarna AB, iio BiinobiIae 3a TexHiHy DoKyMeHTaIIO).
EXPLICATIA SIMBOLURILOR
Simboluri
Putere. maxima motor, conform. ISO 8893, kW/ rpm 1,5/9000 1,5/9000
Sistem de aprindere
Bujia NGK CMR7H-10 NGK CMR7H-10
Distanatirente electrozi, mm 0,9-1,0 0,9-1,0
Sistemul de alimentare 山 ungere
Benzin deposu hacmi, litre 1,0 1,0
Agrlik
Agrlik, yakitsiz, kesme cihazi ve koruma, kg 7.3 7.4
Gürültü emisyonları
(1 nolu dipnota bakiniz)
Ses gucu duzeyi, olgulmus dB(A) 112 112
Ses gucu duzeyi, garantili L_WA dB(A) 118 118
Ses duzeyi
(2 nolu dipnota bakíniz)
Kullanicin n kulaigna gelen ses basincin n karslig olculmues ve EN ISO 11806 ve ISO