
T22 LS - Lawn mower MCCULLOCH - Free user manual and instructions
Find the device manual for free T22 LS MCCULLOCH in PDF.


| Product Type | Lawn Mower |
| Model | T22 LS |
| Brand | McCulloch |
| Cutting Width | 22 inches (approx. 56 cm) |
| Power Source | Petrol (4-stroke engine) |
| Engine Displacement | Approx. 140-160 cc |
| Weight | Approx. 30-35 kg |
| Cutting Height Adjustment | Central lever, multiple positions (25-75 mm) |
| Grass Collection | Rear bagger included (approx. 50-60 L capacity) |
| Mulching Capability | Yes (mulching plug required) |
| Drive Type | Push (manual) |
| Handle Type | Foldable, ergonomic |
| Engine Start | Recoil start |
| Fuel Tank Capacity | Approx. 1.0 L |
| Oil Capacity | Approx. 0.5 L |
| Maintenance | Regular blade sharpening, oil change, air filter cleaning |
| Safety Features | Operator presence control (blade brake), safety shield |
| Spare Parts Availability | Blades, belts, filters, spark plugs commonly available |
| Reparability | Moderate; user serviceable with basic tools |
| General Information | Designed for medium to large lawns; included manual covers operation and safety |
Frequently Asked Questions - T22 LS MCCULLOCH
User questions about T22 LS MCCULLOCH
0 question about this device. Answer the ones you know or ask your own.
Ask a new question about this device
Download the instructions for your Lawn mower in PDF format for free! Find your manual T22 LS - MCCULLOCH and take your electronic device back in hand. On this page are published all the documents necessary for the use of your device. T22 LS by MCCULLOCH.
USER MANUAL T22 LS MCCULLOCH
GB Operator's manual 2-22
SE Bruksanvisning 23-43
DK Brugsanvisning 44-64
FI Käyttöohje 65-86
NO Bruksanvisning 87-107
T22 LCS T22 LS

KEY TO SYMBOLS
Symbols
WARNING! Clearing saws, brushcutters and trimmers can be dangerous! Careless or incorrect use can result in serious or fatal injury to the operator or others. It is extremely important that you read and understand the contents of the operat

Please read the operator's manual carefully and make sure you understand the instructions before using the machine.

Always wear:
A protective helmet where there is a risk of falling objects
• Approved hearing protection
- Approved eye protection
Max. speed of output shaft, rpm

max 10000rpm
This product is in accordance with applicable EC directives.
Watch out for thrown objects and ricochets.
The operator of the machine must ensure, while working, that no persons or animals come closer than 15 metres.
Always wear approved protective gloves.
Wear sturdy, non-slip boots.
Only use non-metallic, flexible cutting attachments, i.e. trimmer heads with trimmer cord.


Ignition; choke:
Set the choke control in the choke position.
Air purge.
Noise emission to the environment according to the European Community's Directive. The machine's emission is specified in chapter Technical data and on label.
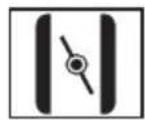
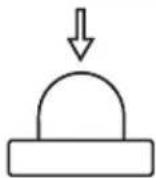

Other symbols/decals on the machine refer to special certification requirements for certain markets.
The engine is switched off by moving the stop switch to the stop position. CAUTION! The stop switch automatically returns to the start position. In order to prevent unintentional starting, the spark plug cap must be removed from the spark assembling, checking and/or perform

Always wear approved protective gloves.
Regular cleaning is required.
Visual check.



CONTENTS
Contents Note the following before
KEY TO SYMBOLS
Symbols 2
CONTENTS
Contents 3
Note the following before starting: 3
INTRODUCTION
Dear Customer, 4
WHAT IS WHAT?
What is what on the grass trimmer? 5
GENERAL SAFETY PRECAUTIONS
Important 6
Personal protective equipment 6
Machine's safety equipment 7
Cutting equipment 9
ASSEMBLY
Fitting the loop handle 10
Assembling and dismantling the two-piece shaft 10
Assembling the cutting equipment 10
Fitting the trimmer guard and trimmer head ..... 11
Fitting the trimmer guard and trimmer head ..... 11
FUEL HANDLING
Fuel safety 12
Fuel 12
Fueling 13
STARTING AND STOPPING
Check before starting 14
Starting and stopping 14
WORKING TECHNIQUES
General working instructions 15
MAINTENANCE
Carburettor 17
Muffler 17
Cooling system 18
Spark plug 18
Two-piece shaft 18
Air filter 19
Maintenance schedule 20
TECHNICAL DATA
Technical data 21
EC-declaration of conformity 22
starting:
Please read the operator's manual carefully.

WARNING! Long-term exposure to noise can result in permanent hearing impairment. So always use approved hearing protection.

WARNING! Under no circumstances may the design of the machine be modified without the permission of the manufacturer. Always use genuine accessories. Non-authorized modifications and/or accessories can result in serious personal injury or the death of the operator or others.

WARNING! A clearing saw, brushcutter or trimmer can be dangerous if used incorrectly or carelessly, and can cause serious or fatal injury to the operator or others. It is extremely important that you read and understand the contents of this operator's manual.
INTRODUCTION
Dear Customer,
Thank you for choosing a McCulloch product. You are thereby part of a story that started long ago, when the McCulloch Corporation started its manufacturing of engines during World War II. In 1949, when McCulloch introduced its first light one-man chainsaw, woodworking would never be the same again.
The line of innovative chainsaws would continue over the decades, and business was expanded, first by airplane and kart engines in the 1950s, then by mini chainsaws in the 1960s. Later, in the 1970s and 80s, trimmers and blower vacs were added to the range.
Today, as a part of the Husqvarna group, McCulloch continues the tradition of powerful engines, technical innovations, and strong designs that have been our hallmarks for more than half a century. Lowering fuel consumption, emissions and noise levels are of top priority to us, as is improving safety and user-friendliness.
We certainly hope that you will be satisfied with your McCulloch product, as it is designed to be your companion for a long time. By following this operators manual's advice on usage, service, and maintenance, its lifespan can be extended. If you should need professional help with repair or service, please use the Service Locator at www.mcculloch.biz.
McCulloch has a policy of continuous product development and therefore reserves the right to modify the design and appearance of products without prior notice.
This manual can also be downloaded at www.mcculloch.biz.
WHAT IS WHAT?

What is what on the grass trimmer?
1 Trimmer head
2 Grease filler cap, bevel gear
3 Bevel gear
4 Cutting attachment guard
5 Shaft
6 Shaft coupling
7 Loop handle
8 Throttle trigger
9 Stop switch
10 Throttle lockout
11 Spark plug cap and spark plug
12 Starter
13 Starter handle
14 Fuel tank
15 Air filter cover
16 Air purge.
17 Choke control
18 Drive disc
19 Operator's manual
20 Combination spanner
Important Personal protective equipment
IMPORTANT!
The machine is only designed for trimming grass.
The only accessories you can operate with this engine unit are the cutting attachments we recommend in the chapter on Technical data.
Never use the machine if you are tired, if you have drunk alcohol, or if you are taking medication that could affect your vision, your judgement or your co-ordination.
Wear personal protective equipment. See instructions under the heading "Personal protective equipment".
Never use a machine that has been modified in any way from its original specification.
Never use a machine that is faulty. Carry out the checks, maintenance and service instructions described in this manual. Some maintenance and service measures must be carried out by trained and qualified specialists. See instructions under the heading Maintenance.
All covers, guards and handles must be fitted before starting. Ensure that the spark plug cap and ignition lead are undamaged to avoid the risk of electric shock.
The machine operator must ensure that no people or animals come closer than 15 metres while working. When several operators are working in the same area the safety distance should be at least twice the tree height and no less than 15 metres.

WARNING! This machine produces an electromagnetic field during operation. This field may under some circumstances interfere with active or passive medical implants. To reduce the risk of serious or fatal injury, we recommend persons with medical implants to consult their physician and the medical implant manufacturer before operating this machine.

WARNING! Running an engine in a confined or badly ventilated area can result in death due to asphyxiation or carbon monoxide poisoning.

WARNING! Never allow children to use or be in the vicinity of the machine. As the machine is equipped with a spring-loaded stop switch and can be started by low speed and force on the starter handle, even small children under some circumstances can produce the force necessary to start the machine. This can mean a risk of serious personal injury. Therefore remove the spark plug cap when the machine is not under close supervision.
IMPORTANT!
A clearing saw, brushcutter or trimmer can be dangerous if used incorrectly or carelessly, and can cause serious or fatal injury to the operator or others. It is extremely important that you read and understand the contents of this operator's manual.
You must use approved personal protective equipment whenever you use the machine. Personal protective equipment cannot eliminate the risk of injury but it will reduce the degree of injury if an accident does happen. Ask your dealer for help in choosing the right equipment.

WARNING! Listen out for warning signals or shouts when you are wearing hearing protection. Always remove your hearing protection as soon as the engine stops.
HELMET
A protective helmet where there is a risk of falling objects

HEARING PROTECTION
Wear hearing protection that provides adequate noise reduction.

EYE PROTECTION
Always wear approved eye protection. If you use a visor then you must also wear approved protective goggles. Approved protective goggles must comply with standard ANSI Z87.1 in the USA or EN 166 in EU countries.

GLOVES
Gloves should be worn when necessary, e.g., when fitting cutting attachments.

GENERAL SAFETY PRECAUTIONS
BOOTS
Wear sturdy, non-slip boots.

CLOTHING
Wear clothes made of a strong fabric and avoid loose clothing that can catch on twigs and branches. Always wear heavy, long pants. Do not wear jewellery, shorts sandals or go barefoot. Secure hair so it is above shoulder level.
FIRST AID KIT
Always have a first aid kit nearby.

Machine's safety equipment
This section describes the machine's safety equipment, its purpose, and how checks and maintenance should be carried out to ensure that it operates correctly. See the "What is what?" section to locate where this equipment is positioned on your machine.
The life span of the machine can be reduced and the risk of accidents can increase if machine maintenance is not carried out correctly and if service and/or repairs are not carried out professionally. If you need further information please contact your nearest service workshop.
IMPORTANT!
All servicing and repair work on the machine requires special training. This is especially true of the machine's safety equipment. If your machine fails any of the checks described below you must contact your service agent. When you buy any of our products we guarantee the availability of professional repairs and service. If the retailer who sells your machine is not a servicing dealer, ask him for the address of your nearest service agent.

WARNING! Never use a machine with faulty safety equipment. The machine's safety equipment must be checked and maintained as described in this section. If your machine fails any of these checks contact your service agent to get it repaired.
Throttle lockout
The throttle lockout is designed to prevent accidental operation of the throttle control. When you press the lock (A) (i.e. when you grasp the handle) it releases the throttle control (B). When you release the handle the throttle control and the throttle lockout both move back to their original positions. This movement is controlled by two independent return springs. This arrangement means that the throttle control is automatically locked at the idle setting.
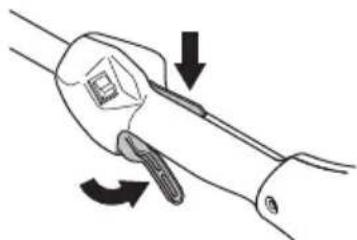
Make sure the throttle control is locked at the idle setting when the throttle lockout is released.

Press the throttle lockout and make sure it returns to its original position when you release it.

Check that the throttle trigger and throttle lockout move freely and that the return springs work properly.
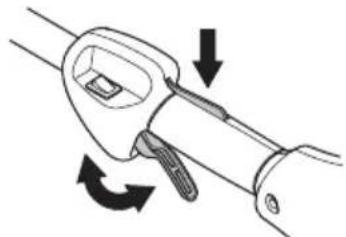
See instructions under the heading Start. Start the machine and apply full throttle. Release the throttle and check that the cutting attachment stops and remains at a standstill. If the cutting attachment rotates with the throttle in the idle position then the carburettor idle setting must be checked. See instructions under the heading Maintenance.
GENERAL SAFETY PRECAUTIONS
Stop switch
Use the stop switch to switch off the engine.
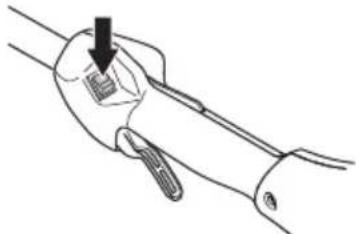
Start the engine and make sure the engine stops when you move the stop switch to the stop setting.
Cutting attachment guard

This guard is intended to prevent loose objects from being thrown towards the operator. The guard also protects the operator from accidental contact with the cutting attachment.

Check that the guard is undamaged and not cracked. Replace the guard if it has been exposed to impact or is cracked.
Always use the recommended guard for the cutting attachment you are using. See chapter on Technical data.

WARNING! Never use a cutting attachment without an approved guard. See the chapter on Technical data. If an incorrect or faulty guard is fitted this can cause serious personal injury.
Muffler

The muffler is designed to keep noise levels to a minimum and to direct exhaust fumes away from the user. A muffler fitted with a catalytic converter is also designed to reduce harmful exhaust gases.
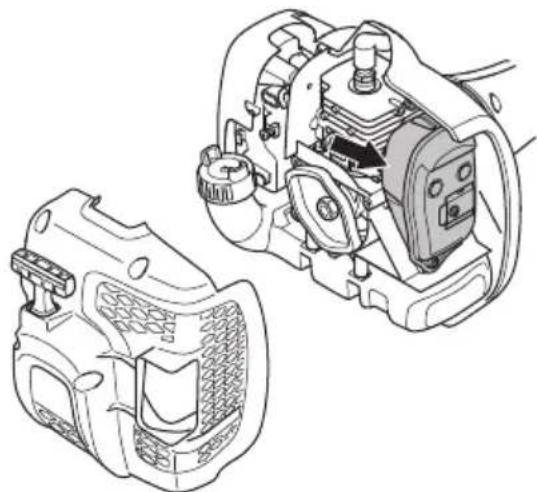
In countries that have a warm and dry climate there is a significant risk of fire. We therefore fit certain mufflers with a spark arrestor mesh. Check whether the muffler on your machine is fitted with this kind of mesh.
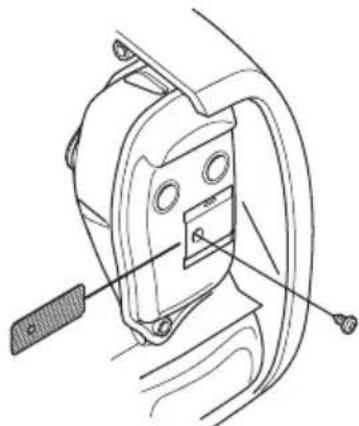
For mufflers it is very important that you follow the instructions on checking, maintaining and servicing your machine.
Never use a machine that has a faulty muffler.
Regularly check that the muffler is securely attached to the machine.
If the muffler on your machine is fitted with a spark arrestor mesh this must be cleaned regularly. A blocked mesh will cause the engine to overheat and may lead to serious damage.
GENERAL SAFETY PRECAUTIONS

WARNING! Mufflers fitted with catalytic converters get very hot during use and remain so for some time after stopping. This also applies at idle speed. Contact can result in burns to the skin. Remember the risk of fire!

WARNING! The inside of the muffler contain chemicals that may be carcinogenic. Avoid contact with these elements in the event of a damaged muffler.

WARNING! Bear in mind that:

The exhaust fumes from the engine are hot and may contain sparks which can start a fire. Never start the machine indoors or near combustible material!
Cutting equipment
This section describes how to choose and maintain your cutting equipment in order to:
- Reduce the risk of blade thrust.
- Obtain maximum cutting performance.
- Extend the life of cutting equipment.
IMPORTANT!
Only use cutting attachments with the guards we recommend! See the chapter on Technical data.
Refer to the instructions for the cutting attachment to check the correct way to load the cord and the correct cord diameter.

WARNING! Always stop the engine before doing any work on the cutting attachment. This continues to rotate even after the throttle has been released. Ensure that the cutting attachment has stopped completely and disconnect the HT lead from the spark plug before you start to work on it.

WARNING! A faulty cutting attachment may increase the risk of accidents.
Trimmer head
IMPORTANT!
Always ensure the trimmer cord is wound tightly and evenly around the drum, otherwise the machine will generate harmful vibration.
- Only use the recommended trimmer heads and trimmer cords. These have been tested by the manufacturer to suit a particular engine size. This is especially important when a fully automatic trimmer head is used. Only use the recommended cutting attachment. See the chapter on Technical data.


- Smaller machines generally require small trimmer heads and vice versa. This is because when clearing using a cord the engine must throw out the cord radially from the trimmer head and overcome the resistance of the grass being cleared.
- The length of the cord is also important. A longer cord requires greater engine power than a shorter cord of the same diameter.
- Make sure that the cutter on the trimmer guard is intact. This is used to cut the cord to the correct length.
• To increase the life of the cord it can be soaked in water for a couple of days. This will make the line tougher so that it lasts longer.
ASSEMBLY
Fitting the loop handle

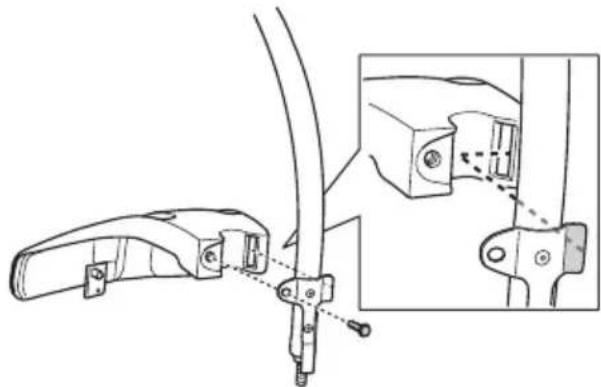
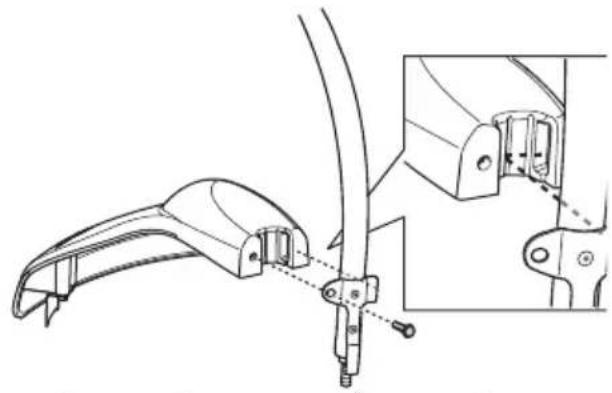
- Clip the loop handle onto the shaft. Note that the loop handle must be fitted between the arrows on the shaft.

- Fit the bolt, securing plate and wing nut as shown in the diagram. Tighten the wing nut.
Assembling and dismantling the two-piece shaft

Assembly:
- Loosen the coupling by turning the knob.

- Align the tab of the attachment (A) with the hole in the coupling (B).

- Push the attachment into the coupling until the attachment snaps into place.
- Before using the unit, tighten the knob securely.

Dismantling:
- Loosen the coupling by turning the knob (at least 3 times).
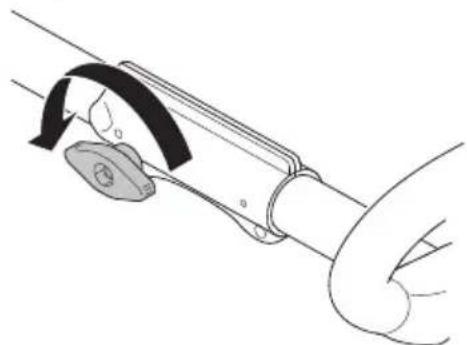
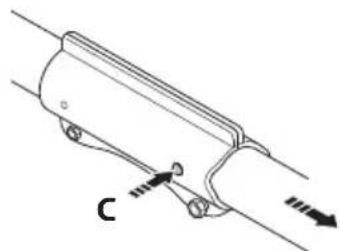
- Push and hold the button (C). While securely holding the engine end, pull the attachment straight out of the coupling.

Assembling the cutting equipment

WARNING! Never use a cutting attachment without an approved guard. See the chapter on Technical data. If an incorrect or faulty guard is fitted this can cause serious personal injury.
ASSEMBLY
Fitting the trimmer guard and trimmer head (T22LS)
- Fit the correct trimmer guard (A) for use with the trimmer head. Hook the trimmer guard/combination guard onto the fitting on the shaft and secure with the bolt (L).

- Fit the drive disc (B) on the output shaft.
- Turn the blade shaft until one of the holes in the drive disc aligns with the corresponding hole in the gear housing.
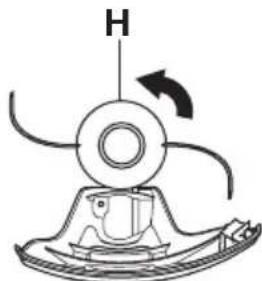
- Insert the locking pin (C) in the hole to lock the shaft.
- Screw on the trimmer head/plastic blades (H) in the opposite direction to the direction of rotation.
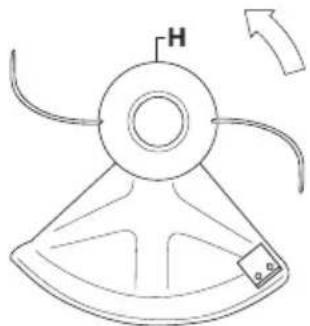
- To dismantle, follow the instructions in the reverse order.
Fitting the trimmer guard and trimmer head (T22LCS)

- Fit the guard as shown in the diagram. Tighten securely.
- Fit the dust cup on the shaft. The nut must be completely covered by the dust cup.

- Hold the dust cup with a spanner to prevent the shaft from rotating.
- Screw the trimmer head onto the shaft.
Fuel safety
Never start the machine:
1 If you have spilt fuel on it. Wipe off the spillage and allow remaining fuel to evaporate.
2 If you have spilt fuel on yourself or your clothes, change your clothes. Wash any part of your body that has come in contact with fuel. Use soap and water.
3 If the machine is leaking fuel. Check regularly for leaks from the fuel cap and fuel lines.
Transport and storage
- Store and transport the machine and fuel so that there is no risk of any leakage or fumes coming into contact with sparks or naked flames, for example, from electrical machinery, electric motors, electrical relays/ switches or boilers.
- When storing and transporting fuel always use approved containers intended for this purpose.
- When storing the machine for long periods the fuel tank must be emptied. Contact your local petrol station to find out where to dispose of excess fuel.
- Ensure the machine is cleaned and that a complete service is carried out before long-term storage.
- The transport guard must always be fitted to the cutting attachment when the machine is being transported or in storage.
- Secure the machine during transport.
- In order to prevent unintentional starting of the engine, the spark plug cap must always be removed during long-term storage, if the machine is not under close supervision and when performing all service measures.

WARNING! Take care when handling fuel. Bear in mind the risk of fire, explosion and inhaling fumes.
Fuel
CAUTION! The machine is equipped with a two-stroke engine and must always been run using a mixture of petrol and two-stroke oil. It is important to accurately measure the amount of oil to be mixed to ensure that the correct mixture is obtained. When mixing small amounts of fuel, even small inaccuracies can drastically affect the ratio of the mixture.

WARNING! Fuel and fuel fumes are highly inflammable and can cause serious injury when inhaled or allowed to come in contact with the skin. For this reason observe caution when handling fuel and make sure there is adequate ventilation.
Petrol

CAUTION! Always use a quality petrol/oil mixture at least 90 octane (RON). If your machine is equipped with a catalytic converter (see chapter on Technical data) always use a good quality unleaded petrol/oil mixture. Leaded petrol will destroy the catalytic converter.
Use low-emission petrol, also known as alkylate petrol, if it is available.

- The lowest octane recommended is 90 (RON). If you run the engine on a lower octane grade than 90 so-called knocking can occur. This gives rise to a high engine temperature, which can result in serious engine damage.
- When working at continuous high revs a higher octane rating is recommended.
Two-stroke oil
- For best results and performance use Universal, Universal powered by McCULLOCH two-stroke engine oil, which is specially formulated for our air-cooled two-stroke engines.
- Never use two-stroke oil intended for water-cooled engines, sometimes referred to as outboard oil (rated TCW).
- Never use oil intended for four-stroke engines.
- A poor oil quality and/or too high oil/fuel ratio may jeopardise function and decrease the life time of catalytic converters.
- Mixing ratio
1:50 (2%) with Universal, Universal powered by McCULLOCH two-stroke oil.
1:33 (3%) with oils class JASO FB or ISO EGB formulated for air-cooled, two-stroke engines.
| Petrol, litre | Two-stroke oil, litre | |
| 2% (1:50) 3% (1:33) | ||
| 5 0,10 0,15 | ||
| 10 0,20 0,30 | ||
| 15 0,30 0,45 | ||
| 20 0,40 0,60 | ||
FUEL HANDLING
Mixing
• Always mix the petrol and oil in a clean container intended for fuel.
• Always start by filling half the amount of the petrol to be used. Then add the entire amount of oil. Mix (shake) the fuel mixture. Add the remaining amount of petrol.
- Mix (shake) the fuel mixture thoroughly before filling the machine's fuel tank.

- Do not mix more than one month's supply of fuel at a time.
- If the machine is not used for some time the fuel tank should be emptied and cleaned.

WARNING! The catalytic converter muffler gets very hot during and after use. This also applies during idling. Be aware of the fire hazard, especially when working near flammable substances and/or vapours.
Fueling


WARNING! Taking the following precautions, will lessen the risk of fire:
Mix and pour fuel outdoors, where there are no sparks or flames.
Do not smoke or place hot objects near fuel.
Always shut off the engine before refuelling.
Always stop the engine and let it cool for a few minutes before refuelling.
When refuelling, open the fuel cap slowly so that any excess pressure is released gently.
Tighten the fuel cap carefully after refuelling.
Always move the machine away from the refuelling area and source before starting.
• Always use a fuel container with an anti-spill valve.
- If you have spilt fuel on it. Wipe off the spillage and allow remaining fuel to evaporate.
- Clean the area around the fuel cap. Contamination in the tank can cause operating problems.
- Ensure that the fuel is well mixed by shaking the container before filling the tank.
Check before starting

- Check that the trimmer head and trimmer guard are not damaged or cracked. Replace the trimmer head or trimmer guard if they have been exposed to impact or are cracked.

- Never use the machine without a guard nor with a defective guard.
- All covers must be correctly fitted and undamaged before you start the machine.
Starting and stopping


WARNING! The complete clutch cover and shaft must be fitted before the machine is started, otherwise the clutch can come loose and cause personal injury.
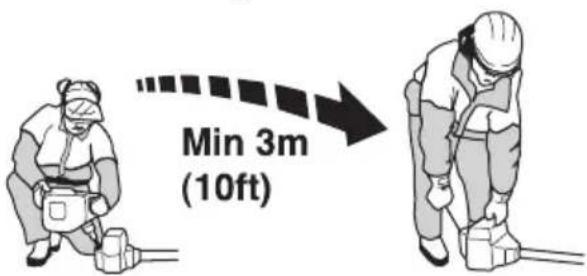
Always move the machine away from the refuelling area and source before starting. Place the machine on a flat surface. Ensure the cutting attachment cannot come into contact with any object.
Make sure no unauthorised persons are in the working area, otherwise there is a risk of serious personal injury. The safety distance is 15 metres.
Starting
Primer bulb: Press the air purge repeatedly until fuel begins to fill the bulb. The bulb need not be completely filled.

14 - English
Choke: Set the choke control in the choke position.


WARNING! When the engine is started with the choke in choke position the cutting attachment will start to rotate immediately.
Hold the body of the machine on the ground using your left hand (CAUTION! Not with your foot!). Grip the starter handle, slowly pull out the cord with your right hand until you feel some resistance (the starter pawls grip), now quickly and powerfully pull the cord. Never twist the starter cord around your hand.
Repeat pulling the cord until the engine starts. When the engine starts, return choke control to run position and apply full throttle; the throttle will automatically disengage from the start setting.
CAUTION! Do not pull the starter cord all the way out and do not let go of the starter handle when the cord is fully extended. This can damage the machine.

Stopping
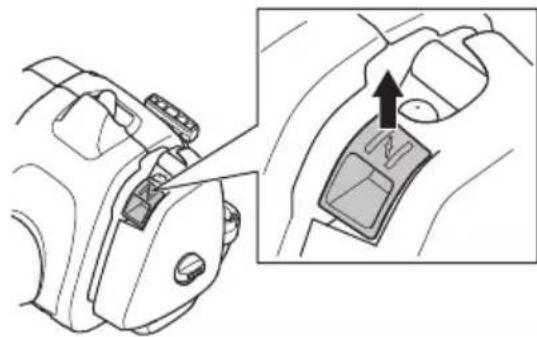
Stop the engine by switching off the ignition.

CAUTION! The stop switch automatically returns to the start position. In order to prevent unintentional starting, the spark plug cap must be removed from the spark plug when assembling, checking and/or performing maintenance.
WORKING TECHNIQUES
General working instructions
IMPORTANT!
This section takes up the basic safety precautions for working with a trimmer.
If you encounter a situation where you are uncertain how to proceed you should ask an expert. Contact your dealer or your service workshop.
Avoid all usage which you consider to be beyond your capability.
You must understand the difference between forestry clearing, grass clearing and grass trimming before use.
Basic safety rules

1 Look around you:
• To ensure that people, animals or other things cannot affect your control of the machine.
• To ensure that people, animals, etc., do not come into contact with the cutting attachment or loose objects that are thrown out by the cutting attachment.
- CAUTION! Do not use the machine unless you are able to call for help in the event of an accident.
2 Inspect the working area. Remove all loose objects, such as stones, broken glass, nails, steel wire, string, etc. that could be thrown out or become wrapped around the cutting attachment.
3 Do not use the machine in bad weather, such as dense fog, heavy rain, strong wind, intense cold, etc. Working in bad weather is tiring and often brings added risks, such as icy ground, unpredictable felling direction, etc.
4 Make sure you can move and stand safely. Check the area around you for possible obstacles (roots, rocks, branches, ditches, etc.) in case you have to move suddenly. Take great care when working on sloping ground.
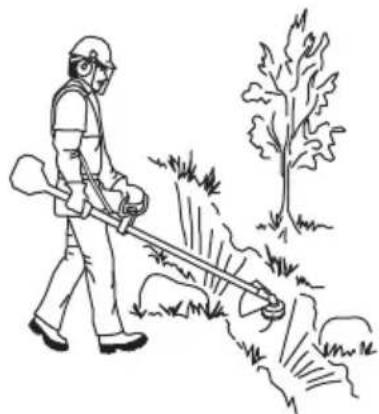
5 Keep a good balance and a firm foothold. Do not overreach. Keep proper footing and balance at all times.
6 Always hold the machine with both hands. Hold the machine on the right side of your body. Keep all parts of your body away from the hot surfaces. Keep all parts of your body away from the rotating cutting attachment.
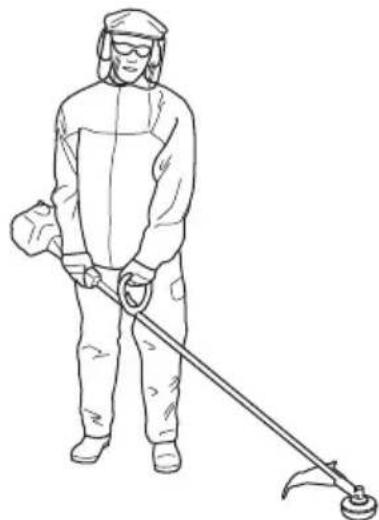
7 Keep the cutting attachment below waist level.
8 The engine must be switched off before moving.
9 Never put the machine down with the engine running unless you have it in clear sight.

WARNING! Neither the operator of the machine nor anyone else may attempt to remove the cut material while the engine is running or the cutting equipment is rotating, as this can result in serious injury.
Stop the engine and cutting equipment before you remove material that has wound around the blade shaft as otherwise there is a risk of injury. The bevel gear can get hot during use and may remain so for a while afterwards. You could get burnt if you touch it.

WARNING! Watch out for thrown objects. Always wear approved eye protection. Never lean over the cutting attachment guard. Stones, rubbish, etc. can be thrown up into the eyes causing blindness or serious injury.
Keep unauthorised persons at a distance. Children, animals, onlookers and helpers should be kept outside the safety zone of 15 m. Stop the machine immediately if anyone approaches. Never swing the machine around without first checking behind you to make sure no-one is within the safety zone.
WORKING TECHNIQUES
Basic working techniques
Always slow the engine to idle speed after each working operation. Long periods at full throttle without any load on the engine can lead to serious engine damage.

WARNING! Sometimes branches or grass get caught between the guard and cutting attachment. Always stop the engine before cleaning.

WARNING! Overexposure to vibration can lead to circulatory damage or nerve damage in people who have impaired circulation. Contact your doctor if you experience symptoms of overexposure to vibration. Such symptoms include numbness, loss of feeling, tingling, pricking, pain, loss of strength, changes in skin colour or condition. These symptoms normally appear in the fingers, hands or wrists. The risk increases at low temperatures.
Grass trimming with a trimmer head


Trimming
- Hold the trimmer head just above the ground at an angle. It is the end of the cord that does the work. Let the cord work at its own pace. Never press the cord into the area to be cut.
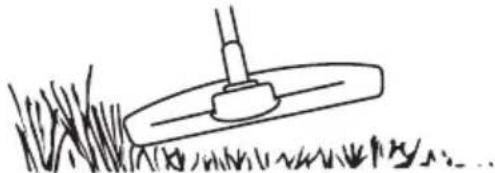
- The cord can easily remove grass and weeds up against walls, fences, trees and borders, however it can also damage sensitive bark on trees and bushes, and damage fence posts.
- Reduce the risk of damaging plants by shortening the cord to 10-12 cm and reducing the engine speed.
Clearing
- The clearing technique removes all unwanted vegetation. Keep the trimmer head just above the ground and tilt it. Let the end of the cord strike the ground around trees, posts, statues and the like.
CAUTION! This technique increases the wear on the cord.

- The cord wears quicker and must be fed forward more often when working against stones, brick, concrete, metal fences, etc., than when coming into contact with trees and wooden fences. - When trimming and clearing you should use less than full throttle so that the cord lasts longer and to reduce the wear on the trimmer head.
Cutting
- The trimmer is ideal for cutting grass that is difficult to reach using a normal lawn mower. Keep the cord parallel to the ground when cutting. Avoid pressing the trimmer head against the ground as this can ruin the lawn and damage the tool.

- Do not allow the trimmer head to constantly come into contact with the ground during normal cutting. Constant contact of this type can cause damage and wear to the trimmer head.
Sweeping
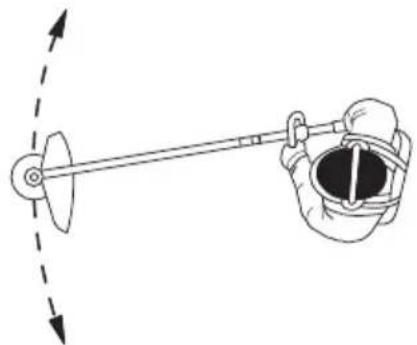
- The fan effect of the rotating cord can be used for quick and easy clearing up. Hold the cord parallel to and above the area to be swept and move the tool to and fro.

- When cutting and sweeping you should use full throttle to obtain the best results.
MAINTENANCE
Carburettor
Adjustment of the idle speed
Before any adjustments are made, make sure that the air filter is clean and the air filter cover is fitted.
Adjust the idle speed using the idle adjustment screw T, if it is necessary to readjust. First turn the idle adjustment screw T clockwise until the cutting attachment starts to rotate. Then turn the screw anticlockwise until the cutting attachment stops. The idle speed is correctly adjusted when the engine will run smoothly in every position. The idle speed should also be well below the speed at which the cutting attachment starts to rotate.

Rec. idle speed: See the Technical data section.

WARNING! If the idle speed cannot be adjusted so that the cutting attachment stops, contact your dealer/service workshop. Do not use the machine until it has been correctly adjusted or repaired.
Muffler

CAUTION! Some mufflers are fitted with a catalytic converter. See chapter on Technical data to see whether your machine is fitted with a catalytic converter.
The muffler is designed to reduce the noise level and to direct the exhaust gases away from the operator. The exhaust gases are hot and can contain sparks, which may cause fire if directed against dry and combustible material.
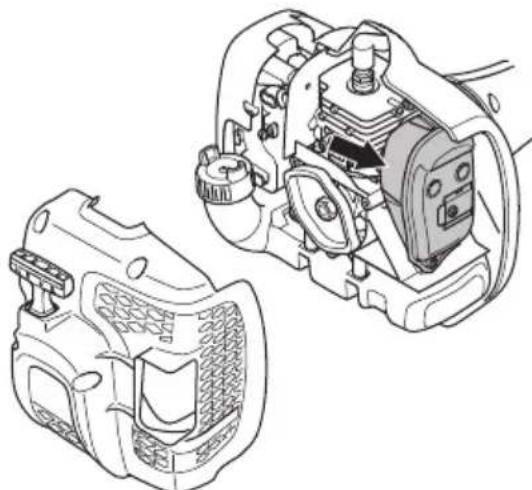
Some mufflers are equipped with a special spark arrestor mesh. If your machine has this type of muffler, you should clean the mesh at least once a week. This is best done with a wire brush. On mufflers without a catalytic converter the mesh should be cleaned weekly, or replaced if necessary. On mufflers fitted with a catalytic converter the mesh should be checked, and if necessary cleaned, monthly. If the mesh is damaged it should be replaced. If the mesh is frequently blocked, this can be a sign that the performance of the catalytic converter is impaired. Contact your dealer to inspect the muffler. A blocked mesh will cause the machine to overheat and result in damage to the cylinder and piston.

CAUTION! Never use a machine with a defective muffler.

WARNING! Mufflers fitted with catalytic converters get very hot during use and remain so for some time after stopping. This also applies at idle speed. Contact can result in burns to the skin. Remember the risk of fire!
MAINTENANCE
Cooling system

To keep the working temperature as low as possible the machine is equipped with a cooling system.
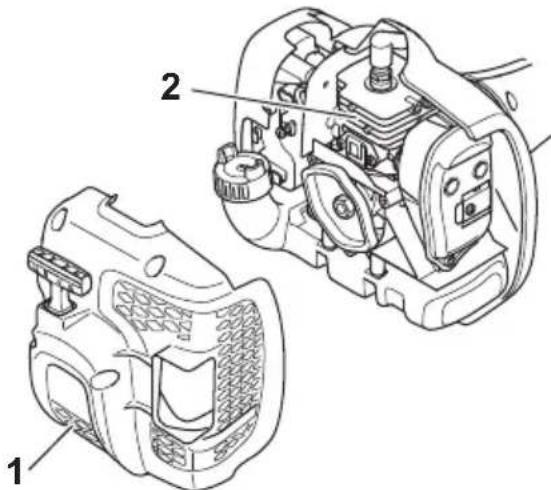
The cooling system consists of:
1 Air intake on the starter.
2 Cooling fins on the cylinder.
Clean the cooling system with a brush once a week, more often in demanding conditions. A dirty or blocked cooling system results in the machine overheating which causes damage to the piston and cylinder.
Spark plug

The spark plug condition is influenced by:
- Incorrect carburettor adjustment.
- An incorrect fuel mixture (too much or incorrect type of oil).
- A dirty air filter.
These factors cause deposits on the spark plug electrodes, which may result in operating problems and starting difficulties.
If the machine is low on power, difficult to start or runs poorly at idle speed: always check the spark plug first before taking any further action. If the spark plug is dirty, clean it and check that the electrode gap is 0,5 mm. The
spark plug should be replaced after about a month in operation or earlier if necessary.

CAUTION! Always use the recommended spark plug type! Use of the wrong spark plug can damage the piston/cylinder. Check that the spark plug is fitted with a suppressor.
Two-piece shaft

The drive shaft end in the lower shaft should be lubricated with grease every 30 hours. There is a risk that the drive shaft ends (splined coupling) on models with two-piece shafts will seize if they are not lubricated regularly.

MAINTENANCE
Air filter
The air filter must be regularly cleaned to remove dust and dirt in order to avoid:
• Carburettor malfunctions
- Starting problems
- Loss of engine power
- Unnecessary wear to engine parts.
• Excessive fuel consumption.

Clean the filter every 25 hours, or more regularly if conditions are exceptionally dusty.
Cleaning the air filter
Remove the air filter cover and take out the filter. Wash it clean in warm, soapy water. Ensure that the filter is dry before refitting it.
An air filter that has been in use for a long time cannot be cleaned completely. The filter must therefore be replaced with a new one at regular intervals. A damaged air filter must always be replaced.
If the machine is used in dusty conditions the air filter should be soaked in oil. See instructions under the heading Oiling the air filter.
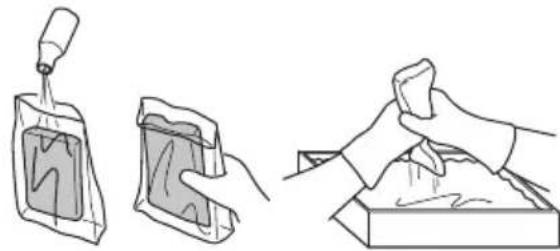
Oiling the air filter

Always use filter oil, art. no. 531 00 92-48. The filter oil contains a solvent to make it spread evenly through the filter. You should therefore avoid skin contact.
Put the filter in a plastic bag and pour the filter oil over it. Knead the plastic bag to distribute the oil. Squeeze the excess oil out of the filter inside the plastic bag and pour off the excess before fitting the filter to the machine. Never use common engine oil. This would drain through the filter quite quickly and collect in the bottom.
Bevel gear

The bevel gear is filled with the right quantity of grease at the factory. However, before using the machine you should check that the bevel gear is filled three-quarters full with grease. Use HUSQVARNA special grease.

The grease in the bevel gear does not normally need to be changed except if repairs are carried out.
MAINTENANCE
Maintenance schedule
The following is a list of the maintenance that must be performed on the machine. Most of the items are described in the Maintenance section. The user must only carry out the maintenance and service work described in this Operator's Manual. More extensive work must be carried out by an authorized service workshop.
| Maintenance | Daily maintenance | Weekly maintenance | Monthly maintenance |
| Clean the outside of the machine. X | |||
| Make sure the throttle trigger lock and the throttle function correctly from a safety point of view. | X | ||
| Check that the stop switch works correctly. X | |||
| Check that the cutting attachment does not rotate at idle. X | |||
| Clean the air filter. Replace if necessary. X | |||
| Check that the guard is undamaged and not cracked. Replace the guard if it has been exposed to impact or is cracked. | X | ||
| Check that the trimmer head is undamaged and not cracked. Replace the trimmer head if necessary. | X | ||
| Check that nuts and screws are tight. X | |||
| Check that there are no fuel leaks from the engine, tank or fuel lines. | X | ||
| Check the starter and starter cord. X | |||
| Check that the vibration damping elements are not damaged. X | |||
| Clean the outside of the spark plug. Remove it and check the electrode gap. Adjust the gap to 0.5 mm or replace the spark plug. Check that the spark plug is fitted with a suppressor. | X | ||
| Clean the machine's cooling system. X | |||
| Clean or replace the spark arrestor mesh on the muffler (only applies to mufflers without a catalytic converter). | X | ||
| Clean the outside of the carburettor and the space around it. X | |||
| Check that the bevel gear is filled three-quarters full with lubricant. Fill if necessary using special grease. | X | ||
| Check the fuel filter from contamination and the fuel hose from cracks or other defects. Replace if necessary. | X | ||
| Check all cables and connections. X | |||
| Check the clutch, clutch springs and the clutch drum for wear. Replace if necessary by an authorized service workshop. | X | ||
| Replace the spark plug. Check that the spark plug is fitted with a suppressor. | X |
TECHNICAL DATA
Technical data
| T22LCS T22LS | ||
| Engine | ||
| Cylinder displacement, cm3 | 21,7 21,7 | |
| Cylinder bore, mm 32,0 32,0 | ||
| Stroke, mm 27 27 | ||
| Idle speed, rpm 2900 2900 | ||
| Recommended max. speed, rpm 7200 9100 | ||
| Speed of output shaft, rpm 7200 6700 | ||
| Max. engine output, acc. to ISO 8893, kW/ rpm 0,6/7800 0,6/7800 | ||
| Catalytic converter muffler Yes Yes | ||
| Speed-regulated ignition system | No | No |
| Ignition system | ||
| Spark plug | NGK CMR6A | NGK CMR6A |
| Electrode gap, mm | 0,5 | 0,5 |
| Fuel and lubrication system | ||
| Fuel tank capacity, litre | 0,3 | 0,3 |
| Weight | ||
| Weight without fuel, cutting attachment and guard, kg | 4,6 | 4,9 |
| Noise emissions | ||
| (see note 1) | ||
| Sound power level, measured dB(A) | 103 | 105 |
| Sound power level, guaranteed LWA dB(A) | 103 | 104 |
| Noise levels | ||
| (see note 2) | ||
| Equivalent sound pressure level at the operator's ear,measured according to EN ISO 11806 and ISO 22868, dB(A): | 88 90 | |
| Vibration levels | ||
| (see note 3) | ||
| Equivalent vibration levels ( ahv,eq ) at handles, measuredaccording to EN ISO 11806 and ISO 22867, m/s2 | ||
| Equipped with trimmer head (original), left/right | 4,22/3,49 | 3,76/3,12 |
Note 1: Noise emissions in the environment measured as sound power ( LWA ) in conformity with EC directive 2000/14/EC. Reported sound power level for the machine has been measured with the original cutting attachment that gives the highest level. The difference between guaranteed and measured sound power is that the guaranteed sound power also includes dispersion in the measurement result and the variations between different machines of the same model according to Directive 2000/14/EC.
Note 2: Reported data for equivalent sound pressure level for the machine has a typical statistical dispersion (standard deviation) of 1 dB (A).
Note 3: Reported data for equivalent vibration level has a typical statistical dispersion (standard deviation) of 1 m/s2 .
TECHNICAL DATA
| T22LS | ||
| Approved accessories Type Cutting | attachment guard, Art. no. | |
| Blade shaft thread M10 | ||
| Trimmer head P25 (∅ 2.0 mm cord) 574 55 72-01 | ||
| T22LCS | ||
| Approved accessories Type Cutting | attachment guard, Art. no. | |
| Blade shaft thread 3/8 R | ||
| Trimmer head P25 (∅ 2.0 mm cord) 574 61 31-01 |
The following attachments are recommended for the specified models.
| Approved accessories Art No. Use with | ||
| Cultivator attachment CAC 577 61 62-02 T22LCS, T22LS | ||
| Blower attachment BAC 577 61 62-03 T22LCS, T22LS | ||
| Edger attachment EAC 577 61 62-04 T22LCS, T22LS | ||
| Pole saw attachment PAC 577 61 62-05 T22LCS, T22LS | ||
| Hedge trimmer attachment 967 17 64-01 T22LCS, T22LS |
EC-declaration of conformity (Applies to Europe only)
We, Husqvarna AB, SE-561 82 Huskvarna, Sweden, tel: +46-36-146500, declare that the grass trimmers McCULLOCHT22LS and T22LCS with serial numbers dating from 2013 onwards (the year is clearly stated on the rating plate, followed by the serial number), comply with the requirements of the COUNCIL'S DIRECTIVE:
- of May 17, 2006 "relating to machinery" 2006/42/EC
- of December 15, 2004 "relating to electromagnetic compatibility" 2004/108/EC.
- of May 8, 2000 "relating to the noise emissions in the environment" 2000/14/EC. Conformity assessment according to Annex V. For information relating to noise emissions, see the chapter Technical data.
The following standards have been applied: EN ISO 12100:2010, EN ISO 11806-1:2011, ISO 14982:1998, CISPR 12:2007
SMP Svensk Maskinprovning AB, Box 7035, SE-750 07 Uppsala, Sweden, has performed voluntary type examination on behalf of Husqvarna AB. The certificates are numbered:
SEC/11/2328 - T22LCS, SEC/11/2329 - T22LS. Furthermore, conformity with Appendix V of Council Directive 2000/14/EG is certified. The certificates are numbered: 01/164/080, - T22LCS, 01/164/079, - T22LS.
Huskvarna 19 April 2013
Pe Gusleptin
Per Gustafsson, Development manager (Authorized representative for Husqvarna AB and responsible for technical documentation.)
SYMBOLFÖRKLARING
Symboler
HANDSKAR
Demontering:
MONTERING

Stopp
Kylsystemet består av:
UNDERHÅLL
Luftfilter

Vinkelväxel

H∅REVÆRN
Kontrollér, at gasreguleringen er låst i tomgangsstilling, när gasreguleringsläsen befinder sig i udgangsstilling.
GENERELLE SIKKERHEDSINSTRUKTIONER
Start motoren, og kontrollér, at motoren slukkes, når stopkontakten sættes i stopposition.
- Ret tappen på monteringsdelen (A) ind efter hullet i koblingsstykket (B).

Demontering:
- Løsn koblingsstykket ved at dreje grebet (mindst 3 omgange).

- Hold støvhætten fast med en skiftenøgle for at forhindre, at akslen drejer.
- Skru trimmerhovedet på akslen.
Brændstofsikkerhed
Start aldrig maskinen:
56 – Danish
Choker: Stil chokeren i chokestilling.


ADVARSEL! Når motoren startes med chokeren i chokerposition, begynder skæreudstyret straks at rotere.
Stop
- Undgå at lade trimmerhovedet have permanent kontakt med jorden ved normal klipning. En sådan kontakt kan medføre skader og slitage på trimmerhovedet.
Fejning
Anbefalet omdrejningstal i tomgang: Se kapitlet Tekniske data.

Luftfilter

Vinkelgear

Cylinderdiameter, mm 32,0 32,0
Trimmin osat
Irrotus:
Rikastin: Aseta rikastin rikastusasentoon.


KÄYNNISTYS JA PYSÄYTYS
Pysäytys
KUNNOSSAPITO
Ilmansuodatin
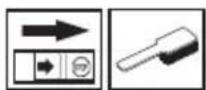
Kulmavaihde

GENERELLE SIKKERHETSINSTRUKSJONER
HANSKER
Kontroller at gassregulatoren er låst i tomgangsstilling när gassregulatorsperren er i sin utgangsposisjon.

GENERELLE SIKKERHETSINSTRUKSJONER
I land med varmt og tørt klima er skogbrannfaren stor. Vi har derfor utstyrt noen av lyddempermodellene med et såkalt gnistfangernett. Kontroller om lyddemperen på din maskin har et slikt nett.

Demontering:
- Trykk ned og hold nede knappen (C). Mens du holder godt fast i motorenden, treker du tilbehøret rett ut av koplingen.

MONTERING
- Monter medbringeren (B) på den utgående akselen.
- Vri rundt klingeakselen til ett av hullene i medbringeren stemmer overens med tilsvarende hull i girhuset.
- Før läsepinnen (C) inn i hullet slik at akselen läses.
- Skru på trimmerhodet/plastknivene (H) mot rotasjonsretningen.
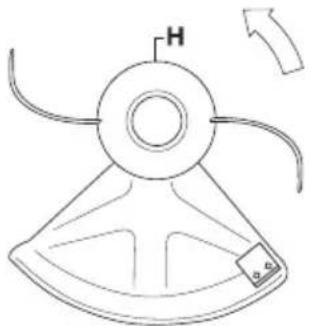
- Monter støvkoppen på den akselen. Mutteren skal være helt dekket av støvkoppen.

Choke: Still chokehendelen i choke-stilling.
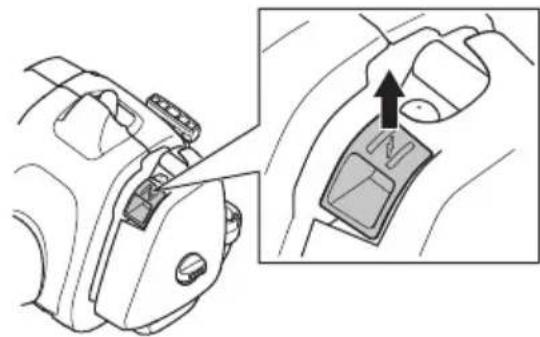

Stopp
Anbefalt tomgangsturtall: Se kapitlet Tekniske data.

OBS! Bruk aldri maskinen med en lyddemper som er i dårlig stand.

Kjølesystemet består av:
1 Luftinntak i startmotor.
2 Kjøleflenser på sylinderen.
VEDLIKEHOLD
Luftfilter

Vinkelgir

Sylinderdiameter, mm 32,0 32,0
Attention: projections et ricochets.

PROTÈGE-OREILLES
GANTS
INSTRUCTIONS GÉNÉRALES DE SÉCURITÉ
INSTRUCTIONS GÉNÉRALES DE SÉCURITÉ
Démontage:
MONTAGE
Starter: Tirer la commande de starter.


DÉMARRAGE ET ARRÊT
Arrêt
ENTRETIEN
Filtre à air

Renvoi d'angle

Alésage, mm 32,0 32,0
Course, mm 27 27
Régime de ralenti, tr/min 2900 2900
Controleer of de gashendel vergrendeld is in de stationaire stand wanneer de gashendelvergrendeling in de oorspronkelijke stand staat.
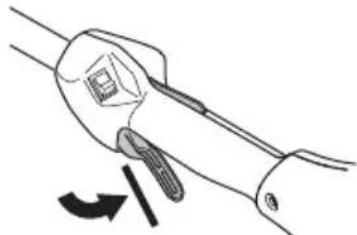
ALGEMENE VEILIGHEIDSINSTRUCTIES
ALGEMENE VEILIGHEIDSINSTRUCTIES
WAARSCHUWING! Denk erom dat:
Demonteren:
Montage van snijuitrusting

142 – Dutch
Choke: Zet de choke-hendel in de choke-positie.


Stoppen
ONDERHOUD
Luchtfilter

Hoekoverbrenging

CUFFIE PROTETTIVE
Smontaggio:

Arresto
MANUTENZIONE
Filtro dell'aria

Riduttore angolare

GUANTES
Desmontaje:

Parada
MANTENIMIENTO
Filtro de aire

Engranaje angulado

GEHÖRSCHUTZ
HANDSCHUHE
Demontage:

Choke: Den Chokehebel in Choke-Lage führen.


Stoppen
WARTUNG
Luftfilter

Winkelgetriebe

Bohrung, mm 32,0 32,0
Hublänge, mm 27 27
PROTECTORES ACÚSTICOS
LUVAS
INSTRUÇÕES GERAIS DE SEGURANÇA
INSTRUÇÕES GERAIS DE SEGURANÇA
Desmontagem:
MONTAGEM

Paragem
MANUTENÇÃO
Filtro de ar

Engrenagem angular

FÜLVÉDŐK
VÉDŐKESZTYÚ
ÁLTALÁNOS BIZTONSÁGI INTÉZKEDÉSEK
Szétszerelés:

Leállítás
KARBANTARTÁS
Levegőszűrő

Szögváltómű

REKAWICE
OGÓLNE ZASADY BEZPIECZEŃSTWA
Demontaż:

Wyłączanie silnika
Przekładnia kątowa

Średnica cylindra, mm 32,0 32,0
Mis on mis trimmeril?
KÖRVAKLAPID
KINDAD
- Seadke lisaosa kinnitusdetail (A) kohakuti ühendusosal oleva noolega (B).

• Lükake lisaseade sidurisse, kuni see klöpsatab paigale.
Lahti võtmine:

Seiskamine
Öhufilter
HOOLDUS
Nurkreduktor

Kas ir kas trimerim?
CIMDI
VISPĀRĒJAS DROŠIBAS INSTRUKCIJAS
Demontāža:
- Pagriežot kloki (vismaz 3 reizes), atbrivojiet savienojumu.


Apstādināšana
Gaisa filtrs
Reduktors

Cilindra diametrs, mm 32,0 32,0
Šlūtenes garums, mm 27 27
Žoliapjovės dalys
BENDRI SAUGUMO REIKALAVIMAI
PIRŠTINĖS
- Sulyginkite priedo ąsele (A) su skyle jungiamojoje movoje (B).

Demontavimas:

Išjungimas
PASTABA! Niekada nenaudokite jrenginio su netvarkingu duslintuvu.

Oro filtras

Kampinė pavara

Cilindro diametras, mm 32,0 32,0
Stūmoklio eiga, mm 27 27
CHRÁNIČE SLUCHU
Demontáz:
- Stlačte a podržte tlačidlo (C). Pevne chytte koniec zariadenia a vytiahnite nástavec priamo zo spojky.
- Založte unášač (B) na výstupný hriadel.
- Otáčajte hriadel'om, kým jeden z otvorov unášača nelíćuje s príslušným otvorom na telese kužel'ového prevodu.
- Zastrčte poistný kolík (C) do otvoru na zaistenie hriadel'a.
- Zaskrutkujte žaciu hlavu/plastové nože (H) v opačnom smere, ako je smer otáčania nástroja.
- Založte protiprachové veko na hriadel. Matica musí byt kompletne zakrytá protiprachovým vekom.

- Pridržte protiprachové veko klúčom, aby ste zabránili otáčaniu hriadel'a.
- Priskrutkujte žaciu hlavu na hriadel.
Sýtič: Vytiahnite sýtič.


Zastavenie
Chladiaci systém pozostáva z:
1 Nasávania vzduchu na štartéri.
2 Chladiacich rebier na valci.
Vzduchový filter

Kužel'ový prevod

Vrtanie valca, mm 32,0 32,0
Zdvih, mm 27 27
Otáčky pri volínobehu, ot./min. 2900 2900
Što je što na trimeru?
1 Glava trimera
2 Punjenje masti, pužni zglob
3 Pužni zglob
4 Štitnik rezne opreme
5 Pogonska cijev
6 Spoj pogonskih cijevi
7 Loop okrugla ručka
8 Regulator gasa
9 Glavni prekidač
10 Gumb za gas
11 Kapica svjećice i svjećica
12 Naprava za paljenje
13 Ručica za paljenje
14 Spremnik goriva
15 Poklopac filtera zraka
16 Pumpica za gorivo.
17 Poluga čoka
18 Pogonska podloška
19 Priručnik
20 Kombi ključ
Važno Osobna zaštitna oprema
VAŽNO!
Stroj je samo namijenjen šišanju trave.
Provjerite da li je kontrola gasa stavljena na prazan hod prije nego otpustitie gumb za gas.

Vidi uputstva pod rubrikom Pokretanje. Pokrenite stroj i dajte pun gas. Otpustite gas i provjerite da li se rezna oprema zaustavlja i ostaje nepomična. Ukoliko se rezna oprema pomiče, a gas je nepritisnut, provjerite podešenost rasplinjača. Vidi uputstva pod rubrikom Održavanje.
Glavni prekidač
Koristite glavni prekidač da biste isključili motor.
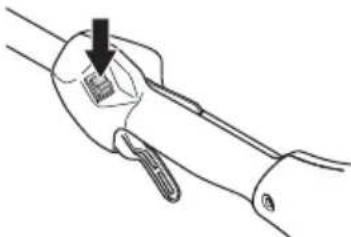
Upalite motor i provjerite da li se motor zaustavlja kada pritisnete glavni prekidač u stop položaj.
OPĆENITA PRAVILA ZA SIGURNOST NA RADU
Štitnik rezne opreme

Štitnik rezne opreme sprječava odbacivanje predmeta prema korisniku i sprječava slučajan dodir korisnika s reznom opremom.

Za prigušivače je veoma važno da se slijedi uputstva o provjeri, održavanju i servisiranju.
- Općenito, manji strojevi zahtjevaju i manje glave i obrnuto. To je zato što pri košnji flaksom, motor mora vrtiti flaks i ujedno se suprotstavljati otporu koji pruža trava pri šišanju.
- Duljina flaksa je također važna. Dulji flaks zahtjeva jači motor od kraćeg flaksa iste debljine.
- Provjerite da je nožić na štitniku flaksa netaknut. Njime se flaks ograničava na dopuštenu duljinu.
- Da bi produljili vijek trajanja flaksa, namočite ga u vodi par dana. To će učiniti flaks tvrdim i trajnijim.
SASTAVLJANJE
- Namjestite svornjak, sigurnosnu podlošku i leptir maticu kao što je prikazano na slici. Zategnite leptir maticu.
Sastavljanje i rastavljanje dvodjelne osovine

Sastavljanje:
- Izravnajte vršak dodatka (A) s otvorom na spojnici (B).
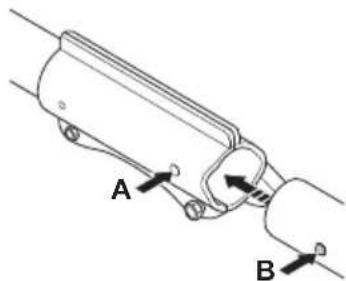
Rastavljanje:
- Stisnite i držite gumb (C). Dok sigurno držite kraj mašine, ravno povucite dodatak iz spojnice.

SASTAVLJANJE
Pričvršćivanje rezne opreme

UPOZORENJE! Nikad ne upotrebljavajte reznu opremu bez da je namješten odobreni štitnik. Vidi poglavlje Tehnički podaci. Ukoliko je namješten krivi ili oštećeni štitnik, postoji velika opasnost od ozljede.
Namještanje štitnika trimera i glave trimera (T22LS)

- Namjestite pogonsku podlošku (B) na osovinu.
- Okrećite osovinu dok se rupa na podloški ne poravna s rupom na pužnom zglobu.
- Umetnite polugu za blokiranje (C) kroz rupu i blokirajte osovinu.
- Napravite navoj na glavi trimera/plastičnim noževima (H) protiv pravca okretaja.

- Da bi skinuli glavu, ponovite postupak obrnutim redoslijedom.
Namještanje štitnika trimera i glave trimera (T22LCS)

- Instaliraj štit prema opisu slike. Čvrsto pritegni.

- Drži šalicu za prašinu sa francuskim ključem da bi spriječio okretanje osovine.
• Nareži navoj na glavu trimera na osovinu.

UPOZORENJE! U slučaju da pokrećete motor s uključenim čokom, oprema za rezanje se odmah počinje okretati.
lsključivanje
7 Rezni nastavak držite ispod razine struka.
8 Motor mora biti isključen prilikom premještanja.
9 Nikada ne ostavljajte stroj s uključenim motorom ukoliko se udaljujete.

- Flaks može lako ukloniti svu travu i raslinje uz zidove, ograde, drveća i sl., ipak, isto tako možete oštetiti nježniju koru stabla i grmlja i oštetiti boju na ogradama.
- Smanjite opasnost oštećivanja bilja, kraćenjem flaksa na 10–12 cm i smanjenjem gasa.
Čišćenje
- Tehnika čišćenja uklanja svu neželjenu vegetaciju. Držite glavu trimera tik iznad tla i nagnite ju. Dopustite flaksu da udara po tlu oko drveća, stupova, kipova i sl. OBAVIJEST! Ova tehnika rada povećava potrošnju flaksa.

- Flaks se brže troši i mora ga se češće namatati kada radite oko kamenja, cigle, betona, metalnih ograda i sl. nego kada dolazi u dodir s drvećem i drvenim ogradama.
- Kada šišate i čistite koristite slabiji gas (80%) od punog tako da flaks traje dulje i smanji trošenje glave s flaksom.
Šišanje
- Ne dopustite neprekidno udaranje glave o tlo tijekom normalnog rada. Neprestani kontakt može oštetiti glavu trimera.
Metenje
- Kada čistite i metete, koristite pun gas za najbolje učinke.
ODRŽAVANJE
Rasplinjač
Ugađanje brzine okretaja u praznom hodu
Prije bilo kakvog podešavanja, filter zraka mora biti čist, a poklopac cilindra namješten.
Podesite brzinu okretaja u praznom hodu vijkom T. Ukoliko je potrebno ponovo podesiti, prvo okrenite vijak T u smjeru kazaljke na satu dok se rezna oprema ne počne okretati. Tada okrećite, u smjeru suprotnom kazaljci na satu dok se rezna oprema ne prestane pomicati. Pravilno podešena brzina okretaja u praznom hodu je ona u kojoj motor radi glatko u svim položajima. To bi trebala biti dobra granica broja okretaja kada se rezna oprema počinje pomicati.

Preporučeni broj okretaja u praznom hodu: Pogledajte poglavlje Tehnički podaci.

Neki prigušivači su opremljeni s specijalnom zaštitnom mrežicom. Ukoliko Vaš stroj ima takvu vrstu prigušivača, onda
Rashladni sistem sastoji se od:
Filter za zrak

ODRŽAVANJE
Pužni zglob

Promjer cilindra, u mm 32,0 32,0
Put klipa u cilindru, u mm 27 27
Broj obrtaja pri praznom hodu, rpm 2900 2900
Preporučen maksimalni broj obrtaja, rpm 7200 9100
Broj okretaja izlazne osovine, o/min 7200 6700
Maks. snaga motora, sugl.. ISO 8893, kW/ rpm 0,6/7800 0,6/7800
Katalizatorski ispušni lonac Da Da
Sustav pokretanja reguliran brojem okretaja Ne Ne
Sistem paljenja
Svjećica NGK CMR6A NGK CMR6A
Razmak elektroda, u mm 0,5 0,5
Sistem goriva i podmazivanja
Zapremnina spremišta za gorivo, lit. 0,3 0,3
Težina
Težina, bez goriva, rezne opreme i štitnika, kg 4,6 4,9
Emitovanje buke
RUKAVICE
Proveri da li je regulator gasa utvrpen u neutralnom položaju kad otpustiš kočnicu regulatora gasa.

Pritisni kočnicu regulatora gasa i proveri da li se vraća u prvobitni položaj kad je otpustiš.
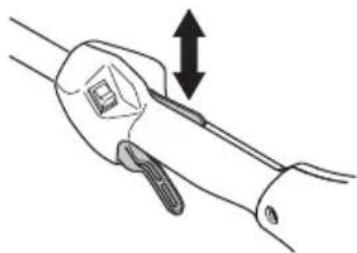
OPŠTA UPUTSTVA ZA BEZBEDNOST
Proveri da li se regulator gasa i kočnica regulatora gasa slobodno pokreću i da li ispravno rade povratne opruge.
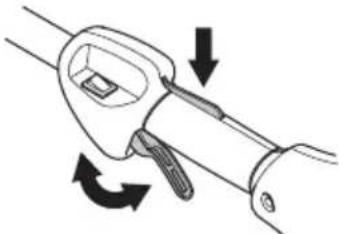
Vidite uputstva pod rubrikom Startovanje. Startujte mašinu i dajte puni gas. Otpustite ručicu za gas i prekontrolišite da li se zaustavlja uređaj za rezanje i da li ostaje u zaustavljenom položaju. Ukoliko se uređaj za rezanje okreće i dalje mada se ručica za gas nalazi u položaju praznog hoda, onda treba prekontrolisati podešavanje praznog hoda na karburatoru. Vidite uputstva pod rubrikom Održavanje.
Prekidač za gašenje
Pomoću ovog prekidača gasiš motor.

Upali motor i proveri da li se motor gasi kad staviš prekidač za gašenje u položaj za gašenje.
Zaštita uređaja za rezanje

Prokontrolišite da li je zaštita neoštećena i da nema stvorenih naprslina. Zamenite zaštitu ukoliko je bila izložena udaru ili ima naprsline.
Za prigušivače je vrlo bitno da se prati uputstva o proveravanju, održavanju i servisiranju.
Nikad ne upotrebljavaj mašinu s neispravnim prigušivačem.
Redovno proveravaj da li je prigušivač dobro pričvršćen za mašinu.
Ako prigušivač tvoje mašine ima mrežu protiv varničenja ta se mreža mora redovno čistiti. Začepljena mreža dovodi do pregrevanja motora i može da prouzrokuje teško oštećenje.
OPŠTA UPUTSTVA ZA BEZBEDNOST

- Montiraj zavrtanj, limenu pločicu i krilastu navrtku. Stegni krilastu navrtku.
- Poravnajte oznaku na dodatku (A) sa rupom na spojnici (B).

- Ugurajte dodatak u spojnicu tako da legne na mesto.
- Pre korišćenja uređaja čvrsto pritegnite dugme.

Demontaža:
- Popustite spojnicu okretanjem dugmeta (najmanje 3 puta).

- Pritisnite i zadržite dugme (C). Čvrsto držeći kraj motora, izvucite dodatak iz spojnice.

Montiranje reznog pribora

• Montirajte zahvatnik (B) na izlaznom vratilu.
- Okrenite osovinu lista sve dok se otvor zahvatnika ne poklopi sa odgovarajućim otvorom na kućištu menjača.
- Uložite trn za osiguranje (C) u otvor tako da se osovina osigura.
- Navrnite glavu trimer/plastične noževe (H) nasuprot smeru obrtanja.
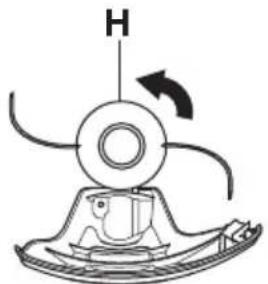
• Demonaža se vrši obrnutim redosledom.
Montaža zaštite trimera i glave trimera (T22LCS)

- Postavi zaštitu po opisu slike. Čvrsto stegni.
- Ne upotrebljavajte nikada mašinu bez zaštite ili sa neispravnom zaštitom.
- Sva kućišta moraju biti ispravno montirana i besprekorna pre palenja mašine.
Paljenje i gašenje


UPOZORENJE! Pre startovanja mašine mora da bude montirano kućište spojnice zajedno sa cevi pogonskog vratila, inače se spojnica može otpustiti i prouzrokovati ozleđivanje lica.
Saug: Staviti ružicu sauga o položaj paljenja pod saugom.

Gašenje
Motor se zaustavlja isključivanjem paljenja.

NAPOMENA! Zaustavni prekidač automatski se vraća u startni položaj. Kako ne bi došlo do slučajnog puštanja u rad, prilikom montiranja, provere i/ili izvođenja radova na održavanju treba ukloniti kapicu sa svećice.
TEHNIKA RADA
5 Održavajte ravnotežu i čvrst oslonac za stopala. Nemojte previše odmicati od tela. Uvek držite u odgovarajućem položaju i pazite na ravnotežu. 6 Mašinu uvek držite obema rukama. Mašinu držite sa desne strane tela. Vodite računa da neki deo tela ne dode u kontakt sa površinama visoke temperature. Vodite računa da neki deo tela ne dode u kontakt sa rotirajućim dodatkom za rezanje.

7 Dodatak za rezanje držite ispod visine struka.
8 Kod premeštanja treba zaustaviti motor.
9 Ne ostavljajte nikada mašinu sa motorom koji i dalje radi, a da pri tome nemate nadzora nad njom.

UPOZORENJE! Ni rukovalac mašine, ni bilo ko drugi, ne bi trebalo da pokušava da ukloni isečeni materijal u toku rada motora ili okretanja lista, jer to može rezultovati ozbiljnim povredama.
Zaustavite rad motora i sečiva pre nego što uklonite materijal koji se omotao oko osovine lista, inače postoji rizik od povrede. Tokom korišćenja i trenutak nakon korišćenja, menjač ugla može biti vruć. Postoji rizik opekotine prilikom kontakta.

- Rezni gajtan se haba brže i mora se češće puniti pri radu sa kamenjem, opekom, betonom, metalnim stubovima, itd. nego pri kontaktu sa drvetom i drvenim stubovima.
- Kod trimovanja i čišćenja struganjem treba da manje primenjujete puni gas (80%), kako bi rezni gajtan trajao duže i kako bi se manje habala glava trimera.
Podsecanje
- Trimeri su idealni za podsecanje na mestima, na kojima bi teško moglo da se izađe na kraj sa uobičajenom kosačicom za travu. Držite rezni gajtan paralelno sa tlom pri podsecanju. Izbegavajte pritiskanje glave trimera prema tlu, pošto se time može uništiti travnjak i oštetiti rezni alat.

- Izbegavaj da glava trimera bude u stalnom kontaktu sa tlom za vreme normalnog podsecanja. Takav stalni kontakt može da prouzrokuje oštećenja i i habanje glave trimera.
Čišćenje metenjem
- Ventilatorski efekat rotacionog reznog gajtana može da se upotrebi za brzo i jednostavno čišćenje. Držite rezni gajtan paralelno iznad površine koju treba da pometete i povlačite alat napred i nazad.
- Kod podsecanja i čišćenja metenjem treba da koristite puni gas kako biste postigli dobar rezultat.
ODRŽAVANJE
Karburator
Preporučeni broj obrtaja u praznom hodu: Vidi poglavlje Tehnički podaci.

NAPOMENA! Ne upotrebljavajte nikada mašinu sa prigušivačem buke koji je u lošem stanju.

Prečistač vazduha

ODRŽAVANJE
Menjač ugla

Menjač ugla je u fabrici napunjen odgovarajućom količinom masti za podmazivanje. Pre nego što se mašina pusti u rad, treba da se prokontrtoliše da li je menjač napunjen mazivom do 3/4. Upotrebljavajte specijalnu mast za podmazivanje firme HUSQVARNA.

Prečnik cilindra, mm 32,0 32,0
Hod klipa, mm 27 27
Prazan hod, o/min 2900 2900
Preporučena maks. brzina bez opterećenja, o/min 7200 9100
Broj obrtaja na izlaznom vratilu, o/min 7200 6700
Maks. snaga motora, sagl. ISO 8893, kW/ o/min 0,6/7800 0,6/7800
Prigušivač buke sa katalizatorom Da Da
Sistem za paljenje reguliran brojem obrtaja Ne Ne
Uređaj za paljenje
Svećica NGK CMR6A NGK CMR6A
Razmak između elektroda, mm 0,5 0,5
Uređaj za gorivo i podmazivanje
Zapremina rezervoara za gorivo, I 0,3 0,3
Težina
Težina, bez goriva, uređaja za rezanje i zaštite, kg 4,6 4,9
Emitovanje buke
(vidi napomenu 1)
Huskvarna 19 April 2013
Pe Gustefron
Stisnite zaporo plina in se prepričajte, da se povrne v svoj prvotni položaj, ko jo izpustite.

Preverite, će se ročica za plin in zapora plina premikata neovirano in ali njuni povratni vzmeti delujeta pravilno.

SPLOŠNA NAVODILA ZA VARNOST
Vžgite motor in preverite, če se ustavi, ko izklopno stikalo potisnete v položaj STOP.
Ščitnik rezilnih priključkov

- Montirajte vijak, pločevinasta spona in navojnik tako, kot je prikazano na risbi. Zategnite navojnik.
- Poravnajte zatič priponke (A) z luknjo na spojki (B).

- Priponko potisnite v spojko, dokler se le-ta ne zaskoči.
Demontaža:
- Odvijte spojko z obračanjem ročaja (najmanj 3 krat).

Montaža rezilnih priključkov

• Demontiranje poteka po obratnem postopku.
Montaža ščitnika trimerja in glave trimerja (T22LCS)

1:50 (2%) z Universal, Universal powered by McCULLOCH dvotaktnim oljem.
1:33 (3%) z olji, narejenimi za zračno hlajenje, dvotaktni motorji, klasificirani za JASO FB/ISO EGB.
| Bencin, l | Olje za dvotaktne motorje, l | |
| 2% (1:50) 3% (1:33) | ||
| 5 0,10 0,15 | ||
| 10 0,20 0,30 | ||
| 15 0,30 0,45 | ||
| 20 0,40 0,60 | ||
Mešanje
- Mešanico bencina in olja vedno pripravljajte v čisti posodi, atestirani za gorivo.
- Vedno začnite tako, da v posodo najprej natočite polovico potrebne količine bencina. Nato dodajte celotno količino olja. Dobro premešajte (s tresenjem). Dodajte preostalo količino bencina.
- Predno vlijete mešanico v posodo za gorivo, jo (s tresenjem) temeljito premešajte.


Čok: Ročico čoka premaknite v položaj za čok.


Izklop
Motor ustavite z izklopnim stikalom.

7 Rezalnika ne dvigujte v višino pasu.
8 Kadarkoli menjate delovni okoliš, mora biti motor ugasnjen.
9 Nikoli ne odložite stroja s prižganim motorjem, će ga ne morete nadzorovati.

- Kadar kosite in pometate, delajte s polnim plinom, da bo rezultat dela najboljši.
VZDRŽEVANJE
Uplinjač
Deli hladilnega sistema so:
Zračni filter

Filter očistite po 25 urah uporabe ali pogosteje, će delate v okolju, kjer se zelo praši.
Kotni menjalnik

Razmik valjev, mm 32,0 32,0
Takt, mm 27 27
Prosti tek, rpm 2900 2900
ZAŠTITA SLUHA
Zaštita sluha mora imati dovoljan prigušujući efekat.

ZAŠTITA ZA OČI
Odobrena zaštita za oči se uvijek mora upotrijebiti. Pri upotrebi vizira istovremeno se mora upotrijebiti odobrene zaštitne naočale. Odobrene zaštitne naočale su takve koje ispunjavaju standard ANSI Z87.1 za SAD ili EN 166 za EU-države.


OPŠTE SIGURNOSNE INSTRUKCIJE
RUKAVICE
Rukavice se moraju upotrebljavati kada je to potrebno, npr. prilikom montiranja reznog pribora.

ČIZME
Kontroliši da je regulator gasa zatvoren u praznom hodu kad je regulator za ograničavanje gasa u svom početnom položaju.
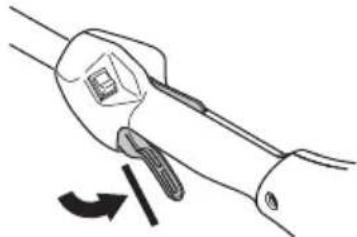
Pritisni regulator za ograničavanje gasa i prekontroliši da se on vraća u svoj prvobitni položaj kad se pusti.

Kontroliši da li regulator gasa i regulator za ograničavanje gasa idu lako kao i da li funkcionišu njihovi sistemi povratnih opruga.

Vidi odjeljak Paljenje. Upali mašinu i daj puni gas. Otpusti regulaciju gasa i kontroliši da li se rezni pribor zaustavlja i ostaje u mirnom položaju. Ako rezni pribor rotira sa regulacijom gasa
OPŠTE SIGURNOSNE INSTRUKCIJE
u položaju praznog hoda potrebno je kontrolisati podešenost karburatora pri praznom hodu. Vidi uputstva pod rubrikom Održavanje.
Prekidač za gašenje
Prekidač za gašenje se upotrebljava da se ugasi motor.

Upali motor i kontroliši da li se motor ugasi kad se prekidač premjesti u stop-položaj.
Zaštita reznog pribora

Ova zaštita je predviđena da spriječi da razni predmeti budu odbačeni prema rukovaocu. Zaštita spriječava takođe da rukovalac dođe u kontakt sa reznim priborom.

U toploj i suhoj klimi postoji rizik od požara. Zato smo opremili određene prigušivače sa tzv. mrežicom protiv iskričenja. Kontroliši da li ona postoji na prigušivaču tvoje mašine.
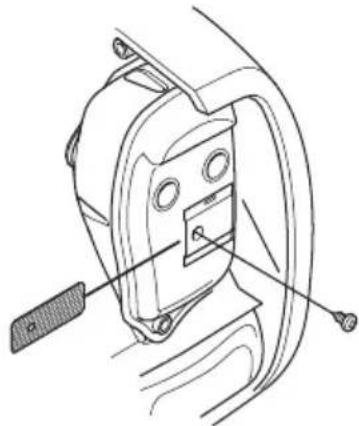
Za prigušivač zvuka je veoma važno da se prate instrukcije za kontrolu, održavanje i servis.
Nikad ne upotrebljavaj mašinu koja ima neispravan prigušivač zvuka.
Kontroliši redovno da li je prigušivač dobro pričvršćen na mašini.
Ako je prigušivač zvuka na tvojoj mašini opremljen mrežicom koja štiti od varničenja, treba je redovno čistiti. Začepljena mrežica dovodi do zagrijavanja motora sa posljedicom ozbiljnih oštećenja motora.

UPOZORENJE! Prigušivač zvuka sa katalizatorom je vrlo vruć kako kod upotrebe tako i nakon gašenja mašine. To važi i kod rada mašine u praznom hodu. Doticanje može izazvati opekotine na koži. Obrati pažnju na opasnost od požara!
OPŠTE SIGURNOSNE INSTRUKCIJE

UPOZORENJE! Misli na to:
- Montiraj šaraf, limenu pločicu i krilastu maticu. Zategni krilastu maticu.
Montiranje i demontiranje djeljive snast-cijevi

Montiranje:
Demontiranje:
- Pritisnite i držite dugme (C). Dok sigurno držite kraj mašine, ravno povucite dodatak iz spojnice.

• Montiraj sunosač (B) na izlaznoj osovini.
- Zavrći oko osovine sječiva dok se jedan od otvora u sunosaču ne podudari sa odgovarajućim otvorom u kućištu mjenjača.
- Uvedi štap za bravu (C) u otvor tako da se osovina zaključa.
- Navoj na glavi trimera/plastičnim noževima (H) je suprotan od pravca rotacije.
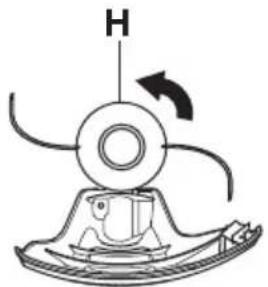
- Demontiranje se obavlja suprotnim redosljedom.
Montiranje zaštite trimera i glave trimera (T22LCS)
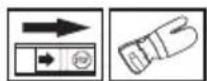
- Instaliraj zaštitu prema opisu slike. Čvrsto zategni.

- Drži šalicu za prašinu sa francuskim ključem da bi spriječio rotiranje osovine.
• Nareži navoj na glavu trimera na osovinu.
Sigurnost goriva
- Ne mješaj nikad više goriva nego što je potrebno za maksimalno jedan mjesec.
- Ako se mašina ne upotrebljava duži period treba isprazniti rezervoar i očistiti ga.

UPOZORENJE! Prigušivač zvuka s katalizatorom je vrlo vruć kako pri radu tako i nakon gašenja. To važi takođe i kod rada pri praznom hodu. Obrati pažnju na opasnost od požara naročito kod rukovanja u blizini zapaljivih materija i/ili plinova.
Punjenje


Saug: Staviti ružicu sauga o položaj paljenja pod saugom.


UPOZORENJE! Kad se motor pokrene s klinom u položaju klina, priključak za rezanje odmah se počinje okretati.
Gašenje
PAŽNJA! Stop prekidač se automatski vraća na start poziciju. Da bi se spriječilo nenamjerno paljenje, poklopac ručice za paljenje mora biti skinut sa ručice za paljenje tokom montiranja, provjeravanja i/ili servisiranja.
TEHNIKA RADA
7 Rezni nastavak držite ispod nivoa pojasa.
8 Pri premještanju mora se ugasiti motor.
9 Nikad ne spuštaj mašinu sa motorom u pogonu bez da imaš kontrolu nad njom.

UPOZORENJE! Niti rukovatelj mašinom niti bilo koja druga osoba ne smije pokušati ukloniti otsječeni materijal dok motor radi ili dok se oštrica okreće, jer to može dovesti do ozbiljnih povreda.
Zaustavite motor i oštricu prije nego što uklonite otsječeni materijal koji se omotao oko sječiva. U protivnom postoji rizik od povreda. Tokom upotrebe i trenutak poslije upotrebe, ugaoni mjenjač može biti vruć. Postoji rizik opekline prilikom kontakta.

UPOZORENJE! Pazite na izbačene predmete. Uvijek nosite sigurnu zaštitu za oči. Nikada se ne naginjite preko štitnika oštrice. Kamenje i otpad mogu ući u oči i izazvati sljepoću ili ozbiljne povrede.
Drži druge osobe na odstojanju. Djeca, životinje, gledaoci i pomagači se moraju nalaziti izvan zone sigurnosti od 15 metara. Zaustavi mašinu odmah ako ti se neko približava. Nikada se nemoj okrenuti sa mašinom bez da prvo provjerite da nikoga nema u zoni sigurnosti.
TEHNIKA RADA
- Uže otklanja lako travu i korov blizu zidova, ograda i cvjettnih lijeha ali takođe može oštetiti osjetljivu koru od drveća i žbunja, kao i oštetiti stubove ograde.
- Rizik za oštećenje rastinja se umanjuje tako što se uže skrati na 10–12 cm i smanji broj obrtaja motora.
Struganje
- Tehnikom struganja otklanja se sva neželjena vegetacija. Drži glavu trimera neposredno iznad zemlje i nagni je. Pusti da kraj užeta udara prema zemlji oko drveća,
- Uže se troši brže i mora se dodavati češće kod rada sa kamenicama, ciglama, betonom, metalnom ogradom i slično nego u kontaktu sa drvećem i drvenom ogradom.
- Kod trimovanja i struganja ne radi se sa punim gasom (80%) da bi uže trajalo duže i da bi se glava trimera trošila manje.
Sječenje
- Izbjegavaj da glava trimera ima stalni kontakt sa zemljištem u toku normalnog sječenja. Jedan takav stalan kontakt može izazvati oštećenje i habanje glave trimera.
Skupljanje smeća
- Strujanje vazduha koje proizvodi rotirajuće uže se može koristiti za brzo i jednostavno čišćenje. Drži uže paralelno sa i iznad onih površina koje čistiš i pomiči alat naprijed i nazad.

- Kod sječenja i skupljanja smeća trebaš koristiti puni gas da bi dobio dobar rezultat.
ODRŽAVANJE
Karburator
Neki prigušivači zvuka su opremljeni sa posebnom mrežicom koja gasi iskrice. Ako je i tvoja mašina opremljena jednim takvim prigušivačem zvuka treba mrežicu očistiti jednom sedmično a najbolje je čistiti sa čeličnom četkom. Na prigušivačima zvuka bez katalizatora je potrebno mrežicu čistiti i eventualno mjenjati jednom sedmično. Na prigušivačima zvuka sa katalizatorom je potrebno mrežicu kontrolisati i eventualno čistiti jednom mjesečno. Ako na mrežici postoje eventualna oštećenja potrebno ju je zamjeniti. Ako se mrežica često začepljava to može biti znak da je smanjena funkcija katalizatora. Kontaktiraj svog prodavca radi kontrole. Sa oštećenom mrežicom se mašina pregrijava što dovodi do oštećenja na cilindru i klipu.

PAŽNJA! Nikad ne upotrebljavaj mašinu sa prigušivačem zvuka koji je u lošem stanju.

UPOZORENJE! Prigušivač zvuka sa katalizatorom je vrlo vruć kako kod upotrebe tako i nakon gašenja mašine. To važi i kod rada mašine u praznom hodu. Doticanje može izazvati opekotine na koži. Obrati pažnju na opasnost od požara!
Rashladni sistem


Rashladni sistem se sastoji od:
1 Dovođenja zraka u aparat za startovanje.
2 Škrgi za hlađcnje na cilindru.
Čisti rashladni sistem četkom jedanput sedmično ili češće po potrebi. Nečist ili začepljen rashladni sistem prouzrokuje pregrijavanje mašine i oštećenja cilindra i klipa.
Svjećica motora

Zračni filter

Zračni filter treba redovno čistiti od prašine i nečistoće da bi se izbjeglo slijedeće:
- Smetnje karburatora
• Smetnje prilikom startovanja - Lošiji efekat
• Nepotrebna izlizanost na dijelovima motora - Nenormalno velika potrošnja goriva

ODRŽAVANJE
Ugaoni mjenjač

Ugaoni mjenjač je u fabrici napunjen dovoljnom količinom masti. Prije nego što se mašina počne koristiti treba međutim kontrolisati da li je mjenjač napunjen mašću do tri četvrtine. Upotrebljavaj uvijek specijalnu mast HUSQVARNA.

Sredstvo za podmazivanje u kućištu mjenjača ne mora se u normalnim prilikama mijenjati izuzev kod eventualnih popravki.
ODRŽAVANJE
Šema održavanja
U nastavku su date upute za održavanje koje je potrebno provoditi na ovoj mašini. Većina radnji je opisana u poglavlju Održavanje. Korisnik smije vršiti servisiranje i održavanje samo kako je navedeno u ovom uputstvu za upotrebu. Obimnije radove smije izvršavati samo ovlašteni servis.
| Održavanje | Dnevno nadgledanje | Sedmično nadgledanje | Mjesečno nadgledanje |
| Očisti mašinu izvana. X | |||
| Provjerite da li zatvarač gasa i gas rade sigurno. X | |||
| Kontroliši da li stop-prekidač funkcioniše. X | |||
| Kontroliši da rezni pribor ne rotira na praznom hodu. X | |||
| Čisti zračni filter. Promjeni ga po potrebi. X | |||
| Kontroliši da li je zaštita naoštećena i da nema pukotina. Zamjeni zaštitu ako je bila izložena udarcima ili ima pukotine. | X | ||
| Kontroliši da li je glava trimera neoštećena i da nema pukotina. Zamjeni glavu trimera ako je potrebno. | X | ||
| Provjeri da li su zavrnuti šarafi i matice. X | |||
| Kontroliši da nema ispust goriva iz motora, rezervoara goriva ili cijevi goriva. | X | ||
| Kontroliši aparat za paljenje i njegovo uže. X | |||
| Prekontroliši da vibracioni izolatori nisu oštećeni. X | |||
| Očisti svjećicu izvana. Demontiraj je i kontroliši razmak između elektroda. Podesi razmak na 0,5 mm ili zamjeni svjećicu. Nadgledaj da svjećica ima tkz. štit protiv radio valova. | X | ||
| Očistite rashladni sistem mašine. X | |||
| Očisti ili zamjeni mrežicu protiv iskričenja na prigušivaču zvuka (važi samo za prigušivače zvuka bez katalizatora). | X | ||
| Očisti karburator izvana i prostor oko njega. X | |||
| Kontroliši da je ugaoni mjenjač ispunjen do tri četvrtine sa sredstvom za podmazivanje. Dopuni ako je potrebno sa specijalnom mašću. | X | ||
| Provjerite da filter goriva nije prljav i da crijevo za dovod goriva nije napuklo ili na drugi način oštećeno. Zamijenite ukoliko je potrebno. | X | ||
| Prekontroliši sve kablove i prilkjučke. X | |||
| Provjerite istrošenost kvačila, opruge kvačila i bubnja kvačila. Ukoliko je potrebno zamijenite ih u ovlaštenom servisu. | X | ||
| Promjeni svjećicu. Nadgledaj da svjećica ima tkz. štit protiv radio valova. | X |
TEHNIČKI PODACI
Tehnički podaci
T22LCS T22LS
Motor
Zapremina cilindra, cm 3 21,7 21,7
Prečnik cilindra, mm 32,0 32,0
Huskvarna 19 April 2013

OBECNÁ BEZPEČNOSTNÍ OPATŘENÍ
RUKAVICE
OBECNÁ BEZPEČNOSTNÍ OPATŘENÍ
Demontáž:


Vypínání
Vzduchový filtr
PROTECTIA AUZULUI
MÂNUŞI
MÂSURI GENERALE DE PROTECTIA MUNCII
Demontarea:
MONTAJ

Oprire
Sistemul de răcire se compune din:
Filtrul de aer
Angrenajul cotit

Alezaj, mm 32,0 32,0
Cursă, mm 27 27
Bujia NGK CMR6A NGK CMR6A
АНТИФОНИ
РЪКАВИЦИ
Демонтиране:

Изключване
Въздушен филтър
Разборка:


Останов
Воздушный фильтр

ΓANTIA
Αποσυναρμολόγηση
ΣΥΝΑΡΜΟΛΟΓΗΣΗ


Σταμάτημα
Φίλτρο αέρα

ELDİVENLER
GENEL GÜVENLIK AÇIKLAMALARI
Demontaj:

ÇALIŞTIRMA VE DURDURMA
Stop
Hava filtresi

Debriyajlar

Silindir çapí, inç/mm 32,0 32,0
Що є що на тример
ЗАХИСНІ НАВУШНИКИ
РУКАВИЦІ
демонтаж:

Вимкнення
Вона складається з:
Повітряний фільтр

Зубчаста передача





- KEY TO SYMBOLS
- SYMBOLS
- IGNITION; CHOKE
- OTHER SYMBOLS/DECALS ON THE MACHINE REFER TO SPECIAL CERTIFICATION REQUIREMENTS FOR CERTAIN MARKETS
- CONTENTS
- CONTENTS NOTE THE FOLLOWING BEFORE
- INTRODUCTION
- WHAT IS WHAT
- GENERAL SAFETY PRECAUTIONS
- ASSEMBLY
- FUEL HANDLING
- STARTING AND STOPPING
- WORKING TECHNIQUES
- MAINTENANCE
- TECHNICAL DATA
- STARTING
- DEAR CUSTOMER
- WHAT IS WHAT ON THE GRASS TRIMMER
- IMPORTANT PERSONAL PROTECTIVE EQUIPMENT
- IMPORTANT
- HELMET
- HEARING PROTECTION
- EYE PROTECTION
- GLOVES
- BOOTS
- CLOTHING
- MACHINE'S SAFETY EQUIPMENT
- THROTTLE LOCKOUT
- STOP SWITCH
- CUTTING ATTACHMENT GUARD
- MUFFLER
- CUTTING EQUIPMENT
- TRIMMER HEAD
- FITTING THE LOOP HANDLE
- ASSEMBLING AND DISMANTLING THE TWO-PIECE SHAFT
- DISMANTLING
- ASSEMBLING THE CUTTING EQUIPMENT
- FITTING THE TRIMMER GUARD AND TRIMMER HEAD (T22LS)
- FITTING THE TRIMMER GUARD AND TRIMMER HEAD (T22LCS)
- FUEL SAFETY
- TRANSPORT AND STORAGE
- FUEL
- PETROL
- TWO-STROKE OIL
- MIXING
- FUELING
- CHECK BEFORE STARTING
- STOPPING
- GENERAL WORKING INSTRUCTIONS
- BASIC SAFETY RULES
- BASIC WORKING TECHNIQUES
- GRASS TRIMMING WITH A TRIMMER HEAD
- TRIMMING
- CLEARING
- CUTTING
- SWEEPING
- CARBURETTOR
- ADJUSTMENT OF THE IDLE SPEED
- COOLING SYSTEM
- SPARK PLUG
- TWO-PIECE SHAFT
- AIR FILTER
- CLEANING THE AIR FILTER
- OILING THE AIR FILTER
- BEVEL GEAR
- MAINTENANCE SCHEDULE
- EC-DECLARATION OF CONFORMITY (APPLIES TO EUROPE ONLY)
- SYMBOLFÖRKLARING
- SYMBOLER
- HANDSKAR
- DEMONTERING
- MONTERING
- STOPP
- UNDERHÅLL
- LUFTFILTER
- VINKELVÄXEL
- H∅REVÆRN
- GENERELLE SIKKERHEDSINSTRUKTIONER
- BRÆNDSTOFSIKKERHED
- STOP
- FEJNING
- VINKELGEAR
- TRIMMIN OSAT
- IRROTUS
- KÄYNNISTYS JA PYSÄYTYS
- PYSÄYTYS
- KUNNOSSAPITO
- ILMANSUODATIN
- KULMAVAIHDE
- GENERELLE SIKKERHETSINSTRUKSJONER
- HANSKER
- VEDLIKEHOLD
- VINKELGIR
- PROTÈGE-OREILLES
- GANTS
- INSTRUCTIONS GÉNÉRALES DE SÉCURITÉ
- DÉMONTAGE
- MONTAGE
- DÉMARRAGE ET ARRÊT
- ARRÊT
- ENTRETIEN
- FILTRE À AIR
- RENVOI D'ANGLE
- ALGEMENE VEILIGHEIDSINSTRUCTIES
- DEMONTEREN
- MONTAGE VAN SNIJUITRUSTING
- STOPPEN
- ONDERHOUD
- LUCHTFILTER
- HOEKOVERBRENGING
- CUFFIE PROTETTIVE
- SMONTAGGIO
- ARRESTO
- MANUTENZIONE
- FILTRO DELL'ARIA
- RIDUTTORE ANGOLARE
- GUANTES
- DESMONTAJE
- PARADA
- MANTENIMIENTO
- FILTRO DE AIRE
- ENGRANAJE ANGULADO
- GEHÖRSCHUTZ
- HANDSCHUHE
- DEMONTAGE
- WARTUNG
- WINKELGETRIEBE
- PROTECTORES ACÚSTICOS
- LUVAS
- INSTRUÇÕES GERAIS DE SEGURANÇA
- DESMONTAGEM
- MONTAGEM
- PARAGEM
- MANUTENÇÃO
- FILTRO DE AR
- ENGRENAGEM ANGULAR
- FÜLVÉDŐK
- VÉDŐKESZTYÚ
- ÁLTALÁNOS BIZTONSÁGI INTÉZKEDÉSEK
- SZÉTSZERELÉS
- LEÁLLÍTÁS
- KARBANTARTÁS
- LEVEGŐSZŰRŐ
- SZÖGVÁLTÓMŰ
- REKAWICE
- OGÓLNE ZASADY BEZPIECZEŃSTWA
- DEMONTAŻ
- WYŁĄCZANIE SILNIKA
- PRZEKŁADNIA KĄTOWA
- MIS ON MIS TRIMMERIL
- KÖRVAKLAPID
- KINDAD
- LAHTI VÕTMINE
- SEISKAMINE
- ÖHUFILTER
- HOOLDUS
- NURKREDUKTOR
- KAS IR KAS TRIMERIM
- CIMDI
- VISPĀRĒJAS DROŠIBAS INSTRUKCIJAS
- DEMONTĀŽA
- APSTĀDINĀŠANA
- GAISA FILTRS
- REDUKTORS
- ŽOLIAPJOVĖS DALYS
- BENDRI SAUGUMO REIKALAVIMAI
- PIRŠTINĖS
- DEMONTAVIMAS
- IŠJUNGIMAS
- ORO FILTRAS
- KAMPINĖ PAVARA
- CHRÁNIČE SLUCHU
- DEMONTÁZ
- ZASTAVENIE
- VZDUCHOVÝ FILTER
- KUŽEL'OVÝ PREVOD
- ŠTO JE ŠTO NA TRIMERU
- VAŽNO OSOBNA ZAŠTITNA OPREMA
- VAŽNO
- GLAVNI PREKIDAČ
- OPĆENITA PRAVILA ZA SIGURNOST NA RADU
- ŠTITNIK REZNE OPREME
- SASTAVLJANJE
- SASTAVLJANJE I RASTAVLJANJE DVODJELNE OSOVINE
- RASTAVLJANJE
- PRIČVRŠĆIVANJE REZNE OPREME
- NAMJEŠTANJE ŠTITNIKA TRIMERA I GLAVE TRIMERA (T22LS)
- NAMJEŠTANJE ŠTITNIKA TRIMERA I GLAVE TRIMERA (T22LCS)
- LSKLJUČIVANJE
- ČIŠĆENJE
- ŠIŠANJE
- METENJE
- ODRŽAVANJE
- RASPLINJAČ
- UGAĐANJE BRZINE OKRETAJA U PRAZNOM HODU
- FILTER ZA ZRAK
- PUŽNI ZGLOB
- SISTEM PALJENJA
- SISTEM GORIVA I PODMAZIVANJA
- TEŽINA
- EMITOVANJE BUKE
- RUKAVICE
- OPŠTA UPUTSTVA ZA BEZBEDNOST
- PREKIDAČ ZA GAŠENJE
- ZAŠTITA UREĐAJA ZA REZANJE
- DEMONTAŽA
- MONTIRANJE REZNOG PRIBORA
- MONTAŽA ZAŠTITE TRIMERA I GLAVE TRIMERA (T22LCS)
- PALJENJE I GAŠENJE
- GAŠENJE
- TEHNIKA RADA
- PODSECANJE
- ČIŠĆENJE METENJEM
- KARBURATOR
- PREČISTAČ VAZDUHA
- MENJAČ UGLA
- UREĐAJ ZA PALJENJE
- UREĐAJ ZA GORIVO I PODMAZIVANJE
- SPLOŠNA NAVODILA ZA VARNOST
- ŠČITNIK REZILNIH PRIKLJUČKOV
- MONTAŽA REZILNIH PRIKLJUČKOV
- MONTAŽA ŠČITNIKA TRIMERJA IN GLAVE TRIMERJA (T22LCS)
- MEŠANJE
- IZKLOP
- VZDRŽEVANJE
- UPLINJAČ
- ZRAČNI FILTER
- KOTNI MENJALNIK
- ZAŠTITA SLUHA
- ZAŠTITA ZA OČI
- OPŠTE SIGURNOSNE INSTRUKCIJE
- ČIZME
- ZAŠTITA REZNOG PRIBORA
- MONTIRANJE I DEMONTIRANJE DJELJIVE SNAST-CIJEVI
- MONTIRANJE
- DEMONTIRANJE
- MONTIRANJE ZAŠTITE TRIMERA I GLAVE TRIMERA (T22LCS)
- SIGURNOST GORIVA
- PUNJENJE
- STRUGANJE
- SJEČENJE
- SKUPLJANJE SMEĆA
- RASHLADNI SISTEM
- SVJEĆICA MOTORA
- UGAONI MJENJAČ
- ŠEMA ODRŽAVANJA
- TEHNIČKI PODACI
- T22LCS T22LS
- MOTOR
- OBECNÁ BEZPEČNOSTNÍ OPATŘENÍ
- DEMONTÁŽ
- VYPÍNÁNÍ
- VZDUCHOVÝ FILTR
- PROTECTIA AUZULUI
- MÂNUŞI
- MÂSURI GENERALE DE PROTECTIA MUNCII
- DEMONTAREA
- MONTAJ
- OPRIRE
- FILTRUL DE AER
- ANGRENAJUL COTIT
- АНТИФОНИ
- РЪКАВИЦИ
- ДЕМОНТИРАНЕ
- ИЗКЛЮЧВАНЕ
- ВЪЗДУШЕН ФИЛТЪР
- РАЗБОРКА
- ОСТАНОВ
- ВОЗДУШНЫЙ ФИЛЬТР
- ΓANTIA
- ΑΠΟΣΥΝΑΡΜΟΛΌΓΗΣΗ
- ΣΥΝΑΡΜΟΛΟΓΗΣΗ
- ΣΤΑΜΆΤΗΜΑ
- ΦΊΛΤΡΟ ΑΈΡΑ
- ELDİVENLER
- GENEL GÜVENLIK AÇIKLAMALARI
- DEMONTAJ
- ÇALIŞTIRMA VE DURDURMA
- HAVA FILTRESI
- DEBRIYAJLAR
- ЩО Є ЩО НА ТРИМЕР
- ЗАХИСНІ НАВУШНИКИ
- РУКАВИЦІ
- ДЕМОНТАЖ
- ВИМКНЕННЯ
- ПОВІТРЯНИЙ ФІЛЬТР
- ЗУБЧАСТА ПЕРЕДАЧА
Brand : MCCULLOCH
Model : T22 LS
Category : Lawn mower