A 320 E - Lawn mower Wolf Garten - Free user manual and instructions
Find the device manual for free A 320 E Wolf Garten in PDF.
| Technical Specifications | Wolf Garten A 320 E electric lawn mower, 32 cm cutting width, 1200 W power. |
|---|---|
| Engine Type | Electric motor, quiet and emission-free. |
| Cutting Height | Adjustable on 3 levels (20-60 mm). |
| Grass Box Capacity | 30 liters, with fill level indicator. |
| Weight | Approximately 12 kg, facilitating maneuverability. |
| Usage | Ideal for small and medium areas, easy to maneuver. |
| Maintenance | Cleaning the cutting deck recommended after each use, blade sharpening as needed. |
| Safety | Safety switch, overload protection. |
| General Information | 2-year warranty, user manual included, spare parts available. |
Frequently Asked Questions - A 320 E Wolf Garten
User questions about A 320 E Wolf Garten
0 question about this device. Answer the ones you know or ask your own.
Ask a new question about this device
Download the instructions for your Lawn mower in PDF format for free! Find your manual A 320 E - Wolf Garten and take your electronic device back in hand. On this page are published all the documents necessary for the use of your device. A 320 E by Wolf Garten.
USER MANUAL A 320 E Wolf Garten
Meaning of the symbols. 17
For your safety. 17
Safety information. 18
Intended use 21
Identification plate. 21
Assembly 21
Operation 22
Servicing 23
Troubleshooting 25
Warranty 25
CE Declaration of Conformity 25
Environmentally-friendly disposal 25
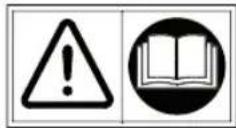
Meaning of the symbols
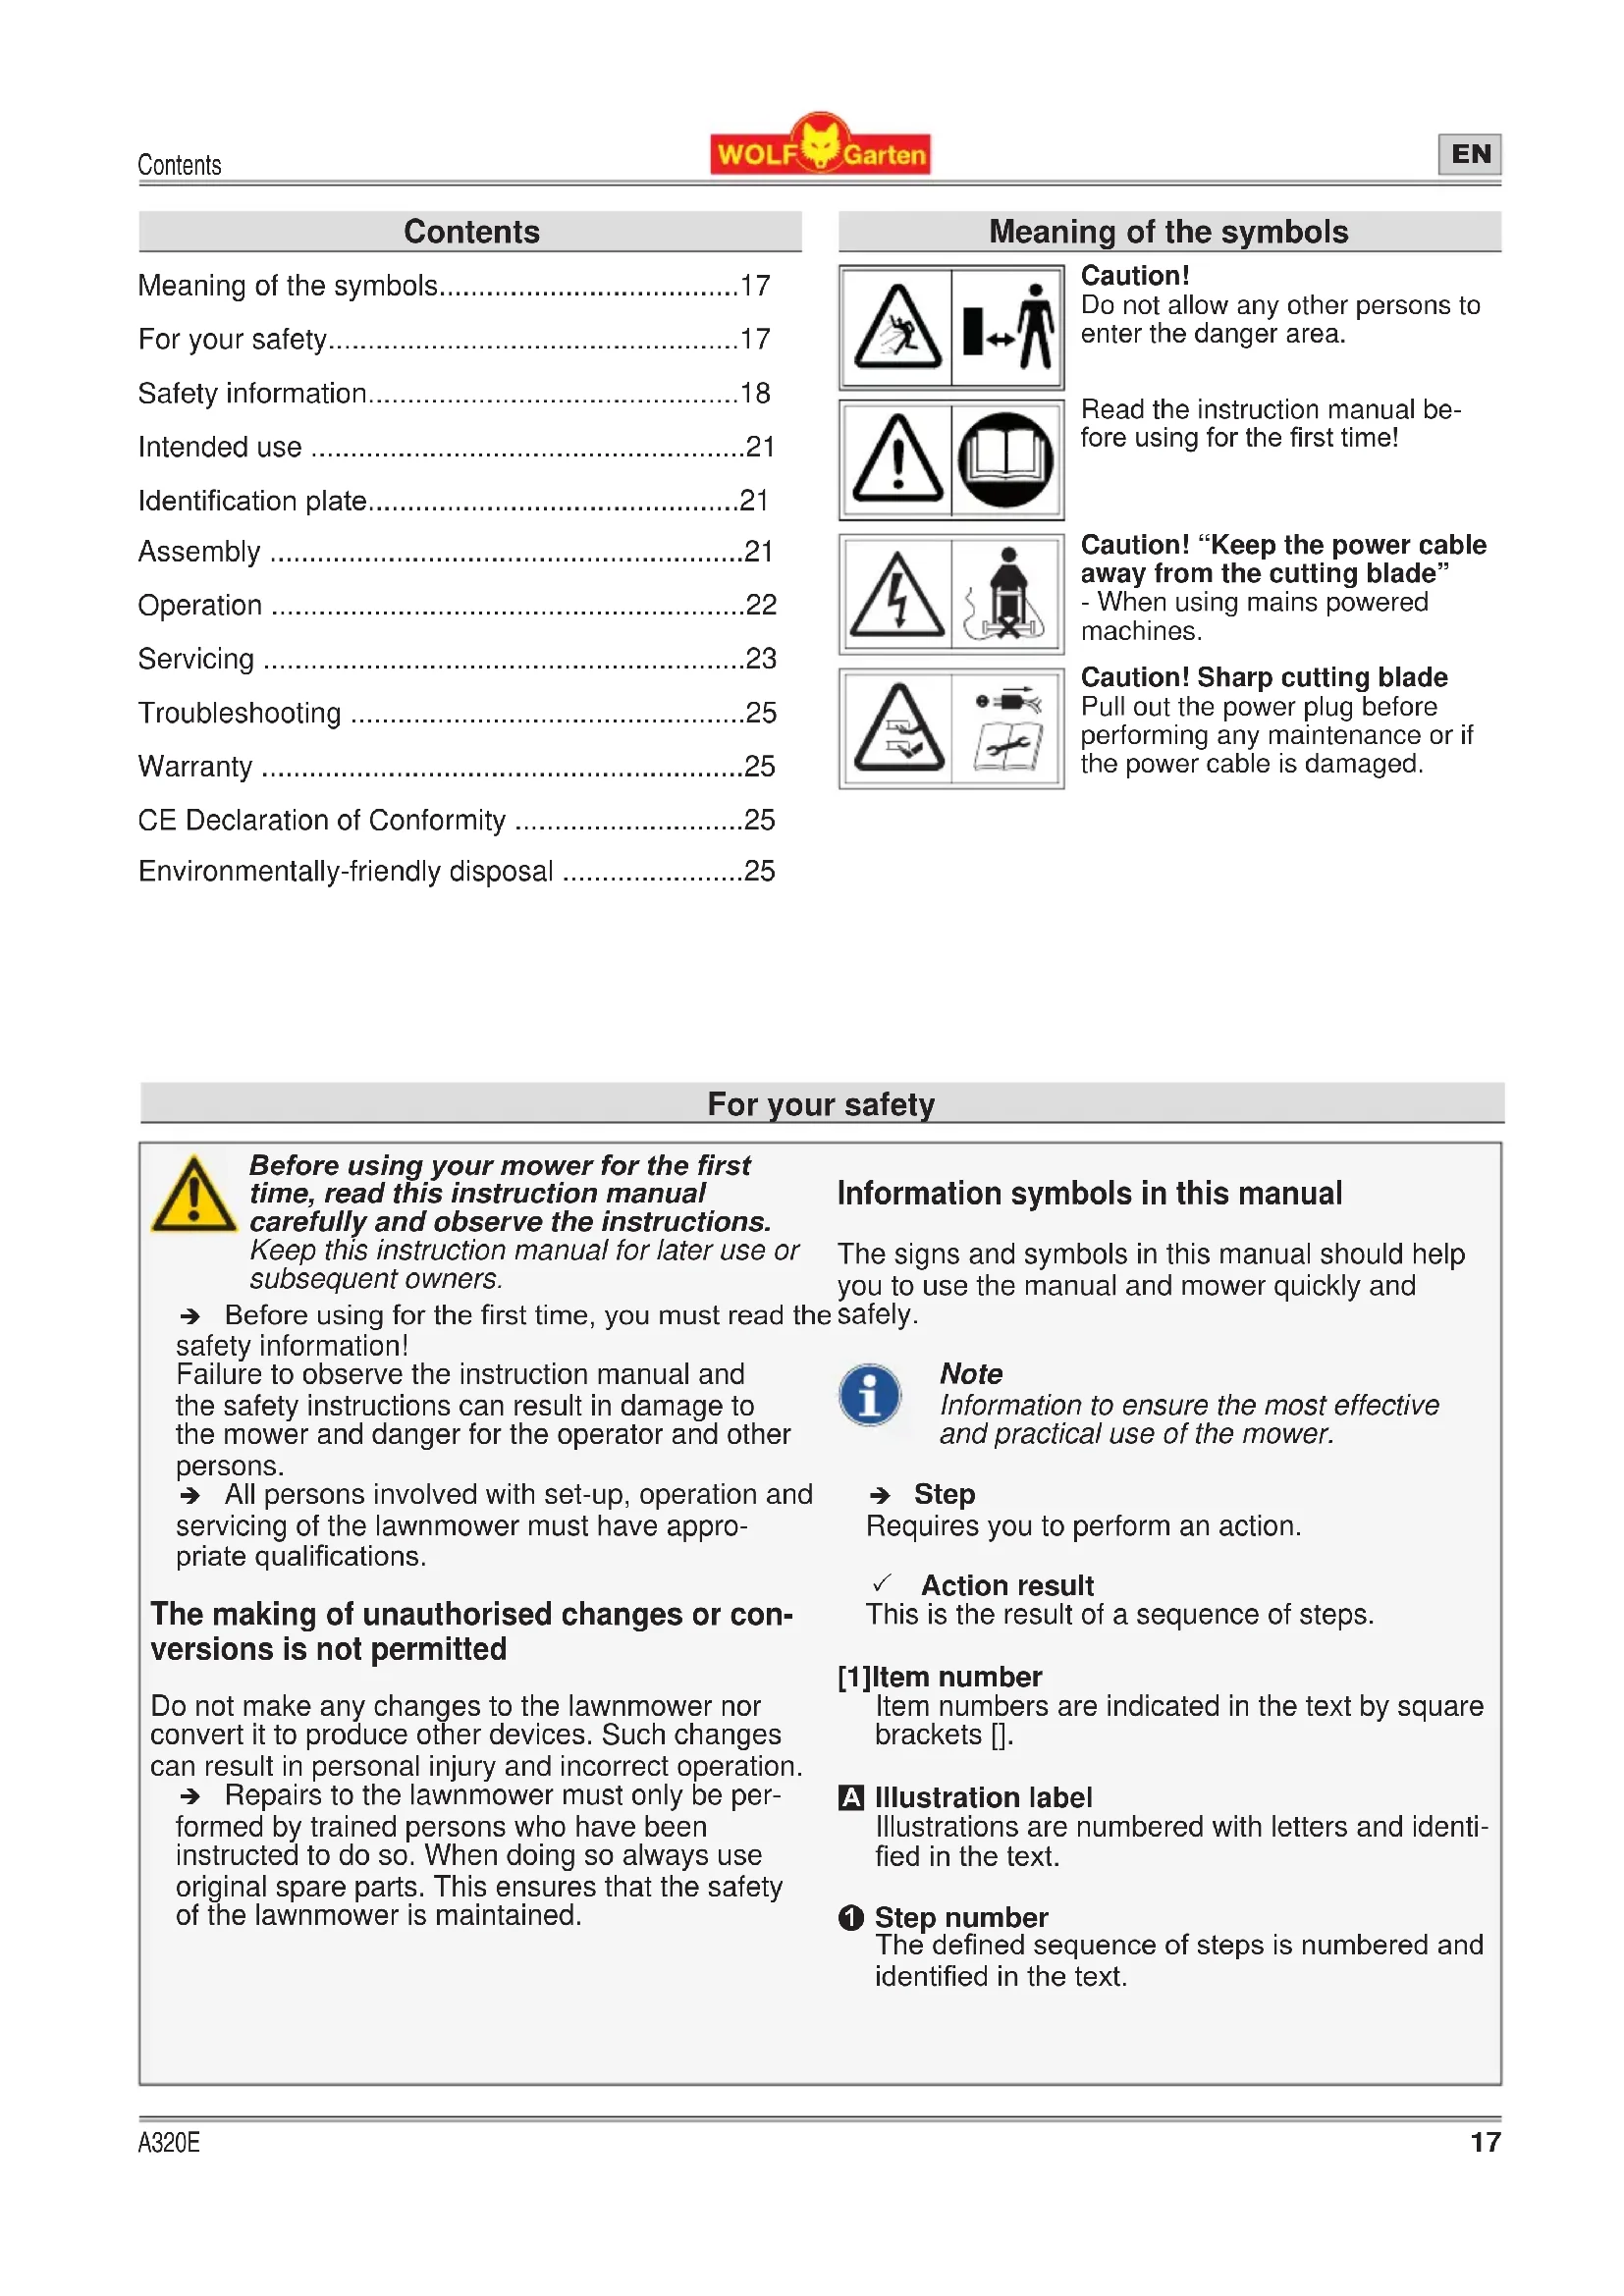
Caution!
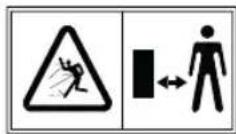
Do not allow any other persons to enter the danger area.
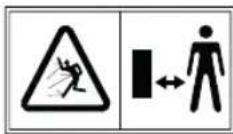
Read the instruction manual before using for the first time!
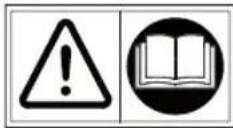
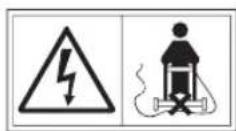
Caution! "Keep the power cable away from the cutting blade"
- When using mains powered machines.
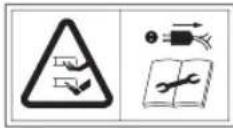
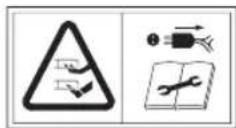
Caution! Sharp cutting blade
Pull out the power plug before performing any maintenance or if the power cable is damaged.
For your safety

Before using your mower for the first time, read this instruction manual carefully and observe the instructions.
Keep this instruction manual for later use or subsequent owners.
Before using for the first time, you must read the safely.
safety information!
Failure to observe the instruction manual and the safety instructions can result in damage to the mower and danger for the operator and other persons.
All persons involved with set-up, operation and servicing of the lawnmower must have appropriate qualifications.
The making of unauthorised changes or conversions is not permitted
Do not make any changes to the lawnmower nor convert it to produce other devices. Such changes can result in personal injury and incorrect operation.
Repairs to the lawnmower must only be performed by trained persons who have been instructed to do so. When doing so always use original spare parts. This ensures that the safety of the lawnmower is maintained.
Information symbols in this manual
The signs and symbols in this manual should help you to use the manual and mower quickly and

Note
Information to ensure the most effective and practical use of the mower.
Step
Requires you to perform an action.
√ Action result
This is the result of a sequence of steps.
[1]Item number
Item numbers are indicated in the text by square brackets []
A Illustration label
Illustrations are numbered with letters and identified in the text.
Step number
The defined sequence of steps is numbered and identified in the text.
Safety information
Danger levels of warning information
The following danger levels are used in this instruction manual to indicate potentially dangerous situations:
DANGER!

A dangerous situation is highly likely and, if the measures are not followed, will result in severe injury and even death.
WARNING!

A dangerous situation may occur and, if the measures are not followed, will result in severe injury and even death.
CAUTION!

A dangerous situation may occur and, if the measures are not followed, will result in slight or minor injuries.
Attention!
A possibly harmful situation may occur which if not avoided will result in property damage.
Safety information content
DANGER!

Type and source of the danger!
Consequences of non-observation
Measure for preventing the danger
Protection of yourself and others
For safety reasons, children, young persons under 16 years of age and persons who are not familiar with the instruction manual and the operation of the lawnmower, must not use it. The minimum age of users may be defined by local or national legislation.
Persons operating the lawnmower must not be under the influence of intoxicants (e.g. alcohol, drugs or medication).
Be careful and do not reach into the mower blade area.Remember that the mower operator is responsible for any accidents with other persons or their property.
The mower should not be operated by persons (including children) with limited physical, sensory or mental abilities or lack of experience and / or knowledge, unless they are supervised by a person responsible for their safety and receive instructions about the operation of the mower.
Do not operate the mower when there are people (especially children) or animals in the immediate vicinity. Ensure children do not play with the mower.
Stop mowing if you notice that persons (especially children) or animals are nearby.
Never mow barefoot or wearing only sandals.
Only switch the motor on if your feet are at a safe distance from the mower blade.
Always wear sturdy shoes and long trousers as well as other appropriate personal protective equipment (safety glasses, ear defenders, safety gloves etc.). The wearing of personal protective equipment minimises the risk of injury. Do not wear loose clothing or clothing with hanging cords or belts.
Before use
Before use, make sure you are familiar with the mower, its functions and controls.
Check that all nuts, bolts and screws are tight to ensure safe operation of the mower.
Before use and after an impact check the mower for signs of wear or damage. Make sure the motor is switched off before making any adjustments or cleaning and ensure that the mains plug is pulled out of the socket to prevent accidental starts. Any damage must be repaired by a qualified expert or workshop.
Safety information
Do not use any mower whose switch is defective and which can no longer be switched on or off. It must be repaired by a qualified expert or workshop.
Remove any adjustment tools or spanners before switching the mower on. Injuries could be caused by a tool or spanner that is left attached to the rotating mower blade.
Check the connection cable and any extension cable that may be connected to the mower for damage and aging (brittleness).
Only use the cable if it is free from defects. Damaged cables must be repaired by a qualified electrician or workshop.
Never use a lawnmower with damaged or missing safety equipment such as a deflector flap and / or grass collector, casing, etc. They must be repaired or replaced by a qualified expert or workshop.
Check the deflector flap for brittleness and correct seating.
Before mowing, make sure that the lawn is free from branches, stones, wire etc. and look out for such objects the whole time when mowing.
Regularly check the grass collector for wear and to ensure it is in good working order.
Visually inspect the mower blade to check that it is not blunt, damage or deformed.
Tips for use
Adopt a normal posture. Ensure you are standing securely and that you maintain your balance at all times. Do not run, rather walk forwards at a steady pace. This will ensure that you can maintain better control of the lawnmower if unexpected situations occur.
Do not use the lawnmower in an explosive environment, where there are inflammable liquids, gases or dusts. The lawnmower may create sparks, which could ignite the dust or vapours.Do not tilt the lawnmower when starting-up or switching the motor on unless the mower must be raised while doing so. In this case only tip the lawnmower as far as is absolutely necessary and only lift the side that is away from the user.
Maintain the safety distance that is defined by the handle.
Under the following circumstances, switch the lawnmower off and pull out the plug. Make sure that all moving parts have come to a complete standstill:
- If leaving the lawnmower unattended;
- When clearing a blocked mower blade;
- If checking, cleaning or working on the lawn-mower;
- If you have mowed over a foreign body (check whether lawnmower or mower blade have been damaged);
- If the lawnmower is vibrating strongly because it is out of balance;
- If the power cable is damaged during use.
Take extra care if you are mowing backwards and pulling the lawnmower towards you.
Switch the lawnmower off, if you need to tilt or transport it, e.g. between lawns or over paths.
Do not stand in front of the grass ejector opening. Otherwise you could be caught up in the mower blade or hit by the ejected grass.
Never leave the lawnmower unattended during breaks and store it in a secure location.
Before lifting or carrying the lawnmower away, switch the motor off, pull out the power plug and wait until the mower blade has come to a standstill.
Only adjust the cutting height with the motor switched off and the mower blade at a standstill.
Before removing the grass collector, switch the motor off and wait until the mower blade comes to a standstill. After emptying the grass collector, attach it carefully and make sure that it is securely fixed to the lawnmower.
Never open the deflector flap if the motor is still running.
Safety information
Never move the mower over gravel with the motor running. You may be hit by stones!
Where possible do not mow the lawn when the grass is wet.
Mowing on steep slopes
Ensure you have secure footing and mow slowly.
Always mow across the slope and not up and down.
Take extra care when changing direction. There is a risk of tripping.
Do not mow on very steep slopes.
After use
Switch the lawnmower off and store it in a secure location.
If you need to clean or service the lawnmower, switch it off, pull out the mains plug and remove the grass collector.
During maintenance work make sure that you do not trap your fingers between moving cutting blades and fixed parts of the machine.
Note that the cutting blades can still be moved during maintenance even if the power supply is switched off.
Ensure that ventilation slots are free from dirt.
Store the lawnmower out of reach of children.
Do not repair the lawnmower yourself; it must be repaired by a qualified expert or workshop.
Allow the motor to cool before putting the mower away.
Electrical safety

Electric shock due to cable damage! A fuse/circuit breaker will not always blow/trip if the cable is cut through or damaged.
Do not touch the cable before the mains plug has been pulled out of the socket.
Damaged cables must be repaired by a qualified electrician or workshop. Repair of the cable using insulating tape is forbidden.Fasten the connection cable to the strain-relief and do not allow it to rub on edges, points or sharp objects.
Do not crush the cable in between door and doorframe or window and window frame.
Do not remove or bypass any switching devices (e.g. taping of the safety lever to the handle).
The mower should be operated via a residual current device (RCD) with a tripping current of no more than 30mA .
For outside use, use only approved and appropriately labelled connection cables, e.g. H07RN - F 3 x 1.5 mm² (max. 25 m).
The connector parts of connection cables must be splash-proof and made of rubber or rubber-coated.
General safety information
Spare parts must meet the requirements of the manufacturer. Therefore use only original WOLF-Garten spare parts or spare parts approved by the manufacturer. When replacing spare parts, always observe the supplied fitting instructions and always pull out the mains plug before starting work.
Repairs must only be performed by a qualified expert or workshop.
To ensure safety replace worn or damaged parts.
This lawnmower is intended for the care of grass and lawn areas in private households. The lawnmower must not be used for other purposes because of the risk of bodily injury to the user or other persons.
Only use the lawnmower in daylight or under bright artificial light. Keep your work area clean and well lit.
Only use the lawnmower in dry weather conditions. Keep it away from rain or damp. The ingress of water into the lawn mower increases the risk of an electric shock.
Intended use
The lawnmower is intended solely for the mowing of lawns. Any other use is classed as an unintended use.
The user is liable for any damages arising from unintended use.
Identification plate
Position
The identification plate is located on the deflector flap.

Note
The identification is considered as a document. It must never be altered or obliterated.
Structure
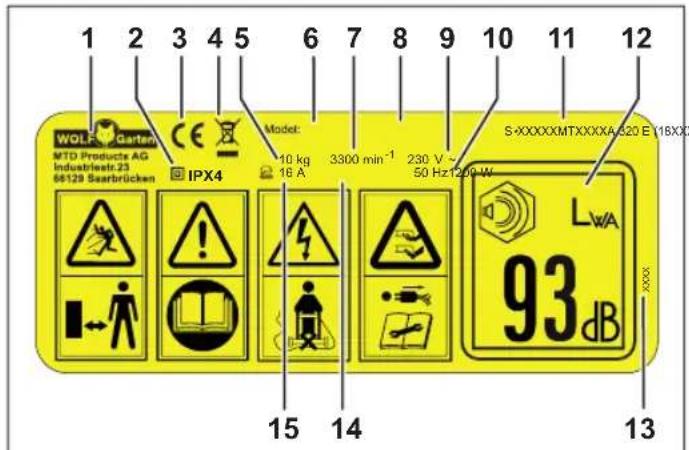
1 Manufacturer
2 Protection class/IP code
3 CE label
4 Disposal note
5 Weight
6 Model name
7 Motor rotation speed in rpm
8 Lawnmower model number
9 Rated voltage, kind of current
10 Frequency
11 Serial number
12 Guaranteed sound level
13 Year of manufacture
14 Capacity
15 Fuse
Assembly
Attaching the handle (Fig. ABCDEF)
Push the bottom part of the handle onto the threaded rod 1.
Push a wasA on to the threaded rod B 2.
Screw the handle Nut on to the threaded rod. Tighten the handle nut until the handle lies fully within the mounting B 3.
Repeat the procedure on the other side.
Push the bracket with the on/off switch into the provided guide on the top part of the handle C 1.
Undo the scicv from the cable strain-relief A b and remove the nut A d C 2.
Push the cable strain-reAfb from below onto the upper part of the handle on the side on which the on/off switch is located C3.
Screw the cable strain-reAeb tight at a distance of approximately 9 cm from the bracket of the on/off switch using screw A c and nut A d.
Connect the top part of the handle with the two bottom parts by feeding a screw A e through one of the holes D 1 on each side.

Note
Dependent on how tall you are, you can select one of two optional working positions D (a or b).
Push a was onto each screw A e D 2.
Screw a handle A f onto each screw A e and fully tighten D 3.
Press the cable cAsg on to the handle and thread the cable in E 1

Note
Ensure that the cable is not kinked.
Clamp the cable into the cable strain-re
Assembling the grass collector (Fig. 6)
Connect the two bottom parts of the cover together G 1.
Insert the rear part of the coR2.
Close the cover slowly and insert the sides when doing so G 3.
Attach the handle to the coG4.
Position the guide in the grooves provided for it on the grass collector 5
Operation
Operating elements (Fig. P)
1 Operator presence control
2 On/off switch
3 Cable strain-relief
4 Handle height adjustment
5 Deflector flap
6 Grass collector
7 Cutting height indicator
8 Cutting height adjuster
Operating times
Observe the times stipulated in local byelaws.
Check if there are any operating time limitations with your local authorities.
Attaching the grass collector (Fig. 1)

DANGER!

Risk of injuries due to the rotating mower blade.
Switch the motor off. Wait until the blade comes to a standstill, and pull out the mains plug before you make any adjustments to the device.
Raise the deflector f3b1.
Grip the grass collector by the handle and attach it the lawnmower J 2.
The grass collector is attached and you can release the deflector flap again.
Adjusting the cutting height (Fig. 1)

Risk of injuries due to the rotating mower blade.
Switch the motor off. Wait until the motor blade comes to a standstill, and pull out the mains plug before you make any adjustments to the device.
Pull the lever slightly 1t0.
Set the desired cutting hel
Release the lever agn3.

Note (cutting height - grass condition)
Whenever possible, to protect the turf of the lawn, only mow the grass when it is thoroughly dry.
Set a cutting height of 45mm (1 3/4").
When cutting damp or long grass mow with a higher cutting height.
Connecting to the socket (230 Volt, 50 Hz) (Fig. K)
Attention!
Only connect the lawnmower to sockets that are protected by a 16 amp slow fuse (or type B circuit breaker).
Fix the mains cable in the cable strain reff1.
Push the mains plug into the socket on the device
K 2.
Important information about RCDs
An RCD protects you against severe injury in the event of you coming into contact with damaged/bare wires, if an insulation defect exists and, under certain circumstances, if damage to live wires occurs.
Only connect the lawnmower to power outlets that are protected by a residual current device (RCD) with a tripping current of no more than 30~mA .
- For older wiring installations, upgrade kits are available. Consult a qualified electrician.
Switching the lawn mower on/off (Fig. L M)

CAUTION!

Risk of injuries due to the rotating mower blade.
Do not switch the lawnmower on if you are standing in front of the grass ejector opening!
Only switch the lawnmower on when it on a level surface.
Attention!
Do not switch the lawnmower on in long grass if necessary raise it slightly, as shown in L.
Switching the motor on (Fig. M)
Press the on/off button and keep it pressed down M 1.
Pull the operator presence con in.
Release the on/off butn1.
Switching the motor off (Fig. M)
Release the operator presence conu3.
Removing and emptying the grass collector (Fig. 1)

DANGER!

Risk of injuries due to the rotating mower blade.
Switch the motor off. Wait until the motor blade comes to a standstill, and pull out the mains plug before you make any adjustments to the device.

Note
If grass cuttings are left lying on the ground the grass collector is full and you should empty it immediately.
Switch the motor off and pull out the plug.
Raise the deflector 1
Take off the grass collep2.
Lower the deflector flap again.
Empty the grass collector.
Before starting, clear any blockages in the mowing chamber.
Working without a grass collector
Remove the grass collector.
- When working without the grass collector, the grass cuttings are thrown downwards.
Lawn care tips (Fig. N)
A lawn comprises various grass types. If you mow more frequently, the growth of strongly-rooting grasses is favoured resulting in firm turf. If you mow only rarely, the growth of tall grasses and other weeds (e.g. clover, daisies) is encouraged.
To ensure you lawn grows healthily and uniformly, without any lines, the cutting stripes must always overlap by a couple of inches/several centimetres
N
- Always route the cable safely on a patio, path or the part of the lawn that is already cut.
- The normal height of the grass is 40 - 50mm (1 1/2-2"). Cut approximately one third of the overall height as soon as the lawn has reached a height of 60 - 70mm (2 1/5-2 3/4").
-
Do not cut the lawn shorter than 45mm (1 3/4") as otherwise the turf can be damaged during dry periods.
-
Cut long grass in stages until normal height is reached.
After mowing
Switch the lawnmower off, wait until the motor blade comes to a standstill, and pull out the mains plug.
Empty the grass collector.
Store the lawnmower in a secure location.
Servicing

WARNING!

Risk of injuries or material damage.
Only clean or service the mower if the motor is stationary and the mains plug is pulled out.
Do not reach into the area of the rotating mower blade.
Arrange for repair and service work, and the replacement of safety elements, cables, etc., to be performed by a qualified expert or workshop.
Do not store the lawnmower in a damp environment.
At the end of each mowing season have the mower inspected by a qualified expert or workshop.
Cleaning the lawn mower

DANGER!

Risk of injuries due to the rotating mower blade.
Switch the motor off. Wait until the motor blade comes to a standstill, and pull out the mains plug before cleaning the device.
Every time you use the lawnmower, clean it with a hand brush after you have finished mowing.
Clean the mulch flap with a hand brush at regular intervals.
Attention!
Never spray the lawnmower with water or a pressure washer.
Cleaning the grass collector

Note
It is best to clean the grass collector directly after mowing.
Raise the deflector flap
Remove the grass collector.
Lower the deflector flap again.
Empty the grass collector.
Clean the grass collector including the frame with water or a hand brush.
In particular, clean the area beneath the fill level indicator.
Allow the grass collector to dry before next use.
Transport and storage

DANGER!

Risk of injuries due to the rotating mower blade.
Switch the motor off. Wait until the motor blade comes to a standstill, and pull out the mains plug before transporting or storing.
Secure the lawnmower sufficiently to prevent its unintentional slipping if you are transporting it in or on a motor vehicle.
Storage during winter
Thoroughly clean your lawnmower after every mowing season.
Arrange for a specialist workshop to check your lawnmower in Autumn.
Store the lawnmower in a clean and dry room.
Protect the lawnmower against rust during long storage periods in winter.
Replacing the mower blade (Fig. 0)

WARNING!

Risk of injuries.
Arrange for a specialist workshop to replace the mower blade.
Only work on the mower if the motor is stationary.
Pull out the mains plug.
Wear suitable safety gloves.
Attention!
Grinding the mower blade can result in an imbalance. Arrange for a specialist workshop to check for imbalance.

Note
Use a torque wrench with a 13 mm socket to change the mower blade.
Screw tightening torque:
M8:14-16Nm
Troubleshooting

WARNING!

Risk of injuries or material damage
In case of doubt always consult a specialist workshop.
Before any inspection or any work on the mower blade, switch the lawnmower off and pull out the plug.
Problem Possible cause Remedy
| Uneven running, severe vibration of the lawnmower. | The mower blade is damaged. The mower blade has come loose from its attachment. | Take your mower to a specialist workshop. |
| Motor does not run. | The fuse at the mains connection has blown/ is defective. | Contact an electrician to arrange its repair. |
| Procedure in the event of cable damage: Attention electric shock! The fuse/circuit breaker will not always blow/ trip if the cable is cut through or damaged. Do not touch the cable before the mains plug has been pulled out of the socket. Damaged cables must be repaired by a qualified electrician or workshop. Repair of the cable using insulating tape is forbid- den. | Take your mower to a specialist workshop. | |
| Poor mowing/grass collection performance. | The mower blade is blunt. | Take your mower to a specialist workshop. |
| The grass collector is clogged. | Follow the instructions in the section “Adjusting the cutting height”. | |
| The cutting height is not adjusted. | Follow the instructions in the section “Adjusting the cutting height”. |
Spare parts and accessories
Order no. Part code Part description
WG742-04355 Vi 32 D Mower blade 32 cm
Warranty
The warranty conditions of our local company or importer apply in all countries. Under the terms of the warranty we will repair faults on your lawnmower free of charge, insofar as material or manufacturing defects are the cause. To make a claim under warranty please contact your reseller or your nearest branch.
CE Declaration of Conformity

Further details about the lawnmower are contained on the separately enclosed CE Declaration of Conformity, which forms part of this instruction manual.
Environmentally-friendly disposal
Do not throw power tools away with your domestic waste!
According to European Directive 2012/19/
EU on Waste Electrical and Electronic
Equipment and its implementation in
national law, irreparable or non-serviceable power tools must be collected separately and routed into an environmentally compatible recycling chain.
Table des matieres
Fareniveauer for advarsler
Meta to teao ts epyaoc
ATTEVEpyOTIOInOTE Tn XOPTOKOTIKn mNxavn, TEPiEVETE MEXPI VA AKIVNTOTIOINthe i n AETIIDA KOTNc KAI ATTOUVDToT Bua.
Ovladaci privky (obr. P)
Ovladacie privky (obr. P)
YcTpaHHeH HeNCpPaBHOCTe 178
TapaHTnA 178
DeknapauncooTBeTCTBnE C 178
3KoIorHueckn 6e3OpacnaYyTnIn3aunr .178
3HaueHne CnMBOJOB
OctopoxHo!
HnB KOem cnyae He donyckaTe B onachyio 30Hy TpeTbIX Niu.
IpeE BBOOMB 3KcNlyatau npOHTe pyKOBoCTBO NO 3KcNly- ataun!
OcToPoxKHO! «DepKHTe coeHnHTeJIbHbI Ka6eJIb BdaJIb OT HOKeJ»
-BMaHax,pa6oTaOuxOT CETN.
OctopoXHO!OcTpbie HOxN
Ipeed hauanom pa60T no pemOH ty nTexnueckomy o6cnykBaHnIO nnB cnyuae NOBpeKdEHHa COeHNHTbHOrO Ka6eN I3BLeKaIte CTeByIO BNky.
ДлЯВаш经6e3oanacHocTn

Ipeod nepbBIM uCnONb3ObaHuem ycmpoucmea eHumameJIbHO npOymuhe Hacmoaee pykoobcmeo no 3Kcnnyamauuu u deucmeyume e coombecmenu c Hum. CoxpaHume hacmoaee pykoobcmeo no 3Kcnnyamauu dno nocnedykueseo uCnONb3ObaHua unu dno nocnedykueseo enadebua.
→Передпервим ВВОДOMВЗКПУаТAUЮ6ЯЗАTeNBHO npOчTNTe yka3aHЯ NOTEXHnke 6e3onac-HoCTN!
B cnyuae HecobnOeHn pykoBocTba no 3Kc- nnyatauHn yka3aHn NO Texnke 6e3OnacHOCTn BO3MOxHo NOBpeXdEHNye ycTpoNCTBa, TAKKe MOrTy BO3HNKHyTb ONaCHOCTn DnI NOJb3OBaTeJI n dpyrnx IIOdei.
BceIuca,BbInonHryIOUe BBOB3KcnpnyatauIO,
06cnykubahne n TexHueckoe 06cnykubahne yCTpoiCTBa,doJXHBIO6nadaTb COOTBETCTBYIoue KBAINΦKauine.
3anpeT Ha caMOBOLbHbIe N3MeHeHnI nepe- o6OpydoBaHne
3aPpeaaetcBHOCTbN3MeHeHnB KOHCTpyKUIO yCTpOJCTBa NIN N3rOTabNJBaTb N3 Hero DOnONHHTeJIbHbIe yCTpOJCTBa.Takne N3MeHeHnMOyT npNBecTN K TpaBMam HEnCnPaBHOCTm.
→ PemOHtnipoBaTb yCTpoNCTBO MOrYT OToBko IMeOUsne COOTBeTCTByIOUsne NOHOMOuH N O6yueHHbIe INuCa. Pn3TOM BcerDa NCNoJIb3yTe OPnIHHaJIbHbIe 3aNaChbIe YactN. 3TO No3BOJNT COxpaHHTb 6e30NaChOCTb yCTPOINCTBa.
HhOpmaunOHbIe CmBOLbl B HactoJeM pyKOBoDCTBe
3HaKn n CmBONbl B HactoIeM PyKOBOcTBe
doJXHbI Bam nomOy 6bICTpo N 6e30aCHO nCnoNb-
3OBaTB PyKOBOCTBO u ycTPOiCTBO.

Yka3aHue
Hopmaua O hauboee 3phiekmuBHom U npakmuHOM uCnoB30aHuU ycmpoucmea.
War deicTBnA
PpeINCbIbAeT DeiCTBne.
Pe3yNbTaT DeiCTBnA
3decb yka3bIbaetcpe3yIbTaT nocneIOBaTeNb HOCTn WaRO DeICTBn.
[1]Homep no3nun
HomepaNo3nuiO6o3HaueHbIBTeKCTeKbaDpaT HbIMNCKo6kamn[]
A O6o3nueHne nJIIOCTpaun
IInIOCTpaun CHa6KeHbI 6yKBaMn n O6o3Ha-yeHb I TEKCTe.
Homep wara deHCTBna
OnpeHeneHHa nocneIOBateIbHOCTb WaROB DeiCTBn IpoHymepoBaHa N o6O3HaueHa B TEKCTe.
Yka3aHnno TExHnke 6e3OnachOCTn
CTeHeH onaCHOCTn npdeynpekxden
B hactoJem pykoOIOCTBe NO 3KcNpyataunnncnoIb3yOTcCneDyoUne CTeNEHn OAnCHOCTn DnA O603HaueHn NOTeHuaJIbHO ONaChbIXcTyaui:
ONACHO!

HenocpeDCTBeHHoe HAcTyPHeHne onaCHO nTuayuun, KOToPAI npBEdET K TAgKeIbIM TpaBMam IIN DaJKe K CMePTN B Cnyae HecO6JIIODeHnA COOTBeTCTByUOnx MEP.

PENEYNPEXDEHNE!

Bo3MOxHa onaHaj CHTyaun, KOTopar, B cnyuae HecO6JIIODeHN COOTBeTCTByUoX Mep, npuBeTeK TJaKeJbIM TpaBMam Nn daKe K CmepTu.

OCTOPOXHO!

MoKet HAcTyNtB onaCha CnTyau, KOtOpa npBeTe K JIeKIM IIN He3HaHTeJbHbIM TpaBMam B Clyuae Heco6JIIODeHncoOTBeTCTByIOxMep.
BhumaHue!
Moxet HactyntB noteHuaNbHO onachna cnTyauN, KOTOPa npuBeTeK MaTePnAusbHomy yuepe6y,ecn He npedotBpaTntb ee.
CTpykTypa yka3aHn no TexHnke 6e3oNaCHOCTN

ONACHO!

BnD nIcToHnK OaCHOCTN!
TnocneDCTBna nHropnpobAHNA
Mepa no npedeTbpaueHnO onachoctn
HnBnDyanbHa 3aunTa
No coo6paXeHnM 6e3OnaChocTn DeTn, nOdpocTkB Bo3pacte do 16 letn IIOuN, KOtOpbIe He O3HaKOMnJIncb C HnCtpyKUnei NO 3KcNpyatauNeH He HayuNlncb o6paueHIO C ra3OHOKOCnIKoH, He MOryt pa60TaTb C Hei. MnHmAlhBhI B3Pact NOnb3OBaTeJMy MOxET onpeJeTbc MeCTHbIMN HopMaTnBaMn.
Pa60TaTb c ra3oHOKOcNkO 3aIpeuaeTcraIOJAM, KOToPbIe HaxOJaTcra NOB3DeiCTBnEM ONbHaHooX CpeDCTB (HaNPmEp: aIKOrOl, HApKOTnKn NnMeDnKaMeHTbl).
BybTe octopoKhbl Hne npocobBaIte pyKn BO Bpaauooyocn HOKeByIO peKy.ПOMHHTe O TOM,ЧTO ONepaTOp MaunHbI NJI INOJIb3OBaTeJIb OTBeuayET 3a HecyactHbIe CnyauC dpyrMn JIOdbMn NIN INx IMyueCTBOM.
Ra3OHOKOcNkoH He DOJXHbI ynpaBnTb Jnca (BKNIOUyAJeTeu) C ORpaHnueHHbIMN n3NUeCKnM, CEHCOPHBIMN yMCTBeHHbIMN BO3MOxHOCTaMn Nn npo OTCyTCTBn ONbTa n/nn 3HaHn, 3a NCKIOUeHNem cnyaeB, KOrda 3a HmN pncMaTpNBaET NIO, OTBeTCTBeHHoe 3a nx 6e30NaChOcTb n ecnn OHn 6bln npoHCTpykTnpoBaHbI NO nobOdy o6paueHnra Ra3OHOKOcNkoN.
He 3anyckaTe ra3oHOKOcNkU,ecnB HEnocpeDCTBeHHoN 6nn30CTn HaxoJrTcI NHOu (B Oco6eHHOCtN DeTn) nIN JKNBOTbIE. CneiTe 3a Tem, yTo6bl DeTn He irpaNN c ra3OHOKOcNkoN.
PepeTaHbTe Kocntb,ecn3aMeTnte,yTO pAOM HaxoJrTcra IIOu(BOCO6eHHOCTn DeTn)IIN DOMaUHHe XNBOThble.
Hn B Koem cIyue He Kocnte 6ocNKOM nN B caHdaJInx.
BknioaTe Dnuratelb ToIbKO B TOM cnyuae, ecnn Baun Hnr haxoJrTcH a 6e3onacHom pacctOHHN OT HOKeBO peKN.
Bo Bpempa60tbI cra3oHOKocnKoHnn BO3Je Hee Bcerda Hocnte npOHyO6yBb N DnHHbIe WtAHbl, a TaKKeNCnoJIb3yIte NOxODaJUne CpeCTBaHHNDbNyAIBHO 3aunTbI (3aunTHbIE OUYKN, IpOTnBOwymHbIe HayuHNKn, pa6OuNe nepaATkn n T.D.). NcNoJIb3OBaHne CpeCTB INDnVBdyaJIbHOI 3aUnTIb CHNXaET PNUCK TpaBM.He Hocnte Cbo6OHyO ODeJy IIN ODeJy CO CBnCAIOUMM UHypkAmn IIN peMeUKAMn.
IpeepnpimmeHneHem
Перед наразлам pa60тб O3HaKOMbTecб c ra30HOKOcNko, ee Функцma, a ТаКж e ee 3ЛeMeHTamn ynpaBHeHn.
Проверъ,ВсЕлгайкИВИNTьnpочно 3аТянъ,ЧTo6ьОБecпeунь6e3Опaнсую 3КСЛУаТAUЮ r3OHOKOCиKN.
Ipeep BBODOM B 3KcNpyatauHIO n noCJe CToJKNHOBHeHn IPOBepaTe Ra3OHOKOncNKy Ha HAnuHne npn3HaKOB n3HOca nn NOBpeXdEHN. Ipeep NaCTpoiKOu OOnCTKOu BO n36ExaHne cIyauHOro 3anycKa, yBeDuTEcb, qTO dBnraTeNb BbIKNoyeH, a CeTeBa BnJa Ka N3BNeueHa n3 po3eTKn. IopyuAte ycTaPaeHne IOBpeXdEHN KBaJIuΦnUnpoBAHHOMy CNEuaJIncTy nnn CneuaJIuN3nPoBAHHoM MaCTepckOi.
Yka3aHnno TExHnke 6e3onacHOCTn
He nCnoB3yIte ra3OHOKocnky, ecn ee BbIKIOuAteJIb HenCnpaBeH npecTaJI BKIOUaTBCra NIN BbIKIOUaTbcr. IopyHTe erOpMOHT KBaJIuΦNUPOBAHOMy CneuaJNCTU INN CNEUaJIu3NPOBaHHo MactepCKoI.
ПрждчemВКЛIOHTb Ra3OHOKOcNkU, y6epeIe NHCtpyMeHtblДЯ HAcTpOuKN IINrAeYHbIE KJIOnu.NIHCtpyMeHt NINKJIQUHaxOJaIaIcBBO BpaaIooJeCn HOKeBOI peKe,MOyT pInBecTn K TpaBMam.
Ocmotpnte coeHNHTeHbI KabeN b npoBOD, npoloxeHHbI cHapxN Ha ra3OHOKOcNlke,Ha HAnuYne NOBpeXdHn N ha npedmet CTapeHn (JOMKocTb). IcnoJIb3yIte Ka6eNb TOnbKO B 6e3ynpeHOM COCToAHN. IopyaIte peMOHT NOBpeXdHHbIX Ka6eNe KBaIIINΦUPOBaHHOMy JNeKTpy NIN CNEuaJIIN3UPOBaHHoM MaCTepCKoN.
HnB Koem Cnyae He NcNoJIb3yIte ra30HOKOCNky C NOBpeXDeHHbIMN 3aunTHbIMN yCTPOINCTBaMn NN npo OTCyTCTBm 3aunTHbIX yCTPOINCTB, TaKNX KAK, HApPIMep, pa3rpy3OuHa 3acNOHka n/ NN KOHTeHep dJa c6opA TpaBbl, KopynC nT.Д. IopyaIte nx peMOHT nn 3ameHy KBaIINFUncPOBaHHOMy CneuaNNCTy INIcNEuaJIIN3IPOBaHHoM MaCTepcKOi.
Поверп Te pa3rpy3OHyU 3acNoHky Ha npeДмET JOMKocTи Ha NaDeXHOCtB KpenJIeHn.
Передстрихков ra30Ha y6eintecb,чTo c Hero y6paHbI cy7b, KaMHn, npoBOJOKa n T. d.,и NOCTOHHO yHTbIBaIte 3TO BO BpeMa nepemeueHn Kocnkn.
Perylaepno npOBepnTe KOHTeHep dIa c6opa TpaBbHa npeDMET N3HOca Nn HEnCnpaBHOCTN.
Проверяпe(Bn3yaalbHo)HOKeByo peiKy n ee KpeNexHbIe npncnocO6JIeHnHa npEaMeT 3aTyIJIeHn, NOBpeXdEHN HnN DeOpMaun.
BoBpem npimHeHn
N36eraIte Heydo6hIx NOJoxHn TeJa. CneInte 3a XopoWey cToUHBOCTbIO H Bcerda NoDepKNaIe paBHOBeCne. Hn B KOem cnyuae He 6eraIte, DBurAaTeCb BpePei CNOKoINbIM WaROM. 3TO no3BOInr Bam lyuwe KOHTPOINpOBaTb Ra3OHOKOcNIky B HeOxNJaHHbIX CNTyaUNX.
He nCnoNb3yIte ra3OHOKOCnky BO B3pbIBOONaCHOM OKpyXeHH, rIe NMeOTcR ROpOuHne XnDKoCTn, Ra3bl IIN NblB. Ra3OHOKOCnIka MOxET CO3DaBaTb NCKpbl, KOTOpbl E MOrYT BOCnJaMeHHTb Nbl Nn Napbl.
He haKNoHnTe ra3oHOKocnky npn BkIIOueHnn 3aNyCKe DbIraTeJI, 3a NCKIOUeHnem CnyaeB, KOrda ee Heo6xOdmo npInoHnMaTb BO BpeM pa60tbl. B 3To mClyuae HaKNoHnTe ee IINb HAcTONbKO, HAcKOBko 3TO DeNCTBNTeJbHO Heo6xOdmo, n OndHMaIte ToIbKO CTOpOHy, ydaJIeHHyO OT NOb3OBaTeJI.
Co6nIpaTe 6e3oNaChoe paccToHHe, KOtOpoe 3aAaeTcKoHpUpyauneu pykoTkn.
B cneyuoux cnuyax otknnoaute ra30HOKOcNky n3BnkeaTe ceTeByIO BUNKy. Y6eNTecb, yTO BCE dBnKUneCraTaN IOJIHOCTbIO OCTaHOBNJNCb:
- ecn Bby ocTabIe Ta3OHOKOcNlKy;
TO6bIOCB06OaNTb 3a6NOKpOBaHHyHOHKeByIO peKy;
- TTO6bl npOBepntb r30HOKOCNJky, ONUCTNTb ee nn pa60TaTb C Hei;
B Cnyuae nonaDaHnna NocToPOHHe rpeMeTa (y6eInTeCb B TOM, He 6blna IIN NOBpeKDeHa ra3OHOKOcNlka IJIN HOKeBa peKa);
ecnnra30HOKOCnIKA cnIbHo Bn6pnpyET no npuHne pa36aJAnaHCnpOBKn;
B Cnyuae NOBpeKdEHNr COeINHHTeJIbHOrKa6eJIa BO BpeM npImHeHn.
Будte oc6eHNO octopoxHbI B TOM cnyae, ecnBbI noCDtpraete ra3OH 3aHm XoDm n TAHETe ra3OHOKOcNkY Ha ce6y.
BbIKIouaTe ra3OHOKOCnKy,ecNn Bbl onpOKnHynn ee nnn TpaHcnpOpTypee ee, HanpImep,OTra3OHa/Kra3OHynnYepe3 dopoKKn.
He ctaHOBntecb nepeo OTBepcTneM nIy Bb6poca TpaBbl. B npOTNBOM cnUyae HOKeBa peKa moKet 3axBaNTb Bac Jn6o B Bac moKet nonactb BblpoeHHa TpaBA.
Bo BpemnpepebIBOB pa6oTe HN B KOEM cnyuae He octaBnIe ra3OHOKOcNkU 6e3 npncMoTpa n XpaHnTe ee B HaJeKHom MeCTe.
Прждчem noДнЯТь nIn y6paTb ra3OHOKOCnIky, BblKJIIOUHTe DBnRaTeIb, n3BJIeKNITe CeTeByO BnIKy ndoXdNTecb, nOKa HOKeBaJ peKa OCTaHOBNTcJ.
Perynpyte BbICOTy cpe3a TOnbKO B TOM cnyuae, ecn DBrNaTeJb BBIKIOUeH, a HOKeBa peKa HEnoDbNxHa.
Ipepe chTneM KOTheHepa dJa c6opa TpaBbI BbIKIOHTe DBnraTeNb N DOXdNTecb OCTaHOBa HOKeBO PeKn. Pocne ONOpOXHeHn TuaTeNbHO 3aKpeNte KOTheHep dJa c6opa TpaBbI yBeDNTecb, YTO OH HAdexHo KpeNTcHa r3oHOKOcnlke.
HnB Koem cnyuae He OTKpbIbaIte pa3rpy3OHyIO 3acNOHky,ecnIN DBnraTeJIb pa6oTaET.
Yka3aHnno TExHnke 6e3OnachOCTn
HnB Koem cnyuae He nepemeaute Ra30HOKOcNkCy c pa6oTaIOUm DBNrAteJeM no rpaBnO. CyueCTByeT onaCHOctb Bbl6poca kamHe!
No BO3MOXHOCTH He KOCHTe cbipyTO TpaBy.
Kocb6a Ha kpytbix cknohax
CneiTe 3a xopoWey yToHnBOcTbIO n Kocnte MeJeHNO.
Bcerda kocnte nepneHdkyjrapHo yKIOHy, a He BBepx n BHN3.
BybTe Oco6eHNO OCTOpOxHbI npn CMeHe HapabHeH. MoXHo cNOTKHyTbcr!
He kocnte Ha kpytbix Kocoropax.
Pocne npmheHna
BbIKHouHTe ra3OHOKOcNkU N NOCTaBBTe ee BHaJeXHOM MeCTe.
EcInn Bam Heo6xOJMo BbIIOJHNTb pa60TbI no TexHNueCKOMy 06cIyXNBaHHIO N OYNCtKe ra3OHOKOCNk, BbIKIOHTe ee, IN3BNeKITe ceTeByIO BNkY n CHMNTe KOHTeHep dIra c6opa TpaBbl.
При Вьл�ненpa6OT no TexHnueckomy 06cnyKbAHNo DeiCTByTe OCTOpOxHo, qTo6bl He 3aUeMNTb NaIbCuI MExdy NOdBnXHbIMN HOxAMN HEnoDBrXHbIMN qactrMaMunHbl.
При Выллгени пабOT по Тхнчeckomy обслужваню учтьовп, чTo дже при OTКЛЮЧЕHOM ПИТАнН HOЖМORУТ ДВИГАТСЕ.
CneIte 3a TeM, yTo6bI BeHTnJIaUNOHHbIE ueHN He 6bln 3arpa3HeHbl.
XpaHnte ra3OHOKOcNky B HeIOCTyINHom dIaTei MeCTe.
He peMOHTnpuTe ra3oHOKOcNkCy camocToTaeNbHo, npuyaIte ee peMOHT TObKO KBaJIncnupOBaHHOMy CneZnaJInctTy INn CneZnaIN3nPOBaHHo MaCTepcko.
ДаиTe DBnraTeJIO OCTbITb, npexKe Yem NOCTaBNTb r3OHOKOChJky Ha MeCTo.
3JIeKtpnuecka 6e3onacHOCTb

IopaxeHne 3nEeKtpnueckm TOKOM n3-3a NOBpeXdHnKa6eJ!
Pn o6pbIe HIN NOBpeXdHn Ka6E JnpdoxpaHntb cpa6aTbIbAet He Bcerda.
He npikacaiTecb K Ka6eIIO Do n3BneueHnCeTeBOB BUNKn N3 po3eTKn.
NopyuatapeMOHT NOBpeXdEHHbIX Ka6eJe KBAHnΦuNPOBaHHOMy 3NeKTpNU Hn CneuaJIN3NPOBaHHoMaCTepcKoN.
3anpeaetcpeMOHTnpoBaTka6eNb npn NOMOUN3OJNIOHHOIHTbl.
3akpenTe Ka6eJb Ha npncnocO6JeHn dna 3aunTbI OT HaTjXeHn I cDeJaIe TaK, YTo6bl OH He Tepcra O KpOMKn IOCTpOKoHeHbI NJIIOCTpbie npedMeTbI.
He 3aueemnTe Ka6eB B DBePbIX n OKOHbIX IeJAX.
He demontpyuTe n He nepembikaTe npedoxpaHnteIbHbIe ycTpoiCTBa (HaNPmep, He npBra3bIBaTe npedoxpaHnteIbHyO duyk pykoTke).
Ra3OHOKOcNJka DOJXHa pa6oTaTb c yCTpoiCTBOM 3aunTHoro OTKIOUeHnR (RCD) C TOKOM pacuENHe H e 60nee 30 mA.ПОД OTKpbITbIM He60m NcNoIb3yIte TOnIbKOB IMeIOUHe COOTBeTCTByIOUm DOnyck IN COOTBeTCTByIOUm 6pa3OM 6oO3HaueHHbIE coeINHITeJIbHbIe Ka6eII, HapnMep, H07RN -F3x1,5MM² (MaKc.25M).
CoeHHTeHbIe DeTaHn CoeHHTeHBIX Ka6JIeN DOJXHbI 6bITb 3aUuIeHbI OT 6pb13r BObl N COCToTb N3 pe3INbI IIN IMeTb pe3INHOBoe NOKpbITne.
06üne yka3aHnnoTexnke 6e3onacHOCTn
3aunactn DOJXHbI COOTBeTCTBOBaTb Tpe6oBAHNm, yCTaHOBJIeHHbIM npOn3BOdnteMe. nO3tOMy nCNOJb3yInTe TOIbKO OpiuHaJIbHbIe 3aunactn KOMNaHn WOLF-Garten nIIN oO6peHHbIe npOn3BOdnteMe 3anactn. PpN 3aMeHe Bc co6IIOdaIte npUnraAemblie INHCTpyKcHn NO yCTaHOBKe nPpeDbapNTeJIbHo n3BJIeKaIte CeTEByIO BVJKy.
PopyaIte npOBeHne peMOHTa NCKIIOUHTeJIbHO KBaJIuΦNUPOBaHHOMy CNeuaIINCTy IIN CNeuaJIuN3nPobAHHO MaCTepcKoI.
N3 coo6paXeHn 6e30nacHocTn 3aMeHnTe n3HOweHHbI e Hn NOBpeKdEHHbI YeactN.
3Ta ra3OHOKOcNJa npeHa3NaueHa dJa yXoJa 3a TpaBnHbIM NOKpbITnMaMn Ra3OHAMN B DomAChEM Xo3JCTBe. H3-3a ONaCHOCTn TpaBMPOBaHn NOJb3OBaTeJIy INI Dpyrnx IIOJe rA3OHOKOCNky HeJIb3r INCNoJIb3OBaTb B INhIX CEJIAX.
NcnoIb3yIte ra3OHOKOcnkTy TOnbKO dHem nn npHaNNuXopoWero NCKycCTBeHHORO OCBeueHn. MecTo pa6oTbI DOJxHO 6bITb YNCTbIM I XopoWO OCBeueHHbIM.
NcnoB3yIe ra3OHOKOcNky TOnbKO B cyxuH orody. Bepernte ee otdojra nn cbiopctn. IonaaHne BoBb I ra3OHOKOcNky NObbiHaet onaCHOCTb nopajKeHna 3JIeKTPnueCKM TOKOM.
PpimHeHne no Ha3HaueHnIO
Ta30HOKOcNka npedHa3NaYeHa NCKIIOHTeJIbHO Dnna NOCTpRanraHnra30HOB. JIO6oe BbIXoJruee 3a 3TN paMKn NCNoJIb3OBaHHe CHTaEtCn pIMHeHNEM He No Ha3NaYeHIO.
3a yue6, npou3oueduin B clyuae npimeneHn He no Ha3haueHIO, OTBeuaet NOb3ObaTeJIb.
PacnopTna Ta6nUka
IopokHeHne
PacnopTna Ta6nUka HaxoNTcHa pa3rpy3OHyOn 3acNoHke.

yKa3aHue
Nacnpmna ma6nukka Hocum xapaKmep dokymehma - ee HeIb3a U3MeHmb UUN npubodumb e Heuumaembl bud.
Ctpyktypa

1Pon3BOJNTeB
2 Knacc 3auntbi/cteneHb 3auntbi
3 3HaK CE
4 Yka3aHne nO yTJIm3aJIIM
5 Macca
6 Ha3BaHnE MoDJIIN
7 Yactota BpaueHn ABurateJn, 06/MnH-1
8 Hmep moeJn r3oHOKOcnJIK
9 Pacyehoe HnpanxkeHne /poToka
10 Yactota
11 CepiHbI Homep
12「apaHTIpOBaHHoe 3HaHeHne 3ByKOBoMooHocTn
13TovBbinycka
14 MoHocTb
15 PpeoXpaHnTeJIb
C6opka
Kpenenne pykoarTKn
(pnc. ABCDEF)
HaeneHbTe HxHIOU qactb pyKoTka Ha pe3b6OByIO WnNlbKy B 1.
HaenebTe noKnaHyIO WaHa pe3b6OByIO WnIbKy B 2.
→ HabepHnTe 6apaWKoByIO raHa pe3b6ObyIO WnIbky. 3aTARnBaIte 6apaWKoByIO raKy Do Tex Nop, noka pyKoRTKa nonHOCTbIO He npnJxKET K KpeNneHnIO B 3.
→ NOBTOPTE 3TN DeiCTBnC dpyroT CTOPOHbl.
→3aADBHe TE KOHCOJIb C BbIKIOuHaTeIeM B npeYCMOTpeHHBe IINr 3TOrO HAnpabJIouUeB BepxHeu Yactn pyKoRTKn C1.
OTnyctnte BAt npncnoc6neHnA n3aunTb ka6eJr OT HaTjXeHnA b n CHUMnte raKy A d C 2.
→HaBnHbTe npncnoc6neHne 3aunTb Ka6eJr OT HATXKeHnA b CHN3y Ha BepxHIOU YaCTb pyKoRTK n TOI CTOpOHbl, IDe HaxOHTC BbIKIOu- ChaTeNb C 3.
CHOBA 3aKpEnIte npncnoc6JeHne dJna 3a-NTbI Ka6eJIa OT HaTaeHNA bHa pacCToHIN nPIMepHO 9 CM OT KOHCJIN BbIKIOHcTeJIa C NOMOuBnBnHTa A c n raIKN A d.
CoeHNHTe BepxHIO yactb pyKoTKn C o6eHMn BepxHIMN YACTaMn, BCTaBbC KaXDoI CTOpOHbI IO ODNOMy BNHTy A eYepe3 OJHO N3 OTBepCTnD 1.

YKa3aHue
B 3a8ucumocmu om co6cm8eHHou KOMnneKuuu, 6bIMoxeme ycmaHOEBmbykoamky 8 oHO u3 deyx pa6Ouyx nonoKeHu (a unu b).
HaenebTe Ha KaKdbiB Ate No NODKaIaHOn
→HabePNTe Ha KaKDbI BAte 6apaUKOByIO raKy A f D 3.
3aueKHNTEepKaTeIN Ka6Ha pyKoTKe n npOeHbTe Ka6enb E 1.

Yka3aHue
Cneume 3a mem, ymo6bI ka6enb He nepe-2ubancr.
3aKMTe Ka6eJIb B npucnoo6JeHn nn 3aunTbI Ka6eJr OT HaTKeHn A b F 1.
Kpenenne KOHTeHepa dIra c6opa TpaBbl (Pnc. G)
Co6epnte BmecTe DBe HxHHe yactn KpbIuKn G 1.
BCTaBbTe 3aDnHIOU qACTb KpbIc2
→MeIeHHO 3aKpbBaJ KpbIiKy, BCTaBbTe 6OKOBBe CTeHNK C
YctaHOBnTe pyuKy Ha KpbHg4.
BctabbTe HnpaBnIouyIO B npedymOTpeHHbIE 1TOrO n3bHa KOHTeHepdNc6opa TpaBbl
3Kcnnyatauia
3JeMeHTbI ynpaBneHn (Pnc. P)
1 PpeoxpaHnteIbHaI dyra
2 BbiknHoyaTeIb
3Pncno6JeHneJ3aunTbKa6eJrOHTaRKeHHN
4 PeryIaTOp BbICOtbl pyKoTkn
5 Pa3rpy3oHna 3acNoHka
6 KOnTeHepIJIa c6opa TpaBbI
7 INnKaTOp BbICOTbI cpe3a
8 PernyTOp BbICOTbI cpe3a
Yacbl pa60TbI
Co6IIOaItepeHnOHaJIbHbIe npEiNcAHn.
→ Y3haIte o pa3peWeHHbIX yacax pa6oTbIB MecTHOM opraHe 6BecTBeHHoro npabONopraKa.
HaedeBaHne KOHTeHepa dIra c6opa TpaBbl (Pnc. J)
ONIACHO!

OnachocTb TpaBMnpoBaHnBpaaHoueJc HOKeBOpeKoN.
BbIKIOUHTe DBrIaTeJIb. NpeEd BbIOJHHeHnEM HAcTpoE K yCTpOiCTBa DOxNITcB, NOKA HOKeBa peKa OCTaHOBNTcR, IN3BJeKInTe CeTeByo BNkY n3 p03ETKn.
→ POnHIMnTe pa3rpy3OHyU 3acJIOy1.
Bo3bMnTe KOHTeHep dIЯ c6opa TpaBbI 3a pyky HnHaDeHbTe eIro Ha rA3OHOKOcNIky J 2.
Tepeb KOHTeHep JIc6opa TpaBbHaJeT pa3py3OHy 3acNoHky MOxHO OTnycNTtB.
PerynnpOBka BblcOtbl cpe3a (Pnc. I)

OnachocTb TpaBMnpoBaHnBpaauouec HoxeBo peKoN.
BbIKIOUHTe DBrIaTeJIb. Npeed BbINOJHHeHnEM HAcTpoEYcTPOINCTBa DOxDITecb, NOKa HOKeBa peKAp OCTaHOBNTcR, IN 3BNeKInTe CETeByIO BUNKy I3 PO3eTKN.
→ПOTЯнITEpbuHARHemHoroHapyIyO.
HactpoTe Heo6xOdmyo BBICOTy cp1a2
CHOBAOTnycTnepebl

YKa3aHue (eblcoma cpe3a-cocmoHue mpa6bl)
No 803MOxHocmu Kocume 2a3OH cyxum, 4mo6bI He noBepdumb depH. Hacmpoume bicomy cpe3a, paehyIO 45 MM. Ecnu 2a3OH baxhbiu u bicoku, ycmaHO- bume Heckonbko bonyu bicomy cpe3a.
Подкlioуене К розтke (230В,50Гц) (Pnc. K)
BhumaHue!
IopKlUoyaTe Ra3OHOKOcNky ToJbKO K pO3eTKam, KOToPbIe IpeOxpaHeHbI C NOMoUbIO INHePsoHHoro npEdoXpaHnteTn 16 A (nIn nHeHoro 3aunTHoro aBtOMaTa TnA B).
3aKpeNITe ceTeBOI Ka6JIb B npCnOc6JeHIN DnI 3aUNTb Ka6JIra OT HaTJKeHnR K1.
→BCTaBBte ceTeBOI Ka6eJIb B rHe3IO Ha ycTpoi-CTBe K 2.
BaxhIe yka3aHnO 6 ycTpoNCTBe 3auNTHOrO OTKIOUeyHn
3TN 3aunTHbIe yCTPOINCTBa 3aunuHOT OT TJeBIX TpaBM B Cnyae PnIKOCHOBeHNK NOBpeKDeHHbIM npoBOdAm, B Cnyae DeEeKTOB N3OJLcN, a B ONpeJeHHbIX CnyaX TaKKe I pN NOBpeKDeHNN npoBOIOB, HaxOJaUxxCr ND HAnpRKeHNEM.
→ПодкючайтгаонокосикуТовkoКpo3eTKam, KOTOPbIe npeOxpaHbI yCTpoiCTBOM 3aunTHoro OTKIOUeHnR (RCD) c TOKOM yTeuKN He 60Jee 30 mA.
-ДястаролдягрпогбнIMeOTcKOMПЯктыдяdo06opydOBAH.N.РOKOHcybTpyITEcb KBAJIINФицрOBaHHbIM 3JNEKTpNKOM.
BkIIOueHne/BbIKIOueHne ra3OHOKOcNIKN (Pnc. L M)
OCTOPOXHO!

OnachocTb TpaBMPOBaHnBbpaauouec HoxeBO peKoN.
He BkHouaTe ra3oHokocnky, cTOr nepeD OTBepCTnEM dNЯ Bbl6poca TpaBbI!
BknHouaTe ra3oHOKocnIKy Ha poBHOI NOBepxHOCTN.
BhumaHue!
He BKNHouaTe ra3OHOKocnky B BBICOKoTtpaBe -B Cnyuae KpaHHe HEObXoDMOCtINpNIOHNMITE ee, KAK NOKa3aHo Ha Pnc. L
BknoueHne DnRaTeJna (Pnc. M)
→HaxMNTe BBiJIIOuHaTMyepKINBaIte erO HAXaTbIM M ①.
→NotaHTe npedeoxpaHnteJbHyu Mv2.
OTnyCTnTe BbIKIOuAt
BbIKIOueHne DnRaTeNa(Pnc. M)
OTnyctnte npedoxpahntbHyu 3
Сяг��е и onopoxHeHne KOHTeHepa ДЯ сбopa TpaBbI (Pnc. J
ONIACHO!

OnachocTb TpaBMPOBaHnBbpaauouec HoxeBO peKoN.
BbIKIouHTe DnIaTeJIb. Ipeed BblIOJIHeHHeM HAcTpoE K yCTpoIcTBa DOKdITecb, NOKA HOKeBa peKa OCTaHOBNTcR, IN 3BNEKITE CeTeByIO BNJKy n3 pO3ETKn.

yKa3aHue
Ecnu ckoueHHa mpaea ocmaemcHa 3emne, 3mo 3Naum, ymo KOhmeuHep dJa c6opa mpaBb IOnHbI u e2o Heo6xodUmo cpoHNoopoxHumb.
→BbIKHQUHTe DBnraTeJIb Nn3BnKeKNTe CeTeByIO BnIKy.
→ПиноДнИМЛТe pa3rpy3OHyTO 3acINoJy1.
→ CHHMMTe KOHTeINHeP dIa c6opa Tpa2
CHOBA OTnycTnte pa3rpy30uHy 3acNOHky.
OnpoxkHnTe KOHTeHep dIa c6opa TpaBbl.
→Передз苹uckomуctpaHHTe BO3MOKHOe 3aBnBaHHe B KocnouHOn KaMepe.
Pa6ota 6e3 KOnteHepa dJa c6opa TpaBbl
CHIMITE KOHTeHep dIa c6opa TpaBbl.
Bo Bpempa6oTbI 6e3 KOHTHepa JIAc6opa TpaBbI cKOWeHHa TpaBa Bbl6paCbIBaETCra HEnoCpeiCTBeHHO BHn3.
COBETbI no yxOdy 3a ra3oHOM (Pnc. N)
Fa3OH coCToNT u3 TpaBbl pa3hBIX copTOB. EcNn Bbl qacto Kocnte, nHTeHcNBHO pactyT TpaBbl, KOtOpbIe CnIbHO NyckaOT KopHn o6pa3yOT npOuHbI nepH.
EcNn Bby Kocnte peko, aKTHBHO pa3BnBaIOTcR BBICOKopacTyuue n Dpyrne DNKKopacTyuue TpaBbl (HaNPmep, KneBep, MaprapNTkn)
YTo6bI BaIra30H 6bl 3dOpOBbIM n poc paBHOmepHo, TaKke YTo6bI He o6pa30BBiBaJNCb DeepHOBblneNoOcbI, npoxoBl DoJXHb I BcERda nepeKpbIBaTbCnHa yUacTKe HeCKOJIbKnx CaHTMmETpoB N.
- Bcerda knainte ka6enb Ha Teppacy, dopoxky nncKoWeHHyIO TpaBy TaK, yTo6bl NCKIIOHTb IIO6yIO onaCHOCTb.
-HopmaJIbHra BbICota Ra3OHa CoCTaBnREt OKoNo 40-50 MM.CKOCITEpaby npi6n3nteJbHO Ha OHy TpeTb OT O6ueBbICotbl,ecNn BbICota Ra3OHa DoCTnIgna 60-70 MM. - He noidctpuraTe ra3OH kopoye 45 MM, TAK KAK B npOTNBOM Clyuae npn 3acyuINBOI NOrOe BO3-MoXHO NOBpeKdHne DepHa.
- No3aHNO COCTPnraIe BBICOKOpaCTyUHO TpaBy DO HOPMaJIbHOB BBICOTbl.
I0 3aBepuenn pa6oTbI
→BbIKHouHTe ra3OHOKOCnIky, NOOxNITE, NOKa HOKeBa peKa OCTaHOBnTcR, IN 3BJIeKNTe CeTeByIO BnKy.
OnopoxHNTe KOHTeHep dIa c6opa TpaBbl.
→ NocTaBbTe ra3OHOKOcNkY B HaJekHOM MecTe.
TexHnueckoe o6cJyKuBaHne
I PENDYNPEXKDEHNE!

Onachoctb noJyehn TpaBM n NOBpeKdEHHmUeCTBa.
Pa6oTbI no TEXHnueckomy 06cnyKnBaHnIO n OChCTKe MOxHO BblNOJIrHb Iprn BBIKJIOUeHHOM DBnraTeJe N N3BJeUeHHO CTeBOB BNJIke.
He xbataaTeCb 3a Bpaauoouyocn HOKeByu peKy.
IopyaIte npoBeJeHne peMOHTa, texnueckoro o6cnykBaHna, a TaKKe 3aMeHbI npeOxpaHnteBbIX 3JIeMeHToB, KaBeNe H T. D. KBaINΦuNpOBaHHOMy CneuaNNCTU INIcEuaJIN3npOBaHHoM MaCTepCKoI
He cTaBbTe ra3OHOKOcNkY B cbIpbIX NOMeueHnax.
IopyaTe KBaInuNpOBAHHOMy CneuaNtTy INn CneuaN3npoBAHHo MaCTepCKo BbIOJHrTb npOBepKy Ra3OHOKCNKIN B KOHc Ce30Ha.
OuNCTka r3OHOKOcnJIKN
ONACHO!

OnachocTb TpaBMnpoBaHnBpaaHoueJc HOKeBOpeKoN.
BbIKIOUHTe DnurateIb. Npeed ouvycTpoNCTBa DOXdNTecb, Noka HOKeBa peKa OCTaHOBNTcR, N3BJeKITc CeTeByO BnIKy N3 p03ETKn.
XpaheHne 3mO
→PocneKaKdOrOce3oHaTtTaTeNbHOouuJaTeBauyra30HOKOcNkY.
OceHbIO OTdAbaIte ra30HOKOCnKy Ha npOBepKy B CneuaN3npOBaHHyMoCTepckyIO.
XpaHnTe ra3OHOKOCnKy B YnCTOM N CyXOM NOME-
→3IMoB Bcnyae dIITeHbHO xpaHeHna 3aUNTTe ra3OHOKOcNkOy OT pKaBUnHbI.
→Поссе каддд Кocьбы Oчицай Te ra30HOKOcNlKy3aMeHa HOKeBOI peiKN (Pnc. ) 费Tko c pyko.
→ PeryIaRHO ouHuaTe 3acNoHKy Ira MyIbUH npn NOMOUsuI cpykoN.
BhumaHue!
HnB Koem Cnyuae He OnpbickBaIte ra30HOKOcNkY BODOn H He OUnuAte ee c NOMOUsIO OUHCTNTeJRA BICOKO RaBJeHn.
OuNCTka KOHTeHepa dIra c6opa TpaBbl

Yka3aHue
Iyuee 0cezo ouuamb KOHmeuHep dna cbopa mpaBb HENOCpeDcMbeHNO nocne Koc6bl.
→ПинОДнIMITE pa3rpy3OuHyIO 3acNoHky
CHHMMTe KOHTeHep dIa c6opa TpaBbl.
CHOBA OTnycTe pa3rpy3oHyIO 3acNOHy.
OnopoxHNTe KOHTeHep dJa c6opa TpaBbl.
OuHCTnTe KOHTeHep IJra C6opa TpaBbI BMeCTe CO WtAHrAMN BODo HJN UeTKoC pyKoN.
Oco6eHNO TuaTeNbHO ONUCTnTe NOBepXHOCTb NOD HUNKATOPOM yPOBHA 3aONHeHNA.
→ДаиTe KOHTeHepy dЯсбopa TpaBbI BbICoxHyTbpepeCneDyUOuM NcNoB3OBaHnEM.

PENEYNPEXDEHNE!
OnachocTh TpaBMnpoBaHnA.
NopyaIte BbIIOJIHeHne 3aMeHbI HOKeBOI peIKN KBaIIuΦnIupoBaHHOJ MaCTepckOJ.
Pa60TbIc yCtpoNCTBOM pa3peWaeTcB BbINOJIHrTb TOJbKO pN BBIKJIIOUeHHOM DBnraTeNe.N3BneKaIte cTeByIO BnIKy.
Hocnte noxoadyue 3aunTHbie nepuatkn.
BhumaHue!
B pe3yIbTaTe IOToUKN HOKeBOI peKIN BO3MOXHa ee pa36baHcnpOBka. N03Tomy nopyuHte cNeuaJIaN3nPoBAHHO MaCTepCKoB BbINOJHHTb npOBepKy baHaHCnpOBKn.

YKa3aHue
ДяЗamHeHbHOxKeOu peKu mpeSyemcduHAMomempuecku KIOUc SW13.MomeHm 3amJku BuHa:
M8:14-16HM
TpaHcnpOpTupOBka n xpaHeHne
ONACHO!

OnachocTb TpaBMnpoBaHnBpaaHoueIc HOKeBOpeKoN.
BbIKIOHTe DnurTaTeIb. Ipeed TpaHcnpTIpOBKO u XpaHeHneM yCTpOINCTBa DOxNITecb, NOKa HOKeBaI peKa OCTaHOBNTcR, n 3BNEKITe CeTEByIO BnKy n3 p03eTKI.
BdoctaToHouMepe npedoxpaHnTe ra3oHOKocnkyOT cnyuainHO CmeueHna,ecn BbI nepeBO3HTe ee c nOMOsbTO pAHcnpTHOrO cpeCTBa.
YcTpaHHeH HeCnPaBHOCTe
I PENEYNPEXKDEHNE!

Onachoctb noJyehn TpaBM n NOBpeKdEHN mMyeCTBa
Пи BO3нКНовен ComHeH Bcerda o6paaTecb Cneuaan3npoBaHHyO MaTepeckyI.
Перед Кадд Роверков Или Рев Даюм pa6OT c HOжевоу peйкоу OTKЮчайт ra30HOKOcUNky И n3BЛЕКaIte ceTeByIO BUNky.
He Bb6paCbBAaTe 3NeKtpOnHCTpyMeHT BmecTe C 6bITOBbIMN OTXoJaM! Cornacho DnpeKTnBE EC o6 yTuIN3a- cnn 3NeKtpuYeCKOrn 3NeKtpOnHOrO 6opuyoBaHn 2012/19/EC n ee mnnne
MeHTaUNBHaIIOHaJIbHOM npaBe CTaBWHne HEnpNIrOdHbIMNK3KcNlNyatauIN 3JNEKTPoIHCTpyMeHTbl Heo6xOIMo CObnpaTb OTdeJIbHO HAnpaBJIaTb Ha 3KoIOnrueckn 6e3OnacHyIO BToPunHyIO o6pa6Otky.