Ambition 400E - Lawn mower Wolf Garten - Free user manual and instructions
Find the device manual for free Ambition 400E Wolf Garten in PDF.


User questions about Ambition 400E Wolf Garten
0 question about this device. Answer the ones you know or ask your own.
Ask a new question about this device
Download the instructions for your Lawn mower in PDF format for free! Find your manual Ambition 400E - Wolf Garten and take your electronic device back in hand. On this page are published all the documents necessary for the use of your device. Ambition 400E by Wolf Garten.
USER MANUAL Ambition 400E Wolf Garten
natural_image
Black-and-white photo of a woman sitting among a lawn mower in a garden, no visible text or symbols.text_image
B ① "click" ② ③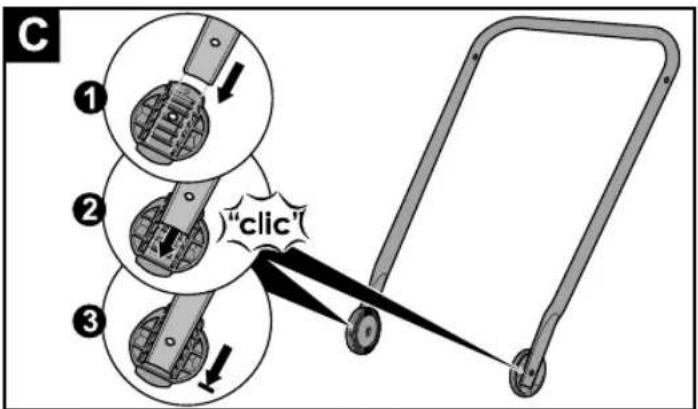
text_image
C ① ② ③ "click"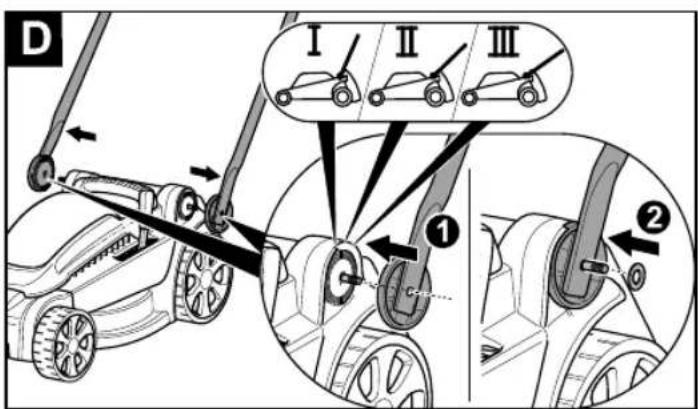
text_image
D I II III ① ②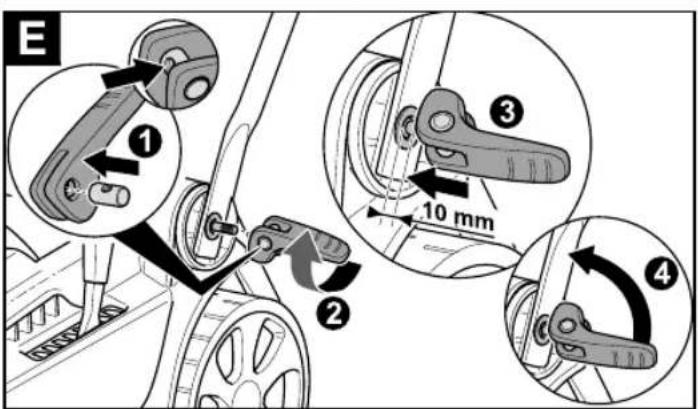
text_image
E ① ② ③ 10 mm ④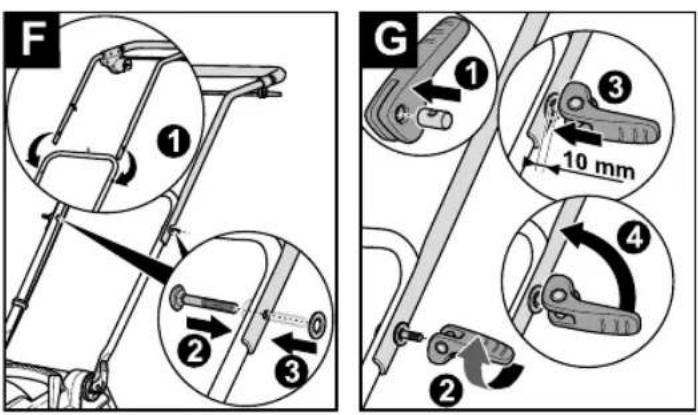
text_image
F ① ② ③ G ① ③ 10 mm ④ ②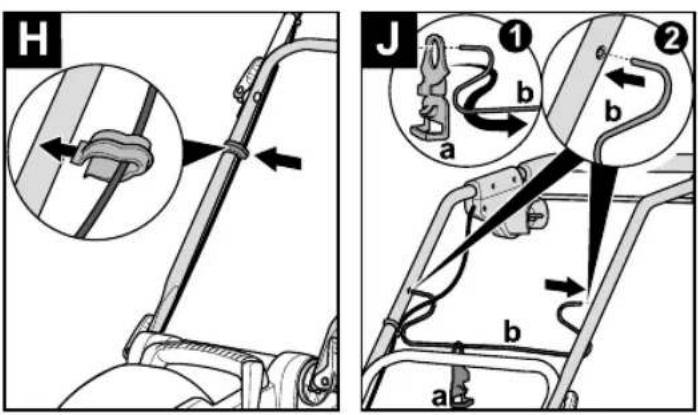
text_image
H J ① b a ② b b a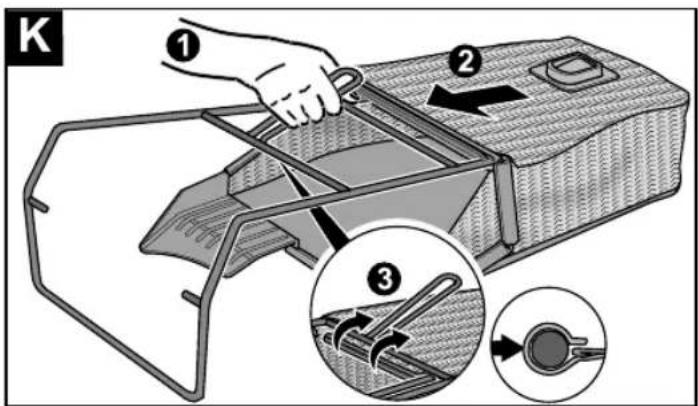
text_image
K ① ② ③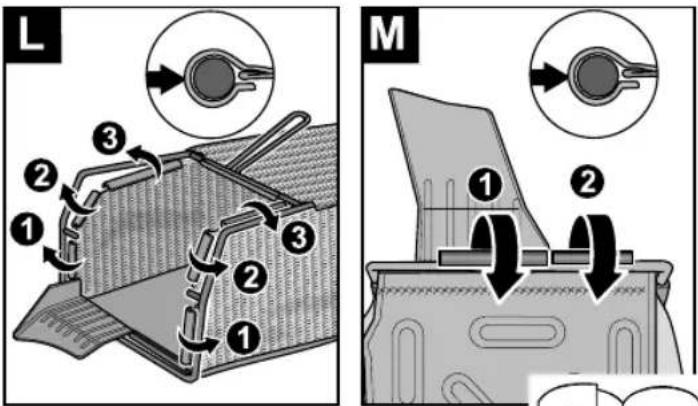
text_image
L M ① ② ③ ① ② ③
text_image
N ① <ø6,5 mm >ø6,5 mm ②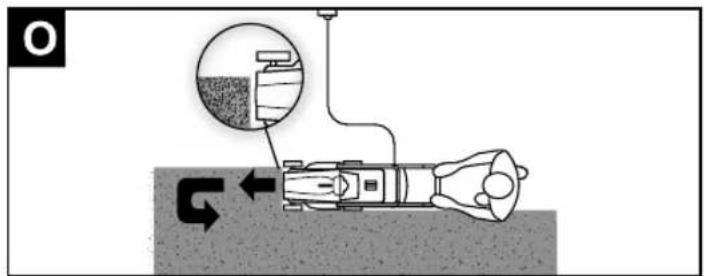
text_image
Diagram illustrating a mechanical or fluid system with labeled components and directional arrows, including a magnified inset showing a textured surface.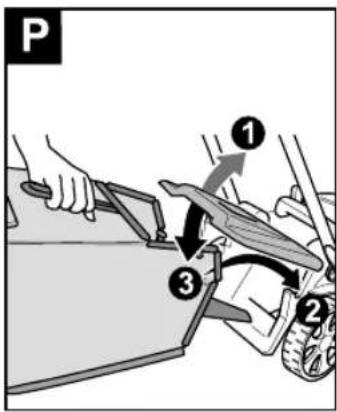
text_image
P ① ② ③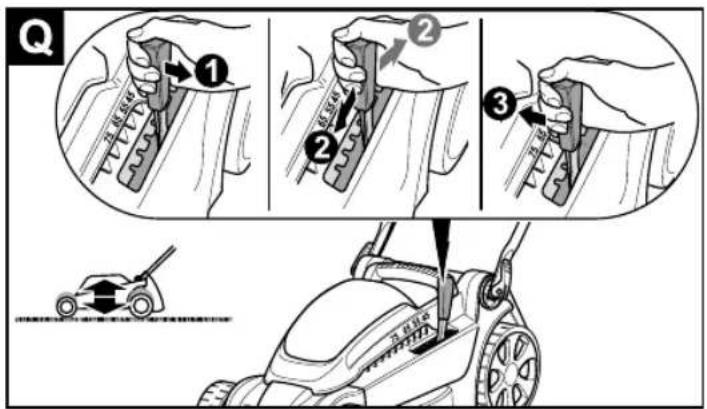
text_image
Q ① ② ③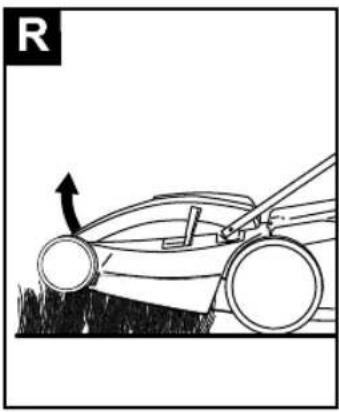
natural_image
Diagram of a lawn mower in motion, showing blade and wheel alignment (no text or symbols)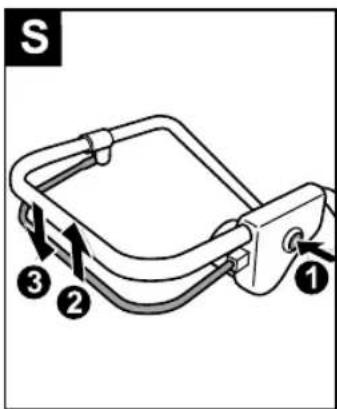
text_image
S ① ② ③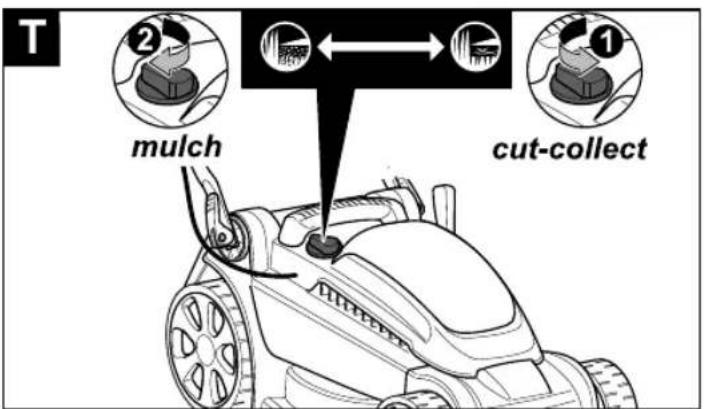
text_image
T ② mulch ← cut-collect ①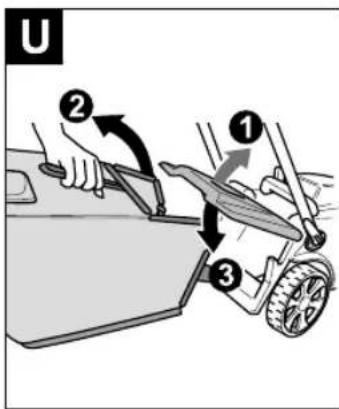
text_image
U ② ① ③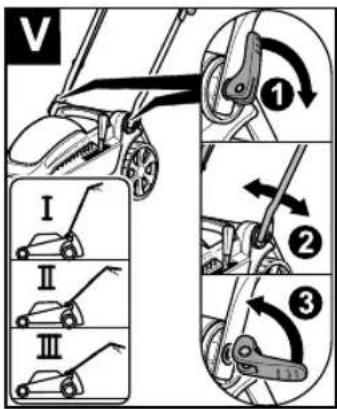
text_image
V I II III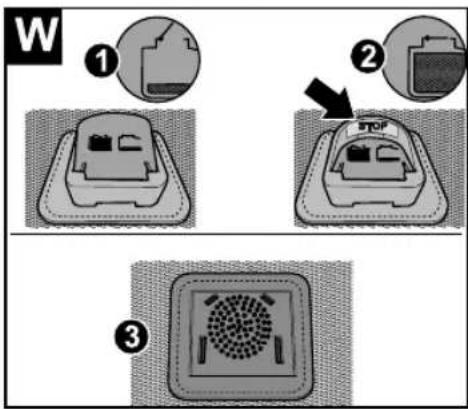
text_image
W ① ② ③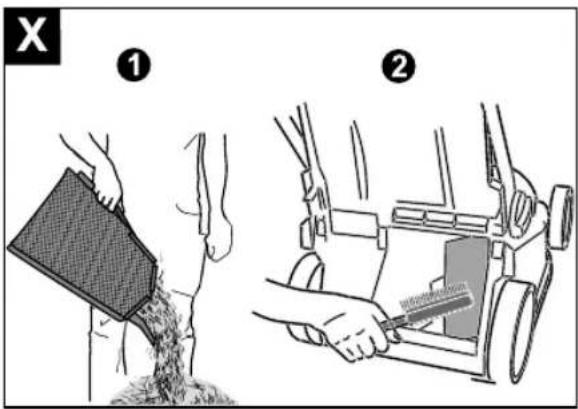
text_image
X ① ②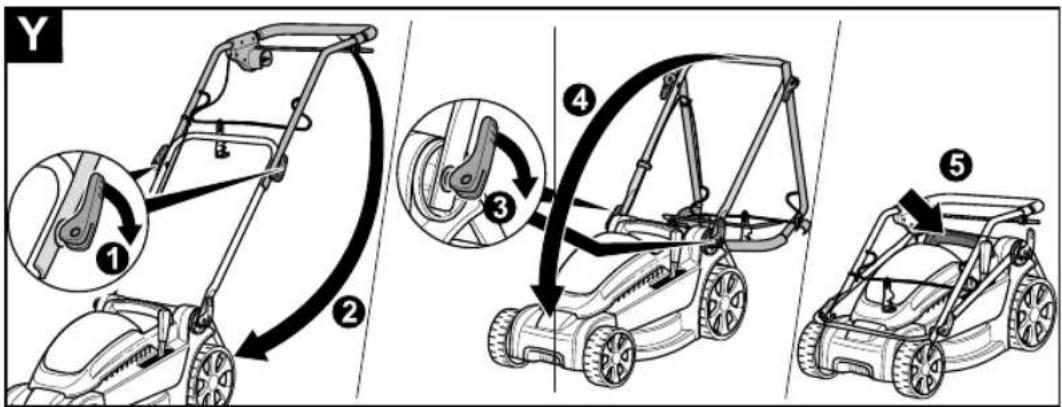
text_image
Y ① ② ③ ④ ⑤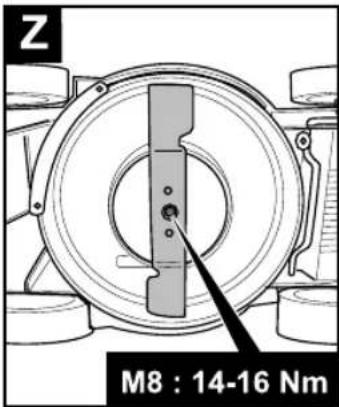
text_image
Z M8 : 14-16 NmD
(Original operating instructions)
Français 23
text_image
Warning sign with exclamation mark and open book icon, commonly used to indicate educational or operational hazard.Warnung!
text_image
Warning sign with hazard symbol, correct safety instruction, and electrical hazard symbolstext_image
Safety warning sign showing hazard symbol and pictogram of a person crossing a barriertext_image
Safety warning symbol for a person using a tool, indicating hazard or electrical hazard.With this lawnmower you have chosen a quality product of the WOLF-Garten brand. Your lawnmower fulfils a wide range of requirements in the area of lawn care.

Before switching on the lawnmower for the first time, carefully read the operating manual and familiarise yourself with the controls and the functions of the lawnmower. It contains important information about safety, operation and maintenance of the lawnmower.
Follow the safety instructions for the lawnmower in order to protect yourself and others. Improper use may result in injuries, a risk of fire and electric shock and releases WOLF-Garten from any liability.

For reasons of safety, children, young people under the age of 16 and other people, who are not familiar with the operating manual and the handling of the lawnmower, must not operate the lawnmower. Local provisions may specify the minimum age of the user.
Contents
Meaning of the symbols 14
Safety instructions 15
Cable 17
Disposal 17
Installation 17
Operation 18
Maintenance 21
Troubleshooting 22
Spare parts and accessories 22
Warranty 22
Meaning of the symbols

text_image
Warning sign with exclamation mark and open book icon, commonly used to indicate education or safety warning.Warning!
Before switching on the lawnmower, read the instructions for use!

text_image
Warning symbol and hazard icon with Chinese text, including a warning triangle, electrical plug, and open book.Caution! Sharp cutting tool! While operating the lawnmower, do not reach into the rotating cutter bar. Keep fingers and feet away from the cutter bar! Before working on the cutter bar, pull out the mains plug! Before cleaning the lawnmower, pull out the mains plug.
text_image
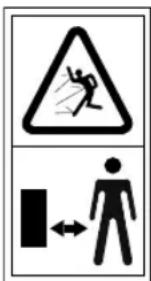
Warning sign with pictogram and human figure indicating hazard or accidentKeep third parties away from the danger area.
Always maintain a safe distance from the cutter bar!
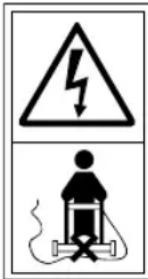
text_image
Safety warning sign showing lightning bolt symbol and electrical hazard symbol with a person using a deviceAlways keep the power cord away from the cutter bar!

Cut-collect function (Mowing/Collecting)

Mulchfunction (Mulching)
Safety instructions
General safety instructions
- To ensure your safety and for the safety of others, read this operating manual and its safety instructions before using the lawnmower.
Please keep the operating manual and its safety instructions safe for subsequent use and always have them ready to hand. - The lawnmower is designed exclusively for mowing lawns. Any other use is regarded as improper and you, as the person responsible, will be liable for all injuries to third parties and for damage to their property.
- Persons who operate the lawnmower must not be under the influence of intoxicants (e.g. alcohol, drugs or medication).
- The lawnmower is not designed to be used by persons (including children) who have limited physical, sensory or mental abilities or who have no experience and/or knowledge of the lawnmower, unless they are supervised by a person responsible for their safety or they have been instructed how to use the lawnmower.
- Also inform other users how to use the unit correctly.
- Operate the lawnmower only in the technical condition stipulated and delivered by the manufacturer. Unauthorised changes to the lawnmower exclude liability of the manufacturer for any resulting damage and/or injury.
- If the lawnmower changes ownership, hand over the operating manual with the lawnmower.
- Spare parts must conform with the requirements specified by the manufacturer.
Therefore use original WOLF-Garten spare parts only or spare parts authorised by the manufacturer. When replacing parts, always follow the supplied installation instructions and pull out the mains plug beforehand.
● Have repairs carried out exclusively by a qualified technician or the service centre.
● This lawnmower is designed for maintaining grassy areas and lawns in the garden.
The lawnmower must not be used for any other purposes due to the risk of physical injury to the user or other persons. -
For reasons of safety this lawnmower must not be used by young people under the age of 16 or by persons who are not familiar with its operation.
-
Do not switch on the lawnmower if there are persons (particularly children) or animals in the immediate vicinity. Ensure that children do not play with the lawnmower.
- Interrupt mowing if you notice that persons (particularly children) or pets are nearby.
- Use the lawnmower only in daylight or in good artificial lighting. Keep your working area clean and well lit.
- Use the lawnmower only at reasonable times of the day and not early in the morning or at night when you may disturb people.
Local provisions may specify times of the day. - Use the lawnmower in dry conditions only. Protect it from rain and moisture.
The ingress of water into the lawnmower increases the risk of an electric shock.
Before starting the unit
- Before starting work, familiarise yourself with the lawnmower and its functions as well as its controls.
- Inspect the lawnmower before switching it on and check for signs of wear and damage if it strikes an object. Ensure that the motor is switched off before switching on, adjusting or cleaning the lawnmower and that the mains plug has been pulled out of the socket to prevent the lawnmower from starting unintentionally.
Have damage repaired by a qualified technician or the service centre. - Check that all nuts, bolts and screws are tight to ensure that the lawnmower can be operated safely.
- Before switching on the lawnmower, remove adjusting tools and spanners. A tool or wrench, which is located in the rotating cutter bar, may cause injuries.
- Inspect the power cord and the line installed on the outside of the lawnmower for damage and ageing (brittleness). Do not use the cable unless in perfect condition. Have damaged cables repaired by an electrician or the service centre.
- Do not use a lawnmower which has a defective switch and can no longer be switched on or off. Have the switch repaired by a qualified technician or the service centre.
-
Never use the lawnmower with damaged or missing guards, e.g. discharge flap and/or grass catcher bag, housing, etc.
Have them repaired or replaced by a qualified technician or a service centre. -
Check the discharge flap for brittleness and secure attachment.
- Before mowing, ensure that there are no branches, stones, pieces of wire, etc. on the lawn; always look out for them while mowing and remove any objects before mowing.
- Check the grass catcher bag for wear and deformation.
- Check (visual inspection) whether the cutter bar and its fastening mechanisms are blunt, damaged or deformed.
- Replace a blunt or damaged cutter bar completely in order to avoid generating an imbalance. For further information see “Maintenance” chapter.
- Never mow the grass barefoot or wearing sandals.
When using the lawnmower
- While mowing, ensure that there are no persons (particularly children) or animals in the working area.
- Do not operate the lawnmower unless it is in a technically sound condition and do not change the motor settings preset at the factory.
- When working with or on the lawnmower, always wear sturdy footwear, long trousers and the appropriate personal protective equipment (goggles, hearing protection, non-slip protective gloves, etc.). The wearing of personal protective equipment reduces the risk of injuries. Do not wear any jewellery or loose clothing which could be caught by the cutter bar and keep them away from moving parts and the cutter bar.
- Avoid an abnormal body posture. Ensure that you have a firm footing and always keep your balance. Never run, but walk slowly forwards. This will enable you to better control the lawnmower in unexpected situations.
- Do not work with the lawnmower in a potentially explosive environment in which there are flammable liquids, gases or dust. The lawnmower may generate sparks which could ignite the dust or the vapours.
- Do not tilt the lawnmower when switching on the motor unless the lawnmower has to be tilted to start it.
- Maintain a safe distance as provided by the handle frame.
- Do not switch on the motor until your feet are at a safe distance from the cutter bar.
Mowing on steep slopes
- Ensure that you have a firm footing and mow slowly.
● Always mow across the slope and not up and down. - Be particularly careful when changing direction. There is a risk of tripping!
- Do not mow on steep slopes.
- Be particularly careful when mowing backwards and pulling the lawnmower towards yourself.
- Switch the lawnmower off before tilting or transporting it, e.g. from/to lawn or over paths.
- Be careful and do not reach into the rotating cutter bar.
- Do not stand in front of the grass discharge opening. Otherwise, you could become caught by the cutter bar or struck by the discharged grass.
- When interrupting work, never leave the lawn-mower unattended and keep it in a safe place.
- Before lifting or transporting the lawnmower, switch the motor off, pull out the mains plug and wait until the cutter bar has come to a standstill.
- Do not adjust the cutting height until the motor has been switched off and the cutter bar has come to a standstill.
- Never open the discharge flap while the motor is running.
- Before removing the grass catcher bag, switch the motor off and wait until the cutter bar has come to a standstill. After emptying the grass catcher bag, carefully re-attach it and ensure that the grass catcher bag is attached securely to the lawnmower.
- Never run over gravel while the motor is running. There is a risk of being hit by stones!
- If possible, do not mow wet grass.
- Switch off the lawnmower, pull out the mains plug and leave the lawnmower upright under the following circumstances:
– when leaving the lawnmower;
– when removing blockages from the cutter bar; - when checking, cleaning or working on the lawnmower;
- if the lawnmower was struck by a foreign object (check carefully whether the lawnmower or cutter bar has been damaged. First repair the damage);
- if the lawnmower vibrates violently due to an imbalance (immediately switch the lawnmower off and look for the cause);
- if the power cord becomes damaged during use.
After using the lawnmower
- Switch the lawnmower off and then place it in a safe location.
- Before performing maintenance or cleaning work on the lawnmower, switch the lawnmower off and pull out the mains plug and remove the grass catcher bag.
● Ensure that the ventilation slots are clean. - Do not keep the lawnmower near children.
- Do not repair the lawnmower yourself, but have it repaired by a qualified technician or the service centre only.
Cable

Attention! Electric shock due to damaged cable! The fuse will not always trip if the cable is severed or damaged.
- Do not touch the cable until the mains plug has been pulled out of the socket.
-
Have damaged cables repaired by an electrician or the service centre. It is forbidden to repair the cable with insulating tape.
-
Attach the power cord to the cable strain relief and do not let it rub against edges or pointed or sharp objects.
- Do not crush the cable in a door crack or window gap.
- Do not remove or bypass any switching devices (e.g. connection of the safety lever to the handlebar).
- Use outdoors with the permitted and appropriately identified power cord only, e.g. H07RN – F 3 x 1,5 mm ^2 (max. 25 m).
- Connecting parts of the power cord must be splash-proof and made of rubber or covered with rubber.
Disposal
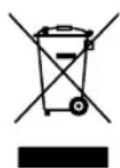
Do not throw lawnmowers into the household refuse. Have the lawnmower, accessories and packaging disposed of in an environmentally friendly manner.
Installation
Attaching the handlebar
A B C D E F G H J V

Caution! When collapsing or unfolding the handlebar, the cable may be damaged. Ensure that the cable is not kinked.
Assemble the handlebar according to Figures A B C D E F G H J and V as follows:
- Take hold of the recessed grip in the discharge flap ① B and pull the discharge flap upwards until the hook on the back of the housing and the hook on the underside of the discharge flap disengage with a loud “click” ② B.
- Then put the discharge flap down again ③ B. The grass can be discharged without difficulty through the gap between the discharge flap and housing when working without a grass catcher bag. Further information can be found in the chapter "Working without a grass catcher bag".
- Now attach the two handlebar holders A d to the lower part of the handlebar A k 1 C.
-
Place the lower part of the handlebar on the handlebar holder and press them together ② C. Push the handlebar up to the end of the handlebar holder ③ C.
-
Pull the ends of the lower part of the handlebar apart slightly and place them on the threaded screws which are on the left and right sides of the housing ① D.
- Then place the two washers A f on the threaded screws ② D.
- Insert the threaded bolts A h into the quick-clamping levers A c so that the hole can be seen ① E. Hold them firmly between thumb and index finger and screw on the quick-clamping levers and threaded bolts clockwise ② E until they are at a distance of \~10 mm ③ E.
- Attach the lower part of the handlebar by folding the quick-clamping lever upwards in the direction of the lawnmower ④ E.
- Then attach the upper part of the handlebar A j by placing it on the lower part of the crossbeam ① F. Hold the upper part of the handlebar firmly with one hand and insert the two screws A g with the other hand into the holes from the inside on the lower part of the handlebar ② F.
-
Then place the two washers A f on the screws ③ F.
-
Insert the threaded bolts A h into the quick-clamping levers A c so that the holes can be seen ① G. Hold them firmly between thumb and index finger and screw on the quick-clamping levers and threaded bolts clockwise ② G until they are at a distance of \~10 mm ③ G.
- Attach the upper part of the handlebar by folding the quick-clamping lever upwards ④ G.
- You can adjust the handlebar, depending on your height, to three required working positions (I/II/III - V) by loosening the two lower quick-clamping levers ① V and by changing the inclination of the assembled handlebar until the required height has been reached ② V. When the handlebar has been set to the required height, fold the lower quick-clamping levers upwards ③ V.
- Fasten the power cord to the lawnmower by attaching it with a cable clamp A e in the position shown in Fig. H (see arrow).
- Take the cable strain relief A a and hang it by the large opening on the WOLF-Garten Flick-Flack® cable guide A b 1 J.
-
Finally insert the WOLF-Garten Flick-Flack® cable guide into the two eyes on the left and right sides on the upper part of the handlebar ② J.
-
You have the option of folding the handlebar to facilitate transportation and storage.
Further information can be found in the chapter "Transportation and storage".
Attaching the grass catcher bag K L M
Attach the grass catcher bag according to Figures K L and M as follows:
- Grip the frame on the handle ① K with one hand and pull the fabric catcher bag over the long end of the frame ② K with the other hand. Guide the fabric catcher bag with its profile under the handle on the frame and attach the profile of the fabric catcher bag to the frame under the handle ③ K.
- Then attach the side profiles of the fabric catcher bag to the frame. Start with the two lowest profiles ① L. Then attach the two small profiles above them ② L and finally the two profiles on the left and right under the handle ③ L (see arrows).
- Then turn the grass catcher bag over and first attach the profile under the chute ① M and then the profile next to the chute ② M on the lower part of the frame.
Operation
Operating times
- Observe the regional regulations.
- Enquire at your local authority regarding the operating times.
Guiding cable into the cable strain relief N O
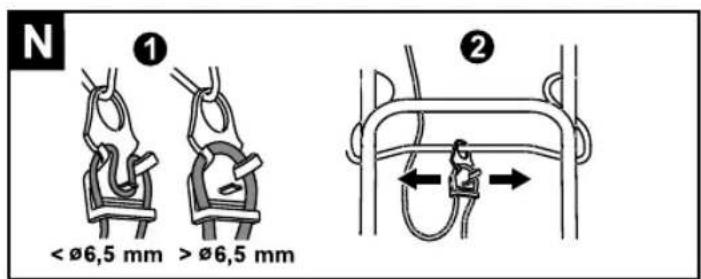
- Please guide the cable into the cable strain relief according to Fig.① N. How the cable is fastened depends on its diameter.
- If the diameter of the cable is less than 6.5 mm, insert the cable from below through the cable strain relief and first pull over the left and right hooks and then over the middle hook of the cable grip.
- If the diameter of the cable is greater than 6.5 mm, insert the cable from below through the cable strain relief and pull over the left and right hooks only.
Information on the WOLF-Garten
Flick-Flack ^® cable guide ② N O
The WOLF-Garten Flick-Flack ^® cable guide keeps the cable away from the cutter deck ② N O.
Attaching the grass catcher bag P
Attention! Rotating cutter bar! Do not make any adjustments to the lawn- mower until the motor has been switched off and the cutter bar has come to a standstill.
- Lift the discharge flap ① P.
- Grip the grass catcher bag by its black handle and tilt it slightly so that you can hook the grass catcher bag into the recesses in the back of the lawnmower ② P (see arrows).
- Hook the grass catcher bag into the lawn-mower ② P.
- Fold the discharge flap down again ③ P.
Adjusting the cutting height Q

Attention! Rotating cutter bar! Do not work on or make any adjustments to the lawnmower until the motor has been switched off and the cutter bar has come to a standstill.
- Pull the handle outwards slightly 1 Q.
- Set the required cutting height ② Q.
- Release the lever again ③ Q.
Cutting height – condition of grass
- To protect the sward, mow a lawn which is as dry as possible.
- Set a cutting height of 45 mm.
- Increase the cutting height when mowing damp or all grass.
Connection to the socket (230 volts, 50 Hz)

Connect the lawnmower only to sockets which are fused with a slow-blow 16 amp fuse (or LS switch type B).
Important information about residual current device
- These protective devices protect you from serious injuries if you touch damaged lines, faulty insulation and, in certain cases, also when live cables are damaged.
- Connect the lawnmower only to sockets which are fused with a residual current device (RCD) and have a residual current of no more than 30mA .
- There are retrofit kits for old installations. Speak with a qualified electrician.
Switching lawnmower on/off R S
- Switch on the lawnmower on a level surface.
- Do not switch it on in tall grass – if required, lift it as shown in Fig. R.
- To prevent injuries, do not switch on the lawnmower if you are standing in front of the grass discharge opening!
Motor on S
- Press and hold down the button ① S.
- Pull the safety lever ② S.
- Release the button ① S.
Motor off S
- Release the safety lever ③ S.
Activating the cut-collect function PTU

Attention! Rotating cutter bar! Do not make any adjustments to the lawn- mower until the motor has been switched off and the cutter bar has come to a standstill.
The lawnmower features a changeover switch (cut-collect-mulch). Cut-collect is for mowing and catching, mulch is for mulching.
You can use this switch to set cut-collector mulch functions on the lawnmower for looking after your garden.
- Lift the discharge flap ① U.
- Remove the grass catcher bag ② U.
● Lower the discharge flap down again ③ U. - Turn the switch to cut-collect ① T.
- Lift the discharge flap ① P.
- Hook in the grass catcher bag ② P.
● Lower the discharge flap down again ③ P. - Start the motor and ensure that your feet are at a safe distance from the cutter bar.
Removing and emptying the grass catcher bag U W X
If clippings are left lying on the ground or the yellow STOP sign is visible on the level indicator W ②, the grass catcher bag is full and should be emptied immediately ① X.

Attention! Rotating cutter bar! Do not make any adjustments to the lawn- mower until the motor has been switched off and the cutter bar has come to a standstill.
- Switch the motor off and pull out the mains plug.
- Lift the discharge flap ① U.
- Remove the grass catcher bag ② U.
- Lower the discharge flap down again ③ U. Empty the grass catcher bag ① X.
- Before starting, remove any obstructions from the mowing area.
Information about the level indicator W
● The position of the flap on the level indicator indicates how full the grass catcher bag is.
- When the grass catcher bag is empty, the flap of the level indicator is pointing upwards ① W.
- When the grass catcher bag is full, the flap of the level indicator is pointing downwards and the yellow STOP sign is visible ② W. The grass catcher bag must be emptied immediately ① X.
- To ensure that the level indicator functions correctly, regularly clean the area under the level indicator on the inside of the grass catcher bag with a hand brush ③ W.
Working without the grass catcher bag
- If your remove the grass catcher bag, the dis-charge flap folds down.
- When working without the grass catcher bag, the clippings are ejected directly downwards.
Mulching T
When mulching, the grass is cut several times by a special cutting system and fed back into the soil. So there is no lawn waste. Mulching also protects the lawn from drying out. The mulched lawn receives a lot of nutrients. For an optimum result always keep the lawn short. Further information can be found in the chapter “Tips for looking after your lawn”.
Information about mulching
We recommend mulching 1–2 x per week depending on lawn growth. However, the lawn must not be too high or too damp!
- When mulching, push the lawnmower slowly.
- Ensure that the swaths overlap.
- Do not cut off more than 20 mm of grass.
If the lawn is infested with moss or thatch, mulching is not recommended because the clippings will be left on the moss or thatch and can therefore not be fed back into the soil.
● Regularly scarify and fertilize the lawn.
Activating the mulch function T U

Attention! Rotating cutter bar! Do not work on or make any adjustments to the lawnmower until the motor has been switched off and the cutter bar has come to a standstill.
The lawnmower features a changeover switch (cut-collect-mulch). Cut-collect is for mowing and catching, mulch is for mulching.
You can use this switch to set cut-collect or mulch functions on the lawnmower for looking after your garden.
- Lift the discharge flap ① U.
- Remove the grass catcher bag ② U.
● Lower the discharge flap down again ③ U. - Turn the switch to mulch ② T.

Do not re-attach the grass catcher bag, as the chute may be damaged.
Tips for looking after your lawn
- Your lawn consists of different types of grass. If you mow the lawn frequently, this promotes the growth of grass which forms strong roots and a firm sward. If you mow the lawn infrequently, this promotes the growth of tall grass and other weeds (e.g. clover, daisies)
- To ensure that your lawn can grow healthily and evenly and without stripes, the swaths must always overlap by a few centimetres ☐.
● Always place the cable safely on the patio, path or cut grass. - The normal height of a lawn is approx. 40–50 mm. Mow approx. one third of the total height as soon as the lawn has reached a height of 60–70 mm.
- Do not cut the lawn shorter than 45 mm, otherwise the sward may be damaged in dry conditions.
- Cut tall grass (e.g. after your holidays) in stages to normal height.
At the end of work ✗
- Switch the lawnmower off, wait until the cutter bar has come to a standstill and pull out the mains plug.
● Empty the grass catcher bag ① X. - Place the lawnmower in a safe location.
Maintenance
General

Attention! Rotating cutter bar! Before performing any maintenance and cleaning work, pull out the mains plug and keep clear of the rotating cutter bar.
- Do not place the lawnmower in a damp room.
- At the end of the season have the lawnmower checked by a qualified technician or the service centre.
- For reasons of safety never perform repairs or maintenance or replace safety elements, cables, etc. yourself, but have this work done by a qualified technician or the service centre.
Cleaning the lawnmower X

Attention! Before transporting and storing the lawnmower, always switch it off, wait until the cutter bar has come to a standstill and pull out the mains plug!
● After mowing, always clean the lawnmower with a hand brush.
- Clean the mulch flap at regular intervals using a hand brush ② X.
● Never spray the lawnmower with water or a high-pressure cleaner.
Cleaning the grass catcher bag U W X
- It is best to clean the grass catcher bag directly after mowing.
- Lift the discharge flap ① U.
- Remove the grass catcher bag ② U.
● Lower the discharge flap down again ③ U.
● Empty the grass catcher bag① X. - Clean the fabric catcher bag and frame with water or a hand brush.
- In particular, clean the area under the level indicator ③ W.
- Leave the fabric catcher bag to dry before using it again.
Transportation and storage Y

Attention! Before transporting and storing the lawnmower, always switch it off, wait until the cutter bar has come to a standstill and pull out the mains plug!
- Secure the lawnmower when transporting it by vehicle.
- Adequately secure the lawnmower to prevent it from unintentionally slipping if transporting it on or in a vehicle.
- The lawnmower can be stowed more easily by folding the handlebar Y.
- To do this, loosen both upper quick-clamping levers and threaded bolts ① Y and unscrew them by approx. 5 mm. Hold the upper part of the handlebar firmly, otherwise your hand and fingers could become trapped.
- Then fold the upper part of the handlebar backwards ② Y.

Attention! If you fold the handlebar forwards, the cable may be damaged.
- Loosen both lower quick-clamping levers ③ Y.
- Fold both handlebars forwards and place them on the front wheels of the lawnmower 4 Y.
- You can now transport the lawnmower without difficulty by its handle or take it to a safe location for storage ⑤ Y (see arrow).
Storage in winter
● After each mowing season clean your lawnmower thoroughly.
- In autumn have your lawnmower checked by a service centre.
● Store the lawnmower in a clean and dry room.
- In winter protect the lawnmower against rust if stored for a prolonged period.
Changing the cutter bar Z
- Before performing any work on the cutter bar, pull out the mains plug and wear protective gloves.

Attention! Have all work on the cutter bar carried out by a qualified technician or the service centre.
- Regrinding the cutter bar may cause an imbalance. Therefore, have an imbalance check performed by the service centre.
- A torque wrench A/F13 (M8) is required to change the cutter bar. Tightening torque of the screws: 14–16 Nm Z.
Troubleshooting
| Problem Possible cause | Remedial action | |
| Uneven running, lawnmower vibrates excessively. | The cutter bar is damaged. Contact a service centre. | |
| The cutter bar has become detached. | Follow the instructions in the chapter “Changing the cutter bar”. | |
| Motor is not running. | The fuse on the mains connection has tripped/is defective. | Have it repaired by an electrician. |
Procedure in the event of a damaged cable: Attention!  Electric shock due to damaged cable! The fuse will not always trip if the cable is severed or damaged. Do not touch the cable until the mains plug has been pulled out of the socket. Have damaged cables repaired by an electrician or the service centre. It is forbidden to patch the cable with insulating tape. Electric shock due to damaged cable! The fuse will not always trip if the cable is severed or damaged. Do not touch the cable until the mains plug has been pulled out of the socket. Have damaged cables repaired by an electrician or the service centre. It is forbidden to patch the cable with insulating tape. | Contact a service centre. | |
| Poor mowing/ catching capacity. | The cutter bar is blunt. Contact a service centre. | |
| The grass catcher bag is blocked. | Follow the instructions in the chapter “Emptying the grass catcher bag”. | |
| The cutting height has not been adjusted. | Follow the instructions in the chapter “Adjusting the cutting height”. | |

If in doubt, always visit a service centre.
Attention! Before checking or working on the cutter bar, always switch the lawnmower off and pull out the mains plug.
Spare parts and accessories
| Order no. Article designation | Article description | |
| 196-122-650 WBL3401 | Cutter bar A340 (34 cm cutting width) | |
| 196-123-650 WBL3701 | Cutter bar A370 (37 cm cutting width) | |
| 196-124-650 WBL4001 | Cutter bar A400 (40 cm cutting width) |
Warranty
The warranty regulations issued by our company or the importer are valid in all countries.
Your lawnmower will be repaired free of charge under the warranty, provided the cause was a material or manufacturing fault. In the event of a claim under the warranty, please contact your dealer or nearest branch office.
Cher client!
text_image
Warning sign with exclamation mark and open book icon, commonly used to indicate education or safety warningAvertissement !