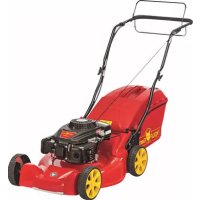
A 5300 A - Lawn mower Wolf Garten - Free user manual and instructions
Find the device manual for free A 5300 A Wolf Garten in PDF.



| Technical Specifications | Wolf Garten A 5300 A lawn mower, petrol engine, cutting width 53 cm, cutting height adjustment 25-75 mm, collection box capacity 70 L. |
|---|---|
| Usage | Ideal for medium to large gardens, autonomous operation thanks to the petrol engine, easy start. |
| Maintenance and Repair | Regularly check engine oil, clean the collection box after each use, sharpen blades at least once per season. |
| Safety | Use protective gloves, do not use in the rain, always check the cutting area before starting. |
| General Information | Weight: approximately 35 kg, 2-year warranty, spare parts available, customer service accessible. |
Frequently Asked Questions - A 5300 A Wolf Garten
User questions about A 5300 A Wolf Garten
0 question about this device. Answer the ones you know or ask your own.
Ask a new question about this device
Download the instructions for your Lawn mower in PDF format for free! Find your manual A 5300 A - Wolf Garten and take your electronic device back in hand. On this page are published all the documents necessary for the use of your device. A 5300 A by Wolf Garten.
USER MANUAL A 5300 A Wolf Garten
natural_image
Black and white photo of a wolf lawn mower with attached arm and headrest (no visible text or symbols)
3
text_image
A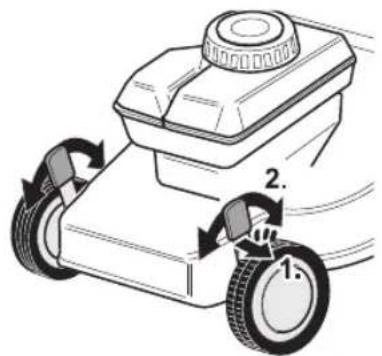
text_image
Diagram of a grass lawn mower with labeled parts and motion arrows indicating rotational motionB
text_image
Diagram showing a mechanical device with labeled parts 1 and 2, indicating a step in the process.3
text_image
Diagram illustrating a mechanical or robotic operation with labeled parts and directional arrowsC
text_image
Diagram showing a mechanical switch mechanism with labeled parts 1 and 2, likely illustrating vehicle or mechanical assembly.C
natural_image
Mechanical diagram showing a wheel assembly with a knob and gear mechanism (no text or labels)3
text_image
Technical diagram showing mechanical assembly with numbered components and directional arrows indicating motion or forceC
text_image
Technical diagram showing mechanical assembly with labeled parts 1 and 2, likely illustrating a gear or cam mechanism.4
natural_image
Mechanical diagram showing a wheel-mounted device with a curved arm and directional arrow (no text or symbols)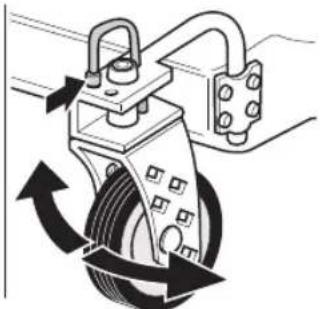
natural_image
Mechanical diagram showing a rotating mechanical component with rotational arrows (no text or symbols)
5
text_image
C 1. 2.D
text_image
1.
text_image
3. I 2. b) 1 2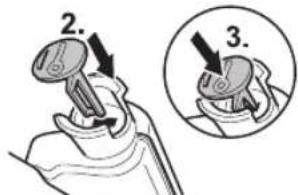
text_image
2. 3.6

B
natural_image
Diagram of a mechanical clamp or bracket with an arrow indicating rotation (no text or symbols)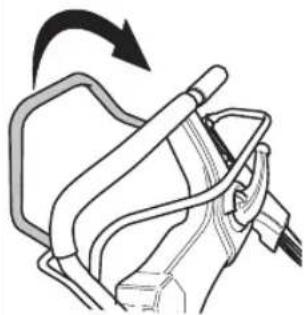
natural_image
Diagram of a mechanical device with a rotating arrow indicating rotation (no text or symbols)6

C

natural_image
Mechanical diagram showing a lever mechanism with rotating components (no text or labels)D
natural_image
Technical line drawing of a mechanical component with no visible text or symbolsE
text_image
4/ 1/6
F
natural_image
Diagram of a device with internal components and directional arrows indicating motion (no text or symbols)G
text_image
G7
text_image
Diagram illustrating a mechanical assembly with labeled parts and directional arrows, including a diagram of a tool and a magnified view.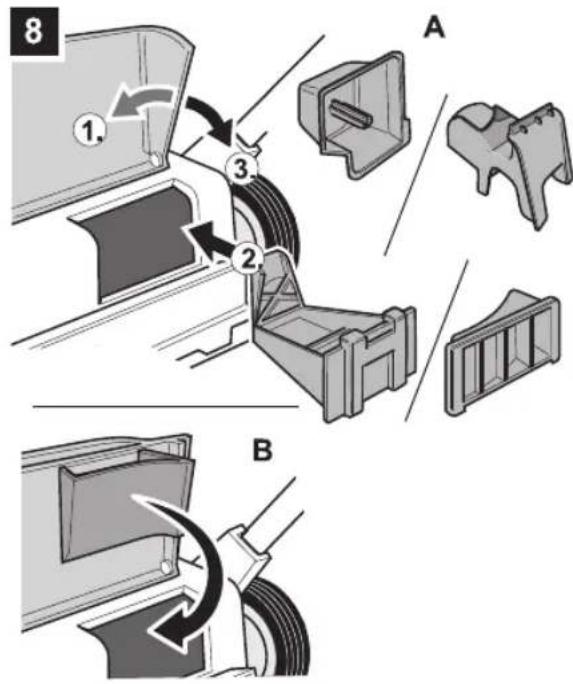
text_image
8 1. 2. 3. A B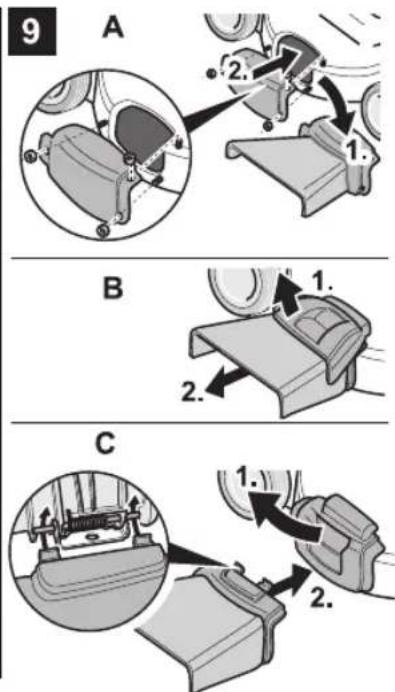
text_image
9 A 1. 2. B 1. 2. C 1. 2.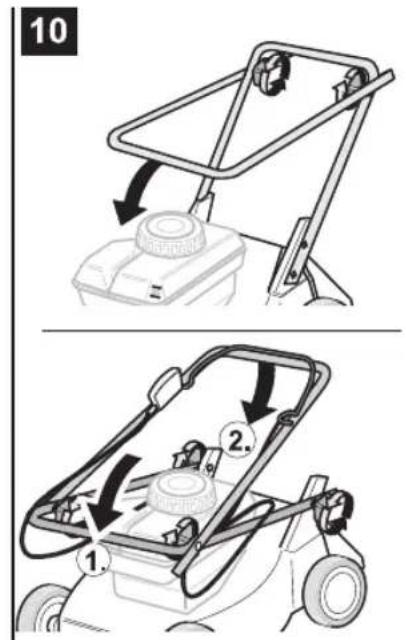
text_image
10 1. 2.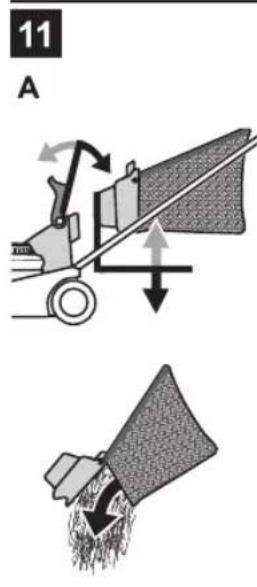
text_image
11 A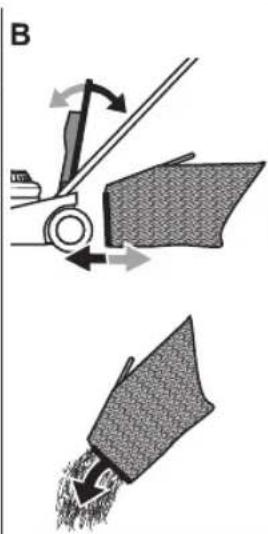
natural_image
Diagram showing mechanical components with directional arrows, no text or symbols present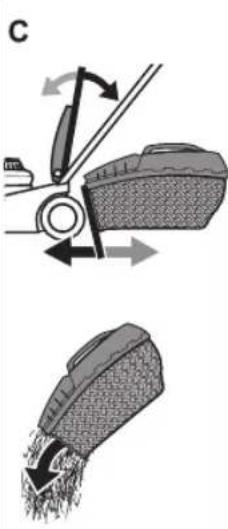
natural_image
Diagram showing mechanical components with directional arrows, no text or symbols present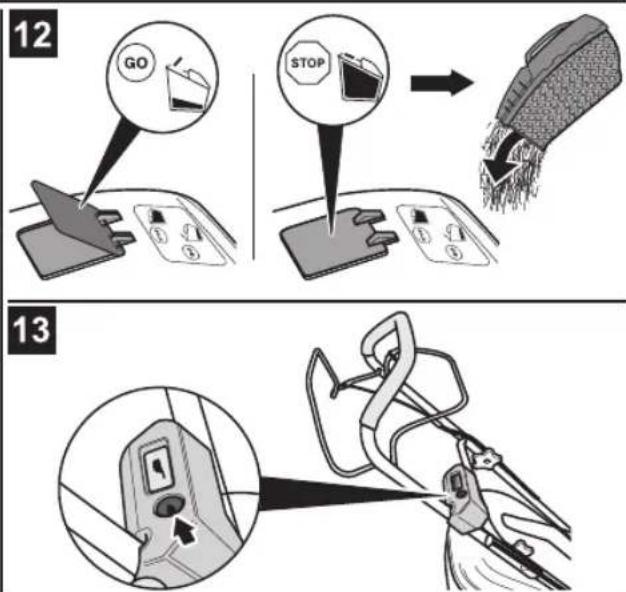
text_image
12 GO STOP 13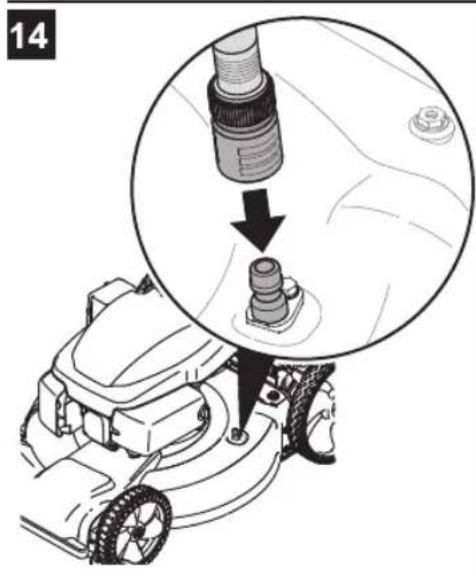
text_image
14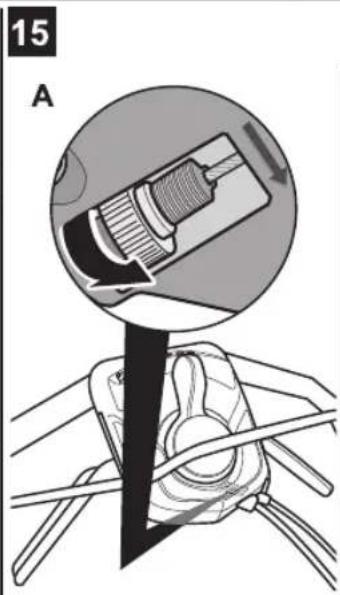
text_image
15 A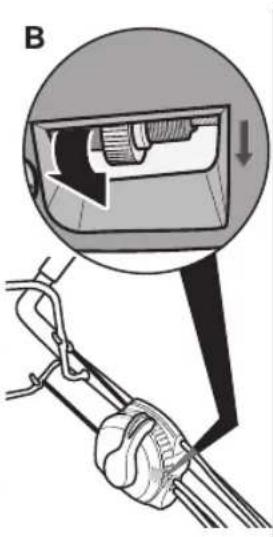
natural_image
Diagram showing a mechanical device with a magnified inset view of a component, no text or symbols present.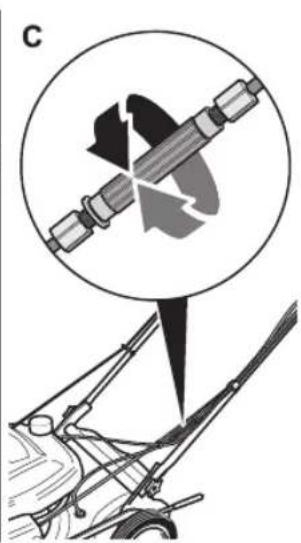
natural_image
Diagram showing a mechanical assembly with a circular inset highlighting a cross-section of a mechanical component (no text or labels)
English 8
(Original operating instructions)
Français 18
Servicing/cleaning 14
Immobilizing 15
Warranty 15
Engine 15
Identifying and eliminating malfunctions .... 15
Information on the identification plate
These specifications are very important for subsequent identification when ordering spare parts and for customer service. You will find the identification plate in the vicinity of the engine. Copy all information stated on the identification plate into the following space.
natural_image
Empty rectangular frame with three horizontal lines inside (no text or symbols)You can find these and further details on the device in the separate CE declaration of conformity that is a constituent part of this operating manual.
Illustrations
Fold out the illustrated pages at the start of the operating manual. Various models are described in these operating instructions. Graphical representations can vary in detail from the appliance which has been bought.
For your safety
Use the appliance properly
This device is approved solely for use
– in accordance with the descriptions and safety instructions specified in these operating instructions
– to mow the lawns of domestic and leisure gardens.
Any other use is not an intended use. Improper use is not covered by the warranty and the manufacturer will reject any liability.
The user is then liable for all injuries to third parties and damage to their property.
Unauthorised changes to the device shall exclude all liability of the manufacturer for any resulting damage and/or injury.
Only for appliances with electric starter:
When the appliance is fitted with an electric starter, the provided charger is intended exclusively to charge the accumulator fitted in the appliance. The accumulator must be charged from this charger only.
Observe the safety and operating information
Before operating the appliance for the first time, please read these operating instructions carefully and act accordingly. Comply with the operating manual and keep it for subsequent use. Never allow children or other people unfamiliar with this operating manual to use the unit.
All persons involved in bringing into service, operation or maintenance of the mower must be appropriately qualified.
If the mower changes ownership, hand over the operating manual.
General notes on safety
In this section you will find general information about safety. Warnings that apply specifically to individual parts of the mower, functions or activities are shown at the corresponding point in this user's guide.
Before working with the mower Persons who use the mower must not be under the influence of intoxicants, e.g. alcohol, drugs or medication.
Do not permit children under the age of 16 to handle this power tool (e.g. local regulations may specify the minimum age of the user).
Do not use the mower if you have not received appropriate training or are tired or ill.
This appliance is not intended for use by persons (including children) with reduced physical, sensory or mental capabilities, or lack of experience and knowledge, unless they have been given supervision or instruction concerning use of the appliance by a person responsible for their safety.
Children should be supervised to ensure that they do not play with the device.
Before starting work, familiarise yourself with all the equipment and controls as well as their functions.
Store fuel in permitted containers only and never near heat sources (e.g. cooker or hot water tank). Refuel the mower outdoors only.
Never refuel the mower while the engine is running or hot.
Replace the exhaust, tank or fuel cap if they become damaged.
Before using the appliance,
- whether the grass catcher works and the deflector closes correctly. Replace damaged, worn out or missing parts immediately.
– check for any wearing or damage to the cutters, fastening pins, and the whole cutter unit. Have worn or damaged parts replaced by a specialist company and only in sets to exclude imbalances.
Spare parts and accessories must satisfy the requirements specified by the manufacturer.
Therefore only use original spare parts and original accessories or spare parts and accessories that have been authorised by the manufacturer.
The use of spare parts or accessories that have not been approved by the manufacturer can represent a significant safety risk. Have repairs performed exclusively by a qualified technician or specialist workshop. Ensure that maintenance work is always performed to schedule so that the mower remains in a safe condition.
When working with the mower When working with or on the appliance you must wear protective clothing. This includes:
- Safety shoes,
- trousers,
– close-fitting garments,
– hearing protection,
- protective goggles.
Wearing personal protective equipment reduces the risk of injuries. Avoid the wearing of loose clothing or clothing with hanging cords or belts. Working without ear protection may result in loss of hearing. Even when wearing ear protection, include regular work breaks to give your ears a rest.
All safety devices must be installed on the appliance, and they must be complete and in a fully functional condition.
Do not make any changes to the safety devices.
Operate the mower only in the technical condition stipulated and delivered by the manufacturer. Never change the preset factory engine settings.
Prevent naked flames and spark formation, and do not smoke.
Notes on vibrations:
The impact of vibrations can cause damage to nerves and disrupt blood circulation in the hands and arms.
- When working in cold environments, wear warm clothing and keep your hands warm and dry.
- Take breaks.
- If you notice that the skin on your fingers or hands is becoming numb, tingling, painful or going white in colour, cease working with the machine and, if necessary, seek medical attention.
Before carrying out any work on this mower
To prevent injury, before performing any work on the appliance (e.g. maintenance and adjustments) and before transporting it (e.g. lifting or carrying):
- switch off the engine,
- remove the ignition key (if used),
- wait until all moving parts have come to a complete stop and the engine has cooled down,
– remove the spark plug connector on the engine to prevent the engine from being accidentally started,
– which takes into account additional safety information in the engine manual.
After working with the device Never leave the appliance without switching off the engine and – if used – without removing the ignition key.
Safety devices
Fig. 1

Danger
Never use an appliance if it has damaged safety devices or if there are no safety devices fitted.
Safety lever (1)
The safety lever stops the motor and cutting blades in an emergency.
There must be no attempt to circumvent this function, which is crucial for your personal safety.
Ejection flap (2) or impact protection (3)
The ejection flap/impact protection protects you from being injured by the blade or by ejected solid objects. The appliance must always be operated with the ejection flap or impact protection.
Symbols on the unit
On the device you will find various symbols on adhesive labels. They have the following meanings:

text_image
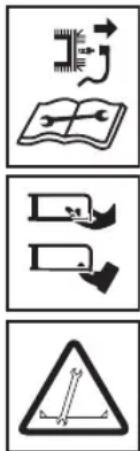
Three black-and-white icons representing warning, open book, and person reading with a magnifying glass symbolCaution! Before switching on, read the operating instructions!

text_image
Three black-and-white safety symbols: warning triangle, pictogram with cross, and warning sign with motion arrows.Keep third parties out of the danger area!

Switch off the engine and remove the ignition key before carrying out any work on the appliance and before leaving the appliance.
text_image
Three black-and-white icons representing electronic devices, reading, and safety symbols with Chinese labels.Please follow additional information in the section entitled "For your safety".
Always remove the spark plug connector before working on the cutters!
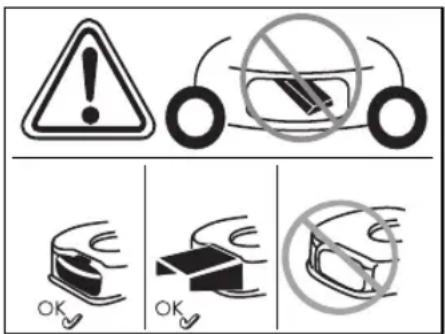
Keep fingers and feet away from the cutters! Always switch off the mower and remove the spark plug connector before adjusting, cleaning or checking it.
natural_image
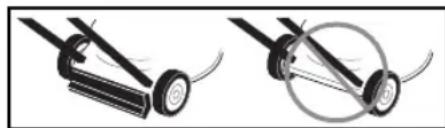
Two diagrams showing a pushpin mechanism with a circular motion indicator (no text or symbols)Risk of injury – only work with impact protection mounted.
text_image
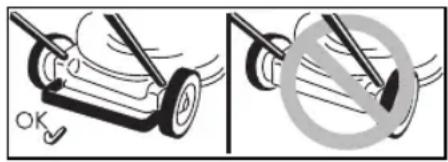
OKRisk of injury – only work with tail clamp mounted.
text_image
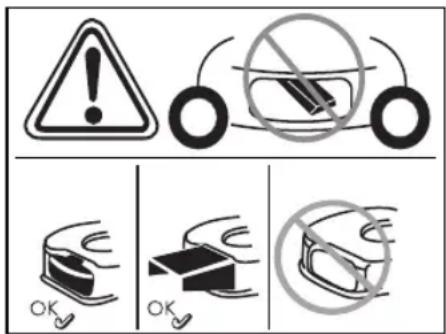
Warning symbols for car safety, including warning sign, no smoking, and three correct/incorrect signs with checkmarks.Risk of injury – only work with deflector mounted.
Ensure these symbols mounted on the unit remain legible.
Replace any damaged or illegible symbols.
Symbols in the operating manual
Symbols are employed in the operating manual to indicate hazards or draw attention to important information. Here is an explanation of the symbols:
Danger
Draws your attention to sources of potential danger associated with the task you are undertaking at the time which constitute a danger to persons.
Caution
Draws your attention to potential hazards associated with the task you are undertaking at the time which could result in damage to the mower.
i Note
This indicates important information and application tips.
Assembling the appliance
Assembly of the appliance is illustrated on a separate supplementary sheet.
i Disposal instructions
Dispose of packaging remnants, old mowers, etc. in accordance with local regulations.
Operation
Also follow the instructions in the engine handbook.
Danger
Accident
- No person, especially children, and/or animals should be allowed to stand close to the appliance while it is in use. Risk of injury due to ejected stones or other objects.
Falling over
- Only push the machine along at walking pace.
- Be particularly careful when mowing in reverse and pulling the appliance towards you.
- When mowing on steep slopes, there is a risk of the mower tipping over and you could be injured as a result. Mow crossways to the slope, never upwards and down-wards. Do not mow on slopes with an incline greater than 20%.
- Be particularly careful when changing the direction and always pay attention to a good position.
- Mowing along perimeters involves a risk of injury. Mowing near edges, hedges or steep inclines is dangerous. Keep a safe distance from perimeters when mowing.
- If the ground is wet the mower could slip due to reduced traction and overturn. Only cut the grass when the ground is dry.
- Work only by daylight or in good artificial lighting.
Injury
- Always observe the safety distance to the rotating tool specified by the steering handle.
- The working area of the operator is behind the steering handle during operation.
- Never place your hands or feet on or under rotating parts.
- Do not use the device in adverse weather conditions, e. g. if there is a risk of rain or a storm.
– Turn off the engine and wait until the blade has stopped:
– before tilting the appliance,
- for transporting over surfaces other than grass,
- Switch off the engine to prevent the engine from being started unintentionally: Remove ignition key (if used), leave the engine to cool down and remove the spark-plug terminal,
– before you clear the ejector of blockages and other hindrances,
– before you check, clean, or configure the appliance or perform any work on it,
– immediately after a foreign object. Check the appliance for damage, and have any damage repaired at a specialised garage,
– immediately after the appliance starts to vibrate. With unusual violence and before you check the appliance.
– Never lift or carry the appliance when the engine is running.
- Inspect the ground on which the mower is going to be used and remove any loose objects that could be picked up and thrown out again by the mower.
- If the cutter strikes a foreign object (e.g. stone) or if the mower starts vibrating unusually: Immediately switch off the engine.
Before continuing to use the unit, have it checked for damage by a specialist workshop.
- When rotary mowing, never stand in front of the grass discharge openings.
Appliances with grass catchers:
- If you remove the grass catcher, you or other persons might get injured due to ejected, mowed materials or foreign bodies. Never empty the grass sack while the engine is running. Switch off the appliance.
Danger of asphyxiation due to carbon monoxide poisoning Run the internal combustion engine outdoors only.
Danger of explosion and fire
– Petrol vapours are explosive and petrol is highly flammable.
- Fill with fuel before starting the engine. Keep the tank closed while the engine is running or still hot.
– Before refuelling, switch off the engine and wait until it has cooled down. Prevent naked flames and spark formation, and do not smoke. Refuel the mower outdoors only.
- If fuel has overflowed, do not start the engine. Remove unit from the fuel-contaminated area and wait until the fuel vapours have evaporated.
- To avoid fire hazard, please keep the following parts free of grass and escaping oil:
-Engine
- Exhaust
- Batteries / accumulators
- Petrol tank.
Danger of stumbling
- Operate the mower at walking speed only.

Caution
Damage to the lawn mower
- Stones, branches or similar objects lying about may damage the unit and its mode of operation. Remove all objects from the appliance's path before every use.
- Do not operate the mower if it is not in perfect working order. Before operating the unit, always carry out a visual inspection. Check in particular the safety equipment, controls and threaded connections for damage and secure attachment. Replace damaged parts before operating.
i Operating times
Comply with the national/municipal regulations concerning the times when the machine may be used (if required, contact your local authority).
i Location details
Specified positions on the appliance (e.g. on the left, on the right) are always seen from the steering handle in the working direction of the appliance.
Before starting up the appliance for the first time Filling the engine with oil
Caution
For reasons of transportation the unit is delivered without engine oil.
■ Therefore, you must fill the engine with oil before putting into operation for the first time.
Charging the accumulator (appliances with electric starter)
Risk of chemical burns/poisoning
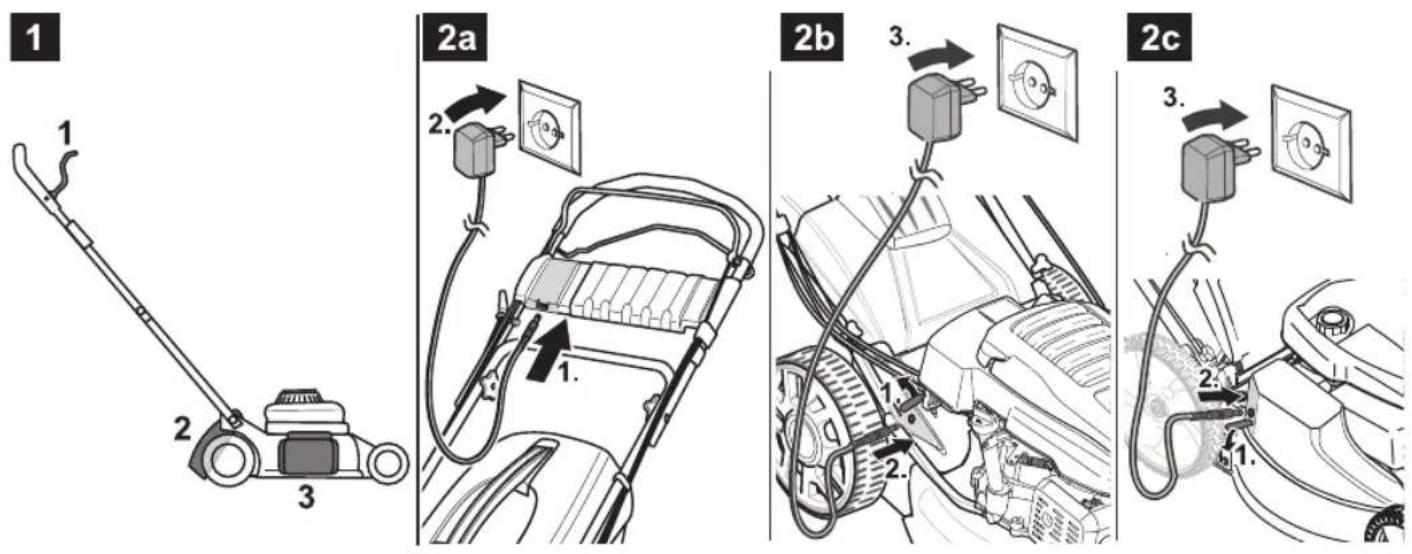
In extreme cases be alert to the escape of liquids or gases. Depending on the model, the accumulator is located in the dashboard, on the upper handle (Fig. 2a) or on the mower deck (Fig. 2b/c).
Risk of electric shock
Before using the charger, always check for external damage. Never use a damaged charger.
Caution
- Ensure that the power supply operates at 220–230 V and 50 Hz according to the specifications on the rating plate of the charger.
- Protect the charger from humidity, rain, snow and frost. - Charge accumulator in well ventilated and dry rooms only. Do not exceed the maximum charging time of 12 hours. - Before switching on, disconnect the charger from the power supply and appliance.
Fig. 2
■ Before using the unit for the first time, charge the accumulator for at least 10 hours. Only use the battery charger included in the delivery.
i Note
Disconnect the battery charger in reverse order.
i Disposal information for the charger
The charger is subject to the disposal regulations for electrical appliances. Observe the local regulations.
Always adjust machine before using
Risk of injury
Before carrying out any work on this mower
- Switch off the engine
- Remove the ignition key (if used),
- Wait until all moving parts have come to a standstill; the engine must have cooled down,
- Remove the spark plug connector on the engine in order to prevent the engine from accidentally being started.
Hang the grass catcher (only in the case of appliances with grass catchers)
Fig. 11
■ Lift up the deflector flap and hook the grass sack onto the lawn scarifier.
Set the cutting height
Caution
Select cutting height for uneven terrain to prevent the cutter from ever coming into contact with the ground.
Fig. 3
Set the cutting height of the grass as required.
Setting option (depending on model) from approx. 3 cm to maximum 9 cm.

Note
If appliances have individual wheel adjustment, set all wheels to the same height.
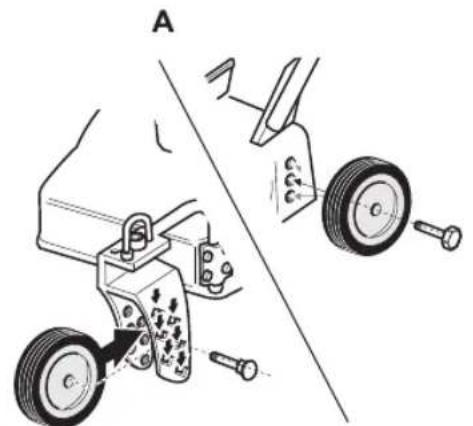
Model A
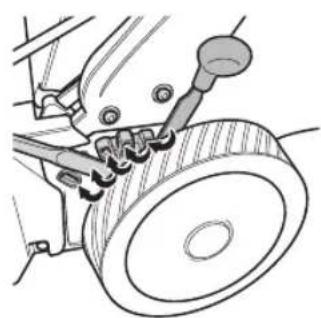
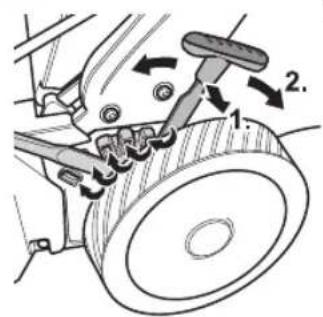
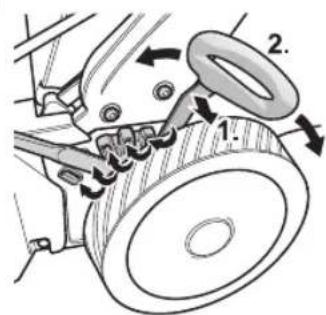
■ Attach the wheels in the position required.
Model B
■ Pull the flap and snap into place in the position required.
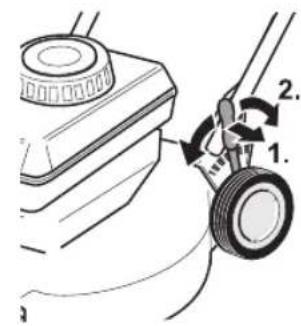
Model C
■ Advance or push back the lever of the central vertical adjustment and snap into place in the position required.
Locking front wheels
(only appliances with lockable front wheels)
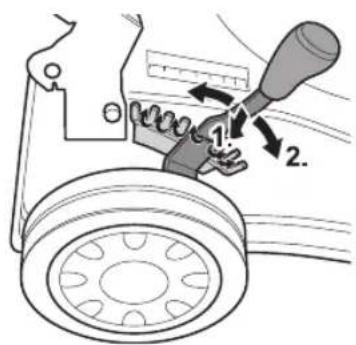
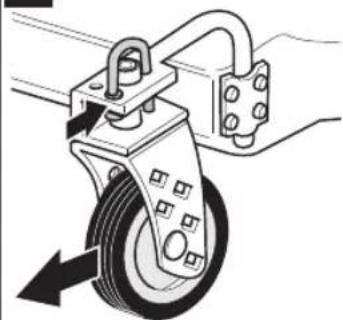
Fig. 4
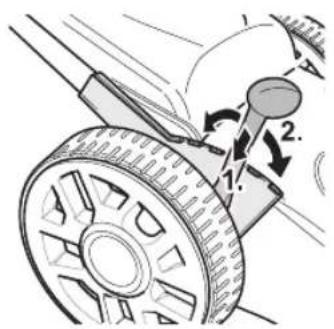
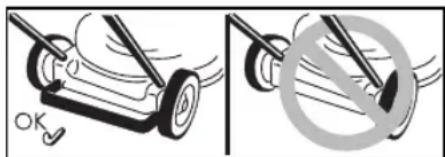
Lock wheels to drive straight ahead – set the wheels in forward position and put hoop into large hole.
Wheels are freely movable – put clamp into large hole.
Fill up with fuel and check the oil level
■ Fill up with lead-free petrol (see engine manual).
■ Fill fuel tank up to max. 2 cm below the lower edge of the inlet nozzle.
■ Close fuel tank tightly.
■ Check oil level and, if required, top up (see Engine manual).
Starting the engine
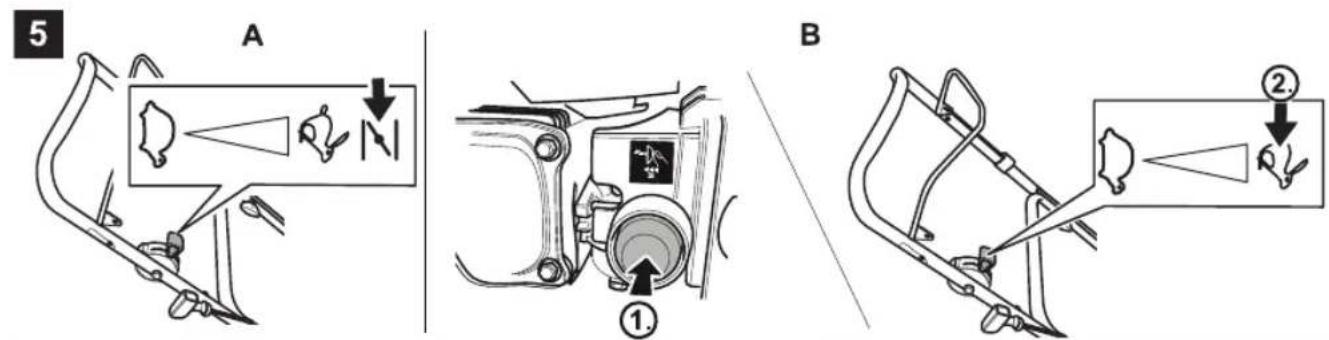
Fig. 5

Danger
To prevent injury:
- Do not start the engine when you are standing in front of the ejector;
- Keep hands and feet well away from the cutting blade;
– never place your hands, feet, or other parts of the body near rotating parts; Always keep away from the ejector.
Before starting the engine, disengage the clutches for all cutters and drives.
Do not tip the appliance when starting. Keep the appliance on an even surface with little or the shortest possible grass.

Information about the engine
Observe the information in the engine manual.
- Some models have no throttle and the speed is adjusted automatically. The engine always runs at optimum speed.
- Even if the engine is warm, it may be necessary to actuate the choke or the primer.
- Some models have no choke and no primer. The engine is automatically set to the particular starting process.
If the engine is cold:
■ Open the fuel tap (if fitted).
Units with choke
■ Set the choke lever to/ or pull out the choke and set the accelerator lever (if fitted) to /max. (Fig. 5A)
or
■ Set the accelerator lever ⚡ to - fig. 5A.
Appliances with primer:
- Press primer forcefully 1–5x and move throttle (if fitted) to /max. – fig. 5B.
If the engine is warm:
■ Open the fuel tap (if fitted).
■ Set throttle (if available) to /max. – Fig. 5B
Appliances without electric starter: Fig. 5C
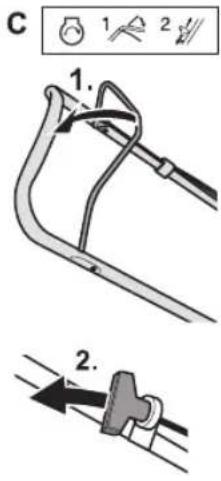
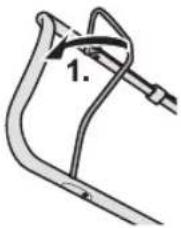
■ Stand behind appliance – Press and hold safety lever.
■ Slowly pull the starter cable grip until you feel resistance, and then pull quickly and strongly. Do not let the pull-starter handle spring back, but slowly guide it back.
For appliances with electric starter: Fig. 5D
■ Disconnect charger from power supply and unit.
■ Stand behind appliance – Press and hold safety lever.
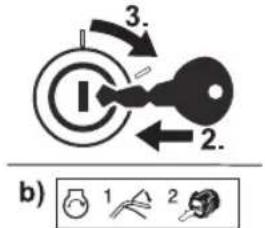
■ Turn ignition key on the steering handle until the engine starts (start attempt max. 5 seconds, wait 60 seconds before the next attempt).

Note:
If appliances feature electric starter, the engine (depending on model) can also be started manually with the pull-starter handle.
When the engine is running:
■ After starting the engine (depending on the model):
– return the choke (if fitted),
- move the accelerator lever (if fitted) between /max and /min so that the engine can warm up briefly.
■ Set the throttle to full throttle (if available).

Note
If you need more information about operating the engine, please refer to the engine manual.
Stopping the engine
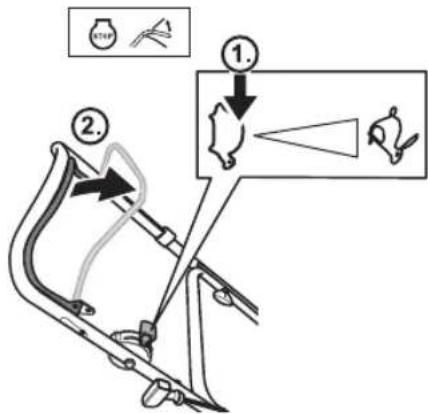
Fig. 7
■ Bring throttle (if available) into position ↩/min.
■ Release the safety hoop. The engine and the cutting tool stop after a short time.
Working with the snow-clearing machine
Engaging/disengaging gear drive
(only in the case of appliances with gear drives)
Fig. 6A, B, C
Wheel drive activation

■ Pull and hold the lever/hoop. Wheel drive deactivation

■ Release lever/hoop.
i Information for units corresponding with Fig. 6C
The unit can be switched on/off with the left or the right lever or even with both levers together.
i Note
When the unit is pulled back, there may be increased resistance on the back wheels on account of the design. This is not a fault with the appliance but occurs for technical reasons.
Remedy (depending on model): Without pulling the drive handle, push appliance forwards a little, then backwards.
Changing drive speed of the wheel drive
(depending on model)
Caution
Damage to the lawn mower Make adjustments when the engine is running only. Model 6D, E
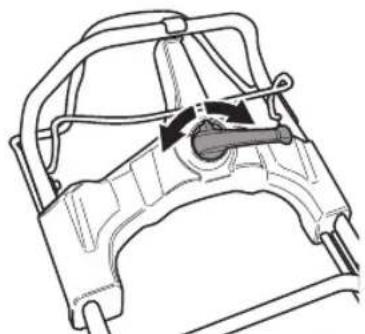
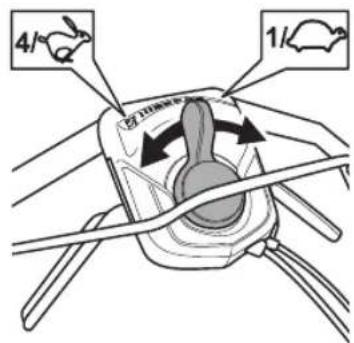
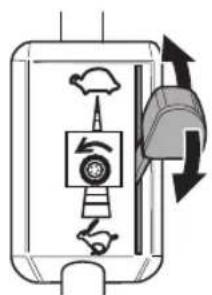
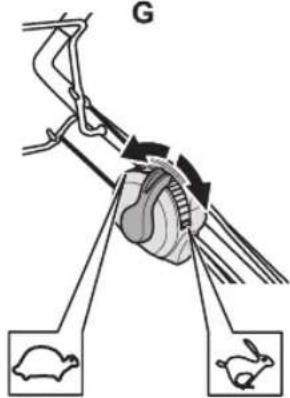
■ Select from the different speeds using the small lever (1/min./and 4/max./
Fig. 6F, G
■ Select from the different speeds using the lever (1/min./→ and 4/max./)
i Note
For technical reasons the speed may be difficult to change when the appliance is at a standstill.
Remedy: Pull drive bar and select speed setting.
Detaching and emptying the grass sack
(for appliances with grass catchers) Fig. 11
If cut grass is left lying on the ground or if the level indicator (optional, Fig. 12) indicates that the basket is full:
■ Release safety hoop and wait until the engine stops.
■ Lift the deflector flap and unhook the grass sack.
■ Empty out the contents.
Working without the grass sack Whenever you detach the grass sack, the deflector flap drops down. When working without a grass catcher, the mowed grass is ejected directly downwards.
Retrofitting for mulching (for appliances with optional mulcher)
Appliances with rear discharge:
Fig. 8A
■ Lift the ejection flap.
■ Remove the grass catcher.
■ Insert mulch key (depending on model).
■ Lower the ejection flap.
i Note
Models with integrated mulching function do not require a separate mulch key - a specially shaped rear flap assumes this function (fig. 8B).
Appliances with side discharge:
Fig. 9
■ Attach impact protection/mulch lock instead of the side discharge (Fig. 9A)
or
■ Remove side discharge – impact protection/mulch lock closes automatically (Fig. 9B).
Changing appliances over to side discharge
(depending on model)
■ If fitted:
Remove grass catcher and lower the rear discharge flap.
■ Lift impact protection/mulch lock and attach side discharge (Fig. 9C).
After finishing work
■ Remove the ignition key (if used).
■ Wait until all moving parts have come to a complete stop and the engine has cooled down.
■ Turn off the fuel tap (if fitted – see engine manual).
■ Disconnect the spark plug terminal on the engine.
■ Empty grass catcher.
For appliances with electric starter:
■ Recharge accumulator for 10 hours.
i Note
Leave engine to cool down before placing the mower in an enclosed space.
Tips on lawn care
Here are some tips to help you keep your lawn looking healthy and ensure uniform growth.
Mowing
A lawn is made up of various different types of grass. If you mow your lawn frequently, those types of grass which form strong roots and a firm turf surface will grow better. If you only rarely cut the grass, you will encourage the development of high-growing types of grass and other weeds, such as clover and daisies.
The normal height of a lawn is approx. 4–5 cm. Only 1/3 of the total height should be mown; therefore cut 7–8 cm long grass to normal height.
Preferably do not cut the lawn shorter than 4 cm, otherwise the turf will be damaged in a dry period. If the grass has grown particularly high (e.g. during a holiday period), cut it back to its normal height in stages.
When mowing, always overlap the mown swaths slightly.
Mulching (using the accessories)
During mowing the grass is cut into small pieces (approx. 1 cm) and is left on the ground. A lot of the nutrients in the cut grass are retained for the benefit of the lawn. For the best possible result the grass must always be kept short, see also section "Mowing".
Observe the following mulching instructions:
- Do not mow wet grass.
- Never mow more than 2 cm.
- Drive slowly.
- Use the maximum engine speed.
- Regularly clean the cutter deck.
Transporting
Short distances by hand

Danger
Solid objects may be hit/propelled by the rotating cutter deck causing damage.
First stop the engine before moving it over surfaces other than grass.
When using a vehicle

Danger
Before transportation, always stop the engine and leave to cool down. Remove spark-plug terminal.
The mower must not be tilted when it is transported.
When transporting the scarifier in or on a vehicle, ensure that it does not move around unintentionally. Empty the fuel tank before transporting the device. The filler cap must be closed tightly.
Appliances with collapsible bars:
Fig. 10
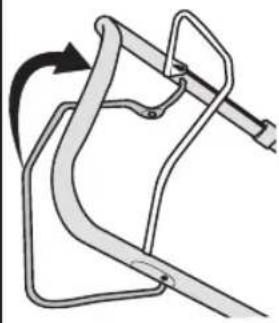
■ The steering handle can be folded down to facilitate storage.
Servicing/cleaning

Danger
To protect against injury before all work on the device
- switch off the engine,
- Remove the ignition key (if used),
- wait until all moving parts have come to a complete stop and the engine has cooled down,
– remove the spark plug connector on the engine to prevent the engine from being accidentally started,
– which takes into account additional safety information in the engine manual.

Danger
To protect against injury from the cutters, have a specialist garage perform all work such as replacing or regrinding the cutters (special tools required).

Caution
When tilting the unit, always ensure that the spark plug is face up to prevent fuel or oil damaging the engine.

Note
Regular care ensures a long service life and fault-free operation. Inadequate maintenance of your appliance may lead to safety-related defects.
Maintenance

Caution
Observe the servicing instructions in the engine manual. At the end of the season, have the mower inspected and serviced by a specialist workshop. Any repairs as well as the replacement of defective accumulators or defective fuses may be carried out by a specialist workshop only.

Caution
Environmental hazard caused by engine oil.
After changing the oil, take the waste oil to a waste oil collecting point or to a waste disposal company.

Batteries / accumulators pollute the environment.
Used accumulators do not belong in domestic waste. Give used accumulators to your dealer or other disposal company. Remove batteries / accumulators before appliances are scrapped.

Note
Observe the inspection and maintenance intervals in the engine manual.
Depending on the model, your appliance features an electronic maintenance indicator (fig. 13).
Observe the appropriate maintenance indicators in addition to the written maintenance instructions. Operation as well as further information can be found in the separate operating instructions which are enclosed with the maintenance indicator.
Before each operation
■ Check the oil level and top up as necessary.
■ Check all screw fittings for firm seating, tighten them if necessary.
■ Check the safety features.
Check the point of contact of the clutch:
(only in the case of appliances with gear drives)
- The appliance should not drive forwards when the engine is running and when the gear drive is not engaged.
- The appliance should drive forwards when the engine is running and the gear drive is engaged.
Fig. 15
■ If required, set contact point using thumb wheel/adjusting nut on the wheel drive lever (depending on design on the underside of the control panel) or Bowden cable.

Note
Adjustments are not possible on some models.
After the first 2–5 operating hours
■ Change oil (please see engine manual enclosed).
Each time after mowing or every 8 weeks
(only appliance with electric starter)
■ Recharge accumulator for 10 hours.
Once a season
■ Change oil (please see engine manual enclosed).
■ Lubricate the pivot points and torsion spring on the ejector cover.
■ At the end of the season the unit must be checked and serviced by a specialist workshop.
Cleaning

Caution
Clean the device after every use. A device which is not cleaned will result in damaged materials and impaired function.
Do not clean the unit with a high-pressure cleaner.
Cleaning the grass sack
(only in the case of appliances with grass catchers)
The easiest time to clean the grass catcher is immediately after mowing.
■ Detach and empty the grass sack.
■ The grass catcher may be cleaned with a powerful jet of water (garden hose).
■ Allow the grass sack to dry out thoroughly before using it again.
Cleaning lawn mower
Danger
Work on the cutters can cause injury. Wear safety gloves for your protection.
Caution
When tilting the unit, always ensure that the spark plug is face up to prevent fuel or oil damaging the engine.
Do not spray the device with water, otherwise electric components may be damaged.
Whenever possible, always clean the appliance directly after mowing.
Units without deck washing system:
■ Clean the cutter chamber and the ejector cover with brush, hand broom, or cloth,
■ Set the appliance down on its wheels, and remove all visible grass residue and other soiling.
Units with deck washing system:
Fig. 14
Lawnmowers with a deck washing system feature a water connection. Grass clippings can then be rinsed off the underside of the mower deck and deposits of corrosive chemicals prevented.
After mowing, proceed as follows:
■ Place appliance on level ground, free of debris, stones, etc.
i Note
Discharge chute must not be directed at houses, garages, etc.
■ Attach a commercially available hose adapter (optionally included in the product package) to a water hose and connect to the water connection on the mower deck.
■ Turn on water.
■ Start engine and leave running for several minutes.
■ Stop engine and remove water hose from the appliance.
At the end of the cleaning process:
■ Start engine and leave running for several minutes to dry the underside of the mower deck.
■ Stop the engine.
Immobilizing
Danger
Risk of explosion and fire.
When there is fuel (petrol) in the tank, never keep the appliance in rooms where fuel vapours can come into contact with naked flames or sparking.
Caution
Damage to mower materials.
Only store the unit (with the engine cooled down) in a clean and dry room. Protect the appliance when storing it for longer periods of time e.g. against rust in winter.
At the end of the season or if the unit will not be used for longer than a month:
- Drain off the fuel into a suitable receptacle, and immobilise the engine as described in the engine manual.
Caution
Drain fuel outdoors only.
■ Clean the appliance and the grass sack.
■ To protect metal parts from rust, wipe them all down with an oiled cloth (resin-free oil) or apply an oil spray.
■ Charge the accumulator (if fitted).
Warranty
The warranty rules issued by our company or the importer apply to every country. Faults will be repaired free of charge within the framework of the guarantee, provided that they have been caused by a material defect or manufacturing error. Should you need to call upon the warranty, please apply to the vendor of your machine or to the nearest agency.
Engine
The manufacturer of the engine is liable for all engine-related problems with respect to output power, power measurement, specifications, warranties, and service. More detailed information can be found in the owner/operator handbook provided separately by the engine manufacturer.
Identifying and eliminating malfunctions
Malfunctions that occur during the operation of your lawnmower often have simple causes that you should know and be able to repair on your own. In cases of doubt your specialised dealer will be pleased to assist you further.
Problem Possible cause(s) Remedy
| Starter cable resists pulling. Safety lever has not been pressed. | Press safety loop against the upper bar. | |
| Blade is blocked. Remove spark plug connector and get rid of the blockage. | ||
| Engine defective. Contact a specialist garage | ||
| Engine does not start. Throttle is not in the right position. | Set throttle to position Nor CHOKE (if the engine is cold). | |
| Set throttle to /max position or START (if the engine is warm). | ||
| Lawnmower is standing in long grass. Place the lawnmower onto a surface with shorter grass. | ||
| No fuel in the tank. Fill tank with clean, fresh fuel | ||
| Spark-plug lead not connected. Connect spark-plug terminal. | ||
| Fuel old or dirty. Replace with new fuel. | ||
| Air filter clogged. Clean air filter. | ||
| Choke not actuated. Pull out choke. | ||
| Primer not actuated for cold start. Actuate primer. | ||
| - For appliances with electric starting devices: | Accumulator discharged. Charge accumulator with the charger provided. | |
| Lead damaged. Check whether electric lead OK. | ||
| Fuse defective. Have defective fuse replaced by a specialist workshop. | ||
| Unusual noises (rattling, clanging, knocking). | Bolts, nuts or other mounting parts slack. Tighten parts. If the noises persist: Contact a specialist garage | |
| Shaking, vibrations. | Cutter(s) loose. Cutter fastening screw must be tightened at specialist garage. | |
| Cutter(s) damaged. Cutters must be replaced at specialist garage. | ||
| Cutters not balanced correctly. Cutters must be replaced or balanced at specialist garage. | ||
| Engine not secure. Engine must be secured at specialist garage. | ||
| Unclean cut or speed is decreasing. | Grass too high. Set larger cutting height, if necessary mow twice. | |
| Grass is not being picked up or grass catcher is not filling. | Grass too damp. Let the lawn dry. | |
| Ejector clogged. Switch OFF engine, remove hindrance. | ||
| Blades blunt. Cutters must be replaced or reground at a specialist garage. | ||
| Insufficient power from motor. Mow more often. Select a greater cutting height. | ||
| Grass sack full. Switch off engine. Unload grass catcher. | ||
| Dirty grass sack. Switch off engine. Clean air ducts in the grass catcher. | ||
Problem Possible cause(s) Remedy
| Wheel drive does not work. | V belt torn or gears defect. | Damaged parts must be replaced at a specialist garage. |
| Cable pull/Bowden cable torn. | Damaged parts must be replaced at a specialist garage. |
Sommaire
natural_image
Two diagrams showing mechanical components with curved arrows indicating motion, no text or symbols presenttext_image
Warning sign and safety icons for car accident detection, showing no violations in vehicle and parking.natural_image
Two diagrams showing a mechanical component with curved lines and a circle highlighting a specific section (no text or symbols present)text_image
Warning symbols for car safety, including warning sign, no-dsymbol sign, and three warning icons with checkmarks.natural_image
Two diagrams showing a manual pushpin mechanism with a circular motion indicator (no text or symbols)text_image
Warning symbols for car safety, including warning sign, no-dominant car, and three warning icons with checkmarks.natural_image
Blank white image with three horizontal black lines inside a rectangular border (no text or symbols)natural_image
Two diagrams showing mechanical components with curved lines, one circled to indicate a dissection or locking mechanism (no text or symbols present)text_image
Warning symbols for car safety, including warning sign, no-drawn car, and three checkmark icons with 'OK' text.natural_image
Two diagrams showing a manual pushpin mechanism with a circular motion control (no text or symbols)text_image
Warning symbols for car safety, including warning sign, no-dominant car, and three warning icons with checkmarks.natural_image
Two diagrams showing mechanical components with curved and straight lines, one with a circular arrow indicating rotation or force (no text or symbols)text_image
Warning symbols for car safety, including warning sign, no-drawn car, and three icons indicating OK or no signs.natural_image
Two diagrams showing mechanical components with curved lines and a circle highlighting a specific part (no text or symbols present)text_image
Warning symbols for car safety, including warning sign, no-drawn car, and three checkmark icons with 'OK' text.– Batterier/akkumulatorer
- Benzintank.
Fare for at snuble
natural_image
Empty rectangular frame with three horizontal lines inside (no text or symbols)Disse og andre opplysninger om maskinen finner du på den separate CE-samsvarserklæringen som er en del av denne bruksanvisningen.
Illustrasjoner

natural_image
Two diagrams showing a mechanical component with curved lines and a circle highlighting a circular feature (no text or symbols)text_image
Warning symbols for car safety, including warning sign, no-drawn car, and three 'OK' icons indicating no violations.Fare for skade – det må kun arbeides med påsatt utkastklaff.
Hold alltid disse symbolene på maskinen i lesbar tilstand. Erstatt skadde eller uleselige sym- boler.
Symbolene i veiledningen
- for transport over andre flater enn gress,
natural_image
Two diagrams showing a manual pushpin and a circular motion control mechanism (no text or symbols)natural_image
Two illustrations showing a manual lawn mower and a prohibition symbol (no text or symbols present)text_image
Warning symbols and safety icons for car accidents, including warning signs, no-drawn car, and checkmarksnatural_image
Empty rectangular frame with three horizontal lines inside (no text or symbols)natural_image
Two diagrams showing a manual pushpin mechanism with a circular motion indicator (no text or symbols)text_image
Warning symbols for car safety, including warning sign, no-dsymbol car, and three warning icons with 'OK' text.natural_image
Two diagrams showing a mechanical device with wheels and a circle highlighting a specific component (no text or symbols present)text_image
Warning symbols for car safety, including warning sign, no-drawn car, and three masked faces with checkmarks.natural_image
Two diagrams showing a manual pushpin mechanism with a circular motion indicator (no text or symbols)natural_image
Illustration of a manual lawn saw and a prohibition symbol (no text or labels)text_image
Warning symbols and icons for car safety, including warning, no smoking, and OK/No signsnatural_image
Two diagrams showing a manual pushpin mechanism with a circular motion indicator (no text or symbols)text_image
Warning symbols for car safety, including warning sign, no-drawn car, and three icons indicating OK or no signs.natural_image
Two diagrams showing mechanical components with curved lines and a circle highlighting a specific part (no text or symbols present)text_image
Warning symbols for car safety, including warning, no smoking, and check signsnatural_image
Two diagrams showing mechanical components with curved lines, one with a circle highlighting a circular feature (no text or symbols)Nebezpečenstvo poranenia – pracujte iba s namontovanou protinárazovou ochranou.
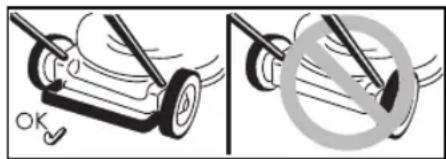
text_image
OKtext_image
Warning symbols for car safety, including warning triangle, no-noise sign, and three icons for disrepair or anti-smoking.Nebezpečenstvo poranenia – pracujte iba s namontovanou odhadzovacou koncovkou.
natural_image
Two mechanical components with curved arms and a circular outline, no visible text or symbolstext_image
Warning symbols for car safety, including warning sign, no-drawn car, and three checkmark icons with 'OK' text.natural_image
Two diagrams showing a manual pushpin mechanism with a circular motion indicator (no text or symbols)text_image
Warning symbols for car safety, including warning sign, no-drawn car, and three warning icons with checkmarks.natural_image
Two diagrams showing a manual pushpin mechanism with a circular motion indicator (no text or symbols)Opasnost od ozljede – raditi samo sa ugradjenim odbojnikom.
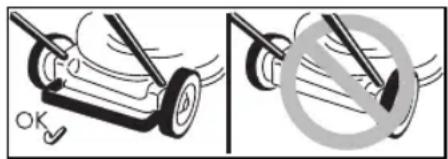
text_image
OKtext_image
Warning symbols for car safety, including warning sign, no-dominant car, and three warning icons with checkmarks.Opasnost od ozljede – raditi samo sa ugradjenim uređajem za izbacivanje.
natural_image
Empty rectangular frame with three horizontal lines inside (no text or symbols)Ove i druge podatke o uređaju naći ćete u posebnoj CE izjavi o usaglašenosti koja je sastavni deo ovog uputstva za upotrebu.
Slikovni prikazi
Rasklopite stranice sa slikama na početku uputstva za upotrebu. U ovom uputstvu za upotrebu su opisani različiti modeli. Grafički prikazi u detaljima mogu da se razlikuju od kupljenog uređaja.
Za vašu sigurnost
Aparat pravilno koristiti
Ovaj uređaj je isključivo namenjen – za upotrebu u skladu sa opisima i sigurnosnim uputstvima koja su data u ovom uputstvu za upotrebu;
- za kosidbu travnatih površina u kućnoj bašti i vikendici.
Svaka drugačija upotreba je nenamenska. Posledica nenamenske upotrebe je prestanak važenja garancije i odbijanje svake odgovornosti od strane proizvođača. Korisnik je odgovoran za sve štete koje nastanu kod trećih lica ili na njihovom vlasništvu.
Svojevoljne izmene na uređaju isključuju garanciju proizvođača za štete koje mogu proizići iz toga.
natural_image
Two illustrations showing a manual pushpin and a circular motion control mechanism (no text or symbols)Opasnost od povrede – raditi samo sa montiranim odbojnikom.
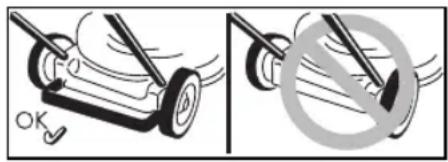
text_image
OKOpasnost od povrede – raditi samo s montiranim zadnjim branikom.
text_image
Warning symbols for car safety, including warning sign, no-dominant car, and three warning icons with checkmarks.Opasnost od povrede – raditi samo s montiranim izbacivačem.
natural_image
Two diagrams showing a mechanical component with a circular gap between them, no text or symbols present.Opasnost od ozljede – raditi samo sa montiranim odbojnikom.
text_image
OKtext_image
Warning symbols for car safety, including warning triangle, car with no disc, and three warning icons labeled OK.Opasnost od ozljede – raditi samo sa montiranim uredjajem za izbacivanje.
natural_image
Two diagrams showing a mechanical component with curved lines and a circle highlighting a circular feature (no text or symbols present)text_image
Warning symbols for car safety, including warning, no stop, and clear signs with checkmarksnatural_image
Two diagrams showing a mechanical component with a circular hole, no text or symbols presenttext_image
Warning symbols and icons for car safety, including warning, no smoking, and disapproval signsnatural_image
Diagram showing two mechanical components with curved arrows indicating motion, one with a circular arrow and the other with a straight line (no text or symbols)text_image
Warning symbols for car safety, including warning triangle, car with no plaque, and three icons showing 'OK' and 'No' signs.natural_image
Two diagrams showing a hand operating a wheel with a circular motion path, no text or symbols presentnatural_image
Two diagrams showing mechanical components with curved lines, one circled (no text or symbols)text_image
Warning symbols and safety icons for car accidents, including warning signs, no-drawn car, and masked faces with checkmarks.Monteerimine .....284
Transportimine .....287
Hooldamine/puhastamine .....288
Hoiustamine .....289
Garantii ....289