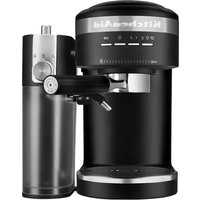
Artisan 5KES2103EOB - Coffee machine KITCHENAID - Free user manual and instructions
Find the device manual for free Artisan 5KES2103EOB KITCHENAID in PDF.
| Product type | Espresso machine |
| Brand | KitchenAid |
| Model | Artisan 5KES2103EOB |
| Dimensions (L × D × H) | Approx. 35 × 28 × 33 cm |
| Weight | Approx. 10 kg |
| Power supply | 220-240 V ~, 50-60 Hz |
| Power | Max. 1300 W |
| Pump | 15 bar, self-priming |
| Water tank | 1.8 L, removable, left/right sliding, BPA-free |
| Boiler | Dual independent boilers (espresso and steam) |
| Brew head | Chromed brass, professional size |
| Filter holder | Chromed brass, ergonomic handle, swiveling |
| Filter baskets | 2: small (1 cup) and large (2 cups), stainless steel |
| Steam nozzle | Frothing arm pivoting horizontally and vertically, removable nozzle |
| Drip tray | Removable, stainless steel grid, dishwasher safe (top rack) |
| Warming plate | Stainless steel cup warming rack (4 to 6 cups) |
| Auto shut-off | Yes, after 30 min of inactivity |
| Maintenance | Descale every 2 months; clean steam arm and screen regularly |
| Safety | Auto shut-off, anti-drip solenoid valve, overheat protection |
| Warranty | 10 years (parts and labor at authorized centers) |
| Included accessories | Stainless steel milk pitcher 255 ml, tamper, measuring spoon, cleaning brush |
Frequently Asked Questions - Artisan 5KES2103EOB KITCHENAID
User questions about Artisan 5KES2103EOB KITCHENAID
0 question about this device. Answer the ones you know or ask your own.
Ask a new question about this device
Download the instructions for your Coffee machine in PDF format for free! Find your manual Artisan 5KES2103EOB - KITCHENAID and take your electronic device back in hand. On this page are published all the documents necessary for the use of your device. Artisan 5KES2103EOB by KITCHENAID.
USER MANUAL Artisan 5KES2103EOB KITCHENAID
ESPRESSOMACHINEINSTRUCTIONS
TABLE OF CONTENTS
ESPRESSOMACHINE SAFETY
Important safeguards. 6
Electrical equipment waste disposal. 7
Electrical requirements. 7
PARTS AND FEATURES
Espresso Machine parts 8
Espresso Machine features 8
PREPARING THE ESPRESSO MACHINE FOR USE
Attaching the cup rail. 9
Removing and washing the water tank 9
Filling and rinsing the boilers 10
USING THE ESPRESSO MACHINE
Brewing espresso 11
Frothing and steaming milk. 12
Preparing cappuccino. 13
Dispensing hot water. 13
CARE AND CLEANING
Before cleaning the Espresso Machine. 13
Cleaning the frothing arm and nozzle 13
Cleaning the housing and accessories 14
Cleaning the shower screen. 14
Priming after long periods of non-use. 14
Dscaling. 15
Winter storage care for your KitchenAid Espresso Machine. 15
TROUBLESHOOTING PROBLEMS 16
BEFORE BREWING: THE ELEMENTS OF A GREAT ESPRESSO
Fresh coffee beans. 16
Great tasting water. 16
The right grind - and grinder 16
ESPRESSO BREWING TECHNIQUES
Brewing temperature 17
Grinding 17
Dosing 17
Leveling 17
Tamping. 17
Volume 18
Extraction rate. 18
The golden crema. 18
Troubleshooting espresso as it brews 18
WARRANTY AND SERVICE 19
ESPRESSOMACHINE SAFETY
Your safety and the safety of others are very important.
We have provided many important safety messages in this manual and on your appliance. Always read and obey all safety messages.

This is the safety alert symbol.
This symbol alerts you to potential hazards that can kill or hurt you and others.
All safety messages will follow the safety alert symbol and either the word "DANGER" or "WARNING." These words mean:
DANGER
You can be killed or seriously injured if you don't immediately follow instructions.
WARNING
You can be killed or seriously injured if you don't follow instructions.
All safety messages will tell you what the potential hazard is, tell you how to reduce the chance of injury, and tell you what can happen if the instructions are not followed.
IMPORTANT SAFEGUARDS
When using electrical appliances, basic safety precautions should always be followed, including the following:
- Read all instructions. Misuse of appliance may lead to personal injury.
- Do not touch hot surfaces. Use handles or knobs.
- To protect against fire, electric shock and personal injury do not immerse cord, plugs, or appliance in water or other liquids.
- This appliance can be used by children aged from 8 years and above and persons with reduced physical, sensory or mental capabilities, or lack of experience and knowledge if they have been given supervision or instruction concerning use of the appliance in a safe way and understand hazards involved. Children shall not play with the appliance. Cleaning and user maintenance shall not be made by children without supervision.
- Unplug from outlet when not in use and before cleaning. Allow to cool before putting on or taking off parts, and before cleaning.
- Do not operate any appliance with a damaged cord or plug, or after appliance malfunctions or has been damaged in any manner. Return the appliance to the nearest authorised service centre for examination, repair, or adjustment.
- The use of accessories not recommended by the appliance manufacturer may result in fire, electric shock, or personal injury.
- Do not use outdoors.
- Do not let cord hang over edge of table or counter, or touch hot surfaces.
- Do not place on or near a hot gas or electric burner, or in a heated oven.
- Always switch the appliance off, then plug cord into the wall outlet. To disconnect, turn the appliance off, then remove plug from wall outlet.
- Use extreme caution when using hot steam.
SAVE THESE INSTRUCTIONS
Do not use appliance for other than intended household use.
ESPRESSOMACHINE SAFETY
Electrical equipment waste disposal
Disposal of packing material
The packing material is 100% recyclable and is marked with the recycle symbol. The various parts of the packing must therefore be disposed of responsibly and in full compliance with local authority regulations governing waste disposal.
Scrapping the product
- This appliance is marked in compliance with European Directive 2012/19/EU, Waste Electrical and Electronic Equipment (WEEE).
- By ensuring this product is disposed of correctly, you will help prevent potential negative consequences for the environment and human health, which could otherwise be caused by inappropriate waste handling of this product.
图
- The symbol on the product or on the accompanying documentation indicates that it should not be treated as domestic waste but must be taken to an appropriate collection centre for the recycling of electrical and electronic equipment.
For more detailed information about treatment, recovery and recycling of this product, please contact your local city office, your household waste disposal service or the shop where you purchased the product.

Electrical requirements
Volts: 220-240 Volts A.C.
Hertz: 50-60 Hz
Wattage: Max. 1300 W
NOTE: To reduce the risk of electrical shock, the plug will fit in an outlet only one way. If the plug does not fit in the outlet, contact a qualified electrician. Do not modify the plug in any way.
A short power supply cord (or detachable power supply cord) should be used to reduce the risk resulting from becoming entangled in or tripping over a longer cord.
WARNING

Electrical Shock Hazard
Plug into a grounded (earthed) outlet.
Do not remove ground prong.
Do not use an adapter.
Do not use an extension cord.
Failure to follow these instructions can result in death, fire, or electrical shock.
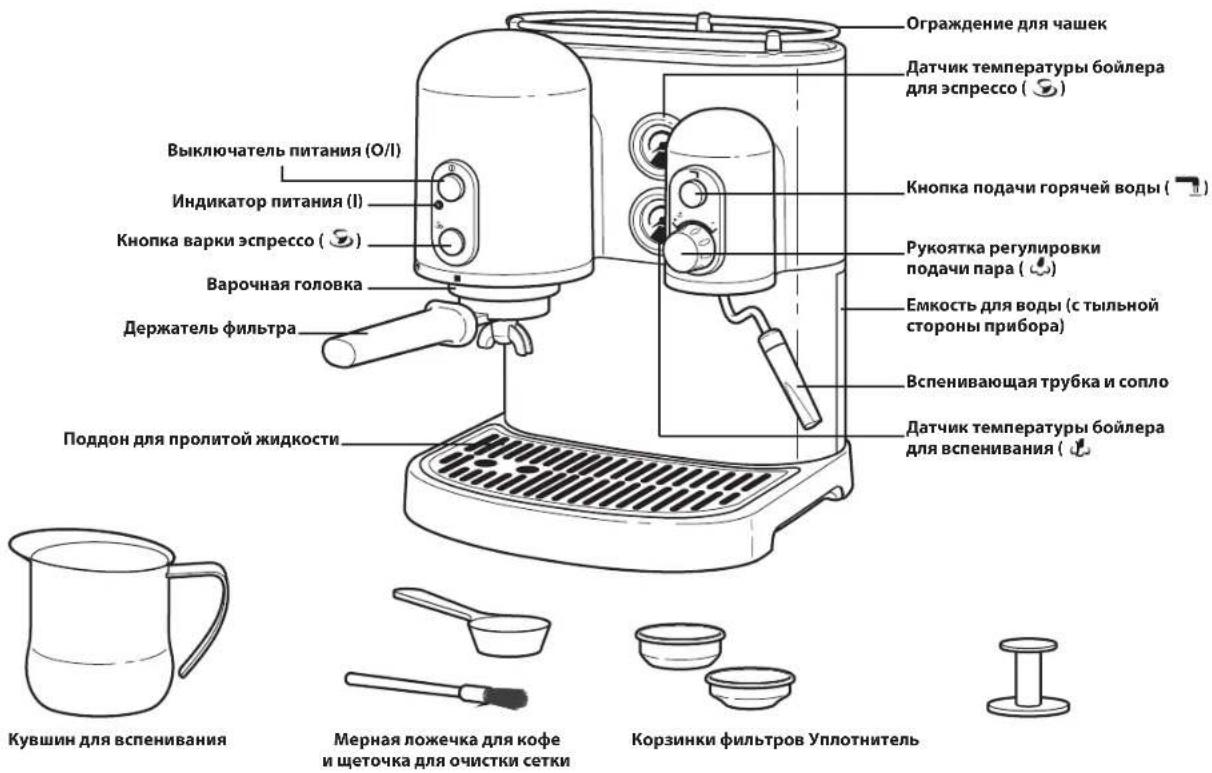
PARTS AND FEATURES
Espresso Machine parts
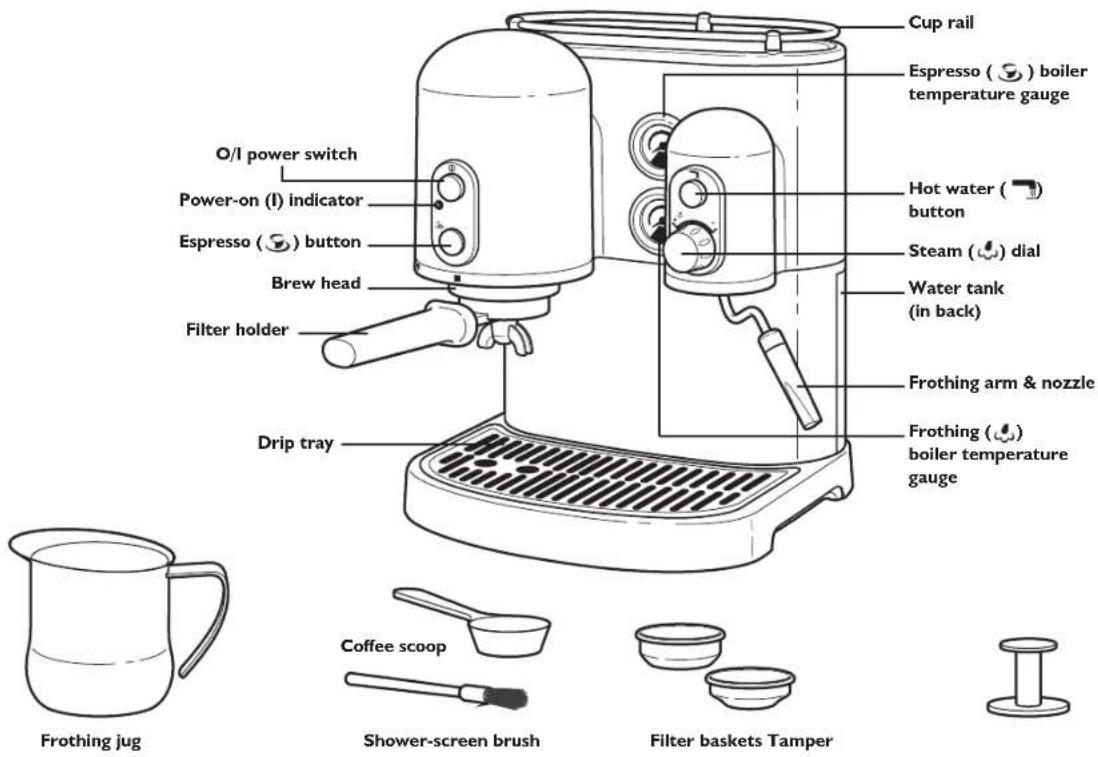

Espresso Machine features
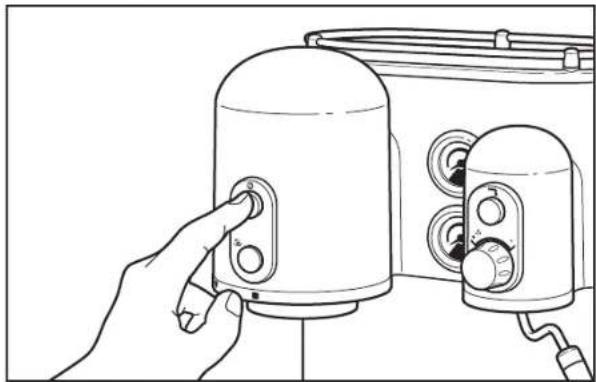
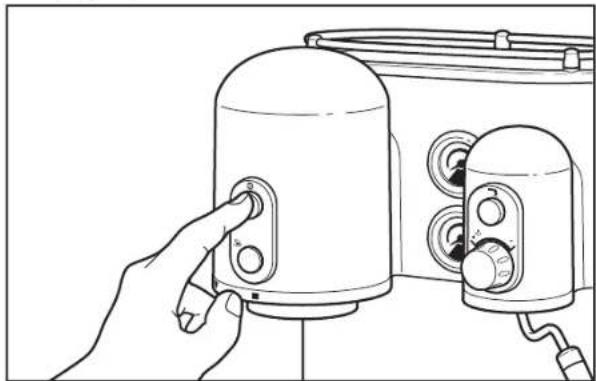
O/I Power (①) Switch
Press once to turn the Espresso Machine on, press again to turn off. When on, the dual boilers begin heating and the " ^ and " buttons will function.
Auto Switch Off Feature
The Espresso Machine features an auto shut-off system: it will switch off automatically after 30 minutes without any interaction with the "S" or the "T" buttons.
Power-On (I) Indicator
When the Espresso Machine is on, the indicator light will be illuminated.
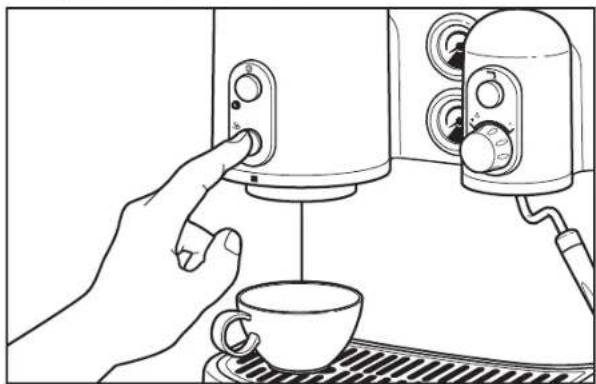
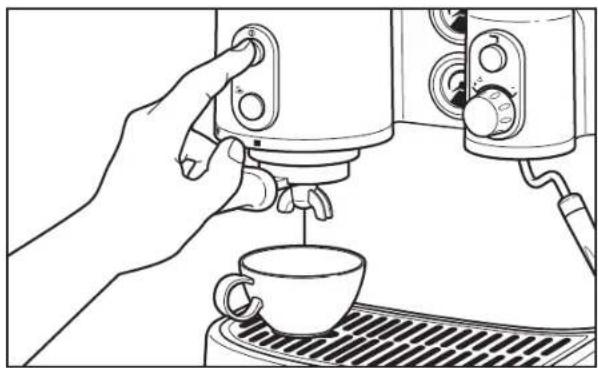
Espresso (一) Button
Press the " " button to activate the water pump for brewing espresso. To stop brewing, press the " " button a second time.
Hot Water (7) Button
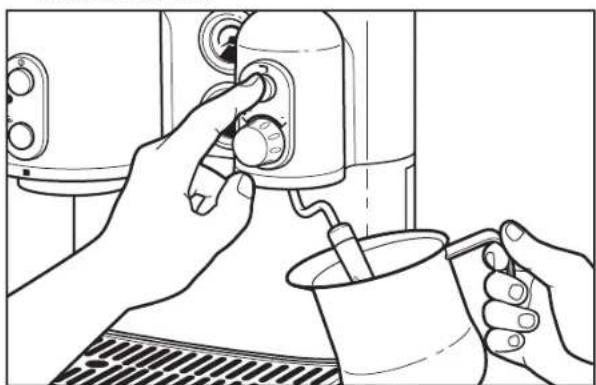
When the " " dial is open, press and hold the " " button to activate the water pump and dispense hot water from the frothing arm. Pump shuts off automatically when the button is released.
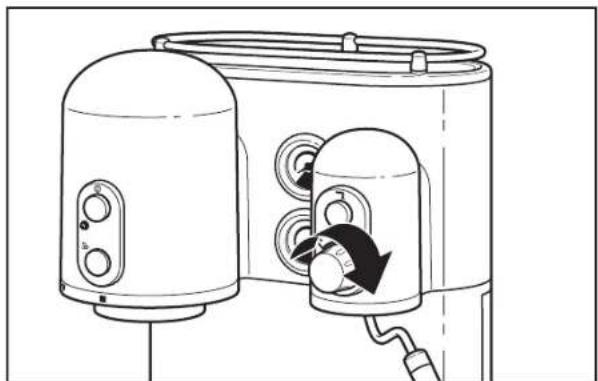
Steam ( ) Dial
To dispense steam or hot water through the frothing arm, open the " " dial by turning it counterclockwise. The volume of steam is controlled by the dial position: rotate the dial counterclockwise for more steam, clockwise for less.
To turn off steam, close the " " dial by rotating it clockwise until it stops.
Brew Head
Commercial-size brew head is chrome-plated brass for exceptional durability and brew temperature stability. Brewing boiler is bolted directly to group head, so brew group heats quickly and thoroughly.
Frothing Arm & Nozzle
Dispense steam or hot water through the frothing arm. The frothing arm pivots horizontally and vertically to provide a convenient position. Nozzle enhances frothing and is removable for cleaning.
Drip Tray
Large, removable drip tray catches spills and is dishwasher safe if placed in the top rack. Tray features a removable stainless steel drip plate.
BPA-Free Water Tank
The removable water tank slides left or right for easy filling, and features easy-to-see "max" (1.8 litres) and "min" fill lines. Translucent tank shows the water level at a glance. BPA-free tank can be washed in the top rack of a dishwasher.
Cup Rail
Top of unit accommodates 4 to 6 espresso cups for warming. Stainless steel cup rail helps prevent breakage.
PARTS AND FEATURES
Espresso (Boiler Temperature Gauge
Dial gauge indicates when espresso boiler has reached optimum brewing temperature.
Frothing ( ) Boiler Temperature Gauge
Dial gauge indicates when frothing boiler has reached optimum steaming temperature.
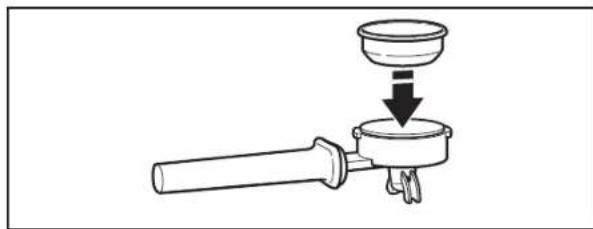
Filter Holder
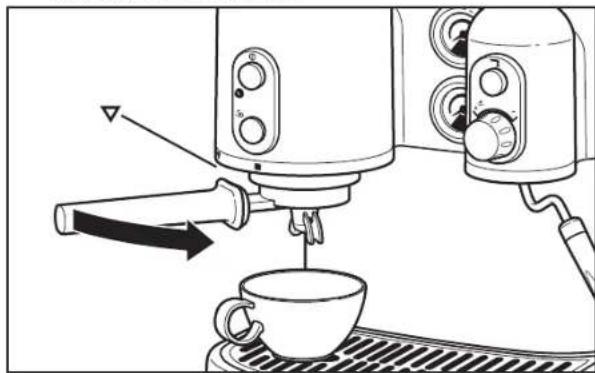
Commercial-size filter holder features chrome-plated brass construction and an easy-to-grip flared handle. Attaches to the brew head with a firm twist to the right.
Filter Baskets
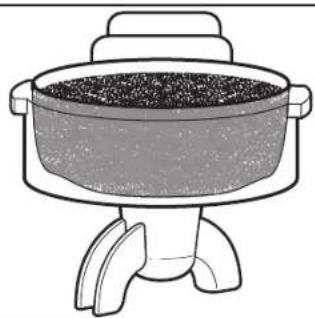
Stainless steel filter baskets snap into filter holder. Use the small-capacity basket for a single cup (30 ml) of espresso, and the large-capacity basket for two cups (60 ml). The small basket also accommodates paper coffee pods.
Frothing Jug
The 255ml capacity stainless steel jug is invaluable for frothing.
Tamper
Evenly tamps coffee within the filter basket.
Coffee Scoop and Shower-Screen Brush
Use one level scoop of coffee for each cup (30 ml) of espresso. The shower-screen brush will help keep the brew head and shower screen free of grounds.
Not Shown:
Dual Boilers
Separate boilers eliminate the wait single-boiler machines require when switching between frothing and brewing. Boiler heating elements never touch water: they are located on the outside of the boiler for superb brew temperature consistency and burnout resistance. Quick-heating boilers reach operating temperatures in approximately 6 minutes.
Drip-Free System with 3-Way Solenoid Valve
A 3-way solenoid valve virtually eliminates drips by instantly reducing pressure in the brew group when the pump is switched off. The filter holder can be removed immediately after brewing without a messy spray of coffee grounds.
15-Bar Pump
Self-priming water pump comfortably supplies pressure that perfect espresso demands.

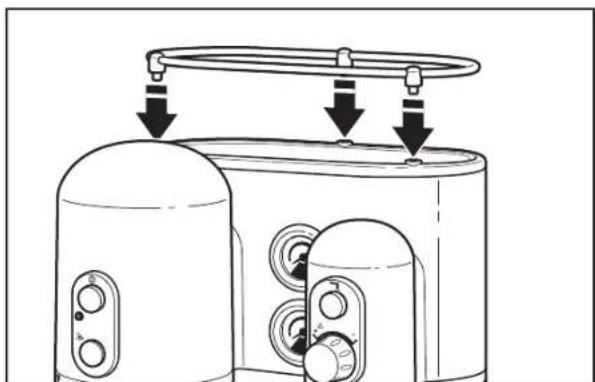
PREPARING THE ESPRESSO MACHINE FOR USE
Attaching the cup rail
Align the three rail posts with the holes on top of the Espresso Machine. Then press the rail posts firmly into the holes.

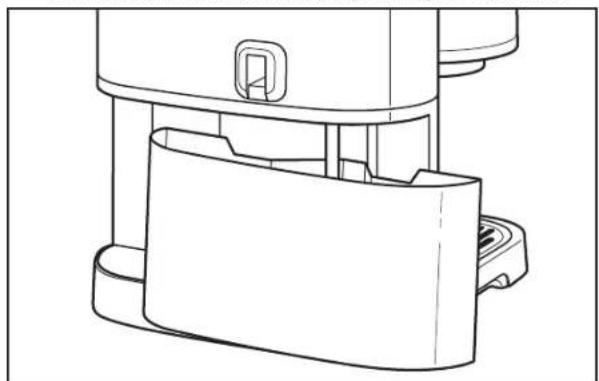
Removing and washing the water tank
- Lift the tank slightly, then remove by pulling the bottom of the tank from the Espresso Machine.

- Wash the tank in hot, soapy water, and rinse with clean water. The tank can also be washed in the top rack of the dishwasher.
- Place the tank back into the Espresso Machine, making sure the siphon hoses are placed inside the tank. The rib on the bottom of the tank fits into the grooves on the base of the housing.
PREPARING THE ESPRESSO MACHINE FOR USE
Filling and rinsing the boilers
WARNING
Electrical Shock Hazard
Plug into a grounded (earthed) outlet.
Do not remove ground prong.
Do not use an adapter.
Do not use an extension cord.
Failure to follow these instructions can result in death, fire, or electrical shock.
The boilers need to be filled and rinsed before the Espresso Machine is used for the first time. The boilers will also need to be filled when:
the Espresso Machine is not used for a prolonged period,
- the water tank runs dry during use (this can damage the Espresso Machine),
- multiple beverages are steamed without brewing espresso or dispensing hot water.
I. Slide the water tank left or right to expose the top, and fill with fresh cold water to the max fill line.
NOTE: Distilled water or highly mineralised water can damage the Espresso Machine. Do not use either to brew espresso.
- Insert the end of the electrical cord without prongs into the cord receptacle in the back of the Espresso Machine.
- Plug the other end of the cord into an earthed outlet.
- Make certain the " " dial is closed by rotating it clockwise as far as possible.
- Press the " ① " button to turn the Espresso Machine on. When the Espresso Machine is on, the Power-on (I) Indicator will illuminate, the dual boilers will begin heating, and the " " and " " buttons will operate.
- Place a coffee cup underneath the brew head. Do not attach the filter holder to the brew head.
- Press the "S" button - it is not necessary to wait for the boiler to heat. This activates the water pump and fills the brewing boiler with water. After a few seconds, water will flow from the brew head. When the cup is full, press the "S" button again to stop the water pump. The brewing boiler is now ready for use.

- Place the frothing jug under the nozzle of the frothing arm.
- Slowly open the "D dial by turning it counterclockwise, then press and hold the " button. This activates the water pump and fills the frothing boiler with water. After a few seconds, water will start flowing from the nozzle.

PREPARING THE ESPRESSO MACHINE FOR USE
-
When the jug is about half full, release the "7" button and close the "dial by rotating it clockwise until it stops. The frothing boiler is now ready for use.
-
If no espresso is desired at this time, press the " ①" button to turn the Espresso Machine off.
NOTE: Do not press the "S" or "T" buttons without water in the tank. Damage to the water pump may occur.
USING THE ESPRESSO MACHINE
Brewing espresso
For the finest results when brewing espresso, see the "Before Brewing: The Elements of a Great Espresso" section.
- Make certain the water tank has an adequate supply of water (the water level should be between the "max" and "min" fill lines).
- Select the small- or large-capacity filter basket. Use the small-capacity basket for one cup (30 ml) of espresso, and the large-capacity basket for two cups (60 ml). The small-capacity basket can be used with paper coffee pods.
- Press the filter basket into the filter holder until it snaps into place. Do not fill the filter holder with coffee at this time.
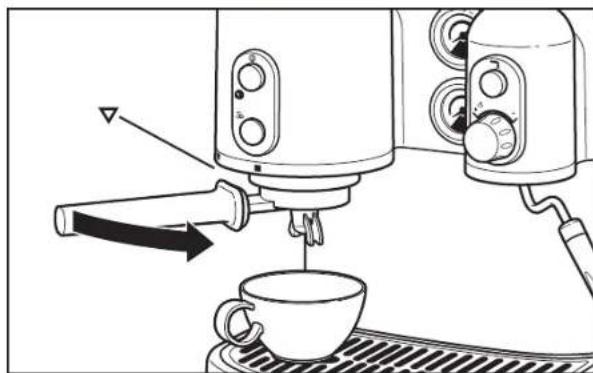
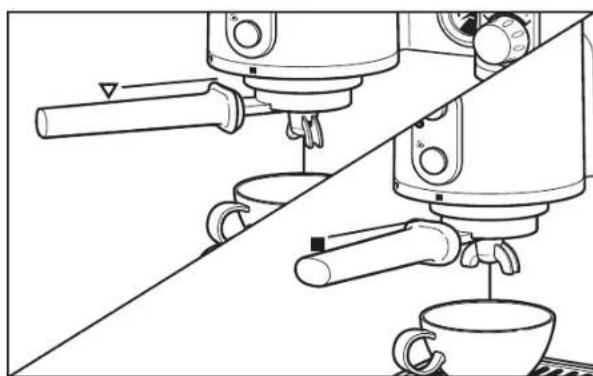
- Position the filter holder underneath the brew head and align the filter holder handle with the “ ” on the left side of the metal trim ring. Raise the filter holder into the brew head, then move the filter holder handle to the right so that it aligns with the “■” on the metal trim ring.
- Press the " ① " button to turn the Espresso Machine on.

- Wait until the Espresso Machine has reached operating temperature; this will take approximately 6 minutes.
When the espresso boiler temperature gauge needle climbs into the " " zone, the Espresso Machine is ready to brew.
- Remove the filter holder from the brew head by moving the handle to the left. Place one level measure of ground coffee (or a paper coffee pod) in the small filter basket, or two measures of ground coffee in the large basket. Be sure to use a fine espresso-style grind for your coffee.
- Using the tamper, tamp the coffee down firmly with a twisting motion. Make sure the surface of the coffee is as level as possible. See the "Leveling" and "Tamping" sections for more details.
- Sweep any excess grinds from the rim of the filter holder, and insert the filter holder into the brew head.
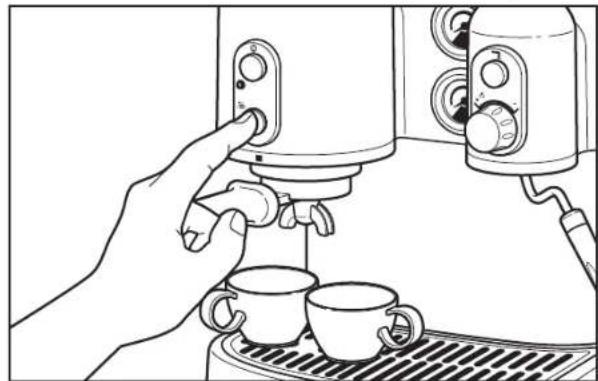
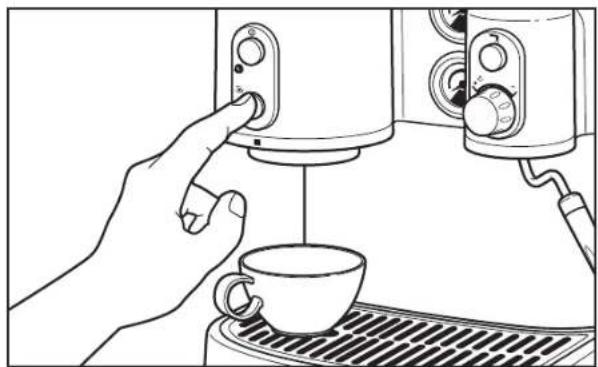
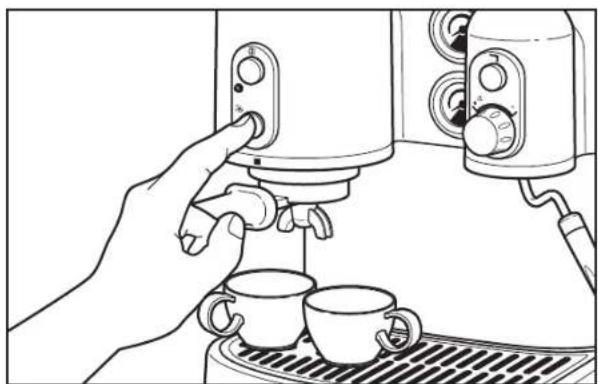
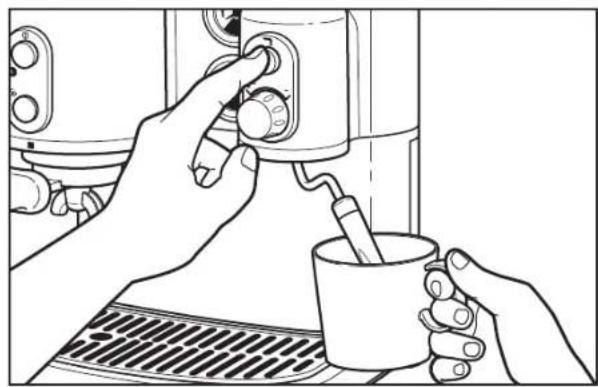
- Place one or two espresso cups on the drip plate under the spouts of the filter holder. Press the " " button, and espresso will start to flow into cups. When the desired amount of espresso has been brewed, press the " " button to stop brewing.
NOTE: Do not remove the filter holder when brewing.

USING THE ESPRESSO MACHINE
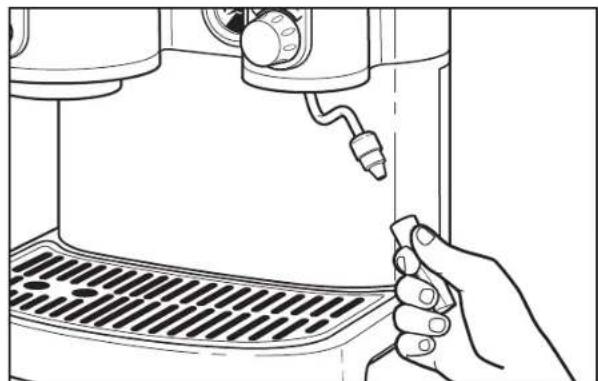
- The Espresso Machine is equipped with a 3-way solenoid valve that instantly releases pressure in the brew group when the water pump is switched off, so the filter holder can be removed immediately after brewing. Remove the filter holder by moving the handle to the left. When knocking coffee grounds from the filter basket, avoid striking the filter holder handle.
- After removing the filter holder, place a cup under the brew head and press the " ^ button for a second or two. This cleans the shower screen and flushes any coffee oils and grounds that have migrated into the brew head.
- To brew more espresso, repeat steps 6 through 12, but see the barista tips below.
Barista Tips
When brewing multiple cups:
-
Use a towel to clean and dry the filter basket before filling with coffee. This will help ensure even coffee extraction.
-
To maintain the proper brewing temperature, it is important to keep the brew group warm, so:
-
Do not rinse the filter holder with tap water - doing so will cool the filter. It's best to wipe leftover grounds from the filter with a towel.
- When you're busy with other tasks, like grinding coffee or frothing milk, keep the empty filter holder warm by attaching it to the brew head.
Frothing and steaming milk
Frothing and steaming milk requires a bit of practice, but you'll be surprised how quickly your skills will develop. The Artisan Espresso Machine gives you all the tools you need: a stainless steel jug shaped especially for frothing, a frothing arm that adjusts horizontally and vertically for a comfortable working position, a frothing nozzle designed to enhance frothing, and a "dial that lets you precisely control the volume of frothing steam.
- Press the " ① " button to turn the Espresso Machine on.
- Wait until the Espresso Machine has reached operating temperature; this will take approximately 6 minutes. When the frothing boiler temperature gauge needle climbs into the " zone, the Espresso Machine is ready to froth.
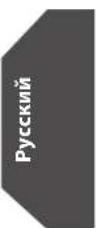
- Fill the frothing jug 1/3 full with cold milk.
- With the frothing arm pointed into an empty cup, open the " " dial for a moment to purge excess water from the line. To open the " " dial, turn it slowly counterclockwise; to close the " " dial, rotate it clockwise until it stops.
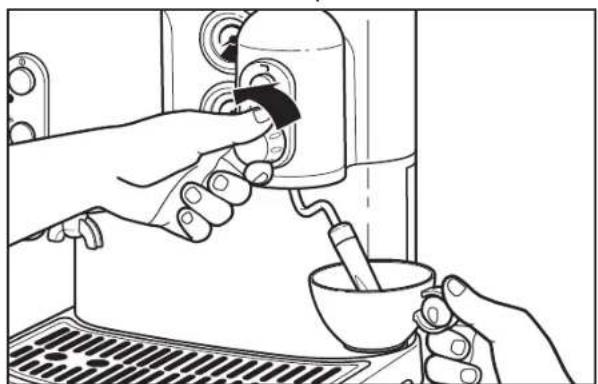
- With the " " dial closed, adjust the frothing arm so it's in a comfortable working position, and submerse the tip of the frothing nozzle just below the surface of the milk in the frothing jug.
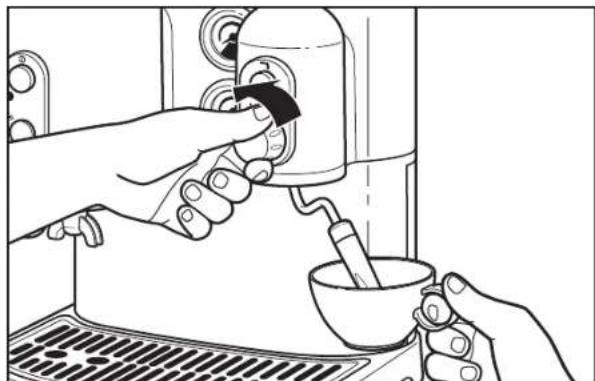
- Slowly open the " dial by turning it counterclockwise. The farther the " dial is rotated, the greater the volume of steam that will be released. Tilt the jug to one side to create a whirling motion in the milk, keeping the tip of the frothing nozzle about 5mm below the milk's surface. If large bubbles are being created or if the milk spatters, the nozzle is being held too high.

- As the froth expands, it will be necessary to lower the jug.
- When the frothed milk has expanded to about 3/4 the volume of the jug, lower the frothing nozzle into the jug to finish steaming (heating) the milk. Keep the jug tilted to maintain a whirling motion in the milk. Steam the milk until it's between 60 and 74^ . (At these temperatures, the jug will be very warm to the touch.) Avoid scalding the milk, which occurs at 80 degrees.
- Before removing the frothing arm from the milk, close the "dial by turning it clockwise until it stops. This prevents splattering.
USING THE ESPRESSO MACHINE
Barista Tips
- Clean the frothing arm and nozzle immediately after use. See the "Care and cleaning" section.
- Lower fat milks are generally easier to froth. Skim milk can be tricky because it froths very easily, with a tendency to form large bubbles and dry peaks that mar its texture.
Ultimately, the choice of milk is a matter of experimentation and taste. The most important factors in producing a superior froth are experience and good refrigeration: the colder the milk you use, the better.
Preparing cappuccino
To prepare cappuccino, froth and steam the milk before.
brewing the espresso. This allows the froth to jell slightly and fully separate from the milk.Once the milk is prepared,
brew one cup (30ml) of espresso into a cappuccino cup,
then pour the frothed and steamed milk into the cup with a gentle shaking motion. For a show-stopping flourish, top your cappuccino with chocolate shavings.
Dispensing hot water
Hot water can also be dispensed from the frothing arm. This provides a convenient way to make Americanos, tea, or hot chocolate. Filling a demitasse with hot water is also a great way to warm it before brewing espresso.
NOTE: Always dispense hot water into an empty container - dispensing into a cup or jug containing other ingredients may cause splattering.
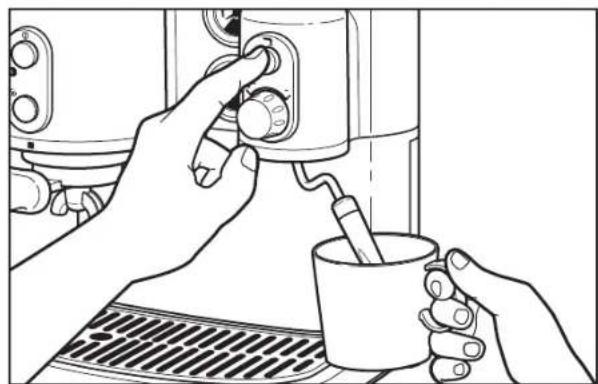
- Press the " ① " button to turn the Espresso Machine on.
- Wait until the Espresso Machine has reached operating temperature; this will take about 6 minutes. When the frothing boiler temperature gauge needle climbs into the " zone, the Espresso Machine is ready to dispense hot water.
- With the frothing arm pointed into an empty cup, open the "dial by turning it slowly counterclockwise. Then press and hold the " button to dispense water.
NOTE: Residual frothing steam may exit the nozzle before water dispenses. It may take several seconds for water to begin flowing from the nozzle.
- When the desired amount of water has been dispensed, release the " " button and close the " " dial by turning it clockwise until it stops.
CARE AND CLEANING
Keeping the Artisan Espresso Machine clean is vital to brewing the best espresso possible. Stale coffee oils on the filter holder, filter baskets, and shower screen will ruin the flavour of the most expertly prepared coffee, and any milk left on the frothing arm should be removed.
Before cleaning the Espresso Machine
I. Turn off the Espresso Machine.
2. Unplug the Espresso Machine from the wall outlet, or disconnect power.
- Let the Espresso Machine, and any attached parts or accessories, cool.
Cleaning the frothing arm and nozzle
The frothing arm and nozzle should always be cleaned after milk is frothed.
- Remove the frothing sleeve from the frothing nozzle by pulling it downward. The frothing sleeve can be washed in warm, soapy water. Make sure any openings in the sleeve are free of residue.
- Wipe the frothing arm and nozzle with a clean damp cloth. Do not use an abrasive scouring pad.
- Plug into an earthed outlet.
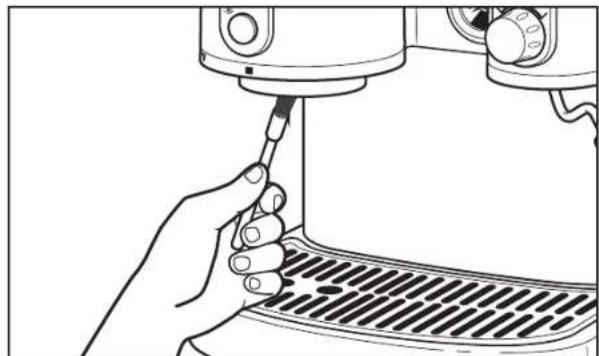
- Turn the Espresso Machine on, and let the boilers reach operating temperature. Point the frothing arm into an empty cup and open the "D" dial momentarily to run steam through the frothing nozzle. This will clean the nozzle tip.
CARE AND CLEANING
Cleaning the housing and accessories
Do not use abrasive cleansers or scouring pads when cleaning the Espresso Machine, or any Espresso Machine part or accessory.
- Wipe the Espresso Machine housing with a clean, damp cloth and dry with a soft cloth.
- Wash the filter holder in warm, soapy water and rinse with clean water. Dry with a soft cloth. Do not wash the filter holder in a dishwasher.
-
The filter baskets, drip tray, drip plate, water tank, and frothing jug can be washed in the top rack of a dishwasher, or by hand in warm, soapy water. If washing by hand, be sure to rinse with clean water and dry with a soft cloth.
-
Use the shower-screen brush or a damp cloth to brush or wipe coffee grounds from the brew head gasket and shower screen.
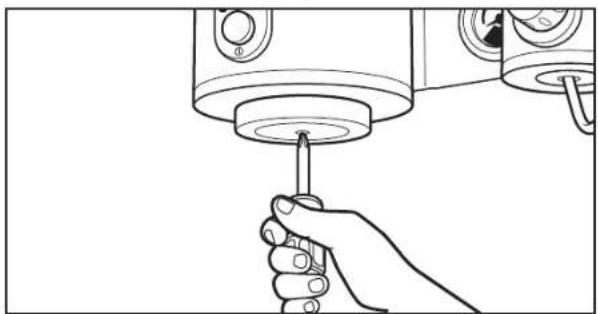
Cleaning the shower screen
Once every 75 to 100 cups of espresso, the shower screen should be removed from the brew head to clean thoroughly.
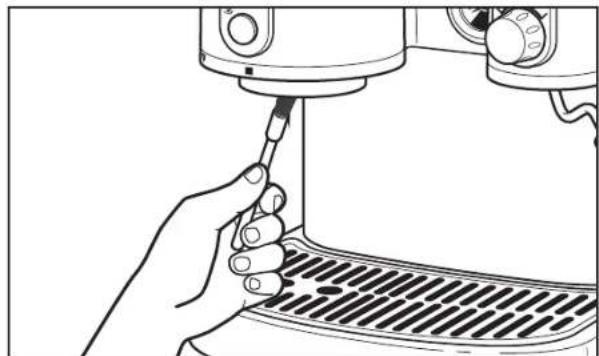
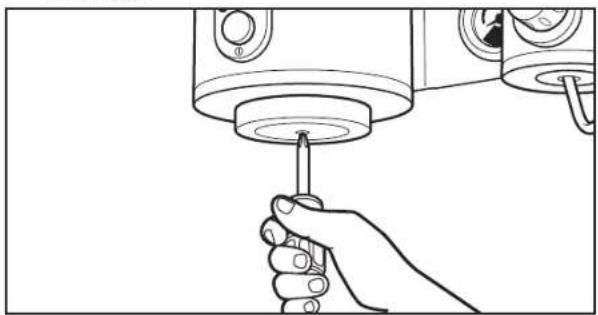
- Using a short screwdriver, remove the screw at the centre of the shower screen by turning it counterclockwise. Once the screw is free, the shower screen should drop from the brew head.
- Wash the shower screen in warm, soapy water, and rinse with clean water.
- Place the shower screen into the brew head with the smooth side facing down, and attach with the shower screen screw. Turn the screw clockwise until snug.
NOTE: When the shower screen is attached, the centre screw should be flush with the surface of the screen. If it is not, remove the screen, turn it over, and reattach it.
Priming after long periods of non-use
For the best tasting espresso, prime the Espresso Machine with fresh water after a long period of non-use. Priming will also ensure that the boilers are filled and the Espresso Machine is ready to operate.
- Remove the tank, empty any stale water, replace, and fill the tank with fresh water to the max fill line.
- Fill the boilers with the fresh water. For instructions, see the "Filling and rinsing the boilers" section.
CARE AND CLEANING
Dscaling
Calcium deposits ("scale") from water will build up in the
Espresso Machine over time and may impair espresso quality. NOTE: Scale should be removed every two months; local hard-water conditions may require more frequent descalings.
Use a packaged descending agent or appropriate decalcification tablets to remove scale.
- Remove the shower screen from the brew head. See the "Cleaning the shower screen" section for instructions.
- Make certain the water tank is empty. Following the directions on the descending agent packet, mix the descending solution and add it to the tank.
- To catch the cleaning solution, place a large cup under the brew head (do not attach the filter holder), and another under the frothing nozzle.
- Press the "①" button to turn the Espresso Machine on. It is not necessary for the boilers to heat before proceeding to the next step.
-
Press the "按钮 and dispense cleaning agent through brew head for 15 seconds; press the "button again to shut off.
-
Open the "D" dial by turning it counterclockwise, then press and hold the "T" button for 15 seconds to dispense cleaning agent through the frothing arm and nozzle.
- Press the "①" button to turn the Espresso Machine off.
- Wait 20 minutes, then repeat steps 4-7. Every 20 minutes, keep repeating steps 4-7 until nearly all the solution in the tank has been run through the Espresso Machine. Do not allow the tank to run completely dry.
- Remove the water tank and rinse with fresh water, then replace and fill with fresh water to the max fill line. Press the "①" button to turn the Espresso Machine on, and flush the Espresso Machine by quickly dispensing the contents of the tank, alternating between the brew head and frothing arm. Do not allow the water tank to run completely dry.
- Attach the shower screen to the brew head. See the "Cleaning the shower screen" section for instructions. Be sure to add additional fresh water to the tank for brewing.
Winter storage care for your KitchenAid Espresso Machine
IMPORTANT: To avoid damage, use and store your KitchenAid Espresso Machine where it will not freeze. Because some water remains inside the unit, freezing can damage the product. If storing or moving during freezing weather, purge your Espresso Machine.
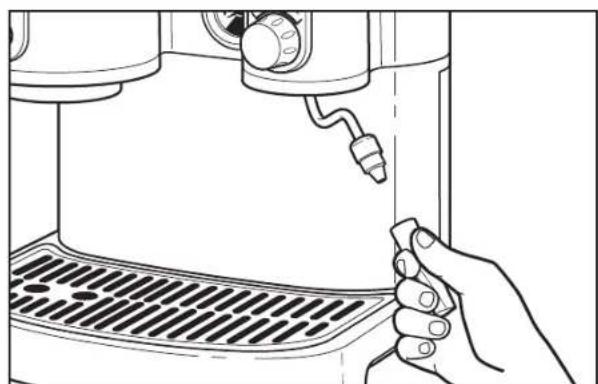
To purge the Espresso Machine:
- Empty water reservoir and place back into unit.
- Place a container underneath the brew head.
- Press and hold " until the On indicator lights up.
- Press " and let all the water empty from the boiler.
-
When water stops coming out, press "stop the pump.
-
Empty the container, then move it to underneath the nozzle of the frothing arm.
- Open the steam dial and let all remaining steam exit the unit.
- Press and hold the " 1" button and let the water empty from the boiler.
- When water stops coming out, release the "Button.
- Close the steam dial.
- Press to turn the Espresso Machine off.
- Empty remaining water from reservoir and place reservoir back into unit.
TROUBLESHOOTING PROBLEMS
If the Power-on (I) Indicator remains off and the boilers fail to heat when the "①" button is pressed:
Check to see if the Espresso Machine is plugged in; if it is, unplug the Espresso Machine, plug it back in, and press the "0" button again. If the Espresso Machine still does not operate, check the fuse or circuit breaker on the electrical circuit the Espresso Machine is connected to and make certain the circuit is closed.
If coffee does not flow from the filter holder, the...
water tank may be empty, or the brewing boiler may not be filled
water tank siphon hoses may be kinked or improperly placed
- shower screen may require cleaning
- Espresso Machine may need to be descaled
coffee may be too finely ground
coffee may be too firmly tamped
If the water pump is noisy, the...
water tank may be empty
water tank siphon hoses may be kinked or improperly placed
- boilers may not be filled
If water leaks from the filter holder...
the filter holder may not be properly attached to the brew head
- coffee grinds may be clinging to rim of filter holder or brew head gasket
- the brew head gasket may be dirty or worn
If little steam or froth is being produced, the...
- frothing boiler may not be at operating temperature
- " " dial may not be completely open
- frothing nozzle may be need to be cleaned
water tank may be empty, or the frothing boiler may not be filled
If the problem cannot be fixed with the steps above, see the "Warranty and service" section.
BEFORE BREWING: THE ELEMENTS OF A GREAT ESPRESSO
Before the Espresso Machine is even plugged in, you'll need several elements to produce great coffee.
Fresh coffee beans
Great coffee can only come from fresh coffee beans, properly roasted. Many baristas recommend buying beans roasted no darker than a medium roast, the colour of which appears as an even chocolate brown. This roast preserves the natural sugars and flavour of the bean, which sets the stage for excellent espresso. A medium roast is the darkest a bean can be roasted without oils developing on the surface. Darkly roasted beans - which appear dark brown or nearly black - look great, but the extra roasting overwhelms the more delicate coffee flavours and caramelises any sugars. A heavy "roasted" coffee flavour, often bitter and sharp, will predominate with a dark roast.
To preserve the freshness of coffee beans:
Keep beans in an opaque, airtight container and store them in a cool, dry place. Refrigeration is not recommended, as condensation tends to form on the beans whenever the container is opened. Freezing can help preserve beans stored for an extended period, but it will also impair flavour.
Great tasting water
An often overlooked element of great espresso is the brew water. If you don't enjoy the flavour of your tap water, don't use it to brew espresso - use bottled, purified water instead. Since it doesn't take long for fresh water to acquire a "flat" quality and taste, it's also a good idea to change the water in the tank often and refill the boilers after a long period of non-use. Do not use highly mineralised water or distilled water - they can damage the Espresso Machine.
The right grind—and grinder
Espresso demands a very fine, very consistent grind. Blade grinders and inexpensive burr grinders usually fall short when it comes to producing the grinds needed for outstanding espresso. The best espresso requires a quality burr grinder, like the KitchenAid Burr Grinding. A good burr grinder will maximise the flavour and aroma of espresso by producing an extremely consistent grind with very little frictional heating.
ESPRESSO BREWING TECHNIQUES
Brewing temperature
Water temperature and temperature consistency have a direct impact on the flavour of espresso. Great espresso comes from brewing at an optimum temperature, ideally between 90^ - 96^ C.
To ensure proper brewing temperature:
Always attach the filter holder (with filter basket) to the brew head when the Espresso Machine is heating. This warms the filter.
- Always wait until the boilers are fully heated before brewing - approximately 6 minutes.
- Dose and tamp your coffee quickly, and brew immediately. This prevents the filter holder from cooling significantly.
- Never rinse the filter holder with cool water if you are brewing additional cups. After knocking the old grounds from the filter, wipe leftover grounds from the basket with a clean towel. Make sure the filter basket is dry before adding more coffee.
- Keep the empty filter holder attached to the brew head when you're engaged in other tasks, like grinding or frothing.
- Warm a cup or demitasse by placing it on top of the Espresso Machine before brewing. Cups can also be heated instantly with steam from the frothing arm.
Grinding
Great espresso demands the freshest coffee, and the freshest coffee is always ground immediately before brewing. The most delicate aromatic compounds in coffee go stale within a few minutes of grinding, so grind only as much as you intend to brew immediately.
Dosing
Dosing is the process of measuring ground coffee into the filter basket. A single cup (30 ml) of espresso requires 7 grams of coffee - two cups, twice that. If filled level with finely ground coffee, the scoop included with the Artisan Espresso Machine is a near perfect measure for one cup of espresso.
If you're dosing coffee without the aid of a measuring scoop, it is important not to overfill the filter basket. Coffee needs room to expand when brewing. If the coffee is crushed against the shower screen, it will prevent an even dispersion of water across the filter, leading to uneven extraction and poor espresso. Here's how to tell if you're overfilling the filter basket:
I. Fill the basket, level the coffee, and apply a good tamp (see the "Tamping" section).
2. Attach the filter holder to the brew head, then remove it immediately.
3. If the coffee in the filter holder has an imprint of the shower screen or the shower screen screw, there is too much coffee in the filter basket!
Leveling
Leveling the coffee after it has been dosed into the filter is a critical technique for great espresso. If the coffee isn't evenly distributed in the filter, tamping the coffee will create areas of high and low density. The high-pressure brew water will inevitably follow the path of least resistance, flowing heavily through the low-density coffee – overextracting the bitter
coffee compounds - and flowing lightly through the higher density coffee, underextracting the flavourful essences. This uneven extraction results in thin, weak, bitter espresso.
To level coffee in the filter basket:
- Make sure the filter basket is dry before adding coffee; moisture in the basket will create a path of least resistance for the brew water.
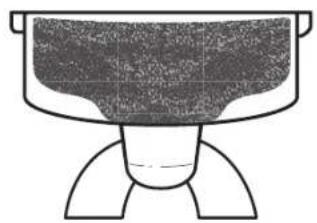
After dosing the filter with coffee, level the coffee by sweeping a finger back and forth over the filter. Do not sweep in one direction only - this will cause the coffee to pile up on one side of the basket and produce uneven extraction. Try to impart a slight bowl shape to the coffee, with the centre lower than the sides. - Make certain there are no gaps between the coffee and the sides of the filter.

Properly leveled coffee
Tamping
Tamping compresses the coffee into a level disc that provides uniform resistance to the high-pressure brew water. Properly leveled and tamped coffee will produce an even extraction of coffee compounds – and great espresso. Coffee that is tamped too softly will be deformed by the brew water, resulting in uneven extraction, a fast brewing time, and mediocre espresso. Coffee tamped too firmly will slow the brewing time, making for a bitter, overextracted beverage.
Proper tamping technique
- The tamper handle should be grasped like a doorknob, with the base of the handle firmly against the palm. When tamping, try to keep the tamper, wrist, and elbow in a straight line.
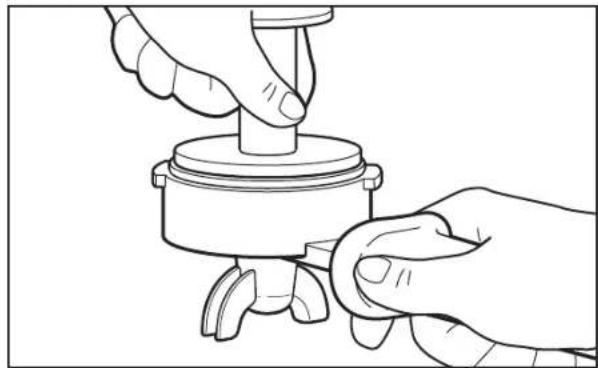
- With the bottom of the filter holder resting on a solid surface, gently press the tamper into the coffee with the goal of creating a level surface. Remove the tamper from the filter basket with a slight twisting motion - this will help prevent the tamper from pulling up chunks of coffee.
ESPRESSO BREWING TECHNIQUES
- After removing the tamper, some grinds may stick to the side of the filter basket. Tap the filter holder gently on the table to jostle the grinds onto the tamped coffee disc. Do not tap too hard, or the tamped coffee will dislodge or fracture.
- Apply a second, finishing tamp (also called a polishing tamp). Press straight down on the coffee with about 15 kilograms of pressure, then relax the force slightly (to about 9 kilograms) and polish the coffee by turning the tamper completely around twice.
- Inspect your tamp. The coffee disc should be smooth and level with no gaps between the side of the filter basket and the coffee.
Measuring tamping pressure
9 kilograms, 15 kilograms - how do you know how much tamping force you are actually using? Do what the baristas do: use a bathroom scale! Place a scale on a table or countertop, and tamp your coffee on top of it. Pretty soon, you will develop a feel for how much 9 or 15 kilograms of force is.
Volume
The brew group and boilers are heated. The fresh coffee has been ground, dosed into the filter holder, expertly leveled, and precisely tamped. Now comes the moment of truth: brewing!
For the best espresso, never extract more than one cup (30 ml) using the small filter basket or two cups (60 ml) using the large one. Brewing more will overextract the coffee and result in thin, bitter espresso.
As it pours, perfect espresso is a deep reddish brown with a thick texture like honey running off a spoon. It often forms what are called mouse-tails, or thin syrupy streams. As increasingly bitter and acidic compounds are extracted, the espresso pour will begin to lighten; in some cases, the pour will become almost white. Expert baristas will watch the pour carefully and quickly stop brewing if it starts to lighten.
Espresso Ristretto is espresso brewed with less than normal volume. Prepare the Espresso Machine to brew two cups, but stop brewing when only 45ml have been extracted. What you've done is restrict the pour to include only the most flavourful and least bitter coffee oils and essences.
Extraction rate
Decades of experience have shown that the best espresso – whether a single or a double cup – takes about 20–25 seconds to brew.
If your espresso is brewing much faster or slower than 20-25 seconds, and your tamping technique is good, adjust the grind! Grind finer for a slower extraction rate, and coarser for a faster one. Keep the dose and tamp the same.
Coffee is sensitive to the ambient humidity and will absorb moisture readily. This will affect the extraction rate. In a humid environment, the extraction rate will slow down; in dry conditions, the extraction rate will speed up. You may find yourself adjusting the grind according to the season – or the day's weather.
Some grinders do not allow the fine adjustments necessary to correct the extraction rate. The best solution is to invest in the KitchenAid Burr Grinding. If this isn't possible, experiment with the tamping pressure. Tamp with less force for a faster pour, and more force for a slower one.
The golden crema
A mark of fine espresso is crema, the dense golden foam of emulsified coffee oils that captures the essence of coffee flavour. Good crema should be thick and cling to the side of the cup when it's tilted; the best crema should be able to support a sprinkling of sugar for nearly 30 seconds.
Troubleshooting espresso as it brews
As it pours, if your espresso...
...has more of a cinnamon colour, instead of being deep brown:
make sure your brew group and boilers are fully heated
- use a less-acidic blend of coffee
...is whitish with thin brown streaks:
- review your tamping technique - the tamped coffee has fractured, or a gap has developed between the coffee and the side of the filter basket
...is thin and fast flowing:
- review your tamping technique – the tamp may not be firm enough to provide an even resistance to the brew water
- use a finer grind
check coffee freshness
...barely dribbles out of the filter holder:
- review your tamping technique—the tamp could be too firm
- use a coarser grind
WARRANTY AND SERVICE
KitchenAid Espresso Machine warranty
| Length of Warranty: KitchenAid Will Pay For: KitchenAid Will Not Pay For: | ||
| Europe, Middle East and Africa: 5KES2102 Two years full warranty from date of purchase. | The replacement parts and repair labour costs to correct defects in materials or workmanship. Service must be provided by an Authorised KitchenAid Service Centre. | A. Repairs when Espresso Machine is used for operations other than normal household food preparation. B. Damage resulting from accident, alterations, misuse, abuse, or installation/ operation not in accordance with local electrical codes. |

KITCHENAID DOES NOT ASSUME ANY RESPONSIBILITY FOR INDIRECT DAMAGES.
Customer service
In U.K. and Ireland:
For any questions, or to find the nearest Authorised KitchenAid Service Centre, please find our contact details below.
NOTE: All service should be handled locally by an Authorised KitchenAid Service Centre.
Contact number for U.K. and Northern Ireland:
Tollfree number 0800 988 1266 (calls from mobile phones are charged standard network rate)
Contact number for Ireland:
Tollfree number +44 0208615148
E-mail contact for U.K. and Ireland:
Go to www.kitchenaid.co.uk, and click on the link "Contact Us" at the bottom of the page.
Address for U.K. and Ireland:
KitchenAid Europa, Inc.
POBOX19
B-2018 ANTWERP 11
BELGIUM
General hotline number: 00800 3810 4026
In other countries:
For all product related questions and after sales matters, please contact your dealer to obtain the name of the nearest Authorised KitchenAid Service/Customer Centre.
For more information, visit our website at:
www.KitchenAid.co.uk
www.KitchenAid.eu
©2017 All rights reserved.
Specifications subject to change without notice.


USO DELLA MACCHINA PER CAFFÉ ESPRESSO
Caffé in grani fresco 64
USO DELLA MACCHINA PER CAFFÉ ESPRESSO
USO DELLA MACCHINA PER CAFFÉ ESPRESSO
USO DELLA MACCHINA PER CAFFÉ ESPRESSO
Caffé in grani fresco
Encher e lavar as caldeiras 106
UTILIZAR A MAQUINA DE CAFE EXPRESSO
Preparar expressos 107
Encher e lavar as caldeiras
AVISO
Perigo deCHOque eletrico Ligue a umatomada comligacaoa terra. Nao retire ocontacto deligacaoa terra.
GARANTIA E ASSISTÉNCIA
Garantia da Maquina de Café Expresso KitchenAid
Fasta koppracket 137
ANVANDA ESPRESSOMASKINEN
Brygga espresso 139
SKOTSEL OCH RENGORING
Innan espressomaskinen rengörs. 141
INNAN BRYGGNING: INGREDIENSERNA I EN GOD ESPRESSO
Farska kaffebonor 144
Gott vatten. 144
Termostat for skumming (
Termostaten indikerar nar skumningskokaren har natt optimal angtemperatur.
Filterhãllare
ANVANDA ESPRESSOMASKINEN
Bryggapresso
ANVANDA ESPRESSOMASKINEN
ANVANDA ESPRESSOMASKINEN
Barista-tips
INNAN BRYGGNING:INGREDIENSERNA I EN GOD ESPRESSO
VEDLIKEHOLD OG RENGJØRING
FrdurrengjorEspressomaskinen 157
VEDLIKEHOLD OG RENGJØRING
Å holde Artisan Espressomaskin ren er en betingelse få lage sa god espressor som mulig. Harske kaffeoljer pa bajonetten, filtrene, og dusjhodet vil odelegge smaken pa kaffen uansett for dyktig den er tillaget, og enhver melk pa stearm Armen bor fjernes.
Fordu rengjor Espressomaskinen
VEDLIKEHOLD OG RENGJØRING
VEDLIKEHOLD OG RENGJØRING
Avclalking
john@servicecompaniet.no
Kundeservice
Norsk Importer:
HOWARD AS:
Hansteensgate 12
0253 OSLO
Tel: 23084130


Rengaring of brusehoved. 190
Taendt indicator (I)
Nár espressomaskinen er taendt, lyser indicatorlyset.
Espressoknap ( )
Tryk knappen " 念 " for at aktivere vandpumpen til at bryggepresso. Tryk knappen " 念 "igen for at standse bryngingen.
Varmtvandsknap (7)
När drejeknappen " 一 er Åben, holds den knappen " 一 nede, for at aktivere vandpumpen og abne for det varme vand fra opskunningsarmen. Pumpen slukker automatisk, nar knappen slipspe.
Dampdrejeknap (
Dampen aller det varme vand fra opskunningsarmen doseres ved at abne drejehandtaget * " ved at dreje det mod uret. Maengden af damp kontroleres med drejeknappens placering: Drej drejeknappen mod uret for mere damp, med uret for minre damp. Dampen slukkes ved at lukke for drejeknappen * ved at rotere den med uret, til dampen ophorer.
Bryggehoved
Brug已经超过 the length of a single cycle.
Manglende overholdelse af disse anvisninger kan medfore personskade, brand ellerelektrisk stod.
Aodunirbua cappuccino 205
Ad skammta heitt vatn. 205
UMHIRDA & HREINSUN
Aodur en Espresso-velin er hreinsud 205
Hreinsun a frouarmi og stut 205
ACTN INX XAPAKTEPNUKIN
Jactn 3cnpecco-MaunHbI. 216
KOMnoHeHbI 3cnpecco-MaunHbI. 216
NODIOTOBKA 3CNPECCO-MAUINHbIKNCIOb3OBAHIO
UcTaHOBka orpaKdEHHaIy aIeK 217
CHaTne N MoKa eMKoCTN DnA BoDbI 217
3aonHeHne npombBka 6oJnepob 218
NCIOJIb3OBAHHe 3CNIPECCO-MAUINHbl
PpuroToBnHe nEcnpecco 219
BcneHbAHnE HarpeB MoIoka napOM 220
PnirroToBneHne KanyuynHo. 221
Iopaya ropey Bods 221
YXODIOOHCTKA
Iodrotobka K oucctke 3cnpecco-MaunHbl. 221
OuHCTKa BCHeHbAIOue Tpy6Kn n coIIa 221
OuicTka Kopnyca n akceccyapob 222
OuicTkca cetkn 222
3aMbKa nocne npoDoJnxTeNbHoro npocToa 222
YdaneHne Hakinn 223
IIOrTOBka K 3mHemy XpaHeHHIO BaWee EKnpecco-MaunHb KitchenAid. 223
ONPEDEJEHNE UYCTPAHEHNE HENCPABHOCTE 224
NEPEI PIPNTOBJIENEM: COCTABJIIOUHE XOPOWEFO 3CNIPECCO
CbeKne KofoeHbIe 3epHa 224
Bkychai Boda 224
Ppabnblbno nOmoN I COOTBeCTBByouca Kofoemolka. 224
METOДИКA BAPKИ 3СПЕCCO
TempepatyaBapkn 225
Pomon 225
Доэровka 225
Pa3paBnBaHne 225
YnIOTHeHne 225
06bem 226
Ckopoctb kctpaKun 226
3oToTCTa neHka 226
KoHTpOJIb 3a 3cnpcecco BO BpeMa BapKn. 226
TAPAHNTI IN TEXHNUCKOE OBCJNYKUBAHUE 227
TEXHnKA BE30PACHOCTN INI NCIOJIb3OBAHIN 3CNPECCO-MAUNHBI
Bawa 6e3onacnoctb n 6e3onacnoctb dpyrx CTOUT Ha nepBOM mecte.
B daHHO INHCTpyKcun Hn BaWem yCTPOIcTBe Mbl pa3MeCTINM MHOKeCTBO Baxkbx COo6ueHN O 6e3OnaCHOCTN. O6a3aTeNbHO npOHTNE BCE COo6ueHN O 6e3OnaCHOCTN n CneDyIte NX Yka3AHNAM.

3To cunbo npdeynpeckdne H6 onaCHOCT.
3OT CUMBON INPEynpexJaet BAC O BO3MOXHbIX ONaCHOCTx, CNOC6HbIX HaHECTn TpaBMY INN daJce y6ntb Bac n Dpynx IIOeI.
Bce coo6eHn o 6e3oNaCHOCTn CneDyIOT 3a 3TmM CmMBONOM n CNoBaM N OPACHOCTb Nnn BHHMAHNE. 3Tn cNoBa O3HaayAOT:
ONACHOCTb
Mbl moKTe nOrn6HyTb mnn nonyHtB TReKeIbe TpaMbbl, ecnn HEmeDneHHO He NocJeYte NHCTpyKzmaR.
BHUMMAHVE
Mbl moKTe nOrn6HyTb mnn nOnyUHTb TxKEnIbe TpaBmbl, ecH He nocNeDyEt HcTpyKuJAM.
IpeynpejdeHn6 onaHocCTy ykaKyT Bam Ha nToEHnAaNbHyIO nAncHocTb, daHT peKOMeHdaCmN OTHOCNTbHO TOrO, KaK yMeHbWtB BepoTHOCTh TpaMbbl, a TaKxHe HTO, tO MoKe TpOn3oITn, cCNI Bb He 6yTe CneDoBaT hHCTpykUAM.
MEPbI INPEAOCTOPOXHOCTN
Pn nCnoJb3OBAHm 6bITOBbIX 3JIeKTpponp6OpOB Heo6xOaMo co6JIOaTb OCHOBHbie MepblpeoctopoxHOCTN, B YactHOCTN:
1.Почтпe BCE ИНСТPyкци. HenpaBnIbHoe IcNoIb3ObaHne yCtpoIcTba MoxTe npuBecTu K cepbe3HbIM TpaBMam.
2. He npikacauTecb K ropaym nobepxhoCTaM. Icnojbyte pykotkn nnpyuKn.
3.Bo n36exahne ybeu nn nopaxeHn ORhem nn 3neKtpueckm TOKOM, Hn B KOem cnyae He norpykaTe uHyp, wTeNCenb nn CaMo yCTpOInCTBO B BOy nn dpyryo KndKOCTb.
4. 3TOT np6op pa3pe7aetcNcNoIb3OBA Tb DeTAM OT 8 let n CTapwe, a TaKx JIOJMA COrpaHnueHHbIMn fN3uYeCKmMn, CeHCOPHBIMn UyMCtBEHHbIMn CNOCo6HOCTaMn NII IN TeM, KTO He3HaKOM C pa60To Inp6opa, TOnbKO NOD Ha6NIOJeHNEM N B COOTBeTCTBNI C HCTpyKUmaM; 3TO Heo6XoDIMO dNra Co6NIODeHnRA TexHnKn 6e3ONaCHOCTn N BO N36EkaHne TpaBM. DeTAM He pa3pe7aetcNrPaTaB c yCTpOInCTBOM. DeTu He DOnXhbl NCNoIb3OBA Tb NII YnCTNTb yCTPOINCTBO 6e3 HAD3opa.
5. Bcerda otKlnoaTe yctpoNCTBO OT cETn, ecn Bbl ero He nCNOb3yeTe, nn nepeOuNCTKO np60pa. NpeD Tem KaK yctaHaBnBaTb nn BBHMaTb qactn n3 np60pa, daTe emy OCTbTb.
6.He nCnoB3yIte yCTpoINCTBO,ecn y Hero noBpeKJEN HYP 3JeKTPoNITAHN INN WTeNCeNB, B Cnyae HapyWeHn erO HopMaIbHOH pa6Obl INN INHO rOBpeKJENH. OTHecNTe yCTPOINCTBO B 6nnKaIshn ABTopu3OBaHHbI cepBucHBI CEHTp IINr OCMOTpa, pEmOnTa INN HAcTPOINKn.
7. NcnoJb3ObaHnne HbIX akceccyapOB, KpOme peKoMeHIOBaHHbIX npOn3BOdnteJIeM, MOKeT NOBLeYb BO3RopaHnE, 3JIeKTpuYeCKN WOK UIN TpaBMbl.
8.He nCnoJb3yIte npn6Op Ha OTKpbITOM Bo3dyxe.
9.He onyckaTe CBicaHnIshypa nHaHnC kpa CToJa nn dpYro pa6oey noBepxHOCTN KOHTAKTa C ropaymno NobepxHOCTMn.
10. He cTaBbTe npi6Op B6Iu3n Ra3OBoN nn 3JeKtpueeckO neu, a TaXke B HArpeTyIO dYxOBky.
11. Bcerda Chauana BbIKNoayane np6op, a 3aTe M BbIHMaTe BnKy hHpya n3 po3eTKu. YTo6bl OTKnIOHTb np6Op OT cETN, Chauana BbIKNooyte erO, a 3aTe M BbIHbTe BnKy hHpya n3 po3eTKu.
12. Co6nJaTe MepbI npedocToPOKHOCTN, nCNoB3y ropayn nap.
COXPAHNTE DAHHOE PYKOBODCTBO NCNoJIb3yIte YCTPOINCTBO TOJbKO IO HA3HAueHnIO.
TEXHUNKA BE3ONACHOCTN INP NICINJb3OBAHIN 3CNPECCO-MAUINHBI
Ytun3aunorXo0B3nEeckoro6OpydoBaHn
Ytlnn3aunyaNakOBouHbIX MaTePnaNoB
Ynakoboyhie MaTePnaIbI NoJnxKaT BToPunHoe nepepa6oTke n CoepKAT COOTBeTCTByIOUnn 3HaK TEm He MeHee, OTdJIbHbe YactN yNakOBKn DOnXKnBbObITb yTNIN3OBAHbI CORlaCHO npabInam MecTHOH aDMNHcTpaUN, KacAoUMCRA NIKBnDAuN OTxOoB.
ytnnn3aunn3denn
-3To 06OpyoBaHne MapKInpoBaHo cornacHO EbponeckOu DnapeKTBe 2012/19/EU no NcNoJIb3oBaHnIO 3JeKtpueeCKOrO n 3JeKtpoHHoro 06OpyoBaHna (WEEE).
-CobnOHeHne npabn ytnn3aun n3dennn NOMoae npedOTbpaTntb NOTeHuaNbHbe HeRaTNBbIe NocneCTBn IJN OKpykaUeI cpebl 3DopOBbY eNoBeka, KOTOpbl EMOI6bl 6bl BblBaHbI HEnpabnBHOyTNn3auee 3TOrnpodykTa.
-3Ha Ka Ha n3dennn nn Ha cnpoBOnTeIbHbIX DOkymeTAX 6o3Naayet, YTO yCTPOINaAET NOI ONpeDeneHne 6bITOBx OTXODOB IN DOLKHO 6bIT BoCTaBJeHO B COOTBeTcByOuN ciHTP No nepepaBOTke 3JIeKTPueckoro N 3JIeKTPoHHOrO 6OpOyDoBaHna.
Mouhoctb:MaKc.1300BT
PIMMEUAHNE: To6b CBcTn K MmHmMy BO3MOxHOCTb NopaxHeN 3NeKTPnueckm TOKOM, WTeNCJIb MOxHO BCTABJIb B PO3eTKy TOJbKO OJHO CTOPHOI. Ecn WTeNCJIb He BCTABJIeTcB B PO3eTKy, O6patNTecb 3a NOMOuB K npofoecnHOHaJIbHOMy 3NeKTPnky. He nbTaIaTEcb NOOrHaTb WTeNCJIb K pa3Mepy PO3eTKn CaOcTOrTeJIbHO.
KopOTKn Wnyp yctpoCTBa CBOINT K MNHIMMy BO3MOXHOCTb 3aNYTaTbC B HEM INN CNOTKHytbc. He nCnoJIb3yIte YdINHInTeB.EcNI WHyP nITAHn CNIIJKOM KOpOTKn, Heo6xOIMNO yCTaHOBNb PO3eTKy BO3Ne np6bopa.O6paNTecb K KBaINIΦuPOBaHHOMY 3JIeKTPNKU INI pa6oTHNKU cepBnCHORO CEHTpa 3a NOMOIOBIO.
ABHUMAHVE
Onachoctb npaKeHHN 3JIeKtpuYeCKM TOKOM
IopknIOUHTe K3a3eMJIeHHo pO3eTKe.
HydaIaIte 3a3emlaIOuIeNJIeKtpoI.
He nCnoB3yIte yDnHnHTenb.
HecobnOeHHe 3TNX INCTpyKmIO MoKET npHBcTeN K CMeptN, noxapy nnn nopaxKeHHIO 3JekTpueckm TokOM.
YACTMIMXXAPAKTEPNUKIN
Yactn 3cnpecco-MaunHbI
KomnoentbI 3cnpecco-MaHHbI
BbikkoateIb nTuHa (0/1) (1)
HaKMITE OINH pa3, YTO6bl BKIOUHTb 3cnpceco-MaunHy; HAKMITE eue pa3, YTO6bl BIKIOUHTb ee. Ipn BKNIOUeHNn HAUNHOIT HArpeBaTcBcO6a 60NJepa N HAUNHAOT fHKUHNOHPoBaT KHONN "
EMKoCTbIaBBoDbl(6e3b0A)
CbeMHyo EMKOCTb DnB BoDbl MOXHO CdBnRaTb B neByIO nn npabyIO CTopoHbI Dn yDIO6CTBa yCTaHOBKn. Ha Hei HaHeceHbX OPOW0 3AMeTHbE DENEHNr Dn MaKcHMAbHoRTO (1,8 nITpa) u MNHMalbHO rpoBHe 3AnONHeHn. Ipo3aHbIe CTENk EMKOCTn N03BOJNtOT cpa3y Je yBnTe b yPOBeHb XIKoCTN. EMKOCTb MOXHO MblTa H BePxHe NOnKe NOcyDMoEOHHo MaunHbl.
OrpaKdHne dnyaasek
Cbepy Ha 3cnpecco-MaunHy MoXHO nOCTABNTb 4-6 uwek 3cnpecco IJI NaOOrpeBaHn. OpraxJeHne n3 HepxKaeIoue CTaII He daet YauKam ynaCTb.
KyBunH dnn BCneHbAHn
KyBHHN3HepXbaEOUe CTaJI NEMKOCTbIO 255 Mn He3aMeHNM DnBcNEHbAHJ.
YnnnoTHnTeNb
Cero nOmoIbHO MOxHOp aBHomepHO yNtHTb KoΦe B KOp3nHKe dNbTpA.
Mepna nokeka nka Koe n ueouka nry ouctknc
HacbinaTe OHy NOnHyo MEPHyo JoxKy KoFe Ha Kaxdyu yauKy (30 MN) 3cnpeco. Ppi NOMOoi 9eToOKn MOXHO cTPRxHyb TaCnKuN KoFe C bapOCHI RONOBKN cTcKn.
He noka3aHo ha pncyHke:
Dba6oinepa
OTdIbHbIe 6oIepbIO3BOJIoT IO36EkaTb NepepbBa, IMeIOUero MeTo HA MaunHax C ODNHM 6oIepom BO Bpem NpeKIOUeHHa MExky BCNEHBAHm E BapKO.HarpeBaTeBbIe 3IEMENTb 6oIepOB He cOpNkAcAOTc C BoO: OHn paCNOJOKeHb ChApyn6oIepa IINoDepXaHAnI NDeaIbHO TempePaTybpBapKn 3aauITb OT nepeopAAH.BoIepb6bCTPoro HArpeBa DOCTrAoiT paooye TMpepaTybl pImepHo 3a MmHyT.
Bpb3ro3aunuHnHnCtema C TpExxOoOBbIM 3NEKTPomarHHTbIM KlaNaHOM
TpexoobOJ 3eKTPomarHHTbIKaNaH npaKTueckn YcTpaHReT KaIIIN, MRHOBeHHO yMeHbua DaJIeHHe B BApOCHOM yIpi OTKIOUeHN HAcoc.A. DePkaTeB fNtPa MoXHO CHIMaTb Cpa7y Je NocJe OKOHuaHraBpKn, He BoRcb pa36pb3rNBAHna YaCTnEKe KOfe.
Hacoc daBHeHMe 156ap
CamaonHouaCBOHaH NOMnNoDepKnaBaet HeoOdmoe dIy ndealbHorO 3cnpecco daBneHne.
IIOIROTOBKA 3CNPECCO-MAUINHbIKNCIOJIb3OBAHIO
YctahOBka orpaxdHnna TaWeK
Cobmctnte TPN onopby orpaKaHeHc TpeM oTBepCTnMn CBepxHa 3cnpecco-MaunHe.3aTe M c HaxMMOM BCTaBbTe onopby orpaKaDeHnB oTBepCTnR.
CHATNE MOIKA EMKOCTN DnB BoDbI
- HemHoro npnOaHmMte eMKoCTb n CHMmTe ee, notAHyB HxKHOU qACTb eMKoCTn B CTOPHY OT 3CnpeCCo-MaunHbl.
- PpOMOte EMKoCTb RopueMblbHO BDOu N OONOCHTe YNCTO BDOI. EMKoCTb TaKHe MOXHO MItb Ha BepxHei NOJIke NOCyDOMoeHoi MaunHbl.
3.YCTAHOBHTeEMKOCb6oPaTHO B3CnpeCCoMaHHy, y6eHNBcB, YTO CnFOHHbIe TpykN pa3MeueHb BYHTPN EMKOCTN. BbICTyNb Ha DHe EMKOCTN BCTABJIaOTcB BByrny6neHnA OCHOBAHm KOpNyca.
IIOIROTOBKA 3CNPECCO-MAUINHbIKNCIOJIb3OBAHIO
3anJHHeHn npomblk6oJInepoB
ABHUMAHVE
Onachoctb npaxKeHHN 3eKtpueckmTOKOM
PoiKIIouHTe K 3a3eMHeHHo pO3eTke.
He ydaIaIte 3aEIMnIOuIeN 3JeKtpoI.
He nconnoB3yIte aanTep.
He nnonb3yire ynnnHmTEnb.
Hec6bIIOeHHe 3nX HcTpyKm MOKeT PnBecTN K CmeptN, NOxApy NIN NOPaXeHNIO 3NeKTPuYeCKM TOKOM.
PepenHauanomIOIb3oBAHN3ePCco-MaunHbI Heo6xOJIM0 3aONHHTb INpOIONcAbt 6oINepb. TaKoe 6oINepb1 Tpe6yetc HAnOIJIHTB TOM CnYae, ECNI:
3cnpecco-MaHnHa He nCnOlb3OBaIacb B TeueHne dNITeBHoro nepnoa BpeMeHH
EMKOCbI DnB0bl ONYCTOOWINacB BO BpeMa NcONb3OBaHNA (3TO MOKeT pInBeCTN K NOBpeXeHNIO 3CnPcecco-MaUNHbl)
-60nboe KOINueCTBO HAnNTKOB BCNeHnBaTc8e3
npirotOBJIeHNA3CpcecoIINNPOaHrOpaeyBBoBb
1.CBnHbTe EMKocTb IIN BObl B NcByIO INI npabyO CTOpOH,TO6bl OTKpbITb ee CBepx, IN3aJIeNTe YNCToXONODHO BOOn Do BepxHeOTMeTKN.
INPIMEYAHNE: INcnoJIb3OBAHHe INCTUINIIpOBaHHoN ININHepaIbHOBdIO MOJE npNBecTI K NOBpeXeHIO 3cnpceco-MaunHb. He cNoJIb3yTe Takyo BDO JnpiRTOBHeHNe 3cnpeCO.
- BctabBe KOHee 3neKtpueckoro Ka6eB6e3 wTeNcEBA pa3bEm B 3aHHeu qactn 3cnpecco-Maunbl.
- BCTaBbTe pyroKoHeu Ka6eBa 3a3eMnEHHy0 po3eTky.
4.Y6eNTecb,TOpykoTka"3aKpbita,NOBepHyB ee 10 KOHuaNo yacobO CTpeIke.

- HaxMNTe KhoNky" ①, YTO6bI BkIOHHTb MaINHy. Nocne BKHOUeHNMAaMHb3aTOpRTcN HnDkaTOp NTaTHy (I), Oba 6oJIepaHaHyT HarpeBaTcR, IN KhoNKn " " npInyt B paOooie COCTOHRHe.
- NocTabte KofoeHyu ChaKy noB BapOHyIO roOBky. He npncoeDnHne depKaTeNb K BapOHyo rOLOBke.
- HaxMMTE Ha KONky" -PnI 3OM He Tpe6yETcKdTaB HArpeBa 6oHepa. PnHaxTmN KONKn BkIOuAeTCR HAcoc, KOtOpB 3aONHReT 6oHneP dJa BapKn BOOn. Yepe3 HeckOJIbKO CEyHd BOa NToeHT N3 BapOCHo ROrOBKn. KorDa YaHa Ka 3aONHCTC, HaxMMTE KONky" eEe pa3, 4TO6bl OTKIOUHNTb HACOC. TeNepb 6oHnep dJa BApKn rOTOB KNCIONb3OBAHIO.
8.YCTAHOBITE KBYBUN INI BCSHEHBAHNA NOI CONIO BCNEHBAIOUe Tpy6K.
9.ПлавындьжehмOTКроTe pyKoTky" NOBopaYnBa ee npOTNB YacoBON CTpeKN, NOcIe Yero HaxMITE uYEprXbAte KhoNKy".PpN 3OM BKNUHTc HAcOC, KOtOpB 3aONHReT BoJIepДЯ BCeHbAHBaH BOJ.Yepe3 HeckOJIbKO cekHyd n3 conJa HaHHT TeCb BOJa.
IIOIITOTOBKA 3CNPECCO-MAUHHbIKNCIOJIb3OBAHNIO
-
Nocne 3aONHeHn KByuHa npMepHo HAnoBnHy OTNCTNE KHOKNY " n 3aKPONe PYKoTky NOBpHy ee Do yOpna no YaacBOH CTpeKe. Teepb 6OInep DnBa BapKn rTOB K cNcNoB3BOAHIO.
-
Ecn npiroToBnHeHcnpceco Hte Tpe6yeTcHaxMITE Ha KHOKy 日 ^ ,TO6bI OTKIOUHTb MaunHy.
PIMMEAHHE: He haxmuTe KhoNKn " 7Cnn EMKocTb DnA BObl NcTa. B npOTNBOM Cnyae MoXeT 6bItb NOBpeXdeHacoc.
NcIIOJIb3OBAHHe 3CnPECCo-MAUINHbI
PmroToBnHeHneCnPpecco
POnyueHne HnnyuNX pe3yNbTaTOB BapKn 3cnpecco ONncbIaETcB BA3dene "PepeTem, KaK npiroTOBtB OTINHbN 3cnpecco".
1.YbTeCb,TOBEMKCTNOCTaTOHO BObl. (YpOBeHBoBDI DOnJIeH 6bITb MEKJy MaKcIMAbHoN mNHIMAbHOOTMkAMn.)
2. Bb6epnte Kop3nHKy fHbtpa MehBwero HN 60nbwo pa3mepa. NcNoIb3yIte Kop3nHKy MehBweemKOCt n npiroTOBHeHMy ODHou qAaKN (30 m) 3cnpecco, a Kop3nHKy 60nbweemEKOCTn dnpiroTOBHeHMy DByx qAwek (60 m). B MaNEbKne Kop3nHKy fHbTpO TaKke MoXHO BCTaJIbTb 6ymaxHbIe "KoFeHbIe Ta6NeTk".
3.YcTaHOBITe KOpuHky FInbTpa BepKxATEne, BCTaUB ee Do 1ueKHa. Ha daHOM 3tane He 3aONJIHe DEpKaTeNb FInbTpa KoPe.

4.YCTAHOBHTe depKaTeNb fHnBtpa NOI BapOuHOI rOIOKoIN COBMecNTe pyKy depKaTeNco CTpeKoN "HaJeBOI CTOPOHE MetaJIIMHeCKOR KOJIba. BCTABTE depKaTeNb FInbTpa B BAPoHyIO rOIOKY, NoCte Yero NOBepHITe pyKy depKaTeNHaPBO, COBMecTNBE ee CO 3HAKOEM HaMetaJIIMHeCKOM KONbCe.

5.HaKMTe KHOHKy" ① ,YTO6bblBKNIOUHTbMaUNHy.
6.ДохиntecbHarpeBaMaunHbIdo pa6ouey TemnepaTpybI; 3TO 3aIMET np6nIn3ntelbHo 6 MNHT.
Iocne TOrO, KaK CTpeNkA TePmOMeTpA 60Jnepa DnA 3Cnpceco DOCTURHTOHbI"MOXHO HAuHaTb BapNTb KoFe.
- OToCoeINHnTe IepKaeTbIbIbTpA OT BapOuHOr TOnOBKn, NOBEPHyB erO pyuKy HaneBO.HacBInbTe Ody MePHyIO NoxKy MONOTOro KoPe (INN BCTaBtE Ody 6ymaxHHy To6neTKy KoPe) B MaHehKyIO KOp3nHKy INN DBe MePbIX NoxKn MONOTOro KoPe B 60bnSyUo Kop3nHKy. McNoB3yIte JnI npTOrOBHeHn Ecnpceco TOnBkO KoPe cneMaNaBHoro MEKoro NOMOA.
8.CnOMOuBHO yNIOHTHnTeBApaAteNbHbIMn DBrXHeHnAMn 3eHPrNHOYyIOTHnTE KoPe. IOBepxHOCTb KoPe 0JONKHa 6bTb KaMOKHO BoOE pOBHO. CM.pa3Jebl "Pa3pABHBaHne" n "YyIIOHTHeHne" dner NOnyueHnBOoe Ioppo6HO HnΦOpMaun. - CtpaxHnTe IINHnE KPOsK n O6Oka DePkaTeIa FInbTp a BCTaBBTe eR O B BapOHyIO ROnOBky.
- UcTaHOBnTe OHy HIn DBe YauKn IIn 3CnPceco Ha NIOIOH IOI TPy6Kn DEpKaTeIe PInbTpHa. HaxMnTE Ha KONkY " " Nocne Qero 3CnPceco HaNet Teu B uAaKn. Nocne ToR, KaK Heo6xOumoe KoninueCTBO KoKe CBapITcA, HaxMnTE Ha KHONKy " " eIe pa3, YTO6bl OCTaHOBnTB pNIRTOBnHeHne.
PIMMEAHNE:He cHMaTe depKaTeIb fNtpa BO BpMaBapKn.
NCHONJIb3OBAHNE 3CNPECCO-MAUINHbl
- 3cnpceco-MaHnHa 60pOyOBaHa TpeXoDBbIM 3NEKTPOMarHHTbIM KJlanaHOM, KOToPbI PpaKTNUeCKN MRHOBENHOYEMHBwaET DaBHeNHBE BapOCHOM y3Je NOCLe OTKIOUeHN HAOCa, NO3OTMy DEpKaTeNb FOINbTp aMOKN CHMAtb Cpa3y Je NocLe OKOHuaHN BApKn. CHmnte DEpKaTeNb FOINbTp, NOBepHyB erO pykY BInEO. BByrPaXIBaNcONb3OBAHbHI KOPeN3KKn FOINbTp, He 3aDeBaIte pykY DEpKaTeNaFbItpa.
12.CHABdepkateNbФnIbTpA,yCTaHOBtteyauKynoD BapOuHOI RTOOBKOHN HAKMITE KHOKNY HA OHy-DAE CKeYHDbI. Pn3TOM ONUCTNTcCetKa n CMOJTCBCE KoFeHbIe MaNa N YACTNUKN,OCTaBUNecB BAPoOHrROJOBKe.

- YTO6bI npiroToBHTe ue Ody nOpuH 3cnpecco, NOBtOpHTe 7arn 6-12, Ondako yHTbIaIte npnbedeHHble Hnke COBtbl OT 6apncra.
CoBeTbIOT6apnCTa
PnpnpnroTOBHeHnHEckONbKnxHaWeK Kofoe:
1. OuHuaTe N BcIyUWBaTKe KOp3Hky fNtpa NIoTeHcEmpeed 3acbIKoHOBIO npCIN KoFe.3To nOMOKeTobecneHTb paBHomepyKCTpakUIO KoFe.
2. TOb6bI NOIDepKINBaTb Heo6xOIMMyIO TEMpepaTy BPaKN, CNeDyET COXpAHrTB BApOuHbI y3en rOpAUM, NOrTomY:
He ononackBaIe depkaTeIb fumbTa BOOnpOBOHnB Odo -3To npBedeK OxnaXdHIO fNbTpA. Jyue Bcero ydaTb octaTK Kooe n3 fumbtpa noToHcEM.
Ecnn BbBbINHnEte Dpyrne Oepaun, Hapnpmep, pa3MaIbBaTe KoFe nn BcneHbAeTe MOJOKo, noDepxNBAite HopMaIbHyIO TemnepaTy pnyTOO fNbTpa, npncoeHNHB erO K BapouHoi rONOBke.
BcneHbAHn Harpe Mooka napom
BcneHbAHme MONoka Tpe6yET HeKOTOPORO onbTa, OdaHko
Bb Camn yDINBITEc TbOn CKOPoCTn, C KOTOPOI CMoXeTe 3TOMy
HayuHTCBa.3Cppeco-MaunHa Artisan npedocTabnert nI
3TOrO BCE HeOBxOIMmoe: KyBmH N3 HepXABeIOUe CTAni,
fOpMa KOTOPORO Lyuue Bcero NoxDxOJTn IBA BCNEHbAHnra,
BCNEHbAIOUyIO Tpy6ky, perynypemyIO nI yDObCTBa pa6Otbl
B BePTNKAbHOM N Trop3OHaTJbHOM HanpaBNeHHN, BCNEHbAIOUooee
CoIINo, npeHa3NaHeHHeO nI yUyHeHn ENoHObpaOBAHn,
nPyKoRTKy " ,no3BOJNOUyTOUYHO KOHTPOJIpObaT
KONueCTBO NOCTyNAoUeO rI BA BCNEHbAHnna napa.
- HaxmTe KhoNky 日 _ 0 ^ ,tO6bbl BKNIOUHTb MaUNHy.
- Doxntecb HarpeBa MaunHbdo pa6oey Temepatypb; 3TOaMET np6bnntBho 6 MnHyT. Pocne toro, KaC TpenKa TepMOMeTp GoNepA DBCNEHBAHNAO DCNTHRET 3OHbI"Q,MOXHO HAUNHt BCNEHBAHHe.
- 3aONIHHTe KByuHn DnA BCHeHbAHn Ha 1/3 XoJIOHbIM MOJOKOM.
- HanpaBnB Tpy6ky DnB BCnHbAHnB N yCyTio YaIky, OTKpoIte Ha ceKyHy pyKoRTky " ,yTo6bl CNTb IINHIO BOY M3 CNCTeMbI. YTo6bl OTkpBtby PkOaTKy " HeoXoIMNoNCTeNEHNOOBaHbTe e npOTNB YacoBOI CTpeKN, a YTO6bl 3aKeBHpyKoRTky " ,noBepHyTB eoYoNAcoBOI CTpeKe.
- Pn 3aKpbToI pyKoTKe" yCTaHOBtBe BCpeHbAooyIO Tpy6ky B ydo6Hoe dIpaObI bnoLoXeHne n Norpy3nte KOHeu BCpeHbAIOeO cOnla B MONOKo B KyBUNHe IJI BA BCpeHbAHHa.
6.ПлавыIMДижkeHMeM OTKpoIte pyKoTky",NOBepHyB ee npotNB YacOBoi CTpeKN.Yem 60nbwe NOBopauHbAeTcRpyKoRTKa",TEM 60nbwee KOnuYeCTBO napa 6ydt NDabatcba.HaknoHnTe KByuHn B Ody H cToPOHy,YTO6bI CO3aTb BpaAtelbHoe DBNKeHne MOnoka,coxpaHry KOHN BCNEHnBaUeO CoNla NpIMePHO Ha 5 MM NOI NOBepxHOCTbO MONoka.ECNI NOBJIaOTc6OblWne Iy3bIpN.IIN MONOKO pa36pb3rHbAeTc-3HaHT, CONIO NOrpyKeHo HeOCTaTOH.O
- CybeIueHem KOJIueCTBa neHbI KByuH HyXHO 6ydetOnyckaTb.
- Korla BcneHHeMOKo 3aONHnT KByuHn npimepHo Ha 3/4, onyCTNe BCNEHbBAIOOe conno B KyBUnH, YTO6bl 3aBePmNb HArpeB MOJoka napOM. DePKite KByuHn nod HaKIOHom, COxPAHRA BpaAteNbHO DEINKHeHne MOnoKa. IOnorpeIte MOKO do TEmnpatypbyt O6 70 da7 rpaYcoB no LcEbnio. (Pn TakO TemnpaType KByuHn 6ydet ouHb TeNbIM HAOUynb). He DOBoNTe MOKO Do KInneHn (To npoucxOHT npT emnpaType 80 rpaYcoB.)
- NpeTe TEM, KAK BbHyTb BCNEHnBaOnuOyTOpy6Ky u3 MoNoka, 3aKpoIe pykoTky" , noBepHyB ee Do KOHua No YacOBoi CTpenke. 3To He daCT MoNOKy pa36pb13RnBaTbCra.
NcIIOJIb3OBAHHE 3CINPECCO-MAUINHbI
Cobetbl ot 6apncta
OuHuaTe BCnHbHaOnyU Tpy6ky u cno n0 pa3y Je noCne NcNoB3OBaHn. CM.pa3den "YxOJ OoNCTKa".
- MONOKO C HN3KOJ KINPHOCbIO O6bIuHO JERue BCNEHNBaETc. C063eKnpeHbIM MONOKOM TAKKe MOrTy BO3HKNHYb CNOXHOct, TAK KAO HOB BCNEHNBaTcOeHb JERko, 6Op3ayr 6oJIbUne NBy3bpKn u CyXyO KOpKy, KOtOpA NOPIT NT HeY.
B KOHeuHOM cYeTe, BbIbOp MOJOKa -3To BOIpoc ObnTa H BkyCa. Han6Obee BaXbMn foKTopamn B pInrTOBJIeHNm XopoWey neHbYBaNtca ONbIT N XOpaee OxJaKe HnKe TeMnepaTypa MoJOKa, Tm NyUe.
PnroToBnHeNkanyuHNO
TTObI npnroTOBnTb KanyuHNO, BCneHbTe HarpTe napOM MOnOko nepeD npnroTOBHeHmE cNpecco. 3To no3BOJETe Ne He CnFEKa 3aCTbN INONHOCTbIO TOpENbTc O TOnoka. Nocle npnrroTOBHeHm MOkA, CBAPte OHy uAky (30Mn) eCnpcco
HaneTeeroBuaKyDnKaanyuHo,nocYeero HaneTe TyJaXe BcneHeHNoEHarpetoe NapOMMOKO,Clerkaero B30nTab.YKpaCnTBaaykyKaanyuHO MoxHO,NocBInAB ee WOKAJADHOCTyKkO.
Iopaya ropayew Boyb
IV3 BCNEHnBaIOUe Tpy6Kn TaKKe MoXHO HaINBaTb RopayIO BODy.TakYBO 8O3MOXHOCTb YD06HO NcNOb3OBA TbJ nprirotOBHeNAmepKaHo, qa nnRopayero WOKoJaA. HAnONHBNNONOBHny aauKn RopayB ODoM, MoXHO OTnHNOIorpeB ee nepd BapKOJcnpecco.
PIMMEYAHNE:HaHnBaIe TROPuyIO BDOy TOIbKO B NcTbe EMKoCTn. Ecm HAnBaTb RopuyIO BOy B YAuKy IIN KyBUnH C KaKIM-Ni6o CoepXIMbIM,TO BODa MoKET pa36pb3raTbcra.
- HaxMMTe KONKy" ①", yTO6bI BKNIOHTb MaUNHy.
- Doxntecb HarpeBaMaunHbdo pa6oey TemnepaTpyb;30 TaHMeT np6bn3ntEnbHO 6 MNHT. Nocne TOrO, KAK CTpenKa TepMOTePa 6oNepa BCNEHUBAHIO DCTMHTET 30HbI “,MOKHO HANBAtb TOpHry BOyD.
- HanpaBn BCneHbAouyIO ty6Ky B NycTyO uAky, OTKpoIte pyKoRKy" "MeJeHNO NOePHyE ee npOTNB HacBOI cTpeKNI.PocTe 2TOrHO HaxMITE N yDepKbMaIe HaxaToN KHONKY "1, YTO6bI HaNITb BOY.
PIMMEAHHE:OctaNnnapaIINBcNEHbHAHMOYT BbINBaTcpe3conlOdoBiteKaHNAoBogaHOrda HauHaet BiteKaTbHe cpa3y,ape3 HeckoJIbKOceHyd.
- KOrda BblnIOcb HxKHOe KOJIueCTBO BOIbI, OTNCTNE KhoNky" " n 3aKpOte pyKOrtKy " , NOBepHyB ee no yacOBn CTpeNke Do ynpa.
YXODI YNCTKA
Ipy npuroToBnHnE 3cnpecco HauuUyWero KaueCTBa BaxHo coepKaTb 3cnpecco-MaunHy Artisan B uHcTote. OctAtKn KoepHbIX Macen Ha depKatae fHnbTpA, Kop3HHkax fHnbTpoB nCtke NcnpT Bkyd aKe Hau6oJe pOphiCCNHaNbHO ppiroTOBnHoro 3cnpecco. TaKke cneDyet ydaTb ocTaTK MoNOKa CO BCNEHBAIOUe Tpy6Kn.
IodrotOBKa K ouncTe 3cnpecco-MaunHbI
- OTKIIOUHTe 3cnpceco-MaunHy.
- BbIepHHTe IHyp MaunHbI N3 3NeKTPnuecko po3eTKN IN OTKHOHTe NITaHne.
3.ДаTeMaHInHeI npuCOeINHeHHbIM K HeN yCTpoINCTBaM nAkCECCyapamOCTbTb.
OuNTKa BCnEHMBaIOueI Tpy6Km conla
BcneHbAoOaTpy6Ka n cOnnIO dOnJXbI 6bITb OOnuEhbl NocLe KaKdOrO BcneHbAHMaMOJOKa.
- OToeHNInTe BcneHbAIOuIpaCTpy6OT BCNEHbAIOUoero CoNla,NotAHyB NepBbl BnH3. BCneHbAIOuIpaCTpy6 MOKHO MtBt TEnIO MblHO BDOJ.Y6eINTEcb,4TO BOTBepCTnIX PaCTpy6 He KAcNX-Ni6O OTNoKeHNI.
- IpoTpIte BCnHnBaIOUyIO Tpy6ky IN COnIO YNCTOIN BnAHHoTKaHbHO.He nCnONb3yIne A6pa3NBHe ry6Kn.
3.BCTaBbTe uTencelb 3cnpecco-MaunHb B 3a3emnEHyO p03eTKy.
4.BkIOHHTe MaunHy n daIte 6oJInePam DoCTnHyTb pa6Oeyem TEmnepaTpybl. HanpAbBe BCNEHnBAIOU Ty6Ky B NyctyO uAuKy IOKpoITe Ha KOpOTKoe BPmE pyKoRTy "0, T06bl npOnyCTNb Nap cep3 BCNEHnBAIOUe e conNo. 3TO NOMOXETnpOCHNTb KOHNK CONNA.
YXODIYNCCTKA
OuNTKa Kopnyca n AkceccyapOB
He nCnoB3yIte a6pa3nBhIe uNCTaIue BeuEcTBA IIN ry6Kn IIN ONUCTK NcPiPecco-MaunHb IIN IIO6bIX ee Yactei n akceccayob.
Ipoptpnte Kopny MaunHbI YCTOIN BnaXHOI TkaHbIO IN BbCyWHTe MArKOIN TkaHbIO.
POMOHTe CETKY B TENNO MBJHBOH BODE IN OONOCHITE B HCTO BOE. BbCyUHTe MArKOI TKAHbIO. 3aNpeaTcER MbTb DepXaTeB PhnBTPa B NocyDMOeYHOH MaMInHE.
Kop3HKnФnIbTpOB,poJOnH pIPOJNTOJ KNDKCTN, BepxHOIO NaHeIb NOdOHa DII npONTOJ KNDKCTN, EMKOCB TJI BDOI N KBYUHN DII BCNEHBAHNA MOXHO MblTb HApBEXHE NOKE NOCyDOMoeHoi MaunHBI NIN BpyHyBO TeNlO MblHo BOe.Ecyn Yka3aHHbIe DetanM MOOTCB BYPyHOr, He 3a6yDbTe ONoONCHyB IN B uNCTOJ BOe IN BBICyWHTb MArKOJ TKaHbIO.
CtpxNBAtpkpynHKnKoFe cynltoHeHHBapOHOI rONOBKN IN CETKNMOKHO CNEuHaBHHOI eTOUKOININ BIAKHOI TKAHbIO.
OuNTKa cETK
Pncne npnroTOBnene 75 nnn 100 qaewk cnppeco Heo6xOIMO n3BNEkaTb n3 BapouHoi rONOBKn cTeKy dIra TuaTeBHO ONUCTKN.
1.CnOMOuBIO KOPOTKOBTBePKNOTBePNHTpaONoJIeHbN BcHTpeCtKn, NOBOpaINBaER oE npOTNBacBOB CTpenKn. Nocne TORO, KaBnTH 6yDet BbIePHyT, cTeKa DOnJHb BAInaCTb N3 BapouHOrIONOBKn.
2.ПROMOHTe CETKBYTeNIOI MbIbHOI BOe N OONOCHTe B YNCTO BOe.
3.BCTabBe CEkY B BapOHyIO rONOBKy rnaIKo CTOpHOB BHn 3aKpeNITe BNHTm.Do ynpa 3aTHe NTe BNHT no YacBOI CTpeJIke
PIMMEAHHE: Ecn cTeKa 3akpenneHa npabnIbHo, ceHTpaIbHbBn BnHT dONKeH pacNONaRaTcB 3anOpNIO C noBepXHOCTbO CEKn. Ecn 3To He TaK, OTBePHnTE BnHT, nepeBepHnTE cTeKY n3aTHnTE CHOBA.
3aIbKa nocne npoDOnxHTeNbHoro npocToR
IyuyuHHeBkyca 3cnpecco nocne Donrro npocToaMaaiTe B MaunHy CBexyIO Body.3anBka TAKKxO obeCneuNT3aONHeHHOCb60JnepOB N rTOBHOCTb 3cnpecco-MaunHbIKCNOpNBJOBAHIO.
- CHIMITE EMKOTb, CneTe N3 Hee CTapyIO BODy, yCTaHOBITe ee Ha MeTO I 3aneTe CBexkyIO BODy DO MAKCImaJIbHOI OTMeTKI.
2.3aONHHe 6oJIepb CBexeB BDOI. IOpO6HyIO HcTpKuIO YHTaIe TB pa3Je "HaONHeHne IOONACKINBaHHe 6oJIepOB".
YXODI YNCTKA
YdaenneHakunn
OTnloKeHnKaIbUa (HaKnIb)OT BOnIc CO BpeMeHem 6yDyT
O6pa3oBbIbTaBc BA MauHIne N MOrY TxyDuNTb KaueCTBO 3cnpecco.
NPIMEAYAHNE:YdaIaTb HKnIb cneJeY KaaDbie Dba
MecaA.EcnnncNoBayETc Boone JxctKar Boga, MoKet
notpe6oBaTbc Boone YacToe yJaaneHHe HKnIN.
IydaJIeHnHaKnnNcNoB3yTe COOTBeTCTByIOUne CpeIcTBa IIN DeKaJIbCmHpyOuNe Ta6NetKn.
- N3BNEKITE CEK TYI3 BAPOCHOH rONOBKN.CM.pa3dEN"YnCTKa cETKn",rJe nOpRoHO ONuCaH nPoCeCC YnCTKN cETKn.
- y6eNTecb, yTO eMKoCTb DnB OBObl NcTa.CneDy INHCTpyKUAM Ha yNakOBKe CpeDCTBa DnR ydaJIeHnHaKINPi, NOIroTOBBTe pactBOp n 3aJIeTI ero B EMKOCTb MaunHbl.
3.ДЯсбopaчstацero paCTbopa nocTaBte 6oIbUyo aUky NOI BapOCHOnOBKn (He npCooEINHNe DepeXaTeNФнБТР)и ese OJNY NOI BCNEHBAIOUM CONOM. - Haxmte KhoNky" 0", YTO6bI BKNIOHtB MaunHy. Npei nepexoJOM K cneIyOuEMy 3aTany He HyxHo DoKnaTaBcra, noka 6oJIepebl nporpeotc.
-
HaxMMTE KONKy" "N BblNBaIte NCTAuee CpeCTBO uepe3 Bapouhyo roIOBky B TeueHne 15 cekyH; HaxMMTE Ha KONky" "eue pa3, YTO6bI OTKIOUHTb NOaCy CpeCTBa.
-
OTKpoIte pyKoRTy",noBepHy ee npOTNB acOBO BTEeHNIE 15 cKeNcHOro HAKMnTe N DEpKnTe KONKy B TeueHHe 15 cKeNcHOro HApNcyTb HcTaeUee CpeCTBO uepe3 BCneHNBaIOuHIO ty6ky n CoNO.
- HaxMMTe KONKy" 0",TO6bbl BKJIOHTb MaunHy.
- Bixknte 20 MNHT, noce yero nobTOpnte warn 4-7. KaXdble 20 MNHT NOBTOpTne WArn 4-7 do Tex nop, noka npakTNueckn BeCb paCTbOp n3 EMKoCTn He 6yJeT npOnyuHepeE3 cNpCEco-MaunHy. He donyCkaTe nonHoro onyctOWeHnEMKoCTn.
9.CHIMMTE EMKOCbI IBA BoI NpOMoHTe ee YCTOBoIOI, NOcIe Yero yCTAHOBnTe ee Ha MeTO n 3aONHITe CBExe BOIOI DO MAKcIMaIbHorO yOpBHa. HaxMMTE KHOIKy"①"YTObI BKHOHTb MaUINy, a 3aTEM pOMOTe ee, b6tPo npOnyctNB COepxKmoe EMKCTN NOpeMeHHO ueE3 BApOHy rONOBKy BCENHeBaOuSy Tpy6Ky. He donyckaiTe OKOHATenBHorO oncyToWeHn EMKCTN. - BCTaBbTe ceTky B BapOuHyI rOJbKy.CM.pa3dJe"UncTkacetKn",rIe noPpO6Ho onncaH npOcecc uNcTKcn cETKn. He 3a6yDbTe dOnnMb uNcTyIO BODy B EMKOCTb IraBapKn.
Iodrotobka K 3mmHemy xpaHnIO Baewe 3Kcnpecco-maunHbIKitchenAid
BAXHAR INHOPMAUHA:Bo n36eKaHHe NOBpeKDeHn Bawen 3cnpecco-MaunHb KichenAid nCnoNb3yIte H xpaHHTe ee B MecTax, B KOToPbIX OHa He MoKeT 6bITb NOBBePcHea 3aMeP3aHnO. TAK KaK BHYTpMaunHb OCTaeTcH HeKOtOpoe KoINueCTBO BoDbl, ee 3aMeP3aHne MoKeT npuBectNu K bXbOdy N3 cTPO.B Cnuyae xpaHENM IIN TpAnCnpOTnpOBKn 3cnpecco-MaunHb pN oTPnCaTeNbHbIX TemnepaTpyx Heo6XoDnMo NOnHOCTbY ydaJIb Tb N3 Hee BOy.
Длг полHorоу ydaHENBAObln3cnpceco-MaunHbI:
- Onopoxhnte emkoctb Iy BObI yctaHOBHTe ee Ha CBOE MECTO.
2.YCTaHOBNTyNCTyIO EMKOCbI NOI BapOCHyIO rONOBky. - Haxmte KhoNky" ① "nyedpKbaiTe ee HaxaToI do Tex nop, noka He 3arOpntc HnduKaTOp NITAHNA.
-
Haxmte" " n daTe BOe NOHOCbIO BbTEy 36oInepa.
-
Korda Boda nepectaHET BbITEKaTb, HaxMNTe " 6"ДЯ BbIKJIIOUeHnHaCocA.
- OnopoxHNTE emKocb n 3aTEM yCTAHOBITE ee NOI cONIO BCNEHINBAIOe Tpy6Kn.
- OTKpoIe pyKoTky peRyIINpOBKn IOnaHn npa n daIte octBaWseMcynapy BbIHTN mMaunHbl.
- HaxMnte KhoNky" n ydepKnaTe ee HaKaToi, 4TO6bI DaTb BOe BbTEChn 6OuInepa.
- Korga Boga nepectaHET BBiteKaTb, OTnycTne KhoNkY
- 3akpoTe pykoTky perynipOBKn noaun npa.
- Haxmte" ①" DnB BbIKIOUeHnE Ncnpcecco-MaunHbI.
- CnTe octaBwUOcB OBy n3 EMKoCTn DnA BODbI yCTaHOBtE eMKoCTb Ha CBOE MECTo.
ONPEDELEHNE UYCTPAHEHNE HENCPABHOCTE
Ecm npn HaxaTHN KHONK " MHdNKATOp NtAHNA (I) OCTaeTcBbIKIOeHHbIM 60JIepeH He HarpeBaIOTcA:
PpOBepbTe, noKnIOueHa n3cnpcco-MaunHa K pOzTe. Ecnn OHa noKIOUeHa, OTKIOUHTe ee, CHOba BKNIOHTe HAnkMITE Ha KHOKNy ① eue pa3. EcnN yCTPOiCtBO He 3apa6oTaet Ha 3OT pa3, npOBepbTe npEdoxaHntB nnn ABOMatNueckn BbIKOATEB bJNEKTmuCKeCN tK KOtopoN oKnIOueHa MaunHa, uY6eINTecb, yTO B cENn Het pa3pbBa.
Ecn Kofo He TeuET n3 depKaTeIa FmIbTpA, BO3MOXHa npuHa...
-EMKOCbI B0Bbl NyCTa WnBapOHyb 6oINep He 3aONHeH
CnOHHBHe IaHm EMKoCTn Iy BODbI nepeKaTb INHepaBnBHo YcTaHOBJeHbI
-CETKa HJXJaETcB OOHCTKe
- MaunHa HykaeTCB OounCTKe OT HaKIN
-KOΦe NOMONOT CNIUKKOM MEIko
-KoOe CINUKOM CNJBHO yNIOTHEH
EcHn Hacoc CnHKOM CNbHO uymT, Bo3MOxHa npuHa...
-EMKOCbIaBBOBblNyCTa
CnOHHBHe IaHm EMKoCTn Dn BODbI nepeKaTb HnnePaBnBHO YcTaHOBJeHb
-6oHnepbI He 3aONHeHbI
EcnB Oda npotekaet yepe3 depkataenb fnnbtpa, BO3MOXHn npuHa...
-epKaTeIbΦnIbTpHa HnPaBnIbHo nPncOeHHe K BapOuHOI ROOBKe
KpoosKn KoFe HAnInnHa OoOok DepeKaTeIa FnNbTpa Nn Ha yNtHeHne BapOHOr TOnOBKn
- yNIOHTHeHHe BApOCHOn fONOBKn 3aRpa3HeHO NnN N3HOUeHO
Ecnno nopaetc cnkwkom mano npapa nn o6pa3yertc cnkwkom mano nehbl, BO3MOxHn npuHa...
-60nepDnBcneHbAHnHE DocntpabooyemTmnpaTypb -pyKoRTKa OTKpbita He KOHOHa
-BCnHnBaIOuee CONNO HyXdaETcB OOHTKe
-EMKOCbIyBOdyIpyCTaIINB0JnepIINBCNEHnBaHnHe 3aONJIeH
EcnBbBOcN0b3OBaJIncb COBETAMn, PnNBeDeHHbIMN B 3OM pa3dene, HO npo6nema no-tpexHemy He peweHa, o6paNTecb Kpa3dEny "PapaHTnHoe n cepBnCHe 0cbnyKBAHne".
IPEP INPIFOTOBLEHEM: COCTABLAIOUXOPOWERO 3CNPECCO
Ee do BkIOUeHn Ecnpecco-MaunHb B nepBb pa3 Bam notpebyetc HecKoNbKO COCTABJIOUX DnI pInrOToBHeHn XopoWero Kofe.
CbeXne KofoeHbIe zepHa
XopoIuN KoFe MoKeT NOnUyHbCra TOnBko N3 CBexKx NpAbInbHO
OxbaPeHbX KoFeHbIX 3epeH. MOrHe 6apnCTa peKoMeHdyOT
nokYNaTb 3epHa cpeHne OxbapKn, POBHO 8oKoONaHIO
kopuHBeBO rCBeta. TaKa OxbapKa PO3BOJAE CoXPaHt b Bec
HaTypaHbN Caxap N BCE apOMaTHueCeB YeceCTBa 3epeH,
AByrBaC OChOB0 OTMHNO 3cnpccO. CpeHne OxbapKo
Ha3bIbAE TCoCToHnE, NO KOToPOro MOxHo DOBeCTNu 3epHa,
He DOnyckar BbIeDEHnMaCe HnOBePxHOCTN.CuNbHO
OxbaPeHbNte 3epHa TEMHO-KOpMuaHEBO RnN NOvTH eHPOHO 3eBA
BByrJaT XopoIo, OdHako NmHna OxbapKa nepe6bNAe TOnKne apOMaTb KoFe nPebBaPaHTec BcAp xABeB T cepHX B KapaMeIb. ApomAT CnBbHO OxbaPeHBO KoFe, OxbuHO rOpBkn N pe3Kn,
6ydet DomHHpoBaT b np CnBho OxbapKe 3epeH.
CoxpaHeHne CbeKecT KoFeiHbIX 3epH:
IepKHTe 3epHa B Ipo3paHOM RepMeTnHOM KOTheHepe HxPAHNTb IN CxHOM PPOXnADHom MecTe. XpaHNTb 3epHa B XOIOINBnHE Ke pKoMEHnyETC, TAK KAp NpN OTKpbBaHN NOKTeHepa H Na Hx6yDeT KOHeCNPOBaTcBcra BnAra. 3AmOp03Ka MOKeT NMOOc COxPAnHb 3epHa B TeueHne JInTeBHorO cPoKa, ODAHO KAe BbIOBET yxyDWeHn BkyCa.
Bkycha Boda
Hacto ynyckaetca n3 Bnda taKa CoCTabIHOaJxOpoWero
3cnpecco, KaK BOJa. EcIn Bam He npABITcBkyc BODOpBOADHO
BObIy,He nCnONb3yIte ee dIy npriTOBJIeHnA 3cnpecco -
NCnONb3yIte OuMHeHHy BOy n3 6ByIIOK. TaK Ka BOa
6bICrPo pnpOBpeTaET "HecBexN" npNBkyc, peKOMeHdyETc
MeHrBoY BEmKCTn Aaue N 3aONHbTb BoIIneP CBExe
BOoDnOncE DmNTBeHOrO npocTOn. He nCnONb3yIte
BbICOKOMHePAIINIOBaHHy IIN INCTUINPiPOBaHHy BOy - OHa MOKeT NOBpeDHT 3cnpecco-MaunHy.
PpabnHbI NOMONN COOTBETCTBYOuzaa Koemonka
3cnpecco Tpe6yet ouheb ToHKoro n ouehb OndopOHO romona.HoxeBie KoemolnKn HedOporne JepHOBbie KOemolkn ObchyHr He CnpaJIbIOTc C NOMON, Heo6XODMbIM dAOTNUHOrO 3cnpecco.Длп nprirotOBnEHn IyUwero 3cnpecco Heo6xOdima KauCTBeHHaJ KepHOBa KofemOka TAKA,Kak KOFemOJa Artisan.Xopo7a JepHOBa KofemOka yUYuHT Bkyc n apOMaT 3cnpecco, pOn3BODa NCKLIOHTeJIbHO OndopHbI NOMON PnO ouehb He6OblWOM HarpeBE OTpEHN.
METOДИKA BAPKИ 3СПЕCCO
Temnepatypa Bapkn
TemnepaTypa BOdyIe paBAmOpHePoCTBeHHO BInHOT Ha Bkyc 3cnpecco. XopoOni 3cnpeco nonyaetc npri Bapke C oTNImaBHOm TemnpaTypo, B nDeane ot 90 do 96oC.
06ecneueHne npabNbHO TempeaTypb BapKn:
Bcerda npncoeiHnIte DepeKataIb foNtpa (c KOp3nHKofoNtba) K BapouHOI rONOBKe, KOrDa 3cnpecco-MaunHa pa3orpeBaetc. 3To nOMOxET HaPrtbfoNtbp.
- PeneB BapKoB BCERda DOXuJaTecb NOJHOrO HArpeBa 60JIePoB -3TO 3aHMaet He MeHee 6 MInHT.
OTMepaHTe n yIIOHTHnTE KoFe 6bICTPO n BAPITe erO cpa3y JHe He daT depKaTeNIO OINbTp aCINbHO OxnaJdaTbCA.
He ononacknbaite depkaTeIb fnhbtpa xoJOnHO BODO nepeB bapkoI cneyuouxu waeke Kope. BItprxHyB CTapbl MONOTbIK OKeE n3 fnhbtpa, cotpnte OCTabUmeCA KPOsK C KOP3HbY NcTbIM NOnToTeHMe.IpePeTEM.KAK HAcBInTa cNeyoUyIO npunio Kope,y6eJeNTecb, yTO KOp3Ha fNtbpA BbcUyHeA.
EcnBbBnHReTe Dpyrne Opeaun, Hanpumep, p3MaJIbBAeTe KoeF INN BCNEHbAeTe MONOKO, yCTaHaBnBaIte DePxAeTb FInbTpHa BapOCHyTO RONOBK. - Ipeed Bapko Kofe noDorpBeaIte YaAikn CbepxHa 3cnpeccMoAinHe. YaAikn TaKke MoXHo 6bIcTpo noDorpeTb napOM n3 BCneHBAIOUe Tpy6Kn.
Помон
XopoWn 3cPipecco Tpe6yeT camoro CBexero KoFe, a CBexn KoFe pa3MaIbIbAeTc HEnOpceDCTBHeHNo nepei BapKo. Camble TOHKne apOMaTHueCKne BeUeCTBa B KoFe NcE3aOT Hepe3 HECKOBKO MNHT Nocie NOMOla, NOtOMy pa3MaIbIBaTb HEo6xOIMO CTJbKO KoFe, CKoJIbKO Heo6xOIMO CBAPNTB B DaHHbIMOMEHT.
O3npoBka
I03npoBkoH HbBaetc npoecc 3aonHeHH KOp3nHKn
fNtbpMaONtBMKoe, IOnOHOuAaWK (30M) 3cnpecco
Tpe6yeTc7 rpaMMOB KoPe, HaDBe YauaWK - B Dba pa3a 6oBbue.
IO kpaeb 3aONHeHHa MePha NoxeKeKa, NOCTabHemaM BMeTe
c 3cnpecco-MaunHOr Artisan, npakTueeKn UeaeanbHo nOdoXoDHT
dNBApKn OOnH YuAaWK 3cnpecco.
PnDIO3NPOBKe KOe6eNCN0b3OBaHnMepHOJIOXeKn BaxHo He HacbInaTb NINHeRo KoE B Kop3NHkyΦNtPa. KoE HyxHO MeTo DnpaCwHpeHN BO BPmABapKn. ECn KoE npuabEn CTeKo,Boa He CMOKeT paBHomepHO paCpeJeTbcNo PNOzAdn FnhTpA,TO npNBedT K hepBHomepHO 3KCTPAkU IN yXyUdEHNO KaueCTBa 3cnpccO.O nepenONHeHn KOp3NHKnΦNtPa MOXHO cyNTb NO cNeIyoUIM pN3HaKaM:
- 3aONHnTe KOp3nHKy, BbIpOBnHTe KoFe n XopoOy yNtHnTe KoFe (CM.paDnE "YnTHeHne").
- PncoeHnHTe depxateIb foNbtpa K BapouHOI rOIOBKe n cpa3y Je CHmHTe erO.
3.EcHnHaKofoBΦIbTpOeCTaONeOTNeuTOKceTKNJINee BnHTA,TO Kofo 3acbinaHO CNiUKOM MHOrO.
Pa3paBnBaHne
Pa3paBnBaHne Koe focne 3acbInK BfNbTp KpaIe BaXho
dIra nOnyuEHHxOPOwEero cncpecco.EcIIN KoFe HepaBHOmePHO
paccnpedeneo FIObtpy, yNIOtHeHne Koe npBEdet
K o6pa3aBoHIO bOlaCTe C NOBbIeEHHO NIO NOnHoEHH
noTHOCBtIO. POnDAHna IOD aBJIeHNEM BOa pRn BApke
HeN36ExHNOIeT NOpyTN HAImMeHBwero CONpoTnBLeHHRA
CnIbHee IpocauHBaCb Chepe3 KoFe C MeHbWei IIOTHOCBtIO,
13BNEkAra, TAKIM O6pa3OM, N3bIToOHoe KOINueCTBO rOpbkNx
BeUeCTB, He cIbee IpocauHBaCb Chepe3 KoPe C 60lbwei
IIIOTHOCBtIO, He I3BKeAa Do KOHa BKycOBtie BeueCTBa.
HepaBHOmePNaJ EkCTpKaUzna Dact BoaHNCTbI, cIa6bl
n IopbkN 3cnpecco.
BbipabHbAHHe Kofo B KOp3HKe fHbTpA:
IpeTe TEM, KaHacbInaTb KoFe, 6eBdntcB, TTO KOp3HaA Hnltpa BbCyUHeA. Bnara B Kop3nHKe Co3daet nytB NaHMeHbIbero COnpToNtBHeHnI DnB oIpn BApke.
3acbnaB Heo6xoJnmoe KOJIueCTBO KoFe B 0nIbTp, pa3pOBHnIte KoFe B 0nIbTpne, npOBeJa no Hemy HEcoNbKO pa3 nIbIeM. He pa3paBHnBaIte KoFe TOnbKO B ODHOM HAnpABNeHH - B 3TOM Cnyae KoFe CKONITcR BOHOH cACTN KOp3NbI, TO pINBHeTe K HepaBHomePHoN EKCTPAkCmN. NocTapaTecb npndTa nobepxHoctu KoFe cna6o BblpaKeHHy qaAeo6pa3Hy oFpMy, C eHTPOM, paCNOJooKeHHbIM Hnke KpaEB.
Y6eIntecb, yTO MekJy Kcfo N CteHkAmu fNtpa HET He3aONHeHHbIX POMexkyTkoB.
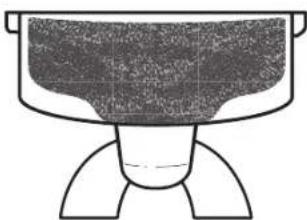
PpabunbHo BbipOBHeHHb KoΦe
YnnotheHne
PnynlnotHeHHn KoFe cnpcecoBBaBcTcBPOBbI NCK,
0k3Ba1oUm npBHOMepHoe cOpOTNBLeHne NOaHHO
NOBbICOM dABpHEHm BOe. PpaBbHO BbIPOBHeHH
yNpIoTHHeHHK KoFe rapaHTpye paBHOMepHy 3KCTpaKuIO
BeueCTB nKOFe n PpINOToBHeHne OTNIHOrO 3cnpeCO.
CnIKOM CnaboYPiOTHeHHb KoFe deΦopMpyeTcBOoJ
PnBapKe, YTO pINbODNT K HEPaBHOMepHO 3KCTpaKUIM,
COKPAaEHIO BpEMeHH BAPKn I NOnyueHHIO 3cnpecco 6e3
OCbIX BKycobix CBOITB.CnIKOM CNbHO yNlOTHeHHb
KoFe yBemnuBaT BPEm BAPKn, B pe3yblTaTe Yero NOnyaetc
RopbKn, NepeHaCbIeHHb HAnITOK.
PpabMbHaMaMeToaKa yNtTheHn
1.Bo3bMNTecb 3a pyKy yIyNtHTenIeKak 3a IBePHyIO pyKy, nIIOTHo npIxKab OCHOBAHne pyKu K naOHN.Bo BpEmyIyNtOTHe CtaPaTcB, TTO6bl yNtOHnTeJIb, 3aIraCTbe nIOKOTb 0bpA3OBIBaII pIMyIIO HINIO.
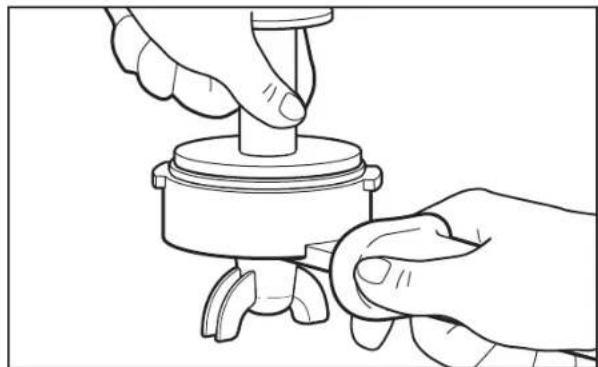
2.YcTaHOBb Hn3 fHbTpHa TBepeyIO NobepxHOCTb, HecuNbHO npKmNTe yNtOHTHeNk KOpe, Yo6bl NOyUHTb POByIO NOBepXHOCTb.OTdJeNte yNtOHTHeNb OTkop3HNKfNoBTPa C nERKM BpaAATEbHbM DnBxHEMeM - 3TO He DaTcYnnoTHHeTIIO NODHTb 3a Co0B CNINuINc KaPe.
3. Nocne OTdeneHn ynnOTnTe Hn60nbOe KOJIueCTBO KpOweK MoXET npINnHyTb K CTEHKM KOp3nHKn FInIbTpA Cnerka NoctyHtepeKApTeENm FInIbTpA NO CTOny, TTo6bl CTpxHYb KPOsKN KoFe BNYtpB, Ha YnIOtHeHHN KoFe. He CTyHnTE CNbHO, T.K. 3o MoXet npINbECTN K HApYWeHHIO NNTOHcTN TeKCTypbl KoPe.
METOIMKA BAPKN 3CINPECCO
- PnKMTe yNtOHTeB BO BTOPOI NocEHN pa3 (Takoe yNtOHTHeHne TAKKE Ha3bBaEcTc NOINPOBOHybIM). PnIOXmTE K KOpe DaJIbNEHne OKONO 15 Kr, a 3aTeM cnerKa ocA6Be erO (PnIMepHO do 9 Kr) n 3anONpyTe NOBEPXHOCT KoPe, DBAJKDb NNOHcTbIO NOBEPHyB yNtOHmTeB BOKpyCBOe OCN.
- PnoBepbTe yHnToHeHHbI KoPe. Dnck KoPe dOnKeH 6bITb RnAkmu N POBHbIM, M EMey CTeHKaMn KOp3nHKn FOnbTpa N KoPe He DoNkHO 6bItb pOmeKxTyKOB.
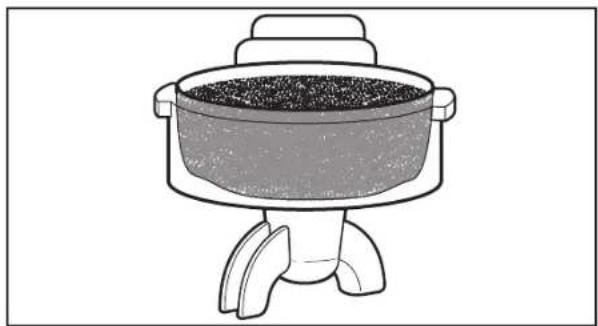
I3MepenHe daBneHn, npknlaDbBaemoro npu ynloTheHN
9KnIOrpAMMOB,15KnIOrpAMMOB-KaK y3HaTb,C KaKoI NMeHNO CnIOB Bt DabNTe?NocTynaTe TaK,KaK DeNaOT 6apnta: UcNcIb3yIte 6bITOBBe BeCbl IocTabTe BeCbl Ha CTOn IIN Ha CTOnkyuynlOTHaTE KcOeHa HIX.OueHb CKopo Bbl CMOKeTe OnpedEnTb,KakA CNa HaxKaTnCoOTBeCTByeT 9 INI 15KnIOrpAMMaM.
06bem
Bapouhnyu3en n 6oepbHarpeTb.CbeKn Kofo nomonot,OTmepeH B depkaTeIb foIbtpa,TouHO BbipOBHeN npabInbHOyNIOthe.Tenepb HAcTynaeT Momet NCTNuHb:Bapka!
Длгяпунуесьхороэсрcc He roToBbTe 60lbwe OndHашк (30m) cManeHbKoKop3nHkoIФиВТpa NIN60lbweDByxчaewk (60m) c60lbwoI piroToBJIeHme 60lbweroKoJNueCTBa Kofo npBeTe K TOMy, qTO 3cpecco 6ydt6OoneBODAHCTbIM I TOpbKM.
IocTyauoHn 3MaunHbnpaBnHbno npiroToBneHHbnnpecco nMeet KpaCHOBATO-KopnueHBeBn UBeT n RCTOTy MeDa, CTeKaIOUero CLOKKn. OH NaCto O6pa3yET TAK Ha3bAaeMbIe "MblHNHbte XBOCTb INn ToHkBc nCPONoO6pa3Hbte ctpynKn. Korda HauNtOHT M3BNEkATCBn 60Jone rOpBkNe nKcnBle BeueCTBa, ctpnyka 3cnppeco cTaHOBNTcmeHee rctO; B HeKOTOpBX CnuyAax ctpnyka cTaHOBNTc npaKTNUeCKn 6enoi. OnbTHbE 6apNCaBHnMaTeNbHO CneJAT 3a ctpnyko IN HeMeJeNHeo PnepKaiaot BApKy, KaK TOnbKO OHa HauNHaet CBETNb.
3cnpecco, CbapeHbI C MeHbIIM, Yem ObIyHO, KOJIyEcTBOM
KJIKKOCTN, HABIBAeTcra 3cnpecco PnCTpeTTO. NpOToBObTe
3cnpecco-MaunHy dI nproTOBHeHr DByx YaueK, OJHaKO
npEkpATNE BApKy, KOrDa 6yET cBaPeHO ToIbKO 45 Ml.
PpN 3OM BapKa npEkapaaTcra C TAKIm paCteTom, TTo6bl
13BNeB ToIbKO Camble apOMaTHbe N HAmeHee rOpkne
KoFeHbIe MaCla N 3ccEHuIN.
Ckopoocb 3KcTpaKuIM
DecTnIeTnOblTaNOKa3ann,TOnyuWm3cnpeco-Kak OHa,TAKINDBeYauKn-BapntcBTeueHne20-25cekyH
Ecni 3cnpecco Bapntcra Ropazdo 6bictpee nn MeiHee 20-25 CekyHd, HOp nTOM Bbl npabINbHO yNIOTHReTe KOFe, N3MeHnTE NOM.Ду mYeHbEHNCKOPoCTn BAPKn CenaiTe NOM 6Oone ToKHM, a Dny MEmeHbEHNr - rpybIM. Do3npOBky UyIIOHTHENE OCTABBe TAKUMX JKe.
KoFe yUbCTBnTeH K BLnAaXHoCTN Bo3Dyxa N erKO BnNTbIbaeB bIary. 3To TaKke BnJraE HcKOpOCTb kctpaKm. Pnp NOBbIeHHo BnAaXHOCTN cKOpOCTb kctpaKm yMeHbwaetc, a npu cyxOM Bo3Dyxe -Bo3pactaT. MoKeT oka3TaBc Noe3hBIM n3MeHrB NOMO I B 3ABNCMOCNT O BPemEHrFOda NIN NORoDb. HeKOTopbIE KoFemOJIKN He No3BOAnIO TocUSeCTBnAeTb TOUYhepeRyInPobKn, Heo6xoImMbIe Dn rN3MeHeHnCKOpOCTn EKCTPAkQm. IOnTOmy Lyuue Bcero npNo6pCtn XepHOByo KoFemONky O tKichenAidTM. EcnTakO B0MaXHOCTN Het, nonpOByte NsOKePmeHInPOBaTb CnIoN yNlOTHeHry. YILOTHaTE C MeHbUm HaxHMOM dYBEyHeHHeckOPoCTn BApKn Nn C6OJIbWM HaxHMOM dny UMeHbWeHry.
3oJotncta neHka
Pn3HaKOM XopoWero 3cnpecco ABnIeTcTa KHaBbAemaKpema, nOthna NeHa 3oNToCToro UBeTa PneBpaUeHHbIX B3MynbCmIO KoFeHbX MacEn, COCePOtauHbAoUaJcay CuHOCbBkyca KoFe. Xopo7a Kpema DoJNKh6bTb ToJIcTOn N DoJNKh npInnataK CTehKaM qawKn, ECIN ee HAKIoHNb. Lyu7aKpema DoJNKhyepxNbAtb He6oJbIoe KOINHeCTBO caxapa OKONO 30 cekHyd.
KoHTpOJIb 3a 3cPipecco BO BpeMBAbpKl
PocmptnTe Ha To, KaKMM BaW 3cnpccO noaetcA N3 MaHnHbI. Ecm OH...
...MEETCBETNO-KOPUHEBBIUBET,BMECTOTORO,YTO6b6bitb HacbIeHHO KOPUHEBIM:
y6eintecb,TO BapouHbI y3en I 6oJnepbl noHoctbHO HarpEnCb
- INONb3yIte MeHee KINcNlyo Cmecb COPTOB Kofo
...6eNoBaTbI C ToHKIMN KOpuHHeBbIM NKpaPnEHaMIM:
IMMEHHTeMetOAnkyIyIOHTHeHnI - NOBepXHOCTb yIIOHTHeHoro KoepaactpeckanacbnnMekdy Koep nCTEHKAMN KOp3HNKnΦnBtPa o6p3oBaJcnpomEkTyOK
...BODAHCTbI N 6bICTPO NbETcR:
M3MEHHTe MToDNIkyIyNIOTHEHIN -YIIOHTHEHMe MOKET 6bTb HeOCTaTOHO CnBbIM, YTOb6I06cNEHTb paBHOMepHOE cOnPOTBJIeHNe BOJE npu BapKe
- INCINb3yIte 6Oone ToHKn IOMOn
y6eHITcB BCBeXeCTN KoΦe
...eBa KaanaTn3 DepeKaTeNa fNbTpTa:
IMMEHHTMeTODkyyIIOTHEHNA-YYIOHTHEHNEMOKET 6bITb CNIWKOM CINbHbIM
nnonb3yute6onee rpy6bnoom
TAPAHNTN I TEXHNUECKOE OBCNYKUBAHNE
TapaHTnHa 3cnpecco-MaunHy KitchenAid
TYTO POKNY USCHOVEJTE
Regulator tlaku pary (
K vypusteni pary nebo horke vody pres napenovac rameno, oteviete regulator"otocenim proti smru hodinovych rucicek. Mnozstvi pary kontrlujete polohou regulator: pro vice pary otacejte regulatorem proti smru hodinovych rucicek, pro mene pary po smru hodinovych rucicek. Pro vypnuti pary zaviete
regulator" otacenim po smeru hodinovych rucicek, dokud se nezastavi.
Hlava bojleru
S = 21
Jably Jgliae Iy jgjly gbaial yblally jzly 1s15i and ay jay jalil pliy
ailllll 10000000000000000000000000000000000000
1
e 1
billaal lall ylll al no jiall all jly g a p alil
jol jol jol jol jol jol jol jol
i
Aa aaii i 1
guyuoyi iayiyaiyaiyaiyaiyaiyaiyaiyaiyaiyaiyaiyaiyaiyaiyaiyaiyaiyaiyaiyaiyaiyaiyaiyaiyaiyaiyaiyaiyaiyaiyaiyai
a 1
i
J 1 J 1 J 1 J 1 J 1 J 1 J 1 J 1 J 1 J 1 J 1 J 1 J 1 J 1 J 1 J 1 J 1 J 1 J 1 J 1 J 1 J 1 J 1 J 1 J 1 J 1 J 1 J 1 J 1 J 1 J 1 J 1 J 1 J 1
BPA 0a jn oj
aaiy aaiy aaiy aaiy aaiy aaiy aaiy aaiy aaiy aaiy aaiy aaiy aaiy aaiy aaiy aaiy aaiy aaiy aaiy aaiy aaiy aaiy aaiy aaiy aaiy aaiy aaiy aaiy aaiy aaiy aaiy aaiy aaiy aaiy aal yaae
.2
1 1
1.

282 - 1


platiuill gnuyul kysla y
logabing jidaxil
Slo 10000000000000000000000000000000000000000000000000000000000000000000
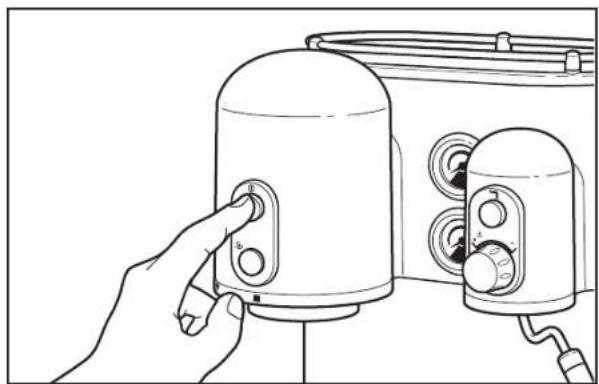
"j11e
y, p aill yaiy e Jao ayall axiaay iie dll Jao y
ySII e Jo JauS1 10g. yauill aia jao ayall gaaiaag .jao ayaiy
ayle gaiy, aoall axiaa ayi yjai yjai yjai yjai y
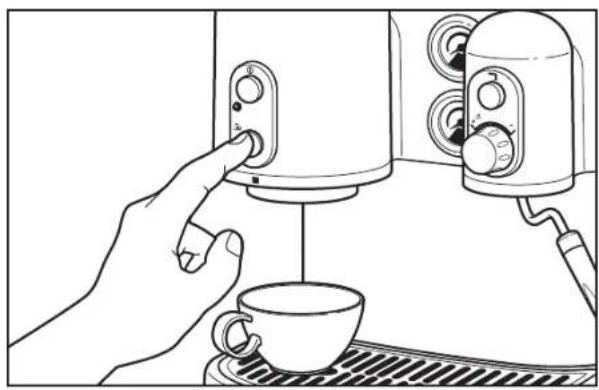

6
L 1
- 1
(y)
1
aai aai aai alal 5 5 aal alal plaaal y j kay
2
3
4
3.
- acluiyjiae
J 10000000000000000000000000000000000000000000000000000000000000
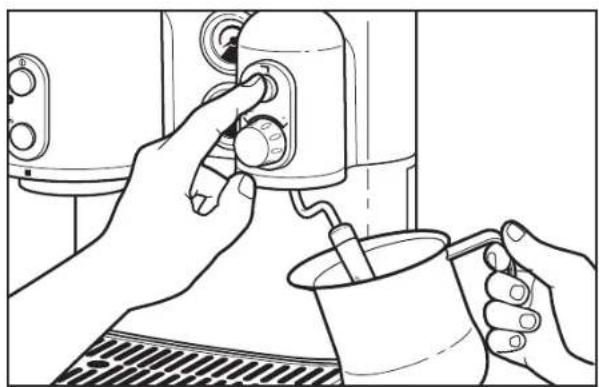
8
9
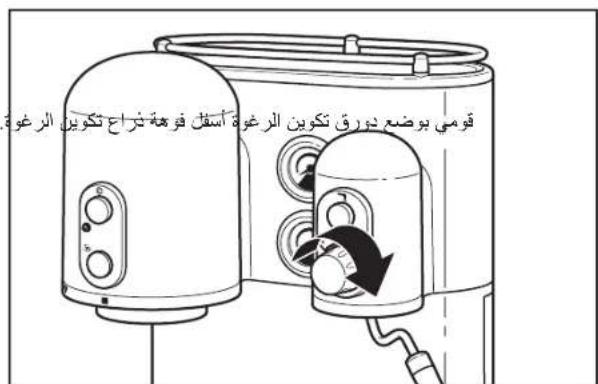
plattdg yuynl iylo
11
y 1
"1 1111111111111111111111111111111111111111
gouyuyu 1
1 5
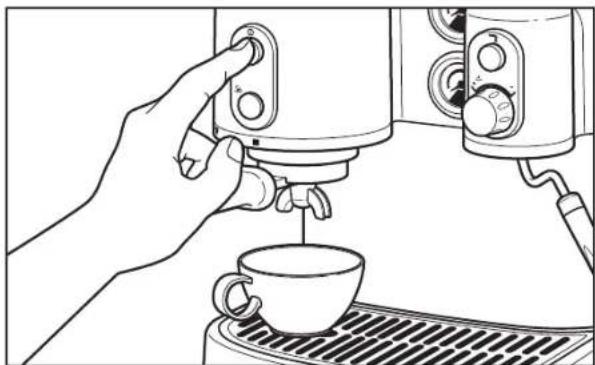
6
" 8aaiiil y g uusuuiy dix o jz jz juaia jao jauo Jaiie Laiic
a 7
j 10
j 10
j 10
j 10
j 10
8
9
10
10
aaii 1
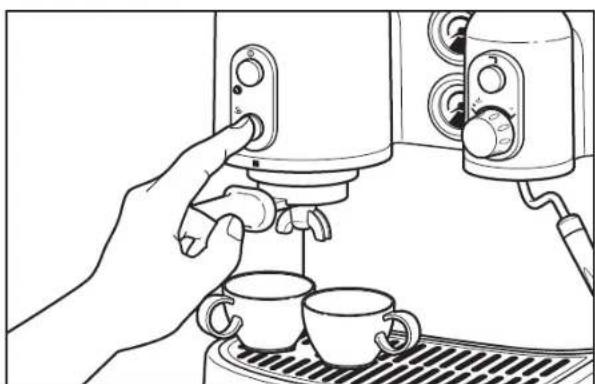
guyu 1
aal l aal al gie s ygall "V" aal al gaaal Jda 1y jy gaiy gaiy gaiy gaiy gaiy gaiy gaiy gaiy gaiy gaiy gaiy gaiy gaiy gaiy gaiy gaiy gaiy gaiy gaiy gaiy gaiy gaiy gaiy gaiy gaiy
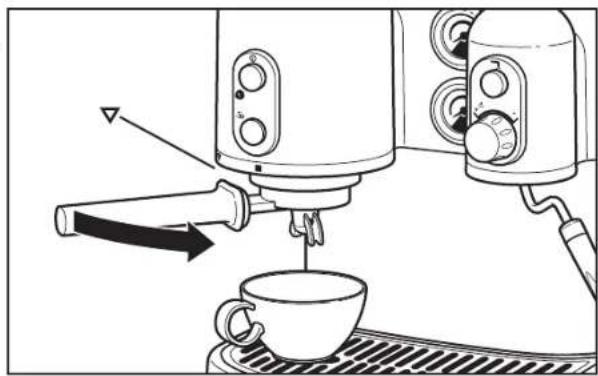
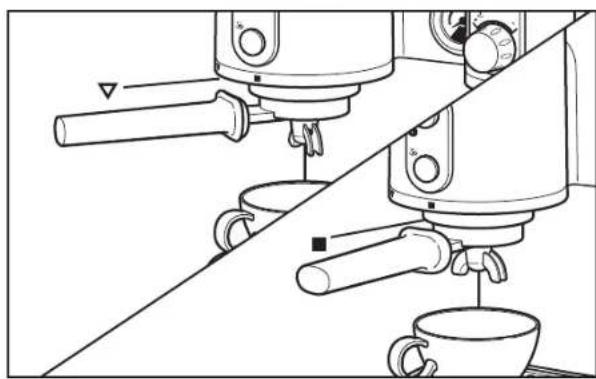
gss
Jus jus jus jus Jus Jus Jus Jus
sill
1 1 1 1 1 1 1 1 1 1 1 1 1 1 1 1 1 1 1 1 1 1 1 1 1 1 1 1 1 1 1 1 1
a a a a a a a a a a a a a a a a a a a a a a a a a a a a a a a a
y
gaaal 1
a a
Kill jn jnsll lll all j slal j 1a aas jall jale
8g 8e 8g gllg 8g.
J 1
y
aaii iiaai jai jyjai jia jia jia jia jia jia jia jia jia jia jia jia jia jia jia jia jia jia jia jia jia jia jia jia jia jia jia jia jia jia jia jia jia jia jia jia jia
jLg jyJ 1
:
1
jaiiei 0jia cie j
3.
. (日 ^ 日 ) " On
AaJn jzjdoal 4

Lggs
KitchenAid 5y jia jia jia jia jia jia jia jia jia jia jia jia jia jia jia jia jia jia jia jia jia jia jia jia jia jia jia jia jia jia jia jia jia
www.KitchenAid.eu
2017@ jiuji jiuji jiuji jiuji jiuji jiuji jiuji jiuji jiuji jiuji jiuji jiuji jiuji jiuji jiuji jiuji jiuji jiuji jiuji jiuji jiuji jiuji jiuji jiuji jiuji jiuji jiuji jiuji jiuji jiuji jiuji jiuji jiuji jiuji
292 - 19
KitchenAid
©2017 All rights reserved.
W10553375B 08/17