KES8558 - Coffee machine KITCHENAID - Free user manual and instructions
Find the device manual for free KES8558 KITCHENAID in PDF.

User questions about KES8558 KITCHENAID
0 question about this device. Answer the ones you know or ask your own.
Ask a new question about this device
Download the instructions for your Coffee machine in PDF format for free! Find your manual KES8558 - KITCHENAID and take your electronic device back in hand. On this page are published all the documents necessary for the use of your device. KES8558 by KITCHENAID.
USER MANUAL KES8558 KITCHENAID
Fully Automatic Espresso Machine
KES8556
KES8557
KES8558

natural_image
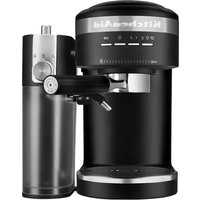
Modern kitchen milk dispenser with digital display and glass cup, no visible text or symbols on main devicePARTS AND FEATURES

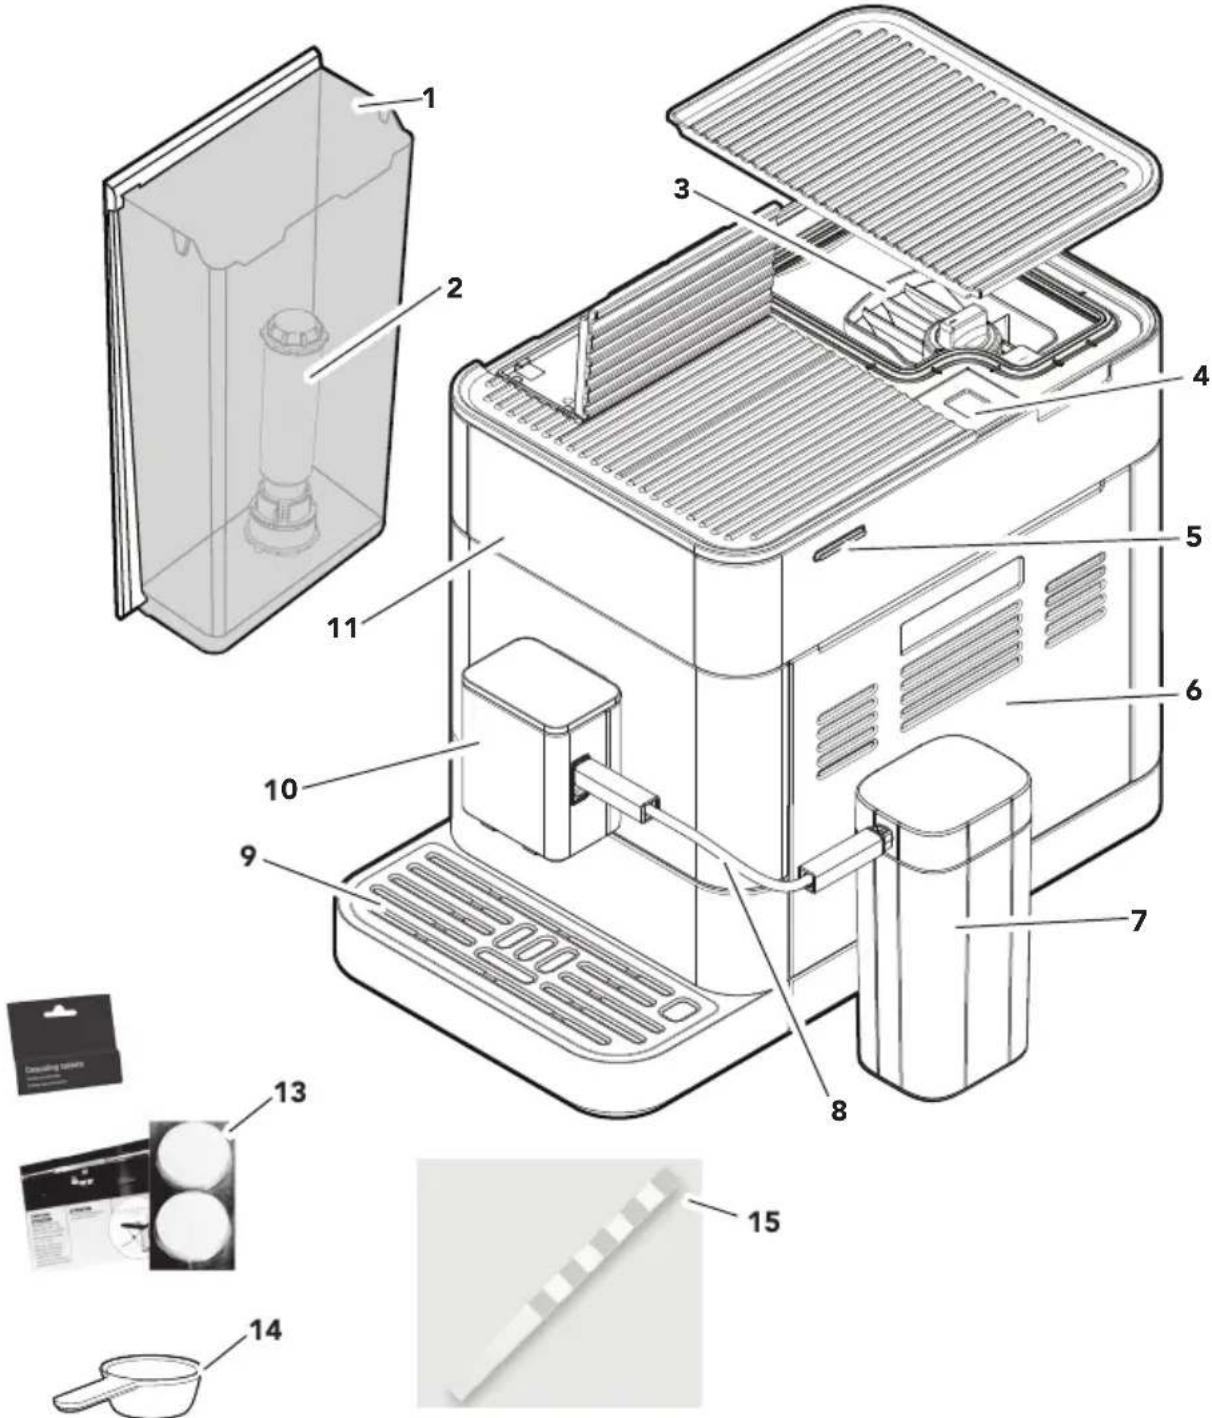
1 Water Tank (2.2 L)
2 Water Filter
3 Bean Hopper (Removable)
4 Coffee Grounds Shaft
5 Main Power Switch
6 Service Door
7 Milk Tank (0.8 L) ^*
8 Milk Tube
9 Drip Tray
10 Dispenser
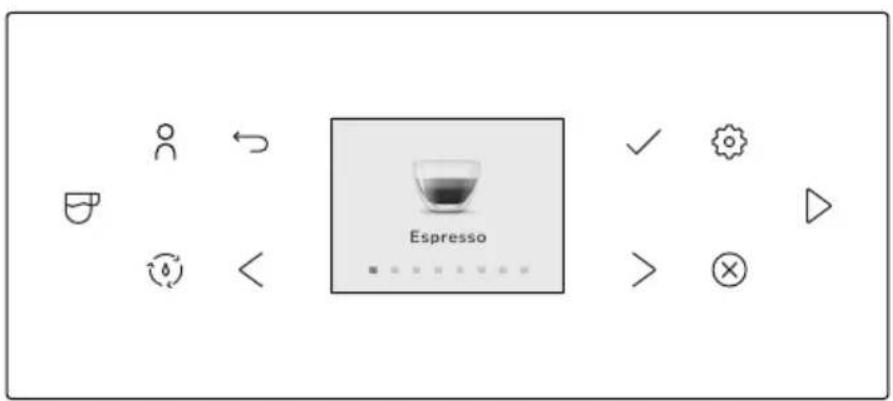
11 Display
13 Cleaning Tablets (Brew Unit)
14 Spoon (Filter Mounting Aid)
15 Test Strip (to measure the water hardness)
| Model KES8556 | |||
| ICON WHAT? ICON WHAT? | |||
| User Profiles Settings Menu | |||
| Drink Selection | Toggle Left Or Right | ||
| Cleaning Menu | Cancel | ||
| Return Key / Back Start | |||
| √ | Confirm choice | ||
| Model KES8557 | |||
| ICON WHAT? ICON WHAT? | |||
| Drink Selection Settings | Menu | ||
| User Profiles Start | |||
| Cleaning Menu Cancel | |||
PARTS AND FEATURES
CONTROL PANEL FEATURES
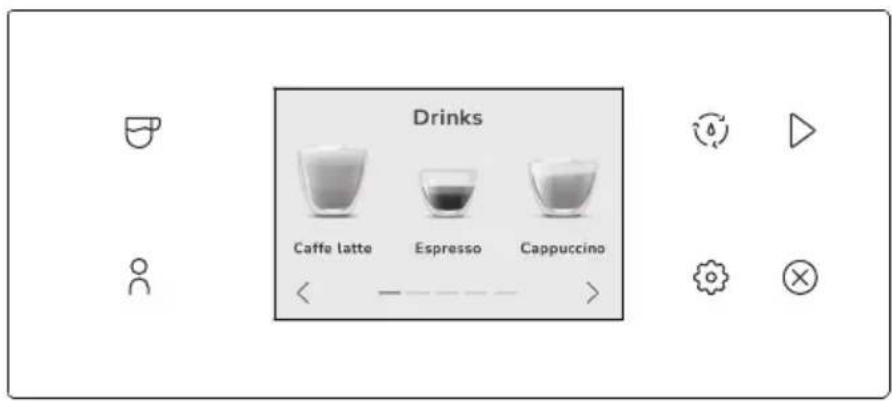
KES8556: Includes Removable Bean Hopper, illuminated Dispenser, cup clearance (3.5" to 5.4" (89-137 mm)), 11 drink types, 4 user profiles, cappuccinatore, and 2.4" color Display.
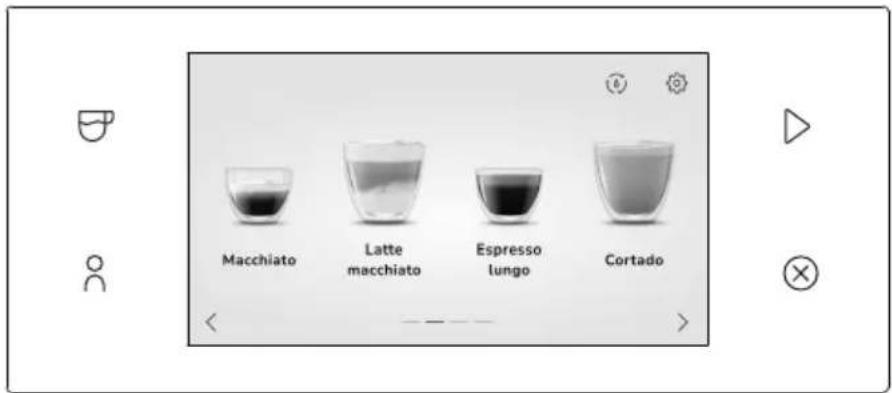
KES8557: Includes Removable Bean Hopper, illuminated Dispenser, cup clearance (3.5" to 5.4" (89-137 mm)), 15 drink types, 4 user profiles, milk container, dual milk based beverages, and 3.5" touch screen.
KES8558: Includes Removable Bean Hopper, illuminated Dispenser, cup clearance (3.5" to 5.4" (89-137 mm)), 21 drink types, 6 user profiles, milk container, dual milk based beverages, alternative milk cycle and 5" touch screen.
Your safety and the safety of others are very important.
We have provided many important safety messages in this manual and on your appliance. Always read and obey all safety messages.

This is the safety alert symbol.
This symbol alerts you to potential hazards that can kill or hurt you and others.
All safety messages will follow the safety alert symbol and either the word "DANGER" or "WARNING." These words mean:
! DANGER
You can be killed or seriously injured if you don't immediately follow instructions.
WARNING
You can be killed or seriously injured if you don't follow instructions.
All safety messages will tell you what the potential hazard is, tell you how to reduce the chance of injury, and tell you what can happen if the instructions are not followed.
IMPORTANT SAFEGUARDS
When using electrical appliances, basic safety precautions should always be followed, including the following:
- Read all instructions. Misuse of appliance may result in personal injury.
- Do not touch hot surfaces. Use handles or knobs.
-
Close supervision is necessary when any appliance is used by or near children. This appliance is not intended for use by persons (including children) with reduced physical, sensory or mental capabilities, or lack of experience and knowledge, unless they have been given supervision or instruction concerning use of the appliance by a person responsible for their safety. Children should be supervised to ensure that they do not play with the appliance. The appliance and cord should be out of reach of children.
-
Turn the appliance off (1) then unplug from the outlet when not in use, before assembling or disassembling parts and before cleaning. To unplug, grasp the plug and pull from the outlet. Never pull from the power cord. Allow the appliance to cool completely before putting on or taking off parts, and before cleaning the appliance.
-
The use of accessories/attachments not recommended or sold by KitchenAid may cause fire, electrical shock, or injury to persons.
-
Do not use the appliance outdoors.
-
Do not let cord hang over edge of table or counter, or touch hot surfaces.
-
Do not place on or near a hot gas or electric burner, or in a heated oven.
-
Turn the appliance off, then plug cord into the wall outlet. To disconnect, turn the appliance off, then remove plug from wall outlet.
-
Do not clean the Fully Automatic Espresso Machine with abrasive cleaners, steel wool, or other abrasive materials.
-
Use extreme caution when using hot steam.
PRODUCT SAFETY
- Do not use appliance for other than intended use. It shall only be used for coffee preparation and to heat milk and water, according to these instructions.
- Do not operate any appliance with a damaged cord or plug or after the appliance malfunctions or is dropped or damaged in any manner. Return appliance to the nearest Authorized Service Center for examination, repair or adjustment.
- Irritation to skin or eyes can occur if they come into contact with the descaling solution. Avoid skin and eye contact. Rinse off descaling solution with clean water. Obtain medical advice after eye contact.
- Damage to delicate surfaces can occur after contact with the descaling solution. Remove any splashes immediately.
- To protect against fire, electric shock and injury to persons do not immerse cord, plugs, or appliance in water or other liquid.
- Remove detachable parts before washing.
- This product is designed for household use only.
- To avoid the risk of injury, do not open the brew chamber during the brew process.
- The maximum altitude of use is 6500 feet (2000 m) above sea level.
- This appliance is not suitable for commercial use.
- The coffee machine must not be used in mobile installations such as boats, motor vehicles, trains etc.
- Use this coffee system only in standard household environments for making coffee, milk or tea beverages such as espresso, cappuccino, latte macchiato, etc.
- Any other type of use is not permitted.
- Do not fill liquids into the Bean Hopper or the powder chute.
- Only fill the Water Tank with cold, fresh tap water. Do not use deionized or mineral water.
- To avoid contamination of the water, use fresh water every day you use the machine.
- The appliance shall not be placed in a cabinet when in use.
- Do not place removable parts such as the Water Tank, Dispenser, Service Door, Drip Tray, or milk tank lid in the dishwasher. Never soak these parts in water or detergent. Sharp edges can cause cuts.
SAVE THESE INSTRUCTIONS
This product is designed for household use only.
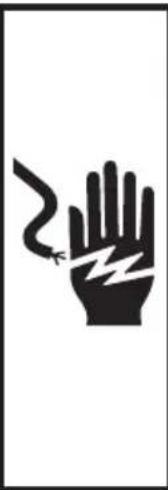
WARNING

Electrical Shock Hazard
Plug into a grounded 3 prong outlet.
Do not remove ground prong.
Do not use an adapter.
Do not use an extension cord.
Failure to follow these instructions can result in death, fire, or electrical shock.
Voltage: 120 V\~
Frequency: 60 Hz
Power: 1450 W
NOTE: If the plug does not fit in the outlet, contact a qualified electrician or service person. Do not modify the plug in any way. Do not use an adapter.
Do not use an extension cord. If the power supply cord is too short, have a qualified electrician or service person to install an outlet near the appliance.
The cord should be arranged so that it will not drape over the countertop or tabletop where it can be pulled on by children or tripped over unintentionally.
GETTING STARTED
natural_image
Black-and-white illustration of a hand with a lightning bolt symbol, no text or labels present.WARNING
Electrical Shock Hazard
Plug into a grounded 3 prong outlet.
Do not remove ground prong.
Do not use an adapter.
Do not use an extension cord.
Failure to follow these instructions can result in death, fire, or electrical shock.
First, clean all parts and accessories (See "Care and Cleaning" section).
Place the Fully Automatic Espresso Machine on a dry, flat, level surface such as a counter-top or table. The ventilation slots must not be covered.
natural_image
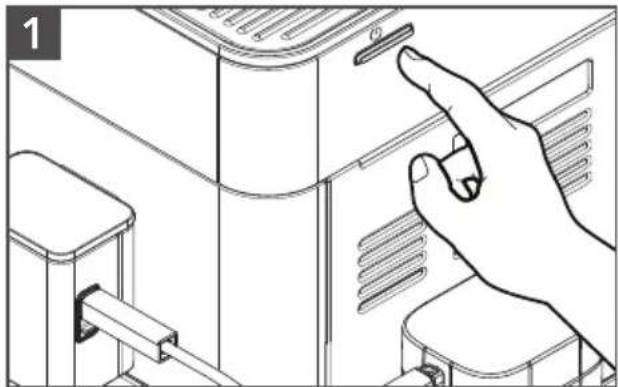
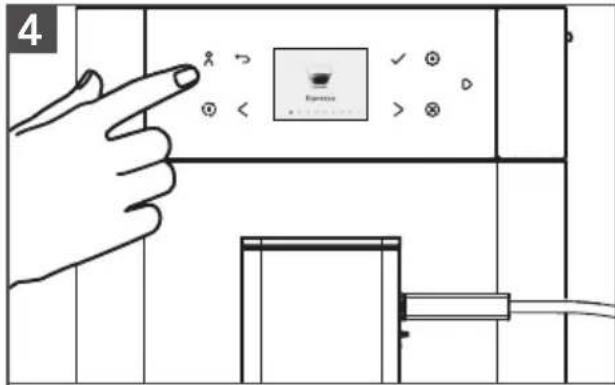
Line drawing of a hand interacting with a device panel, showing a finger pressing the button (no text or symbols present)Plug into a grounded 3 prong outlet. Press the Main Power Switch on the side of the machine "⏻" (to switch the machine off, press the Main Power Switch again).
Model KES8557 and KES8558: The
machine operates with a touch screen and touch buttons that can be used to select or navigate between menus.
Model KES8556: The machine has a color Display with only off-screen touch buttons to navigate between menus.
GETTING STARTED
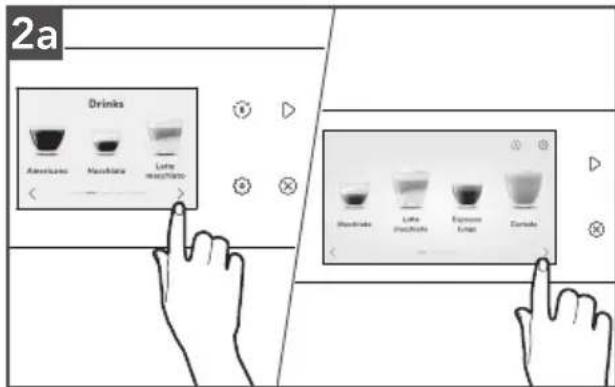
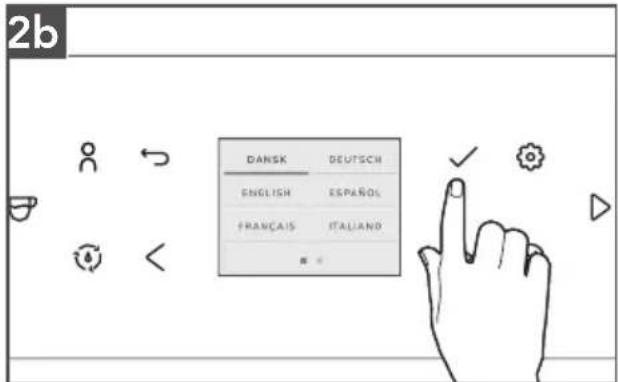
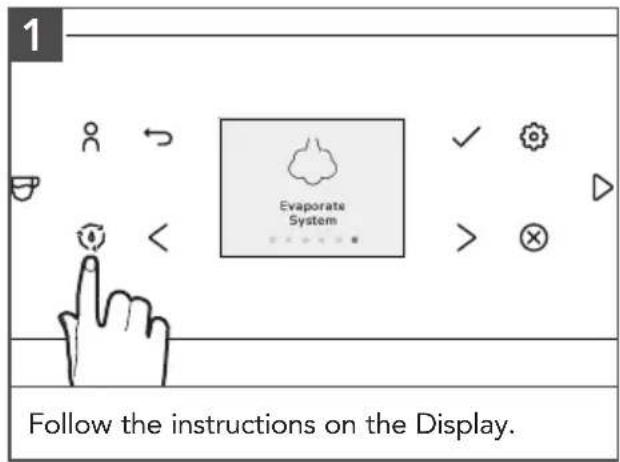
The instructions on the Display will lead through the initial start menu step by step.
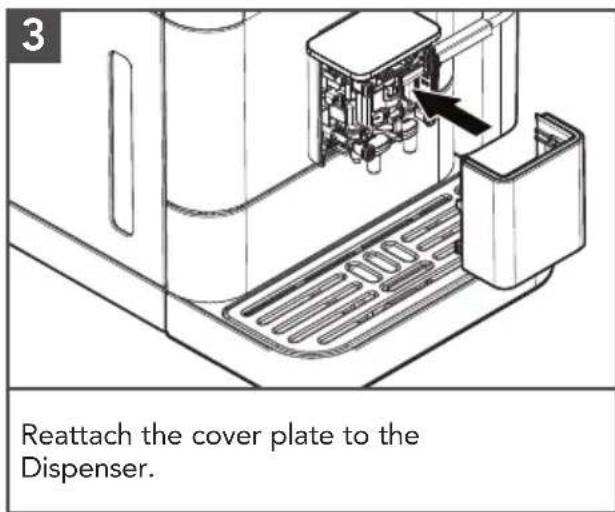
3
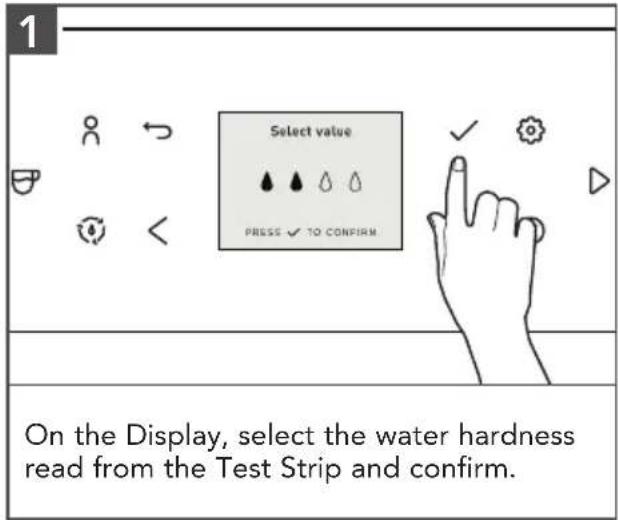
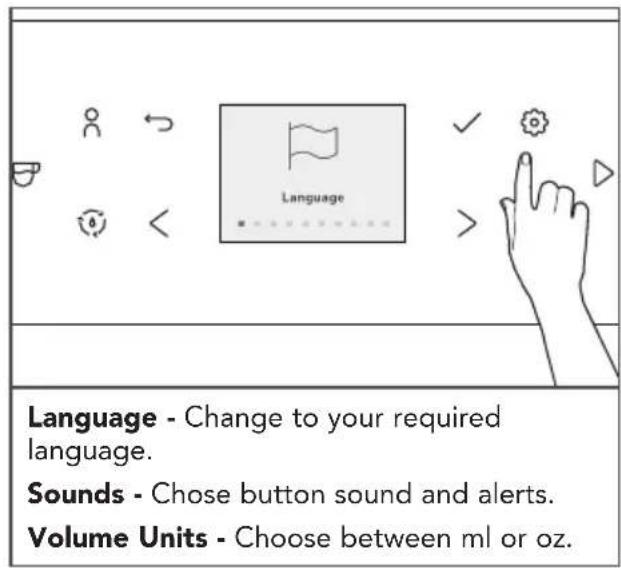
To set Language: Select and confirm the desired language by pressing the " √" icon on the screen.
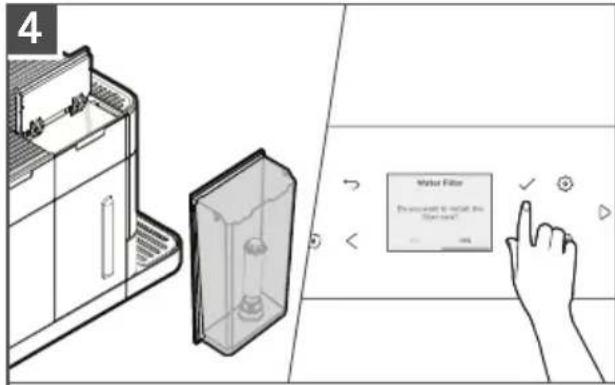
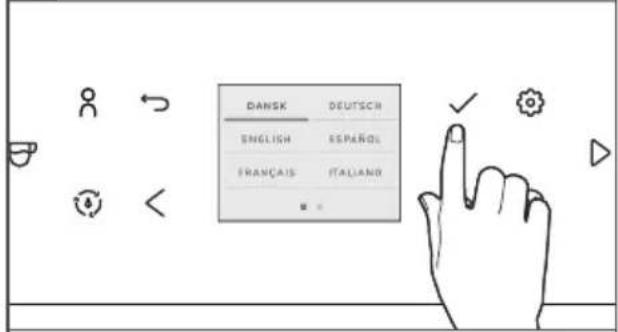
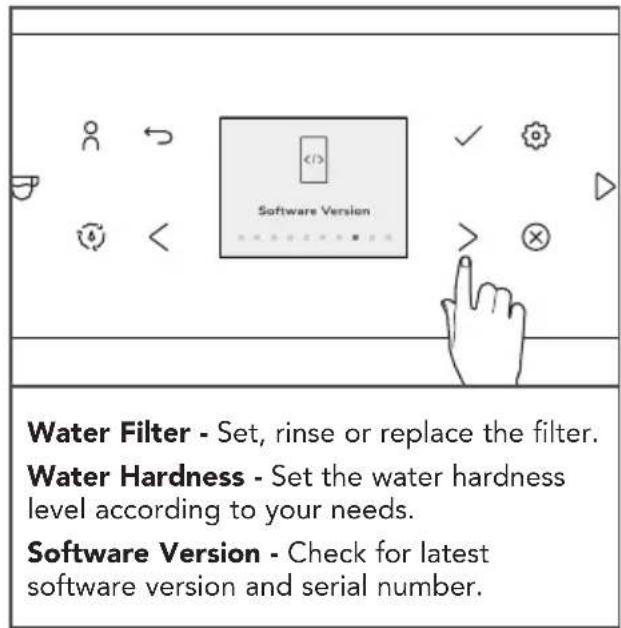
To set the Water Filter: Follow the instructions on the Display. If you've chosen to use the supplied Water Filter, make use of the mounting aid at the end of the measuring Spoon to install the Water Filter.
IMPORTANT: The opposite end of the ground spoon can be used as a filter mounting aid. Place the top of the filter into the opposite end of the ground spoon to insert easily into the tank.
NOTE: If a filter is used, the unit does not need to be descaled as often.
5
| TEST STRIPS | DISPLAY |
| ≤1 red point | |
| 2 red points | |
| 3 red points | |
| ≥4 red points |
To set the Water Hardness Level: Follow the instructions on the Display (make use of the supplied Test Strip or consult the instructions in the "Setting the Water Hardness" section).
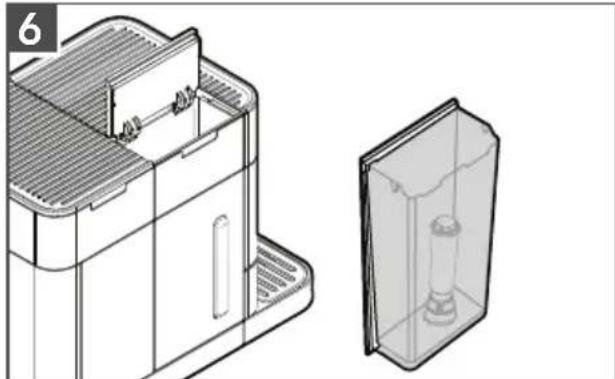
natural_image
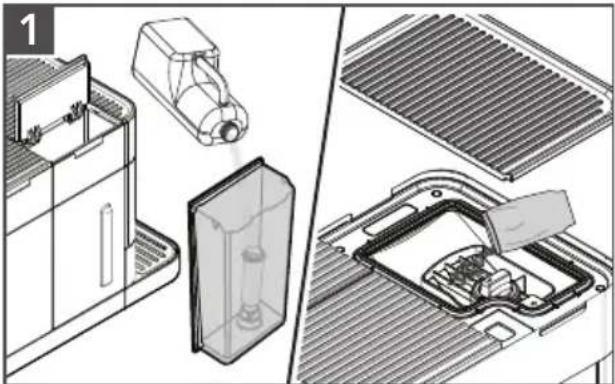
Technical line drawing of a mechanical device with a side view showing internal components (no text or symbols)Open hinged lid on the front left of the Espresso Machine. Remove the Water Tank and fill to the max fill line (2.2 L). Fill the Bean Hopper with whole roasted beans, then close the Lid.
7
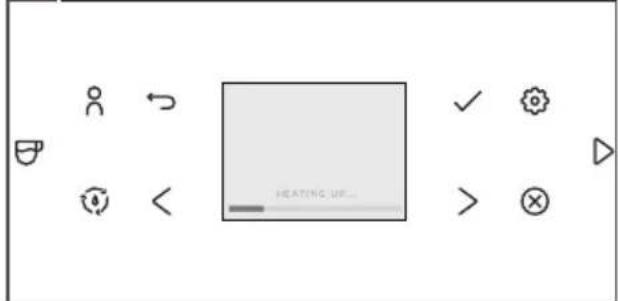
A HEATING UP and RINSING message appear on the Display. The machine is now ready to be used.
NOTE:
- The first time you use the machine, you need to make 4-5 coffee based drinks before the results in your cup will be satisfactory.
- The first time you use the machine, the machine can be noisy due to the water system being empty. This noise is reduced after being filled up.
- All settings that were determined during initial startup can be changed at any time in the Settings menu.
GETTING STARTED
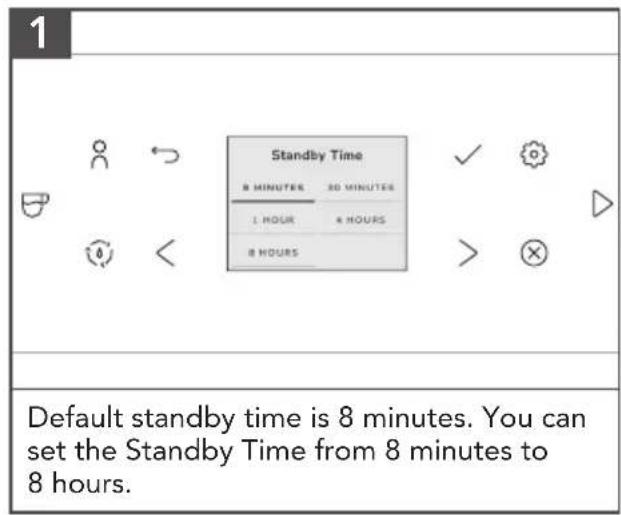
STANDBY TIME
By instructing your appliance to automatically switch itself off, you can cut down your energy consumption. Your product switches off automatically after the preset time following the last action on the machine.
PRODUCT USAGE
BREWING A DRINK

PRODUCT USAGE
3
Select "1x" option and single press the "√" icon if you want to brew two shots.
The machine automatically carries out two grinding cycles in sequence of the selected drinks.
Press the "8" icon to brew one of your saved drinks.
Slide the Dispenser spout up or down to adjust the height to the size of the cup or glass you are using.
BREWING COFFEE-BASED DRINKS
natural_image
Technical illustration showing internal components of a washing machine, including a plastic bag, cover plate, and fan assembly (no text or symbols)Fill the Water Tank with tap water and fill the Bean Hopper with beans.
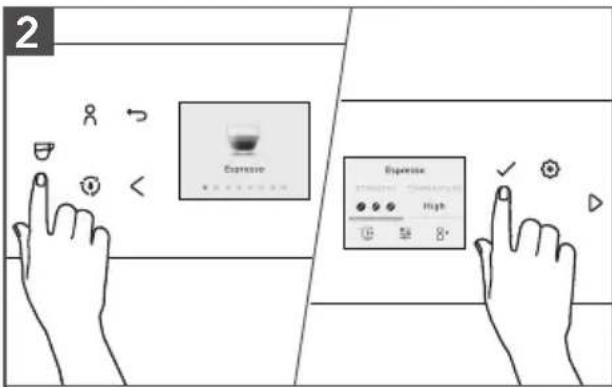
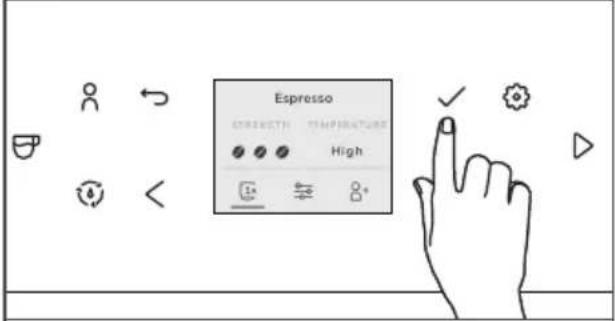
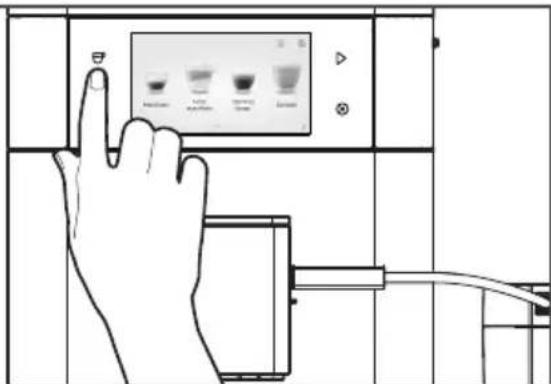
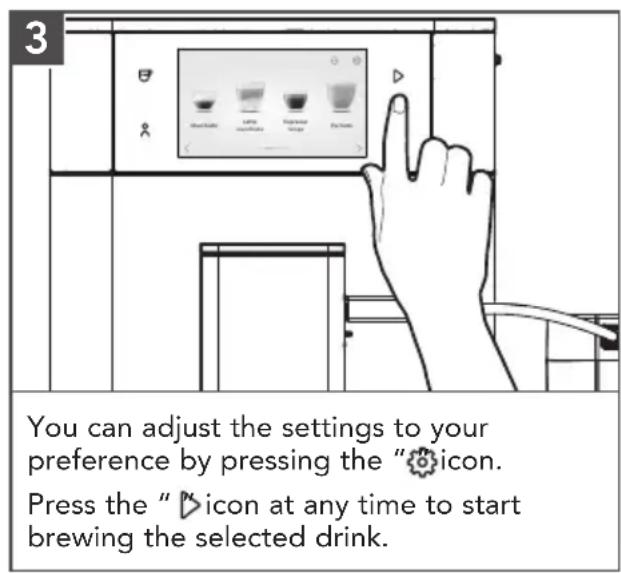
Press the "icon and select your coffee. You can adjust the settings to your preference by pressing the "icon.
Press the "icon to start brewing the selected drink.
BREWING MILK-BASED DRINKS
natural_image
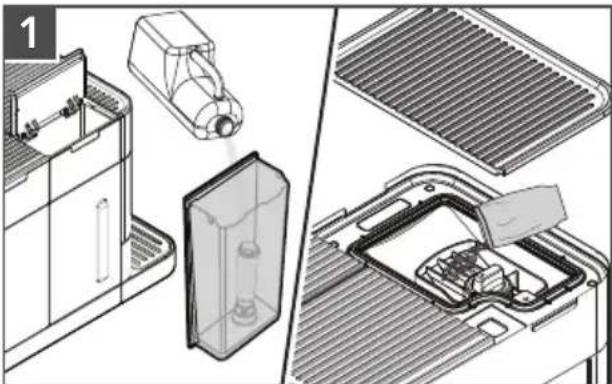
Technical illustration of a cleaning or assembly process showing internal components and structural details (no text or symbols)Fill the Water Tank with tap water and fill the Bean Hopper with beans.
Remove the lid of the milk container and fill the milk container with milk. Always use milk coming directly from the fridge for optimal results.
2
Model KES8557 and KES8558 only:
Connect one side of Milk Tube to the milk tank lid, connect the other side of the Milk Tube to the side of the Dispenser.
Press the "icon and select your coffee.
PRODUCT USAGE
NOTE: Model KES8556, does not include a Milk Tank. To brew milk based drinks, place hose end directly in milk container or container of your choice.
TIP: You can also use a regular milk carton to brew your milk-based drinks. Place the Milk Tube directly into the milk carton.
NOTE: These can be changed individually and stored indefinitely, please see the "Personalizing Drinks" section.
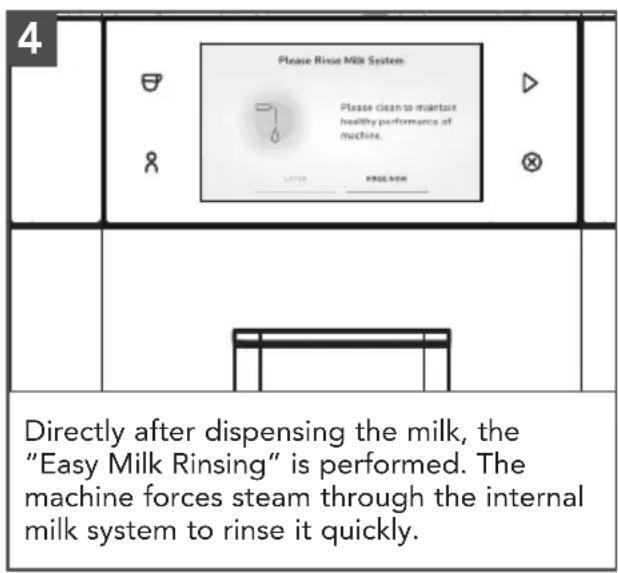
NOTE: After completion of the milk-based coffee beverage, the Display shows the message/instruction to rinse the frother. The frother should then be rinsed as soon as possible, but at the latest before switching off the machine. To do this, select and confirm the message/instruction on the Display.
PRODUCT USAGE
BREWING COFFEE WITH PRE-GROUND COFFEE
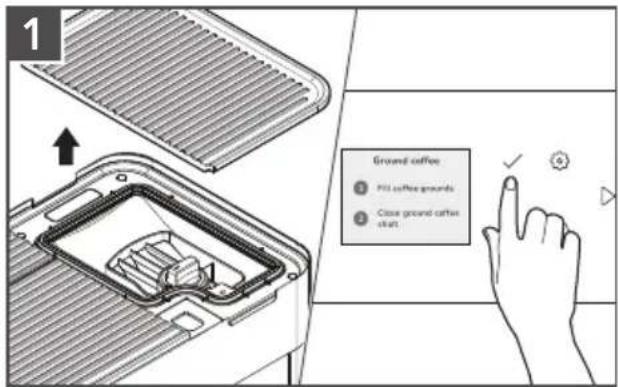
Remove top Lid.
Open Coffee Grounds Shaft (underneath the cover on the upper right of the machine), the Display shows Fill coffee grounds and Close ground coffee shaft.
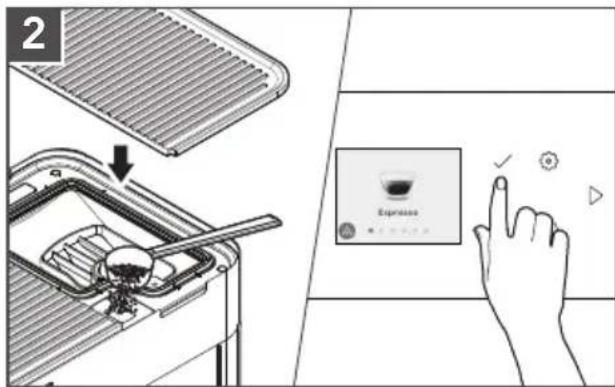
Add a level measuring Spoon of ground coffee. Close Coffee Grounds Shaft and Lid.
The Display shows when the Ground coffee is ready.
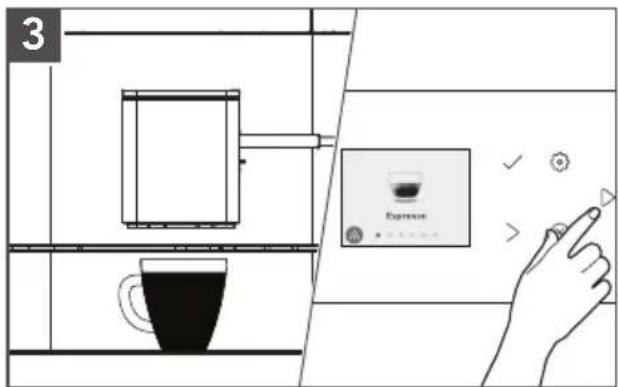
Place a cup in the middle below the Dispenser outlet.
Select the beverage from the options available on the screen.
The machine will then begin to brew.
NOTE: When using "Ground coffee" mode, the shots cannot be adjusted.
1
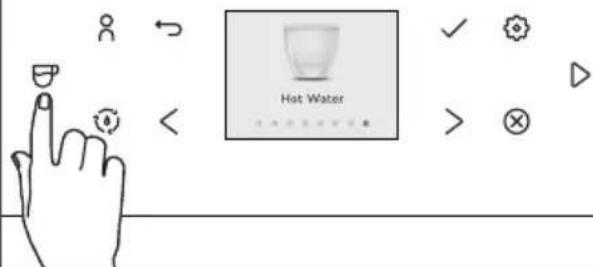
Press the "icon to enter the Drinks menu and select "Hot Water" by pressing the "icon.
2
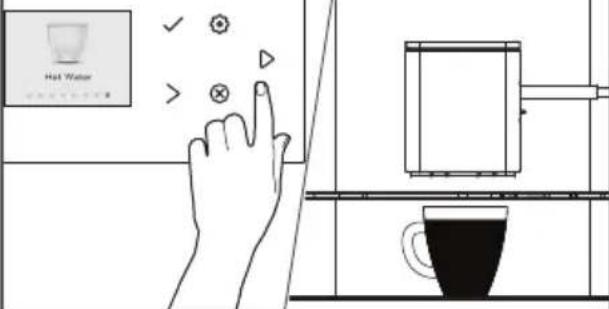
Press the "icon to start dispensing hot water.
PERSONALIZING DRINKS AND CREATING PROFILES
Within the drinks menu, the factory recipe settings can be changed individually and stored indefinitely. The machine allows you to adjust the settings of a drink to your own preference and to save the adjusted drink in a personal profile. There are two ways to create a profile:
1
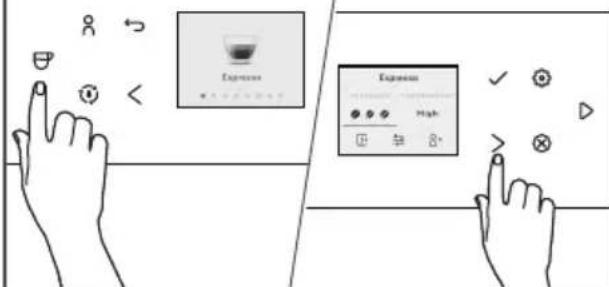
Personalizing your drinks:
- Press the "icon.
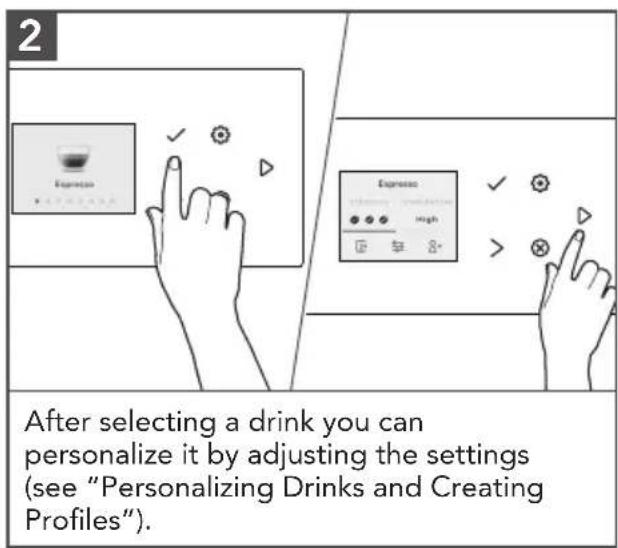
- Press the "√" icon to select your preferred drink.
- After selecting a drink, you can see next screen for more settings to adjust.
- Use the "<" or " "icon to navigate different selection buttons depending on the type of drink to adjust strength, volume of coffee, milk and foam, temperature, the taste and the order of brewing milk-based drinks to your preferred level.
- You can save these settings to your profile by selecting the "♀" icon on the screen and confirm it by pressing "✓" icon or press " "icon to brew the personalized drink.
2
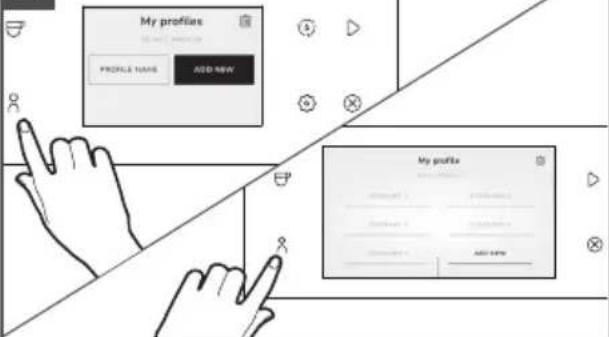
Creating a profile:
- Press the "8" icon.
- Select "Add profile".
- Enter a name for the new profile and click on "Add New".
- Select the newly created profile.
- Add drinks to the profile by selecting "Add Drink".
NOTE: In the shown image Model KES8557 and KES8558 are illustrated respectively.
NOTE: In model KES8556, 4 user profiles are available, but you cannot create a personalized username.
In model KES8557, 4 user profiles are available, and you can create a personalized username. In model KES8558, 6 user profiles are available, and you can create a personalized username.
Within the drinks menu, the factory recipe settings can be changed individually and stored indefinitely. Adjustable parameters in the drinks menu:
| DRINKS | STRENGTH | TEMPERATURE | SHOT | OTHER SETTINGS | ||||
| COFFEE VOLUME | WATER VOLUME | MILK VOLUME | BODY TYPE | ORDER OF MILK OR COFFEE FIRST* | ||||
| Espresso, Espresso Lungo, Coffee | 123 | LowMediumHigh | √ √ | - - | LightMediumStrong | - | ||
| Macchiato | 123 | LowMediumHigh | √ √ | - √ | LightMediumStrong | - | ||
| Cappuccino, Latte Macchiato, Flat White, Caffee Latte, Cortado | 123 | LowMediumHigh | √ √ | - √ | LightMediumStrong | √ | ||
| Americano | 123 | LowMediumHigh | √ √ | √ - | LightMediumStrong | - | ||
| Hot Water | - | LowMediumHigh | - - | √ - | - - | |||
| Frothed Milk* | - - | - - - | √ - - | |||||
| Warm Milk | - - | - - - | √ - - | |||||
PRODUCT USAGE
2-CUP FUNCTIONALITY
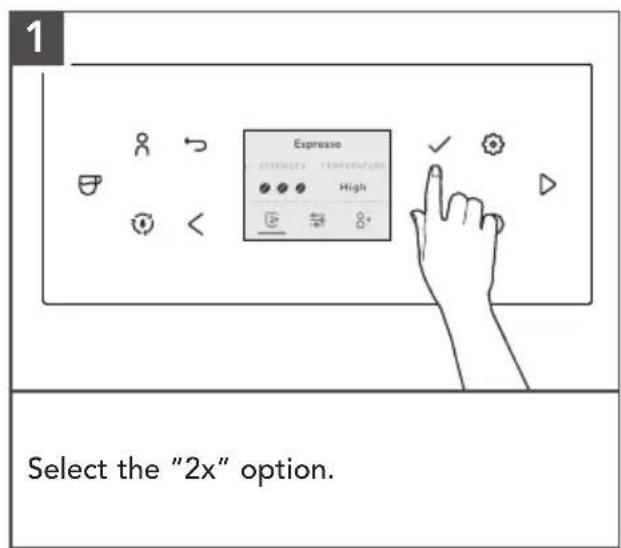
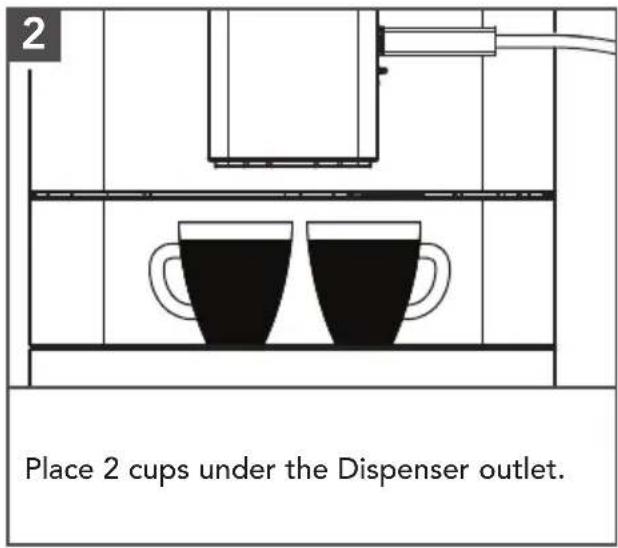
To fill two cups directly at same time, a second cup must be placed under the Coffee Dispenser outlet and the cup symbol in the recipe menu changed to "2x".
NOTE: All models have dual coffee outlets, but only models KES8557 and KES8558 have dual milk outlet delivery option. Model KES8556 has a single milk outlet.
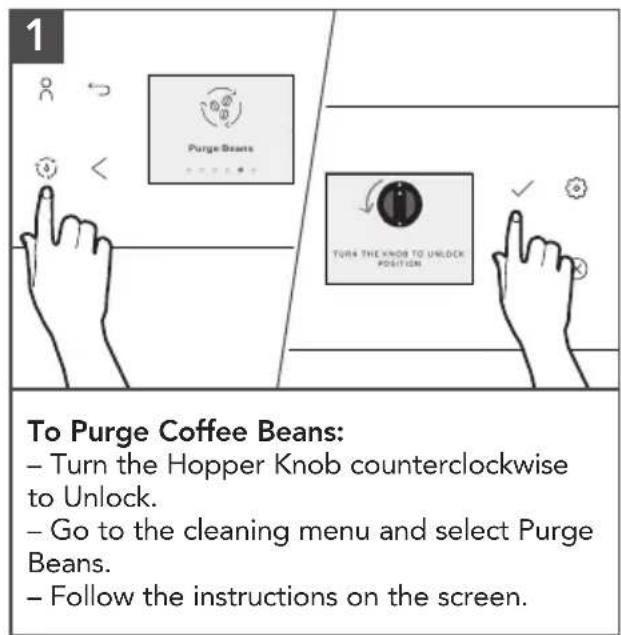
HANDLING THE REMOVABLE BEAN HOPPER AND PURGE FUNCTION
The Bean Hopper can be removed from the unit to allow for easy access and exchange of coffee beans. With this feature, there is a purging function that can remove any leftover coffee beans in the grinder chamber so a new cup can be brewed immediately with new coffee beans.

NOTE: Coffee beans which have been treated with additives (e.g. sugar), ground coffee or freeze-dried coffee will damage the grinder. Only use roasted, untreated coffee beans to fill the bean container.
Coffee beans may be covered with a slight oil film which remains on the walls of the bean container. These traces may negatively affect the coffee result. For this reason, clean the bean container from time to time. Do not put in the dishwasher.
PRODUCT USAGE
SET GRIND FINENESS (OR GRIND SIZE)
natural_image
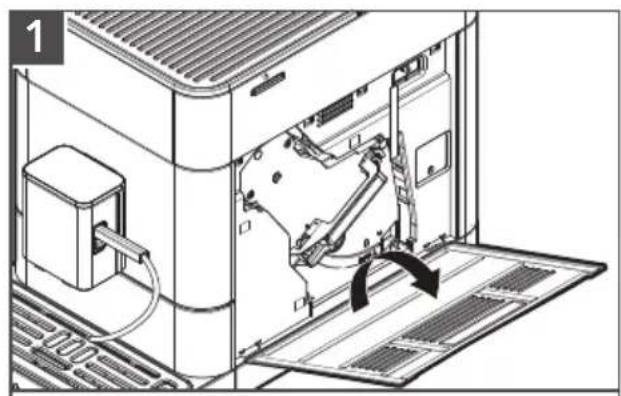
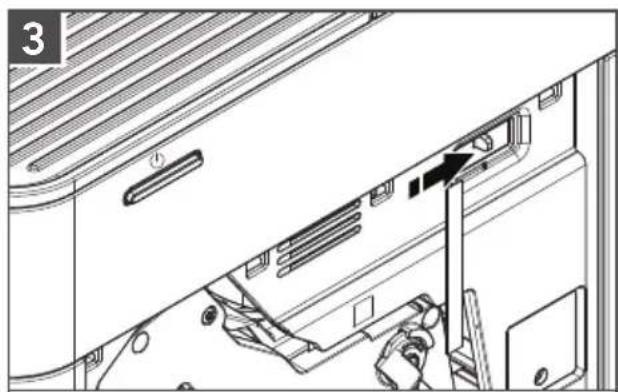
Technical line drawing of an internal machine with a handle and ventilation slots, showing no text or symbols.Open the Service Door on the right side of the housing (gently pull the unlocking device inside the handle upward, then carefully remove the Service Door from the housing).
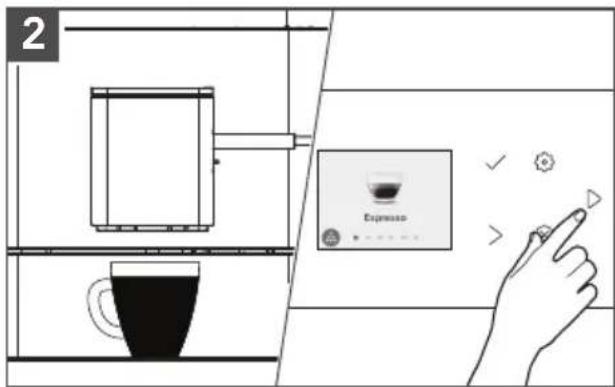
Place cup under the Dispenser outlet. Select in the drinks menu "Espresso", then press the "▷icon.
natural_image
Technical diagram of a device interior showing a door, ventilation slots, and a tool inserted into the door (no text or symbols present)While the grinder grinds, change the grind fineness by moving the regulator, located in the upper right corner (left = finer, right = coarser).
natural_image
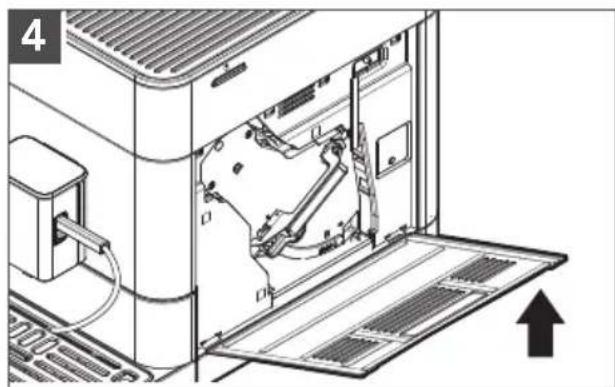
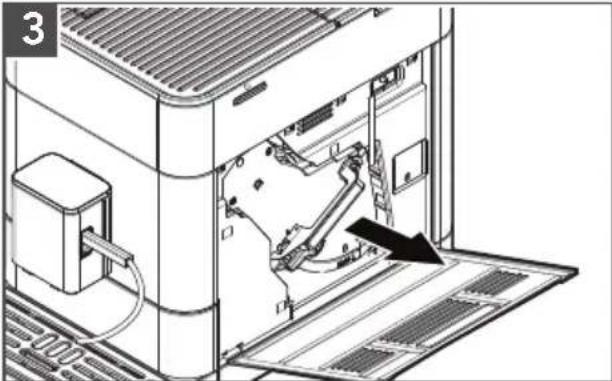
Technical line drawing of an internal machine or device with visible components and a directional arrow (no text or symbols)Close Service Door again (guide pins on the bottom of the Service Door into the recesses, then press the Service Door until it locks in place).
NOTE: The grind fineness may only be set when the grinder is running. The grinder can be adjusted to adapt to the roast of the coffee beans.
NOTE: When changing the grind fineness, we recommend:
– A finer setting for light roasts (regulator further to the left),
– A coarser setting for dark roasts (regulator further to the right).
PRODUCT USAGE
SETTING THE WATER HARDNESS
Immerse supplied Test Strip briefly in the water, shake and wait one minute for the test results.
WATER HARDNESS CHART
| TEST STRIPS DISPLAY | ||
| ≤ 1 red point |  | |
| 2 red points | ||
| 3 red points | ||
| ≥ 4 red points | ||
NOTE: Water Hardness - Low: 0 to 60 ppm
Medium: 60 to 120 ppm
High: more than 120 ppm
PRODUCT USAGE
SETTINGS MENU
In the Settings Menu there's a various selection of items that can be adjusted to your needs.

CARE AND CLEANING
For best results, regularly clean the Fully Automatic Espresso Machine and accessories.
IMPORTANT: Allow the appliance to cool completely before putting on or taking off parts, and before cleaning the appliance.
NOTE: Do not use abrasive cleansers or scouring pads when cleaning the Fully Automatic Espresso Machine, parts, or accessories. Do not immerse the Fully Automatic Espresso Machine or cord in water or other liquids. None of the removable parts such as Drip Tray, Bean Hopper, Lid, Water Tank, Brew Unit, Service Door, Dispenser, and milk tank lid are dishwasher-safe and should be washed by hand and thoroughly rinsed.
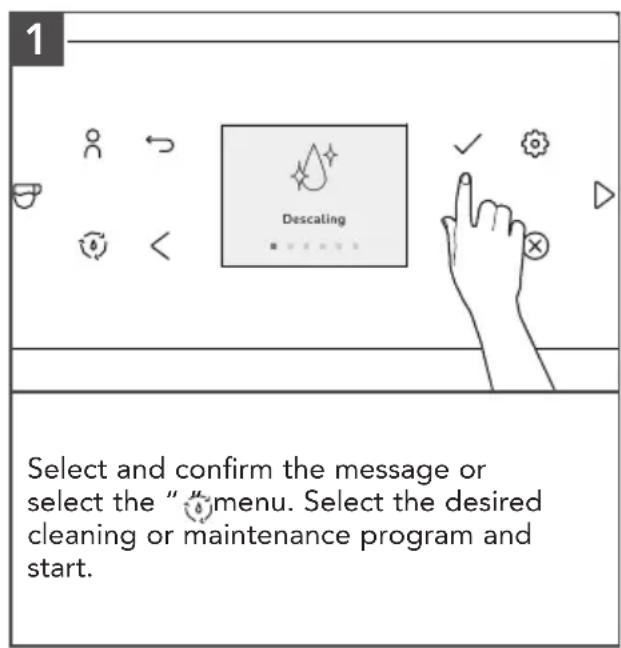
NOTE: All cleaning and maintenance programs can be selected and started in the Maintenance menu. If a message, instruction for cleaning or maintenance activity appears on the Display, the program can be started directly through the message/instructions.
CLEANING THE FULLY AUTOMATIC ESPRESSO MACHINE
IMPORTANT: For model KES8556 only, before any cleaning cycle, insert connector tip and connector cover with hose before inserting into the hose port in the Drip Tray area.
All cleaning and maintenance programs can be selected and started in the Cleaning menu "⑧. If a message for a cleaning or maintenance activity appears on the Display, this program can also be started directly through the message.
CARE AND CLEANING
RINSING THE FROTHER: EASY MILK RINSING
After you make milk based drinks, the Display instructs you to rinse the frother. This should be done as soon as possible, but at the latest before switching off the machine.
1
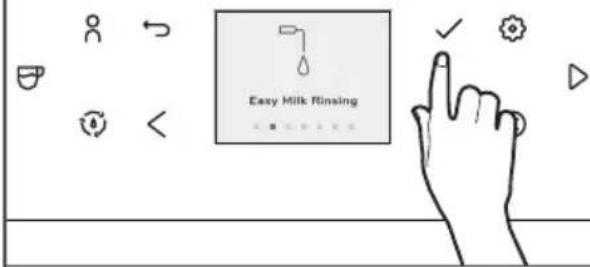
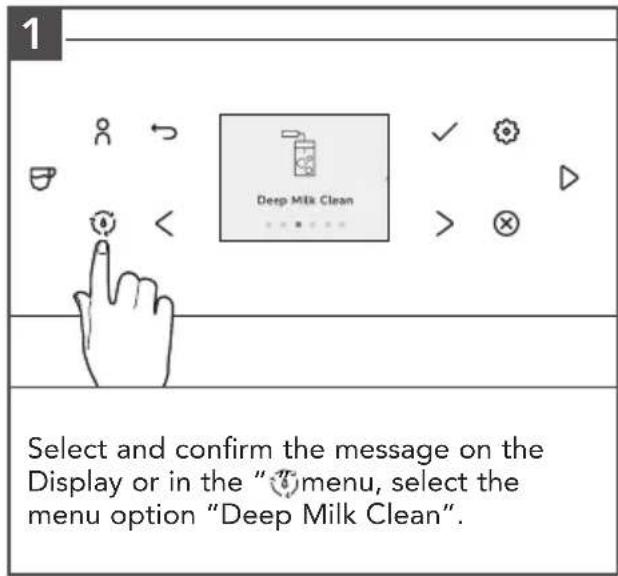
Select and confirm the instruction or in the "menu, select the menu option "Easy Milk Rinsing"
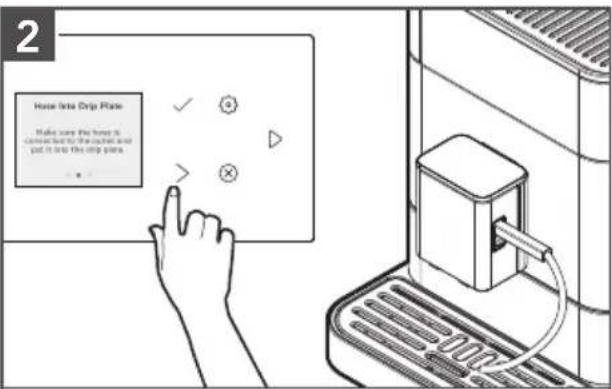
Connect the supplied Milk Tube with one end to the Dispenser outlet and put the other end in the Drip Tray, and confirm on the Display.
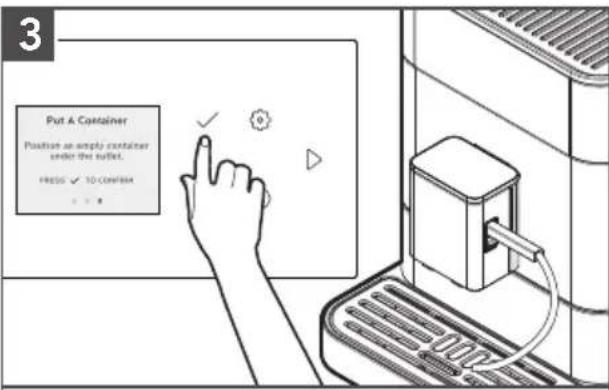
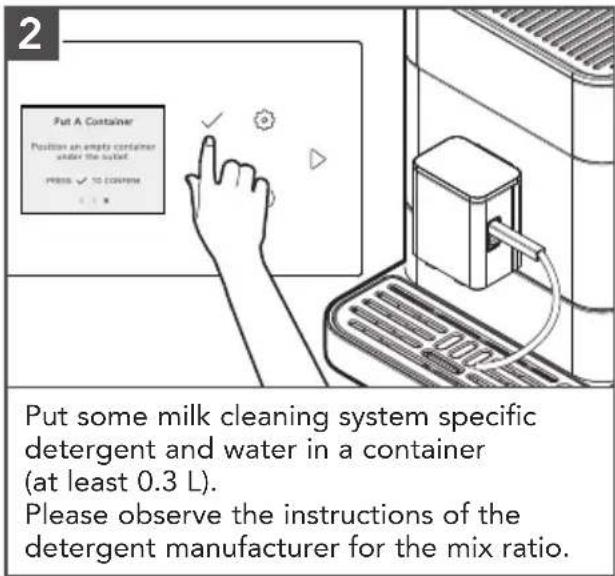
Place a sufficiently large container ( ≥ 0.5 L) under the Dispenser outlet and confirm on the Display.
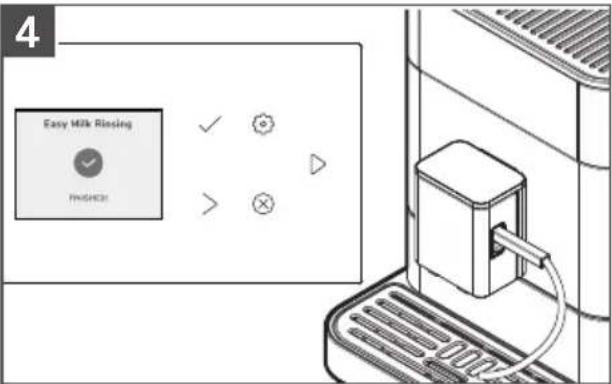
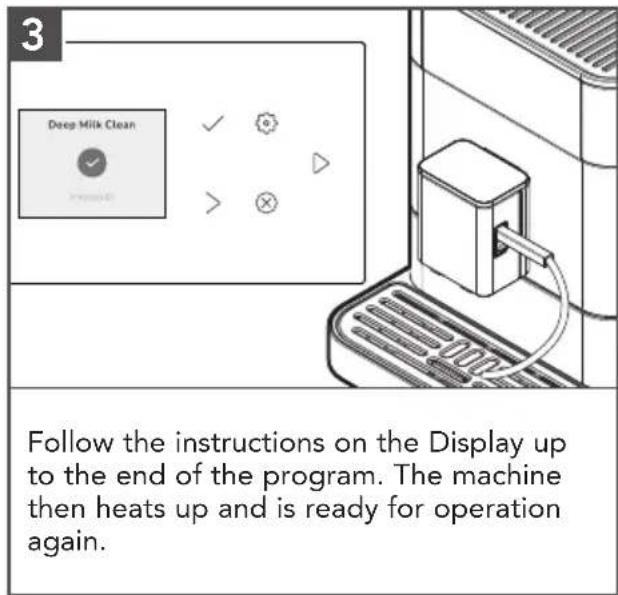
The machine starts the rinsing process. As soon as the rinse cycle is ended, the machine heats up and is then ready for operation again.
NOTE: Rinsing milk frother after each use is important to avoid milk build up.
CARE AND CLEANING
CLEAN FROTHER: DEEP MILK CLEANING
A message is shown on the Display when the machine has to be descaled. The descaling program can also be started manually at any time. Beverages can still be drawn, but we recommend carrying out the cleaning program as soon as possible.
NOTE: Descaling agents are known to stain the steel parts of the machine. Ensure that you have a large container under the brew unit to avoid splashing and spills. If stain occurs, make sure to use an oxalic acid or citric acid product to remove properly. When applying cleaner, rub with the grain and rinse properly after cleaning. For a nice shine, add stainless cleaner after cleaning.
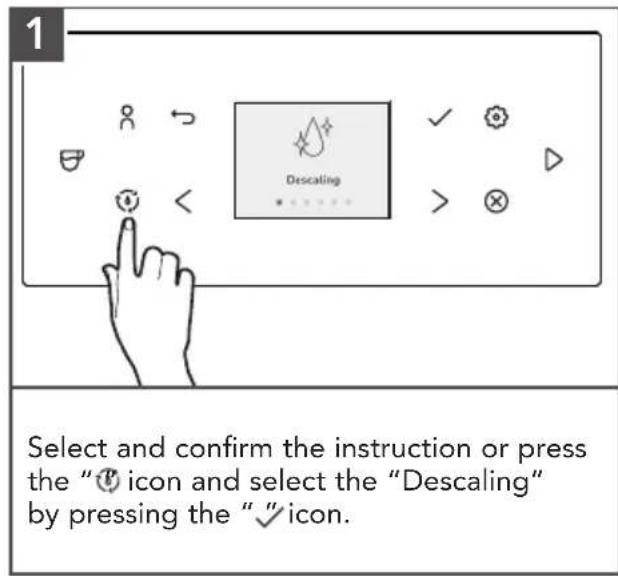
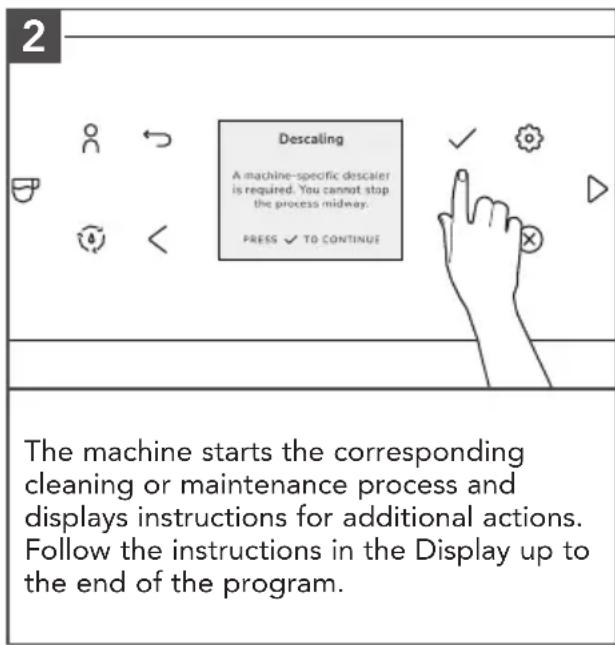
IMPORTANT: The running descaling program must not be interrupted. Do not use vinegar or vinegar-based materials for descaling, but use products recommended for fully automatic coffee machines. The filter (if present) must be removed from the Water Tank prior to the start of the descaling program.
During descaling, please follow exactly the sequence of the displays:
- First pour in the corresponding amount of water up to the 0.5 L mark and then add the descaler.
- Do not in reverse order. Observe the instructions of the descaler manufacturer.
CARE AND CLEANING
BREW UNIT CLEANING - 2-PHASE BREW UNIT CLEANING PROCESS
The brewing unit should be removed and cleaned under running water as needed and before each cleaning program. Please do not use detergent, but only cold water.
1
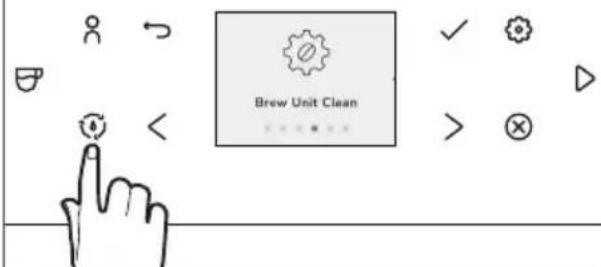
Select and confirm the instruction.
Empty the trays.
Fill the Water Tank to max fill line (2.2 L)
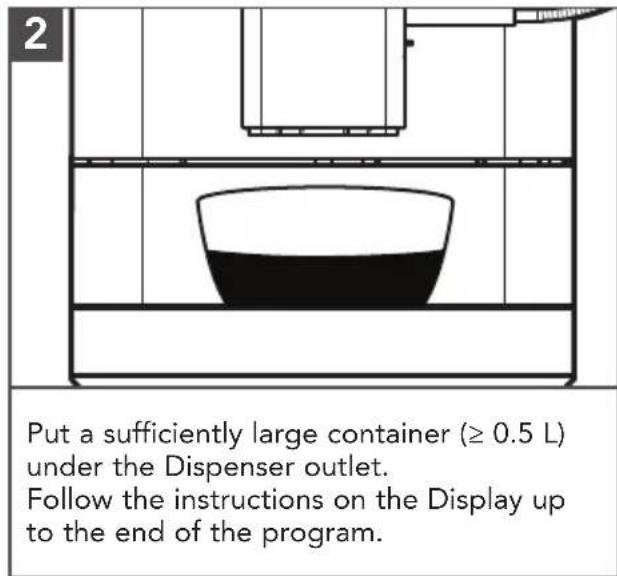
Place a sufficiently large container ( ≥ 0.5 L) under the Dispenser outlet.
Follow the instructions on the Display up to the end of the first phase.
natural_image
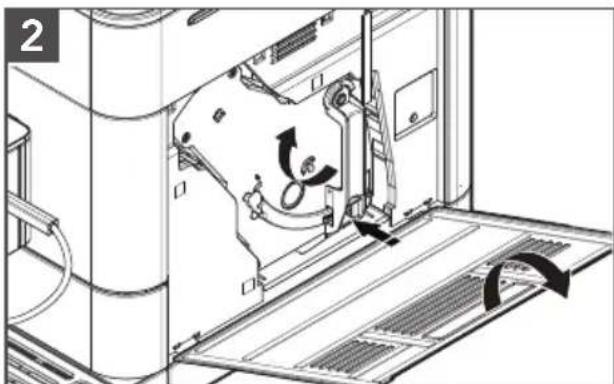
Technical line drawing of a mechanical assembly with no visible text or symbolsFor the second phase open the Service Door on the right side of the housing (gently pull the unlocking device inside the handle upward, then carefully remove the Service Door from the housing).
Unlock brewing unit (press red switch upwards and rotate the handle up and to the left until it locks).
natural_image
Technical diagram of an internal device with a black arrow indicating a component or connection (no text or symbols present)Grasp handle and pull the brewing unit straight out to remove. Clean the brewing unit under cold, running water and then let it dry. Put a brew unit specific cleaning tablet inside the brew unit.
Please observe the manufacturer's instructions of the cleaning tablet for usage. Follow the instructions on the Display up to the end of the program and confirm each time.
The machine is ready for use again.
NOTE: Do not interrupt the cleaning programs while they are running.
CARE AND CLEANING
EMPTY SYSTEM
This process empties the machine of any residual water and is recommended in case of long term storage.
NOTE: Freezing residual water can damage the appliance. Avoid exposing the appliance to temperatures below 32^ F/ 0^ C. Empty the system when the appliance is not used for a long period, prior to transport and when there is a risk of frost.
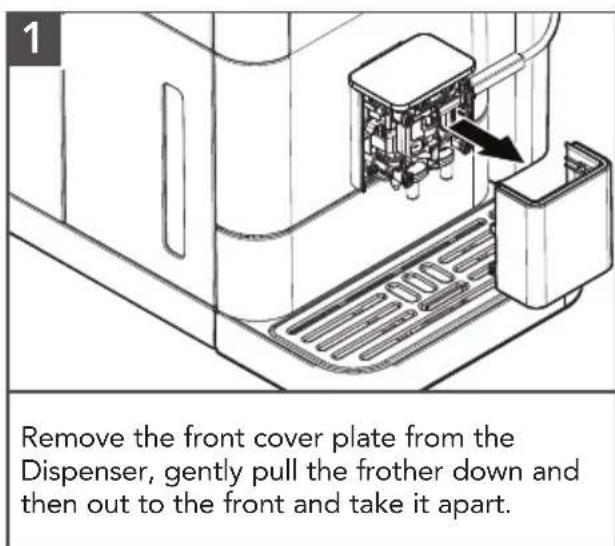
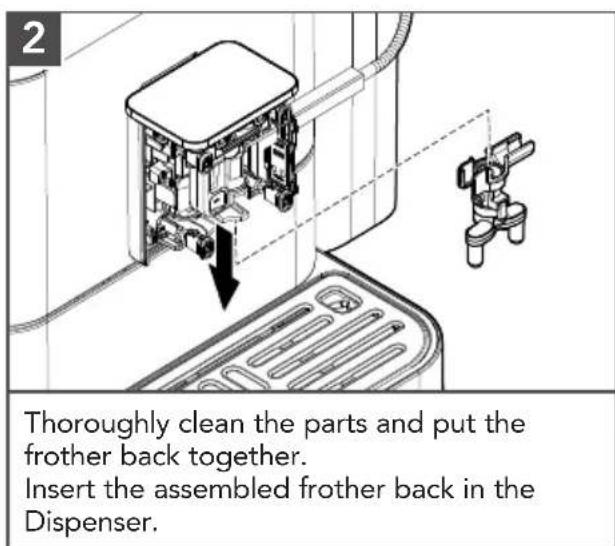
DISASSEMBLE AND CLEAN FROTHER
From time to time, the frother must be disassembled completely and cleaned using water.
The filter's effectiveness is used up after about 50L of water has flowed through it.
A message/instruction to replace the filter appears on the Display.
- In the “💡” menu, select the Water Filter menu option. Select Yes so that the machine detects that a filter is currently inserted. Select “Replace Filter”.
- Using the mounting aid at the end of the measuring Spoon, empty the Water Tank. Unscrew the old filter from its holder and throw the filter away.
- Using the mounting aid at the end of the measuring Spoon, screw the new filter into its intended holder in the Water Tank.
- Follow the instructions on the Display up to the end of the program and confirm each time.
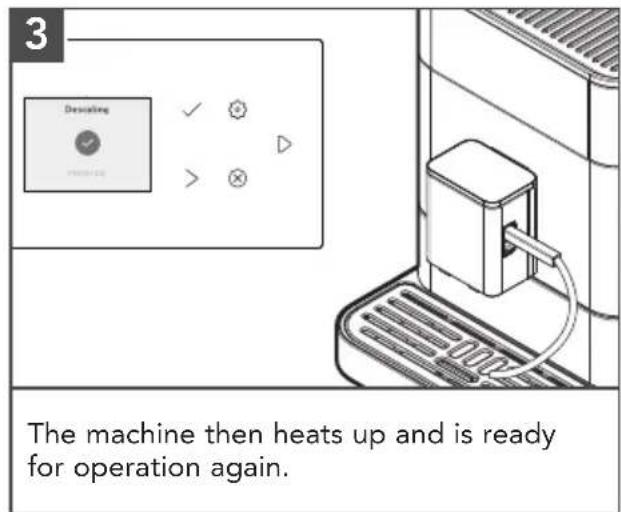
- The machine then heats up and is ready for operation again.

WARNING
Electrical Shock Hazard
Plug into a grounded 3 prong outlet.
Do not remove ground prong.
Do not use an adapter.
Do not use an extension cord.
Failure to follow these instructions can result in death, fire, or electrical shock.
| PROBLEM CAUSE/RESULT SOLUTION | ||
| Espresso pours out slowly or drips/not coming out | Grind is too fine | Change grind to a coarser option. |
| Too much coffee Reduce coffee | dose. | |
| Limescale built up in the system | Descaling is required (see "Care and Cleaning"section). | |
| Brewing unit is dirty or clogged | Cleaning cycle is required (see "Care and Cleaning"section). | |
| Coffee has no/poor crema | Beans are no longer roast-fresh | Use fresh coffee beans. |
| Espresso shot is not hot enough | Brewing temperature selected is Medium or Low | Increase the brewing temperature using the temperature independent button in the control panel. |
| Milk System not providing enough foam/not coming out | Scale has built up Descaling is required. | |
| Milk is too warm | Frothing should start with cold milk, taken directly form the refrigerator. | |
| Grinder is very loud/strange noise | Foreign object in the grinder | Stop using. Contact KitchenAid customer service. |
| Bean Hopper knob cannot be locked into position | Coffee beans and/or grind present under Bean Hopper | Remove the Bean Hopper and clear loose coffee beans or grinds. |
If the problem cannot be corrected or Display is showing any type of error, please see the "KitchenAid Warranty and Service" section and contact our service suport team. Do not return the product to the retailer - retailers do not provide service.
LIMITED WARRANTY AND SERVICE
KITCHENAID® FULLY AUTOMATIC ESPRESSO MACHINE WARRANTY FOR THE 50 UNITED STATES, THE DISTRICT OF COLUMBIA, PUERTO RICO, AND CANADA
This limited warranty extends to the purchaser and any succeeding owner for KitchenAid Fully Automatic Espresso Machine operated in the 50 United States, the District of Columbia, Puerto Rico, and Canada.
| Length of Warranty: | Two Year Limited Warranty from date of delivery. |
| KitchenAid Will Pay for: | The factory-specified replacement parts and labor to correct defects in materials and workmanship that existed when this product was purchased, or at its sole discretion, replace the product. In the event of a replacement, your product will be warranted for the remaining term of the original unit's warranty period.Warranty service is provided by our Authorized KitchenAid Service Center.See the next page for details on how to arrange for service, or call the Customer eXperience Center (CxC) toll-free at 1-800-541-6390. |
| KitchenAid Will Not Pay for: | A. Repairs when your Fully Automatic Espresso Machine is used in other than normal single family home use.B. Defects or damage resulting from accident, alteration, misuse, abuse, fire, floor, or acts of God.C. Any shipping or handling costs to deliver your Fully Automatic Espresso Machine to an Authorized Service Center.D. Replacement parts or repair labor costs for Fully Automatic Espresso Machine operated outside the 50 United States, District of Columbia, Puerto Rico, and Canada. |
| DISCLAIMER OF IMPLIED WARRANTIES; LIMITATION OF REMEDIES IMPLIED WARRANTIES, INCLUDING TO THE EXTENT APPLICABLE WARRANTIES OF MERCHANTABILITY OR FITNESS FOR A PARTICULAR PURPOSE, ARE EXCLUDED TO THE EXTENT LEGALLY PERMISSIBLE. ANY IMPLIED WARRANTIES THAT MAY BE IMPOSED BY LAW ARE LIMITED TO TWO YEAR, OR THE SHORTEST PERIOD ALLOWED BY LAW. SOME STATES AND PROVINCES DO NOT ALLOW LIMITATIONS OR EXCLUSIONS ON HOW LONG AN IMPLIED WARRANTY OF MERCHANTABILITY OR FITNESS LASTS, SO THE ABOVE LIMITATIONS OR EXCLUSIONS MAY NOT APPLY TO YOU.IF THIS PRODUCT FAILS TO WORK AS WARRANTED, CUSTOMER'S SOLE AND EXCLUSIVE REMEDY SHALL BE REPAIR OR REPLACEMENT ACCORDING TO THE TERMS OF THIS LIMITED WARRANTY. KITCHENAID AND KITCHENAID CANADA DO NOT ASSUME ANY RESPONSIBILITY FOR INCIDENTAL OR CONSEQUENTIAL DAMAGES. This warranty gives you specific legal rights and you may also have other rights which vary from state to state or province to province. | |
We're confident the quality of our products meets the exacting standards of KitchenAid. If your Fully Automatic Espresso Machine should fail:
- Before contacting us to arrange service, please take a few minutes to review the Troubleshooting or Problem Solver section of the Use and Care Guide, or visit http://www.kitchenaid.com/customer-service.
- If your Fully Automatic Espresso Machine requires repair, please contact the CxC to arrange for service:
In the United States and Puerto Rico:
For service information, or to order accessories or replacement parts, call toll-free at 1-800-541-6390 or write to:
Customer eXperience Center,
KitchenAid Small Appliances,
P.O. Box 218, St. Joseph, MI 49085-0218
Outside the United States and Puerto Rico:
Consult your local KitchenAid dealer or the store where you purchased the Fully Automatic Espresso Machine for information on how to obtain service.
For service information in Canada: Call toll-free 1-800-807-6777.
For service information in Mexico: Call toll-free 01-800-0022-767.
The fully automatic espresso machine should be properly packaged to avoid damage in transit as we will not be responsible for any such damage.
- If your Fully Automatic Espresso Machine is still under warranty, KitchenAid will return the repaired unit or, at our option, an identical or comparable unit to your door free of charge. If your product is no longer under warranty, the CxC agent would guide through the service process and costs shall be borne by the consumer.
PIÈCES ET CARACTÉRISTIQUES
natural_image
Line drawing of a hand pressing a button on a computer monitor (no text or symbols)natural_image
Technical illustration showing assembly of a refrigerator and air conditioner unit with internal components (no text or symbols)natural_image
Technical illustration of a battery pack assembly and internal components (no text or symbols)Créer un profil :
natural_image
Diagram of a coffee machine with two cups on a platform, no text or symbols presentnatural_image
Technical line drawing of an internal machine or server unit with a door panel and ventilation duct (no text or symbols)natural_image
Technical diagram of a mechanical assembly with a tool inserted, showing internal components and a directional arrow (no text or symbols)natural_image
Technical diagram of an internal device with labeled components and an upward arrow indicator (no text or symbols present)natural_image
Line drawing of a hand pressing a button next to a computer with a plug and keyboard (no text or symbols)natural_image
Line drawing of a small electronic device with a cable inserted, mounted on a base (no text or symbols visible)natural_image
Technical line drawing of a mechanical assembly with directional arrows indicating motion (no text or symbols)natural_image
Technical line drawing of an internal machine with a black arrow indicating a component or operation (no text or symbols present)KitchenAid Small Appliances,
P.O. Box 218, St. Joseph, MI 49085-0218
natural_image
Line drawing of a hand pressing down on a computer panel with a scroll (no text or symbols)natural_image
Technical line drawing of a mechanical housing and a transparent enclosure (no text or symbols)natural_image
Technical illustration showing internal components of a refrigerator and air conditioner unit (no text or symbols)natural_image
Technical illustration showing internal components of a device, including a spray bottle, plastic container, and heat sink (no text or symbols)natural_image
Diagram of a coffee machine with two cups, showing liquid level and support structure (no text or symbols)natural_image
Technical diagram of an internal device with labeled ports and a directional arrow indicating movement (no text or symbols present)natural_image
Technical line drawing of a door or cabinet with an arrow pointing to a component (no text or symbols present)natural_image
Technical line drawing of an internal machine or device with visible components and a directional arrow (no text or symbols)natural_image
Technical diagram of a mechanical device with internal components and directional arrows indicating motion (no text or symbols)natural_image
Diagram of an internal device with a black arrow pointing to a component, no visible text or symbolsCustomer eXperience Center KitchenAid Small Appliances, P.O. Box 218, St. Joseph, MI 49085-0218
www.kitchenaid.com.mx
www.kitchenaid-ca.com
Colombia
web: www.kitchenaid.com.do
DISCOVER MORE. DÉCOUVREZ PLUS. DESCUBRA MÁS.
KITCHENAID.COM/QUICKSTART

natural_image
White silhouette of a telephone handset on black background (no text or symbols)PRODUCT QUESTIONS OR RETURNS
QUESTIONS SUR LE PRODUIT OU LES RETOURS
MEXICO: KitchenAid.com.mx
LATIN AMERICA: KitchenAid-Latam.com
KitchenAid®
®/™ ©2023 KitchenAid. All rights reserved. Used under license in Canada.