CTS 4110 - Toilet DOMETIC - Free user manual and instructions
Find the device manual for free CTS 4110 DOMETIC in PDF.
Frequently Asked Questions - CTS 4110 DOMETIC
User questions about CTS 4110 DOMETIC
0 question about this device. Answer the ones you know or ask your own.
Ask a new question about this device
Download the instructions for your Toilet in PDF format for free! Find your manual CTS 4110 - DOMETIC and take your electronic device back in hand. On this page are published all the documents necessary for the use of your device. CTS 4110 by DOMETIC.
USER MANUAL CTS 4110 DOMETIC
WATER AND SANITATION
CASSETTE TOILETS
CT4050, CT4110, CTE4110, CTLP4050, CTLP4110, CTS4050, CTS4110, CTES4110, CTW4050, CTW4110
EN Cassette toilet
Operating manual 16
DE Kassettentoilette
© 2022 Dometic Group. The visual appearance of the contents of this manual is protected by copyright and design law. The underlying technical design and the products contained herein may be protected by design, patent or be patent pending. The trademarks mentioned in this manual belong to Dometic Sweden AB. All rights are reserved.


3
4
7
8

16
17
18
22
23

26
27
Please read these instructions carefully and follow all instructions, guidelines, and warnings included in this product manual in order to ensure that you install, use, and maintain the product properly at all times. These instructions MUST stay with this product.
By using the product, you hereby confirm that you have read all instructions, guidelines, and warnings carefully and that you understand and agree to abide by the terms and conditions as set forth herein. You agree to use this product only for the intended purpose and application and in accordance with the instructions, guidelines, and warnings as set forth in this product manual as well as in accordance with all applicable laws and regulations. A failure to read and follow the instructions and warnings set forth herein may result in an injury to yourself and others, damage to your product or damage to other property in the vicinity. This product manual, including the instructions, guidelines, and warnings, and related documentation, may be subject to changes and updates. For up-to-date product information, please visit documents.dometic.com.
Contents
1 Explanation of symbols 16
2 Safety instructions 17
3 Accessories 18
4 Intended use 19
5 Technical description 19
6 Before first use. 20
7 Operation 21
8 Cleaning and greasing 25
9 Maintenance 26
10 Troubleshooting 29
11 Warranty 29
12 Disposal. 30
13 Technical data 30
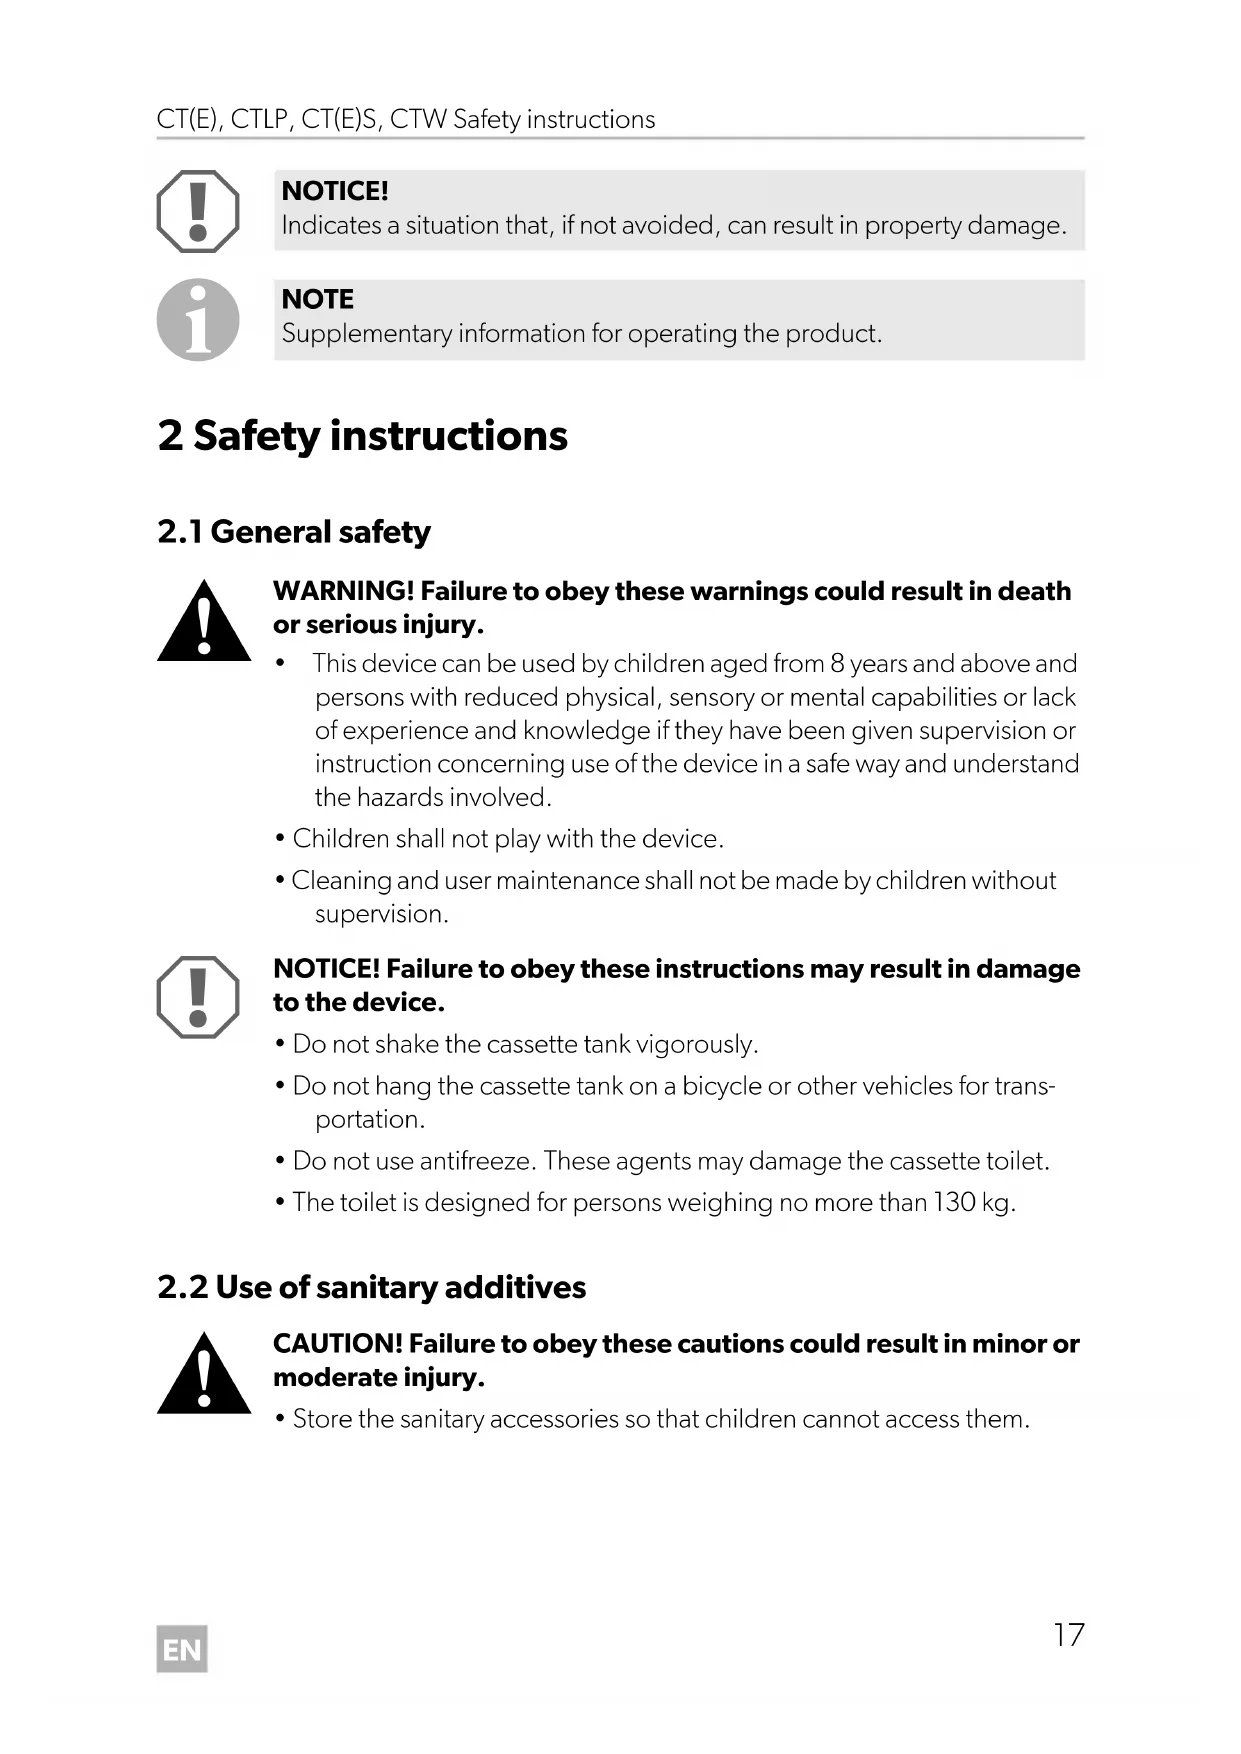
1 Explanation of symbols

WARNING!
Safety instruction: Indicates a hazardous situation that, if not avoided, could result in death or serious injury.

CAUTION!
Safety instruction: Indicates a hazardous situation that, if not avoided, could result in minor or moderate injury.

NOTICE!
Indicates a situation that, if not avoided, can result in property damage.

NOTE
Supplementary information for operating the product.
2 Safety instructions
2.1 General safety

WARNING! Failure to obey these warnings could result in death or serious injury.
- This device can be used by children aged from 8 years and above and persons with reduced physical, sensory or mental capabilities or lack of experience and knowledge if they have been given supervision or instruction concerning use of the device in a safe way and understand the hazards involved.
Children shall not play with the device. - Cleaning and user maintenance shall not be made by children without supervision.

NOTICE! Failure to obey these instructions may result in damage to the device.
- Do not shake the cassette tank vigorously.
- Do not hang the cassette tank on a bicycle or other vehicles for transportation.
- Do not use antifreeze. These agents may damage the cassette toilet.
- The toilet is designed for persons weighing no more than 130kg .
2.2 Use of sanitary additives

CAUTION! Failure to obey these cautions could result in minor or moderate injury.
- Store the sanitary accessories so that children cannot access them.

NOTICE! Failure to obey these instructions may result in damage to the device.
- When using sanitary additives for use and cleaning of the toilet, observe the instructions for use on the accompanied packaging.
3 A c c e s o r i
Available as accessories (not included in the scope of delivery):
Description Ref. no.
Service door SK4 9104100197
Dometic Renew Kit - Replacement Set
for CT 3000/CT 4000 Toilet Models
9600000458
On the Dometic website (see back page) you can find further information about sanitary accessories.
4 Intended use
The cassette toilet is intended for installation and use in recreational vehicles such as camper vans or motor caravans.
The 4050 cassette toilets can be installed in a wet room. The 4110 cassette toilets are not intended to be installed in a wet room.
This product is only suitable for the intended purpose and application in accordance with these instructions.
This manual provides information that is necessary for proper installation and/or operation of the product. Poor installation and/or improper operating or maintenance will result in unsatisfactory performance and a possible failure.
The manufacturer accepts no liability for any injury or damage to the product resulting from:
- Incorrect assembly or connection, including excess voltage
- Incorrect maintenance or use of spare parts other than original spare parts provided by the manufacturer
- Alterations to the product without express permission from the manufacturer
- Use for purposes other than those described in this manual
Domatic reserves the right to change product appearance and product specifications.
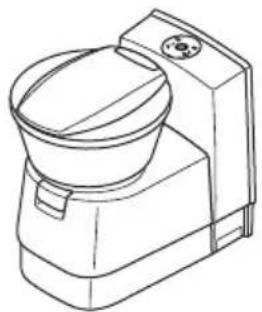
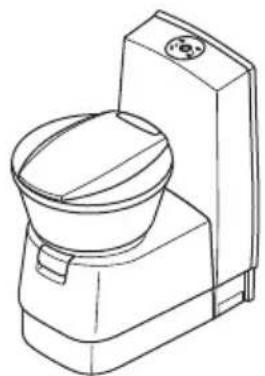
5 Technical description
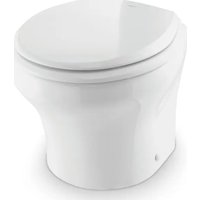
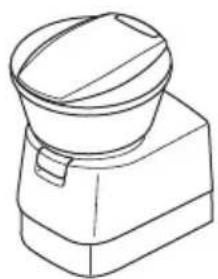
The cassette toilet consists of a toilet permanently installed in the vehicle and a removable, mobile cassette as a holding tank. The cassette is externally accessible through a door. Depending on the model, the toilet is supplied with rinse water from the vehicle-side freshwater tank or a tank integrated in the housing.
The following model versions of the toilet are available:
- CT4050, CT/CTE4110: Detached, without water tank, without console
- CTLP4050, CTLP4110: Detached, without water tank, low console
CTS 4050, CTS/CTES4110: Detached, without water tank, with console
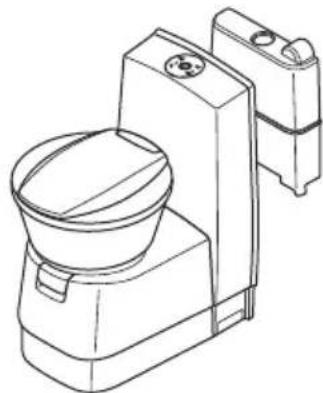
CTW4050, CTW4110: Detached, with water tank in the console
5.1 Description of the components
| No. in fig. 1, page 3 | Designation | ||||
| 1 | Housing for cassette tank | ||||
| 2 | Draining slider for toilet bowl | ||||
| 3 | Toilet bowl | ||||
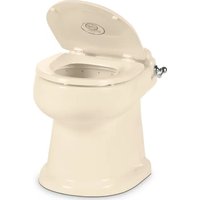
| 4 | Lid and seat, rotatable | ||||
| 5 | C | o | n | s | o |
| 6 | Control and operating panel | ||||
| 7 | Freshwater tank (optional) | ||||
| 8 | CTLP, CTS, CTES, CTW only: Wall bracket | ||||
| 9 | Cassette tank (capacity 19 l) | ||||
| 10 | Service door (accessory) | ||||
| 11 | CTW only: Tank flap (lockable tank flap optional) | ||||
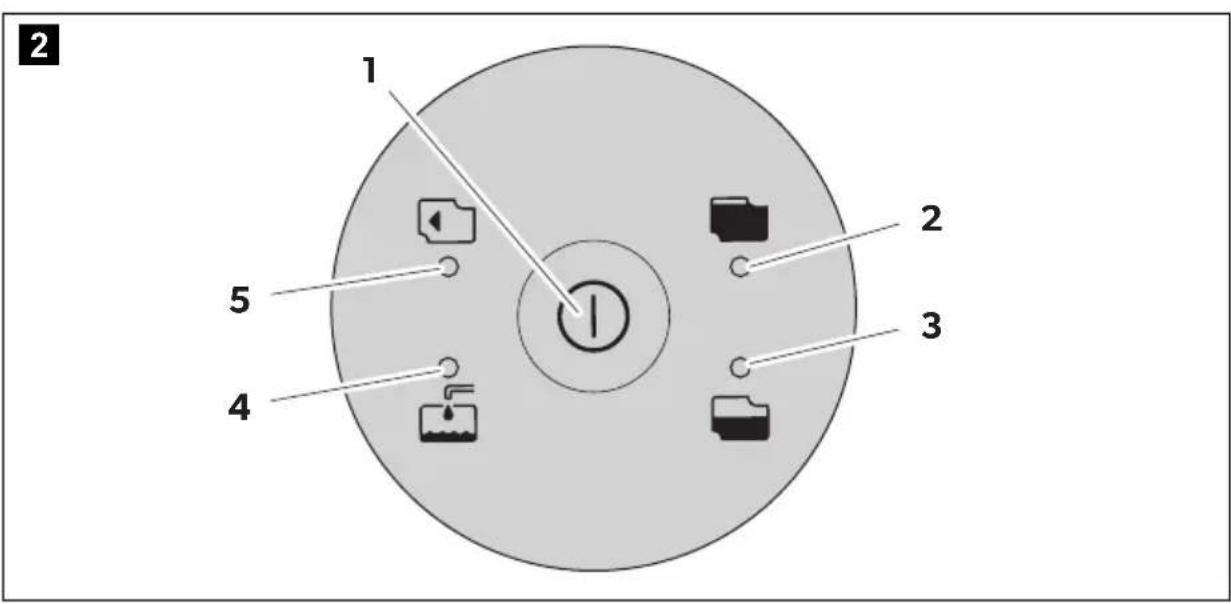
5.2 Control and display elements
| No. in fig. 2, page 3 | Designation |
| 1 Flush button | 1 |
| 2 "Cassette tank full" indicator | |
| 3 | CT, CTLP, CTS, CTW only: "Cassette tank 3/4 full" indicator |
| 4 | CT, CTLP, CTS, CTW only: "Fill freshwater tank" indicator (Not always connected when using the on-board tanks) |
| 5 CT, CTLP, CTS, CTW only: "Cassette tank removed" indicator | |
6 B e f o r e f i r
Before putting the toilet into operation, clean inside and outside with a soft cloth and lukewarm water with a mild cleaning agent (also refer to chapter "Cleaning and greasing" on page 25).
7 O p e r a t i o n
7.1 Preparing the cassette tank
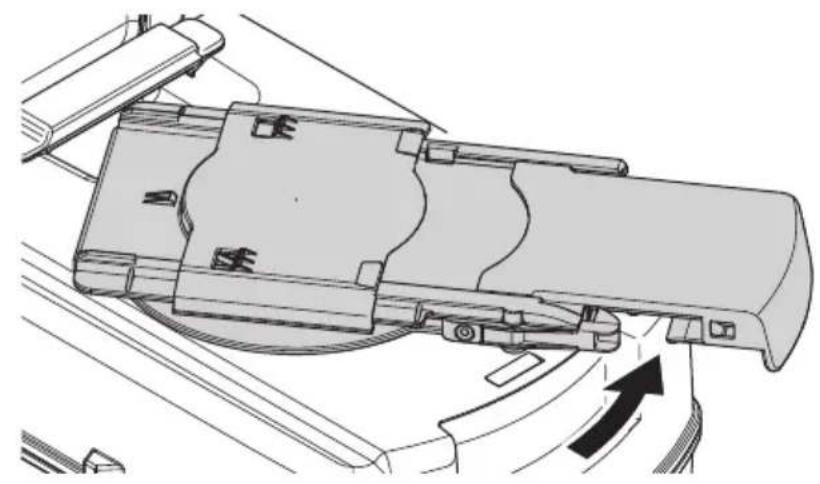
Removing the cassette tank (fig. 3, page 4)
- Open the service door.
- Push the catch upwards to unlock the cassette tank.
- Pull the cassette tank out of the cassette housing. When pulling out the tank, resistance has to be overcome.
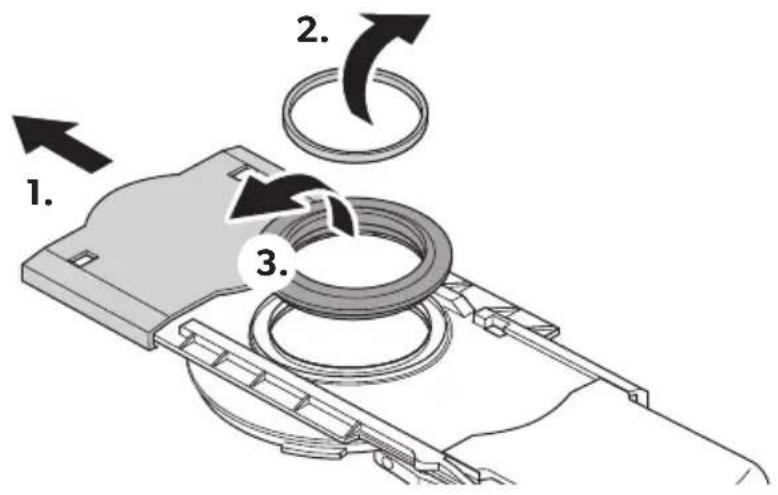
Filling the cassette tank
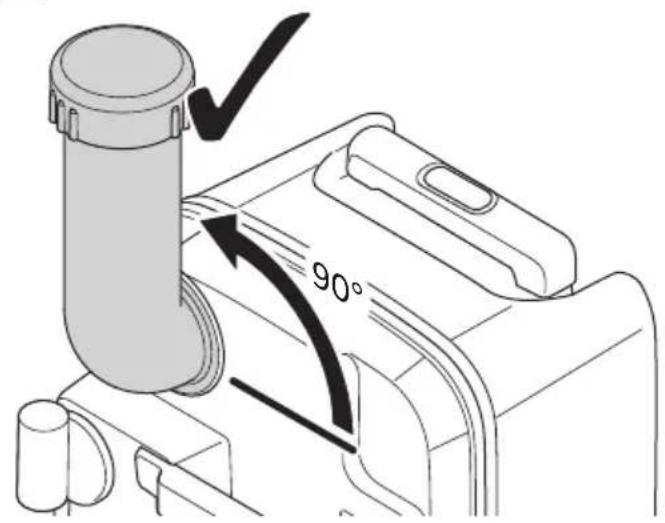
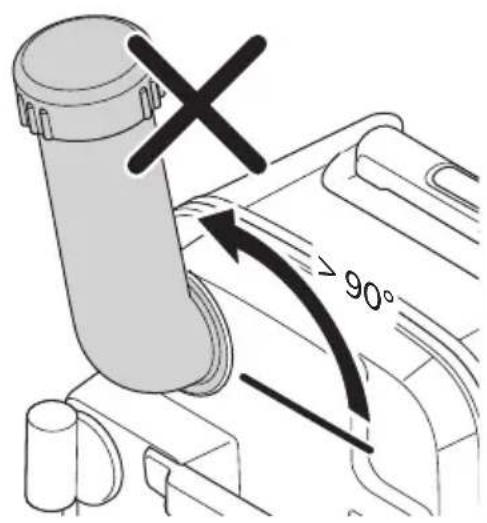
- Position the cassette tank upright.
- Rotate the drain pipe approx. 90^ upwards (fig. 4, page 4).

NOTE
Avoid turning the drain pipe more than 90^ , as it otherwise can come off (fig. 4, page 4).
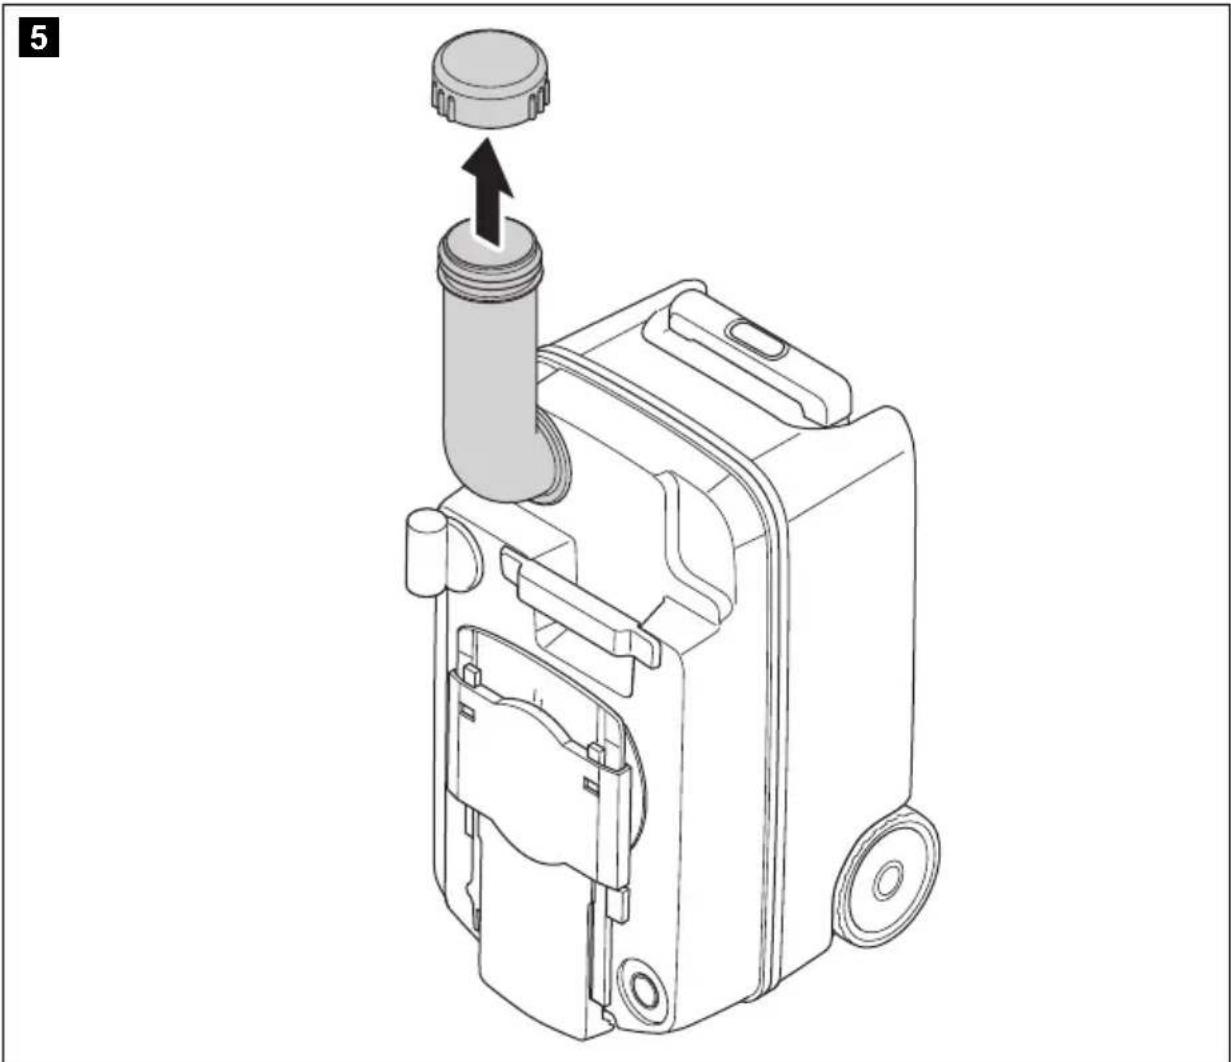
- Twist off the cap (fig. 5, page 5).
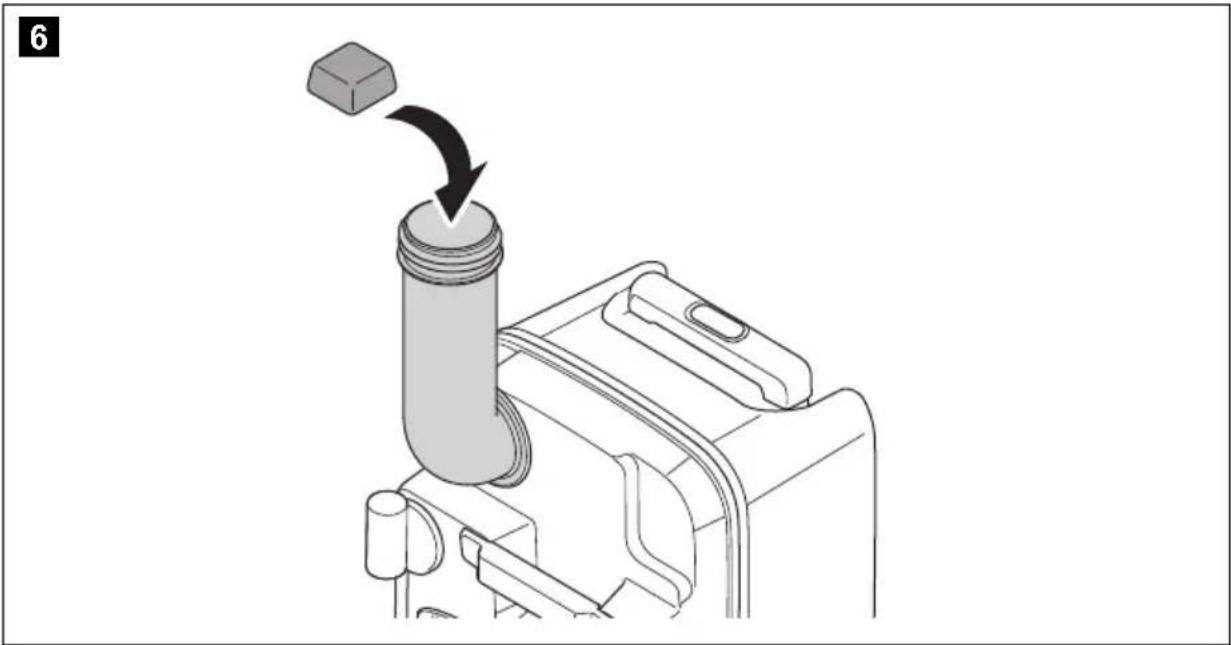
- Fill water into the cassette tank via the drain pipe (fig. 6, page 5).
With a tilted position (such as lasting inclination of the vehicle), the cassette may only be 3/4 full. Otherwise overflowing through the vent is possible.
Adding sanitary additive
- If using sanitary additives, observe the instructions for use on the packaging.
- Position the cassette tank upright.
- Rotate the drain pipe approx. 90^ upwards (fig. 4, page 4).

NOTE
Avoid turning the drain pipe more than 90^ , as it otherwise can come off (fig. 4, page 4).
- Twist off the cap (fig. 5, page 5).
- Add sanitary additive into the cassette tank via the drain pipe (fig. 6, page 5). Observe the instructions for the sanitary additive.
Pushing the cassette tank into the cassette housing

NOTICE! Damage hazard
Ensure that the cassette tank can be pushed into the cassette housing easily. Ensure that the cassette tank does not bump into other objects or components.
- Slide the cassette tank all the way into the cassette housing.
The cassette tank lock locks by itself upon being pushed in.
2. Check that the cassette tank is securely installed.
3. Close and lock the service door.
7.2 Filling the freshwater tank (integrated tank)
Fill the freshwater tank through the filler neck on the outside of the vehicle. The amount depends on the tank used (the integrated tank's capacity is 7 liters for the CTW4050 and CTW4110 models).
7.3 Using the toilet

NOTE
- Conventional toilet paper can clog the toilet. Use a special fast-dissolving toilet paper.
- Sanitary additives for the holding tank decompose feces and prevent unpleasant odors.
-
The slider must be closed while driving, and no liquid should be above the slider.
-
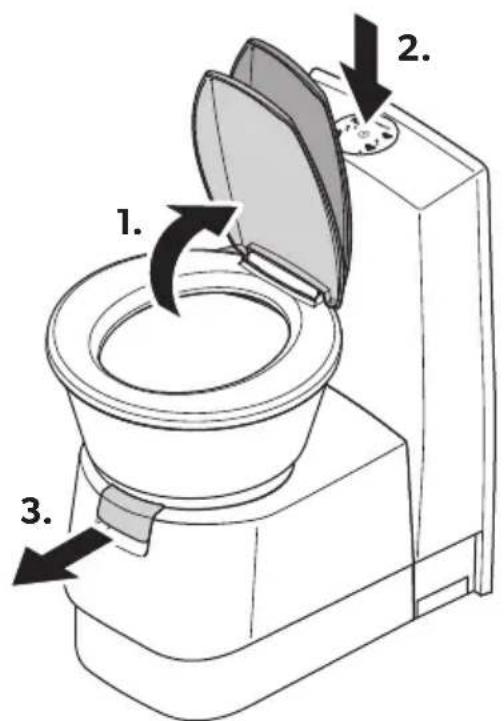
Open the toilet lid (fig. 7 1, page 6). The toilet lid remains in a position of approx. 70^
- Before each use press the flush button to allow some water to run into the bowl (fig. 7 2, page 6).
- Pull the slider forward (fig. 7 3, page 6). Leave the slider open during use.
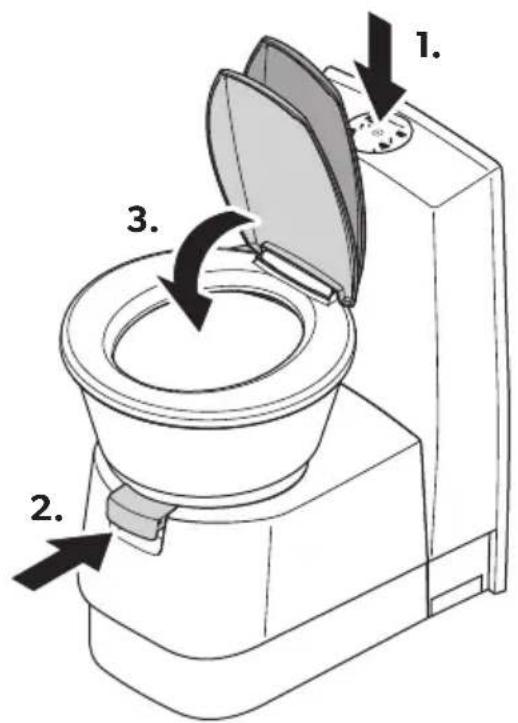
- After use press the flush button ① again to rinse the bowl (fig. 8 1, page 6). CT, CTLP, CTS, CTW only: When the indicator lights up, the toilet can only be used a few more times.
- Close the slider (fig. 8 2, page 6).
- Close the toilet lid (fig. 8 3, page 6).
7.4 Draining the cassette tank
Empty the cassette tank when the indicator lights up.
- Remove the cassette tank (chapter "Removing the cassette tank (fig. 3, page 4)" on page 21).
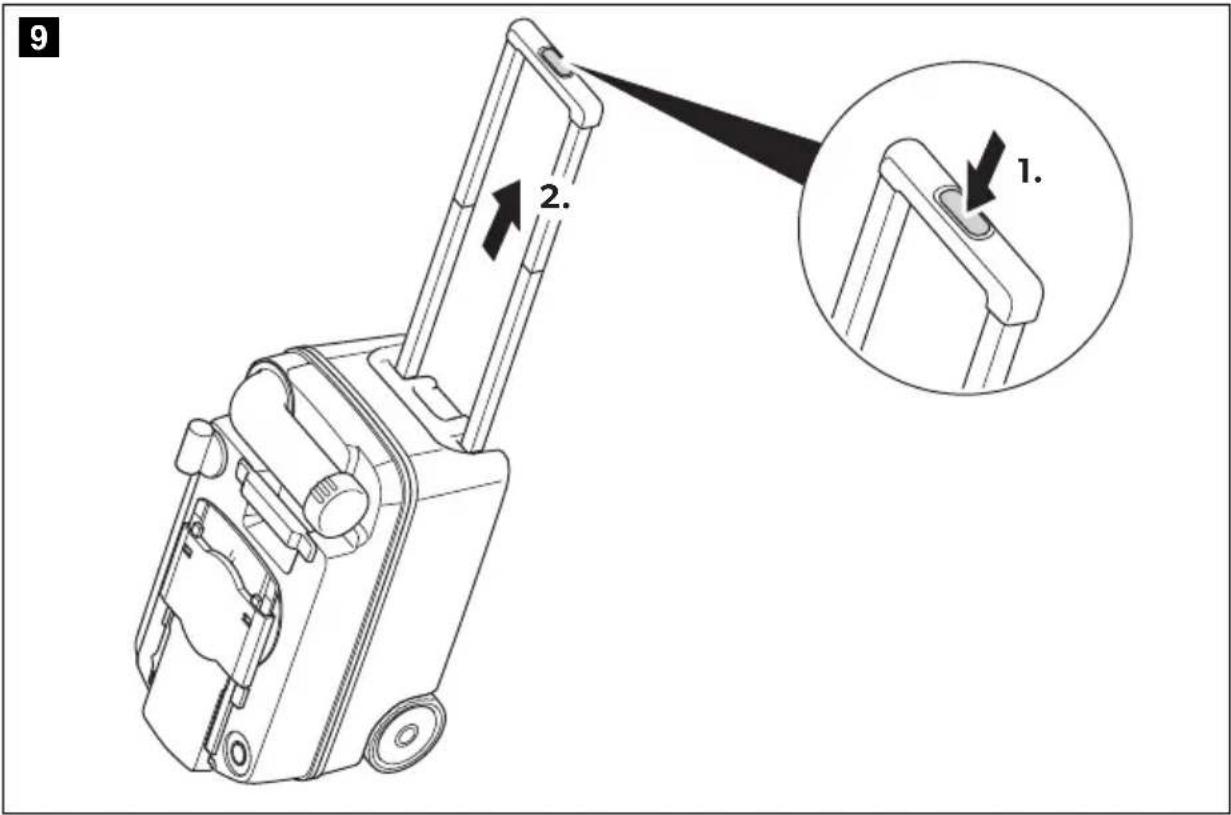
- Press the release button in the middle of the handle and pull the handle out to its end position (fig. 9, page 7).

NOTICE! Damage for housing and rollers
- Do not shake the cassette tank vigorously.
- Do not hang the cassette tank on a bicycle or other vehicle for transportation.
-
Do not place heavy objects on the cassette tank during transport.
-
Bring the tank to the nearest designated disposal location.
- Press the release button in the middle of the handle and push the handle back into the cassette.
- Set the cassette tank upright and rotate the drain pipe 90^ upwards (fig. 4, page 4).

NOTE
Avoid turning the drain pipe more than 90^ , as it otherwise can come off.
- Twist off the cap (fig. 5, page 5).
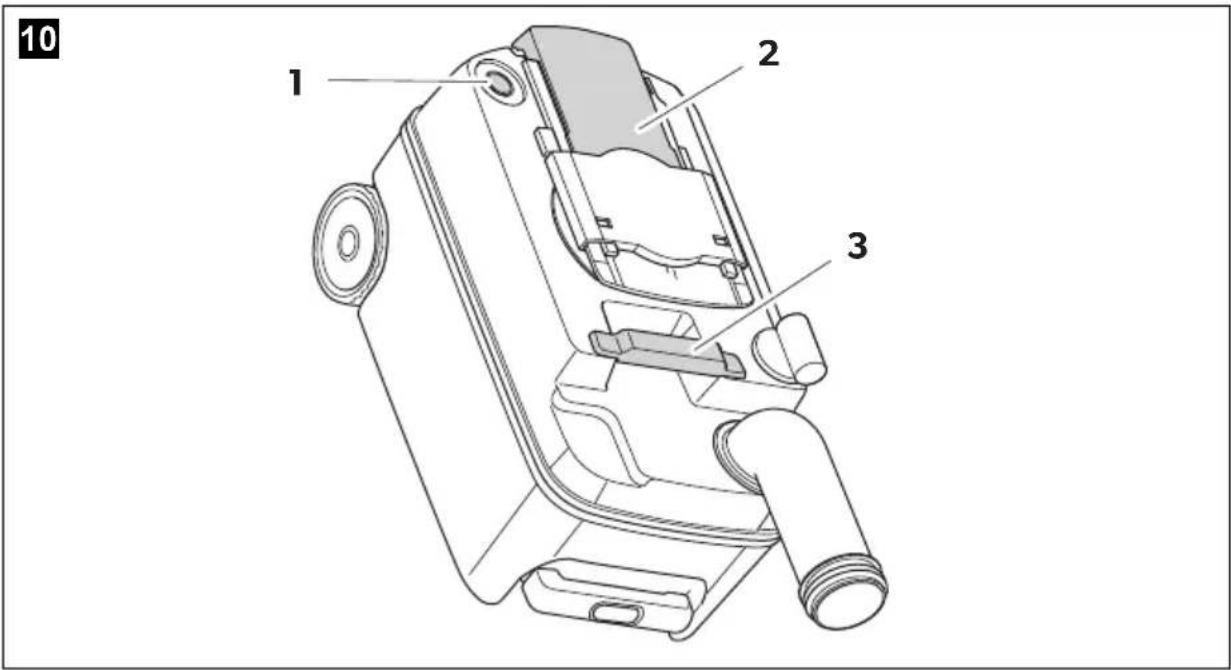
- Hold the cassette tank by the handle with one hand (fig. 10 3, page 7) and with the other hand on the slider (fig. 10 2, page 7), so that you can push the vent button (fig. 10 1, page 7) while it is draining.
- Press the vent button when the drain pipe points downwards.
The tank drains steadily and without splashing.
- After draining, rinse out the cassette tank carefully.
- Add a sanitary additive to the cassette (chapter "Adding sanitary additive" on page 21).
- Clear away course dirt from the wheels of the cassette tank to prevent scratching of the cassette housing.

NOTICE! Damage hazard
Do not clean the inside of the cassette tank with a high-pressure cleaner. This can damage the float for the level indicator.
- Push the cassette tank into the cassette housing (chapter "Pushing the cassette tank into the cassette housing" on page 22).
7.5 Positioning the toilet seat
The toilet seat can be swiveled continuously (fig. 11, page 8).
7.6 Winter operation

NOTICE! Damage hazard
Do not use antifreeze. Antifreeze may damage the cassette toilet.
You can also use the cassette toilet in the winter, as long as the toilet and cassette tank are in a frost-free area.
If this is not the case, empty the freshwater tank, the cassette tank and the water line of the freshwater supply.
This will prevent damage by frost (chapter "Shutting down" on page 24).
7.7 Shutting down
Drain the freshwater tank (optional accessory) and the water supply system completely if you are going to take the toilet out of service for an extended period of time.
- Clean the toilet carefully (chapter "Cleaning and greasing" on page 25).
- Operate the flush button until no more water is in the pipes.
- Interrupt the power supply to the toilet.
- Drain the cassette tank and rinse it out carefully.
- Clean the cassette. To allow the cassette tank to dry, do not close the drain pipe.
- Clean and grease all seals and moving parts of the toilet and the cassette tank (chapter "Cleaning and greasing" on page 25) and repeat this operation before putting the toilet back into service.
8 Cleaning and greasing

NOTICE! Damage hazard
- Cleaning agents for the toilet may not contain chlorine or alcohol.
- To prevent material changes, do not use hard, abrasive or soda-based cleaning agents (scouring agents).
- Do not use polish for cleaning.
Clean and grease all seals on the toilet and cassette tank regularly. In case of frequent use, perform these actions monthly or after 3-5 drainings of the cassette. Use grease or silicone-based spray.
The manufacturer recommends:
- G r e a®s1110 : O K S
-Silicone spray: OKS 1111
Clean the toilet regularly inside and out with a soft cloth and lukewarm water with a mild colorless cleaning agent. Then wash the surfaces with clear water.
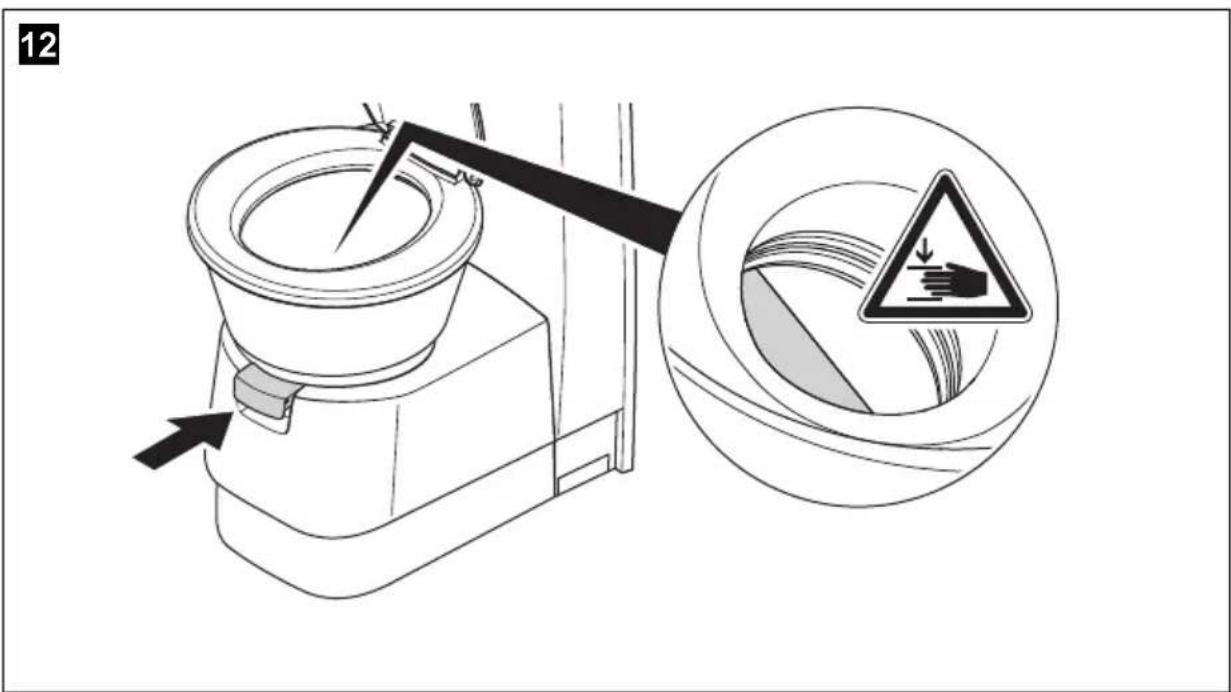
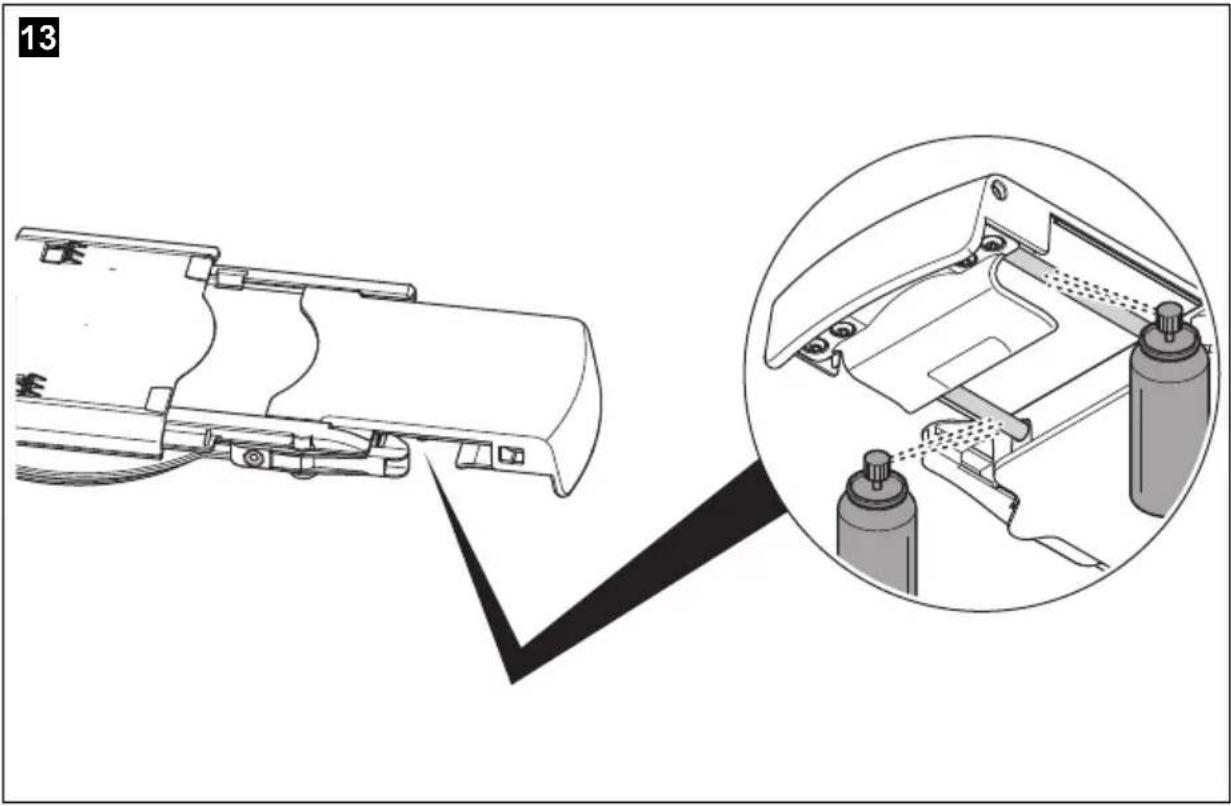
8.1 Greasing the slider rods

CAUTION! Risk of crushing
When the slider is closed during cleaning or greasing, there is a risk of crushing body parts (fig. 12, page 8).
The slider moves smoothly when it is regularly lubricated.
Spray the slider rods with silicone spray (fig. 13, page 9).
8.2 Greasing the cassette seal
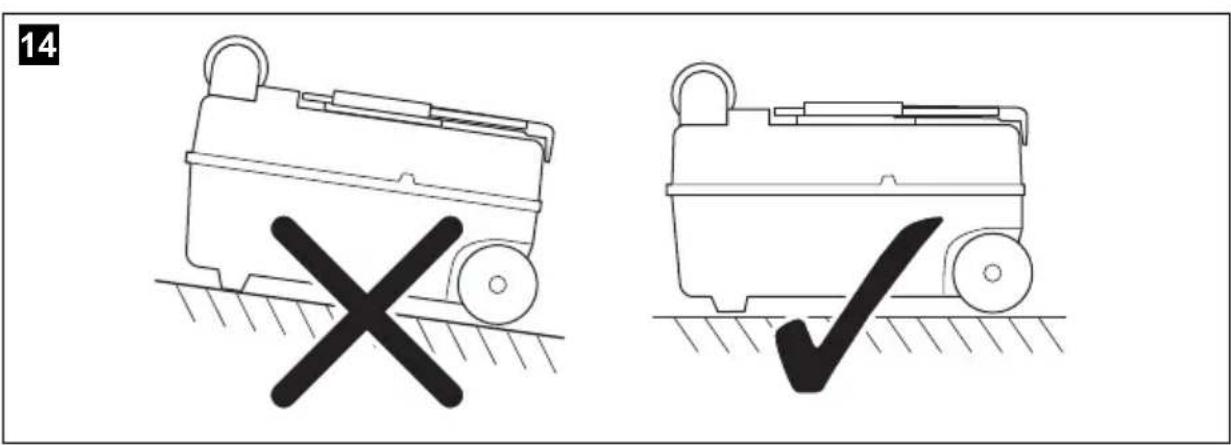
- Remove the cassette tank and place it on a firm surface (fig. 14, page 9).
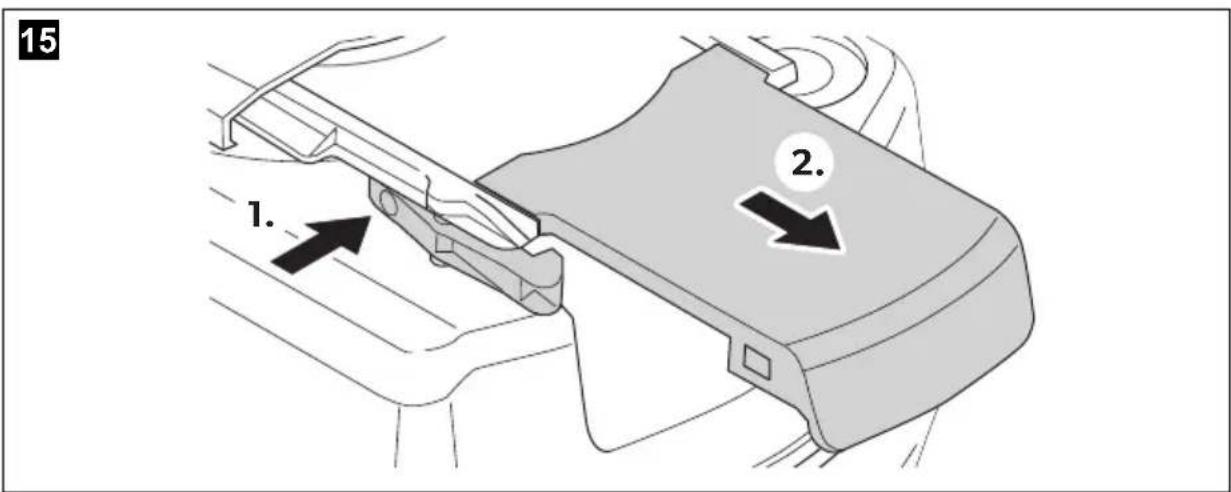
- Unlatch the slider handle and pull it out (fig. 15, page 9).
- Turn the slider anti-clockwise and release it from the cassette (fig. 16, page 10).
- Push back the cover so that the seal is accessible (fig. 17, page 10).
- Clean and grease the seal.

CAUTION! Risk of crushing
Do not reach into the opening when you close the cover.
- Close the cover (fig. 21, page 11).
- Place the slider back on.
8.3 Cleaning the bayonet fitting and greasing the bayonet seal
- Remove the cassette tank and place it on a firm surface (fig. 14, page 9).
- Unlatch the slider handle and pull it out (fig. 15, page 9).
- Turn the slider anti-clockwise and release it from the cassette (fig. 16, page 10).
- Clean the bayonet fitting (fig. 22 1, page 12) on the slider.
In the state upon delivery and after extended use, the bayonet fitting can be loosened only with difficulty.
- Evenly grease the bayonet seal (fig. 22 2, page 12) with silicone grease.
- Place the slider back on.
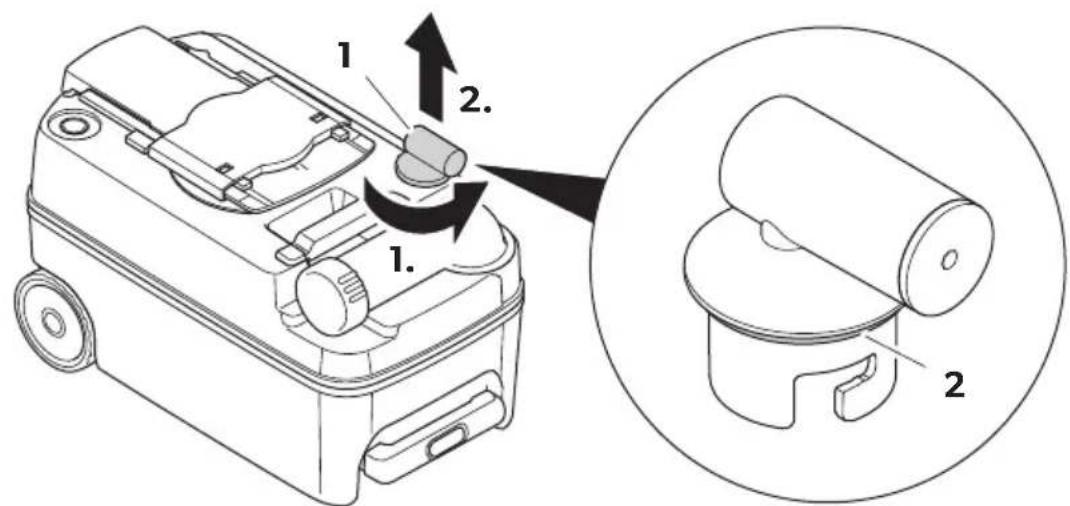
8.4 Greasing the O-ring of the cassette vent
- Take the adapter (fig. 23 1, page 12) off the cassette.
- Grease only the attached O-ring (fig. 23, page 12) with silicone grease.
- Place the adapter back on.
9 Maintenance
This chapter describes maintenance that may be performed by the user. Have all other maintenance and service work performed by qualified personnel (see dometic.com/contact).
When contacting customer service, make a note of the following information on the data plate:
· Modél Designation
• Pro d u c t N u m b e r
- Serial No.
MLC

NOTE
You can find the data plate in the cassette housing after removal of the cassette.
9.1 Obtaining spare parts
Spare parts can be obtained from the customer service of the respective country.
All the accessories are available from specialist dealers. If you have any questions, please contact the dealer or your service partner directly.
9.2 Removing and replacing the lid and seat

NOTE
The manufacturer accepts no liability for damage resulting from incorrect or faulty installation.
For the exchange of lid and seat, use the Dometic Renew Kit - Replacement Set for CT 3000/CT 4000 Toilet Models (ref. no. 9600000458). The required tools are included with the kit.
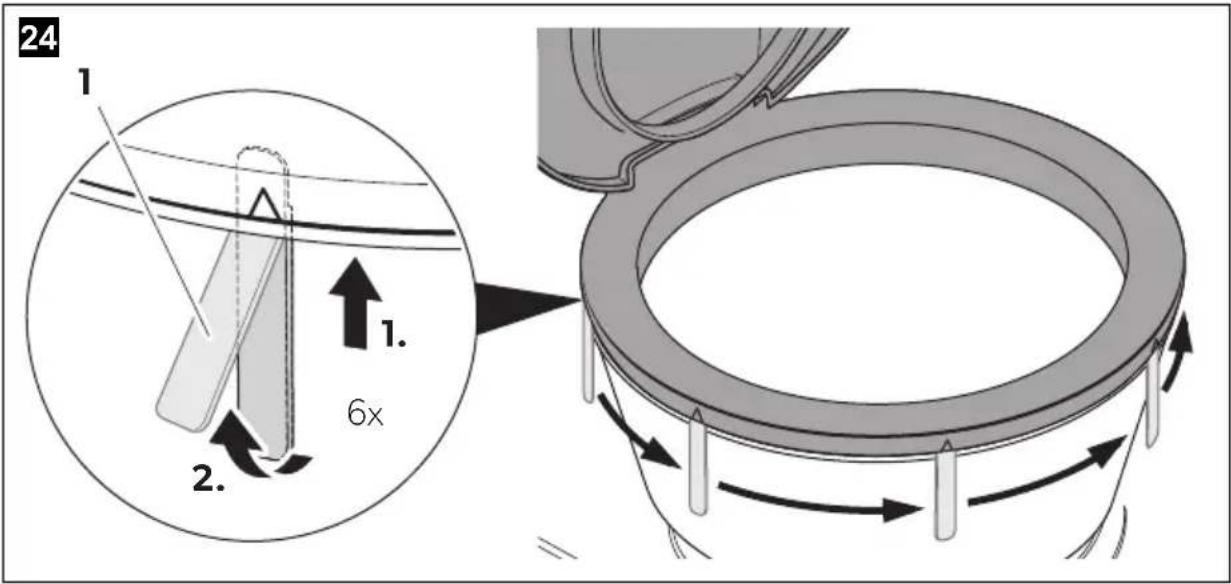
- Release the toilet seat (fig. 24, page 13).
- Remove the toilet seat (fig. 25, page 13).
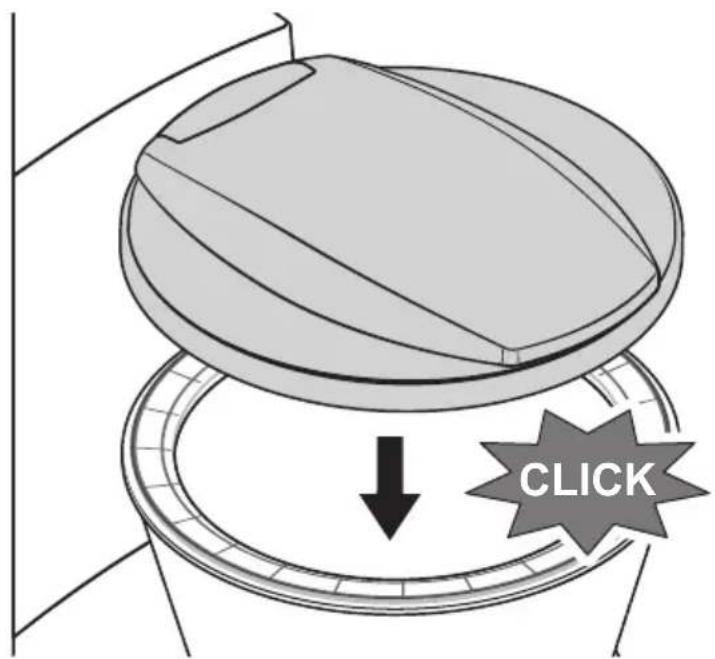
- Position the new toilet seat and press it down until it latches in place (fig. 26, page 14).
9.3 Replacing the cassette seal
- Remove the cassette tank and place it on a firm surface (fig. 14, page 9).
- Unlatch the slider handle and pull it out (fig. 15, page 9).
- Turn the slider anti-clockwise and release it from the cassette (fig. 16, page 10).
- Push back the cover so that the seal is accessible (fig. 17, page 10).
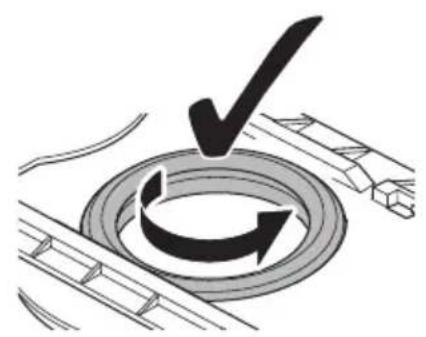
- Remove the support ring and the seal (fig. 17, page 10).

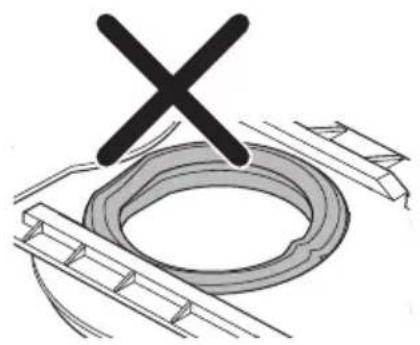
NOTICE! Damage hazard
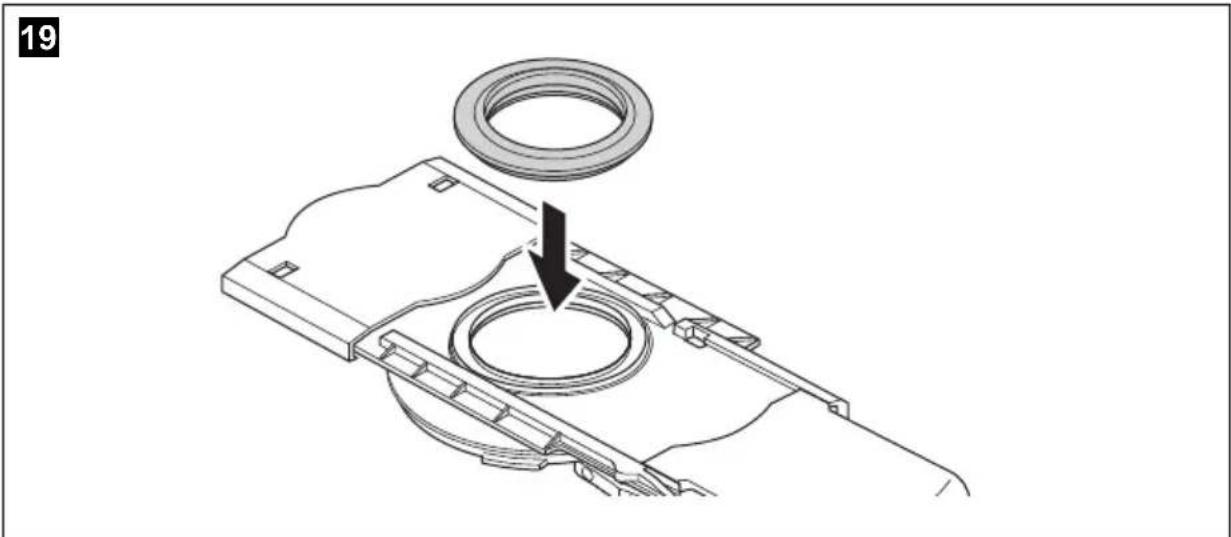
The seal must be positioned uniformly in the opening (fig. 18, page 10) so that the cassette is sealed and the slider can move easily.
- Insert the new seal (fig. 19, page 11).
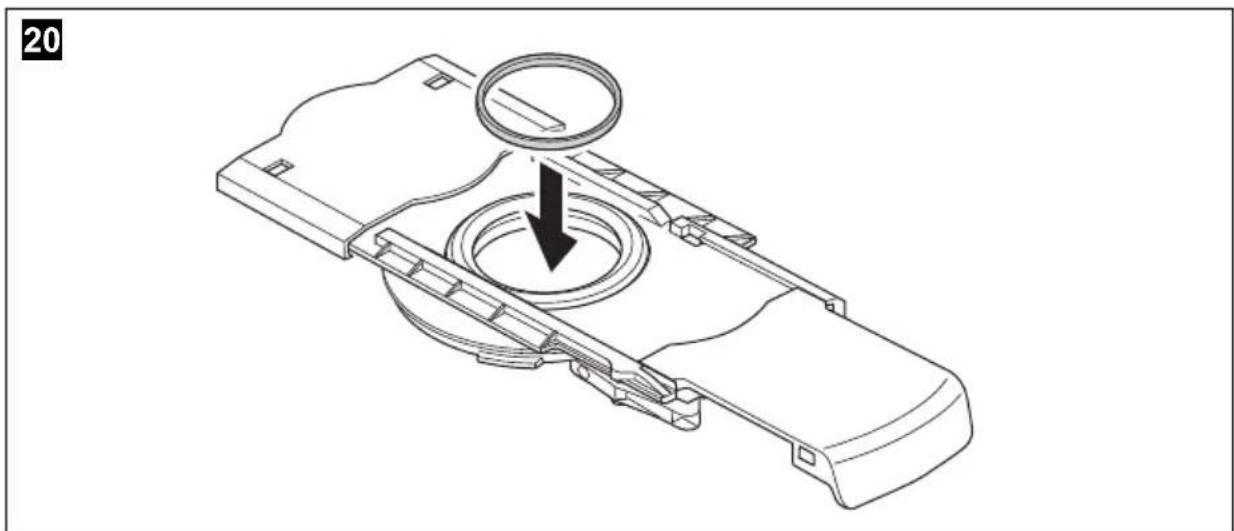
- Insert the support ring (fig. 20, page 11).
- Grease all areas.

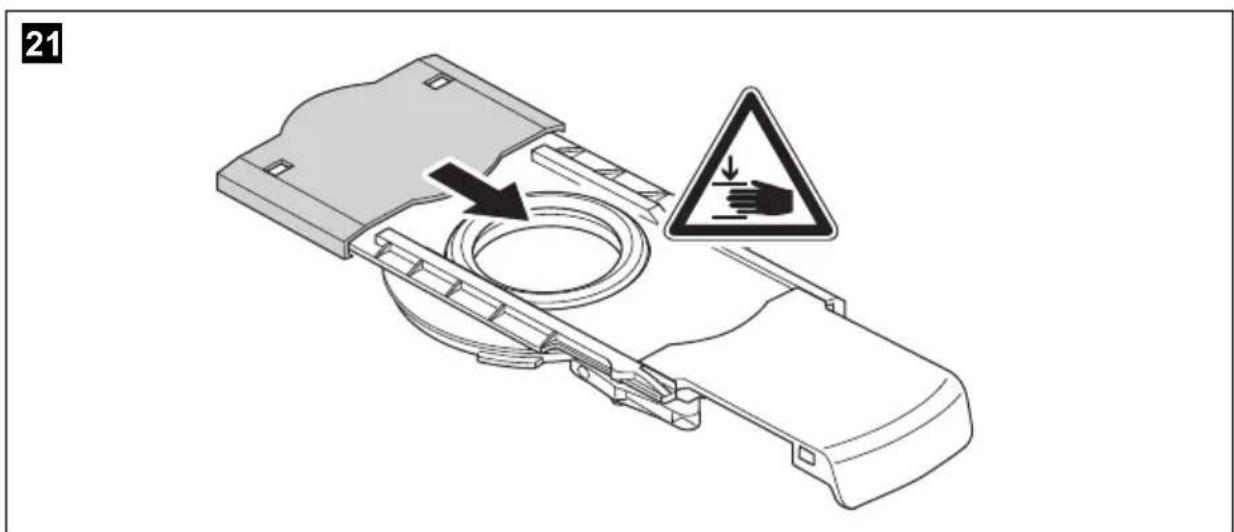
CAUTION! Risk of crushing
Do not reach into the opening when you close the cover.
-
Close the cover (fig. 21, page 11).
-
Place the slider back on.
9.4 Replacing the bayonet seal
- Remove the cassette tank and place it on a firm surface (fig. 14, page 9).
- Unlatch the slider handle and pull it out (fig. 15, page 9).
- Turn the slider anti-clockwise and release it from the cassette (fig. 16, page 10).
- Remove the old seal (fig. 22 2, page 12).
- Clean the bayonet fitting.
- Insert the new seal.
- Ensure uniform seating of the new seal.
- Place the slider back on.
- Grease all areas.
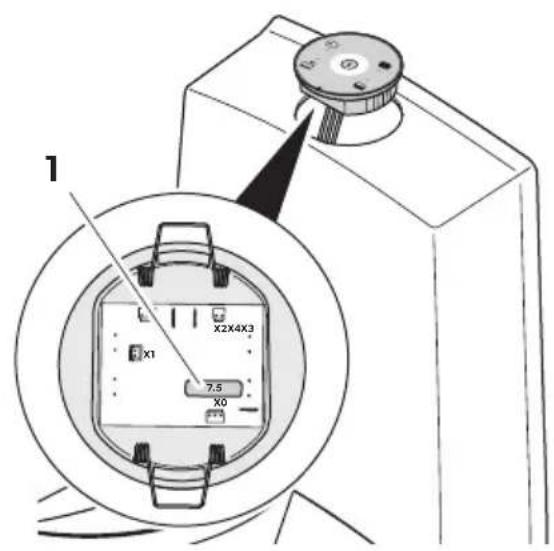
9.5 Replacing the fuse in the operating unit

CAUTION! Risk of injury
- Switch off the voltage supply before you start.
CT, CTLP, CTS, CTW only:
-
Carefully pull the control unit out of the wall opening. There is a risk of injury due to the springs springing back.
-
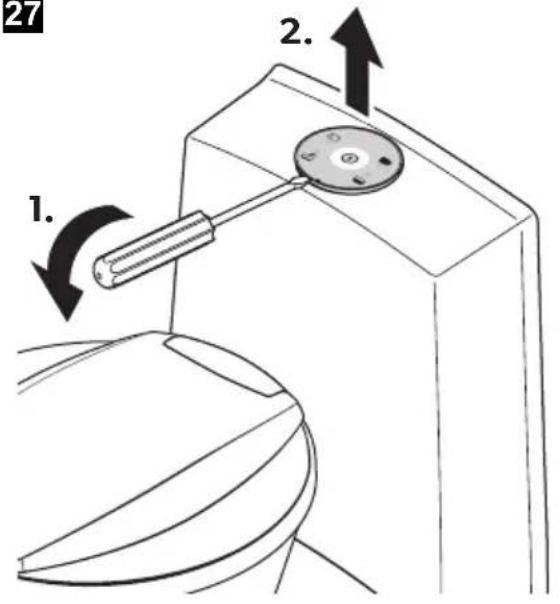
Lift the control unit with a suitable tool and then pull it out of the bracket or wall (fig. 27, page 14).
- Replace the fuse (automotive fuse: 7.5 A) on the bottom of the control unit (fig. 27 1, page 14).
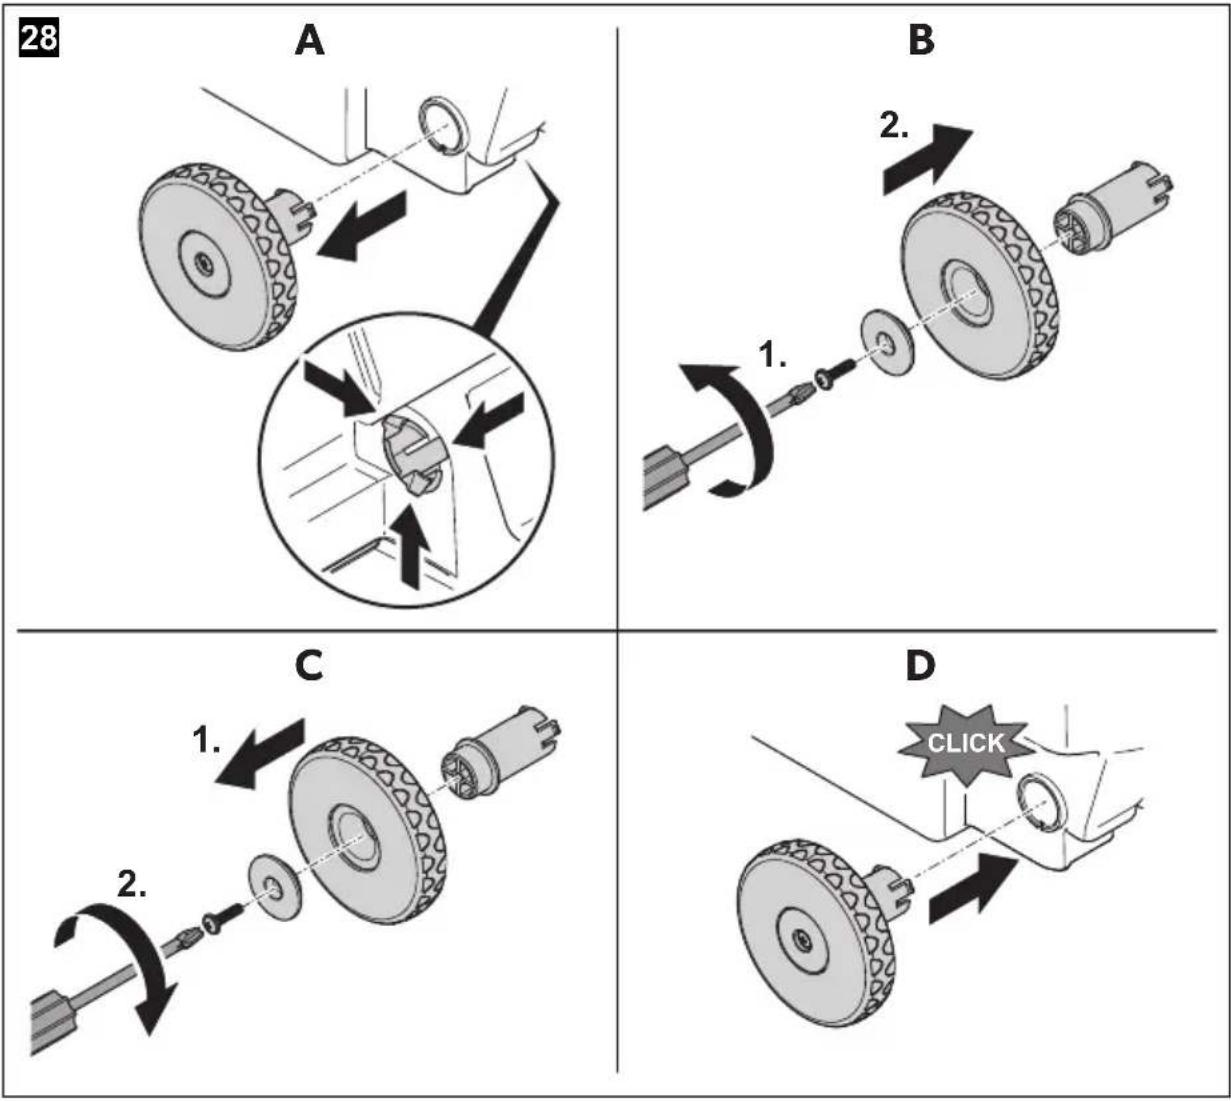
9.6 Replacing the wheels on the cassette tank
The wheels on the cassette tank can be replaced individually if required:
- Remove the old wheel as shown (fig. 28, page 15).
- Mount the new wheel as shown (fig. 28, page 15).
- Ensure that the wheel moves freely.
10 Troubleshooting
Fault Possible cause Remedy
Toilet no longer flushes. Faulty fuse.
Cassette not inserted.
Cassette full.
No power supply.
Electronics defective.
Pump defective.
Solenoid valve defective.
Screen of solenoid valve is dirty.
Replace the fuse (see chapter
"Replacing the fuse in the operating unit" on page 28).
If there are repeated failures, let a qualified person check the electrical connections.
Replace defective parts.
Cassette tank leaks. Seal worn. Replace the cassette seal
(see chapter "Replacing the cassette seal" on page 27).
CT, CTLP, CTS, CTW only:
The float in the cassette tank is hung up or jammed by toilet paper.
Clean the float in the cassette.
Do not use a high-pressure cleaner!
11 Warranty
The statutory warranty period applies. If the product is defective, please contact your retailer or the manufacturer's branch in your country (see dometic.com/dealer).
For repair and warranty processing, please include the following documents when you send in the product:
- A copy of the receipt with purchasing date
- A reason for the claim or description of the fault
Note that self-repair or non-professional repair can have safety consequences and might void the warranty.
12 Disposal

Place the packaging material in the appropriate recycling waste bins wherever possible.
Consult a local recycling center or specialist dealer for details about how to dispose of the product in accordance with the applicable disposal regulations.

NOTICE! Environmental damage
When disposing sanitary additives for use and cleaning of the toilet, observe the instructions for use on the accompanied packaging.
13 Technical data
| Input voltage 12 V--- | |
| Current consumption Max. 2 A with internal pump Max. 5 A with external pump | |
| Max. person weight 130 kg | |
| Operating temperature 0 °C to +50 °C | |
| Capacity 19 l (cassette tank) | 7 l (freshwater tank, optional) |
| Test mark | CE N1 ECE13 |
For the current EU declaration of conformity for your device please refer to the respective product page on dometic.com or contact the manufacturer directly (see dometic.com/dealer).
5 Description technique
Alternatively, you can use the inodoro de cassette during the invierno, and then use the inodoro and the deposito of cassette to encounter them.
8 Limpare lubricificar

Yka3bIbaet Ha cnTyaunIO, KOTopA, ecn ee He n36eXaTb, MoXeT npVeCTN K MaTePnaHOMy yUep6y.

YKA3AHNE
DOnonHntbHaNOpMaunOpa6ote c yctpoiCTBOM.
He nCNoB3yIe cpeICTBa IJRA 3aIITbI OT 3aMeP3aHnR. OHmOryT NOBpeIITb KaCCeTHbI TyaNET.
KaccetHbIe TyaIeTbIMOXHO NcNoJIb3OBaTb IN B 3mHee BpeM, NOMECTNB TyaIeT IN KaccetHbI 6aK B MeCTO, Ie HET Hn3Knx Temnepatyp.
EcnI TyaIeT NOBBepxH BO3DeIcTBnIO OTPuataTeNbHbIX TemNepaTyP, ONOpoxHnTe 6ak CBexKe B0dbI, KaccetHbI 6aK IN Tpy6bl Ira N Odaun CBeXeB 0DbI.
3To Heo6xOaHMo, YTO6bI He dOnyCTnTb NOBpeXeHnO6OpydoBaHnB pe3yNbTaTe 3aMeP3aHnXnKoCTn (rI. «BbIKIOUeHne» Ha cTp. 196).
7.7 BbIKIIOUeHne
Ipexde yem BbBeCTn TyaNET n3 3KcPnyatauH, nonHOCTbIO ONOPOXHnte 6aK CBExeB BObl (DOnONHNTeNbHbI akceccyap) n CnCTemy BDOCHa6XeHn.
- TuaTeNbHO ouHCTnTe tyanet. (I.. «OuNcTka n Cma3Ka» Ha cTp. 196).
- HaximaiTe KhoNky cInBa Do Tex nop, noka B Tpy6ax N UJnHaRax He octaHeTcB ODibl.
- OToCoeHNHInTe TyaIeT OToNtOuHNka NITaHnIa.
- Onopoxhnte kaccetHbI 6aK n TuaTeNbHO npOMoTe eTo.
- Ou nctnte kaccety. DaIte kaccetHomy 6aky BbICOXHyTb, dIra 3TOrO He 3aKpbBaIte CnIBHyIO Tpy6y.
- Ouinchiteи cmaxbTe BCE ynpnoTHHeHn I DnBxUneCyaCTN TyaneTa n KaccetHO 6aka (rI. «OuicTKa n Cma3Ka» Ha cTp. 196); nobTopiTe 3Tu npoueDpy neped BBO- dom B 3KcPnyatauio.
8 OuNTka N cMa3Ka

BHIMAHHE! Pnck noBpeXdHnA
He nCnoB3yIe dIy NcCTKu Tyaneta CpeDCTBa, codepxuaune Xnop nn cnprt!
- UTo6bI He DoIpyCTnTb NOBpeXeHn I N3MeHeHn MaTePnaIOB, He nCNoJIb3yIte a6pa3nBhIe, aIpeCCNBHbIe IIN COepeXaUne CoOy YnCTraUne cpeDCTBa.
He ncponb3yIte dIra ouNCTKn nonnpoB.
Perynapno uHCTte n Cma3bBaIte yNnOThHeNn B TyaneTe n B KaccetHom 6ake. Pn INHTeHCNBHOM NCNoB3OBaHn peKOMeHdyEeTcB bInONHrTb 3Ty npOueDpy aAne nn noCte 3-5 onopoxHeHn Kaccetbl. NcNoB3yIte dnn 3TOrO Cma3ky nn a3po3Obn Ha OCHOBE CNNIKOHa.
N3rOToBHTeIbpeKOMeHdyet:
- c m a 3® k110 : O K S
-A3po30nb Ha oCHOBe cnNkoHa: OKS 1111
Perynapno uHCTnTe TyaIeT n3HyTpNI cHApxN, nCNoJIb3yra MmKkyo BeToBb, TeNpyIO BODU IN HearpeccnBHOe, 6ecuBeTHoe YnCTaue CpeDCTBO. Pocne uNCTKN OONOCHNTe NOBepXHOCTn TyaIeTa YnCTOBoDOn.
8.1 Cma3bIbAHne nOIO3beB 3aADBKKN

OCTOPOXHO! OnacHocTb cdaBnBaHHa
3aKpbBa 3aDbNk Ky B Ipouece Ounch Kn Hn Cma3bHaHn, MoXHO 3aIeMnTb pyKn (pnc. 12, ctp. 8).
UTo6bI 3aADBnKka DnRanacb Nergko, Heo6xoDIMO pepyrphO cMa3bBaTb ee.
O6pa6oTaIe IIOIO3b8 3aADBIXKc NOMOUIIO CINIKOOBOrO aAp03OJIa (pnc.13, ctp.9).
8.2 Cma3bIbAHne yPnOThHnKaCCeTbl
- CHINMITE KACCETHbI 6aK IN NOCTaBbTe eRO Ha ycToiYuIO NOBepXHOCTb (pnc. 14, ctp. 9).
- OToCoeHNHInTe pyUky 3aBnXKn N BbITAHnTe ee HapUxy (pnc. 15, ctp. 9).
- ПовернITE заимьку потив уасов стpeпи и ИЗВпeКпе ee ИЗ Кассы (pnc. 16,ст. 10).
- ΦTO6bI nOlyuHTb dOCTyN K yPnOThEHHU, npNXMnTe KpbIshKy Ha3aI (pnc. 17, cTp. 10).
- OuHCTInTe N CMaxbTe yIyNtOHeHHe.

OCTOPOXHO! OnacHocTb cdaBnBaHHa
He xbaataTecb 3a OTBepCTne npn 3aKpbBaHnn KpbIshKn.
- 3aKpoIte KpbIshKy (pnc. 21, cTp. 11).
- YCTaHOBnTE 3aDbNkKy Ha MeCTO.
8.3 OuInCTka 6aioHeTHoro 3aMKa N Cma3Ka yIIOtHeHn
- CHINMITE KACCETHbI 6aK IN NOCTaBbTe eRO Ha yCTOuYnByIO NOBepxHOCTb (pnc. 14, ctp. 9).
- OToCoeAnHInTe pyUky 3aDbNxxKn I BbITAHnTE ee HapUxy (pnc. 15, ctp. 9).
- ПовернITE задику потив уасоь CTpeпки ИИЗВпКITE ee ИЗ Касстб (pnc. 16,ст. 10).
- OuNTte 6aHHeHTbI 3AMOK (pnc. 22 1, ctp. 12) Ha 3aBnKke. BaHOHTbI 3AMOK HxOHTcB TOM NOnOKeHN, B KOTOpOM OH 6bln BHaJaNe, NO3tOMy Nocne dNITeNbHO HeNCNoB3OBaHN XoD 3aMka MoXeT 6blb TyHM.
-
PaBHomepHo HaHeCnTe CnNkoHObYo CMa3Ky Ha yPnOTheHne 6aNoHeTa (pnc. 22 2, ctp. 12).
-
YCTaHOBnTe 3aDbNkKy Ha MeCTO.
8.4 Cma3bIbAHne yNIOHTHNTeIbHOro KOJIbca B BEHTnlaCNI KaCCeTbl
- BbICBO6OAnTe nepexoHnK (pnc. 23 1, cTp. 12) n3 KaCCeTbI.
- CmaXbTe yIINOTHInTeBHOe KOJIbUo (pnc. 23 2, cTp. 12) cnNkoHOBOcMa3KoJ.
- YctaHOBNTe nepexOJHK Ha MeCTo.
9 yxodn o6cnyxnbHne
B 3ToI rnaBe oNcIbAIOTe pa6OtBI NO O6CnyXnBaHnIO n3ePnIA, KOToPbIE BblONHrIoTc IOnb3OBaTeIeM. Pa6OtBI NO yXoDy I O6CnyXnBaHnIO, KOToPbIE He nepeuNCJIeHbB 3ToM pa3DeNe, DOnxHbI BblONHrTbc SneuaanCTamN (cm. dometic.com/contact).
Ipn o6paueHn B cepBnchb IeHTp Bam MOrY T NOHaIO6ntbcra daHHbIe nacnpTHoT a6nnuK:
- Model (Model Designation)
- Ho m e p n 3 d e p n i (P r oduct Number)
- cepnHbH Homep (Serial No.)
KoMLC(MLC)

YKA3AHNE
PacnoptHa Ta6nUka pacnoIoxeHa Ha o6uBke Kaccetb (Heo6xOIMO n3BneYkaccety).
He xbaataTecb 3a OTBepCTne npn 3aKpbIBaHnn KpbIuKN.
- 3akpoIte KpbIshKy (pnc. 21, ctp. 11).
- YcTaHOBInTe 3aDnKky Ha MeCTo.
9.4 3aMeHa ynpToHHeNjaOHeTa
- CHINMTe KACCETHbI 6aK I NOCTaBbTe ero Ha ycToiYByIO NOBepXHOCTb (pnc. 14, ctp. 9).
- OToCoeHnHTe pyUky 3aBnxKn I BbITAHnTe ee HapUxy (pnc. 15, ctp. 9).
- ПовернITE заимьку потив часовь стpeпки и ИЗВпeкпte ee ИЗ Кассъ (рис. 16,ст. 10).
- Chmite cnapoe ynpnoTHenne (pnc. 22 2,ctp.12).
- OuNCTInTe 6aNoHETbIi 3aMOK.
- BctaBbTe HOBOe ynnOTHeHne.
- y6eIntecb, yTO HOBOe yNIOtHeHne neXHT POBHO.
- YCTaHOBNTe 3aDbNkKy Ha MeCTO.
- CmaXbTe BCE yUacTKn.
9.5 3aMeHa npeOxpaHnteHa naneu ynpabIeHHa

OCTOPOXHO! Onachoctb nonyueynra TpaBM
- Pered 3aMeHOn OTKIouHte yCTpoNcTBO OT NCTOuHnKa PntaHnJ.
ToIbko CT,CTLP,CTS,CTW:
-
Octopoxho BbTaIHTe nHaHb ynpaBneHn 13 OTBepCTnB CTHe. OnachOcTb nOnyuHn TpaBMbl B pe3yNbTaTe Bb6poca npyXnHbl.
-
Понимпгларь ураленя похдшим Инструментов и симпго с
CTeHbI (pnc. 27,ст. 14).
2. 3amehnte npedeoxpaHntelb (npedeoxpaHntelb aBtOMo6nla: 7,5 A) B HnxHeJyactn naHEnu ynpabNeHnra (pnc. 27 1, ctp. 14).
9.6 3aMeHa KonecNkoB Ha KaCCeTHOM 6aKe
Pn Heo6xOIMOCtN KOJecNKHa KaCCeTHOM 6aKe MoXHO 3aMeHHTb.
- Chnmtte ctabie konecnK, kaK n3o6paxeHo ha pncyHke (pnc. 28, ctp. 15).
- YctaHOBInTe HObIe KOJIecnK, KaK n3o6paXeHo Ha pncyHKe (pnc. 28, ctp. 15).
- ПоверътхODКОпескOB.
10 YctpaHHe HencpapBHOCTe
HencnpaBHOctb Bo3MOXHbI npuHHbI YcTpaHeHne
He pa6oTaET cInB. HenCnpaBeH npeOxpaHn
TENb.
He BCTaBnHa KaCCeTa.
Kacceta nepenonHeHa.
OTcyTCTByeT 3neKtpoNTaHHe.
HencnpabHa 3NeKeTpoHnKa.
HencnpaBHeHaCoc.
HeicnpaBeH 3neKtpomarHHTnbl KnaNaH.
3aŋp3HeN cTepxeHb ənek-tpOMaHHTHOKnaHaHa.
3aMeHnte npedeoxpaHntenb (cm. I1I. «3aMeHa npedeoxpaHntenHa naneu ynpabneHnra» Ha cTp. 200).
pre modelly toalist CT 3000/CT 4000
Vymenit poškodené diely.
dometic.com/sales-offices