HD 515 C - Pressure washer Kärcher - Free user manual and instructions
Find the device manual for free HD 515 C Kärcher in PDF.
| Product type | High-pressure cleaner |
| Brand | Kärcher |
| Model | HD 515 C |
| Supply voltage | 230 V |
| Frequency | 50 Hz |
| Connected load | 2.8 kW |
| Protection type | IPX5 |
| Operating pressure | 15 MPa (150 bar) |
| Maximum pressure | 20 MPa |
| Water flow rate | 8.1 l/min |
| Detergent flow rate | 0 - 25 l/h |
| Max. feed temperature | 60 °C |
| Typical operating weight | 25.2 kg |
| Dimensions (L x W x H) | 380 x 360 x 930 mm |
| Sound pressure level (LpA) | 72 dB(A) |
| Sound power level (LWA) | 88 dB(A) |
| Hand-arm vibration | 2.4 m/s² |
| Connection system | EASY!Lock |
| Main functions | High-pressure jet, detergent injection, automatic shut-off (pressure switch) |
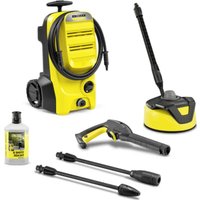
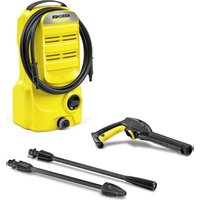
| Included accessories | EASY!Force high-pressure gun, EASY!Lock lance, high-pressure nozzle, high-pressure hose |
| Maintenance | Regular cleaning of the water inlet filter and detergent filter |
| Safety | Safety lever, safety catch on the gun, frost protection |
| Warranty | Conditions according to country, contact authorized service center |
Frequently Asked Questions - HD 515 C Kärcher
User questions about HD 515 C Kärcher
0 question about this device. Answer the ones you know or ask your own.
Ask a new question about this device
Download the instructions for your Pressure washer in PDF format for free! Find your manual HD 515 C - Kärcher and take your electronic device back in hand. On this page are published all the documents necessary for the use of your device. HD 515 C by Kärcher.
USER MANUAL HD 515 C Kärcher
Chairman of the Board of Management

S. Reiser
Director Regulatory Affairs & Certification
71364 Winnenden (Germany)
Tel.: +49 7195 14-0
Fax: +49 7195 14-2212
Winnenden, 2019/05/01
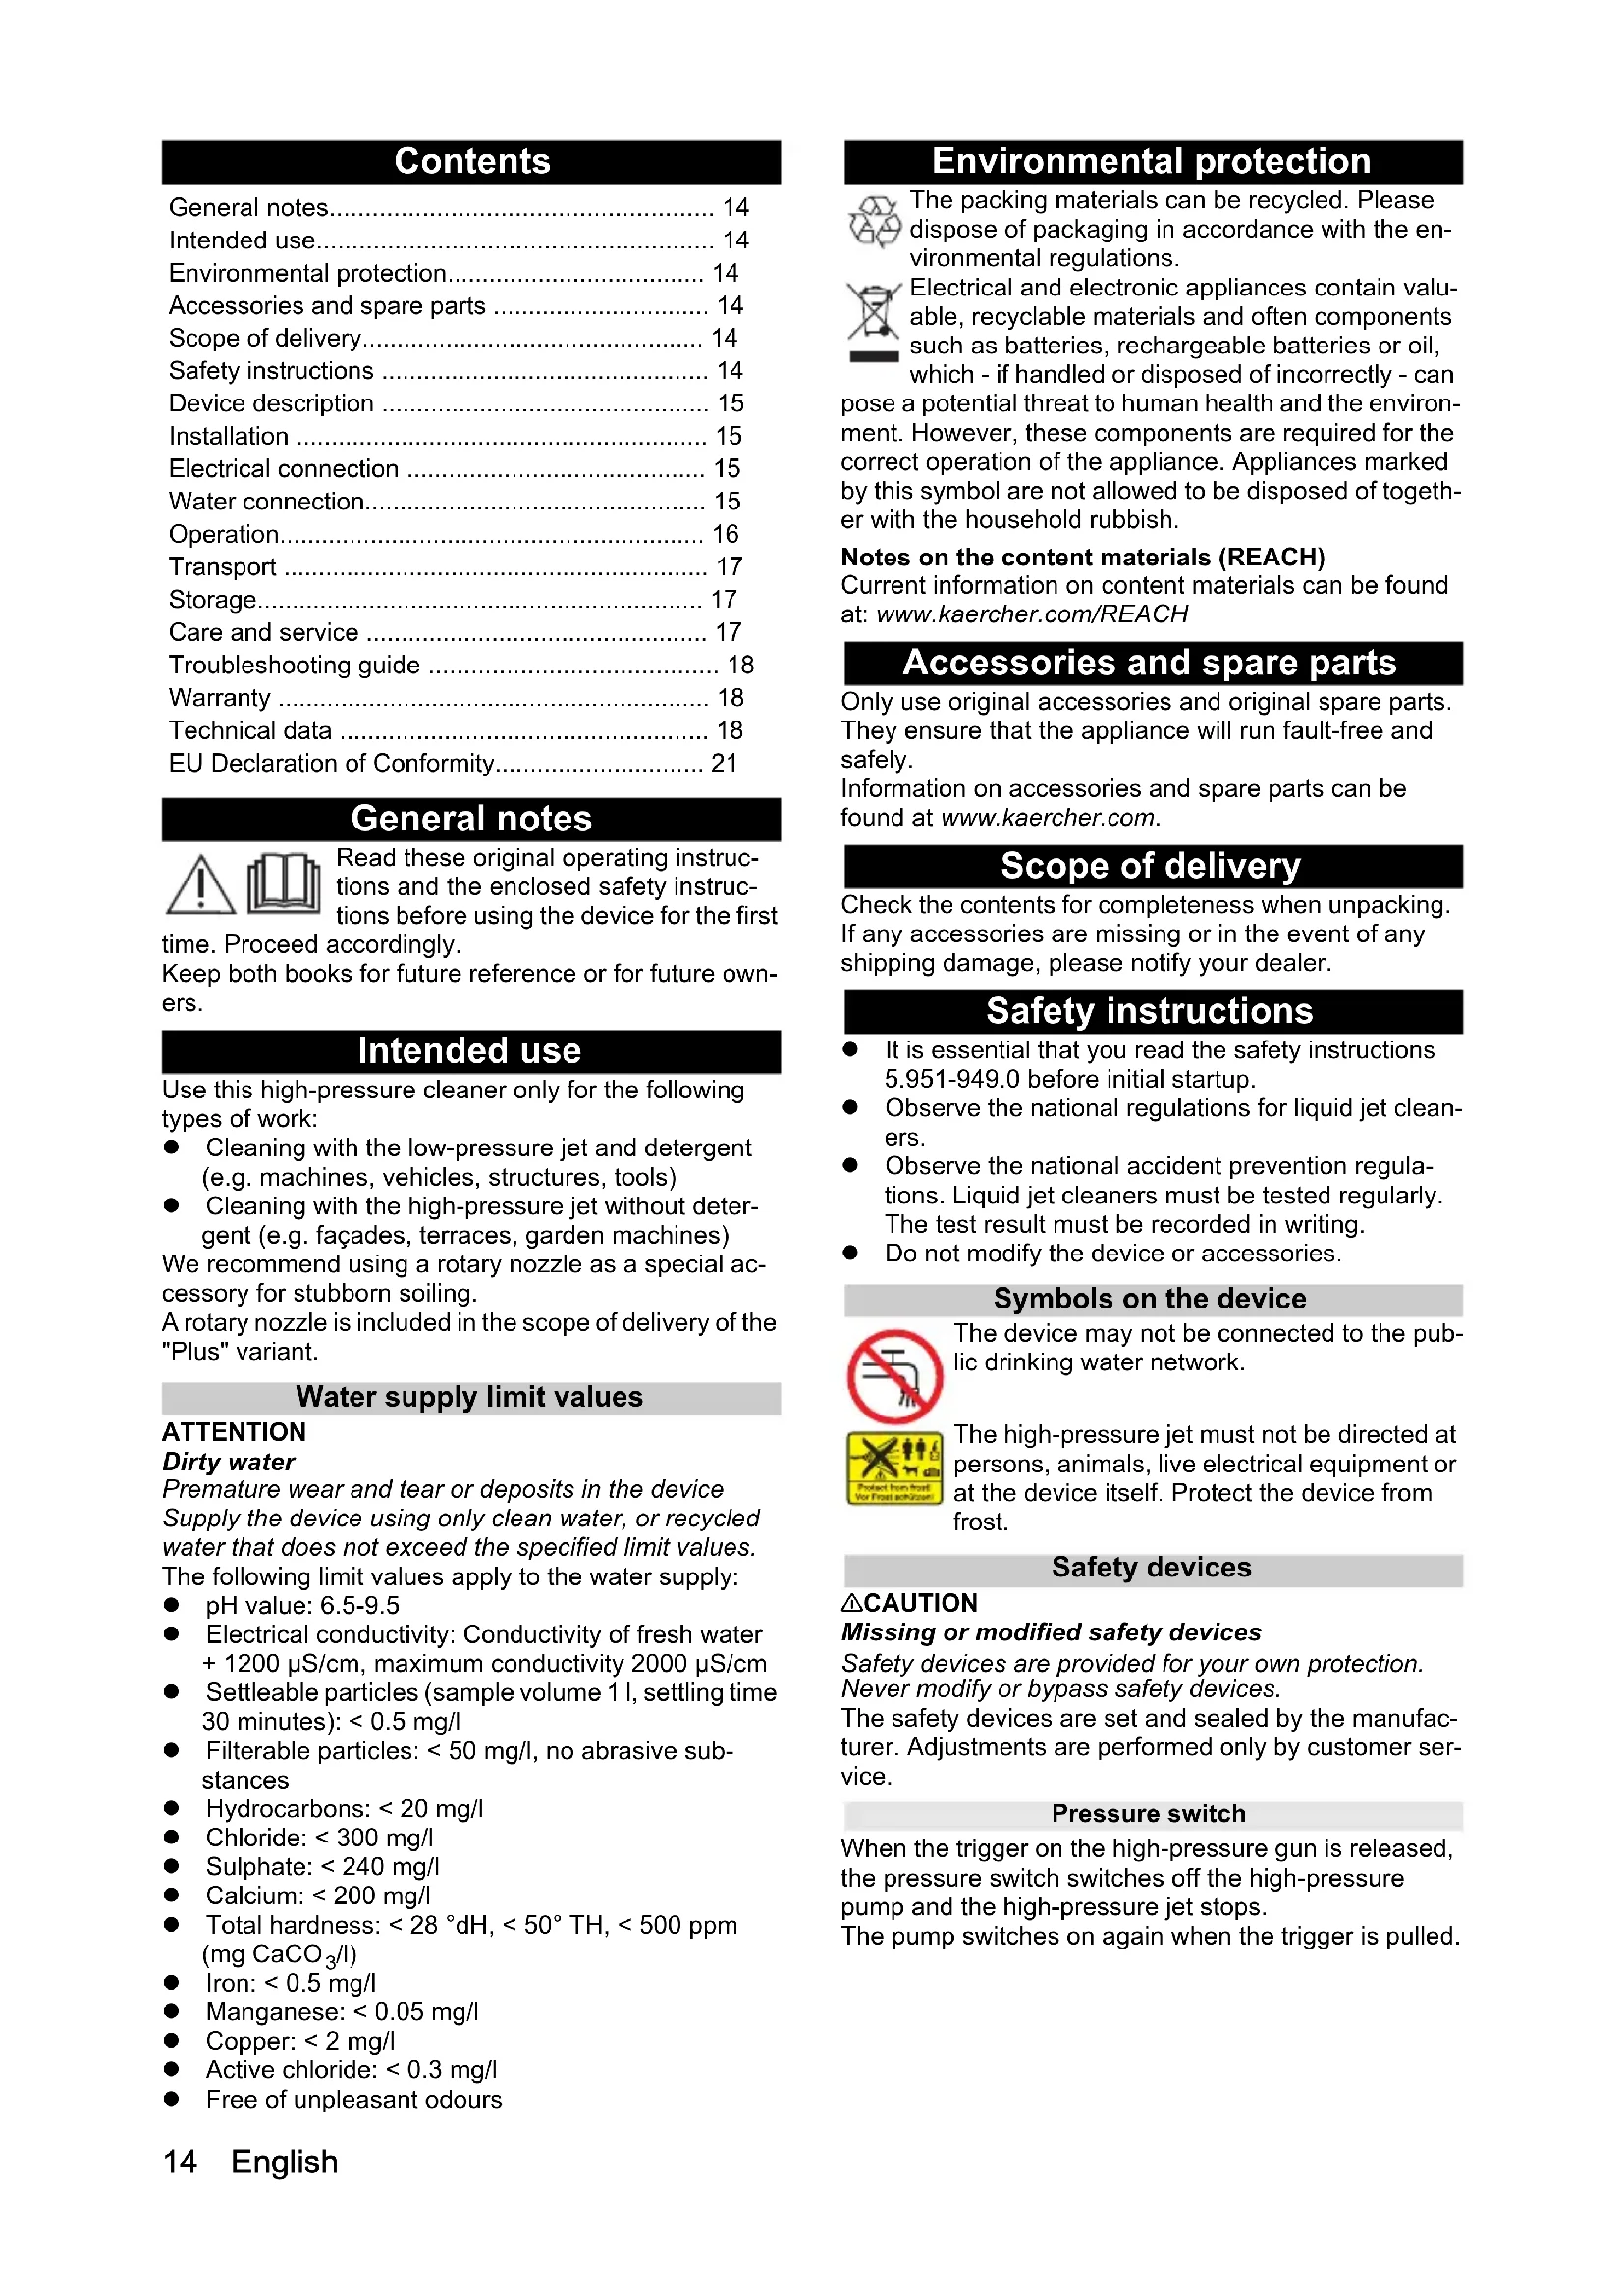
Contents
General notes. 14
Intended use 14
Environmental protection. 14
Accessories and spare parts 14
Scope of delivery. 14
Safety instructions 14
Device description 15
Installation 15
Electrical connection 15
Water connection. 15
Operation 16
Transport 17
Storage 17
Care and service 17
Troubleshooting guide 18
Warranty 18
Technical data 18
EU Declaration of Conformity 21
General notes

Read these original operating instructions and the enclosed safety instructions before using the device for the first
time. Proceed accordingly.
Keep both books for future reference or for future owners.
Intended use
Use this high-pressure cleaner only for the following types of work:
- Cleaning with the low-pressure jet and detergent (e.g. machines, vehicles, structures, tools)
- Cleaning with the high-pressure jet without detergent (e.g. facades, terraces, garden machines)
We recommend using a rotary nozzle as a special accessory for stubborn soiling.
A rotary nozzle is included in the scope of delivery of the "Plus" variant.
Water supply limit values
ATTENTION
Dirty water
Premature wear and tear or deposits in the device Supply the device using only clean water, or recycled water that does not exceed the specified limit values. The following limit values apply to the water supply:
pH value: 6.5-9.5
- Electrical conductivity: Conductivity of fresh water + 1200 S/cm, maximum conductivity 2000 S/cm
- Settleable particles (sample volume 1 l, settling time 30 minutes): < 0.5 mg/l
- Filterable particles: < 50 mg/l , no abrasive substances
Hydrocarbons: < 20 mg/l
- Chloride: < 300 mg/l
- Sulphate: < 240 mg/l
Calcium: < 200 mg/l
Total hardness: < 28^, < 50^, < 500ppm (mg CaCO_3/l )
- Iron: < 0.5 mg/l
Manganese: < 0.05 mg/l
Copper: < 2mg / l
Active chloride: < 0.3mg / l
Free of unpleasant odours
Environmental protection

The packing materials can be recycled. Please dispose of packaging in accordance with the environmental regulations.

Electrical and electronic appliances contain valuable, recyclable materials and often components such as batteries, rechargeable batteries or oil, which - if handled or disposed of incorrectly - can
pose a potential threat to human health and the environment. However, these components are required for the correct operation of the appliance. Appliances marked by this symbol are not allowed to be disposed of together with the household rubbish.
Notes on the content materials (REACH)
Current information on content materials can be found at: www.kaercher.com/REACH
Accessories and spare parts
Only use original accessories and original spare parts. They ensure that the appliance will run fault-free and safely.
Information on accessories and spare parts can be found at www.kaercher.com.
Scope of delivery
Check the contents for completeness when unpacking. If any accessories are missing or in the event of any shipping damage, please notify your dealer.
Safety instructions
It is essential that you read the safety instructions 5.951-949.0 before initial startup.
- Observe the national regulations for liquid jet cleaners.
- Observe the national accident prevention regulations. Liquid jet cleaners must be tested regularly. The test result must be recorded in writing.
- Do not modify the device or accessories.
Symbols on the device

The device may not be connected to the public drinking water network.
The high-pressure jet must not be directed at persons, animals, live electrical equipment or at the device itself. Protect the device from frost.
Safety devices
CAUTION
Missing or modified safety devices
Safety devices are provided for your own protection. Never modify or bypass safety devices.
The safety devices are set and sealed by the manufacturer. Adjustments are performed only by customer service.
Pressure switch
When the trigger on the high-pressure gun is released, the pressure switch switches off the high-pressure pump and the high-pressure jet stops.
The pump switches on again when the trigger is pulled.
Device description
Overview of the unit
See graphics page
①Hubcap
2Nozzle holder
Skid
Type plate
⑤ Nozzle storage for triple nozzle
⑥ Transport retainer for surface cleaner
⑦Push handle lock
8Push handle, bottom (pushed in)
9Push handle, top (pulled out)
10 High-pressure nozzle
① High-pressure nozzle marking
EASY!Lock spray lance
13EASY!Force high-pressure gun
(4)Safety latch
15 Trigger
Safety lever
EASY!Lock high-pressure hose
(18)Hose storage compartment
19Cable clips
20 Spray lance holder without a clamp
② Rubber band (not in devices with a hose reel)
22 Nozzle storage compartment for rotary nozzle (rotary nozzle only included in the scope of delivery of the "Plus" variant)
23Spray lance holder with a clamp for transport
24Power switch
(25) Handle
EASY!Lock high-pressure connection
27 Handle
28Water connection
Detergent suction hose with filter and detergent dosing unit
30 sieve
③ Hose spout
③ Union nut
(33)Crank
34Hose reel
Colour coding
Control elements for the cleaning process are yellow.
Control elements for maintenance and servicing are light grey.
Installation
Fastening the hubcaps
- Fasten the hubcaps.
Installing accessories
Note
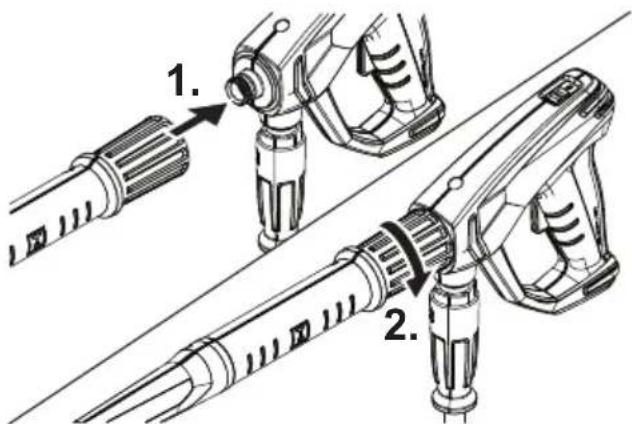
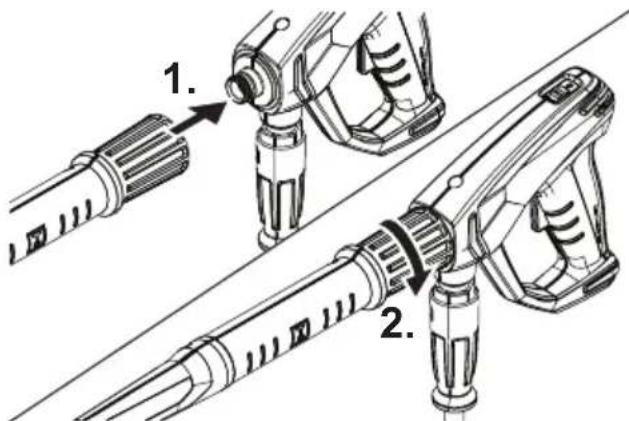
The EASY!Lock system connects components quickly and safely via a single turn of the quick-release thread.
- Fit the high-pressure nozzle onto the spray lance with the marking facing upwards.
- Tighten the high-pressure nozzle hand-tight (EASY!Lock).
- Connect the spray lance to the high-pressure gun and hand-tighten (EASY!Lock).
- Release the push handle lock.
- Pull the push handle out to the end position. For devices without a hose reel:
- Connect the high-pressure hose to the high-pressure gun and high-pressure connection of the device and tighten hand-tight (EASY!Lock).
For devices with a hose reel:
- Lay the high-pressure hose on the ground in a straight line.
- Insert the crank into the hose reel shaft and latch into position.
- Turn the crank clockwise and wind the high-pressure hose onto the hose reel in evenly distributed layers.
- Connect the high-pressure hose to the high-pressure gun and hand-tighten (EASY!Lock).
Electrical connection
△DANGER
Failure to disconnect the mains
Risk of injury from electric shock
Use a plug to connect the device to the mains grid. Permanent connection to the mains grid is prohibited. The plug is used for disconnection from the mains.
- Unwind the mains cable and place on the ground.
- Plug the mains plug into the socket.
Water connection
Connection to a water line
△WARNING
Return flow of dirty water into the drinking water network
Health risk
Observe the regulations of your water supply company. According to applicable regulations, the device must never be used with the drinking water network without a system separator. Use a system separator from KARCHER or a system separator as per EN 12729
Type BA. Water that has flowed through a system separator is classified as undrinkable. Always connect the system separator to the water supply and never directly to the water connection on the device.
- Check the supply pressure, supply temperature and supply volume of the water supply (see chapter Technical data).
- Connect the system separator to the water connection of the device using a water supply hose (for the requirements placed on the water supply hose see chapter Technical data).
- Open the water inlet.
Suck water from the container
- Screw the suction hose with filter onto the water connection (for the order number see chapter Technical data).
- Vent the device (see chapter Vent the device).
Vent the device
- Unscrew the high-pressure nozzle from the spray lance.
- Allow the device to run until the escaping water is free of air bubbles.
- In the case of venting problems, allow the device to run for 10 seconds and then switch it off. Repeat the procedure several times.
- Switch off the device.
- Screw the high-pressure nozzle onto the spray lance.
Operation
△DANGER
High-pressure water jet
Danger of injury
Never fasten the trigger and safety lever in the actuated position.
Do not use the high-pressure gun when the safety lever is damaged.
Push the safety latch of the high-pressure gun forwards every time before starting work with the device.
Hold the high-pressure gun and spray lance with both hands.
WARNING
Defective device and accessories, defective supply lines and connections
Danger of injury
The device may only be operated when in a correct operating condition.
Opening/closing the high-pressure gun
- Actuate the safety lever and trigger. The high-pressure gun opens.
- Release the safety lever and trigger. The high-pressure gun closes.
High-pressure operation
The device can be operated in a standing or lying position.
Note
The device is equipped with a pressure switch. The motor only starts up when the high-pressure gun is open.
- For devices with a hose reel: Completely unroll the high-pressure hose from the hose reel.
- Set the power switch to the "I/ON" position.
- Push the safety latch of the high-pressure gun to the rear.
The high-pressure gun is unlocked.
- Open the high-pressure gun.
Selecting the spray type
- Close the high-pressure gun.
- Turn the casing of the nozzle until the desired symbol lines up with the marking.
| - - | High-pressure round stream \( \left( {0}^{ \circ }\right) \) for espe- cially stubborn soiling |
|  | Low-pressure flat stream (CHEM) for oper- ating with detergent or cleaning at low pres- sure |
|  | High pressure flat stream \( \left( {25}^{ \circ }\right) \) for large soiled areas |
Operation with detergent
△DANGER
Residual high pressure in the device
Danger of injury
Switch off the device prior to changing nozzles.
Actuate the high-pressure gun until the device is completely depressurised.
WARNING
Incorrect handling of detergents
Health risk
Adhere to the safety instructions stated on the detergent
packaging.
ATTENTION
Unsuitable detergents
Damage to the device and the objects to be cleaned Use only detergents approved by KARCHER.
Observe the dosing recommendations and notes provided with the detergent.
Use detergents sparingly to help conserve the environment.
Note
KÄRCHER detergents ensure fault-free operation. Ask us for a consultation, request our catalogue or our detergent information sheets.
- Pull out the detergent suction hose.
- Adjust the detergent solution suction volume at the detergent filter.
- Hang the detergent suction hose in a container with detergent.
- Set the nozzle to the "CHEM" position.
- Start up the high-pressure cleaner.
Recommended cleaning method
- Spray the detergent sparingly on the dry surface and let it work for a while (do not let it dry).
- Rinse off the loosened dirt with the high-pressure jet.
After operation with detergent
- Adjust the suction volume at the detergent filter to the maximum volume.
- Immerse the filter in clear water.
- Start the device and rinse clear for one minute.
Interrupting operation
- Close the high-pressure gun. The device switches off.
- Push the safety latch forwards.
The high-pressure gun is secured.
Continuing operation
- Push the safety latch backwards.
The high-pressure gun is unlocked. - Open the high-pressure gun.
The device switches on.
Finishing operation
- Close the water inlet.
- Open the high-pressure gun.
- Set the power switch to "I/ON" and allow the device to run for 5-10 seconds.
- Close the high-pressure gun.
- Set the power switch to "0/OFF"
- Pull the mains plug out of the socket only when your hands are dry.
- Remove the water inlet.
- Open the high-pressure gun until the device is completely depressurised.
- Push the safety latch forwards. The high-pressure gun is secured.
Transport
CAUTION
Failure to observe the weight
Risk of injury and damage
Be aware of the weight of the device during transport and storage.
ATTENTION
Improper transportation
Risk of damage
Protect the trigger of the high-pressure gun from damage.
- Transporting the device in a vehicle: Secure the device in accordance with the respectively applicable guidelines to prevent it from slipping or overturning.
- Transporting the device over longer distances: Pull the device behind you via the push handle.
- Transporting the device over stairs: Pull the device step by step. The skids protect the casing from damage.
- Carrying the device: Carry the device by the handles only.
Transport retainer for surface cleaner
- Plug the connection union of the surface cleaner on to the transport holder of the high-pressure cleaner.
- Screw on the union nut by approximately 1 turn.
Crane transport
△DANGER
Improper crane transport
Risk of injury from a falling device or falling objects Observe the local regulations for accident prevention and the safety instructions.
The device may only be transported with a crane by persons instructed in the operation of the crane.
Check the lifting gear for damage before each crane transport.
Check the handle for damage before each crane transport.
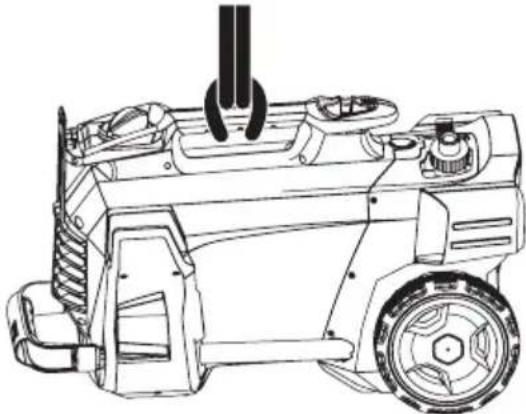
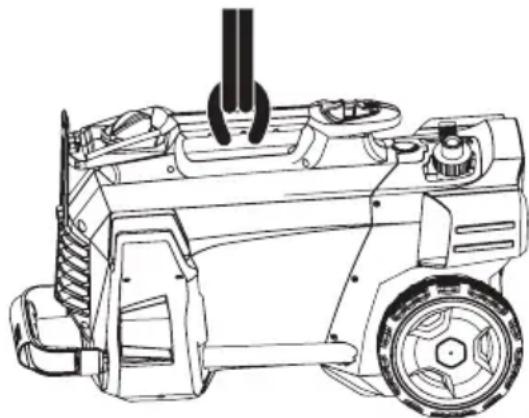
Lift the device only by the handle.
Do not use an slinging chains.
Secure the lifting gear against unintentional unhooking of the load.
Remove the spray lance with high-pressure gun, nozzles, surface cleaner and other loose objects before transporting by crane.
Do not transport any objects on the device during the lifting operation.
Do not stand under the suspended load.
Ensure that no persons are in the hazard zones of the crane.
Do not leave the device handing unattended on the crane.
- Attach the lifting gear to the handle on the device.
Storage
CAUTION
Failure to observe the weight
Risk of injury and damage
Be aware of the weight of the device during transport and storage.
Store the device indoors only.
Storing the device
-
Fit the spray lance with high-pressure gun into the nozzle holder and latch into position in the spray lance holder.
-
Roll up the mains cable and hang it over the cable holders.
-
Fasten the plug with the clip provided.
For devices with a hose reel:
- Wind the high-pressure hose onto the hose reel and fold over the crank handle.
For devices without a hose reel:
- Storing the high-pressure hose:
a Wind up the high-pressure hose.
b Hang the high-pressure hose over the hose storage compartment.
c Secure the high-pressure hose with the rubber band.
- Press the push handle lock and slide in the push handle.
Frost protection
ATTENTION
Frost
Destruction of the device through freezing water Drain all water from the device.
Store the device in a frost-free location.
If frost-free storage is not possible:
- Drain the water.
- Pump commonly available anti-freeze through the device.
Note
Use commonly available, Glycol-based vehicle antifreeze. Observe the handling instructions of the antifreeze manufacturer.
3. Allow the device for run for a maximum of 1 minute until the pump and lines are empty.
Care and service
DANGER
Inadvertently starting up device
Risk of injury, electric shock
Switch off the device immediately and unplug the mains plug before performing work.
Note
Old oil may only be disposed of at designated collection points. Please dispose of any old oil at these locations. Polluting the environment with old oil is punishable by law.
Safety inspection/maintenance contract
You can agree on regular safety inspections or close a maintenance contract with your dealer. Please seek advice on this.
Maintenance intervals
Each time before use
- Check the mains cable for damage. Have a damaged cable replaced immediately by the authorised Customer Service or a qualified electrician.
- Check the high-pressure hose for damage. Immediately replace a damaged high-pressure hose.
- Check the device for leaks. 3 drops of water per minute are permissible. Contact Customer Service in the case of more serious leaks.
Weekly
- Empty and clean the sieve in the water connection (see chapter Clean the sieve in the water connection).
- Clean the filter on the detergent suction hose.
Every 500 operating hours, at least annually
- Have the device serviced by Customer Service.
Maintenance work
Clean the sieve in the water connection
- Unscrew the union nut.
- Remove the hose union.
- Remove the sieve.
- Externally clean and rinse the sieve.
- Insert the sieve.
Note
Align the hex-head of the hose union to the connection on the device.
6. Attach the hose union and tighten with the union nut.
Troubleshooting guide
△DANGER
Inadvertently starting up device, touching live components
Risk of injury, electric shock
Switch off the device before performing any work on the device.
Remove the mains plug.
Have all checks and work on electrical parts performed by a qualified electrician.
In case of any malfunctions not mentioned in this chapter, contact the authorised Customer Service.
The device cannot be started.
- Check the mains cable for damage.
- Check the mains voltage.
-
If the device overheats: a Set the power switch to "0/OFF". b Allow the device to cool for at least 15 minutes. c Set the power switch to the "I/ON" position.
-
Contact Customer Service in the case of electrical faults.
Device does not reach required pressure
- Set the nozzle to high-pressure.
- Vent the device (see chapter Vent the device).
- Empty and clean the sieve in the water connection (see chapter Clean the sieve in the water connection).
- Check the water supply volume (for the necessary volume see chapter Technical data).
- Clean the nozzle and replace if necessary.
- Contact Customer Service if necessary.
The pump is leaking.
Up to 3 drops of water per minute are permissible.
In case of more serious leaks, have the device checked by Customer Service.
The pump knocks
- Check the water supply line for leaks.
- Check the detergent suction line for leaks.
-
Adjust the suction volume at the detergent filter to the minimum volume.
-
Vent the device (see chapter Vent the device).
- Contact Customer Service if necessary.
The detergent mixture ratio is too weak
- Set the nozzle to "CHEM".
- Increase the suction volume at the detergent filter.
- Open or check/clean the detergent suction hose with filter.
- Contact Customer Service if necessary.
Warranty
The warranty conditions issued by our relevant sales company apply in all countries. We shall remedy possible malfunctions on your appliance within the warranty period free of cost, provided that a material or manufacturing defect is the cause. In a warranty case, please contact your dealer (with the purchase receipt) or the next authorised customer service site.
(See overleaf for the address)
Technical data
| HD 5/11 C | HD 5/12 C HD 5/ 12 CX | HD 5/12 C HD 5/ 12 CX | HD 5/12 C HD 5/ 12 CX | HD 5/12 C HD 5/ 12 CX | HD 5/12 C HD 5/ 12 CX | HD 5/12 C | |
| Country variant | |||||||
| Country AU EU GB CH AU KAP SA | |||||||
| Electrical connection | |||||||
| Voltage | V | 240 | 230 | ||||
| Phase | ~ | 1 | 1 | 1 | 1 | 1 | 1 |
| Frequency | Hz | 50 | 50 | 50 | 50 | 60 | 60 |
| Connection output | kW | 2,1 2,5 | 2,5 2,2 | 2,4 2,4 | |||
| Degree of protection | IPX5 | IPX5 | IPX5 | IPX5 | IPX5 | IPX5 | |
| HD 5/11 C | HD 5/12 C HD 5/ 12 CX | HD 5/12 C HD 5/ 12 CX | HD 5/12 C HD 5/ 12 CX | HD 5/12 C HD 5/ 12 CX | HD 5/12 C HD 5/ 12 CX | ||
| P | o | w | e | r | p | r | o |
| Extension cable, 30 m mm | 2 | 2,5 | 2,5 | 2,5 | 2,5 | ||
Water connection
| F | e | e | d | p | r | e | s | s | u | r | e | ( |
| I | n | p | u | t | e | m | p | e | r | a | t | u |
| Input amount (min.) | l/min | 12 | 12 | 12 | 12 | 12 | 12 | 12 | ||||
| Suction height (max.) | m | 0,5 | 0,5 | 0,5 | 0,5 | 0,5 | 0,5 | |||||
| Minimum water supply hose length | m | 7,5 | 7,5 | 7,5 | 7,5 | 7,5 | 7,5 | |||||
| Minimum water supply hose diameter in | 1/2 | 1/2 | 1/2 | 1/2 | 1/2 | 1/2 | ||||||
| Suction hose with filter order number | 2.643- | 2.643- | 2.643- | 2.643- | 2.643- | 2.643- | 2.643- | |||||
| 100.0 | 100.0 | 100.0 | 100.0 | 100.0 | 100.0 | 100.0 | ||||||
Device performance data
| Nozzle size of standard nozzle | 038 | 035 | 035 | 038 | 038 | 036 | 036 | |
| Operating pressure | MPa | 11 | 12 | 12 | 11,5 | 11,5 | 12 | 12 |
| Operating pressure (max.) | MPa | 17,1 | 17,5 | 17,5 | 17,1 | 17,1 | 18 | 18 |
| Water flow rate | l/min | 8,3 | 8,3 | 8,3 | 8,3 | 8,3 | 8,3 | 8,3 |
| Detergent flow rate | l/h | 0-25 | 0-25 | 0-25 | 0-25 | 0-25 | 0-25 | 0-25 |
| High-pressure gun recoil force | N | 21,3 | 21,3 | 21,3 | 21,3 | 21,3 | 21,3 | 21,3 |
Dimensions and weights
| Typical operating weight (CX) | kg | 24,2 (-) | 23,7 (26) | 23,7 (26) | 23,7 (26) | 24,2 (26,4) | 25,2 (-) | 25,2 (-) |
| Length | mm | 380 | 380 | 380 | 380 | 380 | 380 | 380 |
| Width (CX) | mm | 360 (-) | 360 (370) | 360 (370) | 360 (370) | 360 (370) | 360 (-) | 360 (-) |
| Height | mm | 930 | 930 | 930 | 930 | 930 | 930 | 930 |
Determined values in acc. with EN 60335-2-79
| Hand-arm vibration value | m/s2 | 3,6 | 3,6 | 3,6 | 3,6 | 3,6 | 4,2 | 4,2 | ||
| Uncertainty K | m/s2 | 0,9 | 0,9 | 0,9 | 0,9 | 0,9 | 0,9 | 0,9 | ||
| Sound pressure level LpA (CX) | dB(A) | 72 (-) | 72 (75) | 72 (75) | 72 (75) | 72 (75) | 72 (75) | 74 (-) | 74 (-) | |
| Uncertainty KpA | d | B | ( | A | ) | 3 | 3 | 3 | 3 | |
| Sound power level LWA+K uncertaintyWA (CX) | dB(A) | 88 (-) | 88 (92) | 88 (92) | 88 (92) | 88 (92) | 88 (92) | 90 (-) | 90 (-) |
| HD 5/13 | HD 5/15 | HD 5/17 | HD 5/17 | HD 6/13 | HD 6/13 | HD 6/13 | |
| C HD 5/13 CX | C HD 5/15 CX | C HD 5/17 CX | C HD 5/17 CX | C HD 6/13 CX | C HD 6/13 CX |
Country variant
| Country | EU EU EU KAP | EU AR GB | |||||||||
| Electrical connection | |||||||||||
| Voltage | V | 230 | 230 | 230 | 220 | 230 | 220 | 230-240 | |||
| P h a s e | ~ | 1 | 1 | 1 | |||||||
| Frequency | Hz | 50 | 50 | 50 | 60 | 50 | 50 | 50 | |||
| Connection output | kW | 2,6 2,8 | 3,0 3,0 | 2,9 2,9 | |||||||
| Degree of protection | IPX5 | IPX5 | IPX5 | IPX5 | IPX5 | IPX5 | IPX5 | ||||
| P o w e r p | r | o | t | e | c | t | i | o | |||
| Extension cable, 30 m mm | 2 | 2,5 2,5 | 2,5 2,5 | 2,5 2,5 | |||||||
Water connection
| F | e | e | d | p | r | e | s | s | u | r | e | ( | ||
| I | n | p | u | t | t | e | m | p | e | r | a | t | u | r |
| HD 5/13 C HD 5/13 CX | HD 5/15 C HD 5/15 CX | HD 5/17 C HD 5/17 CX | HD 5/17 C HD 5/17 CX | HD 6/13 C HD 6/13 CX | HD 6/13 C HD 6/13 CX | |
| Input amount (min.) l/min 12 12 12 13 13 13 | ||||||
| Suction height (max.) m 0,5 0,5 0,5 0,5 0,5 0,5 | ||||||
| Minimum water supply hose length m 7,5 7,5 7,5 7,5 7,5 7,5 | ||||||
| Minimum water supply hose diameter in 1/2 1/2 1/2 1/2 1/2 1/2 | ||||||
| Suction hose with filter order number 2.643- | 100.0 | 2.643- 100.0 | 2.643- 100.0 | 2.643- 100.0 | 2.643- 100.0 | 2.643- 100.0 |
| Device performance data | ||||||
| Nozzle size of standard nozzle 034 032 027 030 038 038 038 | ||||||
| Operating pressure MPa 13 15 17 16,5 | 13 13 13 | |||||
| Operating pressure (max.) | MPa 17,5 | 20 | 20 | 20 19 19 | ||
| Water flow rate | l/min | 8,3 | 8,3 | 8,1 | 8,0 | 9,8 |
| Detergent flow rate | l/h | 0-25 | 0-25 | 0-25 | 0-25 | 0-25 |
| High-pressure gun recoil force | N | 22,2 | 23,8 | 25,4 | 25,4 | 26,6 |
| Dimensions and weights | ||||||
| Typical operating weight (CX) | kg | 23,7 (26) | 25,2 (27,5) | 25,2 (27,5) | 25,2 (27,5) | 25,2 (-) (27,5) |
| Length | mm | 380 | 380 | 380 | 380 | 380 |
| Width (CX) | mm | 360 (370) | 360 (370) | 360 (370) | 360 (370) | 360 (-) (370) |
| Height | mm | 930 | 930 | 930 | 930 | 930 |
| Determined values in acc. with EN 60335-2-79 | ||||||
| Hand-arm vibration value | m/s2 | 3,6 | 2,4 | 2,4 4,1 | 4,1 4,1 | |
| Uncertainty K | m/s2 | 0,9 | 0,7 | 0,7 0,9 | 0,9 0,9 | |
| Sound pressure level LpA (CX) | dB(A) | 72 (75) | 72 (74) | 72 (75) | 75 (75) | 72 (-) |
| Uncertainty KpA | dB(A) | 3 | 3 | 3 | 3 | 3 |
| Sound power level LWA+K uncertaintyWA (CX) | dB(A) | 88 (92) | 88 (90) | 88 (92) | 91 (91) | 88 (-) |
| HD 6/13 C | HD 6/13 C | HD 6/13 C | HD 6/13 C | HD 6/13 C | HD 6/13 C | |
| Country variant | ||||||
| Country | KAP SA | |||||
| Electrical connection | ||||||
| Voltage | V | 220 | 220 | |||
| Phase | ~ | 1 1 | ||||
| Frequency | Hz | 60 60 | ||||
| Connection output | kW | 2,9 2,8 | ||||
| Degree of protection | IPX5 | IPX5 | ||||
| Power protection (slow-blowing) A | 15 13 | |||||
| Extension cable, 30 m | mm2 | 2,5 2,5 | ||||
| Water connection | ||||||
| Feed pressure (max.) | MPa | 1 1 | ||||
| Input temperature (max.) | °C | 60 60 | ||||
| Input amount (min.) l/min 13 13 | ||||||
| Suction height (max.) m | 0,5 0,5 | |||||
| Minimum water supply hose length m | 7,5 7,5 | |||||
| Minimum water supply hose diameter in | 1/2 1/2 | |||||
| Suction hose with filter order number | 2.643- 100.0 | 2.643- 100.0 | ||||
| HD 6/13 C | HD 6/13 C | HD 6/13 C | |
| Device performance data | |||
| Nozzle size of standard nozzle 042 043 | |||
| Operating pressure MPa 13 12,5 | |||
| Operating pressure (max.) MPa 18 18 | |||
| Water flow rate l/min 10,0 10,0 | |||
| Detergent flow rate l/h 0-25 | 0-25 | ||
| High-pressure gun recoil force | N | 26,6 | 26,6 |
| Dimensions and weights | |||
| Typical operating weight (CX) kg | 25,2 (-) | 25,2 (-) | |
| Length | mm | 380 | 380 |
| Width (CX) | mm | 360 (-) | 360 (-) |
| Height | mm | 930 | 930 |
| Determined values in acc. with EN 60335-2-79 | |||
| Hand-arm vibration value | m/s2 | 3,7 | 3,7 |
| Uncertainty K | m/s2 | 0,9 | 0,9 |
| Sound pressure level LpA (CX) | dB(A) | 73 (-) | 73 (-) |
| Uncertainty KpA | dB(A) | 3 | 3 |
| Sound power level LWA + K uncertaintyWA (CX) | dB(A) | 89 (-) | 89 (-) |
Subject to technical modifications.
EU Declaration of Conformity
We hereby declare that the machine described below complies with the relevant basic safety and health requirements in the EU Directives, both in its basic design and construction as well as in the version placed in circulation by us. This declaration is invalidated by any changes made to the machine that are not approved by us.
Product: High-pressure cleaner
Type: 1.520-xxx
Currently applicable EU Directives
2006/42/EC (+2009/127/EC)
2014/30/EU
2000/14/EC
Harmonised standards used
EN 60335-1
EN 60335-2-79
EN 55014-1: 2006+A1: 2009+A2: 2011
EN 55014-2: 2015
EN 62233: 2008
EN 61000-3-2: 2014
EN 61000-3-3: 2008
Applied conformity evaluation method
2000/14/EG: Appendix V
Sound power level dB(A)
The signatories act on behalf of and with the authority of the company management.

H. Jenner
Chairman of the Board of Management

S. Reiser
Director Regulatory Affairs & Certification
Documentation supervisor: S. Reiser
Alfred Karcher SE & Co. KG
Alfred-Karcher-Str. 28 - 40
71364 Winnenden (Germany)
Ph.: +49 7195 14-0
Fax: +49 7195 14-2212
Winnenden, 2019/05/01
Contenu
Remarques generales. 22
Transport non-conforme
Risque d'endommagement
Chairman of the Board of Management

S. Reiser
Director Regulatory Affairs & Certification
Responsible de la documentation : S. Reiser
Alfred Kärcher SE & Co. KG
Alfred-Karcher-Str.28-40
71364 Winnenden (Germany)
Tel.:+49719514-0
Télécopie: +49 7195 14-2212
Winnenden, 2019/05/01
Indices
Chairman of the Board of Management

S. Reiser
Director Regulatory Affairs & Certification
71364 Winnenden (Germany)
Tel.: +49 7195 14-0
Fax: +49 7195 14-2212
Winnenden, 2019/05/01
Inhoud
Chairman of the Board of Management

S. Reiser
Director Regulatory Affairs & Certification
71364 Winnenden (Germany)
Tel.: +49 7195 14-0
Fax: +49 7195 14-2212
Winnenden, 2019/05/01
2006/42/CE (+2009/127/CE)
2014/30/UE
2000/14/CE

H. Jenner
Chairman of the Board of Management

S. Reiser
Director Regulatory Affairs & Certification
Responsible de documentacion: S. Reiser
Alfred Kärcher SE & Co. KG
Alfred-Karcher-Str.28-40
71364 Winnenden (Germany)
Tel.: +49 7195 14-0
Fax: +49 7195 14-2212
Winnenden, 2019/05/01
Indices
Indicaoesgerais 54
2006/42/CE (+2009/127/CE)
2014/30/UE
2000/14/CE

H.Jenner
Chairman of the Board of Management

S. Reiser
Director Regulatory Affairs & Certification
Winnenden, 2019/05/01
Indhold
Generelle henisninger 62
Korrekt anvendelse 62
Miljobeskyttelse 62
Tilbehør ogreservedele 62
Leveringsomfang. 62
www.kaercher.com/REACH
2006/42/EF (+2009/127/EF)
2014/30/EU
2000/14/EF
2000/14/EF: Tillaeg V
Lydeffektniveau dB(A)

H. Jenner
Chairman of the Board of Management

S. Reiser
Director Regulatory Affairs & Certification
71364 Winnenden (Germany)
TIf.: +49 7195 14-0
Fax: +49 7195 14-2212
Winnenden, 2019/05/01
Indhold
Generelle merknader 69
6Transportholder for flaterenser
⑦Sperremekanismeskyvehandtak
8 Skyvehandtak, nede (skjovet inn)
9 Skyvehandtak, oppe (trukket ut)
10Hoytrykksdyse
Transportholder for flaterenser
- Sett tilkoblingsstussen til flaterenseren pa hoytrykksvaskerens transportholder.
- Skru overfalsmutteren omtrent 1 omdreining.
Transport med kran
△FARE
2006/42/EF (+2009/127/EF)
2014/30/EU
2000/14/EF
Anvendte harmoniserte standarder
EN 60335-1
EN 60335-2-79
EN 55014-1: 2006+A1: 2009+A2: 2011
EN 55014-2: 2015
EN 62233: 2008
EN 61000-3-2: 2014
EN 61000-3-3: 2008
Chairman of the Board of Management

S. Reiser
Director Regulatory Affairs & Certification
71364 Winnenden (Germany)
TIf.: +49 7195 14-0
Winnenden, 2019/05/01
Innehåll
Allman information 77

H. Jenner
Chairman of the Board of Management

S. Reiser
Director Regulatory Affairs & Certification
Dokumentationsbefullmaktigad: S. Reiser
Alfred Karcher SE & Co. KG
Alfred-Karcher-Str.28-40
D-71364 Winnenden (Germany)
Tfn: +49 7195 14-0
Fax: +49 7195 14-2212
Winnenden, 2019/05/01
Sisaltö
Yleisia ohjeita 84
Chairman of the Board of Management

S. Reiser
Director Regulatory Affairs & Certification
Dokumentointivastaava: S. Reiser
Alfred Karcher SE & Co. KG
Alfred-Karcher-Str. 28 - 40
71364 Winnenden (Germany)
Puh.: +49 7195 14-0
Winnenden, 2019/05/01
περιεχόμενα
EviKec UToδεiεεiε 92

H.Jenner
Chairman of the Board of Management

S. Reiser
Director Regulatory Affairs & Certification
71364 Winnenden (Germany)
TnA: +49 7195 14-0
Φaξ: +49 7195 14-2212
Winnenden, 2019/05/01
icindekiler
Genel uyarilar. 100
2006/42/AT (+2009/127/AT)
2014/30/AB
2000/14/AT

H. Jenner
Chairman of the Board of Management

S. Reiser
Director Regulatory Affairs & Certification
Winnenden, 2019/05/01
CopepxaHne
O6uhe yka3aHn. 108
IcnoJIb3OBAHHe no Ha3NaYeHHIO 108
3aunTaOkpykaIOuei cpebl 108
PpHaJnEeHocTn 3anaChbIe YacTn. 108
KoMJIeKT NocTaBKn. 108
Yka3aHnno TEsHHke 6e3oNaChocOCTn 108
OncanHe yctpoiCTBa 109
MoHTax 109
3JIeKtpnueckoe noDJIuOyeHne 110
IoiKJIIOUeHnE K NcTOUHNy BOJbl 110
UnpaBJIeHne 110
TpanncnpotnoBka. 111
XpaeHne 112
YxOД n TeXHnueckoe obcnykBaHne 112
Pomoub npn HncnpaBHOCTx. 113
Tapaantna 113
Texnueckne xapaKTepeuCTnKn 114
DeknapaunOcooTBcTBnCTaHapTaMC. 116
ОвICIе укаЗаня

IpeepnepBbIM npimMeHneM yctpoiCTBa 03HaKOMtbcS C daHHo OPINHAJIbHO IHCTpyKuNeI NO
3KcNpyatauH N npUnaeMbIM Yka3aHnMn NO TEXHKe 6e3oNaChOCTn. DeiCTBOBaTb B COOTBeTCTBnC HmN.
CoxpaHrB o6 6pouOpbln daJIbHeWero noIb3OBAHn nn nIeDyUoero BlaJeBca.
IcnoJIb3OBAHHe NO Ha3HaueHnIO
MoIoun annapat BbICOKO TaBHeHn npEHa3Haueh TOJbKO DnB BbIOJIHeHn CneDyUoNx pa60T:
OuNcTa cTpyeHn3KOro daBHeHnC nCNoIb3OBAHNEM MOUSeero CpeIcTBA (HaNPmEp, o6OpyIOBaHn, TpaHCnOpTHbIX CpeIcTBA, CTpOnTeNbHbIX KOHCTpyKun, INHCTpyMeHTOB)
OuNTka CTpye BbICOKoT DaBHeHn63 MoUeRo CpeCTBa (HaPmep, facaob, Teppac, caOBbIX INHCTpyMeHTOB)
IydaenHcToKnx3aRpa3HeHn peKoMeHnyeTcNcNoJb30BaTb potOpHoe cOnIO n3 CneuaNbHbIX npHaadnEkoCTe.
Potophoe cOJIb BxOJIT B KOMJIeKT nocTaBKn BapnaHTa «Plus»
PpeBbIe 3NaueHnIy BODOcHa6KeHnI
BHIMAHNE
3aapn3Hennb8oda
PpeKdeepemHbui u3Hoc unu omnoKeHua ycmpoucmee
ДяЗкпnyamaquuu ycmpoucmea ucnonb308ammbonbko yucmyu unu obopomHyO body, komopar He npebbiwaem npedenbHbix 3HaHeu.
IINBDOCHa6KeHnI pIMMeHrOToC sJeDyIOuNe IpeDeJIbHbIe 3HaueHnI:
3Haehne pH:6,5-9,5
3NeKtpoPoBOHocTb:3JIeKtpoPBOADHOCTb YnCTOBoDbl+1200MKCM/cm,MaKC. 3JIeKtpoPBOHOCTb2000MKCM/cm
OcaKaJaembIeBeuEcTBA(o6beM npo6bl 1n, BpeMa ocakJeHn30 MNHyT) <0.5 Mr/
- ΦιπόντργεMbIe BeμεctBa < 50 Mr/π, Heaδρa3nVBHbIe BeμεctBa
- YrneBODopDbl: < 20 mR/π
XnpnD: <300 m/π
CytbpaT: < 240M /n
KaJIbUcH: < 200Mr/I - 06zaJxecKocTB: <28°dH, <50°TH, <500 ppm (Mg CaCO₃/π)
Keeneo: < 0,5m r/n
Mapraheu: < 0.05m / n
MeBb: <2 m/π - AKTNBbI XJIOp: <0,3 Mr/π
- Be3 HENPNArTHbIX 3aIaxOB
3aunTa OkpyXaOoSe CpeDbI
YnakoobHbIe MaTePnaJIbI NOaIOCTcBTOpNHyOn Nepepa6oTKe. YnakoBky Heo6xOIMyTIN3npoBaT 6e3 yuep6a dIra OkpykaIOuei cpebl.
3JIeKtpnueckne n 3JIeKtpoHHbIe yCTpOInCTBa
yacto coepkataeHHbIe MaTePnaHbI,
npiroDhIbe IJRA BTOpUHHoN nepepa6OTKn, IN
3aYacTyo TaKHe KOMNoHEtB, KaK BaTaPeH,
aKKMyJrAToBpI bIN MaCNO, KOtOpBle npi
HeNPaBnIbHOM oBpaUeHNu INn HeHaIeXaUe
yTuIN3aunPipeCTaBnIOT NToEHTuaNBHyO
ONaCHOCb IJNA 3dOpOBbI aKoJOnrnn. Tem He MeHee,
DaHHbIe KOMNoHEnTb Heo6xOdMbl dNpRaBnHoh
pa60tbl yCTpoINCTBa.YCTPOINCTBa, O6O3HaueHHbIe 3TMM
CNMBONOM, 3anpeUeHO yTuIN3uPoBaTb BMeCTe C
6bITOBbIMN OTXdAMNI.
Yka3aHnno nHrpEnHeTam (REACH)
Pexm pa6oTbI c MOUcIM cpeIcTBOM
ONACHOCTb
BbICOKoe daIeHue, coXpaHoueec8 ycmpoucmee
OnachocmbmpaemupoeaHua
Ipeedcmehou conen bblknioumb ycmpoucmeo.
Haxumambb bicokohanophbu nucmonem, noka u3
ycmpoucmea He 6ydem c6pweno daaeneue.
△PENDyINPEXDEHNE
HenpaunbHoe o6paueHue c moouumu cpedcmeamu
Onachocmb dna 3doopobb Co6nodambyyka3aHua no mexHuke 6e3oNaChocmu, codepkaaueecHa mouux cpedcmeax!
BHIMAHNE
Henpuzodhble moouue cpedcmea
IopexdeHue ycmpoucmea u ouuuaembix obbekmo
Icnonb3o8amb monko moouue cpedcmea,
odobpeHHie KomnaHuei KARCHER.
Co6nloamb peKOMeHdauuu no do3upoeke u yka3aHua KMOUeMy cpecmey.
Buejx 6epeKHOo omHoue H K Okpykaioe cupe 3KOHOHOCINb3OaMb MOUue cpedcm8a.
PpumeyaHue
Icnonb3oebaHue MoUux cpeOme KARCHER
obecneueaem 6eomka3Hyio paBomy o6OpdyoeaHua.
Bbl moXeme obpamumbcra 3a konCylmaueei,
3anpocmb haw kamaIOu unu uHΦopMaUOHbIE
nAmmku nO MOUUM cpeOmeam.
- BbITaHyTb BCaCbIbAIOUcNm WnHaHr Dnra MoOuEero cpeDCTBa.
- YCTAHOBITb 06bem BCACsbHnna pactBopa MOIOUeO cpeDCTBa HaΦINbTpE dIa MoIOUeO cpeDCTBa.
- BcacbIbAIOUm IuaHr MOUeRo CpeDCTBa BCTaBnTb B EMKOCTb C MOUOUM CpeDCTBOM.
- YctahOBHTb cOnIIO B noIooKeHne «CHEM»
- 3anyctntb MOUOn annapat BbICOKOraabNeHnA.
PekomeHDoBaHHbI MeToD OChCTK
- MoOuee cpeCTBO 3KOHOMHO paCnblNTb Ha cyxuO NOBepXHOCTb N DaTb emy NOeIcTBOBaTb (He BbICblXaTb).
- Cmblt3aqr3HeHnCTpye BbICOKoT daBJIeHnI.
Iocne 3Kcnnyataunm c MOOnm CpeDCTBOM
- YctaHOBntb MaKcMmaJIbHoe 3HaueHne 6bema BCacbIBaHnHaΦnIbTpE nra MOUeO CpeCTBa.
- NOrpy3NtB qnIbTp B uHCTyIO BODy.
- 3aynctntb yctpoiCTBO IN B TeHeHne MmHyTbI npomblb YnCTOIN BOIO.
PpnoocTaHOBka pa6oTbI
- 3aKpbItb BbICOKOHaOpHbI NICTOneT. YCTpOJCTBO BbIKNHOaETcR.
- PpeOxpaHnteBbHbI ΦnKcaTOp nepemecNTb BnepeJ. BbICOKoHaOpHbI nCToTe 3a6JokuPoBaH.
PpOdoJxKeHne pa6oTbI
- PpeoxpaHntbHbI ΦnKcaTOp nepMeCTNTbHa3aI.
BbICOKoHaOpHbI NtCTOJIe pa36JIOKIpOBaH. - OTKpbIb BbICOKOHAnOpHbI INCTOJET. YCTPOINCTBO BKJIHOHaETcR.
3aBepueHne pa6oTbI
- 3aKpbTb JINHIO NOaHu BObl.
-
OTKpbItb BbICOKOHAnOpHbI NICTOJE.
-
YcTaHOBnTb BbIKNIOyAteJIb yCTpoiCTBa B nOIOxKeHne «I/ON» n DaTb yCTpoiCTBy npa6oTaTb B TeueHne 5-10 c.
- 3akpbItb BbICOKHaOpHbI NICTOJEt.
- YcTaHOBtB BbIKIIOuTeNb B NOJIOKeHne «0/OFF»
- ɪəBʌŋeKaTb ʌTænceJIbHŋO BʌŋIky ɪz3 pɔ3eTKn TɔJIbKO cyxʌmɪ pykʌmɪ.
- CHaTb JINHHIO NOdaH NBObl.
- OTKpbItb BbICOKOHaNoPbHn NCTOnet Do Tex nop, noka B yctpoictBe He 6ydt c6poWeHO daBJIeHne.
- PpeOxpaHnteBbHbI qKcTOp nepemecTtB Bnepei. BicOKoHaopHbI nCTOJET 3a6JokpObaH.
TpaHcNoptNupOBka
△OCTOPOKHO
Hecobnoidhebeeca
Onachocmb nonyuhenura mpaem u noepexkdeHu Bo epem xpanenur u mpaHcnpmuoeku yumbieamb eec ycmpoucma.
BHIMAHNE
Henaekaa mpaancpnpoKa
Onachocmb noepexkdeHua
Bepc bnyckoo pbnae ebicokohanopho2o
nucmonema om noepexkdeHu.
- TpaHcnopTnpOBka ycTpOyCTBa B TpaHCnOpTHbIX cpeIcTBax: 3aΦNkCnpOBaTb ycTpOyCTBO OT CKoJIbXeHn I ONpOKUdbAHn B COOTBETCTBn C DeIcTByIOUmm nPabUNaMn.
- TpaHcnpTnpoBka yctpOcnTbHa Ha 60nbWne pacCToHn: TaryTb yctpOcnTBO 3a co6oN 3a dyro06pa3HyO pyKy.
TpaHcnpTnpoBka yCTpOCTBa NO CTyneHbKaM: nepemeaTa b co CTyneHbKn Ha CTyneHbKy. PIoIoo3bJ 3aunuAOT Kopnyc ot nobpeKeDeHn. - Perepenoc yctpoicTBa: nepenocntb ycptpoicTBO 3a pyuKn.
TpaHcnpToPBOOHyBJePkaTeIb DnOuHCTnTEeN NOBepxHOCTeN
- CoeHnHTeBHyI nATpy6oK OUnCTuTeIaOBepxHOCTe BCTaBNTb B TpaHCnOpTIpOBOUHbI DePkaTeIb Ha MOIOSeM aAnnapaTe BbICOKOTo DaBHeHra.
- 3aBnHTntb HAKnDHyO raiKy np6JI. Ha 1 o6oPOT.
TpaHcnpOpBkKa KpaHOM
ONACHOCTb
Headexkaa mpaHcnpmuoka kpaHom
OnachocmbmpaBmupoeaHnnaadoouum ycmpoucbom unu nadaouum npedmemamu Co6nodamb mecmhble npabuna mexnuku 6e0nacchocmu u yka3aHn no mexnuke 6e0nacchocmu.
TpaHcnopmupoKa ycmpoucmea KpaHOM donxHa eblonnHmBcra molbKO luqamu, obyehhbIMu ynpaeJeHuO KpaHOM.
Peped kaxdou mpaHcnpmupo8kou KpaHOM npoeepb apy30nOdbemHoe ycmpoucmeo Ha npedMem noepexdehu.
Peped kaxdou mpaHcnpmupo8Kou KpaHOM npoeepb pyky Ha npedMem noepekdehu.
IodHumamb ycmpoecmo monbko 3a pyky. He uonnb0abm zenhble cmponbl.
Фukcupo8amnbnoBemHoe ycmpoucmeo om HenpeHaMepeHHoo omcoeduneHua apy3a.
IpeodmpaHcnpmupoeko kpaHOM cHymbcmpyHympy6ky C blicOKOHaOpHBIM nuCmonemom, conJaMu, ouucummenem noeepxHocmu u dpyzmu He3akpenneHHbIMu npedMemamu.
Bo epem npoueca noDbema He mpaHcnopmupoeamb Ha ycmpoucmee Hukakux npedMemoe.
He cmoaMb nod apy30M.
Ipu 3mom cneumb 3a mem, ymo6bi e onachou 3oHe KpaHa He Haxodunucb NIOU.
He ocmabm ycmpoucmeo nodweeHHbIM K kpaHy be3 npucmompa.
- 3aKpeNTb NOBemHoe yCTpOiCTBO 3a pyKy yCTpOiCTBa.
XpaHeHne
OCTOPOXHO
Hecobnoideneeca
Onachocmb npuyehn mpaem u noepexdehu
Bo epem xpaehn u mpaHcnpmuoeku yumbieamb beec ycmpoucmea.
XpaHTb yCTpOncTO TObKO B NOMEueHn.
XpaHHeYyCtPouCTBa
- NomeCTnTb CtpyHyu Tpy6ky C BbICOKHaOpHbIM NICTOJETOM B depKaTeNb CONeI N 3aΦHKCuPoBaTb B depKaTeNe CtpyHOn Tpy6kn.
- CMOTaB ceTeBOI Ka6eN I NOBecuTb Ha depKaTeJIb Ka6eN.
- 3aKpeNtB wTeNCeNBHyO BNlKy yCTaHOJIeHHbIM 3aXIMOM.
Дя устpoиCTBсбарабанOMДЯшног:
- HamotaB shaHr BlicOKoro daBneHna Ha 6apa6an n cNoKntb pyky pykOaTkn.
Дя устюпстб 6e3 6apabana Дяшанга:
5. YIoxnTb ⅢaHr BbICOKOr DaBHeHn Ha xpaHeHne:
a CMOTatb ⅢaHr BbICOKO daBHeHn.
b NobecuTb wHaHr BbICOKOr daBHeHn Ha noCTaBky dny wHaHra.
c 3aФИКСИРОВАТБ ШАнг ВИСОКО Г ДавЛЕНЯ C NOMOДБЮ pe3HNOBOJ JIeHTbl.
- HaxatbФnKcATOp Dyroo6pa3HOn pyuKn N BDbNHyTb ee.
3aunTa ot 3amep3aHna
BHIMAHNE
3aMep3aHue
Pa3pyueHue ycmpoucmea e pe3ymbame 3amep3aHua o0bl
PonHocmbio cIumb 8ody u3 ycmpoucmea.
XpaHumb ycmpoucmeo 8 Mecme,3auuueHHOM om Mop03a.
Ecnn HeBo3MOxHO n36ExaTb TempeaTp HnKe Hynr BO Bpem xpaHeHn:
1. Cnntb Body.
2.Покаатьчep3уctpoiCTBOCTaHdapTHbI aHTnФрИЗ.
PpumeyaHue
NcnoB3o8amb cmaHapmHbui aHmuFpu3 dna aBmOMobuneu Ha 6a3e 2nukoi. Co6nIOamb uHcmpykuu no uCnoB3o8aHuO aHmuFpu3a.
3. OctabNTb yCTpoNCTBO BKIOHcyEHbIM B TeueHne He 6OJee 1 MInHyTbI Do Tex nop, NOKa HAcOC n Tpy6oNpOBoDbl He ONOpOxHrTcR.
YxOД n TexHnueckoe 06cInyXnBaHne
ONACHOCTb
HenpehamepeHHbI 3anyck ycmpoucmea
OnachocmbmpaemupoabaHua,ydap3neKmpuueckum mOKOM
Ipepe bInonHeuem IIObIx pa6om Ha ycmpoucme 6bIKIOUumb ycmpoUcm8O u BbHymb cemeoo wmekep u3 po3emku.
PpumeyaHue
Cmapoe macno doJnKHO ymunusupoeambc monbko 8 npedycmompeneHHbx dna 3mozo npuemhbx nyHKmax.
O6pa3o8a8ueec smapoe Macno Heo6xodmo cdaamb myda. 3aap3nHeue okpykaoue cupebl cmapbIM macnOM rIyemc Haka3yeMbIM.
Поберкa Тхнки 6e3oanachocTN /ДorOBOP OТхнчecOMO6cnyxuBaHn
C ToproBbIM npedctabntelem MOxHO DOrOBOpuTbcO o peryIpaHoi npOBepke TexHKn 6e3onacHoCTn INN 3aKIOUCHt b C Hm DoROBOP Ha Texo6cnyKuBaHne.
06paauTecb K HAM 3a KOHcyIbTaUme.
PepaKaKdbimHaayanompa6oTbI
- PpOBepuTb ceTeBoi Ka6eIb Ha npEiMeT NOBpeXdEHN.
IobpeJeHHb Ka6eNb CneJyET HemeJeHHO 3aMeHnTb B aBtOpN3OBaHHo CepBcHcH cnyK6e INC pINBNeHeHEm CneUaJIncTa-3JKeKTpKa.
PpOBepuB WJIaHr BbICOKO rDaJIeHnHa npeJMeT NOBpeXdEHN.
IobpeKdEHHb WJHaHr BbICOKO DaBHeHn NOJNEXKNT He3aMeDJIHTeBHOn 3aMeHe.
PpOBepntb repMeTnHoctb yctpoiCTBa. DonycTmbl 3 KaNN B0dbI B MNHyTy. Ppi 6oJee CNJIbHOyTeueke O6paTnTBcB CepBnCHyO cnyk6y.
ExeHeDeIbHo
OuHCTb CetTaBn FInbTp B nAtpy6Ke NOB0a BObl (CM. rnaBy OuncTka ceTuato RhoNtpa B nAtpy6Ke dnn noB0da BObl).
OuHCTHTbΦNJIbTp BO BCaCbIbAIOUeM UJHaHRe MOHOeO CpeDCTBa.
KaxDbie 500 yacOB pa6oTbI, Ho He pexe oDHorop a3a B roD
TexHueeckoe 06cnyxuBaHne yCtpoNCTBa DOJXHO OcyuectBnTbC aepBnCHo CnykBoi.
Pa60TbI NO TexHnueckomy 06cJnyKnBaHNIO Ounchka cetuaToRo fInbTpRa B natapy6ke dna IOBBOda BObl
- OTBnHTNb HauNHyu raKy.
- ChTb BCacBBAIOU npaTpy6ok.
3.ИЗВЛЕЧБСЕТЧАТПФИЛБТР. - CeTcTaBtI ΦnIbTp OunCTnTb ChapyKn n npombItb.
- BcTaBntb cTeuTaBnΦnIbTp.
PpumeyaHue
BbpoBnMb wecmuaepaHnuk nampy6ka wnahea dnoNDKIOHeHUR K ycmpoucmey.
- YctaHOBt b ntpy6ok uHaHra n 3aTHyTb HAKnDHO rAkoN.
POMOuB npHHeNCppaBHOCTaX
ONACHOCTb
HenpehamepeHHbI 3anyck ycmpoucmea, kacahue mokoeedyux yacmei
OnachocmbmpaMupoBaHua,ydap 3neKmpuueckum mOKOM
Ipepe npoeedeenuem paobm ha ycmpoucmee ebiknoumb ycmpoucmo.
U3aneuwmencelbHyuBnky.
Bce npoeepku u paobombc3nekmpuueckmu yacmudonxHbEblnohmbc cneuaunucmau.
B cnyuae Heucnpaehocmeu, He ynomhymbix 3moi anaee, obpamumbcra e aemopuzoahnyo cepuechnyo cnky6y.
YcTPOINCTBO He 3anyckaetca
- PpOBepuTb CeTeBOi Ka6eIb Ha npEIMET NOBpeKJeHn.
- PpOBepntb HapjKeHne cetn.
- Ecni yctpoiCTBO neperpeto:
a YcTaHOBnTb BblKnIOuYaTeNb B NOnOKeHne «0/ OFF».
b OxnAaNTb yCTpOINCTBO B TeueHne He MeHee 15 MNHyT.
c YctaHOBntb BblKIOUOATEJIb yCTPOINCTBa B NOJOKHeHNE I/ON).
4.Пи HeuCnpaBHOCTaX 3JIeKtpoO6OpyIOBaHnO6paTntbca B cepBnCHyO cnIyK6y.
AaBHeHbYcTpoIcTBHe Co3JaTeC
- YctahOBnTB cONJIO Ha BBICOKoe daBneHHe.
- YdaJIITb BO3dyx n3 yCTpoiCTBa (CM. rnaBy YdaJIeHHe BO3dyxa n3 yCTpoiCTBa).
- OuHCTb cTatbI qnIbTp B nATpy6ke noB0da BOdb (cm. rnaBy OuchcKa cTatoro qnIbTpBa nATpy6ke dnnnoB0da BOdb).
- Поверпь количесТВ NOДаBAЕМОВ BODы (Heo6xOДИМоE KolIчесТВ CM.ВгАБе TexHnueckne xapakTepructuK).
- OuHCTb coNIO, npn Heo6xOaMOCtN 3aMeHHTb.
- Пи Heo6xOaHMoCTn 6paTntbC8 B cepBnCHyO cnJy6y.
HacocHerepMeTnueH.
IOnyCTnMbI Do 3KaIeNb BbITeKaIOUeI BOBb I MHyTy.
- Ppi 60JIe cINbHOn yTeHKe nOpyuHTb npOBepKy yCTpOInCTBa cepBnCHOn cnJxBe.
Ctyk Haocca
- PpOBePntB repMeTnUHOCtB JINHH NODBODa BObl.
2.Поверпь repMeTnHOCb JINHINДЯ BCaCbIbAHN MOHcero cpeCTBa.
3.YCTaHOBntb MmHmMaIbHoe 3HaueHne o6bema BCacbBaHnHaΦnIbTpE DnRA MOUeO CpeDCTBa. - YdaJIITb BO3dyx n3 yCTpoiCTBa (CM. rnaBy YdaJIeHHe BO3dyxa n3 yCTpoiCTBa).
- Пи Heo6xOaMocTn 6paTntbC8 B cepBnchyO cnJx6y.
Cnukom manoe KOJInyeCTBO MOUoero cpeDCTBa
- YcTaHOBnTb HacaDky Ha «CHEM»
- YBeJIuHTb Osbem BCacbIbAHnHa φnJIbTppe dIra MOHcero CpeCTBa.
- Поверпь/очнстпь BCасьВаюшланг моюsero cpeДСТВсФЛьТРМ.
4.Пи Heo6xOuMocTn 6paTntbC8 B cepBucHyO cnIyK6y.
RapaHTn
B kaskdo ctpaHne DeNCTbYOT COOTBeTcTBYUOuHe rapaHTnHbIe ycIOBnA, yCTaHOBJIeHHbIe yNOJHOMOueHHo OprAHn3aUeNe I NO C6bIy HaWei npOdyKuNN. Bo3MOXHbIe HEnCnpaBHOCTn YcTPOIcTBa B TeueHne rapaHTnHOrO cPoka Mbl YcTpaHReM 6ecnIaTHO, ecnI npuHuHa 3aknOuaeTCB N depeKtax MaTePnaIOB nnn npOn3BOdCTBeHHbIX 6pake. B cnyuae BO3NHKHOBEHnI pPeTeH3N B TeueHne rapaHTnHOrO cPoka Poc6Ba o6paTaTbcra C yeKOM O nOKyIke B TOPROByO praHn3aUuO, npOdaBHyIO n3dennE nIN B 6nKaWyU yNoJHOMOueHHyO cLyX6y cepBNCHO 06cNyXBAHN. (Adpec yka3aH Ha o6opote)
Data BbInycka OTo6paXaTeCn Ha 3aBOcKoT TaBnue K 3aKoINpOBaHHOM BnDE.
Pn3TOMOTDeIbHbIeUΦpblmEIO TcneDyUouee 3HaueHHe:
Ppimep:30190
3 roB BbInycka
0 CTOnetne BbInycka
1 DecaTnIeTne BbInycka
9 BTOPAIcPMAeCABbIycka
0 nepBaunpa Mecaa BbInycka
TakIM 6pa3OM, B daHHOM npHMepe KOD 30190 O3Haayet DaTy BbInycka 09/(2)013.
TexHnueckne XapaKTepNCTnKn
| HD 5/11C | HD 5/12C HD 5/12CX | HD 5/12C HD 5/12CX | HD 5/12C HD 5/12CX | HD 5/12C HD 5/12CX | HD 5/12C HD 5/12CX | HD 5/12C HD 5/12CX | ||
| Варanta B зависмости отстрады заимлуаташи | ||||||||
| Стара на AU EU GB CH AU KAP SA | ||||||||
| Злесуресло podк nullочипспьдяпшпчпшпьдяпшпчпшпьдяпшпчпшпьдяпшпчпшпьдяпшпчпшпьдяпшпчпшпьдяпшпчпшпьдяпшпчпшпьдяпшпчпшпьдяпшпчпшпьдяпшпчп�рпшпьдяпшпчпшпьдяпшпчпшпьдяпшпчпшпьдяпшпчпшпьдяпшпчпшпьдяпшпчпшпьдяпшпчпшпьдяпшпчпшпьдяпшпчпшпьдяпшп皓н STAN. | ||||||||
| Напраожнио V | 240 | 230 | ||||||
| Фаза ~ 1 1 | 1 1 | 1 | 1 | 1 | 1 | 1 | ||
| Частota Hz 50 50 50 50 50 60 60 | ||||||||
| Потравлиема мошноctь | kW | 2,1 | 2,5 | 2,5 | 2,2 | 2,2 | 2,4 | 2,4 |
| Стениь зашипties | IPX5 | IPX5 | IPX5 | IPX5 | IPX5 | IPX5 | IPX5 | IPX5 |
| Сетевий predecessormь (иертун) | A | 10 | 16 | 13 | 10 | 10 | 15 | 13 |
| Удзин… Бал… Каб… Каб… Каб… Каб… Каб… Каб… Каб… Каб… Каб… Каб… Каб… Каб… Каб… Каб… Каб… Каб… Каб… Каб… Каб… Каб… Каб… Каб… Каб… Каб… Каб… Каб… Каб… Каб… Каб… Каб… Каб… Каб… Каб… Каб …… | mm2 | 2,5 | 2,5 | 2,5 | 2,5 | 2,5 | ||
| Патубок… Поведа ворь | ||||||||
| Давлиения на ворode (мас.) | MPa | 1 | 1 | 1 | 1 | 1 | 1 | 1 |
| TemperatURA на ворode (мас.) | °C | 60 | 60 | 60 | 60 | 60 | 60 | 60 |
| Осы… Пов… Пов… Пов… Пов… Пов… Пов… Пов… Пов… Пов… Пов… Пов… Пов… Пов… Пов… Пов… Пов… Пов… Пов… Пов… Пов… Пов… Пов… Пов… Пов… Пов… Пов… Пов… Пов… Пов… Пов… Пов… Пов… Пов… Пов …… | l/min | 12 | 12 | 12 | 12 | 12 | 12 | 12 |
| Высан… Бал… Бал… Бал… Бал… Бал… Бал… Бал… Бал… Бал… Бал… Бал… Бал… Бал… Бал… Бал… Бал… Бал… Бал… Бал… Бал… Бал… Бал… Бал… Бал… Бал… Бал… Бал… Бал… Бал… Бал… Бал… Бал… Бал… Бал …… | m | 0,5 | 0,5 | 0,5 | 0,5 | 0,5 | 0,5 | 0,5 |
| Минимал… Дал… Дал… Дал… Дал… Дал… Дал… Дал… Дал… Дал… Дал… Дал… Дал… Дал… Дал… Дал… Дал… Дал… Дал… Дал… Дал… Дал… Дал… Дал… Дал… Дал… Дал… Дал… Дал… Дал… Дал… Дал… Дал… Дал… Дalam… Дал… Дalam… Дalam… Дalam… Дalam… Дalam… Дalam… Дalam… Дalam… Дalam… Дalam… Дalam… Дalam… Дalam… Дalam… Дalam… Дalam… Дalam… Дalam… Дalam… Дalam… Дalam… Дalam… Дalam… Дalam… Дalam… Дalam… Дalam… Дalam… Дalam… Дalam… Дalam… Дalam… Дalam… Дalam …… | m | 7,5 | 7,5 | 7,5 | 7,5 | 7,5 | ||
| Минимал… Дал… Дал… Дал… Дал… Дал… Дал… Дал… Дал… Дал… Дал… Дал… Дал… Дalam… Дalam… Дalam… Дalam… Дalam… Дalam… Дalam… Дalam… Дalam… Дalam… Дalam… Дalam… Дalam… Дalam… Дalam… Дalam… Дalam… Дalam… Дalam… Дalam… Дalam… Дalam… Дalam… Дalam… Дalam… Дalam… Дalam… Дalam… Дalam… Дalam… Дalam… Дalam …… | in | 1/2 | 1/2 | 1/2 | 1/2 | 1/2 | ||
| Homepr… Дал… Зам… Зам… Зам… Зам… Зам… Зам… Зам… Зам… Зам… Зам… Зам… Зам… Зам… Зам… Зам… Зам… Зам… Зам… Зам… Зам… Зам… Зам… Зам… Зам… Зам… Зам… Зам… Зам… Зам… Зам… Зам… Зам… Зам… Зам …… | 2.643-100.0 | 2.643-100.0 | 2.643-100.0 | 2.643-100.0 | 2.643-100.0 | 2.643-100.0 | 2.643-100.0 | 2.643-100.0 |
| Равоч… Хараз… Ха… х… х… х… х… х… х… х… х… х… х… х… х… х… х… х… х… х… х… х… х… х… х… х… х… х… х… х… х… х… х… х… х… х… х… х… х… х… х… х… х… х… х… х… х… х… х… х… х… х… х… x… x… x… x… x… x… x… x… x… x… x… x… x… x… x… x… x… x… x… x… x… x… x… x… x… x… x… x… x… x… x… x… x… x… x… x… x… x… x… x… x… x… x… x… x… x… x… x… x… x… X Y Z M N O P R S T U V W X Y Z B C D E F G H I J K L M N O P R S T U V W X Y Z B C D E F G H I J K L M N O P R S T U V W X Y Z B C D E F G H I J K L M Y Z B C D E F G H I J K L M N O P R S T U V W X Y Z B C D E F G H I J K L M N O P R S T U V W X Y Q R S T U V W X Y Q R S T U V W X Y Q R S T U V W X Y Q R S T U V W X Y Q R S T U V W X Y Q R S T U W X Y Q R S T U V W X Y Q R S T U V W X Y Q R S T U V W X Y Q R S T U V W X Y Q R S T U V W X Y Q r S T U V W X Y Q r S T U V W X Y Q r S T U V W X Y Q r S T U V W X Y Q r S T U V W X Y Q r S T U V w Y Q r S T U V w Y Q r S T U V w Y Q r S T U V w Y Q r S T U V w Y Q r S T U V w Y Q r S T U V w Y q r S T U V w Y q r S T U V w Y q r S T U V w Y q r S T U V w Y q r S T U V w Y q r S T U V w Y q r s T U V w Y q r S T U V w Y q r S T U V w Y q r S T U V w Y q r S T U V w Y q r S T U V w Y q r S T u v w Y q r S T u v w Y q r S T u v w Y q r S T u v w Y q r S T u v w Y q r S T u v w Y q r S T u v w y Z Z Z Z Z Z Z Z Z Z Z Z Z Z Z Z Z Z Z Z Z Z Z Z Z Z Z Z Z Z Z Z Z Z Z Z Z Z Z Z Z Z Z Z Z Z Z Z Z Z z Z Z Z Z Z Z Z Z Z Z Z Z Z Z Z Z Z Z Z Z Z Z Z Z Z Z Z Z Z Z Z Z Z Z Z Z Z Z Z Z Z Z Z Z Z Z Z Z Z Q R S T U V W Y Q r S T U V W Y Q r S T U V W Y Q r S T U V W Y Q r S T U V W Y Q r S T U V W Y Q r S T U V W Y Q r S t W Y Q r S T U V W Y Q r S T U V W Y Q r S T U V W Y Q r S T U V W Y Q r S T U V W Y Q r S T U V W y Z Z Z Z Z Z Z Z Z Z Z Z Z Z Z Z Z Z Z Z Z Z Z Z Z Z Z Z Z Z Z Z Z Z Z Z Z Z Z Z Z Z Z Z Z Z Z Z z z z z z z z z z z z z z z z z z z z z z z z z z z z z z z z z z z z z z z z z z z z z z z z z z z Z Z Z Z Z Z Z Z Z Z Z Z Z Z Z Z Z Z Z Z Z Z Z Z Z Z Z Z Z Z Z Z Z Z Z Z Z Z Z Z Z Z Z Z Z Z Z Z Q r S T U V W Y Q r S T U V W Y Q r S T U V W Y Q r S T U V W Y Q r S T U V W Y Q r S T U V W Y Q R S T U V W Y Q R S T U V W Y Q R S T U V W Y Q R S T U V W Y Q R S T U V W Y Q R S T U V W Y Q R S t W Y Q R S T U V W Y Q R S T U V W Y Q R S T U V W Y Q R S T U V W Y Q R S T U V W Y Q R S T U V W y Z Z Z Z Z Z Z Z Z Z Z Z Z Z Z Z Z Z Z Z Z Z Z Z Z Z Z Z Z Z Z Z Z Z Z Z Z Z Z Z Z Z Z Q R S T U V w Y Q R S T U V W Y Q R S T U V W Y Q R S T U V W Y Q R S T U V W Y Q R S T U V W Y Q R S T U V W Y q r S T U V W Y Q R S T U V W Y Q R S T U V W Y Q R S T U V W Y Q R S T U V W Y Q R S T U V W Y Q R s T U V W Y Q R S T U V W Y Q R S T U V W Y Q R S T U V W Y Q R S T U V W Y Q R S T U V W Y Q R S T u v w Y Q R S T U V W Y Q R S T U V W Y Q R S T U V W Y Q R S T U V W Y Q R S T U V W Y Q R S T U V W y z Z Z Z Z Z Z Z Z Z Z Z Z Z Z Z Z Z Z Z Z Z Z Z Z Z Z Z Z Z Z Z Z Z Z Z Z Z Z Z Z Z Z Z Z Z Z Z Z z y z | 1 | 1 | 1 | 1 | 1 | 1 | 1 | 1 |
| Па sym… Па sym… Па sym… Па sym… Па sym… Па sym… Па sym… Па sym… Па sym… Па sym… Па sym… Па sym… Па sym… Па sym… Па sym… Па sym… Па sym… Па sym… Па sym… Па sym… Па sym… Па sym… Па sym… Па sym… Па sym… Па sym… | 1 | 1 | 1 | 1 | 1 | 1 | 1 | 1 |
| Па sym… Па sym… Па sym… Па sym… Па sym… Па sym… Па sym… | 1 | 1 | 1 | 1 | 1 | 1 | 1 | 1 |
| Па sym… Па sym… Па sym… Па sym… | 1 | 1 | 1 | 1 | 1 | 1 | 1 | 1 |
| Па sym… Па sym… Па sym… | 1 | 1 | 1 | 1 | 1 | 1 | 1 | 1 |
| Па sym… Па sym… Па sym… | 1 | 1 | 1 | 1 | 1 | 1 | 1 | 1 |
| Па sym… Па sym… Па sym… | 1 | 1 | 1 | 1 | 1 | 1 | 1 | 1 |
| Па sym… Паsym… Па sym… | 1 | 1 | 1 | 1 | 1 | 1 | 1 | 1 |
| Па sym… Па sym… Па sym… | 1 | 1 | 1 | 1 | 1 | 1 | 1 | 1 |
| Па sym… Па sym… Па sym… | 1 | 1 | 1 | 1 | 1 | 1 | 1 | 1 |
| Па sym… Па sym… Па sym… | I | 1 | 1 | 1 | 1 | 1 | 1 | 1 |
| Па sym… Па sym… Па sym… | I | 1 | 1 | 1 | 1 | 1 | 1 | 1 |
| Па sym… Па sym… Па sym… | I | 1 | 1 | 1 | 1 | 1 | 1 | 1 |
| Па sym… Па sym… Па sym… | I | 1 | 1 | 1 | ||||
| Па sym… Па sym… Па sym… | I | 1 | 1 | 1 | ||||
| Па sym… Па sym… Па sym… | I | 1 | 1 | 1 | ||||
| Па sym… Па sym… Па sym… | I | 1 | 1 | 1 | ||||
| Па sym… Па sym… Па sym… | I | I | 1 | 1 | ||||
| Па sym… Па sym… Па sym… | I | I | 1 | 1 | ||||
| Па sym… Па sym… Па sym… | I | I | 1 | 1 | ||||
| Па sym… Па sym… Па sym… | I | I | 1 | 1 | ||||
| Па sym… Па sym… | I | I | 1 | 1 | ||||
| Па sym… Па sym… | I | I | 1 | 1 | ||||
| Па sym… Па sym… | I | I | 1 | 1 | ||||
| Па sym… Па sym… | I | I | 1 | 1 | ||||
| Па sym… Па sym… Па sym… | I | I | 1 | 1 | ||||
| Па sym… Па sym… Па sym… | I | I | 1 | 1 | ||||
| Па sym… Па sym… Па sym… | I | I | 1 | 1 | 1 | 1 | ||
| Па sym… Па sym… Па sym… | I | I | 1 | 1 | ||||
| Па sym… Па sym… Па sym… | I | I | 1 | 1 | ||||
| Па sym… Па sym… Па sym… | I | I | 1 | 1 | ||||
| Па sym… Па sym… Па sym… | I | 1 | 1 | 1 | ||||
| Па sym… Па sym… Па sym… | I | I | 1 | 1 | ||||
| Па sym… Па sym… Па sym… | I | I | 1 | 1 | ||||
| Па sym… Па sym… | I | I | 1 | 1 | ||||
| Па sym… Па sym… Па sym… | I | I | 1 | 1 | ||||
| Па sym… Па sym… Па sym… | I | I | 1 | 1 | ||||
YpOBeHb3ByKOBoMooHocTnD(A)
Chairman of the Board of Management

S. Reiser
Director Regulatory Affairs & Certification
Лиц, OTBETCTBeHHoe 3a BeDEHne DOKymeHTaUIn: IJ.
Painep (S. Reiser)
Alfred Kärcher SE & Co. KG
Alfred-Karcher-Str. 28-40
71364 Winnenden (Germany)
Tei.: +49 7195 14-0
Φaκc: +49 7195 14-2212
Winnenden, 2019/05/01
Tartalom
Chairman of the Board of Management

S. Reiser
Director Regulatory Affairs & Certification
Winnenden, 2019/05/01
Obsah
ObecnéPokyny 125
Chairman of the Board of Management

S. Reiser
Director Regulatory Affairs & Certification
Zmocnenec pro dokumentaci: S. Reiser
Alfred Karcher SE & Co. KG
Alfred-Karcher-Str. 28 - 40
Winnenden, 2019/05/01
Kazalo
Splošna navodila 133
Namenska uporaba 133
Varovanje okolja 133
Pribor in nadomestni deli. 133
Obsegdobave. 133
Varnostna navodila. 133
Opis naprave 134
Montaza. 134
Elektrichi priključek 134
Chairman of the Board of Management

S. Reiser
Director Regulatory Affairs & Certification
Winnenden, 2019/05/01
Spis tresci
Wskazowski ogolne 140

H.Jenner
Chairman of the Board of Management

S. Reiser
Director Regulatory Affairs & Certification
Administrator dokumentaci: S. Reiser
Alfred Karcher SE & Co. KG
Alfred-Karcher-Str.28-40
71364 Winnenden (Germany)
Tel.: +49 7195 14-0
Winnenden, 2019/05/01
Cuprins
Indicatiigenerale 149
Transport necorespunzator
Pericol de deteriorare
Protejati maneta de actionare de la pistolul de inalta presiune impotrivata deteriorarii.
Directive UE relevante
2006/42/UE (+2009 / 127 / UE)
2014/30/UE
2000/14/UE
Norme armonizate aplicate
EN 60335-1
EN 60335-2-79
EN 55014-1: 2006+A1: 2009+A2: 2011
EN 55014-2: 2015
EN 62233: 2008
EN 61000-3-2: 2014
EN 61000-3-3: 2008

H. Jenner
Chairman of the Board of Management

S. Reiser
Director Regulatory Affairs & Certification
Insarcinat cu elaborarea documentatie: S. Reiser
Alfred Kärcher SE & Co. KG
Alfred-Karcher-Str.28-40
71364 Winnenden (Germany)
Tel.: +49 7195 14-0
Fax: +49 7195 14-2212
Winnenden, 2019/05/01
Obsah
2006/42/ES (+2009/127/ES)
2014/30/EU
2000/14/ES
2000/14/ES: Priloha V

H. Jenner
Chairman of the Board of Management

S. Reiser
Director Regulatory Affairs & Certification
71364 Winnenden (Germany)
Tel.: +49 7195 14-0
Fax: +49 7195 14-2212
Winnenden, 2019/05/01
Sadržaj
Opé napomene 165
2006/42/EZ (+2009/127/EZ)
2014/30/EU
2000/14/EZ
Primijenjene uskladene norme
EN 60335-1
EN 60335-2-79
EN 55014-1: 2006+A1: 2009+A2: 2011
EN 55014-2: 2015
EN 62233: 2008
EN 61000-3-2: 2014
EN 61000-3-3: 2008
Chairman of the Board of Management

S. Reiser
Director Regulatory Affairs & Certification
Opunomocenik za dokumentaciju: S. Reiser
Alfred Karcher SE & Co. KG
Alfred-Karcher-Str.28-40
71364 Winnenden (Njemačka)
Tel.: +49 7195 14-0
Telefaks: +49 7195 14-2212
Winnenden, 2019/05/01
Sadržaj
Opste napomene. 173
Namenska upotreba 173
Zastita zivotne sredine 173
Priborirezervni delovi. 173
Obim isporuke 173
Sigurnosne napomene 173
Opis uredaja 174
Montaza. 174
Elektricni priključak. 175
www.kaercher.com/REACH
Pribor i rezervni delovi
Koristite samo originalni pribor i originalne rezervne delove posto oni garantuju bezbedan rad i rad bez smetnji na uredaju.
Informaci o priboru i rezervnim delovima mozete pronaci na www.kaercher.com.
Obim isporuke
2006/42/EZ (+2009/127/EZ)
2014/30/EU
2000/14/EZ
Primenjene harmonizovane norme
EN 60335-1
EN 60335-2-79
EN 55014-1:2006+A1:2009+A2:2011
EN 55014-2: 2015
EN 62233: 2008
EN 61000-3-2: 2014
EN 61000-3-3: 2008
Chairman of the Board of Management

S. Reiser
Director Regulatory Affairs & Certification
Lice ovlaśćeno za dokumentaciju: S. Reiser
Alfred Kärcher SE & Co. KG
Alfred-Karcher-Str.28-40
71364 Winnenden (Germany)
Tel.: +49 7195 14-0
Winnenden, 2019/05/01
CbDpXaHne
O6uynka3aHnna 181
TheBMaTuChen npeKcbBaay
PnOcB6oKdAbaHe Ha NoCTa Ha cnYcbKa Ha nIcToJeTa 3a pa60Ta NOB BnCOKo HnIraHe
HHeBMaTnUHnI TpeKbCBAu N3KJIIOyBa NOMnTa 3a BnCOKO HaJraHe I CTpyrA ToD BnCOKO HaJraHe cnnpa.
LOMIOCTbTHaCnycbKaCeHATNCHe,NOMnata Ce BKNHOUBAOTHOBO.
OnncaHne Ha ypeDa
PperneHa ypeda
BnKTe cTpaHncaTa C rpaΦnKn
① Kanak Ha konenoto
② Hocau Ha IIO3ata
③Пьзра ce peka
4Tunoba Ta6enka
⑤ NocTaBkA 3aДIO3a 3a TpoHnA IIO3a
6 TpaHcnpTHa onopa 3a yctpoiCTBa 3a nouHCTBaHe Ha NOBbpxHOCTn
⑦ДeблokиранеHa nIb3raцаТа ckO6a
⑧Пьзraца ckoba,doу(рибpaHa)
⑨Пиьзraца ckob6a, rope (n3TeTneHa)
10ДIO3a 3a BnCOKHaHnraHe
⑪MapKnupOBka HaДIO3aTa 3a BnCOKO HnIraHe
12 Tpb6a 3a pa3npbckBahe EASY!Lock
13ПиctoneT3a pa6ota NOB BnCOKO HANrAHe EASY!Force
14 PpeDnaseH 3aIbBaM MExAHN3BM
15 NocHa cnycbka
16IpeqnazehJIOCT
⑰ Mapkyu 3a pa60Ta NOD BVCOKO HANRAHe EASY!Lock
18 NocTaBka 3a Mapkya
19 Dbpxka3a ka6en
20 DbpxaHa Tpb6ata 3a pa3npbcKahe 6e3
②ΓymeHaJIeHTa(JIINcBa npn ypeHn c 6apaban 3a Mapkyu)
22 NocTaBka 3a DIO3a 3a POtopHa DIO3a (POtopHaTa DIO3a e BKNIOyeHa B KOMNIEKTA Ha DOCTABKaTa CAMO npu BapnAHT "Plus")
23 έьрхач Ha Tpb6aTa 3a paanpbckBaHe C
ФИКСИРаЧЕ 3a TpaHcNOpTupaHETO
24 PpeKbCBAH ypeDa
(25)Дрьжka
26 N3BOD 3a BnCOKo HauIraHe EASY!Lock
27 Dpbkka 3a Xbaaane
28 U3B0D 3a BOda
29 Mapkyu 3a BcmyKbaHe Ha noHCTBaU npenapat c ΦnIbPиДоЗпанeHa noHCTBaU nIpenapat
30LcEka
31)Uyeep3aMapkya
32XoJIeHJPOBa raIka
33MaHnBena
34 Bapa6aHa 3a Mapkya
UBeTHa MapKIpOBKa
- 06cnyBaunte enemeHTn 3a npouceHa nouchTbaHe ca XbTTN.
- 06cnykbaune eJeMeHTn 3a noDpBka n cepBu3HO o6cnykBaHe ca CBETNOCNB.
MoHTax
3akpenBaHe Ha kanaunTe Ha KoneJaTa
MOHTnpaHe Ha npHaadNexKHOCTNe
YKa3aHue
Cucmemama EASY!Lock cebp3ea 6bp30 u hadexdno KOMnOHeHmu ue3 pe36a 3a 6bp30 3aeueaHe camo c eoHO nblHO 3a6bpmahe.
- NocTabete H03ata 3a BnCOKO HaIraHe CMapKnpoBkata Harope Ha Tpb6ata 3a pa3npbckBaHe.
- 3aTeHHeTe 3dpaBO DIO3aTa 3a BnCOKO HAnraHe (Easy!Lock).
- Cbpxte Tpb6ata 3a pa3npbckBaHe c nncToJeTa 3a pa60ta noD BnCOKo HAnraHe N 3aTeHHe 3dpaBO (EASY!Lock).
- Ocbo6oTe De6nokpuHTo Ha nIb3raaatacko6a.
- N3terne TnB3raaata cko6a do KpaHNOJIOXKeHne.
Pn ypei 6e3 6apa6aH 3a Mapkyua:
- Cbpxte Mapkyua 3a pa60ta noB BnCOKO HJIraHe C nIcToTe 3a pa60ta noD BnCOKO HJIraHe N I3BOda 3a BnCOKO HJIraHe Ha ypeDa n 3aTeHHe 3dpaBO (EASY!Lock).
Pn ypei n 6abaan 3a Mapkyua:
- NocTaBete Mapkya 3a pa6oTa noD BnCOKO HAnJaHaHe N3IbHAT HaNoDa.
- ΠbXHETe MaHnBEnaTa BbB BaNa Ha 6apa6aHa 3a Mapkyu nФнкupaIte.
- 3aBbptTe MaHbEnaTa No Nocoka Ha YacOBHNKOBaTa CTpeJIka I npu TOBa HABnIe MapKyua 3a pa6Ota NOd BnCOKo HAnraHe Ha paBHOMepHn PJIactObe Bbpxy 6apabHa 3a MapKyua.
- CbpxeTe Mapkya 3a pa6oTa noD BnCOKO HJIraHe C nIcToJeTa 3a pa6oTa noD BnCOKO HJIraHe N 3aTeHHe 3dpaBO (EASY!Lock).
EneKtpnuecko Cbbp3BaHe
ONACHOCT
Junca Ha 6b3MOXHOCm 3a u3KIOueAhe om Mpexama Onachocm om HapaHaeHe npadu enekmpueecku yap C8bp3aume ypeda c enekmpueeckama mpeka nocpedcmom uencen. 3a6paHeHa e epb3ka c eIekmpueeckama mpeka 6e3 6b3MOXHOCm 3a u3KIOueAhe. Uencenb m cnyu 3a u3KIOueAhe om Mpexama.
- Pa3BnTe MpeXOBnI 3axpaHbau Ka6eI n ro noJooKeTe Ha noJa.
- BkIoueMpexOBuaenCeB KOnTaKaTa.
N3BOD 3a BODa
Cbbp3BaHe KbM BOOonpoBO
△PENyPENKDEHNE
06pamen nomok Ha 3ambpceHa boda e MPexama 3a numeuHa boda
Onachocm 3a 3paem
Cna3aeime npednucanma Ha eodochabumehomo npednpuamue.
Cbanacho bauudHume npednucanhypebtm Hukozha He mpr6ea da ce u3non3ea 6e3 cuscmemen pa3deNumen KbM MPekama 3a numeHa boda.
H3non3aume cuscmemen pa3denumen Ha KARCHER unu, kamo anmephamuea, cuscmemen pa3denumen B cbomeemcmeue c EN 12729, mun BA. Bodama, npemuna npes cuscmemen pa3denumen, eue he ce cuma 3a zoHa 3a nueHe. Buhasu c6bp3aume cuscmemnpa3denumen KbM bodopoeoda, Hukozaa dupekmno KbM u380da 3a boda Ha ypeda.
- Поверяваite boDOnpoBoDA 3a HaJraHe, Tempepatya n KoJInyeCTBO Ha NOCTbIbAaTa BOda (Bx. rna TaTexHnYeckn daHHn).
- Cbpxke TcntemHnpa3dennTe n 13BOda 3a BOda Ha ypeDa c Mapkyu 3a noJaBaHe Ha BOda (N3NCKBaHHa KbM Mapkyua 3a noJaBaHe Ha BOda - Bk. IJIaBa TexHnueckn daHH).
- OTBopTe nOdaBaHeTo Ha BOna.
N3cMyKBaHe Ha BOaTa OT pe3epBoapa
- 3aBnHTe CmyKaTeJIHn MapKyu KbM φnJTbpa Ha n3BOda 3a BOda (KaTaIOnKeH HOMep - Bx. IJaBa TExHnueKn DaHH).
- 06e3b3dywete ypea (Bk. rnaBa O6e3b3dywaabaHe Ha ypea).
06e3Bb3dyaBaHe Ha ypeda
- Pa3BnIte IIO3aTa 3a BnCOKo HAnraHe OT Tpb6aTa 3a pa3npbCKBaHe.
- OcTabeTe ypeDa pa6oTn, DOKaTO BOdaTa 3anoHne Da n3Jn3a 6e3 Mexypyeta.
- Ppi npo6nmeM npi o6e3B3dyu7aBaHaTe 0ctabeTe ypeDa da pa6oTn B npoDbJxKeHne Ha 10 cekyHn, CJIeT TOBa rO n3KlHouTe. NpOTope Tpoueca HRAKOIO TBTu.
4.ИЗкlioуete урета.
5. 3aBnHTeTe IIO3aTa 3a BnCOKo HJIraHe KbM Tpb6ata 3a pa3npbckBaHe.
06cnyXbaHe
ONACHOCT
Bodha cmpyra noo bucoko hanae
Onachocm om HapaHaahe
HuKoza He fukcupaume Iocma Ha cnycbka u npedna3nua Nocm 8 3adeucmbaHo nonoKeHue.
He u3non3eaume nuCmonema 3a paBoma noB bucoKa
HaJraahe, ako npedna3nua m Nocm e nopeDeH.
PpeDu ccaKaBu paBomu no ypda HamucHeme
Hanpe npedna3nua 3anbeau, Mexahu3bMa
nucmonema 3a paBoma noB bucoKO Hanraahe.
DpbXMe nuCmonema 3a paBoma noB bucoKO
HaJraahe u mp6ama 3a pa3npbckeaHc dee pbue.
△PPEyYPKEXDEHNE
Depekmen yped u npunadneXnocmu, depekmhu
3axpanBaau Ka6enu u u3eodu
Onachocm om HapaHaahe
YpeDb mmp6ea da ce u3non3ea camo e 6e3ynpeHno cbcmorHue.
OTbapnHe/3aTbapnHe Ha nIcToJeTa 3a pa6ota noB BnCOKo HnIraHe
- HatncheTe npedna3HnIoc nIOCTa Ha cnycbka. NcToJeTbT 3a pa6Ota noD BnCOKo HaNraHe ce OTBapr.
- OtnycheTe npedna3HnI IOCT nIOCTa Ha cnycbka. NICTOJETbT 3a pa60Ta NOB BUCOKo HANrAHe ce 3aTBapra.
Pa6ota c BncoKo HaJraHe
YpeBbMOKeJaCeN3nOJ3BaBVn3npaBeHOnnIerHaJIONoXeHne.
yKa3aHue
Ypeobm e obopybaen c nHeMaumueh npekbcay.
IbuameJn m cpabomea camo aKo nucmolemb m 3a paoba noe ucoko hannae o ombopeH.
- Пи уреди с баразан 3a маркуа: Pa3BnTe n3цяло маркуа 3a pa6oTa noД ВICOKO habягache ot баразана 3a маркуа.
- NocTabete npekcbcayha ypeHa "I/ON".
- HatncheTa Ha3aI npedna3nra 3anbBaM
MexAHmHa NCTOneta 3a pa60Ta NOB BnCOKO
HaJraHe.
NCTOnetbT 3a pa60Ta NOB BnCOKO HAnrAHe e cb6
cBAJeH npedna3nten. - OTBopete nIcToIeta 3a pa6oTa noI BnCOKO Hajrahe.
H36op Ha TnHa cTpyTa
- 3aTbOpTe nIcToJeTa 3a pa6Ota noD BnCOKo HAnJaHaHe.
- 3aBbpteteKopnycaHaIIO3ata,doKaToKeNaHnT CmB0N CbBnaDHe CMapKnPOBkata.
3aunTa OT 3ampb3BaHe
BHIMAHNE
3ampb38aHe
Pa3pyuwahe Ha ypda om 3ampb38aua ooda
H3neume Hnblno boda om ypda.
Cbxpanhaume ypda Ha Mmco, Kbdemo Juncemycnoa 3a 3ampb38aHe.
Ako He e Bb3MOxHcBxaHHe 6e3aMp3BaHe:
1.ИЗпсichte BODATA.
2.ИЗнOMNBAITE npe3урда KOHBeHcNoHAneH npenapat 3a 3aunTa O T 3ampb3BaHe.
yKa3aHue
N3non38aume KOH8eHcUoHaene npenapam 3a 3auuma om 3ampb36aHe 3a MomopHu ppeB03Hu cpeCm8a Ha 6a3ama Ha 2nukon. Cna38aume npednucanura ma 3a 6opaehe, daedeHu om npou38odumena Ha npenapama 3a 3auuma om 3ampb36aHe.
3. Octabete ypeda da pa60Tu MaKcImaJIHO 1 MNHyTa, DOkato NOMnata u Tpb6nte ce n3npa3Hrt.
rpxka npoDpBxKa
ONACHOCT
HenpehamepeHo cmapmupau yped
Onachocm om HapaHraBaHe, mokoe ydap
Ppeu ecaeku paobum u3knquaeume ypea u 30bpneae mpekoue uencen.
yKa3aHue
OmcpanhaHemohcmapoMaCnOeNo360JeHo cmoHa npedbudeHume 3a ceIma Mecma 3a cb6upane.Mon, npedeaaumemam nonyunomo ce cmapo Macno.3ambpcraeaHuraHa OKOnHama cpeda Cbc cmapu Macna ca Hakaayemu.
HcneKuaHa 6e3oNaChocTa/OrOBop 3a noDpBxKa
C Baunn nctpn6ytop mokeTe da dorobopnte npOBexdaneTo Ha nepnoDnUHa HnCneKuHa 6eOanachocTta nn Da cKnIOuyte dorobop 3a noDpBkka. Mon, KOHCyTNpaaiTe ce.
HHTepBaJIHa noDpBxKa
PpeBn BcKa ynoTpe6a
YpeBt He noctura Hajrahe
-
NocTaBeteIIO3aTaHa BnCOKO HAnJaHae.
2.06e3Bb3dywete ypea(BK.rnaBa O6e3Bb3dywaBaHe Ha ypea). -
Nocntete Te 2eKaTa B u3BOa 3a BOa (Bx. rnaBa) NocntBaHe Ha 2eKata B u3BOa 3a BOa).
- Поберете КОЛИЧECTBOТо Ha NOCTbNBAuaTa BOДA (Heo6xOДIMO KOLIИЧECTBO-BK.TJIaBa TexHIVeCKn DaHHN).
- Nounctete, npn Heo6xOIMOCCT CmehTe IIO3aTa.
6.Пи Heo6xOuMoCT notbpcTe cepBn3.
Pomnata He e xepMeTuHa.
Ionycka ce n3nyckaHe Ha do 3 Kaikn Boda 3a eHa MNHyTa.
- Ppi no-cnHa npOnyckNIOBCT Bb3JaarTe npOBepKa Ha ypea O T cepBn3a.
Nomnata xiona
- PpOBepeTe IOnaBaHEno Hb Oda 3a XepMeTnHocT.
- Поберете смкателпг Тьбюровд за почесваши пенираза 3херmetиуност.
- 3aJaIte KOJIInueCTBOTo Ha 3acMyKBaHe Ha ФИNTbpa 3a NOUHCTBaU IIpeNapat Ha MHHMaJIHO KOJIInueCTBO.
- 06e3Bb3dywete ypea (BX. rnaBa O6e3Bb3dywaabahe Ha ypea).
- Pn Heo6xOaMocT nOtbpce TcepBn3.
DobaeHnT NouctBaau npenapat TBbpde Maiko
- NocTaBeTe IIO3aTa Ha "CHEM".
- YBENHETe KOINHecTBOTo Ha 3aCMyKBaHe Ha HnTbpa 3a NoHCtBaU npenapaT.
- Поверетe/ночитete Маркуа 3a BCMyKBaHe Ha nouchtbaц npenapat c Фntbp.
4.Пи Heo6xOДIMOCT notbpcTe cepBn3.
RapaHcH
Bb BcKa Ka DpbKabacBaHn Hn HnHaJeHHeOT Haun OtopupanDnctpn6yTop rapaHnOHH yCNoBn.
EbeHTyaHn NOBpeHn Ha BaunypeI ue otctpaHm B paMKInTe Ha rapaHNoHHN CpOK 6e3PiAtHO, aKO ce Kacae 3a DeΦeKT B MaTePnaJIte NnnpOn3BOJCTBeH DeΦeKT. B cIyauHa NpPeJRABaHe Ha npaBO Ha rapaHua, ce ObPheTe KbMa Baunia nCtpr6yTop nNn KbM Hau-6n3KnO OTOpN3upan cepBn3, kato npedCTaBInTe KacOBaTa 6eJexKa.
(Adpec, Bx. 3aHaTa cTpaHa)
TexHnueckn daHHN
| HD 5/11 C | HD 5/12 C HD 5/ 12 CX | HD 5/12 C HD 5/ 12 CX | HD 5/12 C HD 5/ 12 CX | HD 5/12 C HD 5/ 12 CX | HD 5/12 C HD 5/12 C | ||
| Варanta заразличицестара | |||||||
| Стара на EU GB CH AU KAP SA | |||||||
| Еlektronicу Свърбашиe | |||||||
| Наразжения | V | 240 | 230 | 230-240 | 230 | 240 | 220 |
| Фаза | ~ | 1 | 1 | 1 | 1 | 1 | 1 |
| Чебota | Hz | 50 | 50 | 50 | 50 | 50 | 60 |
| Проблемен不出来 мошноct | kW | 2,1 | 2,5 | 2,5 | 2,2 | 2,2 | 2,4 |
| Тил зашита | IPX5 | IPX5 | IPX5 | IPX5 | IPX5 | IPX5 | |
| Проблемен不出来 (именten) | A | 10 | 16 | 13 | 10 | 10 | 15 |
| УдьжITUЕн кабел 30 m | mm2 | 2,5 | 2,5 | 2,5 | 2,5 | 2,5 | |
| Извор за вoda | |||||||
| Налаяне на постывацата вoda (макс.) | MPa | 1 | 1 | 1 | 1 | 1 | 1 |
| Temпература на постывацата вoda (макс.) | °C | 60 | 60 | 60 | 60 | 60 | 60 |
| Колочевно на постывацата вoda (min.) | I/min | 12 | 12 | 12 | 12 | 12 | 12 |
| HD 5/11C | HD 5/12C HD 5/12CX | HD 5/12C HD 5/12CX | HD 5/12C HD 5/12CX | HD 5/12C HD 5/12CX | HD 5/12C HD 5/12CX | ||
| Виочина на засмквае (макс.) | m | 0,5 | 0,5 | 0,5 | 0,5 | 0,5 | 0,5 |
| Минимална дылхина на маркуа заюравaningу на ворda | m 7,5 7,5 7,5 7,5 7,5 7,5 7,5 7,5 7,5 7,5 7,5 7,5 7,5 7,5 7,5 7,5 7,5 7,5 7,5 7,5 7,5 7,5 7,5 7,5 7,5 7,4 | ||||||
| Минимален димаметр на маркуа заюравaningу на ворda | in 1/2 1/2 | 1/2 1/2 | 1/2 1/2 | 1/2 1/2 | 1/2 1/2 | 1/2 1/2 | 1/2 1/2 |
| Смужателен маркус с Фильтук -каталожен Homep | 2.643-100.0 | 2.643-100.0 | 2.643-100.0 | 2.643-100.0 | 2.643-100.0 | 2.643-100.0 | |
| Данни за мошиноста на урда | |||||||
| Големпна на дюза за.stандартона дюза | 038 035 | 035 038 | 038 036 | 036 036 | |||
| РавOTNO налиеганe | MPa | 11 | 12 | 12 | 11,5 | 11,5 | 12 |
| РавOTNO CBPbXhJaYraHne (макс.) | MPa | 17,1 | 17,5 | 17,5 | 17,1 | 17,1 | 18 |
| Дебит, ворda | l/min | 8,3 | 8,3 | 8,3 | 8,3 | 8,3 | 8,3 |
| Дебит, поиславциnpарати | l/h | 0-25 | 0-25 | 0-25 | 0-25 | 0-25 | 0-25 |
| Рразковна сима на пистолесу заюравaningу налиеганe | N | 21,3 | 21,3 | 21,3 | 21,3 | 21,3 | 21,3 |
| Размери и тergla | |||||||
| Тишино собstavenу тergло(CX) | kg | 24,2 (-) | 23,7 (26) | 23,7 (26) | 23,7 (26) | 24,2 (26,4) | 25,2 (-) |
| Дылхина | mm | 380 | 380 | 380 | 380 | 380 | 380 |
| Широчина (CX) | mm | 360 (-) | 360 (370) | 360 (370) | 360 (370) | 360 (-) | 360 (-) |
| Височина | mm | 930 | 930 | 930 | 930 | 930 | 930 |
| Установени Stotшости сбгласно EN 60335-2-79 | |||||||
| Стошост на вибрацьага рыka-pамо m/s2 | 3,6 3,6 | 3,6 3,6 | 3,6 3,6 | 4,2 4,2 | |||
| Heystочимвост K | m/s2 | 0,9 0,9 | 0,9 0,9 | 0,9 0,9 | 0,9 0,9 | ||
| НИво на звуково налиега lepA (CX) | dB(A) | 72 (-) | 72 (75) | 72 (75) | 72 (75) | 72 (75) | 74 (-) |
| Heystочимвost KpA | dB(A) | 3 | 3 | 3 | 3 | 3 | 3 |
| НИво на звукова мошиноct LWA+ Heystочимвost KWA (CX) | dB(A) | 88 (-) | 88 (92) | 88 (92) | 88 (92) | 88 (92) | 90 (-) |
| HD 5/13 C HD 5/13 CX | HD 5/15 C HD 5/15 CX | HD 5/17 C HD 5/17 C HD 5/17 CX | HD 6/13 C HD 6/13 CX | HD 6/13 C HD 6/13 CX | HD 6/13 C HD 6/13 CX | ||
| Варант за различinateстрави | |||||||
| Сtrpanа | EU EU EUR KAP | EU AR GB | |||||
| Еlektрическо Свьрзвае | |||||||
| Напlexенье | V | 230 | 230 | 230 | |||
| Фаза | ~ | 1 | 1 | 1 | 1 | 1 | 1 |
| Чебota | Hz | 50 | 50 | 50 | 60 | 50 | 50 |
| Присьединосянамошост | kW | 2,6 | 2,8 | 3,0 | 3,0 | 2,9 | 2,9 |
| Тил зашипta | IPX5 | IPX5 | IPX5 | IPX5 | IPX5 | IPX5 | |
| Прeding�лесillo (иертын) | A | 16 | 16 | 16 | 15 | 16 | 13 |
| Удьжитенье кабел 30 m | mm2 | 2,5 2,5 | 2,5 2,5 | 2,5 2,5 | 2,5 2,5 | ||
| Извор за ворda | |||||||
| Налога на постывацata ворda (макс.) | MPa | 1 | 1 | 1 | 1 | 1 | 1 |
| Temperatура на постывацата ворda (макс.) | °C | 60 | 60 | 60 | 60 | 60 | 60 |
| Колочевно на постывацата ворda (MH.) | I / m | i | n | 1 | 2 | 1 | 2 |
| Височина на засмухвае (макс.) | m | 0,5 | 0,5 | 0,5 | 0,5 | 0,5 | 0,5 |
| Минимална дылхина на маркуа заюравaningу на ворda | |||||||
| HD 5/13 C HD 5/ 13 CX | HD 5/15 C HD 5/ 15 CX | HD 5/17 C HD 5/ 17 CX | HD 5/17 C HD 5/ 17 CX | HD 6/13 C HD 6/ 13 CX | HD 6/13 C HD 6/ 13 CX | |
| Минимален длиаметр на маркуа за поадане на вора | in 1/2 1/2 | 1/2 1/2 | 1/2 1/2 | 1/2 1/2 | ||
| Смужателен маркус с Фильту- каталожен Homep | 2.643- 100.0 | 2.643- 100.0 | 2.643- 100.0 | 2.643- 100.0 | 2.643- 100.0 | 2.643- 100.0 |
| Данни за мошноста на урEDA | ||||||
| Големпна на дюза за.stандарта дюза | 034 032 | 027 030 | 038 038 | 038 | ||
| РавOTNO наляганe | MPa | 13 | 15 | 17 | 16,5 | 13 |
| РавOTNO CBPьхналяганe (макс.) | MPa | 17,5 | 20 | 20 | 20 | 19 |
| Дебит, вора | I/min | 8,3 | 8,3 | 8,1 | 8,0 | 9,8 |
| Дебит, поиславши пленарати | I/h | 0-25 | 0-25 | 0-25 | 0-25 | 0-25 |
| Рразковая сима на посточуда разота под Високо наляганe | N | 22,2 | 23,8 | 25,4 | 25,4 | 26,6 |
| Размери и тergla | ||||||
| Т��micho соб stavenу тergл(CX) | kg | 23,7 (26) (27,5) | 25,2 (27,5) | 25,2 (27,5) | 25,2 (27,5) | 25,2 (-) (27,5) |
| Дыжина | mm | 380 | 380 | 380 | 380 | 380 |
| Широчина (CX) | mm | 360 (370) | 360 (370) | 360 (370) | 360 (370) | 360 (-) (370) |
| Височина | mm | 930 | 930 | 930 | 930 | 930 |
| Установени Stotonocstс съласно EN 60335-2-79 | ||||||
| Стойост на виссанта ръka-pamо m/s² | 3,6 2,4 | 2,4 2,4 4,1 | 4,1 4,1 | |||
| Heystочимьост K | m/s² | 0,9 0,7 | 0,7 0,7 0,9 | 0,9 0,9 | ||
| НИво на звуково налягане LpA(CX) | dB(A) | 72 (75) | 72 (74) | 72 (75) | 72 (75) | 72 (-) |
| Heystочимьост KpA | dB(A) | 3 | 3 | 3 | 3 | 3 |
| НИво на звуково мошност LWA+ Heystочимьost KWA(CX) | dB(A) | 88 (92) | 88 (90) | 88 (92) | 91 (91) | 88 (92) |
| HD 6/13 C | HD 6/13 C | |||||
| Варanta STа различinateстрави | ||||||
| Страва | KAP SA | |||||
| Еlektриеско Свьрзвае | ||||||
| Напlexенье | V | 220 | 220 | |||
| Фаза | ~ | 1 | 1 | |||
| Чебота | Hz | 60 | 60 | |||
| Письединецima мошност | kW | 2,9 | 2,8 | |||
| Тил заши ta | IPX5 | IPX5 | ||||
| Проблажецпл (иерten) | A | 15 | 13 | |||
| Удьж在里面 Кабел 30 m | mm² | 2,5 2,5 | ||||
| Извod за вора | ||||||
| Напягане на постов��а对接а вора (makc.) | MPa | 11 | ||||
| Tempeра typа на постов��а对接а вора (макс.) | °C | 60 | 60 | |||
| К一步一步 не на постов��а对接а вора (mн.) | I/min | 13 | 13 | |||
| Височина на засуквае (макс.) | m | 0,5 | 0,5 | |||
| Минимална дьлжни на маркуа за п可靠've на вора | m | 7,5 | 7,5 | |||
| Минимален дьлжни на маркуа за поадане на вора | in | 1/2 1/2 | ||||
| Смужателен маркус с Фильту- каталожен Homep | 2.643- 100.0 | 2.643- 100.0 | ||||
| Данни за мошноста на урEDA | ||||||
| HD 6/13 C | HD 6/13 C | ||
| Големпа на дюза за.stандарта dюза | 042 043 | ||
| РавOTNO haJIЯгане MPa 13 12,5 | |||
| РавOTNO CBpbxhaJIЯганe (мakc.) | MPa | 18 | 18 |
| Дебит, ВODа l/min 10,0 10,0 | |||
| Дебит, постваши преларати | l/h | 0-25 | 0-25 |
| PeakTINbHa сила на пистолета за paBOTa по вискун haJIЯганe | N | 26,6 | 26,6 |
| Размери и тergla | |||
| Тулично coбстveho тergло(CX) | kg | 25,2 (-) | 25,2 (-) |
| Дыжина | mm | 380 | 380 |
| ШирочINA(CX) | mm | 360 (-) | 360 (-) |
| ВисочINA | mm | 930 | 930 |
| Установен CTойноCTи CBлалсHo EN 60335-2-79 | |||
| Стойост на вибрацьanta рък-a-pamо m/s2 | 3,7 | 3,7 | |
| Heystойчвocst K | m/s2 | 0,9 | 0,9 |
| НИво на звеков haJIягане LpA(CX) | dB(A) 73 (-) | 73 (-) | |
| Heystойчвocst KpA | dB(A) | 3 | 3 |
| НИво на звеков мошноct LWA+ Heystойчвocst KWA(CX) | dB(A) 89 (-) | 89 (-) | |
3ana3BaMe cn npaBOTO HaTexHnueckn npomeHn.
Chairman of the Board of Management

S. Reiser
Director Regulatory Affairs & Certification
Пьномошник по дOKум entaцята: S. Reiser
Alfred Karcher SE & Co. KG
Alfred-Karcher-Str.28-40
71364 Winnenden (Germany)
Ten.: +49 7195 14-0
Φaκc: +49 7195 14-2212
Winnenden, 2019/05/01
Sisukord
Uldised juhised 190
Siftotstarbeline kasutamine 190
Keskkonnakaitse 190
www.kaercher.com/REACH
Tarvikute monteerimine
Markus
Vee sisseimemine mahutist
Toode: Korgsurvepesur
Tüpp: 1.520-xxx

H. Jenner
Chairman of the Board of Management

S. Reiser
Director Regulatory Affairs & Certification
71364 Winnenden (Germany)
Tel: +49 7195 14-0
Winnenden, 2019/05/01
Saturs
Visparigas norades 197

H.Jenner
Chairman of the Board of Management

S. Reiser
Director Regulatory Affairs & Certification
Pilvarotais sagatavot dokumentaciju: S. Reizers (S. Reiser)
Alfred Kärcher SE & Co. KG
Alfred-Karcher-Str.28-40
71364 Winnenden (Vacija)
Talr.: +49 7195 14-0
Fakss: +49 7195 14-2212
Winnenden, 2019/05/01
Turinys
Chairman of the Board of Management

S. Reiser
Director Regulatory Affairs & Certification
Dokumentacios tvarkytojas: S. Reiser
Alfred Kärcher SE & Co. KG
Alfred-Karcher-Str. 28 - 40
Winnenden, 2019/05/01
3mict
3araIbHI Bka3iBKn 213
BukopncTaHHa npn3HaueHHaM 213
OxopoHa doBkiJJIa 213
PpnilaTa Ta 3anacnI deTani 213
KoMnJIeKT nOcTaBKn. 213
Bka3iBkn 3Texhikn 6e3neKn. 213
Onnc npnctpo 214
MONTAX 214
EneKtpnHe nikKluOeHHra 215
Ptp6ok npi ndnkiuohHHBODOnocTauHHa 215
KepyBaHHa 215
TpaHcnpTyBaHHra 216
36epirahnna 217
Dorla Ta texHnHe 06nyroByBaHHa 217
Donomora B pa3i HecnpabHocTei 218
Tapahtia 218
TexhihixapaKTepeuCTnKi 218
Ieknapaia npo BiinobiHictb cTahapam EC. 221
3araJIbHi Bka3iBKN

PepenepnMMBukopncTahnram npncptpo 03haHOMNTncb 3 ciEOpnrHaNbHOIO IHctpyKciEo 3
eKnnyataui Ta Bkazibkamn 3Texhikn 6e3neKn, 0doaHTbcra. IiaTn BiinobiHNO Do Hx.
36epiratu obnbi 6poowpn nnoanbwoBVKopncTahnna 6o nla HacTyHoro Bnachka.
BnKopncTaHHa 3a npu3HaueHHaM
LcH MIOHn anapat BucOKOTo TCKy npn3HaueHn BIKJIIOHO DnBnKoHaHH 3a3HaueHnx HxKpe po6it:
OuHHeHHcTpyMeHEm Hn3bKOTo TnCKy 3 BnKOpNCtAHHm MMHorO 3acOby (HaPnKnad, OuHSeHHo 6bNaDHaHHa, TpaHcNopTHnx 3ac06iB, 6yIDBeIbHNx KOHCTpyKci, IHCTpyMeHTiB)
OuHHeHHCTpyMeHem BnCOKOro TnCKy 6e3 MnHoro 3ac06y (HaPnKnlaI, facaIb, Tepac, caOBnx IHCTpyMeHTiB)
IINBnAaHHe CTIKNX 3a6pydHeHb MPeKOMeHdyEmo BnKOpNCToByBaTu potOpHe cOnNo i3CneuaIbHorO npnaIaI.
Potophe conno BxOaNTb do KOMnIeKTy nocTaBKn bapiAHTy «Plus».
YcTaHOBJIeHHI npJnaIaI
Bka3i8ka
Cucmema EASY!Lock do3e0nre ueudko u hadiuHo 3'cdhyeamu komnoheHmu, noepmaouy ix y pi3b6o8omy 3'cdhaHHi nuwe Ha oduh o6epm.
- YctaHOBHTI CONIO BnCOKOrO TnCKy Ha CTpyMNHHy Tpy6y MITKOHO DorOpN.
- BpyHy 3aTMyTn CoNIO BucOKOro TnCKy (Easy!Lock).
3.Пд' endatn CTpyMHHy Tpy6ky Do BucOKoHanipHoro nictoneta 3aTyrHyTu BpyHy (EASY!Lock).
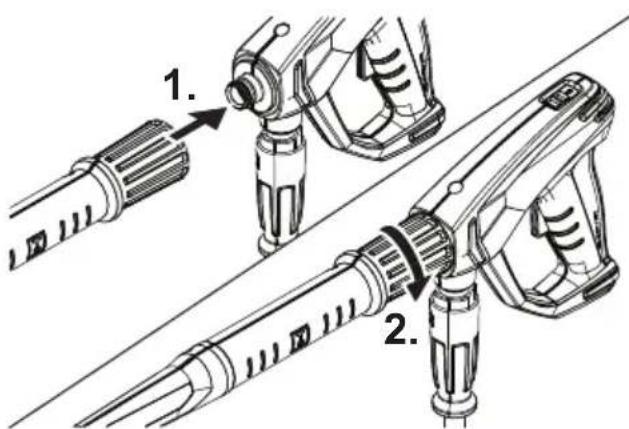
- BiikpnTn pfikcatop dyronoiohoi pykn.
- BntaTn pykny do kiHceBOrO noIIOXKeHHA.
Y npictpoix 6e3 6apa6aHa dIy shaHra
6.Пд'EDHATNшнВиСOKOТИСКУdo BnCOKOHAnipHOro nicToTe Ta natpy6ka BnCOKOROTSCKY npIcTpoHу n 3aTЯrHytВpyHy (EASY!Lock).Y npIcTPOx 3 bapabahOM dIЯшнra: - Po3Knactn po3rOpHyTm IaHr BnCOKOro TnCKy Ha niDnO3i.
- BctabTu i 3aqiKcyBaTu pykoTky y BaNy 6apabaHa dna uHa.
- Nobeptatny pykoTky 3a roDHHNKOBIO CTpiKHO, npu cboMy pIBHomipHO HamOTyOHN UJNAH R BUCOKORo TnCKy Ha 6apa6ah dJa UHaHa.
10.Пд'ЕнатишалгВИСОКОТИСКУДО ВИСОКOHANIPHOrO nICTOneTa N 3aTЯrHyTn BpyuHy (EASY!Lock).
EneKtpnue He nikKIOUeHHA
△HE6E3NEKA
Biodcymhmbid'edhaHnaeid mepexi
He6e3NeKa mpa8My6aHHaYepe3 ypaXeHHaEneKmpuHUM cmpymOM
IidKnUoyumu npucmpiu 3a donomozoi umencelbhoi buku do ekempuuhoi mepexi. BukopucmaHHa Hepo3HIMHO2 3'edhaHHa 3 ekeKpmopepeKeIO He donyckaembcra. Wmencehba uukna npuzhaueHa dna eidknoueHHa bid mepexi.
- Po3moTaTu MepeXeBn Ka6eNb Ta NOKnaCTn NOro Ha NiDnory.
- BctaBnTn uTeNceIbHy BNkky y po3eKy.
Natpy6okДЯпдклоченьВODONOCtayaHHA
PiiknIoueHnIO BODonpoBody
△NONEPEDXEHN
IoeepHeHHa 3a6pydHeHOi oodu e Mepexy numHOi oodu
He6e3neka dna 3doopo8'a
Dompumyamucb npabun, ycmahoeenehux
nipuemcmeom 3 bodoonocmaaHna.
3iioho 3 uHHmu npabunamu He do3oBmcbcr
eknnyamaui npucmppo 6e3 cuscmemnozo
po3dinoeea 6 mepexi numnozo bodoonocmaaHna.
Bukopcmoeyamu cuscmemhu po3dinoobau
KARCHER afo inuui cucemmu po3dinoea, zo
eiNoibae bumozam EN 12729, mun BA. Boda, zo
npouwna uepe3 cuscmemhu po3dinoea,
knacufikyembcra kHe npudamha dn naumr. 3aekdu
npucdhyeamu cuscmemhu po3dinoobau do
eodonpo8ody, he npucdhyeamu uo2o do nampy6ka da
niodknuoyehra bodoonocmaaHna.
- Npebipntu Tnck noaqui BOnn Ha BxoDi, Temepatypy Ha BXoDi i KInbKicTB BoOn, 0noaetbcra (INB. rnaBy TexHiHx xapaKtepncTkn).
- 3'εdHaTn cIstEmHn po3diIOBau i naTppy6ok npncToPO Ira NiKIIuOeHHRA BOOnocTaayHHa 3a DonOMoROU WlnAHa rIra NODaYi BOIN (BmOrn Do WlnAHa rIra NODaYi BOIN dN.B.y rnaBI TexHiHx xapaKTePncTnKi).
- BiikpnTn liHIO BODoonocTaayHna.
Iopaa BOIN 36aka uXOM yCMOKTyBaHH
- ПигвHTTNиланг 3 спьтомdo natpy6ka дяпдкнючehн BAODONOCtayHЯ (HOMepДяЗAMOBJIeHHa DB.yIaBI TexHicHi xapakTepnCTNK).
- BuaNTn nobITpr 3 npictpoIO (INB. rnaBy BuaenHn noBITpr 3 npictpoIO).
BvdaenHnnoBITp3 npctpo
- BiikpyTttn CoNIO BnCOKOro TnCKy BiD CTpyMNHHOI Tpy6Kn.
- Дати пистою NonpaцюВати, по Вoga He по.... TEKTи 6e3 6yIb6aawok NOBITpr.
- Y pa3i npo6nem nizac BuaaeneHHra nobitpr 3anyctntnpictpri Ha 10 ckyH,notim BmKHyTu Ioro. NOBTOPNT npocek kibka pa3ib.
- Bvmkhny npncptpi.
- HApTyTnTn CoNlO BnCOKOro TnCKy Ha CtpyMnHHy Tpy6Ky.
KepyBaHHa
HE6E3NEKA
CmpymiHb oodu bucokozo mucky
He6e3neka mpa8My6aHHa
3a6bopohraembca fikcyamu cnycnhu i 3anobkhu eaxeni bpo6oymy nonoKeHHi.
He eukopucmooyeamu eucokohaniphuu nicmonem, kuo nowkodkeho 3ano6ixhui baxijb.
Ipepe bukoHannm 6ydb-akux po6im i3 npucmpoem Ipecyhymu 3anobixhu φikcamop bucoKoHaipnozo nicmonema eneped.
Tpumamu bucokohanipHu nicmonem i cmpymuHny mpy6ky o6oma pykamu.
△NONEPEDXEHN
HecnpaHu npucmpiu i npunaodra, nowkodxei nideidhi niHii ma 3'cdHaHHA
He6e3neKa mpa8MyaHHa
Ppucmpiu moxha ekcnnyamyu minbku 6e3doaHHOMy cmaHi.
BiKpNBaHH/3akpNBaHH BnCOKOHanipHoro nicToJeTa
- Hatncchytn 3anobixhnn Ta cnysckn Baxeni. Bucokohanipn nictolet Biikpnaetbcra.
- BiDnyctntu 3an06ixHn Ta cnysckn BaKeJI. BucokohanipHn niCtoTet 3akpnaeTbcra.
Eknpnyatai npBnCOKM TnCKOM
Pnpctpi MoKe ekcnnyaTyBaTnCry BepTKaNbHOMy Ta ropu3oHTaNbHOMy noJIOxKeHHi.
Bka3ieka
Ppucmpiu ochaueHu MaHomempuHUM eumukaem. Duaeyn 3anyckaembcra nuwe e momy pa3i, kuo eucokohaniphuu nicmonem idkpumu.
- Y npnctpoax 3 6apa6aHOM nIy IJNAHra: 3aBKnIOBHiCTo PO3MOTyBaTn 3 6apa6aHa IJNAHr BnCOKOrO TnCKy.
- BcTaHOBnTIN BmMnKau npCTpoU y nOJKeHHA 1 / ON
- IpecyHytn 3anO6iKHHI ikCaTop BucOKoHaipHoro nictOneta Ha3aJ. BucOKoHaipHn niCTOnet po36NoKOBaHH.
- BiKpnTn BucOkanipHn nicToIe.
Bn6ip Tnny Ctpymenr
- 3aKpTN BnCOKoHanipHn niCToJET.
- Повертах корпс сонлдоти,notriбни CBBOH He cnIBnade 3 MitkoI.
IpeepKOxHMMBnKOpncTahHm
- Ipebeipntu MepxeBn Ka6enb Ha npedmet NOUKoJKeHb.
IoiKoJKeHn Ka6enb cnId HerauHo 3amHHTB ABTOpU3OBAHn cepBicHi cnYk6i a60 i3 3aJIyueHHm faxIBz-eneKTPnka. - IpepeBipuTn uHaHr BucOKoTo TnCKy Ha npEaMeT NOUKoJKeHb.
NoKoJHnBnHnBnCOKOrTnCKy nIaIrae HeraiHi 3amHI. - IpepeBipnI npicpi Ha repMeTnHicTB. Onyckaebc BntiKaHHa 3 KpaneJIb BOHn Ha XBNHy.Y pa3i 6inbWoTo BNTOKy 3BepHyTncd ocepBicHO cnyx6n.
LOTINKHA
OuHCTHT ciTAcTHn fIbTp B nATpy6ky dny iNkHoueHHBODONOCaHaHH (INB. INaBy OunueHH ciTuCArTOo fInbTa B nATpy6ky dny iNkHoueHHBODONOCaHaHH).
OuHCTHTn fIbTp y BCMOKTyBaIbHOMy IJIaHry MInHO 3ac06y.
Yepe3 KOxHi 500 roDnH po6Otn, aJe He piJUe OdHoro pa3y Ha pik.
- TexHicHe 06cIpyROByBaHHn npIcTpoHO NOBHHO 3dIChHOBaTHCepBICHO CnyK6oH.
Pobtn 3 TexHnHO O6cnyroByBaHHa
OuHHeHH ciTuactoR o fIbTpBa Natpy6ky dnniKIOUeHH BOONOCaAHN
- BiKpyTInHaKnDHyraKy.
- 3HATN BCMOKTyBaIbHn NaTpy60K.
- BntraTn ciTuaCTn fIInbTp.
- Cityactn fInbtp OChCTNTN 330BHi i npomntn.
- BCTaBnTi ciTuaTm fInbTp.
Bka3ieka
BupiHmU weCmuapHHuk nampy6ka wnaHaa dna iidKnoueHHo npucmpoio.
6. BctaHOBHTn naTpy6ok 7JnaHra i 3aTyrHyTu NaKuIDHO raKOHO.
Donomora B pa3i HecnpaBHOcTei
△HE6E3NEKA
HehaMucHu 3anyck npucmpo, domuk do yacmuh, uo npoeodmb enekmpuHu cmpyM
He6e3neKa mpa8My8aHHy, ypaXeHHy eNeKmpuHUM cmpymom
Ipepe npoeedeHHa pOcmpoi eumkhymu npucmpiu.
Bumru umencelbny 6nky.
Yci nepesipku ma poobomu 3 eJekmpuyHumu yaemuHaMu npucmpoio Maombeukohyeamucj faxieumu.
Y pa3i HecnpaBnOcme, kIe 3aadaH e zu2naei, 3eephmucdo aemopuzoeaho cepicho cnyk6u.
Pnucpii He 3anyckaetbcra
- Перевп.Tи Мерекеви Кабь Na прдmet noшковские.
- IpepeBipuHn Happy Mepeksi.
- RaKo npncptpi neperpirtn:
a BcTaHOBnT BmNKaU Ha «0/OFF».
b OxonoJkyBaTN npncTpii npoTgrom He MeHwe 15 xBnInH.
c BCTAHOBHTN BIMUKaU npucTpoU y noIOXeHHRA «I/ON».
- Y pa3i HecnpaBHOcti eneKtpoo6naHnHa 3BepHyTncd ocePbichoi cnky6n.
Tnck B npncptoi He cTBOpoeTbcra
- BctaHOBttn opcyHky Ha BucOKn TnCK.
- BuaanTn nobitpr 3 npictpo (INB. rnaBy BuaenHn noBtpr 3 npictpo).
- OuHCTHT ciTuaCTn fIbTp B naTppy6ky dny nIKKIOUeHHB OBOIOOCTaHaHHa (DnB. rnaBy OunueHH ciTuCArTO fINbTa B naTppy6ky dny nIKKIOUeHHB OBOIOOCTaHaHHa).
- Npebipntn KInbKicTB BoN, IIO noaetbcra (Heo6xHny KInbKicTB nB. y rnaBi TexhiXh i xapakTepcntkN).
-
OuHCTHTn cOnnO, y pa3i Heo6xIDHOCTI 3aMIHNr.
-
Y pa3i Heo6xiIHOCTi 3BepHyTncra Do cepBicHoi cnyx6n.
Hacoc herepmtnhyn.
DonyckaetbcBNTiKaHHa 3 Kpanelb BOnn Ha XBNJINHy.
- Y pa3i cunbHoro BnToKy nepeBipuTn npucTpI y cepBicHi cnYk6i.
CTyk Hacoca
- Ipepebipntn repmetnucHictb liHii noaui BOIN.
- IpebeipuTn repMeTuHicTB liHII dNBA BCMOKTyBaHHa MmHoro 3aco6y.
- BcTaHOBnTmHimAlnBe 3HaueHHra 06'Emy BCMOKTyBaHHa Ha pIbTpI MmHOro 3acOby.
- BuaHITn nobITpr 3 npictpoU (DVB. rnaBy Buaaehn noBITpr 3 npictpoU).
- Y pa3i Heo6xidHocTi 3BepHyTncr Da cepBicHOI cnJyKbN.
3aHaTo Maja KInbKiCTb MNHOrO 3ac06y
- BctaHOBnTu HacaKu Ha «CHEM»
- 36iNbUnTNo6'EMBCMOKTyBaHHHaΦiNbTpIДЯ MmHOrO 3ac0y.
- Ipebeipu/oucHTn BCMOKTyBaIbHn IuaHr dna MmHoro 3aco6y 3fJbTpOM.
- Y pa3i Heo6xiIHOCTi 3BepHyTnCra do cepBicHoi cnJyK6n.
Rapantia
YkoHni KpaHn DiIOb BiINOBiHi rapaHTiHi yMOBn, BCTaHOBNeHi yNOHBaXeHOOpraH3aIcIe 36yTu Hauo npOdyKuB v ki KpaHl MiokNbi HecnpabHocTi npnaDy npOtaROM rapaHTiHoro cTPOky MM yCyBaEMo 6e3KOuTobHo, kUO npuHa HecnpaBHocTI nonrae B deΦeKtax MaTePiaNIB a60 Bnpo6HuOmy bpaKy. Y pa3i BnHNKHeHH NpeTeH3i npOTARom rapaHTiHoro cTPOky npoxAHn 3BepTaTncr, MaOUn npu Co6i Yek npo NOKynk, Do ToproBeNbHOi opraH3aui, UO npOdaNa npOdyKT, a6o Do HaNBnXQoi yNOHBaXeHOi cLyXbN cepBicHOro o6CnyROByBaHH. (Adepcn DnB. Na 3Bopoti)
Texhiuhi xapaKTepeNCTnKN
Chairman of the Board of Management

S. Reiser
Director Regulatory Affairs & Certification
Ocoba, Biinobianda h3a BeDHeHn DOkymeHTaui: Ⅲ.
Painep (S. Reiser)
Alfred Karcher SE & Co. KG
Alfred-Karcher-Str.28-40
71364 Winnenden (Germany)
Ten.: +49 7195 14-0
ΦaKc: +49 7195 14-2212
Winnenden, 2019/05/01
目录
一般性注意事项 221
按规定使用 221
环境保护 222
附件和备件 222
供货范围 222
安全提示 222
设备介绍 222
安装 223
电气接口 223
水接头 223
操作 223
运输 224
存放 224
维护和保养 225
故障排除 225
质量保证 225
技术数据 225
一般性注意事项
www.kaercher.com/REACHI
附件和备件
Register your product and benefit from many advantages.
www.kaercher.com/welcome ★★★★★
Rate your product and tell us your opinion.
www.kaercher.com/dealersearch
Alfred Kärcher SE & Co. KG
Alfred-Karcher-Str.28-40
71364 Winnenden (Germany)
Tel.: +49 7195 14-0
Fax: +49 7195 14-2212