543AE15 - Drill HUSQVARNA - Free user manual and instructions
Find the device manual for free 543AE15 HUSQVARNA in PDF.
Frequently Asked Questions - 543AE15 HUSQVARNA
User questions about 543AE15 HUSQVARNA
0 question about this device. Answer the ones you know or ask your own.
Ask a new question about this device
Download the instructions for your Drill in PDF format for free! Find your manual 543AE15 - HUSQVARNA and take your electronic device back in hand. On this page are published all the documents necessary for the use of your device. 543AE15 by HUSQVARNA.
USER MANUAL 543AE15 HUSQVARNA
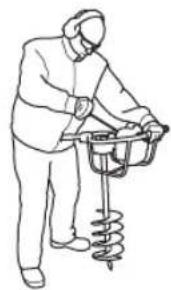
WARNING! An earth auger is a dangerous tool if used carelessly or incorrectly and can cause serious, even fatal injuries. It is extremely important that you read and understand the contents of this Operator's Manual.
Please read the operator's manual carefully and make sure you understand the instructions before using the machine.
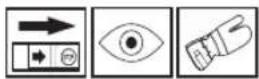
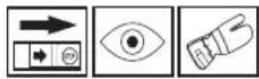
Always wear:
Approved hearing protection
Approved eye protection
This product is in accordance with applicable EC directives.
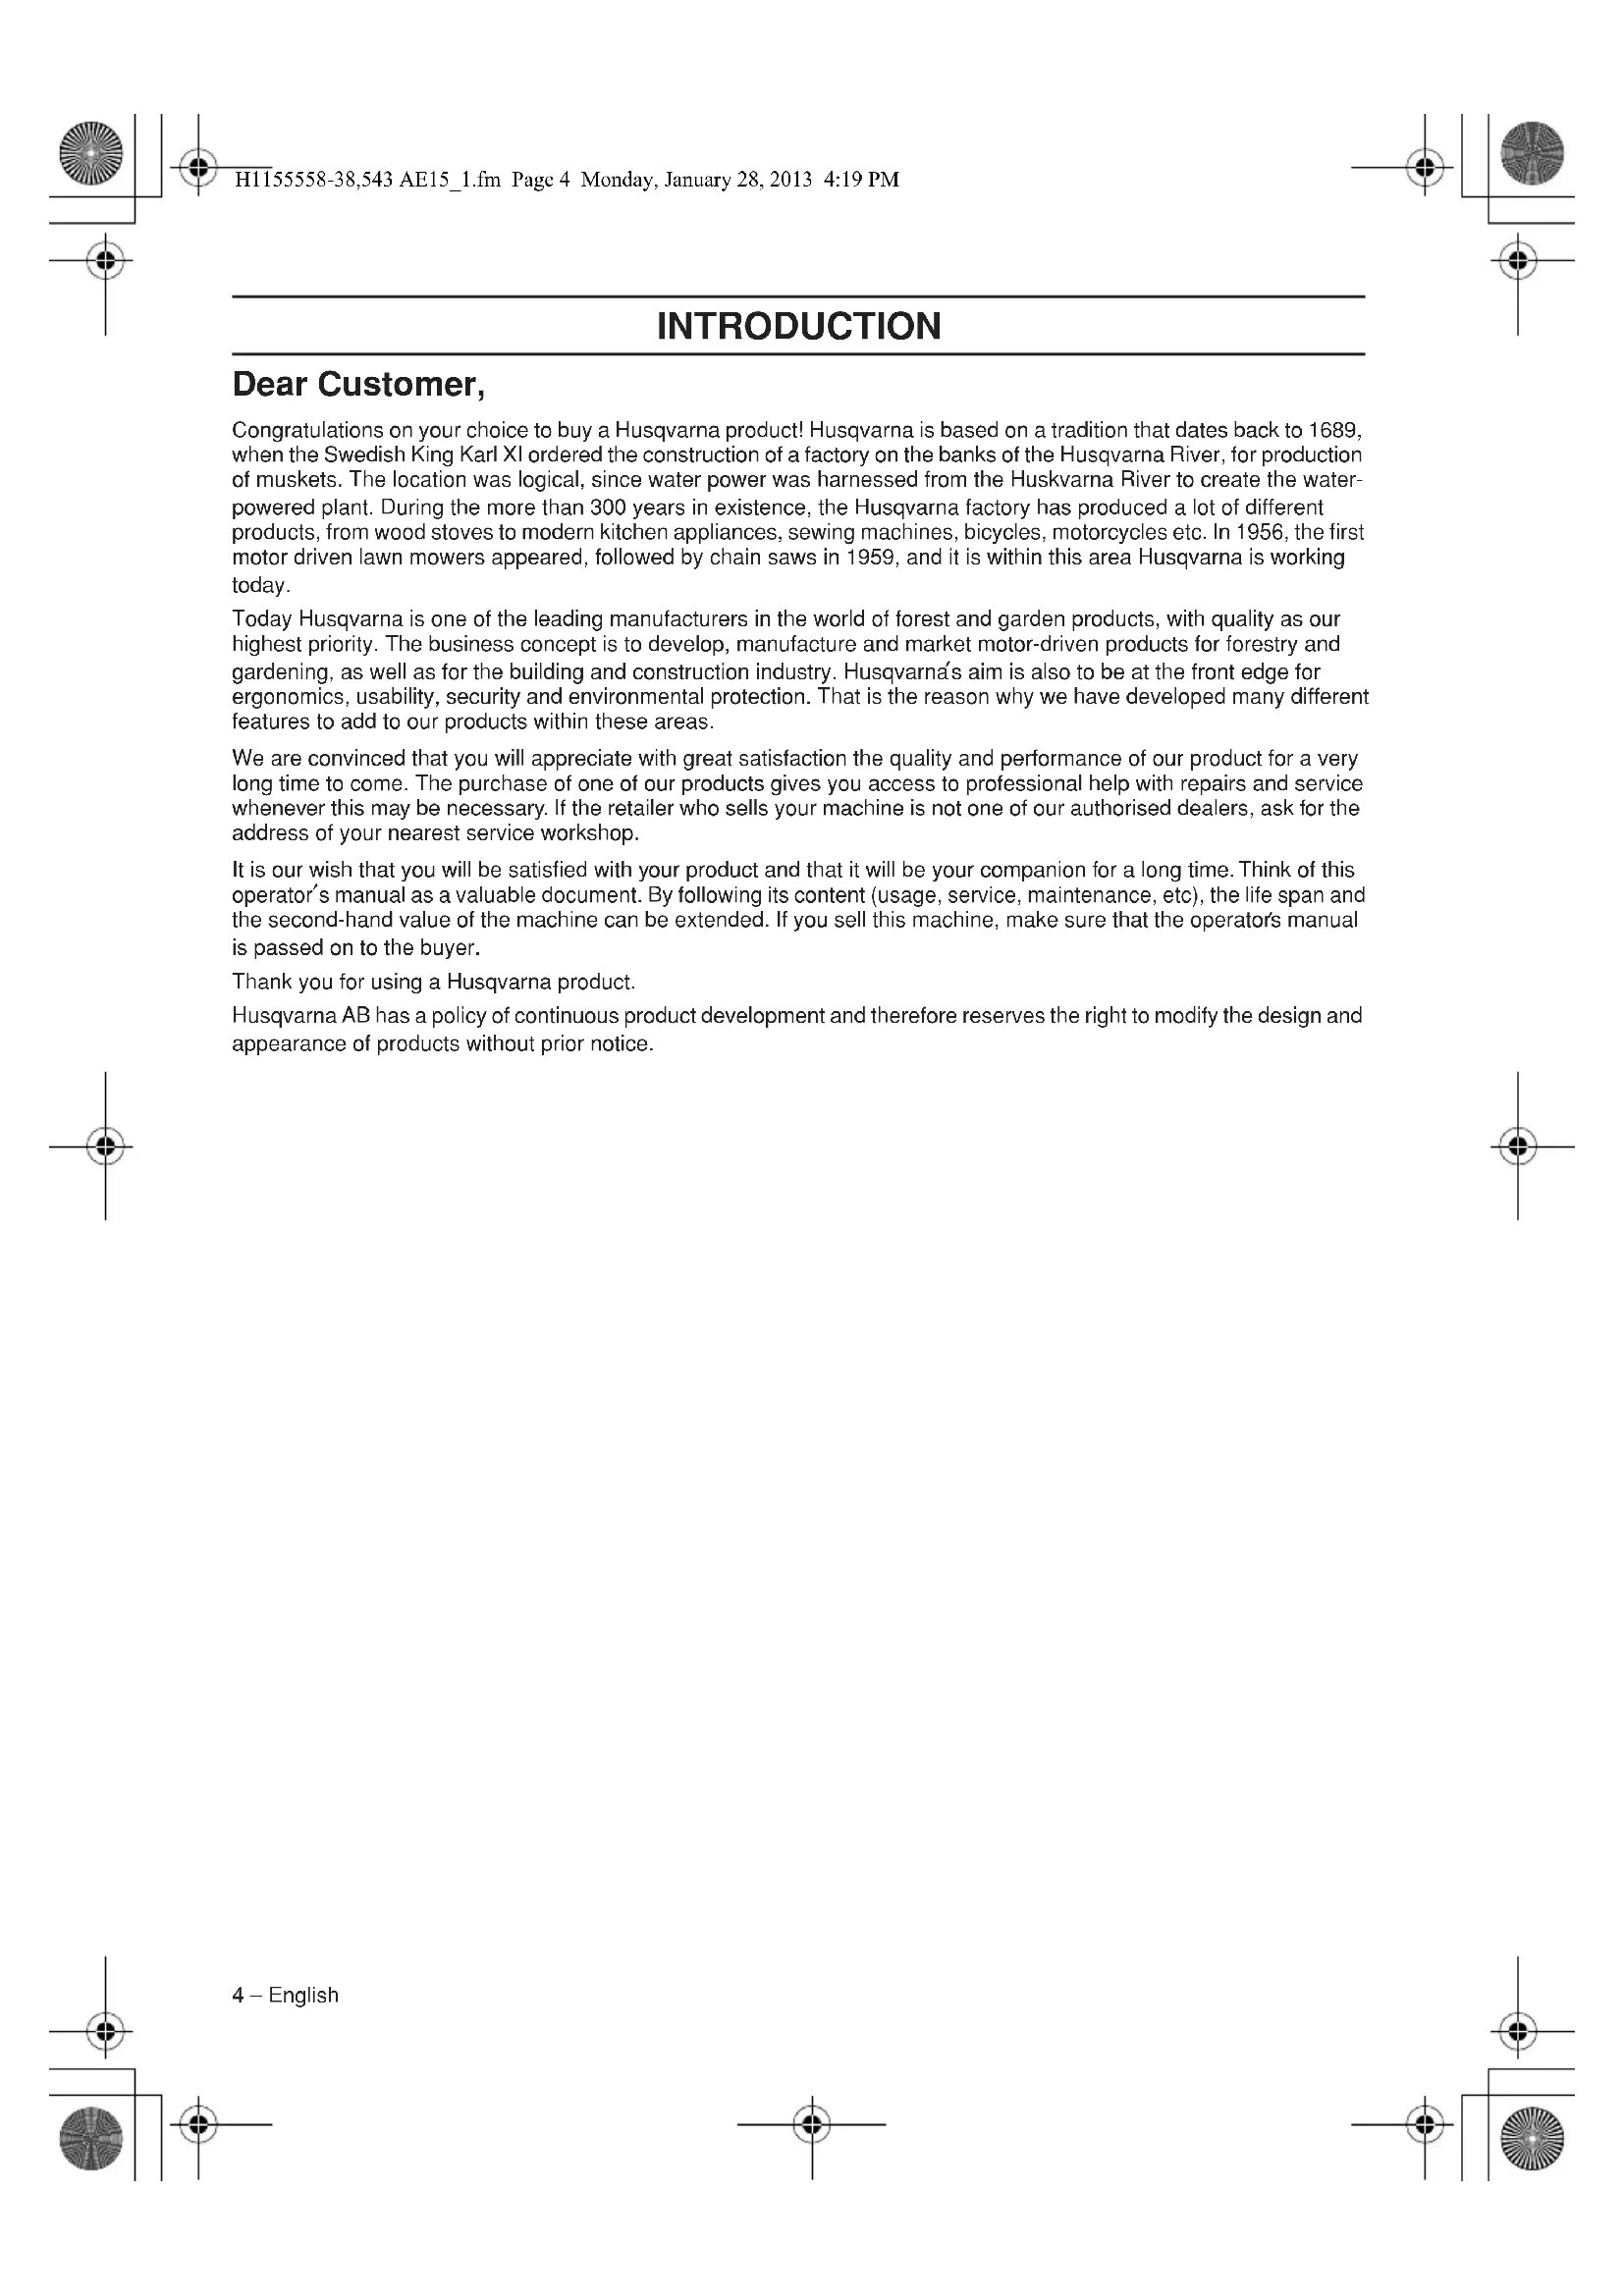
Drilling into or contact with electrical cables or wires can lead to death or serious bodily injury. The machine is not electrically insulated.
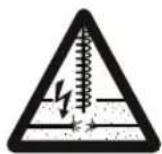
Striking something hard in the earth, such as rocks or tree roots, may cause the drill to come to a sudden stop. This can lead to a reacting motion on the auger, which can cause the operator to lose control of the machine or throw him to the ground, resulting in serious injury.
Always wear approved protective gloves.
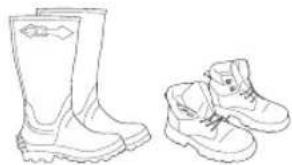
Wear sturdy, non-slip boots or shoes.
Ignition; choke: Set the choke control in the choke position.


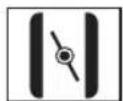
Air purge
Noise emission to the environment according to the European Community's Directive. The machine's emission is specified in the Technical data chapter and on the label.
Keep all parts of your body away from hot surfaces.

Other symbols/decals on the machine refer to special certification requirements for certain markets.
Switch off the engine by moving the stop switch to the STOP position before carrying out any checks or maintenance.
Always wear approved protective gloves.
Regular cleaning is required.
Visual check.

CONTENTS
Contents Note the following before
KEY TO SYMBOLS
Symbols 2
CONTENTS
Contents 3
Note the following before starting: 3
INTRODUCTION
Dear Customer, 4
WHATISWHAT?
What is what? 5
GENERAL SAFETY PRECAUTIONS
Important 6
Personal protective equipment 6
Machine's safety equipment 7
ASSEMBLY
Fitting the handle 9
Fitting the auger 9
FUEL HANDLING
Fuel safety 10
Fuel 10
Fueling 11
STARTING AND STOPPING
Check before starting 12
Starting and stopping 12
WORKING TECHNIQUES
General working instructions 14
MAINTENANCE
Carburettor 16
Muffler 16
Air filter 16
Fuel filter 16
Gear 17
Spark plug 17
Maintenance schedule 18
TECHNICAL DATA
Technical data 19
EC-declaration of conformity 20
starting:
Please read the operator's manual carefully.

WARNING! Long-term exposure to noise can result in permanent hearing impairment. So always use approved hearing protection.

WARNING! Under no circumstances may the design of the machine be modified without the permission of the manufacturer. Always use original accessories. Non-authorized modifications and/or accessories can result in serious personal injury or the death of the operator or others.

WARNING! An earth auger is a dangerous tool If used carelessly or incorrectly and can cause serious, even fatal injuries. It is extremely important that you read and understand the contents of this Operator's Manual.
INTRODUCTION
Dear Customer,
Congratulations on your choice to buy a Husqvarna product! Husqvarna is based on a tradition that dates back to 1689, when the Swedish King Karl XI ordered the construction of a factory on the banks of the Husqvarna River, for production of muskets. The location was logical, since water power was harnessed from the Huskvarna River to create the water-powered plant. During the more than 300 years in existence, the Husqvarna factory has produced a lot of different products, from wood stoves to modern kitchen appliances, sewing machines, bicycles, motorcycles etc. In 1956, the first motor driven lawn mowers appeared, followed by chain saws in 1959, and it is within this area Husqvarna is working today.
Today Husqvarna is one of the leading manufacturers in the world of forest and garden products, with quality as our highest priority. The business concept is to develop, manufacture and market motor-driven products for forestry and gardening, as well as for the building and construction industry. Husqvarna's aim is also to be at the front edge for ergonomics, usability, security and environmental protection. That is the reason why we have developed many different features to add to our products within these areas.
We are convinced that you will appreciate with great satisfaction the quality and performance of our product for a very long time to come. The purchase of one of our products gives you access to professional help with repairs and service whenever this may be necessary. If the retailer who sells your machine is not one of our authorised dealers, ask for the address of your nearest service workshop.
It is our wish that you will be satisfied with your product and that it will be your companion for a long time. Think of this operator's manual as a valuable document. By following its content (usage, service, maintenance, etc), the life span and the second-hand value of the machine can be extended. If you sell this machine, make sure that the operator's manual is passed on to the buyer.
Thank you for using a Husqvarna product.
Husqvarna AB has a policy of continuous product development and therefore reserves the right to modify the design and appearance of products without prior notice.


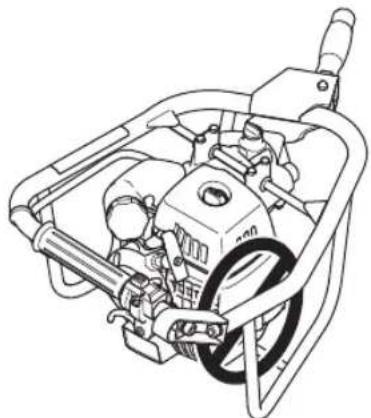
WHATISWHAT?
What is what?
1 Filling with oil
2 Air filter cover
3 Choke control
4 Throttle trigger
5 Gear
6 Drill (Available as an accessory.)
7 Cutters (Available as an accessory.)
8 Cutting equipment
9 Start throttle button
10 Stop switch
11 Starter handle
12 Air purge
13 Fuel tank
14 Spark plug cap and spark plug
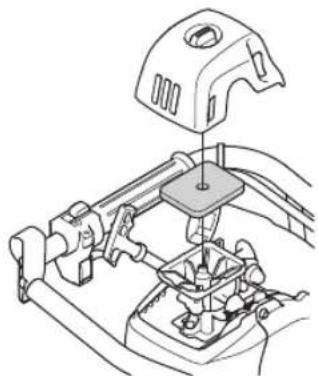
15 Cylinder cover
16 Operator's manual
17 Combination spanner
GENERAL SAFETY PRECAUTIONS
Important Personal protective equipment
IMPORTANT!
The machine is solely designed for drilling in earth.
National legislation could regulate the use of this machine. Find out what legislation is applicable in the place where you work before you start using the machine.
Never use a machine that has been modified in any way from its original specification.
Never use the machine if you are tired, if you have drunk alcohol, or if you are taking medication that could affect your vision, your judgement or your co-ordination.
Wear personal protective equipment. See instructions under the "Personal protective equipment" heading.
Never use a machine that is faulty. Carry out the safety checks, maintenance and service instructions described in this manual. Some maintenance and service measures must be carried out by trained and qualified specialists. See instructions under the Maintenance heading.
All covers and guards must be fitted before starting. Ensure that the spark plug cap and ignition lead are undamaged to avoid the risk of electric shock.
Ensure that no-one comes closer than 5m while you are working.
Carry out an overall inspection of the machine before use. See the maintenance schedule.

WARNING! This machine produces an electromagnetic field during operation. This field may under some circumstances interfere with active or passive medical implants. To reduce the risk of serious or fatal injury, we recommend persons with medical implants to consult their physician and the medical implant manufacturer before operating this machine.

WARNING! Running an engine in a confined or badly ventilated area can result in death due to asphyxiation or carbon monoxide poisoning.
IMPORTANT!
An earth auger is a dangerous tool if used carelessly or incorrectly and can cause serious, even fatal injuries. It is extremely important that you read and understand the contents of this Operator's Manual.
You must use approved personal protective equipment whenever you use the machine. Personal protective equipment cannot eliminate the risk of injury but it will reduce the degree of injury if an accident does happen.
Ask your dealer for help in choosing the right equipment.

WARNING! Listen out for warning signals or shouts when you are wearing hearing protection. Always remove your hearing protection as soon as the engine stops.
HEARING PROTECTION
Wear hearing protection that provides adequate noise reduction.
EYE PROTECTION
Protective goggles or a visor must be worn.


GLOVES
Gloves should be worn when necessary, e.g. when fitting cutting attachments.

BOOTS
Wear sturdy, non-slip boots or shoes.
CLOTHING
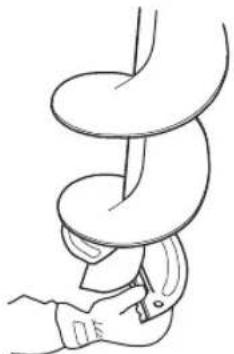
Never wear loose-fitting clothes, scarves, jewellery or similar items that could get caught in the auger. Make sure your hair does not hang below shoulder level.
GENERAL SAFETY PRECAUTIONS
FIRST AID KIT
Always have a first aid kit nearby.
Machine's safety equipment
This section describes the machine's safety equipment, its purpose, and how checks and maintenance should be carried out to ensure that it operates correctly. See the "What is what?" section to locate where this equipment is positioned on your machine.
The life span of the machine can be reduced and the risk of accidents can increase if machine maintenance is not carried out correctly and if service and/or repairs are not carried out professionally. If you need further information please contact your nearest service workshop.
IMPORTANT!
All servicing and repair work on the machine requires special training. This is especially true of the machine's safety equipment. If your machine fails any of the checks described below you must contact your service agent. When you buy any of our products we guarantee the availability of professional repairs and service. If the retailer who sells your machine is not a servicing dealer, ask him for the address of your nearest service agent.

WARNING! Never use a machine with faulty safety equipment. The machine's safety equipment must be checked and maintained as described in this section. If your machine fails any of these checks contact your service agent to get it repaired.
Stop switch
Use the stop switch to switch off the engine.

Start the engine and make sure the engine stops when you move the stop switch to the stop setting.
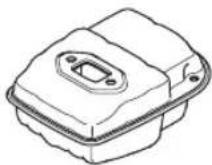
Muffler

The muffler is designed to keep noise levels to a minimum and to direct exhaust fumes away from the user.
In countries that have a warm and dry climate there is a significant risk of fire. We therefore fit certain mufflers with a spark arrester mesh. Check whether the muffler on your machine is fitted with this kind of mesh.
For mufflers it is very important that you follow the instructions on checking, maintaining and servicing your machine.
Never use a machine that has a faulty muffler.
Regularly check that the muffler is securely attached to the machine.
If the muffler on your machine is fitted with a spark arrester mesh this must be cleaned regularly. A blocked mesh will cause the engine to overheat and may lead to serious damage.

WARNING! The inside of the muffler contain chemicals that may be carcinogenic. Avoid contact with these elements in the event of a damaged muffler.

WARNING! Bear in mind that: The exhaust fumes from the engine are hot and may contain sparks which can start a fire. Never start the machine indoors or near combustible material!

ASSEMBLY
Fitting the handle

- Screw in the left grip to the bracket provided on the frame and tighten securely.

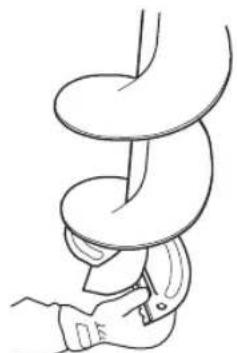
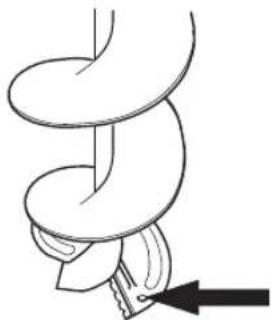
Fitting the auger

- Slide the ring clip (A) and remove the locking pin (B) from the auger.

- Fit the auger (C) to the output shaft (D).
- Fit the locking pin and slide the ring clip so that it covers the locking pin.
FUEL HANDLING
Fuel safety
Never start the machine:
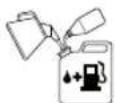
1 If you have spilt fuel on it. Wipe off the spillage and allow remaining fuel to evaporate.
2 If you have spilt fuel on yourself or your clothes, change your clothes. Wash any part of your body that has come in contact with fuel. Use soap and water.
3 If the machine is leaking fuel. Check regularly for leaks from the fuel cap and fuel lines.
Transport and storage
- Store and transport the machine and fuel so that there is no risk of any leakage or fumes coming into contact with sparks or naked flames, for example, from electrical machinery, electric motors, electrical relays/ switches or boilers.
- When storing and transporting fuel always use approved containers intended for this purpose.
- When storing the machine for long periods the fuel tank must be emptied. Contact your local petrol station to find out where to dispose of excess fuel.
- Ensure the machine is cleaned and that a complete service is carried out before long-term storage.
In order to prevent unintentional starting of the engine, the spark plug cap must always be removed during long-term storage, if the machine is not under close supervision and when performing all service measures.

WARNING! Take care when handling fuel. Bear in mind the risk of fire, explosion and inhaling fumes.
Fuel
CAUTION! The machine is equipped with a two-stroke engine and must always been run using a mixture of petrol and two-stroke oil. It is important to accurately measure the amount of oil to be mixed to ensure that the correct mixture is obtained. When mixing small amounts of fuel, even small inaccuracies can drastically affect the ratio of the mixture.

WARNING! Fuel and fuel fumes are highly inflammable and can cause serious injury when inhaled or allowed to come in contact with the skin. For this reason observe caution when handling fuel and make sure there is adequate ventilation.
Petrol

CAUTION! Always use a quality petrol/oil mixture at least 90 octane (RON). If your machine is equipped with a catalytic converter (see chapter on Technical data) always use a good quality unleaded petrol/oil mixture. Leaded petrol will destroy the catalytic converter.
Use low-emission petrol, also known as alkylate petrol, if it is available.
Ethanol blended fuel, E10 may be used (max 10% ethanol blend). Using ethanol blends higher than E10 will create lean running condition which can cause engine damage.
- The lowest octane recommended is 90 (RON). If you run the engine on a lower octane grade than 90 so-called knocking can occur. This gives rise to a high engine temperature, which can result in serious engine damage.
- When working at continuous high revs a higher octane rating is recommended.
Two-stroke oil
- For best results and performance use HUSQVARNA two-stroke engine oil, which is specially formulated for our air-cooled two-stroke engines.
-
Never use two-stroke oil intended for water-cooled engines, sometimes referred to as outboard oil (rated TCW).
-
Never use oil intended for four-stroke engines.
-
A poor oil quality and/or too high oil/fuel ratio may jeopardise function and decrease the life time of catalytic converters.
-
Mixing ratio
1:50 (2%) with HUSQVARNA two-stroke oil.
1:33 (3%) with oils class JASO FB or ISO EGB formulated for air-cooled, two-stroke engines.
| Petrol, litre | Two-stroke oil, litre | |
| 2% (1:50) 3% (1) | 33) | |
| 5 | 0,10 0,15 | |
| 10 | 0,20 0,30 | |
| 15 | 0,30 0,45 | |
| 20 | 0,40 0,60 |
FUEL HANDLING
Mixing
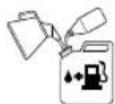
Always mix the petrol and oil in a clean container intended for fuel.
- Always start by filling half the amount of the petrol to be used. Then add the entire amount of oil. Mix (shake) the fuel mixture. Add the remaining amount of petrol.
- Mix (shake) the fuel mixture thoroughly before filling the machine's fuel tank.

- Do not mix more than one month's supply of fuel at a time.
If the machine is not used for some time the fuel tank should be emptied and cleaned.
Fueling

WARNING! Taking the following precautions, will lessen the risk of fire:
Do not smoke or place hot objects near fuel.
Always shut off the engine before refuelling.
Always stop the engine and let it cool for a few minutes before refuelling.
When refuelling, open the fuel cap slowly so that any excess pressure is released gently.
Tighten the fuel cap carefully after refuelling.
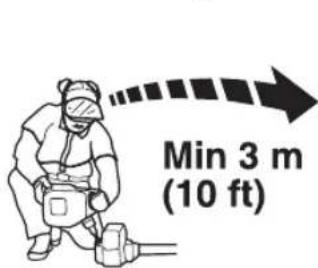
Always move the machine away from the refuelling area and source before starting.
Always use a fuel container with an anti-spill valve.
- Clean the area around the fuel cap. Contamination in the tank can cause operating problems.
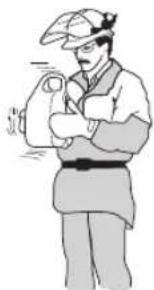
- Ensure that the fuel is well mixed by shaking the container before filling the tank.
STARTING AND STOPPING
Check before starting

- Check the cutters. Never use cutters that are blunt, cracked or damaged.

- Check that the machine is in perfect working order.
Check that all nuts and screws are tight. - Check that the cutting attachment always stops when the engine is idling.
Only use the machine for the purpose it was intended for.
Make sure that the handle and safety features are in good working order. Never use a machine that lacks a part or has been modified outside its specifications. - All covers must be correctly fitted and undamaged before you start the machine.
Starting and stopping


WARNING! Always move the machine about 3 metres from the refuelling position before starting. Place the machine on a flat surface. Ensure the cutting attachment cannot come into contact with any object. Make sure no unauthorised persons are in the working area, otherwise there is a risk of serious personal injury.
Cold engine
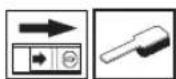
Ignition: Set the stop switch to the start position.
Primer bulb: Press the air purge repeatedly until fuel begins to fill the bulb. The bulb need not be completely filled.
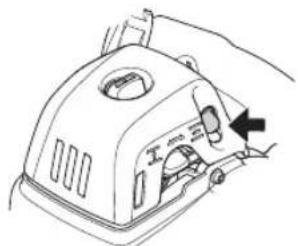
Choke: Set the choke control in the choke position.

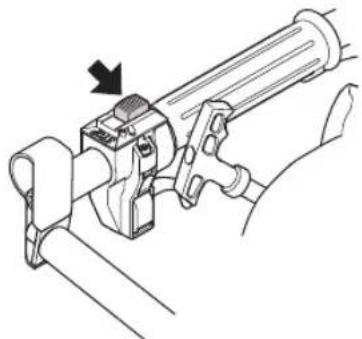
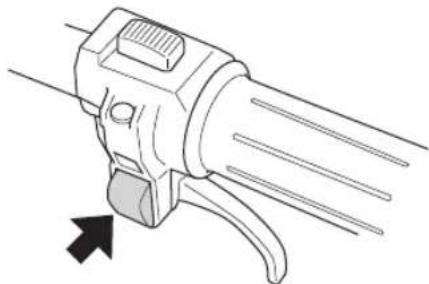
Start throttle:
Set the throttle to the start position by first pressing the throttle trigger, then pressing the start throttle button (A). Then release the throttle trigger, followed by the start throttle button. The throttle function is now activated. To return the engine to idle, press the throttle trigger again.

Warm engine
Use the same starting procedure as for a cold engine but without setting the choke control in the choke position.
Starting

WARNING! When the engine is started with the choke in either the choke or start throttle positions the cutting attachment will start to rotate immediately.
Hold the machine upright with your left hand. Grip the starter handle, slowly pull out the cord with your right hand until you feel some resistance (the starter paws grip), now quickly and powerfully pull the cord.
STARTING AND STOPPING
Push the choke control back to its original position as soon as the engine fires, and continue trying to start until the engine starts.
CAUTION! Do not pull the starter cord all the way out and do not let go of the starter handle when the cord is fully extended. This can damage the machine.

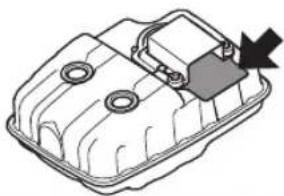
CAUTION! Do not put any part of your body in marked area. Contact can result in burns to the skin, or electrical shock if the spark plug cap has been damaged. Always use gloves. Do not use a machine with damaged spark plug cap.
Stopping
The engine is switched off by moving the stop switch to the stop position.
WORKING TECHNIQUES
General working instructions
IMPORTANT!
This section takes up the basic safety precautions for working with an earth auger.
If you encounter a situation where you are uncertain how to proceed you should ask an expert. Contact your dealer or your service workshop.
Avoid all usage which you consider to be beyond your capability.

WARNING! The machine can cause serious personal injury. Read the safety instructions carefully. Learn how to use the machine.

WARNING! Cutting tool. Do not touch the tool without first switching off the engine.
Safety instructions regarding the surroundings
- Never allow children to use the machine.
- Ensure that no-one comes closer than 5m while you are working.
- Never allow anyone else to use the machine without first ensuring that they have read and understood the contents of the operator's manual.
Safety instructions while working

Always ensure you have a safe and stable working position.
Always hold the machine with both hands.
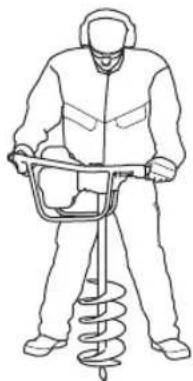
- Use your right hand to control the throttle setting.
Make sure that your hands and feet do not come near the cutting attachment when the engine is running.
- Start drilling with half-throttle, and gradually increase the engine speed so that the drill may get into the ground smoothly.
- If the drill has been caught in the ground and cannot be pulled out, stop the engine and rotate the auger counter-clockwise.
Always turn off the engine when you have finished drilling. - When the engine is switched off, keep your hands and feet away from the cutting attachment until it has stopped completely.
If any foreign object is hit or if vibrations occur stop the machine immediately. Disconnect the HT lead from the spark plug. Check that the machine is not damaged. Repair any damage.

WARNING! Drilling into or contact with electrical cables or wires can lead to death or serious bodily injury. The machine is not electrically insulated. To reduce the risk of electrocution, always check for underground pipes, cables and wires before drilling. Contact your local utility company or locator service for information regarding cable and pipe locations. If necessary, confirm the actual locations by use of devices such as cable detectors and by carefully digging trenches.

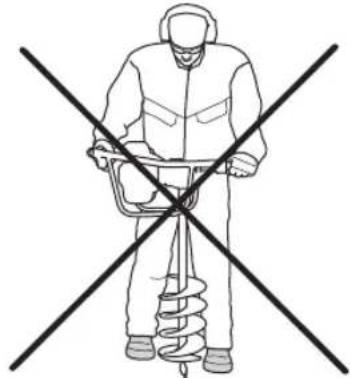
WARNING! Striking something hard in the earth, such as rocks or tree roots, may cause the drill to come to a sudden stop. This can lead to a reacting motion on the auger, which can cause the operator to lose control of the machine or throw him to the ground, resulting in serious injury. To reduce the risk of injury, always hold the auger securely to control such motion.
WORKING TECHNIQUES

WARNING! Overexposure to vibration can lead to circulatory damage or nerve damage in people who have impaired circulation. Contact your doctor if you experience symptoms of overexposure to vibration. Such symptoms include numbness, loss of feeling, tingling, pricking, pain, loss of strength, changes in skin colour or condition. These symptoms normally appear in the fingers, hands or wrists. The risk increases at low temperatures.
Safety instructions after completing work
Make sure the cutting attachment has stopped before cleaning, carrying out repairs or an inspection. Disconnect the HT lead from the spark plug.
Always wear heavy gloves when replacing the cutters. The cutters are extremely sharp and can easily cause cuts.
- Store the machine out of reach of children.
- Use only original spare parts for repairs.
MAINTENANCE
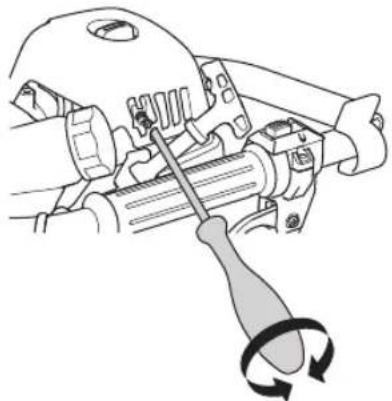
Carburettor
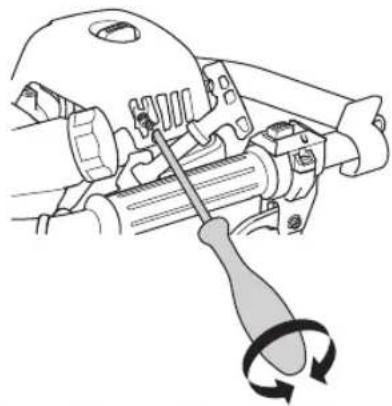
Adjusting the idle speed (T)
Check that the air filter is clean. When the idle speed is correct, the cutting attachment should not rotate. If adjustment is required, close (turn clockwise) the idle adjustment screw T, with the engine running, until the cutting attachment starts to rotate. Open (turn anticlockwise) the screw until the cutting attachment stops. The idle speed is correctly set when the engine runs smoothly in all positions, and there is a clear margin to the speed at which the cutting attachment starts to rotate.

WARNING! If the idle speed cannot be adjusted so that the cutting attachment stops, contact your dealer/service workshop. Do not use the machine until it has been correctly adjusted or repaired.
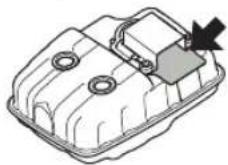
Muffler


The muffler is designed to reduce the noise level and to direct the exhaust gases away from the operator. The exhaust gases are hot and can contain sparks, which may cause fire if directed against dry and combustible material.
Some mufflers are equipped with a special spark arrestor mesh. If your machine has this type of muffler, you should clean the mesh at least once a week. This is best done with a wire brush.
On mufflers without a catalytic converter, the mesh should be cleaned or replaced if necessary once a week. If the mesh is damaged it must be replaced.
If the mesh is frequently blocked, this can be a sign that the performance of the catalytic converter is impaired. Contact your dealer to inspect the muffler. A blocked mesh will cause the machine to overheat and result in damage to the cylinder and piston.
CAUTION! Never use a machine with a defective muffler.
Air filter
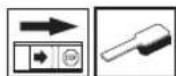
The air filter must be regularly cleaned to remove dust and dirt in order to avoid:
- Carburettor malfunctions
Starting problems - Loss of engine power
- Unnecessary wear to engine parts.
- Excessive fuel consumption.
Clean the filter every 25 hours, or more regularly if conditions are exceptionally dusty.
Cleaning the air filter
Remove the air filter cover and take out the filter. Blow clean with compressed air.
An air filter that has been in use for a long time cannot be cleaned completely. The filter must therefore be replaced with a new one at regular intervals. A damaged air filter must always be replaced.
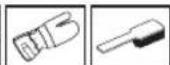
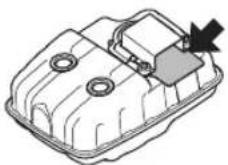
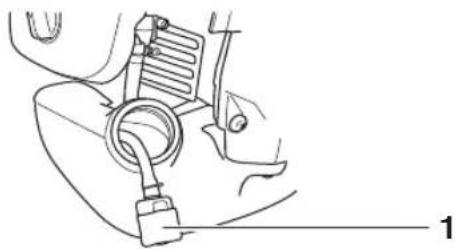
Fuel filter


1
1 Fuel filter
When the engine runs short of fuel supply, check the fuel cap and the fuel filter for blockage.
MAINTENANCE
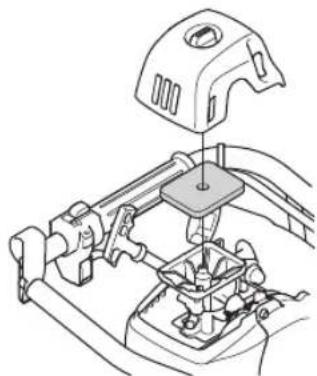
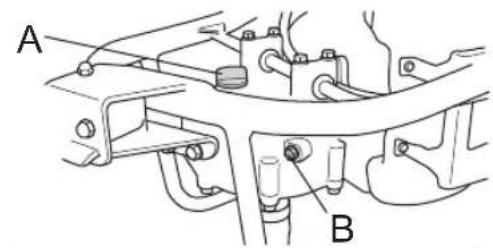
Gear

Check the oil level of the gear box every 50 hours of use and change with new oil as necessary (SAE 80-90).

- Make sure that the auger is standing in an upright position.
- Open the oil filler cap A and the screw B.
- Fill the gear box with oil. The correct level of oil is reached when you can see a drop of oil come out of the hole for the screw B.
- Fit the screw B and close the oil filler cap A.
Spark plug

The spark plug condition is influenced by:
- Incorrect carburettor adjustment.
- An incorrect fuel mixture (too much or incorrect type of oil).
- A dirty air filter.
These factors cause deposits on the spark plug electrodes, which may result in operating problems and starting difficulties.
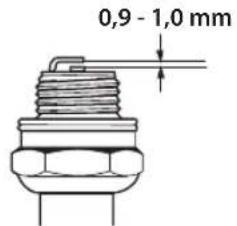
If the machine is low on power, difficult to start or runs poorly at idle speed: always check the spark plug first before taking any further action. If the spark plug is dirty, clean it and check that the electrode gap is 0,9-1,0 mm.
The spark plug should be replaced after about a month in operation or earlier if necessary.
CAUTION! Always use the recommended spark plug type! Use of the wrong spark plug can damage the piston/ cylinder. Check that the spark plug is fitted with a suppressor.
MAINTENANCE
Maintenance schedule
The following is a list of the maintenance steps that must be performed on the machine. Most of the items are described in the Maintenance section. The user must only carry out the maintenance and service work described in this Operator's Manual. More extensive work must be carried out by an authorized service workshop.
| Maintenance | Daily maintenance | Weekly maintenance | Monthly maintenance |
| Clean the outside of the machine. X | |||
| Check that the handle and handlebar are undamaged and secured correctly. | X | ||
| Check that the stop switch works correctly. X | |||
| Check that the cutting attachment does not rotate at idle. X | |||
| Clean the air filter. Replace if necessary. X | |||
| Check the cutters. Never use cutters that are blunt, cracked or damaged. | X | ||
| Check that nuts and screws are tight. X | |||
| Check that there are no fuel leaks from the engine, tank or fuel lines. | X | ||
| Check the starter and starter cord. X | |||
| Check that the vibration damping elements are not damaged. X | |||
| Clean the outside of the spark plug. Remove it and check the electrode gap. Adjust the gap to 0,9-1,0 mm or replace the spark plug. Check that the spark plug is fitted with a suppressor. | X | ||
| Clean the outside of the carburettor and the space around it. X | |||
| Check the oil level of the gear box, and top up if necessary. X | |||
| Some mufflers are equipped with a special spark arrestor mesh. If your machine has this type of muffler, you should clean the mesh at least once a week. This is best done with a wire brush. | X | ||
| Check the fuel filter from contamination and the fuel hose from cracks or other defects. Replace if necessary. | X | ||
| Check all cables and connections. X | |||
| Check the clutch, clutch springs and the clutch drum for wear. Replace if necessary by an autorized service workshop. | X | ||
| Replace the spark plug. Check that the spark plug is fitted with a suppressor. | X |
TECHNICAL DATA
Technical data
543 AE15
Engine
Cylinder displacement, cm³ 40,1
Cylinder bore, mm 40,5
Stroke, mm 31,1
Idle speed, rpm 3000
Recommended max. speed, rpm 12000
Max. engine output, acc. to ISO 8893, kW/ rpm 1,5/9000
Catalytic converter muffler No
Speed-regulated ignition system Yes
Ignition system
Manufacturer/type of ignition system CDI
Spark plug NGK CMR7H-10
Electrode gap, mm 0,9-1,0
Fuel and lubrication system
Manufacturer/type of carburettor Walbro WTEA
Fuel tank capacity, litre 0,75
Weight
Weight, without fuel and cutting tool, kg 9,3
Nolse emissions
(see note 1)
Sound power level, measured dB (A) 106
Sound power level, guaranteed L_WAdB (A) 108
Sound levels
(see note 2)
Equivalent sound pressure level at the operator's ear, measured according to EN ISO 22868, dB(A):
Equivalent noise power level, measured according to ISO 3744, dB(A) 101
Vibration levels
(see note 3)
Equivalent vibration levels (a_hv,eq) at handles, measured according to EN ISO 22867, m/s
left/right handles: 9,5/11,1
Note 1: Noise emissions in the environment measured as sound power (L_WA) in conformity with EC directive 2000/14/EC. Reported sound power level for the machine has been measured with the original cutting attachment that gives the highest level. The difference between guaranteed and measured sound power is that the guaranteed sound power also includes dispersion in the measurement result and the variations between different machines of the same model according to Directive 2000/14/EC.
Note 2: Reported data for equivalent sound pressure level for the machine has a typical statistical dispersion (standard deviation) of 1 dB (A).
Note 3: Reported data for equivalent vibration level has a typical statistical dispersion (standard deviation) of 1m / s^2
English-19

TECHNICAL DATA
EC-declaration of conformity (Applies to Europe only)
Husqvarna AB, SE-561 82 Huskvarna, Sweden, tel: +46-36-146500, declares under sole responsibility that the earth auger Husqvarna 543 AE15 from 2012's serial numbers and onwards (the year is clearly stated in plain text on the type plate with subsequent serial number), are in conformity with the requirements of the COUNCIL'S DIRECTIVES:
- of May 17, 2006 "relating to machinery" 2006/42/EC
- of December 15, 2004 "relating to electromagnetic compatibility" 2004/108/EC.
of May 8, 2000 "relating to the noise emissions in the environment" 2000/14/EC. Conformity assessment according to Annex V. For information relating to noise emissions, see the Technical data chapter.
The following standards have been applied:
EN ISO 12100:2010, ISO 5349-1:2001, EN ISO 3744:2010, EN ISO 22868:2011
SMP Svensk Maskinprovning AB, Box 7035, SE-750 07 Uppsala, Sweden, has carried out voluntary type approval for Husqvarna AB.
The certificate has the number: 543 AE15 - SEC/13/2365
Huskvarna January 11, 2013

Bengt Frögelius, Development manager (Authorized representative for Husqvarna AB and responsible for technical documentation.)
SYMBOLFÖRKLARING
Symboler
Drag at tanklocket noga after tankning.
11155558-38,543 AE15_1.fm Page 66 Monday, January 28, 2013 4:19 PM

ASENNUS
Kahvan asennus

Tennplugg NGK CMR7H-10
Elektrodeavstand, mm 0,9-1,0
II155558-38,543 AE15_1.fm Page 127 Monday, January 28, 2013 4:19 PM

STARTEN EN STOPPEN
Producent/carburatourtype Walbro WTEA
Inhoud benzinetank, liter 0,75
Gewicht
HoceteKopabn60Tuynnn 06yBKn,KOHTo He ce XNb3rA.


3anaJIbaHe; cMyka: 3aJeIcTBaTe cmykaHa.
IopnBHa nOmna.
UyMoBN eMncn B OkJHaTa
cpea cIaIacHo dIpuKeTnBaTa Ha
Ebponeckata O6uHocT.
EmcnraTa 0MaunHaTa e
nocOeHa B pa3Je TExHueckn
XapakTePncTkn N Bbpxy
JIeneHKata.
Pase Te BCnKu qactHa TaIIOTo CNOTopeuNTe NOBbpxHOCTN.

OctaHaJIte CnMBOJIn/JeIeHKn CbC CnMBOJIn, 06o3HaueHn NIN NOCTaBeHn Ha MaunHaTa, ce OTHacrT Do CneUΦNCHN N3NCKBaHn PO THOWeHHe Na CePTNaKATn 3a OnpeJeHn na3apn.
PeobHnte npereNn/nnn noDpBkKaTa ce n3BbpBa npn n3KIOUeH DBNrTeI c npekbcBa a B noLoHeHne CTOn.
HocTe BVHaRn Oo6peHn 3aunTHn PbKaBvU.
N3nCKBa cepeoBHO nouNCtBaHe.
BzayaeH npere.

Bulgarian - 211
C'bД'bP'HAHNE
CbIbpHAnHe Ipei n cTapTnpaHe o6bpHete
OBRCHEHNE HA YCJIOBHNTE
OBO3HAUHIN
UcIobHn 6o3HaueHnra 211
CbDbPZAHNE
CbIbpaHne 212
IpeNi CTapTnpaHe 06bPheTe BHMaHne Ha
cJIeHnTo: 212
B'bBEaEHNE
YBaHaEMn noTppe6nteJIIO! 213
KAKBO-KbIe?
Kakbo-Kbne? 214
OBUNHCTPYKUIN3A6E3ONACHAPABOTAT
3anomHete 215
JnUHa 3aunTHa eKnnpOBKa 215
3aHTo 06OpyDbAHe Ha MaunHaTa 216
MOHTIPAHE
MoHTnpaHe Ha pbKoxBaTkata 218
MoHTnpaHe Ha cBpeJeIa 218
PABOTACTOPUBOTO
BesonacnocT np6opabeHe c rOpBO 219
TopuBHa cMec 219
3apeHdaHe c rOpuBo 22
CTAPTIPAHEN3KIOUBAHE
KoHTpoI npeI n cTapTnpaHe 221
CTapTnpaHe n N3KJIIOUBaHe 221
HAUYH HAPABOTA
OchOBHyka3aHn3a pa6oTa 223
PbHKA
Kap6ypaTop 22 5
Aveey 22
Bb3nyweHnTTbp 22 5
TOpINBeHΦnITbP 22 6
Kopnyc Ha npedabKaTa 22
3anaNTeHa cBeeu 22 6
Texnuecko 06cnykBaHe 227
TEXHINUCKN XAPAKTEPNCIKN
TexHnueckxapaKTepeNCTnKu 228
EO-yBepHe 3a cBoTBcTbIe 229
BHHMaHHe Ha CJIeIHOTo:
IpoueTeTe BHMaTeJIHO pBkoBOcTBOTO 3a eknloatau.

PPEyPENDEHNE!IbIroTpaHTo n3JaTaHe Ha Wm MoHe Da IOBeDe Do nocToHHo BLOwBaHa He cLyxa.Taka ye BINa Hn3NoJ3BaTe Oo6peHa 3aUHTa Ha cLyxa.

PNEUYPENHEHIE!PnHnKaBn
06cToTcTaHe 6Na Da Ce BHaCrt
N3MeHEnB NpBPOHaJaHaTa
KoHCTpyKuHa MaMaHnHaTa 6e3
pa3peSeHHe Ha npOn3BOJNTeJIa
PiJyBaTe CaMo OpunHaHn
npncnoc6JeHn. Hepa3peSeHn
N3MeHEnn/Inn npncnoc6JeHn
bXHa MoJn Da npEIN3BnKAT cepNo3HN
TpabMn INm CMBpTHn ClyuHa Ha
onepatoa nn dpyr nIua.

PNEyPENHEHNE!
HenpeNa3IbTO Nn HnpaBnHo
6opabeHe C MoToepn CBpeJe 3a 3Em
e OnacHO MOnE Do IO BoDe Ido
cepno3Hn I DpN cMbPToHOChn
HapaHaBaHn. MHoro e BaHNO da
npOteTe IN BnKHeTe B
cBDbPbHaMeTo Ha ToBa p'koBOdCTBO
3a ekCnIooTaUna.
B'bBEeHne
YBaKaemn noTppe6nteIIO!
IosdpaBbme Bn 3a Baunr H36op da ce cnpTe Ha npdykT Ha Husqvarna! KomnaHnra Ta Husqvarna mHa IJra nCTopn, npocnpa ca cach do 1689 r., koraTo kpan Kapn XI nocTpOnn fapnka 3a npou3BOcTBo HA MycKeTn Ha 6pera peKa XyckBaPn. H36OpbT Ha MrcToTO - Ha peKa XyckBaPn - 6nil CbCeM nOrueH, Tb KaTo peKaTa ce n3noJ3BaJa 3a npou3BOcTBoTO Ha eHepn qpe3 TeuaHTe BoN, KaTo no To3n HaunocrypBaJa n3TouHnK Ha eHepn. B npOblHeHne Ha nobEe o 300 roHNn FapnKaTa Husqvarna npou3BeHda 6e36pon npdykTn, ot neKn c dbpBeHo ropeH eo Moepn KyxHehckMaHH, WeBn MaHH, BeLoCIneD, MOTouKLeTN T.H. NpPbAta KocauKa 3a TpeBa C MexaHNo 3aDbNBAhe 6eWe npou3BeHena ppe 195 r., KaTo npE 1959 r. 6eWe npou3BeHn MOTOpHnT pInOH, KaTo TOBa eCeKToBt, B KOITo KomnaHnra Ta Husqvarna pa6Ot nNoactToaIeM.
HHe cKOMnHaHnraTa HUsqvarna e eINH OT CBeToBHTe Ipn3BOUnteJIHa N IbPBoo6pa6oTBAuO n rpaAnHcKO 0bOpYBaHe, KaTO KaueCTBOTo Ipn3BOUnteJIHOCTTa Ca Hau-BnCOKTe I npOpNTeTI.
OchOBOnJraaata KOHcEua HA 6n3Heca Hn TOBa ca pa3pa6oTbAHeto, npOn3BOcTBOTo n MapKeTHRa Ha dIpbBoo6pa6oTbAaio n rpaHnHcKO o6OpUdBaHe C MexAHuHO 3aDnHBAHe, KaKTo n o6OpUdBaHe 3a cTPOTeHaTa npOMuHJeHocT. Hauata ceJI cbIo TaKa ce CbCToB ToBa, Da 6bJem BnHar n B aBaHrnapHa ePronHomkata, leChota 3a 6opabeHe, 6eONacHocTTa Ha Tpyda n 3aunTaHa OKoJHaTa CpeDa, n nopAdn Ta3n pInuHa ca pa3pa6oTeHn eINH rOJaM 6poXapakTepcNTKn, KOnTO da noDo6pBaT yHKUohnpaHTo Ha npOdyKUyTA Hn B Te3n CeKTOpN.
Hne cme y6eene,ue Bn e ouenite C roJMy 3aOBOJcTBo KaueCTBOTo n npOn3BOJNTeJIHOCTTa Ha Hauin npOdyKT B eINH npOdbJIHNteJeH nepoIcOT BpeMe. NokynKaTa Ha eINH OT npOdyKTInTe HN BN OcnHyra DoCTbN do npOecnoHaHa NOMou pni peMOHTn N o6cnyKbaHe KbJeTO n da Ce HAlOnn. Ako TbproBeUbT Ha dpe6Ho, KOITo Bn e npOdaI MaunHaTa, He e eINH OT OToPn3npAHTE HN DnJIbpi, nonckaiTe aDpeca Ha HAI-6Jln3knJa Do Ba Hau cepBn3.
Hne ce HndraBame, ye BnE 1e ocTaHaTe DOBoJHn O T MaunHaT a N Ye Ta 1e ocTaHe BaW BepeH NOMOuHK B npDJIkeHne Ha MHO rO uINH. He 3a6paBraIte, ye To3n HapbUHN K HoNEpAToPA pNepCTabJRABa eINH MHO 0eHen DOKyMeNT. Cna3BaHeTo Ha INcHTpyKUnITE (3a pa6oTa, o6cLyKBaHe, NOIDpBHKa N T.H.) Mohe 3NaHTeJNo Da NoOp6pn Cpoka Ha EKCnIooatauHa MaunHaTBA N Iopn Da NobuN cTOHocTTa N npN npEnpoDaJ6a. Ako peuInTe da npOdaBaTe MaunHaTaN, HenpeMeHHo npedaiTe HApbUHN Ka Ha onepaToPA Ha HOBn Jco6CTBeHnK.
BlaOapm Bn 3a n3noJ3BaHeTo Ha npOyKT Ha Husqvarna.
Husqvarna AB HenpeTaHHo ycBbPseHCTByBa cBOITe npOyKTHn nopaAnToBa cn 3ana3Ba npaBOTo da npOMHe npIMepHo OΦOpMaHTo IM, BbHmHa Nm Bn n dp.6e3 ppeBaPteJIHO yBeDMHeHne.

KAKBO-KbIe?

KaBBo-KbIe?
13apeKdane cMacno
2 Kanak Ha Bb3duHnHn HnTbp
3 Cmykau
4 PerylaTOp Ha npocelHaTa KlaTa
5 Kopnyc Ha npedabkata
6 CbpeJIo (IpeJnaRa ce KaTo akcecoap.)
7 HooBe (PpeIaRa ce KaTo aKcecoap.)
8 Peneo o6opyBahe
9 ByToH 3a CTapToBa r3
10Knoucton
11ДрьхкаHa CTapTepa
12TopBHa nomna.
13TopuBEnpe3epBoap
14 Kanayka Ha cBeeu CBeu
15 Kanak Ha cnJinHnBpa
16PbkoOCTBO3aeknloatau
17 Kom6Hnpa raeueKJIou
Hocete Kopabn 60Tuyn nn 06yBkn, KOnTo He ce XJIb3rT.
PA60HO6JIKJIO
Ppna pa6oTa HnKora He HocTe Wnpokn dpexn,
WanoBe, 6nnyTa nn NoD6Hn PpeJMeTn, KOTo
MOraT JecHO Da ce 3akaayat NIn yBnT OKoNo
CBpeJeLa. YBepTe ce, ye KocTe Bn He BNCrT
Korato Ce HabeHdaTe nOd HNBOTo Ha paMOTO cN.
ANTEUKA 3A IIbPBA IOMOU
AnTeKaTa 3a nbpBa nOmoT, Tp6Ba BnHaRn da e noD pKa.

3aHTO O6OpyBaHe Ha MaHHata
BTo3n pa3deI ca onncaHn pa3nHnTe 3aunTHn yctpoiCTBa Ha MaunHaTa, TAXHOTo JeICTBne, KaKTo n HauHHbT 3a N3BbpWbAHe Ha npereJed n noDpBHKa 3a da ce rapaHTnpa 6e3onacHocT Ta npa6Ota. BnK pa3deI KaKBO - KbDe?, B KOInTo e nocOueHO KbDe Te3n ycTpoiCTBa ce HAMnP a Ha BaWata MaunHa.
EcknloatauohnrtcpoKaHaMaunHaTaMoHe da 6bJeHaMaJIeH,apNCkBTOTHeaCTNcIyauyBeIueH,aKoTexHueckToO6cLyKBaHe Ha MaunHaTHecePpOBeJda npabINHOaKO 06cLyKBaHEtoN/InpeMOHTHeJeHocTHe ce N3bJIHBAtpoecnoHaJIHO.AKoImaTeHyJaOT OSe HOpMaJNA,MOJI,ObbPHeTe cKbMHaI- 6n3KnepBn3.
3ANOMHETE!
BcKaIO n3BbPbBaHe Ha cepBn3 n peMOHT Ha MaunHaTa n3NcKBa cneuJaHo 06pa3oBaHHe.Toba BaHn cneuJaHo no OTHOWeHHe Ha 3aUnTHoTo 06OpyDbaHe Ha MaunHaTa.ObbpeTe KbM cepBn3a cn, aKO MaunHaTe OTOBapra Ha n36poEHnTe No-doJy npOBepKn.PnpNoKnykata Ha NaH npOdyKT Hne rapAHTnpaMe PnpocTabReHo Ha KBaJIHnUpAnHpeMOHTn yCJyIeN cepBn3.AKO MRCTO,OT KOEToCTe 3aKynnMaunHaTa, He e Hau CneuaJIn3upan DnCTpn6yTop, 3aNtaiTe 3a Hau-6n3kata cepBn3Ha paOtnJnHua.

PPEyIPEKJEHNE! He n3noJ3baIte HnKoRa MaunHa c HeN3npaBHO 3aunTHO 6OpuyBaHe. PpOBepKeTe n noDpBHKaTa CJeDA na ce n3BbPWBat CbrLaChO yKa3aHnraT Ba To3n pa3dEa. Ako MaunHaTa Bn He n3DbPnHa HnKoA OT n36poeHnte npOBepKn, cJeDa a Ce CBpKeTe Cbc cepBn3a cn 3a n3BbPswBaHe Ha peMOHT.
KJIOU CTON
N3noJI3BaIte KJIIOuCa CTOn 3a CnIIpaHe Ha DBrIgATEJI.

BkIIOUeTe DvIraTeJI n ce y6eTe, Ye ToI ce N3KIOUBy, KOraTO KIOUyBeT e NoCTaBEH B NOJIOHeHcTOn.
Ayncyx

AycnyxbT CBeXda IO MNHmym paBnueTo Ha Wymu HacouBa Otpa6oTeHnte Ra3OBe BcTpahn OT pa6oTeu.
B ctpaHn C ropeu, n cyx KJIMat BepoTHocTta OT Bb3HkBAHe Ha noHapn e rOJaMa. ETo 3aIo Hne cHa6IyBaMe HAKON aycnyc n NCKporacnteJIHa MpeHa. PpOBepTe daJIa aycnyxbT Bn e cha6dE h c TaKaBa MpeHa.
IooHeHnHa acnyx e n3KIOuHTeHO BaHHo Da ce cna3BaT HNCTpyKUNTe 3a npere, NO.1pBHKa N cepBN3.
Hikora He n3noJ3BaIte MaunHa c nobpeH acnyx.
IpoBepBaTepeIOBHOHaJeHIOcTTaHa 3aKpenBaHeTo HaayCyXbT KbMaunHaTa.
H1155558-60,543 AE15_2.fm Page 218 Monday, January 28, 2013 4:28 PM


MOHTIPPAHE
MOnTnpaHe Ha p'bKOxBaTkata

-3aBHTeTe JnBaTa IpbHkKa KbM cKo6aTa, npNkaueHa Ha paMKaTa, n a 3aTeHHe 3dpaBO.

MOnTnpaHe Ha cBpeIeJa

-Пльзerte Крглata cko6a(A)ипрмхerte wlnnta(B)ot CBpeJeNA.


-MoHTpaIte cBpe,IJIoTo (C)KbMn3XoJHnBaI(D).
- NocTabete unnHt a n nnb3HeTe KpbIaTaCKo6a, Taka ye da noKpne unnHtA.
PAEBOTACΓOPNBOTO
Бeэ�асноct npn 6opabene c ropno
Hikora He cTapTupaTe MaunHaTa:
1AkoCTe n3JIeI rOpBnBbpxHrO. N3TpniTe pa3JIaJIoTo ce rOpBnNIMacNoIOocTaBeTe octaTbUInTe OT rOpBnTO da Ce n3napT.
2 Ako cTe n3JIeI rOpuBO Bbpy ce6e cn nIIN dpexnte cn ce npoe6JeueTe. N3MnTe Te3N qactn Ha TAnTo Cn, KOINTo Ca 6NJN B KOHTaKT C rOpuBO. N3NoJ3BaIte canyH n BOda.
3 Ako MaunHaTa mMa Teu Ha rOpNBO. IpoBepaBaiTe peoBHO 3a TeOBe OT KaNaKa MApKyuNTe 3a rOpNBOTo.
TpaHcnopTn cxbxpaHeHne
CbXpaHnBaTne TpaHcnpOpTnpaTe MaunHaTa n TropBOTO TaKa, Ye Da HMa OnaChocTeBeHTyaJeH Teu NIn N3napEny Da Bn3at B KOHTaKT C NCKpn NIn OTKpNT PImbK, HApnPmepOT eJekTpueeCKn MaunH, eJekTpoDBnIaTeJI, eJekTpueeCKN/CnIOBn IpeBKIOUvBaTeJI INI HaPpeBaTeJI.
-TopuBTo Tp6Ba Da ce cbxpaHraBa n TpaHCnOpTnpa B CneUmaHno npeHa3HaueHn 3a Ta3n UeJn Oo6peHn Ty6n.
Ako MaunHaTa ue ce cxbxaHbBa 3a no- npoDbJnHteJeH nepnoCJeBbTropBnHr pe3epBoap da 6bJe n3npa3Heh.ObbpHeTe ce KbM 6eH3nHocTaHuaTa cn 3a HOpMaun KaDe Da N3Ieete N3JNbKa OT rOpBO.
- YBepTe ce, ye MaunHaTa e nouHcTeHa u Ye npedeNbIroCpoHTo 3aKoHcepBnpaHe e npoBeJeHO NbIHO o6cLyHbaHe.
3aIpaTbPaTne HeyMnUHeo 3anaJBaHe Ha DnBraTeJa, KaanuKaTa Ha CBeuTa BnHaRn Tp6Ba Da ce CbaJa npN DblrOBepeMeHc HxpaHbAHe aKo MaunHaTa He e NOD pRk Ha3Op N KOraTo N3bJHbAte BCyKn TexHnueckn Opeaun No 06CnyBaHe Ha MaunHaTa.

PPEyPPEKDEHNE!PpOBABte npEa3NBOcT nppa6oTa c rOpNoTo. POMHeTe,YeIMa onaCHOCT OT NOKAP,B3pNBBoE u BmUBaHe Ha napn.
TOpuBHa Cmec
BHIMAHHE! MaunHaTa e 6OpuyBaHa c DBytaKTOB DBnIaTeN BnHArT Pra6Ba Da pa6oTN Cbc CMEcOT 6eH3HH N DByTAkTOBO MacNo.3a da ce NOJyH Heo6XoDnMTo CbOTHOWeHne Ha CMeCTa, KOJIuYeCTBOTo HA MacLoTO Tp6Ba Da CE OTmepBa ToHIO. Pnp CmecBaHe Ha MaJIKN KoJIuYeCTBa RopBO, DOpN He3HaUHTeHN OTKJIoHeHnO
KoJIyueCTBOTo MaCIO MoTa T Da BNoWaT Pra3Ko CboTHOWeHneTO Ha CmecTa.

PNEyPENDEHNE!TopBOTo n OTnADnHTe npOdyKTNoOTropBOTO ca IeCHO Bb3nAmeHMn MOrat da npNHNrT cepno3HO HapaHBAHe pN BnWbAHe Nn KOraTO BJra3aT B KOtAKTC KOkata. Nopadn Ta3n npNnHa Cb6IIOdaBaTe BHMaHne KOraTO 6opabNTe CROPBO HnpeMeHHo npOBepBaTe DaJIcCbseCTByBa aDeKBaTHa BEHTnlaUna.
BeshnH

BHIMAHHE! BnHaHn 3nOJ3BaIe Cmecn ot KaueCTBeHn 6eH3nH/MacNo Hau-MaJIko 90 OKTaHa (RON).Ako MaunHaTa Bn e 06OpyDbaHa c KaTALNTUeH KOHBepTop (BnKTe TnaBaTa TexHueckn DaHH) BnHaRn 3nOJ3BaIte 6e3oJOBnCmecn 6eH3nH/MacNo c Do6po KaueCTBO. OJOBHnT 6eH3nH ue pa3pyuN KaTALNTUH N KOHBepTop.
AkoImaTeHa pa3noJIOHeHne eKoJIoRnueH 6eH3nH, T.H. aIKNlaTeH 6eH3nH, cJeDbA ToI da ce n3NoJ3Ba.
TOpINc c eTaHOJOBa CMEc, MoHe Da ce N3NoJI3Ba E10 (CMEc C MaKc. 10% eTaHOJ). N3NoJI3BaHETo Ha eTaHOJOBu CMEcu, No-BnCOKn OT E10, Ue cb3daJe IOnu ycIOBna Ha pa6Ota, KoEt MoHe Da nOBpei DBrIgATEJIa.
Hai-HNCKOTo npenOpBaHo OKTaHOBO YncNo e 90 (RON). Ako Bne NoaBaTe Ha DnBraTeJr OPOBO COKTAHOBO YNCNo, NO-HNCKOOT 90, MoHe Da ce noyu NyKaHe. ToBa BoNi Do enHa BnCoka TempepatyHa DnBraTeJr, Koeto MoHe Do DoBeJe Do cepNo3Ha NobpeJa Ha DnBraTeJr.
-Пи npoIbJIHnTeJIHa pa6OHa Ha BucOKn 06opOTn ce npenOpBcBa H3NoJ3yBaHeTo Ha 6eH3nH C NO-BUCOKO OKTaHOBO YNCJIO.
MaNo 3a DByTaKToB DnVrataTeI
-3n0JI3BaIteDByTaKToBOTo DnIraTeJHOMacNoHa HUSQVARNA,KoTeO cneuaJHo npOn3BeJeHO 3a DByTaKToBn DnIraTeJN C Bb3dyuHo OXJaHdaHe,3a Da NoLyUHe HaJIO6bppe3yJITaT IN pOn3BoJNTeJHOCT.
Hikora He n3no3BaTe DByTaKToBO MacNo, PpeHa3HaueHo 3a n3BbH6OpD0n DBVaTeIc BOHO oxJaHdaHe, noHrkora o6o3HaayabaHo
PABOTACTOPNBOTO
KaTo MacNo 3a N3BbH6OpDObu IDbIgTaTeJI (Koeto Hocn Imeto TCW).
3a6paHeHo e 3n0J3yBaHeTo Ha MacNo 3a. qETnpuTAKTOBn DnIgATEJIH.
Cmec C HnCKOKaueCTBeHO MacNo NnnpekaJeHo 6oTaHa MaNcNo/TopBO MoHe DaHJIOHN Ha ONaCHOCTyHKUInrTaHaKaTaNITuHnKOBepTOI NaHaMaJIeKCIIOAToAUNOHnMy HINBOT.
CbctabHa cMeCTa 1:50 (2%) cDByTaKTOBToMaCNo Ha HUSQVARNA. 1:33 (3%) cDpyrMaMacla, npEHa3HaYeHn 3a DByTaKTOBn DnrgaTeN C Bb3DyUHO oxIaJdaHe, KnaCnFUnpaHn 3a JASOFB/ISO EGB.
BunHnI npbTe MaHHaTa c nBe pblue.

-Изнолбайтдясныс рька зунравлесенetoHaHacTpОиКпeHaRa3Ta.
- YBepTe ce, Ye pLcTe Bn N KpaKaTa Bn He ce 106JIHHaBaT Do peHeITo O6OpYdBaHc KOraTo DBNAteJIaT pa6OTn.

3anoyhe Ta npo6nBaTe C noJIOBN MOHOC T nocTeenHNo YBeJIuHaBaIte CKOpocTtHa MaunHaTa, TaKa Ye CBpeJIoTO Da npOHKHe PnaBHO B 3emrTa.
AkoCBpeIIOTo e3aceHnAoB 3emrTa H MeHOHeTe Da rN3BaIInTe, CnPteMaHHaTa N 3aBbPTeTe CBpeJeNa B NoCOKa, O6paTHa Ha YacOBHNKOBaTa CTpeJIka.
BnHaNn NkNoyBaTe MoToP, KOraTo npNKNoUHTe Cnpo6uBaHeTo.
Cne KaTo DnurTaTeJr6bJe N3KIOUoye npBHTe pBcTeu KpaKaTa C daJeOT peHeIoTO o6OpyDbaHe DoKaTo To cnpe HAnbHNO DnHHeHHeTo cN.
AkoHkaKbBCTpaHuehO6eK76deyapEnnnceNoLyuATBn6paun,BeHara cnpetemaHaHa.Pa3KaUTeHT-Ka6eNaOTanaJIteHaTaCBEI.PnoBepeteMaHHaTa
HAUH HA PABOTA
JaH He e NOBpeHa. NoppaBeTe BcKa noBpeHa.

PNEyPENHEHIE! P06nBaHeTo Ha HNI KOHTAKTBCTe EneKTPnueecknte Ka6eN NIN PNOBOHNu MoHe Da DOBBe Do CMbPT NIN Cepno3Hn TeJeChn HapaHbAHn. MaunHaTa He e eNeKTPnueeKn 3oJnpaHa. 3a da OrpaHnUte PnCKA OT KOKB Udap, BuHAR NPOBepBAuTE 3a NOJ3eMHN Tp6n, Ka6eN IN eJNEKTPponpOBoDn, IpeDu Da 3anoHHe Tnpo6NuBaHTo. C8bPHeTce C MeCTHATA FInpMa 3a KOMyHaJIHy YcLyTN NIN CbOTBeTHaTa O6mHcKa Cny6a 3a INHOpMaUN OTHOCHO MecTONOLOHeHHeTo Ha NoJ3eMHNTe Ka6eN IN Tpb6n. Ako e Heo6xOJIMO, npOBepete DeiCTBnTEJIHnTE MeCTONOLOHeHnC NOMouTa HA ycTPOJCTBa, KaTO HanpImep Ka6eN H DeTeKTOpn, uype3 BHIMATEJHo N3KOnaBaHe Ha KaHaJI NTe.

PNEyPENHEHIE! Pn ynap Ha TBbpN o6eK T 3emrTa, KaTo HAnpMep KAMbK NINKOpeHN Ha DbpBO, e Bb3MOHHO CBePeIIOTo BHe3aHNO Da cnp. ToBa MoHe Da IOBeDe Do npOTNbOeJeCTBHe HA CBepeJLa, BCJIeDCTBE Na KOeTO onepaTopbT MOHe Da N3ry6N KOHTPOI NaMaUNHATA NIN Da 6bEe XbplenHa 3eMaT, BpeyIaT Ha KoTe Da NOJyUc nepNo3Hn HapaHbAHNA. 3a Da HamaJIte pNcKa OT HapaHbAHe, BVHaRn DpbHTe CBpeJEA 3dPaBO, 3a Da KOHTPOIpaTe DBInHeHHeTo My.

IPEyIPEHJDEHNE!IpekomepHo
n3laHaHe Ha B6paun Mohe da
doBeJe Do npaKeHna Bbpxy
KpbBOHOCHN CbIOBE HEPBHaTa
CnCTema Ha Xopa Cbc CMUeHnB
KpbBoo6paueHneTo. NToTbpcTe
JIeKApCKa NOMO, aKO ce NOBRT
CmNTOMn, KOTo MOrat da ca
pezYlTaOT B6paun. TaKNaB
CmNTOMn Ca HanpMep N3TpBnBaHe,
3aY6a Ha YyBCTBntEJIHOCT, "rFlnKn, 6oDeHN, 6oJKN,
fN3uYeCKa OTNcHATOCt, nPOMHa Ha
LBeTa NN CbCTOARHHeTO HA KOHaTA. Te3n CmNTOMn Ce NORBA bat
06NKHOBeHO Ha npbCTHTe, pBcTe e
KNTKeTe. PnckbT MoHe Da ce yBeJIuNn
pnn HnCKn Tempepatypn.
Hctpkykun 3a6e3onacHocT cJeI 3aBbpuBaHe Ha pa6oTa

Ipeu nouctbahe, pemont nnpertle Tp6Ba da ce y6eNTe, ye peheoTo 60pyDbAHe He ce dBHH. H3BaTe Ka6eHa 3a CBeTa oT 3anaJIteJHata CBeU.
-Пи ПОДмЯн Ha HOJOBOTe BINHaN HOCTe PJIbTHn pa6OTHn pKabUN. HOJOBeTe ca N3KJIIOHTeJHO OCTPN MOHe JecHO da ce nopexHeTe.
CbxpaHbAteMaHnHaTaHaHeoCTbNHO3a DeLaMRCTO.
-ИзнолзуВанTe eДиHCTBeHo opинHaJIHn pe3epBn YacTn npu peMOHT.
PbKKA
Kap6ypaTop
PergylnpaHe Ha npa3HnTe o6opotn (T)
PpOBepTe DaIIN Bb3dyuHnT FnITbpe qNCT. Korato 06OpOTNe Ha npaseH XoI ca ToHn, peHneTo 06OpUdBaHe He Tpr6Ba da Ce BbPTn. Ako ce n3cKBA HarglacHre, 3aTBopete (3abptTeNo NocOka Ha YacOBHKoBAt cTpeJIka) BNHTbT T 3a peryInpaHne Ha 06OpOTNe Ha npaseH XoI, npi pa6oTeU, DnIRateJ, DOkato peHooTO 06OpUdBaHe 3anoHne Da ce BbPTn. OTBopTe (3abptTe CpeU ynocOKaTa Ha DBHHeHne Ha YacOBHKoBaTa CTpeJIka) BNHTa DOkato peHooTO 06OpUdBaHe cnpe. O6OpOTNe Ha npaseH XoI ce 3aDabat npaBnHO KORATO DBnIRATEJrPa60Tu PnABHO BbB BCNUK NoJIOXEHn, IN CbIeCTByBa IcHa rpaHmua 3a 06OpOTNe, pni KOnTO peHooTo 06OpUdBaHe 3anoBa Da ce BbPTn.

PPEyPPEHDEHNE! CbbpHeTe ce c dNcTp6byTopa/cepBn3a cn, ako 06oPoTnTe Ha np3HNxOd He MoTa T da bDaTpeylnpaHn Taka, ye peKeIto o6OpEyBaHa dc npe. He pa6oTeTe mAsHHata, ppeiTn He e peryInpapaHn nn peMOHTnpaHa.
Aycnyx
Aynbte npHa3Haeh 3a HamaIbHaepabHnueTo Ha UyMa N HacoUBaHe HaOTpa6oTeHnTe RaOBe BcTpaHn OT onepaTopa.OTpa6oTeHnTe RaOBe ca HarpeTu MoarTa cBbPHTNCKPN, KOIT Da npEIN3BVKat NoHAp, KaraTO nonAnHAT Bbpxu cyx nFopJIb MaTepnaJ. HAKON TInOBe aycny Ca Cha6deHn CbC cneuaHaNCkporacntHa MpeKa.Ako BaWataMaHHa eCha6deHa c acnyx OT TaKbTIN, CJeDbA Ja nouchTBate EHeceMmHNo. NoucCTBaHeto ceN3BbpwBa C TeJeHa YeTka.
MpeHataHa aycnyn 6e3KaTaNt3aTop ce NouchTaBn npn Heo6xOIMocT ce noDMHe BEnbck CeMNHy. BcLyuaye MpeHata e NobpeDeHa, Ta Tpr6Ba da ce noDMHeN.
YeCTOTo 3aDpbcTBaHe Ha MpeHaTa Mohe Da e NOKa3aTeJI 3aIOBpeBa B KATAJIN3aTopa.ObbpHete Ce KbM DnCTPb6Tyopa CN 3a TexHNueckn IperJeI.AKO pa6OTte CbC 3aDpbcTeHa MpeHa, DBNrAteJIaT Ce npeHaIpaBA, CJIeCTBne Ha KOeTo ce NOBpeHdAT UINHIDpbT N 6yTaIATO.
BHIMAHHE! He pa6oTeTe HnKora c MaunHa, 4HToaycx e noBpeJeH.
Bb3duyweHΦnTbp


BbanyHnTΦnIbTpIpaCe nouchTba peIOBHOOT npax n 3aMbpcBaHn 3a da ce n36erHaT:
HapyuhenBpa6oTaTHaKaP6ypaTopa
-ПоблемпсntapТиранe
- HamajraBaHe Ha MouHocTta
-HeHyKHO3HocBaHe Ha YaCTuTe Ha DnVraTeJr
TbpeIgMpa3XoHaTopuBO.
ФИТьртТгбВад ace nouNTBa cJIeД BceKu 25 чaca pa60Ta Ииno-YeCTo, aKO pa60THoT O MЯСТоTo eMHOrO npaShO.
NouctBaHe Ha Bb3DyHnna fNITbP
CbaTeKaNaKaHaBb3DyHnHn HnHTbp n3BaTeΦnTbpa.IpoDyxaITe ro cbc crbcTeH Bb3dyX.
Bb3nyeHnIITbp,n3noJ3yBaHdbIro Bpeme,He MoKe da ce nouNCTn HanblHo.ETo 3aio Ha onpeJeHn INTEpBaHnOT Bpeme ToT Tp86Ba Da ce nOMeHc HOB. NObpeHbB3dyWeH FInTbp Tp86Ba Da 6bDe HnpeMeHH CmeHeH.
ПОДДРБЖKA
TOpINBeHΦnJIaTbP

1FopnBcHΦnITbp
Korato DBnraTeJrN3nNTBa HeoCTuH Ha npTuK H a RopINBO, npOBepTe da He ca 3anyeHN Kanaykata 3a RopINBTo NropNBHTfNtbp.
Kopnyc Ha npeIaBkaTa

PpOBepaBaiTe HnBOTo Ha MacNoTo BCKOpocThHaTa KyTna Ha BceKn 50 Yaca pa6oTa n npu Heo6xoDmOcT rO CMeHete cHObO (SAE 80-90).

- YBepeTe ce, ye CBpeIeIbIe IocTaBeH B H3npaBeHO NOIOHeHne.
- OTBopeTe KanaqKaTa A Ha pe3epBoapa 3a MacNo npa3BnTe BnHTa B.
Hanthe cKOpocHaTa Kytna C MacNo. HeoXoNIMOTO HnBO Ha MaCNoTo e DOCTnIHato, KOraTO Noteue KaNkMaCNo OTBopa Ha BnHTa B. - 3abuHTe BnuHTa B u 3aTbopeTe KanaKaTa Ha pe3epBoapa 3a MacNo A.
3anaJInteJHa CBeu

CbctoHHeTo Ha 3anaJIHTeJIHaTa CBeU, ce BnIRe O:
- HenpaBnHa peryuipoBka Ha Kap6ypaTopa.
- HenpaBnJIeH npIMec Ha MacNo B rOpNBOTo (TBbPJe MHOrO MaCNo NIn HeKaYeCTBeHo MacNo).
3aMbpceH Bb3dUweH HnTbp.
Te3nΦakTopn BOJrT Do HacnaBarHnBbpxy
eNEKtpoDHTe Ha 3anaJIteJIHaTa CBeu N MoRaT Da
npEn3BnKaT CMUeHn B pa6OtaN
3aTpPydHeHn Pn CTapTupaHoTo.
Ako IbnuIaTeJIaT pa6Ou C Hncka MoHocT, MaunHaTa ce CTapTnpa TpyNo pa6Ou loo Ha npaeH XoJ: Tpr6Ba IpeN BCnU Ko Da npOBepnte 3anaIteJIHaTa CBeU. Ako 3anaJIteJIHaTa CBeU e 3AmbpceHa, Ta Tpr6Ba Da ce noUcTn N da ce npOBepn Xla6NuHaTa MeHdy eJeKtpOnTe Da e O,9-1,0 MM. 3anaJIteJIHaTa CBeU Tpr6Ba Da ce NOmHe r CLeD OKoIo eEIN MeCeu INI DOpN No-ecTo, aKO TOBa Ce HAJaRa.

BHIMAHHE! H3noJ3yBaIte BnHaHn 3anaJIteJIHHe TcBeeuOT npenOpbuaHn Bn! I3noJ3yBaHTo Ha nOpeWeH Tn CBeuMoHe da npEdu3BnKa cepNo3Hn NobpeDu Ha 6ytaloto/ UINHHbpa. Y6eTeTce, Ye 3anaJIteJIHaTa CBeu e cHa6deHa cbc 3aunTa o PaDIOcmUeHn.
ПОДДРБЖKA
TexHnuecko 06cnyXBaHe
CneBa cnncbk C onepaunite no noDpBHKaTa, KOnto Tpr6Ba Da ce n3nbJHbAaT No MaunHaTa.
Pobueeto ot no3nUnite ca onncanB pa3deJa POnDpBHKa. NToTpe6teJeT Tpr6Ba da n3nbJHbAba Camo
pa60tata no noDpBHKaTa n 06cnyBaHeTo, onncanB To3n HapbUHK Ha onepaTopa. No-KpyHnTe
peMOHTn Tpr6Ba Da ce n3nbJHbAaT OT OtopuImpan cepBu3.
O6oopoTuHa npaeh XoD,06/MnH 3000
PpenopbUbaHm MaKcMaJIHn CBpBxO6oPoTu, 06/MnH 12000
MaKcImaHaMoHocT HaDbVaTeJcBfl.ISO8893,KB/T/06/Mn11,5/9000
AcynycKaTaJn3aTop He
3anaJIteJIHo ycTpoIc TBO c peryIaIop 3a o6oPOTne Da
3anaJIteJIHa cIcTeMa
Ppoun3BouTeJI/TnHa 3anaJInTeJHaTa CnCTema CDI
3anaJIteJIHa cBee NGK CMR7H-10
Xna6nHa MeHny eJekTpOndTe,MM 0,9-1,0
CnTeMaHa3aXpaHbHe/cMa3BaHe
PpOIN3BOIDTeN/TnHaKap6ypaTopa Walbro WTEA
BmecTnMoCT Ha rOpNBHnpe3epBoap, nItpn 0,75
Tero
TeINo 6e3 rOpuBoTo nppeHcTpyMeHT (BKr) 9,3
UymoBn emncn
(BH.3a6eJenka1)
PabHnue Ha 3ByKOBn eEeKT, n3MepeHo bD (A) 106
PabHnue Ha 3ByKOBnEeFekr, rapaHTnpaHo LwA dB (A) 108
PabHnIeHaWyma
(BH.3a6eJenKa2)
EKBVAJIENTHO HINO Ha 3ByKOBOTo HAJRAHe Bbpxy yxOTo Ha onepaTopa,
n3MepeHo cbrnacho EH/ICO 22868, d5(A)
EKBBaJIeTHo HnBO Ha 3ByKOBnHaTnCK, NmpeHo cIaHcHO ISO 3744, 101
PaBnIe Ha Bn6paLnaTa
(BH.3a6eJenKa3)
EKBBaJIeHTH NHBa Ha Bn6paLJaTa (ahv,eq) B pKoXBaTKIte, n3MepeHN cBlaacHO EN ISO 22867, m/s²
JaBa/JaCHaPbKoXBaTka:9,5/11,1
3a6eJekka 1: WymoBa eMncn B OKoJHaTa CpeJa, n3MepeHa KaTo 3ByKOB eEeKT (LwA) cbrJacHo EO dIpeKtnBa 2000/14/EO. OTyeTeHnTe HbA Ha Wyma 3a MaunHaTa ca n3MepeHn C opnHaJIHOto peHeo 06OpyDbaHe, KoTo DaBa Hau-BnCOKoTo HbO. Pa3NJkAta MeHdy rapaHTnpaHOTo n3MepeHOTo HbO Ha Wyma E ToBa, Ye rapaHTnpaHOTo HbO Ha Wyma BKJIOvBa CbIo N DnCnepcnaTBA B pe3yJTATNTe OT n3MepeBaHeTo, KaTo n BapNaUInTe MeHny pa3NJuHnTe MaunHn OT eDnH nCbU MoJeI, B CboTBetCTBne c dIpeKtnBa 2000/14/EC.
3a6eJekka 2:OTyTeHnTe DaHHN 3a EKBNAJIeHTHO HNO Ha 3ByKOBTo HAJIraHe 3a MaunHaTa IMaTtNNuHa cTaTnCTNuCeKa dncnepcn (cTaHApTHo OTKnloHeHne) ot 1 dB (A).
3a6eJHKa 3:OTyTeHnTe DaHH 3a eKBNBaIeHTHOTo paBnue Ha Bn6paunrTa mMat TnNHa cTaTnCTnuecka IncnPcna (ctAnapTHo OTKnOHeHne) ot 1 m/s2.

Uzemanayagkeverek 238
Tankolás 239
11155558-58,543 AE15_3.fm Page 274 Monday, January 28, 2013 4:40 PM
KOOSTAMINE
Käepideme paigaldamine.

II15558-58,543 AE15_3.fm Page 297 Monday, January 28, 2013 4:40 PM

IEDARBINÅŠANA UN APSTADINAŠANA
UZMANIBU! Startera auklu neizvelciet pilnigi lidz galam un ari nelaidiet to vala no pilnigi izvikta stavokla. Ta var sabojat masinu.

UZMANIBU! leverojiet, lai neviena jusu kermena dala.
nesaskartos ar iezmeto laukumu. Ja patrona ir bojata,
kontakra rezultata var rasties adas apdegumi vai erElektrisks
trieciens.Vienmer lietojt cimdus.Nekad neizmantojiet ieriei ar bojatu patronu.

Apstadinašana
Motoru izslédz, stop kontaktu pavirzot stop pozicijā.

Latvian - 297

DARBA TEHNIKA
Visparejas darba instrukcijas
SVARIGI!
II15558-58,543 AE15_3.fm Page 316 Monday, January 28, 2013 4:40 PM
IJUNGIMAS IR ISJUNGIMAS
Sytic: Vythiahnite sytic.

Štartovacíplyn:
Nastavte plyn do startovacej polohy najpri stlačenim ovládača plynu. potom stlačením startovacieho tlacidla plynu (A). Potom povl'te ovládač plynu a nasledne startovacie tlacidlo plynu. Funkcia plynu sa teraz aktivovala. Na vratenie motora na vol'nobeh stlacte znovu ovládač plynu.
Teplymotor
Pouzite ten isty postup ak pri startovni studeneho motora, avsak nenastavujte ovladanie sytica do polohy sytica.
Šartovanie

VAROVANIE! Ked'sa motor nastartuju so syticom alebo s plynom v startovacej polohe, potom sa noz zaene ihned otacat.
Zariadenie drzte favou rukou vo zvislej polhe. Uchopte
startovace drzadlo. pravou rukou pomaly potiahnite snuru, az
kym nepocite isty odpor (zapadky startera sa zachytavaju), a
potom snuru rychlo a silno potiahnite.
Zatlacte ovladanie stytica do povodnej polohy hned, aka sa motor zapali a opakujte, kym nenaustartuje.
START A STOP
UPOZORNENIE! Snuru startera nevytahujte naplo a nepustaje drzadlo startera pri plnom vytahnuti snury. Moze to poskodit stroj.

11155558-58,543 AE15_3.fm Page 386 Monday, January 28, 2013 4:40 PM


MONTAZ
Upevnéi držadla

11155558-62,543 AE15_4.fm Page 404 Monday, January 28, 2013 4:42 PM
MÁSURI GENERALE DE PROTECTIA MUNCII
Dinti taietori
Verificati diniti taietori. Nu utilizati niciodata diniti taietori tocii, fisurasi sau deteriorati.
Asiguratvacadinii taietori sunt corect atasati.
Putere.maxima motor, conform. ISO 8893, kW/ rpm 1,5/9000
Toba de esapament cu catalizator Nu
Sistem de aprindere reglat prin turajic Da
Sistem de prindere
Certificatul are numarul: 543 AE15 - SEC/13/2365
Odyincaaaaiaacnta to teao tsn npyaia


Piv ao kathetao, niaoknun n thwnpwnon, oovtntn va exni otauatnontnvtnaoc to nEaptna konnc. Anouvdeotn to kalwo ano to mouzi.
- OpaTe navTa xovTp aYAvTkaTaN avTKaTaOtaon Tw konTIkwEpyaleiw. Ta konTIk epyaleia elvai Eaipetika axmuPa kalnpouv Eukola va npokaloeoukoiura