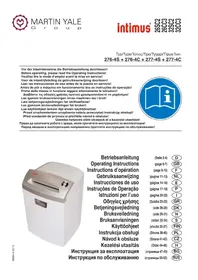
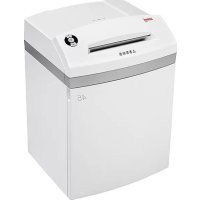
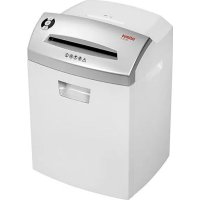
120 CC6 - Shredder Intimus - Free user manual and instructions
Find the device manual for free 120 CC6 Intimus in PDF.
Frequently Asked Questions - 120 CC6 Intimus
User questions about 120 CC6 Intimus
0 question about this device. Answer the ones you know or ask your own.
Ask a new question about this device
Download the instructions for your Shredder in PDF format for free! Find your manual 120 CC6 - Intimus and take your electronic device back in hand. On this page are published all the documents necessary for the use of your device. 120 CC6 by Intimus.
USER MANUAL 120 CC6 Intimus
Before operating, please read the Operating Instructions!
Operating Instructions
The machine may not be operated by more than one person at any given time! The machine was designed for safe operation by "one person only".

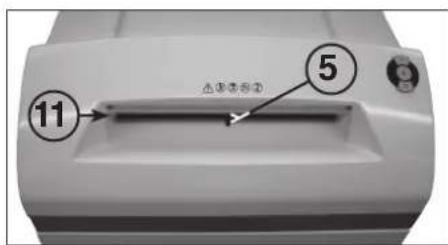
< Danger of injury! Never insert fingers into opening!

<During the shredding process no other work may be performed on the machine (for example cleaning, etc.)!

In case of danger switch the machine off with the mains switch, or with the emergency switch, or unplug the machine!

< The machine is not a toy, and is not suitable for use by children!

Always unplug the machine from the mains power supply before opening the machine!
Repairs may only be performed by trained personnel!
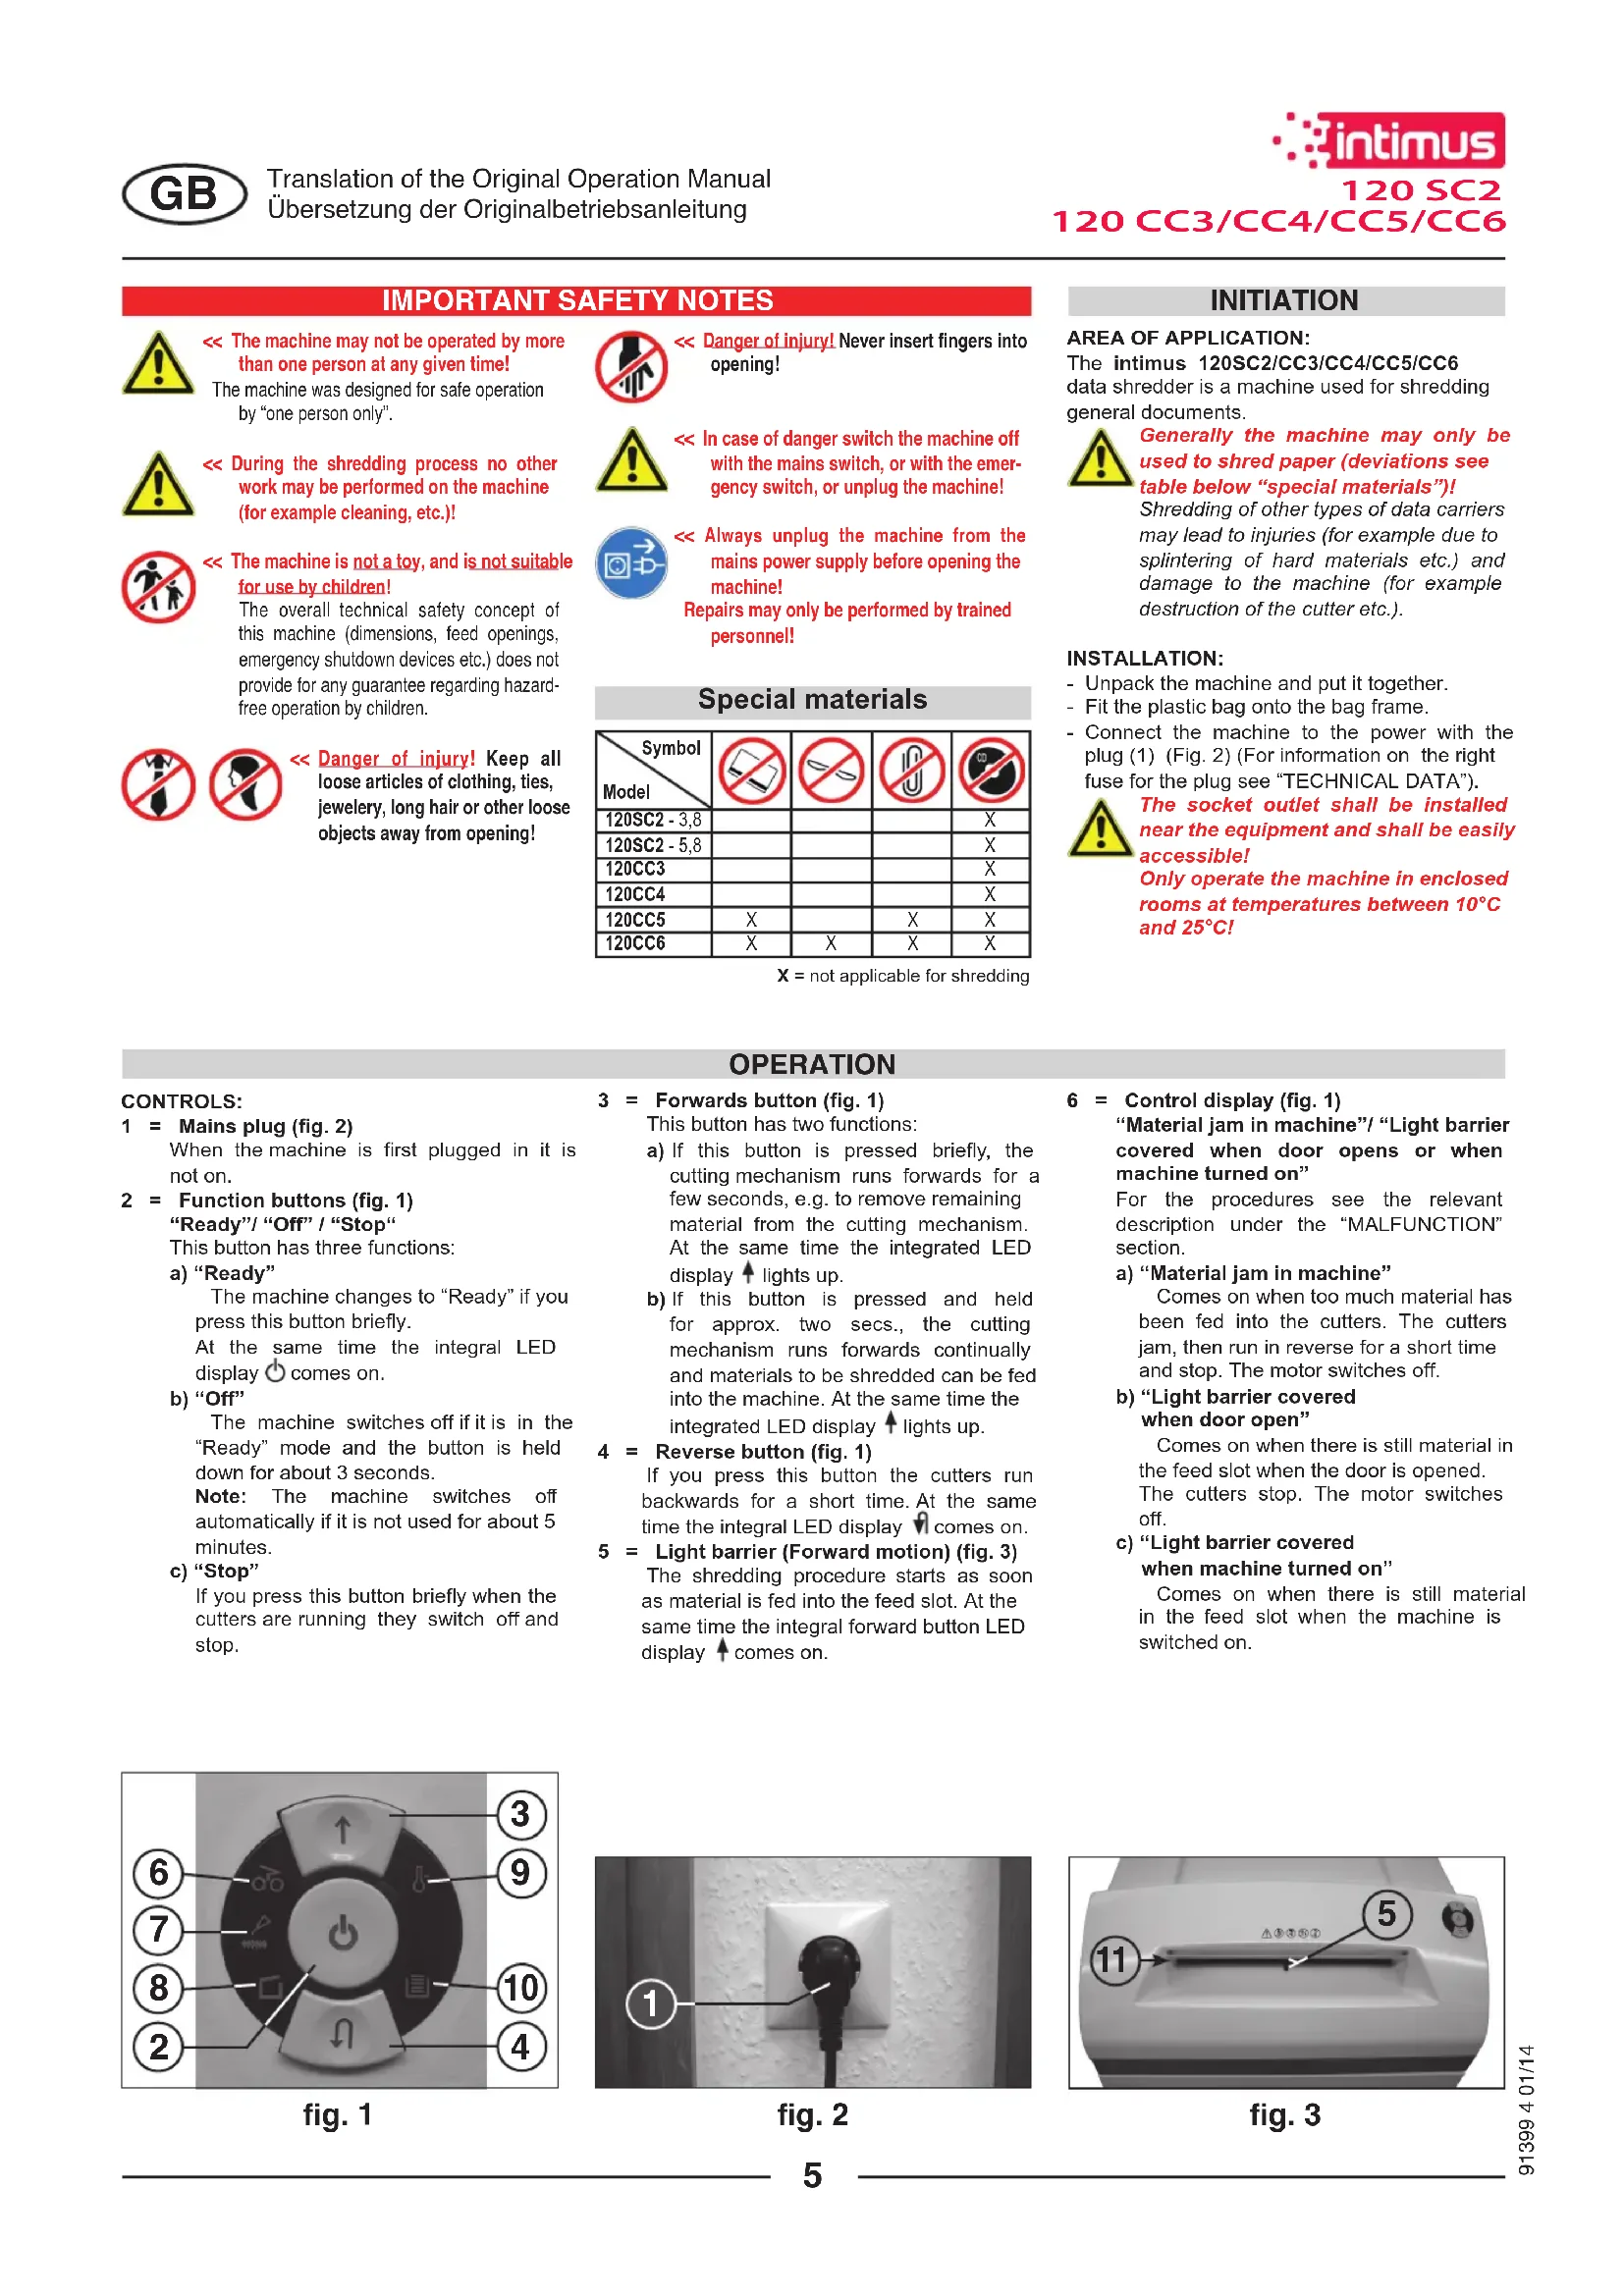
INITIATION
AREA OF APPLICATION:
The intimus 120SC2/CC3/CC4/CC5/CC6
data shredder is a machine used for shredding general documents.

Generally the machine may only be used to shred paper (deviations see table below "special materials")!
Shredding of other types of data carriers may lead to injuries (for example due to splintering of hard materials etc.) and damage to the machine (for example destruction of the cutter etc.).
INSTALLATION:
- Unpack the machine and put it together.
- Fit the plastic bag onto the bag frame.
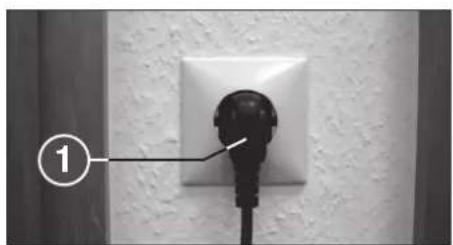
- Connect the machine to the power with the plug (1) (Fig. 2) (For information on the right fuse for the plug see "TECHNICAL DATA").

The socket outlet shall be installed near the equipment and shall be easily accessible!
Only operate the machine in enclosed rooms at temperatures between 10^ and 25^


< Danger of injury! Keep all loose articles of clothing, ties, jewelry, long hair or other loose objects away from opening!
Special materials
| Symbol Model | ||||
| 120SC2 - 3,8 | X | |||
| 120SC2 - 5,8 | X | |||
| 120CC3 | X | |||
| 120CC4 | X | |||
| 120CC5 | X | X | X | |
| 120CC6 | X | X | X | X |
X = not applicable for shredding
OPERATION
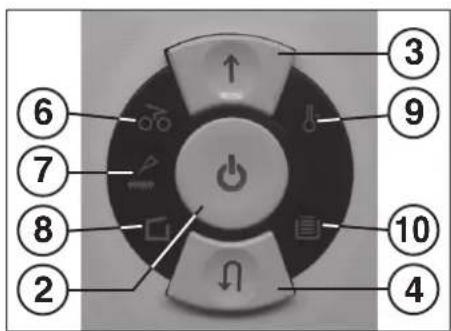
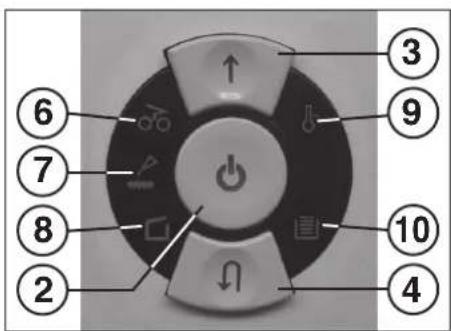
CONTROLS:
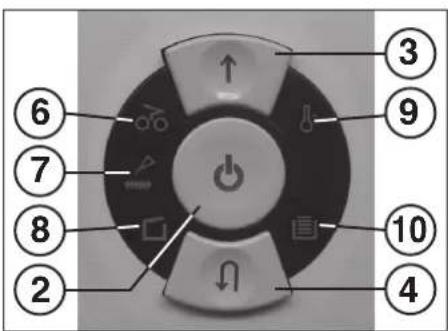
1 = Mains plug (fig. 2)
When the machine is first plugged in it is not on.
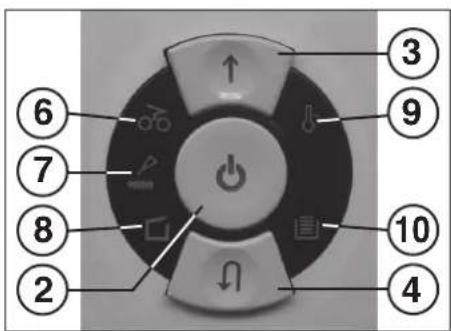
2 = Function buttons (fig.1)
"Ready"/"Off"/"Stop"
This button has three functions:
a) "Ready"
The machine changes to "Ready" if you press this button briefly. At the same time the integral LED display comes on.
b) "Off"
The machine switches off if it is in the "Ready" mode and the button is held down for about 3 seconds.
Note: The machine switches off automatically if it is not used for about 5 minutes.
c) "Stop"
If you press this button briefly when the cutters are running they switch off and stop.
3 = Forwards button (fig. 1)
This button has two functions:
a) If this button is pressed briefly, the cutting mechanism runs forwards for a few seconds, e.g. to remove remaining material from the cutting mechanism. At the same time the integrated LED display lights up.
b) If this button is pressed and held for approx. two secs., the cutting mechanism runs forwards continually and materials to be shredded can be fed into the machine. At the same time the integrated LED display lights up.
4 = Reverse button (fig. 1)
If you press this button the cutters run backwards for a short time. At the same time the integral LED display comes on.
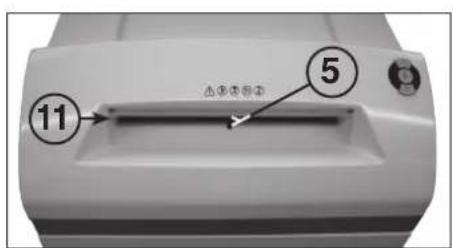
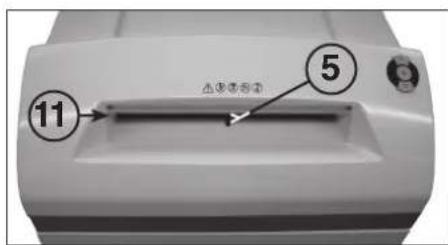
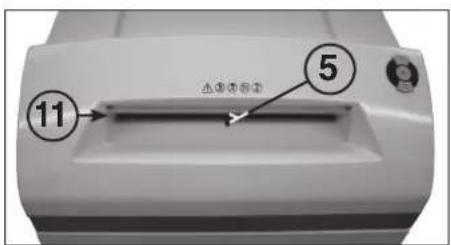
5 = Light barrier (Forward motion) (fig. 3)
The shredding procedure starts as soon as material is fed into the feed slot. At the same time the integral forward button LED display comes on.
6 = Control display (fig. 1)
"Material jam in machine"/"Light barrier covered when door opens or when machine turned on"
For the procedures see the relevant description under the "MALFUNCTION" section.
a) "Material jam in machine"
Comes on when too much material has been fed into the cutters. The cutters jam, then run in reverse for a short time and stop. The motor switches off.
b) "Light barrier covered when door open"
Comes on when there is still material in the feed slot when the door is opened. The cutters stop. The motor switches off.
c) "Light barrier covered
when machine turned on
Comes on when there is still material in the feed slot when the machine is switched on.
fig.1
fig. 2
fig. 3
OPERATION
CONTROLS:
7 = Control display (Fig. 1) "Oil cutters"
Comes on when the cutters in the cross cut version must be oilied. The lubrication procedure must be acknowledged on the reverse button (4) (see description in "CUTTER MAINTENANCE").
8 = Control display (Fig. 1) "Door open"/"Door malfuncti
a) "Door open"
Comes on if the door on the lower part of the machine is opened. The machine switches off automatically and cannot be started as long as the door remains open.
b) "Electrical fault"
Flashes when there is an electrical fault in the door sensor. The machine switches off. Please contact your dealer.
9 = Control display (Fig. 1)
"Motor overload" / "Electrical fault"
To find out what to do see the relevant description under the "MALFUNCTION" section.
a) "Motor protection" Comes on when the motor has been overloaded and has switched off. The machine cannot be started while the motor is cooling down.
b) "Electrical fault" Flashes when there is an electrical fault inside the control board. At the same time the function button (2) LED display flashes. The machine switches off. Please contact your dealer.
10 = Control display
"Paper collection bag full" (Fig. 1)
Comes on when the paper collection bag is full and must be emptied. The cutting unit for reducing paper switches off.
11 = Paper feed slot (Fig. 3)
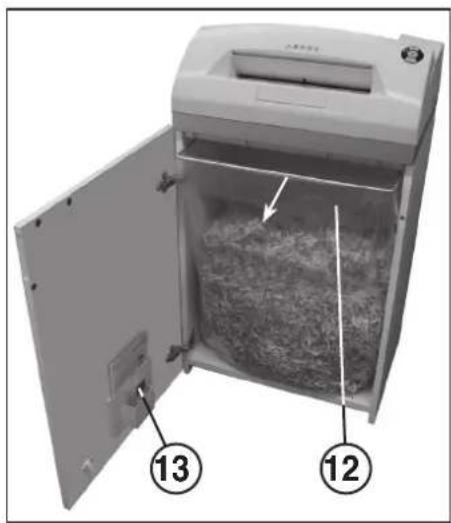
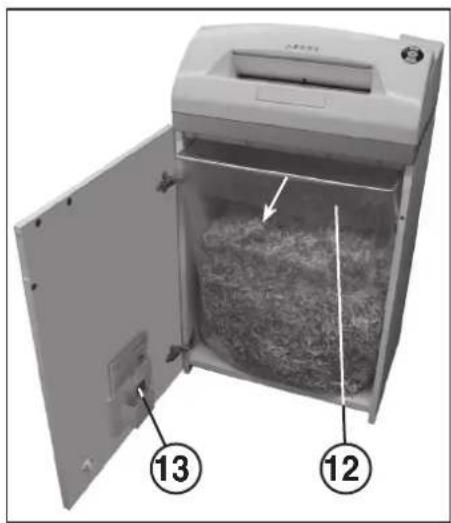
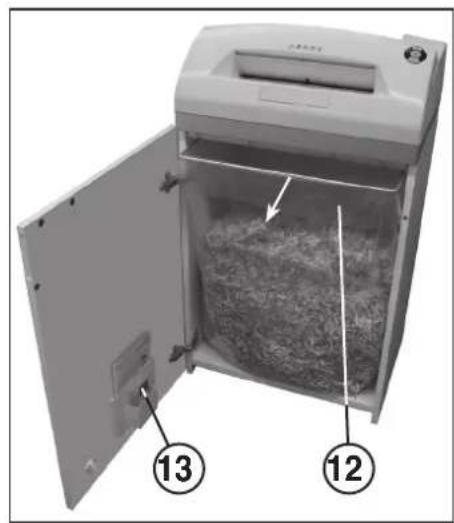
12 = Paper collection bag (Fig. 4)
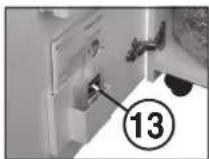
13 = Oil reservoir (Fig. 4 and 6)

The shredder may not be used as a step ladder or as a seat. Danger of falling due to breakage!
SWITCHING THE MACHINE ON:
Proceed as follows to switch the machine to "Ready":
- Press the function button (2) briefly.
- The function button (2) LED display comes on for "Ready".
- The machine can be loaded.
MATERIAL FEED:
Feed paper into the cutting mechanism through the paper feed slot (11) (fig. 3).
The machine automatically switches to forwards running, draws the material in and automatically switches off after shredding.
Note: For shredding transparent films, the machine must be manually switched to forwards running (press and hold the forwards button (3) for approx. 2 secs.).
By briefly pressing the function button (2) (Stop function), the shredding process can be stopped at any time. To continue, press and hold the forwards button (3) for approx. 2 secs. If the machine is not used for a period of approx. 5 mins., it automatically switches off.

Never feed the shredder with a quantity of material exceeding the maximum indicated. Refer to the TECHNICAL DATA section!
Should the machine become overloaded, follow the instructions under "MATERIAL JAM IN MACHINE" under "MALFUNCTIONS".
EMPTYING THE
PAPER COLLECTION BAG (Fig. 4):
If the paper collection bag is full the machine switches off. The control display 10 comes on. Proceed as follows:
- Open the door. The control display (8) comes on. If there is still material in one of the feed slots, the control display (6) also comes on.
Take the collection bag (12) and the frame out of the bottom part of the housing. Remove the bag and dispose of the contents. The control display (10) goes out. - Fit the emptied bag onto the bag frame and insert the bag and the frame into the bottom part of the housing again. Close the door. The control display (8) goes out.
- If the control display 6 comes on, press the forward button (3) briefly. The remaining material in the feed slot is shredded and the display go out.
Note: The machine will only run if the door is closed.
DYNAMIC LOAD DISPLAY:
To prevent a material jam and thus ensure a continual, effective destruction of the data carriers, the current load level of the motor is displayed during the shredding process by a coloured, diffuse light in the feed slot as follows:
Green light: load < 50%
Yellow light: load 50 - 75%
Red light: load 75 - 100%
fig.1
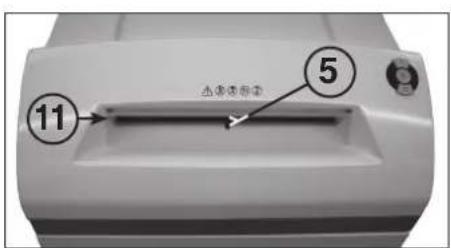
fig. 3
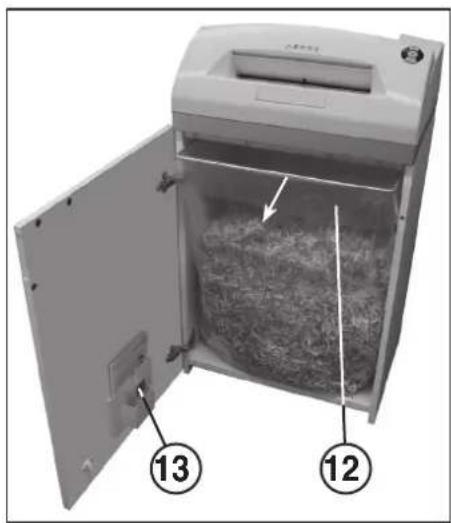
fig. 4
MALFUNCTIONS
MATERIAL JAM IN THE MACHINE:
(Auto reverse function)
If a jam is caused by too much material being fed in the following happens:
- The cutters jam, then run in reverse for a short time (material is released) and stop. The motor switches off. The control display comes on.
Proceed as follows:
Paper jam in paper feed slot (11)
- Remove the paper that has been fed back.
- The cutters now run forwards automatically and shred the remaining paper in the cutters. During the forward run the forward button (3) LED display comes on. The control display (6) goes out.
- Continue shredding with less paper.
- If necessary, switch the cutters manually alternately from forward to reverse until the material has gone through completely and been shredded.
LIGHT BARRIER COVERED
WHEN DOOR OPENED:
Should there still be material in the feed slot when the door is opened, the motor switches off and the cutters stop. The control display 6 comes on.
Close the door and acknowledge the status by pressing the forward button (3) briefly.
The existing material is fed to the cutters and shredded.
LIGHT BARRIER COVERED
WHEN MACHINE TURNED ON:
Should there still be material in the feed slot when the machine is switched on the control display (6) comes on.
Remove the material and acknowledge the status by pressing the forward button (3) briefly.
MOTOR PROTECTION:
Should the motor be overloaded it switches off. The control display (9) comes on.
The machine can be started again after a cooling down period of about 25 - 40 minutes.
ELECTRICAL FAULT:
If the control display (9) flashes together with the function button (2) LED display or only the control display (8) flashes there is an electrical fault. The machine cannot be started. In this case please contact your dealer.
FAULT CHECK LIST:
Should the machine not work, check the following points:
- is the plug connected to the power supply?
- is the door closed?
- is the paper collection bag full?
Follow the instructions for "EMPTYING THE PAPER COLLECTION BAG".
Is there a material jam in the machine? Follow the instructions in "MATERIAL JAM IN THE MACHINE".
Is the motor overloaded? See "MOTOR PROTECTION". If none of these test points apply, please contact your dealer.
MAINTENANCE / DISPOSING
CLEANING THE PHOTOCELLS (Fig. 5):
If paper particles should come to rest in the inlet guide (for example after a paper jam) it is possible that the machine will not turn off, due to the broken light barrier.
To remove these paper strips and also to clean the photocell, pass another sheet of paper through the feed slot, or switch the machine to reverse and wipe both "eyes" of the photocell with a brush.
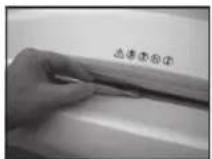
fig.5
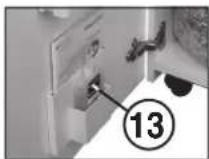
fig. 6
CUTTER MAINTENANCE (CROSS CUT):

Cross cut cutters must be oiled after a specific operating time. If the control display (7) comes on proceed as follows:
Open the door. The control display (8) comes on and the reverse button (4) LED display as well as the control display flashes. Remove the oil reservoir (13) (Fig. 6) from the holder in the door and close the door again.
Pour a little oil onto a sheet of paper and then feed this through the paper feed slot (11) onto the cutters.
The paper is drawn in and in this way the oil is distributed to the cutters.
Note: This procedure is acknowledged as follows to turn off the display after the cutters have been oiled:
-
Open the door until the control display (8) lights up. The control displays (7) and (4) flash.
-
Press the reverse button (4) and keep it held down until the control display (7) goes out.
- Close the door again.
The cutters now start a cleaning cycle automatically (forward and reverse run) and then switch off. The machine is ready for use again. Should you need to re-order the special oil see "SPECIAL ACCESSORIES".
AUTOMATIC ENERGY SAVING:
If the machine is not used for a while it automatically switches off after about 5 minutes. The function button (2) LED display 已 for "Ready" goes out. Press the function button briefly to turn it on again.
DISPOSING OF THE MACHINE:
Disposetofthemachineinan environmentally friendlyfashionat the end of itsuseful service life.Do not dispose of any of the parts included in the machine or itspackagingwithhouseholdwaste.
TECHNICAL DATA
| Model | Typ | Cutting width paper | Cutting capacity paper | Working width | Noise level | Dimensions W x D x H | Weight |
| intimus 120SC2 | 227-6S | 5.8 mm | 35-38 sheets* | 310 mm | app. 57 dB(A) | 535 x 395 x 980 mm | 46 kg |
| intimus 120SC2 | 227-4S | 3.8 mm | 31-33 sheets* | 310 mm | app. 57 dB(A) | 535 x 395 x 980 mm | 46 kg |
| intimus 120CC3 | 227-4C | 3.8x36 mm | 23-25 sheets* | 310 mm | app. 57 dB(A) | 535 x 395 x 980 mm | 47 kg |
| intimus 120CC4 | 227-2C | 1.9x15 mm | 15-17 sheets* | 310 mm | app. 57 dB(A) | 535 x 395 x 980 mm | 47 kg |
| intimus 120CC5 | 227-1C | 0.8x12 mm | 10-12 sheets* | 310 mm | app. 57 dB(A) | 535 x 395 x 980 mm | 47 kg |
| intimus 120CC6 | 227-1CF | 0.8x4.5 mm | 7-8 sheets* | 310 mm | app. 57 dB(A) | 535 x 395 x 980 mm | 47 kg |
Pre-fusing (slow-blow): 220-230V = 10 amps / 120V = 15 amps / 100V = 18 amps
| Model | Power supply data supply voltage/frequency · current consumption · power | ||
| intimus 120SC2 | 220-230V/50Hz · 7.8 amps · 1.8 kW | 120V/60Hz · 12.0 amps · 1.4 kW | 100V/50/60Hz · 18.0 amps · 1.8 kW |
| intimus 120SC2 | 220-230V/50Hz · 7.8 amps · 1.8 kW | 120V/60Hz · 12.0 amps · 1.4 kW | 100V/50/60Hz · 18.0 amps · 1.8 kW |
| intimus 120CC3 | 220-230V/50Hz · 7.8 amps · 1.8 kW | 120V/60Hz · 12.0 amps · 1.4 kW | 100V/50/60Hz · 18.0 amps · 1.8 kW |
| intimus 120CC4 | 220-230V/50Hz · 7.8 amps · 1.8 kW | 120V/60Hz · 12.0 amps · 1.4 kW | 100V/50/60Hz · 18.0 amps · 1.8 kW |
| intimus 120CC5 | 220-230V/50Hz · 7.8 amps · 1.8 kW | 120V/60Hz · 12.0 amps · 1.4 kW | 100V/50/60Hz · 18.0 amps · 1.8 kW |
| intimus 120CC6 | 220-230V/50Hz · 7.8 amps · 1.8 kW | 120V/60Hz · 12.0 amps · 1.4 kW | 100V/50/60Hz · 18.0 amps · 1.8 kW |
*based on A4-paper 70g / m^2 at 230V/50Hz
SPECIAL ACCESSORIES
Description Order-No.
Plastic bag, 440x330x950x0.05 mm 99977
Lubricant, 110 ml bottle 88035
Note: For orders of special accessories and spare parts, please contact your dealer.
RECOMMANDATIONS IMPORTANTES DE SECURITE

DYSFONCTIONNEMENT ELECTRIQUE:
| Symbol Model | ||||
| 120SC2 - 3.8 | X | |||
| 120SC2 - 5.8 | X | |||
| 120CC3 | ||||
| 120CC4 | ||||
| 120CC5 | X | X | X | |
| 120CC6 | X | X | X | X |
3 = Vooruittoets (afb. 1)
8 = Controleampje (afb. 1)
Deur open" / Deurstoring
a)Deur open
9 = Controleampje (afb. 1)
"Overbelasting motor"
Elektrische storing
MATERIALALOPHOPING IN HET APPARAAT: (Auto-Reverse-function)
MANUTENCAO / DISPOSICAO
LIMPEZA DAS
CÉLULAS FOTOELECTRICAS (Fig. 5):
SYNTHPHEN KONTIKOY MHXANEMOY (CROS-CUT):

OkiKoi unXaviaoi Cross-Cut npenei va
a560ouv eta an opioevo xovikobiaomua
Aeroupyiac.Eav avaei n evdei en eeyxou (7),
akoloutheta ta eEgic biata:
AvoIE Tny npota.AvaBcI e vdeEeIeEyxou (8)kai avoBoaNvov n evdeEeIe LED to biakotm kiinoc npoc taniow (4) kai n evdeEeIe IeEyxou (7).ApaieTeTo 5oxia laiou (13) (6.6) an to ompiyma onny npota kai EaavakaeTne npota.
BaTe liyo lao naw o eva xapri kai eayet to meao to thaalqio eayymcxapiv (11) 0Tov koniko mXavio.
To xapri tpaietai poea kai etai to la6i la6wei tv mXawaoKoHc.
EuouaTva afoe Tm evEe npene penta mTv diaikaaia aabawatoc tou konikou unxavou vaakolouthetai erbaaiwan oEc:
-AvoTe mV npOTo TAO, OATE VAVAWaeIeN EvESeIe N EeYxou (8).AvoBooBHyovu OvEeIEc eAeYxou 7)Ka (4).
Piote tv biokimn kivnnc npoc to niow (4) kai kpatote tv nieaevo expi va ohein evdeiE eayxou 7.
- EavakleioTe mV npota.
O Konikoc unxawioac apixc taopa eva kokwaa kaBapiaou (kiwn npoc ta eipnpk ka npoc ta niow) ka katov anevpyoianl. Hnayiv elai wopa etoiun yia aeoutou. Se pinnon npayaylaicu toeikou kabiou, bene okepaiaol EElIAA AEEYOAP
Papir-posedyldt" (afb.1)
OPSTART AF APPARATET:
Guilt lys: Belastinating 50 - 75%
Radt lys: Belastning 75 - 100%
afb.1
afb. 3
afb. 4
FEJL
VEDLIGEHOLD SKAEREENHED (CROSS-CUT):

Plasticpose, 440x330x950x0.05 mm 99977
Olieflaske, 110 ml 88035
Bemerk: Ved afterbestilling af ekstra tilbehor og behov for reservedele henviser vi til naermeste forhandler.
VIKTIGESIKKERHETSHENVISNINGER

INNKOBLING AV MASKINEN:
Maskinen kobles inn til „driftsklar" pa denen maten:
- Trykk kort pa funksjonsknappen (2).
- LED-indikatoren for funksjonsknappen (2) lyser opp for „drifstklar".
- Maskinen kan mates.
MATERIALMATING:
VEDLIKEHOLD/DEPONERING
VEDLIKEHOLD SKJÆREVERKTØY (CROSS-CUT):

Cross-cut-skjaereverktoy ma smores med olje etter en bestem driftsid. Nar kontroll-indikatoren (7) lyser,bruuk donne fremgangsmaten:
| Symbol Model | ||||
| 120SC2 - 3.8 | X | |||
| 120SC2 - 5.8 | X | |||
| 120CC3 | ||||
| 120CC4 | ||||
| 120CC5 | X | X | X | |
| 120CC6 | X | X | X | X |
X = ej lampiefor sonderealing
IDRIFTTAGNING
ANVÄNDNINGSOMRADE:
"Ovi auki/ Oven hairlo
a) "Ovi auki"
| Symbol Model | ||||
| 120SC2 - 3.8 | X | |||
| 120SC2 - 5.8 | X | |||
| 120CC3 | ||||
| 120CC4 | ||||
| 120CC5 | X | X | X | |
| 120CC6 | X | X | X | X |
OBJIACT HA IPIJIOXHEHIE:
Upeepb intimus 120SC2/CC3/CC4/CC5/CC6 e Maunna 3a pa3npobBaHe Ha kymenTn.

Maunnata Tpa6ba da 6bne H3no3BaHa OCHOBHO 3a pa3dpob8aHe Ha xaptna (3a OKJIOHHe BKK TaBnua "CneuHaNN Maepnann")!
Pa3pO6BaHTo Ha Dpyr HocntEn Ha daHH MoKe Oa pnnnHn HapraBBnHa Nmu (Haip. OT pa3yBaHTo HA TBpDn MaTePnAIn N dp.) KAKTO n ets No MaunHata (Haip. p3pyuBaBAe Ha poKeeMn MEXAHNbM).
MHCTAJIMPAHE:
- Pa3oNaKoBaIe ypeHa n ro noCTaBete Ha MmCTOTO 3a pa60Ta.
- OkaheTe nonneTneHOB yBaI Ha paMKaTa 3a TOp6bata.
C 电cena (1) (ΦH.2) BKIOUHTe ypeJa KbM enektpnueckata MPexa (3a DaHHM 3A Heo6xOuHMn BXoHn PpeNaaHTen Ha KOHTAKTa BnK "TEXHNUECKN DAHHN

Cbpaheo KbM eektpueckata Mpeka
Ha MaunHata Tp6ba Da e necho doctbnno
Tp6ba da ce harnpa 6n3o Do MaunHata!
MaunHatae npedna3haueta 3a n3no3Bahe
camo B 3atBopen H omeeHHN csc CTaHa
temneparya (10-25C)!
PABOTACMALIHATA
YNPABJRABUUN ELEMEHTN:
1 = Φencen (Φw.r.2)
CbP3BnKIMaMHHATAOcPdCTOBmIeCNeLaKbM eNkTPueCeKaTAt MPexa, nbpBOHaHAnHO MaHHATA Ce HAMMa B3NKIOeHO CbCTOHNHe.
2 = ΦyHKUOHAEN6yTOH(ΦuR.1)
"TotOBnct 3a pa60ta"/N3KJ./"/Cton" To3n6yToH 06XbaTa TpN FyHKUIN:
a) "TOrOBHOCT3pa6oTa"
Pp3 KpatKo Hauckane Ha To3n BytoH MaunHata Ce npEeKnIOvBa B pexm "ToTOBHOCT 3a pa0ta". EINOBpeMeHHo C TOBA CBETBa BRpaedHrCBEToNDoeH INNkATOp
6) "V3Kn."
AkoTo3n6yToH 6bJe 3aIbpxHaHHaTCHAT 3a OKONO3cek.BpeXHM "TOTOBHOCT3a paOta" MaunHATA ceN3KIOUBA.
YkaaHHe: PnHn3n03BaHe Ha MaunHaTa 3a nepoD OT OKOIO 5 MNH, MaunHaT aBOMATuHO CE NkIIOBA.
B) “Cron”
4pe3 kpaTko HATmckaHe Ha To3n ByToH npnpab0teu pexeue MEXAHn3bM, CbuaCe mKIOUOVA Hcnpa.
3 = BytoTH 3a npedBnXbahe Hanpei (Mnr.1)
To3n ByTOH 0xbwaa DBe FyHKm:
a)Upe3 KpATKO HATNCKAHe Ha TO3n ByTOH PEXeUH MEXAHIN3M CE 3aJbHXKBA 3a HAKOJIKO CekyHnB B NOCOKA HAnPe, HAnp. 3a Da CE N3BaDn XAPTNRTA OCTaHana B pEeUH MEXAHIN3bM. EHNOBPEMeHHo C ToBA CBeTBA BrpaDEHn CBETOHOEN HINIKATOP
6) Ako To3n ByToH Ca 3aDbpKm HATNCHAT OKOJI DE BcEe,peEeuiM MExAHN3bM paBOTN npOdbJxNtHeo B NocOka HApEni MaunHata MoKeJa bIbe ZapeHed. EInDObPeMeHHo C Tota CBETBA BrpaHEnra CBeToOnIOHeh INHkAtop ↑
4 = BytoTH3aBpbuahe(Φm1.1)
PnHaTNCKaHe HaTo36ByToH pexeMmexAH3bM Ce PnDnBnKBa KpaTKBpEmHo B ObaPaTHa nocKa. ENoBpEmHo C ToBA CBETBa BrpaedHr CBToNDoe HINKATOP
5 = ΦoToKneTka (aBnXKeHne HAnpe) (Φnr.3)
Ctaptnpa npoueca Ha pa3dpo6BaHe, KOrato B Jx06a 3a noIaBaBe bSe bKapah MATEpHAn 3a pa3dpo6BaHe. EhdOBpeMeHHO C TOBa CBETBa CBTOIOHINHkATOp HA ByToHa 3a npIbMxBaHe Hanei.
6 = KOnTpOHa naMa (ΦnR.1)
"Ypeda e 3aDpcteh C MaTePnAn 3a
pa3Dpo6BaHe / "FOToKlETkATA DeIeCTBA npn
OTbApRe Ha Bpata HINn PnB BKIOUHBe
3a npnIHnHa Hn DEICTBE BIX CbOTBHTO
onHCanHe Brna "TOBPEDA.
a) "Ypea e 3aapbcten C MaTePmAn 3a pa3pO6BaHe
CBeTBA, KOraTO B pexeunm MexAHn3bM Ce NoJaTe TbPpe MHO Matepua. PexeunrMexAHn3bM bloKupa, cneToBa ce 3abpbMa NkIObpaTHo n Cnpa. EEnKtpoDbiratelaTc enKIOHbA.
6) "3aJeIcTBaHe Ha oToKNeTkata npn OTBaPraHe Ha BpTaTAt
CBETBA, KORATO pnp OTBAPRHe HA BpATnKATA BCE Oue HMa MATEpHaJI B DkoBa 3a NOdaBaHe. PekeUHT MexAHm3bM Cnnpa. EEnkTPOdBnIrataTeJrCe N3KIOHBA.
B) "3aEneCTBaHe Ha FOToKNeTkata npN BKNIOUBAHe"
CBETBa, KORATO pRn BKNIOVAHe Ha MaunHata BCE OOE NMA MATEPNA B DkoBa 3a NoDaBaHe.
Φnr. 1

Φn.2
Φn.r.3
PABOTAC MAUNHATA
YNPABJIBAUIN EJEMENTN:
7 = KONTPOJHa JAMna (ΦnR.1)
"CmaxtepexeunmexaHn3bM
CBeTBA, Korato pexeunna MexaHn3bM OT BepcnTa Cross-Cut TpRb6a Da 6bde cma3ah. Ipoueca Ha cma3BaHe TpRb6a DA bde NOTBvpDne C6yToHa 3a BpUaHe (4) (BnK OnncanHeTO B"OECJYKBAHE HAPELEUNI MEXAHN3bm").
8 = KOHTpOJHa JAmna (Φur. 1)
"OTbopeHa Bpata"
"Поврета На Вратукота"
a) "OTbopeHa BpTa"
CBeTn, KOrato e OTBOpHa BpatNkata Ha DonHnHa WkaΦ. MaunHata Ce n3KIOyBa ABTOMaTHUHO He MoXe da 6bJe CTApTNpaHa, DOKATO BpatNkata CTOn OTBOpHa.
6) "EneKtpnuecka nOBpea"
Mura, KORATO HMA ENEKTPUeCKA NOBpEDA B CEH3OpHATA TEXHKA Ha BpaTnKATA. MaunHATA ce n3KNIOyBa. MOJA, yBEdOMete Baunr TbproBu.
9 = KOHTponHa JAmna (Φnr. 1)
"Ппетоварваноа"
eNEKtpoDbnRaTeTna
"Enektpnuecka nobpea
3a npHHua Ha JeHCTBNE BnK cbOTBeHTOTo ONHCHe B rnaBa "IOBPEDA"
a)“3aunTaHa eNeKtpoDnRatEnra
CBeTa, Korato 6bIe npetobapeH enekTPOBnRATeJI N CE e N3KIOHJN. MaunHaTae MoKeJa da 6bJe CTaptnaHa No Bpeme Ha Pa3aHa OXnAxAHe Ha enekTPOBnRATeJI.
6) "EneKtpueecka noBpea"
Mra, KOrato mMa eNeKTPnuecka
NoBpeDa B nAtkata 3a ynpaBneHne.
EhOBpemHe MNa rCBeToIOuDNHH
HnDnKaTOp H aYHKUHOHaHNH
6yToH (2). MaMHnHata ce n3KJIOuBa.
MoIa, yBeDoMe TaWn TaProBu.
10 = KOHTpOHa naMaNa (ΦnR. 1)
"PpenbHeHa TOp6a 3a ynaBHe Ha xaptnyTa
CBETBA, KORATO TOP6bata 3a ynaBnHe ha xapTnTa e nblHa n Tp8bA da 6bde nnpa3nHa. Pexeunm MexaH3bM 3a pa3dp06BaHe hXapTnCe n3KJIOuBa.

UpeepbT He Tp6Ba da ce 3n0n3Ba 3a CyaHe nn KaTo onopa 3a KaYBaHe. OnachOCT ot nadahe B CneDCTBHe Ha ChynBaHe HA MaTePnana!
BKJIOYBAHE HA MALUNHATA:
3a BKNIOUBAHe Ha MaUNHaT B“ROTOBHOCT 3a paObaT npoueHpaIte KaKTo CneJBa:
-KpataKotpaHnHaTNCHTe FyHKUHOHAJIEN 6yTOH(2).
CBETBA CBETOIOJINHINHINHINKATOP H aIyHKUHOHAJIHH6yTOH (2)3a“TOTOBHOCT3a pa60Ta.
MaunHata MoXe da 6bne 3axpaHeHa.
IIOJABAHHA
MATEPNAJI 3A PA3DPO6RAHE:
IpaTnBpeeMexaHm3bMnp3
Xo6a3noabaHeHa xap7n11(Φn.3).
MaHHaA bTOMaTHO Ce BKIOUba Ha
DINKHe HApEi, N3IbPNa MaTePnaIa n CNEI pOceCa Ha pa3pO6BaHe ce N3KIOUba ABOTMATHO.
Yka3aHn: 3a pa3dp06BaHeTo Ha 6e3UBeTHnФoIa MaunHaTa Tp86Ba Da 6bDe BKIOuePbHO Ha DnBxKeHne HAnpeD (3aDpBxTe 3aOKOLO 2 cek. HATNCHT 6yTOHa 3a npEdbXbaHeHanpeD(3).
4pe3 KpaTkoTpaHn HaTnCKaHe Ha yHKUHOHaJIbMn 6yTOH (2) (fHyHKnIg "CTOn") NO BcKo BpeMe MoKe Ja 6bJe npekcbchat npOeca Ha p3dpo6BaHe. 3a npOdbJkaBaHe 3aDpXte HATncHt 3a OKO 2 cek. 6yToHa 3a npDeBnKBAHe HAnpei (3).
PnHn3n3BaHe Ha MaunHaTa 3a nepnooOT OKOIO5MHN.TAABTOMATUHCOeN3KJIOYBA.

Hnkora He nodaaba Te Ha MaunHaTa NOBue O T ONpeJeHOTOMAKCMaJHo KOJIYeCTBO MaTePuaN (cb6nOdaBaIe "TEXHNeCKN DAHHU")!
AkoBbnpkToBa BpeKeuMEXaHn3bM NOnaDHe TBbpDe MHOrOMATEpua, BuXTe "IOBPEU" B3ADPbCTBAHE CMATEPNAJ".
H3PNA3BAHE HATOPBATA 3A YJABRHE HA XAPTURA (Mn.4):
Ako e 3aunheHa Topbata 3a ynaBHe Ha xapTnra, MaunHata ce NkIIOvBa. KoHTpOlnHata lamna (10)CBETBa. NocTbnBa ce Taka:
-OTBOPe BpatHkata.KoHTPOJIHaTaJaAMnA (8) CBeTBA.AKO BIXO6a 3a NODaBaHe NMa OCTaHAI MaTePnA CBETBA DObJIHNTeHNO KOHTPOIHaTApAMnA 6(6).
- ɪn3baɪte OE ðɔnHata Yact Ha Koprnyca Top6bata 3a ylnabYne (12) 3aeɪdno c paMkTa7a 3a Top6bata, CBaIeTe Top6bata nɪ3xbpIeTe CbIbpxaHHeTc. KoHTpOInHaTlaamna (10) nɪ3ræBa.
- Okayete n3npa3HeHaTa Top6a Ha paMkata 3a Top6ata N OTHOBO NOCTABeTc Top6ata C paMKtA B DOnHATA HAcT Ha KOpnyCa. 3atBopete BpATnKATA KoHTponHa Taamna (8) n3racBa.
-Ako KOHTPOHATA NAMNa 6)CBETN, kPaTOKTpaIHO HATNCHETe 6yTOHa 3a npINDbNkBaHe HAnpei (3).OCTaHJIaRt MATEpHnB Ppoena 3a NOdaBaHe ce pa3npo6Ba n HnHnKaTopa n3rCaBa.
Yka3aHHe: MaunHaTa pa6To n cAmo npn
HAMNUEH HANKATOP
3A HATOBAPBAHE:
3a da ce n36eHHe 3aDpBcTBaHe C MaTePnA IN Taka da CE NOCTHHe NOCTOHHo N eΦeKTHBHO YNIOXoBAHa HOCHTEN Ha DAHH, NO BpeMe HA npoueca Ha pa3dpo6BaHe, MOMeHTHaTcTeHEN Ha HATOBapBaHe Ha ENEKTPOBnIaTeJIa CE NHINKpa NocpEcdTBM ONPeDeNeHa CBETHa, PA3ceHb CBeTnHa B PPOeNa 3a NOJABaHe, KAKTO CJIeB:a:
3eeneha CBeTnHa: HatoBapBaHe <50% XbTa CBeTnHa: HatoBapBaHe 50-75% YepBeHa CBeTnHa: HatoBapBaHe 75-100%
11=Дхкбза noDABaHe Ha xaptna
(Фг.3)
12 = Top6a 3a ynaBnHe Ha xapTn (Φur.4)
13 = Pe3epBoap 3a MacNo (Φnr.6)
Φnr.1
ΦnΓ.3
Φn.r.4
IOBPEI
3AДРbCTBAHE HA YPEДA C
PA3DPO6EH MATEPNAJI:
(Функua Auto-Reverse)
Ako B CnEcTBHe NOdaBaHeTo HA TBbPd MHOr MaTepeHn Ce NOLyu 3aDpbCTBaHe, MaunHaTa pearnpa nO CnEHN HauH:
-PexeunrMexaHn3bM 6noknpa, cIeTobac 3abpyMaKoB 06paHa NoCOKa (MATEPnana ceocbo6oxda) u octaba HenoDbXKeH. EneKtpoBnVatEnrTa eNkJIOvBa. KOHTpOHaTata lamna(6) CEBTA.
Noctbna ce Taka:
OcTaTbU O T xapTnB Dxko6a 3a nOdaBaHe Ha xapTnTa (11)
- OtctpaHete BbphataTaXapTnA.
-PexeIaMEXaHIN3bM cera TpBra aBTOMaTHHO Happe n pa3dpO6Ba XapTneHITE ocTaBcN 3actAHn B pexeIaMEXaHIN3bM. No BpeMe Ha npDBrXBaHETo Happe CBeTN CBeTOINOHN HINIKaTOP HA byToHa 3a npDBrXBaHe Happe (3). KOHTpONHATA JAmna 6(6) I3rAcBA. - PpOdbIxKepe pa3IpO6BaHeto C NO-MaIKOKoJIueCTBO xApTnI.
-Ako e Heo6xOIMO, npeBkIIOyBaIte pbyHOpexeMEXaHN3bMa HdNKeHHe HAnpeiHa3a,IOKaTO MaTePnAna 3a pa3Dp06BaHe npemHe N6bDe pa3Dp06e HanblHo.
FOTOKJETKATA CE 3ADECCTBA
PNI OTBAPRHE HA BPATATA:
Ako npn OTbaprHe Ha BpatuHkata BCE Oue nMa MaTePnA B JxO6a 3a NoDABaHe eNKeTPOBnRatEJIce N3KIOHbA IN pExeMnMexAHn3bM Cnnpa. KoTHpOHaTaNAMna (6)CBETBA.
3aTbOpTe BpaTHNkata NOTBbPdTe CbCTOHNeto C KpatKO HATNCKaHe HA bTyHa 3a npDnKBaHe Hanpe(3).HaNCHrT MaTePnaI 3a pa3dp06BaHe ce noaba Ha pexeun MEXaHn3bM n Ce pa3npo6ba.
ΦOTOKJIETKATA CE 3AEDICTBA ПРИ BKJIIOYBAHE:
Ako npn BknoBaHe Ha MaunHaTc BCE Oue HMa MaTePnAn B DkoBa 3a NDoBaHe, CBeTa KOHTpOHaTnA lamna (6).
PpEmaxHETe MaTePnAna I NOTBbPdTe CbCTOHHEnTO C KpaTko HATnCKaHe Ha 6yToHa 3a npuDnBXBaHe Hanpei(3).
3AUNHTA HA EJEKTPODBNTATEJI:
Ako enektpoBnraTea ce npetobap, toi ce camOn3KnOyBa. KOHTpONHaTaNAMNa 79) CBeTBA.
CnE Bpeme Ha oxnaJahe OI OK. 25-40 MNHytBaunr TbproBc. MoXE OTHOBO Da BKIOUHTe ypeDa.
EJEKTPNUECKA NOBPEDA:
Ako Mra KOHTpOJIHATA JAMn (9) 3aEDHO CbC CBETOJIOJINH INIJKATOP Ha FyHKUOHAHN H BYTO (2) INN KOHTpOJIHATA JAMNA (8) NMa eJEKTPmECKA NOBpeA. MaunHata He MOKe da B6Je BKIOUeHa.
BTO3nCnyaH,MOJyYBeDometeBaunrTbproBEL.
KOHTPOJIEN JIINCT PNI NOBPEIN:
Ako ypea He paobTn, npOBepe CneHnTe ToKn: BKNIOUOHm E uencena B KOHTAKTA?
- 3aTbOpeHa JIe E BpaTnUkKaTa?
- npenbHeHa n e Top6ara 3a ynaBHe Ha xaptna?
CneBae HcTpyKunTe B "N3PpA3BAHE HA TOP5ATA 3AXAPTINr.
- 3aɪpɒbCTeɪn e ypɛda oT paɪdpo6eHnmaTePnən?
CnEaBte HNCTpyKuNTe B"3AIPbCTBAHE HA YPEDA C PA3DPOBEH MATEPNAJI
6nIe npetobape HeneKtpoBnrgatela? BIKTEB“3AUHTA HA EIEKTPoBDnrgATEJI”.
Ako HnTo eHa ot ToyKeTe He nomara da OCTpaHnTe NOBpeData, 06bPheTe ce KbM Baunr Tbpoeu.
PABOTA C MAUHATA / N3XBbPJIaHE HA BPAKyBAH YPeI
NOHCTBAHE HA FOTOKJETKNTE (Φnr.5):
Ako BbB BXOJHNA OTBOP OCTaHaT YACTNUX XAPTNHA (HcIe3aDpBCTBaHE CXPATN) E Bb3MOXHO, ypeJa DA He CE N3KIOHBA 3apADNCKPNTTE FOOTKNKTN.
Moxete da otctpaHITE xaptnehITE npchHcua, cboTBEHO da noCTHNTE POTOKNETKATA, KATO NOdaTe B pexueHHMAxHN3b MO HOB IINT XAPTNIA DA BKIOHTe MAuHHaTa HA dBXHEHHe HA 3aDeH XODI CHTKa Da noCTHNTe KpATKO DBete "OCh" Ha pOTOKNETkata.

Φur.5
Φur.6
06CJYKBAHE HAPEXUEMEXAHN3bM
(CROSS-CUT):

Cross-Cut-pekeuHTe MexAHm3Mn Tp6Ba Da 6bDat Cma3aBHn npe3 onpeDeneH nepHOd Ha eKcnOtaAua. AkoCBEThe KOHTponHaT a lamna 7, npouEduPaeNo cneHHN HauHH:
OTbOpete bpaTnKATA.KoHTpONHATA lamna (8)CBETUN CBETODNHN HmNKATOP Ha 6yToHa 3a npDnKBaHe HaaI4),kAKTO KOHTpONHATA lamna (7)MURt. CbaIe pe3epBoapara 3a Maclo (13) (ΦmR.6)O tNbpxaHa bpaTnKATA n OTHOBO 3aTbOpTe bpaTnKATA.
BbpyxNtXpTnPa3npedeIeMaKoMaCNO nOpaIe Cbunn npes 206a 3a noDabane Ha xaptnra (11) pekeuue MEXAHm3bM.
XapTnTa ce noema n IO TO3N HauHH MacIto nonada pexeunMEXAHH3bM.
YkaaHHe:3a da n3rache HnDnKaTOpae Heo6xOIMCneI npocca Ha cMa3BaHe Ha pexeunMexaHn3bM,TO3n npocecda 6bde NOTBbpDeH KaKTo CneDbA:
-OTBOPETe BpATMkATA TOnKOBa WnPOKO, DOKATO CBETHE KOHTponHata lamna (8). KOHTponHte lamnn (7) n (4) MIRAT.
- Hatnche 6ytoHa 3a Bpduane (4) n ro 3aJpbxte,doKATO yrache KOHTPOINHATA lamna
-3aTbOpTe OTHOBOPATNHkATA. PExeHnRT MEXAH35m 3anoHbA ABTOMaTHHO uKbNa HA NOHCTBaHE (DMBKHeHnHpeJ/Ha3aI) n CneT ToBA N3KIOHObA. MaHHaT A OTHOB e Rotoba 3a paOba. B cnuyai Ha noCneBdaua nopBuKa Hn CNEUAMHO MacNo BxN B"ONbJIHHTENII PnIHADLEXHOCTN".
ABTOMATNKA 3A NECTEHE HA EHEPTIY:
Ako MaunHata He ce n3no13Ba n3BecTHo BpeMe TAreTOMaTHHOce mKIOHbCneO OKNO 5MH. MBETOINOHNHTnHnKATOP HaYHKUHOAHINH BYTOH (2) 3a "ToTOBHOCT 3a paOta" n3rACBa. 3a BKIOHBAHE BTOHO HATUCHETe 3a KpATKO yHKUHOAHINH BYTOH...
H3XBbPJIRe HAMALUNHATA:
N3XbPnTe MaunHata CneI IN3TuHae Ha XNBOTa H aeknnoataa n3aBakn npabnata 3a ona3BaHa H oKoHATA cpeA. He n3XbPnIte ACTN OMaHnata Nn ONAKOBkata 3aeHNO C bntOBTE OTnadblu.
TEXHNUECKN DAHHN
| Моden | Тин | ШирINA на рязанeхастя | Прочьдателност рп рязанeхастя | РаобташирINA | Нимо нашиуma | Раимери ШхдхВ | Тeroо |
| intimus 120SC2 | 227-6S | 5,8 MM | 35-38 писда* | 310 MM | ok. 57 dB(A) | 535 × 395 × 980 MM | 46 кг |
| intimus 120SC2 | 227-4S | 3,8 MM | 31-33 писда* | 310 MM | ok. 57 dB(A) | 535 × 395 × 980 MM | 46 кг |
| intimus 120CC3 | 227-4C | 3,8x36 MM | 23-25 писда* | 310 MM | ok. 57 dB(A) | 535 × 395 × 980 MM | 47 кг |
| intimus 120CC4 | 227-2C | 1,9x15 MM | 15-17 писда* | 310 MM | ok. 57 dB(A) | 535 × 395 × 980 MM | 47 кг |
| intimus 120CC5 | 227-1C | 0,8x12 MM | 10-12 писда* | 310 MM | ok. 57 dB(A) | 535 × 395 × 980 MM | 47 кг |
| intimus 120CC6 | 227-1CF | 0,8x4,5 MM | 7-8 писда* | 310 MM | ok. 57 dB(A) | 535 × 395 × 980 MM | 47 кг |
Ipepa3ntenHaBxaOa(bAeH):220-230V=10A/115-125V=15A/100V=18A
| Mоden | Данни 3a зхарbaие OT Мржата Зхарвацho haplexжени/чесота • Notreblende на сг. eун. eунгя • мошист | ||
| intimus 120SC2 | 220-230V/50Hz • 7,8 A • 1,8 kW | 115-125V/60Hz • 12,0 A • 1,4 kW | 100V/50/60Hz • 18,0 A • 1,8 kW |
| intimus 120SC2 | 220-230V/50Hz • 7,8 A • 1,8 kW | 115-125V/60Hz • 12,0 A • 1,4 kW | 100V/50/60Hz • 18,0 A • 1,8 kW |
| intimus 120CC3 | 220-230V/50Hz • 7,8 A • 1,8 kW | 115-125V/60Hz • 12,0 A • 1,4 kW | 100V/50/60Hz • 18,0 A • 1,8 kW |
| intimus 120CC4 | 220-230V/50Hz • 7,8 A • 1,8 kW | 115-125V/60Hz • 12,0 A • 1,4 kW | 100V/50/60Hz • 18,0 A • 1,8 kW |
| intimus 120CC5 | 220-230V/50Hz • 7,8 A • 1,8 kW | 115-125V/60Hz • 12,0 A • 1,4 kW | 100V/50/60Hz • 18,0 A • 1,8 kW |
| intimus 120CC6 | 220-230V/50Hz • 7,8 A • 1,8 kW | 115-125V/60Hz • 12,0 A • 1,4 kW | 100V/50/60Hz • 18,0 A • 1,8 kW |
OTHACCe3aXapTINΦopMAtA470/m²npn230V/50Hz
DONbJIHHTeJIHN IPNHADJIEXXHOCTN
06o3haeyneN 3a npbka
PiactmacOBnYBaJI440x330x950x,005MM 99977
山HHeue3aMacno110Mn 88035
Ppenopka: 3a donbHInTeHa nopka Ha npnHaJIeXHOCTn INI pe3epBm Yactn Ce o6pbuaTe KbM DOCTaMHKa HA O6OpyBaHTo.
BAXHbIE YKA3AHNIO TEXHnke 6E3ONACHOCTN

<AnnapatdoJXKeHNCIOJIbOBoAtcBcOaHOB peMeHHoToIbKO OaHHM HeNoBekOM!
Yka3aHbIe IeEMEnBtI pNeOCTOPOXHOCTn 06ochOBaHHbBeoAtonChpoBaTo C annapATOMToNko ODoHOro YenOBeKa.

<Bo Bpem npouecca HmMebueHnHa npnbophe He pa3pewaetc npoBOaHTb Hkakne dpytne pabotb (HanpImep, hCTntb erO)!

< Maunha He irpyuoka, OHa He npedha3hauheHa HHe paccunTaHa Ha detey!
KOHCTpykunn HNCNHeHne MaunHb C TOKN 3peHn TExNHKn 6e3OnaChOcTN (pa3Mepb, BXoHbte OTBepCTN, 3auTHbE 60KIOPOBKn N T. .) 3TOI MaUNHb He daOT HIKAKoI rapaHTN 6e3OnaCHOrO 6paueHHn C He DetEn.


<< Onachoctb TpaBMPOBaHn!
He noDnOncTe 6nMaK BxOJHOmy NaSy TaCCTKyu, CbNCaQMe UypaSeHnA, DnHHBme BONoIu HN dpyrHe He3AaKpEnNeHbIe PnePdMeTb, OHM OMy 8bTb BTaYbTH bHytp!

<OnachoctbTpaBMPOBaHn!HeBCTaB nIte naIbIb BO BxOHOH na3.

Cnnyae onaocctm BkyknoHTe MaunHky npn NMOOu TnaBHO Nn ABAPHHoBO BkyknoHaTeNei, Nn BYtaunTE BNKy H3 po3ETK!

< NepedtKpbBAHmMaHnKnHeo6xOdmo BbTaunTcTeByO BuNky npoaetkn! Pemont np6opa donJKeH npob Ondbc TOnbKO KBANHpUPOBaHHbM CneuaHnCTOM!
Ocoobie MaTepeNaIbI
| Симв养老金 Моdensь | ||||
| 120SC2 - 3.8 | X | |||
| 120SC2 - 5.8 | X | |||
| 120CC3 | X | |||
| 120CC4 | X | |||
| 120CC5 | X | X | X | |
| 120CC6 | X | X | X | X |
X=He npiroDhbl Kn3MeJIbyeHIO
BBOD B DÉNCTBNE
OBJACTbIIPIMHEHINr
Pnp6op intimus 120SC2/CC3/CC4/CC5/CC6 npedctabnreT co6o MaHnHKy no nmeBueHIO JIO6o KoppeCnoHdeHn IN DOKymeHTOB.

Maunna npnncnnnabHo npedha3nueHa ⅡI INMEnbHcN TOJbKO 6ymar (ncknoeHHyka3aHb B tabnue "Oco6bte MATEpHaJIb")!
N3MeJIbIeHHe IpyrHx HocHTeJIe NfOpMaUNM MoKTe Bb3BtB TpABMMoBAHMe NOJ30BaTeJIa (Hap.,BbIeTAIOOMn YACTINaAM JEcTKNX MaTePMJAOB,H.T.I.N) NOBpeDITbN3MeJIbUHTeJIb (Hap.,NCOPTNTb PexyUIM MExAHm3,H.T.I.N.)
YCTAHOBKA:
-PacnaKaOBaTbN yctaHOBnTb np6op.
- NOBecHTb nlaCTNKOBbMeWOK Ha pamy dH Hero.
BCTABNTb cTeByo Bnky np6opa (1) (pnc.2) B pO3eTKy AEKTEPOCTM (DaHhIbe No He06xoDAMOMY BXOHNOMY npEOxpaHHeIO CTeBOI PO3eKN PnVBEDeHb I "TEXHMHECKIX DAHHbX".

MecTo npKnHouEnn pnp6opA K cTeNdoXHo 6bIb IeKoDcTynHO n paCOnaRaTcbra 6bn3n er0!
Maunny paapeaetc nCnoB30BaTb TOnbKO BHTPN NOMeueHn c TemnepatypoB 0a3yxa 10-25°C!
3KCNJYATAU
3JEMEHTbI yNPAJBIEHINr:
1 = CTeBoi Ka6eIb (pnc.2)
Pcne BkIOUeHnI CTeBOrO WTeKepa B p03ETky 3JIeKtPoCetn MaUNHa Eue He BkIOUeHa.
2 = ΦyHKUHOHaNbHbI nepeKIOuAtenb (pnc.1)
"TOrToB KpaBoTe/“OToKn/“CToTOn 3Ta KhoNka NMeET TpN fHyKUnn:
a)“ToTob Kpa6ote"
Pn KOpOTKOM HAKaTUN HA 3Ty KHONKY np6op BKNIOHaeTCB Pekm "ToTOB K paObe". OndOBpeMeHNO CBETNcR BCTPOeHHbI CNI-INHnKaTop
b) "OToKn"
Ecnn 3ny KhoNky B pexnme "TOrOB K paBote" depKaTb HaxaToI npImepHO 3 ceKyHbI,TO npnbOp OTKnIOHaETcR.
3ameyane: ecnn npn6op He IcnoIb3yETcB TEHeHnePmepHo5 MmHT, TO OH OKJIIOHAETCR ABTMATHECKN.
c)“Cron”
PnKOPOTKOM Haxattn Ha 3Ty KhoNky BO BpemBpaueHnpexyeero MexaHn3Ma OH OTKJIIOHaTcR N OCTaHbJNAeTCr.
3 = Khonka "Bnepea (pnc.1)
3Ta KHOHnKa HMeET DBe FyHKUIN:
a)Pn KOpTOKM Haxatm Ha 3Ty KHOrky peKyuI MEXAHN3M BpaauaetcH HeCKoJIbKO cekYH BnepeH, Hanp. T06bBbBeCTn N3 MEXAHN3Ma OCTabUWeCer O6pe3Kn. OJHOBPeMeHHO CBETNC BCTPOEHHBt CN-UNIKaTOP
b) Ecnn depkxtb 3ty KhONky Haxkato npHmepHO 2cekyHbI,TOpexyuyn mExAHN3M NOCTOAnHO BpaAaTcB BnpeD, M MaunHy MOxHO 3arpyKaTb. ONDOBpEmHo CBeTtCBACTPOeHNbY CNJ-UNKATOp
4 = Khonka "Ha3aπ" (pnc.1)
Pn Haxatm Ha 3Ty KhoNky pexyunm MEXAHM3K OPOTKO Bpaaaetcra Ha3aD. OndHOBpeMeHHo CBETNTcBCTpoeHHbI CNHdkatop
5 = CBetOBON 3aTBOP
(BpaueHne Bnpepe) (pnc.3)
3aynyckae npocecnMmEnbYeHnKaKToNko BO BXoDHyO Xaxty 6ydt BBeHn MaTePnAn. OHOBpeMeHHO CBtITcR BCTpoEHnBnCINHnIKaTOp KhONKn "BnepeJ".
6 = KOnTpOnbHbIyka3aTeNb(pnc.1)
3atop Maepnana B npnbope" / CBeTOB0 3aTbOP 3aKpbl npn OTKpblTo DBEPNIN PNP BKNIOHEN
ДeнгьпnpвКLOHENykaaTeYI yka3aHbCOOTBETCTBEHBO Bpy6pKeHEMCNPTPABHOCTM.
a) "3atop matepnaIa B np6ope"
CBeHTTCN pnp N36bIToCHOM BBODe MATEPnHa B PEXyUm y3en. PEXyUm y3en 6NoKpYETc, 3aTEM KOpOTKO BpaAaTcR H3aD n OCTaHabINBaEeTcR. 3NeKtPOMOTOP OKIIOuAeTcR.
b) "CBeTOB 3aTbO 3akpI npOTKpbITOn DBepue"
CBeTTCB,ECJINPnOITKpbIBAHINDBepUBBO BxOHOH Wxte Eue HAXODNTCA MATEPNAN. Pexyus y3en octaHABNBAeTCR 3JeKtPOMOTOP OKIQUaETcR
c)"CBeTOBO3aTbO3aKpbIT npBkIOUeHm
CBeITTCB,ecn npBKnIOeHm np60ba BO BXOHOH XaXTe HAXODITcMaTePmaI.
Pnc.1
Pnc.2
Pnc.3
3KcPiJyATAU
3JEMEHTbI yYPABJIeHnI:
7 = KontrpoIbHbIyka3aTeIb (pnc.1) "Cma3aTb pexyuI MEXAHN3M 3aropaeTc, KOrdaDIOJIkeH6blt cMa3AH pexyuIMexAHN3M NcOJIHeHr CXoss-Cut.Iocne CMA3bIbAHn Heo6xoJIMO KBNTIpOBaTb BbIIOJIHeHne HaxKaTNEM KHONKn O6paTHoro XoJa (4) (cM. oniNCaHBe I pa3dJe "TEXHUNECKOE O5CJIYXIBAHIE PEXKYUETOMEXAHN3MA").
8 = KonthpoIbHbI yka3aTeIb (pnc.1) "Dbepb OTKpbIta" / "HeucnPabHocTb DBePn"
a) "Деврь OTКpbTа"
3aropaetc, ecn OTKpbita DBepua HNkHrO WkaFa. MaunHa ABTomATueckn OTKIOUaETc N He MOxet 6bITB BKIOUeHa, NOKa HE 6ydet 3aKpbTa DBep5.
b) "3NeKtpuecka HEnCnpaBnOCTb" MnaeT npH HEnCnpaBHOCTN 3NeKtpuKn DaTHNKOB DBePdu. Pnp6Op OTKIOUaETcB. B TAKOM Cnyae 06paNTecB, IOKaIyIcTa, B BaW CNEuaJIINpOBaBOHbMara3IH.
9 = Kontrpólnykay3aTeJIb (pnc.1) "Peperpy3ka MOTopa" / "3NeKTPnuecka HEnCnPaBHOCTb" DeIcTBnI pNp CBeHEnI 3TOrO mHnKaTOpa OOnCaHb I B pa3dene "HENCnPABHOCTU".
a)3aunTaMOTopa 3aropaeTc,ecn3neKtpomOTOp nepeperkyen OTKJIQUHJICr.0OxJaXKeHHMOtOpMaUNHa He MOXETbBkIOHcHa.
b)“3NeKtpnueckaHHeCnpabHoctb" Muraet Pn HEnCnpabHOCTn 3NeKtpoHKn Ha Nnate ynpabHeHn. OndOBpeMeHHO Muraet CND-HNdkatop 念 FyHKUHOHaIbHOro nepeKIOuOteTaN (2).Pnp6Op OTKIOUaETcN. 06paNTeCb, NOXAnYmCTa, B BaW CNEuaHInpOBAHbM Mara3nH.
10=KoHTpoBHyyka3aTeIb(pnc.1) "MeOOKdIc6Opa6ymarnnoH 3aropaeTc,ecmMeOOKdIc6Opa 6ymarnHaONIOHNCSnDOnJKeH 6blb onopoxHeN.PexyuiMexAHN3M dJI N3MeJIbHeHry6ymarnOTKnIOHaeTCr.
11 = WaxTa nIy BBOda 6ymarn (pnc.3)
12 = Mewok dna c6opa 6ymarn (pnc.4)
13 = Baoyok dny Macna (pnc. 6)

Pnc.1

H3MeIbHTeJIb HN B KOEM Cnyuae HeJIb3A INCIOJIb3OBaTb KAK CuJeHne HnOnOpTy Dn Hor. MoXHO nOlyuHT bpMbI npu pa3pyuEHH np6opa!
BKJIOUeyHNE MAUNHbI:
IINBKNIOUOHeHMaUNHbIBpeXIM“TOrOB pa6oTe"DenCTByITeCNEyIOUMO6pa3OM:
-KopoTko Haxatb FyHKUHOHaJIbHbI nepeKIOuataJIb(2).
CnI-HHNkAtOp yHKNUHOHbHOro nepeKIOuATEJRA2CBETNTcB NOLOXeHN "TOrOB KpaOte".
- PnboP MoXHO 3aRpyKaTb.
BBOID MATEPNAJA:
BBeTn 6yMaRy B waxrty 3arpy3kn (11) (pnc. 3peKyuero MexaHm3Ma.
MaunHa aBTOMaTnueCKn BkIIOHae TdBnKeHne BnepEn BTAIRuBaet MaTePnAan, a NO OKOHn Hm3MeJIbHeHnA ABTOMaTnueCKn OTKIIIOHaETCra.
3ameaHHe:IINM3MeJIbEHHnIPO3paHbIX IJIeHOKIpN6Op HJXHO BpyHyIO BKJIOHTb HA DnBXKeHNE BnepeD (npIMepHO 2 cekyHd DEpKaTb HaKaToH KNKky DnBXKeHHn BnepeD (3).
KopOTKIM HaxaTneM FyHKUHOHaIbHOro nepeKIOHATEAe (2) (FyHKmra "CTOn") N3MeJIbYeHn MOxHO B IIO60 MOMeHT OCTaHOBnTB.ДЯ npOdoJKeHn pa6Ot b CHOba DePaxTb HAcATO KNOKy DInKHeHn Bneped (3) OKoNo 2 cekHyd.
B3 BB0da MaTePnana MaUHna ABA TOMaTHueCKN OTKIOucaTcpeE3 PmMepHo 5 MNHyT.

Hnkorga He BBOdnte B npn6op MaTepuana 6oBbIe, Yem 3TO yka3ano B "TEXHNueCKNX DAHHbIX"!
Ecnn B pexyun MexaHn3M BCE Xe Nonaet CnHUKOM MHORO MATEPNA, CM. JeCTBnBa pa3JeA "HENCNPAHBHOCTN" cactb 3ATOP MATEPNA B PIP6OPE".
ONOPOXHEHNE MELUKA
ДЛЯ CBOPA BymaHn (pnc. 4):
Korda MeWOK IIN C6opa 6ymar 3aONHeH, np6op OTKNIOUaETc. 3aropaetc KOHTPOBbHn INHdkaTOp (10). DeiCTByTe CJeDyIOUM O6pa3OM:
-OTKpbTbDbepuy.3aropaetcKoHTpolbHm KnDnKaTOp□(8).Ecnn BO BXoJHOuXaTe eue octaIcMaTePuaI,TO donONHtEnbHO 3aRopaETc KOHTpolbHm INDnKaTOp (6).
BbTMyb MeoK c bMyarO (12) BmecTe C pAmou n3 HnXHeu qactu Kopnyca, CHrTb MeoK n onopoxKnHb ero. KOHTpOblbHnHdNkatOp (10) rachet.
-PyctoM MeoK NOBecntb Ha paMy 3aDnHyTb B HxNHO YoCTb KOpnyca. 3aKpHTb DBepu KoHTpoJIbHbI uHdNKaTOP (8) rachet.
- Ecn CBETTcK KOHTpOJIbHbI INHdNKATOp 6(6),TO HaxMnTe KOPOTKO KHONKY DINKeHnBnepei (3).OctabuNcB npHmHOJ uXteMaTePnA n3MeJIbHaETcN INHdNKATOp rachet.
3aemeyne: npnbop paobotaet tobko npn 3akpyto nDbepue!
DINHAMMUECKN
YKA3ATEJIb HAPY3KN:
YTObI npedOTBpaTNTb 3aTOp MaTePnana N
OBeCneHTb HEnpepbIBHOe N OΦΦeKTHNBHOe
yHHToXeHHe HOCTeNeu NHΦOpMaun, BO
BpEmr IpouecCa N3MeJIbYeHr CTeNEHb
TEKUeH Harpy3Kn MOTopa yKa3bBaETcR
pACCEeHHbIM UBeTHbIM CBETOM B WaxTe
BBOda:
3eHbCBET: harpyka < 50%
XeIbI CBET: Harpy3ka 50 - 75%
KpachbIcBET: Harpy3ka 75 - 100%
Pnc.4
HENCPABHOCTN
TEXHNUECKOE OBCJLYXKUBAHNE I YTNJIIN3AUJIA
OCHCTKA FOToO3JIEMEHTA (pnc.5):
ECN HACTNb Bymarn 3actpyHy BnyckHn npopee (Hanp, nocne 3atopa Bymarn), TO He NCKNoeHO, TTO npBOp DOI He bdyet OTKIOHcTaBCN3-3a3aKpTOrO CBETOBORO 3ATBOPA.
BbMOKETe yIaIITb 06pe3Kn HIN ONUCTnB FOTozAEMENT,
ecNI BBeDETe B pexyUIM MEXAHN3M eue OINH NCT
bMyaHn IN BNIOHTe 06paTHbXoD MaUNHb KHOKNK
BpaUHeHra HA3ad H kPaTKO npOTpe KNTOcKOn 06a "Tna3a"
fTOAEMENTa.

Pnc.5

Pnc.6
TEXHNUCHECKOE OBCJNYKUBAHNE
PEXUYUERO MEXAHN3MA (TINCA CROSS-CUT):

Pexyime MexaHn3Mb Tnna CROSS-Cut Heo60dmo nocne onpepeHnHO BpemEH paObTc CMAHBaB. Ecn 3arOpHTc KOHpOJIbHn YkazateIb (7)TO deNCTByTe cndyIOUIM o6pa3OM:
OTKpOte DBepu.3aropaetc KHTPOBbHbYyka3aTeIb 8.(8),MnAOT CND - HNDAKATOP KHOKNOBpTHORo DBHXeHN4 (4) N KOHTPOBbHbYyka3aTeIb (7). BbHBe NT KpENeHHa HdEBpeBaOHc MacnOM (13)(PNC.6) n CHOBA 3aKpOte DBepb.
PacnpedeJnte Ha JnCTe Bymarn HEMHoro Macna N BBeJnte eroB waxTy dny Bymarn (11).
JINCTOK BTRNBAETC N MACNO nonadaet B pexyum MEXAH3M.
3ameaHHe:YtOb6KoHTpOblbHyka3aTeIbnorac, nocLe CMA3bBAHHyHKHO KBHTHPoBaTb DeHCTBne cJeDyHMM 06pa3OM:
OTKpbTbDcpebHactoIbKO,HTO6bl3arOpEnC KOnTHpONbHbYk3aTeBb(8)INnKAtopb(7)n(4)MrrAOT.
Haxatb KhoNky o6paTHoro DnKxHeHH (4) n depXaTb Haxato, noka He norachet KOHTpOblhbl yka3aTe(7).
3akpbTbDBepb.
PexyI MEXAHM3M ABOTAMHHECKN PPOBODT UKN LCHKTN (DINKENHE BNEPEI-Ha3d) n OTKHOAETcR. MaUNHa CHOBA roTobKa paBoTe. B Cnyae 3akaa HxHoro cNeuaJIbHoro macna npOHTte pa3den "OCOBbie INPHADLEKHOCTN".
ABTOMATNKAДЛЯЗКOHOMMEN3JEKTPO3HEPIN:
Ecn npbop He HcnoJb3yctc,To npHMePHOepe35 MNHyT OH aTOMaTHueckn OTKnIOVAeCTC.CN- INHdkatop 0fHKUHOJIbHorO nepeKIOVATEEN (2) "TOOB KpaBote" rachET.ДЯ NOBtOPHO BkIOUeHIN HAKMITE KOPOTKO fHKUHOHaIbHm NEpeKIOVAteIb.
YTNIN3AUINPNI6OPA:
No OKOHaHHcpoKa CnyKbMaHbYyTHIN3NpyHTe ee B COOTBETCTBNC npabnAmn3aunTbOKpykaHOeI cpeJI.He BbIpaBCBaIteDEtaJI MaHHbIe H ee yNAKOKn DOMAUHNMCyOPOM.
TEXHnueCKNE DAHHbIE
intimus International Spain, S.L.
Spain intimus International Spain, S.L. +34 / 9 02 22 31 31
Room 260D, C Building
Guojiang No.E-2 Dong San Huan Bei Road, Chaoyang District, Beijing 100027, PRC
www.martinyale.com.cn
fax +86/10 84 47 10 75
info@intimus.com.cn
South Africa MARTIN YALE Africa +27/0118387281
Unit B3 Mount Royal Business Park

James
s Street, Halfway H
Town, Johannesburg
P.O. BOX 1291, Houghton 2041
www.martinyale.co.za
fax +27 / (0) 11 838 73 22
sales@martinyale.co.za
+27/(0)118387281