45 CC3 - Shredder Intimus - Free user manual and instructions
Find the device manual for free 45 CC3 Intimus in PDF.
User questions about 45 CC3 Intimus
0 question about this device. Answer the ones you know or ask your own.
Ask a new question about this device
Download the instructions for your Shredder in PDF format for free! Find your manual 45 CC3 - Intimus and take your electronic device back in hand. On this page are published all the documents necessary for the use of your device. 45 CC3 by Intimus.
USER MANUAL 45 CC3 Intimus
Before operating, please read the Operating Instructions!
Operating Instructions
The machine may not be operated by more than one person at any given time! The machine was designed for safe operation by "one person only".


< Danger of injury! Keep all loose articles of clothing, ties, jewelry, long hair or other loose objects away from opening!

<During the shredding process no other work may be performed on the machine (for example cleaning, etc.)!

< Danger of injury! Never insert fingers into opening!

< The machine is not a toy, and is not suitable for use by children!
The overall technical safety concept of this machine (dimensions, feed openings, emergency shutdown devices etc.) does not provide for any guarantee regarding hazard-free operation by children.

In case of danger switch the machine off with the main switch, or with the emergency switch, or unplug the machine!

Always unplug the machine from the main power supply before opening the machine! Repairs may only be performed by trained personnel!
INITIATION
AREA OF APPLICATION:
The intimus 45/60SC2/CC3/CC4/CC5/CC6 data shredder is a machine used for shredding general documents and
data carriers such CD's, DVD's, credit cards and 3.5" diskettes.

The machine must only be used to shred paper, credit cards and CD's, DVD's and 3.5" diskettes.
Shredding other sorts of data carriers may cause damage to the machine (e.g. damage to the cutters etc.).
INSTALLATION:
- Unpack the machine and put it together.
- Fit the plastic bag onto the bag frame.
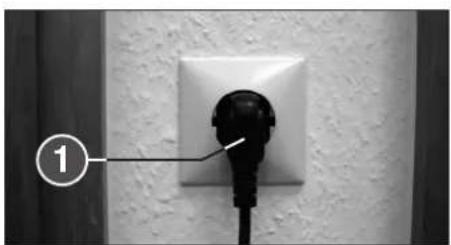
- Connect the machine to the power with the plug (1) (Fig. 2) (For information on the right fuse for the plug see "TECHNICAL DATA").

The socket outlet shall be installed near the equipment and shall be easily accessible!
Only operate the machine in enclosed rooms at temperatures between 10^ and 25^
OPERATION
CONTROLS:
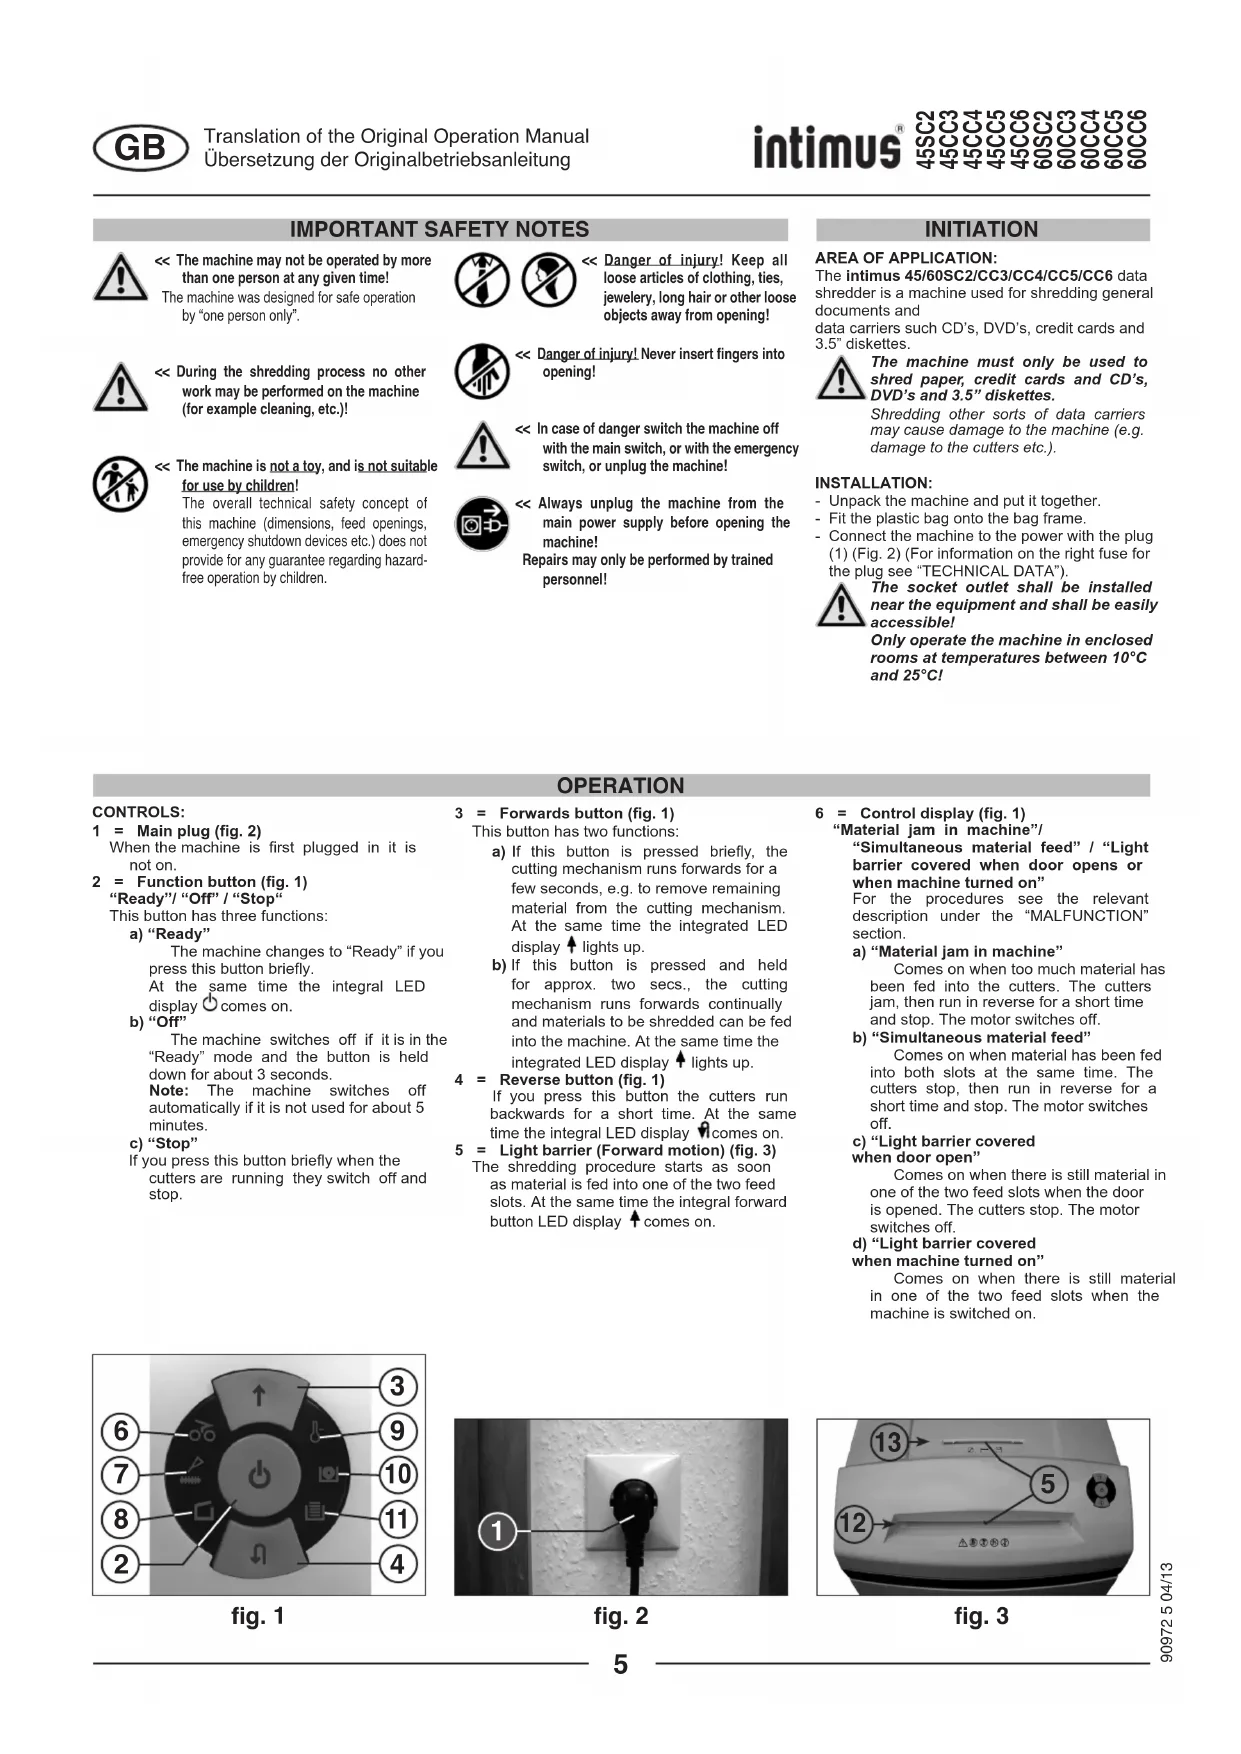
1 = Main plug (fig. 2)
When the machine is first plugged in it is not on.
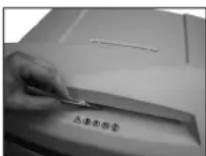
2 = Function button (fig. 1)
"Ready"/ "Off"/ "Stop"
This button has three functions:
a) "Ready"
The machine changes to "Ready" if you press this button briefly.
At the same time the integral LED display comes on.
b) "Off
The machine switches off if it is in the "Ready" mode and the button is held down for about 3 seconds.
Note: The machine switches off automatically if it is not used for about 5 minutes.
c) "Stop"
If you press this button briefly when the cutters are running they switch off and stop.
3 = Forwards button (fig. 1)
This button has two functions:
a) If this button is pressed briefly, the cutting mechanism runs forwards for a few seconds, e.g. to remove remaining material from the cutting mechanism. At the same time the integrated LED display lights up.
b) If this button is pressed and held for approx. two secs., the cutting mechanism runs forwards continually and materials to be shredded can be fed into the machine. At the same time the integrated LED display lights up.
4 = Reverse button (fig. 1)
If you press this button the cutters run backwards for a short time. At the same time the integral LED display comes on.
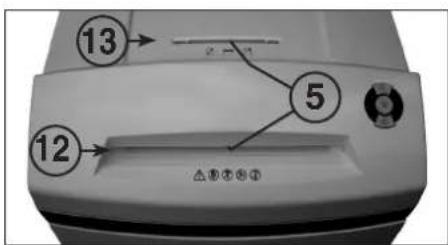
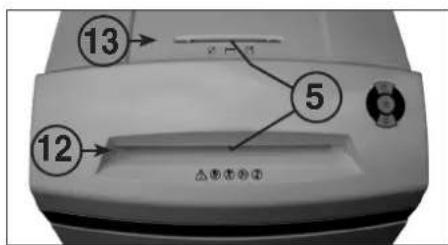
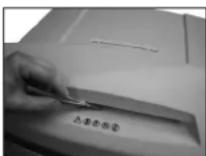
5 = Light barrier (Forward motion) (fig. 3)
The shredding procedure starts as soon as material is fed into one of the two feed slots. At the same time the integral forward button LED display comes on.
6 = Control display (fig. 1)
"Material jam in machine"/
"Simultaneous material feed" / "Light barrier covered when door opens or when machine turned on"
For the procedures see the relevant description under the "MALFUNCTION" section.
a) "Material jam in machine"
Comes on when too much material has been fed into the cutters. The cutters jam, then run in reverse for a short time and stop. The motor switches off.
b) "Simultaneous material feed"
Comes on when material has been fed into both slots at the same time. The cutters stop, then run in reverse for a short time and stop. The motor switches off.
c) "Light barrier covered when door open"
Comes on when there is still material in one of the two feed slots when the door is opened. The cutters stop. The motor switches off.
d) "Light barrier covered
when machine turned on
Comes on when there is still material in one of the two feed slots when the machine is switched on.
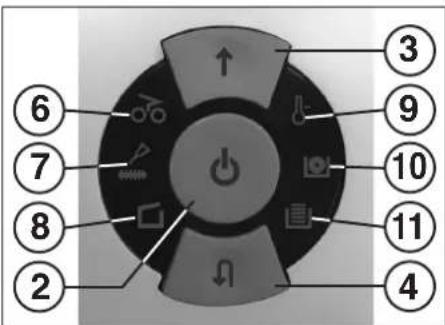
fig.1
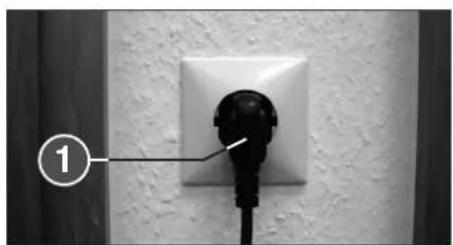
fig. 2

fig. 3
OPERATION
CONTROLS:
7 = Control display (Fig.1)
"Oil cutters"
Comes on when the cutters in the cross cut version must be oiled. The lubrication procedure must be acknowledged on the reverse button (4) (see description in "CUTTER MAINTENANCE").
8 = Control display (Fig. 1)
"Door open"/ "Door malfunction"
a) "Door open"
"Comes on if the door on the lower part of the machine is opened. The machine switches off automatically and cannot be started as long as the door remains open."
b) "Electrical fault"
Flashes when there is an electrical fault in the door sensor. The machine switches off. Please contact your dealer.
9 = Control display (Fig. 1)
"Motor overload"
"Electrical fault"
To find out what to do see the relevant description under the "MALFUNCTION" section.
a) "Motor protection"
Comes on when the motor has been overloaded and has switched off. The machine cannot be started while the motor is cooling down.
b) "Electrical fault"
Flashes when there is an electrical fault inside the control board. At the same time the function button (2) LED display flashes. The machine switches off. Please contact your dealer.
10 = Control display
"CD/DVD container full" (Fig. 1)
Comes on when the CD/DVD container is full and must be emptied. The cutting unit for reducing CD/DVD switches off. The emptying procedure must be acknowledged on the forward button (3).
Note: The cutting unit for reducing paper can be used furthermore.
11 = Control display
"Paper collection bag full" (Fig. 1)
Comes on when the paper collection bag is full and must be emptied. The cutting unit for reducing paper switches off.
Note: The cutting unit for reducing CD/DVD can be used furthermore.
12 = Paper feed slot (Fig. 3)
13 = CD/DVD feed slot (Fig. 3)
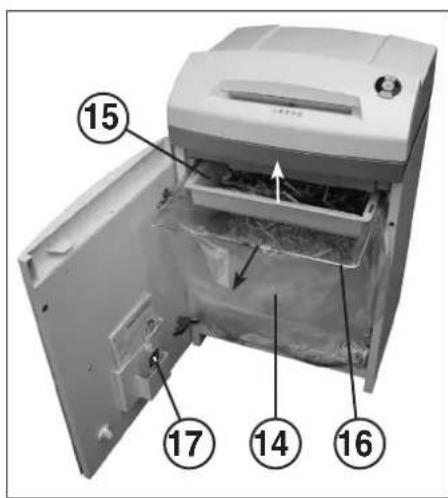
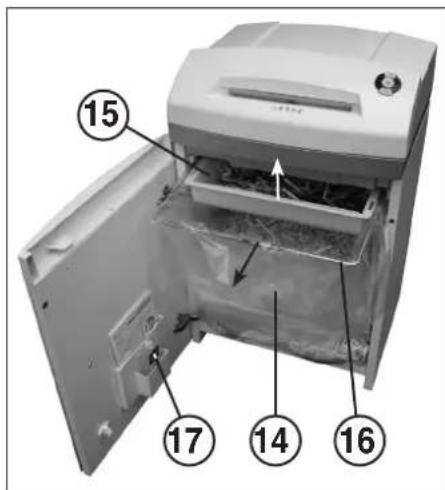
14 = Paper collection bag (Fig. 4)
15 = CD/DVD collection container (Fig. 4)
16 = Bag frame (Fig. 4)
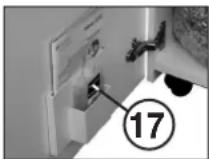
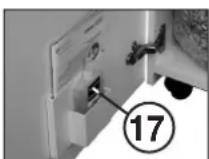
17 = Oil reservoir (Fig. 4, 6)

The shredder may not be used as a step ladder or as a seat. Danger of falling due to breakage!
SWITCHING THE MACHINE ON:
Proceed as follows to switch the machine to "Ready":
- Press the function button (2) briefly.
- The function button (2) LED display comes on for "Ready".
- The machine is ready for operation.
MATERIAL FEED:
Feed paper into the cutting mechanism through the paper feed slot (12) (fig. 3).
Feed data carriers (CD, DVD or credit card) into the cutting mechanism individually into the separate CD/DVD feed slot (13) (fig. 3).
The machine automatically switches to forwards running, draws the material in and automatically switches off after shredding.

When shredding papers, do not shred CD/DVD at the same time, and vice versa!
Note: For shredding transparent films, the machine must be manually switched to forwards running (press and hold the forwards button (3) for approx. 2 secs.). By briefly pressing the function button (2) (Stop function), the shredding process can be stopped at any time. To continue, press and hold the forwards button (3) for approx. 2 secs.
If the machine is not used for a period of approx. 5 mins., it automatically switches off.

Never feed the shredder with a quantity of material exceeding the maximum indicated. Refer to the TECHNICAL DATA section!
Should the machine become overloaded, follow the instructions under "MATERIAL JAM IN MACHINE" under "MALFUNCTIONS".
Two separate collection containers ensure that waste is separated properly.
EMPTYING THE
PAPER COLLECTION BAG (Fig. 4):
If the paper collection bag is full the machine switches off. The control display 1) comes on. Proceed as follows:
- Open the door. The control display (8) comes on. If there is still material in one of the feed slots, the control display (6) also comes on.
Pull out the bag frame (16) together with the attached paper collection bag (14) and fitted CD/DVD container (15) from the lower part of the housing. -
Remove the CD/DVD container, take out the paper collection bag and empty the contents. The control display 1) goes out.
-
Attach the emptied bag to the bag frame (16), fit the CD/DVD container and slide the frame together with the bag and CD/DVD container back into the lower part of the housing.
- Close the door. The control display (8) goes out.
- If the control display (6) comes on, press the forward button (3) briefly. The remaining material in the feed slot is shredded and the display go out.
Note: The machine will only run if the door is closed.
EMPTYING THE CD/DVD COLLECTION CONTAINER (Fig. 4):
Note: The "CD container full" is monitored by counting the number of shredding processes performed.
If the number of CD's/DVD's pre-programmed into the control unit (about 20) is shredded the machine switches off. The control display () comes on. Proceed as follows:
- Open the door. The control display (8) comes on and the forward button (3) LED display as well as the control display (10) flashes.
Pull out the bag frame (16) together with the attached paper collection bag (14) and fitted CD/DVD container (15) from the lower part of the housing, remove the CD/DVD container and empty the contents.
- Press the forward button (3) briefly to acknowledge that the CD/DVD container has been emptied. The counting process begins at zero again. The control display (10) and the forward button (3) LED display go out.
- Fit the emptied CD/DVD container to the bag frame (16) and slide the frame together with the bag and container back into the lower part of the housing.
- Close the door. The control display (8) goes out.
Note: The machine will only run if the door is closed.
DYNAMIC LOAD DISPLAY:
To prevent a material jam and thus ensure a continual, effective destruction of the data carriers, the current load level of the motor is displayed during the shredding process by a coloured, diffuse light in the feed slot as follows:
Green light: load < 50%
Yellow light: load 50 - 75%
Red light: load 75 - 100%
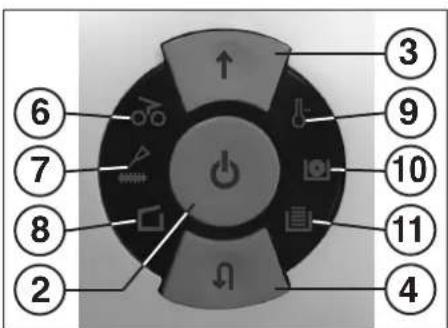
fig.1
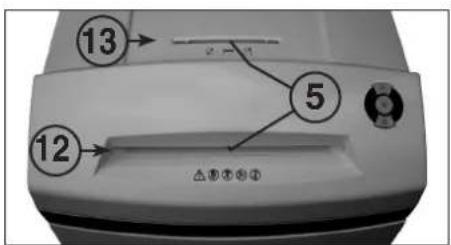
fig. 3
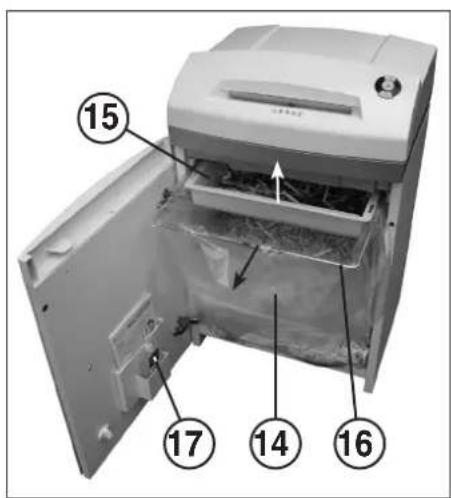
fig. 4
MALFUNCTIONS
MATERIAL JAM IN THE MACHINE:
(Auto reverse function)
If a jam is caused by too much material being fed in the following happens:
- The cutters jam, then run in reverse for a short time (material is released) and stop. The motor switches off. The control display 66 comes on.
Proceed as follows:
Paper jam in paper feed slot (12)
-
Remove the paper that has been fed back.
-
The cutters now run forwards automatically and shred the remaining paper in the cutters. During the forward run the forward button (3) LED display 1 comes on. The control display (6) goes out.
- Continue shredding with less paper.
Material jam in CD/DVD feed slot (13)
- Remove the returned material
Remove the material carefully because there is the risk of being injured by the sharp cut surfaces.
- The remaining material to be cut is now automatically fed to the cutters again and shredded. During the forward run the forward button (3) LED display comes on. The control display goes out.
- If the material to be cut has gone through continue shredding with the right amount of material.
- If necessary, switch the cutters manually alternately from forward to reverse until the material has gone through completely and been shredded.
SIMULTANEOUS MATERIAL FEED:
Should material be fed into the two feed slots at the same time the following happens:
- The cutters jam, then run in reverse for a short time (material is released) and stop. The motor switches off. The control display 46 comes on.
- Take the material out of one of the slots.
- Press the forward button (3) briefly. The material in the other slot is fed to the cutters and shredded. The control display goes out.
LIGHT BARRIER COVERED WHEN DOOR OPENED:
Should there still be material in one of the two feed slots when the door is opened, the motor switches off and the cutters stop. The control display comes on.
Close the door and acknowledge the status by pressing the forward button (3) briefly. The existing material is fed to the cutters and shredded.
LIGHT BARRIER COVERED: WHEN MACHINE TURNEO
Should there still be material in one of the two feed slots when the machine is switched on the control display 6) comes on.
Remove the material and acknowledge the status by pressing the forward button (3) briefly.
MOTOR PROTECTION:
Should the motor be overloaded it switches off. The control display (9) comes on.
The machine can be started again after a cooling down period of about 25 - 40 minutes (depending on the model and the room temperature).
ELECTRICAL FAULT:
If the control display (9) flashes together with the function button (2) LED display or only the control display (8) flashes there is an electrical fault. The machine cannot be started. In this case please contact your dealer.
FAULT CHECK LIST:
Should the machine not work, check the following points:
- is the plug connected to the power supply?
- is the door closed?
- is the paper collection bag full? Follow the instructions for "EMPTYING THE PAPER COLLECTION BAG".
- Is the CD/DVD collection container full? Follow the instructions for "EMPTYING THE CD/DVD COLLECTION CONTAINER".
Is there a material jam in the machine? Follow the instructions in "MATERIAL JAM IN THE MACHINE".
- Is the motor overloaded? See "MOTOR PROTECTION". If none of these test points apply, please contact your dealer.
MAINTENANCE / DISPOSING
CLEANING THE PHOTOCELLS (Fig. 5):
If paper particles should come to rest in the inlet guide (for example after a paper jam) it is possible that the machine will not turn off, due to the broken light barrier.
To remove these paper strips and also to clean the photocell, pass another sheet of paper through the feed slot, or switch the machine to reverse and wipe both "eyes" of the photocell with a brush.
fig. 5

fig. 6
CUTTER MAINTENANCE (CROSS CUT):

Cross cut cutters must be oiled after a specific operating time.
If the control display 7 comes on proceed as follows:
Open the door. The control display (8) comes on and the reverse button (4) LED display as well as the control display (7) flashes. Remove the oil reservoir (17) (Fig. 6) from the holder in the door and close the door again.
Pour a little oil onto a sheet of paper and then feed this through the paper feed slot (12) onto the cutters.
The paper is drawn in and in this way the oil is distributed to the cutters.
Note: This procedure is acknowledged as follows to turn off the display after the cutters have been oiled:
-
Open the door until the control displays (8) lights up. The control displays (7) and (4) flash.
-
Press the reverse button (4) and keep it held down until the control display (7) goes out.
-
Close the door again.
The cutters now start a cleaning cycle automatically (forward and reverse run) and then switch off. The machine is ready for use again. Should you need to re-order the special oil see "SPECIAL ACCESSORIES".
AUTOMATIC ENERGY SAVING:
If the machine is not used for a while it automatically switches off after about 5 minutes. The function button (2) LED display for "Ready" goes out. Press the function button briefly to turn it on again.
DISPOSING OF THE MACHINE:
Dispose of the machine in an environmentally friendly fashion at the end of its useful service life. Do not dispose of any of the parts included in the machine or its packaging with household waste.
TECHNICAL DATA
SPECIAL ACCESSORIES
| Model | Power supply data supply voltage/frequency - current consumption - power | ||
| intimus 45/60SC2 | 220-230V/50Hz · 3.0 amps · 0.7 kW | 120V/60Hz · 5.6 amps · 0.7 kW | 100V/50/60Hz · 7.0 amps · 0.7 kW |
| intimus 45/60CC3+CC4+CC5 | 220-230V/50Hz · 3.0 amps · 0.55 kW | 120V/60Hz · 5.6 amps · 0.55 kW | 100V/50/60Hz · 7.0 amps · 0.55 kW |
| intimus 45/60CC6 | 220-230V/50Hz · 3.0 amps · 0.7 kW | 120V/60Hz · 5.6 amps · 0.7 kW | 100V/50/60Hz · 7.0 amps · 0.7 kW |
Pre-fusing (slow-blow): 220 - 230V = 10 amps / 120V = 15 amps / 100V = 15 amps
Description Order-No. Plastic bag, 440× 330× 600× 0.05mm (45) 83079 Plastic bag, 440× 330× 950× 0.05mm (60) 99977 Lubricant, 110 ml bottle 88035 Note: For orders of special accessories and spare parts, please contact your dealer.
| Model | Typ | Cutting width paper / CD,DVD | Cutting capacity paper / CD,DVD | Working width | Noise level | Dimensions W x D x H | Weight |
| intimus 45SC2 | 278-4S | 3.8 mm / 8 mm | 22-24 sheets* / 1 piece | 235 mm | app. 55 dB(A) | 450 x 390 x 650 mm | 31 kg |
| intimus 45CC3 | 278-4C | 3.8x30 mm / 8 mm | 13-15 sheets* / 1 piece | 235 mm | app. 55 dB(A) | 450 x 390 x 650 mm | 32 kg |
| intimus 45CC4 | 278-2C | 1.9x15 mm / 8 mm | 10-11 sheets* / 1 piece | 235 mm | app. 55 dB(A) | 450 x 390 x 650 mm | 32 kg |
| intimus 45CC5 | 278-1C | 0.8x12 mm / 8 mm | 5-6 sheets* / 1 piece | 235 mm | app. 55 dB(A) | 450 x 390 x 650 mm | 32 kg |
| intimus 45CC6 | 278-1CF | 0.8x4.5 mm / 8 mm | 5-6 sheets* / 1 piece | 235 mm | app. 55 dB(A) | 450 x 390 x 650 mm | 32 kg |
| intimus 60SC2 | 279-4S | 3.8 mm / 8 mm | 22-24 sheets* / 1 piece | 235 mm | app. 55 dB(A) | 450 x 390 x 770 mm | 33 kg |
| intimus 60CC3 | 279-4C | 3.8x30 mm / 8 mm | 13-15 sheets* / 1 piece | 235 mm | app. 55 dB(A) | 450 x 390 x 770 mm | 34 kg |
| intimus 60CC4 | 279-2C | 1.9x15 mm / 8 mm | 10-11 sheets* / 1 piece | 235 mm | app. 55 dB(A) | 450 x 390 x 770 mm | 34 kg |
| intimus 60CC5 | 279-1C | 0.8x12 mm / 8 mm | 5-6 sheets* / 1 piece | 235 mm | app. 55 dB(A) | 450 x 390 x 770 mm | 34 kg |
| intimus 60CC6 | 279-1CF | 0.8x4.5 mm / 8 mm | 5-6 sheets* / 1 piece | 235 mm | app. 55 dB(A) | 450 x 390 x 770 mm | 34 kg |
RECOMMANDATIONS IMPORTANTES DE SECURITÉ

DYSFONCTIONNEMENT ELECTRIQUE:
Fusible (a action retardee): 220-230V = 10 A / 120V = 15 A / 100V = 15 A
Refermer la porte.
ELIMINATION DE LA MACHINE:
3 = Vooruittoets (afb. 1)
6 = Controleampje (afb. 1)
7 = Controlelampje (afb.1)
9 = Controleampje (afb. 1)
"Overbelasting motor"
"Elektrische storing"
"CD/DVD-bak vol" (afb. 1)
(Auto-Reverse-function)
- is de motor overbelast?
Zie "MOTORBEVEILIGING".
Plastic zak, 440x330x600x0,05 mm (45)
Plastic zak, 440x330x950x0,05 mm (60)
Flesje olie, 110 ml
Best.nr.
83079
99977
88035
"Recipiente CD/DVD Ileno" (Fig.1)
MANUTENCAO / DISPOSICAO
LIMPEZA DAS CÉLULAS FOTOELECTRICAS (Fig. 5):
Procedure come sequel:
SYNTHPHEN KOITIKOY MHXANEMOY (CROS-CUT):

O Koniko mXavaoi Cross-Cut npTea va AaBawu ma oioevo xovk'obidomma aeoupyiac.
Eav aovbae n evobie (eEyxou 7), akolouhote ta Efcic Bijuaata:
AvaleTnV npTa.Avaei n evEeEg Eeyxou 8)Kai avaoBooynov n evEeEn LED Tou biakomtn kwnnc npoc tanioo4 Kau n evEeEg Eeyxou 7).ApaapeTe to doxio Iaio (17) (Ek.6) ano to onpuyra onny npota Ka Eaavakxiate ny npota.
BalaIyA loa naw o eva xapti kai eiyate to eo ano to 06laio iocaywic xaptiv (12) stov konriko unxavio.
To xapi Tpaaietau paoa kai etoi to laobi laowei tov mXawiooc konig.
Joua Tva afoane Tey Ev6eE npentei me ta Tnv diaikacaa Aabogatoc Tou KOTIKOU JNAXAVOAO AOLOHTOEI EBEAoiw Oc Efc:
-AwoIeTeMnnpTaToo,OWTeVauVaeWnEvEgEnEaeyou8.
AvoobqivouovE68EicEεEyxu 7Kai.
PioteTov biakotn kivonqnpoc ta niow (4)kai kpatoteTov pieevo expia va oBne i evbEiE 7
EawakAeiTe Tm npota.
O KonTIOc mXwIOc apx(Se Topa eva Kkawma Kaapaiou (kiyon npoc To enpoc, kai npoc To kiio) kai konTOW anepepyoiei. H mXwiv Eovr TApoi yiaLeuoyia, Se peipinwn aayyEAduc Tou EIIOAIAI BAEIE OTO KEPOAIO "EIIDAI AEEYOAP."
AYTOMATO ZYTHMA EEOIKONOMHZHE ENEPTEIAZ
Eav n unxavn 1ev xpononnoiye ia opioevo xpwikidoanma, aneevypnoieirautoataetaeanepe.5AeTt.2Bjwei eEvseIg
LED cou aetoupyko diokottn (2) eouoteta yig aetoupyia
Iaenaveevpyooinmoteovotovtoueouyko diaokntm.
TEXNIKA ΣTOIXEIA
1 = Netstik (afb. 2)
3 = Fremad-tast (afb. 1)
Papir-posedyldt" (afb.1)
OPSTART AF APPARATET:
TOMNING AF OPSAMLINGSBEHOLDEREN for CD/DVD (afb.4):
VEDLIGEHOLD SKAREENHED (CROSS-CUT):

Plasticpose, 440x330x600x0,05 mm (45)
83079
Plasticpose, 440× 330× 950× 0.05mm (60)
99977
Olieflaske, 110 ml
88035
INNKOBLING AV MASKINEN:
Maskinen kobles inn til „driftsklar" på denen maten:
VEDLIKEHOLD/DEPONERING
Plastpase, 440x330x600x0.05 mm (45)
83079
Plastpase, 440x330x950x0.05 mm (60)
99977
Oljekanna, 110 ml
88035
"Ovi auki"/ "Oven hairio"
a) "Ovi auki"
ANYAGTORLODAS A GEPBN:
FENYSOROMPO FOGLALT A BEKAPCSOLASNAL:
"CMaxeTe pexeunMexaHn3bM"
CBETBA, KORATOPEKEXUH MEXAHIN3bM OT BEPCHRTA CrossCut TPR6BA da bSyde CMA3AH. IPOUECA HA CMA3BAAHE TPR6BA da bSyde NOTBpDcH C BYTOHa 3a BpBUaHE (4) (BIX ONICAMETO B "05CJYXBAHE HA PEXEULMEXAHM3bM").
8 = Konhtpojna na mna (Φn.r.1)
"OTBOPeHa Bpata/ "IbpeHa HbaTmKata
a) "Orbopeha bpaata"
CBeTH, KORATO e OTBOPEA BpATNKA THa DOnHMA Wka. MaunHATA CE N3KNOBA ABOTMAnHO Hc MOKe Da bDe CTAPTNPAH, DOKOTo BpATNKA cTOn OTBOPEA.
6) "Enektpruecka noBpeda"
Mura, KORATO MMa enektpupeckn noBpda B ceH3OpHATA texHnka HbpatmHata. MaunHata ce nKIOOBA. MoN, yBdomete Baunr Tpboeu.
9 = KOnTpOJaHa naMaHa (Φur.1)
"PpeOBapBaHe Ha eneKtpoDbnraTeTn/
"Elektpruecka nobpeda"
3a npnHmna Ha deIeCTBnBE BnK CbOTBETHO OINCAHMe B rnaBa *IOBPEDA.
a)3aunhaeJeKtpoDnBnrateT
CebTBA, KOrato 6bIpe npTeBaepen eHekTKDnHrAteTne nCe e H3KnOuyn. MaunHATA He MoKe Da 6bJe CTaRTHAPA No BpEme Ha Pha3ata Ha OxlanDahe Ha eEknTKDnHrAteTne.
6) "Elektrepecka noBpeda"
Mura, KORATO IMA eNEKTPUeCKI NOpea B INATkATA 3a YnpaBnHEMe. EINHOPEMeHHO MRA CEBTONDHn HINDKAtoP HnFyHKnHOHaHnHb6YToH (2).MaunHata ce NkIOBa.MOnJ, yBeDMTe Baunr TpBoaeu.
10 = KOHTponHa naMa
eHOBpeMeHHo c roBa He noDaBaiTe CD/DVD n 6paTHO!
Yka3aHa: 3a pa3do6baHeTo Ha 6e3uBTHn FOHMAaHnHATA Tp86Ba Da 6bDe BkIOUeHa pIHO HA DABKHeHn HAPpe (3aDpBKe 3a OKO2 c6n. HATNCHT 3a npEDBHXBAHE HAPpe(3)). Ype3 KpaTkoTpaHn HATnCKAe Ha FyHKUHOHnHn 6yTOH (2) (PhHKUIN "CtOn") NO BCKO BPEMe MOKE da 6bJe Pekcbchat IpocceHa naP3do60BAeBA. 3a npOJXBAHe 3aDpBXTe HATNCHT 3a OKO2 c6k. 6yTOHa 3a npEDBHXBAHe HAPpe(3).
PnHn3n03BaHeMaMmHnTa 3a nepHOOTOKOIO5MH.TABOTOMATNUHO C9H3KIOHOBA.

HnKora He noDaBaIte Ha MaunHata nobYe ot
OpnepeHTo MAXCHMaIHO KOJIYeCTBO MaTePhaI (cb6nOdaBae "TEXHNueCKN DAHH"!
AKO bJpeKo TOBa BpeXeMn MEXAHm3bM NONAnDE TBpDe MHOrO MatePmaI, BxKeTbe "IOBPEDIN" a 3AIPbCTBAHCE MATEPMAI
3a npabHnHOTo pa3dEnerHe Ha oTaNbKa ce rpnKAT Da 0TDenN KOHTeHepa 3a pa3dpO6eHm MaTePmAn.
M3NPA3BAHE HATOPBATA 3A YJNABRAH
HAXAPTYTA(Фнr.4):
Ako e 3aBnHHeTOp6Ta3 aYnaBHHe HxApTnHa, MaunHata ce 3KIOHbA. KoHTponHATA lamna (11) cEBTa. IocTbNAce TaKa:
OTBOPETBbPAWnKA.TKOHTPOHATAaAMNA 8CBETBA.AKOBHKOJXo63aNOdaBaHEIMACCTAHAMATEPMAI,CBETBADOBbINHTHO KOHTPOHATAaAMNA 6(6).
- N3aBdTePamkata HAp06bata (16)c5c 3akHeHATA TOp6a3a ynaBHe HApXpTnA (14) nOocBaTHeKoHTeHep 3a p3aDnp6eH MatepehAn CD/DVD (15) otDnHata HAt Ho KnpNyca.
I3BaTeIe KOtHeHepa 3a CD/DVD, CBaIe ToP6bTa 3a yIaBHe HxapTn IINp3aHETe CbIbpxAHMeTO. KOhtpOnHa TAmnA (11)IgacBa.
Φnμ.3
3aKaHETe KnPa3HeHATA TOp6a BbPxy pAmkata 3a TOp6bata (16), NoCTABETe KOHTeHepa 3a CD/DVD M OTHOB BMsKHepe pAmkata C TOp6bata H KOHTeHepa 3a CD/DVD B DonHata Yact Ha KopNYca.
3aTbOpTe BpTaMkata.KoHTpOHaTaaMa nC(8)H3rAcBa. AkoKoHTpOHaTaaMa nC(6)CBETn, kpaTKeTpaHHOHaTHcHete 6yToHa 3a npDmKBaHe HAnpe(3).OCTaHAIAT MATEpHnB npOeNa 3aNoDaBaHe ce p3aDp06BaN HnDkkatopA H3rCaB.
YkaaHHe: MaHHTa pabOTc cAmo np 3ATBOpHa BpAtnKa!
H3NPA3BAHE HA KOHTEHEPA
3A CD/DVD (Φm.4):
Ykaaane: KOHTPOna 3a npenbnahe Ha KOHTeHepa 3a CD ce OcBueCTBa 4pe3 6poeHe Ha N3BpUeHnTe UkKnHa pa3D06BaHe.
Korato 6bdeocthHAT 6poHT (OK.206poHa ha noaandeHnTE CD/DVD-ta nporpampaB ynpabneHMeTo, MaunHata ce n3KnOBA.KOHPTNATA hana 10) CEBTA.
IOCTbNBA Ce Taka:
OTBOPETe BpATMkata.KoHTPOHATA NaMaTn 8CBETN CBTODIOHMA HDAKATOp HA BYTOHa 3a npHBXBAHe HAnpe(3),KaKTOn KOHTPOHATA NaMaTn (10) MURat.
N3BaTepe pamkata 3a Top6a (16)c63 cakaeHATA top6a 3aYJabHe (14) mocTabeHH KOHTHEp 3a CD/DVD (15)OT DnHATAacCT HA KOpNYCA, N3MbKHTe KOHTHEpHa 3a CD/DVD nI3np3HETe CbIbPxAHNEo.
3a KpATKO HATCHETE 6yToHa 3a npDnBxKBaHe HAnpeD (3) 3a Da NotOBpTneHnPpTaBnOeHO KaONTeHepa 3a CD/DVD-Ta. PnpocCT Ha OTbPOBaHE OTHoTO HAOTNBA OHTyNA. KOtPOnHATA NaMa (10),KaTko NCBtoMDHnHnDnKTop H6yToHa 3a npDMnBxABe HAnpeD (3) nRACsBt.
- Nocetabete H3Np3A3HHeH KOTHEHep 3a CD/VDbPxy pAMKATA 3a Top6ata (16) 17OHO BMBKHTe pAMkata C Top6ata N KOHTEHPB DJOJHATA cH8 HOKOPYCA.
-3aTbOpTeBpaTmKATA.KoHTpOHaTaIaMaNla8(8)H3racBa.
YkaaHHe: Maunnata paobtnc amo npn 3atBopena BpatuKa!
INHAMNUEHNHIMKATOP3A HATOBAPBAHE:
3a da ce h608he 3aDpBCTBaHe C MATEPnTn Taka da Ce NOCTHNE NOCTHO H eEKFTVBHO YHHIOXoJABAHc H a HOCTENn HA DAHNn NO BPEMa H pOuCeHa PaaDIOPOBAHe,MOEMHTaTcTeEN Ha HOBATBaHBe H enEeKTopDaRnTaee He uINIDKpaN ONCpeCTbOM ONePeHEna LCBtHa,paCzEHa CBETmHa BnpOena 3aNoDAabeHae
KAKTO CNEIDA:
3eHaCBTnHa: HATOBapBaHc<50%
Kbta cBttnha: HatoBapBaHe 50-75%
Yepbena CBeTmHa: HATOBaBHe 75-100%
Φn.r.4
IOBPEI
3ADPbCTBAHE HA YPEDA C PA3DPOBEH MATEPHA! (fynxua Auto-Reverse)
AkoB CnEeCTBNE NOdaBaHETO HA TBpIe MHOrO MaTePnAn Ce IOnyH3aDbcTBAHe, MauHHATA peaHmP aNo CneDHy HauH:
- PexelHMT MEXAH3bM 6nKHPa, cneT OBa ce 3abpTa MaNko B opaTHA NocKa (MATEPNa CEOCBO6XZaB) n OCTa B HNOBHXe. ENEKPOBnIgatEnrTe n 3KJIIOyBA. KOHTPOnHATA lamna CEBETA.
NocbBa ce taka:
OctaTbU OX xapTnB Dxko6a 3a noDaBaHe Ha xapTnTa (12)
- OCTpahete BbpHataxaptnra
- Pekel MEXAH3bM Cera TpBFA ABTomAtHNO HApneI paoDpo6Ba XapmHeNte OctaTbUa 3acTaHAn BpeEeHn MEXAH3bM. Ip BpeMe Ha npDmbXBAHeto HApneI CBTeN CBToIOIDH NIdKATOp H6byTOHa 3a PnDmbXBAhe HanpeI (3). KOhtponHata lamna cM3racBa.
- PnpbIxetepa3dp06BaHetoC No-MANKO KONMueCTBO XAPTN. 3aapcbTBAe cpeapoeBmtepeHnepenB npocena 3a noDabAH h CD/DVD-ta (13)
-OTCTpaHeteBbpHATMaTePnAJI.
BHMMaTeJHn IpemaxHeTe MATEpHana, BHMBaMauKn Da He Ce HapaHnte OcTpuTe peKeuN qaTH!
- Octahanna MATEpHnA 3a pa3Dpo6BaHE ATOMATHNO CE
ha HpapeKsHnM EMAHX4Bm H ce p3Dpo6Ba. IIO BpeMe
Ha npDnBnKBaHTo HnpeD CbETn CBeTOnIOHN HnDnKaTop
Ha ByTOHa 3a npDnBnKBaHe HnpeD (3). KOHTPOINHATA NaMa
(6) n3rCaB.
Korato MaTePmHa 3a pa3doPo8BaHe npemHHe,poDbIKeTe pa3doPo8BaHceto B ppaBnHMr O6eM.
-AKo e Heo60JIMMO, npeBKNOpaJIe BpHNO pRcEJIuaM MEXAH3bM HnBKeHne HappeN H3aI,doKaTO MaTePnAa 3a pa3pa06BaHBe PpmHHe N5be da3pa06BeHnAbuHIO.
IAPAJELHOIODABAHE HA MATEPNAJ3A PA3DPOBRAHA:
AkoB DbaTApouenaEHNOBpeMeHHO bDe nOaIeH MATEpMaI, MaIIHATApeNIPA KAKTO CNEBA:
- Pekexueta MEXAHIN3bM 6nOKPra, cneI TOBA CE 3abpTa MaNko B o6paTHa NocOa (MaTePHNA ce OCBO60KJADA) n OCTABe HenoDInkEeKToPOBfRatEnTn e HxKIOHBA. KOHTPOnHATA lamnA CEBTBa.
- Ppemaxhete MaTePnana OTe eHHOT npouenite.
HATCHETE 3a KpATKO BYOHA 3a npdeBnKBAe HAnpei (3) MATEPnAHT 3a pa3Dpo6BaHe Ha DpyrN npoen Ce noDAHa peKeeuINMEXAH3bMnCe pa3DPO6Ba. KOHTPolHATA lamna (6) INRACBa.
FOTOKJETKATA CE 3AEDCTBA IPII OTBAPRHE HA BPATATA;
AIO pIOI OBATEHNE HA BPAWNTKATA B EINOH T DBATAPOOJNA BCE OUIE HMA MATEPHAI, ENEKTPOBDMATIELCE N3KJIIOUBA npeeJHRA MEXHAH43MB CUNHA. KOHTPONHATA JAMNA CCBETA.
3aTbOpTe BpAtnuKata n NtOBpDeTe cBCTOHNHeTO C KpaTko HATNCKaHe HA 6yToHa 3a npDnBnKBeHae HanpeD (3). HaNnHHT MATEpHa 3a pa3doBoBaHe ce noDaBa H peKeuMexaHmB m Ce pa3doPbHa.
FOTOKJETKATA CE 3AEDCTBA IPN BKJIOUBAHE:
AOKPBNBKNIOHBAHE BEDINOT DBATAIPOCENA BCE OUE MATEPAJ, CBEYBA KOHTPOINHATA JAMNA
PpEmaxheMe MaepnnaI NoTbpeTe CbToHmTo C KpaTKo HATNCKaHe Ha 6yToHa 3a npDvBxBaHe HanpeJ(3).
3AUNTA HA EJIEKTKPODBMΓATEJI:
Ako enektpoDnBraTaeNce npetobapn,Toe ce camOn3KnOuBa. KOthponHata lamna 9CBETBA.
CnBbPme Ha OxJaxDahe OToK.25-40MmHyTc (Cnopei moela n Temnepatypata Ha NOMEuHMeTo),MOKe oTHOB Da BKIOHHTe ypeda.
EJEKTPNUECKAIOBPEDA:
AkoMira KOHTPOHATA JAMNA 93aeJHO CbC CBTODIOHN HINIKATOP HA FyHKUHOHAHNA BYTOH (2) WNI KOHTPOHATA lamna 8 IMA eNEKTPnCeKa NOpeMa. MaMHATA He MoKe da 6bde BkHOHeHa.
BTO3nCnyaMMOYyBEmOteBaMnTBpRoBeu
KOHTOJENJIHNTPINIOBPEI:
Ako ypeda He pa60TN, npoepeTe cIeDnHTe TOHk:
BKNIOUHJMEuencenaBKOHTAKTa?
- 3ATBDOEHAJIMeBpAaHkata?
- npenbIHeHa nIe TOp6Ba 3a yIyABHe HxapTnTa? CneBaeTe NcHcTpKuMInTe B "13PNA3BAHE HA TOPEATA 3A XAPTNIA
npenbIeHn H e KOHTeHEpHa 3a CD/DVDt-Ta? CJeIaBte NcHcTpyKUImTe B "N3TPA3BAHE HA KOHTeHEPA 3A CD/DVDt-Ta"
3aDbTeHnE ypeDaOpa3p06BHeMaMepHn? CLeBaIe NIncTpyKuHnTe B"3AIPbCTBAHE HA YEPA C PA3JPOEH MATEPANJ
-6nIe npetobapeen ekeTPODbratena?
Bnxte B"3AUINTA HA ENEKTPODBNIFATEJRA
Ako HnTo eHa OT ToKHe He nomar da OToCTpaHnTe nobpeData, o6bPheTe ce KbMaBm TaProBeu.
PABOTA C MAUHATA / N3XBbPJIrHE HA BPAKyBAH YPEI
NOYHCTBAHE HA FOTOKJETKNTE (Mn.5):
Ako BbB XBDHNAOTBOPOCTAHATYACHTHINXAPRTN(HnP,CNE3aapbCTBAeCXPHT)eB3M0XHO,yepdaHeceN3KIOHb3aapaNCKPMNTIE"ΦOTOKJNTKN.
MOKETe da OTCpaHHTe XAPTHENHE TnpaHua, cBtOBtHO da MOKHTeTc foTOKNTkATA, KATO NOAETe B PEXEUY MEXAHbM HOB IINTC XAPTm HA DA BIKIOYATA MAHMAHA HDAIBKHeHMe HA 3aEDXoH N C YETKa Da NCHITc KPATKO JDBete "OH" HA FOTOKNTkTA.
Φur.5
Φur.6
06CNYBAHE PEXEILM MEXAHIM3bM (CROSS-CUT):

Cross-Cut-pexeunite MexaHIMMTP6Ba da 6bdat Cm3BaHIN p9e onpelehenepmoHaekcnoatauia
Ako cBETHE KOHTPONHATA JAMNA 7, npouednpaIte no CNEHIM HAHIM:
OTbOpete BpaTmKata. KoHTpONHata lamma 8CBETn H CBeTOIOHOINMHNkATOp HbSYTOHa 3a PnpBdXKBaHe H3a3d4, KaTO IN KOHTpONHATA lamna 7MHR. CAnETe pe3epoBaPa 3a MaCNO (17) (Hr.6) OT dpxKaHa h BaTPOKATA n OTHOBO 3aTbOpTe BPAITMKATA.
BpxyIcT XapTHa pa3npedene MAnKO MaCNO NnOaIte CbUHnPpe3Jko63a 3oNpaBaHe HApTHHTA (12)KbM pExeunMeXAHn3bM. XapTHa ce Noema Hn To3n HauHH MacIoTO nona D pexeunMeXaHn3bM.
Yka3aHHe: 3a Da N3raChe HnHnKaTOpa e Heo6xOdHMo CneI npocea Ha cMa3BaHe a PekeEua MExAHm3bM, T03n IpOec da 6Be notBpDhen KAKTOcBda
OTBOPETBPAHTHKATA TOJKOBU MPOKO,DOKAOT CBEHTHE KOHTPOHATA lamna(8).KOHPTONKTE lamn(7)m(4)MnT.
TEXHnueCKN DAHHN
HATINCHETe6yTOHa3aBpUaHe(4)ro 3aDpXTe,doKATO yraChe KOHTPOJHATA JAMNA (7).
- 3aTbOpTe OTHOBOPaTHKkATA.
PekuHHTM EMAH33M 3ANOHB A BTOMATHNO UKbHa Na HIOHCTBAHE (DKBKEHNE HAPeD, HA3aD) N CTE TOB HA KNOHBA. MaHKnATA OTHOB e rotoba 3a pabota. B Cnayh Na nocneBaua npor-ka Na cneuHaHO MaCBO BIXK B "DOJFBIHNTEJIIN PIPNHAJLEKHOCINT".
ABTOMATMKA 3A NIECTEHE HA EHEPTNRA
Ako MaHnHaTe He c H3N03Ba 3hBcTHO speme Ta ABOMaTHOe KcH3KNOBa CneI OKOAn 5 MHN.CBToDIOHnIHnHKnATOp H aPhyHKUHnAHJbByoT (2) 3a "FOBOTbCtA 3a pabota" h3rAcBa. 3a BJKIOBHe OTOHBO HATNHCTe 3a KPATKO FyHKUHnOHnHbTyOnH.
H3XBbPJIHE HAMALUNHATA:

Mx3Bbprnete MaunHata cneI M3THaHe Ha XJbota H Ka eKcnoaatra Chna3BaayknpaBnHata 3a Ona3BaHe Ha OKoHATA cpeA. He Nx3BbprnTe TaCtN ToMaunHata HmN OAnOKBbATA caeDnO C6 botOBTuE Ortnadblu.
DONJIHINTEJIHNIPUHAIDJEKHOCTN
0603HaeHHne
No 3a npobyka
Пл actmaobnyuBaHn,440x330x600x,005MM(45)
83079
Пл actmacobnyubaN4,440x330x950x,005 MM (60)
99977
山申申电电3a macno 110m
88035
Ppenopbka:3aDnBnHnTeJHaNopbKaHaPiHaIeKHOCTM NIMpe3epBnHnactnCeOBpbuaTHeKbMDOCTaBmKa Ha OBopyBaHeto.
| Moden | Данни захраанвае от мржени замаровадианджени/ vectота - постория на拈. севрия - мошиноct | ||
| intimus 45/60SC2 | 220-230V/50Hz · 3,0 A · 0,7 kW | 115-125V/60Hz · 5,6 A · 0,7 kW | 100V/50/60Hz · 7,0 A · 0,7 kW |
| intimus 45/60CC3+CC4+CC5 | 220-230V/50Hz · 3,0 A · 0,55 kW | 115-125V/60Hz · 5,6 A · 0,55 kW | 100V/50/60Hz · 7,0 A · 0,55 kW |
| intimus 45/60CC6 | 220-230V/50Hz · 3,0 A · 0,7 kW | 115-125V/60Hz · 5,6 A · 0,7 kW | 100V/50/60Hz · 7,0 A · 0,7 kW |
П配电и�геловьхда (баев): 220-230V = 10A/115-125V = 15A/100V = 15A
| Mоden | Тин | ШирINA на рязане хагин/CD,DVD | Проблеменocуprпязанe хагин/CD,DVD | РавOTHA ШирINA | НИБО наш汞ma | Размери Ш xД xВ | Тeroо |
| intimus 45SC2 | 278-4S | 3,8 MM / 8 MM | 22-24 liucta*/1 bpoi | 235 MM | ok. 55 dB(A) | 450 x 390 x 650 MM | 31 кг |
| intimus 45CC3 | 278-4C | 3,8x30 MM / 8 MM | 13-15 liucta*/1 bpoi | 235 MM | ok. 55 dB(A) | 450 x 390 x 650 MM | 32 кг |
| intimus 45CC4 | 278-2C | 1,9x15 MM / 8 MM | 10-11 liucta*/1 bpoi | 235 MM | ok. 55 dB(A) | 450 x 390 x 650 MM | 32 кг |
| intimus 45CC5 | 278-1C | 0,8x12 MM / 8 MM | 5-6 liucta*/1 bpoi | 235 MM | ok. 55 dB(A) | 450 x 390 x 650 MM | 32 кг |
| intimus 45CC6 | 278-1CF | 0,8x4,5 MM / 8 MM | 5-6 liucta*/1 bpoi | 235 MM | ok. 55 dB(A) | 450 x 390 x 650 MM | 32 кг |
| intimus 60SC2 | 279-4S | 3,8 MM / 8 MM | 22-24 liucta*/1 bpoi | 235 MM | ok. 55 dB(A) | 450 x 390 x 770 MM | 33 кг |
| intimus 60CC3 | 279-4C | 3,8x30 MM / 8 MM | 13-15 liucta*/1 bpoi | 235 MM | ok. 55 dB(A) | 450 x 390 x 770 MM | 34 кг |
| intimus 60CC4 | 279-2C | 1,9x15 MM / 8 MM | 10-11 liucta*/1 bpoi | 235 MM | ok. 55 dB(A) | 450 x 390 x 770 MM | 34 кг |
| intimus 60CC5 | 279-1C | 0,8x12 MM / 8 MM | 5-6 liucta*/1 bpoi | 235 MM | ok. 55 dB(A) | 450 x 390 x 770 MM | 34 кг |
| intimus 60CC6 | 279-1CF | 0,8x4,5 MM / 8 MM | 5-6 liucta*/1 bpoi | 235 MM | ok. 55 dB(A) | 450 x 390 x 770 MM | 34 кг |
BAXHBIE YKA3AHNIO TEXHNIKE BE3ONACHOCTN

<AnnapatdoJnKHeHcNoIb3oBaTbCraOHOB pemeHNOToBkoOHNHM YeOBekOM! KaaHHBe ENEMtBu PneOpctOPOKHOCTn 06CHOBAHBBe3oNaCHOpaOte c anapATOMToBkoOHOHOENoBA.


<Onachoctb TpaBMPOBaHn! He noDHOCTe 6n3KO K BXOHDOMy na3yranctyK, CBCAIOUme ykpaawHn, dnnHHBte BONcbln DpyrHe h3akpenPnHbne HpeMTebl OHMOYtB BTANHTb BYHTpB

<Bo Bpem npouecca HmEnbueHn Ha npnbope He pa3pewaetc npoBODHT Hkakne dpyrne pabotb (Hanpumep, hctntb erO)!

<Onachoctb TpaBMnpoBaHna!He BCTAB nIe TaBbBo BXoHOH na.

< Maunha He Hrpyka, OHa He npedha3hauheHa He paccntaHa Ha deten!

<< B cnuyae onaocnTb bblkIOHTe MaunHky npn nmoOnuHaBHOrOmIaBapmHOrO bblKIOHTeNei, HmBbTaUHTe BnIKy h3 poETKn!

< NepeodOTKpbBaHnEMMaunHKn Heo6xOdHMo BbTaaHTcTeBvOy BnKy Hs poTeTk! PemOnT npbopaDolJxen npob OaNTbCToTbKO KBaHnΦuPobAHbHM cneuaHCTOM!
BBOD B DÉNCTBNE
OBJACTbIPIPMHEHINr
H3MeBbHTeJI HocTeJIeI INHOpMaUN intimus
45/60SC2/CC3/CC4/CC5/CC6 npectabnietco6oMaunHy dnnmEnbChnKAK OobHbX HOCHTeNeNcBmEHHO IHOpMaun, TAK N TAKHX HAKONTEeJANHbX, KaCD, DVD, KpeNTbHe KAPTockn INDCKeTb3.5".

Pn60p paaepaetcH cnoNb3OBaT bToBko 1nnmEnbeyHgymn KpeuHTbix Kaptoye, a taKxE CD, DVD u ncker 3,5"!
N3MeJIeHHeIpyrHX HOCHTeJIe INHOpMaUN MoKET NOBpeNTb npINbOP (HaNP. pa3pyuNTb peXyUIM MEXAHIN3M, nT.I.).
YCTAHOBKA:
-PacnakOBaBtu yCTaHOBtbpnp6p.
-Повспь паctиковы Мewok Ha paMy Дя HERO.
BCTABNTb cTeByo BNky npNbopa (1) (pnc. 2) B pO3eTKy 3JIeKTOPCOTI DAHNHE NO HE0xOIMMOY BXOHOMy npEOxPOHnTEIO cTeBOY po3eKN pINBeHeBb B "TEXHHNECKHX DAHNbX".

MecTo NOKNUOENH Pn6Opa K cTeN DOxHO 6bIb NcKO DcTynH No paCOnlaRaTcbc 6bN3n er0!
Maunny paspewaetc HcnoIb3oBaTb TOnBko BHytn NomeueHn C Temnepatypoi Bo3yxa 10-25C!
3KcPJIyATAU
3JEMEHTbI UYPABJIEHNIA:
1 = CTeBovKa6eNb(pnc.2)
Pocne BkIOUeHn CTeBOrO WTeKepeB pOeTky 3NEKTOPOCTMaMHa eue He BkIOUeHa.
“TOTOBKpa6ote”/“OTkn”/“Cron"
3Ta KhoNka NMeeT Tpu FyHKmH
a) "TOTOB K pa6oTe"
PnKoPOTKOM HaxaTM HA 3Ty KHOIky npB6Op HcHaeTc B pexkM "TOTOB K pa6ote".
OIOHOBpeMeHHo CBETNTCBACTPOeHHH CNDHnDnKATOP
b) "OTKJ"
Ecn 3ty KONKy B pexmme "TOTOB KAObTe" depKaTaB haxaToI npImeHPO 3 cekyHdu, To npi6Op OTKIOHaetc.
3aMeaHHe:ecnnpBOp He nCIOJIb3yeTcR
B TeueHHe npMepHo 5 MNHyT,TO OH OTKIOUaETcABOTOMaTHueCKn.
c)“Cron”
Pn KOPOTKOM HAKATMn HA 3Ty KHONKY BO BVPEMR BPAUENH PEXUYeRO MEXAHN3Ma OH OKNIQUAETCn N OCTaHABNBAETCn.
3 = Khonka "Bnepeş" (pnc.1)
3TaKHONikaMMeET DBeΦyHKUIM
a) PnKopOTkOM HaxaTm Ha 3Ty KhoNky pExyuiM MEXAHm3B BpaauTeCn HECKoJIbKO CekyHn Bnepei, HAp., YTO6bI bYBecTe N3 MEXAHN3Ma OCTabuineCn OObpe3Kn. OIOHOPEMeHHO CBETNTCR BCTPOeHHbCnID INHdkATOp
b) EcIn depKataB 3ty KhoNkY haxaTOnI npImepHo 2 cekyHdb, To pexyuM MeaxHaN3M NOCTOReHH BpaAaETcBpeEi, M MaunHy MoXHO 3aRpyKaTb. OJHOBpeMeHNo CBeTnTCBCTpoEHb CNi-HmNkaTOp
4 = KhoIIKa "Ha3aI" (pnc.1)
Pn HAKATIN HA 3Ty KHOKNy peJxuyn MEXAHN3K OPOTK BpaaAetc HaaJ. OIOHOpeMeHOB CBETTCBCTPOEHHBI CNI-HNHNKATOP
5 = CBETOBOù3aTBOp
(Врашени Впес徴) (pnc.3)
3anyckaertnpoccc N3MeIbYeHnKAK TOnbKO B Ody HN 06EHx BXOHyBx WaxT 6ydet BBeH MATEpna. ONoHBpeMeHHo CBETNCa BCTPOeHHn CND-HNkKatop KHOKN "BNEpeH"
6 = KOHTpOJIbHbIyka3aTeJIb (PNC.1)
3atop MaTePnAa B np6ope
"napaJIneJIbHbI BBOd MaTePnAna/
CBeTOB0 3aTbO 3akpbl npn OTKpbIToI DBepn nnpn BkNoeHm
Дeйтбгпрьвкючehиуka3aTeЯуka3aHb COOTBETCTBEHHOBpy6pIKe"HEMCNPABHOCTN".
a) "3atop MaTeepnana B npnbope"
CBETTcR npn N36bItoHOM BBOe MATEpMaNAB Pekyuyn y3en. Pekyuyn y3en 6bnokpyteC, 3aTeM KOpOTK BpauaetcR Ha3ad N octaHaBnBaTaCtR. 3JIeKtPOMToP OTKHOaTcR.
b) "PapannelbHbI BBOMaTePnAna"
CBeHTcR,ecnMATEpHAn BBOITcR OIOHBpeMeHHoB obe waxTb. PexyUu y3en OCTaHaBnBaTeCt, 3aTEM KOPTOK BpaAaTeCt Haa3d nCTouT. 3eKPTPOMOTOp OTKnIOaTeCt.
c) “CBetOB03aTBOP3aKpbT
PnO TOKpbIToN DBepe
CBETNTC,ecnnpoTOKpbBaHmNDbepnB ODHNO3OeBNXBXOndbIXxwxtEue HaxODNTC MaTepean.Pexyun y3en octaHaBnaBaTc. 3NeKtPOMOTOP OKIOUoyaeTC.
d) “CBetOB03aTBOP3aKpbIT
PnBkIIOueHm
CBeITTCs,ecnnpBKNIOHENnpbOpaB OHOI 03OBEX BXOHNbIX WAXT HAXODNTc MaTePmI.

Pnc.1
Pnc.2
Pnc.3
3KcPiJyATAU
“Cma3aTb pexyuzm MexAHm3M"
3aropaetcraKoJdaIOnKeH6bTb CMA3aHpeKyuMm MEXAH3M MCNOHNHEAR Cross-Cut.Pocne CMA3bBAHnHn HEO60xOIMK BKTINPOBaTb BbIOINHEHn HAKATMEM KHOKNOBpHOroXoA4(Cm.ONCAHnBE PpaDene "TEXH/HECKOE O5CNYKBAHVE PEKXYUERO MEXAHN3Ma").
8 = KOnTpOJIbHbIyKa3aTeNb (pnc.1)
"DbepbOTkpTa" /"HeHcnpaBnOCTb Dbepn"
a)"BepbOrkpbita
3aropaetcra,cnnt OKpbita DBepua HxHxero uka.
Maunha aTOMATHECKMOTKIOHaTeCn He MoXeT
6bItb BKNIOHe,NOKa He dyEt 3akpbitaDbep.
b) "3neKtpnueckKaH HeCnpaBHOCTb"
Muraert npn HncnpabHoctn 9eKTPmK DaTmKOB DBepu. Pnp6op OTKnHOaETc. B TAKOM Cnyae 6oPATTEc, noxanyIcTa, BAaCneuaN3npoBaHHb MaraAHH.
9 =KoHTpOJIbHbIyYkAsaTeJIb(pnc.1)
"Perperpyka Motopa
3NeKtpueckKa HnCnpaBHOCTb
AeCTBnnpCBeHm3TOFOMHkAtop01MCAhblBa3dene"HEMCNPABHOCTN".
a) "3aunnta mToporta"
3aropaetc,ecim 3neKTPOMOTOP nepepykeH mOKIOHNC.0 OxnaXeHMAOTOP MaHnHa He MOxET bIbBkIOHHe.
b) "3NeKtpMueckKa HeHcnpaBHOctb"
Mraer npn HnncpabHNOCT nKeTPOHNKHa nnte ynpaBHeN. ONoHBpeMeHHO MrrAET CND-nHmKATOp 0fHKnHOJIbHOrno nepeKnIOHateTn (2).Pn6op OKIOHOaTc. ObpatNTecb, NoXaJIyCTa, B Bau CHneuHApOBAHMHarMa3HH
10 = KoHTpOlbHbYka3aTeIb
Dpyrme HocTeHnHOpmaunn (CD, DVD Hm KpeuHTbHe kapTOHN) NO OTeBbHOCTN B CnueaIbHyo WaxTy DnA CD/DVD (13)(pnc.3)KpyrmypexyuemyMekAHmMy.
MaHaHnA BOMATMNECKH BKJIOAeT DIBXGEHE BNEPED, N 3BTRNAET MATEHnA, a NO OKOHaHHN N3MJIb4EHnA BOMATMNECKN OTKINQAeTc.

Bo Bpemra BBOda 6ymaru OJHOBpeMeHH BOaHTb CD/DVD Heh3a, KaH N HAO6OpOT, 6myar npn mMmEnbueHH CD/DVD!
3ameyane: nH 3meHneHnnp03paHbX npHeOK npBop HxHNO BpuyHyD BkIOUYt Ha DnIXeHnE BnpeD (npMnepHO 2 CeKHyDn DEpxTb HaxatO KHONKY DnIXeHnA BnpeD(3)).
KOpOTKHM HaxaTMem FyHKUHOHbHOro nepeKHOHATEeN (2) (fYHKUIM "CTOnI" U3MJIeHHeM MOXHO B JIO60mOMeHT OCTAHOBIT.ДЯnpOdoJNXeHn pAOBtCHOBA DEpxaTb HAXATON KHNKY DBIXEHN BNEpeD (3) OKANO 2ckyHd.
B3 BBOda MATEPMAI MAIINHA ATOMATUeCKN OTKIOHaeTcR Yepe3 pIMePHo 5 MNHT.

HnKOrda He BbOuTe B np6Op MaTePnHa 6oIbSe, Yem3TO yKa3aHO B "TEXHmEeCKNX DAHHbIX"
EcmB pexymmexaanm3 Boe je nonadet CmXKOM MHO TATEPNA, CM. DECTBn B Pa3dena "HECNIPABHOCTN" 3ACTB 3ATOP MATEPNJA B PNP5OPE."
I npaBnHbOH yTNH3aun OTXoOB B nPb6ope HmeeTcB DbaOTdNbHbxC6OpHMka 06pe3KOB.
ONIOPOXHEHME MELIKA
J13C60PA6yMaHn(pnc.4):
Korda MeoK dIa c6opa ByMaH 3aONHe, np6op otKIOUaTcR. 3aropaetc KOHTpolbHm HndkaTOp (11). DeiCTByTE CNEyD0M O6p3OM:
OTKpbTbDpeuy.3aRpaetcKoHTpOblhNmHnDKatop 8. EcnB OOnH N3 npHeMHbIX XaXt eue OCTaCRA MATEPnA,TO DOnONHITeJIbHO 3aRpaETcKOHTpOblhMnHnDKatop
BbTnHbN HmHxHero xkaFapnpbopa pamy(16)c 3aXpeIeHHbIM Ha Hei MeXKOM DBy6yMaH(14)MBCTaBHeHHbIM CBepxBaHHoKoDMO6pE3KOB CD/DVD(15).
-CHHTB BAHHOUy CD/DVD mMeWOK DnBybymn nOPOOXHmX. KOHTPOnbHM yK3a3eYb1(11)rachet.

Pnc.3
IpyoTMeMwOxNIOBcNTbHaPamy(16),yCTaHOBtBaHNOHYKpyo6pe3KO8CD/DVDnCHOBa3aBmHyTBpamyCMeXKOMBAHHOyKOWDyCD/DVDBkaOpopa.
-3akpybIbDbepey.KoHTpObnHbMnHmKApToP18rachET.
-ECN CBETHTOKHTPOBbIbIbINHIMKATOP 6)TO HAKMITE KOPOTKOKHONYDJIbIXeHBeNBAIEpeD(3).OCTaBIMcB INPbEMHOJ KOATEMPTAHNMEHbYeTAeTNOHIMKATOP RACET.
3ameyane: npn60 npabotaet tobko npn 3akpbtoDbepe!
ONOPOXHEHMEEMKCTNJL4CD/DVD(pnc.4):
3aMeyHHe: KOHTPbI 3aONJIHeHnEMKOCtN BKNIOeHMe yKa3aTeJIEMKOCtB Dn CD 3aONJIHeHa"OcyUcECTBnRETCn NOCHETOM LMKNOB PE3KH.
PnDocTHXeHN3aPOrpaMmPbOBAHHoTOHcIa(npHMePHO20 7yK)BBOIDMbIXCD/DVD npH6OpOTKnIOHaETcN3aRopaETcKoHTPOBbHMyHIMKaTOp (10).
DéchéTByIe CSeJeIyIouIIM Obpa30M:
OtkpbIbIeepuy.3aropaetcKoHTpOBHmIHnIKaTOp 8,aCNyAaTeB KHOJIKN DnIXeHN BpeD(3)n KOHTpOBHmIHnIKaTOp (10)MnraOT.
- BbIITyIbI3HIXKHeOHaKa4pnp60paMpy(16)cNoDBeWeHHbIM HA HEB MEUKOm (14) INCTABINHEHM CSEpy BaHNOKoJnOB6pe3KOB CDVD(15),CHrTBBaHNooKyJnCD/CDVOnOpOKNHtB ee.
KopTOKaTaB KHOKNy DmXeHn Bnepe3(3),TTO6bKNTMPOBaTb onoPOKHeHn EMKOCTn Ia CD/DVD.PnoecC NOCheta CHOBA HnHaAETCR C Hyr. KOHTpONbHb HnHnKATOp (10) nCNDyka3aTeJIb KHOKNk DmXeHn Bnepe3(3) raCHyt.
YCTAHOBHTyNCTYIO BAAHOHOKyI OOBe3KOB CD/DVD Ha pamy (16) NCHOBA 3aDBHHTypaMycMeUKOM N BAAHOHOKmI PAID CD/ DVD B WkAq npnOpa.
3aKpbIbDbepey.KoHTpOJIbHbMnHmKApToP 18)rachet.
3aMeuHHe:MaunHa pa6oTaet TOnbKp np 3akpToI DBeP!
DINHAMUHECKN YKA3ATEJIb HAPY3K:
Yro6bI npoDopBpAHTb 3aTOp MATEPnana n ObeCneHtB HnpepbHoeN 3ΦΦeKTHnHOe YHINTOKeHHe HOCNTENEH HOPMAU, B0 BPEMnPOeCCA K3MeJIeHHN CTeENb TEkyueH HaryPcKMO TOpApKa3BaEaTCa PaccERHHbM LCBTHMb CBETOM B uXkTe BEOda:
3enehcbet: Harpy3ka < 50%
KentbCBT: Harpyka 50-75%
KpaChbI CBET: Harpy3ka 75-100%
Pnc.4
HENCPAPBHOCTN
3ATOP MATEPHAJA B IPINBOPE:
EcnBpe3yIbTaee BbOaN36bItkMaTeepnAna 06pa3yETc3atOp, pnp6op pearpyet cJeDyoIm 06pa30M:
PexyMEXAH3M60KpyTc3aTeM KOPOTK BpaAeTc H3ad (TObOc0B6OuMb MaepnH) N octAhabnBaTc. Motop OTKnIOHaTc. 3aropaTc KOthpblhYk3aTeIb
IeJIcTByIte CneJeYIOUIM Obpa3OM
3aTOp MaTePnAna B WaxTe DnBBoa 6yMaHn (12) -BbHbTe BBBeDHHyU H3aD 6yMaRy.
PexyunmexaHn3mTenepebABTOMATuecknBpaaaetcBnepeHn3meIbyaet octatKn6ymarN.BoBpMaDBHXeHnBnepeCBETTCsCN-1HnDKaTOp HONKn DBXeHnBnepe(3).KoHTPolbHnHnDKaTOp 4rachet.
- PpOIOJXHITb N3MeJIbYeHHe C MeHbIIMM KOJIHyEChBOM 6yMaI.
3aTOp MaTePnA B WaxTe DnBBoDa CD/DVD (13)
- BbHytB bIbeJeHHb H3aJMaTepeHaJ.

BbHMaTe MATEpHaN octOpoxHo, TaM MOrTy 6bItb OAnChIe OCTpbie KpaI!
- Octabunna MATEPMAI 6yET ABOTMaTHeCKN BTHT K pexyuMmEXaHn3MmU H3MeJIbHe. Bo BPema BpaUeHnBnepeCCBtTcR CND-HnDnKATop HONKn DBIXeHnBnepe(3).KoHTPolbHHn HnDnKATop rachet.
- Pocne npoxxdeHnOcTAtKOB MaTePmAla npoDIOI 3MEnbChHeNE CnpabINbHOJIO3pOBKO.
-Пи Heo6xOdMnOCTn NepeKIOHauTe peKyUuMEXaHm3M DЯДБNIXEHN NOPEPeMHNO BnepeI NHasaD, NOKA OCTaTOK MATEpHaNA He 6yET NoJHOCTbO H3MeJIbH.
IAPALJIeIbHbI BBOMDATEPHNAI:
EcnB o6e waxtbbyedt OndHOBpeMeHHo BBeHe MATEpHaJ,TO MaunHa peaIpyET cIeyduOum 6pa30m:
Pexyim MexaHm 6IbKpyETc4,3aTeM KOpOTkoBpaaaetc H3ad (ocbo60xdHeMaTeepana) nOCTAHABIMBaETc. MoTOp OCTAHABIMBaETc. KOHTpOlbHy yka3aTeIb 3aropaeTc.
- BbHBe MaTePnAn I3 OJHOI I3 Jxxt.
HaxMMTE KOPOTK KOHNKY DnIXeHm BnepeD (3).MaTePnA1B DpyrOJ Wxte 6ydtB TByHT B pexyIIM MExAHM3M IN3MeJIbHe. KOHTPOBLHbY kya3aTeJIb RachET.
CBETOBO3ATBOP3AKPbITTPNOTKPbITOnDBEPN
Ecn npn OTKpbAHIN DEBn BODH N3 DByx XaXt 3arpy3kn
eHaeHXoDNTC MATEpnaI,TO MOTOP OTKIOHAcTcN pekyuM
mExAHN3M OCTaHaBIMBaETc. KOHTPOJIbHbYkAaTeIb 3aropaetc.
3aKpoIte DBeBn KBNITpyTe 3TO COCTOHRME KOPOTKM HAKATHE KHNKIN DBKENHIN BNEpei (3).OctabuHINCA MaTePnAIN ONaAETCB PexyMmexAHNm HImeMbAeTcR.
CBETOBOI 3ATBOP 3AKPbit PNI BKJIOYEHIN:
EcnnpBKNIOHMMaIMHHBBOHOH N3DByX WxT3arpy3Kn
eue HAXOINTCA MATEHN,TO 3aROpaeTc KOHTPOJIbHbI
yka3aTeJIb
BbHbTe MaTePnJI N KBNTpyIe 3TO COCTOHNHE KOPOKIM HAKATMEM KHONKN DBXKEHM BpepeD (3).
Ecln 3to He no Cneunnnnnp
3AALLNTAMOTOPA:
Pnpepy3e MoTopa OH OTKIOUaETc. 3aRpaetc KHTpObHbYyKaAsTeB9).
Iocne nepepbiaa Dn 0xlaXeHnH,25-40 MmHT (B3aBNCVMoCTN OT MOeJI N TEMpepaTybp B NOMEueHIN) MOXHO CHOBA BKIOCHITb np6op.
3JEKTPWNECKARHEMCNPAHBOCTb:
Ecn KOHTPOBHy ykAsTeB 9) MMaet Bmecte C CnHINDAKATOPOM FyHKUHOHbHoro NEPEKIOVATEJ (2), IMTOJbKO KOHTPOBHy ykAsTeB 1(8), TO HMeTc HEnCpABHOCTBeNkTOPHNK. Pm6Op B TOM CNYae pabotab He ByET.06paNTeCb, NoXajYcyta, B BaH cneuaHn3npOBaHH MaarAHN.
IPOBEPKINPIHAPUYEHEHX:
Ecn npb0p he pa6oTaet, npoBepte cneDyiooe:
BKNIOH NIN B pOeTKy cTeBOU uTeKep?
3akpbtaIIMDbepua?
He npenonHn MeoK nC6pa 6ymar? DeIcByIte no HNCTpyuM, pa3JeI *ONIOPOXHEHMEUKA DnC6P0A BMyMaN."
He npenonHn Hc6pHKn dA CD/DVD? DeiCTBMyTe no nHcTpyKm,pa3dE "ONPOXHEHEMKOCtI Dn CD/DVD".
He6pa3oBAnCnH3aTOpMATEpHnA B np6Ope? DeIc7yIe no HnCTpyKuIi, pa3dEe "3ATOP MATEPNAJA B PNP6OPE"
He neperepyxhen nn MOTOp? Cm. pa3dien *3ALIITAMOTOPA"
EcHn 3TO He NOMOXET, TO o6paTInTeCb, NOXanyiCTa, B BaW CneuaJIIN3IPOBaHbH MAra3HH.
TEXHNUECKOE OBCJUYKXBAHNE I YTNJIN3AUJIa
OYNCTKA FOTO3JIEMEHTA (pnc.5):
Ecnu Tactnblb Bymatn 3aeePHTy BO NcckOnn npore3n (Hapn, nocne 3atopa bmyan), To ne KcNkUeHO, 70r npnbop dnoTo he 6bydet otknokutcb8 n3-3a3kp2ToroC cBeTobOR 3atBpa.
Bb MoKTe ydaNtB o6pe3kH Nn OcHTNb fOto3neMeT,ecN BBeDEeB ePzuyuMexxAHm3 Eue OdnI JnCT Gymar, nN BKnHOITE 0b4aTHbXoMaHH KhoNKoBpaEHH RaAeHH H3aH NkpATKO npOTpTe KKTOKO6oa "rna3a" foTO3neHMeTBA.
Pnc.5
Pnc.6
TEXHUNCHECKOE OBCNYKBAHNE PEXKYUETO MEXAHM3MA (TINACROSS-CUT):

Pexyue MEXAH3MTH TnA CROSS-Cut Heo6xDnMO nOcne OpepeHEnHOrBpEmEH pa60bI cMa3bYBaTb.
Ecn 3aoropTcKoHTpOblbIykaaateIb7,TO DeHCTByTe CLEdyuOum o6pa30:
OTkpOteBepu.3aropaTeKoHTpObHbIyka3aTeB 3, MrrAOT CND- HIMKATOP KHOKN6opatHOrO DBHXeHHRA (4) KOHTpObHbIy yka3aTeB 7).BbHtE NKPENJIHeHa Bepue BaOHc MacnOM (17)(PNC.6) IN CHOBA 3akpoTBe DEpB.
Pacnpednte Ha Nmte 6ymarn HEMHoro Macna n BBeDnTe ero B axaTy dna 6ymarm (12).
JIACTOK BTARBaTeCnI MACNO nonaTeB PexyUIM MEXAHN3M.
3aMeaChHHe: YTO6b KOnTHPOJbHbY UKAsTeBJe NOrac, NOcNe CMA3bIBAHn HUYHX KBTNIPoBaTb DeIECTBne CNeDyOuHM
06a3POM
-0KpbTb Daepb HactoBko: Yo6b3aorpenca KOHTpObnHbIyKa3aTeJIb (8).VHdNkAtOpB 7)N(4)MnTaoT.
HaxaTHKONKyOBpaTHoROdMxHeHHN(4)HEpXaTHhAXaTOH,NOKA He norachET KOHTPObHbYkAsaTeB7.
-3akpbTbDBebp.
Pexyunm MEXAHM3A bOMATNIHECKN pNOBODT UKNI OCHCTKN (DbIXeHne BNEpeD-HaAsd) NtOKnKaeTCR. MaIINHa cHOBA rotOba K paOBe. B Cnyae 3aak3a HNkoTHcOeMaJIbHO rMOcA npOHTTE paADEN "OCOBIE PIPNAIDJXHOCTH".
ABTOMATNKAДЛЯ3KOHOMMн3JIeKTPO3HEPFRHn:
EcmnpbOp He hncnObl3yTe,To npmepHOppee5 MMHyT OH ABOTMaTHMeCKN OTKNoHaTaC.ND- mHdkatop 0yHKUHOHaBHO rnepKIOuATeIe (2) "TOOB KpaOBe" racHe. DnnoBtOPHO BKLIOHHe HAKMITE KOPOKO yHKUHOHaBHy npeKIOuAteIb.
YTNIM3AUNIIPNIBOPA:
No OKOHANm Cpoka CnykbMaunHb yTHIN3HPyIe ee B COOTBETCTBNC nPpabnAMn 3aunTbO kOPKxAOuien cpebl. He bblpacbBaTe Detanm MaunHb H ne ynakoskn CdomaunHm MycOpom.
TEXHnueCKNE DAHHbIE
| Моdenь | Данные сetiэлктрочи Нарождени/чадота • расхалтоа • моцшость | ||
| intimus45/60SC2 | 220-230B/50ГU·3,0A·0,7 KBT | 115-125B/60ГU·5,6A·0,7 KBT | 100B/50/60ГU·7,0A·0,7 KBT |
| intimus 45/60CC3+CC4+CC5 | 220-230B/50ГU·3,0A·0,55 KBT | 115-125B/60ГU·5,6A·0,55 KBT | 100B/50/60ГU·7,0A·0,55 KBT |
| intimus 45/60CC6 | 220-230B/50ГU·3,0A·0,7 KBT | 115-125B/60ГU·5,6A·0,7 KBT | 100B/50/60ГU·7,0A·0,7 KBT |
npedoxpahntelb(nabk): 220-230V=10A/115-125V=15A/100V=15A
CNEUHAJIbHbI E IPNHADJEXKHOCTN
HaMeHOBAHnne N#JIA3aKa3a
Пл actKOBmMeW0K,440x330x600x0,05MM(45) 83079
Пл actokbmy Me0K,440x330x950x0,05 MM (60) 99977
MaCneHka,110Mn 88035
3aMeaHne: 1Ig 3aKa3a cneuaIbHbI npHaIeXHOCTe I 3aIacbHx Hctei 6paauTecb B Bau cneuaImPobAHbM aHaMH.
| Мо德尔 | Тин | Ширна разецаем Буmarг / CD, DVD | Проблемыпьость Буmarг / CD, DVD | Равочая Ширна | Уровеньшуma | Размеры ШхГхВ | Bec |
| intimus 45SC2 | 278-4S | 3,8 MM / 8 MM | 22-24 Линстов*/1 Штуka | 235 MM | OKOTO 55 ДБ (A) | 450 x 390 x 650 MM | 31 кг |
| intimus 45CC3 | 278-4C | 3,8x30 MM / 8 MM | 13-15 Линстов*/1 Штуka | 235 MM | OKOTO 55 ДБ (A) | 450 x 390 x 650 MM | 32 кг |
| intimus 45CC4 | 278-2C | 1,9x15 MM / 8 MM | 10-11 Линстов*/1 Штуka | 235 MM | OKOTO 55 ДБ (A) | 450 x 390 x 650 MM | 32 кг |
| intimus 45CC5 | 278-1C | 0,8x12 MM / 8 MM | 5-6 Линстов*/1 Штуka | 235 MM | OKOTO 55 ДБ (A) | 450 x 390 x 650 MM | 32 кг |
| intimus 45CC6 | 278-1CF | 0,8x4,5 MM / 8 MM | 5-6 Линстов*/1 Штуka | 235 MM | OKOTO 55 ДБ (A) | 450 x 390 x 650 MM | 32 кг |
| intimus 60SC2 | 279-4S | 3,8 MM / 8 MM | 22-24 Линстов*/1 Штуka | 235 MM | OKOTO 55 ДБ (A) | 450 x 390 x 770 MM | 33 кг |
| intimus 60CC3 | 279-4C | 3,8x30 MM / 8 MM | 13-15 Линстов*/1 Штуka | 235 MM | OKOTO 55 ДБ (A) | 450 x 390 x 770 MM | 34 кг |
| intimus 60CC4 | 279-2C | 1,9x15 MM / 8 MM | 10-11 Линстов*/1 Штуka | 235 MM | OKOTO 55 ДБ (A) | 450 x 390 x 770 MM | 34 кг |
| intimus 60CC5 | 279-1C | 0,8x12 MM / 8 MM | 5-6 Линстов*/1 Штуka | 235 MM | OKOTO 55 ДБ (A) | 450 x 390 x 770 MM | 34 кг |
| intimus 60CC6 | 279-1CF | 0,8x4,5 MM / 8 MM | 5-6 Линстов*/1 Штуka | 235 MM | OKOTO 55 ДБ (A) | 450 x 390 x 770 MM | 34 кг |
International Network
Headquarters
USA MARTIN YALE Industries +1/260563-0641
251Wedeor Avenue fax +1/260 563-4575
Wabashin N 46992 info@martinyale.com
www.mattynyle.com
Germany MARTIN YALE INTERNATIONAL GmbH +49/0)7544 60-0
Borheimer StraBe 6-12 fax +49/0)7544 60-248
57 James Street, Halfway House sales@martinyale.co.za
Marshall Town, Johannesburg
P.O. BOX 1291, Houghton 204
www.martinyale.co.za
United Kingdom
MARTIN YALE International
Unit C-2 The Fleming Centre, Fleming Way
Crawley, West Sussex, RH10 9NN
http://tinsus.co.uk
+44/0)1293441900
fax +44 / (0) 1293611155
enquiries@intimus.co.uk
France

MARTIN YALE International S.A.R.L.
fax +33 / (1)70006924
contact@martinyale.fr
+33/(1)70006900
Spain
Room 260D, C Building
Guojiang no.2 Dong Sanhuan Bei Lu
Chaoyang District, Beijing 100027, PRC
www.martinyale.com.cn
MARTIN YALE International Trading (Beijing)
+86/1084471071/72/73
fax +86/10 844 710 75
my_beijing@martinyale.com.cn