26 CC3 - Shredder Intimus - Free user manual and instructions
Find the device manual for free 26 CC3 Intimus in PDF.
User questions about 26 CC3 Intimus
0 question about this device. Answer the ones you know or ask your own.
Ask a new question about this device
Download the instructions for your Shredder in PDF format for free! Find your manual 26 CC3 - Intimus and take your electronic device back in hand. On this page are published all the documents necessary for the use of your device. 26 CC3 by Intimus.
USER MANUAL 26 CC3 Intimus
Before operating, please read the Operating Instructions!
natural_image
Blue circular icon with an open book and a person silhouette inside (no text or symbols)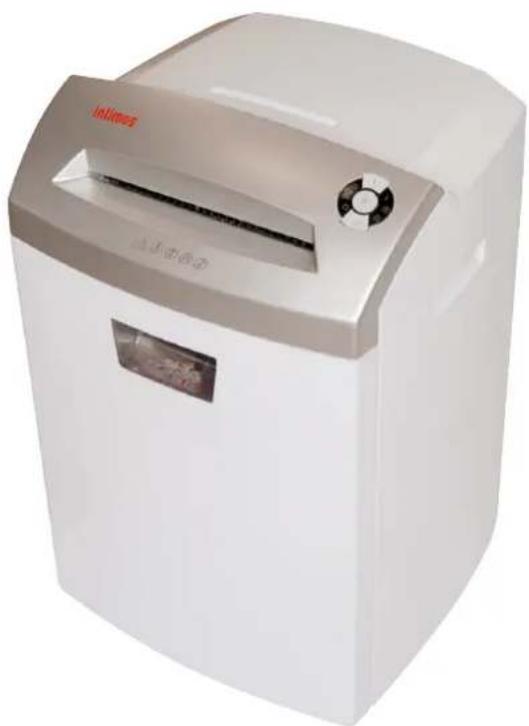
natural_image
White industrial paper<|im_start|> Puerto Rico printer with gray lid and control knob (no visible text or symbols on body)Betriebsanleitung
Operating Instructions
natural_image
Close-up of a black electrical plug inserted into a wall socket, labeled with number 1 (no text or symbols on the plug itself)Abb. 2
INBETRIEBNAHME
EINSATZBEREICH:
natural_image
3D diagram of a white disposable water dispenser with labeled parts (14 and 15), showing internal compartments and casing (no text or symbols beyond labels)Abb. 4
STÖRUNG
MATERIALSTAU IM GERÄT:
<< The machine may not be operated by more than one person at any given time!
The machine was designed for safe operation by "one person only".

<< During the shredding process no other work may be performed on the machine (for example cleaning, etc.)!

<< The machine is not a toy, and is not suitable for use by children!
The overall technical safety concept of this machine (dimensions, feed openings, emergency shutdown devices etc.) does not provide for any guarantee regarding hazard-free operation by children.


<< Danger of injury! Keep all loose articles of clothing, ties, jewelry, long hair or other loose objects away from opening!

<< Danger of injury! Never insert fingers into opening!

<< In case of danger switch the machine off with the mains switch, or with the emergency switch, or unplug the machine!

<< Always unplug the machine from the mains power supply before opening the machine!
Repairs may only be performed by trained personnel!
OPERATION
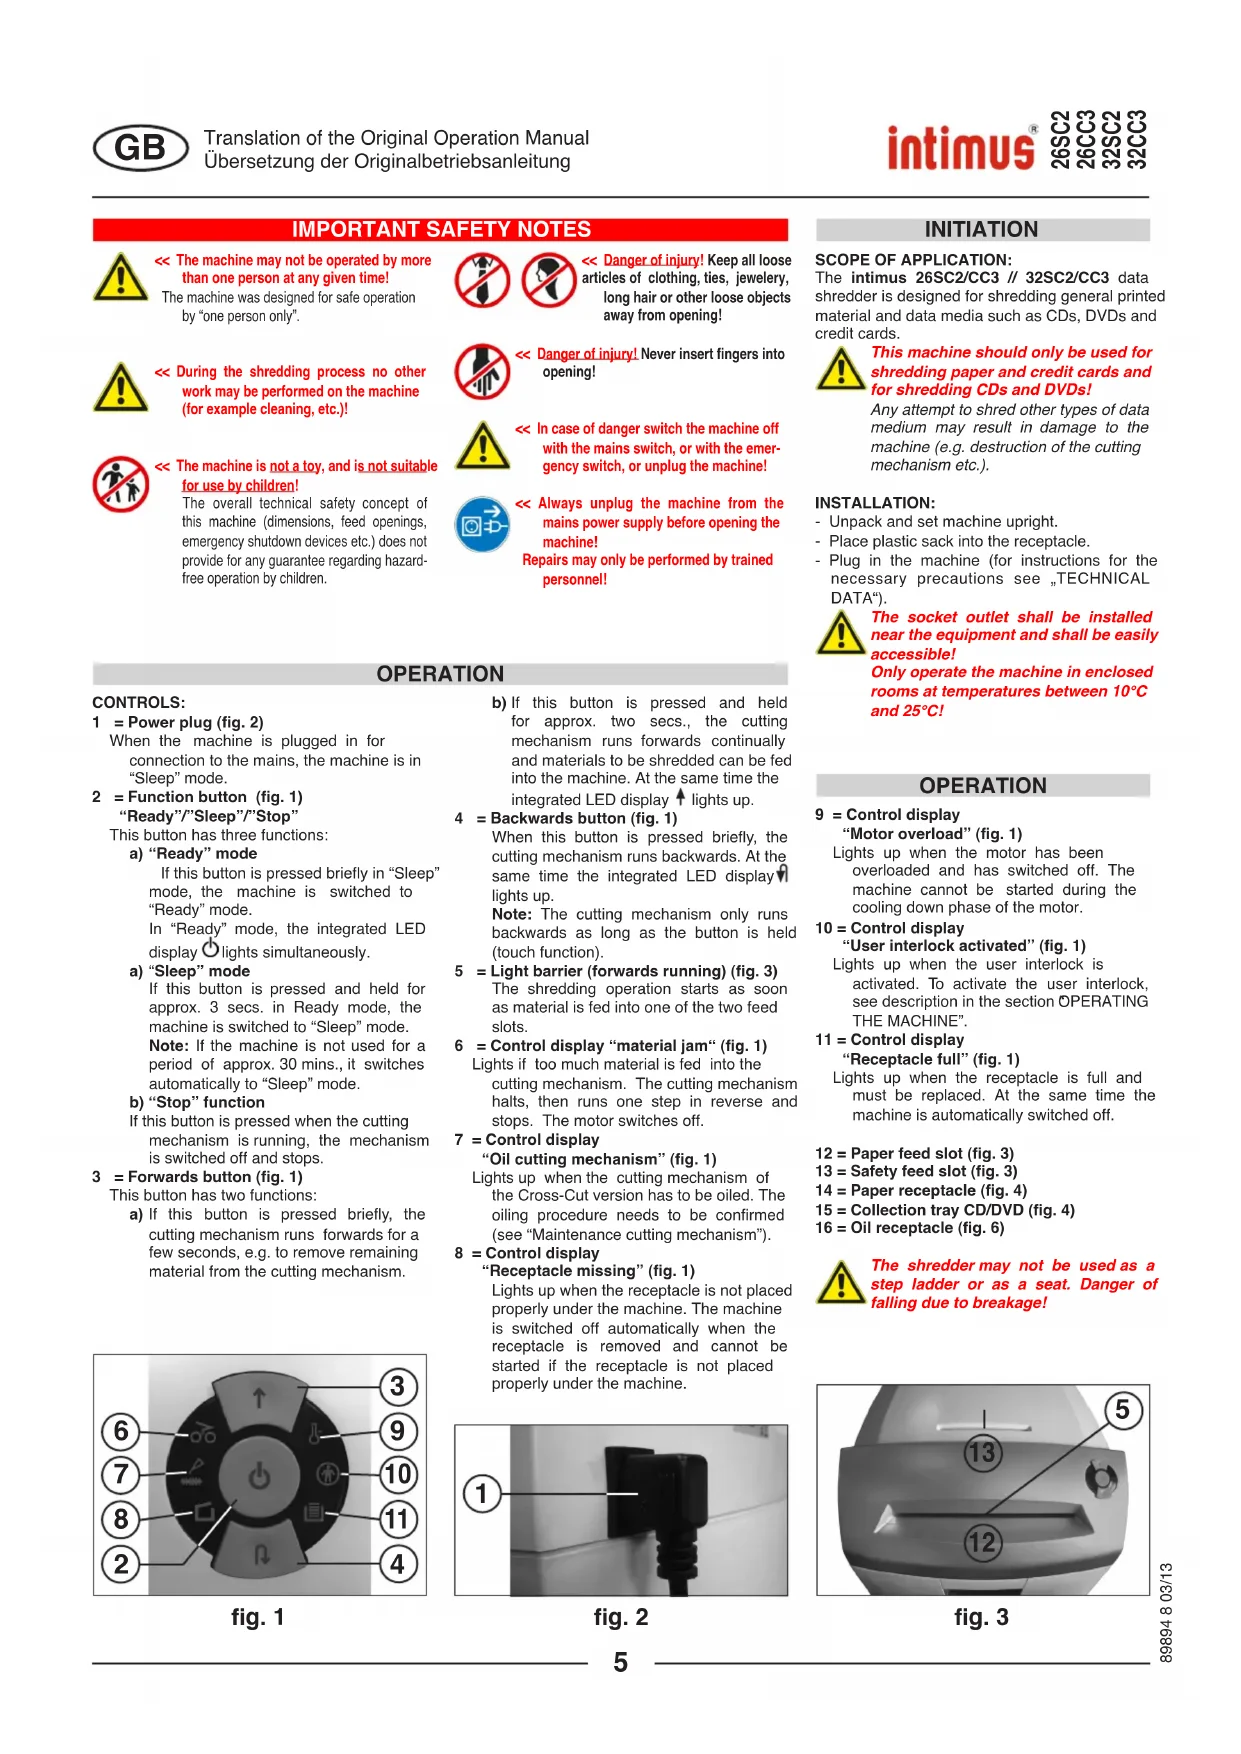
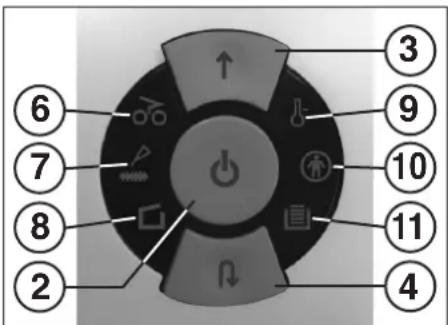
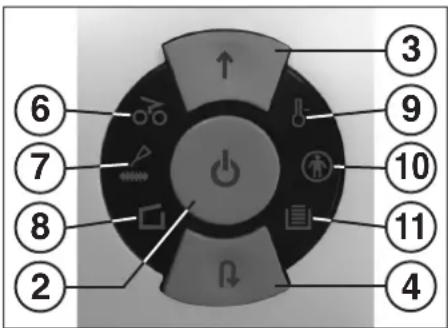
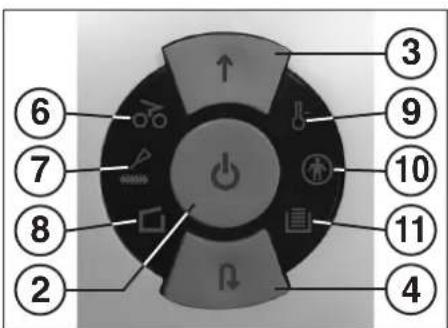
CONTROLS:
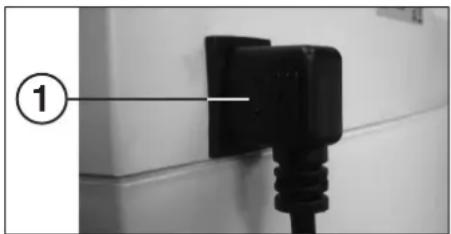
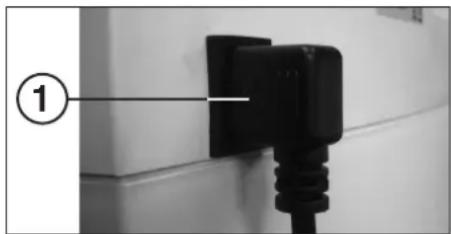
1 = Power plug (fig. 2)
When the machine is plugged in for connection to the mains, the machine is in "Sleep" mode.
2 = Function button (fig. 1)
"Ready"/"Sleep"/"Stop"
This button has three functions:
a) "Ready" mode
If this button is pressed briefly in "Sleep" mode, the machine is switched to "Ready" mode.
In "Ready" mode, the integrated LED display ⏻ lights simultaneously.
a) "Sleep" mode
If this button is pressed and held for approx. 3 secs. in Ready mode, the machine is switched to "Sleep" mode. Note: If the machine is not used for a period of approx. 30 mins., it switches automatically to "Sleep" mode.
b) "Stop" function
his button is pressed when the cutting mechanism is running, the mechanism is switched off and stops.
3 = Forwards button (fig. 1)
This button has two functions:
a) If this button is pressed briefly, the cutting mechanism runs forwards for a few seconds, e.g. to remove remaining material from the cutting mechanism.
text_image
⑥ ⑦ ⑧ ② ↑ ↓ ③ ⑨ ⑩ ⑪ ④fig. 1
b) If this button is pressed and held for approx. two secs., the cutting mechanism runs forwards continually and materials to be shredded can be fed into the machine. At the same time the integrated LED display ↑ lights up.
4 = Backwards button (fig. 1)
When this button is pressed briefly, the cutting mechanism runs backwards. At the same time the integrated LED display lights up.
Note: The cutting mechanism only runs backwards as long as the button is held (touch function).
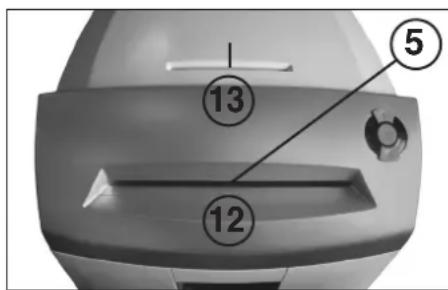
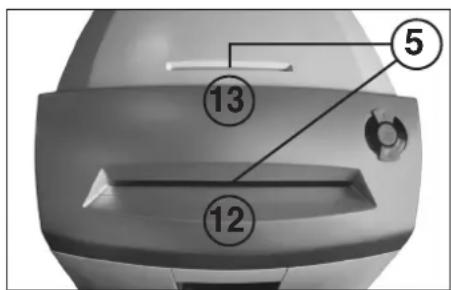
5 = Light barrier (forwards running) (fig. 3)
The shredding operation starts as soon as material is fed into one of the two feed slots.
6 = Control display "material jam" (fig. 1)
Lights if too much material is fed into the cutting mechanism. The cutting mechanism halts, then runs one step in reverse and stops. The motor switches off.
7 = Control display
"Oil cutting mechanism" (fig. 1)
Lights up when the cutting mechanism of the Cross-Cut version has to be oiled. The oiling procedure needs to be confirmed (see "Maintenance cutting mechanism").
8 = Control display
"Receptacle missing" (fig. 1)
Lights up when the receptacle is not placed properly under the machine. The machine is switched off automatically when the receptacle is removed and cannot be started if the receptacle is not placed properly under the machine.
text_image
①fig. 2
INITIATION
SCOPE OF APPLICATION:
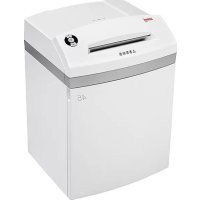
The intimus 26SC2/CC3 // 32SC2/CC3 data shredder is designed for shredding general printed material and data media such as CDs, DVDs and credit cards.

This machine should only be used for shredding paper and credit cards and for shredding CDs and DVDs!
Any attempt to shred other types of data medium may result in damage to the machine (e.g. destruction of the cutting mechanism etc.).
INSTALLATION:
- Unpack and set machine upright.
- Place plastic sack into the receptacle.
- Plug in the machine (for instructions for the necessary precautions see „TECHNICAL DATA“).

The socket outlet shall be installed near the equipment and shall be easily accessible!
Only operate the machine in enclosed rooms at temperatures between 10^ C and 25^ C!
OPERATION
9 = Control display
"Motor overload" (fig. 1)
Lights up when the motor has been overloaded and has switched off. The machine cannot be started during the cooling down phase of the motor.
10 = Control display
"User interlock activated" (fig. 1)
Lights up when the user interlock is activated. To activate the user interlock, see description in the section OPERATING THE MACHINE".
11 = Control display
"Receptacle full" (fig. 1)
Lights up when the receptacle is full and must be replaced. At the same time the machine is automatically switched off.
12 = Paper feed slot (fig. 3)
13 = Safety feed slot (fig. 3)
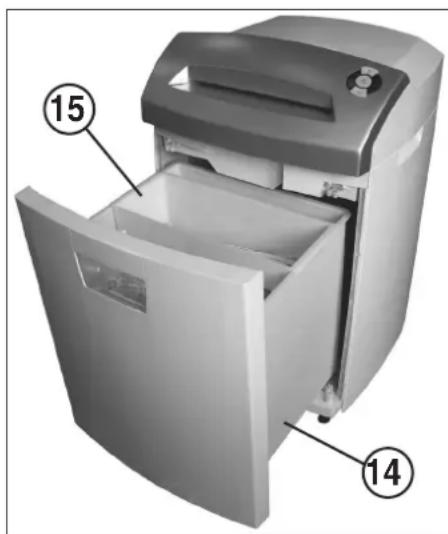
14 = Paper receptacle (fig. 4)
15 = Collection tray CD/DVD (fig. 4)
16 = Oil receptacle (fig. 6)

The shredder may not be used as a step ladder or as a seat. Danger of falling due to breakage!
text_image
⑤ ⑬ ⑭fig. 3
OPERATION
Note: When the machine is delivered, the function of the user interlock is switched off.
For information on activating the user interlock, please refer to the description in "OPERATION OF THE USER INTERLOCK".
To switch the machine into „ready-to-operate“ continue depending on the actual programmed mode as follows:
Mode "User interlock switched off"
- Briefly press function button (2).
- The LED display of the function button (2) lights up for "Ready". The machine can be loaded.
Mode "User interlock switched on"
Note: While switching on the machine subject to the procedure described below, the user interlock will be temporarily deactivated.
- Briefly press function button (2).
- The Control display "User interlock activated" Ⓧ (10) lights up.
- Keep forwards button (3) and backwards button (4) pressed simultaneously for approx. 2 secs.
- The LED display of the function button (2) flashes for "not ready".
- Briefly press function button (2).
- The LED display of the function button (2) is now permanently lit for "Ready". The control display (10) goes out.
The machine can be loaded.
Note: When the machine is switched on again from the "Sleep" mode, the activated user interlock must be deactivated again.
MATERIAL FEED:
Feed paper into the cutting mechanism through the paper feed slot (12) (Fig. 3).
Feed data carriers (CD, DVD or credit card) into the cutting mechanism individually into the separate safety feed slot (13) (Fig. 3).
The machine automatically switches to forwards running, draws the material in and automatically switches off after shredding.

When shredding papers, do not shred CD/DVD at the same time, and vice versa!
text_image
⑥ ⑦ ⑧ ② ↑ ↓ ③ ⑨ ⑩ ⑪ ④fig. 1
Note: For shredding transparent films, the machine must be manually switched to forwards running (press and hold the forwards button (3) for approx. 2 secs.).
By briefly pressing the function button (2) (Stop function), the shredding process can be stopped at any time. To continue, press and hold the forwards button (3) for approx. 2 secs.
If the machine is not used for a period of approx. 30 mins., it automatically switches to "Sleep" mode. If the user interlock is switched on, it must be deactivated again when the machine is switched on again (see "OPERATING THE MASCHINE").

Never feed the shredder with a quantity of material exceeding the maximum indicated. Refer to the TECHNICAL DATA section!
Should the machine become overloaded, follow the instructions under "MATERIAL JAM IN MACHINE" under "MALFUNCTIONS".
EMPTYING THE RECEPTACLE (fig. 4):
A two compartment receptacle ensures that waste is separated. It consists of a paper receptacle (14) and a separate collection tray (15) for the shredded CDs, DVDs and credit cards.

The fill level of the collection tray (15) is not displayed by the control display!
When shredding large quantities of CDs/DVDs (approx. 25 per load), please check the fill level of the collection tray occasionally and empty the tray separately as required.
If the receptacle for paper is full, the machine switches off. The control display (11) lights up. Proceed as follows:
- Pull the receptacle (14) with the collection tray (15) out of the lower housing. The control display (8) lights up and the control display (11) goes out.
- Dispose of the contents of the containers separately.
- Push the empty receptacle with the collection tray back into the lower housing. The control display □(8) goes out. If there is still material in one of the feed slots, the control display ⚙ (6) now lights up.
- Briefly press the forwards button (3). The remaining material is shredded and the display ⚙(6) goes out.
Note: The machine only runs when the receptacle is fully pushed in!
MANUAL "SLEEP" MODE:
By keeping the function button (2) pressed for approx. 3 secs. in "Ready" mode, the machine is manually switched to "Sleep" mode. When the user interlock is switched on, the locking function of the user interlock is simultaneously activated. The machine cannot be started. In order to deactivate the user interlock, please refer to "OPERATING THE MASCHINE".
OPERATION OF THE USER INTERLOCK: Set programming mode:
To enter programming mode, the machine must be switched to "Ready" (see "OPERATING THE MASCHINE").
Proceed as follows:
- Pull out receptacle (14) until the control display □(8) lights up.
- Press and hold forwards button (3) for approx. 4 secs. The integrated LED display ↑ flashes. You are now in programming mode.
Note: If programming is not completed within the programming time window of approx. 20 secs., the machine automatically returns to "Ready" mode.
Programming sequence
to switch user interlock on:
- Set programming mode (see above).
- Press forwards button (3) and backwards button (4) simultaneously and keep them pressed until the control displays ⏻ (10), ⏻ (2) and ⚡ (4) flash.
- Push receptacle in again.
Programming is complete. Programming mode is switched off automatically. The control displays(10), (2) and (4) continue to flash for approx. 5 secs to indicate completion of programming.
Programming sequence
to switch user interlock off:
- Set programming mode (see above).
- Press forwards button (3) and backwards button (4) simultaneously and keep them pressed until the control displays ⏻10) and ⏱4) flash.
- Push receptacle in again.
Programming is complete. Programming mode is switched off automatically. The control displays (10) and (4) continue to flash for approx. 5 secs to indicate completion of programming.
text_image
Diagram of a refrigerator with labeled parts showing open and closed doors, numbered 14 and 15.fig. 4
MALFUNCTIONS
MATERIAL JAM IN THE MACHINE:
(Auto-reverse function)
If a jam is caused by feeding in too much material, the machine reacts as follows:
- The cutting mechanism is blocked, then runs briefly in reverse (material is released) and stops. The motor is switched off.
- The control display (6) lights up.
Proceed as follows:
Paper jam in paper feed slot (12)
- Remove released paper from the feed slot (12).
- Cutting mechanism now runs forwards automatically and shreds the remaining paper in the cutting mechanism.
- The control display c(6) goes out. The LED display
↑ of the forwards button (3) is permanently lit.
- Continue shredding with lower quantity of paper.
Material jam in safety feed slot (13)
- Remove released material.

Take care when removing material as sharp edges may cause injury!
- The remaining material is now automatically fed into the cutting mechanism again and shredded.
- The control display (6) goes out. The LED display ↑ of the forwards button (3) is permanently lit.
- When the material has run through, continue shredding with correct quantities.
- If necessary, operate the cutting mechanism manually forwards and backwards alternately until the material has completely run through and has been shredded.

Wait each time until the motor stops before switching direction!
MOTOR PROTECTION:
If the motor is overloaded, it switches off. The control display (9) flashes. Switch the machine off with the rocker switch (1).
After a cooling down period of approx. 25-40 minutes (depending on the model and room temperature), you can switch the machine on again.
CHECKLIST IN THE EVENT OF FAULTS:
If the machine does not work, check the following points:
- is the mains plug connected to the mains?
- is the machine in "Sleep" mode?
See "AUTOMATIC ENERGY SAVING".
- has the user interlock been activated?
See "OPERATION OF THE USER INTERLOCK". - is the receptacle pushed in?
- is the receptacle full?
Follow the instructions in "EMPTYING THE RECEPTACLE".
- is there a material jam in the machine?
Follow the instructions in "MATERIAL JAM IN THE MACHINE". - Has the motor been overloaded?
See "MOTOR PROTECTION".
If none of the above applies, please contact your dealer.
MAINTENANCE / DISPOSING
CLEANING THE PHOTOCELLS (Fig. 5):
If paper particles should come to rest in the inlet guide (for example after a paper jam) it is possible that the machine will not turn off, due to the broken light barrier.
To remove these paper strips and also to clean the photocell, pass another sheet of paper through the feed slot, or switch the machine to reverse and wipe both "eyes" of the photocell with a brush.
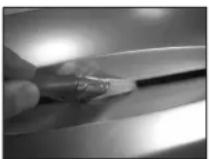
fig. 5
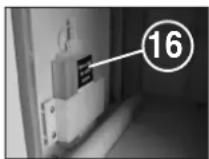
fig. 6
MAINTENANCE OF THE
CUTTING MECHANISM (CROSS-CUT):

Cross-cut cutting mechanisms must be oiled after a certain operating time.
If the control display (7) lights up, proceed as follows:
Pull out receptacle (14), take oil receptacle (16) (Fig. 6) out of the holder in the lower cabinet and push receptacle in again.
Spread some oil on a sheet of paper and then feed it into the cutting mechanism through the paper feed slot (12).
The paper is drawn in and the oil thus gets into the cutting mechanism.
Note: The oiling procedure needs to be confirmed as follows to delete the control display:
- Pull out receptacle (14) until the control display (8) lights up.
- The control displays (7) and (4) flash.
- Press backwards button (4) and keep pressed until the control display ⏻ (7) goes out.
- Push receptacle in again.
The cutting mechanism now automatically begins the cleaning cycle (forwards operation/backwards operation) and then switches off. The machine is ready again. To re-order the special oil, see "SPECIAL ACCESSORIES".
AUTOMATIC ENERGY-SAVING:
If the machine is not used for a while, it automatically switches to the so-called "Sleep" mode after approx. 30 mins. The LED display of the function button (2) for "Ready" goes out. To switch on again, briefly press the function button. If the user interlock is switched on, it must be deactivated again when the machine is switched on again (see "OPERATING THE MACHINE").
DISPOSING OF THE MACHINE:

Dispose of the machine in an environmentally friendly fashion at the end of its useful service life. Do not dispose of any of the parts included in the machine or its packaging with household waste.
TECHNICAL DATA
| Model | Typ | Cutting widthpaper / CD,DVD | Cutting capacitypaper / CD,DVD | Working width | Noise level | Intermittent operationON / OFF | DimensionsW x D x H | Weight |
| intimus 26SC2 | 276-4S | 4 mm / 8 mm | 13 sheets* / 1 piece | 240 mm | app. 55 dB(A) | 10 / 45 min | 390 x 330 x 550 mm | 16 kg |
| intimus 26CC3 | 276-4C | 4x28 mm / 8 mm | 9 sheets* / 1 piece | 240 mm | app. 55 dB(A) | 10 / 45 min | 390 x 330 x 550 mm | 16.2 kg |
| intimus 32SC2 | 277-4S | 4 mm / 8 mm | 17 sheets* / 1 piece | 240 mm | app. 55 dB(A) | 10 / 45 min | 390 x 360 x 600 mm | 16.5 kg |
| intimus 32CC3 | 277-4C | 4x28 mm / 8 mm | 12 sheets* / 1 piece | 240 mm | app. 55 dB(A) | 10 / 45 min | 390 x 360 x 600 mm | 16.7 kg |
Pre-fusing (slow-blow): 220-240V = 10 amps / 120V = 15 amps
| Model | Power supply datasupply voltage/frequency · current consumption · power | ||
| intimus 26SC2 | 220-240V/50Hz · 1.7 amps · 0.39 kW | 120V/60Hz · 2.9 amps · 0.35 kW | |
| intimus 26CC3 | 220-240V/50Hz · 1.7 amps · 0.39 kW | 120V/60Hz · 2.9 amps · 0.35 kW | |
| intimus 32SC2 | 220-240V/50Hz · 1.9 amps · 0.44 kW | 120V/60Hz · 3.5 amps · 0.42 kW | |
| intimus 32CC3 | 220-240V/50Hz · 1.9 amps · 0.44 kW | 120V/60Hz · 3.5 amps · 0.42 kW | |
* based on A4-paper 70g/m² at 230V/50Hz – 10%
SPECIAL ACCESSORIES
| Description | Order-No. |
| Plastic bag, 300x300x700x0.018 mm | 99925 |
| Lubricant, 110 ml bottle | 88035 |
Note: For orders of special accessories and spare parts please contact your dealer.
RECOMMANDATIONS IMPORTANTES DE SÉCURITÉ

text_image
Diagram of a refrigerator with labeled parts showing open and closed doors, marked with numbers 14 and 15.fig. 4
COMMENT REMEDIER AUX PETITES PANNES
BLOCAGE DE MATERIEL DANS L'APPAREIL :
(Fonction auto-reverse)
ELIMINATION DE LA MACHINE:

APPARAAT INSCHAKELEN:
MANUELE "SLEEP-MODE":
natural_image
Interior view of a refrigerant appliance with labeled parts (14 and 15), showing internal compartments and casing (no text or symbols beyond labels)Fig. 4
text_image
③ ⑨ ⑩ ⑪ ① ⑥ ⑦ ⑧ ② ④Fig. 1
STORING
DOORVOERSTORING:
natural_image
Close-up of a black electrical plug inserted into a wall socket, labeled with number 1 (no text or symbols on the plug itself)Fig. 2
PUESTA EN SERVICIO
natural_image
Interior view of a white disposable water dispenser with labeled parts (14 and 15), showing internal compartments and casing (no text beyond labels)Fig. 4
AVERIA
MATERIAL ATASCADO EN EL APARATO:
MODO "SLEEP" MANUAL:
natural_image
Interior view of a refrigerator with labeled parts (14 and 15), showing internal compartments and casing (no text beyond labels)Fig. 4
AVARIAS
ACCENSIONE DELLA MACCHINA
MODALITÀ "SLEEP" MANUALE:
text_image
Diagram of a refrigerator with labeled parts showing open and closed doors, marked with numbers 14 and 15.Fig. 4
text_image
③ ⑨ ⑩ ⑪ ⑪ ④ ⑥ ⑦ ⑧ ②Fig. 1
XEIPOKINHTH ΛΕΙΤΟΥΡΓΙΑ "SLEEP":
natural_image
Interior view of a refrigerator with labeled parts (14 and 15), showing open door, front panel, and lid (no text or symbols beyond labels)Eik. 4
ВЛАВН
1 = Strømstik (afb. 2)
3 = Frem - tast (afb. 1)
4 = Retur - tast (afb. 1)
16 = Oliebeholder (afb. 6)

natural_image
Interior view of a refrigerated appliance with labeled parts (14 and 15), showing internal compartments and casing (no text or symbols beyond labels)afb. 4
FEJL
MATERIALESTOP I APPARATET:
Plasticpose, 300x300x700x0,018 mm
Olieflaske, 110 ml
Ordrenr.
99925
88035
natural_image
Close-up of a black electrical plug inserted into a wall socket, with a numbered label pointing to the plug (no text or symbols on the plug itself)Fig. 2
BRUK
BRUKSOMRÅDE:
Makuleringsmaskinen intimus 26SC2/CC3
// 32SC2/CC3 er en maskin for å makulere dokumenter samt databærere som CDer, DVDer og kredittkort.

Maskinen må kun benyttes for å kutte papir og kredittkort samt CDer og DVDer!
text_image
Diagram of a refrigerator with labeled parts showing open and closed doors, marked with numbers 14 and 15.Fig. 4
FUNKSJONSFEIL
VEDLIKEHOLD / DEPONERING
RENGJ∅RING AV FOTOCELLENE (Fig. 5):
VEDLIKEHOLD SKJÆREVERK (CROSSCUT):

Crosscut-skjæreverk må oljes etter en viss driftstid.
text_image
⑥ ⑦ ⑧ ② ↑ ← ③ ⑨ ⑩ ⑪ ④Fig. 1
text_image
①Fig. 2

text_image
⑤ ⑬ ⑭Fig. 3
HANDHAVANDE
INKOPPLING AV MASKIN:
MANUELL "SLEEP"-LÄGE:
natural_image
Interior view of a refrigerant appliance with labeled parts (14 and 15), showing internal compartments and casing (no text beyond labels)Fig. 4

text_image
⑥ ⑦ ⑧ ② ↑ ↓ ③ ⑨ ⑩ ⑪ ④Fig. 1
STÖRNING
MATERIALSTOCKNING I APPARATEN:
UNDERHÅLL SKÄRANORDNING (CROSS-CUT):

natural_image
Close-up of a black electrical plug inserted into a wall, labeled with number 1 (no text or symbols on the plug itself)kuva 2
KÄYTTÖÖNOTTO
KÄYTTÖALUE:
natural_image
Interior view of a refrigerator with labeled parts (14 and 15), showing open door, front panel, and lid (no text or symbols beyond labels)kuva 4
„HAIRIÖ“
MATERIAALIRUUHKA KONEESSA: (Auto-Reverse-toiminto)
Sulake (hidas):
220-240V = 10 A / 120V = 15 A
| Malli | Verkkoliitäntätiedotliitäntäjännito/taajuus · virranottotoho · toho | ||
| intimus 26SC2 | 220-240V/50Hz · 1,7 A · 0,39 kW | 120V/60Hz · 2,9 A · 0,35 kW | |
| intimus 26CC3 | 220-240V/50Hz · 1,7 A · 0,39 kW | 120V/60Hz · 2,9 A · 0,35 kW | |
| intimus 32SC2 | 220-240V/50Hz · 1,9 A · 0,44 kW | 120V/60Hz · 3,5 A · 0,42 kW | |
| intimus 32CC3 | 220-240V/50Hz · 1,9 A · 0,44 kW | 120V/60Hz · 3,5 A · 0,42 kW | |
text_image
Diagram of a refrigerator with labeled parts showing open and closed doors, marked with numbers 14 and 15.rys. 4
ZAKŁÓCENIE PRACY
ZATOR MATERIAŁU W URZĄDZENIU:
natural_image
Interior view of a refrigerator with labeled parts (14 and 15), showing internal compartments and casing (no text or symbols beyond labels)Obr. 4
PORUCHA
NAHROMADĚNÍ MATERIÁLU V PŘÍSTROJI: (funkce auto-reverse)
natural_image
Close-up of a black electrical plug inserted into a wall, with a numbered label pointing to the socket (no text or symbols on the plug itself)- ábra
ÜZEMBE HELYEZÉS
ALKALMAZÁSI TERÜLET:
Az intimus 26SC2/CC3 // 32SC2/CC3
text_image
Diagram of a refrigerator with labeled parts showing open and closed doors, numbered 14 and 15.- ábra
ÜZEMZAVAR
ANYAGTORLÓDÁS A KÉSZÜLÉKBEN:
A GÉP MEGSEMMISÍTÉSE:

natural_image
Interior view of a refrigerator with labeled parts (14 and 15), showing open door, front panel, and lid (no text or symbols beyond labels)Фиг. 4
ПОВРЕДИ
natural_image
Close-up of a black electrical plug inserted into a wall, with a numbered label pointing to the plug (no text or symbols on the plug itself)Рис. 2
text_image
⑤ ⑬ ⑭Рис. 3
ЭКСПЛУАТАЦИЯ
ВКЛЮЧЕНИЕ МАШИНЫ:
natural_image
Interior view of a refrigerator with labeled parts (14 and 15), showing open door, casing, and lid (no text or symbols beyond labels)Рис. 4
НЕИСПРАВНОСТИ
257 James Street, Halfway House sales@martinyale.co.za
Marshall Town, Johannesburg
P. O. BOX 1291, Houghton 204
www.martinyale.co.za
United Kingdom MARTIN YALE International +44 / (0) 1293 44 1900
Unit C 2 The Fleming Centre, Fleming Way fax +44 / (0) 1293 61 11 55
Crawley, West Sussex, RH10 9NN enquiries@intimus.co.uk
www.vintimus.co.uk
France MARTIN YALE International S.A.R.L. +33 / (1) 70 00 69 00
40 Avenue Lingenfeld fax +33 / (1) 70 00 69 24
77200 Torcy contact@martinyale.fr
Spain MARTIN YALE Ibérica S.L. +34 / 9 02 22 31 31
Chaoyang District, Beijing 100027, PRC
www.martinyale.com.cn