SHM 170 - Hedge trimmers STIGA - Free user manual and instructions
Find the device manual for free SHM 170 STIGA in PDF.

| Product type | Gas hedge trimmer |
| Brand | Stiga |
| Model | SHM 170 |
| Engine | 2-stroke, displacement 25.4 cm³, power 0.8 kW |
| Fuel | Mixture of unleaded gasoline (90 octane) and synthetic 2-stroke oil (50:1) |
| Fuel tank capacity | 0.5 liter |
| Cutting length | 550 mm |
| Weight | 5.7 kg |
| Sound pressure level | 90.5 dB(A) |
| Vibration level | 2.5 - 5.4 m/s² |
| Spark plug | NGK BPMR6Y |
| Main functions | Trimming and shaping hedges, small-branch shrubs |
| Adjustable rear handle | 5 positions (rotation of cutting device) |
| Starting system | Easy Start recoil starter with choke and primer |
| Safety | Safety throttle lever, stop switch, blade guard, centrifugal clutch |
| Routine maintenance | Air filter cleaning every 8-10 h, blade lubrication, spark plug check |
| Gearbox lubrication | Every 20 h, molybdenum disulfide grease |
| Blade sharpening | Recommended by a professional; fine grit file if necessary |
| Storage | Drain the tank for inactivity >2-3 months, store in a dry place |
| Warranty | Warranty valid only for use in accordance with instructions |
Frequently Asked Questions - SHM 170 STIGA
User questions about SHM 170 STIGA
0 question about this device. Answer the ones you know or ask your own.
Ask a new question about this device
Download the instructions for your Hedge trimmers in PDF format for free! Find your manual SHM 170 - STIGA and take your electronic device back in hand. On this page are published all the documents necessary for the use of your device. SHM 170 by STIGA.
USER MANUAL SHM 170 STIGA

natural_image
Illustration of a person using a power shaver to dig through soil, with an upward arrow indicating flow or process (no text or symbols)

Gentile Cliente,
thank you for choosing one of our products. We hope that you will be completely satisfied with this machine and that it fully meets your expectations. This manual has been compiled in order to provide you with all the information you need to get acquainted with the machine and use it safely and efficiently. Don't forget that it is an integral part of the machine, so keep it handy so that it can be consulted when necessary, and pass it on to a further user if you resell or loan the machine.
Your new machine has been designed and manufactured in pursuance of current regulations, and is safe and reliable if used in compliance with the instructions provided in this manual (proper use). Using the machine in any other way, or non-compliance with the safety specifications relative to use, maintenance and repair is considered "improper use" which will invalidate the warranty, relieve the manufacturer from all liabilities, and the user will consequently be liable for all and any damage or injury to himself or others.
Since improvements are periodically made to our products, you may find slight differences between your machine and the descriptions contained in this manual. Certain modifications can be made to the machine without prior warning and without the obligation to update the manual, although the essential safety and function characteristics will remain unaltered. In case of any doubts, please contact your Retailer. And now enjoy your work!
1. IDENTIFICATION OF MAIN COMPONENTS
- Engine
- Cutting device (blade)
- Cutter protection plate
- Front handgrip
- Rear handgrip
- Rear handgrip release command
- Fuel tank cap
- Starter button
- Blade protection
- Registration plate
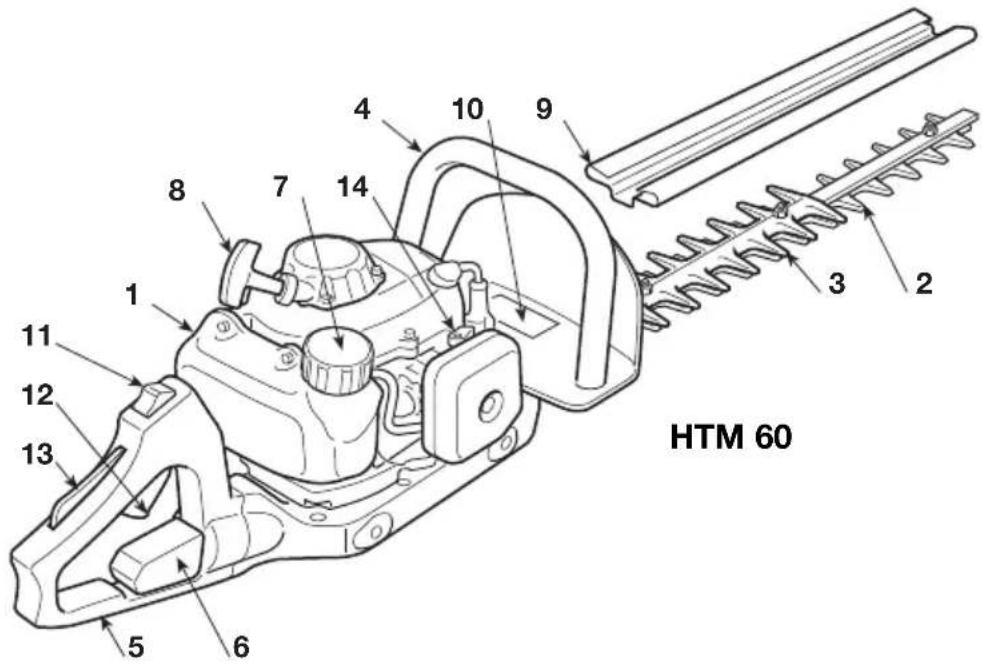
CONTROLS
- Engine stop switch
- Blade command (Accelerator lever)
- Accelerator safety lever
- Starter
REGISTRATION PLATE
10.1) Mark of conformity with EC 98/37 standards
10.2) Name and address of the manufacturer
10.3) Acoustic output level according to EC 2000/14 Standards
10.4) Manufacturer's model of reference
10.5) Machine model
10.6) Serial number
10.7) Certification Body mark
10.8) Year of manufacture
10.9) Article Code
10.10) Emission number

2. SYMBOLS


natural_image
Two icon-style symbols: one open book and one closed book, both enclosed in a circle (no text or symbols)
natural_image
Icon of a person wearing a helmet and safety goggles, enclosed in a black circle (no text or symbols)
natural_image
Two black circular icons with white hand and sock symbols, no text or numbers present

WARNING: The machine you have purchased has been manufactured for domestic use.
1) Warning! Danger.
2) Read the instruction manual before using the machine.
3) Irreversible damage can be caused to your hearing.
Anyone operating this machine under normal conditions during continuous daily use may be exposed to a noise level equal to or exceeding 85 dB (A).
The operator must wear Personal Protective Equipment (PPE).
Whenever the machine is in use, safety goggles must be worn to safeguard against flying objects, as must ear protectors, such as a soundproof helmet, in order to protect the operator's hearing.
If the operator is working in an area where there is a risk of falling objects, a safety helmet must also be worn.
4) Wear protective footwear and gloves!
5) Fire danger. The fuel mix is inflammable. Do not spill the fuel.
6) Danger: Deadly intoxicating fumes! During use, the engine produces toxic gases. Do not use the machine in closed or poorly ventilated areas. These fumes are deadly!
3. SAFETY REQUIREMENTS
A) TRAINING
1) Read the instructions carefully. Become acquainted with the controls and the proper use of the machine. Learn how to stop the engine quickly.
2) Only use the machine for its intended use, that is “the cutting and trimming of hedges, consisting in plants with small sized branches”.
Any other use may be dangerous and severely damage the machine.
3) Never allow children or persons unfamiliar with these instructions to use the machine. Local regulations may restrict the age of the operator.
4) The machine must never be used by more than one person.
5) Never use the machine :
- when people, especially children or pets are in the vicinity;
- if the user is tired or unwell, or has taken medicine, drugs, alcohol or any substances which may slow his reflexes and compromise his judgement;
- if the user is not capable of holding the machine firmly with two hands and/or of remaining standing on the ground whilst working.
6) Remember that the operator or user is responsible for accidents or hazards occurring to other people or their property.
B) PREPARATION
1) Always wear adequate clothing when using the machine which do not hamper movements in any manner.
- Always wear slim-fitting protective clothing, fitted with shear-proof protection devices.
- Always wear protective gloves and eye-goggles and safety anti-shear boots with non-slip soles.
- Always wear ear and hearing protection devices.
- Never wear scarves, shirts, necklaces, or any hanging or flapping accessory that could catch in the machine or in any objects or materials in the work area.
- Tie your hair back if it is long.
2) WARNING: DANGER! Fuel is highly flammable:
- keep the fuel in containers which have been specifically manufactured and homologated for such use;
– never smoke when handling fuel;
– slowly open the fuel tank to allow the pressure inside to decrease gradually;
- top up the tank with fuel in the open air, using a tunnel;
- add fuel before starting the engine. Never remove the fuel tank cap or add fuel while the engine is running or when the engine is hot;
- if you have split some fuel, do not attempt to start the engine but move the machine away from the area of spillage and avoid creating any source of ignition until the fuel has evaporated and fuel vapours have dissipated;
– immediately clean up all traces of fuel spilt on the machine or on the ground;
– never start the machine in the same place you refilled it with fuel;
- make sure your clothing does not come into contact with the fuel, on the contrary, change your clothes before starting the engine;
- always put the tank and fuel container caps back on and tighten well.
3) Replace faulty or damaged silencers.
4) Before using the machine, check its general condition and in particular:
– the accelerator lever and the safety lever must move freely, they must not need forcing and should return automatically and rapidly back to the neutral position;
– the accelerator lever must remain locked until the safety lever is pressed;
– the engine stop switch must easily move from one position to the other;
- the electric cables and in particular the spark plug cable must be in perfect condition to avoid the generation of any sparks and the cap must be correctly fitted on the spark plug;
– the machine handgrips and protection devices must be clean and dry and well fastened to the machine;
– the blades must never be damaged or in poor condition;
5) Before starting your work, make sure that all the protection devices are correctly fitted.
C) OPERATION
1) Do not operate the engine in a confined space where dangerous carbon monoxide fumes can collect.
2) Work only in daylight or good artificial light.
3) Take on a firm and well-balanced position:
- where possible avoid working on wet slippy ground or in any case on uneven or ripid
ground which does not guarantee stability for the operator;
- avoid using unstable ladders or platforms;
– never run, but walk carefully paying attention to the lay of the land and any eventual obstacles.
4) Start the engine when the machine is firmly on the ground and hold it in place with your free hand:
- start the motor in an area at least 3 metres from where you refuelled;
– check that there are no persons in the vicinity of the machine;
- do not direct the silencer and therefore the exhaust fumes towards inflammable materials.
5) Do not change the engine tuning and do not rev the engine excessively at maximum speed.
6) Check that when the machine is running at minimum speed and ticking over, there is no movement of the blades and, after accelerating, the engine quickly returns to minimum speed.
7) Make sure the blades do not come into violent contact with foreign bodies and try to prevent any material from being hurled after trimming.
8) Stop the engine:
– whenever you leave the machine unattended.
- before refuelling.
9) Stop the engine and disconnect the spark plug cable:
– before cleaning, checking or working on the machine;
- after striking a foreign object. Inspect the machine for any damage and make repairs before restarting it again;
- If the machine starts to vibrate abnormally: find and remove the cause of the vibration immediately;
- when the machine is not in use.
1) Keep all nuts, bolts and screws tightly fastened to be sure the equipment is in safe working condition. Routine maintenance is essential for safety and for maintaining a high performance level.
2) Do not store the machine with fuel in the tank in an area where the fuel vapors could reach an open flame, a spark or a strong heat source
3) Allow the engine to cool before storing in any enclosure.
4) To reduce fire hazards, keep the engine, exhaust silencer and fuel storage area free from branches, leaves, or excessive grease; never leave containers with the cut debris inside the storage area.
5) If the fuel tank has to be emptied, this should be done outdoors once the engine has cooled down.
6) Always wear protective gloves when handling the cutting device.
7) Make sure the blades are well sharpened. All operations on the blades require a certain level of experience and specialised tools. For safety reasons, take them to a specialised centre to be sharpened.
8) For safety reasons, never use the machine with worn or damaged parts. Damaged parts are to be replaced and never repaired. Only use original spare parts. Parts that are not of the same quality can seriously damage the equipment and compromise safety.
9) Store the machine out of the reach of children!
E) TRANSPORTATION AND HANDLING
1) Whenever the machine is to be handled or transported you must:
- turn off the engine, wait for the blades to stop and disconnect the spark plug cap;
- apply the protection devices to the blades;
- only hold the machine using the handgrips and position the blades in the opposite direction to that used during operations.
2) When using a vehicle to transport the machine, position it so that it can cause no danger to persons and fasten it firmly in place to avoid it from tipping over, which may cause damage or fuel spillage.
F) HOW TO READ THE MANUAL
Certain paragraphs in the manual contain particularly significant information and are marked with various levels of highlighting with the following meaning:
NOTE
or
IMPORTANT
These give details or further
information on what has already been indicated, and aim to prevent both damage to the machine, and the machine from causing damage.

WARNING!
Non-observance will re-
sult in the risk of injury to oneself or others.

DANGER!
Non-observance will re-
sult in the risk of serious injury or death to oneself or others.
4. PREPARING TO WORK
CHECKING THE MACHINE
Before starting work please:
- Check that all the screws on the machine and the blade are tightly fastened;
- check that the blades are sharp and there are no signs of any damage;
- check that the air filter is clean;
- check that the protection devices are well fastened and working efficiently;
- check that the handgrips are well fastened
PREPARING THE FUEL
This machine is fitted with a two-stroke engine which requires a mix of petrol and lubricating oil.
IMPORTANT
Using petrol alone will damage the motor and will cause for invalidation of the warranty.
IMPORTANT
Only use quality fuels and oils to maintain high performance and guarantee the duration of the mechanical parts over time.
• Petrol characteristics
Only use unleaded petrol (green petrol) with octane number no less than 90 N.O.
IMPORTANT
Unleaded petrol tends to create deposits in the container if preserved for more than 2 months. Always use fresh petrol!
- Oil characteristics
Only use top quality synthetic oil specifically for two-stroke engines.
Your retailer can provide you with oils which have been specifically studied for this type of engine, which are capable of guaranteeing a high level of protection.
The use of these oils makes it possible to prepare a 2% mix, consisting in 1 part oil to 50 parts petrol.
• Preparation and preservation of the fuel mix

DANGER!
Petrol and the fuel mix are highly inflammable!
- Keep the petrol and fuel mix in homologated fuel containers, in safe place, away from any flames or heat sources.
- Never leave the containers within the reach of children.
- Never smoke whilst preparing the mix and avoid inhaling the petrol fumes.
The chart indicates the amount of petrol and oil to use to prepare the fuel mix according to the type of oil used.
| Petrol Synthetic oil 2-stroke | ||
| liters liters cm | 3 | |
| 1 | 0 | . |
| 2 | 0 | . |
| 3 | 0 | . |
| 5 0.10 100 | ||
| 10 0.20 200 | ||
To prepare the fuel mix:
- Place about half the amount of petrol in a homologated tank.
- Add all the oil, according to the chart.
- Add the rest of the petrol.
- Close the top and shake well.
IMPORTANT
The fuel mix tends to age.
Do not prepare excessive amounts of the fuel mix to avoid deposits from forming.
IMPORTANT
Keep the petrol and fuel mix containers separate and easily identifiable to avoid the mistake of using one in place of the other.
IMPORTANT
Periodically clean the petrol and fuel mix containers to remove any eventual deposits.
REFUELLING

DANGER!
Never smoke whilst refu-
elling and avoid inhaling the petrol fumes.

WARNING!
Carefully open the tank
top as pressure could have formed inside
Before refuelling:
- Shake the fuel mix container well.
-
Place the machine on a flat stable surface, with the fuel tank cap facing upwards.
-
Clean the fuel tank cap and the surrounding area to avoid any dirt from entering the tank during refilling.
- Carefully open the fuel tank cap to allow the pressure inside to decrease gradually. Use a funnel to refill and avoid filling the tank to the brim (Fig. 1).

WARNING!
Always close the fuel
tank cap firmly.

WARNING!
Immediately clean all tra-
ces of fuel which may have dripped on the machine or the ground and do not start the engine until the petrol fumes have dissipated.
5. HOW TO START - USE - STOP THE ENGINE
STARTING THE ENGINE

WARNING!
The engine must be
started in an area at least 3 metres from where you refilled the fuel tank.
Before starting the engine:
- Place the machine firmly on the ground.
- Remove the blade protection devices.
- Make sure the blade is not touching the ground or any other object.
- Make sure the handgrip is locked in the centre position (only HTM 60).
- Cold start
NOTE
A "cold" start of the engine
means starting it after at least 5 minutes from when it was switched off or after refuelling.
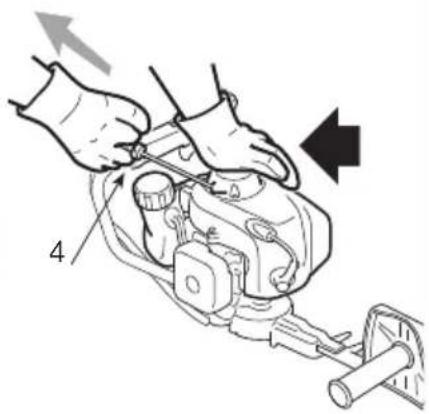
To start the engine (Fig. 2):
-
Press switch (1) to position «I».
-
Gently press the bulb (2) on the "primer" 7-10 times until the fuel flows from the exhaust pipe.
- Turn the starter control lever (3) to the «START» position.
- Hold the machine firmly on the ground with one hand on the handgrip, in order not to lose control of the machine during startup.

WARNING!
If the machine is not held
firmly, the force of the engine could cause the user to lose his balance or direct the blade towards an obstacle or the same user.
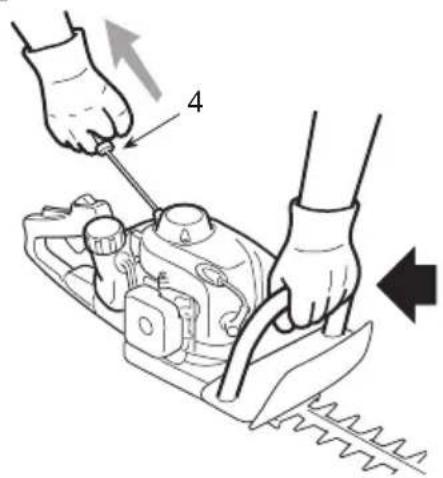
- Pull the starter rope slowly for 10 - 15 cm until you feel some resistance, then tug it a few times until you hear the engine turn over.
IMPORTANT
This machine is fitted with
an "Easy Start" system which makes the starting procedure different and easier compared to traditional methods. This system reduces the effort required to start the machine. The rope only
requires pulling until you hear the engine start to tick over; no effort is required to pull the rope as it does not create any resistance.
IMPORTANT
To avoid breaking the
starter rope, do not pull the whole length of it or let it slide along the edge of the cable guide hole. Release the starter gradually, to avoid letting it fly back uncontrollably.
- Gradually release the handle (4) on the starter wire to avoid it from returning too fast and out of control.
- Turn the starter control lever (3) to the «RUN» position.
NOTE
The starter lever (3) will au-
tomatically return to the «RUN» position as soon as the accelerator lever (5) is activated.
- Allow the engine to run at minimum speed for at least one minute before accelerating to maximum speed.
IMPORTANT
If the handle (4) on the
starter wire is pulled repeatedly with the starter control lever (3) in the «START» position it can flood the engine and make starting difficult.
If you have flooded the engine, remove the spark plug and gently pull the handle (5) on the starter wire to eliminate any excess fuel; then dry the spark plug electrodes and replace it on the engine.
- Hot starting
When hot starting (immediately after stopping the engine), follow the procedure indicated above in points 1 - 4 - 5 - 6.
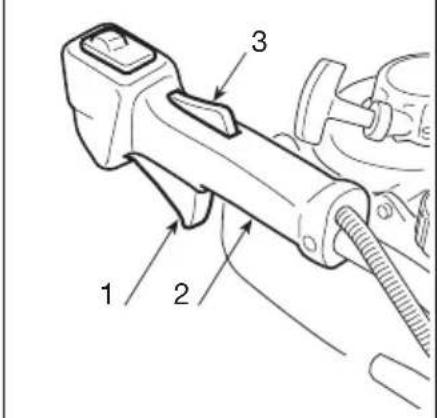
USE OF THE ENGINE (Fig. 3)
The speed of the cutting device is regulated by the accelerator lever (1) positioned on the rear
handgrip (2).
It is only possible to use this lever if the safety lever (3) is pressed simultaneously.
The movement is transmitted from the engine to the blade by a centrifugal mass clutch that prevents the blade from moving when the engine is running at minimum speed.

WARNING!
Do not use the machine if the cutting device moves when the engine is running idle; in this case, contact you dealer.
The correct running speed will be achieved by pressing the accelerator lever (1) as far as possible.
IMPORTANT
Avoid using the engine at full power for the first 6-8 working hours.
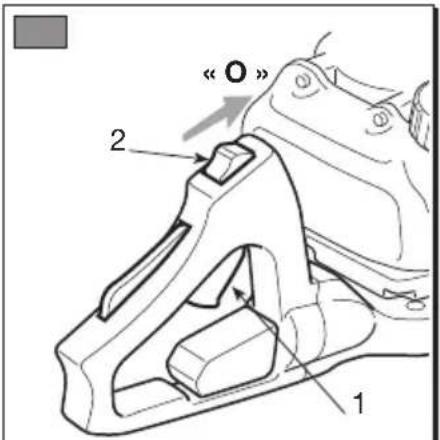
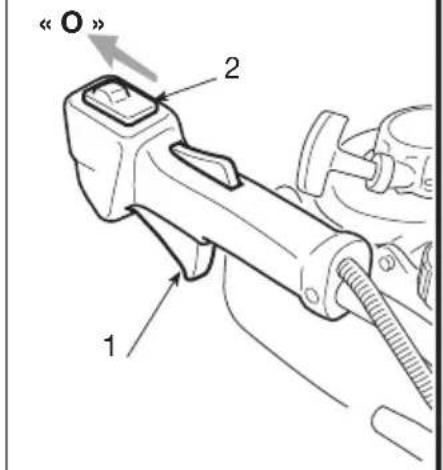
STOPPING THE ENGINE (Fig. 4)
To stop the engine:
- Release the accelerator lever (1) and allow the engine to run at minimum speed for a few seconds.
- Press the (2) switch to the «O» position.

WARNING!
When the engine is ticking over, it will take a few seconds for the blades to stop.
6. USING THE MACHINE
To respect persons and the environment :
- Please try not to cause any disturbance.
- Scrupolously comply with local regulations and provision for disposal of waste materials after trimming.
- Scrupolously comply with local regulations and provision for the disposal of oils, petrol, damaged parts or any element which has a strong impact on the environment.
WARNING!
Always wearing suitable clothing when using the machine. Your retailer can provide you with all the information on the most suitable accident prevention devices to guarantee your safety at work
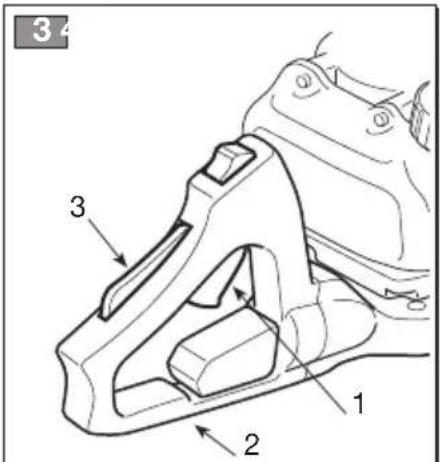
REGULATING THE HANDGRIP (Fig. 5) (only HTM 60)
The rear handgrip (1) can be adjusted to 5 different positions in relation to the cutting device to make trimming your hedges easier.
WARNING!
The handgrip must only be adjusted when the engine is switched off.
– Pull the release lever (2).
- Rotate the rear handgrip (1) to the desired position.
- Before using the machine check that the release lever (2) is correctly in place, and the rear handgrip is firmly attached.
WARNING!
When working, the rear handgrip must always be in a vertical position, whatever the position of the cutting device (3).
CUTTING PROCEDURES
WARNING!
When cutting, always hold the machine firmly with both hands.
WARNING!
Immediately stop the engine if the blades block while running or if they get caught up in the hedge branches
It is recommended to trim the two vertical sides of the hedge before trimming the top.
• Vertical trimming (Fig. 6)
The best results will be obtained with the blade slightly inclined ( 5^ - 10^ ) in the direction you are cutting, proceed with a curved movement, slowly and without interruptions, especially in the case of very thick hedges.
LUBRICATING THE BLADES DURING JOBS
If the trimming device overheats whilst working, it is necessary to lubricate the internal surfaces of the blades.
WARNING!
This operation must only be performed when the blades have stopped running and the engine is switched off.
END OF OPERATIONS
When you have finished your work:
- Switch off the engine as indicated above (Chap. 5).
- Wait for the blades to stop and replace the protection device.
7. MAINTENANCE AND PRESERVATION
Correct maintenance is essential to maintain the original efficiency and safety of the machine over time.

WARNING!
During maintenance ope-
rations:
- remove the spark plug cap.
- Wait until the engine is sufficiently cold.
- Use protective gloves when handling the blades.
- Keep the blade protection devices on, except when intervening directly on the blade.
- Never dispose of oils, fuel or other polluting materials in unauthorised places
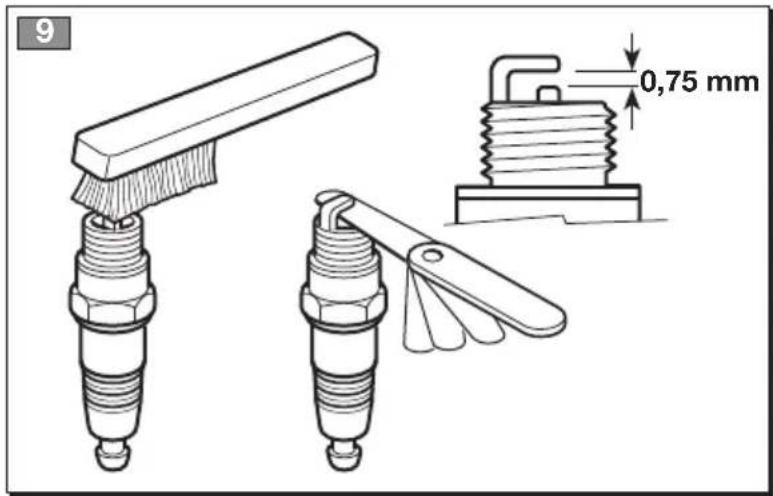
CHECKING THE SPARK PLUG
Periodically, remove and clean the spark plug from any eventual deposits using a metal brush.
Check and reset the correct distance between the electrodes (Fig. 9).
Replace the spark plug and fasten it firmly using the supplied key.
The spark plug must be replaced with one with the same characteristics in the cases where the electrodes have burnt or the insulation has worn out, and in any case every 100 working hours.
CLEANING THE ENGINE AND THE SILENCER
To reduce fire risks, periodically clean the cylinder flaps with compressed air and clear the silencer area from branches, leaves or other debris.
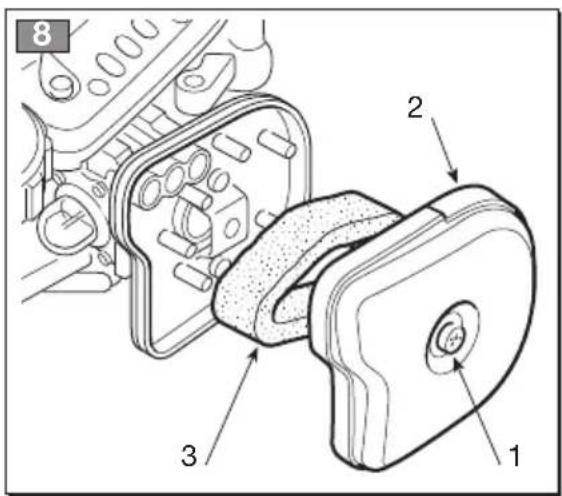
CLEANING THE AIR FILTER
IMPORTANT
Cleaning the air filter is
essential to guarantee the efficiency and duration of the machine.
It must be cleaned after every 8-10 working hours.
To clean the filter (Fig. 8):
- Loosen the screw (1) remove the cover (2) and the filter element (3).
- Wash the filter element (3) with soap and water. Do not use petrol or other solvents.
– Leave the filter to dry in the open air. - Replace the filter element (3) and the cover (2) and tighten the screw (1).
FUEL FILTER
Inside the fuel tank there is a filter which prevents impurities from entering the engine.
The filter should be replaced once a year by your Retailer.
TUNING THE CARBURETTOR
The carburettor is tuned by the manufacturer to achieve maximum performance in all situations of use, with a minimum emission of toxic gas in compliance with current specifications.
In the case of poor performance, first check that the blades are not partially blocked or deformed, on the contrary ask your Retailer to check the carburettor and the engine.
- Tuning minimum speed

WARNING!
The cutting device must
not move when the engine is running idle. If the cutting device moves when the engine is running idle, contact your dealer to correctly regulate the engine.
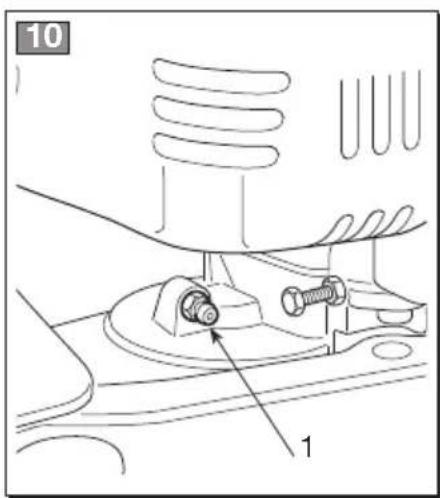
LUBRICATING THE REDUCTION GEAR (Fig. 10)
Every 20 working hours, top up the level with special molybdenum bisulphur lubrication, injecting it into the lubricator (1).
ADJUSTING THE BLADES
The blades are subject to progressive wear, which is noticed by a decrease in the trimming performance due to excessive play of the unit.
WARNING!
Switch off the engine and
wait until the blades come to a halt before performing any adjustments.
Proceed with the adjustment by (Fig. 11):
- Loosen the nuts (1).
- Carefully remove any dust or debris from the screw (3) slots (2).
- Tighten the screws (3) as far as possible, without over-tightening, and then unscrew them by 1/4 - 1/2 a turn.
- Then tighten the nuts (1).
- Lubricate the blades.
- Start the engine and let it run at maximum speed for about 1 minute.
- Switch off the engine and wait for the blades to come to a halt and then touch them with your hand; if you can manage to touch them with your hand without them being too hot, the blades are adjusted correctly.
- If they have overheated, slightly loosen the nuts (1) and the screws (3) and repeat the test until you achieve satisfactory results.
WARNING!
Always check that the
nuts (3) are tightened as far as possible before starting work.
SHARPENING THE BLADES
It is necessary to sharpen the blades when the trimming performance decreases and the branches tend to stick together.
WARNING!
Always replace and never
repair a blade which has blunt cutting edges
IMPORTANT
We recommend you take
your machine to your Retailer for sharpening as he has the required tools and suitable experience.
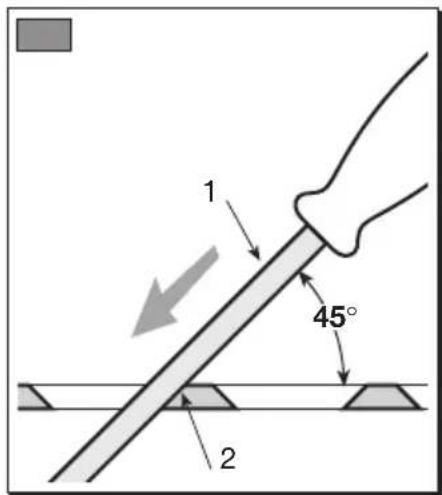
In order to sharpen the blades, it is recommended to use a fine grain file and proceed as follows (Fig. 12):
- Place the file (1) on the blade (2) at a 45^ angle, and proceed with upward strokes towards the cutting edge.
- Make sure that you put pressure on the file only when stroking upwards and raise it from the blade when you move it back towards you.
- Only remove a smallest amount of material.
- Eliminate any burr with a grinding stone.
- Eliminate all grinding traces and lubricate the blades before reassembling them.
EXTRAORDINARY INTERVENTIONS
All maintenance operations not foreseen in this manual must be performed exclusively by your Retailer.
All and any operations performed in unauthorised centres or by unqualified persons will totally invalidate the warranty.
PRESERVATION
After each working session, carefully clean the machine from dust and debris, repair or replace any faulty parts and lubricate the blades to prevent them from rusting.
The machine must be preserved in a dry area, protected from all weather conditions and with the blade protection device correctly fitted.
PROLONGED IDLE PERIODS
IMPORTANT
If the machine will not be
used for a period of more than 2-3 months it is recommended to follow some advice to avoid difficulty when you wish to use the machine and to prevent permanent damage to the engine.
- Storage
Before storing the machine:
- Empty the fuel tank.
- Start the engine and allow it to tick over until it comes to a halt, so that it uses all the fuel that is left in the carburettor.
- Allow the engine to cool down and remove the spark plug.
- Pour a teaspoon of (new) 2-stroke engine oil into the spark plug slot.
- Pull the starter wire a couple of times to distribute the oil in the cylinder.
- Replace the spark plug with the piston in the dead end upper position (visible from the spark plug slot when the piston is at maximum stroke).
- Restarting work
When you wish to start using the machine again:
- Remove the spark plug.
- Pull the starter wire a couple of times to eliminate all excess oil.
- Check the spark plug as described in chapter "Checking the spark plug".
- Prepare the machine as indicated in the paragraph entitled "Preparing for work".
8. IDENTIFICATION OF FAULTS
PROBLEM LIKELY CAUSE SOLUTION
| 1) The engine will not start or will not keep running | - Incorrect starting procedure | - Follow the instructions (see chap. 5) |
| - Dirty spark plug or incorrect distance between the electrodes | - Check the spark plug (see chap. 7) | |
| - Air filter clogged | - Clean and/or replace the filter (see chap. 7) | |
| - Carburation problems | - Contact your Retailer | |
| 2) The engine starts but is lacking in power | - Air filter clogged | - Clean and/or replace the filter (see chap. 7) |
| - Carburation problems | - Contact your Retailer | |
| 3) The engine runs irregularly and lacks in power when revved | - Dirty spark plug or incorrect distance between the electrodes | - Check the spark plug (see chap. 7) |
| - Carburation problems | - Contact your Retailer | |
| 4) The engine gives off an excessive amount of smoke | - Incorrect composition of the fuel mix | - Prepare the fuel mix according to the instructions (see chap. 4) |
| - Carburation problems | - Contact your Retailer |
9. TECHNICAL SPECIFICATIONS
| MODEL | HTM 60 | HTM 75 |
| Displacement cm ^3 | 25.4 25.4 | |
| Power kW 0.8 0.8 | ||
| Spark plug NGK BPMR6Y NGK BPMR6Y | ||
| Petrol : oil ratio | 50 : 1 | 50 : 1 |
| Tank capacity litres 0.5 0.5 | ||
| Trimming length mm | 550 | 700 |
| Acoustic level (according to EN 27917) dB(A) | 90.5 | 91 |
| Vibration level m/s ^2 | 2.5 - 5.4 | 7.4 - 6.0 |
| Mass kg 5.7 5.4 | ||
Cher Client,
natural_image
Two icon-style symbols: one open book and one closed book, both enclosed in a circle (no text or symbols)
natural_image
Icon of a person wearing a helmet and safety goggles, enclosed in a black circle (no text or symbols)
natural_image
Two black circular icons with white hand and sock symbols, no text or numbers present

natural_image
Two icon-style symbols: one open book and one closed book, both enclosed in a circle (no text or symbols)
natural_image
Icon of a person wearing a helmet and safety goggles, enclosed in a black circle (no text or symbols)
natural_image
Two black circular icons with white hand and sock symbols, no text or numbers present

PROBLEMA CAUSA PROVÁVEL SOLUÇÃO
MOTOR STOPU (Res. 4)
natural_image
Two icon-style symbols: one open book and one closed book, both enclosed in a circle (no text or symbols)
natural_image
Icon of a person wearing a helmet and safety goggles, enclosed in a black circle (no text or symbols)
natural_image
Two black circular icons with white hand and sock symbols, no text or numbers present

POLTTOAINESEOKSEN VALMISTUS
natural_image
Two icon-style symbols: one open book and one closed book, both enclosed in a circle (no text or symbols)
natural_image
Icon of a person wearing a helmet and safety goggles, enclosed in a black circle (no text or symbols)
natural_image
Two black circular icons with white hand and sock symbols, no text or numbers present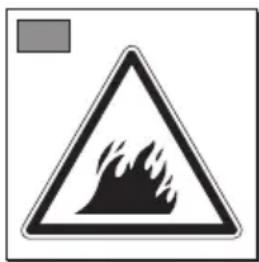

AFLSUTNING AF ARBEJDET
D) VEDLIKEHOLD OG LAGRING
7. VEDLIKEHOLD OG LAGRING
natural_image
Two icon-style symbols: one open book and one closed book, both enclosed in a circle (no text or symbols)
natural_image
Icon of a person wearing a helmet and safety goggles, enclosed in a black circle (no text or symbols)
natural_image
Two black circular icons with white hand and sock symbols, no text or numbers present
OBDOBÍ DLOUHODOBÉ NEČINNOSTI
DŮLEŽITÉ
natural_image
Two icon-style symbols: one open book and one closed book, both enclosed in a circle (no text or symbols)
natural_image
Icon of a person wearing a helmet and safety goggles, enclosed in a black circle (no text or symbols)
natural_image
Two black circular icons with white hand and sock symbols, no text or numbers present

UPORABA MOTORJA (Slika 3)
DALJŠE OBDOBJE NEUPORABE
POMEMBNO
Če stroja ne nameravate
natural_image
Two simple line drawings: one open book and one closed book, both enclosed in a black circle (no text or symbols)
natural_image
Icon of a person wearing a helmet and safety goggles, enclosed in a black circle (no text or symbols)
natural_image
Two black circular icons with white hand and sock symbols, no text or numbers present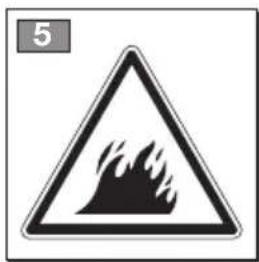

UPORABA MOTORA (SI. 3)
natural_image
Two icon-style symbols: one open book and one closed book, both enclosed in a circle (no text or symbols)
natural_image
Icon of a person wearing a helmet and safety goggles, enclosed in a black circle (no text or symbols)
natural_image
Two black circular icons with white hand and sock symbols, no text or numbers present

natural_image
Two icon-style symbols: one open book and one closed book, both enclosed in a circle (no text or symbols)
natural_image
Icon of a person wearing a helmet and safety goggles, enclosed in a black circle (no text or symbols)
natural_image
Two black circular icons with white hand and sock symbols, no text or numbers present

4. PASIRUOŠIMAS DARBUI
JRENGINIO PATIKRINIMAS
Prieš pradedant darba reikia:
natural_image
Two icon-style symbols: one open book and one closed book, both enclosed in a circle (no text or symbols)
natural_image
Icon of a person wearing a helmet and safety goggles, enclosed in a black circle (no text or symbols)
natural_image
Two black circular icons with white hand and sock symbols, no text or numbers present