
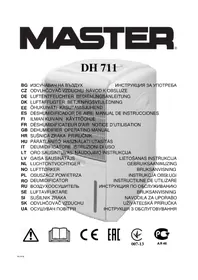
DH 720 - Humidifier Master - Free user manual and instructions
Find the device manual for free DH 720 Master in PDF.
| Brand | Master |
| Model | DH 720 |
| Product type | Dehumidifier |
| Power supply | 230 V ~ 50 Hz |
| Refrigerant | R290 (propane) |
| Minimum room area | 4 m² |
| Operating temperature range | 5 °C to 35 °C |
| Humidity modes | Continuous, 40%, 50%, 60%, 70% |
| Timer | 1 to 24 hours |
| Fan speed | High / Low |
| Drying function | Yes (turbo mode for clothes drying) |
| Display | Ambient temperature and humidity |
| Humidity indicator light | Blue (>70%), Green (50-70%), Red (<50%) |
| Dust filter | Washable with water |
| Activated carbon filter | Non-washable, replace periodically |
| Continuous drainage | Possible via Ø11 mm hose (not supplied) |
| Mobility | Swivel casters |
Frequently Asked Questions - DH 720 Master
User questions about DH 720 Master
0 question about this device. Answer the ones you know or ask your own.
Ask a new question about this device
Download the instructions for your Humidifier in PDF format for free! Find your manual DH 720 - Master and take your electronic device back in hand. On this page are published all the documents necessary for the use of your device. DH 720 by Master.
USER MANUAL DH 720 Master
| USER AND MAINTENANCE BOOK | en |
| LIBRETTO USO E MANUTENZIONE | it |
| BEDIENUNGS- UND WARTUNGSANLEITUNG | de |
| MANUAL DE INSTRUCCIONES PARA EL USO Y MANTENIMIENTO | es |
| MANUEL D'UTILISATION ET DE MAINTENANCE | fr |
| HANDLEIDING VOOR GEBRUIK EN ONDERHOUD | nl |
| MANUAL DE USO E MANUTENÇÃO | pt |
| VEJLEDNING OM BRUG OG VEDLIGEHOLDELSE | da |
| INSTRUKCJA OBSLUGI I KONSERWACJI | pl |
| РУКОВОДСТВО ПО ЭКСПЛУАТАЦИИ И ТЕХНИЧЕСКОМУ ОБСЛУЖИВАНИЮ | ru |
| PŘÍRUČKA PRO POUŽTÍ A ÚDRŽBU | cs |
| HASZNÁLATI ÉS KARBANTARTÁSI KÉZIKÖNYV | hu |
| NAUDOJIMO IR PRIEZIÜROS KNYGELE | It |
| LIETOŠANAS UN TEHNISKÄS APKOPES GRÂMATINA | lv |
| LIVRET DE UTILIZARE SI INTRETINERE | ro |
| ИНСТРУКЦІЯ З ОБСЛУГОВУВАННЯ | uk |
| 使用和维护手册 | zh |
ТЕХНИЧЕСКИ ДАНИ - ТЕЧНИСКÉ ÚDAJE - TECHNISCHE DATEN - TEKNISK DATA - TEHNILISED ANDMED - ESPECIFICACIONES TÉCNICAS - TEKNISET TIEDOT - DONNÉES TECHNIQUES - TECHNICAL DATA - TEHNIČKI PODACI - MÓSZAKI ADATOK - DATI TECNICI - TECHNINIAI DUOMENYS - TEHNISKIE DATI - TECHNISCHE GEGEVENS - TEKNISKE DATA - DANE TECHNICZNE - DADOS TÉCNICOS - DADOS TÉCNICOS - INFORMAHI TEHNICE - ТЕХНИЧЕСКИЕ ДАННЫЕ - TEKNISKA DATA - TEHNIČNI PODATKI - TECHNICKÉ PARAMETRE - ТЕХНІЧНІ ДАНИ - 技术参数
| MODEL DH 720 P | |
 | ~220V-240V-B / 50Hz - Гц415W - Вт / 1,9A |
 (RT 30°C)RH 80% (RT 30°C)RH 80% | 20 l/day - л / 24ч |
| [2DC6] | Rotary |
 | R-290 0,09kg - кг |
 | 150 m3/h - м3/ч |
 | 5 ~ 32°C |
 | 35 ~ 95% |
 | 5 L - л |
 | 336 x 210 x 569 mm - мм |
 | 11 kg - кг |
 | 0,0003 |
| GWP | 3 |
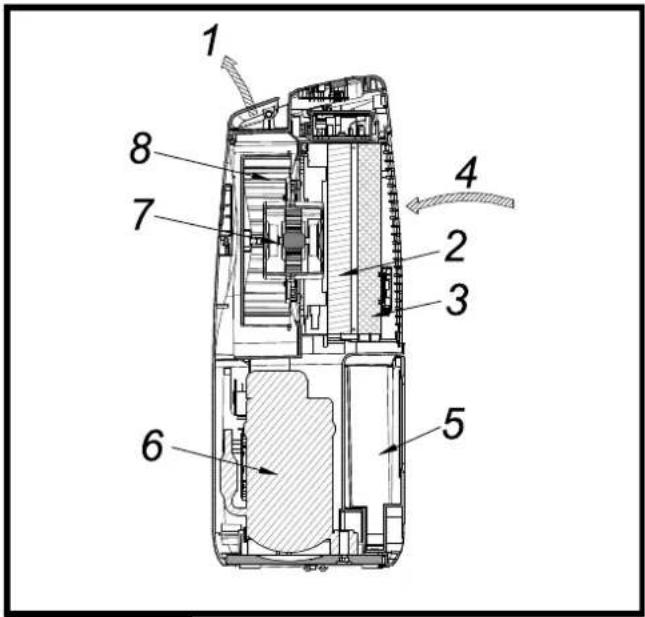
Fig. 1 F
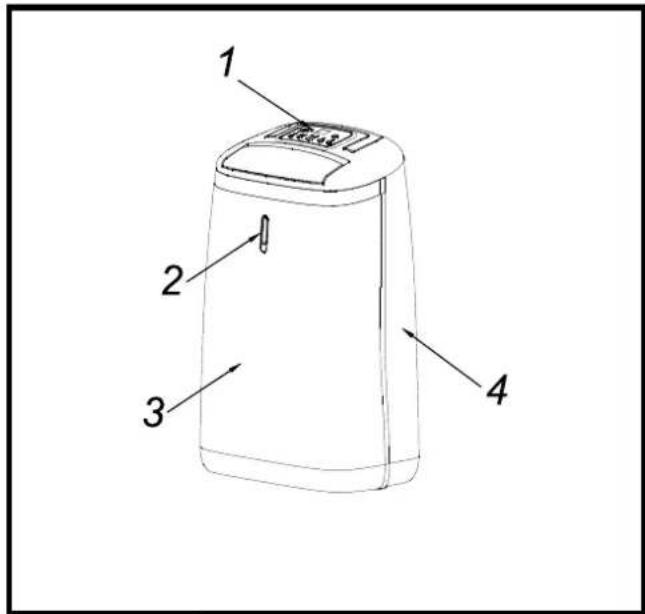
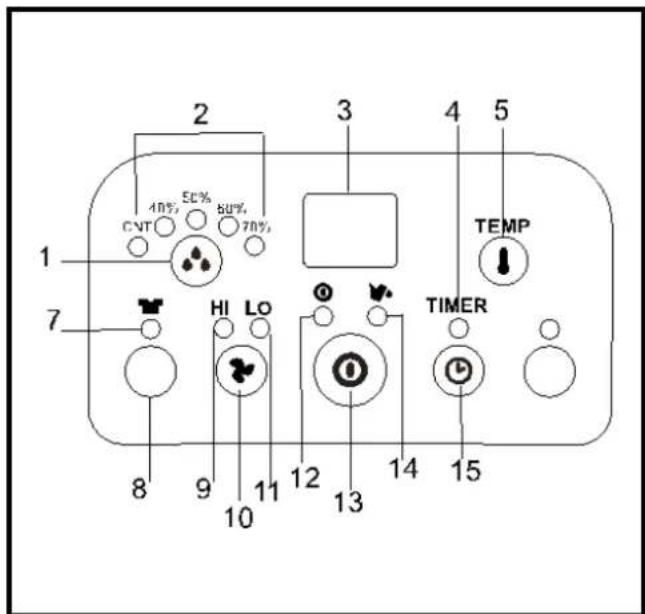

Fig. 3 F
natural_image
Line drawing of a portable electric heater with ventilation slots and plug (no text or symbols)Fig. 6Fi
natural_image
Line drawing of a portable air conditioner unit with a separate housing and ventilation panel (no text or symbols)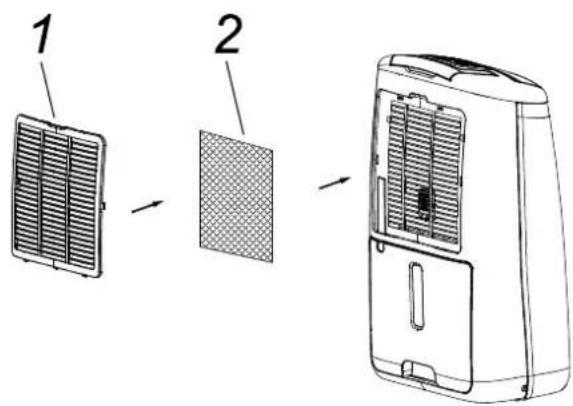
Fig. 7
CONTENTS
1... HOW IT WORKS
2... WHERE TO POSITION
3... BEFORE USE
4... PARTS
5... OPERATION
6... DRAINAGE
7... MAINTENANCE
8... TROUBLE SHOOTING
PLEASE TAKE TIME TO READ THIS MANUAL CAREFULLY BEFORE USE AND SAVE IT FOR FUTURE REFERENCE.
▶ 1. HOW IT WORKS
This product is a dehumidifier. It controls relative humidity by passing the air through the unit, forcing the excess moisture to condensate over the cooling elements. Contact with this cold surface causes the moisture in the air to condense. This condensed water then drains safely into the water tank. The dried air then passes through the condenser where it is slightly warmed and re-enters the room at a slightly elevated temperature.
▶ FIG. 1
- Dry warmer air
- Condenser (warmed coil)
- Evaporator (cold refrigerated coil)
- Moist saturated air
- Water tank
- Compressor
- Motor
- Fan rotor
▶ 2. WHERE TO POSITION
Excess moisture will travel throughout your home, in the same way that cooking smells waft to every room in the house. For this reason, the dehumidifier should be positioned, so that it can draw this moist air towards it from all over the home.
Alternatively, if you have a serious problem in one area you can begin by positioning the dehumidifier close to this area and later moving it to a more central point.
When positioning the dehumidifier, ensure that it is placed on a level surface and that there is a minimum of 10 cm (4") of space on either side of the unit to allow for efficient airflow.
This dehumidifier is fitted with castors for extra mobility, if you move the unit, it should first be switched off and the water tank emptied.
We do not recommend the use of an extension lead, so please try to ensure that the unit is sufficiently close to a fixed mains socket. If it is necessary to use am extension lead, please ensure the diameter of the wires of the cable is at least 1 mm ^2 .
When the dehumidifier is in operation, outside doors and windows should be closed when necessary for most efficient use.
▶ 3. BEFORE USE CAUTION!

These symbols on your device mean:
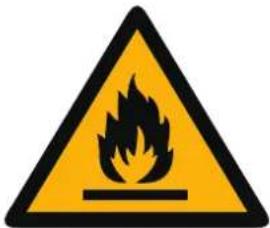
- This appliance is filled with Propane gas R290. Follow strictly the manufacturer's instruction concerning use and repairs!
▶ Before using the machine, read carefully the entire in struction manual.
▶ Do not install, operate or store the device in a room smaller than 4m^2 .
GENERAL CAUTIONS
▶ FOR INDOOR USE ONLY.
▶ Do not use in cabinet, closet, boats, caravans or similar locations.
▶ Do not use the unit in swimming pools, washrooms or similar wet areas.
▶ Leave the unit to stand for 12 hours before connecting to the mains supply after transport or when it has been titled (ex. During cleaning).
▶ Only use the unit in the upright position on a flat level surface (even during transport!) and at least 50cm from any objects.
▶ Do not use the unit in a potentially explosive environment containing combustible liquids, gases or dusts.
▶ Do not use the appliance in the vicinity of flammable or explosive substances or fuels. Never use any paint, cleaning sprays, anti-insect sprays or similar near the unit; this could deform the plastic or cause electrical damage.
▶ Ensure that there is at least 50cm between the sides of the appliance and any flammable, heating materials.
▶ Do not place objects on the unit or restrict air inlet/outlet.
▶ Avoid the unit from splash.
▶ Closely supervise any children and pets when the unit is in use.
▶ CHILDREN SHALL NOT PLAY WITH APPLIANCE.
▶ Cleaning and user maintenance shall not be made by children without supervision.
▶ Switch off and unplug the unit when not in use.
▶ Never leave a functioning device unsupervised.
▶ Do not pull the unit along by the cord.
- Avoid over-twisting, -coiling, -pulling the power cord, never use nylon or iron wire to tide the power cord.
▶ Make sure that the plug and socket remain visible and accessible at all the time.
▶ Do not use extension cords.
▶ Never reach to retrieve the unit if it has fallen in water. In such case, immediately pull the plug. Have the unit checked before using it again.
▶ The appliance shall be installed in accordance with national wiring regulations.
▶ Do not exceed the recommended room size for max. efficiency.
▶ Close the doors and windows.
▶ Keep curtains or blinds closed during the sunniest hours of the day.
▶ Keep filters clean.
▶ Once room has reached the desired conditions, reduce the setting for temperature and ventilation.
▶ Do not turn on the appliance if you have discovered damage to the appliance, cord or plug, if the appliance is malfunctioning or if there are signs of any other defect. Return the complete product to the vendor or to a certified electrician for inspection and/or repair. Always ask for original parts. The appliance (incl. cord and plug) may only be opened and/or repaired by properly authorized and qualified persons.
▶ Suggest to send the unit for professional maintenance periodically.
▶ ONLY A LICENSED PROFESSIONAL IS ALLOWED TO DISMANTLE OR MODIFY THE APPLIANCE.
▶ THE MACHINE IS TO BE USED ONLY FOR ITS PRESCRIBED PURPOSE. ANY OTHER USE IS DEEMED TO BE A CASE OF MISUSE. THE USER/OPERATOR, NOT THE MANUFACTUER WILL BE LIABLE FOR ANY DAMAGE OR INJURIES OF ANY KIND CAUSED AS A RESULT OF THIS.
▶ Always keep the unit in vertical position.
▶ Keep all foreign objects away from the air intake or output openings.
▶ The mains supply must conform to the specification shown on the rating plate at the back of the unit.
▶ If the supply cord is damaged, it must be replaced by an approved service representative or a similar qualified person in order to avoid a hazard.
▶ Never use the plug to start and stop the unit. Always use switch on the control panel.
▶ Before moving the unit, first switch off, then unplug and empty the water tank.
- Don't use bug sprays or other flammable cleaners on the unit.
▶ Never pour or spray water over the unit.
- THIS APPLIANCE IS NOT INTENDED FOR USE BY PERSONS (INCLUDING CHILDREN) WITH REDUCED PHYSICAL, SENSORY OR MENTAL CAPABILITIES, OR LACK OF EXPERIENCE AND KNOWLEDGE, UNLESS THEY HAVE BEEN GIVEN SUPERVISION OR INSTRUCTION CONCERNING USE OF THE APPLIANCE BY A PERSON RESPONSIBLE FOR THEIR SAFETY. CHILDREN SHOULD BE SUPERVISED TO ENSURE THAT THEY DO NOT PLAY WITH APPLIANCE.
▶ SAFETY RELATING TO REFRIGERANT R290:
▶ Read these warnings carefully.
▶ This appliance contains the refrigerant R290. R290
is a refrigerant that complies with the relevant European Directives. Never perforate the refrigerant circuit. R290 is flammable (GWP3)!
▶ Do not use means to accelerate the defrosting process or to clean, other than those recommended by the manufacturer.
The appliance shall be stored in a room without continuously operating ignition sources (for example: open flames, an operating gas appliance or an operating electric heater).
▶ Do not pierce or burn any of the components of the cooling circuit of the unit. Do not set light to the unit.
▶ The appliance shall be stored so as to prevent mechanical damage from occurring.
▶ Appliance should be installed, operated and stored in a room with a floor area larger than 4m^2 .
▶ Be aware that the refrigerants may not contain an odour, which means you cannot smell leaks.
▶ Compliance with national gas regulations shall be observed.
▶ Keep ventilation openings clear of obstruction.
▶ A warning that the appliance shall be stored in a well-ventilated area where the room size corresponds to the room area as specified for operation.
▶ Any person who is involved with working on or breaking into a refrigerant circuit should hold a current valid certificate from an industry-accredited assessment authority, which authorizes their competence to handle refrigerants safely in accordance with an industry recognized assessment specification.
▶ Servicing shall only be performed on the grounds as recommended by the equipment manufacturer. Maintenance and repair requiring the assistance of other skilled personnel shall be carried out under the supervision of the person competent in the use of flammable refrigerants.
IMPORTANT!
Do not use this unit at ambient temperatures below 5^ C, to prevent the possibility of a heavily ice up evaporating coil.
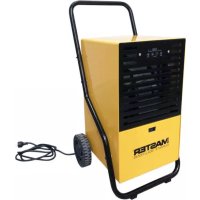
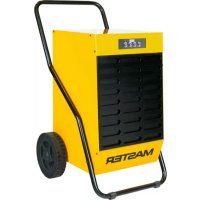
▶ ▶ 4. PARTS
▶ Front FIG. 2
-
Control panel
-
Ambient light
-
Front plate
-
Rear plate
▶ Rear FIG. 3
-
Wind flap
-
Handle
-
Air inlet / Filters
-
Water level window
-
Water tank
▶ 5. OPERATION
▶ Control panel FIG. 4
-
Humidity setting button
-
Working mode indicator (continuous working, humidity 40%, 50%, 60%, 70%)
-
Humidity/Temperature display
-
Timer operation indicator
-
Temperature display button
-
DRYER indicator
-
DRYER button
-
High ventilation indicator
-
Speed/Ventilation button
en
- Low ventilation indicator
- Power indicator
- ON/OFF (power) button
- "Full Water" indicator
- TIMER button
Please note, the indicator in the front plate will light on in 3 different colors to reflect the ambient humidity level. By this, the user can understand immediately what the ambient humidity condition is: Blue light – room humidity > 70% Green light – room humidity 50\~70% Red light – room humidity < 50% Red light flash – water full alarm
Operation
- Plug the unit into a correct mains socket. (Please refer to the rating label at the rear of the unit for correct voltage/frequency.)
- Press ON/OFF button to turn on the unit. The compressor will start to work.
- Press humidity setting button to set the working model you need: continuous working, humidity 40%, 50%, 60% or 70%. The relative indicator will light on.
- Press speed/ventilation button to set the ventilation speed, high or low. The relative indicator will light on.
- Press the TIMER button to set the operating hour you need (1\~24 hours). The display window will show the hour(s) you set as you press the TIMER button, after releasing it for 8 seconds around, the display window will return to the room humidity. As the set time has been reached, the compressor will stop working automatically.
- By pressing the "TEMP" button, the display window will show the room temperature, after releasing the button for 8 seconds around, the display window will return to the room humidity.
- DRYER function is turbo ventilation to dry the moisture in the air continuously, so it could help to dry the laundry.
- To turn off the unit, press ON/OFF button again.
- Pre-setting function By pressing TIMER button but without turning on the other functions (including ON/OFF button), you can PRE-SET the time for the machine to work. For example, if you press the timer to '2', the unit will work automatically after 2 hours
▶ 6. DRAINAGE
While the water tank is full, the compressor will stop for self-protection and the water full indicator will turn into red. To move the water tank, pull it out squarely from the unit. After emptying the water tank, place the water tank into space. Make sure it is properly positioned, in order for the 'water full' sign to go out and your dehumidifier is operating. Please note, in case, the water tank has not been positioned well, the water full indicator will turn into red.
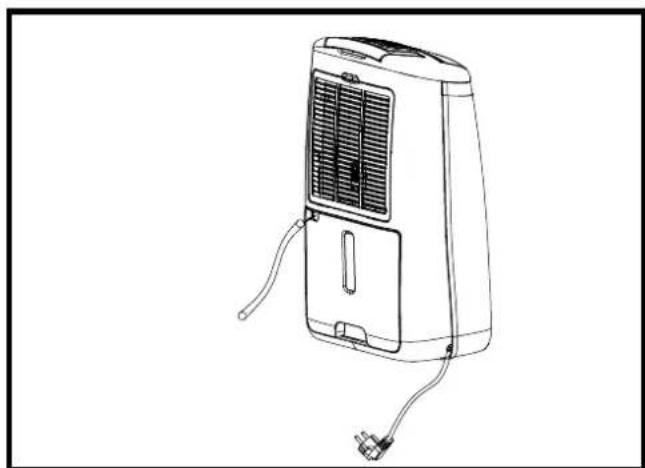
▶ ▶ CONTINUOUS DRAINAGE
When the dehumidifier is operated at very high humidity levels, the water tank will require more frequent drainage. In this situation, it may be more convenient to set the unit up for continuous drainage with the following procedures:
- Pull out the water tank (FIG. 5).
- Connect the drain hole with water tube of inner diame -
ter: 11 mm. The water tube is not supplied with the unit (FIG. 6).
3. Ensure the water will always drain away freely and the tube will remain in right place. Note! In very cold weather conditions, precautions should be taken to prevent the water tube from freezing.
4. Put the water tank back to its position.
▶ 7. MAINTENANCE
Always unplug the unit from the mains before carrying out any maintenance or cleaning of the unit.
CLEANING THE BODY
Use soft cloth to wipe the unit clean.
Don't ever use volatile chemicals, gasoline, detergents, chemically treated clothes, or other cleansing solutions. These all could possibly hurt the cabinet.
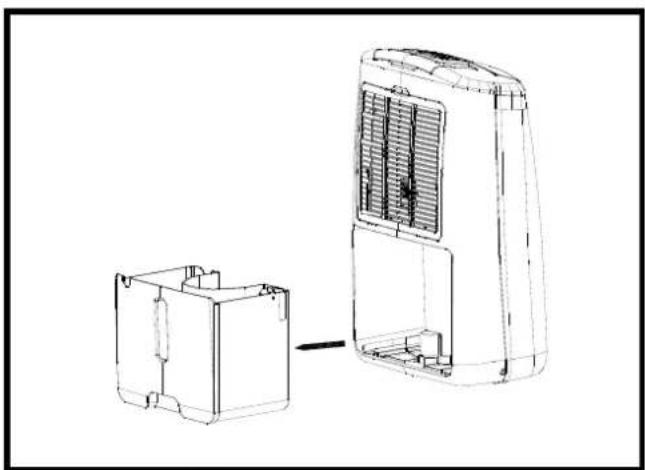
CLEANING THE FILTER
This dehumidifier is equipped with 2 filters (FIG. 7):
- ANTI-DUST FILTER
Extract the filter holder, remove the active carbon filter.
Use a vacuum cleaner or tap the filter lightly for easy cleaning. If the filter is particularly dirty, use warm water with a small amount of a small amount of medium strength detergent.
Make sure the filter is completely dry before replacing. Do not expose the filter to sunlight.
- ACTIVE CARBON FITLER (for capturing the particles of dust suspended in the air and preventing the production of bacteria.)
The active carbon filter placed under the anti-dust filter is not washable. Its life span is variable and depends on the ambient conditions where the unit is used. The filter should be checked periodically and replaced if necessary.
STORAGE
If not use the unit for an extended period of time. Please: Turing the unit off, unplug and tidy AC cord.
▶ Completely empty the water tank and wipe it clean.
▶ Cover the unit and store where it will not receive direct sunlight.
▶ 8. TROUBLE SHOOTING
THE UNIT DOES NOT OPERATE:
▶ Is the unit plugged in?
▶ Is the house electricity on?
▶ Is the room temperature below 5^ C or above 35^ C? If so, then it is out of the working range of the unit.
▶ Ensure the humidistat (or ON/OFF switch) is turned on.
▶ Check the water tank is positioned properly in the unit and it is not full.
▶ Make sure the air inlet and outlet are not obstructed.
THE UNIT SEEMS TO DO NOTHING:
▶ Is the filter dusty, contaminated?
▶ Is the air intake or outlet blocked up?
▶ Is the room humidity already quite low?
THE UNIT SEEMS TO DO LITTLE:
▶ Are too many windows or doors open?
▶ Is there something in the room producing lots of humidity?
THE UNIT IS TOO NOISY:
▶ Check whether the unit is sitting on a level surface.
THE UNIT IS LEAKING:
▶ Make sure the unit is in good shape.
▶ If you are not using continuous drainage, make sure the rubber plug (at the bottom of the unit) is in its position.
| Error codes on display | ||
| Code Cause Solution | ||
| E1 The room temperature sensor (with resin head) is open or short circuit fault | Checking if the room temperature sensor is plugged in properly on the PCB. | |
| Replace the room temperature sensor of room temp. | ||
| Replace main PC board. | ||
| The humidity level is below RH40% | ||
| E2 The system sensor (with copper head) is open or short circuit fault | Checking if the system sensor is plugged in properly on the PCB. | |
| Replace the system sensor | ||
| Replace main PC board. | ||
| E3 The Temperature Control (TC) sensor wire is loosen or breaks down.The machine will beep for 3 sounds, the E3 code will flash on every one second.The compressor and fan motor will stop. | Pls check and replace it. | |
| E5 When the TC sensor wire senses the temperature is > or = 130oC more than 5 seconds, the E5 code will flash on every second, the machine will beep for 3 sounds.The compressor and fan motor stop. | When it happens, pls press ON/OFF button on and off again to check if E5 signal still exists, if yes, that means the compressor system is abnormal.Pls check it and get rid of the mal-function. | |

▶ 8. DIAGNOSTICAR LOS PROBLEMAS
EL APARATO NO ARRANCA:

▶ 6. EVACUATION D'EAU
HET APPARAAT MAAKT VEEL LAWAAI:
▶ Feche as portas e as janelas.

▶ LAD B∅RNENE IKKE LEGE MED APPARATET.
APPARATETS YDEEVNE ER MEGET SVAG:
▶ 6. ODPROWADZENIE WODY


▶ NAUDOTI TIK PATALPOSE.

这些标识在你的设备上的意思是:
Stefano Verani (Member of the Board)

- CONTENTS
- PLEASE TAKE TIME TO READ THIS MANUAL CAREFULLY BEFORE USE AND SAVE IT FOR FUTURE REFERENCE.
- ▶ 1. HOW IT WORKS
- ▶ FIG. 1
- ▶ 2. WHERE TO POSITION
- ▶ 3. BEFORE USE CAUTION!
- GENERAL CAUTIONS
- IMPORTANT!
- ▶ ▶ 4. PARTS
- ▶ 5. OPERATION
- en
- Operation
- ▶ 6. DRAINAGE
- ▶ ▶ CONTINUOUS DRAINAGE
- ▶ 7. MAINTENANCE
- CLEANING THE BODY
- CLEANING THE FILTER
- STORAGE
- ▶ 8. TROUBLE SHOOTING
- THE UNIT DOES NOT OPERATE:
- THE UNIT SEEMS TO DO NOTHING:
- THE UNIT SEEMS TO DO LITTLE:
- THE UNIT IS TOO NOISY:
- THE UNIT IS LEAKING:
- ▶ 8. DIAGNOSTICAR LOS PROBLEMAS
- EL APARATO NO ARRANCA:
- ▶ 6. EVACUATION D'EAU
- HET APPARAAT MAAKT VEEL LAWAAI:
- APPARATETS YDEEVNE ER MEGET SVAG:
- ▶ 6. ODPROWADZENIE WODY
Brand : Master
Model : DH 720
Category : Humidifier