
DHA 10 - Humidifier Master - Free user manual and instructions
Find the device manual for free DHA 10 Master in PDF.
| Product type | Adsorption dehumidifier (without compressor) |
| Brand | Master |
| Model | DHA 10 |
| Main functions | Dehumidification, clothes drying, silent and turbo modes |
| Humidity setting | Continuous, 40%, 50%, 60%, 70% |
| Timer | 1 to 24 hours |
| Water tank capacity | Not specified, manual drainage |
| Continuous drainage | Possible via hose (diameter 12 mm, not supplied) |
| Air filter | Washable dust filter and replaceable activated carbon filter |
| Power supply | Refer to the rating plate (220-240 V, 50 Hz typical) |
| Power consumption | Not specified |
| Noise level | Not specified |
| Safety | Tilt switch, overheat protection, automatic shut-off when tank full |
| Maintenance | Clean the dust filter regularly, check the carbon filter every 6 months, drain the tank |
| Storage | Unplug, empty the tank, clean, cover and store away from sunlight |
| Spare parts available | Air filter, water tank |
| Repairability | Replacement of power cord by an authorized representative |
| Warranty | Not specified |
| Operating temperature | Ideal below 5°C (effective at low temperature) |
| Safety distance | At least 20 cm on each side, 40 cm in front for drying, 1 m from flammable materials |
Frequently Asked Questions - DHA 10 Master
User questions about DHA 10 Master
0 question about this device. Answer the ones you know or ask your own.
Ask a new question about this device
Download the instructions for your Humidifier in PDF format for free! Find your manual DHA 10 - Master and take your electronic device back in hand. On this page are published all the documents necessary for the use of your device. DHA 10 by Master.
USER MANUAL DHA 10 Master
Pastrengo (VR) - Italy
info@mcsitaly.it
MCS Central Europe Sp. z o.o.
ul. Magazynowa 5A,
62-023 Gądki, Poland
office@mcs-ce.pl
MCS Russia LLC
ul. Transportnaya 22 vl 2,
142802, Stupino, Moscow region, Russia
info@mcsrussia.ru
MCS China LTD
Unit A1, No. 1515, Jinshao Rd.,
Baoshang Industrial Zone,
Shanghai,200949,China
office@mcs-china.cn

| USER AND MAINTENANCE BOOK | en |
| LIBRETTO USO E MANUTENZIONE | it |
| BEDIENUNGS- UND WARTUNGSANLEITUNG | de |
| MANUAL DE INSTRUCCIONES PARA EL USO Y MANTENIMENTO | es |
| MANUEL D'UTILISATION ET DE MAINTENANCE | fr |
| HANDLEIDING VOOR GEBRUIK EN ONDERHOUD | nl |
| VEJLEDNING CM BRUG OG VEDLIGEHOLDElse | da |
| KÄYTTÖ- JA HUOLTO-OHJE | fi |
| HEFTE FOR BRUK OG VEDLIKEHOLD | no |
| ANVÄNDAR- OCH UNDERHÄLLSHANDBOK | sv |
| INSTRUKCJA OBSŁUGI I KONSERWACJI | pl |
| РУКОВОДСТВО ПО ЭКСПУТАЦИИ И ТЕХНИЧЕСКОМУ ОБСЛУЖИВАНИЮ | ru |
| PŘÍRUČKA PRO POUŽITI A ÚDRŽBU | cs |
| HASZNÁLATI ÉS KARBANTARTÁSI KÉZIKÖNYV | hu |
| PRIROČNIK Z NAVODILI ZA UPORABO IN VZDRŽEVANJE | sl |
| KNJÍZICA O UPORABI I ODRŽAVANJU | hr |
| NAUDOJIMO IR PRIEZŮROS KNYGELE | lt |
| LIETOŠANAS UN TEHNISKÄS APKOPES GRÂMATINA | lv |
| KASUTUS- JA HOOLDUSJUHEND | et |
| LIVRET DE UTILIZARE SI ÎNTRETINERE | ro |
| PRÍRUČKA PRE POUŽITIE A ÚDRŽBU | sk |
| НАРЬЧНИК ЗА ИЗПОЛЗВАНЕ И ПОДДРЬЖКА | bg |
| ІНСТРУКЦЯ З ОБСЛУГОВУВАННЯ | uk |
Edition 14 - Rev.2
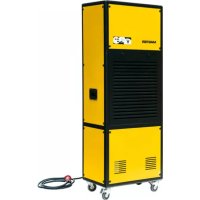
DHA 10
ТЕХНИЧЕСКИ ДАНИ - TECHNICKÉ ÚDAJE - TECHNISCHE DATEN - TEKNISK DATA - TEHNILISED ANDMED - ESPECIFICACIONES TÉCNICAS - TEKNISET TIEDOT - DONNÉES TECHNIQUES - TECHNICAL DATA - TEHNIČKI PODACI - MÓSZAKI ADATOK - DATI TECNICI - TECHNINIAI DUOMENYS - TEHNISKIE DATI - TECHNISCHE GEGEVENS - TEKNISKE DATA - DANE TECHNICZNE - DADOS TÉCNICOS - INFORMAIII TEHNICE - ТЕХНИЧЕСКИЕ ДАННЫЕ - TEKNISKA DATA - TEHNIČNI PODATKI - TECHNICKÉ PARAMETRE - ТЕХНІЧНІ ДАНИ
| MODEL DHA 10 | |
 | 220V-240V~, 50Hz |
| 230 V | 780W |
| (YCD [3482]) | 9l/day |
 | 200 m3/h |
 | 1 ~ 35°C |
 | 35 ~ 90% |
 | 3,5 L |
 | 445 x 200 x 525 mm |
 | 8,5 kg |

Fig. 1
natural_image
Two line drawings of a room interior with furniture and tiled flooring, no text or symbols present.Fig. 2
Fig. 3
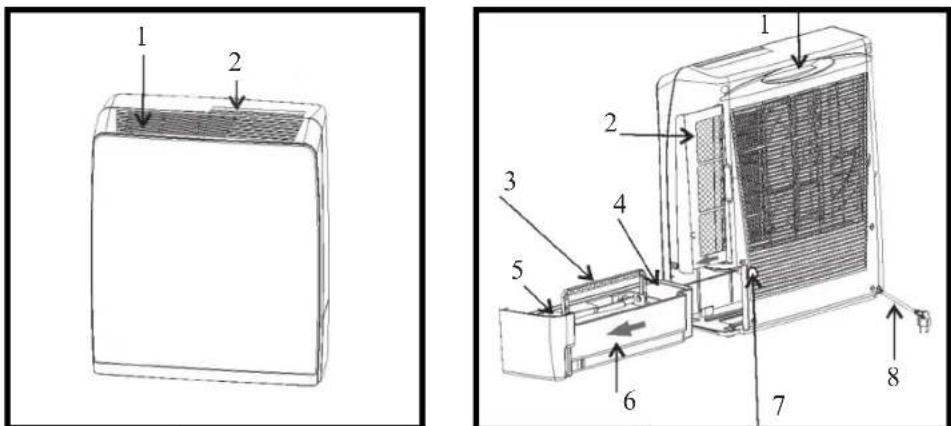
Fig. 4 F
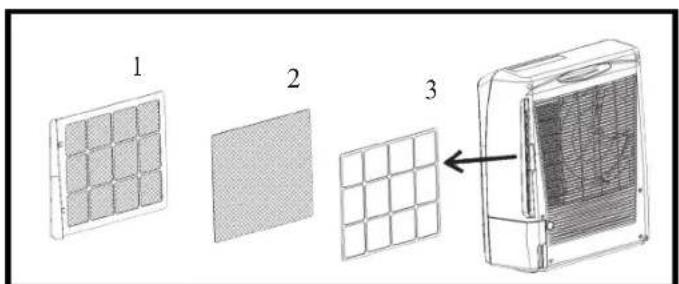
Fig. 6
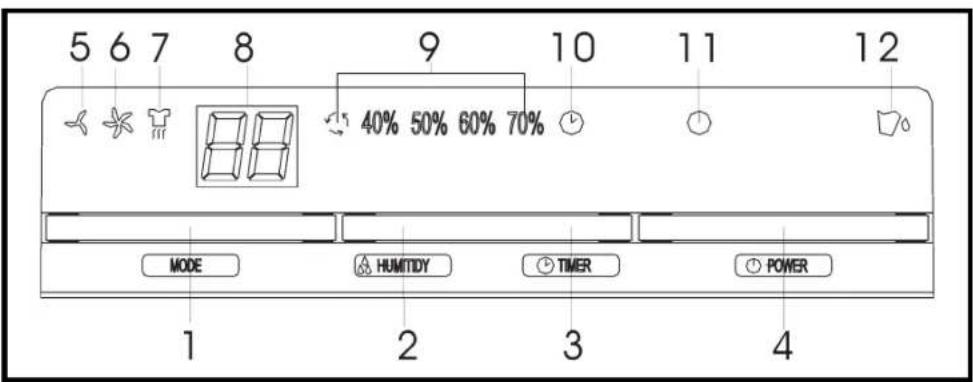
Fig. 7
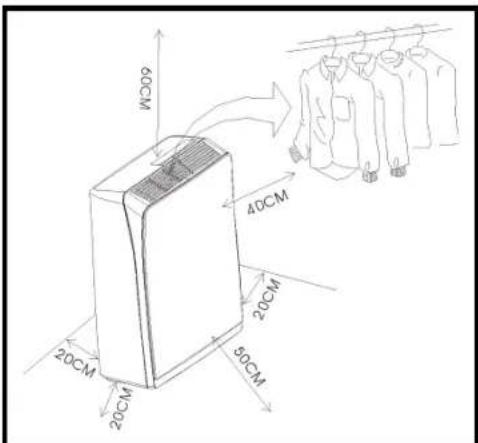
Fig. 8
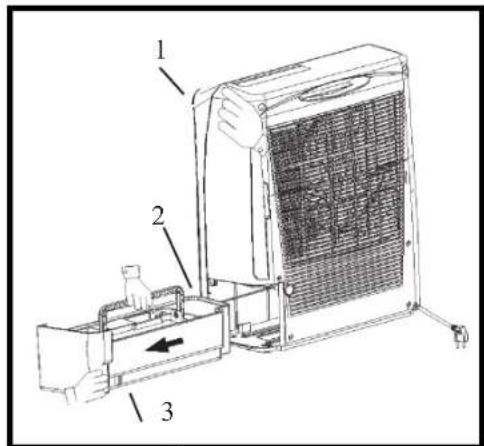
Fig. 9

Fig. 10
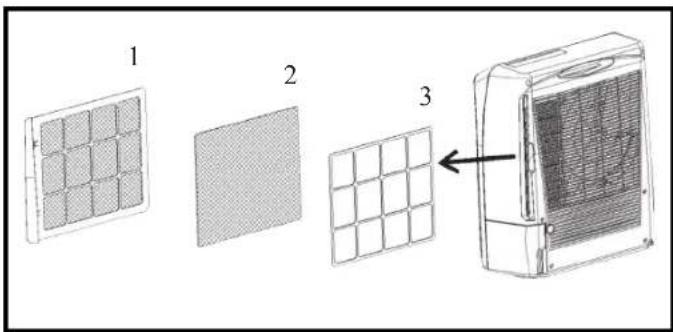
Fig. 11
natural_image
Line drawing of a box with a grid-patterned lid and handle (no text or symbols)Fig. 12
| Instruction Manual | |
| 1... | HOW IT WORKS |
| 2... | WHERE TO POSITION |
| 3... | BEFORE USE |
| 4... | PARTS |
| 5... | PROGRAMMING FEATURE |
| 6... | OPERATION |
| 7... | DRAINAGE |
| 8... | MAINTENANCE |
| 9... | TROUBLE SHOOTING |
⚠️ PLEASE TAKE TIME TO READ THIS MANUAL CAREFULLY BEFORE OPERATION.
PERSONS WHO ARE NOT FAMILIAR WITH THIS MANUAL SHOULD NOT USE THIS DEHUMIDIFIER. WE STRONGLY RECOMMEND KEEPING THIS MANUAL IN A SAFE PLACE FOR FUTURE REFERENCE.
▶ 1. HOW IT WORKS
This is a compressor free dehumidifier which operates without refrigerant. It has an almost consistent rate of water extraction at all temperatures and is more efficient than compressor based dehumidifiers when used at low temperatures below 5^ C.
The operation theory exists in the Dehumidify Wheel (a chemically impregnated rotating wheel). Damp air from the environment is drawn through the unit where it comes into contact with the wheel. The chemical on the wheel removes the moisture from the air and warmed by the heating elements inside. As the wheel rotates to a different position, the heater drives the water from the chemical wheel and the water is condensed through heat exchange system and removed to water tank.
▶ FIG. 1
- Humidity air within the room
- Water recycle after frozen
- Heat exchange elements
- Humidity in the air
- Dehumidify wheel
- Heating elements
- Air wheel
- Dry air discharged from room space
- Air discharge
- Water dropped in to the water tank after dehumidifying operation
- Gathering water after dehumidifying
- Dry air after dehumidifying
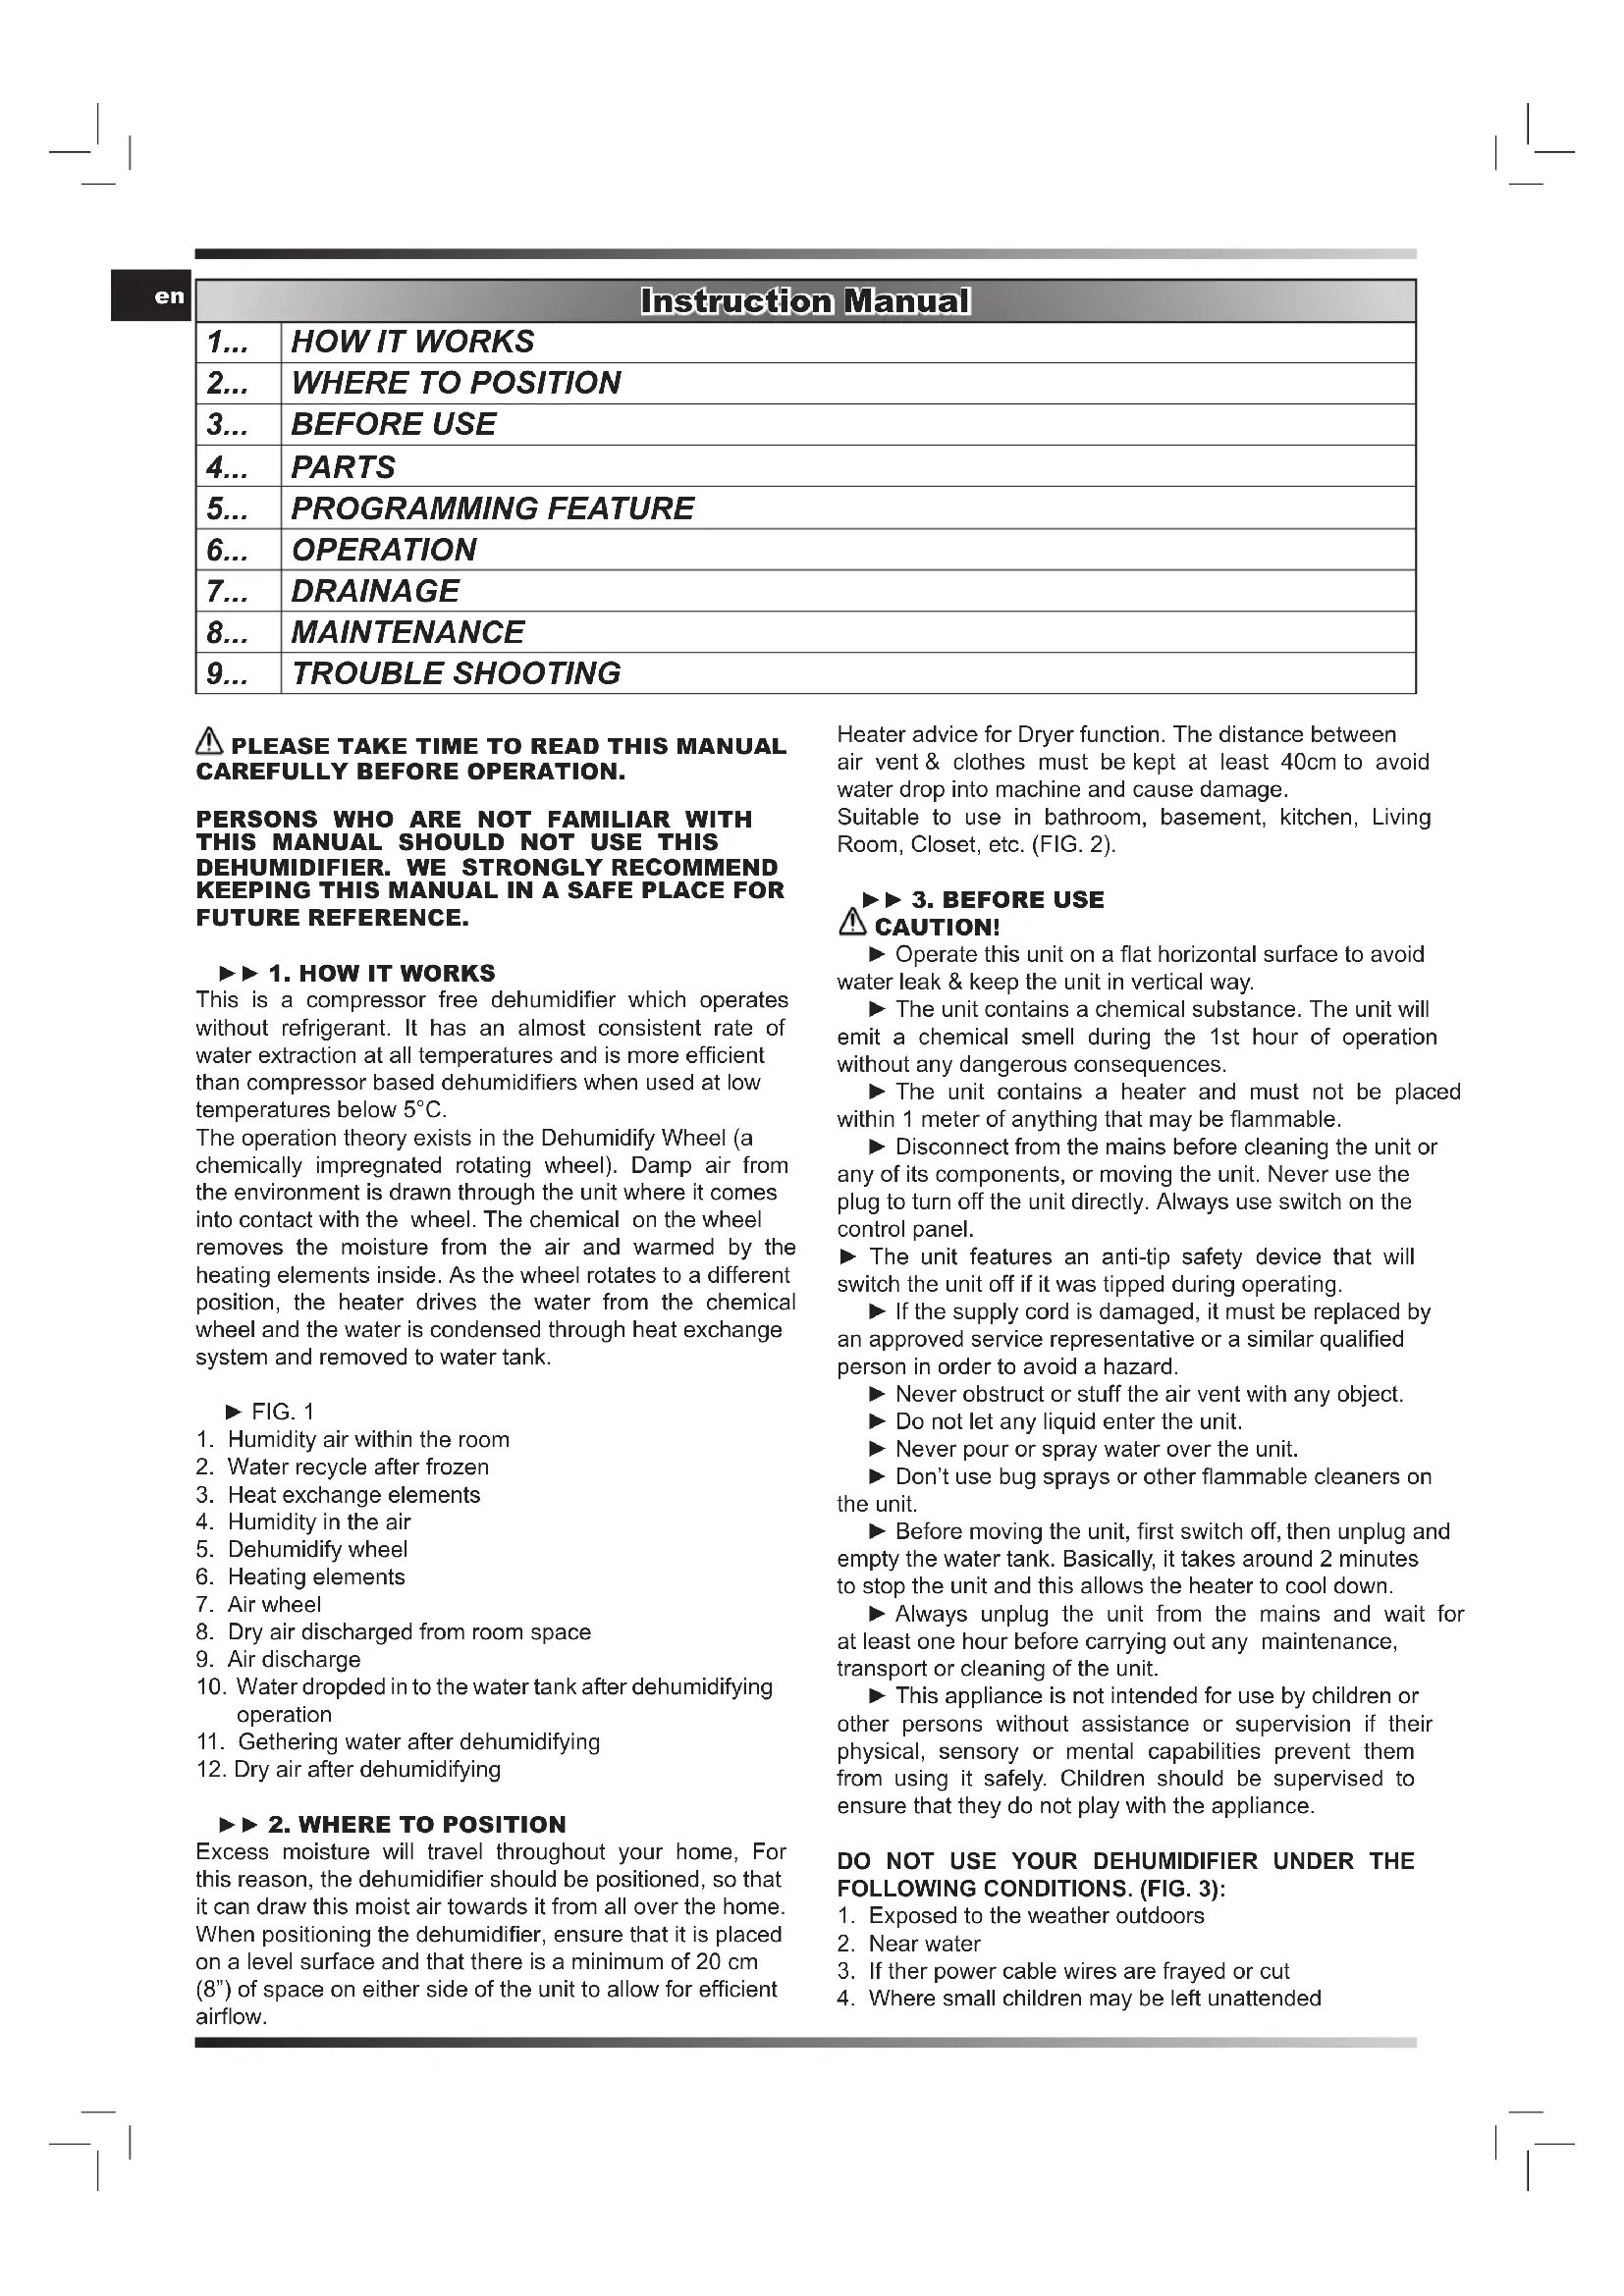
▶▶ 2. WHERE TO POSITION
Excess moisture will travel throughout your home. For this reason, the dehumidifier should be positioned, so that it can draw this moist air towards it from all over the home. When positioning the dehumidifier, ensure that it is placed on a level surface and that there is a minimum of 20 cm (8") of space on either side of the unit to allow for efficient airflow.
Heater advice for Dryer function. The distance between air vent & clothes must be kept at least 40cm to avoid water drop into machine and cause damage.
Suitable to use in bathroom, basement, kitchen, Living Room, Closet, etc. (FIG. 2).
▶▶ 3. BEFORE USE
CAUTION!
▶ Operate this unit on a flat horizontal surface to avoid water leak & keep the unit in vertical way.
The unit contains a chemical substance. The unit will emit a chemical smell during the 1st hour of operation without any dangerous consequences.
▶ The unit contains a heater and must not be placed within 1 meter of anything that may be flammable.
▶ Disconnect from the mains before cleaning the unit or any of its components, or moving the unit. Never use the plug to turn off the unit directly. Always use switch on the control panel.
▶ The unit features an anti-tip safety device that will switch the unit off if it was tipped during operating.
▶ If the supply cord is damaged, it must be replaced by an approved service representative or a similar qualified person in order to avoid a hazard.
▶ Never obstruct or stuff the air vent with any object.
▶ Do not let any liquid enter the unit.
▶ Never pour or spray water over the unit.
- Don't use bug sprays or other flammable cleaners on the unit.
▶ Before moving the unit, first switch off, then unplug and empty the water tank. Basically, it takes around 2 minutes to stop the unit and this allows the heater to cool down.
▶ Always unplug the unit from the mains and wait for at least one hour before carrying out any maintenance, transport or cleaning of the unit.
▶ This appliance is not intended for use by children or other persons without assistance or supervision if their physical, sensory or mental capabilities prevent them from using it safely. Children should be supervised to ensure that they do not play with the appliance.
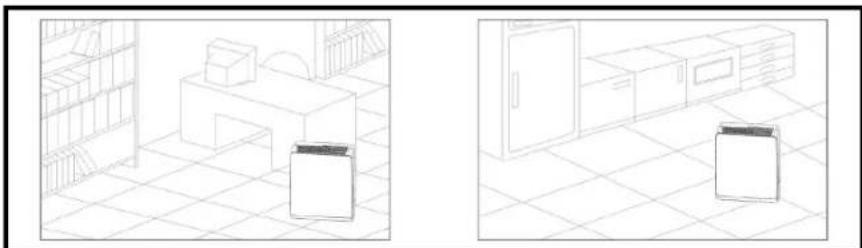
DO NOT USE YOUR DEHUMIDIFIER UNDER THE FOLLOWING CONDITIONS. (FIG. 3):
- Exposed to the weather outdoors
- Near water
- If ther power cable wires are frayed or cut
-
Where small children may be left unattended
-
If an extension lead may become overloaded
- Where the power cable may be damaged
- On a slope or uneven surface
- Where there is risk of fire or close to a naked flame
- Where it may be damaged by chemicals
- Where there is a risk of interference by foreign objects
- This product is not made for DIY repair
- If there is a risk of water falling on the unit
▶▶ 4. PARTS
▶ FIG. 4
- Air vent
- Control panel
▶ FIG. 5
- Handle of the unit
- Air filter
- Handle of the water tank
- Drain of the tank
- Cover of the water tank
- Water tank
- Drain hole for continuous drainage
- Power cord
▶ FIG. 6
- Dust filter
- Active carbon filter
- Filter fixer
▶ 5. PROGRAMMING FEATURE (FIG. 7)
1. MODE BUTTON
By pressing this button, you can set the working mode of the machine to be:
LOW (MUTE dehumidifying):
When the ambient humidity < set humidity, the unit will run in LOW fan speed (without Heater).
When the ambient humidity ≥ set humidity, the unit will run in LOW fan speed & WITH Heater.
HIGH (TURBO dehumidifying):
When the ambient humidity ≥ set humidity, the unit will run in HIGH fan speed & WITH Heater.
When the ambient humidity < set humidity, machine will run in HIGH fan speed (without Heater).

DRYER: ALWAYS ON with HIGH fan speed and ATER.
2. HUMIDITY BUTTON
Press HUMIDITY button to set the room humidity you need: continuous dehumidifying, 40%, 50%, 60% or 70%. The relative indicator will light on.
If the humidity button is not set, the unit will work in the pre-set humidity: 50%..
3. TIMER BUTTON
Press TIMER button to set the working hours you desired. As you press the button, the LED window will show the number you chose (starting from 0, 1 to 24 in a cycle). When the timer is activated, the TIMER Symbol would light on and the setting time would appear 8 seconds on the LED. After that, LED returns to room humidity again.
When the set time has been reached, the machine will turn off automatically. If the timer button is not pressed, the unit will work continuously for 24 hours.
en
4. POWER (ON/OFF) BUTTON
Press this button to start or turn off the machine. While the power is on, the power indicator should light on.
5. MUTE OPERATION INDICATOR
While the MUTE function is chosen, this operation indicator will light on.
6. TURBO OPERATION INDICATOR
While the TURBO function is chosen, this operation indicator will light on.
7. CLOTHES DRYER OPERATION INDICATOR
While the CLOTHES DRYER function is chosen, this operation indicator will light on.
8. HUMIDITY DISPLAY WINDOW
Display the room humidity (35\~95%RH). While press "TIMER" button, it shows the setting time, after 8 seconds, return to room humidity.
9. HUMIDITY SETTING INDICATORS
continuous de-humidifying, 40%, 50%, 60%, 70%.
10. TIMER INDICATOR
Press this button to set the working time (1 to 24 hours).
11. POWER (ON/OFF)/CHECK INDICATOR
When the unit is in normal operation, this indicator will light in blue. And, in the following conditions, the power indicator will BLINK to warn you:
▶ The unit was tipped over.
▶ The fan is dissipating the heat (after the power is off, the unit will keep dissipating the heat for 2 minutes to cool down the unit).
12. WATER FULL INDICATOR
It turns to RED when water tank is full or the tank is not in proper position.
▶▶ 6. OPERATION
▶ Plug the unit into a correct mains socket. (Please refer to the rating label at the rear of the unit.)
▶ Press button POWER to turn on the unit. The unit will start to work in continuous mode.
▶ Press button HUMIDITY to set the room humidity you need: continuous de-humidifying, 40%, 50%, 60% or 70%
▶ Press button MODE to choose the ventilation speed, MUTE, TURBO or DRYER.
▶ Press button TIMER to set the working hour you need (1\~24 hours).
▶ To turn off the unit, press button POWER again.
IMPORTANT!
▶ After switching off the unit, it takes at least 2 minutes to OFF the unit completely, this allows the heater to cool down. During the cool-down, the power indicator will blink for warning.
DO NOT DISCONNECT THE PLUG DIRECTLY FOR QUICK-OFF.
▶ Do not operate the unit without the AIR FILTER.
▶ For safety purpose, the heater will break for 2 minutes after running for 8 hours continuously, then restart, whatever the set time has been reached or not.
▶ During the break, the fan keeps working for heat-dissipating. To turn off the unit, press the "POWER" button (the set time will be cleared). When the water tank is full, the set time will be cleared, too. If the time was not set, the machine will shut off automatically after 24 hours.
▶ While using DRYER mode for clothes, please keep the unit AT LEAST 40CM away from the objects (ex. the clothes) and ensure no water will drip into the air vent of unit. Please refer to the illustration as below for the minimal distance from each direction. (FIG. 8).
▶ This unit is equipped with tilt switch for overheat protection. While the unit is tipped, the unit will stop automatically, the POWER indicator will turn into RED and the unit will beep 3 sounds for warning. After repositioning the unit upright, press POWER button to re-start.
▶ Self-Diagnosis: If the room sensor, humidity sensor or tip-over device is out of function, the unit will beep 3 times for warning, the POWER indicator would turn into RED and the unit will turn OFF.
▶▶ 7. DRAINAGE
While the water tank is full, the unit will stop working for self-protection and:
▶ The water full indicator will light on.
The unit will buzz 10 beeps to remind you. * To stop the buzz, you may press ON/OFF button to turn off the unit.
▶ To empty the tank, please follow the steps:
- Hold the unit with one hand to make it stand firmly.
- Pull out the tank squarely from the unit.
- Grasp the water tank handle, remove the cover of the tank, empty the water from the drain.
- After the tank was empty, return the water tank to its position, make sure it is properly positioned, so the 'water full' sign can go out and your dehumidifier is operating again.
⚠️ PLEASE NOTE, IF THE WATER TANK HAS NOT BEEN POSITIONED WELL, THE WATER FULL INDICATOR WILL TURN INTO RED AND THE UNIT WILL KEEP BUZZING.
CONTINUOUS DRAINAGE
- When the dehumidifier is operated in very high humidity, the water tank will require more frequent drainage. In this condition, it may be more convenient to set the unit up for continuous drainage with the following procedures: (FIG. 10):
- Cut off the cover of the continuous drain at the unit back. Unplug the water plug.
- Connect the drain hole with a water tube of inner diameter 12mm. * Please note, the water tube is not supplied with the unit.
- Pull out the water tank, plug the dropping gate inside the unit with the water plug taken from the continuous drain.
- Return the water tank to its position.
▶▶ 8. MAINTENANCE
Always unplug the unit from the mains and wait for at least one hour before carrying out any maintenance or cleaning of the unit.
CLEANING THE BODY
Use soft cloth to wipe the unit clean.
Don't ever use volatile chemicals, gasoline, detergents, chemically treated clothes, or other cleansing solutions.
These all could possibly hurt the cabinet.
CLEANING THE FILTER
Draw out the air filter from the rear of the unit. (FIG. 11)
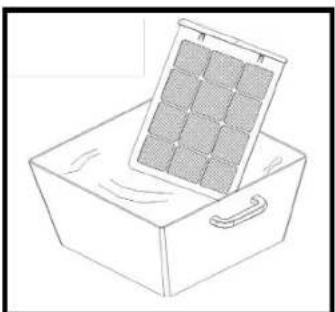
▶ For dust filter (washable filter): (FIG. 12):
- Use a vacuum cleaner or tap the filter lightly for easy cleaning. If the filter is particularly dirty, use warm water with a small amount of medium strength.
- Make sure the filter is completely dry before replacing.
- Do not expose the filter to sunlight.
FOR ACTIVE CARBON FILTER:
This filter is not washable. Its life span is variable and depends on the ambient conditions where the appliance is used. The filter should be checked periodically (about every 6 months) and replaced if necessary.
STORAGE
If not use the unit for an extended period of time. Please: Turing the unit off, unplug and tidy AC cord.
Completely empty the water tank and wipe it clean.
Cover the unit and store where it will not receive direct sunlight.
▶▶ 9. TROUBLE SHOOTING
| PROBLEM POSSIBLE REASON | |
| The unit doesn't work at all 1. Bad connection of the main plug.2. Water tank not positioned well or full.3. Is the unit standing upright and level. | |
| The unit not work dehumidifying 1. Too heavy dust on air filter.2. Any things stuck on intake or air vent.3. Too low room humidity already. | |
| Dehumidifying efficiency not good 1. Too many doors and windows open.2. Any room equipments increase the room humidity. | |
| Abnormal noises from the motor 1. Check and clean the air filter2. Is the unit standing upright and on a level surface? | |
| The unit leaks water 1. Has the unit been tipped?2. Check if the float of the water tank is blocked by foreign material. | |
| After the unit has been switched off, the fan motor is still running | 1. After the unit stops, about 2 minutes are needed to cool down the electric heater by running the internal fan. |
en
▶ 5. PROGRAMMATION (FIG. 7)
1. BOUTON POUSSOIR (MODE)
▶▶ 7. EVACUATION D'EAU
1. MODE KNAP (DRIFT)
konstant tørring, 40%, 50%, 60%, 70%
10. TIDSINDIKATOR
permanent tørking, 40%, 50%, 60%, 70%
10. TIDSINDIKATOREN
Kontinuerlig avfuktning, 40%, 50%, 60%, 70%
10. TIDSINDIKATOR
▶ 5. PROGRAMOWANIE (FIG. 7)
1. PRZYCISK MODE (TRYBU)
▶▶ 7. ODPROWADZANIE WODY
8. DISPLEJ STUPNJA VLAŽNOSTI
pastovus sausinimas, 40%, 50%, 60%, 70%.
10. LAIKMATIS
▶ 5. PROGRAMMĚŠANA (FIG. 7)
1. MODE (REŽIMA) POGA
▶▶ 5. PROGRAMAREA (FIG. 7)
1. BUTONUL MODE (TRIBULUI)
▶▶ 7. EVACUAREA APEI
DRENAREA CONTINUĂ A APEI
FR DÉCLARATION CE DE CONFORMITÉ
GB EC DECLARATION OF CONFORMITY
MCS Central Europe Sp. z o.o.
2006/95/EC, 2004/108/EC
AL dhe normë BG И норми CN 的指令和规范 CZ A normami DE und Normen DK og standarder EE ja normidele ES y las
EN - Disposal of your old product
- You product is designed and manufactured with high quality materials and components, which can be recycled and reused.
- When this crossed-out wheeled bin symbol is attached to a product it means the product is covered by the European Directive 2002/96/EC.
- Please inform yourself about the local separate collection system for electrical and electronic products.
- Please act according to your local rules and do not dispose of your oldproduct with your normal household waste. The correct disposal of your old product will help prevent potential negative consequences for the environment and human health.

- MCS Central Europe Sp. z o.o.
- MCS Russia LLC
- MCS China LTD
- ⚠️ PLEASE TAKE TIME TO READ THIS MANUAL CAREFULLY BEFORE OPERATION.
- PERSONS WHO ARE NOT FAMILIAR WITH THIS MANUAL SHOULD NOT USE THIS DEHUMIDIFIER. WE STRONGLY RECOMMEND KEEPING THIS MANUAL IN A SAFE PLACE FOR FUTURE REFERENCE.
- ▶ 1. HOW IT WORKS
- ▶ FIG. 1
- ▶▶ 2. WHERE TO POSITION
- ▶▶ 3. BEFORE USE
- CAUTION!
- DO NOT USE YOUR DEHUMIDIFIER UNDER THE FOLLOWING CONDITIONS. (FIG. 3):
- ▶▶ 4. PARTS
- ▶ 5. PROGRAMMING FEATURE (FIG. 7)
- MODE BUTTON
- HUMIDITY BUTTON
- TIMER BUTTON
- POWER (ON/OFF) BUTTON
- MUTE OPERATION INDICATOR
- TURBO OPERATION INDICATOR
- CLOTHES DRYER OPERATION INDICATOR
- HUMIDITY DISPLAY WINDOW
- HUMIDITY SETTING INDICATORS
- TIMER INDICATOR
- POWER (ON/OFF)/CHECK INDICATOR
- WATER FULL INDICATOR
- ▶▶ 6. OPERATION
- IMPORTANT!
- DO NOT DISCONNECT THE PLUG DIRECTLY FOR QUICK-OFF.
- ▶▶ 7. DRAINAGE
- ⚠️ PLEASE NOTE, IF THE WATER TANK HAS NOT BEEN POSITIONED WELL, THE WATER FULL INDICATOR WILL TURN INTO RED AND THE UNIT WILL KEEP BUZZING.
- CONTINUOUS DRAINAGE
- ▶▶ 8. MAINTENANCE
- CLEANING THE BODY
- CLEANING THE FILTER
- FOR ACTIVE CARBON FILTER:
- STORAGE
- ▶ 5. PROGRAMMATION (FIG. 7)
- BOUTON POUSSOIR (MODE)
- ▶▶ 7. EVACUATION D'EAU
- MODE KNAP (DRIFT)
- TIDSINDIKATOR
- TIDSINDIKATOREN
- ▶ 5. PROGRAMOWANIE (FIG. 7)
- PRZYCISK MODE (TRYBU)
- ▶▶ 7. ODPROWADZANIE WODY
- DISPLEJ STUPNJA VLAŽNOSTI
- LAIKMATIS
- ▶ 5. PROGRAMMĚŠANA (FIG. 7)
- MODE (REŽIMA) POGA
- ▶▶ 5. PROGRAMAREA (FIG. 7)
- BUTONUL MODE (TRIBULUI)
- ▶▶ 7. EVACUAREA APEI
- DRENAREA CONTINUĂ A APEI
- 2006/95/EC, 2004/108/EC
- EN - Disposal of your old product
Brand : Master
Model : DHA 10
Category : Humidifier