Essence 4 - Remote control ONE FOR ALL - Free user manual and instructions
Find the device manual for free Essence 4 ONE FOR ALL in PDF.
| Product type | Universal remote control |
| Brand | One For All |
| Model | Essence 4 |
| Dimensions (approx.) | 20 x 5 x 2 cm |
| Weight (approx.) | 100 g (without batteries) |
| Power supply | 2 AAA batteries (not included) |
| Compatible devices | TV, SAT, DVD, AMP |
| Programming methods | SimpleSet, direct code, automatic search |
| Learning function | Yes (copies functions from original remote) |
| Volume Control | Yes (always controls the same device) |
| Combi Control | Yes (simultaneous control of multiple devices) |
| Master Power | Yes (turns all devices on/off) |
| Key Magic | Yes (program functions even without original remote) |
| Macro | Yes (sends a series of commands with one button) |
| Reassignment Mode | Yes (allows modifying a device mode) |
| Infrared range | Approximately 10 meters |
| Cleaning and maintenance | Clean with a soft, dry cloth. Do not use chemical products. |
| Safety precautions | Do not expose to moisture or excessive heat. Remove batteries during prolonged non-use. |
| Repairability | Batteries replaceable by user. For other defects, contact customer service. |
| Warranty | 1 year (material and workmanship defects) |
Frequently Asked Questions - Essence 4 ONE FOR ALL
User questions about Essence 4 ONE FOR ALL
0 question about this device. Answer the ones you know or ask your own.
Ask a new question about this device
Download the instructions for your Remote control in PDF format for free! Find your manual Essence 4 - ONE FOR ALL and take your electronic device back in hand. On this page are published all the documents necessary for the use of your device. Essence 4 by ONE FOR ALL.
USER MANUAL Essence 4 ONE FOR ALL
other
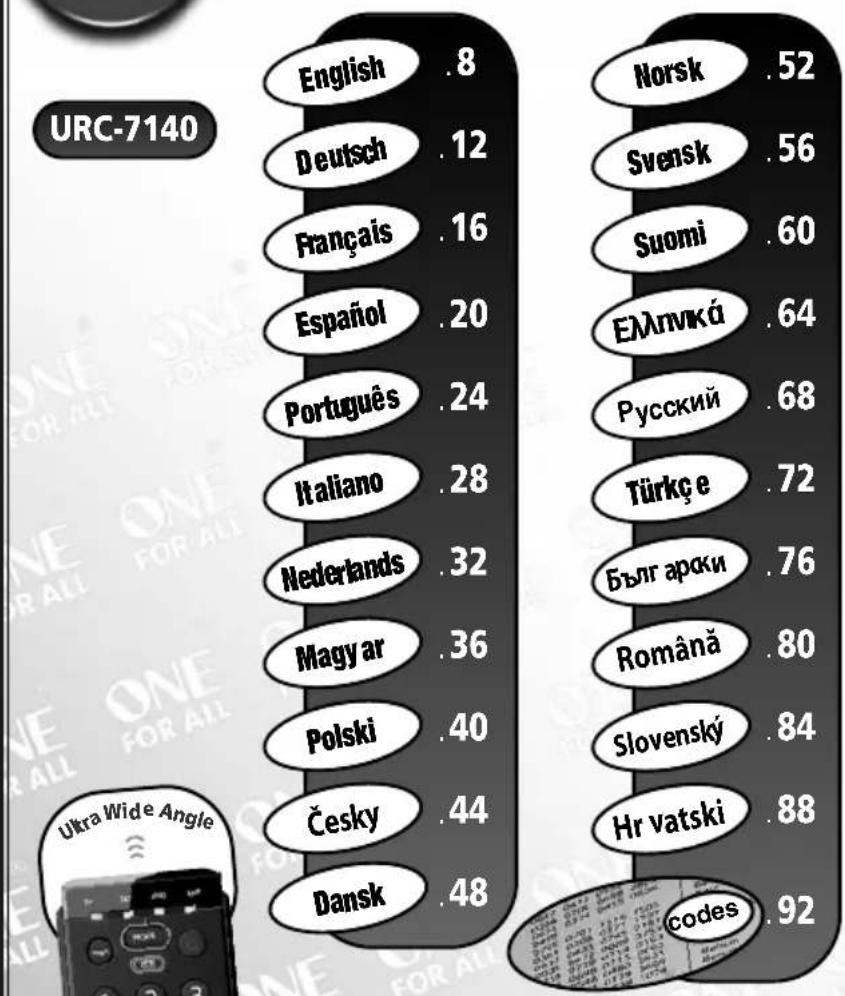
URC-7140 | Language Pair | Score | | :--- | :--- | | English | .8 | | Deutsch | .12 | | Français | .16 | | Español | .20 | | Português | .24 | | Italiano | .28 | | Nederkands | .32 | | Magyar | .36 | | Polski | .40 | | Česky | .44 | | Dansk | .48 | | Language Pair | Score | | :--- | :--- | | English | 8 | | Deutsch | 12 | | Français | 16 | | Español | 20 | | Português | 24 | | Italiano | 28 | | Nederkands | 32 | | Magyar | 36 | | Polski | 40 | | Česky | 44 | | Dansk | 48 | | Language Pair | Score | | :--- | :--- | | Norsk | .52 | | Svensk | .56 | | Suomi | .60 | | Еллмкá | .64 | | Русский | .68 | | Türkç e | .72 | | Бълг арски | .76 | | Română | .80 | | Slovenský | .84 | | Hr vatski | .88 | codes: 92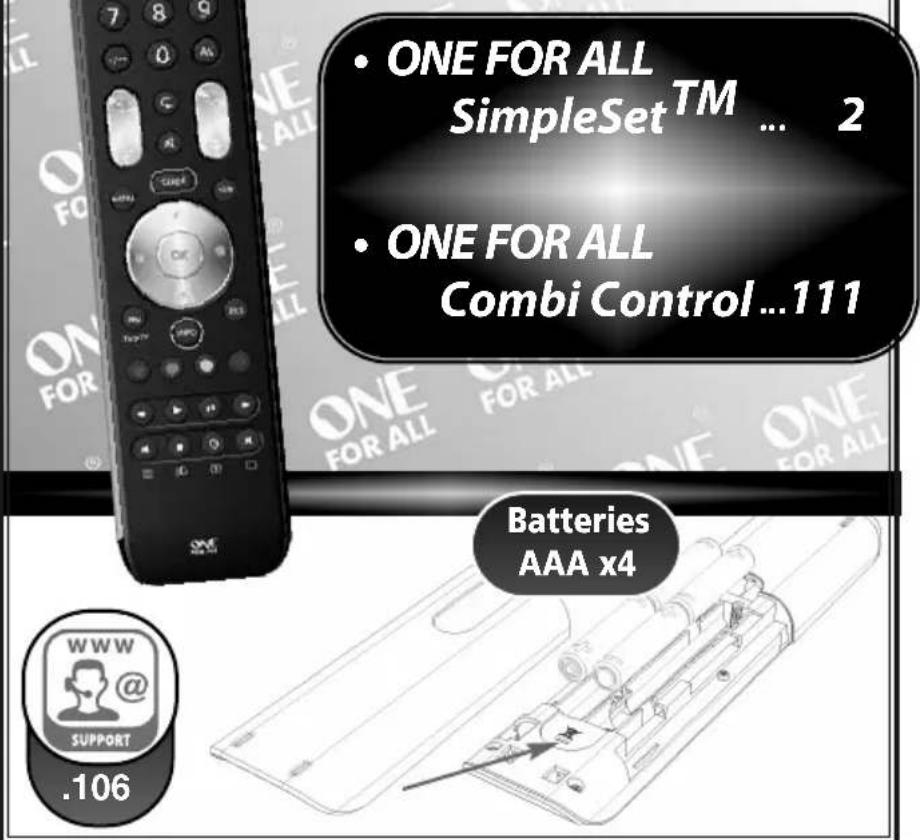
ONE FOR ALL SimpleSet™

natural_image
Computer monitor displaying a landscape image with 'ON' button overlay (no readable text or symbols on screen)TV = Hitachi
SimpleSet List
| TV | SAT | DVD | AMP | |
| 1 | Hitachi | CanalSat | JVC | Denon |
| 2 | JVC | Digital + | LG | Harman Kardon |
| 3 | LG | Foxtel | Panasonic | JVC |
| 4 | Panasonic | Humax | Philips | NAD |
| 5 | Philips | MultiChoice | Pioneer | Onkyo |
| 6 | Pioneer | Philips | Samsung | Panasonic |
| 7 | Samsung | SKY (Premiere) | Sony | Philips |
| 8 | Sharp | SKY | Teac | Pioneer |
| 9 | Sony | TechniSat | Telefunken | Sony |
| 0 | Toshiba | Virgin Media | Toshiba | Yamaha |
TV
SAT
TV : Television / HDTV / LCD / Plasma / Projector / Rear Projector
SAT: Satellite Receiver / Set-Top-Box / IPTV / DVB-S / DVB-T / Freeview (UK) / TNT (F) / Digitenne (NL) / SAT/HDD
CBL : Cable Converter / Set-Top-Box / IPTV / DVB-C
VAC : Video Accessory like Media Centres / AV Accessories / AV Selectors
DVD
DVD : DVD Player / DVD-R / Blu-ray / DVD Home Cinema / DVD Combi / DVD/HDD
LASER: Laserdisc
AMP
MIS : Miscellaneous Audio
AMP: Audio / Amplifier / Active Speaker System
TUNER : Audio / Audio Receiver/Tuner/Amplifier / (DVD) Home Cinema
1
2
3
natural_image
Computer monitor displaying a grayscale landscape photo (no visible text or symbols)
English
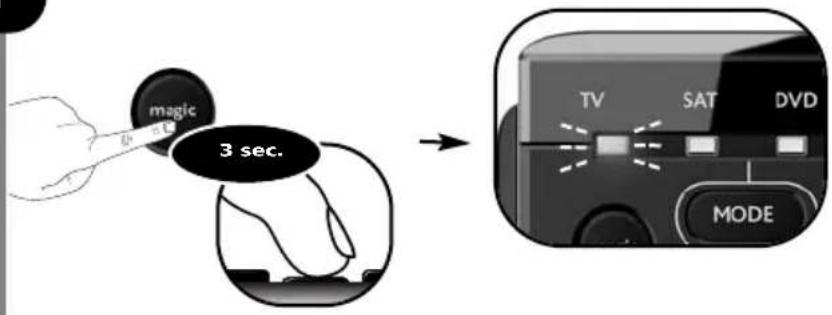
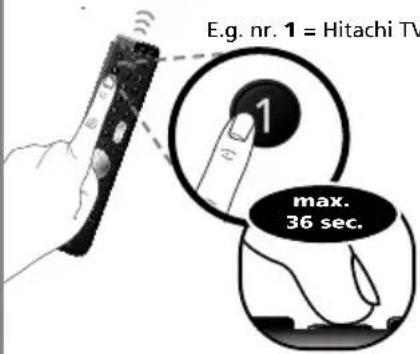
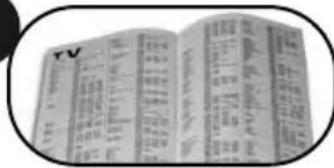
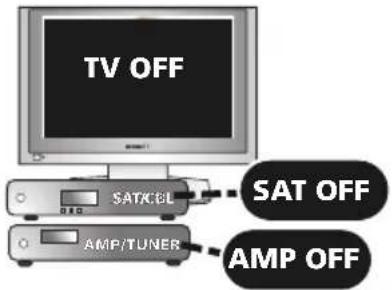
Start by checking if the brand of your particular device is listed in the "SimpleSet" brand list and check which "number key" is assigned to your brand (e.g. Hitachi tv = 1).
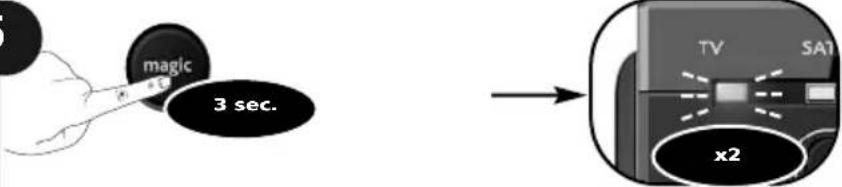
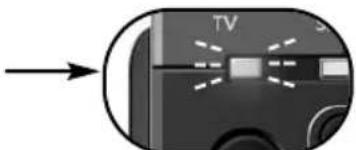
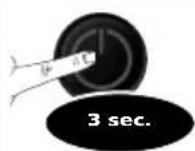
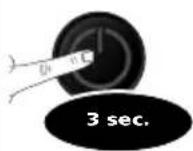
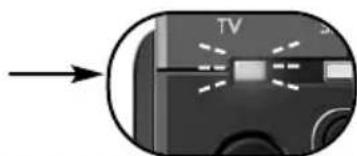
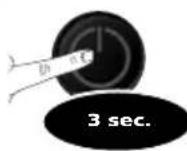
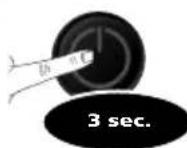
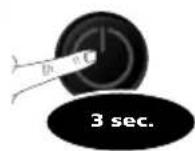
1) Press and hold MAGIC for 3 seconds until a mode indicator (Blue LED) stays lit.
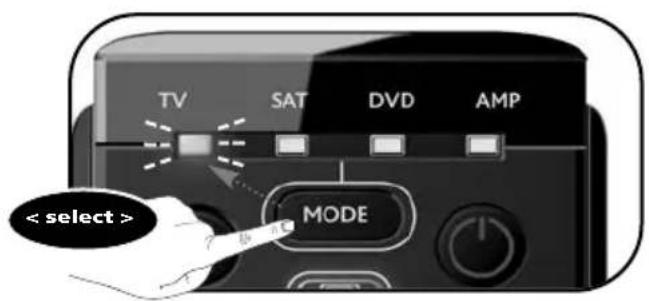
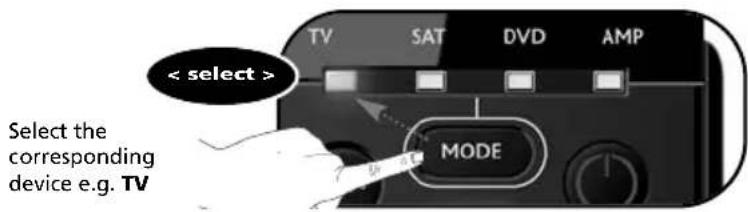
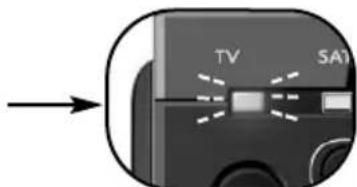
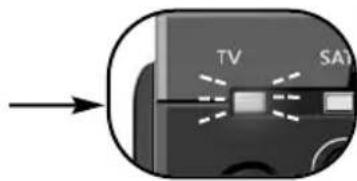
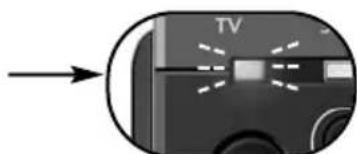
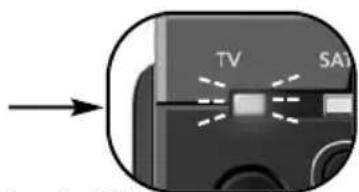
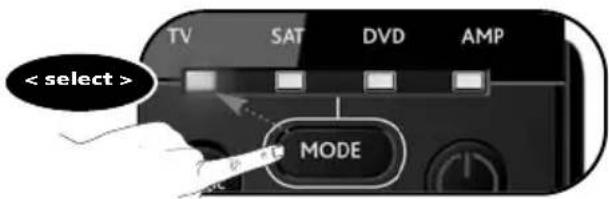
2) Select the device you wish to set up (e.g. tv).
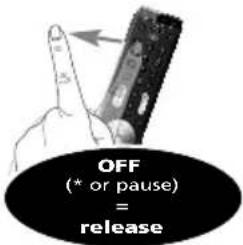
3) Press and hold the "number key" according to your brand (e.g. for Hitachi tv = press 1) until your device switches off (max. 36 seconds). The blue LED will switch off every 3 seconds as a 'power signal' is being sent. Make sure to release this "number key" as soon as your device switches OFF to complete the set up.
- If your brand is not listed in the "SimpleSet - brand list"? --> Go to the Direct Code Set up (page 8).
- The ONE FOR ALL is not performing commands properly? --> Simply repeat SimpleSet
- If SimpleSet is unsuccessful? --> Go to the Direct Code Set Up or try the Search Method.
Deutsch
- Extra Features (see manual on our internet site)
- Mode Reassignment - Changing a device mode to set up two (or more) devices of the same type.
- Key Magic® - Allows you to program functions from your original remote control even when LOST or BROKEN.
- Macro - Allows you to send a sequence of commands with the press of a single key.
Direct Code Set Up
1
Find the code for your device in the Code list (page 92 - 105). Codes are listed by device type and brand name. The most popular code is listed first. Make sure your device is switched on (not on standby).
2

natural_image
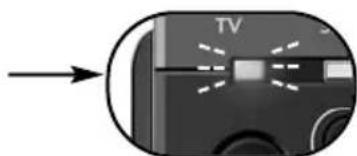
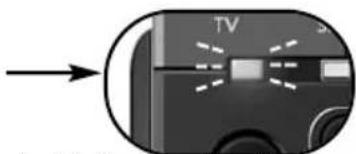
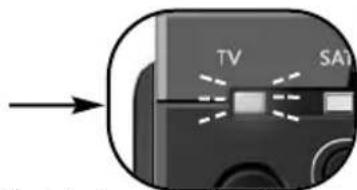
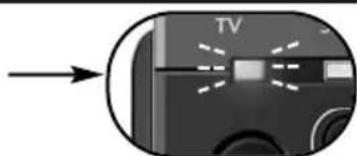
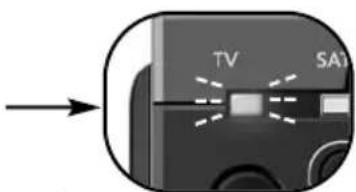
Close-up of a device's screen with a 'TV' label and directional arrow (no readable text or symbols beyond the label)Press and hold magic for 3 seconds until the blue LED (any LED) stays on.
3
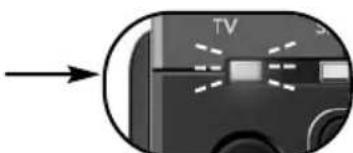
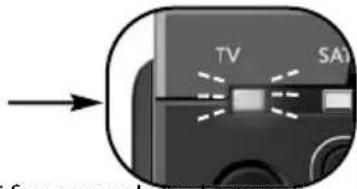
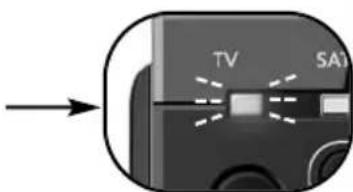
Select the corresponding device e.g. TV

4


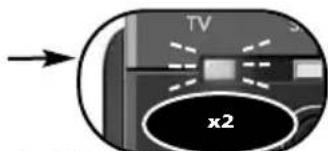
--> The blue LED will blink twice and then Switch off.
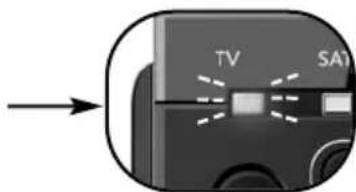
5


If your device does NOT switch off?
--> Please repeat steps 1 - 5 trying the next code listed for your brand.
If NOT successful?
--> Try the Search Method.
Congratulations! You should now be able to switch your device back ON and control your device successfully.
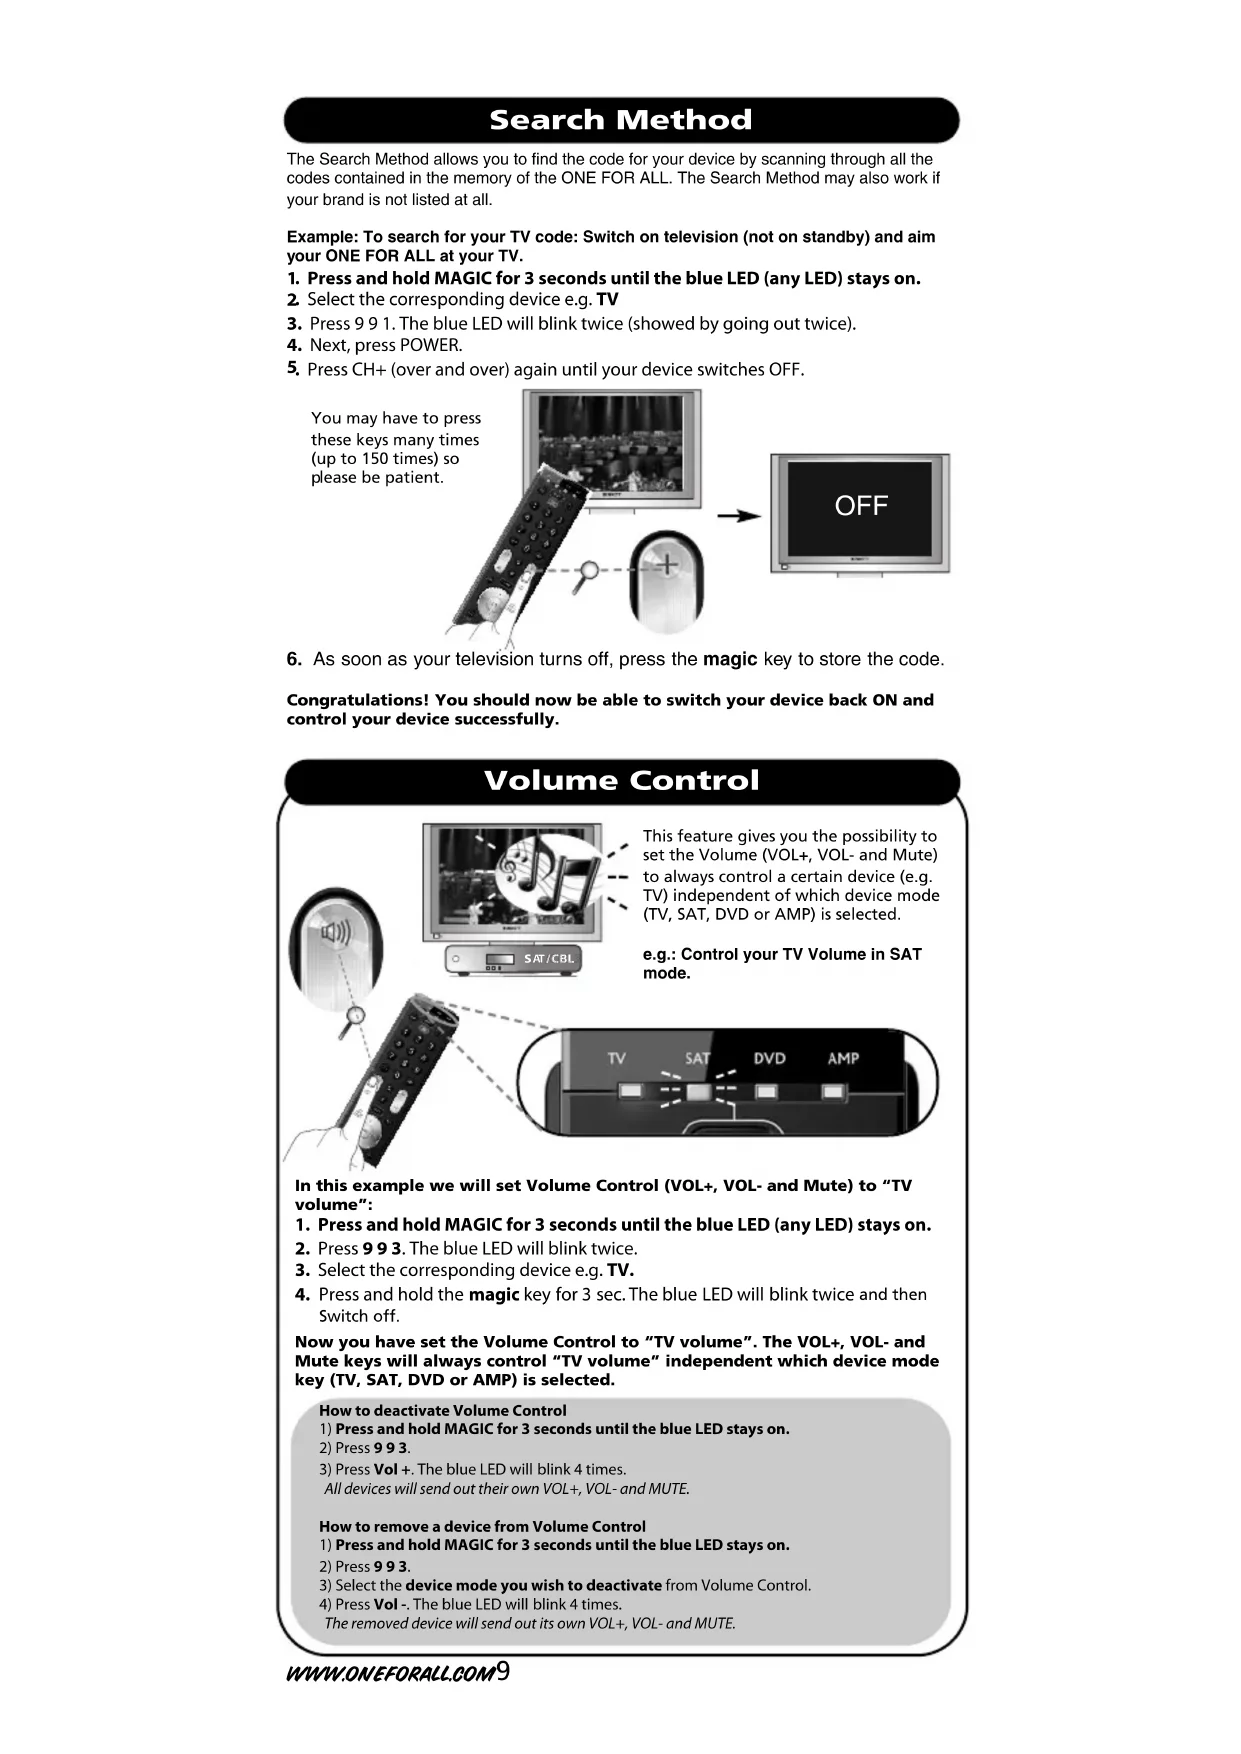
Search Method
The Search Method allows you to find the code for your device by scanning through all the codes contained in the memory of the ONE FOR ALL. The Search Method may also work if your brand is not listed at all.
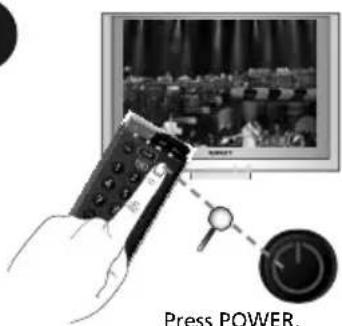
Example: To search for your TV code: Switch on television (not on standby) and aim your ONE FOR ALL at your TV.
- Press and hold MAGIC for 3 seconds until the blue LED (any LED) stays on.
- Select the corresponding device e.g. TV
- Press 9 9 1. The blue LED will blink twice (showed by going out twice).
- Next, press POWER.
- Press CH+ (over and over) again until your device switches OFF.
You may have to press these keys many times (up to 150 times) so please be patient.
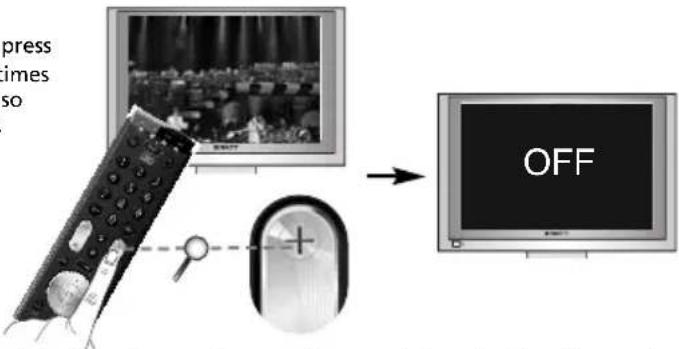
- As soon as your television turns off, press the magic key to store the code.
Congratulations! You should now be able to switch your device back ON and control your device successfully.
Volume Control
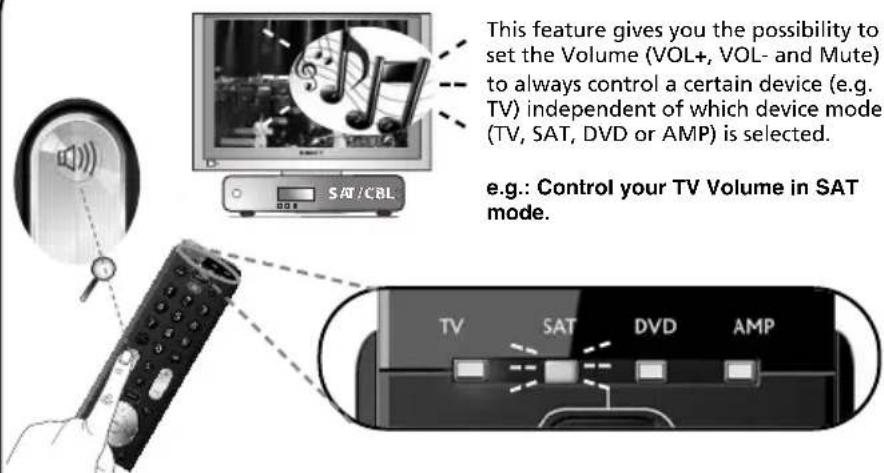
In this example we will set Volume Control (VOL+, VOL- and Mute) to "TV volume":
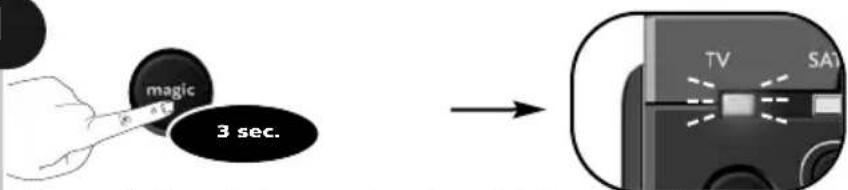
- Press and hold MAGIC for 3 seconds until the blue LED (any LED) stays on.
- Press 9 9 3. The blue LED will blink twice.
- Select the corresponding device e.g. TV.
- Press and hold the magic key for 3 sec. The blue LED will blink twice and then Switch off.
Now you have set the Volume Control to "TV volume". The VOL+, VOL- and Mute keys will always control "TV volume" independent which device mode key (TV, SAT, DVD or AMP) is selected.
How to deactivate Volume Control
1) Press and hold MAGIC for 3 seconds until the blue LED stays on.
2) Press 993.
3) Press Vol +. The blue LED will blink 4 times.
All devices will send out their own VOL+, VOL- and MUTE.
How to remove a device from Volume Control
1) Press and hold MAGIC for 3 seconds until the blue LED stays on.
2) Press 993.
3) Select the device mode you wish to deactivate from Volume Control.
4) Press Vol -. The blue LED will blink 4 times.
The removed device will send out its own VOL+, VOL- and MUTE.
The Learning Feature
(How to copy functions from your original working remote onto the ONE FOR ALL 4)
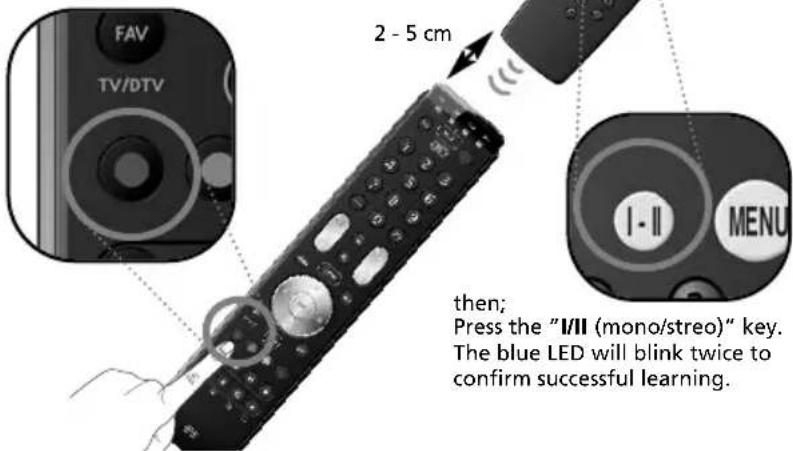
Example: How to learn (copy) the "I/II (mono/stereo)" function from your original remote onto the "red key" on your ONE FOR ALL remote control.
1
Press and hold magic for 3 seconds until a mode indicator (Blue LED) stays lit.
2
3

Press 975.
--> The blue LED will blink twice.
First; Press the "red" key. The TV LED will flash rapidly.
4
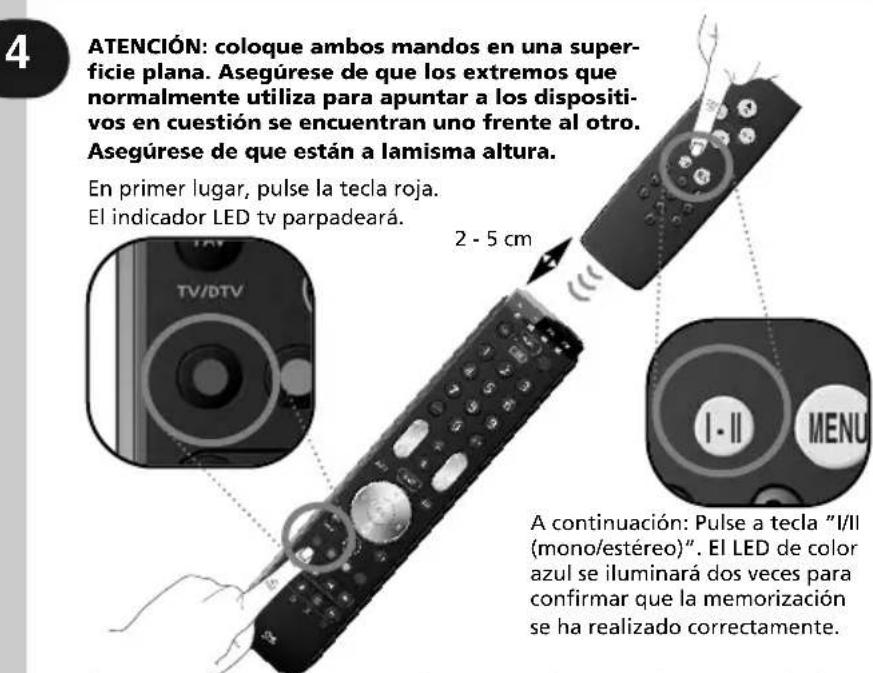
ATTENTION: Place both remote controls on a flat surface. Make sure that the ends you normally point at your device are facing each other. Align both remotes also in height
- If you want to copy other functions within the same mode, simply repeat step 4 pressing the next key you want to copy by learning.
- You can learn approximately 100 functions.
5
Press and hold the magic key for 3 sec.
--> The blue LED will blink twice and switch off.
Congratulations! You successfully learned (copied) the "I/II (mono/stereo)" function from your original remote control onto your ONE FOR ALL remote control. NOW whenever you press the "red key" (in TV mode) you will obtain the "I/II (mono/streo)" function.
How to delete a learned function to obtain the original function?
1) Press and hold MAGIC for 3 seconds until a mode indicator (Blue LED) stays lit.
2) Press 976.
3) Select the corresponding device mode (e.g. TV).
4) Press the key to be deleted (e.g. red key) twice.
ONE FOR ALL Combi Control
By now you probably have set up the ONE FOR ALL remote to control all (or most of) your devices. Wouldn't it be convenient if you wouldn't have to select a device type all the time. You can make this possible with ONE FOR ALL Combi Control. Combi Control enables you to control up to 3 devices simultaneously (e.g control TV + SAT simultaneously).
"Combi Control" settings
(combination 1) --> control TV + SAT (see p. 111)
(combination 2) --> control TV + SAT + AMP (see p. 111)
(combination 3) --> control TV
„Combination 1" is programmed automatically when you set up a TV and SAT.
Example) How to activate "Combination 2" (See the key pad configuration on page 111).


Press and hold magic for 3 seconds until a mode indicator (Blue LED) stays lit.

Press Combi Control.

Press 2 (to select combination 2).
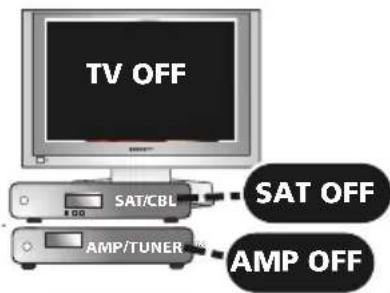
Master Power (in Combi Control)

In Combi Control the POWER key will switch ON/OFF all devices within the activated Combi Control Setting – simply by pressing it for 3 seconds.
E.g. within Combi Control combination 2 you can switch OFF your TV, SAT and AMP by by pointing towards these devices and simply press and hold the POWER key for 3 seconds.

Deutsch
Bedienungsanleitung
- Suchmethode * 13
natural_image
Close-up of a device's front panel with a screen and indicator light, no visible text or symbolsnatural_image
Illustration of a hand holding a remote control next to a computer monitor displaying a cityscape (no text or symbols visible)3

Drücken Sie 9 7 5.
Master Power (in Combi Control)

natural_image
Close-up of a device's front panel with a screen and indicator lights, no visible text or symbolsnatural_image
Illustration of a hand holding a remote control next to a screen showing a cityscape, with a clock nearby (no text or symbols)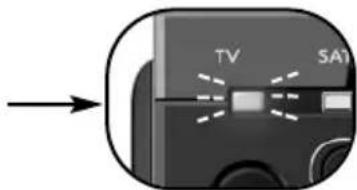
natural_image
Illustration of a hand holding a remote control with a monitor displaying a cityscape and a magnifying glass nearby (no text or symbols)Pulse 975.

natural_image
Close-up of a device's front panel with a screen and indicator light, no visible text or symbolsnatural_image
Illustration of a hand holding a remote control next to a TV screen and a clock (no text or symbols visible)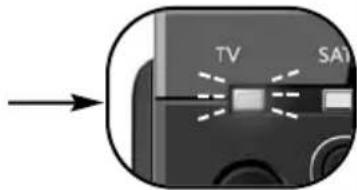

natural_image
Close-up of a computer monitor with an arrow pointing to the screen (no visible text or symbols)natural_image
Hand holding remote control with a magnifying glass and clock icon nearby (no text or symbols)Premere Power.


Master Power (in Combi Control)

natural_image
Hand holding remote control with a monitor displaying a cityscape background (no visible text or symbols)Druk op Power.


Master Power (in Combi Control)

natural_image
Close-up of a TV remote control panel with indicator lights and a directional arrow (no text or symbols on the panel itself)natural_image
Illustration of a hand holding a remote control next to a TV screen and a clock, with no visible text or symbols.Nyomja meg a 9 7 5.
4

natural_image
Close-up of a device's front panel showing a screen with light rays and a 'TV' label, no readable text or symbols beyond the label.natural_image
Illustration of a hand holding a remote control next to a screen showing a cityscape, with a close-up of a circular device nearby (no text or symbols)


Master Power (in Combi Control)
natural_image
Close-up of a device's front panel with a screen and indicator lights, no visible text or symbolsnatural_image
Hand holding remote control next to a computer monitor displaying a cityscape (no visible text or symbols)Stiskněte Power.


natural_image
Close-up of a device's front panel with a screen and indicator lights, no visible text or symbolsnatural_image
Illustration of a hand holding a remote control next to a TV screen with a lock and clock icon (no text or symbols)Tryk på Power.


Tryk på 9 7 5.
4
Tryk på magic-tasten, og hold den nede for at gemme dine indstillinger.
Master Power (in Combi Control)


natural_image
Close-up of a device's screen with a 'TV' label and directional arrow (no readable text or symbols beyond the label)Trykk på og hold nede magic i 3 sekunder til en modusindikator (blå lampe) lyser konstant.
3
natural_image
Hand holding remote control on a TV screen, with a close-up of a power switch and a lock icon (no text or symbols visible)Trykk på og hold nede magic i 3 sekunder til en modusindikator (blå lampe) lyser konstant.
2

3

Trykk på 9 7 5. --> Den blå lampen vil blinke (slukkes) to ganger.
4

Trykk på og hold nede magic i 3 sekunder til en modusindikator (blå lampe) lyser konstant.

Master Power (in Combi Control)


Example: To search for your TV code: Switch on television (not on standby) and aim your ONE FOR ALL at your TV.
Master Power (in Combi Control)

Jos laite ei sammu
Master Power (in Combi Control)

natural_image
Illustration of a hand holding a remote control next to a monitor displaying a cityscape, with a key inserted (no text or symbols)
Master Power (in Combi Control)
natural_image
Close-up of a TV remote control panel with indicator lights and a circular arrow pointing to it (no text or symbols on the panel itself)natural_image
Hand holding remote control with a TV screen showing a cityscape, connected to a power button (no text or symbols visible)Натиснете и задръжте MAGIC за 3 секунди --> Синий индикатор мигнет (погаснет) дважды и погаснет.
Master Power (in Combi Control)


natural_image
Close-up of a computer monitor with a 'TV' label and light rays, no readable text or symbols beyond the label.Aracınız AÇILMAZSA?

Master Power (in Combi Control)


natural_image
Hand holding remote control with a screen showing a video, and a key inserted into a circular button (no text or symbols visible)(combination 3) --> TV
"Combination 1" (Комбинация 1) се програмира автоматично, когато настройвате телевизор и SAT.

Master Power (in Combi Control)

Master Power (in Combi Control)


natural_image
Close-up of a device's screen with a 'TV' label and light rays, no readable text or symbols beyond the label.Stlačte tlačidlo MAGIC a podržte ho stlačené 3 sekundy.
Master Power (in Combi Control)

Pronađite kôd za vaš uređaj na listi kodova (stranica 92 - 105). Kodovi su izlistani putem vrste uređaja i naziva branda. Najpopularniji kôd je izlistan prvi. Uvjerite se da je vaš uređaj uključen (ne u stanju mirovanja).
2


natural_image
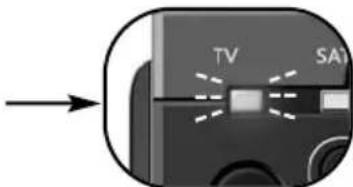
Close-up of a device's screen with a TV button and light indicator light (no text or symbols visible)Tipku MAGIC držite pritisnutom 3 sekunde dok indikator načina rada (plavi LED indikator) ne ostane uključen.
3
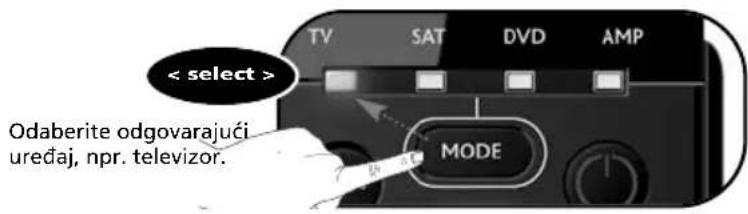
Odaberite odgovarajući uređaj, npr. televizor.
4
1
natural_image
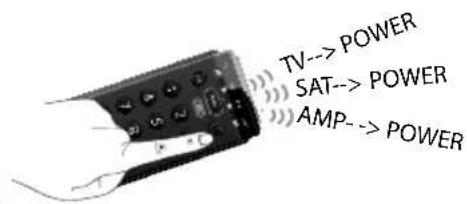
Illustration of a hand holding a remote while watching a TV screen (no text or symbols visible)Ako se vaš uređaj NIJE isključio? --> Ponovite korake 1-5 koristeći sljedeću šifru koja je navedena za marku vašeg uređaja.
Tipku MAGIC držite pritisnutom 3 sekunde dok indikator načina rada (plavi LED indikator) ne ostane uključen.
2
3

Pritisnite 9 7 5.
--> Plavi LED indikator dvaput će zatreperiti.
4
Tipku magic držite pritisnutom 3 sekunde dok indikator načina rada (plavi LED indikator) ne ostane uključen.

Pritisnite Combi Control.
Pritisnite 2 (combination 2).
Master Power (in Combi Control)

U značajki Combi Control tipkom za uključivanje/isključivanje možete uključiti/isključiti sve uređaje iz aktivirane Combi Control postavke - jednostavno je 3 sekunde držite pritisnutom (Master). Npr. u Combi Control kombinaciji 2 možete isključiti televizor, STB i AMP tako da pokažete na te uređaje i jednostavno tipku za uključivanje/isključivanje 3 sekunde držite pritisnutom.
TV
A.R. Systems 0037 0556
Accent 0009 0037 0556
Accusound 0860
Acer 1339
Acoustic Solutions 1667 1523 1865 1037
Adcom 0625
ADL 1217
Admiral 0093 0264
Advent 1613
AEA 0037 0556
AEG 0606 1556 1037 1324 1163
Aftron 0891
Agashi 0264
Aiko 0009 0037 0556 0371 1681
0035 0880 0264
Aim 0037 0412 0556 0753 0208
0706 0698 0634 0606 0499
Airis 1531 1833 2050
Aiwa 0705 1916 1505
Akai 1326 0208 0371 0037 0035
0009 0753 0729 0714 0706
0698 0715 0556 0548 0480
0264 0178 0606 1037 0473
0812 1248 1308 1865
Akashi 0860 0009
Akiba 0037 0556
Akira 0753 0037
Akito 0037 0556
Akura 0037 1687 0556 0668 1667
1645 1770 0412 1585 0009
0264 0714 1982 1983 1363
2059
Alba 0037 1037 0556 0714 0009
0371 0668 0487 0443 2050
1865
Alkos 0035
Allstar 0037 0556
Amitech 1849
Amstrad 0009 0264 0371 0037 0556
0412 1037 1324 1982
Anam 0037 0556 0009 0650
Anam National 0037 0650 0556
Andersson 1163 1585
Anglo 0009 0264
Anitech 0009 0264 0037 0556
Ansonic 0037 0556 0009 0668 0292
AOC 0625 1588 2111 2214
Apollo 0473
Arc en Ciel 0109
Arçelik 0714
Ardem 0714 0486 0633 0037 0556
Arena 0037
Aristona 0556 0037
Art Mito 1585
Asberg 0037 0556
Asora 0009
Astra 0037 0556
Asuka 0264
ATD 0698
Atec 1606
Atlantic 0037 0556
Atori 0009
Audiosonic 0009 0037 0820 0556 1308
1681 0109 0714 2050 0715
0264 0486 1983
Audioton 0486 0264
Audioworld 0698
AWA 0009 0412 0037 0556 0606
0108 0264 0178 0698 1681
Axxent 0009
Axxon 0714
B&D 1217
Baier 1324
Baird 0109 0343 0208 0606
Bang & Olufsen 0565
Base 0780
Basic Line 0037 0668 0556 0009 1037
Bauer 0009 0698 0706 0264
Baur 0009 0195 0512 0037 0556
1505
BBK 1523 1645
Beaumark 0178
Beko 0714 0486 0035 0715 0037
0556 2125 1308 0606 0808
1652
Belson 2032
Bennett 0556 0037
BenQ 1562
Bensten 1326
Beon 0037 0556
Berthen 0668 0556
Bestar 0037 0556
Bestwell 1326
Black Diamond 0614 0820 1037 0556 0753
1163 0587
Black Strip 0035
Blaupunkt 0195 0170
Blue Media 1606
Blue Sky 0037 1324 1037 1709 0714
0487 0668 0715 0625 1652
1909 0556 0808 1363 1916
Boman 1324
Boots 0009
Bork 1363
BPL 0037 0556
Brandt 0625 0109 0287 0335 0343
0560
Brandt
Electronique 0287 0335
Brimax 1709
Brinkmann 0037 0556 0668 0486
Brionvega 0037 0556
Brother 0264
Bruns 0486
Bush 1037 1326 0614 2127 0714
0037 0668 1652 0009 0371
0264 0487 0208 1556 0698
0556 1667 1248 1982 1916
1682 0587 1687 1308 2053
2050 2214 1983
1523 0556
Camper 0037 0556 0486
Capsonic 0264
Carad 0610 0037 0556 0668 1037
Carena 0037 0556
Carrefour 0037 0556
Carver 0170
Cascade 0009 0037 0556
Casio 0037 0556
CAT 1682
Cathay 0037 0556
CCE 0037 0556
Celestial 0820
cello 1770
Centrex 0780 0891 1536 0698
Centrum 1037
Centurion 0037 0556
CGE 0074
Cimline 0009
Cinex 1556 1982
City 0009
Clarivox 0037 0556
Clatronic 0037 0371 0714 0264 0556
0009 0606 1324 1163
Clayton 1037
Cobolt 0891
Concorde 0009
Condor 0037 0556 0009 0264
Conia 1687 0754 1645 0820 1523
2032
Conrac 0808
Conrad 0037 0556
Contec 0009 0264 0037 0556
Continental Edison 0109 0287 0487
Cosmel 0009 0037 0556
CPTEC 0625 1363
Crosley 0074
Crown 0009 0712 0486 0037 0556
0487 0714 0606 0715 0208
0653 1037 1652 0668
Curtis Mathes 0093
CWR-Tech 1324
Cyberpix 1667
Cytronix 1298
D.Boss 0037
Daewoo 0634 1849 0499 1909 0037
0556 0009 1137 0880 0698
0714 0706 2037
Dansai 0037 0556 0264 0035 0009 0208
Dansette 0412
Dantax 0486 1652 1916 0714 0606 1037 0715
Datsura 0208
Dawa 0009 0037 0556
Daytek 0698 0706 0264
Daytron 0009 0037 0556
de Graaf 0208 0548
DEC 0860 0891 1326 0896
Decca 0037 0556 1137
Deitron 0037 0556
Denko 0264
Denver 0037 1324 0556 0606 0587 2050 1709
Desmet 0037 0556 0009
DGM 2059
Diamant 0037 0556
Diamond 0264 0698 0009 0371 0860
0820 0896 1681 0706
DiBoss 0037 0556
Digatron 0037 0556
Digihome 1667
Digiline 0037 0556 0668
DigiLogic 0037 0556
Digital Device 1606
Digitek 1709
Digitex 0820
Digitor 0037 0556 0888
DigiX 0880
DiK 0037 0556
Dixi 0009 0037 0556
DL 0891 0780 0037 0587 1363
1326
DMTECH 2001
Domeos 0668 0037 1037
DSE 0888 1556 0820 0698 1682
DTS 0009
Dual 0343 0037 0556 1137 1037
2032 1324 1163
Durabrand 0037 0556 1652 1037
Dux 0037 0556
D-Vision 0037 1982 0556
DVX 0891
Dynatron 0037 0556
e:max 1324 0606 1531
Easy Living 1248 1709 1613 1217 1308
2005 1556 1666
Ecco 0773 0706 0698
Edison-Minerva 0487
Elbe 0610 0292 0037 0556
Electrion 1585
Elekta 0009 0037 0556 0264
Elfunk 1208 1037
ELG 0037 0556
Elin 0037 0556 0548 0009
Elite 0037 0556
Elonex 1776
Elta 0009 0264
Emerson 0714 0178 0037 0556 0371
1909 0486 0668
e-motion 1709
Enzer 0753 0773 0860
Erisson 1682
Erres 0037 0556
ESC 0037 0556
Etron 0037 0556 0820 0009
Eurofeel 0264
EuroLine 0037 2050
Euroman 0264 0037 0556
Europa 0037 0556
Europhon 0037 0556
Evesham 1248 1667 1606 1536
Excel 0037 0556
Excello 1037
Exquisit 0037 0556
Fagor 0037 0556
Family Life 0037 0556
Fenner 0009
Ferguson 0625 0287 0335 0109 0560
0037 0556 0035 0343 0653
0108 0548 0443 1037 1916
2053 1954
Fidelity 0512 0037 0556 0371 0412
0264
Finlandia 0208 0548 0287 0343
Finlux 0037 0556 0714 1585 1667
0715 0480 1556 0473 0606
0808 1248
Fintec 1982
Firstline 0037 0556 0668 0714 0009
1909 0208 1037 0808 1363
1163 1308
Fisher 0208
Flint 0037 0556 0610 0264
Formenti 0037 0556 0486
Fortress 0093
Fraba 0037 0556
Friac 0009 0037 0556 0499 0610
Frontech 0264 0009
Fuchware 0780
Fujicom 1709
Fujiitsu 0009 0037 0556
Fujitsu General 0009
Fujitsu Siemens 1666 1298 1248 1163 0808
Funai 1817 1394 1037 1666 1595
0668 0264 0412 1505 0714
Furichi 0860
Futronic 0264 0860 0698
Future 0037 0556
Gaba 1037 0037
Galaxi 0037 0556
Galaxis 0037 0556
Galeria 0009
GBC 0009
0343 0178 0560 0287 0109
0335 0625
GEC 0037 0556
Geloso 0009
General 0109 0287
General Electric 0343 0287
General Technic 0009
Genesis 0009 0037 0556
0037 0556 0412 0009
Gericom 1606 1721 1298 1217 0880
0808
G-Hanz 1681 1363
Giant 0009
Gold 1833 1770
Goldfunk 0668
GoldStar 0037 0009 0178 0556 0109
0606 0714 0715
Gooding 0487
Goodmans 0634 0715 1248 1037 0037
0499 0556 0714 0668 1909
0264 0009 0487 0371 0343
0035 0480 0560 0335 0880
1308 0587 1645 1667 1687
1682 1720 2053 2127 1983
Gorenje 1585 1667
GP 0753
Gradiente 0653 0170 0037 0556
Graetz 0714 0371 0037 0556 1163
Granada 0037 0556 0226 0108 0208
0473 0335 0560 0225 0343
0548
Grandin 0037 1652 0556 0009 0610
0714 0715 0668 1037 0880
Grundig 0195 0508 1223 2059 2127
1037 0487 0037 0443 0706
0556 0587 0009 1916 1308
0178 0343 1667 2053 1248
2125 1324
Grunkel 1163
GVA 1326
H&B 0808 2001
Haaz 0706
Haier 0698 0264
Halifax 0264
Hammerstein 0264
Hanns.G 1613
Hannspree 1613 1776 2214
Hanseatic 0037 0556 0499 0292 0634
0009 0714 0808 0486 0625
2001
Hantarex 0009 0037 0556
Hantor 0037 0556
Harwa 0773
Harwood 0009 0412 0037 0556 0487
Hauppauge 0037 0556
HCM 0009 0412 0037 0556 0264
| Hedzon 0556 0037 | ||||||
| Hema 0009 | ||||||
| Hicon 1298 | ||||||
| Hifivox 0109 | ||||||
| Highlander 1531 | ||||||
| Highline 0264 0037 0556 | ||||||
| Hikona 1983 | ||||||
| Hinari 0208 0037 0556 0009 0443 | ||||||
| 0487 | 0264 | |||||
| Hisawa 0610 0714 | ||||||
| Hisense 1363 0208 | 2037 | 0698 | 0891 | |||
| 0860 | 0780 | |||||
| Hitachi 1576 0481 | 0578 | 0719 | 2207 | |||
| 0225 | 0108 | 0744 | 1585 | 1037 | ||
| 1484 | 2127 | 1667 | 0634 | 0473 | ||
| 0343 | 2214 | 1163 | 0499 | 0480 | ||
| 0037 | 0556 | 0109 | 0548 | 0178 | ||
| 1137 | ||||||
| Hitachi Fujian 0108 | 0037 | 0225 | 0556 | 0860 | ||
| 0499 | ||||||
| Hitsu 0009 0610 | ||||||
| Höher 0714 1556 1163 | ||||||
| Home Electronics 0606 | ||||||
| Hornyphon 0037 0556 | ||||||
| Hugoson | 1666 | 1217 | ||||
| Humax 1539 2057 | ||||||
| Hyper | 0009 | |||||
| Hypson | 0037 | 0556 | 0714 | 0715 | 0264 | |
| 1037 | 0668 | 0486 | ||||
| Hyundai | 0037 | 0860 | 0556 | 1531 | 0753 | |
| 1326 | 0698 | 1681 | 1770 | 0264 | ||
| 0888 | 1037 | 1606 | 0706 | 1556 | ||
| Iberia 0037 0556 | ||||||
| ICE | 0264 | 0037 | 0371 | 0009 | 0556 | |
| Ict | 0037 | 1137 | 0556 | |||
| iDEAL | 1556 | |||||
| IISonic | 1613 | |||||
| Iiyama | 1217 | |||||
| Imperial | 0037 | 0074 | 0508 | 0556 | ||
| Indiana 0037 0556 | ||||||
| Ingelen 0487 0610 | 0714 | |||||
| Ingersoll | 0009 | |||||
| Inno Hit | 0009 | 1037 | 0037 | 0556 | 1163 | |
| 1585 | ||||||
| Innovation | 0037 | 0556 | ||||
| Innowert | 1298 | |||||
| Inotech 0773 0820 | ||||||
| Inspira | 1324 | 1556 | ||||
| Interactive | 0037 | 0556 | 0512 | 0109 | ||
| Interbuy 0009 0037 | 0264 | 0512 | 0556 | |||
| Interfunk | 0037 | 0556 | 0512 | 0109 | ||
| Internal | 0037 | 0556 | 0499 | 1909 | ||
| Intervision | 0037 | 0371 | 0486 | 0487 | 0264 | |
| 0009 | 0556 | |||||
| Irradio | 0009 | 0037 | 0556 | 0371 | 0714 | |
| Isukai 0037 0556 | ||||||
| ITS | 0037 | 0371 | 0264 | 0009 | 0556 | |
| ITT | 2125 | 0480 | 0473 | 0548 | 0208 | |
| 0610 | ||||||
| ITT Nokia | 0548 | 0473 | 0480 | 0208 | 0606 | |
| 0610 | ||||||
| ITV | 0037 | 0264 | 0556 | |||
| JDV | 1982 | |||||
| JEC | 0035 | |||||
| JGC | 1709 | |||||
| JMB | 0037 | 0499 | 0634 | 0556 | 0443 | |
| JNC | 1536 | 0896 | ||||
| Jocel | 0712 | |||||
| JTV | 0860 | |||||
| Jubilee 0556 | ||||||
| JVC | 0653 | 1818 | 0606 | 1653 | 0371 | |
| 0093 | 0650 | |||||
| Kaisui | 0037 | 0556 | 0009 | |||
| Kambrook | 0264 | |||||
| Karcher 0037 0556 | 0610 | 0264 | 0714 | |||
| 1556 | 0606 | 1982 | 2125 | 1308 | ||
| Kathrein | 0556 | 0037 | 0880 | |||
| Kawa | 0371 | |||||
| Kendo | 0610 | 0037 | 0556 | 0512 | 1585 | |
| 1037 | 0486 | 1163 | 1137 | |||
| Kennex 1037 | ||||||
| Keymat | 1326 | |||||
| Kingsbrook | 1037 | |||||
| Kiton | 0556 | 0037 | 0668 | |||
| Kneissel | 0037 | 0610 | 0499 | 0556 | 0292 | |
| Kobra 1298 | ||||||
| Kolster 0037 0556 | |||||
| Konichi 0009 | |||||
| Konka | 0037 | 0556 | 0371 | 0714 | 0587 |
| 0754 | 0606 | ||||
| Kontakt | 0487 | ||||
| Korpel | 0037 | 0556 | |||
| Kosmos | 0037 | 0556 | |||
| Kotron 0412 0264 | |||||
| Koyoda | 0009 | ||||
| Kross | 1536 | ||||
| Kyoshu | 0412 | 0264 | |||
| L&S Electronic | 0714 | ||||
| LaSAT | 0486 | ||||
| Lavis | 1037 | 0037 | |||
| Leader | 0009 | ||||
| Lecson | 0037 | 0556 | |||
| Legend | 0009 | ||||
| Lenco 0009 0037 | 0556 | 0587 | 1037 | ||
| 1983 | |||||
| Lenoir | 0009 | ||||
| Lentec | 1531 | ||||
| Levis Austria | 0037 | 0556 | |||
| Leyco | 0264 | 0037 | 0556 | ||
| LG | 1423 | 2182 | 0178 | 1663 | 0037 |
| 1305 | 0009 | 0556 | 0714 | 0606 | |
| 0109 | 0698 | 0715 | 1721 | 1681 | |
| 2057 | |||||
| Liesenkötter | 0037 | 0556 | |||
| Lifetec | 0037 | 0668 | 1037 | 1137 | 2001 |
| 0009 | 0512 | 0556 | 0714 | 0264 | |
| 1248 | |||||
| Lloyd's | 0009 | ||||
| Lodos 1037 | |||||
| Loewe | 0512 | 0633 | 1884 | 0556 | 0292 |
| Logik | 0698 | 1865 | 0773 | 0009 | 0264 |
| 0371 | 0880 | 1217 | 1037 | 1687 | |
| 1645 | |||||
| Logix | 0668 | ||||
| Luker | 1982 | ||||
| Luma | 0037 | 0556 | 0009 | ||
| Lumatron | 0037 | 0556 | 0264 | ||
| Lux May | 0037 | 0009 | 0556 | ||
| Luxor | 1163 | 0480 | 0208 | 0548 | 0473 |
| 1037 | |||||
| LXI | 0178 | ||||
| Madison | 0037 | 0556 | |||
| Magnavox | 0037 | 0556 | 0780 | 0753 | |
| Magnum | 0714 | 0037 | 0556 | 0715 | 1556 |
| Mandor | 0264 | ||||
| Manesth | 0037 | 0556 | 0264 | 0035 | |
| Manhattan 0037 | 0556 | 0668 | 1037 | ||
| Maqma | 1298 | 1709 | 1606 | ||
| Marantz 0037 0556 | 0412 | ||||
| Mark | 0037 | 0556 | 0009 | 0714 | 0715 |
| Marks and Spencer | 1770 | ||||
| Mascom | 1556 | 0556 | 0037 | ||
| Master's | 0499 | 0037 | |||
| Masuda | 0371 | 0009 | 0264 | 0037 | 0556 |
| Matsui | 0037 | 1163 | 0556 | 0487 | 0443 |
| 2007 | 0009 | 0371 | 0035 | 0208 | |
| 0195 | 0335 | 0714 | 1037 | 1916 | |
| 1666 | 0880 | 1667 | |||
| Matsushita | 0650 | ||||
| Matsuviama | 0587 | ||||
| Maxam | 0264 | ||||
| Maxdorf | 0773 | 0698 | 0706 | 0264 | |
| Maxim | 1982 | 1556 | |||
| MCE | 0009 | ||||
| Mediator | 0037 | 0556 | |||
| Medion 0714 0808 | 0037 | 0668 | 0556 | ||
| 0512 | 1137 | 0698 | 1037 | 1248 | |
| 0880 | 1916 | 1556 | 2001 | 1667 | |
| MegaDrive | 1248 | ||||
| Megas | 0610 | ||||
| Megatron | 0178 | ||||
| MEI | 1037 | 0037 | 0556 | ||
| Melectronic | 0037 | 0512 | 0109 | 0343 | 0009 |
| 0480 | 0287 | 0556 | 0634 | 0195 | |
| 0714 | 1652 | ||||
| Memorex | 0009 | 0178 | 0650 | ||
| Memory | 1983 | ||||
| Memphis | 0009 | ||||
| Mercury | 0037 | 0009 | 0698 | 0264 | 0556 |
| 0706 | |||||
| Merritt 0548 | |||||
Metz 1533 0746 0447 1163 0195 0037 0556 0587 0668 1037
MGA 0178 0037 0556
Micromaxx 0037 0556 0668 1037 0808
1324 2001 0714
Microspot 1614
Microstar 0808
MicroTEK 0820 0698 0860 0706 0264
Mikomi 1163 0744 1585
Minato 0037 0556
Minerva 1248 0487 0195 0108
Ministry of Sound 1667
Minoka 0412 0037 0556
Mirai 1666 1852 1651
Mitsai 1556
Mitsubishi 0108 0093 0512 0037 0178
0556 0208 1037
Mivar 0292 0609
Monaco 0009
Moree 0037
Morgan's 0037 0556
Motorola 0093
MTC 0512
MTlogic 0714 1308 2050
Multitec 0037 0556 0486 0668 1037
1556 1982
Multitech 0009 0486 0037 0556 0264
Murphy 2005
Musikland 0037 0556
Mx Onda 1687 1983 1645
MyCom 0178
Myryad 0556 0037
NAD 0178
Naiko 0037 1982 0606 0556
Nakimura 0037 0556
Narita 1982
NAT 0226
National 0226
NEC 0170 0587 1775 0009 0037
0556 0499 0653
Neckermann 0037 1505 0556 0512
NEI 0037 0556 0371 1037
NEO 0754 1324
Neon 1770
Netsat 0037 0556
Neufunk 0037 0009 0556 0610 0714
New Tech 0037 0009 0556 0343
Nikkai 0037 0556 0264 0035 0009
Nikkei 0714
Nikko 0178
Nintaus 0891
Noqamatic 0109
Nokia 0480 0548 0473 0208 0606
0610 0109
Nordmende 0109 0891 0287 0560 0343
0195 0037 0556 0335 1248
0714 2001 0443 2007 1585
1667 1163 1308
Normerel 0037 0556
Novak 0037 0556
Novatronic 0037 0556
Novex 1523
Novita 1585
NU-TEC 0698 0820 0037 0556 0706
0264
O.K.Line 1037 1324 1556
Oceanic 0208 0473 0548 0480 2001
Odeon 0264
Okano 0037 0556 0264 0009
OKI 1037 2125
Omega 0264
Omni 0780 0891 0698
Onei 1667
Onn 1709 2125 0556 1667 1770
Onwa 0371
Onyx 1709 1770
Opera 0037 1308 0556 0714
Optimus 0650
Optonica 0093
Orava 1037
Orbit 0037 0556
Orion 2007 2032 2005 0037 0443
0714 0556 0009 0264 0412
1916 0880 2001 1954
Orline 0037 0556
Ormond 0668 1037 0037 0556
Osaki 0264 0037 0412 0556
Osio 0037 0556
Osume 0037 0556
OTIC 1687 1645 1983
Otto Versand 1505 0093 0512 0037 0556
0195 0109 0226 0009 0343
Pacific 0037 0556 1137 0714 1037
0443 1324
Palladium 0037 0714 1137 1505 0556
1982
Palsonic 0264 0412 0037 0698 0556
0773 1326 1681
Panache 1585
Panama 0009 0264 0037 0556
Panasonic 0650 1636 1650 0226 1310
0037 0556 0548 0108
Panavision 0037 0556
Papouw 0037 0556
Pathe Cinema 0292
Pathe Marconi 0109
Pausa 0009
Perdio 0037 0556
Perfekt 0037 0556
Philco 0074 0037 0556
Philips 0556 0037 1506 0605 0343
0009
Phocus 1308 0714 1652
Phoenix 0037 0556 0486
Phonola 0037 0556
Pilot 0556 0037 0712 0706
Pioneer 1260 1457 0170 0679 0037
0556 0343 0109 0287 0486
0512
Pionier 0486
Plantron 0037 0556 0264 0009
Playsonic 0714 0037 0715 1652
Polar 0037
Polaroid 1523 1720 1645 1687 2125
Policom 0109 0074
Poppy 0009
Portland 1909
Powerpoint 0487 0037 0556 0698 1770
Premier 0009 0264 0891
President 0860
Prima 0009 0264 0412
PrimeView 1606
0698 1326
Prinston 1037
Profex 0009
Profi 0009
Profilo 1556
Profitronic 0037 0556
Proline 0037 1613 0556 0625 0634
1037
Prosonic 0037 0556 1865 0880 0371
0668 0714 2001 1324 1770
2106 1709 0606 2125 1849
0715 2050
Protech 0037 0556 0009 0264 0668
0486 1037
Proton 0178
Proview 1687 1645
Provision 0499 0037 0556 1037 0714
1324 1531
PVision 2001
Pye 0037 0556 0412
Pymi 0009
Quadro 0753 1326 0556 0037 1163
Quasar 0650 0009
Quelle 0037 1505 0109 0512 0074
0668 0556 0195 0264 1037
0009
Radialva 0109 0037 0556 0287
Radiola 0037 0556
Radiomarelli 0037 0556
RadioShack 0037 0556 0178
Radiotone 0009 0037 0556 0412 0668
0264 1037
Rank Arena 0753
RCA 0625 0093 0560 0335 0343
0753
Realistic 0178
Recor 0037 0556
Rectiligne 0037 0556
Red Star 1556
Rediffusion 0548
| Redstar 0037 0556 | ||||||
| Reflex 0037 0556 1037 0668 | ||||||
| Relisys 1298 1585 1645 | ||||||
| Reoc 0714 0634 1909 | ||||||
| Revox 0037 0808 0556 | ||||||
| Rex 0264 | ||||||
| RFT 0292 0264 0037 0556 0486 | ||||||
| Ricoh 0037 0556 | ||||||
| Rinex 0773 0698 0264 0706 | ||||||
| R-Line 0037 0556 | ||||||
| Roadstar 1037 0715 0009 0037 0556 | ||||||
| 0714 0668 0264 1916 1326 | ||||||
| Rodex 0037 0556 | ||||||
| Rolsen 0037 0556 2037 | ||||||
| Rowa 0264 0698 0712 0009 0706 | ||||||
| 0587 0037 0556 | ||||||
| Royal 0606 | ||||||
| Royal Lux 0412 0335 | ||||||
| Rukopir 0556 0037 | ||||||
| Saba 0625 0109 0560 0343 0287 | ||||||
| 0335 0548 0650 0714 1588 | ||||||
| Sagem 0610 0618 1596 | ||||||
| Saisho 0634 0009 0264 | ||||||
| Saivod 0037 1982 1163 0556 0668 | ||||||
| 1556 0712 1037 | ||||||
| Salora 0548 0208 0480 1556 2125 | ||||||
| Salsa | 0335 | |||||
| Samsung | 0812 2051 0618 0178 0587 | |||||
| 0093 2094 1619 0556 1249 | ||||||
| 0009 0037 0264 | ||||||
| Sansui 0037 0729 1709 0706 0556 | ||||||
| 0371 0888 0753 1531 0698 | ||||||
| 0264 0714 1248 1681 1556 | ||||||
| Santon | 0009 | |||||
| Sanyo 0208 1208 0292 0009 0037 | ||||||
| 0108 0556 0486 0170 1037 | ||||||
| 1667 1163 1585 | ||||||
| Save | 0037 0556 | |||||
| SBR | 0037 0556 | |||||
| Schaub Lorenz | 0548 0714 0606 0486 1324 | |||||
| 1363 1667 2125 | ||||||
| Schneider | 1137 0037 0556 0343 0371 | |||||
| 0668 1037 0714 1909 1982 | ||||||
| 1916 1324 | ||||||
| Schöntech | 1037 | |||||
| Scott | 0178 1983 | |||||
| Sears | 0178 | |||||
| Seaway 0634 | ||||||
| Seelver | 0556 1037 0037 | |||||
| SEG | 1037 0037 1163 0556 0668 | |||||
| 0487 0009 0264 0634 1909 | ||||||
| SEI | 1505 0037 0556 | |||||
| Sei-Sinudyne | 1505 0037 0556 | |||||
| Seitech | 1217 1324 | |||||
| Seleco 0371 0264 | ||||||
| Sencora 0009 | ||||||
| Sentra 0035 0009 | ||||||
| Serie Dorada | 0178 | |||||
| Serino 0610 0093 1193 | ||||||
| Sharp | 0093 1193 1659 1393 2214 | |||||
| 0653 | ||||||
| Shintoshi | 0037 0556 | |||||
| Shivaki | 0037 0556 0443 0178 | |||||
| Show 0009 0698 0264 0706 0037 | ||||||
| Siemens | 0195 0037 0556 | |||||
| Siera | 0037 0556 0587 | |||||
| Silva | 0037 0556 | |||||
| Silva Schneider | 0753 1556 2125 | |||||
| Silver | 0037 0556 0715 | |||||
| SilverCrest | 1037 0037 0556 | |||||
| Singer 0009 0698 1556 0037 0556 | ||||||
| 0335 | ||||||
| Sinotec | 0773 0606 0698 | |||||
| Sinudyne | 1324 1505 0037 0556 0606 | |||||
| Sky | 0037 0880 1614 0178 0556 | |||||
| 1613 1606 1775 | ||||||
| Skysonic | 0753 | |||||
| Sliding | 0880 1324 | |||||
| SLX 0668 | ||||||
| Smaragd 0487 | ||||||
| S-Media | 1217 | |||||
| Soemtron | 1298 | |||||
| Sogo | 2050 | |||||
| Solavox | 0548 0037 0556 | |||||
| Sonic | 0753 | |||||
| Soniko | 0037 0556 | |||||
| Soniq 1298 | |||||
| Sonitron | 0208 | ||||
| Sonneclair | 0037 | 0556 | |||
| Sonoko 0037 0556 | 0009 | 0264 | |||
| Sonolor | 0208 | 1505 | 0548 | ||
| Sontec 0037 0556 | 0009 | ||||
| Sontech | 1983 | ||||
| Sony 1505 1825 1651 | |||||
| Sound & Vision | 0037 | 0556 | |||
| Sounddesign | 0178 | ||||
| Soundwave | 0037 | 0556 | 0715 | ||
| Soyea | 0773 | ||||
| Soyo 1709 | |||||
| Spectra | 0009 | ||||
| Ssangyong | 0009 | ||||
| Staksonic | 0009 | ||||
| Standard | 0037 | 0556 | 1037 | 0009 | |
| Starion | 1037 | ||||
| Starlite | 0009 | 0037 | 0556 | 0264 | 0412 |
| Stern | 0264 | ||||
| Stevison | 1982 | 1556 | |||
| Strato | 0037 | 0556 | 0264 | 0009 | |
| Strong 1163 1037 | 0037 | 0556 | |||
| Sungoo | 1248 | 2037 | |||
| Sunic Line | 0037 | 0556 | |||
| Sunkai 0610 0037 | 0556 | 0487 | |||
| Sunny | 0037 | ||||
| Sunstar | 0371 | 0037 | 0556 | 0009 | 0264 |
| Sunstech 2001 | |||||
| Sunwood | 0037 | 0556 | 0009 | ||
| Supersonic | 0009 | 0208 | 0556 | 0698 | 0264 |
| 0037 | |||||
| SuperTech | 0009 | 0037 | 0556 | ||
| Supervision | 0698 | 0264 | |||
| Supra | 0178 | 0009 | 0037 | ||
| Susumu | 0335 | 0287 | |||
| Sutron 0009 | |||||
| SVA | 0698 | 0264 | 0208 | 0706 | |
| Svasa | 0698 | 0208 | 0706 | 0264 | |
| Swedx 1606 | |||||
| Swisstec | 1613 | 1614 | 1606 | 0880 | 1775 |
| 1776 | 1849 | 2059 | |||
| Sysline 0037 0556 | |||||
| T+A | 0447 | ||||
| Tandberg 0109 | |||||
| Tandy 0093 | |||||
| Targa 0618 | |||||
| Tashiko 0170 | |||||
| Tatung | 1720 | 0037 | 1248 | 1556 | 0556 |
| 1324 | |||||
| TCL 1916 0625 | |||||
| TCM | 0714 | 0808 | 2001 | 1308 | |
| Teac | 0698 | 1645 | 2168 | 0037 | 1037 |
| 0556 | 0512 | 0712 | 0668 | 0706 | |
| 0264 | 1909 | 0178 | 0009 | 0412 | |
| 0170 | 0714 | 1363 | 0587 | 1770 | |
| 1709 | 2032 | ||||
| TEC | 0009 | 0335 | 0037 | 0556 | |
| Tech Line | 0037 | 0556 | 0668 | 1163 | |
| Technica | 1982 | ||||
| Technics | 0650 | ||||
| Technika 2032 1865 | 2059 | 1849 | 2106 | ||
| 1667 | 1983 | 1585 | 2125 | ||
| TechniSat 0037 0556 | |||||
| Technisson | 0714 | 1652 | |||
| Techno | 1585 | 1037 | |||
| Technol Ace | 0698 | 0264 | 0634 | ||
| Technosonic | 0037 | 0556 | 1324 | 0499 | 0880 |
| 1326 | 1982 | 2032 | |||
| Technotrend | 1531 | ||||
| Techvision | 1709 | 2032 | 1531 | ||
| Techwood | 1163 | 1037 | 1667 | ||
| Tecnimagen | 0556 | ||||
| Teco | 1523 | ||||
| Tedelex | 0698 | 0706 | 0606 | 0037 | 0009 |
| 0208 | 0891 | 0587 | 0556 | 1709 | |
| 1531 | 1681 | 0264 | |||
| Teiron 0009 | |||||
| Tek | 0820 | 0037 | 0698 | 0009 | |
| TELE System | 2125 | ||||
| Teleavia | 0109 | 0287 | 0343 | ||
| Telecor | 0037 | 0556 | |||
| Telefunken 0625 | 0560 | 0587 | 0074 | 0109 | |
| 0698 | 0343 | 0712 | 0820 | 0896 | |
| 0754 | 0780 | 0891 | 0287 | 0335 | |
| 1681 | 1536 | 0753 | 0706 | 0037 | |
| 0556 | 0486 | 0714 | 1556 | 1585 | |
| 1588 | |||||
Telefusion 0037 0556
Telegazi 0037 0264 0556
Marks and Spencer 2112
Marquant 0770
Mastec 1006
| Matsui 0651 0713 0672 0695 | |||||
| Maxdorf 0788 | |||||
| Maxim 0713 1367 | |||||
| Maya 1345 | |||||
| MBO 0730 1917 | |||||
| Mecotek 0770 | |||||
| Mediencom 0751 | |||||
| Medion 0831 2189 | 1347 | 0651 | 1345 | ||
| 1006 | 0652 | 1416 | 1644 | 0741 | |
| 2425 | |||||
| MEI 0790 | |||||
| Memorex 0831 | |||||
| Memory 0730 1383 | |||||
| Metz 0571 0713 | |||||
| MiCO 0723 0751 | |||||
| Micromaxx 0695 1347 | |||||
| Micromedia 0503 0539 | |||||
| Micromega | 0539 | ||||
| Microsoft 0522 1708 | |||||
| Microstar | 0831 | ||||
| Minax | 0713 | ||||
| Minoka | 0770 | 1115 | |||
| Mirror | 0652 | ||||
| Mitsubishi | 0713 | ||||
| Mizuda | 0857 | ||||
| Multitec 1367 | |||||
| Mustek | 0730 | 1917 | |||
| Muvid | 1643 | 2173 | |||
| Mx Onda | 0651 | 0751 | 0723 | 1383 | 1601 |
| Mystral | 0831 | 1894 | |||
| NAD | 0741 | 0692 | |||
| Naiko | 0770 | 1367 | 1004 | ||
| Narita | 1367 | ||||
| NEC | 0869 | 0692 | 1918 | 0741 | |
| Neom | 1493 | 1643 | |||
| Neon | 2112 | ||||
| NeoXeo | 0826 | ||||
| Nevir | 0831 | 0770 | 0672 | ||
| Nexius | 0790 | ||||
| Next Base | 0826 | ||||
| Nfren | 0826 | ||||
| Nikkai | 1923 | ||||
| Nordmende 1614 | 0831 | 1530 | |||
| Nortek | 1643 | 2173 | |||
| NU-TEC | 1493 | ||||
| Oasis-Media | 1601 | ||||
| Oceanic | 1614 | ||||
| Omni 1832 | |||||
| Onkyo | 0627 | 0503 | 1769 | 2147 | |
| Onn | 2112 | ||||
| Onyx 2112 | |||||
| Oopla | 1158 | ||||
| Optimus | 0571 | ||||
| Orava | 1923 | ||||
| Orbit | 0872 | ||||
| Orion | 0695 | 1006 | 1233 | 0898 | |
| Oritron | 0651 | ||||
| OTIC | 0826 | 1383 | |||
| Pacific | 1152 | 0790 | 0768 | 0759 | 0713 |
| 0831 | |||||
| Packard Bell | 0831 | ||||
| Palladium | 0695 | 0713 | 1367 | ||
| Palsonic | 0672 | 1251 | |||
| Panasonic | 0490 | 1834 | 1908 | 1905 | 1910 |
| 1579 | 1641 | ||||
| Papouw | 0533 | ||||
| peeKTON 1224 0898 | |||||
| Philips | 0539 | 2056 | 1340 | 0646 | 1354 |
| 0675 | 1506 | 1813 | 0503 | 1158 | |
| 1846 | 2049 | 2084 | 2093 | 2334 | |
| 2434 | |||||
| Philo 1345 | |||||
| Pioneer | 0571 | 1965 | 0631 | 1900 | 1571 |
| 0142 | 1531 | 2442 | |||
| Play It | 1643 | ||||
| Pointer | 0770 | ||||
| Portland 0770 | |||||
| Powerpoint | 0872 | 2112 | |||
| Prinz 0831 | |||||
| Prism | 1006 | 0831 | |||
| Pro2 | 1272 | 1345 | |||
| ProCaster 1004 | |||||
| Proline | 0651 | 0672 | 0790 | 1004 | 0652 |
| 1483 | |||||
| Proscan | 0522 | ||||
| Proson 0713 | |||||
| Prosonic 1614 2112 1923 | |||||
| Provision | 1923 | 1321 | 1493 | 0730 | 1272 |
| PVision | 1614 | ||||
| Pye | 0646 | 0539 | |||
| Radionette | 0741 | 0869 | 1906 | ||
| Radiotone | 0713 | ||||
| RCA | 0522 | 0651 | |||
| REC 0490 | |||||
| Red Star 0759 0770 0788 0898 1923 | |||||
| 1345 | |||||
| Relisys | 1347 | ||||
| Reoc | 0768 | 1152 | |||
| Richmond | 1233 | ||||
| Roadstar | 0713 | 0730 | 0898 | 1227 | 1832 |
| Ronin | 0872 | ||||
| Rotel | 0623 | ||||
| Rowa 0759 1004 | |||||
| Rownsonic | 0723 | ||||
| Saba | 0651 | 2173 | 1643 | 0551 | |
| Sabaki | 0768 | ||||
| Saivod | 0759 | 0831 | 1367 | 0770 | |
| Sakyno | 1152 | 0768 | |||
| Salora | 0741 | ||||
| Sampo 1347 | |||||
| Samsung | 0573 | 0744 | 1932 | 1075 | 0490 |
| 1635 | 1748 | 0298 | 0199 | 2107 | |
| 2269 | |||||
| Sansui | 0695 | 0768 | 0770 | 1152 | 1230 |
| 0723 | 0751 | 1832 | 1884 | 1115 | |
| 0826 | 1894 | ||||
| Sanyo | 0670 | 0695 | 0790 | 0213 | 1919 |
| 0713 | |||||
| ScanMagic | 0730 | ||||
| ScanSonic | 0857 | ||||
| Schaub Lorenz | 0788 | 0770 | 1152 | 1643 | 2173 |
| Schneider | 0831 | 0539 | 0788 | 0713 | 0651 |
| 0869 | 0790 | 1884 | 1367 | 0646 | |
| 1227 | |||||
| Schöntech | 0713 | ||||
| Scientific Labs | 0768 | 1152 | 0652 | ||
| Scott 0651 0672 1036 1233 1383 | |||||
| 2173 | |||||
| Seeltech 1224 1643 | |||||
| SEG 0713 0768 1152 0872 1530 | |||||
| 1483 | |||||
| Shanghai | 0672 | ||||
| Sharp | 0713 | 0695 | |||
| Sherwood | 0741 | 0213 | |||
| Sigmatek | 0857 | 1224 | 2139 | 2172 | |
| Siltex | 1224 | ||||
| Silva | 0788 | 0898 | 0831 | ||
| Silva Schneider | 0831 | 1906 | 0741 | ||
| SilverCrest | 1152 | 0768 | 1643 | 2173 | |
| Singer | 0723 | 0751 | 0768 | 1152 | |
| Sinotec | 0770 | 1115 | |||
| Sistemas | 0672 | ||||
| Skymaster | 0730 | 0768 | 1152 | ||
| Skyworth | 0898 | ||||
| Sliding 1115 | |||||
| Slim Art | 0770 | ||||
| Slim Devices | 0533 | ||||
| SM Electronic | 0730 | 0768 | |||
| Smart | 0713 | ||||
| Sogo 2172 1493 2139 | |||||
| Sonashi | 0831 | ||||
| Soniko 0788 | |||||
| Sontech | 1383 | ||||
| Sonwa | 1004 | ||||
| Sony | 0533 | 1070 | 1536 | 1981 | 1633 |
| 1516 | 2020 | 0864 | 0772 | 2043 | |
| 1824 | 2132 | 2457 | |||
| Sound Color | 1233 | ||||
| Soundmaster | 0768 | 1152 | |||
| Soundmax | 0768 | 1152 | |||
| Soundwave | 1530 | ||||
| Spectra | 0872 | ||||
| Standard | 0651 | 1152 | 0768 | 0788 | 0831 |
| 0898 | |||||
| Star Clusters | 0768 | 1227 | 1152 | ||
| Starmedia | 0893 | 1224 | |||
| Stein 1601 | |||||
| Stevison | 1367 | ||||
| Strato | 1527 | 1152 | |||
| Strong | 0713 | ||||
| Sunfly | 0857 | ||||
| Sunkai | 0770 | ||||
Sunstech 2139 0831 1601 2172 1614
Sunwood 0788
Superior 1643
Supervision 0730 0768
Supratech 2172 0893 2139
SVA 0672
Symphonic 0675
Synn 0768 1152
Syscom 0826
Sytech 1601 2139
Tandberg 0713
Tangent 1321
Tarqa 0652 1158 1227 1644 1906
0741
Tatung 0770
TBoston 2172 2139
Tchibo 0741
TCM 0741
Teac 0741 0790 0768 0571 0692
1006 1152 0759 1227 0675
1224 1913 2112
TEC 0898
Technica 1367
Technics 0490 1905 1908 1910
Technika 0770 1115 0831 1530 1383
1152
Technisson
Technosonic 1115 1367
TechnoStar 1643
Techwood 0713 1530 0539
Tecnimagen 1233
Tedex 1004 0768 0770 1152
Telefunken 0790 0788 1923 1832 1483
1115 0770 1345 1555
Teletech
Tensai 0651 0770
Tevion 0651 1036 1152 0768 1004
2425 1227 1347 0652
Textorm 1493
Theta Digital 0571
Thomson 0551 0522 0831
Tokai 0898 1894 0788 1233
Top Suxess 1224
Toshiba 0503 1510 0452 1769
Tosumi 1367 2112
TRANS-continents 0872 0826 0831 1233
Transonic 0672
Trevi 0831
Trio 0770
TruVision 0857
TSM 1224
TVE 0713
United 0788 0730 1383 0790 0672
0695 1115 0768 1233 1555
0713 1152 0826 1832 1367
0675 2112
Universal
Multimedia 0768 1152
Universum 0741 0713 1918 1913 1227
0790 1530
Uptek 0893
upXus 1345
Vecatech 1493
Venturer 0790 1769
Vestel 0713 1530
Viewmaster 1224
Voxson 0730 0831
Waitec 1224 1894 1917 0730
Waltham 1530
Welkin 0831
Wellington 0713
Weltstar 0713
Wharfedale 0768 1832 0723 0790 1152
0751 0652 0770 1115 1383
Wilson 0831 1233
Windy Sam 0573
Woxter 2139 2172 1224
XBox 0522 1708
Xenon 1923
Xiron 1383
XLogic 1832 0770 0768 1152
XMS 0788 0770
Xomax 2112
Xoro 1251
Yakumo 1004 0652
Yamada 1004 0872 1493 1416 1158
0652 1623 2139
0539 1840 0646 0817 0490
1158
Yamakawa 0872
Yukai 0730 1917
Zenith 0503 0741
| In the UK0901-5510010(£ 0,50 per minute)FAX: +31 53 432 9816ofahelp@uebv.com (*) | Ireland016015986FAX: +31 53 432 9816ofahelp@uebv.com (*) | Australia1 300 888 298FAX: 02 9972 7143 |
| New Zealand0508 663 4 255FAX: 06 878 2760 | South Africa0860 100551011 417 3074 /011 417 3075FAX: 011 417 3275 /011 417 3274support@oneforall.co.za | Deutschland06966984962FAX: +31 53 432 9816ofahelp@uebv.com (*) |
| España917873180FAX: +31 53 432 9816ofahelp@uebv.com (*) | France0173036536FAX: +31 53 432 9816ofahelp@uebv.com (*) | Italia0248296093FAX: +31 53 432 9816ofahelp@uebv.com (*) |
| Luxemburg/Luxembourg4066615632FAX: +31 53 432 9816ofahelp@uebv.com (*) | Portugal800-831397FAX: +31 53 432 9816ofahelp@uebv.com (*) | Schweiz/Suisse/Svizzera0443420449FAX: +31 53 432 9816ofahelp@uebv.com (*) |
| Österreich/Austria01790876064FAX: +31 53 432 9816ofahelp@uebv.com (*) | Nederland0205174790FAX: +31 53 432 9816ofahelp@uebv.com (*) | België/Belgique022750851FAX: +31 53 432 9816ofahelp@uebv.com (*) |
(*) Just send a blank message, you'll get auto-reply
(*) Bitte senden Sie uns nur eine blanko Nachricht, Sie erhalten direkt eine automatische Rückantwort.
(*) Envoyez juste un message 'blanc', vous obtiendrez automatiquement un questionnaire à remplir.
(*) Por favor envíenos un mensaje en blanco, a su vez recibirá una respuesta automática con un formulario a rellenar.
(*) Por favor envie-nos somente uma mensagem em branco, porque você receberá um e-mail de volta.
(*) Basta inviare un messaggio vuoto, riceverà un'auto reply (risposta automatica).
(*) U kunt ons een blanco mailbericht sturen, u ontvangt dan spoedig een auto-reply (met daarin een gegevensformulier dat u kan invullen en terug sturen).
| Magyar/Hungary+36-034-316-348FAX: +36-034-309-477info@vivanco.hu | Polskawww.kconsult.plwww.oneforall.com | Türkiyewww.oneforall.com |
| Česká/Czech+420 491 512 080oneforall@solid-czech.cz | Slovenská/Slovakia+420 571 114 299oneforall@solid-czech.cz | Ykpaïha/Ukrainewww.oneforall.com |
| Danmark+45 4434 0811 (8:30 - 16:00)FAX: +45 4434 0829ofasupport@fovitech.dkwww.fovitech.dk | Norgewww.cenor.sewww.oneforall.com | Sverigewww.cenor.sewww.oneforall.com |
| Suomi/Finland0800-9-0323FAX: 09-8678 0250Info@oneforall.fiwww.avkomponentti.fi | Ελληνική/Hellas/Greece2410 555599FAX: 2410 579092info@oneforall.grwww.digitech.gr | Русский/Russia0495 787 3211FAX: 0495 251 9132sales@oneforall.ruwww.oneforall.ru |
| България/Bulgariawww.oneforall.com | Româniawww.oneforall.com | Hrvatska/Croatia+385-1-4816-806FAX: +385-1-4816-807info@tehnocentar.hr |
| India• Toll Free number(Airtel/BSNL/TataIndicom/BPLsubscribers only):1800-102-3299• Other subscribers:080-40351700support@oneforall.co.in | ||
India
UEI Electronics Private Ltd offers you, the customer, ONE YEAR WARRANTY for your Remote.
The Remote is warranted against manufacturing defects arising from faulty design, poor workmanship and materials for a period of One year; "the period"; from the date of its original purchase by you, on the following terms and conditions.
To obtain warranty service, please call us at the numbers applicable to your local area mentioned on the Customer Service Page of the User Manual or available on www.oneforall.co.in
This warranty will be valid only when the original invoice/ purchase receipt (indicating date of purchase, product description, dealer's name etc.) is presented with the defective Remote. Universal reserves the right to refuse free-of-charge warranty replacement if the above document cannot be presented or if the information contained in it is incomplete, illegible or incorrect. This Warranty does not apply if the type, serial number on the Remote has been altered, deleted, removed or otherwise made illegible. Universal's liability, under this warranty, shall be strictly limited to the first/original sale by the dealer/retailer to you (the first user), and will not apply or extend to any secondary or subsequent sale/transfer of the Remote by you.
You shall be liable for all expenses incurred in delivering the defective Remote to us at the applicable addresses, however, we shall bear the cost of delivery to you for the replacement Remote. While Universal shall make all efforts to replace the defective Remote at the earliest, it is made expressly clear that Universal is under no obligation to do so in a specified period of time. Universal reserves the right to retain the defective Remote, at its own discretion. Please note that the replacement of the Remote, shall not extend the warranty period beyond one year from the original purchase. No fresh warranty shall apply to the replacement Remote.
This Warranty covers only manufacturing defects in the Remote which occur under conditions of normal operation of the Remote and in consonance with their proper and prescribed use. This Warranty does not cover the damage resulting from adaptations, adjustments, modifications made to the Remote or normal wear and tear, misuse, reckless use, damages caused due to natural disasters, Acts of God. This Warranty does not extend to accessories or products used with the Remote, batteries, broken or marred cabinets, cartons, carrying cases or any other item used in connection with the Remote. This Warranty does not apply if the Remote has been tampered with, altered, serviced by any agency, person not authorized by Universal. It is your responsibility to check and verify from Universal, the authenticity of the authorization, which any servicing agency may represent to you.
This Warranty is in lieu of all implied conditions and warranties under applicable law and is confined to replacement of the defective Remote and does not cover any special, consequential, incidental or resulting liability, damage, loss arising from such defects. This warranty, in no event, shall extend to the payment of any monetary consideration or compensation whatsoever. This Warranty does not affect your statutory rights under applicable Indian laws. This Warranty is valid only within the territory of India. In the event of a dispute arising in relation to or connected with this Warranty, the decision of Universal shall be final and binding.
For more information, write to: UEI Electronics Private Ltd
5th Floor, East Wing
Khanija Bhavan
# 49 Race course Road
Bangalore 560 001
Dansk
UNIVERSAL ELECTRONICS INC./ONE FOR ALL warrants to the original purchaser that this product will be free from defects in materials and workmanship under normal and correct use for a period of one (1) year from the date of original purchase. This product will be replaced free of charge if it has been proven to be defective within the one (1) year warranty period. This warranty does not cover cartons, carrying cases, batteries, broken or marred cabinets or any other item used in connection with the product. Any further obligation than listed above is excluded. To obtain warranty service during the warranty period, please call us at the number mentioned on the Customer Service page. Please notice that we need your purchase receipt so that we may establish your eligibility for service.
If you have bought this product for purposes which are not related to your trade, business or profession, please remind that you may have legal rights under your national legislation governing the sale of consumer goods. This guarantee does not affect those rights.
Deutsch
VAC: Video Accessory like Media Centres / AV Accessories / AV Selectors 101
DVD
DVD : DVD Player / DVD-R / Blu-ray / DVD Home Cinema / DVD Combi / DVD/HDD ....102
LASER: Laserdisc 102
AMP
MIS: Miscellaneous Audio 101
AMP: Audio / Amplifier / Active Speaker System 101
TUNER : Audio / Audio Receiver/Tuner/Amplifier / (DVD) Home Cinema 101
•Акосветлинатанасветодиодитеотслабне,моля,сменетебатериите.