USER MANUAL PowerMax 37 E GARDENA
GB Operating Instructions
Electric Lawnmower
F Mode d'emploi
Tondeuse électrique
natural_image
Line drawing of a robotic lawn mower with two arrows indicating force or movement (no text or symbols)
natural_image
Line drawing of a lawn mower with visible blades and wheels, no text or symbols present


natural_image
Technical line drawing of a mechanical component with two arrows indicating assembly or movement (no text or symbols)
natural_image
Technical line drawing of a cleaning or cleaning device with arrows indicating component alignment (no text or symbols)
natural_image
Line drawing of a lawn mower with mesh grille and wheels (no text or symbols)
natural_image
Line drawing of a tracked agricultural vehicle with visible tire tracks and dust lanes (no text or symbols)
natural_image
Line drawing of a mechanical device with a cable inserted, showing internal components and a directional arrow (no text or symbols)

natural_image
Line drawing of a hand using a tool to adjust or install a mechanical component (no text or symbols visible)
natural_image
Illustration of a hand using a tool to adjust or install a mechanical component (no text or symbols visible)
natural_image
Illustration of hands using a tool to adjust or install a mechanical component (no text or symbols visible)
natural_image
Illustration of hands performing a belt drive mechanism with arrows indicating motion (no text or symbols)

natural_image
Illustration of hands using a medical device to interact with a tool, showing motion arrows (no text or symbols)
natural_image
Line drawing of a tractor's front wheel assembly with visible tire tracks and mounting brackets (no text or symbols)
natural_image
Technical line drawing of a vehicle chassis with visible suspension components and wheels (no text or symbols)
natural_image
Technical line drawing of a mechanical device with no visible text or symbols
natural_image
Technical line drawing of a lawn mower assembly with labeled component (1), showing internal components and external housing (no text or symbols beyond label)
natural_image
Mechanical assembly diagram showing hands operating a motor or gear system (no text or symbols visible)
natural_image
Technical line drawing of a lawn mower with visible blades and wheel (no text or symbols)
natural_image
Line drawing of a person operating a vehicle chassis with wheels and a handle (no text or symbols)
natural_image
Line drawing of a person using a tool to clean or adjust a mechanical component (no text or symbols visible)
natural_image
Line drawing of a hand using a brush to clean or store items inside a vehicle (no text or symbols)
natural_image
Line drawing of a hand cleaning a lawn mower with a cloth (no text or symbols)
natural_image
Line drawing of a lawn mower with visible blades and wheels (no text or symbols)

natural_image
Line drawing of a lawn mower with visible blades and wheels (no text or symbols)
natural_image
Technical line drawing of a robotic device with a close-up inset showing the mechanism (no text or symbols)
D Verwenden Sie keine Flüssigkeiten zur Reinigung.
GB DO NOT use liquids for cleaning.
F NE PAS utiliser de produit liquide pour le nettoyage.
NL Voor het reinigen NOOIT vloeistoffen gebruiken.
S ANVÄND INTE vätskor för rengöring.
DK BRUG IKKE væske til rengøring.
N Flytende midler MÅ IKKE brukes til rengjøring.
FIN ÄLÄ käytä nesteitä puhdistamiseen.
I NON usare liquidi per la pulizia.
E NO utilice líquidos para la limpieza.
P NÃO use líquidos para limpar.
PL NIE używać płynów do czyszczenia.
H NE használjon folyadékokat tisztításra.
CZ K čištění NEPOUŽÍVEJTE kapaliny.
SK NEPOUZIVAJTE na čistenie tekuté materiály.
GR MHN καθαρίζετε με υγρά.
RUS HE используйте жидкости для
очистки.
SLO NE uporabljajte raznih tekočin za čiščenje.
HR NEMOJTE koristiti tekućine za čišćenje.
SRB/ NEMOJTE koristiti tečnosti za BIH čišénje.
UA Для очищення НЕ
ВИКОРИСТОВУЙТЕ рідину.
RO NU utilizati pentru curătire lichide.
TR Temizleme için sıvılar
KULLANMAYIN.
BG HE използвайте течности за
почистване
AL MOS përdorni lëngje për pastrim.
EST ARGE kasutage puhastamiseks vedelikke.
LT Nenaudokite skysčių valymui.
LV Tirišanai NEIZMANTOJIET škidrumus.
D Reparaturen dürfen nur von GARDENA Servicestellen oder von GARDENA autorisierten Fachhändlem durchgeführt werden.
GB Repairs may only be carried out by GARDENA service centres or dealers authorised by GARDENA.
F Pour des raisons de sécurité, les réparations ne doivent être effectuées que par le Service Après- Vente de GARDENA France ou l'un des Centres SAV agréés GARDENA.
NL Reparaties mogen alleen door de GARDENA technische dienst of door GARDENA geautoriseerde vakhandels uitgevoerd worden.
S Reparationer får endast utföras av GARDENA service eller av återförsäljares service auktoriserad av GARDENA.
DK Reparationer må kun udføres af GARDENA service centre eller forhandlere, der er autoriseret af GARDENA.
N Reparasjon vil muligens kun bli utført av GARDENAs servicesenter eller autoriserte GARDENA-forhandlere.
FIN Korjaukset voidaan ainoastaan suorittaa GARDENA'n huoltokeskusten tai GARDENA'n valtuuttamien myyjien toimesta.
I Le riparazioni possono essere eseguite solo dai centri assistenza GARDENA o da personale specializzato autorizzato GARDENA.
E Las reparaciones solo pueden hacerlas los centros de servicio de GARDENA o los distribuidores autorizados por GARDENA.
P As reparações podem não ser feitas nos centros de serviço ou concessionários autorizados da GARDENA.
PL Naprawy mogą być wykonywane tylko w placówkach serwisowych GARDENA lub u dealerów autoryzowanych przez GARDENA.
H Javítást csak a GARDENA szervizközpontok vagy a GARDENA által meghatalmazott márkakereskedők végezhetnek.
CZ Opravy mohou provádět pouze servisní střediska firmy GARDENA nebo prodejci schválení firmou GARDENA.
SK Opravy môžu byť prevedené iba v servisnom stredisku GARDENA alebo u predajcov autorizovaných spoločnosťou GARDENA.
GR Οι επισκευές διεξάγονται μόνο από τα κέντρα σέρβις της GARDENA ή από εξουσιοδοτημένους αντιπροσώπους της GARDENA.
RUS Починка устройства может быть выполнена только сервис-центрами компании GARDENA или официальными посредниками GARDENA.
SLOPopravila lahko opravijo samo servisni centri GARDENA ali prodajalci, ki jih je pooblastilo podjetje GARDENA.
D - INHALT
16.Mulching Plug - 37E/42E
-
Instruction Manual
-
Warning Symbols
19.Product rating label
F - TABLE DES MATIÈRES
If not used properly this product can be dangerous! This product can cause serious injury to the operator and others, the warnings and safety instructions must be followed to ensure reasonable safety and efficiency in using this product. The operator is responsible for following the warning and safety instructions in this manual and on the product.
Explanation of Symbols on the product
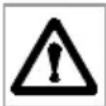
Warning
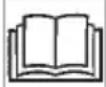
Read the user instructions carefully to make sure you understand all the controls and what they do.
Always keep the product on the ground when operating. Tilting or lifting the product may cause stones to be thrown out.
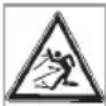
Keep bystanders away. Do not operate whilst people especially children or pets are in the area.
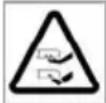
Beware of sharp blades - remove plug from mains before maintenance or if cable is damaged.
Blades continue to rotate after the machine is switched off.

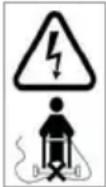
Keep the supply cable away from the blade.
General
- This product is not intended for use by persons (including children) with reduced physical, sensory or mental capabilities, or lack of experience and knowledge, unless they have been given supervision or instruction concerning the use of the product by a person responsible for their safety. Children should be supervised to ensure that they do not play with the product. For safety reasons, children under the age of 16 or people who are not familiar with these operating instructions should not use this product.
- Never allow children or people unfamiliar with the instructions to use the machine.
- Stop using the machine while people, especially children, or pets are nearby.
- Only use the product in the manner and for the functions described in these instructions.
- Never operate the product when you are tired, ill or under the influence of alcohol, drugs or medicine.
- The operator or user is responsible for accidents or hazards occurring to other people or their property.
Electrical
-
The use of a Residual Current Device (R.C.D.) with a tripping current of not more than 30mA is recommended. Even with a R.C.D. installed 100% safety cannot be guaranteed and safe working practice must be followed at all times. Check your R.C.D. every time you use it.
-
Before use, examine the cable for signs of damage or ageing. If the cable is found to be defective, take the product to an Authorised Service Centre and have the cable replaced.
-
Do not use the product if the electric cables are damaged or worn
- Immediately disconnect from the mains electricity supply if the cable is cut, or the insulation is damaged. Do not touch the electric cable until the electrical supply has been disconnected. Do not repair a cut or damaged cable. Replace it with a new one.
- Your extension cable must be uncoiled, coiled cables can overheat and reduce the efficiency of your mower.
- Keep cable away from product, always work away from the power point mowing up and down, never in circles.
- Do not pull cable around sharp objects.
- Always switch off at the mains before disconnecting any plug, cable connector or extension cable.
- Switch off, remove plug from mains and examine electric supply cable for damage or ageing before winding cable for storage. Do not repair a damaged cable, replace it with a new one. Use only genuine replacement cable.
- Always wind cable carefully, avoiding kinking.
- Never carry the product by the cable.
- Never pull on the cable to disconnect any of the plugs.
- Use only on AC mains supply voltage shown on the product rating label.
- Our products are double insulated to EN60335. Under no circumstances should an earth be connected to any part of the product.
Cables
If extension cables are used, these must comply with the minimum cross-sections in the table below:
Voltage Cable Cross
length section
220-240V/50Hz Up to 20 m 1.5 mm ^2
220-240V/50Hz 20-50m 2.5mm ^2
-
Mains cables and extensions are available from your local Approved Service Centre.
-
Only use extension cables specifically designed for outdoor use and which conform to one of the following specifications: Ordinary rubber (60245 IEC 53), Ordinary PVC (60227 IEC 53) or Ordinary PCP (60245 IEC 57)
-
If the short connection lead is damaged, it must be replaced by the manufacturer, its service agent or similarly qualified persons in order to avoid a hazard.
Preparation
- While using your product always wear substantial footwear and long trousers. Do not operate the equipment when barefoot or wearing open sandals.
- Make sure the lawn is clear of sticks, stones, bones, wire and debris; they could be thrown by the blade.
- Before using the machine and after any impact, check for signs of wear or damage and repair as necessary.
- Replace worn or damaged blades together with their fixings in sets to preserve balance.
Use
- Use the product only in daylight or good artificial light.
- Avoid operating your product in wet grass, where feasible.
Safety
-
Take care in wet grass, you may lose your footing.
-
On slopes, be extra careful of your footing and wear non-slip footwear.
-
Operate your product across the face of slopes, never up and down.
-
Exercise extreme caution when changing direction on slopes. Walk never run.
-
Make sure you always take up a safe and stable stance whilst working, especially on slopes. Do not use the mower close to swimming pools or garden ponds.
-
Do not walk backwards when operating, you could trip.
-
Never cut grass by pulling the product towards you.
-
Switch off before pushing the product over surfaces other than grass.
-
Never operate the product with damaged guards or without guards in place.
-
Keep hands and feet away from the cutting means at all times and especially when switching on the motor.
13.Do not tilt product when the motor is running.
-
Do not put hands near the grass discharge chute.
-
Never pick up or carry a product when it is operating or still connected to the mains supply.
-
Remove the plug from the mains :
-
before leaving the product unattended for any period;
- before clearing a blockage;
- before checking, cleaning or working on the appliance;
- if you hit an object. Do not use your product until you are sure that the entire product is in a safe operating condition.;
- if the product starts to vibrate abnormally. Check immediately. Excessive vibration can cause injury.
Maintenance and storage
- Caution: Do not touch rotating blade(s)
- Keep all nuts, bolts and screws tight to be sure the product is in safe working condition.
- Check the grassbox frequently for wear or deterioration.
- Replace worn or damaged parts for safety.
- Only use the replacement parts specified for this product.
- Be careful during adjustment of the product to prevent entrapment of the fingers between moving blades and fixed parts of the machine.
- Store in a cool dry place and out of reach of children. Do not store outdoors.
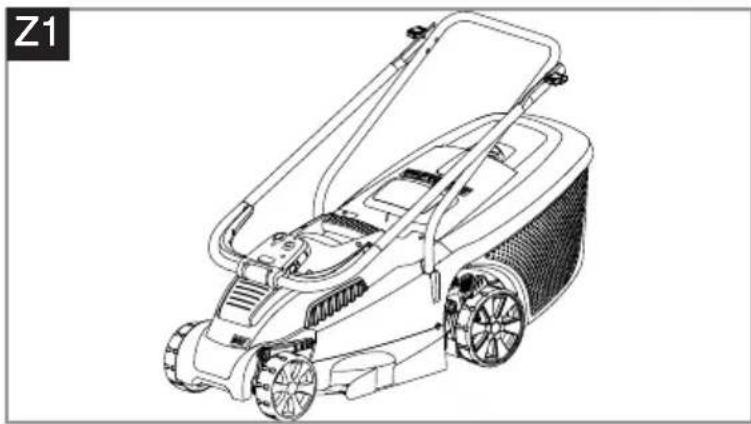
Where to Use Your GARDENA PowerMax Mower
The GARDENA mower is designed for cutting lawns in and around the garden.
Do not use the mower on a slope steeper than 20^ maximum.
To prevent injury, the mower must not be used for trimming bushes, hedges, shrubs, for cutting and pruning of climbers or grass on roofs or in balcony boxes. In addition, the mower must not be used for chopping up branches, twigs or for levelling irregularities in the soil.
When received from the Manufacturer, the wheels are in a raised position. Do not switch on the product before removing from the raised position into position 5. (See fig A)
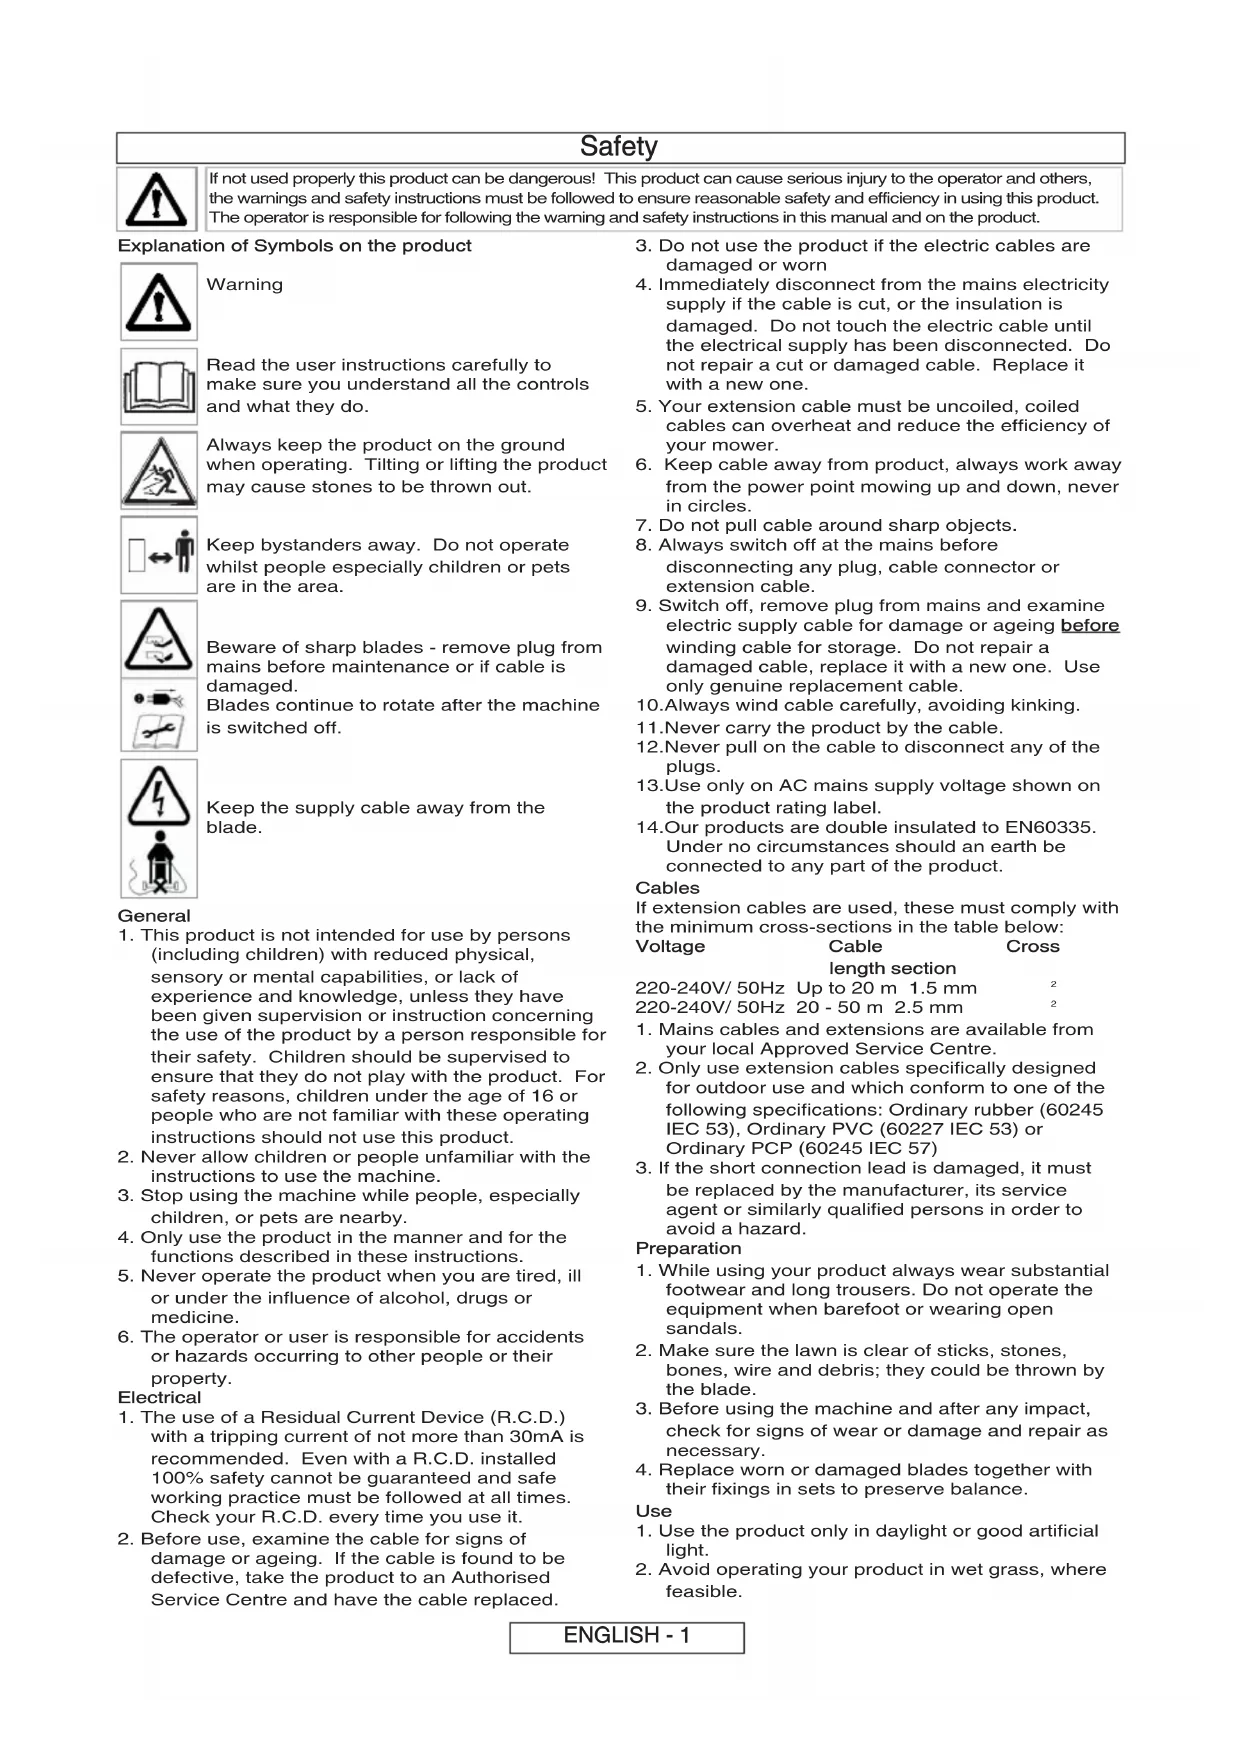
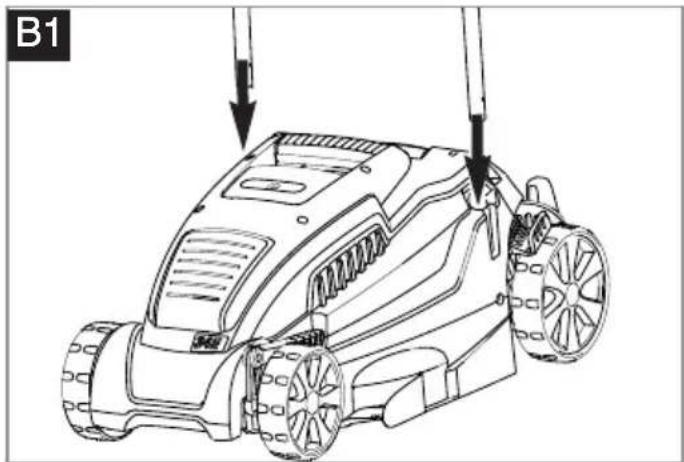
Assembly of Lower Handles to Lawnmower
-
Insert lower handles into the deck and push down (B1).
-
Using a pozi drive screwdriver insert the screws into the deck and handles and fully tighten (B2).
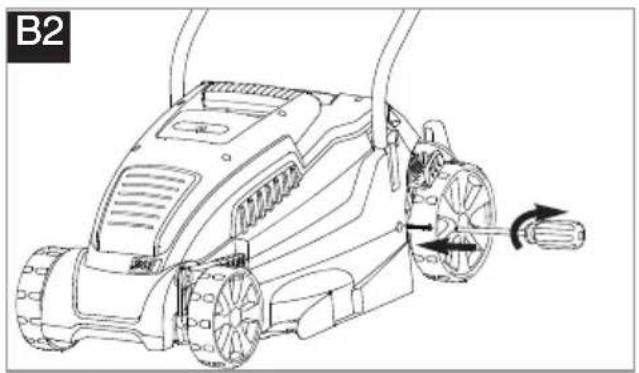
Assembly of Upper Handles to Lower Handles
Powermax 34E only
- Ensure the upper handle is located correctly with the lock-off button on the switchbox uppermost.
- Ensure the upper handle (C1) and the lower handle (C2) are aligned correctly. There are two holes for upper handle height adjustment.
- Fit the bolt (C3), washer (C4) and wing knob (C5). Tighten the wing knob.
- Repeat on the other side.
- Fit the cable to the handles with the clips provided.
See Contents page for position. Make sure the cable is not trapped between the upper and lower handles.
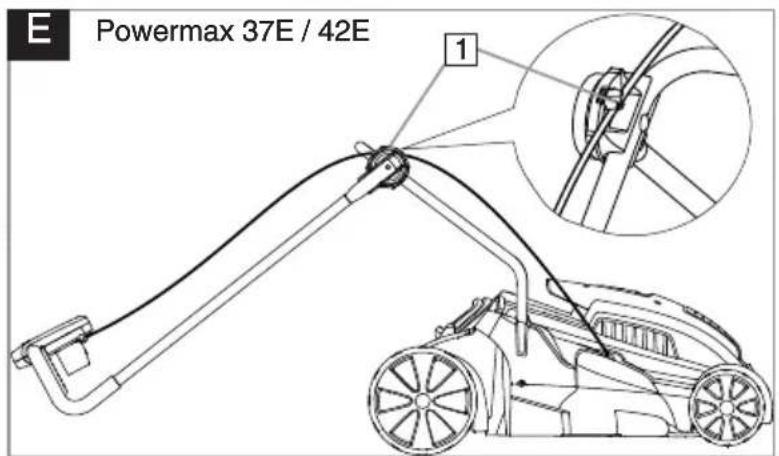
Powermax 37E and 42E only
- Position the the adjuster bolt (D1) through the lower handle. Repeat for the other side.
- Place the tilt adjuster (D2) over the adjuster bolt and attach it to the lower handle, ensuring that it clicks into position. Repeat for the other side.
- Rest the upper handle on the floor as illustrated in Fig E and locate onto the adjuster bolt on both sides, ensuring that the attached cable is clipped into the tilt adjuster (E1).
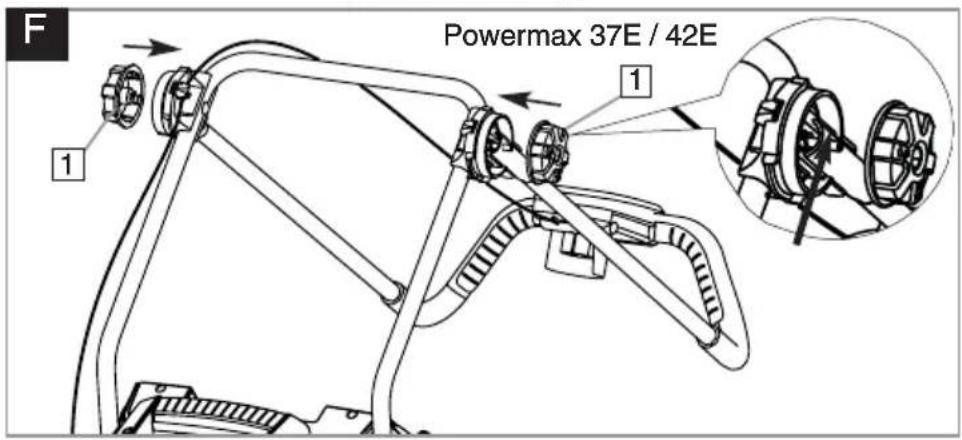
- Attach the lock disc (F1) to the adjuster bolt and turn twice clockwise in the direction of lock symbol (G).
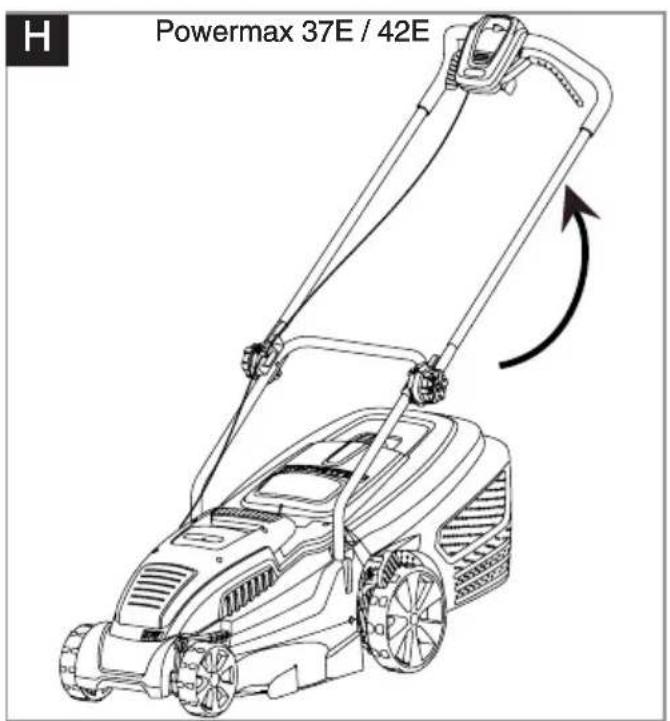
- Lift the upper handle into user position (H) and fully tighten the lock disc in the direction of the lock symbol (G).
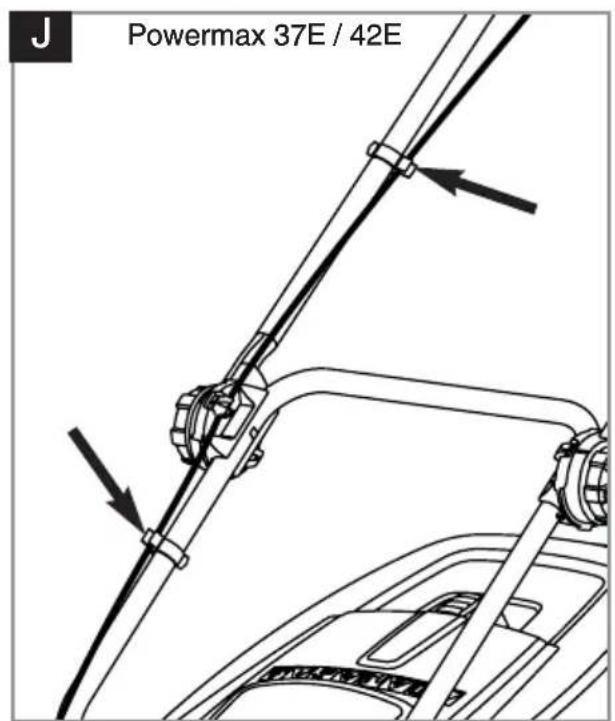
- Fit the cable to the upper and lower handle with the clips provided (J).
Grassbox Assembly
Grassbox Handle Assembly
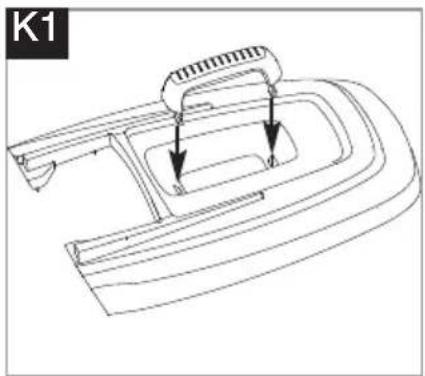
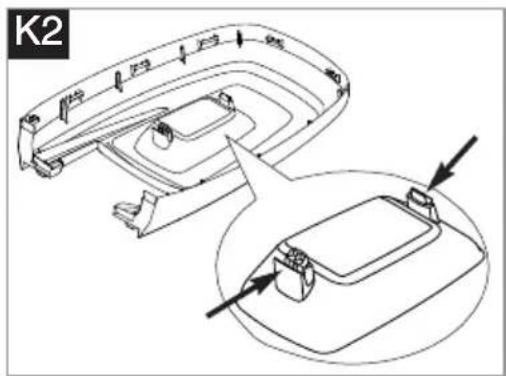
- Locate the grassbox handle into the slots in the grassbox upper and push until it clicks into position. (K1)
- Looking at the underside of the lid (K2), ensure the clips of the grassbox handle are securely located.
Grassbox Assembly
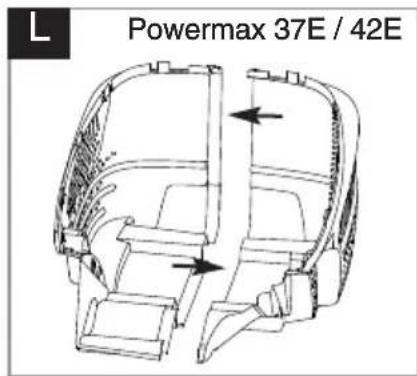
- Powermax 37E / 42E only:- Locate the the grassbox halves together by aligning the clips Ensure all clips are correctly located before clicking into position. (L)
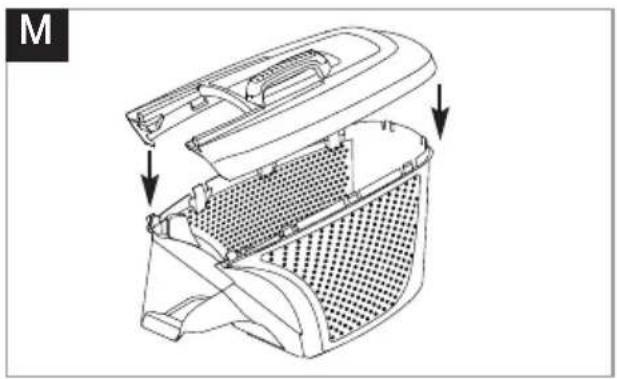
- Powermax 34E / 37E & 42E: - Locate the grassbox lid onto the grassbox by aligning the clips. Ensure all clips are correctly located before clicking into position (M)
Fitting Fully Assembled Grassbox to Lawnmower.
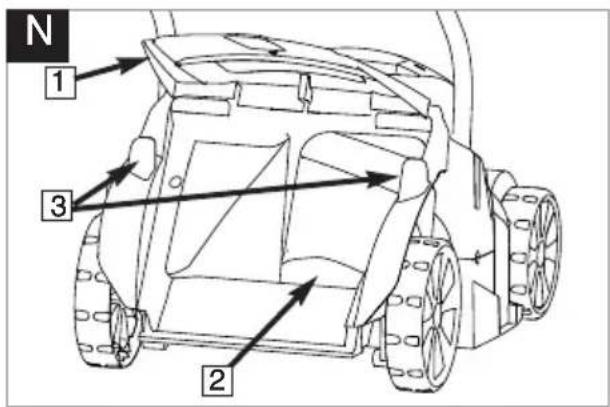
- Lift safety flap (N1)
-
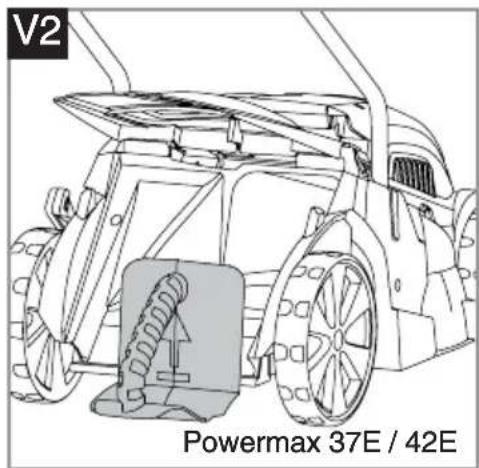
Powermax 37E / 42E only:- Remove the Mulch Plug (V1) from the discharge chute (N2).
-
Make sure the discharge chute is clean and free from debris (N2)
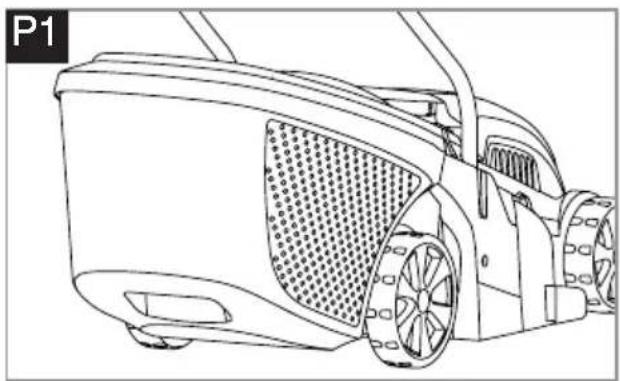
- Locate fully assembled grassbox onto 2 location points (N3) at the rear of the deck as illustrated in pic. P1
- Locate safety flap onto the top of the grassbox. Ensure the grassbox is securely located.
- IMPORTANT! AFTER FITTING ENSURE NO GAP REMAINS BETWEEN THE SAFETY FLAP AND THE GRASSBOX.
- Removal is the reverse procedure.
- For larger areas of grass where grass collection is not required you can use your lawnmower without the grassbox. Ensure the Safety Flap is fully closed. The design of the safety flap permits the cut grass to be discharged downward behind the machine.
Cutting Height Adjustment
- Height of cut is adjusted by raising or lowering the wheels using the height adjustment lever (A)
- There are five heights of cut on this product (20 - 60 mm).
Heights of cut:-
1 & 2 - low, 3 - medium, 4 & 5 - high
• NOTE
A medium height of cut is recommended for most lawns. The quality of your lawn will suffer and collection will be poor if you cut too low.
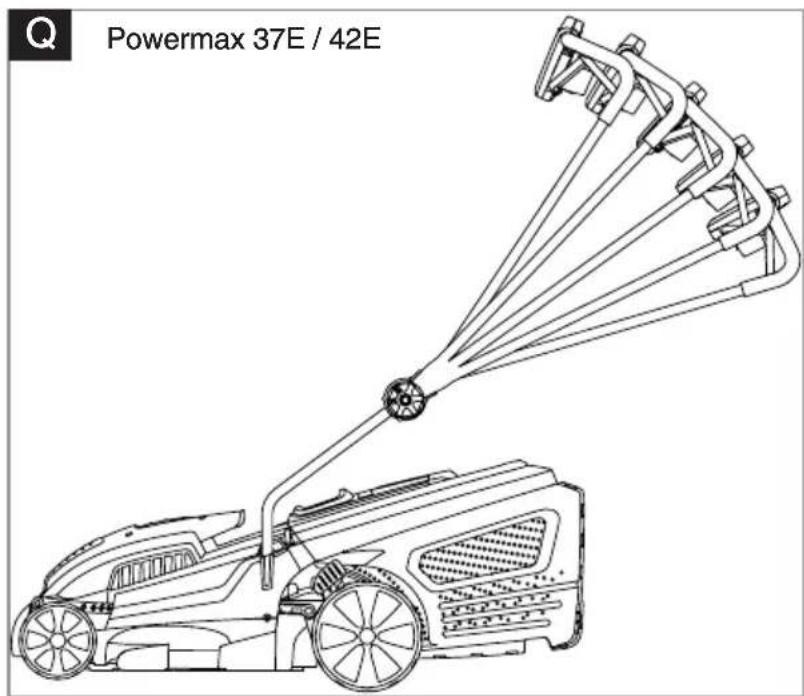
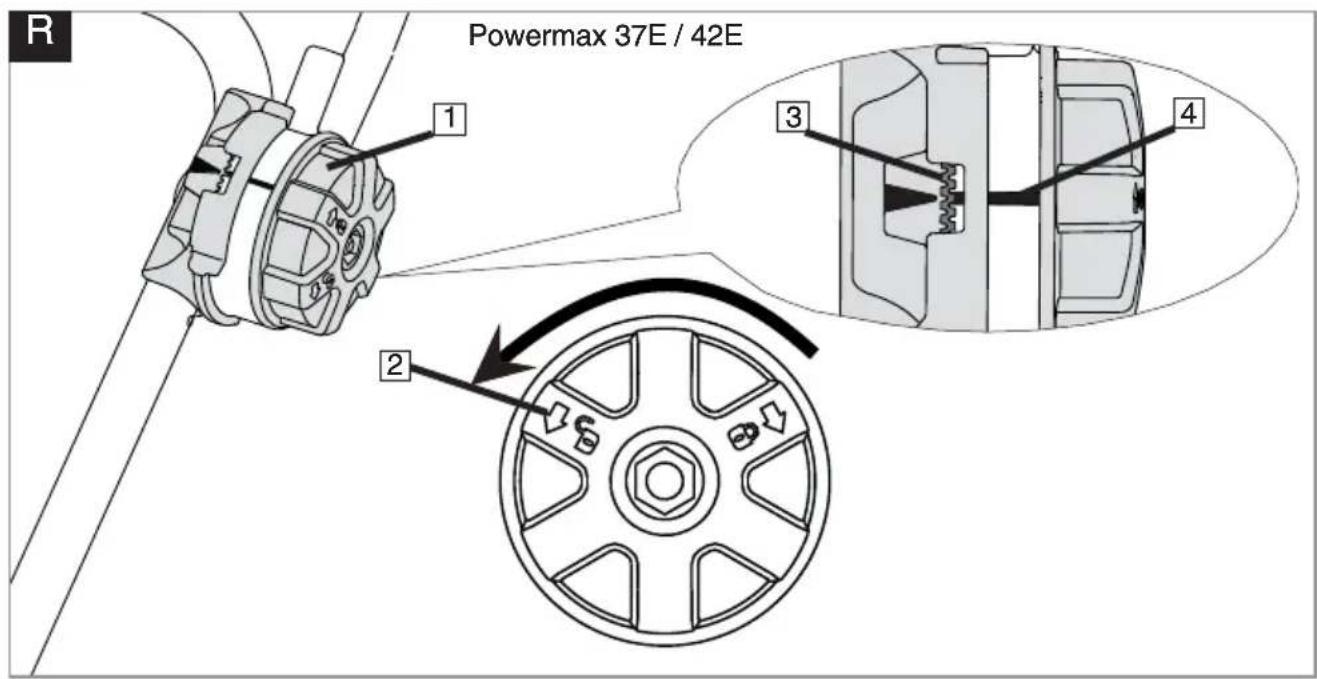
Handle Height Adjustment - Powermax 37E/42E only
This product is equipped with an adjustable handle, allowing 5 different positions to suit the height of the operator.(Q)
Adjustting the handle height
- Turn both of the locking discs (R1) anti-clockwise (approximately 2 turns) in direction of the unlock symbol
(R2) until the teeth disengage (R3), ensuring that the upper handle is supported at all times.
- Adjust the handle position to a comfortable height, ensuring the indicator on the locking disc (R4) is in the same position on both of the tilt adjusters.
- Tighten both locking discs until secure.
Starting and Stopping
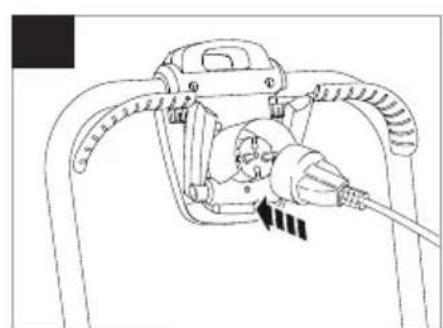
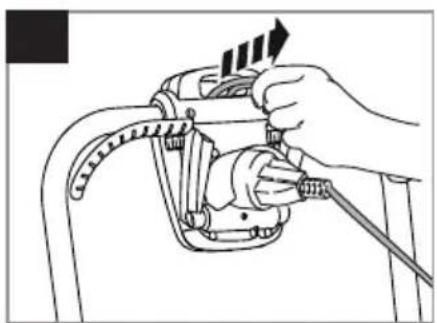
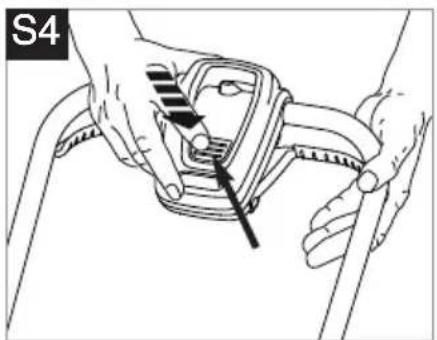
To Start your Lawnmower
- Attach the extension cable to the back of the switchbox.(S1)
- Form a loop in the cable and push the loop through the slot. (S2)
- To secure, position the loop over the hook and pull the cable back through the slot (S3).
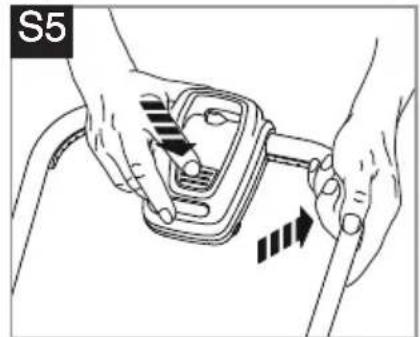
- Connect the plug to the mains and switch on. The switchbox is provided with a lock-off button (S4) to prevent accidental starting.
- Press and hold the lock-off button (S4) on the
switchbox, then squeeze one of the Start/Stop levers towards the upper handle (S5).
- Continue to squeeze the start/stop lever towards the upper handle and release the lock-off button (S6).
- NOTE - There are two start/stop levers fitted. Either one can be used for starting the lawnmower.
To Stop your Lawnmower
- Release the pressure on the Start/Stop lever.
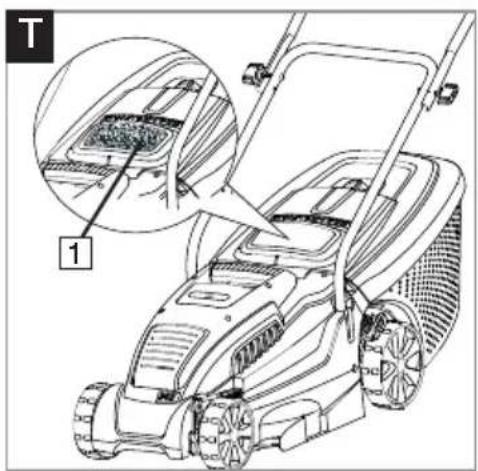
Grassbox Full Window
- As the grassbox fills up, grass will be visible through the window (T1).
- When the window/grassbox is full it is time to empty the grassbox.
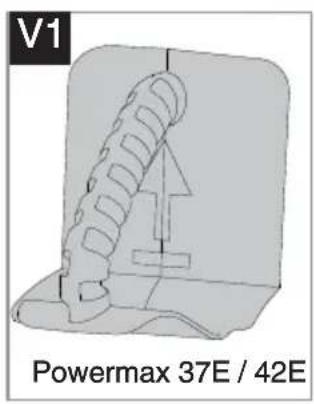
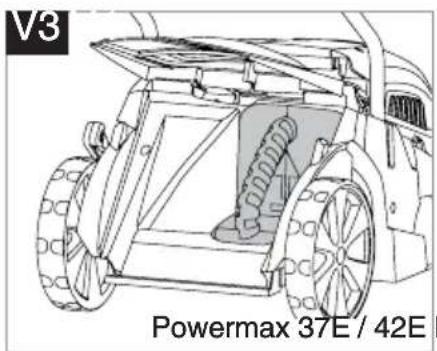
Mulching Plug - Powermax 37E/42E only
Using as a mulcher
- Your lawnmower is supplied with a mulching plug.
(V1)
- Stop your lawnmower as described in Starting and Stopping.
- Lift safety flap and insert the mulching plug into
rear discharge chute, (V2) ensuring it is securely fitted. (V3)
- The mulching plug prevents grass from being collected by blocking the collection chute on the underside of the deck. (V4)
How to Mow
Your product can be used to cut grass using the following methods:-
- Grassbox Fitted:- grass is collected effectively and compacted into the grassbox. (P1)
- Mulch Plug Fitted - Powermax 37E/42E only:- only grass cuttings are finely chopped to return nutrients to your lawn (V3).
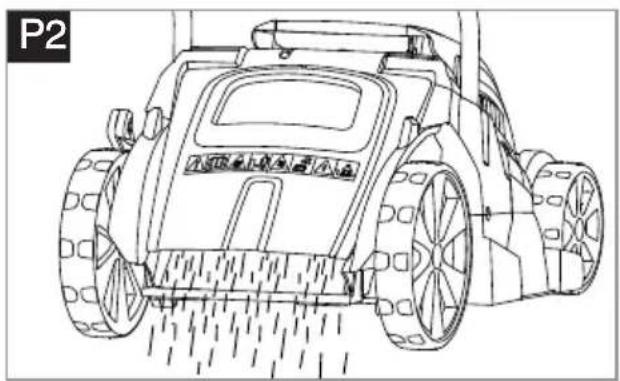
- Rear Discharge:- Effectively cuts long grass with no need to empty the grassbox (P2)
How to Mow
-
Start mowing the edge of the lawn nearest to the power point so the cable is laid out on the lawn you have already cut.
-
Mow twice a week during the growing season,
your lawn will suffer if more than a third of its length is cut at one time.
Do Not Overload Your Mower
Mowing long thick grass may cause the motor speed to drop, you will hear a change in the motor sound. If the motor speed drops you may overload your lawnmower which may cause damage. When mowing in long thick grass a first cut with the cutting height set higher will help reduce the load. See Cutting Height Adjustment.
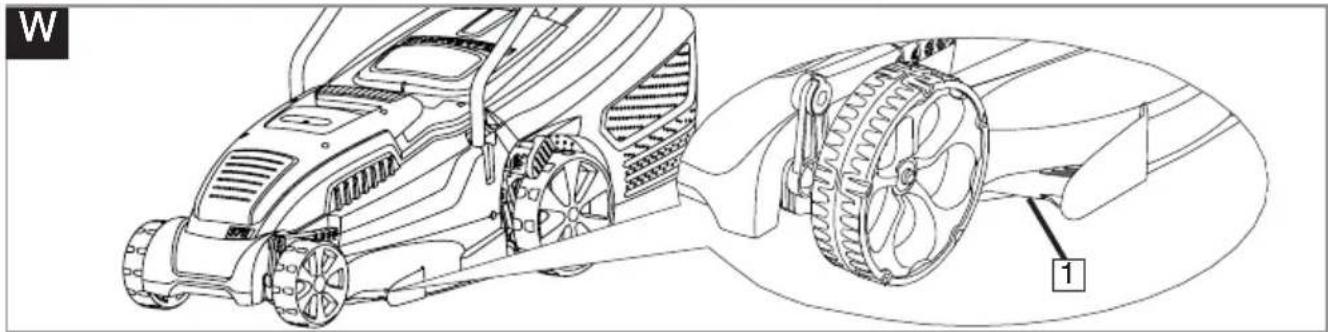
Edging Comb (W1)
Enables cutting up close to walls and fences
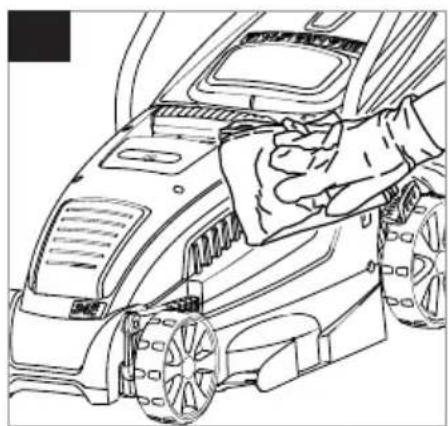
Caring for your Lawnmower
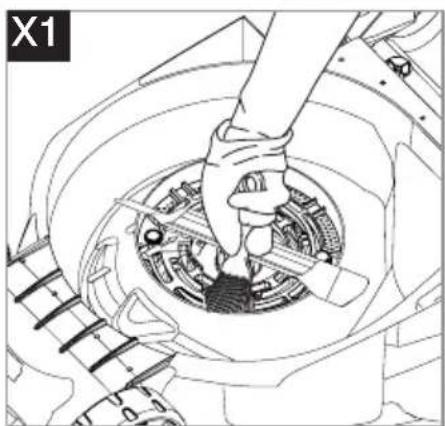
Cleaning
- USE GLOVES
- IMPORTANT:- It is very important that you keep your lawnmower clean. Grass clippings left in any of the air intakes or under the deck could become a potential fire hazard.
-
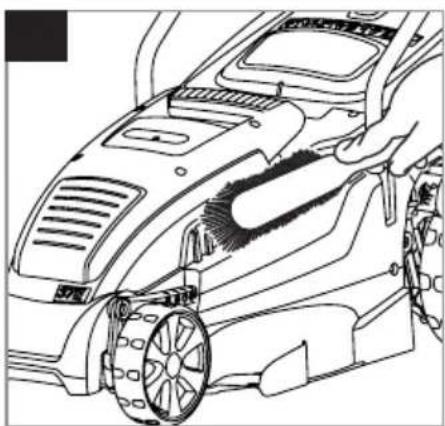
Remove grass from under the deck with brush.
(X1)
-
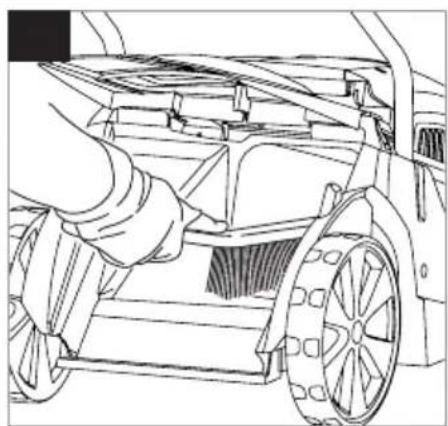
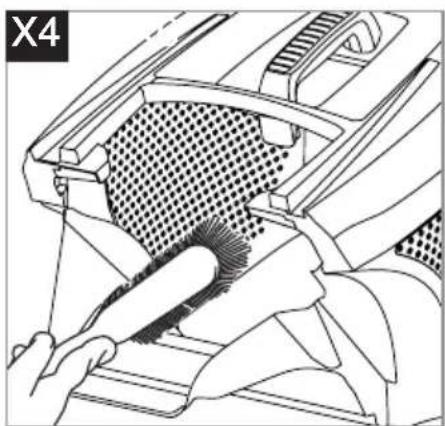
Using a soft brush - remove grass clippings from all air intakes (X2), the discharge chute (X3) and the grass box (X4).
-
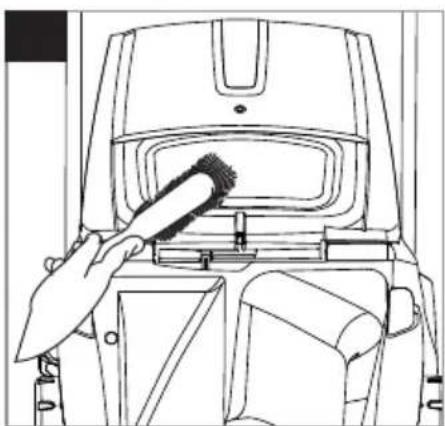
Using a soft brush, remove grass clippings from the vision window (X5).
-
Wipe over the surface of your lawnmower with a dry cloth (X6).
- IMPORTANT:- Never use water for cleaning your lawnmower. Do not clean with chemicals, including petrol, or solvents - some can destroy critical plastic parts.
Storing your Lawnmower:
- Store in a dry place where your lawnmower is protected from damage
Powermax 34E
- Loosen the wing knobs to enable the handles to be folded over the product (Z1) ensuring that the upper handle is supported.
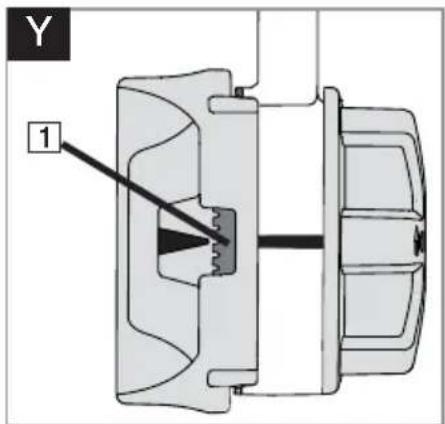
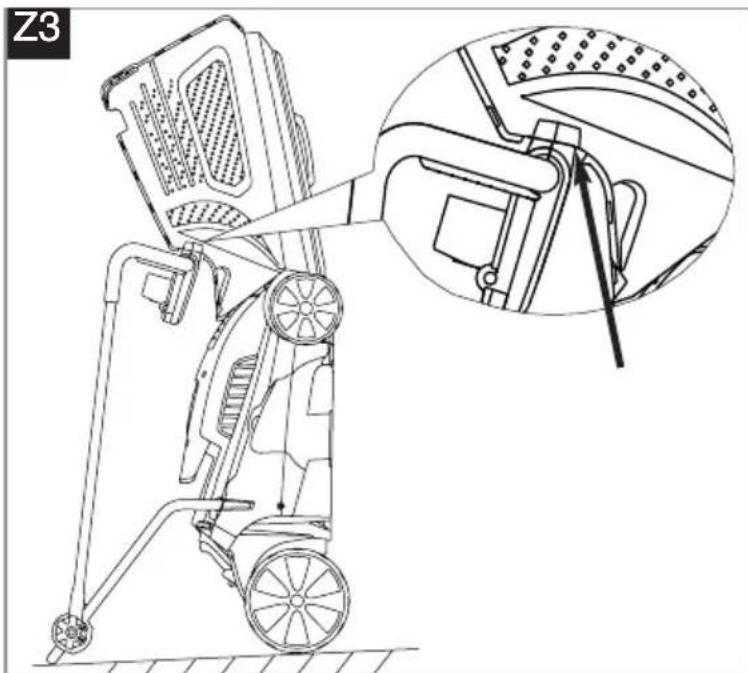
Powermax 37E/42E
- Loosen the tilt adjusters to enable the handles to be folded over the product (Z2) ensuring that the upper handle is supported. Ensure that the locking discs are fully unscrewed (Y1) before folding.
- The product can be stored upright on its back wheels as illustrated in Fig Z3.
At the End of the Mowing Season
- Replace bolts, nuts or screws, if necessary.
- Clean your lawnmower thoroughly.
- Make sure that the electric cable is stored correctly to prevent damage.
Fault Finding Hints
Fails to Operate
-
Is the correct Starting procedure being followed? See 'To Start your Lawnmower'
-
Is the Power Turned On?
-
Check the fuse in the plug, if blown replace.
-
Fuse continues to blow?
Immediately disconnect from the mains electricity supply and consult your GARDENA Service Centre.
Poor Grass Collection
- Disconnect from the mains electricity supply.
- Clean the outside of the air intakes, the discharge chute and the underside of the deck.
- Raise to a higher height of cut. See Cutting Height Adjustment.
- If poor collection persists.
Immediately disconnect from the mains electricity supply and consult your GARDENA Service Centre.
Excessive Vibration
- Disconnect from the mains electricity supply.
- Check that the blade is fitted correctly?
-
If the blade is damaged or worn, replace it with a new one.
-
If vibration persists?
Immediately disconnect from the mains electricity supply and consult your GARDENA Service Centre.
Lawnmower becomes heavy to push
-
Disconnect from the mains electricity supply.
-
In long grass or uneven ground, the height of cut should be raised to a higher position. See Cutting Height Adjustment.
-
Check that the wheels can rotate freely.
-
If problem persists?
Immediately disconnect from the mains electricity supply and consult your GARDENA Service Centre.
Replacement Parts
Blade
GARDENA 34E Article no.: 4015-20
GARDENA 37E Article no.: 4016-20
GARDENA 42E Article no.: 4017-20
Part no.: 585207101
Part no.: 585207001
Part no.: 585206901
GARDENA products are manufactured under an Environmental Management System (ISO 14001) using, where practical, components manufactured in the most environmentally responsible manner, according to company procedures, and with the potential for recycling at the end of the products' life.
- Packaging is recyclable and plastic components have been labelled (where practical) for categorised recycling.
- Awareness of the environment must be considered when disposing of ‘end-of-life’ product.
- If necessary, contact your local authority for disposal information.

The symbol — on the product or on its packaging indicates that this product may not be treated as household waste. Instead it shall be handed over to the applicable collection point for the recycling of electrical and electronic equipment. By ensuring this product is disposed of correctly, you will help prevent potential negative consequences for the environment and human health, which could otherwise be caused by inappropriate waste handling of this product. For more detailed information about recycling of this product, please contact your local council office, your household waste disposal service or the shop where you purchased the product.
Warranty / Service
GARDENA guarantees this product for 2 years (starting from the date of purchase). This guarantee covers all serious defects of the unit that can be proved to be material or manufacturing faults.
Under warranty we will either replace the unit or repair it free of charge if the following conditions apply:
- The unit must have been handled properly and in keeping with the requirements of the operating instructions.
- Neither the purchaser or a non-authorised third party have attempted to repair the unit.
The blade is a wearing part and is not covered by the guarantee.
This manufacturer's guarantee does not affect the user's existing warranty claims against the dealer/ seller. If a fault occurs with your Powermax Lawnmower, please return the faulty unit together with a copy of the receipt and a description of the fault, with postage paid to one of the GARDENA Service Centres listed on the back of these operating instructions.
The undersigned Husqvarna AB, S-561 82, Huskvarna, Sweden, hereby certifies that, when leaving our factory, the units indicated below are in accordance with the harmonised EU guidelines, EU standards of safety and product specific standards. This certificate becomes void if the units are modified without our approval.
Designation......Lawnmower = Lawnmower
Designation of type(s)......34E, 37E, 42E
Year of CE marking......2013
EU Directives:
2006/42/EC, 2004/108/EC, 2000/14/EC, 2011/65/EU
Harmonised EN:
EN60335-1, EN60335-2-77, EN50366, EN55014-1, EN61000-3-2, EN61000-3-3
Working area related emission characteristic Level LpA according to EN60335-2-77 given in the table.
Vibrations Value avhw according to EN ISO 20643 given in the table.
The Noise Level L_WA values according to 2000/14/EC are given in the table.
Conformity Assessment Procedure..... Annex VI
Notified Body..... Intertek, Cleeve Road
Leatherhead, Surrey
KT22 7SB, England
Huskvarna 05/12/2013
P. Lameli
Chief Technical Officer
Keeper of technical documentation

| Type | 34E | 37E | 42E |
| Width of Cut (cm) | 34 | 37 | 42 |
| Speed of rotation cutting device (rpm) | 3700 | 3600 | 3500 |
| Power (kW) | 1.4 | 1.6 | 1.7 |
| Measured Sound Power L_WA (dB(A)) | 94 | 93 | 96 |
| Guaranteed Sound Power L_WA (dB(A)) | 96 | 96 | 96 |
| Sound pressure L_PA (dB(A)) | 82.9 | 80.9 | 84.1 |
| Uncertainty K_PA (dB(A)) | 2.5 | 2.5 | 2.5 |
| Hand / arm vibration a_vhw (m/s ^2 ) | 1.30 | 1.24 | 1.68 |
| Uncertainty K_ahw (m/s ^2 ) | 1.5 | 1.5 | 1.5 |
| Weight (Kg) | 10.9 | 11.8 | 12.2 |
Precautions a Prendre
Benaming van type(s): 34E, 37E, 42E
Notified Body.... Intertek, Cleeve Road
Leatherhead, Surrey
KT22 7SB, England
Huskvarna 05/12/2013
P. Lameli
Teknisk direktør
Solo Powermax 37E and 42E
Director General Técnico
220-240V/50Hz 20-50m 2.5mm
220-240V/50Hz 20-50m 2.5mm
Typ(y): 34E, 37E, 42E
220-240V/50Hz 20-50m 2.5mm
220-240V/50Hz 20-50m 2.5mm
Samo Powermax 37E in 42E
220-240V/50Hz 20-50m 2.5mm
2
220-240V/50Hz 20-50m 2.5mm
220-240V/50Hz 20-50m 2.5mm
2220-240V/50Hz 20-50m 2.5mm
Keeper of technical documentation


| Lloji | 34E | 37E | 42E |
| Gjerësia e prerjes (cm) | 34 | 37 | 42 |
| Shpejtësia e rrotullimit të pajisjes prerëse (rpm) | 3700 | 3600 | 3500 |
| Fuqia (kW) | 1.4 | 1.6 | 1.7 |
| Fuqia e Matur e Tingullit L_WA (dB(A)) | 94 | 93 | 96 |
| Fuqia e Garantuar e Tingullit L_WA (dB(A)) | 96 | 96 | 96 |
| Presioni zanor L_pA (dB(A)) | 82.9 | 80.9 | 84.1 |
| Pasiguria K_pA (dB(A)) | 2.5 | 2.5 | 2.5 |
| Dridhja e dorës/krahut a_ahw (m/s ^2 ) | 1.30 | 1.24 | 1.68 |
| Pasiguria K_ahw (m/s ^2 ) | 1.5 | 1.5 | 1.5 |
| Pesha (kg) | 10.9 | 11.8 | 12.2 |
Ohutus
220-240V/50Hz 20-50m 2.5mm
"Notified Body"....Intertek, Cleeve Road
Leatherhead, Surrey
KT22 7SB, England
Huskvarna 18/10/2013
P. Lameli
Husqvarna Australia Pty. Ltd.
Locked Bag 5
Central Coast BC, NSW 2252
Phone: (+ 61) (0) 2 4352 7400
customer.service
husqvarna.com.au
GARDENA Belgium NV/SA
Brampton, Ontario L6T 4X3
Phone: (+1) 905 792 93 30
info@gardenacanada.com
chile
Antonio Martinic y Cia Ltda.
Cassillas 272
Centro de Cassillas
Santiago de Chile
Phone: (+56) 2 20 10 708
garfar_cl@yahoo.com
Costa Rica
Compania Exim
Euroiberoamericana S.A.
Los Colegios, Moravia,
Czech Republic /Slovak Republic
Consumer Outdoor Products
Consumer Outdoor Products
Consumer Outdoor Products
Lautatarhankatu 8 B / PL 3
00581 HELSINKI
info@gardena.fi
France
GARDENA France
Immeuble Exposal
Aycliffe Industrial Park
Newton Aycliffe
County Durham, DL5 6UP
info.gardena@husqvarna.co.uk
Greece
Northern Cross Business Park
North Road, Finglas
Dublin 11
Italy
23868 VALMADRERA (LC)
Phone: (+39) 0341.203.111
info@gardenaitalia.it
Japan
KAKUICHI Co. Ltd.
Sumitomo Realty &
Development Kojimachi
BLDG., 8F, 5-1 Nibanncyo,
Chiyoda-ku, Tokyo 102-0084
Phone: (+81) 33 264 4721
m_ishihara@kaku-ichi.co.jp
Latvia
Husqvarna Latvija
Consumer Outdoor Products
Bakužu iela 6
LV-1024 Riga
info@husqvarna.lv
Lithuania
UAB Husqvarna Lietuva
Consumer Outdoor Products
Ateities pl. 77C
LT-52104 Kaunas
centras@husqvarna.lt
Luxembourg
Magasins Jules Neuberg
Husqvarna New Zealand Ltd.
PO Box 76437
Manukau City 2241
Phone: (+64) (0) 9 9202410
support.nz@husqvarna.co.nz
Norway
GARDENA / Husqvarna
Consumer Outdoor Products
Salgskontor Norge
Kleverveien 6
1540 Vestby
info@gardena.no
Poland
Sintra Business Park
02-08 Tat Ann Building
Singapore 577185
Phone: (+65) 6253 2277
shiying@hyray.com.sg
Slovenia
GARDENA d.o.o.
Brodiljne 15
1236 Trzin
Phone: (+386) 1 580 93 32
servis@gardena.si
South Africa
GARDENA
South Africa (Pty.) Ltd.
P.O. Box 11534
Vorna Valley 1686
Phone: (+27) 11 315 02 23
sales@gardena.co.za
Spain
GARDENA IBÉRICA S.L.U.
C/ Basauri, n° 6
La Florida
28023 Madrid
Phone: (+34) 91 708 05 00
Consumer Outdoor Products