iSensys MFG4730 - Printer CANON - Free user manual and instructions
Find the device manual for free iSensys MFG4730 CANON in PDF.
User questions about iSensys MFG4730 CANON
0 question about this device. Answer the ones you know or ask your own.
Ask a new question about this device
Download the instructions for your Printer in PDF format for free! Find your manual iSensys MFG4730 - CANON and take your electronic device back in hand. On this page are published all the documents necessary for the use of your device. iSensys MFG4730 by CANON.
USER MANUAL iSensys MFG4730 CANON
natural_image
Line drawing of a printer with a magnified inset showing internal components (no text or symbols)

MF4890dw/MF4780w
MF4890dw/MF4870dn/MF4780w/MF4750
natural_image
Technical line drawing of a circular component and a grid-patterned square (no text or symbols)图
natural_image
Simple line drawing of an open box with dotted lines indicating hidden edges (no text or symbols)MF4890dw/MF4870dn
natural_image
Line drawing of hands operating a portable electronic device (no text or symbols)▶
natural_image
Line drawing of a printer or printer with arrows indicating movement or force (no text or symbols)
natural_image
Illustration of a printer with an open lid and a hand inserting a tool, showing a curved arrow indicating rotation (no text or symbols present)
natural_image
Diagram of an open printer with a screen and arrow indicating a device (no text or symbols present)MF4780w/MF4750/MF4730
natural_image
Line drawing of a person handling a small object inside a container (no text or symbols)▶
natural_image
Technical line drawing of a printer or printer with no visible text, numbers, or symbols
natural_image
Illustration of a printer with an open lid and a hand inserting a tool into it, showing a curved arrow indicating rotation (no text or symbols present)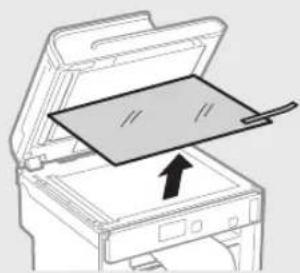
natural_image
Illustration of a printer with an open lid and a paper tray, showing a black arrow pointing to the tray (no text or symbols present)
flowchart
graph TD
    A["Step 1: Folded printer with part ①"] --> B["Step 2: Insert part, labeled X1"]
    B --> C["Step 3: Folded printer with part X2"]
    C --> D["Step 4: Final packaging unit with X1"]
natural_image
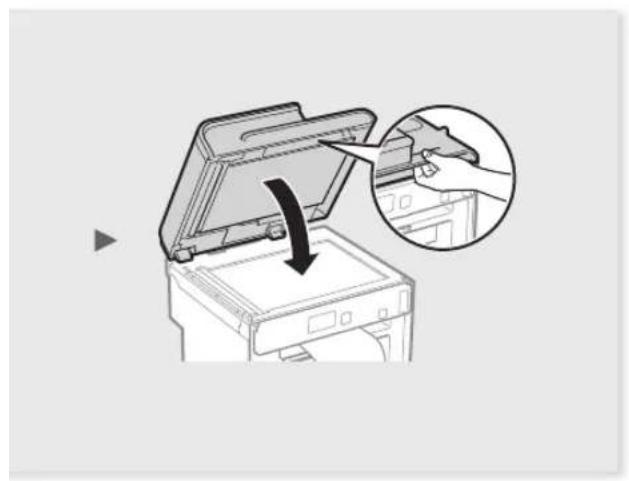
Diagram of a printer's open lid being inserted, showing the lid being inserted with a hand inserting a clip (no text or symbols present)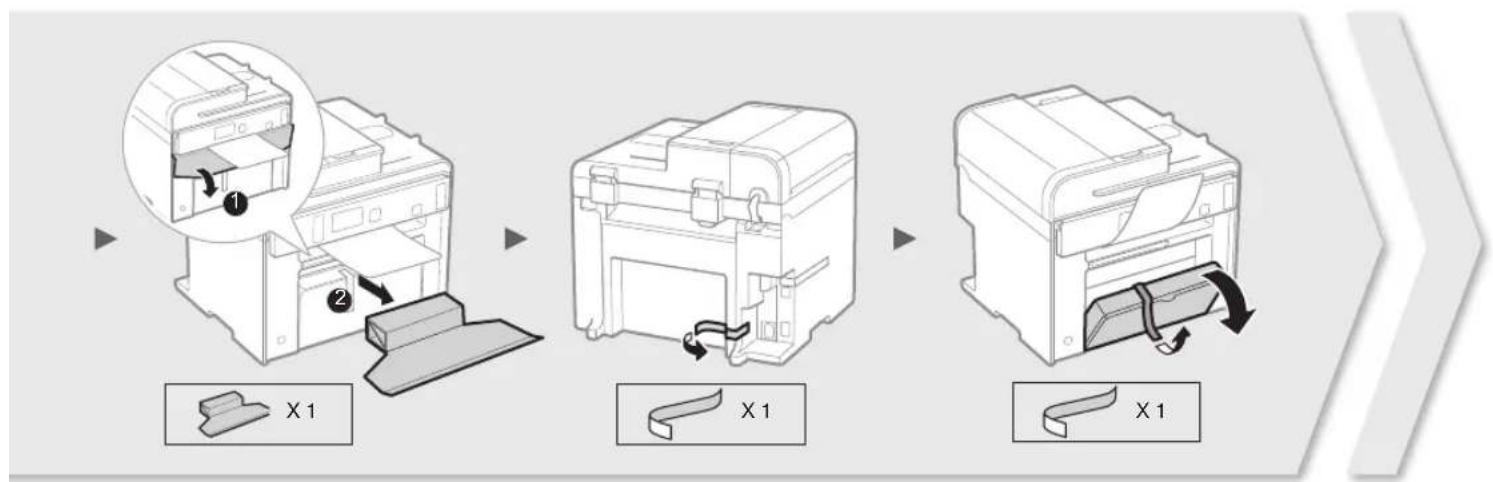
flowchart
graph TD
    A["Step 1: Printer with X1"] --> B["Step 2: Disassembly of the printer"]
    B --> C["Step 3: Disassembly of the printer"]
    C --> D["Final Printer with X1"]
natural_image
Diagram of a printer's open lid being inserted, showing a hand inserting a clip into the cover (no text or symbols present)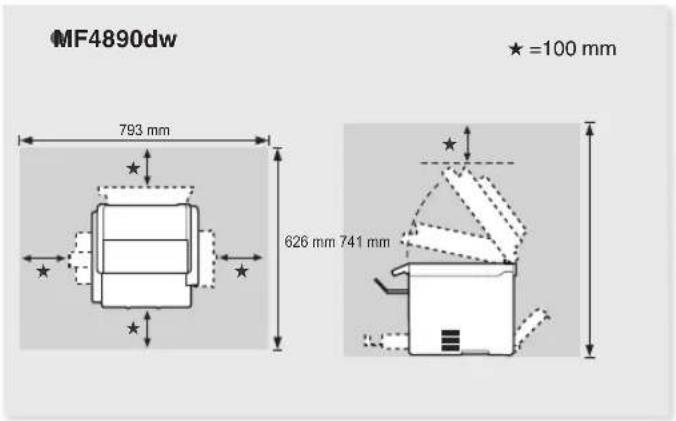
text_image
MF4890dw 793 mm 626 mm 741 mm ★ =100 mm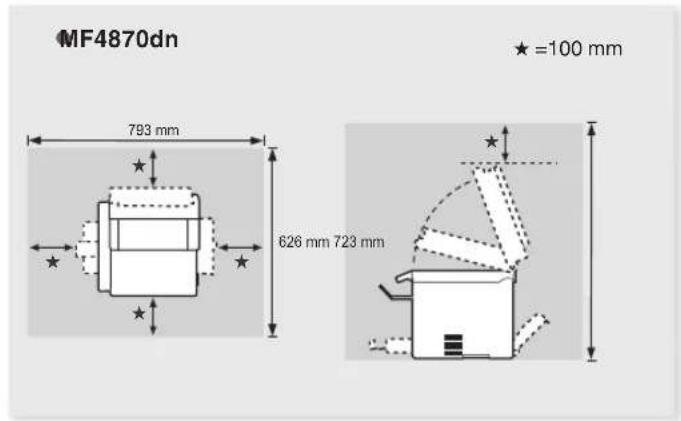
text_image
MF4870dn 793 mm 626 mm 723 mm ★ =100 mm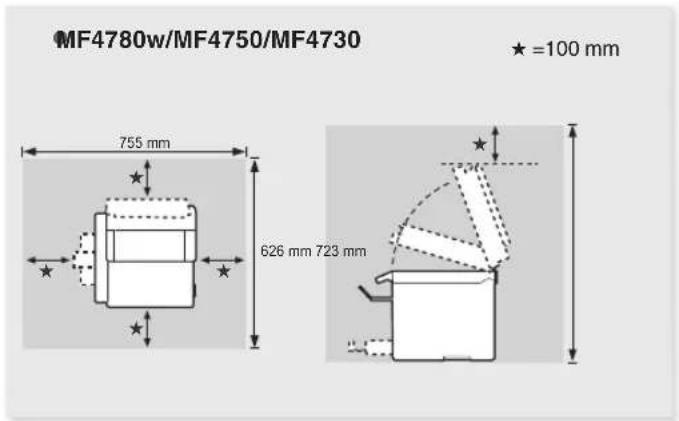
text_image
MF4780w/MF4750/MF4730 ★=100 mm 755 mm 626 mm 723 mmInstalling the Handset (Option)
About the Supplied Manuals ....10
Navigating the Menu and Text Input
Method 10
Connecting the Power Cord and
Turning ON the Power 11
Specifying the Initial Settings ....11
Choosing the Method to Connect
the Machine to the Computer 12
Connecting via a Wired LAN
(MF4890dw/MF4870dn/MF4780w Only) 12
Connecting via a USB Cable....12
Setting a Paper Size and Type 13
Specifying Initial Fax Settings and
Connecting a Telephone Cable
(MF4890dw/MF4870dn/MF4780w/MF4750 Only) .....13
Perform Useful Tasks 14
Clearing Paper Jams....15
Replacing Toner Cartridge 16
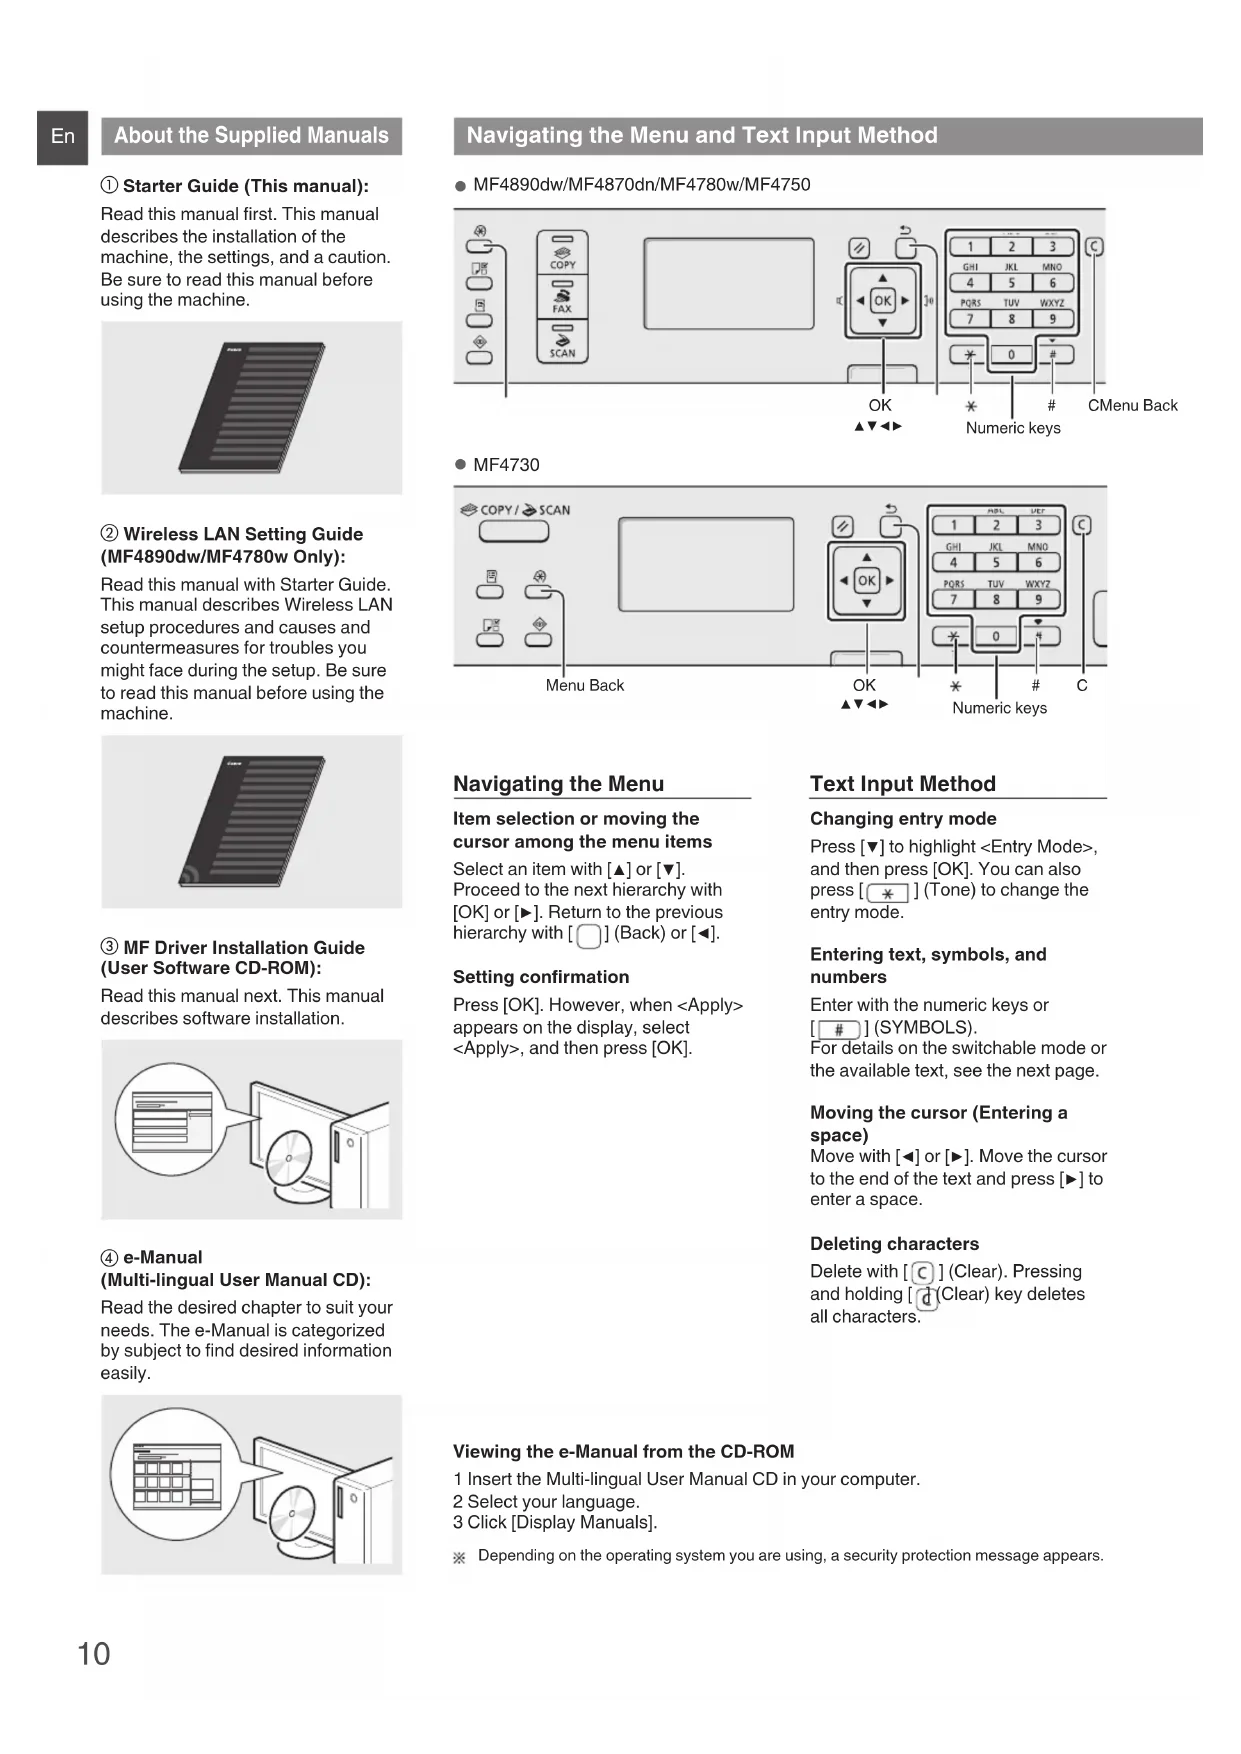
About the Supplied Manuals
① Starter Guide (This manual):
Read this manual first. This manual describes the installation of the machine, the settings, and a caution. Be sure to read this manual before using the machine.
② Wireless LAN Setting Guide (MF4890dw/MF4780w Only):
Read this manual with Starter Guide. This manual describes Wireless LAN setup procedures and causes and countermeasures for troubles you might face during the setup. Be sure to read this manual before using the machine.
③ MF Driver Installation Guide (User Software CD-ROM):
Read this manual next. This manual describes software installation.
text_image
Diagram showing a computer monitor with an open CD and a speech bubble containing text or data.④ e-Manual (Multi-lingual User Manual CD):
Read the desired chapter to suit your needs. The e-Manual is categorized by subject to find desired information easily.
natural_image
Illustration of a computer monitor with a CD and a grid interface, no text or symbols presentNavigating the Menu and Text Input Method
MF4890dw/MF4870dn/MF4780w/MF4750

text_image
COPY FAX SCAN OK OK GHI IKL MNO 4 5 6 PQRS TUV WXYZ 7 8 9 * 0 # Numeric keys CMenu BackMF4730
text_image
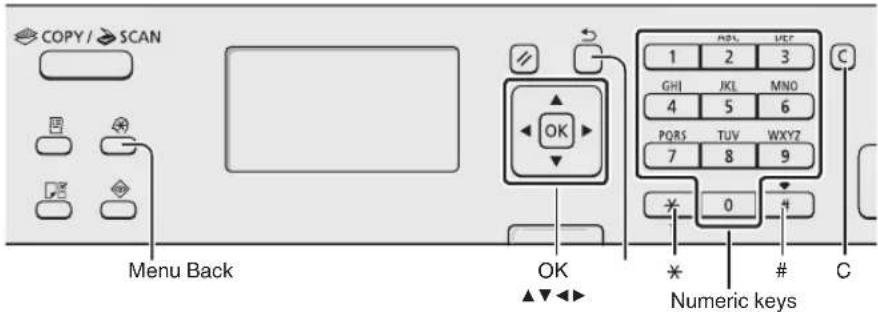
COPY / SCAN Menu Back OK Numeric keys 1 2 3 GHI JKL MNO 4 5 6 PQRS TUV WXYZ 7 8 9 0 CNavigating the Menu
Item selection or moving the cursor among the menu items
Select an item with [▲] or [▼]. Proceed to the next hierarchy with [OK] or [▶]. Return to the previous hierarchy with [□] (Back) or [◀].
Setting confirmation
Press [OK]. However, when
Text Input Method
Changing entry mode
Press [▼] to highlight
Entering text, symbols, and numbers
Enter with the numeric keys or [#] (SYMBOLS).
For details on the switchable mode or the available text, see the next page.
Moving the cursor (Entering a space)
Move with [◀] or [▶]. Move the cursor to the end of the text and press [▶] to enter a space.
Deleting characters
Delete with [c] (Clear). Pressing and holding [d] (Clear) key deletes all characters.
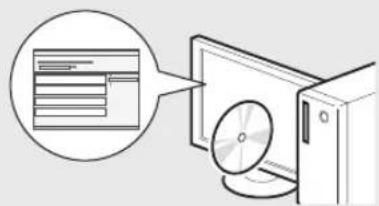
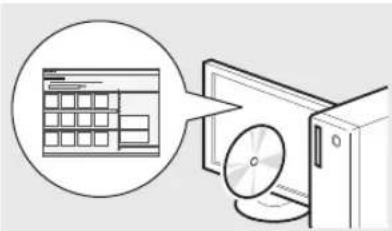
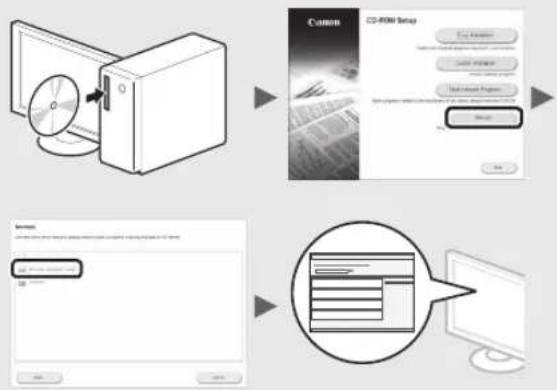
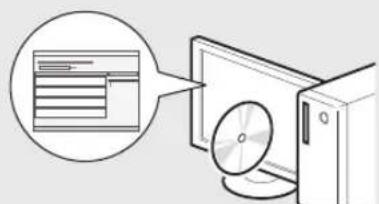
Viewing the e-Manual from the CD-ROM
1 Insert the Multi-lingual User Manual CD in your computer.
2 Select your language.
3 Click [Display Manuals].
※ Depending on the operating system you are using, a security protection message appears.
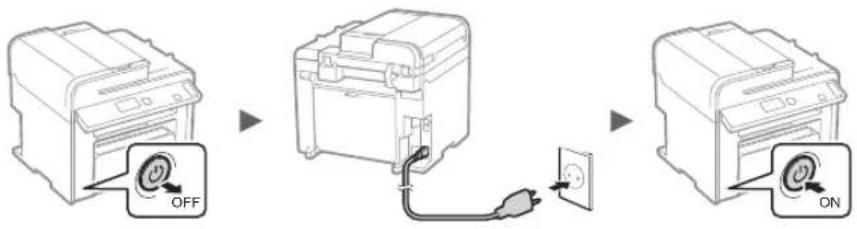
Connecting the Power Cord and Turning ON the Power
En
Entering text, symbols, and numbers
| Entry mode: | Entry mode: <12> | |
| 1 | @ . - _ / 1 | |
| 2 | ABCabc 2 | |
| 3 | DEFdef 3 | |
| 4 | GHIghi 4 | |
| 5 | JKLjkl 5 | |
| 6 | MNOmno 6 | |
| 7 | PQRSpqrs 7 | |
| 8 | TUVtuv 8 | |
| 9 | WXYZwxyz 9 | |
| 0 | (Not available) 0 | |
| # | @ . / - _ ! ? & $ % # ( ) [ ] { } <> * + = ", :; ' ^ ' | \ | (Not available) |
Changing entry mode
| Entry mode Available text | |
| Alphabet (capital and small letters) and symbols | |
| <12> Numbers | |
text_image
OFF ONDo not connect the USB cable at this time. Connect it when installing software.
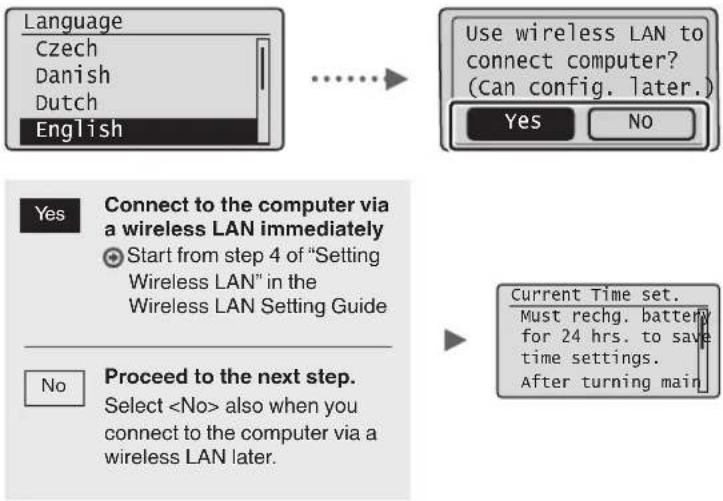
Specifying the Initial Settings
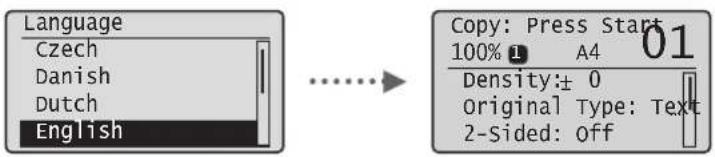
Follow the instructions on the screen, set the language and time. For details on navigating the menu and how to input the numbers, see "Navigating the Menu and Text Input Method" (P.10).
MF4890dw/MF4780w
flowchart
graph TD
    A["Language\nCzech\nDanish\nDutch\nEnglish"] --> B["Use wireless LAN to connect computer?\n(Can config. later.)"]
    B --> C{Yes}
    B --> D{No}
    C --> E["Connect to the computer via a wireless LAN immediately\nStart from step 4 of "Setting Wireless LAN" in the Wireless LAN Setting Guide"]
    D --> F["Proceed to the next step.\nSelect <No> also when you connect to the computer via a wireless LAN later."]
    E --> G["Current Time set.\nMust rechg. battery for 24 hrs. to save time settings.\nAfter turning main"]
- Connect to the computer via a wired LAN
Proceed to "Connecting via a Wired LAN (MF4890dw/MF4870dn/MF4780w Only)" (P.12).
- Connect to the computer via a USB cable
Proceed to "Connecting via a USB Cable" (P.12).
- Do not connect to PC
Proceed to "Specifying Initial Fax Settings and Connecting a Telephone Cable (MF4890dw/MF4870dn/MF4780w/MF4750 Only)" (P.13).
MF4870dn/MF4750/MF4730
text_image
Language Czech Danish Dutch English Copy: Press Start 100% 1 A4 01 Density: ± 0 Original Type: Text 2-Sided: offEn
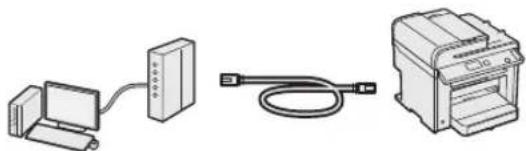
Choosing the Method to Connect the Machine to the Computer
- Connecting via a Wired LAN
(MF4890dw/MF4870dn/MF4780w Only)
See "Connecting via a Wired LAN"
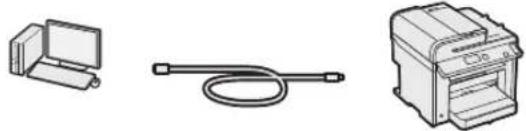
natural_image
Three electronic devices: a computer connected via cable, a server with ports, and a printer (no text or symbols visible)You can connect the machine to the computer through a wired router. Use the LAN cables to connect the machine to the wired router (access point).
※ Make sure that there is an available port in the router to connect the machine and the computer.
※ Have a LAN Cable of Category 5 twisted-pair cable or higher ready.
- Connecting via a USB cable
See "Connecting via a USB Cable"
natural_image
Three technical illustrations of electronic devices: a desktop computer, a cable with a plug, and a printer (no text or symbols visible)You can connect the machine to the computer using a USB cable.
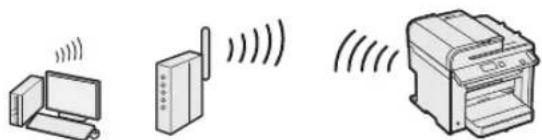
- Connection via a Wireless LAN (MF4890dw/MF4780w Only)
See the Wireless LAN Setting Guide.
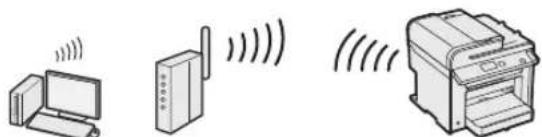
natural_image
Illustration of three electronic devices: a desktop computer, a wireless router, and a printer with signal waves (no text or symbols)You can connect the machine to the computer through a wireless router*. Since it is connected to wireless, no LAN cables are needed.
* A wireless router (or access point), which supports IEEE802.11b/g/n, is required.
If you do not sure whether your router is wireless or wired:
See the instruction manual provided with your network device, or contact the manufacturer.
Connecting via a Wired LAN (MF4890dw/MF4870dn/MF4780w Only)
1 Connect the LAN cable.
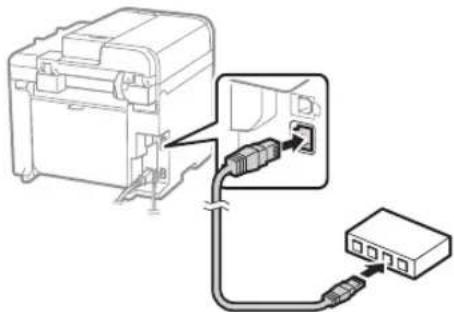
natural_image
Diagram of a device with connectors and a switch, showing internal wiring (no text or symbols)The IP address will be automatically configured in 2 minutes. If you want to set the IP address manually, see the following items.
e-Manual "Network Settings" ▶ "Basic Network Settings" ▶ "Setting the IP Address"
2 Install the driver and software using the User Software CD-ROM.
Proceed to "Setting a Paper Size and Type" (P.13).
Connecting via a USB Cable
Connect the USB cable after installing the MF Drivers and the MF Toolbox.
1 Install the driver and software using the User Software CD-ROM.
2 Connect the USB cable.
natural_image
Line drawing of a mechanical device with a handle and mounting bracket (no text or symbols)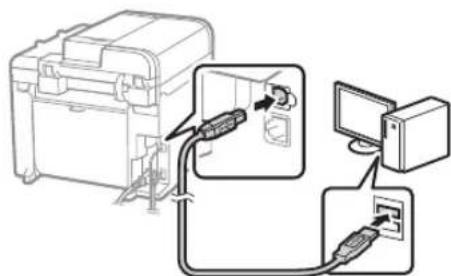
text_image
Diagram showing connection between a device and computer via cable, with labeled components and directional arrows indicating signal or data flow.Proceed to "Setting a Paper Size and Type" (P.13).
For details on the installation procedures:

See the MF Driver Installation Guide
flowchart
graph TD
    A["CD-ROM Setup"] --> B["File Transfer"]
    B --> C["Data Transfer"]
    C --> D["Computer Interface"]
    D --> E["System Interface"]
    E --> F["User Interface"]
    style A fill:#f9f,stroke:#333
    style B fill:#ccf,stroke:#333
    style C fill:#cfc,stroke:#333
    style D fill:#fcc,stroke:#333
    style E fill:#cff,stroke:#333
    style F fill:#ffc,stroke:#333
- We ask for the user's cooperation for the Product Extended Survey Program. For details, see the descriptions on the screen.
Setting a Paper Size and Type
Follow the instructions on the screen, set the paper size and type.
MF4890dw/MF4870dn/MF4780w/MF4750
MF4730
text_image
Q1 Q2 R COPY TAX SCAN
text_image
COPY/YEAR
flowchart
graph TD
    A["Paper Settings\nMP Tray\nDrawer 1"] --> B["Applying settings\nWait a moment."]
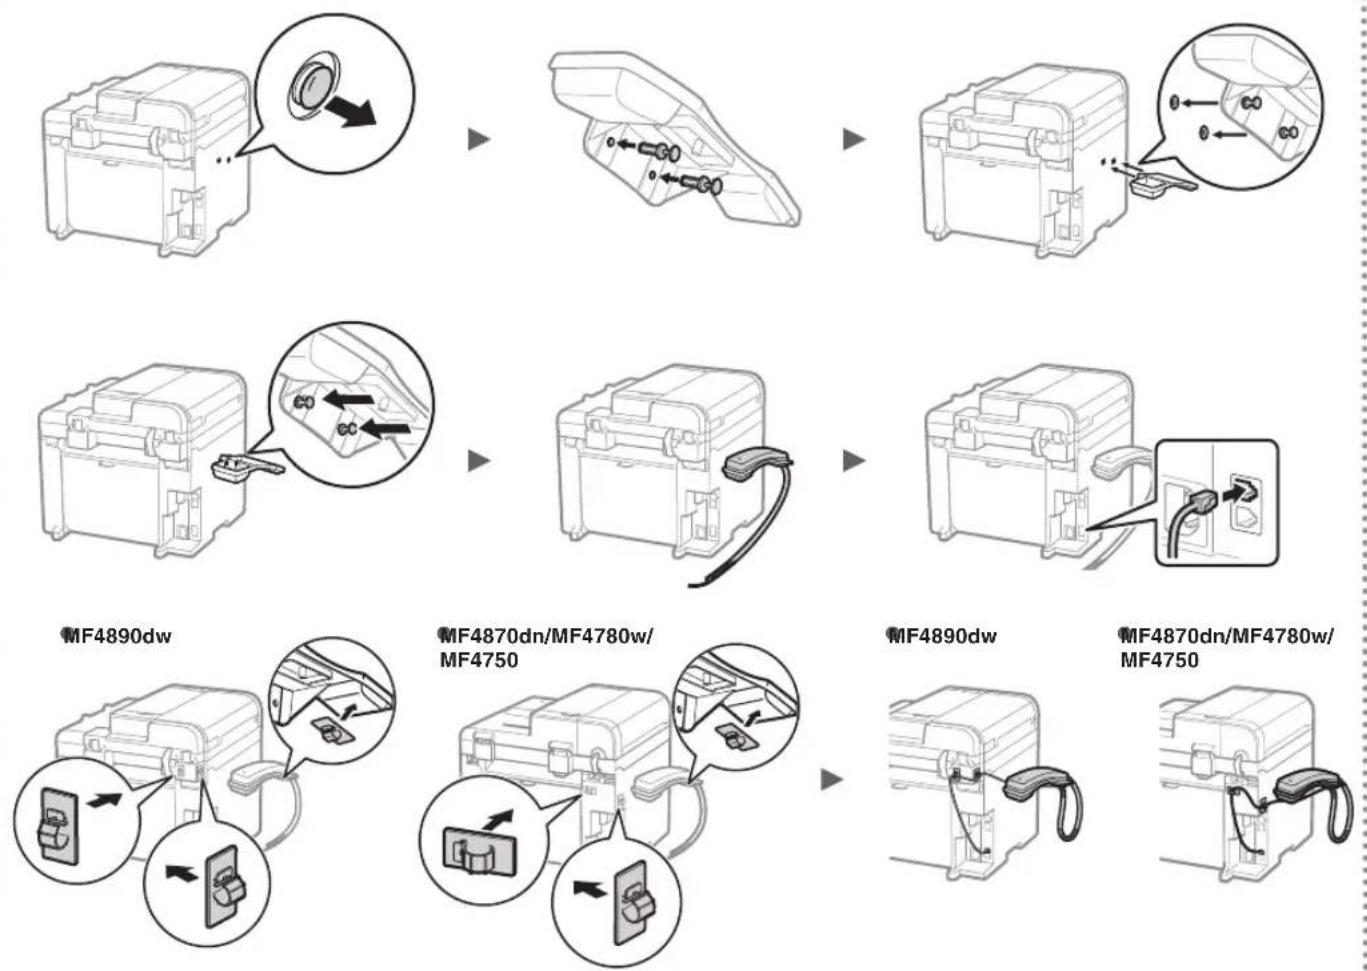
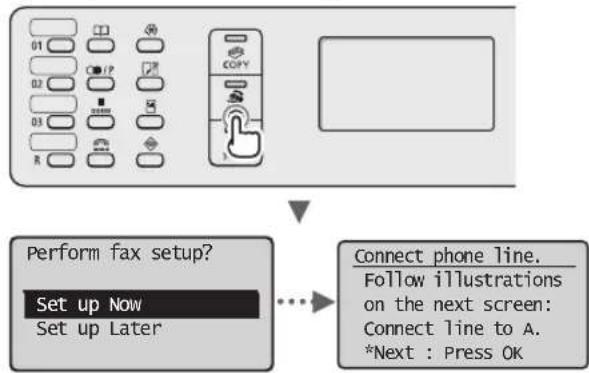
Specifying Initial Fax Settings and Connecting a Telephone Cable (MF4890dw/MF4870dn/MF4780w/MF4750 Only)
1 Specify the initial fax settings.
flowchart
graph TD
    A["Start"] --> B["Menu with icons: 01-03, R, IP, COPY"]
    B --> C{Perform fax setup?}
    C --> D["Set up Now\nSet up Later"]
    D --> E["Connect phone line.\nFollow illustrations on the next screen:\nConnect line to A.\n*Next : Press OK"]
Follow the "Fax Setup Guide" to specify a fax number, a unit name, and a receive mode. For more details on the receive mode, see the e-Manual.
e-Manual "Fax" ▶ "Using the Fax Functions" ▶ "Receiving Faxes" ▶ "RX Mode"
How to use a username
When you send a document, the sender information that you registered is printed on the recipient's paper.
2 Connect a telephone cable.
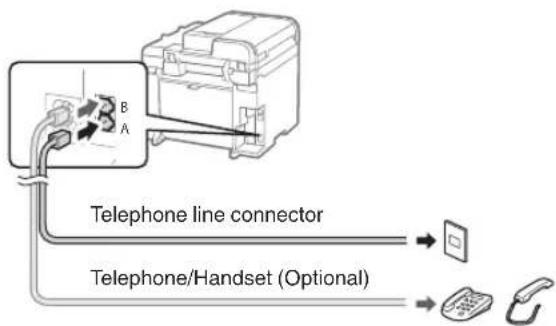
text_image
Telephone line connector Telephone/Handset (Optional)When
When installing the optional handset:
For more details, see the supplied manual with the handset.
3 Exit the Fax Setup Guide, and then restart the machine.
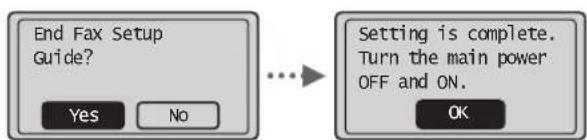
text_image
End Fax Setup Guide? Yes No Setting is complete. Turn the main power OFF and ON. OKTurn OFF the machine and wait for at least 10 seconds before turning it ON again. The telephone line types are not detected automatically. See the e-Manual and set a telephone line manually.
e-Manual "Fax" ▶ "Using the Fax Functions" ▶ "Changing Fax Settings (Settings that Can Be Specified Using the [Menu] Button)" ▶ "Configuring Send Settings" ▶ "Select Line Type"
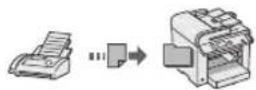
You can use various functions in this machine. Following functions are the overview of the main functions that you can use routinely.
Copy
Enlarged/Reduced Copies
You can enlarge or reduce standard size documents to copy on standard size paper or specify the copy ratio in percentage.
2-Sided Copying\*
You can copy 1-sided documents on both sides of paper.
Collating
You can sort copies into sets arranged in page order.
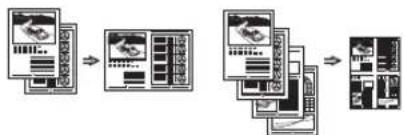
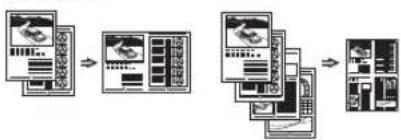
Reduced Layout
You can reduce multiple documents to copy them onto one sheet.
2 on 1 4 on 1
flowchart
graph TD
    A["Input Device"] --> B["Data Processing Unit"]
    B --> C["Output Module"]
    C --> D["Storage System"]
Copying ID Card
You can make a copy of a 2-sided card onto one side of paper.
Fax\*\*
Sending a Document Directly from a Computer (PC Fax)
In addition to the normal sending and receiving faxes, you can use the PC fax.
Sending
You can register fax destinations in the address book. You can specify the destinations using various methods, enabling you to send documents quickly and easily.
- Destination search
- One-touch keys
- Coded dialing
- Destination Group
- Specifying from the sending history
- Sequential broadcast
- Delayed sending
Receiving
● Receiving in the memory You can store the received documents in the memory. You can print the stored documents at any time, and if you do not need them, you can delete them.
- Remote Receiving
If an external telephone is connected, you can switch to the fax receiving mode immediately by dialing the ID number for fax receiving using the dial buttons of the telephone during a phone call.
- Polling Receiving
You can retrieve pre-loaded documents from a sender's fax machine when you want to receive the fax.
Enlarged/Reduced Printing
2-Sided Printing\*
Reduced Layout
You can reduce multiple documents to print them onto one sheet.
2 on 1 4 on 1
flowchart
graph TD
    A["Input Module"] --> B["Data Processing Module"]
    B --> C["Output Server Module"]
    C --> D["Processed Modules"]
    D --> E["Storage System"]
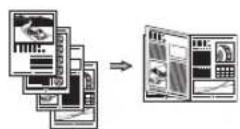
Booklet Printing\*
Poster Printing
Watermark Printing
Displaying a Preview before
Printing
Selecting a "Profile"
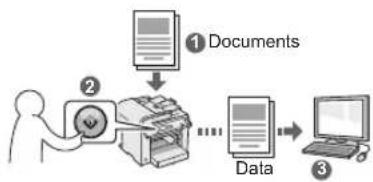
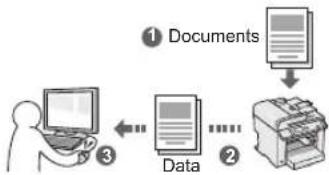
Scan
Saving the Documents Using the Operation Panel of the Machine
flowchart
graph TD
    A["Documents"] --> B["Data"]
    B --> C["Computer"]
Saving the Documents Using Operations from a Computer
- Scanning with the MF Toolbox
flowchart
graph TD
    A["Documents"] --> B["Data"]
    B --> C["Output"]
- Scanning from an Application
- Scanning with the WIA Driver***
Network Settings\*\*\*\*
This machine comes equipped with a network interface that you can construct a network environment easily. You can print a document, use the PC fax, and use the network scan from all computers which are connected with the machine. The machine supports to increase work efficiency as a shared machine in the office.
Remote UI\*\*\*\*
You can understand the condition of the machine from the computers on the network. You can access the machine and manage jobs or specify various settings via network.
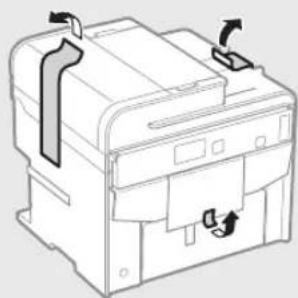
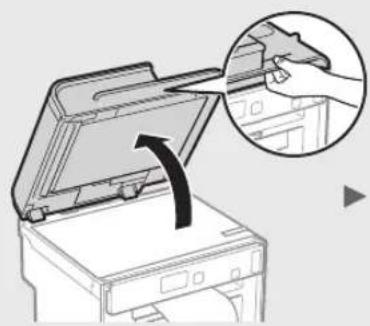
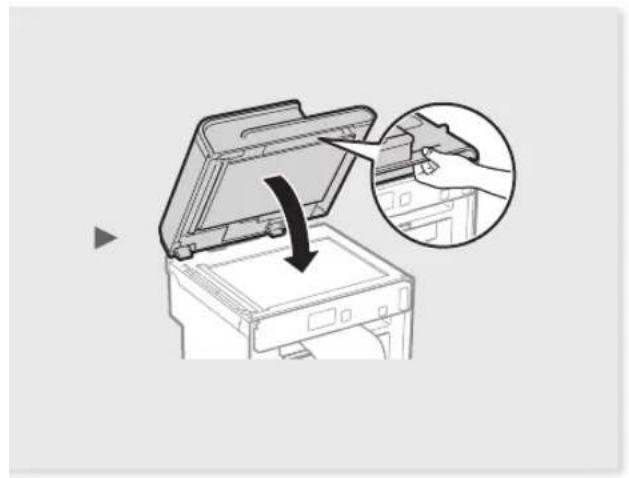
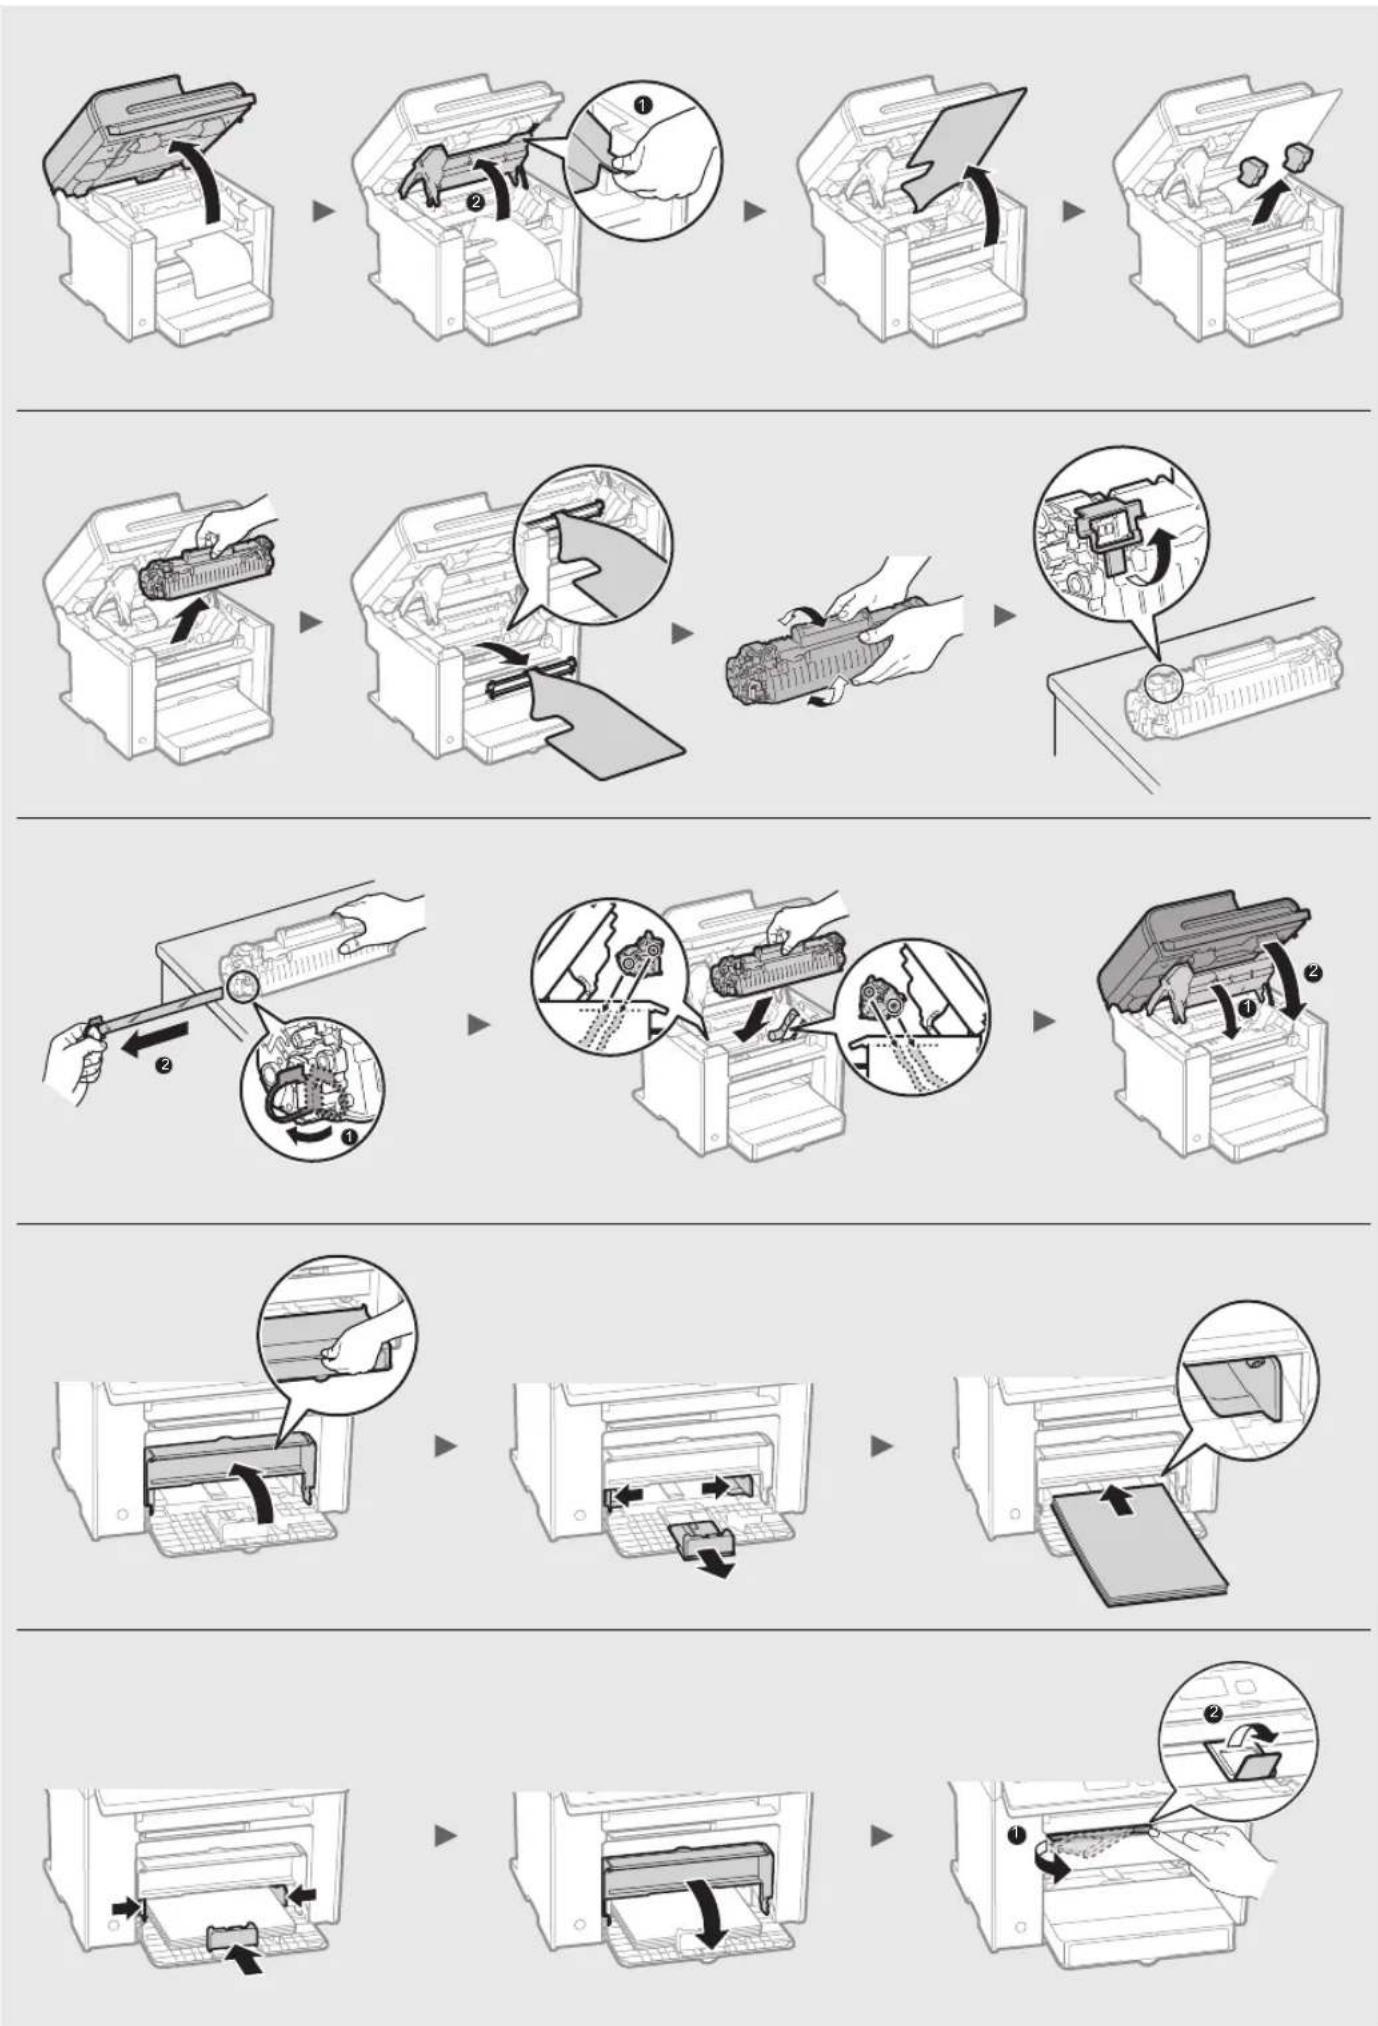
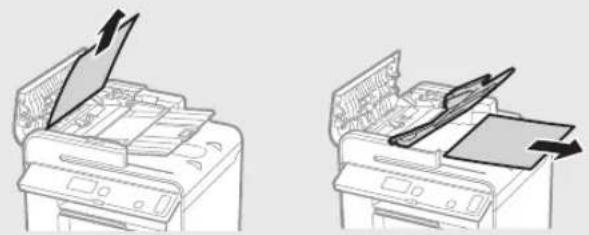
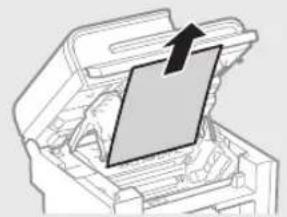
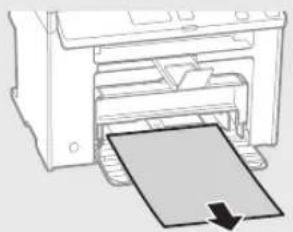
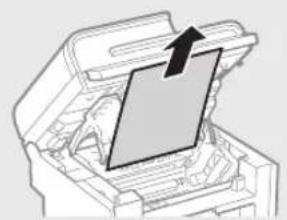
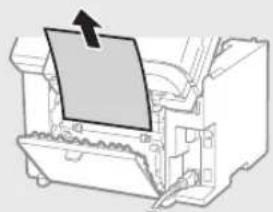
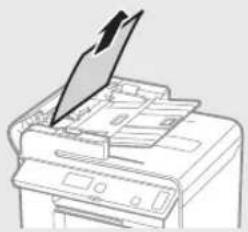
Clearing Paper Jams
If the following screen appears, a paper jam has occurred in the feeder or inside the machine. Follow the procedure displayed on the screen to remove the jammed document or paper. This manual indicates only areas where paper jams occur. For details on each function, see the e-Manual.
84 Paper jam.
Press [▶] to
display steps.

Feeder
natural_image
Two line drawings of a printer with paper and paper roll, showing different printer orientations (no text or symbols)MF4890dw

natural_image
Line drawing of a printer with a paper airplane being inserted (no text or symbols)MF4870dn/MF4780w/MF4750/MF4730
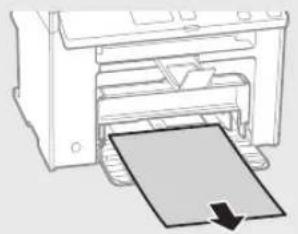
Inside the machine Multi-purpose tray

natural_image
Diagram of a printer's internal structure showing a paper feeding into a printer (no text or symbols visible)
natural_image
Technical line drawing of a mechanical component with internal channels and a black arrow indicating direction (no text or symbols)
natural_image
Technical diagram showing a mechanical component with an arrow indicating direction, enclosed in a circular inset (no text or symbols)
natural_image
Illustration of hands installing or adjusting a mechanical component with a blue arrow (no text or symbols visible)
natural_image
Technical line drawing of a printer with internal components and mounting holes (no text or symbols)
natural_image
Technical line drawing of a mechanical device housing with mounting brackets and internal components (no text or symbols)
natural_image
Diagram of a printer with a paper sheet being inserted, showing no text or symbols.Paper Cassette

natural_image
Diagram of a printer with a paper being inserted, showing the printer's internal structure and paper plane (no text or symbols)Back cover
(MF4890dw/MF4870dn only)

natural_image
Diagram of a printer's internal structure with a paper clip and arrow indicating orientation (no text or symbols)Toner cartridges are consumables. When the toner becomes nearly empty or has run out completely in the middle of a job run, a message appears on the screen, or the following problems may occur. Take the appropriate action accordingly.
When a Message Appears
When the toner becomes nearly empty in the middle of a job run, a message appears on the screen.
| Message | When the message is displayed on the screen | Description and Solutions |
| When the toner cartridge needs a replacement soon. | Shake the toner cartridge to evenly distribute the toner inside the cartridge.⊕ e-Manual “Before Replacing the Toner Cartridge”We recommend that the toner cartridge be replaced before printing high-volume documents.⊕ e-Manual “Replacing the Toner Cartridge” | |
| When the toner cartridge has reached the end of its life. | Shake the toner cartridge to evenly distribute the toner inside the cartridge.⊕ e-Manual “Before Replacing the Toner Cartridge”If this message does not disappear, replace the toner cartridge.⊕ e-Manual “Replacing the Toner Cartridge”If this message is displayed, the incoming fax will be stored in the memory without being printed. Also, reports may not be printed, even if they are set to be printed automatically.Ifinis set to, however, printing will be continued, but white streaks or smudges may appear on printouts.⊕ e-Manual “Printing the Report Automatically”⊕ e-Manual “Continue Print. When Toner Is Nearly Out” |
When white streaks appear on the output, or the output is partially faded:
When white streaks appear on the output or the output is partially faded, the toner cartridge has almost reached the end of its life, even if no message appears on the screen. When the print quality becomes unacceptable, see the following to fix the problem.
When White Streaks Appear on the Output or the Output Is Partially Faded
When the toner nearly runs out, white streaks appear on the output, or the output is partially faded.

natural_image
Illustration of a photo frame and a circular object with internal patterns (no text or symbols)
natural_image
Abstract graphic with a document icon and a black circle (no text or symbols)No message appears on the screen, if the toner nearly runs out. Replace the toner cartridge when white streaks appear on the output, or the output is partially faded.
When this problem occurs:
Follow the steps in the procedure below before replacing the toner cartridge. The machine continues printing until the toner runs out completely.
e-Manual "Before Replacing the Toner Cartridge"
When the print quality is still unacceptable:
If the problem persists after you have followed the steps in the procedure below, replace the toner cartridge.
e-Manual "Replacing the Toner Cartridge"
Memo
En
En
Symbols Used in This Manual

WARNING
Indicates a warning concerning operations that may lead to death or injury to persons if not performed correctly. To use the machine safely, always pay attention to these warnings.

CAUTION
Indicates a caution concerning operations that may lead to injury to persons if not performed correctly. To use the machine safely, always pay attention to these cautions.
Keys and Buttons Used in This Manual
The following symbols and key names are a few examples of how keys to be pressed are expressed in this manual.
- Operation panel keys: [Key icon] + (Key name) Example: [☐] (Stop)
- Display:
- Buttons and items on the computer display: [Preferences]
Illustrations and Displays Used in This Manual
Illustrations and displays used in this manual are which of MF4890dw unless specified.

WARNING
To avoid the risk of personal injury or damage to the equipment and for legal information, read the Legal Notice and Important Safety Information in Multi-lingual User Manual CD that is included with the product.
Important Safety Instructions
Please read the "Important Safety Instructions" in this manual and in the e-Manual thoroughly before operating the machine.
As these instructions are intended to prevent injury to the user and other persons or to prevent destruction of property, always pay attention to these instructions and operational requirements.
Please note that you are responsible for all damages caused by failure to follow the directions provided herein, using the device for any purpose for which it was not intended, or repairs or alterations made by anyone other than a Canon-approved technician.
Installation

WARNING
- Do not install the machine near flammable substances such as alcohol-based products or paint thinners. If these substances come in contact to the electrical parts inside the machine could ignite these substances and cause a fire or increase your risk of electric shock.
- Do not place necklaces and other metal objects or containers filled with liquid on the machine. If foreign substances come into contact with electrical parts inside the machine, this may result in a fire or electrical shock. If any of these substances falls into the machine, turn off the power to the machine immediately and contact your local Canon dealer.
- Do not use near any medical equipment. Radio wave emitted from this machine may interfere with medical equipments, which may result in serious accidents.

CAUTION
- Do not install the machine in the following locations. Doing so may result in personal injury, fire or electrical shock.
- Unstable location
– A location subject to excessive vibrations -
A location where block the ventilation slots (too close to walls, bed, shaggy rug, and other similar objects)
– A damp or dusty location
– A location exposed to direct sunlight or an outside place
– A location subject to high temperatures
– A location near open flames
– A location with poor ventilation system -
Although ozone is generated from the machine during operation, it does not have any affect on the human body. However, if you intend to use the machine for long periods of time, ensure that the installation location is well ventilated.
- Do not connect unapproved cables to this machine. Doing so may result in a fire or an electric shock.
- Machines with a hard disk may not operate properly when used at high altitudes of about 3,000 meters above sea level, or higher.
Power Supply

WARNING
- Do not use power cords other than the one provided, as this can result in a fire or electrical shock.
- Do not modify or bend the power cord and do not pull on it with great force. Do not place heavy objects on the power cord. Damaging the power cord may result in a fire or an electric shock.
- Do not plug or unplug the power plug with wet hands, as this can result in electrical shock.
- Do not use extension cords or multi-plug power strips with this machine. Doing so may result in a fire or electric shock.
- Do not bundle up or tie up the power cord in a knot, as this can result in a fire or electrical shock.
- Insert the power plug completely into the AC power outlet. Failure to do so can result in a fire or electrical shock.
- Remove the power plug completely from the power outlet during a thunder storm. Failure to do may result in a fire, electric shock, or malfunction.

CAUTION
- Use only a power supply that meets the voltage requirements listed herein. Failure to do so may result in a fire or electric shock.
- Do not obstruct the power outlet where this machine is connected, so that you can unplug the power cord easily in an emergency.
Handling

WARNING
- Do not disassemble or modify the machine. There are high-temperature and high-voltage components inside the machine which may result in a fire or electrical shock.
- Do not allow children to touch or play with the power cord and cables or internal or electrical parts. Doing so may result in serious personal injury.
- Please contact an authorized Canon dealer if the machine makes an unusual noise, emits an unusual smell, or emits smoke or excessive heat. Continued use may result in a fire or electric shock.
- Do not use flammable sprays near the machine. If flammable substances come into contact with electrical parts inside the machine, this may result in a fire or electric shock.

CAUTION
- For your safety, please unplug the power cord if the machine will not be used for a long period of time.
- Use caution when opening and closing covers to avoid injury to your hands.
- Keep hands and clothing away from the rollers in the output area. If the rollers catch your hands or clothing, this may result in personal injury.
- The inside of the machine and the output slot is very hot during and immediately after use. Avoid contact with these areas to prevent burns. Also, printed paper may be hot immediately after being output, so use caution when handling it. Failure to do so may result in burns.
Maintenance and Inspections

WARNING
- Turn off the machine and unplug the power cord from the outlet before cleaning. Failure to do so may result in a fire or an electric shock.
- Unplug the power plug from the power outlet periodically and clean the area around the base of the power plug's metal pins and the power outlet with a dry cloth to remove dust and grime. When damp, accumulated dust may cause short circuiting or fires.
- Use a damp, well wrung-out cloth to clean the machine. Dampen cleaning cloths with water only. Do not use alcohol, benzenes, paint thinners, or other flammable substances. If these substances come into contact with electrical parts inside the machine, this may result in a fire or electric shock.
- Check the power cord and plug regularly for damage. Check the machine for rust, dents, scratches, cracks, or excessive heat generation. Use of poorly-maintained equipment may result in a fire or electric shock.
Consumables

WARNING
- Do not dispose of used toner cartridges in open flames. This may cause an ignition, and result in burns or fire.
- If you accidentally spill or scatter toner, carefully wipe up the loose toner with a damp, soft cloth and avoid inhaling any toner dust. Never use a vacuum cleaner to clean up loose toner. Doing so may cause a malfunction in the vacuum cleaner or result in a dust explosion due to static discharge.

CAUTION
- Keep the toner cartridges and other consumables out of the reach of small children. If toner is ingested, consult a physician or poison control center immediately.
- Do not attempt to disassemble the toner cartridge. The toner may scatter and get into your eyes or mouth. If toner gets into your eyes or mouth, wash them immediately with cold water and consult a physician.
- If toner spills from the toner cartridge, avoid inhaling it or allowing it to come into contact with your skin. If the toner comes into contact with your skin, wash immediately with soap. If you inhale the toner or your skin becomes irritated due to contact with the toner, consult a physician or poison control center immediately.
Others

WARNING
- If you are using a cardiac pacemaker: This machine generates a low level magnetic field. If you feel any abnormalities in your body while using this machine, please move away from the machine and consult your physician immediately.
Legal Notices
En
Legal Limitations on Usage of Your Product and the Use of Images
Using your product to scan, print or otherwise reproduce certain documents, and the use of such images as scanned, printed or otherwise reproduced by your product, may be prohibited by law and may result in criminal and/or civil liability. A non-exhaustive list of these documents is set forth below. This list is intended to be a guide only. If you are uncertain about the legality of using your product to scan, print or otherwise reproduce any particular document, and/or of the use of the images scanned, printed or otherwise reproduced, you should consult in advance with your legal advisor for guidance.
- Paper Money
- Traveler's Checks
- Money Orders
- Food Stamps
– Certificates of Deposit - Passports
– Postage Stamps (canceled or uncanceled) - Immigration Papers
– Identifying Badges or Insignias
– Internal Revenue Stamps (canceled or uncanceled)
– Selective Service or Draft Papers
– Bonds or Other Certificates of Indebtedness
– Checks or Drafts Issued by Governmental Agencies - Stock Certificates
– Motor Vehicle Licenses and Certificates of Title
– Copyrighted Works/Works of Art without Permission of Copyright Owner
Considerable effort has been made to make sure that the manuals for the machine are free of inaccuracies and omissions. However, as we are constantly improving our products if you need an exact specification, please contact Canon.
text_image
Diagram showing a computer monitor with an icon pointing to a file browser interface, likely illustrating a desktop or DVD setup.natural_image
Illustration of a computer monitor with a CD and a grid display, no text or symbols presentflowchart
graph LR
    A["Printer with OFF"] --> B["Switched to power outlet"]
    B --> C["Power outlet with ON button"]
natural_image
Three electronic devices: a computer connected via cable, a server with ports, and a printer (no text or symbols visible)natural_image
Three technical illustrations: a desktop computer, a cable with a plug, and a printer (no text or symbols present)natural_image
Illustration of three electronic devices: a desktop computer, a wireless router, and a printer (no text or symbols present)natural_image
Diagram of a device with connectors and a switch, showing internal wiring (no text or symbols)natural_image
Two line drawings of a printer with paper and paper roll, showing front and side views (no text or symbols)MF4890dw

natural_image
Line drawing of a printer with a paper airplane being inserted (no text or symbols)MF4870dn/MF4780w/MF4750/MF4730
natural_image
Diagram of a printer's internal structure showing a paper feeding into a slot (no text or symbols visible)
natural_image
Technical line drawing of a mechanical component with internal channels and a black arrow indicating direction (no text or symbols)
natural_image
Technical diagram showing a mechanical component with an arrow indicating direction, enclosed in a circular inset (no text or symbols)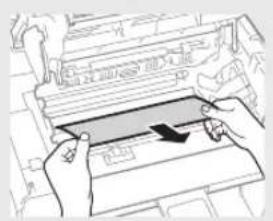
natural_image
Illustration of hands inserting a card into a device (no text or symbols visible)
natural_image
Technical line drawing of a printer with internal components and mounting holes (no text or symbols)
natural_image
Technical line drawing of a mechanical device housing with mounting brackets and internal components (no text or symbols)
natural_image
Illustration of a printer with a paper sheet being inserted (no text or symbols visible)Cassette à papier

natural_image
Diagram of a printer with a paper sheet being inserted, showing no text or symbols.Capot arrière
(MF4890dw/MF4870dn uniquement)

natural_image
Diagram of a printer's internal structure with a paper clip and arrow indicating orientation (no text or symbols)natural_image
Illustration of a photo frame and a circular object with diagonal lines (no text or symbols)
natural_image
Abstract graphic with a document icon and a black circle (no text or symbols)text_image
Diagram showing a computer monitor with an icon pointing to a document, likely illustrating a file or system interface.④e-Anleitung (Multi-lingual User Manual CD):
natural_image
Illustration of a computer monitor with a CD inside, showing a grid screen and an open disk (no text or symbols)flowchart
graph LR
    A["Printer with OFF"] --> B["Power plug"]
    B --> C["Power plug with ON"]
    C --> D["Power plug with OFF"]
natural_image
Three-line diagram showing a printer connected via cable to a computer and a printer (no text or symbols present)natural_image
Three technical illustrations of electronic devices: a desktop computer, a cable with a probe, and a printer (no text or symbols present)natural_image
Illustration of three electronic devices: a desktop computer, a wireless router, and a printer (no text or symbols present)natural_image
Diagram of a device with connectors and a switch, showing internal wiring (no text or symbols)natural_image
Technical line drawing of a mechanical device with no visible text or symbols
text_image
Diagram showing cable connection between a device and computer, with labeled components and cable routing arrowsnatural_image
Two line drawings of a printer with paper and a stack of paper, showing the process (no text or symbols)MF4890dw

natural_image
Line drawing of a printer with a paper airplane being inserted (no text or symbols)MF4870dn/MF4780w/MF4750/MF4730
natural_image
Diagram of a printer's internal structure showing a paper sheet being inserted (no text or symbols visible)
natural_image
Technical diagram of a mechanical component with internal channels and a black arrow indicating a specific section (no text or symbols present)
natural_image
Technical diagram showing a mechanical component with an arrow indicating direction, and a magnified inset highlighting a detail (no text or symbols present)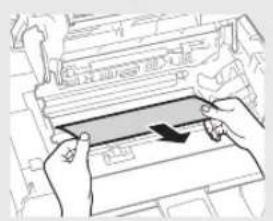
natural_image
Illustration of hands inserting a rectangular object into a machine (no text or symbols visible)
natural_image
Technical line drawing of a printer with internal components and mounting holes (no text or symbols)
natural_image
Technical line drawing of a mechanical device with internal components and mounting holes (no text or symbols)
natural_image
Line drawing of a printer with a paper sheet being inserted (no text or symbols)Papierkassette

natural_image
Diagram of a printer with a paper being inserted, showing no text or symbolsnatural_image
Diagram of a printer's internal structure with a paper clip and arrow indicating orientation (no text or symbols)natural_image
Two abstract circular diagrams: one with a grid of squares and another with a document or interface (no text or symbols)CLASS 1 LASER PRODUCT
LASER KLASSE 1
APPAREIL À LASER DE CLASSE 1
APPARECCHIO LASER DI CLASSE 1
PRODUCTO LÁSER DE CLASE 1
APARELHO A LASER DE CLASSE 1
LUOKAN 1 LASER-TUOTE
LASERPRODUKT KLASS 1
text_image
Diagram showing a computer monitor with an open CD and a speech bubble containing text, likely illustrating a presentation or message.④ Manuale in formato elettronico (Multi-lingual User Manual CD):
text_image
Diagram showing a computer monitor with a CD and a grid interface, with an annotation box highlighting the screen area.text_image
Lingua German Greek Hungarian Italian Usare LAN wireless per connes.computer? (configurab.succes.) Si No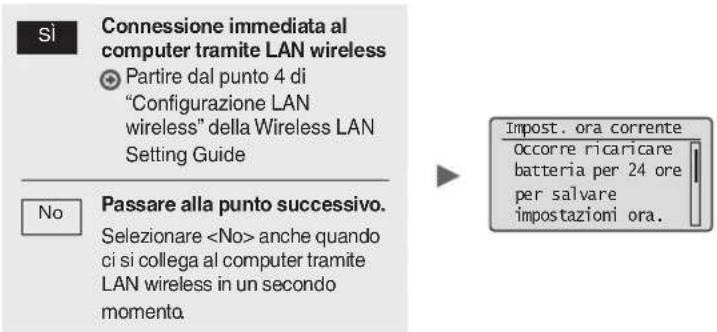
natural_image
Three electronic devices: a desktop computer connected via cable, a printer with cable, and a printer (no text or symbols visible)natural_image
Three technical illustrations of electronic devices: a desktop computer, a cable with a plug, and a printer (no text or symbols present)natural_image
Illustration of three electronic devices: a desktop computer, a wireless router, and a printer (no text or symbols present)natural_image
Diagram of a device with connectors and an attached switch (no text or symbols)flowchart
graph TD
    A["CPU"] --> B["CDS"]
    B --> C["Network Setup"]
    C --> D["Computer Interface"]
natural_image
Two line drawings showing a printer being inserted into a paper airplane, with no text or symbols present.MF4890dw

natural_image
Line drawing of a printer with a paper airplane being inserted (no text or symbols)MF4870dn/MF4780w/MF4750/MF4730
natural_image
Diagram of a printer's internal structure showing a paper sheet being inserted (no text or symbols visible)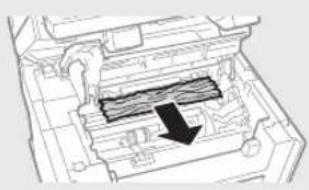
natural_image
Technical diagram of a mechanical component with internal channels and a black arrow indicating a specific section (no text or symbols present)
natural_image
Technical diagram showing a mechanical component with an arrow indicating direction, enclosed in a magnified inset (no text or symbols present)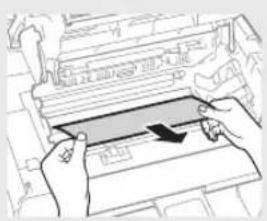
natural_image
Illustration of hands inserting a rectangular object into a machine (no text or symbols visible)
natural_image
Technical line drawing of a printer with visible internal components and mounting holes (no text or labels)
natural_image
Technical line drawing of a mechanical device housing with mounting brackets and internal components (no text or symbols)
natural_image
Diagram of a printer with a paper sheet being inserted, showing no text or symbolsnatural_image
Diagram of a printer printing a sheet of paper with a downward arrow (no text or symbols)Coperchio posteriore
(solo MF4890dw/MF4870dn)

natural_image
Diagram of a printer's internal structure with a paper clip and arrow indicating orientation (no text or symbols)natural_image
Illustration of a photo frame and a circular object with abstract patterns (no text or symbols)
natural_image
Abstract graphic with a document icon and a large circle (no text or symbols)text_image
Diagram showing a computer monitor with an open CD and a speech bubble containing text or data.④ e-Manual (Multi-lingual User Manual CD):
text_image
Diagram showing a computer monitor with a CD and a grid interface, highlighting the screen area.natural_image
Illustration of a desktop computer connected via a network to a printer (no text or symbols present)natural_image
Three technical illustrations: a desktop computer, a cable with a probe, and a printer (no text or symbols present)natural_image
Illustration of three electronic devices: a desktop computer, a wireless router, and a printer (no text or symbols present)natural_image
Diagram showing a device connected to an audio jack via cable (no text or symbols present)natural_image
Line drawing of a mechanical housing or enclosure with a handle and mounting bracket (no text or symbols)
text_image
Diagram showing cable connection between a device and computer, with labeled components and directional arrows indicating cable routing.text_image
Screenshot of a software interface showing file transfer and composition options with dialog boxes and buttonsnatural_image
Two line drawings of a printer with paper and a pencil, showing the process (no text or symbols)MF4890dw

natural_image
Line drawing of a printer with a paper airplane being inserted (no text or symbols)MF4870dn/MF4780w/MF4750/MF4730
natural_image
Diagram of a printer's internal structure showing a paper sheet being inserted (no text or symbols visible)
natural_image
Technical diagram of a mechanical component with internal channels and a black arrow indicating a specific section (no text or symbols present)
natural_image
Technical diagram showing a mechanical component with an arrow indicating direction, enclosed in a circular inset (no text or symbols)
natural_image
Illustration of hands inserting a card into a printer (no text or symbols visible)
natural_image
Technical line drawing of a printer with visible internal components and mounting holes (no text or labels)
natural_image
Technical line drawing of a mechanical device housing with mounting brackets and internal components (no text or symbols)
natural_image
Diagram of a printer with a paper sheet being inserted, showing no text or symbolsBandeja de papel

natural_image
Diagram of a printer with a paper being inserted, showing no text or symbolsContratapa
(MF4890dw/MF4870dn solamente)

natural_image
Diagram of a printer or printer with a paper clip inserted, showing internal components and an arrow indicating the paper's direction (no text or symbols present)natural_image
Illustration of a photo frame and a circular object with diagonal lines, no text or symbols present.
natural_image
Abstract graphic with a document and a circle, no text or symbols presenttext_image
Diagram showing a computer monitor with an icon pointing to a file browser interface, likely illustrating a desktop or DVD setup.④ Manual Eletrónico (Multi-lingual User Manual CD (CD do Manual de Utilizador Multilingue)):
natural_image
Illustration of a computer monitor with a CD and a grid interface, no text or symbols presentflowchart
graph LR
    A["Printer with OFF"] --> B["Switched to power outlet"]
    B --> C["Power outlet with ON button"]
natural_image
Three electronic devices: a computer connected via cable, a server with ports, and a printer (no text or symbols visible)natural_image
Three technical illustrations of electronic devices: a laptop, a cable, and a printer (no text or symbols present)natural_image
Illustration of three electronic devices: a desktop computer, a tower with signal waves, and a printer (no text or symbols)natural_image
Diagram of a device with connectors and a switch, showing internal wiring (no text or symbols)text_image
COPY/SCAN ✓ ✓ ✓ ✓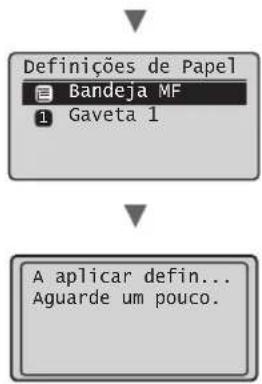
natural_image
Two line drawings of a printer with paper and a document, showing different printer orientations (no text or symbols)MF4890dw

natural_image
Line drawing of a printer with a paper airplane being inserted (no text or symbols)MF4870dn/MF4780w/MF4750/MF4730
Interior da máquina Bandeja multifuncional
natural_image
Diagram of a printer's internal structure showing a paper feeding into a slot (no text or symbols)
natural_image
Technical diagram of a mechanical assembly with internal components and a black arrow indicating a specific section (no text or symbols present)
natural_image
Technical diagram showing a mechanical component with an arrow indicating direction, enclosed in a circular inset (no text or symbols)
natural_image
Illustration of hands inserting a card into a device (no text or symbols visible)
natural_image
Technical line drawing of a printer with internal components and mounting holes (no text or symbols)
natural_image
Technical line drawing of a mechanical device housing with mounting brackets and internal components (no text or symbols)
natural_image
Diagram of a printer with a paper sheet being inserted, showing no text or symbols.Gaveta de papel
natural_image
Diagram of a printer with a paper being inserted, showing the printer's internal structure and page loading (no text or symbols present)Tampa de trás
(apenas MF4890dw/MF4870dn)

natural_image
Diagram of a printer's internal structure with a paper clip and arrow indicating orientation (no text or symbols)natural_image
Illustration of a photo frame and a circular object with diagonal lines (no text or symbols)
natural_image
Abstract graphic with a document icon and a large circle (no text or symbols)text_image
Diagram showing a computer monitor with an open disk, accompanied by a speech bubble containing text or data.natural_image
Illustration of a computer monitor with a CD inside, showing a grid layout and an open screen (no text or symbols)natural_image
Illustration of a desktop computer connected via a network to a printer (no text or symbols present)natural_image
Three line drawings of electronic devices: a desktop computer, a cable with a pointer, and a printer (no text or symbols)natural_image
Illustration of three electronic devices: a desktop computer, a router with signal waves, and a printer (no text or symbols)natural_image
Diagram of a device with connectors and a switch, showing internal wiring (no text or symbols)natural_image
Line drawing of a mechanical device with no visible text or symbols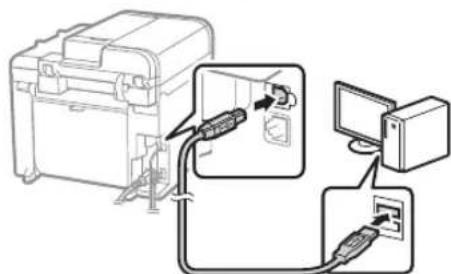
text_image
Diagram showing connection between a device and a computer via cable, with labeled components and directional arrows indicating wiring or connections.natural_image
Two line drawings of a printer with an open lid and a paper airplane, showing mechanical components (no text or symbols)MF4890dw

natural_image
Line drawing of a printer with a paper airplane being inserted (no text or symbols)MF4870dn/MF4780w/MF4750/MF4730
natural_image
Diagram of a printer's internal structure showing a paper sheet being inserted (no text or symbols visible)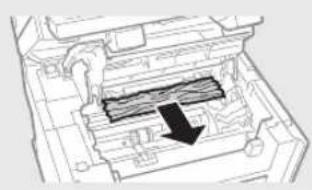
natural_image
Technical diagram of a mechanical component with internal channels and a black arrow indicating a specific section (no text or symbols present)
natural_image
Technical diagram showing a mechanical component with an arrow indicating direction, enclosed in a circular inset (no text or symbols)
natural_image
Illustration of hands installing or adjusting a mechanical component with a blue arrow (no text or symbols)
natural_image
Technical line drawing of a printer with internal components and mounting holes (no text or symbols)
natural_image
Technical line drawing of a mechanical device housing with mounting brackets and internal components (no text or symbols)natural_image
Illustration of a printer with a paper sheet being inserted (no text or symbols)Κασέτα χαρτιού

natural_image
Diagram of a printer with a paper being inserted, showing the printer's internal structure and page loading (no text or symbols present)natural_image
Diagram of a printer's internal structure with a paper plane and an arrow indicating orientation (no text or symbols)natural_image
Illustration of a photo frame and a circular object with abstract patterns (no text or symbols)
natural_image
Abstract graphic with a document icon and a large circle (no text or symbols)natural_image
3D rendering of a black rectangular electronic device with horizontal slats (no visible text or symbols)natural_image
3D rendering of a rectangular electronic device with horizontal slats and a small circular component on the side (no text or symbols visible)③ MF Driver Installation Guide (User Software CD (Cd med brugersoftware)):
text_image
Diagram showing a computer monitor with an open CD and a magnified view of the screen, likely illustrating a desktop setup or system interface.text_image
Diagram showing a computer monitor with a CD and a grid interface, accompanied by an annotation box highlighting the screen layout.flowchart
graph LR
    A["Printer with OFF"] --> B["Switched to power outlet"]
    B --> C["Power outlet with ON button"]
text_image
Sprog Chinese (Traditiona... Croatian Czech Danish Kopi: Tryk Start 01 100% 1 A4 Tæthed: ±0 Originaltype: Tekst.. 2-sidet: Franatural_image
Three electronic devices: a computer connected via cable, a server with ports, and a printer (no text or symbols visible)natural_image
Three line drawings of electronic devices: a desktop computer, a cable with a plug, and a printer (no text or symbols)natural_image
Illustration of three electronic devices: a desktop computer, a wireless router, and a printer (no text or symbols present)natural_image
Diagram of a device with connectors and a switch, showing internal wiring (no text or symbols)text_image
COPY/SCAN OK Cancel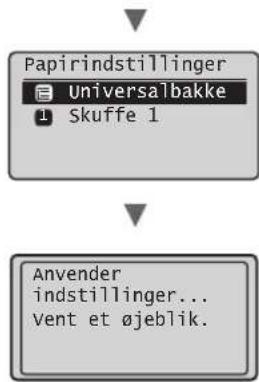
flowchart
graph TD
    A["Papirindstillinger"] --> B["Universalbakke"]
    B --> C["Skuffe 1"]
    D["Anvender indstillinger..."] --> E["Vent et øjeblik."]
natural_image
Two line drawings of a printer with paper and paper roll, showing different printer orientations (no text or symbols)MF4890dw

natural_image
Line drawing of a printer with a paper airplane being inserted (no text or symbols)MF4870dn/MF4780w/MF4750/MF4730
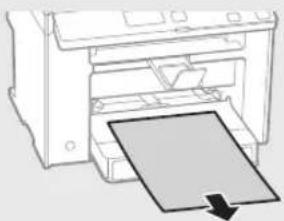
Inde i maskinen Universalbakke

natural_image
Diagram of a printer's internal structure showing a paper sheet being inserted (no text or symbols visible)
natural_image
Technical diagram of a mechanical component with internal channels and a black arrow indicating a specific section (no text or symbols present)
natural_image
Technical diagram showing a mechanical component with an arrow indicating direction, enclosed in a circular inset (no text or symbols)
natural_image
Illustration of hands inserting a card into a machine (no text or symbols visible)
natural_image
Technical line drawing of a printer with internal components and mounting holes (no text or symbols)
natural_image
Technical line drawing of a mechanical device housing with mounting brackets and internal components (no text or symbols)
natural_image
Diagram of a printer with a paper sheet being inserted, showing no text or symbols.Papirkassette

natural_image
Diagram of a printer with a paper being inserted, showing the printer's internal structure and page loading (no text or symbols present)Bagdæksel
(Kun MF4890dw/MF4870dn)

natural_image
Diagram of a printer or printer with a paper clip inserted, showing internal components and a black arrow indicating the paper's direction (no text or symbols present)natural_image
Illustration of a photo frame and a circular object with internal patterns (no text or symbols)
natural_image
Abstract graphic with a document icon and a circle, no text or symbols presenttext_image
Diagram showing a computer monitor with an open CD and a speech bubble containing text or data.natural_image
Illustration of a computer monitor with a CD and a grid, showing no text or symbols.flowchart
graph LR
    A["Printer with OFF"] --> B["Switched to power outlet"]
    B --> C["Power outlet with ON button"]
natural_image
Three electronic devices: a computer connected via cable, a server with ports, and a printer (no text or symbols visible)natural_image
Three technical illustrations: a desktop computer, a cable with a plug, and a printer (no text or symbols present)natural_image
Illustration of three electronic devices: a desktop computer, a wireless router, and a printer with signal waves (no text or symbols)natural_image
Diagram of a device with connectors and a switch, showing internal wiring (no text or symbols)natural_image
Line drawing of a mechanical device with no visible text or symbols
text_image
Diagram showing cable connection between a device and computer, with labeled components and directional arrows indicating signal flow.natural_image
Two line drawings of a printer with paper and a stack of papers, showing different printer orientations (no text or symbols)MF4890dw

natural_image
Line drawing of a printer with a paper airplane being inserted (no text or symbols)MF4870dn/MF4780w/MF4750/MF4730
natural_image
Diagram of a printer's internal structure showing a paper sheet being inserted into a printer (no text or symbols visible)
natural_image
Technical diagram of a mechanical component with internal structure and a black arrow indicating a specific section (no text or symbols present)
natural_image
Technical diagram showing a mechanical component with an arrow indicating direction, enclosed in a circular inset (no text or symbols)
natural_image
Illustration of hands inserting a card into a machine (no text or symbols visible)
natural_image
Technical line drawing of a printer with visible internal components and mounting holes (no text or labels)
natural_image
Technical line drawing of a mechanical device housing with mounting brackets and internal components (no text or symbols)Handinvoer
natural_image
Diagram of a printer with a paper sheet being inserted, showing no text or symbols.Papiercassette

natural_image
Diagram of a printer with a paper sheet being inserted, showing no text or symbolsnatural_image
Diagram of a printer's internal structure with a paper clip and arrow indicating orientation (no text or symbols)Tonercartridge vervangen
natural_image
Illustration of a photo frame and a circular object with abstract patterns (no text or symbols)
natural_image
Abstract graphic with a document and a black circle (no text or symbols)③ MF Driver Installation Guide (User Software CD (Brukerprogramvare-CD)):
Les denne håndboken etterpå. Denne håndboken beskriver programvareinstallasjon.
text_image
Diagram showing a computer monitor with an open screen and a speech bubble containing text or data.natural_image
Illustration of a computer monitor with a CD and a grid interface, no text or symbols presentflowchart
graph LR
    A["Printer with OFF"] --> B["Switched to power outlet"]
    B --> C["Power outlet with ON button"]
natural_image
Three electronic devices: a computer connected via cable, a server with ports, and a printer (no text or symbols visible)Du kan koble maskinen til datamaskinen via en kablet ruter. Bruk LAN-kablene til å koble maskinen til den kablede ruteren (tilgangspunktet).
Sørg for at det er en ledig port i ruteren for å koble til maskinen og datamaskinen.
※ Ha en LAN-kabel i kategori 5, tvunnet parkabel, klar.
natural_image
Three technical illustrations: a desktop computer, a cable with a plug, and a printer (no text or symbols present)Du kan koble maskinen til datamaskinen via en USB-kabel.
natural_image
Illustration of three electronic devices: a desktop computer, a wireless router, and a printer (no text or symbols present)natural_image
Diagram of a device with connectors and a switch, showing internal wiring (no text or symbols)flowchart
graph TD
    A["Device with cable"] --> B["Switch to PC"]
    B --> C["Electrical outlet connected via cable to computer"]
natural_image
Two line drawings of a printer with paper and a stack of papers, showing different printer orientations (no text or symbols)MF4890dw

natural_image
Line drawing of a printer with a paper airplane being inserted (no text or symbols)MF4870dn/MF4780w/MF4750/MF4730
Innvendig i maskinen Multibrett
natural_image
Diagram of a printer's internal structure showing a paper feeding into a tray (no text or symbols visible)
natural_image
Technical diagram of a mechanical component with internal structure and directional arrow (no text or symbols)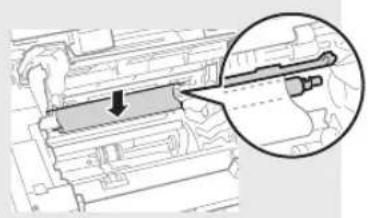
natural_image
Technical diagram showing a mechanical component with an arrow indicating direction, and a magnified inset highlighting a detail (no text or symbols present)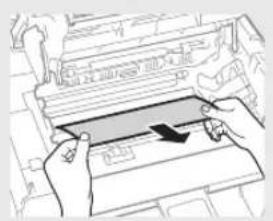
natural_image
Illustration of hands installing or adjusting a mechanical component with a blue arrow (no text or symbols)
natural_image
Technical line drawing of a printer with internal components and mounting holes (no text or symbols)
natural_image
Technical line drawing of a mechanical device housing with mounting brackets and internal components (no text or symbols)
natural_image
Line drawing of a printer with a paper sheet being inserted (no text or symbols)Papirkassett

natural_image
Diagram of a printer with a paper being inserted, showing the printer's internal structure and page loading (no text or symbols present)Bakdeksel
(Bare for MF4890dw/MF4870dn)
natural_image
Diagram of a printer or printer with a paper clip inserted, showing internal components and an arrow indicating the paper's direction (no text or symbols present)Bytte tonerkassett
natural_image
Illustration of a rose and a circular object with diagonal lines, no text or symbols present.
natural_image
Abstract graphic with a document icon and a large circle (no text or symbols)text_image
Diagram showing a computer monitor with an open CD and a speech bubble containing text or data.natural_image
Illustration of a computer monitor with a CD and a grid interface, no text or symbols presentflowchart
graph LR
    A["Printer with OFF"] --> B["Switched to power outlet"]
    B --> C["Power outlet with ON button"]
natural_image
Illustration of a desktop computer connected via a network to a printer (no text or symbols present)natural_image
Three technical illustrations of industrial devices: a laptop, a coiled cable, and a printer (no text or symbols present)natural_image
Illustration of three electronic devices: a desktop computer, a wireless router, and a printer (no text or symbols present)natural_image
Diagram of a device with connectors and a switch, showing internal wiring (no text or symbols)natural_image
Technical line drawing of a mechanical device with no visible text or symbols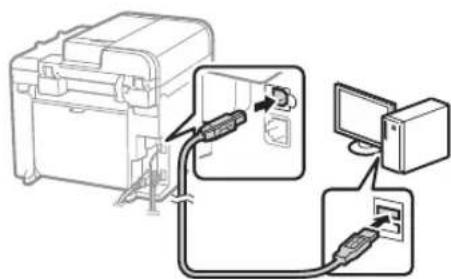
text_image
Diagram showing cable connection between a device and computer via cable routing, with labeled components and directional arrows.text_image
System dialog box with a text input field and buttons, likely from an older software interface.

natural_image
Simple line drawing of a speech bubble containing a document, connected to a computer monitor (no text or symbols)natural_image
Two line drawings of a printer with paper and a stack of papers, showing different printer orientations (no text or symbols)MF4890dw

natural_image
Line drawing of a printer with a paper airplane being inserted (no text or symbols)MF4870dn/MF4780w/MF4750/MF4730
natural_image
Diagram of a printer's internal structure showing a paper sheet being inserted (no text or symbols visible)
natural_image
Technical line drawing of a mechanical component with internal structure and an arrow indicating direction (no text or symbols)
natural_image
Technical diagram showing a mechanical component with an arrow indicating direction, and a magnified inset highlighting a detail (no text or symbols present)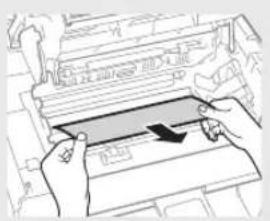
natural_image
Illustration of hands inserting a card into a machine (no text or symbols visible)
natural_image
Technical line drawing of a printer with internal components and mounting holes (no text or symbols)
natural_image
Technical line drawing of a mechanical device housing with mounting brackets and internal components (no text or symbols)
natural_image
Diagram of a printer with a paper sheet being inserted, showing no text or symbolsPapperskassett

natural_image
Diagram of a printer with a paper being inserted, showing no text or symbolsBakre lucka
(endast MF4890dw/MF4870dn)

natural_image
Diagram of a printer's internal structure with a paper clip and arrow indicating orientation (no text or symbols)Byta tonerpatron
natural_image
Illustration of a photo frame and a circular object with internal patterns (no text or symbols)
natural_image
Abstract graphic with a document icon and a circle, no text or symbols presentnatural_image
3D rendering of a rectangular electronic component with horizontal grooves (no text or symbols visible)② Langattoman lähiverkon asetusopas (vain MF4890dw/MF4780w):
natural_image
3D rendering of a rectangular electronic device with horizontal slats and a small circular mark on the side (no text or symbols visible)③ MF Driver Installation Guide (User Software CD (Ohjelmisto-CD) -levy):
text_image
Diagram showing a computer monitor with an open CD and a magnified view of the screen, likely illustrating a physical setup or interface.text_image
Diagram showing a computer monitor with a CD and a grid interface, accompanied by an annotation box highlighting the screen layout.flowchart
graph LR
    A["Printer with OFF"] --> B["Switched to power outlet"]
    B --> C["Power outlet with ON button"]
natural_image
Illustration of a desktop computer connected via a network to a printer (no text or symbols present)natural_image
Three technical illustrations of electronic devices: a flat-panel computer, a coiled cable, and a printer (no text or symbols)natural_image
Illustration of three electronic devices: a desktop computer, a wireless router, and a printer (no text or symbols present)natural_image
Diagram showing connection between a device box and an attached cable with connectors (no text or symbols)natural_image
Line drawing of a mechanical device with no visible text or symbols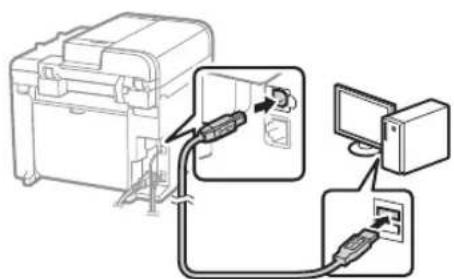
text_image
Diagram showing connection between a device and computer via cable, with labeled components and directional arrows indicating signal flow.natural_image
Two line drawings of a printer with an open lid, showing front and side views (no text or symbols)MF4890dw

natural_image
Line drawing of a printer with a paper airplane being inserted (no text or symbols)MF4870dn/MF4780w/MF4750/MF4730
natural_image
Diagram of a printer's internal structure with an arrow indicating the paper plane (no text or symbols present)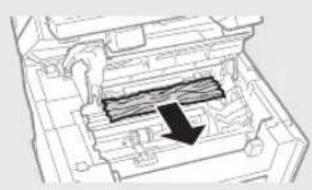
natural_image
Technical diagram of a mechanical component with internal channels and a black arrow indicating a specific section (no text or symbols present)
natural_image
Technical diagram showing a mechanical component with an arrow indicating direction, enclosed in a circular inset (no text or symbols)
natural_image
Illustration of hands installing or adjusting a mechanical component with a blue arrow (no text or symbols)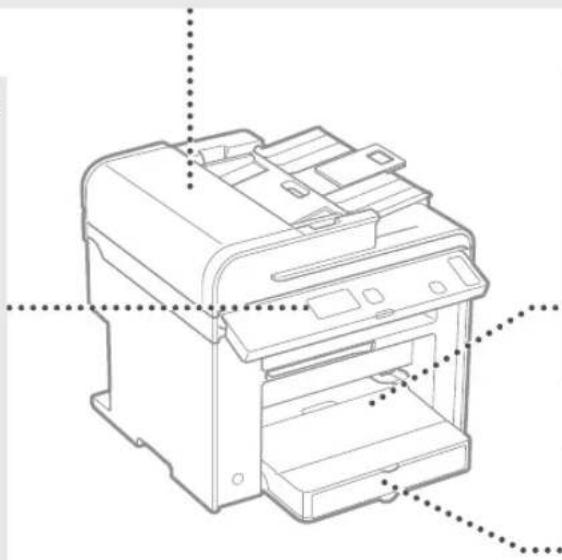
natural_image
Line drawing of a printer with internal components and mounting holes (no text or symbols)
natural_image
Technical line drawing of a mechanical device housing with mounting brackets and internal components (no text or symbols)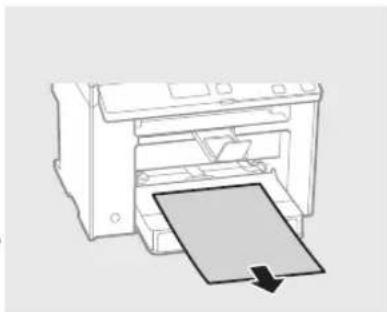
natural_image
Diagram of a printer with a paper being inserted, showing the printer's internal structure and paper plane (no text or symbols)Paperikasetti
natural_image
Diagram of a printer printing a sheet of paper with a downward arrow (no text or symbols)Takakansi
(vain MF4890dw/MF4870dn)

natural_image
Diagram of a printer or printer with a paper clip and arrow indicating the paper's direction (no text or symbols present)natural_image
Illustration of a rose and a circular object with diagonal lines, no text or symbols present.
natural_image
Abstract graphic with a document icon and a large circle (no text or symbols)text_image
Diagram showing a computer monitor with an open CD and a speech bubble containing text, likely illustrating a presentation or instruction.text_image
Diagram showing a computer monitor with a CD and a grid interface, accompanied by an annotation box highlighting the screen layout.flowchart
graph LR
    A["Printer with OFF"] --> B["Switched to power outlet"]
    B --> C["Power outlet with ON button"]
natural_image
Three electronic devices: a computer connected via cable, a server with ports, and a printer (no text or symbols visible)natural_image
Three technical illustrations of electronic devices: a desktop computer, a cable with a plug, and a printer (no text or symbols visible)natural_image
Illustration of three electronic devices: a desktop computer, a wireless router, and a printer (no text or symbols present)natural_image
Diagram of an electronic device showing connections to a power connector (no text or symbols present)flowchart
graph TD
    A["Top Device"] --> B["Bottom Device"]
    B --> C["Switch: Cable & Power Connection"]
    C --> D["Computer"]
text_image
Screenshot of a software interface showing file transfer and export steps with Chinese text labelsnatural_image
Two line drawings of a printer with an open lid, showing front and side views (no text or symbols)MF4890dw
natural_image
Line drawing of a printer with a paper airplane being inserted (no text or symbols)MF4870dn/MF4780w/MF4750/MF4730
natural_image
Diagram of a printer's internal structure showing a paper sheet being inserted (no text or symbols visible)
natural_image
Technical diagram of a mechanical device with internal components and a black arrow indicating a specific section (no text or symbols present)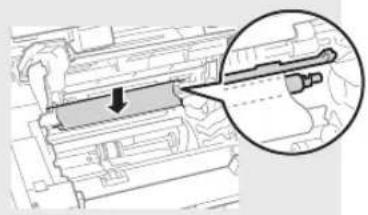
natural_image
Technical diagram showing a mechanical component with an arrow indicating direction, enclosed in a magnified inset (no text or symbols)
natural_image
Illustration of hands inserting a card into a machine (no text or symbols visible)
natural_image
Technical line drawing of a printer with internal components and mounting holes (no text or symbols)
natural_image
Technical line drawing of a mechanical device housing with mounting brackets and internal components (no text or symbols)
natural_image
Diagram of a printer with a paper sheet being inserted, showing no text or symbols.Кассета для бумаги

natural_image
Diagram of a printer with a paper sheet being inserted, showing no text or symbolsnatural_image
Diagram of a printer or printer with a paper sheet being inserted, showing no text or symbols.natural_image
Illustration of a photo frame and a circular object with vertical lines, no text or symbols present.
natural_image
Abstract graphic with a document and a dark circle (no text or symbols)text_image
Diagram showing a computer monitor with an icon pointing to a file browser interface, likely illustrating a desktop or DVD setup.natural_image
Illustration of a computer monitor with a CD and a grid interface, no text or symbols presentflowchart
graph LR
    A["Printer with OFF"] --> B["Switched to switch"]
    B --> C["ON with switch"]
text_image
Language Czech Danish Dutch English Use wireless LAN to connect computer? (Can config. later.) Yes No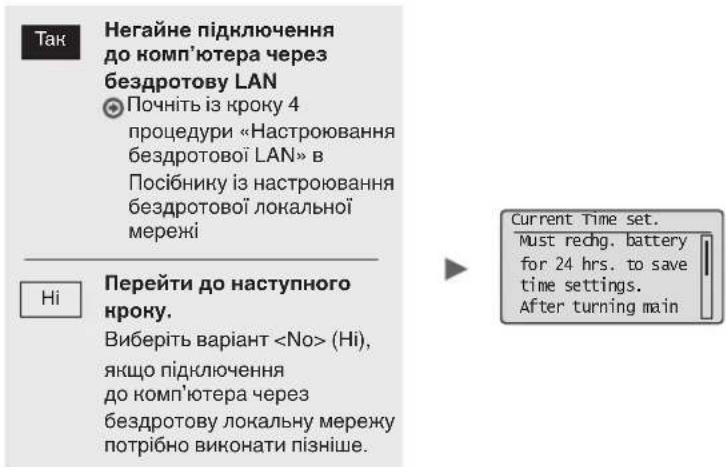
text_image
Language Czech Danish Dutch English Copry: Press Start 01 100% 1 A4 Density: ±0 Original Type: Text... 2-Sided: offnatural_image
Illustration of a desktop computer connected via a network to a printer (no text or symbols present)natural_image
Three technical illustrations of computer devices: a desktop, a cable, and a printer (no text or symbols present)natural_image
Illustration of three electronic devices: a desktop computer, a wireless router, and a printer (no text or symbols present)natural_image
Diagram of an electrical connector with cable and socket, showing internal wiring (no text or symbols)flowchart
graph TD
    A["Call"] --> B["Print"]
    B --> C["Send"]
    D["Perform fax setup?"] --> E["Set up Now\nSet up Later"]
    F["Connect phone line.\nFollow illustrations\non the next screen:\nConnect line to A.\n*Next : Press OK"] --> G["..."]
text_image
End Fax Setup Guide? Yes No Setting is complete. Turn the main power OFF and ON. OKflowchart
graph TD
    A["① Document"] --> B["② Printing"]
    B --> C["③ Digital Printing"]
    C --> D["④ Transmission"]
natural_image
Two line drawings showing a printer's open lid and its paper holder, no text or symbols presentMF4890dw

natural_image
Line drawing of a printer with a paper airplane being inserted (no text or symbols)MF4870dn/MF4780w/MF4750/MF4730
natural_image
Diagram of a printer's internal structure with an arrow indicating the paper plane (no text or symbols present)
natural_image
Technical diagram of a mechanical device with internal components and a black arrow indicating a specific section (no text or symbols present)
natural_image
Technical diagram showing a mechanical component with an arrow indicating direction, and a magnified inset highlighting a detail (no text or symbols present)
natural_image
Illustration of hands inserting a rectangular object into a machine (no text or symbols visible)
natural_image
Technical line drawing of a printer with internal components and mounting holes (no text or symbols)
natural_image
Technical line drawing of a mechanical device housing with mounting brackets and internal components (no text or symbols)
natural_image
Diagram of a printer with a paper sheet being inserted, showing no text or symbols.Касета для паперу

natural_image
Illustration of a printer with a paper being inserted, showing no text or symbols.natural_image
Diagram of a printer or printer with a paper sheet being inserted, showing no text or symbols.natural_image
Illustration of a photo frame and a circular object with internal patterns (no text or symbols)
natural_image
Abstract graphic with a document icon and a solid circle (no text or symbols)text_image
Diagram showing a computer monitor connected to a CD, with an annotation box highlighting the screen area.natural_image
Illustration of a computer monitor with a CD and a grid display, showing no text or symbols.flowchart
graph LR
    A["Printer with OFF"] --> B["Switched to power outlet"]
    B --> C["Power outlet with ON button"]
text_image
Language Czech Danish Dutch English Use wireless LAN to connect computer? (Can config. later.) Yes No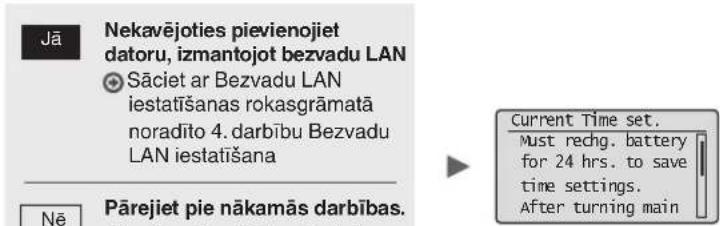
text_image
Language Czech Danish Dutch English Copy: Press Start 01 100% A4 Density: ±0 original Type: Text... 2-Sided: offnatural_image
Three electronic devices: a computer connected via cable, a server with ports, and a printer (no text or symbols visible)natural_image
Three technical illustrations of electronic devices: a desktop computer, a cable with a plug, and a printer (no text or symbols present)natural_image
Illustration of three electronic devices: a desktop computer, a wireless router, and a printer (no text or symbols present)natural_image
Diagram of a device with connectors and a switch, showing internal wiring (no text or symbols)text_image
COPY/SCAN OK Cancel ADD ADD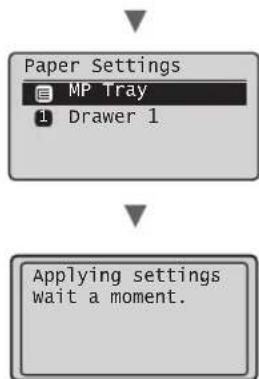
flowchart
graph TD
    A["Paper Settings"] --> B["MP Tray"]
    B --> C["Drawer 1"]
    D["Applying settings wait a moment."] --> E
flowchart
graph TD
    A["Start"] --> B["Set up Now"]
    B --> C["Set up Later"]
    D["Perform fax setup?"] --> E["Connect phone line."]
    E --> F["Follow illustrations on the next screen: Connect line to A. *Next : Press OK"]
text_image
End Fax Setup Guide? Yes No Setting is complete. Turn the main power OFF and ON. OKnatural_image
Two line drawings showing a printer's open lid and its paper holder, no text or symbols present.MF4890dw

natural_image
Line drawing of a printer with a paper airplane being inserted (no text or symbols)MF4870dn/MF4780w/MF4750/MF4730
natural_image
Diagram of a printer's internal structure showing a paper sheet being inserted (no text or symbols visible)
natural_image
Technical diagram of a mechanical component with internal channels and a black arrow indicating a specific section (no text or symbols present)
natural_image
Technical diagram showing a mechanical component with an arrow indicating direction, enclosed in a magnified inset (no text or symbols)
natural_image
Illustration of hands pressing down a mechanical component with an arrow indicating motion (no text or symbols)
natural_image
Technical line drawing of a printer with internal components and mounting holes (no text or symbols)
natural_image
Technical line drawing of a mechanical device housing with mounting brackets and internal components (no text or symbols)
natural_image
Diagram of a printer with a paper sheet being inserted, showing no text or symbols.Papīra kasete

natural_image
Illustration of a printer with a paper being inserted (no text or symbols visible)natural_image
Diagram of a printer's internal structure with a paper clip and arrow indicating orientation (no text or symbols)Tonera kasetnes nomaina
natural_image
Illustration of a photo frame and a circular object with abstract patterns (no text or symbols)
natural_image
Abstract graphic with a document icon and a black circle (no text or symbols)text_image
Diagram showing a computer monitor with an icon pointing to a file browser interface, likely illustrating a desktop or DVD setup.natural_image
Illustration of a computer monitor with a CD and a grid display, showing no text or symbols.flowchart
graph LR
    A["Printer with OFF"] --> B["Switched to power outlet"]
    B --> C["Power outlet with ON button"]
text_image
Language Czech Danish Dutch English Use wireless LAN to connect computer? (Can config. later.) Yes No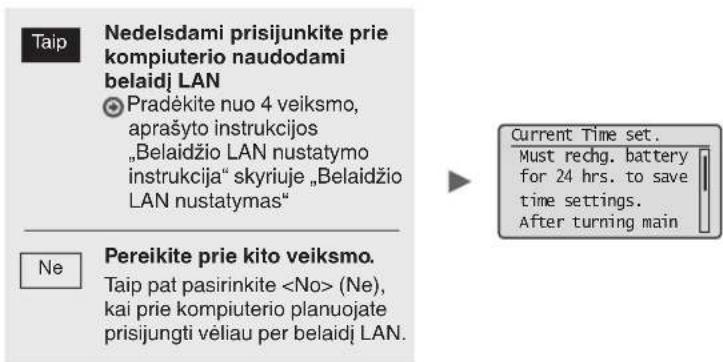
text_image
Language Czech Danish Dutch English Copy: Press Start 01 100% A4 Density: ±0 Original Type: Text... 2-Sided: offnatural_image
Three electronic devices: a computer connected via cable, a server with ports, and a printer (no text or symbols visible)natural_image
Three technical illustrations: a laptop, a cable with a plug, and a printer (no text or symbols present)Galite prijungti aparata prie kompiuterio naudodami USB kabelj.
- Prijungimas naudojant belaidi LAN (tik MF4890dw/MF4780w)
Žr. „Belaidžio LAN nustatymo instrukciją“
natural_image
Illustration of three electronic devices: a desktop computer, a wireless router, and a printer (no text or symbols present)natural_image
Diagram of a device with connectors and a switch, showing internal wiring (no text or symbols)natural_image
Line drawing of a mechanical device with no visible text or symbols
text_image
Diagram showing cable connection between a device and computer, with labeled components and directional arrows indicating cable routing.flowchart
graph TD
    A["Radio System"] --> B["Radio Button"]
    B --> C["User Interface"]
    D["Perform fax setup?"] --> E["Set up Now\nSet up Later"]
    F["Connect phone line.\nFollow illustrations\non the next screen:\nConnect line to A.\n*Next : Press OK"] --> G["Next Step"]
text_image
End Fax Setup Guide? No Yes Setting is complete. Turn the main power OFF and ON. OKnatural_image
Two line drawings of a printer with paper and a stack of paper, showing different printer orientations (no text or symbols)MF4890dw

natural_image
Line drawing of a printer with a paper airplane being inserted (no text or symbols)MF4870dn/MF4780w/MF4750/MF4730
Aparato viduje Universaliajame dékle

natural_image
Diagram of a printer's internal structure showing a paper sheet being inserted (no text or symbols visible)
natural_image
Technical diagram of a mechanical device with internal components and a black arrow indicating a specific section (no text or symbols present)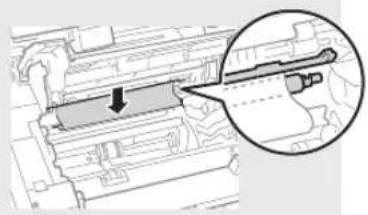
natural_image
Technical diagram showing a mechanical component with an arrow indicating direction, enclosed in a magnified inset (no text or symbols)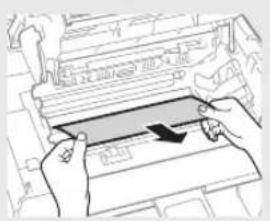
natural_image
Illustration of hands pressing down on a mechanical component with an arrow indicating motion (no text or symbols)
natural_image
Technical line drawing of a printer with internal components and mounting holes (no text or symbols)
natural_image
Technical line drawing of a mechanical device housing with mounting brackets and internal components (no text or symbols)
natural_image
Diagram of a printer with a paper sheet being inserted, showing no text or symbolsPopieriaus kasetėje

natural_image
Illustration of a printer with a paper sheet being inserted (no text or symbols)Galiniame dangtyje
(tik MF4890dw/MF4870dn)

natural_image
Diagram of a printer or printer with a paper sheet being inserted, showing no text or symbols.natural_image
Illustration of a photo frame and a circular object with diagonal lines (no text or symbols)
natural_image
Abstract graphic with a document icon and a black circle (no text or symbols)text_image
Diagram showing a computer monitor with an open CD and a speech bubble containing text, likely illustrating a presentation or instruction.natural_image
Illustration of a computer monitor with a CD inside, showing a magnified view of the screen (no text or symbols present)flowchart
graph LR
    A["Printer with OFF"] --> B["Switched to power outlet"]
    B --> C["Power outlet with ON button"]
natural_image
Illustration of three electronic devices: a desktop computer connected via cable, a printer with cable, and a printer (no text or symbols visible)natural_image
Three technical illustrations of electronic devices: a desktop computer, a cable with connectors, and a printer (no text or symbols present)natural_image
Illustration of three electronic devices: a desktop computer, a wireless router, and a printer (no text or symbols present)natural_image
Diagram of a device with connectors and a switch, showing internal components connected to a terminal block (no text or symbols present)natural_image
Two line drawings of a printer with paper and paper roll, showing different printer orientations (no text or symbols)MF4890dw

natural_image
Line drawing of a printer with a paper airplane being inserted (no text or symbols)MF4870dn/MF4780w/MF4750/MF4730
Seadme sisemus Universaalalus

natural_image
Diagram of a printer's internal structure with an arrow indicating the paper's direction (no text or symbols present)
natural_image
Technical diagram of a mechanical component with internal channels and a black arrow indicating a specific section (no text or symbols present)
natural_image
Technical diagram showing a mechanical component with an arrow indicating direction, enclosed in a circular inset (no text or symbols)
natural_image
Illustration of hands installing or adjusting a mechanical component with a blue arrow (no text or symbols)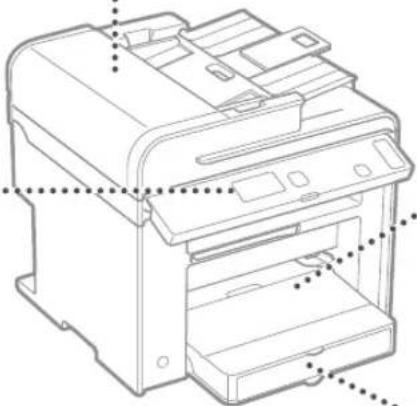
natural_image
Technical line drawing of a printer with visible internal components and mounting holes (no text or labels)
natural_image
Technical line drawing of a mechanical device housing with mounting brackets and internal components (no text or symbols)
natural_image
Diagram of a printer with a paper sheet being inserted, showing no text or symbols.Paberikassett

natural_image
Diagram of a printer with a paper being inserted, showing the printer's internal structure and paper plane (no text or symbols)Tagakaas
(ainult MF4890dw/MF4870dn)

natural_image
Diagram of a printer or printer with a paper clip and arrow indicating the paper's direction (no text or symbols present)natural_image
Illustration of a photo frame and a circular object with abstract patterns (no text or symbols)
natural_image
Abstract graphic with a document icon and a black circle (no text or symbols)text_image
Diagram showing a computer monitor with an open CD and a magnified view of the screen, likely illustrating a desktop computer interface.natural_image
Illustration of a computer monitor with a CD and a grid interface, no text or symbols presentflowchart
graph LR
    A["Printer with OFF"] --> B["Switched to power outlet"]
    B --> C["Power outlet with ON button"]
natural_image
Illustration of three electronic devices: a desktop computer connected via cable, a printer with cable, and a printer (no text or symbols visible)natural_image
Three technical illustrations of electronic devices: a desktop computer, a cable with a plug, and a printer (no text or symbols present)natural_image
Illustration of three electronic devices: a desktop computer, a wireless router, and a printer (no text or symbols present)natural_image
Diagram of a device with connectors and a switch, showing internal wiring (no text or symbols)natural_image
Two line drawings of a printer with paper and a stack of papers, showing different printer orientations (no text or symbols)MF4890dw

natural_image
Line drawing of a printer with a paper airplane being inserted (no text or symbols)MF4870dn/MF4780w/MF4750/MF4730
natural_image
Diagram of a printer's internal structure showing a paper sheet being inserted (no text or symbols visible)
natural_image
Technical diagram of a mechanical component with internal structure and directional arrow (no text or symbols)
natural_image
Technical diagram showing a mechanical component with an arrow indicating direction, and a magnified inset highlighting a detail (no text or symbols present)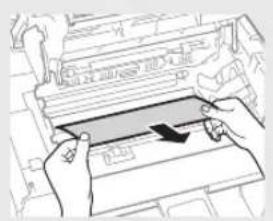
natural_image
Illustration of hands inserting a component into a machine (no text or symbols visible)
natural_image
Technical line drawing of a printer with internal components and mounting holes (no text or symbols)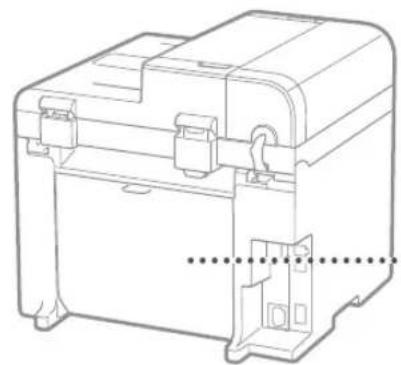
natural_image
Technical line drawing of a mechanical device with internal components and mounting brackets (no text or symbols)
natural_image
Diagram of a printer with a paper sheet being inserted, showing no text or symbolsKaseta na papier

natural_image
Diagram of a printer with a paper sheet being inserted, showing no text or symbolsnatural_image
Diagram of a printer's internal structure with a paper clip and arrow indicating orientation (no text or symbols)natural_image
Illustration of a photo frame and a circular object with vertical lines, no text or symbols present.
natural_image
Abstract graphic with a document icon and a dark circular shape (no text or symbols)text_image
Diagram showing a computer monitor with an open CD and a magnified view of the screen, likely illustrating a desktop interface or system setup.natural_image
Illustration of a computer monitor with a CD and a grid interface, no text or symbols presentflowchart
graph LR
    A["Printer with OFF"] --> B["Switched to power outlet"]
    B --> C["Power outlet with ON button"]
natural_image
Illustration of a desktop computer connected via a network to a printer (no text or symbols present)natural_image
Three technical illustrations of computer monitors, a cable, and a printer (no text or symbols)natural_image
Illustration of three electronic devices: a desktop computer, a wireless router, and a printer (no text or symbols present)natural_image
Diagram of a device with connectors and a switch, showing internal wiring (no text or symbols)natural_image
Two line drawings of a printer with paper and a stack of paper, showing different printer orientations (no text or symbols)MF4890dw

natural_image
Line drawing of a printer with a paper airplane being inserted (no text or symbols)MF4870dn/MF4780w/MF4750/MF4730
natural_image
Diagram of a printer's internal structure with an arrow indicating the paper's direction (no text or symbols present)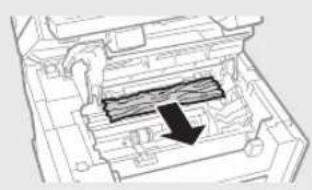
natural_image
Technical diagram of a mechanical assembly with internal components and a black arrow indicating a specific section (no text or symbols present)
natural_image
Technical diagram showing a mechanical component with an arrow indicating direction, and a magnified inset highlighting a detail (no text or symbols present)
natural_image
Illustration of hands inserting a card into a device (no text or symbols visible)
natural_image
Technical line drawing of a printer with internal components and mounting holes (no text or symbols)
natural_image
Technical line drawing of a mechanical device housing with mounting brackets and internal components (no text or symbols)
natural_image
Diagram of a printer with a paper sheet being inserted, showing no text or symbolsZásobník papíru

natural_image
Diagram of a printer with a paper being inserted, showing the printer's internal structure and page loading (no text or symbols)natural_image
Diagram of a printer's internal structure with a paper clip and arrow indicating orientation (no text or symbols)natural_image
Illustration of a photo frame and a circular object with abstract patterns (no text or symbols)
natural_image
Abstract graphic with a document icon and a black circle (no text or symbols)text_image
Diagram showing a computer monitor connected to a CD, with an annotation box highlighting the screen area.natural_image
Illustration of a computer monitor with a CD inside, showing no text or symbols on the screen or background.flowchart
graph LR
    A["Printer with OFF"] --> B["Switched to power outlet"]
    B --> C["Power outlet with ON button"]
natural_image
Three-line diagram showing a printer connected to a computer and cable, no text or symbols present.natural_image
Three technical illustrations of printer components: desktop, cable, and printer (no text or symbols)natural_image
Illustration of three electronic devices: a desktop computer, a wireless router, and a printer (no text or symbols present)natural_image
Diagram of an electronic device showing connections to a power connector (no text or symbols present)natural_image
Technical line drawing of a mechanical device with no visible text or symbols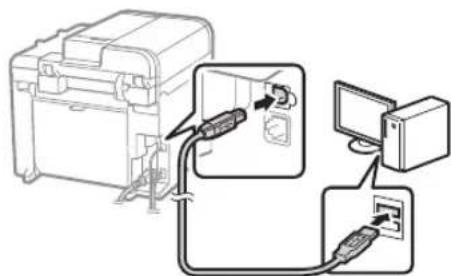
text_image
Diagram showing cable routing between a device and computer, with labeled components and connectionsnatural_image
Two line drawings of a printer with paper and paper roll, showing different printer orientations (no text or symbols)MF4890dw

natural_image
Line drawing of a printer with a paper airplane being inserted (no text or symbols)MF4870dn/MF4780w/MF4750/MF4730
natural_image
Diagram of a printer's internal structure with an arrow indicating a component (no text or symbols present)
natural_image
Technical diagram of a mechanical device with internal components and a black arrow indicating a specific section (no text or symbols present)
natural_image
Technical diagram showing a mechanical component with an arrow indicating direction, enclosed in a circular inset (no text or symbols)
natural_image
Illustration of hands inserting a card into a machine (no text or symbols visible)
natural_image
Technical line drawing of a printer with internal components and mounting holes (no text or symbols)
natural_image
Technical line drawing of a mechanical device housing with mounting brackets and internal components (no text or symbols)
natural_image
Diagram of a printer with a paper sheet being inserted, showing no text or symbols.Zásobník papiera

natural_image
Diagram of a printer with a paper being inserted, showing no text or symbolsnatural_image
Diagram of a printer's internal structure with a paper clip and arrow indicating orientation (no text or symbols)natural_image
Illustration of a rose and a circular object with vertical lines, no text or symbols present.
natural_image
Abstract graphic with a document icon and a black circle (no text or symbols)text_image
Diagram showing a computer monitor with a CD and a dialog box containing text, likely illustrating a software interface or settings.natural_image
Illustration of a computer monitor with a CD and a grid interface, no text or symbols presentKrmarjenje po meniju in način vnosa besedila
MF4890dw/MF4870dn/MF4780w/MF4750
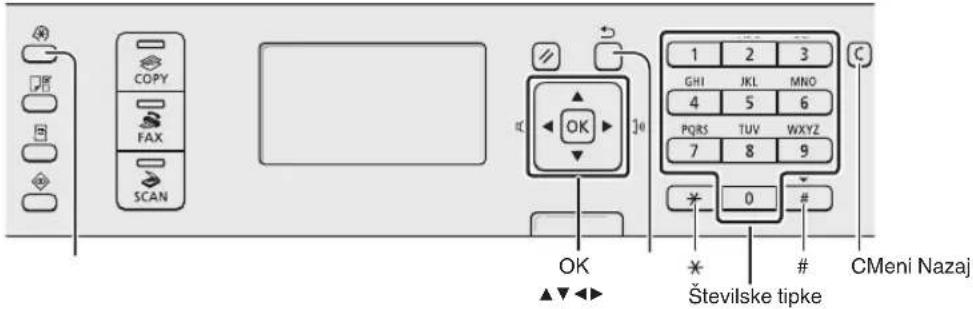
text_image
COPY FAX SCAN OK GHI 1 2 3 JKL MNO 4 5 6 PQRS TUV WXYZ 7 8 9 0 # Številske tipke CMeni NazajMF4730
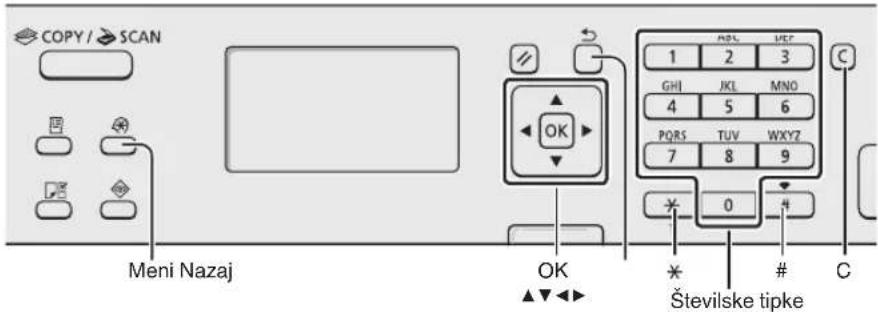
text_image
COPY / SCAN Meni Nazaj OK OK Številske tipkeKrmarjenje po meniju
Izbiranje elementa ali premikanje kazalke po menijskih elementih
Element označite s tipko [▲] ali [▼]. S tipko [OK] (V redu) ali [▶] se pomaknite na naslednjo hierarhijo. S tipko [□] (Nazaj) ali [◀] se pomaknite na prejšnjo hierarhijo.
flowchart
graph LR
    A["Printer with OFF"] --> B["Switched to power outlet"]
    B --> C["Power outlet with ON button"]
natural_image
Illustration of a desktop computer connected via a network to a printer (no text or symbols present)natural_image
Three technical illustrations of electronic devices: a desktop computer, a cable with a plug, and a printer (no text or symbols visible)natural_image
Illustration of three electronic devices: a desktop computer, a wireless router, and a printer (no text or symbols present)natural_image
Diagram of a device with connectors and a switch, showing internal components connected to a terminal block (no text or symbols present)natural_image
Technical line drawing of a mechanical device with no visible text or symbols
text_image
Diagram showing cable connection between a device and computer, with labeled components and cable routing arrowsnatural_image
Two line drawings showing a printer's open lid and its paper holder, with no text or symbols present.MF4890dw

natural_image
Line drawing of a printer with a paper airplane being inserted (no text or symbols)MF4870dn/MF4780w/MF4750/MF4730
Notranjost naprave Večnamenski podstavek

natural_image
Diagram of a printer's internal structure showing a paper feeding into a printer (no text or symbols visible)
natural_image
Technical diagram of a mechanical assembly with internal components and a black arrow indicating a specific section (no text or symbols present)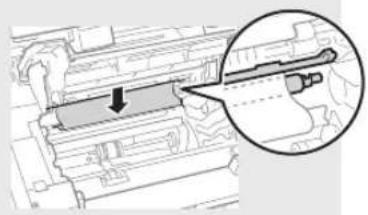
natural_image
Technical diagram showing a mechanical component with an arrow indicating direction, and a magnified inset highlighting a detail (no text or symbols present)
natural_image
Illustration of hands pressing down on a mechanical component with an arrow indicating motion (no text or symbols)
natural_image
Technical line drawing of a printer with internal components and mounting holes (no text or symbols)
natural_image
Technical line drawing of a mechanical device housing with mounting brackets and internal components (no text or symbols)
natural_image
Diagram of a printer with a paper sheet being inserted, showing no text or symbols.Kaseta za papir

natural_image
Illustration of a printer with a paper sheet being inserted (no text or symbols)Hrbtni pokrov
(samo MF4890dw/MF4870dn)

natural_image
Diagram of a printer's internal structure with a paper clip and arrow indicating orientation (no text or symbols)Zamenjava kartuše s tonerjem
natural_image
Illustration of a rose and a circular object with diagonal lines, no text or symbols present.
natural_image
Abstract graphic with a document and a dark circle (no text or symbols)text_image
Diagram showing a computer monitor with an icon pointing to a file browser interface, likely illustrating a desktop or DVD setup.④ e-priručnik (Multi-lingual User Manual CD (CD s korisničkim uputama na više jezika)):
Pročitajte poglavlje koje odgovara vašim potrebama. Da biste jednostavno pronašli tražene informacije, e-priručnik podijeljen je u kategorije po temama.

natural_image
Illustration of a computer monitor with a CD and a grid display, no text or symbols presentKretanje po izborniku i način unosa teksta
MF4890dw/MF4870dn/MF4780w/MF4750

text_image
COPY FAX SCAN OK ▲▼◀◀ GHI JKL MNO 4 5 6 PQRS TUV WXYZ 7 8 9 * 0 # Numeričke tipke Clzbornik NatragMF4730
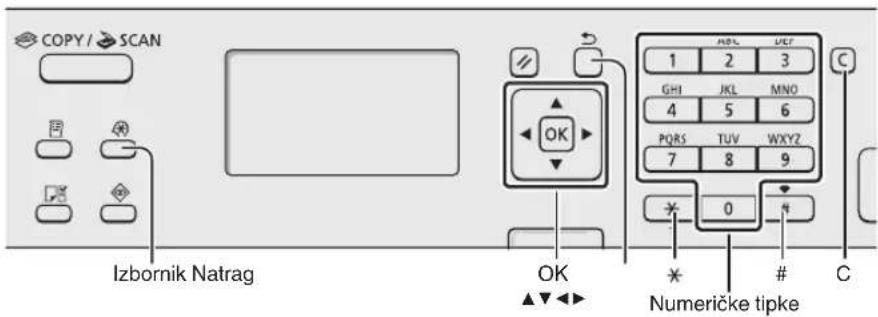
text_image
COPY / SCAN Izbornik Natrag OK Numeričke tipkeflowchart
graph LR
    A["Printer with OFF"] --> B["Switched to power outlet"]
    B --> C["Power outlet with ON button"]
O U ovom trenutku nemojte priključivati USB kabel. Priključite ga prilikom instaliranja softvera.
Određivanje početnih postavki
Pratite upute na zaslonu; postavite jezik i vrijeme. Pojedinosti o kretanju po izborniku i načinu unosa brojeva potražite u poglavlju "Kretanje po izborniku i način unosa teksta" (str. 220).
MF4890dw/MF4780w
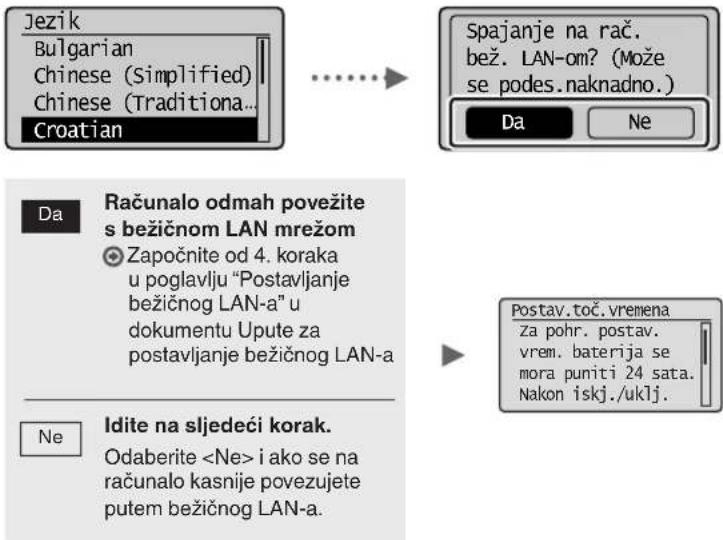
text_image
Jezik Bulgarian Chinese (Simplified) Chinese (Traditiona... Croatian Spajanje na rač. bež. LAN-om? (Može se podes.naknadno.) Da Ne Da Računalo odmah povežite s bežičnom LAN mrežom Započnite od 4. koraka u poglavlju "Postavljanje bežičnog LAN-a" u dokumentu Upute za postavljanje bežičnog LAN-a Ne(Idite na sljedeći korak. Odaberite- Povežite se s računalom putem kabelske LAN mreže
Prijedite na "Povezivanje pomoću kabelske LAN veze (samo MF4890dw/MF4870dn/MF4780w)" (str. 222).
natural_image
Three-line diagram showing a computer connected to a server and a printer (no text or symbols present)natural_image
Three line drawings of electronic devices: a desktop computer, a cable with a plug, and a printer (no text or symbols)natural_image
Illustration of three electronic devices: a desktop computer, a wireless router, and a printer (no text or symbols)natural_image
Diagram of a device with connectors and an attached switch (no text or symbols)IP adresa automatski će se konfigurirati za 2 minute. Ako želite ručno postaviti IP adresu, pogledajte sljedeće stavke.
e-priručnik "Mrežne postavke" ▶ "Osnovne mrežne postavke" ▶ "Postavljanje IP adrese"
natural_image
Two line drawings of a printer with paper and a stack of paper, showing different printer orientations (no text or symbols)MF4890dw

natural_image
Line drawing of a printer with a paper airplane being inserted (no text or symbols)MF4870dn/MF4780w/MF4750/MF4730
natural_image
Diagram of a printer's internal structure showing a paper sheet being inserted (no text or symbols visible)
natural_image
Technical diagram of a mechanical component with internal channels and a black arrow indicating direction (no text or symbols)
natural_image
Technical diagram showing a mechanical component with an arrow indicating direction, and a magnified inset highlighting a detail (no text or symbols present)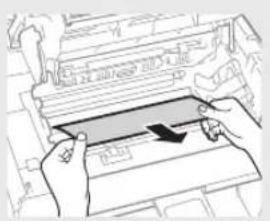
natural_image
Illustration of hands inserting a card into a machine (no text or symbols visible)
natural_image
Technical line drawing of a printer with internal components and mounting holes (no text or symbols)
natural_image
Technical line drawing of a mechanical device housing with mounting brackets and internal components (no text or symbols)
natural_image
Diagram of a printer with a paper sheet being inserted, showing no text or symbols.Kaseta za papir

natural_image
Diagram of a printer with a paper being inserted, showing the printer's internal structure and page loading (no text or symbols)Poledina
(Samo MF4890dw/MF4870dn)

natural_image
Diagram of a printer's internal structure with a paper clip and arrow indicating orientation (no text or symbols)Zamjena spremnika za toner
natural_image
Illustration of a photo frame and a circular object with abstract patterns (no text or symbols)
natural_image
Abstract graphic with a document and a black circle (no text or symbols)text_image
Diagram showing a computer monitor with an open CD and a magnified view of the screen, likely illustrating a physical setup or presentation.natural_image
Illustration of a computer monitor with a CD and a grid display, no text or symbols presentflowchart
graph LR
    A["Printer with OFF"] --> B["Switched to switch"]
    B --> C["ON"]
natural_image
Three-line diagram showing a computer connected via a cable to a printer (no text or symbols present)natural_image
Three technical illustrations of printer components: a laptop, a cable, and a printer (no text or symbols present)natural_image
Illustration of three electronic devices: a desktop computer, a wireless router, and a printer (no text or symbols present)natural_image
Diagram showing connection between a device box and an attached cable with connectors (no text or symbols)text_image
Diagram showing two connected devices with labeled components and a computer interface connectionflowchart
graph TD
    A["File Transfer"] --> B["CD-ROM Setup"]
    B --> C["Outputting a webpage with CD-ROM Setup"]
    C --> D["Action: Click to Print or Print as needed"]
    D --> E["Printed: Screen, Copy, Paste, Print & Audio"]
natural_image
Two line drawings of a printer with paper and a stack of paper, showing different printer orientations (no text or symbols)MF4890dw

natural_image
Line drawing of a printer with a paper airplane being inserted (no text or symbols)MF4870dn/MF4780w/MF4750/MF4730
natural_image
Diagram of a printer's internal structure with an arrow indicating a loading or assembly process (no text or symbols present)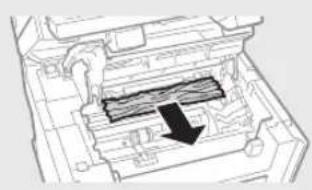
natural_image
Technical diagram of a mechanical component with internal channels and a black arrow indicating a specific section (no text or symbols present)
natural_image
Technical diagram showing a mechanical component with an arrow indicating direction, and a magnified inset highlighting a detail (no text or symbols present)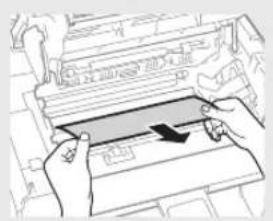
natural_image
Illustration of hands inserting a rectangular device into a tray (no text or symbols visible)
natural_image
Technical line drawing of a printer with visible internal components and mounting holes (no text or labels)
natural_image
Technical line drawing of a mechanical device housing with mounting brackets and internal components (no text or symbols)
natural_image
Line drawing of a printer with a paper sheet being inserted (no text or symbols)Papírkazetta
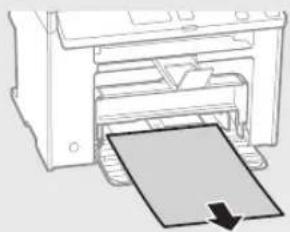
natural_image
Diagram of a printer with a paper sheet being inserted, showing no text or symbolsnatural_image
Diagram of a printer or printer with a paper clip inserted, showing internal components and an arrow indicating the paper's direction (no text or symbols present)Hu
natural_image
Illustration of a photo frame and a circular object with vertical lines, no text or symbols present.
natural_image
Abstract graphic with a document icon and a black circle (no text or symbols)text_image
Diagram showing a computer monitor with an open CD and a dialog box containing text or data, likely illustrating a software interface or system.④ e-Manual (Manual electronic) (Multi-lingual User Manual CD (CD cu manualul de utilizare mutilingv)):
natural_image
Illustration of a computer monitor with a CD inside, showing a grid layout and an open screen (no text or symbols)flowchart
graph LR
    A["Printer with OFF"] --> B["Switched to power outlet"]
    B --> C["Power outlet with ON button"]
text_image
Limba Norwegian Polish Portuguese Romanian Fol. LAN wireless pt.conect.computer? (Config. ulterior.) Da Nu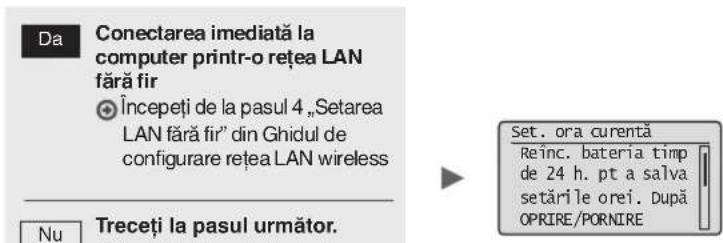
natural_image
Three electronic devices: a computer connected via cable, a server with ports, and a printer (no text or symbols visible)natural_image
Three technical illustrations: a desktop computer, a cable with a probe, and a printer (no text or symbols present)natural_image
Illustration of three electronic devices: a desktop computer, a wireless router, and a printer (no text or symbols present)natural_image
Diagram of a device with connectors and an attached switch (no text or symbols)natural_image
Line drawing of a mechanical device with no visible text or symbols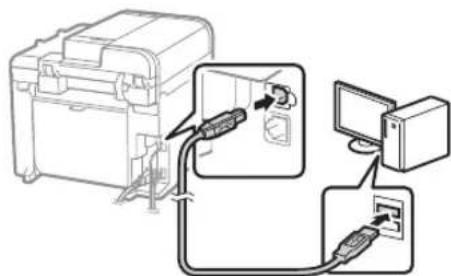
text_image
Diagram showing cable connection between a device and computer, with labeled components and cable routingnatural_image
Two line drawings of a printer with an open lid, showing front and side views (no text or symbols)MF4890dw

natural_image
Line drawing of a printer with a paper airplane being inserted (no text or symbols)MF4870dn/MF4780w/MF4750/MF4730
natural_image
Diagram of a printer's internal structure showing a paper sheet being inserted (no text or symbols visible)
natural_image
Technical diagram of a mechanical device with internal components and a black arrow indicating a specific section (no text or symbols present)
natural_image
Technical diagram showing a mechanical component with an arrow indicating direction, enclosed in a circular inset (no text or symbols)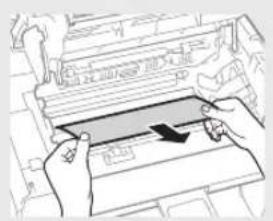
natural_image
Illustration of hands inserting a rectangular object into a machine (no text or symbols visible)
natural_image
Technical line drawing of a printer with internal components and mounting holes (no text or symbols)
natural_image
Technical line drawing of a mechanical device housing with mounting brackets and internal components (no text or symbols)
natural_image
Diagram of a printer with a paper sheet being inserted, showing no text or symbols.natural_image
Illustration of a printer with a paper being inserted (no text or symbols visible)natural_image
Diagram of a printer's internal structure with a paper clip and arrow indicating orientation (no text or symbols)natural_image
Illustration of a rose and a circular object with diagonal lines, no text or symbols present.
natural_image
Abstract graphic with a document icon and a black circle (no text or symbols)text_image
Diagram showing a computer monitor connected to a CD, with an annotation box highlighting the screen area.natural_image
Illustration of a computer monitor with a CD and a magnifying glass, no text or symbols presenttext_image
Език Bulgarian Chinese (Simplified) Chinese (Traditiona Croatian)natural_image
Illustration of a desktop computer connected via a network to a printer (no text or symbols present)natural_image
Three technical illustrations of computer devices: a remote control unit, a cable with a hose, and a printer (no text or symbols visible)natural_image
Illustration of three electronic devices: a desktop computer, a router with signal waves, and a printer (no text or symbols)natural_image
Diagram of an electrical connector with cable and socket, showing internal wiring (no text or symbols)natural_image
Technical line drawing of a mechanical device with no visible text or symbols
text_image
Diagram showing connection between a device and computer via cable, with labeled components and directional arrows indicating wiring or data flow.natural_image
Two line drawings of a printer with an open lid, showing front and side views (no text or symbols)MF4890dw

natural_image
Line drawing of a printer with a paper airplane being inserted (no text or symbols)MF4870dn/MF4780w/MF4750/MF4730
natural_image
Diagram of a printer's internal structure showing a paper sheet being inserted (no text or symbols visible)
natural_image
Technical line drawing of a mechanical component with internal channels and a black arrow indicating direction (no text or symbols)
natural_image
Technical diagram showing a mechanical component with an arrow indicating direction, enclosed in a circular inset (no text or symbols)
natural_image
Illustration of hands inserting a card into a machine (no text or symbols visible)
natural_image
Technical line drawing of a printer with internal components and mounting holes (no text or symbols)
natural_image
Technical line drawing of a mechanical device housing with mounting brackets and internal components (no text or symbols)
natural_image
Diagram of a printer with a paper sheet being inserted, showing no text or symbols.Касета за хартия

natural_image
Diagram of a printer with a paper sheet being inserted, showing no text or symbolsnatural_image
Diagram of a printer or printer with a paper clip inserted, showing internal components and a black arrow indicating the paper's direction (no text or symbols present)natural_image
Illustration of a photo frame and a circular object with internal patterns (no text or symbols)
natural_image
Abstract graphic with a document icon and a solid circle (no text or symbols)text_image
Diagram showing a computer monitor with an open CD and a magnified view of the screen, likely illustrating a physical setup or display.natural_image
Illustration of a computer monitor with a CD and a grid screen, no text or symbols presentflowchart
graph LR
    A["Printer with OFF"] --> B["Switched to switch"]
    B --> C["ON with switch"]
natural_image
Three electronic devices: a desktop computer connected via cable, a printer with cable, and a printer (no text or symbols visible)natural_image
Three technical illustrations of computer devices: a flat-screen monitor, a coiled cable with a plug, and a printer (no text or symbols visible)natural_image
Illustration of three electronic devices: a desktop computer, a wireless router, and a printer (no text or symbols present)natural_image
Diagram of a device with connectors and a switch, showing internal components connected to a terminal block (no text or symbols present)natural_image
Two line drawings of a printer with paper and a stack of papers, showing different printer orientations (no text or symbols)MF4890dw

natural_image
Line drawing of a printer with a paper airplane being inserted (no text or symbols)MF4870dn/MF4780w/MF4750/MF4730
natural_image
Diagram of a printer's internal structure with an arrow indicating a component (no text or symbols present)
natural_image
Technical diagram of a mechanical component with internal channels and a black arrow indicating direction (no text or symbols)
natural_image
Technical diagram showing a mechanical component with an arrow indicating direction, enclosed in a magnified inset (no text or symbols)
natural_image
Illustration of hands inserting a component into a machine (no text or symbols visible)
natural_image
Technical line drawing of a printer with internal components and mounting holes (no text or symbols)
natural_image
Technical line drawing of a mechanical device housing with mounting brackets and internal components (no text or symbols)
natural_image
Diagram of a printer with a paper sheet being inserted, showing no text or symbols.Kağıt Kaseti

natural_image
Diagram of a printer with a paper being inserted, showing the printer's internal structure and paper plane (no text or symbols)Arka kapak
(Yalnızca MF4890dw/MF4870dn)

natural_image
Diagram of a printer's internal structure with a paper clip and arrow indicating orientation (no text or symbols)natural_image
Illustration of a rose and a circular object with internal patterns (no text or symbols)
natural_image
Abstract graphic with a document and a circle, no text or symbols presentnatural_image
3D rendering of a rectangular electronic component with horizontal grooves (no text or symbols visible)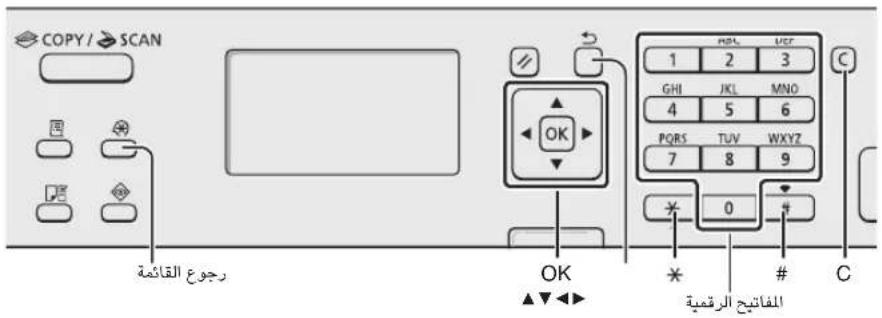
text_image
COPY / SCAN OK OK 1 2 3 GHI JKL MNO 4 5 6 PQRS TUV WXYZ 7 8 9 * 0 # العربية herquema C###
natural_image
3D rendering of a rectangular electronic device with horizontal slats and a small circular mark on the side (no text or symbols visible)طريقة إدخال النص
تغير وضع الإدخال
ل JEAMJE LEI MECTHDM
natural_image
Illustration of a computer monitor with an open CD and a speech bubble containing text (no readable document text)text_image
MF4870dn/MF4750/MF4730 Copy: Press Start 01 100% A4 Density: ±0 Original Type: Text... 2-Sided: off Language Czech Danish Dutch Englishnatural_image
Diagram of a device with connectors and a switch, showing internal components connected to a terminal block (no text or symbols present)"Setting the IP Address" ◀ (إعدادtriangle ABC)
natural_image
Technical line drawing of a mechanical device with no visible text or symbols
text_image
Diagram showing cable connections between a device and computer, with labeled components and cable routing.natural_image
Three electronic devices: a desktop computer connected via a network to a printer (no text or symbols visible)natural_image
Illustration of three electronic devices: desktop computer, tower, and printer with wireless signal lines (no text or symbols)flowchart
graph TD
    A["Connect phone line.<br>Follow illustrations on the next screen:<br>Connect line to A.<br>*Next : Press OK"] --> B["Perform fax setup?\nSet up Now\nSet up Later"]
text_image
Setting is complete. Turn the main power OFF and ON. OK End Fax Setup Guide? Yes Notext_image
Canon CD-ROM Setup File Summary Download Save As per Add to Print Remove Format Save Next Add to Print Add to Print Add to Print Add to Print Add to Print Add to Print Add to Print Add to Print Add to Print Add to Print Add to Print Add to Print Add to Print Add to Print Add to Print Add to Print Add to Print Add to Print Add to Print Add to Print Add to Print Add to Print Add to Print Add to Print Add to Print Add to Press Add to Press Add to Press Add to Press Add to Press Add to Press Add to Press Add to Press Add to Press Add to Press Add to Press Add to Press Add to Press Add to Press Add to Press Add to Press Add to Press Add to Press Add to Press Add to Press Add to Press Add to Press Add to Press Add to Press Add to Press Add to Print- Product Ext
natural_image
Illustration of a photo frame and a circular object with abstract patterns (no text or symbols)
natural_image
Abstract graphic with a document icon and a black circle (no text or symbols)The Ground Truth image displays a single, solid horizontal line, which is a stylistic or background element (like a rule line on paper). According to Rule 2, such lines must be ignored by the OCR result. The provided OCR content is "____", which consists of underscores. Underscores are not equivalent to a solid line and are not permitted under the “Stylistic/Background Lines (Ignore)” rule. Outputting underscores for a stylistic line is incorrect because it misinterprets the line as a placeholder fill-in-the-blank area. Since the OCR output incorrectly rendered a stylistic line as underscores (which should be ignored), this violates the rule. Therefore, the OCR result is inconsistent with the Ground Truth.
تحذیر
natural_image
Black rectangular object with horizontal striped pattern, no visible text or symbols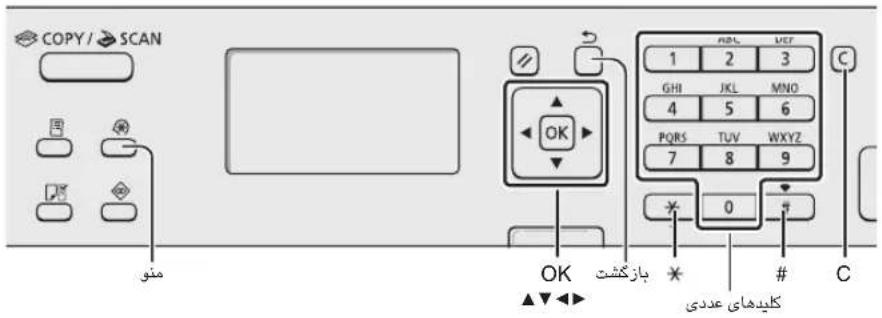
text_image
Diagram showing a computer monitor with an open CD and a speech bubble containing text, likely illustrating a presentation or message.text_image
Diagram showing three steps of printer operation: ON/OFF, connected to a power outlet with plug.text_image
Use wireless LAN to connect computer? (Can config, later.) Yes No MF4780w/MF4890dw Language Czech Danish Dutch English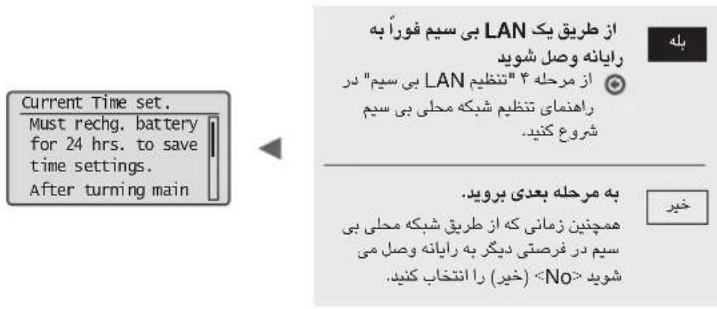
text_image
MF4730/MF4750/MF4870dn Copy: Press Start 01 100% A4 Density: ±0 Original Type: Text... 2-Sided: off Language Czech Danish Dutch Englishnatural_image
Diagram of an electrical connector with cable and socket, showing internal wiring (no text or symbols)natural_image
Technical line drawing of a mechanical device with no visible text or symbols
text_image
Diagram showing cable connections between a device and computer, with labeled components and cable routing.natural_image
Three electronic devices: a desktop computer connected via a network to a printer, and a cable (no text or symbols visible)natural_image
Three technical illustrations: a desktop computer, a cable with a hose, and a printer (no text or symbols present)natural_image
Illustration of three electronic devices: a desktop computer, a tower, and a printer with wireless signal lines (no text or symbols)text_image
Connect phone line. Follow illustrations on the next screen: Connect line to A. *Next : Press OK Perform fax setup? Set up Now Set up Latertext_image
Setting is complete. Turn the main power OFF and ON. OK End Fax Setup Guide? Yes Notext_image
Paper Settings MP Tray Drawer 1
natural_image
Two abstract circular icons: one with a floral graphic and another with a document and cursor, both without any text or symbols.30-2, Shimomaruko 3-chome, Ohta-ku, Tokyo 146-8501, Japan
One Canon Park, Melville, NY 11747, U.S.A.
CANON EUROPA N.V.
Bovenkerkerweg 59, 1185 XB Amstelveen, The Netherlands
15F Jinbao Building No.89, Jinbao Street, Dongcheng District, Beijing 100005, PRC
CANON SINGAPORE PTE LTD
1 HarbourFront Avenue, #04-01 Keppel Bay Tower, Singapore 098632
CANON AUSTRALIA PTY LTD
1 Thomas Holt Drive, North Ryde, Sydney NSW 2113, Australia
CANON GLOBAL WORLDWIDE SITES
http://www.canon.com/
Printed on non-chlorine bleached paper.